Embed Size (px)
DESCRIPTION
zd
Citation preview
YMC Workshop 16th
June 2012 Russell Levinson
Young Magicians Club Workshop 16th
June 2012
A selection of colour changes
Russell Levinson AIMC
Introduction
“Colour change” is the term used for the visible transformation of one card into another. It’s one of
the things that looks like real magic and marks the performer as a skilled magician.
A single colour change, or a sequence of them, can be used as a self-standing piece of magic, or as
part of an effect, for example:
• to magically change an indifferent card into a spectator’s card
• to change one spectator’s card into another’s
• to change an indifferent card into an Ace, say
It’s also useful as an out – even if you have to ask the name of the card, if you can covertly move it,
then colour change the face card into the chosen one, it’s such a powerful effect, that the spectator
is impressed anyway
Below is a selection of colour changes. There are a few easier ones for those who aren’t used to
card sleights; a couple of moves well within the range of the magician who is comfortable handling a
pack; and some more advanced ideas. There are also a few general tips.
The Snap Change - Easy
This is so old it’s almost impossible to credit an inventor. A startling change done with the cards held
away from the pack
Pack in left hand in dealing position. Chosen card is second from top. Push off the top card, take it
with the right hand, and show it to the audience. They will tell you it’s wrong. As you do so, push
over the top card with the left thumb and get a break under it with the left little finger. Put the
chosen card back on top of the pack, face up.
Take double from pack in right hand overhand grip – thumb at near end, 2nd
& 3rd
fingers at far end,
first finger curled on top. Tilt your hand forward so the audience sees the face of the card. Bend the
card as in Fig 1. Wave it up your sleeve and release the 2nd
and 3rd
fingers. The double flips over,
showing the other side, held at one end between thumb and first finger (Fig 2). Put the double back
on the pack and you can now thumb off the top face up card.

YMC Workshop 16th
June 2012 Russell Levinson
Fig 1 Fig 2
Alternatives
• Release with the thumb rather than the fingers – the card flips the other way and ends up
held between first finger on one side, second and third fingers at the other.
• Hold the card at sides rather than ends (Fig 3). In this case one nice touch from Will
Houstoun is to partially hide the change by waving the other hand in front. It makes it more
magical
• Use a double-faced card
• Bob Hummer’s Visual Change (Dai Vernon’s Inner Secrets of Card Magic by Lewis Ganson)
Fig 3
Example effect
Double faced card at bottom of pack. Spread cards, incidentally showing the backs all face down,
but not exposing the bottom card; and say we will choose a card a different way. Take pack in RH,
Hindu shuffle, drawing packets from top into LH. When spectator says stop, show the forced bottom
card of RH packet, then drop packet on top of LH packet. Snap fingers, ribbon spread packet to
show one card turned over (it’s the other side of the double face card). Spectator tells you you’re
wrong, so take it out and use the snap change to correct it. Clear up by flipping ribbon spread over
and putting card on face.
YMC Workshop 16th
June 2012 Russell Levinson
The Pirouette Change (Oscar Munoz) / Shapeshifter Change (Marc de Souza) - Easy
A dramatic change with the cards held away from the pack. Needs just a little practice to get the
timing right.
The original effect, the Pirouette Change, is done at chest level with just the two cards involved Marc
de Souza’s better-known variation, the Shapeshifter Change is done with the pack in the hands in
dealing position. I’ll describe the Shapeshifter version here.
Start as for the Snap change. Pack in left hand in dealing position. Chosen card is second from top.
Push off the top card, take it with the right hand, and show it to the audience – they tell you it’s
wrong. As you do so, push over the top card with the left thumb and get a break under it with the
left little finger. Put the chosen card back on top of the pack, face up.
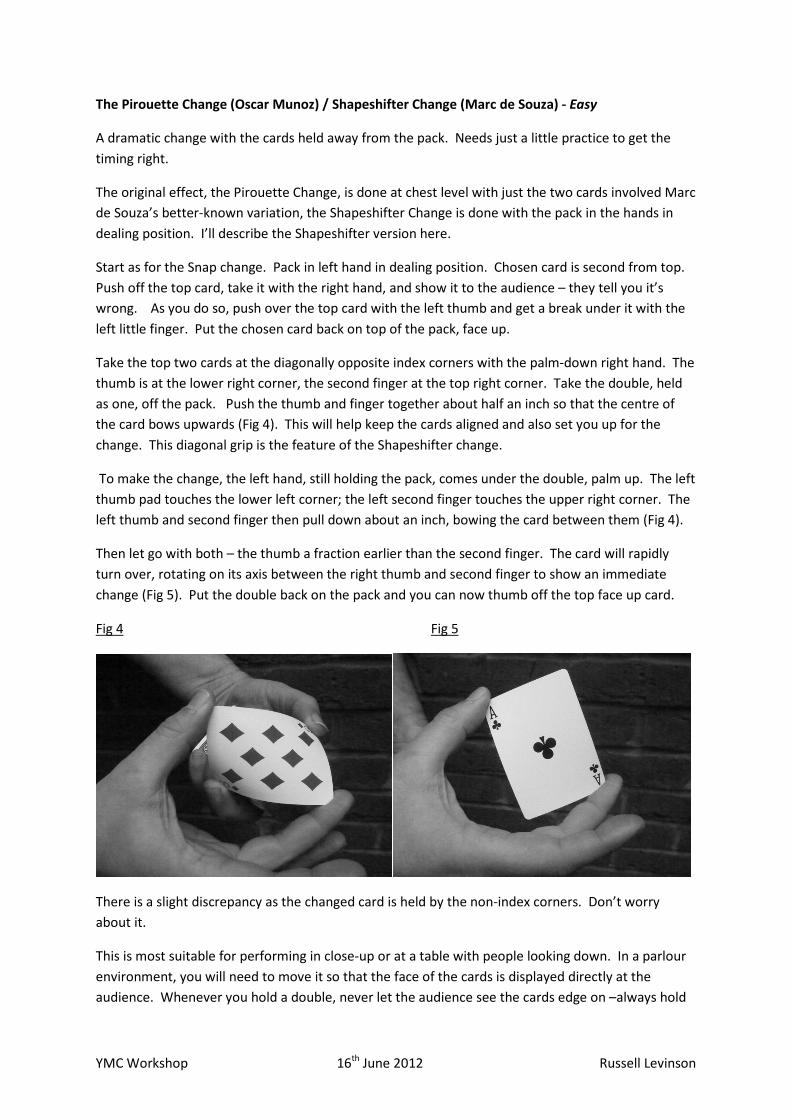
Take the top two cards at the diagonally opposite index corners with the palm-down right hand. The
thumb is at the lower right corner, the second finger at the top right corner. Take the double, held
as one, off the pack. Push the thumb and finger together about half an inch so that the centre of
the card bows upwards (Fig 4). This will help keep the cards aligned and also set you up for the
change. This diagonal grip is the feature of the Shapeshifter change.
To make the change, the left hand, still holding the pack, comes under the double, palm up. The left
thumb pad touches the lower left corner; the left second finger touches the upper right corner. The
left thumb and second finger then pull down about an inch, bowing the card between them (Fig 4).
Then let go with both – the thumb a fraction earlier than the second finger. The card will rapidly
turn over, rotating on its axis between the right thumb and second finger to show an immediate
change (Fig 5). Put the double back on the pack and you can now thumb off the top face up card.
Fig 4 Fig 5
There is a slight discrepancy as the changed card is held by the non-index corners. Don’t worry
about it.
This is most suitable for performing in close-up or at a table with people looking down. In a parlour
environment, you will need to move it so that the face of the cards is displayed directly at the
audience. Whenever you hold a double, never let the audience see the cards edge on –always hold
YMC Workshop 16th
June 2012 Russell Levinson
it facing the audience. This is a better display for the audience and cuts out the risk of them seeing
two cards at the edge.
Similar ideas:
• The original Pirouette Change. Discard the pack, and do it at chest level, just using the two
cards, facing out to the audience.
• The twist change (not sure of the name) – essentially a one-handed version of the same
thing, the forefinger reaching to turn the card(s) over under cover of an arm wave
• Use a double-faced card
Horace Goldin's Snap Change - Easy
One of the most beautiful changes there is, angly.
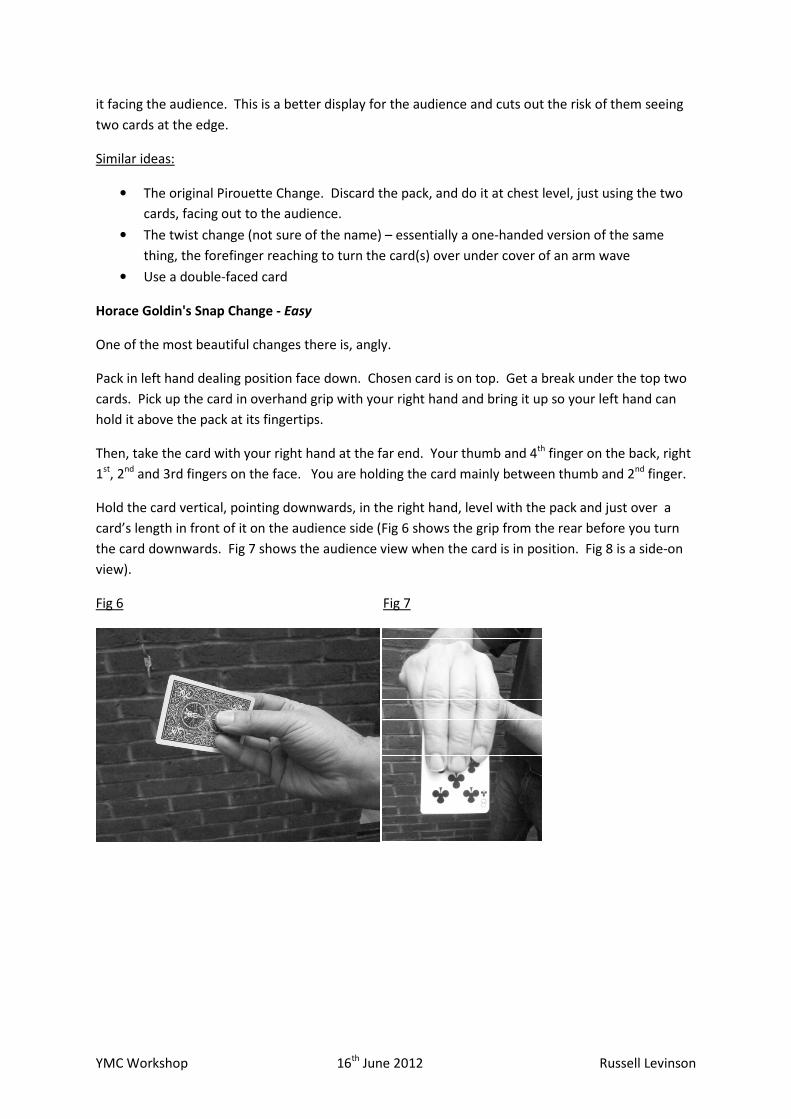
Pack in left hand dealing position face down. Chosen card is on top. Get a break under the top two
cards. Pick up the card in overhand grip with your right hand and bring it up so your left hand can
hold it above the pack at its fingertips.
Then, take the card with your right hand at the far end. Your thumb and 4th
finger on the back, right
1st
, 2nd
and 3rd fingers on the face. You are holding the card mainly between thumb and 2nd
finger.
Hold the card vertical, pointing downwards, in the right hand, level with the pack and just over a
card’s length in front of it on the audience side (Fig 6 shows the grip from the rear before you turn
the card downwards. Fig 7 shows the audience view when the card is in position. Fig 8 is a side-on
view).
Fig 6 Fig 7
YMC Workshop 16th
June 2012 Russell Levinson
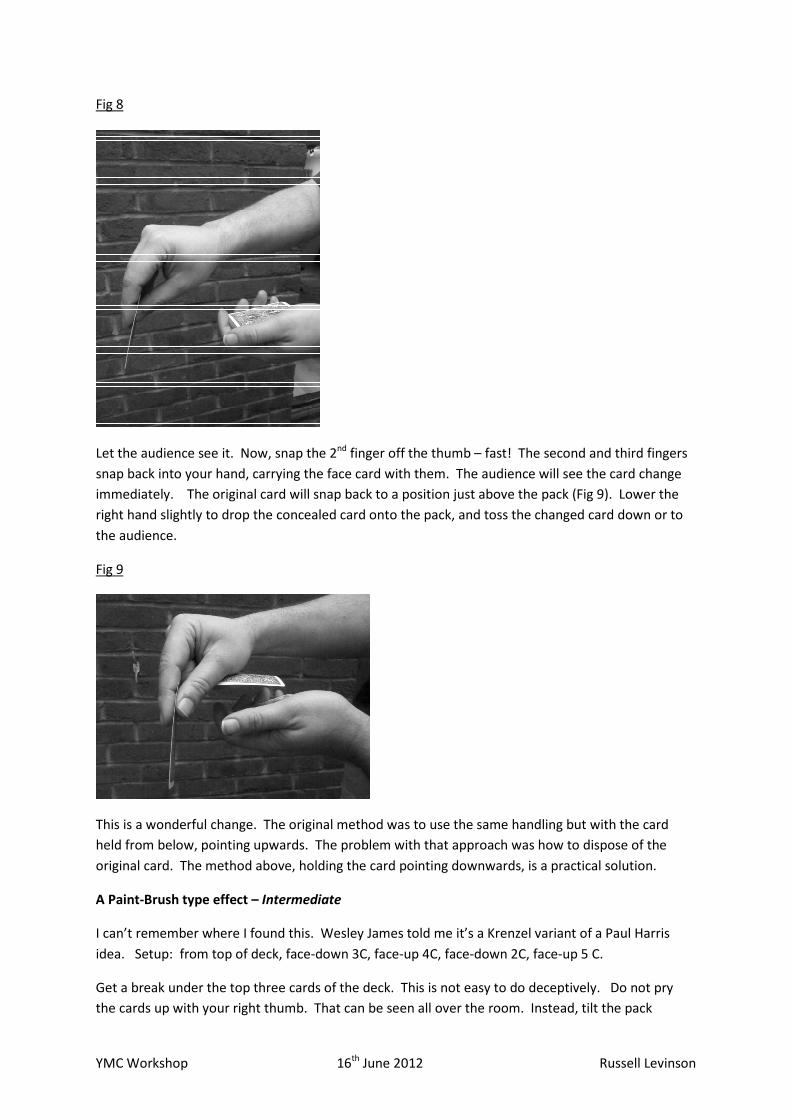
Fig 8
Let the audience see it. Now, snap the 2nd
finger off the thumb – fast! The second and third fingers
snap back into your hand, carrying the face card with them. The audience will see the card change
immediately. The original card will snap back to a position just above the pack (Fig 9). Lower the
right hand slightly to drop the concealed card onto the pack, and toss the changed card down or to
the audience.
Fig 9
This is a wonderful change. The original method was to use the same handling but with the card
held from below, pointing upwards. The problem with that approach was how to dispose of the
original card. The method above, holding the card pointing downwards, is a practical solution.
A Paint-Brush type effect – Intermediate
I can’t remember where I found this. Wesley James told me it’s a Krenzel variant of a Paul Harris
idea. Setup: from top of deck, face-down 3C, face-up 4C, face-down 2C, face-up 5 C.
Get a break under the top three cards of the deck. This is not easy to do deceptively. Do not pry
the cards up with your right thumb. That can be seen all over the room. Instead, tilt the pack
YMC Workshop 16th
June 2012 Russell Levinson
towards you (so the audience can’t see the face-up cards) and spread the top three cards over a tiny
bit, about the width of a white border, and get a break under the third.
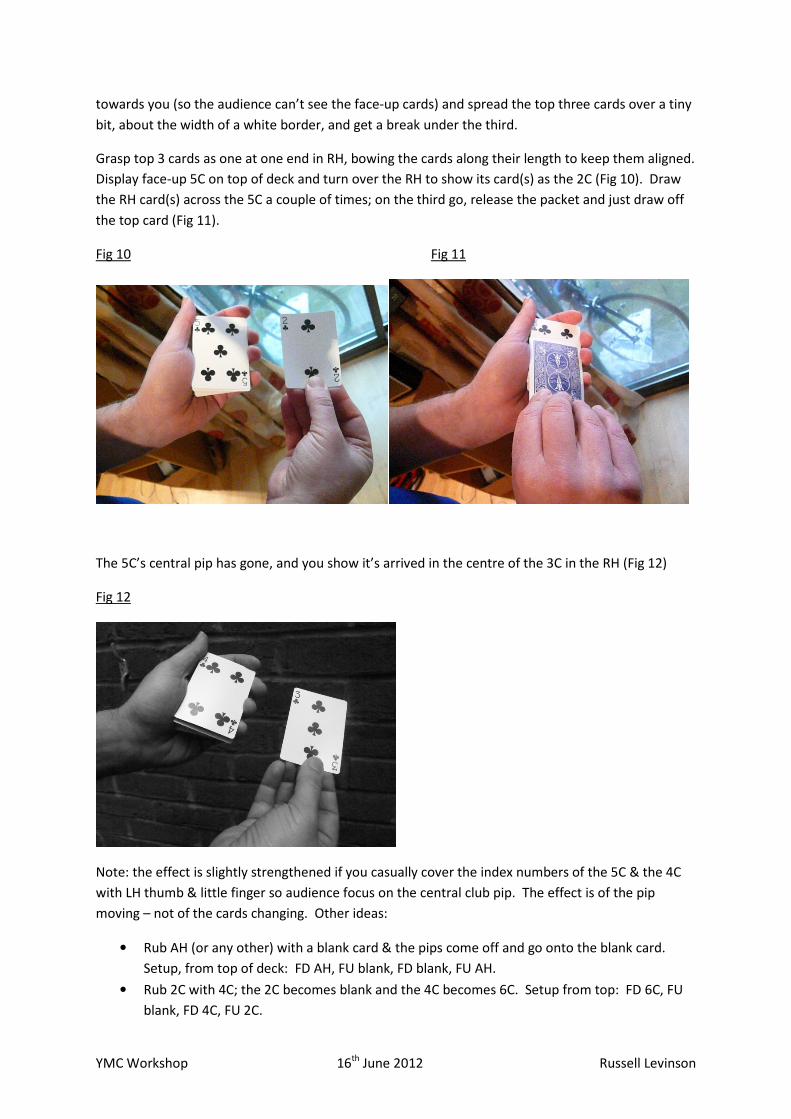
Grasp top 3 cards as one at one end in RH, bowing the cards along their length to keep them aligned.
Display face-up 5C on top of deck and turn over the RH to show its card(s) as the 2C (Fig 10). Draw
the RH card(s) across the 5C a couple of times; on the third go, release the packet and just draw off
the top card (Fig 11).
Fig 10 Fig 11
The 5C’s central pip has gone, and you show it’s arrived in the centre of the 3C in the RH (Fig 12)
Fig 12
Note: the effect is slightly strengthened if you casually cover the index numbers of the 5C & the 4C
with LH thumb & little finger so audience focus on the central club pip. The effect is of the pip
moving – not of the cards changing. Other ideas:
• Rub AH (or any other) with a blank card & the pips come off and go onto the blank card.
Setup, from top of deck: FD AH, FU blank, FD blank, FU AH.
• Rub 2C with 4C; the 2C becomes blank and the 4C becomes 6C. Setup from top: FD 6C, FU
blank, FD 4C, FU 2C.
YMC Workshop 16th
June 2012 Russell Levinson
Note: this is not the Paintbrush change, which is a different effect created by Roy Walton
Variations
• For a fine way to get the three card break, check out Dai Vernon’s Double Lift (the Dai
Vernon Book of Magic) and adapt for a triple lift
• Another way is with a little-finger count. See Card College Volume 1, or Darwin Ortiz at the
Card Table. Needs a lot of practice.
French Drop Colour Change (Dai Vernon) - Intermediate
If you are doing orthodox colour changes, by palming out a face-up card and replacing it on the face
card of the pack, the Finlay Tent Vanish is a useful throw-off which leads the audience away from
palming as an explanation.
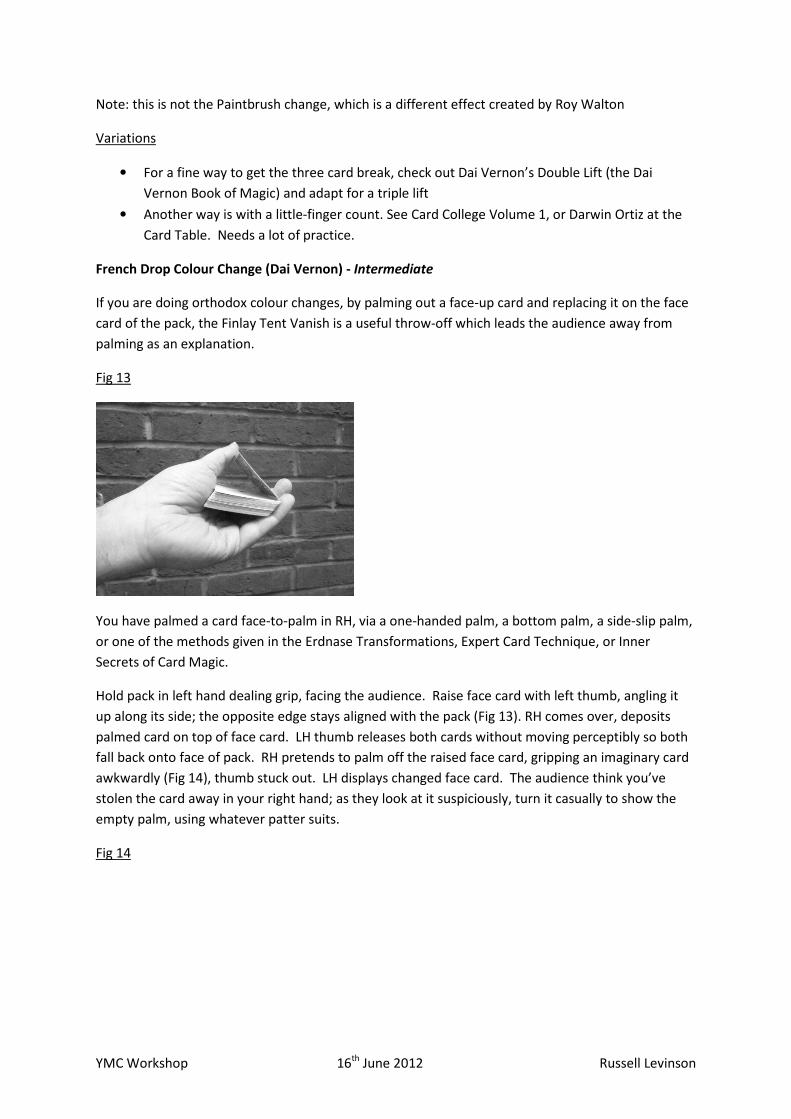
Fig 13
You have palmed a card face-to-palm in RH, via a one-handed palm, a bottom palm, a side-slip palm,
or one of the methods given in the Erdnase Transformations, Expert Card Technique, or Inner
Secrets of Card Magic.
Hold pack in left hand dealing grip, facing the audience. Raise face card with left thumb, angling it
up along its side; the opposite edge stays aligned with the pack (Fig 13). RH comes over, deposits
palmed card on top of face card. LH thumb releases both cards without moving perceptibly so both
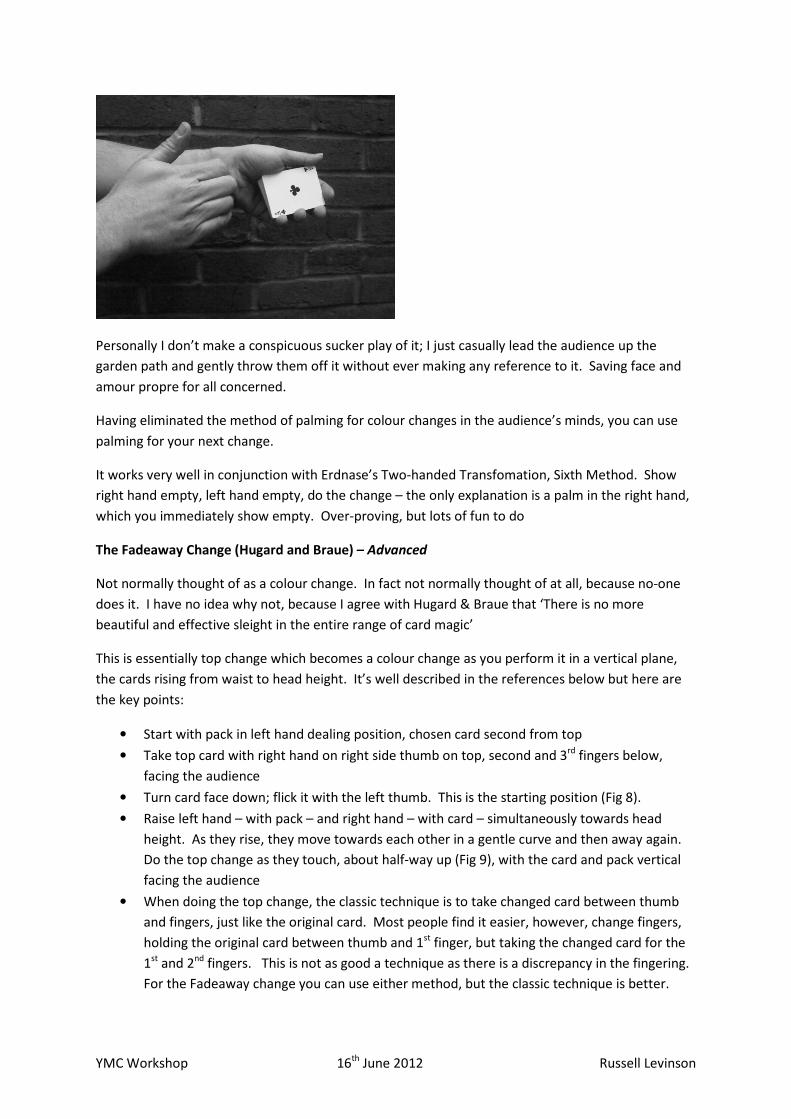
fall back onto face of pack. RH pretends to palm off the raised face card, gripping an imaginary card
awkwardly (Fig 14), thumb stuck out. LH displays changed face card. The audience think you’ve
stolen the card away in your right hand; as they look at it suspiciously, turn it casually to show the
empty palm, using whatever patter suits.
Fig 14
YMC Workshop 16th
June 2012 Russell Levinson
Personally I don’t make a conspicuous sucker play of it; I just casually lead the audience up the
garden path and gently throw them off it without ever making any reference to it. Saving face and
amour propre for all concerned.
Having eliminated the method of palming for colour changes in the audience’s minds, you can use
palming for your next change.
It works very well in conjunction with Erdnase’s Two-handed Transfomation, Sixth Method. Show
right hand empty, left hand empty, do the change – the only explanation is a palm in the right hand,
which you immediately show empty. Over-proving, but lots of fun to do
The Fadeaway Change (Hugard and Braue) – Advanced
Not normally thought of as a colour change. In fact not normally thought of at all, because no-one
does it. I have no idea why not, because I agree with Hugard & Braue that ‘There is no more
beautiful and effective sleight in the entire range of card magic’
This is essentially top change which becomes a colour change as you perform it in a vertical plane,
the cards rising from waist to head height. It’s well described in the references below but here are
the key points:
• Start with pack in left hand dealing position, chosen card second from top
• Take top card with right hand on right side thumb on top, second and 3rd
fingers below,
facing the audience
• Turn card face down; flick it with the left thumb. This is the starting position (Fig 8).
• Raise left hand – with pack – and right hand – with card – simultaneously towards head
height. As they rise, they move towards each other in a gentle curve and then away again.
Do the top change as they touch, about half-way up (Fig 9), with the card and pack vertical
facing the audience
• When doing the top change, the classic technique is to take changed card between thumb
and fingers, just like the original card. Most people find it easier, however, change fingers,
holding the original card between thumb and 1st
finger, but taking the changed card for the
1st
and 2nd
fingers. This is not as good a technique as there is a discrepancy in the fingering.
For the Fadeaway change you can use either method, but the classic technique is better.

YMC Workshop 16th
June 2012 Russell Levinson
• When the card arrives at head height, Roberto Giobbi teaches you flick it again with the left
thumb. He’s absolutely right that you should do something to mark the change. My
approach is slightly different; I flick it with the left thumb before the change, open my mouth
to breathe in, do the change, and blow on the card when it reaches head height. That gives
justification for raising the card, cover for the change as people watch my mouth, and the
effect of changing the card by blowing on it.
Not too difficult but needs some time to get smooth. You’ll fool yourself and other magicians with it.
Reference: Expert Card Technique Chapter 8, p81 of Dover edition, ‘The Fadeaway Card Change’.
Also Card College V3, pp748-749
Thoughts on the Houdini Change - Advanced
This well-known change, popularly known as the Erdnase Change, was actually invented by Houdini.
It was also written up by Erdnase as his first method for the Two-Handed Transformation.
It is widely used and generally performed badly. Typically with a mechanical sliding forward and
back movement that looks terrible. If you are going to do it, please think about the following:
• Try Roberto Giobbi’s handling in Card College, or Dai Vernon’s handling in Inner Secrets of
Card Magic
• The outjog of the face card looks very unnatural normally. But if you do it while turning the
right hand palm down onto the card, it’s undetectable – a Howard Schwarzman tip.
• Think about why you are moving the right hand back to display the card again. Check out
what Erdnase has to say about it. Challenge the audience ‘do you remember what the card
was, or what colour it was? ‘ That gives you a reason to show it again
• Try the variations:
o Guy Hollingworth published in Genii a beautiful variation of the First Transformation
done from side to side, rather than end to end. It allows you to have the right hand
fingers open
o Sliding off at the lower left corner, Harry Levine’s ‘Hurricane Change’ written up in
Steve Beam’s Trapdoor magazine
o My variation of Guy Hollingworth’s idea, given below. It’s not particularly difficult in
itself, but may take some learning because of the intricacies of hand movement and
because it’s a little different to standard approaches.
Begin with the pack face-up in left hand dealing, the first finger at the end of the pack. The right
hand is palm up beside the deck. As the right hand turns palm down to cover the deck, the pad of
the little finger comes onto the top right corner of the face card. In a continuing movement, while
turning palm down, the right hand moves forward, a distance at least the length of the last joint of
the little finger, sliding the top card with it. The distance can be more if you need, up to about one-
third of a card length.
Whatever distance you slide, the forward movement should be done as part of the turning of the
hand palm down. It’s too often done as a second movement afterwards, which is much less
effective. This transformation is often done in a jerky manner; it must flow.
YMC Workshop 16th
June 2012 Russell Levinson
The right hand straightens, and hinges down at the back, so that the area of the palm close to the
base of the fingers touches the second card, exposed by the forward movement of the top card. The
right fingers come off the surface of the pack, creating space under them. The right hand, still
straight, moves back towards you and downwards, sliding the second card out. Do not attempt to
palm the card; it is flat, held only by pressure between the upper part of the palm and the near edge
of the pack.
You will feel the front edge of the card come free of the top card. At this point, slide the right hand
forward. When your right fingers cover the left index finger, push it in, squaring the pushed-out top
card with the deck. The normal transformation ends here by laying the right hand’s card on top of
the pack; and you may well feel you have done enough work already! But since you’ve done most of
the hard work already why not do a little bit more and have a lovely open-handed transformation.
So we soldier on…you will feel the right hand’s card butting up against the left index finger. Now,
leaving the card where it is, slide the right hand forward, until you feel the left index finger under the
roots of the right hand fingers. Slide the right hand, with the flat card under it, forward a touch. You
can now open the right fingers as the card is concealed under the flat right hand, held between the
palm and the nail of the left first finger.
Now you can play. Slide the right hand to the right, with the card under it; it travels over the left first
fingernail, and is now supported by the left second and third finger nails. The unchanged face card is
completely exposed and the right fingers are open. Slide the card in an arc, forward and to the left,
so it’s over the left first fingernail again, then back and to the left, so it’s supported by the left
thumbnail. As far as the audience are concerned you have done nothing and there is no way you
could have a card concealed.
So now is the time to make the change…move your right hand over the deck from left to right, let
the card drop onto the face, square slightly with the left fingers if needed, and keep moving your
right hand to the right to expose the changed face card.
General Hints and Tips
• There are plenty of colour changes around. Choose one that fits into your routine and
handling. If you need to change grips to get into your colour change, then you have the
wrong change. Don’t be lazy and just use the move you happen to know.
• Use bridge-sized cards. Particularly if you’re a young magician, and your hands are not yet
full-sized. You will fool them more with cards suitable for your hands. Mind you, there are
lots of adult magicians who should be using bridge cards particularly when palming. Don’t
feel that real magicians use poker sized cards are for. That is rubbish. The audience doesn’t
care what size cards you use providing you entertain them. In fact they may well be more
used to bridge sized cards as they are more widely used for card playing in the UK. They will
be less likely to think you are using special trick cards. I have very big hands and can palm
poker-sized cards easily, yet I often use bridge-sized cards just to be more deceptive. So
should you.
• If you can, set up and force the cards which will change, to ensure a dramatic, visible change.
• If possible change colour, ideally from red to black (which is more visible)
YMC Workshop 16th
June 2012 Russell Levinson
• This may be a counsel of perfection, but if possible, change in the direction of increased
visibility, e.g. from a high red spot to a low black.
• Try doing a colour change that adds a spot or takes one away
• Changing from one court card to another will have little impact.
• Before placing a classic palmed card on the deck, flatten the hand a little first, so the card
straightens or even bows out a little, held only at the corners between little finger tip and
thumb base. This gives a cleaner replacement, the card flatter, and the dirty hand further
from the deck. Also, you can have your left thumb across the face of the deck and still do
the change by slipping the card underneath the left thumb as your right hand moves from
right of the pack to above the face. This subtly rules out the idea of replacing a card on the
face of the deck. This is a variation on the ‘Impossible Card Change’ (Expert Card Technique,
Dover edition, p163) with a cleaner handling
• Make the moment of change dramatic. Give it importance. Here are some ideas. Spread
the right hand fingers quickly. Lift the right hand off sharply, or slowly. Blow at the pack.
Use a magic word. Anything you like.
• I also love the Tenkai Colour Change (Dai Vernon’s Inner Secrets of Card Magic by Lewis
Ganson) and the Erdnase 6th
Two-Handed Transformation. No-one else does either of them!
Great books on colour changes and card magic which should be in every magician’s library
• Two inexpensive classics, available in low-cost reprint editions
o The Expert at the Card Table, SW Erdnase
o Expert Card Technique, Jean Hugard & Frederick Braue
• The Dai Vernon Book of Magic, Lewis Ganson
• Dai Vernon’s Inner Secrets of Card Magic Trilogy, by Lewis Ganson.
o The first volume, Inner Secrets, has a section on colour changes. You should also read
More Inner Secrets and Further Inner Secrets.
• Card College, Roberto Giobbi. Volume 3 has a chapter on colour changes.
Thanks to….
• John Eaton: These notes were originally created for an ‘Eaton College’ night at the Zodiac
Magical Society, run by the wonderful John Eaton
• Alexônia Padilha for the photos