Embed Size (px)
Citation preview

1
A Note from the Author 5/28/2016
First off, let me say thanks to everybody who has given me feedback so far. This is of course
very useful and very much appreciated.
I have made some updates based on feedback, as well as some other minor tweeks and
additions. I have also added in some of new rules for Mounted Missile Troops, Attacking War
Machines and a couple other things that were missing. There are a couple of important updates
to how Stone Throwers fire, and Tough Hide on the Monstrous Creatures.
Anything that has changed or is new, is in Blue Text.
For the first time I am also giving you some of the advanced rules. These cover Terrain and its
effects, Characters, Advanced Combat Rules, and Reserves and Flank Marchers. I hope these
bring a new level to your games.
Bestiary. This is not complete. I have only included stuff that is currently available, or will be
shortly. I don’t want to give the game away on all the stuff that is coming!
This is a draft only, please remember that. It is not the final layout or product. My intention is to
let you have this so you can have a read, try it out, and contribute any and all feedback,
suggestions, critiques you are willing to give. It will all be appreciated. You won’t offend me, but
I do ask that you be constructive.
I am not precious. I want to make these rules great. I am not going to promise I will make every
change you may suggest, but they will not fall on deaf ears.
Email me at [email protected]
Enjoy
Ed Spettigue.
2
Battle Valor
Fantasy
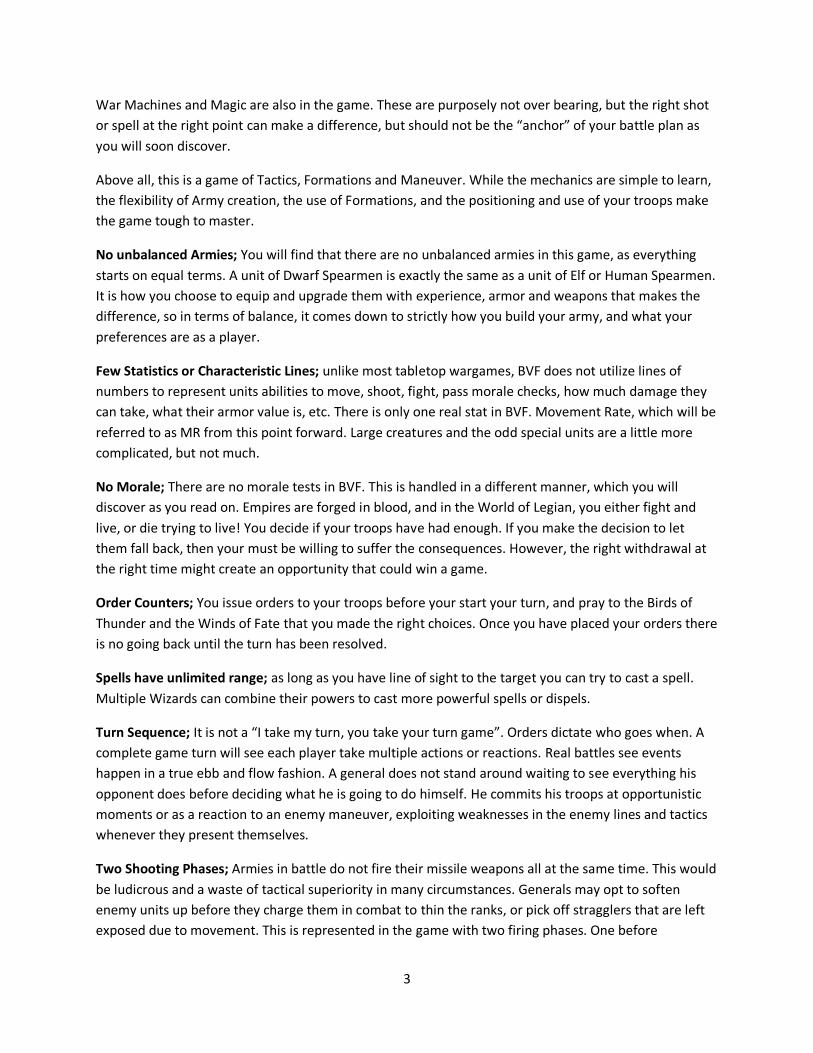
“ War is coming? I think not. War has been here, is here, and will continue to be here until
such a time that the Gods see fit to rid the World of the Pestilence of so called Intelligent
beings. It is within our very nature to covet, desire, and try to obtain those things that belong
to our neighbors, be they man or beast. Thus, conflict is inevitable.”
Attributed to William of the Legian, Wise beyond his Years.
Introduction
Battle Valor Fantasy (BVF) is a 15mm Scale Tabletop Wargame, set in the World of the Legian, which
utilizes the Battle Valor Rules System.
Like many similar games, it is played using Armies built from collectible metal miniatures on a wargames
table or surface.
The game is designed to be realistic, in that it represents what truly happens in a battle. Not everyone
charges and makes it into combat at the same time. Fleeing troops may succumb to their wounds or
fatigue before reforming or leaving the battle field. It takes time to organize a formation. Formations
affect combat results. Troops rally to the sound of their musicians. The loss or capture of a Standard or
Banner can demoralize troops. Generals and characters truly exert an influence in the outcome of
things. Fate and Luck can change the outcome of a battle, as well a tactics and planning. Maneuvering
your units actually matters. Armor, weapon type, terrain, and troop experience truly dictate whether
you win or lose. You must build your army considering all these factors to create a well balanced fighting
force, capable of defeating your opponent.
There are many game mechanics that set this rule system apart from most similar types of games.
It’s a game about Armies; Battle Valor Fantasy is about Battles between Armies. If you like playing
games that are won by Characters and Generals, then this game is not for you. There are Generals and
Characters in the game, but they are there to lend support to the troops, not to decide the outcome of
the game. In fact, the General of an Army can never be targeted or killed. It is his positioning and
presence on the field that is important. He is the figure head and leader of the army and his position on
the field and the use of his abilities will help you get the most out of your troops, but he will not single
handedly ever win a game for you. Characters are attached to units for the most part, to help “boost”
them in various ways, but again they will not be physically capable of destroying an entire unit by
themselves.
3
War Machines and Magic are also in the game. These are purposely not over bearing, but the right shot
or spell at the right point can make a difference, but should not be the “anchor” of your battle plan as
you will soon discover.
Above all, this is a game of Tactics, Formations and Maneuver. While the mechanics are simple to learn,
the flexibility of Army creation, the use of Formations, and the positioning and use of your troops make
the game tough to master.
No unbalanced Armies; You will find that there are no unbalanced armies in this game, as everything
starts on equal terms. A unit of Dwarf Spearmen is exactly the same as a unit of Elf or Human Spearmen.
It is how you choose to equip and upgrade them with experience, armor and weapons that makes the
difference, so in terms of balance, it comes down to strictly how you build your army, and what your
preferences are as a player.
Few Statistics or Characteristic Lines; unlike most tabletop wargames, BVF does not utilize lines of
numbers to represent units abilities to move, shoot, fight, pass morale checks, how much damage they
can take, what their armor value is, etc. There is only one real stat in BVF. Movement Rate, which will be
referred to as MR from this point forward. Large creatures and the odd special units are a little more
complicated, but not much.
No Morale; There are no morale tests in BVF. This is handled in a different manner, which you will
discover as you read on. Empires are forged in blood, and in the World of Legian, you either fight and
live, or die trying to live! You decide if your troops have had enough. If you make the decision to let
them fall back, then your must be willing to suffer the consequences. However, the right withdrawal at
the right time might create an opportunity that could win a game.
Order Counters; You issue orders to your troops before your start your turn, and pray to the Birds of
Thunder and the Winds of Fate that you made the right choices. Once you have placed your orders there
is no going back until the turn has been resolved.
Spells have unlimited range; as long as you have line of sight to the target you can try to cast a spell.
Multiple Wizards can combine their powers to cast more powerful spells or dispels.
Turn Sequence; It is not a “I take my turn, you take your turn game”. Orders dictate who goes when. A
complete game turn will see each player take multiple actions or reactions. Real battles see events
happen in a true ebb and flow fashion. A general does not stand around waiting to see everything his
opponent does before deciding what he is going to do himself. He commits his troops at opportunistic
moments or as a reaction to an enemy maneuver, exploiting weaknesses in the enemy lines and tactics
whenever they present themselves.
Two Shooting Phases; Armies in battle do not fire their missile weapons all at the same time. This would
be ludicrous and a waste of tactical superiority in many circumstances. Generals may opt to soften
enemy units up before they charge them in combat to thin the ranks, or pick off stragglers that are left
exposed due to movement. This is represented in the game with two firing phases. One before
4
movement and combat takes place, and one afterwards. We feel this gives a more realistic feel to the
way missile troops would perform in a real battle.
Flexible Army Creation; We want you to build the army you field the way you want it. There are very
few restrictions on how you build and equip your troops, giving you a wide variety of possibilities for
your army. This allows you to choose which are your Elite units, or how your troops are equipped. There
is plenty of variation in the miniatures for the game for you to build your units. In fact, the vast number
of possibilities will make it impossible to make miniatures for them all, but we will try!
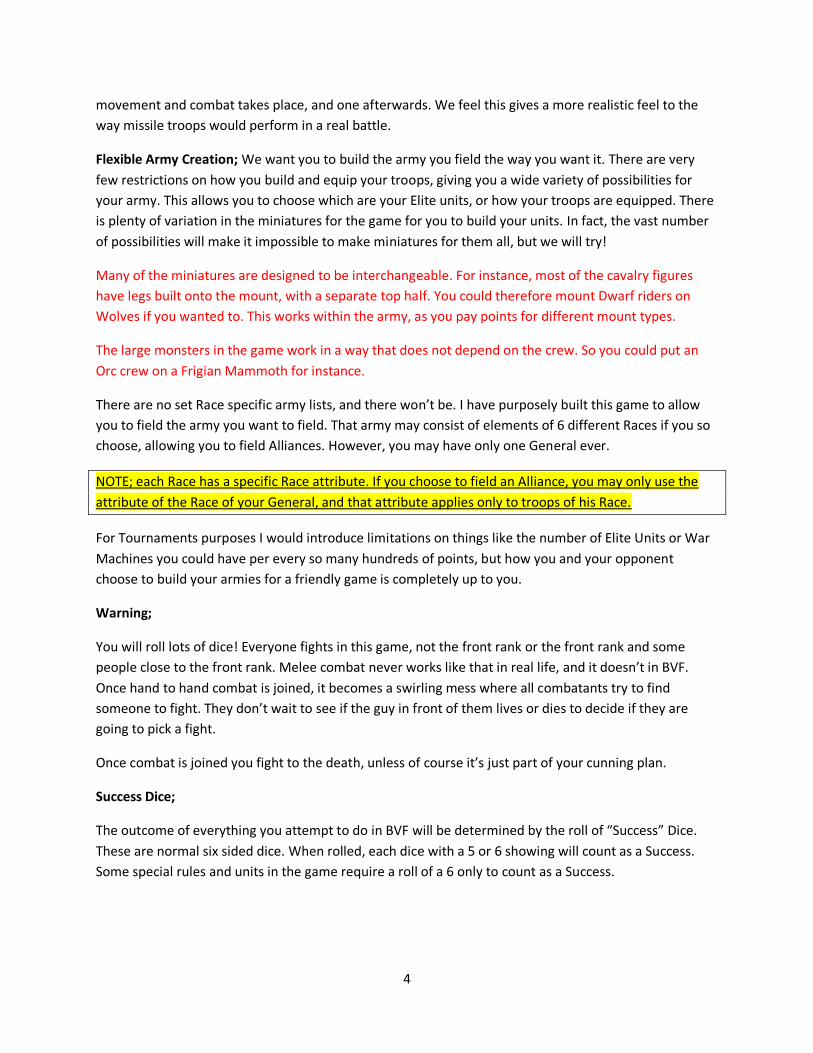
Many of the miniatures are designed to be interchangeable. For instance, most of the cavalry figures
have legs built onto the mount, with a separate top half. You could therefore mount Dwarf riders on
Wolves if you wanted to. This works within the army, as you pay points for different mount types.
The large monsters in the game work in a way that does not depend on the crew. So you could put an
Orc crew on a Frigian Mammoth for instance.
There are no set Race specific army lists, and there won’t be. I have purposely built this game to allow
you to field the army you want to field. That army may consist of elements of 6 different Races if you so
choose, allowing you to field Alliances. However, you may have only one General ever.
NOTE; each Race has a specific Race attribute. If you choose to field an Alliance, you may only use the
attribute of the Race of your General, and that attribute applies only to troops of his Race.
For Tournaments purposes I would introduce limitations on things like the number of Elite Units or War
Machines you could have per every so many hundreds of points, but how you and your opponent
choose to build your armies for a friendly game is completely up to you.
Warning;
You will roll lots of dice! Everyone fights in this game, not the front rank or the front rank and some
people close to the front rank. Melee combat never works like that in real life, and it doesn’t in BVF.
Once hand to hand combat is joined, it becomes a swirling mess where all combatants try to find
someone to fight. They don’t wait to see if the guy in front of them lives or dies to decide if they are
going to pick a fight.
Once combat is joined you fight to the death, unless of course it’s just part of your cunning plan.
Success Dice;
The outcome of everything you attempt to do in BVF will be determined by the roll of “Success” Dice.
These are normal six sided dice. When rolled, each dice with a 5 or 6 showing will count as a Success.
Some special rules and units in the game require a roll of a 6 only to count as a Success.

5
NOTE; you will apply modifiers to your Success dice throughout the game, whenever you attempt to do
something. You may never achieve more “Success” than the original number of dice rolled. Modifiers
increase or decrease the number of Successes you achieve. They do not modify the dice themselves.
For example, you may roll 20 dice, of which 14 result in a success. After applying modifiers you may have
achieved 22 Successes. Your “Success” total would be 20 as this was the original amount of dice you
rolled (this would be a very rare occurrence however).
Activating Units; Units may only Activate once in a complete game turn. There are a very few special
rules that allow a second activation. For instance, a General can pass down an order to a unit that may
have already been activated once. You will see that this is very important in combat. If a unit engaged in
combat is charged again after it has already been activated in the game turn (whether by choice or not),
it cannot fight back.
You must think like a General; You will find that the order you choose to do things in, during the game
can greatly influence the outcome of the battle. Think very carefully when you are placing your order
counters. Acting first or reacting at the right time will be of great importance, particularly during
combats. The more combats that are going on, the trickier this gets. You will choose to strike first in
some, forgoing the ability to do so in others.
Army Construction; Armies in BVF are made up of Units consisting of a number of stands of troops,
beasts, and war machines, as well as a General and other Special Characters.
There is a vast variety of troops in the game, and you will have to choose and pay points for their level of
experience and equipment.
Levy; these units are not very good. Although everyone in the World of Legian is up for a fight, not
everyone has the skills or ability to do it well. While useful to hold up the enemy, they are not likely too
win to many combats unless they are facing other Levy Troops. Levy troops have -1 Success in
everything they attempt to do. You lose one of your Succesful Dice rolls.
Regulars; these units are made up of troops from the Standing Army. Reliable, with proven skills, they
will form the backbone of your fighting force in most cases.
Veterans; these units are made up of battle tested and hardened troops, who have already proved
themselves by surviving many battles and campaigns. These units are not numerous, but very important.
You should consider very carefully where they are placed in your battle line. Veteran Troops have +1
Success in everything they attempt to do. You gain an additional Success Dice.
Elites; these units are made up of the most skilled and battle tested troops, and are quite capable of
performing excellently on their own or under command. Typically you would only have one or two Elite
Troop units in an army. Elite Troops have +2 Success in everything they attempt to do. You gain two
additional Success Dice.
6
Command Stands; these are vital in the game and comprise of a Leader, Musician and Standard Bearer.
You opt to buy these as an upgrade for your unit.
Leaders; Troops need direction, discipline, inspiration, and sometimes a push to perform properly.
Leaders give you +1 Success when attempting to charge your unit, which can make a big difference. It is
important to note that a “Captain” is different from a Leader. Captains are characters that can attach to
a unit to give it additional buffs.
NOTE; Units without Command stands cannot charge into combat, with the exception of Berserker units
which just don’t give a damn, and are far to unruly too be led anyway.
They may of course receive a charge and can be effective at blocking enemy units, but without a Leader
to push them forwards they are simply too intimidated by the enemy to run towards them. Leaderless
units can still be very useful on the field of battle.
Musicians; Units with Musicians can automatically reform at the start of their turn if they are fleeing, as
long as the Command stand is still alive and the Musician has his instrument!
Standard Bearers; Standards give you a bonus in combat resolution as well as counting towards victory
both positively and negatively.
Generals; Every army gets a “FREE” General Stand. This should be on a 40mm Diameter Base, and you
are free to decide how it looks. Generals are important because they make your troops more likely to
charge, but may also pass on an order every turn. It is very important where they are positioned in your
battle line, as they have a limited 12 inch range of effect. In addition, a General has 3 rerolls that can be
used to reroll any complete set of Success Dice rolled for a unit within 12 inches of him. A General may
also Rally a Fleeing Unit within 12 inches of him, instead of activating an order during a Game Turn.
You must think carefully about how you place you General and your units. Do you have your Elite Troops
further away from your General, where you know they will still perform reasonably well on their own?
Do you have your Levy and Regular Troops close to your General, so he can make them perform better
than they might usually?
Or do you stack your deck and have your Elites near your General for maximum performance, and have
flanks that you are willing to let collapse?
Battle Valor will have a General Miniature available for your army, if you don’t want to make your own.
Miniature Bases; BVF Miniatures are mounted on Round or Square/Rectangular bases depending on the
type of unit. Generals, Characters, Ogres and Trolls for instance are mounted on Round bases. This
represents that these units have a 360 degree Arc of Vision. Most other units Infantry, Cavalry and War
Machines are mounted on Square/Rectangular bases representing the fact that they have a more
limited Arc of Vision to their front.
General- Your general should be mounted on a 40mm Diameter Bases.
7
Characters- Your character models should be mounted on 25mm Diameter Bases.
Infantry- Your Infantry should be mounted 4 miniatures to a base on 40mm x 40mm bases.
Missile Troops – Your Missile Troops should be mounted 2 to a base on 40mm x 20mm bases.
Cavalry – Your Cavalry should be mounted 2 figures to a base on 40mm x 40mm bases.
Animal Packs – Your Animal Packs should be mounted 3 figures to a base on 40mm x 40mm bases.
Chariots - ?
Heavy Infantry – Your Heavy Infantry should be mounted 3 figures to a base on 40mm x 40mm bases.
Line Breakers – Your Line Breakers should be mounted individually on 25mm diameter bases.
Shock Troops – Your Shock Troops should be mounted individually on 40mm x 40mm bases.
Fliers- Your Fliers should be mounted individually on 40mm diameter bases, unless stated otherwise.
Monstrous Creatures – Your Monstrous Creatures should be mounted individually on 40mm x 60mm
bases.
War Machines – Your War Machines should be mounted on a 100mm x 50mm bases.
What you need to play
Once you have collected some Miniatures and have a suitable gaming surface you are basically ready to
start playing BVF. A few other things will come in handy.
Success Dice; At least 20 6 sided dice to share between you, but you will want more!
A Quick Reference Sheet; This will help speed your game along so you don’t have to keep finding things
in the rulebook. We have provided one of these for you.
Order Counters; These are critical for game play as nothing will happen without them! We have
provided some for you.
Spell Counters; These help remind you what spells units have cast on them.
Templates; Some things in BVF require use of a Template.
Movement Rates (MR)
The MR for Infantry Units is 4 Inches.
The MR for Cavalry, Animal Pack & Chariot Units is 8 Inches.
The MR for Generals, Characters, Heavy Infantry, Line Breaker, and Shock Troop Units is 6 Inches.

8
The MR for Flier Units is 10 Inches.
The MR for Monstrous Creatures is 6 inches unless stated otherwise in the Bestiary.
The MR for War Machines is 4 inches.
Remember These 5 very Important Rules
You can pre-measure everything.
Units may only Activate Once per Game Turn unless this is over ridden by a Special Rule.
If a Unit becomes Split by anything other than a Charge or Flee Move it may only be issued a Reform
order in the next game turn.
Friendly units may Move and Fire through Skirmishing Units. Enemy troops may fire through them.
Command Stands must always be as close to the center of the front rank of a Unit as possible.
Starting the Game
Step 1) Determine the deployment zones for your armies. This is up to you as players unless you are
using a preset scenario where the deployment zones are dictated.
Step 2) Each player rolls 4 Success Dice. The person with the most “Successes”, wins the Initiative. In the
case of a tie, reroll until there is a winner.
Step 3) The player who did not win the initiative, places one of his units anywhere within his
deployment zone, or according to any deployment rules dictated by the game scenario if one is being
utilized.
The player who won the initiative then places one of his units within his deployment zone, or according
to any deployment rules dictated by the game scenario if one is being utilized.
Each player takes turns to place units in their deployment zone in this manner until all units have been
deployed.
If one player has more units than his opponent he will place any leftover units after his opponent has
placed their last unit, but before their opponent places their general.
NOTE; Each player’s General Stand is always the last stand to be placed during their deployment phase,
starting with the player that lost the initiative.
You are now ready to start the Game!
9
The Game Turn
Each full game turn consists of the following phases;
Roll for Initiative
Place Orders
Reveal Orders
Fate
Compulsory Moves
Cast Spells
Reform Units
Fire Missile Units
Move Charging Units & Resolve Combats
Move Advancing Units
Fire Remaining Un-activated Missile Units
Phase 1 Roll for Initiative;
During this phase each player rolls 4 Success Dice. The person with the most “Successes” wins the
Initiative for this game turn. In the case of a tie, reroll until there is a winner.
Phase 2 Place Orders;
During this phase each player places one order token, face down, next to each of their units including
their General. You do not take turns. Once all counters have been placed you are ready for the next
phase.
Mounted Missile Troops
The only exception to this is Mounted Missile Troops. During battle these types of troop are most
effective when they are constantly on the move, harassing the enemy’s flanks, and picking off weakened
or fleeing units. To represent this in the game Mounted Missile Troops must be given 2 Orders. One of
these must be either Advance or Charge and the other must be Fire or Fire & Flee.
During the game turn they must use both order counters. This means they may choose to Fire in the first
Fire Phase and then Advance or Charge, or they may Advance or Charge and then Fire in the second Fire
Phase. Whichever order they do things in, they must use both order counters during the game turn.

10
NOTE; Make sure you place an Order counter next to any units you have in combat. This is easily over
looked and costly. Failure to place a counter means you can only react to any enemy action, rather than
initiate a round of combat in a situation where you might want to be the one to strike first. Typically you
would be placing an Attack, Brace, or Flee Order Counter.
Order Counter Types;
There are 10 different types of Orders Counters in BFV.
Fate Counter; Each player must place one and only one Fate counter during each Order Phase next to
one of their units instead of any other order counter. The Fate Counter has two uses.
During the first turn of the game only, the player may use his Fate Counter to move an enemy unit of his
choice up to 10 inches in any direction within the normal deployment zone The units facing or formation
cannot be changed, just its position on the field of battle. This move may not take the unit off the table
edge. This is done instead of opting to do the following;
The Fate Counter may be replaced with any order counter of the player’s choice. This represents the
commander carefully considering his enemies actions around him and reacting accordingly with brilliant
strategy. This comes in handy when a unit is faced with multiple possible enemy actions in front of
them, allowing the unit to decide what to do after the enemy has revealed their order counters. Placing
the Fate counter on your General gives you ultimate flexibility, as he gets to change his order after
seeing what the enemy has planned, and then has the ability to pass it on to where it is most needed.
NOTE; Each player must place a FATE Counter next to one of his units, instead of any other order
counter, in each Order Phase of the Game. If your opponent fails to place a FATE Counter during the
order phase, you may move anyone of their units 6 inches in any direction immediately after orders are
revealed. You may not change the units facing or formation, just its placement on the table.If this move
results in the unit being moved off the table edge, FATE has dictated that they will not take part in this
battle.
Spell; This order should be placed next to any spell casting unit that you want to cast a spell.
Reform; This order should be placed next to any unit you want to make a formation change, or to
change its facing.
Fire; This order should be placed next to any unit you want to fire any kind of missile weapon. This
includes War Machines.
Charge; This order should be placed next to any unit you want to make a charge move.
Attack; This order should be placed next to any unit that is currently engaged in a combat that you want
to make an attack against the enemy unit.
Advance; this order should be placed next to any unit you want to make an advance move.
11
Brace; this order can be placed on a unit that you feel is going to receive a charge or missile fire. In the
case of a charge it represents the unit readying their stance, shields, and weaponry to receive the
charge. In the case of missile fire, raising their shields, going to ground, or spreading out. In either case
it will give them +1 Success during the Defense resolution of combat or firing.
It can also be placed on a unit already engaged in combat giving them +1 Success during the Defense
resolution of combat, but in doing so they lose 2 of their total attack dice.
NOTE; Brace only works against missile fire or charges received against the front of the unit. You cannot
anticipate stuff you can’t see on the sides or in the rear.
Flee; This order can be placed on a unit you want to withdraw from combat, or that you feel is about to
be overrun by a charge, or generally wherever you feel moving backwards rather than forwards might
be useful. Obviously choosing to Flee comes with some risks. See the rules for Fleeing further on. A Flee
counter will stay on the unit until it is removed by rallying your troops successfully with a Musician or a
Success dice roll.
Fire & Flee; This order can be placed on a unit with missile weapons of any kind. It gives you the
opportunity to get one last shot in at the enemy before quickly getting the hell out of the way!
Obviously these would be considered pressure shots, so you fire at -2 Success.
NOTE; Your army General may pass his order onto a unit under his command that is within 12 inches
instead of using it himself. This is done in the appropriate phase. For instance, if you issue your General
a Charge order, he may pass this order onto a unit during the Charge phase.
Phase 3 Reveal Orders;
During this phase each player flips over and reveals all of their order counters for this game turn.
Remember to check that your opponent has placed a Fate counter!
Phase 4 Fate;
During this phase each player will activate their Fate Counter, starting with the player who won the
initiative. The player that won initiative may choose whether to activate his Fate Counter before or after
his opponent activates theirs. As soon as a player has activated the Fate Counter they will remove the
counter from the game surface.
NOTE; Remember when activating your Fate Counter, if it is the first game turn you can choose to move
an enemy unit or place an order on the unit. After the first game turn you may only place an order.
Phase 5 Compulsory Moves;
During this phase each player will resolve any and all compulsory moves, starting with the player who
won the initiative. These are Flee Order Counters, Fire & Flee Order Counters, and Split Charges that
12
have arisen from the previous game turn (see Phase 9). The player who won the initiative completes
“ALL” of their compulsory moves first.
Flee Counters placed this turn;
For each unit that you have placed a Flee Counter on this turn, do the following;
Count the number of stands in the unit.
Roll as many dice as there are stands in the unit.
Count up the number of Successes you have, and modify the number by your Units Experience Level.
For instance, you have six stands in the unit, and roll 3 Successes. The unit is Veteran, so you get +1.
Your total Success is 4.
Move that many stands double their normal Movement Rate directly away from the closest enemy unit.
If this move takes them off a table edge they are counted as lost.
The remaining stands from the unit are moved their normal rate directly away from the enemy. If this
move takes them off a table edge they are counted as lost. This represents wounded and fatigued
troops not being able to keep up with the main body of the unit, lagging behind.
Stragglers- Obviously you now have some “straggling” stands. This can also happen during a charge. One
of the risks of opting to flee or charging is that your unit may become split. This is intentional. These
straggling units are vulnerable and can be picked off by enemy missile troops, marauding cavalry, or well
placed enemy flier units. This risk can be mitigated by proximity of the general, having a command stand
in the unit, and carefully considering the units experience level modifier on your dice roll.
If a unit has become split, and for any reason, cannot rejoin in the next compulsory movement phase, it
remains permanently split for the rest of the game, and must be treated as 2 separate units for order
purposes.
The Flee counter remains with the unit until it is removed by Rallying to a Musician or a Success Roll in
an ensuing turn, or the unit is lost due to continued casualties or it leaves the gaming surface.
Flee Counters left from previous game turns;
First move any stands that did not Flee double their movement when the Flee order was originally
issued into base to base contact with the main unit, assuming of course that they were not picked off
and wiped out by enemy units.
If they are unable to rejoin the Parent unit by a direct path due to intervening enemy troops they are
destroyed.
If the Parent unit has been destroyed leave them where they are and proceed with the below.
13
Any units that still have Flee Counters from the previous game turn may attempt to rally. This is
achieved in one of two ways.
Rallying
If the unit has a musician, it rally’s to the sound of the drums, pipes, or whatever instrument the
musicians are playing. The unit is automatically turned around and placed in whatever formation the
player desires.
To do this, leave the Command stand exactly where it is, but change its facing to where you want it
pointing. Place the rest of the stands in formation around the Command stand, remembering that the
Command stand must always be in the center of the front rank of the unit.
The Flee counter is removed from the gaming surface and the unit is considered activated for this turn.
If the unit does not have a musician it may attempt to rally by rolling success dice.
Count the number of stands in the unit. Roll as many dice as there are stands in the unit.
If you roll all Successes the unit is considered rallied and may be turned around and placed in whatever
formation the player desires as described previously. This roll is always modified by the units experience
level. The Flee counter is removed from the gaming surface and the unit is considered activated for this
turn.
A unit of Levy Troops therefore will never rally without a Musician as they are always at -1 Success in
everything they do, but that is okay because let’s face it, they are crap and have probably served their
purpose at this point.
On the other hand Elite Troops are far more likely to rally as they are always at +2 Success in everything
they do, representing their ability to get wisely get out of harm’s way, reorganize, and go at it again.
If you do not roll all Successes after applying the units experience modifier do the following. Count the
number of failures and remove that many stands from the unit as casualties.
This represents Fleeing troops succumbing to their injuries or fatigue as they try to escape from the field
of battle.
Then move the remaining stands double their normal Movement Rate directly away from the closest
enemy unit. The Flee counter remains with the unit until it is either removed by a Success Roll in an
ensuing turn, or the unit is lost due to continued casualties or it leaves the gaming surface.
Obviously electing to Flee can have very dangerous consequences, especially for inexperienced troops or
troops without command stands.
But, a well timed withdrawal might allow a better unit to charge into the enemy. This allows you to use
Levy Troops as bait, luring your enemy into the cooking pot!
14
NOTE; Remember you can always modify a Flee Success roll by the units Experience Level
Complete unfinished charges;
If you have any units that had stands that did not make it into combat during the initial charge in the
previous game turn, you may now move those stands into the combat, in the same formation the unit
was in when it originally initiated the charge. If the lead stands that completed the initial charge were
wiped out, you must still complete the charge with the remaining stands. This would count as a new
charge and combat should be resolved immediately.
If, for some reason the enemy unit you initially charged is no longer in the same position, you must
redirect the charge to the closest enemy within range of the charge. If no such unit exists, you must
finish the charge move in the original direction you charged, finishing the charge in open ground.
Phase 6 Cast Spells;
During this phase the players will take turns activating their Spell Order Counters, starting with the
player who won initiative, and alternating between players until all Spell Order Counters have been
activated. As soon as a player has activated a Spell Order Counter they will remove the counter from the
game surface.
Step 1) Choose a Spell Order to activate.
Step 2) Choose a Spell to attempt to cast from the list further down. There are two types of spells,
offensive and defensive. Spells vary in difficulty to cast based on the effects that they inflict. These are
basic Spells available to all Spell Casters.
Step 3) Declare which unit on the table you are attempting to cast the Spell on.
Step 4) Check that the Spell Caster(s) has clear Line of Sight to the Target.
Step 5) Roll 10 Dice and score the required amount of Success rolls to make the Spell work!
Step 6) Resolve the effects of the Spell and place any required Markers.
All Spells only require clear line of sight to the targeted unit, there are no ranges.
Sometimes, one spell caster isn’t enough. To cast the most powerful spells takes the combined might of
more than one spell caster. If you wish to cast a spell which requires a high success roll, you may
activate more than one spell caster at once. For each spell caster taking part in the casting you may roll
10 dice. For instance, 2 spell casters allow you to roll 20 dice.
You may also want to cast a lower level spell with multiple spell casters to cause more damage. For
instance, Ice Shards causes as much damage as the number of successes you roll. Using 2 spell casters to
cast it and rolling 20 dice obviously gives you a chance of inflicting many more casualties.
15
The targeted unit must be within clear line of sight of each spell caster attempting to cast the spell.
If you activate more than one Spell Order counter at once to cast a spell, remember to remove them
from the game surface once activated.
Dispels
You may attempt to dispel a spell that has been cast, as long as you have 1 or more Un-activated
Wizards.
Wizards attempting to Dispel do not need line of sight to the casting Wizards. They can sense the
fluctuations of magical energy in the air.
To dispel, roll 10 dice per Wizard attempting to dispel. You must score at least 1 more Success than the
casting Wizard(s) scored to cast the spell.
Remember, this activates your Wizard(s), and any order counter they had should be removed from the
table surface.
Clearly, you must choose whether it is worth sacrificing the chance to cast a spell to be able to dispel
one.
Offensive Spells;
Fire Ball -Score 2 Success
If successful the targeted unit must roll 3 dice. These cannot be modified in anyway. For each failure the
unit takes one casualty.
Ice Shards-Score 3 Success
If successful count the total number of successes you scored. The targeted unit must roll an equal
amount of dice. Armor rerolls can be used to save against these attacks. For each failure the unit takes
one casualty.
Bad Luck-Score 4 Success
If successful the targeted unit is at -2 Success on everything it attempts to do this game turn.
Fog-Score 5 Success
If successful the targeted unit is surrounded by a blanket of thick fog for this game turn. It may move at
half its normal movement rate. If it has a charge order it may only charge its normal movement rate. If
the unit engages in combat all attacks by both the unit and any enemies are made at -2 Success.
Crevasse- Score 6 Success

16
If successful a crevasse opens up directly in front of the targeted unit. The unit may not move forwards
this game turn. The Crevasse spell may be cast against an enemy unit that has a magic shield in place, as
the effect does not affect the unit itself, but rather the ground in front of it.
Corrosion-Score 7 Success
If successful the targeted units armor and weapons are overcome by time and rust. A unit with Heavy
Armor counts as having Medium Armor for the rest of the turn. A unit with Medium Armor counts as
having Light Armor for the rest of the turn. A Unit with Light Armor counts as having no armor for the
rest of the turn. All combat attacks made by the unit are made at -2 Success, due to their weapons being
rusted, blunt, or simply crumbling to pieces.
Flee- Score 8 Success
If successful the targeted enemy unit must Flee exactly as if it was issued a Flee Order immediately.
Confusion-Score 9 Success
If successful, the player may choose 2 enemy units and immediately change their order counters to
anything but Fate, Fire & Flee, or Flee
Chain Lightning-Score 10 Success
If successful, count up your total number of successes. Pick an enemy unit. That unit must roll a number
of dice equal to your number of successes. These cannot be modified in anyway. For each failure the
targeted unit takes a casualty. As long as the unit takes at least one casualty the lightning will jump to
the next closest unit, friend or foe. That unit must roll a number of dice equal to the number of
casualties suffered by the previous unit. For each failure the unit takes a casualty. This process will
continue until the lightning fails to cause a casualty.
Bird of Thunder-Score 11 Success
If successful choose one enemy unit. The Great Bird of Thunder swoops down and scoops up the unit in
its claws. You may move the enemy unit up to 18 inches in any direction. You may not move them off of
the gaming surface or change their formation, but you may change their facing.
Defensive Spells;
Magic Armor- Score 2 Success
If successful the target unit gains the protection of Magic Armor for the turn, allowing it to reroll a
number of un-succesful defense rolls equal to the amount of success dice scored during casting. This is
done before applying modifiers. For instance, if the Wizard successfully casts the spell with 5 Success
dice, the unit would be able to reroll 5 un-succesful defense dice.
Keen Weapons- Score 3 Success
17
If successful the target unit gains the benefit of razor sharp weapons for the turn, allowing it to reroll a
number of un-succesful attack rolls equal to the amount of success dice scored during casting. This is
done before applying modifiers. For instance, if the Wizard successfully casts the spell with 5 Success
dice, the unit would be able to reroll 5 un-succesful attack dice.
Wisdom-Score 4 Success
If successful the target unit gains extra wisdom for the turn, and may change its order counter.
Magic Missiles-Score 5 Success
If successful the target unit doubles the amounts of shots it fires this turn. The extra shots must be used
all at once. You are not allowed to fire half the shots in the first Fire phase, and half in the second Fire
Phase. All shots must be used in the same phase. For instance, a unit of 10 Bowmen would roll 20 dice
when it fires its weapons instead of 10.
In the case of War Machines they fire 2 shots at the target they elected instead of 1.
NOTE; If a unit has Magic Missile cast on it and your General issues another Fire order to them, they do
not get to use the Double Shot bonus again. It works for one set of dice rolls only.
Vigor- Score 6 Success
If successful the target unit feels invigorated and may make an extra Advance move immediately.
Magic Shield- Score 7 Success
If successful the target unit is magically resistant for this turn, and cannot have any further spells cast on
it this turn by either side.
Glamor-Score 8 Success
If successful the target unit manages to charm its close combat opponents, convincing them not to
attack this turn. Note, if the unit is in combat with multiple units it effects all the enemy units. Having
lulled the enemy into a false sense of security, your unit can attack normally. Bastards!
Wall of Spikes-Score 9 Success
If successful a wall of spikes springs up around the targeted unit, making it very difficult to attack them.
Enemy attacks in close combat must reroll any success dice that are successful.
Hatred-Score 10 Success
If successful the targeted unit suffers from hatred of the enemy, and become infuriated. The unit
doubles the amount of attack dice it rolls in combat this turn.
18
Bird of Thunder-Score 11 Success
If successful choose any one of your units. The Great Bird of Thunder swoops down and scoops up the
unit in its claws. You may move the unit up to 18 inches in any direction. You cannot change their
formation, but you can change their facing.
Phase 7 Reform Units;
During this phase the players will take turns activating their Reform Order Counters, starting with the
player who won initiative, and alternating between players until all Reform Order Counters have been
activated. As soon as a player has activated a Reform Order Counter they will remove the counter from
the game surface.
NOTE; Units already engaged in combat cannot reform
The player will choose one of his Reform Order Counters and activate it. He may reform his unit into one
of eight Formations. Skirmish, Line, Column, Attack Column, Square, Snake, Wedge, or Shield Wall. Each
of these formations has their own unique special rules.
You may just want to change your facing to align a charge in the next turn or point a war machine in a
different direction. This is accomplished exactly the same way as making a formation change.
To make a Formation or Facing Change, leave the Command Stand where it is but change it’s facing to
where you want the unit to end up facing. Then arrange your formation, or line up your troops if
changing facing as they were before, around the Command Stand, remembering that it has to be in the
center of the front rank.
Formations Special Rules;
NOTE; During a game turn many things can happen that can effect a units formation. For instance you
are required to have 6 stands to be able to form a wedge. It is possible as a result of magic or missile
fire that you may suffer enough casualties that your “wedged” unit is reduced below 6 stands before
it gets to charge.
For simplicities sake, a unit counts as being in whatever formation it was in after the Reform phase
until the end of the game turn.
Skirmish;
Skirmishing troops are loosely organized and generally speaking tend to consist of troops equipped with
missile weapons, although any unit can adopt skirmish formation. Stands of troops in skirmish formation
have to be within 1 inch of at least one other stand in the unit at all times. If at any time there is more
than 1 inch between stands, the unit counts as split, and can only be issued a Reform order in the next
game turn.
19
If a unit in skirmish formation charges or receives a charge it must “Form up” to fight the enemy. This is
achieved by placing the unit in a “line” formation in front of the enemy unit. The line may be one stand
or figure wider than the enemy formation on either end. Any remaining models are placed behind the
front rank, to form more ranks.
NOTE; A skirmishing unit that “Forms Up” counts as being in Line Formation for combat resolution
purposes.
Skirmishing Units have the following special rules;
No facing-they can as such move or fire in any direction
-1 Success to hit with missile weapons- being loosely organized these troops are harder to hit than more
densely packed units.
+2 Inch Movement- being loosely organized makes it a lot easier to move around, as such skirmishing
units can add 2 inches to their MR.
NOTE; Friendly or enemy units can fire through a Skirmishing Unit. Friendly Units may move or charge
through a skirmishing unit, making them a very effective screen.
Line;
Forming a unit into a line formation can be very useful in many circumstances, particularly if you are
trying to block enemy units movement by filling gaps in your overall Battle Line. A unit is considered to
be in line as long as it has more stands in width, than it does in depth. For instance a unit of 6 stands,
that is 3 wide and 2 deep would be considered to be in line.
Diagram
Troops with missile weapons benefit greatly by forming a line allowing them to poor a steady stream of
fire into the enemy with as many troops as possible having a clearer line of sight to their target.
Units in Line Formation have the following special rule;
+2 Success when shooting
Movement Column;
Troops often form into column to allow for fast movement, particularly across flat or open terrain, or on
roads. A unit is considered to be in column formation if it is only 1 stand wide, with the rest of the
stands lined up behind. For instance a unit of 6 stands, that is 1 stand wide and 6 deep would be
considered to be in column.
Diagram
Units in Movement Column Formation have the following special rules;
20
Double Movement Rate on Flat Ground and Roads.
A unit in Movement column cannot charge.
Attack Column;
Forming an attack column is probably your best bet if you are planning on charging an enemy unit,
particularly if they are in Line. This formation allows troops to stack up behind one another and
effectively lend their weight to the momentum of the charge, forcing their way through the enemys
front ranks. This is super effective against troops in Line formation as their ranks are not deep enough to
slow down the impetus of the charge. A unit is considered to be in Attack Column Formation if it is more
stands deep than it is wide. For instance a unit of 6 stands, that is 2 stands wide, and 3 stands deep
would be considered to be an attack column.
Diagram
Units in Attack Column Formation have the following special rules;
+1 Success in Combat
+2 Success in Combat Against Line
NOTE; Units in Attack Column only get the +1 or +2 bonus in the first round of combat. After this their
impetus has been lost.
Impact Hits- These are worked out as follows. You cause 1 Impact Hit per “stand” deep that the Attack
Column is. For example if you have a unit that is 2 stands wide, and 4 stands deep, you would cause 4
Impact Hits. These are made as the unit charges in outside of the normal combat sequence. The enemy
unit must roll one dice per impact hit. Each unsuccessful roll causes a casualty. These hits cannot be
modified in anyway and count towards combat resolution. You may use Armor Rerolls against Impact
Hits.
-1 Defense Against Shooting – being densely packed together, troops in attack column are easier to hit
than most with missile weapons.
Square;
Forming square has saved many a unit that has been in danger of being surrounded, or if Infantry, being
charged by Cavalry. This formation allows the units troops to face in all directions, creating a practically
impenetrable wall of steel and weapons with a hollow centre. A unit must have at least 4 stands to be
able to form square, placed facing outwards, but touching at the corners. Any extra stands are placed in
the centre of the square or off to the side. If at any point the unit is reduced to 3 stands or less, it is no
longer considered to be in a Square formation and looses any benefits associated with the formation.
Units in Square have the following special rules;

21
No flanks- since the unit faces in every direction it has no flanks or rear to charge
-1 Defense Against Shooting – being densely packed together, troops in Square Formation are easier to
hit than most with missile weapons.
Causes Fear in Cavalry- regardless of how good the riders are, most creatures are very wary when it
comes to charging a bristling wall of sharp, pointy objects. Any cavalry unit charging a square must half
the number of attacks it can make.
Snake;
This unique formation is only available to cavalry units. It works like a column in that a snake formation
can only be 1 stand wide. It can be as deep as is needed. This formation allows cavalry units to move
quickly in and around friendly and enemy units, as well as through difficult terrain.
A cavalry unit in snake formation may not charge.
Units in Snake Formation have the following special rule;
Plus 6 inches of MR.
Wedge;
This formation is most often used by cavalry at high speed but can also be used by infantry, to help
smash through enemy lines or columns. It is used to force holes through enemy lines and split units
asunder. A unit in wedge formation will look like a pyramid and must consist of at least 6 stands of
troops. The front of the formation consists of 1 stand, the second rank of 2 stands, and the third of 3
stands. A wedge can be as big as you like as long as it consists of at least six stands.
Diagram;
Units in Wedge Formation have the following special rules;
Impact hits and Follow Through;
As long as the Wedge charges it causes impact hits. These are resolved immediately. The enemy unit
must roll 1 dice per stand in the charging unit. Any unsuccessful rolls cause a casualty. These hits cannot
be modified in anyway and count towards combat resolution. You may use Armor Rerolls against Impact
Hits. Proceeed to resolve the combat as normal. If the charging unit causes more casualties than the
defending unit, move the charging unit a charge move from the front stand past the enemy until it
completes the entire move or hits another unit. The unit it passed through must be split in half leaving a
2 inch gap in the center. This unit counts as being “split” and must be issued a Reform Order in the next
game turn.
If the charging unit hits another unit, this starts another combat immediately.
22
-1 Defense Against Shooting – being densely packed together, troops in Wedge Formation are easier to
hit than most with missile weapons.
NOTE; A unit, that is split by a Wedge, can only be issued a Reform Counter in the next order phase.
Diagram
Shield Wall;
Infantry often form shields walls to lessen the impact and effectiveness of an enemy charge or shooting
by locking their shields together to create a “wall”. Any infantry unit equipped with shields may create a
shieldwall, but note that it is only effective to the front facing, and will not help if you are charged in the
flank or rear.
A unit in Shield Wall Formation may move and maintain its formation as long as it moves Forward.
Units using a Shield Wall have the following special rule;
+2 Success in Defense for both combat and shooting against attacks from the front.
NOTE; Units in Movement Column or Snake Formations cannot charge.
Phase 8 Fire Missile Units;
During this phase the players will take turns activating their Fire Order Counters, starting with the player
who won the initiative.
In the basic rules, all missile weapons have a range up to 24 inches. This is done on purpose to make
learning the rules mechanics a little simpler. In the Advanced Rules section, you will find a list of missile
weapons, which shows specific ranges and rules for different types of weapons. Javelins for instance
only have a range of 8 inches in the Advanced Rules, and may be thrown as you charge.
NOTE; This is the first of the two Firing Phases. You can choose whether or not units with Fire Orders
shoot in this phase, or hold their Fire for the second firing phase after movement has taken place.
The player will choose one of his units with a Fire Order Counter and activate it.
Unit Facing and Arc of Vision; It is important at this point to address unit facing and Arc of Vision.
Units on round bases, typically generals, characters, spell casters or big troop types like trolls and ogres,
can see in any direction. Hence they have a 360 degree arc of Vision.
Units on square bases have a 90 degree arc of vision to their front only.
23
The player who is activating his unit needs to determine whether or not the enemy unit is within his Fire
Arc. If it is, then he may proceed with his shooting.
Line of sight – the player must check if he has unobstructed line of sight to the target. Stone Throwers,
and some other War Machines do not require line of sight. This is an actual line of sight game. If you can
see it you can shoot it. Get down behind you model and look. If you can see your target, you can shoot
it.
Check the Target is in Range. The range will be based on the type of weapon firing, some War Engines
have unlimited range. If the target is in range proceed with your firing. You can pre-measure everything
in this game.
Only models that have actual line of sight to the target unit may fire. Every model in the unit that has
line of sight may fire, even if they are in a 2nd, 3rd, 4th rank etc.Remember that friendly skirmishing units
do not block line of sight.
Shooting into Combat
You can shoot into a combat if you so desire, but hits are applied to both units. For instance, if you shoot
a unit of Archers into a combat and score 6 Successes, each unit in the combat takes 6 hits.
All Handheld Missile Weapons (bows, longbows, crossbows, slings, javelins etc) have a maximum range
of 24 inches.
Bolt Throwers have a Maximum Range of 36 Inches
Stone Throwers have unlimited range and do not require line of sight.
There are many different types of ranged weapons in the game but they all fire the same way.
Step 1) Roll as many dice as you have figures firing or the specified number of dice for a War Machine.
Every success counts as a hit.
Step 2) Apply any Shooting Modifiers, good and bad, to get your final Success number.
Step 3) Your Opponent roles as many dice as you have scored Successes. Every success counts as a
save.
Step 4) Reroll a number of failed dice equal to Armor Value of Unit. For instance, if they have medium
armor they could reroll 2 dice.
Step 5) Apply any Shooting Defense Modifiers, good and bad, to get your final Success number (some
weapons don’t allow modifiers to be applied like the Stone or Bolt Throwers).
Step 6) Remove Casualties equal to the number of Failures.
24
Shooting Modifiers
Unit Bonus (-1,+1,+2) based on Troop Experience Level
+2 if in Line Formation
+1 if Large Target (Troll sized or bigger)
+1 Short Range (up to 8 inches)
-1 Long Range (16 -24 inches)
-1 if Target is Skirmishing or you are firing through a Skirmishing Unit
-1 if Target has a Charge Order
-2 if the firing unit has a Fire & Flee Order
Shooting Defense Modifiers
Armor Rerolls (1,2, or 3)
Unit Bonus (-1,+1,+2)
+2 if your unit is in Shieldwall Formation
+1 if your unit is Braced
-1 if in your unit is in Attack Column, Square or Wedge Formation
Stone Throwers; These machines can be devastating, hurling huge boulders or chunks of rock at the
enemy. However, they are not the most accurate items in an Armies missile arsenal. Firing a Stone
Thrower works like casting a spell. If you have direct Line of Sight to your target Roll 10 dice. If you do
not have Direct Line of Sight to your target Roll 8 Dice. If you score 3 successes after modifiers have
been applied you are successful in hitting your target. Your opponent must roll defensive dice equal to
your total number of successes. These dice cannot be modified, and there is no Armor reroll against a
Stone Thrower. For each failure the unit takes a casualty. If you roll less than 3 successes after modifiers
have been applied, your have failed to hit your target or something has gone wrong. The shot lands
exactly half way between the Stone Thrower and its original target. If it lands on a unit, friend or foe, roll
10 dice, and resolve hits as stated above.
Bolt Throwers; These horrific machines fire man sized arrows capable of penetrating most armor and
multiple victims. Firing a Bolt Thrower works like casting a spell. Roll 10 dice. If you score at least 3
successes after modifiers have been applied you are successful in hitting your target. Your opponent
must roll dice equal to your total number of successes. These dice cannot be modified, and there is no
Armor reroll against a Bolt Thrower. For each failure the unit takes a casualty. If you kill as many enemy
25
troops as there are ranks in the unit, the bolt passes through and continues on its way striking anything
else that is unfortunate enough to get in its way.
NOTE; The Bolt cannot ever travel more than its maximum range of 36 inches
If it contacts another unit friend or foe, proceed exactly as if it struck the unit you were originally
shooting at again. It is possible for the bolt to continue until it leaves the table edge or runs out of units
in its path.
If you roll less than 3 successes or after modifiers have been applied, your have failed to hit your target
or something has gone wrong. The bolt veers of course and strikes the closest unit, friend or foe in
exactly the same manner as described above, but it does not continue on after the hits have been
resolved.
Attacking War Machines;
War Machines can be annoying, and a wise player will try to take them out. This is often best achieved
with flanking units or flying units, but when these are not available counter missile fire or assault is all
that is left.
All War Machines have 7 wounds. These are split between the Machine and the Crew. The Machine
has 3 wounds and the crew has 4.
War Machines count as having Heavy Armor and thus get 3 Armor Rerolls. This represents the
strength of the machine itself, and the crew’s ability to hide behind it.
If the crew is reduced to 2 it may only fire every other turn.
War Machines do not fight back in combat.
A War Machine engaged in combat may not fire.
Shooting at or Attacking a War Machine – Resolve attack and defense rolls as normal. Calculate the
number of casualties caused. The player who owns the war machine must decide how to allocate the
hits between the war machine and the crew. If either the crew of the machine itself is reduced to
zero, it is out of action. For example, my war machine has taken 5 hits. I put 2 wounds on the
machine, and 3 on the crew. This means it is still functional but may only fire very other turn.
Phase 9 Activate Charge & Attack Orders, Resolve Combats;
Writing the combat rules in any game system, is always the tricky part. There are so many different
things that can happen. I will attempt to cover as many “what if’s” as possible. If you come across an
instance that is not covered, use common sense to resolve it in a friendly manner, and drop me a note
about it!
There are 6 key things to remember in any combat situation.

26
Both Sides fight in the combat starting with the player who activated the Charge or Attack Order.
Everyone fights. You roll a dice for every figure or in some cases, stands in your unit.
Whenever a combat is fought, both units are considered Activated for the game turn.
Here are a couple of quick examples.
Example 1. You have a unit with an Advance Order that is charged by the enemy. Once the combat is
complete you remove your advance order as your unit counts as Activated.
Example 2. Both of your units are in combat from a previous turn, and both have Attack orders.
Whichever side activates their Attack order first, forces the other side to become Activated. So both
Attack counters are removed at the end of the combat.
Removing Casualties- Casualties should be removed from where they are caused or as close to that
point as possible, with the exception of the Command Stand, which is always last to die. Why? Imagine
this. A Cavalry unit is in Snake Formation, and it gets charged in the middle. The charging unit causes
enough casualties to make a hole in the line. The Snaking unit now counts as Split, and may only be
issued a Reform order in the next turn. This reform must be to line up in combat with the enemy unit,
which means they will not get to strike first in the ensuing round of combat. This is the risk of the Snake
Formation. Once combat has been resolved, “fill” in the gaps where casualties were removed from with
stands from the back of the unit.
If a unit ever becomes Split as a result of a combat, it may only be issued a Reform Order in the next
game turn.
The Sliding Casualty Scale – this will be covered more shortly, but it is easy to forget. When you have
finished your attacks in a combat and before your opponent rolls for his attacks, compare your units
Experience to your opponents, and remove any extra casualties caused. This rule enables troops to
cause damage based on their skill level compared to their opponents. If an Elite unit for instance, is in
combat with a Levy unit, and fails to roll any Successful Attacks, it will still cause 3 casualties because of
the difference in the skill level.
During this phase the players will take turns activating their Charge and Attack Order Counters, starting
with the player who won initiative. You do not have to Activate all your Charge Orders and then all your
Attack Orders. You Activate them in the sequence that you feel will be most beneficial to you. So you
might Activate an Attack Order first, so you get to strike first in a combat where you think it is important
to do so, and then when it is your turn again, you might do a Charge. This rule is intended to make
players make difficult choices about what is most important to do first. As your game progresses and
there are more combats, these choices become more and more difficult.
Charging
27
Charging units double their MR, so for instance infantry can charge 8 inches and cavalry can charge 16
inches.
Remember you can pre-measure in this game.
In reality not everyone can run at the same rate, it is easy for the troops at the front of a formation to
distance themselves from those at the back. Differences in discipline, stature, stamina, equipment,
terrain and many other factors can also interfere with speed on a battlefield. This is represented in the
game.
When you charge there is a distinct possibility that not everyone may make it into combat at the same
time, and the unit may become split.
When you Activate a Charge Counter do the following;
Step 1) Declare which enemy unit you are attempting to charge.
Step 2) Make sure it is within your Arc of Vision.
Step 3) Measure the distance.
NOTE; If you cannot physically make the charge because the distance is too great you must still go
through the charge sequence below and move the unit its maximum charge distance. I added this rule
because even though you can pre-measure, we found during play testing that often we would forget to
do so in the heat of battle. When we attempted to make the charge, we found we were not quite in
range. Consider this rule a punishment for being hasty.
Step 4) Count the number of stands in the unit. Roll as many dice as there are stands in the unit, count
up the number of Successes and then apply the following modifiers to the dice.
+2 Success if the unit is within 12 inches of the Army General
+1 Success if the unit has a Leader
+2 Success if it is a Elite Unit
+1 Success if it is a Veteran Unit
-1 Success if it is a Levy Unit
Step 5) Once you have worked out the total number of Successes move that many stands from the
unit into base to base contact with the enemy unit in the same formation they were in at the start of
the charge.
Step 6) Any stands that did not complete the charge are moved half way between their current
position and the back of your stands that made it into combat. These stands will “Catch up” in the
Compulsory Moves phase of the next game turn.
28
It should be fairly obvious that an Elite Unit with a Leader within 12 inches of the General is far more
likely to make it into combat intact than say a Levy Unit. This is done purposely to represent the
difference in experience, organization and ability of the different troop types.
NOTE; You may perform “one” wheel during the charge at any point to align it, but you may not change
the units facing to do so.
Step 7) Resolve Any Impact Hits
Some units and formations cause Impact Hits when they charge. These are resolved first, and any
casualties caused are removed before the actual combat takes place.
Step 8) Fight the Combat
Both sides fight in a combat.
The player who is activating the Charge or Attack counter always strikes first. This is particularly
important in situations where units are already engaged in combat from a previous turn. You must
choose very carefully which Charge or Attack order counters you activate in what sequence to maximize
your chance of winning any combat. Opting to initiate a new charge before you activate units already in
combat can be very costly, particularly if your unit is out numbered.
Step 9) Attacker works out Hits
Roll one dice for “EVERY” figure you have in the unit that is activating. This may vary depending on the
type of troop you are fighting with. Ogres for instance roll 2 dice each. So a unit of 5 Ogres will get roll
10 dice. Most basic infantry units will roll dice equal to the number of figures in the unit.
Count the number of Successes you have scored and then apply the following modifiers.
Attack Modifiers
Unit Experience Bonus (-1,+1,+2)
+2 if it is your units Last Stand
+2 if Attacking Rear
+2 if Attack Column vs Line
+1 Battle Standard
+1 if High Ground or Mtd vs Foot or Large vs Small (Ogre Sized or bigger vs Less than Ogre Sized)
+1 if Pole vs Hand Weapon
+1 if Attacking Flank
29
+1 if Charging (counts when initiating a new charge or being the first to strike in an existing combat)
+1 if Attack Column
NOTE; Flank and Rear bonuses only count on the first round of combat
Once you have determined the total number of Successes you have scored to hit the enemy, the enemy
must attempt to save against them.
Step 10) Defender works out Saves
Roll 1 Dice for every Successful Hit your opponent scored.
Reroll a number of Failures equal to your Armor Value.
Count up your total number of Successes and apply the following modifiers.
Defense Modifiers
Unit Experience Bonus (-1,+1,+2)
+2 Shieldwall
+1 if High Ground or Mtd vs Foot or Large vs Small (Ogre Sized or bigger vs Less than Ogre Sized)
+1 if Pole vs Hand Weapon
+1 if Braced
-1 if Flanked
-2 if Charged in Rear
NOTE; Flank and Rear modifiers only count on the first round of combat
Once you have worked out your total number of Successes, remove Casualties from your unit equal to
the number of failures you have scored.
For instance.
Your opponent scored 8 hits against you.
You rolled 3 Successes.
You have Light Armor which allows you to reroll 1 dice. It is a Success, you now have 4 Successes.
You were also Braced giving you a +1.
Your total number of Successes is now 5.
30
8 Hits minus your 5 Successful saves = 3 Casualties.
Step 11) The ‘We are better than you rule”-
After resolving the Attack and Defense there is one more very important step. Some troops are simply
much better trained, disciplined, equipped, or simply better fighters than others.
If the Attacking player Troop Type is better than the defending player Troops Type, remove additional
casualties per the chart below.
Elite vs Veteran +1
Elite vs Regular +2
Elite vs Levy +3
Veteran vs Regular +1
Veteran vs Levy +2
Regular vs Levy +1
This represents well trained troops vastly superior fighting ability over say farmers who have been
forced into battle to defend their lands.
NOTE; An Elite Unit fighting a Levy Unit will always kill at least 3 enemy troops, even if it doesn’t roll any
Success dice, or if the enemy defends against all of the Successful Attacks it makes, due to their vastly
superior abilities.
Step 12) Defender Attacks Back
Repeat the process above from Step 4.
Once this has been done, make sure both units remove any Order Counters they have on them, and
move onto the next Charge or Attack Order Counter, remembering to take turns in Activations.
Activating and Attack Order Counter
When a player activates an Attack Counter, simply follow the process for combat from Step 4 onwards
above.
NOTE; Remember, both sides in are combat count as being Activated for the game turn, once the
combat is over.
Phase 10 Move Advancing Units;
31
During this phase the players will take turns activating their Advance Order Counters, starting with the
player who won initiative.
Each unit with an Advance order may make a move according to its normal MR, plus any extra MR
allowed by Formation type.
NOTE – A unit with an advance order must move at least 1 inch, and may move up to its maximum
move. For instance, an Infantry Unit in Column formation on open ground, can move between 1 and 8
inches, but it must move at least 1 inch. An advance move cannot bring you into contact with the
enemy. You must stop a half inch away from any enemy unit.
Once you have completed the units move, remember to remove the order counter from the gaming
surface.
Phase 11 Fire Remaining Un-activated Missile Units;
During this phase the players will take turns activating their remaining Fire Order Counters, starting with
the player who won initiative.
Simply follow the same procedures as for Firing in Game Phase 8.
Once you have completed the units move, remember to remove the order counter from the gaming
surface.
You have now completed 1 Complete Game Turn. To start the second simply Roll for Initiative and
Good Luck!
It is up to you to decide how many game turns you want to play. We normally play six turns, things
generally start to get really bloody around turn three after a bit of posturing and maneuvering.
Other Things you Need to Know;
Armor Values
There are 4 basic Armor Types in the Game. Unarmored, Light, Medium and Heavy.
These Armor Values give you a number of rerolls when you are defending against enemy hits.
Unarmored – You don’t have any Armor so you don’t get a reroll.
Light Armor – Gives you 1 reroll.
Medium Armor – Gives you 2 rerolls.
Heavy Armor – Gives you 3 rerolls.
Weapon Attributes
32
In the basic rules weapon types are very simple, and have only a couple of special rules.
Hand Weapons – Axes, Swords, Daggers, etc confer no special bonuses
Double Handed Weapons – Halberds, Axes, Swords etc negate your enemies Armor, so they do not get
to reroll against your hits.
Pole Weapons – Spears, Halberds, Pikes etc give you +1 Success during combat resolution when fighting
against units with Hand Weapons and Double Handed Weapons due to their length.
Pikes – Have their own special rules as well. They negate any unit’s ability to cause impact hits against
you if your enemy is attacking you from the front, or all around if you are in Square Formation.
These Basic Game Rules should give you everything you need to play a simple head to head game with
your armies.
Advanced Rules;
Terrain and Its Effects
It is common in most table top war games for the features of both the Gaming Board itself and the
terrain features placed upon it to have an effect on the Armies and Units marching around it. I advise
that while you are learning the “basic” mechanics of the game, that you ignore these rules, or pick a
couple to use, so that you are not trying to remember so much stuff.
It is unlikely I am going to remember or include every single type of terrain that you might encounter in
these rules, so if you come across something not included here, make your own rules!
The important thing with all terrain, is that you and your opponent agree on what each type of terrain
on your gaming surface is before you start playing, to avoid name calling and fist fights later! Worse, the
“I would have won if scenario” that can plague you long after a simple black eye has gone away.
Open Ground and Roads;
Flat open ground and roads have no negative effect on the troops moving across it, and in many
instances, based on the Formation your troops are in, allows them to move more quickly than normal.
This is covered in the Formation descriptions in the Basic rules.
Difficult Terrain
Difficult Terrain usually slows movement down due to its tricky to cross nature.
Examples of difficult terrain are; plowed fields or muddy ground, streams and shallow rivers, rocky
ground, woods and forests, steep or rocky slopes (35 degrees or steeper), heavy grassland, jungle,
swamps and marshes, and any Linear Obstacle.
33
If you choose to declare that something is difficult terrain, then any unit that starts its move either
wholly or partially within it, has its MR reduced by half rounding up.
If a unit enters difficult terrain during its move do the following.
Measure the distance it travelled to reach the difficult terrain.
Reduce the units MR by that amount.
Half the remaining MR (rounding up), to finish the units move into the difficult terrain.
Some units and troops ignore the effects of difficult terrain. Rams for instance having great stamina and
climbing ability ignore or difficult terrain effects.
Impassable Terrain
Impassable Terrain is exactly as the name suggests. It’s impassable, unless of course, you happen to be
flying on something, or you can cast a spell to transport a unit past it.
Examples of Impassable Terrain are; sheer cliff walls or castle walls, deep or wide rivers, lava flows,
crevasses and chasms.
Linear Obstacles
Linear obstacles can either be natural formations or constructed features. Generally they are something
that you can stand behind and defend, making it more difficult for the enemy to attack or shoot you.
Examples of Linear obstacles are; Walls, hedges, barricades of any nature, fences.
Linear obstacles of any kind negate and prevent Impact Hits from units that cause them.
If you are “attacking” an enemy behind a Linear Obstacle you require a 6 to score a Success instead of a
5 or 6. This is true of combat and missile fire attacks.
NOTE – Any “foot” unit that either does not have an order counter or does not want to activate its
existing order may construct 2 inches of Linear Obstacle in front of it during any game turn.
Woods, Forests and Jungles
It is common for there to be wooded features on most war gaming tables. These are represented in
many forms from simple cut out shapes of cloth or paper, too elaborately crafted bases with removable
trees.
On top of counting as difficult terrain the following rules apply to all wooded areas.
You cannot see through a wooded area.
34
You must be within 2 inches of the edge of a wooded area to see out of it when determining line of
sight.
If you are targeting a unit within a wooded area for any reason, they must be within 2 inches of the edge
of the wooded area for you to be able to see them.
If you are attempting to use missile fire or spells against a target in a wooded area, you will require a 6
to score a Success instead of a 5 or 6.
Units that are both within a wooded area can see (and hear) each other, regardless of distance.
Characters
Generals, Heroes, Champions, and Personalities are an important part of any fighting force. They lend
leadership, inspiration, muscle and sometimes special talents which can bolster a single unit’s
performance or that of a whole army. This is absolutely the case in BVF.
While these individuals will not necessarily destroy an enemy unit single handedly for you, they can
greatly influence and enhance your armies overall performance.
Characters in BVF lend “buffs” to your units, as noted below, none more so than the General.
NOTE- Not including the General, you “cannot” have a second of a character type, until you have 1 of
each character type. So, if you wish to have 2 Wizards, you must first have an Apothecary, an Assassin, a
Captain, a Seer, and a Thief. Likewise, you cannot have a third of a Character type, until you have 2 of
each character type.
Moving Characters;
All Characters have an MR of 6.
Most characters start the game attached to one of your units. They must be placed in base to base
contact with the front rank of the unit they are attached to, off to one side.
General - He is a stand alone unit, and may never attach to a unit.
Wizards – Wizards can choose to operate on their own or be attached to a unit.
During the game, characters may choose to leave the unit they are attached to and join a different one.
To do this you must give them an “Advance Order”. During the Advance Phase of the game, you must
declare that they are “unattaching” from the unit that they are with and move them up to their MR of 6
inches, towards the unit you want them to join. This can be a risky business leaving them exposed to
enemy attack. Should they reach the unit you intended them to join you must declare that they are
“attaching” to that unit.
35
Any character figure, with the exception of a General, may be targeted by an enemy charge or missile
fire, if it is not within 2 inches of a friendly unit.
Shooting or Casting Spells against an Enemy Characters;
Any enemy character not within 2 inches of a friendly unit may be targeted by missile fire or spells.
When rolling Success Dice to hit them, you must roll a 6 to score a Success instead of a 5 or 6.
A Character must be killed outright in whichever phase of the game it is being targeted. For instance, a
character that takes 3 wounds during the magic phase, counts as having no wounds against it when the
shooting phase starts.
All Characters have 3 wounds.
All Characters count as having Heavy Armor, so they get 3 Armor Rerolls against attacks that allow them.
All Characters ignore the first wounds caused on them equal to their experience level modifier in each
game phase.
Regular Character No Modifier
Veteran Character +1 Success, ignores the first wound caused against it, after Armor Rerolls are made.
Elite Character +2 Success, ignores the first 2 wounds caused against it, after Armor Rerolls are made.
Charging Enemy Characters;
On the odd rare occasion an enemy character is left exposed to a charge.
Any character that is charged by an enemy unit is automatically destroyed unless it rolls 2 Successes on
2 Dice, at which point it has successfully managed to sidestep, find cover, or go to ground.
If the character does not sidestep, the enemy charge stops where the character was positioned.
If the character sidesteps, it remains where it is and the enemy charge must move its full distance. If
after all stands have been moved, the enemy unit is still “on top” of the character, then the character is
still destroyed, even if the stands on top of its position are stands “split” from the enemy unit by the
charge move.
Should the enemy units charge bring it into contact with another unit, this counts as another charge and
is resolved immediately.
It should be fairly obvious that Characters are not easy to kill, and this is deliberate. BVF is a game about
armies, not about characters. If you choose to use your offensive capability eliminating enemy
characters instead of whittling down enemy units, then your overall fate will be a direct result of your
actions and choices. That doesn’t mean you shouldn’t try however, if presented with the right
opportunity!
36
Characters Attached to Units;
Once a character is attached to a unit, he acts in accordance with the unit itself, following the same
orders and the same Fate! If the unit is destroyed, so is the character. If the unit Flees, so does the
Character.
Characters Types;
There are 7 Character Types in BVF. These are listed below along with their abilities. I may add more in
at some point in the future.
General FREE – He is the figure head of your army. He can never attack or be attacked by the enemy. His
position on the field will dictate how well your units perform during battle.
Apothecaries 10 Points (Veteran 15 Points, Elite 20 Points)
Apothecaries are very useful individuals, tending to wounded and fallen troops, passing out elixirs to
boost stamina, and generally caring for your troops well being.
After all enemy attacks have been resolved from either shooting or combat, and the number of
casualties has been determined, a unit with an Apothecary attached may roll 10 Dice. For each Success
scored the number of casualties is reduced by 1.
A Veteran Apothecary can add +1 Success to this.
An Elite Apothecary can add +2 Success to this.
Assassins 10 Points (Veteran 15 Points, Elite 20 Points)
Assassins are dangerous individuals, and are trained to kill enemy high value enemy individuals. They
hide themselves within a friendly unit, and “pop” out at a fortuitous moment, delivering poisoned
blades or worse to their unsuspecting target.
Assassins are not deployed at the start of the game, as they are hidden in a unit. To represent this you
must write the name of the unit it is hidden in on a piece of paper and place it face down or folded on
the gaming table surface in clear sight of your opponent where it will remain until you reveal the
Assassins location. At this point you must show your opponent the piece of paper to confirm its location.
When a unit containing an Assassin is engaged in combat with an enemy unit, the Assassin may unleash
his deadly attack. He can do this once per game turn, as long as the unit he is attached to is in combat.
He must first declare his target. This will be an enemy character, the enemy units leader, standard
bearer or musician. The loss of any of these potential targets can have serious effects on the enemy
unit.
Roll 10 Dice. You must score 5 Successes to “immediately” eliminate the chosen enemy target, plunging
a well placed blade into the targets chest or some other vital area.
37
A Veteran Assassin can add +1 Success to this.
An Elite Assassin can add +2 Success to this.
Captains 5 Points (Veteran 10 Points, Elite 15 Points)
Captains can be very dangerous. These are individuals that have survived many campaigns, are very
skilled warriors, have inspirational qualities, massive physiques, fearsome looks, special or magical
weapons, and at worst a combination of many of these.
A unit with a Captain attached automatically gains +1 Success when rolling for both Attack and Defense.
A Veteran Captain adds an additional +1 Success to this.
An Elite Captain adds an additional +2 Success to this.
Seers 5 Points (Veteran 10 Points, Elite 15 Points)
Seers have the “Sight”. This gift gives them the uncanny ability to see what an enemy is going to do
before it happens, allowing them to alter the actions of the unit they are attached to, too compensate.
A unit with a Seer attached to it may be issued 2 Orders in the Order Phase, choosing which one to
activate.
If you are using the Advanced Combat Rules, a unit with a Seer attached may always Counter Charge
regardless of its order counter.
Once per game, a unit with a Seer attached can make a FREE Advance move “before orders are
revealed”. To do this you must roll 10 Dice and Score 5 Successes.
A Veteran Seer adds +1 Success to this.
An Elite Seer adds +2 Success to this.
Thieves 5 Points (Veteran 10 Points, Elite 15 Points)
Thieves are not very useful to have around during times of piece, but their skills can give an army an
edge during war time.
Thieves are not deployed at the start of the game, as they are hidden in a unit. To represent this you
must write the name of the unit it is hidden in on a piece of paper and place it face down or folded on
the gaming table surface in clear sight of your opponent where it will remain until you reveal the Thief’s
location. At this point you must show your opponent the piece of paper to confirm its location.
When a unit containing an Thief is engaged in combat with an enemy unit, the Thief may attempt to
steal either the enemy Standard or Musical Instrument if they have one. He can do this once per game
turn, as long as the unit he is attached to is in combat.
38
He must first declare his target. This will be either the enemy standard bearer or musician.
Roll 10 Dice. You must score 5 Successes to steal the enemy’s standard or musical instrument, the loss of
which removes any bonuses or abilities they would normally provide to the unit.
A Veteran Thief can add +1 Success to this.
An Elite Thief can add +2 Success to this.
Wizards 10 Points (Veteran 20 Points, Elite 30 Points)
Wizards are powerful individuals, that through Birthright have inherited and been passed down some of
the Powers of Creation, allowing them to manipulate and wield forces that most normal individuals
cannot even begin to comprehend. This allows them to cast spells that can be of either an offensive or
defensive nature.
The use of magic and how it works is covered in the Spell Phase of the game description.
A Regular Wizards ability to wield the Power of Creation is somewhat limited by his knowledge, skills,
and level of practice, thus he only gets 10 Dice to roll when attempting to cast a spell or dispel.
As their understanding of the Art increases, so does their ability to wield it.
A Veteran Wizard gains an additional 5 Dice, allowing him to roll 15 Dice when attempting to cast a spell
or dispel.
An Elite Wizard gains an additional 10 Dice, allowing him to roll 20 Dice when attempting to cast a spell
or dispel.
Advanced Combat Rules
These rules should be considered optional. The more experienced gamers out there might like to add
these in, whilst those of you getting to grips with the rules might want to get the basic mechanics down
first.
Counter Charge;
During battle it is unusual for a unit to just allow itself to receive an enemy charge, although this is not
always the case. If the unit is behind a defended obstacle, armed with pikes, formed into a shield wall or
square, they might be happy to wait for the enemy to “arrive”.
More often than not though, if a unit sees the enemy preparing a charge or charging they will surge
forwards to meet them.
If your unit has a charge order and is charged by an enemy you may counter charge.
39
Both sides must roll as normal to see how many stands make it into combat. Those that are successful
will “meet” half way between the two units starting position. Any stragglers are then moved as normal.
Attacks happen simultaneously, meaning that both sides get to roll their full number of attacks before
any casualties are removed.
The exception to this is if either unit causes impact hits. In this case the impact hits are worked out and
the casualties removed before the two units actually fight, allowing the unit that causes impact hits to
reduce the number of enemies fighting back before the combat is worked out.
Loss of Front Rank;
Earlier in the rules I said that casualties should be removed from where they were caused, and then
“filled” in after combat had been resolved.
This is important for this rule. If during charge you wipe out the enemies entire front rank, the enemy
unit may not fight back at all. The front rank should be removed from the gaming surface.
Also, in the basic combat rules the Command Stand is always the last to die. This is not the case here. If
you cause enough casualties to wipe out the front rank, then the enemy command stand is destroyed,
which is obviously a real blow for many reasons. This is the only way to destroy a command stand
outright in the game.
Instead of the enemy unit “filling” in the gap from where the casualties were removed, you get to move
your charging unit forward to engage the second rank, allowing you to gain some ground.
Reserves and Flank Marchers
Many Generals prefer not to fight a straight head to head battle, revealing all their forces at once.
Keeping troops in reserve or trying to flank the enemy’s position are common tactics on any battle field.
You can also do this in BVF.
Reserves
At the beginning of the game, before deployment occurs you may elect to keep up to half your force as
reserves. You do not need to tell your opponent what these units are, but you should place a list of them
face down on the gaming surface in clear sight of your opponent so that you can show them what they
were once you have got them on the table surface. This prevents any false accusations later on.
Your General cannot be held in reserve, but any other characters can.
At the start of each gaming turn after the first, after initiative has been rolled but before orders are
placed, you may attempt to bring your reserves onto the table, starting with the player that “lost” the
initiative.
Select one of your reserve units.
40
You must declare where on your table edge they will appear, and then roll a dice. If your get a success
your unit appears on the table edge and may be issued order counters like any other unit. You may
choose whatever formation you like. The back of the unit must be touching the table edge.
If your General is within 12 inches of the spot where you wish them to enter, you do not need to roll for
them, they appear automatically.
Repeat this process with each reserve unit you wish to bring on this game turn.
Flank Marchers Coming on the Table Sides
This works exactly the same as above, with the exception that you cannot bring your reserves on the
table sides until the beginning of turn 3 if it is on your own table half, or turn 4 if it is on your opponents
table half.
Flank Marchers Coming on your Opponents Table Edge
This works exactly the same as above, with the exception that you cannot bring your reserves
opponents table edge until the beginning of turn 6.
Building Your Army;
Like any Wargame, building your Army is one of the most exciting parts of Battle Valor Fantasy. We have
specifically designed the Army Construction in BVF to be as flexible as possible. We want you to be able
to field the Army you want to field. You might like a small Army of very skilled troops. You might like a
large Army of less seasoned troops. You might like a more balanced force consisting of both. You might
want to field an Army consisting entirely of one Race, or an Army consisting of an Alliance of 3 Races.
The point is that you build the army you have always dreamed of fielding, not the one we dreamed up
for you.
Like most game systems there are a few rules to follow when building an Army, but we hope not too
many.
Unit Types;
There are 10 types of Units in a BVF Army. They are;
Infantry Units
Cavalry Units
Animal Pack Units
Heavy Infantry Units
Line Breaker Units
41
Shock Troop Units
Flier Units
Chariot Units
Monstrous Creature Units
War Machines Units
Unit Sizes
The minimum unit size in BVF for Infantry, Cavalry, and Animals Pack, and Heavy Infantry Units is 4
stands.
The minimum unit size in BVF for Line Breaker Units is 5 stands.
The minimum unit size in BVF for Shock Troop, Flier and Chariot Units is 3 stands.
Monstrous Creatures and War Machines are individual units by themselves.
Each Army Must Include the Following;
General; Each Army must have one, and only one General. The exception to this is if you are playing a
multi player game (2 or more people a side) in which case each player may have a General, and each
side may have an Overall General. See the Grand Alliance Rules in the Advanced Rules sections for more
on this.
Two Infantry Units; Each Army must have two Infantry Units
Points
Many people like to construct Armies using point based systems, although this is not always necessary. I
like to play games where we just field everything we have and use a scenario or story line for the game.
Points are useful if you want to play a balanced game and use set Victory conditions, or if you are taking
part in a Tournament.
In BVF you pay points to equip your units with Weapons, Armor, and Experience. Anything and
everything can be upgraded in BVF, with the exception of the Army General. This gives you a vast scope
to build your army the way you want. It also means that there is a vast variety of possible miniatures. I
doubt we will ever get around to making every possible combination. This means you might find yourself
doing some conversions at some point.
The Cost of Things;
Your General is FREE!
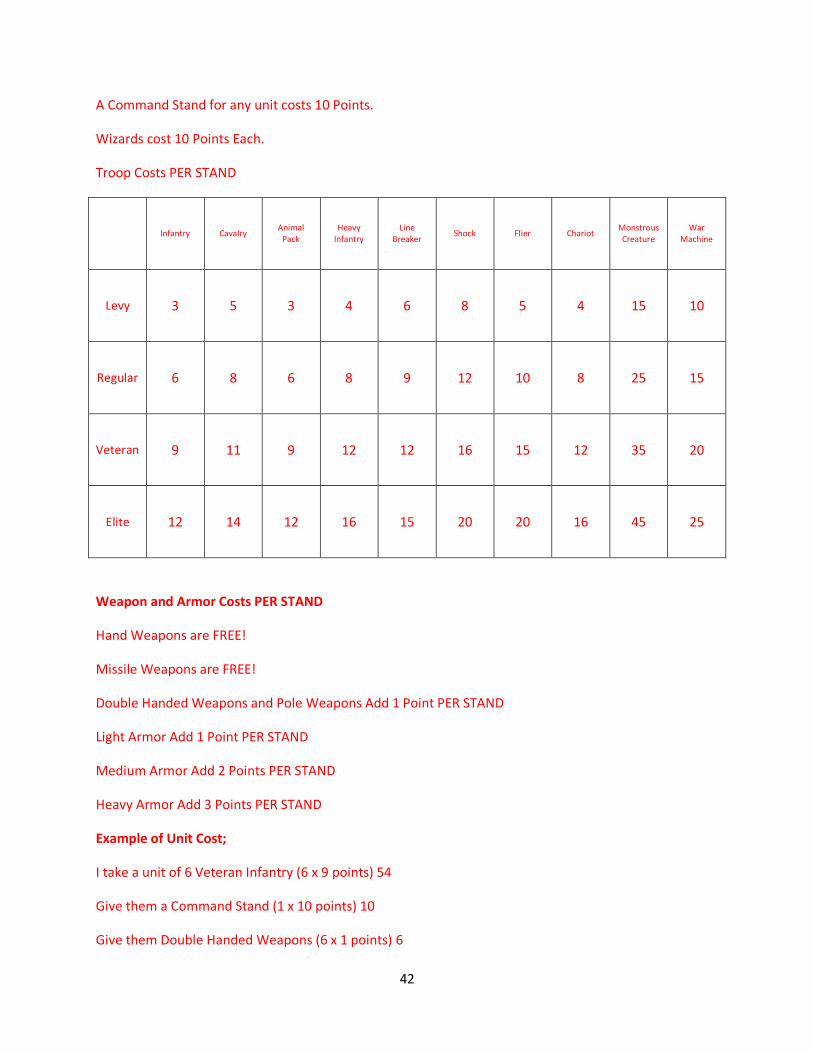
42
A Command Stand for any unit costs 10 Points.
Wizards cost 10 Points Each.
Troop Costs PER STAND
Infantry Cavalry Animal
Pack Heavy
Infantry Line
Breaker Shock Flier Chariot
Monstrous Creature
War Machine
Levy 3 5 3 4 6 8 5 4 15 10
Regular 6 8 6 8 9 12 10 8 25 15
Veteran 9 11 9 12 12 16 15 12 35 20
Elite 12 14 12 16 15 20 20 16 45 25
Weapon and Armor Costs PER STAND
Hand Weapons are FREE!
Missile Weapons are FREE!
Double Handed Weapons and Pole Weapons Add 1 Point PER STAND
Light Armor Add 1 Point PER STAND
Medium Armor Add 2 Points PER STAND
Heavy Armor Add 3 Points PER STAND
Example of Unit Cost;
I take a unit of 6 Veteran Infantry (6 x 9 points) 54
Give them a Command Stand (1 x 10 points) 10
Give them Double Handed Weapons (6 x 1 points) 6
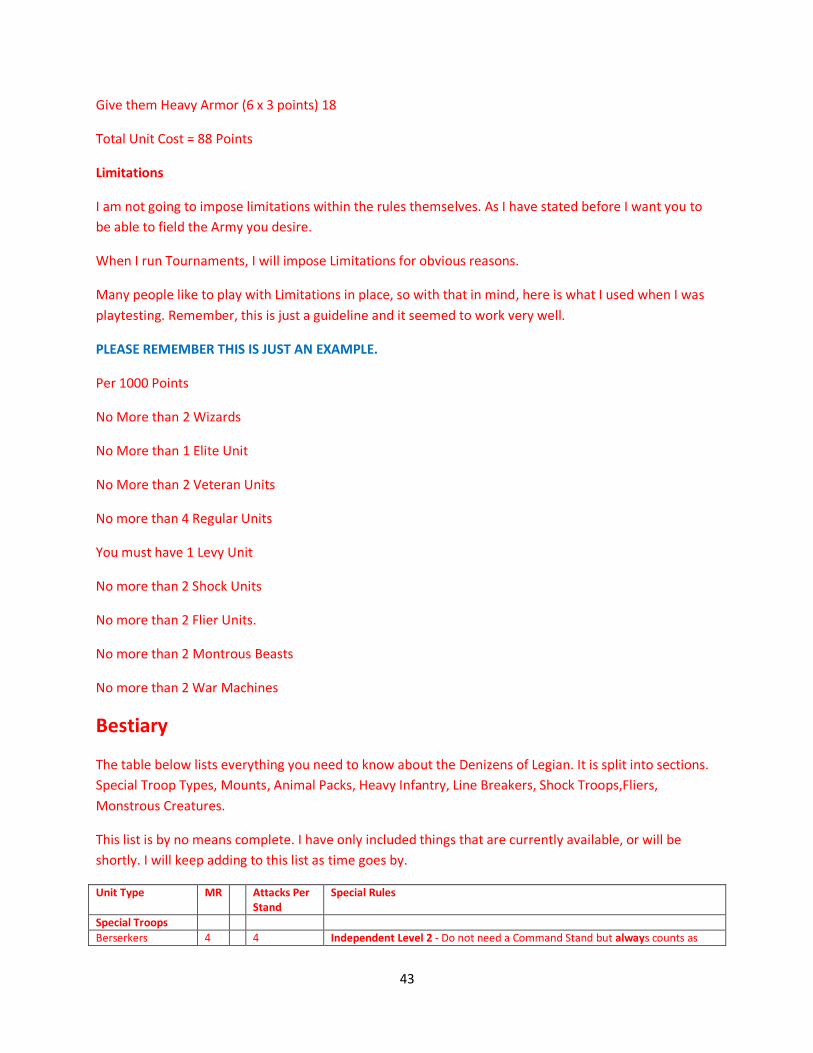
43
Give them Heavy Armor (6 x 3 points) 18
Total Unit Cost = 88 Points
Limitations
I am not going to impose limitations within the rules themselves. As I have stated before I want you to
be able to field the Army you desire.
When I run Tournaments, I will impose Limitations for obvious reasons.
Many people like to play with Limitations in place, so with that in mind, here is what I used when I was
playtesting. Remember, this is just a guideline and it seemed to work very well.
PLEASE REMEMBER THIS IS JUST AN EXAMPLE.
Per 1000 Points
No More than 2 Wizards
No More than 1 Elite Unit
No More than 2 Veteran Units
No more than 4 Regular Units
You must have 1 Levy Unit
No more than 2 Shock Units
No more than 2 Flier Units.
No more than 2 Montrous Beasts
No more than 2 War Machines
Bestiary
The table below lists everything you need to know about the Denizens of Legian. It is split into sections.
Special Troop Types, Mounts, Animal Packs, Heavy Infantry, Line Breakers, Shock Troops,Fliers,
Monstrous Creatures.
This list is by no means complete. I have only included things that are currently available, or will be
shortly. I will keep adding to this list as time goes by.
Unit Type MR Attacks Per Stand
Special Rules
Special Troops
Berserkers 4 4 Independent Level 2 - Do not need a Command Stand but always counts as
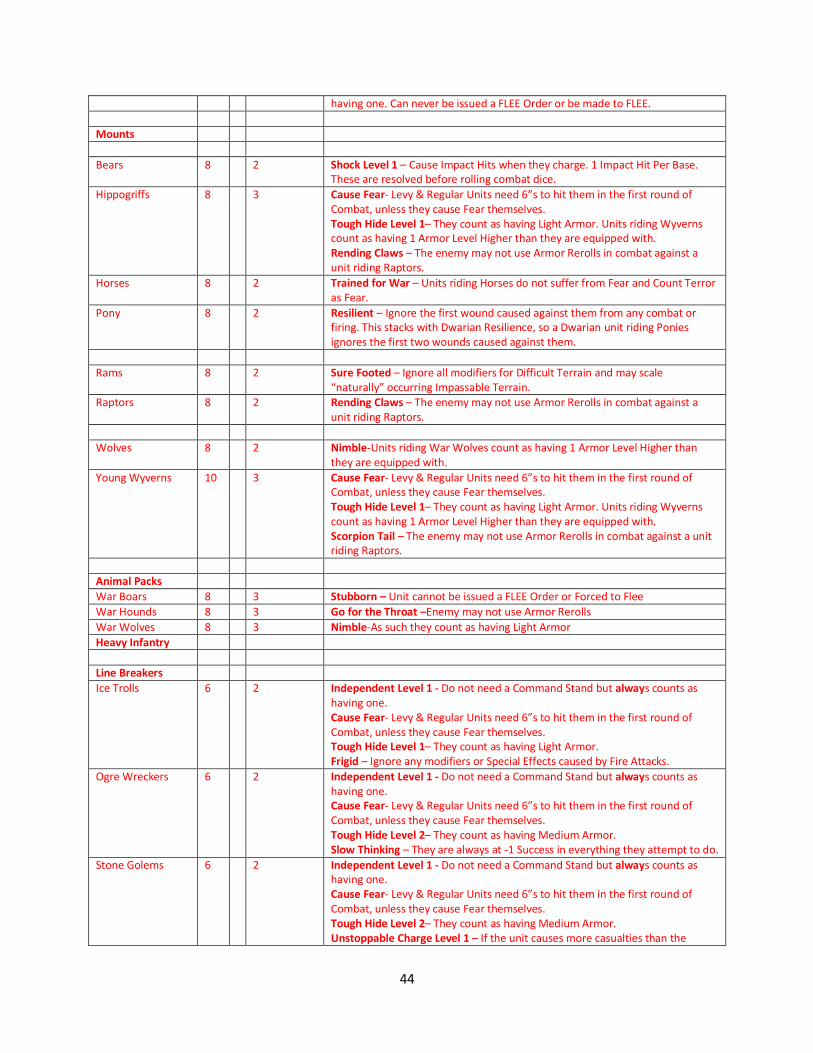
44
having one. Can never be issued a FLEE Order or be made to FLEE.
Mounts
Bears 8 2 Shock Level 1 – Cause Impact Hits when they charge. 1 Impact Hit Per Base. These are resolved before rolling combat dice.
Hippogriffs 8 3 Cause Fear- Levy & Regular Units need 6”s to hit them in the first round of Combat, unless they cause Fear themselves. Tough Hide Level 1– They count as having Light Armor. Units riding Wyverns count as having 1 Armor Level Higher than they are equipped with. Rending Claws – The enemy may not use Armor Rerolls in combat against a unit riding Raptors.
Horses 8 2 Trained for War – Units riding Horses do not suffer from Fear and Count Terror as Fear.
Pony 8 2 Resilient – Ignore the first wound caused against them from any combat or firing. This stacks with Dwarian Resilience, so a Dwarian unit riding Ponies ignores the first two wounds caused against them.
Rams 8 2 Sure Footed – Ignore all modifiers for Difficult Terrain and may scale “naturally” occurring Impassable Terrain.
Raptors 8 2 Rending Claws – The enemy may not use Armor Rerolls in combat against a unit riding Raptors.
Wolves 8 2 Nimble-Units riding War Wolves count as having 1 Armor Level Higher than they are equipped with.
Young Wyverns 10 3 Cause Fear- Levy & Regular Units need 6”s to hit them in the first round of Combat, unless they cause Fear themselves. Tough Hide Level 1– They count as having Light Armor. Units riding Wyverns count as having 1 Armor Level Higher than they are equipped with. Scorpion Tail – The enemy may not use Armor Rerolls in combat against a unit riding Raptors.
Animal Packs
War Boars 8 3 Stubborn – Unit cannot be issued a FLEE Order or Forced to Flee
War Hounds 8 3 Go for the Throat –Enemy may not use Armor Rerolls
War Wolves 8 3 Nimble-As such they count as having Light Armor
Heavy Infantry
Line Breakers
Ice Trolls 6 2 Independent Level 1 - Do not need a Command Stand but always counts as having one. Cause Fear- Levy & Regular Units need 6”s to hit them in the first round of Combat, unless they cause Fear themselves. Tough Hide Level 1– They count as having Light Armor. Frigid – Ignore any modifiers or Special Effects caused by Fire Attacks.
Ogre Wreckers 6 2 Independent Level 1 - Do not need a Command Stand but always counts as having one. Cause Fear- Levy & Regular Units need 6”s to hit them in the first round of Combat, unless they cause Fear themselves. Tough Hide Level 2– They count as having Medium Armor. Slow Thinking – They are always at -1 Success in everything they attempt to do.
Stone Golems 6 2 Independent Level 1 - Do not need a Command Stand but always counts as having one. Cause Fear- Levy & Regular Units need 6”s to hit them in the first round of Combat, unless they cause Fear themselves. Tough Hide Level 2– They count as having Medium Armor. Unstoppable Charge Level 1 – If the unit causes more casualties than the
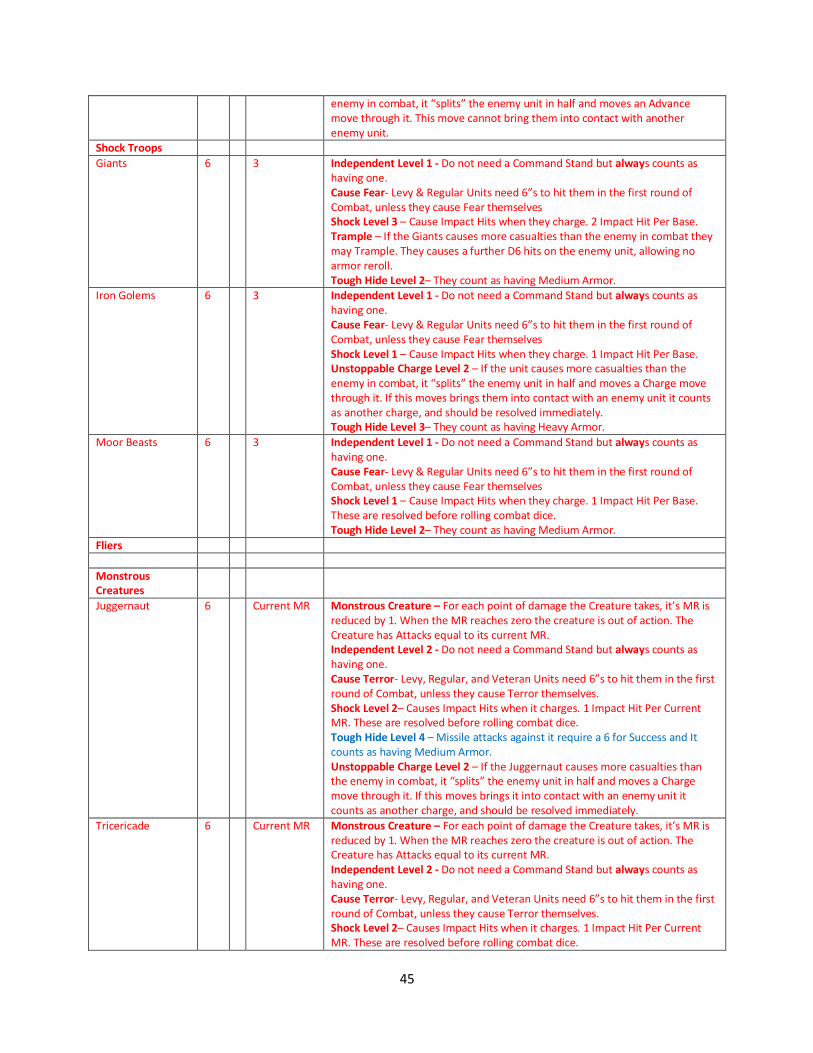
45
enemy in combat, it “splits” the enemy unit in half and moves an Advance move through it. This move cannot bring them into contact with another enemy unit.
Shock Troops
Giants 6 3 Independent Level 1 - Do not need a Command Stand but always counts as having one. Cause Fear- Levy & Regular Units need 6”s to hit them in the first round of Combat, unless they cause Fear themselves Shock Level 3 – Cause Impact Hits when they charge. 2 Impact Hit Per Base. Trample – If the Giants causes more casualties than the enemy in combat they may Trample. They causes a further D6 hits on the enemy unit, allowing no armor reroll. Tough Hide Level 2– They count as having Medium Armor.
Iron Golems 6 3 Independent Level 1 - Do not need a Command Stand but always counts as having one. Cause Fear- Levy & Regular Units need 6”s to hit them in the first round of Combat, unless they cause Fear themselves Shock Level 1 – Cause Impact Hits when they charge. 1 Impact Hit Per Base. Unstoppable Charge Level 2 – If the unit causes more casualties than the enemy in combat, it “splits” the enemy unit in half and moves a Charge move through it. If this moves brings them into contact with an enemy unit it counts as another charge, and should be resolved immediately. Tough Hide Level 3– They count as having Heavy Armor.
Moor Beasts 6 3 Independent Level 1 - Do not need a Command Stand but always counts as having one. Cause Fear- Levy & Regular Units need 6”s to hit them in the first round of Combat, unless they cause Fear themselves Shock Level 1 – Cause Impact Hits when they charge. 1 Impact Hit Per Base. These are resolved before rolling combat dice. Tough Hide Level 2– They count as having Medium Armor.
Fliers
Monstrous Creatures
Juggernaut 6 Current MR Monstrous Creature – For each point of damage the Creature takes, it’s MR is reduced by 1. When the MR reaches zero the creature is out of action. The Creature has Attacks equal to its current MR. Independent Level 2 - Do not need a Command Stand but always counts as having one. Cause Terror- Levy, Regular, and Veteran Units need 6”s to hit them in the first round of Combat, unless they cause Terror themselves. Shock Level 2– Causes Impact Hits when it charges. 1 Impact Hit Per Current MR. These are resolved before rolling combat dice. Tough Hide Level 4 – Missile attacks against it require a 6 for Success and It counts as having Medium Armor. Unstoppable Charge Level 2 – If the Juggernaut causes more casualties than the enemy in combat, it “splits” the enemy unit in half and moves a Charge move through it. If this moves brings it into contact with an enemy unit it counts as another charge, and should be resolved immediately.
Tricericade 6 Current MR Monstrous Creature – For each point of damage the Creature takes, it’s MR is reduced by 1. When the MR reaches zero the creature is out of action. The Creature has Attacks equal to its current MR. Independent Level 2 - Do not need a Command Stand but always counts as having one. Cause Terror- Levy, Regular, and Veteran Units need 6”s to hit them in the first round of Combat, unless they cause Terror themselves. Shock Level 2– Causes Impact Hits when it charges. 1 Impact Hit Per Current MR. These are resolved before rolling combat dice.
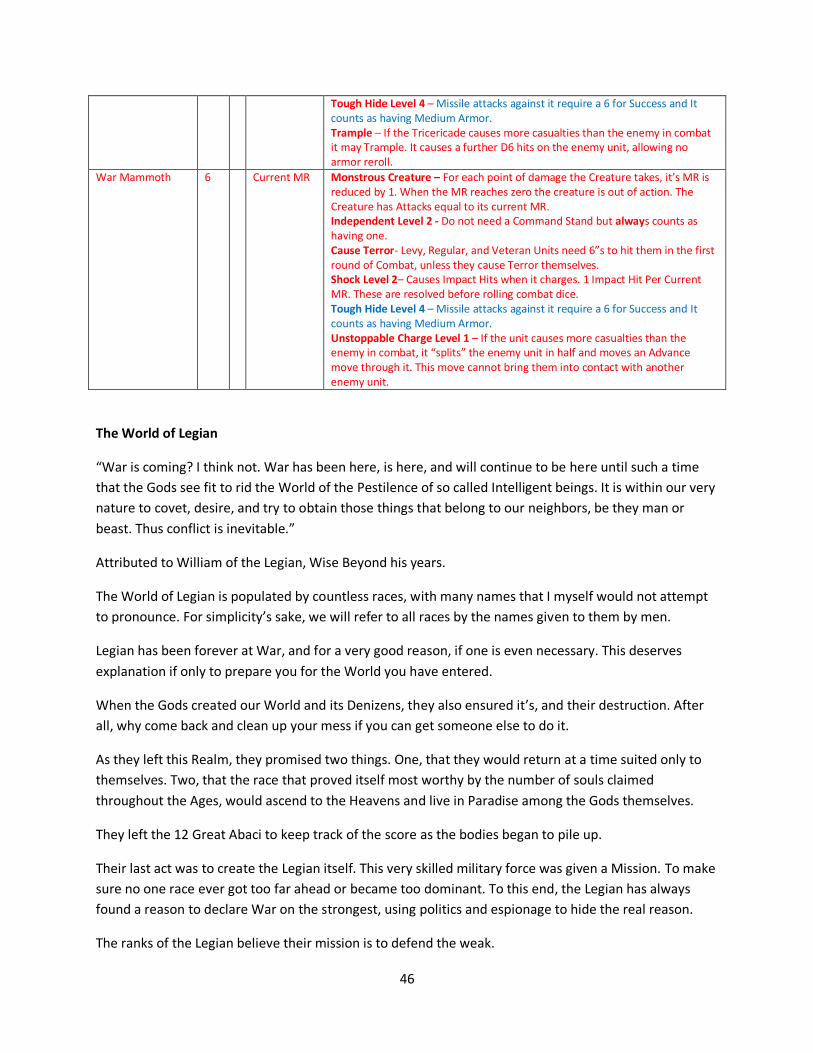
46
Tough Hide Level 4 – Missile attacks against it require a 6 for Success and It counts as having Medium Armor. Trample – If the Tricericade causes more casualties than the enemy in combat it may Trample. It causes a further D6 hits on the enemy unit, allowing no armor reroll.
War Mammoth 6 Current MR Monstrous Creature – For each point of damage the Creature takes, it’s MR is reduced by 1. When the MR reaches zero the creature is out of action. The Creature has Attacks equal to its current MR. Independent Level 2 - Do not need a Command Stand but always counts as having one. Cause Terror- Levy, Regular, and Veteran Units need 6”s to hit them in the first round of Combat, unless they cause Terror themselves. Shock Level 2– Causes Impact Hits when it charges. 1 Impact Hit Per Current MR. These are resolved before rolling combat dice. Tough Hide Level 4 – Missile attacks against it require a 6 for Success and It counts as having Medium Armor. Unstoppable Charge Level 1 – If the unit causes more casualties than the enemy in combat, it “splits” the enemy unit in half and moves an Advance move through it. This move cannot bring them into contact with another enemy unit.
The World of Legian
“War is coming? I think not. War has been here, is here, and will continue to be here until such a time
that the Gods see fit to rid the World of the Pestilence of so called Intelligent beings. It is within our very
nature to covet, desire, and try to obtain those things that belong to our neighbors, be they man or
beast. Thus conflict is inevitable.”
Attributed to William of the Legian, Wise Beyond his years.
The World of Legian is populated by countless races, with many names that I myself would not attempt
to pronounce. For simplicity’s sake, we will refer to all races by the names given to them by men.
Legian has been forever at War, and for a very good reason, if one is even necessary. This deserves
explanation if only to prepare you for the World you have entered.
When the Gods created our World and its Denizens, they also ensured it’s, and their destruction. After
all, why come back and clean up your mess if you can get someone else to do it.
As they left this Realm, they promised two things. One, that they would return at a time suited only to
themselves. Two, that the race that proved itself most worthy by the number of souls claimed
throughout the Ages, would ascend to the Heavens and live in Paradise among the Gods themselves.
They left the 12 Great Abaci to keep track of the score as the bodies began to pile up.
Their last act was to create the Legian itself. This very skilled military force was given a Mission. To make
sure no one race ever got too far ahead or became too dominant. To this end, the Legian has always
found a reason to declare War on the strongest, using politics and espionage to hide the real reason.
The ranks of the Legian believe their mission is to defend the weak.

47
Only the 3 High Marshalls know the truth. That the members of the Legian, and only them, will ascend
to live among the Gods.
© Copyright Battle Valor Games LLC 2016. Battle Valor Games, Battle Valor Fantasy, Battle Valor Fantasy Rules, Battle Valor
Games Logo, and any and all associated logos, illustrations, images, names, races, creatures ,characters and the distinctive likeness
thereof. © Battle Valor Games LLC. All Rights Reserved