Embed Size (px)
Citation preview

A FACE DETECTION SYSTEM USED FOR ACCESS CONTROL
by
Dmitri Warren De Klerk
A mini-thesis submitted in partial fulfillment of the requirements for the degree of
Bachelor of Science (Honours) in Computer Science
University of the Western Cape
Supervisor Mr J Connan
November 2009
ii
University of Western Cape
Abstract
A FACE DETECTION SYSTEM USED FOR ACCESS CONTROL
by Dmitri Warren De Klerk
Supervisor Mr J Connan Department of Computer Science
In this project we develop a face detection system which is used for access control The face detection system will accurately determine the locations and sizes of all possible human faces The faces are then scaled to a recognizable size and passed to a face recognition system implemented by Desmond Eustin van Wyk [1] that can accurately determine the identity of a person and decide whether or not to grant them access to a facility
iii
TABLE OF CONTENTS
Table of Contents iii
declaration v
keywords vi
Acknowledgments vii
Glossary viii
CHAPTER 1 10 11 - Users view of the problem 10 12 - Problem domain 11 13 - Complete description of the problem 11 14 - Expectations from a system 12
CHAPTER 2 13 21 - Users requirements interpretation 13 22 - Existing solutions 14 23 - Suggested system 14
CHAPTER 3 16 31 ndash Complete user interface 16 311 - How the user interface behaves 19 312 - The Add User Dialog 20 313 - The Confirm User Delete dialog 22 314 - The File menu 23 315 - The Face Detection menu 24 316 ndash Face Detection Settings dialog 25 317 ndash The Help menu 26 318 ndash The User Guide dialog 27 319 ndash The About dialog 28
CHAPTER 4 30 Object Orientated Analysis (OOA) 30
41 - Data dictionary 30 42 - Class diagrams 33 43 - Relationship between objects 40
CHAPTER 5 41 Object Orientated Analysis (OOD) 41
51 ndash Inner details of class attributes and methods 41
CHAPTER 6 48
CHAPTER 7 49
iv
CHAPTER 8 51 81 - System requirements 51 82 - The Face Recognition System project directory 52 83 - Running the Access Control system 54 84 ndash Complete user interface 54 841 - How the user interface behaves 57 841 - The Add User Dialog 58 842 - The Confirm User Delete dialog 61 843 - The File menu 62 844 - The Face Detection menu 63 845 ndash Face Detection Settings dialog 64 846 ndash The Help menu 65 847 ndash The User Guide dialog 66 848 ndash The About dialog 67
Chapter 9 69 CONCLUSION 69
v
DECLARATION
I declare that A FACE DETECTION SYSTEM USED FOR ACCESS CONTROL is
my own work that it has not been submitted for any degree or examination in any other
university and that all sources I have used or quoted have been indicated and
acknowledged by complete references
Dmitri Warren De Klerk November 2009
Signature helliphelliphelliphelliphelliphelliphelliphelliphelliphelliphellip
vi
KEYWORDS
Haar Features
Integral Image
Cascade
AdaBoost
Boosting
Classifier
Weak Classifier
Strong Classifier
vii
ACKNOWLEDGMENTS
I thank the Almighty God for itrsquos through his strength I can do all things through Christ
who strengthens me Thanks to my supervisor Mr J Connan for his patience support
and guidance and his input in this project Thanks to my family and girlfriend who has
supported and motivated me
Thanks to the staff members of the Department of Computer Science and my classmates
for their kind assistance during the year
I also would like to acknowledge the work done by Desmond Eustin van Wyk His
documentation proved extremely useful in documenting my work
viii
GLOSSARY
AdaBoost (Adaptive Boosting) AdaBoost is an efficient machine learning boosting
algorithm which combines weak classifiers while reducing significantly not only the
training error but also the more elusive generalization error
Boosting A method of producing a very accurate prediction rule by combining rough
and moderately inaccurate rules of thumb
Base Resolution The resolution at which the detector starts to detect faces
Weak Classifier The classifier is called weak because they only need to classify correctly
the examples in more of 50 of the cases
9
INTRODUCTION
In this project a face detection system is implemented and integrated into an Access
Control system Face detection systems locate the size and scale of human faces in images
and video sequence if present Face detection is the first step for Face localization Face
Tracking Facial Expression recognition and Face Recognition
Face detection in itself is a challenging problem The difficulty resides in the face that faces
are non rigid objects Face appearance may vary between two photographs of the same
person depending on the emotional stage lighting conditions or pose[4] This is why so
many methods have been developed in the past years
The goal is to detect very quickly faces in cluttered backgrounds This situation can be
found in many applications as surveillance of public places common Access Control
conditions Thus far learning-based approaches have been the most effective and have
therefore attracted a lot of attention the last years Viola and Jones [6][7] introduced an
impressive face detection system capable of detection frontal-view faces in real time This
is attributed to the AdaBoost learning algorithm presented by Freund and Schapire [8] and
the response of simple
features used by Viola and Jones [6] Hundreds of features can quickly be calculated by
introducing a new image representation called the ldquoIntegral ImagerdquoThe Adaboost
algorithm sequentially contructs a classifier as a linear combination of ldquoweakrdquo classifier
The classifiers are combined in a ldquocascaderdquo which allows background regions to be quickly
discarded while spending more computation on more promising object like reqions
10
C H A P T E R 1
USERS REQUIREMENTS DOCUMENT (URD)
This document describes the problem from the users point of view It briefly describes
the problem domain of face detection Then the document delivers a simple and exact
problem description wherein the user states exactly what heshe would like the face
detection system to do We focus on the tasks to be solved rather than the interface
required solving them
11 - Users view of the problem
The user requires a face detection system given an image the goal of the face detection
system is to determine whether or not there are any faces in the image and if present
return the face location The system should operate at real-time to make for a passive and
fully automatic Access Control system A user would only be required to stand in front of
the camera in order to be recognized The main motivation for a face detection system is
that the user wouldnrsquot be required to position hisher face into a fixed size box in order to
be recognized by the face recognition system
Other reasons for a face detection system are that it is the first step
Face localization seeks to determine the position of a single face within an image the
detection problem is simplified since the input image contains only one face
Facial feature detection seeks to detect the presence and location of features such as the
mouth nose eyes lips ears etc the detection problem is simplified since the input image
contains only one face
Facial expression recognition identifies the emotional states of humans eg happy sad
anger
Face tracking methods estimates the location and possibly the orientation of a face in an
image on a continuous basis within real time
11
As proven above face detection is the first step in any fully automated system which solves
the above problems therefore a robust and accurate face detector system is critical
12 - Problem domain
Given an image the goal of a face detection system is to identify all face regions regardless
of its position and scale [1] This problem is challenging as faces are non rigid objects Face
appearance may vary between two different persons and also between two images of the
same person depending on the lighting conditions emotional state and pose of the
subject [4]
Face detection difficulties
The face global attributes Some common face attributes from every face A face can
globally be estimated by a kind of ellipse but humans have thin faces round faces etc
Skin color is also different from one person to another
The facial expression Face appearance is highly depends on emotional state of people
Face features of a smiling face is far from those of an indifferent temperament or a sad
face
Presence or absence of structural components Face detection included objects that
can be found on a face glasses which change one of the main characteristics of the faces
the darkness of the eyes Natural facial features beards mustaches or can occult part of
the face
13 - Complete description of the problem
Determine whether or not there are any faces in the camera output and if present return
the face locations of the images The biggest face detected being the user closest to the
camera are scaled to a recognizable scale This detection window is then passed to the face
recognition system implemented by Desmond Eustin van Wyk [3] for recognition
12
14 - Expectations from a system
The first and foremost expectation for a face recognition system is that it must have a high
degree of accuracy when recognizing people The next highest expectation from a system
is that people should be indicated who they are when the system recognized them It must
also be possible to add and remove people from the system that should be recognized
The system is to accurately identify and locate human faces under the following conditions
and circumstances
upright frontal faces
minor variations in lighting conditions and
minor variations in facial expression
minor variation in illumination
big enough scale in order to perform face recognition
any position
15 - Not expected from a system
A solution system is not expected to detect a human face under the following conditions
and circumstances
non frontal face pose
rotated faces
extreme lighting conditions
darkness
too much light
13
C H A P T E R 2
REQUIREMENTS ANALYSIS DOCUMENT (RAD)
This document takes the user requirements as a starting point and looks at face detection
from the designers view The analysis focuses on the system and software needed to
implement the user requirements We take the userrsquos requirements and clearly identify all
of the details and mitigating factors that will affect the solution the user wants The RAD
then identifies the software system and paradigm that will best fit the user requirements
21 - Users requirements interpretation
Access control systems are considered to be mission-critical and real-time systems and
thus must operate correctly under many different situations and circumstances For a fully
automatic face recognition system face detection and face localization are very important
and the very first steps to developing such a system[3] The background composition is
one of the main factors for explaining the difficulties in face detection [4] Face detection
in access control systems need to detect faces in any background meaning the background
can be textured and with great variability [4] The single most dominant problem with a
face recognition system or other biometric systems is accuracy and they do not perform
well under the many different situations and circumstances that are encountered in day-to-
day life [3]
The two most important characteristics for a face detector are its detection and error rate
The detection rate of a face detector is defined as the ratio between the number of
correctly detected and the number of actual faces The error can be broken down into two
types of error namely
False positives ndash an image sub-region is declared to be a face but is not
False negatives ndash an image sub-region is not declared as a face when it is a face
14
22 - Existing solutions
Face detection is the first step to any fully face recognition face localization face
expression recognition system etc Thus face detection has been highly researched in the
past years there are many different techniques and algorithms for performing face
detection All these techniques fall under the following main methods
Knowledge-based methods
Based on what constitutes a typical face eg the relationship between facial
features
Feature invariant approaches
Finds structural features of a face that exist even when the viewpoint lighting or
pose vary
Template matching methods
Uses several standard patterns to describe the face as a whole or the facial features
separately
Appearance based methods (classifierslearning-based)
The models are learned from a set of training images that capture the
representative variability of facial appearance
23 - Suggested system
Detecting faces in black and white still images with unconstrained complex backgrounds
is a complicated task [1] Thus far learning-based approaches have been most effective
and have therefore attracted a lot of attention over the last years In 2001 Viola and Jones
[6][7] published an impressive face detector system capable of detecting frontal-view faces
in real time The properties of the detector are partly attributed to the AdaBoost learning
algorithm
15
AdaBoost (Adaptive Boosting) was rapidly made popular in the machine learning
community when it was presented by Freund and Schapire [8]
As we want to detect faces in various backgrounds found in Access Control systems it
would be improper to use purely geometrical methods In fact the main advantage to these
geometrical methods is the geometric invariant properties We are not interested by them
since were staying in the context of frontal face detection So it is quite naturally that we
have oriented our choice towards learning algorithms Boosting is a powerful iterative
procedure that builds efficient classifiers by selecting and combining very simple classifiers
The suggested system uses Boosting and Haar features (features)
The first step is to compute an image representation called an integral image that allows
for very fast feature evaluation In order to compute these features very rapidly at many
scales we introduce the integral image representation for images The integral image can be
computed from an image using a few operations per pixel Once computed any one of
these Haar-like features can be computed at any scale or location in constant time[7]
The second contribution of this paper is a method for constructing a classifier by selecting
a small number of important features using AdaBoost [6] AdaBoost is used to both select
and train the classifier AdaBoost then boost the performance of weak classifier
The third major contribution of this paper is a method for combining successively more
complex classifiers in a cascade structure which dramatically increases the speed of the
detector by focusing attention on promising regions of the image [7]
24 - Testing the suggested system
The system can be tested on the MIT+CMU frontal face test set [6] This set consists of
130 images with 507 labeled frontal faces
The image dataset is used by the CMU Face Detection Project and is provided for
evaluating algorithms for detecting frontal views of human faces
16
C H A P T E R 3
USERS INTERFACE SPECIFICATION
This chapter describes exactly what the user interface is going to do what it looks like and
how the user interacts with the program The UIS however does not describe how the
interface is implemented Nor does it describe what the program does behind the
interface Rather the UIS focuses in detail specifically on the user interface itself
31 ndash Complete user interface
Figure 31 below displays the main graphical user interface frame for our system titled
Access Control
Figure 31 Complete user interface
17
User Image panel
The User Image panel displays the user image of the user currently selected in the User list
panel
User List panel
The User List panel lists the authorized users the Access Control system can recognize
Search field
The search field can be used to search for a user in the face recognition system This
feature can be very useful when the face recognition system have hundreds of users
The search function searches for the substring of the search text in the username and
lists all the matched usernames in alphabetical order displaying the first matched usersrsquo
image in the user image panel
Camera output
The camera output displays the camerarsquos output Used for capturing images when adding
users to the face recognition system and for monitor current user login activity
Add user button
The add user button adds an authorized user to the Access Control system On execution
of the Add User button the Add User dialog as shown in Figure 35 is displayed
Remove user button
The remove button is only enabled when there are users in the system The remove button
removes a user from the Access Control system On execution of the Remove User
button the Confirm User Delete dialog in Figure 38 is displayed
Recognition output
The Access Control system displays the output of the recognized user below camera
output When a user is not recognized by the Access Control system the system displays
Who are you otherwise the system displays the user ID of the recognized user and the
rate of the face recognition
18
Log panel
When a user is detected by the face detection system and recognized by the face
recognition system the Access Control system logs the userrsquos information to the log panel
The log panel logs the user and the time at which the user logged in the log file gets saves
with the current date every time the user terminates the system
Acceptance threshold
The face recognition system has a threshold at which users should be recognized With 0
being the lowest threshold value and with 1 being the highest threshold value With 0
being the most lenient and 1 being the most strict at which the recognition operates The
Acceptance threshold spinner is used to adjust the acceptance threshold value used with
which the ANNs output is compared [1]
19
311 - How the user interface behaves
When the face detection system does not detect any faces or detects a false positive or the
face recognition system does not recognize the user Then the system displays Who are
you As displayed in Figure 33 below
Figure 33 How the user interface behaves ndash with detection and no recognition
When the users face is detected and recognized the system will display the user ID and
the recognition rate as displayed in Figure 34 below
Figure 34 How the user interface behaves ndash with detection and recognition
20
312 - The Add User Dialog
The Add User Dialog is displayed in Figure 35 below this frame is displayed when the
Add User button in the Access Control GUI is pressed or when the Add User menu item
from the File menu is selected The location of the Add User Dialog is such that the
cameras output can be clearly viewed Each interface component in the Add User Dialog
with its purpose or action is described in Table 31
Figure 35 The Add User dialog
Add User dialog
Interface component PurposeAction
User Image panel Displays the captured image
Capture Image button Captures an image
ID label and text field The text field where a user identifier should
be entered
Ok button Add the user with the specified identifier
that should be recognized If the ID text
field is empty the error dialog in Figure 36
is displayed If no images was captured the
error dialog in Figure 37 is displayed
Cancel button Do not add the user discard the captured
image and close the Add User dialog
Table 31 The Add User dialog interface components described
21
From the add user dialog if a user clicks Ok without entering a user ID or capturing an
image The following dialog in Figure 36 below is displayed
Figure 36 Error dialog displayed for empty ID text field or no captured image
From the add user dialog if a user clicks Ok without capturing an image The following
dialog in Figure 37 below is displayed
Figure 37 Error dialog displayed when no image was captured
22
313 - The Confirm User Delete dialog
The Confirm User dialog is displayed in Figure 38 below this dialog is displayed when
selecting a user in the User List panel and clicking the Remove User button When
removing a user from the system the default option is set to no such that the
administrator doesnrsquot blindly remove a user from the Access Control system
Figure 38 Confirm User Delete dialog displayed when clicking the remove user button
Confirm User Delete dialog
Interface component PurposeAction
Yes button Completely removes the user from the
Access Control system
No button Do not remove the user close the
confirmation dialog
Table 32 The Confirm User Delete dialog interface components described
23
314 - The File menu
The complete File menu with the menu items it contains is displayed in Figure 39 below
Each menu item of the File menu with its associated action is described in Table 33
Figure 39 The File menu
The File menu
Menu item Action
Add User Adds a user to the Access Control system
Exit Exits the Access Control system
Table 33 The File menu items described
24
315 - The Face Detection menu
The complete Face Detection menu with the menu items it contains is displayed in Figure
310 below Each menu item of the Face Detection menu with its associated action is
described in Table 34
Figure 310 The File Detection menu
The Face Detection menu
Menu item Action
Settings Opens the Face Detection Settings dialog as
displayed in Figure 311
Table 34 The File menu items described
25
316 ndash Face Detection Settings dialog
The Face Detection Settings dialog is displayed in Figure 311 below this dialog is
displayed when the Settings menu item from the Face Detection menu is selected
In this dialog the administrator can set the scales in which the face detection should
operate The face detection system will try and locate faces at the starting scale and
increasing in step size until it reaches the final scale The default settings has a starting
scale of 19 thus the face detection system will try and locate all 19x19 faces in the camera
output Then the system will increase this resolution by its step size which are 5 by
default The system then tries and locates all 24x24 faces in the camera output The system
will continue increasing in step size until it reaches the final scale which are set to 240x240
by default
Choosing a big starting scale will dramatically improve the performance of the face
detection system and thus the Access Control system This is because there are more small
scales in a 320x240 window than big scales
Important
These settings highly affect the performance of the Access Control system The more
scale the face detections system has to cover the slower the system will run
The starting scale and final scale is also the distance as to how close a user should stand
in front of the camera in order to be detected by the face detection system so much care
should be taken into playing with these settings
Figure 311 The File Detection Setting dialog
26
317 ndash The Help menu
The complete Help menu with the menu items it contains is displayed in Figure 312 Each
menu item of the Help menu with its associated action is described in Table 35
Figure 312 The Help menu
The Help menu
Menu item Action
User Guide Open the Users Guide dialog displayed
in Figure 313
About Open the About dialog displayed in
Figure 314
Table 35 The Help menu items described
27
318 ndash The User Guide dialog
The Users Guide dialog is a modal dialog that is displayed in Figure 313 This dialog
contains the Users Guide for the Administrator It is opened when the Users Guide menu
item from the Help menu is selected The Users Guide dialog can be closed by either the
close button at the top right corner or the Ok button at the bottom of the dialog [1]
Figure 313 The Users Guide dialog
28
319 ndash The About dialog
The About dialog is a modal dialog that is displayed in Figure 313 This dialog contains a
message about the Access Control system The About dialog can be closed by either the
close button at the top right corner or the OK button at the bottom of the dialog
Figure 314 The About dialog
29
Figure 315 below displays the webcam that Users interact with and that is also used to
capture face images
Figure 315 The webcam that Users interact with and that is also used to capture face images
30
C H A P T E R 4
OBJECT ORIENTATED ANALYSIS (OOA)
In this chapter we apply an object-oriented view to the face detection system We begin by
providing a detailed description of the objects in the form of a data directory In addition
we provide detailed class diagrams identifying class attributes and methods Finally we
present the relationships between objects
41 - Data dictionary
The data dictionary describes the Face detection system objects in detail each object is
documented We provide a clean understanding of each object in terms of the functions
they perform in the form of a detailed description
Class Description
adaboostTrain This class trains a weak classifier using the AdaBoost machine learning algorithm presented by Freund amp Schapire [8] Once trained the weak classifier is saved to the database of weak classifiers
buildCascadeClassifier This class builds a cascade classifier which achieves increased performance while radically improving computation time The key insight is smaller more efficient classifiers are constructed which reject many of the negative sub windows while detecting all positive image instances Simple classifiers are used to reject the majority of sub-windows before more complex classifiers are called upon to decrease the false positive [6][7] The stages in the cascade classifier are constructed by training classifiers using AdaBoost and then adjusting the threshold to minimize the false negatives [6][7]
cascadeClassifier This class represents a complete cascade classifier with all its stages The cascade classifier is a chainarray of cascade stages Recall that each stage in the cascade
31
classifier is a smaller more efficient boosted classifier The form of the cascade classifier is that of a degenerate decision tree A positive result from the first classifier triggers the evaluation of a second classifier and so on A negative result at any point leads to immediate rejection of the sub-window[6][7]
cascadeStage This class represents a cascade classifier stage used in the cascade classifier class The cascade classifier stage is an AdaBoost strong classifier with a fairly small number of weak classifiers This is such that the detector can quickly distinguish if an image sub region is a Face or a Non-face Each stage in the cascade classifier is trained by adding weak classifiers until the target detection and false positive rates are met The stage threshold is adjusted to accept all face example in the training set while minimizing the false negatives
feature The class represents simple features our detector classifies images based on the value of simple features These features which have also been used by Viola and Jones are also known as Haar features or Haar-like features We use 5 kinds of features Given the base resolution of the detector is 19x19 our detector has an exhaustive set of 67209 features
integralImage
This class determines the integral image of a given input PGMImage The integral image can be considered as a means to quickly compute the rectangle features This intermediate representation for the input PGMImage at location (x y) is the sum of all the pixels above and to the left of (x y) Making use of the integral image any rectangular sum can be computed in four array references
integrateMultipleDetections This class represents a final detection since the final detection is insensitive to small changes in translation and scale multiple detections will normally occur around each face in a scanned image This class returns in one final face detection per face by combining clusters of overlapping detections into a single detection In addition this class returns the biggest face detection used by the face recognition system
scanDetector The final detector is scanned across the 320x240 image sequences at multiple scales and locations The detector itself is scaled rather than the image The detector is
32
scanned across locations by shifting the detector by two pixels horizontally and vertically The choice of this shifting affects both speed and accuracy of the detector The two pixels shifting promised good results in experiments In addition this class passes the biggest detection to the face recognition system
trainImage This class represents a training image for the AdaBoost machine learning algorithm Each training image has an integral image that represents the object of interest The type being a positive or negative image The weight of the training image is used for training the face detector The weight is used by AdaBoost the weight is a measure of how important the training image is
weakClassifier
This class represents a weak classifier the classifier is called ldquoweakrdquo because the classifier is only expected to classify 50 of the training set images correctly The features are used to build the weak classifiers A weak classifier is a feature with the extend of a classifier error ndash how bad the classifier is tested on a validation set and a classifier weight ndash how good the classifier is tested on the positive training set
Table 4-1 Data Dictionary - the objects combined with a brief
description of each
33
42 - Class diagrams
The class diagrams contain the name of the class itrsquos attributes as well as the associated
methods of the class The type of the class attributes the return types of the methods as
well as the class method parameters
Figure 41 adaboostTrain Class ndash trains a weak classifier using the AdaBoost algorithm
34
Figure 42 buildCascadeClassifier Class ndash trains a cascade classifier used by the face detector for face detection
35
Figure 43 cascadeClassifier Class ndash The trained cascade classifier used by the face detector for face detection
Figure 44 cascadeStage Class ndash A smaller more efficient boosted classifier used by the cascade classifier
36
Figure 45 feature Class ndash Our detector classifies images based on these features
Figure 46 integralImage Class ndash determines the integral image in order to quickly compute feature response values
37
Figure 47 integrateMultipleDetections Class ndash This class combines multiple detection as well as return the biggest
detection
38
Figure 48 scanDetector Class ndash scans the detector at multiple scales and locations and passes the biggest detection to the face
recognition system
39
Figure 49 trainImage Class ndash training image used to train the face detector
Figure 410 weakClassifier Class ndash classifier used by the
cascade classifier
40
43 - Relationship between objects
The following Figure 411 represents the relationship between the objects indicates how
the objects interact with each other or how they are related to each other
Figure 411 Relationship between classes
41
C H A P T E R 5
OBJECT ORIENTATED ANALYSIS (OOD)
The document is as close to coding as you can get without actually coding This document
takes the classes in the Object Oriented Analysis deeper into the realm of pseudo-code
51 ndash Inner details of class methods
The inner details of class method in detail each method is documented to give a more
detailed description of the class object
Class Method Description
adaboostTrain determineNumPosAndNeg() This method determines the number of negative and positive images the training set consists of
getTrainingSet() This method gets the Adaboost training set
getWeakClassifierCounter() This method returns the number of weak classifiers trained thus far in the weak classifier database
initializeWeights() This function initializes the weight uniformly over the training data the sum of the weights of all images in the trainingSet equals 1
normalizeWeights(javautilVectorlttrainImagegt training
Set) This method normalize the weights of the training set such that the weights is a probability distribution Sum(all weights) = 1
printWeights(javautilVectorlttrainImagegt trainingSet) This method is used for debugging
setupTrainingSet() This function sets the positive and negative images of the training set
setWeakClassifierCounter(int weakClassifierCounter) This method sets the Adaboost training set
42
trainClassifierWithAdaBoost() This method trains a weak classifier using AdaBoost and writes the weak classifier to the database of weak classifiers
updateNegativeTrainingImages(javautilVectorlttrainIma
gegt newNegatives) This method updates the negative training images by adding the input vector of negatives to the training set
updateWeight(weakClassifier weakClassifiers
javautilVectorlttrainImagegt trainingSet) This method updates the weight of the training set
baseLearner
allFeatures(int scale) This method calculates all possible features that can fit into a given image of width and height specified
baseLearner(javautilVectorlttrainImagegt trainingSet) This method returns the weak classfier with the lowest training error on the training set
calculateOptimalThresholdValues(javautilVectorlttrain
Imagegt trainingSet) This method determines the optimal thresold values for all the features
evaluateError(int featureOptThreshold
double lowestError) This method evaluates the weighted error of a feature over the training set such that we can choose the weak classifier with the lowest error
getAllFeatures() This method gets the features used to choose a weak classifier from
getFeatureOptimalThreshold() This method sets the feature optimal threshold values for all the features
initializeValues() This method initialize the features response values as well as the feature optimal threshold values
optimalThreshold() This method is used to determine the optimal threshold over the training set
removeFeatures(int featureNum) This method removes a feature from being used
setAllFeatures(javautilVectorltfeaturegt allFeatures) This method sets the features used to choose a weak classifier from
setFeatureOptimalThreshold(javautilVectorltjavalang
43
Integergt featureOptimalThreshold) This method sets the feature optimal threshold values for all the features
totalHScales(int imageWidth feature evaluateFeature) This method determines the total number of scales at which the input feature can be applied within a given imageWidth
buildCascadeClassifier
buildCascadeClassifier() This method build a cascade classifier using the AdaBoost machine learning algorithm
calculateTotalWeightForStage() This method calculates the total weight for the current stage from where the stage start to where the stage end
evaluateD() This method calculates the values D the detection rate of the cascade classifier on a the positive training images
evaluateF(boolean getThresholdValues) This method calculates the value F - the false positive rate of the cascade classifier on a validation set
initializeThresholdValues() This method initialize the thresholdValues array
smartTrainWrite(javautilVectorlttrainImagegt trainingS
et javalangString filename)
stageThreshold() The initial AdaBoost threshold is designed to yield a low error rate on the training data
cascadeClassifier addStage(cascadeStage stage) This method adds a stage to the cascade classifier
getStage(int stageNum) This method returns the cascade classifier stage at the given stageNum
readCascade(javalangString filename) This method reads the cascade classifier from the file system
stageEdit(int stageNum cascadeStage newStage)
toFile() This method is used by the writeCascade method
toString() This method prints the cascade classifier to a string
totalStages() This method returns the total number of stages in the cascade classifier
44
writeCascade(cascadeClassifier cascade
javalangString filename) This method saves the cascade classifier to the file system
cascadeStage getThreshold() This method gets the threshold of the stage
getTotalClassifiers() This method gets the total number of weak classifiers there are in this stage
getweakClassifierStart() This method gets the start of the weak classifiers in the weak classifier database for this stage
increaseTotalClassifiers() This method increase the total number of weak classifiers there are in this stage
setThreshold(double threshold) This method sets the threshold of the stage
setTotalClassifiers(int weakClassifierTotal) This method sets the total number of weak classifiers there are in this stage
setweakClassifierStart(int weakClassifierStart) This method sets the start of the weak classifiers in the weak classifier database for this stage
feature calculateFeature(int[][] integralimage
int initialScale int currentScale int x int y) This method calculates the feature response value of this feature on the input integral image
getHeight() This method gets the height of the feature
getHeightScale() This method gets the heightScale of the feature
getOptimalThreshold() This method gets the optimal threshold of the feature
getWidth() This method gets the width of the feature
getWidthScale() This method gets the widthScale of the feature
getX() This method gets the x(topleft) column location of the feature
getY() This method gets the y(topleft) row location of the feature
I(int[][] integralImage int xCoordinate
45
int yCoordinate) This method returns the integral image values in case x = -1 or y = -1 for the following condition I(-1 y) = I(x -1) = I(-1-1) = 0 else it just returns the integral image value at x and y respectively
setHeight(int height) This method sets the height of the feature
setHeightScale(int heightScale) This method sets the heightScale of the feature
setOptimalThreshold(int optimalThreshold) This method sets the optimal threshold of the feature
setWidth(int width) This method sets the width of the feature
setWidthScale(int widthScale) This method sets the widthScale of the feature
setX(int xCoordinate) This method gets the x(topleft) column location of the feature
setY(int yCoordinate) This method gets the y(topleft) row location of the feature
toString() This method prints the feature to a string
integralImage
I(int x int y) This function returns the integral image values in case x = -1 or y = -1 for the following condition I(-1 y) = I(x -1) = I(-1-1) = 0 else it just returns the integral image value at x and y respectively
integralImage(PGMImage pgm) This function takes as input a pgm image and determines the corresponding integral image of the image
printIntegralImage(int[][] integralImage) This method is used for debugging
integrateMultipleDetections
biggestDetection() This method returns the biggest detection of all the detections
clusterizeDetections() This method puts the detections into clusters - a cluster is defined as detections which overlaps
integratedDetections(boolean print) Each partition yields a single final detectionThe corners of the final bounding region are the average of the corners of all detections in the set
integrateMultipleDetections(javautilVectorltdetection
Windowgt multipleDetections byte[] outData int cy
int cY int cx int cX int lineStride
46
int pixelStride) This method takes as input a Vector of detections of faces
printDetection(detectionWindow detectWindow) Takes as input a detection and prints a white border around the detected face
scanDetector loadCascade() This method loads in the cascade classifier from the file system
scanDetector(PGMImage inputImage byte[] outData
int cy int cY int cx int cX int lineStride
int pixelStride) This method runs the detector(cascade classifier) over the camera output images
trainImage getIntegralImage() This method gets the integral image for this trainImage
getType() This method gets the type of an image if its a positive or a negative image
getWeight() This method gets the weight of an image in the training database over the training set
setIntegralImage(int[][] image) This method sets the integral image for this trainImage
setType(int type) This method sets the type of an image if its a positive or negative image
setWeight(double weight) This method sets the weight of an image in the training database over the training set
weakClassifier
determineAndSetClassifierWeight(double error) This method determines and sets the weight of the classifier since hypothesis weight = 12 ln (1-error)error
getClassifierError() This method gets the error of this classifier
getClassifierFeature() This method gets the feature of a weak classifier
getClassifierWeight() This method gets the weight of the classifier
readWeakClassifier(javalangString filename) This function reads the weakClassifier from a file
setClassifierError(double classifierError) This method sets the error for this classifier
setClassifierFeature(feature classifierFeature)
47
This method sets the feature of a weak classifier
weakClassifiertoString() This function prints the weak classifier to a string
writeWeakClassifier(weakClassifier weakclassifier
javalangString filename) This function write the weakClassifier to a file
Table 5-1 Inner details of the system classes
52 ndash Pseudo Code
521 ndash Scan Detector
Recall that the detector gets scanned at all scales and location across the image rather than
the image itself This pseudo code scans the image at the base (initial) resolution of 19x19
at all locations in the image it then scans the 320x240 resolution image The scale of the
detector is increased and the process in repeated until itrsquos scanned the images at all scales
windowWidth = 320 heightWidth = 240 width = 19 height = 19 for ( all possible scales a widthheight sub-window can fit into windowWidthheightWidth) scanDetectorWithSubwindow(width height ) width ++ height ++ function scanDetectorWithSubwindow(width height ) for (h = 0 to h lt windowHeight ) for (w=0 to w lt windowWidth ) if (w + width lt windowWidth AND h + height lt windowHeight ) classifySubWindow(w+width h+height ) endIf endFor endFor
48
C H A P T E R 6
CODE DOCUMENTATION
The full code documentation of our code is not contained in this project due to the
number of pages it covers The code documentation can however be found on the
accompanying compack disk(CD)
In the code documentation
Every class and class method are described using in-line comments or a brief
detailed description of the algorithm or its workings The same applies for
methods The javadoc web pages makes for easily browsing the code
documentation Where applicable we note any caveats ndash things that could go
wrong or things that the code doesnrsquot address
49
C H A P T E R 7
TESTING DOCUMENT
This chapter describes how we tested our system The system has been tested on the
MIT+CMU frontal face test set The results of the face detector are shown below
MIT+CMU frontal face test set
Images collected at CMU and MIT
275 Correctly detected out of 472 images
58 Detection rate
The following Figure 71 displays a false positive the system detects the following sub-
window as a face when itrsquos not
Figure 71 ndash False positive detection
50
The following Figure 72 displays a positive detection the system detects the face in this
sub-window and the detection isnrsquot a fully cropped face This is because of the way the
system integrates multiple detections The system is invariant to small changes in
detection therersquos multiple detections around the face The best detection is the one
displayed
Figure 72 ndash Correct detection
51
C H A P T E R 8
USERS GUIDE
This document tells a user how to use the Access Control system This document may
also be used by a programmer as a guide to improve or edit the system This document
describes the system requirements to use the Access Control system the system project
directory structure and how to run the Access Control system
81 - System requirements
All the requirements to setup run and edit the Access Control system are contained in
Table 81
System requirements
Hardware Software
A personal computer (PC) that can satisfy
the software requirements and webcamrsquos
requirements
Microsoft Windows based operating system
available from Microsoft Corporation
A webcam Installed Sun Java Runtime Environment
(JRE) and Java Development Kit (JDK) ndash
6u2 (Update 2) available from Sun
Microsystems
Installed Java Media Framework 211e
available from Sun Microsystems
Installed NetBeans IDE 65 available from
wwwnetbeansorg
Table 81 The system requirements a table to setup run and edit the Access Control system
52
82 - The Face Recognition System project directory
The Access Control System project directory is displayed in Figure 81 below Table 82
explains the directory and its contents
Figure 81 Access Control Systemrsquos project directory structure
53
Directory ContentsDescription
Access_Control_System The main project directory which contains all
project directories The directory contains two
files
AccessControljar ndash an executable jar file that
runs the Access Control system
AccessControlJavadocshtml ndash a link to the
javadocs indexhtml file which documents the
source code
Access_Control_SystemUserGuide This directory contains the Html User Guide
file used by the Access Control system
Access_Control_Systemlog This directory logs any Access Control activity
The directory contains a directory namely
YEAR-MONTH-DAY this directory contains
the log files for that day The log files are
named per hour and minute the system was
terminated eg HOUR-MINUTElog
Access_Control_Systemtrain This directory contains the training images used
for training the face detector as well as the
weak classifiers and cascade classifier the
detector uses for face detection
Access_Control_Systemdistjavadoc This directory contains the generated javadoc
files
Access_Control_Systemsrc The directory that contains all the source code
used by the Access Control system
Access_Control_SystemsrcaccessControl
Systemresources
The directory that contains all the Access
Control resources
Access_Control_SystemsrcfaceDetection The source code directory for the faceDetection
package
54
Table 82 The Access Control system project directory and contents explained
83 - Running the Access Control system
Table 83 below describes the steps necessary to run the Access Control system
Running the Access Control system
Step 1 Make sure that the system requirements in Table 81 are met
Step 2 Make sure that a video capture device is connected to the PC
Step 3 Double click the Executable Jar File named Access Controljar to run the
Access Control System
Table 83 Running the Access Control system
84 ndash Complete user interface
Figure 82 below displays the main graphical user interface frame for our system titled
Access Control
55
Figure 82 Complete user interface
User Image panel
The User Image panel displays the user image of the user currently selected in the User list
panel
User List panel
The User List panel lists the authorized users the Access Control system can recognize
Search field
The search field can be used to search for a user in the face recognition system This
feature can be very useful when the face recognition system have hundreds of users
The search function searches for the substring of the search text in the username and
lists all the matched usernames in alphabetical order displaying the first matched usersrsquo
image in the user image panel
Camera output
The camera output displays the camerarsquos output Used for capturing images when adding
users to the face recognition system and for monitor current user login activity
56
Add user button
The add user button adds an authorized user to the Access Control system On execution
of the Add User button the Add User dialog as shown in Figure 86 is displayed
Remove user button
The remove button is only enabled when there are users in the system The remove button
removes a user from the Access Control system On execution of the Remove User
button the Confirm User Delete dialog in Figure 89 is displayed
Recognition output
The Access Control system displays the output of the recognized user below camera
output When a user is not recognized by the Access Control system the system displays
Who are you otherwise the system displays the user ID of the recognized user and the
rate of the face recognition
Log panel
When a user is detected by the face detection system and recognized by the face
recognition system the Access Control system logs the userrsquos information to the log panel
The log panel logs the user and the time at which the user logged in the log file gets saves
with the current date every time the user terminates the system
Acceptance threshold
The face recognition system has a threshold at which users should be recognized With 0
being the lowest threshold value and with 1 being the highest threshold value With 0
being the most lenient and 1 being the most strict at which the recognition operates The
Acceptance threshold spinner is used to adjust the acceptance threshold value used with
which the ANNs output is compared [1]
57
841 - How the user interface behaves
When the face detection system does not detect any faces or detects a false positive or the
face recognition system does not recognize the user Then the system displays Who are
you As displayed in Figure 84 below
58
Figure 84 How the user interface behaves ndash with detection and no recognition
When the users face is detected and recognized the system will display the user ID and
the recognition rate as displayed in Figure 85 below
Figure 85 How the user interface behaves ndash with detection and recognition
841 - The Add User Dialog
The Add User Dialog is displayed in Figure 85 below this frame is displayed when the
Add User button in the Access Control GUI is pressed or when the Add User menu item
59
from the File menu is selected The location of the Add User Dialog is such that the
cameras output can be clearly viewed Each interface component in the Add User Dialog
with its purpose or action is described in Table 81
Figure 86 The Add User dialog
Add User dialog
Interface component PurposeAction
User Image panel Displays the captured image
Capture Image button Captures an image
ID label and text field The text field where a user identifier should
be entered
Ok button Add the user with the specified identifier
that should be recognized If the ID text
field is empty the error dialog in Figure 87
is displayed If no images was captured the
error dialog in Figure 88 is displayed
Cancel button Do not add the user discard the captured
image and close the Add User dialog
Table 81 The Add User dialog interface components described
60
From the add user dialog if a user clicks Ok without entering a user ID or capturing an
image The following dialog in Figure 87 below is displayed
Figure 87 Error dialog displayed for empty ID text field or no captured image
From the add user dialog if a user clicks Ok without capturing an image The following
dialog in Figure 88 below is displayed
Figure 88 Error dialog displayed when no image was captured
61
842 - The Confirm User Delete dialog
The Confirm User dialog is displayed in Figure 89 below this dialog is displayed when
selecting a user in the User List panel and clicking the Remove User button When
removing a user from the system the default option is set to no such that the
administrator doesnrsquot blindly remove a user from the Access Control system
Figure 89 Confirm User Delete dialog displayed when clicking the remove user button
Confirm User Delete dialog
Interface component PurposeAction
Yes button Completely removes the user from the
Access Control system
No button Do not remove the user close the
confirmation dialog
Table 82 The Confirm User Delete dialog interface components described
62
843 - The File menu
The complete File menu with the menu items it contains is displayed in Figure 810 below
Each menu item of the File menu with its associated action is described in Table 88
Figure 810 The File menu
The File menu
Menu item Action
Add User Adds a user to the Access Control system
Exit Exits the Access Control system
Table 88 The File menu items described
63
844 - The Face Detection menu
The complete Face Detection menu with the menu items it contains is displayed in Figure
811 below Each menu item of the Face Detection menu with its associated action is
described in Table 84
Figure 811 The File Detection menu
The Face Detection menu
Menu item Action
Settings Opens the Face Detection Settings dialog as
displayed in Figure 812
Table 84 The File menu items described
64
845 ndash Face Detection Settings dialog
The Face Detection Settings dialog is displayed in Figure 812 below this dialog is
displayed when the Settings menu item from the Face Detection menu is selected
In this dialog the administrator can set the scales in which the face detection should
operate The face detection system will try and locate faces at the starting scale and
increasing in step size until it reaches the final scale The default settings has a starting
scale of 19 thus the face detection system will try and locate all 19x19 faces in the camera
output Then the system will increase this resolution by its step size which are 5 by
default The system then tries and locates all 24x24 faces in the camera output The system
will continue increasing in step size until it reaches the final scale which are set to 240x240
by default
Choosing a big starting scale will dramatically improve the performance of the face
detection system and thus the Access Control system This is because there are more small
scales in an 820x240 window than big scales
Important
These settings highly affect the performance of the Access Control system The more
scale the face detections system has to cover the slower the system will run
The starting scale and final scale is also the distance as to how close a user should stand
in front of the camera in order to be detected by the face detection system so much care
should be taken into playing with these settings
Figure 812 The File Detection Setting dialog
65
846 ndash The Help menu
The complete Help menu with the menu items it contains is displayed in Figure 813 Each
menu item of the Help menu with its associated action is described in Table 85
Figure 813 The Help menu
The Help menu
Menu item Action
User Guide Open the Users Guide dialog displayed
in Figure 814
About Open the About dialog displayed in
Figure 815
Table 85 The Help menu items described
66
847 ndash The User Guide dialog
The Users Guide dialog is a modal dialog that is displayed in Figure 814 This dialog
contains the Users Guide for the Administrator It is opened when the Users Guide menu
item from the Help menu is selected The Users Guide dialog can be closed by either the
close button at the top right corner or the Ok button at the bottom of the dialog [1]
Figure 814 The Users Guide dialog
67
848 ndash The About dialog
The About dialog is a modal dialog that is displayed in Figure 815 This dialog contains a
message about the Access Control system The About dialog can be closed by either the
close button at the top right corner or the OK button at the bottom of the dialog
Figure 815 The About dialog
68
Figure 816 below displays the webcam that Users interact with and that is also used to
capture face images
Figure 816 The webcam that Users interact with and that is also used to capture face images
69
C h a p t e r 9
CONCLUSION
In this mini-theses We discussed the implementation of a face detection system to be
used for access control The focus was thus to implement a face detection system good
enough to be used for access control Access control systems normally use video cameras
that deliver image data of poor quality and that also contain much noise [3] The focus was
also on developing a real-time face detection system The Viola and Jones have been most
suited for our requirements thus we implemented a detector strongly based on the Viola
and Jones detector
70
BIBLIOGRAPHY
[1] A Jorgensen AdaBoost and Histograms for Fast Face Detection 2006
[2] BKL Erik Hjelmas ldquoFace Detection A Surveyrdquo Computer Vision and Image
Understanding vol 3 no 3 pp 236-274 Sept 2001
[3] D van Wyk httpwwwcsuwcaczaindexphpHonours-2006Desmond-Van-
Wykhtml[online] November 2006
[4] J Meynet Fast Face Detection Using AdaBoost July 2003
[5] R Lienhart and J Maydt An extended set of Haar-like features for rapid object detection In IEEE ICIP 2002 Vol1 pp 900-903 [6] P Viola and M Jones Rapid object detection using a boosted cascade of
simple features In Proc IEEE Conference on Computer Vision and Pattern Recognition pages
511ndash518 Dec 2001
[7] P Viola and M Jones Robust real-time object detection IEEE ICCV Workshop
Statistical and Computational Theories of Vision July 2001
[8] Y Freund and RE Schapire A decision-theoretic generalization of on-line learning
and an application to boosting In Proceedings of the Second Europen Conference on Computational
Learning Theory pages 23ndash37 Springer-Verlag 1995
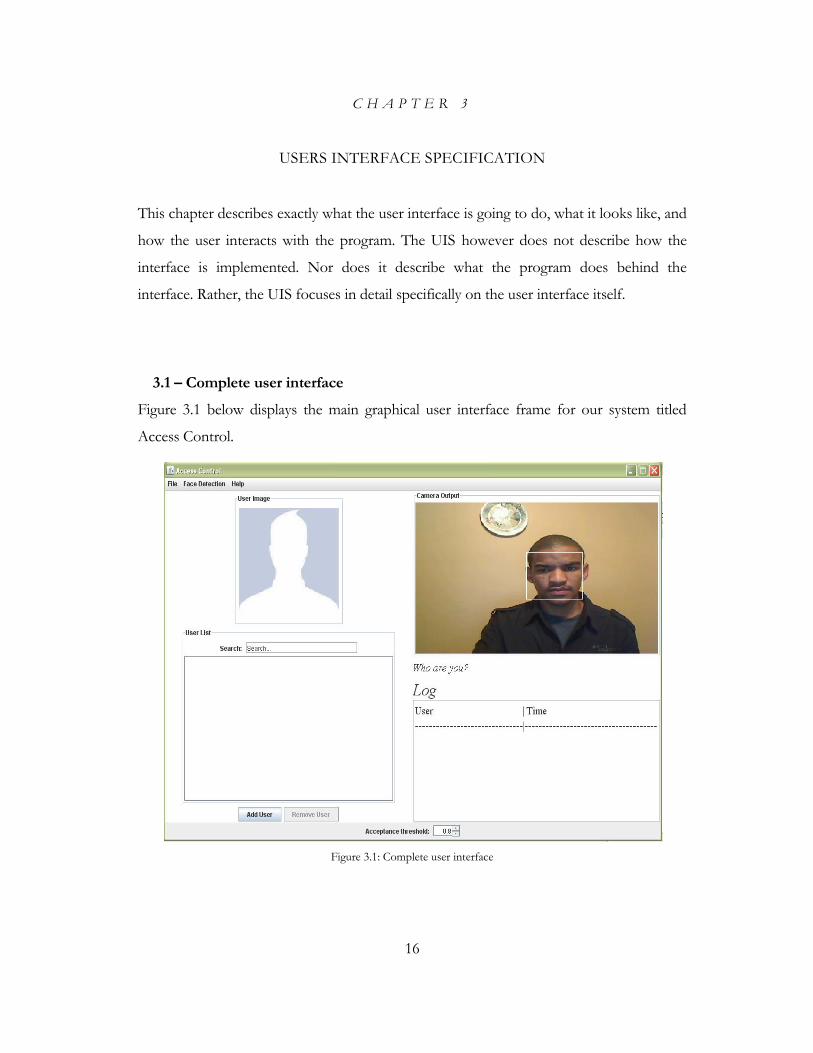
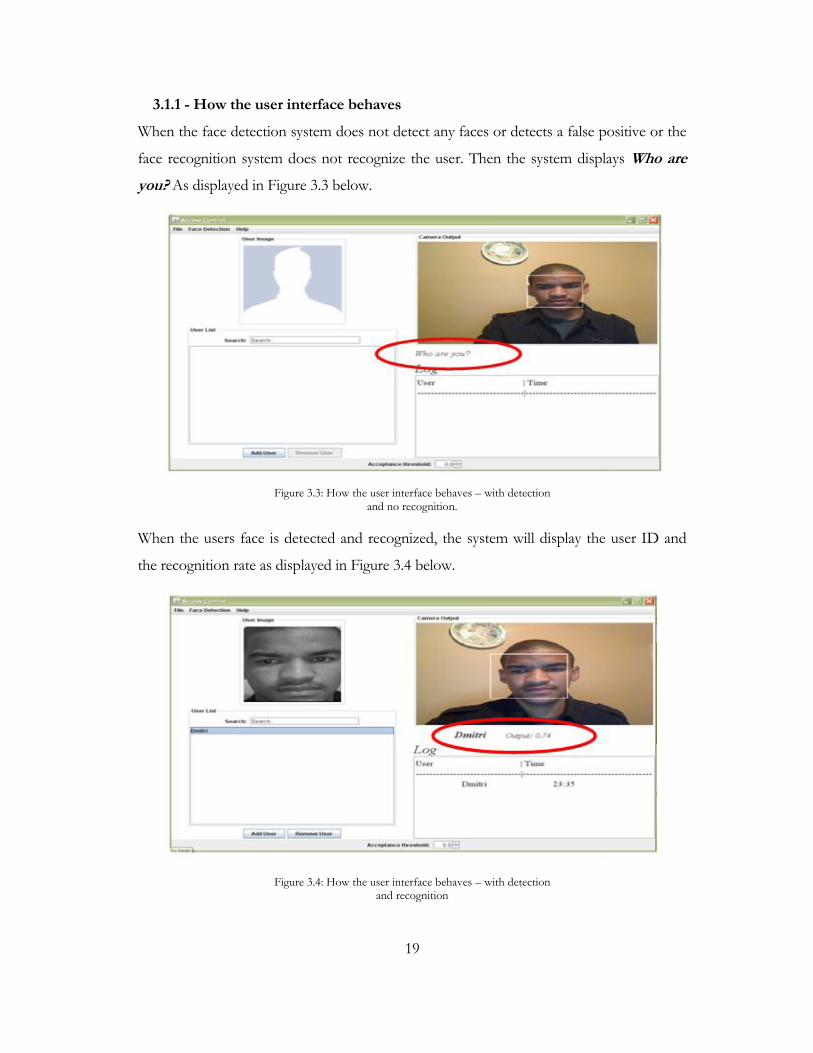
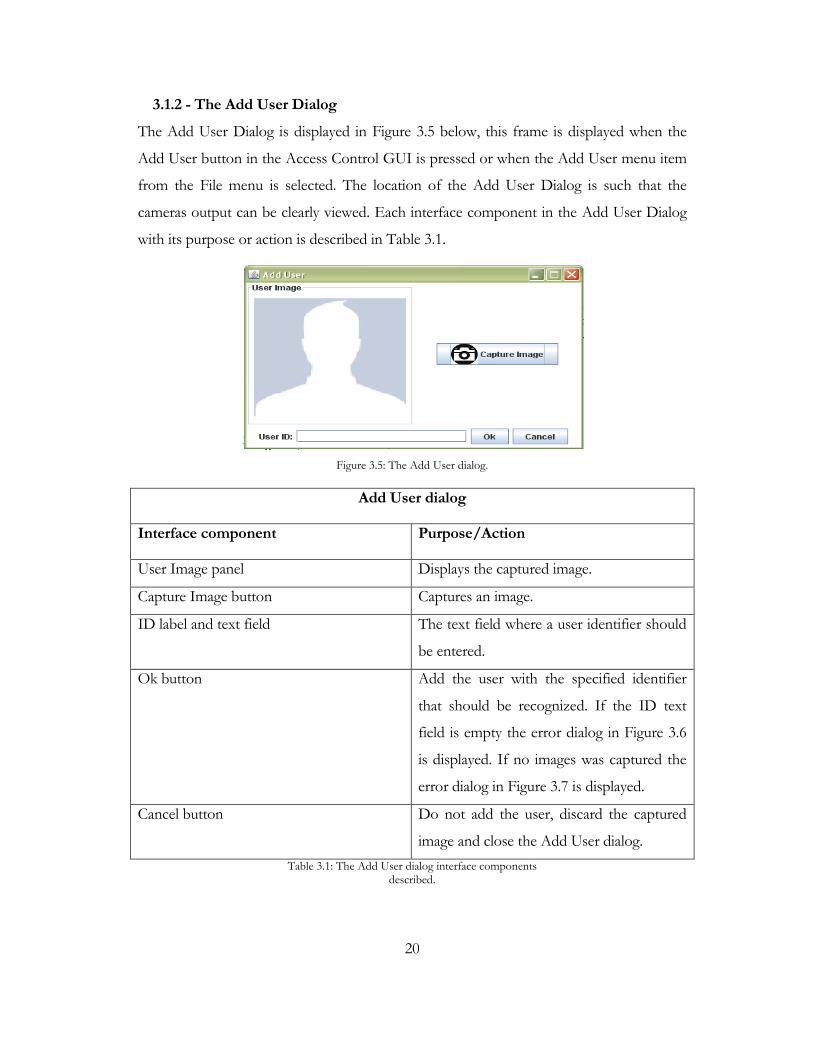
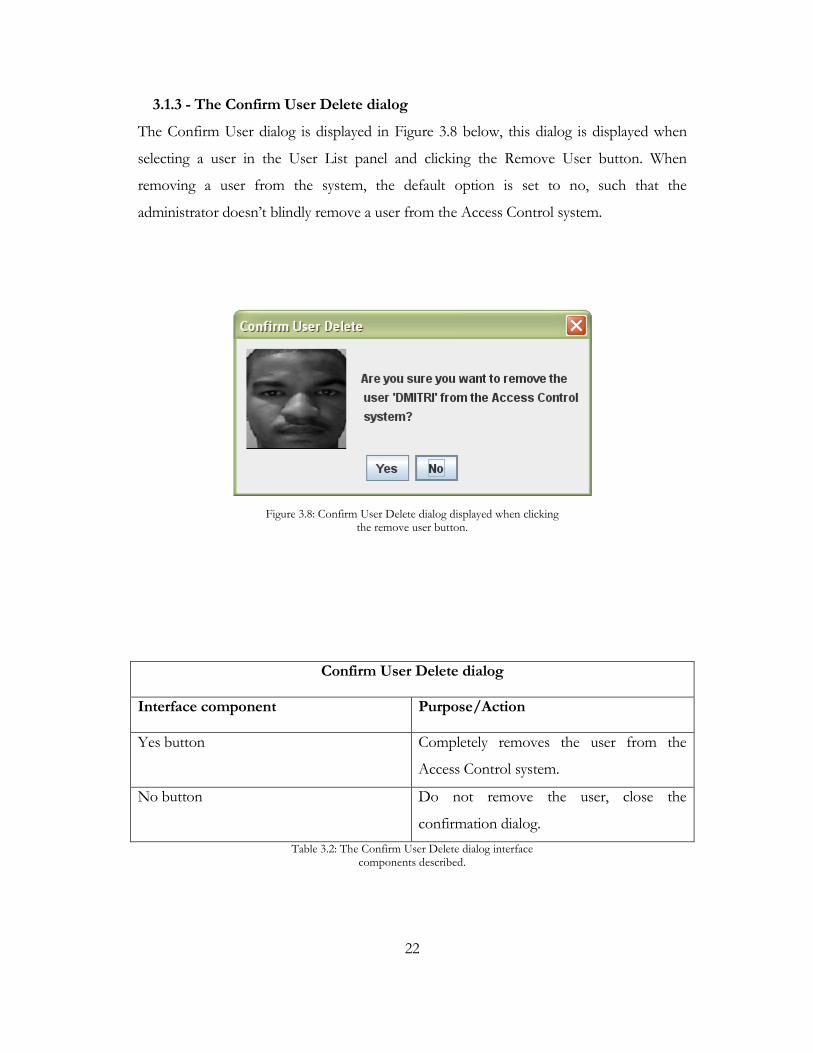
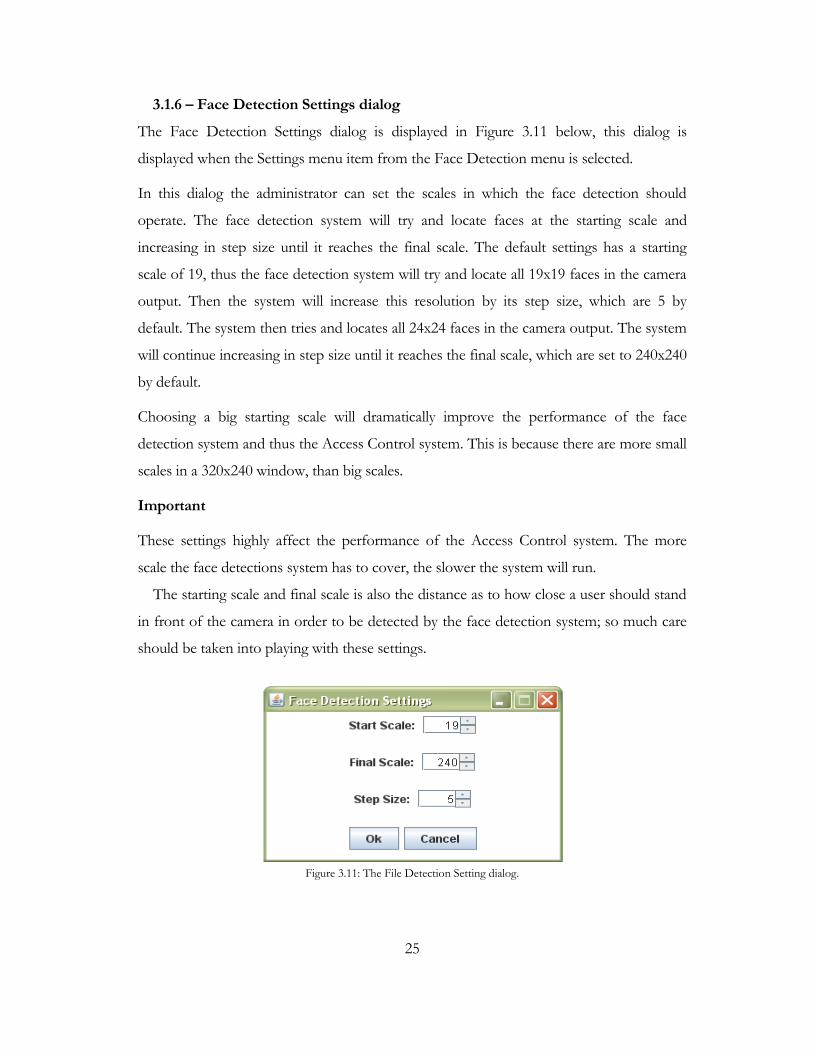
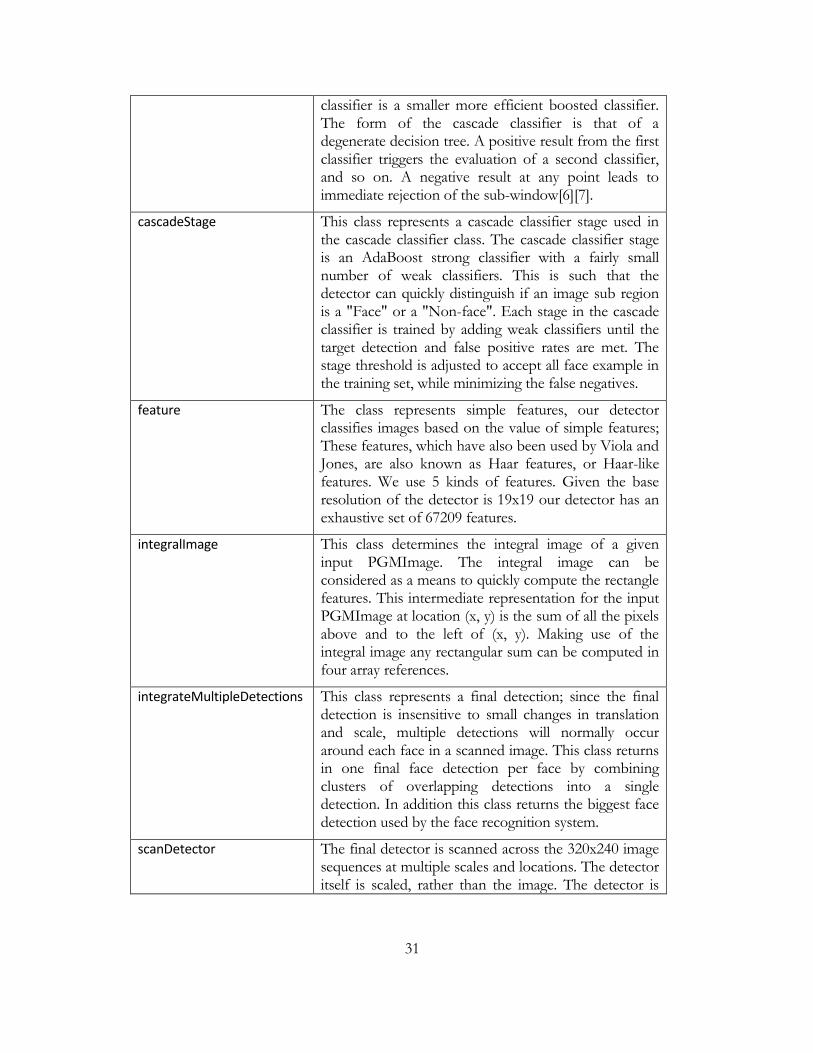
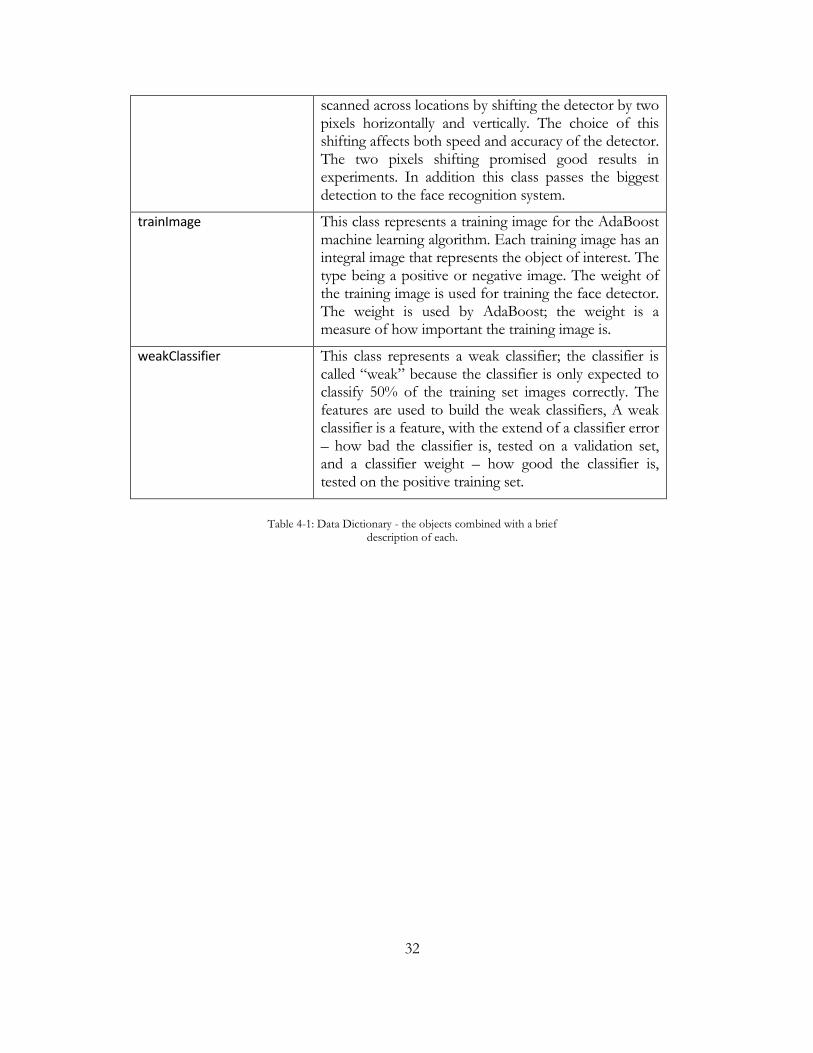
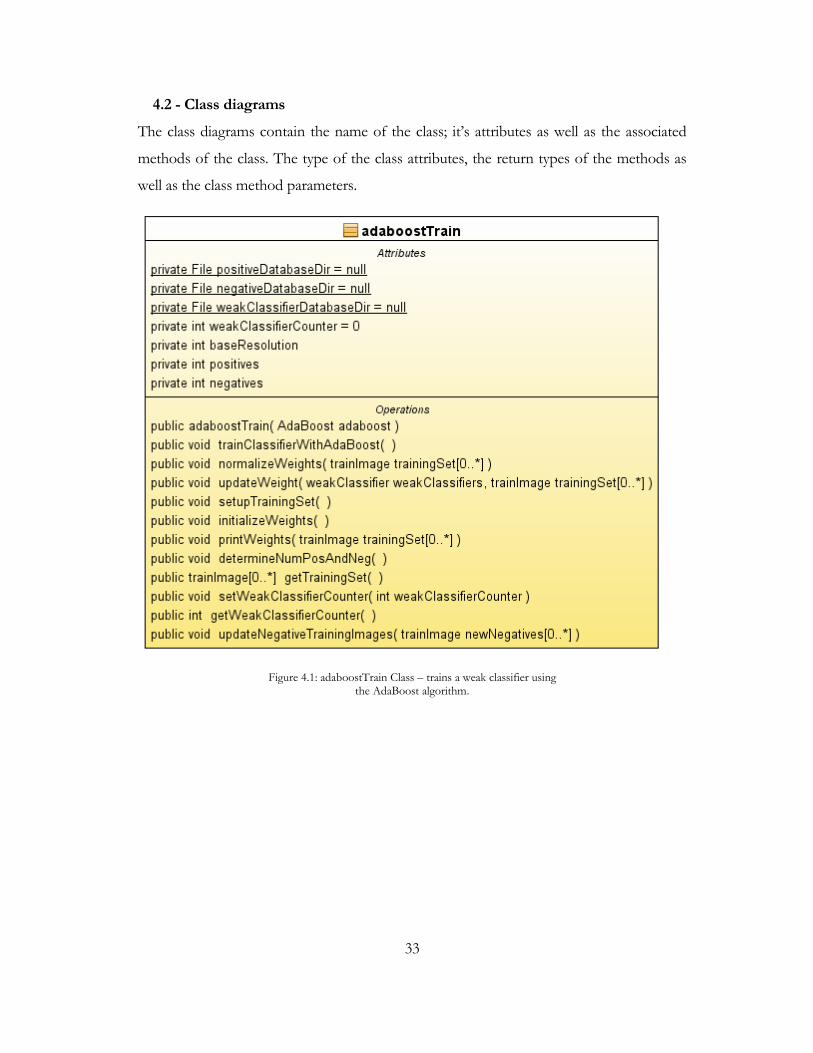
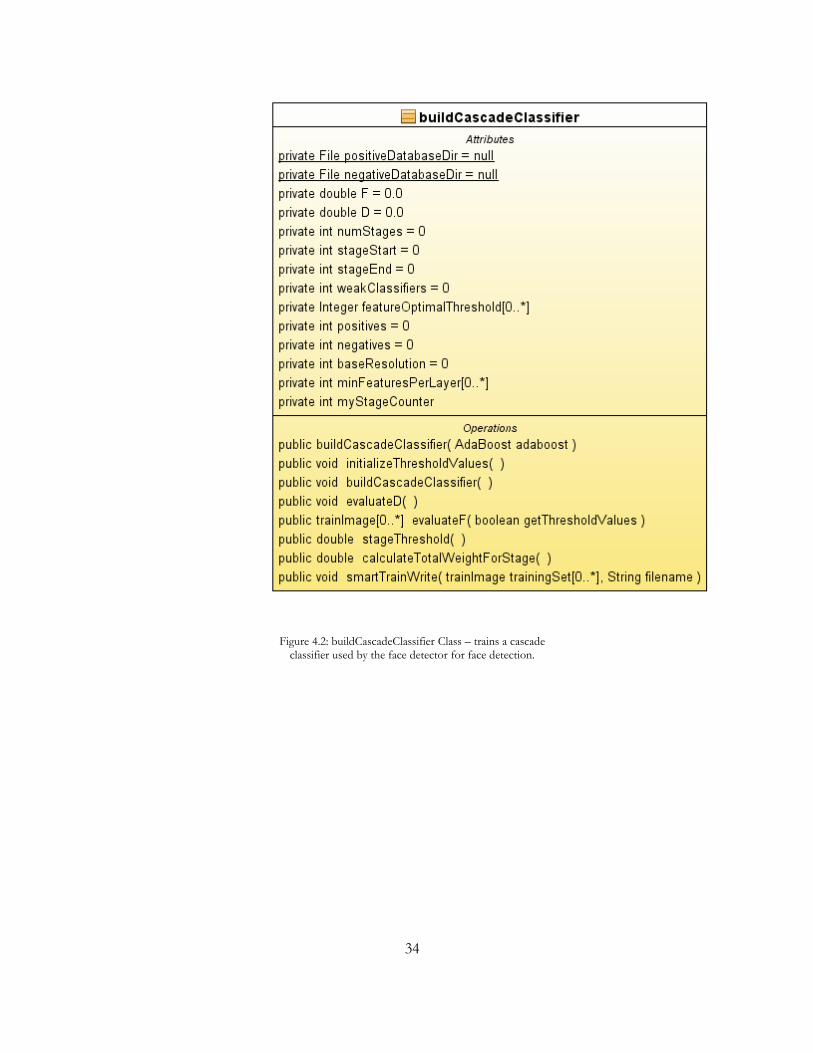
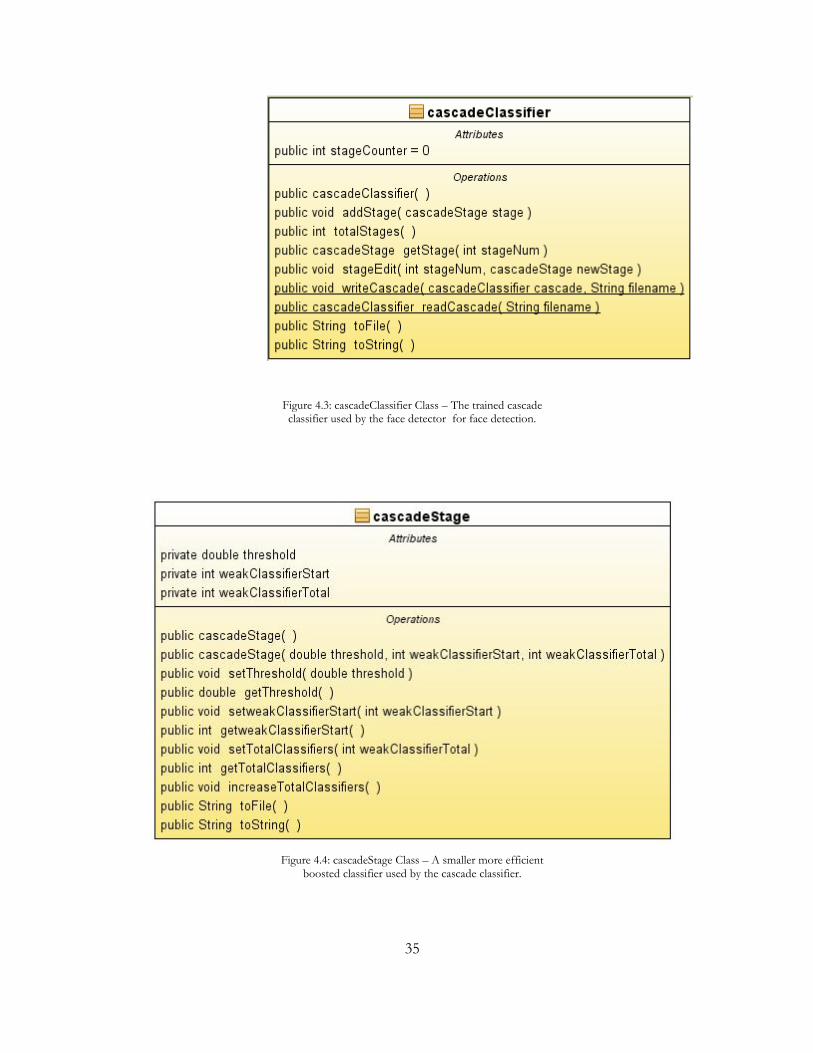
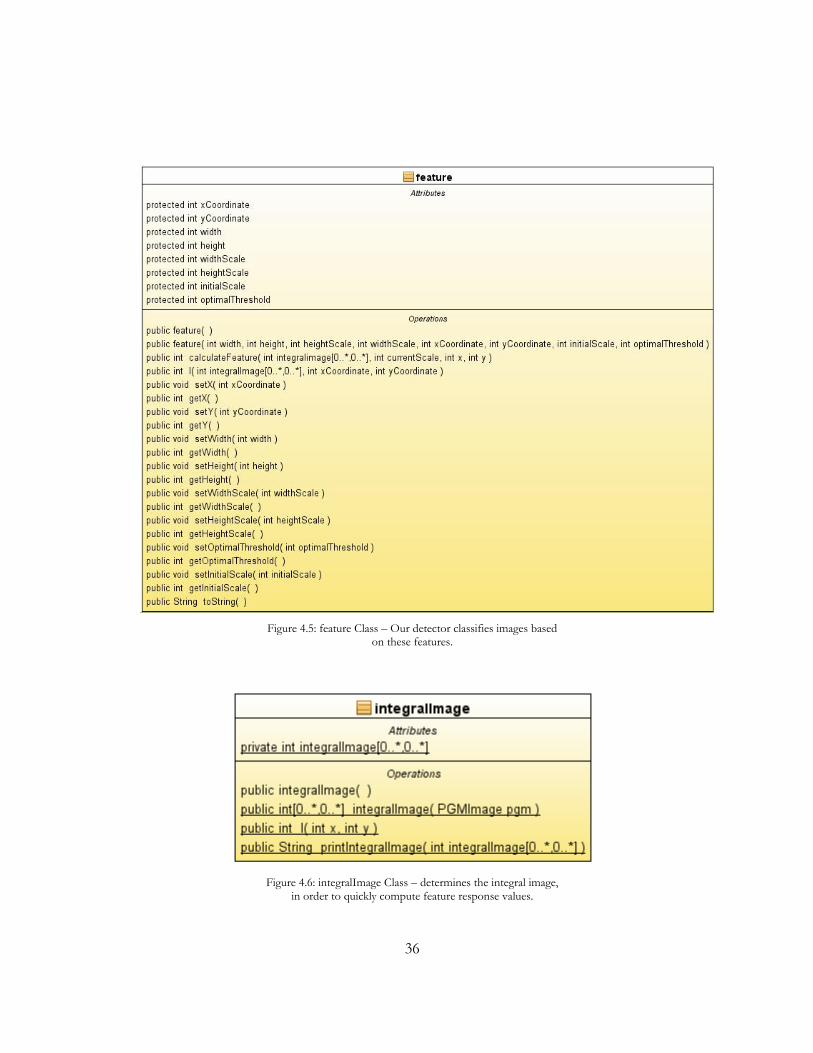
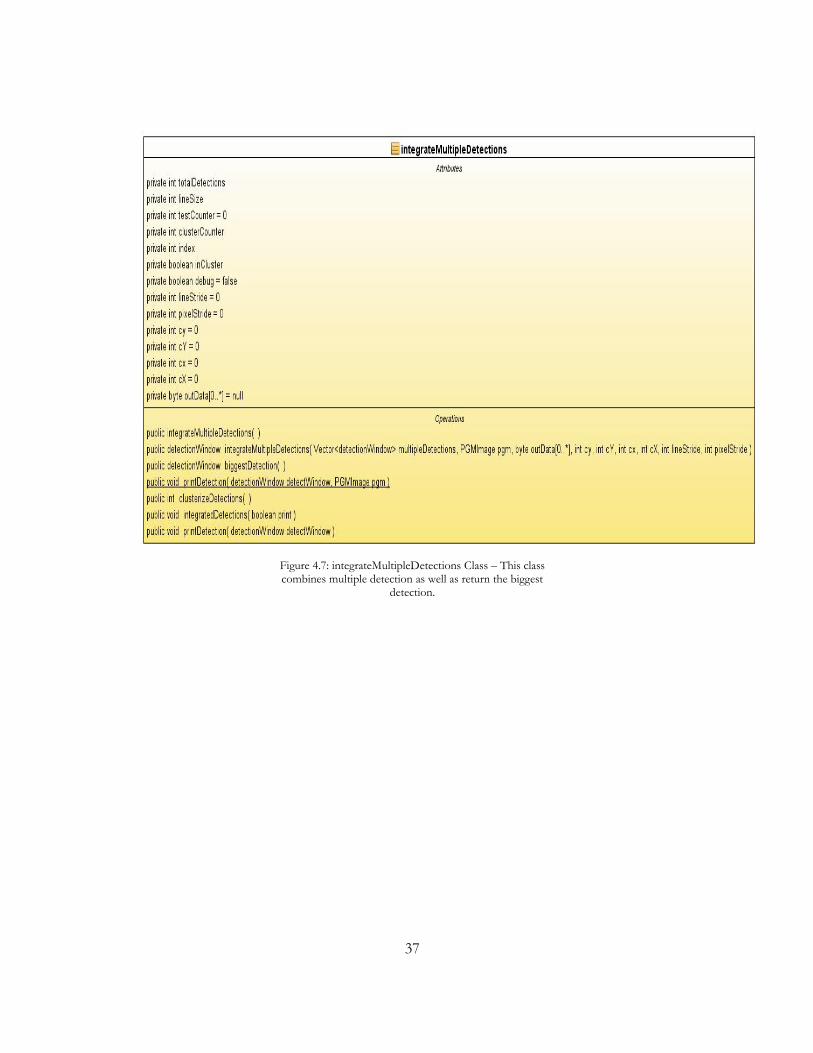
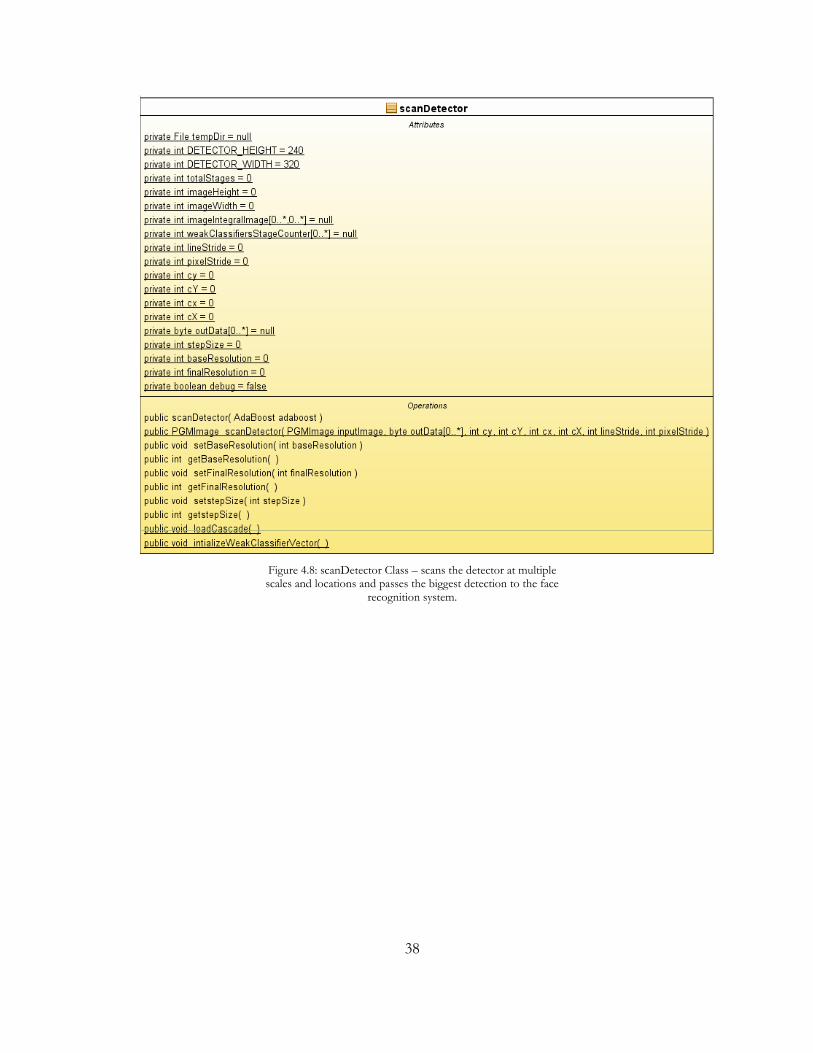
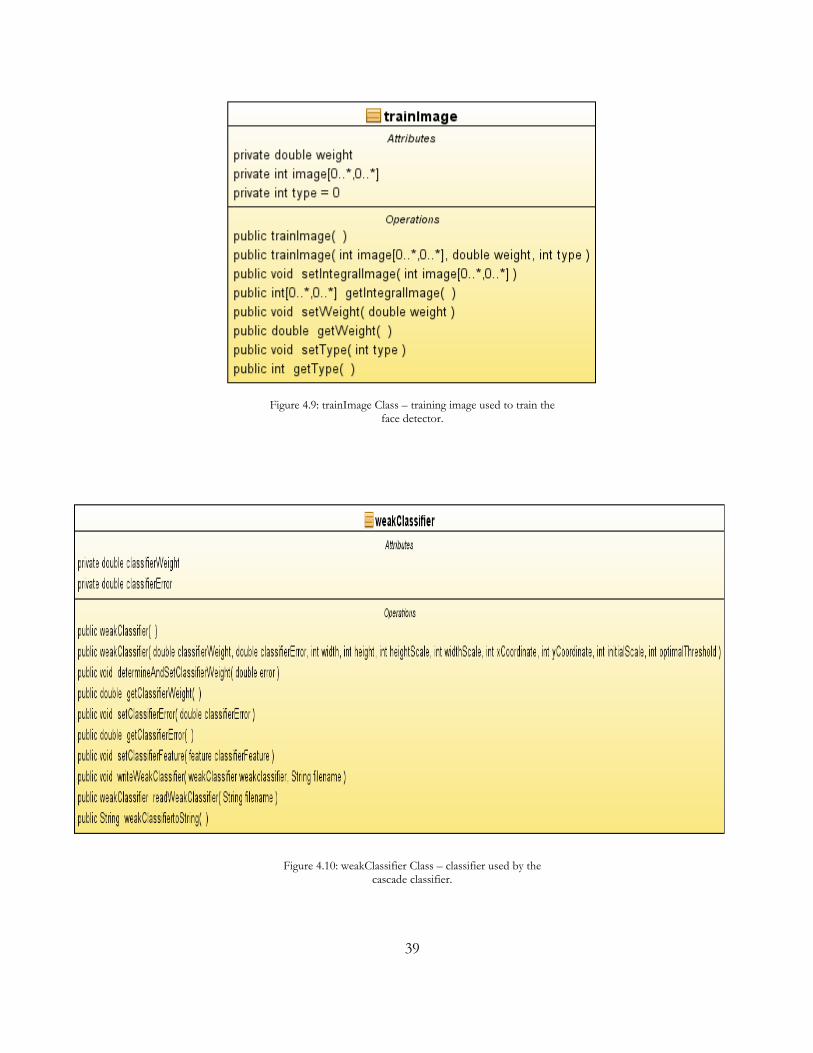
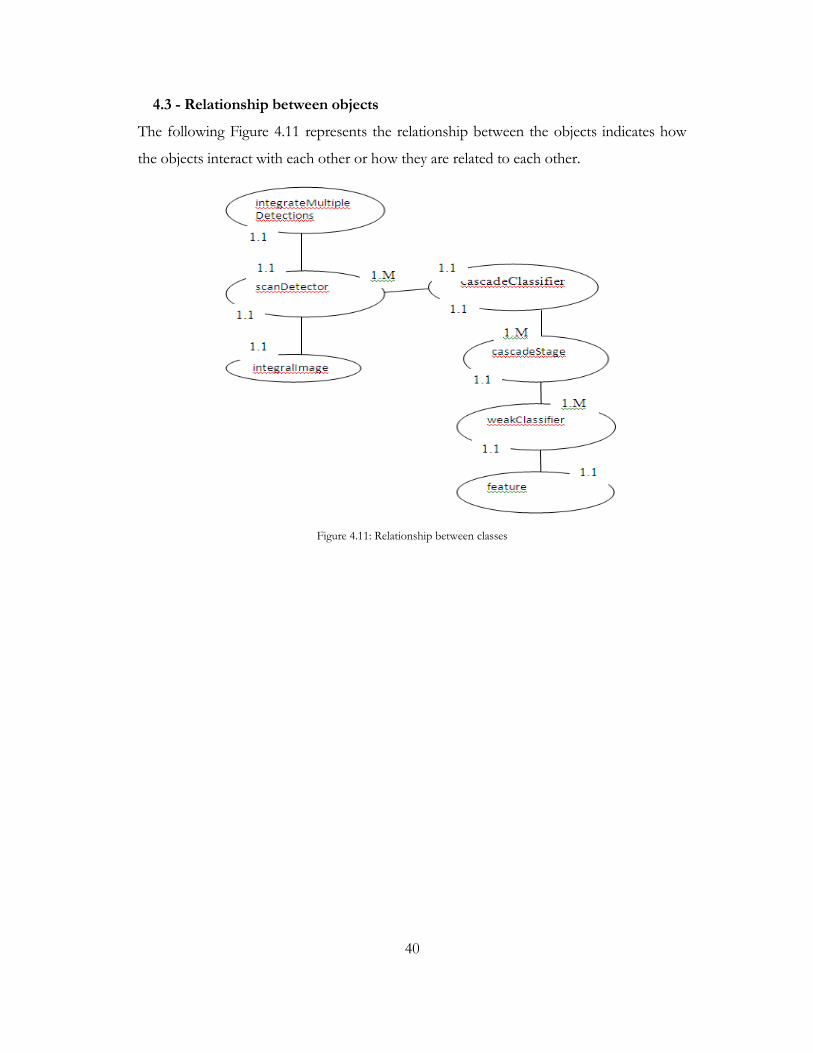
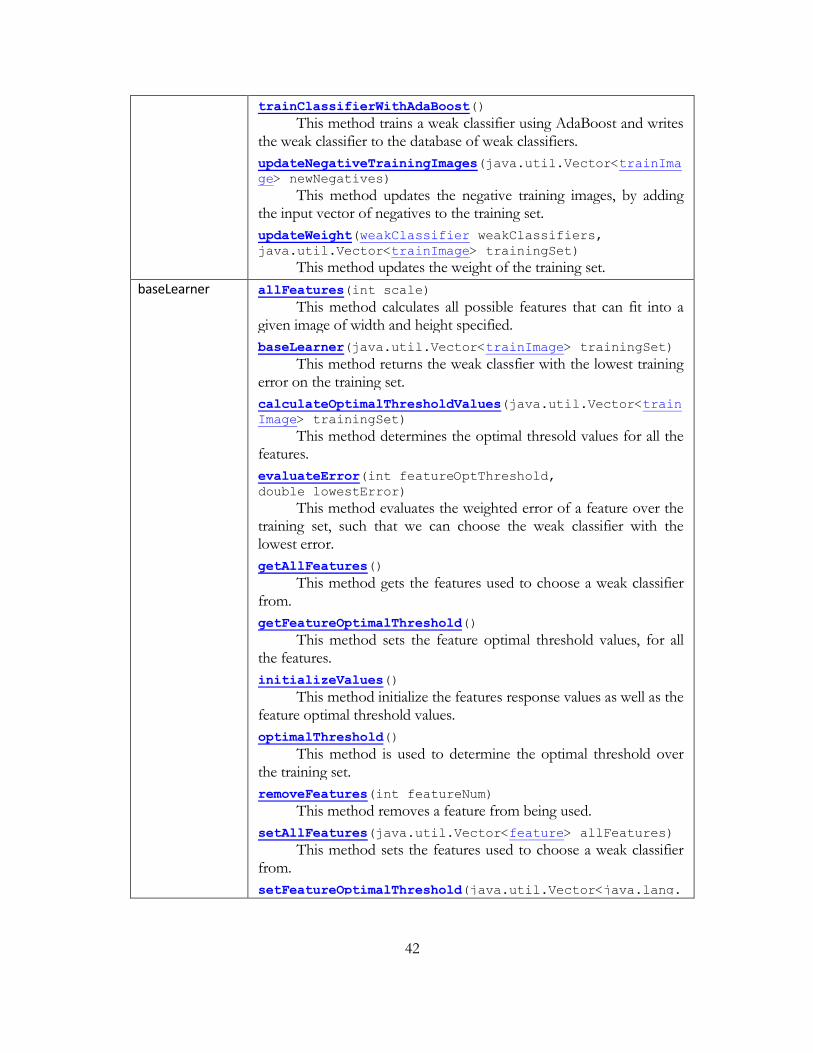
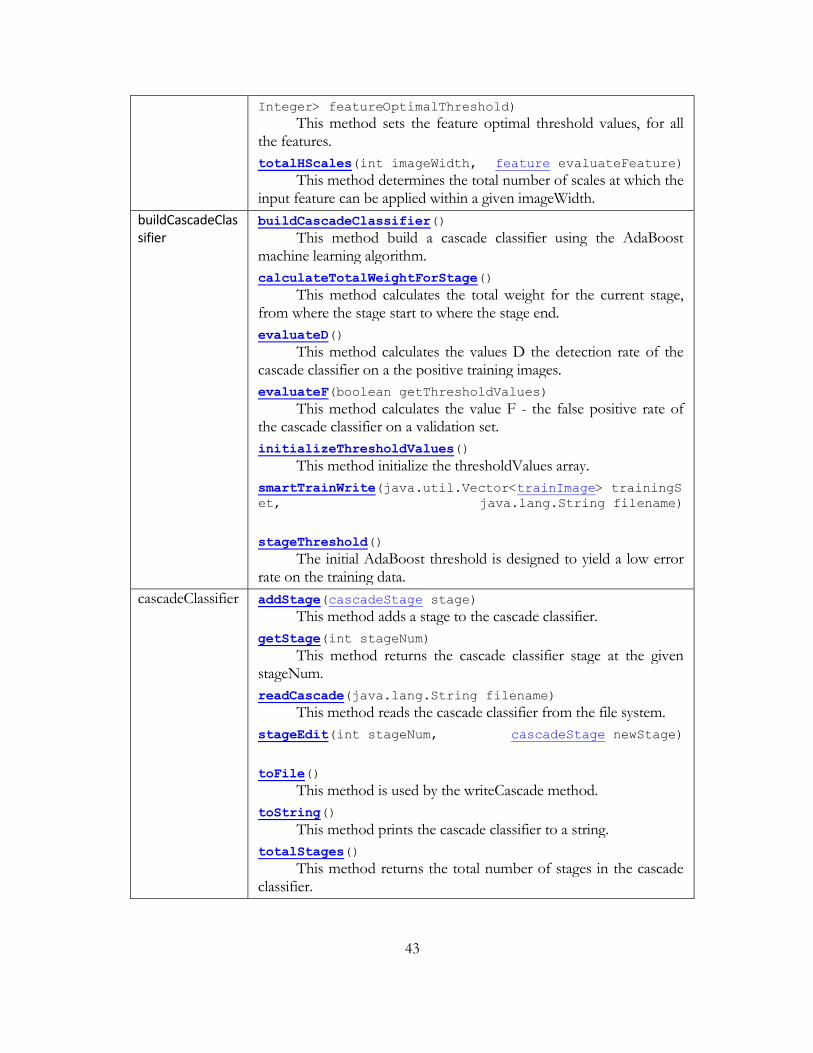
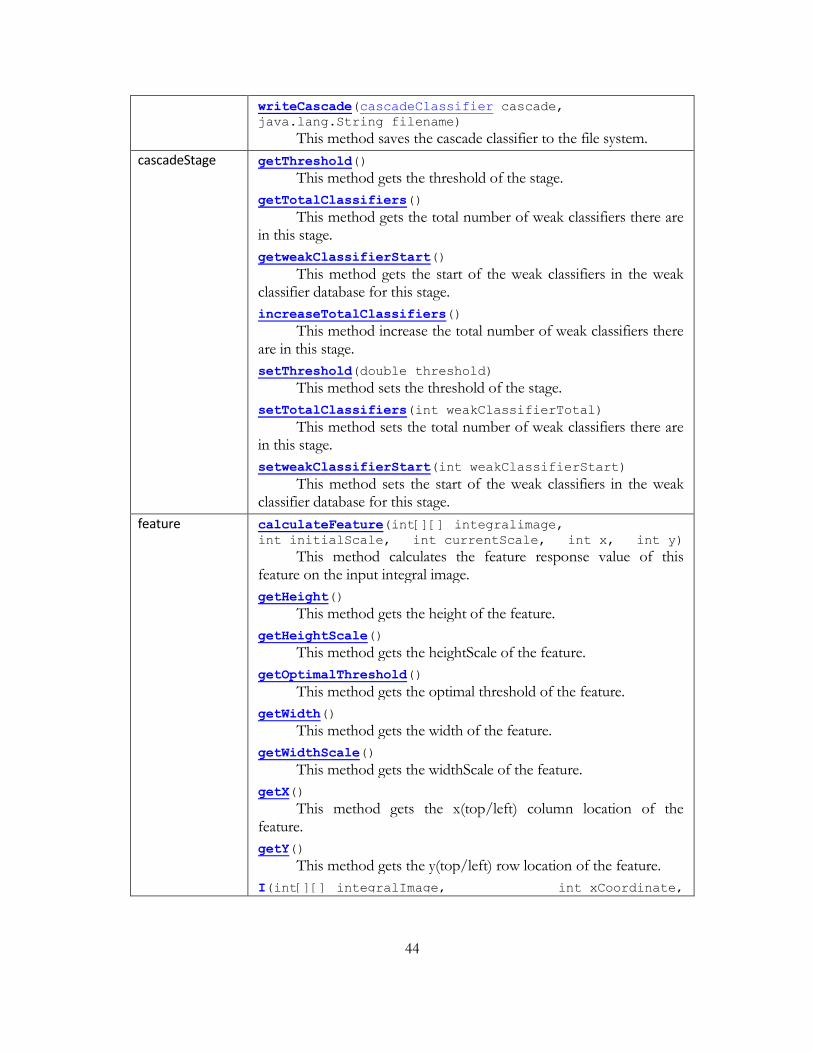
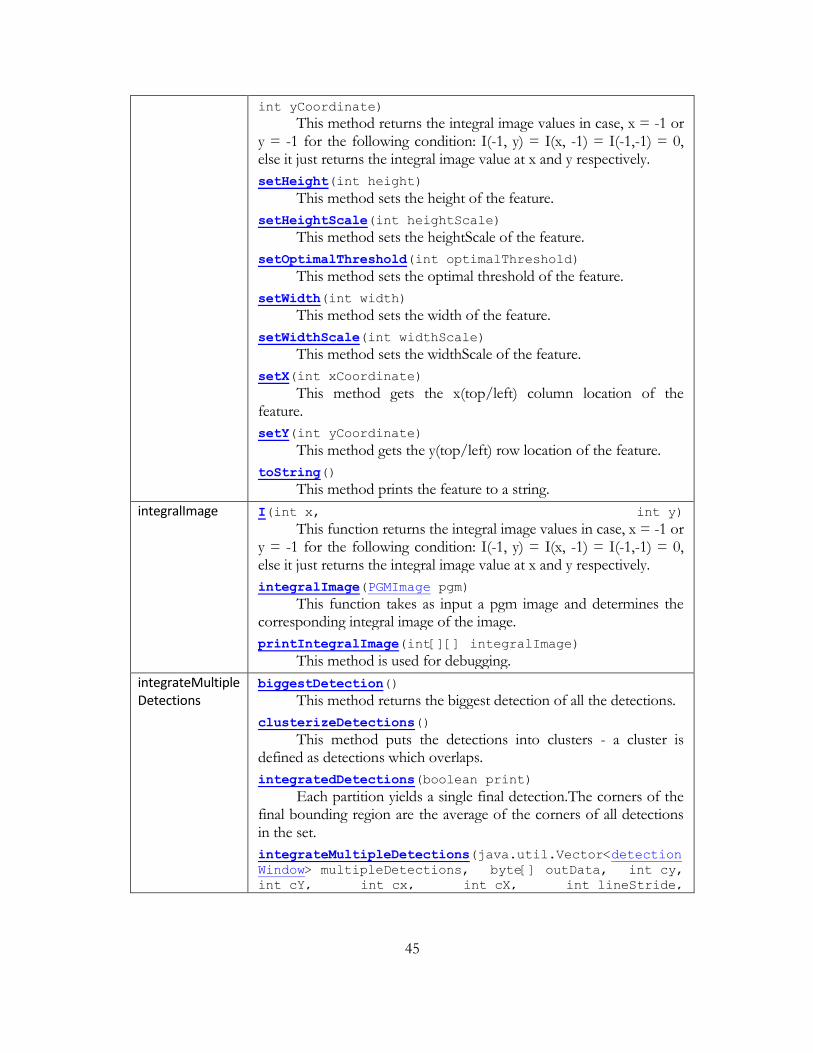
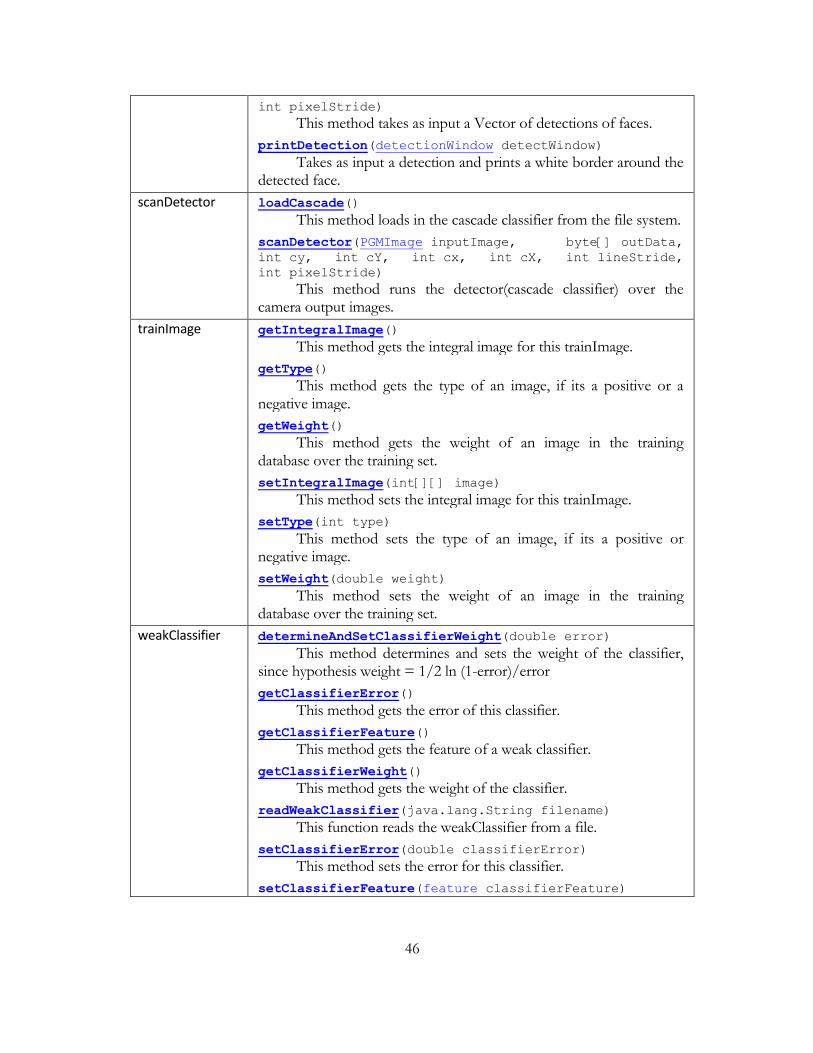
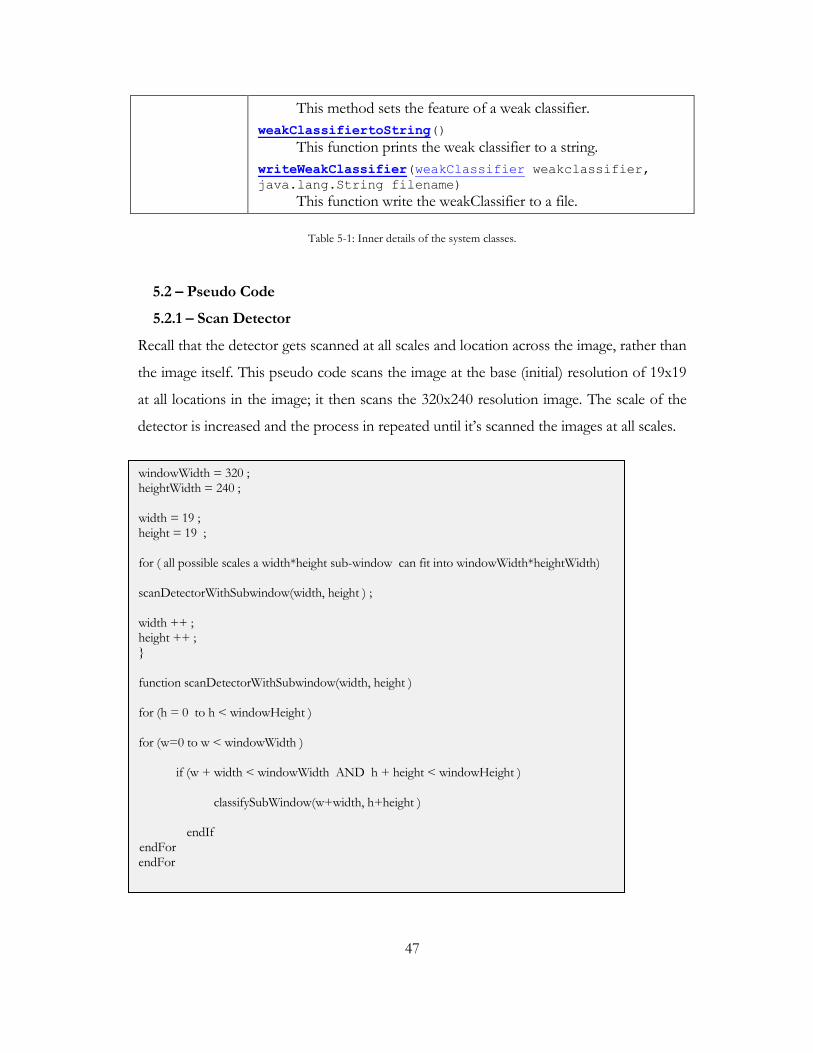
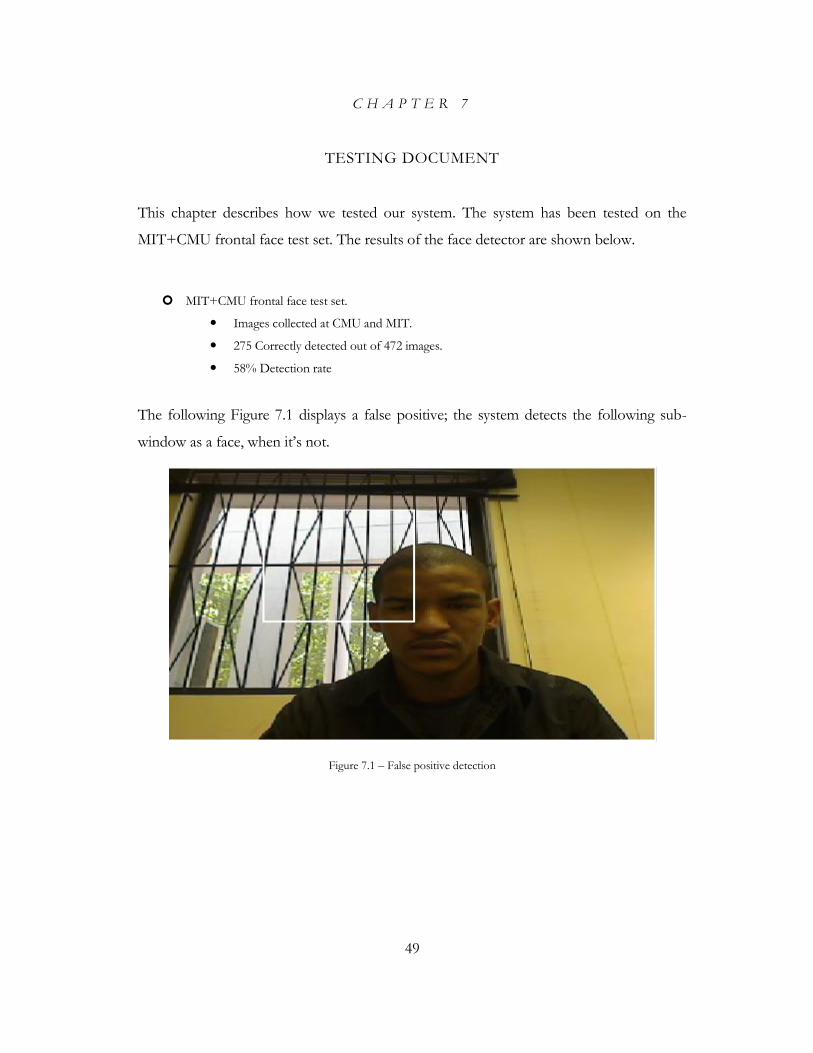
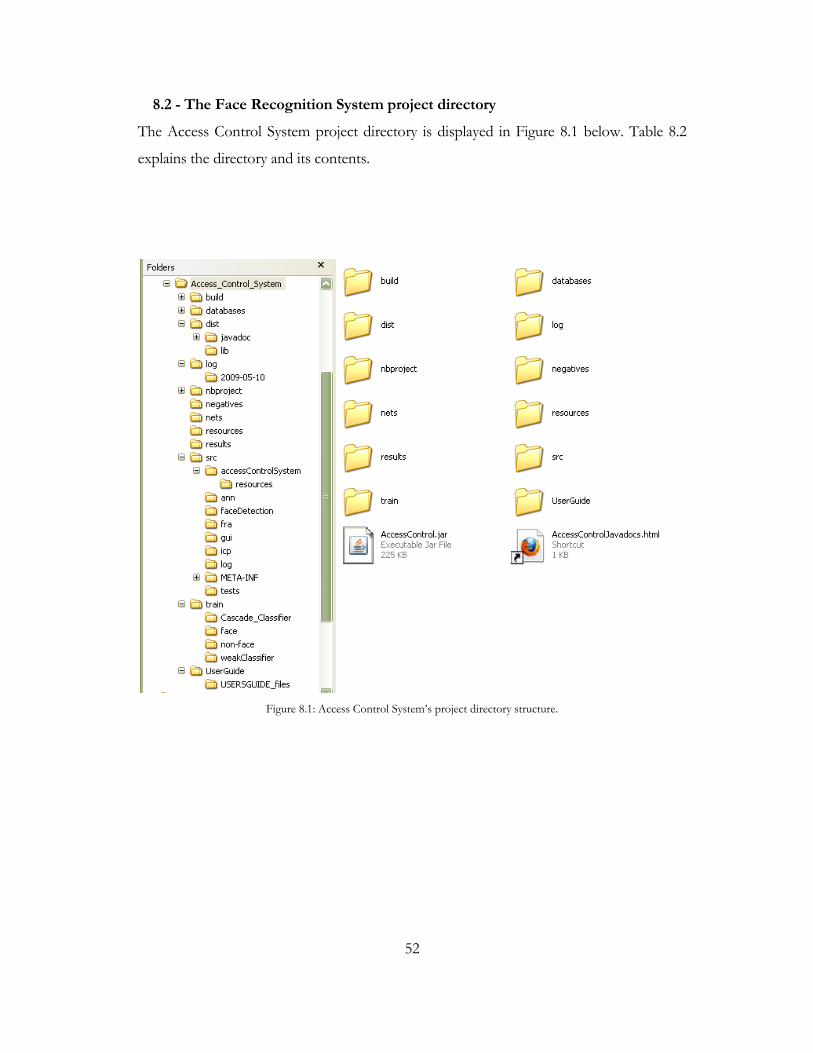
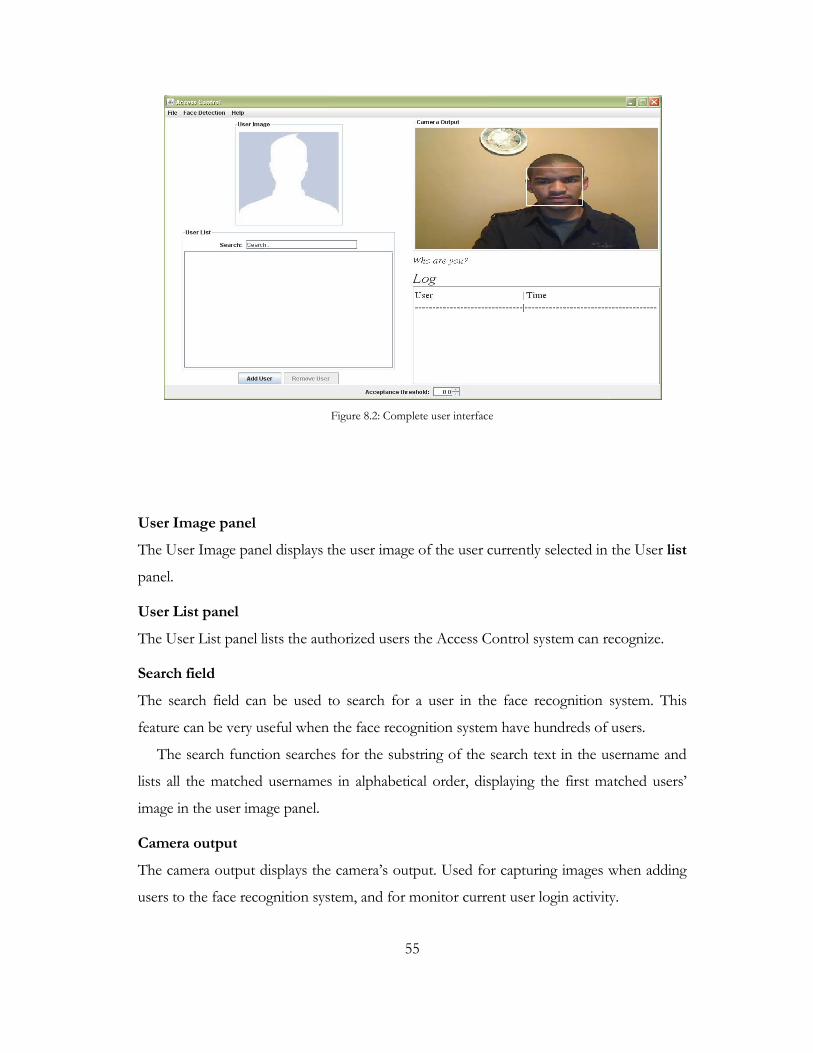
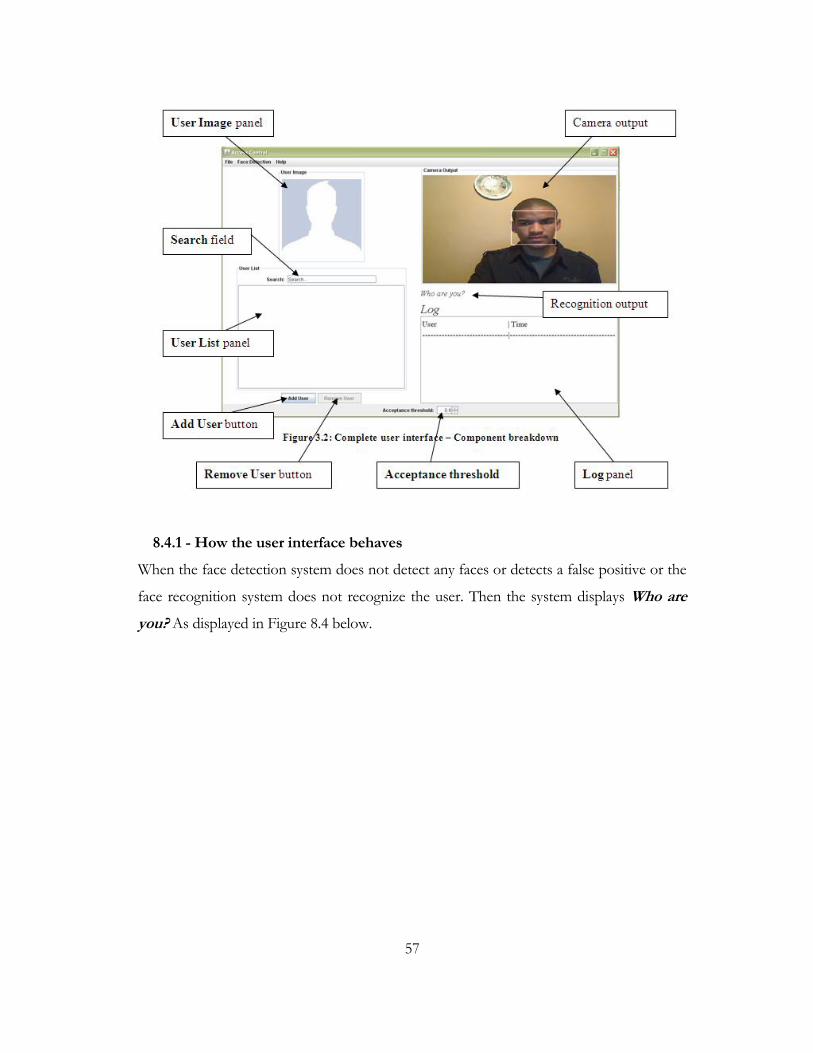
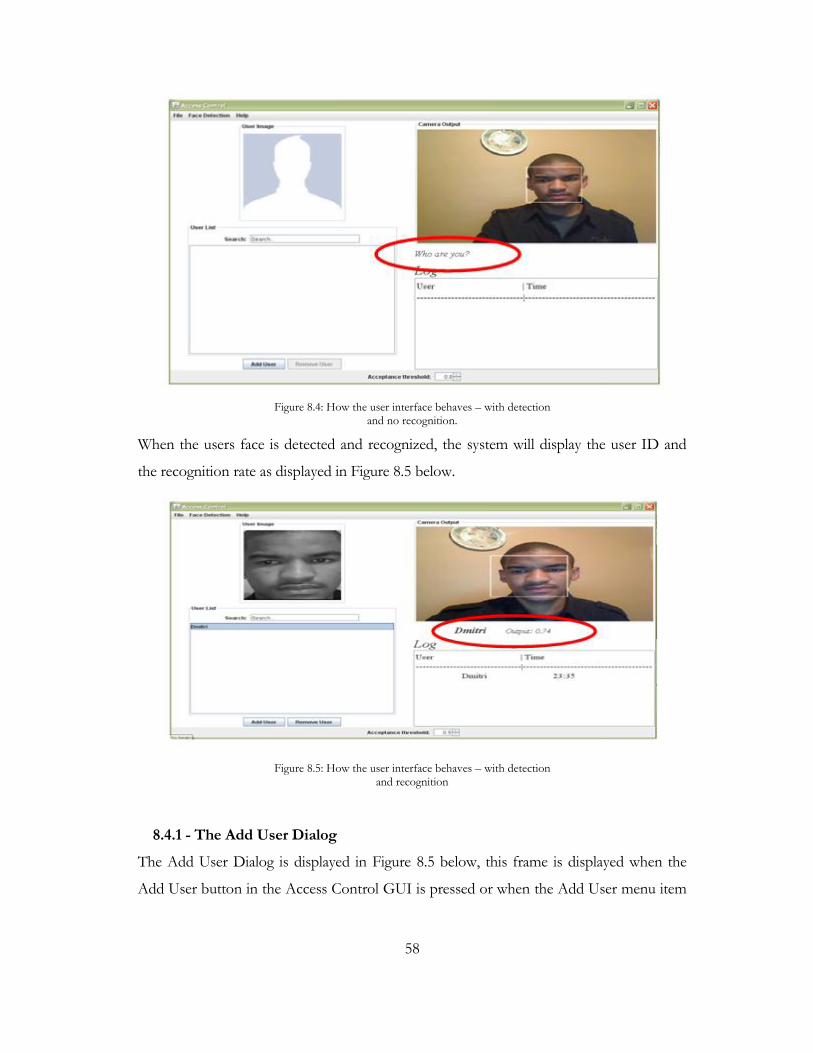
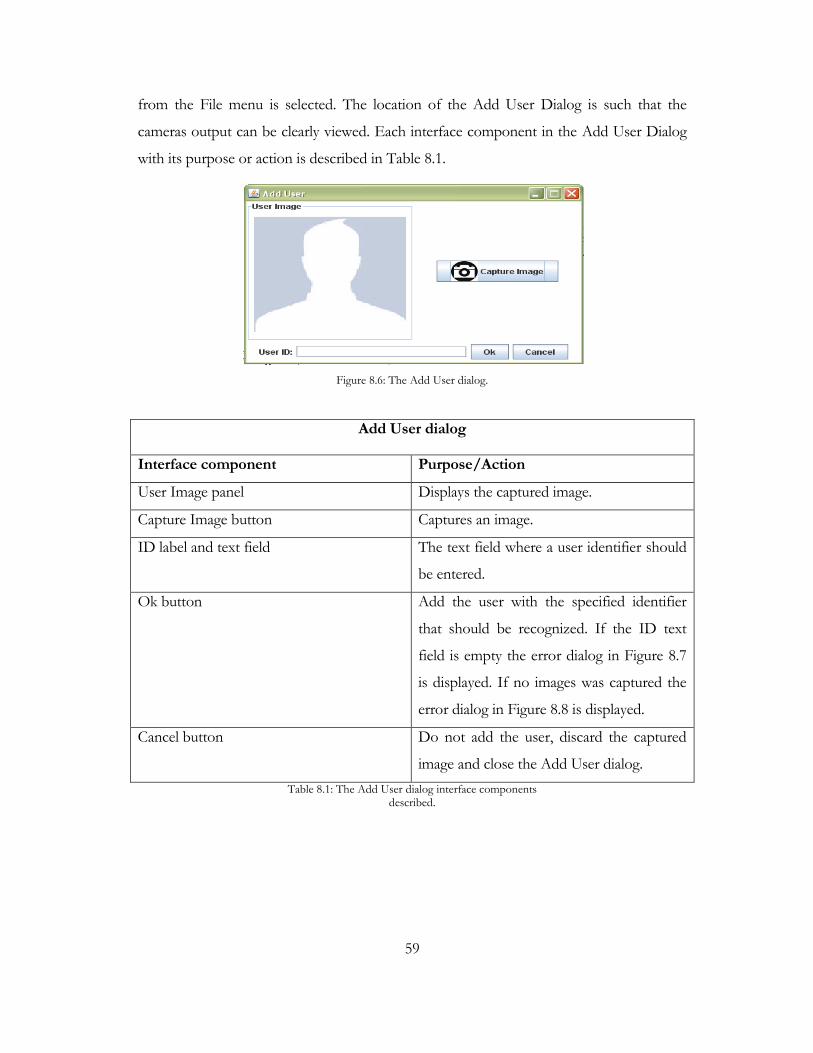
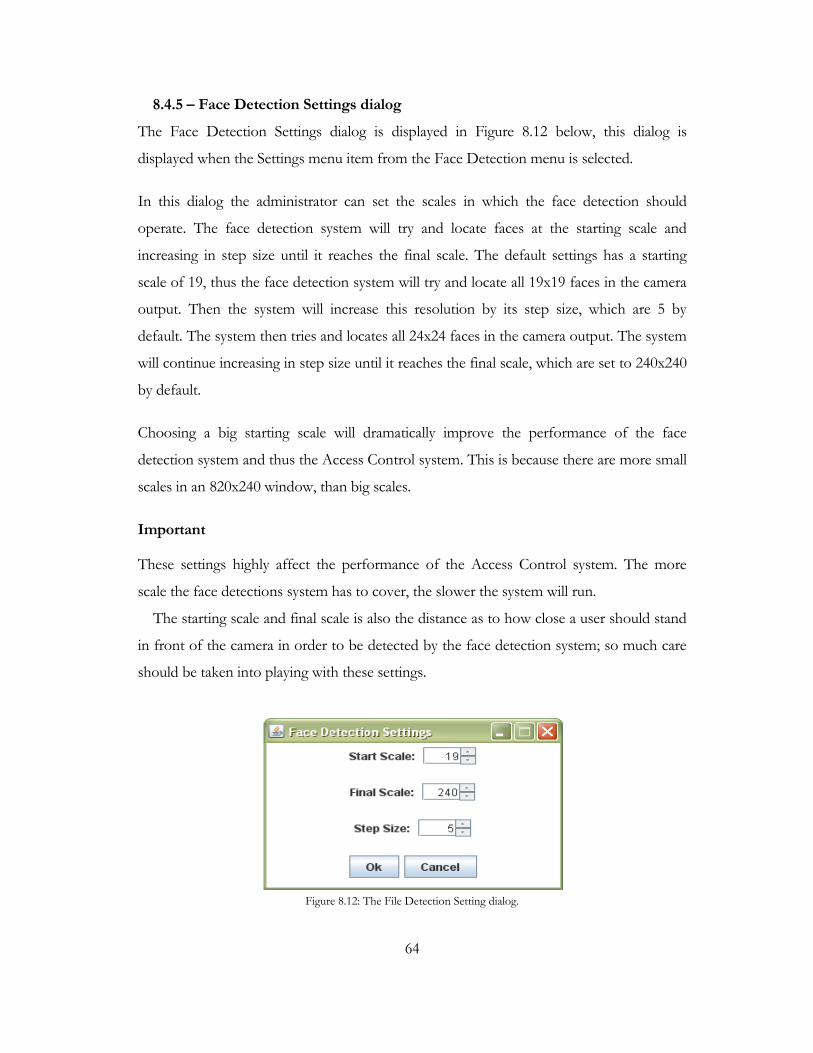


![Face Detection & Face Recognition [Teori Informasi 2011]](https://img.pdfslide.us/doc/110x75/548258a6b07959570c8b476a/face-detection-face-recognition-teori-informasi-2011.jpg)