Embed Size (px)
Citation preview
A Department Payroll Guide to Kronos Workforce Timekeeper
A guide for payroll managers that summarizes the most common payroll tasks, which include using Workforce Genies, Timecards, Schedules, Reports, and the People Editor
Kronos Workforce Central Suite
University of Georgia
Version 8
2
Table of Contents Employee Records ........................................................................................................................................ 3
Identity Management Tool ....................................................................................................................... 3
Create Employee Record .......................................................................................................................... 3
Multi‐job Employees ............................................................................................................................... 11
Pay from Schedule Setup ............................................................................................................................ 12
PFS Setup with Multiple Accounts .......................................................................................................... 17
Payroll Processing Checklist ........................................................................................................................ 20
Approvals ................................................................................................................................................ 20
Printing Time Sheets ............................................................................................................................... 24
Post Approval Steps .................................................................................................................................... 28
Payroll Voucher Reconciliation ................................................................................................................... 29
Supervisor Setup ......................................................................................................................................... 30
Supervisor Roles ...................................................................................................................................... 30
Supervisor Setup ..................................................................................................................................... 30
Employee Group ..................................................................................................................................... 31
Supervisor Settings ................................................................................................................................. 38
Estimated Payroll ........................................................................................................................................ 43
Estimated Payroll Background ................................................................................................................ 43
Estimated Payroll Procedures ................................................................................................................. 44
Estimated Time Pay Code ....................................................................................................................... 44
Sick, Vacation or Comp Taken Pay Code ................................................................................................. 45
Pay From Schedule .................................................................................................................................. 46
Not Using Pay from Schedule ................................................................................................................. 47
Group Edits ............................................................................................................................................. 48
Reconciling Estimated and Actual ........................................................................................................... 50
3
Employee Records Each employee, in order to be paid through the myTime (Kronos) system, must have an active myTime record. The employee record contains information about the employee, such as their name, ID number, hourly rate and primary labor account. A process called the people import executes each night and updates existing salaried records and imports new hourly and salaried records. Once an hourly record is added to the myTime system, it is not updated by the nightly process. However, there are times when an employee’s record will not import into the myTime system. The department will be required to manually add some employee records when the people import is not able to add the record.
Identity Management Tool In an effort to assist UGA with the social security number (SSN) to 81X conversion, a web‐based Identity Management (IdM) tool has been created. Staff involved in the payroll process should request access to this tool as it provides a means to locate an employee’s UGA ID number and myID, which are needed to create an employee record in the myTime system. Follow these steps to request IdM access:
Navigate to the http://idmanage.uga.edu/ site
Click the Request for IDM Data Access link
Complete the form and click Send
EITS will contact the employee when IdM access has been granted
Once access is granted, access the tool at http://idm.uga.edu
Create Employee Record In order to create an employee record, employee‐specific information is required. One item that is never needed in the myTime system is the social security number (SSN). The SSN should never be used to identify an employee record in the myTime system. The myTime system is not certified to store the SSN. In the myTime system, employees are identified by their UGA ID number (81X #).
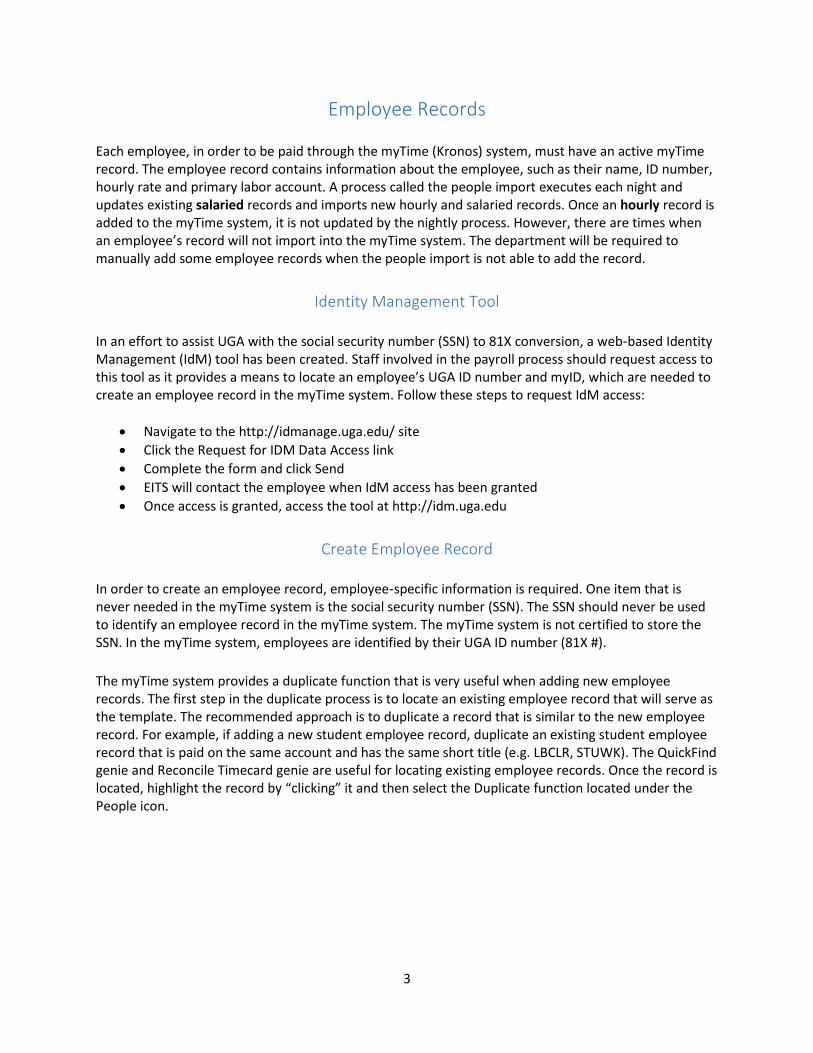
The myTime system provides a duplicate function that is very useful when adding new employee records. The first step in the duplicate process is to locate an existing employee record that will serve as the template. The recommended approach is to duplicate a record that is similar to the new employee record. For example, if adding a new student employee record, duplicate an existing student employee record that is paid on the same account and has the same short title (e.g. LBCLR, STUWK). The QuickFind genie and Reconcile Timecard genie are useful for locating existing employee records. Once the record is located, highlight the record by “clicking” it and then select the Duplicate function located under the People icon.
4
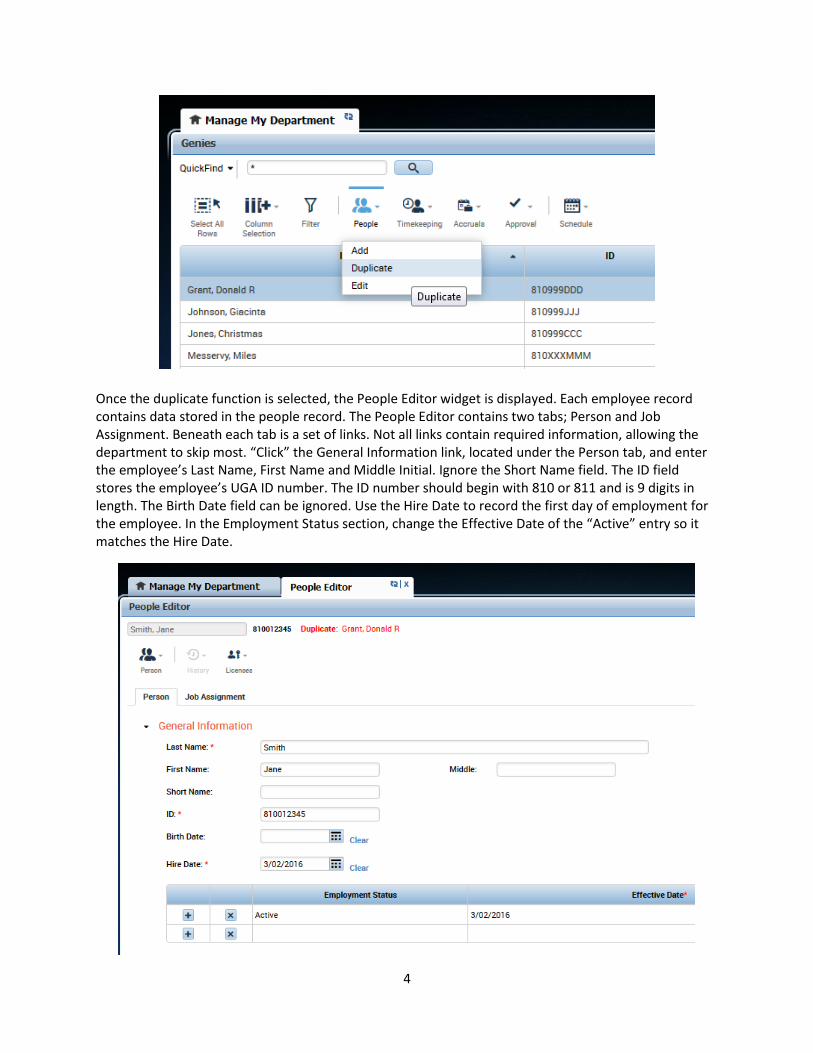
Once the duplicate function is selected, the People Editor widget is displayed. Each employee record contains data stored in the people record. The People Editor contains two tabs; Person and Job Assignment. Beneath each tab is a set of links. Not all links contain required information, allowing the department to skip most. “Click” the General Information link, located under the Person tab, and enter the employee’s Last Name, First Name and Middle Initial. Ignore the Short Name field. The ID field stores the employee’s UGA ID number. The ID number should begin with 810 or 811 and is 9 digits in length. The Birth Date field can be ignored. Use the Hire Date to record the first day of employment for the employee. In the Employment Status section, change the Effective Date of the “Active” entry so it matches the Hire Date.
5
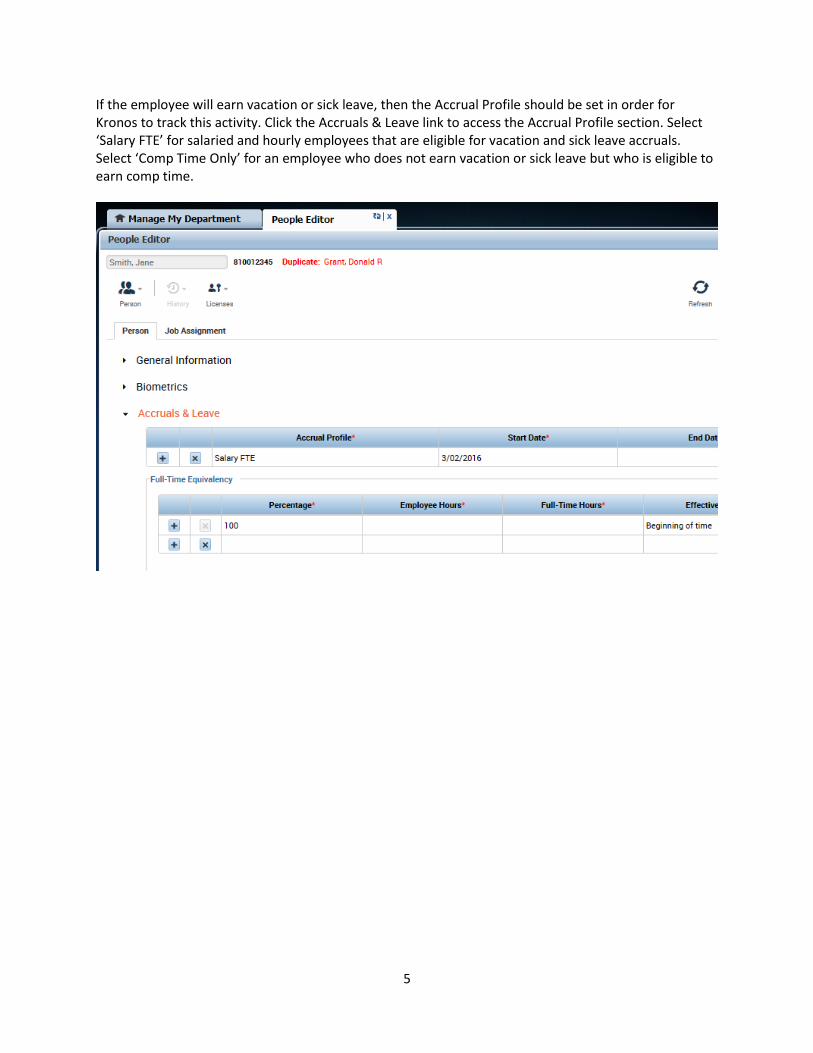
If the employee will earn vacation or sick leave, then the Accrual Profile should be set in order for Kronos to track this activity. Click the Accruals & Leave link to access the Accrual Profile section. Select ‘Salary FTE’ for salaried and hourly employees that are eligible for vacation and sick leave accruals. Select ‘Comp Time Only’ for an employee who does not earn vacation or sick leave but who is eligible to earn comp time.
6
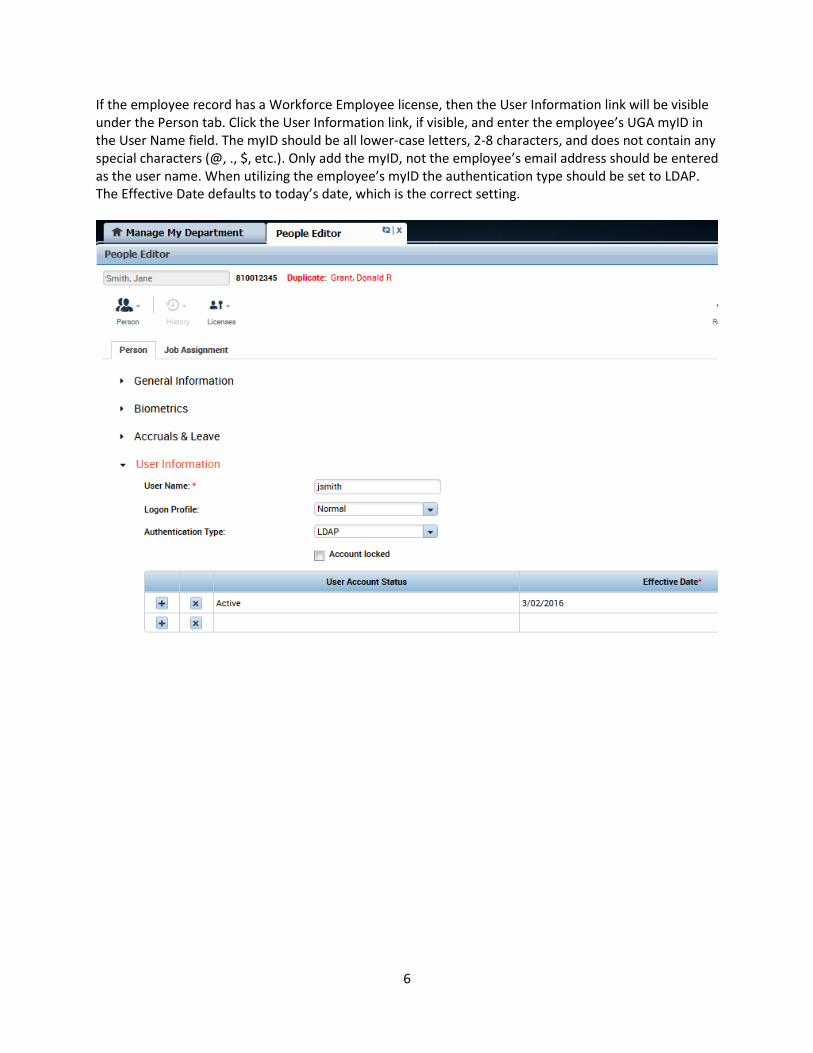
If the employee record has a Workforce Employee license, then the User Information link will be visible under the Person tab. Click the User Information link, if visible, and enter the employee’s UGA myID in the User Name field. The myID should be all lower‐case letters, 2-8 characters, and does not contain any special characters (@, ., $, etc.). Only add the myID, not the employee’s email address should be entered as the user name. When utilizing the employee’s myID the authentication type should be set to LDAP. The Effective Date defaults to today’s date, which is the correct setting.

7
Click the Job Assignment tab and review the data contained in the Primary Account link. The Primary Labor Account is a required field and contains the budget information that will be used when an employee is paid. The Primary Labor Account consists of seven settings offset with a forward slash. Together, these seven labor level entries make up the Primary Labor Account. Since the new record has not been saved, changes can be made to the Primary Labor Account by clicking the entry and deleting and adding the appropriate changes. The Effective Date of the Primary labor Account should be changed to match the hire date.
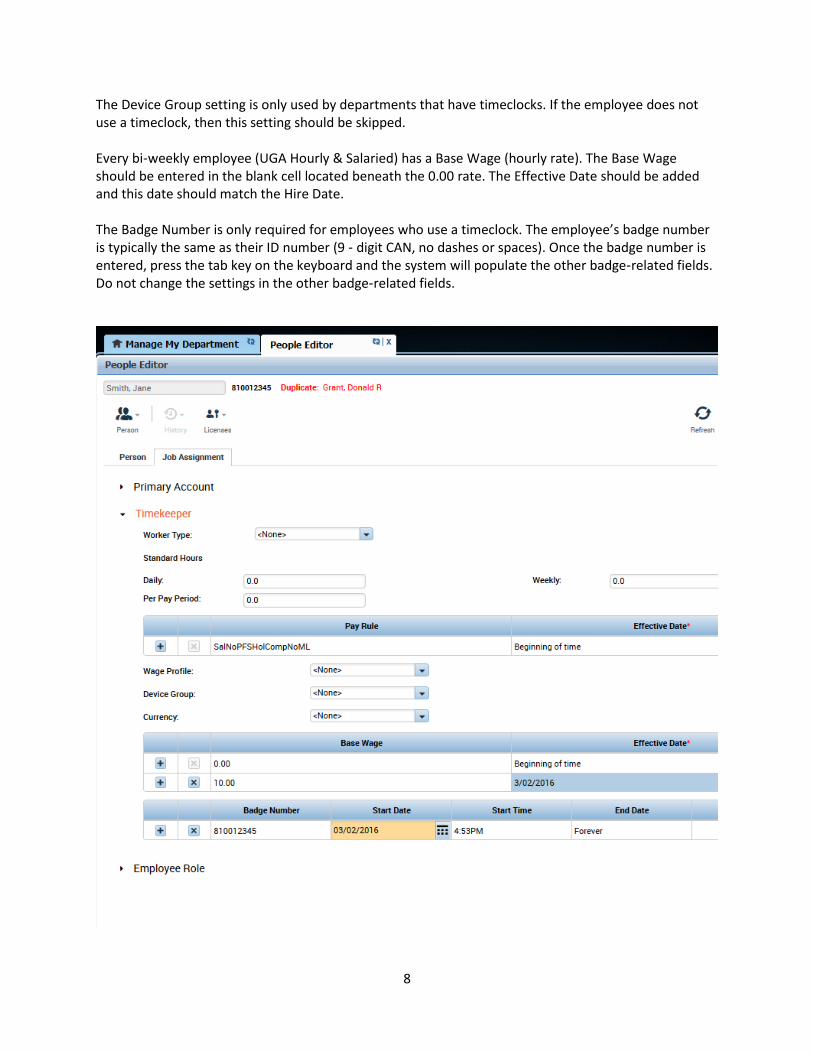
Use the Timekeeper link to adjust the employee’s Pay Rule, Device Group, Base Wage and Badge Number. The Pay Rule is a setting that is unique to the myTime system. Even though the duplicate function copies the Pay Rule, a department should be familiar with the various options contained with this setting. Please see this link for more information on the Pay Rule settings: http://www.policies.uga.edu/FA/nodes/view/940
8
The Device Group setting is only used by departments that have timeclocks. If the employee does not use a timeclock, then this setting should be skipped. Every bi‐weekly employee (UGA Hourly & Salaried) has a Base Wage (hourly rate). The Base Wage should be entered in the blank cell located beneath the 0.00 rate. The Effective Date should be added and this date should match the Hire Date. The Badge Number is only required for employees who use a timeclock. The employee’s badge number is typically the same as their ID number (9 ‐ digit CAN, no dashes or spaces). Once the badge number is entered, press the tab key on the keyboard and the system will populate the other badge‐related fields. Do not change the settings in the other badge‐related fields.
9
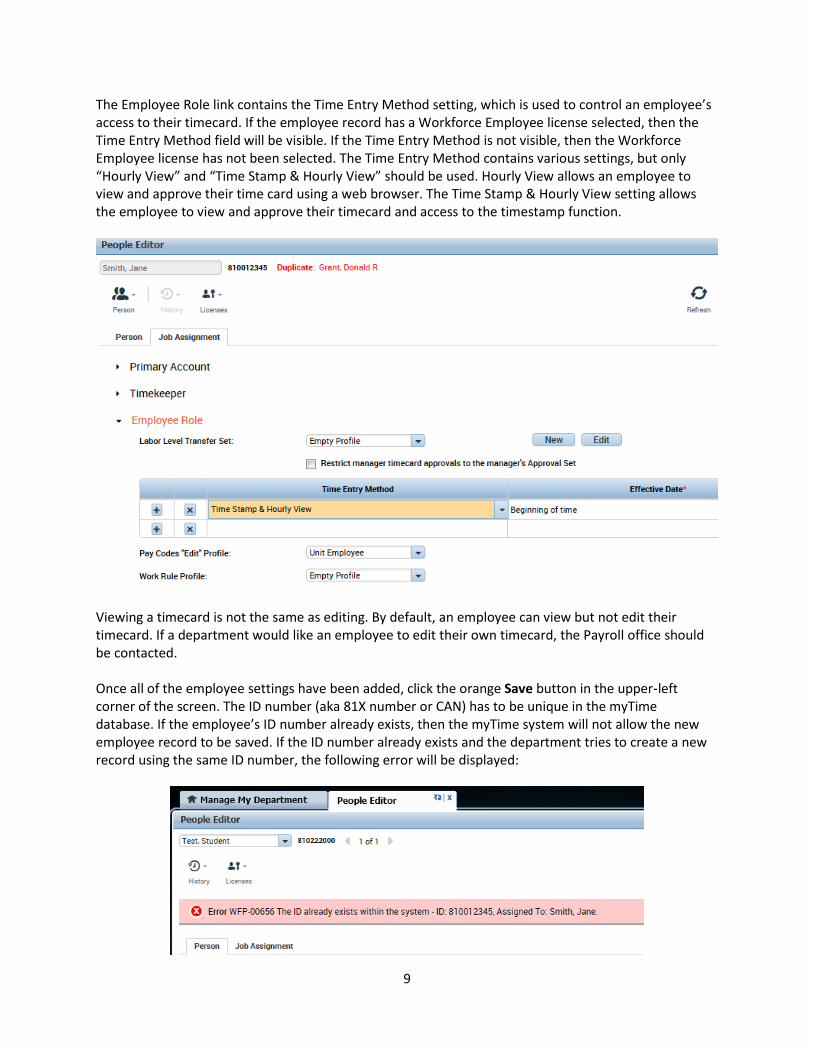
The Employee Role link contains the Time Entry Method setting, which is used to control an employee’s access to their timecard. If the employee record has a Workforce Employee license selected, then the Time Entry Method field will be visible. If the Time Entry Method is not visible, then the Workforce Employee license has not been selected. The Time Entry Method contains various settings, but only “Hourly View” and “Time Stamp & Hourly View” should be used. Hourly View allows an employee to view and approve their time card using a web browser. The Time Stamp & Hourly View setting allows the employee to view and approve their timecard and access to the timestamp function.
Viewing a timecard is not the same as editing. By default, an employee can view but not edit their timecard. If a department would like an employee to edit their own timecard, the Payroll office should be contacted. Once all of the employee settings have been added, click the orange Save button in the upper‐left corner of the screen. The ID number (aka 81X number or CAN) has to be unique in the myTime database. If the employee’s ID number already exists, then the myTime system will not allow the new employee record to be saved. If the ID number already exists and the department tries to create a new record using the same ID number, the following error will be displayed:
10
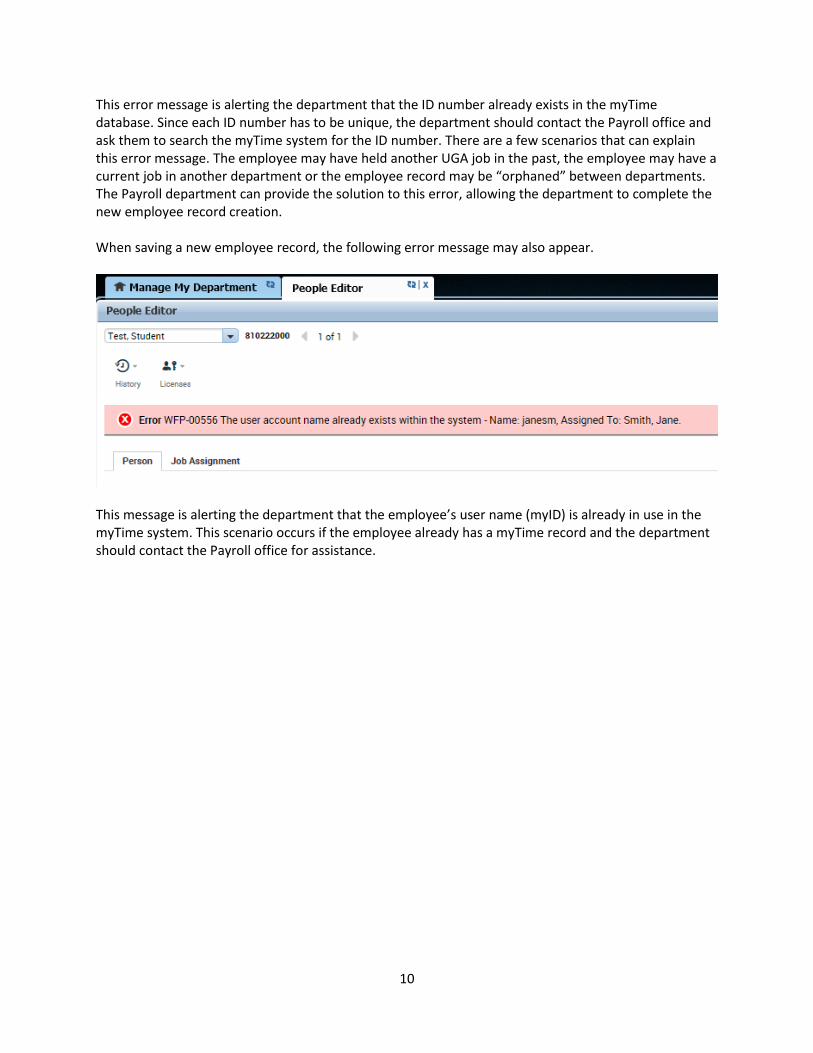
This error message is alerting the department that the ID number already exists in the myTime database. Since each ID number has to be unique, the department should contact the Payroll office and ask them to search the myTime system for the ID number. There are a few scenarios that can explain this error message. The employee may have held another UGA job in the past, the employee may have a current job in another department or the employee record may be “orphaned” between departments. The Payroll department can provide the solution to this error, allowing the department to complete the new employee record creation. When saving a new employee record, the following error message may also appear.
This message is alerting the department that the employee’s user name (myID) is already in use in the myTime system. This scenario occurs if the employee already has a myTime record and the department should contact the Payroll office for assistance.
11
Multi‐job Employees Some employees work multiple jobs in different departments. Each job requires a dedicated employee record in the myTime system. Creating a unique employee record for each job allows the department to manage the record as needed, independent of the other jobs the employee may hold. Since each ID number in the myTime system has to be unique, only the first department to employ the employee will be able to use the 9 digit UGA ID number. The second department that attempts to create a new employee record using the 9 digit ID number will receive an error message when saving the record. This is by design and alerts the department that the employee already has a myTime employee record. The department should contact Payroll when this occurs and request additional information about the employee’s myTime records. Payroll will be able to determine if the exiting record is from a prior job or if the employee is actively employed by another UGA department. If the employee is working in another department and the new department wants to hire the employee, then Payroll will instruct the department to add the 9 digit ID number, followed by a ‐1 or a ‐2. Adding a ‐1 to the end of the ID number allows the record to be saved and maintains the requirement of a unique ID number. The payroll export interface is designed to read the first 9 digits of the ID number, ignoring the ‐1 or ‐2. Since an employee’s user name also has to be unique in the myTime system, a similar issue occurs when an employee has multiple records. The first department to hire the employee will use the employee’s myID but the second department will not be able to use the same user name. The Payroll department may direct the department to change the authentication type from LDAP to Kronos, allowing the department to create a new user name and password.
12
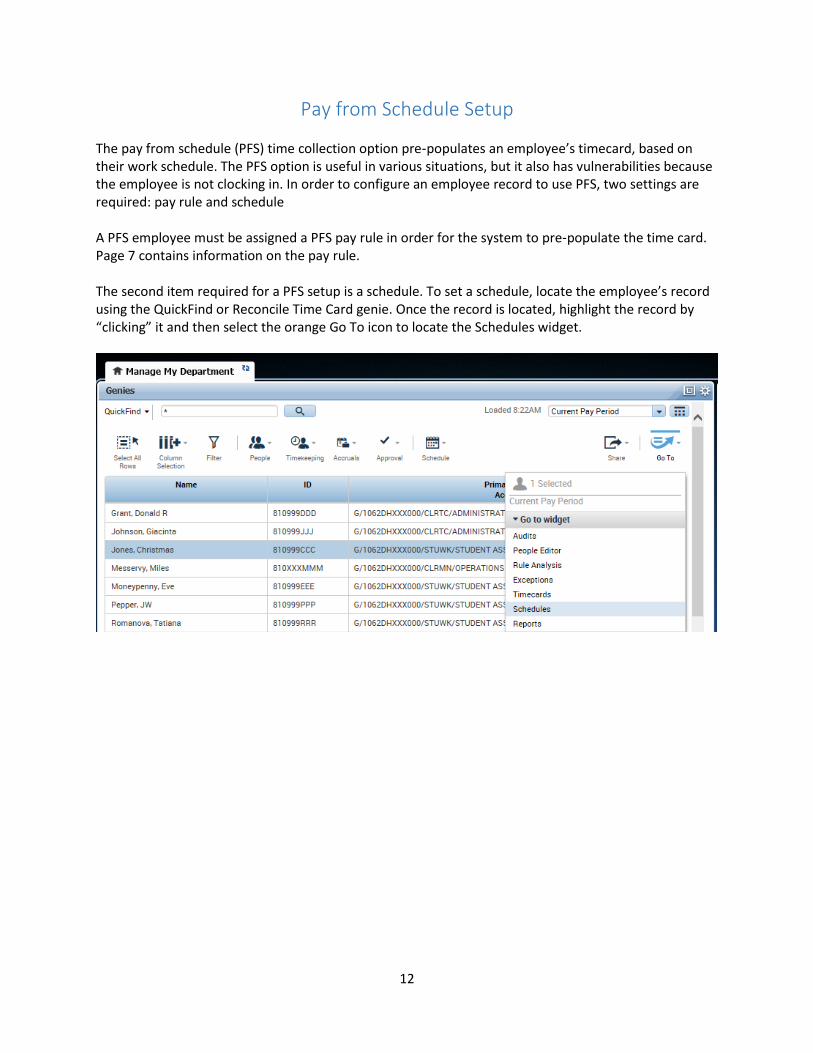
Pay from Schedule Setup The pay from schedule (PFS) time collection option pre‐populates an employee’s timecard, based on their work schedule. The PFS option is useful in various situations, but it also has vulnerabilities because the employee is not clocking in. In order to configure an employee record to use PFS, two settings are required: pay rule and schedule A PFS employee must be assigned a PFS pay rule in order for the system to pre‐populate the time card. Page 7 contains information on the pay rule. The second item required for a PFS setup is a schedule. To set a schedule, locate the employee’s record using the QuickFind or Reconcile Time Card genie. Once the record is located, highlight the record by “clicking” it and then select the orange Go To icon to locate the Schedules widget.
13
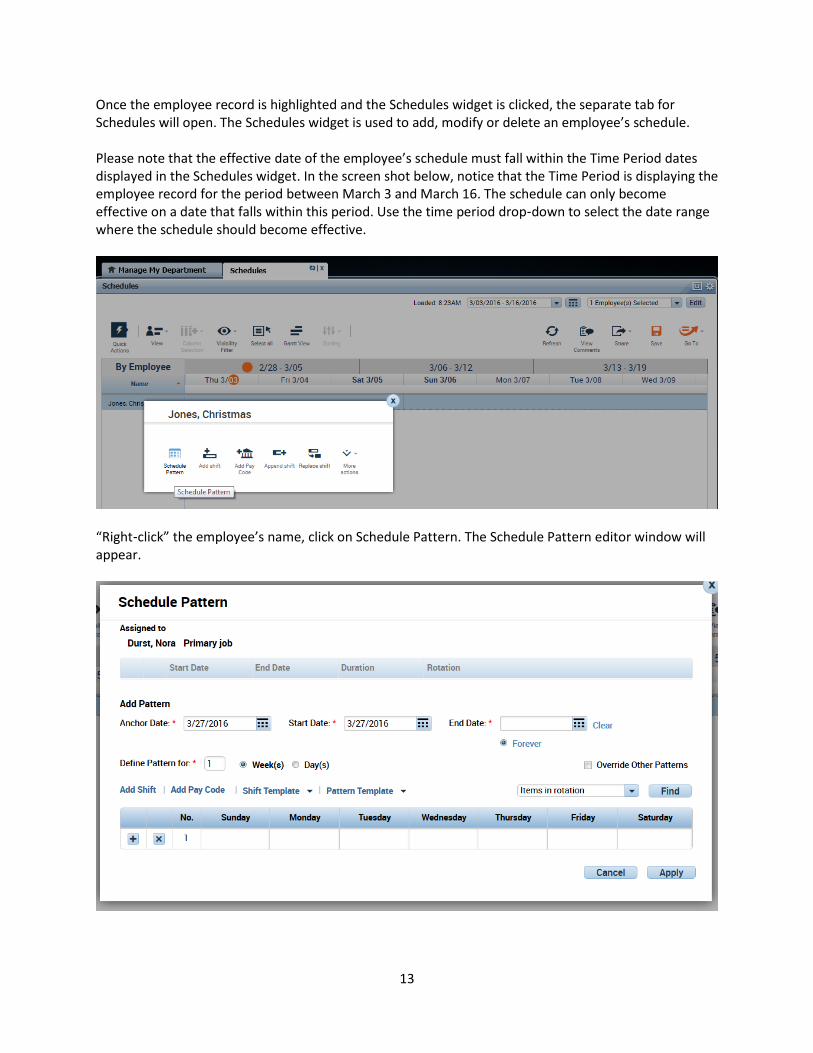
Once the employee record is highlighted and the Schedules widget is clicked, the separate tab for Schedules will open. The Schedules widget is used to add, modify or delete an employee’s schedule. Please note that the effective date of the employee’s schedule must fall within the Time Period dates displayed in the Schedules widget. In the screen shot below, notice that the Time Period is displaying the employee record for the period between March 3 and March 16. The schedule can only become effective on a date that falls within this period. Use the time period drop‐down to select the date range where the schedule should become effective.
“Right‐click” the employee’s name, click on Schedule Pattern. The Schedule Pattern editor window will appear.
14
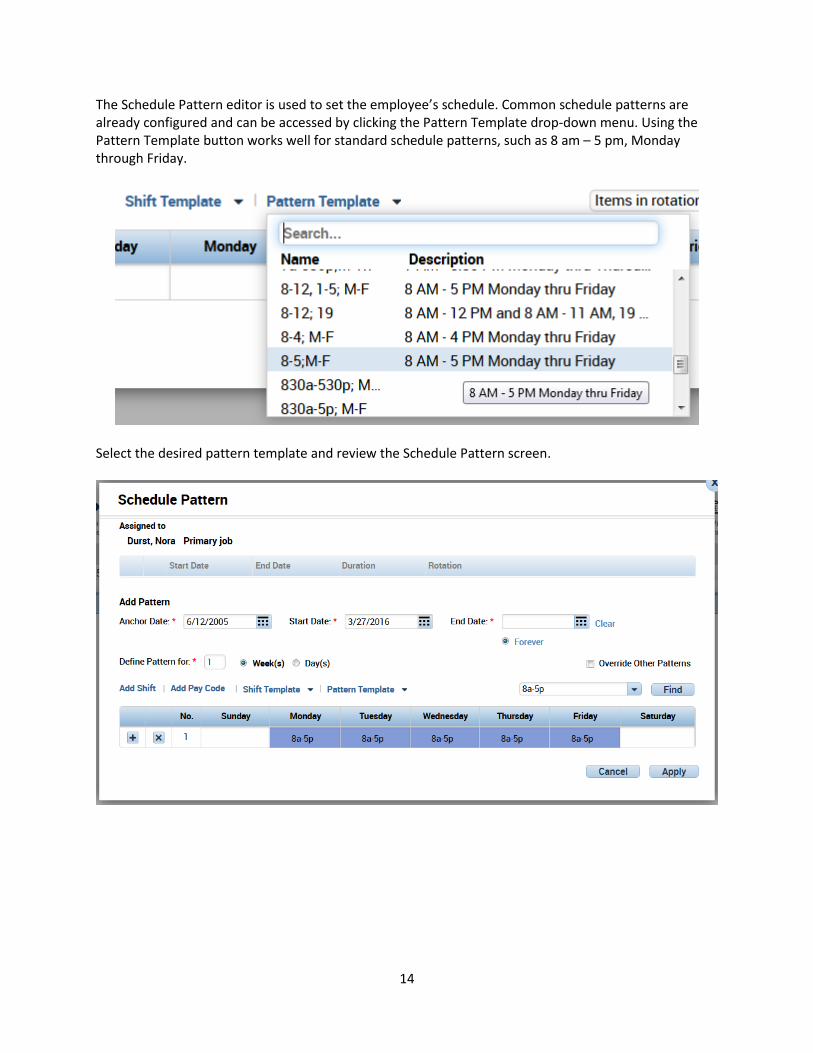
The Schedule Pattern editor is used to set the employee’s schedule. Common schedule patterns are already configured and can be accessed by clicking the Pattern Template drop-down menu. Using the Pattern Template button works well for standard schedule patterns, such as 8 am – 5 pm, Monday through Friday.
Select the desired pattern template and review the Schedule Pattern screen.
15
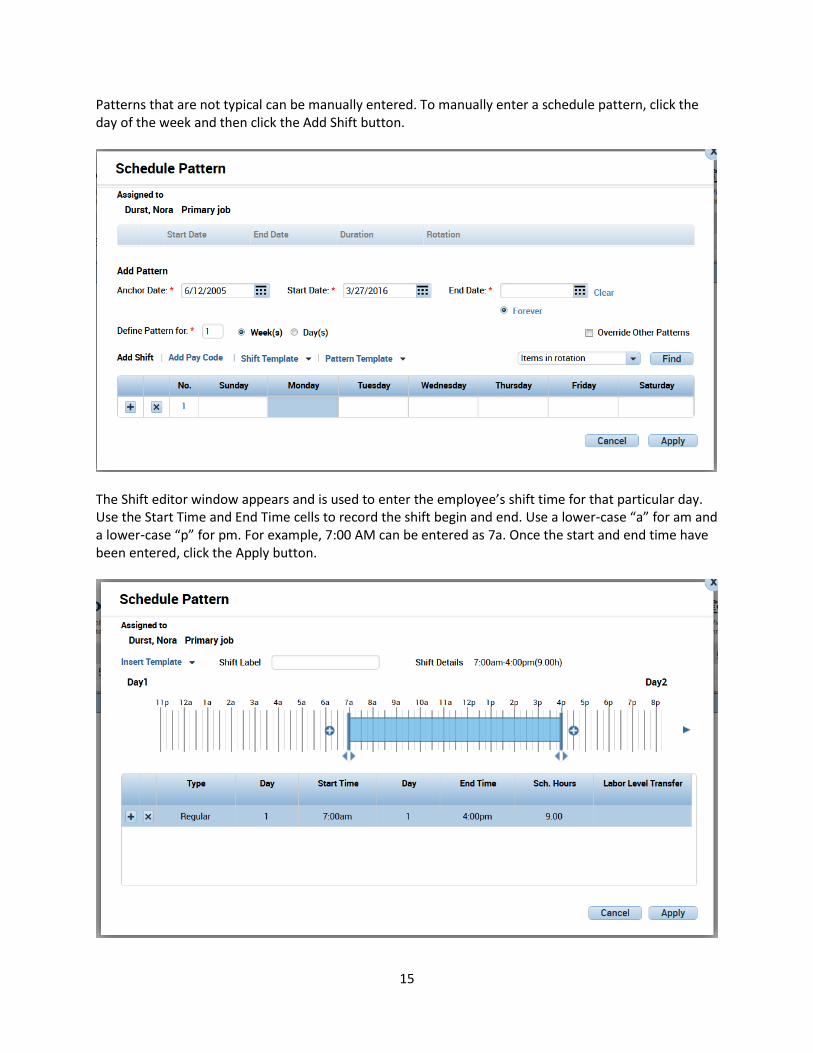
Patterns that are not typical can be manually entered. To manually enter a schedule pattern, click the day of the week and then click the Add Shift button.
The Shift editor window appears and is used to enter the employee’s shift time for that particular day. Use the Start Time and End Time cells to record the shift begin and end. Use a lower‐case “a” for am and a lower‐case “p” for pm. For example, 7:00 AM can be entered as 7a. Once the start and end time have been entered, click the Apply button.

16
Repeat this process for each day until the employee’s weekly schedule is added to the Schedule Pattern tool. Please note that it does not matter which option you use (Pattern Template, Shift Template, or manually Add Shift). The goal is to add the employee’s schedule to the Schedule Pattern tool. If multiple days have the same shift, highlight each day (use shift or control keys) in the Schedule Pattern screen prior to clicking the Add Shift or Shift Template menu. Once the employee’s schedule pattern is set, “check” the Override Other Patterns box and add a Work Start Date. Remember that the Work Start Date should fall within the Time Period you selected for the employee’s record. Ignore the Pattern Start Date since the system will add the correct date to this field. Once the pattern is added, the override box is checked and the work start date has been set, click the Apply button.
Click Yes when asked this question:
17
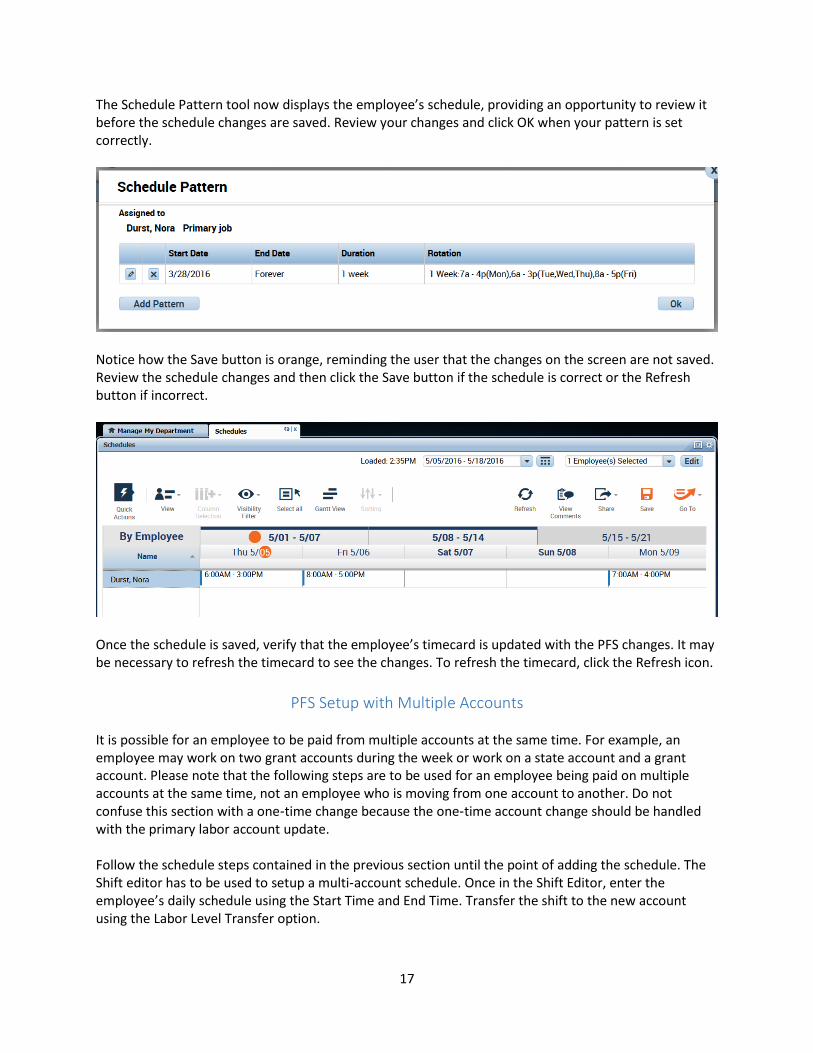
The Schedule Pattern tool now displays the employee’s schedule, providing an opportunity to review it before the schedule changes are saved. Review your changes and click OK when your pattern is set correctly.
Notice how the Save button is orange, reminding the user that the changes on the screen are not saved. Review the schedule changes and then click the Save button if the schedule is correct or the Refresh button if incorrect.
Once the schedule is saved, verify that the employee’s timecard is updated with the PFS changes. It may be necessary to refresh the timecard to see the changes. To refresh the timecard, click the Refresh icon.
PFS Setup with Multiple Accounts It is possible for an employee to be paid from multiple accounts at the same time. For example, an employee may work on two grant accounts during the week or work on a state account and a grant account. Please note that the following steps are to be used for an employee being paid on multiple accounts at the same time, not an employee who is moving from one account to another. Do not confuse this section with a one‐time change because the one‐time account change should be handled with the primary labor account update. Follow the schedule steps contained in the previous section until the point of adding the schedule. The Shift editor has to be used to setup a multi‐account schedule. Once in the Shift Editor, enter the employee’s daily schedule using the Start Time and End Time. Transfer the shift to the new account using the Labor Level Transfer option.
18
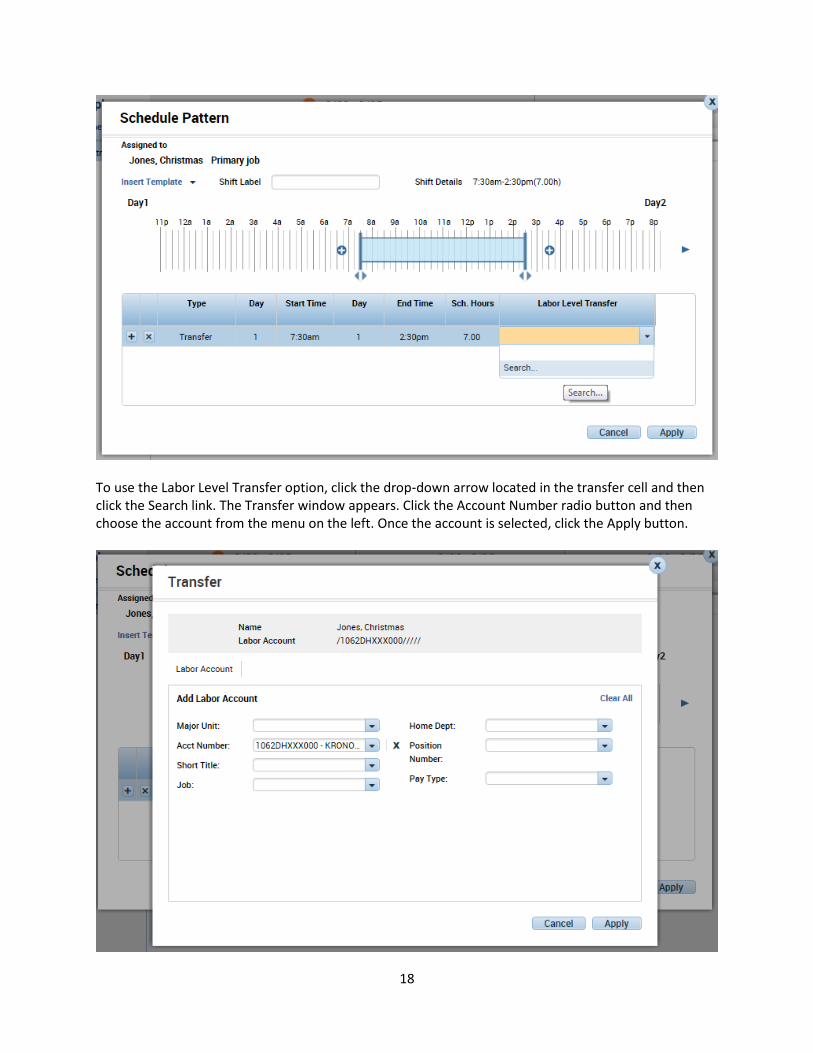
To use the Labor Level Transfer option, click the drop‐down arrow located in the transfer cell and then click the Search link. The Transfer window appears. Click the Account Number radio button and then choose the account from the menu on the left. Once the account is selected, click the Apply button.

19
Repeat this process for each shift. Make sure the Type option is set to Transfer for each shift that is transferred to a different account. The results should look like this:
Click Apply and then complete the schedule setup using the steps included in the PFS section above.
20
Payroll Processing Checklist When processing hourly or salaried payroll through the myTime system, a unit payroll person should ensure that steps are taken to maintain the integrity of the payroll data and process. These steps reflect UGA policy and/or best practices.
Approvals Per UGA policy, an employee paid by the hour (UGA hourly & salaried payroll) should approve their timecard every pay period. If an employee has questions about their timecard, they should contact their supervisor or payroll representative prior to approval. Once the employee approves the timecard, the supervisor should also approve the timecard. The supervisor approval certifies that the data contained on the timecard are an accurate reflection of the employee’s worked hours and/or leave for the period. The department payroll person should review the timecard data, including hourly rates, account and short title information before approving. The payroll person is not always in a position to know the employee’s work schedule and relies on the supervisor to certify that the timecard activity is accurate. Once the payroll person reviews the data, they should add their approval. The final approval step that occurs is the sign off. The sign off should be performed at the appropriate level within the department. A sign off in the myTime system “locks” the timecard, preventing further department changes. The sign off also indicates to the UGA Payroll office that the record is ready for processing. The supervisor/payroll staff should use the Pay Period Close genie to monitor the employee timecard approval process. This tool displays the employee’s name and approvals and should be used by the department to monitor the timecard approval. The employee should approve their timecard every pay period, after they complete their final shift of the period. Please see this link for a detailed web demonstration on the approval process. Please note that the employee can approve their timecard after the supervisor and/or payroll representative has approved. The employee can approve their timecard until the Unit Approver applies the sign off. No approvals or changes can occur once the sign off is issued.
21
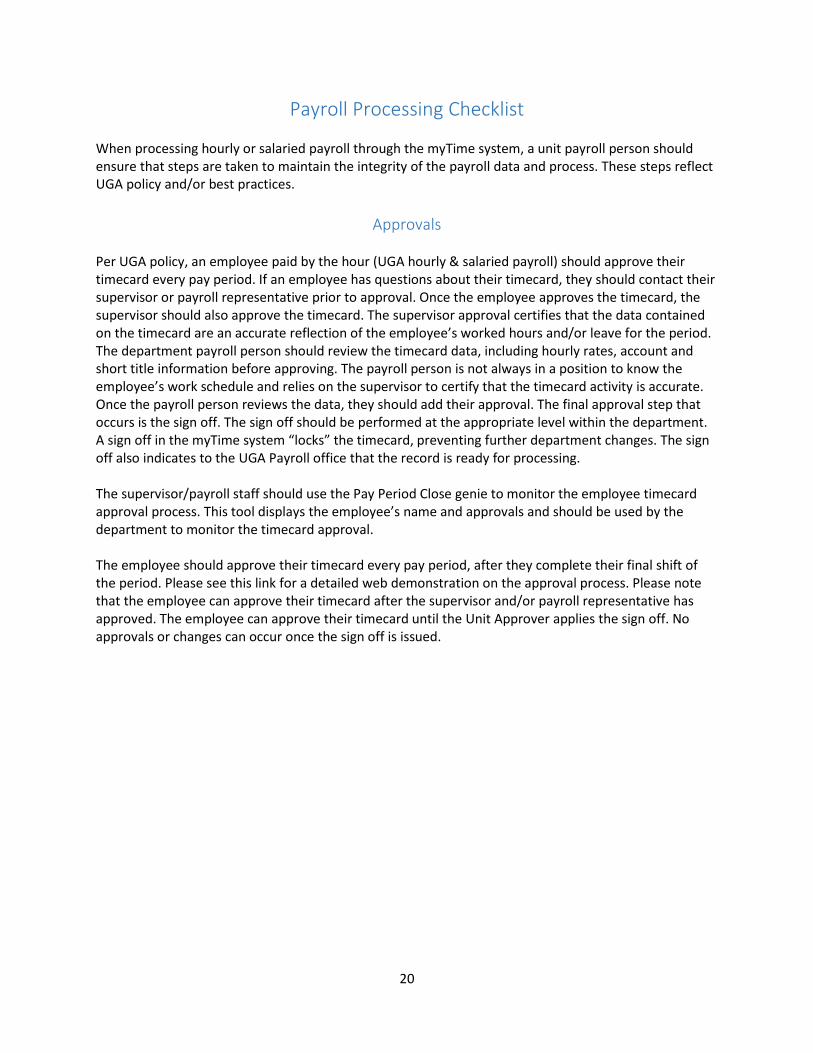
Supervisors and payroll staff should use the Pay Period Close genie to monitor the timecard approval process. Access the genie by clicking the drop-down menu in Manage My Department.
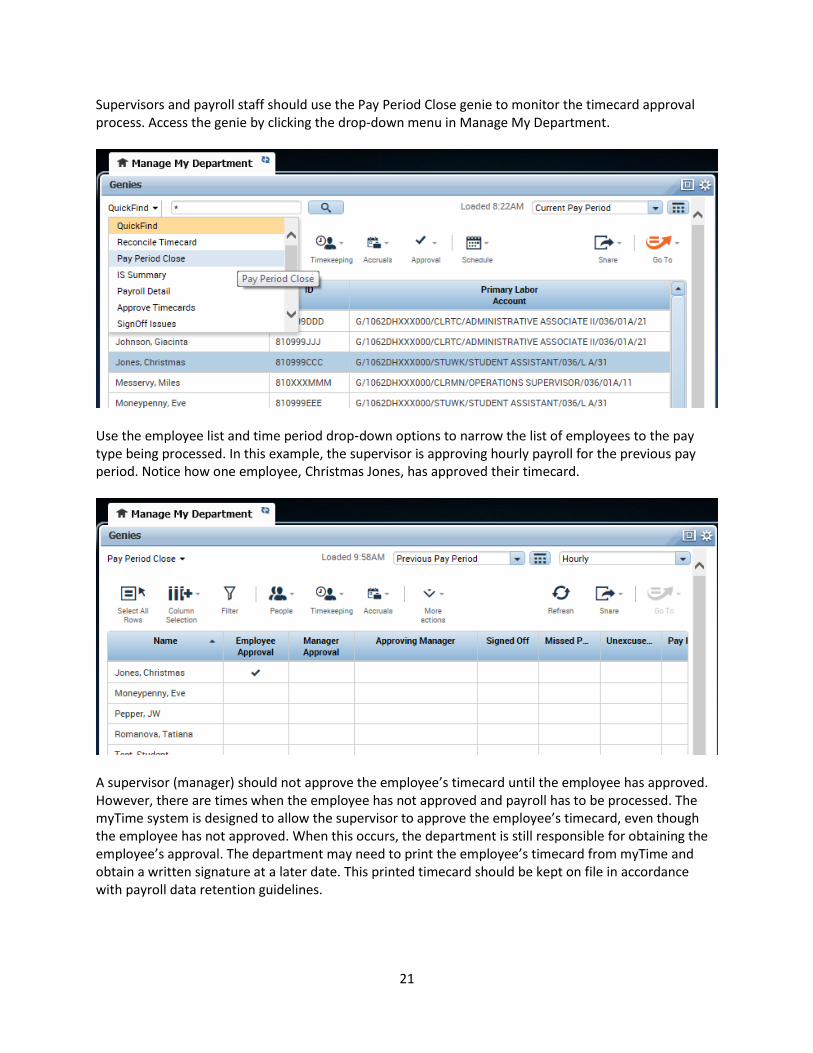
Use the employee list and time period drop‐down options to narrow the list of employees to the pay type being processed. In this example, the supervisor is approving hourly payroll for the previous pay period. Notice how one employee, Christmas Jones, has approved their timecard.
A supervisor (manager) should not approve the employee’s timecard until the employee has approved. However, there are times when the employee has not approved and payroll has to be processed. The myTime system is designed to allow the supervisor to approve the employee’s timecard, even though the employee has not approved. When this occurs, the department is still responsible for obtaining the employee’s approval. The department may need to print the employee’s timecard from myTime and obtain a written signature at a later date. This printed timecard should be kept on file in accordance with payroll data retention guidelines.
22
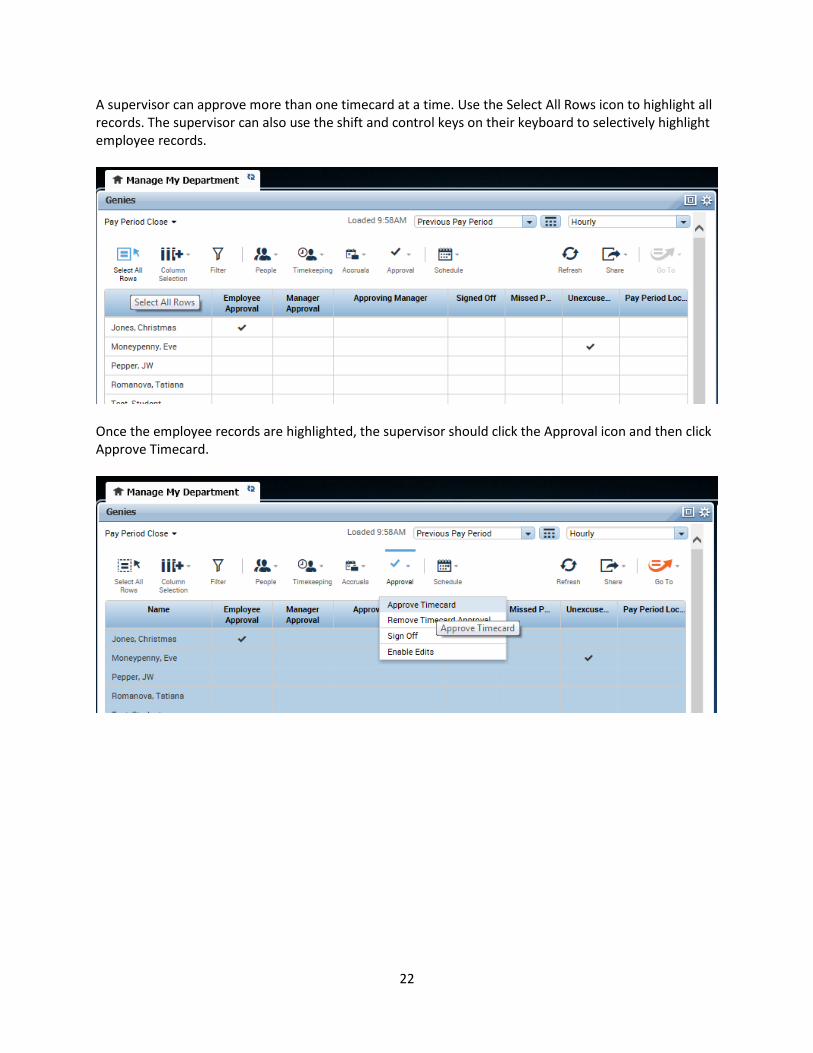
A supervisor can approve more than one timecard at a time. Use the Select All Rows icon to highlight all records. The supervisor can also use the shift and control keys on their keyboard to selectively highlight employee records.
Once the employee records are highlighted, the supervisor should click the Approval icon and then click Approve Timecard.
23
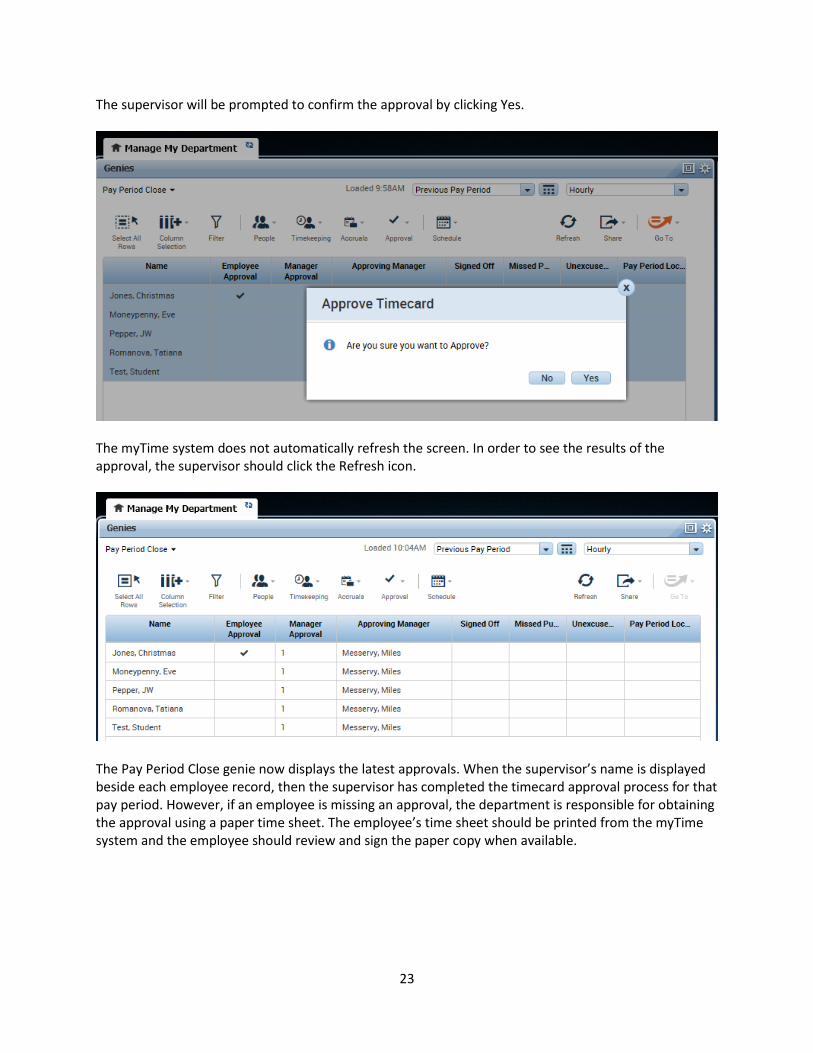
The supervisor will be prompted to confirm the approval by clicking Yes.
The myTime system does not automatically refresh the screen. In order to see the results of the approval, the supervisor should click the Refresh icon.
The Pay Period Close genie now displays the latest approvals. When the supervisor’s name is displayed beside each employee record, then the supervisor has completed the timecard approval process for that pay period. However, if an employee is missing an approval, the department is responsible for obtaining the approval using a paper time sheet. The employee’s time sheet should be printed from the myTime system and the employee should review and sign the paper copy when available.
24
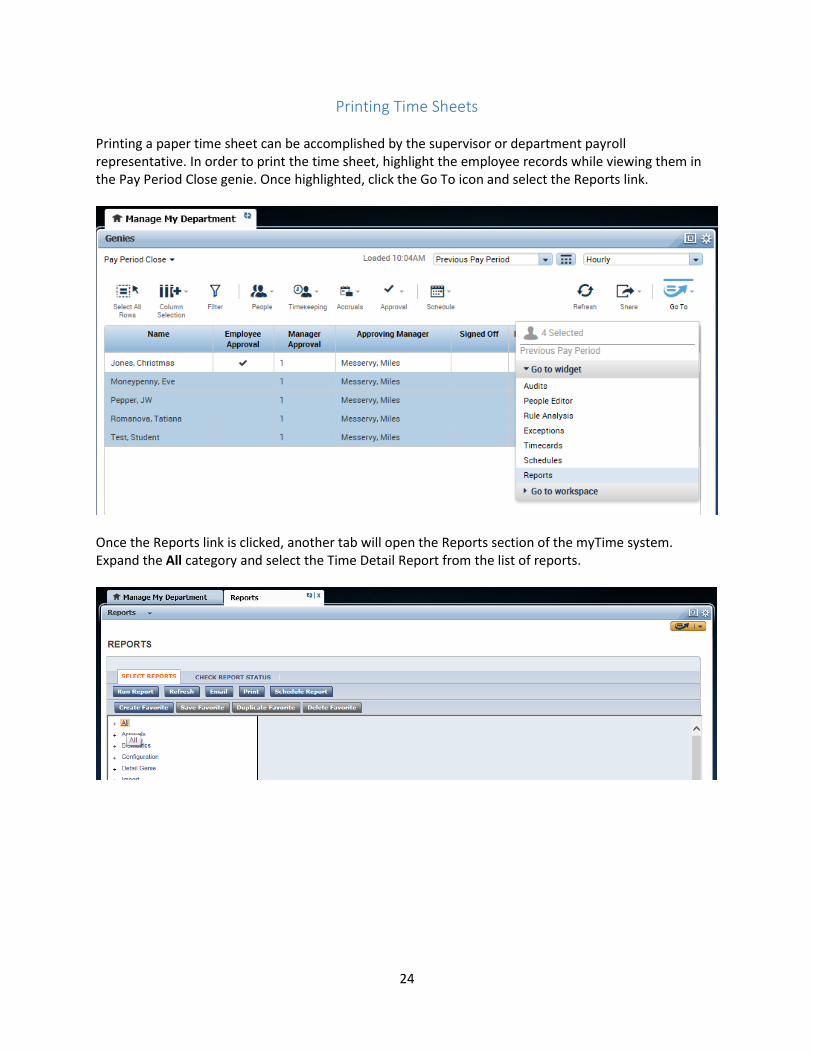
Printing Time Sheets Printing a paper time sheet can be accomplished by the supervisor or department payroll representative. In order to print the time sheet, highlight the employee records while viewing them in the Pay Period Close genie. Once highlighted, click the Go To icon and select the Reports link.
Once the Reports link is clicked, another tab will open the Reports section of the myTime system. Expand the All category and select the Time Detail Report from the list of reports.
25
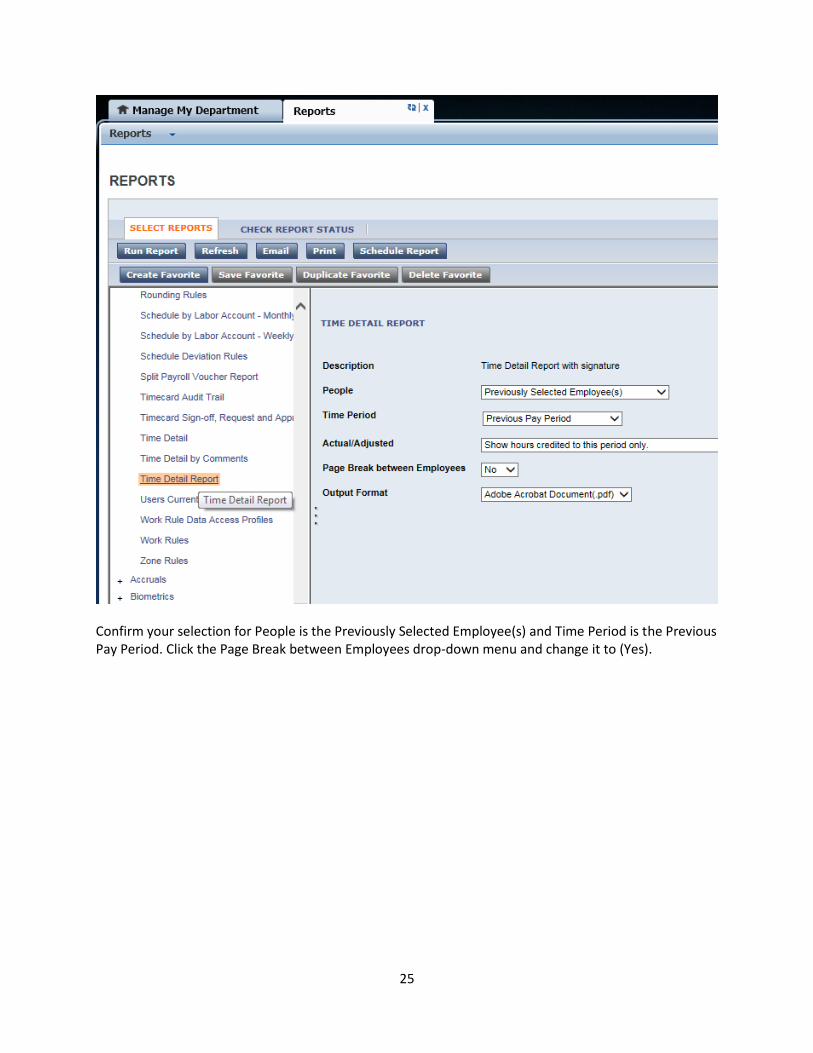
Confirm your selection for People is the Previously Selected Employee(s) and Time Period is the Previous Pay Period. Click the Page Break between Employees drop-down menu and change it to (Yes).
26
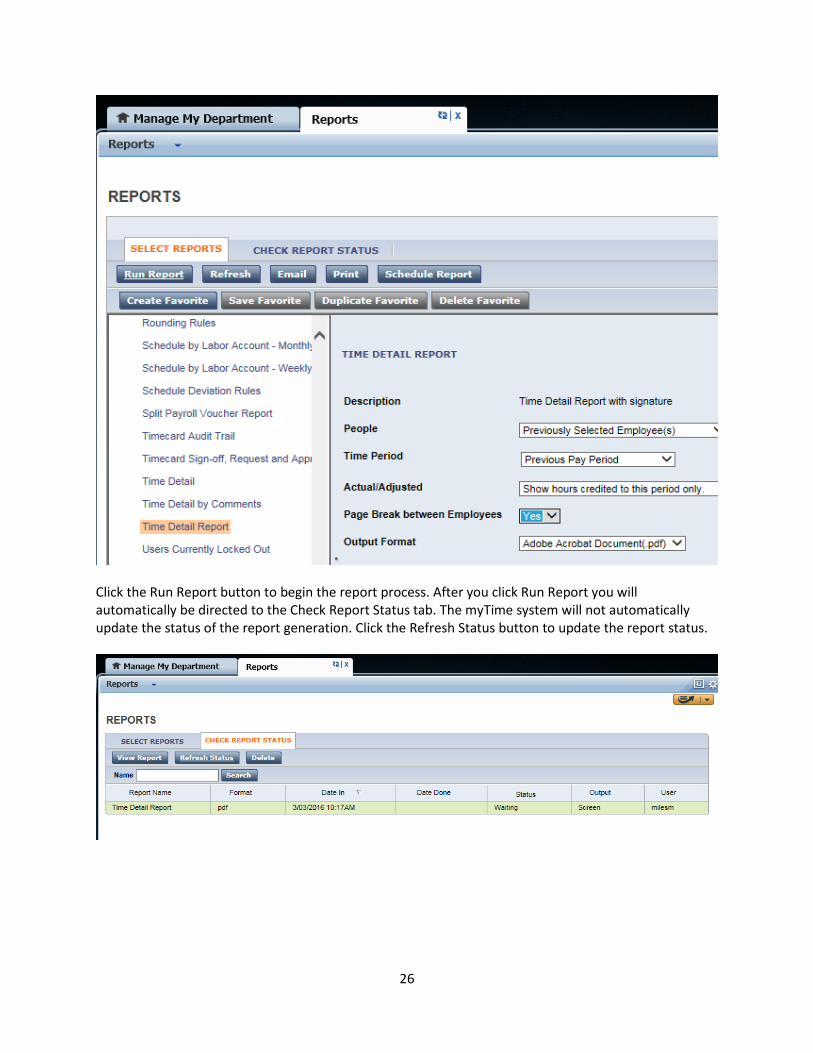
Click the Run Report button to begin the report process. After you click Run Report you will automatically be directed to the Check Report Status tab. The myTime system will not automatically update the status of the report generation. Click the Refresh Status button to update the report status.
27
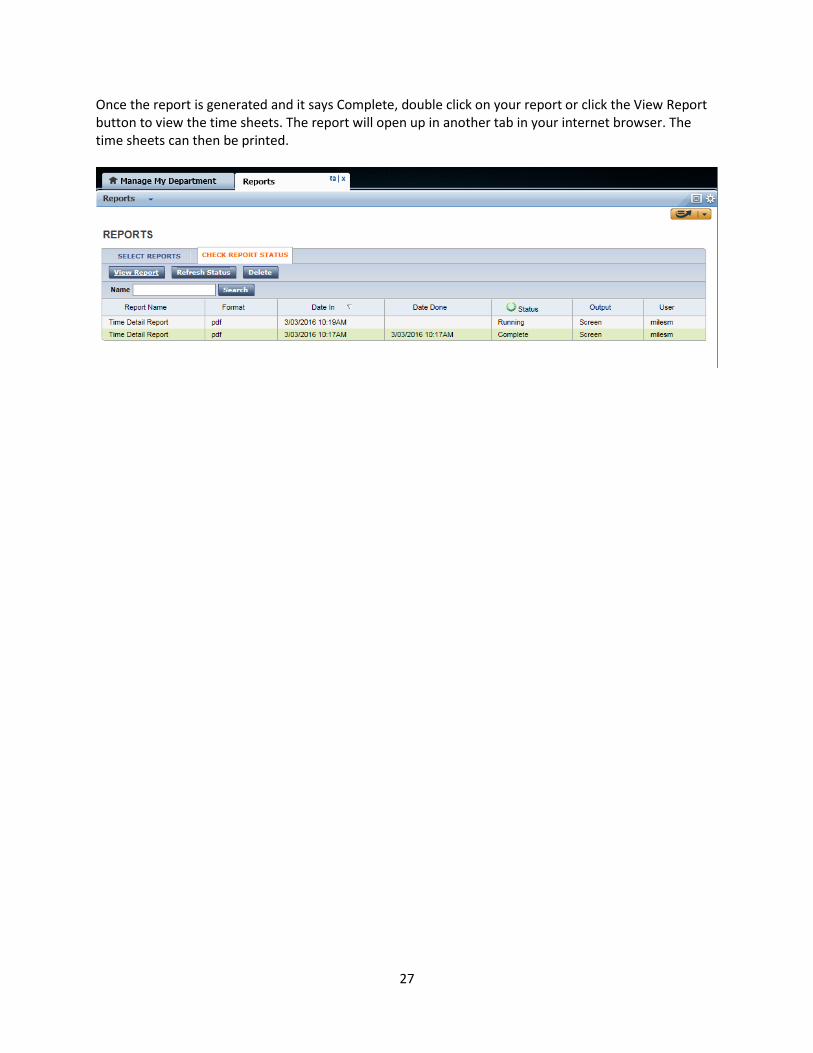
Once the report is generated and it says Complete, double click on your report or click the View Report button to view the time sheets. The report will open up in another tab in your internet browser. The time sheets can then be printed.
28
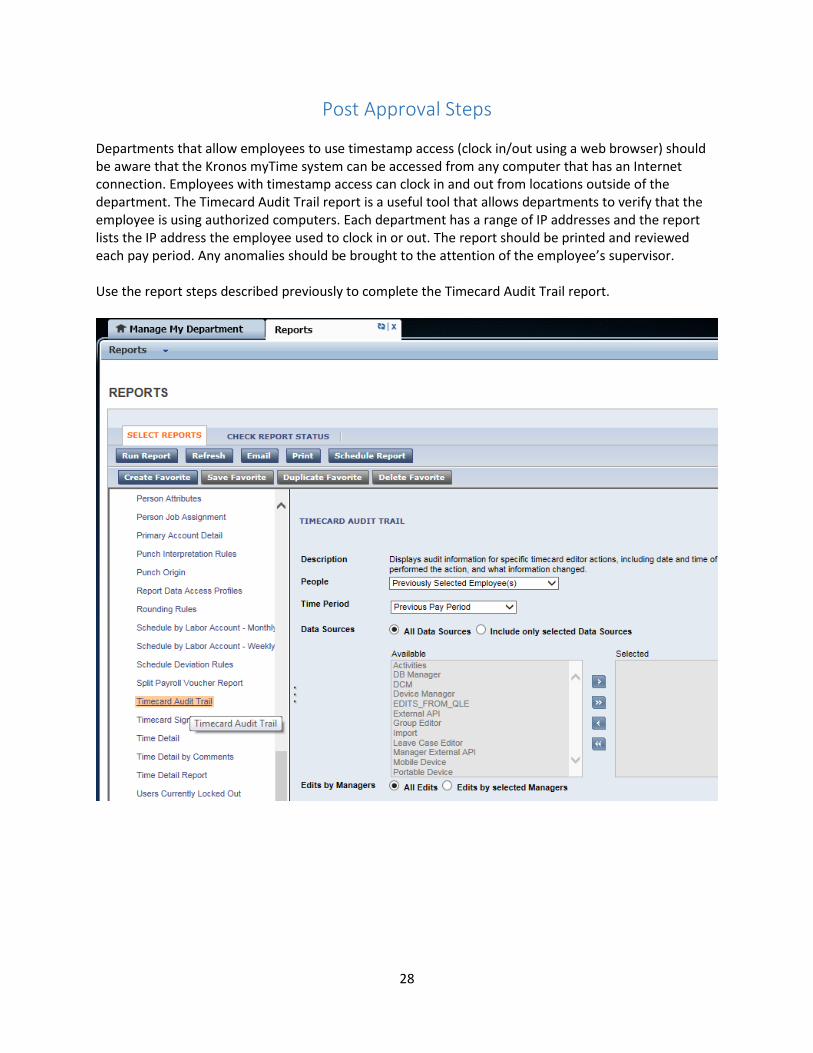
Post Approval Steps Departments that allow employees to use timestamp access (clock in/out using a web browser) should be aware that the Kronos myTime system can be accessed from any computer that has an Internet connection. Employees with timestamp access can clock in and out from locations outside of the department. The Timecard Audit Trail report is a useful tool that allows departments to verify that the employee is using authorized computers. Each department has a range of IP addresses and the report lists the IP address the employee used to clock in or out. The report should be printed and reviewed each pay period. Any anomalies should be brought to the attention of the employee’s supervisor. Use the report steps described previously to complete the Timecard Audit Trail report.
29
Payroll Voucher Reconciliation Departments should use the WebDFS voucher report to verify that the timecard data contained in the myTime system is transmitted correctly to the payroll system. This report should be used as a reconciliation step, performed each pay period. The report displays the worked hours, leave and other timecard data that was transmitted to the payroll system, from the Kronos myTime interface. This payroll report provides UGA departments with a tool that can be used to reconcile payroll and detect any issues that might have occurred between the Kronos myTime system and the payroll system, during the payroll processing. To see the report:
Access the WebDFS system (www.webdfs.uga.edu)
Click the Payroll Reports link
Click the link of the report you want to view (Hourly or Salaried)
Click the Report button
If the report is blank, close all of your browser windows and try again
If the report is still blank, contact [email protected] and inquire about your payroll QMF access The data for the report is generated after all employees’ timecards have been signed off in Kronos. Payroll will notify campus through the myTime listserv when these reports are available for view. Access to the WebDFS report is independent of the payroll employee’s Kronos access. Please follow these steps to obtain WebDFS payroll access:
Navigate to the Access Services site (http://www.eits.uga.edu/accserv/)
Click the link for the Online Request Form (you will be prompted for your myID & password)
Check the box next to Payroll QMF
Fill in the appropriate boxes and then click Send at the bottom of the page You will be notified when the access is granted.
30
Supervisor Setup A Kronos myTime supervisor is someone who accesses the system using a web browser and has permission to view, edit and approve another employee’s timecard. Each UGA department determines who will act as a supervisor and the department is responsible for terminating the supervisor’s access to myTime when it is no longer needed. The department also controls what employee records the supervisor has access to view.
Supervisor Roles There are three roles that a department supervisor can fill: Unit Supervisor, Unit Payroll or Unit Approver. The department determines what role the supervisor should be granted and each role has varying permissions. The Unit Supervisor role is appropriate for front‐line supervisors who require the ability to view an employee’s timecard. Additionally, this role allows the supervisor to edit (add punches or leave), modify and approve the timecard. The Unit Payroll role is appropriate for employees who are responsible for the payroll process. This role builds on the Unit Supervisor role and also grants the manager permission to change an employee’s hourly rate, modify the primary labor account (account, short title, home department, etc.) and set the pay rule. Additionally, a Unit Payroll supervisor can process correction edits (back pay), create and terminate employee records and create supervisor records. The Unit Approver role is reserved for employees who are the final department approver for payroll. In addition to having the same rights as the Unit Supervisor and Unit Payroll, the Unit Approver also has the ability to “sign off” employee timecards. The sign off is the final approval step in the payroll process and alerts UGA Payroll that the record is ready for payroll processing. Each role builds on the permissions from the lower‐level role. A Unit Payroll supervisor has the same rights as the Unit Supervisor, in addition to the rights as a Unit Payroll. A Unit Approver supervisor has the same rights as a Unit Supervisor and a Unit Payroll, in addition to the ability to “sign off” timecards. A supervisor can only be assigned one role and this role applies to all accounts that the supervisor has access to. It is not possible for a supervisor to have different roles for different accounts.
Supervisor Setup The supervisor setup process is initiated by the department and completed by the UGA Payroll office. The department is responsible for configuring the supervisor record. The supervisor will not be able to access the myTime system until the access request form is submitted and processed by the Payroll office. Each supervisor is required to submit an access request form before their supervisor account will be completed. The access request form is located on the http://mytime.uga.edu site. The department should select the appropriate role and the supervisor and department will sign the form. The form should be submitted to the Payroll office for processing.
31
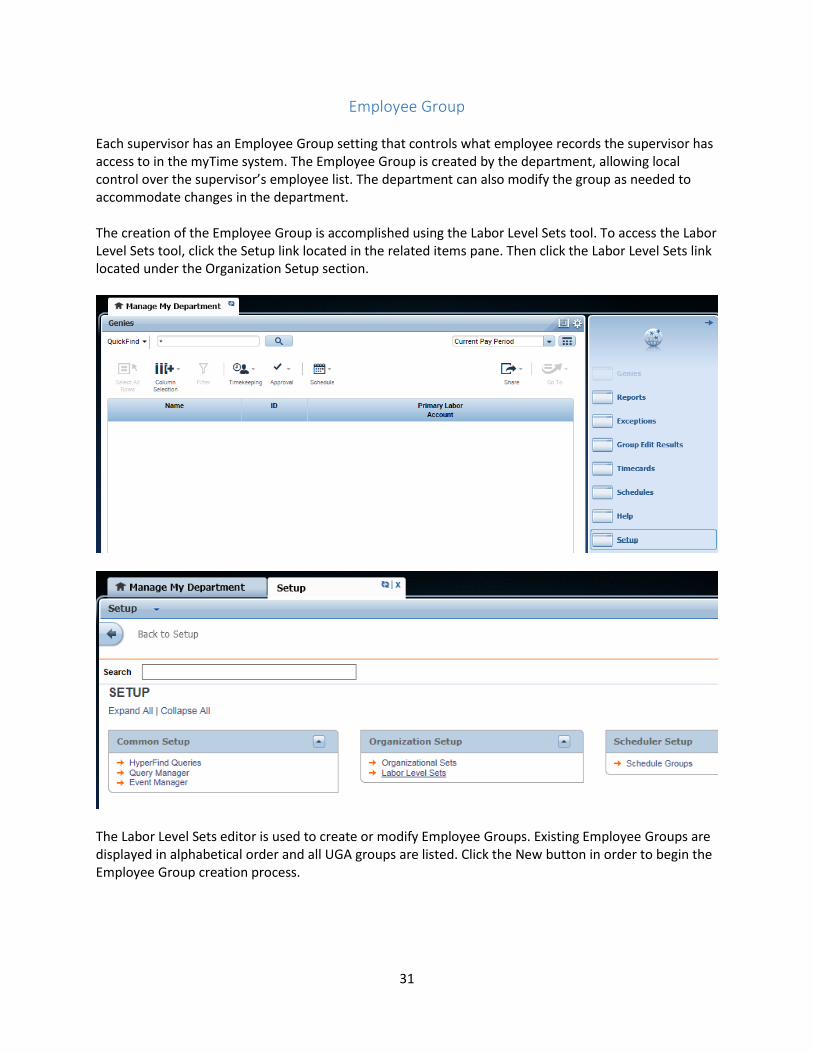
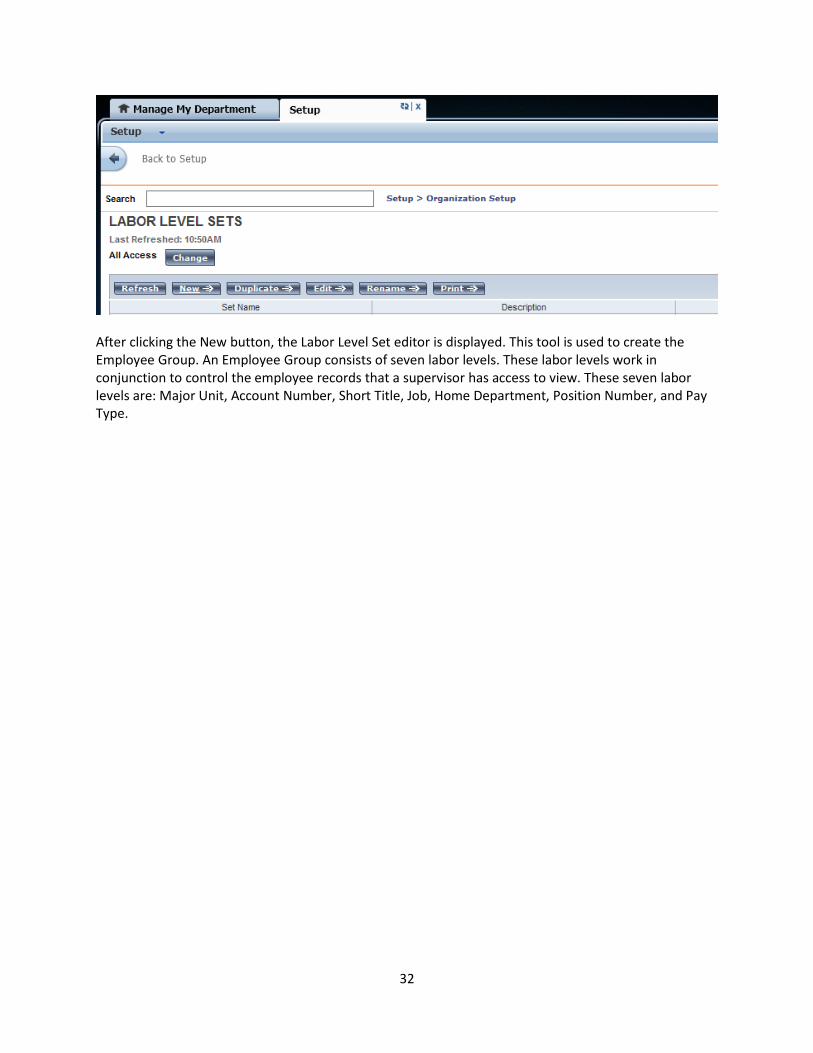
Employee Group Each supervisor has an Employee Group setting that controls what employee records the supervisor has access to in the myTime system. The Employee Group is created by the department, allowing local control over the supervisor’s employee list. The department can also modify the group as needed to accommodate changes in the department. The creation of the Employee Group is accomplished using the Labor Level Sets tool. To access the Labor Level Sets tool, click the Setup link located in the related items pane. Then click the Labor Level Sets link located under the Organization Setup section.
The Labor Level Sets editor is used to create or modify Employee Groups. Existing Employee Groups are displayed in alphabetical order and all UGA groups are listed. Click the New button in order to begin the Employee Group creation process.
32
After clicking the New button, the Labor Level Set editor is displayed. This tool is used to create the Employee Group. An Employee Group consists of seven labor levels. These labor levels work in conjunction to control the employee records that a supervisor has access to view. These seven labor levels are: Major Unit, Account Number, Short Title, Job, Home Department, Position Number, and Pay Type.
33
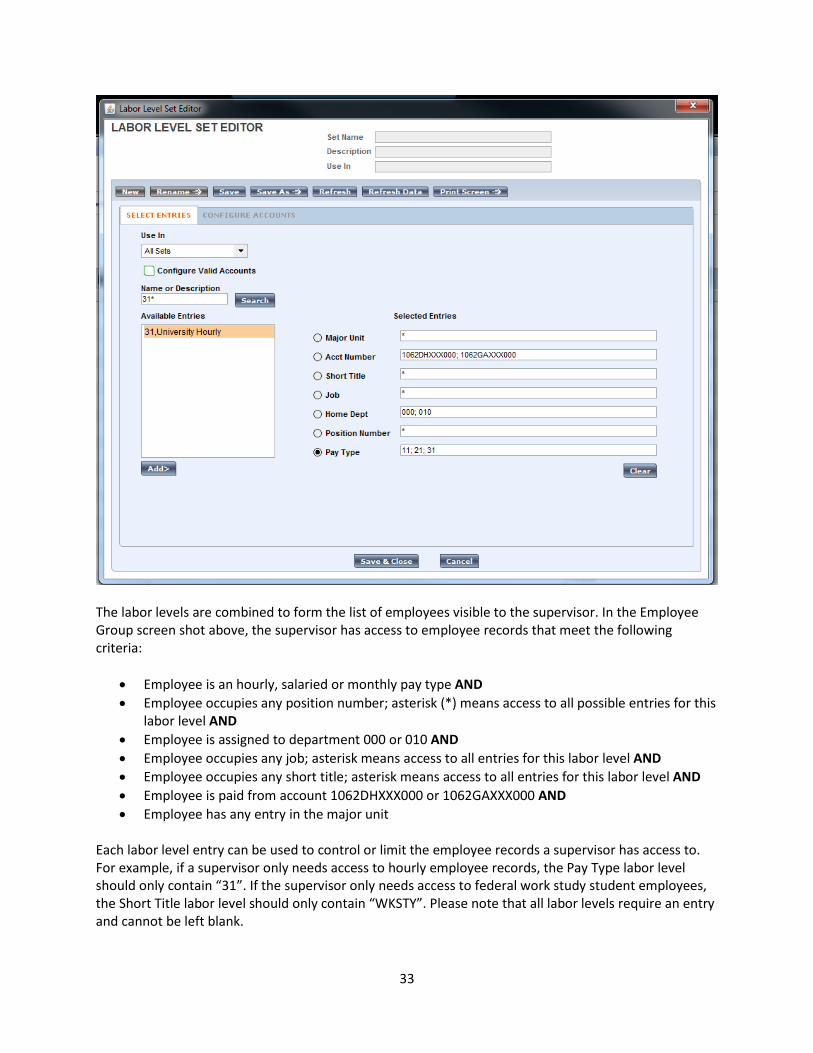
The labor levels are combined to form the list of employees visible to the supervisor. In the Employee Group screen shot above, the supervisor has access to employee records that meet the following criteria:
Employee is an hourly, salaried or monthly pay type AND
Employee occupies any position number; asterisk (*) means access to all possible entries for this labor level AND
Employee is assigned to department 000 or 010 AND
Employee occupies any job; asterisk means access to all entries for this labor level AND
Employee occupies any short title; asterisk means access to all entries for this labor level AND
Employee is paid from account 1062DHXXX000 or 1062GAXXX000 AND
Employee has any entry in the major unit Each labor level entry can be used to control or limit the employee records a supervisor has access to. For example, if a supervisor only needs access to hourly employee records, the Pay Type labor level should only contain “31”. If the supervisor only needs access to federal work study student employees, the Short Title labor level should only contain “WKSTY”. Please note that all labor levels require an entry and cannot be left blank.
34
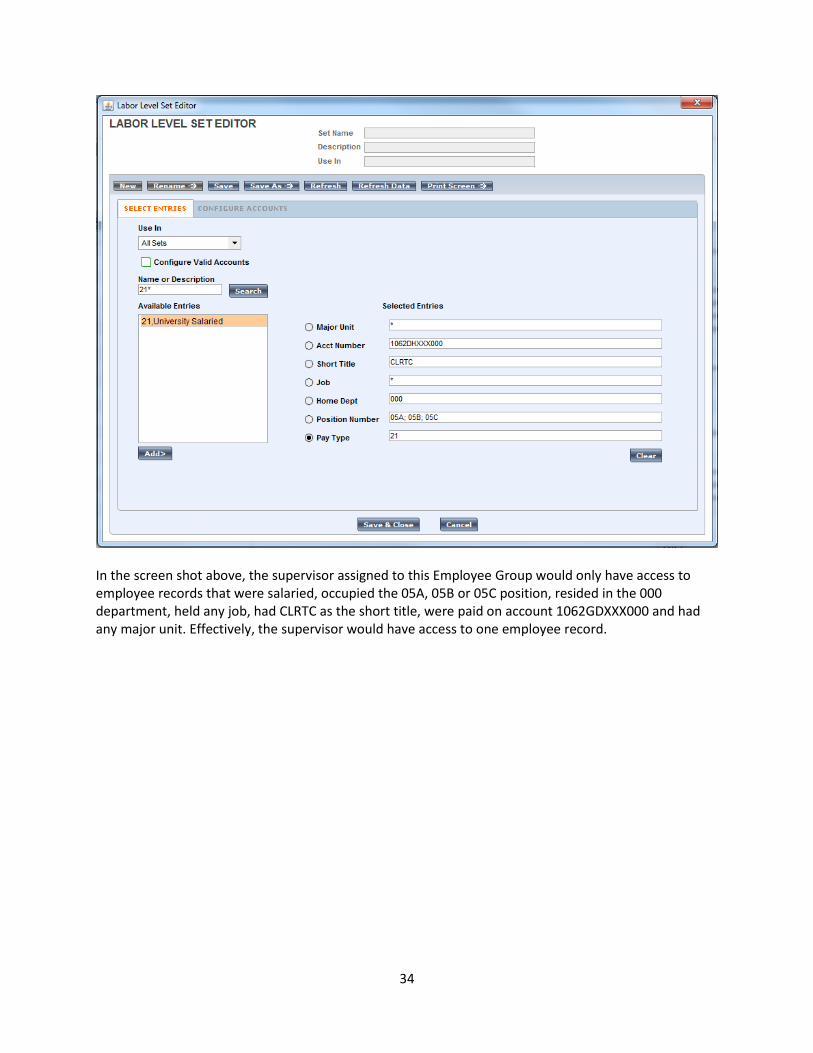
In the screen shot above, the supervisor assigned to this Employee Group would only have access to employee records that were salaried, occupied the 05A, 05B or 05C position, resided in the 000 department, held any job, had CLRTC as the short title, were paid on account 1062GDXXX000 and had any major unit. Effectively, the supervisor would have access to one employee record.
35
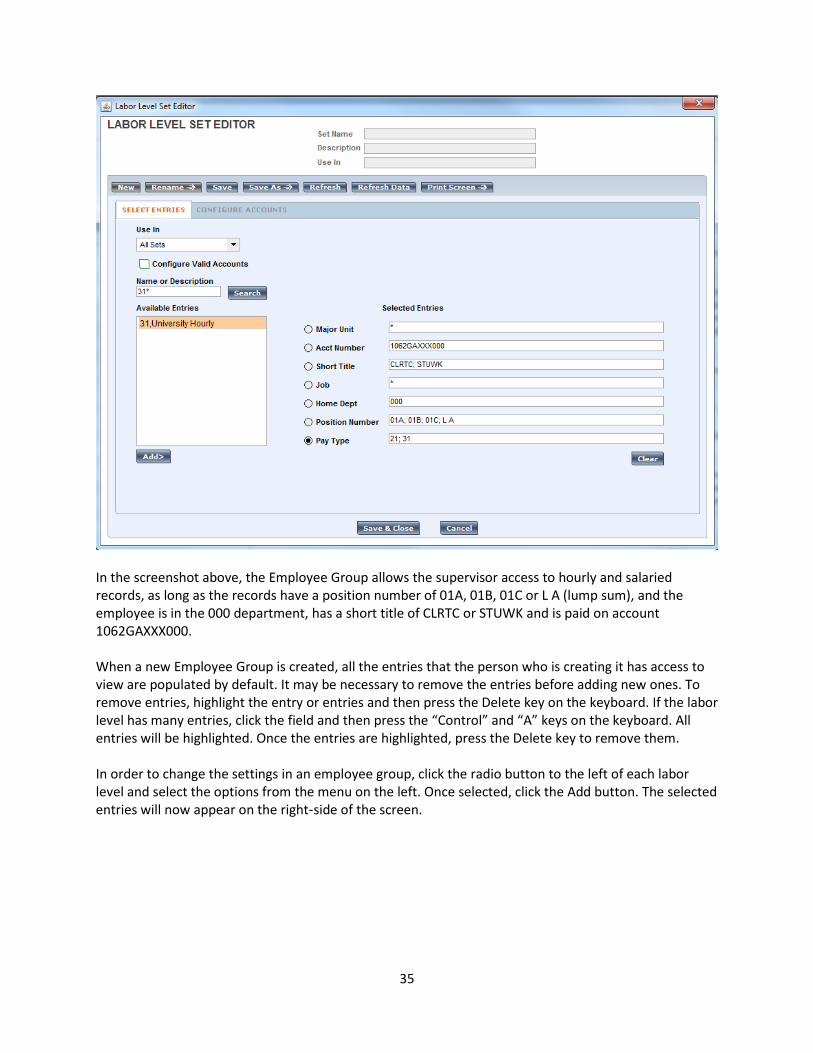
In the screenshot above, the Employee Group allows the supervisor access to hourly and salaried records, as long as the records have a position number of 01A, 01B, 01C or L A (lump sum), and the employee is in the 000 department, has a short title of CLRTC or STUWK and is paid on account 1062GAXXX000. When a new Employee Group is created, all the entries that the person who is creating it has access to view are populated by default. It may be necessary to remove the entries before adding new ones. To remove entries, highlight the entry or entries and then press the Delete key on the keyboard. If the labor level has many entries, click the field and then press the “Control” and “A” keys on the keyboard. All entries will be highlighted. Once the entries are highlighted, press the Delete key to remove them. In order to change the settings in an employee group, click the radio button to the left of each labor level and select the options from the menu on the left. Once selected, click the Add button. The selected entries will now appear on the right‐side of the screen.

36
When clicking the radio button for Position Number or Job, the following message may appear.
This message is an indicator that there are simply too many entries to display at once. The user will need to use the search feature to select the appropriate entries for this labor level. To proceed, click the OK button and then click the “Name or Description” field in the upper‐left corner. Enter the first few characters of the entry desired, followed by an asterisk (*). The asterisk is a wild‐card character allowing for searches. Click the Search button to see the results.
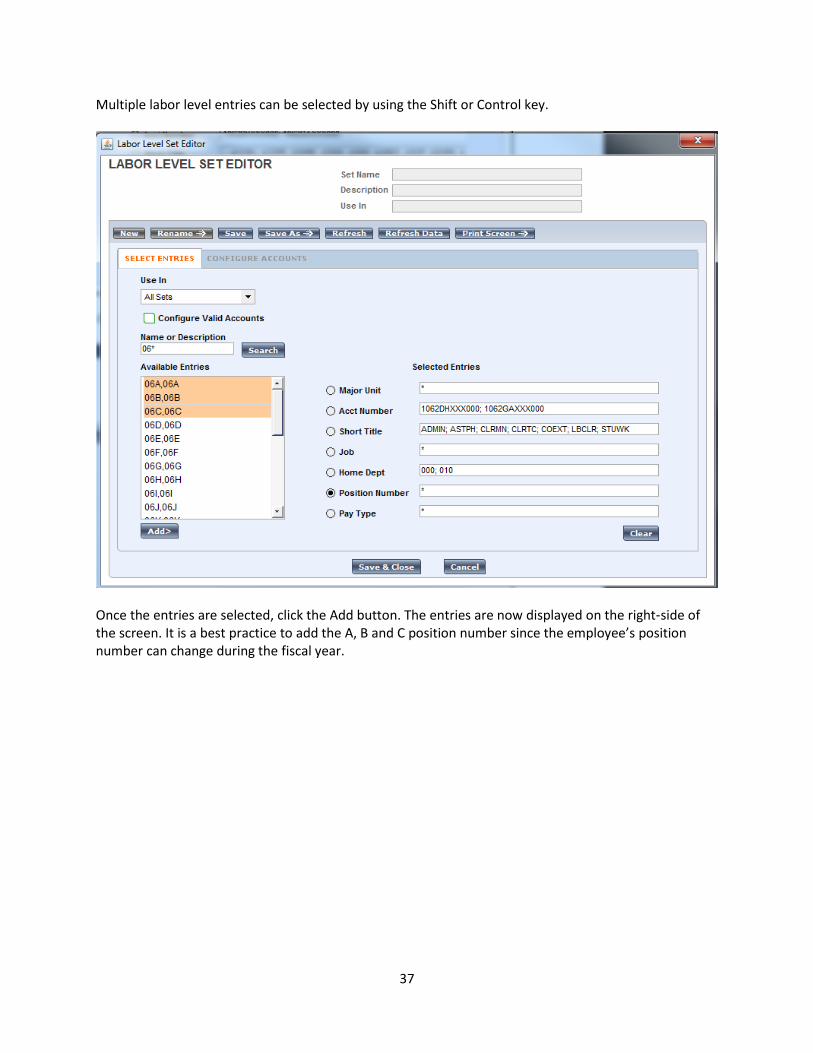
37
Multiple labor level entries can be selected by using the Shift or Control key.
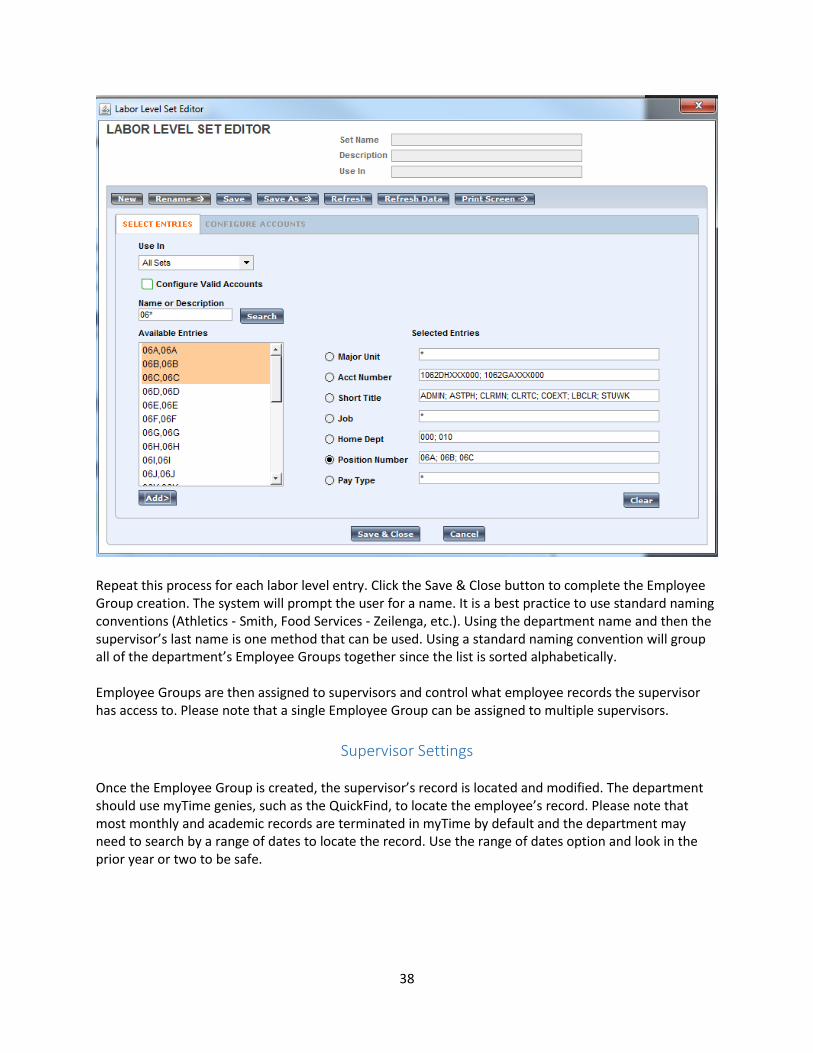
Once the entries are selected, click the Add button. The entries are now displayed on the right‐side of the screen. It is a best practice to add the A, B and C position number since the employee’s position number can change during the fiscal year.
38
Repeat this process for each labor level entry. Click the Save & Close button to complete the Employee Group creation. The system will prompt the user for a name. It is a best practice to use standard naming conventions (Athletics ‐ Smith, Food Services ‐ Zeilenga, etc.). Using the department name and then the supervisor’s last name is one method that can be used. Using a standard naming convention will group all of the department’s Employee Groups together since the list is sorted alphabetically. Employee Groups are then assigned to supervisors and control what employee records the supervisor has access to. Please note that a single Employee Group can be assigned to multiple supervisors.
Supervisor Settings Once the Employee Group is created, the supervisor’s record is located and modified. The department should use myTime genies, such as the QuickFind, to locate the employee’s record. Please note that most monthly and academic records are terminated in myTime by default and the department may need to search by a range of dates to locate the record. Use the range of dates option and look in the prior year or two to be safe.
39
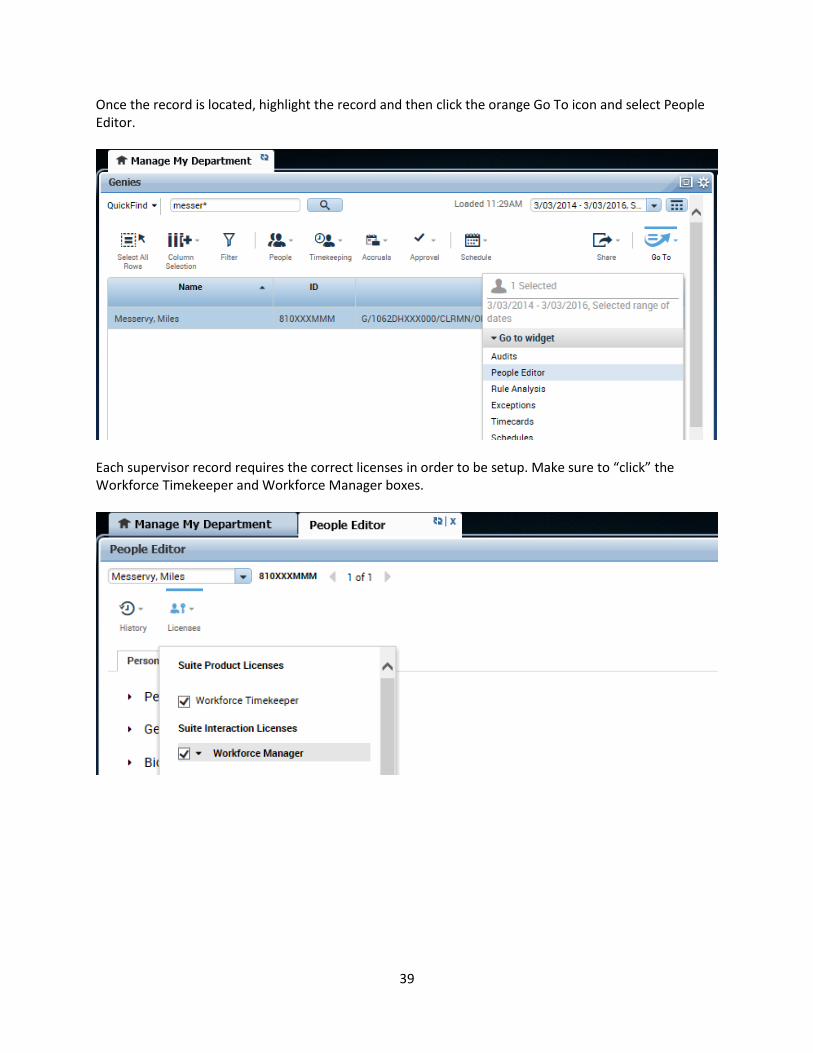
Once the record is located, highlight the record and then click the orange Go To icon and select People Editor.
Each supervisor record requires the correct licenses in order to be setup. Make sure to “click” the Workforce Timekeeper and Workforce Manager boxes.
40
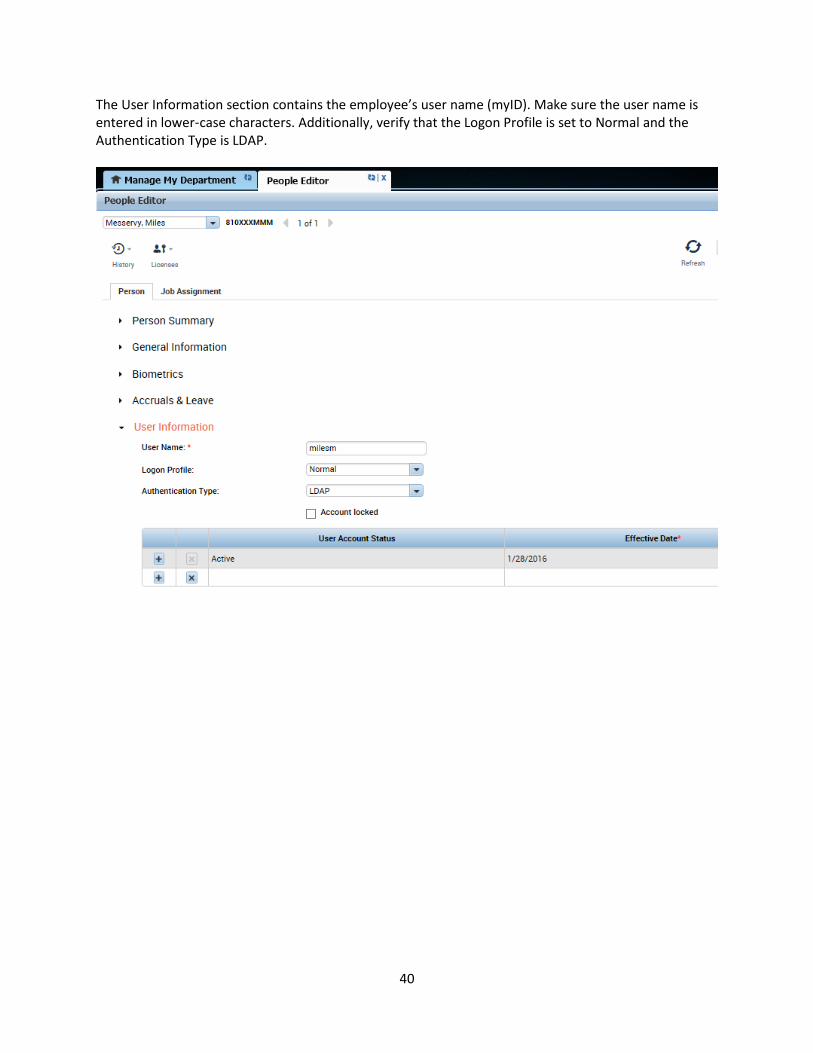
The User Information section contains the employee’s user name (myID). Make sure the user name is entered in lower‐case characters. Additionally, verify that the Logon Profile is set to Normal and the Authentication Type is LDAP.
41
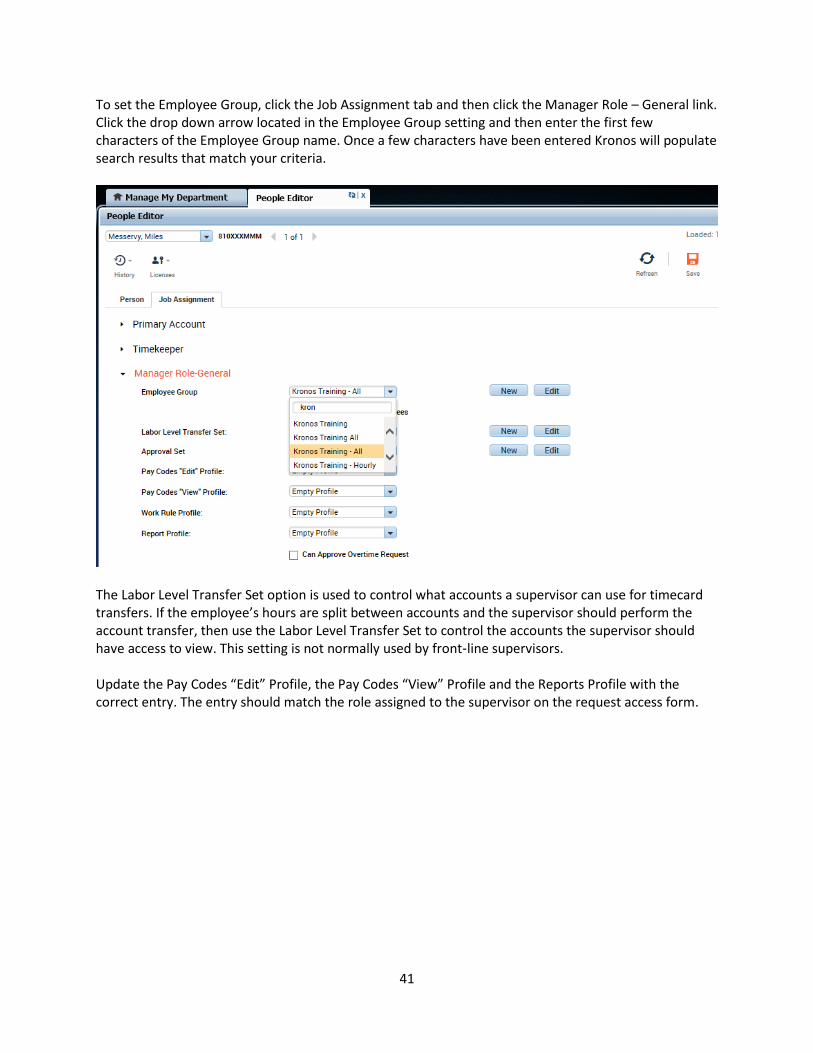
To set the Employee Group, click the Job Assignment tab and then click the Manager Role – General link. Click the drop down arrow located in the Employee Group setting and then enter the first few characters of the Employee Group name. Once a few characters have been entered Kronos will populate search results that match your criteria.
The Labor Level Transfer Set option is used to control what accounts a supervisor can use for timecard transfers. If the employee’s hours are split between accounts and the supervisor should perform the account transfer, then use the Labor Level Transfer Set to control the accounts the supervisor should have access to view. This setting is not normally used by front‐line supervisors. Update the Pay Codes “Edit” Profile, the Pay Codes “View” Profile and the Reports Profile with the correct entry. The entry should match the role assigned to the supervisor on the request access form.
42
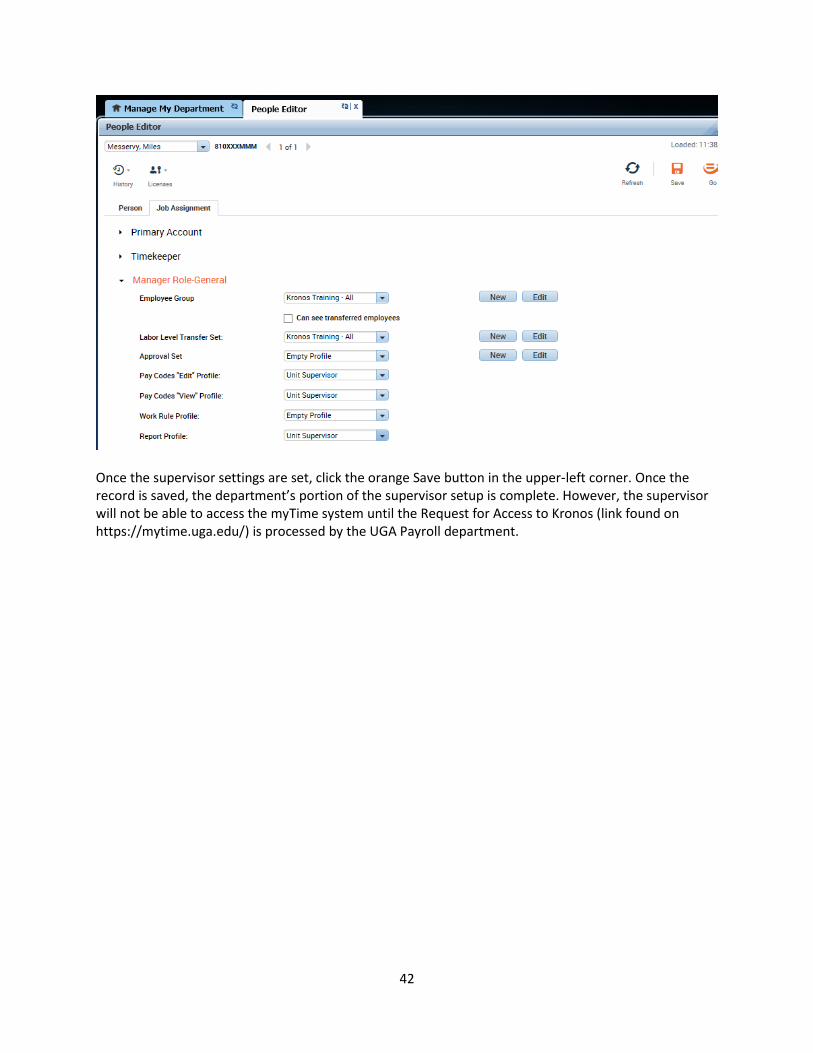
Once the supervisor settings are set, click the orange Save button in the upper‐left corner. Once the record is saved, the department’s portion of the supervisor setup is complete. However, the supervisor will not be able to access the myTime system until the Request for Access to Kronos (link found on https://mytime.uga.edu/) is processed by the UGA Payroll department.
43
Estimated Payroll Each year UGA is officially closed between Christmas and New Year’s Day to observe holidays. During this time hourly and salaried biweekly employees would normally receive paychecks, but due to the holidays, paychecks are issued in advance of the normal pay date. This early processing requirement necessitates the use of estimated payroll procedures.
Estimated Payroll Background An estimated payroll is required when the deadline for units to submit payroll (hourly or salaried) occurs BEFORE the pay period is complete. When payroll is processed before the pay period is complete, units must decide how to handle the estimated period. One option is to pay the employee only the hours worked up until the early deadline and to then “back pay” the employee the remaining hours after the period completes. The second option is to pay the employee for the worked hours and to estimate the remainder of the employee’s pay period. If the unit chooses to estimate an employee’s hours, a conservative approach is highly recommended in order to minimize employee overpayments. Due to the complexity of correcting an overpayment, IRS regulations and calendar year‐end payroll processing, it is in UGA’s best interest to estimate the minimum hours and then perform a back pay if the employee works more hours than estimated. A unit should never estimate hours in excess of the employee’s standard schedule unless the unit head is consulted. Correcting an overpayment of overtime is a difficult process for the unit and the UGA Payroll office. Estimating an employee’s activity (work hours, vacation, sick, etc.) is not difficult. The larger concern is reconciling the estimated activity with the actual activity. For example, a supervisor estimated that an employee will work 8 hours per day for the remaining period and the employee actually calls in sick one of the days. Work hours were submitted to the payroll system but this is no longer accurate since the employee was sick one of the days. In this example, a leave adjustment should be processed to reflect the sick leave taken. An additional factor that complicates the estimated payroll process is the time card sign off. In the Kronos myTime system, an employee’s timecard must be signed off prior to payroll processing. A sign off “locks” the timecard, preventing any further changes. This is by design and works well most of the year. However, during the estimated payroll processing periods, a signed off timecard will reject timestamp and timeclock activity, resulting in no record of worked hours during the remainder of the estimated period. When an employee’s timecard is signed off early during the current pay period due to the estimated payroll processing requirements, the employee can no longer use the timestamp function or the timeclock to record their shift start and end times. The supervisor is also prevented from making timecard changes during this period, once the sign off is applied.

44
Estimated Payroll Procedures If a unit chooses to estimate payroll for an employee, the estimated hours should be recorded on the employee’s Kronos timecard prior to the approval and early sign off date. When estimating time, a unit has several options. The unit can use the “Estimated Time” pay code, the “Sick” pay code, the “Vacation” pay code, or the “Comp Taken” pay code (assuming the employee has an available comp time balance). Additionally, if the employee is setup as a pay from schedule employee, the timecard will be pre‐populated with the employee’s schedule. This scheduled time will also meet the estimated payroll requirements.
Estimated Time Pay Code In the example below, the supervisor has chosen to estimate the remaining days of the pay period using the “Estimated Time” pay code. Please note that this pay code is treated as worked time and will count towards the 40 hour overtime limit. Using this pay code is useful because it provides a delineation between actual worked hours (the in and out punches) and the estimated hours (estimated time pay code).
45
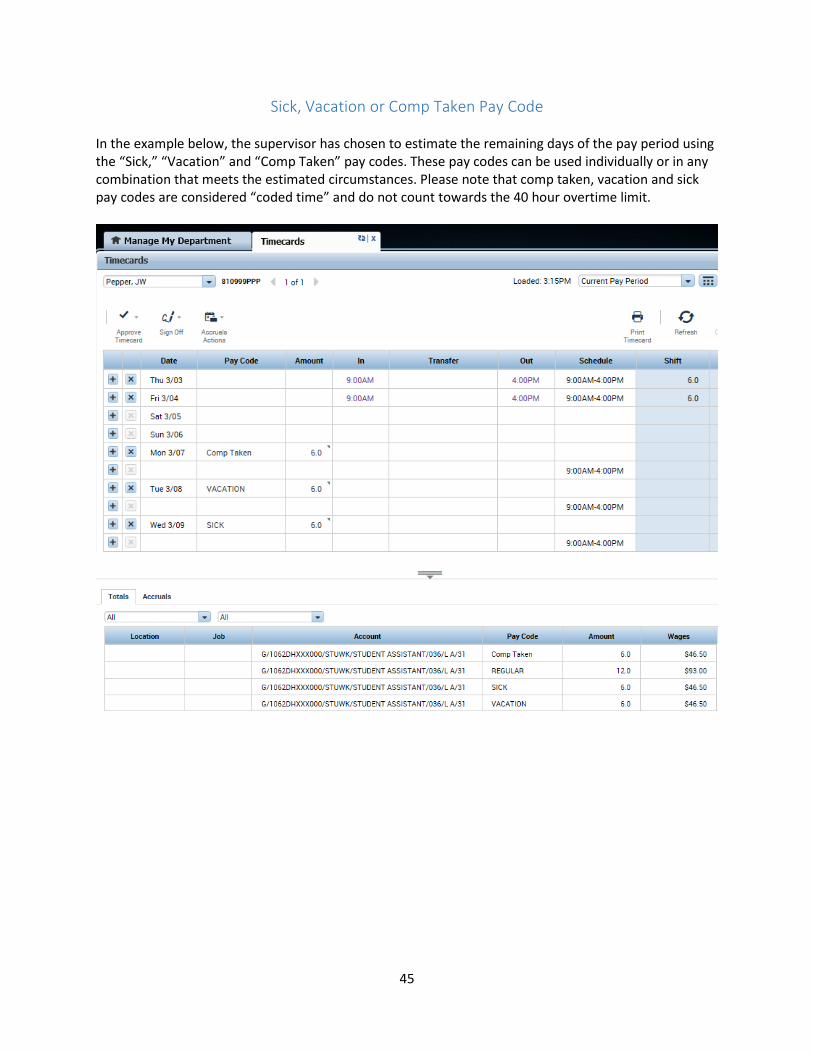
Sick, Vacation or Comp Taken Pay Code In the example below, the supervisor has chosen to estimate the remaining days of the pay period using the “Sick,” “Vacation” and “Comp Taken” pay codes. These pay codes can be used individually or in any combination that meets the estimated circumstances. Please note that comp taken, vacation and sick pay codes are considered “coded time” and do not count towards the 40 hour overtime limit.

46
Pay From Schedule In the example below, the employee’s timecard is configured with the pay from schedule option. If the employee plans to work their normal schedule during the estimated period, no changes are required.
47
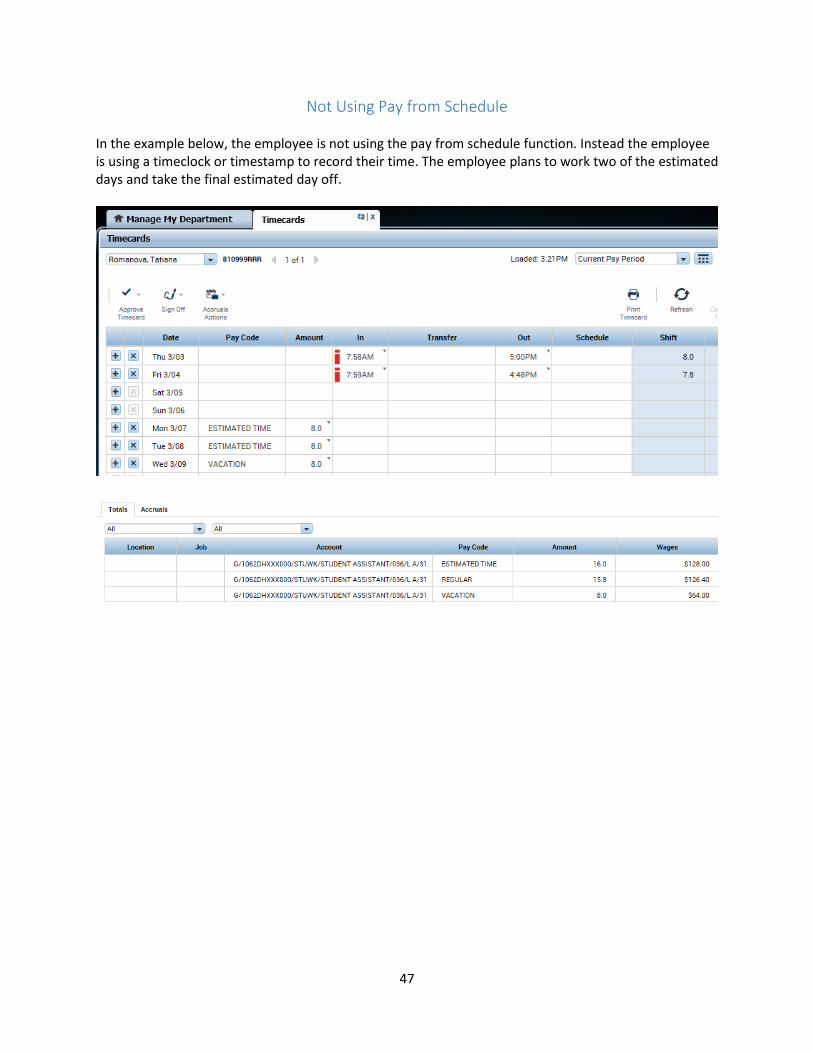
Not Using Pay from Schedule In the example below, the employee is not using the pay from schedule function. Instead the employee is using a timeclock or timestamp to record their time. The employee plans to work two of the estimated days and take the final estimated day off.
48
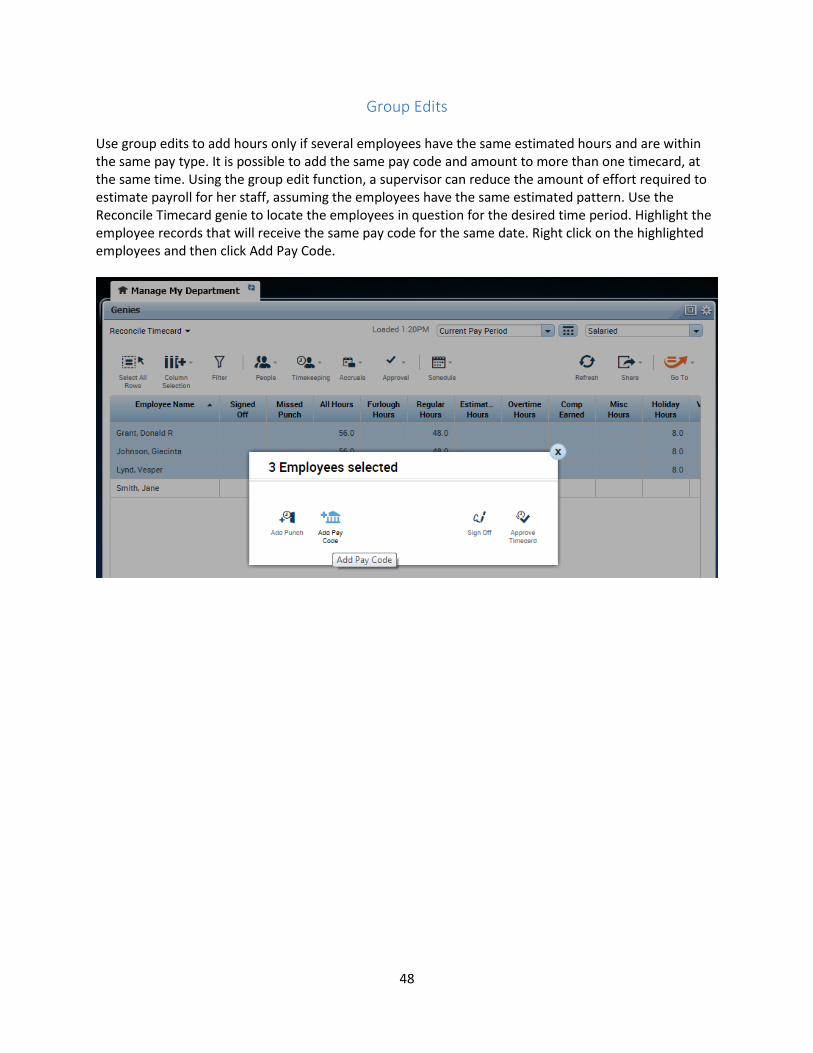
Group Edits Use group edits to add hours only if several employees have the same estimated hours and are within the same pay type. It is possible to add the same pay code and amount to more than one timecard, at the same time. Using the group edit function, a supervisor can reduce the amount of effort required to estimate payroll for her staff, assuming the employees have the same estimated pattern. Use the Reconcile Timecard genie to locate the employees in question for the desired time period. Highlight the employee records that will receive the same pay code for the same date. Right click on the highlighted employees and then click Add Pay Code.
49
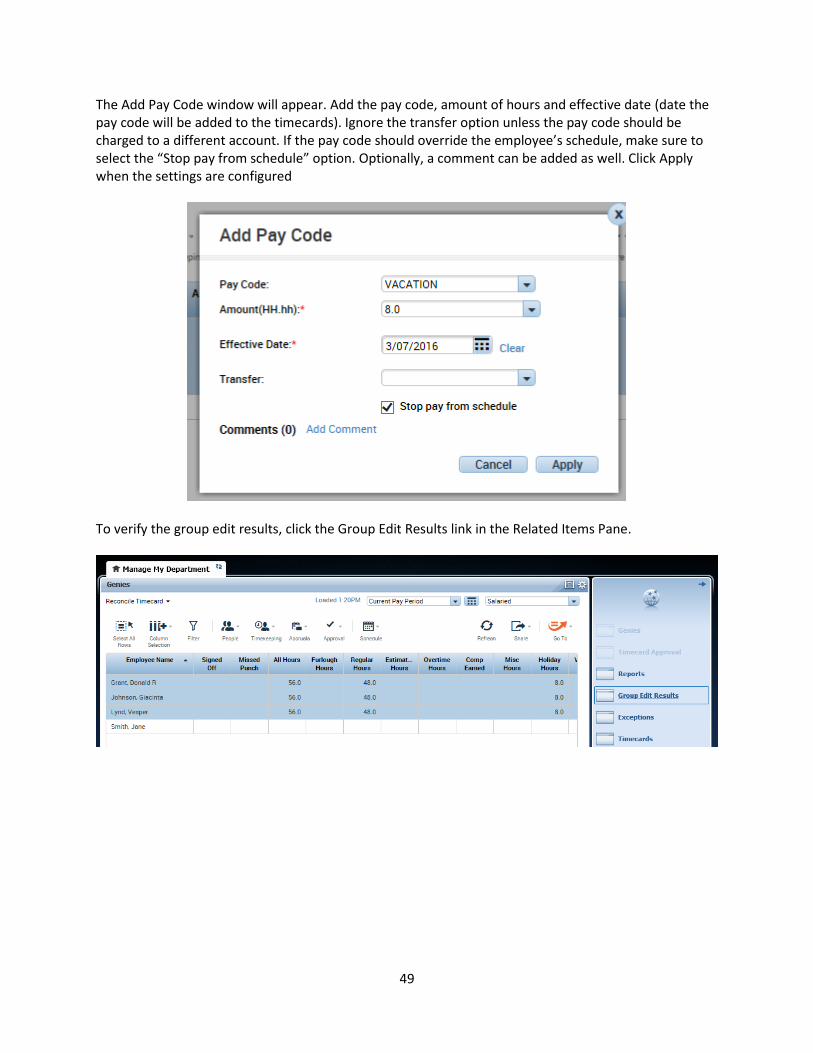
The Add Pay Code window will appear. Add the pay code, amount of hours and effective date (date the pay code will be added to the timecards). Ignore the transfer option unless the pay code should be charged to a different account. If the pay code should override the employee’s schedule, make sure to select the “Stop pay from schedule” option. Optionally, a comment can be added as well. Click Apply when the settings are configured
To verify the group edit results, click the Group Edit Results link in the Related Items Pane.

50
Another tab will be open to show the results of the group edit. The status should display “Completed” and the “Success” number should match the “Total” number of highlighted employees.
As a final check, review the employee timecards to verify the pay code edit is correct.
Reconciling Estimated and Actual Once the employee’s timecard has been processed early, the unit will need to reconcile what was processed with what actually occurred. This is necessary because payroll was processed prior to the pay period end date. Reconciling estimated payroll is a necessary part of the estimated payroll process. As mentioned previously, when a timecard is signed off during the current pay period, it is locked and no punches or pay code edits can occur. Since the pay period is not complete and the employee may continue to work, there may be differences between what is estimated and what is actually worked. Since the timecard is signed off during the current pay period, the employee cannot use the timestamp function or a timeclock to record his shift start and end times. The unit will need to track worked time on estimated payroll days in an alternate manner, outside the Kronos myTime system. The unit will need to reconcile what was estimated and processed with what actually occurred. The reconciliation process might lead to a back pay (correction edits in Kronos) or submitting an overpayment worksheet to the Payroll office.