Embed Size (px)
Citation preview

8/17/2016 DirectHit Search
http://dh.identifix.com/SearchFixes/Index?ROID=142244662&VID=2382867&VSM=4&HasBookmark=0&LocationId=2#KW=clunk&SOption=1&VETId=5&ST… 1/12
#15NA082: CLUNKING NOISE FR...
#15NA082: CLUNKING NOISE FROM FRONT OF VEHICLE DURING TURNS AND/OR BUMPS(DEC 16, 2015)
Document ID#4329653
#15NA082: CLUNKING NOISE FROM FRONT OF VEHICLE DURING TURNS AND/OR BUMPS (DEC 16,2015)
Subject: Clunking Noise from Front of Vehicle During Turns and/or Bumps
Attention: This Bulletin also applies to any of the models that may be Export vehicles.
Brand: Model:
Model Year: VIN:
Engine: Transmission:
from to from to
Cadillac Escalade EXT 2007 2013 All All
Cadillac Escalade, Escalade ESV 2007 2016 All All
Chevrolet Avalanche 2007 2013 All All
Chevrolet Silverado 1500, Suburban 1500, Tahoe 2007 2016 All All
GMC Sierra 1500, Yukon, Yukon XL 1500 2007 2016 All All
Condition Some customers may comment on a clunking noise originating from the front of the vehicle that is morepredominant during turns or traveling over bumps.
Cause

8/17/2016 DirectHit Search
http://dh.identifix.com/SearchFixes/Index?ROID=142244662&VID=2382867&VSM=4&HasBookmark=0&LocationId=2#KW=clunk&SOption=1&VETId=5&ST… 2/12
This may be caused by a damaged stabilizer shaft frame bracket. There have been some cases in whichthe bracket is cracked, as shown. This condition has been found to be the result of insufficient weldsbetween the bracket and frame rail. There have been some cases on older vehicles of corrosion affectingthe bracket.
Correction
If you encounter a vehicle with the above concern, follow the procedure below to install a new stabilizer shaft bracketto the frame.
1. Disconnect the negative battery cable. Refer to Battery Negative Cable Disconnection and Connection.

8/17/2016 DirectHit Search
http://dh.identifix.com/SearchFixes/Index?ROID=142244662&VID=2382867&VSM=4&HasBookmark=0&LocationId=2#KW=clunk&SOption=1&VETId=5&ST… 3/12
2. Raise the vehicle in the air and inspect the stabilizer shaft frame brackets (both left and right) for anyabnormalities or cracks and inspect welds to ensure good alignment and integrity. Refer to Lifting and Jackingthe Vehicle in SI.
Note: Be sure to inspect frame rails for any cracks or damage in relation to the stabilizer bracket. If the framerail itself is cracked or damaged, repair should not be attempted.
3. Once verified that the bracket is damaged or the welds are insufficient, remove the stabilizer shaft. Refer toStabilizer Shaft Replacement in SI.
4. On 4WD models, once the stabilizer shaft is removed also remove the front frame/front axle mount exhaustheat shield (1) located above the stabilizer bracket.
5. With the stabilizer shaft and shield removed, using a rag and wax/grease removing solvent, remove the waxcoating and any grease, oil, or undercoating from the truck frame in the affected repair area.
Important: Be sure to remove all wax coating around the areas of the bracket. If the wax coating is not fullyremoved, this could affect the weld quality when installing the new bracket.
6. After all the wax coating is removed, using a cut off wheel, remove the old bracket from the frame.
Warning
To avoid personal injury when exposed to welding flashes or to galvanized (Zinc Oxide) metal toxic fumes whilegrinding/cutting on any type of metal or sheet molded compound, you must work in a properly ventilated area,

8/17/2016 DirectHit Search
http://dh.identifix.com/SearchFixes/Index?ROID=142244662&VID=2382867&VSM=4&HasBookmark=0&LocationId=2#KW=clunk&SOption=1&VETId=5&ST… 4/12
wearing an approved respirator, eye protection , earplugs, welding gloves, and protective clothing.
Important: Be sure to not cut the frame in process of removing the bracket.
7. After the bracket has been removed, using an angle grinder with 24 grit sand paper or equivalent clean theareas of any excess bracket weld material from the frame so that the new bracket can sit flush in the locationof the old one.
Important: Be sure to not grind away any frame material, only remove the weld material.
8. Clean the area of all debris in preparation of the new bracket to be welded to the frame.
Important: Be sure to inspect frame rails for any cracks or damage in relation to the stabilizer bracket. If theframe rail itself is cracked or damaged, repair should not be attempted.

8/17/2016 DirectHit Search
http://dh.identifix.com/SearchFixes/Index?ROID=142244662&VID=2382867&VSM=4&HasBookmark=0&LocationId=2#KW=clunk&SOption=1&VETId=5&ST… 5/12
9. After the area is clean of all debris, place the new bracket in the location of the removed one. The bracketshould seat against the frame crossmember bracket in the most forward position, along the lower surface ofthe frame rail, and along the inner surface of the frame rail in the rear.
Note: The new bracket will need the welding locations stripped of all coating. Be sure to grind all edges of thenew bracket so that the quality of the weld will not be affected.
10. After the bracket is in location, tack weld the bracket to the frame in all 4 corners of the bracket. This will keepthe bracket from moving while welding the bracket fully to the frame.

8/17/2016 DirectHit Search
http://dh.identifix.com/SearchFixes/Index?ROID=142244662&VID=2382867&VSM=4&HasBookmark=0&LocationId=2#KW=clunk&SOption=1&VETId=5&ST… 6/12
11. After the bracket is tack welded in the location, loosely position the stabilizer shaft to verify that the bracket isin the correct location. Refer to Stabilizer Shaft Replacement in SI.
12. After verifying that the bracket is in the correct location, remove the stabilizer shaft. Refer to Stabilizer ShaftReplacement in SI.

8/17/2016 DirectHit Search
http://dh.identifix.com/SearchFixes/Index?ROID=142244662&VID=2382867&VSM=4&HasBookmark=0&LocationId=2#KW=clunk&SOption=1&VETId=5&ST… 7/12
13. Continuousweld the new bracket into position. Ensure the rear vertical weld (1) is extended approximately 15 mm above the edge of the bracket.
Note: When welding, be sure to start from the bottom of the bracket and work your way upward.
Note: Gas metal arc weld using ER70S3 electrode and an Argon CO2 protective gas mixture. Alternatively,meeting AWS 7013.
Note: Provide a continuous weld around the bracket. If access does not permit a continuous weld, make a 6 mm minimum overlap of adjacent welds.
Warning
To avoid personal injury when exposed to welding flashes or to galvanized (Zinc Oxide) metal toxic fumes whilegrinding/cutting on any type of metal or sheet molded compound, you must work in a properly ventilated area,wearing an approved respirator, eye protection , earplugs, welding gloves, and protective clothing.
14. After the bracket has been fully welded to the frame, using Lloyd’s Pure Prep™ Metal Surface Preparation P/N25418 (10 fluid ounce bottle), or equivalent, saturate a towel or ScotchBrite™ (3M) pad with the predilutedsolution and scrub the area well, rendering a foaming of the Pure Prep.™ This will greatly improve adhesion andcorrosion resistance in the repair areas.
15. Using a water dampened clean towel, remove any residue and dry the affected area. Dry the repair areacompletely using an air hose to blow dry the frame and bracket.
16. Check the repair area for phosphate treatment by wiping it to see if any corrosion residue can be picked up.Correctly treated areas will not have any residue on the surface.

8/17/2016 DirectHit Search
http://dh.identifix.com/SearchFixes/Index?ROID=142244662&VID=2382867&VSM=4&HasBookmark=0&LocationId=2#KW=clunk&SOption=1&VETId=5&ST… 8/12
17. Apply a light flashcoat of Lloyds Kryptonite Metal Treatment P/N 36502 Life Long Rust Protection (14 ounceaerosol), or equivalent, to all bare areas of the frame where the wax coating was removed. This first coatshould flash in approximately 35 minutes. Apply a light flashcoat to the inside of the frame rail using existingaccess holes, as shown. Insert the straw of the aerosol can as far as possible, and slowly work the straw backout while applying material.
18. Apply a second coat of Lloyds Kryptonite. This can be a heavy coat; double and triple passes with this product,over a light first coat, are not a problem.

8/17/2016 DirectHit Search
http://dh.identifix.com/SearchFixes/Index?ROID=142244662&VID=2382867&VSM=4&HasBookmark=0&LocationId=2#KW=clunk&SOption=1&VETId=5&ST… 9/12
19. We suggest top coating the Lloyds Kryptonite with Daubert NoxRust® P/N X121B “One Coat RustPreventative Coating” (aerosol), or equivalent.
20. Reinstall the stabilizer shaft with new stabilizer shaft clamp bolts. With new stabilizer thread cutting bolts, drivethe bolts to cut the new threads, then loosen the bolts two turns and then torque to 50 N•m (37 lb ft). Refer toStabilizer Shaft Replacement in SI.
Note: The stabilizer shaft clamp bolt attachment holes on the new bracket are not threaded, the clamp boltsare thread cutting.
21. On 4WD models, install the front frame/front axle mount exhaust heat shield.22. Reconnect the negative battery cable. Refer to Battery Negative Cable Disconnection and Connection.
Parts Information
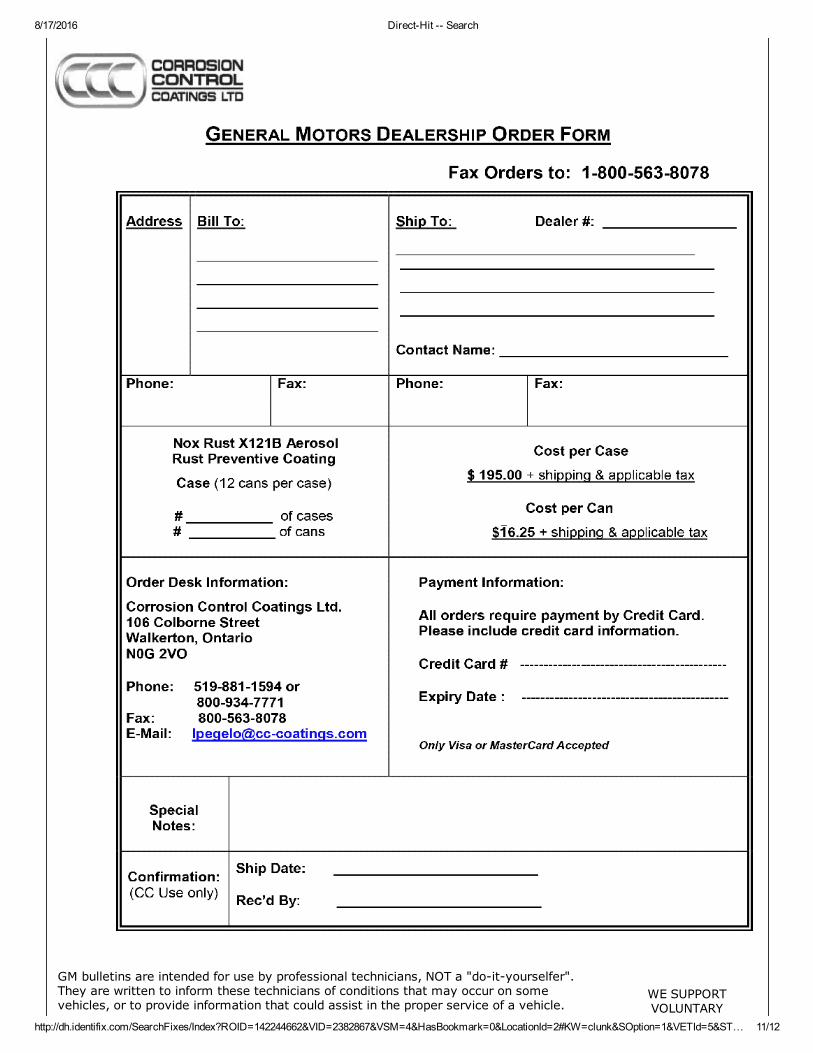
Dealers should obtain 25418 and 36502 by contacting Lloyds by email at [email protected], or bycalling 18003616766.
U.S. Dealers can obtain the X121B topcoat by contacting the Daubert website at www.daubertchemical.com orinside the U.S. only, by calling 18009140034.
Canadian dealers must contact the Daubert distributor in Canada, Corrosion Control Coatings Ltd, by faxing the formbelow to 18005638078.
Part Number Description
84037074 Bracket – Drivetrain & Frt Susp Frm Stab (Left Hand)
84037075 Bracket – Drivetrain & Frt Susp Frm Stab (Right Hand)
11570934 (2 Qty) SCREWHEX FLANGE HEAD TAPPING
Warranty Information
For vehicles repaired under the BumpertoBumper coverage (Canada Base Warranty coverage), use the followinglabor operation. Reference the Applicable Warranties section of Investigate Vehicle History (IVH) for coverageinformation.
Labor Operation Description Labor Time

8/17/2016 DirectHit Search
http://dh.identifix.com/SearchFixes/Index?ROID=142244662&VID=2382867&VSM=4&HasBookmark=0&LocationId=2#KW=clunk&SOption=1&VETId=5&ST… 10/12
1480628* Repair and Replace Stabilizer Bracket on One Side 2.5 hrs
Add Replace Both Stabilizer Brackets 1.5 hrs
*This is a unique Labor Operation for Bulletin use only.
Additional Keywords: Sway
Version 2
Modified December 16, 2015 – Updated Important statements and added Additional Keywords.
8/17/2016 DirectHit Search
http://dh.identifix.com/SearchFixes/Index?ROID=142244662&VID=2382867&VSM=4&HasBookmark=0&LocationId=2#KW=clunk&SOption=1&VETId=5&ST… 11/12
GM bulletins are intended for use by professional technicians, NOT a "doityourselfer".They are written to inform these technicians of conditions that may occur on somevehicles, or to provide information that could assist in the proper service of a vehicle.
WE SUPPORTVOLUNTARY

8/17/2016 DirectHit Search
http://dh.identifix.com/SearchFixes/Index?ROID=142244662&VID=2382867&VSM=4&HasBookmark=0&LocationId=2#KW=clunk&SOption=1&VETId=5&ST… 12/12
Properly trained technicians have the equipment, tools, safety instructions, and knowhow to do a job properly and safely. If a condition is described, DO NOT assume that thebulletin applies to your vehicle, or that your vehicle will have that condition. See your GMdealer for information on whether your vehicle may benefit from the information.
TECHNICIANCERTIFICATION
Copyright General Motors Corporation.
Portions of materials contained herein are sourced from General Motors Inc., Co.
Copyright 2007 2016 Service Repair Solutions, Inc.