Embed Size (px)
Citation preview

6 Slice Toaster Oven with Air Fry TechnologyInstruction Manual
Styled for Life Designed & Engineered in New York City

THANK YOU CARD - inside Front Cover
Thank You for choosing
We hope your new CRUX small kitchen appliance will add sleek elegance to your kitchen

THANK YOU CARD - inside Front Cover
Thank You for choosing
We hope your new CRUX small kitchen appliance will add sleek elegance to your kitchen
Important Safeguards ........................................................................................................................................4-6Additional Important Safeguards ................................................................................................................. 6-7Notes on the Plug ................................................................................................................................................... 8Notes on the Cord ................................................................................................................................................... 8Plasticizer Warning ................................................................................................................................................. 8Electric Power ........................................................................................................................................................... 9Getting to Know Your 6 slice toaster Oven with Air Fry Technology........................................9-10Control Panel .......................................................................................................................................................10-11Pre-Programmed Functions ......................................................................................................................... 11-12Function Chart ......................................................................................................................................................... 12Shelf Positions .......................................................................................................................................................... 13Convection Cooking .............................................................................................................................................. 13TURBO Boost ...........................................................................................................................................................14Weight/Size Restrictions ...................................................................................................................................14Before Using for the First Time ..................................................................................................................14-15USDA Cooking Guidelines ..................................................................................................................................16TOAST .................................................................................................................................................................... 16-17Hints For TOAST .................................................................................................................................................... 17BAGEL ....................................................................................................................................................................18-19Hints For BAGEL ....................................................................................................................................................19WARM ...................................................................................................................................................................20-21CONVECTION BAKE/ROAST ..................................................................................................................... 21-22Cooking Containers ..............................................................................................................................................23Hints for CONVECTION BAKE .......................................................................................................................23Hints for CONVECTION ROAST ....................................................................................................................24CONVECTION PIZZA .................................................................................................................................... 25-26Hints for CONVECTION PIZZA ........................................................................................................................26AIR FRY ................................................................................................................................................................27-28Hints for AIR FRY ............................................................................................................................................28-29AIR FRY Cooking Chart ...............................................................................................................................29-32BROIL ...................................................................................................................................................................33-34Hints for BROIL/CONVECTION BROIL ......................................................................................................34COOKIES ............................................................................................................................................................35-36DEHYDRATE .....................................................................................................................................................36-37DEHYDRATING CHART ...............................................................................................................................38-39REHEAT .............................................................................................................................................................39-40User Maintenance Instructions ....................................................................................................................... 40Care & Cleaning Instructions .....................................................................................................................40-41Storing Instructions ...............................................................................................................................................41Warranty .............................................................................................................................................................42-43
Table of Contents

4
IMPORTANT SAFEGUARDSWhen using electrical appliances, basic safety precautions should always be followed including the following:
1. Read all instructions.
2. Do not touch hot surfaces. Use handles or knobs.
3. To protect against electrical shock do not immerse cord, plugs, or appliance in water or other liquid.
4. This appliance is not intended for use by persons (including children) with reduced physical, sensory or mental capabilities, or lack of experience and knowledge, unless they have been given supervision or instruction concerning use of the appliance by a person responsible for their safety.
5. Children should be supervised to ensure that they do not play with the appliance.
6. Unplug from outlet when not in use and before cleaning. Allow Toaster Oven to cool before putting on or taking off parts.
7. Do not operate any appliance with a damaged cord or plug or after the appliance malfunctions, or has been damaged in any manner. Bring it to a qualified technician for examination, repair or electrical or mechanical adjustment.
8. The use of accessory attachments not recommended by the appliance manufacturer may cause injuries.
9. Do not use outdoors.
10. Do not let cord hang over edge of table or counter, or touch hot surfaces.
11. Do not place on or near a hot gas or electric burner, or in a heated oven.

5
12. Extreme caution must be used when moving an appliance containing hot oil or other liquids.
13. To disconnect, press the red START/CANCEL Button. Remove the plug from the wall outlet.
14. Do not use appliance for other than intended use.
15. Oversize foods or metal utensils must not be inserted in the Toaster Oven as they may create a fire or risk of electric shock.
16. A fire may occur if the Toaster Oven is covered or touching flammable material, including curtains, draperies, walls, and the like, when in operation. Do not store any item on top of the appliance when in operation.
17. Do not clean with metal scouring pads. Pieces can break off the pad and touch electrical parts involving a risk of electrical shock.
18. Extreme caution should be exercised when using containers constructed of other than metal or glass.
19. Do not store any materials, other than manufacturer’s recommended accessories, in this Toaster Oven when not in use.
20. Do not place any of the following materials in the Toaster Oven: paper, cardboard, plastic, and the like.
21. Do not cover crumb tray or any part of the Toaster Oven with metal foil. This will cause overheating of the Toaster Oven.
22. Use extreme caution when removing the crumb tray or disposing of hot grease.
23. Do not cover the Toaster Oven with anything that would prevent steam from escaping. This may cause warping, discoloration, malfunction or even fire.

6
SAVE THESE INSTRUCTIONSFOR HOUSEHOLD USE ONLY
ADDITIONAL IMPORTANT SAFEGUARDS
CAUTION HOT SURFACES: This appliance generates heat and escaping steam during use. Proper precautions must be taken to prevent the risk of burns, fires, or other injury to persons or damage to property.
1. A person who has not read and understood all operating and safety instructions is not qualified to operate this appliance. All users of this appliance must read and understand this instruction manual before operating or cleaning this appliance.
2. If this appliance falls or accidentally becomes immersed in water, unplug it from the wall outlet immediately. Do not reach into the water!
3. When using this appliance, provide adequate air space above and on all sides for air circulation. Do not operate this appliance while it is touching or near curtains, wall coverings, clothing, dishtowels or other flammable materials.
4. To reduce the risk of fire, do not leave this appliance unattended during use.

7
5. If this appliance begins to malfunction during use, press the red START/CANCEL Button. Remove the plug from the wall outlet. Do not use or attempt to repair a malfunctioning appliance!
6. The cord to this appliance should only be plugged into a 120V AC electrical wall outlet.
7. Do not use this appliance in an unstable position.
8. To reduce the risk of burns or other injuries, do not touch hot surfaces. Use of protective oven mitts or gloves as well as long-handled utensils is recommended.
9. To reduce the risk of injury to persons or property, unplug this appliance before inserting food. Always keep the appliance unplugged from the wall outlet when not in use.
CAUTION: Never leave the Toaster Oven unattended while in use.

8
NOTES ON THE PLUG
This appliance has a polarized plug (one blade is wider than the other). To reduce the risk of electric shock, this plug will fit in a polarized outlet only one way. If the plug does not fit fully into the outlet, reverse the plug. If it still does not fit, contact a qualified electrician. Do not modify the plug in any way.
NOTES ON THE CORD
A. A short power-supply cord (or detachable power-supply cord) is to be provided to reduce risks resulting from becoming entangled in or tripping over a longer cord.
B. Longer detachable power-supply cords or extension cords are available and may be used if care is exercised in their use.
C. If a long detachable power-supply cord or extension cord is used: 1. The marked electrical rating of the detachable power-supply cord
or extension cord should be at least as great as the electrical rating of the appliance;
2. If the appliance is of the grounded type, the extension cord should be a grounding- type 3-wire cord; and
3. The longer cord should be arranged so that it will not drape over the counter top or table top where it can be pulled on by children or tripped over.
PLASTICIZER WARNING
CAUTION: To prevent Plasticizers from migrating to the finish of the counter top or table top or other furniture, place NON-PLASTIC coasters or place mats between the appliance and the finish of the counter top or table top. Failure to do so may cause the finish to darken; permanent blemishes may occur or stains can appear.
9
ELECTRIC POWER
If the electrical circuit is overloaded with other appliances, your appliance may not operate properly. It should be operated on a separate electrical circuit from other appliances.
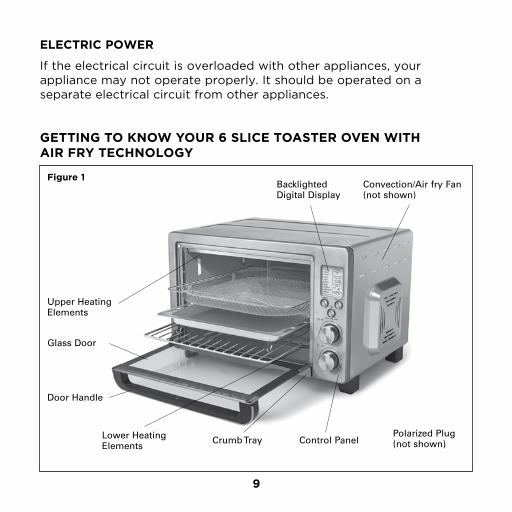
GETTING TO KNOW YOUR 6 SLICE TOASTER OVEN WITH AIR FRY TECHNOLOGY
Figure 1
Door Handle
Glass Door
Backlighted Digital Display
Control PanelCrumb Tray
Convection/Air fry Fan (not shown)
Upper Heating Elements
Lower Heating Elements
Polarized Plug (not shown)

10
CONTROL PANEL1. DIGITAL DISPLAY. When the unit is plugged in, or if the
FUNCTION button is pressed, the backlighted screen will indicate active FUNCTION, PREHEAT, toast SHADE (1 - 7), cook TIME remaining, CONVECTION or TURBO Boost and TEMP.
2. FUNCTION Button. Press once to advance the arrow to 10 pre-programmed cook cycles. An audible beep can be heard and the active cycle will flash, the FUNCTION button will illuminate until the START button is pressed.
3. START/CANCEL Button. Press to START the selected function or CANCEL. The button will illuminate red to indicate the unit is ON. When the START/CANCEL button is pressed again, the unit and the red lighted button will turn OFF.
4. CONVECTION/TURBO Button. When pressed “CONV.” a fan appears on the digital display to indicate the convection fan is operating. Press the illuminated CONVECTION/TURBO button again to activate TURBO Boost at any time. Press the illuminated CONVECTION/TURBO button again to turn the fan OFF. TURBO mode is used for air frying foods
Figure 2 Figure 3
Bake/Broil Pan
Crumb Tray
Air Fryer/Dehydrator Basket
Wire Rack
ACCESSORIES CONTROL PANEL

11
5. TIME Control Dial. Turn to manually change times from 01:00 minute minimum to 99:00 minutes maximum. When using the DEHYDRATE function, times can be programmed from 01:00 hour to 72:00 hours. An audible tone can be heard as the TIME is changed.
NOTE: Functions are preprogrammed and can only be changed within preset limits.
6. TEMP Control Dial. Turn to manually change temperature from 150°F minimum to 480°F maximum. When using the DEHYDRATE function, temperatures can be programmed from 80°F to 180°F. An audible tone can be heard as the TEMP is changed.
NOTE: Functions are preprogrammed and can only be changed within preset limits
PRE-PROGRAMMED FUNCTIONS1. TOAST: High heat sears and produces deliciously crisp results. Bread, muffins, frozen
waffles, frozen toaster pastries, prepared toaster foods, etc.
2. BAGEL: High heat sears the topsides of bagels, while warming the insides. The BAGEL function is ideal for toasting English muffins or thick sliced specialty breads which require only the top side to be toasted.
3. WARM: Maintains hot foods for up to 99:00 minutes at 170°F the recommended temperature to prevent bacterial growth, and can be programmed from 150°F to 200°F.
4. CONVECTION BAKE: Use of the convection fan, promotes browning and may shorten cooking time without turning and basting. Bake cakes, pies, cookies, poultry, beef, pork, etc.
NOTE: Default is convection fan on, press once for TURBO boost, twice to turn the fan off.
5. CONVECTION PIZZA: This Toaster Oven accommodates any 12-inch (or smaller) fresh or frozen pizza. Convection baking assures even pizza cooking and browning.
NOTE: Default is convection fan on, press once for TURBO boost, twice to turn the fan off.
6. AIR FRY: Use TURBO mode to air fry foods. ALWAYS use the mesh Air Fryer/Dehydrator Basket when AIR FRYING. The 6 Slice Digital Toaster’s steady high heat combined with convection air, ensures crispy results with a minimum or no oil.

12
NOTE: The default is TURBO boost, press once to turn the fan off.
7. BROIL: Fish, steak, poultry, pork chops, etc.
8. COOKIES: Perfect for baking home made or prepared refrigerated cookies, biscuits, cinnamon or crescent rolls.
9. DEHYDRATE: Use TURBO mode to dehydrate foods. ALWAYS use the mesh Air Fryer/Dehydrator Basket when DEHYDRATING. Precise low temperatures and TURBO Boost maximized airflow evenly dry out foods without cooking or overheating.
NOTE: The default is TURBO boost, press once to turn the fan off.
10. CONVECTION REHEAT: Reheat leftovers using the convection fan for even warming without browning.
NOTE: The default is fan off, press once for TURBO, twice to turn off.
FUNCTION CHART
Function
Default Adjustable Default Adjustable
Toast Shade 4 Shade 1 – 7 450° NO OFF NO OFF NOBagel Shade 4 Shade 1 – 7 450° NO OFF NO OFF NOWarm 90:00 01:00 - 99:00 170° 150° - 200° OFF YES OFF YESBake 30:00 01:00 - 99:00 350° 170° - 450° ON YES OFF YESPizza 16:00 01:00 - 60:00 350° 350° - 450° ON YES OFF YES
Air Fry 30:00 01:00 - 60:00 450° 200° - 480° OFF NO ON YESBroil 10:00 01:00 - 60:00 450° OFF YES OFF YES
Cookies 11:00 01:00 - 60:00 350° 170° - 450° ON YES OFF YESDehydrate 08:00 hr. 01:00 - 72:00
hr.120° 80° - 180° OFF NO ON YES
Reheat 15:00 01:00 - 60:00 350° 170° - 450° OFF NO OFF YES
Convection TurboTime (Min) Temperature (Fahrenheit)
Default DefaultAdjustable Adjustable

13
SHELF POSITIONS NOTE: Certain foods may require different shelf positions depending on the recipe, size, amount of food to be cooked and personal taste. Use the following information as a guide only.
1. There are 3 height positions that the air fryer/dehydrator basket, wire rack or the bake/broil pan may be inserted.
2. Use the upper shelf position for the BROIL function.
3. The center shelf position is commonly used for TOAST, BAGEL, PIZZA, AIR FRY, COOKIES and DEHYDRATE functions.
4. Use the lower shelf position for BAKE, ROAST, REHEAT and WARM functions.
WARNING: Never set the bake/broil pan directly onto the lower heating elements.
CONVECTION COOKING Convection cooking circulates heated air throughout the Toaster Oven cavity to maintain uniform temperature around the food. This constant, gentle airflow promotes browning and seals in juices when cooking meats. Due to the efficiency of using a convection fan, cooking time may be shortened.
• As a general rule, baked goods require a lower temperature when using a convection fan than cooking in a convectional oven. Lower the temperature by 25°F to a minimum of 300°F when baking cakes, pies, cookies, and bread.
• Follow package instructions for time and temperature when cooking convenience foods.
• Check food about 3/4 way through cooking cycle and adjust time or temperature if necessary.
• CONVECTION cooking is the default setting for BAKE, PIZZA, and COOKIES functions. Turn the fan OFF at any time by pressing the illuminated CONVECTION/TURBO button 2x.
• CONVECTION cooking is available for all functions except TOAST, BAGEL, DEHYDRATE, REHEAT and AIR FRY.
• Use the air fryer/dehydrator basket, oven-proof baking dishes, roasting pans, pizza pans or cookie sheets with very low sides, and place on the center of the wire rack to allow maximum airflow.
• Do not cover foods with metal foil or any other type of lid for maximum airflow.
14
TURBO BOOST• Press the CONVECTION/TURBO button once to turn TURBO Boost ON. “TURBO” and a
twirling fan appears on the digital display indicating the TURBO Boost is ON”.
• TURBO Boost maximizes convection airflow, shortens cook time and increases cooking efficiency and is available when using any function except TOAST or BAGEL.
• TURBO Boost is the default setting for AIR FRY and DEHYDRATE functions. Turn the fan OFF at any time by pressing the illuminated CONVECTION/TURBO button.
WEIGHT/SIZE RESTRICTIONSWARNING:
• The Toaster Oven can cook up to a 5 lb. chicken or turkey and up to a 5 lb. roast.
• We suggest that you periodically check the cooking progress with a meat thermometer.
BEFORE USING FOR THE FIRST TIMECAUTION: To protect against electric shock, do not immerse the Toaster Oven or allow cord to come into contact with water or other liquids.
1. Read all operating instructions carefully.
2. Carefully unpack the Toaster Oven and accessories, removing all packaging materials. Remove any labels from the outer surfaces.
3. Place your Toaster Oven on a level surface such as a countertop or table. Be sure the sides, back, and top of the Toaster Oven are at least 4 inches away from any walls, cabinets, or objects on the counter or table.
4. To avoid scratching, marring, or discoloration, do not store anything on top of the Toaster Oven during operation.
5. Wash the air fryer/dehydrator basket, bake/broil pan, wire rack, and crumb tray in warm, soapy water. Rinse and dry thoroughly before placing in the Toaster Oven.
6. Do not use abrasive cleaners.

15
7. To ensure that the Toaster Oven is free from oils used in manufacturing, it is necessary to operate the unit once, empty.
8. Make sure the crumb tray is in place in the bottom of the Toaster Oven.
9. Plug into a 120V AC electrical wall outlet. A long audible beep will sound; 3 buttons and the red START/CANCEL button will flash once; the digital display will illuminate as the function arrow points to a flashing TOAST. Press the FUNCTION button until the arrow points to a flashing BAKE. Turn the TEMP control dial to 400°F. The default 30:00 minutes will be displayed.
10. Press the START/CANCEL button; the button will illuminate indicating the Toaster Oven is ON. The TIME will count down after preheat is finished.
11. At the end of the 30:00 minutes, the TIMER control will display 00:00, 3 audible beeps can be heard, and the Toaster Oven will turn OFF. The Toaster Oven is ready for use.
CAUTION: Appliance surfaces are hot during and after use. Always wear protective, insulated oven mitts on hands when touching a hot Toaster Oven.
NOTE: The Toaster Oven will not operate until the START/CANCEL button is pressed.
NOTE: Press the red START/CANCEL button at any time to turn the Toaster Oven OFF. If no buttons are pressed within 1 minute, the backlighted digital display will turn OFF as the Toaster Oven rests in standby mode.

16
USDA COOKING GUIDELINESA meat thermometer should always be used to gauge internal temperature. The thermometer should be inserted into thickest portion of roast away from bones or fatty areas.
The United States Department of Agriculture recommends that meat and poultry be cooked to the following internal temperatures to be sure any harmful bacteria has been killed. Ground turkey and chicken should be cooked to an internal temperature of 165° F and ground beef, veal, lamb and pork be cooked to an internal temperature of 160° F. Chicken and turkey should be cooked to an internal temperature of 170° F for white meat and 180° F for dark meat. Goose and duck should be cooked to an internal temperature of 180° F. Fresh beef, veal and lamb, etc. should be cooked to an internal temperature of at least 145° F. Fresh pork should be cooked to an internal temperature of at least 160° F. When re-heating meat and poultry products, they should also be cooked to an internal temperature of 165° F.
TOAST1. Make sure the crumb tray is clean and in place in the bottom of the Toaster Oven.
2. Open the glass door. Slide the wire rack into the center shelf position and arrange bread or food on the wire rack. Close the glass door.
3. Plug into a 120V AC electrical wall outlet. The digital display will illuminate as the function arrow points to a flashing TOAST; and the BROWNING control will flash at 4, medium. Turn the TIME control dial until the desired shade setting is displayed. Temperature is set at 450° F.
Desired Shade Shade Setting
Light 1 or 2
Medium 3, 4, 5
Dark 6 or 7
NOTE: If bread or toaster food is frozen, increase shade setting by 1.
4. Press the START/CANCEL button; the button will illuminate indicating the Toaster Oven is ON. TIME will count down.
CAUTION: As soon as the START/CANCEL button is pressed, the Toaster Oven will turn ON. Both the top and the lower heating elements may cycle ON and OFF to maintain temperature for the entire cooking time.

17
CAUTION: Use care not to place anything on top of the Toaster Oven. Do not touch the Toaster Oven or any part of the Toaster Oven without wearing oven mitts.
NOTE: Press the red START/CANCEL button at any time to turn the Toaster Oven OFF.
5. When the TIMER control displays 00:00, 3 audible beeps can be heard, and the Toaster Oven will turn OFF.
6. Open the glass door and check toasting progress. Continue toasting if desired.
7. When you are satisfied with the toast color, wear protective oven mitts to pull the wire rack out from the Toaster Oven. Be careful when removing toast from the back of the wire rack. The inside of the Toaster Oven is very hot. Close glass door.
8. Unplug unit and allow to cool before cleaning.
WARNING: DO NOT LEAVE THE TOASTER OVEN UNATTENDED WHILE TOASTING.
9. Unplug when not in use.
HINTS FOR TOAST• Remove all protective wrappings from food before placing in Toaster Oven. Follow
toaster food directions.
• Frozen bread requires a longer time setting.
NOTE: Use extra caution when using this Toaster Oven for toasting pastry items with runny-type frosting or open fillings.
• When toasting more than one slice of bread, use slices of similar size, thickness and freshness.
• Stale bread, thin bread or sweet bread products, such as tea cakes and fruit loaf, brown much more quickly than ordinary bread, so they should be toasted for less time.
• For best results, clean crumb tray frequently.

18
BAGELUse the BAGEL function to toast English muffins or thick sliced specialty breads which require only the top side to be toasted.
1. Make sure the crumb tray is clean and in place in the bottom of the Toaster Oven.
2. Open the glass door. Slide the wire rack into the center shelf position and arrange bagels, English muffins or toaster food cut-side-up on the wire rack. (See Figure 4.) Close the glass door.
3. Plug into a 120V AC electrical wall outlet. The digital display will illuminate.
4. Press the FUNCTION button until the arrow points to a flashing BAGEL; and the BROWNING control will flash at 4, medium. Turn the TIME control dial until the desired shade setting is displayed.
Desired Shade Shade Setting
Light 1 or 2
Medium 3, 4, 5
Dark 6 or 7
5. Press the START/CANCEL button; the button will illuminate indicating the Toaster Oven is ON. TIME will count down.
CAUTION: As soon as the START/CANCEL button is pressed, the Toaster Oven will turn ON. Both the top and the lower heating elements may cycle ON and OFF to maintain temperature for the entire cooking time.
CAUTION: Use care not to place anything on top of the Toaster Oven. Do not touch the Toaster Oven or any part of the Toaster Oven without wearing oven mitts.
NOTE: Press the red START/CANCEL button at any time to turn the Toaster Oven OFF.
6. When the TIMER control displays 00:00, 3 audible beeps can be heard, and the Toaster Oven will turn OFF.
7. Open the glass door and check toasting progress. Continue toasting if desired.
FUNCTION START / CANCEL
TEMP
TIMECONVECTION/TURBO
ºF
TOASTBAGELWARMBAKEPIZZAAIRFRYBROILCOOKIESDEHYDRATEREHEAT
SHADE1 2 3 4 5 6 7
PREHEAT
TEMPCONVTURBO
°F
15:00
425
Figure 4

19
8. When you are satisfied with the toasted bagel color, wear protective oven mitts to pull the wire rack out from the Toaster Oven. Be careful when removing toast from the back of the wire rack. The inside of the Toaster Oven is very hot. Close glass door.
9. Unplug unit and allow to cool before cleaning.
WARNING: DO NOT LEAVE THE TOASTER OVEN UNATTENDED WHEN USING THE BAGEL FUNCTION.
10. Unplug when not in use.
HINTS FOR BAGEL• Remove all protective wrappings from food before placing in Toaster Oven. Follow
toaster food directions.
• The BAGEL function offers a darker browning to accommodate bagels and English muffins, thicker and denser slices of bread.
• Frozen bagels or English muffins require a longer time setting.
• WARNING: Use extra caution when toasting pastry items with runny-type frosting or open fillings.
• When toasting more than one bagel, use halves of similar size, thickness and freshness.
• Stale bagels, thin bagels or sweet bread products, such as tea cakes and fruit loaf, brown much more quickly than ordinary bread, so reduce toasting time.
• For best results, clean crumb tray frequently.

20
WARM CAUTION: NEVER use plastic containers in the Toaster Oven.
NOTE: Please read previous section entitled “Cooking Containers” for before placing any food in the Toaster Oven for warming.
1. Make sure the crumb tray is in place in the bottom of the Toaster Oven.
2. Open the glass door. Slide the wire rack or the bake/broil into the lower or middle shelf position. Place food on the wire rack or in the bake/broil pan or place food in an oven-proof dish, then place on the center of the wire rack so air flows around all sides of the food.
3. Close the glass door.
4. Plug into a 120V AC electrical wall outlet. The digital display will illuminate. Press the FUNCTION button until the arrow points to a flashing WARM; the default TIME 90:00 minutes and TEMP 170°F will be displayed.
5. To adjust the TIME, turn the TIME control dial to a minimum of 01:00 minute and a maximum of 99:00 minutes. Turn the TEMP control dial to adjust from 150°F to 200°F.
6. Press the START/CANCEL button; the button will illuminate indicating the Toaster Oven is ON. The TIME will count down after preheat is finished.
NOTE: Press the CONVECTION/TURBO button at any time to turn the fan ON. Press the CONVECTION/TURBO button 2x for TURBO Boost maximized airflow and faster warming.
CAUTION: As soon as the START/CANCEL button is pressed, and the Toaster Oven is turned ON, both the top and the lower heating elements may cycle ON and OFF to maintain temperature for the entire cooking time.
CAUTION: Use care not to place anything on top of the Toaster Oven. Do not touch the Toaster Oven or any part of the Toaster Oven without wearing oven mitts.
NOTE: Press the red START/CANCEL button at any time to turn the Toaster Oven OFF.
7. When the TIMER control displays 00:00, 3 audible beeps can be heard, and the Toaster Oven will turn OFF.
NOTE: If no buttons are pressed within 1 minute, the backlighted digital display will turn OFF as the Toaster Oven rests in standby mode.
8. Open the glass door and check for warming progress. Extend WARM time if needed.

21
9. Be careful when removing foods from the back of the wire rack. The inside of the Toaster Oven is very hot. Close glass door.
10. Unplug unit and allow to cool before cleaning.
WARNING: DO NOT LEAVE THE TOASTER OVEN UNATTENDED WHILE USING THE KEEP WARM FUNCTION.
11. Unplug when not in use and allow the Toaster Oven to cool completely before cleaning.
CONVECTION BAKE/ROASTUse BAKE or CONVECTION BAKE to bake casseroles, cakes, cookies, pies, biscuits or your favorite recipe according to package or recipe instructions. ROAST is a term often applied when using the BAKE or CONVECTION BAKE function to cook meats.
NOTE: Please read previous section entitled “Convection Cooking” for additional information.
CAUTION: NEVER use roasting bags or plastic containers in the Toaster Oven.
1. Make sure the crumb tray is in place in the bottom of the Toaster Oven.
2. Open the glass door. If you choose to use your own baking dish, slide the wire rack onto the center or lower shelf position. Carefully center baking dish directly on wire rack and close the glass door.
CAUTION: Make sure the baking dish is at least 1 inch away from the upper heating element.
3. You may use the bake/broil pan alone to bake foods such as biscuits, cookies, or hot appetizers.
4. To ROAST meats or fish, place the wire rack, feet side down, into the bake/broil pan to create the bake/broil assembly. Place meats or fish onto the bake/broil assembly. Juices and/or fat will drip into the pan and decrease spattering while roasting.
5. Plug into a 120V AC electrical wall outlet. The digital display will illuminate. Press the FUNCTION button until the arrow points to a flashing BAKE; the default TIME 30:00 minutes and TEMP 350°F will be displayed.

22
6. Adjust the TIME and TEMP according to recipe instructions. Turn the TIME control dial to a minimum of 01:00 minute and a maximum of 99:00 minutes. Turn the TEMP control dial to adjust from 170°F to 450°F.
7. Press the START/CANCEL button; the button will illuminate indicating the Toaster Oven is ON. The CONVECTION/TURBO button will illuminate, indicating the fan is ON. The TIME will count down after preheat is finished.
8. For an added blast of heat, press the illuminated CONVECTION/TURBO button again to activate TURBO Boost at any time. “TURBO” and a twirling fan appears on the digital display.
CAUTION: As soon as the START/CANCEL button is pressed, and the Toaster Oven is turned ON, both the top and the lower heating elements may cycle ON and OFF to maintain temperature for the entire cooking time.
CAUTION: Use care not to place anything on top of the Toaster Oven. Do not touch the Toaster Oven or any part of the Toaster Oven without wearing oven mitts.
NOTE: Press the red START/CANCEL button at any time to turn the Toaster Oven OFF.
9. When the TIMER control displays 00:00, 3 audible beeps can be heard, and the Toaster Oven will turn OFF.
NOTE: If no buttons are pressed within 1 minute, the backlighted digital display will turn OFF as the Toaster Oven rests in standby mode.
10. Open the glass door and check for brownness. Extend BAKE time if needed.
11. When you are satisfied with the baked or roasted food, wear protective oven mitts and pull the wire rack out from the Toaster Oven. Be careful when removing foods from the back of the wire rack. The inside of the Toaster Oven is very hot. Close glass door.
12. Unplug unit and allow to cool before cleaning.
WARNING: DO NOT LEAVE THE TOASTER OVEN UNATTENDED WHILE CONVECTION BAKING OR ROASTING.
13. Unplug when not in use and allow the Toaster Oven to cool completely before cleaning.

23
COOKING CONTAINERS• Both the air fryer/dehydrator basket and the bake/broil pan included with the Toaster
Oven are suitable for cooking items such as cookies, rolls, biscuits, nachos and hot appetizers.
• A variety of standard baking dishes, such as an 8” x 12” casserole, any 8” or 9” round or square cake pan, a 12-cup muffin pan, 1 and 2 quart round, square, or rectangular casserole dishes may be used for cooking many different foods.
• Choose bakeware made of either metal or glass/ceramic without lids.• Dark or dull pans absorb heat faster; foods will bake more rapidly, and crust will brown
more easily than in shiny bake pans.• Check package directions on the container or contact the ovenware manufacturer to
determine the container’s suitability for use in a Toaster Oven.• Do not use oven roasting bags in this Toaster Oven, as they may come in contact with
the heating elements.CAUTION: Do not use glass covers on baking pans. If using a glass or glass-ceramic baking container, make sure it is at least 1 inch away from the upper heating element.
HINTS FOR CONVECTION BAKE• For an added blast of heat, press the illuminated CONVECTION/TURBO button again to
activate TURBO Boost at any time. “TURBO” and a twirling fan appears on the digital display.
• When using CONVECTION BAKE, lower the bake recipe temperature by 50°F to a minimum of 300°F when baking cakes, pies, cookies, and bread.
• When baking, the shelf position used will depend on the size of the food being prepared. It is important to place your food as close to the center of the Toaster Oven as possible to ensure even cooking.
• Dark or dull pans absorb heat faster; foods will bake more rapidly, and crust will brown more easily than in shiny bake pans.
• Choose bakeware made of metal, ovenproof glass, and ceramic.• Check package directions to determine if the container is suitable for use in a
conventional or toaster oven. CAUTION: Allow at least 1” air space between the top of the container and the upper heating elements. Never use glass lids on glass or metal bakeware. If a lid is necessary, cover tightly with aluminum foil.

24
HINTS FOR CONVECTION ROAST• For an added blast of heat, press the illuminated CONVECTION/TURBO button again to
activate TURBO Boost at any time. “TURBO” and a twirling fan appears on the digital display.
• IMPORTANT! Consult the USDA Cooking Guidelines section of this instruction manual before cooking begins. Always test meat using an accurate cooking thermometer.
• A meat thermometer inserted into the center of the meat should always be used to ensure desired doneness.
• Cook to 5 to 10 degrees below desired doneness (internal temperature). Allow meat to stand 15 to 20 minutes before serving. The temperature will continue to rise while standing.
• CONVECTION ROAST large, tender cuts of meat and poultry. Seasoning prior to cooking adds to the flavor and the aroma during cooking.
• A layer of fat on the top of the roast promotes better browning and provides natural basting.
• To speed up browning, brush lean cuts of meat, chicken and fish with oil, margarine or melted butter.
• When roasting meats with a high fat content, the bake/broil pan may fill with grease before cooking is completed. Carefully remove the bake/broil pan assembly using oven mitts and empty. Replace for continued roasting.
• Place meat (fat side up) or food to be cooked into a bake pan. If desired, turn over half-way through BAKE/ROAST time.
25
CONVECTION PIZZANOTE: Please read previous section entitled “Convection Cooking” for additional information.
Your Toaster Oven can accommodate a 12-inch fresh or frozen pizza.
1. Make sure the crumb tray is in place in the bottom of the Toaster Oven.
2. When cooking prepared pizza, fresh or frozen, remove all packaging, including cardboard, plastic, paper, or other flammable materials before placing the pizza in the Toaster Oven. When baking fresh pizza, use a lightly oiled pizza pan sprinkled with cornmeal to make removing the baked pizza easier.
WARNING: Never cook pizzas directly on the wire rack as melted cheese and other ingredients may fall onto the heating elements and create a potential fire risk.
3. Depending on the depth of the pizza, slide the wire rack or bake/broil assembly into the center or lower shelf position. Carefully center pizza pan directly on the wire rack and close the glass door.
CAUTION: Make sure the pizza is at least 1 inch away from the upper heating element.
4. Plug into a 120V AC electrical wall outlet. The backlighted digital display will illuminate. Press the FUNCTION button until the arrow points to a flashing PIZZA; the default TIME 16:00 minutes and TEMP 350°F will be displayed.
5. Adjust the TIME and TEMP according to recipe instructions. Turn the TIME control dial to a minimum of 01:00 minute and a maximum of 60:00 minutes. Turn the TEMP control dial to adjust from 350°F to 450°F.
6. Press the START/CANCEL button; the button will illuminate indicating the Toaster Oven is ON. The CONVECTION/TURBO button will illuminate, “CONV.” and a twirling fan appears on the digital display to indicate the convection fan is operating. The TIME will count down after preheat is finished.
7. For an added blast of heat, press the illuminated CONVECTION/TURBO button again to activate TURBO Boost at any time. “TURBO” and a twirling fan appears on the digital display.
26
8. Press the illuminated CONVECTION/TURBO button again to turn the fan OFF.
CAUTION: As soon as the START/CANCEL button is pressed, and the Toaster Oven is turned ON, both the top and the lower heating elements may cycle ON and OFF to maintain temperature for the entire cooking time.
CAUTION: Use care not to place anything on top of the Toaster Oven. Do not touch the Toaster Oven or any part of the Toaster Oven without wearing oven mitts.
NOTE: Press the red START/CANCEL button at any time to turn the Toaster Oven OFF.
9. When the TIMER control displays 00:00, 3 audible beeps can be heard, and the Toaster Oven will turn OFF.
NOTE: If no buttons are pressed within 1 minute, the backlighted digital display will turn OFF as the Toaster Oven rests in standby mode.
10. Open the glass door and check for brownness. Extend PIZZA bake time if needed.
11. When you are satisfied with the baked pizza, wear protective oven mitts to pull the wire rack out from the Toaster Oven. Be careful when removing foods from the back of the wire rack. The inside of the Toaster Oven is very hot. Close glass door.
12. Unplug unit and allow to cool before cleaning.
13. WARNING: DO NOT LEAVE THE TOASTER OVEN UNATTENDED WHILE BAKING PIZZA.
14. Unplug when not in use and allow the Toaster Oven to cool completely before cleaning.
HINTS FOR CONVECTION PIZZA NOTE: If package directions do not list convection cooking times, lower the TEMP 50°F and monitor cooking progress carefully.
• The versatility of this digital Toaster Oven allows you to cook a wide variety of pizzas: fresh or frozen pizza; thin crust, stuffed or deep dish perfectly every time.
• Use the TIME and TEMP controls for consistent and precision baking results.

27
AIR FRY Achieve browned and crispy results with a minimum or no oil using the mesh basket, combined with intense heat and maximum TURBO fan power.
IMPORTANT! When air frying fatty foods (such as chicken wings or pork ribs), use the roasting pan instead of the air fry/dehydrator basket to prevent oil from dripping onto the heating elements. Discard excess oil as necessary.
NOTE: Turn food halfway through AIR FRY time. To speed up browning, brush lean cuts of meat, chicken and fish with oil or melted butter.
1. ALWAYS use the mesh air fryer/dehydrator basket when AIR FRYING.
2. Make sure the crumb tray is in place in the bottom of the Toaster Oven.
3. Open the glass door. Slide the mesh basket (air fryer/dehydrator basket) onto the middle shelf position. Close the glass door.
4. Plug into a 120V AC electrical wall outlet. The backlighted digital display will illuminate. Press the FUNCTION button until the arrow points to a flashing AIR FRY; the default TIME 30:00 and TEMP 450°F will be displayed.
5. Adjust the TIME and TEMP according to recipe instructions. Turn the TIME control dial to a minimum of 01:00 minute and a maximum of 60:00 minutes. Turn the TEMP control dial to adjust from 200°F to 480°F.
6. Press the START/CANCEL button; the button will illuminate indicating the Toaster Oven is ON. TIME will count down. “TURBO” and a twirling fan appears on the digital display.
7. Press the illuminated CONVECTION/TURBO button again to turn the fan OFF.
CAUTION: As soon as the START/CANCEL button is pressed, and the Toaster Oven is turned ON, both the top and the lower heating elements may cycle ON and OFF to maintain temperature for the entire cooking time.
CAUTION: Use care not to place anything on top of the Toaster Oven. Do not touch the Toaster Oven or any part of the Toaster Oven without wearing oven mitts.
NOTE: Press the red START/CANCEL button at any time to turn the Toaster Oven OFF.

28
8. When the TIMER control displays 00:00, 3 audible beeps can be heard, and the Toaster Oven will turn OFF.
NOTE: If no buttons are pressed within 1 minute, the backlighted digital display will turn OFF as the Toaster Oven rests in standby mode.
9. Open the glass door and check for brownness. Extend AIR FRY time if needed.
10. When you are satisfied with the baked or roasted food, wear protective oven mitts to pull the wire rack out from the Toaster Oven. Be careful when removing foods from the back of the wire rack. The inside of the Toaster Oven is very hot. Close glass door.
11. Unplug unit and allow to cool before cleaning.
WARNING: DO NOT LEAVE THE TOASTER OVEN UNATTENDED WHILE AIR FRYING.
12. Unplug when not in use and allow the Toaster Oven to cool completely before cleaning.
HINTS FOR AIR FRY1. Use AIR FRY function to cook pre-packaged foods with a fraction of the oil, in a fraction
of the time!
2. Always check food halfway through cooking time to determine final cook time and temperature.
3. Always pat food dry before cooking to encourage browning and avoid excess smoke.
4. To avoid excess smoke, when cooking naturally high fat foods, such as chicken wings or sausages, it may be necessary to empty fat from the bake/broil pan between batches.
5. For crispier results, air fry small batches of freshly breaded foods. Create more surface area by cutting food into smaller pieces. Press breading onto food to help it adhere. Refrigerate breaded foods for at least 30 minutes. Spray with oil before air frying.
6. Spray olive oil or vegetable oil works best as oil is distributed evenly and less oil is needed.
7. Arrange breaded food in the air fryer/dehydrator basket so that food is not touching to allow air flow on all surfaces.
8. Do not overfill air fryer/dehydrator basket with food. NEVER fill air fryer/dehydrator basket more than 2/3 full. When air frying fresh vegetables, we do not recommend adding more than 3 cups of food to the air fryer/dehydrator basket.

29
9. A Note About Air Frying Frozen Foods: For best results, follow oven or toaster oven package directions. Set Air Fryer for suggested TEMPERATURE. Cut the TIME in half. Turn and rotate food halfway through air frying. Check food and continue cooking for 5 minute intervals until food is done to your liking.
AIR FRY COOKING CHART
FOOD TEMP AIR FRY TIME*
ACTION
Vegetables
Asparagus 400°F 5 - 7 minutes Turn & rotate air fryer basket halfway through air frying.
Broccoli Florets (roasted)
400°F 6 - 10 minutes Turn & rotate air fryer basket halfway through air frying.
Brussels Sprouts 380°F 12 - 15 minutes Turn & rotate air fryer basket halfway through air frying.
Cauliflower Florets (roasted)
400°F 6 - 10 minutes Turn & rotate air fryer basket halfway through air frying.
Corn on the Cob 390°F 6 - 8 minutes Turn & rotate air fryer basket halfway through air frying.
Eggplant, 1-1/2-inch cubes (roasted)
400°F 15 minutes Turn & rotate air fryer basket halfway through air frying.
Fennel, fresh, chopped 380°F 10 - 13 minutes Turn & rotate air fryer basket halfway through air frying.
French Fries, (fresh, soaked, 1/4 to 1/3-in. thick)
400°F 16 - 20 minutes Turn & rotate air fryer basket halfway through air frying.
Mushrooms, sliced 400°F 5 minutes Turn & rotate air fryer basket halfway through air frying.
Peppers, bell, 1-inch chunks
380°F 10 minutes Turn & rotate air fryer basket halfway through air frying.

30
Peppers, jalapeno, poblano (roasted)
380°F 10 minutes Turn & rotate air fryer basket halfway through air frying.
Potatoes, 1-inch cubes 400°F 12 - 14 minutes Turn & rotate air fryer basket halfway through air frying.
Potatoes, whole 400°F 40 minutes Turn & rotate air fryer basket halfway through air frying.
Root Vegetables, 1/2-in. chunks (roasted)
400°F 15 - 20 minutes Turn & rotate air fryer basket halfway through air frying.
Sweet Potatoes, whole 380°F 30 - 35 minutes Turn & rotate air fryer basket halfway through air frying.
Zucchini, 1/4-inch discs 400°F 12 - 17 minutes Turn & rotate air fryer basket halfway through air frying.
FOOD TEMP AIR FRY TIME*
ACTION
Beef
Hamburgers, 1/4 lb. (up to 4)
360°F 12 – 16 minutes Turn & rotate air fryer basket halfway through air frying.
Hot Dogs /Sausages 360°F 10 – 15 minutes Turn & rotate air fryer basket halfway through air frying.
Meatloaf, 1 lb. 360°F 35 – 40 minutes Rotate loaf pan halfway through air frying.
Steak 360°F 8 – 12 minutes Turn and rotate halfway through air frying.
Beef Tenderloin, 1 lb., rare
360°F 16 minutes Turn and rotate halfway through air frying.
Beef Tenderloin, 1 lb., medium
360°F 18 minutes Turn and rotate halfway through air frying.

31
FOOD TEMP AIR FRY TIME*
ACTION
Chicken
Chicken Breast, boneless, skinless
360°F 10 – 15 minutes Turn and rotate halfway through air frying.
Chicken Pieces 360°F 20 - 30 minutes Turn & rotate air fryer basket halfway through air frying.
Chicken Tenders/Fingers, battered
360°F 13 - 15 minutes Turn & rotate air fryer basket halfway through air frying.
Chicken Wings 360°F 20 minutes Turn & rotate air fryer basket halfway through air frying.
Pork and Lamb
Bacon, thick cut 400°F 8 – 10 minutes Turn and rotate halfway through air frying.
Ham, precooked, boneless, 3 lb.
300°F 1 hour Turn and rotate halfway through air frying.
Lamb Loin Chops, 1-inch thick
400°F 8 – 12 minutes Turn and rotate halfway through air frying.
Pork Chops, 1-inch thick
380°F 10 – 14 minutes Turn and rotate halfway through air frying.
Fish and Seafood
Catfish Fingers (thawed, battered)
400°F 10 - 15 minutes Turn & rotate air fryer basket halfway through air frying.
Shrimp (thawed, battered)
320°F 12 minutes Turn & rotate air fryer basket halfway through air frying.
Shrimp (thawed, sauced) 320°F 5 - 8 minutes Turn & rotate air fryer basket halfway through air frying.

32
FOOD TEMP AIR FRY TIME* ACTION
Fish and Seafood
Catfish Fingers (thawed, battered)
400°F 10 - 15 minutes Turn & rotate air fryer basket halfway through air frying.
Shrimp (thawed, battered)
320°F 12 minutes Turn & rotate air fryer basket halfway through air frying.
Shrimp (thawed, sauced) 320°F 5 - 8 minutes Turn & rotate air fryer basket halfway through air frying.
Frozen Foods
Cheese Sticks (frozen) 350°F 6 – 9 minutes Turn & rotate air fryer basket halfway through air frying.
Chicken Nuggets (frozen)
360°F 10 - 15 minutes Turn & rotate air fryer basket halfway through air frying.
Fish Sticks (frozen) 400°F 12 – 18 minutes Turn & rotate air fryer basket halfway through air frying.
French Fries, thick (frozen) 4 cups
400°F 17 – 21 minutes Turn & rotate air fryer basket halfway through air frying.
French Fries, thin (frozen) 4 cups
400°F 15 – 17 minutes Turn & rotate air fryer basket halfway through air frying.
FOOD TEMP AIR FRY TIME* ACTION
Desserts
Apple Turnovers 400°F 10 minutes Rotate air fryer basket halfway through air frying.
Cake 350°F 25 minutes Rotate cake halfway through air frying.
Donuts 350°F 8 minutes Turn & rotate air fryer basket halfway through air frying.

33
BROILBROIL is used to cook tender cuts of meats or marinated meats, fish and some fruits and vegetables. Cooking time is determined by the desired doneness and the distance between the food and the element.
NOTE: Turn food halfway through cooking time. To speed up browning, brush lean cuts of meat, chicken and fish with oil or melted butter.
1. To BROIL meats, poultry or fish, place meats or fish onto the bake/broil pan. Juices and/or fat will drip into the pan and decrease spattering while broiling.
2. Make sure the crumb tray is in place in the bottom of the Toaster Oven.
3. Open the glass door. Slide the bake/broil assembly into the upper shelf position. Close the glass door.
4. Plug into a 120V AC electrical wall outlet. The backlighted digital display will illuminate. Press the FUNCTION button until the arrow points to a flashing BROIL; the default TIME 10:00 will be displayed.
5. Adjust the TIME according to recipe instructions. Turn the TIME control dial to a minimum of 01:00 minute and a maximum of 60:00 minutes.
6. Press the START/CANCEL button; the button will illuminate indicating the Toaster Oven is ON. TIME will count down.
7. Press the CONVECTION/TURBO button. “CONV.” and a twirling fan appears on the digital display indicating the fan is ON. TIME will count down.
8. For an added blast of heat, press the illuminated CONVECTION/TURBO button again to activate TURBO Boost at any time. “TURBO” and a twirling fan appears on the digital display.
9. Press the illuminated CONVECTION/TURBO button again to turn the fan OFF.
NOTE: Press the CONVECTION/TURBO button at any time to turn the fan ON. Press the CONVECTION/TURBO button 2x for TURBO Boost maximized airflow and faster broiling.
CAUTION: Use care not to place anything on top of the Toaster Oven. Do not touch the Toaster Oven or any part of the Toaster Oven without wearing oven mitts.
NOTE: Press the red START/CANCEL button at any time to turn the Toaster Oven OFF.

34
10. When the TIMER control displays 00:00, 3 audible beeps can be heard, and the Toaster Oven will turn OFF.
NOTE: If no buttons are pressed within 1 minute, the backlighted digital display will turn OFF as the Toaster Oven rests in standby mode.
11. Open the glass door and check for brownness. Extend BROIL time if needed..
12. Wearing protective oven mitts, pull the wire rack out from the Toaster Oven. Be careful when removing foods from the back of the wire rack. The inside of the Toaster Oven is very hot. Close glass door.
13. Unplug unit and allow to cool before cleaning.
WARNING: DO NOT LEAVE THE TOASTER OVEN UNATTENDED WHILE BROILING.
14. . Unplug when not in use and allow the Toaster Oven to cool completely before cleaning.
HINTS FOR BROIL/CONVECTION BROIL• The Toaster Oven defaults to BROIL. If you would prefer to CONVECTION BROIL, press
the CONVECTION/TURBO button to turn the fan ON. Press the CONVECTION/TURBO button 2x for TURBO Boost.
• Convection Broiling is used for thinner, tender cuts of meats.
• Marinated meats and fish should be dried before broiling.
• Broiling time is determined by the desired doneness and the distance between the food and the upper heating elements.
• NEVER place aluminum foil on top of the bake/broil pan. This traps grease and can cause a fire.
• Trim excess fat from meat and score edges to prevent curling.
• Thaw frozen meats and fish before broiling.
• ALWAYS pat meat dry to reduce smoke and promote brownness during broiling.

35
COOKIESThe Toaster Oven’s flexibility and pinpoint accuracy makes it perfect for baking a wide variety of cookie types – fresh, refrigerated or frozen cookie doughs can all be used to produce fabulous results.
NOTE: For example, frozen cookie dough may need additional baking time. The amount of dough per cookie or the thickness of the cookie many also vary the cooking time.
1. Slide the cookie-filled bake/broil pan into the center shelf position.
2. Plug into a 120V AC electrical wall outlet. The backlighted digital display will illuminate. Press the FUNCTION button until the arrow points to a flashing COOKIES; the default TIME 11:00 minutes and TEMP 350°F will be displayed.
3. Adjust the TIME and TEMP according to recipe instructions. Turn the TIME control dial to a minimum of 01:00 minute and a maximum of 60:00 minutes. Turn the TEMP control dial to adjust from 170°F to 450°F.
4. Press the START/CANCEL button; the button will illuminate indicating the Toaster Oven is ON. TIME will count down after preheat is finished.
NOTE: Press the CONVECTION/TURBO button at any time to turn ON TURBO Boost maximized airflow and faster warming.
CAUTION: As soon as the START/CANCEL button is pressed, and the Toaster Oven is turned ON, both the top and the lower heating elements may cycle ON and OFF to maintain temperature for the entire cooking time.
CAUTION: Use care not to place anything on top of the Toaster Oven. Do not touch the Toaster Oven or any part of the Toaster Oven without wearing oven mitts.
NOTE: Press the red START/CANCEL button at any time to turn the Toaster Oven OFF.
5. When the TIMER control displays 00:00, 3 audible beeps can be heard, and the Toaster Oven will turn OFF.
NOTE: If no buttons are pressed within 1 minute, the backlighted digital display will turn OFF as the Toaster Oven rests in standby mode.
6. Open the glass door and check for brownness. Extend COOKIE bake time if needed.

36
7. When you are satisfied with the cookies, wear protective oven mitts and pull the bake/broil pan out from the Toaster Oven. Be careful when removing foods from the back of the wire rack. The inside of the Toaster Oven is very hot. Close glass door.
8. Unplug unit and allow to cool before cleaning.
WARNING: DO NOT LEAVE THE TOASTER OVEN UNATTENDED WHILE BAKING COOKIES.
9. Unplug when not in use and allow the Toaster Oven to cool completely before cleaning.
DEHYDRATEThe DEHYDRATE function combines low, steady heat and maximum TURBO fan power. Preparing your own dried foods ensures healthy, safe, preservative-free results. Dehydrate fresh, ripe foods to preserve nutrients and enhance flavor. Your Toaster Oven’s automated drying makes home dehydration both simple and rewarding.
NOTE: Turn food halfway through DEHYDRATE time. To speed up browning, brush lean cuts of meat, chicken and fish with oil or melted butter.
1. ALWAYS use the mesh Air Fryer/Dehydrator Basket when using DEHYDRATE function.
2. Make sure the crumb tray is in place in the bottom of the Toaster Oven.
3. Open the glass door. Slide the mesh basket onto the middle shelf position. Close the glass door.
4. Plug into a 120V AC electrical wall outlet. The backlighted digital display will illuminate. Press the FUNCTION button until the arrow points to a flashing DEHYDRATE; the default TIME 08:00 hours and TEMP 120°F will be displayed.
5. Adjust the TIME and TEMP according to recipe instructions. Turn the TIME control dial to a minimum of 01:00 hour and a maximum of 72:00 hours. Turn the TEMP control dial to adjust from 80°F to 180°F.
6. Press the START/CANCEL button; the button will illuminate indicating the Toaster Oven is ON. TIME will count down. The CONVECTION/TURBO button will illuminate. “TURBO” and a twirling fan appears on the digital display .
7. Press the illuminated CONVECTION/TURBO button again to turn the fan OFF.
CAUTION: As soon as the START/CANCEL button is pressed, and the Toaster Oven is turned ON, both the top and the lower heating elements may cycle ON and OFF to maintain temperature for the entire cooking time.

37
CAUTION: Use care not to place anything on top of the Toaster Oven. Do not touch the Toaster Oven or any part of the Toaster Oven without wearing oven mitts.
NOTE: Press the red START/CANCEL button at any time to turn the Toaster Oven OFF.
8. When the TIMER control displays 00:00, 3 audible beeps can be heard, and the Toaster Oven will turn OFF.
NOTE: If no buttons are pressed within 1 minute, the backlighted digital display will turn OFF as the Toaster Oven rests in standby mode.
9. Open the glass door and check dried food. Extend DEHYDRATE time if needed.
10. When you are satisfied with the dehydrated food, wear protective oven mitts to pull the mesh basket out from the Toaster Oven. Be careful when removing foods from the back of the mesh basket. The inside of the Toaster Oven is very hot. Close glass door.
11. Unplug unit and allow to cool before cleaning.
WARNING: DO NOT LEAVE THE TOASTER OVEN UNATTENDED WHILE DEHYDRATING.
12. Unplug when not in use and allow the Toaster Oven to cool completely before cleaning.

38
DEHYDRATING CHART
HERB TEMP: TIME NOTES
Oregano 125°F 2 -3 hrs. Rotate basket.
Parsley 125°F 2 -3 hrs. Rotate basket.
Thyme 125°F 3- 4 hrs. Rotate basket.
Rosemary 125°F 2 -3 hrs. Rotate basket.
Tarragon 125°F 3- 4 hrs. Rotate basket.
Sage 125°F 3- 4 hrs. Rotate basket.
Kale Chips 125°F 1 hr. 30 mins. Massage kale with olive oil. Rotate basket.
FRUIT• Wash all fruit skins well.
• Slice fruit into 1/4-inch thick slices and arrange on both dehydrator basket to ensure even drying.
• Rotate shelves halfway through DEHYDRATE TIME for even drying.
Apples 135°F 8 - 10 hrs. Core/slice into 1/4-in. rounds, soak in acidulated water.
Rotate basket.
Mango/Papaya 135°F 10 hrs. Peel/slice into 1/4-in. pieces. Rotate basket.
Kiwi 135°F 6 hrs. 1/4-in. rounds. Rotate basket.
Orange Slices 135°F 10 hrs. Citrus is crisp when fully dried. Rotate basket.
Tomatoes (Roma) 145°F 10 hrs. Skin-side down. Rotate basket.
Tomatoes (Cherry/Grape) 145°F 5 - 9 hrs. Skin-side down. Rotate basket.

39
BEEF JERKY1/2 lb. London Broil or Flank 145°F 5 - 6 hrs. Flip and rotate basket halfway.
CROUTONS 400°F 3 - 4 mins. Flip, oil, and rotate basket halfway.
REHEATNOTE: Please read previous section entitled “Convection Cooking” for additional information.
CAUTION: NEVER plastic containers in the Toaster Oven.
NOTE: Please read previous section entitled “Cooking Containers” for before placing any food in the Toaster Oven for reheating.
1. Make sure the crumb tray is in place in the bottom of the Toaster Oven.
2. Open the glass door. Place food on the bake/broil pan or in an oven-proof dish, then place on the center of the wire rack so air flows around all sides of the food.
3. Close the glass door.
4. Plug into a 120V AC electrical wall outlet. The backlighted digital display will illuminate. Press the FUNCTION button until the arrow points to a flashing REHEAT; the default TIME 15:00 minutes and TEMP 350°F will be displayed.
5. To adjust the TIME, turn the TIME control dial to a minimum of 01:00 minute and a maximum of 60:00 minutes. Turn the TEMP control dial to adjust from 170°F to 450°F.
6. Press the START/CANCEL button; the button will illuminate indicating the Toaster Oven is ON. Time will start counting down. Press the CONVECTION/TURBO button at any time to turn ON TURBO Boost maximized airflow and faster warming. .“TURBO” and a twirling fan appears on the digital display.
NOTE: Press the illuminated CONVECTION/TURBO button at any time to turn the fan OFF.
CAUTION: As soon as the START/CANCEL button is pressed, and the Toaster Oven is turned ON, both the top and the lower heating elements may cycle ON and OFF to maintain temperature for the entire REHEAT time.

40
CAUTION: Use care not to place anything on top of the Toaster Oven. Do not touch the Toaster Oven or any part of the Toaster Oven without wearing oven mitts.
NOTE: Press the red START/CANCEL button at any time to turn the Toaster Oven OFF.
7. When the TIMER control displays 00:00, 3 audible beeps can be heard, and the Toaster Oven will turn OFF.
NOTE: If no buttons are pressed within 1 minute, the backlighted digital display will turn OFF as the Toaster Oven rests in standby mode.
8. Open the glass door and check for brownness. Extend REHEAT time if needed.
9. When you are satisfied with the reheated food, wear protective oven mitts and pull the wire rack out from the Toaster Oven. Be careful when removing foods from the back of the wire rack. The inside of the Toaster Oven is very hot. Close glass door.
10. Unplug unit and allow to cool before cleaning.
WARNING: DO NOT LEAVE THE TOASTER OVEN UNATTENDED WHILE REHEATING FOODS.
11. Unplug when not in use and allow the Toaster Oven to cool completely before cleaning.
USER MAINTENANCE INSTRUCTIONSThis appliance requires little maintenance. It contains no user serviceable parts. Do not try to repair it yourself. Any servicing that requires disassembly other than cleaning must be performed by a qualified appliance repair technician.
CARE & CLEANING INSTRUCTIONS1. Allow the Toaster Oven and all accessories to cool completely before cleaning.
2. Clean the outside of the Toaster Oven with a damp cloth and dry thoroughly. A non-abrasive liquid cleaner may be used for stubborn stains. Rinse and dry thoroughly. Do not use metal scouring pads or abrasive cleaners that will scratch the surface.
3. Clean interior with a mild or non-abrasive cleaner and plastic scouring pad after each use to avoid build-up. Do not rub too hard as surface can be scratched.
4. To remove baked-on food, pour a small amount of cooking oil onto the food and allow to stand for 5 to 10 minutes. Remove the softened food with a soft cloth. Do not use steel wool, scouring pads or abrasive cleaners.

41
5. Rinse and dry thoroughly before closing the glass door. Clean the glass door with a cloth or sponge dampened with warm, sudsy water. Dry thoroughly.
6. Wash the air fryer/dehydrator basket, bake/broil pan, wire rack, and crumb tray in soapy water and dry thoroughly. Toaster Oven accessories may be washed in the dishwasher.
7. If crumbs and spills have accumulated on the crumb tray, wipe with a damp cloth. Always dry the crumb tray thoroughly before replacing.
8. DO NOT use abrasive cleaners or metal scouring pads to clean bake/broil pan, wire rack, wire rack, or crumb tray. For stubborn stains, clean with a nylon or polyester mesh pad and a mild, non-abrasive cleaner. Rinse and dry thoroughly.
CAUTION: DO NOT use spray-on or other oven cleaners. Using these types of cleaners may cause cosmetic and/or electrical damage to the Toaster Oven.
STORING INSTRUCTIONS1. Unplug unit, allow to cool, and clean before storing.
2. Slide the bake/broil assembly (wire rack and bake/broil pan) into the lower shelf position.
3. Store Toaster Oven in its box in a clean, dry place.
4. Never store appliance while it is hot or still plugged in.
5. Never wrap cord tightly around the appliance. Do not put any stress on the cord where it enters the unit, as it could cause the cord to fray and break.

Limited Two-Year Warranty
SENSIO Inc. hereby warrants that for a period of TWO YEARS from the date of purchase, this product will be free from mechanical defects in material and workmanship, and for 90 days in respect to non-mechanical parts. At its sole discretion, SENSIO Inc. will either repair or replace the product found to be defective, or issue a refund on the product during the warranty period.
The warranty is only valid for the original retail purchaser from the date of initial retail purchase and is not transferable. Keep the original sales receipt, as proof of purchase is required to obtain warranty validation. Retail stores selling this product do not have the right to alter, modify, or in any way revise the terms and conditions of the warranty.
Exclusions:
The warranty does not cover normal wear of parts or damage resulting from any of the following: negligent use of the product, use of improper voltage or current, improper routine maintenance, use contrary to the operating instructions, disassembly, repair, or alteration by anyone other than qualified SENSIO Inc. personnel. Also, the warranty does not cover Acts of God such as fire, floods, hurricanes, or tornadoes.
SENSIO Inc. shall not be liable for any incidental or consequential damages caused by the breach of any express or implied warranty.
Apart from the extent prohibited by applicable law, any implied warranty of merchantability or fitness for a particular purpose is limited in time to the duration of the warranty. Some states, provinces or jurisdictions do not allow the exclusion or limitation of incidental or consequential damages, or limitations on how long an implied warranty lasts, and therefore, the above exclusions or limitations may not apply to you. The warranty covers specific legal rights which may vary by state, province and/or jurisdiction.
42

43
How To Obtain Warranty Service:
You must contact Customer Service at our toll-free number: 1-866-832-4843. A Customer Service Representative will attempt to resolve warranty issues over the phone. If the Customer Service Representative is unable to resolve the problem, you will be provided with a case number and asked to return the product to SENSIO Inc. Attach a tag to the product that includes: your name, address, daytime contact telephone number, case number, and description of the problem.
Also, include a copy of the original sales receipt. Carefully package the tagged product with the sales receipt, and send it (with shipping and insurance prepaid) to SENSIO Inc.’s address. SENSIO Inc. shall bear no responsibility or liability for the returned product while in transit to SENSIO Inc.’s Customer Service Center.

crux.kitchen cruxkitchen cruxkitchen cruxkitchen CRUX kitchen
For customer service questions or comments1-866-832-4843
For Recipes and Cooking tips cruxkitchen.com
CRUX is a trademark of 8479950 Canada Inc., Montreal, Canada H3C 4S9.
All rights reserved SO
-316
152
148
05
R
1