Embed Size (px)
Citation preview
1
To : Cluster Managers
cc : Ricky Vibandor, Lawrence Lao, Joseph Yu, Emilie Dalisay, Wally Magno,
Jack Coson, Robert Dequito, Patrick Ricafort, Jose Ma. A. Grau Jr.,
Tito Jose B. Chavez, George H. Tan
From : Archie Nicasio, Marketing Division
Date : November 8, 2007
Re : LOCAL STORE MERCHANDISING GUIDELINES
Ref No. : MKTG-070-2007
LOCAL STORE MERHCANDISING GUIDELINES
The Local Store Merchandising Guidelines is aimed at standardizing the look of all the branches by means of putting a system and regulation that will aid employees in implementing uniform
merchandising procedure in all Netopia branches.
I. BRANCH WALLS Regardless of store configuration every branch is assumed to have four (4) Major or
Merchandising Walls comprised of the following: Wall 1 or Front Wall, Wall 2 or Back Wall,
Wall 3 or Counter Wall, and Wall 4 or Side Wall. Placement of any merchandising materials in these walls is dictated by the Marketing Division as presented in the Advertisement Placement Schedule (APS) and approved local store initiatives.
1. WALL 1 - Front Wall:
a. The frontage of the branch where the main entrance is located b. Exclusive for Netopia’s use
c. Where Netopia displays collaterals to promote its highlight products d. Where a portion is allotted for the Click Feature Corner
2. WALL 2 - Back Wall: a. The wall opposite to Wall 1 / Front Wall
b. Non-exclusive c. Where Netopia displays collaterals of third party advertisers
3. *WALL 3 - Counter Wall:
a. The wall along the side of the Counter
b. Exclusive for Netopia’s use c. Where Netopia displays collaterals to promote its lowlight products
4. WALL 4 – Side Wall:
a. The wall opposite to Wall 3 / Counter Wall
b. Non-exclusive c. Where Netopia displays collaterals of third party advertisers
6th Floor, The Centerpoint Building Garnet Road Cor. Julia Vargas Avenue, Ortigas Center, Pasig City Philippines Trunkline: (+632) 638 6742 Fax: (+632) 633 4181 Website: www.netopia.ph

2
*There are those that have Counters situated in the center of the branch. For this instance, when facing Wall 2 (back wall) the right wall shall be considered as Wall 3 and the left wall as Wall 4. For this instance same guidelines shall apply.
Illustration 1.1
Minor or Non-Merchandising Walls:
• Partition Wall: It is the wall that separates the Function Room (formerly called Quiet Room) from the Common Area. Usually made out of glass or wood panels painted in
yellow. This should be freed from any forms of display. Only In-store Signage may be displayed on this.
• Accent Wall: These are the yellow built up walls commonly positioned in the common
area. Accent walls should be freed from any forms of display as well
Illustration 1.2
Accent Wall
Partition Wall
3
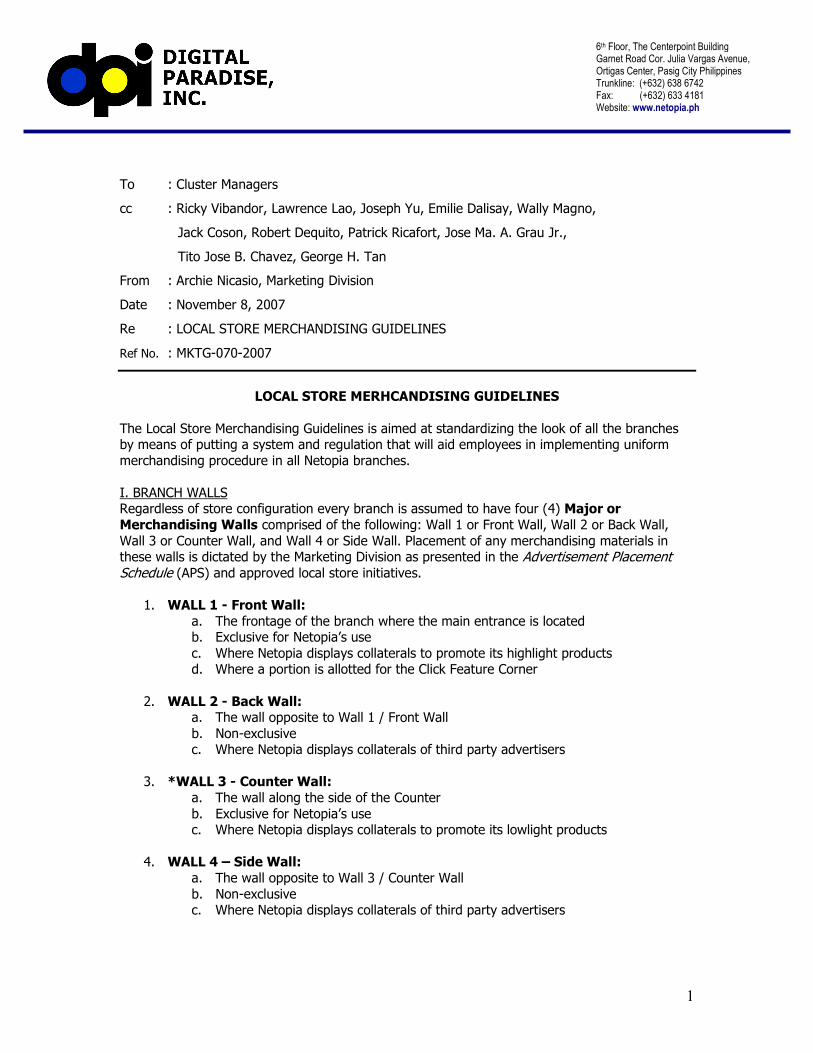
Poster Space:
• Standard poster size: 18”x24”
• Evenly distribute the posters on the wall
• THUMB DISTANCE: If there are several posters that have to be accommodated on a wall,
Thumb Distance will help you determine the poster spacing. Use your Thumb in determining the distance of one poster to another as illustrated below:
• A poster must be positioned only at the vertical center of the designated poster space
this is to accommodate posters with varying sizes • The end of the poster should be 4ft from the floor; the center of the 18”x24” poster
serves as the vertical center of the display wall
• Maintain a single file or linear poster display per wall
• Multi-linear poster display is NOT ALLOWED
Thumb Distance
CORRECT ORIENTATION: Linear Display WRONG ORIENTATION: Multi-linear Display
vertical center
18”x24”
4ft clearance from the floor
POSTER 1 POSTER 2 POSTER 3 POSTER 4 POSTER 5 POSTER 6
vertical center
18”x24”
4ft clearance from the floor
POSTER 1 POSTER 2 POSTER 3 POSTER 4 POSTER 5 POSTER 6
4
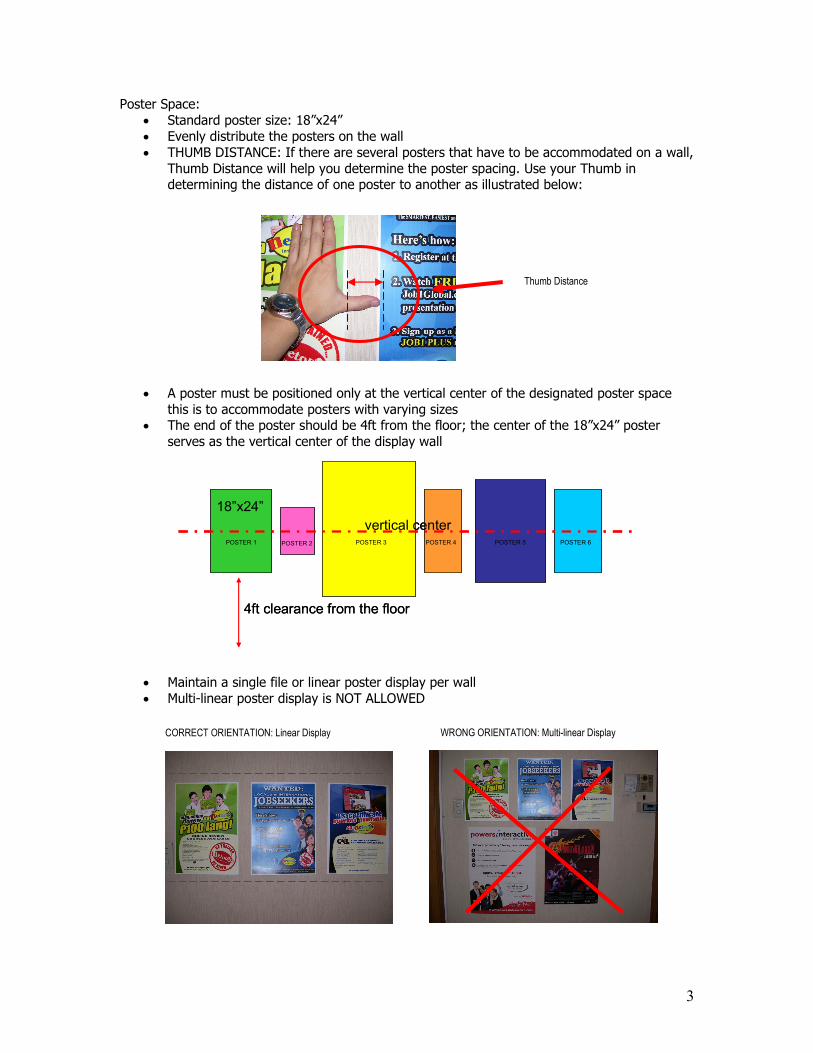
• WALL 1 / Front Wall which is normally composed of glass panels, is included as
merchandising /poster space. o Only one poster can be displayed at the center of every glass panel.
o Posting of posters on glass panels should be done alternately o Poster must be displayed at eye level. Please note that this excludes the branch
doors.
• Eye-level is displaying a poster at a readable height. As mentioned previously poster
distance from the floor is approximately four (4) feet or four (4) ruler-length
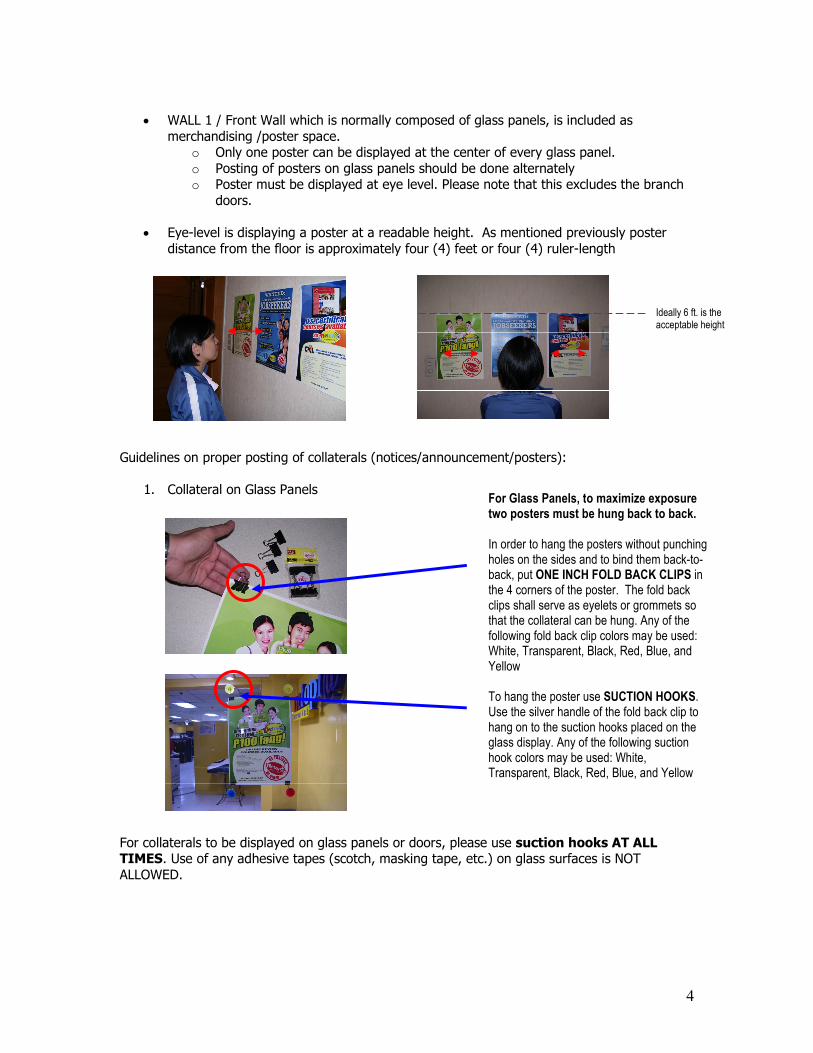
Guidelines on proper posting of collaterals (notices/announcement/posters):
1. Collateral on Glass Panels
For collaterals to be displayed on glass panels or doors, please use suction hooks AT ALL TIMES. Use of any adhesive tapes (scotch, masking tape, etc.) on glass surfaces is NOT
ALLOWED.
Ideally 6 ft. is the acceptable height placement
For Glass Panels, to maximize exposure two posters must be hung back to back. In order to hang the posters without punching holes on the sides and to bind them back-to-back, put ONE INCH FOLD BACK CLIPS in the 4 corners of the poster. The fold back clips shall serve as eyelets or grommets so that the collateral can be hung. Any of the following fold back clip colors may be used: White, Transparent, Black, Red, Blue, and Yellow
To hang the poster use SUCTION HOOKS. Use the silver handle of the fold back clip to hang on to the suction hooks placed on the glass display. Any of the following suction hook colors may be used: White, Transparent, Black, Red, Blue, and Yellow
5
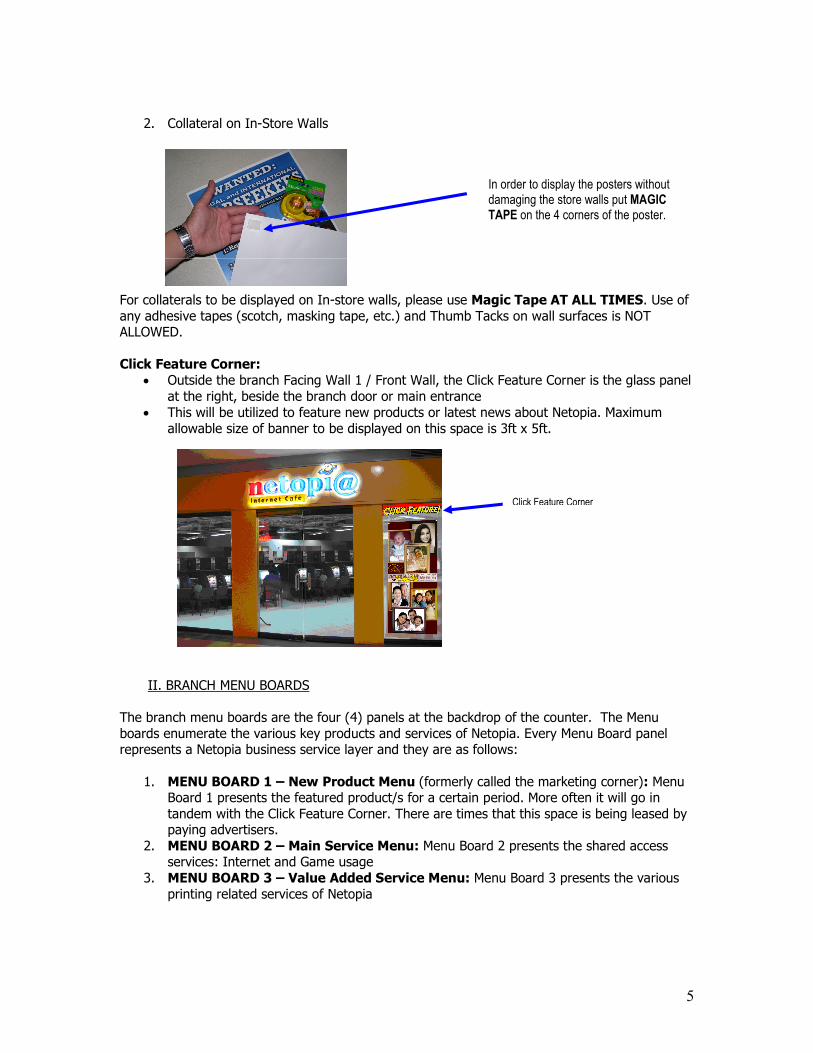
2. Collateral on In-Store Walls
For collaterals to be displayed on In-store walls, please use Magic Tape AT ALL TIMES. Use of
any adhesive tapes (scotch, masking tape, etc.) and Thumb Tacks on wall surfaces is NOT ALLOWED.
Click Feature Corner:
• Outside the branch Facing Wall 1 / Front Wall, the Click Feature Corner is the glass panel
at the right, beside the branch door or main entrance
• This will be utilized to feature new products or latest news about Netopia. Maximum
allowable size of banner to be displayed on this space is 3ft x 5ft.
II. BRANCH MENU BOARDS
The branch menu boards are the four (4) panels at the backdrop of the counter. The Menu
boards enumerate the various key products and services of Netopia. Every Menu Board panel represents a Netopia business service layer and they are as follows:
1. MENU BOARD 1 – New Product Menu (formerly called the marketing corner): Menu Board 1 presents the featured product/s for a certain period. More often it will go in
tandem with the Click Feature Corner. There are times that this space is being leased by paying advertisers.
2. MENU BOARD 2 – Main Service Menu: Menu Board 2 presents the shared access services: Internet and Game usage
3. MENU BOARD 3 – Value Added Service Menu: Menu Board 3 presents the various
printing related services of Netopia
Click Feature Corner
In order to display the posters without damaging the store walls put MAGIC TAPE on the 4 corners of the poster.
6
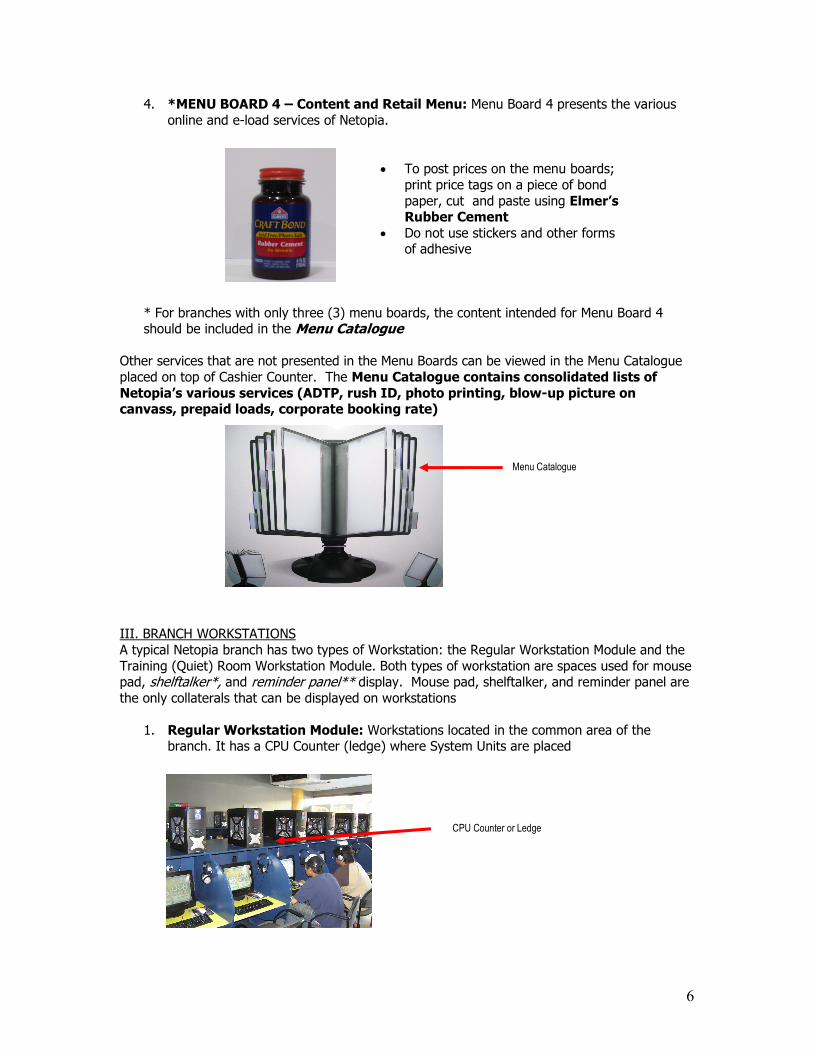
4. *MENU BOARD 4 – Content and Retail Menu: Menu Board 4 presents the various
online and e-load services of Netopia.
* For branches with only three (3) menu boards, the content intended for Menu Board 4 should be included in the Menu Catalogue
Other services that are not presented in the Menu Boards can be viewed in the Menu Catalogue
placed on top of Cashier Counter. The Menu Catalogue contains consolidated lists of
Netopia’s various services (ADTP, rush ID, photo printing, blow-up picture on canvass, prepaid loads, corporate booking rate)
III. BRANCH WORKSTATIONS
A typical Netopia branch has two types of Workstation: the Regular Workstation Module and the
Training (Quiet) Room Workstation Module. Both types of workstation are spaces used for mouse pad, shelftalker*, and reminder panel** display. Mouse pad, shelftalker, and reminder panel are the only collaterals that can be displayed on workstations
1. Regular Workstation Module: Workstations located in the common area of the branch. It has a CPU Counter (ledge) where System Units are placed
CPU Counter or Ledge
Menu Catalogue
• To post prices on the menu boards;
print price tags on a piece of bond
paper, cut and paste using Elmer’s Rubber Cement
• Do not use stickers and other forms of adhesive

7
2. Function Room Workstation Module: Workstations located inside the Function
Room. It does not have a CPU Counter. System Units are normally positioned beside or at the back of the LCD Monitors. Display of *Shelftalker in the Training Room
workstations is NOT ALLOWED.
*Shelftalker – another form of a mini-poster that serves as collateral to promote or feature a service or product.
• Standard size: 10”x3” • Should be displayed one workstation apart • Placement of shelftalker is grouped in to two: odd or even
o ODD: displayed on workstation 1,3,5… o EVEN: displayed on workstations 2,4,6…
No CPU counter
NETOPIA INTERNET CAFE
SHELF TALKER
To display, align the magic tape along the fold line of the shelftalker
Stick the shelftalker at the center of the workstation, under the CPU counter.

8
Workstations are divided by a Spacer Partition Panel to define the space allotted for each workstation.
** Reminder Panel - mini poster merchandising collateral displayed on the left and right of the workstation spacer partition panel. Standard size: 8.5”x11”
IV. BRANCH FLOOR
Branches carrying the latest design have the series of yellow circle Floor Patterns. The biggest
circle is seen at the main doorstep. As the other circles move closer to the counter they become smaller. This was incorporated in the store design to help direct the customers to go inside the
branch and login at the counter. At times advertisers lease this to display their advertising floor decal* *Advertising floor decal / Floor Graphics - Merchandising Collateral printed on vinyl sticker posted on the main doorstep in a store
Spacer Partition Panel
Reminder Panel
Floor Pattern
9
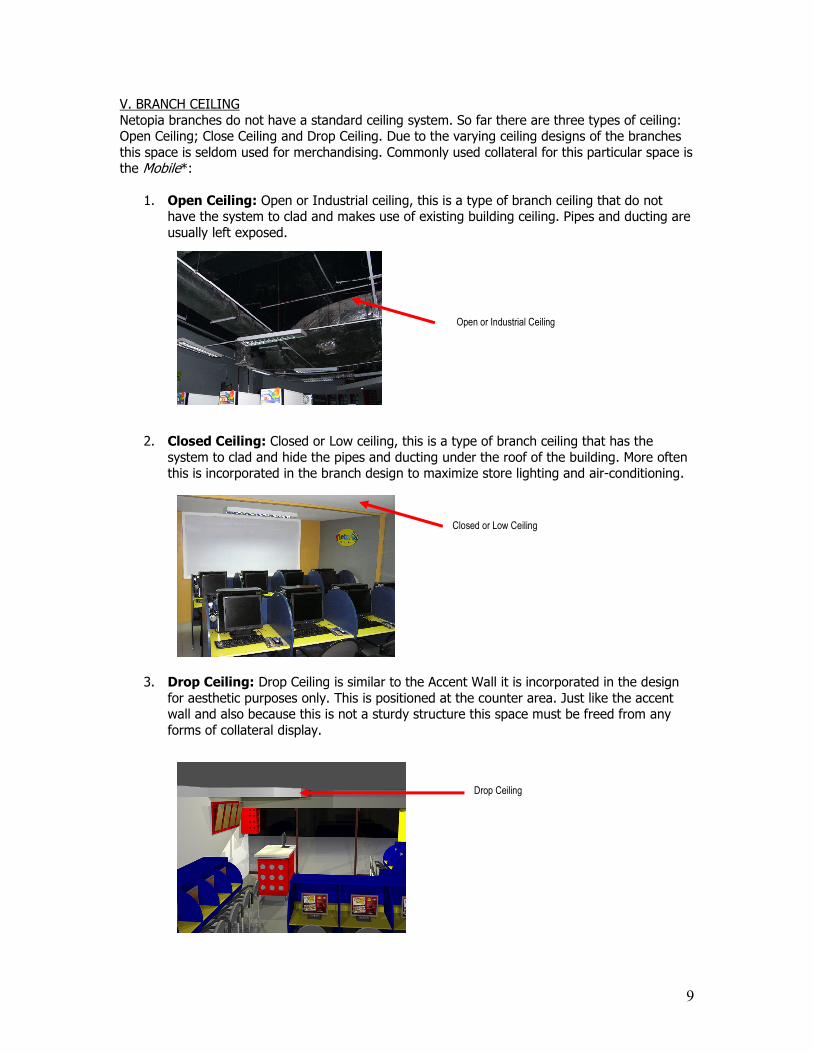
V. BRANCH CEILING
Netopia branches do not have a standard ceiling system. So far there are three types of ceiling: Open Ceiling; Close Ceiling and Drop Ceiling. Due to the varying ceiling designs of the branches
this space is seldom used for merchandising. Commonly used collateral for this particular space is the Mobile*:
1. Open Ceiling: Open or Industrial ceiling, this is a type of branch ceiling that do not have the system to clad and makes use of existing building ceiling. Pipes and ducting are
usually left exposed.
2. Closed Ceiling: Closed or Low ceiling, this is a type of branch ceiling that has the
system to clad and hide the pipes and ducting under the roof of the building. More often this is incorporated in the branch design to maximize store lighting and air-conditioning.
3. Drop Ceiling: Drop Ceiling is similar to the Accent Wall it is incorporated in the design
for aesthetic purposes only. This is positioned at the counter area. Just like the accent wall and also because this is not a sturdy structure this space must be freed from any
forms of collateral display.
Closed or Low Ceiling
Open or Industrial Ceiling
Drop Ceiling

10
*Mobile is a type of collateral displayed by hanging at the store ceiling. Mobile Space
• Standard Mobile size: 12”x12”x12”
• Technically the whole ceiling space can be used for Mobile display, but for organization
purposes the number of mobile that can be displayed in a branch is half or 50% of the total rentable workstations.
• In terms of placement, mobile hangers can be hung one workstation apart parallel to the
aisle
VI. IN-STORE SIGNAGE
A branch should have at least one of each of the following In-Store signage:
Signage Branch Placement
SIGNAGE # 1: Thank You For Coming To Netopia
DOOR EXIT
SIGNAGE # 2: We Would Like To Keep The
Branch Secured. Please Help Us In Achieving This By Doing Your Part. Please Watch Your
Belongings
COMMON AREA
SIGNAGE # 3:
Please Count Your Change Before Leaving The Counter
Please Transact With Netopia Personnel Only
COUNTER
SIGNAGE # 4: Please Observe Silence FUNCTION ROOM
SIGNAGE # 5: Grade School And High School Students Are Not Allowed To Play Games
During School Hours
RIGHT DOOR ENTRANCE
SIGNAGE # 6: Viewing of Pornographic Materials not allowed
RIGHT DOOR ENTRANCE
SIGNAGE # 7: Open / Close RIGHT DOOR ENTRANCE
SIGNAGE # 8: Function Room FUNCTION ROOM ENTRANCE
Mobile

11
VII. PERMITS AND LICENSES
Permits and licenses issued by the government should be displayed at the wall space behind the counter. BUREAU OF INTERNAL REVENUE (BIR) All BIR permits and licenses should be displayed in its original form. So far there are five (5) types of BIR permits that have to be visibly displayed in the branch: 1. Certificate of Registration 2. *Notice to the Public - Ask for Receipt (Orange Sign) 3. Annual Registration 0605 Form with Official Receipt 4. CMS2 Certificate of Accreditation 5. CMS2 Permit to Use
*Not all BIR branches issue a Notice to the Public signage. LOCAL GOVERNMENT Local Government permits and licenses may be resized except for the Business License Permit Plate. Original copies must be compiled in a clear-book and safely kept in the branch. Nevertheless all should be visibly displayed in the branch: 1. Mayor and/or Business Permit 2. Business License Permit Plate 3. Electrical Permit 4. Mechanical Permit 5. Building Permit 6. Occupancy Permit
BANGKO SENTRAL NG PILIPINAS (BSP) Currently there is only one (1) branch that carries this form. If the branch has to carry this permit likewise this should also be visibly displayed in the branch: BSP Accreditation (Wirecard).

12
VIII. ADVERTISEMENT PLACEMENT SCHEDULE AND SPACE ALOTTMENT
Due to the several partnerships being established by and with Netopia with different institutions,
the Marketing Division has consolidated into a single schedule template the various types of advertisement placement in the branches called, Advertisement Placement Schedule (APS)
to aid operations in managing local store merchandising, this will be the ONLY source of
instruction for all ad placements and displays in the branch.
The Marketing Division releases an updated APS every Friday. Placement schedule must be strictly followed. These are the 13 types of advertisement placement in the branch:
No. Type of Advertisement Maximum Number of Ad Space
1 Screensaver Ad 10
2 Permanent Banner Ad 27
3 Click Feature Corner 1
4 Poster* 15
5 Shelftalker 2 sets
6 Mobile Hanger 2 sets
7 Reminder Panel 2
8 Floor Decal 1
9 Menu Board 1
10 Flyer Holder 12 sets
11 Click Feature Corner 1
12 In-store Signage 6
13 Others 2
*There are a total of 15 poster spaces grouped according to designated branch wall: Wall1, Wall2, Wall3 and Wall4. This helps in determining which particular posters or other forms of collaterals must be posted. This has to be strictly followed.
The APS as presented in Annex A includes the following important information:
a. Advertiser Column - Name of institution which owns the advertising material
b. Start Date Column
- Date when an advertising material must be visibly posted in the branch c. End Date Column
- Date when an advertising material must be removed from display in the branch d. Branch/s Covered Column
- Branches where an advertising material must be visibly posted. If this column
is left unfilled it means that posting of a particular advertising material should be done on a system wide level. Otherwise, if placement is limited to select-
branches only names of the branches will be identified in the cells and therefore should be done accordingly.
e. Branch Placement Column - Dictates the particular branch zone, wall or space an advertisement material
should be displayed
f. Remarks Column - Where special instruction or information is specified

13
Annex A