Embed Size (px)
Citation preview

5thGrade
Fall2016LessonPlans
VanderbiltStudentVolunteersforScience
http://studentorgs.vanderbilt.edu/vsvs/

VOLUNTEERINFORMATIONTeamMemberContactInformation
Name:PhoneNumber:_
Name:PhoneNumber:_
Name:PhoneNumber:_
Name:PhoneNumber:_
Name:PhoneNumber:_
Teacher/SchoolContactInformation
SchoolName:_________________________________________TimeinClassroom:_______________________
Teacher’sName:_______________________________________PhoneNumber:__________________________
VSVSINFORMATIONVSVSDirector:PatTellinghuisen 615-343-4379(W),615-297-5809(H)[email protected] VSVSOffice:StevensonCenter5234
Co-Presidents: ArulitaGupta [email protected]
AmandaJurewicz [email protected]: NuryLee [email protected]
VanderbiltProtectionofMinorsPolicy:AsrequiredbytheProtectionofMinorsPolicy,VSVSwillkeeptrackoftheattendance–whogoesoutwhenandwhere.https://www4.vanderbilt.edu/riskmanagement/Policy_FINAL%20-%20risk%20management%20v2.pdfBeforeYouGo:§ Thelessonsareonlineat:http://studentorgs.vanderbilt.edu/vsvs/§ Emailtheteacherpriortothefirstlesson.§ Setadeadlinetimeforyourteam.Thismeansifateammemberdoesn’tshowupbythistime,youwillhavetoleavethembehindtogettotheschoolontime.
§ Don’tdropoutfromyourgroup.Ifyouhaveproblems,emailPatoroneoftheco-presidents,andwewillworktohelpyou.Don’tletdownthekidsorthegroup!
§ Ifyourgrouphasanyproblems,letusknowASAP.
PickinguptheKit:§ KitsarepickedupanddroppedoffintheVSVSLab,StevensonCenter5233.§ TheVSVSLabisopen8:30am–4:00pm(earlierifyouneeddryiceorliquidN2).§ Assignatleastonememberofyourteamtopickupthekiteachweek.§ Kitsshouldbepickedupatleast30minutesbeforeyourclassroomtime.§ Ifyouarescheduledtoteachat8am,pickupthekitthedaybefore.§ Therearetwo20minuteparkingspotsintheloadingdockbehindStevensonCenter.Pleasedonotusethehandicapspaces–youwillgetaticket.
Whileyou’rethere–Justrelaxandhavefun!

SEPTEMBERSUN MON TUES WED THU FRI SAT
1 2 3
4
5 6
7
8 9 10
11 12 13 14 15 16 17
18 19
20TeamLeaderTraining
21 22TeamLeaderTraining
23 24
25 27 28 29 30 1
OCTOBERSUN MON TUES WED THU FRI SAT2 3 4
5
6 7
8
9 10 11SomeTeams
Start
12SomeTeams
Start
13 14 15
16 17 18 19 20 21
22
23 24 25 26 27
28
29
30 31
NOVEMBERSUN MON TUES WED THU FRI SAT
1
2
3 4
5
6 7 8 9 10 11
12
13 14 15 16 17 18
19
20 21 22 23 24
25
26
27
28 29 30
Lesson1/2
Lesson2/3
TeamTraining
TeamTraining
Lesson3/4
Lesson4/Make-up
Make-up

CLASSROOMETIQUETTEFollowMetroSchools’DressCode!
§ Nominiskirts,shorts,ortanktops.§ Tuckinshirtsifyoucan.§ Pleasedressappropriately.
Metrostudentstandardattireguideline:http://jtmoorems.mnps.org/pages/JohnTrotwoodMooreMiddle/About_Our_School/8998762518461552450/Dress_Code
COLLEGEQ&ASESSIONVSVSmembersshouldbecandidabouttheirexperiencesandemphasizetheroleofhardworkandasolidbodyofcourseworkinhighschoolasameanstogettocollege.• Emailtheteacherpriortothefirstlesson.
o Theymaywanttohavethestudentswritedownquestionspriortoyourlesson.o Theymayalsowanttohavearoleinfacilitatingthediscussion.
• Finishtheexperimentofthedayandopenupthefloortothestudents.• Remindthemofyouryearsandmajorsandaskiftheyhavespecificquestionsaboutcollegelife.• Iftheyareshy,startbyexplainingthingsthataredifferentincollege.
o Choosingyourownschedule,dormlife,extracurricularactivities,etc.o Emphasizethehardworkingattitude.
Thefollowingaresomesamplequestions(posedbystudents):• Whenisbedtimeincollege?Doesyourmomstillhavetowakeyouupincollege?• Howmuchdoescollegecost?• Whatdoyoueatincollegeandcanyoueatinclassincollege?• Howmuchhomeworkdoyouhaveincollege?
DIRECTIONSTOSCHOOLSH.G.HILLMIDDLESCHOOL:150DAVIDSONRD 615-353-2020HGHillSchoolwillbeontherightacrosstherailroadlines.HEADMAGNETSCHOOL:1830JOJOHNSONAVE 615-329-8160TheparkinglotonthelefttotheJohnstonAve.JOHNEARLYMIDDLESCHOOL:1000CASSSTREET 615-291-6369GoingdowntheCassStreet,theschoolisontheright.J.T.MOOREMIDDLESCHOOL:4425GRANNYWHITEPIKE 615-298-8095FromLoneOak,theparkinglotisontheright,andtheentrance intotheschoolfacesLoneOak,butisclosertoGrannyWhite.MEIGSMIDDLESCHOOL:417RAMSEYSTREET 615-271-3222GoingdownRamseyStreet,Meigsisontheleft.ROSEPARKMAGNETSCHOOL:10259thAVESOUTH 615-291-6405Theschoolislocatedontheleftandtheparkingisoppositetheschool,orbehindit(preferred).WESTENDMIDDLESCHOOL:3529WESTENDAVE 615-298-8425Parkingisbesidethesoccerfield,oranywhereyoucanfindaplace.Enterthroughthesidedoor.MCKISSACKMIDDLESCHOOL:91538thAVENORTH 615-329-8170Goingdown38thAveNorth,McKissackMiddleSchoolisontheleft.EASTLITERATUREMAGNETSCHOOL:110GALLATINAVE 615-262-6947GoingdownGallatinAvenue,EastLiteratureMagnetSchoolisontheleft.

VANDERBILT STUDENT VOLUNTEERS FOR SCIENCE http://studentorgs.vanderbilt.edu/vsvs
Osmosis Mini-Lesson Fall 2016
Goal: To demonstrate the concept of osmosis using potatoes and fruit. TN Curriculum Alignment: SPI 0507.1.1 Lesson Outline: I. Introduction: VSVS volunteers will explain the concept of osmosis to students. II. Illustration: Osmosis in Potatoes: Students will observe three potato slices. One that has been freshly cut, one that has been soaking in a salt solution, and one that has been soaking in distilled water. VSVS volunteers will discuss the differences in the potato slices and record them for the class on the board and then discuss the reason for the differences in the three potato slices. III. Experiment: Observing Osmosis with a Super Absorbent Polymer: Students will experiment with osmosis using a super absorbent polymer. When salt is added to the gel, the gel turns into a liquid because the water has moved out of the polymer. IV. Examples of Osmosis in Beans and Fruits: Volunteers will demonstrate the effect of soaking on beans and raisins and explain the effect of osmosis. Materials: 1 plastic bag with: 1 jar containing dry beans 1 jar containing beans that have been soaking in water overnight 1 jar containing dried raisins 1 containing soaked raisins 16 16 oz cups (the large opaque ones) 16 sheets of paper (labeled) for placing potato slices Several bottles of water (3200 mL needed) 16 10 oz cups (the clear ones, with a black line at the 200 mL mark) 16 plates 4 containers of sodium polyacrylate 16 teaspoons 8 containers of salt 16 potato slices (rectangles) in 1% salt solution or freshly cut 16 potato slices in distilled water 16 potato slices in 40% salt solution 4 sheets of paper towel for blotting potato slices 32 sandwich bags (for students to take home sodium polyacrylate) 32 3.5 oz cups marked to 30 ml 1 small bag of “orbs”, tucked into a 10oz clear cup. Note: For this activity, new potatoes work best (redskin). Each potato slice should be as long as possible (at least 6 cm), about 1.5 cm wide, and should be as thin as possible. Store potato slices in the 1% salt solution provided, until ready to be used by students. In the car ride, read through this quiz together as a team. Make sure each team member has read the lesson and has a fundamental understanding of the material.
1. During osmosis, water flows in what direction? 2. If we put pieces of fruit with high water content, such as an orange, in distilled water and salt
water, what do you think will happen to the fruit in both situations?

Your Notes:
______________________________________________________________________________
______________________________________________________________________________
______________________________________________________________________________
______________________________________________________________________________
2. During the Lesson: Here are some Fun Facts for the lesson Osmosis is responsible for the ability of plant roots to draw water from the soil. Reverse osmosis (RO) is a water purification technology used to desalinate ocean water. Your kidneys functions as an osmosis and dialysis machine. It utilizes osmosis to maintain your body’s water balance, filtering out excess water from the blood to the urine. Waste produced by your body travels through the bloodstream and into the kidneys where a semi-permeable membrane allows water and certain small molecules to pass through into the urine. Kidney dialysis machines use osmosis to take over the filtering function of the kidneys. Dialysis machines use a semi-permeable membrane, which is a membrane through which some small molecules can pass (such as water, salts, and metabolites) but through which larger objects (such as proteins and blood cells) cannot. Osmosis also plays an important role in foods such as pickles, jams, and canned foods. The high salt/sugar content causes the bacteria to die by dehydration as the water moves from their cells to the briny/sugary solution. Unpacking the Kit For Part II. Illustration – Osmosis in Potatoes 16 potato slices (rectangles) in 1% salt solution or freshly cut, 16 potato slices in distilled water, 16 potato slices in 40% salt solution, 4 sheets of paper towel for blotting potato slices 16 sheets of paper (labeled) for placing potato slices, 16 plates Remove the potato slices from water/salt solutions, blot them on a paper towel and place the three slices on the labeled diagram and on a plastic plate ready to distribute to each pair of students. For Part III. Experiment – Observing Osmosis with a Superabsorbent Polymer. Count the number of students and prepare enough 16 oz and 10 oz cups for each pair of students: Fill the 10 oz cups with cold tap water to the mark. Put 1 tsp. sodium polyacrylate into each of the 16 oz opaque cups and set aside. 4 containers of sodium polyacrylate, 16 teaspoons, 8 containers of salt 32 3.5 oz cups marked to 30 ml For Part IV. Examples of Osmosis in Beans and Fruits
1 plastic bag with:1 jar containing dry beans, 1 jar containing beans that have been soaking in water overnight 1 jar containing dried raisins, 1 containing soaked raisins
For Part V. Example of Osmosis in “Orbs”and clean-up 1 small bag of “orbs”, tucked into a 10oz clear cup, 32 sandwich bags (for students to take home sodium polyacrylate)
Your Notes:
______________________________________________________________________________
______________________________________________________________________________
______________________________________________________________________________
______________________________________________________________________________
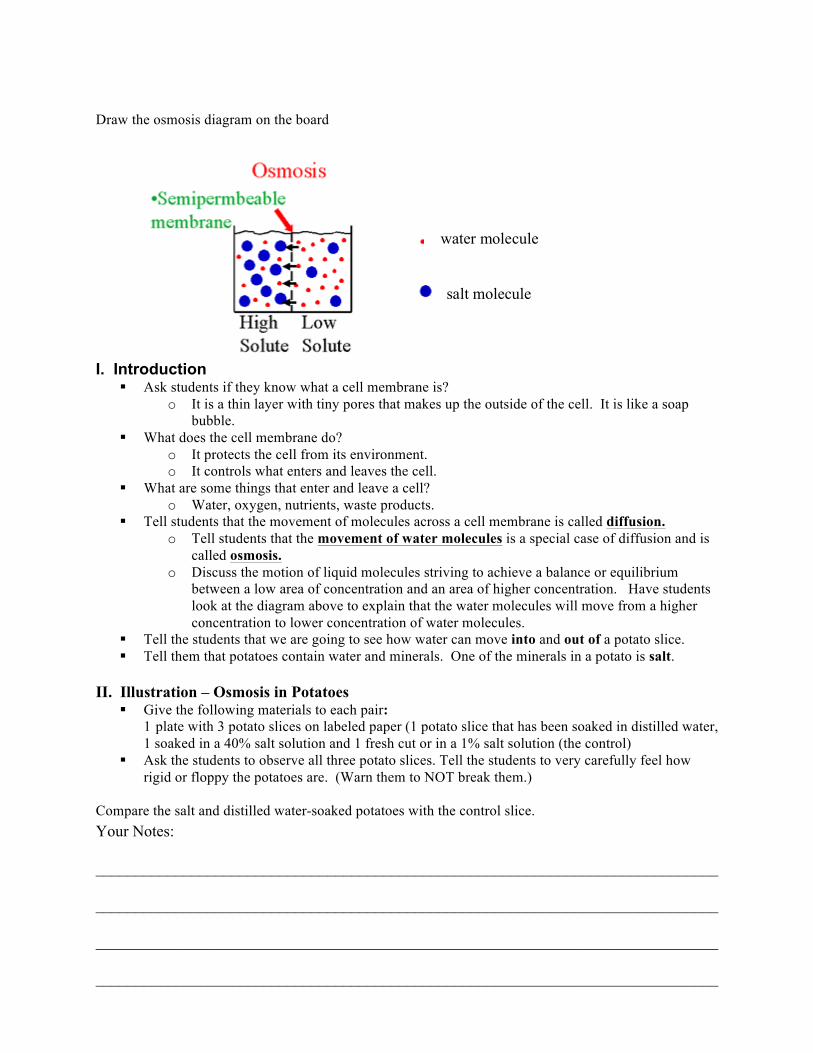
Draw the osmosis diagram on the board
I. Introduction
§ Ask students if they know what a cell membrane is? o It is a thin layer with tiny pores that makes up the outside of the cell. It is like a soap
bubble. § What does the cell membrane do?
o It protects the cell from its environment. o It controls what enters and leaves the cell.
§ What are some things that enter and leave a cell? o Water, oxygen, nutrients, waste products.
§ Tell students that the movement of molecules across a cell membrane is called diffusion. o Tell students that the movement of water molecules is a special case of diffusion and is
called osmosis. o Discuss the motion of liquid molecules striving to achieve a balance or equilibrium
between a low area of concentration and an area of higher concentration. Have students look at the diagram above to explain that the water molecules will move from a higher concentration to lower concentration of water molecules.
§ Tell the students that we are going to see how water can move into and out of a potato slice. § Tell them that potatoes contain water and minerals. One of the minerals in a potato is salt.
II. Illustration – Osmosis in Potatoes
§ Give the following materials to each pair: 1 plate with 3 potato slices on labeled paper (1 potato slice that has been soaked in distilled water, 1 soaked in a 40% salt solution and 1 fresh cut or in a 1% salt solution (the control)
§ Ask the students to observe all three potato slices. Tell the students to very carefully feel how rigid or floppy the potatoes are. (Warn them to NOT break them.)
Compare the salt and distilled water-soaked potatoes with the control slice.
water molecule
salt molecule

Your Notes:
______________________________________________________________________________
______________________________________________________________________________
______________________________________________________________________________
______________________________________________________________________________
Students should observe the following, with your guidance:
§ The potato slice in the distilled water is stiffer, indicating that more water molecules went into the potato than came out.
§ The potato slice in the 40 % salt solution is limp, indicating that more water molecules came out of the potato than went in.
§ Share the following explanation with students (adapt to the age of the student), along with the diagram drawing on the board:
o Osmosis refers to the movement of water molecules across a membrane trying to achieve equilibrium.
o Because there are no salts in distilled water, there is a higher concentration of water molecules in the distilled water compared to inside the potato. Therefore water moves INTO the potato.
o Because the salt water contains a lot of salt then there is less water in the salt solution compared with the concentration of water in the potato. This means that the water from the potato will pass out of the potato in effort to achieve a balance.
o In all cases, water is moving across the membrane to equalize the concentration of the solutions.
III. Experiment – Observing Osmosis with a Superabsorbent Polymer. § At this point, have 2 pairs join together so that students can share chemicals. § Give each pair a large (16 oz) cup containing the sodium polyacrylate and a 10 oz cup containing
200 mL water. § Tell them to pour the water into the cup with the sodium polyacrylate. § Observe that all the water is absorbed (forms a gel) immediately. This is osmosis - the water
moved into the white powder. § Tell them to take out about 2 tsps. of the gel and put in to the 3.5 oz cup. Add 1 tsp salt and stir. § Observe that the gel will return to liquid. This is osmosis again – the water moved out of the gel. § Tell the students that this is similar to what happens when the potatoes are placed in water.
o When the potato is put into the distilled water, it will absorb the water. The water is trying to dilute the salt inside the potato.
o When the potato is put into salty water, it will lose water. The water in the potato moves towards the salty water to try to dilute it.
Uses for sodium polyacrylate include high absorbency disposable diapers and moisture absorbent for automobile and jet fuels. When the super-absorbent polymer is added to a sandy soil, it improves the soil’s ability to retain moisture and improves its ability to support agriculture. It is sold in gardening stores for this purpose. This polymer absorbs about 300 times its weight of tap water (800 times its weight of distilled water because the ions in tap water reduce the absorbing properties of the polymer). The addition of the salt (sodium chloride) breaks the "gel" polymer apart as water leaves the polymer to dilute the salt concentration outside the polymer network

Your Notes:
______________________________________________________________________________
______________________________________________________________________________
______________________________________________________________________________
______________________________________________________________________________
IV. Examples of Osmosis in Beans and Fruits
§ Show the students the dried beans and fruit and the fruit and beans that have been soaking in water overnight.
§ Explain to them that water was absorbed through osmosis. V. Example of Osmosis in “Orbs”
• Show students the orbs and tell them they are the same as a product sold in gardening stores (see above), with dye added.
• Put the “orbs” into a clear 10 oz cup and add water so that it is about ¾ full. Tell students they can observe the orbs over the next few days.
• Give the cup with orbs to the teacher to keep. Tell the class that the orbs can be reduced to their original size by putting them on a plate and left to dry for several days. They can then be rehydrated and used again. Some can be sprinkled with salt and water observed being drawn out.
Observation Sheet
Fresh Soaked in salt water Soaked in distilled water
Clean-up: Return all cups to the VSVS lab in the garbage bag. Do not put the sodium polyacrylate down the sink. The students can keep the sodium polyacrylate if they wish (there are some plastic bags included for this), but warn them to treat it as a chemical.

VANDERBILT STUDENT VOLUNTEERS FOR SCIENCE http://studentorgs.vanderbilt.edu/vsvs
Conduction, Convection and Radiation Fall 2016
Goal: To introduce students to conduction, convection and radiation. TN Curriculum Alignment: GLE 0507.10.2 Conduct experiments on the transfer of heat energy through conduction, convection and radiation
1. Introduction – What is Temperature? What is Heat? Students discuss the difference between temperature and heat. 2. Introducing Liquid Crystal Thermometers Liquid crystal sensors are introduced.
A. Experiment. Students observe the color changes when they put their fingers on the sensor.
B. How Do Liquid Crystals work? 3. How is Energy Transferred?
Tell students they are going to “see” conduction, convection and radiation by using the liquid crystal sensors.
A. Radiation: A liquid crystal sensor is exposed to a lamp and/or sunlight and the color changes noted.
B. Convection: A heat pack is activated and a liquid crystal sensor held above it and the color changes noted.
C. Conduction: 1. Students visualize conduction in copper, iron and wood strips, using a heat pack as the heat
source. 2. Students observe that ice melts faster on one of two black squares. 3. Students measure the temperatures of 3 squares, using liquid crystal temperature strips, and
discover that it is the same for all. VSVS members put a piece of ice on the 3 objects. Students will observe that the ice on the aluminum melts faster than on the wood or Styrofoam.
D. Results and Discussion Students conclude that the aluminum metal square is a good conductor and that the Styrofoam would be a good insulator.
1. Before the lesson: In the car ride, read through this quiz together as a team. Make sure each team member has read the lesson and has a fundamental understanding of the material.
1. Why is hot water warmer than cold water? Be sure to mention how energy is involved. 2. List what form of heat transfer each of these examples is: A boiling pot of water cooks your spaghetti: Rays of the sun hitting you: Microwaves heating your frozen dinner: Sand feeling hot under your feet: 3. You hold an ice cube in your hand. Explain why your hand feels cold and the ice cube melts.
Your Notes: ______________________________________________________________________________
______________________________________________________________________________
______________________________________________________________________________
______________________________________________________________________________
4. Different materials have different conductivities. If you wanted to go into space, what would you make your space suit out of? What material would you definitely not use in your spacesuit?
2. During the Lesson: Here are some Fun Facts • When sunrays hit an object, more rays will be absorbed by darker colors than lighter ones. As a result,
they are better at absorbing radiation. This is why black pavement is so hot during the summer. • People actually build computers in fish tanks filled with water to keep them cool • Earthquakes are actually caused by convection! The hot mantle in Earth has many convection
currents that move the Earth’s crust in separate plates. • Conduction works better in metals than other solid materials because metal atoms are more “flexible”
and can more easily transfer heat energy from one molecule to the next. That’s why your metal pots and pans have wooden or plastic handles. The heat can very easily move from the bottom of the pan to the handle if it was all metal.
Materials
10 Plastic bags containing: 1 aluminum metal square 1 small Styrofoam square 1 wood square 10 white foam board rectangles
10 pairs of black ice melting blocks 10 thermometer strips
10 liquid crystal sensors, 25-30o C 10 heat packs (recyclable) 1 work light 1 large laminated liquid crystal sensor, 30-35o C 1 large Styrofoam cup with ice 10 thermal conductivity foam blocks with a strip of copper, iron and wood attached 1 infrared thermometer 10 paper towels Unpacking the Kit: VSVSers do this while 1 person is giving the Introduction. Note that students are put into 10 groups (or 3 per group) Write the following vocabulary words on the board: Temperature, heat, liquid crystals, conduction, convection, radiation
For Part 2. Introducing Liquid Crystal Thermometers 10 liquid crystal sensors, 25-30o C. 1 per group of 3

Your Notes: ______________________________________________________________________________
______________________________________________________________________________
______________________________________________________________________________
______________________________________________________________________________
For Part 3. How is Energy Transferred? A. Radiation: 1 work light, 1 large laminated liquid crystal sensor, 30-35o C, 1 infrared
thermometer B. Convection: 10 white foam board rectangles, 10 heat packs (recyclable) plus 10 liquid crystal
sensors from Part 2 C. Conduction:
a. Experiment 1 - Visualizing Conduction 10 thermal conductivity foam blocks with a strip of copper, iron and wood attached, plus
10 liquid crystal sensors from Part 2 b. Experiment 2. Observing ice melt on 2 black squares 10 sets of 2 identical looking black squares (1 is aluminum and the other plastic), Ice, 10 paper towels c. Experiment 3. Ice melting on 3 different materials 10 plastic bags containing: 1 aluminum metal square, 1 styrofoam square, 1 wood square, 1 Thermometer strips, 10 foam board rectangles (students should already have), Ice
1. What is Temperature? What is Heat? Ask students: what is temperature? Temperature is the scientific measure of how hot or cold something is (ref. Holt text) It is measured with a thermometer. It is a measure of the average kinetic energy of the molecules in a substance.
• Hot tea has more kinetic energy than ice tea. The temperature of hot tea is higher than ice tea.
Ask students: what happens when we add ice to hot tea?
• The ice melts – its temperature becomes warmer. Energy from the hot tea is transferred to the ice cube. This transfer of energy is called heat.
2. Introducing Liquid Crystal Temperature Sensors • Ask students if they have ever seen anything that changes color with temperature? Answers may include mood rings, strip thermometers.
Hand out a laminated liquid crystal temperature sensor to each group of students. Tell students that they will be using these to visualize temperature changes and how heat flows.
Note: The temperature of the classroom determines which sensor is more effective. The laminated sensor changes color between 25-30o C. The sensors attached to the metal strips used in Part 3C of the lesson sense changes between 30-35o C. The sensors should be black at the lowest temperature they measure, so if the classroom temperature is above 25oC, it will have already turned green or red-orange without being touched.

Your Notes: ______________________________________________________________________________
______________________________________________________________________________
______________________________________________________________________________
______________________________________________________________________________
Give the students the following rules for using the sensors: 1. The sensor must not be placed in the sun or near a heat source such as room heater, computer, hot
drinks etc, since this will skew the results of the experiments. 2. Always hold the strips using the clear laminated part (show students how to do this). 3. Do NOT touch the liquid crystal unless instructed to do so.
A. Experiment
1. Tell students to look at the liquid crystal sensor and note the temperatures written on the colored tab. Explain that different sensors have different temperature ranges.
2. Tell students to hold the liquid crystal temperature sensor by the clear plastic part. Tell students to note the color of the sensor. Turn the sensor over and note that it is covered with white paper.
3. Tell students place the sensor on the white foam pad, black side facing up. 4. Tell one student in each pair to place 3 fingertips on the liquid crystal sensor for 15 seconds and
then remove them. Record what happens, and note the pattern of colors produced. Some observations will include: § the color of the sensor changes. § color changes spread out from the center of the finger and changes color as it spreads.
5. Ask students: • What color is in the center of the finger print? At the outer edge? What color fades first?
Last? • What color indicates the coolest temperature? – Black • What color indicates the warmest temperature? – Blue • What is the order of temperature colors from cooler to warmer? Black, yellow, red, green,
blue. Explanation: Blue represents the warmest area because that was the area in direct contact with the finger. The surrounding area’s colors were not directly touched by the fingertips, but were produced as a result of conduction of heat through the crystal.
6. Place the strip back on the desk top and watch it return to room temperature.
B. How do Liquid Crystals work? • Explain to students that liquid crystals are sensitive to temperature, and will separate visible light
into different colors according to the temperature of the crystal. Black is the coolest color. (Note: it only appears black because of the black background glued onto the back side of the sensor. The lowest temperature is actually clear!)
Liquid crystals are used in displays for cell phones, laptop computers, and other electronics. • Where does the thermal energy come from to change the liquid crystal color?

Your Notes: ______________________________________________________________________________
______________________________________________________________________________
______________________________________________________________________________
______________________________________________________________________________
Answer: your skin temperature is about 10 degrees C higher than room temperature. When you touch something at room temperature, heat flows from your fingers into the object.
• Where does the energy go when the color changes back to its colder temperature? Answer: it is transferred to the desk or Styrofoam pad, which is at room temperature. Heat flows from the warmer sensor to the colder desk.
3. How is Energy Transferred?
• Thermal energy is transferred by heat. • Heat always flows from a hotter object to one that is cooler. In this case, your body is warmer
than room temperature and heat flows from your finger to the sensor. • Ask students if they know the different ways thermal energy is transferred?
Energy can be transferred by conduction, convection, or radiation. • Tell students we are going to “see” conduction, convection and radiation by using the liquid
crystal sensors.
Information for VSVS team – use it if you feel the class can grasp the topics. (This information is from NanoDays Exploring Materials – Liquid Crystals.) The way a material behaves on the macroscale is affected by its structure on the nanoscale. Changes to a material’s molecular structure are too small to see directly, but we can sometimes observe corresponding changes in a material’s properties. The liquid crystals change color as a result of nanoscale shifts in the arrangement of their molecules.
Nanotechnology takes advantage of special properties at the nanoscale to create new materials and devices. Liquid crystals are used in cell phone displays, laptop computer screens, and strip thermometers. They’re also being used to create nanosensors—tiny, super-sensitive devices that react to changes in their environment.
1. Liquid crystals represent a phase in between liquid and solid. The molecules can move independently, as in a liquid, but remain somewhat organized, as in a crystal (solid).
2. The liquid crystals are thermotropic, which means that they respond to changes in temperature by changing color. As the temperature increases, the color of the liquid crystal changes from red to orange, yellow, green, blue, and purple.
3. The liquid crystals are made of mixtures of long, thin molecules stacked in rotating layers, like a spiral staircase (helix).
4. When light strikes a liquid crystal, some of the light is reflected. The color of the reflected light depends on how tightly twisted the helix is.
5. More tightly twisted helixes reflect wavelengths on the blue end of the spectrum. 6. More loosely twisted helixes reflect wavelengths on the red end. 7. As the temperature of the liquid crystal changes, the spacing of the helix changes. This
changes the wavelength of light that is reflected and the color that you see.

Your Notes: ______________________________________________________________________________
______________________________________________________________________________
______________________________________________________________________________
______________________________________________________________________________
A. Radiation • Radiation is the transfer of energy by electromagnetic waves. • Ask students if they can name some sources that transfer heat by radiation?
The sun, a fire, bar heater, incandescent light bulb …. • Radiation is a method of heat transfer that does not rely upon any contact between the heat source
and the heated object. Radiation can even be transferred through space where there is a vacuum (where there are no particles in air to carry heat). We can feel heat from the sun or a fire even though we are not touching them. Demonstration - Visualizing Radiation
• A VSVS member holds the large liquid crystal sensor up so that all students can see it. Note the color.
• Hold the lamp in a vertical position, turn it on and hold the large sensor vertically, about 5 inches away.
• Wait for a few minutes until the sensor changes color, then remove the light and let students observe the changes.
Demonstration: Visualizing Sun Radiation (if the sun is shining into the classroom) Now hold the sensor in the sunlight and note the color changes. Point out that there is no contact between the lamp and the sensor. Other experiments with the sensor and sunlight are at the end of this lesson and can be done if there is time, after convection and conduction experiments are finished. Demonstration: Infrared Thermometer
The TN110g thermometer uses a sensor to measure the surface temperature of an object. • To use the thermometer press (do not hold down) the large blue “Meas” button while the
sensor is pointed at a surface. • Hold the sensor in place while the thermometer takes a reading. • Use this thermometer to measure the surface temperature of the lamp. • Compare the temperature of the light bulb to the temperatures of various surfaces around the
class room. You should find that objects directly exposed to light have significantly higher surface temperatures than objects that receive less light.
B. Convection • Convection is the transfer of thermal energy by the movement of liquids or gases. • Ask students if they can name some sources that transfer heat by convection?
Heating water, hot air balloons…
Note: Make sure that the large crystal sensor being used in this demonstration has been kept out of sunlight and has not been exposed to heat. The color needs to be black before starting.

Your Notes: ______________________________________________________________________________
______________________________________________________________________________
______________________________________________________________________________
______________________________________________________________________________
Experiment – Visualizing Convection • Show students how to activate the hot pack and place it on the white foam board. • Tell students to hold their hands above it to feel the transfer of heat through convection through
the air. Hold a hand to the side and below it. The air will feel warmer above the hot pack. • Hold the liquid crystal sensor (by the clear plastic part) about 10 cm above the heat pack and note
the color changes Explanation: When the heat pack warms up it begins to warm the air next to it (through conduction). The warm air molecules move more quickly, which forces them to spread out. This causes the air to become less dense, so the warmer air rises. The sensor changes color.
C. Conduction
• Conduction is the transfer of thermal energy between objects that are touching. Thermal conduction is slow – it moves from one side of an object to the other.
• Remind students that they have already “seen” conduction when they put a finger on the sensor. • Tell students that some materials are better conductors than others.
Ask students if they can name a good thermal conductor and poor thermal conductor? Metals are usually good conductors.
Experiment 1 - Visualizing Conduction • Hand out the thermal conductivity boards. Explain that the 3 different materials have been
covered with a liquid crystal sensor, mounted on a Styrofoam board and covered with plastic. • Ask students if they can identify the 3 different materials?
They are copper, wood and iron. • Tell students to place the heat pack on top of the bottom edges of the 3 exposed prongs, being
careful to keep the heat pack from contacting the sensor. • Watch the liquid crystal change colors (or not). Students will need to wait a few minutes before
they see any changes. • Ask students to describe what they see.
Answers should include: The color change starts nearest the heat pad. The color change travels up the materials.
The rate that the color change travels is different for the 3 materials. Therefore heat is travelling up the materials at different rates.
• Which material had the fastest changing temperature sensor? Copper • Which material had the slowest changing temperature sensor? Wood • Ask students which material is the best conductor of heat? Copper • Tell students that copper and iron are both good conductors of heat and have high thermal
conductivity. Wood is a poor conductor and has a low thermal conductivity.
Note: Do not spend too much time in discussions. The heat pack needs to be used with the next experiment while it is still hot.

Your Notes: ______________________________________________________________________________
______________________________________________________________________________
______________________________________________________________________________
______________________________________________________________________________
• Tell students to remove the sensor and watch which metal loses energy faster. The sensor on the copper strip returns to its original color faster.
• Collect the liquid crystal sensors, heat packs and thermal conducting blocks. Experiment 2. Observing ice melt on 2 black squares Materials
10 sets of 2 identical looking black squares (1 is aluminum and the other plastic) Ice
• Distribute the pairs of black blocks at student’s tables so that all can see the next experiment. • Do not explain that the 2 blocks are made from different materials. • Place some ice in the middle of each block and tell students to watch what happens. • Ask students if they can explain this. Tell them that it has something to do with conduction of
heat. Do not spend more than a few minutes on discussion. Experiment 3. Ice melting on 3 different materials
Materials 10 plastic bags containing:
1 aluminum metal square 1 styrofoam square 1 wood square 1 Thermometer strips 10 foam board rectangles (students should already have)
• Pass out the plastic bags containing the wood, styrofoam and metal squares and thermometer strips to groups. Spread the materials on the long piece of foam board.
• Tell the students they must not touch the blocks being handed out until they are told. • Tell the students to:
1. Briefly place a palm on top of each block (for no more than 1 second). 2. Decide, as a group, and put the blocks in order from coolest to warmest. 3. Report the order to VSVS members who will record the results on the board.
Results may vary, but make sure that students in each group all agree which one feels colder (the aluminum square should feel coldest, the foam board will feel warmer, and the wood may be in between, but definitely warmer than the aluminum ).
4. Set aside the squares so that they can return to room temperature (ie. do not touch while the next demonstration is done.)
• Show the students the strip thermometer and the degree markings (in F and C) on it. Explain that the thermometer strips are made of the same liquid crystal material, with a temperature scale added.
• Note the temperature where the dark blue color is. Explain that this is room temperature, and all measurements will be compared to this number.
Important: do not tell the students that the identical-looking black blocks are actually made of different materials. They will be asked to come to that conclusion after the experiment.

Your Notes: ______________________________________________________________________________
______________________________________________________________________________
______________________________________________________________________________
______________________________________________________________________________
Explain that these thermometers are not highly accurate but are good enough measure changes in temperature.
• Tell them to place a thermometer strip in the middle of the wood block and record its temperature. Repeat with the Styrofoam and metal blocks.
• Ask students if the temperatures of the blocks are different? There should be no significant difference within a group. Temperature readings will differ from one group to another.
• Ask students what they think will happen to ice if it is placed on the blocks? Will the ice melt faster on one? Tell students to place a small piece of ice in the middle of each block and to record the results. The ice on the metal will melt in just a few seconds. Wipe the ice off the metal block and measure its temperature again. The temperature will have dropped significantly.
• Ask the students why the ice on the metal melted faster? Since the metal is a good conductor, it transfers heat from it to the ice faster than the other 2 materials.
• Based on these results, what materials are the 2 black squares made from?
4. Results and Discussion • Ask students why the metal square felt cooler than the others, when the actual temperature is the
same? The square that felt colder is CONDUCTING heat away from your hand so it is actually your hand that is cooling. Your hand is not a thermometer!
• Ask students which object is the best conductor? This metal square is the best conductor. • Ask students which object would be a good insulator? Styrofoam.
Clean-up: Place all materials back in kit. Wipe off wet surfaces. Discard leftover ice at the school if possible. Return kit immediately. Radiation extension: A VSVS member can cast a shadow on the sensor by blocking the radiation reaching half the sensor with a book. Students will see that the sun’s radiation does not travel through the book. Ask students how this could relate to weather on a cloudy day? (Clouds prevent or block radiation.) The sensor can also be held at an angle to the lamp’s or sun’s rays rather that facing it directly, and note the sensor warms up slower. Ask students how this can relate to the seasons. As Earth orbits the sun, its tilted axis always points in the same direction. So, throughout the year, different parts of Earth get the sun’s direct rays.Lesson written by: Pat Tellinghuisen, VSVS Director and Faculty Advisor, Vanderbilt University

Conduction, Convection and Radiation Observation Sheet 1. What is Temperature? What is Heat? 2. Introducing Liquid Crystal Temperature Sensors
Record what happens when you put your fingers on the liquid crystal sensor. Note the pattern of colors produced. ________________________________________________________________________
What color indicates the coolest temperature? __________________________________ What color indicates the warmest temperature? _________________________________ 3. How is Energy Transferred?
A. Radiation What color does the sensor change to when the lamp is shone on to it? _______________ What does this show?______________________________________________________ B. Convection
What color does the sensor change to when it is held above the heat pack? ____________ What does this show?______________________________________________________ C. Conduction 1. Using the Thermal Conductivity boards
Which material had the fastest changing temperature sensor? ________________ Which material had the slowest changing temperature sensor? _______________ Ask students which material is the best conductor of heat? __________________
2. Ice melting on the 2 black squares.
What do you observe? _______________________________________________
3. Ice melting on 3 different materials Which block feels the coldest? ________________________________________ Which block feels the warmest?________________________________________ What are the temperatures of the 3 blocks?_______________________________ Which block melts ice the fastest? ______________________________________ What do you think the black squares (in #2 above) are made of? ___________________________________________________________________

Conduction, Convection and Radiation Answer Sheet 1. What is Temperature? What is Heat? 2. Introducing Liquid Crystal Temperature Sensors
Record what happens when you put your fingers on the liquid crystal sensor. Note the pattern of colors produced. color changes spread out from the center of the finger (blue/green) and changes color as it spreads
What color indicates the coolest temperature? Black What color indicates the warmest temperature? Blue 3. How is Energy Transferred?
A. Radiation What color does the sensor change to when the lamp is shone on to it? From black to yellow/red/green/blue
What does this show? Heat is being transferred from the lamp to the sensor via electromagnetic radiation
B. Convection What color does the sensor change to when it is held above the heat pack? From black to yellow/red/green/blue
What does this show? Thermal energy is being transferred from the heat pack to the sensor by convection currents.
C. Conduction 1. Using the Thermal Conductivity boards
Which material had the fastest changing temperature sensor? Copper (orange metal)
Which material had the slowest changing temperature sensor? Wood
Which material is the best conductor of heat? Copper
2. Ice melting on the 2 black squares. What do you observe? Ice melts very fast on one of the blocks, and does not melt on the other. Both blocks look the same. One is heavier to hold.
3. Ice melting on 3 different materials Which block feels the coldest? Aluminum (silver colored)
What are the temperatures of the 3 blocks? The temperatures of the 3 blocks are nearly the same within each group. The thermometers are not accurate and can differ from one group to another. Which block melts ice the fastest? The aluminum metal.
What do you think the black squares (in C2 above) are made of? One is aluminum and the other is a material similar to Styrofoam.

VANDERBILT STUDENT VOLUNTEERS FOR SCIENCE http://studentorgs.vanderbilt.edu/vsvs
Cryogenic Temperatures Fall 2016
Goal: To investigate the properties of substances at extremely cold temperatures (referred to as cryogenic temperatures). To illustrate that changes in phases of matter are physical changes.
TN Curriculum Alignment: GLE 0507.9.2 Design and conduct an experiment to demonstrate how various types of matter freeze, melt, or evaporate. GLE 0507.9.3 Investigate factors that affect the rate at which various material freeze, melt, or evaporate. Lesson Outline I. Introduction Discuss the meaning of the word cryogenics and the properties of nitrogen. Also discuss physical and chemical changes. Discussion of the Cold Temperature of Boiling Nitrogen Give each pair of students one of the diagrams (in binder) of a thermometer and use this to help students understand how cold liquid nitrogen is by comparing the markings for the boiling point of water, freezing point of water, the sublimation temperature of dry ice, and the boiling point of liquid nitrogen. II. Demonstration of Liquid Nitrogen Pour some liquid nitrogen into a clear 10 oz cup. Use a glove to hold the cup high enough for students to see. Ask them to write down their observations on the observation sheet. Draw a picture of the cup on the board and discuss the students’ observations. III. Demonstration - Hammering a Nail with a Banana Note: Never place any objects in the liquid nitrogen dewar since it is going to be used to make ice cream. There is a small dewar (one made from two clear plastic bottles with packing peanuts for insulation.) Pour liquid nitrogen from the large dewar into the smaller insulated container. Even if you are wearing gloves, the temperature is too cold for these to protect you. Attempt to hammer a nail into a piece of wood with a banana. Then cool the bottom half of the banana in the small dewar that has been filled with liquid nitrogen. After the banana has been in the liquid nitrogen for several minutes, use the banana to pound a nail into the piece of wood. IV. Demonstration - Rubber Tubing in Liquid Nitrogen Demonstrate the loss of elasticity of rubber by bending the middle of two pieces of split rubber tubing and putting the bent middle portion in the small dewar used for the banana. After removing the pieces of rubber tubing from liquid nitrogen, take one piece and quickly and forcefully hit the cold end against the top of the table. This should shatter the tubing. Allow the other piece of rubber tubing to warm up to show the flexibility of the rubber returns. V. Demonstration - Shrinking a Balloon and Whistling Tea Kettle Blow up a balloon, place it in the bowl, and pour liquid nitrogen over it. Do not use an excessive amount of liquid nitrogen in order to have about one-third of the liquid nitrogen left for making ice cream. Put a small amount of liquid nitrogen into a tea kettle and explain the whistling. VI. Demonstration - Reconstituting Dry Ice Place some dry ice in water in a plastic coke bottle, put a balloon over the top, and allow it to fill with carbon dioxide gas. Then place the balloon in the bowl and pour liquid nitrogen over it. After it is deflated, cut the balloon open and put the pieces of dry ice in a clear plastic cup, and show them to the students. Use the thermometer drawing to show where dry ice forms compared to the boiling point of liquid nitrogen. VII. Demonstration - Making Ice Cream VIII. Review

Your Notes:
______________________________________________________________________________
______________________________________________________________________________
______________________________________________________________________________
______________________________________________________________________________
Materials: 17 Thermometer diagrams in sheet protectors (one for VSVS team) 1 large Dewar of liquid nitrogen 1 Styrofoam cup, with lid, with a few small pieces of dry ice (small enough to drop in a coke bottle) 2 10 oz. clear plastic cups 1 Whistling tea kettle 1 Ladle 2 pairs of gloves 1 piece of wood 2 nails 1 banana 2 pieces of split rubber tubing or split bicycle inner-tube - 18” long (tubing is slit down the middle) 1 small dewar - a double set of plastic bottles with packing peanuts between them 1 pair of tongs 1 large stainless steel bowl 4 balloons (inflate and tie one before class begins) 1 20 oz. plastic coke bottle 1 container with 6 oz. of water 1 pair of scissors 1 stirring spoon or spatula 1 quart of whole milk 1 box of ice cream mix 32 small paper cups for ice cream 32 taster spoons for ice cream 1 newspaper article on cryogenics - "Company puts freeze on metals to extend use” 32 pencils (have students use classroom pencils) 32 Observation Sheets 1. Before the lesson: In the car ride, read through this quiz together as a team. Make sure each team member has read the lesson and has a fundamental understanding of the material.
1. What is Cryogenics? 2. What happens to liquid nitrogen when placed in a cup? 3. What is a physical change? 4. What is a chemical change? 5. What is dry ice?
2. During the Lesson: Here are some Fun Facts Liquid Nitrogen:
- Liquid nitrogen boils at 77 K (−195.8°C or −320.4°F). - Nitrogen is non-toxic, odorless, and colorless. - It can be used for freezing and transporting food products. - Used for preservation of biological samples - Gaseous nitrogen makes up about 78% of air.

Your Notes:
______________________________________________________________________________
______________________________________________________________________________
______________________________________________________________________________
______________________________________________________________________________
- Your body is about 3% nitrogen by weight. - Liquid nitrogen is used in medicine. (Dermatologists use liquid nitrogen to remove warts
and moles.) Dry Ice:
- CO2 becomes a solid at -78° C or -108° F - Dry ice does not melt. Instead of melting it transforms from a solid to a gas through a
process called sublimation. - Dry ice can be used to create special effects such as fog. - Dry ice can be used to seed clouds (putting certain compounds in clouds) to induce
precipitation.
Unpacking the Kit
For Part I – Introduction: 17 Thermometer diagrams in sheet protectors (one for VSVS team)
For Part II. Demonstration #1: Liquid Nitrogen 1 10 oz. clear plastic cup, 1 large dewar of liquid nitrogen, 1 pair of gloves 32 Observation Sheets
For Part III. Demonstration #2: Hammering with a Banana 1 piece of wood, 1 nail, 1 banana, liquid nitrogen, 1 small dewar (small plastic insulated bottle, 1 pair of gloves
For Part IV. Demonstration #3: Rubber Tubing in Liquid Nitrogen 2 pieces bicycle inner-tube, 1 pair of gloves, 1 pair of tongs, 1 pair of safety goggles for VSVS team member doing rubber tubing demonstration From Part III: 1 small dewar (made from plastic bottles) of liquid nitrogen
For Part V. Demonstration #4: Whistling Tea Kettle and Shrinking a Balloon 1 inflated balloon (tied off), 1 large stainless steel bowl, 1 whistling tea kettle, 1 ladle From Part IV: 1 dewar of liquid nitrogen, 1 pair of gloves (Put On!)
For Part VI. Demonstration #5: Reconstituting Dry Ice 1 balloon, 1 pair of scissors, 1 plastic coke bottle, 1 container of dry ice, 1 6 oz bottle of water, 110 oz. clear plastic cup From Part V: 1 large dewar of liquid nitrogen, 1 large stainless steel bowl, 1pair of gloves
For Part VII. Demonstration: Making Ice Cream with Liquid Nitrogen 1 stirring spoon or spatula, 1 quart of whole milk, 1 box of ice cream mix 32 small paper cups for ice cream, 32 taster spoons for ice cream 2 pairs of gloves 1 large dewar of liquid nitrogen (from Part V1), 1 large stainless steel bowl

Your Notes:
______________________________________________________________________________
______________________________________________________________________________
______________________________________________________________________________
______________________________________________________________________________
For Part VIII. Review 1 newspaper article on cryogenics - "Company puts freeze on metals to extend use”
I. Introduction One VSVS team member should write the following vocabulary words on the board while another member leads the introduction: Cryogenics, chemical change, dry ice, condensation, physical change, liquid nitrogen
Ask students if they have ever heard of cryogenics. § If they have, ask them to share what they know. § If they haven’t, share some of the following information with them:
o Cryogenics is a branch of physics that deals with the production and effects of very low temperatures.
o Substances such as liquid nitrogen that are used for cooling things to very low temperatures are called cryogens.
o The derivation of the word cryogen is from the Greek "kryos”, meaning "icy cold”. o Cryogens represent special hazards since contact with cryogens produces instantaneous
frostbite, and structural materials such as plastics, rubber gaskets, and some metals become brittle and fracture easily at these low temperatures.
o Cryogenics is used by companies to make some metal tools more durable and less likely to break under stress.
Ask students: What do you know about nitrogen? Include the following points in the discussion:
§ Nitrogen is a gas that makes up 78% of the air. Oxygen makes up 21%, and the rest is made up of other gases such as argon, carbon dioxide, water vapor, and trace amounts of neon and krypton.
§ Nitrogen liquefies at -196° C or -320° F. § Liquid nitrogen is used in medicine. (Dermatologists use liquid nitrogen to remove warts and
moles.) § Since nitrogen is not reactive, liquid nitrogen has found wide use in frozen food preparation and
preservation during transit to grocery stores.
Ask students: What are some examples of physical and chemical changes? Include the following points in the discussion:
§ Physical changes involve changes in the phase of a substance. Examples: Liquid water freezes
Safety Precautions: Team members pouring liquid nitrogen and doing experiments with liquid nitrogen need to wear safety goggles. Always pour from the large nitrogen dewar to small containers. Never try to fill a small container by dipping it in the large dewar. You risk frostbite if your skin is exposed to liquid nitrogen. The cotton gloves are provided only for use when pouring and will not provide protection.

Your Notes:
______________________________________________________________________________
______________________________________________________________________________
______________________________________________________________________________
______________________________________________________________________________
to form ice or boils to change to water vapor gas. All three forms are chemically the same and have the same formula. H2O.
§ Chemical changes involve the reaction of two substances to create a new substance with a different formula and may be evidenced by a color change, the formation of a gas or precipitate.
DISCUSSION OF THE COLD TEMPERATURE OF BOILING NITROGEN Give each pair of students one of the thermometer diagrams and use this diagram to help students understand how cold liquid nitrogen is by comparing the markings for the boiling point of water, freezing point of water, the sublimation temperature of dry ice, and the boiling point of liquid nitrogen.
II. Demonstration #1: Liquid Nitrogen Materials: 1 10 oz. clear plastic cup 1 large dewar of liquid nitrogen 1 pair of gloves 32 Observation Sheets

Your Notes:
______________________________________________________________________________
______________________________________________________________________________
______________________________________________________________________________
____________________________________________________________________________
§ Give each student one of the observation sheets. § Pour liquid nitrogen into the 10 oz. clear plastic cup so that it is half full. § Use a glove to hold the cup up high enough so students can see the liquid nitrogen. Then set the
cup on the front desk (well away from any students to avoid skin contact). § Have the students look at the liquid nitrogen, but do not allow them to touch it. Liquid nitrogen is
not toxic, but the temperature is so cold that it will hurt the skin. § Ask the students to draw a cup on their observation sheet and write down what they see
happening in and around it. § Draw a picture of the cup on the board and ask the students to tell you what happened. Write
these observations around the drawing. Students may not have observed all of the following. If not, point them out.
1. Liquid nitrogen boils. 2. Fog is formed which goes down when it gets to the air outside the cup. 3. Frost is formed on the side of the cup
Ask students: What is happening to liquid nitrogen and is this a physical or chemical change? Include the following points in the discussion:
1. Liquid nitrogen boils (changes from a liquid to a gas) because the temperature of the room (about 25 oC) is much higher than the boiling point of liquid nitrogen (–196oC). This is a physical change. 2. Fog forms above the liquid nitrogen. This is a physical change.
o The fog is not liquid nitrogen but solid water (ice particles) suspended in the cold nitrogen gas above the liquid nitrogen.
o Gaseous nitrogen is colorless as evidenced by the fact that we can’t see air, which is 78% nitrogen.
o The fog goes down after it leaves the cup because the cold nitrogen gas contains crystals of water, which makes the fog heavier than air. Remind students that this is why regular fog is close to the ground – fog contains air mixed with small drops of water.
3. Condensation on the outside of the plastic cup is water vapor (gas) from the air, changing to liquid water.
o The water droplets are quickly frozen by the low temperature of the liquid nitrogen to form solid water (frost or ice). These changes are also physical changes.

Your Notes:
______________________________________________________________________________
______________________________________________________________________________
______________________________________________________________________________
____________________________________________________________________________
o Most students will report only seeing the frost since the water droplets are only observable for a brief time before they turn to solid water (frost).
III. Demonstration #2: Hammering with a Banana Materials 1 piece of wood 1 nail 1 banana 1 large dewar of liquid nitrogen 1 small dewar - small plastic insulated bottle 1 pair of gloves
§ Show students the nail and piece of wood. § Tell them that you forgot your hammer so you think you’ll just use the banana. § Ask students if they think you can hammer the nail into the piece of wood with the banana. § Attempt to hammer the nail into the board with the banana. Watch out! This can be messy. § Tell the students that you think the banana needs a little help. § Fill the small dewar about two-thirds full with liquid nitrogen. § Put the banana in the small dewar. § Wait 2-3 minutes for the liquid nitrogen to cool the banana. Ask the next two questions while you
wait. o Ask students to predict what the banana will look like when it comes out of the liquid
nitrogen. Ask the students if they think you will be able to hammer a nail into the board this time.
§ When 2-3 minutes have passed, use a glove to pull the banana out of the liquid nitrogen and hammer the nail into the board.
IV. Demonstration #3: Rubber Tubing in Liquid Nitrogen Materials: 2 pieces of rubber tubing or bicycle inner-tube (tubing must be slit down the middle to avoid the possibility of liquid oxygen collecting) 1 small dewar (made from plastic bottles) of liquid nitrogen 1 pair of gloves 1 pair of tongs
Note: Do not place any objects in the large liquid nitrogen dewar since it is going to be used to make ice cream. There is a small dewar (one made from two clear plastic bottles with packing peanuts for insulation) for freezing the banana and rubber tubing.
Note: Please dispose of banana at the school, before the box is returned to the VSVS lab.
Note: Tell students that the next few experiments will show some of the things that can be done with liquid nitrogen. Ask them to decide whether each experiment involves a chemical or physical change and to underline their choice on their Observation Sheet.

Your Notes:
______________________________________________________________________________
______________________________________________________________________________
______________________________________________________________________________
____________________________________________________________________________
§ Use the small dewar of liquid nitrogen from Demonstration #2. § Hold up a piece of split rubber tubing and demonstrate how flexible it is by bending it back and
forth. § Take the two pieces of split rubber tubing and bend in half at the middle (not kinked but a little
rounded) and while holding the pieces of tubing together at the open ends, immerse the bent middle portions into the small dewar containing the liquid nitrogen for about one minute.
§ While the middle of the rubber tubing is in the liquid nitrogen, ask students what they think the cooling in liquid nitrogen will do to the rubber tubing. Accept logical responses.
§ Take the pieces of rubber tubing out of the liquid nitrogen, and put one piece aside to warm up to room temperature. Caution: Have safety goggles on for this part. Take the other piece and quickly and forcefully hit the cold end against the top of the table. This should shatter the tubing.
Explanation: Rubber is made up of long chains of molecules that are loosely coiled. The elasticity of rubber is caused by coiling and uncoiling of these long chains. At liquid nitrogen temperatures the molecular motion is slowed down enough that the coils are locked into one position.
§ Pick up the rubber tubing that was allowed to warm to room temperature and show the students that it is flexible again.
Explanation: When the temperature of the rubber becomes warmer, the elasticity of the rubber returns because the molecular motion increases again and allows the coiling and uncoiling of the polymer chains.
§ Ask the students: Are the changes in elasticity with temperature a physical or chemical change? Physical because the rubber recovers its elasticity when it warms up.
V. Demonstration #4: Whistling Tea Kettle and Shrinking a Balloon Materials: 1 inflated balloon (tied off) 1 dewar of liquid nitrogen 1 large stainless steel bowl 1 pair of gloves (Put On!) 1 whistling tea kettle 1 ladle A. Whistling Tea Kettle Ask the students if they know what happens when water is boiled in a whistling tea kettle. The whistle makes a loud whistling noise when water boils. Ask – what causes the whistle? The boiling water (liquid) creates steam (a gas).
Pressure builds up and the steam has nowhere to go, except through a hole in the lid. (Show the students the hole.) When enough steam has been created so that it rushes through the hole, vibrations are set up, causing the kettle to whistle.
Important Safety Note: The VSVS team member performing this demonstration must wear safety goggles.

Your Notes:
______________________________________________________________________________
______________________________________________________________________________
______________________________________________________________________________
____________________________________________________________________________
Use the ladle to put some liquid nitrogen into the kettle. Ask the students to explain why the kettle is whistling.
The liquid nitrogen is boiling, producing nitrogen gas, which is forced out through the hole, in the same way the steam from the boiling water was.
B. Shrinking a Balloon
§ Show an inflated balloon to the class. § Ask students to predict what will happen to the balloon when you pour liquid nitrogen over it.
Accept logical responses. § Put the bowl in a spot where students can see it. § Place the inflated balloon in the bowl. § Tell students to watch and to be very quiet so they can hear what happens. § Pour a small amount of liquid nitrogen over the balloon. § The balloon will shrink and crackle as it gets cold. § Ask students to predict what will happen when you pull the balloon out of the bowl. Accept
logical responses. § Use a glove and remove the deflated balloon from the bowl. § As you hold the balloon in the air, the students will be able to observe the balloon inflate and
return to its original state. Explanation Gases contract when cooled and expand when heated. The volume of a gas is directly related to the temperature. Therefore, the balloon was larger in the warmer air of the room and smaller in the coldness of the liquid nitrogen. This can be explained by the molecular motion of the gas molecules. They move faster at higher temperatures and as a result, take up more room (volume). When the molecules of gas are cooled, they slow down and take up less room (volume). Ask students: Are these chemical or physical changes? Physical
VI. Demonstration #5: Reconstituting Dry Ice Materials 1 balloon 1 pair of gloves 1 plastic coke bottle 1 container of dry ice 1 large dewar of liquid nitrogen 1 6 oz bottle of water 1 10 oz. clear plastic cup 1 large stainless steel bowl 1 pair of scissors
§ Tell students that the following demonstration will use dry ice and liquid nitrogen to show how to turn a solid into a gas and back into a solid again. These are additional examples of physical changes.
§ Using a glove, hold up a piece of dry ice. Ask students: What is dry ice? Ask students if the dry ice is in the solid, liquid, or gas state. The piece you are holding is in the solid state. The "fog” sublimating from the solid piece is carbon dioxide gas and water ice crystals.
§ Tell students that you are going to change the dry ice to a gas and then return it to its solid form. o Place several small pieces of dry ice into an empty 20 oz. plastic coke bottle.

Your Notes:
______________________________________________________________________________
______________________________________________________________________________
______________________________________________________________________________
____________________________________________________________________________
o Pour 6 oz of water into the bottle of dry ice. Tell students that the water is added to warm up the dry ice so the change from solid to gas happens faster.
o As the CO2 gas is being given off, place a balloon over the bottle. o The balloon will fill up with CO2. o When the balloon is a little bigger than a softball, remove it from the bottle and tie a knot
in the end. § Ask students to predict what will happen this time when you pour liquid nitrogen over the balloon
filled with CO2. (They should know based on the last experiment.) § Place this balloon into the stainless steel bowl and pour liquid nitrogen over it. § Once the balloon is deflated, lift it out of the bowl and cut it open with the scissors. § Pour the dry ice into the clear plastic cup and show the students that the CO2 gas has returned to
dry ice (solid CO2). Explanation Refer to the thermometer diagram discussed at the beginning of the lesson.
§ CO2 becomes a solid at -78° C or -108° F. § The liquid nitrogen is much colder (-196° C or -320° F) than the CO2 so it is able to freeze the
CO2 gas into solid dry ice.
VII. Demonstration: Making Ice Cream with Liquid Nitrogen Materials: 1 stirring spoon or spatula 1 quart of whole milk 1 box of ice cream mix 1 large dewar of liquid nitrogen 1 large stainless steel bowl 32 small paper cups for ice cream 32 taster spoons for ice cream 2 pairs of gloves (have handy in case they are needed)
§ Tell students that liquid nitrogen is great for making a quick batch of ice cream. § Pour all (1 quart) of the whole milk into the bowl. § Open the ice cream mix and sprinkle it on top of the milk. Stir to mix. § Have one VSVS volunteer slowly pour about 1 pint of liquid nitrogen into the bowl while another
volunteer holds the bowl still and stirs the mixture. Both volunteers need to wear gloves. § Slowly add more liquid nitrogen. § Stop if any of the liquid turns solid. If ice cream becomes too hard, wait a few minutes for it to
soften. § Put a small amount in enough paper cups to serve everyone. Pass these out with the taster
spoons.

Your Notes:
______________________________________________________________________________
______________________________________________________________________________
______________________________________________________________________________
____________________________________________________________________________
VIII. Review Chemical and Physical Changes:
§ Review the physical and chemical change responses on the students’ observation sheets. See answer sheet.
Cryogenics § Cryogenics is a branch of physics that deals with the production and effects of very low
temperatures. § Substances such as liquid nitrogen that are used for cooling things to very low temperatures are
called cryogens. § The derivation of the word cryogen is from the Greek "kryos”, meaning "icy cold”. § Containers used to hold cryogens are large vacuum-walled bottles much like the thermos used to
carry hot soup or coffee. Liquid Nitrogen:
§ Nitrogen is a gas that makes up 78% of the air. (Oxygen makes up 21%, argon 0.9%, and the rest is made up of other gases such as carbon dioxide, water vapor, and trace amounts of neon and krypton.)
§ Nitrogen liquefies at -196° C or -320° F. § Liquid nitrogen is used in medicine. (Dermatologists use liquid nitrogen to cool a localized area
of skin prior to removal of a wart or mole.) § Since nitrogen is not reactive, liquid nitrogen has found wide use in frozen food preparation and
preservation during transit to grocery stores. Hazards Associated with Cryogenics: Cryogens represent special hazards since contact produces instantaneous frostbite, and structural materials such as plastics, rubber gaskets, and some metals become brittle and fracture easily at these low temperatures.
Clean-Up: Throw away the banana and the milk carton. Empty the water/dry ice bottle – make sure there is no cap on it. Discard pieces of broken balloon and small pieces of rubber tubing. Put the bowl and spoon back in the trash bag and place it in the kit. Be sure to return both the liquid nitrogen dewar and the kit to the VSVS lab. Note: If there is any liquid nitrogen left at the END of the lesson you can pour some on the floor to allow students to watch it roll around. BE SURE TO ASK THE TEACHER BEFORE YOU DO THIS!
Note: The slower the liquid nitrogen is added, the better the consistency of the ice cream. Pour the liquid nitrogen at about the rate of a drip coffee machine for about 20 to 30 seconds. Then stop and look. Continue pouring the liquid nitrogen at a slow rate. Have the stirrer check every 20-30 seconds for the consistency of soft serve ice cream.

Your Notes:
______________________________________________________________________________
______________________________________________________________________________
______________________________________________________________________________
____________________________________________________________________________
Share this information about the Challenger Explosion The tragic explosion of the space shuttle Challenger in January, 1986 was caused by the effect of cold temperatures on a rubber gasket. The rubber gasket was used to seal joints in the booster rockets to prevent contact with the hydrogen fuel tanks. The cold launch temperature on that January day made the rubber gasket lose some of its elasticity. This allowed flames from the booster rocket to burn through the hydrogen fuel tank and cause the explosion that killed the astronauts and the teacher-in-space, Christa McAuliffe. Share this information about the news article “Company puts freeze on metals to extend use” (in binder). Read the article before going to the class so you can share the information with students. Highlights from the article are listed below:
§ Cryo-Processing of Tennessee freezes metal items - drill bits, saw chains, punch tools, musical instruments, guitar strings - at temperatures hundreds of degrees below zero, and then quickly reheats them, to strengthen their molecular structure.
§ This process makes these items more durable and less likely to break under stress. § This means less cost for the company or individual forced to spend precious time replacing or
repairing the items. A company has increased production due to decreased downtime to replace the tools.
§ The company in the article cryo-processes twice a week for 48 hours each time. They also do some quick heat processing - called "sweetening” - before they put it in the "fridge”.
§ This technique was developed by a Decatur, Illinois firm called 300 Below. It uses a chest-freezer-sized piece of equipment to hold parts while liquid nitrogen gradually cools the air surrounding them.
§ Cryo-Processing can treat golf clubs and golf balls to give an increased driving distance. Tennis rackets and aluminum baseball or softball bats can be treated cryogenically.
§ The cost of cryo-processing varies according to volume. One to five pounds cost $49.50 per pound. 10 pounds drops to $9.75 per pound. A ton of cryo-processed equipment will cost $2.54 a pound.
Old tires can be frozen in liquid nitrogen to make them so brittle that they can be ground to a fine powder and then used in paints, coatings and sealants. These products then take on some of the qualities of rubber – they are more elastic and impact resistant. (Time, March 3 2008).
If time permits, use the insert in the article ("Just pop it in the fridge”) and draw the molecules on the board. Share the explanation in the article with the students to show what happens to the molecules before, during, and after cryogenic treatment. Lesson written by Dr. Melvin Joesten, Chemistry Department, Vanderbilt University Pat Tellinghuisen, Director of VSVS, Vanderbilt University
Dr. Todd Gary, former Coordinator of VSVS, Vanderbilt University Susan Clendenon, Teacher Consultant, Vanderbilt University

ANSWER SHEET OBSERVATION SHEET – Cryogenics
Name _____________________________________ Demonstration #1 – Liquid Nitrogen – The VSVS team adds liquid nitrogen to a clear cup. Draw a cup like the one being used and write down everything you see happening in and around the cup. (List of possible observations and labeled cup given on page 5 of lesson.)
Are the following physical or chemical changes? Circle your response. Boiling liquid nitrogen: Chemical Physical Formation of fog: Chemical Physical Condensation: Chemical Physical Freezing and thawing of banana: Chemical or Physical (You may get both responses here. Since the banana skin turns brown, this would indicate a chemical change. However, the banana still tastes like a banana, although the part that was frozen is mushy.) Cooling and warming rubber tubing Chemical Physical Shrinking and inflating balloon: Chemical Physical Changing solid dry ice into gas and back to solid: Chemical Physical Making ice cream: Chemical Physical (The ice cream mix contains flavor and sugar; mixing and freezing this with milk is a physical change.)

OBSERVATION SHEET - Cryogenics Name _____________________________________ Vocabulary words: cryogenics dry ice physical change chemical change condensation liquid nitrogen Demonstration #1 – Liquid Nitrogen – The VSVS team adds liquid nitrogen to a clear cup. Draw a cup like the one being used and write down everything you see happening in and around the cup. Are the following physical or chemical changes? Underline your response. Boiling liquid nitrogen: Chemical Physical
Formation of fog: Chemical Physical
Condensation: Chemical Physical
Freezing and thawing of banana: Chemical Physical
Cooling and warming of rubber tubing Chemical Physical
Shrinking and inflating balloon: Chemical Physical
Changing solid dry ice into gas and back to solid: Chemical Physical
Making ice cream: Chemical Physical

VANDERBILT STUDENT VOLUNTEERS FOR SCIENCE
http://studentorgs.vanderbilt.edu/vsvs
Polymer Chemistry Fall 2016
Goal: To introduce the concepts of polymers and cross-linkers and to investigate their properties. Fits TN State Science Standards for grades 5 and 8. GLE0507.9.1:Observeandmeasurethesimplechemicalpropertiesofcommonsubstances
GLE0807.9.2:Explainthatmatterhaspropertiesthataredeterminedbythestructureandarrangementofitsatoms
Lesson Outline I. Introduction - Solids, Liquids, Gases, and Polymers.
Two VSVS volunteers conduct this section while other volunteers prepare the cups and the blue and yellow slime for the demonstration. A number of activities demonstrate the differences between polymers involve the use of student volunteers. Ask the teacher to help in selecting students who are willing to link arms.
II Superabsorbant Polymer – Demonstration. Sodium polyacrylate in the form of Insta-Snow is used to demonstrate the ability of this polymer to absorb water. After the demonstration, mention that sodium polyacrylate is used in superabsorbant diapers – particles of sodium polyacrylate are between the layers of the diaper. III. Making Slime.
Students make slime by mixing solutions of PVA and 4% borax. IV. Determining the Properties of Slime.
Students perform a number of tests on the slime and record their observations on an observation sheet. For Observation 6 show the students the 2 cups containing the blue and yellow slime. Add one of the colored slimes to the other. By the end of the period you may be able to see green color at the interface. If so, explain that the green is there because the blue and yellow layers have mixed (reminding them that mixing blue and yellow colors produces green). This is a property of a liquid. Leave the cup with the class and tell them to check it the next day. (The cup of slime will be green because the two polymer layers will have mixed completely.)
V. Tearing a Newspaper. Students find that a newspaper tears straight in one direction and crooked in the other direction.
Explain that newspaper is made from cellulose, a long-chain polymer. You get a straight tear when you tear parallel to the long chains and a crooked tear when you tear across the chains.
VI. Review. Review the results of the tests in part IV in terms of properties of solids and liquids. Explain the classification of slime as a non-Newtonian liquid. Materials (for 35 students): 1 Bag containing: 1 plastic water bottle with cap 1 sandwich bag 1 polyester sock (or other polymer blend) 2 small cups marked at 10 mL to measure 4% borax1 ziploc bag with container of Insta-Sno 1 bottle containing 60 mL water 1 clear 10 oz cup 1 disposable diaper 1 plastic bag containing: 2 containers 4% PVA (containing 50mL each) 2 small bottles 4% borax – 1 with blue food coloring added and 1 with yellow food coloring added 2 clear 10 oz cups

Your Notes: ______________________________________________________________________________
______________________________________________________________________________
______________________________________________________________________________
______________________________________________________________________________
2 popsicle sticks 32 10 oz cups stuffed with sandwich Ziploc bags for use by students 1 box ziploc sandwich bags (includes at least 15 extras in case some break ) 32 3.5 oz plastic cups marked for 50 mL (PVA cups) 2 bottles (1L each) PVA 1 bottle 4% borax solution 32 ¼ sheets of paper 1 Borax box front 32 2oz cups 32 Observation Sheets 36 Instruction Sheets (in sheet protectors) (4 for VSVS team) 32 sheets of newspaper 1 trash bag 32 small slips of paper telling students what to do if the slime gets spilled on the carpet etc 1. Before the lesson: In the car ride, read through this quiz together as a team. Make sure each team member has read the lesson and has a fundamental understanding of the material.
1. What are the three different phases? What are the differences between them? Can an object have more than one phase at a time? If yes, what do you call it?
2. What is a polymer? Give some examples. What makes polymers so useful? 3. You named some different types of polymers earlier? Some of them are really strong and sturdy
while others are soft and flexible. What causes these differences? 4. What uses Insta-Sno or something like it? Also, where did all of the water go when it mixed with
the Insta-Sno and why does it take up more/less space now? 5. Why is slime so different from the things you used to make it; what kind of reaction occurred? Is
slime a solid or liquid?
2. During the Lesson: Here are some Fun Facts for the lesson Insta-Sno can absorb anywhere from 200 to 300 times its mass in water. If you have a scale, try weighing out how much water you can add before the Insta-Sno stops “growing”.
You might not be able to make slime at home without the right ingredients, but there is another non-Newtonian fluid you can make at home called “oobleck”. If you mix corn starch and water, it can make an ooze that drips like a liquid but feels solid when you press it.
Polymers can be thousands, even millions, of molecules long. A polymer chain of 10,000 subunits is proportional to a half-inch thick rope that is 140 yards.
Different polymers can have very different strengths. For example, the newspaper you ripped is a very easy to break polymer, but carbon nanotubes and graphene, other type of polymers, are some of the strongest materials in the world for their size. A more common super strong polymer is spider silk, which is, accounting for weight, stronger than steel.

Your Notes: ______________________________________________________________________________
______________________________________________________________________________
______________________________________________________________________________
______________________________________________________________________________
The difference in strengths between polymers is partly based on the types of chains formed by them. If you change the ratio of PVA and borax you use, it can result in more or less bonds being created and more or less oozy slime. We’re made up mainly of polymers. All four of the major biological groups (DNA, proteins, sugars, fats) are technically polymers. Unpacking the Kit
For Part I. Introduction 1 Bag containing: Plastic water bottle with cap, sandwich bag, polyester sock (or other polymer blend) For Part II. SuperAbsorbent Polymer 1 ziploc bag with container of Insta-Sno , 1 bottle containing 60 mL water, 1 clear 10 oz cup 1 disposable diaper
For Part III. Making Slime 32 10 oz. cups (inserted with ziploc bags that contain 10 mL of 4% borax) 32 3.5 oz plastic cups (with 50 mL of PVA) 32 2oz cups 32 ¼ sheets of paper 1 Borax box front 34 Instruction Sheets 32 Observation Sheets
Management Note: Two VSVS volunteers should conduct the Introduction section of this lesson while the other one or two volunteers prepare the cups for the slime and then make the blue and yellow colored slime for the Demonstration in part VI. Preparation for Experiment:
§ Count the students and prepare enough cups so each student will have one. § Use the small marked cup to measure 10 mL borax and pour this amount into a ziploc bag
inside a 10 oz cup. § Measure 50 mL of 4% polyvinyl alcohol into enough 3.5 oz cups so each student will have
one (fill to line on cups which is 50 mL) Making Blue and Yellow Slime
§ Use the materials in the bag containing: 2 containers PVA (containing 50mL each), 2 small bottles borax – 1 with blue food coloring added, and 1 with yellow food coloring added, 2 clear 10 oz cups, 2 popsicle sticks
§ Pour the blue borax into one of the 10oz cups and add the PVA. Stir with a popsicle stick until it is thick.
§ Repeat with the yellow borax and PVA in the second cup. § Set aside the 2 cups until later.
Note: Cups for this experiment should have been prepared for the students at the beginning of the lesson while two VSVS volunteers conducted the Introduction Section of the lesson.

Your Notes: ______________________________________________________________________________
______________________________________________________________________________
______________________________________________________________________________
______________________________________________________________________________
For Part V. Tearing a Newspaper: 32 sheets of newspaper
I. Introduction Materials: 1 Bag containing: Plastic water bottle with cap sandwich bag polyester sock (or other polymer blend)
§ A VSVS member should put the following vocabulary words on the board: o solid, liquid, gas, polymer, non-Newtonian liquid
§ Ask students: What is the difference between solids, liquids, and gases? § Be sure to bring up the following points if they do not come up in the discussion:
o Solids maintain their own shape; molecules are densely packed and move slowly. o Liquids take the shape of the container; molecules are close enough to maintain shape
but have more freedom to move. o Gases fill the container; molecules have the greatest amount of movement (free to move
anywhere in the container). § Make a chart on the board to compare properties of liquids and solids. § Have a students brainstorm about properties of each. Write their responses on the board under
the appropriate headings. § Some answers can be:
A Solid A Liquid
has definite shape has no definite shape (flows and takes the shape of a container)
can break into pieces
does not break into pieces
takes up a definite space
takes up a definite space
particles are packed tightly together and
move slowly
particles are not packed very tightly
and move faster than those in a solid
Tell the students that they will focus on solids and liquids and their characteristics. Modeling Solids, Liquids and Gases: Use 8 student volunteers to demonstrate the properties of solids, liquids, and gases. Ask the teacher to help in selecting students who are willing to hold arms. Solids:
§ Ask the 8 volunteers to come to the front and stand in a close cluster (not in two lines).

Your Notes: ______________________________________________________________________________
______________________________________________________________________________
______________________________________________________________________________
______________________________________________________________________________
§ Instruct the students to look at a spot on the floor and take baby steps around that spot in a side to side or forward and backward manner.
§ They should also vibrate their bodies to simulate molecular movement. § Explain to the students that this is a model of the molecules in a solid. The movement is limited
but is constant. § Molecules in solids do not travel far but they are constantly vibrating.
Liquids: § Now have the same students move an arm’s length away from the other students. § They should continue to vibrate while they move around a small section of the room (whichever
section you choose to designate). § Explain that this is a model of the molecules in a liquid; the molecules move more freely than the
molecules in a solid. Gases:
§ Tell the same students to continue to vibrate and allow them to move freely throughout the room. § These students now represent the molecules of a gas. § The molecules in a gas can fill up the entire space. Actually, to be more accurate, the students
would have to be able to fly around the room to simulate the molecules in a gas.
Modeling Polymers:
Now that we know how molecules move in the three states of matter, we are going to investigate a special class of large molecules that are made by forming chemical bonds between a large number of small molecules. The product that we are going to investigate is called a polymer. § Polymers occur as natural products (cotton, wool, hair, DNA) or are manufactured (polyethylene,
nylon, plexiglass, styrofoam). § Molecules in any state (solid, liquid, gas) can join together to create polymers.
Using the volunteers to demonstrate this process: § When the molecules are separate, each one is called a monomer because "mono” means one. § Ask the molecules (students) to lock arms and form a chain. § Tell students: When we join the monomers, we have created a polymer. § Ask students: Since "mono” means one, what do you think "poly” must mean? (Many) § Joining monomers to form polymers is a chemical reaction because a new substance is created. § Break the human "polymer” chain into two smaller chains of four students each. § Ask the two chains to walk across the room. § Ask them if it is easier to move as an individual or as a chain. § Then have the groups stand facing each other. § Ask for two more volunteers. Have each new volunteer stand between the two chains and grasp
the upper arm of a molecule (student) from each of the two different chains. These new students are the cross-linkers that join the two chains. (See picture below.)
§ Ask the entire group to walk across the room.
Note: In the next activity, students will be moving around in the room. Encourage them to move carefully. If they bump into objects or other "molecules” they should do this gently.
Note: Have the volunteers return to the front of the room and freeze in place while you share the following information with the students.

Your Notes: ______________________________________________________________________________
______________________________________________________________________________
______________________________________________________________________________
______________________________________________________________________________
§ Ask if the cross-linking made movement more difficult. Groups should conclude that it is more difficult to move with the cross-linkers.
§ Thank the student volunteers and ask them to return to their seats.
2 polymer chains joined by cross-linkers:
Examples of Polymers: § Show students the four polymer samples: sandwich bag, plastic water bottle and cap, sock. § Explain that these are examples of things made out of polymers. § They differ because of the way in which the molecules are joined. § Cross-linking is one way to join polymers that will be explored in the following activities. § There are thousands of polymers used in a variety of everyday products.
II. SuperAbsorbent Polymer Materials: 1 ziploc bag with container of Insta-Sno 1 bottle containing 60 mL water 1 clear 10 oz cup 1 disposable diaper
§ Take the cap off the container of Insta-Sno (sodium polyacrylate) and pour all of it into the clear
10 oz cup. § Hold the cup up so that everyone can see it, and slowly add all the water (60 mL) from the bottle. § Show students the fluffy snow-like particles that are produced. Insta-Sno is so realistic that it is
used in indoor snowboarding parks. § Unlike traditional artificial snow, Insta-Sno will not melt or ice up. Tell them that the white
powder is a polymer called sodium polyacrylate. § Point out the following additional uses for sodium polyacrylate:
o high absorbency disposable diapers (show them the one from the Ziploc bag) o moisture absorbent for automobile and jet fuels o When the superabsorbant polymer is added to sandy soil, it improves the soil’s ability to
retain moisture and improves its ability to support agriculture. It is sold for use in household plant soil.
o This polymer absorbs about 300 times its weight of tap water.
For VSVS Information Only: The sandwich bag is made up of branched polymer chains, the water bottle is composed of densely packed linear polymer chains, and the cap is composed of cross-linked polymer chains.

Your Notes: ______________________________________________________________________________
______________________________________________________________________________
______________________________________________________________________________
______________________________________________________________________________
III. Making Slime Materials 32 10 oz. cups (inserted with ziploc bags that contain 10 mL of 4% borax) 32 3.5 oz plastic cups (with 50 mL of PVA) 32 2oz cups 32 ¼ sheets of paper 1 Borax box front 34 Instruction Sheets 32 Observation Sheets
§ Share the following background information on slime with the students:
o Slime is a polymer compound that exhibits properties of both a solid and a liquid. o Scientists call this a non-Newtonian liquid. o The reaction between PVA and borax happens quite quickly, although the slime will
change slightly as it is kneaded. o It starts off slightly moist and quickly stabilizes into an unusual combination, with some
of the characteristics of a liquid and some of a solid. § Give the following to each student:
o 1 cup with 50 mL of 4% PVA o 1 (10-12 oz) cup containing a Ziploc bag filled with 10 mL 4% borax solution o 1 sheet of paper o 1 2oz cup o 1 Instruction Sheet o 1 Observation Sheet
§ Tell students to follow the directions on the instruction sheet. (Same as those given below.) You will still need to still guide them through the procedures, making sure they understand the instructions.
§ Have students place the paper on top of the desk to protect the surface. § Ask students to describe the two liquids. The PVA solution is thicker than the borax solution.
o Polyvinyl alcohol is a polymer that has a chain structure. o These chains are able to slip by each other like the noodles of freshly cooked spaghetti.
The noodles are long enough to make the solutions thick and gooey. o But when the borax is added, things change!
§ Show the students the Borax box front cutout and explain that: o Borax is a solid chemical used in detergents. o Borax was added to water to make the borax solution that is in the small cup on their
desks. Green food coloring was also added. o Borax is the cross-linker in this activity. (Relate the human cross-linker from the
previous demonstration to the borax used in the PVA.) The borax links the long chains of PVA together, which combines with the PVA to make Slime.
§ Have students pour the PVA solution into the borax solution in the Ziploc bag. § Show the students how to take the sandwich bag out, close the top, hold the bag with one hand
and knead the solutions inside until Slime, a thick gel is formed.
Note: Cups for this experiment should have been prepared for the students at the beginning of the lesson while two VSVS volunteers conducted the Introduction Section of the lesson.

Your Notes: ______________________________________________________________________________
______________________________________________________________________________
______________________________________________________________________________
______________________________________________________________________________
§ Ask the students to describe the slime. (The slime forms a thick gel within 1-2 minutes squeezing the outside of the bag with their hands.)
§ Explain that slime is a thick gel because the borax is the "cross-linker" between polyvinyl alcohol chains. By mixing the solutions, the students have made a cross-linked polymer.
§ Ask students if Slime is the result of a physical or a chemical change and explain why. o Emphasize that Slime is evidence of a chemical change, because the PVA and the borax
react to form a new substance that is a polymer compound. o The borax acts as the cross-linker to produce a substance that has different properties
from both the PVA and the borax.
IV. Determining the Properties of Slime
§ Show the students the 2 cups containing the blue and yellow slime. § Ask the students what happens when you add blue water to yellow water? The solution will turn
green. § Ask the students what will happen when you stack a blue solid on top of a yellow solid. Nothing
will change. § Tell the students that they can test if the slime is more like a solid or liquid by observing what
happens to the two different colored slimes. § Add one of the colored slimes to the other. § Leave the cup set on the front desk in the classroom. By the end of the period you may see green
color at the junction of the two slime layers. Leave the cup with the class and tell them to look at it the next day. After 24 hours, all of the slime will be green.
§ Tell the students that this illustrates a liquid property of slime since the blue and yellow mix together.
§ Have the students perform the following tests by following the instructions on the instruction sheet. Tell them to refer back to the table you put on the board that lists properties of solids and liquids and write their responses (liquid or solid) on their observation sheet.
§ Circulate among the students to check their responses without interrupting the flow of the experiment.
§ Students should take the slime out of the Ziploc bag and work it around with their hands until it is
not sticky and then form it into a ball. § Students don’t have to get all of the slime. Some will stick to the side. § Break off half of the slime, squeeze it into a ball, and roll it gently between the palms of the hands
to smooth the ball. Place it in the 2-oz cup and set aside until Observation 3. Observation 1
§ Take the other half of slime and roll it into a cylindrical shape (make a snake 2-3 inches long). § Hold the cylinder at both ends and slowly pull it apart.
Note: Do the following demonstration before the students test the properties of their slime.
Note: Do as many of these as time permits; make sure you leave enough time at the end of the lesson for a review.

Your Notes: ______________________________________________________________________________
______________________________________________________________________________
______________________________________________________________________________
______________________________________________________________________________
§ Ask students: Is this more like a liquid or a solid? It droops in the middle; it is more like a property of a liquid.
Observation 2 § Roll the slime into a cylindrical shape again and pull it apart quickly. § Ask students: Is this more like a liquid or a solid? The slime breaks; this is more like a property
of a solid. Observation 3
§ Have students look at the ball of slime they placed in the 2oz cup. § What happened? The ball has flattened on the bottom and taken the shape of the cup. § Ask students: Does this change demonstrate a property of a liquid or a solid and why? liquid -
because it flows and takes the shape of its container. Observation 4
§ Roll the slime into a ball and drop it on a clean desktop. § Ask students: Is this more like a liquid or a solid? (It bounces, but it will shatter if you throw it
too hard.) Bouncing and shattering are more like properties of a solid.
Observation 5 § Roll the slime into a ball and put it inside the ziploc bag. Force all the air out of the bag, zip it
and place it on the desktop. § Use the bottom of your fist and hit the ball in the bag. § Ask students: Is this more like a liquid or a solid? The slime breaks into pieces, which is more
like the property of a solid. Observation 6: Demonstration
§ Show the students the clear cup with the blue and yellow slime layers. § Is there any green color at the interface? § If so, explain that the green is there because the blue and yellow layers have mixed (reminding
them that mixing blue and yellow colors produces green). § Ask students: Is this a property of a liquid or a solid? Liquid
Have students put their slime into the ziploc bag and seal it so they can take it home. Give them the following information about Slime:
§ Do not put slime in the sink. It can plug up the drain. § Slime will get stuck to clothes or carpet. If this happens, use vinegar to help remove it. § The slime will keep about two weeks. When mold starts forming, discard the slime. § Do not eat the slime and do not let little brothers or little sisters play with it (as they may eat it). § Tell students to try to make impressions with coins or small objects at home. A solid will hold an
imprint. § Tell them to go to the VSVS web site (given on their observation sheet) for other ways to make
polymers. § Give each student a slip of paper explaining how to care for their slime.
Note: VSVS team members may want to do the shattering part of this observation if the classroom is carpeted, or the class is unruly.
Clean-Up: Roll up the papers and throw them away after this activity. Put all used cups in the trash bag and place it in the kit. We re-use plastic cups.

Your Notes: ______________________________________________________________________________
______________________________________________________________________________
______________________________________________________________________________
______________________________________________________________________________
V. Tearing a Newspaper: § Give each student one of the small pieces of newspaper. § Tell them to tear it one way and then the other way. (They will find that it tears straight in one
direction and crooked when they tear the other way.) § Explain that newspaper is made from cellulose, a long-chain polymer of (β-glucose ) monomers. § When you tear one way, you are tearing between chains (parallel to chains), and you get a cleaner
tear. Tearing the other way doesn't give a straight tear because you are tearing across the chains. § Tearing the newspaper is one way to show that polymers exist in nature. § Other naturally occurring polymers that students would be familiar with are proteins, DNA, RNA,
starch.
VI. Review Go over the observation sheet responses with students (see answer sheet) and ask:
§ When does the slime act like a solid? Liquid? § How do you know if a chemical or physical change occurs when the slime is made?
Tell students they might like to read Bartholomew and the Oobleck by Dr. Seuss. Handout for students to take home with their slime:
§ Do not put slime in the sink. It can plug up the drain. § Slime will get stuck to clothes or carpet. If this happens, use vinegar to help remove it. § The slime will keep about two weeks. When mold starts forming, discard the slime. § Do not eat the slime and do not let little brothers or little sisters play with it (as they may eat it). § Tell students to try to make impressions with coins or small objects at home. A solid will hold an
imprint. § Go to the VSVS web site (http://studentorgs.vanderbilt.edu/vsvs) for other
ways to make polymers. References: 1. Journal Editorial Staff, J. Chem. Educ., 1998, 75, 1432A 2. Kids & Chemistry: Hands on Activities and Demonstrations, American Chemical Society.
3. Fun with Chemistry, Vol. 2; Sarquis, M; Sarquis, J., Eds.;, Publ. 93-001; Institute for Chemical Education, University of Wisconsin: Madison, 1991; pp. 67-76, 81-88, 95-99.
Lesson written by: Dr. Melvin Joesten, Chemistry Department, Vanderbilt University Pat Tellinghuisen, Coordinator of VSVS, Vanderbilt University Susan Clendenen, Teacher Consultant, Vanderbilt University
Dr. Joe Lopez, Vanderbilt Center for Science Outreach

DETERMINING THE PROPERTIES OF SLIME Observation Sheet
Name ____________________________________________ Vocabulary words: solid, liquid, gas, polymer, non-Newtonian liquid, viscosity Follow the instruction sheet to perform observations on slime. After each observation, determine if it is more like a solid or liquid by putting an X in the correct column, and then write in the reason why (choose from the list below.) Solid: Liquid: has definite shape flows, can take the shape of the container can bounce or break into pieces does not break into pieces can be stretched
Observation # Solid Liquid Why?
1-pull apart slowly 2-pull apart quickly 3-put into a cup 4-drop it 5-hit it 6-2 colors added together
What is the name given to a substance that has solid and liquid properties? Check out the Vanderbilt web site for more information on polymers at http://www.vanderbilt.edu/vsvs.

DETERMINING THE PROPERTIES OF SLIME Observation Sheet - Answers
Name ____________________________________________ Vocabulary words: solid, liquid, gas, polymer, non-Newtonian liquid, viscosity Follow the instruction sheet to perform observations on Slime. After each observation, determine if it is more like a solid or liquid by putting an X in the correct column, and then write in the reason why. (choose from the list below.) Solid: Liquid: has definite shape flows, can take the shape of the container can bounce or break into pieces does not break into pieces can be stretched
Observation # Solid Liquid Why?
1-pull apart slowly X Flows 2-pull apart quickly X Breaks 3-put into a cup X Flows and takes shape
of its container 4-drop it X Bounces 5-hit it X Breaks 6-2 colors stacked together
X Two colors flow together
What is the name given to a substance that has solid and liquid properties? ________________Non-Newtonian liquid_____________________ Check out the Vanderbilt web site for more information on polymers at: http://studentorgs.vanderbilt.edu/vsvs