Embed Size (px)
Citation preview
© 2013 Cisco and/or its affiliates. All rights reserved. This document is Cisco Public. Page 1 of 9
IT Essentials 5.0 5.3.4.8 Lab - Managing System Files with Built-in Utilities in Windows XP Introduction Print and complete this lab. In this lab, you will use Windows built-in utilities to gather information about the system and to troubleshoot system resources. Recommended Equipment The following equipment is required for this exercise:
• A computer running Windows XP
Step 1
Log on to the computer as an administrator. Open the command prompt by clicking Start > Run > type cmd > click OK.
What is the drive path shown? Type help and press Enter.
IT Essentials Chapter 5 Lab
© 2013 Cisco and/or its affiliates. All rights reserved. This document is Cisco Public. Page 2 of 9
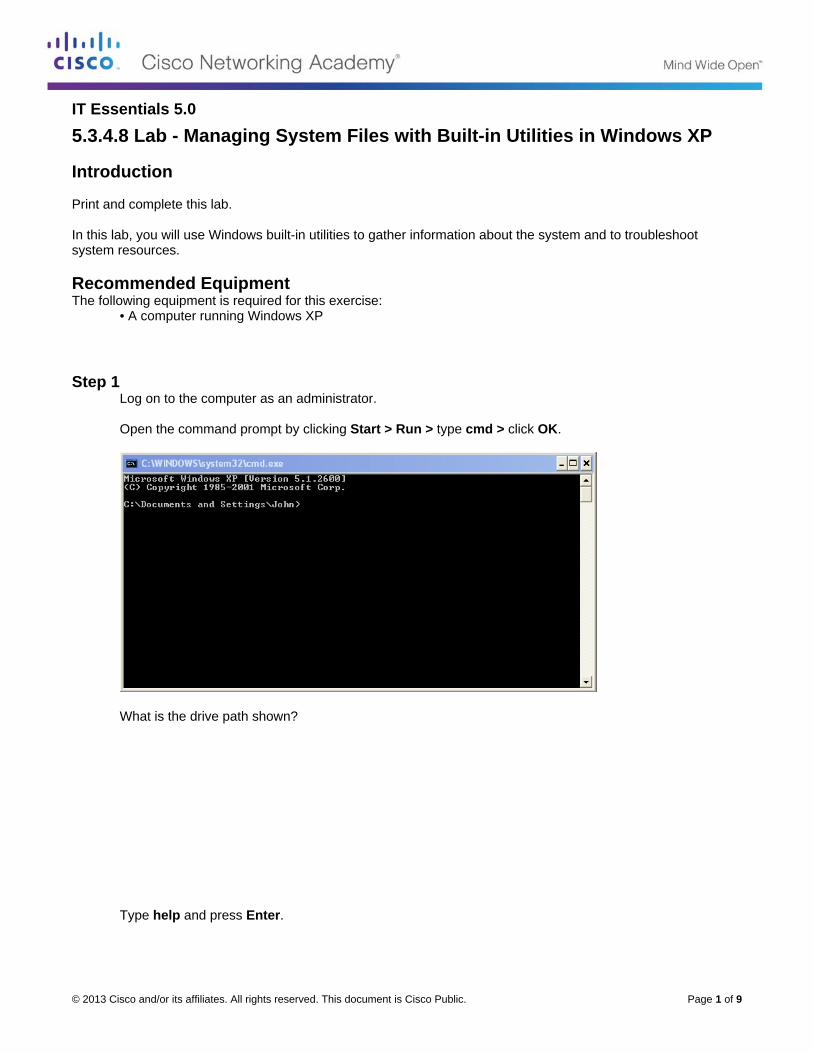
What is the command to change directory? What is the command to display the contents in a directory? Type cd .. and press Enter.
What is the drive path shown? Change back to original drive path. Example: Type cd John and press Enter. What is the drive path shown? Type dir /? and press Enter. If asked, press any key to continue.
IT Essentials Chapter 5 Lab
© 2013 Cisco and/or its affiliates. All rights reserved. This document is Cisco Public. Page 3 of 9
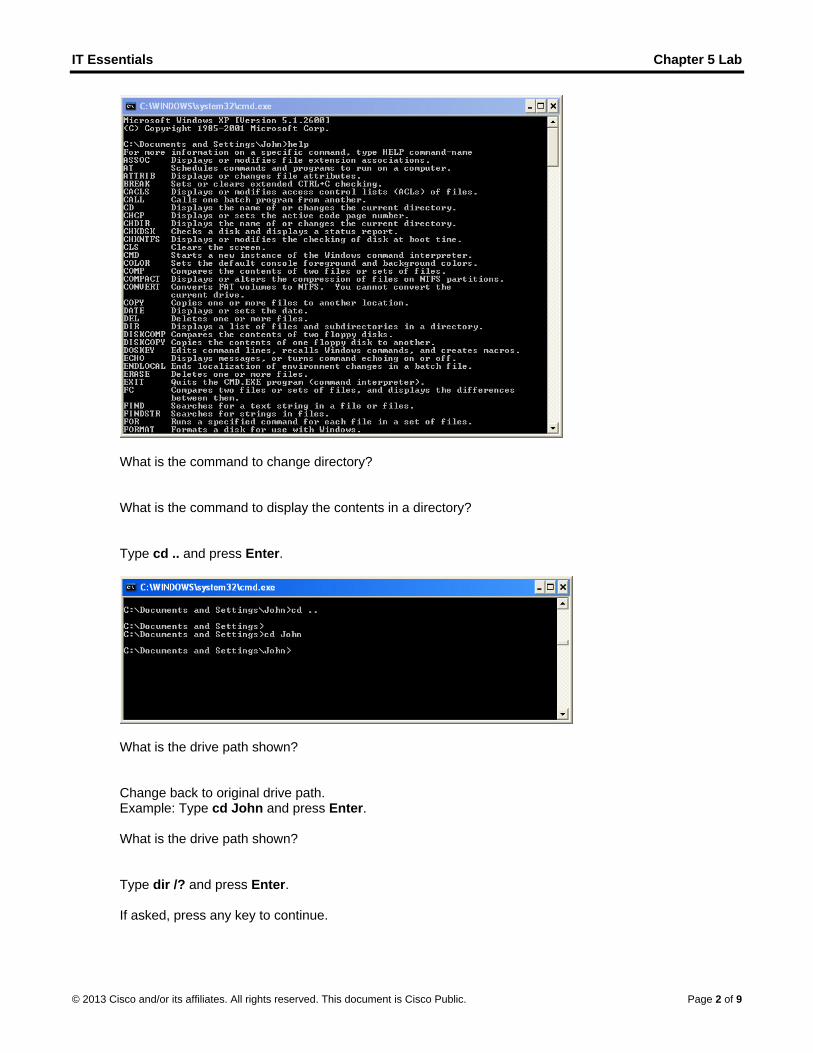
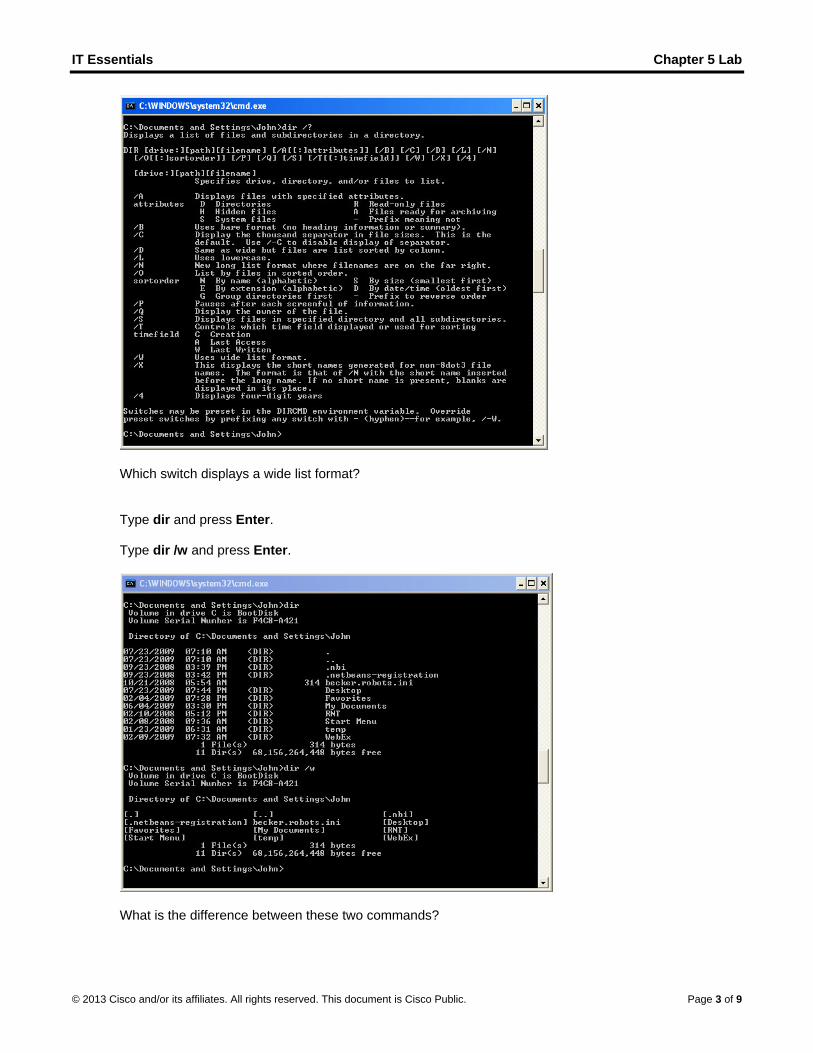
Which switch displays a wide list format? Type dir and press Enter. Type dir /w and press Enter.
What is the difference between these two commands?
IT Essentials Chapter 5 Lab
© 2013 Cisco and/or its affiliates. All rights reserved. This document is Cisco Public. Page 4 of 9
Type VOL. What volume is drive C in? Close the Command prompt window.
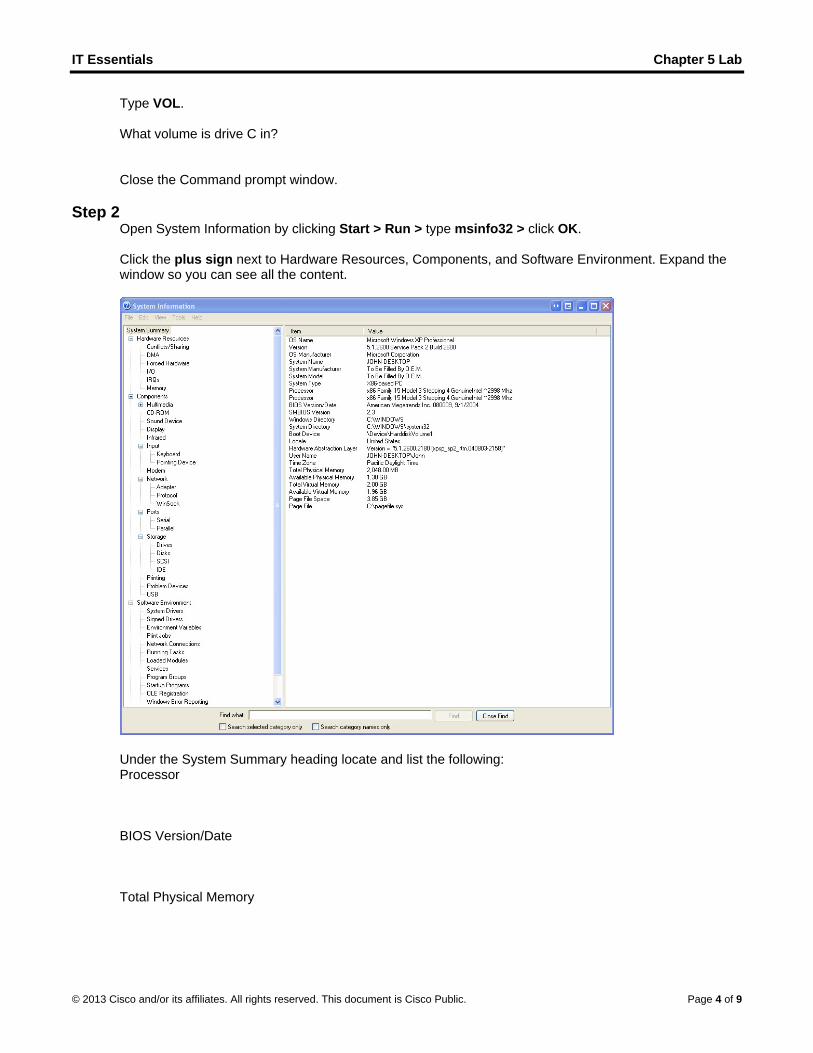
Step 2 Open System Information by clicking Start > Run > type msinfo32 > click OK. Click the plus sign next to Hardware Resources, Components, and Software Environment. Expand the window so you can see all the content.
Under the System Summary heading locate and list the following: Processor BIOS Version/Date Total Physical Memory

IT Essentials Chapter 5 Lab
© 2013 Cisco and/or its affiliates. All rights reserved. This document is Cisco Public. Page 5 of 9
Under the Hardware Resources heading locate and list the following: DMA channels and the device using the resources. I/O address range for these devices: Printer Port (LPT1) Communications Port (COM1) Communications Port (COM2) IRQ address for these devices: System timer Communications Port (COM1) Communications Port (COM2) Under the Components heading and Software heading look around to see what information is provided in these areas. Close the System Information window.
Step 3 Open System Configuration Utility by clicking Start > Run > type msconfig > click OK. Note: It is very important that you do not make any changes in this utility without instructor permission.
IT Essentials Chapter 5 Lab
© 2013 Cisco and/or its affiliates. All rights reserved. This document is Cisco Public. Page 6 of 9
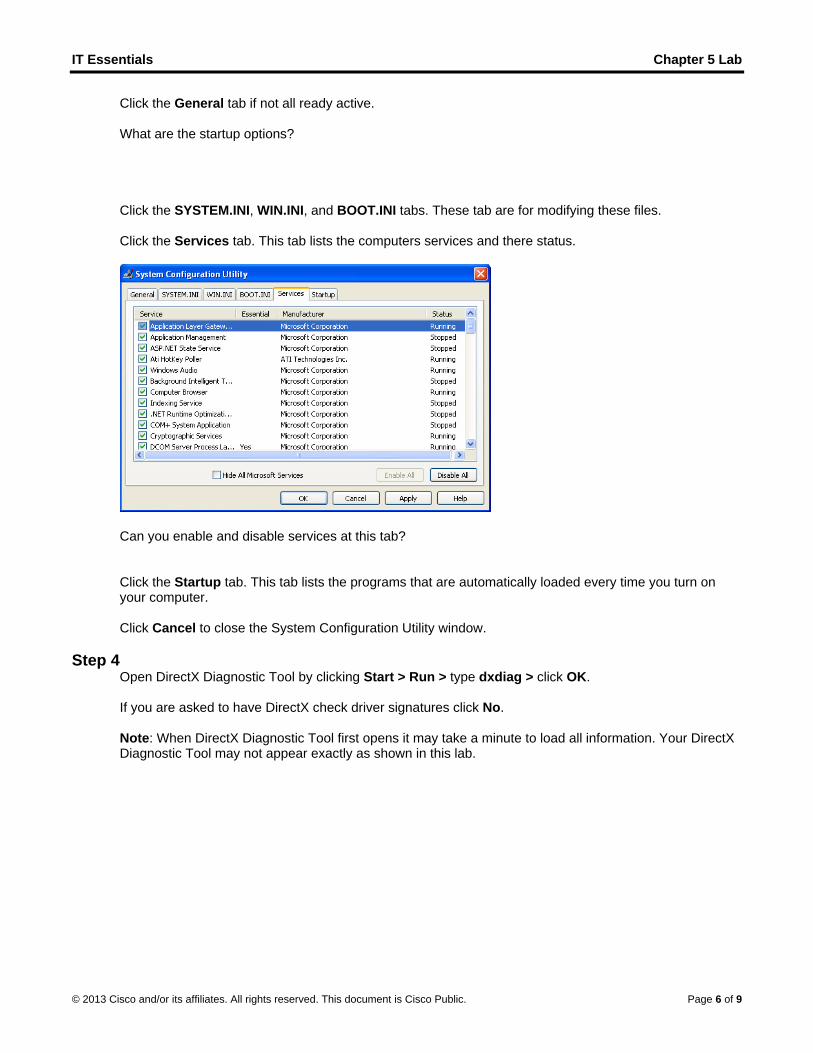
Click the General tab if not all ready active. What are the startup options? Click the SYSTEM.INI, WIN.INI, and BOOT.INI tabs. These tab are for modifying these files. Click the Services tab. This tab lists the computers services and there status.
Can you enable and disable services at this tab? Click the Startup tab. This tab lists the programs that are automatically loaded every time you turn on your computer. Click Cancel to close the System Configuration Utility window.
Step 4
Open DirectX Diagnostic Tool by clicking Start > Run > type dxdiag > click OK. If you are asked to have DirectX check driver signatures click No. Note: When DirectX Diagnostic Tool first opens it may take a minute to load all information. Your DirectX Diagnostic Tool may not appear exactly as shown in this lab.
IT Essentials Chapter 5 Lab
© 2013 Cisco and/or its affiliates. All rights reserved. This document is Cisco Public. Page 7 of 9
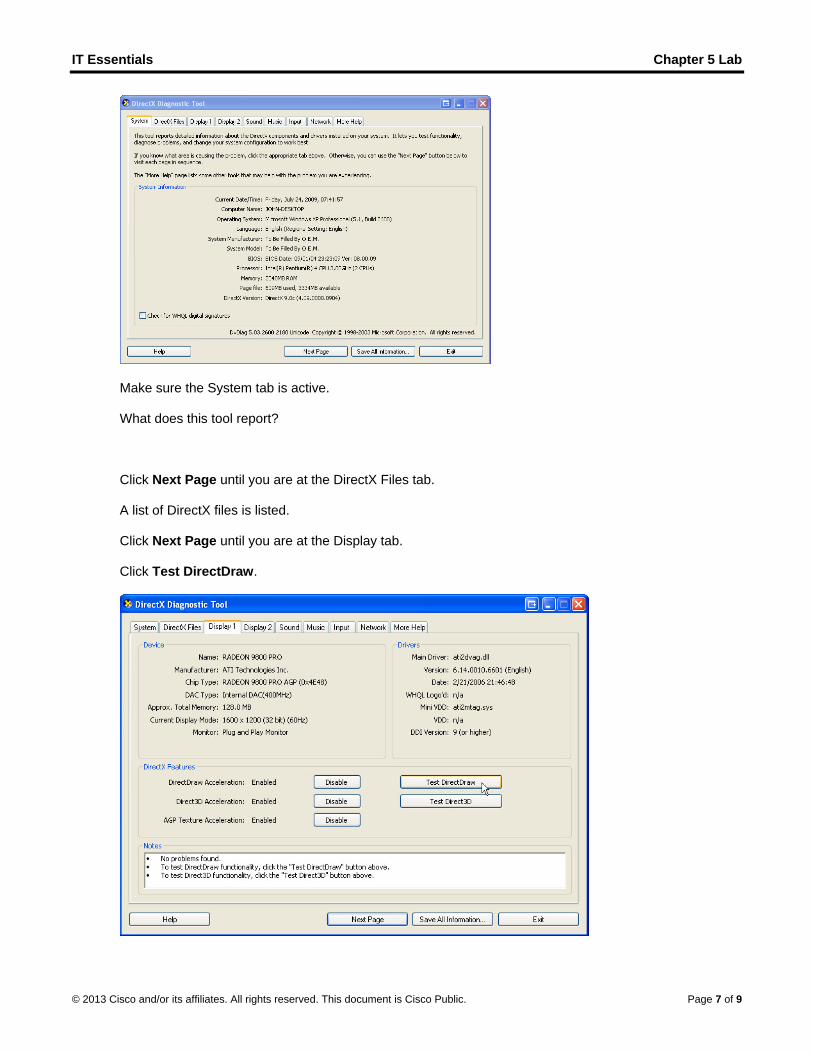
Make sure the System tab is active. What does this tool report? Click Next Page until you are at the DirectX Files tab. A list of DirectX files is listed. Click Next Page until you are at the Display tab. Click Test DirectDraw.
IT Essentials Chapter 5 Lab
© 2013 Cisco and/or its affiliates. All rights reserved. This document is Cisco Public. Page 8 of 9
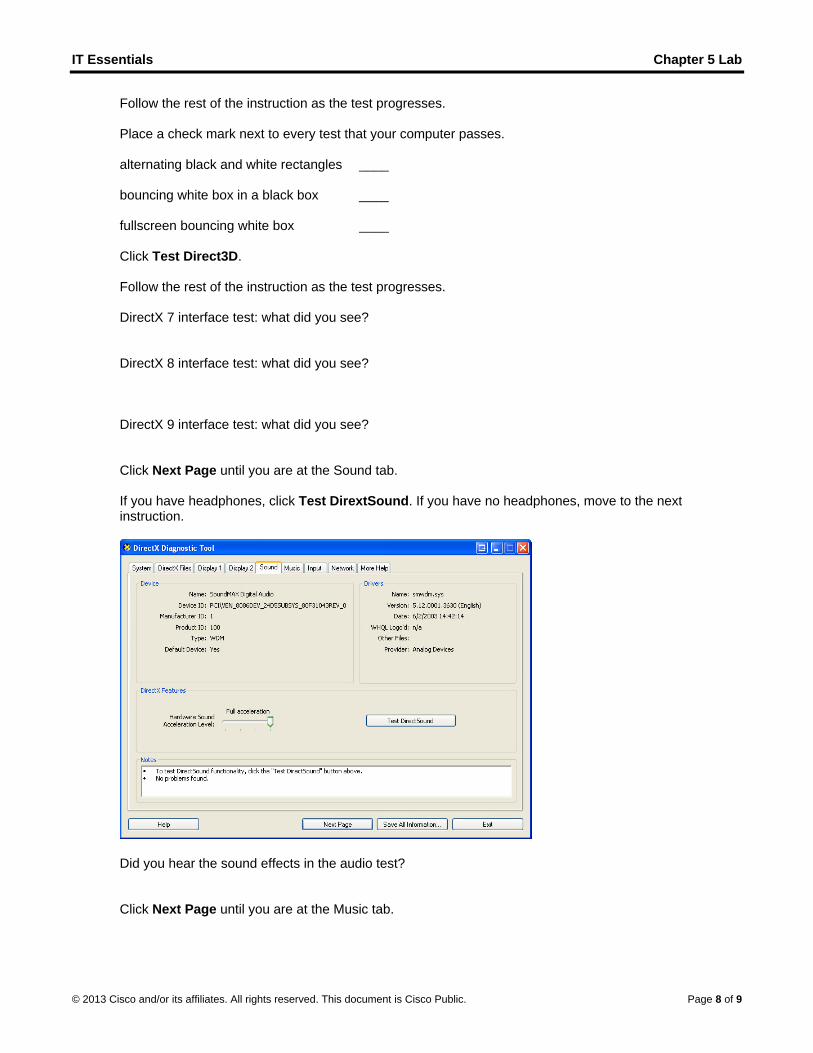
Follow the rest of the instruction as the test progresses. Place a check mark next to every test that your computer passes. alternating black and white rectangles ____ bouncing white box in a black box ____ fullscreen bouncing white box ____ Click Test Direct3D. Follow the rest of the instruction as the test progresses. DirectX 7 interface test: what did you see? DirectX 8 interface test: what did you see? DirectX 9 interface test: what did you see? Click Next Page until you are at the Sound tab. If you have headphones, click Test DirextSound. If you have no headphones, move to the next instruction.
Did you hear the sound effects in the audio test? Click Next Page until you are at the Music tab.
IT Essentials Chapter 5 Lab
© 2013 Cisco and/or its affiliates. All rights reserved. This document is Cisco Public. Page 9 of 9
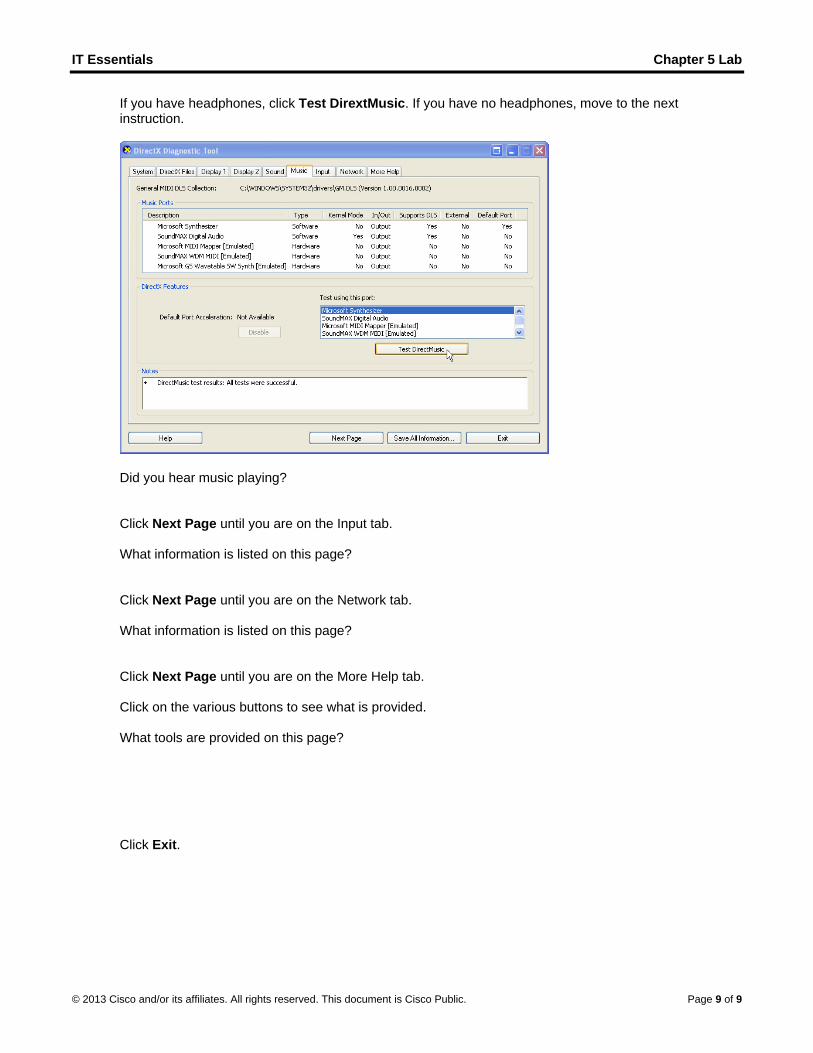
If you have headphones, click Test DirextMusic. If you have no headphones, move to the next instruction.
Did you hear music playing? Click Next Page until you are on the Input tab. What information is listed on this page? Click Next Page until you are on the Network tab. What information is listed on this page? Click Next Page until you are on the More Help tab. Click on the various buttons to see what is provided. What tools are provided on this page? Click Exit.