Embed Size (px)
Citation preview
Access Basics for Programming: Form and Report Design Crystal – Jan 8, 2008, 5-1
© Copyright 2008 Crystal Long [email protected]
5. Form and Report Design
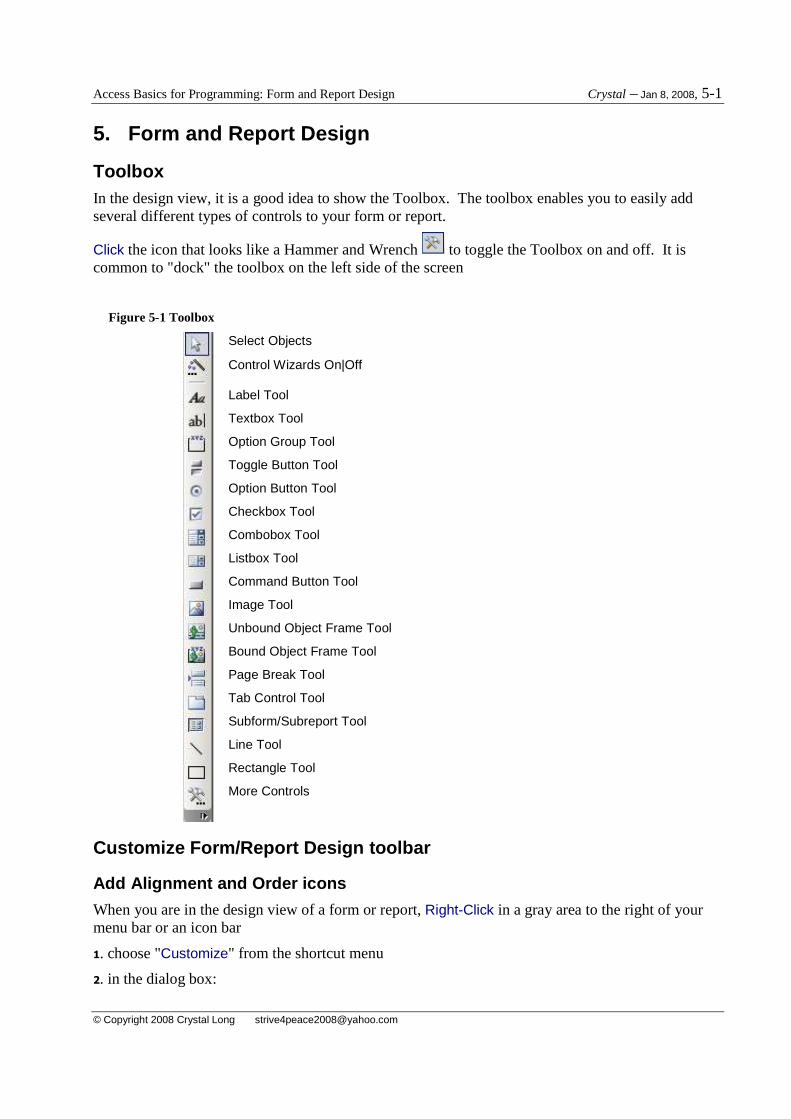
Toolbox In the design view, it is a good idea to show the Toolbox. The toolbox enables you to easily add several different types of controls to your form or report.
Click the icon that looks like a Hammer and Wrench to toggle the Toolbox on and off. It is common to "dock" the toolbox on the left side of the screen
Figure 5-1 Toolbox
Select Objects
Control Wizards On|Off
Label Tool
Textbox Tool
Option Group Tool
Toggle Button Tool
Option Button Tool
Checkbox Tool
Combobox Tool
Listbox Tool
Command Button Tool
Image Tool
Unbound Object Frame Tool
Bound Object Frame Tool
Page Break Tool
Tab Control Tool
Subform/Subreport Tool
Line Tool
Rectangle Tool
More Controls
Customize Form/Report Design toolbar
Add Alignment and Order icons
When you are in the design view of a form or report, Right-Click in a gray area to the right of your menu bar or an icon bar
1. choose "Customize" from the shortcut menu
2. in the dialog box:
Access Basics for Programming: Form and Report Design Crystal – Jan 8, 2008, 5-2
© Copyright 2008 Crystal Long [email protected]
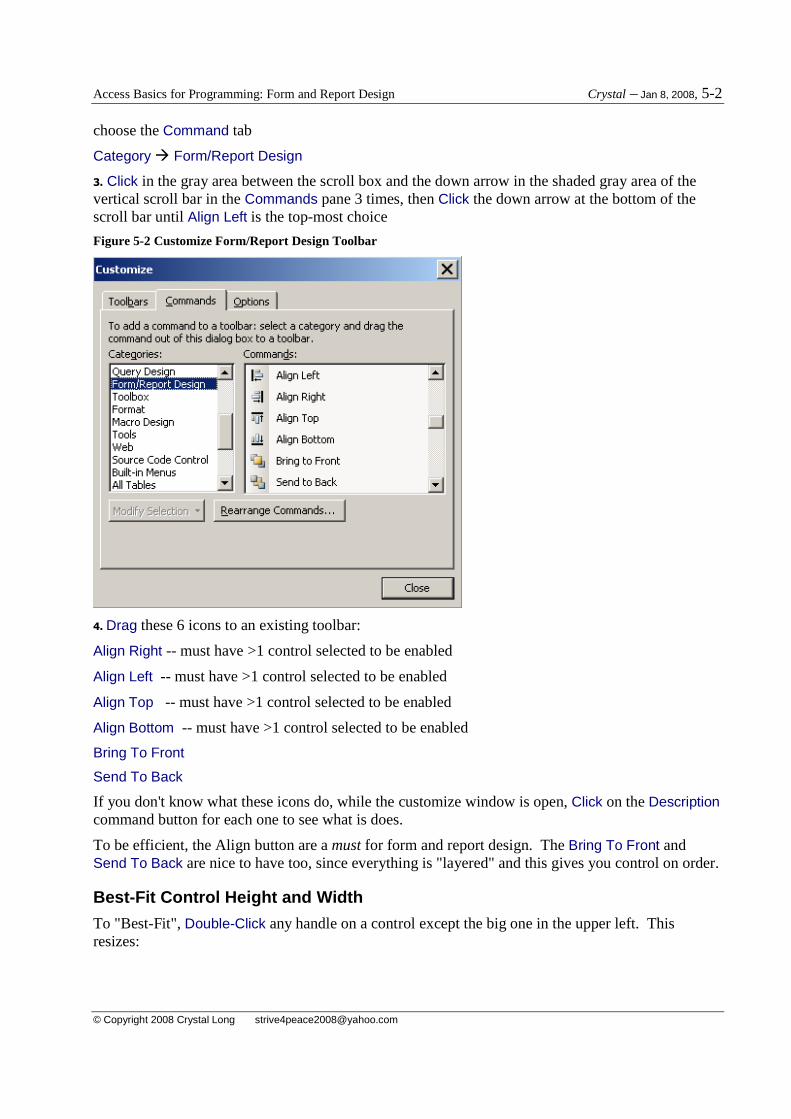
choose the Command tab
Category � Form/Report Design
3. Click in the gray area between the scroll box and the down arrow in the shaded gray area of the vertical scroll bar in the Commands pane 3 times, then Click the down arrow at the bottom of the scroll bar until Align Left is the top-most choice
Figure 5-2 Customize Form/Report Design Toolbar
4. Drag these 6 icons to an existing toolbar:
Align Right -- must have >1 control selected to be enabled
Align Left -- must have >1 control selected to be enabled
Align Top -- must have >1 control selected to be enabled
Align Bottom -- must have >1 control selected to be enabled
Bring To Front
Send To Back
If you don't know what these icons do, while the customize window is open, Click on the Description command button for each one to see what is does.
To be efficient, the Align button are a must for form and report design. The Bring To Front and Send To Back are nice to have too, since everything is "layered" and this gives you control on order.
Best-Fit Control Height and Width
To "Best-Fit", Double-Click any handle on a control except the big one in the upper left. This resizes:
Access Basics for Programming: Form and Report Design Crystal – Jan 8, 2008, 5-3
© Copyright 2008 Crystal Long [email protected]
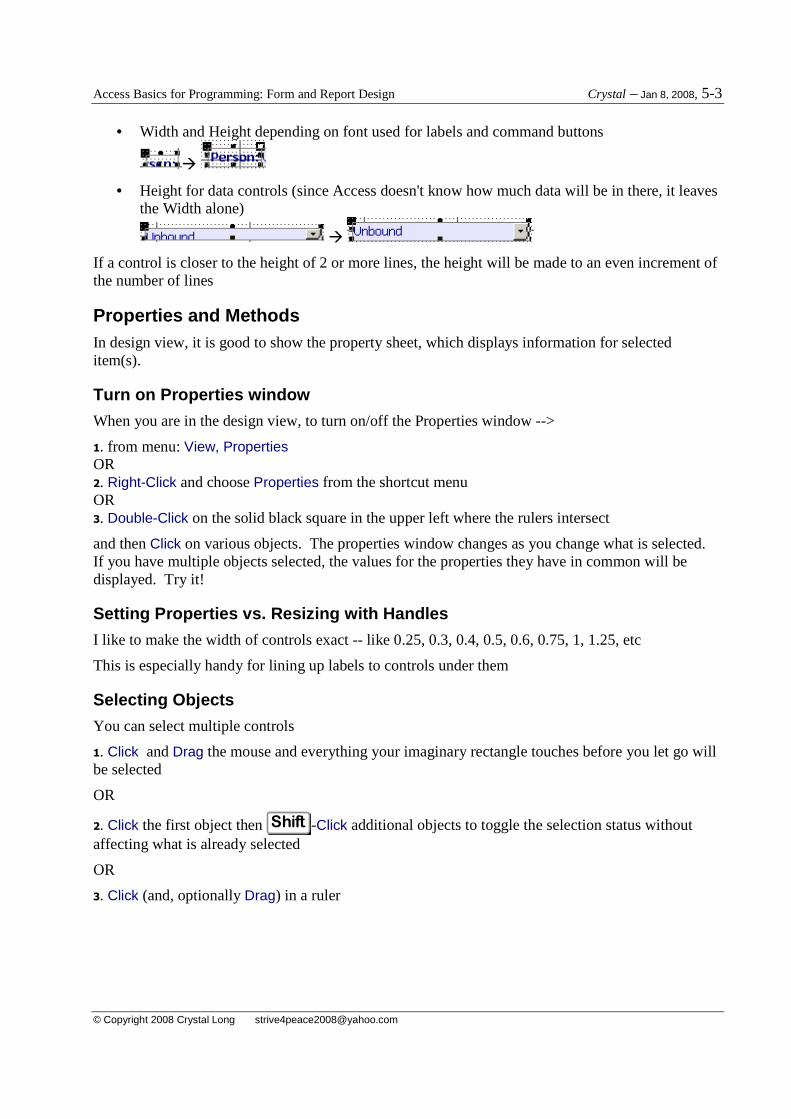
• Width and Height depending on font used for labels and command buttons
�
• Height for data controls (since Access doesn't know how much data will be in there, it leaves the Width alone)
�
If a control is closer to the height of 2 or more lines, the height will be made to an even increment of the number of lines
Properties and Methods In design view, it is good to show the property sheet, which displays information for selected item(s).
Turn on Properties window
When you are in the design view, to turn on/off the Properties window -->
1. from menu: View, Properties OR 2. Right-Click and choose Properties from the shortcut menu OR 3. Double-Click on the solid black square in the upper left where the rulers intersect
and then Click on various objects. The properties window changes as you change what is selected. If you have multiple objects selected, the values for the properties they have in common will be displayed. Try it!
Setting Properties vs. Resizing with Handles
I like to make the width of controls exact -- like 0.25, 0.3, 0.4, 0.5, 0.6, 0.75, 1, 1.25, etc
This is especially handy for lining up labels to controls under them
Selecting Objects
You can select multiple controls
1. Click and Drag the mouse and everything your imaginary rectangle touches before you let go will be selected
OR
2. Click the first object then Shift -Click additional objects to toggle the selection status without affecting what is already selected
OR
3. Click (and, optionally Drag) in a ruler
Access Basics for Programming: Form and Report Design Crystal – Jan 8, 2008, 5-4
© Copyright 2008 Crystal Long [email protected]
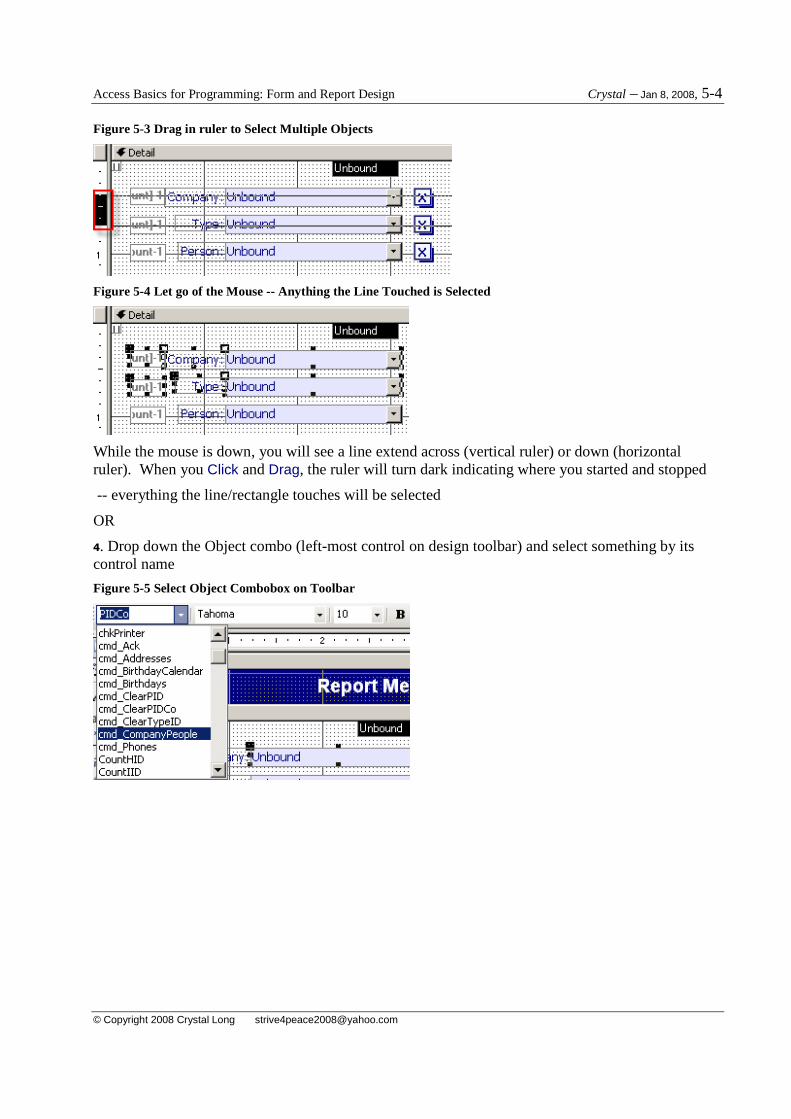
Figure 5-3 Drag in ruler to Select Multiple Objects
Figure 5-4 Let go of the Mouse -- Anything the Line Touched is Selected
While the mouse is down, you will see a line extend across (vertical ruler) or down (horizontal ruler). When you Click and Drag, the ruler will turn dark indicating where you started and stopped
-- everything the line/rectangle touches will be selected
OR
4. Drop down the Object combo (left-most control on design toolbar) and select something by its control name
Figure 5-5 Select Object Combobox on Toolbar
Access Basics for Programming: Form and Report Design Crystal – Jan 8, 2008, 5-5
© Copyright 2008 Crystal Long [email protected]
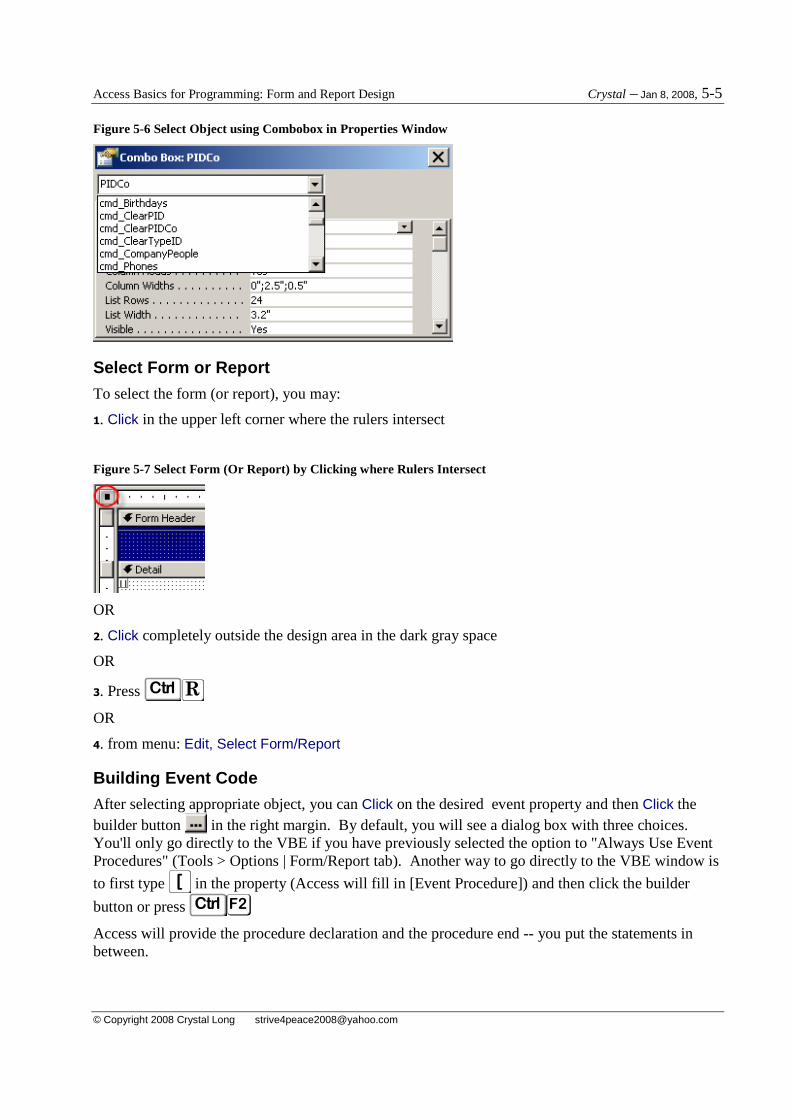
Figure 5-6 Select Object using Combobox in Properties Window
Select Form or Report
To select the form (or report), you may:
1. Click in the upper left corner where the rulers intersect
Figure 5-7 Select Form (Or Report) by Clicking where Rulers Intersect
OR
2. Click completely outside the design area in the dark gray space
OR
3. Press Ctrl R
OR
4. from menu: Edit, Select Form/Report
Building Event Code
After selecting appropriate object, you can Click on the desired event property and then Click the builder button in the right margin. By default, you will see a dialog box with three choices. You'll only go directly to the VBE if you have previously selected the option to "Always Use Event Procedures" (Tools > Options | Form/Report tab). Another way to go directly to the VBE window is
to first type [ in the property (Access will fill in [Event Procedure]) and then click the builder
button or press Ctrl F2F2
Access will provide the procedure declaration and the procedure end -- you put the statements in between.
Access Basics for Programming: Form and Report Design Crystal – Jan 8, 2008, 5-6
© Copyright 2008 Crystal Long [email protected]
Name property
Procedures are NAMED according to the object name (except the form object), so always change the Name property of any object to something logical before creating any event procedures. If you change the name after creating an event procedure, then you will have to change the name of the procedure too. For example, if you have a command button named cmdClose, its (simplified) event procedure may be something like this:
Private Sub cmdClose_Click() DoCmd.Close End Sub
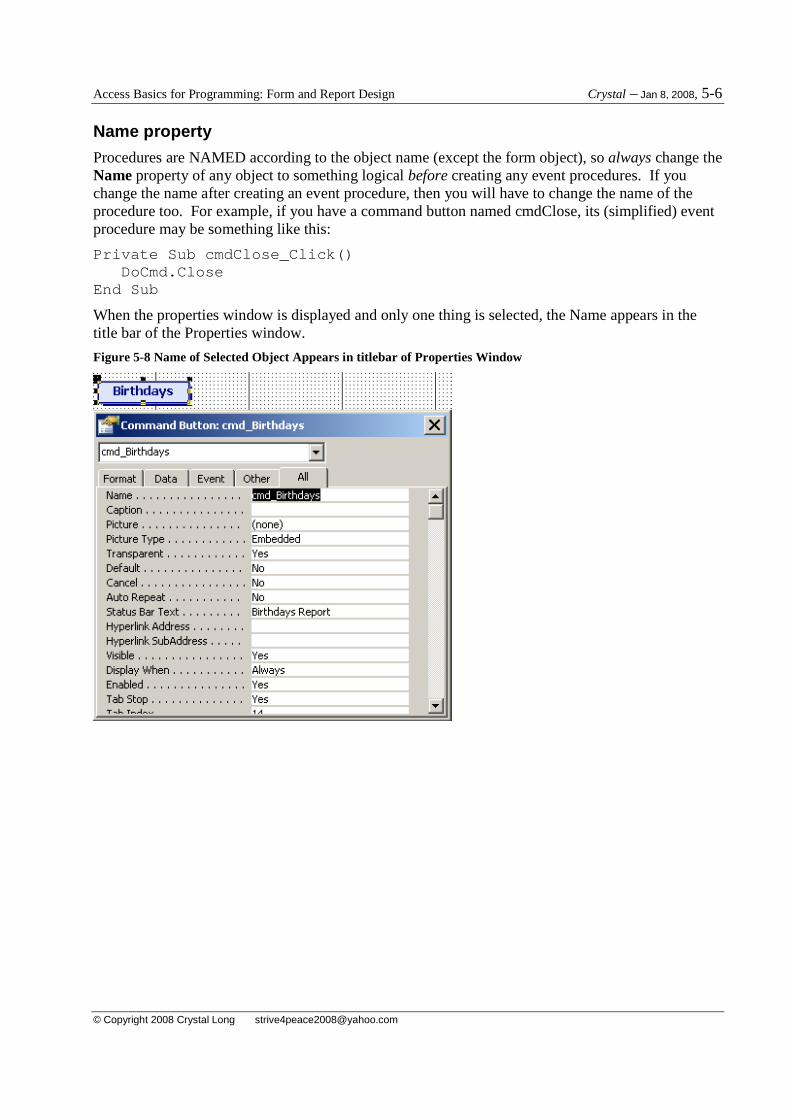
When the properties window is displayed and only one thing is selected, the Name appears in the title bar of the Properties window.
Figure 5-8 Name of Selected Object Appears in titlebar of Properties Window
Access Basics for Programming: Form and Report Design Crystal – Jan 8, 2008, 5-7
© Copyright 2008 Crystal Long [email protected]
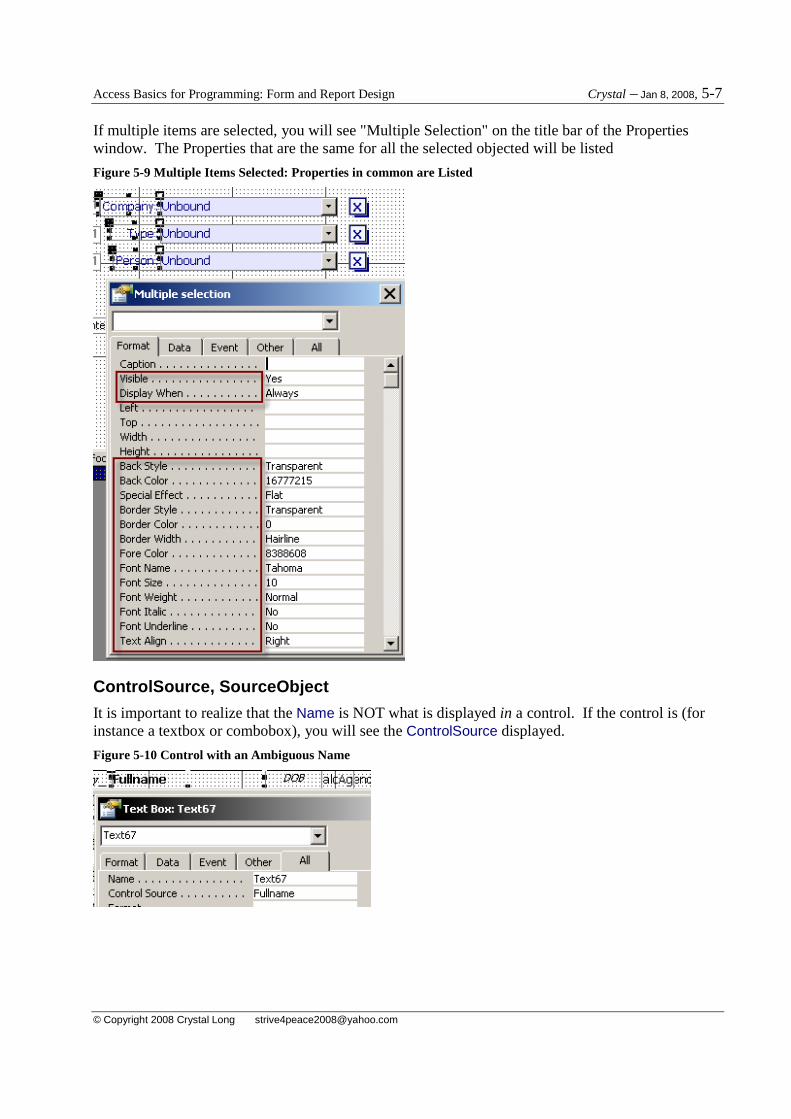
If multiple items are selected, you will see "Multiple Selection" on the title bar of the Properties window. The Properties that are the same for all the selected objected will be listed
Figure 5-9 Multiple Items Selected: Properties in common are Listed
ControlSource, SourceObject
It is important to realize that the Name is NOT what is displayed in a control. If the control is (for instance a textbox or combobox), you will see the ControlSource displayed.
Figure 5-10 Control with an Ambiguous Name
Access Basics for Programming: Form and Report Design Crystal – Jan 8, 2008, 5-8
© Copyright 2008 Crystal Long [email protected]
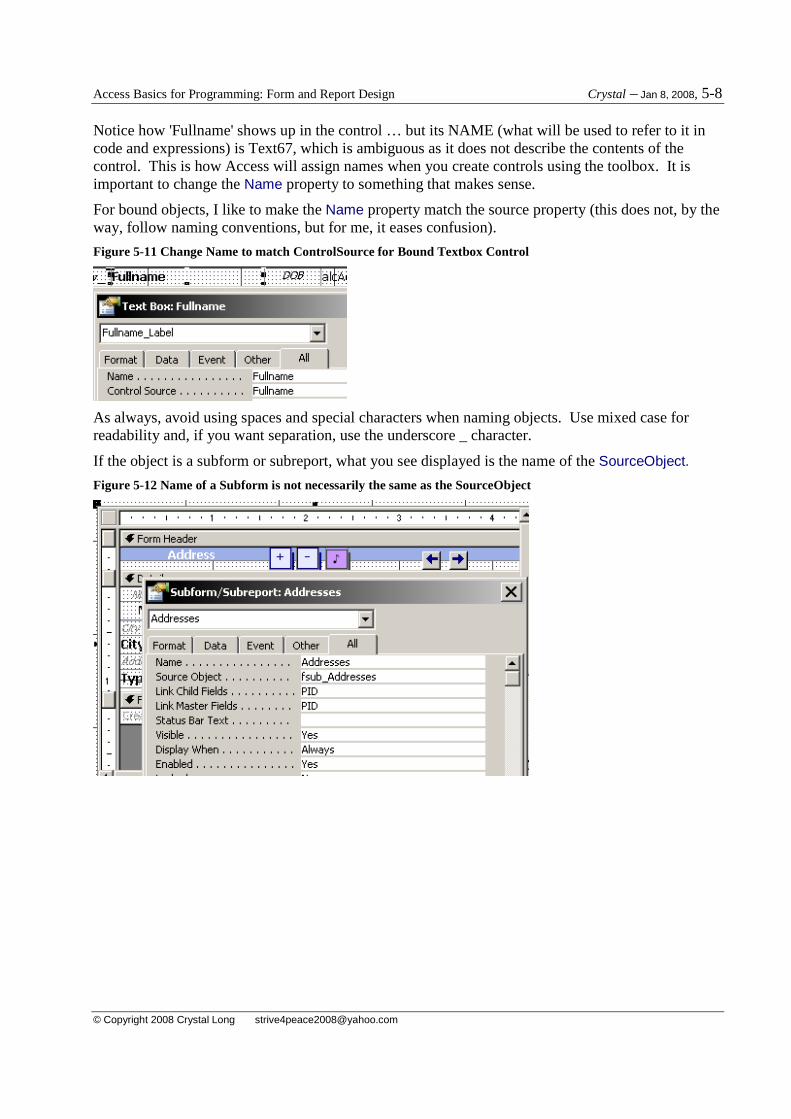
Notice how 'Fullname' shows up in the control … but its NAME (what will be used to refer to it in code and expressions) is Text67, which is ambiguous as it does not describe the contents of the control. This is how Access will assign names when you create controls using the toolbox. It is important to change the Name property to something that makes sense.
For bound objects, I like to make the Name property match the source property (this does not, by the way, follow naming conventions, but for me, it eases confusion).
Figure 5-11 Change Name to match ControlSource for Bound Textbox Control
As always, avoid using spaces and special characters when naming objects. Use mixed case for readability and, if you want separation, use the underscore _ character.
If the object is a subform or subreport, what you see displayed is the name of the SourceObject.
Figure 5-12 Name of a Subform is not necessarily the same as the SourceObject
Access Basics for Programming: Form and Report Design Crystal – Jan 8, 2008, 5-9
© Copyright 2008 Crystal Long [email protected]
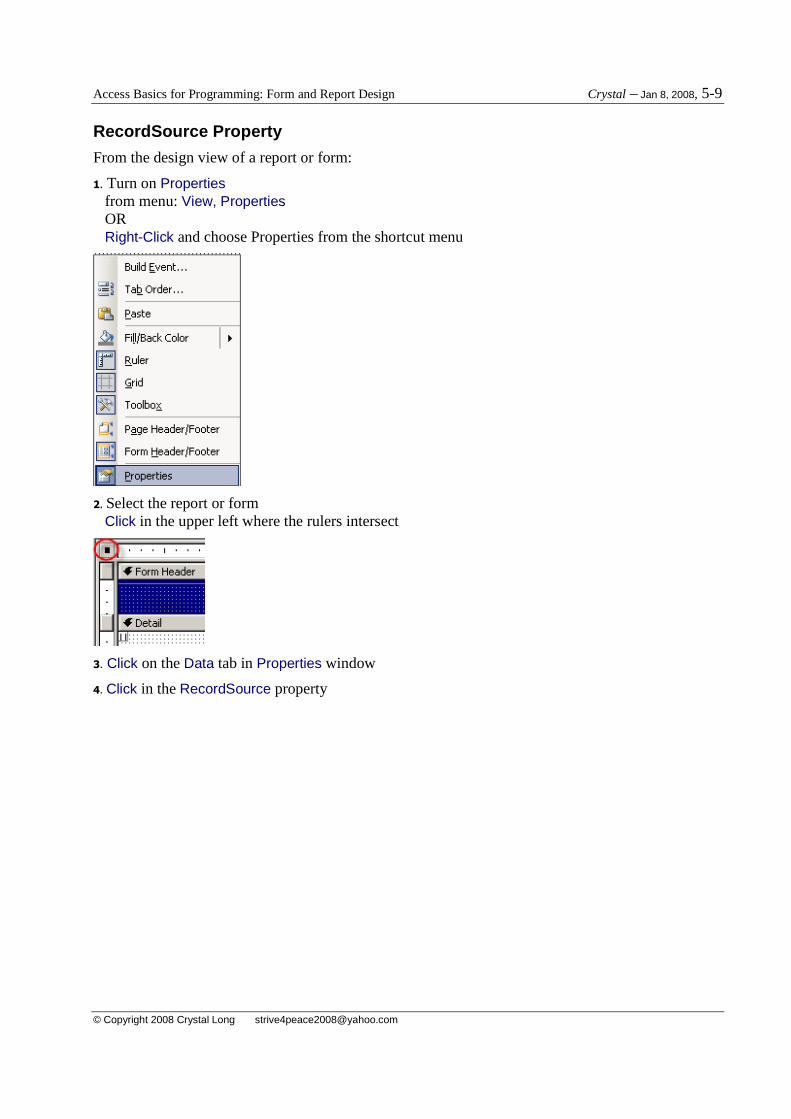
RecordSource Property
From the design view of a report or form:
1. Turn on Properties from menu: View, Properties OR Right-Click and choose Properties from the shortcut menu
2. Select the report or form Click in the upper left where the rulers intersect
3. Click on the Data tab in Properties window
4. Click in the RecordSource property
Access Basics for Programming: Form and Report Design Crystal – Jan 8, 2008, 5-10
© Copyright 2008 Crystal Long [email protected]
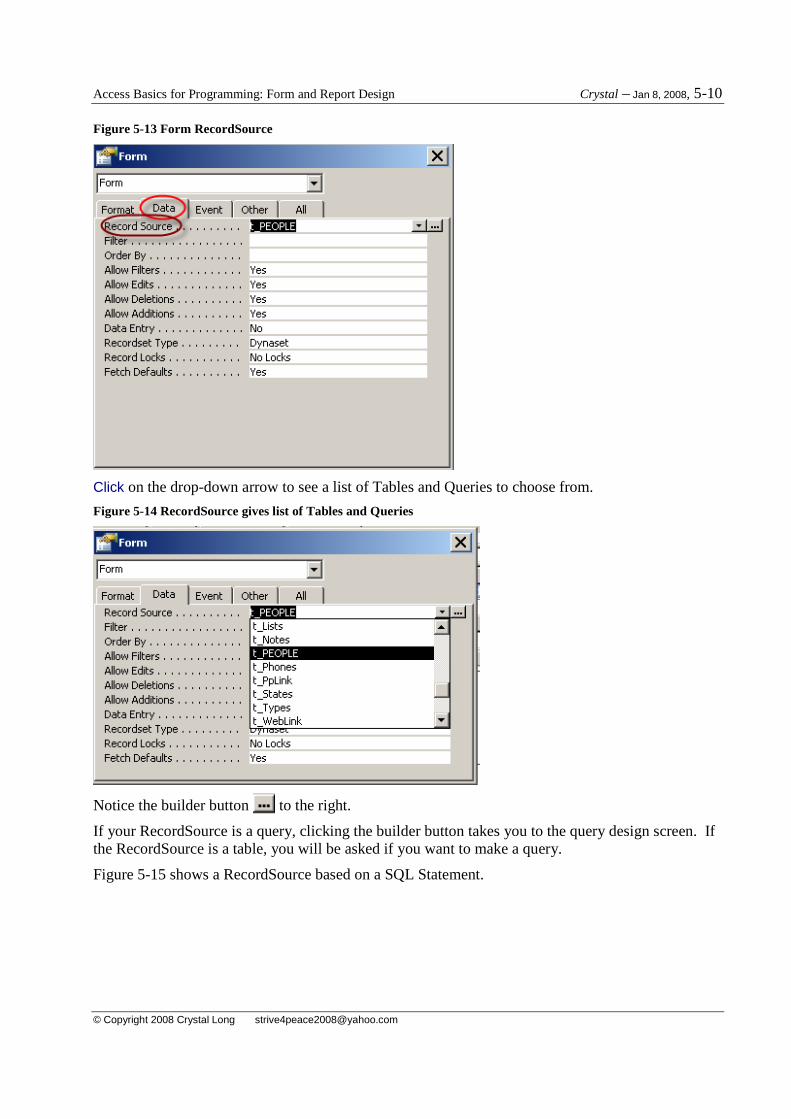
Figure 5-13 Form RecordSource
Click on the drop-down arrow to see a list of Tables and Queries to choose from.
Figure 5-14 RecordSource gives list of Tables and Queries
Notice the builder button to the right.
If your RecordSource is a query, clicking the builder button takes you to the query design screen. If the RecordSource is a table, you will be asked if you want to make a query.
Figure 5-15 shows a RecordSource based on a SQL Statement.

Access Basics for Programming: Form and Report Design Crystal – Jan 8, 2008, 5-11
© Copyright 2008 Crystal Long [email protected]
Figure 5-15 RecordSource can be SQL Statement
If you use a SQL statement as the RecordSource for a form, the combo box wizard will not work
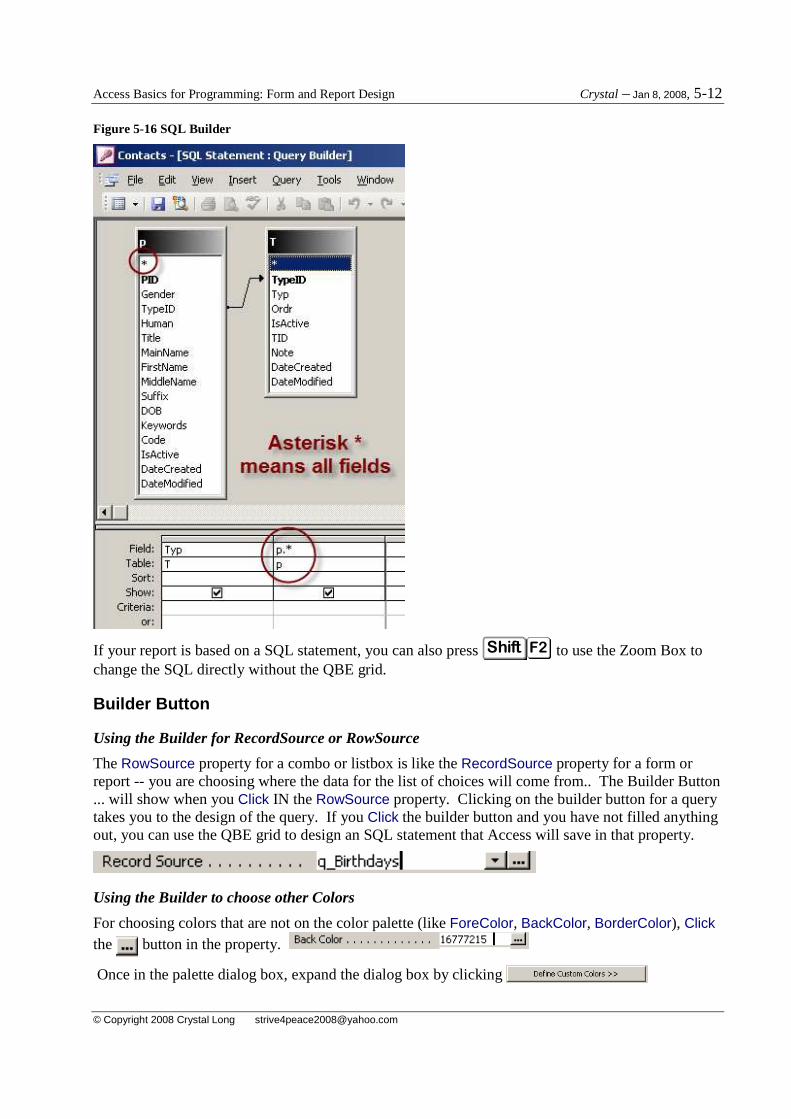
Clicking the Builder Button takes you to the same kind of screen you would see if the RecordSource was a query. Figure 5-16 shows that Aliases have been used for the People (p) and the Types (T) tables. The asterisk means all fields will be used from the p table because this form is primarily for editing information in the People table. In this case, the only reason that Typ is pulled in as well is for sorting. It is not, however, visible on the form except in the TypeID combobox which shows Typ and collected TypeID (refer to Combobox Example).
Access Basics for Programming: Form and Report Design Crystal – Jan 8, 2008, 5-12
© Copyright 2008 Crystal Long [email protected]
Figure 5-16 SQL Builder
If your report is based on a SQL statement, you can also press Shift F2F2 to use the Zoom Box to change the SQL directly without the QBE grid.
Builder Button
Using the Builder for RecordSource or RowSource
The RowSource property for a combo or listbox is like the RecordSource property for a form or report -- you are choosing where the data for the list of choices will come from.. The Builder Button ... will show when you Click IN the RowSource property. Clicking on the builder button for a query takes you to the design of the query. If you Click the builder button and you have not filled anything out, you can use the QBE grid to design an SQL statement that Access will save in that property.
Using the Builder to choose other Colors
For choosing colors that are not on the color palette (like ForeColor, BackColor, BorderColor), Click the button in the property.
Once in the palette dialog box, expand the dialog box by clicking
Access Basics for Programming: Form and Report Design Crystal – Jan 8, 2008, 5-13
© Copyright 2008 Crystal Long [email protected]
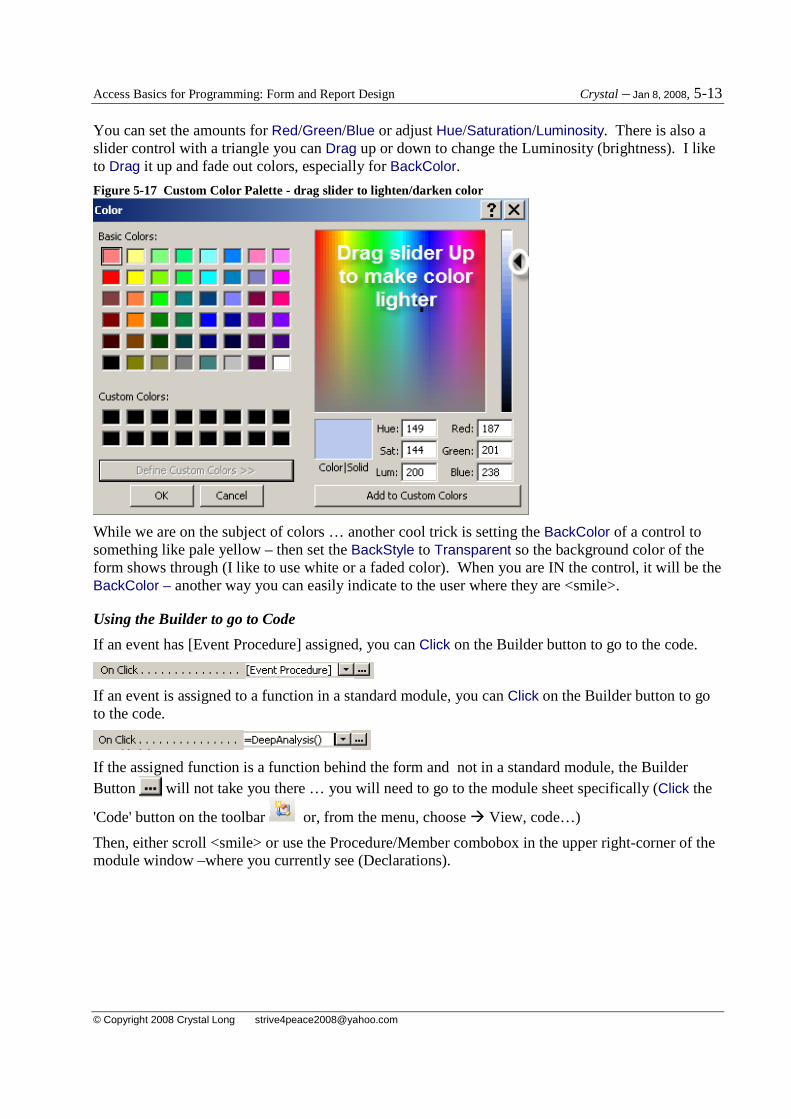
You can set the amounts for Red/Green/Blue or adjust Hue/Saturation/Luminosity. There is also a slider control with a triangle you can Drag up or down to change the Luminosity (brightness). I like to Drag it up and fade out colors, especially for BackColor.
Figure 5-17 Custom Color Palette - drag slider to lighten/darken color
While we are on the subject of colors … another cool trick is setting the BackColor of a control to something like pale yellow – then set the BackStyle to Transparent so the background color of the form shows through (I like to use white or a faded color). When you are IN the control, it will be the BackColor – another way you can easily indicate to the user where they are <smile>.
Using the Builder to go to Code
If an event has [Event Procedure] assigned, you can Click on the Builder button to go to the code.
If an event is assigned to a function in a standard module, you can Click on the Builder button to go to the code.
If the assigned function is a function behind the form and not in a standard module, the Builder Button will not take you there … you will need to go to the module sheet specifically (Click the
'Code' button on the toolbar or, from the menu, choose � View, code…)
Then, either scroll <smile> or use the Procedure/Member combobox in the upper right-corner of the module window –where you currently see (Declarations).
Access Basics for Programming: Form and Report Design Crystal – Jan 8, 2008, 5-14
© Copyright 2008 Crystal Long [email protected]
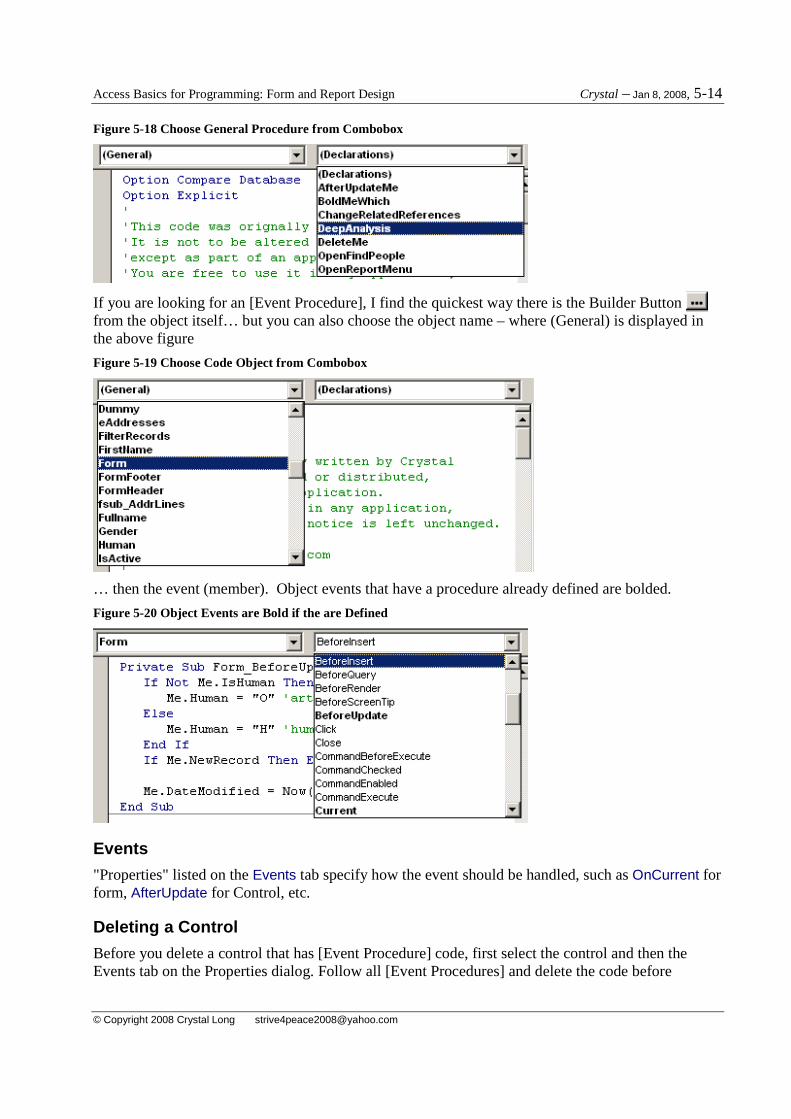
Figure 5-18 Choose General Procedure from Combobox
If you are looking for an [Event Procedure], I find the quickest way there is the Builder Button from the object itself… but you can also choose the object name – where (General) is displayed in the above figure
Figure 5-19 Choose Code Object from Combobox
… then the event (member). Object events that have a procedure already defined are bolded.
Figure 5-20 Object Events are Bold if the are Defined
Events
"Properties" listed on the Events tab specify how the event should be handled, such as OnCurrent for form, AfterUpdate for Control, etc.
Deleting a Control
Before you delete a control that has [Event Procedure] code, first select the control and then the Events tab on the Properties dialog. Follow all [Event Procedures] and delete the code before
Access Basics for Programming: Form and Report Design Crystal – Jan 8, 2008, 5-15
© Copyright 2008 Crystal Long [email protected]
deleting the control; otherwise, your code will become filled with "spiderwebs" (a "Tom-term") –all kinds of procedures for non-existent controls.
Learning Properties and Methods Explore the property sheet. Get familiar with how properties are grouped on the tabs and the different properties for different objects.
Help on Properties and Methods
You can get help about any property by pressing F1 while in a property on the property sheet where
you want more information.
Object Browser
... Find out more about references... or just get Help!
In a code window to View the Object Browser:
1. from the menu --> View, Object Browser
OR
2. Press F2F2
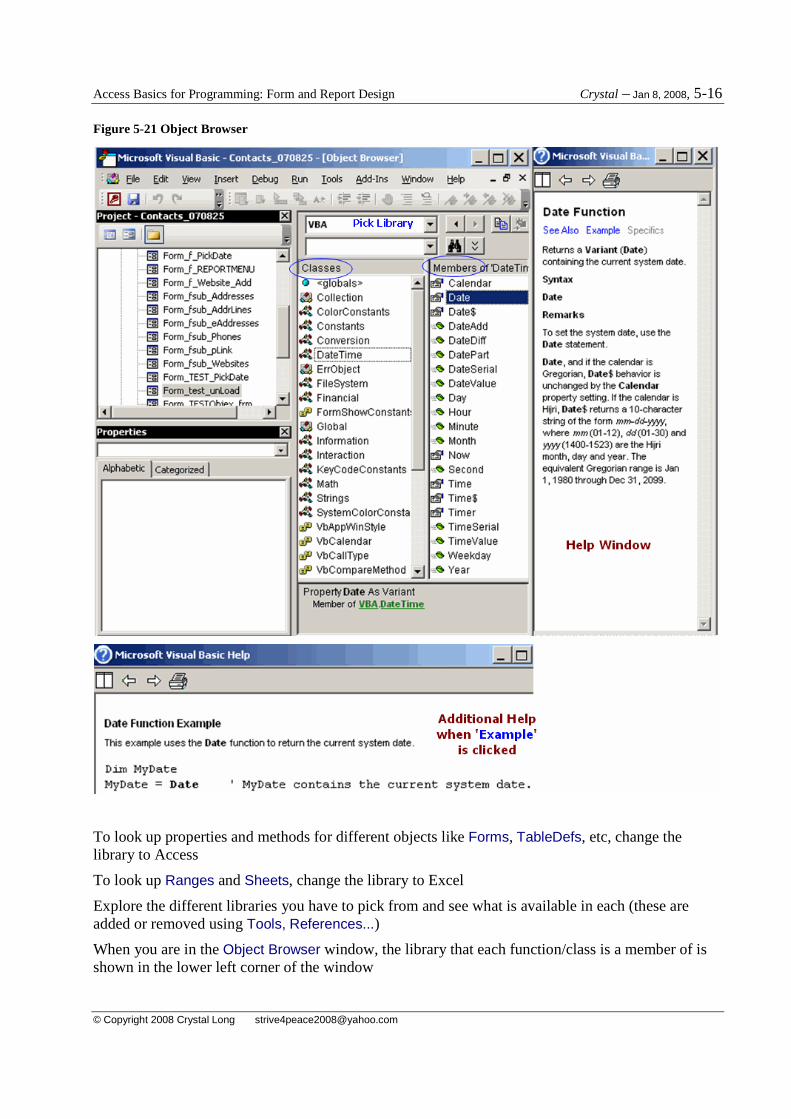
On the left, you will probably see a Project window and a Properties window below it
On the right, you will see the main Object Browser window
As you select a Class on the left (DateTime selected), its members appear in the pane on the right
When you are getting started, change the library to "VBA" (for instance, instead of <all libraries>) and look at the classes (categories) of functions -- Click on a class and then Click on a function in the right pane. When you see something you want help on, press the F1 key and switch to the Help
window
The VBA library is the most basic library and a great place to start exploring.
Access Basics for Programming: Form and Report Design Crystal – Jan 8, 2008, 5-16
© Copyright 2008 Crystal Long [email protected]
Figure 5-21 Object Browser
To look up properties and methods for different objects like Forms, TableDefs, etc, change the library to Access
To look up Ranges and Sheets, change the library to Excel
Explore the different libraries you have to pick from and see what is available in each (these are added or removed using Tools, References...)
When you are in the Object Browser window, the library that each function/class is a member of is shown in the lower left corner of the window
Access Basics for Programming: Form and Report Design Crystal – Jan 8, 2008, 5-17
© Copyright 2008 Crystal Long [email protected]
When you have an object selected, press F1 to get help.
General Help
For general help, I find it interesting and informative to read the Help starting from the beginning of the Contents. In fact, if you have the desire to print a ream of paper, it would be good to print it like a book and read it so you can also take notes -- and you can read it away from the computer -- a good time to put new information into your head is just before you sleep ... let your subconscious figure it out!
Code Behind Form (CBF) … or Report To see the code behind a form (anything said about code behind a form also applies to code behind a report): from the menu in the design view of a form, choose --> View, Code
This will take you to the module sheet that is stored 'behind' and with the form. When the form is copied, the module sheet tags along without you having to do anything special. This kind of code is a Class Module as opposed to a Standard (General) Module. When you Click on the Modules tab in the Database Window, you see a list of Standard Modules -- they are able to be used by any form, any report, any query ... anything in the database. Therefore, their scope is global.
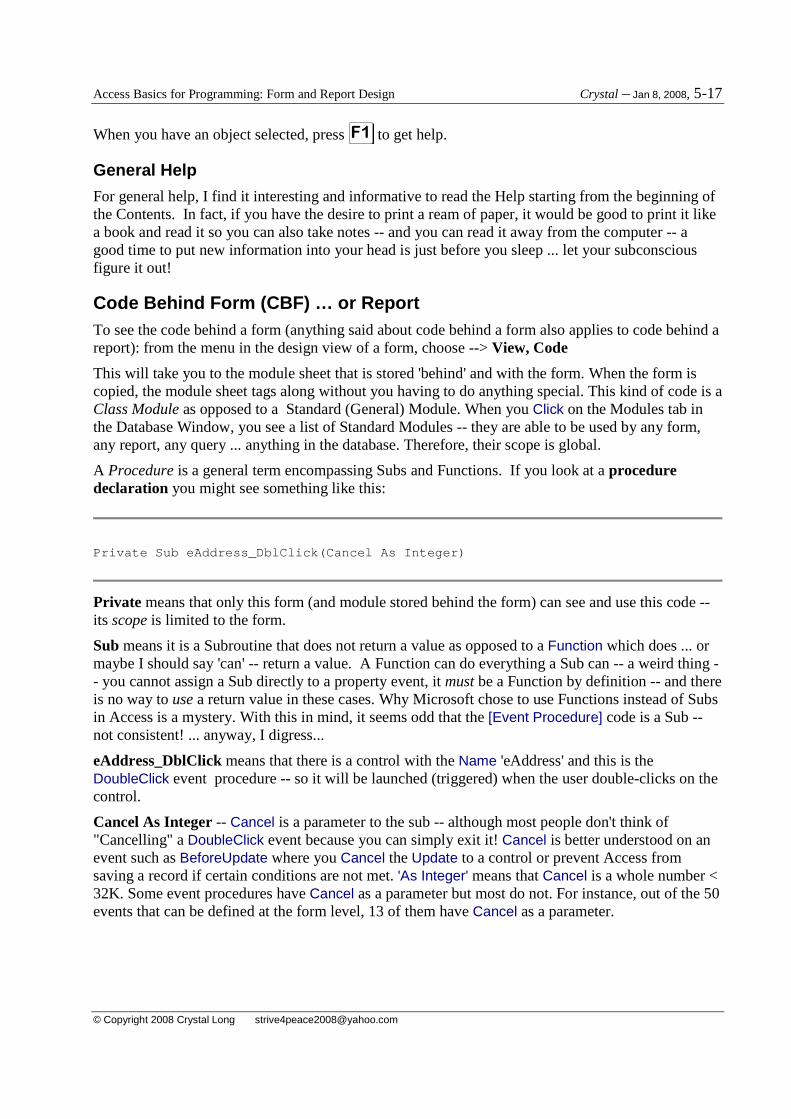
A Procedure is a general term encompassing Subs and Functions. If you look at a procedure declaration you might see something like this:
Private Sub eAddress_DblClick(Cancel As Integer)
Private means that only this form (and module stored behind the form) can see and use this code -- its scope is limited to the form.
Sub means it is a Subroutine that does not return a value as opposed to a Function which does ... or maybe I should say 'can' -- return a value. A Function can do everything a Sub can -- a weird thing -- you cannot assign a Sub directly to a property event, it must be a Function by definition -- and there is no way to use a return value in these cases. Why Microsoft chose to use Functions instead of Subs in Access is a mystery. With this in mind, it seems odd that the [Event Procedure] code is a Sub -- not consistent! ... anyway, I digress...
eAddress_DblClick means that there is a control with the Name 'eAddress' and this is the DoubleClick event procedure -- so it will be launched (triggered) when the user double-clicks on the control.
Cancel As Integer -- Cancel is a parameter to the sub -- although most people don't think of "Cancelling" a DoubleClick event because you can simply exit it! Cancel is better understood on an event such as BeforeUpdate where you Cancel the Update to a control or prevent Access from saving a record if certain conditions are not met. 'As Integer' means that Cancel is a whole number < 32K. Some event procedures have Cancel as a parameter but most do not. For instance, out of the 50 events that can be defined at the form level, 13 of them have Cancel as a parameter.
Access Basics for Programming: Form and Report Design Crystal – Jan 8, 2008, 5-18
© Copyright 2008 Crystal Long [email protected]
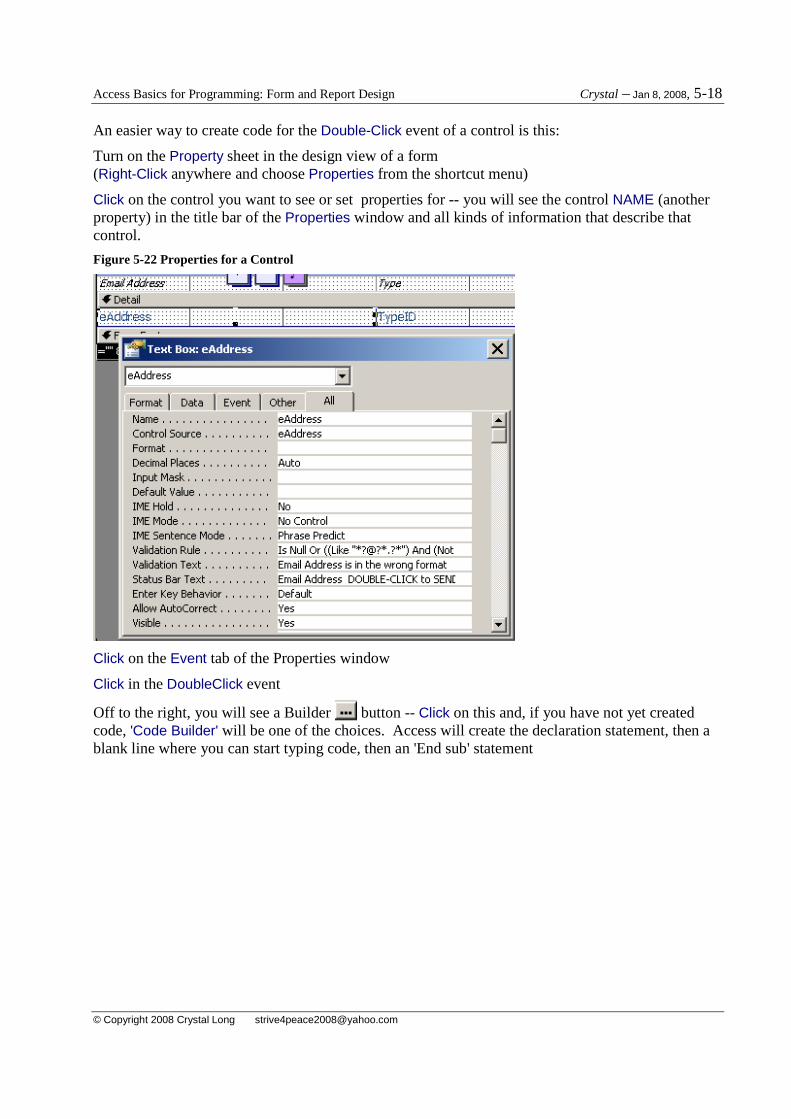
An easier way to create code for the Double-Click event of a control is this:
Turn on the Property sheet in the design view of a form (Right-Click anywhere and choose Properties from the shortcut menu)
Click on the control you want to see or set properties for -- you will see the control NAME (another property) in the title bar of the Properties window and all kinds of information that describe that control.
Figure 5-22 Properties for a Control
Click on the Event tab of the Properties window
Click in the DoubleClick event
Off to the right, you will see a Builder button -- Click on this and, if you have not yet created code, 'Code Builder' will be one of the choices. Access will create the declaration statement, then a blank line where you can start typing code, then an 'End sub' statement
Access Basics for Programming: Form and Report Design Crystal – Jan 8, 2008, 5-19
© Copyright 2008 Crystal Long [email protected]
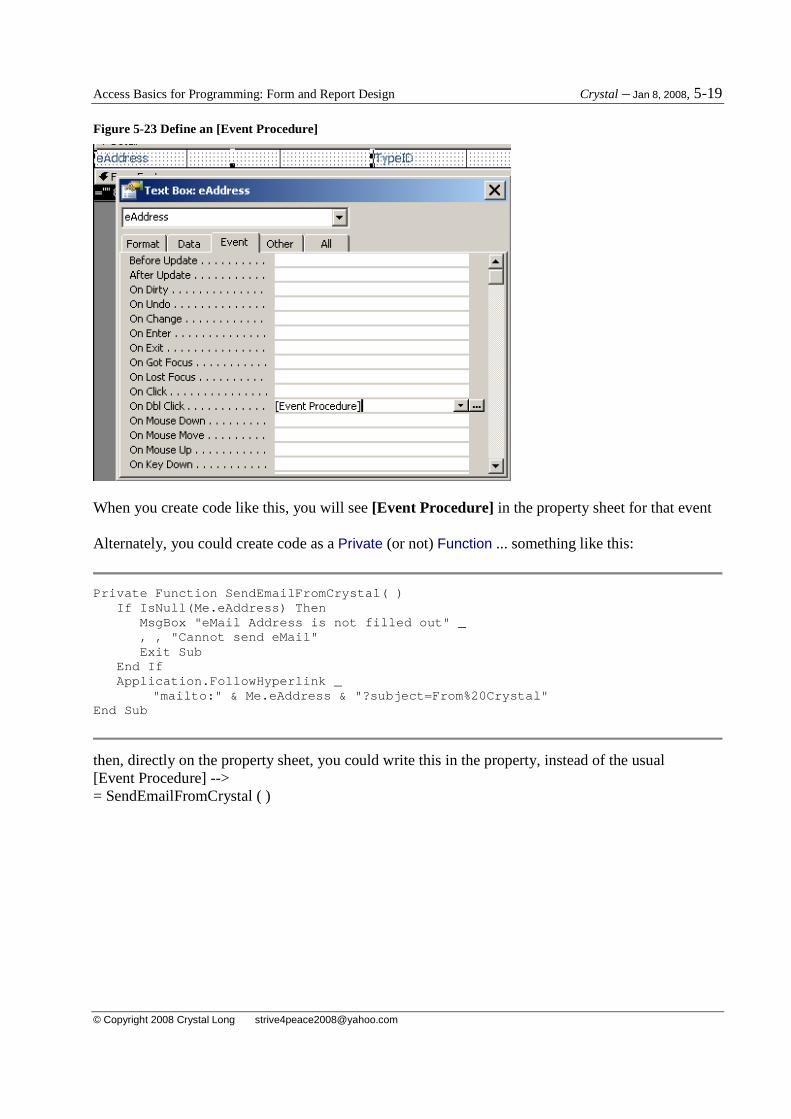
Figure 5-23 Define an [Event Procedure]
When you create code like this, you will see [Event Procedure] in the property sheet for that event Alternately, you could create code as a Private (or not) Function ... something like this:
Private Function SendEmailFromCrystal( ) If IsNull(Me.eAddress) Then MsgBox "eMail Address is not filled out" _ , , "Cannot send eMail" Exit Sub End If Application.FollowHyperlink _ "mailto:" & Me.eAddress & "?subject=From%20Crystal " End Sub
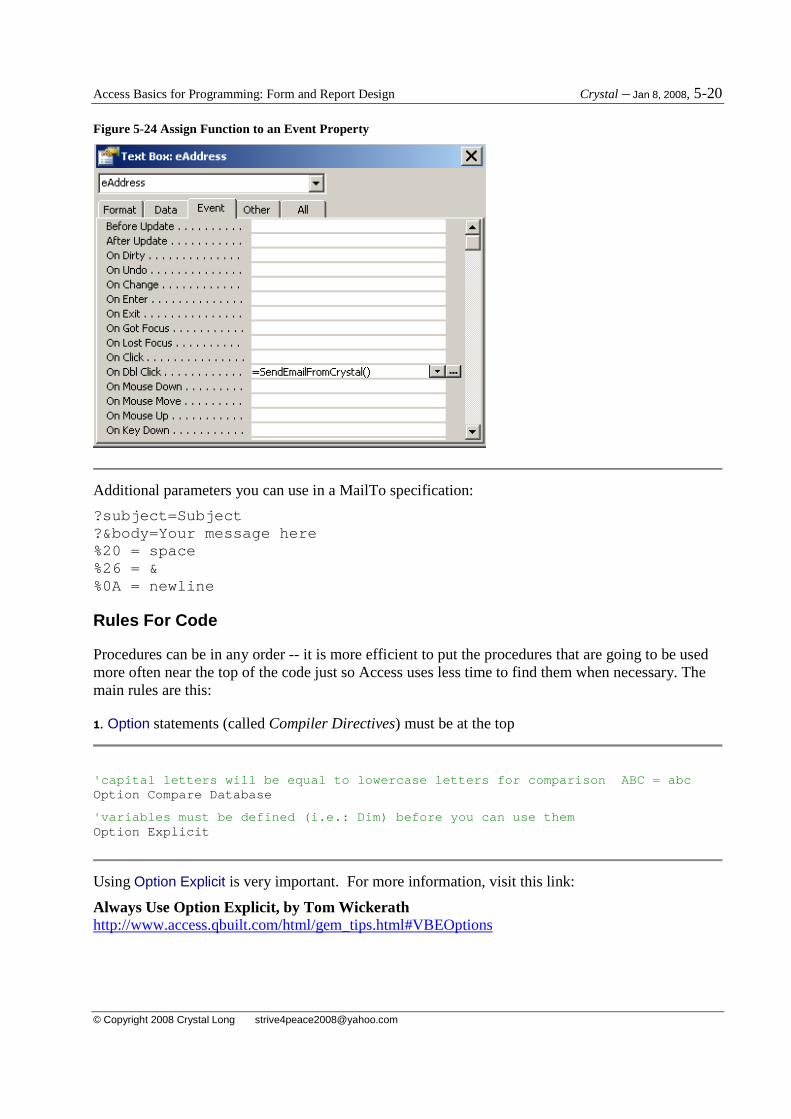
then, directly on the property sheet, you could write this in the property, instead of the usual [Event Procedure] --> = SendEmailFromCrystal ( )
Access Basics for Programming: Form and Report Design Crystal – Jan 8, 2008, 5-20
© Copyright 2008 Crystal Long [email protected]
Figure 5-24 Assign Function to an Event Property
Additional parameters you can use in a MailTo specification:
?subject=Subject ?&body=Your message here %20 = space %26 = & %0A = newline
Rules For Code
Procedures can be in any order -- it is more efficient to put the procedures that are going to be used more often near the top of the code just so Access uses less time to find them when necessary. The main rules are this:
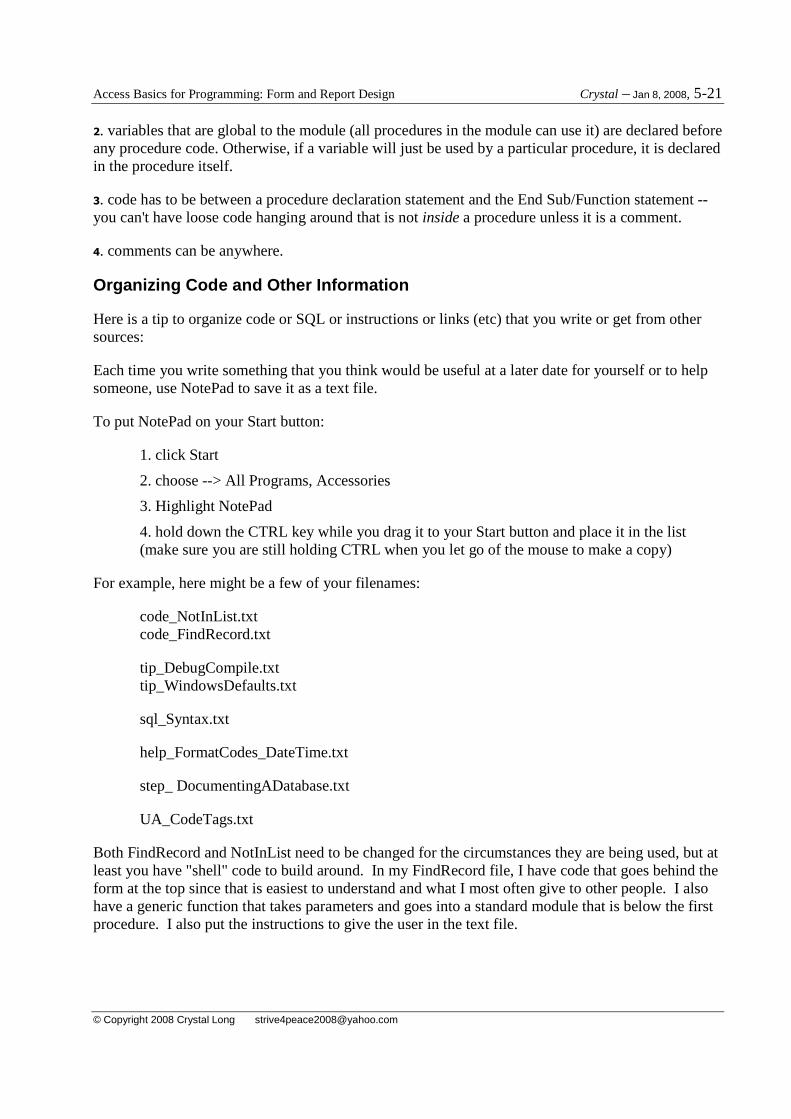
1. Option statements (called Compiler Directives) must be at the top
'capital letters will be equal to lowercase letters for comparison ABC = abc Option Compare Database
'variables must be defined (i.e.: Dim) before you c an use them Option Explicit
Using Option Explicit is very important. For more information, visit this link:
Always Use Option Explicit, by Tom Wickerath http://www.access.qbuilt.com/html/gem_tips.html#VBEOptions
Access Basics for Programming: Form and Report Design Crystal – Jan 8, 2008, 5-21
© Copyright 2008 Crystal Long [email protected]
2. variables that are global to the module (all procedures in the module can use it) are declared before any procedure code. Otherwise, if a variable will just be used by a particular procedure, it is declared in the procedure itself.
3. code has to be between a procedure declaration statement and the End Sub/Function statement -- you can't have loose code hanging around that is not inside a procedure unless it is a comment.
4. comments can be anywhere.
Organizing Code and Other Information
Here is a tip to organize code or SQL or instructions or links (etc) that you write or get from other sources:
Each time you write something that you think would be useful at a later date for yourself or to help someone, use NotePad to save it as a text file.
To put NotePad on your Start button:
1. click Start
2. choose --> All Programs, Accessories
3. Highlight NotePad
4. hold down the CTRL key while you drag it to your Start button and place it in the list (make sure you are still holding CTRL when you let go of the mouse to make a copy)
For example, here might be a few of your filenames:
code_NotInList.txt code_FindRecord.txt
tip_DebugCompile.txt tip_WindowsDefaults.txt
sql_Syntax.txt
help_FormatCodes_DateTime.txt
step_ DocumentingADatabase.txt
UA_CodeTags.txt
Both FindRecord and NotInList need to be changed for the circumstances they are being used, but at least you have "shell" code to build around. In my FindRecord file, I have code that goes behind the form at the top since that is easiest to understand and what I most often give to other people. I also have a generic function that takes parameters and goes into a standard module that is below the first procedure. I also put the instructions to give the user in the text file.
Access Basics for Programming: Form and Report Design Crystal – Jan 8, 2008, 5-22
© Copyright 2008 Crystal Long [email protected]
Here are some prefix examples:
code -- contains code
blog -- link to a blog
db -- has a database attachment you can download
dfn -- definition
eqn - equation
help -- from the Application help
idea -- something you want to write more about later
link -- link
sql -- SQL syntax
step -- numbered steps to do something
tip -- has instructions
UA -- information specific to UtterAccess (my favorite on-line forum)
If you are not sure how you might search, use the filename to specify multiple search terms.
code_LastDateOfMonth_DaysInMonth_EOM.txt
code_CreateDates_FillComboWithDayOfWeek_DOW.txt (This might be instructions on creating a Dates table and code to create date records for 20 or so years, and then instructions to fill a combo box with all dates for a particular day of the week, like all the Tuesdays)
If you open one of the text files to give the information to someone else, after you submit the post and it renders on the screen, copy the post link, subject, and date to the top of your text file. If the post is on UtterAccess, copy the URL (Uniform Resource Locator) from the AddressBar of your browser window and truncate all the information after the number. For instance:
-------------------------- filename --> link_MainformSubform.txt --------------------------
12-6-07
Some rather basic use of relationships -- Mainform/Subform http://www.utteraccess.com/forums/showflat.php?Cat=&Number=1551226 --------------------------
Access Basics for Programming: Form and Report Design Crystal – Jan 8, 2008, 5-23
© Copyright 2008 Crystal Long [email protected]
When someone posts code or SQL or a link that you know will be a good reference, make a note of (1) the link (2) a title (3) who wrote it and, once again, save text files. For example:
code_CloseOpenForms_ArvinMeyer.txt
code_PrinterEscapeSequence_datAdrenaline.txt
code_hideNavigationPane_2007_JohnViescas.txt
link_Access2007_JeffConrad.txt
link_Performance_mishej.txt
When you want to find "your" help, use the Windows search facility. For instance, you might be looking for something on how to send printer escape sequences and you remember that datAdrenaline (Brent Spaulding, Access MVP) wrote it.
Right-click on the top level Application directory for your code in Windows Explorer (or My Computer) and choose --> Search
All or part of the filename --> *print*_dat* to find --> code_PrinterEscapeSequence_datAdrenaline.txt
With the title and a link at the top of the document, you can just copy and paste for others. For example:
-------------------------- sending hex code to printer ... windows default printer, by datAdrenaline (Brent) http://www.utteraccess.com/forums/showflat.php?Cat=&Number=1406383 --------------------------
If you know you have a file that covers the information you are looking for but you cannot remember your search terms, search 'A word or phrase in the file' -- and then when you find it, rename the file to include what you originally used to try to find it by searching on the name.
If a site has some good code that you know you will reference (two examples are www.mvps.org and www.AllenBrowne.com ), I save things like this:
code_API_OpenFile_CommonDialog_KenGetz_mvps.txt
The link is there too, but if you also copy the code for yourself, it is convenient to name it starting with 'code_'
~~~~~~~~~~~~~~~ I also have a document with basic links that I give out often (like the Access Basics document posted in the UtterAccess Tutorials forum and Allen Browne's reserved word list) -- but I keep this short or it would be faster to use the Windows search <smile> ~~~~~~~~~~~~~~~
You can also keep all your Access code in a database and reference it in all your applications ... but I like using TXT files because not everything is code.
Access Basics for Programming: Form and Report Design Crystal – Jan 8, 2008, 5-24
© Copyright 2008 Crystal Long [email protected]
You might have code/info for other applications as well, like Excel, Word, and PowerPoint. Create folders for each application and put the text files under the application folder. Within an application folder, you may create several more folders under them (such as code written for specific versions, or stuff written by other MVPs) -- and when you search, start at the top level directory for that application.
The TXT file thing works real well for me (and I update them) so, like an engineer, I think, "why fix it if it isn't broken?"
Hope this information helps you get organized <smile>
Creating a Main Form and Subform In my opinion, each form/subform should be based on just one table*. If you wish to manipulate information in more than one table, it is best to use a main form to for the "parent" table and subforms to display and edit information in each of the related tables.
*Note: This is a general guideline that helps when you are beginning to use Access. As you get better and realize that certain records must be created before related records, you can bend this rule.
Create the main form and the form(s) that will be used as subform(s) -- make sure to put the linking key fields on them (usually ID fields).
to put a subform on a main form:
Create a subform control on your main form using the subform/subreport tool in the toolbox (Cancel the wizard if it pops up and fill properties manually)
Then, from the design view of the main form:
1. turn on the properties window – Right-Click anywhere and choose Properties from the shortcut menu
2. Click ONE time on the subform control if it is not already selected
3. Click on the DATA tab of the Properties window
SourceObject --> drop list and choose the name of the form you will use as a subform (You can also Drag a form object from the database window and drop it on the main form. This automatically sets the SourceObject property.)
LinkMasterFields --> MainID LinkChildFields --> MainID
If you have multiple fields, delimit the list with semi-colon
LinkMasterFields --> MainID;Fieldname_main LinkChildFields --> MainID;Fieldname_child
WHERE:
-- MainID is replaced with your field name holding an AutoNumber field (usually) in the parent table and a Long Integer field in the child table. Fieldname_main is the fieldname in the main RecordSet – and it is best to actually put the field on the main form. Fieldname_child is the name of a field in the child RecordSet – and, once again, it is best that this field actually be ON the related subform.
Even though the Help for Access says that the linking fields do not have to be ON the forms, I find this not be to be the case. It is best that you reference fields that are ON each of the respective
Access Basics for Programming: Form and Report Design Crystal – Jan 8, 2008, 5-25
© Copyright 2008 Crystal Long [email protected]
forms. If a control is bound, I usually make the Name of the control the same as the ControlSource (what is in it). This does not follow standards but I find that it eases confusion. There are those who disagree and insist that controls should be named according to convention such as:
Naming Conventions for Microsoft Access - Leszynski/Reddick Guidelines for Microsoft Access http://msdn.microsoft.com/archive/default.asp?url=/archive/en-us/dnaraccess/html/msdn_20naming.asp
Reddick VBA (RVBA) Naming Conventions http://www.xoc.net/standards/default.asp
It is common to set the Visible property to No for the control(s) containing the field(s) used in LinkChildFields
4. while still on the subform control, Click the ALL tab in the Properties window -- change the Name property to match the SourceObject property (minus Form. in the beginning if Access puts it there).
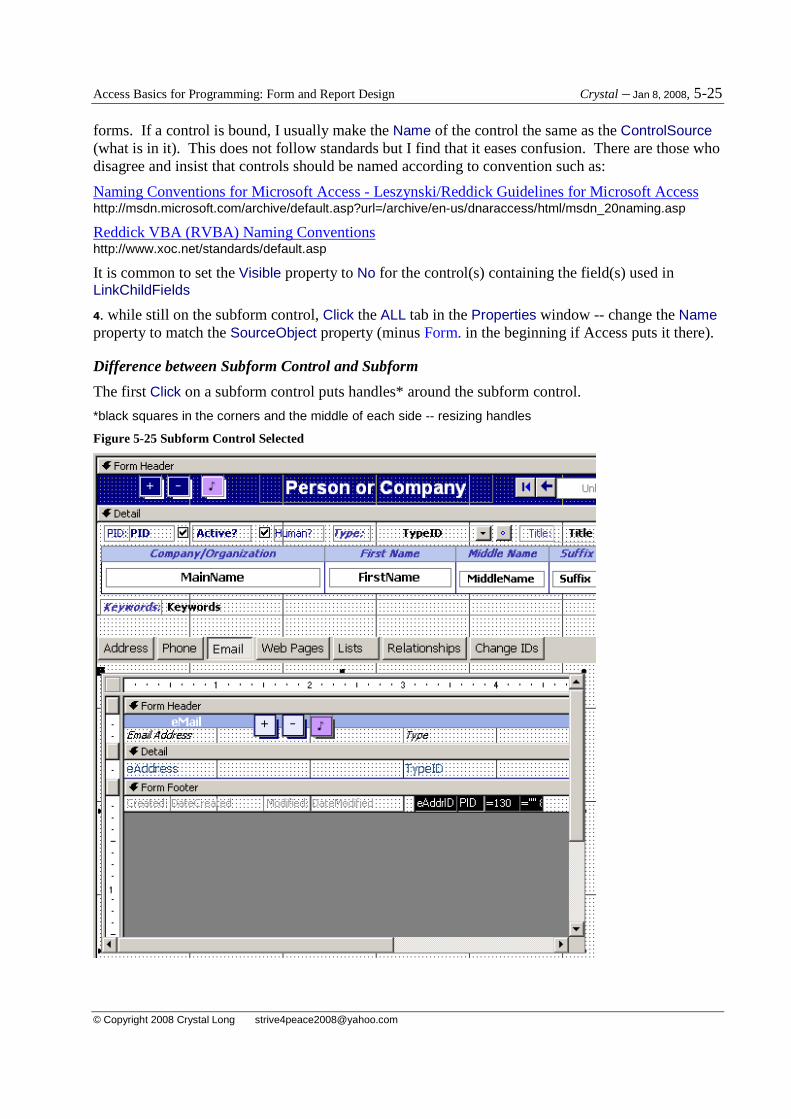
Difference between Subform Control and Subform
The first Click on a subform control puts handles* around the subform control.
*black squares in the corners and the middle of each side -- resizing handles
Figure 5-25 Subform Control Selected
Access Basics for Programming: Form and Report Design Crystal – Jan 8, 2008, 5-26
© Copyright 2008 Crystal Long [email protected]
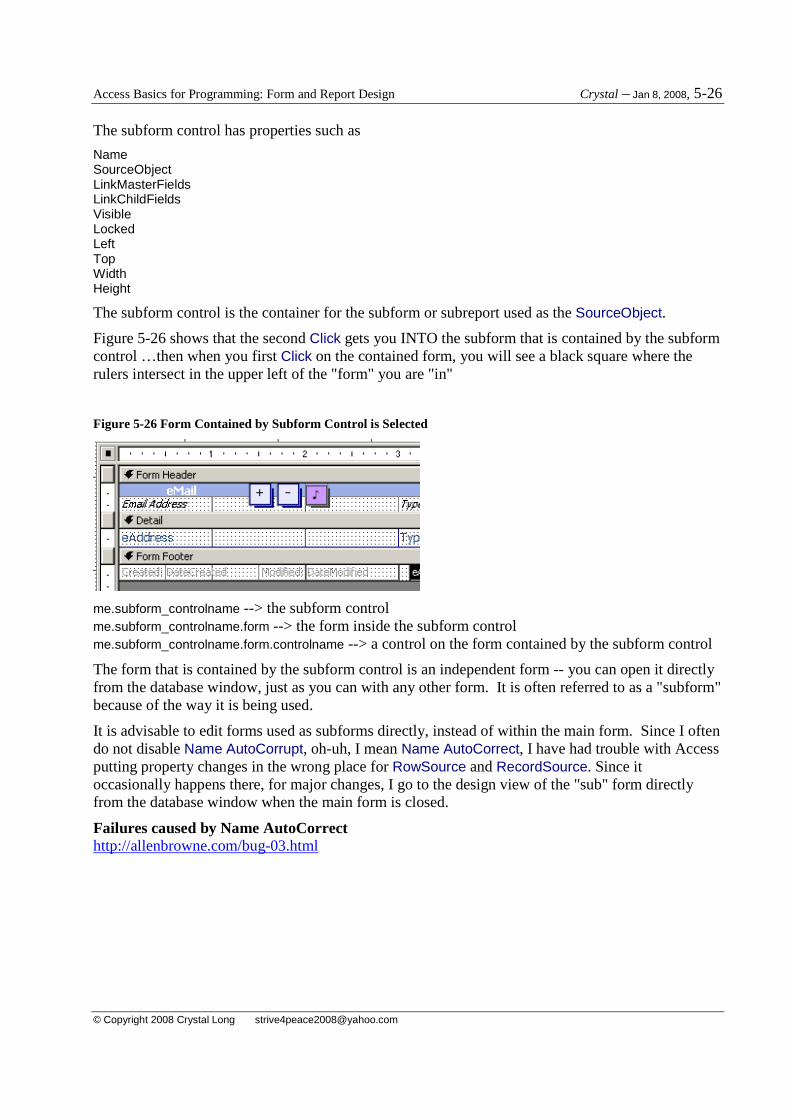
The subform control has properties such as
Name SourceObject LinkMasterFields LinkChildFields Visible Locked Left Top Width Height
The subform control is the container for the subform or subreport used as the SourceObject.
Figure 5-26 shows that the second Click gets you INTO the subform that is contained by the subform control …then when you first Click on the contained form, you will see a black square where the rulers intersect in the upper left of the "form" you are "in"
Figure 5-26 Form Contained by Subform Control is Selected
me.subform_controlname --> the subform control me.subform_controlname.form --> the form inside the subform control me.subform_controlname.form.controlname --> a control on the form contained by the subform control
The form that is contained by the subform control is an independent form -- you can open it directly from the database window, just as you can with any other form. It is often referred to as a "subform" because of the way it is being used.
It is advisable to edit forms used as subforms directly, instead of within the main form. Since I often do not disable Name AutoCorrupt, oh-uh, I mean Name AutoCorrect, I have had trouble with Access putting property changes in the wrong place for RowSource and RecordSource. Since it occasionally happens there, for major changes, I go to the design view of the "sub" form directly from the database window when the main form is closed.
Failures caused by Name AutoCorrect http://allenbrowne.com/bug-03.html