Embed Size (px)
Citation preview

Installation manualDaikin Altherma – Domestic hot water tank kit English
180 l
260 l
Installation manual
Daikin Altherma – Domestic hot water tank kit
EKVSU180A EKVSU260A
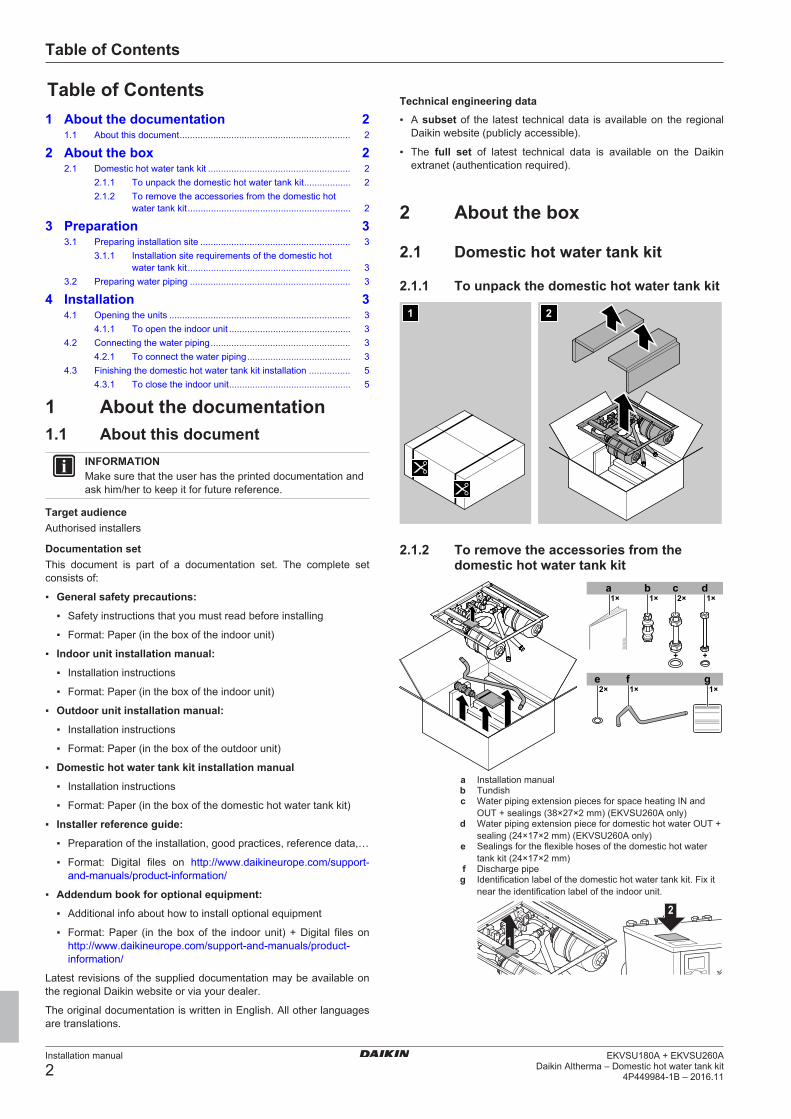
Table of Contents
Installation manual
2EKVSU180A + EKVSU260A
Daikin Altherma – Domestic hot water tank kit4P449984-1B – 2016.11
Table of Contents1 About the documentation 2
1.1 About this document.................................................................. 2
2 About the box 22.1 Domestic hot water tank kit ....................................................... 2
2.1.1 To unpack the domestic hot water tank kit.................. 22.1.2 To remove the accessories from the domestic hot
water tank kit ............................................................... 2
3 Preparation 33.1 Preparing installation site .......................................................... 3
3.1.1 Installation site requirements of the domestic hotwater tank kit ............................................................... 3
3.2 Preparing water piping .............................................................. 3
4 Installation 34.1 Opening the units ...................................................................... 3
4.1.1 To open the indoor unit ............................................... 34.2 Connecting the water piping...................................................... 3
4.2.1 To connect the water piping........................................ 34.3 Finishing the domestic hot water tank kit installation ................ 5
4.3.1 To close the indoor unit............................................... 5
1 About the documentation1.1 About this document
INFORMATIONMake sure that the user has the printed documentation andask him/her to keep it for future reference.
Target audienceAuthorised installers
Documentation setThis document is part of a documentation set. The complete setconsists of:
▪ General safety precautions:
▪ Safety instructions that you must read before installing
▪ Format: Paper (in the box of the indoor unit)
▪ Indoor unit installation manual:
▪ Installation instructions
▪ Format: Paper (in the box of the indoor unit)
▪ Outdoor unit installation manual:
▪ Installation instructions
▪ Format: Paper (in the box of the outdoor unit)
▪ Domestic hot water tank kit installation manual
▪ Installation instructions
▪ Format: Paper (in the box of the domestic hot water tank kit)
▪ Installer reference guide:
▪ Preparation of the installation, good practices, reference data,…
▪ Format: Digital files on http://www.daikineurope.com/support-and-manuals/product-information/
▪ Addendum book for optional equipment:
▪ Additional info about how to install optional equipment
▪ Format: Paper (in the box of the indoor unit) + Digital files onhttp://www.daikineurope.com/support-and-manuals/product-information/
Latest revisions of the supplied documentation may be available onthe regional Daikin website or via your dealer.
The original documentation is written in English. All other languagesare translations.
Technical engineering data▪ A subset of the latest technical data is available on the regional
Daikin website (publicly accessible).
▪ The full set of latest technical data is available on the Daikinextranet (authentication required).
2 About the box
2.1 Domestic hot water tank kit
2.1.1 To unpack the domestic hot water tank kit
21
2.1.2 To remove the accessories from thedomestic hot water tank kit
1× 1× 2×
1×
a b c1×
d
2× 1×fe g
+ +
a Installation manualb Tundishc Water piping extension pieces for space heating IN and
OUT + sealings (38×27×2 mm) (EKVSU260A only)d Water piping extension piece for domestic hot water OUT +
sealing (24×17×2 mm) (EKVSU260A only)e Sealings for the flexible hoses of the domestic hot water
tank kit (24×17×2 mm)f Discharge pipeg Identification label of the domestic hot water tank kit. Fix it
near the identification label of the indoor unit.
1
2
3 Preparation
Installation manual
3EKVSU180A + EKVSU260ADaikin Altherma – Domestic hot water tank kit4P449984-1B – 2016.11
3 Preparation3.1 Preparing installation site3.1.1 Installation site requirements of the
domestic hot water tank kit
INFORMATIONThe domestic hot water tank kit is mounted into the indoorunit. The use of tank kit EKVSU260A extends the height ofthe indoor unit by 190 mm.
3.2 Preparing water pipingRespect the following water circuit requirements:
▪ Domestic hot water tank kit – Clean pipes. Before installing thedomestic hot water tank kit, all piping and fittings must be flushedfree of flux and debris. Failure to do this may cause irreparabledamage to the tank kit control valves. Flush the system byopening the hot water tap.
▪ Domestic hot water tank kit – Drainage. For the dischargepiping connected to the pressure relief valve of the domestic hotwater tank kit, respect the following requirements:
Item RequirementPressure relief valve diameter 15 mmDischarge pipe diameter (to pressure relief valve) 15 mmDischarge piping diameter (from tundish) 22 mmDischarge piping material (from tundish) MetalVertical length below tundish, before first elbow orbend
≥300 mm
Continuous fall after first elbow or bend ≥1:200Maximum resistance(a) ≤9 mResistance created by each elbow or bend 0.8 m
(a) The maximum allowed resistance (i.e. equivalent length) isexpressed as a length of straight pipe (i.e. no elbows orbends).
INFORMATIONAll piping MUST be installed according to section G3 of theBuilding Regulations.
▪ Domestic hot water tank kit – Pressure balancing. To preventlarge pressure differences at the taps and damage to the showervalve due to high‑pressure cold water (5 bar), provide a dedicated2‑bar feed to both cold water and hot water taps. To do this, alsoconnect the cold water supply for the cold water taps to thepressure reducing valve of the domestic hot water tank kit.
ab
e
c
d
e
h
f f
g g
ea Cold water supply into house at 5 barb To 5-bar tapsc Pressure reducing valve (part of the domestic hot water
tank kit)d Indoor unite Dedicated 2‑bar feedf Cold water tapsg Hot water taps
▪ Domestic hot water tank kit – Secondary return. Where thesecondary return circuits are used, an additional expansion vesselmay be required.
4 Installation
4.1 Opening the units
4.1.1 To open the indoor unit1 Loosen and remove the 4 screws that fix the top panel.
2 Remove the top panel from the unit.
4×
4.2 Connecting the water piping
4.2.1 To connect the water piping
NOTICE
Do NOT use excessive force when connecting the piping.Deformation of the piping can cause malfunctioning of theunit.
INFORMATION
If you have to inspect the inside of the domestic hot watertank, you can access it via the booster heater boss.
The installation of the domestic hot water tank kit is part of a largerinstallation flow. The total installation of the water piping consists of:1 Connecting the recirculation piping.2 Connecting the water piping:
▪ Directly to the indoor unit: connecting the water piping to thespace heating inlet, the space heating outlet, and the domestichot water outlet.
▪ Via the domestic hot water tank kit: connecting the waterpiping to the unit’s domestic cold water inlet, andconnecting the kit itself to the drain.
3 Connecting the pressure relief valve to the drain.4 Filling the water circuit.5 Filling the domestic hot water tank.6 Insulating the water piping.
INFORMATION
For more information, see the installation manual of theindoor unit and the installer reference guide.
4 Installation
Installation manual
4EKVSU180A + EKVSU260A
Daikin Altherma – Domestic hot water tank kit4P449984-1B – 2016.11
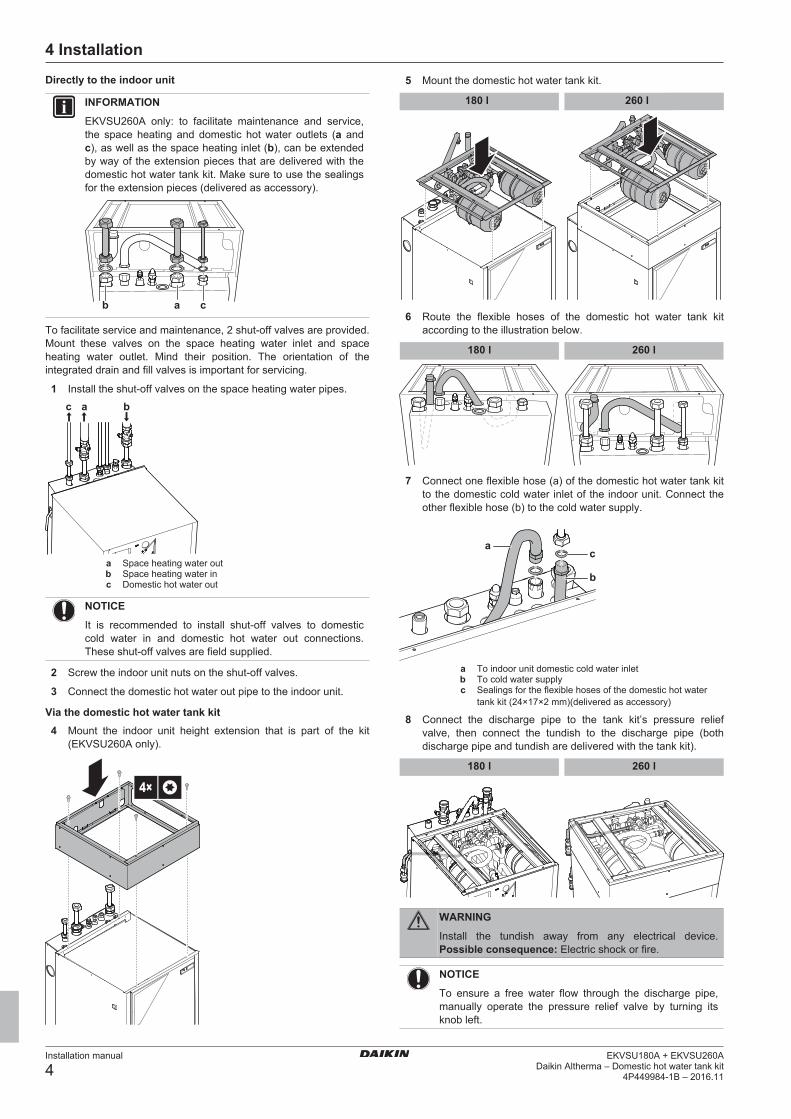
Directly to the indoor unit
INFORMATION
EKVSU260A only: to facilitate maintenance and service,the space heating and domestic hot water outlets (a andc), as well as the space heating inlet (b), can be extendedby way of the extension pieces that are delivered with thedomestic hot water tank kit. Make sure to use the sealingsfor the extension pieces (delivered as accessory).
b a c
To facilitate service and maintenance, 2 shut-off valves are provided.Mount these valves on the space heating water inlet and spaceheating water outlet. Mind their position. The orientation of theintegrated drain and fill valves is important for servicing.
1 Install the shut-off valves on the space heating water pipes.
c a b
a Space heating water outb Space heating water inc Domestic hot water out
NOTICE
It is recommended to install shut-off valves to domesticcold water in and domestic hot water out connections.These shut-off valves are field supplied.
2 Screw the indoor unit nuts on the shut-off valves.
3 Connect the domestic hot water out pipe to the indoor unit.
Via the domestic hot water tank kit4 Mount the indoor unit height extension that is part of the kit
(EKVSU260A only).
4×
5 Mount the domestic hot water tank kit.
180 l 260 l
6 Route the flexible hoses of the domestic hot water tank kitaccording to the illustration below.
180 l 260 l
7 Connect one flexible hose (a) of the domestic hot water tank kitto the domestic cold water inlet of the indoor unit. Connect theother flexible hose (b) to the cold water supply.
a
b
c
a To indoor unit domestic cold water inletb To cold water supplyc Sealings for the flexible hoses of the domestic hot water
tank kit (24×17×2 mm)(delivered as accessory)
8 Connect the discharge pipe to the tank kit’s pressure reliefvalve, then connect the tundish to the discharge pipe (bothdischarge pipe and tundish are delivered with the tank kit).
180 l 260 l
WARNING
Install the tundish away from any electrical device.Possible consequence: Electric shock or fire.
NOTICE
To ensure a free water flow through the discharge pipe,manually operate the pressure relief valve by turning itsknob left.

4 Installation
Installation manual
5EKVSU180A + EKVSU260ADaikin Altherma – Domestic hot water tank kit4P449984-1B – 2016.11
9 Connect the 2 tundishes (1 from the pressure relief valve of thedomestic hot water tank, and 1 from the pressure relief valve ofthe domestic hot water tank kit) to an appropriate drainaccording to the applicable legislation. The following exampleshows discharge below fixed grating (Building Regulation G3section 3.61 gives alternative points of discharge):
≤600 mm
≥300 mm
a
D1
D2
c
b
d
a Safety device (pressure relief valve of domestic hot watertank; pressure relief valve of domestic hot water tank kit)
b Tundishc Fixed gratingd Trapped gully
D1 Metal discharge pipe from safety device to tundishD2 Discharge pipe from tundish, with continuous fall. See
Building Regulation G3 section 3.56, Table 03 and workedexample.
NOTICE
Install air purge valves at all local high points.
4.3 Finishing the domestic hot watertank kit installation
4.3.1 To close the indoor unit1 Reinstall the top plate.
4×
180 l
4×
260 l


4P449984-1 B 00000009
4P449984-1B 2016.11
Cop
yrig
ht 2
016
Dai
kin