Embed Size (px)
Citation preview
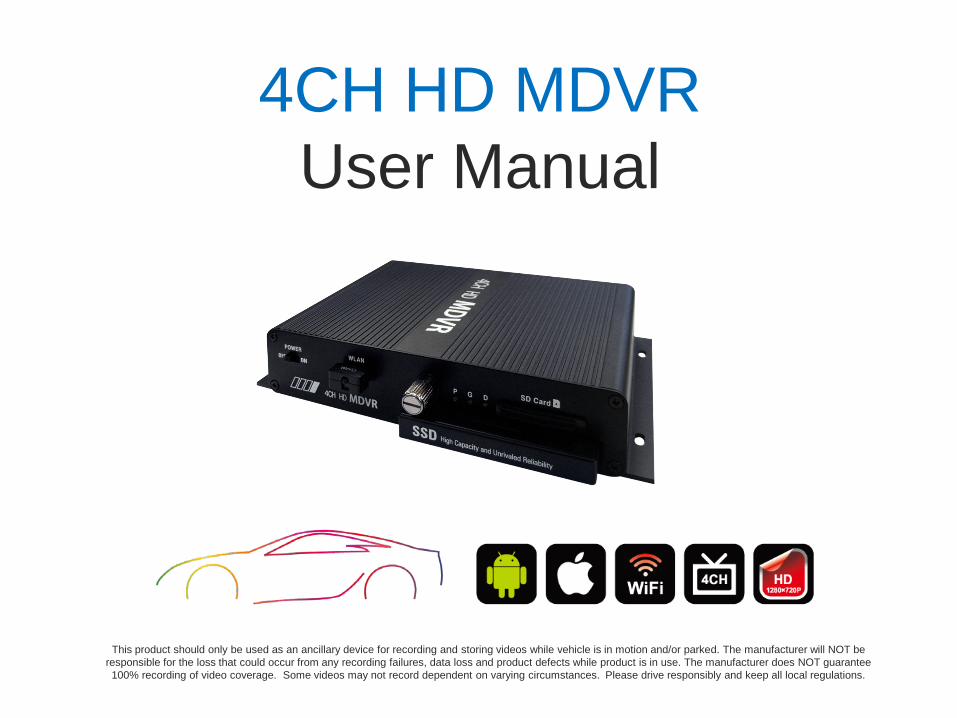
4CH HD MDVR User Manual
This product should only be used as an ancillary device for recording and storing videos while vehicle is in motion and/or parked. The manufacturer will NOT be responsible for the loss that could occur from any recording failures, data loss and product defects while product is in use. The manufacturer does NOT guarantee 100% recording of video coverage. Some videos may not record dependent on varying circumstances. Please drive responsibly and keep all local regulations.

Contents
2
0. Before Use
1. Overview
2. Features
3. Components
4. Precautions for Installation
5. Precautions Before Use
6. Cautions In Use
7. Exterior Names and Functions
8. Operating Modes and Status
9. Firmware Upgrade
10. Viewer - Installation
11. Viewer – Execution and Removal
12. Viewer – Default Window
13. Viewer – Buttons and Functions
14. Viewer – Maximized Window
15. Viewer – Digital Zooming
16. Viewer – Playback of Recorded Files
17. Viewer – Recorded Information
18. Viewer – Blackbox Settings
19. Viewer – Checking and Recovery of Storage
20. App - Installation
21. App – Connecting through Wi-Fi
22. App – Main Menu
23. App – Real-time Monitoring
24. App – Remote Search
25. App – Videos in My Phone
26. App – Screenshot
27. App – Settings
28. App – SD Card via OTG on Android phones
29. App - Information
30. Folders and Files in Storage
31. Storage Partitioning and Usage
32. Pin Assignment of Plugs
33. Specification
34. Warranty
35. Consumer compensation regulations
36. Before Calling Customer Service
37. Self Diagnosis before Calling Customer Service
30 31 32 33 34 35 44 45 46 47 48 49 50 51 52 53 54 55 56
3 4 5 7 8 9 10 12 13 14 17 18 19 20 23 24 26 27 28
0. Before Use
All the contents of this manual are protected according to the federal and international copyright laws.
The product and its information shown in this manual are sole properties of Its manufacturer.
All the rights to the program used for this product belong to its manufacturer and are protected by federal and
international copyright laws. Any duplication, modification, production and distribution of this product and its
programs without prior written consent by the manufacturer is prohibited. Violators are subject to imprisonment of
up to five years and/or maximum monetary penalty of up to 5million USD as set by governing authorities.
The manufacturer holds the rights to all the software and hardware of this product. Any act of unauthorized
reproduction and distribution will be punishable in accordance with the federal and international copyright
protection law.
This manual is based on the most current conditions of the product at the time of first release and may require
technical and/or editorial updates/omissions that are subject to change without prior notice.
Some changes may be made to the product for the purpose of improvements without prior notice.
It is recommended that users should read the manual carefully before using the product for safety.
3
4
The product is designed to store video and audio information to assist as a secondary safety device while driving and
during parked. Videos taken from the device may be used as a circumstantial reference data to help identify the scene
of various events.
Please install and use the product properly according to the user’s manual
The company will not be held responsible for failures or accidents that might occur due to improper use,
The Manufacturer is NOT responsible for accidental failures and failures that may occur due to improper use,
installation, modification. Provided PC viewer program can run on a PC with XP/Vista/Win 7. It is recommended
to use a PC with CPU-intel core2 Quad Q6600@ 2.4GHz, @GB of Ram or equivalent as the minimum
specification.
The product and the user manual can be changed without prior notifications.
The manufacturer holds the rights to all the software and hardware of the product.
Please refrain from making changes to the device while vehicle is in motion for the purpose of safety.
The intent of this product is to help promote driving safety and protection of users and their investments.
1. Overview
5
2. Features (1)
High-Quality recording of videos.
This product shoots High Definition videos for clarity both day and night for optimal viewing pleasure. HD videos are taken during vehicle motion and/or while vehicle is parked.
Wi-Fi Function
This product supports 4Ch live videos and recorded video playbacks via smart phone(android/iOS) using provided mobile application. Wifi reception distance may change due to varying communication circumstances.
Continuous Recording
This product supports continuous recording function that will record videos continuously while in motion and while parked.
Event (Impact) Recording
During vehicle impact, the shock is detected by a three-axis acceleration sensor which records data for 30 seconds total(with 10seconds before impact and 20 seconds after) to be stored in event folder of memory
Recording while parked,
This product supports recording function while the vehicle is parked with motion and impact triggers.
Auto Memory Management Cycle System
This product has Auto Memory Management Cycle System which deletes files starting with the oldest to the latest in order to continue storing new videos recorded.
Backup Function
This product has a backup power function to finish and store video during impact where an impact severe enough may result in unwanted power disconnection.
6
2. Features (2)
Digital zooming
During video playback on the provided PC viewer, videos can be digitally zoomed in and out for enhanced viewing experience.
Checking the Recorded Data through the PC viewer
4 Channel Simultaneous play back is available through the provided viewer program
Checking the Vdeos in Real Time
Once the system is properly installed, the GPS Module will identify the video locations in real time through the usage of video out onto a monitor (HDMI and VGA connections are available)
Voltage cutoff program with timer is available to prevent battery discharge.
The product has an embedded power cutoff unit, which will help prevent the battery from becoming discharged when continuous power is in use. During the Parking mode, when the voltage reaches a certain level as set for the voltage cutoff, the device will be turned off to prevent itself from causing the battery to be discharged. There are four stages in the voltage cutoff as well as four stages of voltage cutoff with the use of a timer.
Saving the driving records
Date/Time/Mileage is recorded while driving and parked through the usage of a properly mounted GPS Module. The information can be seen in the provided PC viewer.

7
After purchasing the product, consumer is asked to check for all components that are included in the package. If a component is damaged or missing, please contact retailer for prompt replacement.
3. Components
The images shown above may appear different from the actual look. Product images and specs are subject to change without prior notice.
Main body stand
Continuous power cable
Micro Memory for (16GB) Front / Rear camera
Cigar power cable
Basic Specification
Left / Right cameras
Optional Item
s (Sold Separately )
WI-FI dongle IR Water Proof CAMERA
Water proof camera
Color : Black White Silver
SD / SSD Memory Card
CD Manual
8
4. Precautions for Installation
▶ It is recommended to install the device in an area with a flat surface. The ignition must be turned off while installing.. ▶ Please check the power supply first before installing the system onto a vehicle. Also check to make sure the cameras in front /
rear / left / right are functioning properly before continuing to install. ▶ All the necessary components are included in the package for installation. Unless installing power to the cigarette lighter
adapter, please seek a professional installer when installing directly to the vehicle fuse box. (Professional knowledge is required to install directly to the fuse box)
▶ Please be sure to insert the SSD or the SD correctly before power is supplied. ▶ Do Not install device in obstruction to the driver’s line of sight for safety. ▶ Please neatly tuck away all cables for safety and aesthetics. ▶ Please clean the glass prior to installing cameras for best adhesion. ▶ Installation should be performed in a safe and bright location. ▶ Please note tinted glass and heat wires on rear widows will decrease quality of videos. ▶Please remove the protective vinyl covers on the front and rear camera lenses before use.
5. Precautions Before Use
Scope of warranty and responsibilities This product should only be used as an ancillary device for recording and storing videos while vehicle is in motion and/or parked. The manufacturer will NOT be responsible for the loss that could occur from any recording failures, data loss and product defects while product is in use. The manufacturer does NOT guarantee 100% recording of video coverage. Some videos may not record dependent on varying circumstances. Please drive responsibly and keep all local regulations. ◆ Precautions for using the memory card
Please Check data once a week to confirm proper operations
Format the micro SD memory card twice a month to maximize stability and longevity of the card.
Purchase of a new memory card is recommended every 6 month to ensure best quality of video. Removal of the memory card or turning its power off while recording is in progress may cause stored data to be deleted. It is recommended to back up and store important video data once captured on your device.
9
Safety precautions must be followed to prevent possible accidents and risks by using the product in a safe and
proper manner. The manufacturer is NOT responsible for negligence of manual instructions.
6. Cautions In Use
Warning: Serious injuries or death could occur.
Do NOT place the product in a heating device such as a heater, microwave and ovens to dry when wet as this can cause explosion.
Do NOT disassemble device as it may cause electric shocks and void all warranty
Do NOT use chemical detergents such as benzne, thinner or alcohol to clean the device as it can cause fire.
Please operate device while vehicle is parked for safety.
10
11
6. Cautions In Use
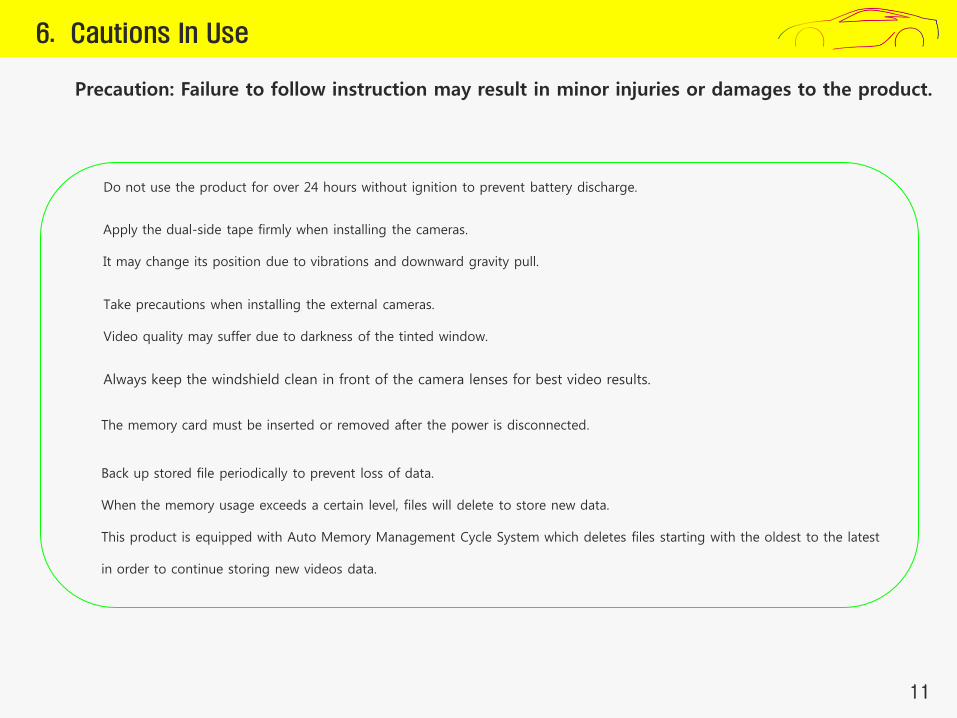
Precaution: Failure to follow instruction may result in minor injuries or damages to the product.
Do not use the product for over 24 hours without ignition to prevent battery discharge.
Always keep the windshield clean in front of the camera lenses for best video results.
Apply the dual-side tape firmly when installing the cameras. It may change its position due to vibrations and downward gravity pull.
Back up stored file periodically to prevent loss of data. When the memory usage exceeds a certain level, files will delete to store new data. This product is equipped with Auto Memory Management Cycle System which deletes files starting with the oldest to the latest in order to continue storing new videos data.
The memory card must be inserted or removed after the power is disconnected.
Take precautions when installing the external cameras. Video quality may suffer due to darkness of the tinted window.
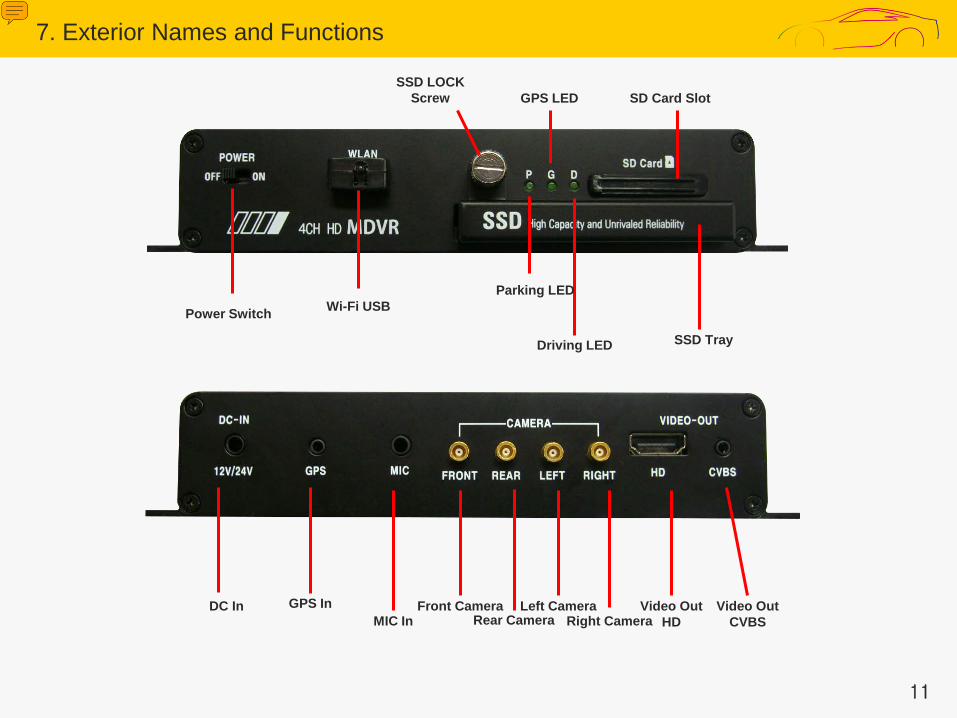
Power Switch
Driving LED
Wi-Fi USB Parking LED
SSD Tray
Front Camera Rear Camera
Left Camera Right Camera
Video Out HD
GPS In DC In
SD Card Slot
Video Out CVBS MIC In
GPS LED SSD LOCK
Screw
7. Exterior Names and Functions
11
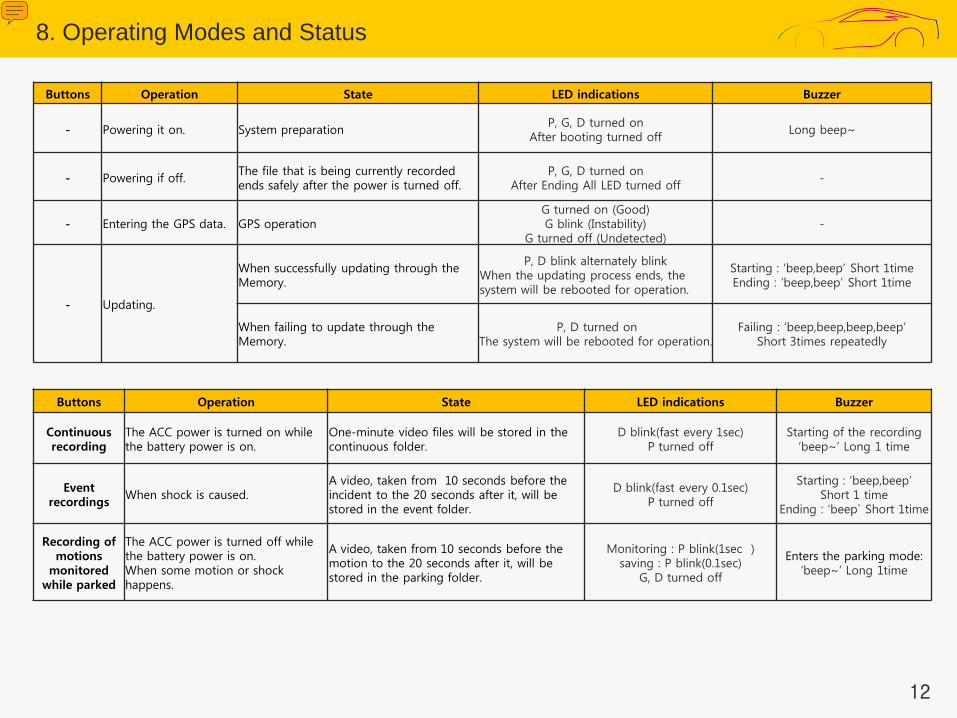
Buttons Operation State LED indications Buzzer
- Powering it on. System preparation P, G, D turned on
After booting turned off Long beep~
- Powering if off. The file that is being currently recorded ends safely after the power is turned off.
P, G, D turned on After Ending All LED turned off
-
- Entering the GPS data. GPS operation G turned on (Good) G blink (Instability)
G turned off (Undetected) -
- Updating.
When successfully updating through the Memory.
P, D blink alternately blink When the updating process ends, the system will be rebooted for operation.
Starting : ‘beep,beep’ Short 1time Ending : ‘beep,beep’ Short 1time
When failing to update through the Memory.
P, D turned on The system will be rebooted for operation.
Failing : ‘beep,beep,beep,beep’ Short 3times repeatedly
Buttons Operation State LED indications Buzzer
Continuous recording
The ACC power is turned on while the battery power is on.
One-minute video files will be stored in the continuous folder.
D blink(fast every 1sec) P turned off
Starting of the recording ‘beep~’ Long 1 time
Event recordings
When shock is caused. A video, taken from 10 seconds before the incident to the 20 seconds after it, will be stored in the event folder.
D blink(fast every 0.1sec) P turned off
Starting : ‘beep,beep’ Short 1 time
Ending : ‘beep` Short 1time
Recording of motions
monitored while parked
The ACC power is turned off while the battery power is on. When some motion or shock happens.
A video, taken from 10 seconds before the motion to the 20 seconds after it, will be stored in the parking folder.
Monitoring : P blink(1sec ) saving : P blink(0.1sec)
G, D turned off
Enters the parking mode: ‘beep~’ Long 1time
12
8. Operating Modes and Status
13
1 2 3
9. Firmware Upgrade (1)
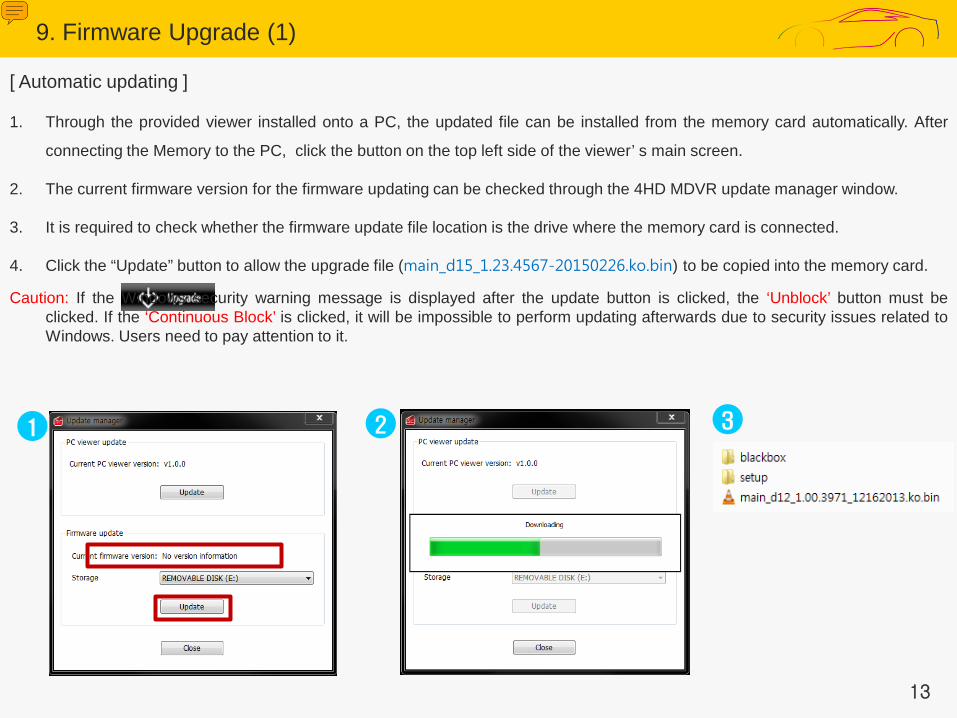
[ Automatic updating ]
1. Through the provided viewer installed onto a PC, the updated file can be installed from the memory card automatically. After
connecting the Memory to the PC, click the button on the top left side of the viewer’ s main screen.
2. The current firmware version for the firmware updating can be checked through the 4HD MDVR update manager window.
3. It is required to check whether the firmware update file location is the drive where the memory card is connected.
4. Click the “Update” button to allow the upgrade file (main_d15_1.23.4567-20150226.ko.bin) to be copied into the memory card.
Caution: If the Windows security warning message is displayed after the update button is clicked, the ‘Unblock’ button must be clicked. If the ‘Continuous Block’ is clicked, it will be impossible to perform updating afterwards due to security issues related to Windows. Users need to pay attention to it.
14
9. Firmware Upgrade (2)
[ Automatic updating ]
5. After the power for the black box is turned off, the Memory needs to be inserted into the main body of the black box.
6. Required to supply power to the black box.
7. Required to wait for about 10-20 seconds.
8. As the updating starts, the LEDs will blink and short beeping sound will be generated.
9. When the updating process ends, the LEDs will be turned off, and, at the same time, a short beep buzzer sound will be
generated. After a short while, the black box will get started again.
Caution: Even when the system gets restarted after formatting is performed according to the formatting menu embedded in the
main body, the previous setting conditions will be maintained.
15
9. Firmware Upgrade (3)
[ Manual updating ]
1. The firmware update file needs to be copied into the Memory
The Memory must be formatted first through the specific PC viewer or through the main body of the black box before
copying the update file (main_d15_1.23.4567-20150226.ko.bin).
2. Required to insert the Memory into the main body of the black box after powering off the black box.
3. Required to supply power to the black box.
4. Required to wait for about 10–20 seconds.
5. As the updating starts, the LEDs will blink and short beeping sound will be generated.
6. When the updating process ends, the LEDs will be turned off and, at the same time, a short beep buzzer sound will
be generated. After a short while, the black box will get started again.
Caution: When the system gets restarted after the format is performed (according to the formatting menu embedded in
the main body) the previous setting conditions will be maintained.

16
1
2
3
4
10. Viewer – Installation
1. Execute 4HD_MDVR.msi, the setup file for the specific viewer for the black box, which is stored in the storage and then
follow the procedure as shown below for installing the viewer.
17
1
2
11. Viewer – Execution and Removal
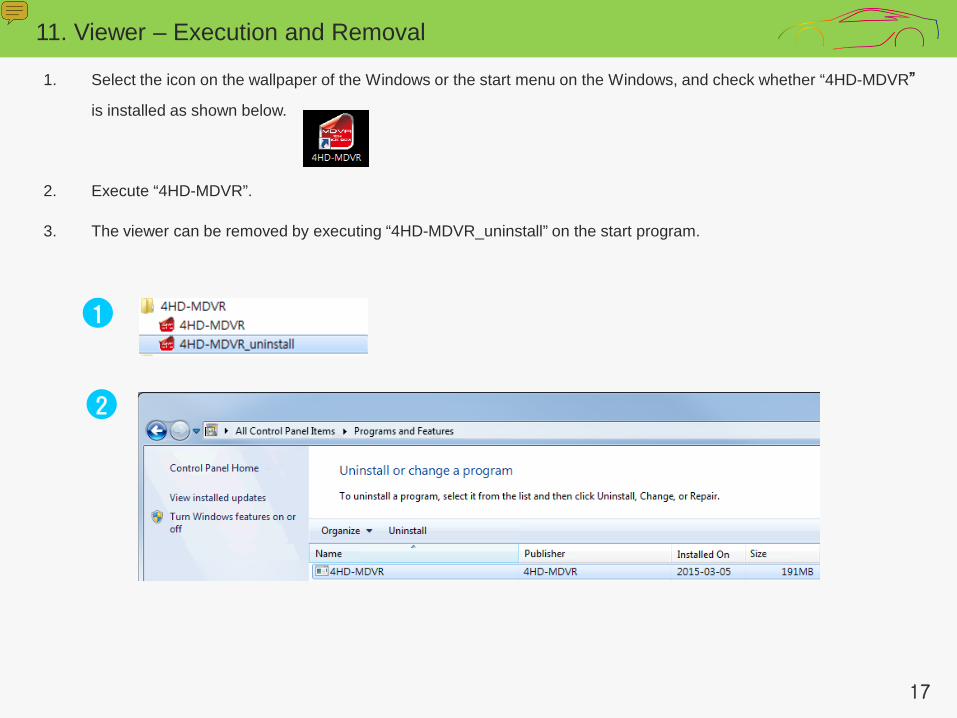
1. Select the icon on the wallpaper of the Windows or the start menu on the Windows, and check whether “4HD-MDVR”
is installed as shown below.
2. Execute “4HD-MDVR”.
3. The viewer can be removed by executing “4HD-MDVR_uninstall” on the start program.
18
Open File
Acceleration / Speed Graphs
Video
Acceleration / Time
File Opening
Play Control
File List
Update Setup Full Screen
Map ON/OFF
Google map
Capture
Graph +/-
Front Rear
Left Right
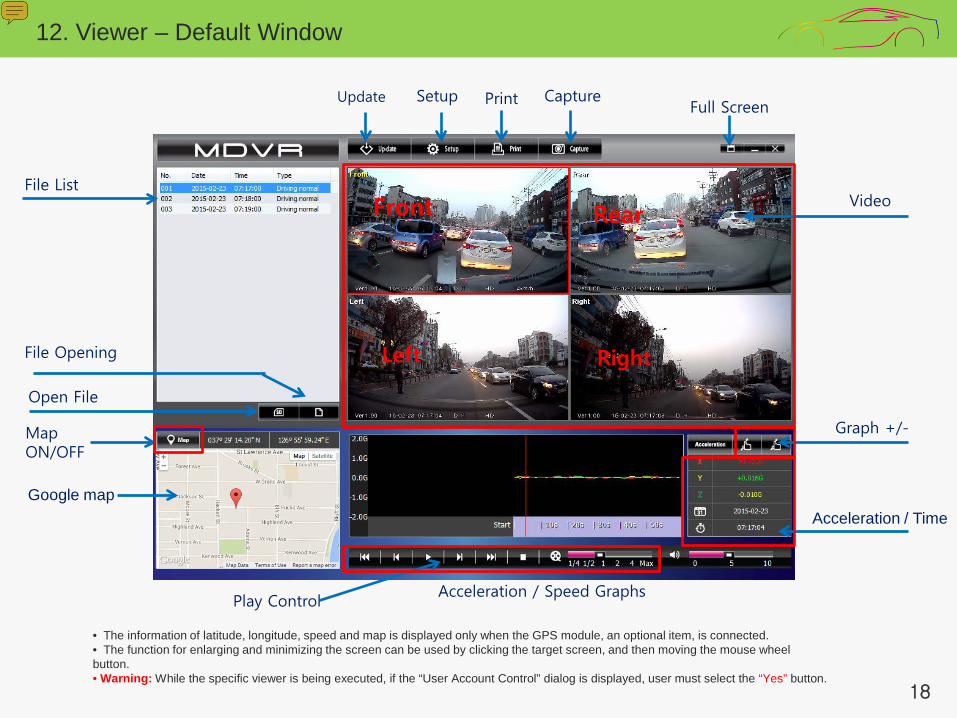
12. Viewer – Default Window
• The information of latitude, longitude, speed and map is displayed only when the GPS module, an optional item, is connected. • The function for enlarging and minimizing the screen can be used by clicking the target screen, and then moving the mouse wheel button. • Warning: While the specific viewer is being executed, if the “User Account Control” dialog is displayed, user must select the “Yes” button.
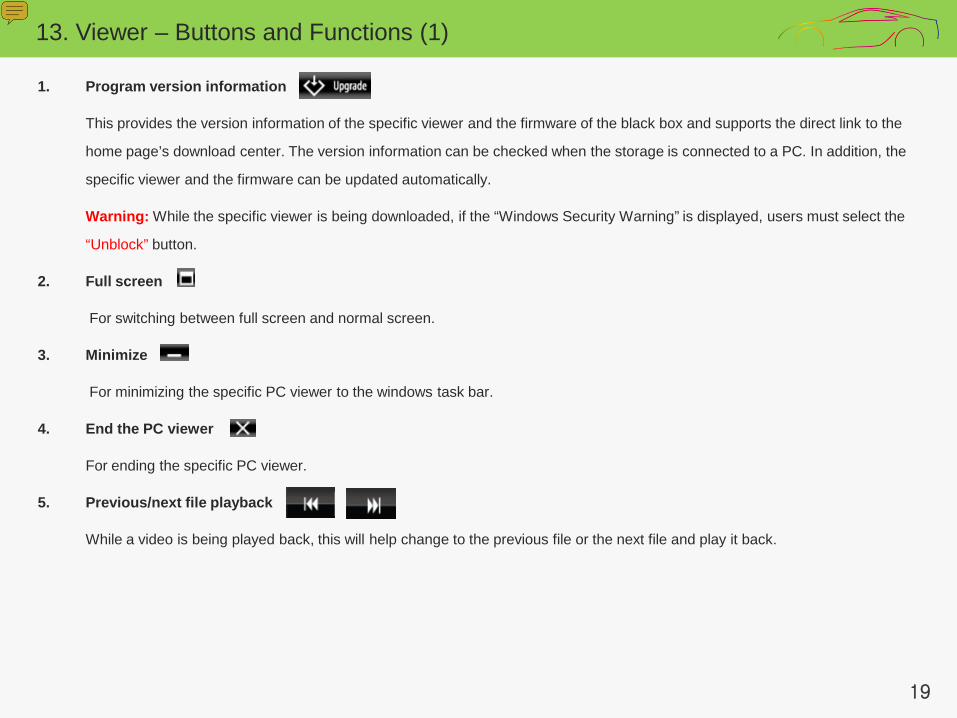
1. Program version information
This provides the version information of the specific viewer and the firmware of the black box and supports the direct link to the
home page’s download center. The version information can be checked when the storage is connected to a PC. In addition, the
specific viewer and the firmware can be updated automatically.
Warning: While the specific viewer is being downloaded, if the “Windows Security Warning” is displayed, users must select the
“Unblock” button.
2. Full screen
For switching between full screen and normal screen.
3. Minimize
For minimizing the specific PC viewer to the windows task bar.
4. End the PC viewer
For ending the specific PC viewer.
5. Previous/next file playback
While a video is being played back, this will help change to the previous file or the next file and play it back.
19
13. Viewer – Buttons and Functions (1)
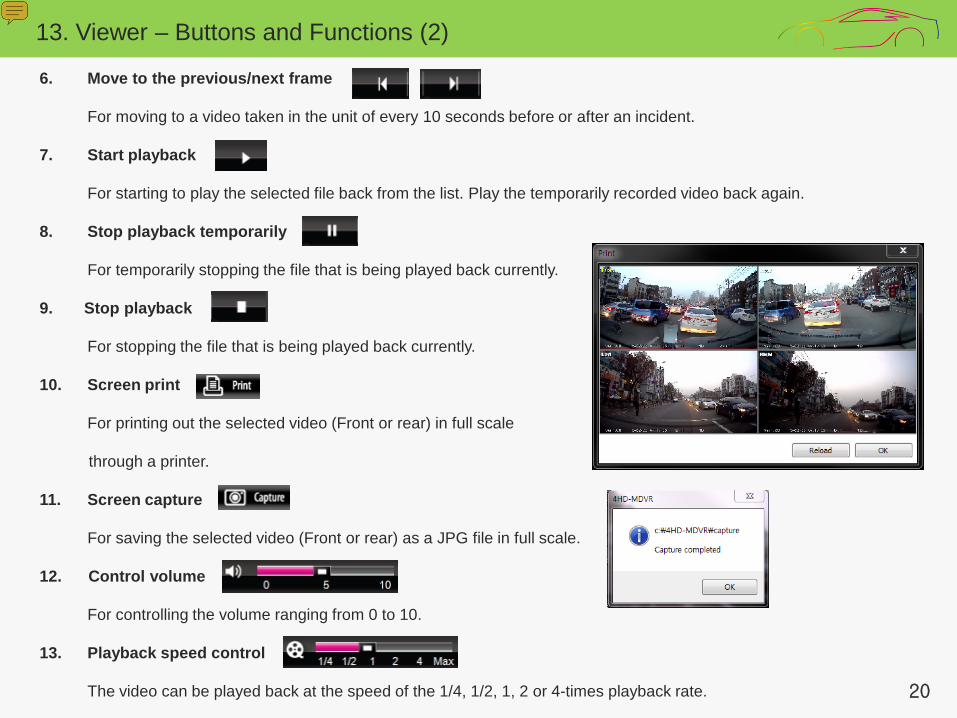
6. Move to the previous/next frame
For moving to a video taken in the unit of every 10 seconds before or after an incident.
7. Start playback
For starting to play the selected file back from the list. Play the temporarily recorded video back again.
8. Stop playback temporarily
For temporarily stopping the file that is being played back currently.
9. Stop playback
For stopping the file that is being played back currently.
10. Screen print
For printing out the selected video (Front or rear) in full scale
through a printer.
11. Screen capture
For saving the selected video (Front or rear) as a JPG file in full scale.
12. Control volume
For controlling the volume ranging from 0 to 10.
13. Playback speed control
The video can be played back at the speed of the 1/4, 1/2, 1, 2 or 4-times playback rate. 20
13. Viewer – Buttons and Functions (2)
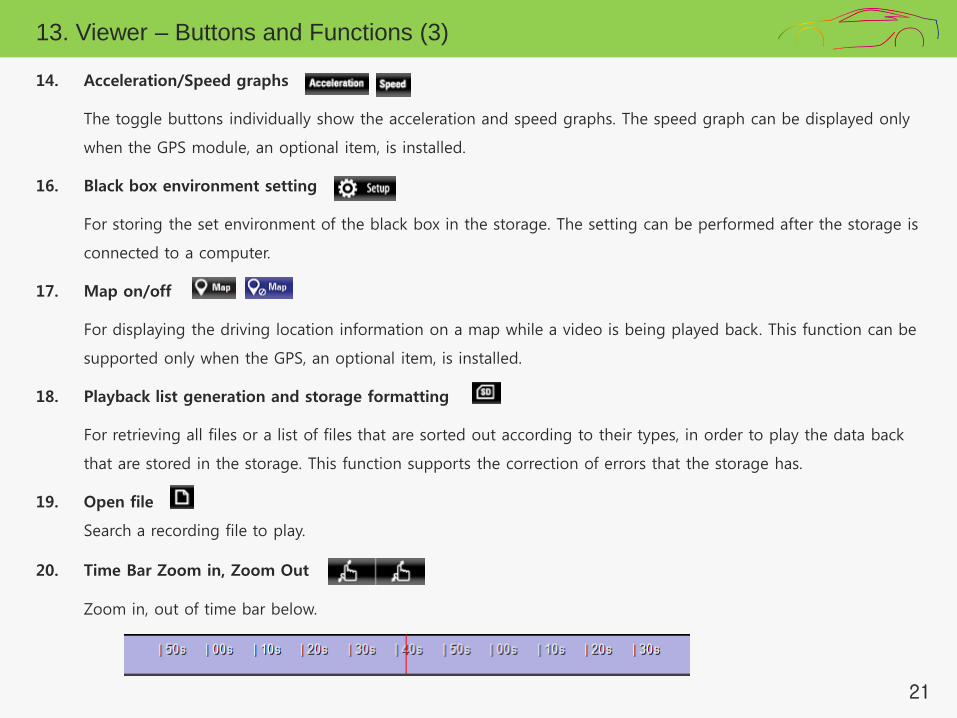
14. Acceleration/Speed graphs
The toggle buttons individually show the acceleration and speed graphs. The speed graph can be displayed only
when the GPS module, an optional item, is installed.
16. Black box environment setting
For storing the set environment of the black box in the storage. The setting can be performed after the storage is
connected to a computer.
17. Map on/off
For displaying the driving location information on a map while a video is being played back. This function can be
supported only when the GPS, an optional item, is installed.
18. Playback list generation and storage formatting
For retrieving all files or a list of files that are sorted out according to their types, in order to play the data back
that are stored in the storage. This function supports the correction of errors that the storage has.
19. Open file
Search a recording file to play.
20. Time Bar Zoom in, Zoom Out
Zoom in, out of time bar below.
13. Viewer – Buttons and Functions (3)
21
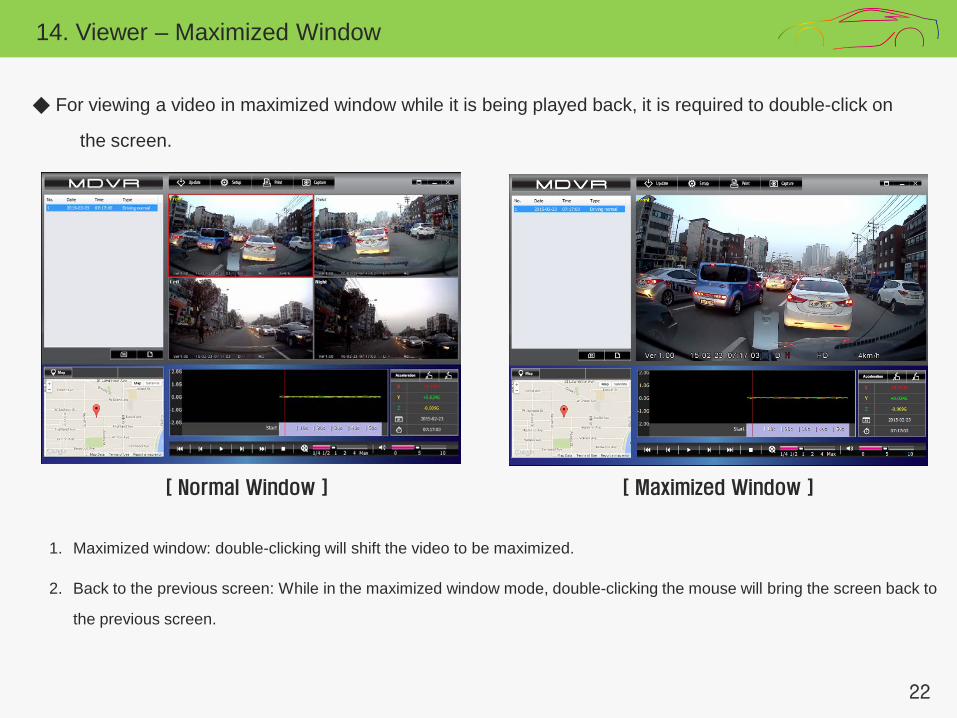
1. Maximized window: double-clicking will shift the video to be maximized.
2. Back to the previous screen: While in the maximized window mode, double-clicking the mouse will bring the screen back to
the previous screen.
22
14. Viewer – Maximized Window
◆ For viewing a video in maximized window while it is being played back, it is required to double-click on
the screen.
[ Normal Window ] [ Maximized Window ]
23
15. Viewer – Digital Zooming
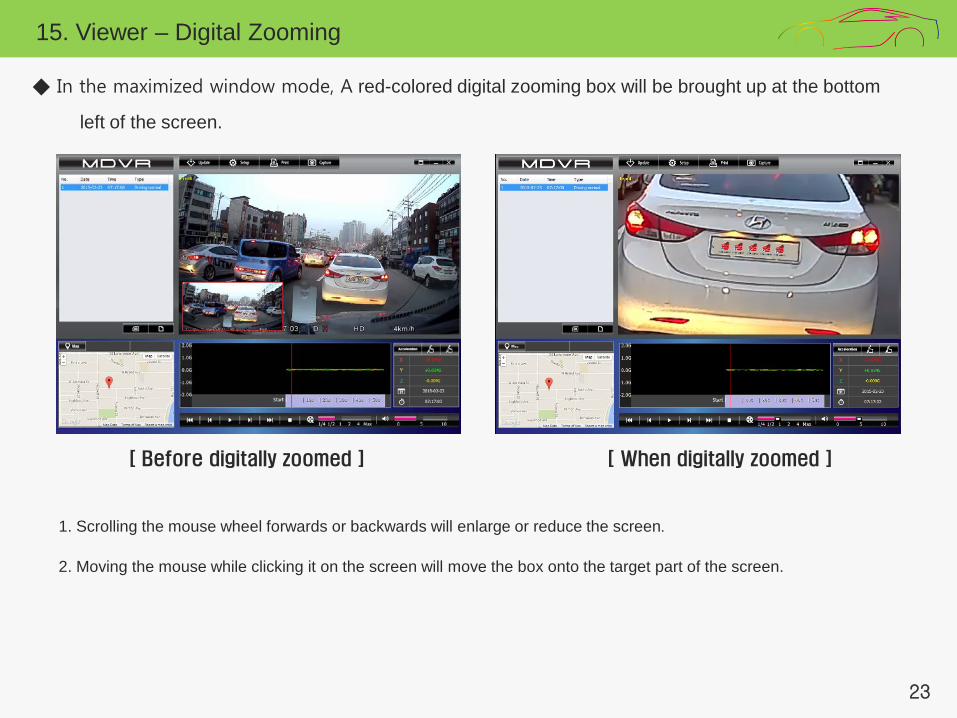
◆ In the maximized window mode, A red-colored digital zooming box will be brought up at the bottom
left of the screen.
[ Before digitally zoomed ] [ When digitally zoomed ]
1. Scrolling the mouse wheel forwards or backwards will enlarge or reduce the screen.
2. Moving the mouse while clicking it on the screen will move the box onto the target part of the screen.
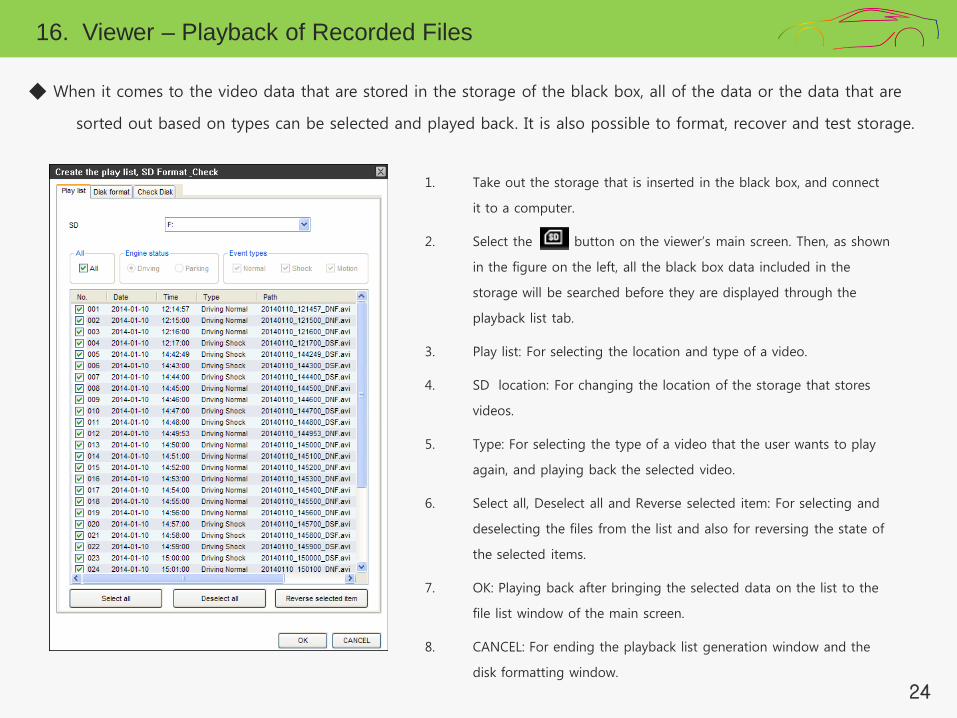
1. Take out the storage that is inserted in the black box, and connect
it to a computer.
2. Select the button on the viewer’s main screen. Then, as shown
in the figure on the left, all the black box data included in the
storage will be searched before they are displayed through the
playback list tab.
3. Play list: For selecting the location and type of a video.
4. SD location: For changing the location of the storage that stores
videos.
5. Type: For selecting the type of a video that the user wants to play
again, and playing back the selected video.
6. Select all, Deselect all and Reverse selected item: For selecting and
deselecting the files from the list and also for reversing the state of
the selected items.
7. OK: Playing back after bringing the selected data on the list to the
file list window of the main screen.
8. CANCEL: For ending the playback list generation window and the
disk formatting window.
24
16. Viewer – Playback of Recorded Files
◆ When it comes to the video data that are stored in the storage of the black box, all of the data or the data that are
sorted out based on types can be selected and played back. It is also possible to format, recover and test storage.
25
17. Viewer – Recorded Information: Shock, Speed, Map
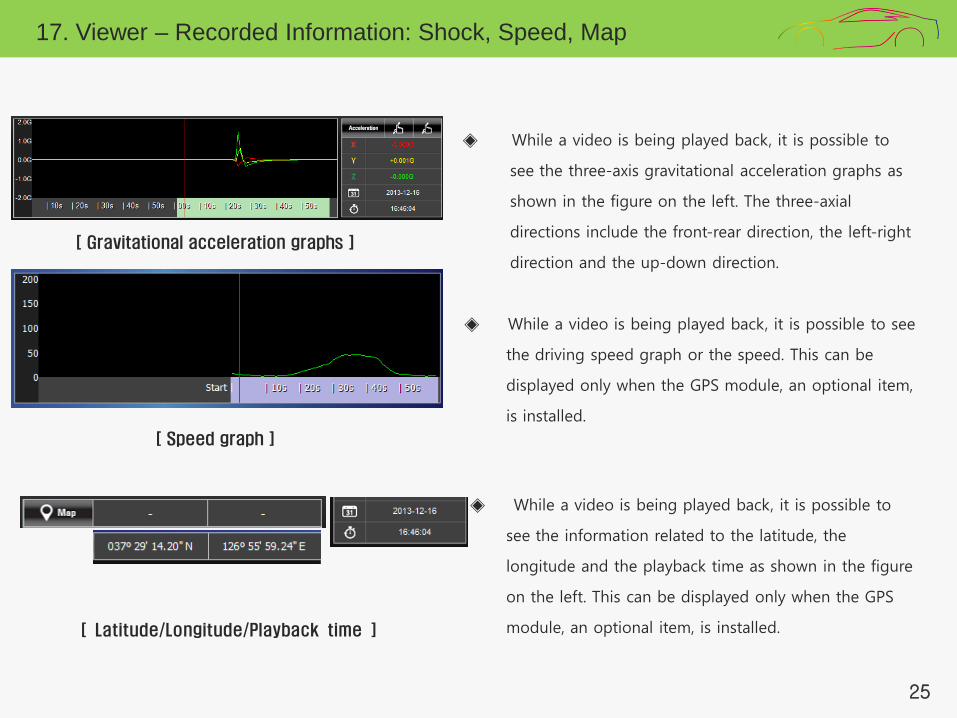
[ Gravitational acceleration graphs ]
[ Speed graph ]
[ Latitude/Longitude/Playback time ]
◈ While a video is being played back, it is possible to
see the three-axis gravitational acceleration graphs as
shown in the figure on the left. The three-axial
directions include the front-rear direction, the left-right
direction and the up-down direction.
◈ While a video is being played back, it is possible to see
the driving speed graph or the speed. This can be
displayed only when the GPS module, an optional item,
is installed.
◈ While a video is being played back, it is possible to
see the information related to the latitude, the
longitude and the playback time as shown in the figure
on the left. This can be displayed only when the GPS
module, an optional item, is installed.
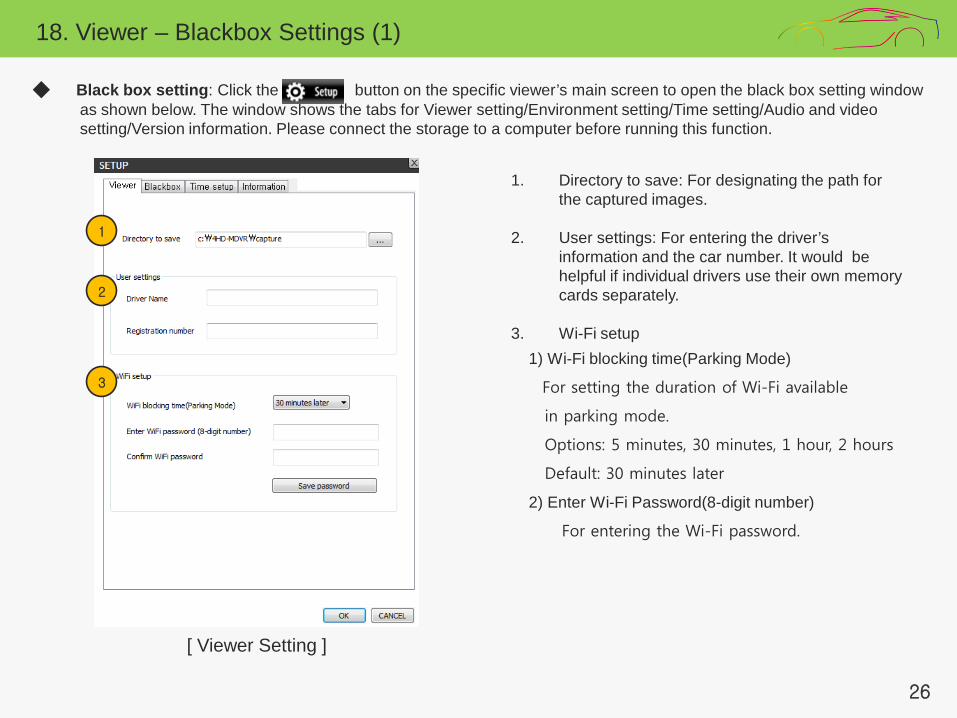
◆ Black box setting: Click the button on the specific viewer’s main screen to open the black box setting window as shown below. The window shows the tabs for Viewer setting/Environment setting/Time setting/Audio and video setting/Version information. Please connect the storage to a computer before running this function.
26
1
2
3
18. Viewer – Blackbox Settings (1)
1. Directory to save: For designating the path for the captured images.
2. User settings: For entering the driver’s
information and the car number. It would be helpful if individual drivers use their own memory cards separately.
3. Wi-Fi setup 1) Wi-Fi blocking time(Parking Mode)
For setting the duration of Wi-Fi available
in parking mode.
Options: 5 minutes, 30 minutes, 1 hour, 2 hours
Default: 30 minutes later
2) Enter Wi-Fi Password(8-digit number)
For entering the Wi-Fi password.
[ Viewer Setting ]
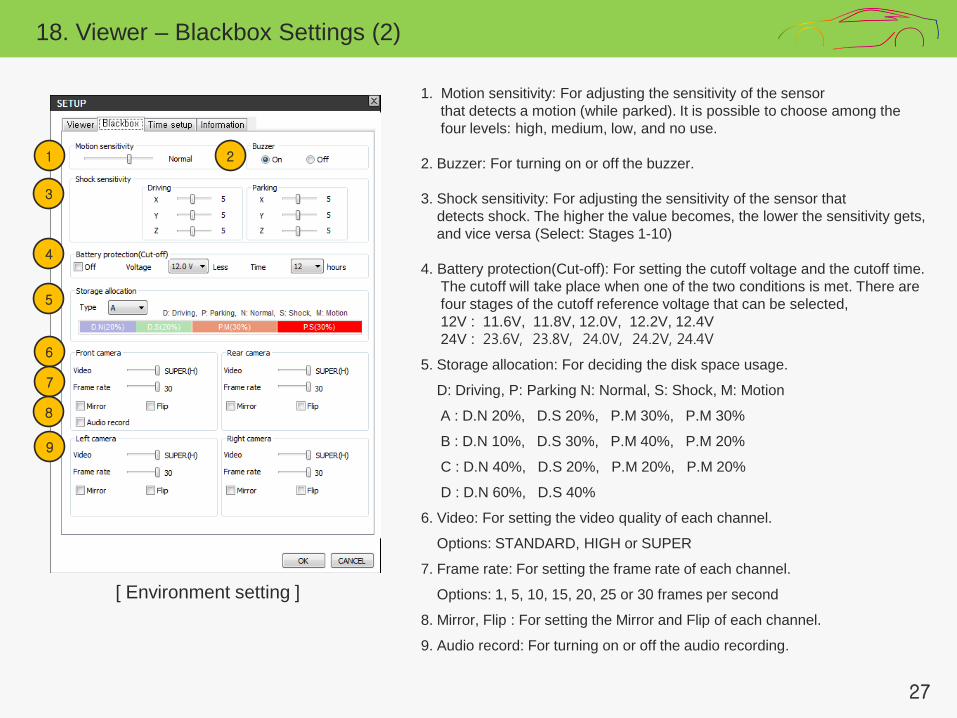
1. Motion sensitivity: For adjusting the sensitivity of the sensor that detects a motion (while parked). It is possible to choose among the four levels: high, medium, low, and no use. 2. Buzzer: For turning on or off the buzzer. 3. Shock sensitivity: For adjusting the sensitivity of the sensor that detects shock. The higher the value becomes, the lower the sensitivity gets, and vice versa (Select: Stages 1-10) 4. Battery protection(Cut-off): For setting the cutoff voltage and the cutoff time. The cutoff will take place when one of the two conditions is met. There are four stages of the cutoff reference voltage that can be selected, 12V : 11.6V, 11.8V, 12.0V, 12.2V, 12.4V 24V : 23.6V, 23.8V, 24.0V, 24.2V, 24.4V
5. Storage allocation: For deciding the disk space usage.
D: Driving, P: Parking N: Normal, S: Shock, M: Motion
A : D.N 20%, D.S 20%, P.M 30%, P.M 30%
B : D.N 10%, D.S 30%, P.M 40%, P.M 20%
C : D.N 40%, D.S 20%, P.M 20%, P.M 20%
D : D.N 60%, D.S 40%
6. Video: For setting the video quality of each channel.
Options: STANDARD, HIGH or SUPER
7. Frame rate: For setting the frame rate of each channel.
Options: 1, 5, 10, 15, 20, 25 or 30 frames per second
8. Mirror, Flip : For setting the Mirror and Flip of each channel.
9. Audio record: For turning on or off the audio recording.
27
1 2
3
4
5
6
7
8
18. Viewer – Blackbox Settings (2)
[ Environment setting ]
9
28
18. Viewer – Blackbox Settings (3)
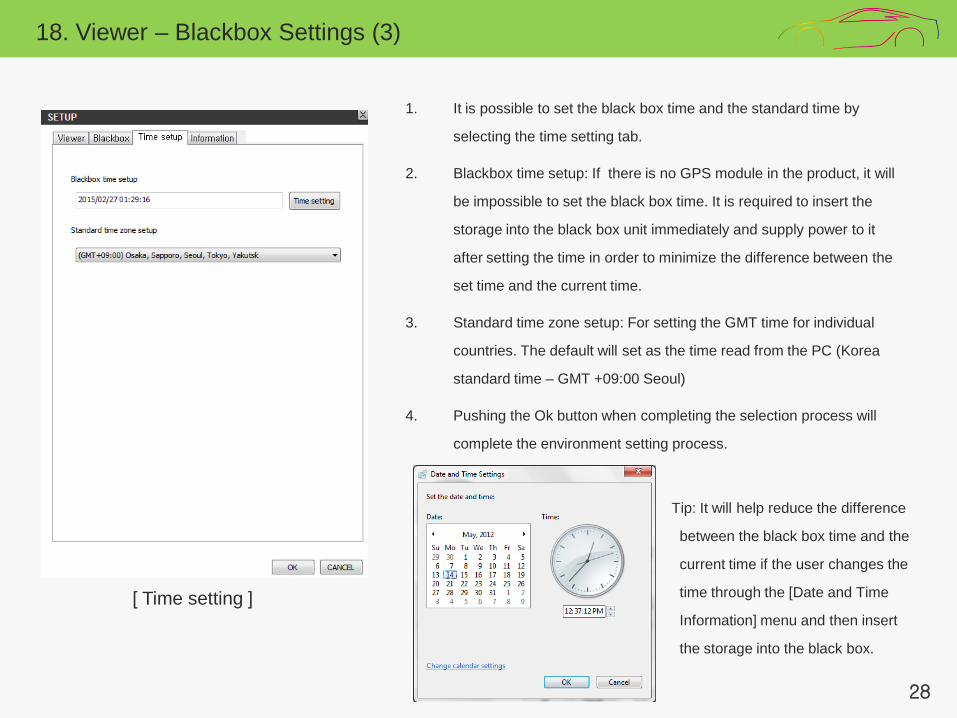
1. It is possible to set the black box time and the standard time by
selecting the time setting tab.
2. Blackbox time setup: If there is no GPS module in the product, it will
be impossible to set the black box time. It is required to insert the
storage into the black box unit immediately and supply power to it
after setting the time in order to minimize the difference between the
set time and the current time.
3. Standard time zone setup: For setting the GMT time for individual
countries. The default will set as the time read from the PC (Korea
standard time – GMT +09:00 Seoul)
4. Pushing the Ok button when completing the selection process will
complete the environment setting process.
Tip: It will help reduce the difference
between the black box time and the
current time if the user changes the
time through the [Date and Time
Information] menu and then insert
the storage into the black box.
[ Time setting ]
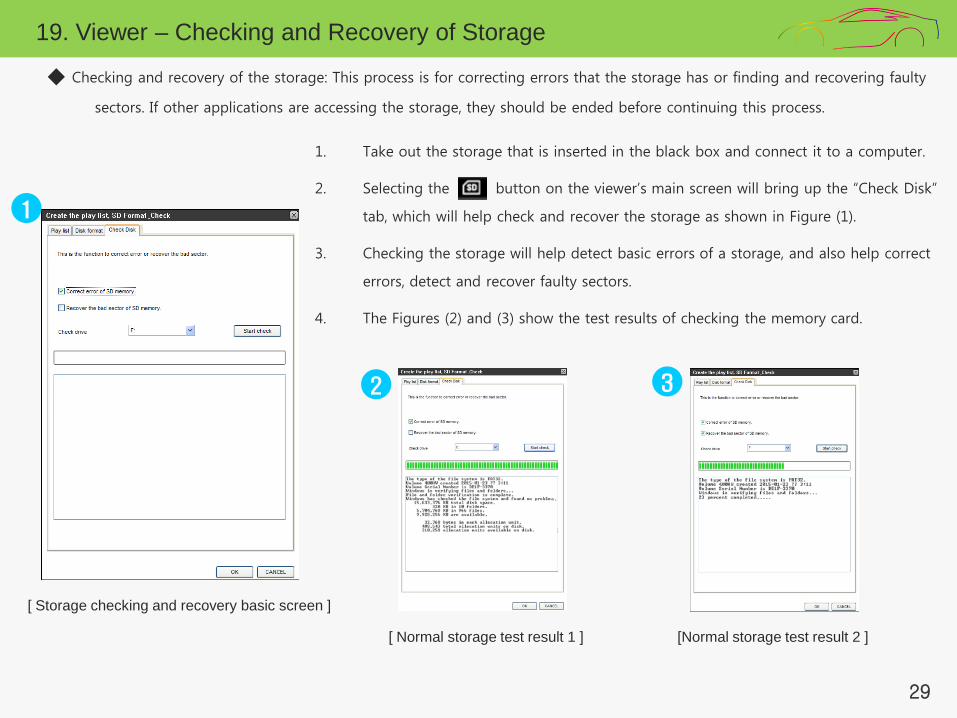
1. Take out the storage that is inserted in the black box and connect it to a computer.
2. Selecting the button on the viewer’s main screen will bring up the “Check Disk”
tab, which will help check and recover the storage as shown in Figure (1).
3. Checking the storage will help detect basic errors of a storage, and also help correct
errors, detect and recover faulty sectors.
4. The Figures (2) and (3) show the test results of checking the memory card.
29
1
2 3
19. Viewer – Checking and Recovery of Storage
◆ Checking and recovery of the storage: This process is for correcting errors that the storage has or finding and recovering faulty
sectors. If other applications are accessing the storage, they should be ended before continuing this process.
[ Storage checking and recovery basic screen ]
[ Normal storage test result 1 ] [Normal storage test result 2 ]
20. App – Installation
[Android APP]
1. Run the "Play Store" icon on your smartphone.
2. Search by "4CH HD MDVR" into the search box.
30
Notices)
- You can download on Android or IOS-based smartphones only
- Multiple smart phone connections are not allowed.(only one connection at a time)
- If you are connected to the Black Box, Internet access may be limited.
- Some smartphone models may not work with video playback as well as other functions
- Wi-Fi connection, depending on the state of the environment or the communication may not operate
properly.
21. App - Connecting through Wi-Fi
32
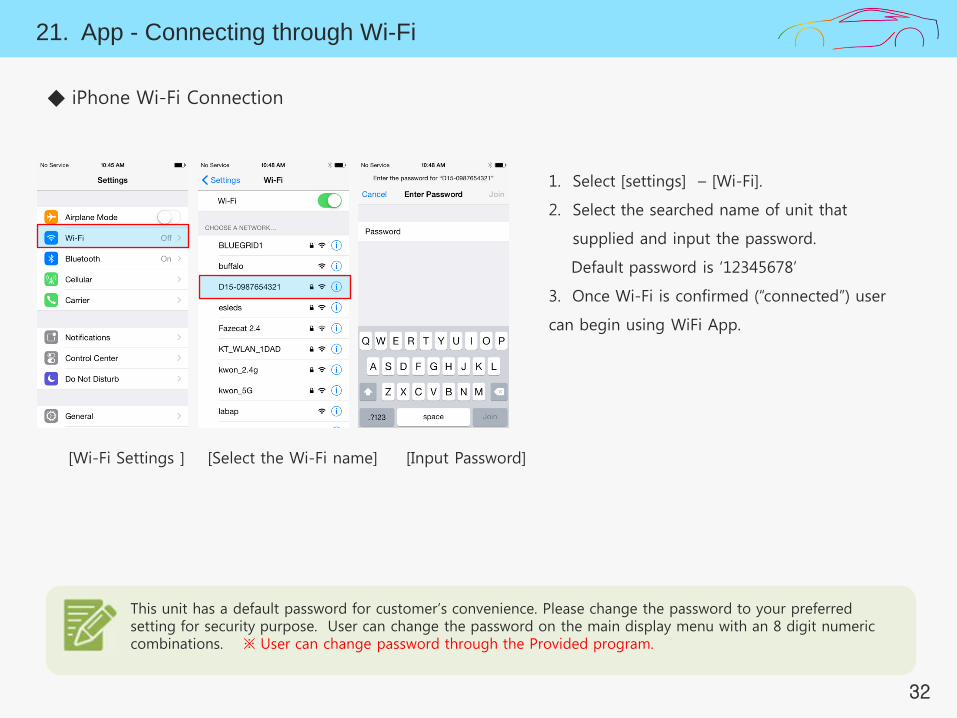
1. Select [settings] – [Wi-Fi].
2. Select the searched name of unit that
supplied and input the password.
Default password is ‘12345678’
3. Once Wi-Fi is confirmed (“connected”) user
can begin using WiFi App.
◆ iPhone Wi-Fi Connection
This unit has a default password for customer’s convenience. Please change the password to your preferred setting for security purpose. User can change the password on the main display menu with an 8 digit numeric combinations. ※ User can change password through the Provided program.
[Wi-Fi Settings ] [Select the Wi-Fi name] [Input Password]
22. App - Main Menu
33
1
2
3
4
5
6
7
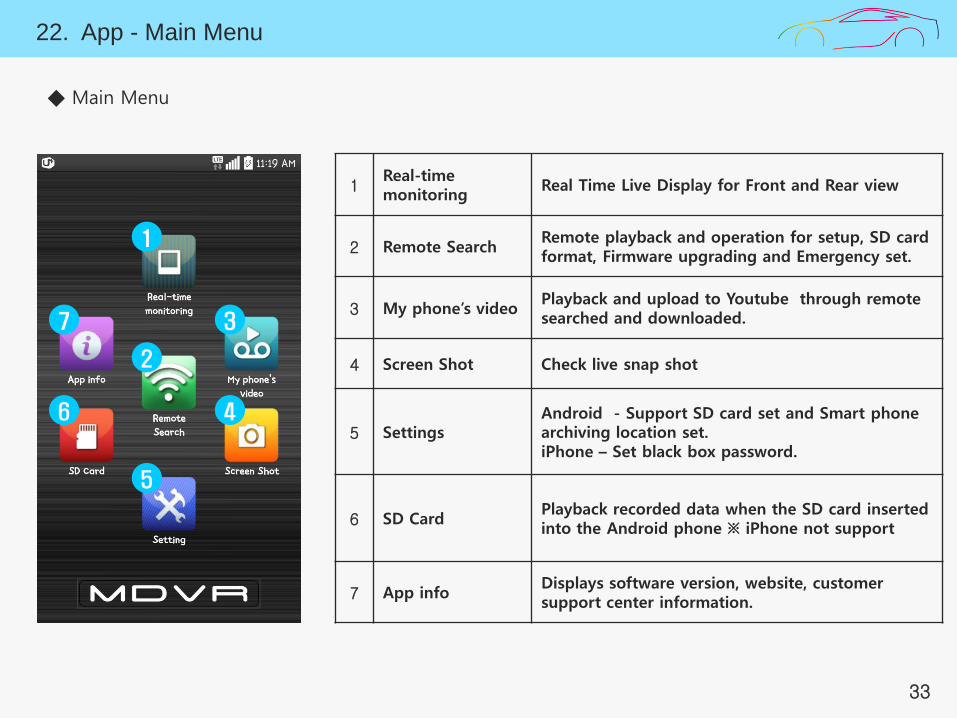
◆ Main Menu
1 Real-time monitoring
Real Time Live Display for Front and Rear view
2 Remote Search Remote playback and operation for setup, SD card format, Firmware upgrading and Emergency set.
3 My phone’s video Playback and upload to Youtube through remote searched and downloaded.
4 Screen Shot Check live snap shot
5 Settings Android - Support SD card set and Smart phone archiving location set. iPhone – Set black box password.
6 SD Card Playback recorded data when the SD card inserted into the Android phone ※ iPhone not support
7 App info Displays software version, website, customer support center information.
23. App - Real-time Monitoring
34
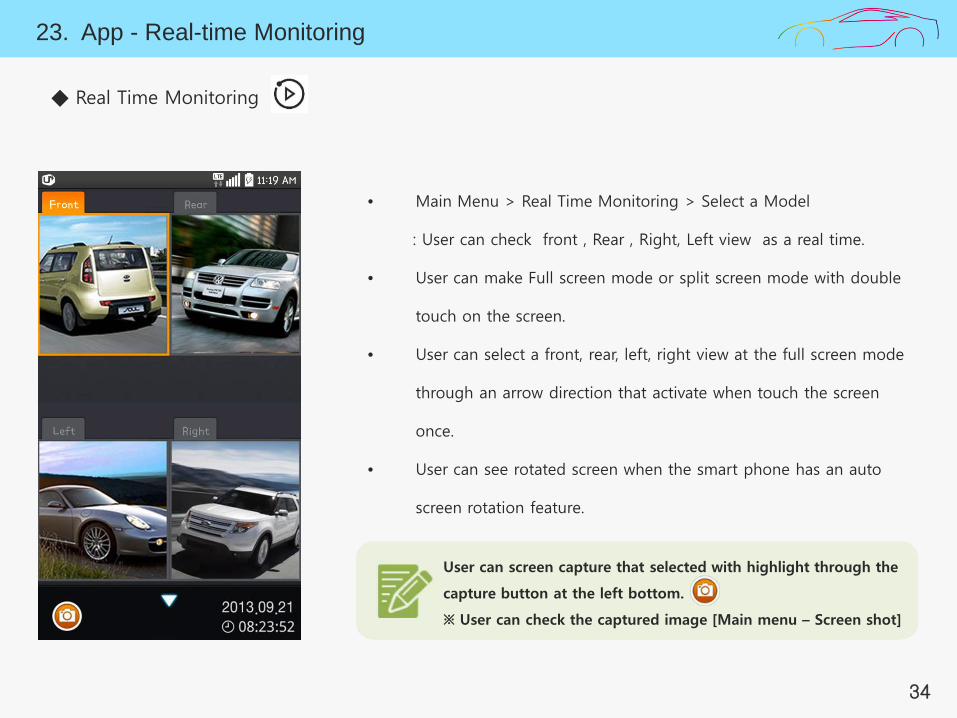
• Main Menu > Real Time Monitoring > Select a Model
: User can check front , Rear , Right, Left view as a real time.
• User can make Full screen mode or split screen mode with double
touch on the screen.
• User can select a front, rear, left, right view at the full screen mode
through an arrow direction that activate when touch the screen
once.
• User can see rotated screen when the smart phone has an auto
screen rotation feature.
◆ Real Time Monitoring
User can screen capture that selected with highlight through the
capture button at the left bottom.
※ User can check the captured image [Main menu – Screen shot]
24. App - Remote Search
35
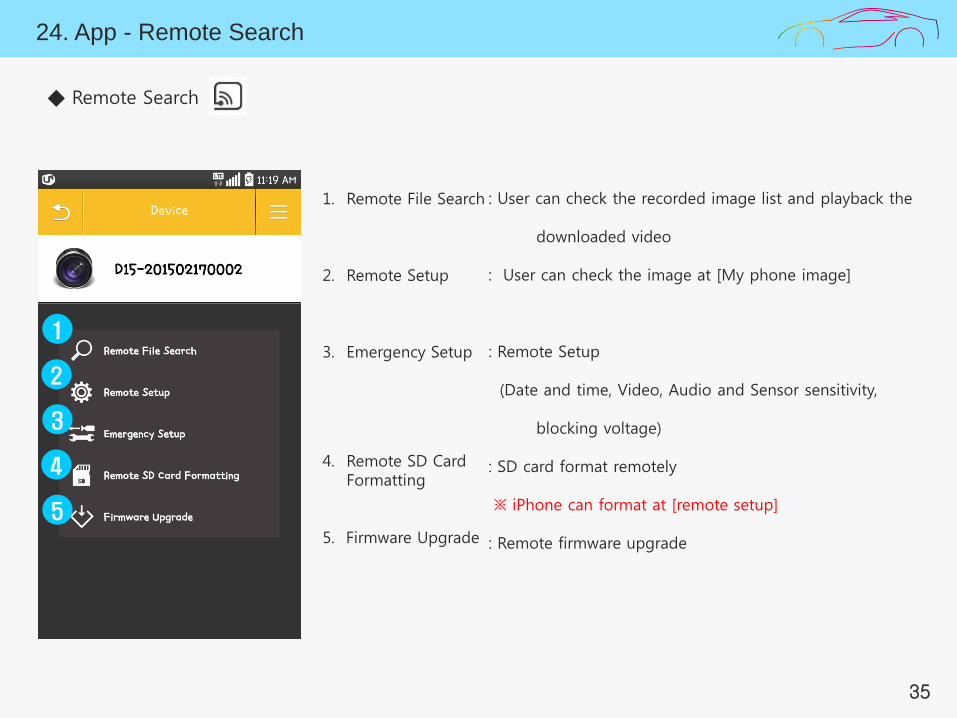
◆ Remote Search
1. Remote File Search
2. Remote Setup
3. Emergency Setup
4. Remote SD Card Formatting
5. Firmware Upgrade
: User can check the recorded image list and playback the
downloaded video
: User can check the image at [My phone image]
: Remote Setup
(Date and time, Video, Audio and Sensor sensitivity,
blocking voltage)
: SD card format remotely
※ iPhone can format at [remote setup]
: Remote firmware upgrade
1
2
3
4
5
24. App - Remote Search > Remote File Search
36
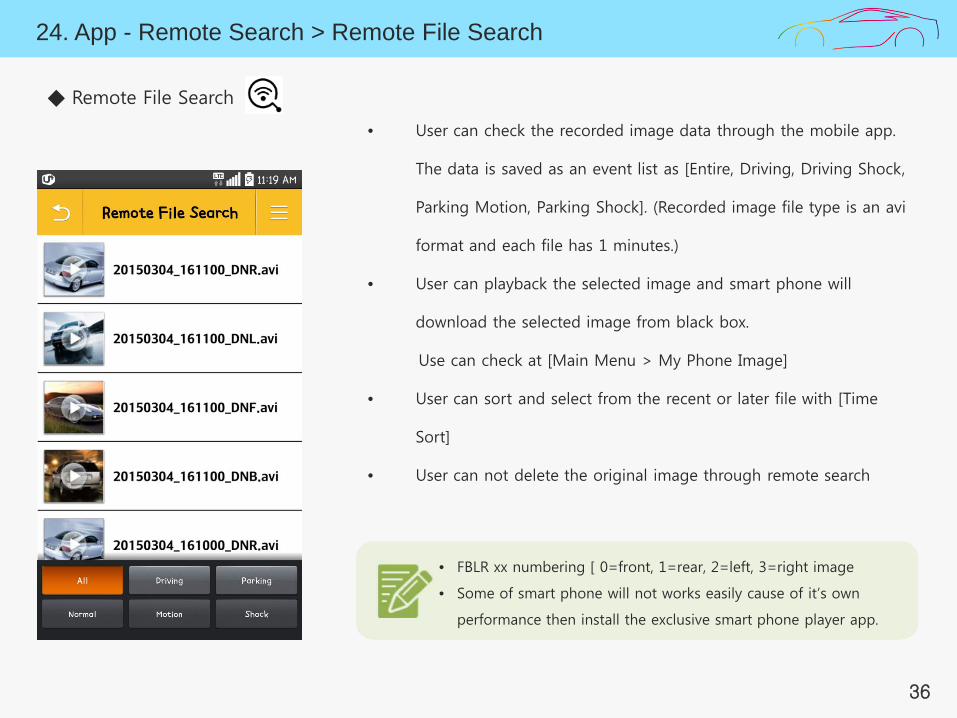
• User can check the recorded image data through the mobile app.
The data is saved as an event list as [Entire, Driving, Driving Shock,
Parking Motion, Parking Shock]. (Recorded image file type is an avi
format and each file has 1 minutes.)
• User can playback the selected image and smart phone will
download the selected image from black box.
Use can check at [Main Menu > My Phone Image]
• User can sort and select from the recent or later file with [Time
Sort]
• User can not delete the original image through remote search
◆ Remote File Search
• FBLR xx numbering [ 0=front, 1=rear, 2=left, 3=right image
• Some of smart phone will not works easily cause of it’s own
performance then install the exclusive smart phone player app.

24. App - Remote Search > Remote Setup (1)
37
◆ Remote Setup
1
2
3
4
5
6
7
1. Date and Time
2. Video
3. Audio
4. Sensor Sensitivity
5. Storage Allocation
6. Battery Protection
7. Firmware Version
: Set the standard date and time
: Set resolution, frame rates, video quality.
: Set audio recording and buzzer sound on/off
: Set Sensitivity level for driving, parking motion.
: Set the storage space rates for recording type.
: Set battery discharge blocking on/off, blocking
voltage, blocking time.
: Current firmware version
24. App - Remote Search > Remote Setup (2)
38
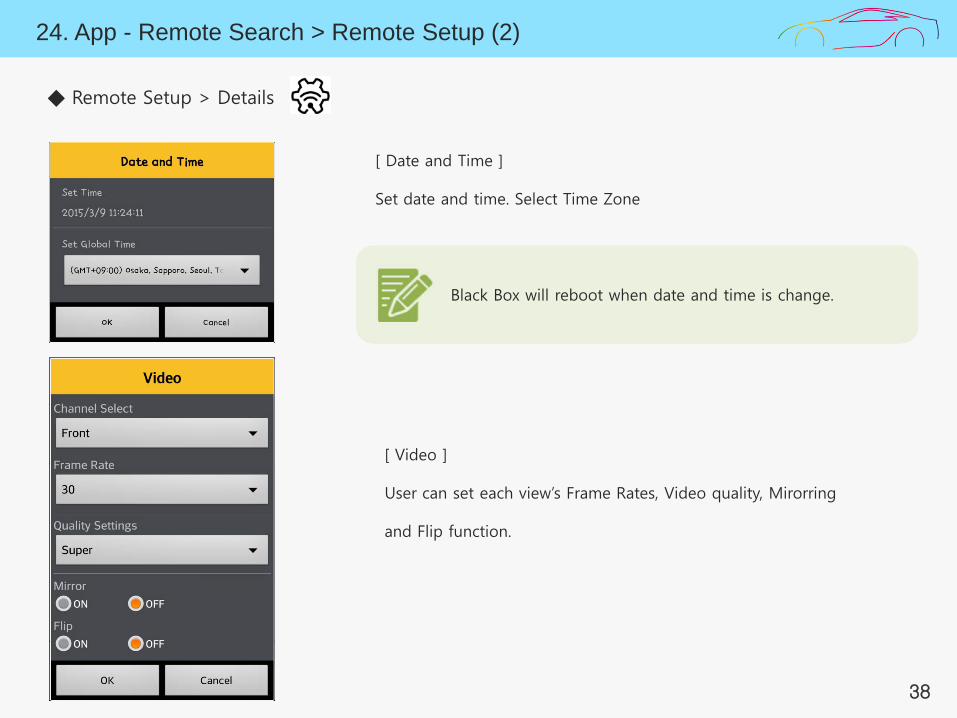
[ Date and Time ]
Set date and time. Select Time Zone
Black Box will reboot when date and time is change.
[ Video ]
User can set each view’s Frame Rates, Video quality, Mirorring
and Flip function.
◆ Remote Setup > Details
24. App - Remote Search > Remote Setup (3)
39
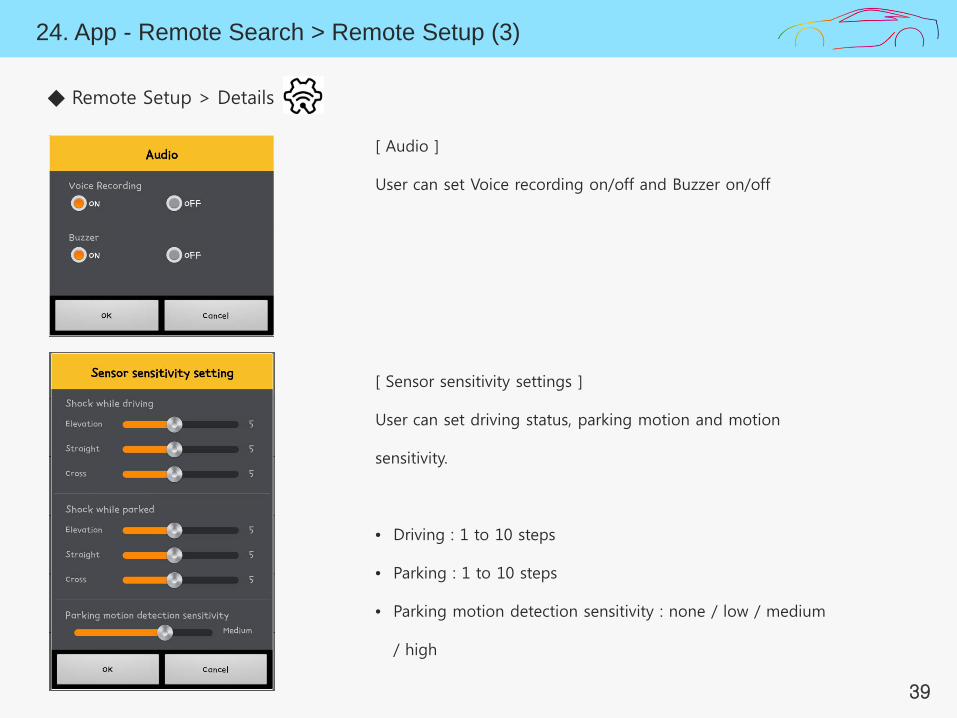
[ Audio ]
User can set Voice recording on/off and Buzzer on/off
[ Sensor sensitivity settings ]
User can set driving status, parking motion and motion
sensitivity.
• Driving : 1 to 10 steps
• Parking : 1 to 10 steps
• Parking motion detection sensitivity : none / low / medium
/ high
◆ Remote Setup > Details
24. App - Remote Search > Remote Setup (4)
40
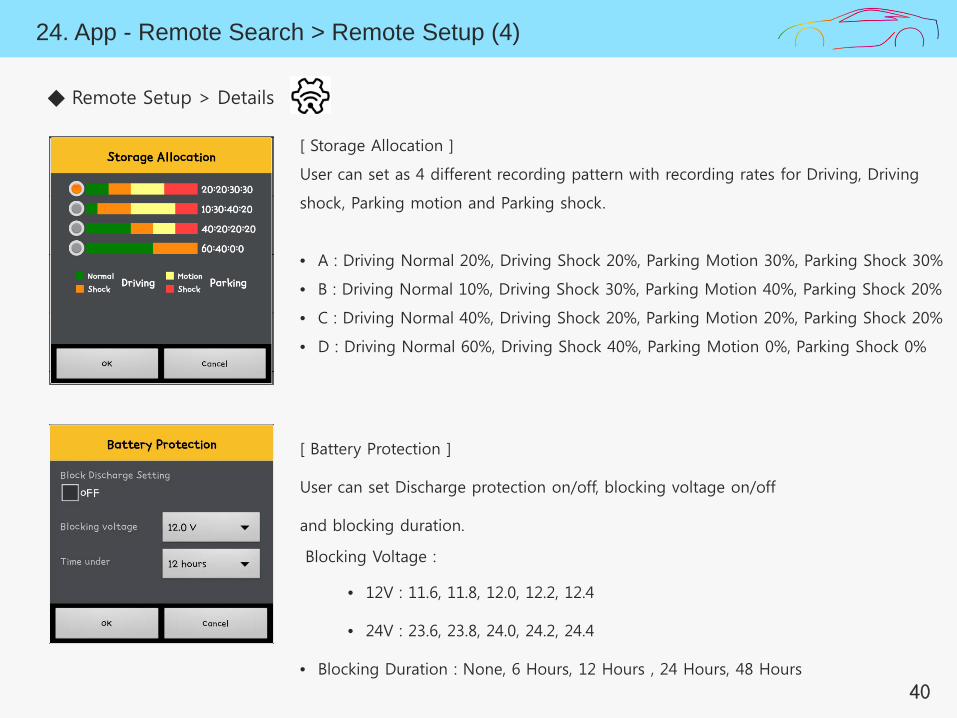
[ Storage Allocation ]
User can set as 4 different recording pattern with recording rates for Driving, Driving
shock, Parking motion and Parking shock.
• A : Driving Normal 20%, Driving Shock 20%, Parking Motion 30%, Parking Shock 30%
• B : Driving Normal 10%, Driving Shock 30%, Parking Motion 40%, Parking Shock 20%
• C : Driving Normal 40%, Driving Shock 20%, Parking Motion 20%, Parking Shock 20%
• D : Driving Normal 60%, Driving Shock 40%, Parking Motion 0%, Parking Shock 0%
[ Battery Protection ]
User can set Discharge protection on/off, blocking voltage on/off
and blocking duration.
Blocking Voltage :
• 12V : 11.6, 11.8, 12.0, 12.2, 12.4
• 24V : 23.6, 23.8, 24.0, 24.2, 24.4
• Blocking Duration : None, 6 Hours, 12 Hours , 24 Hours, 48 Hours
◆ Remote Setup > Details
24. App - Remote Search > Emergency Setup
41
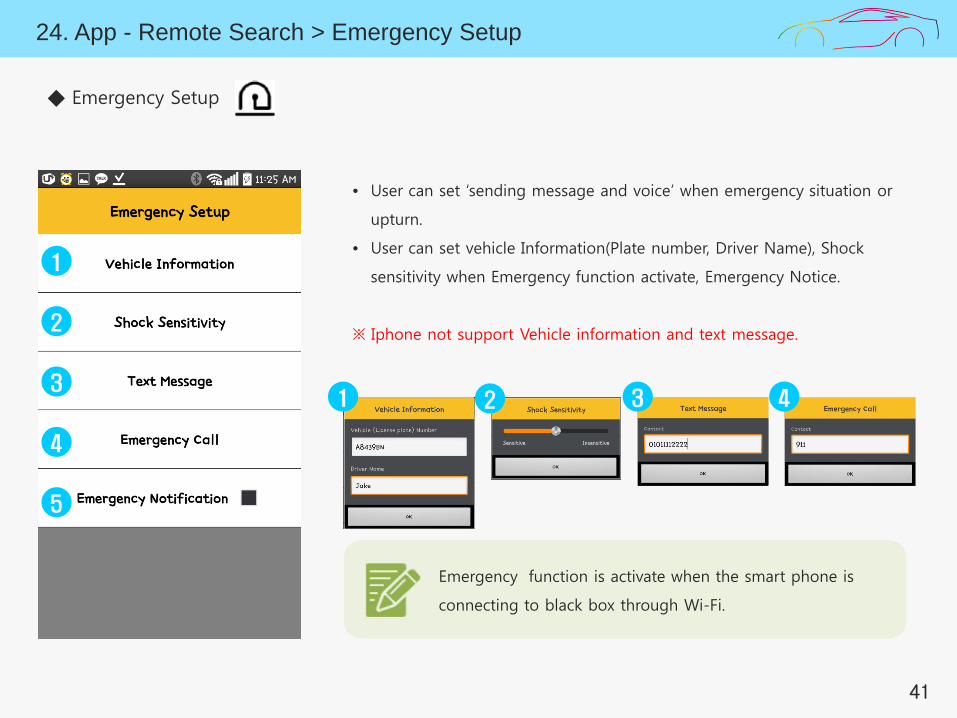
◆ Emergency Setup
1
2
3
4
5
1 2 3 4
Emergency function is activate when the smart phone is
connecting to black box through Wi-Fi.
• User can set ‘sending message and voice’ when emergency situation or
upturn.
• User can set vehicle Information(Plate number, Driver Name), Shock
sensitivity when Emergency function activate, Emergency Notice.
※ Iphone not support Vehicle information and text message.
24. App - Remote Search > Remote SD card Formatting, Firmware Upgrade(Android)
42
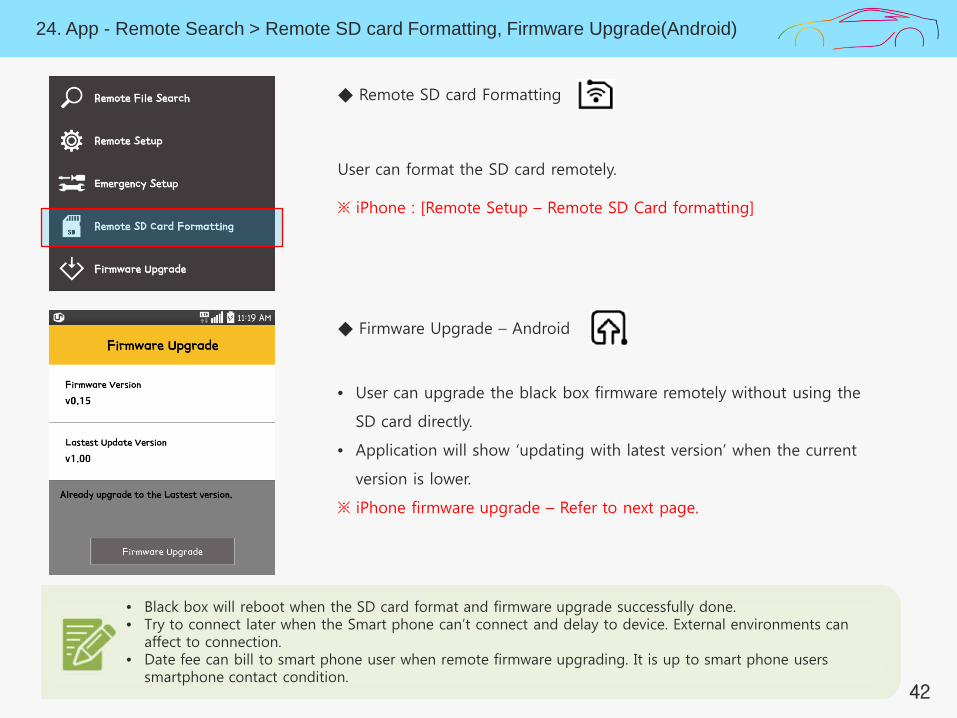
◆ Remote SD card Formatting
User can format the SD card remotely.
※ iPhone : [Remote Setup – Remote SD Card formatting]
◆ Firmware Upgrade – Android
• User can upgrade the black box firmware remotely without using the
SD card directly.
• Application will show ‘updating with latest version’ when the current
version is lower.
※ iPhone firmware upgrade – Refer to next page.
• Black box will reboot when the SD card format and firmware upgrade successfully done. • Try to connect later when the Smart phone can’t connect and delay to device. External environments can
affect to connection. • Date fee can bill to smart phone user when remote firmware upgrading. It is up to smart phone users
smartphone contact condition.
24. App - Remote Search > Firmware Upgrade (iOS)
43
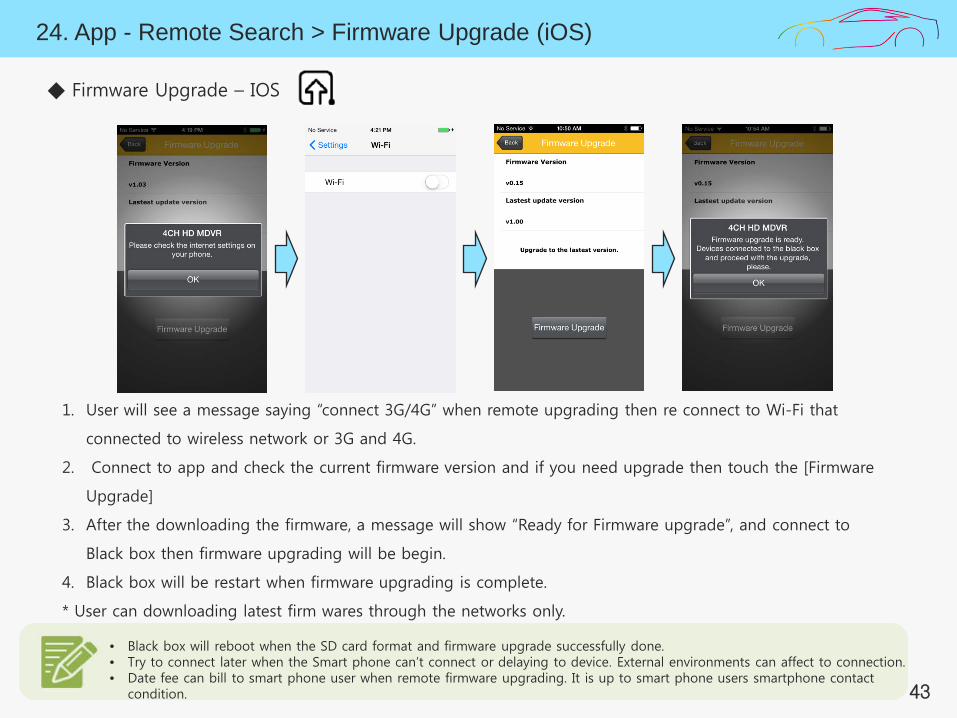
◆ Firmware Upgrade – IOS
1. User will see a message saying “connect 3G/4G” when remote upgrading then re connect to Wi-Fi that
connected to wireless network or 3G and 4G.
2. Connect to app and check the current firmware version and if you need upgrade then touch the [Firmware
Upgrade]
3. After the downloading the firmware, a message will show “Ready for Firmware upgrade”, and connect to
Black box then firmware upgrading will be begin.
4. Black box will be restart when firmware upgrading is complete.
* User can downloading latest firm wares through the networks only.
• Black box will reboot when the SD card format and firmware upgrade successfully done. • Try to connect later when the Smart phone can’t connect or delaying to device. External environments can affect to connection. • Date fee can bill to smart phone user when remote firmware upgrading. It is up to smart phone users smartphone contact
condition.
25. App - Videos in My Phone
44
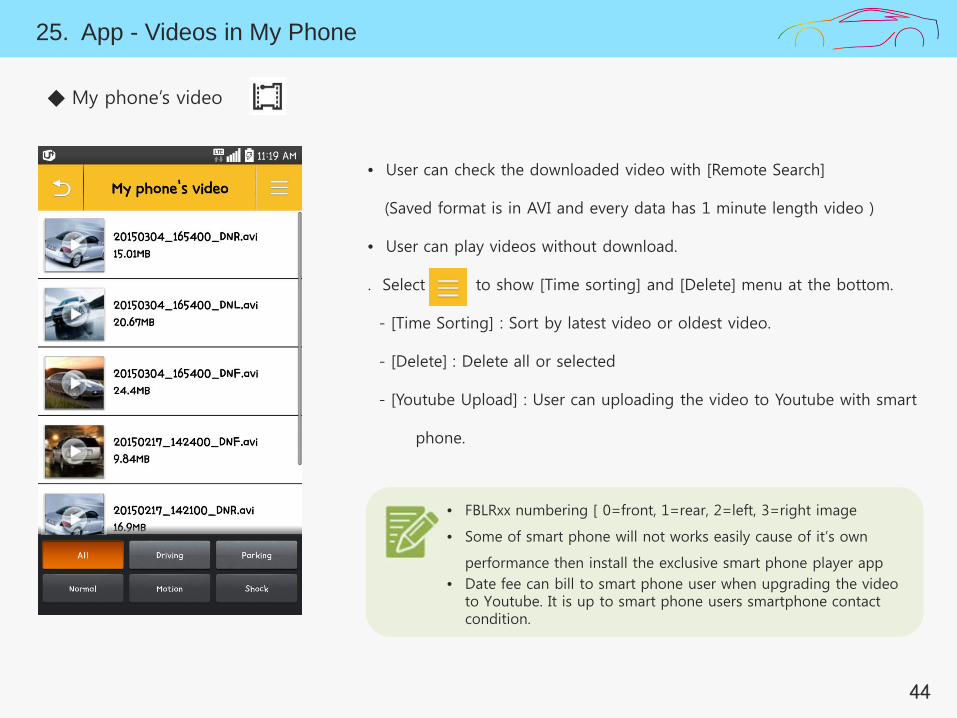
• User can check the downloaded video with [Remote Search]
(Saved format is in AVI and every data has 1 minute length video )
• User can play videos without download.
. Select to show [Time sorting] and [Delete] menu at the bottom.
- [Time Sorting] : Sort by latest video or oldest video.
- [Delete] : Delete all or selected
- [Youtube Upload] : User can uploading the video to Youtube with smart
phone.
◆ My phone’s video
• MDR뒤의 번호가 0=전방, 1=후방, 2=좌측, 3=우측 영상 입니다.
• 일부 스마트폰 기종에서는 영상 재생이 원활하게 작동하지 않을 수
있습니다. 그 경우 스마트폰 전용 플레이어 앱을 설치 후 재생하세요.
• FBLRxx numbering [ 0=front, 1=rear, 2=left, 3=right image
• Some of smart phone will not works easily cause of it’s own
performance then install the exclusive smart phone player app • Date fee can bill to smart phone user when upgrading the video
to Youtube. It is up to smart phone users smartphone contact condition.
26. App - Screenshot
45
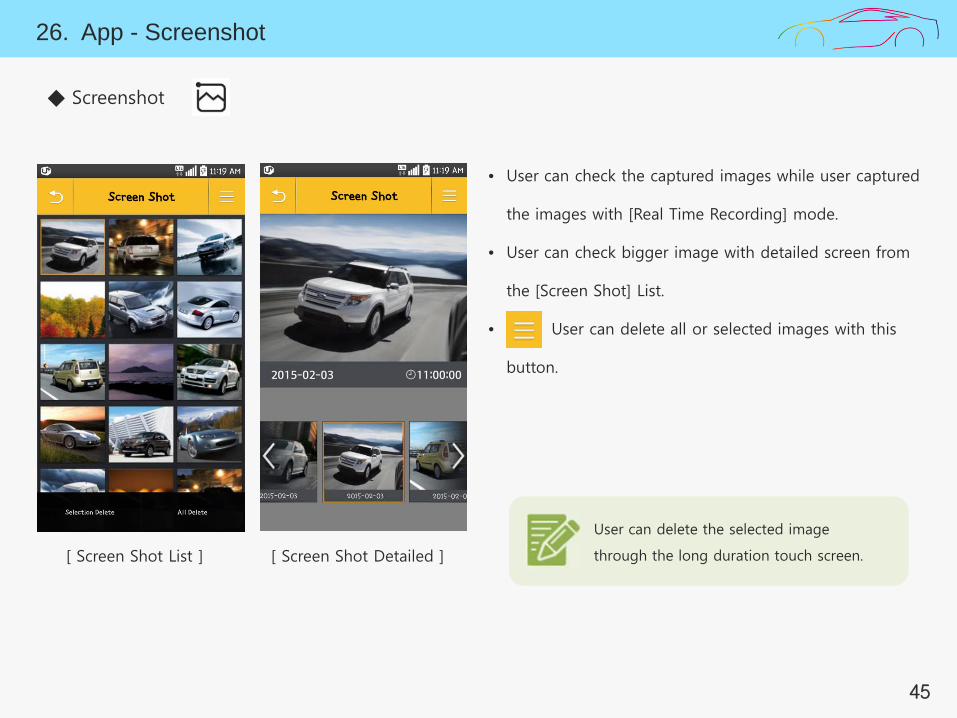
• User can check the captured images while user captured
the images with [Real Time Recording] mode.
• User can check bigger image with detailed screen from
the [Screen Shot] List.
• User can delete all or selected images with this
button.
◆ Screenshot
User can delete the selected image
through the long duration touch screen. [ Screen Shot List ] [ Screen Shot Detailed ]
27. App - Settings
46
◆ Settings
1
2
3
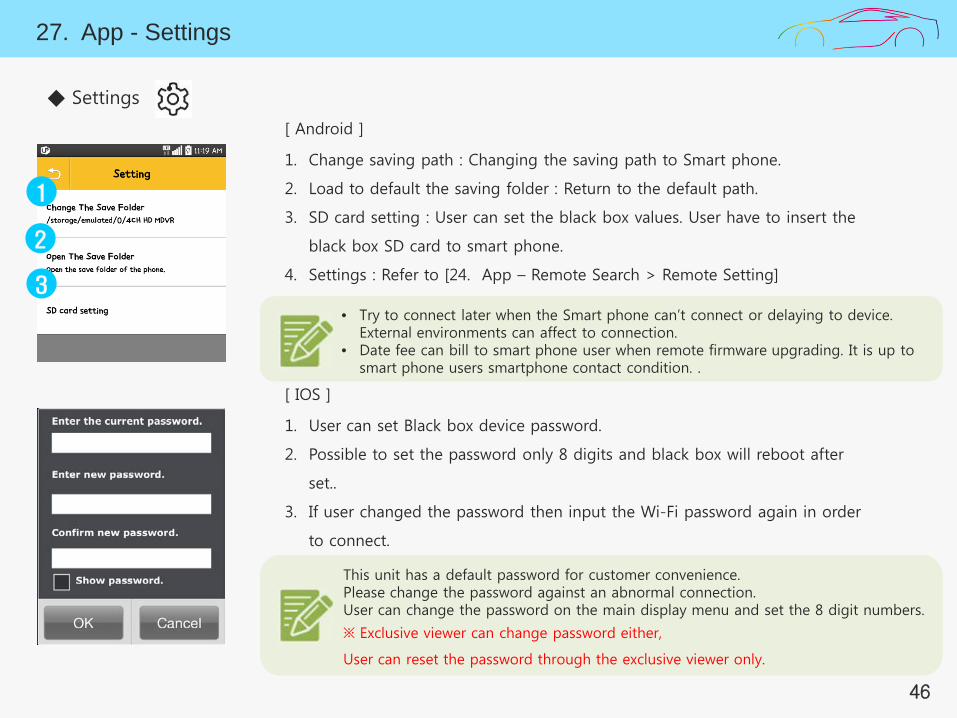
[ Android ]
1. Change saving path : Changing the saving path to Smart phone.
2. Load to default the saving folder : Return to the default path.
3. SD card setting : User can set the black box values. User have to insert the
black box SD card to smart phone.
4. Settings : Refer to [24. App – Remote Search > Remote Setting]
[ IOS ]
1. User can set Black box device password.
2. Possible to set the password only 8 digits and black box will reboot after
set..
3. If user changed the password then input the Wi-Fi password again in order
to connect.
• Try to connect later when the Smart phone can’t connect or delaying to device. External environments can affect to connection.
• Date fee can bill to smart phone user when remote firmware upgrading. It is up to smart phone users smartphone contact condition. .
This unit has a default password for customer convenience. Please change the password against an abnormal connection. User can change the password on the main display menu and set the 8 digit numbers.
※ Exclusive viewer can change password either,
User can reset the password through the exclusive viewer only.
28. App - SD Card via OTG on Android phones
47
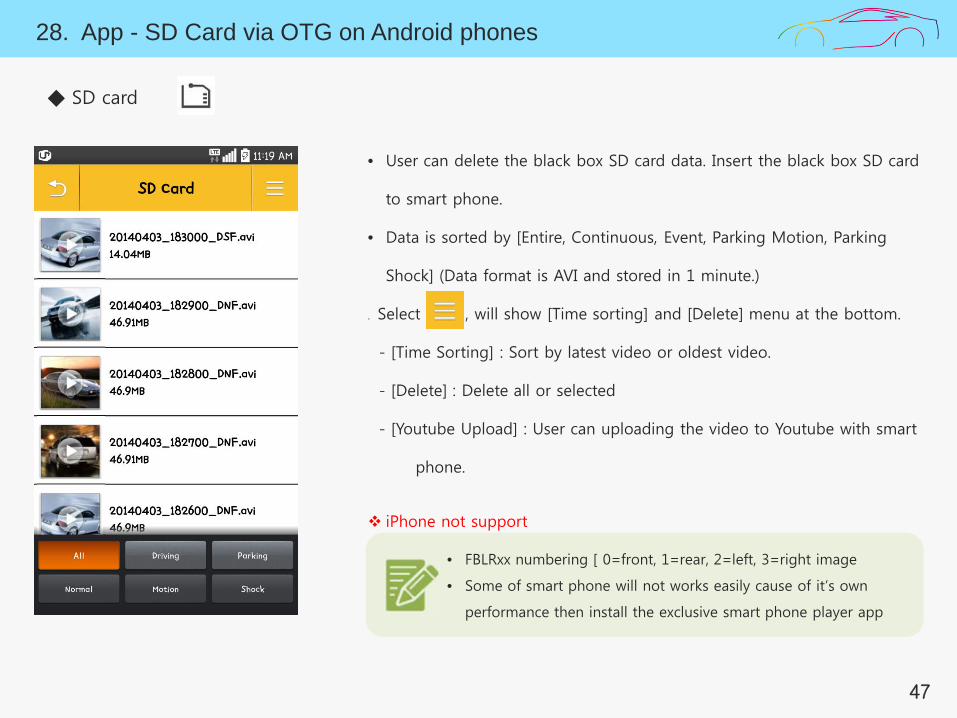
• User can delete the black box SD card data. Insert the black box SD card
to smart phone.
• Data is sorted by [Entire, Continuous, Event, Parking Motion, Parking
Shock] (Data format is AVI and stored in 1 minute.)
. Select , will show [Time sorting] and [Delete] menu at the bottom.
- [Time Sorting] : Sort by latest video or oldest video.
- [Delete] : Delete all or selected
- [Youtube Upload] : User can uploading the video to Youtube with smart
phone.
iPhone not support
◆ SD card
• MDR뒤의 번호가 0=전방, 1=후방, 2=좌측, 3=우측 영상 입니다.
• 일부 스마트폰 기종에서는 영상 재생이 원활하게 작동하지 않을 수
있습니다. 그 경우 스마트폰 전용 플레이어 앱을 설치 후 재생하세요.
• FBLRxx numbering [ 0=front, 1=rear, 2=left, 3=right image
• Some of smart phone will not works easily cause of it’s own
performance then install the exclusive smart phone player app
29. App - Information
48
• User can check current app version.
◆ Information
49
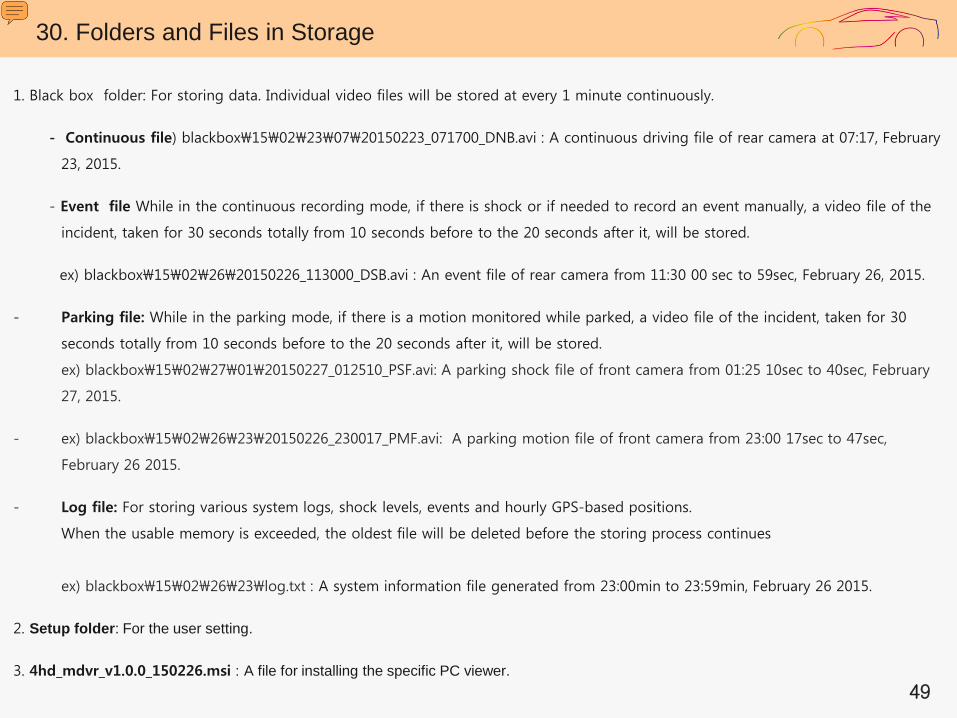
1. Black box folder: For storing data. Individual video files will be stored at every 1 minute continuously.
- Continuous file) blackbox\15\02\23\07\20150223_071700_DNB.avi : A continuous driving file of rear camera at 07:17, February
23, 2015.
- Event file While in the continuous recording mode, if there is shock or if needed to record an event manually, a video file of the
incident, taken for 30 seconds totally from 10 seconds before to the 20 seconds after it, will be stored.
ex) blackbox\15\02\26\20150226_113000_DSB.avi : An event file of rear camera from 11:30 00 sec to 59sec, February 26, 2015.
- Parking file: While in the parking mode, if there is a motion monitored while parked, a video file of the incident, taken for 30
seconds totally from 10 seconds before to the 20 seconds after it, will be stored.
ex) blackbox\15\02\27\01\20150227_012510_PSF.avi: A parking shock file of front camera from 01:25 10sec to 40sec, February
27, 2015.
- ex) blackbox\15\02\26\23\20150226_230017_PMF.avi: A parking motion file of front camera from 23:00 17sec to 47sec,
February 26 2015.
- Log file: For storing various system logs, shock levels, events and hourly GPS-based positions.
When the usable memory is exceeded, the oldest file will be deleted before the storing process continues
ex) blackbox\15\02\26\23\log.txt : A system information file generated from 23:00min to 23:59min, February 26 2015.
2. Setup folder: For the user setting.
3. 4hd_mdvr_v1.0.0_150226.msi : A file for installing the specific PC viewer.
30. Folders and Files in Storage
50
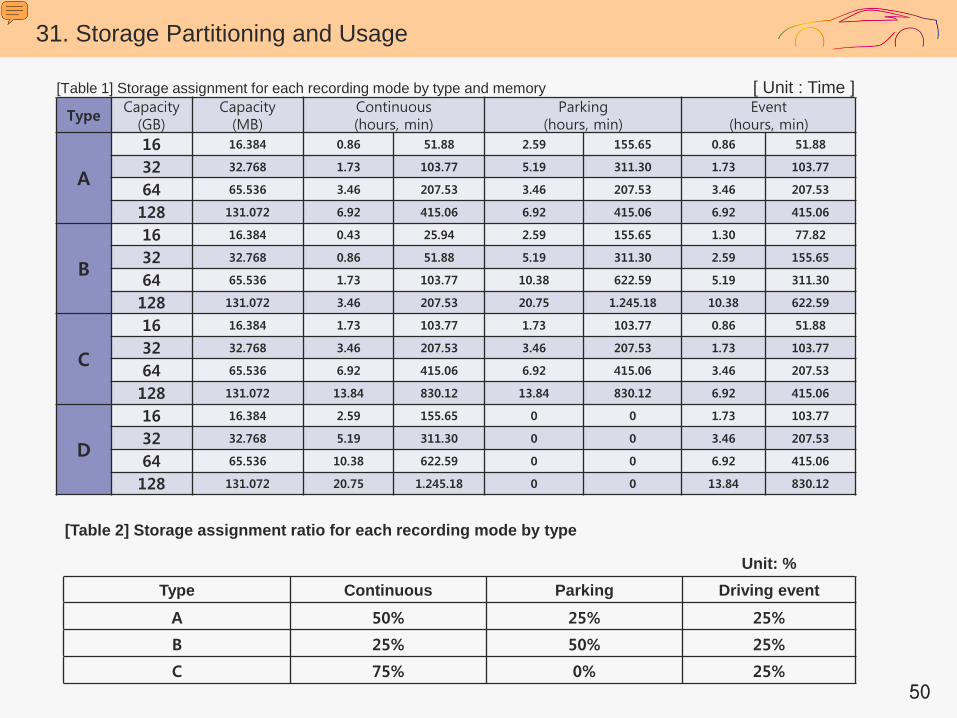
[Table 2] Storage assignment ratio for each recording mode by type
Unit: % Type Continuous Parking Driving event
A 50% 25% 25%
B 25% 50% 25%
C 75% 0% 25%
31. Storage Partitioning and Usage
[Table 1] Storage assignment for each recording mode by type and memory [ Unit : Time ] Type Capacity
(GB) Capacity
(MB) Continuous (hours, min)
Parking (hours, min)
Event (hours, min)
A
16 16.384 0.86 51.88 2.59 155.65 0.86 51.88
32 32.768 1.73 103.77 5.19 311.30 1.73 103.77
64 65.536 3.46 207.53 3.46 207.53 3.46 207.53
128 131.072 6.92 415.06 6.92 415.06 6.92 415.06
B
16 16.384 0.43 25.94 2.59 155.65 1.30 77.82
32 32.768 0.86 51.88 5.19 311.30 2.59 155.65
64 65.536 1.73 103.77 10.38 622.59 5.19 311.30
128 131.072 3.46 207.53 20.75 1.245.18 10.38 622.59
C
16 16.384 1.73 103.77 1.73 103.77 0.86 51.88
32 32.768 3.46 207.53 3.46 207.53 1.73 103.77
64 65.536 6.92 415.06 6.92 415.06 3.46 207.53
128 131.072 13.84 830.12 13.84 830.12 6.92 415.06
D
16 16.384 2.59 155.65 0 0 1.73 103.77
32 32.768 5.19 311.30 0 0 3.46 207.53
64 65.536 10.38 622.59 0 0 6.92 415.06
128 131.072 20.75 1.245.18 0 0 13.84 830.12
51
32. Pin Assignment of Plugs
1 2 3
1 2 3 4
1
2
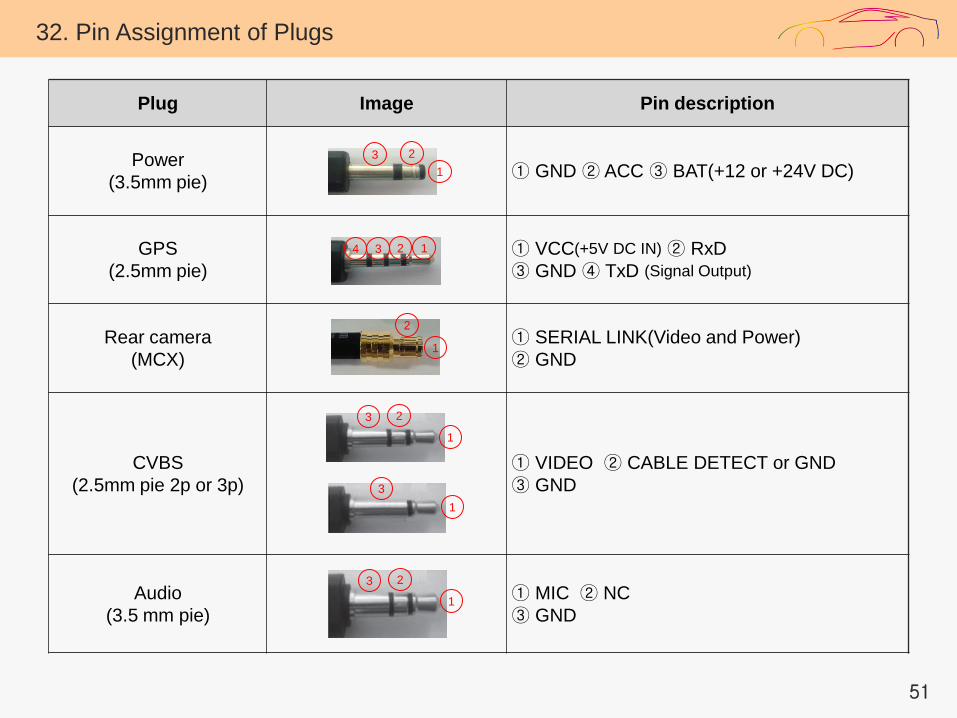
Plug Image Pin description
Power (3.5mm pie) ① GND ② ACC ③ BAT(+12 or +24V DC)
GPS (2.5mm pie) ① VCC(+5V DC IN) ② RxD
③ GND ④ TxD (Signal Output)
Rear camera (MCX)
① SERIAL LINK(Video and Power) ② GND
CVBS (2.5mm pie 2p or 3p)
① VIDEO ② CABLE DETECT or GND ③ GND
Audio (3.5 mm pie)
① MIC ② NC ③ GND
1
2 3
1 3
1
2 3
52
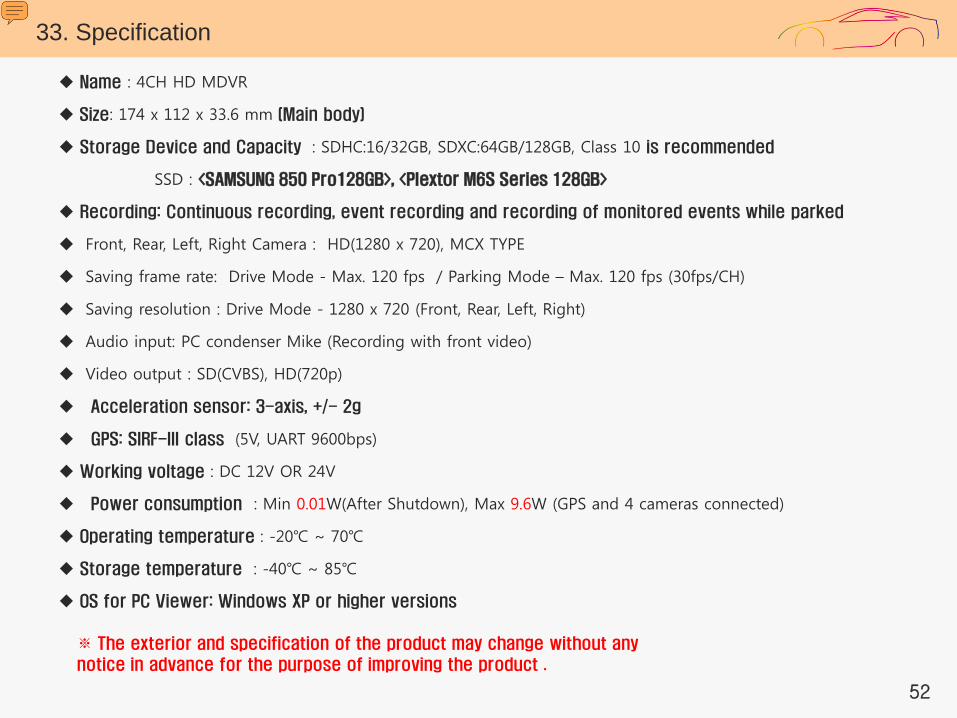
Name : 4CH HD MDVR
Size: 174 x 112 x 33.6 mm (Main body)
Storage Device and Capacity : SDHC:16/32GB, SDXC:64GB/128GB, Class 10 is recommended
SSD : <SAMSUNG 850 Pro128GB>, <Plextor M6S Series 128GB>
Recording: Continuous recording, event recording and recording of monitored events while parked
Front, Rear, Left, Right Camera : HD(1280 x 720), MCX TYPE
Saving frame rate: Drive Mode - Max. 120 fps / Parking Mode – Max. 120 fps (30fps/CH)
Saving resolution : Drive Mode - 1280 x 720 (Front, Rear, Left, Right)
Audio input: PC condenser Mike (Recording with front video)
Video output : SD(CVBS), HD(720p)
Acceleration sensor: 3-axis, +/- 2g
GPS: SIRF-III class (5V, UART 9600bps)
Working voltage : DC 12V OR 24V
Power consumption : Min 0.01W(After Shutdown), Max 9.6W (GPS and 4 cameras connected)
Operating temperature : -20℃ ~ 70℃
Storage temperature : -40℃ ~ 85℃
OS for PC Viewer: Windows XP or higher versions
33. Specification
※ The exterior and specification of the product may change without any
notice in advance for the purpose of improving the product .

53
34. Warranty
The warranty service will be provided based on what is described in the warranty.
The warranty period will be calculated from the purchased date, so, users must provide purchased date info and receipt.
Refer to the ‘consumer compensation regulations’ for more details of the warranty service.
If replacement is required, all the replacement parts will be new or refurbished similar
Manufacturer is not responsible for repairing or replacing until a defective product is returned. (No Refunds will be given)
Users are required to keep the warranty and the product serial number as they will not to be reissued.
Be careful about copy products as the company does not provide services for the products that are not authentic.
The product warranty period is 1 year. Except for the main body, separate warranty periods will be applied for ancillary components and expendable items.
Product warranty Product name 4CH HD MDVR
Manufacturing No.
Warranty period 1 year from the purchased date of
Customer Name Contact
Address
Sold by Name of the shop Contact
Address
54
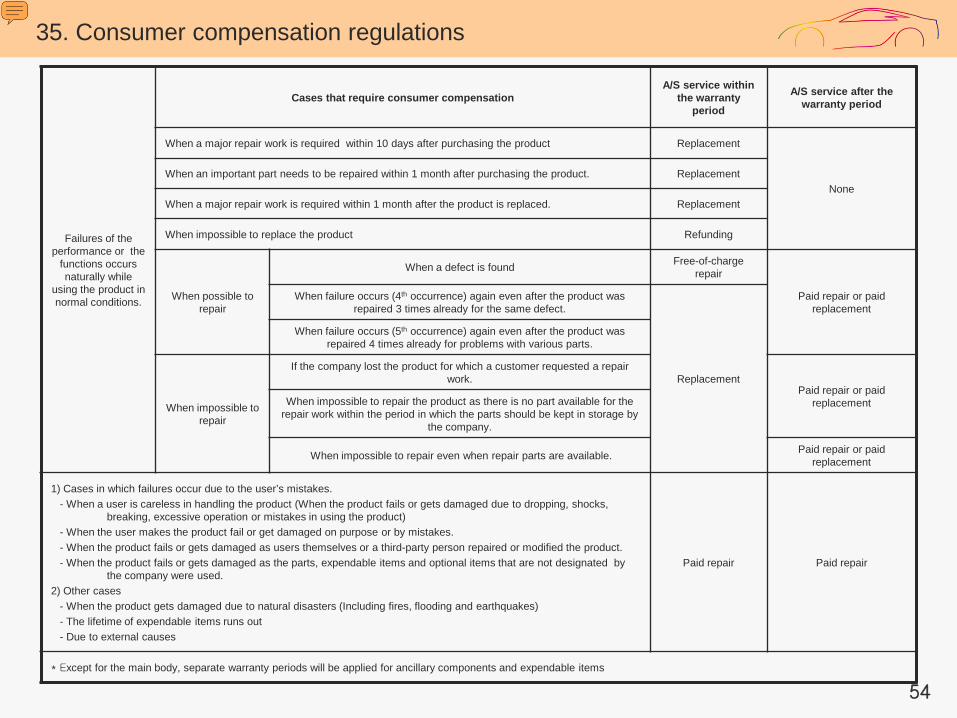
35. Consumer compensation regulations
Failures of the performance or the
functions occurs naturally while
using the product in normal conditions.
Cases that require consumer compensation A/S service within
the warranty period
A/S service after the warranty period
When a major repair work is required within 10 days after purchasing the product Replacement
None When an important part needs to be repaired within 1 month after purchasing the product. Replacement
When a major repair work is required within 1 month after the product is replaced. Replacement
When impossible to replace the product Refunding
When possible to repair
When a defect is found Free-of-charge repair
Paid repair or paid replacement
When failure occurs (4th occurrence) again even after the product was repaired 3 times already for the same defect.
Replacement
When failure occurs (5th occurrence) again even after the product was repaired 4 times already for problems with various parts.
When impossible to repair
If the company lost the product for which a customer requested a repair work.
Paid repair or paid replacement When impossible to repair the product as there is no part available for the
repair work within the period in which the parts should be kept in storage by the company.
When impossible to repair even when repair parts are available. Paid repair or paid replacement
1) Cases in which failures occur due to the user’s mistakes. - When a user is careless in handling the product (When the product fails or gets damaged due to dropping, shocks,
breaking, excessive operation or mistakes in using the product) - When the user makes the product fail or get damaged on purpose or by mistakes. - When the product fails or gets damaged as users themselves or a third-party person repaired or modified the product. - When the product fails or gets damaged as the parts, expendable items and optional items that are not designated by
the company were used. 2) Other cases - When the product gets damaged due to natural disasters (Including fires, flooding and earthquakes) - The lifetime of expendable items runs out - Due to external causes
Paid repair Paid repair
* Except for the main body, separate warranty periods will be applied for ancillary components and expendable items
55
Users should back up (Separate saving) periodically important. It is important to note that during
Customer Service all data may delete. Customer Service is not responsible for any lost data during
service.
When sending package to Customer Service, please make sure to indicate “fragile” on the box and
request special care to prevent undesired damage during shipment. Manufacturer is NOT responsible
for damages that occur during shipment.
Users are recommended to write down their names, addresses, contacts and contents of defect, to
help us facilitate the repairing process.
36. Before calling Customer Service
56
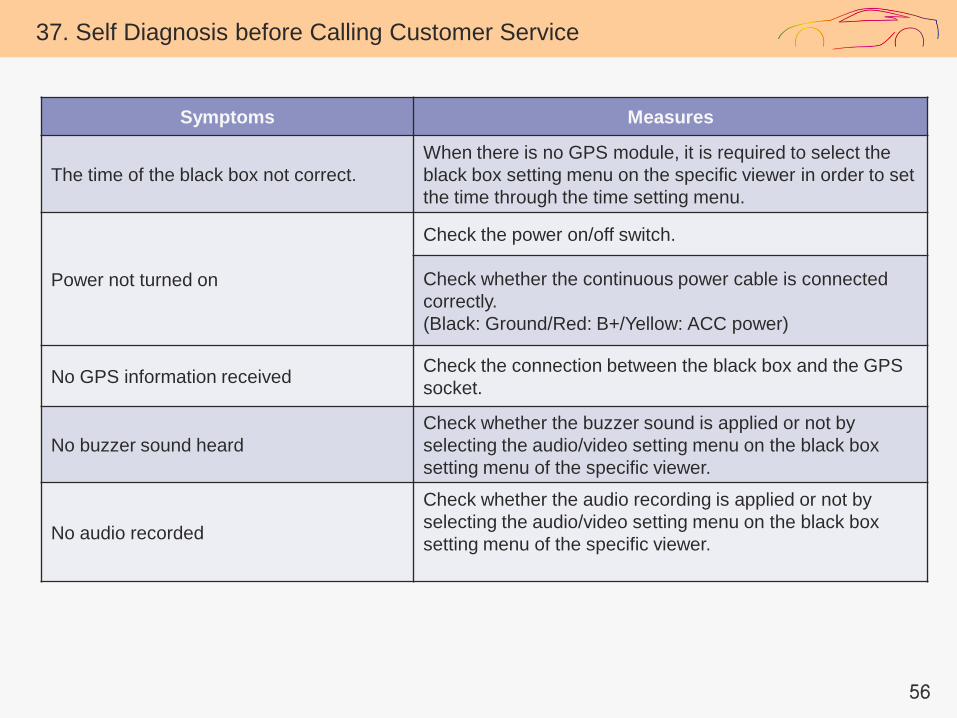
37. Self Diagnosis before Calling Customer Service
Symptoms Measures
The time of the black box not correct. When there is no GPS module, it is required to select the black box setting menu on the specific viewer in order to set the time through the time setting menu.
Power not turned on
Check the power on/off switch.
Check whether the continuous power cable is connected correctly. (Black: Ground/Red: B+/Yellow: ACC power)
No GPS information received Check the connection between the black box and the GPS socket.
No buzzer sound heard Check whether the buzzer sound is applied or not by selecting the audio/video setting menu on the black box setting menu of the specific viewer.
No audio recorded
Check whether the audio recording is applied or not by selecting the audio/video setting menu on the black box setting menu of the specific viewer.