Embed Size (px)
Citation preview
483 Tutorial STK/ Operations
Sara Spangelo, March 27-28, 2012

What did you guys want to learn?
Basically everything… so I’ll do my best to cover as much as possible!
0
10
20
30
40
50
60
70
80
90
100
Per
cen
tra
ge
of
Su
rvey
Res
ult
s
STK Skill
Yes + Absolutely
Needed for Project 2
Survey Results:
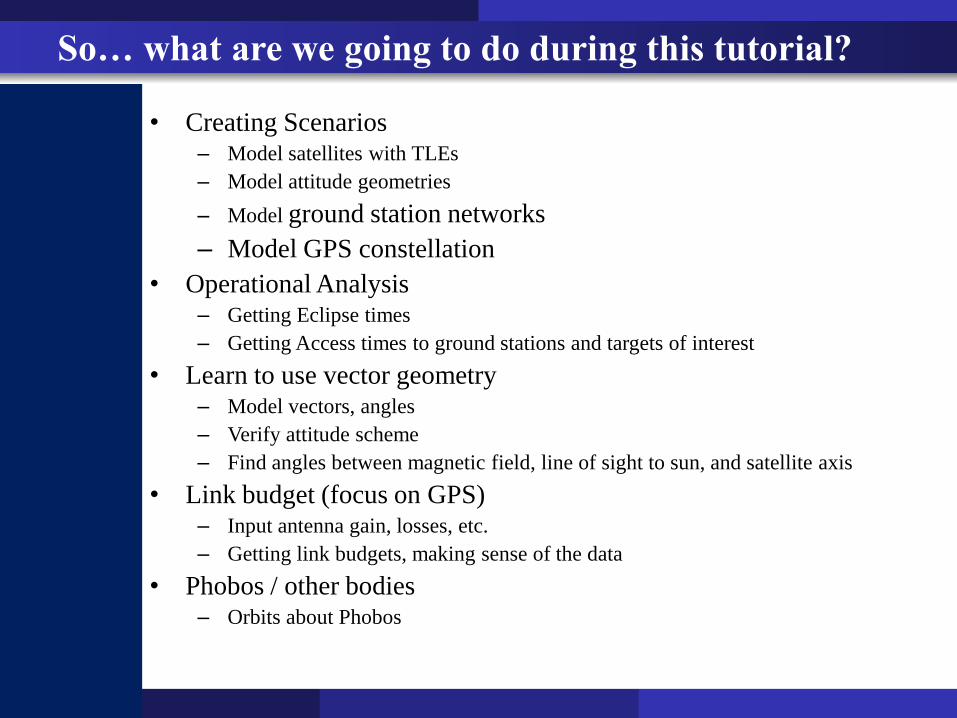
So… what are we going to do during this tutorial?
• Creating Scenarios – Model satellites with TLEs
– Model attitude geometries
– Model ground station networks
– Model GPS constellation
• Operational Analysis – Getting Eclipse times
– Getting Access times to ground stations and targets of interest
• Learn to use vector geometry – Model vectors, angles
– Verify attitude scheme
– Find angles between magnetic field, line of sight to sun, and satellite axis
• Link budget (focus on GPS) – Input antenna gain, losses, etc.
– Getting link budgets, making sense of the data
• Phobos / other bodies – Orbits about Phobos
So… what are we going to do during this tutorial?
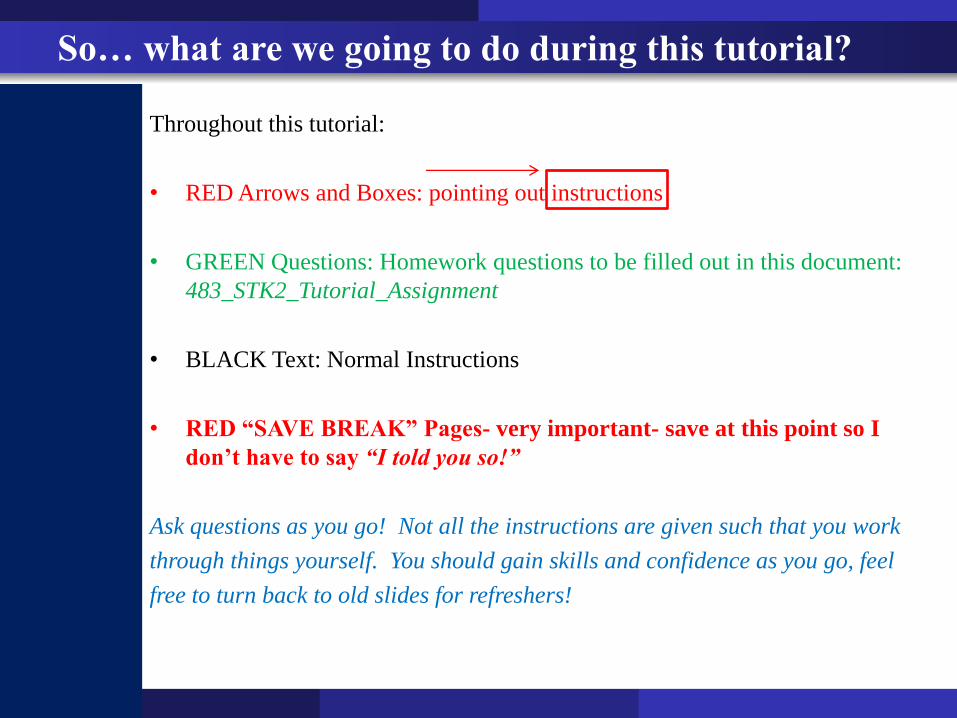
Throughout this tutorial:
• RED Arrows and Boxes: pointing out instructions
• GREEN Questions: Homework questions to be filled out in this document:
483_STK2_Tutorial_Assignment
• BLACK Text: Normal Instructions
• RED “SAVE BREAK” Pages- very important- save at this point so I
don’t have to say “I told you so!”
Ask questions as you go! Not all the instructions are given such that you work
through things yourself. You should gain skills and confidence as you go, feel
free to turn back to old slides for refreshers!
Intro
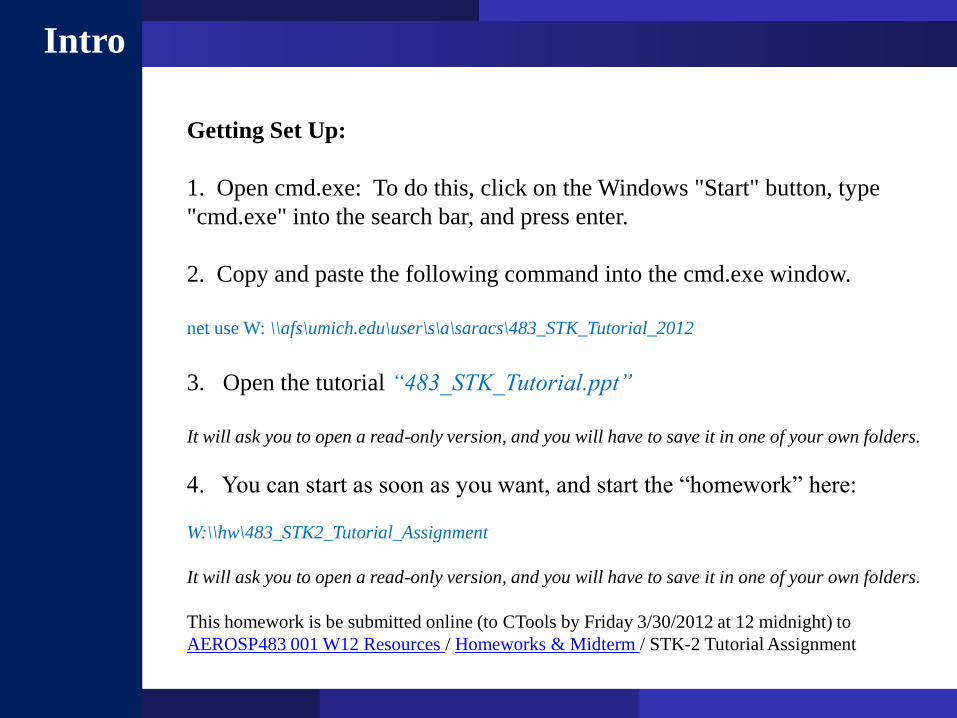
Getting Set Up:
1. Open cmd.exe: To do this, click on the Windows "Start" button, type
"cmd.exe" into the search bar, and press enter.
2. Copy and paste the following command into the cmd.exe window.
net use W: \\afs\umich.edu\user\s\a\saracs\483_STK_Tutorial_2012
3. Open the tutorial “483_STK_Tutorial.ppt”
It will ask you to open a read-only version, and you will have to save it in one of your own folders.
4. You can start as soon as you want, and start the “homework” here:
W:\\hw\483_STK2_Tutorial_Assignment
It will ask you to open a read-only version, and you will have to save it in one of your own folders.
This homework is be submitted online (to CTools by Friday 3/30/2012 at 12 midnight) to
AEROSP483 001 W12 Resources / Homeworks & Midterm / STK-2 Tutorial Assignment
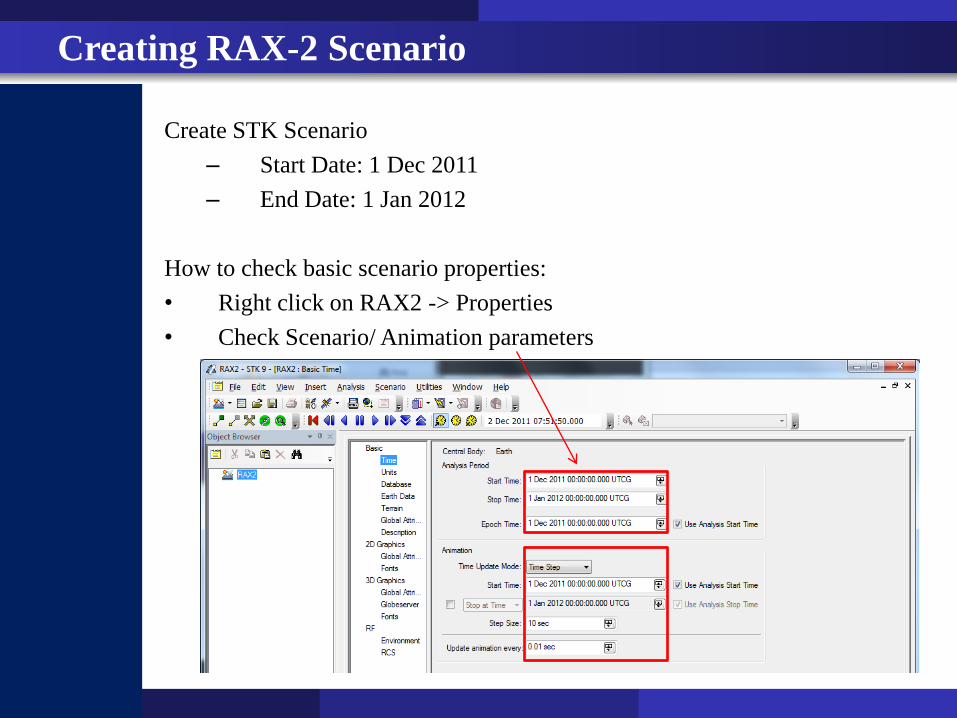
Create STK Scenario
– Start Date: 1 Dec 2011
– End Date: 1 Jan 2012
How to check basic scenario properties:
• Right click on RAX2 -> Properties
• Check Scenario/ Animation parameters
Creating RAX-2 Scenario

Input RAX-2 Satellite:
– Insert: New Satellite
– Define Properties
Creating RAX-2 Scenario
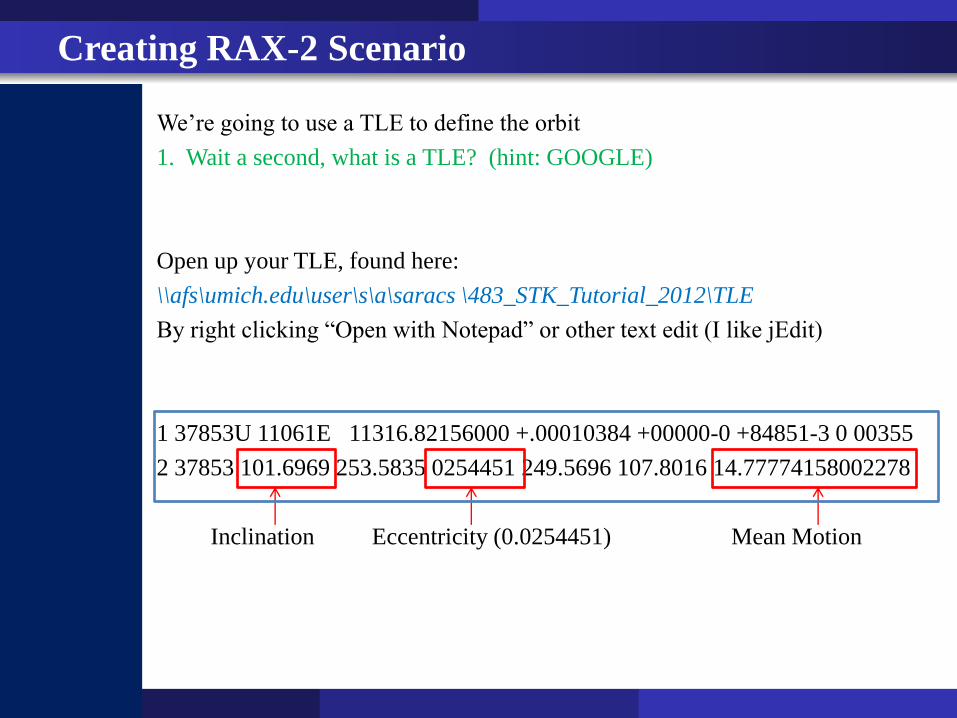
We’re going to use a TLE to define the orbit
1. Wait a second, what is a TLE? (hint: GOOGLE)
Open up your TLE, found here:
\\afs\umich.edu\user\s\a\saracs \483_STK_Tutorial_2012\TLE
By right clicking “Open with Notepad” or other text edit (I like jEdit)
1 37853U 11061E 11316.82156000 +.00010384 +00000-0 +84851-3 0 00355
2 37853 101.6969 253.5835 0254451 249.5696 107.8016 14.77774158002278
Inclination Eccentricity (0.0254451) Mean Motion
Creating RAX-2 Scenario
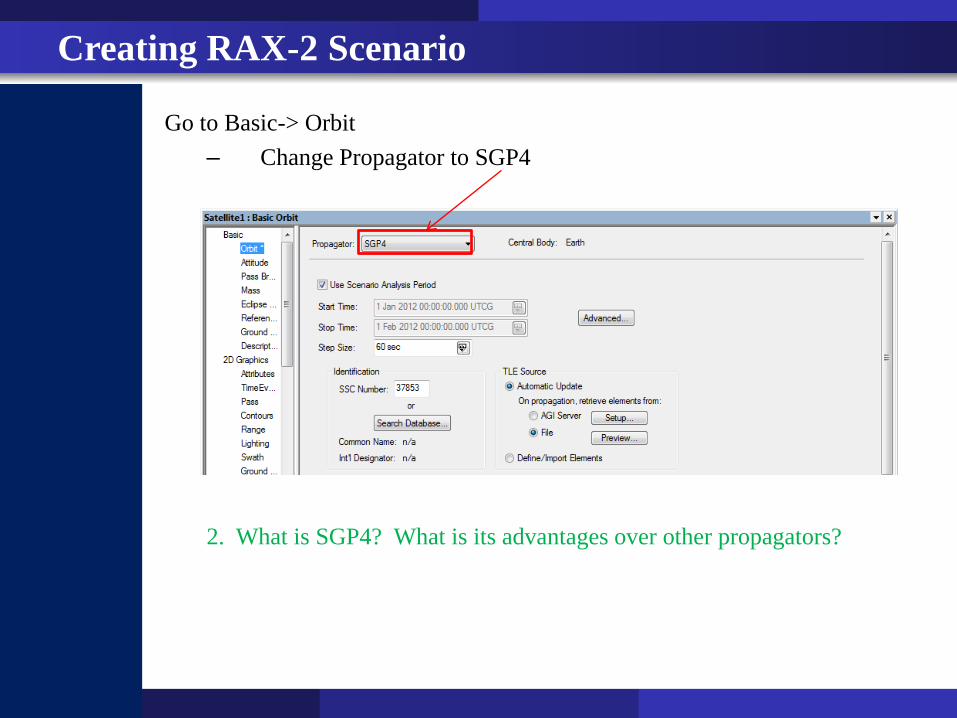
Go to Basic-> Orbit
– Change Propagator to SGP4
2. What is SGP4? What is its advantages over other propagators?
Creating RAX-2 Scenario
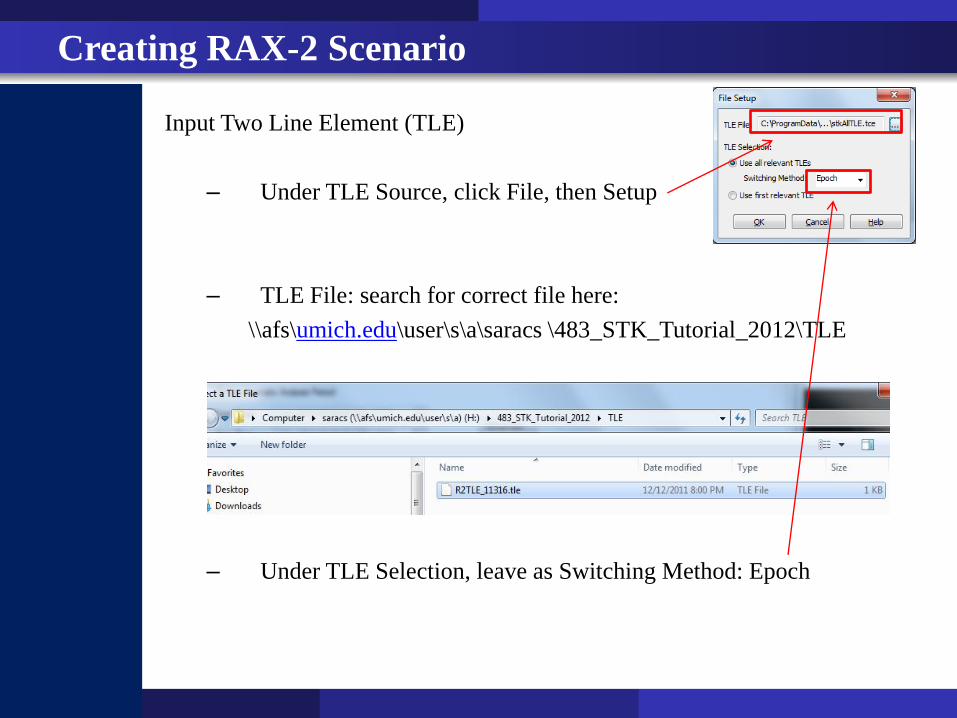
Input Two Line Element (TLE)
– Under TLE Source, click File, then Setup
– TLE File: search for correct file here:
\\afs\umich.edu\user\s\a\saracs \483_STK_Tutorial_2012\TLE
– Under TLE Selection, leave as Switching Method: Epoch
Creating RAX-2 Scenario
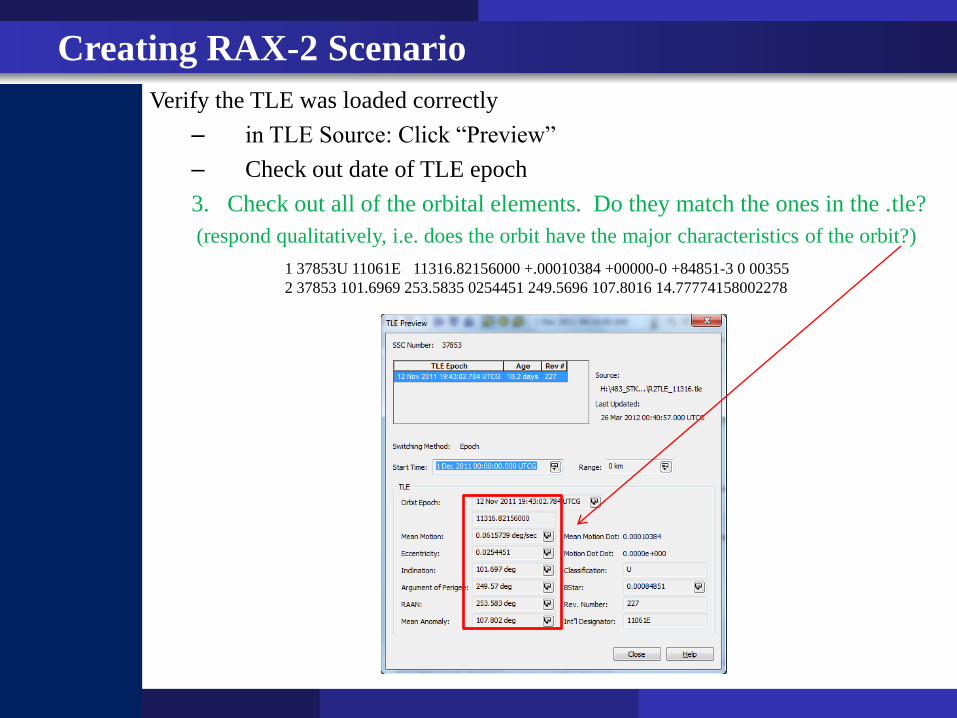
Verify the TLE was loaded correctly
– in TLE Source: Click “Preview”
– Check out date of TLE epoch
3. Check out all of the orbital elements. Do they match the ones in the .tle?
(respond qualitatively, i.e. does the orbit have the major characteristics of the orbit?)
Creating RAX-2 Scenario
1 37853U 11061E 11316.82156000 +.00010384 +00000-0 +84851-3 0 00355
2 37853 101.6969 253.5835 0254451 249.5696 107.8016 14.77774158002278
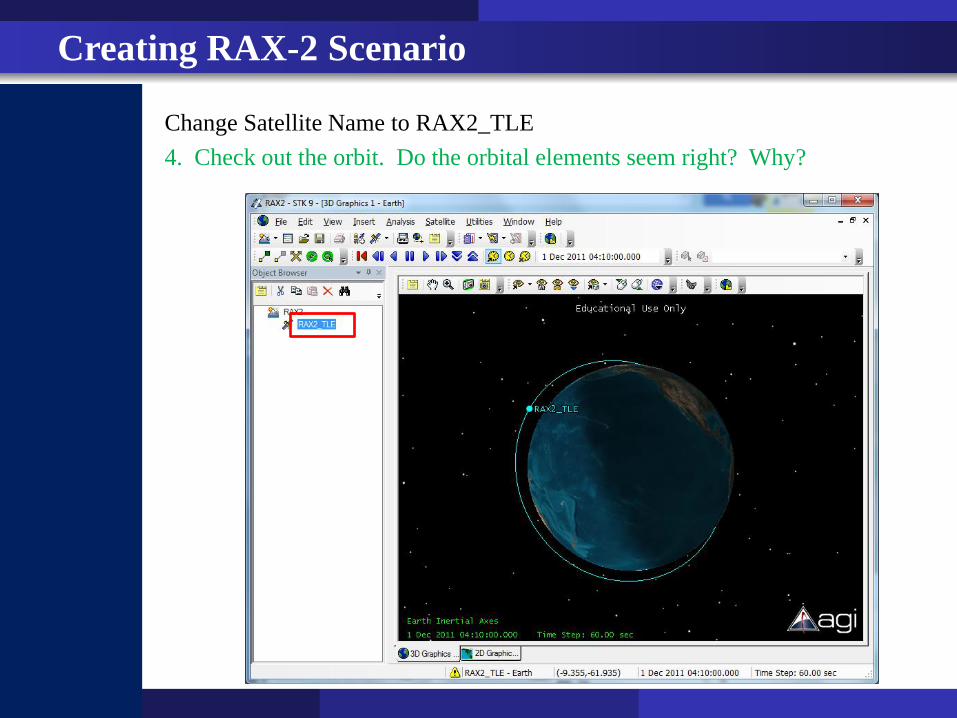
Change Satellite Name to RAX2_TLE
4. Check out the orbit. Do the orbital elements seem right? Why?
Creating RAX-2 Scenario
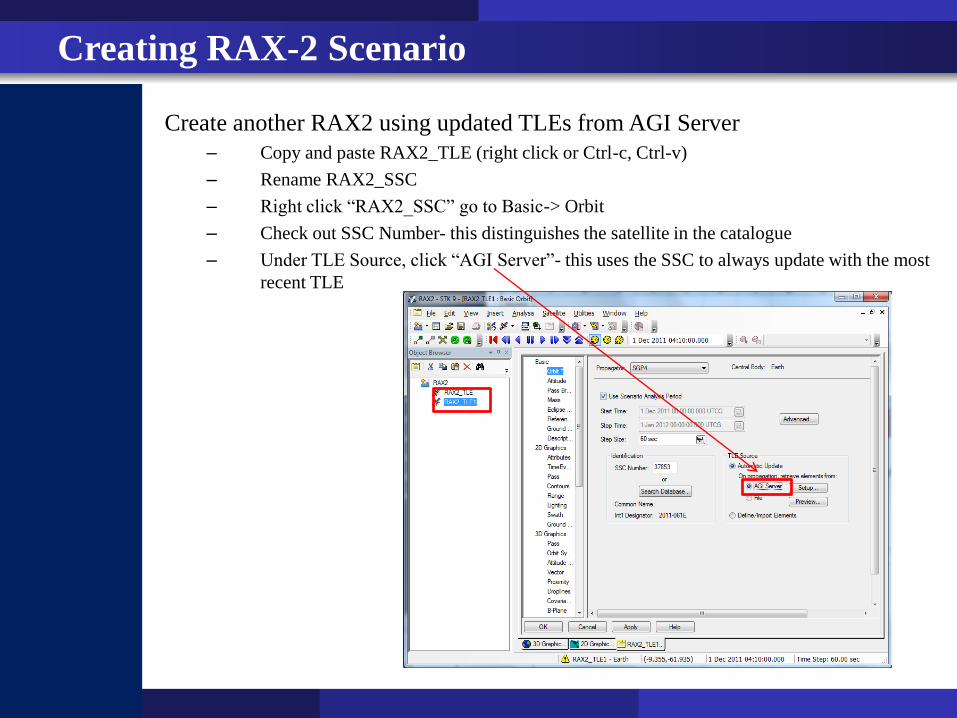
Create another RAX2 using updated TLEs from AGI Server
– Copy and paste RAX2_TLE (right click or Ctrl-c, Ctrl-v)
– Rename RAX2_SSC
– Right click “RAX2_SSC” go to Basic-> Orbit
– Check out SSC Number- this distinguishes the satellite in the catalogue
– Under TLE Source, click “AGI Server”- this uses the SSC to always update with the most
recent TLE
Creating RAX-2 Scenario
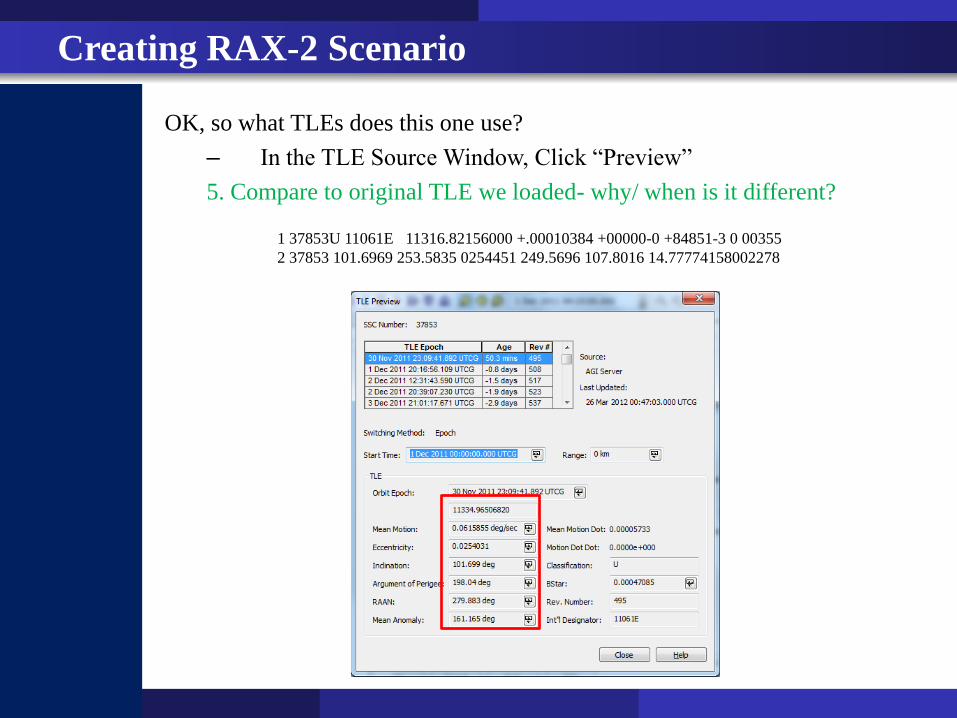
OK, so what TLEs does this one use?
– In the TLE Source Window, Click “Preview”
5. Compare to original TLE we loaded- why/ when is it different?
Creating RAX-2 Scenario
1 37853U 11061E 11316.82156000 +.00010384 +00000-0 +84851-3 0 00355
2 37853 101.6969 253.5835 0254451 249.5696 107.8016 14.77774158002278
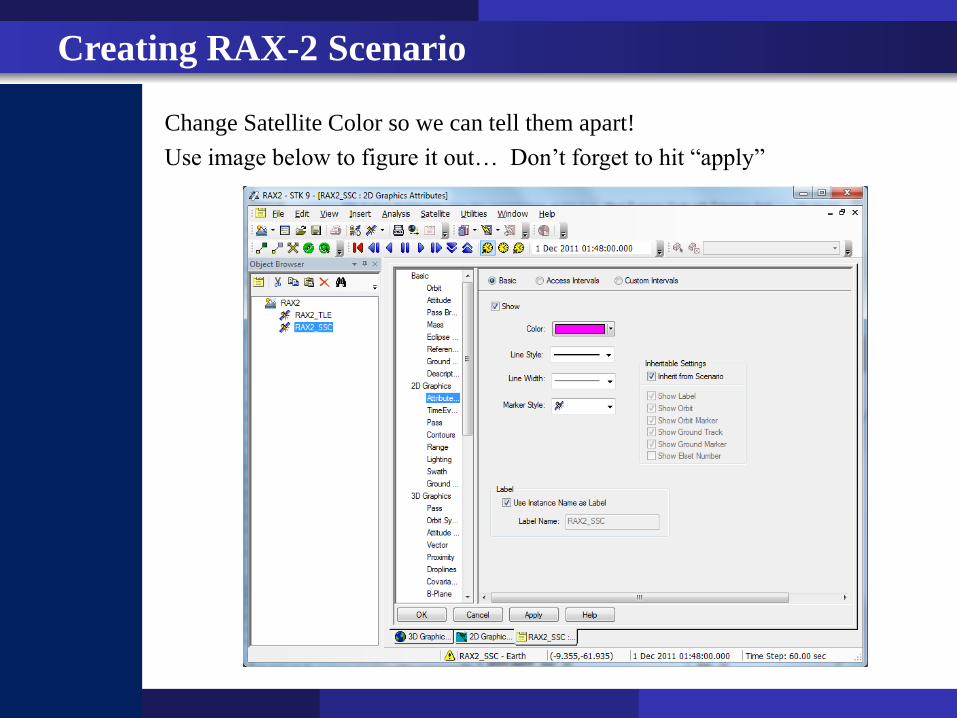
Change Satellite Color so we can tell them apart!
Use image below to figure it out… Don’t forget to hit “apply”
Creating RAX-2 Scenario
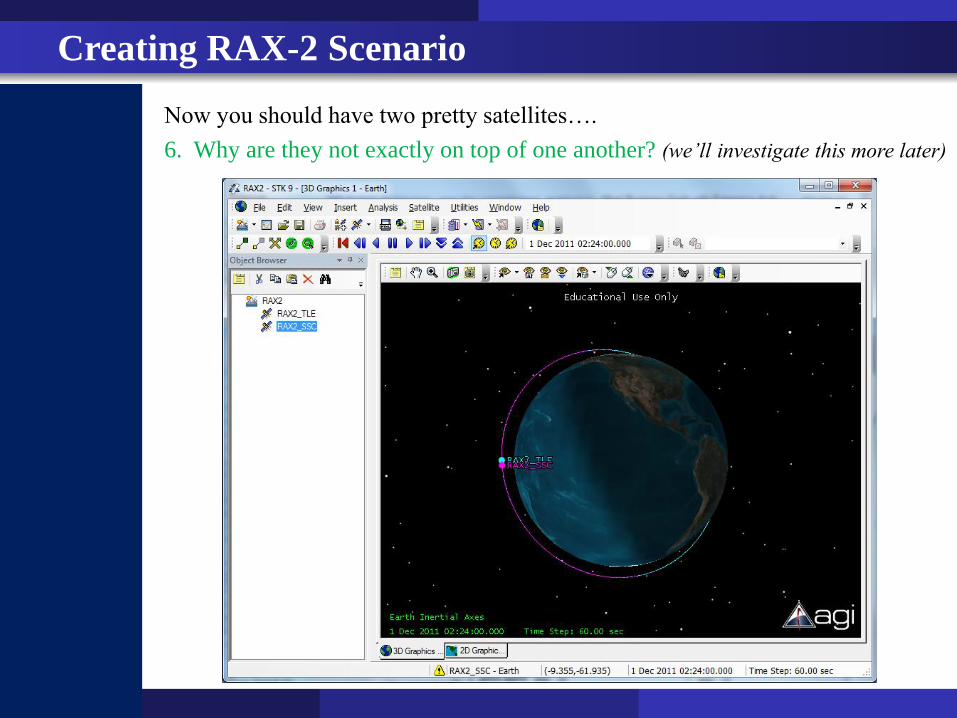
Now you should have two pretty satellites….
6. Why are they not exactly on top of one another? (we’ll investigate this more later)
Creating RAX-2 Scenario
We’ve done a lot of hard work….
SAVE BREAK
Creating RAX-2 Scenario

Let’s learn how to use the toolbar a bit
• Animations
Go to start of scenario, backwards, pause, forwards, slow down, speed up
• Take a picture (Snap Frame)
– This will ask you to save it (save as .bmp)
7. Take a picture of your simulation and copy and paste into your report
Creating RAX-2 Scenario
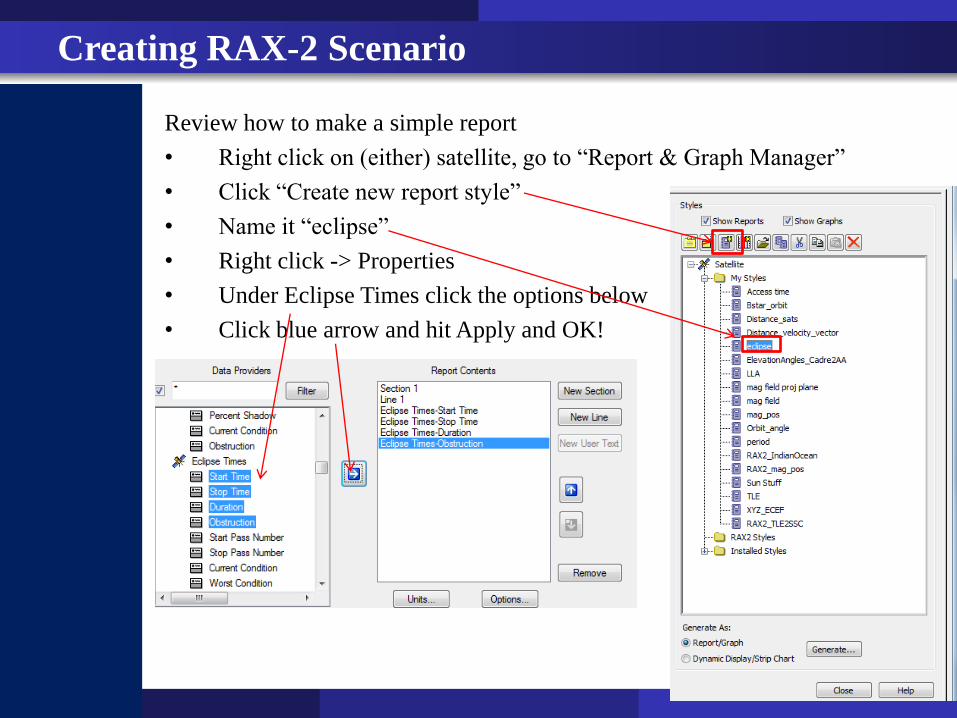
Review how to make a simple report
• Right click on (either) satellite, go to “Report & Graph Manager”
• Click “Create new report style”
• Name it “eclipse”
• Right click -> Properties
• Under Eclipse Times click the options below
• Click blue arrow and hit Apply and OK!
Creating RAX-2 Scenario
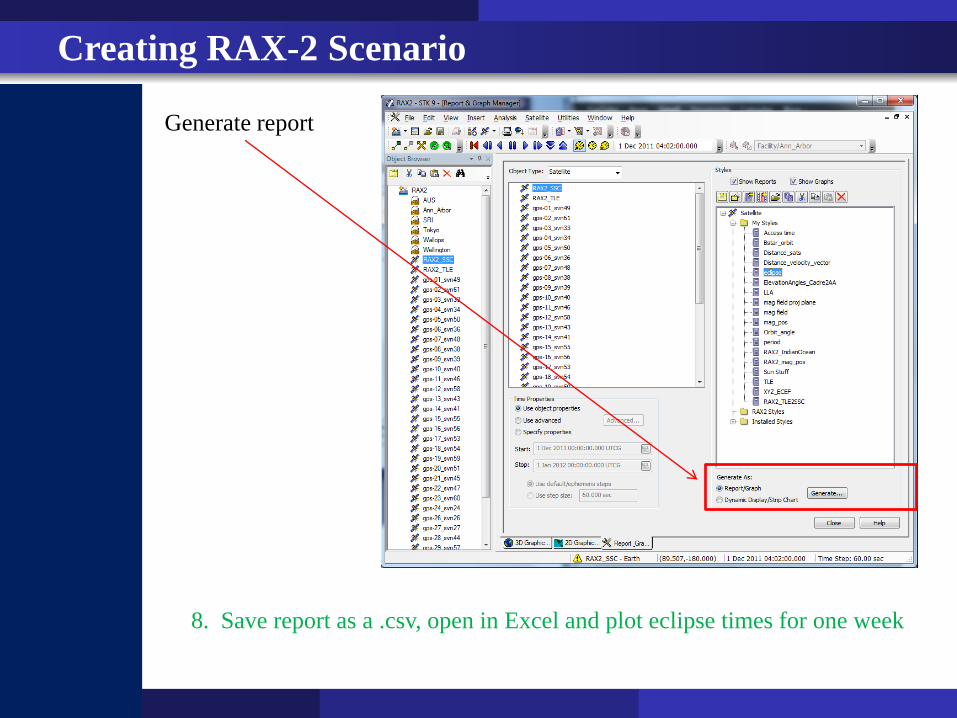
Generate report
Creating RAX-2 Scenario
8. Save report as a .csv, open in Excel and plot eclipse times for one week
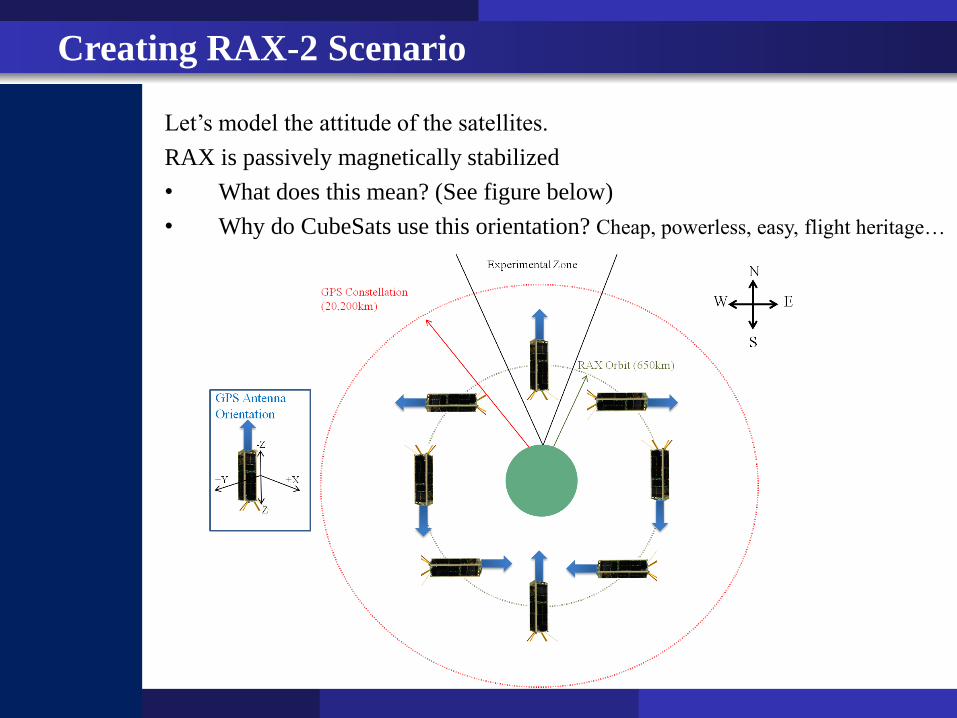
Let’s model the attitude of the satellites.
RAX is passively magnetically stabilized
• What does this mean? (See figure below)
• Why do CubeSats use this orientation? Cheap, powerless, easy, flight heritage…
Creating RAX-2 Scenario
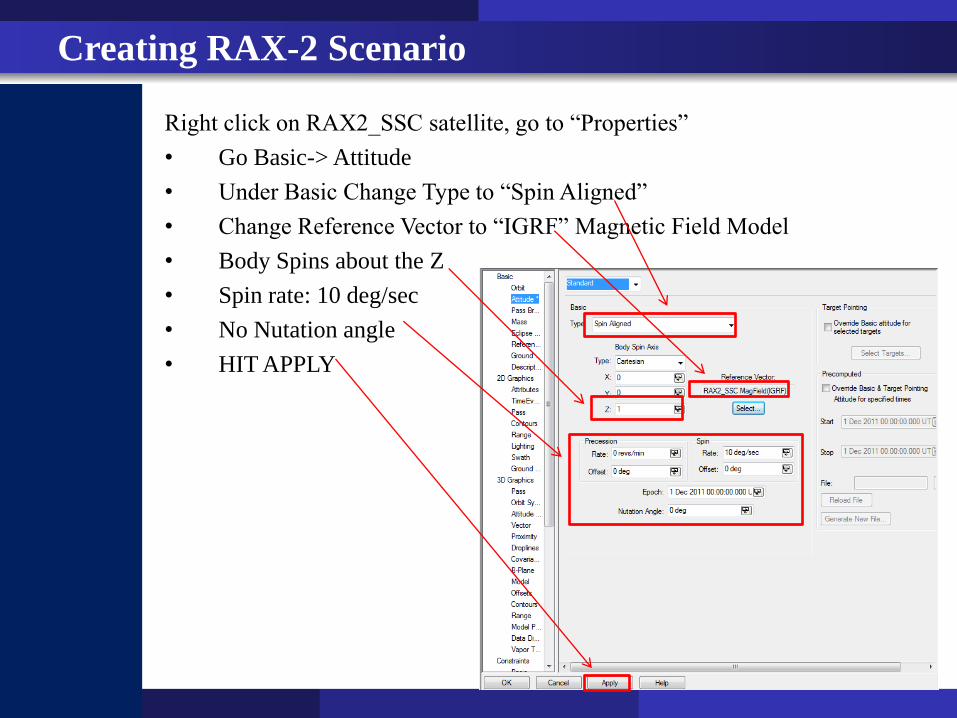
Right click on RAX2_SSC satellite, go to “Properties”
• Go Basic-> Attitude
• Under Basic Change Type to “Spin Aligned”
• Change Reference Vector to “IGRF” Magnetic Field Model
• Body Spins about the Z
• Spin rate: 10 deg/sec
• No Nutation angle
• HIT APPLY
Creating RAX-2 Scenario

We’ve done a lot of hard work….
SAVE BREAK
Creating RAX-2 Scenario
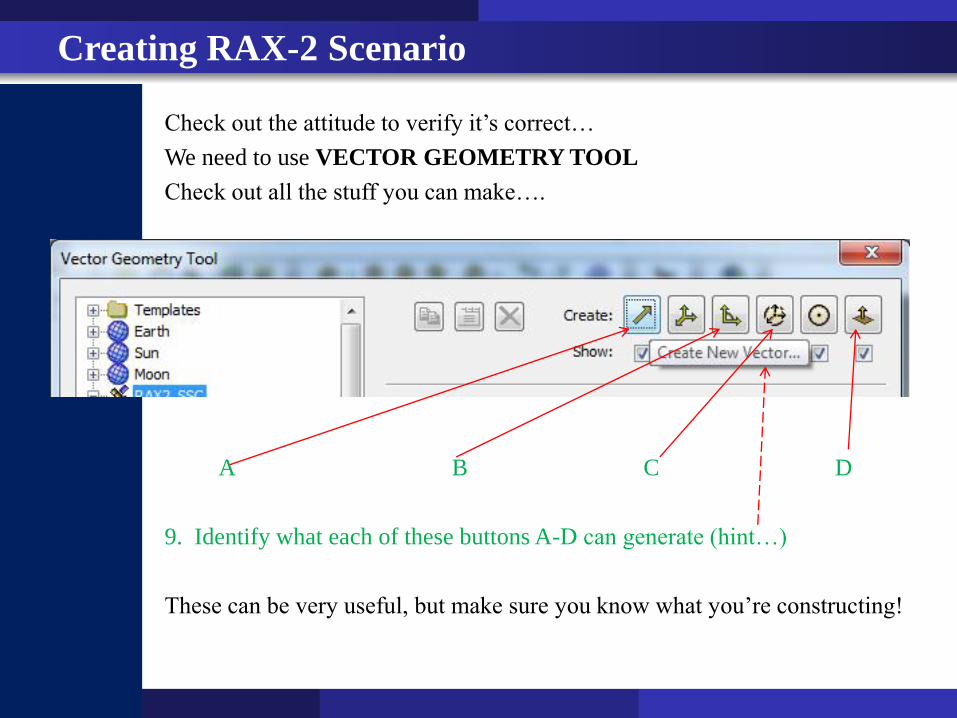
Check out the attitude to verify it’s correct…
We need to use VECTOR GEOMETRY TOOL
Check out all the stuff you can make….
A B C D
9. Identify what each of these buttons A-D can generate (hint…)
These can be very useful, but make sure you know what you’re constructing!
Creating RAX-2 Scenario
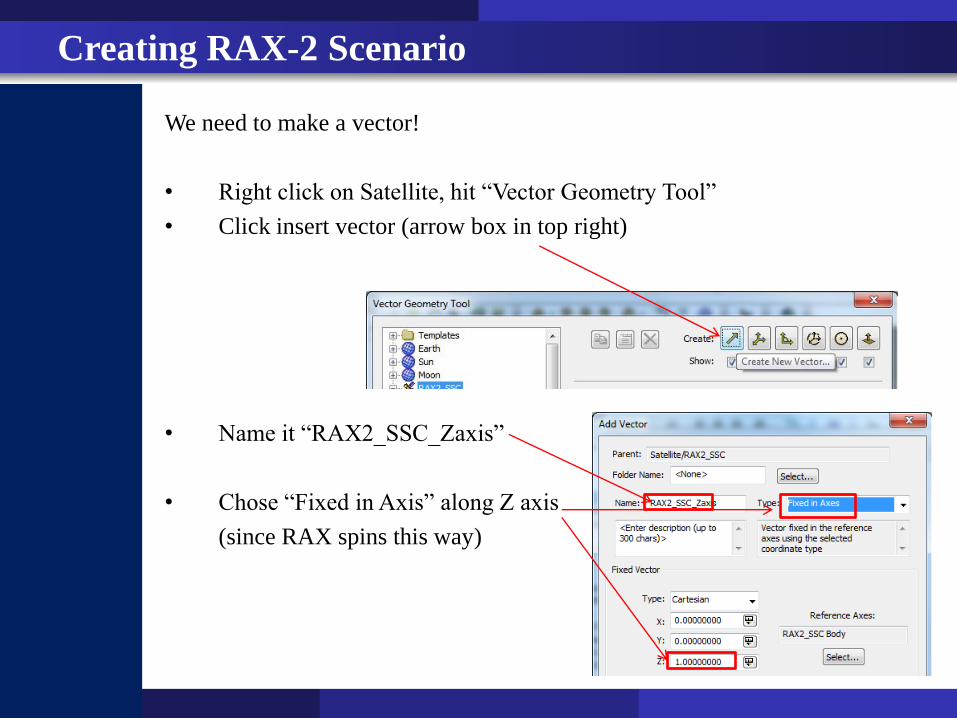
We need to make a vector!
• Right click on Satellite, hit “Vector Geometry Tool”
• Click insert vector (arrow box in top right)
• Name it “RAX2_SSC_Zaxis”
• Chose “Fixed in Axis” along Z axis
(since RAX spins this way)
Creating RAX-2 Scenario
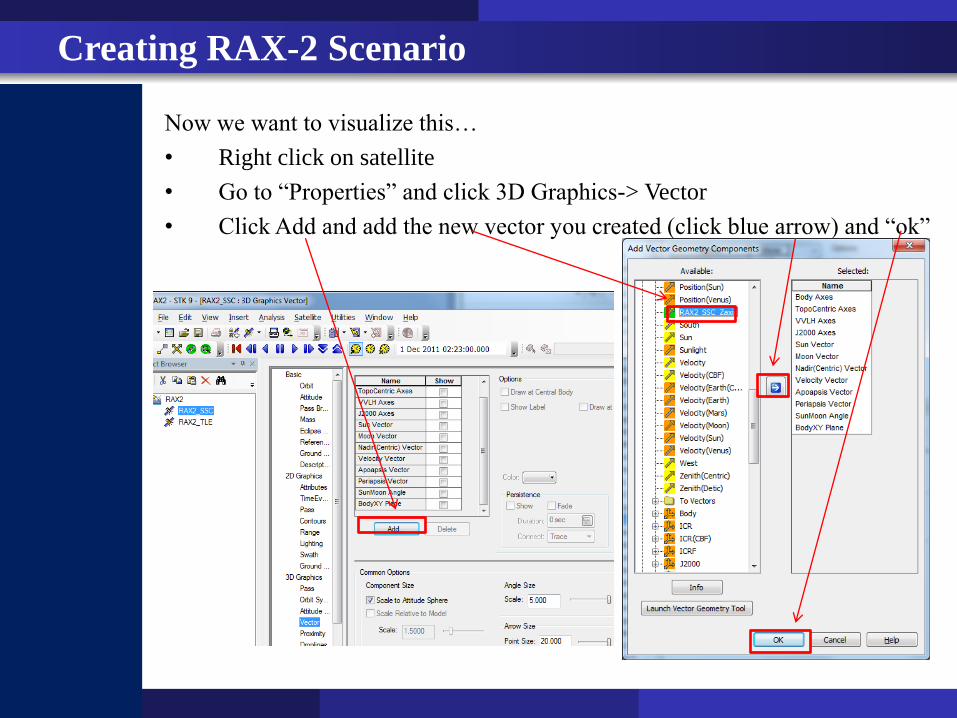
Now we want to visualize this…
• Right click on satellite
• Go to “Properties” and click 3D Graphics-> Vector
• Click Add and add the new vector you created (click blue arrow) and “ok”
Creating RAX-2 Scenario
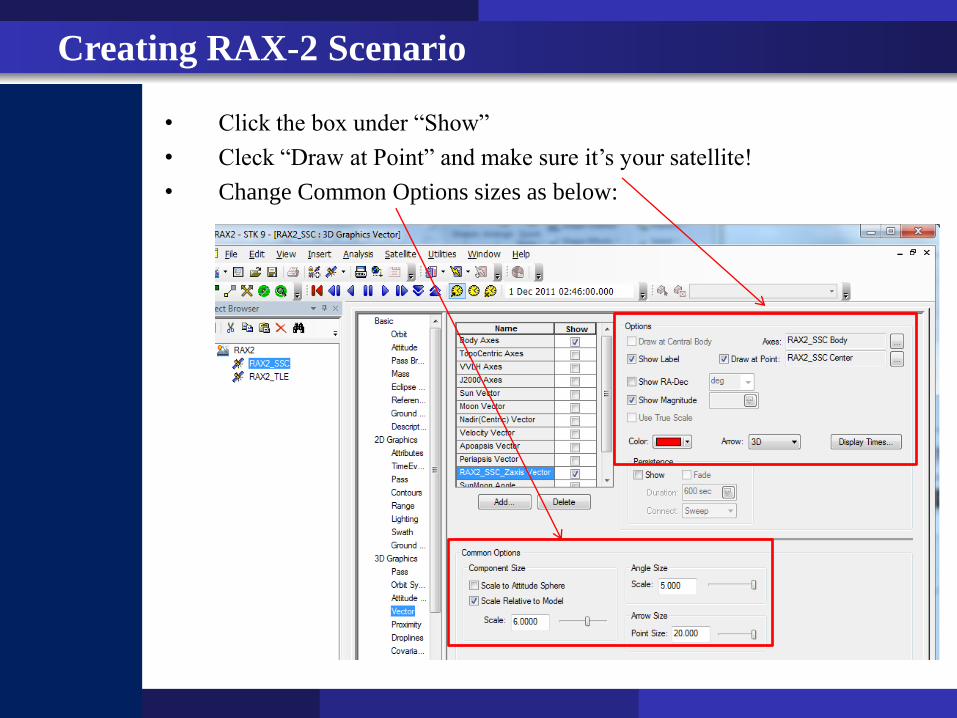
• Click the box under “Show”
• Cleck “Draw at Point” and make sure it’s your satellite!
• Change Common Options sizes as below:
Creating RAX-2 Scenario
10. Is the new vector pointed the direction you would expect it? Justify your
answer by taking picture and watching it through several orbits.
Creating RAX-2 Scenario
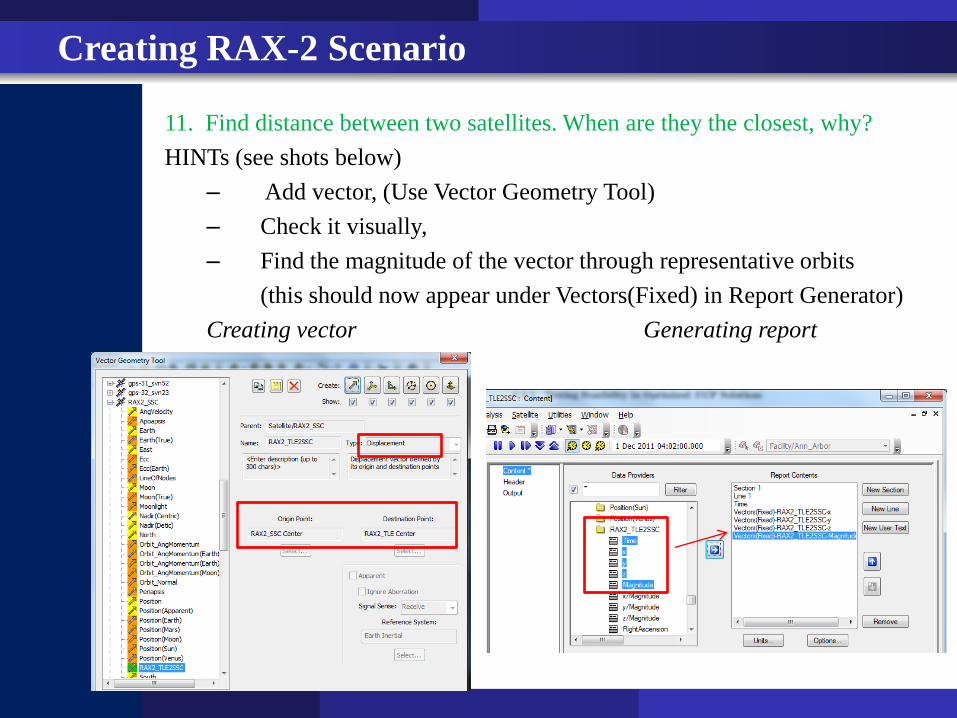
11. Find distance between two satellites. When are they the closest, why?
HINTs (see shots below)
– Add vector, (Use Vector Geometry Tool)
– Check it visually,
– Find the magnitude of the vector through representative orbits
(this should now appear under Vectors(Fixed) in Report Generator)
Creating vector Generating report
Creating RAX-2 Scenario
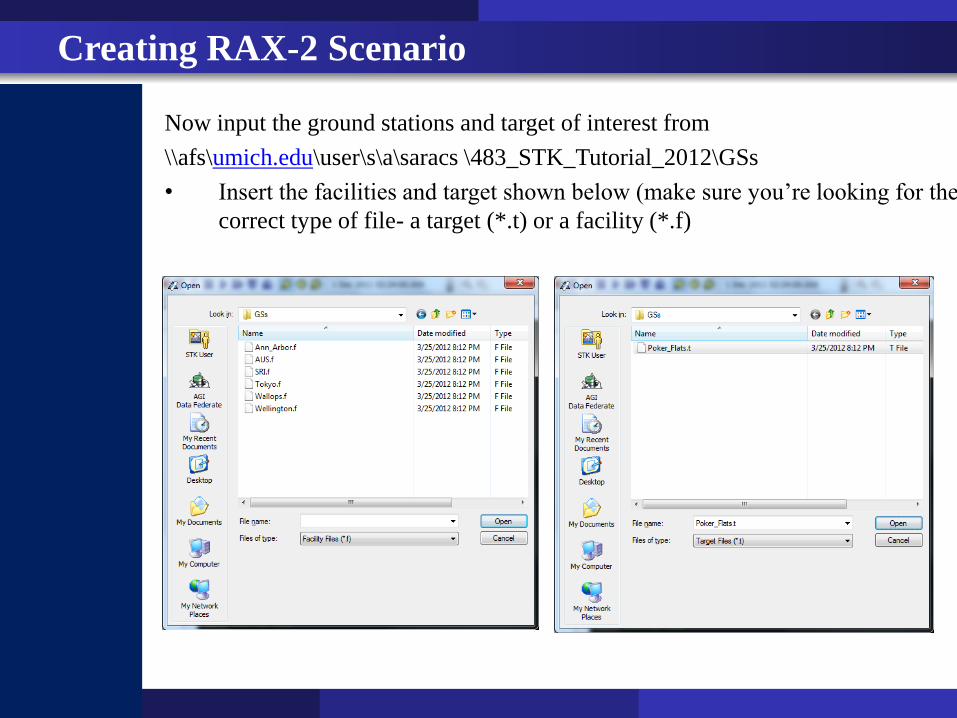
Now input the ground stations and target of interest from
\\afs\umich.edu\user\s\a\saracs \483_STK_Tutorial_2012\GSs
• Insert the facilities and target shown below (make sure you’re looking for the
correct type of file- a target (*.t) or a facility (*.f)
Creating RAX-2 Scenario
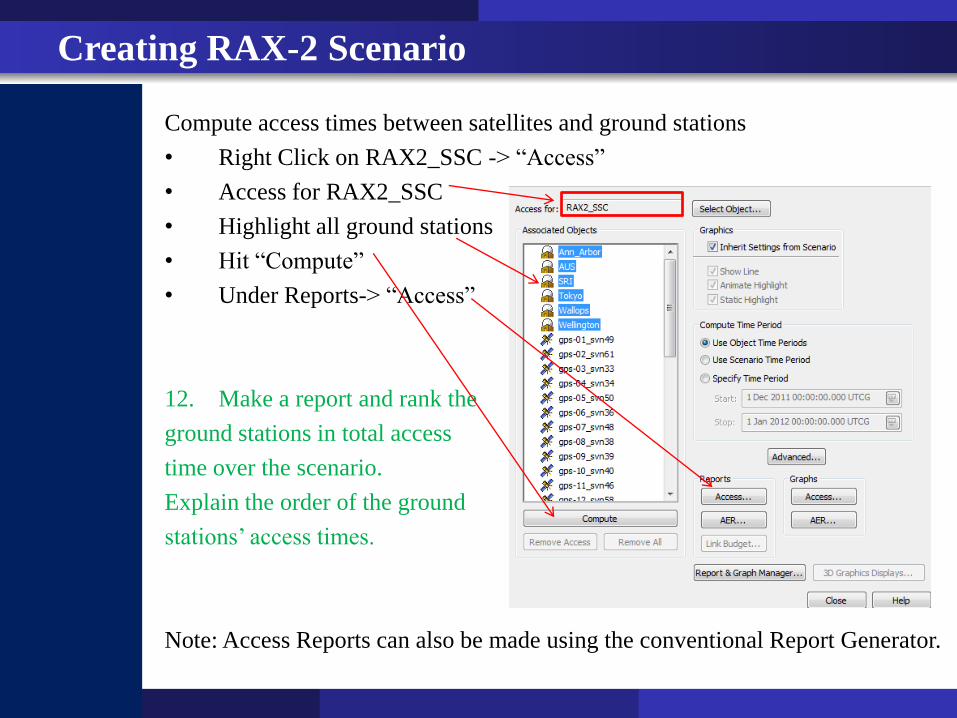
Compute access times between satellites and ground stations
• Right Click on RAX2_SSC -> “Access”
• Access for RAX2_SSC
• Highlight all ground stations
• Hit “Compute”
• Under Reports-> “Access”
12. Make a report and rank the
ground stations in total access
time over the scenario.
Explain the order of the ground
stations’ access times.
Note: Access Reports can also be made using the conventional Report Generator.
Creating RAX-2 Scenario
13. Make a report that provides the access time from RAX2 to the Target of
Interest (Poker Flat) over the scenario.
– Compute the average access time per day
– Figure out the maximum/ minimum access time
Creating RAX-2 Scenario
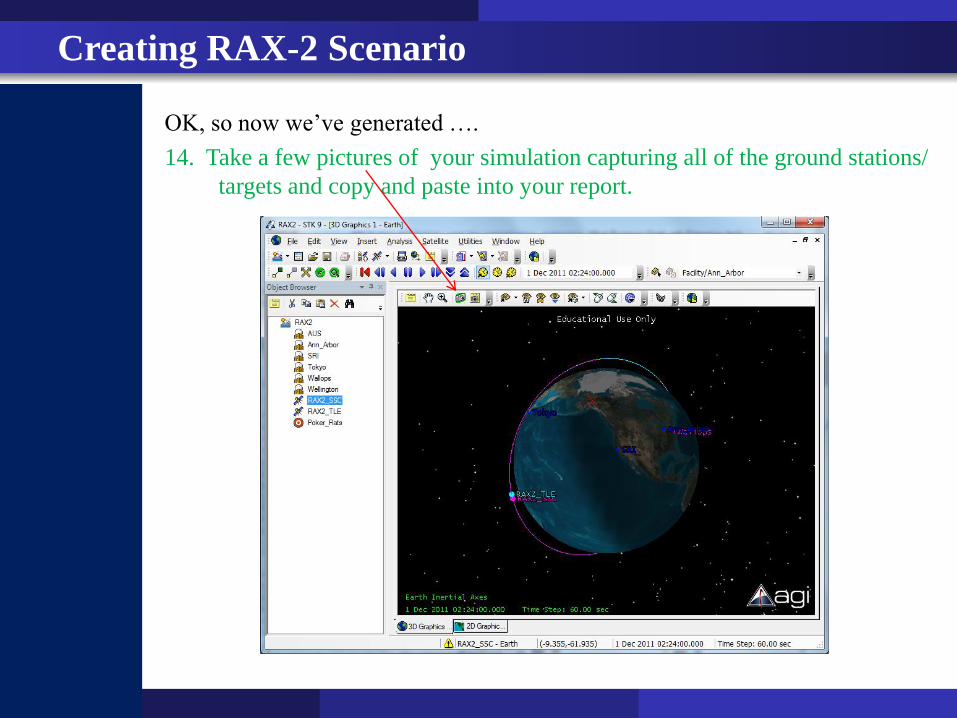
OK, so now we’ve generated ….
14. Take a few pictures of your simulation capturing all of the ground stations/
targets and copy and paste into your report.
Creating RAX-2 Scenario

We’ve done a lot of hard work….
SAVE BREAK
Creating RAX-2 Scenario
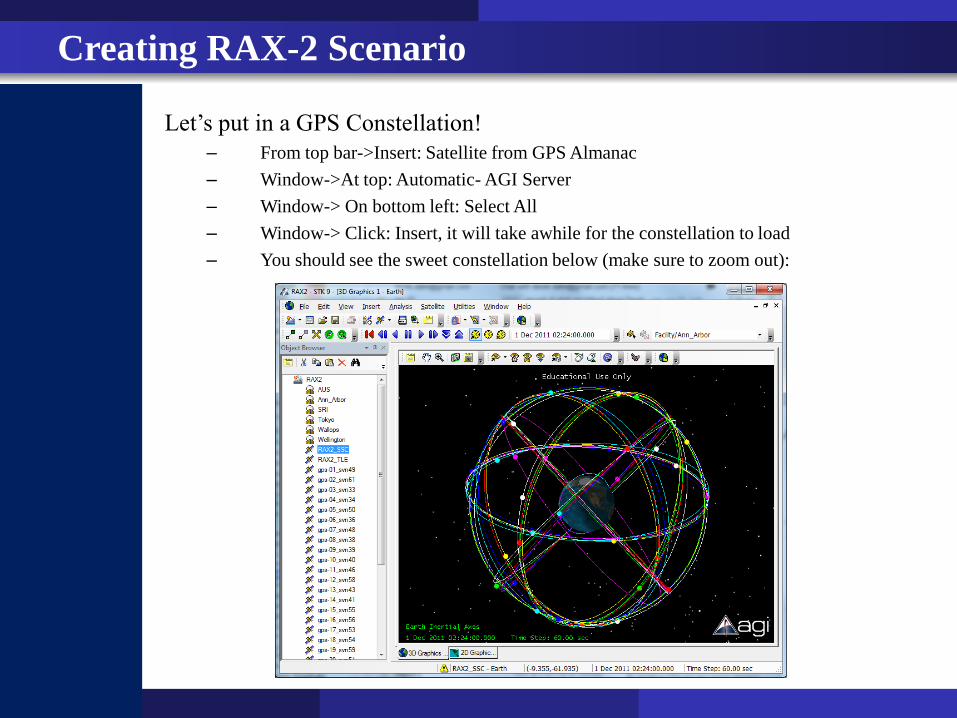
Let’s put in a GPS Constellation!
– From top bar->Insert: Satellite from GPS Almanac
– Window->At top: Automatic- AGI Server
– Window-> On bottom left: Select All
– Window-> Click: Insert, it will take awhile for the constellation to load
– You should see the sweet constellation below (make sure to zoom out):
Creating RAX-2 Scenario
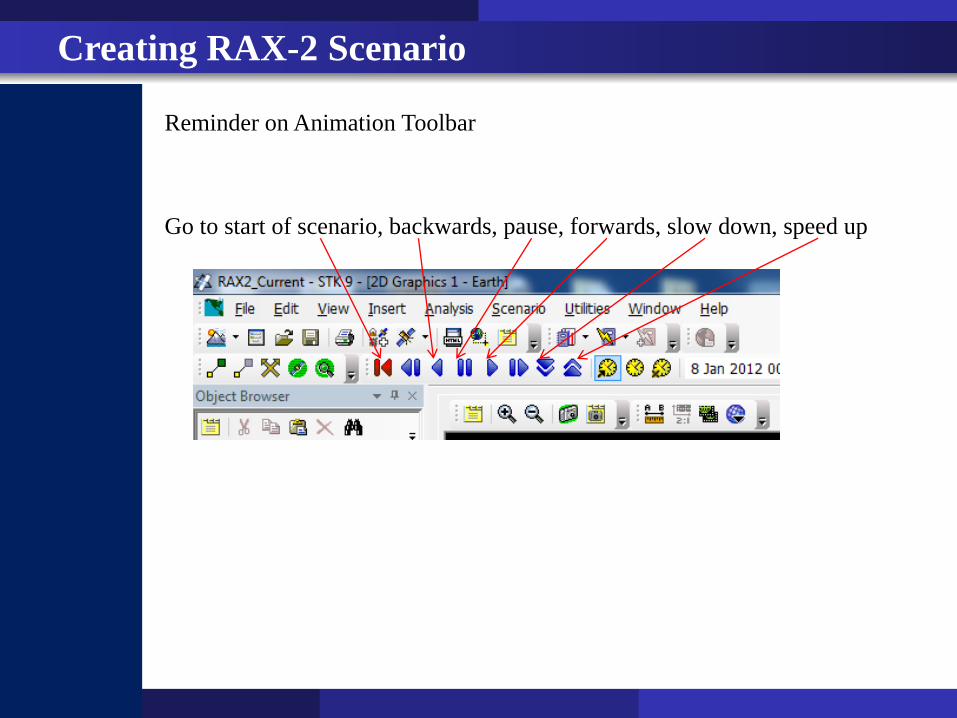
Reminder on Animation Toolbar
Go to start of scenario, backwards, pause, forwards, slow down, speed up
Creating RAX-2 Scenario
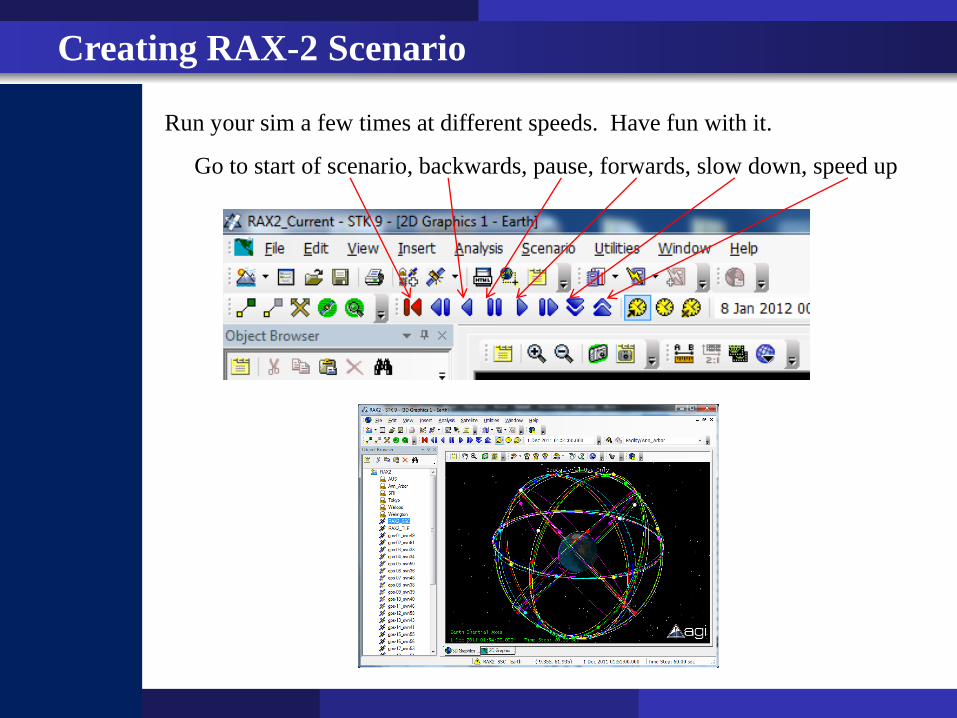
Run your sim a few times at different speeds. Have fun with it.
Creating RAX-2 Scenario
Go to start of scenario, backwards, pause, forwards, slow down, speed up
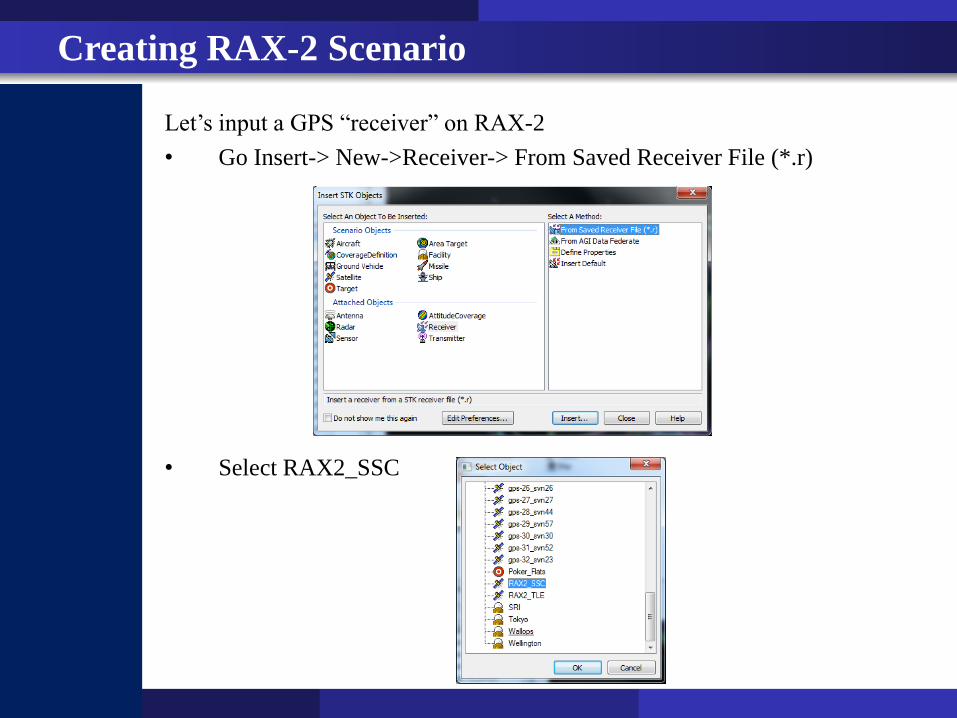
Let’s input a GPS “receiver” on RAX-2
• Go Insert-> New->Receiver-> From Saved Receiver File (*.r)
• Select RAX2_SSC
Creating RAX-2 Scenario
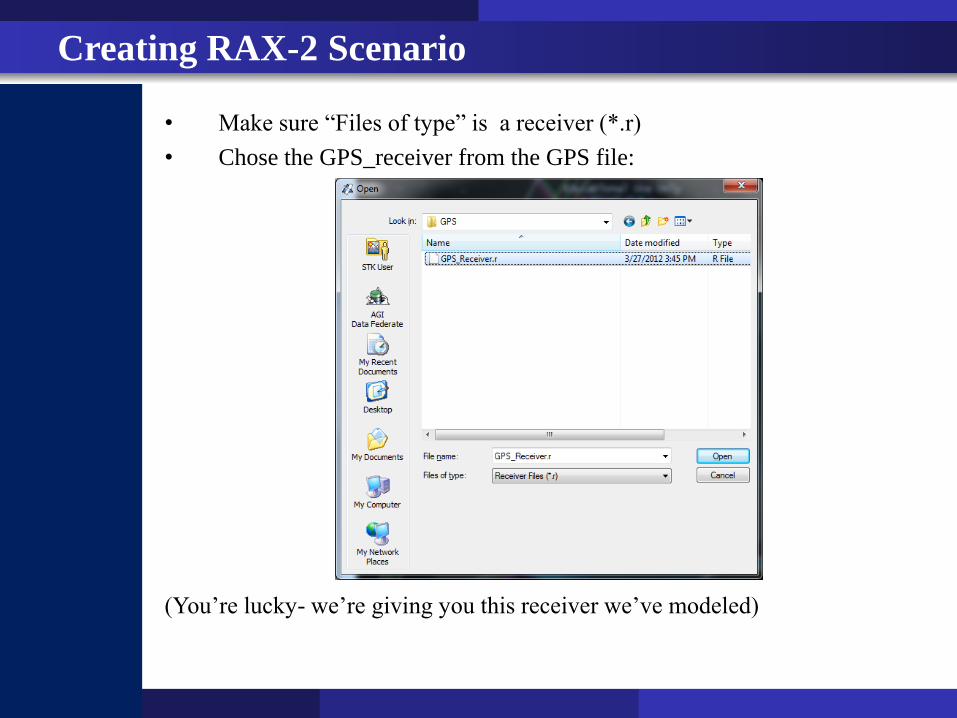
• Make sure “Files of type” is a receiver (*.r)
• Chose the GPS_receiver from the GPS file:
(You’re lucky- we’re giving you this receiver we’ve modeled)
Creating RAX-2 Scenario
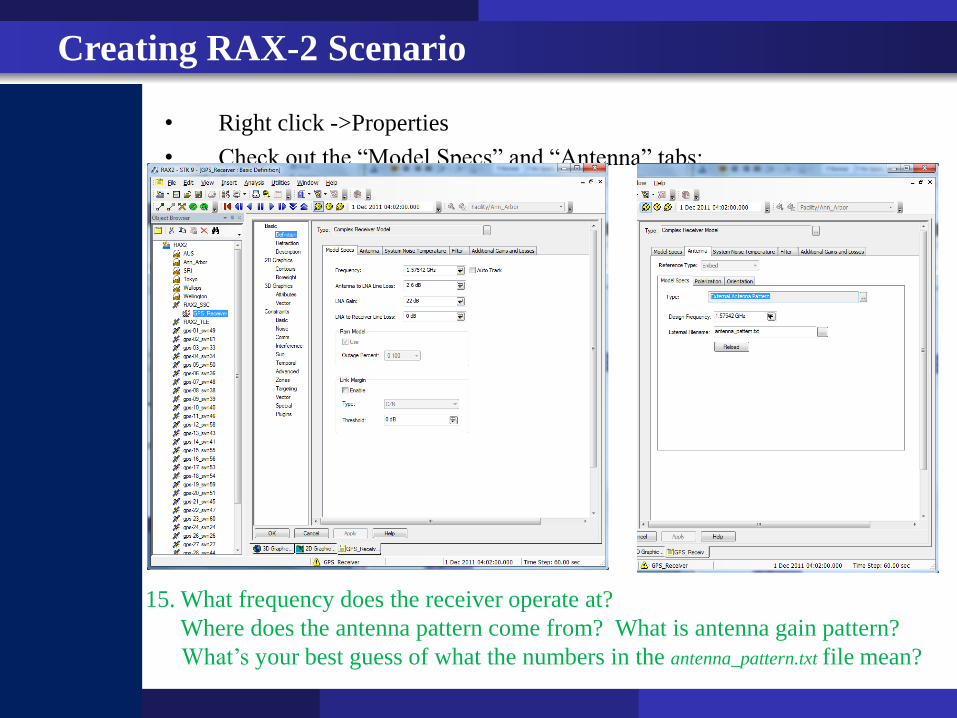
• Right click ->Properties
• Check out the “Model Specs” and “Antenna” tabs:
Creating RAX-2 Scenario
15. What frequency does the receiver operate at?
Where does the antenna pattern come from? What is antenna gain pattern?
What’s your best guess of what the numbers in the antenna_pattern.txt file mean?
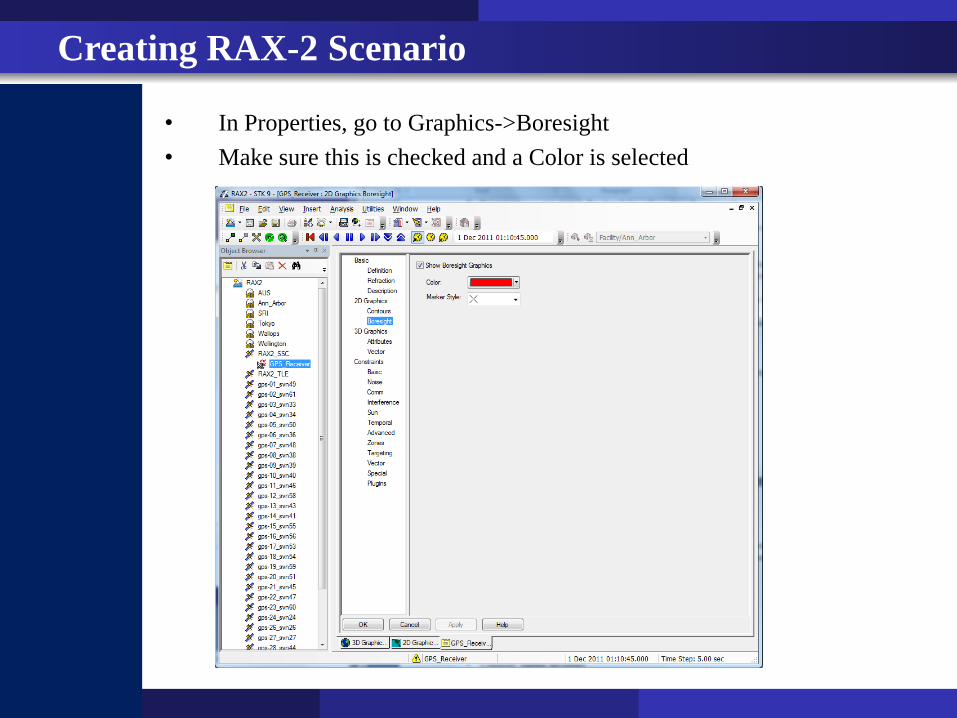
• In Properties, go to Graphics->Boresight
• Make sure this is checked and a Color is selected
Creating RAX-2 Scenario
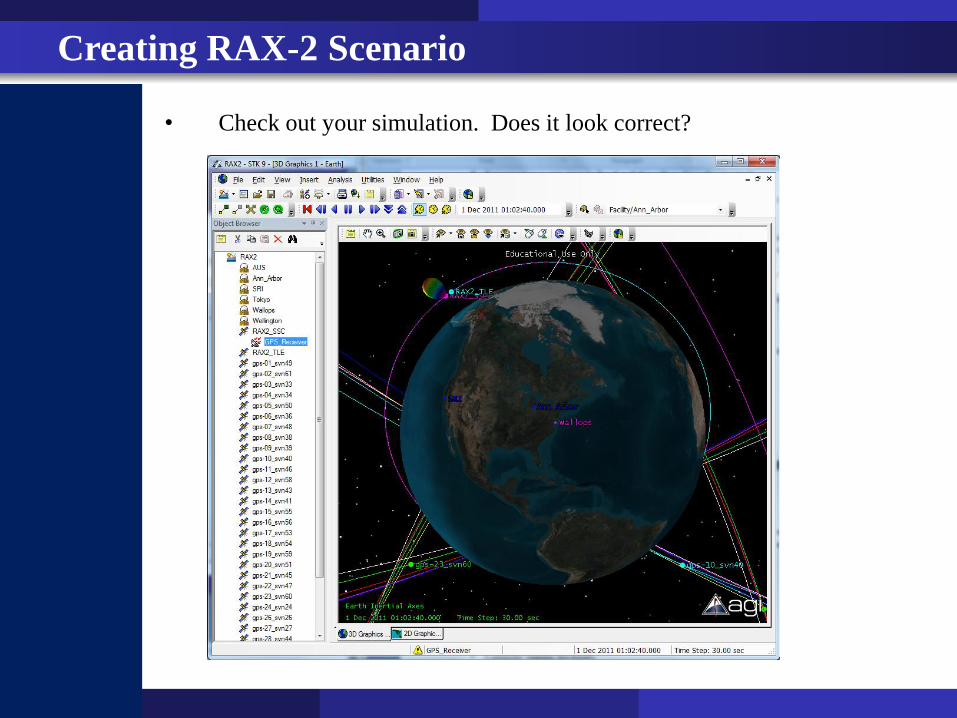
• Check out your simulation. Does it look correct?
Creating RAX-2 Scenario

We’ve done a lot of hard work….
SAVE BREAK
Creating RAX-2 Scenario
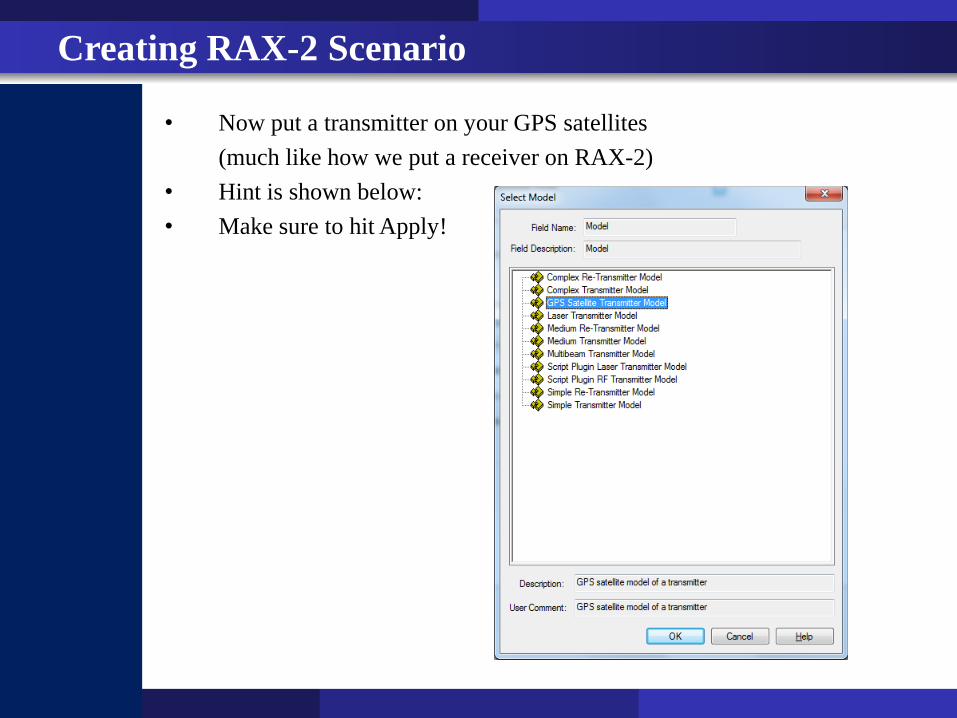
• Now put a transmitter on your GPS satellites
(much like how we put a receiver on RAX-2)
• Hint is shown below:
• Make sure to hit Apply!
Creating RAX-2 Scenario

Now we’re going to compute the link budget!
• Right click on GPS_Receiver: “Properties”->Access
• Select options below and hit Link Budget
16. What is the maximum Eb/No (dB)?
What is the average Eb/No (dB) when the satellites are in view?
Creating RAX-2 Scenario
• Note that we have made a lot of assumptions in this link budget!
• I gave you the antenna gain pattern for the receiver- usually you will need
to find and model this.
• To perform a link budget for a real system, make sure to check all the
inputs (gains/ losses/ etc.)!
• This approach can be used to compute link budgets for communication
links too!
Creating RAX-2 Scenario
We’ve done a lot of hard work….
SAVE BREAK
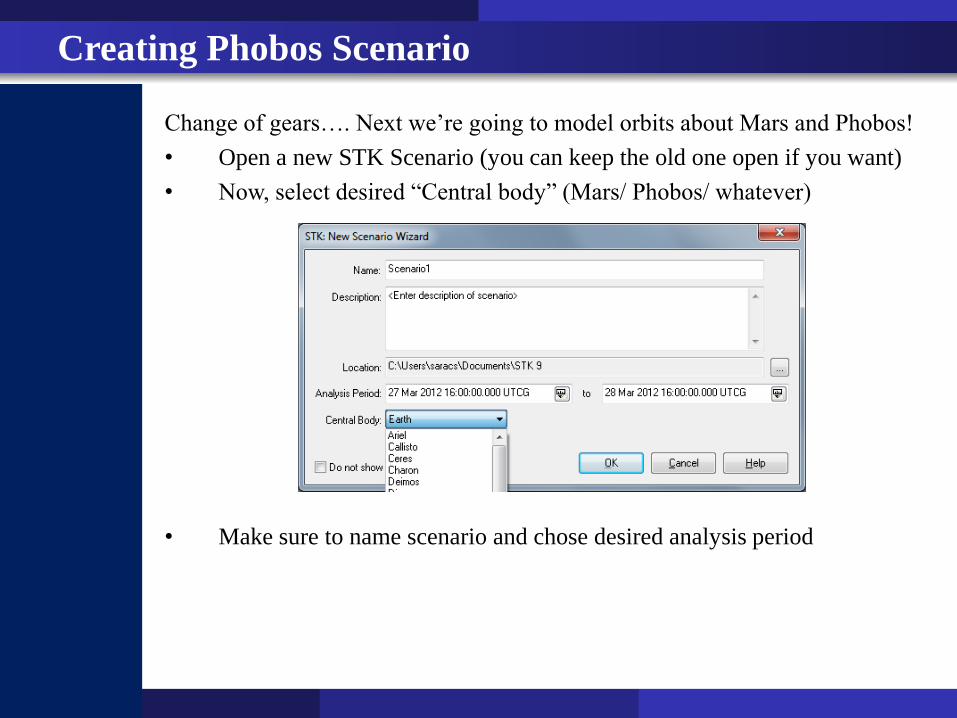
Change of gears…. Next we’re going to model orbits about Mars and Phobos!
• Open a new STK Scenario (you can keep the old one open if you want)
• Now, select desired “Central body” (Mars/ Phobos/ whatever)
• Make sure to name scenario and chose desired analysis period
Creating Phobos Scenario
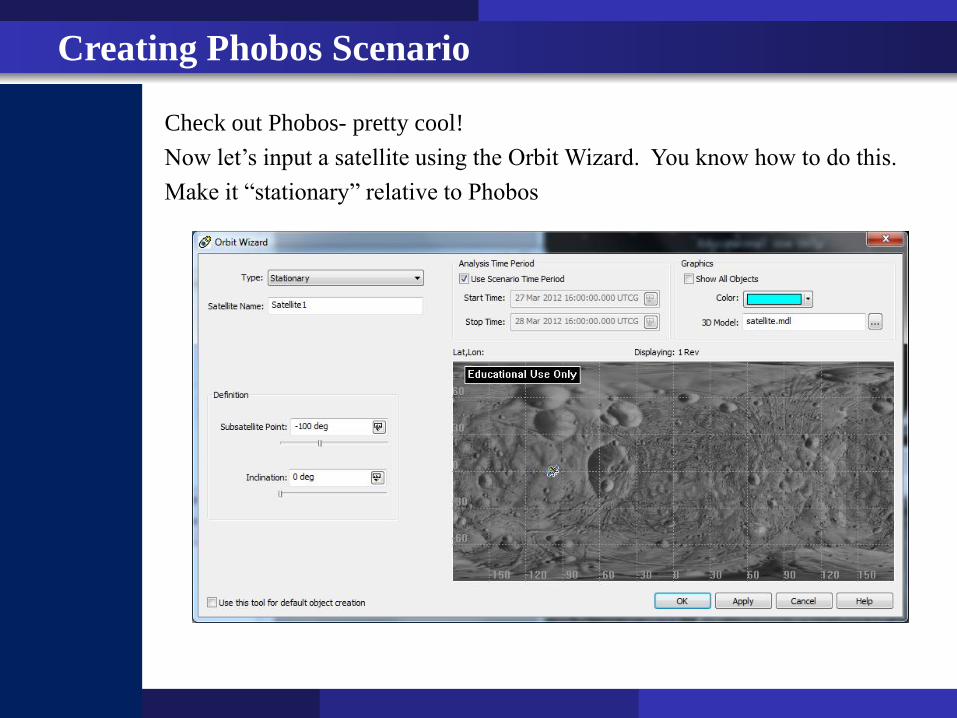
Check out Phobos- pretty cool!
Now let’s input a satellite using the Orbit Wizard. You know how to do this.
Make it “stationary” relative to Phobos
Creating Phobos Scenario
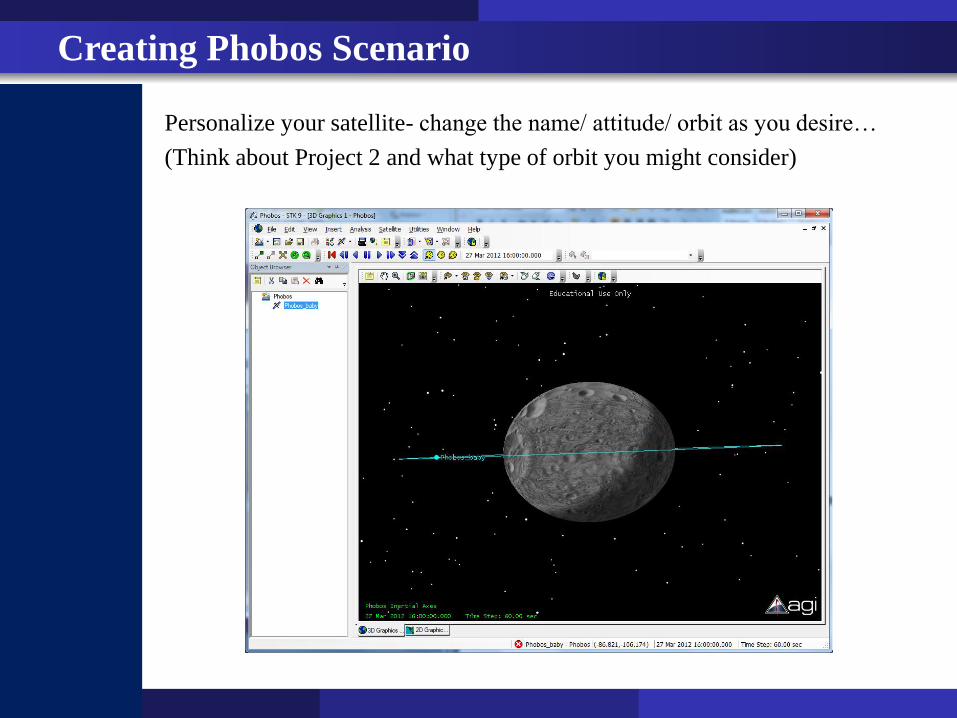
Personalize your satellite- change the name/ attitude/ orbit as you desire…
(Think about Project 2 and what type of orbit you might consider)
Creating Phobos Scenario
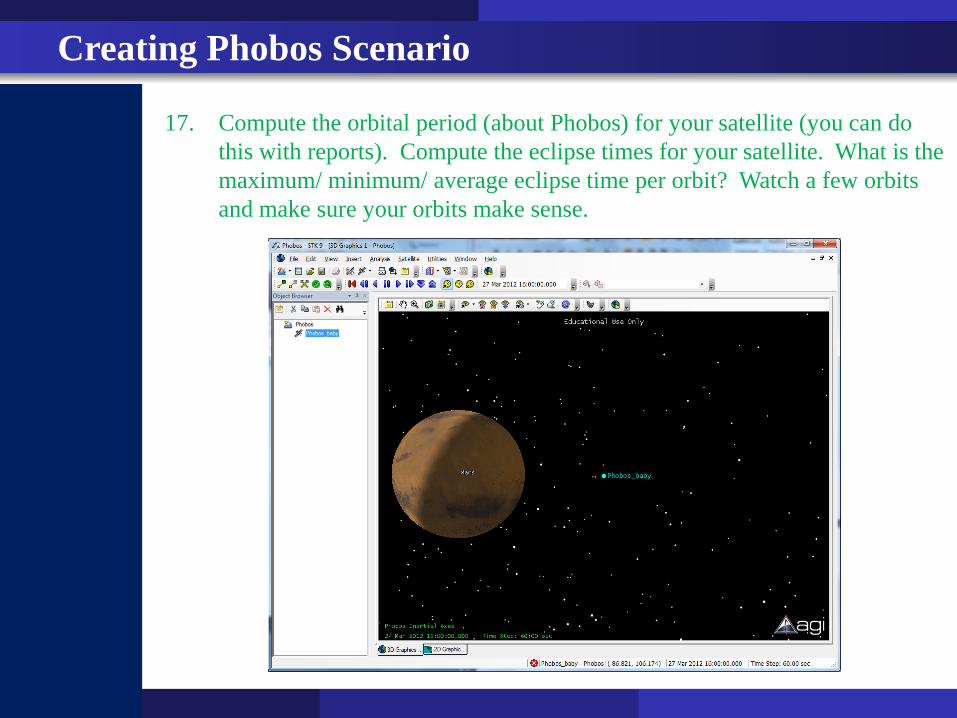
17. Compute the orbital period (about Phobos) for your satellite (you can do
this with reports). Compute the eclipse times for your satellite. What is the
maximum/ minimum/ average eclipse time per orbit? Watch a few orbits
and make sure your orbits make sense.
Creating Phobos Scenario
Extra Assignment 1:
• Compute the angle between the magnetic field line and the RAX-2 satellite
• Plot the results over several orbits
• Comment/ explain the results
Creating RAX-2 Scenario
Extra Assignment 2:
• Compute the angles between the line of sight to the sun and the RAX-2
+X, -X, +Y, -Y faces
• Plot the results over several orbits
• Comment/ explain the results
Creating RAX-2 Scenario

Extra Assignment 3:
Calculate average/ minimum/ maximum distance from:
• Earth to RAX-2
• Earth to GPS Constellation
• RAX-2 to GPS Constellation
Explain why does/ doesn’t make sense.
Creating RAX-2 Scenario
Extra Assignment 4:
Compute the average number of GPS satellites with Eb/No (dB) >35 dB (typical
minimum threshold required for GPS receivers) as a function of satellite latitude
for RAX-2. Does this make sense? Why or why not?
Creating RAX-2 Scenario
Extra Assignment 5:
Compute the average access time between your satellite in an orbit about Phobos
And the Deep Space Network (DSN). Discuss the general trends. How much
data could be communicated from your satellite to Earth at a 10 bps link? 100
bps link? 1kbps link?
Phobos Scenario