Embed Size (px)
Citation preview

USER MANUAL
SKU’S: AKFR-FR45L001, AKFR-FR60L001,AKFR-FR75L_01 & AKFR-FR90L_02
45L, 60L, 75L & 90L FRIDGE/FREEZERS
45L FRIDGE
75L FRIDGE 90L FRIDGE
60L FRIDGE

2V1.4
CONTENTS
1. SAFETY 3
2. SPECIFICATIONS 42.1 Single Zone 4
2.2 Dual Zone 4
3. DIMENSIONS 53.1 45L Fridge/Freezer 5
3.2 60L Fridge/Freezer 5
3.3 75L Fridge/Freezer 5
3.4 90L Fridge/Freezer 5
4. OVERVIEW 6
5. INSTALLATION 7
6. POWER MANAGEMENT 7
7. BATTERY MONITOR/PROTECTION 7
8. CONNECTION INFORMATION 88.1 DC Connection 8
8.2 AC Connection 8
9. POWERING ON 9
10. CELSIUS/FARENHEIT FUNCTION 9
11. MAX/ECO FUNCTION 9
12. ADJUSTING THE TEMPERATURE 1012.1 Single Zone 10
12.2 Dual Zone 10
13. POWER TIPS 11
14. COOLING TIPS 11
15. GENERAL TIPS 11
16. DIFFERENTIAL 12
17. TEMPERATURE DISPLAY 12
18. TROUBLESHOOTING 1318.1 Fridge Troubleshooting Flow Chart 13
19. WARRANTY 14

3 V1.4
1. SAFETY• Please read the user manual and safety instructions carefully before using the appliance.
• This appliance can be used by children aged from 8 years and above and persons with reduced physical, sensory or mental capabilities or lack of experience and knowledge if they have been given supervision or instruction concerning use of the appliance in a safe way and understand the hazards involved.
• Children shall not play with the appliance.
• Cleaning and user maintenance shall not be performed by children without supervision.
• By ignoring the safety instructions 4WD Supacentre cannot be held responsible for the damage.
• The use of accessories that are not recommended by 4WD Supacentre can cause injuries and will invalidate any warranty that you may have.
• The appliance shall not be exposed to rain. Place the refrigerator on a dry, protected surface away from edges.
• Do not use the refrigerator in uncovered, outdoor areas exposed to the elements.
• Do not use this appliance near direct heat sources, for example, a cooker, radiator or exposing it to direct sunlight.
• Do not place ice or liquids which are not sealed in containers within the refrigerator.
• Do not place hot products or hot food in the refrigerator.
• Place the products so that they do not knock against each other or break when the appliance is in motion.
• The power cable must only be replaced by qualified technical personnel or by an assistant body authorized by the manufacturer.
• Before carrying out any maintenance operations on the refrigerator, disconnect the power cable from the plug.
• This appliance is suitable for camping use. In addition to this, it can also be used in households and other residential environments.
• This appliance is intended to be used in household and similar applications such as:
• Staff kitchen areas in shops, offices and other working environments.
• Farm houses and by clients in hotels, motels and other residential type environments.
• Bed and breakfast type environments
• WARNING: Keep ventilation openings, in the appliance enclosure or in the built-in structure, clear of obstruction. Leave a space of at least 15cm across all its sides.
• WARNING: Do not use mechanical devices or other means to accelerate the defrosting process.
• WARNING: Do not use electrical appliances inside the food storage compartments of the appliance, unless they are of the type recommended by 4WD Supacentre.
• WARNING: When positioning the appliance ensure the supply cord is not trapped or damaged.
• WARNING: Do not locate multiple portable socket-outlets or portable power supplies at the rear of the appliance.
• WARNING: Do not store explosive substances such as aerosol cans with a flammable propellant in this appliance.
• WARNING: Do not use an extension cord.
• DANGER: Risk of child entrapment. Before you throw away your old refrigerator or freezer:
• Take off the doors.
• Leave the shelves in place so that children may not easily climb inside.
• FOR SAFE DISPOSAL: Dispose of appliance at a suitable resource and recovery centre.
If the supply cord is damaged, it must be replaced by the manufacturer, its service agent or similarly qualified persons in order to avoid a hazard. The products are suitable for camping use.
PLEASE READ AND UNDERSTAND THIS MANUAL COMPLETELY BEFORE USING THIS PRODUCT.

4V1.4
2. SPECIFICATIONS2.1 SINGLE ZONE
2.2 DUAL ZONE
SKU AKFR-FR45L001 AKFR-FR60L001
MODEL # FCD45K FCD60K
EXTERNAL DIMENSIONS 713 x 405 x 461 mm 768 x 470 x 461 mm
NET WEIGHT 23.6kg 25.3kg
COOLING SYSTEM SECOP BD35F
INSTALLED POWER 85W
SUPPLY VOLTAGE DC 12V/24V, AC 100-240V
USB 5V
TEMPERATURE SETTING -18°C to +10°C
REFRIGERANT GAS R134a-CFC Free
INSULATION C-pentane
SKU AKFR-FR75L_01 AKFR-FR90L_02
MODEL # FCD75K FCD90K
EXTERNAL DIMENSIONS 928 x 470 x 461 mm 973 x 525 x 461 mm
NET WEIGHT 30.4kg 33.1kg
COOLING SYSTEM SECOP BD50F
INSTALLED POWER 85W
SUPPLY VOLTAGE DC 12V/24V, AC 100-240V
USB 5V
TEMPERATURE SETTING -18°C to +10°C
REFRIGERANT GAS R134a-CFC Free
INSULATION C-pentane
This appliance contains fluorinated greenhouse gas R134a within a hermetically sealed system and its operation depends on this gas.
Further information is provided on the technical data label attached to the appliance. This appliance is not intended for use by persons (including children) with reduced physical, sensory or mental capabilities, or lack of experience and knowledge, unless they have been given supervision or instruction concerning use of the appliance by a person responsible for their safety.
Children should be supervised to ensure that they do not play with this appliance.

5 V1.4
3. DIMENSIONS3.1 45L FRIDGE/FREEZER
3.2 60L FRIDGE/FREEZER
3.3 75L FRIDGE/FREEZER
3.4 90L FRIDGE/FREEZER

6V1.4
4. OVERVIEW
NUMBER ITEM
1 Lid Latches
2 Control Panel
3 Carry Handle
4 DC Power Input Panel
5 AC Power Input Panel
6 USB
7 12V/24V DC Power Cable
8 240V AC Power Cable

7 V1.4
5. INSTALLATIONIt is important that your appliance is installed and operated in accordance with the manufacturers instructions to guarantee the performance, efficiency and operation.
• Position the appliance in a safe and secure location. Limit exposure to heat sources or direct sunlight which can affect the units’ performance and efficiency.
• The normal operation of the appliance requires heat to be radiated away from the condenser located in the rear end of the unit. Adequate airflow is required to be available around the compressor at all times.
This appliance is designed to operate on AC and DC voltage inputs.
The device is equipped with a multi-level battery monitor that protects your vehicle battery against excessive discharging when the appliance is connected to a 12/24V supply.
The fridge switches off if the input Voltage falls below the set value. The fridge will switch back on after a 60 Second delay, once the input Voltage is above the set value, in the table below.
Push, hold and release button until the desired setting is reached.
6. POWER MANAGEMENT
AC INPUT 240V at 50Hz
DC INPUT 12V or 24V
7. BATTERY MONITOR/PROTECTION
BATTERY PROTECTION
MODE INPUT POWER: 12V INPUT POWER: 24V
LOW9.6V/OFF10.9V/ON
21.3V/OFF22.7V/ON
MED10.1V/OFF11.4V/ON
22.3V/OFF23.7V/ON
HIGH11.1V/OFF12.4V/ON
24.3V/OFF25.7V/ON

8V1.4
8. CONNECTION INFORMATION
The unit is equipped with an electronic control system that will prevent polarity reversal. In the event that the battery connection is reversed, the unit will not start or operate. The power inlet socket is fitted with a 15A fuse for protection.
Plug the 12/24V connection cable into the DC voltage socket on the rear and then connect it to the cigarette lighter or a suitable 12V or 24V power source.
This unit is equipped with a multi-voltage power supply with a priority circuit for connecting to an AC voltage source of 240V. The power supply automatically switches to a mains operation if the device is connected to 240V AC mains, even if the 12/24V connection cable is still attached. The power inlet socket is fitted with a fuse for protection.
Plug the 240V connection cable into the AC voltage socket on the rear and connect to a suitable 240V AC Voltage.
8.1 DC CONNECTION
8.2 AC CONNECTION

9 V1.4
9. POWERING ON
Connect to the desired input voltage and press and hold the button for 2-3 seconds to turn the unit on, the display will show the current internal fridge temperature.
10. CELSIUS/FARENHEIT FUNCTION
11. MAX/ECO FUNCTION
When the appliance is on, press the and buttons (positioned at right side of control panel) at the same time to enter the Celsius and Fahrenheit function menu.
This function allows the compressor speed to be slowed down to increase operating efficiencies (ECO) or increase the compressor speed to provide “quick” cool down time (MAX).
To operate press the button to commence the “economy” operation mode, the ECO indicator will illuminate.
Press the button again to select the MAX operating mode. The MAX indicator red light will illuminate.
10V1.4
12. ADJUSTING THE TEMPERATURE
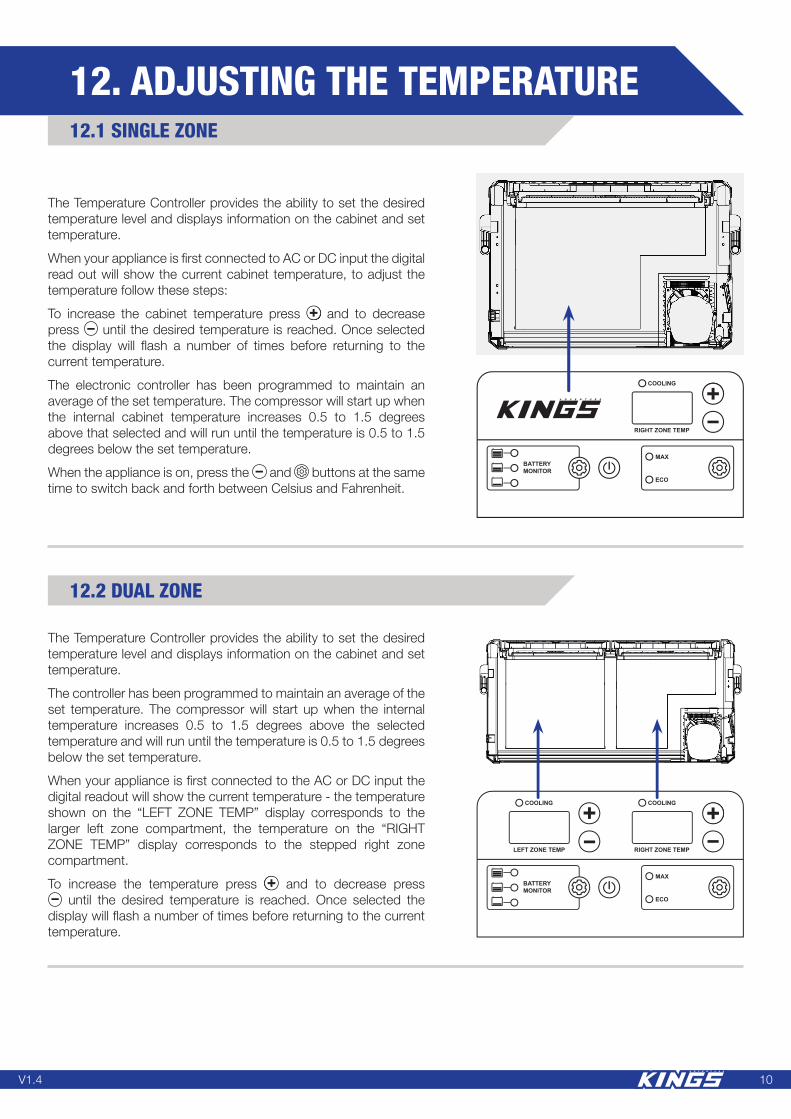
The Temperature Controller provides the ability to set the desired temperature level and displays information on the cabinet and set temperature.
When your appliance is first connected to AC or DC input the digital read out will show the current cabinet temperature, to adjust the temperature follow these steps:
To increase the cabinet temperature press and to decrease press until the desired temperature is reached. Once selected the display will flash a number of times before returning to the current temperature.
The electronic controller has been programmed to maintain an average of the set temperature. The compressor will start up when the internal cabinet temperature increases 0.5 to 1.5 degrees above that selected and will run until the temperature is 0.5 to 1.5 degrees below the set temperature.
When the appliance is on, press the and buttons at the same time to switch back and forth between Celsius and Fahrenheit.
The Temperature Controller provides the ability to set the desired temperature level and displays information on the cabinet and set temperature.
The controller has been programmed to maintain an average of the set temperature. The compressor will start up when the internal temperature increases 0.5 to 1.5 degrees above the selected temperature and will run until the temperature is 0.5 to 1.5 degrees below the set temperature.
When your appliance is first connected to the AC or DC input the digital readout will show the current temperature - the temperature shown on the “LEFT ZONE TEMP” display corresponds to the larger left zone compartment, the temperature on the “RIGHT ZONE TEMP” display corresponds to the stepped right zone compartment.
To increase the temperature press and to decrease press until the desired temperature is reached. Once selected the
display will flash a number of times before returning to the current temperature.
12.1 SINGLE ZONE
12.2 DUAL ZONE

11 V1.4
13. POWER TIPS
14. COOLING TIPS
15. GENERAL TIPS
Pre-chill before your trip. Your fridge will use the most amount of power in the first 24 Hours of operation. The fridge needs to cool down the walls, air and any product that isn’t already down to temperature. Ideally start loading your fridge 24 - 36 Hours before leaving home. If you are setting temperatures below -12ºC or a dual zone unit as a split fridge/freezer then 36 – 48 Hours before your trip the unit should be running.
All Adventure Kings Fridge/Freezers have either a 240 Volt connection built in or via the included external 240 Volt adapter. The fridge is no more or less efficient on 12 or 240 Volt power but to ensure your batteries are fully charged, ideally use the 2 days before your trip to cool your fridge and contents, this is an ideal time to make sure the battery your fridge will be running from is fully charged.
Keep good air flow around the fridge, at least 50 mm on all 4 sides of the fridge, and an additional 100mm where the vents of the fridge are located. All the heat from the compressor bay is removed through these vents, any restriction to this air flow will reduce the cooling performance of the fridge and increase the power usage.
How full should your fridge be? It comes down to energy; pull energy out of something and it gets cooler, put energy in and it gets warmer. Think of a kettle, put energy by turning it on, the water gets hotter, turn the kettle off and energy is released from the water and the water gets cooler. Water vs Air, water takes around 4 times more energy to cool down compared to air.
Therefore filling a fridge with liquid instead of leaving empty will take noticeably longer to cool down and use more power. This is one big reason why pre-cooling your fridge is strongly recommended.
But every time you open your fridge, cool air will be pulled out and replaced with warm and moist air. So initially your empty fridge will get cooler quicker, but anytime you open the lid it will take longer to get back down to temperature.
The optimum point ends up being around ½ to ¾ full of product. This fills the majority of the fridge and reduces air lost each time the lid is opened but also leaves enough room for air flow around the product inside the fridge.
Air flow around products is also important for keeping all the product inside the unit at similar temperatures and making for a more efficient fridge.
If you tightly pack product, it can take days for the product at the centre to correctly come down to temperature. This will also have an effect on power usage.
1. Pre-chill before trips.
2. If the fridge will be accessed frequently (drinks fridge for example) aim to have around ¾ loaded.
3. If needing more items to fill up space, empty reusable containers are easy to stack and helps with air flow around products.
4. Keep the fridge out of direct sunlight.
5. Keep the vents of the fridge at least 150mm clear from any obstructions.
6. Keep pillows, swags, sleeping bags away from the fridge, if they move they can easily block the air vents of the fridge.

12V1.4
16. DIFFERENTIAL
17. TEMPERATURE DISPLAY
A differential is the measurement between the hottest and coldest part of a cooling cycle. Common differentials can be 2 – 5ºC, meaning the difference between the warmest and coldest part of a cooling cycle could be up to 5ºC. This is not a product fault and the same measurement exists for your fridge at home. So if your fridge runs and cools to 1ºC, when it turns off it may warm up to 3 – 6ºC before the unit switches back on and cools back down to 1ºC. This is not a fault and is in fact part of normal operation for any compressor fridge. Good fridge/freezer temperature is not reliant on the warmest or coldest part of the cycle but the average temperature this keeps the unit at.
An easy way to measure this average is to place a large glass of water in an otherwise empty fridge, set at 2ºC and allow the fridge to run overnight. Measuring the temperature of the water the next day will show you both the average temperature of your unit when set to 2ºC and also any variation between your set temperature and the average temperature, at the placement of the glass of water. See the below point on the temperature display on why this can vary from what your display shows.
The temperature display on your Adventure fridge is an indication of the temperature inside your fridge. It is not an exact read-out. There are multiple reasons why this is the case but two main reasons are temperature sensor placement and temperature flow. As cold air falls and warm air rises, the temperature inside your fridge will not be the same top to bottom. There can be around 2 – 4ºC degrees of difference, so if it is 2ºC at the bottom of the fridge, it could be around 4 – 6ºC at the top of the fridge.
As there is one temperature sensor inside the fridge, there is no easy way to give an accurate read-out of the temperature inside your fridge at all points, as above it will vary depending on where the temperature measurement was taken.

13 V1.4
18. TROUBLESHOOTING18.1 FRIDGE TROUBLESHOOTING FLOW CHART
STEP
3
STEP
4
STEP
5
STEP
1
STEP
2
Fridge concern is not cooling, running for only a short period, error code shown etc.
The above concerns can have several causes. The following helps confirm where the issue lies.
Rest the fridge. If the fridge has turned on and off too quickly, a number of errors can occur. Disconnect the fridge from all power sources for 15 Minutes.
This acts as a reset for the fridge’s electrical and refrigeration system.
Fridge setting issues. Incorrect settings can cause operation issues. If the fridge has an adjustable Voltage cut-off, set to the lowest value for testing. For testing the unit should be empty, as a warm/large product load in the fridge can take more than 24 Hours to completely come down to temperature.
If the fridge is not operating correctly after the above tests, or the fault is outside those listed and is a manufacturing defect (fridge still not cooling, works on DC but not on AC power, broken fan etc.) then please follow warranty claim procedure on the last page of this manual.
Power source issue. One of the most common issues stem from power source issues. Connect the fridge for at least 30 Minutes to 2 different power sources, for example a suitable house based 240 Volt socket and a vehicle with the engine running.
If this corrects the issue with the fridge, the source of the concern is outside the fridge. The fridge itself does not operate differently based on the power source, if the power to the fridge is in the correct range and consistent the fridge will operate.
Typical issues are related to wiring issues, under charged batteries and connection problems.

14V1.4
19. WARRANTY
WARRANTY PERIOD:
Full 60 month warranty from date of purchase against all manufacturing defects.
WHAT DOES THE WARRANTY COVER?
Under normal usage conditions, this warranty covers:
a. Any defect in design or manufacture which results in the product failing to perform substantially as described in authorised advertising or literature.
b. We will either repair or replace the product at our discretion providing that the fault is found to have been caused by a design or manufacturing defect and not misuse or tampering.
Our goods come with guarantees that cannot be excluded under the Australian Consumer Law. You are entitled to a replacement or refund for a major failure and for compensation for any other reasonably foreseeable loss or damage. You are also entitled to have the goods repaired or replaced if the goods fail to be of acceptable quality and the failure does not amount to a major failure. The bene�ts provided to you as the consumer by this warranty are in addition to other rights and remedies available to you under the law.
THE WARRANTY DOES NOT COVER:
a. Any damage resulting from improper use
b.
c. The cost of removing and reinstalling the product
d. Travel and /or other expenses due to customer’s remote location
e. Transport charges and damage in transit. It is your responsibility to deliver and pick up your product, including any costs associated with the postage of your repair or replacement product. If you do freight your product we recommend that you insure against loss or damage.
f. Any loss directly or indirectly associated with the product failing to operate.
g. Damage caused by mould, insects, animals, misuse, incorrect operation, adverse weather, accidents and fair wear and tear
TO MAKE A CLAIM, PLEASE ENSURE YOU RETAIN YOUR SALES RECEIPT OF PURCHASE
1800 88 39 64
60 MONTH LIMITED
WARRANTY
OUTDOOR SUPACENTRE PTY LTDLevel 1, Building A, 6 Figtree Drive, Sydney Olympic Park, NSW 2127, AustraliaPHONE: 1800 88 39 64www.4wdsupacentre.com.au
Faulty installation or modi�cation made during installation