Embed Size (px)
Citation preview
Frederick W. Graff©2014 www.physicsplayground.com
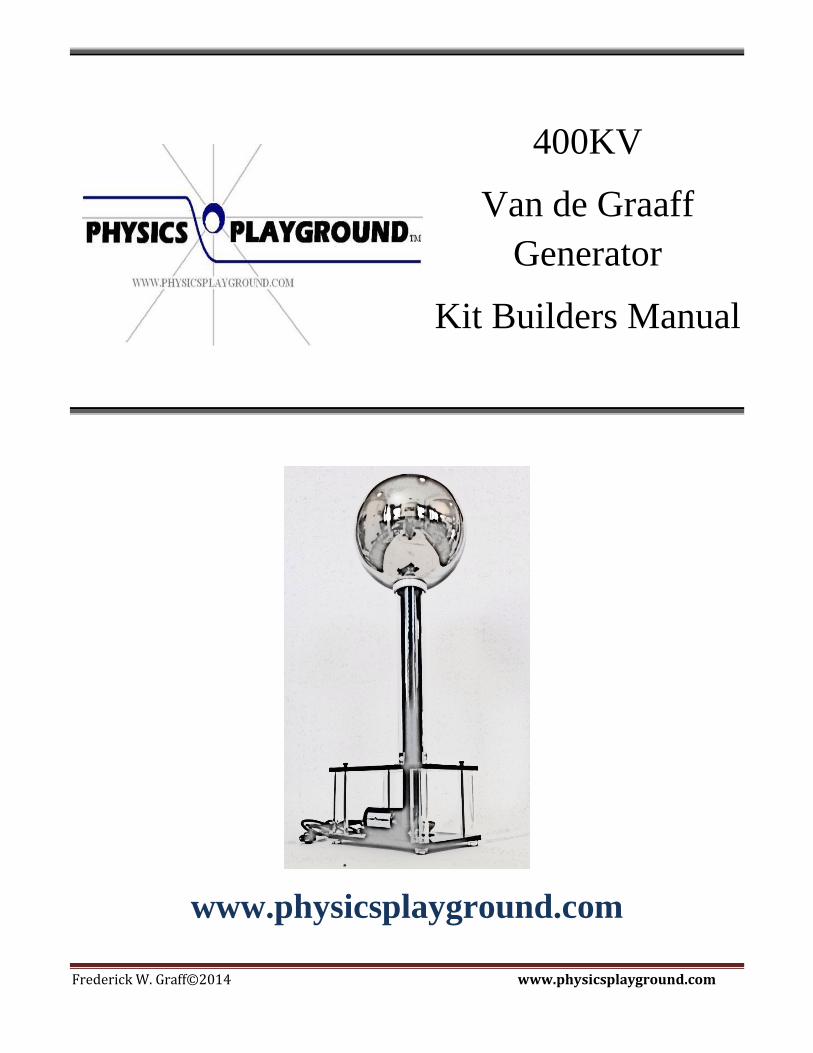
400KV
Van de Graaff
Generator
Kit Builders Manual
www.physicsplayground.com
Frederick W. Graff©2014 www.physicsplayground.com
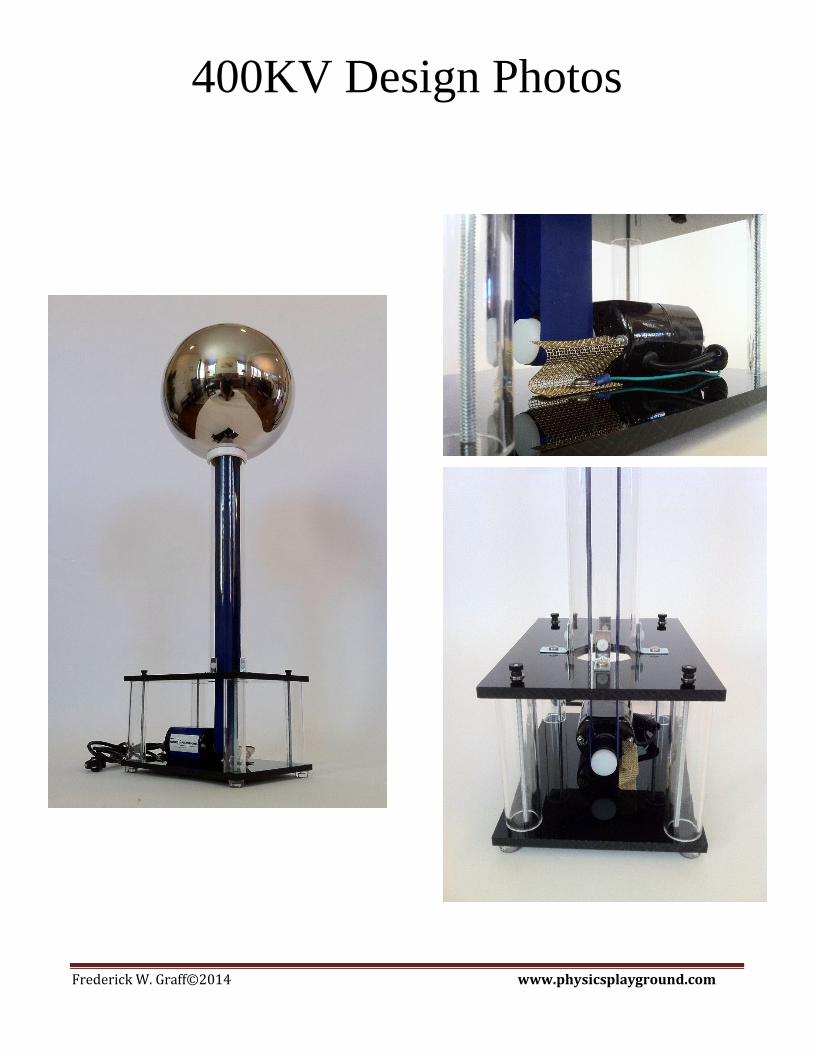
400KV Design Photos
Frederick W. Graff©2014 www.physicsplayground.com
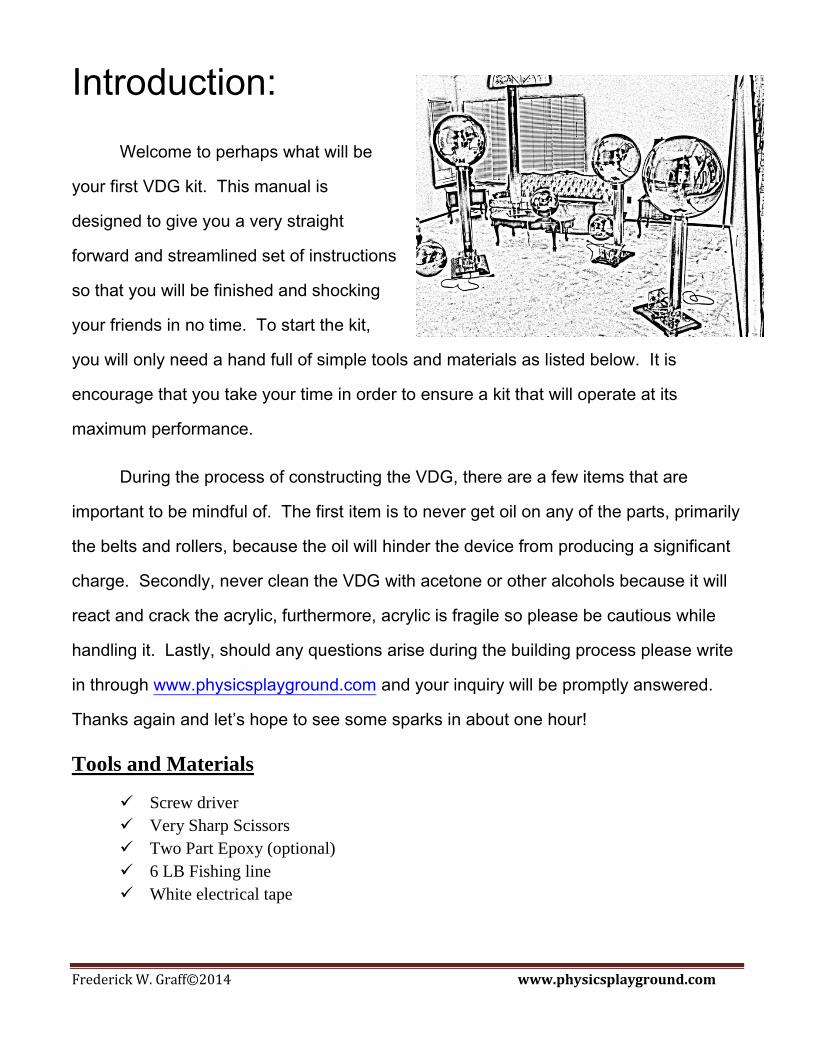
Introduction:
Welcome to perhaps what will be
your first VDG kit. This manual is
designed to give you a very straight
forward and streamlined set of instructions
so that you will be finished and shocking
your friends in no time. To start the kit,
you will only need a hand full of simple tools and materials as listed below. It is
encourage that you take your time in order to ensure a kit that will operate at its
maximum performance.
During the process of constructing the VDG, there are a few items that are
important to be mindful of. The first item is to never get oil on any of the parts, primarily
the belts and rollers, because the oil will hinder the device from producing a significant
charge. Secondly, never clean the VDG with acetone or other alcohols because it will
react and crack the acrylic, furthermore, acrylic is fragile so please be cautious while
handling it. Lastly, should any questions arise during the building process please write
in through www.physicsplayground.com and your inquiry will be promptly answered.
Thanks again and let’s hope to see some sparks in about one hour!
Tools and Materials
Screw driver
Very Sharp Scissors
Two Part Epoxy (optional)
6 LB Fishing line
White electrical tape
Frederick W. Graff©2014 www.physicsplayground.com
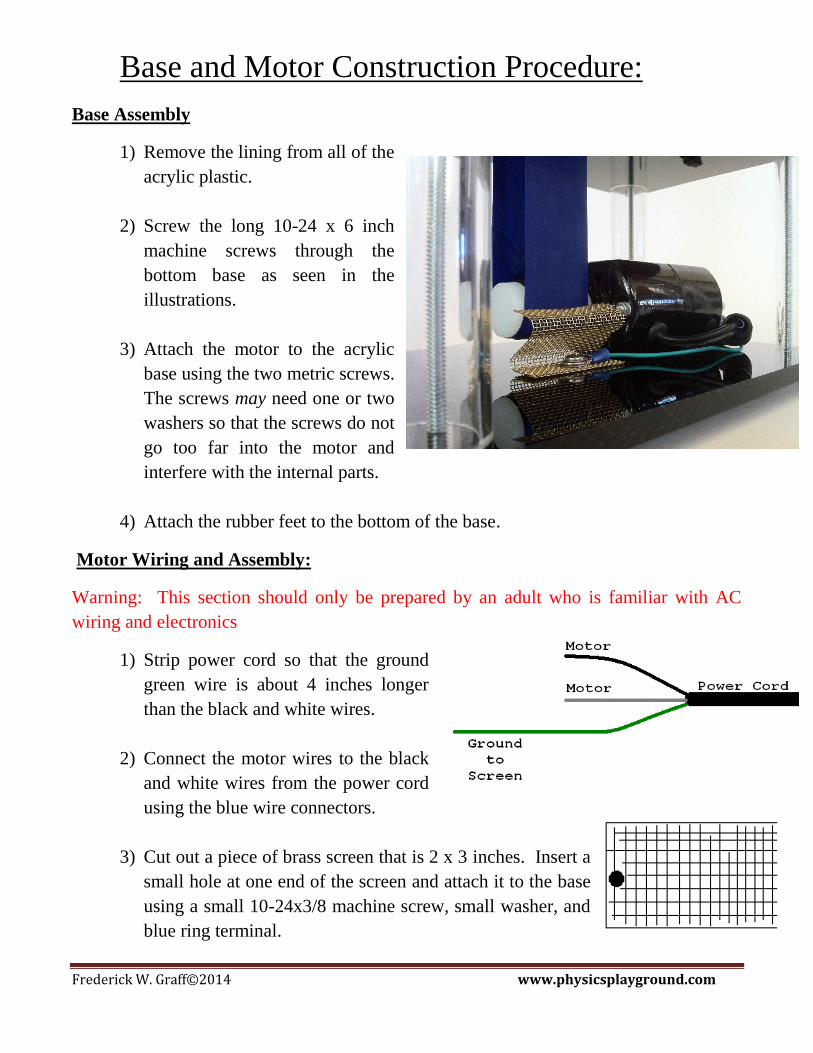
Base and Motor Construction Procedure:
Base Assembly
1) Remove the lining from all of the
acrylic plastic.
2) Screw the long 10-24 x 6 inch
machine screws through the
bottom base as seen in the
illustrations.
3) Attach the motor to the acrylic
base using the two metric screws.
The screws may need one or two
washers so that the screws do not
go too far into the motor and
interfere with the internal parts.
4) Attach the rubber feet to the bottom of the base.
Motor Wiring and Assembly:
Warning: This section should only be prepared by an adult who is familiar with AC
wiring and electronics
1) Strip power cord so that the ground
green wire is about 4 inches longer
than the black and white wires.
2) Connect the motor wires to the black
and white wires from the power cord
using the blue wire connectors.
3) Cut out a piece of brass screen that is 2 x 3 inches. Insert a
small hole at one end of the screen and attach it to the base
using a small 10-24x3/8 machine screw, small washer, and
blue ring terminal.
Frederick W. Graff©2014 www.physicsplayground.com
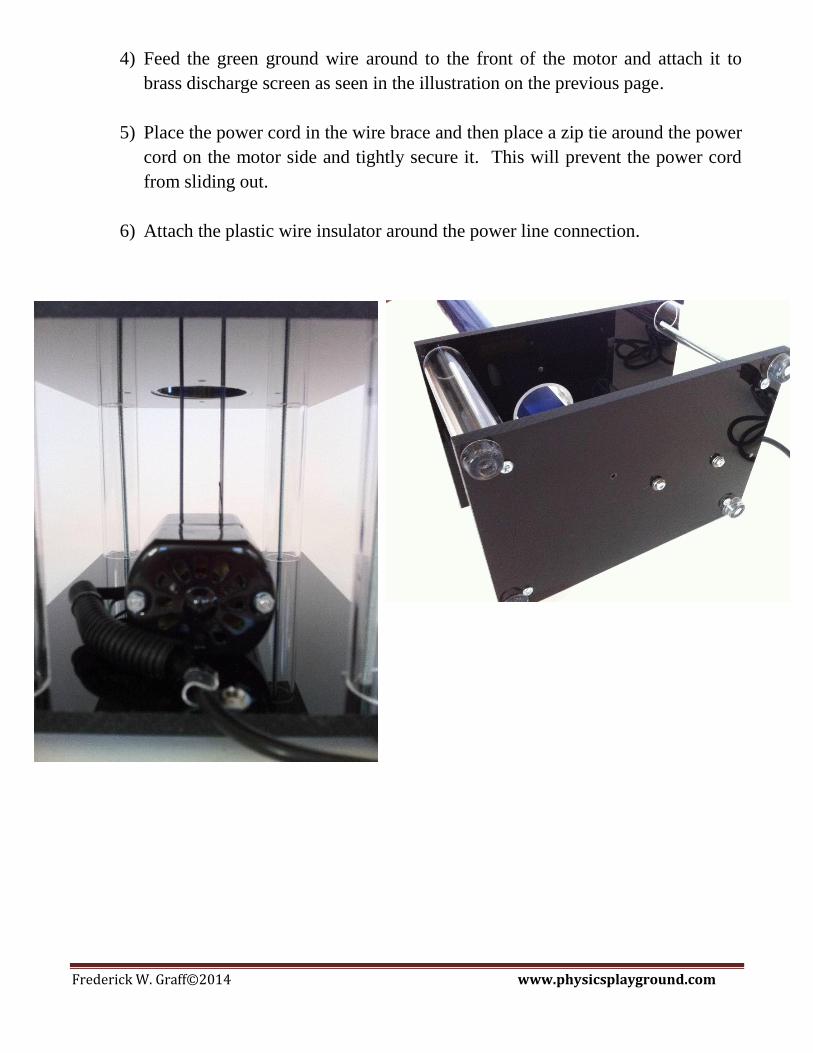
4) Feed the green ground wire around to the front of the motor and attach it to
brass discharge screen as seen in the illustration on the previous page.
5) Place the power cord in the wire brace and then place a zip tie around the power
cord on the motor side and tightly secure it. This will prevent the power cord
from sliding out.
6) Attach the plastic wire insulator around the power line connection.
Frederick W. Graff©2014 www.physicsplayground.com
Rollers and Static Belt:
Prior to assembling the belt and rollers, it is crucial to have an extremely clean
area free of dirt and oil. Oil will especially stop the VDG from efficiently operating.
Once the belt and rollers are completed, they should be washed and then stored separately
until installation and testing begins.
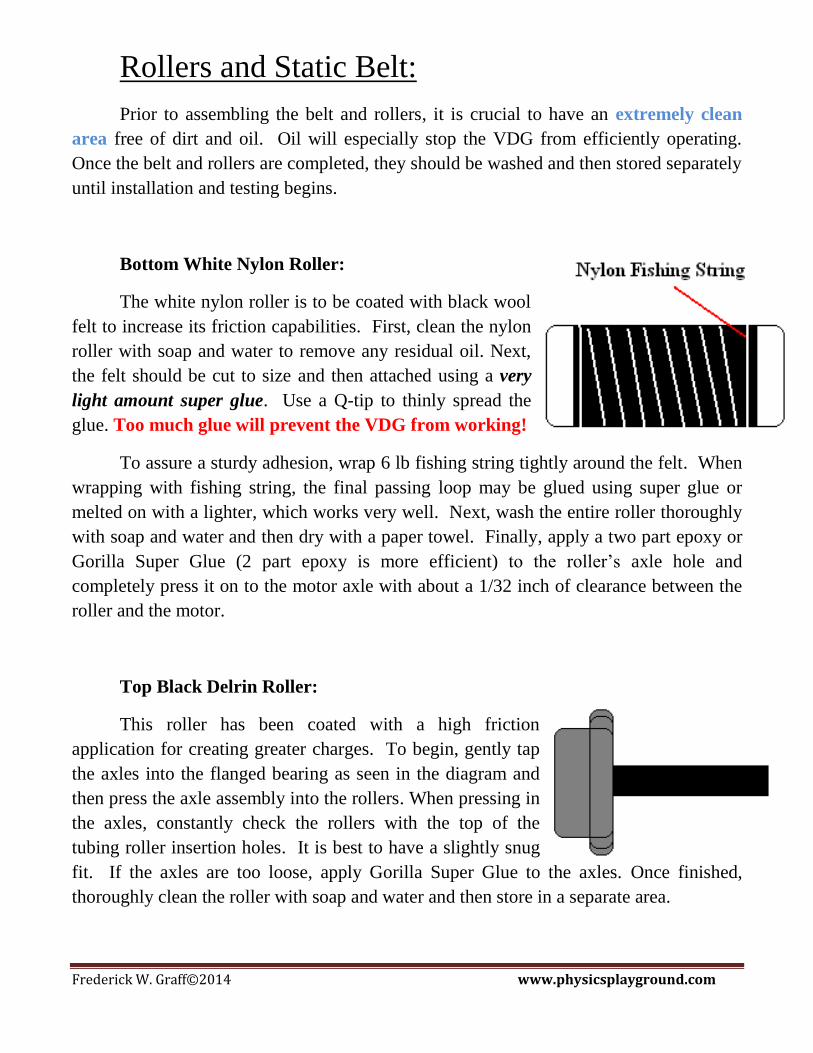
Bottom White Nylon Roller:
The white nylon roller is to be coated with black wool
felt to increase its friction capabilities. First, clean the nylon
roller with soap and water to remove any residual oil. Next,
the felt should be cut to size and then attached using a very
light amount super glue. Use a Q-tip to thinly spread the
glue. Too much glue will prevent the VDG from working!
To assure a sturdy adhesion, wrap 6 lb fishing string tightly around the felt. When
wrapping with fishing string, the final passing loop may be glued using super glue or
melted on with a lighter, which works very well. Next, wash the entire roller thoroughly
with soap and water and then dry with a paper towel. Finally, apply a two part epoxy or
Gorilla Super Glue (2 part epoxy is more efficient) to the roller’s axle hole and
completely press it on to the motor axle with about a 1/32 inch of clearance between the
roller and the motor.
Top Black Delrin Roller:
This roller has been coated with a high friction
application for creating greater charges. To begin, gently tap
the axles into the flanged bearing as seen in the diagram and
then press the axle assembly into the rollers. When pressing in
the axles, constantly check the rollers with the top of the
tubing roller insertion holes. It is best to have a slightly snug
fit. If the axles are too loose, apply Gorilla Super Glue to the axles. Once finished,
thoroughly clean the roller with soap and water and then store in a separate area.
Frederick W. Graff©2014 www.physicsplayground.com
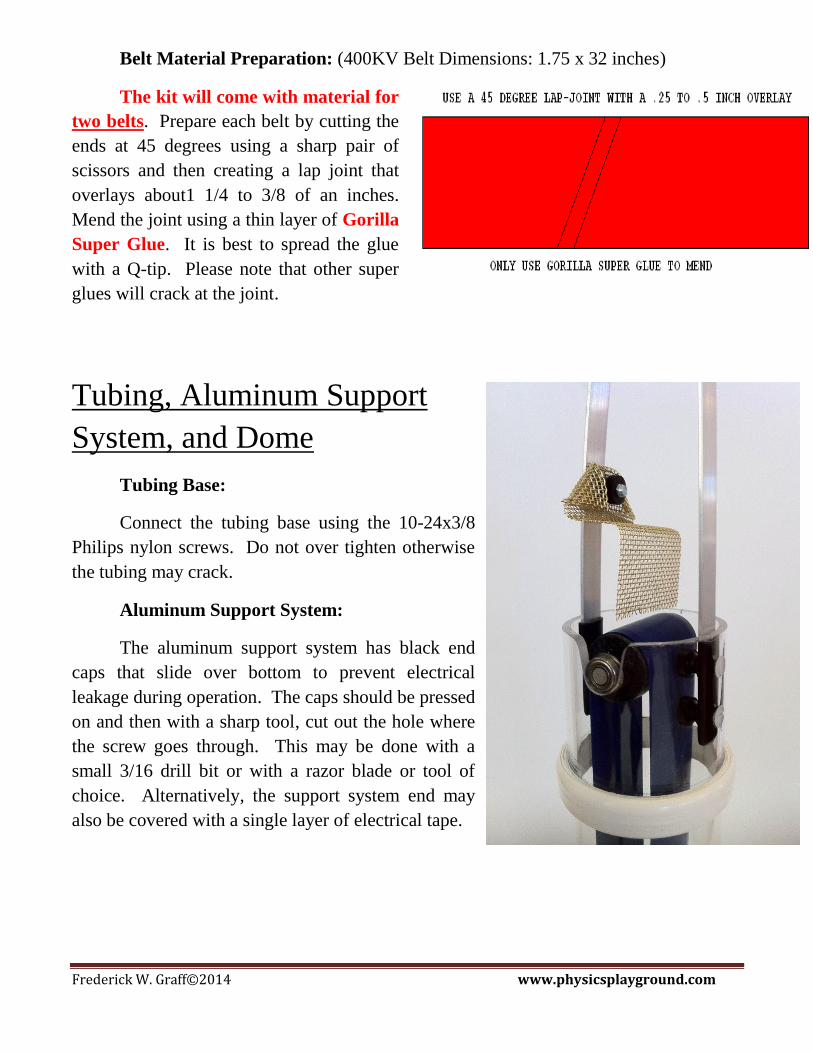
Belt Material Preparation: (400KV Belt Dimensions: 1.75 x 32 inches)
The kit will come with material for
two belts. Prepare each belt by cutting the
ends at 45 degrees using a sharp pair of
scissors and then creating a lap joint that
overlays about1 1/4 to 3/8 of an inches.
Mend the joint using a thin layer of Gorilla
Super Glue. It is best to spread the glue
with a Q-tip. Please note that other super
glues will crack at the joint.
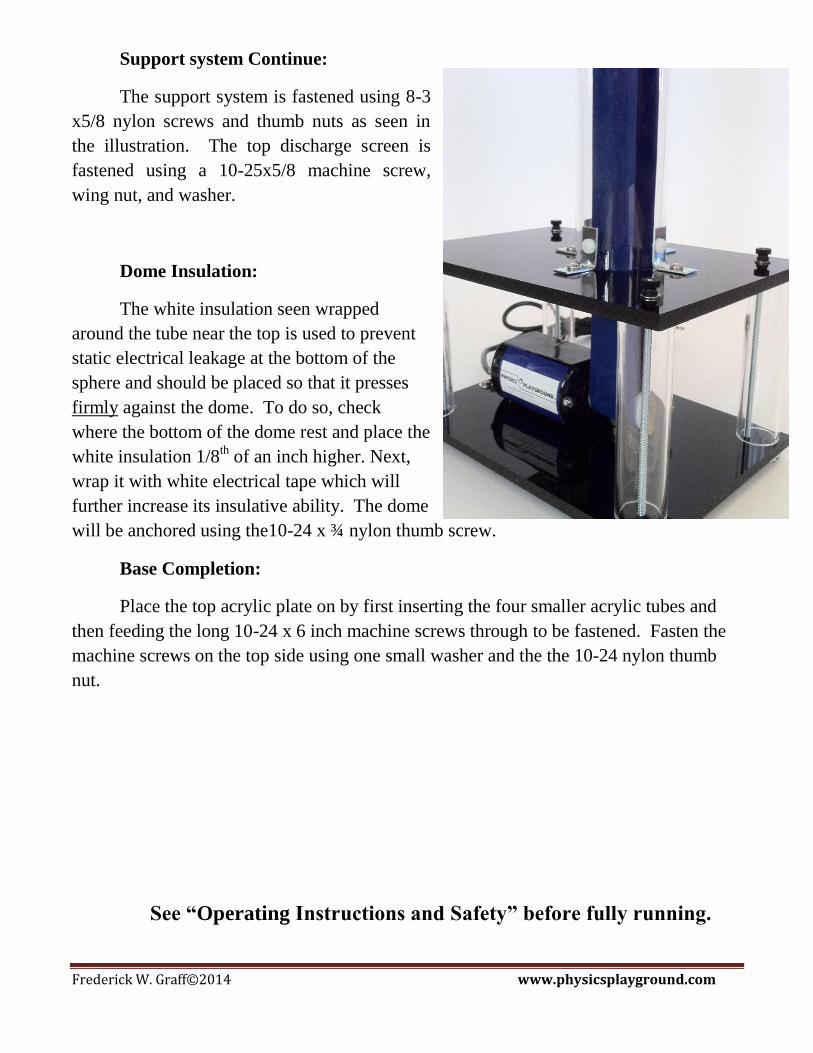
Tubing, Aluminum Support
System, and Dome
Tubing Base:
Connect the tubing base using the 10-24x3/8
Philips nylon screws. Do not over tighten otherwise
the tubing may crack.
Aluminum Support System:
The aluminum support system has black end
caps that slide over bottom to prevent electrical
leakage during operation. The caps should be pressed
on and then with a sharp tool, cut out the hole where
the screw goes through. This may be done with a
small 3/16 drill bit or with a razor blade or tool of
choice. Alternatively, the support system end may
also be covered with a single layer of electrical tape.
Frederick W. Graff©2014 www.physicsplayground.com
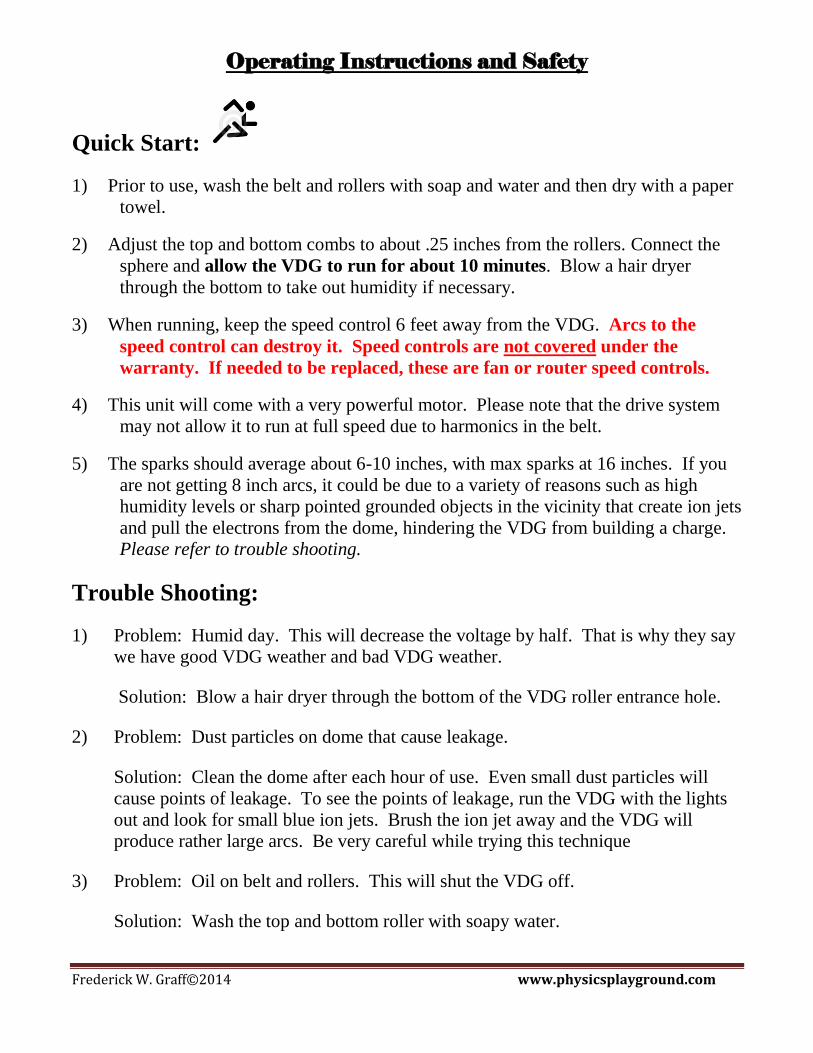
Support system Continue:
The support system is fastened using 8-3
x5/8 nylon screws and thumb nuts as seen in
the illustration. The top discharge screen is
fastened using a 10-25x5/8 machine screw,
wing nut, and washer.
Dome Insulation:
The white insulation seen wrapped
around the tube near the top is used to prevent
static electrical leakage at the bottom of the
sphere and should be placed so that it presses
firmly against the dome. To do so, check
where the bottom of the dome rest and place the
white insulation 1/8th of an inch higher. Next,
wrap it with white electrical tape which will
further increase its insulative ability. The dome
will be anchored using the10-24 x ¾ nylon thumb screw.
Base Completion:
Place the top acrylic plate on by first inserting the four smaller acrylic tubes and
then feeding the long 10-24 x 6 inch machine screws through to be fastened. Fasten the
machine screws on the top side using one small washer and the the 10-24 nylon thumb
nut.
See “Operating Instructions and Safety” before fully running.
Frederick W. Graff©2014 www.physicsplayground.com
Operating Instructions and Safety
Quick Start:
1) Prior to use, wash the belt and rollers with soap and water and then dry with a paper
towel.
2) Adjust the top and bottom combs to about .25 inches from the rollers. Connect the
sphere and allow the VDG to run for about 10 minutes. Blow a hair dryer
through the bottom to take out humidity if necessary.
3) When running, keep the speed control 6 feet away from the VDG. Arcs to the
speed control can destroy it. Speed controls are not covered under the
warranty. If needed to be replaced, these are fan or router speed controls.
4) This unit will come with a very powerful motor. Please note that the drive system
may not allow it to run at full speed due to harmonics in the belt.
5) The sparks should average about 6-10 inches, with max sparks at 16 inches. If you
are not getting 8 inch arcs, it could be due to a variety of reasons such as high
humidity levels or sharp pointed grounded objects in the vicinity that create ion jets
and pull the electrons from the dome, hindering the VDG from building a charge.
Please refer to trouble shooting.
Trouble Shooting:
1) Problem: Humid day. This will decrease the voltage by half. That is why they say
we have good VDG weather and bad VDG weather.
Solution: Blow a hair dryer through the bottom of the VDG roller entrance hole.
2) Problem: Dust particles on dome that cause leakage.
Solution: Clean the dome after each hour of use. Even small dust particles will
cause points of leakage. To see the points of leakage, run the VDG with the lights
out and look for small blue ion jets. Brush the ion jet away and the VDG will
produce rather large arcs. Be very careful while trying this technique
3) Problem: Oil on belt and rollers. This will shut the VDG off.
Solution: Wash the top and bottom roller with soapy water.
Frederick W. Graff©2014 www.physicsplayground.com
4) Problem: Belt is not dry enough after washing. This will shut the VDG off.
Solution: Blow hot air up through the bottom of the tower while running.
5) Problem: Pointed metal objects around the VDG will cause it leak.
Solution: The VDG cannot be around pointed objects because they will
prematurely pull charge from the dome and not allow it to build to its maximum
potential. Keep the VDG located in open space.
6) Problem: Belt begins to rub on the combs at very high speeds.
Solution: Once the belt develops a large amount of ware, it will loosen and
possibly brush the combs during operation. This will indicate that it is time to
change the belt. These belts are made from a latex material and will break down in
UV light, therefore when finished using the VDG, take off the belt and place it in a
dark location. These belts should last a very long time if stored correctly.
VDG Maintenance:
1) Do not allow the belt to come in contact with the combs during operation in order to
maximize the belt’s life.
2) VERY IMPORTANT: Latex will oxidize when in the presence of ozone or UV light.
The ozone is inevitable due to the voltage produced however the UV will inflict a
significant amount of damage over time, therefore always store the belt in a dark place
when not in use.
3) Never clean with alcohol or acetone due to sever cracking of the acrylic.
4) The VDG belt and rollers may be cleaned with dish soap and water only. Try to avoid
water contact with the bearings.
5) All parts of the VDG charging system (dome, belt and rollers, and tower should be
cleaned every 2 hours of run time.
Frederick W. Graff©2014 www.physicsplayground.com
VDG Safety:
1) VDG’s should not be used around people with heart condition or pacemakers.
2) Be careful not to make items that will act as high voltage capacitors. The current
from the VDG’s are fairly safe, however when the current is allowed to store at
such high voltages they can become lethal.
3) Larger VDGs will produce welts from prolong exposure to arcs.
4) Keep away from all electronics.
5) Do not plug into outlets that are connect to other sensitive electronics.
6) Operate in well ventilated areas due to the ozone produced.
7) Avoid making human chains.
8) Never touch the speed control while handling the VDG during operation otherwise
will ruin the control. The control must always be kept 6 feet from the VDG. Speed
controls are not covered under warranty.
Experimenter Ideas:
1) Insulate yourself and touch the VDG while pointing at various objects in the room
to place a charge on. When done to a chandelier it will cause arcs within the chain.
2) Insulate and charge yourself with 700,000V and then step off of the insulated
material and experience the feeling of your body just electrically shut off from the
field.
3) Wrap the bottom roller with a metallic coating and force feed it with a
15,000V charge to induce higher currents. These VDG are designed to do so.
(Dangerous)
4) Wrap a balloon in foil and then hang it from a string attached to the ceiling so that
it can touch the dome. Turn on the VDG and watch the outcome.
Frederick W. Graff©2014 www.physicsplayground.com
5) Take two pie pans and attach a positive and negative lead from the VDG to each
pan. Next place small foil leaves between the pans or string. Very cool to see!
6) Bring fluorescent tubes near the VDG. This makes a great visual for examining
electric fields. The tube will begin to glow at 5 feet away.
7) Charging Lynden Jar and high voltage beer cup capacitors (Dangerous)
8) Place pie pans on the generator and watch them fly.
9) Static electricity motors and ion jets.
10) Just insulate yourself to feel your entire body light up from being immersed in the
320,000V electric field. ABSOLUTELY AWESOME!!! However, if someone
touches you....ouch! This seems to be my students favorite thing to do especially
with the x-large 700KV VDG where they will develop 8 inch arcs coming off of
them when approached. Yes, this is a crowd pleaser!!!
All of these demos are extremely fun and exciting to do, however
as in every situation when experimenting, please consider
all dimensions of safety. Please note that this item is not a toy.
Use at your own risk
________________________________________________________________________
Warranty: Physics Playground generators and high voltage
equipment are covered under a one year warranty accept for static
belts and speed controls (or AC to DC converter power supplies)
Signs of rough use such as dropping, over tightening hardware, and
exposure to caustic chemicals will dismiss the equipment from
eligibility of the warranty.
Prior to sending the replacement part, the buyer must email a photo
of the damaged part to [email protected] for verification.
All replacement parts will be shipped within 4 business days.
www.physicsplayground.com
Frederick W. Graff©2014 www.physicsplayground.com
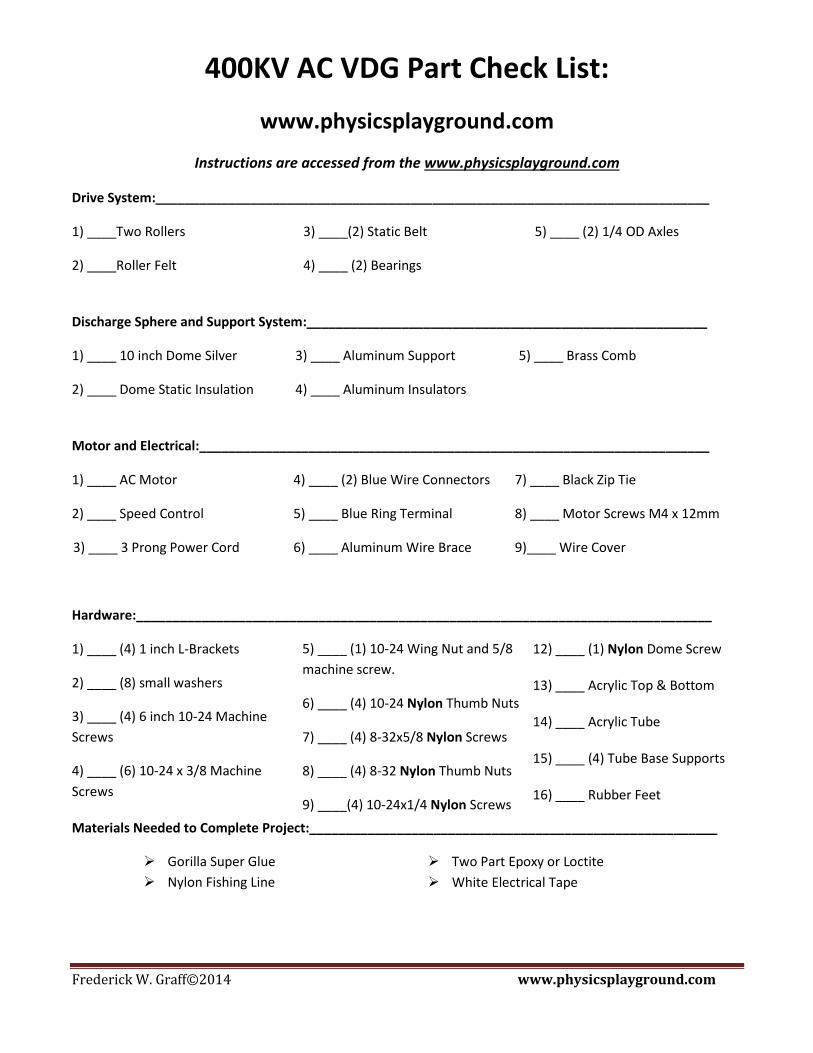
400KV AC VDG Part Check List:
www.physicsplayground.com
Instructions are accessed from the www.physicsplayground.com
Drive System:____________________________________________________________________________
1) ____Two Rollers
2) ____Roller Felt
3) ____(2) Static Belt
4) ____ (2) Bearings
5) ____ (2) 1/4 OD Axles
Discharge Sphere and Support System:_______________________________________________________
1) ____ 10 inch Dome Silver
2) ____ Dome Static Insulation
3) ____ Aluminum Support
4) ____ Aluminum Insulators
5) ____ Brass Comb
Motor and Electrical:______________________________________________________________________
1) ____ AC Motor
2) ____ Speed Control
3) ____ 3 Prong Power Cord
4) ____ (2) Blue Wire Connectors
5) ____ Blue Ring Terminal
6) ____ Aluminum Wire Brace
7) ____ Black Zip Tie
8) ____ Motor Screws M4 x 12mm
9)____ Wire Cover
Hardware:_______________________________________________________________________________
1) ____ (4) 1 inch L-Brackets
2) ____ (8) small washers
3) ____ (4) 6 inch 10-24 Machine
Screws
4) ____ (6) 10-24 x 3/8 Machine
Screws
5) ____ (1) 10-24 Wing Nut and 5/8
machine screw.
6) ____ (4) 10-24 Nylon Thumb Nuts
7) ____ (4) 8-32x5/8 Nylon Screws
8) ____ (4) 8-32 Nylon Thumb Nuts
9) ____(4) 10-24x1/4 Nylon Screws
12) ____ (1) Nylon Dome Screw
13) ____ Acrylic Top & Bottom
14) ____ Acrylic Tube
15) ____ (4) Tube Base Supports
16) ____ Rubber Feet
Materials Needed to Complete Project:________________________________________________________
Gorilla Super Glue
Nylon Fishing Line
Two Part Epoxy or Loctite
White Electrical Tape