Embed Size (px)
Citation preview

© Jim McCarthy 2007 - All rights reserved
4.
CONTENTS Some notes from the Author - - - - - 3. CONTENTS - - - - - - - 4.
Foreword - - - - - - 6. About the Author - - - - - - - 6. HOW TO USE THIS BOOK - A WORD ON TECHNIQUE 7. SECTION 1. - TECHNIQUE PRINCIPLES A General Technique Philosophy. - - - - - 8. Stick and Body Terminology. - - - - - - 9. Systems of Movement -General Principle of Body Movement. - 10. -Finger Pivot. - - - - - 11. -Wrist Pivot. - - - - - 11. -Elbow Pivot. - - - - - 12. -Combining the Systems. - - - - 12. Basic Body Position -Standing - - - - - - 14. -Sitting - - - - - - 15. Two Different Grips - Traditional vs Matched Grip. - - - 16. -The Traditional Grip - - - 18. -Finger Control for Traditional Grip. - 21. -Matched Grip - - - 22. -Common Errors in Matched Grip - 26. Dynamics -The Importance of Dynamics - - - - - 30. -Stick Speed & Volume - The Relationship. - - - 31. -Stroke Height & Volume - The Relationship. - - 32. -Playing Speed & Volume - The Relationship. - - 34. -Musical Context - How loud is loud? - - - - 35. -Different Movement Types and Tone Qualities. - - 36. SECTION 2 - TYPES OF STROKE The Natural Rebound Principle AND the Piston Stroke. - - 37. -The Full Stroke & Tap Stroke. - - 39. Changing Stroke Heights. -The Down Stroke. - - - - 40. -The Up Stroke. - - - - 41. More Advanced Strokes and Technique. -More on Elbow Movement. 42. -The “Elbow Snap”. - - - 43. More on Finger Movement. -Active Finger Control - - - 44. -Passive Finger Control - - - 45. -More Notes on Finger Control - - 46. -The “Buzz Stroke” and ”Finger Snaps” 47.

© Jim McCarthy 2007 - All rights reserved
5.
SECTION 3 - ESSENTIAL RUDIMENTS & EXERCISES -More on the Buzz-Roll - - - - - 48. Working Specific Pivot Points. -Wrists. - - - - - 49. -Fingers. - - - - 50. -Elbows. - - - - 52. -Combinations. - - - - 53. Building up the Weaker Hand. - - - - - - - 54. Some Basic but Essential Rudiments (Movement by Movement) - - 56. Putting Rudiments Together - Some Good Practise Combinations. - - 58. Advanced Rudiment Technique - Some Simple Rudiments at Much Higher Speeds! 60. SECTION 4 - THE DRUM KIT Setting Up a Drum Kit for More Speed & Control. - - - 64. Efficient Movement Around The Drums -Positioning the arms - - 70. -Linear Movement VS Independence. - - 73. -Sticking Patterns & Rudiments. - - 74. Technique for the Feet. -Bass Drum Pedals - - - - - 77. -Some Notes on the High Hat. - - - 80. SECTION 5 - SPECIAL TECHNIQUES FOR SOUND & SHOW Techniques for different sounds. -Playing near the Edge. - - - - - - 82. -Playing on the Rim AND Rimshots. - - - - 83. -Rimclicks. - - - - - - - - 84. -Stick on Stick. - - - - - - - 85. -Pressing or Dampening the Head. - - - - 86. -The Stick Rub AND The Finger Vibrate & The Moose Call. 87. Techniques for Visual Effect and Showmanship. -Twirling. - - - - - - - - 88. -Spinning. - - - - - - - - 89. -Butting AND The “Twirl-Over” or “Grip-Over”. - - 90. -Backsticking. - - - - - - - 92. -The “Windscreen Wiper” - - - - - 94. -Stick Bouncing. - - - - - - - 96. -The “Flip” and “Toss” - - - - - - 98. -The “Flip-Over” and “Toss-Over” - - - - 99. -The “Flip-Across” and “Toss-Across” - - - 100. SECTION 6 - PRACTISING AND PERFORMANCE Hints on Practising. - - - - - - - - - 102. Practising and Preparing for a Performance. - - - - - 104. Some Things to Remember. - - - - - - - - 106.

© Jim McCarthy 2007 - All rights reserved
SECTION ONE - TECHNIQUE PRINCIPLES
10.
SYSTEMS OF MOVEMENT General Principle of Body Movement.
The following section is from the viewpoint of the matched grip player, though with a little thought, the traditional grip player should be able to apply some of the general principles to the left hand as well. If you are not sure what matched grip and traditional grip are, then you will find out about that later in this book. When discussing the movement of drumsticks, it’s common to talk about moving them up and down, but strictly speaking this is not an accurate description. In fact the tip of the drumstick moves in a circular motion. If we imagine the tip of the drumstick as a ball tied to the end of a piece of string which we are swinging downwards towards a drum, we can see that the ball travels along a quarter circle arc. The centre of the circle is pivot point which acts just like a door hinge.
The spot on the drumstick that we grip between our thumb and finger is called the FULCRUM - it is the pivot point or “hinge” point of the stick. The fulcrum is the bit of the stick that doesn’t move. Imagine the drumstick as a see-saw out in the playground - you can see from the picture that the fulcrum is the hinge point, and either end of the stick moves in a circular motion around it. Obviously when playing a drum we don’t have the fulcrum in the middle of the stick - we have it further towards the butt of the stick, so the tip moves in a much bigger circle. There are actually three pivot points from which we can get the stick moving in this quarter circle motion. The first is from the fulcrum of the grip as just discussed, but we can also use the wrist joint as the pivoting hinge or the elbow joint.
Like a ball on a string.
Fulcrum

© Jim McCarthy 2007 - All rights reserved
11. SECTION ONE - TECHNIQUE PRINCIPLES
The Fulcrum is the pivot point.
Finger Pivot
The first way we can move the stick is by making the fulcrum of our grip, the pivot point (centre of the circle), and using our fingers to propel the stick. This way of playing is often used in conjunction with the other pivot points. When using finger control all the fingers work to pull the butt of the stick upwards towards the groove of the hand. The stick pivots around the fulcrum, so that the tip is propelled downwards towards the drum. Finger control uses very small muscle groups, and there is very little mass (or weight if you like) being moved by those muscles, so is excellent for fast playing. We
will usually use finger control anytime we have to play more than two notes in a row with one hand. There are two problems associated with use of the fingers. The first is the lack of power and stamina which is inherent with the use of any small muscles. This means that finger control is not so good for loud or continuous playing, but excellent for short bursts of speed at medium volume or below. The second is that the fingers can only move the stick in the downwards direction. This means that we have to allow the stick to rebound from the drum before we can begin the next finger stroke. We cannot let the butt of the stick touch the palm of the hand, as it will absorb the kinetic (movement) energy from the stick that would otherwise cause it to bounce back. This can create problems at very soft dynamics, as there tends to be very little, or no rebound anyway.
Wrist Pivot
The second way we can move the stick is to make the wrist joint into the pivot point. This is by far the most important tool we have for stick movement, and in general playing, is responsible for most of the notes we play.
The muscles required to move from the wrist are similar to those that move the fingers, and are in fact part of the same group. The disadvantage of pivoting at the wrist is that we are now required to move the considerable extra mass of the hand as well as the stick, which slows the movement a little bit. It is also more difficult to allow the stick to rebound smoothly. There are some major advntages to using the wrist though. Firstly it requires much less tension in the fulcrum (which uses the smallest muscle group of all) so this means the wrist has more stamina. It also has more power as the circle of movement is slightly bigger. The major advantage over finger control though, is that the wrist doesn’t rely on rebound to move the stick upwards, so it allows much more control at really soft dynamics.
Because of the muscle group similarities, the wrist is often used in conjunction with the fingers, although for practise purposes we should spend plenty of time using the wrist while holding the butt of the stick into the groove of the hand, so the wrist is not helped by finger control.
The wrist joint is the pivot point
The Fulcrum is the pivot point.
© Jim McCarthy 2007 - All rights reserved
SECTION ONE - TECHNIQUE PRINCIPLES
22.
The Matched Grip
The matched grip is very effective because it utilises all the sections of our hands in a very natural way. The most important part of this grip is the "fulcrum" or "pivot point". This is where we actually hold on to the stick, and is in most cases the ONLY part of our hand which actually grips it.
Getting this fulcrum correct is the single most important thing you can do for your grip. There are two fundamental points which need to be addressed: Which parts of the hand are creating our fulcrum, and which part of the stick the fulcrum should hold.
With matched grip we hold the stick between the thumb and first finger, with the butt of the stick on the palm side of the hand. The stick should contact the tip of the thumb using the
whole of the fleshy pad under the thumbnail. The first finger should contact the stick behind the middle knuckle (the side closest to the palm) and on the side of the finger. By having just these single points of contact either side of the stick, we create a good hinging point for the stick to rotate around. (Remember the picture with the stick as a see-saw?) Imagine just like we would have with a see-saw, a steel pin going through our thumb, the stick and our finger. This pin is the axis of rotation of the stick.
So where on the stick should this imaginary pin penetrate? The “magic spot” on the stick where we place the fulcrum is called the “centre of balance”, or sometimes the “balance point”, and it is usually about two fifths of the stick’s length from the butt end. This varies a little however, depending on the shape and composition of the drumstick model.
We call this spot the “centre of balance” because the stick will actually balance at that point as the stick is bouncing, without even being held. You can experiment with the balance point by using a round pen or pencil, or even your finger - and simply resting the stick on it instead of gripping it. Using the other hand, try bouncing the tip of the stick on a flat drum or practise pad, just like you might bounce a basketball. You will find that if you place the pen too far back towards the butt of the stick, you will get very little rebound as there is too much weight at the tip. If you just lift and drop the stick in this position, you will only get about one or two bounces at best. If we place the pen too far forward - say in the middle of the stick - there is not enough weight at the tip, and dropping the stick produces no result at all!
Imagine a steel hinge pin here!
The stick rotates around the pin in THIS direction.
Bouncing the stick balanced on a pen - just like bouncing a basketball! (see page 37)
Balance point of the stick.
© Jim McCarthy 2007 - All rights reserved
35. SECTION ONE - TECHNIQUE PRINCIPLES
Musical Context - How loud is loud?
I’m continually telling my students to pay more attention to dynamics. Even those students who thoroughly understand all the ideas in the previous few pages, and have good control of their playing volume - even those students, seem to regularly have difficulty finding the appropriate dynamic levels. The essential problem many of us have with dynamics, is that they are a very subjective thing. You can use a sound level meter to measure how much energy a sound has in decibels, but that means very little to the listener in a musical situation. Some types of sound SEEM louder than others even though they may measure the same, and two identical sounds may SEEM quite different if placed in different contexts. Also our imagination can effect the way we subjectively hear the volume of notes - particularly when stimulated visually. There are essentially three issues I regularly discuss with students concerning dynamics. ONE: Music and sound is interpreted in our brain. If our brain expects a certain audible input from the ears, it tends to imagine it even if it is not there. Our brains have a way of “filling in the blanks” for us. If we see a drummer on stage using big theatrical body movements to produce the notes and perhaps dancing whilst playing, we expect a loud sound. The same drummer might use minimal movement instead to play the drum with exactly the same volume, but because we don’t SEE the big movement, we often hear the sound as softer. This is just one way in which our imaginations can fool us. One of the biggest issues I encounter with musicians - particularly students - is that of dynamic changes not being exaggerated enough. I still fall victim to this myself on occasion - its very easy to do! The problem is, that as performers we already know what the dynamic changes are supposed to be. We already know which notes are loud and which ones are soft, so we don’t actually need our ears to supply the information. Often we might imagine we are performing significant changes in volume, and because we already know where they are, we can hear them easily. The listener has only their ears though, and they might have real trouble discerning any differences at all. Recording your performances is a wonderful way of learning about your own abilities in this area. I have often received quite a shock when listening back to a recording of my own performance - realizing that things I thought were really obvious, were in fact not so clear at all! TWO: The subjective loudness of a note depends on it’s musical context. For example, a snare-drum hit that would be considered soft in a rock concert, might be considered very loud indeed if played with a small orchestra or jazz group. It also may depend on the position in a piece of music. eg. a note played in the middle of ten minutes of other notes of the same volume would sound pretty average - medium volume - our brain/ears soon adapt to the “general” level of sound. The same note played next to a lot of much softer notes would tend to really stand out! It sounds like a much louder note than it really is. THREE: We tend to hear dynamic levels in music, as an average of all the notes we have in a section. This might be within a group - for example if nine out of ten musicians in a group are playing strongly, but one is playing softly, we tend to hear the overall effect - LOUD! If nine out of ten are playing softly but one is playing strongly - we still hear the average effect - LOUD! A different way this averaging works might be within a passage of notes. Imagine a section of snare-drum music which is entirely semiquavers with some of them accented. The dynamic marking is mf so overall we have to make the passage sound mf, but does this mean the accents should be mf, or the other notes should be mf? It all depends on how many of the semiquavers are accented. If it’s just a few accents, then the other notes should be mf and the accents stronger - on average it still pretty much sounds mf. If most of the are accents, then doing it this way will just make it sound too loud, so the accents need to be played mf, and the other notes at something less.

© Jim McCarthy 2007 - All rights reserved
SECTION TWO - TYPES OF STROKE
44.
More on Finger Movement.
We have already discussed finger movement a little throughout the book so far - particularly on page eleven, but if we want to have really good control of the stick, a more thorough understanding of finger control is essential. There are essentially two completely different ways that the fingers can be used to control the movement of the stick - lets call them “ACTIVE finger control”, and “PASSIVE finger control.”
Active finger control is what we have mostly disscussed so far, and it is where the fingers themselves are the main driving force behind the stick movement. The stick is pivoting at the fulcrum at the tip of the thumb, and the fingers are driving the butt of the stick inwards towards the palm of the hand. This creates the downwards movement of the stick tip, but the upwards movement is entirely reliant on the natural rebound so its vital with active finger control, that the but of the stick not be allowed to actually touch the palm. This would mean that the energy of the stick goes into the palm rather than into the drum, and there will be no rebound from your palm! The main skill involved with active finger control, is that of making the driving part of the finger motion quickly and at the start of the stroke, then most importantly get them to stop driving and be relaxed enough in the rebound phase of the stroke, to allow the rebound to occur unimpeded.
A great way to begin the development of active control, is with a practise pad turned sideways. Have a look at the picture on this page, and copy the position of the pad and the hand exactly. With the pad turned sideways, you can do one stroke at a time without having to repeat the motion straight away, because gravity will not be working in the same direction as the stick movement, This also means that you can practise the motion more slowly. Once you can sustain the bouncing action smoothly and continuously, then its time to position the practise pad normally and try the action vertically.
A fantastic exercise for developing both our finger movement and even more importantly, our fulcrum strength and control, - is using one finger at a time. Once again, it is a good idea to use the sideways practise pad in the early stages. Start by keeping the lower three fingers basically straight, and using just the tip of the index finger to propel the stick. (Remember the stick should have its fulcrum BEHIND the middle knuckle - if its not, then you won’t be able to bent the finger tip enough to do this.) Once you are competent with this try using only the second finger, then the third, then even the more difficult little finger. Whilst this exercise is good for building the finger driving muscles, we would not usually use one finger at a time like this in our general playing, and the main benefit is that every time we change fingers, the fulcrum has to shift positions slightly. This is great for fulcrum development. To increase the difficulty, try playing four strokes with each finger using finger 1 then 2,3,4,3,2,1 etc or maybe 1,2,3,4,1,2,3,4 etc - keeping the bouncing action continuous. With that in control you can proceed to three strokes with each finger, then two, then one. This really works the fulcrum, because it has to adjust position all the time.

© Jim McCarthy 2007 - All rights reserved
ADVANCED RUDIMENT TECHNIQUE Some Simple Rudiments at Much Higher Speeds!
This section looks at what happens when we start using some of our basic motions much faster. As we combine the fundamental movements to create patterns of notes (or “rudiments” if you like!), the perfect vesions of the movements actually need to be compromised to varying degrees. Each note effects the one next to it a little bit. The basic principle here is that, at much faster tempos, it is not so much that there is no time for excess stick movements (although there certainly isn’t!), but that there is no time for excess muscle movements! The answer to this problem lies in both the type and timing of the muscular actions we DO use. Essentially we aim to get more than one note from each action. Going through the following example rudiments will give you a start at thinking along these lines - remember though, that this is really only applicable as we reach our maximum physical potential.
Single Paradiddle In the end analysis, performance of this rudiment comes down to relaxing the grip and joints and as much as possible letting the sticks do what they want to do anyway. All of the active muscle movement will end up being arm movement, with the wrists and fingers just controlling the rebound in a passive fashion. Try this experiment: Hold the stick loosely at it’s balance point between two fingers, and have no other part of your hand touching the stick. Let the stick fall to the drum head from about 20cm and allow it to bounce twice. (hitting three times all together) Listen carefully to the rhythm produced in these three notes. It should be fairly close to this: The first note will be the loudest, and bounce the highest. All successive bounces will be softer and lower - getting faster as they lose height. Compare this to one hand of the paradiddle. The rhythm is so close, that at high speeds, if we just think of placing the accents, the other notes should automatically occur providing we are relaxed, and have practiced the rudiment sufficiently at slow speeds. This may sound obvious and easy, but the reality is, that most of us will find it quite difficult to perform the double stroke 100% from natural rebound. This is partially because we get used to thinking of the first note as a “down stroke” where we actually try to kill the rebound. The other main obstacle is one of co-ordination. We need to be able to co-ordinate the passive controlling of the rebound from the original accent (which obtains the double stroke), with the simultaneous large upwards movement of the other arm performing the second note of the rudiment.
SECTION THREE ESSENTIAL RUDIMENTS & EXERCISES
60.

© Jim McCarthy 2007 - All rights reserved
SECTION FOUR THE DRUM KIT
72.
Another example of when less than perfect hand position can be used to make upper body movement easier, is when the ideal position for one hand makes movement of the other hand difficult. The following example is a particular type of pattern which often presents movement problems for drummers. These problems occur when we are required to move between drums, playing a single note on each. Try this example on a standard 5 piece drum kit setup: Play it using single strokes - RLRLRLRL etc... If we position our hands similarly as for the exercises on the previous page, we are going to have trouble, because the movement of one hand must cross over the positions of the other. Then solution is to position our hands more widely, getting the elbows up and out from the body. The idea is to make a “hole” or space inside the crook of the arm for the other stick to move into. Rather than having the hands in a central position with the sticks tending to point outwards towards each drum - we want the hands away from the center where the movement path of the hands is, and the sticks tending to point inwards towards each drum.
These hand positions are less than ideal, but make it much easier to avoid hitting yourself on the forearms or thumbs! This first picture shows how the normal hand positions can get in the way of the required movement path. When the movement path and the hand position take up the same space - you have just hit yourself on the hand - ouch! In particular there tends to be a problem after the floor tom note, as the right hand moves to hit the snare drum again. In general, it is good movement to have one hand moving to the next drum at the same time as the other hand is playing its note. In this case however, that would mean the right hand crosses back over the left to the snare, while the left is playing the floor tom. This makes it very awkward for the left hand to get back up to the first tom. The answer is to hold the right hand out wide above the second tom while the left plays the floor tom, and only start the right hand movement to the snare once the left hand movement to the second tom has already begun. This will allow the left hand movement path to be straight - without an inefficient wide circle around the snare drum. This second picture to the left, shows a better position for the hands when they are not moving to the same drums. The hands and elbows are wider. Notice how the hand and forearm positions at each drum are no longer anywhere near the movement path of the other hand.
1.
2.
3.
4.
1.
2.
3.
4.
© Jim McCarthy 2007 - All rights reserved
TECHNIQUES FOR DIFFERENT SOUNDS
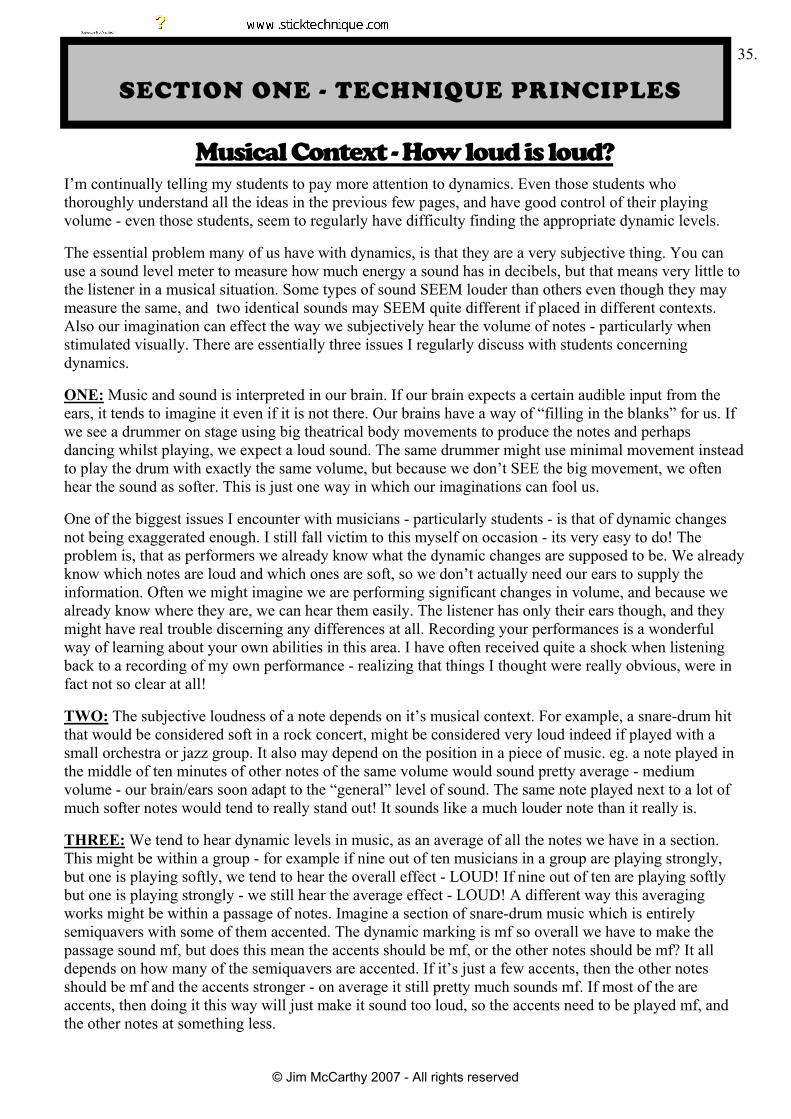
1. Playing Near the Edge The most obvious of all ways to get a different sound from your drum, is to play it in a different spot. Many pieces of music will even specify when they want you to play “in the centre,” and “near the edge.” Whilst playing near the edge of the drum is the most obvious method of varying the sound, it still surprises me how many drummers haven't yet fully understood the differences, so here’s a quick run down. On any drum, playing near the edge makes it easier to play softly. The drum head has more resistance to the stick near the edge, because it is held solidly in position there by the rim. Because there is more resistance, you get less head movement which means less volume from the note. You will also get a different tone. The fundamental mode of vibration that a drum head produces, happens when the centre of the head vibrates up and down. Every time you hit the drum in the middle you will get plenty of this vibrational mode, but you will also get other modes - or harmonics - caused by the skin vibrating in other ways. When you hit the drum near the edge, you don't move the centre of the skin as much, so there is less fundamental, and the sound tends to be made up more from the higher harmonics. Playing near the edge has a particular effect on snare drums. You need to be careful if choosing to “cheat a little” by using the edge of a snare drum for softer notes, because the sound is even more different on a snare. Near the edge of a snare drum you will get much less transfer of energy to the bottom head of the drum where the snares are. This means that if you are playing softly near the edge of a snare, you might not get much - or any - snare sound. The other particular effect you get from the edge of a snare drum, is a note which in musical context sounds longer! The vibration of the snares that you get, is purely that longish buzz which occurs with the harmonics of the bottom head throughout the entire length of the ringing drum note. What you don't get, is the single “snap” that playing in the middle would cause as the snare wires get pushed right off the bottom head and spring back to hit the skin hard one time. This “snap” sound is very short - as indeed is the fundamental tone vibration that causes it. What this means is that the sound we get playing in the middle of the drum is much more articulated. Many times I have heard drummers move to the edge of the snare drum because they have to play a fast section softly. Moving out to the edge does indeed make getting less volume out of the drum easier for them, but unfortunately the fast rhythms they are playing become very indistinct and difficult to make out, because the volume of the snare buzz is almost as loud as the actual contact sound of the stick on the skin! The same type of problem occurs when you loosen the snare wires a little. Looser snare wires will buzz for a little longer, making it much easier to play smooth sounding buzz rolls etc, but any fast rhythms become unclear as the individual notes sound longer and start to run into each other.
SECTION FIVE TECHNIQUES FOR SOUNDS & SHOW
82.

© Jim McCarthy 2007 - All rights reserved
SECTION FIVE TECHNIQUES FOR SOUNDS & SHOW
92.
5. Backsticking.
To play a note with the back end of the stick requires switching to traditional style grip for that note. For sections of music with backsticking, the grip should be moved forward on the stick so the fulcrum is just behind the stick's centre. This will of course make playing much harder, but it is necessary if we want any control and strength with the backstick. In addition to the different gripping point on the stick, the elbows should be lifted a little away from the body so the stick points to the drum more from the sides. Just like the “twirl-over,” backsticking looks better if the stick rotation is left to right rather than front to back.
Start with the stick sideways, and the
elbow away from the body.
When you need to reverse the stick, flick the wrist backwards a little to give the stick momentum. The tip of the first finger should stay on the stick in the same position, whilst you let the butt of the stick come away from the groove of the hand. At the same time, pull the elbow back into the body.
As the tip of the stick goes past vertical to point away from the drum, move fingers three and four to the other side of the stick. The tip of finger three is forming the “platform” position for the traditional grip. Fingers two and three briefly grip the butt end of the stick.
Let the front part of the stick fall back into the gap between the thumb and first finger. The new fulcrum at the base of the thumb is close to the centre of the stick, slightly towards the tip, whilst the back end of the stick is now in the playing position.

© Jim McCarthy 2007 - All rights reserved
93. SECTION FIVE
TECHNIQUES FOR SOUNDS & SHOW
Curl the fingers into their normal “traditional grip” playing positions, and you are ready to play the backstick notes. Many drummers do not take the trouble to learn backsticking properly, rotating their forearms to turn the stick, but not moving the fingers and creating the new working fulcrum position. Without making the grip a proper “traditional” or “normal” grip, it is virtually impossible to play more than one stroke with any strength or control whilst backsticking.
To switch back to the front end of the stick, just reverse the whole procedure. Remember we want to end up with the new fulcrum just behind the middle of the stick, so as you begin to rotate the forearm, let go of the stick with the thumb and grip it between the second and third fingers. Using these fingers, pull the butt of the stick closer in.
As the stick is rotated, the thumb and first finger get ready to grip the stick and create the new fulcrum. Stretch the thumb and first finger down as close to the butt of the stick as possible. This should be behind the centre of the stick. Once the fulcrum is formed with the thumb and first finger, the third and fourth fingers can move back underneath the butt.
As you re-form the completed “normal” grip, the elbow should come back away from the body. The whip like action of the elbow is actually an “elbow snap.” (see page 43.) It is this that actually tends to provide the power of the main “frontstick,” compensating somewhat for the difficult central grip on the stick.