Embed Size (px)
Citation preview
3M™ Command Center
Installation and Upgrade Guide
Copyright 3M, 2015. All rights reserved.
3M™ Command Center Installation and Upgrade Guide, 78-8129-3760-1d
3M is a trademark of 3M.
Microsoft, Windows, Windows Server, Windows Vista and SQL Server are registered trademarks of Microsoft Corporation in the United States and other countries. All other trademarks are the property of their respective owners.
The original instructions in this document were written in U.S. English. All other languages are a translation of the original instructions.
3M™ Command Center Installation and Upgrade Guide
Table of Contents
Change log.......................................................................................................................................................... 5
Introduction and setup overview..........................................................................................................................6
About this guide..............................................................................................................................................6
Chapter 1 – Pre-installation checklist..................................................................................................................7
Chapter 2 – Server installation requirements......................................................................................................8
3M™ Command Center server requirements.................................................................................................8
Operating system.......................................................................................................................................8Processor................................................................................................................................................... 8Memory...................................................................................................................................................... 8Disk space................................................................................................................................................. 8Database server requirements...................................................................................................................9Disk size.................................................................................................................................................... 9Limitations.................................................................................................................................................. 9Security...................................................................................................................................................... 9Connectivity............................................................................................................................................. 10
Application server prerequisites....................................................................................................................10
General.................................................................................................................................................... 10Windows operating system prerequisites.................................................................................................11Windows 2008 R2, Windows 2012, and Windows 2012 R2 prerequisites................................................11Windows 2003 R2 prerequisites...............................................................................................................12Windows 7 prerequisites..........................................................................................................................13Windows Vista prerequisites....................................................................................................................13Installation security requirements.............................................................................................................14Networking requirements.........................................................................................................................15
Command Center application server network requirements.........................................................................16
Node requirements....................................................................................................................................... 16
Node version requirements......................................................................................................................163M™ SelfCheck™ System and 3M™ Intelligent Return and Sorter System Node Requirements................17
Chapter 3 — Installation Procedure..................................................................................................................18
Chapter 4 — Application quick start guide.........................................................................................................21
Chapter 5 — Upgrading your Command Center installation..............................................................................27
Appendix A — Troubleshooting.........................................................................................................................30
Node registration failures..............................................................................................................................30
Node Disconnected Status...........................................................................................................................30
Web application is not responding................................................................................................................30
SQL server is not responding.......................................................................................................................31
Statistics are not updating............................................................................................................................31
Network setup............................................................................................................................................... 31
78-8129-3760-1D © 3M, 2015. All rights reserved. 3
3M™ Command Center Installation and Upgrade Guide
Configuring the SelfCheck Help function and Alert Notifier...........................................................................32
Verify the SelfCheck.................................................................................................................................32Configure the Help function......................................................................................................................34
Appendix B – Installing SQL server...................................................................................................................35
Appendix C – Backing up your Command Center database.............................................................................38
3M-CIMS database backup best practices...................................................................................................38
Perform full backups daily........................................................................................................................38Perform frequent transaction log backups................................................................................................38Backup system databases regularly.........................................................................................................38Practice your recovery.............................................................................................................................38Do not store backups on the same host OS.............................................................................................39Export and purge statistical data that is no longer actively accessed.......................................................39Back up your SQL server database..........................................................................................................39Useful Links............................................................................................................................................. 39Manual backup of 3M-CIMS database using SQL Express 2008 R2, 2012 and 2014..............................40
Appendix D – Command Center migration........................................................................................................41
Move Command Center database to a different SQL server........................................................................41
Move Command Center to a different server................................................................................................41
Appendix E – Re-registering, archiving and moving nodes...............................................................................42
Re-Register nodes........................................................................................................................................42
Archive and move nodes..............................................................................................................................43
Appendix F – Command Center configuration utility.........................................................................................45
Database...................................................................................................................................................... 45
User accounts............................................................................................................................................... 46
Server........................................................................................................................................................... 47
Update server name/address.......................................................................................................................48
Appendix G – WCF configuration utility.............................................................................................................49
Warranty........................................................................................................................................................... 50
3M Service........................................................................................................................................................ 51
Information to gather....................................................................................................................................51
3M Service phone numbers..........................................................................................................................51
3M Library Systems Web Site.......................................................................................................................51
78-8129-3760-1D © 3M, 2015. All rights reserved. 4
3M™ Command Center Installation and Upgrade Guide
Change logUpdated pertinent sections of the guide to reflect the ability to use Windows Server 2012.
78-8129-3760-1D © 3M, 2015. All rights reserved. 5
3M™ Command Center Installation and Upgrade Guide
Introduction and setup overview
About this guideThis guide provides the necessary instructions to install a new instance of the 3M™ Command Center Software or upgrade a previous installation of the Command Center Software (previously referred to as Central Information Management System (CIMS) or Centralized Stats, Status and Configuration Software for 3M™ SelfCheck™ Systems).
If upgrading an existing installation, please begin with Chapter 5 — Upgrading your Command Center installation.
78-8129-3760-1D © 3M, 2015. All rights reserved. 6
3M™ Command Center Installation and Upgrade Guide
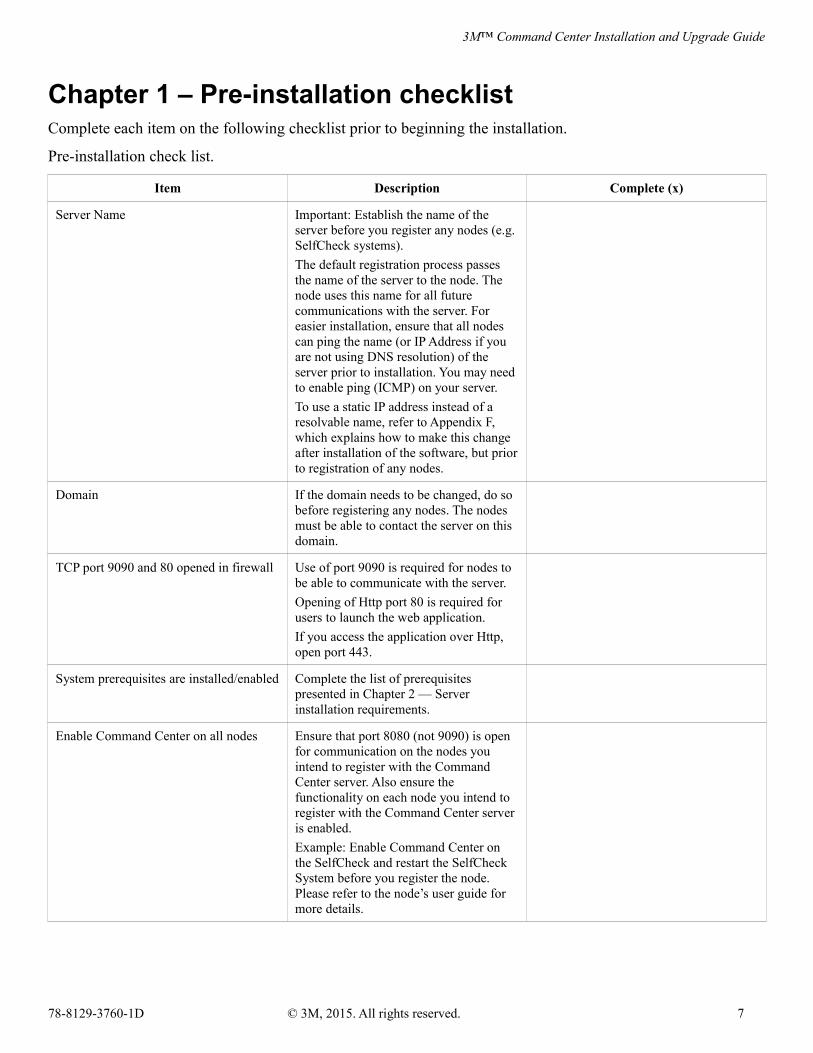
Chapter 1 – Pre-installation checklistComplete each item on the following checklist prior to beginning the installation.
Pre-installation check list.
Item Description Complete (x)
Server Name Important: Establish the name of the server before you register any nodes (e.g. SelfCheck systems).
The default registration process passes the name of the server to the node. The node uses this name for all future communications with the server. For easier installation, ensure that all nodes can ping the name (or IP Address if you are not using DNS resolution) of the server prior to installation. You may need to enable ping (ICMP) on your server.
To use a static IP address instead of a resolvable name, refer to Appendix F, which explains how to make this change after installation of the software, but priorto registration of any nodes.
Domain If the domain needs to be changed, do so before registering any nodes. The nodes must be able to contact the server on this domain.
TCP port 9090 and 80 opened in firewall Use of port 9090 is required for nodes to be able to communicate with the server.
Opening of Http port 80 is required for users to launch the web application.
If you access the application over Http, open port 443.
System prerequisites are installed/enabled Complete the list of prerequisites presented in Chapter 2 — Server installation requirements.
Enable Command Center on all nodes Ensure that port 8080 (not 9090) is open for communication on the nodes you intend to register with the Command Center server. Also ensure the functionality on each node you intend to register with the Command Center server is enabled.
Example: Enable Command Center on the SelfCheck and restart the SelfCheck System before you register the node. Please refer to the node’s user guide for more details.
78-8129-3760-1D © 3M, 2015. All rights reserved. 7
3M™ Command Center Installation and Upgrade Guide
Chapter 2 – Server installation requirementsThis section lists the installation requirements and prerequisites for the 3M Command Center application.
3M™ Command Center server requirements
Operating system
The following operating systems are supported:
• Windows Server® 2012 and Windows Server® 2012 R2 – 64 bit Operating System
• Windows Server® 2008 and Windows Server® 2008 R2 – 32/64 bit Operating System
• Windows Server® 2003 R2 – 32 bit Operating System
• Windows® 7 Professional/Ultimate – 32/64 bit Operating System
• Windows 7 is limited to 10 web connections, so 3M does not recommended it for installations that span more than five locations.
• Windows Vista® Business (SP2) – 32 bit Operating System
Windows Vista is limited to 10 web connections, so 3M does not recommended it for installations that span more than five locations.
Processor
A dual core or better processor is required.
Memory
2 GB RAM or better is required.
Disk space
20 GB or more available hard disk space is required.
Note that this amount is used for the application and application logging. It does not include space required for database storage.
78-8129-3760-1D © 3M, 2015. All rights reserved. 8
3M™ Command Center Installation and Upgrade Guide
Database server requirements
The following database systems are supported:
• Microsoft® SQL Server® 2005 (Express, Standard and Enterprise editions) with service pack 2 and above.
• Microsoft® SQL Server® 2008 (Express, Standard and Enterprise editions) with or without Service Packs.
• Microsoft® SQL Server® 2008 R2 (Express, Standard and Enterprise editions).
• Microsoft® SQL Server® 2012 (Express, Standard and Enterprise editions).
• Microsoft® SQL Server® 2014 (Express, Standard and Enterprise editions).
Disk size
Disk size varies based on the number and type of nodes connected, how long data is stored, and the interval between database backups.
If you do not perform backups, transaction logs grow indefinitely on non-Express SQL databases. If you do not backup your database, you will eventually run out of disk space.
Limitations
While planning for your installation, observe the following limitations.
• SQL Express 2005/2008 is limited to 4GB disk usage, 1GB RAM and 1 Physical Processor
RAM and Processor limitations effect performance when compared to non-Express installations
• SQL Express 2008R2, SQL Express 2012 and SQL Express 2014 are limited to 10GB disk usage, 1GB RAM and 1 Physical Processor
RAM and Processor limitations effect performance when compared to non-Express installations
• SQL Express is not recommended for long term (2 years or more) use on sites with 25 or more nodes connected.
Security
Mixed mode authentication (Windows authentication and SQL Server authentication mode) must be available.
If an SQL Server is already installed that utilizes only Windows authentication, follow the instructions provided in the following link to switch to mixed mode authentication.
http://msdn.microsoft.com/en-us/library/ms188670.aspx
78-8129-3760-1D © 3M, 2015. All rights reserved. 9

3M™ Command Center Installation and Upgrade Guide
Connectivity
If your SQL Server (2005, 2008,2008 R2, 2012, or 2014) resideson a server other than yourCommand Center application(the recommendedconfiguration) server, ensure thatit is configured to allowincoming TCP/IP (or TCP/IP andnamed pipes) connections. Thefollowing example illustrates theconfiguration for SQL Server2005.
Application server prerequisites
General
These prerequisites apply to all Command Center application server installations. The first two are installed by the installation wizard and require no user action.
1. Microsoft .Net 4.0 Framework or later (installed by the installation wizard if not already present).
2. Microsoft Report Viewer control 10.0 (installed by the installation wizard if not already present).
3. Distributed Transaction Coordinator (DTC) service must not be disabled. The service need not be started, but is required to temporarily start the DTC for IIS Virtual directory creation/rollback. The DTC service can be stopped after installation is complete, since it is not required by Command Center.
4. Set CPU, disk and network “sleep” times to “never”.
78-8129-3760-1D © 3M, 2015. All rights reserved. 10
3M™ Command Center Installation and Upgrade Guide
Windows operating system prerequisites
Prerequisites apply to the Command Center installation server. The installation wizard will not proceed until allconditions are met. Once enabled, do not disable these on the Command Center application server.
1. Web Server Role has to be installed (via Server manager, Add Roles) with the following role services (via Server manager, Web Server, Add Role services)
Web Server
• Application Development
➢ .Net Extensibility
➢ ASP.NET
➢ ISAPI Filters
➢ ISAP Extensions
• Common HTTP Features
➢ Static Content
➢ Default Document
• Health Diagnostics
➢ Http Logging
• Security
➢ Windows Authentication
➢ Request Filtering
➢ URL Authorization
Management Tools
• ILS Management Compatibility
➢ ILS Metabase Compatibility
2. The following features must be present (via Server Manager, Add Features).
.NET Framework 3.0 features
• WCF Activation
➢ HTTP Activation
Windows 2008 R2, Windows 2012, and Windows 2012 R2 prerequisites
Web Server Role must be installed (via Server manager, Add Roles) with the following role services (via Servermanager, Web Server, Add Role Services).
78-8129-3760-1D © 3M, 2015. All rights reserved. 11
3M™ Command Center Installation and Upgrade Guide
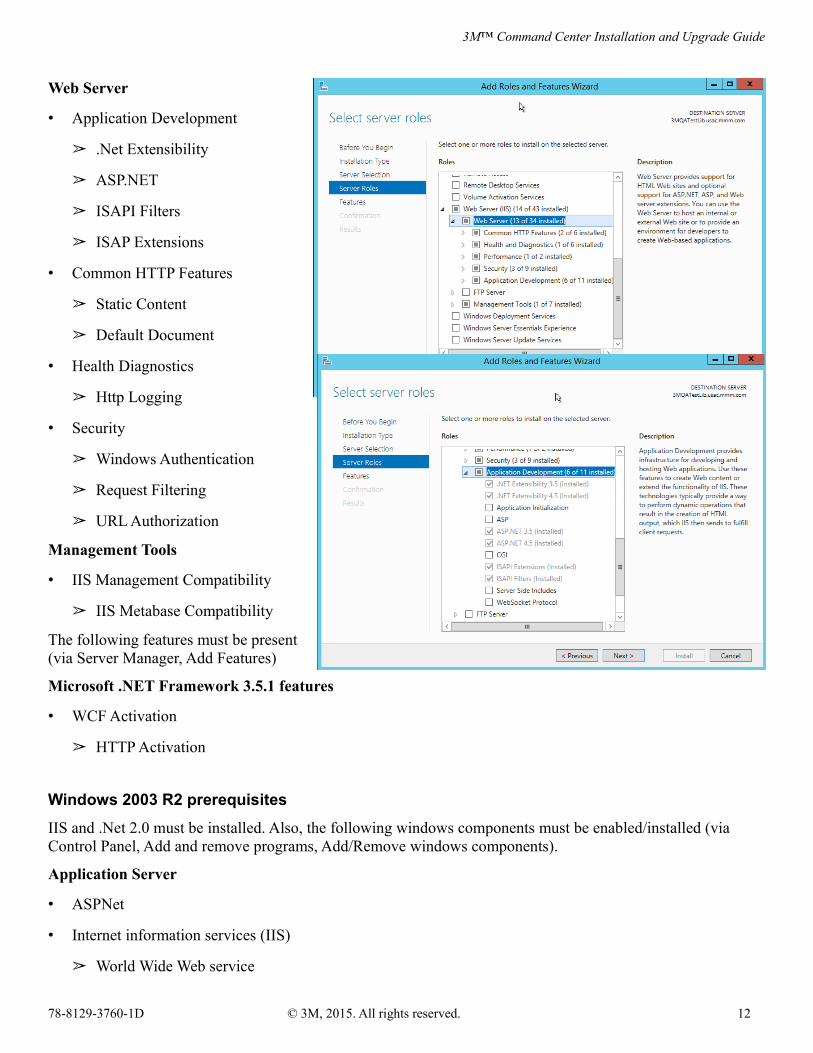
Web Server
• Application Development
➢ .Net Extensibility
➢ ASP.NET
➢ ISAPI Filters
➢ ISAP Extensions
• Common HTTP Features
➢ Static Content
➢ Default Document
• Health Diagnostics
➢ Http Logging
• Security
➢ Windows Authentication
➢ Request Filtering
➢ URL Authorization
Management Tools
• IIS Management Compatibility
➢ IIS Metabase Compatibility
The following features must be present(via Server Manager, Add Features)
Microsoft .NET Framework 3.5.1 features
• WCF Activation
➢ HTTP Activation
Windows 2003 R2 prerequisites
IIS and .Net 2.0 must be installed. Also, the following windows components must be enabled/installed (via Control Panel, Add and remove programs, Add/Remove windows components).
Application Server
• ASPNet
• Internet information services (IIS)
➢ World Wide Web service
78-8129-3760-1D © 3M, 2015. All rights reserved. 12
3M™ Command Center Installation and Upgrade Guide
Windows 7 prerequisites
IIS must be installed. Also, the following windows features must be enabled/installed (via Control Panel, Programs, Programs and Features, Turn Windows Features On/Off).
Internet Information Services
• .Web Management Tools
• IIS 6 Management Compatibility
➢ IIS Metabase and IIS6 Configuration Compatibility
World Wide Web Services
• Application Development Features
• .Net Extensibility
• ASP.NET
• ISAPI Filters
• ISAP Extensions
Common HTTP Features
• Static Content
• Default Document
Health Diagnostics
• Http Logging
Security
• Windows Authentication
• Request Filtering
• URL Authorization
Microsoft .NET Framework 3.5.1
• Windows Communication Foundation HTTP Activation
Windows Vista prerequisites
IIS must be installed. Also, the following windows features must be enabled/installed (via Control Panel, Programs and Features, Turn Windows Features On/Off).
Internet Information Services
• .Web Management Tools
78-8129-3760-1D © 3M, 2015. All rights reserved. 13
3M™ Command Center Installation and Upgrade Guide
• IIS 6 Management Compatibility
➢ IIS Metabase and IIS6 Configuration Compatibility
World Wide Web Services
• Application Development Features
• .Net Extensibility
• ASP.NET
• ISAPI Filters
• ISAP Extensions
• Common HTTP Features
• Static Content
• Default Document
• Health Diagnostics
• Http Logging
• Security
• Windows Authentication
• Request Filtering
• URL Authorization
Microsoft .NET Framework 3.0
• Windows Communication Foundation HTTP Activation
Installation security requirements
The user installing the Command Center application must have the following privileges:
• Administrative privileges on the Command Center server.
• One of the following for the SQL Server Installation
• Administrative privileges to the SQL Server for the Windows account used to install the software.
• An SQL Server User ID and password with administrator rights.
This is required to create a database on the specified SQL Server during installation.
78-8129-3760-1D © 3M, 2015. All rights reserved. 14
3M™ Command Center Installation and Upgrade Guide
Networking requirements
Prior to installing the Command Center software, ensure that each of the following items has been addressed. This should minimize post installation issues you may encounter while attempting to register nodes or obtain status calls from nodes.
• Server network information (e.g. DNS, WINS, static IP) established at each node that will be connected.
• Network connectivity at each node has been tested.
• Use a ping test to ensure network connectivity at the nodes.
➢ Ping (called ICMP in most firewall applications) must be enabled on the Command Center server. In most cases, testing a ping from each physical location is adequate to ensure that nodes can be registered with the server. Some examples are shown below:
• Static IP test — ping 192.168.1.100
• Hostname DNS test — ping ServerName
• Fully qualified DNS test — ping ServerName.yourlibrary.org
78-8129-3760-1D © 3M, 2015. All rights reserved. 15
3M™ Command Center Installation and Upgrade Guide
Command Center application server network requirementsThe following requirements apply to the server used to run the Command Center application.
• Must use a fixed addressing mechanism. One option is to assign the server a fixed IP address. A better option is to establish a DNS server name.
Note that using dynamic IP addresses for the Command Center server is not permitted.
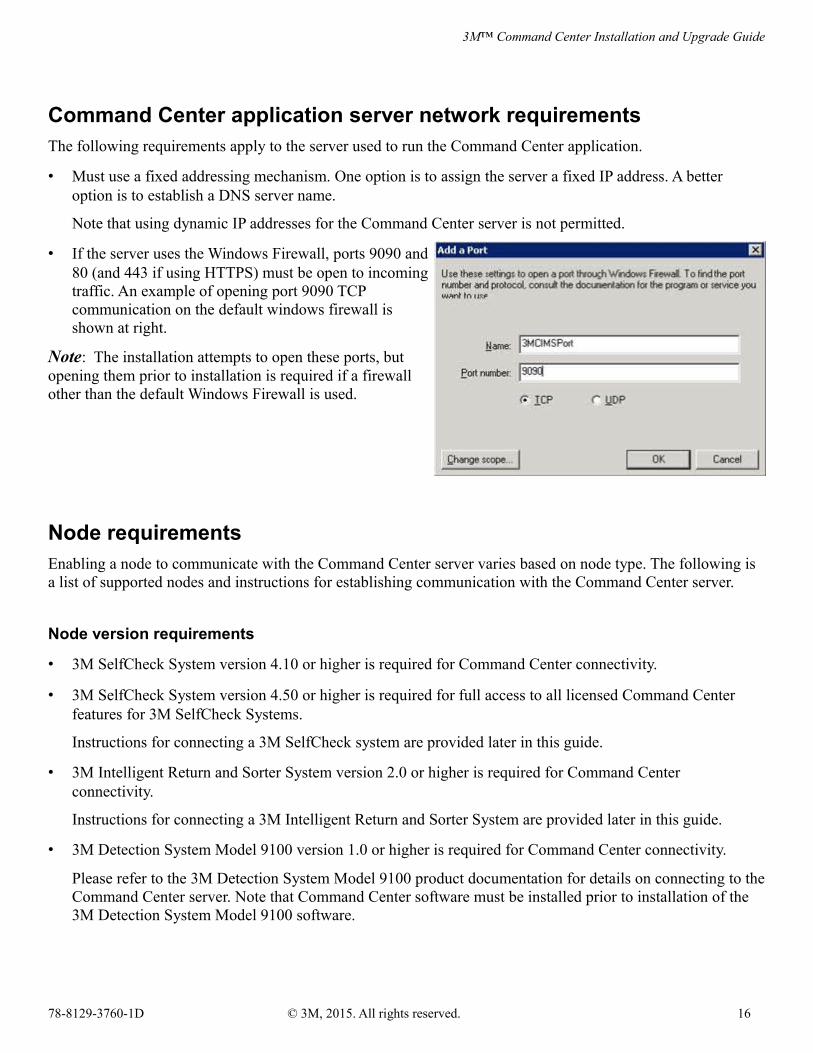
• If the server uses the Windows Firewall, ports 9090 and80 (and 443 if using HTTPS) must be open to incomingtraffic. An example of opening port 9090 TCPcommunication on the default windows firewall isshown at right.
Note: The installation attempts to open these ports, butopening them prior to installation is required if a firewallother than the default Windows Firewall is used.
Node requirementsEnabling a node to communicate with the Command Center server varies based on node type. The following is a list of supported nodes and instructions for establishing communication with the Command Center server.
Node version requirements
• 3M SelfCheck System version 4.10 or higher is required for Command Center connectivity.
• 3M SelfCheck System version 4.50 or higher is required for full access to all licensed Command Center features for 3M SelfCheck Systems.
Instructions for connecting a 3M SelfCheck system are provided later in this guide.
• 3M Intelligent Return and Sorter System version 2.0 or higher is required for Command Center connectivity.
Instructions for connecting a 3M Intelligent Return and Sorter System are provided later in this guide.
• 3M Detection System Model 9100 version 1.0 or higher is required for Command Center connectivity.
Please refer to the 3M Detection System Model 9100 product documentation for details on connecting to theCommand Center server. Note that Command Center software must be installed prior to installation of the 3M Detection System Model 9100 software.
78-8129-3760-1D © 3M, 2015. All rights reserved. 16
3M™ Command Center Installation and Upgrade Guide
3M™ SelfCheck™ System and 3M™ Intelligent Return and Sorter System Node RequirementsRefer to the most recent documentation for the node to resolve any discrepancies with information provided in this guide.
1. If the node uses a firewall, ensure that port 8080 is open.
Port 8080 is used for incoming TCP communication requests from the 3M Command Center server.
2. Use a web browser to open the administration software application for the node, then access the Network tab.
e.g. 3M SelfCheck System Manager – http://<IPaddress or PCName>/SelfCheck
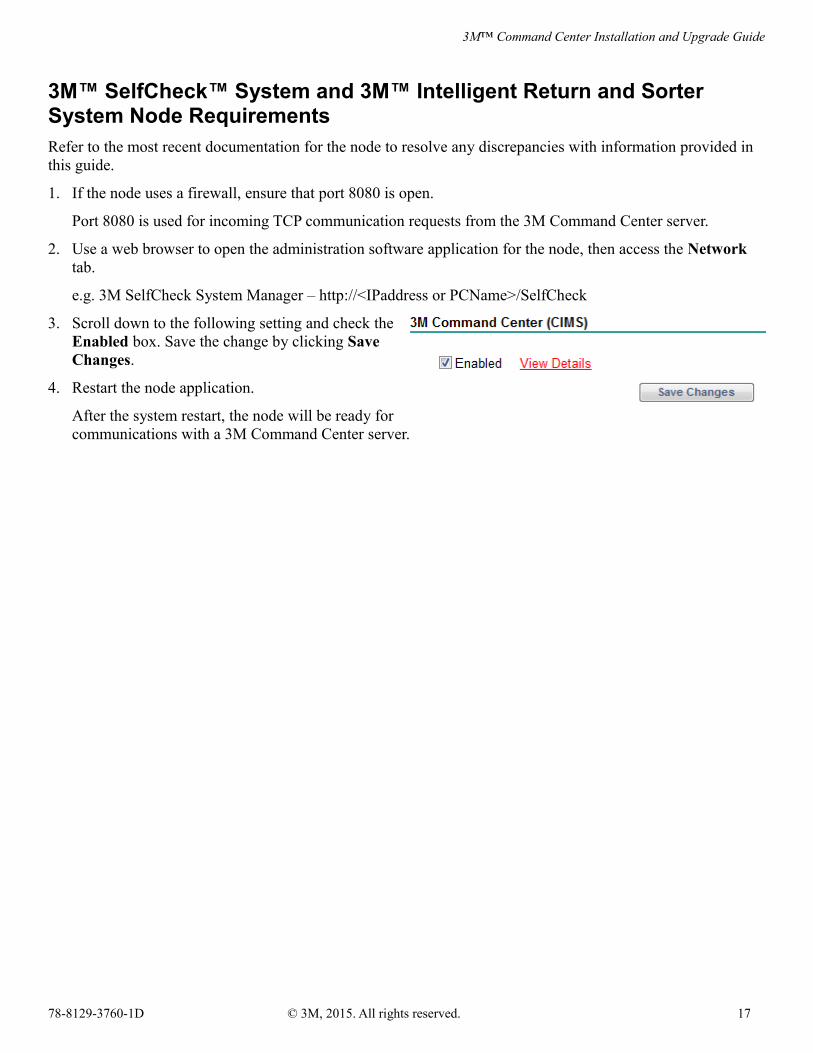
3. Scroll down to the following setting and check the Enabled box. Save the change by clicking SaveChanges.
4. Restart the node application.
After the system restart, the node will be ready forcommunications with a 3M Command Center server.
78-8129-3760-1D © 3M, 2015. All rights reserved. 17
3M™ Command Center Installation and Upgrade Guide
Chapter 3 — Installation ProcedureIf you are performing an upgrade, refer to Chapter 5 — Upgrading your Command Center installation.
Complete the following procedure to install the 3M Command Center software.
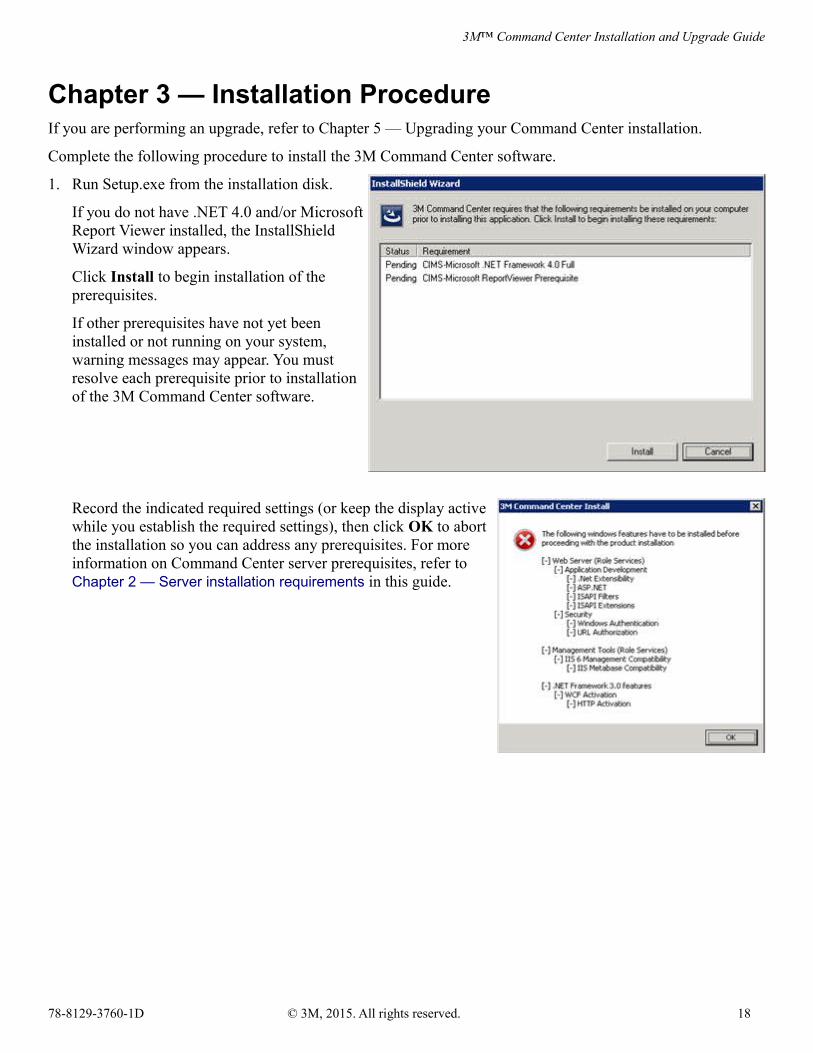
1. Run Setup.exe from the installation disk.
If you do not have .NET 4.0 and/or MicrosoftReport Viewer installed, the InstallShieldWizard window appears.
Click Install to begin installation of theprerequisites.
If other prerequisites have not yet beeninstalled or not running on your system,warning messages may appear. You mustresolve each prerequisite prior to installationof the 3M Command Center software.
Record the indicated required settings (or keep the display activewhile you establish the required settings), then click OK to abortthe installation so you can address any prerequisites. For moreinformation on Command Center server prerequisites, refer to Chapter 2 — Server installation requirements in this guide.
78-8129-3760-1D © 3M, 2015. All rights reserved. 18
3M™ Command Center Installation and Upgrade Guide
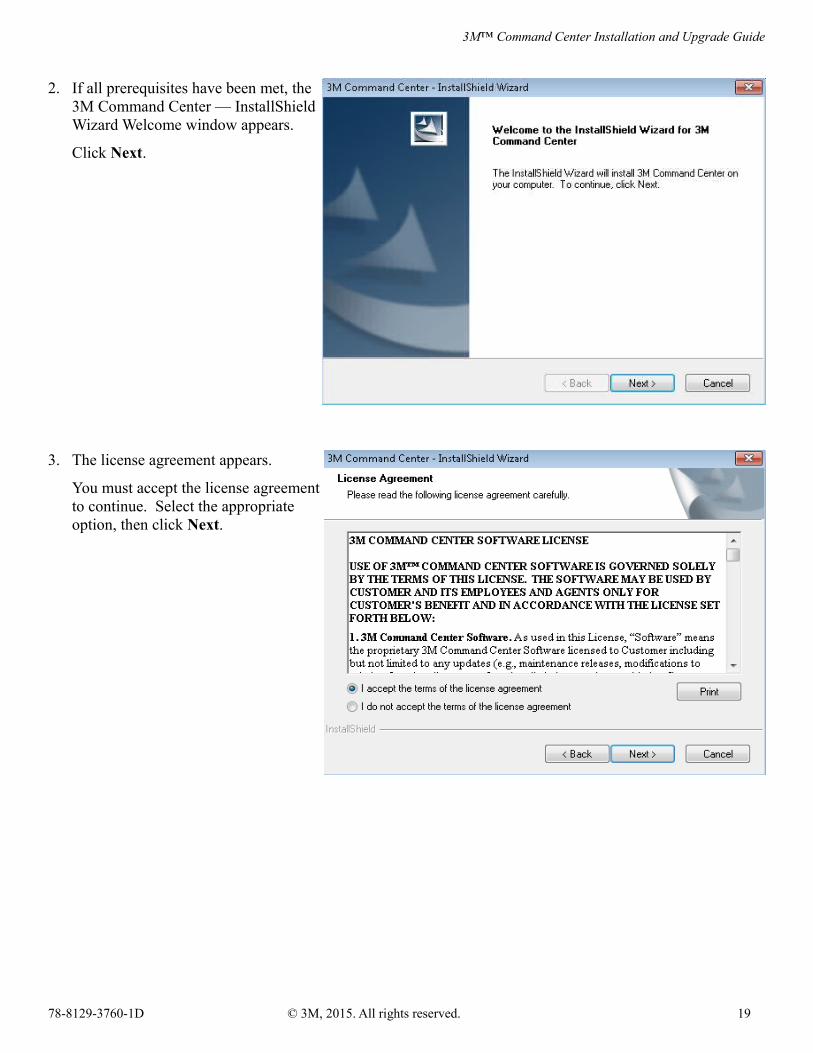
2. If all prerequisites have been met, the3M Command Center — InstallShieldWizard Welcome window appears.
Click Next.
3. The license agreement appears.
You must accept the license agreementto continue. Select the appropriateoption, then click Next.
78-8129-3760-1D © 3M, 2015. All rights reserved. 19
3M™ Command Center Installation and Upgrade Guide
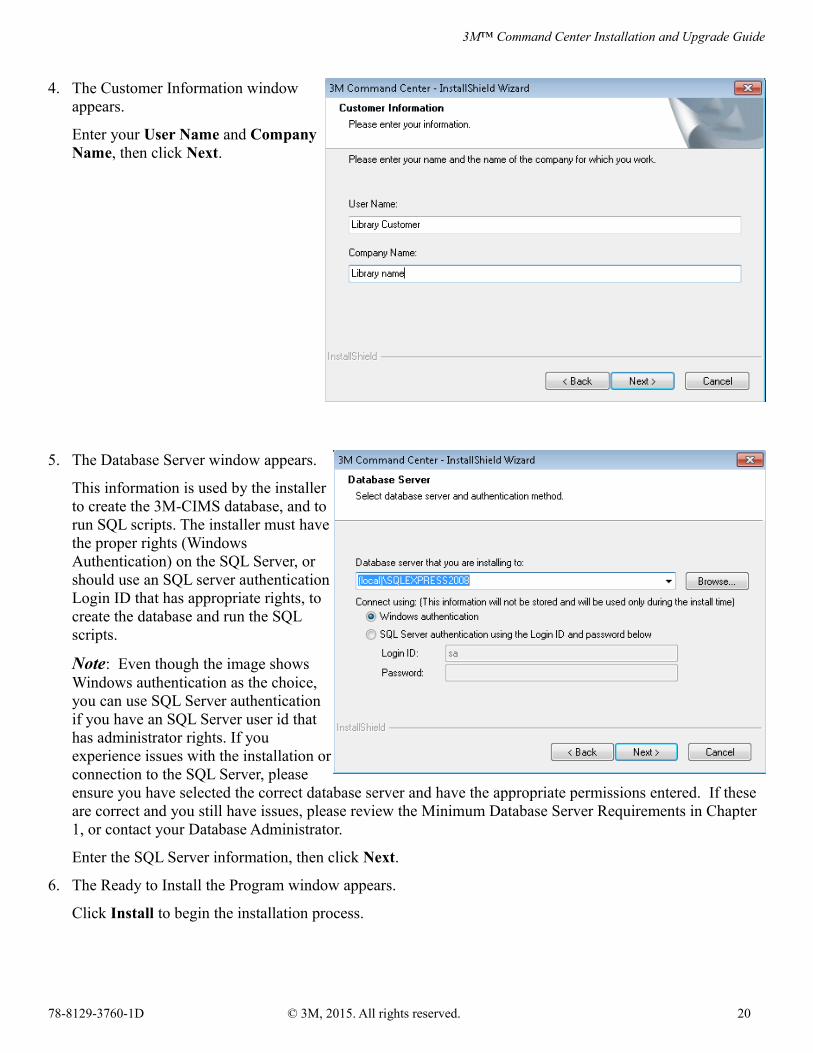
4. The Customer Information windowappears.
Enter your User Name and CompanyName, then click Next.
5. The Database Server window appears.
This information is used by the installerto create the 3M-CIMS database, and torun SQL scripts. The installer must havethe proper rights (WindowsAuthentication) on the SQL Server, orshould use an SQL server authenticationLogin ID that has appropriate rights, tocreate the database and run the SQLscripts.
Note: Even though the image showsWindows authentication as the choice,you can use SQL Server authenticationif you have an SQL Server user id thathas administrator rights. If youexperience issues with the installation orconnection to the SQL Server, pleaseensure you have selected the correct database server and have the appropriate permissions entered. If these are correct and you still have issues, please review the Minimum Database Server Requirements in Chapter 1, or contact your Database Administrator.
Enter the SQL Server information, then click Next.
6. The Ready to Install the Program window appears.
Click Install to begin the installation process.
78-8129-3760-1D © 3M, 2015. All rights reserved. 20
3M™ Command Center Installation and Upgrade Guide
Chapter 4 — Application quick start guideAccess the web application using the following URL.
http://server-name/CIMSWeb
Note: If local on the 3M Command Center computer, you can access the web application at http:\\localhost\CIMSWeb.
If using a static IP to identify the server, replace “server-name” with the IP address. If using DNS, depending onyou network configuration, you may be able to use the server name (e.g. 3MCommandCenter), or you may needa fully qualified DNS name (e.g. 3MCommandCenter.yourlibrary.org) to connect.
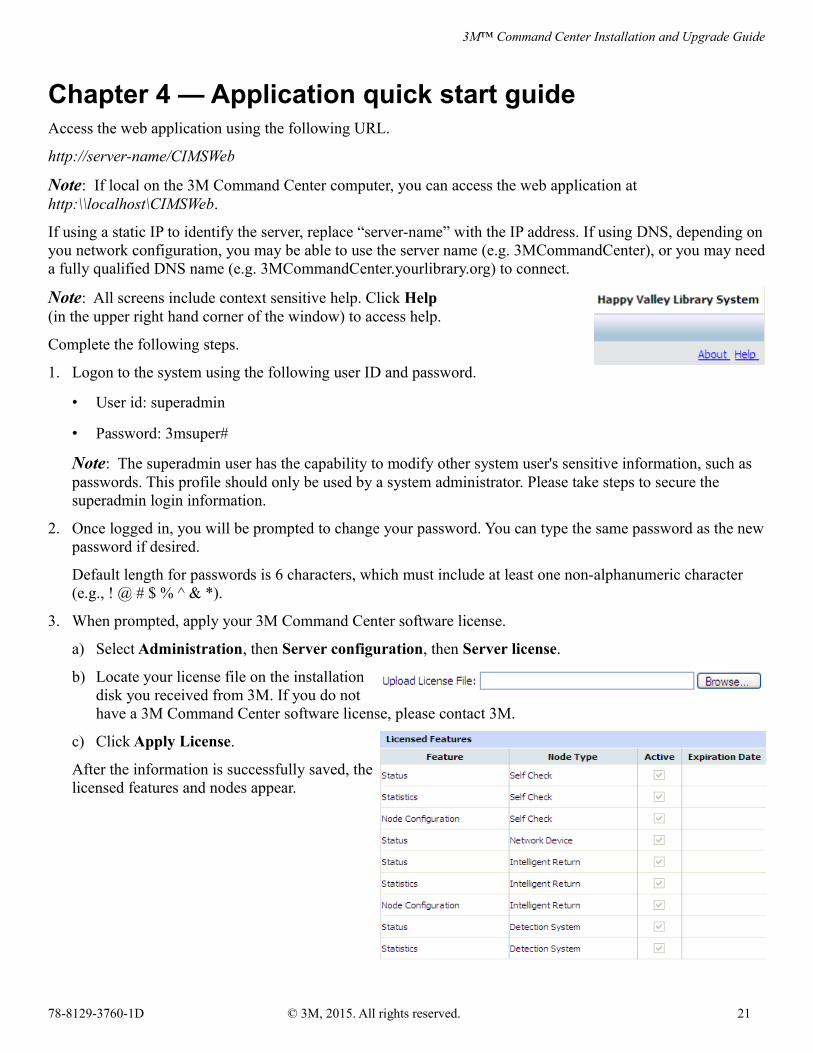
Note: All screens include context sensitive help. Click Help (in the upper right hand corner of the window) to access help.
Complete the following steps.
1. Logon to the system using the following user ID and password.
• User id: superadmin
• Password: 3msuper#
Note: The superadmin user has the capability to modify other system user's sensitive information, such as passwords. This profile should only be used by a system administrator. Please take steps to secure the superadmin login information.
2. Once logged in, you will be prompted to change your password. You can type the same password as the newpassword if desired.
Default length for passwords is 6 characters, which must include at least one non-alphanumeric character (e.g., ! @ # $ % ^ & *).
3. When prompted, apply your 3M Command Center software license.
a) Select Administration, then Server configuration, then Server license.
b) Locate your license file on the installationdisk you received from 3M. If you do nothave a 3M Command Center software license, please contact 3M.
c) Click Apply License.
After the information is successfully saved, thelicensed features and nodes appear.
78-8129-3760-1D © 3M, 2015. All rights reserved. 21
3M™ Command Center Installation and Upgrade Guide
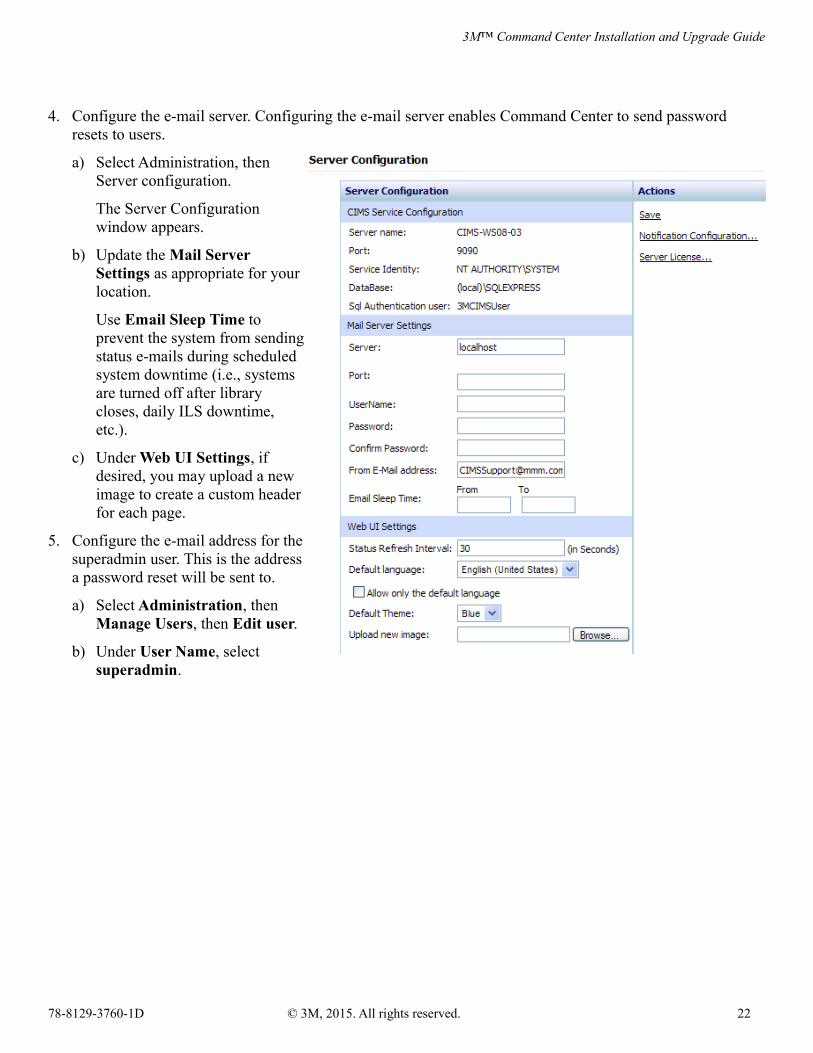
4. Configure the e-mail server. Configuring the e-mail server enables Command Center to send password resets to users.
a) Select Administration, thenServer configuration.
The Server Configurationwindow appears.
b) Update the Mail ServerSettings as appropriate for yourlocation.
Use Email Sleep Time toprevent the system from sendingstatus e-mails during scheduledsystem downtime (i.e., systemsare turned off after librarycloses, daily ILS downtime,etc.).
c) Under Web UI Settings, ifdesired, you may upload a newimage to create a custom headerfor each page.
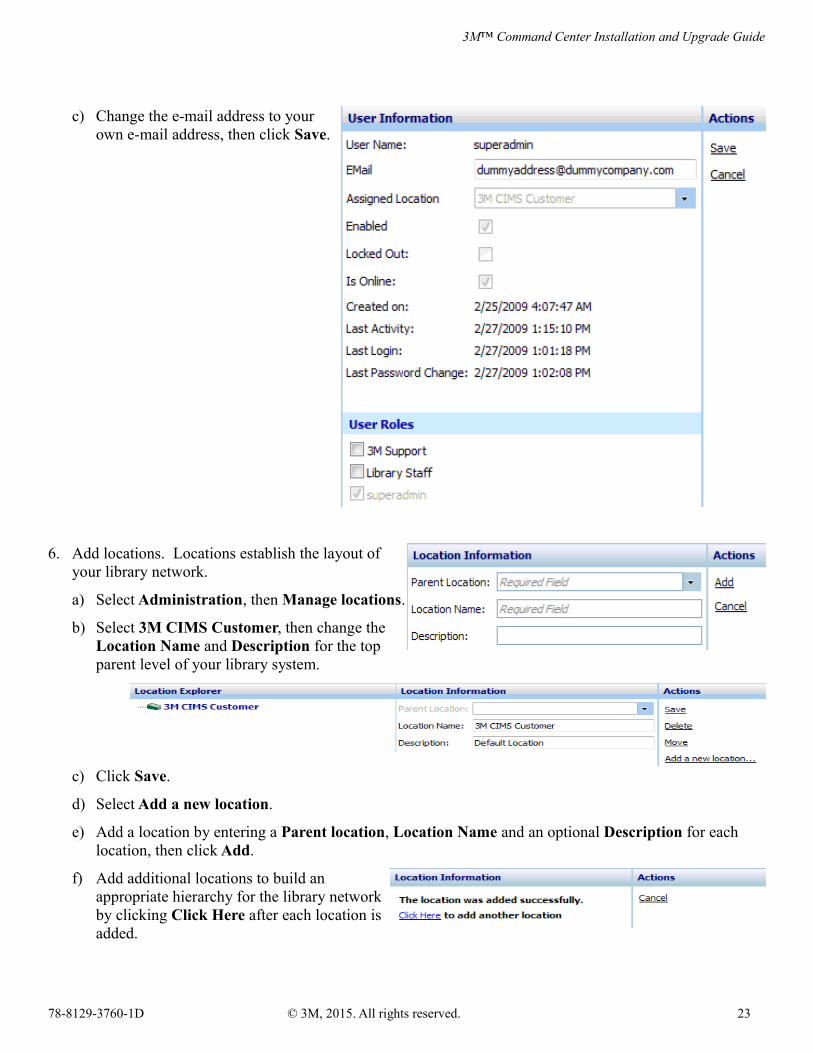
5. Configure the e-mail address for thesuperadmin user. This is the addressa password reset will be sent to.
a) Select Administration, then Manage Users, then Edit user.
b) Under User Name, select superadmin.
78-8129-3760-1D © 3M, 2015. All rights reserved. 22
3M™ Command Center Installation and Upgrade Guide
c) Change the e-mail address to yourown e-mail address, then click Save.
6. Add locations. Locations establish the layout ofyour library network.
a) Select Administration, then Manage locations.
b) Select 3M CIMS Customer, then change the Location Name and Description for the topparent level of your library system.
c) Click Save.
d) Select Add a new location.
e) Add a location by entering a Parent location, Location Name and an optional Description for each location, then click Add.
f) Add additional locations to build anappropriate hierarchy for the library networkby clicking Click Here after each location isadded.
78-8129-3760-1D © 3M, 2015. All rights reserved. 23
3M™ Command Center Installation and Upgrade Guide
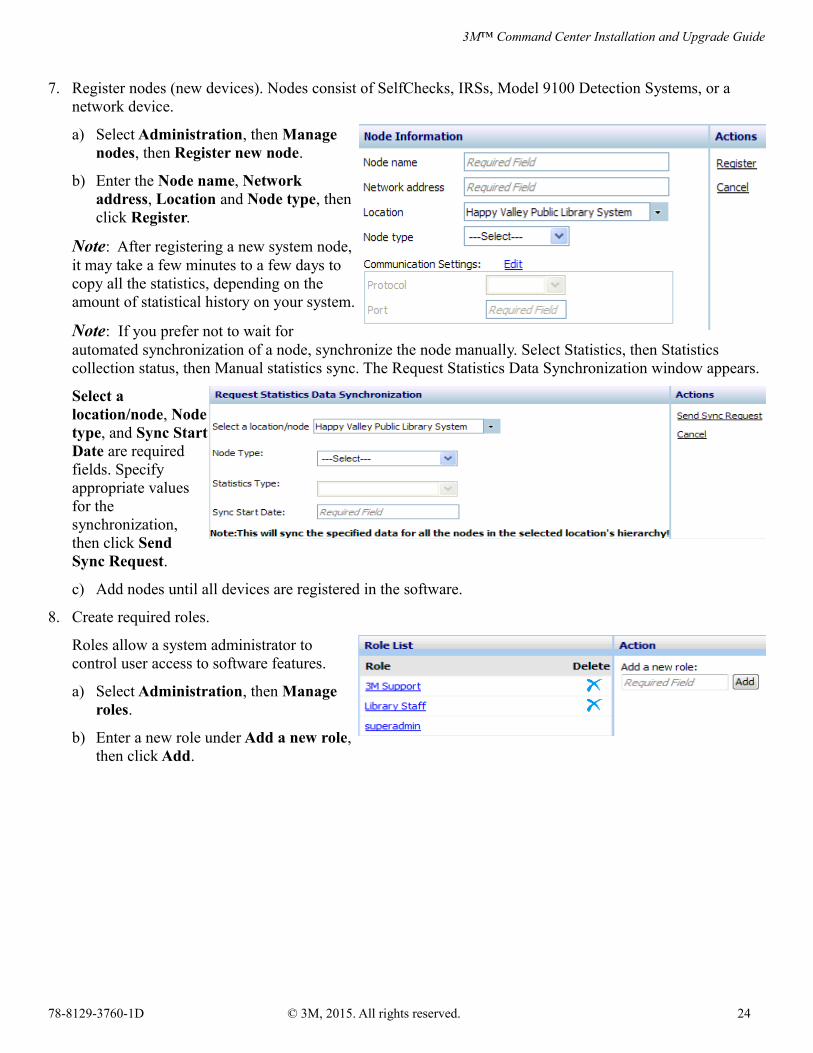
7. Register nodes (new devices). Nodes consist of SelfChecks, IRSs, Model 9100 Detection Systems, or a network device.
a) Select Administration, then Managenodes, then Register new node.
b) Enter the Node name, Networkaddress, Location and Node type, thenclick Register.
Note: After registering a new system node,it may take a few minutes to a few days tocopy all the statistics, depending on theamount of statistical history on your system.
Note: If you prefer not to wait forautomated synchronization of a node, synchronize the node manually. Select Statistics, then Statistics collection status, then Manual statistics sync. The Request Statistics Data Synchronization window appears.
Select alocation/node, Nodetype, and Sync StartDate are requiredfields. Specifyappropriate valuesfor thesynchronization,then click SendSync Request.
c) Add nodes until all devices are registered in the software.
8. Create required roles.
Roles allow a system administrator tocontrol user access to software features.
a) Select Administration, then Manageroles.
b) Enter a new role under Add a new role,then click Add.
78-8129-3760-1D © 3M, 2015. All rights reserved. 24
3M™ Command Center Installation and Upgrade Guide
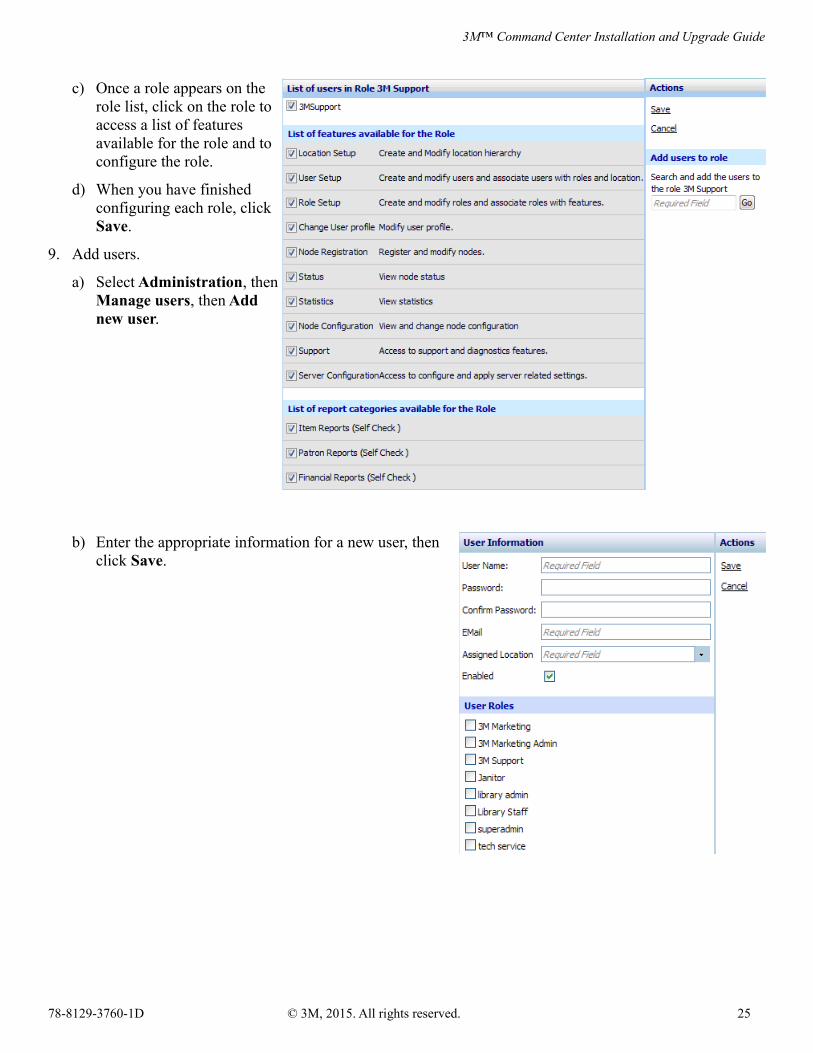
c) Once a role appears on therole list, click on the role toaccess a list of featuresavailable for the role and toconfigure the role.
d) When you have finishedconfiguring each role, click Save.
9. Add users.
a) Select Administration, thenManage users, then Addnew user.
b) Enter the appropriate information for a new user, thenclick Save.
78-8129-3760-1D © 3M, 2015. All rights reserved. 25
3M™ Command Center Installation and Upgrade Guide
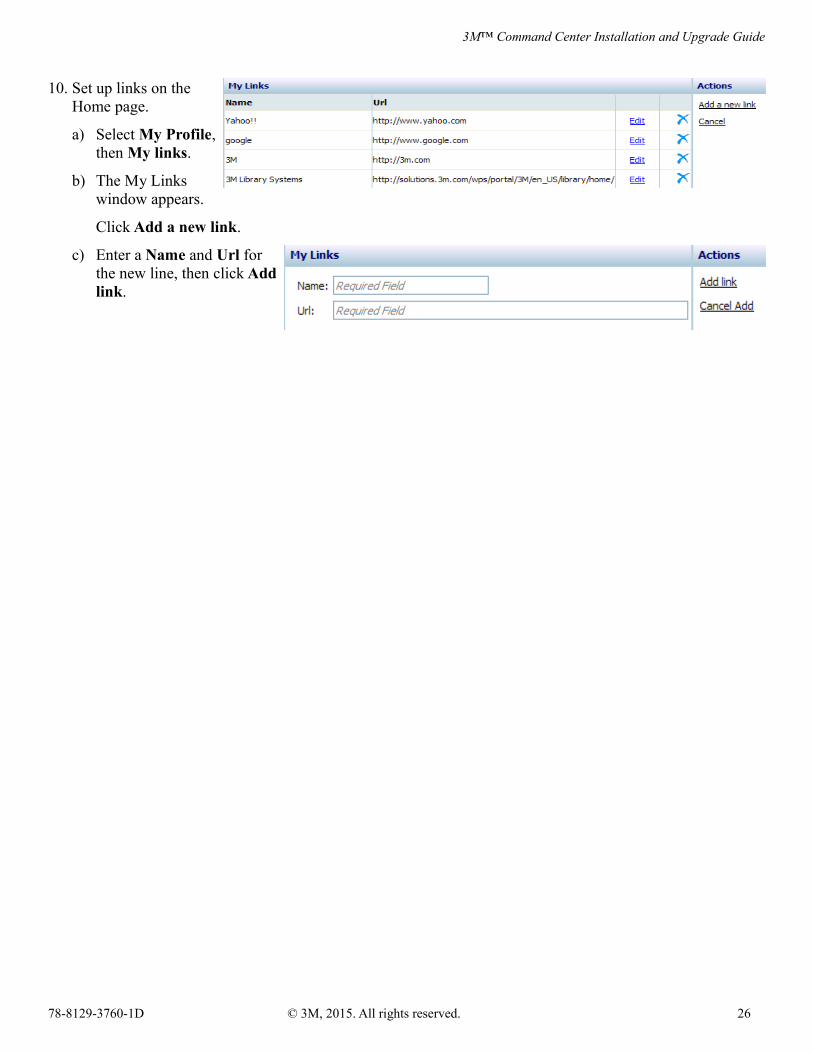
10. Set up links on theHome page.
a) Select My Profile,then My links.
b) The My Linkswindow appears.
Click Add a new link.
c) Enter a Name and Url forthe new line, then click Addlink.
78-8129-3760-1D © 3M, 2015. All rights reserved. 26

3M™ Command Center Installation and Upgrade Guide
Chapter 5 — Upgrading your Command Center installationPrepare for your upgrade by creating a backup of the 3M-CIMS SQL server database. See Appendix C of this guide for more information on Database backups.
WARNING!WARNING! Failure to back up the 3M-CIMS database prior to an upgrade can result in a loss of data if the installation is unexpectedly disrupted (loss of power, connectivity, OS restart, etc.). It is highly recommended that you first back up your current 3M-CIMS database prior to proceeding with the installation of the CommandCenter software.
Complete the following steps to upgrade the 3M Command Center software.
1. Run Setup.exe from the installation disk.
If you do not have .NET 4.0 and/or Microsoft ReportViewer installed, the InstallShield Wizard windowappears with a list of requirements.
2. Click Install to begin the installation of anyprerequisites.
For more information on Command Center serverprerequisites, refer to Chapter 2 — Server installationrequirements in this guide.
If all prerequisites are met, the InstallShieldWizard welcome window appears.
3. If you have created a backup of your 3M-CIMS SQL Server database, click Yes.
The 3M Command Center — InstallShieldWizard Welcome window appears.
78-8129-3760-1D © 3M, 2015. All rights reserved. 27
3M™ Command Center Installation and Upgrade Guide
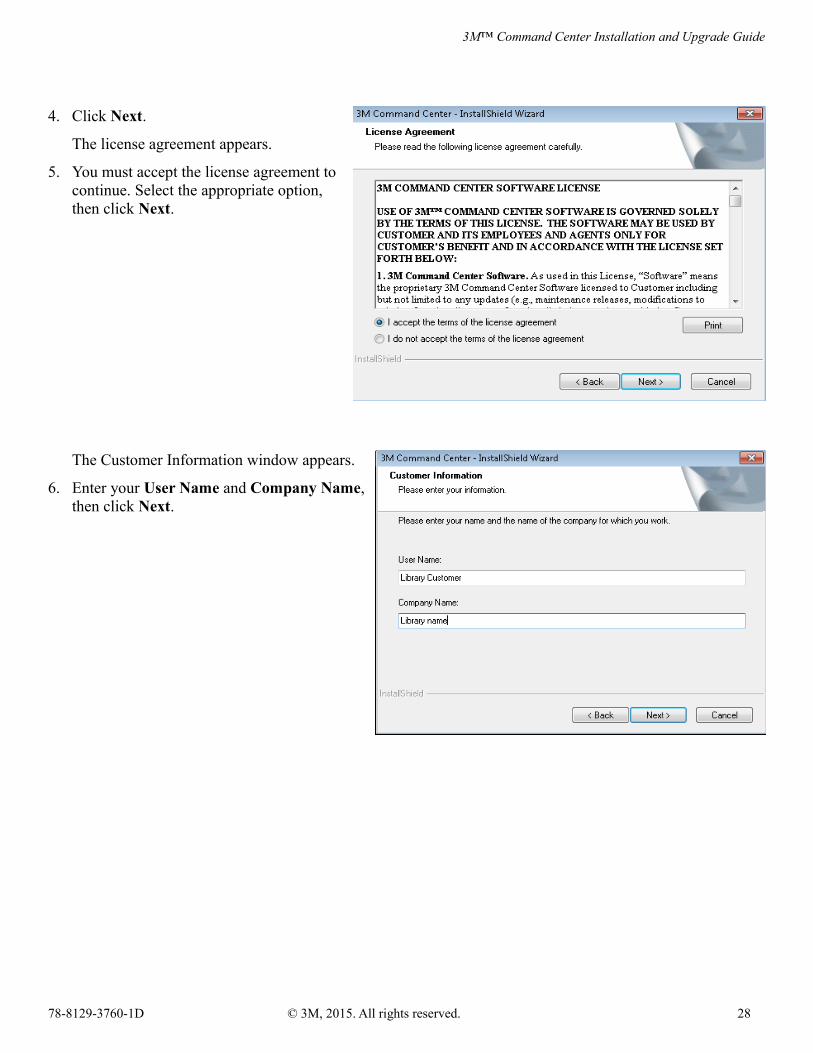
4. Click Next.
The license agreement appears.
5. You must accept the license agreement tocontinue. Select the appropriate option,then click Next.
The Customer Information window appears.
6. Enter your User Name and Company Name,then click Next.
78-8129-3760-1D © 3M, 2015. All rights reserved. 28
3M™ Command Center Installation and Upgrade Guide
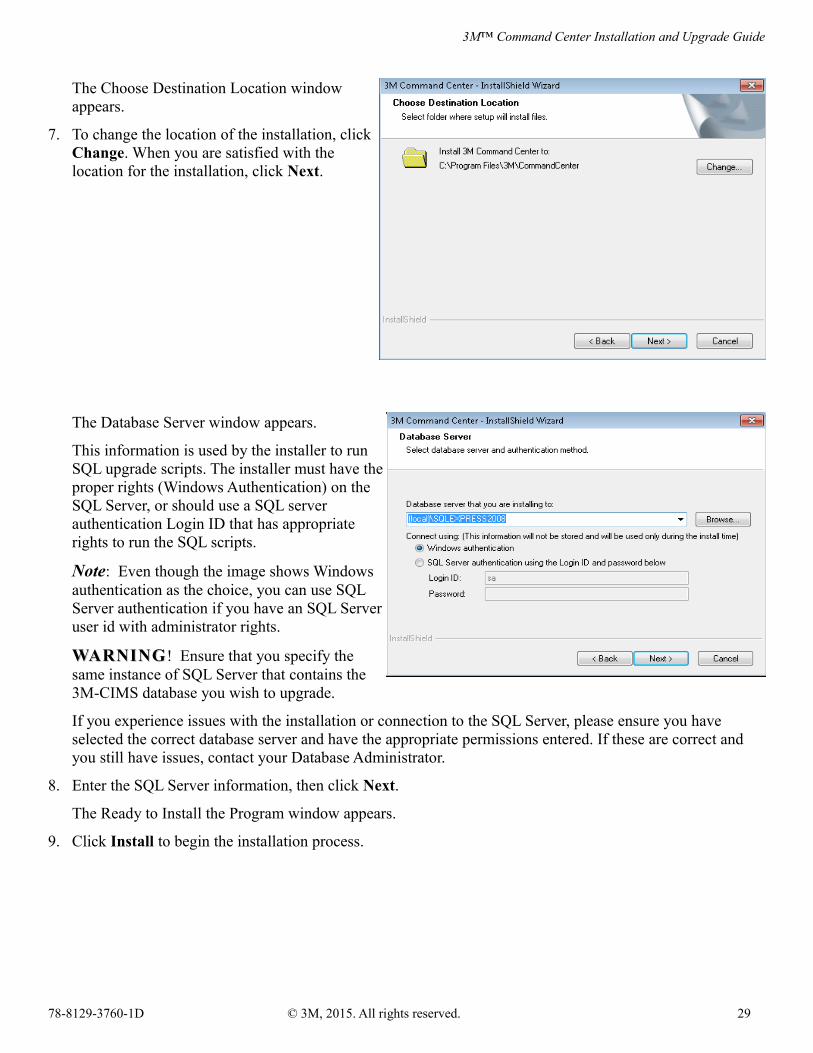
The Choose Destination Location windowappears.
7. To change the location of the installation, click Change. When you are satisfied with thelocation for the installation, click Next.
The Database Server window appears.
This information is used by the installer to runSQL upgrade scripts. The installer must have theproper rights (Windows Authentication) on theSQL Server, or should use a SQL serverauthentication Login ID that has appropriaterights to run the SQL scripts.
Note: Even though the image shows Windowsauthentication as the choice, you can use SQLServer authentication if you have an SQL Serveruser id with administrator rights.
WARNINGWARNING! Ensure that you specify thesame instance of SQL Server that contains the3M-CIMS database you wish to upgrade.
If you experience issues with the installation or connection to the SQL Server, please ensure you have selected the correct database server and have the appropriate permissions entered. If these are correct and you still have issues, contact your Database Administrator.
8. Enter the SQL Server information, then click Next.
The Ready to Install the Program window appears.
9. Click Install to begin the installation process.
78-8129-3760-1D © 3M, 2015. All rights reserved. 29
3M™ Command Center Installation and Upgrade Guide
Appendix A — Troubleshooting
Node registration failuresIf you receive an Unable/Failed To Register The Node error while registering a node, complete the following steps.
1. Review the Networking Requirements in this guide (see Chapter 2 — Server installation requirements).
2. Review the Node Requirements in this guide (see Chapter 2 — Server installation requirements).
3. Ping the server from the node (the server must allow pinging for this test to work).
4. Restart the node’s application and attempt to register the node again.
Node Disconnected StatusIf a node is disconnected, check the following.
1. Ensure that the node is powered on and the node application (e.g. SelfCheck system) is running.
2. Ensure that TCP port 9090 is open for network traffic on the 3M Command Center server.
3. Ping the server from the node (the server must allow pinging for this test to work).
4. If the node is on a different subnet and not in the same domain as the 3M Command Center server, ensure that the WINS setting on the node has a WINS server name (this is located in the same directory as your route table). This allows the node to perform name resolution for the 3M Command Center server using the WINS server.
Note that this is not an issue if all nodes exist on the same domain as the server, or if you are using static IP addresses.
5. Restart the node’s application (not the PC) to see if this resolves the communication issue.
6. If the node’s IP address has changed, or the node’s host PC has been replaced, see Appendix E – Re-registering, archiving and moving nodes.
Web application is not respondingIf the web application fails to respond, complete the following steps.
1. Ensure that IIS is running on the Command Center server.
2. Ensure that TCP Port 80 or 443 (if you are using SSL) is open and not being blocked by a firewall on the Command Center server.
3. Review the Application Server Prerequisites in this guide and ensure that each has been met (see Chapter 2 — Server installation requirements.
78-8129-3760-1D © 3M, 2015. All rights reserved. 30
3M™ Command Center Installation and Upgrade Guide
SQL server is not respondingIf the SQL Server is not responding, complete the following steps.
1. Ensure the SQL Server Service is started on the database server.
2. Review the Minimum Database Server Requirements (see Chapter 2 — Server installation requirements) and ensure that each has been met.
3. If this is a new SQL Server installation, review the steps for Installing an SQL Server (Appendix B — Installing SQL server).
4. Ensure the transaction log is not full.
The transaction log can be full on SQL Server installations where regular backups are not being performed. For more information, refer to Appendix C — Backing up your Command Center database.
Statistics are not updatingIf statistics are not updating, complete the following steps.
1. Check the status of the Statistics collection in the Command Center application. If the collection status is green, it may be behind in statistics collection (usually the case when a new node with a significant amount of historical data is first added).
2. Check the connectivity between the node and the server. Ping the node from the server (the node must allowICMP traffic for this to work).
3. Ping the server from the node (the server must allow ICMP traffic for this test to work).
Network setupWhen SelfCheck and Command Center are connected via a switch without DHCP, you must ensure that the DNS address used for each machine is NOT set to the ip address of the switch.
78-8129-3760-1D © 3M, 2015. All rights reserved. 31
3M™ Command Center Installation and Upgrade Guide
Configuring the SelfCheck Help function and Alert NotifierFor installations that include 9100, SelfCheck 4.7 and Command Center 1.20 components, complete the following procedures to configure the SelfCheck Help feature to work with Command Center.
These procedures assume that the 3M SelfCheck is successfully registered as a node within Command Center.
Verify the SelfCheck
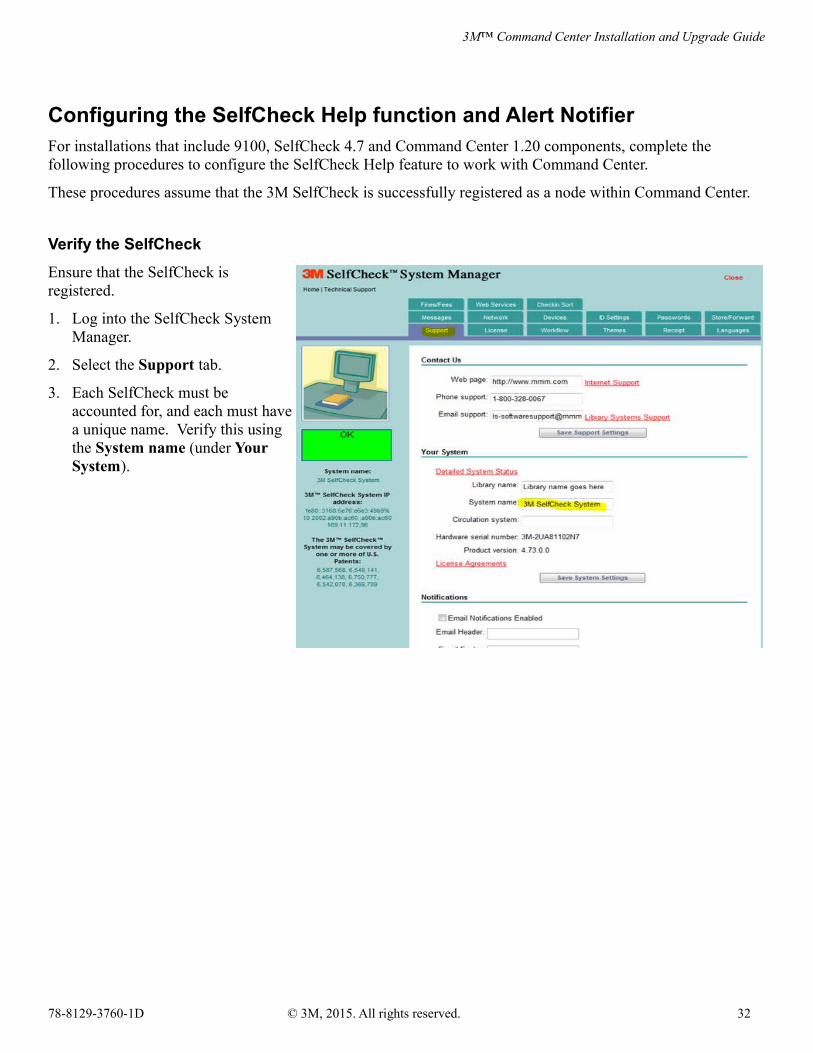
Ensure that the SelfCheck isregistered.
1. Log into the SelfCheck SystemManager.
2. Select the Support tab.
3. Each SelfCheck must beaccounted for, and each must havea unique name. Verify this usingthe System name (under YourSystem).
78-8129-3760-1D © 3M, 2015. All rights reserved. 32
3M™ Command Center Installation and Upgrade Guide
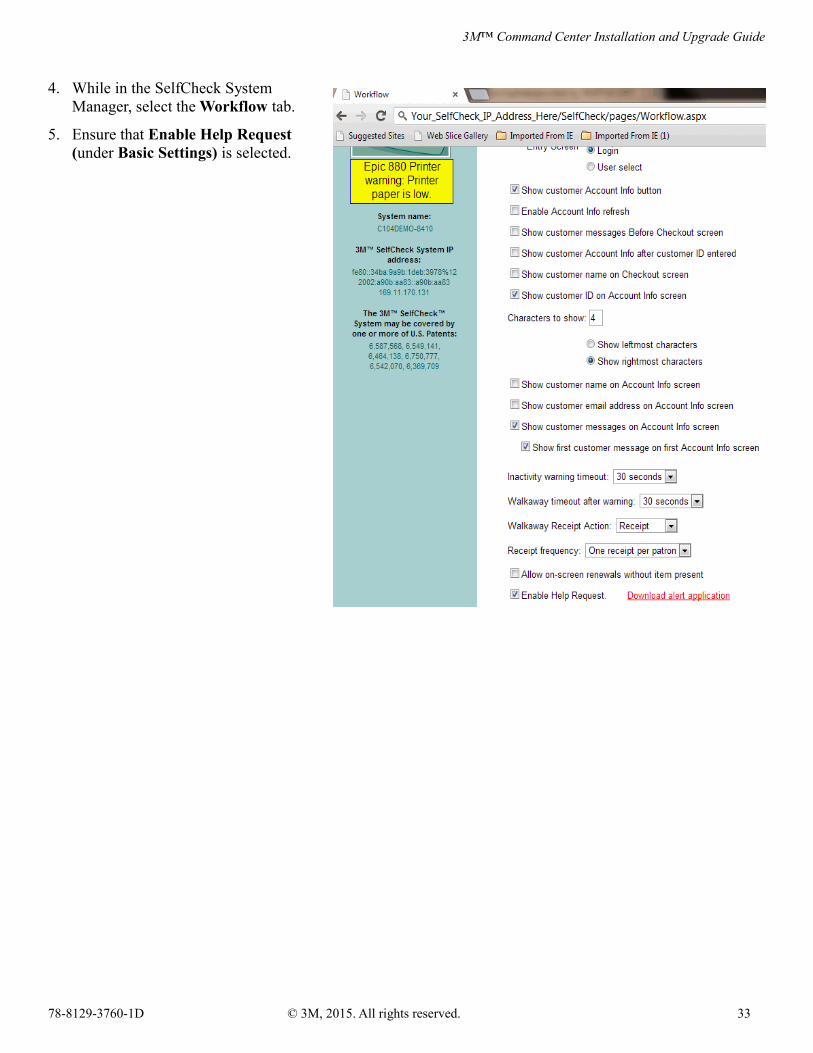
4. While in the SelfCheck SystemManager, select the Workflow tab.
5. Ensure that Enable Help Request(under Basic Settings) is selected.
78-8129-3760-1D © 3M, 2015. All rights reserved. 33
3M™ Command Center Installation and Upgrade Guide
Configure the Help function
Complete the following procedure to configure the SelfCheck Help feature to work with Command Center.
1. From the staff machine where you want the alert notifications to appear, remotely log into the SelfCheck System Manager using a web browser and the following ip address.
http://xxx.xx.xxx.xxx/SelfCheck/pages/Index.aspx
xxx.xx.xxx.xxx represents the ip address of your SelfCheck.
2. Log in using the administrative password advanced (you may be prompted to input the password a second time).
3. Select the Workflow tab.
4. Click Download Alert Application (next to Enable Help Request, under Basic Settings). The most recent version of the alert notifier software will download to the staff system you are working from.
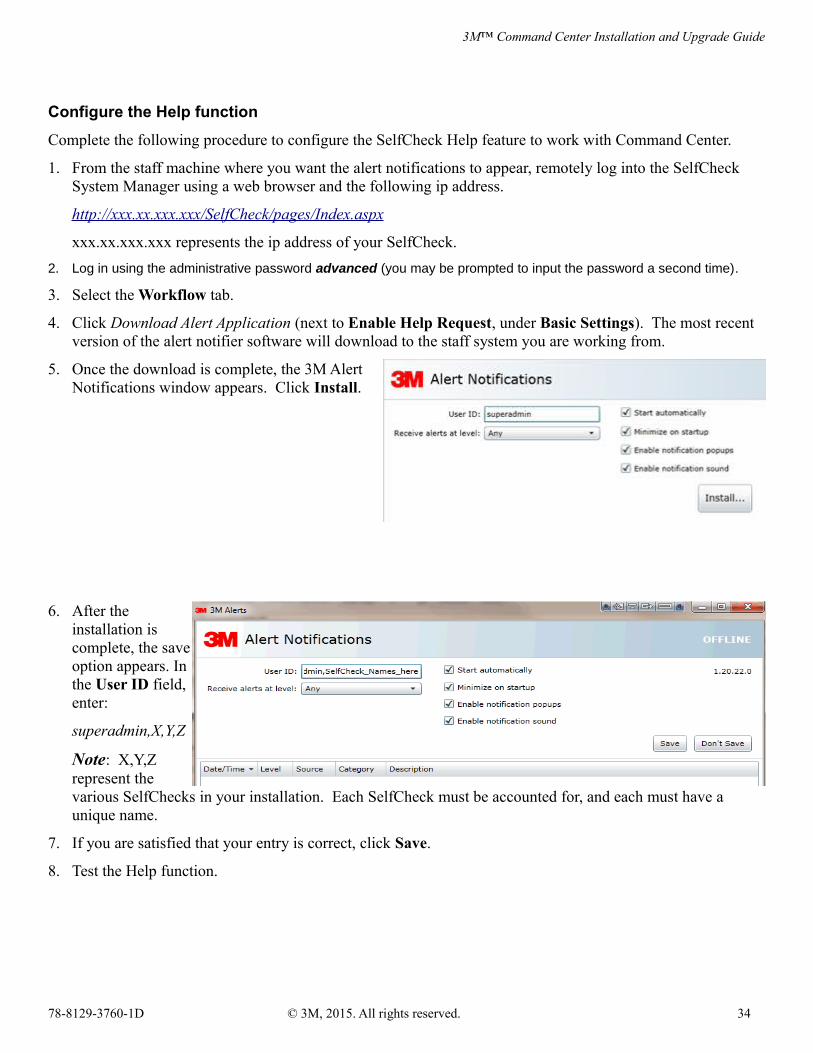
5. Once the download is complete, the 3M AlertNotifications window appears. Click Install.
6. After theinstallation iscomplete, the saveoption appears. Inthe User ID field,enter:
superadmin,X,Y,Z
Note: X,Y,Zrepresent thevarious SelfChecks in your installation. Each SelfCheck must be accounted for, and each must have a unique name.
7. If you are satisfied that your entry is correct, click Save.
8. Test the Help function.
78-8129-3760-1D © 3M, 2015. All rights reserved. 34
3M™ Command Center Installation and Upgrade Guide
Appendix B – Installing SQL serverFor small installations (25 SelfCheck nodes or less) you can use SQL Express as your database server. Currently, SQL Express 2014, 32- and 64-bit, is located on your Command Center server installation disc.
Complete the following procedure to install SQL Express for use with Command Center. These instructions are also useful as reference material if installing other supported versions of SQL Server.
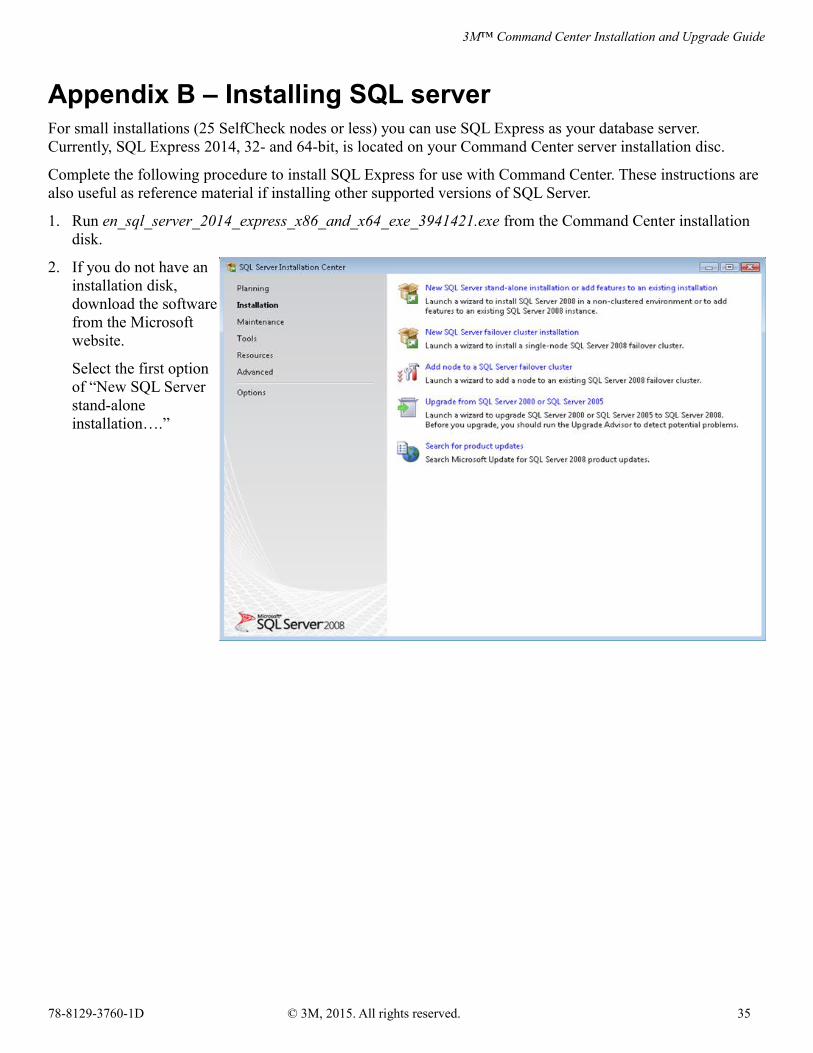
1. Run en_sql_server_2014_express_x86_and_x64_exe_3941421.exe from the Command Center installation disk.
2. If you do not have aninstallation disk,download the softwarefrom the Microsoftwebsite.
Select the first optionof “New SQL Serverstand-aloneinstallation….”
78-8129-3760-1D © 3M, 2015. All rights reserved. 35
3M™ Command Center Installation and Upgrade Guide
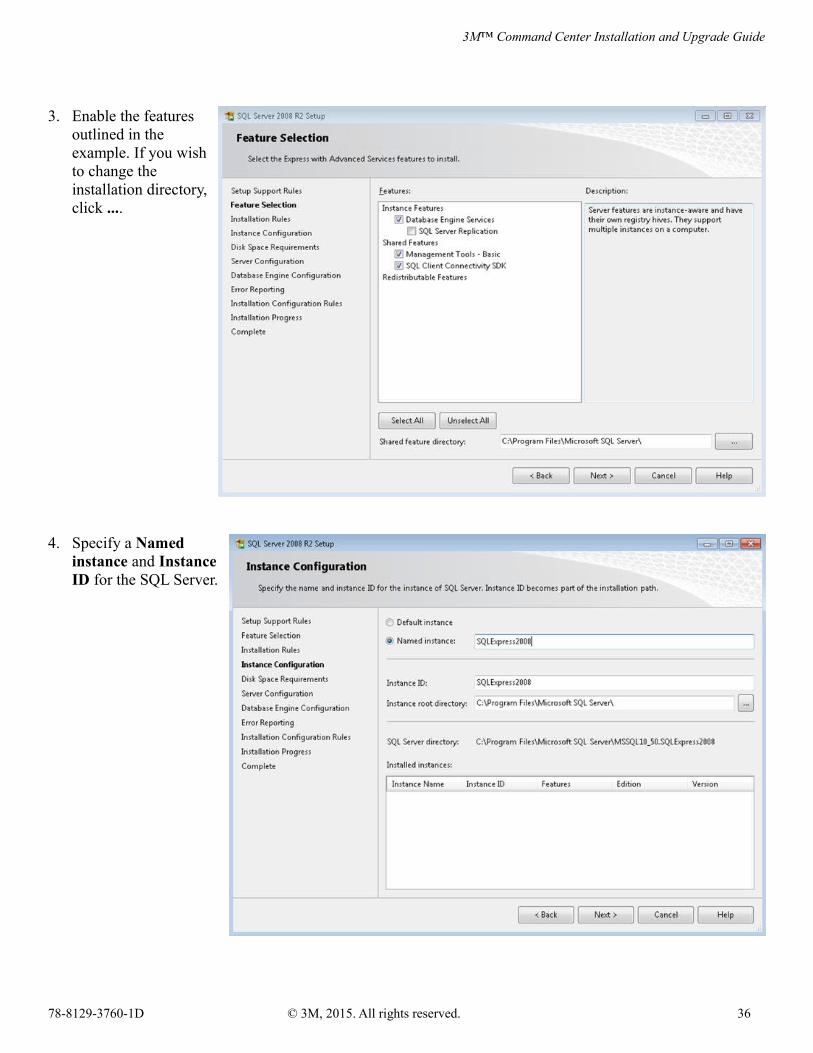
3. Enable the featuresoutlined in theexample. If you wishto change theinstallation directory,click ....
4. Specify a Namedinstance and InstanceID for the SQL Server.
78-8129-3760-1D © 3M, 2015. All rights reserved. 36
3M™ Command Center Installation and Upgrade Guide
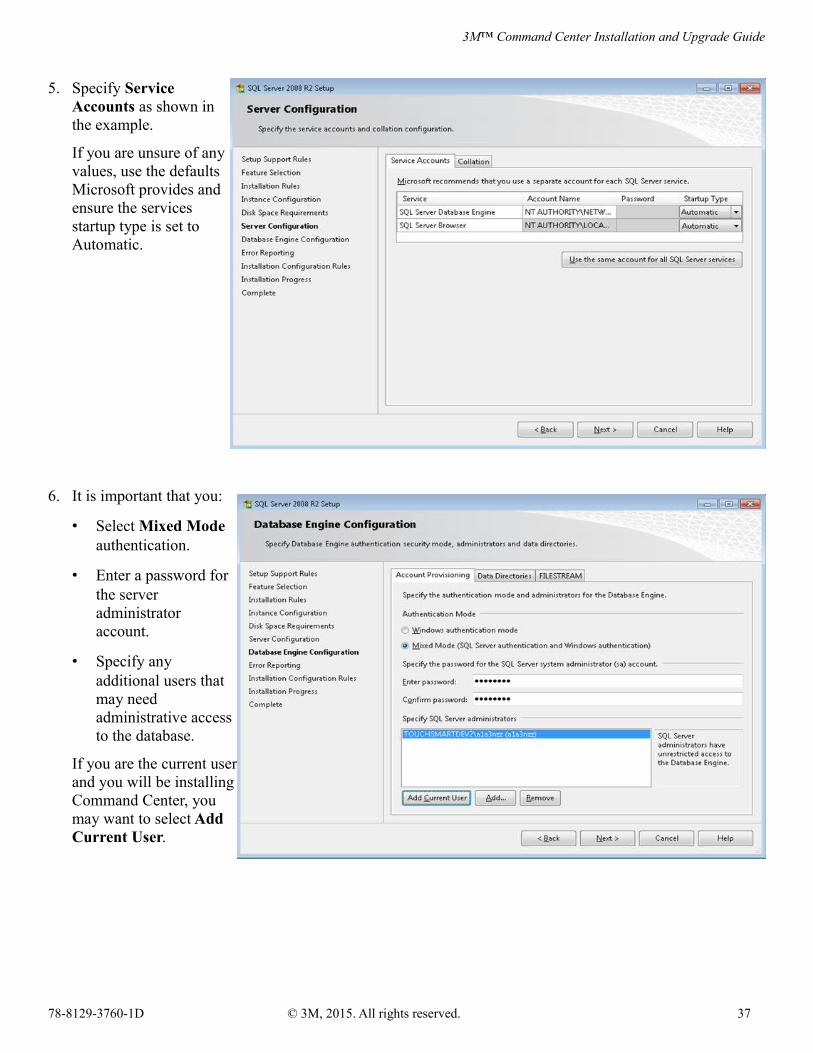
5. Specify ServiceAccounts as shown inthe example.
If you are unsure of anyvalues, use the defaultsMicrosoft provides andensure the servicesstartup type is set toAutomatic.
6. It is important that you:
• Select Mixed Modeauthentication.
• Enter a password forthe serveradministratoraccount.
• Specify anyadditional users thatmay needadministrative accessto the database.
If you are the current userand you will be installingCommand Center, youmay want to select AddCurrent User.
78-8129-3760-1D © 3M, 2015. All rights reserved. 37
3M™ Command Center Installation and Upgrade Guide
Appendix C – Backing up your Command Center databaseThe Command Center server does not automatically back up your database. Backing up your database prevents the loss of information, and also potentially a time consuming reconfiguration.
All node, location, user management and user preference information is stored in the database. In addition, all statistical information collected from nodes is stored in the database. Although you may be able to recover historical data from some of the nodes, you may not be able to recover all of the data from the nodes. Backing up the Command Center database regularly helps minimize potential loss due to hardware failure, software failure, or mistakes that may inadvertently delete or change information.
Follow this list of best practices when backing up your Command Center database. (If you already have a database backup strategy that is working for you, we encourage you to continue following it and use this information to supplement that strategy.)
3M-CIMS database backup best practicesIf the 3M-CIMS database resides on an SQL Server where other databases exist, these best practices should be viewed as minimum recommendations used in conjunction with what you may already be doing.
Perform full backups daily
Full backups of the 3MCIMS database take the longest. Schedule these backups when the system is not in use. As your database grows, the time required to fully backup your database will also grow. Monitor the amount of time backups take to ensure that your backup schedule does not encroach on periods of time when the application needs to be available.
The process for backing up the databases varies for different versions of SQL Server.
Perform frequent transaction log backups
The transaction log contains the most recent activity. Backing up the transaction log allows for recovery at specific time points. Backing up the transaction log also truncates the log file and prevents it from becoming full or using large amounts of disk space.
The process for backing up the transaction log file varies for different versions of SQL Server.
Backup system databases regularly
SQL Server system databases (master, model, msdb) contain system configuration information. This information is required if a full system recovery situation is necessary.
Practice your recovery
Practice your recovery to help you identify and resolve potential issues with your database backup strategy. It also helps optimize the amount of time it may take to recover your system.
78-8129-3760-1D © 3M, 2015. All rights reserved. 38
3M™ Command Center Installation and Upgrade Guide
Do not store backups on the same host OS
Storing database backups (data and transaction log files) on the same system that hosts the database server is notrecommended. Store the backups in an alternate location. The alternate location should also be backed up regularly.
Export and purge statistical data that is no longer actively accessed
Command Center provides the ability to export data (currently in PDF, Excel and Word formats). Export information that is no longer actively used and store it in a location that is backed up regularly. Consider purging this information from the database after it has been exported.
Purging statistical information is a Command Center feature (refer to the online help for more information). Purging data reduces the size of the 3MCIMS database and speeds up database backups.
Note that exported statistics in one of these formats cannot be imported back into the system. Do not use this process as your database backup process.
Back up your SQL server database
There are many ways to backup Microsoft SQL Server databases. 3M encourages you to research alternatives and find the process or tool that works best for you and the backup strategy you choose. To help you be successful, we provide example steps to manually back up the 3M-CIMS database when using SQL Express 2008 R2. 3M highly recommends automating and testing this process.
Useful Links
The following links are provided by Microsoft.
• Backing Up and Restoring Databases in SQL Server - http://msdn.microsoft.com/en-us/library/ms187048.aspx
➢ SQL Server 2012 and SQL Server 2014 http://msdn.microsoft.com/en-us/library/ms187510.aspx
➢ SQL Server 2008 R2 http://msdn.microsoft.com/en-us/library/ms187048(v=SQL.105).aspx
➢ SQL Server 2008 http://msdn.microsoft.com/en-us/library/ms187048(v=SQL.100).aspx
➢ SQL Server 2005 http://msdn.microsoft.com/en-us/library/ms187048(v=SQL.90).aspx
• How to back up a database using SQL Server Management Studio - http://msdn.microsoft.com/en-us/library/ms187510.aspx
➢ SQL Server 2008 R2 http://msdn.microsoft.com/en-us/library/ms187510(v=SQL.105).aspx
➢ SQL Server 2008 http://msdn.microsoft.com/en-us/library/ms187510(v=SQL.100).aspx
➢ SQL Server 2005 http://msdn.microsoft.com/en-us/library/ms187510(v=SQL.90).aspx
78-8129-3760-1D © 3M, 2015. All rights reserved. 39
3M™ Command Center Installation and Upgrade Guide
• How to back up a database using Transact SQL - http://msdn.microsoft.com/en-us/library/ms191304.aspx
➢ SQL Server 2008 R2 http://msdn.microsoft.com/en-us/library/ms191304(v=SQL.105).aspx
➢ SQL Server 2008 http://msdn.microsoft.com/en-us/library/ms191304(v=SQL.100).aspx
➢ SQL Server 2005 http://msdn.microsoft.com/en-us/library/ms191304(v=SQL.90).aspx
Manual backup of 3M-CIMS database using SQL Express 2008 R2, 2012 and 2014
Complete the following procedure to manually backup your database.
1. Open SQL Server Management Studio and connect to the SQL Server Express instance.
2. Open the Databases node on the tree in the left pane.
3. Right click the 3M-CIMS database to access the context menu.
4. Click Tasks, then Backup menu option. Record the backup location and file name.
5. Click OK to perform the backup.
6. Copy the backup file to a network location, or to a removable media (ex. flash drive).
78-8129-3760-1D © 3M, 2015. All rights reserved. 40
3M™ Command Center Installation and Upgrade Guide
Appendix D – Command Center migration
Move Command Center database to a different SQL serverComplete the following procedure.
1. Ensure that mixed mode authentication is enabled on the new SQL server.
2. Add an SQL Server login with the name 3MCIMSUser and a password of your choice.
3. Detach the 3M-CIMS database from the old SQL Server.
You may encounter difficulty detaching the database when the application is still connected to the 3M-CIMS database. In this case, stop the Command Center service and IIS service on your server, then try the detach operation again. Make sure you start the IIS service once you are done detaching the database.
4. Copy the 3M-CIMS.mdf file over to the data folder of the new SQL server.
5. Attach the 3M-CIMS.mdf file as the 3M-CIMS database on the new SQL server.
6. Delete the 3MCIMSUser under the 3M-CIMS database users (not the one that you created in Step 2).
7. Open up the user mapping dialog (right click Properties, then User mapping) for the 3MCIMSUser you created, and map it to 3M-CIMS database and the 3MCIMSAppRole database role.
8. Access the Command Center configuration utility (see Appendix F) and change the database connection information (server and user id/password), then save the changes. Restart the service when you are asked fora confirmation during the save (or you will have to do it manually).
Move Command Center to a different serverComplete the following procedure.
1. If needed, record the SQL server instance name using the Command Center configuration utility (see Appendix F).
2. Uninstall Command Center on the old server.
3. Install Command Center on the new server. Ensure that you provide the same SQL server instance for the new installation.
4. Open the Command Center configuration utility and click the Server tab.
Change the Server name to the new server and save the change. This name is used by the nodes (SelfCheck, IRSS, Detection System, etc.) to connect to the server and send status information.
5. Restart the service when asked for a confirmation during the save (or you will have to do it manually).
6. Click Publish Server address to nodes on the server tab.
7. Select the Publish Server address option, then click Publish server address. The system attempts to propagate the name change to all nodes.
78-8129-3760-1D © 3M, 2015. All rights reserved. 41
3M™ Command Center Installation and Upgrade Guide
Appendix E – Re-registering, archiving and moving nodes
Re-Register nodesRe-registration of nodes is typically required for disaster recovery purposes. It can also be required to discover new services hosted by a node after a software update.
Re-registration of a node sends a registration request to the node. Once the re-registration completes, the node should be online and any statistics not collected during the outage should start to re-synchronize with the Command Center database.
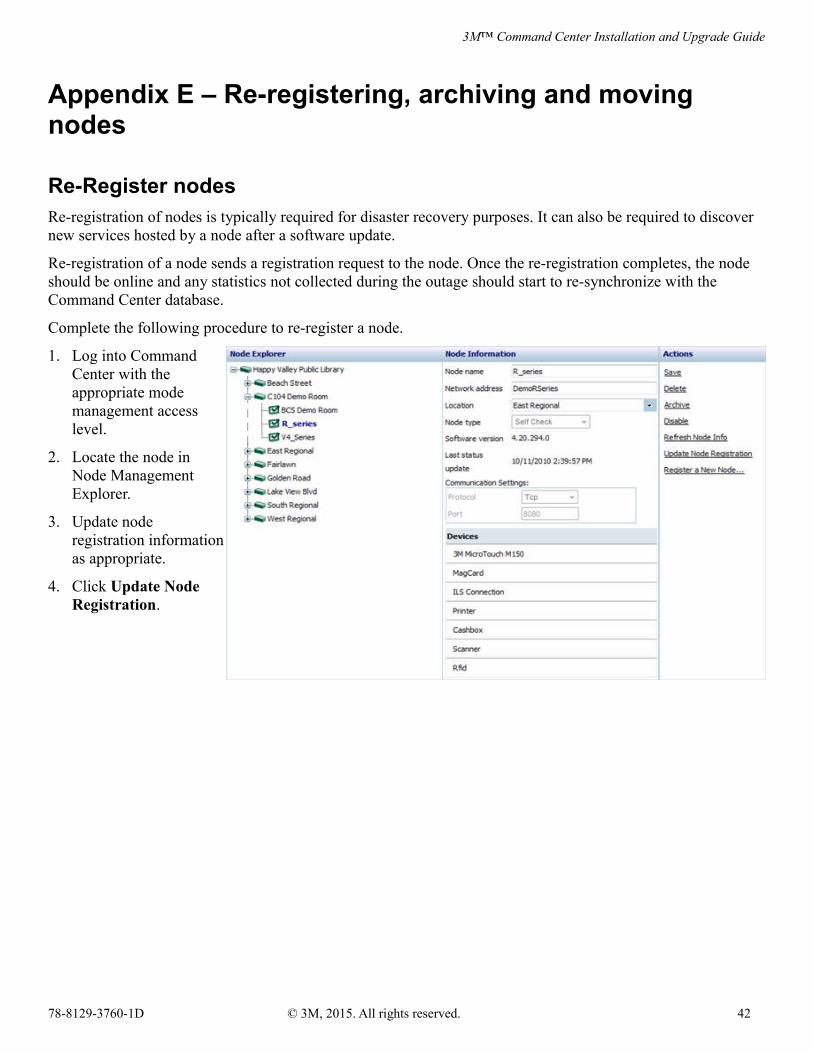
Complete the following procedure to re-register a node.
1. Log into CommandCenter with theappropriate modemanagement accesslevel.
2. Locate the node inNode ManagementExplorer.
3. Update noderegistration informationas appropriate.
4. Click Update NodeRegistration.
78-8129-3760-1D © 3M, 2015. All rights reserved. 42
3M™ Command Center Installation and Upgrade Guide
Archive and move nodesArchiving a node saves its history in the Command Center database. When nodes are archived, they retain their statistics history in the database, but cease to collect or update additional information.
• Once a node is archived it is no longer visible on any system interface, except for report selection and Node Management interfaces.
• Archived nodes can be deleted, enabled or renamed.
• Archiving a node is a prerequisite to moving a node.
• Permanently moving a node from one location to another requires archiving the node’s information in its current location, then reestablishing the node in a new location.
• Nodes are typically archived prior to being retired, or permanently moved to a new location if you want to retain the node usage history.
• A node can be moved to transition the node to a new location without removing the node’s local history (statistics).
• Archiving/Moving is not recommended for temporarily moving a node.
Note that once a node is moved, it cannot return to its original location unless it is identified differently from its archive at that location. In order to avoid “double counting” data, purge the node’s statistical history as well.
Complete the following procedure to archive and move a node.
1. Log into Command Center with the appropriate node management access level.
2. Locate the node in Node Management Explorer.
3. Click Archive.
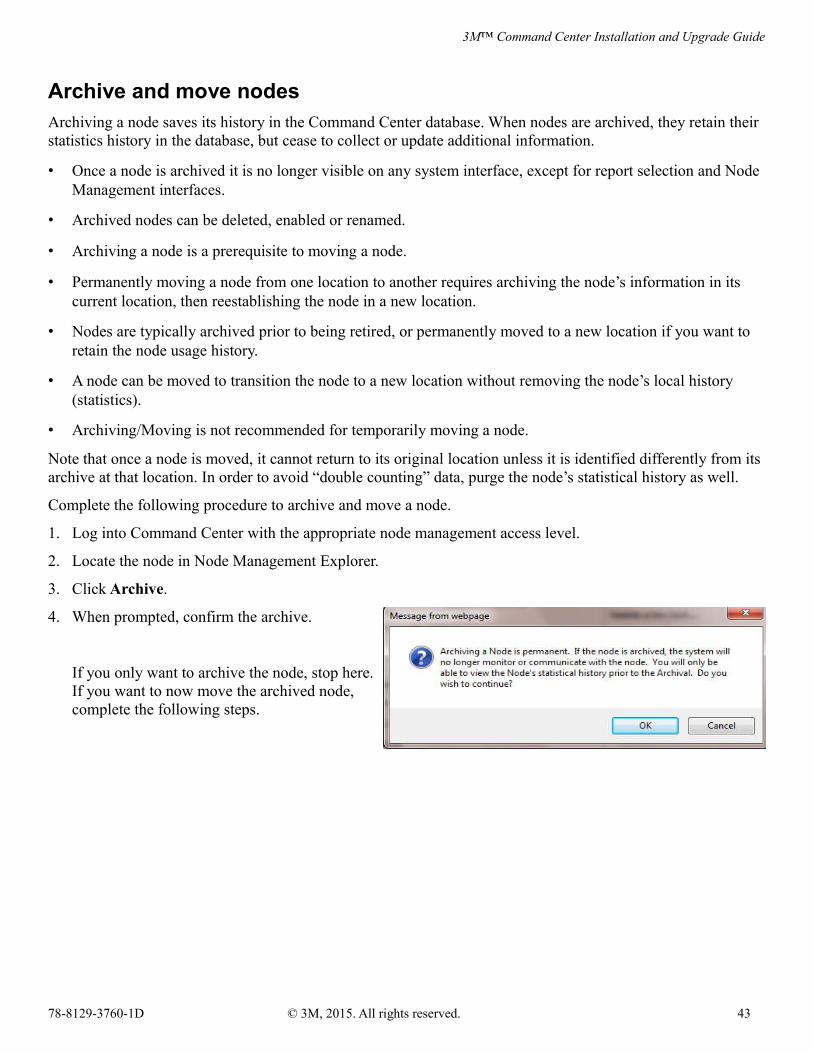
4. When prompted, confirm the archive.
If you only want to archive the node, stop here.If you want to now move the archived node,complete the following steps.
78-8129-3760-1D © 3M, 2015. All rights reserved. 43
3M™ Command Center Installation and Upgrade Guide
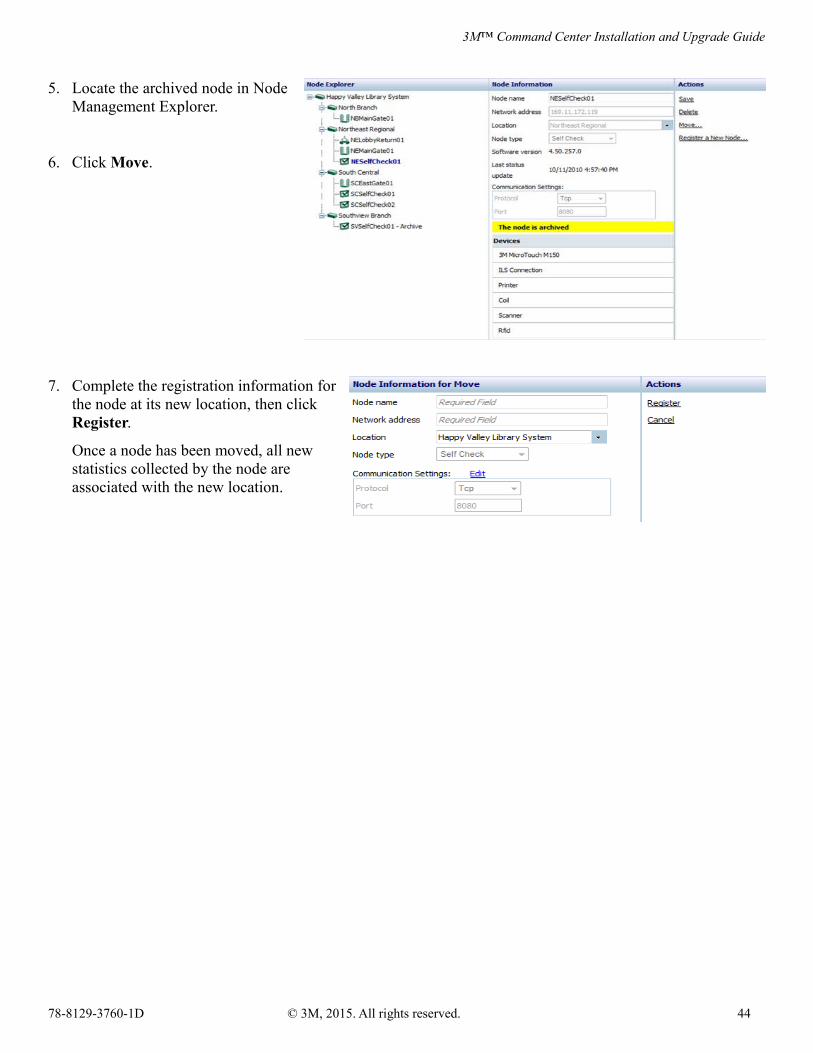
5. Locate the archived node in NodeManagement Explorer.
6. Click Move.
7. Complete the registration information forthe node at its new location, then click Register.
Once a node has been moved, all newstatistics collected by the node areassociated with the new location.
78-8129-3760-1D © 3M, 2015. All rights reserved. 44
3M™ Command Center Installation and Upgrade Guide
Appendix F – Command Center configuration utilityThe Command Center configuration utility is installed locally on the Command Center server. Access the application on your Command Center server by clicking Start, All Programs, 3M, then Command Center.
The application is arranged into three tabs.
• Database
• User Accounts
• Server
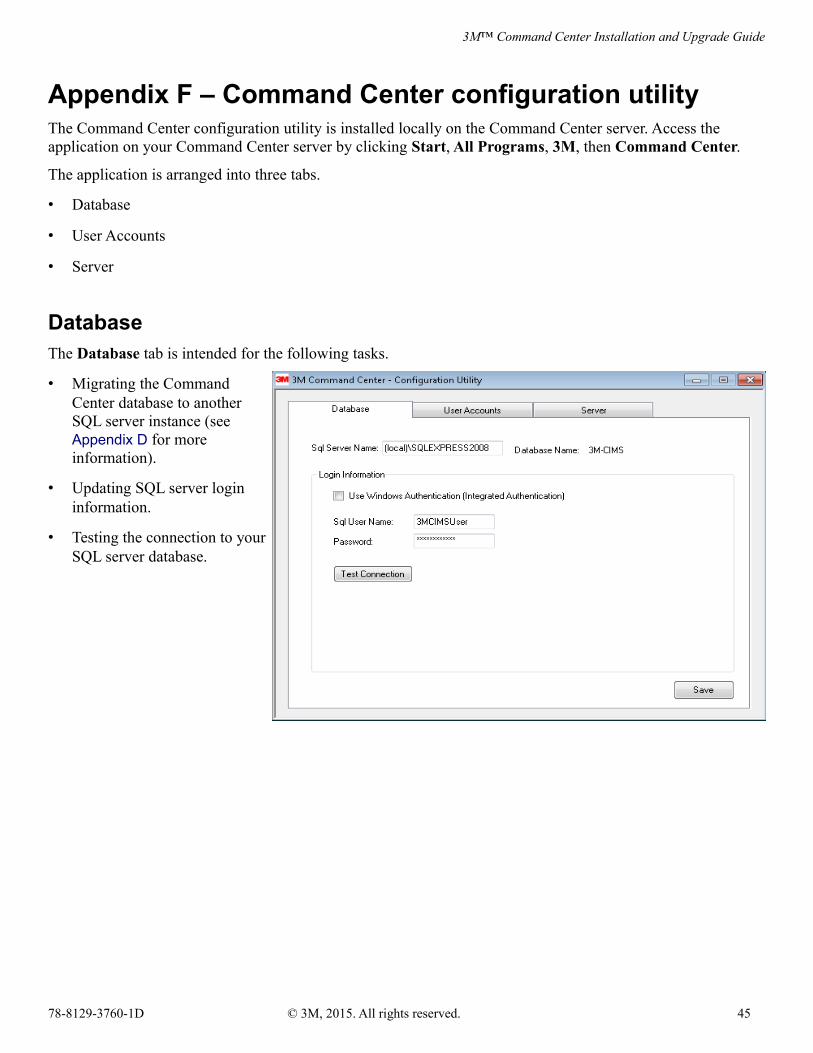
DatabaseThe Database tab is intended for the following tasks.
• Migrating the CommandCenter database to anotherSQL server instance (see Appendix D for moreinformation).
• Updating SQL server logininformation.
• Testing the connection to yourSQL server database.
78-8129-3760-1D © 3M, 2015. All rights reserved. 45
3M™ Command Center Installation and Upgrade Guide
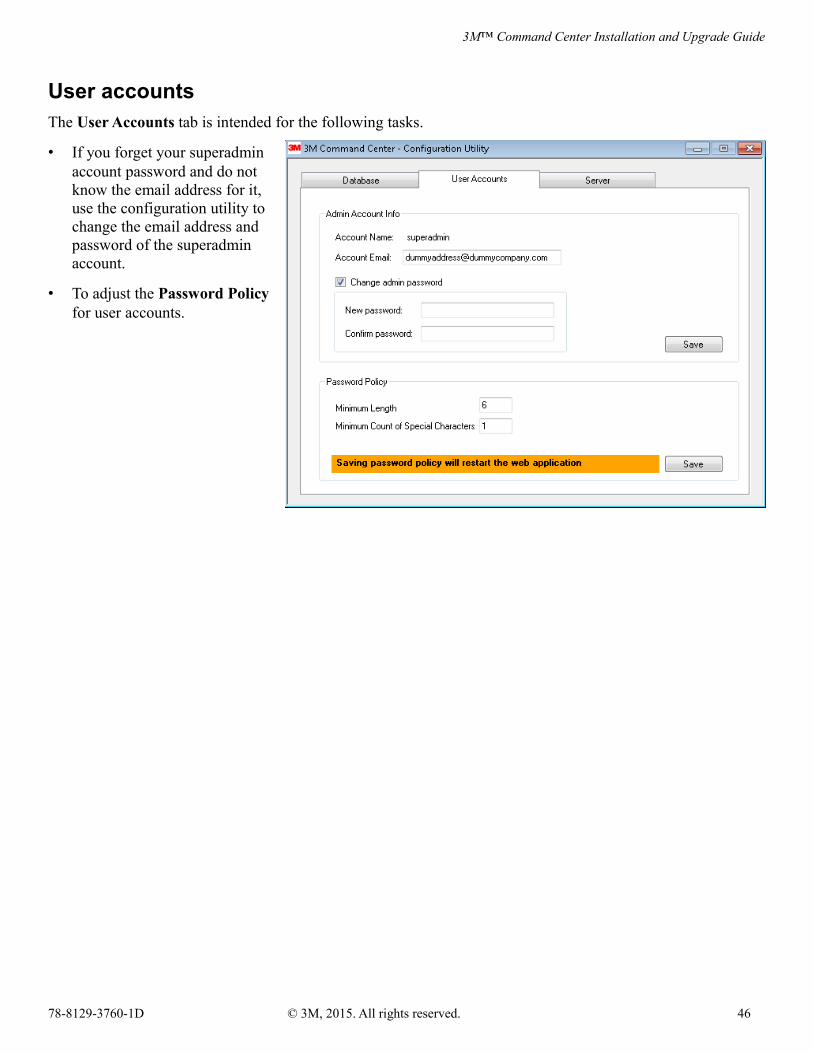
User accountsThe User Accounts tab is intended for the following tasks.
• If you forget your superadminaccount password and do notknow the email address for it,use the configuration utility tochange the email address andpassword of the superadminaccount.
• To adjust the Password Policyfor user accounts.
78-8129-3760-1D © 3M, 2015. All rights reserved. 46
3M™ Command Center Installation and Upgrade Guide
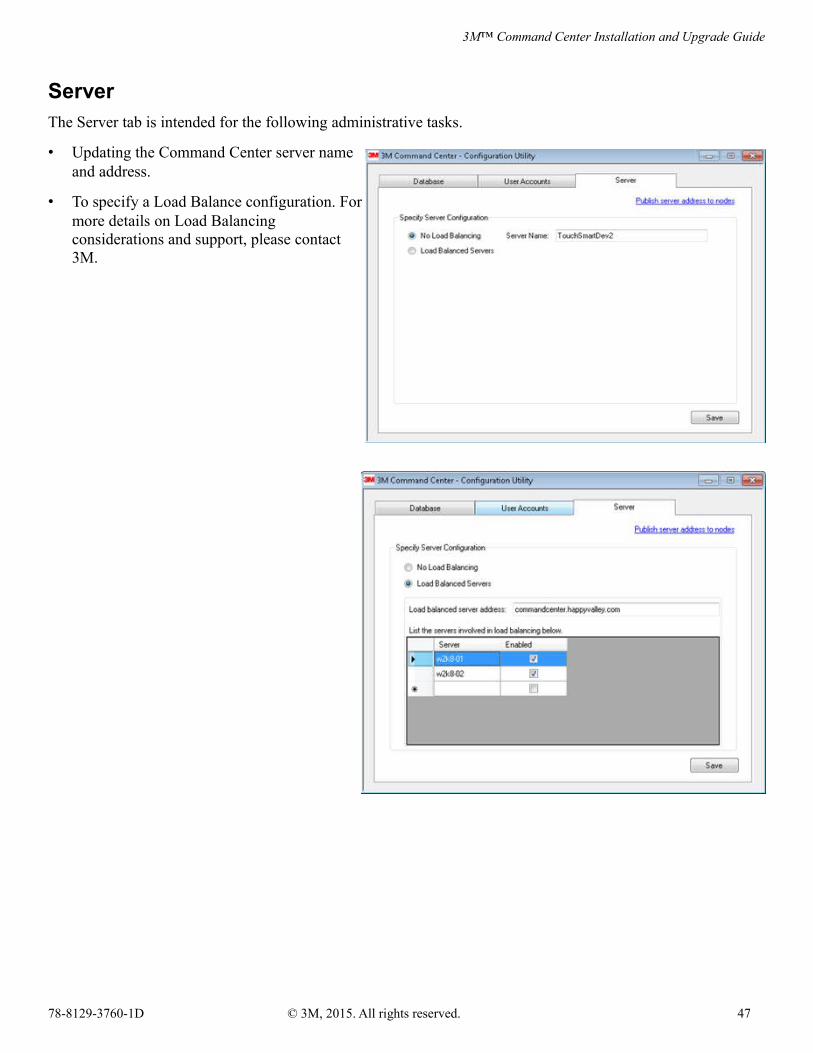
ServerThe Server tab is intended for the following administrative tasks.
• Updating the Command Center server nameand address.
• To specify a Load Balance configuration. Formore details on Load Balancingconsiderations and support, please contact3M.
78-8129-3760-1D © 3M, 2015. All rights reserved. 47
3M™ Command Center Installation and Upgrade Guide
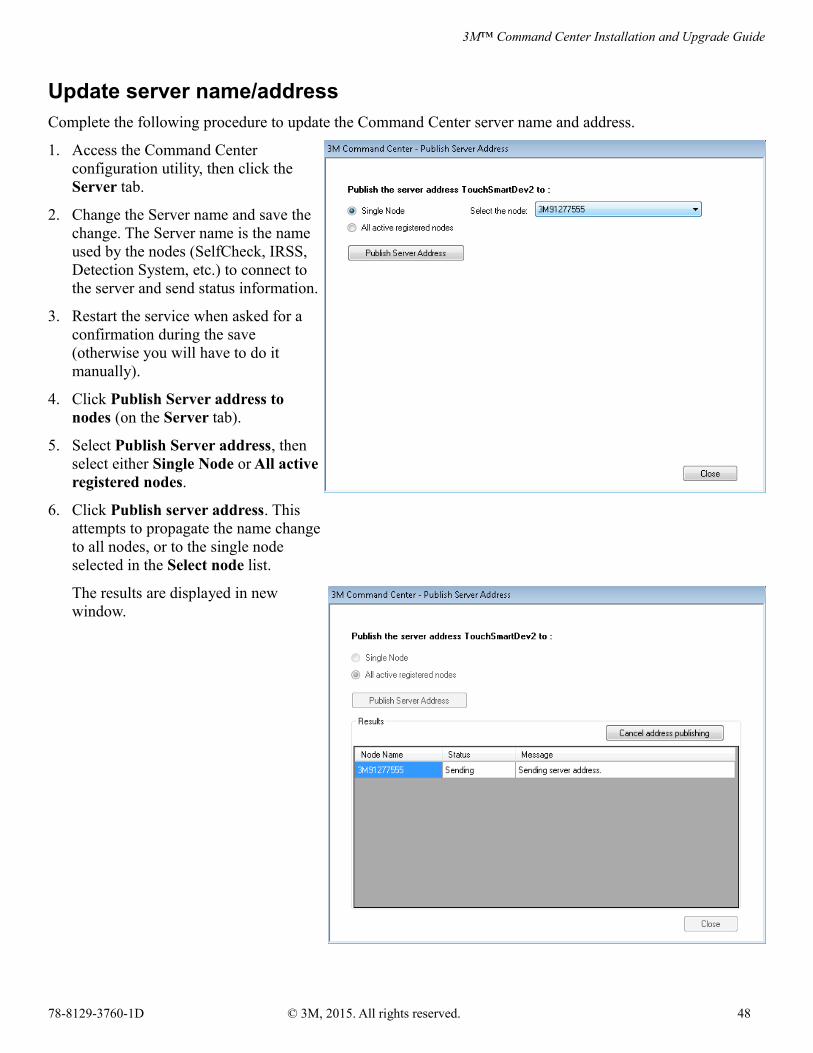
Update server name/addressComplete the following procedure to update the Command Center server name and address.
1. Access the Command Centerconfiguration utility, then click the Server tab.
2. Change the Server name and save thechange. The Server name is the nameused by the nodes (SelfCheck, IRSS,Detection System, etc.) to connect tothe server and send status information.
3. Restart the service when asked for aconfirmation during the save(otherwise you will have to do itmanually).
4. Click Publish Server address tonodes (on the Server tab).
5. Select Publish Server address, thenselect either Single Node or All activeregistered nodes.
6. Click Publish server address. This attempts to propagate the name change to all nodes, or to the single node selected in the Select node list.
The results are displayed in newwindow.
78-8129-3760-1D © 3M, 2015. All rights reserved. 48
3M™ Command Center Installation and Upgrade Guide
Appendix G – WCF configuration utilityCommand Center version 1.20.029.0 requires that the WCF Configuration Utility be executed prior to communicating with the following 3M Library Systems products:
• SelfCheck 4.7 and earlier (Phoenix-based code)
• 3M Intelligent Return and Sorter System, version 3.50.050.0 and earlier (Phoenix-based code)
• 9100 Detection System, version 1.20.124.0
The WCF Configuration Utility is found on the installation CD in the WCF Config Patcher directory. Run the utility on the respective SelfCheck system or 3M Intelligent Return and Sorter System. For the 9100 Detection System, the utility must be executed on the server where the 9100 Detection System and Command Center software reside.
Note: If there is not a version of the 9100 Detection System running on the Command Center server, there is noneed to execute the WCF Configuration Utility on the Command Center server.
To run the WCF Configuration Utility:
1. Copy the files in WCF Config Patcher to a local drive on the target computer.
Note: The WCF Configuration Utility creates a log file in the same directory as the utility executable. If the application is run from a CD, no log file is created.
2. Run the WCF Configuration Utility program.
Select LibrarySystems.CIMS.WCFConfigPatcher.exe.
A DOS window appears showing the program status.
When the program completes, the DOS window closes. The log file resides in the same directory as the WCF Configuration Utility program, and indicates whether the respective applications were successfully patched.
78-8129-3760-1D © 3M, 2015. All rights reserved. 49
3M™ Command Center Installation and Upgrade Guide
Warranty
3M Library Systems Ver1212053M Center, Building 225-4N-14 St. Paul, MN 55144-1000
78-8129-3760-1D © 3M, 2015. All rights reserved. 50
3M™ Command Center Installation and Upgrade Guide
3M Service
Information to gatherBefore you call, please have the following information available:
• Name, address, and telephone number of your facility
• Model number(s) of equipment you are calling about —and, if applicable, other equipment installed
• Your question(s), or if applicable, a description of the problem or issue you want addressed
3M Service phone numbersFor questions regarding your system, call one of the following numbers.
In the United States In Canada In other countries
1-800-328-0067 English 1-800-268-6235 Français 1-800-567-3193
Call your local 3M office.
3M Library Systems Web SiteThe 3M Library Systems Web site can be located at http://www.3M.com/library.
For additional information in the United States about 3M Library Systems, go to http://www.3M.com/us/library.
78-8129-3760-1D © 3M, 2015. All rights reserved. 51
3M™ Command Center Installation and Upgrade Guide
3M Library Systems3M Center, Building 225-4N-14
St. Paul, MN 55144-1000www.3M.com/library
78-8129-3760-1D © 3M, 2015. All rights reserved. 52