Embed Size (px)
Citation preview
8/19/2019 31-3280 Clean Design Electro-Mechanical GE Dishwasher Service Manual
http://slidepdf.com/reader/full/31-3280-clean-design-electro-mechanical-ge-dishwasher-service-manual 1/13
g GE Consumer Service Training
Technician Manual
Clean Design Electro-Mechanical Dishwashers
GSD400T GSD900T GSD1910T
GSD500T GSD930T GSD1920T
GSD530T GSD950T GSD1930T
GSD550T GSD980T
GSD650T GSD1200T GSC700T
GSD680T GSD1230T GSC800T
GSD700T GSD1350T GSC1200T
GSD730T GSD1380T
GSD750T GSD1400T GSM603T
GSD780T GSD1410T
GSD800T GSD1420T
GSD830T GSD1430T
Pub. No. 31-3280
8/19/2019 31-3280 Clean Design Electro-Mechanical GE Dishwasher Service Manual
http://slidepdf.com/reader/full/31-3280-clean-design-electro-mechanical-ge-dishwasher-service-manual 2/13
CleanDesign ishw shers
T LE
CONTENTS
Electro-Mechanical Built-In Models
i
Electro-Mechanical Portable/ConvertiblefUndersink Models ii
General/Exploded Wash
rms
Views 1
Wash rmService 2
Sump Service/Calrod Redesign 3
Etscutcheon Low Travel Switch 4
Control Panel ssembly Service 5
Cycle Extender Operation GSD1400T 6
Cam ChartfWater Fills 7
8/19/2019 31-3280 Clean Design Electro-Mechanical GE Dishwasher Service Manual
http://slidepdf.com/reader/full/31-3280-clean-design-electro-mechanical-ge-dishwasher-service-manual 3/13
I
le n
sign
Dishwasher Models
I
NONE
TUR
4 T
4 T
42 T
43 T
C
I
LT
lT
I
LT DIAL
DIAL
DIAL
DIAL DIAL
DtAL
DIAL
DIAL
DIAL DIAL
DIAL
DIAL
DIAL
DIAL
DIAL
DIAL
DIAL
I LT
lT lT
lT
LT
tL T
LT
T
T
0
I
LT lT
tL T
Lr LT
iJR PB
I
LT
tL r
LT
tL T
LT
I
LT
lT
DIAl
I L I L
DIAL
DIAL
DIAL
DIAL
DIAL
DIAL
DIAL
TURN
DIAL
1
I LS
DIALS
HR
HR
HR
T
LT
LT
ILT
T
RKR RKR RKR
2P O
RKR RKR
OR2PB
2LT
T
LT
lL T
tL T T
2LT 2LT
LT
LT
lL T
T I LT
500
500 500
500 500
S
S
5
500
S
S
00
TIME
TlME TIMED
TIMED
TIMED TIMEO
TIMED
TIME
TIMED
TIME TIMED
TIME
YES
YES YES YES YES YES
YES YES
YES
YES
•
T
•
7
4
J
0
0
0
0
J
J J J
J
J
2 2
2
4
4
•
4 4 4
•
4
4
4 4 4
PClTR
PClTR PClTR
PelTR
PClTR PClTR
pClTR
pCITR P lTR
PClTR PClTR P lTR
SWA
SW SW
SWA STD
STO
sm
STO STO
STO
STO STD
YES
YES YES YES
YES YES
NO NO
NO
NO NO
NO
NO
NO NO
NO
NO NO
Warranty Years
1121512
1121512 1f2FS12 1I215J1
1 211 11211
1 211
11211 1 211
1 2J1D 1 1
D\.\ F_8/93
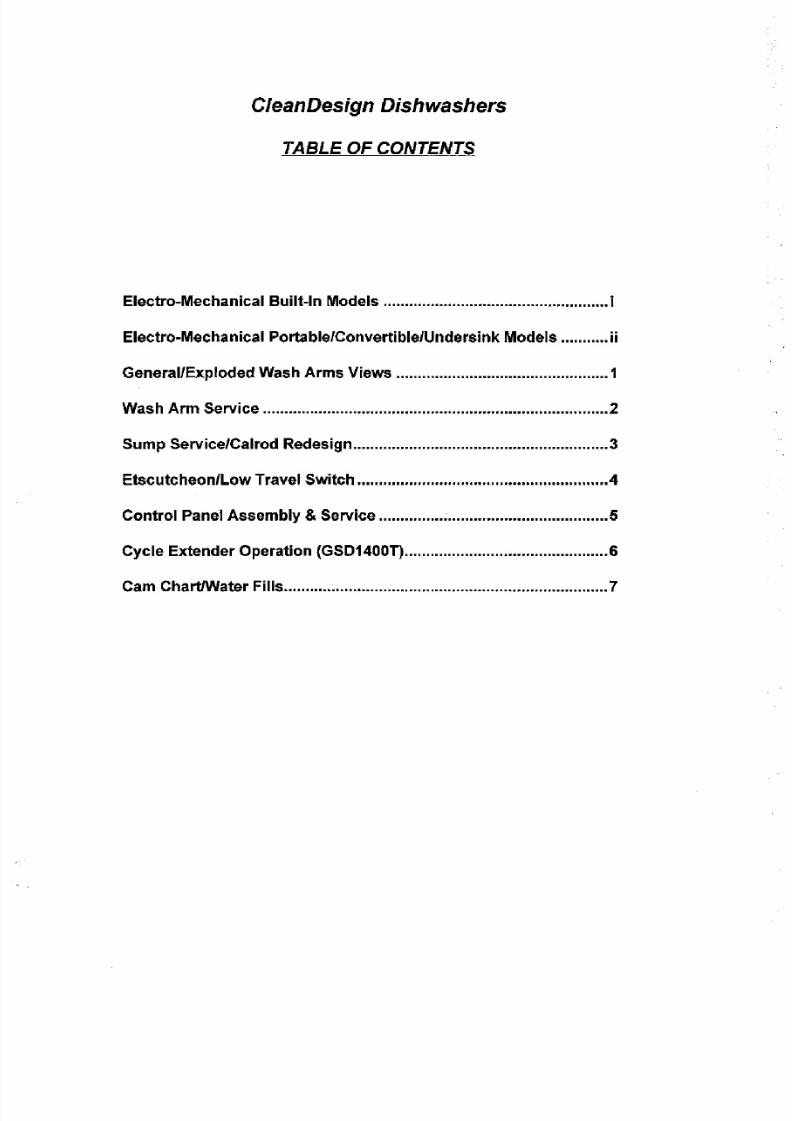
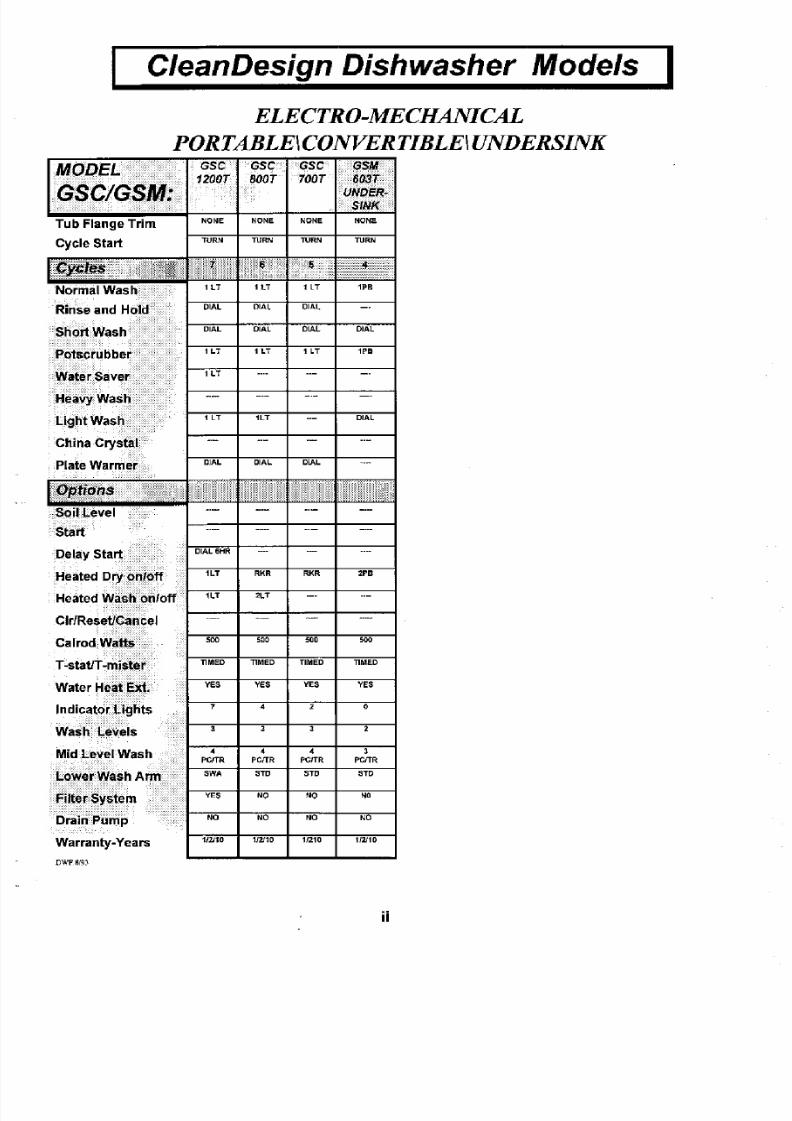
ELECTRO MECH NIC L BUILT IN
r M O i ~ ~ ~ ~
8/19/2019 31-3280 Clean Design Electro-Mechanical GE Dishwasher Service Manual
http://slidepdf.com/reader/full/31-3280-clean-design-electro-mechanical-ge-dishwasher-service-manual 4/13
I
Clean
sign
ishwasher odels
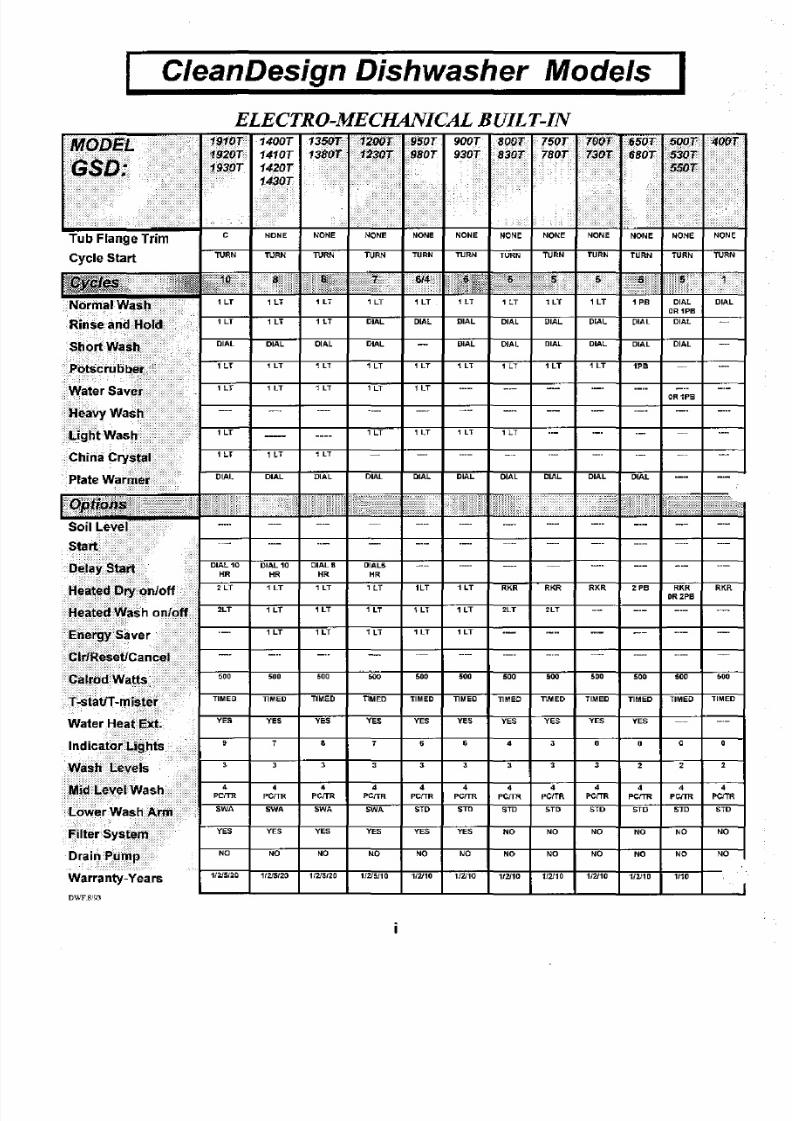
ELECTRO MECH NIC L
PORT BLEICONVERTIBLEIUNDERSINK
MODEL
GSC GSM:
Tu b Flange Trim
Cycle Start
GSC S GSC
SM
1200T
BOOT
700T 603T
UNDER
SINK
NONE
NONE
NONE
NONE
TURN TURN TURN
TURN
5 5
TIMED TIMED
YES YES
1
3
4
perm
PCITR
STO STO
NO
NO NO
1121
f2
Start
Delay Start
Heated Dry onloff
Heated Wash
onloff
Clr/Reset/Cancel
Calrod Walt
T-statIT mister
Water Heat Ext
Indicator
Lights
Wash Levels
Mid Level Wash
Lower Wash
Filter System
Drain Pump
Warranty-Years
D W F 9 ~
DIAL
DIAL
1 LT
1 LT
lLT
DIAL
DIAL6HR
1LT
1LT
5
TIMED
YES
7
3
4
PCITR
sw
YES
NO
1 211
DIAL
DIAL
1 LT
1L T
DI L
RKR
L T
soo
TIMED
yes
4
•
CIT
STO
NO
NO
1 211
DIAL
OIAL
lLT
DI L
RKR
DlAt
1P
DI L
PO
ii
8/19/2019 31-3280 Clean Design Electro-Mechanical GE Dishwasher Service Manual
http://slidepdf.com/reader/full/31-3280-clean-design-electro-mechanical-ge-dishwasher-service-manual 5/13
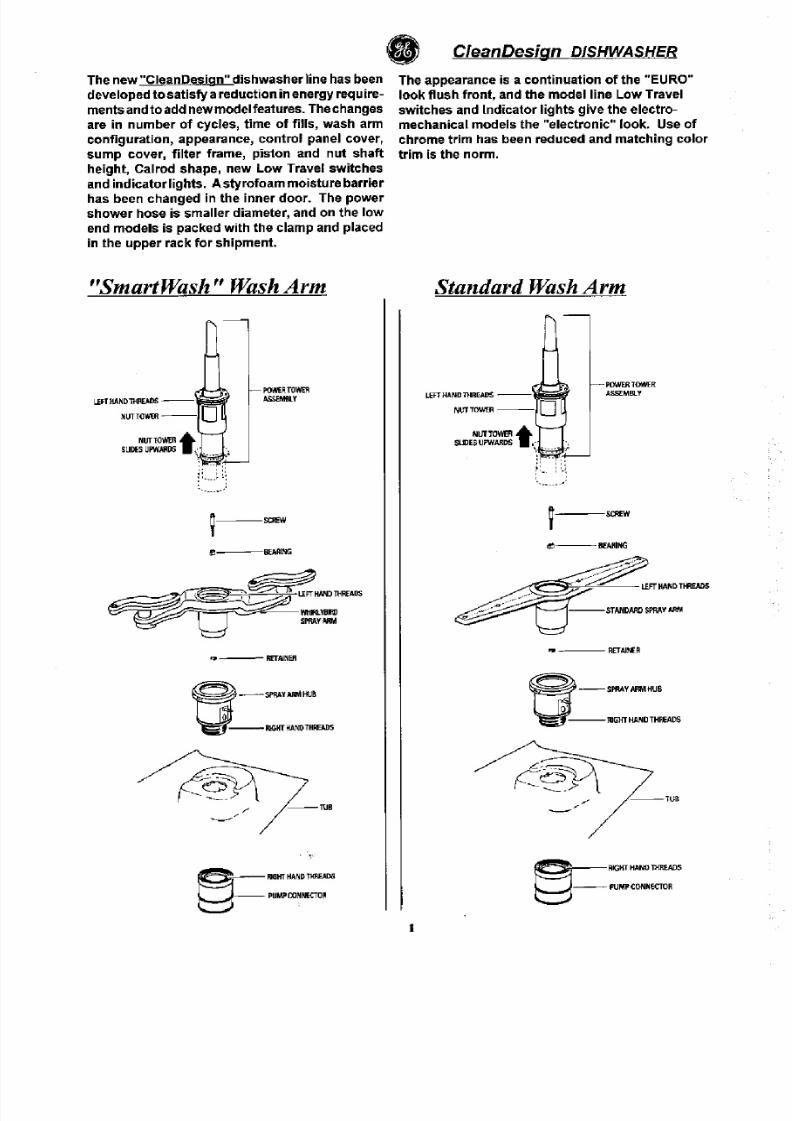
The new CleanDesign dishwasherline has been
developed to satisfya reduction in energy require
mentsand to addnewmodel features. The changes
are in number
of
cycles
time
of f i lls wash arm
configuration
appearance control panel cover
sump cover filter frame piston and
nut shaf t
height Calrod shape new Low Travel switches
and
indicator
lights.
Astyrofoam
moisturebarrier
has been changed in the inner door. The power
shower hose is
smaller
diameter and on the low
end
models
is packedwith
the
clamp and placed
in the upper rack
fo r
shipment.
martWash Wash r
le n
sign
ISHW SHER
The appearance is a continuation of the EURO
look flush front and the model line Low Travel
switches and
Indicator
lights give
the
electro
mechanical models the electronic
look.
Use
of
chrome trim has been reduced and matching color
trim is the norm.
tandard Wash r
L,EHHAND1HREAtIS
NUTT )Yotft 0
NI}TTil NER
t
SLJ ES UPW S •
_
-
POM:R. TOWER
ASSElItlll
Y
I ffT HAND n1READS ~
NUTTO MR
0
NUTTOWEfI
t r---1
SLDES UPWARDS
,- .,
\
: : ~ .
: :
f---------POWERTOWER
ASSlMBlY
e ~ - - , G
RETAiNEfl
6-
SPR Y
. . . .
HU
RlGHf IAN ) THRElDS
ru
~ R I G H T H N D ~
P U M P O O ~ N T O ~
tl-SPRAY... HUB
o
liGHT
THREADS
f i ~
f ~ l
lU
s---- HT HANOll<READS
~
PlIMPCONNECTOR
1
8/19/2019 31-3280 Clean Design Electro-Mechanical GE Dishwasher Service Manual
http://slidepdf.com/reader/full/31-3280-clean-design-electro-mechanical-ge-dishwasher-service-manual 6/13
lean esign DISHW SHER •
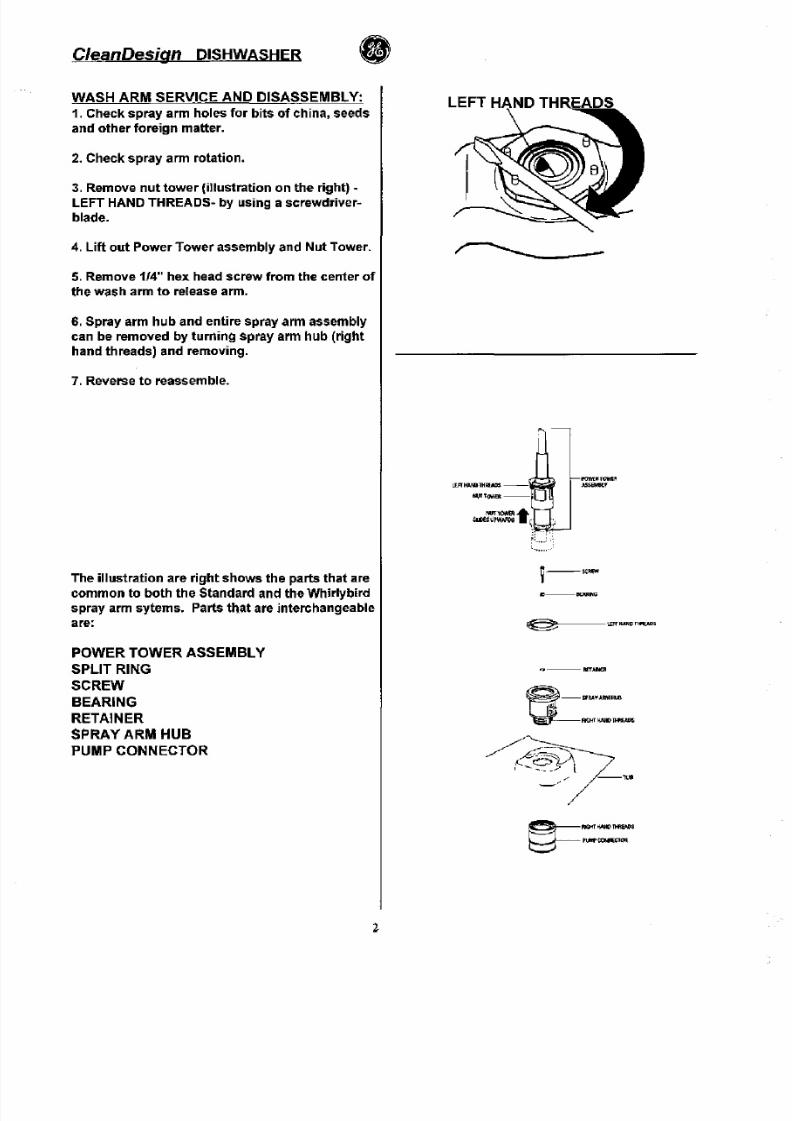
WASH ARM SERVICE AND DISASSEMBLY:
Check spray arm holes fo r bits of china, seeds
and
other
foreign matter.
2
Check spray arm rotation.
3
Remove
nut tower
illustration
on
the
r ight)
LEFT HAND THREADS- by using a screwdriver
blade.
4 Lift
out Power
Tower
assembly and Nut Tower.
5
Remove
1 4
hex head
screw
from the center of
the wash arm
to
release arm.
6
Spray arm hub and entire spray arm assembly
can be removed
by
turning
spray
arm hub
right
hand threads) and removing.
7
Reverse
to
reassemble.
The
illustration
are right
shows
the parts that are
common
to both
the Standard and the Whirlybird
spray arm sytems. Parts that are interchangeable
re
.
~
POWER TOWER ASSEMBLY
SPLIT RING
SCREW
BEARING
RETAINER
SPRAY ARM HUB
PUMP CONNECTOR
VO
8/19/2019 31-3280 Clean Design Electro-Mechanical GE Dishwasher Service Manual
http://slidepdf.com/reader/full/31-3280-clean-design-electro-mechanical-ge-dishwasher-service-manual 7/13
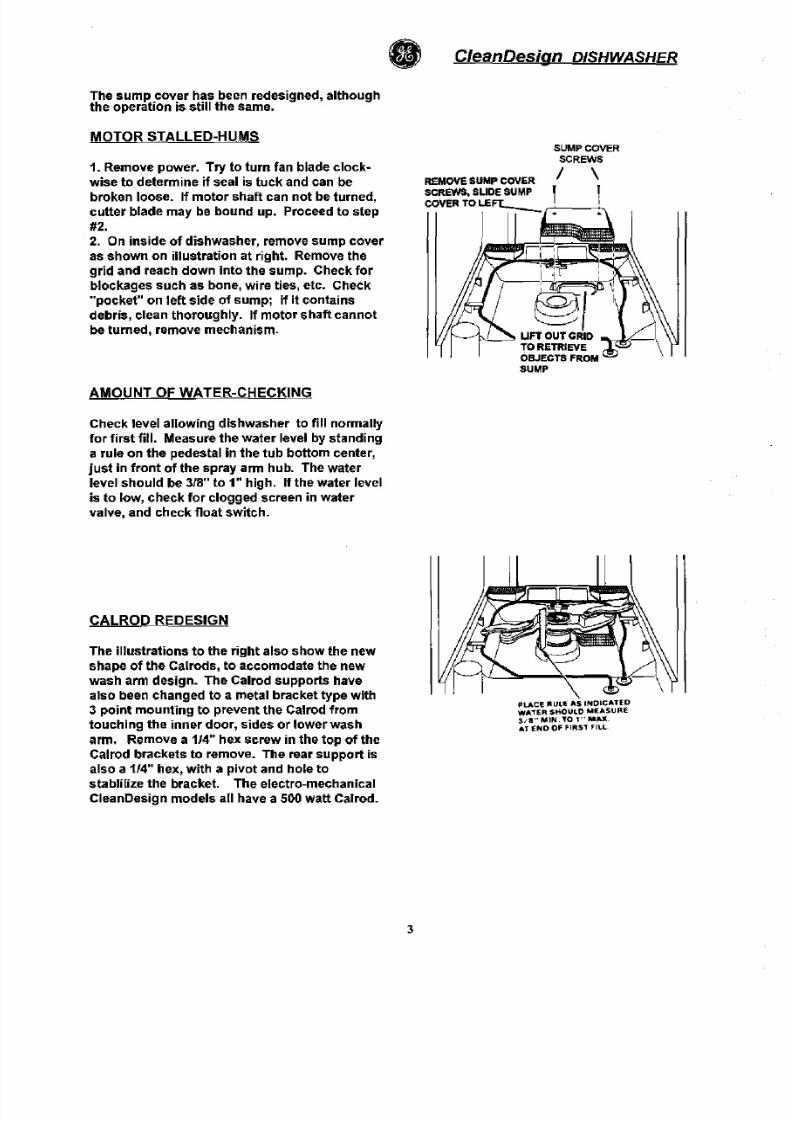
The sump cover has been redesigned although
the operation
is
still the same.
leanDesign DISHW SHER
MOTOR STALLED HUMS
1. Remove power.
Try to
turn fan blade
clock
wise to determine if seal is tuck and can
be
broken loose. If motor shaft can
not
be turned
cutter blade may be bound up. Proceed to step
2
2 On
inside
of
dishwasher remove sump cover
as shown on illustration at r ight . Remove the
grid and reach
down into
the sump. Check
fo r
blockages such as bone wire ties etc. Check
on
left side
of
sump; i f it contains
debris clean thoroughly. If motor s haftcannot
be turned remove mechanism.
AMOUNT OF WATER CHECKING
Check level allowing
dishwasher
to fill normally
fo r first fill.
Measure the water level by standing
a rule
on
the pedestal in the tub
bottom
center
just in
f ront of
the spray arm hub. Thewater
level should be 3 S to 1 high. I f the water level
is to low check fo r clogged screen in water
valve and check float switch.
REMOVE SUMP
covER
SCREWS. SWOE SUMP
COVER TO
LEFt-
SUMP COVER
SCREWS
/ \
I I
CALROD REDESIGN
The illustrations to the right also
show
the new
shape of the Calrods to accomodate the new
wash arm design. The Calrod
supports
have
also been changed
to
a metal bracket type with
3 point mounting to prevent the Calrod from
touching the
inner
door,
sides
or lower
wash
arm. Remove a 114 hex screw in the
top
of the
Calrod brackets
to
remove. The rear
support
is
also a
1 4
hex with a pivot and hole
to
stablil ize the bracket. The electro mechanical
CleanDesign
models
all have a 500
watt
Calrod.
PLACE
lUll AS INDLeATED
WATER $KOULD
MEASURE
, / l I · ·MIN.TO ··M......
At
N O OF
FIRst
il l
8/19/2019 31-3280 Clean Design Electro-Mechanical GE Dishwasher Service Manual
http://slidepdf.com/reader/full/31-3280-clean-design-electro-mechanical-ge-dishwasher-service-manual 8/13
lean esign
DISHWASHER
e
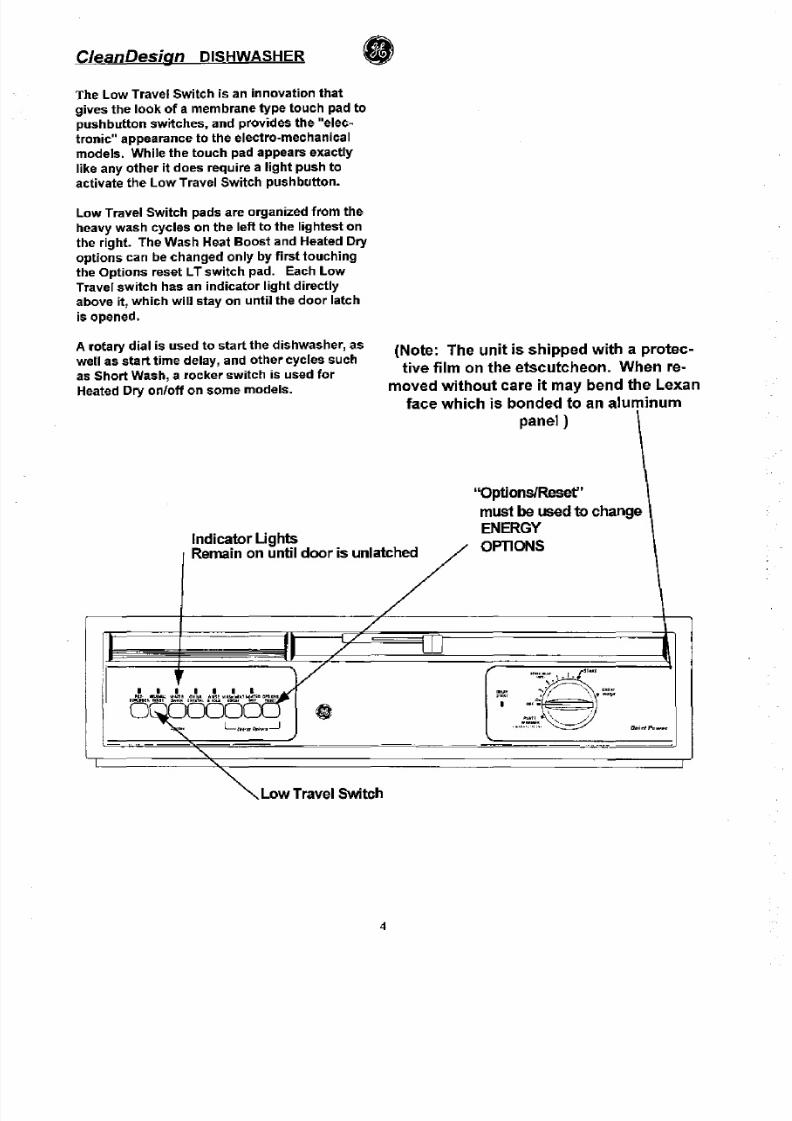
The Low Travel Switch is an innovation that
gives the look of a membrane type touch pad
to
pushbutton
switches, and provides
the
elec
tronic appearance
to
the electro-mechanical
models. While
the
touch pad appears exactly
like any
other
it does require a light push to
activate
the
Low
Travel Switch pushbutton.
Low Travel Switch pads are organized f rom the
heavy wash cycles
on the
left
to the
lightest
on
the right. The Wash Heat Boost and Heated Dry
options
can
be
changed
only
by
first
touching
the Options reset LT switch pad. Each Low
Travel switch has an indicator light directly
above it,
which
will stay on until the door latch
is opened.
A rotary dial is used
to
start the dishwasher, as
wel l as start time delay, and
other
cycles such
as
Short
Wash, a
rocker switch
is used
fo r
Heated Dry on/of f on some models.
(Note: The unit is shipped with a protec
tive
film on the etscutcheon. When re
moved
without
care it may bend the Lexan
face which is bonded to an aluminum
panel
Options/Resef
must be used to change
Indicator Ughts
ENERGY
,
_ , ~ /
OPTIONS
I
II
/
L r
-e
........ t •
f
_ ' ..
.J
. , ~ 6 0 ..
( ,,_ ,, DOT
t r:1( 500Cll x' ')
0
I
< I t , ~
.
- . . w l
L m
.•
~
•.
-.J
~ ? ? - ~ .
a.rirrlPfII. ,
.
-..-
-
~ w Travel Switch
4
8/19/2019 31-3280 Clean Design Electro-Mechanical GE Dishwasher Service Manual
http://slidepdf.com/reader/full/31-3280-clean-design-electro-mechanical-ge-dishwasher-service-manual 9/13
e leanDesign DISHW SHER
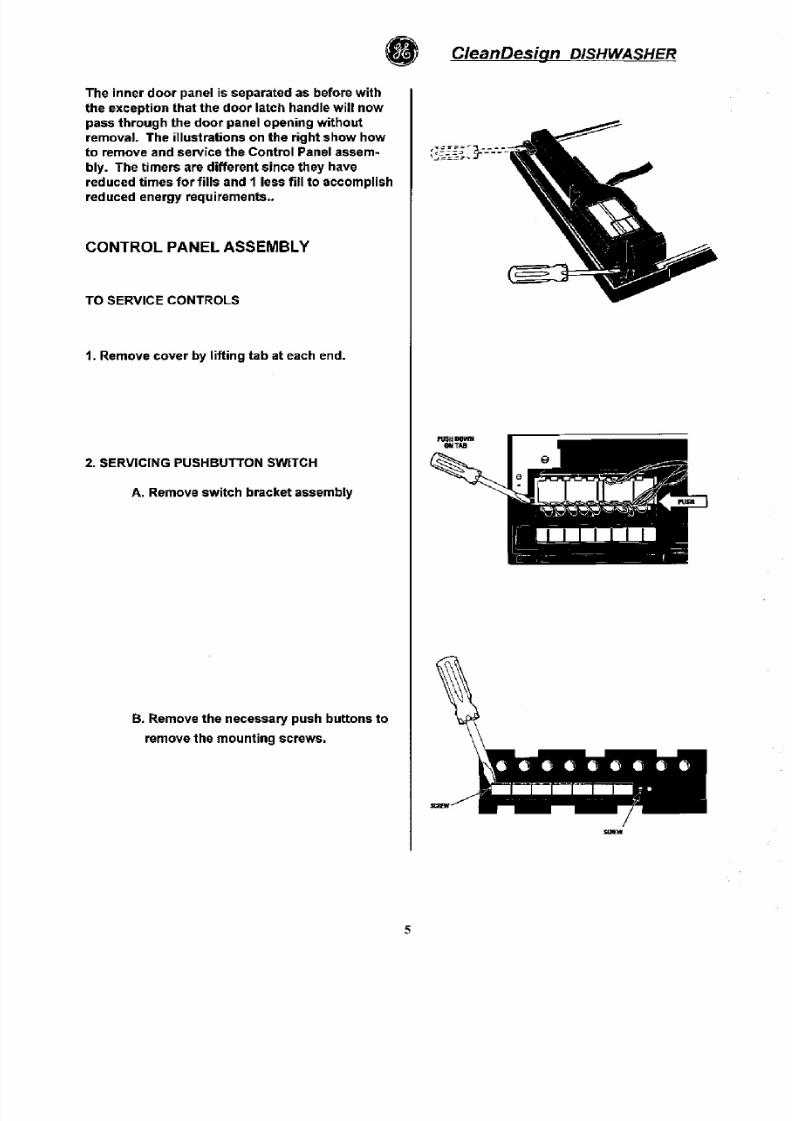
The
inner
door panel is separated as beforewith
the exception
th t
the
door latch handlewil l now
pass through the door panel opening without
removal The illustrations on
the
right show how
to remove and service the Control Panel assem ~ ~ ~ ~ ~ }
bly The timers are different since they have
reduced
times
fo r
f il ls nd
1 less fi ll to accomplish
reduced energy requirements •
CONTROL PANEL ASSEMBLY
=
TO SERVICE CONTROLS
1 Remove cover y l if ting t at each end
GOT
SERVICING PUSHBUTTON SWITCH
A Remove switch bracket assembly
B Remove the necessary push uttons
to
remove the mounting screws
8/19/2019 31-3280 Clean Design Electro-Mechanical GE Dishwasher Service Manual
http://slidepdf.com/reader/full/31-3280-clean-design-electro-mechanical-ge-dishwasher-service-manual 10/13
le n
sign DISHWASHER •
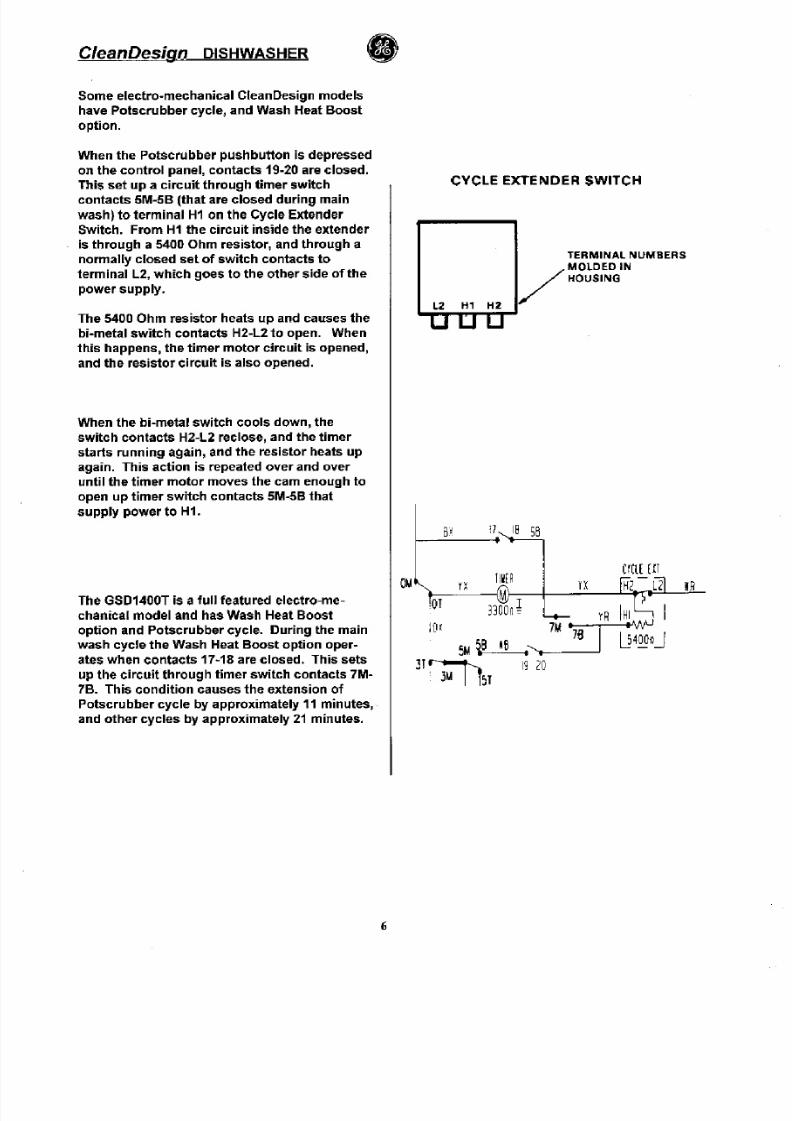
Some electro-mechanical CleanDesign models
have
Potscrubber
cycle
and
Wash Heat
Boost
option.
When
the Potscrubber pushbutton
is depressed
on
the
control panel
contacts
19-20 are closed.
This
se t up
a
circuit through timer
switch
contacts
5M-5B
that
are
closed during
main
wash
to terminal Hi
on the Cycle Extender
Switch.
From Hi the
circuit
inside
the extender
is through a 5400 Ohm resistor and
through
a
normally closed set of
switch
contacts to
terminal L2 which
goes to the
other
side of the
power supply.
The 5400 Ohm resistor heats up and causes the
bi-metal switch contacts H2-L2
to
open. When
this happens
the
t imer motor circuit is opened
and
the
resistor
circuit
is also opened.
When the bi-metal switch cools down the
switch
contacts
H2-L2 reclose and the timer
starts running
again and
the resistor
heats
up
again.
This action
is repeated over and over
unti l the t imer motor
moves
the
cam enough to
open up timer switch contacts 5M-5B that
supply
power
to Hi.
The GSD1400T is a full featured electro-me
chanical model and has Wash Heat Boost
option and Potscrubber cycle. During the main
wash
cycle the
Wash Heat Boost
option
oper
ates when
contacts
17-18 are closed.
This sets
up
the circuit
through timer switch
contacts
7M
7B. This condition causes the extension of
Potscrubber cycle by approximately
minutes
and other cycles by approximately
minutes.
CYCLE EXTENDER
SWITCH
TERMINAL
NUMBERS
/
MOLDEDIN
HOUSING
BI iJ 58
IX IllER IX WR
I::-::------ M I - : I = - - + - ~ : : - - - - - t t ; 1 o = - - - - - = -
1 BOOn
lR IHI I
~
IB
l] QQn
8/19/2019 31-3280 Clean Design Electro-Mechanical GE Dishwasher Service Manual
http://slidepdf.com/reader/full/31-3280-clean-design-electro-mechanical-ge-dishwasher-service-manual 11/13
Cycle extension
fo r
models other than the
GSD1400S occurs in a similar manner. When
Wash Heat Boost
pushbutton
is depressed on the
control
panel, contacts 9-10 are closed.
This sets up a circuit
through timer
switch
con
tacts 4M-4B
to
terminal H1 on the cycle extender
switch. From H1 the circuit inside the cycle
extender switch
is through
a 5400 Ohm resistor,
and through a normally
closed
set
of switch
contacts to
terminal L2,
which
goes
to
the other
side
of
the power supply.
The 5400 Ohm resistor heats up and causes the
bi-metal switch contacts
H2-l2
to open. When
this
happens, the
t imer motor
circuit is opened,
and the resistor circuit is also opened.
When the bi-metal switch cools down, the switch
contacts H2-L2 reclose, and
the
timer
starts
running
again, and
the
resistor heats up again.
This action is repeated over and over until the
t imer motor moves the cam enough
to
open up
timer switch contacts 4M-4B that
supply
power
to
H1. Selecting wash heat boost
option
will extend
wash times of all cycles except Potscrubber and
Rinse and Hold by approximately 21 minutes.
lean
esignDISHW SHER
Water usage has been reduced by shortening fill
t imes. (illustration below). The cam
chart
below
shows that
Potscrubber
has 7 f il ls,
which
can be
from
60
seconds
to 42
seconds.
As an example the 1st fil l in Potscrubber cycle is
60 seconds, while the intial
fill
on
Short
Wash
cycle
is
actually fill
3 which is 53
seconds. The
shortest
fill time
is
42 seconds
and is less than
any of our previous models.
WATER FILLS
fi II time/secs.
1 60
2 53
7 53
I
M CH RT FILLS
f
J V .. ~ ~ ~ r l l £ ltGE.T H IP [ R I ~ ~ [ TI __ Dff
l . .. ,
••
C; i ; ;U IT J l , Y IU I l IE. III < 0 1 l 1 < i 2 1 1 l ~ l l l l6 ~ ~ < .:l V II \ ~ ~ 1 6 ~ ~ 1 1 1 l I I ~ ] ~ J l Iii I ~ Q I I J II19SB:iI
, ''''£.'',
,N'
CLO , E O
OPEN
C L . O S E O
I
.
M O T O R
OPEN
~
~
CL . .OSED
..
II l - ; ; -
CLOSED
w
I
f' 1-<10
T
QP N
I
.
CLOo; cO
.
,
c,
4 0 7
C 'OS ; ;O
I
,
O, , ,N
'
f- II
,
.
• ::J,S
C L . O S E O
nr.,.,:N
CLUSED
•
..
H
J
-
VE
OPEN
CLOSEO
±±1m
....
r
C L . O S E O
II HJ
II1II IlTT 11111
too
P E N
, o . ~
;c
T
HE T
CL.9J,E9
m i ll
w i ~ J n i
----j
?R[-U5H
ASH
'liSE
~ p ~ ~ ~ ~ o ,
====:1
>OlSlRUallER
liJ7
1- . -+-4-+ - : i- -+-----
43
I
4 - + ~ - 8
-
-.ORl,lH ' ~ S H ' 85 f - S- - - - + - 5 -+ - - - -
22
I ~ - + ~ - + - - B I 3S -
~ ~ ~ ~
D
;f-
9
:, 4-
1
1
====:
L ~ l E UR\ j [R J$. 35
NOIE
5El£CIII,IG
US H
H E ~ I oS 0;> ION lAS-H 11 fS L
c n u : s
FXCH'T POIS( .PUllBER D INS HOLO ' ' ' , , ~ O X
: 1
rE
®2 4 6
7

8/19/2019 31-3280 Clean Design Electro-Mechanical GE Dishwasher Service Manual
http://slidepdf.com/reader/full/31-3280-clean-design-electro-mechanical-ge-dishwasher-service-manual 12/13
OT S

8/19/2019 31-3280 Clean Design Electro-Mechanical GE Dishwasher Service Manual
http://slidepdf.com/reader/full/31-3280-clean-design-electro-mechanical-ge-dishwasher-service-manual 13/13
OT S