Embed Size (px)
Citation preview
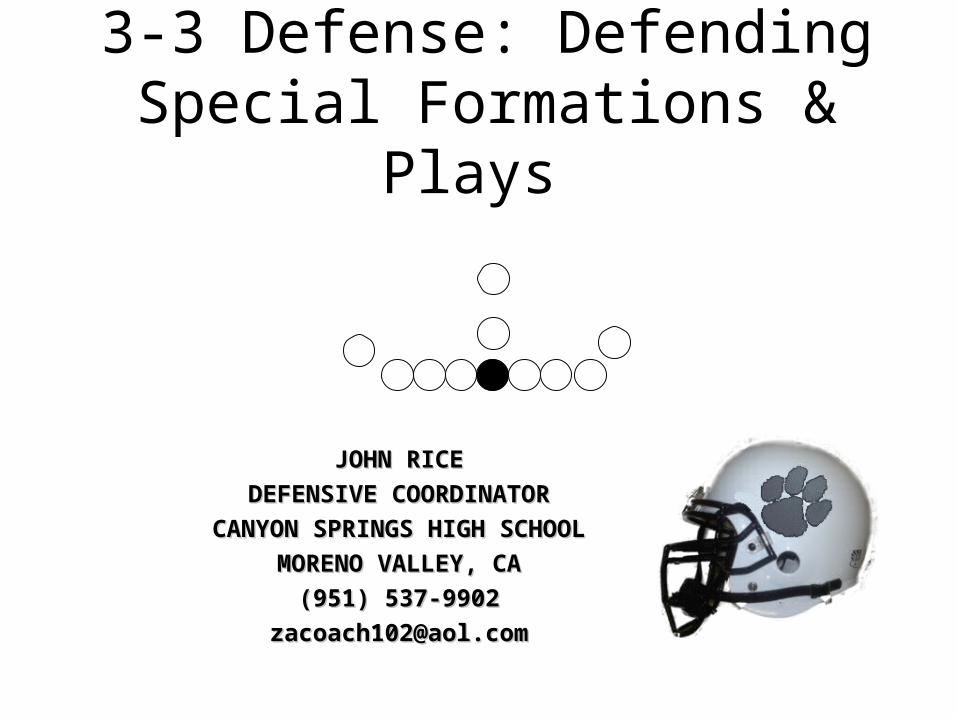
3-3 Defense: Defending Special Formations & Plays
JOHN RICEJOHN RICE
DEFENSIVE COORDINATORDEFENSIVE COORDINATOR
CANYON SPRINGS HIGH SCHOOLCANYON SPRINGS HIGH SCHOOL
MORENO VALLEY, CAMORENO VALLEY, CA
(951) 537-9902(951) 537-9902
[email protected]@aol.com
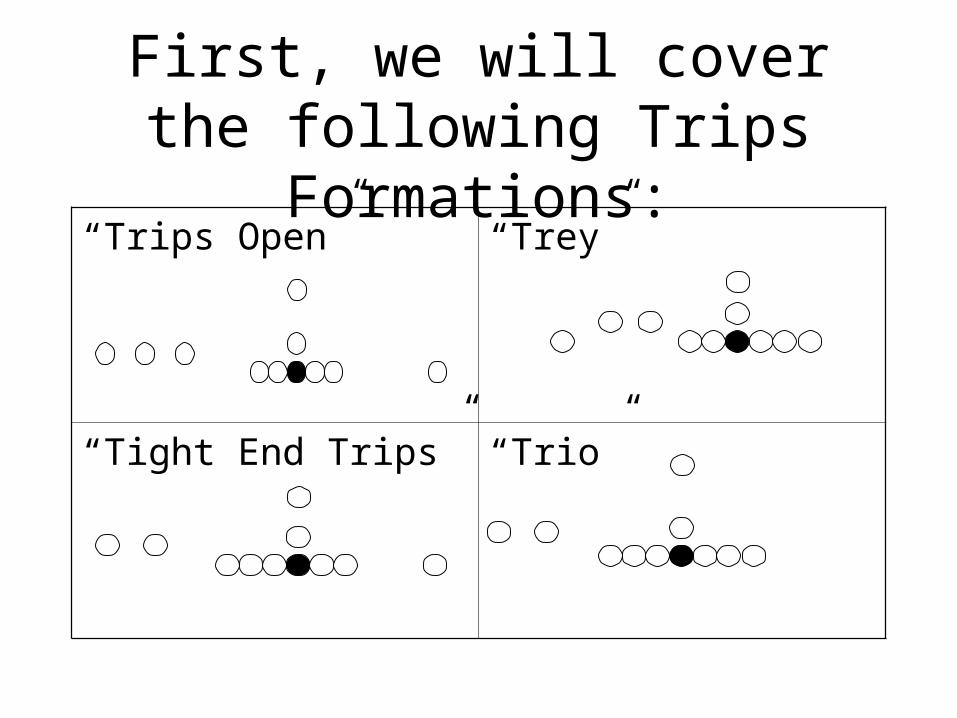
First, we will cover the following Trips Formations:
“Trips Open” “Trey”
“Tight End Trips” “Trio”
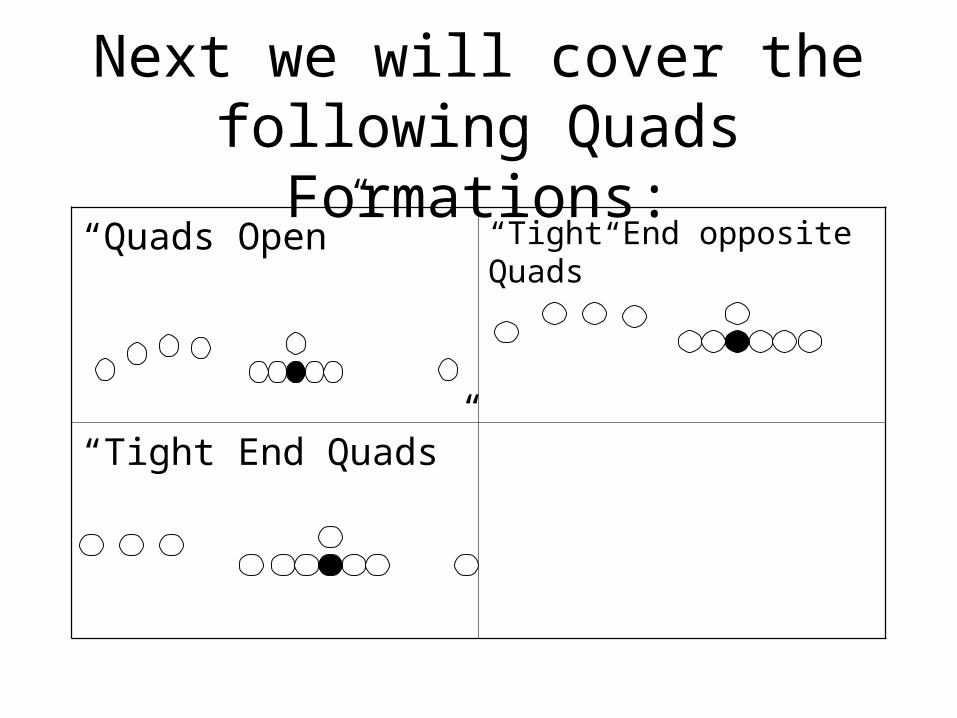
Next we will cover the following Quads Formations:
“Quads Open” “Tight End opposite Quads”
“Tight End Quads”
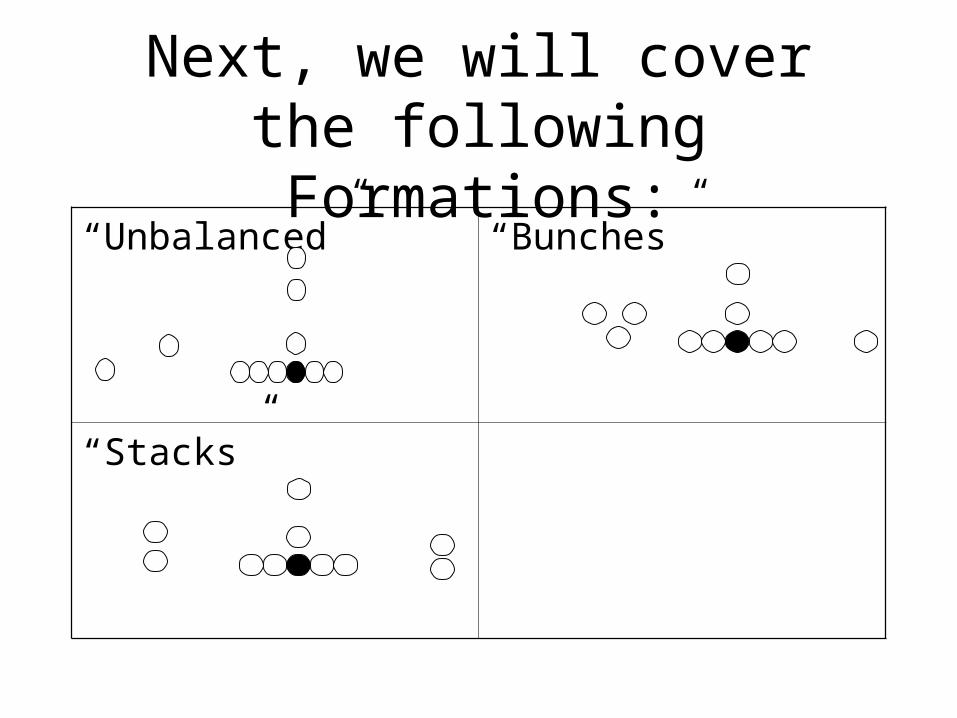
Next, we will cover the following Formations:
“Unbalanced” “Bunches”
“Stacks”
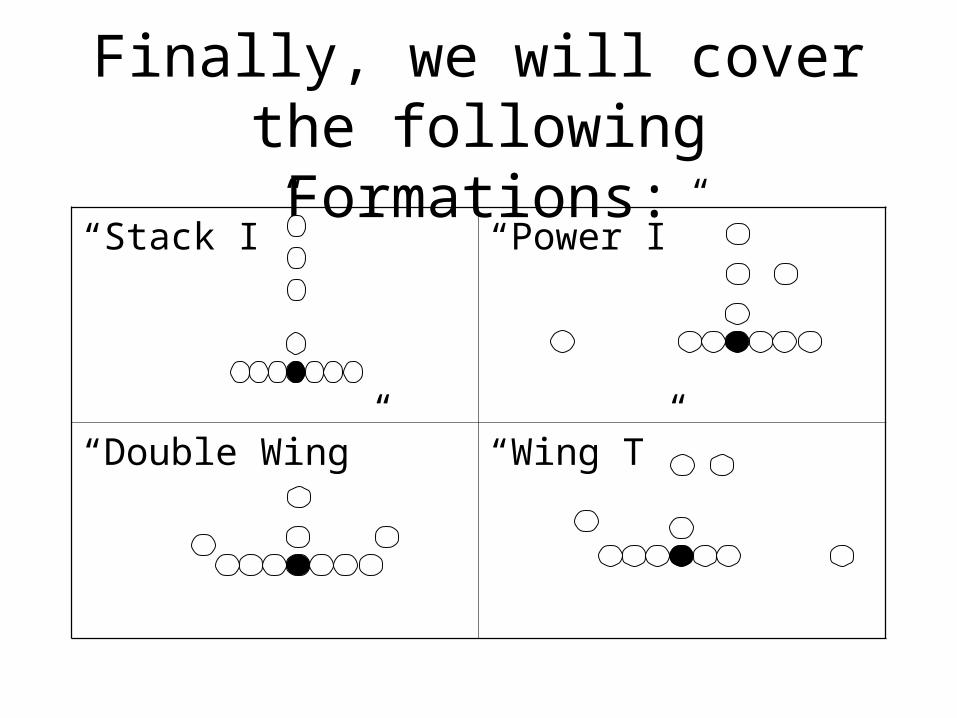
Finally, we will cover the following Formations:
“Stack I” “Power I”
“Double Wing” “Wing T”
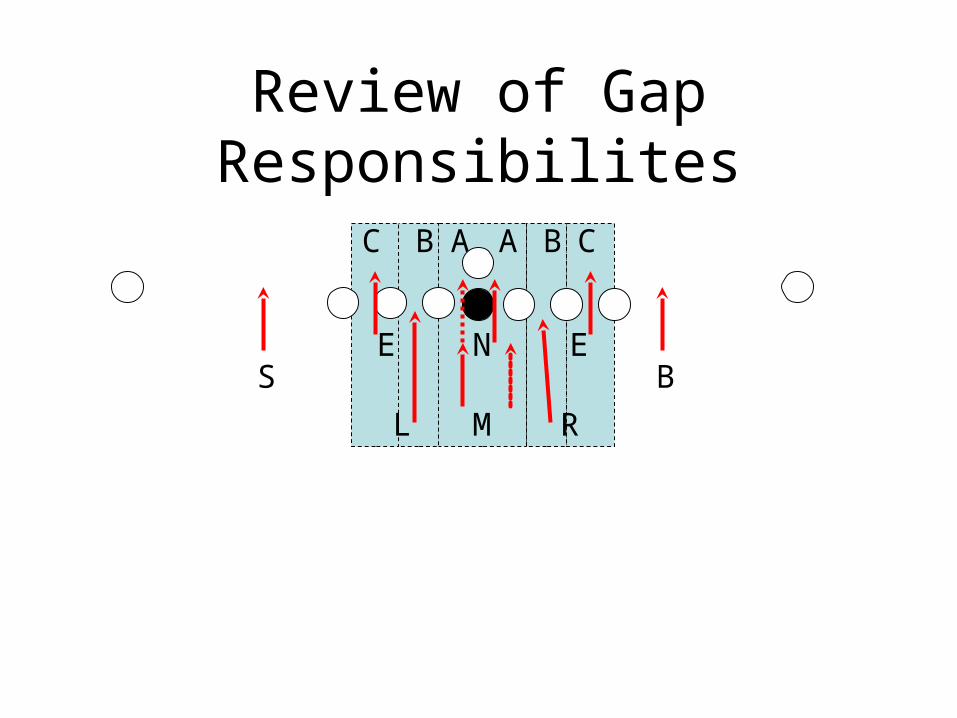
Review of Gap Responsibilites
B
N
M
A B CBC A
RL
EES B
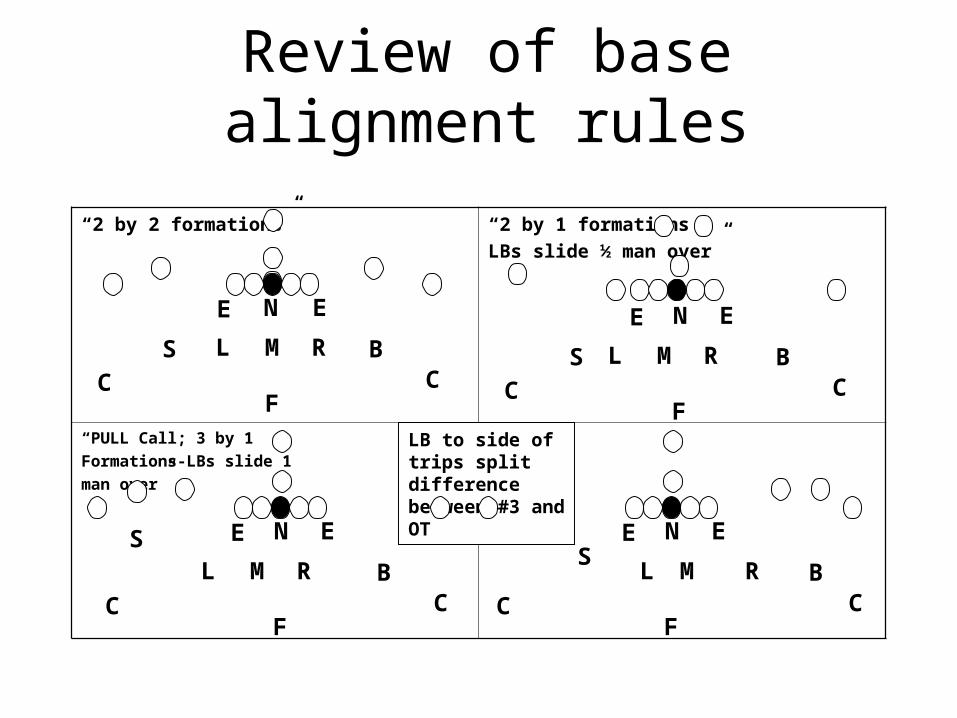
Review of base alignment rules
“2 by 2 formations” “2 by 1 formations
LBs slide ½ man over”
“PULL Call; 3 by 1
Formations-LBs slide 1
man over”
NE
S RL
E
C CM B
F
E E
S
C CRL M B
F
N
S
C CB
F
RL M
E EN
LB to side of trips split difference between #3 and OT
S
C CB
F
RL M
E EN

Aligning to Trips Formations:Trips Open Box intact; FS adjusts
“Pull” Call 2 by 1 rules; FS adjusts
M
N
RL
EE
S B
C C
F
B
R
N
RL
EES
C C
F
M
N
L
EES
B
C C
F
M
N
L
EES
B
C C
F
M R
“Pull” Call 3 Shell
2 Shell
3 Shell
2 Shell
Coaching Point for 2 Deep Zone: defender aligned over #3 run with him
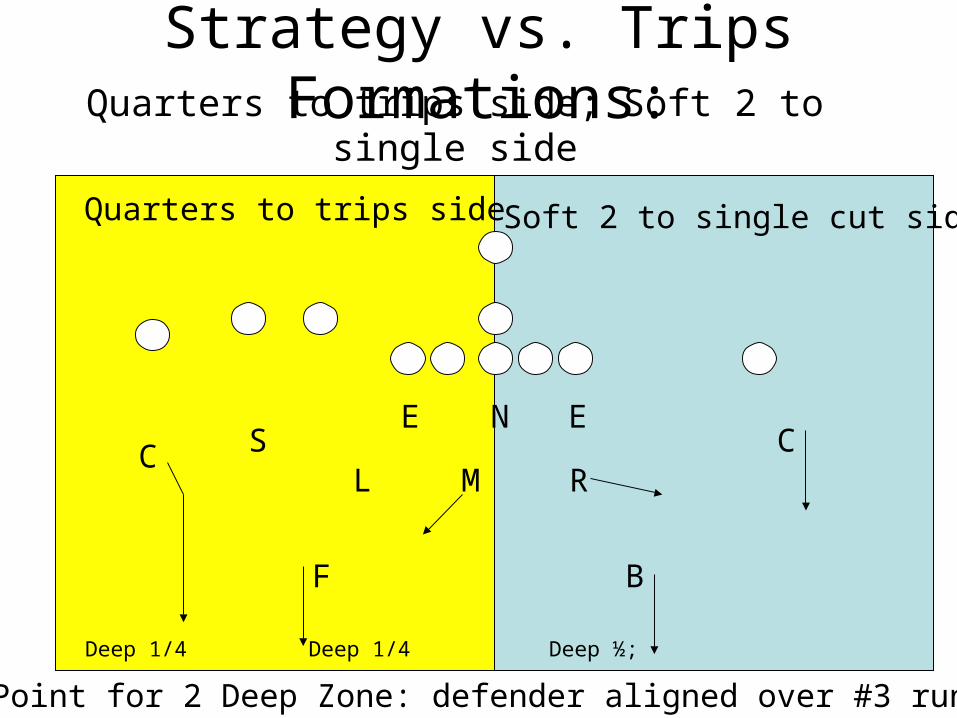
Quarters to trips side; Soft 2 to single side
Strategy vs. Trips Formations:
Coaching Point for 2 Deep Zone: defender aligned over #3 run with him
Soft Cover 2
N EECC S
F
ML R
B
Soft 2 to single cut sideQuarters to trips side
Deep 1/4 Deep 1/4 Deep ½;
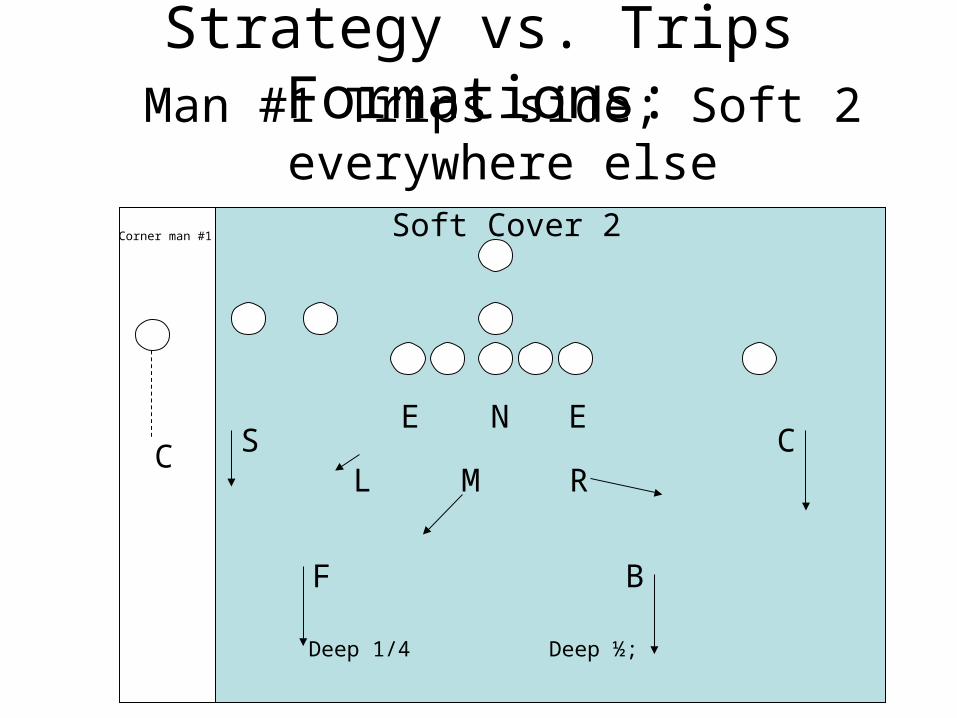
Man #1 Trips side; Soft 2 everywhere else
Strategy vs. Trips Formations:
N EECC S
F
ML R
B
Corner man #1
Deep 1/4 Deep ½;
Soft Cover 2
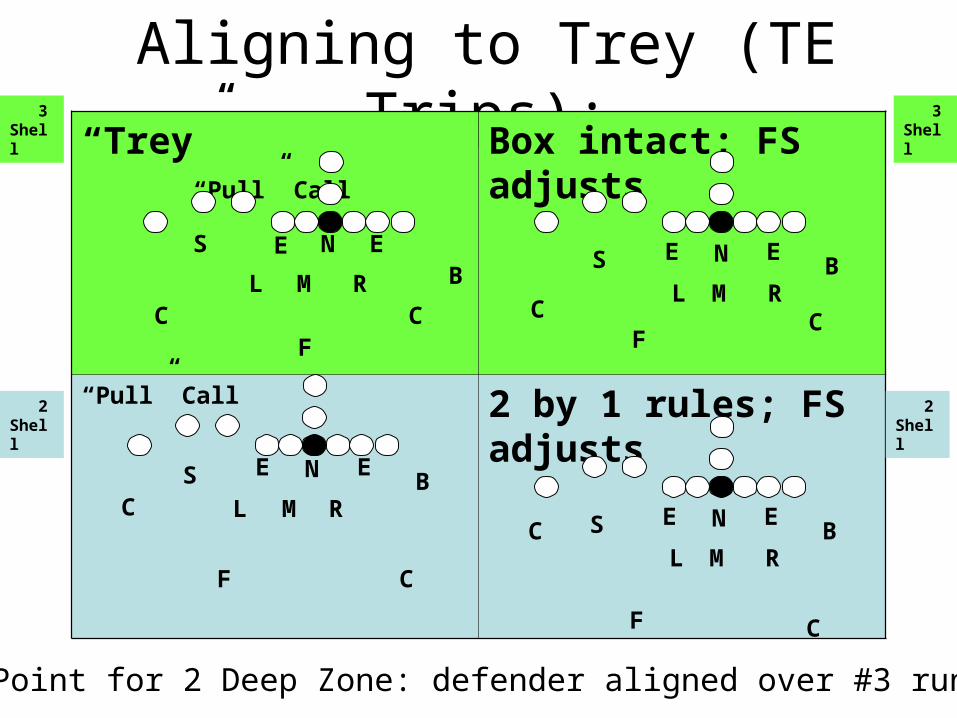
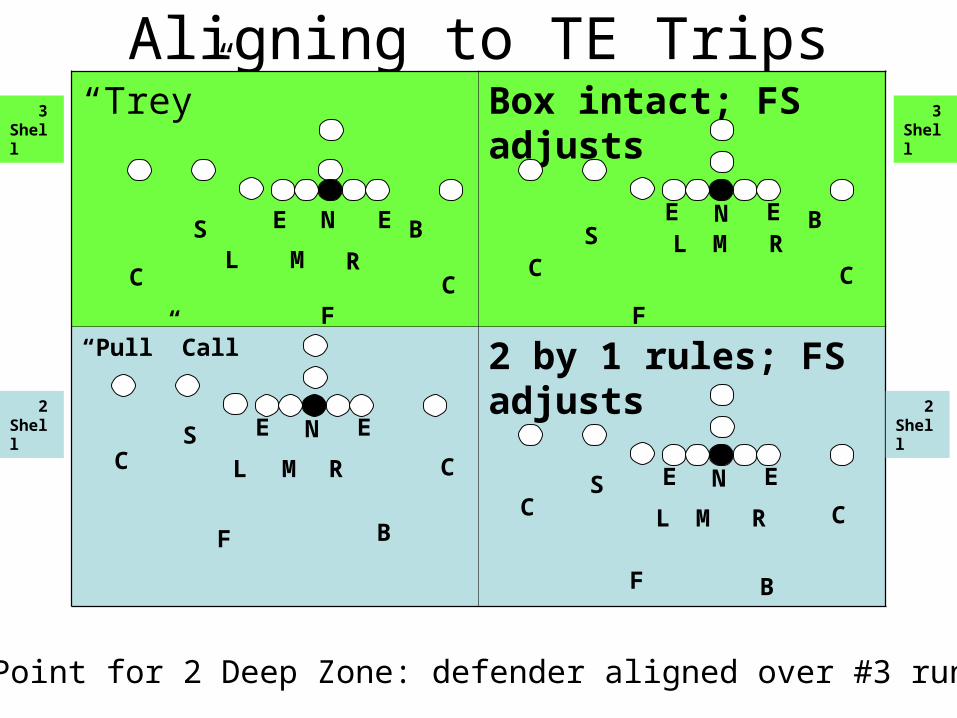
Aligning to Trey (TE Trips):“Trey” “Pull” Call Box intact; FS adjusts
“Pull” Call 2 by 1 rules; FS adjusts
ES N
RL
E
C CF
M BN
RL
E
C CF
MB
ES
N
RL
EC
CF
MB
ES
N
RL
E
C
CF
MB
ES
3 Shell
2 Shell
3 Shell
2 Shell
Coaching Point for 2 Deep Zone: defender aligned over #3 run with him
Aligning to TE Trips“Trey” Box intact; FS adjusts
“Pull” Call 2 by 1 rules; FS adjusts
ES N
RL
E
C CF
MB
NRLE
C C
F
MBE
S
N
RL
EC C
F
M
B
ES
N
RL
E
C C
F
M
B
ES
3 Shell
2 Shell
3 Shell
2 Shell
Coaching Point for 2 Deep Zone: defender aligned over #3 run with him

Aligning to Empty Formations“Pull” Call Box intact;
FS adjusts
“Pull” Call 2 by 2 rules; R adjusts
E N ESRL
C CF
MB
N
RL
E
CC
F
MB
ES
CN
RL
EC
F
M
B
ES
3 Shell
2 Shell
3 Shell
2 Shell
N
RL
E
CC
F
M
B
ES
Coaching Point for 2 Deep Zone: defender aligned over #3 run with him
Aligning to Empty
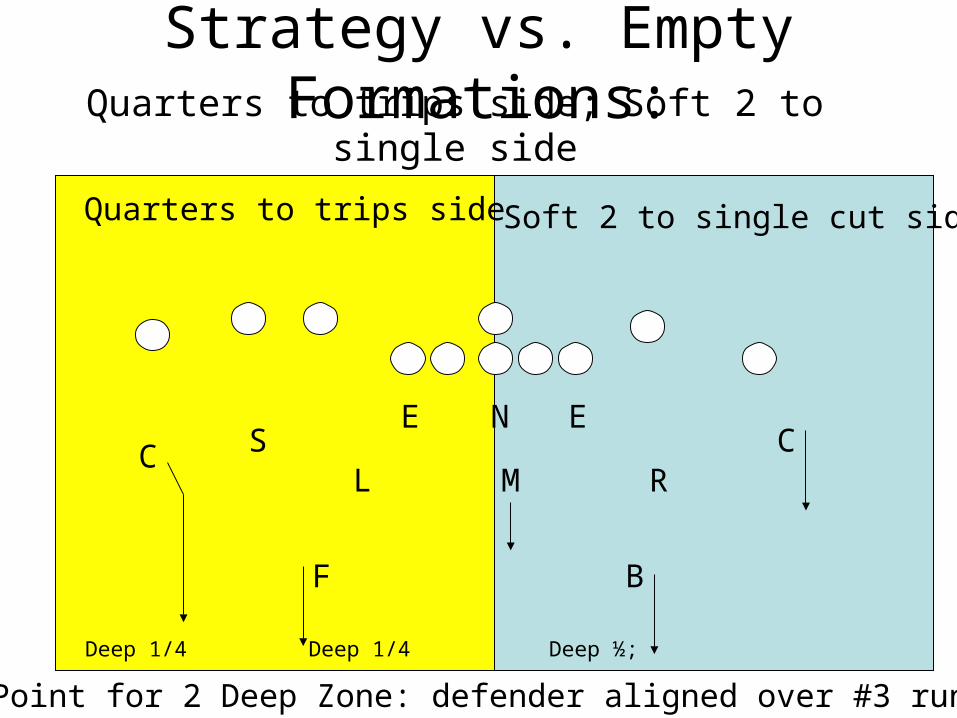
Quarters to trips side; Soft 2 to single side
Strategy vs. Empty Formations:
Coaching Point for 2 Deep Zone: defender aligned over #3 run with him
Soft Cover 2
N EECC S
F
ML R
B
Soft 2 to single cut sideQuarters to trips side
Deep 1/4 Deep 1/4 Deep ½;
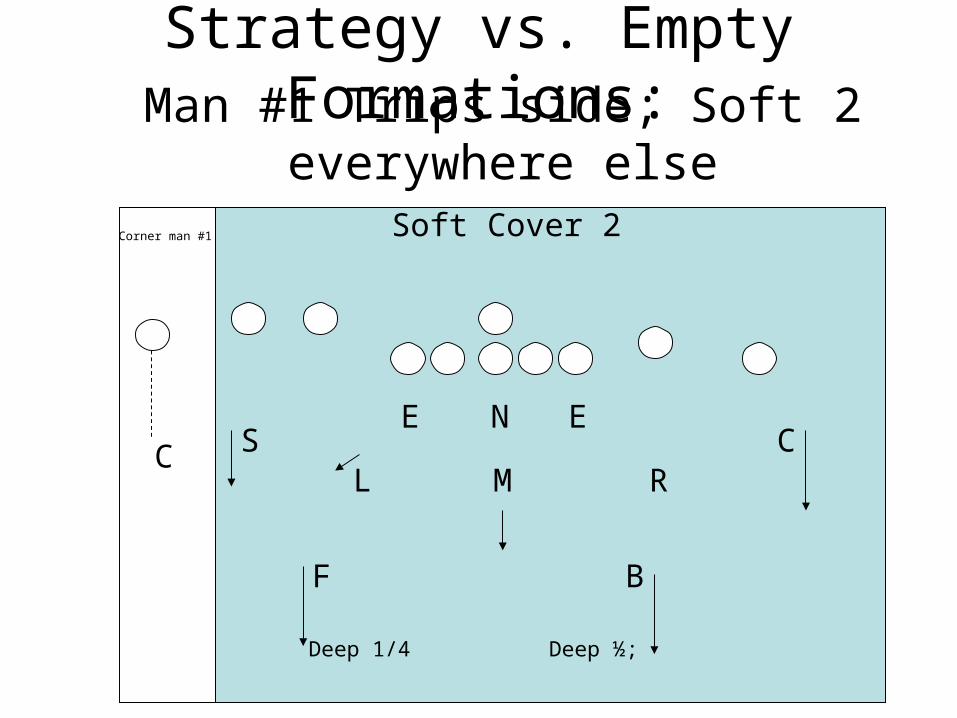
Man #1 Trips side; Soft 2 everywhere else
Strategy vs. Empty Formations:
N EECC S
F
ML R
B
Corner man #1
Deep 1/4 Deep ½;
Soft Cover 2
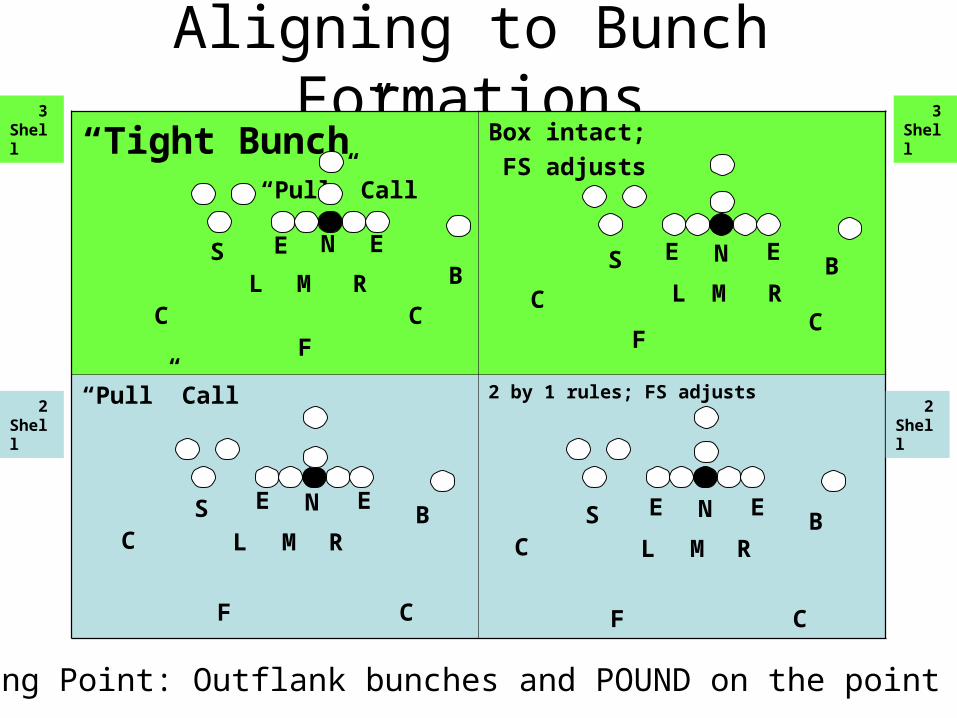
Aligning to Bunch Formations“Tight Bunch” “Pull” Call
Box intact;
FS adjusts
“Pull” Call 2 by 1 rules; FS adjusts
ES N
RL
E
C CF
M BN
RL
E
CC
F
MB
ES
C
N
RL
E
CF
MB
ES
3 Shell
2 Shell
3 Shell
2 Shell
Coaching Point: Outflank bunches and POUND on the point man!
N
RL
E
C
CF
MB
ES
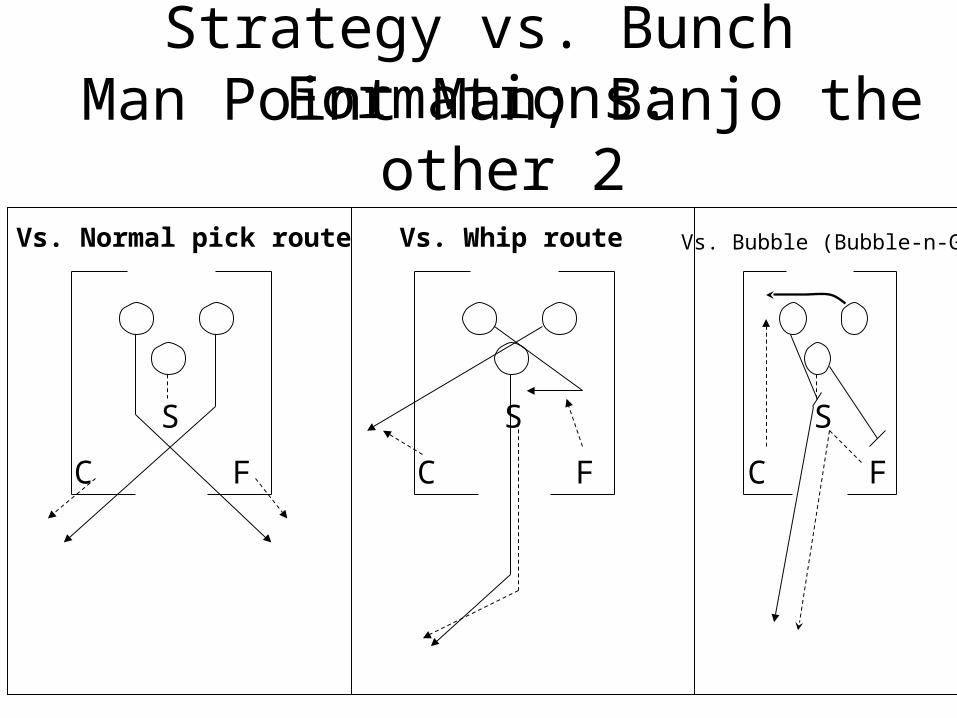
Man Point Man; Banjo the other 2Strategy vs. Bunch Formations:
C
S
F C
S
F
Vs. Whip route
C
S
F
Vs. Bubble (Bubble-n-Go)Vs. Normal pick route
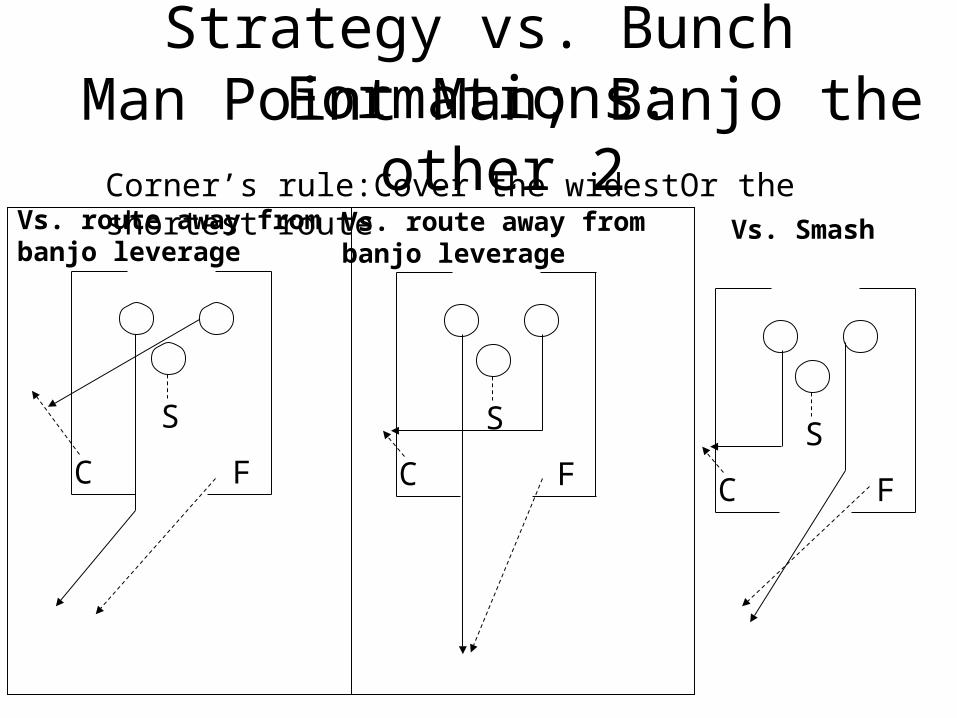
Man Point Man; Banjo the other 2Strategy vs. Bunch Formations:
C
S
F
Vs. route away from banjo leverage
C
S
F
Vs. route away from banjo leverage
Corner’s rule:Cover the widestOr the shortest route
C
S
F
Vs. Smash

Play a two shell behind it.Strategy vs. Bunch Formations:
N
RL
E
C
CF
MB
ES
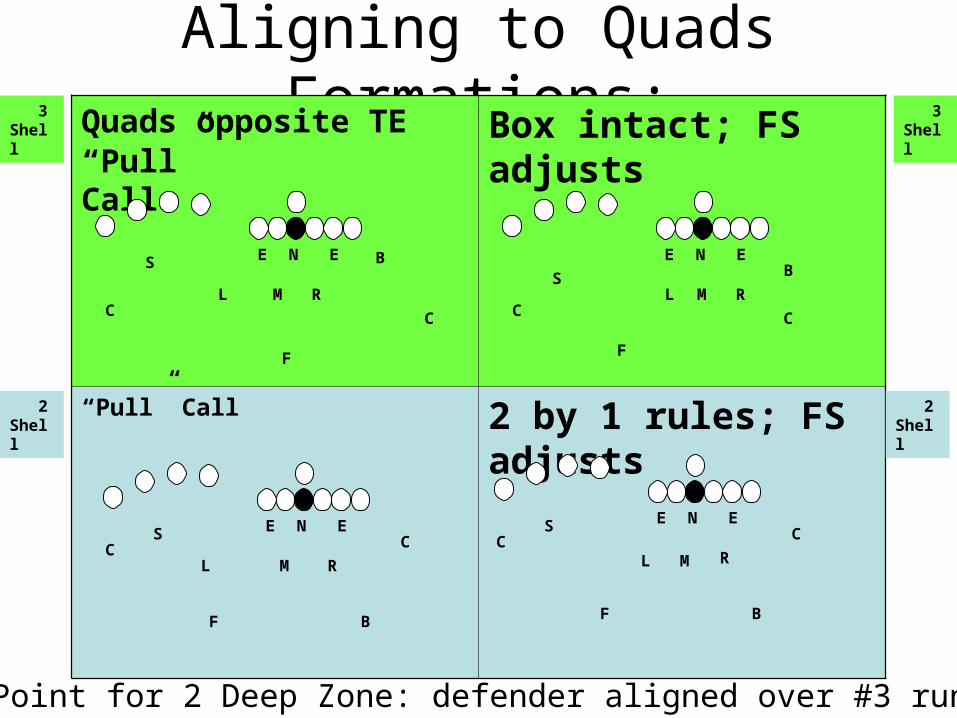
Aligning to Quads Formations:Quads opposite TE Box intact; FS adjusts
“Pull” Call 2 by 1 rules; FS adjusts
M
N
RL
EE
S B
C C
F
B
R
N
RL
EES
C C
F
M
N
L
EES
B
C C
F
M
N
L
EES
B
C C
F
M R
“Pull” Call
3 Shell
2 Shell
3 Shell
2 Shell
Coaching Point for 2 Deep Zone: defender aligned over #3 run with him
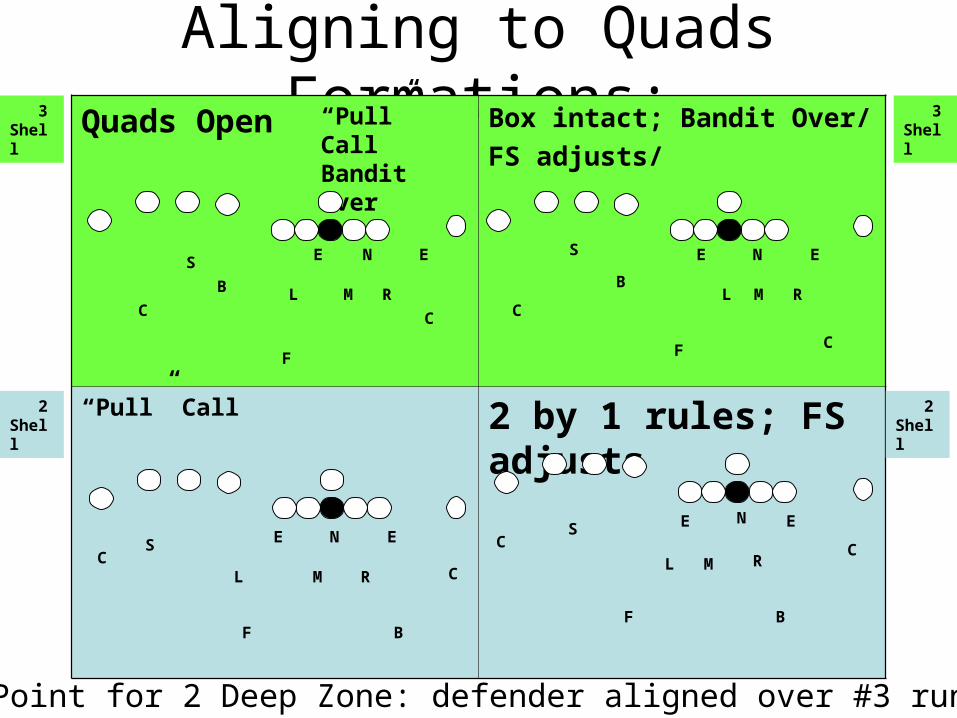
Aligning to Quads Formations:Quads Open Box intact; Bandit Over/
FS adjusts/
“Pull” Call 2 by 1 rules; FS adjusts
M
N
RL
EES
B
C
CF
B
N
RL
EES
C C
F
M
R
N
L
EES
B
CC
F
M
N
B
CL
EESC
F
M R
“Pull” Call Bandit Over
3 Shell
2 Shell
3 Shell
2 Shell
Coaching Point for 2 Deep Zone: defender aligned over #3 run with him
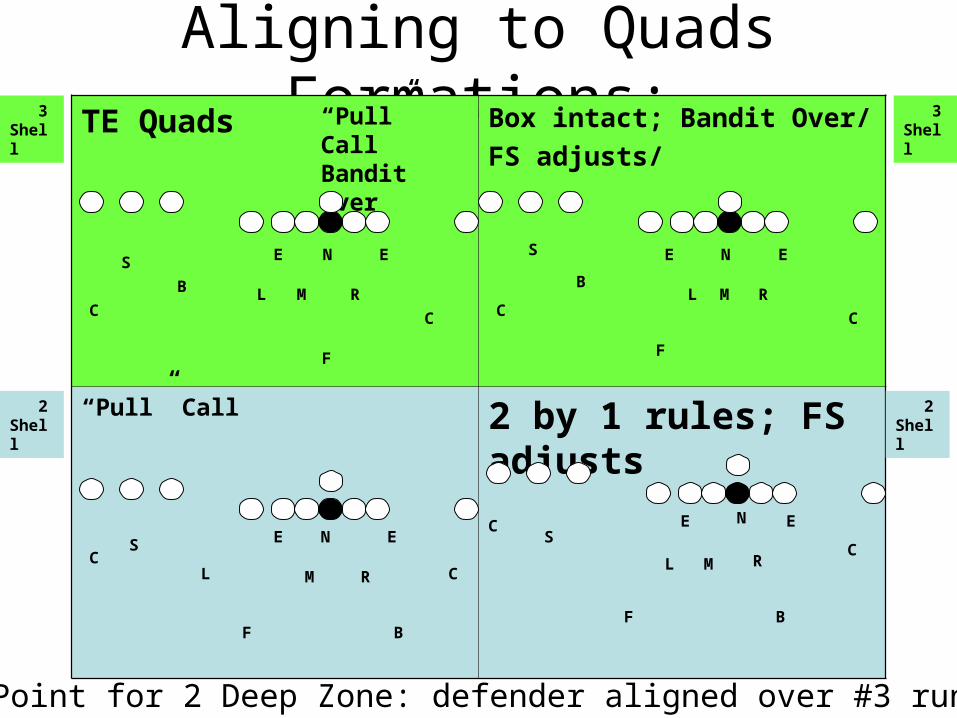
Aligning to Quads Formations:TE Quads Box intact; Bandit Over/
FS adjusts/
“Pull” Call 2 by 1 rules; FS adjusts
M
N
RL
EES
B
C C
F
B
N
RL
EES
C C
F
M
R
N
L
EES
B
CC
F
M
N
B
CL
EES
C
F
M R
“Pull” Call Bandit Over
3 Shell
2 Shell
3 Shell
2 Shell
Coaching Point for 2 Deep Zone: defender aligned over #3 run with him
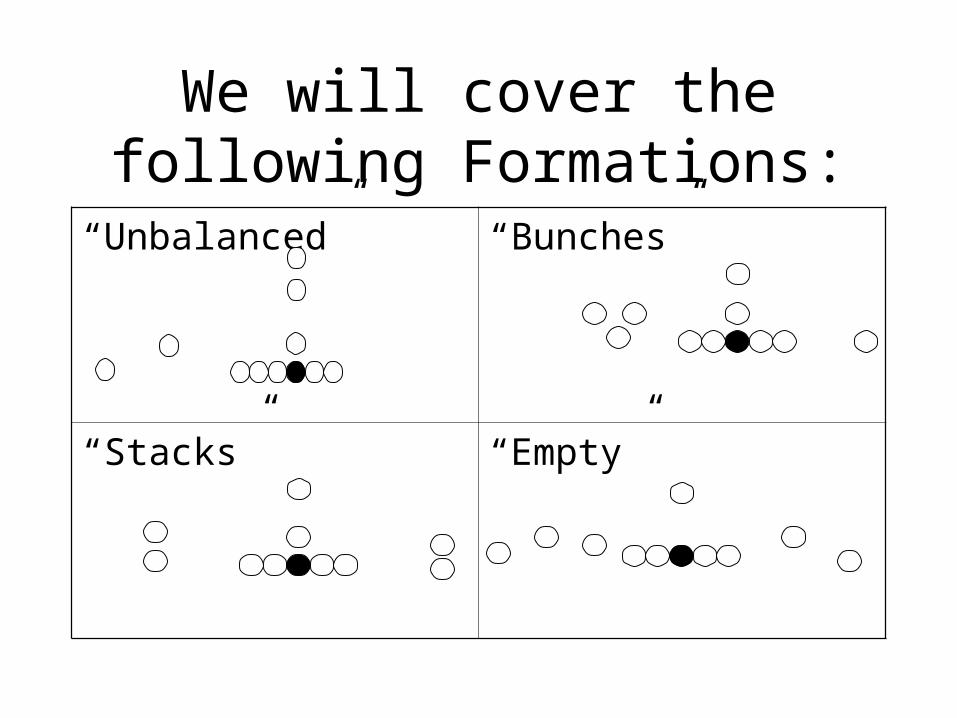
We will cover the following Formations:
“Unbalanced” “Bunches”
“Stacks” “Empty”
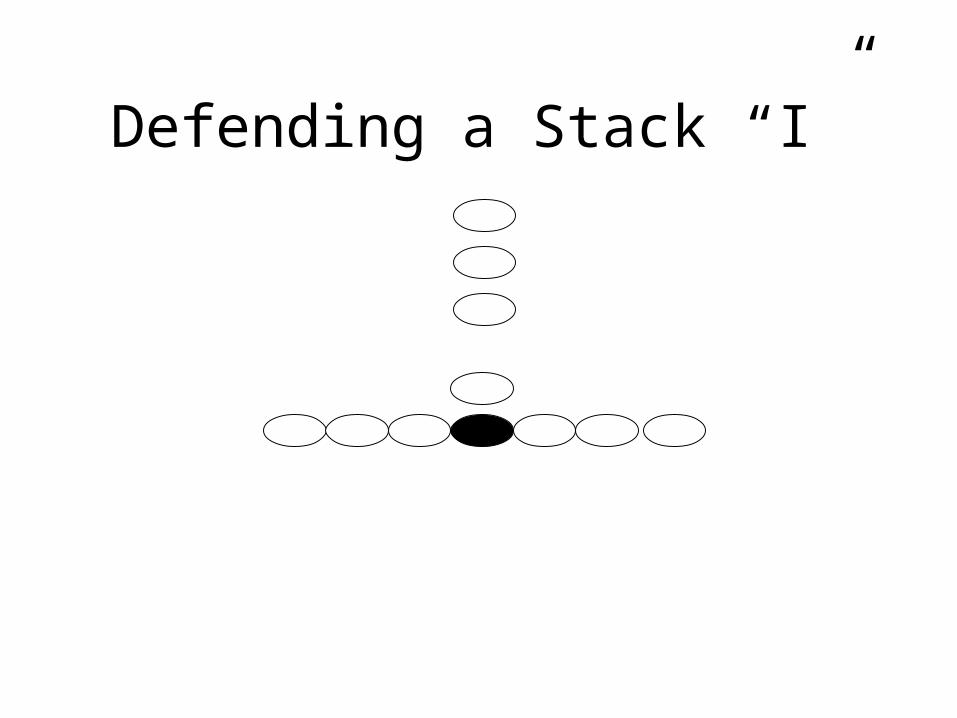
Defending a Stack “I”

Base 3-3 Alignment vs. Stack “I”
M
N
RL
EES B
C C
F
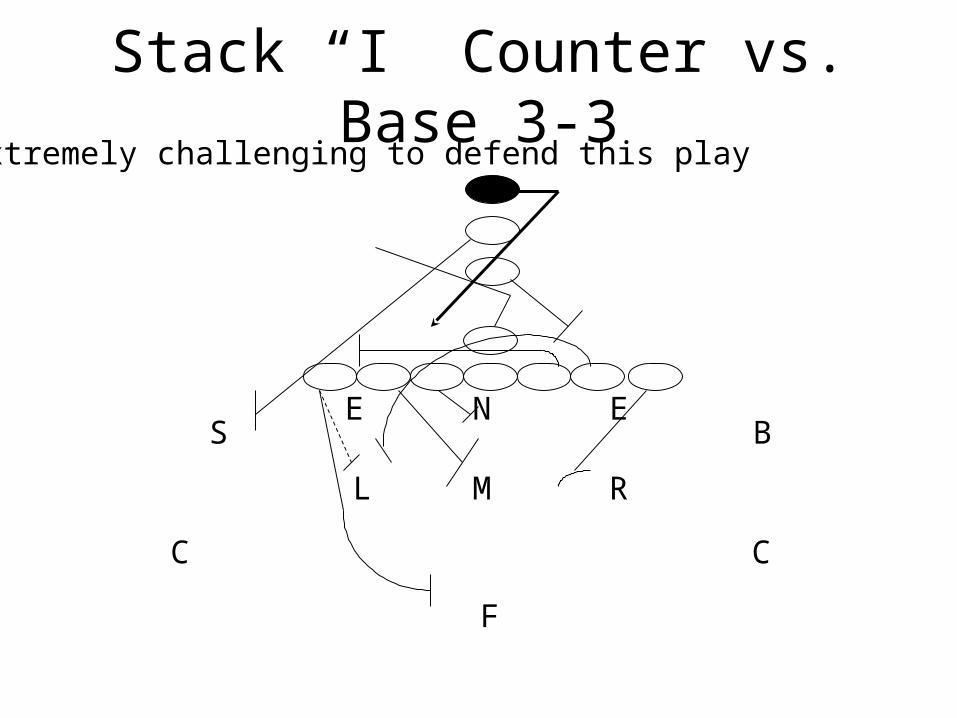
Stack “I” Counter vs. Base 3-3
M
N
RL
EES B
C C
F
*Extremely challenging to defend this play

Stack “I” Counter vs. Base 3-3
M
N
RL
EES B
C C
F
Playside End technique vs. Counter
RB must changeCourse; crease doesn’t exist
Corner is secondary force;Usually unaccounted for & canMake the tackle for a loss or short gain
End wrong arms the puller off the rear end of the Tackle’ block.
Stack “I” Counter vs. Base 3-3
M
N
RL
EES B
C C
F
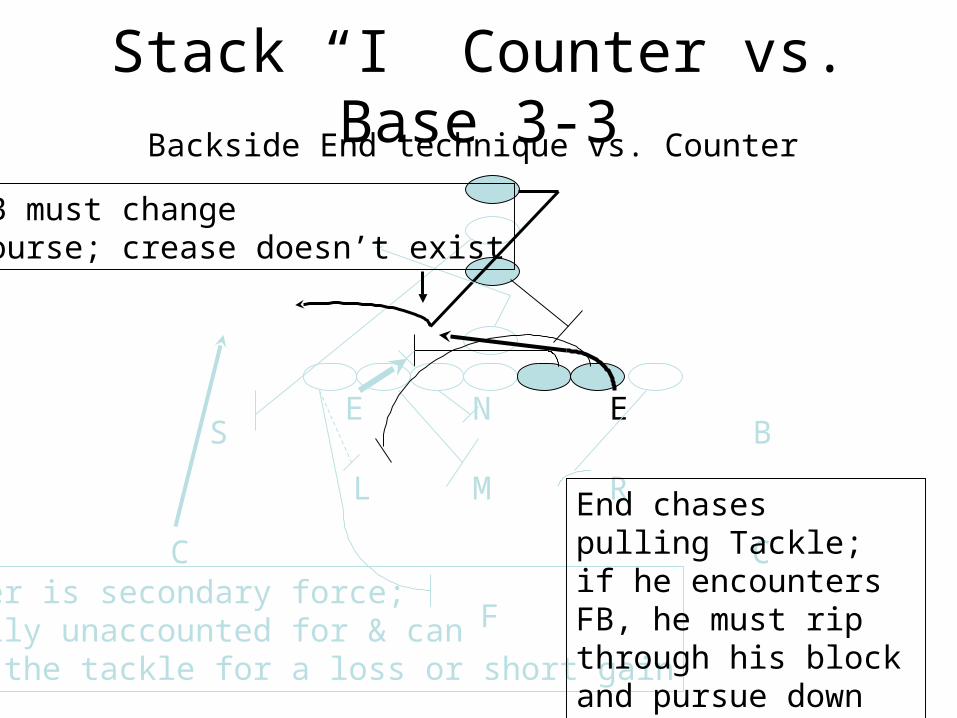
Backside End technique vs. Counter
RB must changeCourse; crease doesn’t exist
Corner is secondary force;Usually unaccounted for & canMake the tackle for a loss or short gain
End chases pulling Tackle; if he encounters FB, he must rip through his block and pursue down the line
Stack “I” Counter vs. Base 3-3
M
N
RL
EES B
C C
F
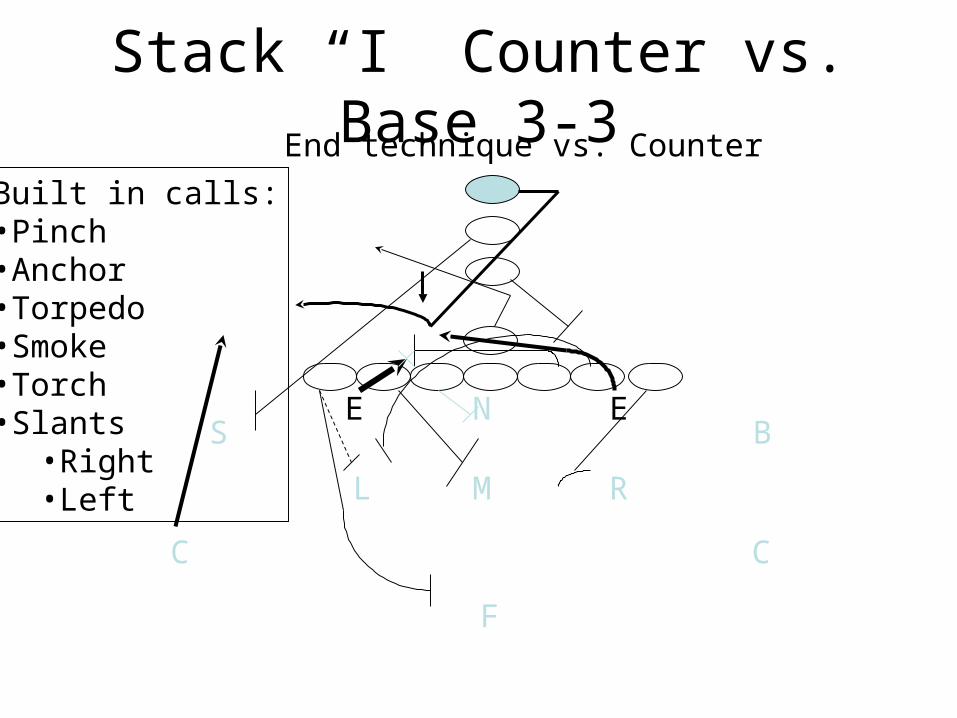
End technique vs. Counter
Built in calls:•Pinch•Anchor•Torpedo•Smoke•Torch•Slants
•Right•Left
Stack “I” Counter vs. Base 3-3
M
N
RL
EES B
C C
F
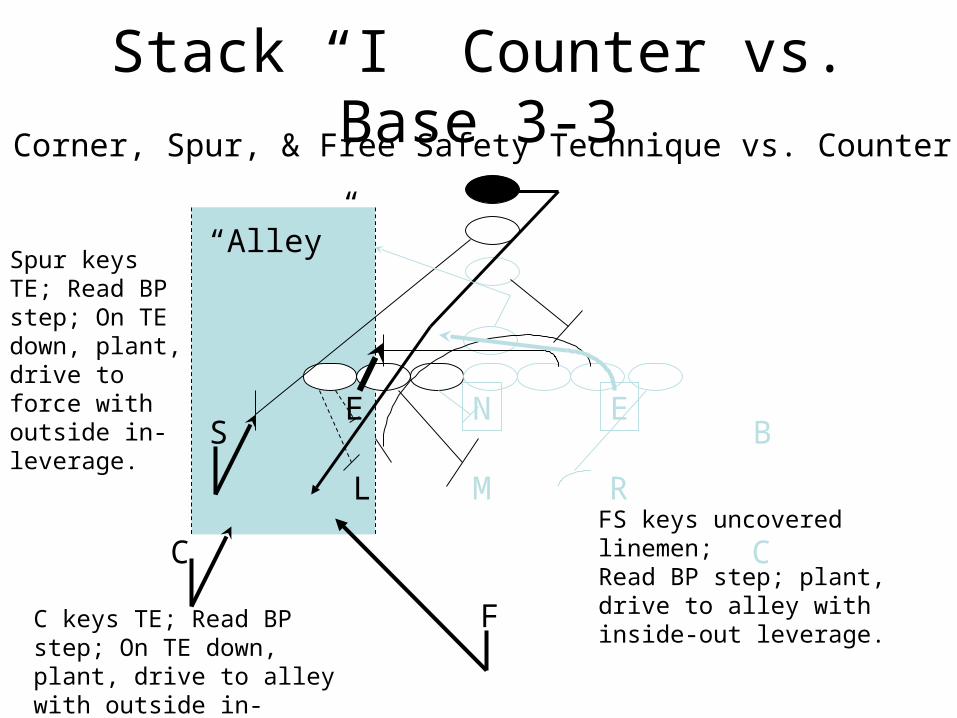
Corner, Spur, & Free Safety Technique vs. Counter
“Alley”
FS keys uncovered linemen;Read BP step; plant, drive to alley with inside-out leverage.
C keys TE; Read BP step; On TE down, plant, drive to alley with outside in-leverage.
Spur keys TE; Read BP step; On TE down, plant, drive to force with outside in-leverage.
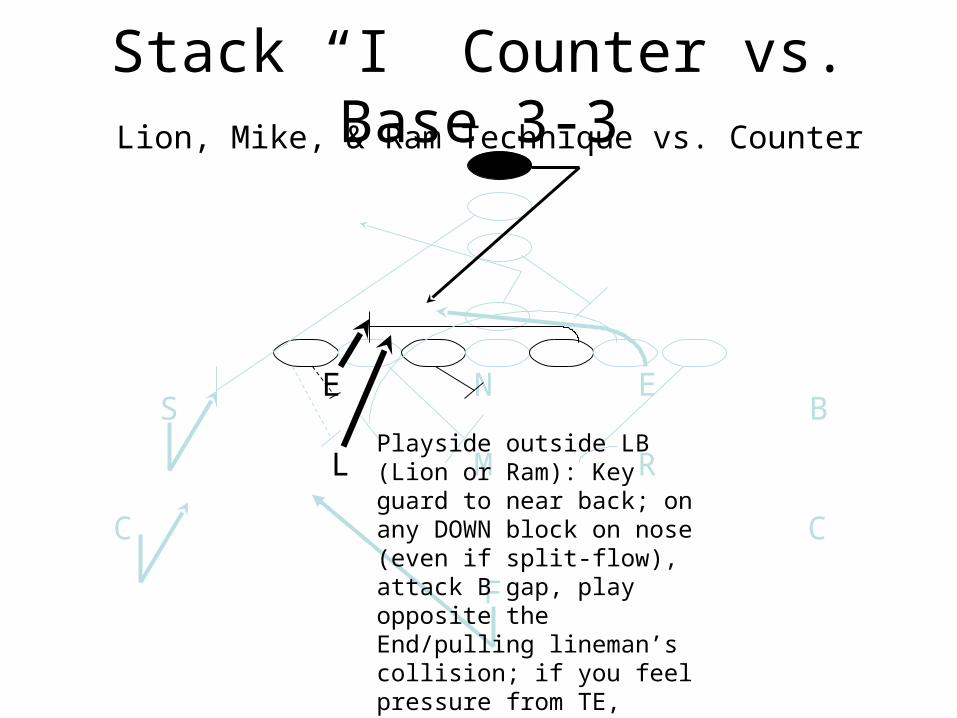
Stack “I” Counter vs. Base 3-3Lion, Mike, & Ram Technique vs. Counter
M
N
RL
EES B
C C
F
Playside outside LB (Lion or Ram): Key guard to near back; on any DOWN block on nose (even if split-flow), attack B gap, play opposite the End/pulling lineman’s collision; if you feel pressure from TE, fight pressure with pressure.
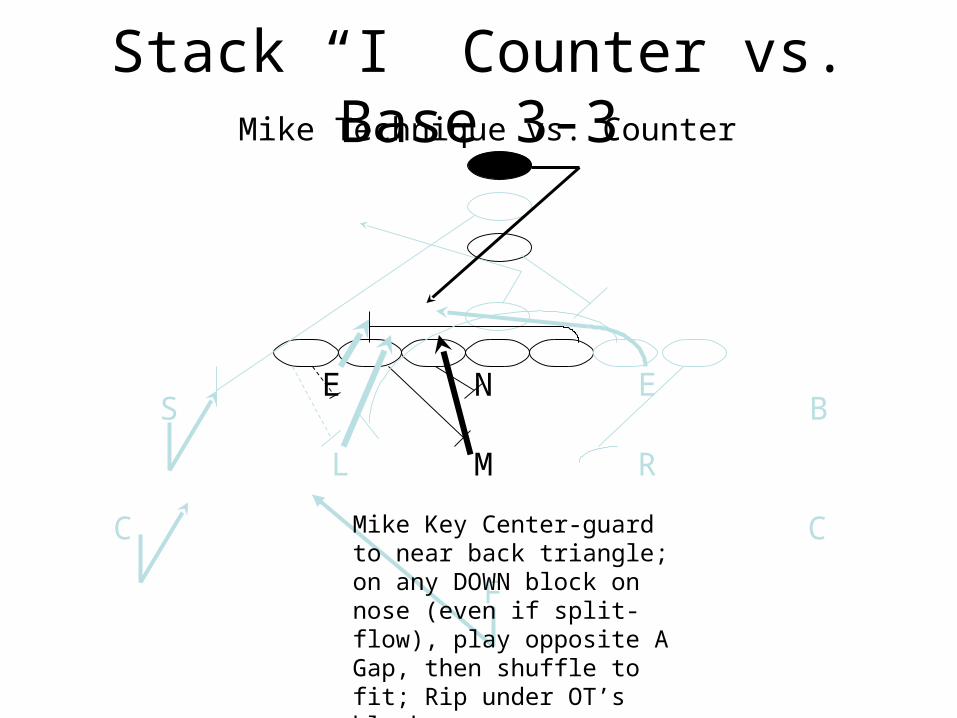
Stack “I” Counter vs. Base 3-3Mike Technique vs. Counter
M
N
RL
EES B
C C
F
Mike Key Center-guard to near back triangle; on any DOWN block on nose (even if split-flow), play opposite A Gap, then shuffle to fit; Rip under OT’s block

Stack “I” Counter vs. Base 3-3 Backside Linebacker Technique vs. Counter
M
N
RL
EES B
C C
F
Mike-Key Center-guard to near back; on any PULL away, step up, secure B Gap, then shuffle to fit; Rip under OT’s block if necessary.

Defending Power “I”
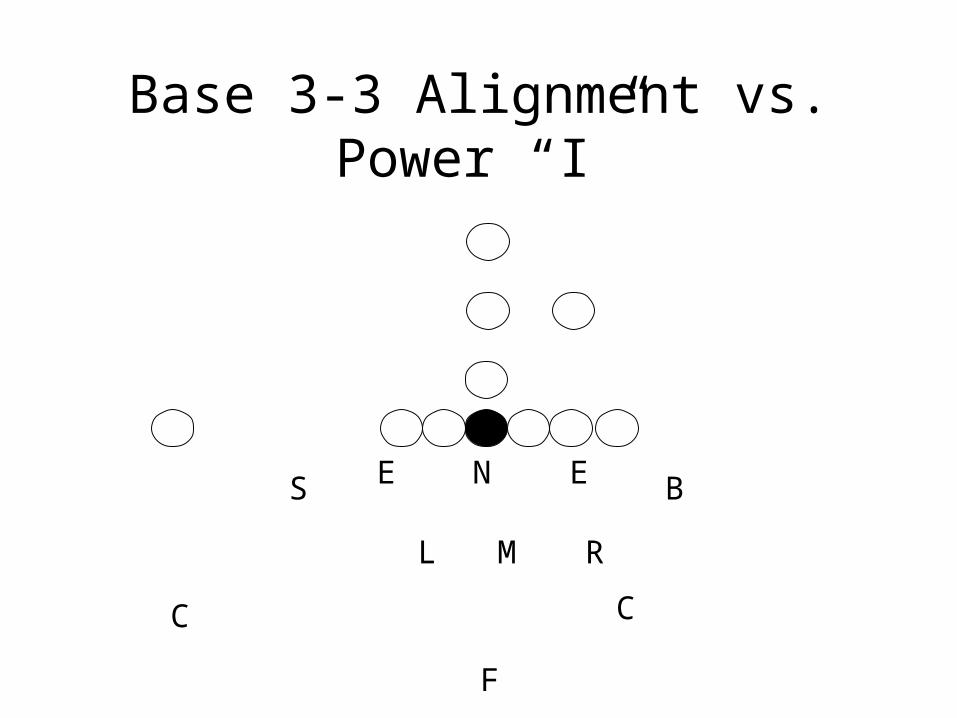
Base 3-3 Alignment vs. Power “I”
M
N
RL
EES B
C C
F
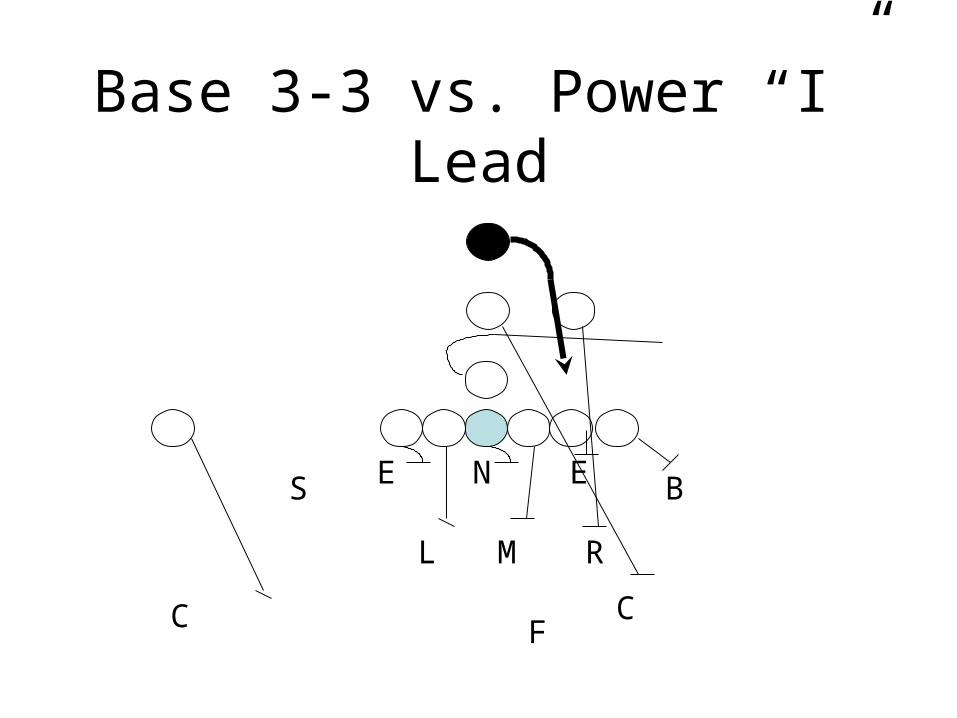
Base 3-3 vs. Power “I” Lead
M
N
RL
EES B
C CF

Technique vs. Power “I” Lead
M
N
RL
EES B
C CF
•Check to Bear Front•Slant to TE•Corner fast fill on run read•FS fast fill on run read•Bandit contain Blitz; and Squeeze hole!
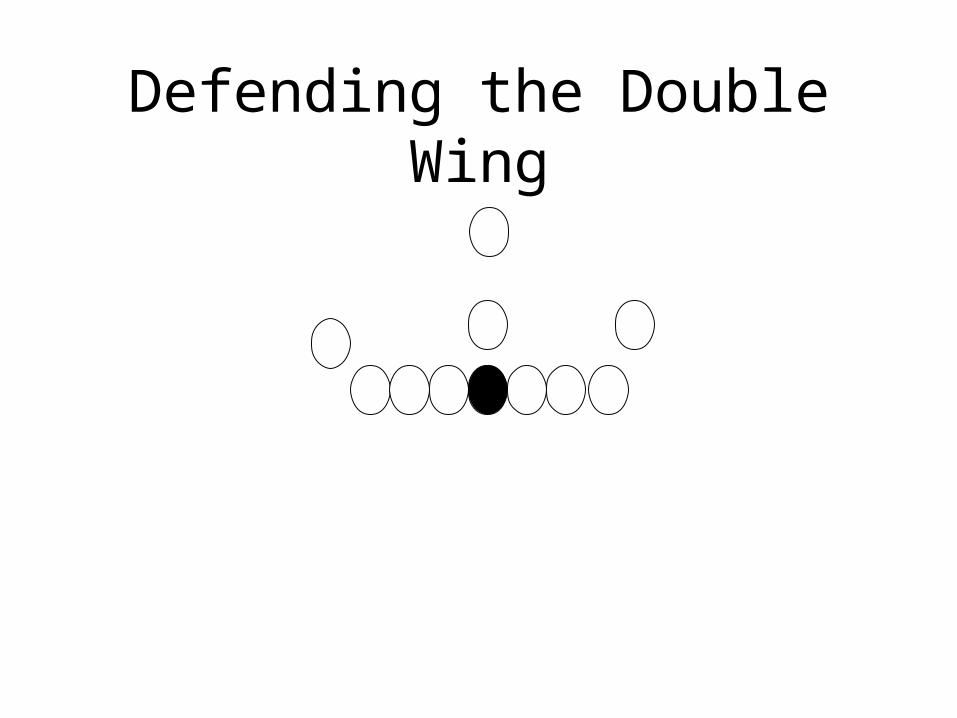
Defending the Double Wing
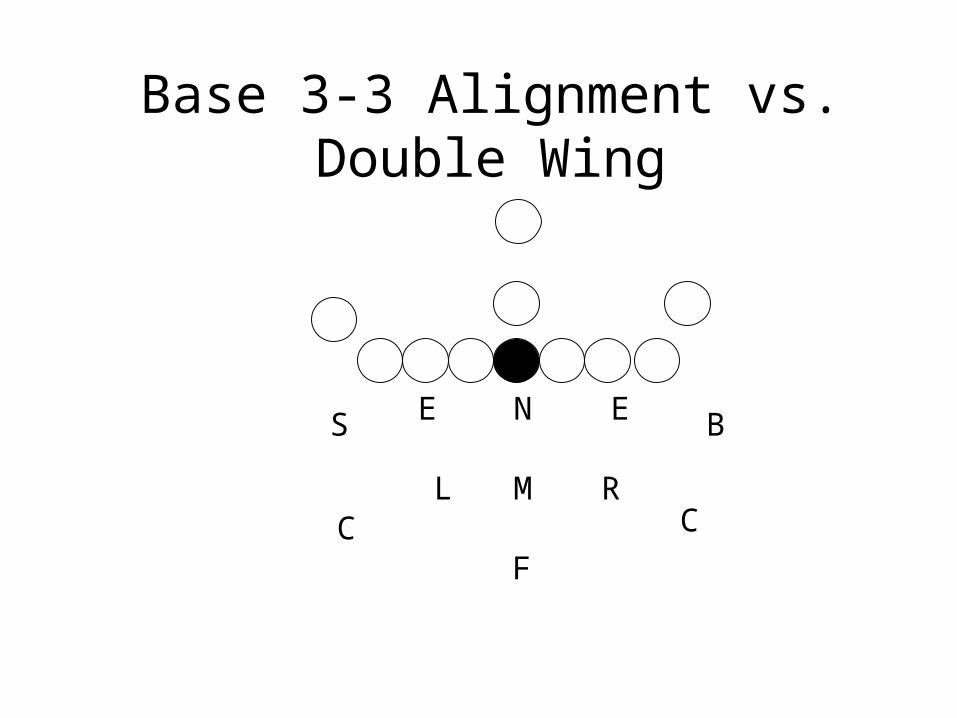
Base 3-3 Alignment vs. Double Wing
M
N
RL
EES B
C C
F
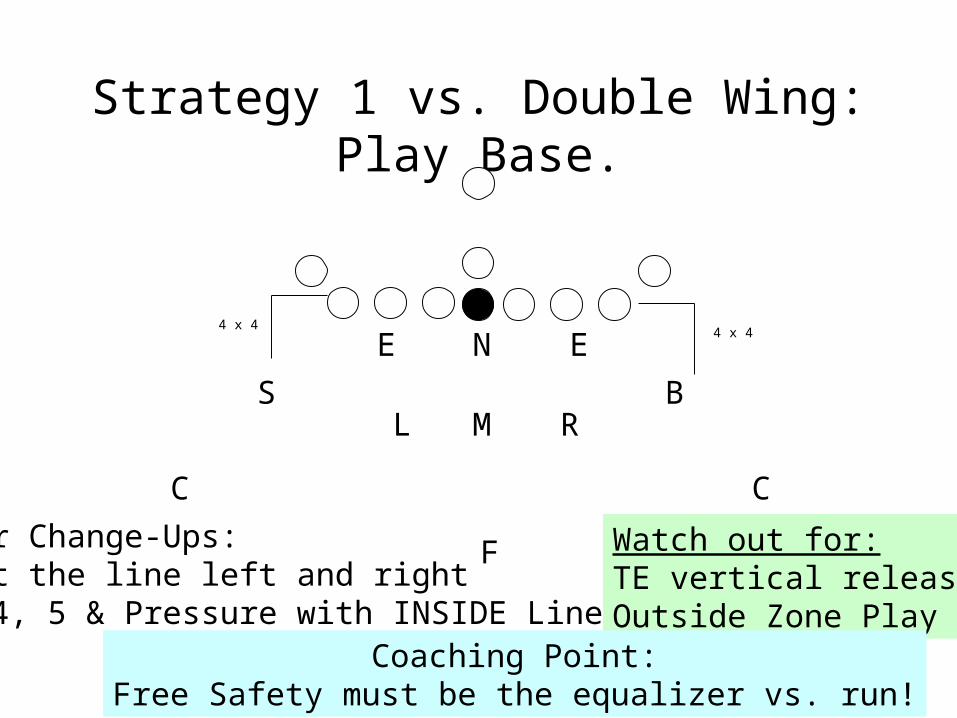
Strategy 1 vs. Double Wing: Play Base.
M
N
RL
EE
S B
C C
4 x 44 x 4
FMinor Change-Ups:Slant the line left and rightRun 4, 5 & Pressure with INSIDE Linebackers
Watch out for:TE vertical releasesOutside Zone Play
Coaching Point:Free Safety must be the equalizer vs. run!
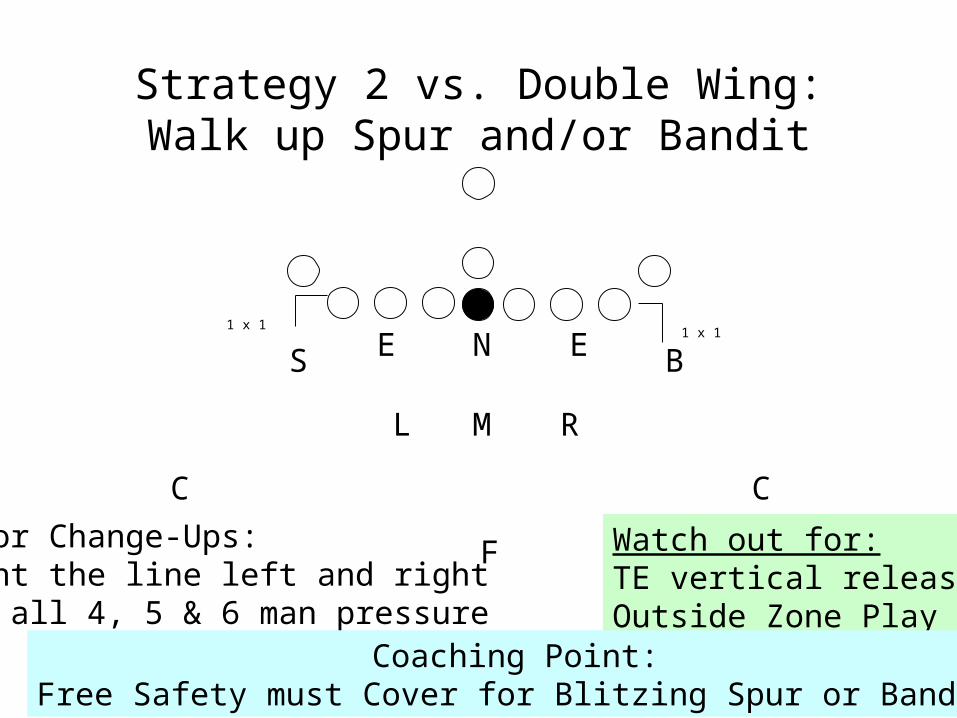
Strategy 2 vs. Double Wing: Walk up Spur and/or Bandit
M
N
RL
EES B
C C
1 x 11 x 1
FMinor Change-Ups:Slant the line left and rightRun all 4, 5 & 6 man pressure
Watch out for:TE vertical releasesOutside Zone Play
Coaching Point:Free Safety must Cover for Blitzing Spur or Bandit
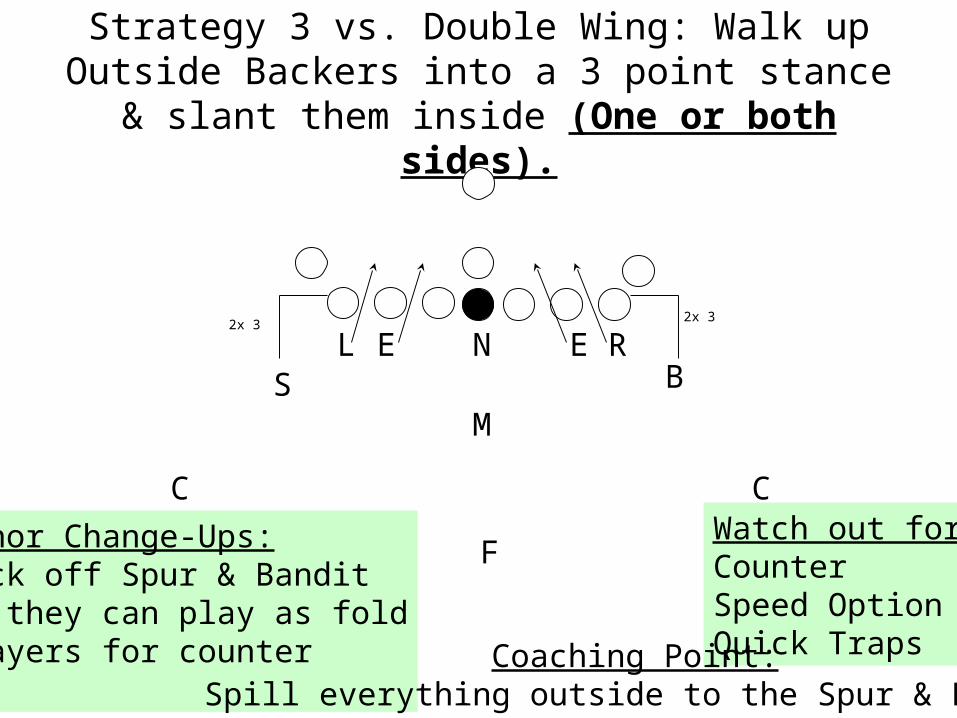
Strategy 3 vs. Double Wing: Walk up Outside Backers into a 3 point stance & slant them inside (One or both
sides).
M
N RL EES B
C C
2x 3
FMinor Change-Ups:Back off Spur & BanditSo they can play as foldPlayers for counter
Watch out for:CounterSpeed OptionQuick TrapsCoaching Point:
Spill everything outside to the Spur & Bandit
2x 3
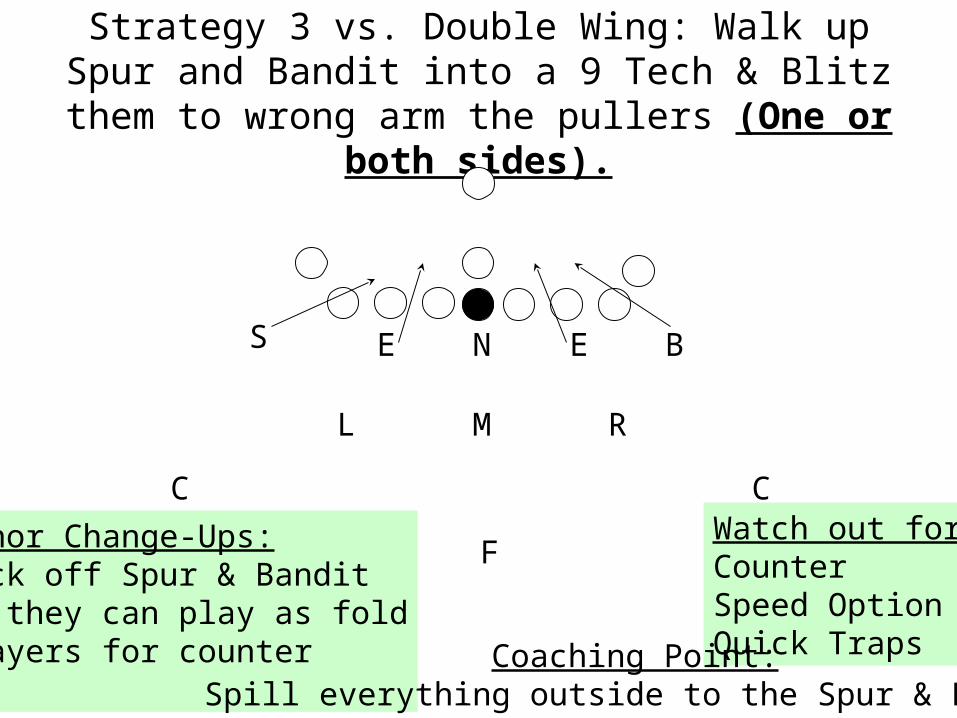
Strategy 3 vs. Double Wing: Walk up Spur and Bandit into a 9 Tech & Blitz them to wrong arm the pullers
(One or both sides).
M
N
RL
EES B
C C
FMinor Change-Ups:Back off Spur & BanditSo they can play as foldPlayers for counter
Watch out for:CounterSpeed OptionQuick TrapsCoaching Point:
Spill everything outside to the Spur & Bandit

Defending the Wing-T(Based on Assignment Conflict)
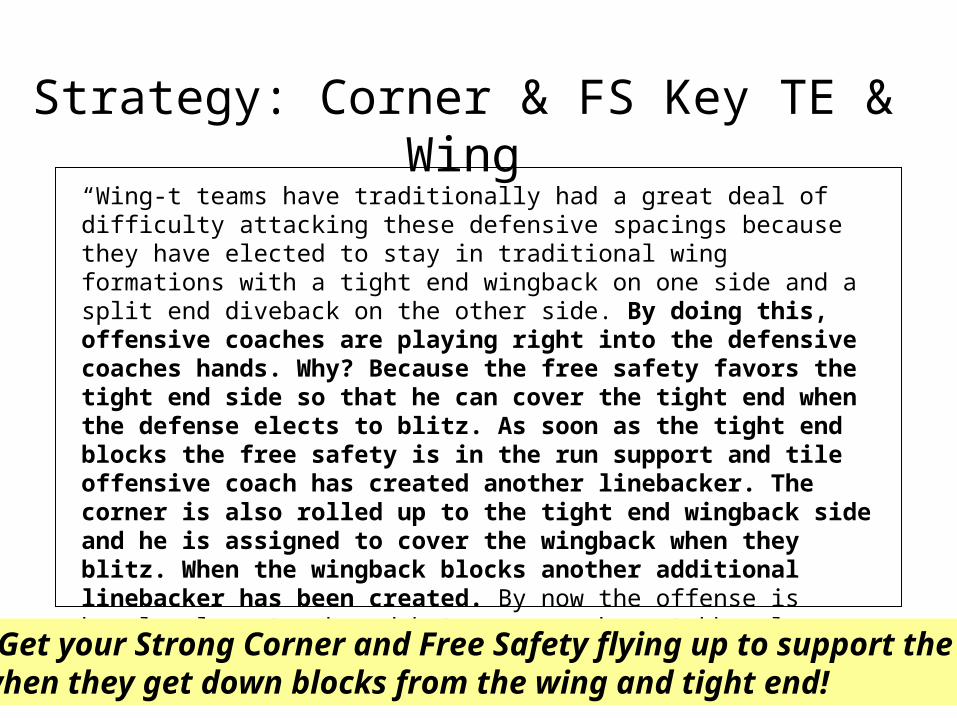
Strategy: Corner & FS Key TE & Wing“Wing-t teams have traditionally had a great deal of difficulty attacking these defensive spacings because they have elected to stay in traditional wing formations with a tight end wingback on one side and a split end diveback on the other side. By doing this, offensive coaches are playing right into the defensive coaches hands. Why? Because the free safety favors the tight end side so that he can cover the tight end when the defense elects to blitz. As soon as the tight end blocks the free safety is in the run support and tile offensive coach has created another linebacker. The corner is also rolled up to the tight end wingback side and he is assigned to cover the wingback when they blitz. When the wingback blocks another additional linebacker has been created. By now the offense is hopelessly outnumbered but many coaches stubbornly continue to try to force the bucksweep and other tight end wingback plays into bad numbers.”-DENNIS CREEHAN•Get your Strong Corner and Free Safety flying up to support the run
when they get down blocks from the wing and tight end!
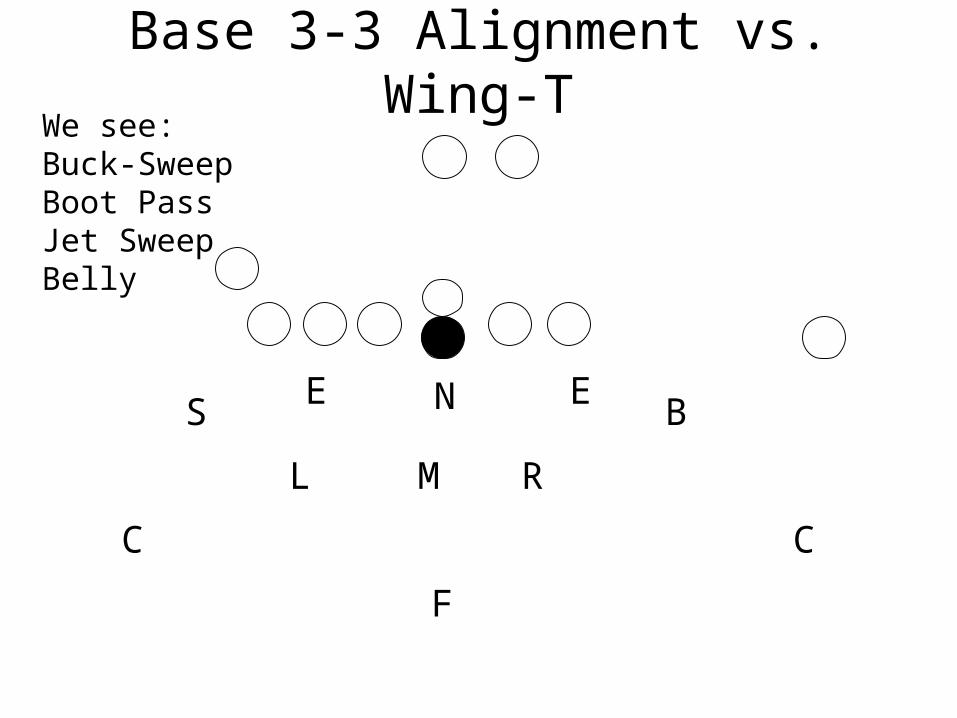
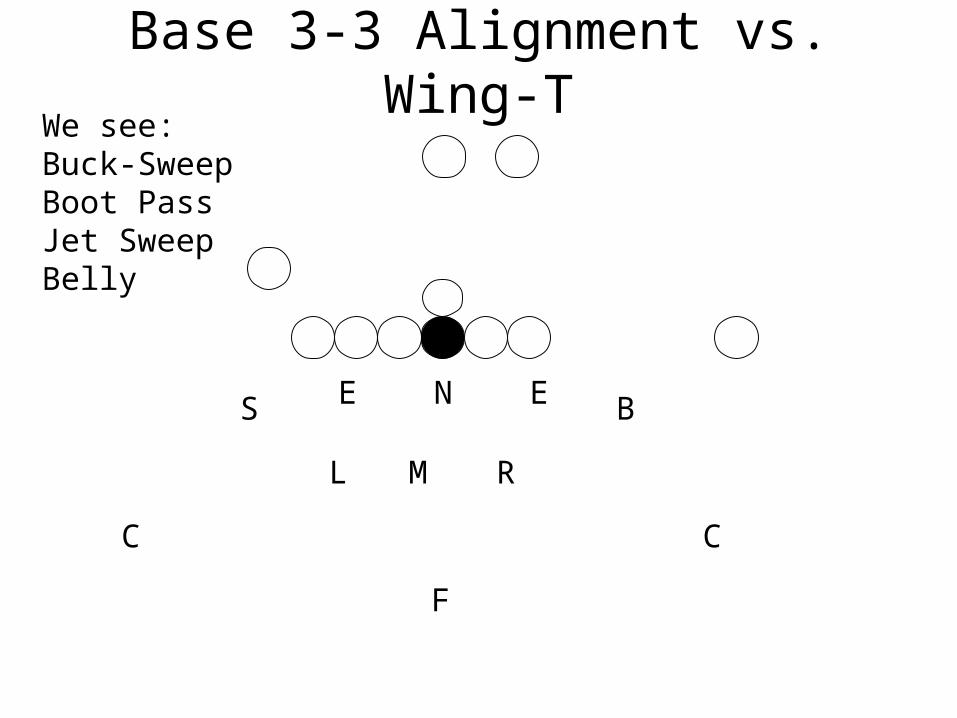
Base 3-3 Alignment vs. Wing-T
M
N
RL
EES B
C C
F
We see:Buck-SweepBoot PassJet SweepBelly
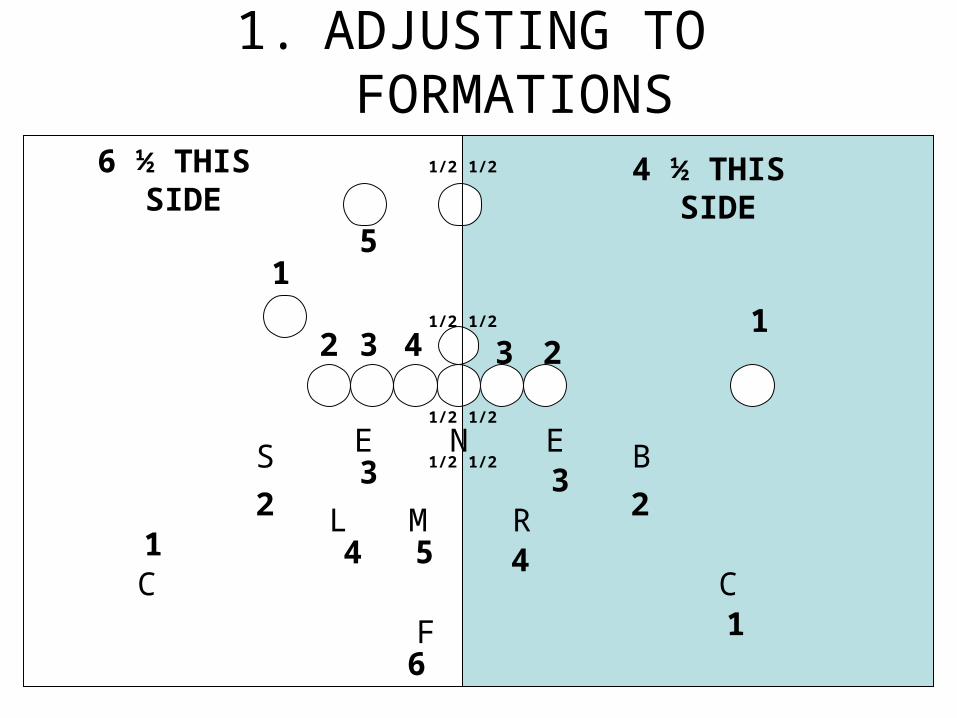
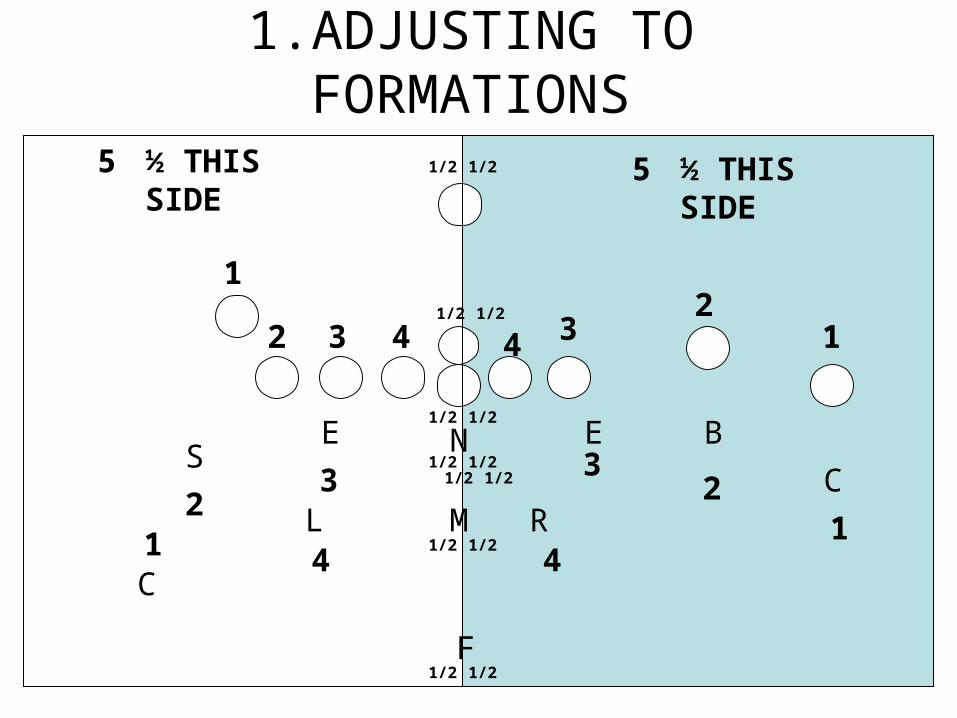
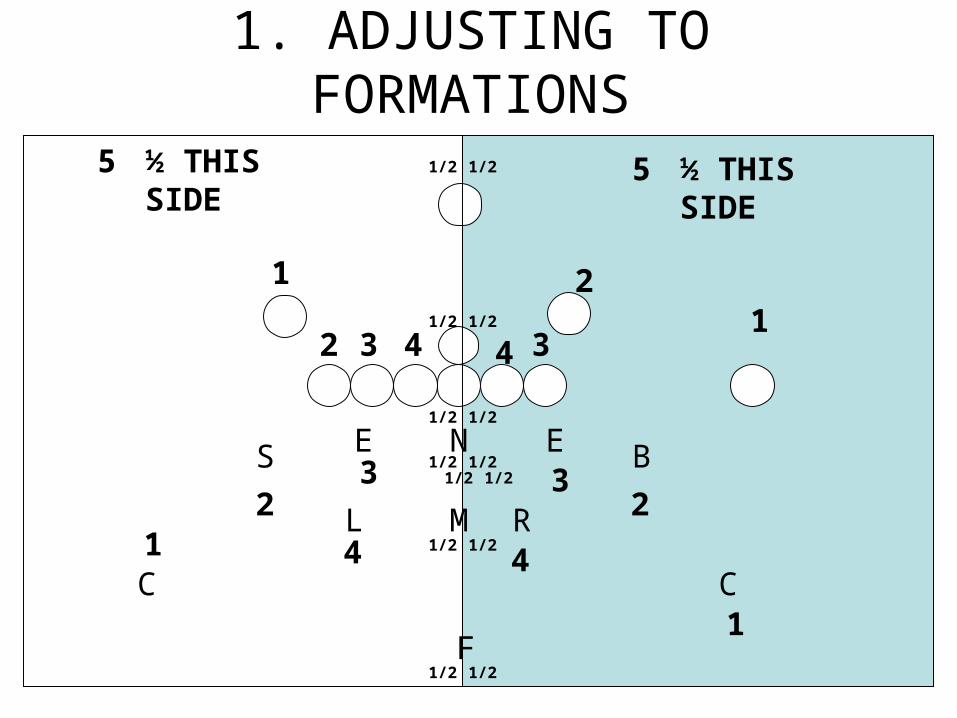
1. ADJUSTING TO FORMATIONS
M
N
RL
EES B
C C
F
1
2 3 41
23
12
3
4
5
1
23
4
1/2 1/2
1/2 1/2
1/2 1/2
1/2 1/2
6 ½ THIS SIDE 4 ½ THIS SIDE
5
6

1. ADJUSTING TO FORMATIONS
M
N
RL
EES B
C C
F
1
2 3 41
2
3
12
3
4
4
1
23
4
1/2 1/2
1/2 1/2
1/2 1/2
1/2 1/2
1/2 1/2
5 ½ THIS SIDE
1/2 1/2
5 ½ THIS SIDE
1/2 1/2
1.ADJUSTING TO FORMATIONS
M
N
RL
EES
B
C
C
F
1
2 3 4 12
3
12
3
4
4
12
3
4
1/2 1/2
1/2 1/2
1/2 1/2
1/2 1/2
1/2 1/2
5 ½ THIS SIDE
1/2 1/2
5 ½ THIS SIDE
1/2 1/2
1.ADJUSTING TO FORMATIONS
M
N
RL
EES B
C C
F
1
2 3 4 123
12
3
4
4
1
23
4
1/2 1/2
1/2 1/2
1/2 1/2
1/2 1/2
1/2 1/2
5 ½ THIS SIDE
1/2 1/2
5 ½ THIS SIDE
1/2 1/2

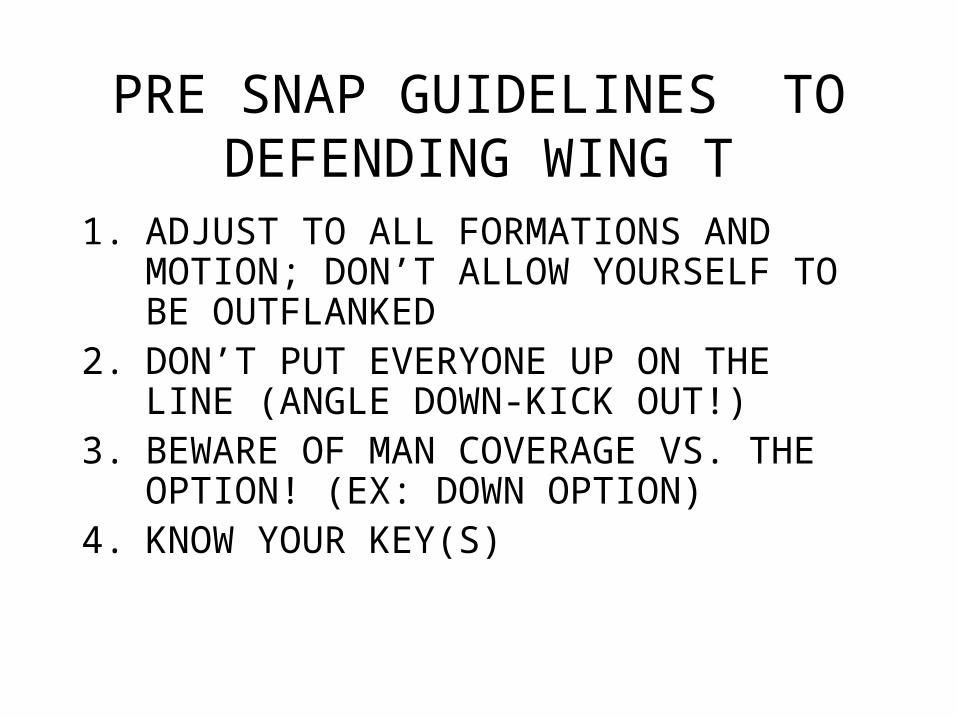
PRE SNAP GUIDELINES TO DEFENDING WING T
1. ADJUST TO ALL FORMATIONS AND MOTION; DON’T ALLOW YOURSELF TO BE OUTFLANKED
2. DON’T PUT EVERYONE UP ON THE LINE (ANGLE DOWN-KICK OUT!)
3. BEWARE OF MAN COVERAGE VS. THE OPTION! (EX: DOWN OPTION)
4. KNOW YOUR KEY(S)
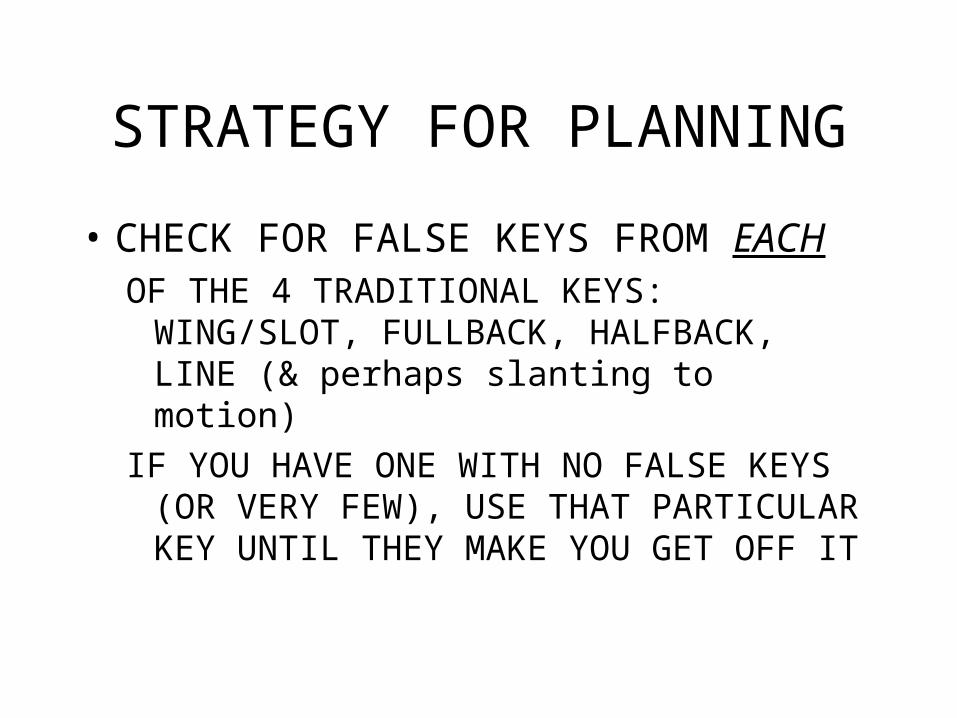
STRATEGY FOR PLANNING
• CHECK FOR FALSE KEYS FROM EACHOF THE 4 TRADITIONAL KEYS:
WING/SLOT, FULLBACK, HALFBACK, LINE (& perhaps slanting to motion)
IF YOU HAVE ONE WITH NO FALSE KEYS (OR VERY FEW), USE THAT PARTICULAR KEY UNTIL THEY MAKE YOU GET OFF IT
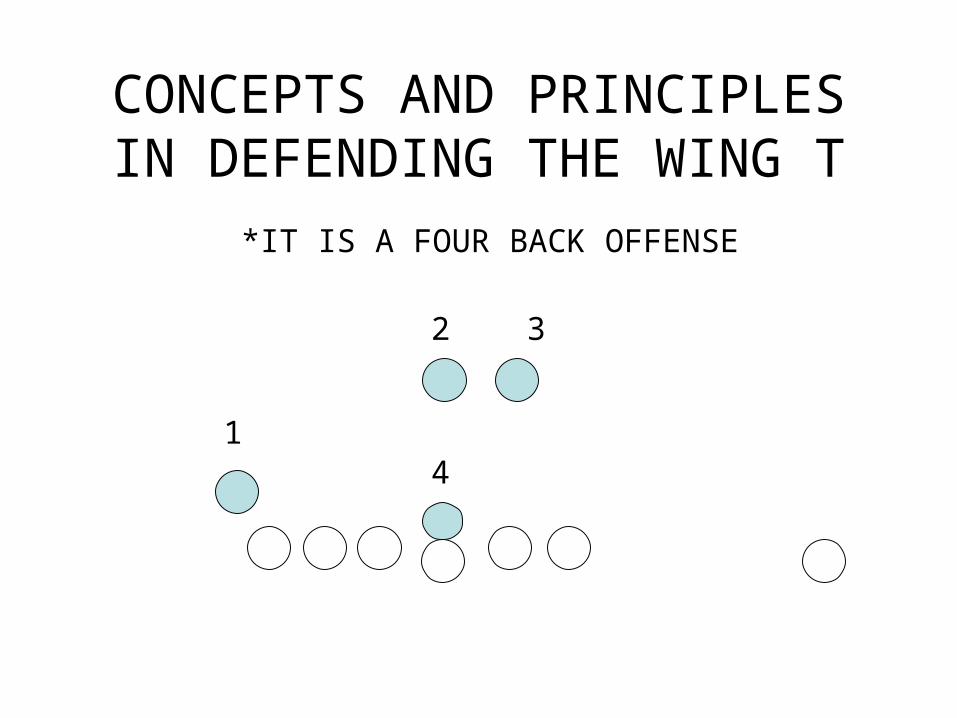
CONCEPTS AND PRINCIPLES IN DEFENDING THE WING T
*IT IS A FOUR BACK OFFENSE
1
2 3
4
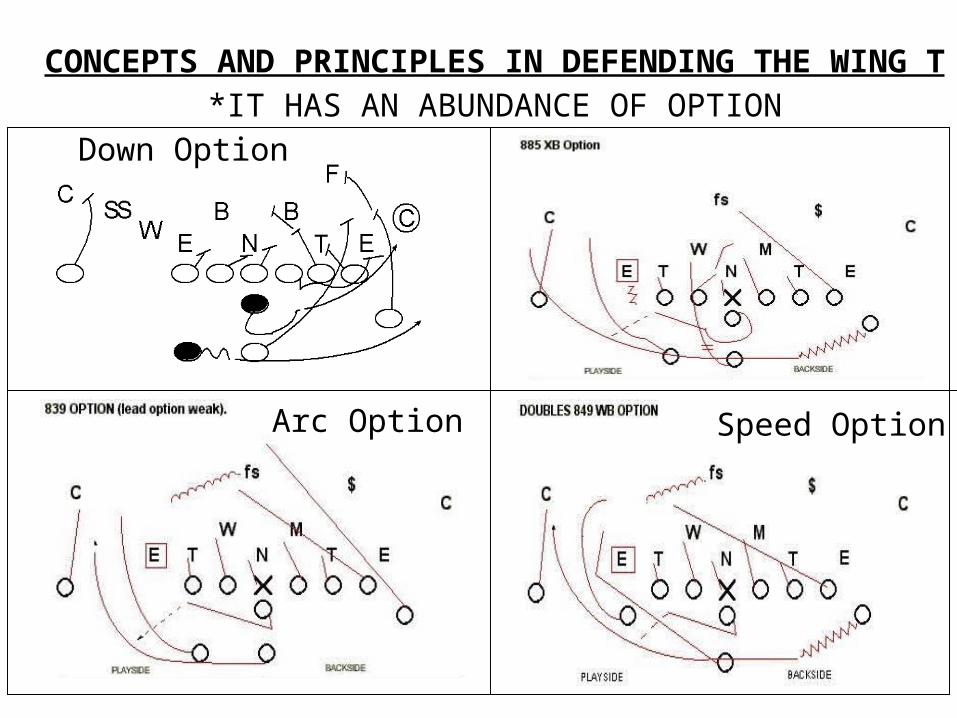
CONCEPTS AND PRINCIPLES IN DEFENDING THE WING T*IT HAS AN ABUNDANCE OF OPTION
Down Option
Arc Option Speed Option
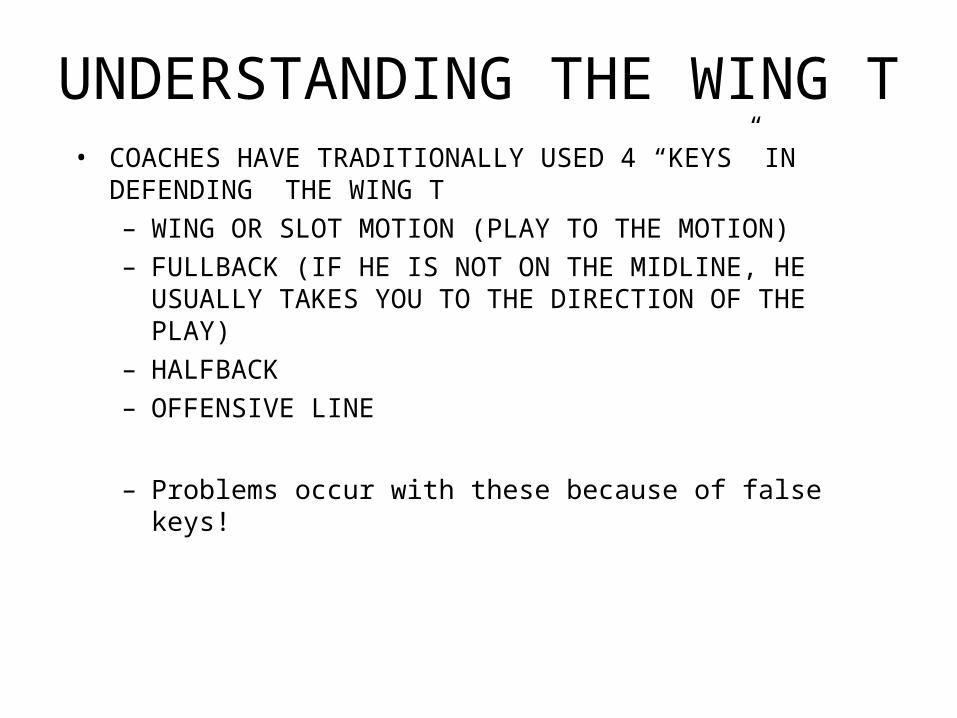
UNDERSTANDING THE WING T• COACHES HAVE TRADITIONALLY USED 4 “KEYS” IN
DEFENDING THE WING T
– WING OR SLOT MOTION (PLAY TO THE MOTION)
– FULLBACK (IF HE IS NOT ON THE MIDLINE, HE USUALLY TAKES YOU TO THE DIRECTION OF THE PLAY)
– HALFBACK
– OFFENSIVE LINE
– Problems occur with these because of false keys!

KEYING HALFBACK
• FALSE KEYS USED– WAGGLE– WAGGLE SHOVEL PASS– BELLY BOOTLEG– BELLY X BLOCK OPTION– BELLY KEEP PASS LOAD– SALLY– COUNTER XX
• TRUE KEYS (HB will take you to the ball)– TAKES YOU TO THE BALL IN THE BUCK SERIES?
• SWEEP-YES• GUT
– WAGGLE SHOVEL PASS– BELLY SERIES– SALLY– COUNTER XX

KEYING FULLBACK
• FALSE KEYS USED– BELLY BOOTLEG– SALLY OR BELLY TACKLE TRAP– COUNTER TREY BOOTLEG
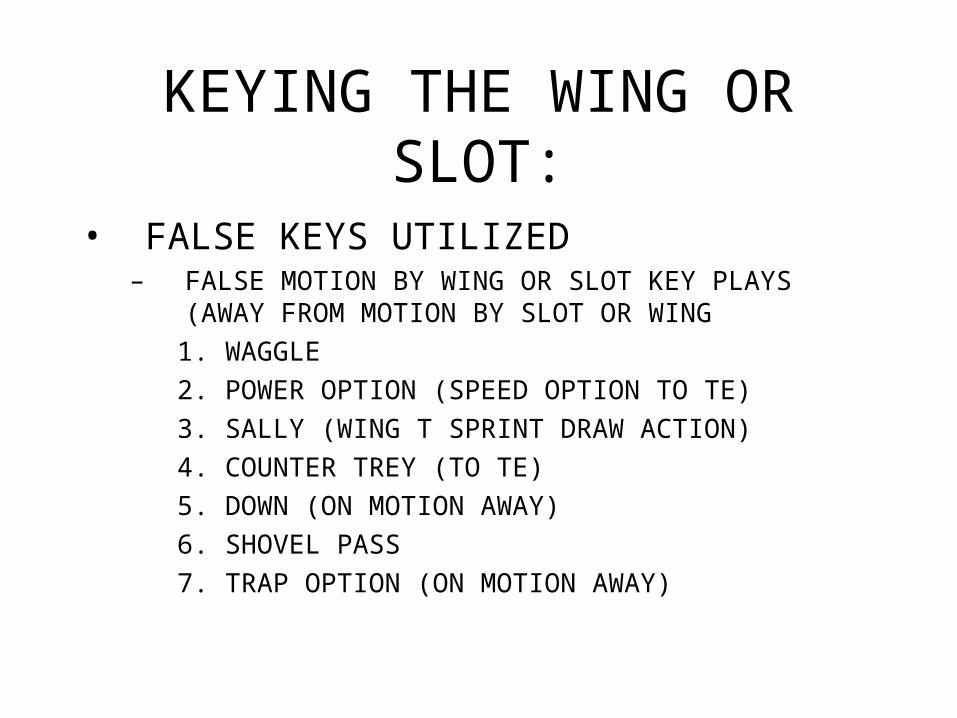
KEYING THE WING OR SLOT:
• FALSE KEYS UTILIZED– FALSE MOTION BY WING OR SLOT KEY PLAYS (AWAY
FROM MOTION BY SLOT OR WING
1. WAGGLE
2. POWER OPTION (SPEED OPTION TO TE)
3. SALLY (WING T SPRINT DRAW ACTION)
4. COUNTER TREY (TO TE)
5. DOWN (ON MOTION AWAY)
6. SHOVEL PASS
7. TRAP OPTION (ON MOTION AWAY)

Strategy: Corner & FS Key TE & Wing“Wing-t teams have traditionally had a great deal of difficulty attacking these defensive spacings because they have elected to stay in traditional wing formations with a tight end wingback on one side and a split end diveback on the other side. By doing this, offensive coaches are playing right into the defensive coaches hands. Why? Because the free safety favors the tight end side so that he can cover the tight end when the defense elects to blitz. As soon as the tight end blocks the free safety is in the run support and tile offensive coach has created another linebacker. The corner is also rolled up to the tight end wingback side and he is assigned to cover the wingback when they blitz. When the wingback blocks another additional linebacker has been created. By now the offense is hopelessly outnumbered but many coaches stubbornly continue to try to force the bucksweep and other tight end wingback plays into bad numbers.”-DENNIS CREEHAN•Get your Strong Corner and Free Safety flying up to support the run
when they get down blocks from the wing and tight end!
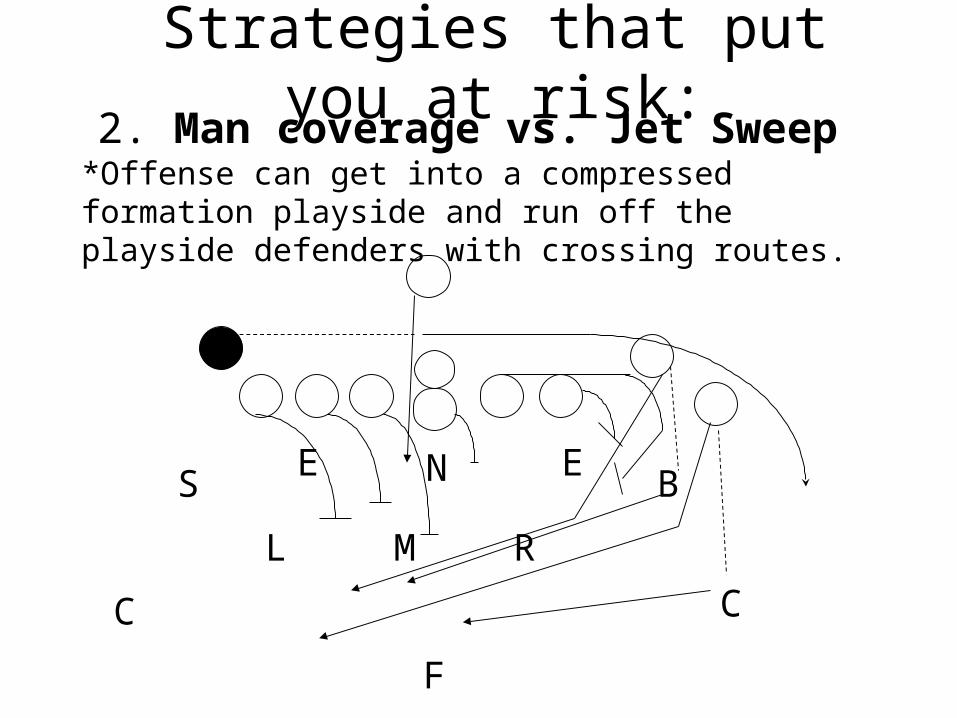
Strategies that put you at risk:2. Man coverage vs. Jet Sweep
M
N
RL
EES B
C C
F
*Offense can get into a compressed formation playside and run off the playside defenders with crossing routes.
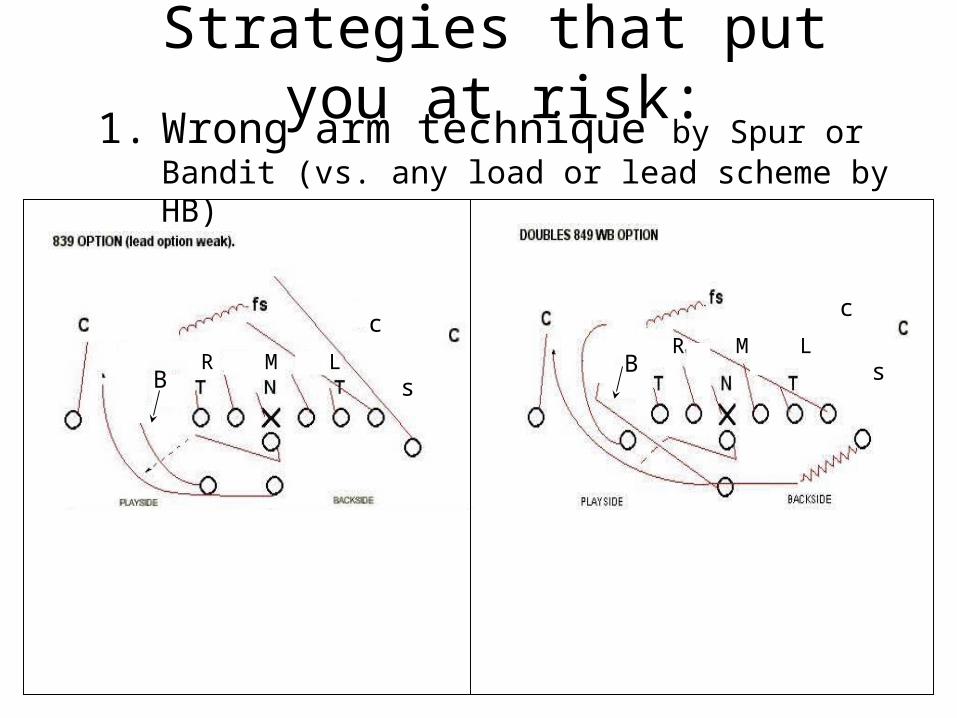
Strategies that put you at risk:1. Wrong arm technique by Spur or Bandit (vs. any
load or lead scheme by HB)
s
c
LMRB
s
c
LMRB
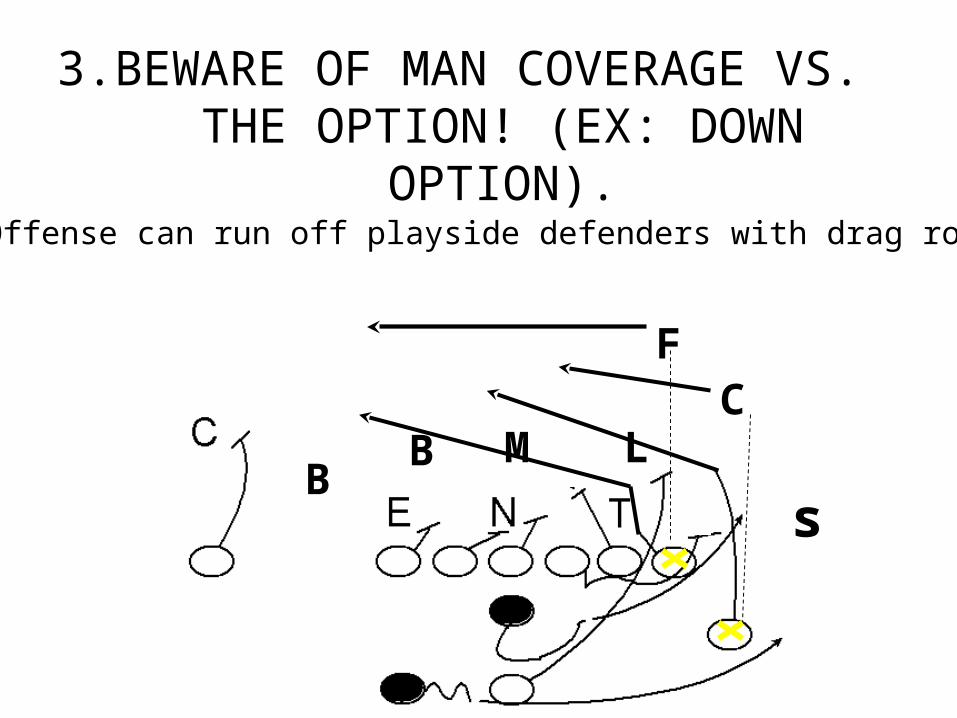
3.BEWARE OF MAN COVERAGE VS. THE OPTION! (EX: DOWN OPTION).
sB
B M L
FC
*Offense can run off playside defenders with drag routes

1. ADJUSTING TO FORMATIONS
M
N
RL
EES B
C C
F
1
2 3 41
23
12
3
4
5
1
23
4
1/2 1/2
1/2 1/2
1/2 1/2
1/2 1/2
6 ½ THIS SIDE 4 ½ THIS SIDE
5
6
1. ADJUSTING TO FORMATIONS
M
N
RL
EES B
C C
F
1
2 3 41
2
3
12
3
4
4
1
23
4
1/2 1/2
1/2 1/2
1/2 1/2
1/2 1/2
1/2 1/2
5 ½ THIS SIDE
1/2 1/2
5 ½ THIS SIDE
1/2 1/2

1.ADJUSTING TO FORMATIONS
M
N
RL
EES
B
C
C
F
1
2 3 4 12
3
12
3
4
4
12
3
4
1/2 1/2
1/2 1/2
1/2 1/2
1/2 1/2
1/2 1/2
5 ½ THIS SIDE
1/2 1/2
5 ½ THIS SIDE
1/2 1/2

1.ADJUSTING TO FORMATIONS
M
N
RL
EES B
C C
F
1
2 3 4 123
12
3
4
4
1
23
4
1/2 1/2
1/2 1/2
1/2 1/2
1/2 1/2
1/2 1/2
5 ½ THIS SIDE
1/2 1/2
5 ½ THIS SIDE
1/2 1/2
PRE SNAP GUIDELINES TO DEFENDING WING T
1. ADJUST TO ALL FORMATIONS AND MOTION; DON’T ALLOW YOURSELF TO BE OUTFLANKED
2. DON’T PUT EVERYONE UP ON THE LINE (ANGLE DOWN-KICK OUT!)
3. BEWARE OF MAN COVERAGE VS. THE OPTION! (EX: DOWN OPTION)
4. KNOW YOUR KEY(S)

STRATEGY FOR PLANNING
• CHECK FOR FALSE KEYS FROM EACHOF THE 4 TRADITIONAL KEYS:
WING/SLOT, FULLBACK, HALFBACK, LINE (& perhaps slanting to motion)
IF YOU HAVE ONE WITH NO FALSE KEYS (OR VERY FEW), USE THAT PARTICULAR KEY UNTIL THEY MAKE YOU GET OFF IT
Base 3-3 Alignment vs. Wing-T
M
N
RL
EES B
C C
F
We see:Buck-SweepBoot PassJet SweepBelly
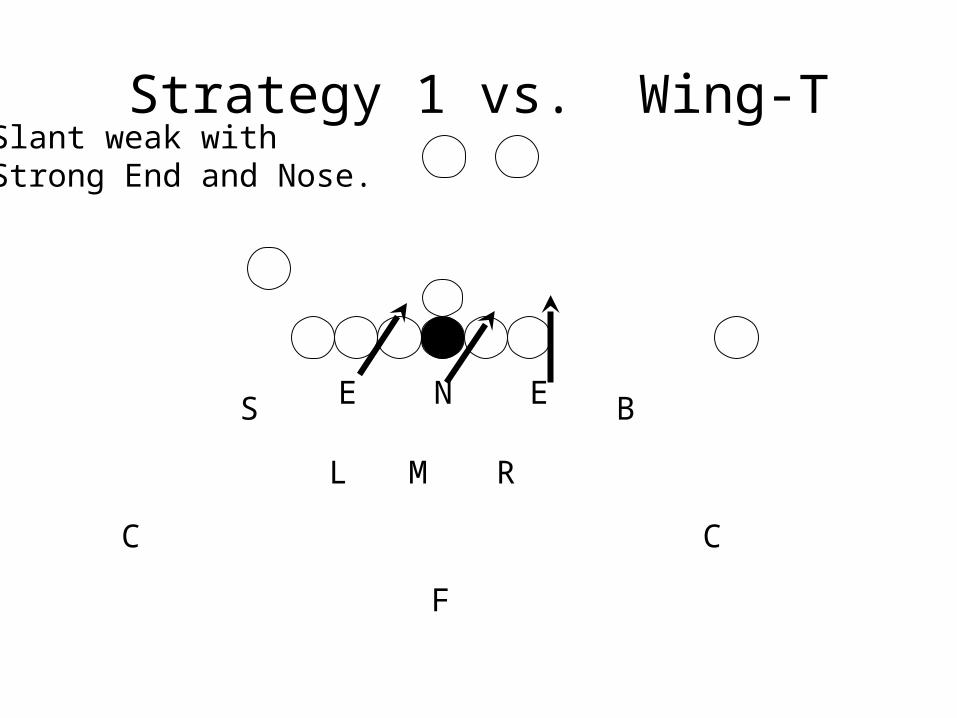
Strategy 1 vs. Wing-T
M
N
RL
EES B
C C
F
Slant weak withStrong End and Nose.
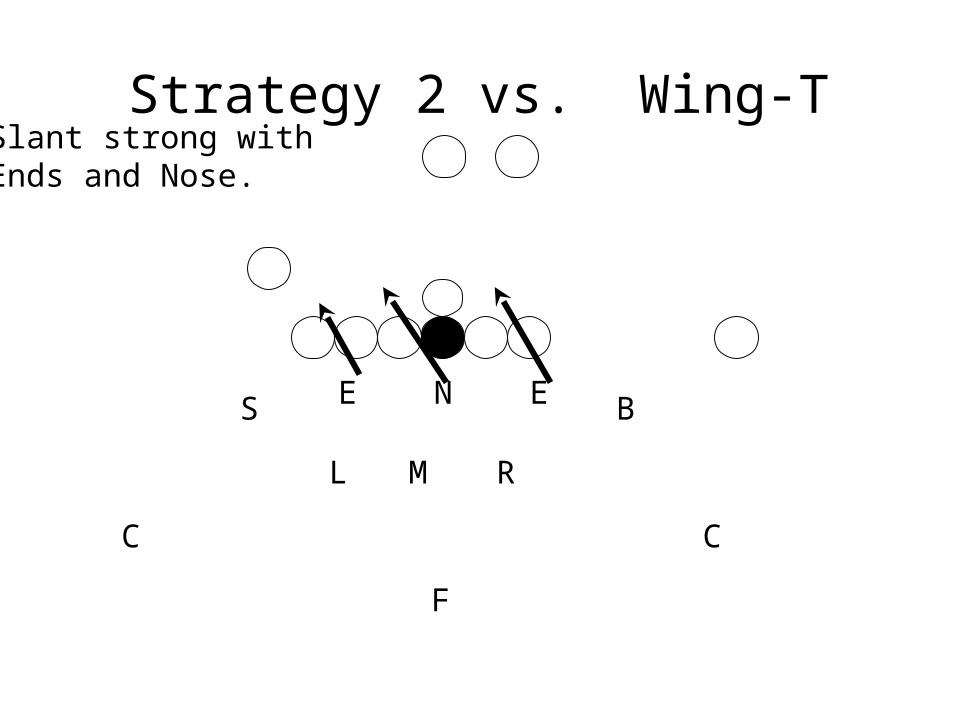
Strategy 2 vs. Wing-T
M
N
RL
EES B
C C
F
Slant strong withEnds and Nose.
M
N
RL
EES B
C C
F
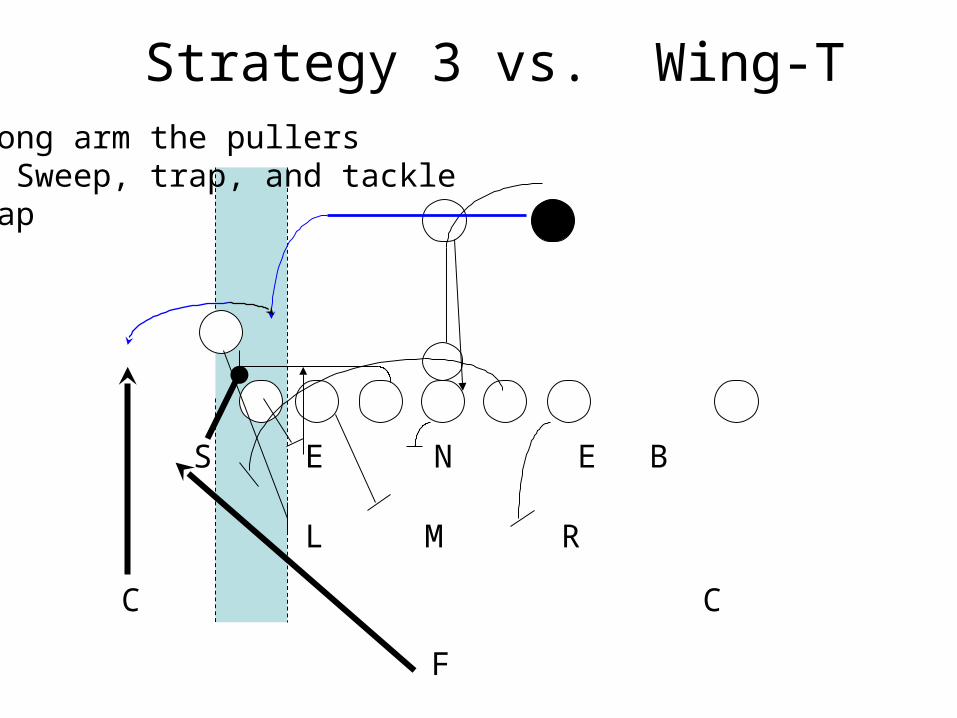
Strategy 3 vs. Wing-TWrong arm the pullersIn Sweep, trap, and tackletrap
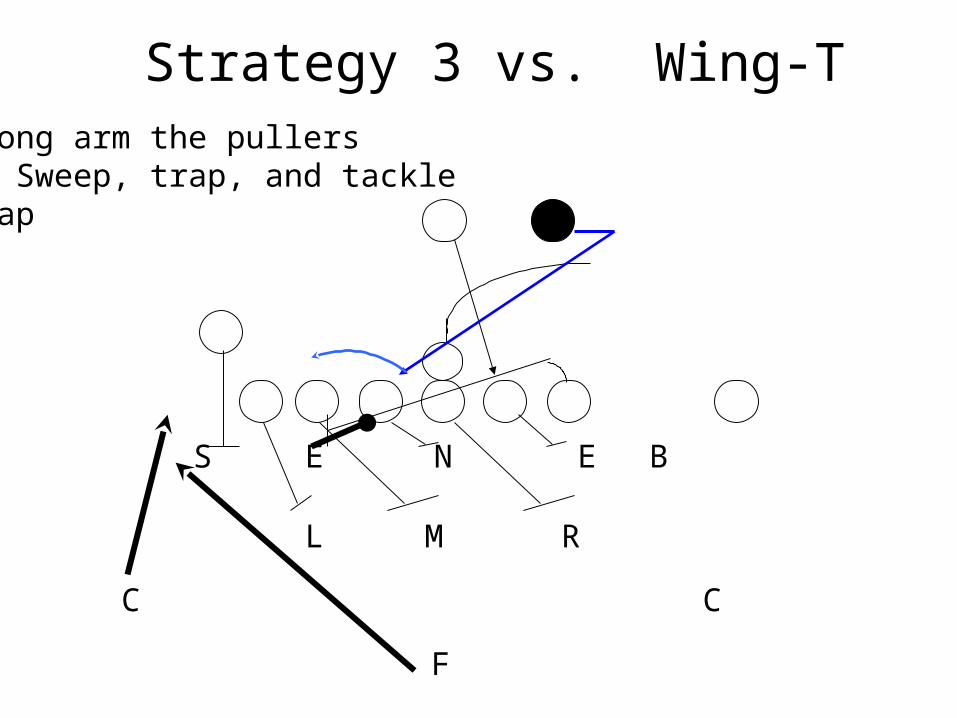
M
N
RL
EES B
C C
F
Strategy 3 vs. Wing-TWrong arm the pullersIn Sweep, trap, and tackletrap
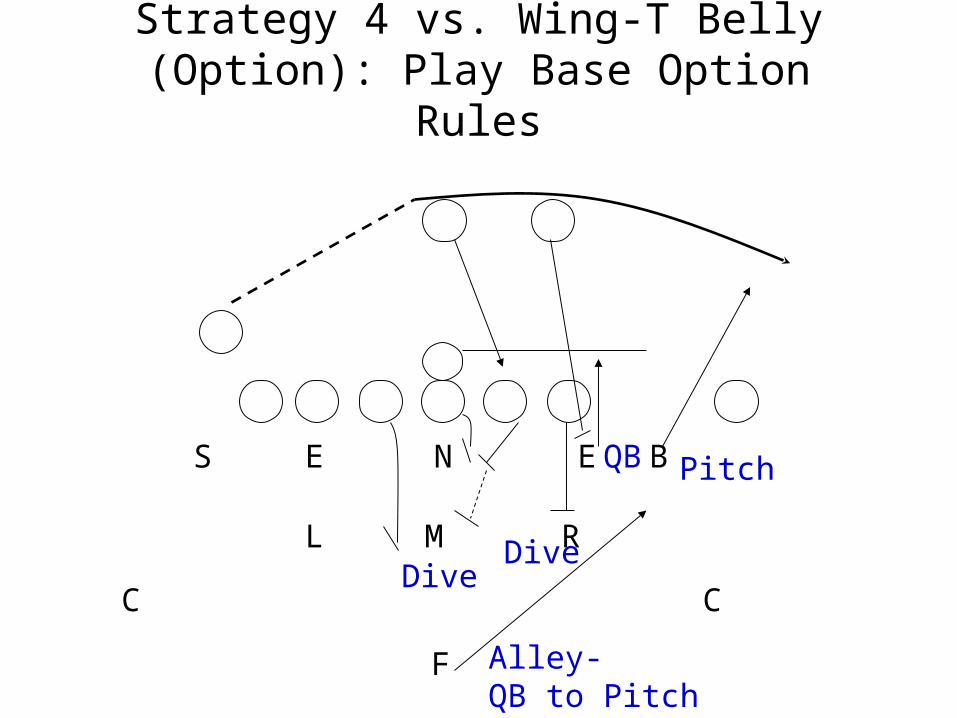
Strategy 4 vs. Wing-T Belly (Option): Play Base Option Rules
M
N
RL
EES B
C C
F
Pitch
Alley-QB to Pitch
DiveDive
QB

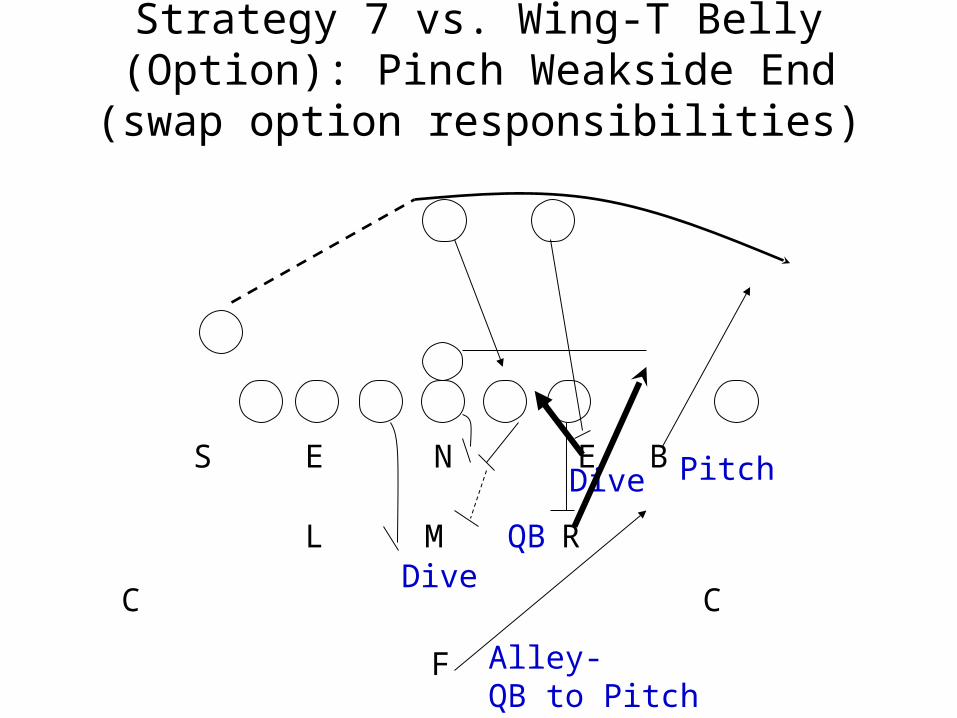
Strategy 5 vs. Wing-T Belly (Option): Pinch Weakside End (swap option responsibilities)
M
N
RL
EES B
C C
F
Pitch
Alley-QB to Pitch
Dive
Dive
QB

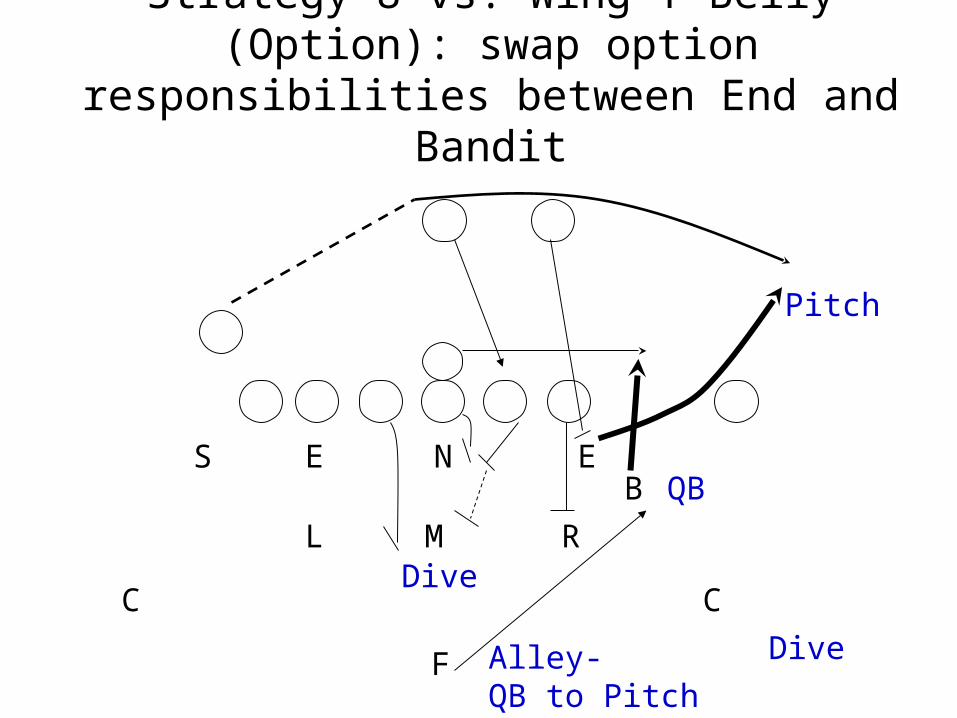
Strategy 6 vs. Wing-T Belly (Option): swap option responsibilities between End and Bandit
M
N
RL
EESB
C C
F
Pitch
Alley-QB to Pitch
Dive
Dive
QB
Strategy 7 vs. Wing-T Belly (Option): Pinch Weakside End (swap option responsibilities)
M
N
RL
EES B
C C
F
Pitch
Alley-QB to Pitch
Dive
Dive
QB
Strategy 8 vs. Wing-T Belly (Option): swap option responsibilities between End and Bandit
Alley-QB to Pitch
M
N
RL
EESB
C C
F
Pitch
Dive
Dive
QB
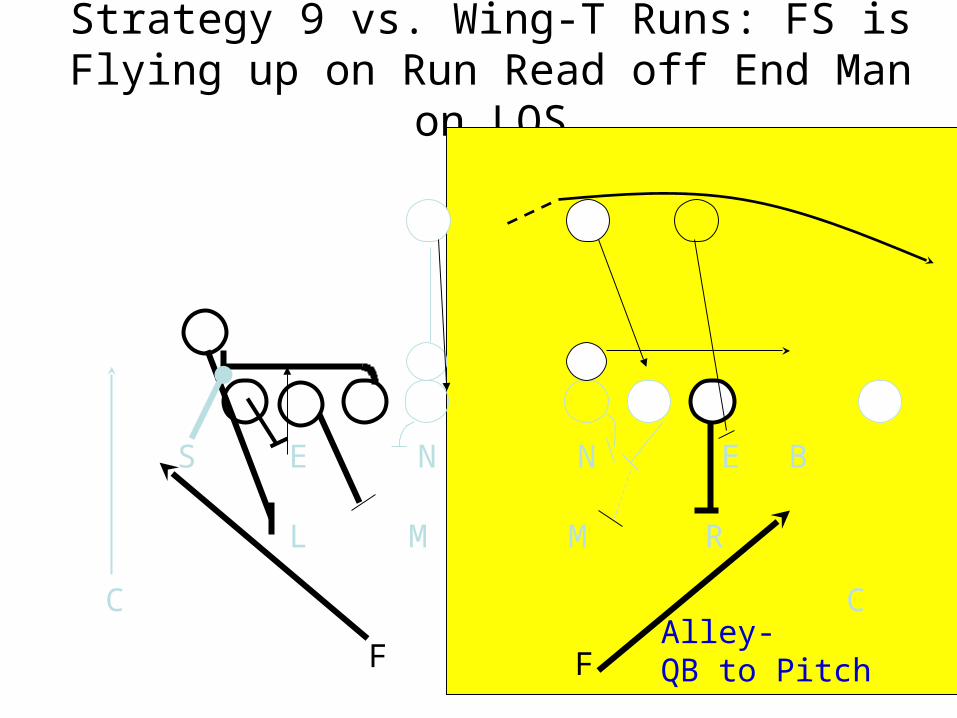
Strategy 9 vs. Wing-T Runs: FS is Flying up on Run Read off End Man on LOS
M
N
L
ES
C
M
N
R
E B
C
FAlley-QB to PitchF
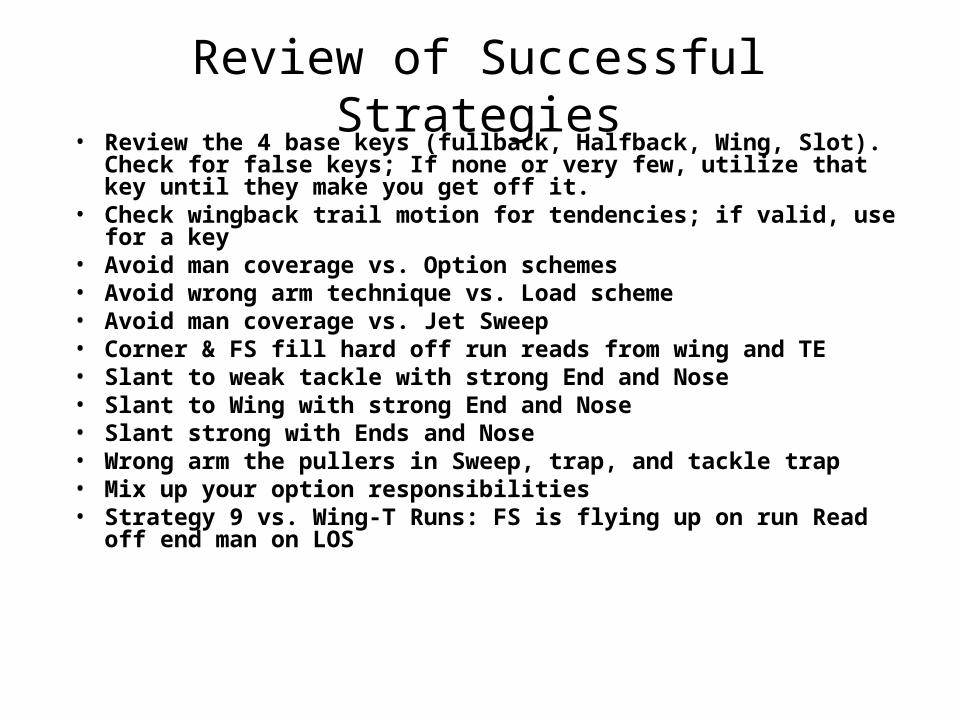
Review of Successful Strategies• Review the 4 base keys (fullback, Halfback, Wing, Slot). Check for false
keys; If none or very few, utilize that key until they make you get off it.• Check wingback trail motion for tendencies; if valid, use for a key• Avoid man coverage vs. Option schemes• Avoid wrong arm technique vs. Load scheme• Avoid man coverage vs. Jet Sweep• Corner & FS fill hard off run reads from wing and TE• Slant to weak tackle with strong End and Nose• Slant to Wing with strong End and Nose• Slant strong with Ends and Nose• Wrong arm the pullers in Sweep, trap, and tackle trap• Mix up your option responsibilities• Strategy 9 vs. Wing-T Runs: FS is flying up on run Read off end man
on LOS
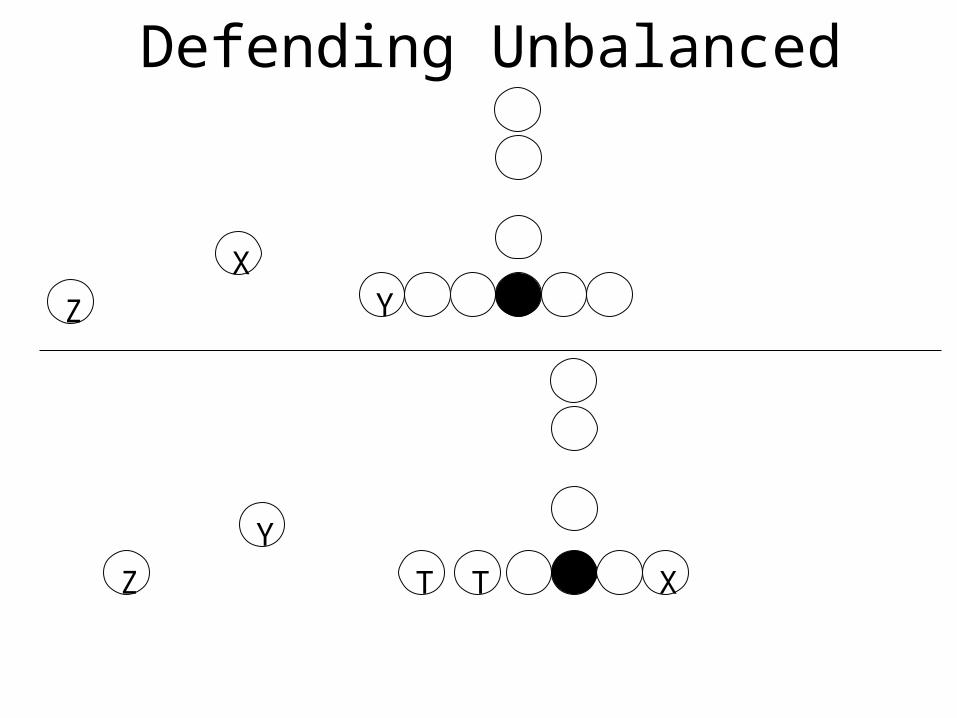
Defending Unbalanced
Z YX
Z
Y
T XT
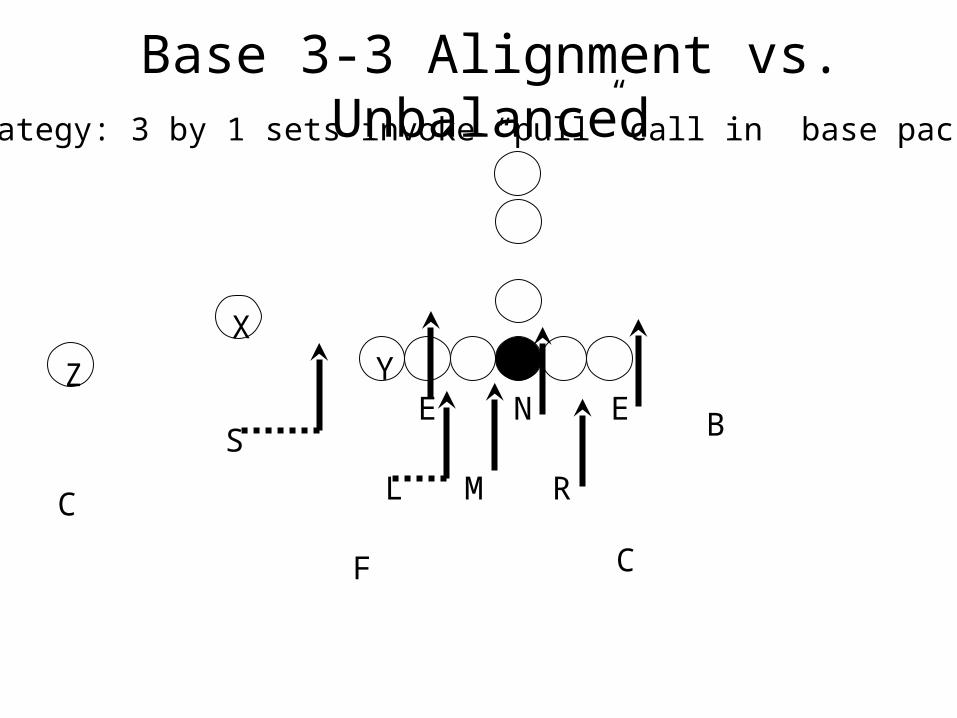
Base 3-3 Alignment vs. Unbalanced
Z YX
M
N
RL
EES B
C
CF
Strategy: 3 by 1 sets invoke “pull” call in base package
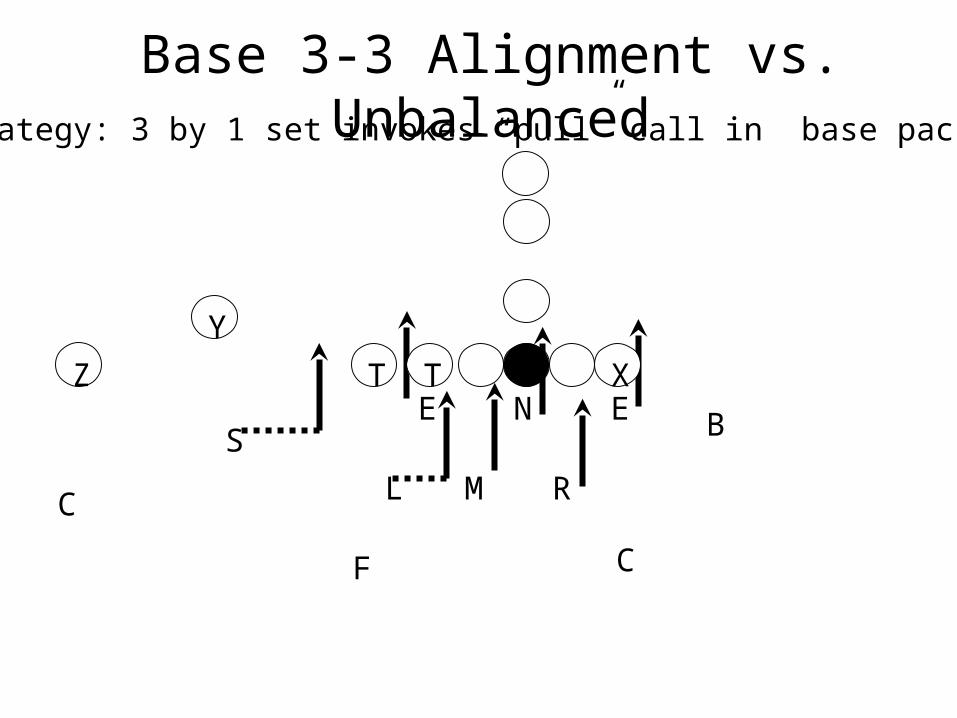
Base 3-3 Alignment vs. Unbalanced
M
N
RL
EES B
C
CF
Z
Y
T XT
Strategy: 3 by 1 set invokes “pull” call in base package

Aligning to Unbalanced Formations“X over” “Pull” Call
Box intact;
FS adjusts
“Pull” Call 2 by 1 rules; FS adjusts
ES N
RL
E
C CF
M BN
RL
E
C CF
MB
ES
N
RL
E
C
CF
MB
ES
3 Shell
2 Shell
3 Shell
2 Shell
Coaching Point for 2 Deep Zone: defender aligned over #3 run with him
N
RL
E
C
CF
MB
ES
ZY
TT xZ
Y
TT x
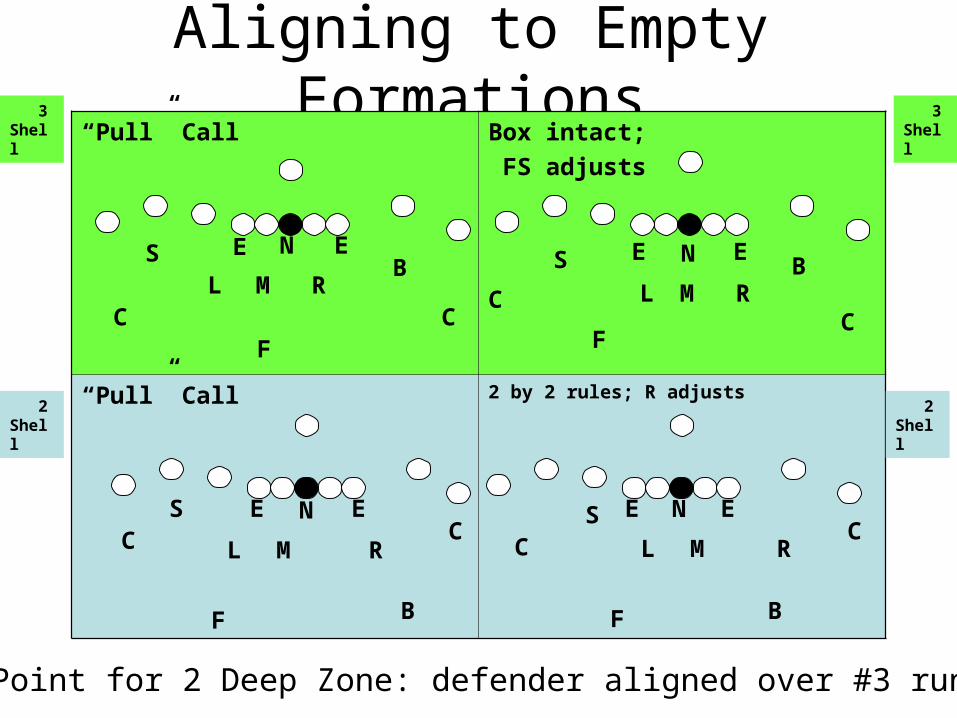
Aligning to Empty Formations“Pull” Call Box intact;
FS adjusts
“Pull” Call 2 by 2 rules; R adjusts
E N ESRL
C CF
MB
N
RL
E
CC
F
MB
ES
CN
RL
EC
F
M
B
ES
3 Shell
2 Shell
3 Shell
2 Shell
N
RL
E
CC
F
M
B
ES
Coaching Point for 2 Deep Zone: defender aligned over #3 run with him