Embed Size (px)
Citation preview

8/8/2019 276ba559b616f0752a9d1ab6240c7e96
http://slidepdf.com/reader/full/276ba559b616f0752a9d1ab6240c7e96 1/176
3-087-414-11 (1)
Digital Video Camera Recorder
Operat ing Inst ruct ionsBefore operating the u nit, please read this man ual thorou ghly,
and retain it for futu re reference.
Owner’s RecordThe model and serial numbers are located on the bottom. Record th e
serial num ber in the space provided below. Refer to these num bers
wh enever you call upon you r Sony dealer regarding this produ ct.
Model No. DCR-VX2100 Model No. AC-
Serial No. Serial No.
DCR-VX2100
©2003 Sony Corporation
8/8/2019 276ba559b616f0752a9d1ab6240c7e96
http://slidepdf.com/reader/full/276ba559b616f0752a9d1ab6240c7e96 2/176
2
Welcome!Congratulations on your pu rchase of this Sony Digital Hand ycam camcorder. With you r Digital
Hand ycam, you can capture life’s precious m oments w ith superior p icture and sound quality. Your Digital
Han dycam is loaded with ad vanced featu res, but at the same time it is very easy to use. You w ill soon be
prod ucing home vid eo that you can enjoy for years to come.
This symbol is intend ed to alert
the user to the presence of un insulated “d angerous voltage”within the p rodu ct’s enclosure
that may be of sufficientmagnitud e to constitute a risk of electric shock to p ersons.
This symbol is intend ed to alert
the user to the presence of important operating andmain tenance (servicing)instructions in the literatureaccompan ying the app liance.
Notice
If static electricity or electromagnetism causes
da ta transfer to discontinue mid way (fail),
restart the application or d isconnect and
connect the i.LINK cable again.
For customers in the U.S.A. and
CANADACAUTIONTO PREVENT ELECTRIC SHOCK, MATCH WIDEBLADE OF PLUG TO WIDE SLOT, FULLY INSERT.
For the customers in the U.S.A.If you have any questions about this product, youmay call:Sony Customer Information Center 1-800-222-SONY (7669)The number below is for the FCC related mattersonly.
Regulatory Information
Declaration of ConformityTrade Name: SONYModel No.: DCR-VX2100Responsible Party: Sony Electronics Inc.Address: 680 Kinderkamack
Road, Oradell,NJ07649 U.S.A
Telep hon e N o.: 201-930-6972This device complies with Part 15 of the FCC Rules.Operation is subject to the following tw oconditions: (1) This device may not cause harm ful
interference, and (2) this device mu st accept anyinterference received, including interference thatmay cause un desired operation.
CAUTIONYou are cautioned that any changes or m odificationsnot expressly approved in this manual could void yourauthority to operate this equipment.
Note:This equipment has been tested and found to complywith the limits for a Class B digital device, pursuant toPart 15 of the FCC Rules. These limits are designed toprovide reasonable protection against harmfulinterference in a residential installation. Thisequipment generates, uses, and can radiate radiofrequency energy and , if not installed and used inaccordance with the instructions, may cause harmfu linterference to radio commu nications. How ever, thereis no guarantee tha t interference will not occur in aparticular installation. If this equipment does causeharm ful interference to rad io or television r eception,which can be determined by turn ing the equipment off and on, the user is encouraged to try to correct theinterference by one or mor e of the following m easures:— Reorient or relocate the receiving antenna.— Increase the separation between the equipment and
receiver.— Connect the equipm ent into an outlet on a circuit
different from that t o wh ich th e receiver is connected.— Consult the dealer or an experienced radio/ TV
technician for help.
The supp lied interface cable mu st be used with theequipm ent in order to comp ly with the limits for a digitaldev ice pu rsuant to su bpart B of Part 15 of FCC Rules.
WARNING
To prevent fire or shock hazard, donot expose the unit to rain ormoisture.
RECYCLING LITHIUM -ION BATTERIES
Lithium -Ion batteries arerecyclable.You can help p reserve ourenvironment by returningyour u sed rechargeablebatteries to th e collection and
recycling location nearest you .For more information regard ing recycling of rechargeable batteries, call toll free 1-800-822-8837, or visit http:/ / ww w.rbrc.org/
Caution: Do not hand le damaged or leakingLithium -Ion batteries.
“Memory Stick”This device complies with Part 15 of the FCC Rules.Operation is subject to the following tw o conditions:
(1) This device may not cause harm ful interference, and(2) this d evice m ust accept a ny int erference received,including interference that ma y cause undesired operat ion.
This Class B digital apparatu s complies with Canad ianICES-003.
8/8/2019 276ba559b616f0752a9d1ab6240c7e96
http://slidepdf.com/reader/full/276ba559b616f0752a9d1ab6240c7e96 3/176
3
Table of contents
Quick Start Guide ............................................... 4
Getting Start ed
Using this manual ............................................... 6Checking supplied accessories ......................... 8
Step 1 Preparing the power supply ................ 9Step 2 Setting the date and time .................... 14Step 3 Inserting a cassette ............................... 15
Recording – Basics
Recording a picture .......................................... 16Shooting backlit subjects
(BACK LIGHT) ................................ 23
Using the spot light function ............ 24
Self-timer recording ........................... 25
Checking the recording – END SEARCH /
EDITSEARCH / Rec Review ....................... 26Playback – Basics
Playing back a tape ........................................... 27Viewing the recording on TV ......................... 31
Advanced Recording Operations
Recording a still image on a tape– Tape Photo recording ................................ 32
Shooting with all the pixels– PROG. SCAN ............................................... 34
Using the guide frame ..................................... 35
Using the wide mode ....................................... 36Using the fader function .................................. 38Using special effects – Picture effect .............. 40Using special effects – Digital effect .............. 41Shooting with manual adjustment ................. 44Adjusting the white balance ........................... 50Adjusting recording level manually
– Sound recording level ................................ 52Presetting the adjustment for picture quality
– Custom preset ............................................. 54Using the PROGRAM AE function ................ 56
Focusing manually ........................................... 59Interval recording ............................................. 60Frame by frame recording – Cut recording .. 62Marking an Index ............................................. 63
Advanced Playback Operations
Quickly locating a scene using the zero setmemory function ........................................... 64
Searching for a recording by index– Index search ................................................. 65
Searching the boundaries of recorded tape bytitle – Title search ........................................... 67
Searching a recording by date– Date search ................................................... 68
Searching for a photo– Photo search/Photo scan ........................... 70
Playing back a tape with picture effects ........ 72
Playing back a tape with digital effects ......... 73
Editing
Dubbing a tape .................................................. 74Dubbing only desired scenes
– Digital program editing ............................. 76Using with an analog video unit and a PC– Signal convert function .............................. 88
Recording video or TV programs .................. 89Inserting a scene from a VCR
– Insert editing ............................................... 93Audio dubbing .................................................. 95Superimposing a title ....................................... 99Making your own titles.................................. 103Labeling a cassette .......................................... 105Erasing the cassette memory data ................ 107
Customizing Your CamcorderChanging the menu settings ......................... 109
“M emory Stick” Operations
Using a “Memory Stick” – introduction...... 116Recording still images on a “Memory Stick”
– Memory Photo recording ........................ 121Superimposing a still image in a “Memory
Stick” on a moving picture– MEMORY MIX .......................................... 125
Recording an image from a tape as a stillimage ............................................................. 128
Copying still images from a tape– Photo save .................................................. 131
Viewing a still picture– Memory Photo playback .......................... 133
Copying an image recorded on a “MemoryStick” to tapes ............................................... 136
Playing back images continuously– SLIDE SHOW ............................................ 138
Preventing accidental erasure– Image protection ....................................... 139
Deleting images .............................................. 140Writing a print mark – Print mark ............... 143
Additional Information
Usable cassettes ............................................... 144About i.LINK ................................................... 146Troubleshooting .............................................. 148Self-diagnosis display .................................... 154Warning indicators and messages ............... 155Using your camcorder abroad ...................... 157Maintenance information and
precautions ................................................... 158
Specifications ................................................... 163Quick Reference
Identifying the parts and controls ................ 164Quick Function Guide .................................... 173Index ................................................................. 174
8/8/2019 276ba559b616f0752a9d1ab6240c7e96
http://slidepdf.com/reader/full/276ba559b616f0752a9d1ab6240c7e96 4/176
4
Q ui ck S t ar t G u
i d e
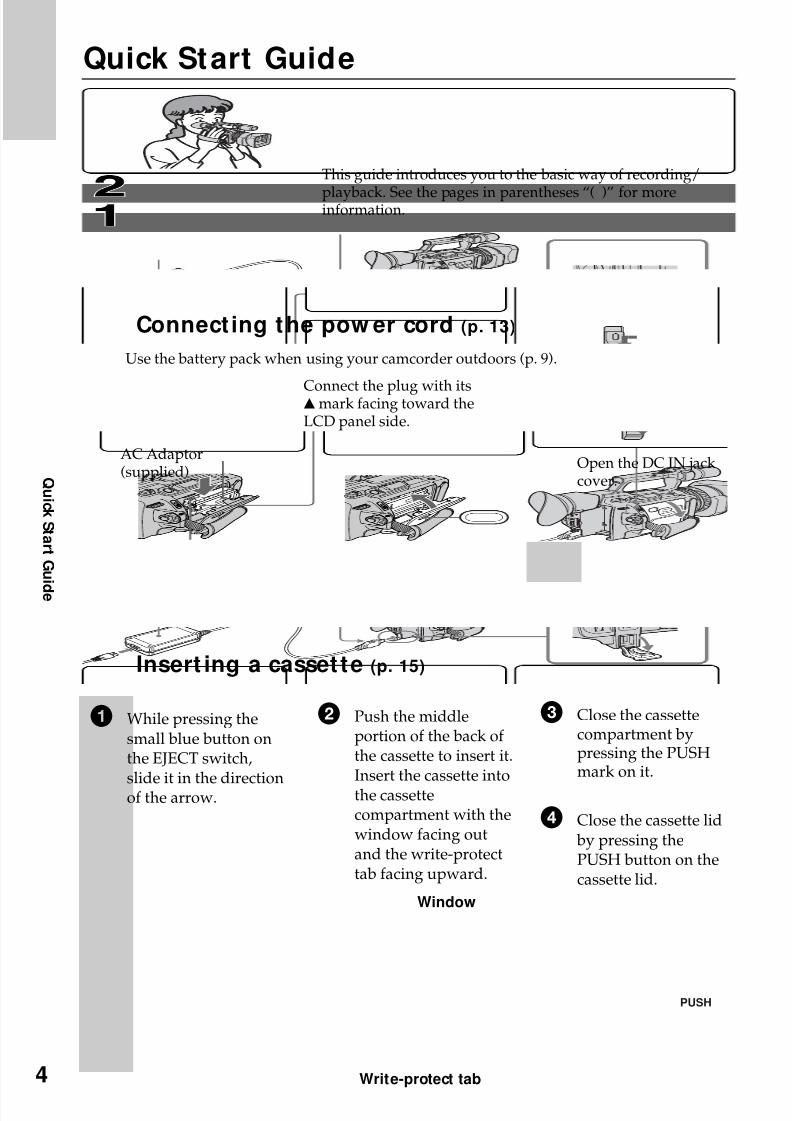
Quick Start Guide
This guide introduces you to the basic way of recording/
playback. See the pages in parentheses “( )” for moreinformation.
Connecting the pow er cord (p. 13)
Use the battery pack when using your camcorder outdoors (p. 9).
AC Adaptor(supplied)
Connect the plug with itsvmark facing toward theLCD panel side.
Open the DC IN jackcover.
Insert ing a casset te (p. 15)
1 While pressing thesmall blue button onthe EJECT switch,
slide it in the directionof the arrow.
2 Push the middleportion of the back of the cassette to insert it.Insert the cassette intothe cassettecompartment with thewindow facing outand the write-protecttab facing upward.
4 Close the cassette lid by pressing thePUSH button on thecassette lid.
PUSH
Window
3 Close the cassettecompartment bypressing the PUSHmark on it.
Write-protect tab
8/8/2019 276ba559b616f0752a9d1ab6240c7e96
http://slidepdf.com/reader/full/276ba559b616f0752a9d1ab6240c7e96 5/176
5
Q ui ck S t ar t G u
i d e
POWER
O F F
( C H G )
C A ME R A
M E M O R Y
V C R
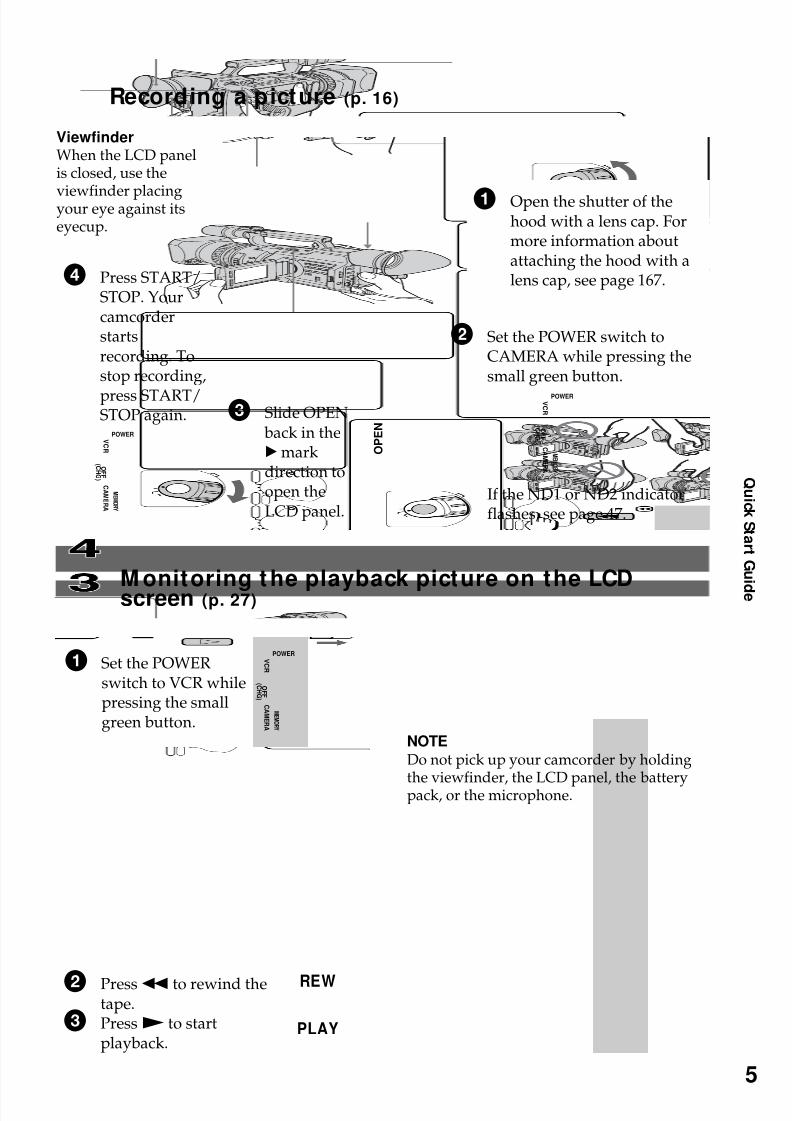
Recording a picture (p. 16)
ViewfinderWhen the LCD panelis closed, use the
viewfinder placingyour eye against itseyecup.
1 Open the shutter of thehood with a lens cap. Formore information aboutattaching the hood with alens cap, see page 167.
2 Set the POWER switch toCAMERA while pressing thesmall green button.
If the ND1 or ND2 indicatorflashes, see page 47.
3 Slide OPEN back in theBmarkdirection toopen theLCD panel.
M onitoring the playback picture on the LCDscreen (p. 27)
1 Set the POWERswitch to VCR whilepressing the smallgreen button.
2 Pressm to rewind thetape.
3 PressN to startplayback.
NOTE
Do not pick up your camcorder by holding
the viewfinder, the LCD panel, the batterypack, or the microphone.
POWER
O F F
( C H G )
C A ME R A
M E M O R Y
V C R
4 Press START/STOP. Yourcamcorderstartsrecording. Tostop recording,
press START/STOP again.
POWER
O F F
( C H G )
C A ME R A
M E M O R Y
V C R
REW
PLAY
O P E N
8/8/2019 276ba559b616f0752a9d1ab6240c7e96
http://slidepdf.com/reader/full/276ba559b616f0752a9d1ab6240c7e96 6/176
6
— Gett ing Started —
Using this manual
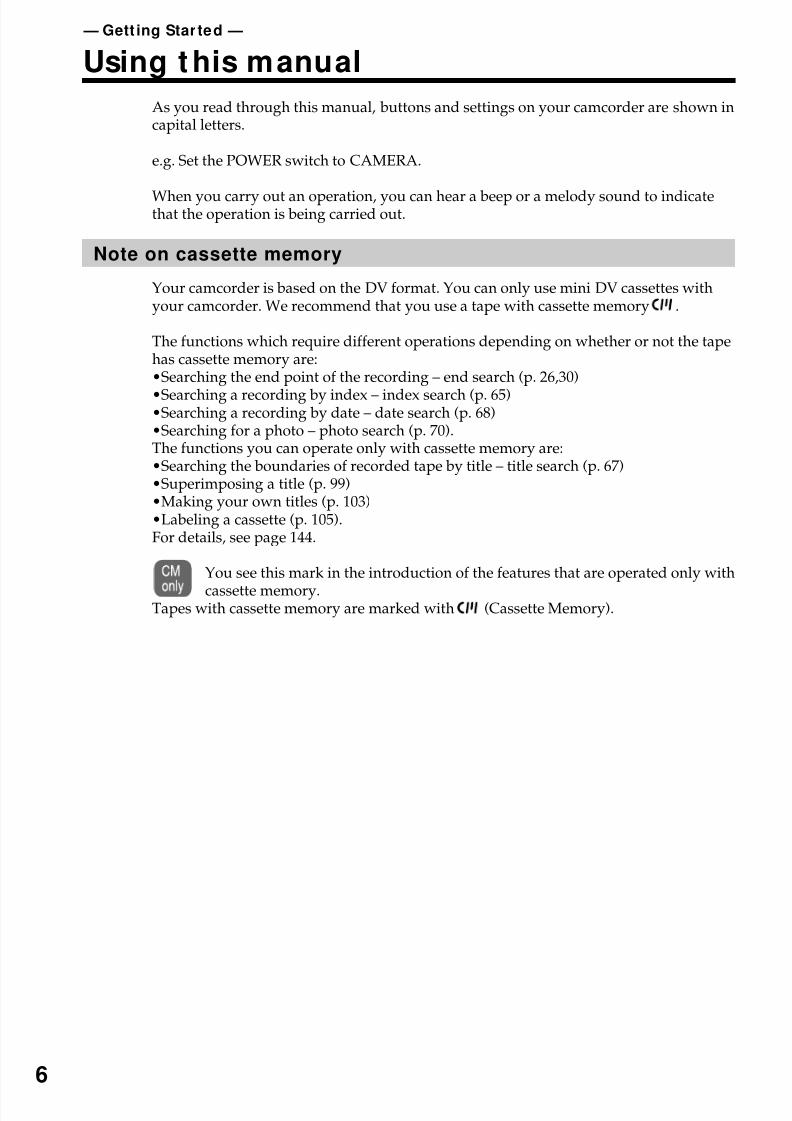
As you read through this manual, buttons and settings on your camcorder are shown incapital letters.
e.g. Set the POWER switch to CAMERA.
When you carry out an operation, you can hear a beep or a melody sound to indicatethat the operation is being carried out.
Note on cassette memory
Your camcorder is based on the DV format. You can only use mini DV cassettes withyour camcorder. We recommend that you use a tape with cassette memory .
The functions which require different operations depending on whether or not the tapehas cassette memory are:•Searching the end point of the recording – end search (p. 26,30)
•Searching a recording by index – index search (p. 65)•Searching a recording by date – date search (p. 68)•Searching for a photo – photo search (p. 70).The functions you can operate only with cassette memory are:•Searching the boundaries of recorded tape by title – title search (p. 67)•Superimposing a title (p. 99)•Making your own titles (p. 103)•Labeling a cassette (p. 105).For details, see page 144.
You see this mark in the introduction of the features that are operated only with
cassette memory.Tapes with cassette memory are marked with (Cassette Memory).
8/8/2019 276ba559b616f0752a9d1ab6240c7e96
http://slidepdf.com/reader/full/276ba559b616f0752a9d1ab6240c7e96 7/176
7
G
e t t i n g S t ar t e d
Using this manual
Not e on TV color systems
TV color systems differ by country or region. To view your recordings on a TV, youneed an NTSC system-based TV.
Copyright precaut ions
Television programs, films, video tapes, and other materials may be copyrighted.Unauthorized recording of such materials may be contrary to the provision of thecopyright laws.
Precautions on camcorder care
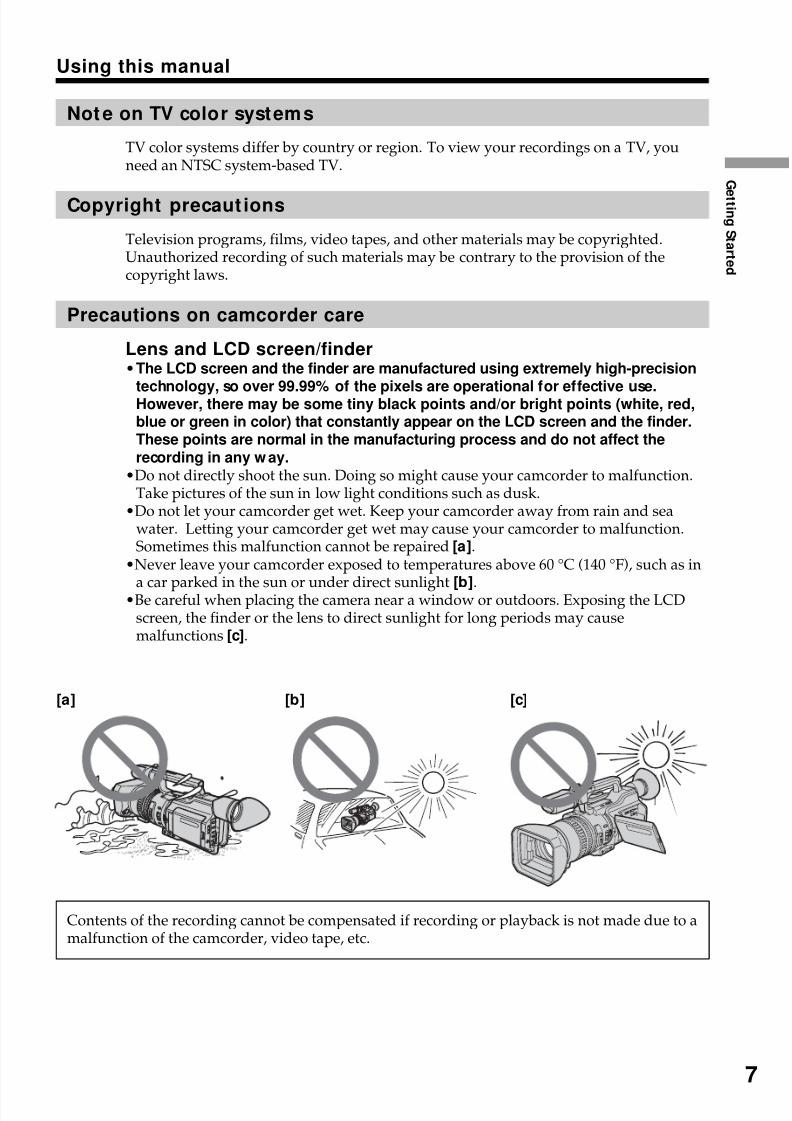
Lens and LCD screen/finder•The LCD screen and the finder are manufactured using extremely high-precision
technology, so over 99.99% of the pixels are operational for effective use.However, there may be some tiny black points and/or bright points (white, red,blue or green in color) that constantly appear on the LCD screen and the finder.These points are normal in the manufacturing process and do not affect therecording in any w ay.
•Do not directly shoot the sun. Doing so might cause your camcorder to malfunction.Take pictures of the sun in low light conditions such as dusk.
•Do not let your camcorder get wet. Keep your camcorder away from rain and seawater. Letting your camcorder get wet may cause your camcorder to malfunction.Sometimes this malfunction cannot be repaired [a].
•Never leave your camcorder exposed to temperatures above 60 °C (140 °F), such as in
a car parked in the sun or under direct sunlight [b].•Be careful when placing the camera near a window or outdoors. Exposing the LCDscreen, the finder or the lens to direct sunlight for long periods may causemalfunctions [c].
Contents of the recording cannot be compensated if recording or playback is not made due to amalfunction of the camcorder, video tape, etc.
[a] [b] [c]
8/8/2019 276ba559b616f0752a9d1ab6240c7e96
http://slidepdf.com/reader/full/276ba559b616f0752a9d1ab6240c7e96 8/176
8
Checking supplied accessories
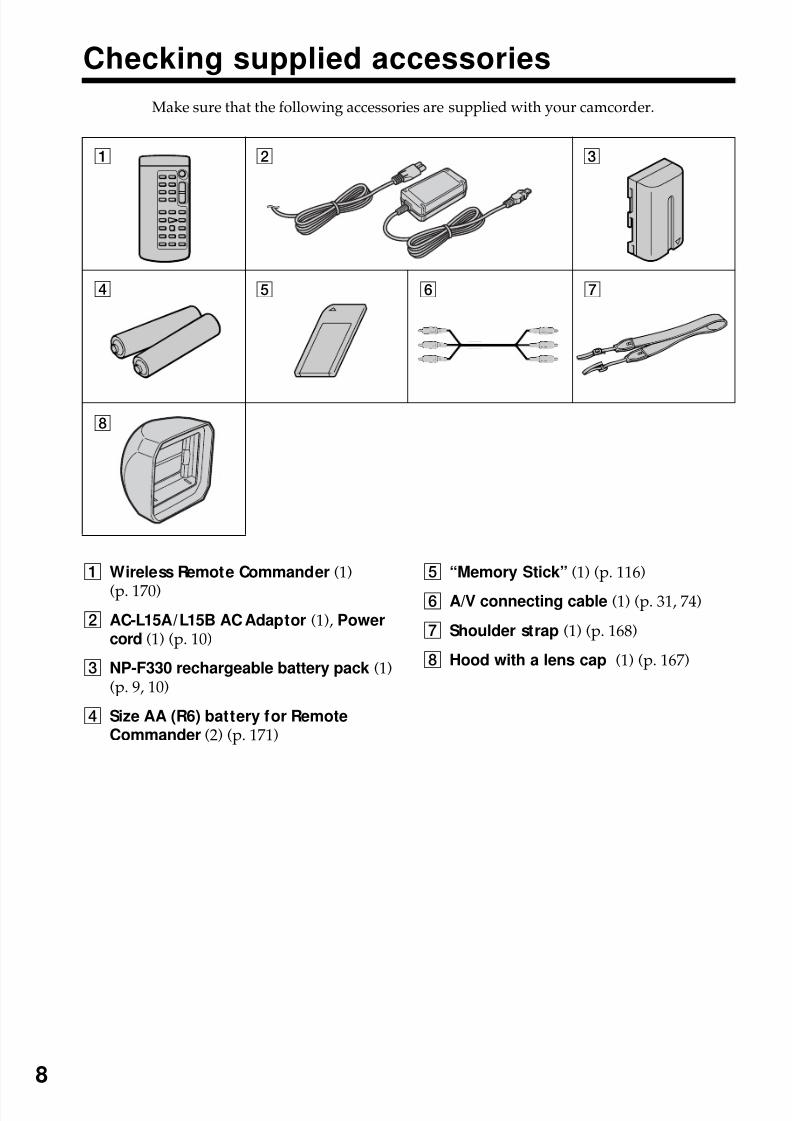
Make sure that the following accessories are supplied with your camcorder.
1 2 3
4 5 7
8
1 Wireless Remote Commander (1)
(p. 170)
2 AC-L15A/L15B AC Adaptor (1), Powercord (1) (p. 10)
3 NP-F330 rechargeable battery pack (1)(p. 9, 10)
4 Size AA (R6) battery for RemoteCommander (2) (p. 171)
5 “Memory Stick” (1) (p. 116)
6 A/V connecting cable (1) (p. 31, 74)
7 Shoulder strap (1) (p. 168)
8 Hood with a lens cap (1) (p. 167)
6

8/8/2019 276ba559b616f0752a9d1ab6240c7e96
http://slidepdf.com/reader/full/276ba559b616f0752a9d1ab6240c7e96 9/176
9
G
e t t i n g S t ar t e d
Step 1 Preparing the pow er supply
Installing the bat tery pack
Install the battery pack to use your camcorder outdoors.
(1) Lift up the viewfinder.(2) Insert the battery pack in the direction of the Vmark on the battery pack. Slide
the battery pack until it clicks.
To remove the battery packLift up the viewfinder.
Slide the battery pack out in the direction of the arrow while pressing BATT RELEASEdown.
1 2
BATTRELEASE
8/8/2019 276ba559b616f0752a9d1ab6240c7e96
http://slidepdf.com/reader/full/276ba559b616f0752a9d1ab6240c7e96 10/176
10
Step 1 Preparing the pow er supply
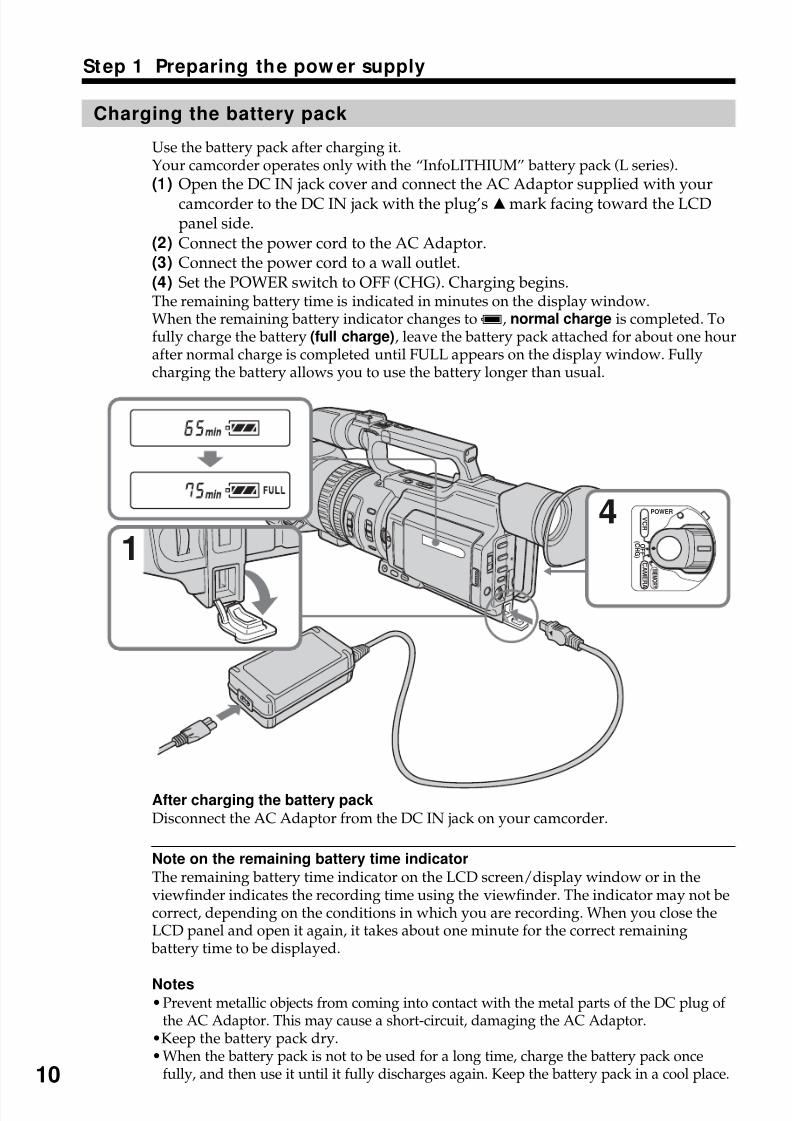
Charging the battery pack
Use the battery pack after charging it.Your camcorder operates only with the “InfoLITHIUM” battery pack (L series).(1) Open the DC IN jack cover and connect the AC Adaptor supplied with your
camcorder to the DC IN jack with the plug’s vmark facing toward the LCDpanel side.
(2) Connect the power cord to the AC Adaptor.(3) Connect the power cord to a wall outlet.(4) Set the POWER switch to OFF (CHG). Charging begins.The remaining battery time is indicated in minutes on the display window.When the remaining battery indicator changes tou, normal charge is completed. Tofully charge the battery (full charge), leave the battery pack attached for about one hourafter normal charge is completed until FULL appears on the display window. Fullycharging the battery allows you to use the battery longer than usual.
After charging the battery pack
Disconnect the AC Adaptor from the DC IN jack on your camcorder.
Note on the remaining battery time indicator
The remaining battery time indicator on the LCD screen/display window or in theviewfinder indicates the recording time using the viewfinder. The indicator may not becorrect, depending on the conditions in which you are recording. When you close theLCD panel and open it again, it takes about one minute for the correct remaining
battery time to be displayed.
Notes•Prevent metallic objects from coming into contact with the metal parts of the DC plug of
the AC Adaptor. This may cause a short-circuit, damaging the AC Adaptor.•Keep the battery pack dry.•When the battery pack is not to be used for a long time, charge the battery pack once
fully, and then use it until it fully discharges again. Keep the battery pack in a cool place.
POWER
O F F
( C H G )
C A ME R A
M E M O R Y
V C R
41
8/8/2019 276ba559b616f0752a9d1ab6240c7e96
http://slidepdf.com/reader/full/276ba559b616f0752a9d1ab6240c7e96 11/176
11
G
e t t i n g S t ar t e d
Step 1 Preparing the pow er supply
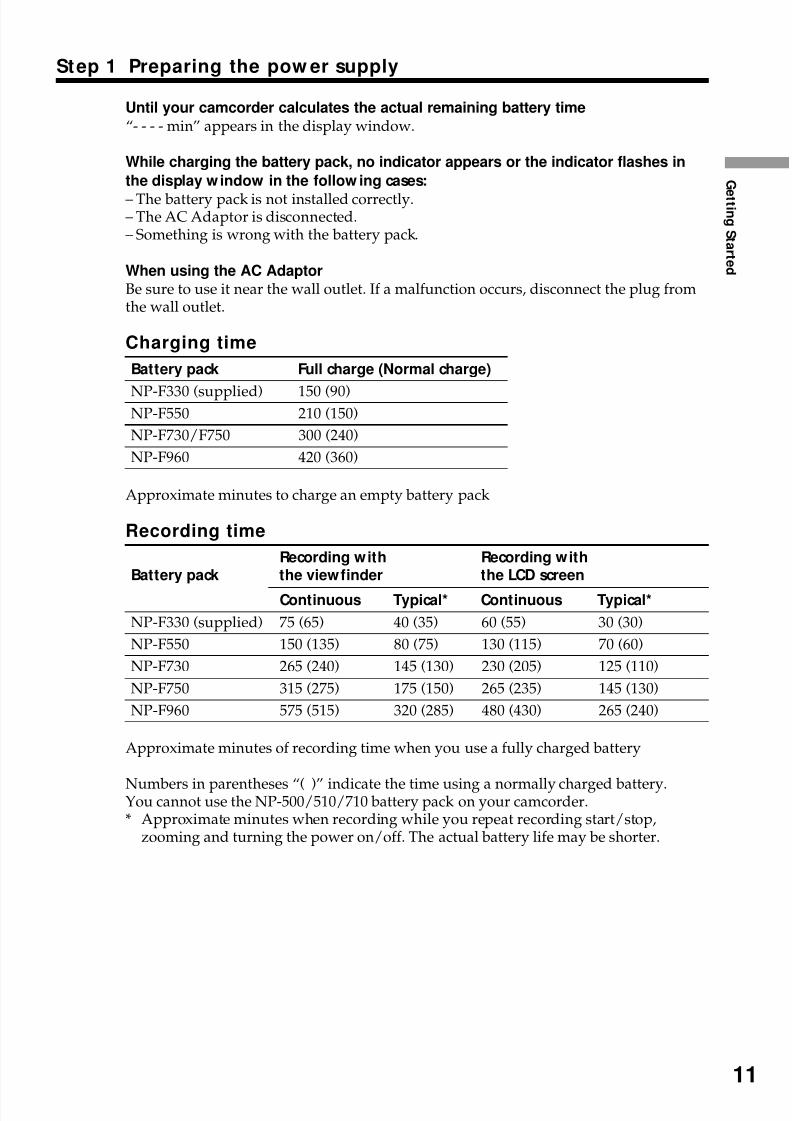
Until your camcorder calculates the actual remaining battery time
“- - - - min” appears in the display window.
While charging the battery pack, no indicator appears or the indicator flashes in
the display window in the follow ing cases:
– The battery pack is not installed correctly.– The AC Adaptor is disconnected.– Something is wrong with the battery pack.
When using the AC Adaptor
Be sure to use it near the wall outlet. If a malfunction occurs, disconnect the plug fromthe wall outlet.
Charging time
Battery pack Full charge (Normal charge)
NP-F330 (supplied) 150 (90)NP-F550 210 (150)
NP-F730/F750 300 (240)
NP-F960 420 (360)
Approximate minutes to charge an empty battery pack
Recording time
Recording with Recording withBattery pack the viewfinder the LCD screen
Continuous Typical* Continuous Typical*
NP-F330 (supplied) 75 (65) 40 (35) 60 (55) 30 (30)
NP-F550 150 (135) 80 (75) 130 (115) 70 (60)
NP-F730 265 (240) 145 (130) 230 (205) 125 (110)
NP-F750 315 (275) 175 (150) 265 (235) 145 (130)
NP-F960 575 (515) 320 (285) 480 (430) 265 (240)
Approximate minutes of recording time when you use a fully charged battery
Numbers in parentheses “( )” indicate the time using a normally charged battery.You cannot use the NP-500/510/710 battery pack on your camcorder.* Approximate minutes when recording while you repeat recording start/stop,
zooming and turning the power on/off. The actual battery life may be shorter.
8/8/2019 276ba559b616f0752a9d1ab6240c7e96
http://slidepdf.com/reader/full/276ba559b616f0752a9d1ab6240c7e96 12/176
12
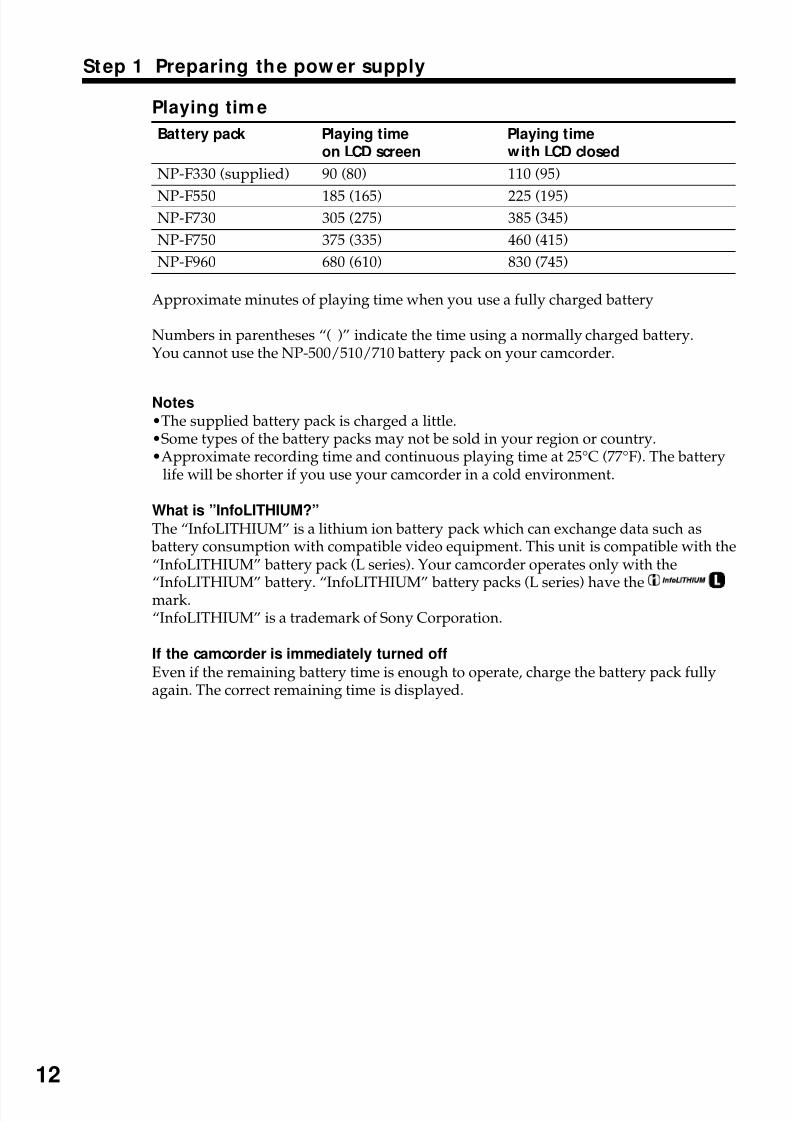
Playing tim e
Battery pack Playing time Playing timeon LCD screen with LCD closed
NP-F330 (supplied) 90 (80) 110 (95)
NP-F550 185 (165) 225 (195)NP-F730 305 (275) 385 (345)
NP-F750 375 (335) 460 (415)
NP-F960 680 (610) 830 (745)
Approximate minutes of playing time when you use a fully charged battery
Numbers in parentheses “( )” indicate the time using a normally charged battery.You cannot use the NP-500/510/710 battery pack on your camcorder.
Notes
•The supplied battery pack is charged a little.•Some types of the battery packs may not be sold in your region or country.•Approximate recording time and continuous playing time at 25°C (77°F). The battery
life will be shorter if you use your camcorder in a cold environment.
What is ”InfoLITHIUM?”
The “InfoLITHIUM” is a lithium ion battery pack which can exchange data such as battery consumption with compatible video equipment. This unit is compatible with the“InfoLITHIUM” battery pack (L series). Your camcorder operates only with the
“InfoLITHIUM” battery. “InfoLITHIUM” battery packs (L series) have themark.“InfoLITHIUM” is a trademark of Sony Corporation.
If the camcorder is immediately turned off
Even if the remaining battery time is enough to operate, charge the battery pack fullyagain. The correct remaining time is displayed.
Step 1 Preparing the pow er supply
8/8/2019 276ba559b616f0752a9d1ab6240c7e96
http://slidepdf.com/reader/full/276ba559b616f0752a9d1ab6240c7e96 13/176
13
G
e t t i n g S t ar t e d
Step 1 Preparing the pow er supply
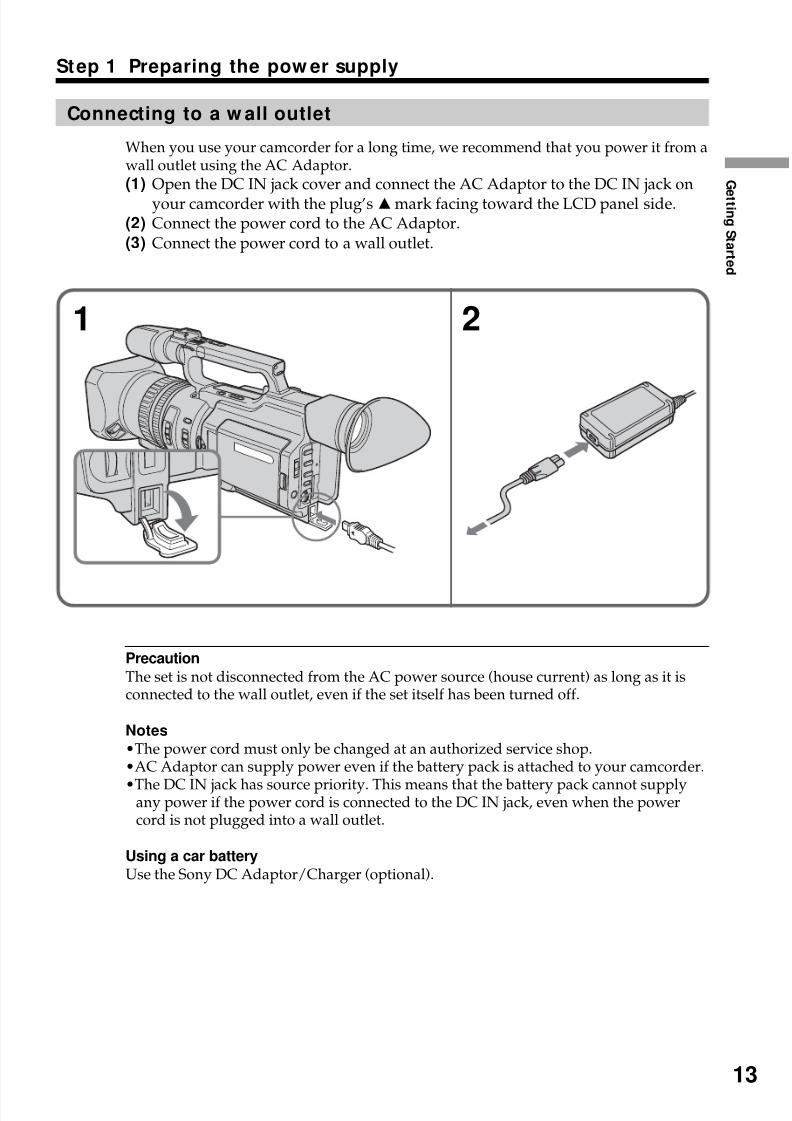
Connecting to a w all outlet
When you use your camcorder for a long time, we recommend that you power it from awall outlet using the AC Adaptor.(1) Open the DC IN jack cover and connect the AC Adaptor to the DC IN jack on
your camcorder with the plug’s vmark facing toward the LCD panel side.(2) Connect the power cord to the AC Adaptor.(3) Connect the power cord to a wall outlet.
Precaution
The set is not disconnected from the AC power source (house current) as long as it isconnected to the wall outlet, even if the set itself has been turned off.
Notes
•The power cord must only be changed at an authorized service shop.•AC Adaptor can supply power even if the battery pack is attached to your camcorder.
•The DC IN jack has source priority. This means that the battery pack cannot supplyany power if the power cord is connected to the DC IN jack, even when the powercord is not plugged into a wall outlet.
Using a car battery
Use the Sony DC Adaptor/Charger (optional).
1 2
8/8/2019 276ba559b616f0752a9d1ab6240c7e96
http://slidepdf.com/reader/full/276ba559b616f0752a9d1ab6240c7e96 14/176
14
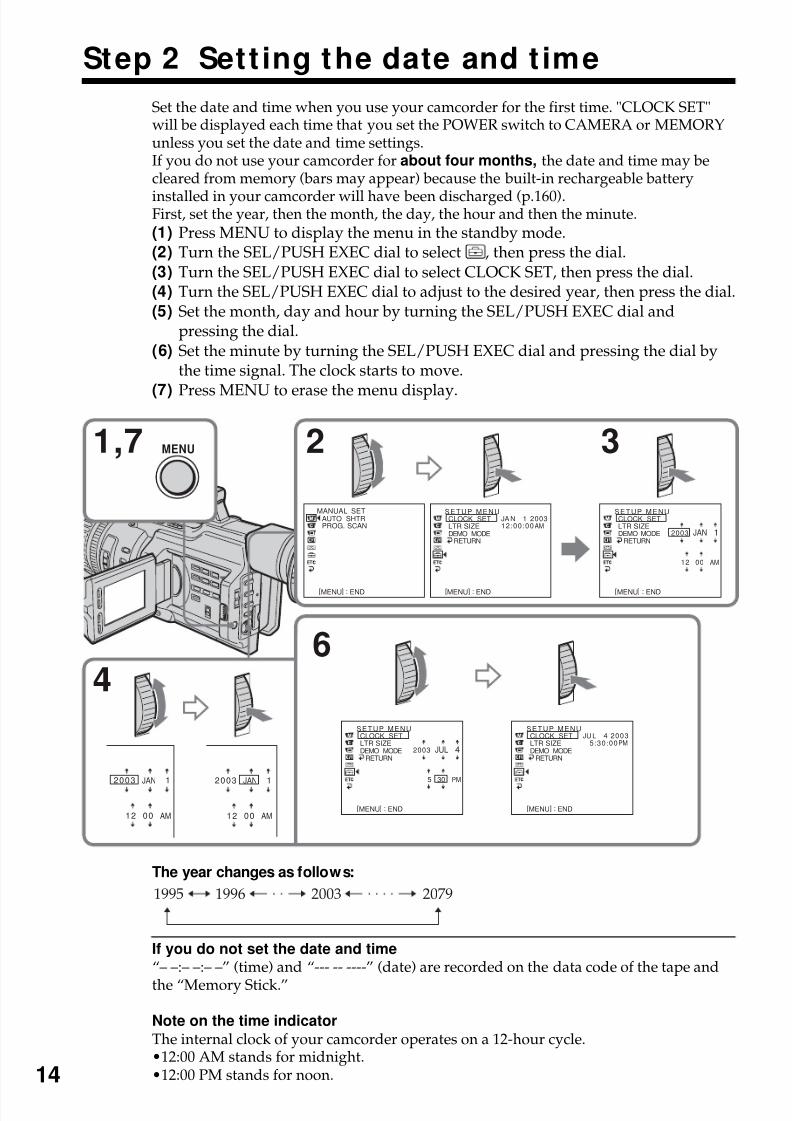
Step 2 Sett ing the date and t ime
Set the date and time when you use your camcorder for the first time. "CLOCK SET"will be displayed each time that you set the POWER switch to CAMERA or MEMORYunless you set the date and time settings.If you do not use your camcorder for about four months, the date and time may becleared from memory (bars may appear) because the built-in rechargeable battery
installed in your camcorder will have been discharged (p.160).First, set the year, then the month, the day, the hour and then the minute.(1) Press MENU to display the menu in the standby mode.(2) Turn the SEL/PUSH EXEC dial to select , then press the dial.(3) Turn the SEL/PUSH EXEC dial to select CLOCK SET, then press the dial.(4) Turn the SEL/PUSH EXEC dial to adjust to the desired year, then press the dial.(5) Set the month, day and hour by turning the SEL/PUSH EXEC dial and
pressing the dial.(6) Set the minute by turning the SEL/PUSH EXEC dial and pressing the dial by
the time signal. The clock starts to move.
(7) Press MENU to erase the menu display.
The year changes as follows:
If you do not set the date and time“– –:– –:– –” (time) and “--- -- ----” (date) are recorded on the data code of the tape and
the “Memory Stick.”
Note on the time indicator
The internal clock of your camcorder operates on a 12-hour cycle.•12:00 AM stands for midnight.•12:00 PM stands for noon.
SETUP MENUCLOCK SETLTR SIZEDEMO MODE
RETURN
2
4
MANUAL SETAUTO SHTRPROG. SCAN
1,7 3
SETUP MENUCLOCK SETLTR SIZEDEMO MODE
RETURN
6
SETUP MENUCLOCK SETLTR SIZEDEMO MODE
RETURN
SETUP MENUCLOCK SETLTR SIZEDEMO MODE
RETURN
JA N 1 200312:00:00AM
2003 JAN 1
12 00 AM
JU L 4 20035:30:00PM
2003 JUL 4
5 30 PM2003 JAN 1
12 00 AM
[MENU] : END [MENU] : END [MENU] : END
[MENU] : END [MENU] : END
MENU
2003 JAN 1
12 00 AM
1995 1996 20792003
8/8/2019 276ba559b616f0752a9d1ab6240c7e96
http://slidepdf.com/reader/full/276ba559b616f0752a9d1ab6240c7e96 15/176
15
G
e t t i n g S t ar t e d
Step 3 Insert ing a casset te
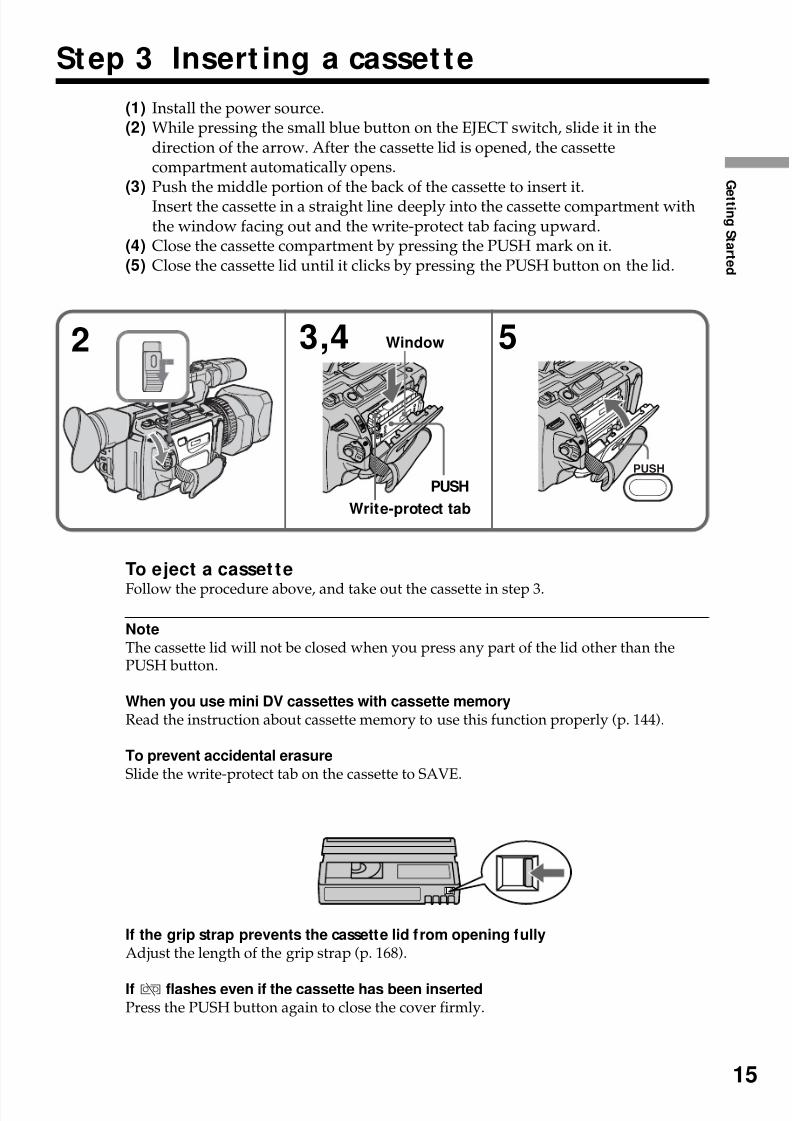
(1) Install the power source.(2) While pressing the small blue button on the EJECT switch, slide it in the
direction of the arrow. After the cassette lid is opened, the cassettecompartment automatically opens.
(3)Push the middle portion of the back of the cassette to insert it.Insert the cassette in a straight line deeply into the cassette compartment withthe window facing out and the write-protect tab facing upward.
(4) Close the cassette compartment by pressing the PUSH mark on it.(5) Close the cassette lid until it clicks by pressing the PUSH button on the lid.
To eject a casset te
Follow the procedure above, and take out the cassette in step 3.
Note
The cassette lid will not be closed when you press any part of the lid other than thePUSH button.
When you use mini DV cassettes with cassette memory
Read the instruction about cassette memory to use this function properly (p. 144).
To prevent accidental erasure
Slide the write-protect tab on the cassette to SAVE.
If the grip strap prevents the cassette lid from opening fully
Adjust the length of the grip strap (p. 168).
IfQ flashes even if the cassette has been inserted
Press the PUSH button again to close the cover firmly.
2
PUSH
Write-protect tab
Window3,4 5
PUSH
8/8/2019 276ba559b616f0752a9d1ab6240c7e96
http://slidepdf.com/reader/full/276ba559b616f0752a9d1ab6240c7e96 16/176
16
4 O P E N
1
3
ME M O R Y
C A ME R A
V CR
O F F
( CH G )
POWER5
240min REC 0:00:01POWER
O F F
( C H G )
C A ME R
A
M E M O R
Y
V C R
— Recording – Basics —
Recording a picture
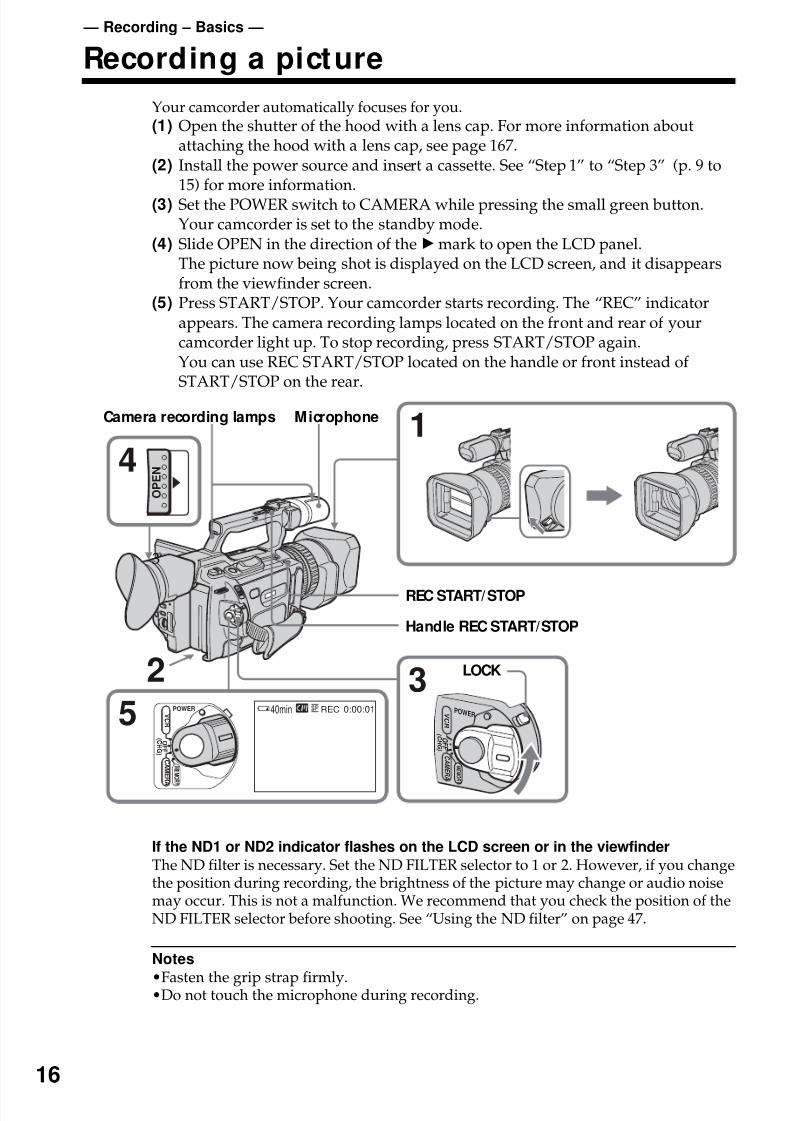
Your camcorder automatically focuses for you.(1) Open the shutter of the hood with a lens cap. For more information about
attaching the hood with a lens cap, see page 167.(2) Install the power source and insert a cassette. See “Step 1” to “Step 3” (p. 9 to
15) for more information.(3) Set the POWER switch to CAMERA while pressing the small green button.
Your camcorder is set to the standby mode.(4) Slide OPEN in the direction of the Bmark to open the LCD panel.
The picture now being shot is displayed on the LCD screen, and it disappearsfrom the viewfinder screen.
(5) Press START/STOP. Your camcorder starts recording. The “REC” indicatorappears. The camera recording lamps located on the front and rear of yourcamcorder light up. To stop recording, press START/STOP again.You can use REC START/STOP located on the handle or front instead of START/STOP on the rear.
3
If the ND1 or ND2 indicator flashes on the LCD screen or in the viewfinder
The ND filter is necessary. Set the ND FILTER selector to 1 or 2. However, if you changethe position during recording, the brightness of the picture may change or audio noisemay occur. This is not a malfunction. We recommend that you check the position of theND FILTER selector before shooting. See “Using the ND filter” on page 47.
Notes
•Fasten the grip strap firmly.•Do not touch the microphone during recording.
LOCK
Camera recording lamps Microphone
Handle REC START/STOP
REC START/STOP
8/8/2019 276ba559b616f0752a9d1ab6240c7e96
http://slidepdf.com/reader/full/276ba559b616f0752a9d1ab6240c7e96 17/176
R e c or d i n g–B a si c s
17
Recording a picture
Note on the recording mode
Your camcorder records and plays back in SP (standard play) mode and in LP (longplay) mode. Select SP or LP in the menu settings. In LP mode, you can record 1.5 timesas long as in SP mode.When you record a tape on your camcorder in LP mode, we recommend playing the
tape on your camcorder.
Note on the LOCK switch
When you slide the LOCK switch to the left, the POWER switch can no longer be set toMEMORY accidentally. The LOCK switch is set to the right as a default setting. Werecommend that you set the LOCK switch to the left when you record on a cassette.
Note on the progressive recording mode
If you intend to use the images on your PC or play the images back as still images, werecommend that you set PROG. SCAN to ON in the menu settings before shooting (p.34). The picture quality may improve in this mode, but if you shoot a moving subject,
the image may shake when it is played back.
To enable smooth transition
Transition between the last scene you recorded and the next scene is smooth as long asyou do not eject the cassette even if you turn off your camcorder. When you use a tapewith cassette memory, however, you can make the transition smooth even after ejectingthe cassette if you use the end search function (p. 26).However, check the following:•When you change the battery pack, set the POWER switch to OFF (CHG).•Do not mix recordings in the SP mode and ones in the LP mode on one tape.
Note on tape transitionThe playback picture may be distorted or the time code may not be written properly
between scenes when:•You change the recording mode (SP/LP).•You record in LP mode.
If you leave your camcorder in standby mode for five minutes while the cassette is
inserted
Your camcorder automatically turns off. This is to prevent tape wear and save batterypower. To resume the standby mode, set the POWER switch to OFF (CHG), and toCAMERA again. When a cassette is not inserted, your camcorder does not turn off.
8/8/2019 276ba559b616f0752a9d1ab6240c7e96
http://slidepdf.com/reader/full/276ba559b616f0752a9d1ab6240c7e96 18/176
18
Recording a picture
Adjusting the LCD screen
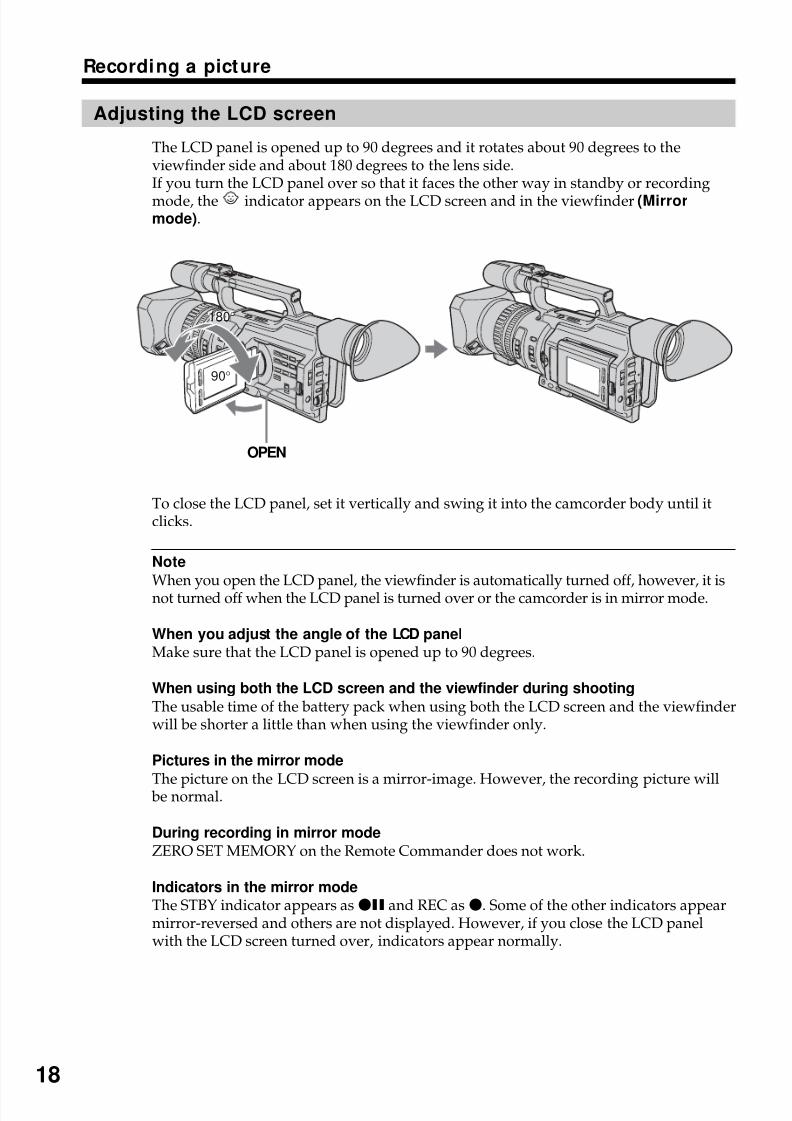
The LCD panel is opened up to 90 degrees and it rotates about 90 degrees to theviewfinder side and about 180 degrees to the lens side.If you turn the LCD panel over so that it faces the other way in standby or recording
mode, the indicator appears on the LCD screen and in the viewfinder (Mirrormode).
To close the LCD panel, set it vertically and swing it into the camcorder body until itclicks.
Note
When you open the LCD panel, the viewfinder is automatically turned off, however, it isnot turned off when the LCD panel is turned over or the camcorder is in mirror mode.
When you adjust the angle of the LCD panelMake sure that the LCD panel is opened up to 90 degrees.
When using both the LCD screen and the viewfinder during shooting
The usable time of the battery pack when using both the LCD screen and the viewfinderwill be shorter a little than when using the viewfinder only.
Pictures in the mirror mode
The picture on the LCD screen is a mirror-image. However, the recording picture will be normal.
During recording in mirror mode
ZERO SET MEMORY on the Remote Commander does not work.
Indicators in the mirror modeThe STBY indicator appears as zX and REC as z. Some of the other indicators appearmirror-reversed and others are not displayed. However, if you close the LCD panelwith the LCD screen turned over, indicators appear normally.
18080°
90°
180°
OPEN
8/8/2019 276ba559b616f0752a9d1ab6240c7e96
http://slidepdf.com/reader/full/276ba559b616f0752a9d1ab6240c7e96 19/176
R e c or d i n g–B a si c s
19
L C D B R I G H T
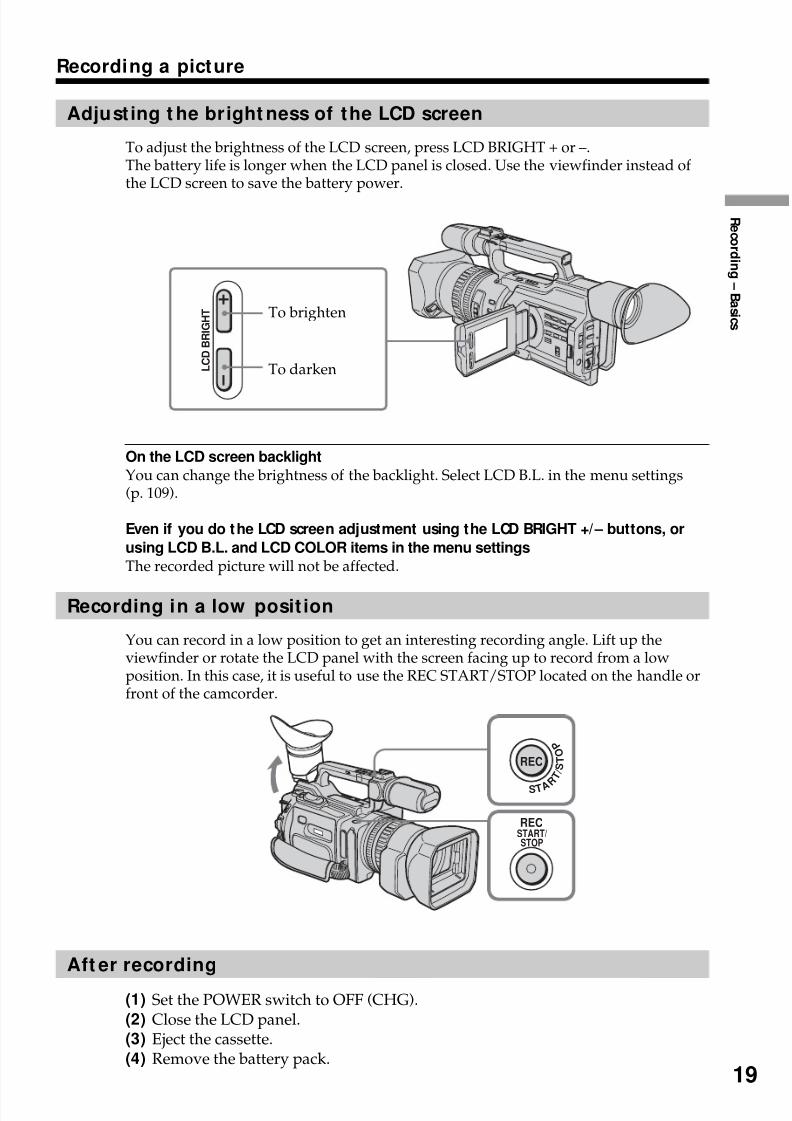
Adjust ing t he bright ness of the LCD screen
To adjust the brightness of the LCD screen, press LCD BRIGHT + or –.The battery life is longer when the LCD panel is closed. Use the viewfinder instead of the LCD screen to save the battery power.
On the LCD screen backlight
You can change the brightness of the backlight. Select LCD B.L. in the menu settings(p. 109).
Even if you do the LCD screen adjustment using the LCD BRIGHT +/– buttons, or
using LCD B.L. and LCD COLOR items in the menu settings
The recorded picture will not be affected.
Recording in a low posit ion
You can record in a low position to get an interesting recording angle. Lift up theviewfinder or rotate the LCD panel with the screen facing up to record from a lowposition. In this case, it is useful to use the REC START/STOP located on the handle orfront of the camcorder.
Aft er recording
(1) Set the POWER switch to OFF (CHG).(2) Close the LCD panel.(3) Eject the cassette.(4) Remove the battery pack.
Recording a picture
RECSTART/STOP
S T A R T
/ S T O P
REC
To brighten
To darken
8/8/2019 276ba559b616f0752a9d1ab6240c7e96
http://slidepdf.com/reader/full/276ba559b616f0752a9d1ab6240c7e96 20/176
20
Recording a picture
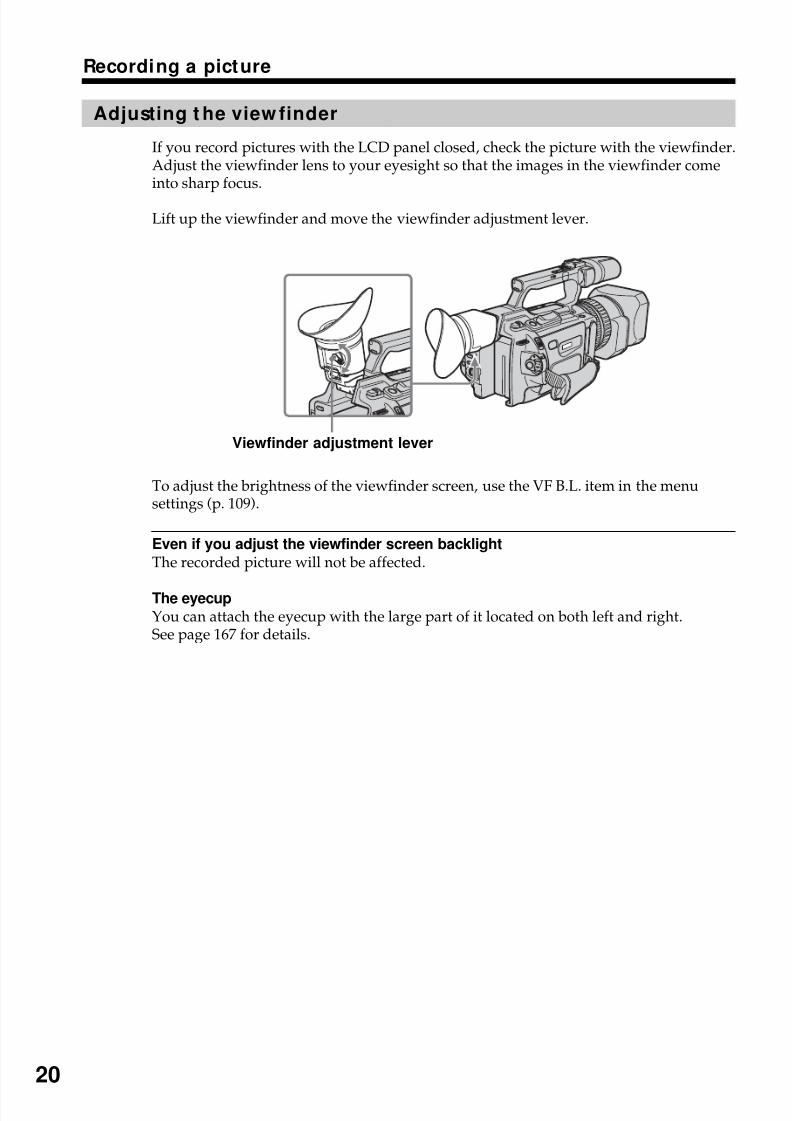
Adjusting t he view finder
If you record pictures with the LCD panel closed, check the picture with the viewfinder.Adjust the viewfinder lens to your eyesight so that the images in the viewfinder comeinto sharp focus.
Lift up the viewfinder and move the viewfinder adjustment lever.
To adjust the brightness of the viewfinder screen, use the VF B.L. item in the menusettings (p. 109).
Even if you adjust the viewfinder screen backlight
The recorded picture will not be affected.
The eyecup
You can attach the eyecup with the large part of it located on both left and right.See page 167 for details.
Viewfinder adjustment lever
8/8/2019 276ba559b616f0752a9d1ab6240c7e96
http://slidepdf.com/reader/full/276ba559b616f0752a9d1ab6240c7e96 21/176
R e c or d i n g–B a si c s
21
W
T
TW
TW
Recording a picture
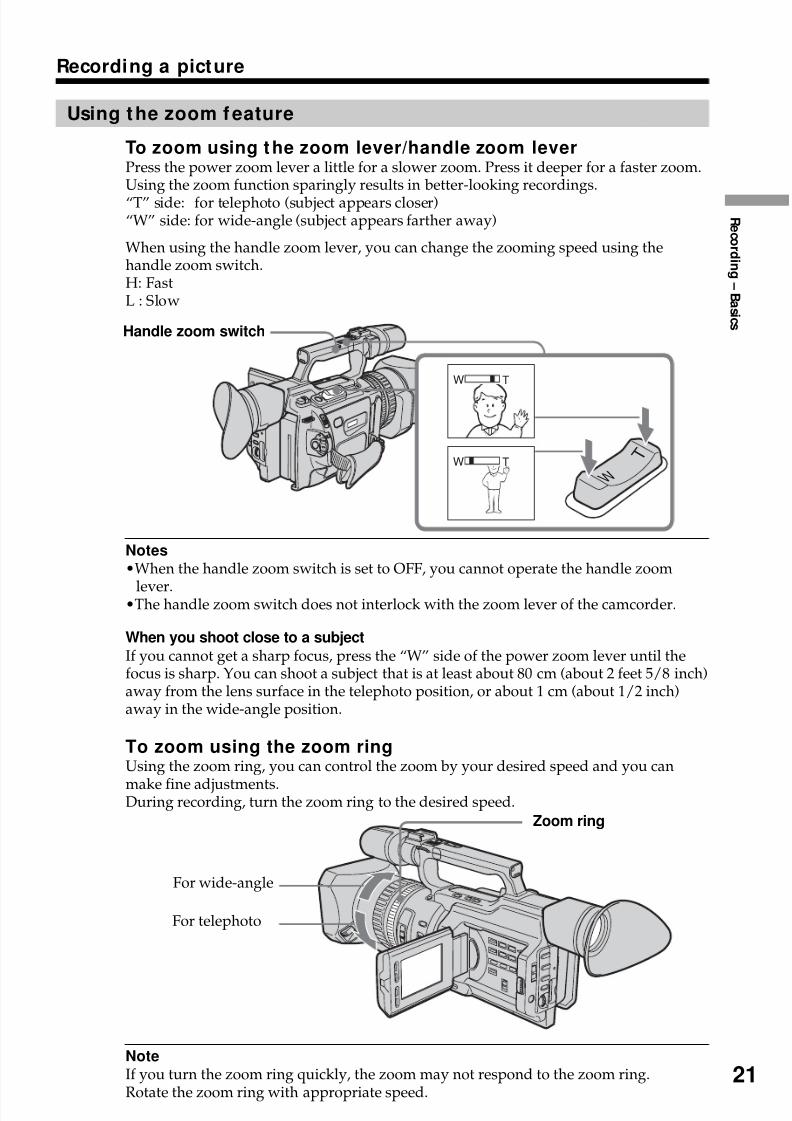
Using the zoom f eature
To zoom using the zoom lever/handle zoom leverPress the power zoom lever a little for a slower zoom. Press it deeper for a faster zoom.Using the zoom function sparingly results in better-looking recordings.“T” side: for telephoto (subject appears closer)“W” side: for wide-angle (subject appears farther away)
When using the handle zoom lever, you can change the zooming speed using thehandle zoom switch.H: FastL : Slow
Notes•When the handle zoom switch is set to OFF, you cannot operate the handle zoom
lever.•The handle zoom switch does not interlock with the zoom lever of the camcorder.
When you shoot close to a subject
If you cannot get a sharp focus, press the “W” side of the power zoom lever until thefocus is sharp. You can shoot a subject that is at least about 80 cm (about 2 feet 5/8 inch)away from the lens surface in the telephoto position, or about 1 cm (about 1/2 inch)away in the wide-angle position.
To zoom using the zoom ringUsing the zoom ring, you can control the zoom by your desired speed and you can
make fine adjustments.During recording, turn the zoom ring to the desired speed.
NoteIf you turn the zoom ring quickly, the zoom may not respond to the zoom ring.Rotate the zoom ring with appropriate speed.
Zoom ring
For telephoto
For wide-angle
Handle zoom switch
8/8/2019 276ba559b616f0752a9d1ab6240c7e96
http://slidepdf.com/reader/full/276ba559b616f0752a9d1ab6240c7e96 22/176
22
Recording a picture
Using the disital zoom – Zoom great er than 12×
Zoom greater than 12× is performed digitally, if you set D ZOOM to 24× or 48× in themenu settings. The digital zoom function is set to OFF as a default setting (p. 109). If you use the digital zoom function, the picture quality deteriorates.
You cannot use the digital zoom:
– When you set PROG. SCAN to ON in the menu settings (p. 109).– When the POWER switch is set to MEMORY.
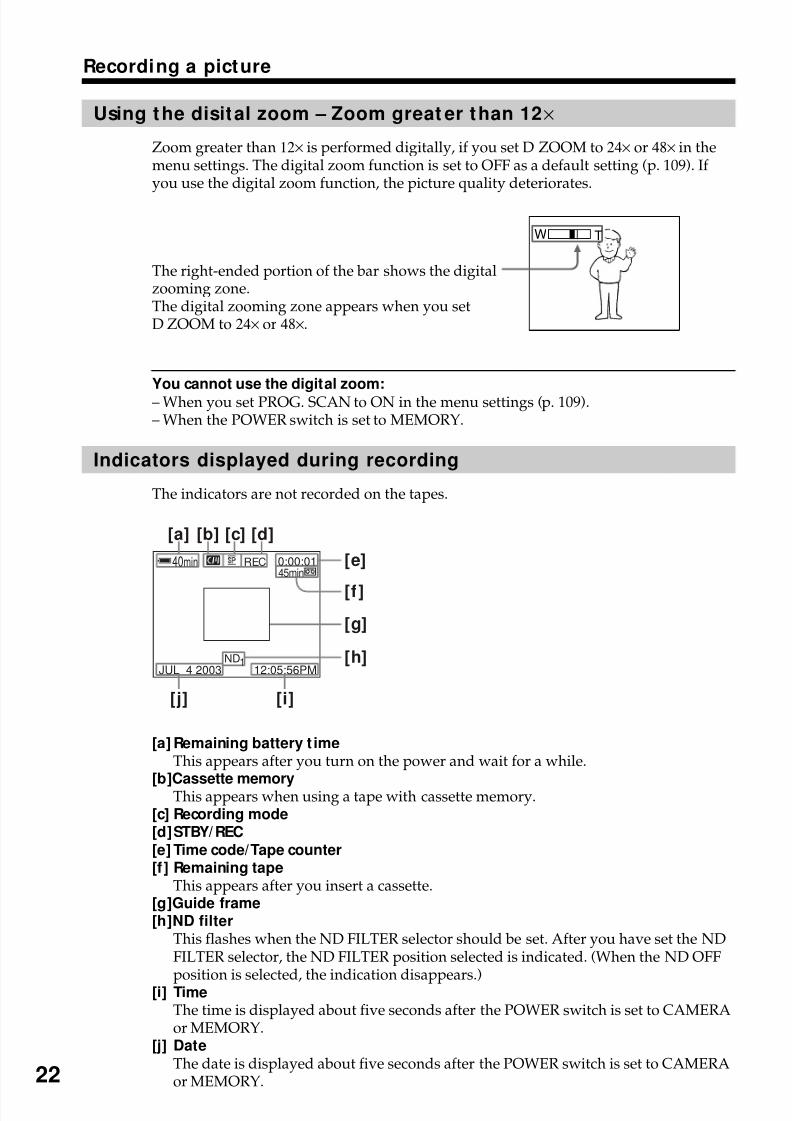
Indicators displayed during recording
The indicators are not recorded on the tapes.
[a] Remaining battery t imeThis appears after you turn on the power and wait for a while.
[b]Cassette memoryThis appears when using a tape with cassette memory.[c] Recording mode[d]STBY/ REC[e] Time code/Tape counter[f ] Remaining tape
This appears after you insert a cassette.[g]Guide frame[h]ND filter
This flashes when the ND FILTER selector should be set. After you have set the NDFILTER selector, the ND FILTER position selected is indicated. (When the ND OFF
position is selected, the indication disappears.)[i] TimeThe time is displayed about five seconds after the POWER switch is set to CAMERAor MEMORY.
[j] DateThe date is displayed about five seconds after the POWER switch is set to CAMERAor MEMORY.
0:00:01
12:05:56PM
45min40min REC
[a] [b] [c] [d]
[j] [i]
[h]
[f ]
[e]
ND1JUL 4 2003
[g]
TW
The right-ended portion of the bar shows the digitalzooming zone.The digital zooming zone appears when you setD ZOOM to 24× or 48×.
8/8/2019 276ba559b616f0752a9d1ab6240c7e96
http://slidepdf.com/reader/full/276ba559b616f0752a9d1ab6240c7e96 23/176
R e c or d i n g–B a si c s
23
Recording a picture
Time code
The time code indicates the recording or playback time, “0:00:00” (hours : minutes :seconds) in CAMERA mode and “0:00:00:00” (hours : minutes : seconds : frames) inVCR mode. You cannot rewrite only the time code. Your camcorder uses the dropframe mode.
Remaining tape indicator
The indicator may not be displayed accurately depending on the tape.
Note on recording date/timeRecording date/time is not displayed during shooting, however, it is automaticallyrecorded on the tape. You can check the recording date/time during playback bypressing DATA CODE.
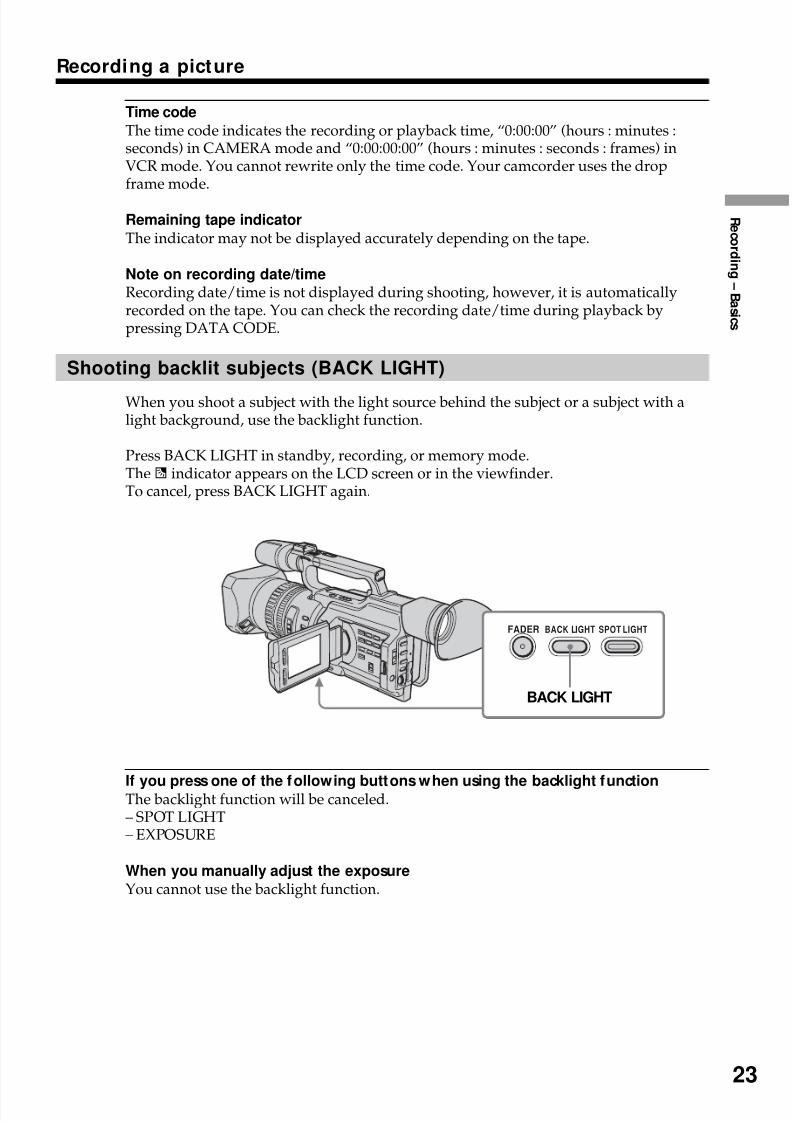
Shooting backlit subjects (BACK LIGHT)
When you shoot a subject with the light source behind the subject or a subject with alight background, use the backlight function.
Press BACK LIGHT in standby, recording, or memory mode.The. indicator appears on the LCD screen or in the viewfinder.To cancel, press BACK LIGHT again.
If you press one of the following buttons when using the backlight functionThe backlight function will be canceled.– SPOT LIGHT– EXPOSURE
When you manually adjust the exposure
You cannot use the backlight function.
FADER BACK LIGHT SPOT LIGHT
BACK LIGHT

8/8/2019 276ba559b616f0752a9d1ab6240c7e96
http://slidepdf.com/reader/full/276ba559b616f0752a9d1ab6240c7e96 24/176
24
Recording a picture
Using the spot light funct ion
This function prevents people’s faces, for example, from appearing excessively whitewhen shooting subjects lit by strong light, such as in the theater.
Press SPOT LIGHT in standby, recording, or memory mode.The indicator appears on the LCD screen or in the viewfinder.To cancel, press SPOT LIGHT again.
If you press one of the following buttons when using the spot light function
The spot light function will be canceled.– BACK LIGHT– EXPOSURE
When you manually adjust the exposure
You cannot use the spot light function.
You cannot use the spot light mode while in the following settings:
– Shutter speed value of 1/30 or smaller– Old movie– Low lux mode of the PROGRAM AE function
FADER BACK LIGHT SPOT LIGHT
SPOT LIGHT
8/8/2019 276ba559b616f0752a9d1ab6240c7e96
http://slidepdf.com/reader/full/276ba559b616f0752a9d1ab6240c7e96 25/176
R e c or d i n g–B a si c s
25
Recording a picture
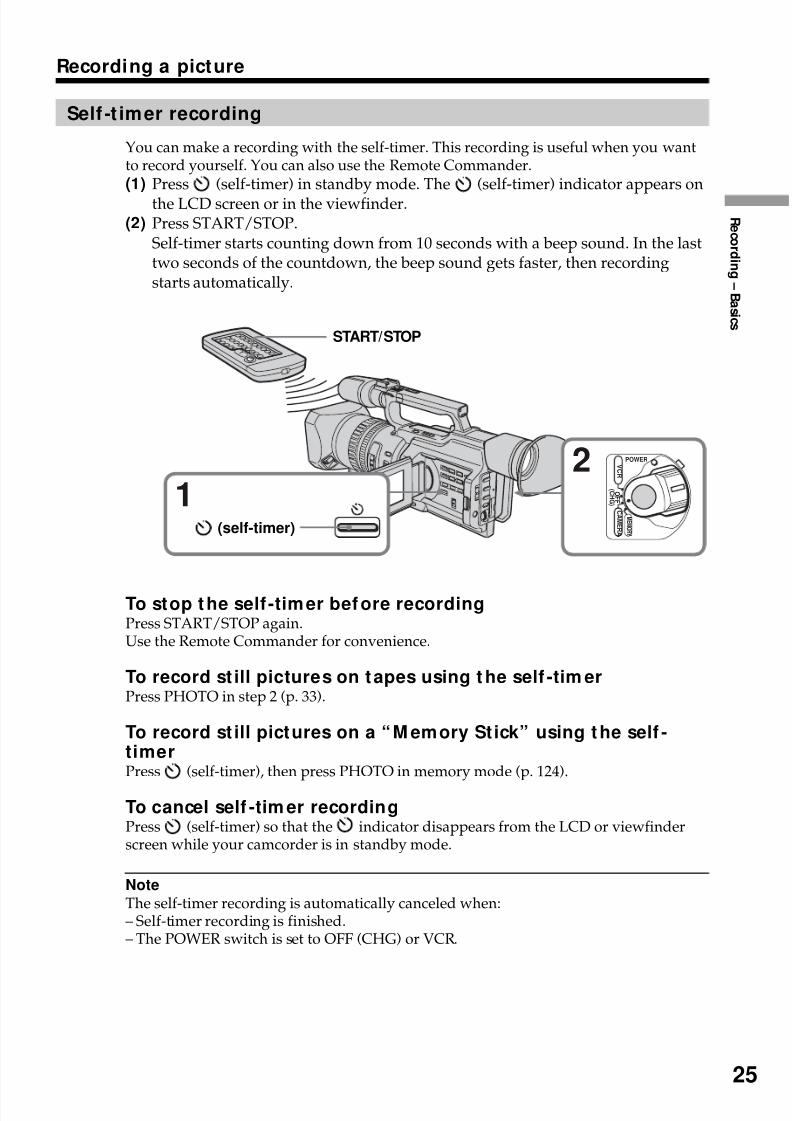
Self -t imer recording
You can make a recording with the self-timer. This recording is useful when you wantto record yourself. You can also use the Remote Commander.(1) Press (self-timer) in standby mode. The (self-timer) indicator appears on
the LCD screen or in the viewfinder.(2) Press START/STOP.
Self-timer starts counting down from 10 seconds with a beep sound. In the lasttwo seconds of the countdown, the beep sound gets faster, then recordingstarts automatically.
To stop the self -timer before recordingPress START/STOP again.Use the Remote Commander for convenience.
To record st ill pictures on tapes using t he self -tim erPress PHOTO in step 2 (p. 33).
To record st ill pictures on a “M emory Stick” using the self -timerPress (self-timer), then press PHOTO in memory mode (p. 124).
To cancel self -tim er recordingPress (self-timer) so that the indicator disappears from the LCD or viewfinderscreen while your camcorder is in standby mode.
Note
The self-timer recording is automatically canceled when:– Self-timer recording is finished.– The POWER switch is set to OFF (CHG) or VCR.
POWER
O F F
( C H G )
C A ME R A
M E M O R Y
V C R
12
(self-timer)
START/STOP
8/8/2019 276ba559b616f0752a9d1ab6240c7e96
http://slidepdf.com/reader/full/276ba559b616f0752a9d1ab6240c7e96 26/176
26
END SEARCH
EDITSEARCH
Checking the recording – END SEARCH / EDITSEARCH / Rec Review
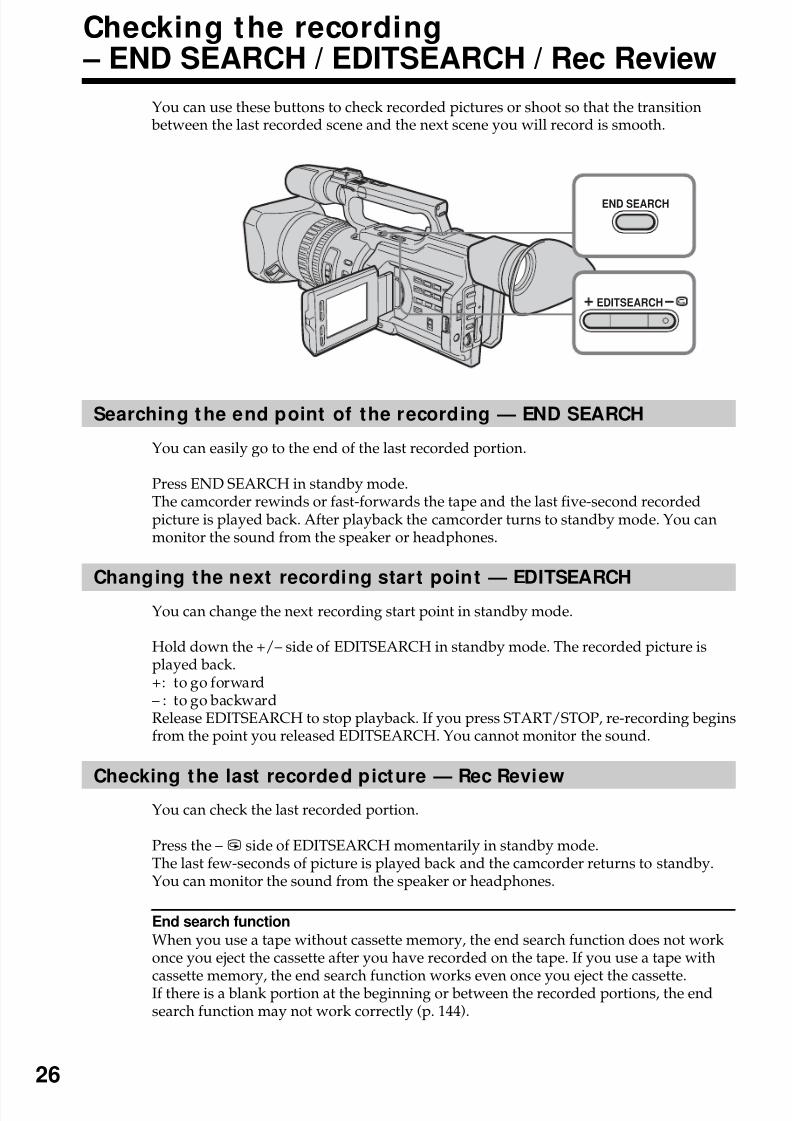
You can use these buttons to check recorded pictures or shoot so that the transition between the last recorded scene and the next scene you will record is smooth.
Searching the end point of the recording — END SEARCH
You can easily go to the end of the last recorded portion.
Press END SEARCH in standby mode.The camcorder rewinds or fast-forwards the tape and the last five-second recordedpicture is played back. After playback the camcorder turns to standby mode. You canmonitor the sound from the speaker or headphones.
Changing the next recording start point — EDITSEARCH
You can change the next recording start point in standby mode.
Hold down the +/– side of EDITSEARCH in standby mode. The recorded picture isplayed back.+: to go forward– : to go backwardRelease EDITSEARCH to stop playback. If you press START/STOP, re-recording beginsfrom the point you released EDITSEARCH. You cannot monitor the sound.
Checking the last recorded picture — Rec ReviewYou can check the last recorded portion.
Press the – 7 side of EDITSEARCH momentarily in standby mode.The last few-seconds of picture is played back and the camcorder returns to standby.You can monitor the sound from the speaker or headphones.
End search function
When you use a tape without cassette memory, the end search function does not workonce you eject the cassette after you have recorded on the tape. If you use a tape with
cassette memory, the end search function works even once you eject the cassette.If there is a blank portion at the beginning or between the recorded portions, the endsearch function may not work correctly (p. 144).

8/8/2019 276ba559b616f0752a9d1ab6240c7e96
http://slidepdf.com/reader/full/276ba559b616f0752a9d1ab6240c7e96 27/176
27
P l a y b a ck –B a si c s
— Playback – Basics —
Playing back a tape
You can monitor the playback picture on the LCD screen. If you close the LCD panel,you can monitor the playback picture in the viewfinder. You can also control playbackusing the Remote Commander supplied with your camcorder.(1) Install the power source and insert the recorded tape.(2) Set the POWER switch to VCR while pressing the small green button. The
video control buttons light up.(3) Slide OPEN in the direction of the Bmark to open the LCD panel.(4) Pressm to rewind the tape.(5) PressN to start playback.(6) To adjust the volume, press either of the VOLUME +/– buttons .
To stop playbackPressx.
4
2
6
13
V O L U M E
5
POWER
O F F
( C H G )
C
A ME R A
M E M O R Y
V C R
PLAYREW
8/8/2019 276ba559b616f0752a9d1ab6240c7e96
http://slidepdf.com/reader/full/276ba559b616f0752a9d1ab6240c7e96 28/176
28
Playing back a tape
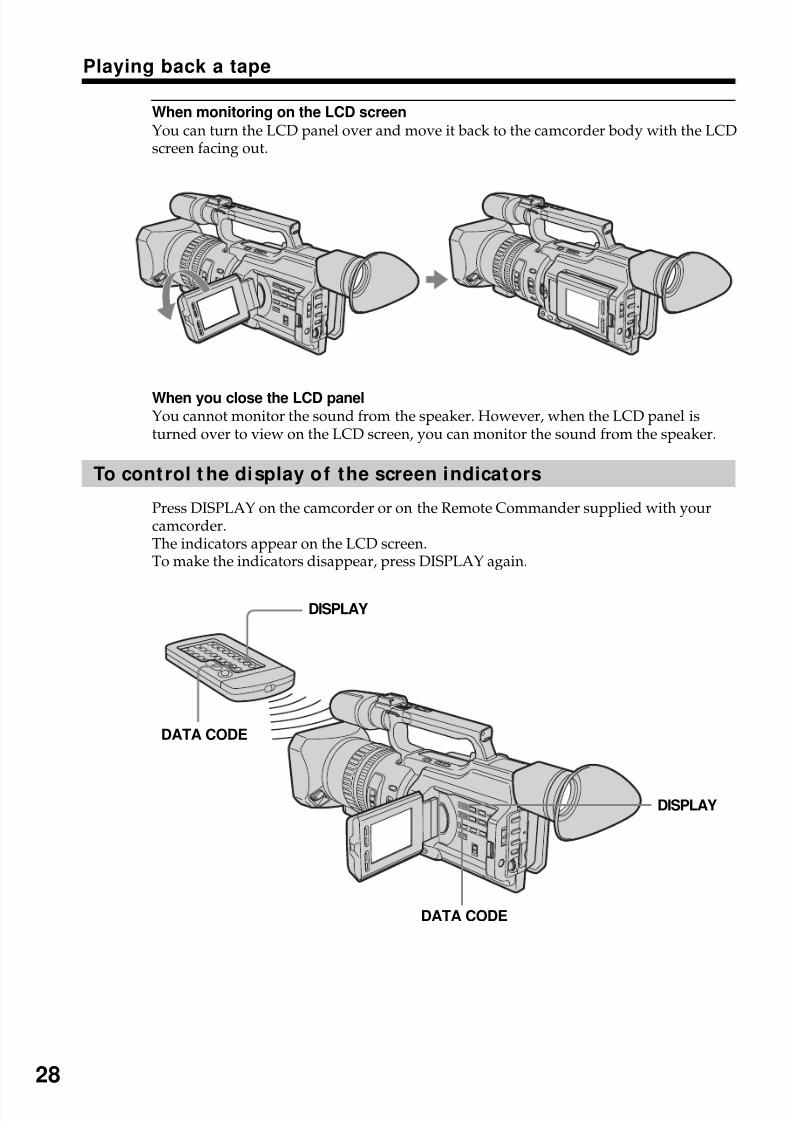
When monitoring on the LCD screen
You can turn the LCD panel over and move it back to the camcorder body with the LCDscreen facing out.
When you close the LCD panelYou cannot monitor the sound from the speaker. However, when the LCD panel isturned over to view on the LCD screen, you can monitor the sound from the speaker.
To control t he display of the screen indicators
Press DISPLAY on the camcorder or on the Remote Commander supplied with yourcamcorder.The indicators appear on the LCD screen.To make the indicators disappear, press DISPLAY again.
DATA CODE
DISPLAY
DATA CODE
DISPLAY
8/8/2019 276ba559b616f0752a9d1ab6240c7e96
http://slidepdf.com/reader/full/276ba559b616f0752a9d1ab6240c7e96 29/176
29
P l a y b a ck –B a si c s
Playing back a tape
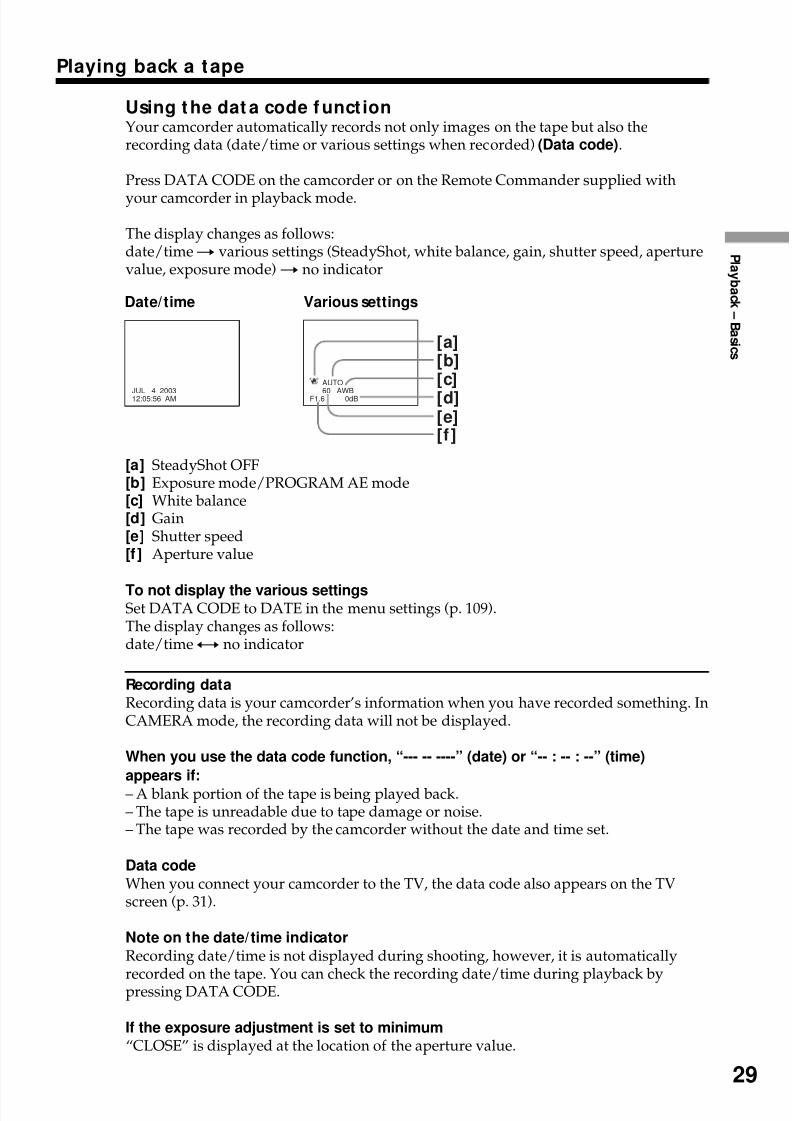
Using the dat a code f unct ionYour camcorder automatically records not only images on the tape but also therecording data (date/time or various settings when recorded) (Data code).
Press DATA CODE on the camcorder or on the Remote Commander supplied with
your camcorder in playback mode.
The display changes as follows:date/timet various settings (SteadyShot, white balance, gain, shutter speed, aperturevalue, exposure mode)t no indicator
[a] SteadyShot OFF[b] Exposure mode/PROGRAM AE mode[c] White balance[d] Gain[e] Shutter speed[f ] Aperture value
To not display the various settingsSet DATA CODE to DATE in the menu settings (p. 109).The display changes as follows:date/timey no indicator
Recording dataRecording data is your camcorder’s information when you have recorded something. InCAMERA mode, the recording data will not be displayed.
When you use the data code function, “--- -- ----” (date) or “-- : -- : --” (time)
appears if:
– A blank portion of the tape is being played back.– The tape is unreadable due to tape damage or noise.– The tape was recorded by the camcorder without the date and time set.
Data code
When you connect your camcorder to the TV, the data code also appears on the TVscreen (p. 31).
Note on the date/time indicator
Recording date/time is not displayed during shooting, however, it is automatically
recorded on the tape. You can check the recording date/time during playback bypressing DATA CODE.
If the exposure adjustment is set to minimum“CLOSE” is displayed at the location of the aperture value.
Date/time Various settings
JUL 4 200312:05:56 AM 60 AWBF1.6 0dB
AUTO
[a][b][c]
[d][e][f ]
8/8/2019 276ba559b616f0752a9d1ab6240c7e96
http://slidepdf.com/reader/full/276ba559b616f0752a9d1ab6240c7e96 30/176
30
Playing back a tape
Various playback modes
To operate video control buttons, set the POWER switch to VCR.
To view a st ill picture (playback pause)
PressX
during playback. To resume normal playback, pressN
orX
.To advance the tapePressM in stop mode. To resume normal playback, pressN.
To rew ind the tapePressm in stop mode. To resume normal playback, pressN.
To change the playback directionPress on the Remote Commander during playback to reverse the playback direction.To resume normal playback, pressN.
To locate a scene m onit oring the picture (picture search)
Keep pressingm orM during playback. To resume normal playback, release the button.
To monitor the picture at high-speed w hile advancing orrew inding the tape (skip scan)Keep pressingmwhile rewinding orMwhile advancing the tape. To resumerewinding or advancing, release the button.
To view the picture at slow speed (slow playback)Pressy during playback. For slow playback in the reverse direction, press on theRemote Commander, then pressy. To resume normal playback, pressN.
To view the picture at double speed
Press ×2 on the Remote Commander during playback. For double speed playback in thereverse direction, press , then press ×2 on the Remote Commander. To resumenormal playback, pressN.
To view the picture f rame-by-fram ePressC on the Remote Commander in playback pause mode. For frame-by-frameplayback in the reverse direction, pressc. To resume normal playback, pressN.
To search t he last scene recorded (END SEARCH)Press END SEARCH in stop mode. The last five seconds of the recorded portion plays
back and stops.
In various playback modes•Sound is muted.•The previous picture may remain as a mosaic image during playback.
When the playback pause mode lasts for five minutesYour camcorder automatically enters the stop mode. To resume playback, pressN.
Slow playbackSlow playback can be performed smoothly on your camcorder, however, this functiondoes not work for a signal output through the DV Interface.
When you play back a tape in reverse
Horizontal noise may appear at the center, or the top and bottom of the screen. This isnot a malfunction.
If you insert the cassette recorded in a PAL system
The camcorder automatically identify the system, and playback starts. You can onlyview the picture on your camcorder. (Quasi PAL playback)
8/8/2019 276ba559b616f0752a9d1ab6240c7e96
http://slidepdf.com/reader/full/276ba559b616f0752a9d1ab6240c7e96 31/176
31
P l a y b a ck –B a si c s
S VIDEO
VIDEO
AUDIO
IN
AUDIOL/R
View ing the recording on TV
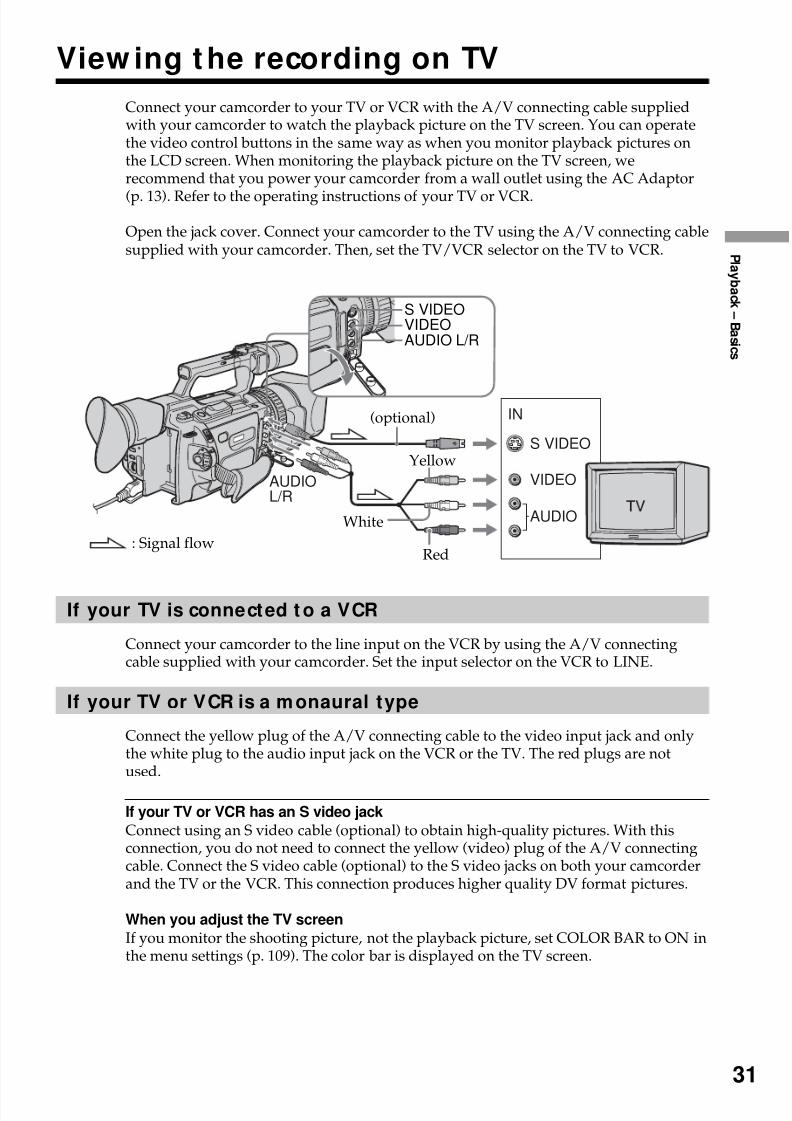
Connect your camcorder to your TV or VCR with the A/V connecting cable suppliedwith your camcorder to watch the playback picture on the TV screen. You can operatethe video control buttons in the same way as when you monitor playback pictures onthe LCD screen. When monitoring the playback picture on the TV screen, werecommend that you power your camcorder from a wall outlet using the AC Adaptor
(p. 13). Refer to the operating instructions of your TV or VCR.
Open the jack cover. Connect your camcorder to the TV using the A/V connecting cablesupplied with your camcorder. Then, set the TV/VCR selector on the TV to VCR.
If your TV is connected t o a VCR
Connect your camcorder to the line input on the VCR by using the A/V connectingcable supplied with your camcorder. Set the input selector on the VCR to LINE.
If your TV or VCR is a monaural type
Connect the yellow plug of the A/V connecting cable to the video input jack and onlythe white plug to the audio input jack on the VCR or the TV. The red plugs are notused.
If your TV or VCR has an S video jack
Connect using an S video cable (optional) to obtain high-quality pictures. With thisconnection, you do not need to connect the yellow (video) plug of the A/V connectingcable. Connect the S video cable (optional) to the S video jacks on both your camcorderand the TV or the VCR. This connection produces higher quality DV format pictures.
When you adjust the TV screen
If you monitor the shooting picture, not the playback picture, set COLOR BAR to ON inthe menu settings (p. 109). The color bar is displayed on the TV screen.
: Signal flow
White
Red
Yellow
(optional)
S VIDEOVIDEOAUDIO L/R
8/8/2019 276ba559b616f0752a9d1ab6240c7e96
http://slidepdf.com/reader/full/276ba559b616f0752a9d1ab6240c7e96 32/176
32
— Advanced Recording Operat ions —
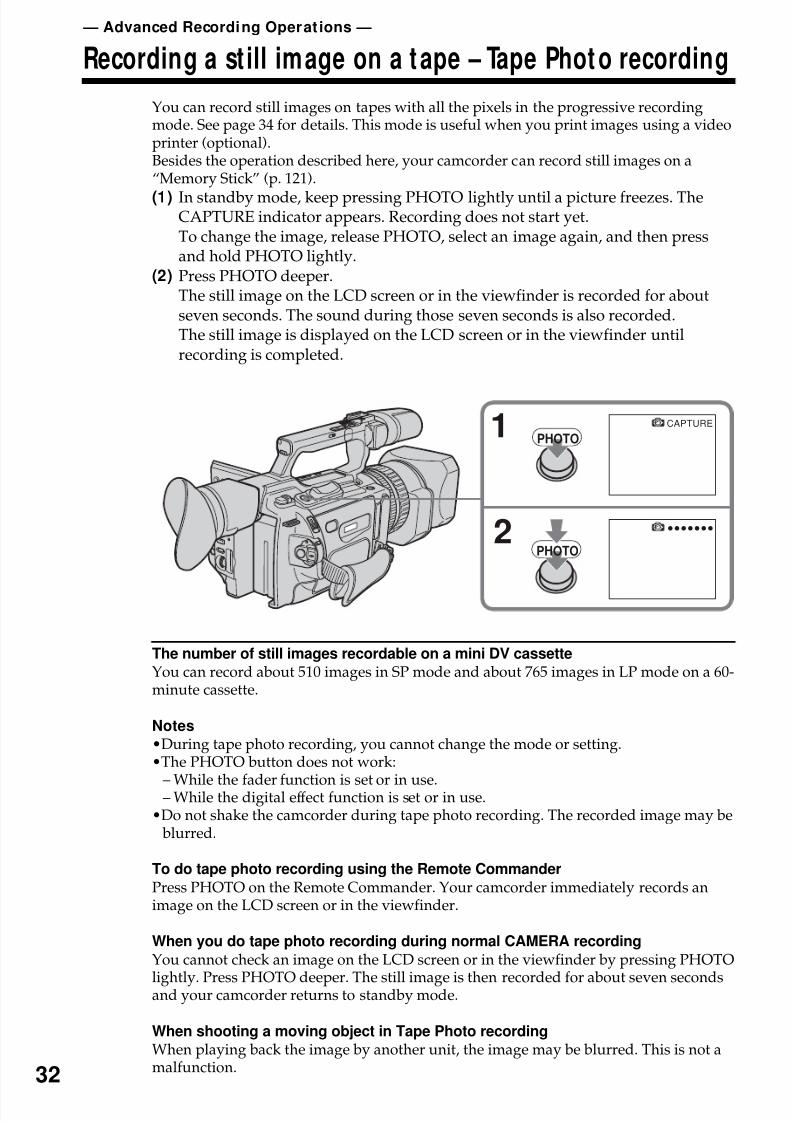
Recording a st ill image on a t ape – Tape Phot o recording
You can record still images on tapes with all the pixels in the progressive recordingmode. See page 34 for details. This mode is useful when you print images using a videoprinter (optional).Besides the operation described here, your camcorder can record still images on a“Memory Stick” (p. 121).
(1) In standby mode, keep pressing PHOTO lightly until a picture freezes. TheCAPTURE indicator appears. Recording does not start yet.To change the image, release PHOTO, select an image again, and then pressand hold PHOTO lightly.
(2) Press PHOTO deeper.The still image on the LCD screen or in the viewfinder is recorded for aboutseven seconds. The sound during those seven seconds is also recorded.The still image is displayed on the LCD screen or in the viewfinder untilrecording is completed.
The number of still images recordable on a mini DV cassette
You can record about 510 images in SP mode and about 765 images in LP mode on a 60-minute cassette.
Notes
•During tape photo recording, you cannot change the mode or setting.•The PHOTO button does not work:
– While the fader function is set or in use.– While the digital effect function is set or in use.•Do not shake the camcorder during tape photo recording. The recorded image may be blurred.
To do tape photo recording using the Remote Commander
Press PHOTO on the Remote Commander. Your camcorder immediately records animage on the LCD screen or in the viewfinder.
When you do tape photo recording during normal CAMERA recording
You cannot check an image on the LCD screen or in the viewfinder by pressing PHOTO
lightly. Press PHOTO deeper. The still image is then recorded for about seven secondsand your camcorder returns to standby mode.
When shooting a moving object in Tape Photo recording
When playing back the image by another unit, the image may be blurred. This is not amalfunction.
1
•••••••2
CAPTURE
PHOTO
PHOTO
8/8/2019 276ba559b616f0752a9d1ab6240c7e96
http://slidepdf.com/reader/full/276ba559b616f0752a9d1ab6240c7e96 33/176
33
A d v an c e d R e c o
r d i n g O p er a t i on s
Recording a still image on a tape – Tape Photo recording
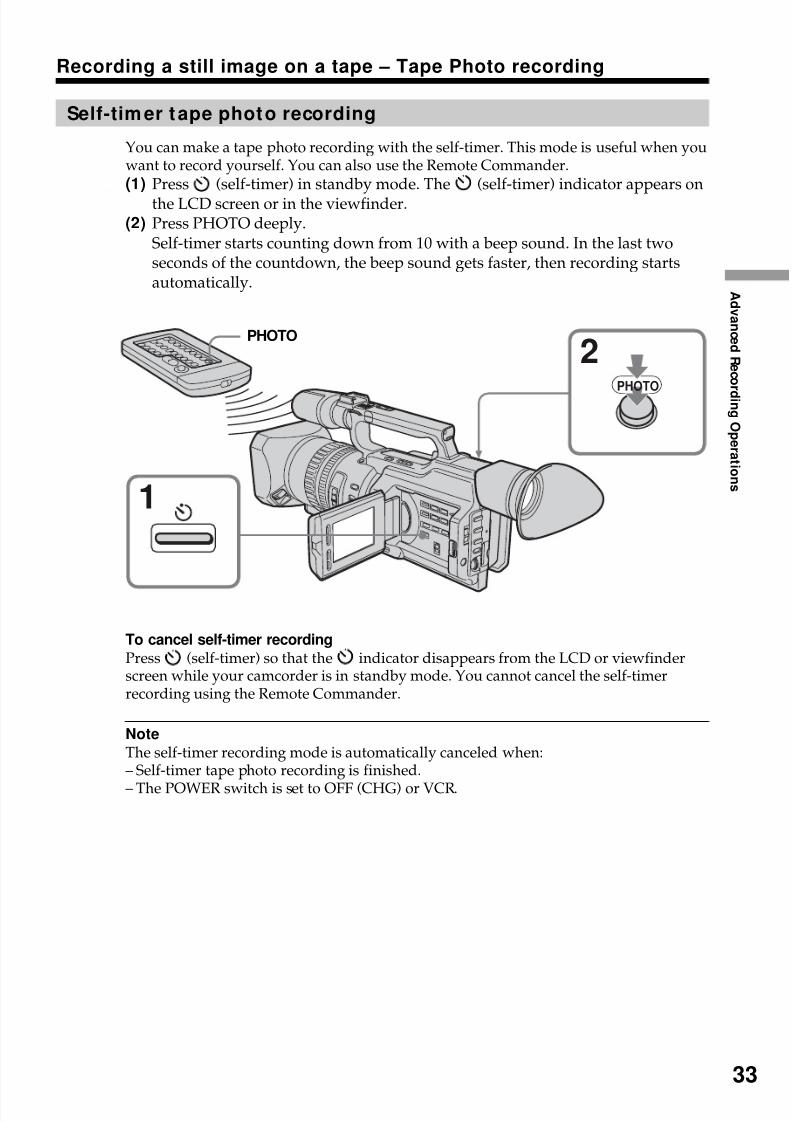
Self-tim er tape photo recording
You can make a tape photo recording with the self-timer. This mode is useful when youwant to record yourself. You can also use the Remote Commander.(1) Press (self-timer) in standby mode. The (self-timer) indicator appears on
the LCD screen or in the viewfinder.(2) Press PHOTO deeply.
Self-timer starts counting down from 10 with a beep sound. In the last twoseconds of the countdown, the beep sound gets faster, then recording startsautomatically.
To cancel self-timer recording
Press (self-timer) so that the indicator disappears from the LCD or viewfinderscreen while your camcorder is in standby mode. You cannot cancel the self-timerrecording using the Remote Commander.
Note
The self-timer recording mode is automatically canceled when:– Self-timer tape photo recording is finished.
– The POWER switch is set to OFF (CHG) or VCR.
2
1
PHOTO
PHOTO
8/8/2019 276ba559b616f0752a9d1ab6240c7e96
http://slidepdf.com/reader/full/276ba559b616f0752a9d1ab6240c7e96 34/176
34
Shoot ing w ith all the pixels – PROG. SCAN
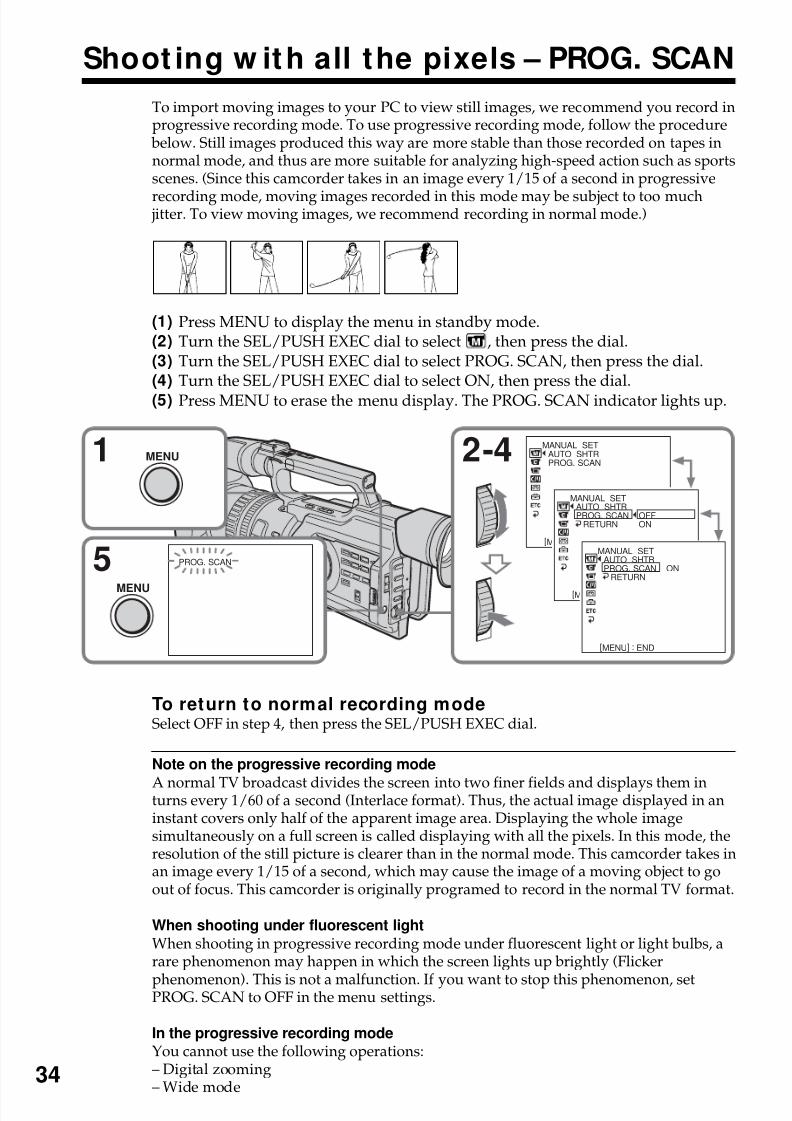
To import moving images to your PC to view still images, we recommend you record inprogressive recording mode. To use progressive recording mode, follow the procedure
below. Still images produced this way are more stable than those recorded on tapes innormal mode, and thus are more suitable for analyzing high-speed action such as sportsscenes. (Since this camcorder takes in an image every 1/15 of a second in progressive
recording mode, moving images recorded in this mode may be subject to too much jitter. To view moving images, we recommend recording in normal mode.)
(1) Press MENU to display the menu in standby mode.(2) Turn the SEL/PUSH EXEC dial to select , then press the dial.(3) Turn the SEL/PUSH EXEC dial to select PROG. SCAN, then press the dial.(4) Turn the SEL/PUSH EXEC dial to select ON, then press the dial.(5) Press MENU to erase the menu display. The PROG. SCAN indicator lights up.
To return to normal recording modeSelect OFF in step 4, then press the SEL/PUSH EXEC dial.
Note on the progressive recording mode
A normal TV broadcast divides the screen into two finer fields and displays them inturns every 1/60 of a second (Interlace format). Thus, the actual image displayed in aninstant covers only half of the apparent image area. Displaying the whole imagesimultaneously on a full screen is called displaying with all the pixels. In this mode, theresolution of the still picture is clearer than in the normal mode. This camcorder takes inan image every 1/15 of a second, which may cause the image of a moving object to goout of focus. This camcorder is originally programed to record in the normal TV format.
When shooting under fluorescent light
When shooting in progressive recording mode under fluorescent light or light bulbs, arare phenomenon may happen in which the screen lights up brightly (Flicker
phenomenon). This is not a malfunction. If you want to stop this phenomenon, setPROG. SCAN to OFF in the menu settings.
In the progressive recording modeYou cannot use the following operations:– Digital zooming– Wide mode
1 2-4
5
MENU
MENU
PROG. SCAN
MANUAL SETAUTO SHTRPROG. SCAN
[MENU] : END
MANUAL SETAUTO SHTRPROG. SCAN
RETURNOFFON
[MENU] : END
MANUAL SETAUTO SHTRPROG. SCAN
RETURNON
[MENU] : END

8/8/2019 276ba559b616f0752a9d1ab6240c7e96
http://slidepdf.com/reader/full/276ba559b616f0752a9d1ab6240c7e96 35/176
35
A d v an c e d R e c o
r d i n g O p er a t i on s
Using the guide frame
You can easily make the picture be on a horizontal line using the guide frame. Theguide frame is not recorded.
(1) Press MENU to display the menu in standby, recording, or memory mode.(2) Turn the SEL/PUSH EXEC dial to select , then press the dial.(3) Turn the SEL/PUSH EXEC dial to select GUIDEFRAME, then press the dial.(4) Turn the SEL/PUSH EXEC dial to select ON, then press the dial.(5) Press MENU to erase the menu display. The guide frame is displayed on the
LCD screen or in the viewfinder.
To clear the guide f rame
Select OFF in step 4, then press the SEL/PUSH EXEC dial or simply press DISPLAY.
Note
The guide frame indicates only a rough level. The size and position of the guide framedo not affect the setting of the camcorder.
If you set GUIDEFRAME to ONThe other screen indicators are also displayed on the LCD screen.
1 2-4
5
MENU
MENU
LCD/ VF SETLCD B. L.LCD COLORVF B. L.GUIDEFRAME
[MENU] : END
LCD/ VF SETLCD B. L.LCD COLORVF B. L.
GUI DEFRAMERETURN
[MENU] : END
OFFONLCD/ VF SET
LCD B. L.LCD COLORVF B. L.GUI DEFRAME
RETURN
[MENU] : END
ON
8/8/2019 276ba559b616f0752a9d1ab6240c7e96
http://slidepdf.com/reader/full/276ba559b616f0752a9d1ab6240c7e96 36/176
36
Using the w ide mode
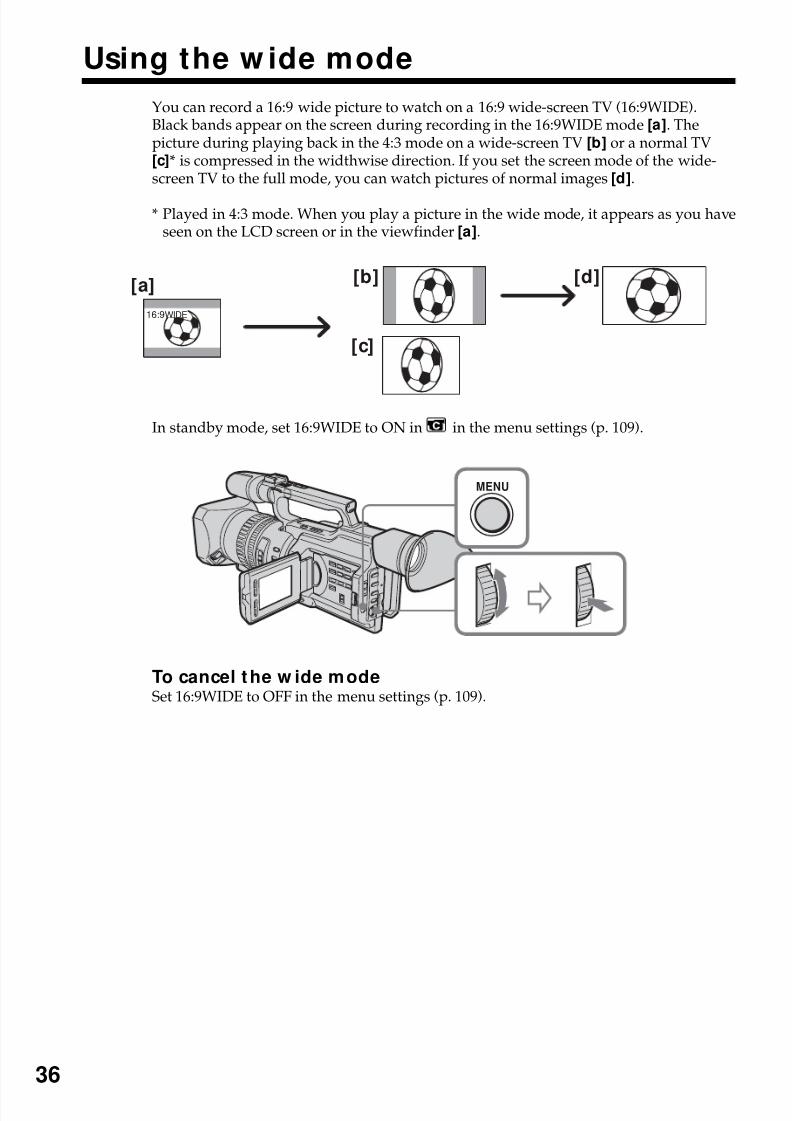
You can record a 16:9 wide picture to watch on a 16:9 wide-screen TV (16:9WIDE).Black bands appear on the screen during recording in the 16:9WIDE mode [a]. Thepicture during playing back in the 4:3 mode on a wide-screen TV [b] or a normal TV[c]* is compressed in the widthwise direction. If you set the screen mode of the wide-screen TV to the full mode, you can watch pictures of normal images [d].
* Played in 4:3 mode. When you play a picture in the wide mode, it appears as you haveseen on the LCD screen or in the viewfinder [a].
In standby mode, set 16:9WIDE to ON in in the menu settings (p. 109).
To cancel the w ide modeSet 16:9WIDE to OFF in the menu settings (p. 109).
[a]
16:9WIDE
[c]
[b] [d]
MENU
8/8/2019 276ba559b616f0752a9d1ab6240c7e96
http://slidepdf.com/reader/full/276ba559b616f0752a9d1ab6240c7e96 37/176
37
A d v an c e d R e c o
r d i n g O p er a t i on s
Using the w ide mode
In w ide mode, you cannot select the follow ing modes:
•Old movie•Progressive recording mode
During recordingYou cannot operate the wide mode function. When you cancel the wide mode, set yourcamcorder to the standby mode and then set 16:9WIDE to OFF in the menu settings.
Connection for a TV
Pictures recorded in the 16:9WIDE mode automatically appear on the TV screen at fullsize when:– You connect your camcorder to a TV compatible with the video ID (ID-1/ID-2)
system.– You connect your camcorder to the S video jack on a TV.
ID-1 system
The ID-1 system sends aspect ratio information (16:9, 4:3 or letter box) using videosignals.If you connect a TV compatible with the ID-1 system, the screen size is automaticallyselected.
ID-2 system
The ID-2 system sends a copyright protection signal with ID-1 signals inserted betweenvideo signals when you connect your camcorder to other equipment using the A/Vconnecting cable.
8/8/2019 276ba559b616f0752a9d1ab6240c7e96
http://slidepdf.com/reader/full/276ba559b616f0752a9d1ab6240c7e96 38/176
38
Using the fader funct ion
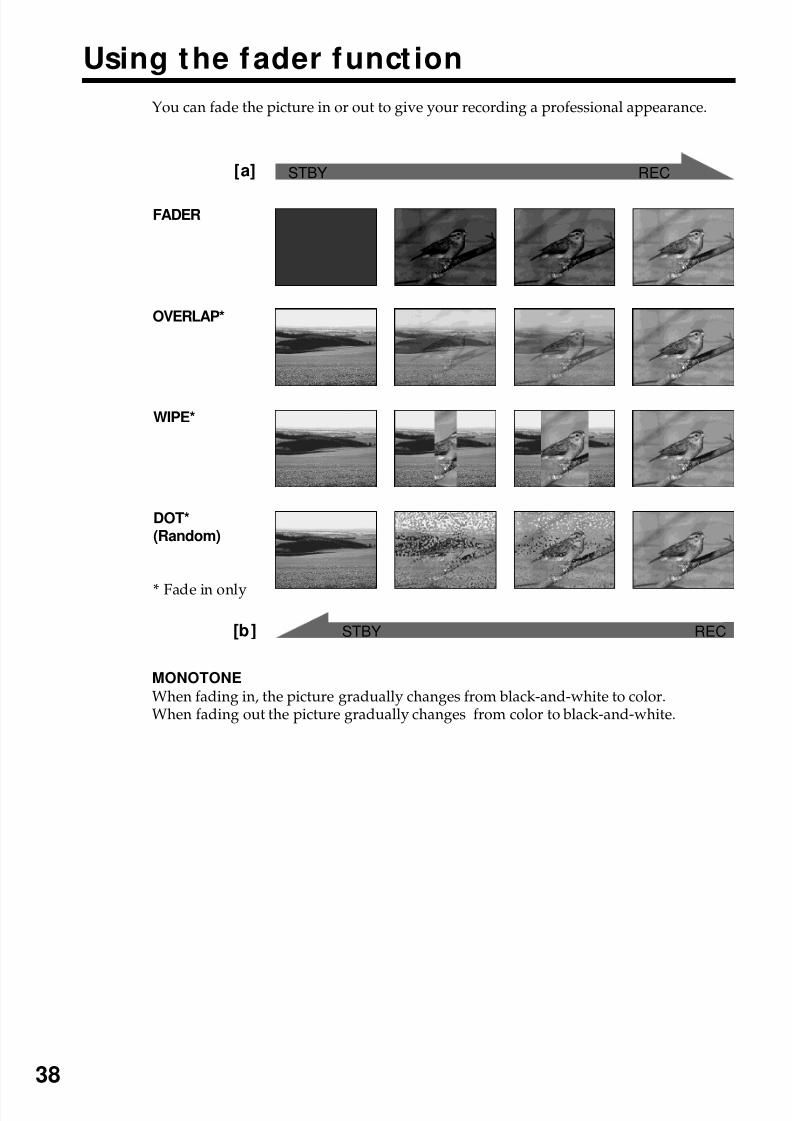
You can fade the picture in or out to give your recording a professional appearance.
MONOTONE
When fading in, the picture gradually changes from black-and-white to color.When fading out the picture gradually changes from color to black-and-white.
[a] RECSTBY
RECSTBY[b ]
FADER
OVERLAP*
WIPE*
DOT*(Random)
* Fade in only
8/8/2019 276ba559b616f0752a9d1ab6240c7e96
http://slidepdf.com/reader/full/276ba559b616f0752a9d1ab6240c7e96 39/176
39
A d v an c e d R e c o
r d i n g O p er a t i on s
Using the fader function
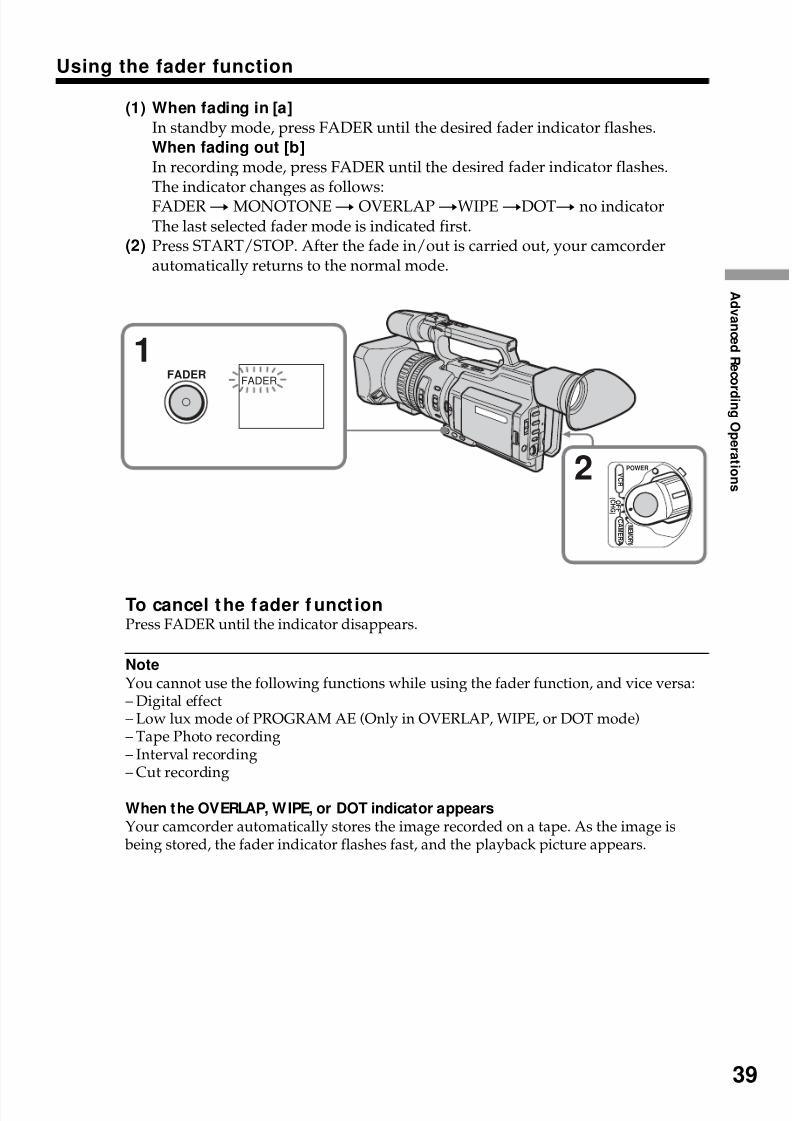
(1) When fading in [a]
In standby mode, press FADER until the desired fader indicator flashes.When fading out [b]
In recording mode, press FADER until the desired fader indicator flashes.
The indicator changes as follows:FADERtMONOTONEt OVERLAPtWIPEtDOTt no indicatorThe last selected fader mode is indicated first.
(2) Press START/STOP. After the fade in/out is carried out, your camcorderautomatically returns to the normal mode.
To cancel the fader f unctionPress FADER until the indicator disappears.
Note
You cannot use the following functions while using the fader function, and vice versa:– Digital effect– Low lux mode of PROGRAM AE (Only in OVERLAP, WIPE, or DOT mode)– Tape Photo recording– Interval recording– Cut recording
When the OVERLAP, WIPE, or DOT indicator appearsYour camcorder automatically stores the image recorded on a tape. As the image is
being stored, the fader indicator flashes fast, and the playback picture appears.
1FADER
FADER
POWER
O F F
( C H G )
C A ME R A
M E M O R Y
V C R
2
8/8/2019 276ba559b616f0752a9d1ab6240c7e96
http://slidepdf.com/reader/full/276ba559b616f0752a9d1ab6240c7e96 40/176
40
Using special effects – Picture ef fect
You can digitally process images to obtain special effects like those in films or on TV.
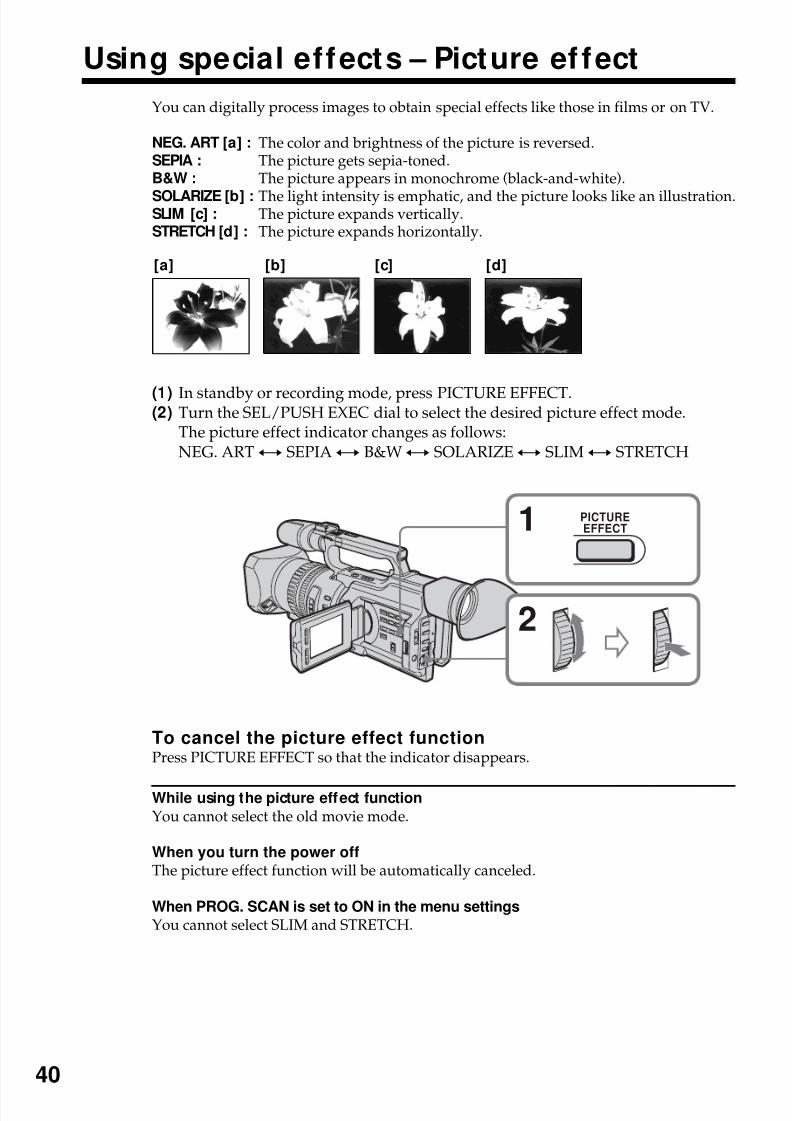
NEG. ART [a] : The color and brightness of the picture is reversed.SEPIA : The picture gets sepia-toned.B&W : The picture appears in monochrome (black-and-white).
SOLARIZE [b] : The light intensity is emphatic, and the picture looks like an illustration.SLIM [c] : The picture expands vertically.STRETCH [d] : The picture expands horizontally.
(1) In standby or recording mode, press PICTURE EFFECT.(2) Turn the SEL/PUSH EXEC dial to select the desired picture effect mode.
The picture effect indicator changes as follows:NEG. ARTy SEPIAy B&Wy SOLARIZEy SLIMy STRETCH
To cancel the picture effect functionPress PICTURE EFFECT so that the indicator disappears.
While using the picture effect function
You cannot select the old movie mode.
When you turn the power off
The picture effect function will be automatically canceled.
When PROG. SCAN is set to ON in the menu settings
You cannot select SLIM and STRETCH.
[a] [b] [c] [d]
2
1 PICTUREEFFECT
8/8/2019 276ba559b616f0752a9d1ab6240c7e96
http://slidepdf.com/reader/full/276ba559b616f0752a9d1ab6240c7e96 41/176
41
A d v an c e d R e c o
r d i n g O p er a t i on s
Using special effects – Digital effect
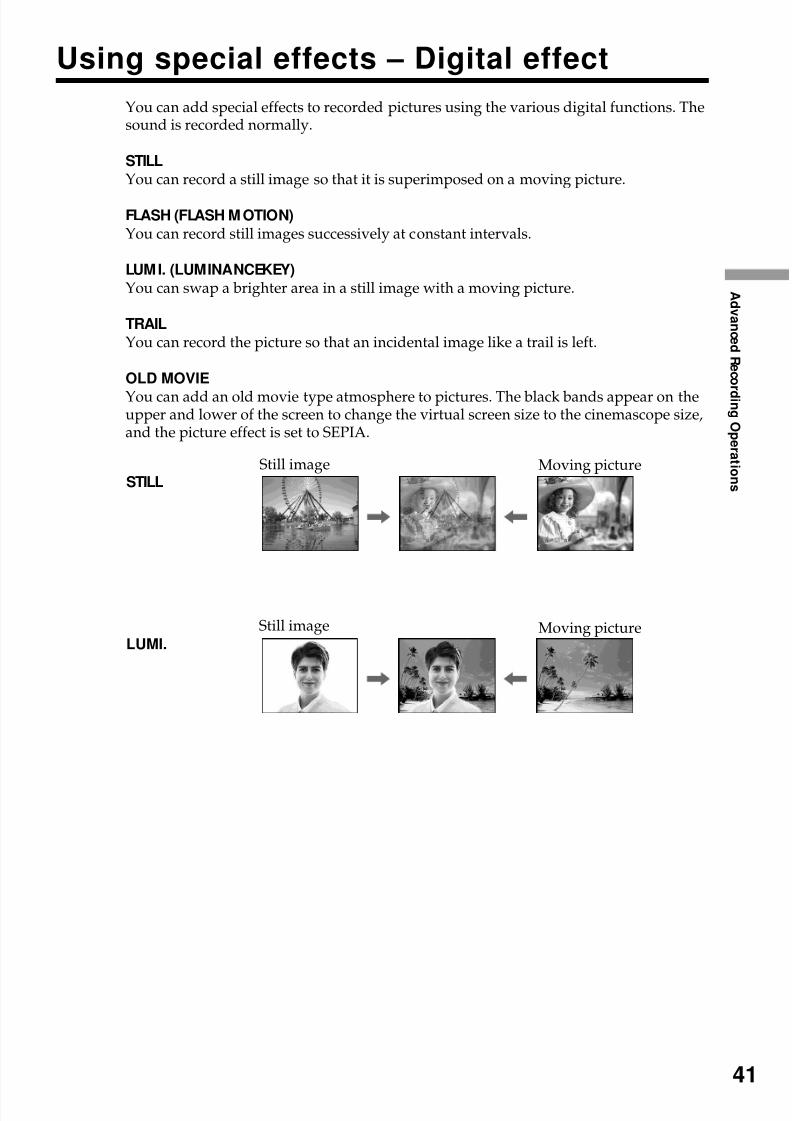
You can add special effects to recorded pictures using the various digital functions. Thesound is recorded normally.
STILL
You can record a still image so that it is superimposed on a moving picture.
FLASH (FLASH M OTION)
You can record still images successively at constant intervals.
LUMI. (LUMINANCEKEY)
You can swap a brighter area in a still image with a moving picture.
TRAIL
You can record the picture so that an incidental image like a trail is left.
OLD MOVIE
You can add an old movie type atmosphere to pictures. The black bands appear on theupper and lower of the screen to change the virtual screen size to the cinemascope size,and the picture effect is set to SEPIA.
STILL
LUMI.
Still image Moving picture
Still image Moving picture
8/8/2019 276ba559b616f0752a9d1ab6240c7e96
http://slidepdf.com/reader/full/276ba559b616f0752a9d1ab6240c7e96 42/176
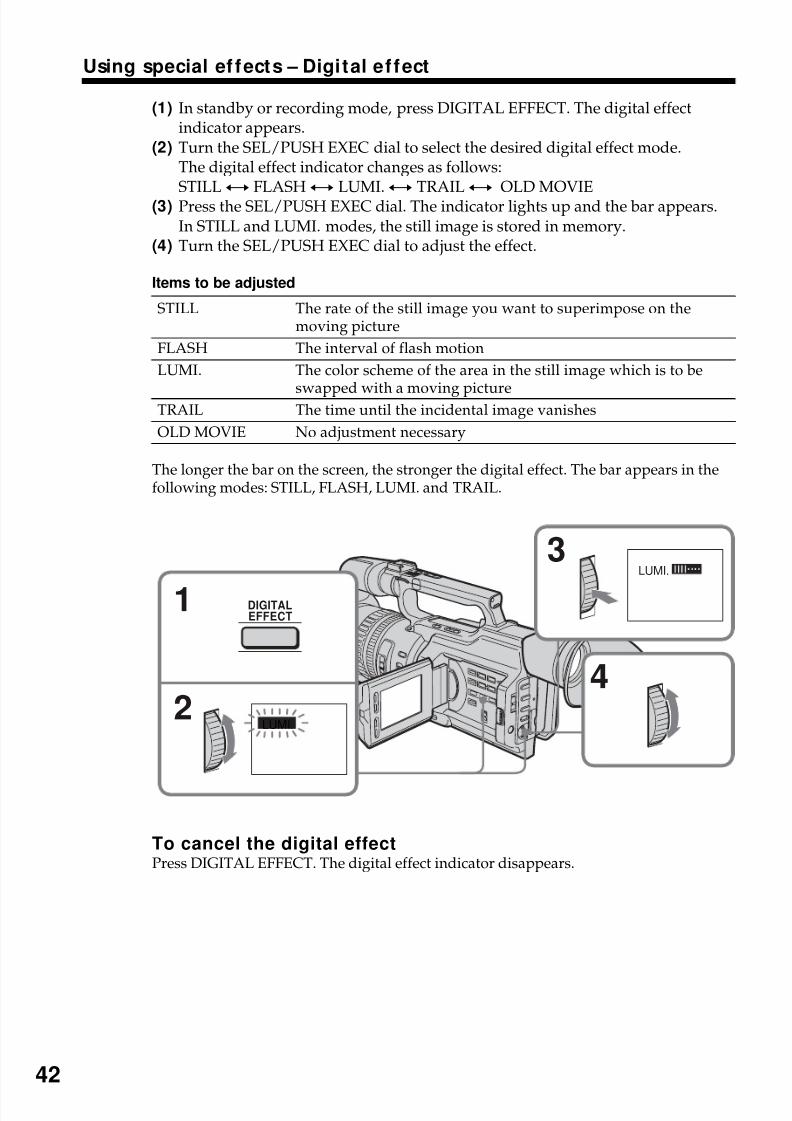
42
Using special ef fects – Digital ef fect
(1) In standby or recording mode, press DIGITAL EFFECT. The digital effectindicator appears.
(2) Turn the SEL/PUSH EXEC dial to select the desired digital effect mode.The digital effect indicator changes as follows:
STILLy
FLASHy
LUMI.y
TRAILy
OLD MOVIE(3) Press the SEL/PUSH EXEC dial. The indicator lights up and the bar appears.In STILL and LUMI. modes, the still image is stored in memory.
(4) Turn the SEL/PUSH EXEC dial to adjust the effect.
Items to be adjusted
STILL The rate of the still image you want to superimpose on themoving picture
FLASH The interval of flash motion
LUMI. The color scheme of the area in the still image which is to be
swapped with a moving pictureTRAIL The time until the incidental image vanishes
OLD MOVIE No adjustment necessary
The longer the bar on the screen, the stronger the digital effect. The bar appears in thefollowing modes: STILL, FLASH, LUMI. and TRAIL.
To cancel the digital effectPress DIGITAL EFFECT. The digital effect indicator disappears.
3
4
LUMI.
1
2
LUMI.
DIGITALEFFECT
8/8/2019 276ba559b616f0752a9d1ab6240c7e96
http://slidepdf.com/reader/full/276ba559b616f0752a9d1ab6240c7e96 43/176
43
A d v an c e d R e c o
r d i n g O p er a t i on s
Using special ef fects – Digital ef fect
Notes
•The following functions do not work in digital effect mode:– Fader– Low lux mode of PROGRAM AE– Tape Photo recording– Shutter speed (1/30 or smaller) adjustment
•The following functions do not work in old movie mode:– Wide mode– Picture effect– PROGRAM AE– Spot light mode– Shutter speed adjustment
When you turn the power off
The digital effect function will be automatically canceled.
8/8/2019 276ba559b616f0752a9d1ab6240c7e96
http://slidepdf.com/reader/full/276ba559b616f0752a9d1ab6240c7e96 44/176
44
Shooting w ith manual adjustment
Under normal conditions, this unit automatically makes various adjustments as itshoots. However, you can adjust the following functions manually to suit yourpreference.
Functions you can adjust by setting the AUTO LOCK selector to the center (auto
lock release) positionBrightness (exposure), shutter speed, white balance, and PROGRAM AE
Functions you can adjust in menu settings
Deactivating the SteadyShot
Functions you can adjust by using other selectors/rings
ND filter, zebra pattern, focus, and zoom
The following describes how to adjust all the functions mentioned above except white balance (p. 50), PROGRAM AE (p. 56), focus (p. 59), and zoom (p. 21).
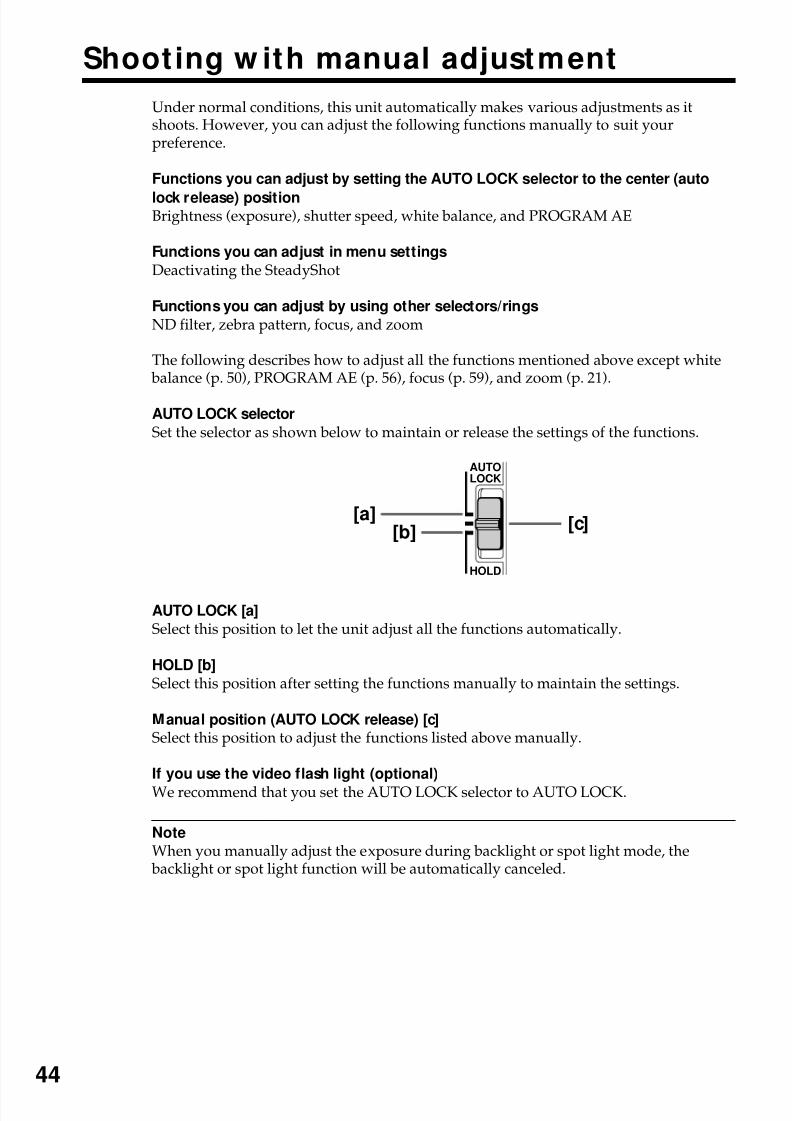
AUTO LOCK selector
Set the selector as shown below to maintain or release the settings of the functions.
AUTO LOCK [a]
Select this position to let the unit adjust all the functions automatically.
HOLD [b]
Select this position after setting the functions manually to maintain the settings.
Manual position (AUTO LOCK release) [c]Select this position to adjust the functions listed above manually.
If you use the video flash light (optional)
We recommend that you set the AUTO LOCK selector to AUTO LOCK.
Note
When you manually adjust the exposure during backlight or spot light mode, the backlight or spot light function will be automatically canceled.
AUTO
LOCK
HOLD
[a][b]
[c]
8/8/2019 276ba559b616f0752a9d1ab6240c7e96
http://slidepdf.com/reader/full/276ba559b616f0752a9d1ab6240c7e96 45/176
45
A d v an c e d R e c o
r d i n g O p er a t i on s
Shooting with manual adjustment
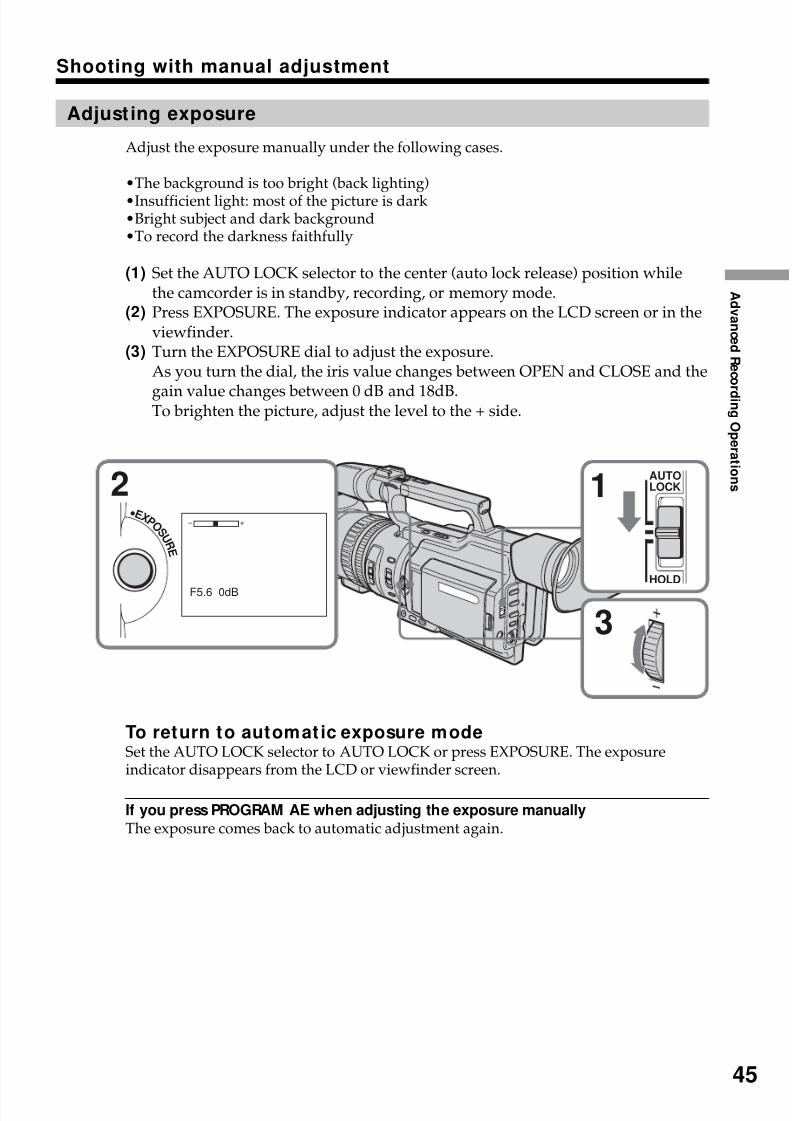
Adjust ing exposure
Adjust the exposure manually under the following cases.
•The background is too bright (back lighting)
•Insufficient light: most of the picture is dark•Bright subject and dark background•To record the darkness faithfully
(1) Set the AUTO LOCK selector to the center (auto lock release) position whilethe camcorder is in standby, recording, or memory mode.
(2) Press EXPOSURE. The exposure indicator appears on the LCD screen or in theviewfinder.
(3) Turn the EXPOSURE dial to adjust the exposure.As you turn the dial, the iris value changes between OPEN and CLOSE and the
gain value changes between 0 dB and 18dB.To brighten the picture, adjust the level to the + side.
To return to automat ic exposure modeSet the AUTO LOCK selector to AUTO LOCK or press EXPOSURE. The exposureindicator disappears from the LCD or viewfinder screen.
If you press PROGRAM AE when adjusting the exposure manually
The exposure comes back to automatic adjustment again.
2 1
3
AUTO
LOCK
HOLD
• E X P O S U R E
2
F5.6 0dB
8/8/2019 276ba559b616f0752a9d1ab6240c7e96
http://slidepdf.com/reader/full/276ba559b616f0752a9d1ab6240c7e96 46/176
46
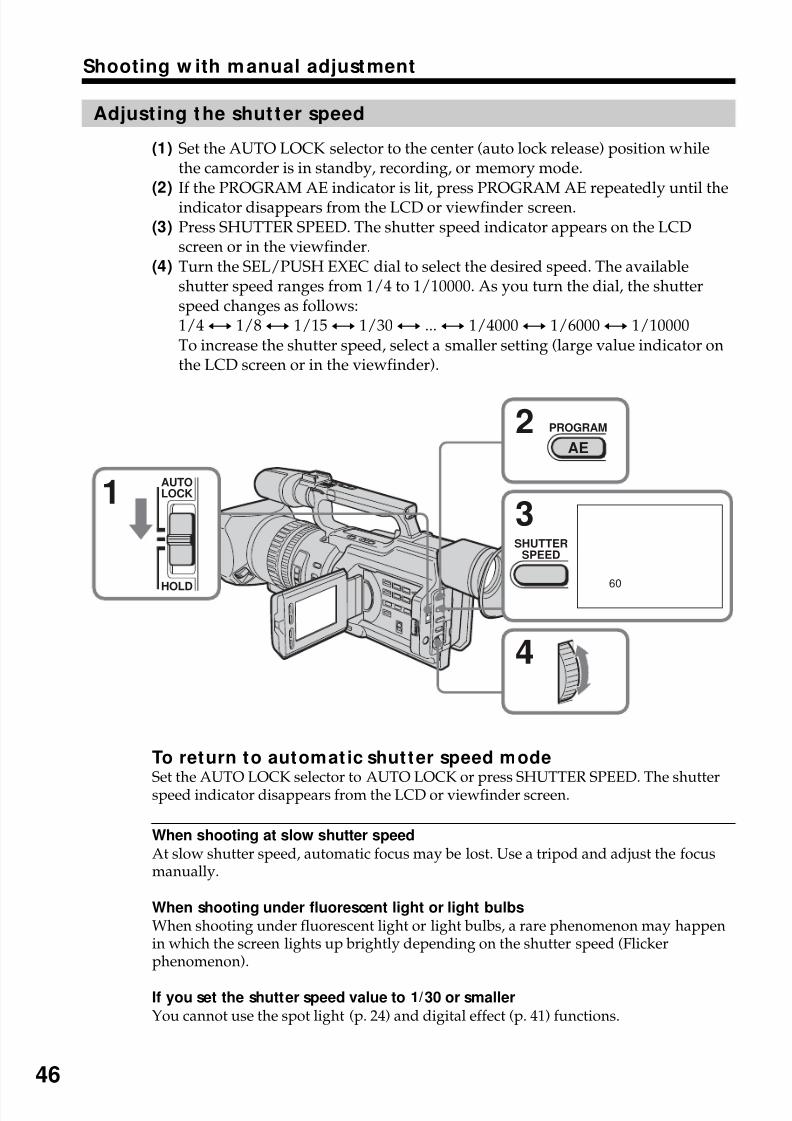
Adjusting the shut ter speed
(1) Set the AUTO LOCK selector to the center (auto lock release) position whilethe camcorder is in standby, recording, or memory mode.
(2)If the PROGRAM AE indicator is lit, press PROGRAM AE repeatedly until theindicator disappears from the LCD or viewfinder screen.
(3) Press SHUTTER SPEED. The shutter speed indicator appears on the LCDscreen or in the viewfinder.
(4) Turn the SEL/PUSH EXEC dial to select the desired speed. The availableshutter speed ranges from 1/4 to 1/10000. As you turn the dial, the shutterspeed changes as follows:1/4y 1/8y 1/15y 1/30y ...y 1/4000y 1/6000y 1/10000To increase the shutter speed, select a smaller setting (large value indicator onthe LCD screen or in the viewfinder).
To return to automat ic shutter speed mode
Set the AUTO LOCK selector to AUTO LOCK or press SHUTTER SPEED. The shutterspeed indicator disappears from the LCD or viewfinder screen.
When shooting at slow shutter speed
At slow shutter speed, automatic focus may be lost. Use a tripod and adjust the focusmanually.
When shooting under fluorescent light or light bulbs
When shooting under fluorescent light or light bulbs, a rare phenomenon may happenin which the screen lights up brightly depending on the shutter speed (Flickerphenomenon).
If you set the shutter speed value to 1/30 or smaller
You cannot use the spot light (p. 24) and digital effect (p. 41) functions.
Shooting w ith manual adjustment
3
60
4
2
1AUTO
LOCK
HOLD
PROGRAM
AE
SHUTTER
SPEED
8/8/2019 276ba559b616f0752a9d1ab6240c7e96
http://slidepdf.com/reader/full/276ba559b616f0752a9d1ab6240c7e96 47/176
47
A d v an c e d R e c o
r d i n g O p er a t i on s
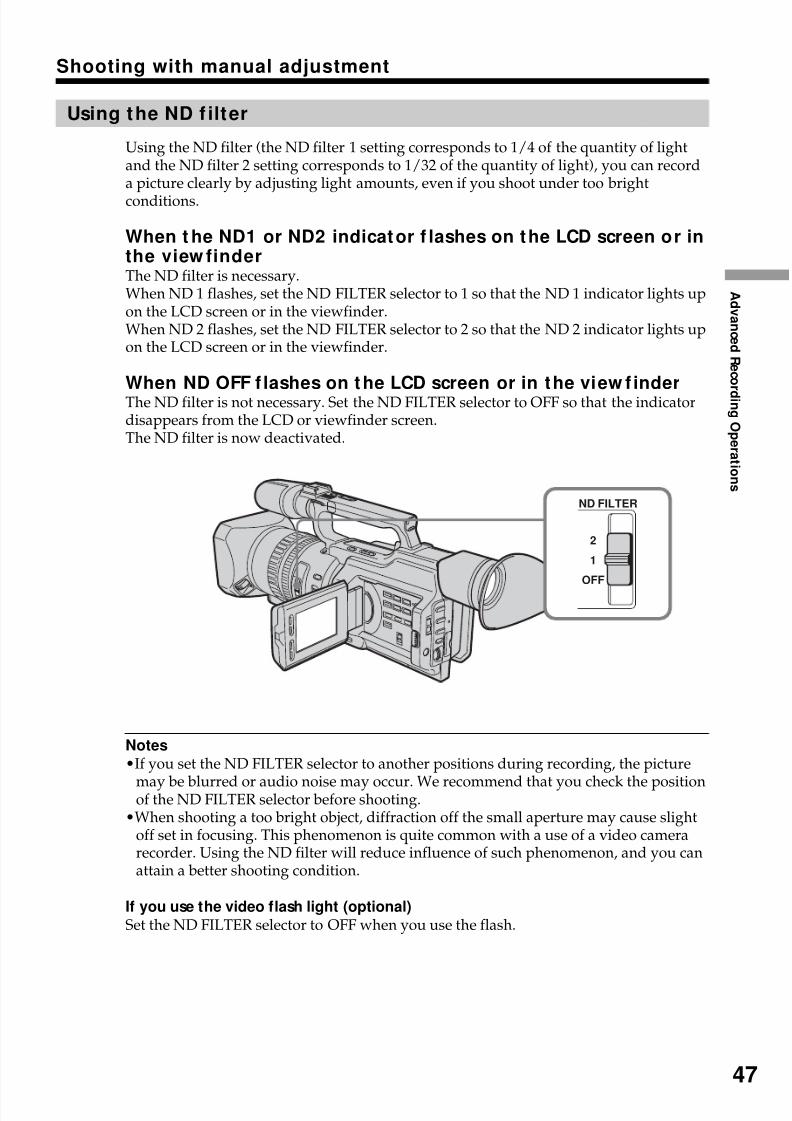
Using the ND f ilter
Using the ND filter (the ND filter 1 setting corresponds to 1/4 of the quantity of lightand the ND filter 2 setting corresponds to 1/32 of the quantity of light), you can recorda picture clearly by adjusting light amounts, even if you shoot under too bright
conditions.
When t he ND1 or ND2 indicator f lashes on the LCD screen or inthe view finderThe ND filter is necessary.When ND 1 flashes, set the ND FILTER selector to 1 so that the ND 1 indicator lights upon the LCD screen or in the viewfinder.When ND 2 flashes, set the ND FILTER selector to 2 so that the ND 2 indicator lights upon the LCD screen or in the viewfinder.
When ND OFF f lashes on the LCD screen or in the view f inderThe ND filter is not necessary. Set the ND FILTER selector to OFF so that the indicatordisappears from the LCD or viewfinder screen.The ND filter is now deactivated.
Notes
•If you set the ND FILTER selector to another positions during recording, the picture
may be blurred or audio noise may occur. We recommend that you check the positionof the ND FILTER selector before shooting.•When shooting a too bright object, diffraction off the small aperture may cause slight
off set in focusing. This phenomenon is quite common with a use of a video camerarecorder. Using the ND filter will reduce influence of such phenomenon, and you canattain a better shooting condition.
If you use the video flash light (optional)
Set the ND FILTER selector to OFF when you use the flash.
Shooting with manual adjustment
ND FILTER
1
2
OFF
8/8/2019 276ba559b616f0752a9d1ab6240c7e96
http://slidepdf.com/reader/full/276ba559b616f0752a9d1ab6240c7e96 48/176
48
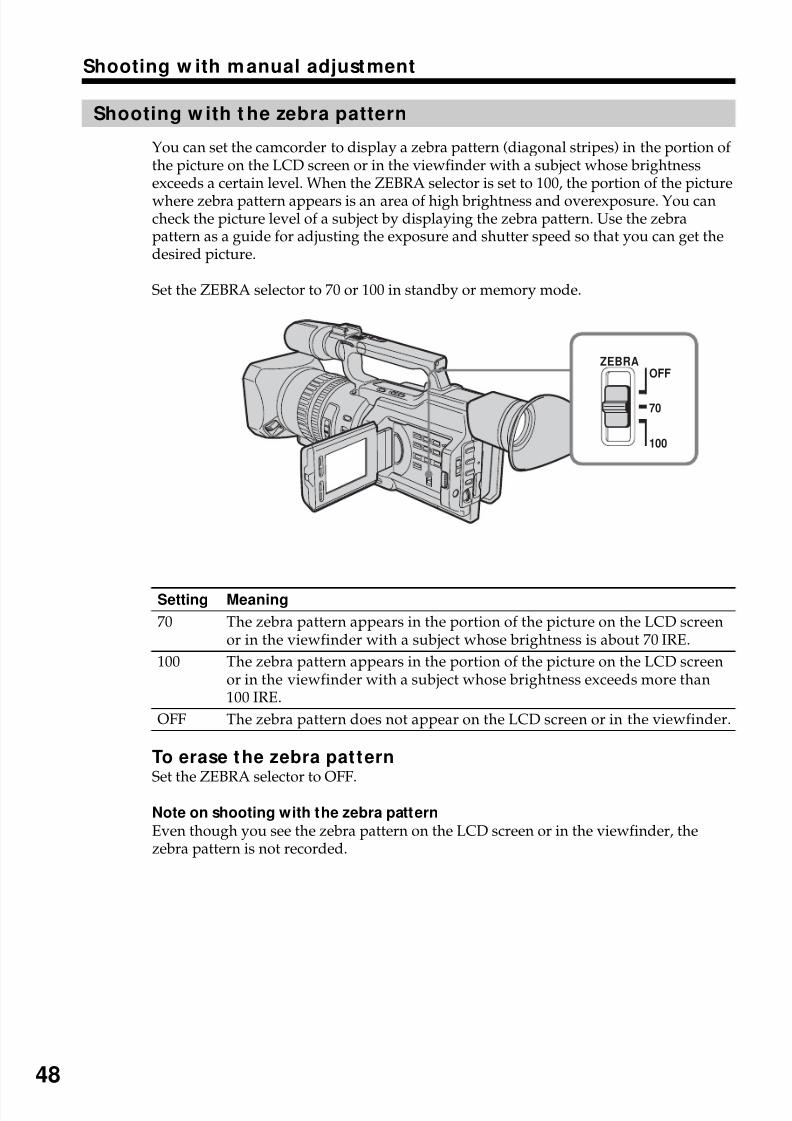
Shooting w ith t he zebra pattern
You can set the camcorder to display a zebra pattern (diagonal stripes) in the portion of the picture on the LCD screen or in the viewfinder with a subject whose brightnessexceeds a certain level. When the ZEBRA selector is set to 100, the portion of the picture
where zebra pattern appears is an area of high brightness and overexposure. You cancheck the picture level of a subject by displaying the zebra pattern. Use the zebrapattern as a guide for adjusting the exposure and shutter speed so that you can get thedesired picture.
Set the ZEBRA selector to 70 or 100 in standby or memory mode.
Setting
70
100
OFF
To erase the zebra patternSet the ZEBRA selector to OFF.
Note on shooting with the zebra pattern
Even though you see the zebra pattern on the LCD screen or in the viewfinder, thezebra pattern is not recorded.
Shooting w ith manual adjustment
Meaning
The zebra pattern appears in the portion of the picture on the LCD screenor in the viewfinder with a subject whose brightness is about 70 IRE.
The zebra pattern appears in the portion of the picture on the LCD screenor in the viewfinder with a subject whose brightness exceeds more than100 IRE.
The zebra pattern does not appear on the LCD screen or in the viewfinder.
ZEBRA
OFF
70
100
8/8/2019 276ba559b616f0752a9d1ab6240c7e96
http://slidepdf.com/reader/full/276ba559b616f0752a9d1ab6240c7e96 49/176
49
A d v an c e d R e c o
r d i n g O p er a t i on s
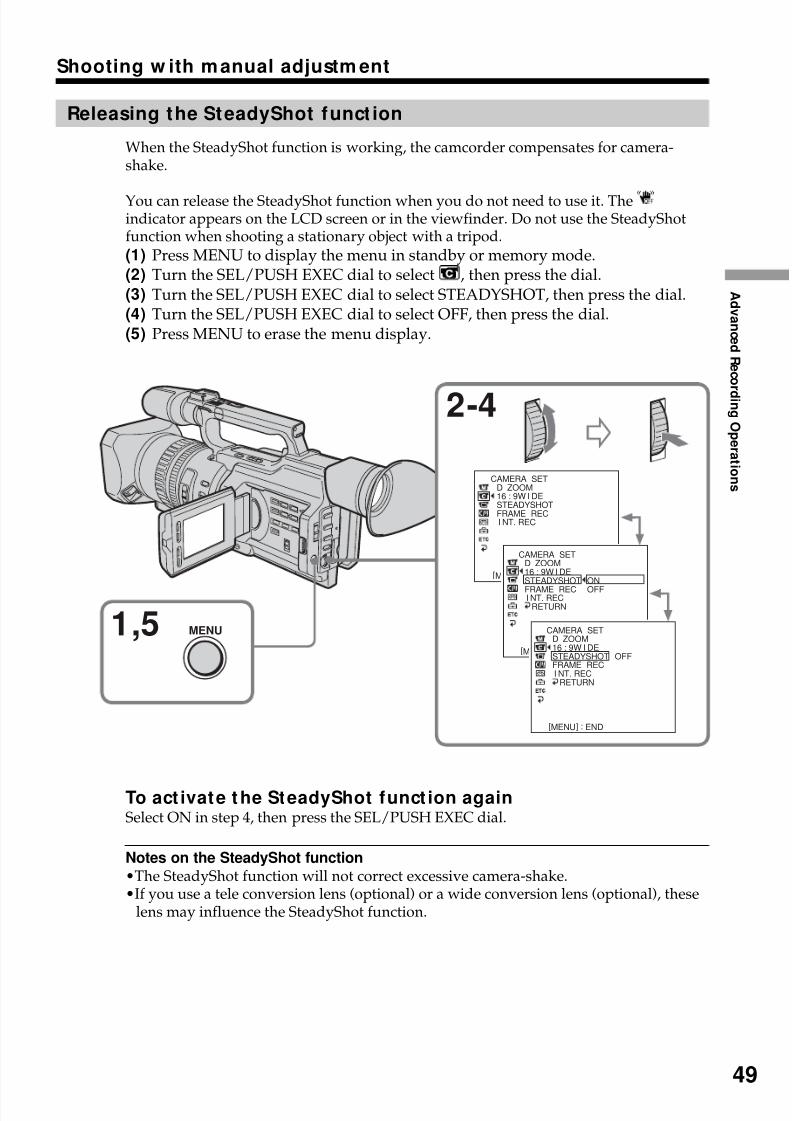
Releasing the SteadyShot funct ion
When the SteadyShot function is working, the camcorder compensates for camera-shake.
You can release the SteadyShot function when you do not need to use it. Theindicator appears on the LCD screen or in the viewfinder. Do not use the SteadyShotfunction when shooting a stationary object with a tripod.
(1) Press MENU to display the menu in standby or memory mode.(2) Turn the SEL/PUSH EXEC dial to select , then press the dial.(3) Turn the SEL/PUSH EXEC dial to select STEADYSHOT, then press the dial.(4) Turn the SEL/PUSH EXEC dial to select OFF, then press the dial.(5) Press MENU to erase the menu display.
To act ivate the SteadyShot funct ion againSelect ON in step 4, then press the SEL/PUSH EXEC dial.
Notes on the SteadyShot function
•The SteadyShot function will not correct excessive camera-shake.•If you use a tele conversion lens (optional) or a wide conversion lens (optional), these
lens may influence the SteadyShot function.
Shooting w ith manual adjustm ent
CAMERA SETD ZOOM16 : 9W I DESTEADYSHOTFRAME REC I NT. REC
[MENU] : END
1,5
2-4
MENU
CAMERA SETD ZOOM16 : 9W I DESTEADYSHOT
FRAME REC I NT. REC
RETURN
ON
OFF
[MENU] : END
CAMERA SETD ZOOM16 : 9W I DESTEADYSHOTFRAME REC I NT. REC
RETURN
OFF
[MENU] : END
8/8/2019 276ba559b616f0752a9d1ab6240c7e96
http://slidepdf.com/reader/full/276ba559b616f0752a9d1ab6240c7e96 50/176
50
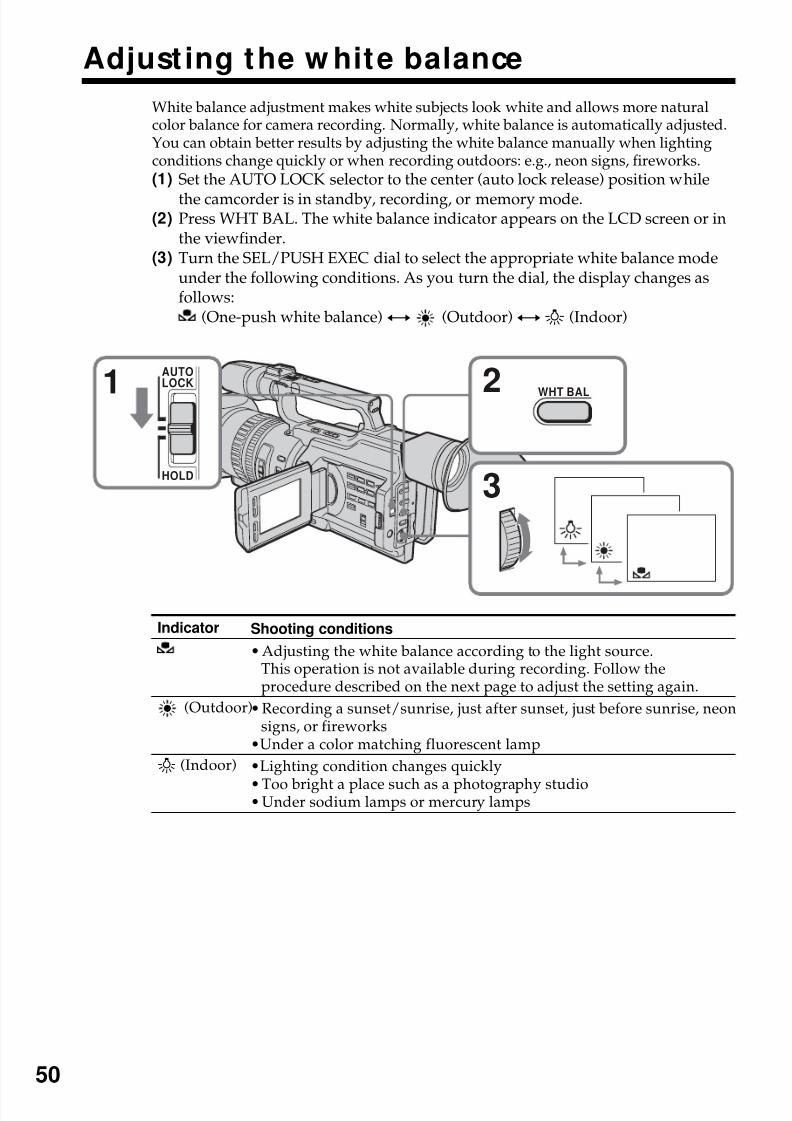
Adjust ing the w hite balance
White balance adjustment makes white subjects look white and allows more naturalcolor balance for camera recording. Normally, white balance is automatically adjusted.You can obtain better results by adjusting the white balance manually when lightingconditions change quickly or when recording outdoors: e.g., neon signs, fireworks.(1) Set the AUTO LOCK selector to the center (auto lock release) position while
the camcorder is in standby, recording, or memory mode.(2) Press WHT BAL. The white balance indicator appears on the LCD screen or in
the viewfinder.(3) Turn the SEL/PUSH EXEC dial to select the appropriate white balance mode
under the following conditions. As you turn the dial, the display changes asfollows:
(One-push white balance)y (Outdoor)y n (Indoor)
Indicator
(Outdoor)
n (Indoor)
Shooting conditions
• Adjusting the white balance according to the light source.This operation is not available during recording. Follow theprocedure described on the next page to adjust the setting again.
• Recording a sunset/sunrise, just after sunset, just before sunrise, neonsigns, or fireworks
•Under a color matching fluorescent lamp
•Lighting condition changes quickly
• Too bright a place such as a photography studio• Under sodium lamps or mercury lamps
1 2
3
AUTOLOCK
HOLD
WHT BAL
8/8/2019 276ba559b616f0752a9d1ab6240c7e96
http://slidepdf.com/reader/full/276ba559b616f0752a9d1ab6240c7e96 51/176
51
A d v an c e d R e c o
r d i n g O p er a t i on s
If you have selected in step 3When you set the white balance to one-push white balance mode, the setting is lockedand maintained even if lighting conditions change. You can achieve recording withnatural colors without the image being affected by ambient light.(With the indicator on the screen)
(1) Aim a white object such as paper fully.(2) Press the SEL/PUSH EXEC dial.The indicator flashes quickly. When the white balance has been adjusted and storedin the memory, the indicator stops flashing. The setting will be maintained even if the
battery is detached.
To return to automat ic adjustmentSet the AUTO LOCK selector to AUTO LOCK or press WHT BAL. The white balanceindicator disappears from the LCD or viewfinder screen.
Notes on white balance•When you shoot with studio lighting or video lighting, use then (indoor) mode.•When you shoot with fluorescent lighting, readjust the white balance using the
(one-push white balance) mode , or use the automatic white balance mode. If you usethen (indoor) mode, white balance may not be adjusted appropriately.
Shooting when lighting conditions have changed
•When lighting conditions have changed, readjust the white balance while thecamcorder is in standby mode.
•In automatic white balance mode, point your camcorder at a white subject for about10 seconds after setting the POWER switch to CAMERA to get a better adjustment
when:– You detach the battery for replacement.– You bring your camcorder outdoors from the interior of a house, or vice versa.
If the indicator does not stop flashing after you press the SEL/PUSH EXEC dial
The white balance cannot be set. Use the automatic white balance mode.
Adjusting the w hite balance
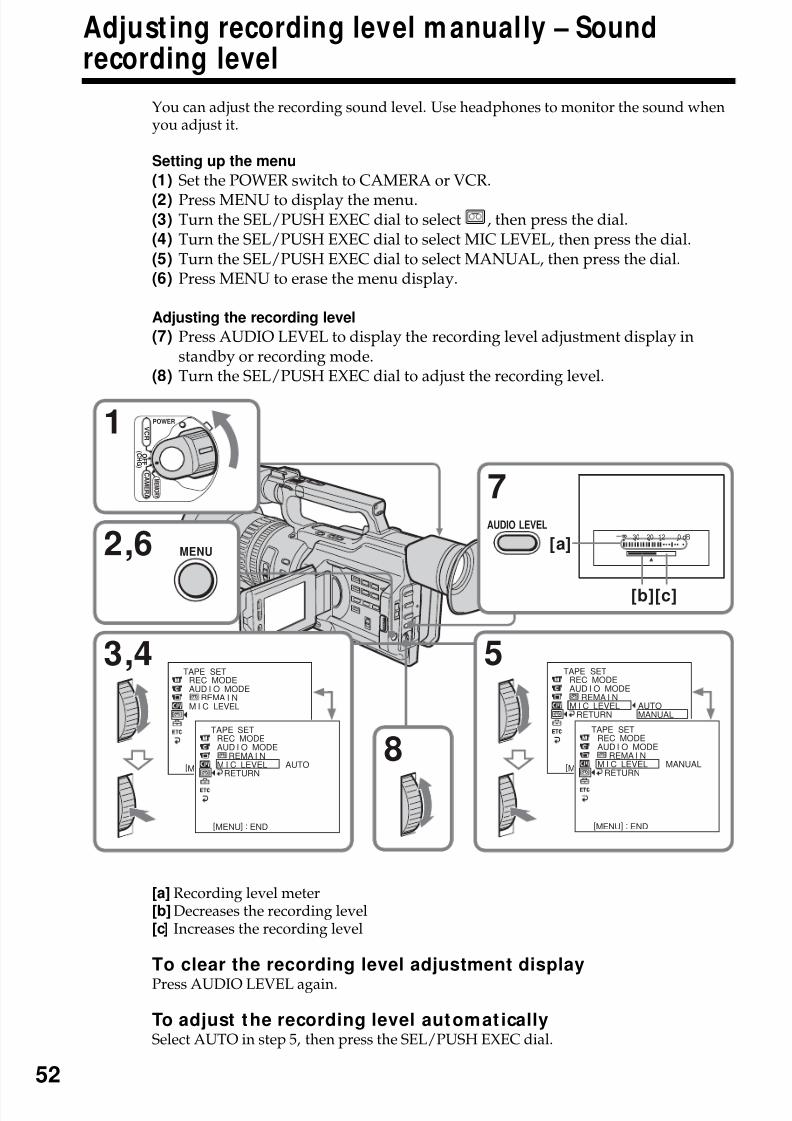
8/8/2019 276ba559b616f0752a9d1ab6240c7e96
http://slidepdf.com/reader/full/276ba559b616f0752a9d1ab6240c7e96 52/176
52
Adjust ing recording level m anually – Soundrecording level
You can adjust the recording sound level. Use headphones to monitor the sound whenyou adjust it.
Setting up the menu
(1) Set the POWER switch to CAMERA or VCR.
(2) Press MENU to display the menu.(3) Turn the SEL/PUSH EXEC dial to select , then press the dial.(4) Turn the SEL/PUSH EXEC dial to select MIC LEVEL, then press the dial.(5) Turn the SEL/PUSH EXEC dial to select MANUAL, then press the dial.(6) Press MENU to erase the menu display.
Adjusting the recording level
(7) Press AUDIO LEVEL to display the recording level adjustment display instandby or recording mode.
(8) Turn the SEL/PUSH EXEC dial to adjust the recording level.
[a] Recording level meter[b] Decreases the recording level[c] Increases the recording level
To clear the recording level adjustment display
Press AUDIO LEVEL again.
To adjust the recording level automat icallySelect AUTO in step 5, then press the SEL/PUSH EXEC dial.
1
2,6
53,4
7
MENU
30 20 12 0 dB
POWER
O F F
( C H G )
C A ME R A
M E M O R Y
V C R
TAPE SETREC MODEAUD I O MODE
REMA I NM I C LEVEL
[MENU] : END
[MENU] : END
TAPE SETREC MODEAUD I O MODE
REMA I NM I C LEVEL
RETURNAUTO [MENU] : END[MENU] : END
TAPE SETREC MODEAUD I O MODE
REMA I NM I C LEVEL
RETURNAUTOMANUAL
[MENU] : END
TAPE SETREC MODEAUD I O MODE
REMA I NM I C LEVEL
RETURNMANUAL
8
[MENU] : END[MENU] : END
[a]
[b][c]
AUDIO LEVEL
8/8/2019 276ba559b616f0752a9d1ab6240c7e96
http://slidepdf.com/reader/full/276ba559b616f0752a9d1ab6240c7e96 53/176
53
A d v an c e d R e c o
r d i n g O p er a t i on s
Notes on the manual adjustment
•The recording level setting is retained for about five minutes after removing the battery.
•The recording level indicator appears at the lower-right on the LCD screen or in theviewfinder.
The sound input through the AUDIO L/R jacks or DV Interface
You cannot adjust the recording level.
When MIC LEVEL is set to AUTOYou cannot adjust the recording level, however, the recording level adjustment displayis displayed.
Adjusting recording level m anually – Sound recording level
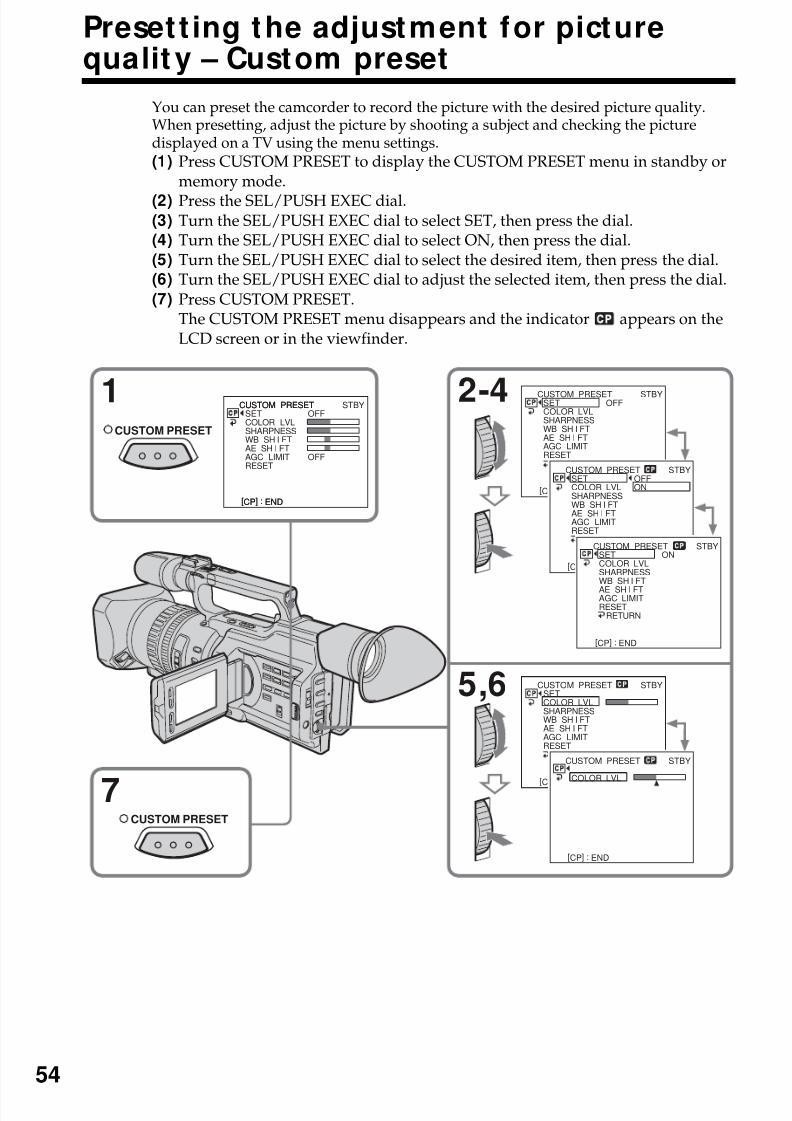
8/8/2019 276ba559b616f0752a9d1ab6240c7e96
http://slidepdf.com/reader/full/276ba559b616f0752a9d1ab6240c7e96 54/176
54
Presett ing the adjustment for picturequalit y – Custom preset
You can preset the camcorder to record the picture with the desired picture quality.When presetting, adjust the picture by shooting a subject and checking the picturedisplayed on a TV using the menu settings.(1) Press CUSTOM PRESET to display the CUSTOM PRESET menu in standby or
memory mode.
(2) Press the SEL/PUSH EXEC dial.(3) Turn the SEL/PUSH EXEC dial to select SET, then press the dial.(4) Turn the SEL/PUSH EXEC dial to select ON, then press the dial.(5) Turn the SEL/PUSH EXEC dial to select the desired item, then press the dial.(6) Turn the SEL/PUSH EXEC dial to adjust the selected item, then press the dial.(7) Press CUSTOM PRESET.
The CUSTOM PRESET menu disappears and the indicator appears on theLCD screen or in the viewfinder.
2-4
5,6
1
7
CUSTOM PRESET
[CP] : END
CUSTOM PRESET STBY
[CP] : END
CUSTOM PRESET STBYSETCOLOR LVLSHARPNESSWB SH I FTAE SH I FTAGC LIMITRESET
RETURN
OFF
[CP] : END
CUSTOM PRESET STBYSETCOLOR LVLSHARPNESSWB SH I FTAE SH I FTAGC LIMITRESET
RETURN
OFFON
[CP] : END
CUSTOM PRESET STBYSETCOLOR LVLSHARPNESSWB SH I FT
AE SH I FTAGC LIMITRESET
RETURN
ON
[CP] : END
CUSTOM PRESET STBYSETCOLOR LVLSHARPNESSWB SH I FTAE SH I FTAGC LIMITRESET
RETURN
[CP] : END
CUSTOM PRESET STBY
COLOR LVL
[CP] : END
SETCOLOR LVLSHARPNESSWB SH I FTAE SH I FTAGC LIMITRESET
OFF
OFF
CUSTOM PRESET
CUSTOM PRESET
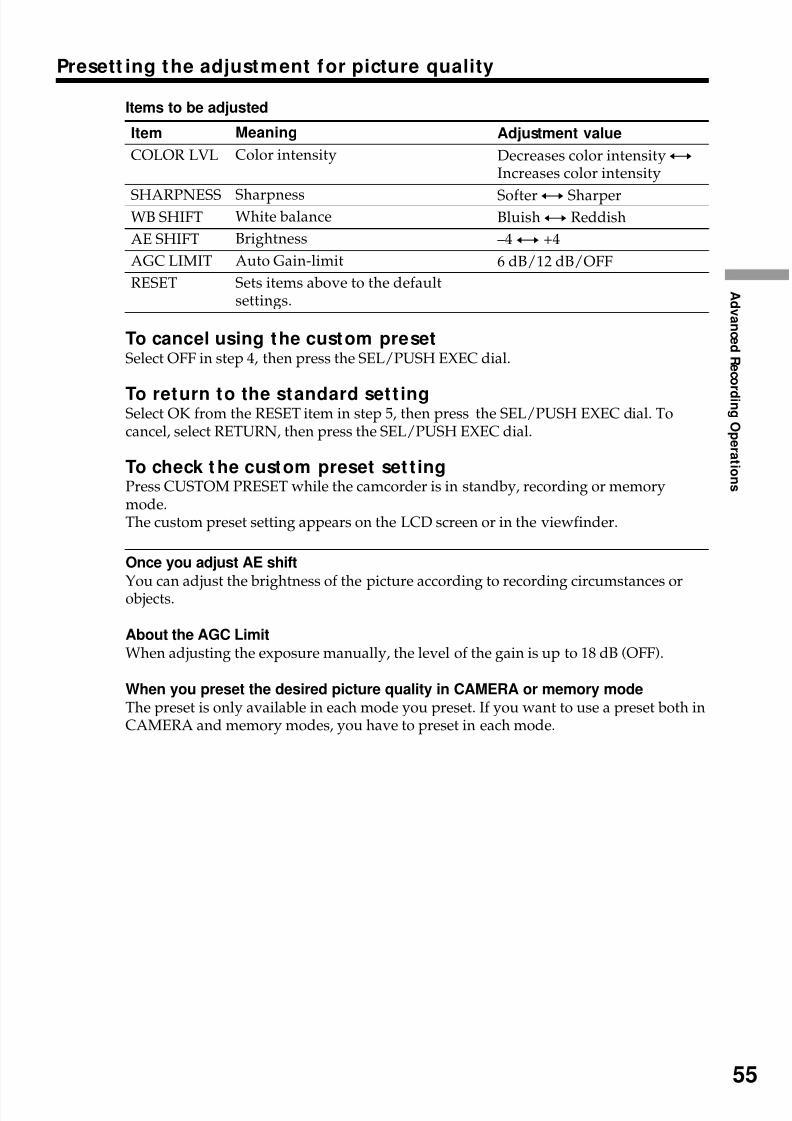
8/8/2019 276ba559b616f0752a9d1ab6240c7e96
http://slidepdf.com/reader/full/276ba559b616f0752a9d1ab6240c7e96 55/176
55
A d v an c e d R e c o
r d i n g O p er a t i on s
Presett ing the adjustment for picture quality
Items to be adjusted
Item
COLOR LVL
SHARPNESSWB SHIFT
AE SHIFT
AGC LIMIT
RESET
To cancel using the custom presetSelect OFF in step 4, then press the SEL/PUSH EXEC dial.
To return to the standard sett ingSelect OK from the RESET item in step 5, then press the SEL/PUSH EXEC dial. Tocancel, select RETURN, then press the SEL/PUSH EXEC dial.
To check t he custom preset set t ingPress CUSTOM PRESET while the camcorder is in standby, recording or memorymode.The custom preset setting appears on the LCD screen or in the viewfinder.
Once you adjust AE shift
You can adjust the brightness of the picture according to recording circumstances orobjects.
About the AGC Limit
When adjusting the exposure manually, the level of the gain is up to 18 dB (OFF).
When you preset the desired picture quality in CAMERA or memory mode
The preset is only available in each mode you preset. If you want to use a preset both inCAMERA and memory modes, you have to preset in each mode.
Meaning
Color intensity
SharpnessWhite balance
Brightness
Auto Gain-limit
Sets items above to the defaultsettings.
Adjustment value
Decreases color intensityyIncreases color intensity
Softery SharperBluishy Reddish
–4y +4
6 dB/12 dB/OFF
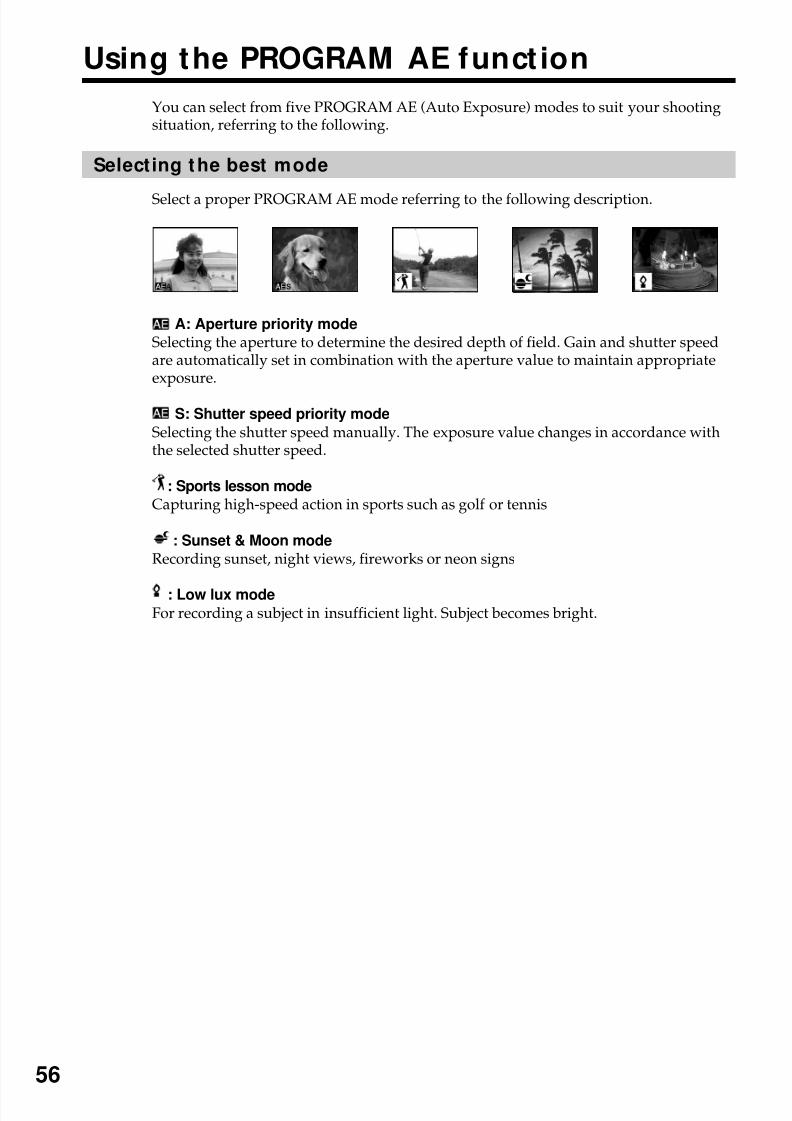
8/8/2019 276ba559b616f0752a9d1ab6240c7e96
http://slidepdf.com/reader/full/276ba559b616f0752a9d1ab6240c7e96 56/176
56
Using the PROGRAM AE function
You can select from five PROGRAM AE (Auto Exposure) modes to suit your shootingsituation, referring to the following.
Selecting the best mode
Select a proper PROGRAM AE mode referring to the following description.
A: Aperture priority mode
Selecting the aperture to determine the desired depth of field. Gain and shutter speedare automatically set in combination with the aperture value to maintain appropriateexposure.
S: Shutter speed priority mode
Selecting the shutter speed manually. The exposure value changes in accordance withthe selected shutter speed.
: Sports lesson mode
Capturing high-speed action in sports such as golf or tennis
: Sunset & Moon mode
Recording sunset, night views, fireworks or neon signs
: Low lux modeFor recording a subject in insufficient light. Subject becomes bright.
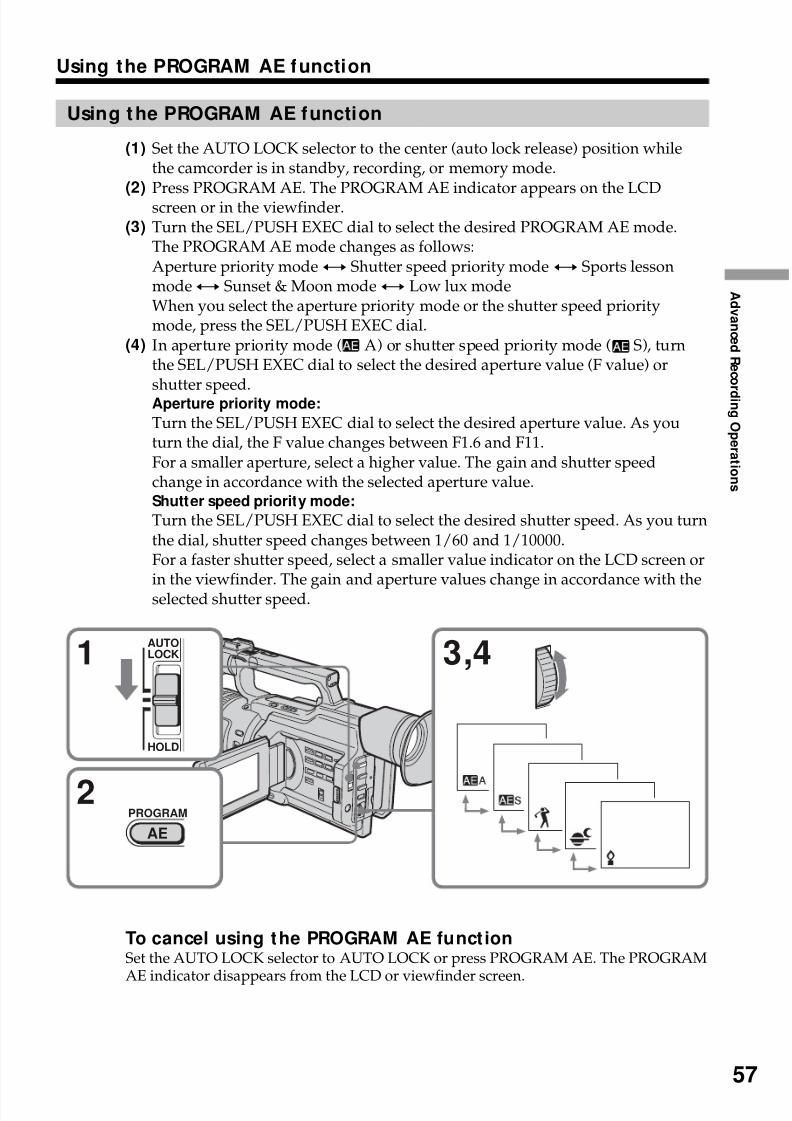
8/8/2019 276ba559b616f0752a9d1ab6240c7e96
http://slidepdf.com/reader/full/276ba559b616f0752a9d1ab6240c7e96 57/176
57
A d v an c e d R e c o
r d i n g O p er a t i on s
Using the PROGRAM AE function
Using the PROGRAM AE function
(1) Set the AUTO LOCK selector to the center (auto lock release) position whilethe camcorder is in standby, recording, or memory mode.
(2)Press PROGRAM AE. The PROGRAM AE indicator appears on the LCDscreen or in the viewfinder.
(3) Turn the SEL/PUSH EXEC dial to select the desired PROGRAM AE mode.The PROGRAM AE mode changes as follows:Aperture priority modey Shutter speed priority modey Sports lessonmodey Sunset & Moon modey Low lux modeWhen you select the aperture priority mode or the shutter speed prioritymode, press the SEL/PUSH EXEC dial.
(4) In aperture priority mode ( A) or shutter speed priority mode ( S), turnthe SEL/PUSH EXEC dial to select the desired aperture value (F value) or
shutter speed.Aperture priority mode:
Turn the SEL/PUSH EXEC dial to select the desired aperture value. As youturn the dial, the F value changes between F1.6 and F11.For a smaller aperture, select a higher value. The gain and shutter speedchange in accordance with the selected aperture value.Shutter speed priority mode:
Turn the SEL/PUSH EXEC dial to select the desired shutter speed. As you turnthe dial, shutter speed changes between 1/60 and 1/10000.For a faster shutter speed, select a smaller value indicator on the LCD screen orin the viewfinder. The gain and aperture values change in accordance with theselected shutter speed.
To cancel using the PROGRAM AE functionSet the AUTO LOCK selector to AUTO LOCK or press PROGRAM AE. The PROGRAM
AE indicator disappears from the LCD or viewfinder screen.
3,41
2
AUTO
LOCK
HOLD
PROGRAM
AE
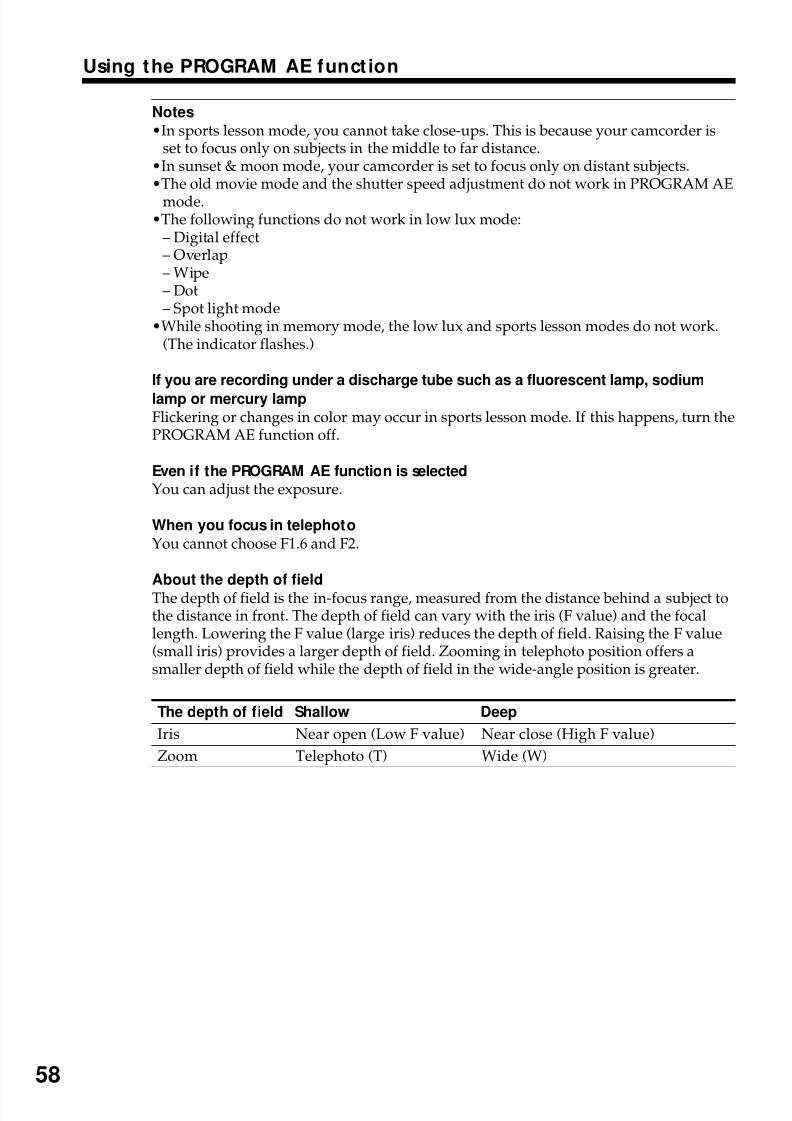
8/8/2019 276ba559b616f0752a9d1ab6240c7e96
http://slidepdf.com/reader/full/276ba559b616f0752a9d1ab6240c7e96 58/176
58
Notes
•In sports lesson mode, you cannot take close-ups. This is because your camcorder isset to focus only on subjects in the middle to far distance.
•In sunset & moon mode, your camcorder is set to focus only on distant subjects.•The old movie mode and the shutter speed adjustment do not work in PROGRAM AE
mode.•The following functions do not work in low lux mode:
– Digital effect– Overlap– Wipe– Dot– Spot light mode
•While shooting in memory mode, the low lux and sports lesson modes do not work.(The indicator flashes.)
If you are recording under a discharge tube such as a fluorescent lamp, sodium
lamp or mercury lampFlickering or changes in color may occur in sports lesson mode. If this happens, turn thePROGRAM AE function off.
Even if the PROGRAM AE function is selectedYou can adjust the exposure.
When you focus in telephoto
You cannot choose F1.6 and F2.
About the depth of field
The depth of field is the in-focus range, measured from the distance behind a subject tothe distance in front. The depth of field can vary with the iris (F value) and the focallength. Lowering the F value (large iris) reduces the depth of field. Raising the F value(small iris) provides a larger depth of field. Zooming in telephoto position offers asmaller depth of field while the depth of field in the wide-angle position is greater.
The depth of field Shallow Deep
Iris Near open (Low F value) Near close (High F value)
Zoom Telephoto (T) Wide (W)
Using the PROGRAM AE funct ion
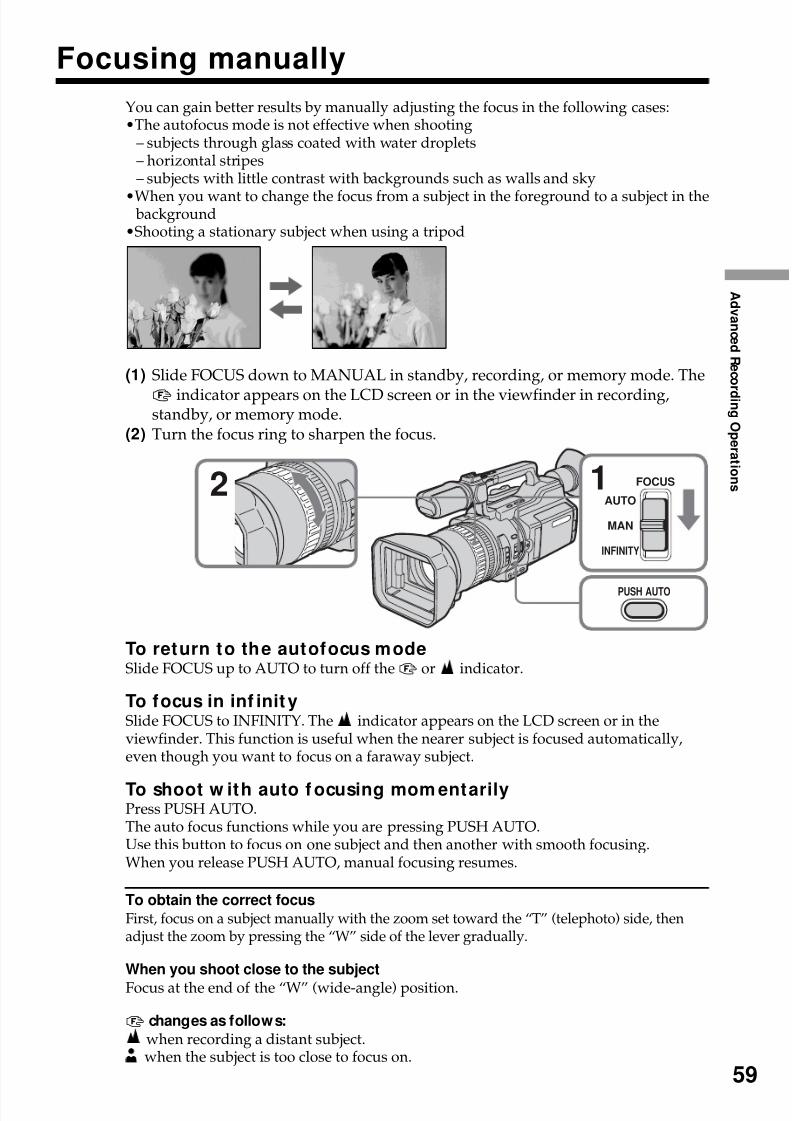
8/8/2019 276ba559b616f0752a9d1ab6240c7e96
http://slidepdf.com/reader/full/276ba559b616f0752a9d1ab6240c7e96 59/176
59
A d v an c e d R e c o
r d i n g O p er a t i on s
Focusing manually
You can gain better results by manually adjusting the focus in the following cases:•The autofocus mode is not effective when shooting
– subjects through glass coated with water droplets– horizontal stripes– subjects with little contrast with backgrounds such as walls and sky
•When you want to change the focus from a subject in the foreground to a subject in the background
•Shooting a stationary subject when using a tripod
(1) Slide FOCUS down to MANUAL in standby, recording, or memory mode. The
9 indicator appears on the LCD screen or in the viewfinder in recording,standby, or memory mode.
(2) Turn the focus ring to sharpen the focus.
To return to the autofocus modeSlide FOCUS up to AUTO to turn off the9 or indicator.
To focus in inf initySlide FOCUS to INFINITY. The indicator appears on the LCD screen or in theviewfinder. This function is useful when the nearer subject is focused automatically,even though you want to focus on a faraway subject.
To shoot w ith auto f ocusing mom entarilyPress PUSH AUTO.The auto focus functions while you are pressing PUSH AUTO.Use this button to focus on one subject and then another with smooth focusing.When you release PUSH AUTO, manual focusing resumes.
To obtain the correct focus
First, focus on a subject manually with the zoom set toward the “T” (telephoto) side, thenadjust the zoom by pressing the “W” side of the lever gradually.
When you shoot close to the subject
Focus at the end of the “W” (wide-angle) position.
9 changes as follows:
when recording a distant subject.when the subject is too close to focus on.
2
PUSH AUTO
FOCUS
MAN
AUTO
INFINITY
1
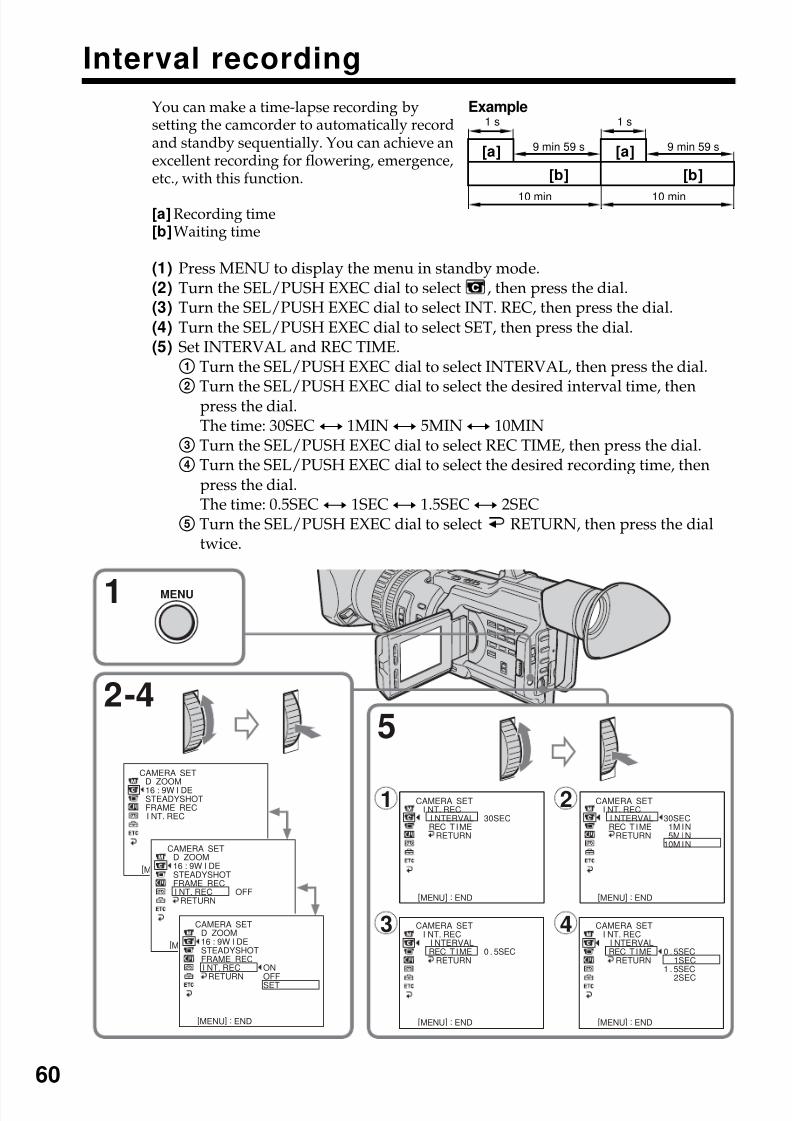
8/8/2019 276ba559b616f0752a9d1ab6240c7e96
http://slidepdf.com/reader/full/276ba559b616f0752a9d1ab6240c7e96 60/176
60
Interval recording
You can make a time-lapse recording bysetting the camcorder to automatically recordand standby sequentially. You can achieve anexcellent recording for flowering, emergence,etc., with this function.
[a] Recording time[b]Waiting time
(1) Press MENU to display the menu in standby mode.(2) Turn the SEL/PUSH EXEC dial to select , then press the dial.(3) Turn the SEL/PUSH EXEC dial to select INT. REC, then press the dial.(4) Turn the SEL/PUSH EXEC dial to select SET, then press the dial.(5) Set INTERVAL and REC TIME.1 Turn the SEL/PUSH EXEC dial to select INTERVAL, then press the dial.
2 Turn the SEL/PUSH EXEC dial to select the desired interval time, thenpress the dial.The time: 30SECy 1MINy 5MINy 10MIN
3 Turn the SEL/PUSH EXEC dial to select REC TIME, then press the dial.4 Turn the SEL/PUSH EXEC dial to select the desired recording time, then
press the dial.The time: 0.5SECy 1SECy 1.5SECy 2SEC
5 Turn the SEL/PUSH EXEC dial to select RETURN, then press the dialtwice.
1
52-4
1 2
3 4
MENU
CAMERA SET
D ZOOM16 : 9W I DESTEADYSHOTFRAME REC I NT. REC
[MENU] : END
CAMERA SETD ZOOM16 : 9W I DESTEADYSHOTFRAME REC I NT. REC
RETURNOFF
[MENU] : END
CAMERA SET I NT. REC
I NTERVALREC T I ME
RETURN
30SEC
[MENU] : END
CAMERA SET I NT. REC
I NTERVALREC T I ME
RETURN
30SEC1M I N5M I N
10M I N
[MENU] : END
CAMERA SET I NT. REC
I NTERVALREC T I ME
RETURN0 . 5SEC
[MENU] : END
CAMERA SET I NT. REC
I NTERVALREC T I ME
RETURN0 . 5SEC
1SEC1 . 5SEC
2SEC
[MENU] : END
CAMERA SETD ZOOM16 : 9W I DESTEADYSHOTFRAME REC I NT. REC
RETURNONOFFSET
[MENU] : END
10 min10 min
1 s 1 s
9 min 59 s 9 min 59 s[a] [a]
[b] [b]
Example
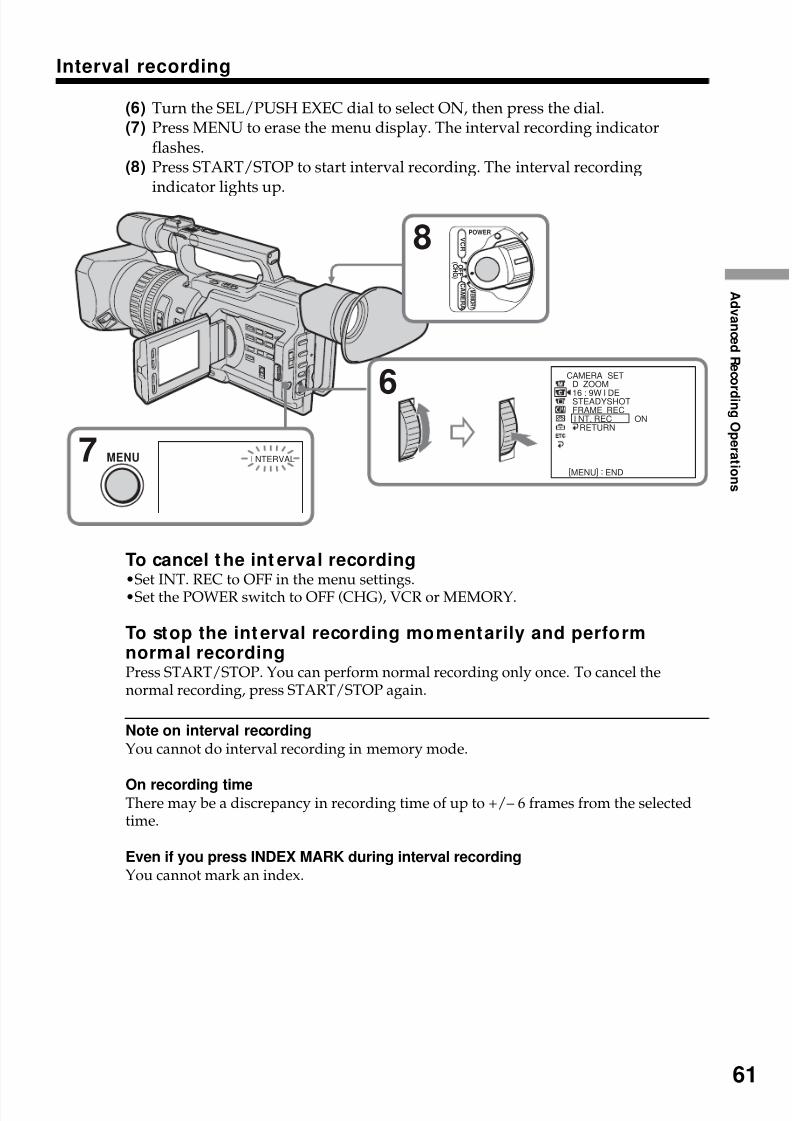
8/8/2019 276ba559b616f0752a9d1ab6240c7e96
http://slidepdf.com/reader/full/276ba559b616f0752a9d1ab6240c7e96 61/176
61
A d v an c e d R e c o
r d i n g O p er a t i on s
Interval recording
(6) Turn the SEL/PUSH EXEC dial to select ON, then press the dial.(7) Press MENU to erase the menu display. The interval recording indicator
flashes.(8) Press START/STOP to start interval recording. The interval recording
indicator lights up.
To cancel the int erval recording•Set INT. REC to OFF in the menu settings.•Set the POWER switch to OFF (CHG), VCR or MEMORY.
To stop the int erval recording momentarily and performnormal recordingPress START/STOP. You can perform normal recording only once. To cancel thenormal recording, press START/STOP again.
Note on interval recording
You cannot do interval recording in memory mode.
On recording timeThere may be a discrepancy in recording time of up to +/– 6 frames from the selectedtime.
Even if you press INDEX MARK during interval recording
You cannot mark an index.
7
6
8
MENU
POWER
O F F
( C H G )
C A ME R A
M E M O R Y
V C R
I NTERVAL
CAMERA SETD ZOOM
16 : 9W I DESTEADYSHOTFRAME REC I NT. REC
RETURNON
[MENU] : END
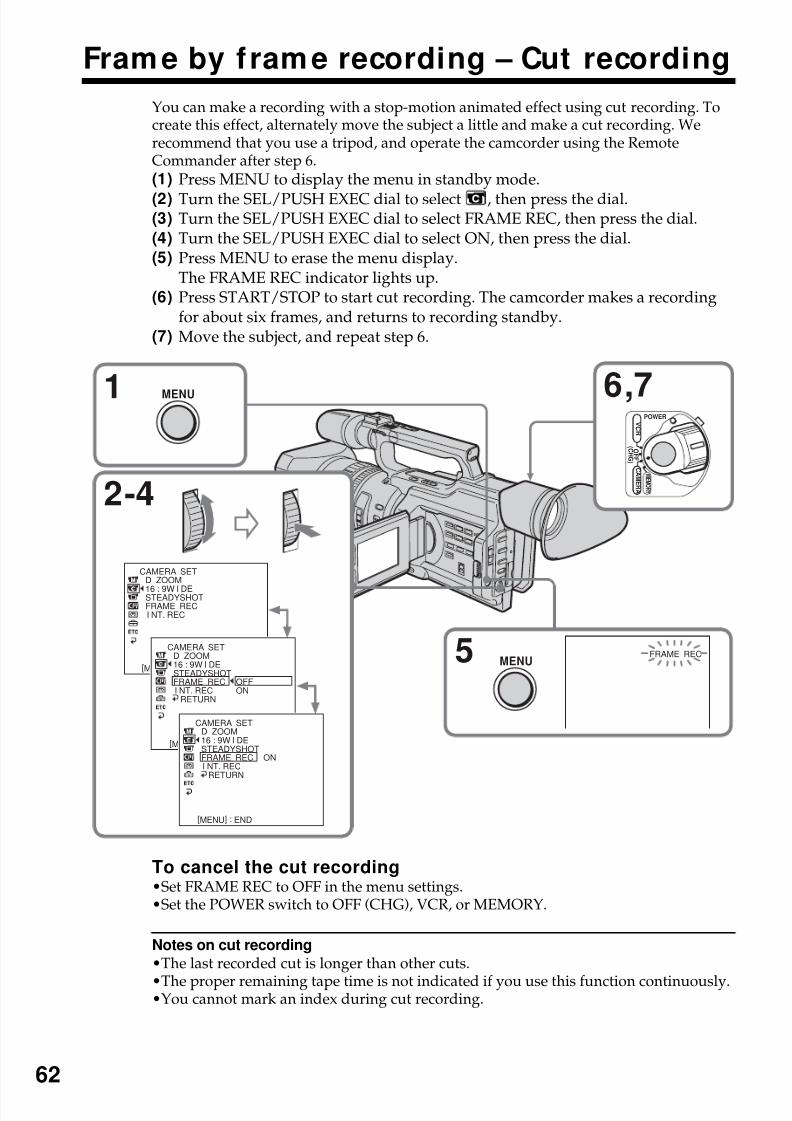
8/8/2019 276ba559b616f0752a9d1ab6240c7e96
http://slidepdf.com/reader/full/276ba559b616f0752a9d1ab6240c7e96 62/176
62
Frame by frame recording – Cut recording
You can make a recording with a stop-motion animated effect using cut recording. Tocreate this effect, alternately move the subject a little and make a cut recording. Werecommend that you use a tripod, and operate the camcorder using the RemoteCommander after step 6.(1) Press MENU to display the menu in standby mode.
(2) Turn the SEL/PUSH EXEC dial to select , then press the dial.(3) Turn the SEL/PUSH EXEC dial to select FRAME REC, then press the dial.(4) Turn the SEL/PUSH EXEC dial to select ON, then press the dial.(5) Press MENU to erase the menu display.
The FRAME REC indicator lights up.(6) Press START/STOP to start cut recording. The camcorder makes a recording
for about six frames, and returns to recording standby.(7) Move the subject, and repeat step 6.
To cancel the cut recording•Set FRAME REC to OFF in the menu settings.•Set the POWER switch to OFF (CHG), VCR, or MEMORY.
Notes on cut recording
•The last recorded cut is longer than other cuts.
•The proper remaining tape time is not indicated if you use this function continuously.•You cannot mark an index during cut recording.
1 6,7MENU
5 MENU
POWER
O F F
( C H G )
C A ME R A
M E M O R Y
V C R
FRAME REC
CAMERA SETD ZOOM
16 : 9W I DESTEADYSHOTFRAME REC I NT. REC
[MENU] : END
CAMERA SETD ZOOM16 : 9W I DESTEADYSHOTFRAME REC I NT. REC
RETURN
OFFON
[MENU] : END
CAMERA SETD ZOOM16 : 9W I DESTEADYSHOTFRAME REC I NT. REC
RETURN
ON
[MENU] : END
2-4
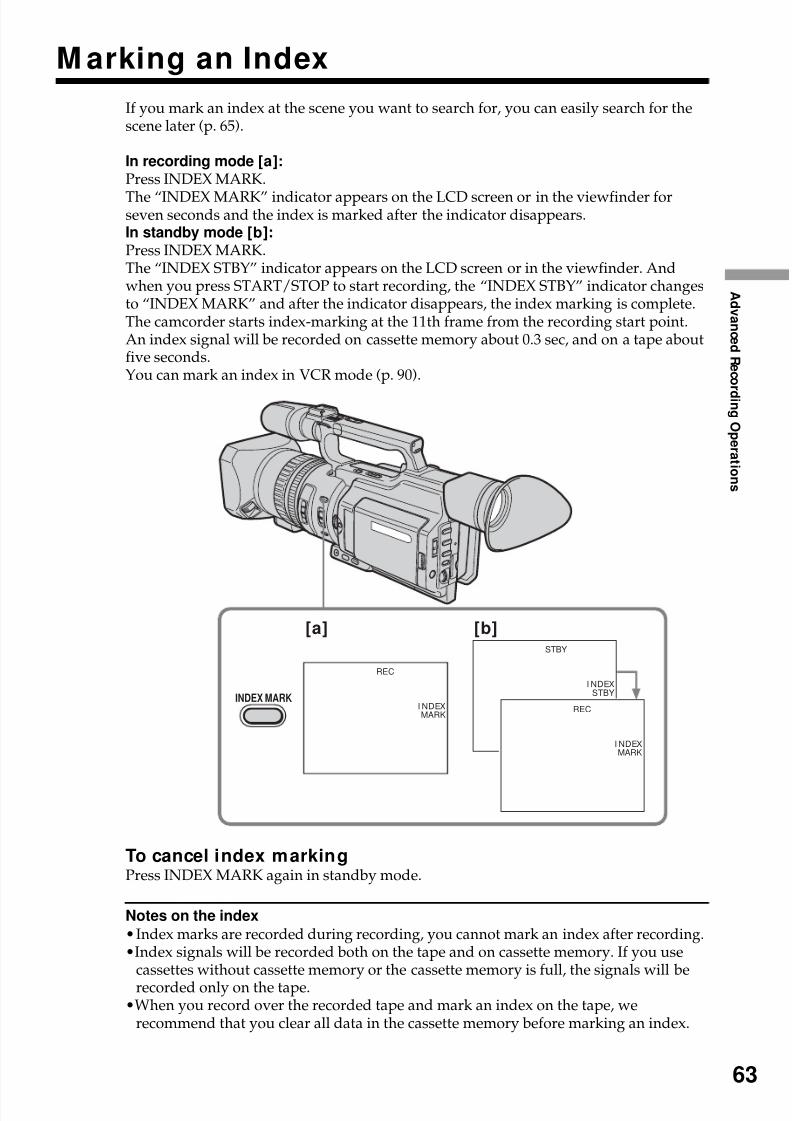
8/8/2019 276ba559b616f0752a9d1ab6240c7e96
http://slidepdf.com/reader/full/276ba559b616f0752a9d1ab6240c7e96 63/176
63
A d v an c e d R e c o
r d i n g O p er a t i on s
M arking an Index
If you mark an index at the scene you want to search for, you can easily search for thescene later (p. 65).
In recording mode [a]:Press INDEX MARK.
The “INDEX MARK” indicator appears on the LCD screen or in the viewfinder forseven seconds and the index is marked after the indicator disappears.In standby mode [b]:Press INDEX MARK.The “INDEX STBY” indicator appears on the LCD screen or in the viewfinder. Andwhen you press START/STOP to start recording, the “INDEX STBY” indicator changesto “INDEX MARK” and after the indicator disappears, the index marking is complete.The camcorder starts index-marking at the 11th frame from the recording start point.An index signal will be recorded on cassette memory about 0.3 sec, and on a tape aboutfive seconds.You can mark an index in VCR mode (p. 90).
To cancel index markingPress INDEX MARK again in standby mode.
Notes on the index
•Index marks are recorded during recording, you cannot mark an index after recording.•Index signals will be recorded both on the tape and on cassette memory. If you use
cassettes without cassette memory or the cassette memory is full, the signals will berecorded only on the tape.
•When you record over the recorded tape and mark an index on the tape, werecommend that you clear all data in the cassette memory before marking an index.
STBY
I NDEXSTBY
REC
I NDEXMARK
INDEX MARK
REC
I NDEXMARK
[a] [b]
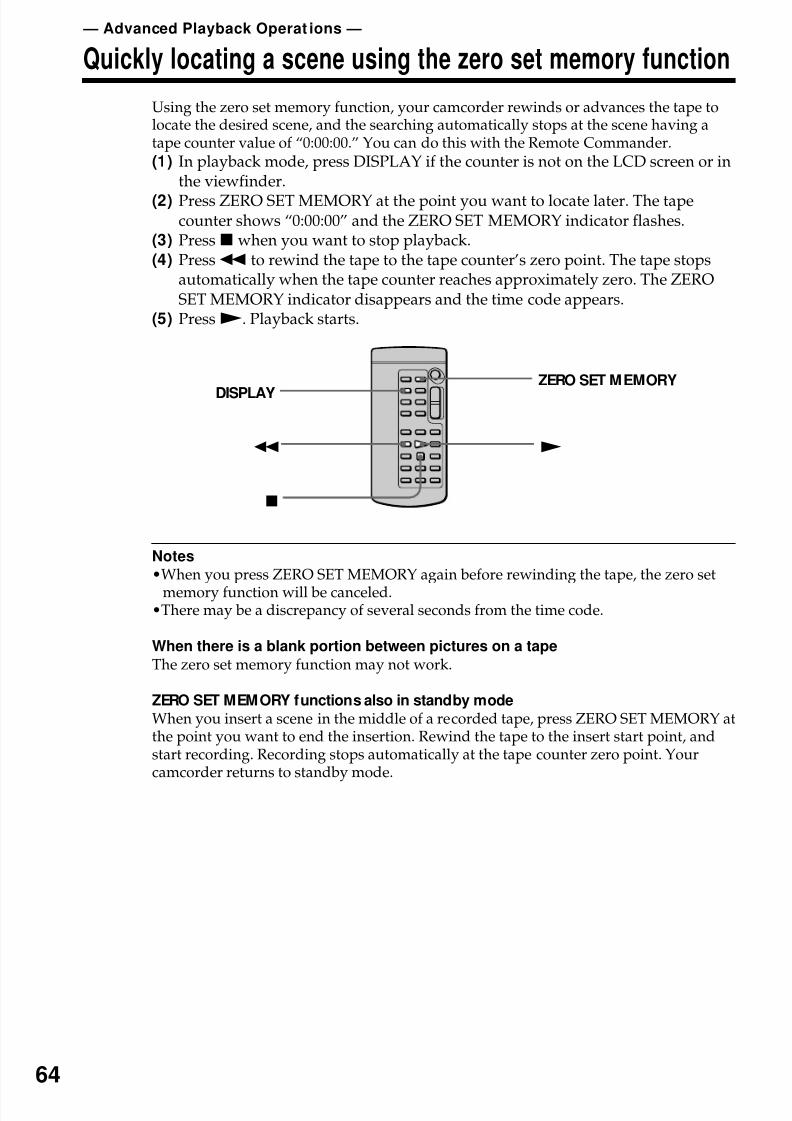
8/8/2019 276ba559b616f0752a9d1ab6240c7e96
http://slidepdf.com/reader/full/276ba559b616f0752a9d1ab6240c7e96 64/176
64
— Advanced Playback Operat ions —
Quickly locating a scene using the zero set memory function
Using the zero set memory function, your camcorder rewinds or advances the tape tolocate the desired scene, and the searching automatically stops at the scene having atape counter value of “0:00:00.” You can do this with the Remote Commander.(1) In playback mode, press DISPLAY if the counter is not on the LCD screen or in
the viewfinder.
(2) Press ZERO SET MEMORY at the point you want to locate later. The tapecounter shows “0:00:00” and the ZERO SET MEMORY indicator flashes.
(3) Pressx when you want to stop playback.(4) Pressm to rewind the tape to the tape counter’s zero point. The tape stops
automatically when the tape counter reaches approximately zero. The ZEROSET MEMORY indicator disappears and the time code appears.
(5) PressN. Playback starts.
Notes
•When you press ZERO SET MEMORY again before rewinding the tape, the zero set
memory function will be canceled.•There may be a discrepancy of several seconds from the time code.
When there is a blank portion between pictures on a tape
The zero set memory function may not work.
ZERO SET MEMORY functions also in standby mode
When you insert a scene in the middle of a recorded tape, press ZERO SET MEMORY atthe point you want to end the insertion. Rewind the tape to the insert start point, andstart recording. Recording stops automatically at the tape counter zero point. Yourcamcorder returns to standby mode.
DISPLAY
m
x
ZERO SET MEMORY
N
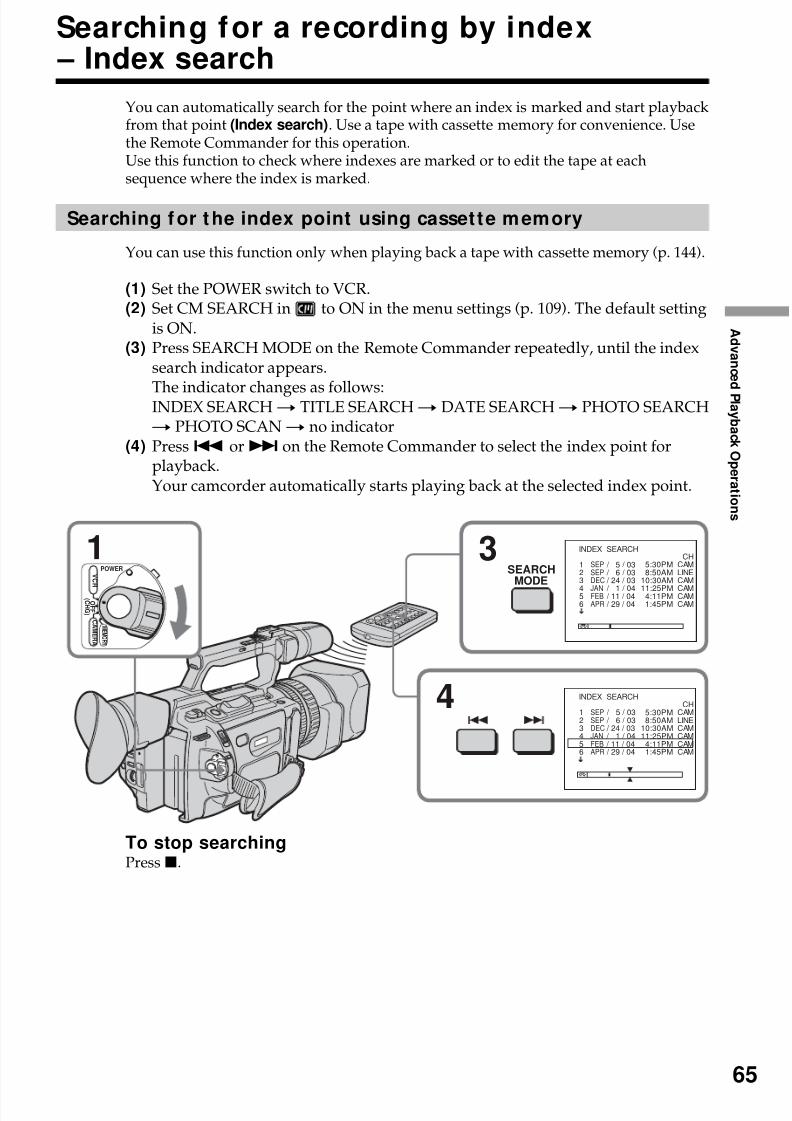
8/8/2019 276ba559b616f0752a9d1ab6240c7e96
http://slidepdf.com/reader/full/276ba559b616f0752a9d1ab6240c7e96 65/176
65
A d v an c e d P l a y b a ck O p er a t i on s
Searching for a recording by index – Index search
You can automatically search for the point where an index is marked and start playbackfrom that point (Index search). Use a tape with cassette memory for convenience. Usethe Remote Commander for this operation.Use this function to check where indexes are marked or to edit the tape at eachsequence where the index is marked.
Searching f or the index point using cassette memory
You can use this function only when playing back a tape with cassette memory (p. 144).
(1) Set the POWER switch to VCR.(2) Set CM SEARCH in to ON in the menu settings (p. 109). The default setting
is ON.(3) Press SEARCH MODE on the Remote Commander repeatedly, until the index
search indicator appears.
The indicator changes as follows:INDEX SEARCHt TITLE SEARCHt DATE SEARCHt PHOTO SEARCHt PHOTO SCANt no indicator
(4) Press. or> on the Remote Commander to select the index point forplayback.Your camcorder automatically starts playing back at the selected index point.
To stop searchingPressx.
3
4
1POWER
O F F
( C H G )
C A ME R A
M E M O R Y
V C R
SEARCH
MODE
INDEX SEARCH
1 SEP / 5 / 032 SEP / 6 / 033 DEC / 24 / 03
4 JAN / 1 / 045 FEB / 11 / 046 APR / 29 / 04
5:30PM8:50AM
10:30AM
11:25PM4:11PM1:45PM
CHCAMLINECAM
CAMCAMCAM
5:30PM8:50AM
10:30AM11:25PM4:11PM1:45PM
CHCAMLINECAMCAMCAMCAM
INDEX SEARCH
1 SEP / 5 / 032 SEP / 6 / 033 DEC / 24 / 034 JAN / 1 / 045 FEB / 11 / 046 APR / 29 / 04
8/8/2019 276ba559b616f0752a9d1ab6240c7e96
http://slidepdf.com/reader/full/276ba559b616f0752a9d1ab6240c7e96 66/176
66
Searching for a recording by index – Index search
In the mark
•The bar in the mark indicates the present point on the tape.•The mark in the indicates the actual point you are trying to search for.
If a tape has a blank portion between recorded portionsThe index search function may not work correctly.
If you mark an index onto an external input signal
“LINE” appears in the CH column.
The index of the recording start point when recorded from external audio
equipment
The index mark is not recorded in cassette memory when recorded from external audioequipment. If you want to search for the index point, set CM SEARCH to OFF in themenu settings and search for the index point without cassette memory.
Searching for the index point w ithout using cassett e memory
(1) Set the POWER switch to VCR.(2) Set CM SEARCH in to OFF in the menu settings (p. 109). If using a tape
without cassette memory, skip this step.(3) Press SEARCH MODE on the Remote Commander repeatedly, until the index
search indicator appears.The indicator changes as follows:INDEX SEARCHt DATE SEARCHt PHOTO SEARCHt PHOTO SCANt no indicator
(4) Press. on the Remote Commander to search for the previous index pointor press > on the Remote Commander to search for the next index point.Your camcorder automatically starts playback at the selected index point. Eachtime you press. or>, your camcorder searches for the previous or nextindex point.
To stop searchingPressx.
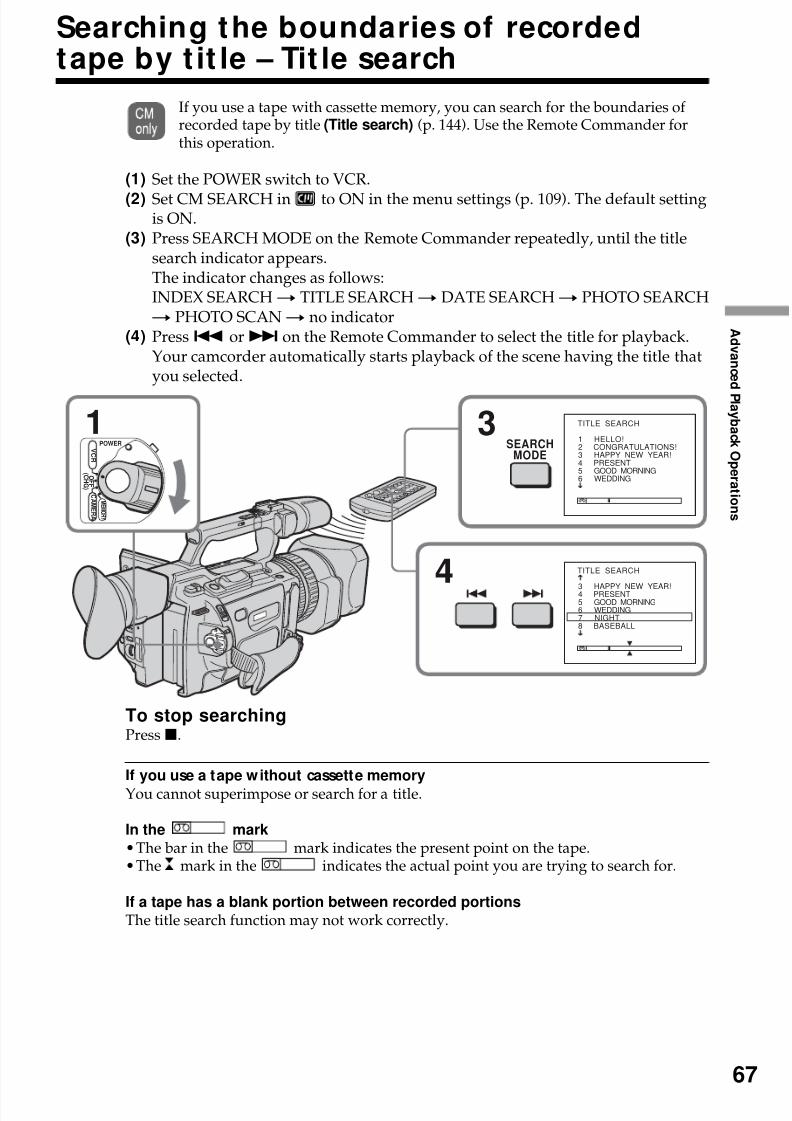
8/8/2019 276ba559b616f0752a9d1ab6240c7e96
http://slidepdf.com/reader/full/276ba559b616f0752a9d1ab6240c7e96 67/176
67
A d v an c e d P l a y b a ck O p er a t i on s
Searching the boundaries of recordedtape by t it le – Tit le search
If you use a tape with cassette memory, you can search for the boundaries of recorded tape by title (Title search) (p. 144). Use the Remote Commander forthis operation.
(1) Set the POWER switch to VCR.
(2) Set CM SEARCH in to ON in the menu settings (p. 109). The default settingis ON.
(3) Press SEARCH MODE on the Remote Commander repeatedly, until the titlesearch indicator appears.The indicator changes as follows:INDEX SEARCHt TITLE SEARCHt DATE SEARCHt PHOTO SEARCHt PHOTO SCANt no indicator
(4) Press. or> on the Remote Commander to select the title for playback.Your camcorder automatically starts playback of the scene having the title thatyou selected.
To stop searchingPressx.
If you use a tape without cassette memory
You cannot superimpose or search for a title.
In the mark
•The bar in the mark indicates the present point on the tape.•The mark in the indicates the actual point you are trying to search for.
If a tape has a blank portion between recorded portions
The title search function may not work correctly.
3
4
1POWER
O F F
( C H G )
C A ME R A
M E M O R Y
V C R
SEARCHMODE
TITLE SEARCH
1 HELLO!2 CONGRATULATIONS!3 HAPPY NEW YEAR!4 PRESENT5 GOOD MORNING6 WEDDING
TITLE SEARCH
3 HAPPY NEW YEAR!4 PRESENT5 GOOD MORNING6 WEDDING7 NIGHT8 BASEBALL
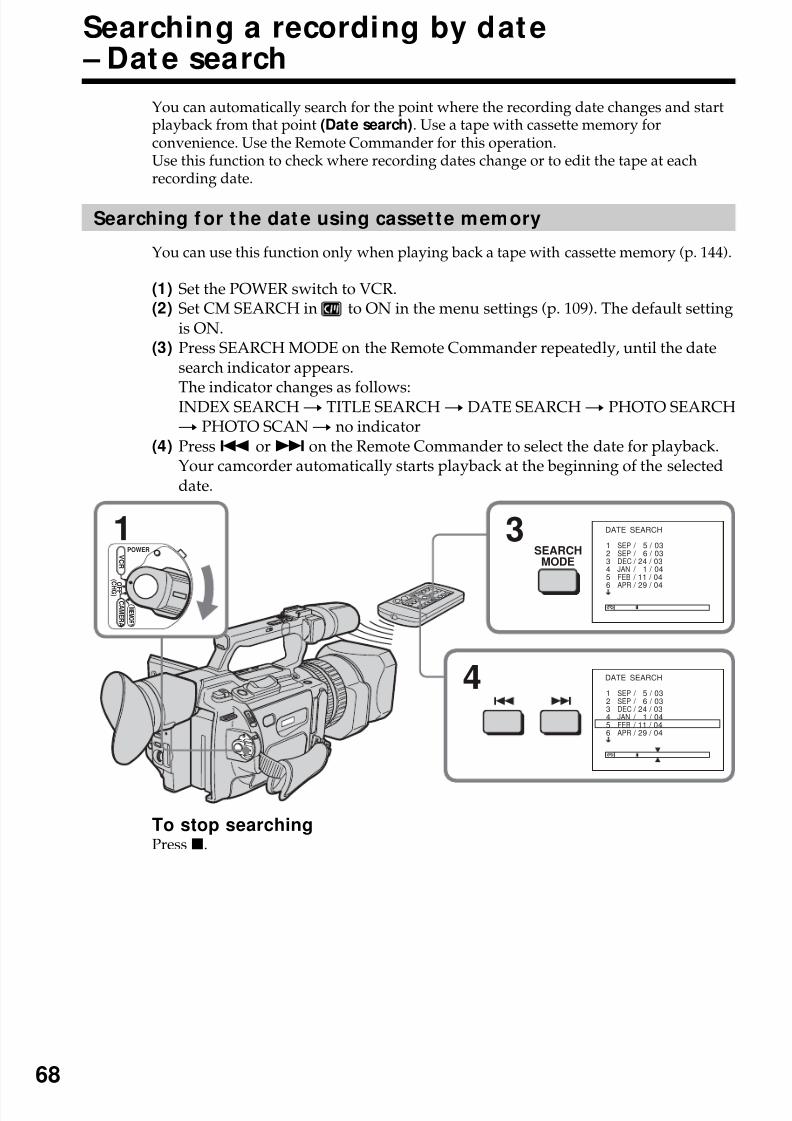
8/8/2019 276ba559b616f0752a9d1ab6240c7e96
http://slidepdf.com/reader/full/276ba559b616f0752a9d1ab6240c7e96 68/176
68
Searching a recording by date – Date search
You can automatically search for the point where the recording date changes and startplayback from that point (Date search). Use a tape with cassette memory forconvenience. Use the Remote Commander for this operation.Use this function to check where recording dates change or to edit the tape at eachrecording date.
Searching f or the dat e using cassette memory
You can use this function only when playing back a tape with cassette memory (p. 144).
(1) Set the POWER switch to VCR.(2) Set CM SEARCH in to ON in the menu settings (p. 109). The default setting
is ON.(3) Press SEARCH MODE on the Remote Commander repeatedly, until the date
search indicator appears.
The indicator changes as follows:INDEX SEARCHt TITLE SEARCHt DATE SEARCHt PHOTO SEARCHt PHOTO SCANt no indicator
(4) Press. or> on the Remote Commander to select the date for playback.Your camcorder automatically starts playback at the beginning of the selecteddate.
To stop searchingPressx.
3
4
1POWER
O
F F
( C
H G )
C A ME R A
M E M O R Y
V C R
SEARCH
MODE
DATE SEARCH
1 SEP / 5 / 032 SEP / 6 / 033 DEC / 24 / 034 JAN / 1 / 045 FEB / 11 / 04
6APR
/ 29 / 04
DATE SEARCH
1 SEP / 5 / 032 SEP / 6 / 033 DEC / 24 / 034 JAN / 1 / 045 FEB / 11 / 046 APR / 29 / 04
8/8/2019 276ba559b616f0752a9d1ab6240c7e96
http://slidepdf.com/reader/full/276ba559b616f0752a9d1ab6240c7e96 69/176
69
A d v an c e d P l a y b a ck O p er a t i on s
Searching a recording by dat e – Dat e search
Note
If one day’s recording is less than two minutes, your camcorder may not accurately findthe point where the recording date changes.
In the mark•The bar in the mark indicates the present point on the tape.•The mark in the indicates the actual point you are trying to search.
If a tape has a blank portion between recorded portions
The date search function may not work correctly.
Searching for t he date w ithout using cassette mem ory
(1) Set the POWER switch to VCR.(2) Set CM SEARCH in to OFF in the menu settings (p. 109). If using a tape
without cassette memory, skip this step.(3) Press SEARCH MODE on the Remote Commander repeatedly, until the date
search indicator appears.The indicator changes as follows:INDEX SEARCHt DATE SEARCHt PHOTO SEARCHt PHOTO SCANt no indicator
(4) Press. on the Remote Commander to search for the previous date or press> on the Remote Commander to search for the next date. Your camcorderautomatically starts playback at the point where the date changes. Each timeyou press. or>, your camcorder searches for the previous or next date.
To stop searchingPressx.
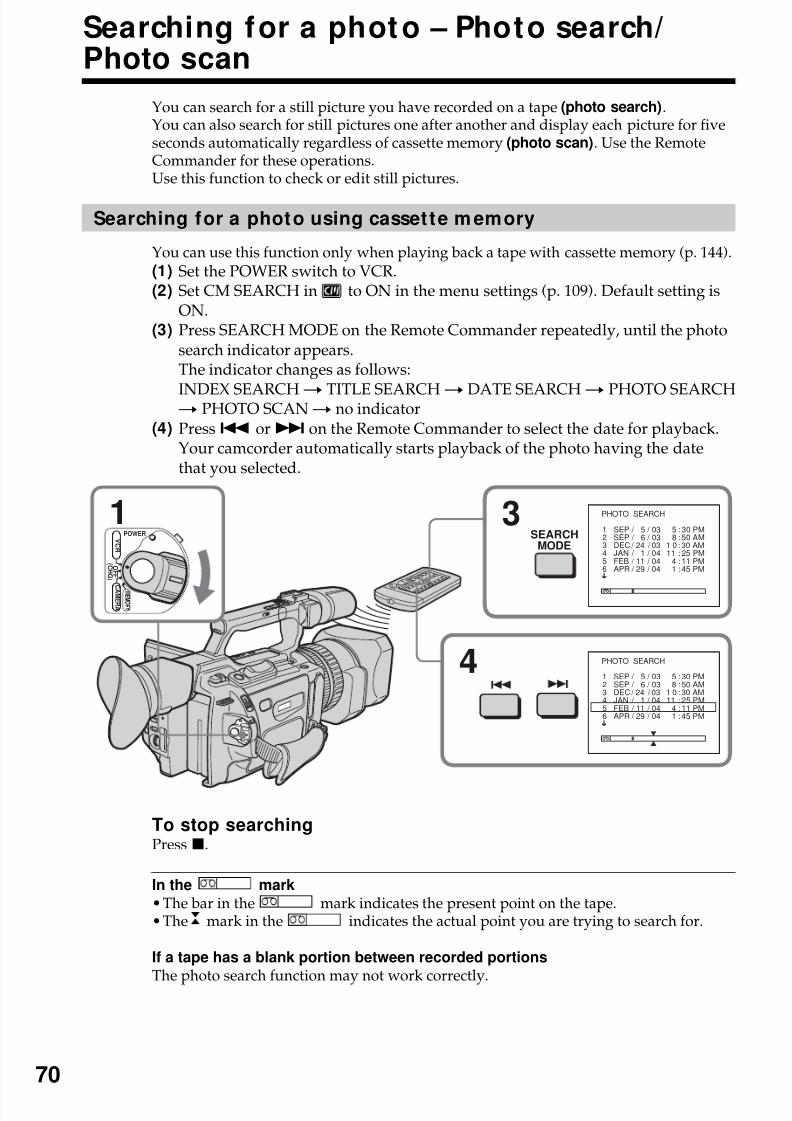
8/8/2019 276ba559b616f0752a9d1ab6240c7e96
http://slidepdf.com/reader/full/276ba559b616f0752a9d1ab6240c7e96 70/176
70
Searching for a photo – Photo search/Photo scan
You can search for a still picture you have recorded on a tape (photo search).You can also search for still pictures one after another and display each picture for fiveseconds automatically regardless of cassette memory (photo scan). Use the RemoteCommander for these operations.Use this function to check or edit still pictures.
Searching for a photo using cassette m emory
You can use this function only when playing back a tape with cassette memory (p. 144).(1) Set the POWER switch to VCR.(2) Set CM SEARCH in to ON in the menu settings (p. 109). Default setting is
ON.(3) Press SEARCH MODE on the Remote Commander repeatedly, until the photo
search indicator appears.The indicator changes as follows:
INDEX SEARCHt TITLE SEARCHt DATE SEARCHt PHOTO SEARCHt PHOTO SCANt no indicator
(4) Press. or> on the Remote Commander to select the date for playback.Your camcorder automatically starts playback of the photo having the datethat you selected.
To stop searchingPress x.
In the mark
•The bar in the mark indicates the present point on the tape.•The mark in the indicates the actual point you are trying to search for.
If a tape has a blank portion between recorded portions
The photo search function may not work correctly.
3
4
1POWER
O F F
( C H G )
C A ME R A
M E M O R Y
V C R
PHOTO SEARCH
1 SEP / 5 / 03 5 : 30 PM2 SEP / 6 / 03 8 : 50 AM3 DEC / 24 / 03 1 0 : 30 AM4 JAN / 1 / 04 11 : 25 PM5 FEB / 11 / 04 4 : 11 PM6 APR / 29 / 04 1 : 45 PM
PHOTO SEARCH
1 SEP / 5 / 03 5 : 30 PM2 SEP / 6 / 03 8 : 50 AM3 DEC / 24 / 03 1 0 : 30 AM4 JAN / 1 / 04 11 : 25 PM5 FEB / 11 / 04 4 : 11 PM6 APR / 29 / 04 1 : 45 PM
SEARCH
MODE
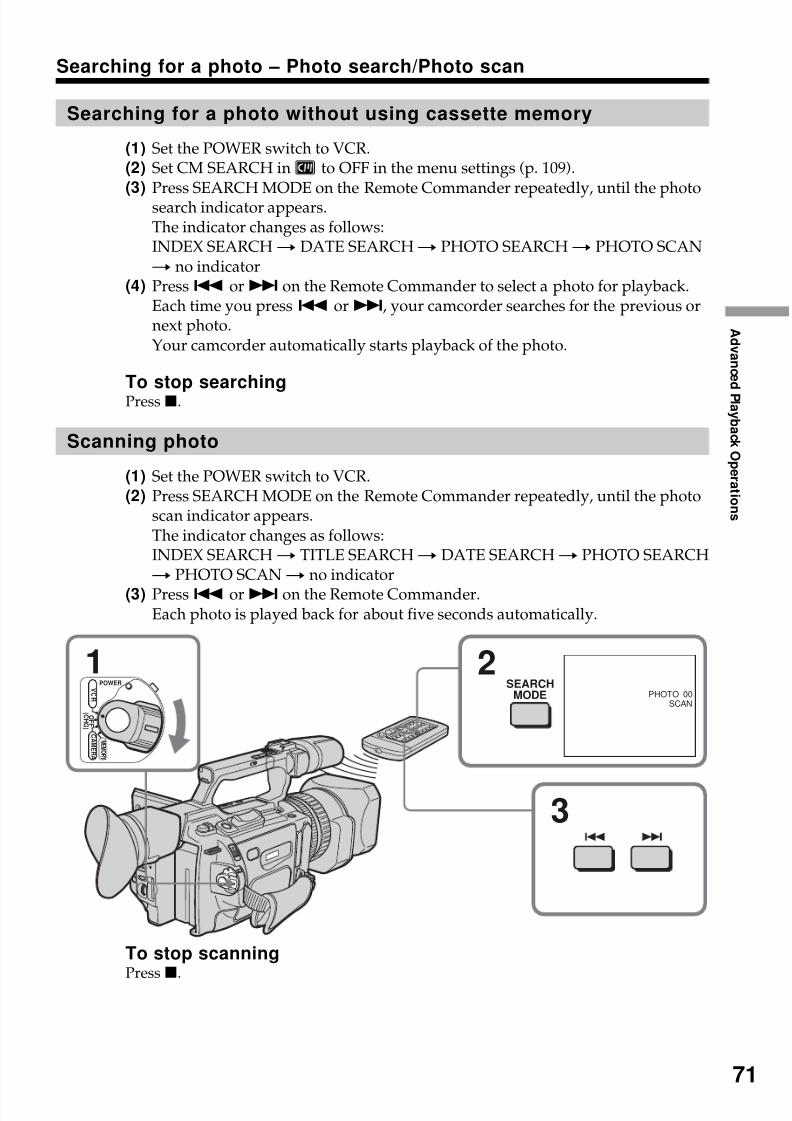
8/8/2019 276ba559b616f0752a9d1ab6240c7e96
http://slidepdf.com/reader/full/276ba559b616f0752a9d1ab6240c7e96 71/176
71
A d v an c e d P l a y b a ck O p er a t i on s
Searching for a photo – Photo search/Photo scan
Searching for a photo without using cassette memory
(1) Set the POWER switch to VCR.(2) Set CM SEARCH in to OFF in the menu settings (p. 109).(3)
Press SEARCH MODE on the Remote Commander repeatedly, until the photosearch indicator appears.The indicator changes as follows:INDEX SEARCHt DATE SEARCHt PHOTO SEARCHt PHOTO SCANt no indicator
(4) Press. or> on the Remote Commander to select a photo for playback.Each time you press. or>, your camcorder searches for the previous ornext photo.Your camcorder automatically starts playback of the photo.
To stop searchingPressx.
Scanning photo
(1) Set the POWER switch to VCR.(2) Press SEARCH MODE on the Remote Commander repeatedly, until the photo
scan indicator appears.The indicator changes as follows:INDEX SEARCHt TITLE SEARCHt DATE SEARCHt PHOTO SEARCHt PHOTO SCANt no indicator
(3) Press. or> on the Remote Commander.Each photo is played back for about five seconds automatically.
To stop scanningPressx.
2
3
1POWER
O F F
( C H G )
C A ME R A
M E M O R Y
V C R PHOTO 00
SCAN
SEARCH
MODE
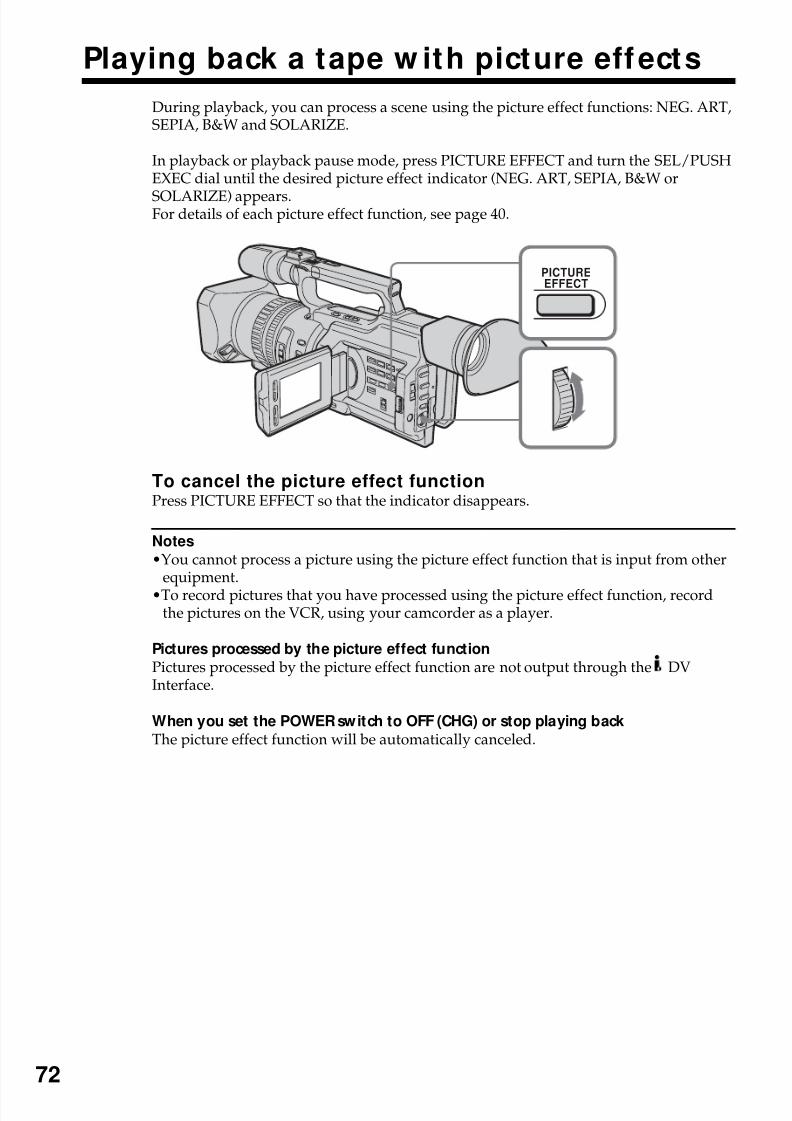
8/8/2019 276ba559b616f0752a9d1ab6240c7e96
http://slidepdf.com/reader/full/276ba559b616f0752a9d1ab6240c7e96 72/176
72
Playing back a tape w ith picture effects
During playback, you can process a scene using the picture effect functions: NEG. ART,SEPIA, B&W and SOLARIZE.
In playback or playback pause mode, press PICTURE EFFECT and turn the SEL/PUSHEXEC dial until the desired picture effect indicator (NEG. ART, SEPIA, B&W or
SOLARIZE) appears.For details of each picture effect function, see page 40.
To cancel the picture effect functionPress PICTURE EFFECT so that the indicator disappears.
Notes
•You cannot process a picture using the picture effect function that is input from otherequipment.
•To record pictures that you have processed using the picture effect function, recordthe pictures on the VCR, using your camcorder as a player.
Pictures processed by the picture effect function
Pictures processed by the picture effect function are not output through the DVInterface.
When you set the POWER switch to OFF (CHG) or stop playing back
The picture effect function will be automatically canceled.
PICTUREEFFECT
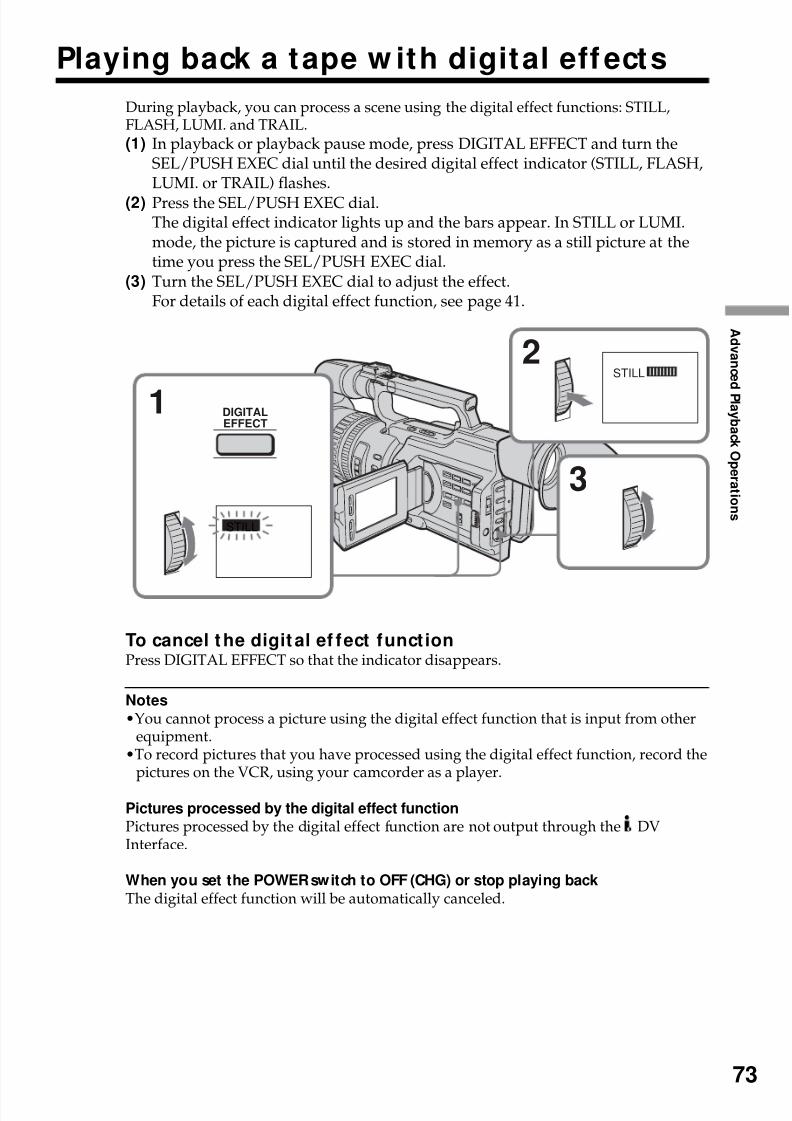
8/8/2019 276ba559b616f0752a9d1ab6240c7e96
http://slidepdf.com/reader/full/276ba559b616f0752a9d1ab6240c7e96 73/176
73
A d v an c e d P l a y b a ck O p er a t i on s
Playing back a tape w ith digital effects
During playback, you can process a scene using the digital effect functions: STILL,FLASH, LUMI. and TRAIL.
(1) In playback or playback pause mode, press DIGITAL EFFECT and turn theSEL/PUSH EXEC dial until the desired digital effect indicator (STILL, FLASH,LUMI. or TRAIL) flashes.
(2) Press the SEL/PUSH EXEC dial.The digital effect indicator lights up and the bars appear. In STILL or LUMI.mode, the picture is captured and is stored in memory as a still picture at thetime you press the SEL/PUSH EXEC dial.
(3) Turn the SEL/PUSH EXEC dial to adjust the effect.For details of each digital effect function, see page 41.
To cancel the digital ef fect functionPress DIGITAL EFFECT so that the indicator disappears.
Notes
•You cannot process a picture using the digital effect function that is input from otherequipment.
•To record pictures that you have processed using the digital effect function, record thepictures on the VCR, using your camcorder as a player.
Pictures processed by the digital effect functionPictures processed by the digital effect function are not output through the DVInterface.
When you set the POWER switch to OFF (CHG) or stop playing back
The digital effect function will be automatically canceled.
STILL2
3
1
STILL
DIGITAL
EFFECT
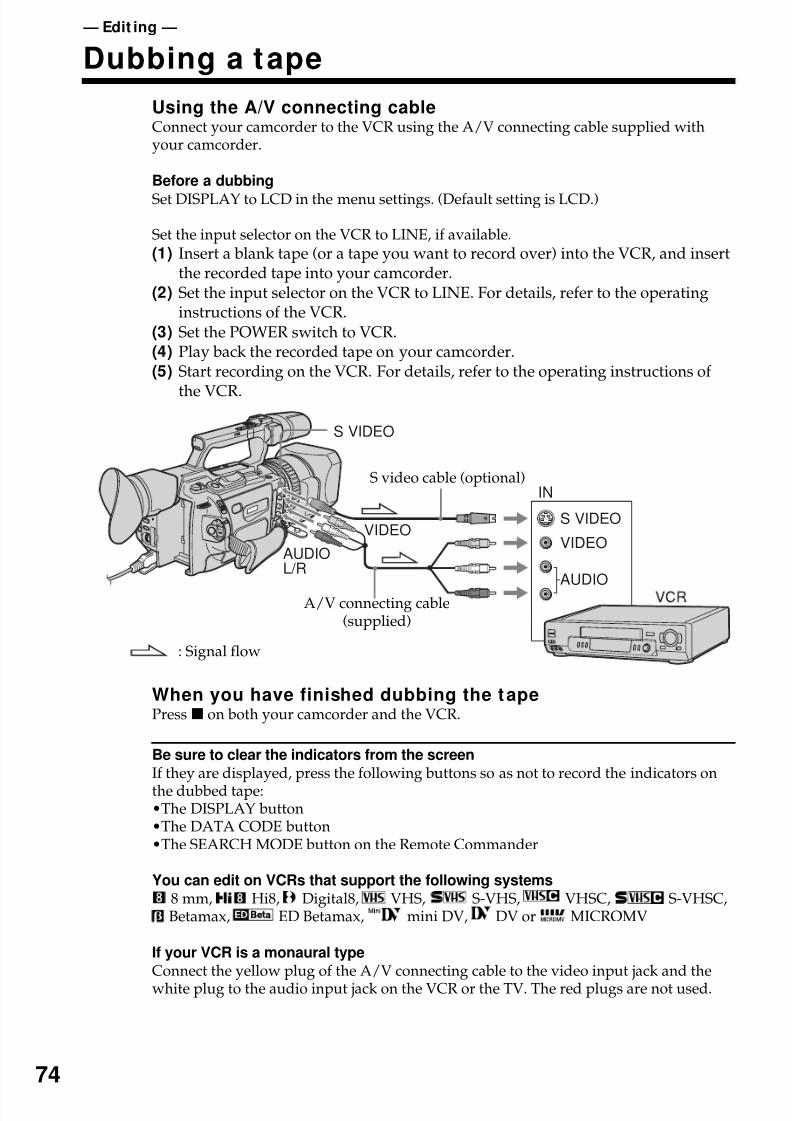
8/8/2019 276ba559b616f0752a9d1ab6240c7e96
http://slidepdf.com/reader/full/276ba559b616f0752a9d1ab6240c7e96 74/176
74
— Edit ing —
Dubbing a tape
Using the A/V connecting cableConnect your camcorder to the VCR using the A/V connecting cable supplied withyour camcorder.
Before a dubbing
Set DISPLAY to LCD in the menu settings. (Default setting is LCD.)
Set the input selector on the VCR to LINE, if available.
(1) Insert a blank tape (or a tape you want to record over) into the VCR, and insertthe recorded tape into your camcorder.
(2) Set the input selector on the VCR to LINE. For details, refer to the operatinginstructions of the VCR.
(3) Set the POWER switch to VCR.(4) Play back the recorded tape on your camcorder.(5) Start recording on the VCR. For details, refer to the operating instructions of
the VCR.
When you have finished dubbing the tapePressx on both your camcorder and the VCR.
Be sure to clear the indicators from the screen
If they are displayed, press the following buttons so as not to record the indicators onthe dubbed tape:•The DISPLAY button•The DATA CODE button•The SEARCH MODE button on the Remote Commander
You can edit on VCRs that support the following systems
8 mm, Hi8, Digital8, VHS, S-VHS, VHSC, S-VHSC,Betamax, ED Betamax, mini DV, DV or MICROMV
If your VCR is a monaural type
Connect the yellow plug of the A/V connecting cable to the video input jack and thewhite plug to the audio input jack on the VCR or the TV. The red plugs are not used.
VIDEO
AUDIO
IN
S VIDEO
AUDIOL/R
VIDEO
S VIDEO
: Signal flow
S video cable (optional)
A/V connecting cable(supplied)
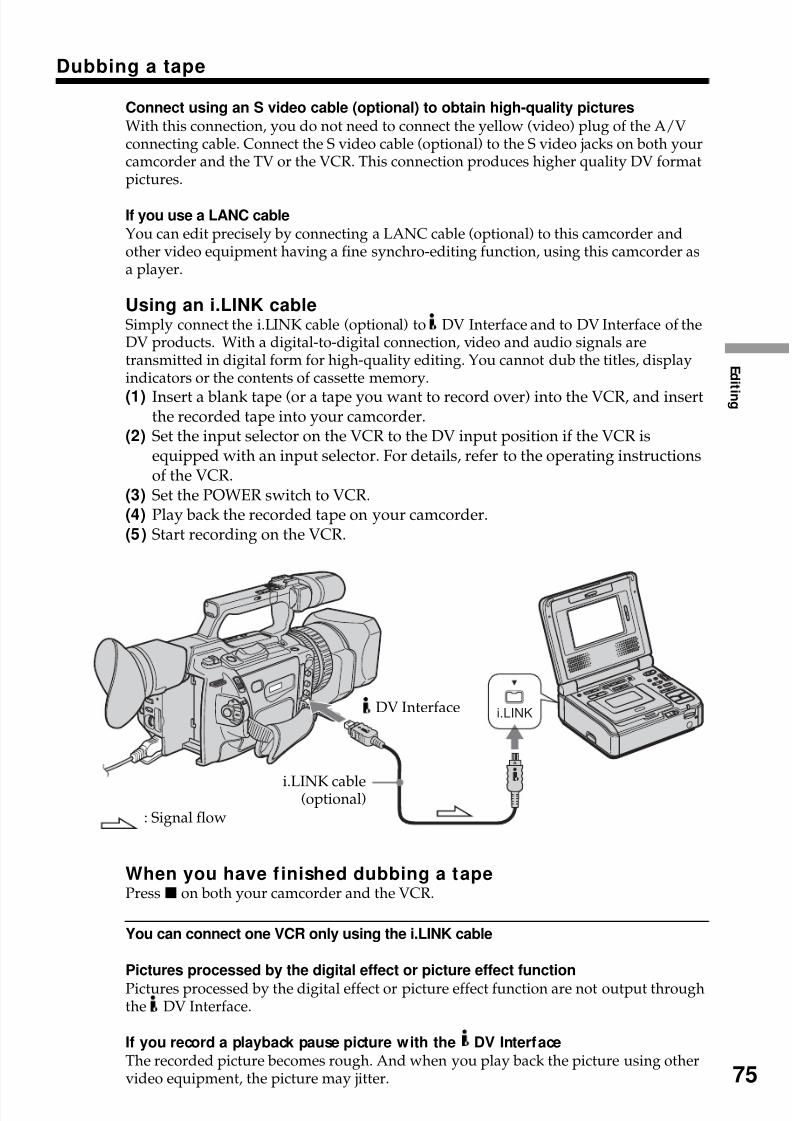
8/8/2019 276ba559b616f0752a9d1ab6240c7e96
http://slidepdf.com/reader/full/276ba559b616f0752a9d1ab6240c7e96 75/176
E d i t i n g
75
Dubbing a tape
Connect using an S video cable (optional) to obtain high-quality pictures
With this connection, you do not need to connect the yellow (video) plug of the A/Vconnecting cable. Connect the S video cable (optional) to the S video jacks on both yourcamcorder and the TV or the VCR. This connection produces higher quality DV formatpictures.
If you use a LANC cable
You can edit precisely by connecting a LANC cable (optional) to this camcorder andother video equipment having a fine synchro-editing function, using this camcorder asa player.
Using an i.LINK cableSimply connect the i.LINK cable (optional) to DV Interface and to DV Interface of theDV products. With a digital-to-digital connection, video and audio signals aretransmitted in digital form for high-quality editing. You cannot dub the titles, displayindicators or the contents of cassette memory.
(1) Insert a blank tape (or a tape you want to record over) into the VCR, and insertthe recorded tape into your camcorder.
(2) Set the input selector on the VCR to the DV input position if the VCR isequipped with an input selector. For details, refer to the operating instructionsof the VCR.
(3) Set the POWER switch to VCR.(4) Play back the recorded tape on your camcorder.(5) Start recording on the VCR.
When you have f inished dubbing a tapePressx on both your camcorder and the VCR.
You can connect one VCR only using the i.LINK cable
Pictures processed by the digital effect or picture effect function
Pictures processed by the digital effect or picture effect function are not output throughthe DV Interface.
If you record a playback pause picture with the DV Interface
The recorded picture becomes rough. And when you play back the picture using othervideo equipment, the picture may jitter.
i.LINK
: Signal flow
i.LINK cable(optional)
DV Interface
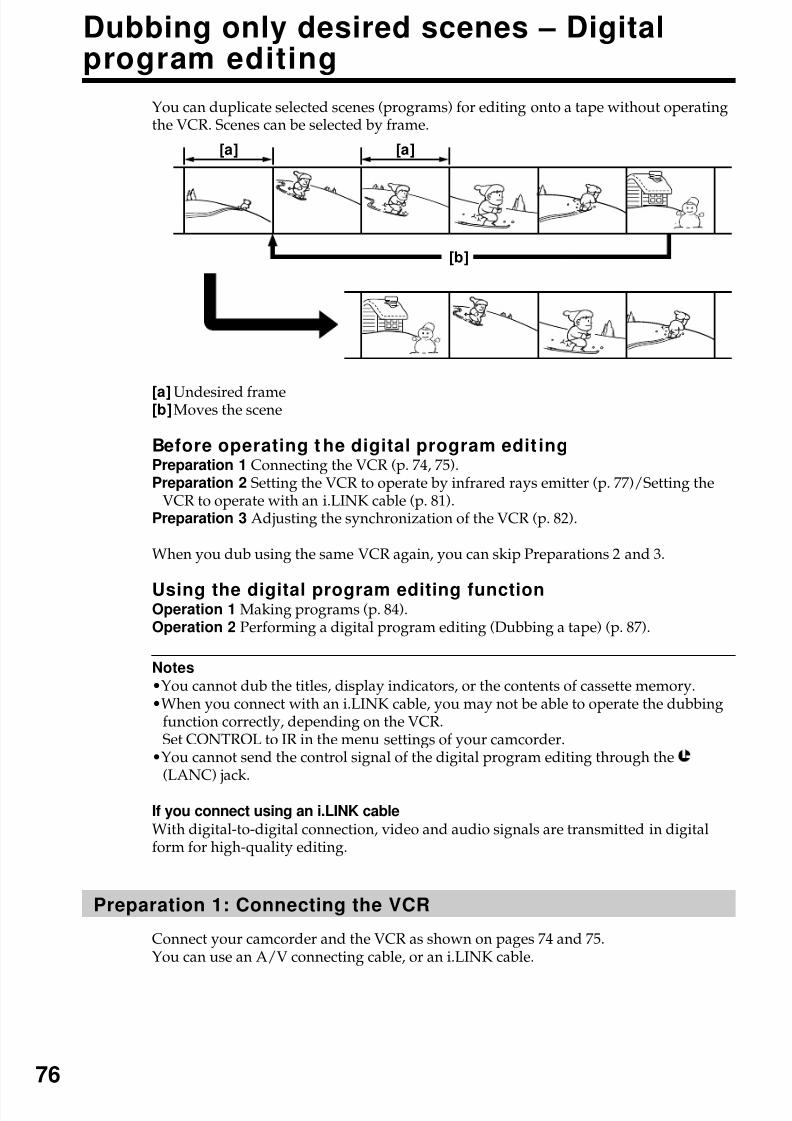
8/8/2019 276ba559b616f0752a9d1ab6240c7e96
http://slidepdf.com/reader/full/276ba559b616f0752a9d1ab6240c7e96 76/176
76
Dubbing only desired scenes – Digitalprogram editing
You can duplicate selected scenes (programs) for editing onto a tape without operatingthe VCR. Scenes can be selected by frame.
[a] Undesired frame[b]Moves the scene
Before operating t he digital program edit ingPreparation 1 Connecting the VCR (p. 74, 75).Preparation 2 Setting the VCR to operate by infrared rays emitter (p. 77)/Setting the
VCR to operate with an i.LINK cable (p. 81).Preparation 3 Adjusting the synchronization of the VCR (p. 82).
When you dub using the same VCR again, you can skip Preparations 2 and 3.
Using the digital program editing functionOperation 1 Making programs (p. 84).Operation 2 Performing a digital program editing (Dubbing a tape) (p. 87).
Notes•You cannot dub the titles, display indicators, or the contents of cassette memory.•When you connect with an i.LINK cable, you may not be able to operate the dubbing
function correctly, depending on the VCR.Set CONTROL to IR in the menu settings of your camcorder.
•You cannot send the control signal of the digital program editing through the(LANC) jack.
If you connect using an i.LINK cable
With digital-to-digital connection, video and audio signals are transmitted in digitalform for high-quality editing.
Preparation 1: Connecting the VCR
Connect your camcorder and the VCR as shown on pages 74 and 75.You can use an A/V connecting cable, or an i.LINK cable.
[a] [a]
[b]
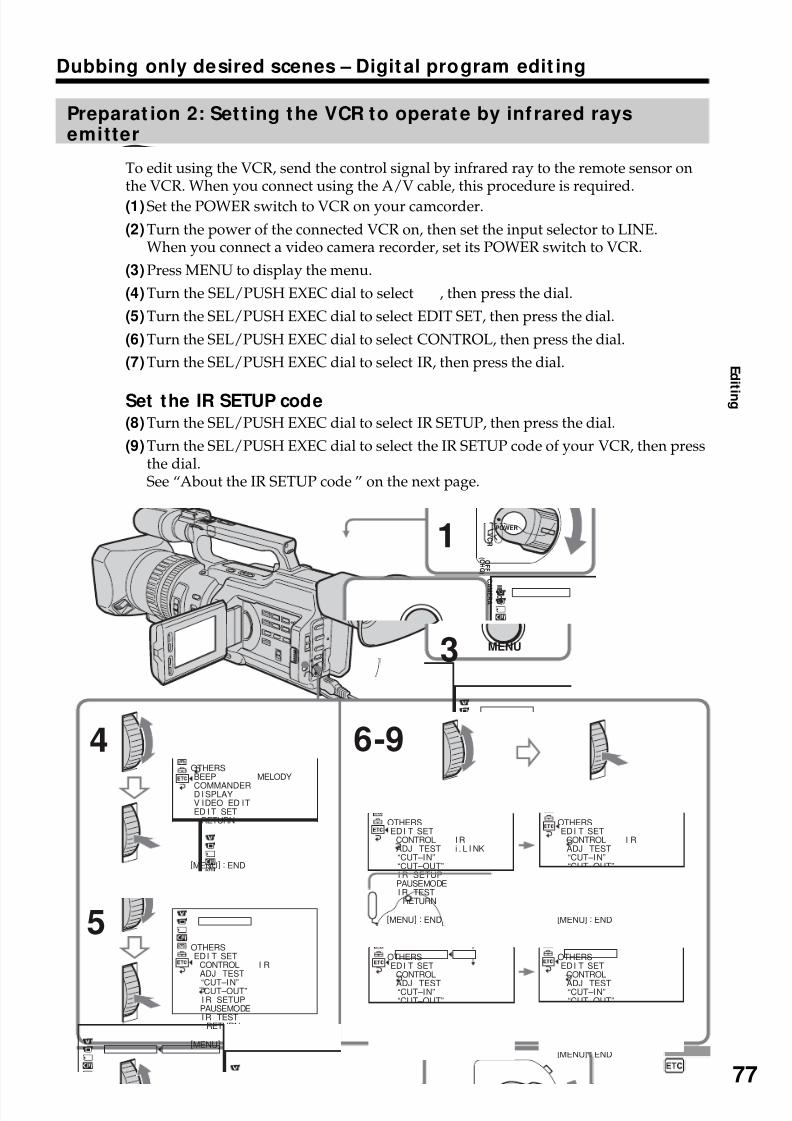
8/8/2019 276ba559b616f0752a9d1ab6240c7e96
http://slidepdf.com/reader/full/276ba559b616f0752a9d1ab6240c7e96 77/176
E d i t i n g
77
Dubbing only desired scenes – Digital program edit ing
Preparat ion 2: Set t ing the VCR to operat e by inf rared raysemitter
To edit using the VCR, send the control signal by infrared ray to the remote sensor onthe VCR. When you connect using the A/V cable, this procedure is required.
(1) Set the POWER switch to VCR on your camcorder.
(2) Turn the power of the connected VCR on, then set the input selector to LINE.When you connect a video camera recorder, set its POWER switch to VCR.
(3) Press MENU to display the menu.
(4) Turn the SEL/PUSH EXEC dial to select , then press the dial.
(5) Turn the SEL/PUSH EXEC dial to select EDIT SET, then press the dial.
(6) Turn the SEL/PUSH EXEC dial to select CONTROL, then press the dial.
(7) Turn the SEL/PUSH EXEC dial to select IR, then press the dial.
Set the IR SETUP code(8) Turn the SEL/PUSH EXEC dial to select IR SETUP, then press the dial.
(9) Turn the SEL/PUSH EXEC dial to select the IR SETUP code of your VCR, then pressthe dial.See “About the IR SETUP code ” on the next page.
6-94
ED I T SETCONTROLADJ TEST
“CUT–I N”“CUT–OUT”I R SETUPPAUSEMODEI R TESTRETURN
[MENU] : END
I R
OTHERS
ED I T SETCONTROLADJ TEST“CUT–I N”“CUT–OUT”I R SETUPPAUSEMODEI R TESTRETURN
[MENU] : END
I R
OTHERSED I T SET
CONTROLADJ TEST“CUT–I N”“CUT–OUT”I R SETUPPAUSEMODEI R TESTRETURN
[MENU] : END
I Ri . L I NK
OTHERS
ED I T SETCONTROL
ADJ TEST“CUT–I N”“CUT–OUT”I R SETUPPAUSEMODEI R TESTRETURN
[MENU] : END
1
OTHERSED I T SET
CONTROL
ADJ TEST“CUT–I N”“CUT–OUT”I R SETUPPAUSEMODEI R TESTRETURN
[MENU] : END
3
OTHERS
BEEP
COMMANDERD I SPLAYV I DEO ED I TED I T SET
RETURN
[MENU] : END
MELODYOTHERS
5
1POWER
O F F
( C H G )
C A
ME R A
M E M O R Y
V C R
3 MENU
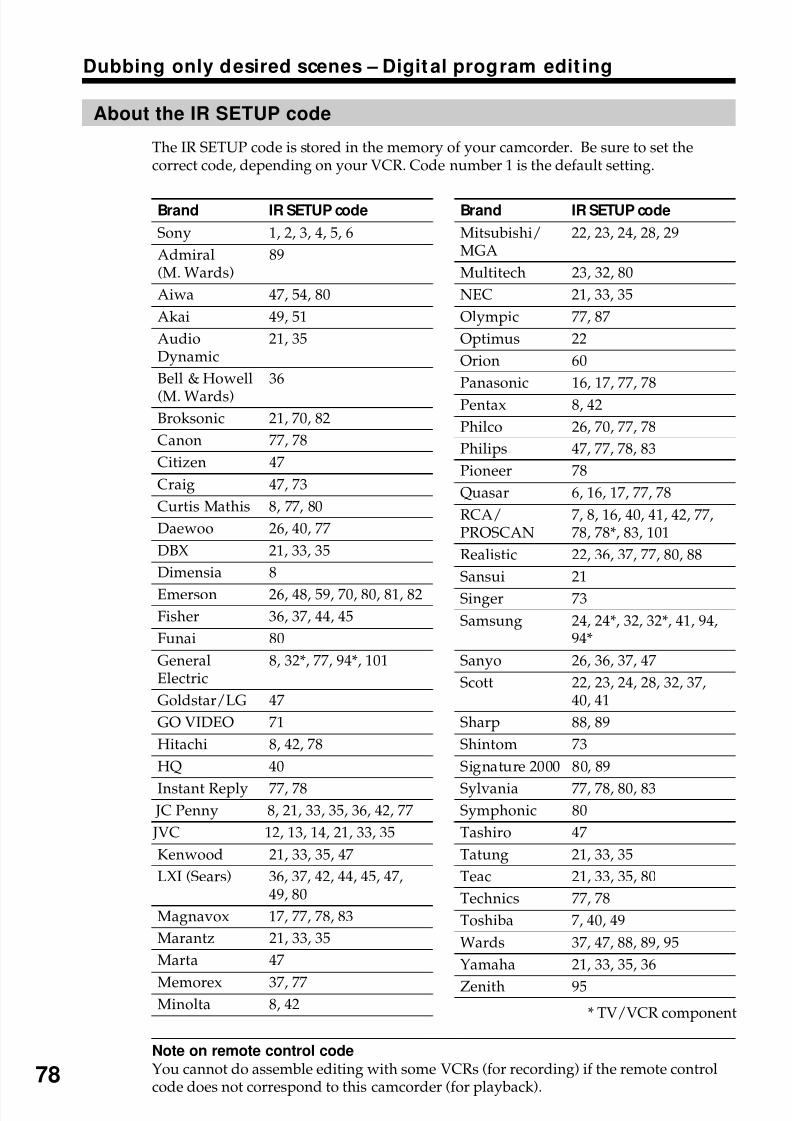
8/8/2019 276ba559b616f0752a9d1ab6240c7e96
http://slidepdf.com/reader/full/276ba559b616f0752a9d1ab6240c7e96 78/176
78
Dubbing only desired scenes – Digit al program edit ing
About the IR SETUP code
The IR SETUP code is stored in the memory of your camcorder. Be sure to set thecorrect code, depending on your VCR. Code number 1 is the default setting.
* TV/VCR component
Note on remote control code
You cannot do assemble editing with some VCRs (for recording) if the remote controlcode does not correspond to this camcorder (for playback).
Brand IR SETUP code
Sony 1, 2, 3, 4, 5, 6
Admiral 89(M. Wards)
Aiwa 47, 54, 80
Akai 49, 51
Audio 21, 35Dynamic
Bell & Howell 36
(M. Wards)
Broksonic 21, 70, 82
Canon 77, 78
Citizen 47
Craig 47, 73
Curtis Mathis 8, 77, 80
Daewoo 26, 40, 77
DBX 21, 33, 35
Dimensia 8
Emerson 26, 48, 59, 70, 80, 81, 82
Fisher 36, 37, 44, 45
Funai 80
General 8, 32*, 77, 94*, 101Electric
Goldstar/LG 47
GO VIDEO 71
Hitachi 8, 42, 78
HQ 40
Instant Reply 77, 78 JC Penny 8, 21, 33, 35, 36, 42, 77
JVC 12, 13, 14, 21, 33, 35
Kenwood 21, 33, 35, 47
LXI (Sears) 36, 37, 42, 44, 45, 47,49, 80
Magnavox 17, 77, 78, 83
Marantz 21, 33, 35
Marta 47
Memorex 37, 77Minolta 8, 42
Brand IR SETUP code
Mitsubishi/ 22, 23, 24, 28, 29MGA
Multitech 23, 32, 80
NEC 21, 33, 35
Olympic 77, 87
Optimus 22
Orion 60
Panasonic 16, 17, 77, 78
Pentax 8, 42
Philco 26, 70, 77, 78
Philips 47, 77, 78, 83
Pioneer 78
Quasar 6, 16, 17, 77, 78
RCA/ 7, 8, 16, 40, 41, 42, 77,PROSCAN 78, 78*, 83, 101
Realistic 22, 36, 37, 77, 80, 88
Sansui 21
Singer 73
Samsung 24, 24*, 32, 32*, 41, 94,94*
Sanyo 26, 36, 37, 47
Scott 22, 23, 24, 28, 32, 37,40, 41
Sharp 88, 89
Shintom 73
Signature 2000 80, 89
Sylvania 77, 78, 80, 83Symphonic 80
Tashiro 47
Tatung 21, 33, 35
Teac 21, 33, 35, 80
Technics 77, 78
Toshiba 7, 40, 49
Wards 37, 47, 88, 89, 95
Yamaha 21, 33, 35, 36
Zenith 95
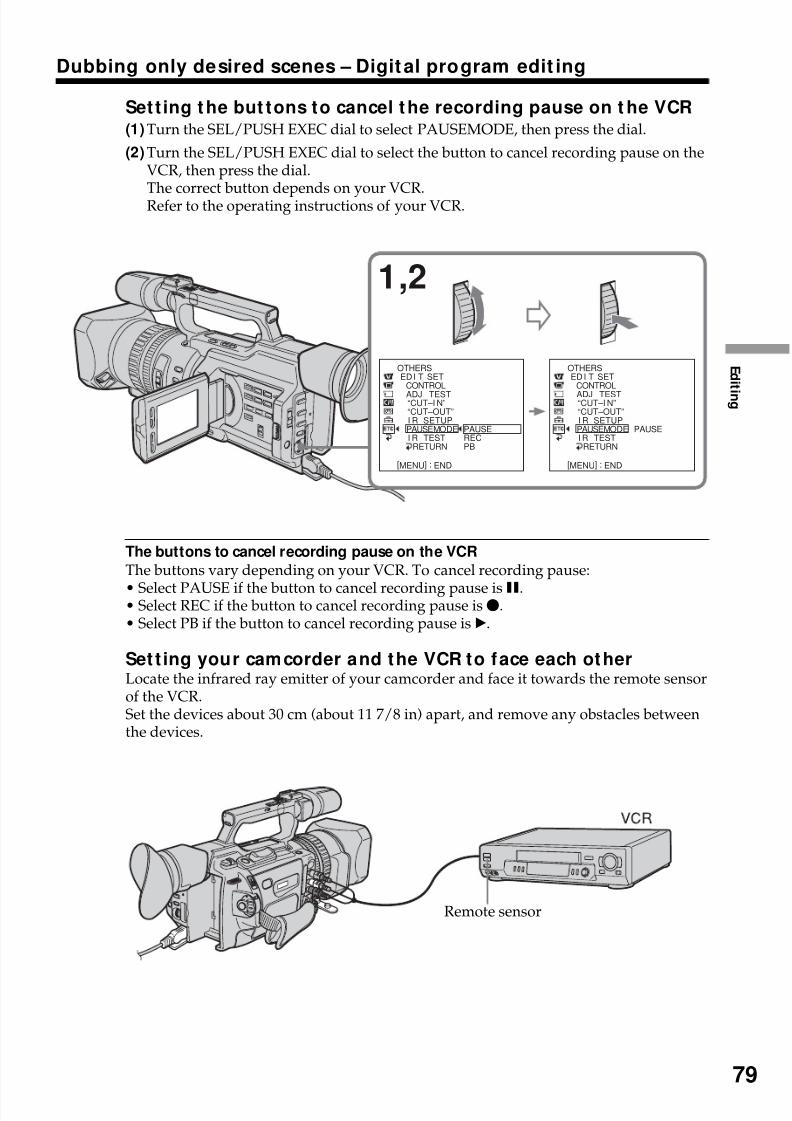
8/8/2019 276ba559b616f0752a9d1ab6240c7e96
http://slidepdf.com/reader/full/276ba559b616f0752a9d1ab6240c7e96 79/176
E d i t i n g
79
Dubbing only desired scenes – Digital program edit ing
Sett ing the but tons to cancel the recording pause on t he VCR(1) Turn the SEL/PUSH EXEC dial to select PAUSEMODE, then press the dial.
(2) Turn the SEL/PUSH EXEC dial to select the button to cancel recording pause on theVCR, then press the dial.
The correct button depends on your VCR.Refer to the operating instructions of your VCR.
The buttons to cancel recording pause on the VCR
The buttons vary depending on your VCR. To cancel recording pause:
• Select PAUSE if the button to cancel recording pause isX.• Select REC if the button to cancel recording pause isz.• Select PB if the button to cancel recording pause is B.
Set t ing your camcorder and the VCR to face each otherLocate the infrared ray emitter of your camcorder and face it towards the remote sensorof the VCR.Set the devices about 30 cm (about 11 7/8 in) apart, and remove any obstacles betweenthe devices.
1,2
ED I T SETCONTROL
ADJ TEST“CUT–I N”“CUT–OUT”I R SETUPPAUSEMODEI R TESTRETURN
[MENU] : END
PAUSERECPB
OTHERSED I T SET
CONTROL
ADJ TEST“CUT–I N”“CUT–OUT”I R SETUPPAUSEMODEI R TESTRETURN
[MENU] : END
PAUSE
OTHERS
Remote sensor
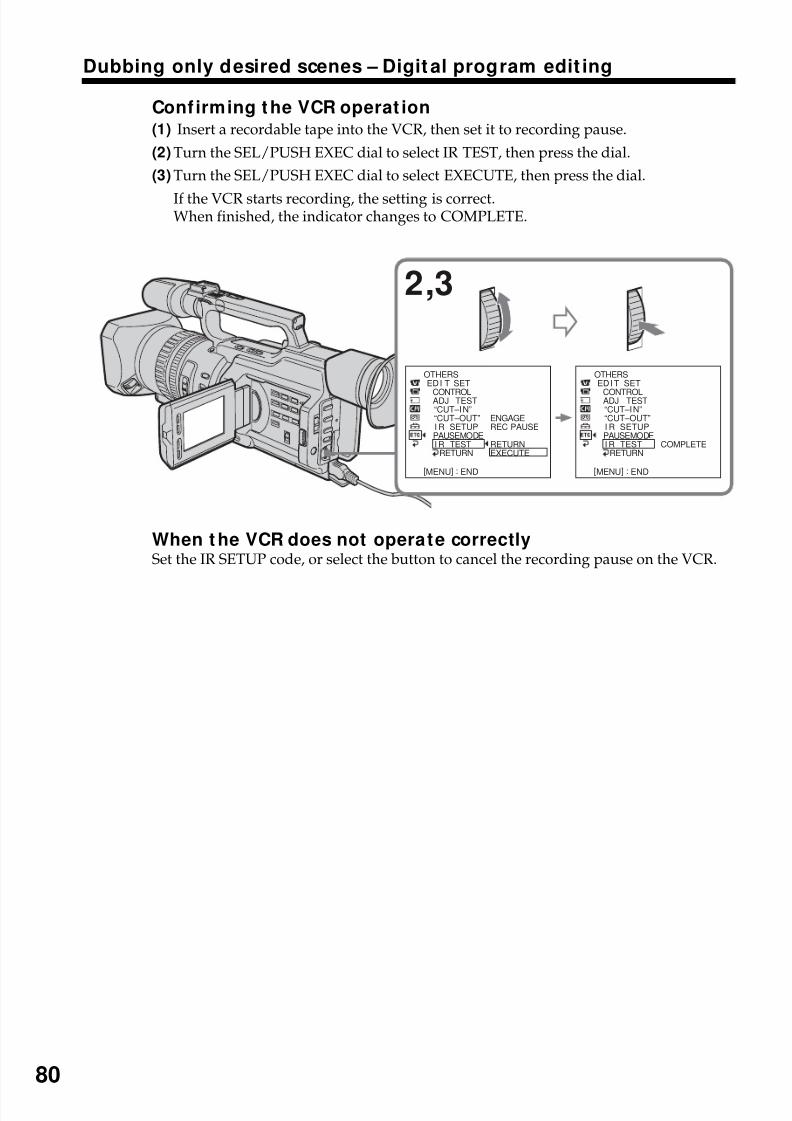
8/8/2019 276ba559b616f0752a9d1ab6240c7e96
http://slidepdf.com/reader/full/276ba559b616f0752a9d1ab6240c7e96 80/176
80
Conf irming the VCR operat ion(1) Insert a recordable tape into the VCR, then set it to recording pause.
(2) Turn the SEL/PUSH EXEC dial to select IR TEST, then press the dial.
(3) Turn the SEL/PUSH EXEC dial to select EXECUTE, then press the dial.
If the VCR starts recording, the setting is correct.When finished, the indicator changes to COMPLETE.
When t he VCR does not operate correctlySet the IR SETUP code, or select the button to cancel the recording pause on the VCR.
2,3
ED I T SET
CONTROLADJ TEST“CUT–I N”“CUT–OUT”I R SETUPPAUSEMODEI R TESTRETURN
[MENU] : END
ENGAGEREC PAUSE
RETURNEXECUTE
OTHERSED I T SET
CONTROLADJ TEST“CUT–I N”“CUT–OUT”I R SETUPPAUSEMODEI R TESTRETURN
[MENU] : END
COMPLETE
OTHERS
Dubbing only desired scenes – Digit al program edit ing
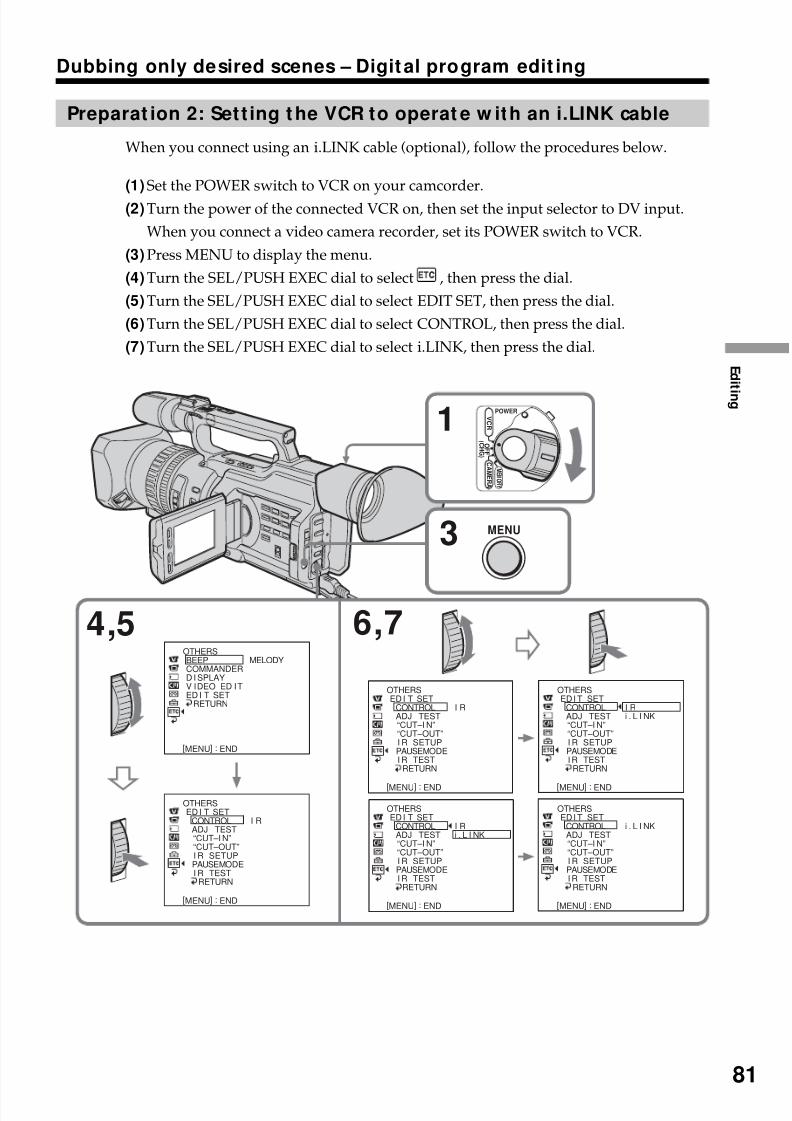
8/8/2019 276ba559b616f0752a9d1ab6240c7e96
http://slidepdf.com/reader/full/276ba559b616f0752a9d1ab6240c7e96 81/176
E d i t i n g
81
Dubbing only desired scenes – Digital program edit ing
Preparat ion 2: Sett ing t he VCR to operat e w ith an i.LINK cable
When you connect using an i.LINK cable (optional), follow the procedures below.
(1) Set the POWER switch to VCR on your camcorder.
(2) Turn the power of the connected VCR on, then set the input selector to DV input.
When you connect a video camera recorder, set its POWER switch to VCR.
(3) Press MENU to display the menu.
(4) Turn the SEL/PUSH EXEC dial to select , then press the dial.
(5) Turn the SEL/PUSH EXEC dial to select EDIT SET, then press the dial.
(6) Turn the SEL/PUSH EXEC dial to select CONTROL, then press the dial.
(7) Turn the SEL/PUSH EXEC dial to select i.LINK, then press the dial.
6,74,5
ED I T SETCONTROLADJ TEST“CUT–I N”“CUT–OUT”I R SETUPPAUSEMODEI R TESTRETURN
[MENU] : END
I R
OTHERS
ED I T SETCONTROLADJ TEST“CUT–I N”“CUT–OUT”I R SETUPPAUSEMODEI R TESTRETURN
[MENU] : END
I R
OTHERSED I T SET
CONTROLADJ TEST“CUT–I N”“CUT–OUT”I R SETUPPAUSEMODEI R TESTRETURN
[MENU] : END
I Ri . L I NK
OTHERS
ED I T SETCONTROLADJ TEST“CUT–I N”“CUT–OUT”I R SETUPPAUSEMODEI R TESTRETURN
[MENU] : END
I Ri . L I NK
OTHERSED I T SET
CONTROLADJ TEST“CUT–I N”“CUT–OUT”I R SETUPPAUSEMODEI R TESTRETURN
[MENU] : END
i . L I NK
OTHERS
BEEPCOMMANDERD I SPLAYV I DEO ED I TED I T SET
RETURN
[MENU] : END
MELODYOTHERS
1POWER
O F F
( C H G )
C A ME R A
M E M O R Y
V C R
3 MENU
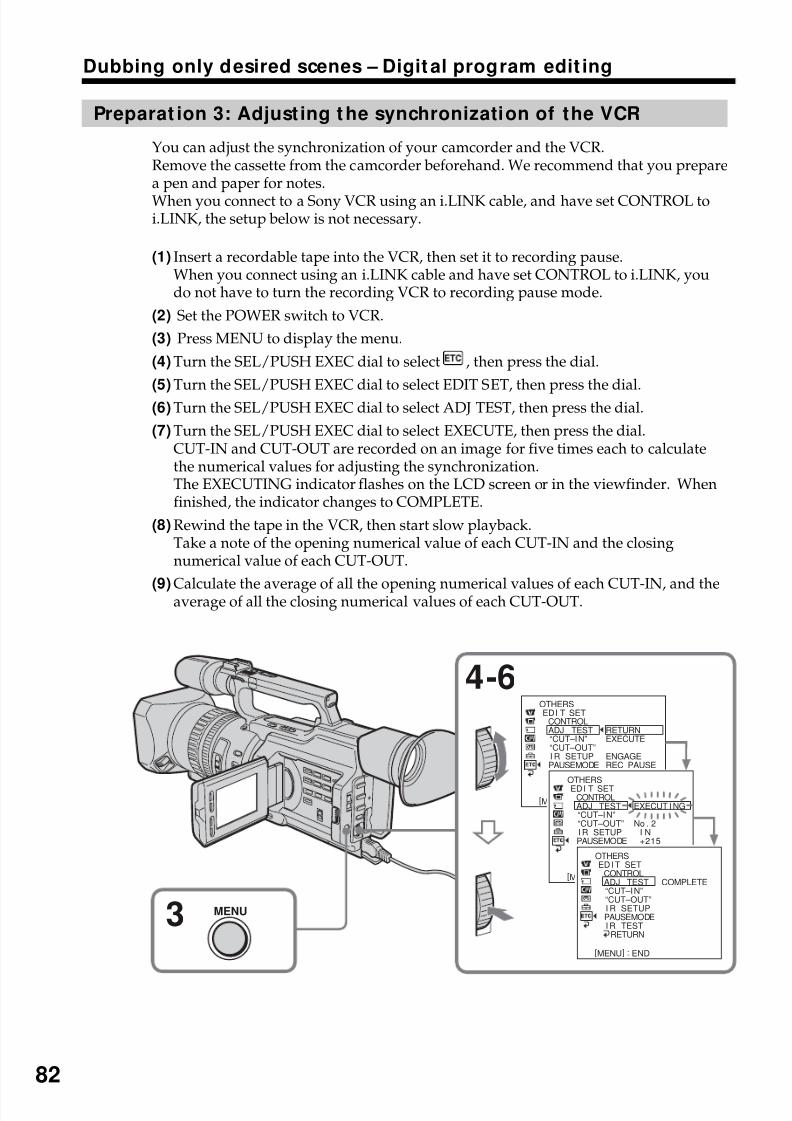
8/8/2019 276ba559b616f0752a9d1ab6240c7e96
http://slidepdf.com/reader/full/276ba559b616f0752a9d1ab6240c7e96 82/176
82
Preparat ion 3: Adjust ing t he synchronization of the VCR
You can adjust the synchronization of your camcorder and the VCR.Remove the cassette from the camcorder beforehand. We recommend that you preparea pen and paper for notes.
When you connect to a Sony VCR using an i.LINK cable, and have set CONTROL toi.LINK, the setup below is not necessary.
(1) Insert a recordable tape into the VCR, then set it to recording pause.When you connect using an i.LINK cable and have set CONTROL to i.LINK, youdo not have to turn the recording VCR to recording pause mode.
(2) Set the POWER switch to VCR.
(3) Press MENU to display the menu.
(4) Turn the SEL/PUSH EXEC dial to select , then press the dial.
(5)Turn the SEL/PUSH EXEC dial to select EDIT SET, then press the dial.
(6) Turn the SEL/PUSH EXEC dial to select ADJ TEST, then press the dial.
(7) Turn the SEL/PUSH EXEC dial to select EXECUTE, then press the dial.CUT-IN and CUT-OUT are recorded on an image for five times each to calculatethe numerical values for adjusting the synchronization.The EXECUTING indicator flashes on the LCD screen or in the viewfinder. Whenfinished, the indicator changes to COMPLETE.
(8) Rewind the tape in the VCR, then start slow playback.Take a note of the opening numerical value of each CUT-IN and the closingnumerical value of each CUT-OUT.
(9) Calculate the average of all the opening numerical values of each CUT-IN, and theaverage of all the closing numerical values of each CUT-OUT.
4-6ED I T SET
CONTROLADJ TEST“CUT–I N”“CUT–OUT”I R SETUPPAUSEMODEI R TEST
RETURN
[MENU] : END
RETURNEXECUTE
ENGAGEREC PAUSE
OTHERS
3 MENU
ED I T SETCONTROLADJ TEST“CUT–I N”“CUT–OUT”I R SETUPPAUSEMODEI R TESTRETURN
[MENU] : END
EXECUT I NG
No . 2I N+215
OTHERS
ED I T SETCONTROLADJ TEST“CUT–I N”“CUT–OUT”I R SETUPPAUSEMODEI R TESTRETURN
[MENU] : END
COMPLETE
OTHERS
Dubbing only desired scenes – Digit al program edit ing
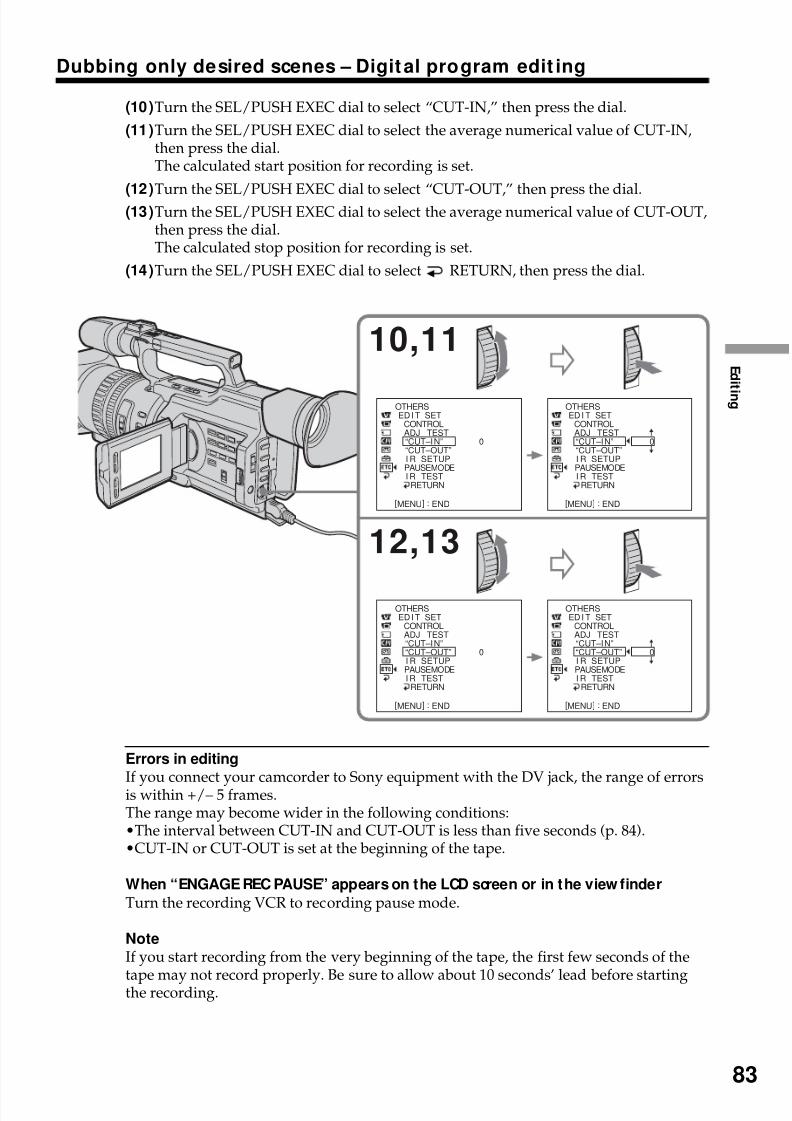
8/8/2019 276ba559b616f0752a9d1ab6240c7e96
http://slidepdf.com/reader/full/276ba559b616f0752a9d1ab6240c7e96 83/176
E d i t i n g
83
Dubbing only desired scenes – Digital program edit ing
(10 )Turn the SEL/PUSH EXEC dial to select “CUT-IN,” then press the dial.
(11 )Turn the SEL/PUSH EXEC dial to select the average numerical value of CUT-IN,then press the dial.The calculated start position for recording is set.
(12 )Turn the SEL/PUSH EXEC dial to select “CUT-OUT,” then press the dial.(13 )Turn the SEL/PUSH EXEC dial to select the average numerical value of CUT-OUT,
then press the dial.The calculated stop position for recording is set.
(14 )Turn the SEL/PUSH EXEC dial to select RETURN, then press the dial.
Errors in editing
If you connect your camcorder to Sony equipment with the DV jack, the range of errorsis within +/– 5 frames.The range may become wider in the following conditions:•The interval between CUT-IN and CUT-OUT is less than five seconds (p. 84).•CUT-IN or CUT-OUT is set at the beginning of the tape.
When “ENGAGE REC PAUSE” appears on the LCD screen or in the view finder
Turn the recording VCR to recording pause mode.
NoteIf you start recording from the very beginning of the tape, the first few seconds of the
tape may not record properly. Be sure to allow about 10 seconds’ lead before startingthe recording.
10,11
12,13
ED I T SETCONTROLADJ TEST“CUT–I N”“CUT–OUT”I R SETUPPAUSEMODEI R TESTRETURN
[MENU] : END
0
OTHERSED I T SET
CONTROLADJ TEST“CUT–I N”“CUT–OUT”I R SETUPPAUSEMODEI R TESTRETURN
[MENU] : END
0
OTHERS
ED I T SETCONTROLADJ TEST“CUT–I N”“CUT–OUT”I R SETUPPAUSEMODEI R TESTRETURN
[MENU] : END
0
OTHERSED I T SET
CONTROLADJ TEST“CUT–I N”“CUT–OUT”I R SETUPPAUSEMODEI R TESTRETURN
[MENU] : END
0
OTHERS
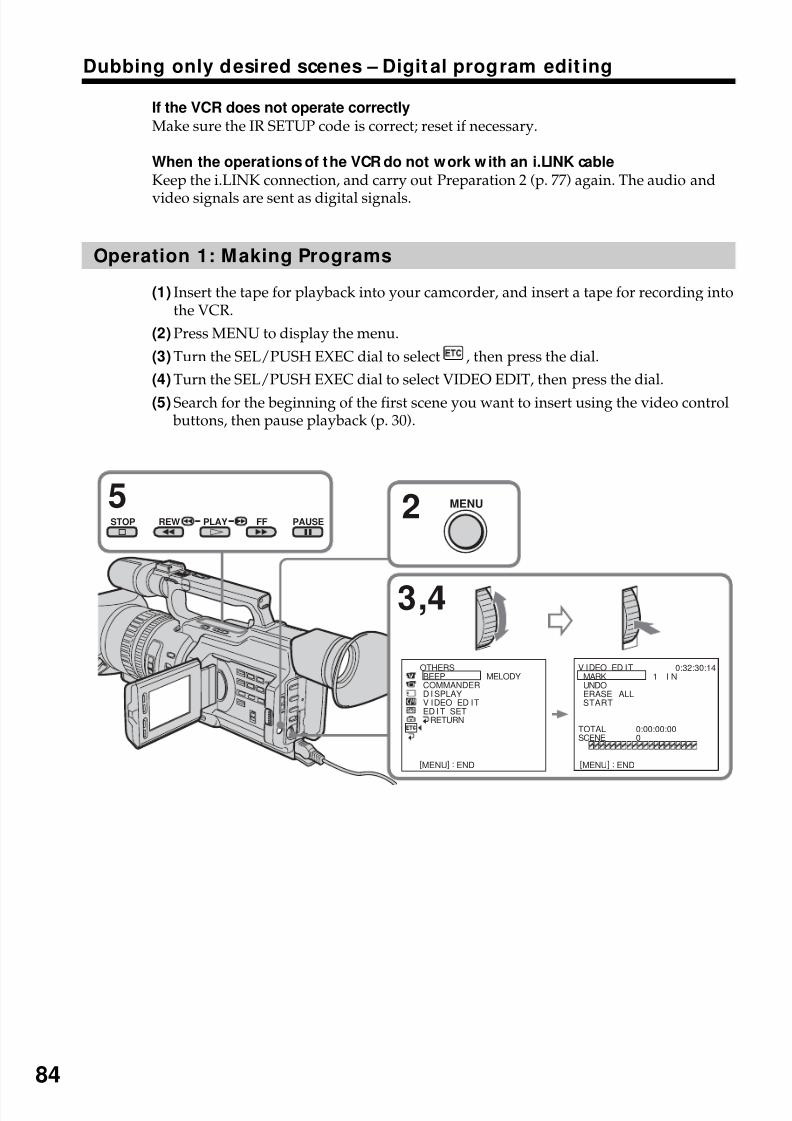
8/8/2019 276ba559b616f0752a9d1ab6240c7e96
http://slidepdf.com/reader/full/276ba559b616f0752a9d1ab6240c7e96 84/176
84
Dubbing only desired scenes – Digit al program edit ing
If the VCR does not operate correctly
Make sure the IR SETUP code is correct; reset if necessary.
When the operat ions of the VCR do not work with an i.LINK cable
Keep the i.LINK connection, and carry out Preparation 2 (p. 77) again. The audio and
video signals are sent as digital signals.
Operation 1: Making Programs
(1) Insert the tape for playback into your camcorder, and insert a tape for recording intothe VCR.
(2) Press MENU to display the menu.
(3) Turn the SEL/PUSH EXEC dial to select , then press the dial.
(4) Turn the SEL/PUSH EXEC dial to select VIDEO EDIT, then press the dial.
(5) Search for the beginning of the first scene you want to insert using the video control buttons, then pause playback (p. 30).
3,4
5STOP PLAYREW FF PAUSE
BEEPCOMMANDERD I SPLAYV I DEO ED I TED I T SET
RETURN
[MENU] : END
MELODYOTHERS
MARKUNDOERASE ALLSTART
0:32:30:141 I N
TOTALSCENE
0:00:00:000
V I DEO ED I T
[MENU] : END
2 MENU
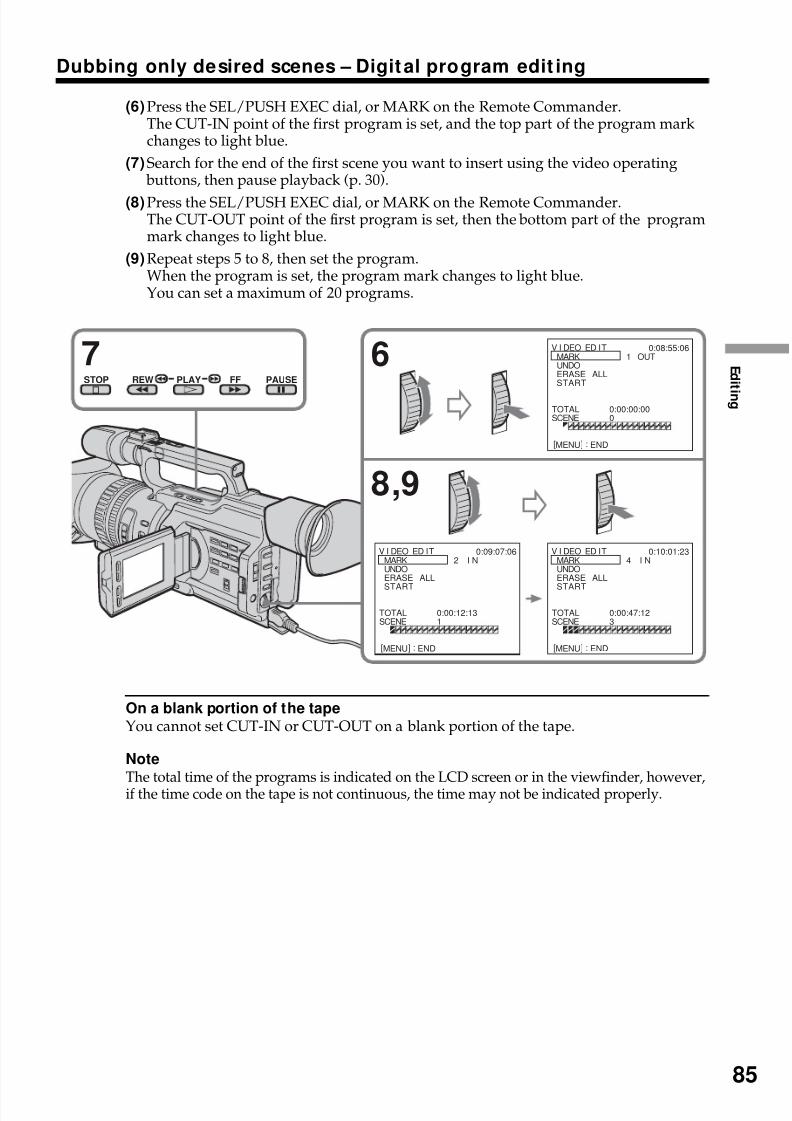
8/8/2019 276ba559b616f0752a9d1ab6240c7e96
http://slidepdf.com/reader/full/276ba559b616f0752a9d1ab6240c7e96 85/176
E d i t i n g
85
Dubbing only desired scenes – Digital program edit ing
(6) Press the SEL/PUSH EXEC dial, or MARK on the Remote Commander.The CUT-IN point of the first program is set, and the top part of the program markchanges to light blue.
(7) Search for the end of the first scene you want to insert using the video operating buttons, then pause playback (p. 30).
(8) Press the SEL/PUSH EXEC dial, or MARK on the Remote Commander.The CUT-OUT point of the first program is set, then the bottom part of the programmark changes to light blue.
(9) Repeat steps 5 to 8, then set the program.When the program is set, the program mark changes to light blue.You can set a maximum of 20 programs.
On a blank portion of the tapeYou cannot set CUT-IN or CUT-OUT on a blank portion of the tape.
Note
The total time of the programs is indicated on the LCD screen or in the viewfinder, however,if the time code on the tape is not continuous, the time may not be indicated properly.
7 6STOP PLAYREW FF PAUSE
MARKUNDOERASE ALLSTART
0:08:55:061 OUT
TOTALSCENE
0:00:00:000
V I DEO ED I T
[MENU] : END
8,9
MARKUNDOERASE ALL
START
0:09:07:062 I N
TOTALSCENE
0:00:12:131
V I DEO ED I TMARKUNDOERASE ALL
START
0:10:01:234 I N
TOTALSCENE
0:00:47:123
V I DEO ED I T
[MENU] : END [MENU] : END
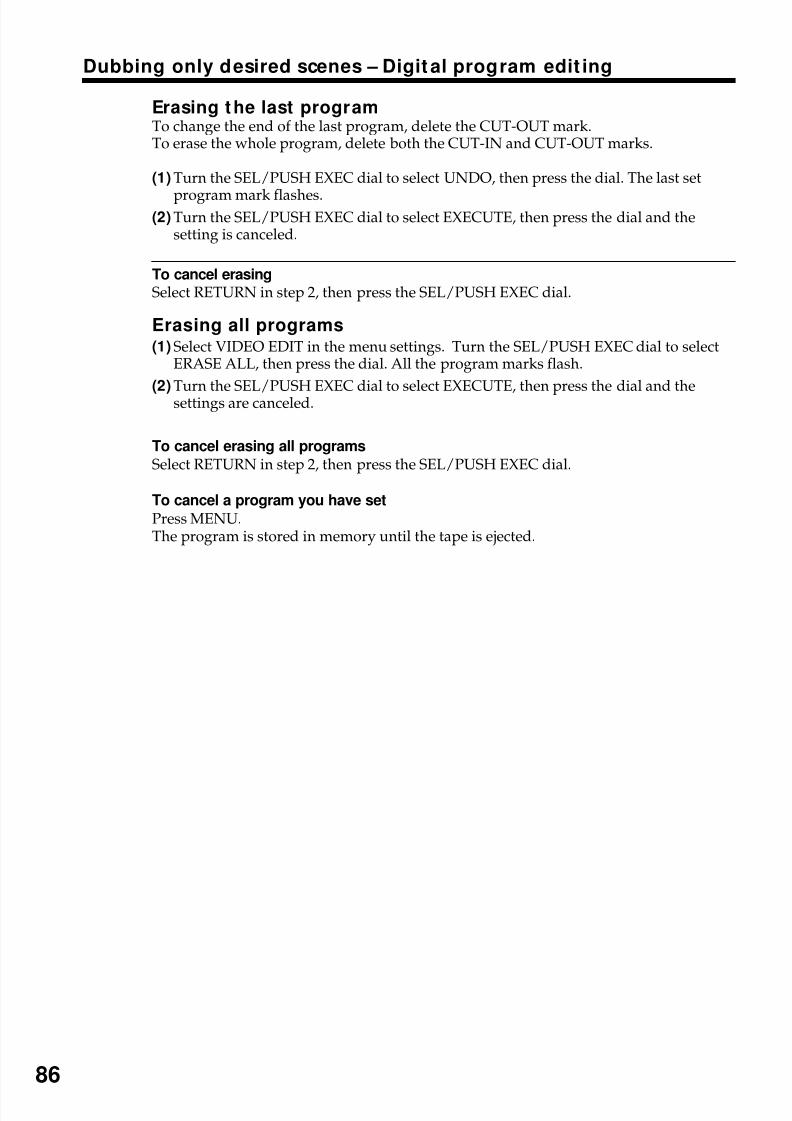
8/8/2019 276ba559b616f0752a9d1ab6240c7e96
http://slidepdf.com/reader/full/276ba559b616f0752a9d1ab6240c7e96 86/176
86
Erasing the last programTo change the end of the last program, delete the CUT-OUT mark.To erase the whole program, delete both the CUT-IN and CUT-OUT marks.
(1) Turn the SEL/PUSH EXEC dial to select UNDO, then press the dial. The last set
program mark flashes.(2) Turn the SEL/PUSH EXEC dial to select EXECUTE, then press the dial and the
setting is canceled.
To cancel erasingSelect RETURN in step 2, then press the SEL/PUSH EXEC dial.
Erasing all programs(1) Select VIDEO EDIT in the menu settings. Turn the SEL/PUSH EXEC dial to select
ERASE ALL, then press the dial. All the program marks flash.
(2) Turn the SEL/PUSH EXEC dial to select EXECUTE, then press the dial and thesettings are canceled.
To cancel erasing all programs
Select RETURN in step 2, then press the SEL/PUSH EXEC dial.
To cancel a program you have set
Press MENU.The program is stored in memory until the tape is ejected.
Dubbing only desired scenes – Digit al program edit ing
8/8/2019 276ba559b616f0752a9d1ab6240c7e96
http://slidepdf.com/reader/full/276ba559b616f0752a9d1ab6240c7e96 87/176
E d i t i n g
87
Dubbing only desired scenes – Digital program edit ing
Operation 2: Perform ing a digital program editing (Dubbing atape)
Make sure your camcorder and VCR are connected, and that the VCR is set to recordingpause. When you use an i.LINK cable, you do not have to set the VCR to recordingpause.When you use a video camera recorder, set its POWER switch to VCR.
(1) Select VIDEO EDIT. Turn the SEL/PUSH EXEC dial to select START, then press thedial.
(2) Turn the SEL/PUSH EXEC dial to select EXECUTE, then press the dial.The camcorder automatically searches for the beginning of the first program, thenstarts dubbing.The EXECUTING indicator flashes.The SEARCH indicator appears during search, and the EDIT indicator appears
during edit on the LCD screen or in the viewfinder.The program marks light up after dubbing is complete.When the dubbing ends, your camcorder and the VCR automatically stop.
To stop dubbing
Pressx on this camcorder or on the Remote Commander.
To end the digital program editing functionYour camcorder stops when the dubbing is complete. Then the display returns toVIDEO EDIT in the menu settings.Press MENU to end the digital program editing function.
When the operations of the VCR do not work with an i.LINK cable
Keep the i.LINK connection, and carry out Preparation 2 (p. 77) again.
You cannot record on the VCR when:
• The cassette is not inserted.• The tape has run out.• The write-protect tab is set to the protect position.• The IR SETUP code is not correct. (When IR is selected.)• The setup to cancel recording pause is not correct (p. 79). (When IR is selected.)
NOT READY appears on the LCD screen when:
• The program to operate the digital program edit has not been made.• i.LINK is selected but an i.LINK cable is not connected. (When i.LINK is selected.)• The power of the connected VCR is not turned on.
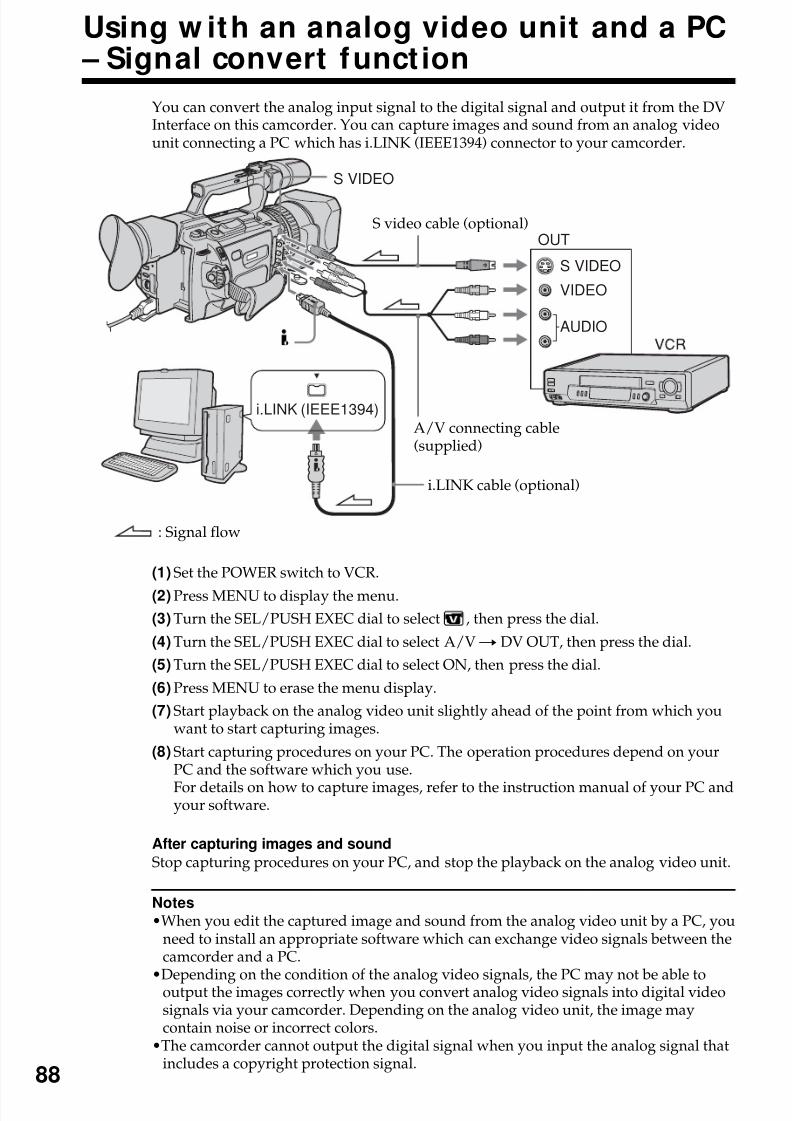
8/8/2019 276ba559b616f0752a9d1ab6240c7e96
http://slidepdf.com/reader/full/276ba559b616f0752a9d1ab6240c7e96 88/176
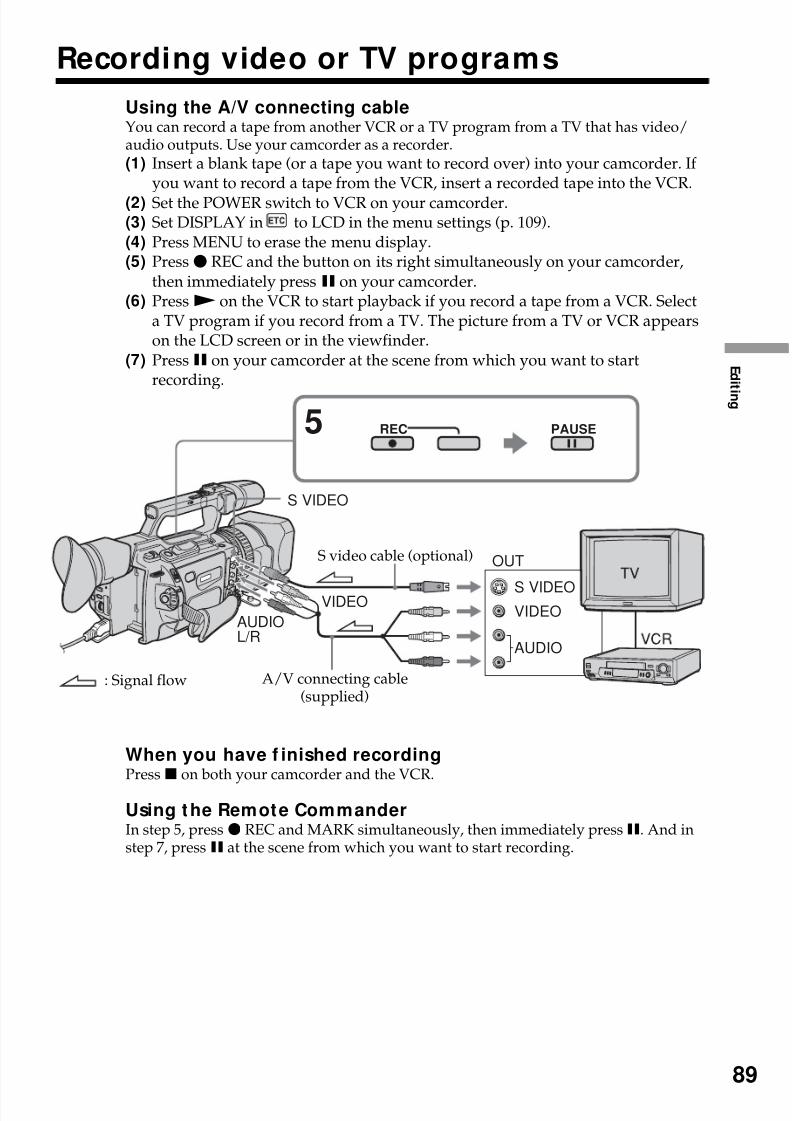
8/8/2019 276ba559b616f0752a9d1ab6240c7e96
http://slidepdf.com/reader/full/276ba559b616f0752a9d1ab6240c7e96 89/176
E d i t i n g
89
Recording video or TV programs
Using the A/V connecting cableYou can record a tape from another VCR or a TV program from a TV that has video/audio outputs. Use your camcorder as a recorder.(1) Insert a blank tape (or a tape you want to record over) into your camcorder. If
you want to record a tape from the VCR, insert a recorded tape into the VCR.(2) Set the POWER switch to VCR on your camcorder.(3) Set DISPLAY in to LCD in the menu settings (p. 109).(4) Press MENU to erase the menu display.(5) Pressz REC and the button on its right simultaneously on your camcorder,
then immediately pressX on your camcorder.(6) PressN on the VCR to start playback if you record a tape from a VCR. Select
a TV program if you record from a TV. The picture from a TV or VCR appearson the LCD screen or in the viewfinder.
(7) PressX on your camcorder at the scene from which you want to startrecording.
When you have f inished recordingPressx on both your camcorder and the VCR.
Using the Remote CommanderIn step 5, press z REC and MARK simultaneously, then immediately pressX. And instep 7, pressX at the scene from which you want to start recording.
VIDEO
AUDIO
OUT
S VIDEO
S VIDEO
VIDEO
5 PAUSEREC
AUDIOL/R
: Signal flow
S video cable (optional)
A/V connecting cable(supplied)
8/8/2019 276ba559b616f0752a9d1ab6240c7e96
http://slidepdf.com/reader/full/276ba559b616f0752a9d1ab6240c7e96 90/176
90
Recording video or TV programs
If your VCR is a monaural type
Connect the yellow plug of the A/V connecting cable to the video output jack and thewhite plug to the audio output jack on the VCR or the TV. The red plugs are not used.
Connect using an S video cable (optional) to obtain high-quality picturesWith this connection, you do not need to connect the yellow (video) plug of the A/Vconnecting cable.Connect an S video cable (optional) to the S video jacks of both your camcorder and theVCR.This connection produces higher quality DV format pictures.
If you do various playbacks on the VCR during recording
The recorded picture may be blurred.
On the commander modeYour camcorder works in the commander mode, VTR 2. Commander modes 1, 2 and 3are used to distinguish your camcorder from other Sony VCRs to avoid remote controlmisoperation. If you use another Sony VCR in the commander mode VTR 2, werecommend changing the commander mode or covering the sensor of the VCR with
black paper.
On index signal
The index is automatically marked on a tape when you start recording. If you mark theindex using the INDEX MARK button during recording, “LINE” appears in the CHcolumn on the INDEX SEARCH screen, and the index is recorded on cassette memory.
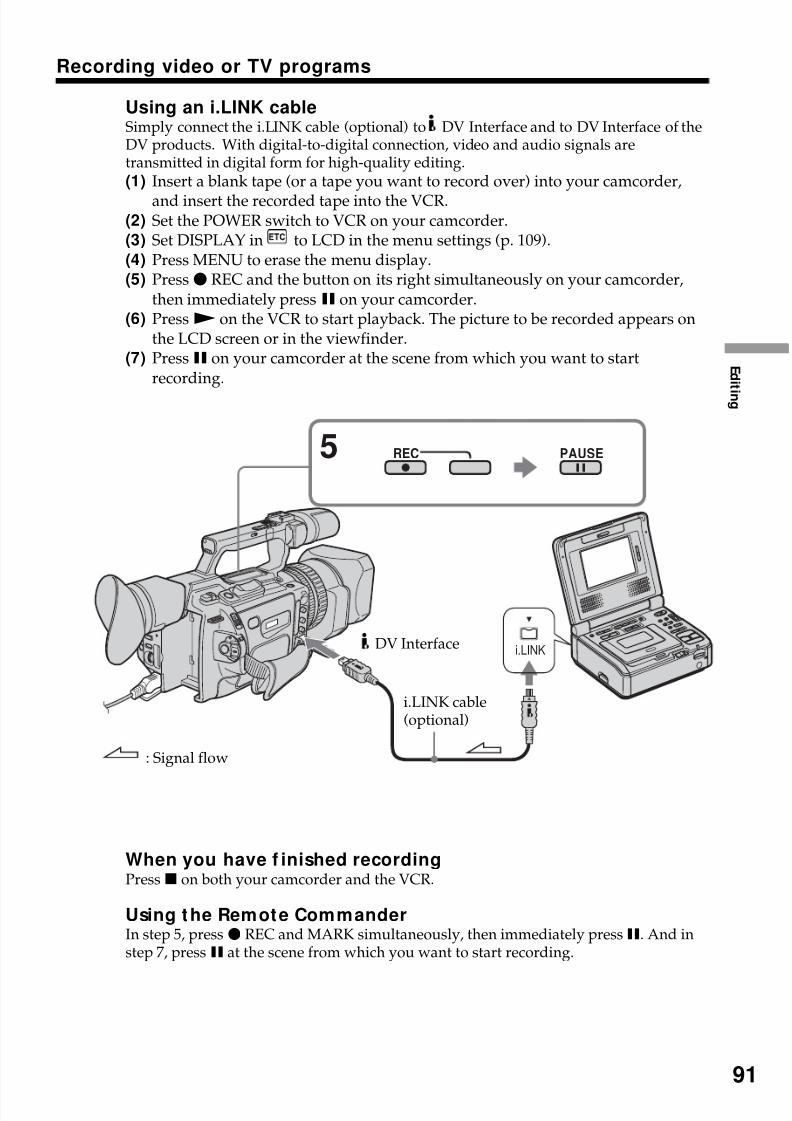
8/8/2019 276ba559b616f0752a9d1ab6240c7e96
http://slidepdf.com/reader/full/276ba559b616f0752a9d1ab6240c7e96 91/176
E d i t i n g
91
Recording video or TV programs
Using an i.LINK cableSimply connect the i.LINK cable (optional) to DV Interface and to DV Interface of theDV products. With digital-to-digital connection, video and audio signals aretransmitted in digital form for high-quality editing.(1) Insert a blank tape (or a tape you want to record over) into your camcorder,
and insert the recorded tape into the VCR.(2) Set the POWER switch to VCR on your camcorder.(3) Set DISPLAY in to LCD in the menu settings (p. 109).(4) Press MENU to erase the menu display.(5) Pressz REC and the button on its right simultaneously on your camcorder,
then immediately pressX on your camcorder.(6) PressN on the VCR to start playback. The picture to be recorded appears on
the LCD screen or in the viewfinder.(7) PressX on your camcorder at the scene from which you want to start
recording.
When you have f inished recordingPressx on both your camcorder and the VCR.
Using the Remote CommanderIn step 5, press z REC and MARK simultaneously, then immediately pressX. And instep 7, pressX at the scene from which you want to start recording.
i.LINK
5 PAUSEREC
: Signal flow
i.LINK cable(optional)
DV Interface
8/8/2019 276ba559b616f0752a9d1ab6240c7e96
http://slidepdf.com/reader/full/276ba559b616f0752a9d1ab6240c7e96 92/176
92
Recording video or TV programs
You can connect only one VCR using the i.LINK cable
When you dub a picture in digital form
The color of the display may be uneven. However this does not affect the dubbedpicture.
If you record a still picture in playback pause mode via the DV Interface
The recorded picture becomes rough. And when you play back the picture using yourcamcorder, the picture may jitter.
Before recording
Press DISPLAY and make sure that the DV IN indicator appears on the LCD screen orin the viewfinder. The DV IN indicator may appear on both pieces of equipment.
On the commander mode
Your camcorder works in the commander mode, VTR 2. Commander modes 1, 2 and 3
are used to distinguish your camcorder from other Sony VCRs to avoid remote controlmisoperation. If you use another Sony VCR in the commander mode VTR 2, werecommend changing the commander mode or covering the sensor of the VCR with
black paper.

8/8/2019 276ba559b616f0752a9d1ab6240c7e96
http://slidepdf.com/reader/full/276ba559b616f0752a9d1ab6240c7e96 93/176
E d i t i n g
93
Insert ing a scene f rom a VCR – Insertediting
You can insert a new scene from a VCR onto your originally recorded tape byspecifying the insert start and end points. Use the Remote Commander for thisoperation. Connections are the same as on page 74 or 88.Insert a cassette containing the desired scene into the VCR.
[A]: The tape that contains the scene to be superimposed[B]: The tape to be edited[C]: The tape after editing
(1) Set the POWER switch to VCR on your camcorder.(2) On the VCR, locate a point just before the insert start point [a], then pressX to
set the VCR to the playback pause mode.
(3) On your camcorder, locate the insert end point [c] by pressingm orM.Then pressX to set it to the playback pause mode.
(4) Press ZERO SET MEMORY on the Remote Commander. The ZERO SETMEMORY indicator flashes and the end point of the insert is stored inmemory. The tape counter shows “0:00:00.” If the tape counter does notappear, press DISPLAY.
(5) On your camcorder, locate the insert start point [b] by pressingm, then pressz REC and the button on its right simultaneously, then immediately pressXon your camcorder.
(6) First pressX on the VCR, and after a few seconds pressX on your camcorder
to start inserting the new scene.Inserting automatically stops near the zero point on the tape counter. Yourcamcorder automatically returns to the recording pause mode.
5
4ZERO SETMEMORY
0:00:00
ZERO SETMEMORY
PAUSEREC
[a]
[b] [c]
[A]
[B]
[C]
8/8/2019 276ba559b616f0752a9d1ab6240c7e96
http://slidepdf.com/reader/full/276ba559b616f0752a9d1ab6240c7e96 94/176
94
Insert ing a scene f rom a VCR – Insert edit ing
To change the insert end pointPress ZERO SET MEMORY on the Remote Commander again after step 5 to erase theZERO SET MEMORY indicator and begin from step 3.
Using the Remote CommanderIn step 5, press zREC and MARK simultaneously, then immediately pressX. And instep 6, pressX at the scene from which you want to start recording.
Note
The picture and sound recorded on the portion between the insert start and end pointswill be erased when you insert the new scene.
If you insert scenes on the tape recorded with an other camcorder (including an
other DCR-VX2100)
The picture and sound may be distorted. We recommend that you insert scenes on a
tape recorded with your camcorder.
When the inserted picture is played back
The picture and sound may be distorted at the end of the inserted portion. This is nota malfunction.The picture and sound at the start point and the end point may be distorted in the LPmode.
To insert a scene w ithout setting the insert end point
Skip steps 3 and 4. Press xwhen you want to stop inserting.
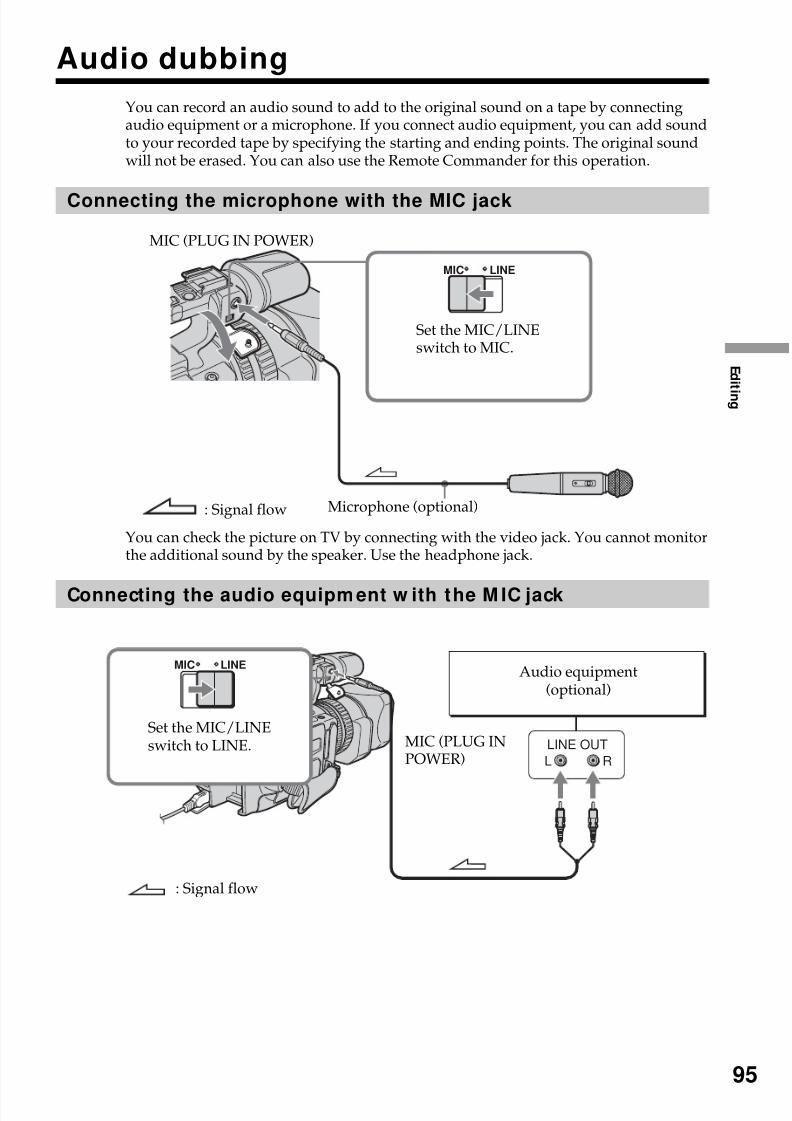
8/8/2019 276ba559b616f0752a9d1ab6240c7e96
http://slidepdf.com/reader/full/276ba559b616f0752a9d1ab6240c7e96 95/176
E d i t i n g
95
LINE OUT
L R
MIC LINE
Audio dubbing
You can record an audio sound to add to the original sound on a tape by connectingaudio equipment or a microphone. If you connect audio equipment, you can add soundto your recorded tape by specifying the starting and ending points. The original soundwill not be erased. You can also use the Remote Commander for this operation.
Connecting the microphone with the MIC jack
You can check the picture on TV by connecting with the video jack. You cannot monitorthe additional sound by the speaker. Use the headphone jack.
Connecting the audio equipm ent w ith the M IC jack
MIC LINE
MIC (PLUG IN POWER)
: Signal flow Microphone (optional)
MIC (PLUG INPOWER)
Audio equipment(optional)
: Signal flow
Set the MIC/LINEswitch to MIC.
Set the MIC/LINEswitch to LINE.
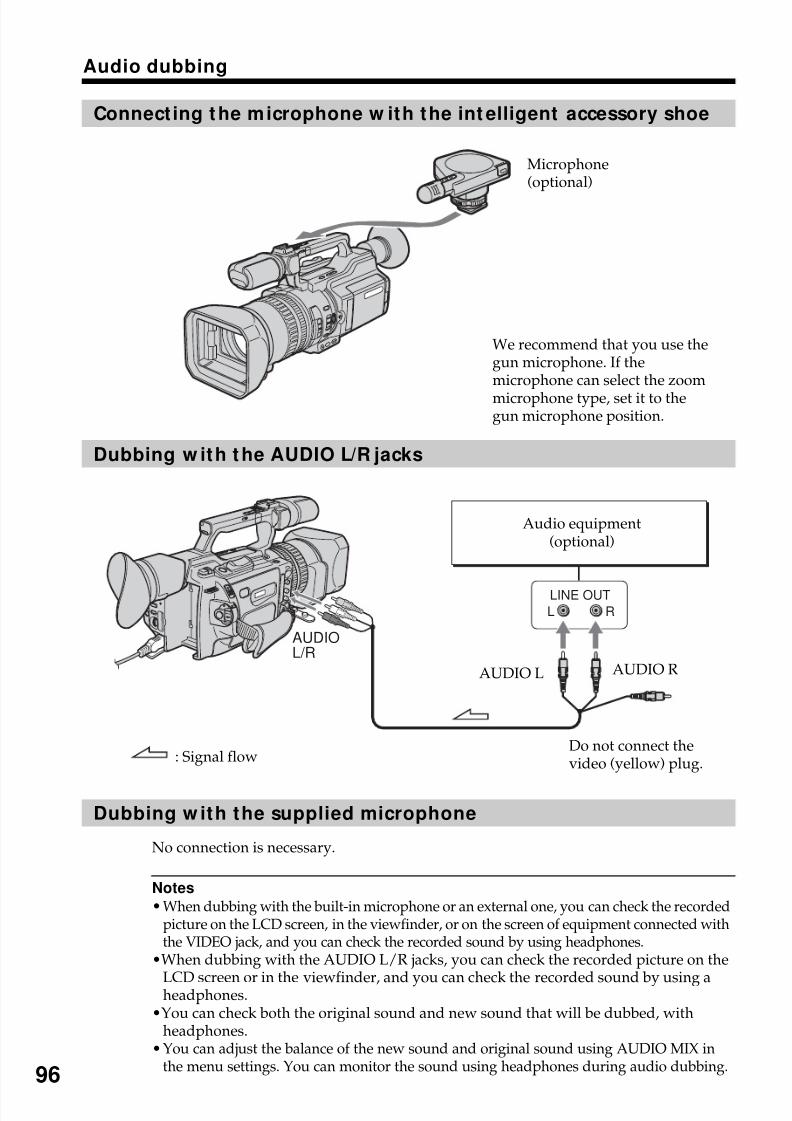
8/8/2019 276ba559b616f0752a9d1ab6240c7e96
http://slidepdf.com/reader/full/276ba559b616f0752a9d1ab6240c7e96 96/176
96
LINE OUT
L R
AUDIOL/R
: Signal flow
AUDIO L AUDIO R
Do not connect thevideo (yellow) plug.
Connect ing t he microphone w ith the int elligent accessory shoe
Dubbing w ith t he AUDIO L/R jacks
Dubbing w ith the supplied microphone
No connection is necessary.
Notes
•When dubbing with the built-in microphone or an external one, you can check the recordedpicture on the LCD screen, in the viewfinder, or on the screen of equipment connected withthe VIDEO jack, and you can check the recorded sound by using headphones.
•When dubbing with the AUDIO L/R jacks, you can check the recorded picture on the
LCD screen or in the viewfinder, and you can check the recorded sound by using aheadphones.•You can check both the original sound and new sound that will be dubbed, with
headphones.•You can adjust the balance of the new sound and original sound using AUDIO MIX in
the menu settings. You can monitor the sound using headphones during audio dubbing.
Audio dubbing
Microphone(optional)
We recommend that you use thegun microphone. If themicrophone can select the zoommicrophone type, set it to thegun microphone position.
Audio equipment(optional)
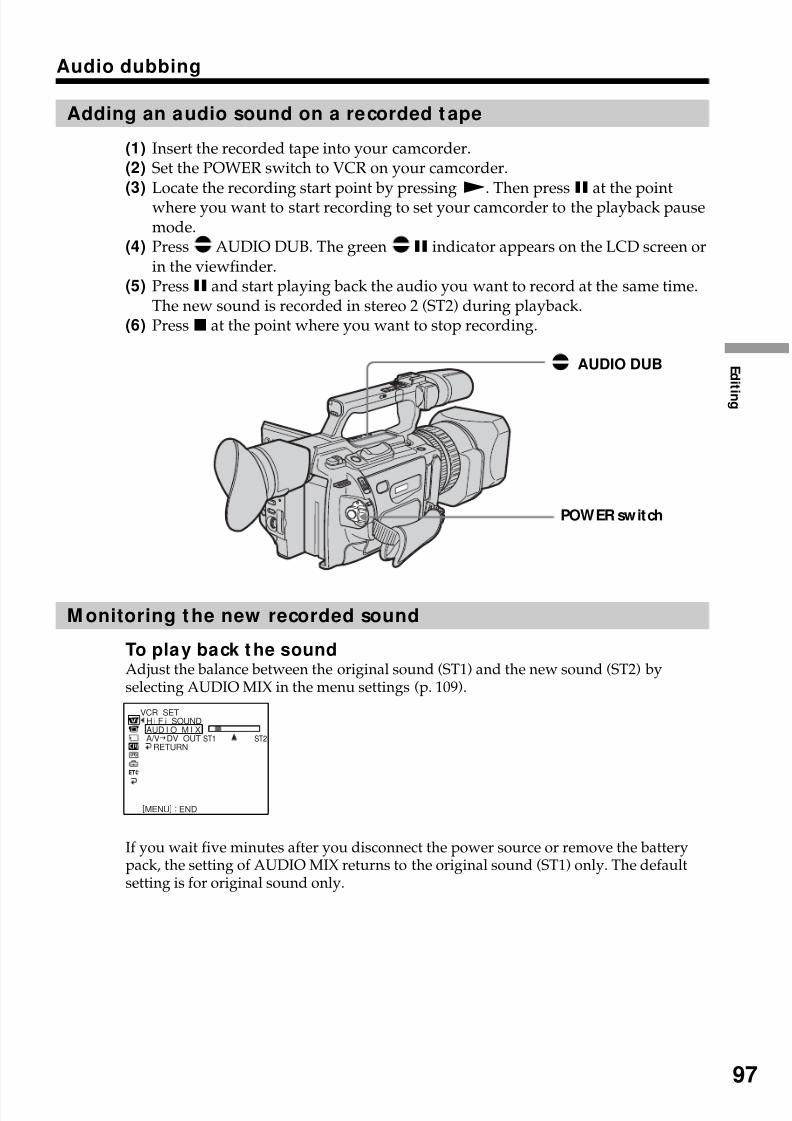
8/8/2019 276ba559b616f0752a9d1ab6240c7e96
http://slidepdf.com/reader/full/276ba559b616f0752a9d1ab6240c7e96 97/176
8/8/2019 276ba559b616f0752a9d1ab6240c7e96
http://slidepdf.com/reader/full/276ba559b616f0752a9d1ab6240c7e96 98/176

8/8/2019 276ba559b616f0752a9d1ab6240c7e96
http://slidepdf.com/reader/full/276ba559b616f0752a9d1ab6240c7e96 99/176
E d i t i n g
99
Superimposing a t it le
If you use a tape with cassette memory, you can superimpose the title whilerecording or after recording. When you play back the tape, the title is displayedfor five seconds from the point where you superimposed it.
You can select one of eight preset titles and two custom titles (p. 103).
(1) Press TITLE to display the title menu in standby, recording, playback, orplayback pause mode.
(2) Turn the SEL/PUSH EXEC dial to select , then press the dial.
(3) Turn the SEL/PUSH EXEC dial to select the desired title, then press the dial.The title flashes.
(4) Change the color, size, or position, if necessary.1 Turn the SEL/PUSH EXEC dial to select the COLOR, SIZE, or POSITION,
then press the dial. The item appears.2 Turn the SEL/PUSH EXEC dial to select the desired item, then press the
dial.3 Repeat steps 1 and 2 until the title is laid out as desired.
VACATION
You can also select the color, size andposition of titles.
1
2 PRESET TITLEHELLO!HAPPY BIRTHDAYHAPPY HOLIDAYSCONGRATULATIONS!OUR SWEET BABYWEDDINGVACATIONTHE END
[T I TLE] : END
PRESET TITLEHELLO!HAPPY BIRTHDAYHAPPY HOLIDAYSCONGRATULATIONS!OUR SWEET BABYWEDDINGVACATIONTHE END
RETURN
[T I TLE] : END
PRESET TITLEHELLO!HAPPY BIRTHDAYHAPPY HOLIDAYSCONGRATULATIONS!OUR SWEET BABYWEDDINGVACATIONTHE ENDRETURN
[T I TLE] : END
TITLE
VACATION
[EXEC] : SAVE [T I TLE] : END
SIZE SMALL
[EXEC] : SAVE [T I TLE] : END
TITLE
VACATIONSIZE LARGE
VACATION
3
4
PRESET TITLEHELLO!HAPPY BIRTHDAYHAPPY HOLIDAYSCONGRATULATIONS!OUR SWEET BABYWEDDINGVACATIONTHE END
[T I TLE] : END
TITLE
8/8/2019 276ba559b616f0752a9d1ab6240c7e96
http://slidepdf.com/reader/full/276ba559b616f0752a9d1ab6240c7e96 100/176
100
Superimposing a title
(5) Press the SEL/PUSH EXEC dial again to complete the setting.In playback, playback pause, or recording mode:The “TITLE SAVE” indicator appears on the screen for five seconds and thetitle is set.
In standby mode:The “TITLE” indicator appears. When you press START/STOP to startrecording, “TITLE SAVE” appears on the screen for five seconds and the titleis set.
If you set the write-protect tab to lock
You cannot superimpose or erase the title. Slide the write-protect tab to release the writeprotection.
To use a custom title
If you want to use the custom title, select in step 2.
If the tape has a blank portion
You cannot superimpose a title on that portion.
If the tape has a blank portion in the middle of the recorded parts
The title may not be displayed correctly.
The tit les superimposed with your camcorder
•They are displayed only on the DV format video equipment with the index titlerfunction.
•The point you superimposed the title may be detected as an index signal whensearching a recording with other video equipment.
To not display titles
Set TITLE DSPL to OFF in the menu settings (p. 109).

8/8/2019 276ba559b616f0752a9d1ab6240c7e96
http://slidepdf.com/reader/full/276ba559b616f0752a9d1ab6240c7e96 101/176
E d i t i n g
101
Superimposing a title
Title setting
•The title color changes as follows:WHITEy YELLOWy VIOLETy REDy CYANy GREENy BLUE
•The title size changes as follows:SMALLy LARGE
You cannot input more than 12 characters in LARGE size.•If you select the title size “SMALL,” you have nine choices for the title position.
If you select the title size “LARGE,” you have eight choices for the title position.
If the “ FULL” mark appears
The cassette memory is full. If you erase the title, index data, date data, photo data, orcassette label in the cassette, you can then superimpose a title.
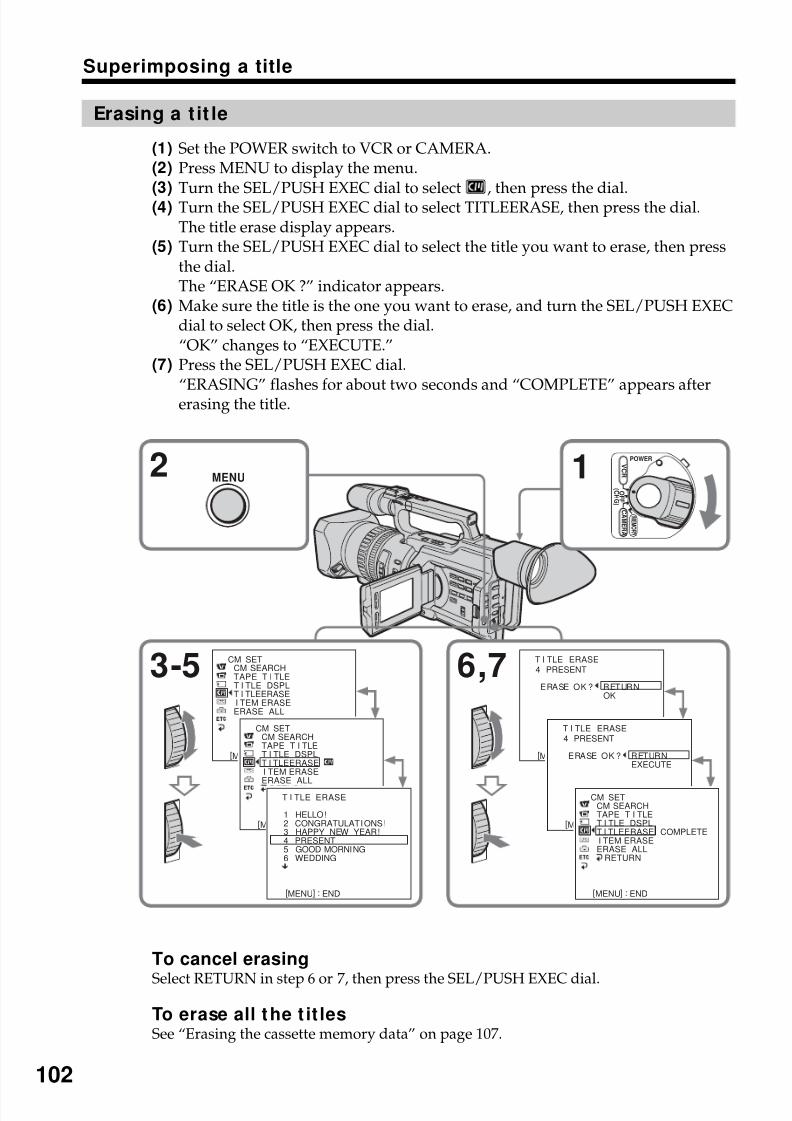
8/8/2019 276ba559b616f0752a9d1ab6240c7e96
http://slidepdf.com/reader/full/276ba559b616f0752a9d1ab6240c7e96 102/176
102
Superimposing a title
Erasing a t it le
(1) Set the POWER switch to VCR or CAMERA.(2) Press MENU to display the menu.(3)
Turn the SEL/PUSH EXEC dial to select , then press the dial.(4) Turn the SEL/PUSH EXEC dial to select TITLEERASE, then press the dial.The title erase display appears.
(5) Turn the SEL/PUSH EXEC dial to select the title you want to erase, then pressthe dial.The “ERASE OK ?” indicator appears.
(6) Make sure the title is the one you want to erase, and turn the SEL/PUSH EXECdial to select OK, then press the dial.“OK” changes to “EXECUTE.”
(7) Press the SEL/PUSH EXEC dial.
“ERASING” flashes for about two seconds and “COMPLETE” appears aftererasing the title.
To cancel erasing
Select RETURN in step 6 or 7, then press the SEL/PUSH EXEC dial.
To erase all the t it lesSee “Erasing the cassette memory data” on page 107.
CM SETCM SEARCHTAPE T I TLET I TLE DSPLT I TLEERASE I TEM ERASEERASE ALL
[MENU] : END
T I TLE ERASE4 PRESENT
ERASE OK ? RETURNOK
[MENU] : END
3-5 6,7
2 1POWER
O F F
( C H G )
C A ME R A
M E M O R Y
V C R
CM SETCM SEARCHTAPE T I TLET I TLE DSPLT I TLEERASE I TEM ERASEERASE ALL
RETURN
[MENU] : END
T I TLE ERASE4 PRESENT
ERASE OK ? RETURNEXECUTE
[MENU] : END
MENU
T I TLE ERASE
1 HELLO !2 CONGRATULAT I ONS !3 HAPPY NEW YEAR !4 PRESENT5 GOOD MORNING6 WEDDING
[MENU] : END
CM SETCM SEARCHTAPE T I TLET I TLE DSPLT I TLEERASE I TEM ERASEERASE ALL
RETURN
COMPLETE
[MENU] : END
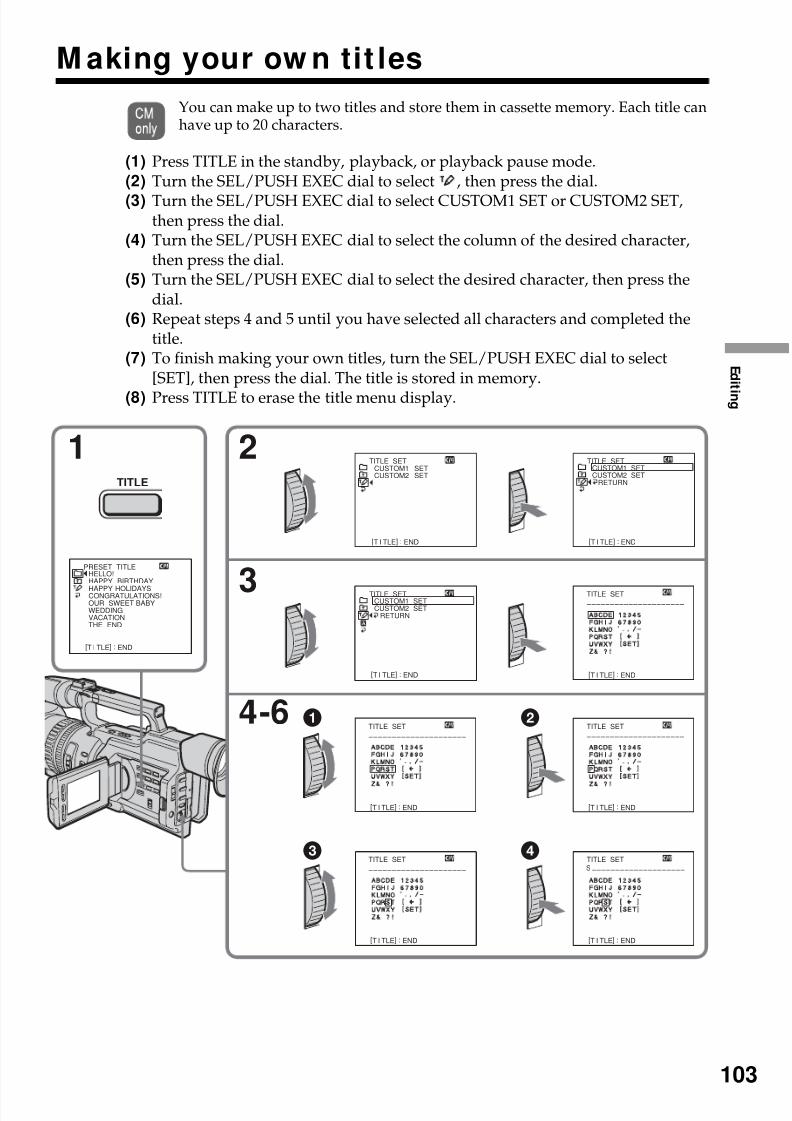
8/8/2019 276ba559b616f0752a9d1ab6240c7e96
http://slidepdf.com/reader/full/276ba559b616f0752a9d1ab6240c7e96 103/176
E d i t i n g
103
M aking your ow n tit les
You can make up to two titles and store them in cassette memory. Each title canhave up to 20 characters.
(1) Press TITLE in the standby, playback, or playback pause mode.(2) Turn the SEL/PUSH EXEC dial to select , then press the dial.
(3) Turn the SEL/PUSH EXEC dial to select CUSTOM1 SET or CUSTOM2 SET,then press the dial.
(4) Turn the SEL/PUSH EXEC dial to select the column of the desired character,then press the dial.
(5) Turn the SEL/PUSH EXEC dial to select the desired character, then press thedial.
(6) Repeat steps 4 and 5 until you have selected all characters and completed thetitle.
(7) To finish making your own titles, turn the SEL/PUSH EXEC dial to select[SET], then press the dial. The title is stored in memory.
(8) Press TITLE to erase the title menu display.
1 2
3
4-6 1 2
3 4
TITLE SETCUSTOM1CUSTOM2
[T I TLE] : END
SETSET
TITLE SETCUSTOM1 SETCUSTOM2 SET
RETURN
[T I TLE] : END
TITLE SETCUSTOM1 SETCUSTOM2 SET
RETURN
[T I TLE] : END
PRESET TITLEHELLO!HAPPY BIRTHDAY
HAPPY HOLIDAYSCONGRATULATIONS!OUR SWEET BABYWEDDINGVACATIONTHE END
[T I TLE] : END
TITLE SET
–––––––––––––––––––––
[T I TLE] : END
TITLE SET
–––––––––––––––––––––
[T I TLE] : END
TITLE SET
–––––––––––––––––––––
[T I TLE] : END
TITLE SET
–––––––––––––––––––––
[T I TLE] : END
TITLE SET
S ––––––––––––––––––––
[T I TLE] : END
TITLE

8/8/2019 276ba559b616f0752a9d1ab6240c7e96
http://slidepdf.com/reader/full/276ba559b616f0752a9d1ab6240c7e96 104/176
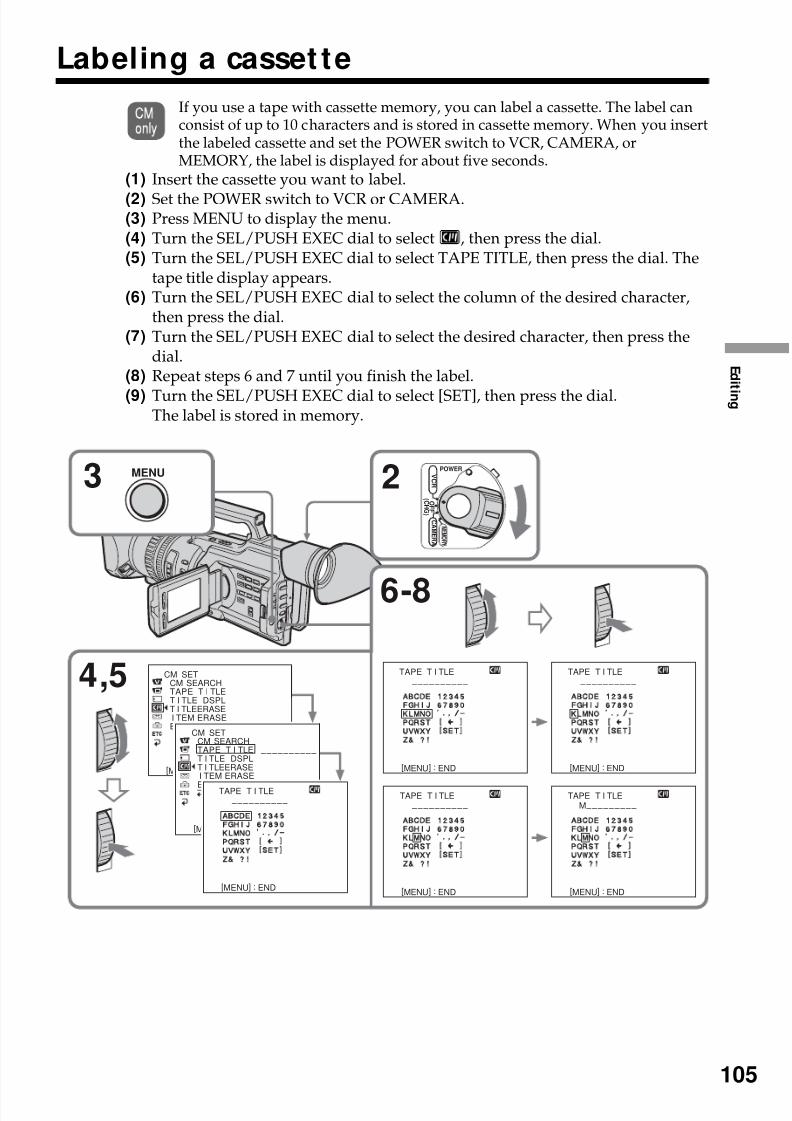
8/8/2019 276ba559b616f0752a9d1ab6240c7e96
http://slidepdf.com/reader/full/276ba559b616f0752a9d1ab6240c7e96 105/176
E d i t i n g
105
Labeling a casset te
If you use a tape with cassette memory, you can label a cassette. The label canconsist of up to 10 characters and is stored in cassette memory. When you insertthe labeled cassette and set the POWER switch to VCR, CAMERA, orMEMORY, the label is displayed for about five seconds.
(1) Insert the cassette you want to label.
(2) Set the POWER switch to VCR or CAMERA.(3) Press MENU to display the menu.(4) Turn the SEL/PUSH EXEC dial to select , then press the dial.(5) Turn the SEL/PUSH EXEC dial to select TAPE TITLE, then press the dial. The
tape title display appears.(6) Turn the SEL/PUSH EXEC dial to select the column of the desired character,
then press the dial.(7) Turn the SEL/PUSH EXEC dial to select the desired character, then press the
dial.(8) Repeat steps 6 and 7 until you finish the label.
(9) Turn the SEL/PUSH EXEC dial to select [SET], then press the dial.The label is stored in memory.
4,5 CM SETCM SEARCHTAPE T I TLET I TLE DSPLT I TLEERASE I TEM ERASEERASE ALL
[MENU] : END
6-8
TAPE T I TLE
––––––––––
[MENU] : END
TAPE T I TLE
––––––––––
[MENU] : END
TAPE T I TLEM –––––––––
[MENU] : END
TAPE T I TLE
––––––––––
[MENU] : END
CM SETCM SEARCHTAPE T I TLET I TLE DSPLT I TLEERASE I TEM ERASE
ERASE ALLRETURN
[MENU] : END
––––––––––
TAPE T I TLE
––––––––––
[MENU] : END
2POWER
O F F
( C H G )
C A ME R A
M E M O R Y
V C R 3 MENU
8/8/2019 276ba559b616f0752a9d1ab6240c7e96
http://slidepdf.com/reader/full/276ba559b616f0752a9d1ab6240c7e96 106/176
106
Labeling a cassette
To change the label you have madeInsert the cassette to change the label, and operate in the same way as you do to make anew label.
If you set the write-protect tab of the tape to lock
You cannot label the tape. Slide the write-protect tab to release the write protection.
If you have superimposed titles in the cassette
When the label is displayed, up to four titles also appear.
When the “-----” indicator has few er than 10 spaces
The cassette memory is full.The “-----” indicates the number of characters you can select for the label.
To erase a character
Turn the SEL/PUSH EXEC dial to select [C
], then press the dial. The last character iserased.
To enter a space
Select [ ], then select the blank part.
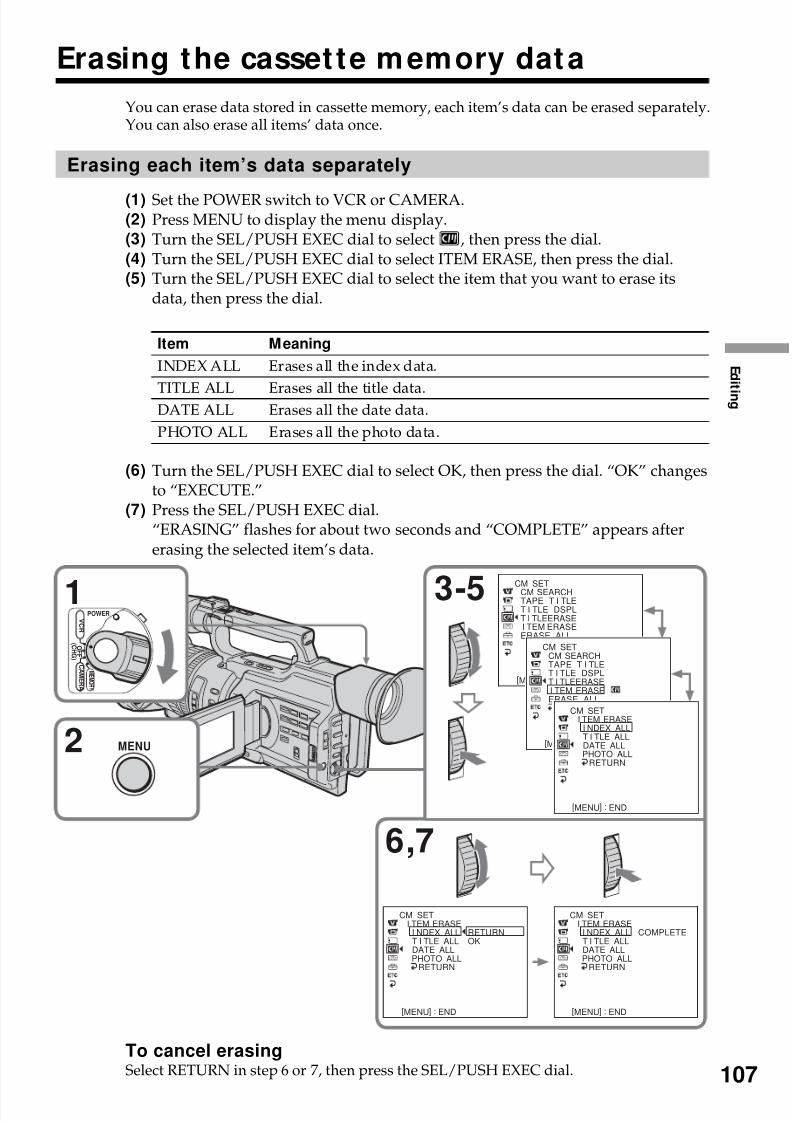
8/8/2019 276ba559b616f0752a9d1ab6240c7e96
http://slidepdf.com/reader/full/276ba559b616f0752a9d1ab6240c7e96 107/176
E d i t i n g
107
Erasing the cassette memory data
You can erase data stored in cassette memory, each item’s data can be erased separately.You can also erase all items’ data once.
Erasing each item’s data separately
(1) Set the POWER switch to VCR or CAMERA.(2) Press MENU to display the menu display.(3) Turn the SEL/PUSH EXEC dial to select , then press the dial.(4) Turn the SEL/PUSH EXEC dial to select ITEM ERASE, then press the dial.(5) Turn the SEL/PUSH EXEC dial to select the item that you want to erase its
data, then press the dial.
Item Meaning
INDEX ALL Erases all the index data.
TITLE ALL Erases all the title data.DATE ALL Erases all the date data.
PHOTO ALL Erases all the photo data.
(6) Turn the SEL/PUSH EXEC dial to select OK, then press the dial. “OK” changesto “EXECUTE.”
(7) Press the SEL/PUSH EXEC dial.“ERASING” flashes for about two seconds and “COMPLETE” appears aftererasing the selected item’s data.
To cancel erasingSelect RETURN in step 6 or 7, then press the SEL/PUSH EXEC dial.
2
3-5
MENU
1 POWER
O F F
( C H G )
C A ME R A
M E M O R Y
V C R
6,7
CM SETCM SEARCHTAPE T I TLET I TLE DSPLT I TLEERASE I TEM ERASEERASE ALL
[MENU] : END
CM SET I TEM ERASE
I NDEX ALLT I TLE ALLDATE ALLPHOTO ALL
RETURN
RETURNOK
[MENU] : END
CM SET I TEM ERASE
I NDEX ALLT I TLE ALLDATE ALLPHOTO ALL
RETURN
COMPLETE
[MENU] : END
CM SETCM SEARCHTAPE T I TLET I TLE DSPLT I TLEERASE I TEM ERASEERASE ALL
RETURN
[MENU] : END
CM SET I TEM ERASE
I NDEX ALLT I TLE ALLDATE ALLPHOTO ALL
RETURN
[MENU] : END
8/8/2019 276ba559b616f0752a9d1ab6240c7e96
http://slidepdf.com/reader/full/276ba559b616f0752a9d1ab6240c7e96 108/176
108
Erasing t he cassette memory data
Erasing all the dat a in cassette memory
(1) Set the POWER switch to VCR or CAMERA.(2) Press MENU to display the menu display.(3)
Turn the SEL/PUSH EXEC dial to select , then press the dial.(4) Turn the SEL/PUSH EXEC dial to select ERASE ALL, then press the dial.(5) Turn the SEL/PUSH EXEC dial to select OK, then press the dial. “OK” changes
to “EXECUTE.”(6) Press the SEL/PUSH EXEC dial.
“ERASING” flashes for about two seconds and “COMPLETE” appears aftererasing all the data.
To cancel erasingSelect RETURN in step 5 or 6, then press the SEL/PUSH EXEC dial.
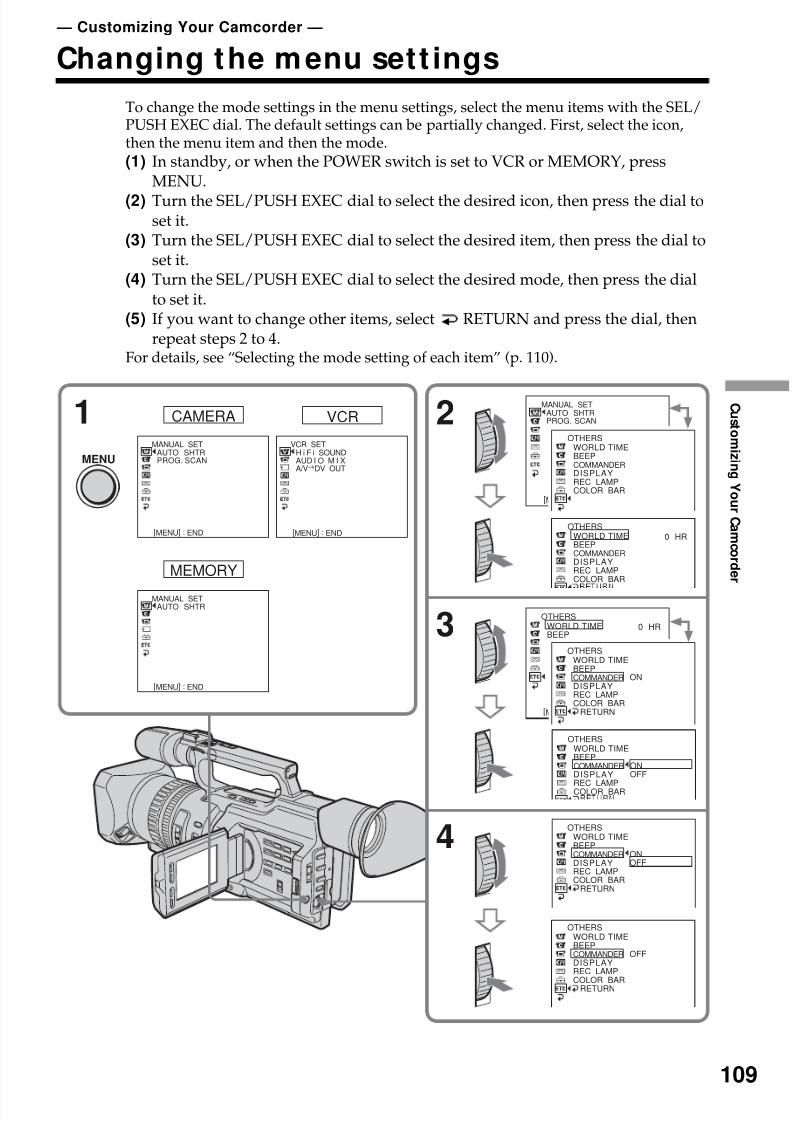
8/8/2019 276ba559b616f0752a9d1ab6240c7e96
http://slidepdf.com/reader/full/276ba559b616f0752a9d1ab6240c7e96 109/176
109
C u s t o mi z i n gY o ur C a m c or d er
— Customizing Your Camcorder —
Changing the menu sett ings
To change the mode settings in the menu settings, select the menu items with the SEL/PUSH EXEC dial. The default settings can be partially changed. First, select the icon,then the menu item and then the mode.(1) In standby, or when the POWER switch is set to VCR or MEMORY, press
MENU.
(2) Turn the SEL/PUSH EXEC dial to select the desired icon, then press the dial toset it.
(3) Turn the SEL/PUSH EXEC dial to select the desired item, then press the dial toset it.
(4) Turn the SEL/PUSH EXEC dial to select the desired mode, then press the dialto set it.
(5) If you want to change other items, select RETURN and press the dial, thenrepeat steps 2 to 4.
For details, see “Selecting the mode setting of each item” (p. 110).
1 CAMERA 2
3
4
MANUAL SETAUTO SHTRPROG. SCAN
VCR
VCR SETH i F i SOUNDAUD I O M I XA/V DV OUT
MEMORY
MANUAL SETAUTO SHTR
MANUAL SETAUTO SHTRPROG. SCAN
OTHERSWORLD TIMEBEEP
0 HR
OTHERSWORLD TIMEBEEPCOMMANDERDISPLAYREC LAMPCOLOR BAR
RETURN
ONOFF
[MENU] : END [MENU] : END
[MENU] : END
[MENU] : END
[MENU] : END
OTHERSWORLD TIMEBEEPCOMMANDERDISPLAYREC LAMPCOLOR BAR
OTHERSWORLD TIMEBEEPCOMMANDERDISPLAYREC LAMPCOLOR BAR
RETURN
ON
OTHERSWORLD TIMEBEEPCOMMANDERDISPLAYREC LAMP
COLOR BARRETURN
OFF
OTHERSWORLD TIMEBEEPCOMMANDERDISPLAYREC LAMPCOLOR BAR
0 HR
OTHERSWORLD TIMEBEEPCOMMANDERDISPLAY
REC LAMPCOLOR BAR
ONOFF
MENU
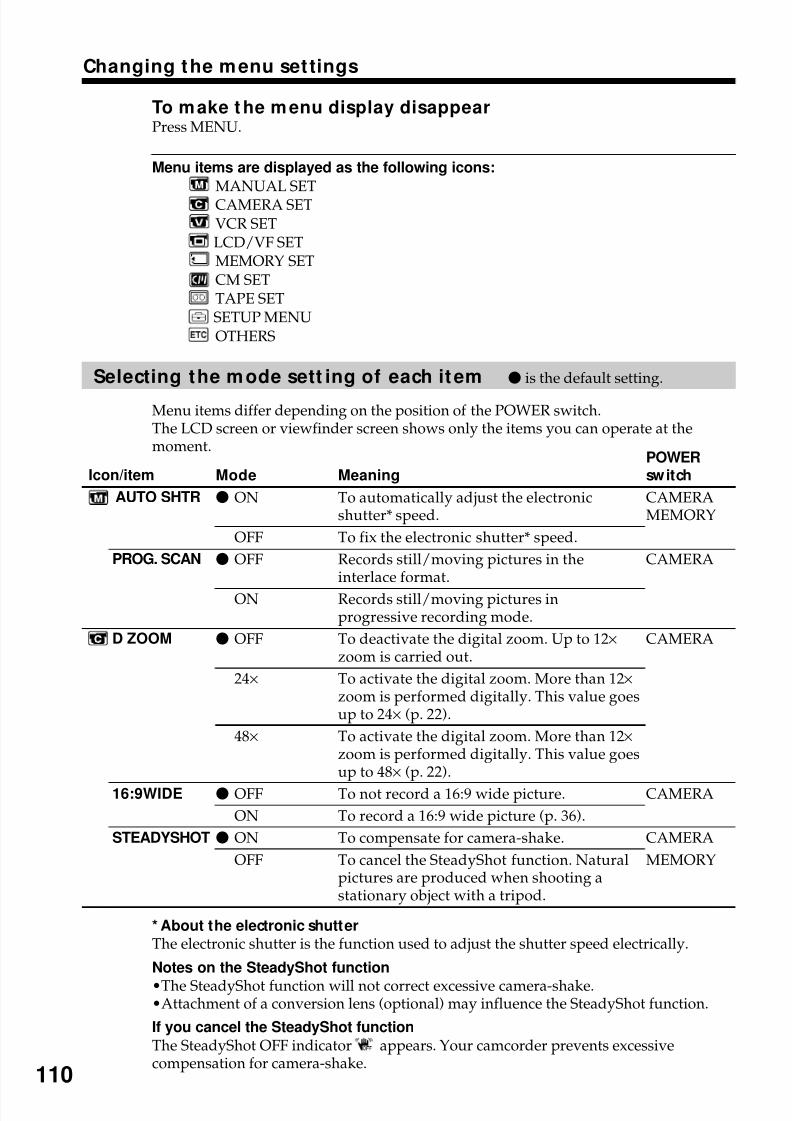
8/8/2019 276ba559b616f0752a9d1ab6240c7e96
http://slidepdf.com/reader/full/276ba559b616f0752a9d1ab6240c7e96 110/176
110
Changing the menu settings
To make t he menu display disappearPress MENU.
Menu items are displayed as the following icons:
MANUAL SETCAMERA SETVCR SETLCD/VF SETMEMORY SETCM SETTAPE SETSETUP MENUOTHERS
Selecting the mode sett ing of each item z is the default setting.
Menu items differ depending on the position of the POWER switch.The LCD screen or viewfinder screen shows only the items you can operate at themoment.
Icon/item
AUTO SHTR
PROG. SCAN
D ZOOM
16:9WIDE
STEADYSHOT
Mode
z ON
OFF
z OFF
ON
z OFF
24×
48×
z OFF
ON
z ON
OFF
Meaning
To automatically adjust the electronicshutter* speed.
To fix the electronic shutter* speed.
Records still/moving pictures in theinterlace format.
Records still/moving pictures inprogressive recording mode.
To deactivate the digital zoom. Up to 12×zoom is carried out.
To activate the digital zoom. More than 12×zoom is performed digitally. This value goesup to 24× (p. 22).
To activate the digital zoom. More than 12×zoom is performed digitally. This value goesup to 48× (p. 22).
To not record a 16:9 wide picture.
To record a 16:9 wide picture (p. 36).
To compensate for camera-shake.
To cancel the SteadyShot function. Naturalpictures are produced when shooting astationary object with a tripod.
POWERswitch
CAMERAMEMORY
CAMERA
CAMERA
CAMERA
CAMERA
MEMORY
* About the electronic shutterThe electronic shutter is the function used to adjust the shutter speed electrically.
Notes on the SteadyShot function
•The SteadyShot function will not correct excessive camera-shake.•Attachment of a conversion lens (optional) may influence the SteadyShot function.
If you cancel the SteadyShot function
The SteadyShot OFF indicator appears. Your camcorder prevents excessivecompensation for camera-shake.
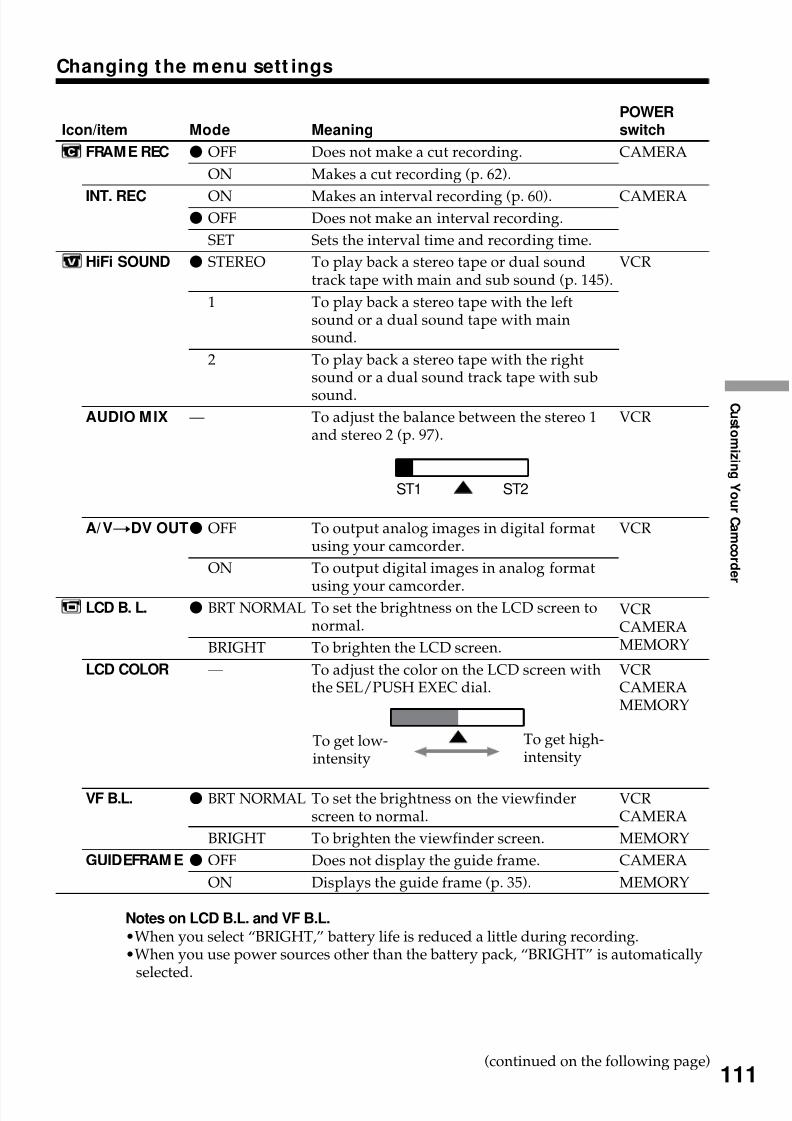
8/8/2019 276ba559b616f0752a9d1ab6240c7e96
http://slidepdf.com/reader/full/276ba559b616f0752a9d1ab6240c7e96 111/176
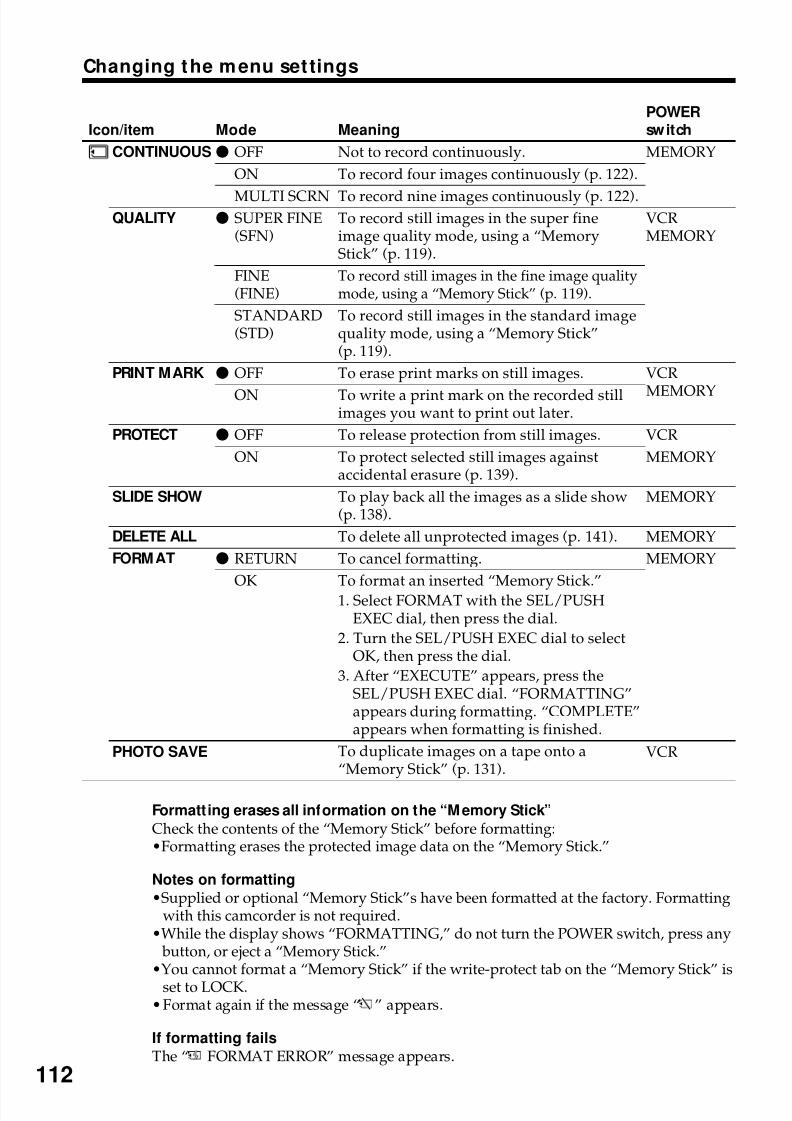
8/8/2019 276ba559b616f0752a9d1ab6240c7e96
http://slidepdf.com/reader/full/276ba559b616f0752a9d1ab6240c7e96 112/176
112
Changing the menu settings
Icon/item
CONTINUOUS
QUALITY
PRINT MARK
PROTECT
SLIDE SHOW
DELETE ALL
FORMAT
PHOTO SAVE
Mode
z OFF
ON
MULTI SCRNz SUPER FINE
(SFN)
FINE(FINE)
STANDARD(STD)
z OFF
ON
z OFF
ON
z RETURN
OK
Meaning
Not to record continuously.
To record four images continuously (p. 122).
To record nine images continuously (p. 122).To record still images in the super fineimage quality mode, using a “MemoryStick” (p. 119).
To record still images in the fine image qualitymode, using a “Memory Stick” (p. 119).
To record still images in the standard imagequality mode, using a “Memory Stick”(p. 119).
To erase print marks on still images.
To write a print mark on the recorded stillimages you want to print out later.
To release protection from still images.
To protect selected still images againstaccidental erasure (p. 139).
To play back all the images as a slide show(p. 138).
To delete all unprotected images (p. 141).
To cancel formatting.
To format an inserted “Memory Stick.”1. Select FORMAT with the SEL/PUSHEXEC dial, then press the dial.
2. Turn the SEL/PUSH EXEC dial to selectOK, then press the dial.
3. After “EXECUTE” appears, press theSEL/PUSH EXEC dial. “FORMATTING”appears during formatting. “COMPLETE”appears when formatting is finished.
To duplicate images on a tape onto a“Memory Stick” (p. 131).
POWERswitch
MEMORY
VCRMEMORY
VCR
MEMORY
VCR
MEMORY
MEMORY
MEMORY
MEMORY
VCR
Formatting erases all information on the “Memory Stick”
Check the contents of the “Memory Stick” before formatting:•Formatting erases the protected image data on the “Memory Stick.”
Notes on formatting
•Supplied or optional “Memory Stick”s have been formatted at the factory. Formattingwith this camcorder is not required.
•While the display shows “FORMATTING,” do not turn the POWER switch, press any button, or eject a “Memory Stick.”
•You cannot format a “Memory Stick” if the write-protect tab on the “Memory Stick” is
set to LOCK.•Format again if the message “ ” appears.
If formatting fails
The “ FORMAT ERROR” message appears.
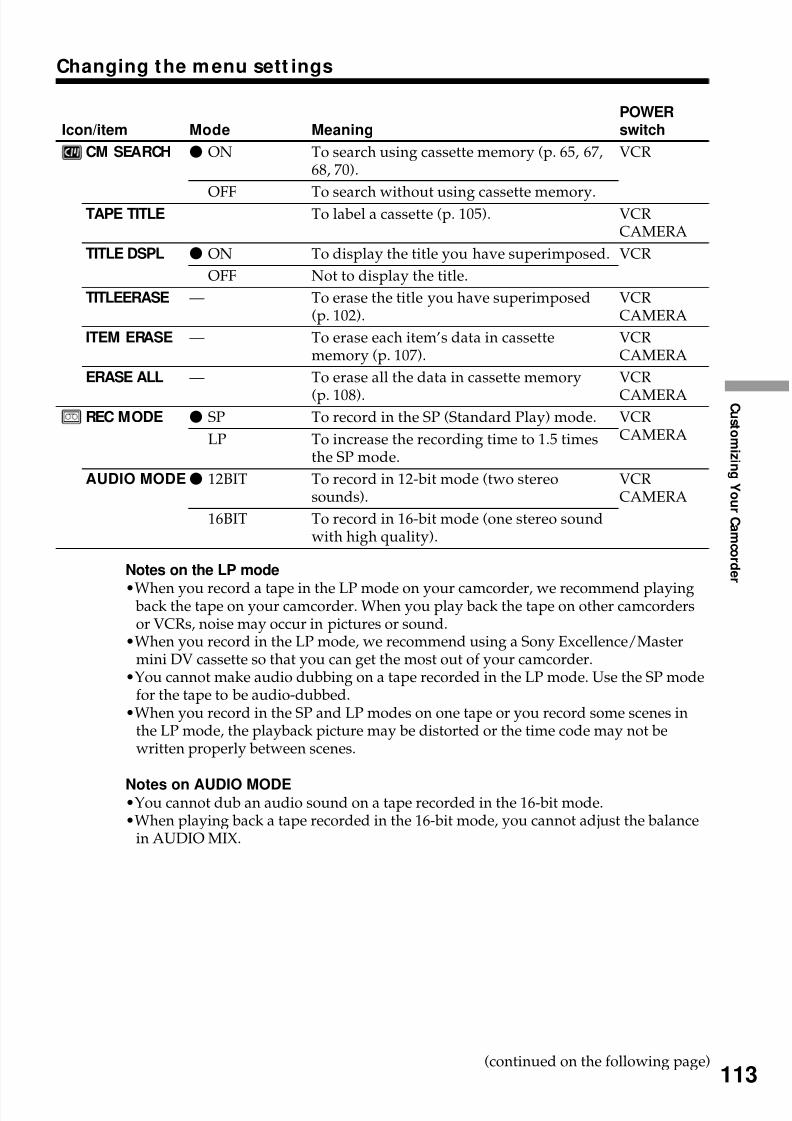
8/8/2019 276ba559b616f0752a9d1ab6240c7e96
http://slidepdf.com/reader/full/276ba559b616f0752a9d1ab6240c7e96 113/176
113
C u s t o mi z i n gY o ur C a m c or d er
Changing the menu sett ings
Icon/item
CM SEARCH
TAPE TITLE
TITLE DSPL
TITLEERASE
ITEM ERASE
ERASE ALL
REC MODE
AUDIO MODE
Mode
z ON
OFF
z ON
OFF
—
—
—
z SP
LP
z 12BIT
16BIT
Meaning
To search using cassette memory (p. 65, 67,68, 70).
To search without using cassette memory.To label a cassette (p. 105).
To display the title you have superimposed.
Not to display the title.
To erase the title you have superimposed(p. 102).
To erase each item’s data in cassettememory (p. 107).
To erase all the data in cassette memory
(p. 108).To record in the SP (Standard Play) mode.
To increase the recording time to 1.5 timesthe SP mode.
To record in 12-bit mode (two stereosounds).
To record in 16-bit mode (one stereo soundwith high quality).
POWERswitch
VCR
VCRCAMERA
VCR
VCRCAMERA
VCRCAMERA
VCR
CAMERAVCRCAMERA
VCRCAMERA
Notes on the LP mode
•When you record a tape in the LP mode on your camcorder, we recommend playing back the tape on your camcorder. When you play back the tape on other camcordersor VCRs, noise may occur in pictures or sound.
•When you record in the LP mode, we recommend using a Sony Excellence/Mastermini DV cassette so that you can get the most out of your camcorder.
•You cannot make audio dubbing on a tape recorded in the LP mode. Use the SP modefor the tape to be audio-dubbed.
•When you record in the SP and LP modes on one tape or you record some scenes inthe LP mode, the playback picture may be distorted or the time code may not bewritten properly between scenes.
Notes on AUDIO MODE•You cannot dub an audio sound on a tape recorded in the 16-bit mode.•When playing back a tape recorded in the 16-bit mode, you cannot adjust the balance
in AUDIO MIX.
(continued on the following page)
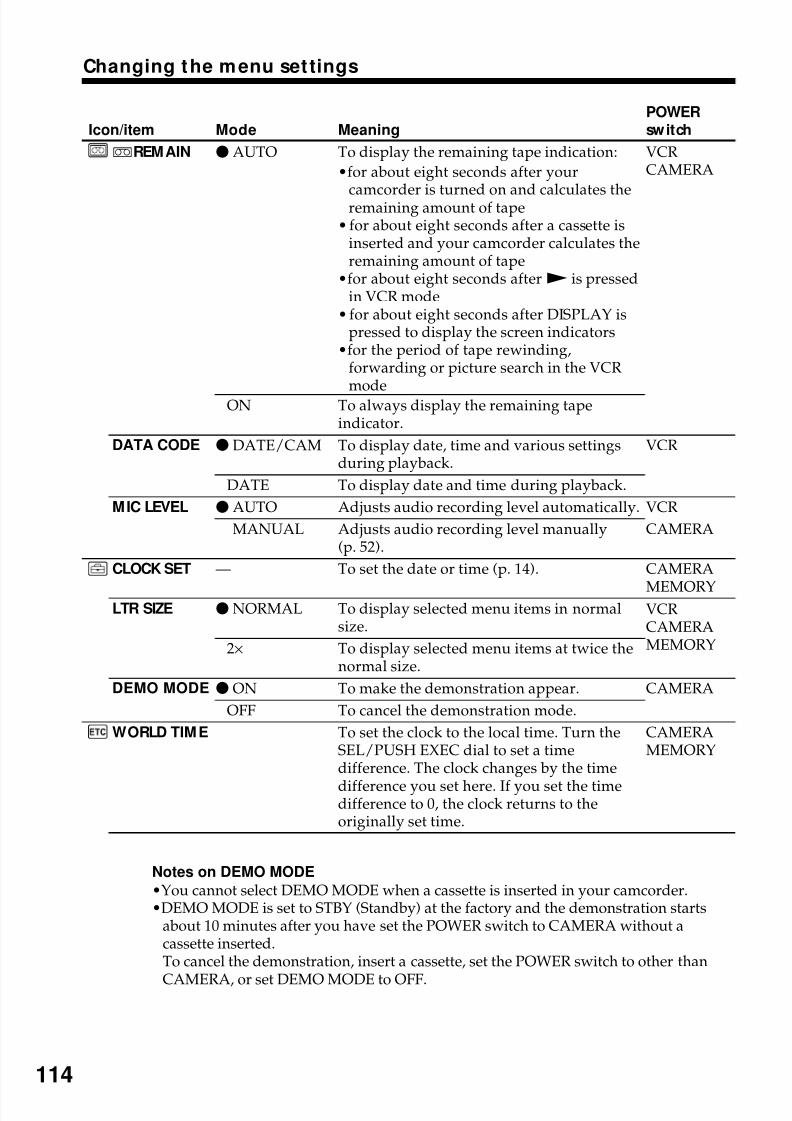
8/8/2019 276ba559b616f0752a9d1ab6240c7e96
http://slidepdf.com/reader/full/276ba559b616f0752a9d1ab6240c7e96 114/176
114
Changing the menu settings
Icon/item
qREMAIN
DATA CODE
MIC LEVEL
CLOCK SET
LTR SIZE
DEMO MODE
WORLD TIME
Mode
z AUTO
ON
z DATE/CAM
DATE
z AUTO
MANUAL
—
zNORMAL
2×
zON
OFF
Meaning
To display the remaining tape indication:
•for about eight seconds after your
camcorder is turned on and calculates theremaining amount of tape• for about eight seconds after a cassette is
inserted and your camcorder calculates theremaining amount of tape
•for about eight seconds afterN is pressedin VCR mode
• for about eight seconds after DISPLAY ispressed to display the screen indicators
•for the period of tape rewinding,forwarding or picture search in the VCR
modeTo always display the remaining tapeindicator.
To display date, time and various settingsduring playback.
To display date and time during playback.
Adjusts audio recording level automatically.
Adjusts audio recording level manually(p. 52).
To set the date or time (p. 14).
To display selected menu items in normalsize.
To display selected menu items at twice thenormal size.
To make the demonstration appear.
To cancel the demonstration mode.
To set the clock to the local time. Turn theSEL/PUSH EXEC dial to set a timedifference. The clock changes by the time
difference you set here. If you set the timedifference to 0, the clock returns to theoriginally set time.
POWERswitch
VCRCAMERA
VCR
VCR
CAMERA
CAMERA
MEMORY
CAMERA
CAMERAMEMORY
Notes on DEMO MODE
•You cannot select DEMO MODE when a cassette is inserted in your camcorder.•DEMO MODE is set to STBY (Standby) at the factory and the demonstration starts
about 10 minutes after you have set the POWER switch to CAMERA without acassette inserted.To cancel the demonstration, insert a cassette, set the POWER switch to other than
CAMERA, or set DEMO MODE to OFF.
VCRCAMERAMEMORY
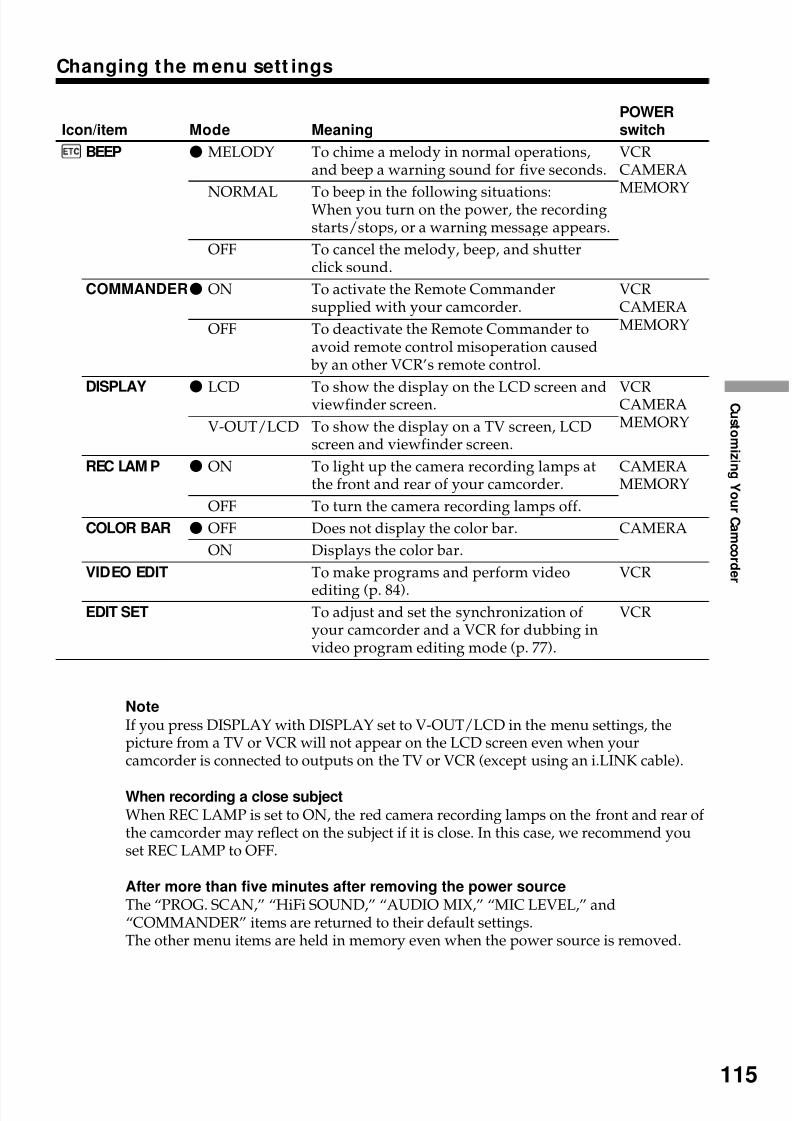
8/8/2019 276ba559b616f0752a9d1ab6240c7e96
http://slidepdf.com/reader/full/276ba559b616f0752a9d1ab6240c7e96 115/176
115
C u s t o mi z i n gY o ur C a m c or d er
Changing the menu sett ings
Icon/item
BEEP
COMMANDER
DISPLAY
REC LAM P
COLOR BAR
VIDEO EDIT
EDIT SET
Mode
z MELODY
NORMAL
OFF
z ON
OFF
zLCD
V-OUT/LCD
z ON
OFF
z OFF
ON
Meaning
To chime a melody in normal operations,and beep a warning sound for five seconds.
To beep in the following situations:When you turn on the power, the recordingstarts/stops, or a warning message appears.
To cancel the melody, beep, and shutterclick sound.
To activate the Remote Commandersupplied with your camcorder.
To deactivate the Remote Commander toavoid remote control misoperation caused
by an other VCR’s remote control.
To show the display on the LCD screen andviewfinder screen.
To show the display on a TV screen, LCDscreen and viewfinder screen.
To light up the camera recording lamps atthe front and rear of your camcorder.
To turn the camera recording lamps off.
Does not display the color bar.
Displays the color bar.
To make programs and perform video
editing (p. 84).To adjust and set the synchronization of your camcorder and a VCR for dubbing invideo program editing mode (p. 77).
POWERswitch
VCRCAMERA
MEMORY
VCRCAMERAMEMORY
VCRCAMERAMEMORY
CAMERAMEMORY
CAMERA
VCR
VCR
Note
If you press DISPLAY with DISPLAY set to V-OUT/LCD in the menu settings, thepicture from a TV or VCR will not appear on the LCD screen even when yourcamcorder is connected to outputs on the TV or VCR (except using an i.LINK cable).
When recording a close subject
When REC LAMP is set to ON, the red camera recording lamps on the front and rear of the camcorder may reflect on the subject if it is close. In this case, we recommend youset REC LAMP to OFF.
After more than five minutes after removing the power source
The “PROG. SCAN,” “HiFi SOUND,” “AUDIO MIX,” “MIC LEVEL,” and“COMMANDER” items are returned to their default settings.The other menu items are held in memory even when the power source is removed.
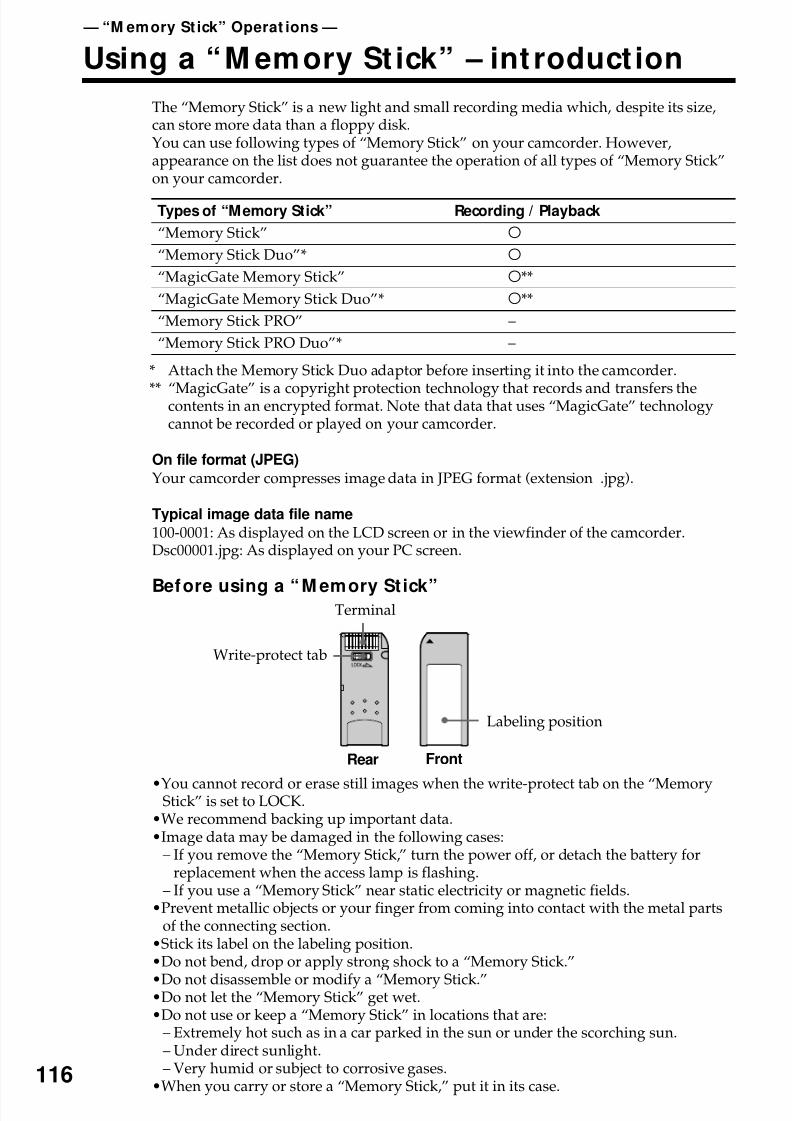
8/8/2019 276ba559b616f0752a9d1ab6240c7e96
http://slidepdf.com/reader/full/276ba559b616f0752a9d1ab6240c7e96 116/176
8/8/2019 276ba559b616f0752a9d1ab6240c7e96
http://slidepdf.com/reader/full/276ba559b616f0752a9d1ab6240c7e96 117/176
117
“ M e m or y S t i ck ” O p er a
t i on s
Using a “M emory Stick” – int roduct ion
A “M emory St ick” format ted by a computerA “Memory Stick” formatted by the Windows OS or Macintosh computers does nothave a guaranteed compatibility with this camcorder.
Note on using the “M emory Stick Duo”You can use a “Memory Stick Duo” in your camcorder after inserting it into theMemory Stick Duo adaptor.You may damage the “Memory Stick Duo” or the Memory Stick slot on yourcamcorder in the following situations.– When you insert a “Memory Stick Duo” that is not inserted into a Memory Stick Duo
adaptor into the Memory Stick slot on your camcorder.– When you insert the “Memory Stick Duo” in the wrong direction.If you insert a “Memory Stick Duo” without a Memory Stick Duo adaptor by mistake,hold the camcorder so the Memory Stick slot is facing down, then hold the lid asideusing a toothpick or similar object to let the “Memory Stick Duo” slide out.
Notes on image data compat ibility•Image data files recorded on a “Memory Stick” by your camcorder conform to the
Design Rules for Camera File Systems universal standard (DCF98 standard)established by the JEIDA (Japan Electronic Industry Development Association). Youcannot play back on your camcorder still images recorded on other equipment (DCR-TRV890E/TRV900/TRV900E or DSC-D700/D770) that does not conform to thisuniversal standard. (These models are not sold in some areas.)
•If you cannot use a “Memory Stick” that is used with other equipment, format it withthis camcorder (p. 112). However, formatting erases all information on the “MemoryStick.”
•“Memory Stick”, and “MagicGate Memory Stick” are trademarks of SonyCorporation.
•“Memory Stick Duo” and “ ” are trademarks of Sony Corporation.•“Memory Stick PRO” and “ ” are trademarks of Sony Corporation.• “MagicGate” and “ ” are trademarks of Sony Corporation.•All other product names mentioned herein may be the trademarks or registered
trademarks of their respective companies.Furthermore, “™” and “®” are not mentioned in each case in this manual.
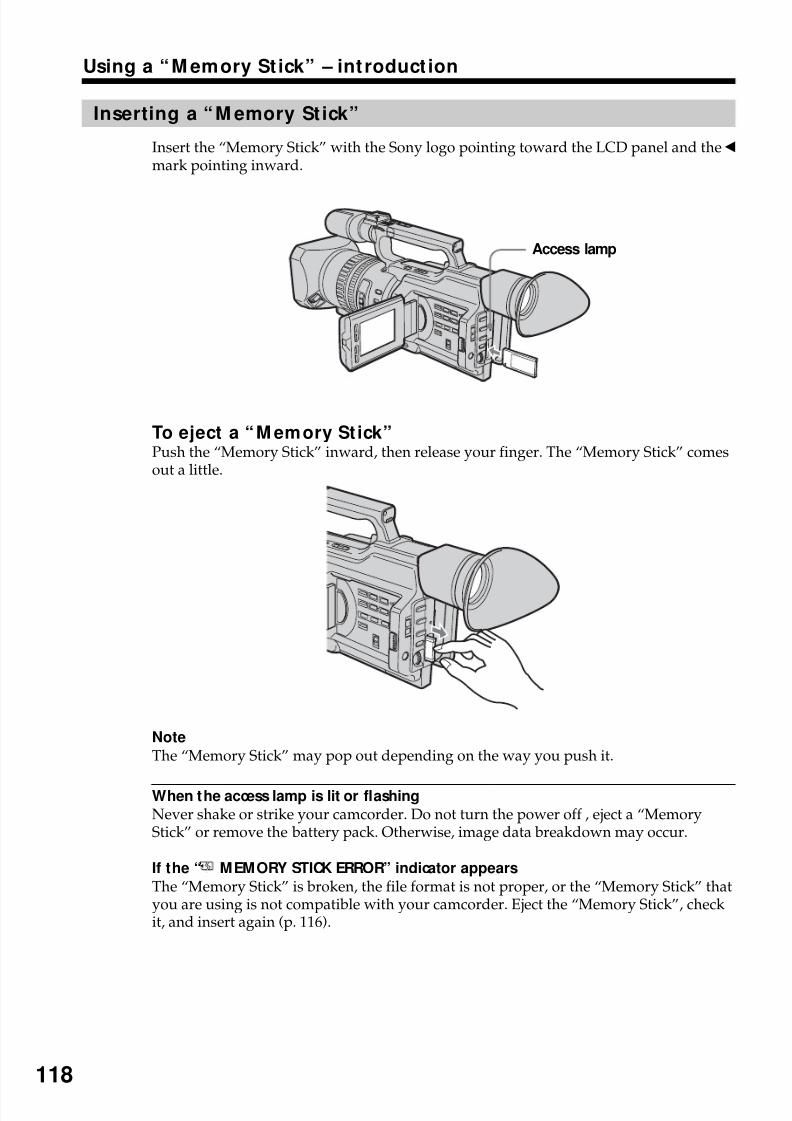
8/8/2019 276ba559b616f0752a9d1ab6240c7e96
http://slidepdf.com/reader/full/276ba559b616f0752a9d1ab6240c7e96 118/176
118
Using a “M emory St ick” – int roduct ion
Inserting a “M emory St ick”
Insert the “Memory Stick” with the Sony logo pointing toward the LCD panel and the bmark pointing inward.
To eject a “M emory Stick”Push the “Memory Stick” inward, then release your finger. The “Memory Stick” comesout a little.
Note
The “Memory Stick” may pop out depending on the way you push it.
When the access lamp is lit or flashing
Never shake or strike your camcorder. Do not turn the power off , eject a “MemoryStick” or remove the battery pack. Otherwise, image data breakdown may occur.
If the “ MEMORY STICK ERROR” indicator appears
The “Memory Stick” is broken, the file format is not proper, or the “Memory Stick” thatyou are using is not compatible with your camcorder. Eject the “Memory Stick”, checkit, and insert again (p. 116).
Access lamp
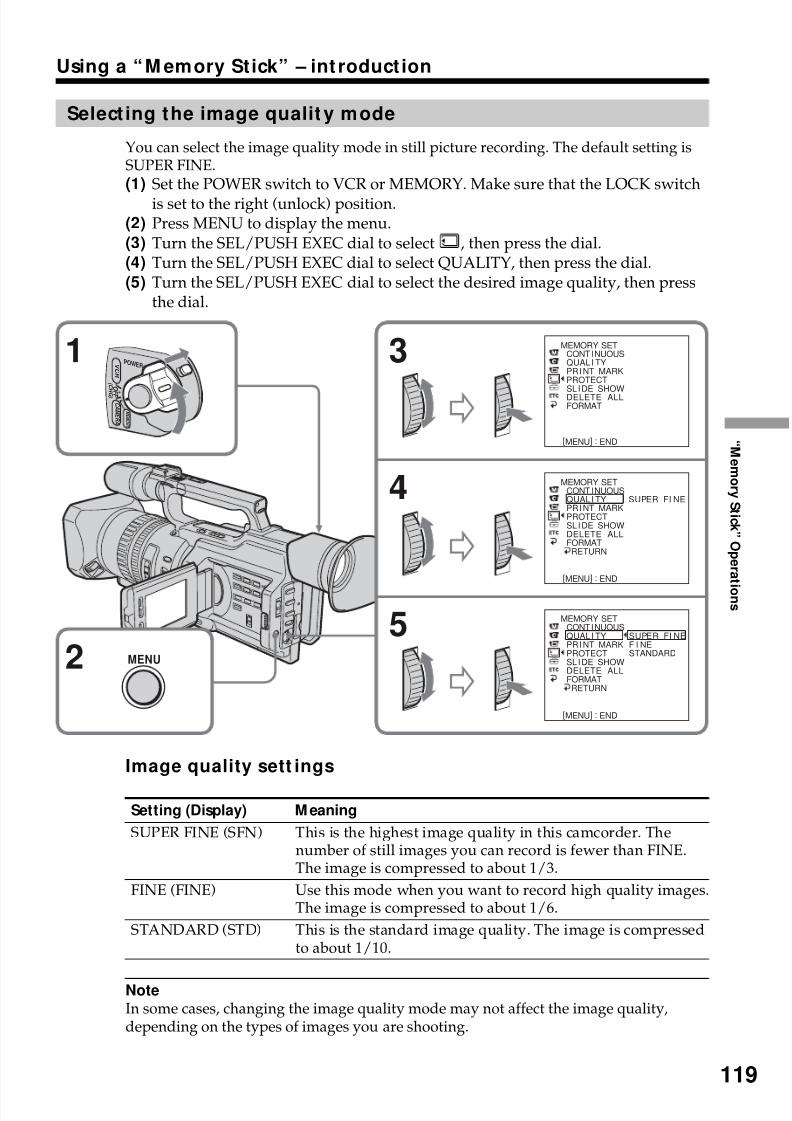
8/8/2019 276ba559b616f0752a9d1ab6240c7e96
http://slidepdf.com/reader/full/276ba559b616f0752a9d1ab6240c7e96 119/176
119
“ M e m or y S t i ck ” O p er a
t i on s
Using a “M emory Stick” – int roduct ion
Select ing the image qualit y mode
You can select the image quality mode in still picture recording. The default setting isSUPER FINE.(1) Set the POWER switch to VCR or MEMORY. Make sure that the LOCK switch
is set to the right (unlock) position.(2) Press MENU to display the menu.(3) Turn the SEL/PUSH EXEC dial to select , then press the dial.(4) Turn the SEL/PUSH EXEC dial to select QUALITY, then press the dial.(5) Turn the SEL/PUSH EXEC dial to select the desired image quality, then press
the dial.
Image quality sett ings
Setting (Display) M eaning
SUPER FINE (SFN) This is the highest image quality in this camcorder. Thenumber of still images you can record is fewer than FINE.The image is compressed to about 1/3.
FINE (FINE) Use this mode when you want to record high quality images.The image is compressed to about 1/6.
STANDARD (STD) This is the standard image quality. The image is compressedto about 1/10.
NoteIn some cases, changing the image quality mode may not affect the image quality,depending on the types of images you are shooting.
1
2
3
4
5
MEMORY SETCONT I NUOUSQUAL I TYPR I NT MARKPROTECT
SL I DE SHOWDELETE ALL
FORMAT
[MENU] : END
MEMORY SETCONT I NUOUSQUAL I TYPR I NT MARKPROTECTSL I DE SHOWDELETE ALLFORMATRETURN
[MENU] : END
SUPER FI NE
MEMORY SETCONT I NUOUSQUAL I TYPR I NT MARKPROTECTSL I DE SHOWDELETE ALLFORMATRETURN
[MENU] : END
SUPER FI NEF I NESTANDARD
MENU
ME M O R Y
C A ME R A
V CR
O F F
( CH G )
POWER
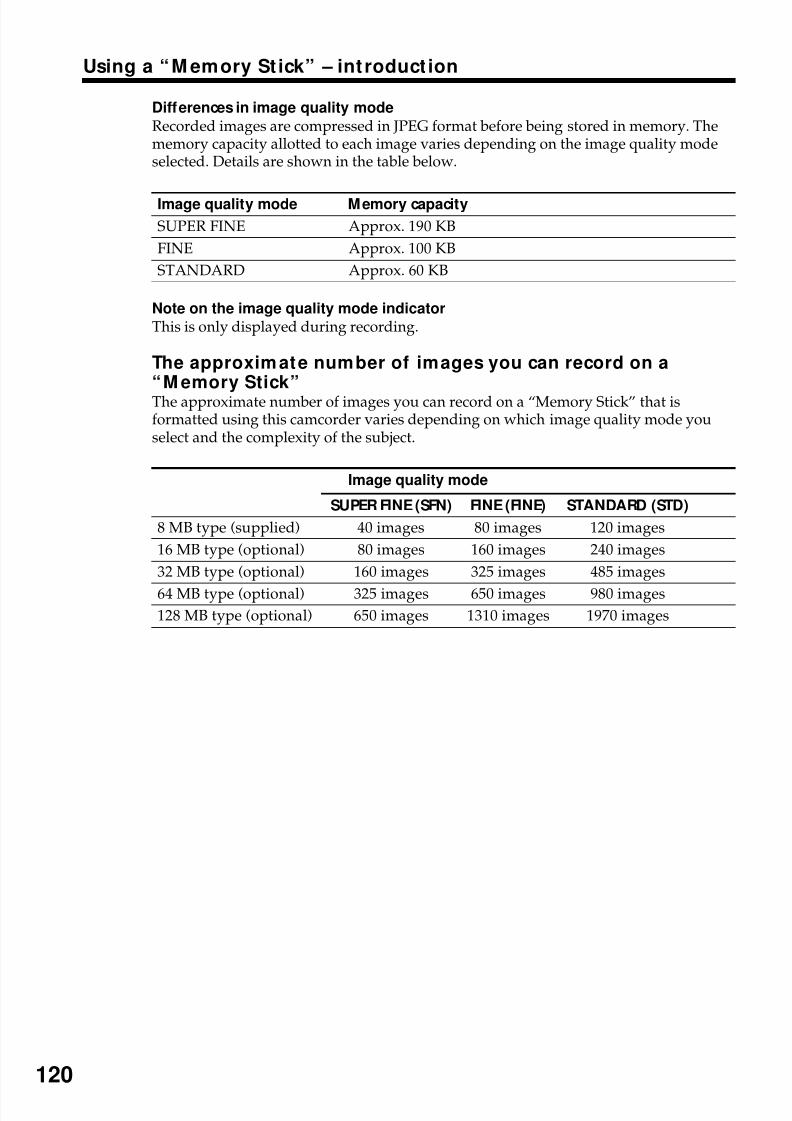
8/8/2019 276ba559b616f0752a9d1ab6240c7e96
http://slidepdf.com/reader/full/276ba559b616f0752a9d1ab6240c7e96 120/176
120
Using a “M emory St ick” – int roduct ion
Differences in image quality mode
Recorded images are compressed in JPEG format before being stored in memory. Thememory capacity allotted to each image varies depending on the image quality modeselected. Details are shown in the table below.
Image quality mode Memory capacity
SUPER FINE Approx. 190 KB
FINE Approx. 100 KB
STANDARD Approx. 60 KB
Note on the image quality mode indicator
This is only displayed during recording.
The approximate number of images you can record on a“M emory Stick”The approximate number of images you can record on a “Memory Stick” that isformatted using this camcorder varies depending on which image quality mode youselect and the complexity of the subject.
Image quality mode
SUPER FINE (SFN) FINE (FINE) STANDARD (STD)
8 MB type (supplied) 40 images 80 images 120 images
16 MB type (optional) 80 images 160 images 240 images
32 MB type (optional) 160 images 325 images 485 images
64 MB type (optional) 325 images 650 images 980 images
128 MB type (optional) 650 images 1310 images 1970 images
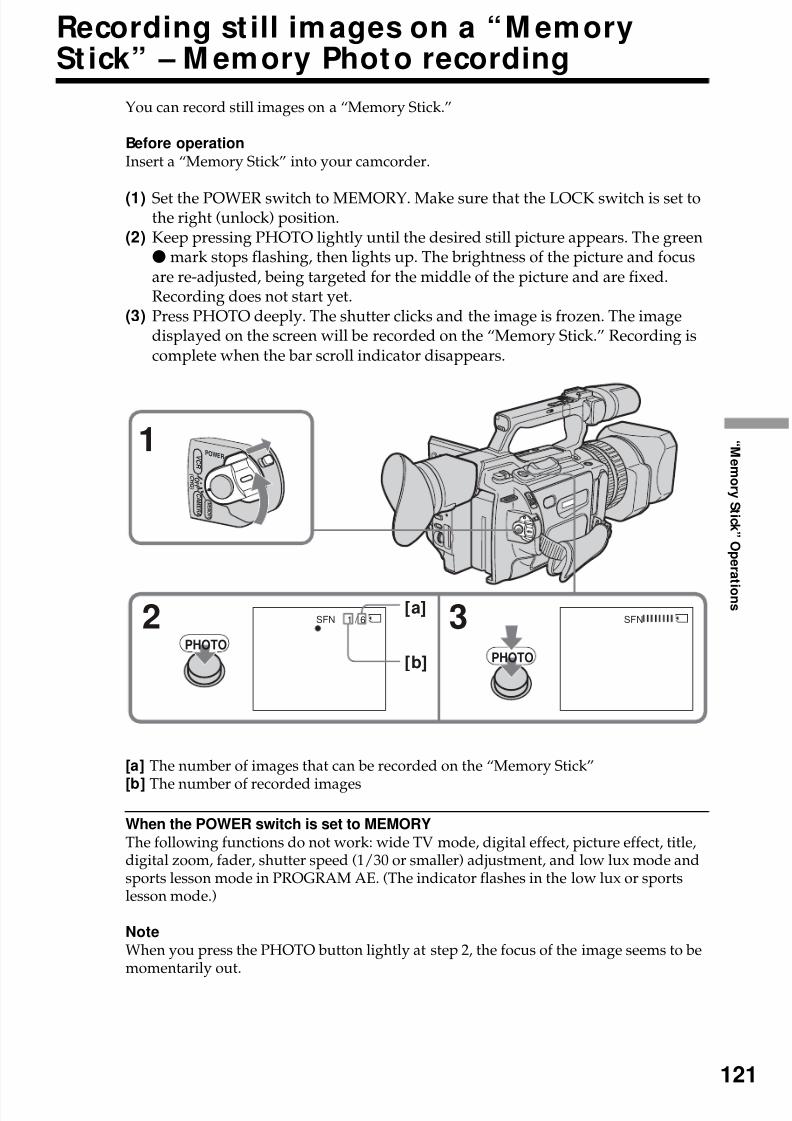
8/8/2019 276ba559b616f0752a9d1ab6240c7e96
http://slidepdf.com/reader/full/276ba559b616f0752a9d1ab6240c7e96 121/176
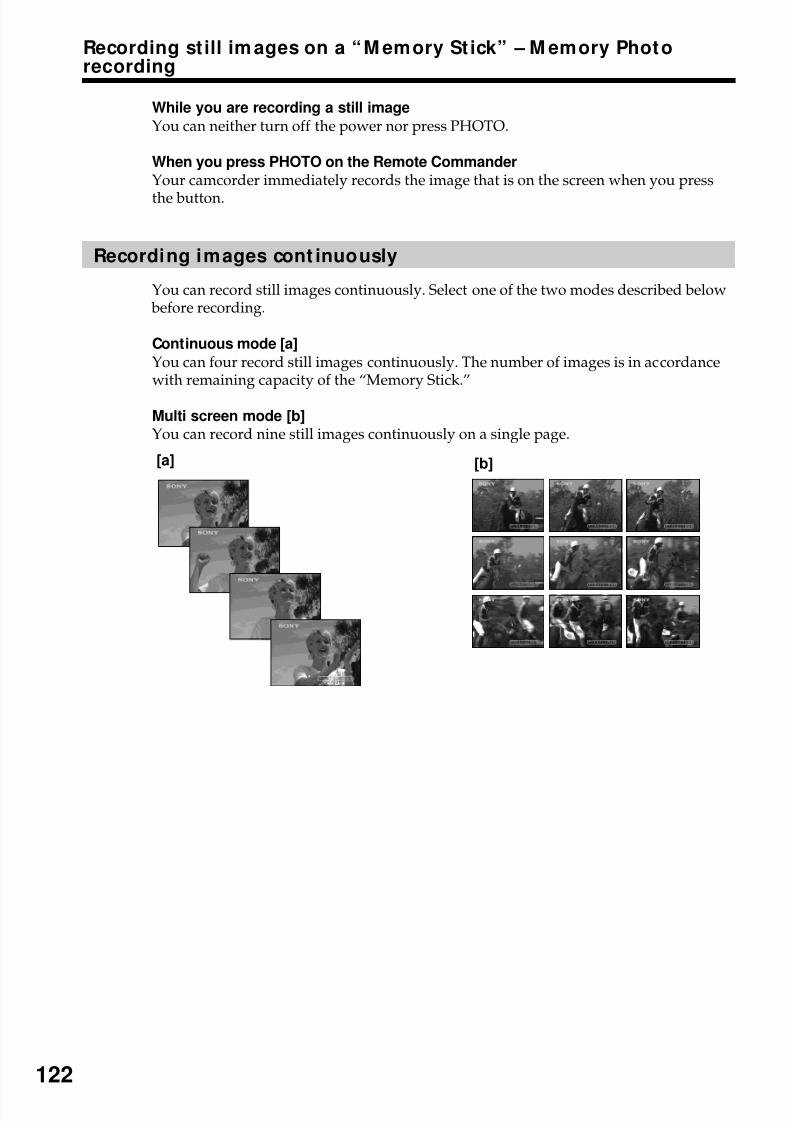
8/8/2019 276ba559b616f0752a9d1ab6240c7e96
http://slidepdf.com/reader/full/276ba559b616f0752a9d1ab6240c7e96 122/176
122
Recording still im ages on a “M emory St ick” – M emory Photorecording
While you are recording a still image
You can neither turn off the power nor press PHOTO.
When you press PHOTO on the Remote Commander
Your camcorder immediately records the image that is on the screen when you press
the button.
Recording images cont inuously
You can record still images continuously. Select one of the two modes described below before recording.
Continuous mode [a]
You can four record still images continuously. The number of images is in accordancewith remaining capacity of the “Memory Stick.”
Multi screen mode [b]You can record nine still images continuously on a single page.
[a] [b]
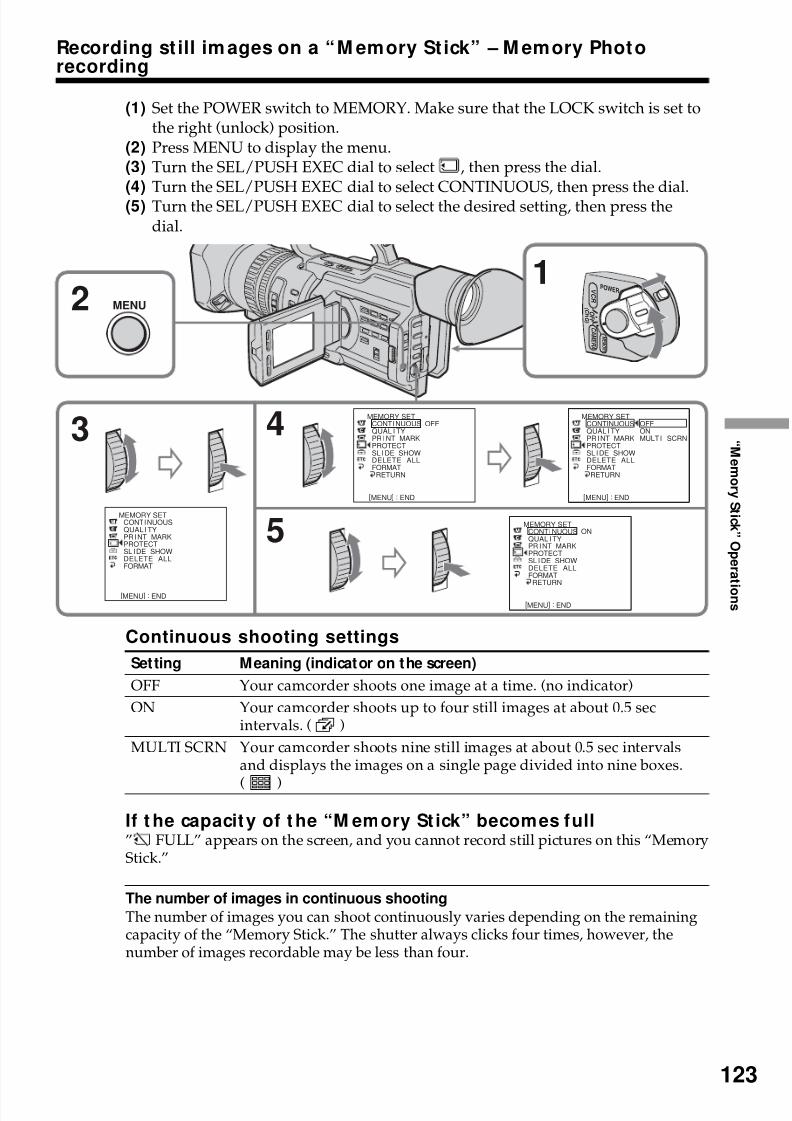
8/8/2019 276ba559b616f0752a9d1ab6240c7e96
http://slidepdf.com/reader/full/276ba559b616f0752a9d1ab6240c7e96 123/176
123
“ M e m or y S t i ck ” O p er a
t i on s
Recording st ill im ages on a “M emory St ick” – M emory Photorecording
(1) Set the POWER switch to MEMORY. Make sure that the LOCK switch is set tothe right (unlock) position.
(2) Press MENU to display the menu.(3) Turn the SEL/PUSH EXEC dial to select , then press the dial.(4)
Turn the SEL/PUSH EXEC dial to select CONTINUOUS, then press the dial.(5) Turn the SEL/PUSH EXEC dial to select the desired setting, then press thedial.
Continuous shooting settings
Setting Meaning (indicator on the screen)
OFF Your camcorder shoots one image at a time. (no indicator)
ON Your camcorder shoots up to four still images at about 0.5 secintervals. ( )
MULTI SCRN Your camcorder shoots nine still images at about 0.5 sec intervalsand displays the images on a single page divided into nine boxes.
( )
If t he capacity of the “M emory St ick” becomes full” FULL” appears on the screen, and you cannot record still pictures on this “MemoryStick.”
The number of images in continuous shooting
The number of images you can shoot continuously varies depending on the remainingcapacity of the “Memory Stick.” The shutter always clicks four times, however, thenumber of images recordable may be less than four.
2
3 4
5MEMORY SET
CONT I NUOUSQUAL I TYPR I NT MARKPROTECTSL I DE SHOWDELETE ALLFORMAT
[MENU] : END
MEMORY SETCONT I NUOUSQUAL I TYPR I NT MARKPROTECTSL I DE SHOWDELETE ALLFORMAT
RETURN
[MENU] : END
OFFMEMORY SET
CONTINUOUSQUAL I TYPR I NT MARKPROTECTSL I DE SHOWDELETE ALLFORMATRETURN
[MENU] : END
OFFONMULT I SCRN
MEMORY SETCONT I NUOUSQUAL I TYPR I NT MARKPROTECTSL I DE SHOWDELETE ALLFORMAT
RETURN
[MENU] : END
ON
1MENU
ME M O R Y
C A ME R A
V CR
O F F
( CH G )
POWER
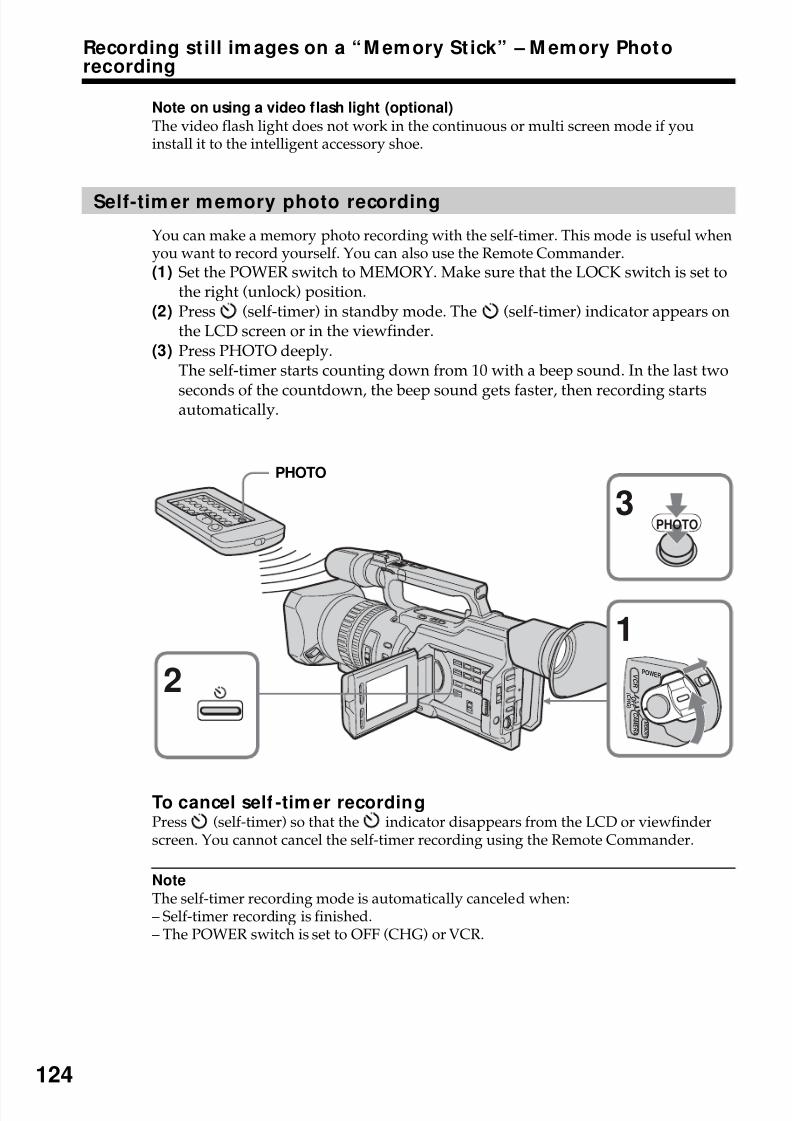
8/8/2019 276ba559b616f0752a9d1ab6240c7e96
http://slidepdf.com/reader/full/276ba559b616f0752a9d1ab6240c7e96 124/176
124
1
3PHOTO
2ME M O R Y
C A ME R A
V CR
O F F
( CH G )
POWER
Recording still im ages on a “M emory St ick” – M emory Photorecording
Note on using a video flash light (optional)
The video flash light does not work in the continuous or multi screen mode if youinstall it to the intelligent accessory shoe.
Self-tim er memory photo recording
You can make a memory photo recording with the self-timer. This mode is useful whenyou want to record yourself. You can also use the Remote Commander.
(1) Set the POWER switch to MEMORY. Make sure that the LOCK switch is set tothe right (unlock) position.
(2) Press (self-timer) in standby mode. The (self-timer) indicator appears onthe LCD screen or in the viewfinder.
(3) Press PHOTO deeply.The self-timer starts counting down from 10 with a beep sound. In the last two
seconds of the countdown, the beep sound gets faster, then recording startsautomatically.
To cancel self -tim er recordingPress (self-timer) so that the indicator disappears from the LCD or viewfinderscreen. You cannot cancel the self-timer recording using the Remote Commander.
Note
The self-timer recording mode is automatically canceled when:– Self-timer recording is finished.– The POWER switch is set to OFF (CHG) or VCR.
PHOTO
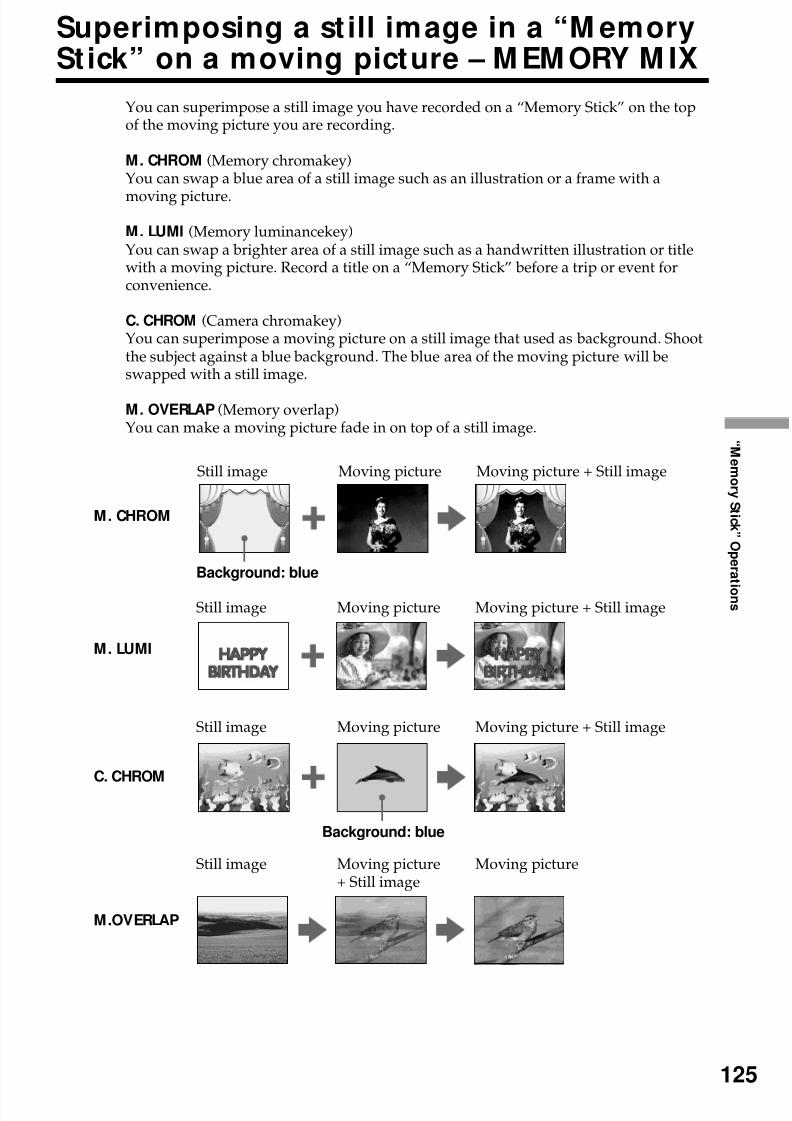
8/8/2019 276ba559b616f0752a9d1ab6240c7e96
http://slidepdf.com/reader/full/276ba559b616f0752a9d1ab6240c7e96 125/176
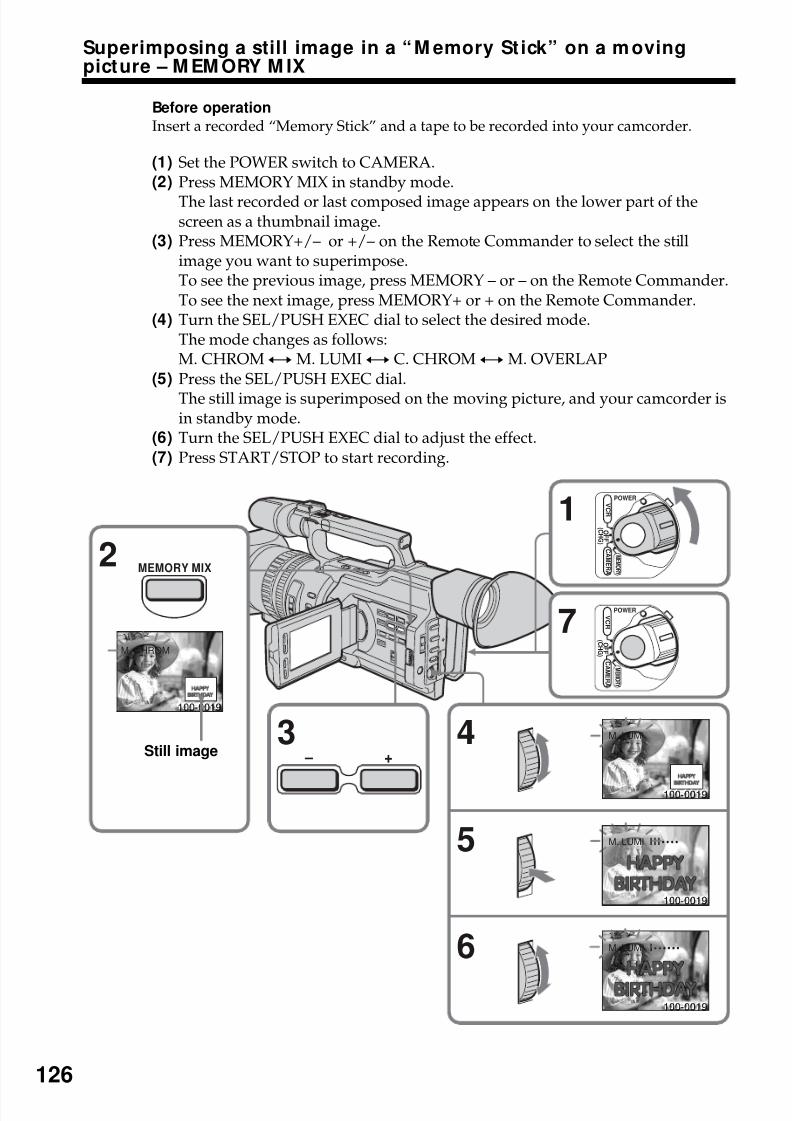
8/8/2019 276ba559b616f0752a9d1ab6240c7e96
http://slidepdf.com/reader/full/276ba559b616f0752a9d1ab6240c7e96 126/176
126
Before operation
Insert a recorded “Memory Stick” and a tape to be recorded into your camcorder.
(1) Set the POWER switch to CAMERA.(2) Press MEMORY MIX in standby mode.
The last recorded or last composed image appears on the lower part of thescreen as a thumbnail image.
(3) Press MEMORY+/– or +/– on the Remote Commander to select the stillimage you want to superimpose.To see the previous image, press MEMORY – or – on the Remote Commander.To see the next image, press MEMORY+ or + on the Remote Commander.
(4) Turn the SEL/PUSH EXEC dial to select the desired mode.The mode changes as follows:M. CHROMyM. LUMIy C. CHROMyM. OVERLAP
(5) Press the SEL/PUSH EXEC dial.
The still image is superimposed on the moving picture, and your camcorder isin standby mode.
(6) Turn the SEL/PUSH EXEC dial to adjust the effect.(7) Press START/STOP to start recording.
Superimposing a still image in a “M emory St ick” on a m ovingpicture – M EM ORY M IX
2
4
5
6
7
M. LUMI
M. LUMI
I I I • • • •
I • • • • • •
3
M. CHROM
100-001900-0019100-0019
M. LUMI
POWER
O F F
( C H G )
C A ME R A
M E M O R Y
V C R
1POWER
O F F
( C H G )
C A ME R A
M E M O R Y
V C R
MEMORY MIX
– +
100-001900-0019
100-001900-0019
100-001900-0019
100-0019
100-0019
100-0019
Still image
8/8/2019 276ba559b616f0752a9d1ab6240c7e96
http://slidepdf.com/reader/full/276ba559b616f0752a9d1ab6240c7e96 127/176
127
“ M e m or y S t i ck ” O p er a
t i on s
Superimposing a st ill image in a “ M emory Stick” on a movingpicture – M EM ORY M IX
Items to be adjusted
M. CHROM The color (blue) scheme of the area in the still picture which is to be swapped with a moving picture
M. LUMI The color (bright) scheme of the area in the still picture which is
to be swapped with a moving pictureC. CHROM The color (blue) scheme of the area in the moving picture which
is to be swapped with a still picture
M. OVERLAP No adjustment necessary
As the bar is shorter, the effect is enhanced.
To change the still image to be superimposedDo either of the following:– Press MEMORY+/– after step 6.– Press the SEL/PUSH EXEC dial after step 6, and repeat the procedure from step 3
(except M. OVERLAP).
To change the mode sett ingPress SEL/PUSH EXEC dial after step 6, and repeat the procedure from step 4 (exceptM. OVERLAP).
To cancel M EM ORY M IXPress MEMORY MIX.
During recording
You cannot change the mode setting.
If a still image to be superimposed has lots of w hite areas
The thumbnail image may not be displayed clearly.
Image data modified with personal computers or shot with other equipmentYou may not be able to play them back with your camcorder.
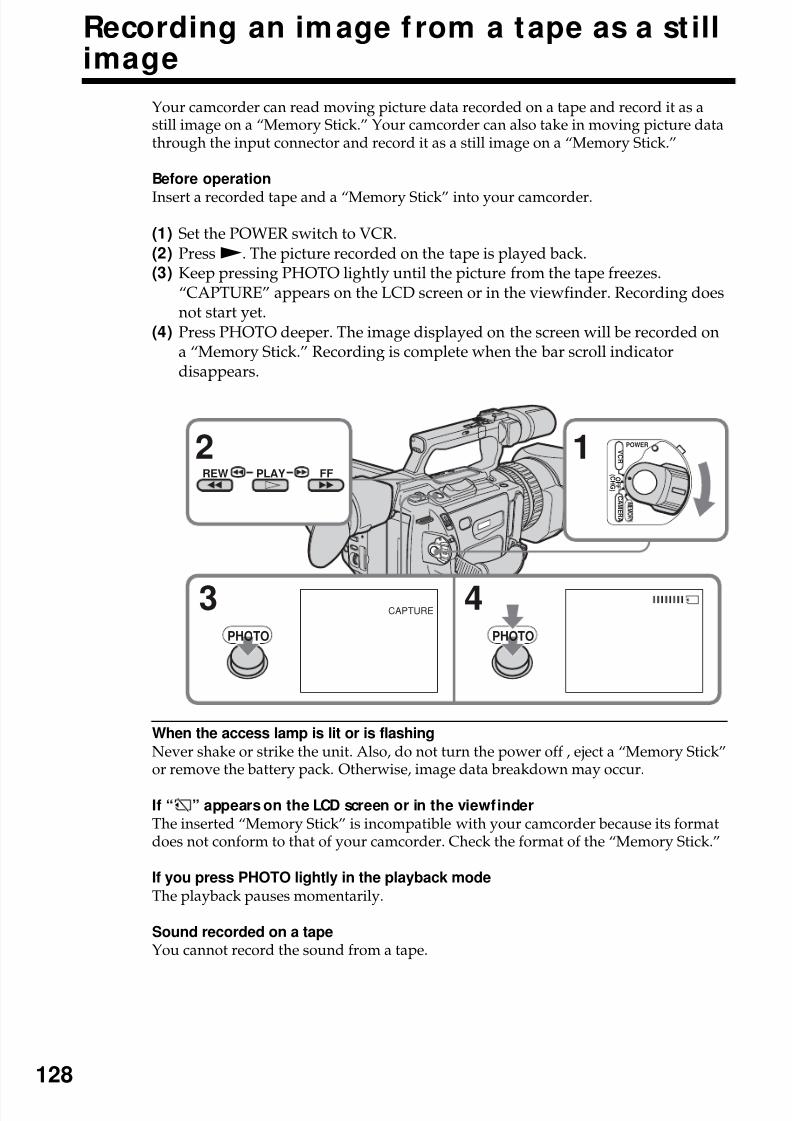
8/8/2019 276ba559b616f0752a9d1ab6240c7e96
http://slidepdf.com/reader/full/276ba559b616f0752a9d1ab6240c7e96 128/176
128
Recording an image f rom a tape as a st illimage
Your camcorder can read moving picture data recorded on a tape and record it as astill image on a “Memory Stick.” Your camcorder can also take in moving picture datathrough the input connector and record it as a still image on a “Memory Stick.”
Before operation
Insert a recorded tape and a “Memory Stick” into your camcorder.
(1) Set the POWER switch to VCR.(2) PressN. The picture recorded on the tape is played back.(3) Keep pressing PHOTO lightly until the picture from the tape freezes.
“CAPTURE” appears on the LCD screen or in the viewfinder. Recording doesnot start yet.
(4) Press PHOTO deeper. The image displayed on the screen will be recorded ona “Memory Stick.” Recording is complete when the bar scroll indicatordisappears.
When the access lamp is lit or is flashing
Never shake or strike the unit. Also, do not turn the power off , eject a “Memory Stick”or remove the battery pack. Otherwise, image data breakdown may occur.
If “ ” appears on the LCD screen or in the viewfinder
The inserted “Memory Stick” is incompatible with your camcorder because its formatdoes not conform to that of your camcorder. Check the format of the “Memory Stick.”
If you press PHOTO lightly in the playback mode
The playback pauses momentarily.
Sound recorded on a tapeYou cannot record the sound from a tape.
12
3 4CAPTURE
PHOTO PHOTO
POWER
O F F
( C H G )
C A ME R A
M E M O R Y
V C R
PLAYREW FF
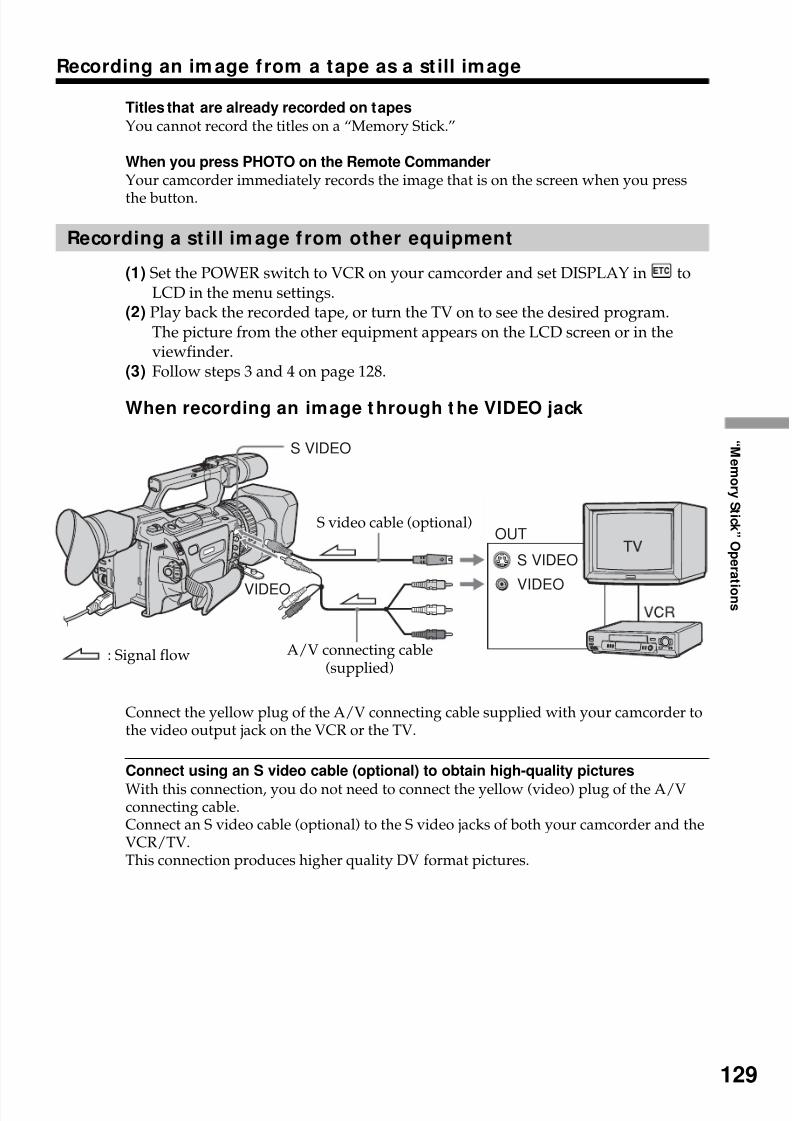
8/8/2019 276ba559b616f0752a9d1ab6240c7e96
http://slidepdf.com/reader/full/276ba559b616f0752a9d1ab6240c7e96 129/176
129
“ M e m or y S t i ck ” O p er a
t i on s
Recording an im age from a tape as a st ill image
Titles that are already recorded on tapes
You cannot record the titles on a “Memory Stick.”
When you press PHOTO on the Remote Commander
Your camcorder immediately records the image that is on the screen when you press
the button.
Recording a st ill image f rom other equipment
(1) Set the POWER switch to VCR on your camcorder and set DISPLAY in toLCD in the menu settings.
(2) Play back the recorded tape, or turn the TV on to see the desired program.The picture from the other equipment appears on the LCD screen or in theviewfinder.
(3) Follow steps 3 and 4 on page 128.
When recording an image t hrough t he VIDEO jack
Connect the yellow plug of the A/V connecting cable supplied with your camcorder tothe video output jack on the VCR or the TV.
Connect using an S video cable (optional) to obtain high-quality pictures
With this connection, you do not need to connect the yellow (video) plug of the A/Vconnecting cable.Connect an S video cable (optional) to the S video jacks of both your camcorder and theVCR/TV.This connection produces higher quality DV format pictures.
VIDEO
OUT
S VIDEO
S VIDEO
VIDEO
: Signal flow
S video cable (optional)
A/V connecting cable(supplied)
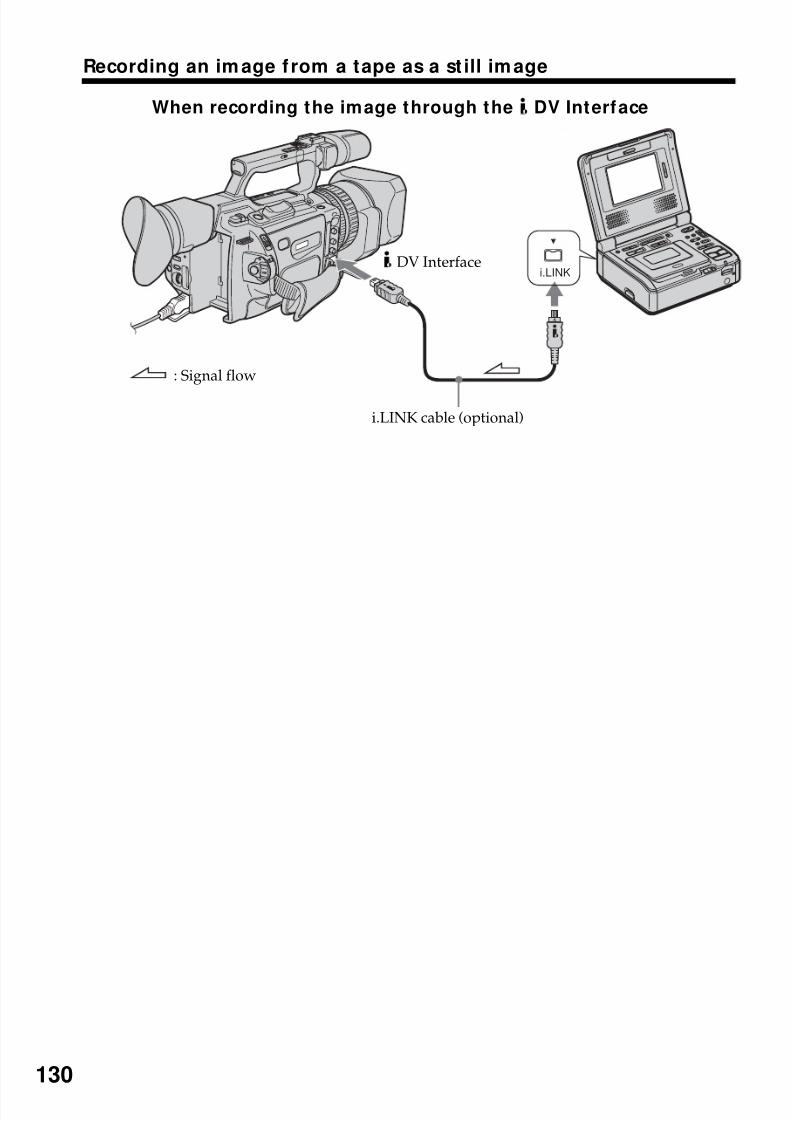
8/8/2019 276ba559b616f0752a9d1ab6240c7e96
http://slidepdf.com/reader/full/276ba559b616f0752a9d1ab6240c7e96 130/176
130
i.LINK
Recording an im age f rom a tape as a st ill image
When recording the image through the DV Interface
: Signal flow
i.LINK cable (optional)
DV Interface
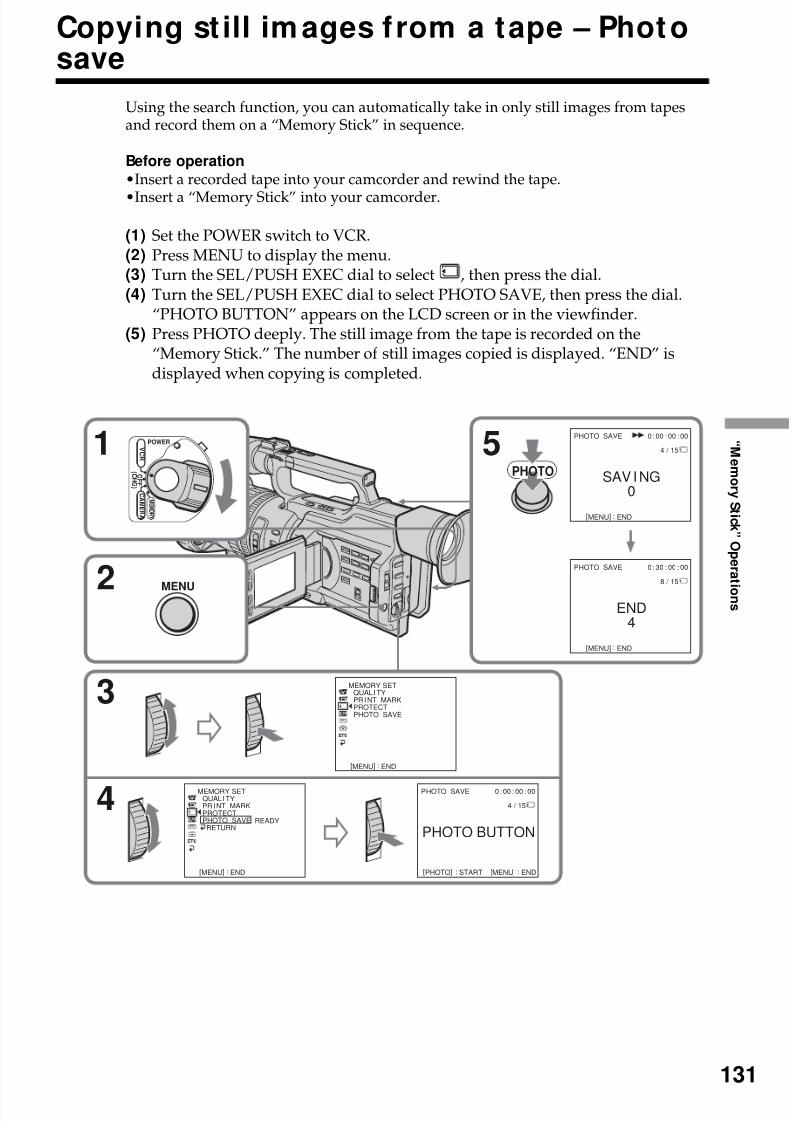
8/8/2019 276ba559b616f0752a9d1ab6240c7e96
http://slidepdf.com/reader/full/276ba559b616f0752a9d1ab6240c7e96 131/176
131
“ M e m or y S t i ck ” O p er a
t i on s
Copying st ill im ages from a tape – Photosave
Using the search function, you can automatically take in only still images from tapesand record them on a “Memory Stick” in sequence.
Before operation
•Insert a recorded tape into your camcorder and rewind the tape.
•Insert a “Memory Stick” into your camcorder.
(1) Set the POWER switch to VCR.(2) Press MENU to display the menu.(3) Turn the SEL/PUSH EXEC dial to select , then press the dial.(4) Turn the SEL/PUSH EXEC dial to select PHOTO SAVE, then press the dial.
“PHOTO BUTTON” appears on the LCD screen or in the viewfinder.(5) Press PHOTO deeply. The still image from the tape is recorded on the
“Memory Stick.” The number of still images copied is displayed. “END” isdisplayed when copying is completed.
3
5
4
MEMORY SETQUAL I TYPR I NT MARKPROTECTPHOTO SAVE
[MENU] : END
MEMORY SETQUAL I TYPR I NT MARKPROTECTPHOTO SAVERETURN
[MENU] : END
READY
PHOTO SAVE 0 : 00 : 00 : 00
[PHOTO] : START [MENU] : END
4 / 15
PHOTO BUTTON
PHOTO SAVE 0 : 00 : 00 : 00
[MENU] : END
4 / 15
SAV I NG0
PHOTO SAVE 0 : 30 : 00 : 00
[MENU] : END
8 / 15
END4
PHOTO
1
MENU
POWER
O F F
( C H G )
C A ME R A
M E M O R Y
V C R
2
8/8/2019 276ba559b616f0752a9d1ab6240c7e96
http://slidepdf.com/reader/full/276ba559b616f0752a9d1ab6240c7e96 132/176
132
Copying st ill im ages from a t ape – Photo save
To cancel copyingPress MENU.
When the memory of the “M emory Stick” is full“MEMORY FULL” appears on the LCD screen or in the viewfinder, and the copying
stops. Insert another “Memory Stick” and repeat the procedure from step 2.
When the access lamp is lit or flashingNever shake or strike your camcorder. Also, do not turn the power off, eject the“Memory Stick” or remove the battery pack. Otherwise, the image data breakdown mayoccur.
To record all the images recorded on the tapeRewind the tape all the way back and start copying.
If the write-protect tab on the “Memory Stick” is set to LOCK“NOT READY” appears when you select the item in the menu settings.
When you change the “Memory Stick” in the middle of copying
Your camcorder resumes copying from the last image recorded on the previous“Memory Stick.”
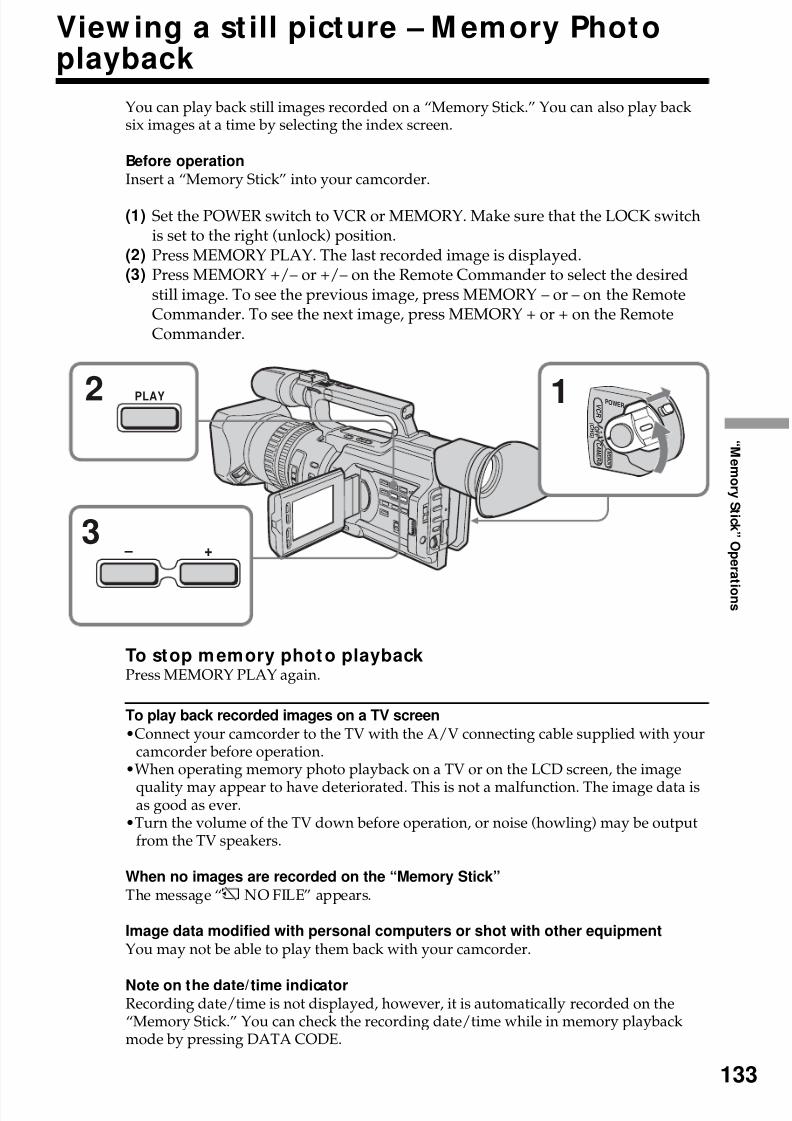
8/8/2019 276ba559b616f0752a9d1ab6240c7e96
http://slidepdf.com/reader/full/276ba559b616f0752a9d1ab6240c7e96 133/176
133
“ M e m or y S t i ck ” O p er a
t i on s
View ing a st ill picture – M emory Photoplayback
You can play back still images recorded on a “Memory Stick.” You can also play backsix images at a time by selecting the index screen.
Before operation
Insert a “Memory Stick” into your camcorder.
(1) Set the POWER switch to VCR or MEMORY. Make sure that the LOCK switchis set to the right (unlock) position.
(2) Press MEMORY PLAY. The last recorded image is displayed.(3) Press MEMORY +/– or +/– on the Remote Commander to select the desired
still image. To see the previous image, press MEMORY – or – on the RemoteCommander. To see the next image, press MEMORY + or + on the RemoteCommander.
To stop memory photo playbackPress MEMORY PLAY again.
To play back recorded images on a TV screen
•Connect your camcorder to the TV with the A/V connecting cable supplied with yourcamcorder before operation.
•When operating memory photo playback on a TV or on the LCD screen, the image
quality may appear to have deteriorated. This is not a malfunction. The image data isas good as ever.
•Turn the volume of the TV down before operation, or noise (howling) may be outputfrom the TV speakers.
When no images are recorded on the “Memory Stick”
The message “ NO FILE” appears.
Image data modified with personal computers or shot with other equipment
You may not be able to play them back with your camcorder.
Note on the date/time indicatorRecording date/time is not displayed, however, it is automatically recorded on the“Memory Stick.” You can check the recording date/time while in memory playbackmode by pressing DATA CODE.
12
3 – +
PLAY
ME M O R Y
C A ME R A
V CR
O F F
( CH G )
POWER
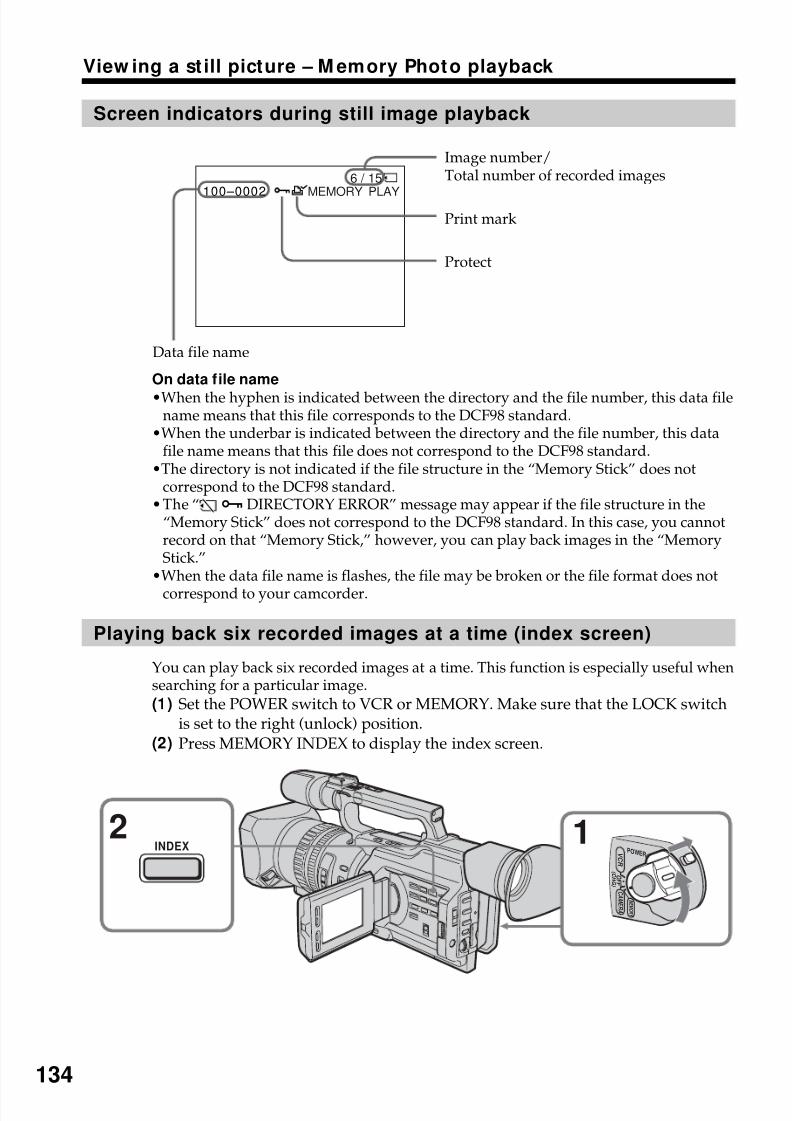
8/8/2019 276ba559b616f0752a9d1ab6240c7e96
http://slidepdf.com/reader/full/276ba559b616f0752a9d1ab6240c7e96 134/176
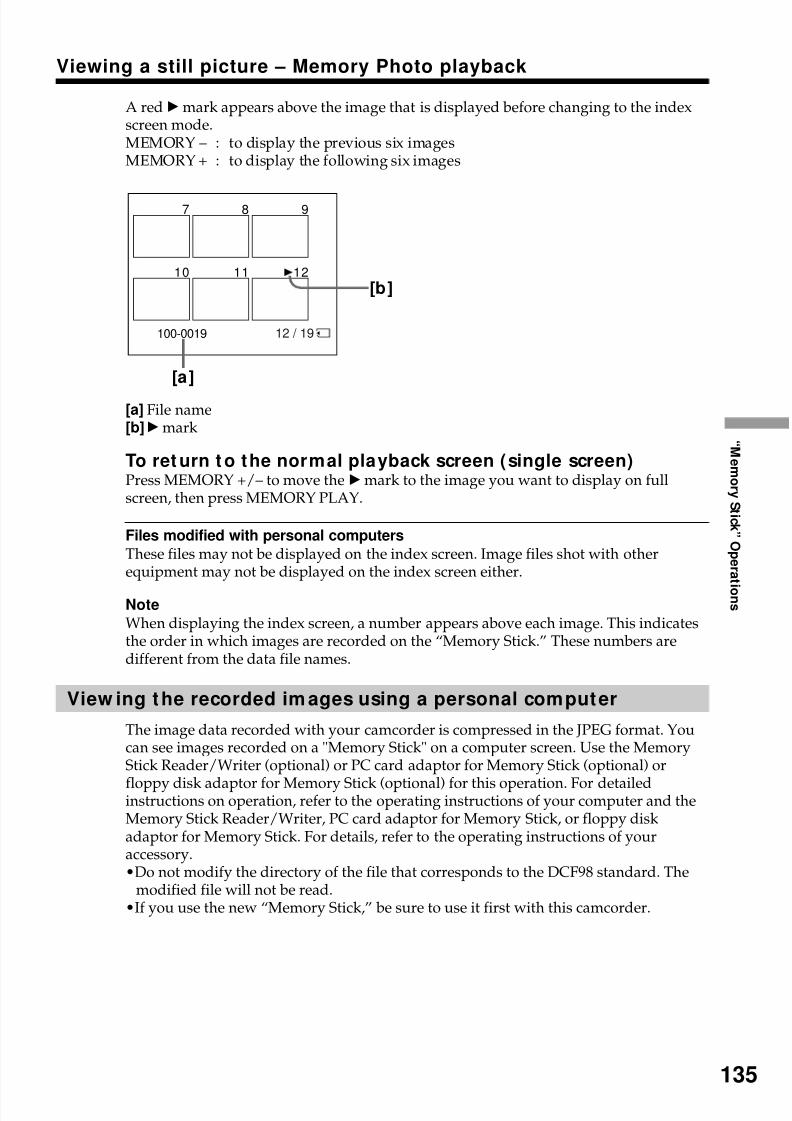
8/8/2019 276ba559b616f0752a9d1ab6240c7e96
http://slidepdf.com/reader/full/276ba559b616f0752a9d1ab6240c7e96 135/176
135
“ M e m or y S t i ck ” O p er a
t i on s
Viewing a still picture – Memory Photo playback
A red Bmark appears above the image that is displayed before changing to the indexscreen mode.MEMORY – : to display the previous six imagesMEMORY + : to display the following six images
[a] File name[b]Bmark
To ret urn t o the normal playback screen (single screen)Press MEMORY +/– to move the Bmark to the image you want to display on fullscreen, then press MEMORY PLAY.
Files modified with personal computers
These files may not be displayed on the index screen. Image files shot with otherequipment may not be displayed on the index screen either.
Note
When displaying the index screen, a number appears above each image. This indicatesthe order in which images are recorded on the “Memory Stick.” These numbers aredifferent from the data file names.
View ing the recorded im ages using a personal computer
The image data recorded with your camcorder is compressed in the JPEG format. Youcan see images recorded on a "Memory Stick" on a computer screen. Use the MemoryStick Reader/Writer (optional) or PC card adaptor for Memory Stick (optional) or
floppy disk adaptor for Memory Stick (optional) for this operation. For detailedinstructions on operation, refer to the operating instructions of your computer and theMemory Stick Reader/Writer, PC card adaptor for Memory Stick, or floppy diskadaptor for Memory Stick. For details, refer to the operating instructions of youraccessory.•Do not modify the directory of the file that corresponds to the DCF98 standard. The
modified file will not be read.•If you use the new “Memory Stick,” be sure to use it first with this camcorder.
12 / 19100-0019
7 8 9
10 11 12
[a]
[b]
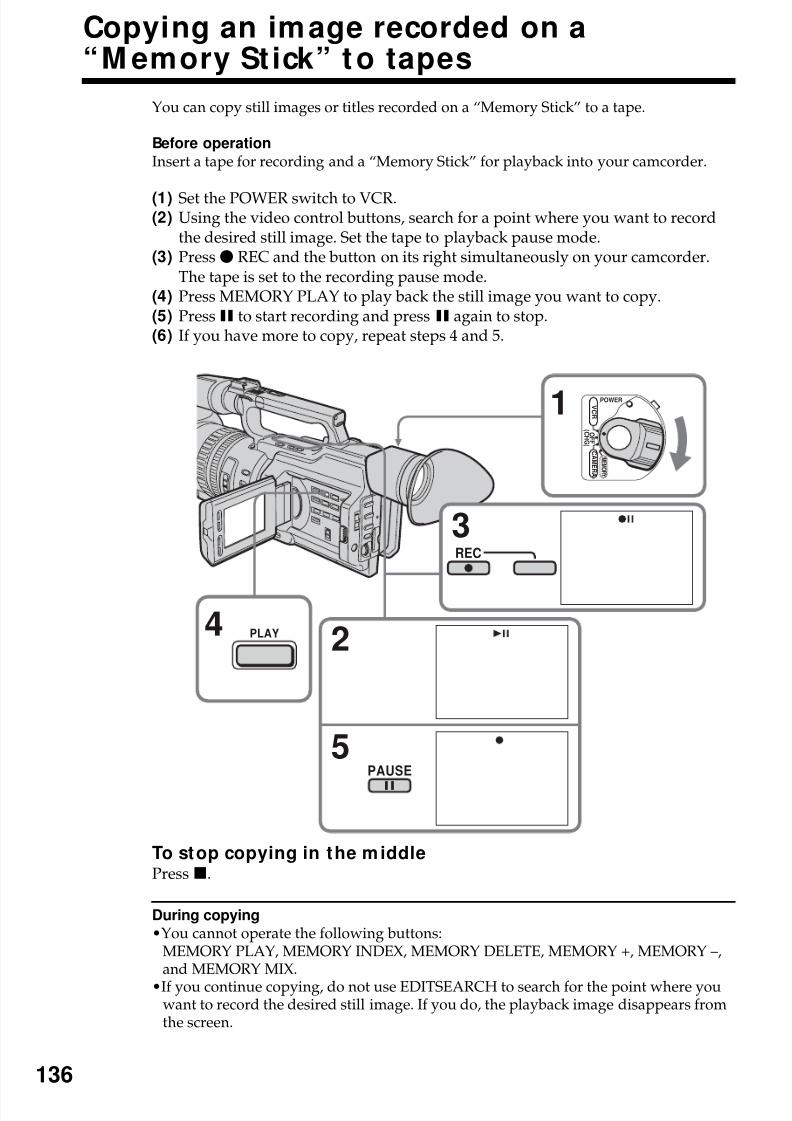
8/8/2019 276ba559b616f0752a9d1ab6240c7e96
http://slidepdf.com/reader/full/276ba559b616f0752a9d1ab6240c7e96 136/176
136
Copying an image recorded on a“M emory St ick” to tapes
You can copy still images or titles recorded on a “Memory Stick” to a tape.
Before operation
Insert a tape for recording and a “Memory Stick” for playback into your camcorder.
(1) Set the POWER switch to VCR.(2) Using the video control buttons, search for a point where you want to record
the desired still image. Set the tape to playback pause mode.(3) Pressz REC and the button on its right simultaneously on your camcorder.
The tape is set to the recording pause mode.(4) Press MEMORY PLAY to play back the still image you want to copy.(5) PressX to start recording and press X again to stop.(6) If you have more to copy, repeat steps 4 and 5.
To stop copying in the middlePressx.
During copying•You cannot operate the following buttons:
MEMORY PLAY, MEMORY INDEX, MEMORY DELETE, MEMORY +, MEMORY –,and MEMORY MIX.
•If you continue copying, do not use EDITSEARCH to search for the point where youwant to record the desired still image. If you do, the playback image disappears fromthe screen.
2
5
4
1
3
PLAY
PAUSE
REC
POWER
O F F
( C H G )
C A ME R A
M E M O R Y
V C R
8/8/2019 276ba559b616f0752a9d1ab6240c7e96
http://slidepdf.com/reader/full/276ba559b616f0752a9d1ab6240c7e96 137/176
137
“ M e m or y S t i ck ” O p er a
t i on s
Copying an image recorded on a “ M emory Stick” to tapes
Note on the index screen
You cannot record the index screen.
Image data modified with personal computers or shot with other equipment
You may not be able to copy them with your camcorder.
If you press DISPLAY in standby or recording mode
You can see memory playback and the file name indicators in addition to the indicatorspertinent to tapes, such as the time code indicator.
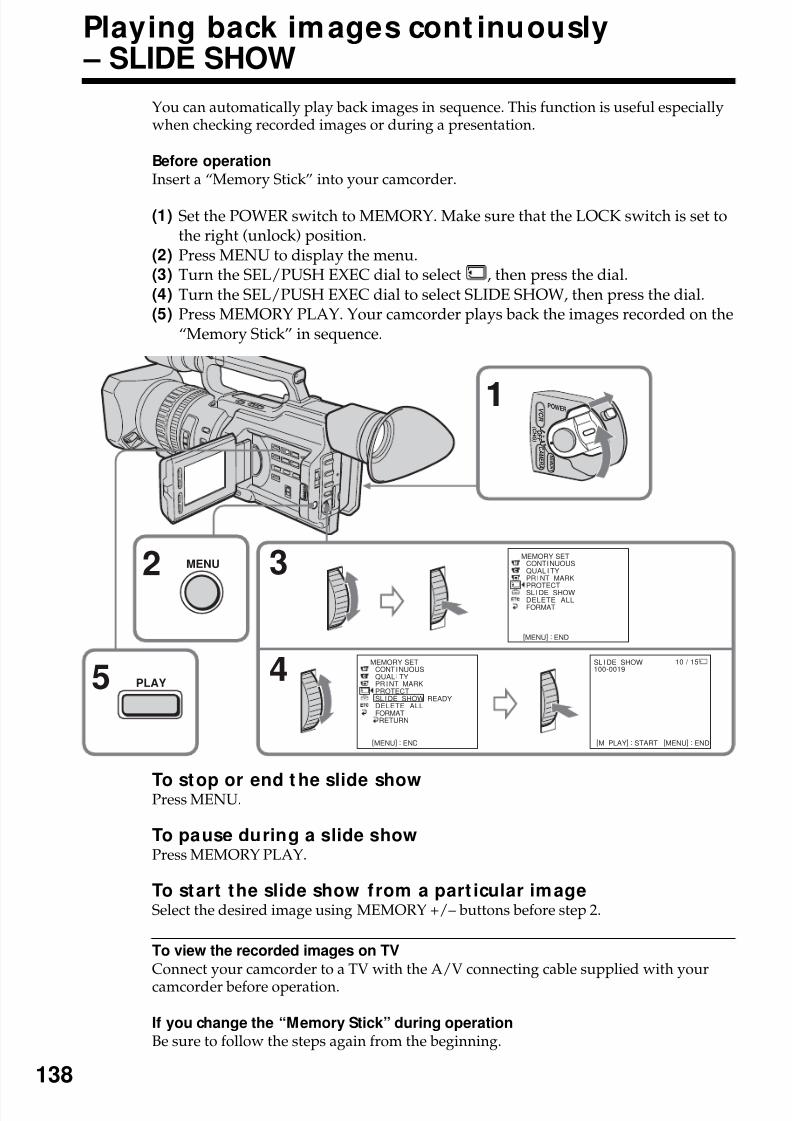
8/8/2019 276ba559b616f0752a9d1ab6240c7e96
http://slidepdf.com/reader/full/276ba559b616f0752a9d1ab6240c7e96 138/176
138
Playing back images cont inuously – SLIDE SHOW
You can automatically play back images in sequence. This function is useful especiallywhen checking recorded images or during a presentation.
Before operation
Insert a “Memory Stick” into your camcorder.
(1) Set the POWER switch to MEMORY. Make sure that the LOCK switch is set tothe right (unlock) position.
(2) Press MENU to display the menu.(3) Turn the SEL/PUSH EXEC dial to select , then press the dial.(4) Turn the SEL/PUSH EXEC dial to select SLIDE SHOW, then press the dial.(5) Press MEMORY PLAY. Your camcorder plays back the images recorded on the
“Memory Stick” in sequence.
To stop or end t he slide showPress MENU.
To pause during a slide showPress MEMORY PLAY.
To start the slide show from a part icular imageSelect the desired image using MEMORY +/– buttons before step 2.
To view the recorded images on TV
Connect your camcorder to a TV with the A/V connecting cable supplied with your
camcorder before operation.
If you change the “Memory Stick” during operation
Be sure to follow the steps again from the beginning.
2
5
3
4
11
MEMORY SETCONT I NUOUSQUAL I TYPR I NT MARKPROTECTSL I DE SHOWDELETE ALLFORMAT
[MENU] : END
MEMORY SETCONT I NUOUSQUAL I TYPR I NT MARKPROTECTSL I DE SHOWDELETE ALLFORMATRETURN
[MENU] : END
READY
[M PLAY] : START [MENU] : END
SL I DE SHOW100-0019
10 / 15
PLAY
MENU
ME M O R Y
C A ME R A
V CR
O F F
( CH G )
POWER
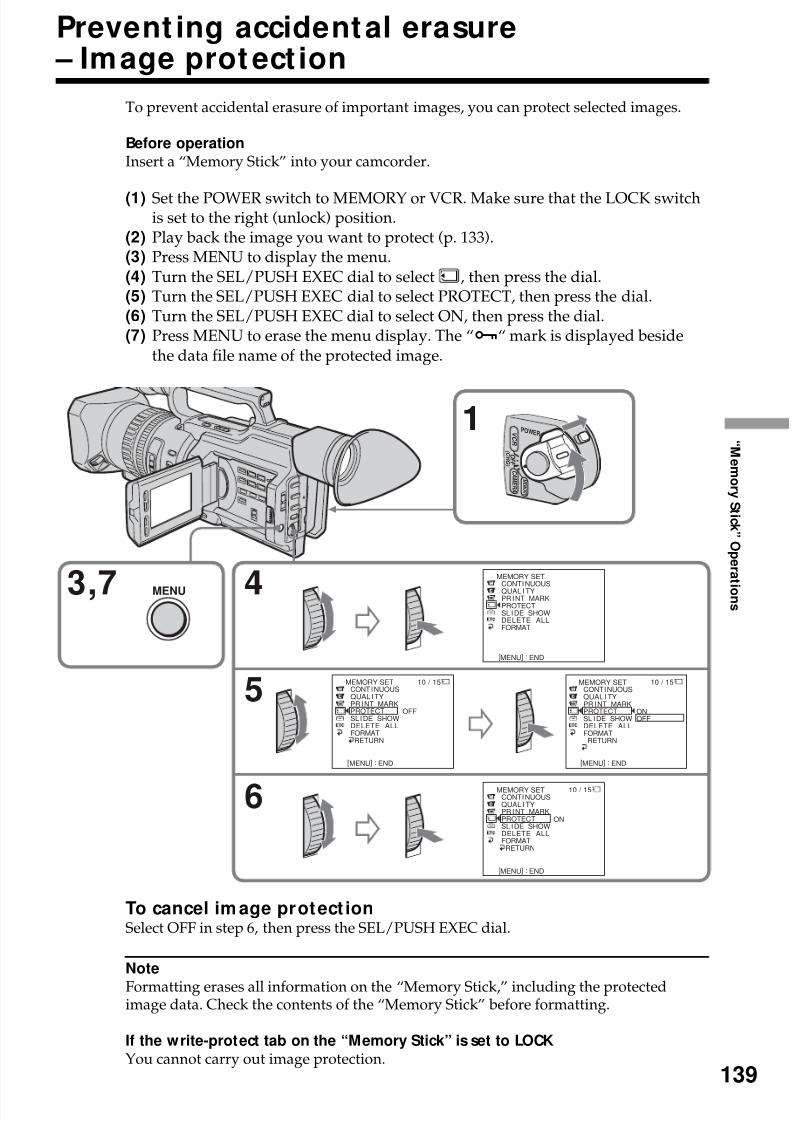
8/8/2019 276ba559b616f0752a9d1ab6240c7e96
http://slidepdf.com/reader/full/276ba559b616f0752a9d1ab6240c7e96 139/176
139
“ M e m or y S t i ck ” O p er a
t i on s
Prevent ing accidental erasure – Image protect ion
To prevent accidental erasure of important images, you can protect selected images.
Before operation
Insert a “Memory Stick” into your camcorder.
(1) Set the POWER switch to MEMORY or VCR. Make sure that the LOCK switchis set to the right (unlock) position.
(2) Play back the image you want to protect (p. 133).(3) Press MENU to display the menu.(4) Turn the SEL/PUSH EXEC dial to select , then press the dial.(5) Turn the SEL/PUSH EXEC dial to select PROTECT, then press the dial.(6) Turn the SEL/PUSH EXEC dial to select ON, then press the dial.(7) Press MENU to erase the menu display. The “-“ mark is displayed beside
the data file name of the protected image.
To cancel im age protect ionSelect OFF in step 6, then press the SEL/PUSH EXEC dial.
Note
Formatting erases all information on the “Memory Stick,” including the protectedimage data. Check the contents of the “Memory Stick” before formatting.
If the write-protect tab on the “Memory Stick” is set to LOCK
You cannot carry out image protection.
1
3,7 4
5
6
MEMORY SETCONT I NUOUSQUAL I TYPR I NT MARKPROTECTSL I DE SHOWDELETE ALLFORMAT
[MENU] : END
MEMORY SETCONT I NUOUSQUAL I TYPR I NT MARKPROTECTSL I DE SHOWDELETE ALLFORMATRETURN
[MENU] : END
OFF
MEMORY SETCONT I NUOUSQUAL I TYPR I NT MARKPROTECTSL I DE SHOWDELETE ALLFORMAT
RETURN
[MENU] : END
ONOFF
MEMORY SETCONT I NUOUSQUAL I TYPR I NT MARKPROTECTSL I DE SHOWDELETE ALLFORMAT
RETURN
[MENU] : END
ON
10 / 1510 / 15
10 / 15
MENU
ME M O R Y
C A ME R A
V CR
O F F
( CH G )
POWER1
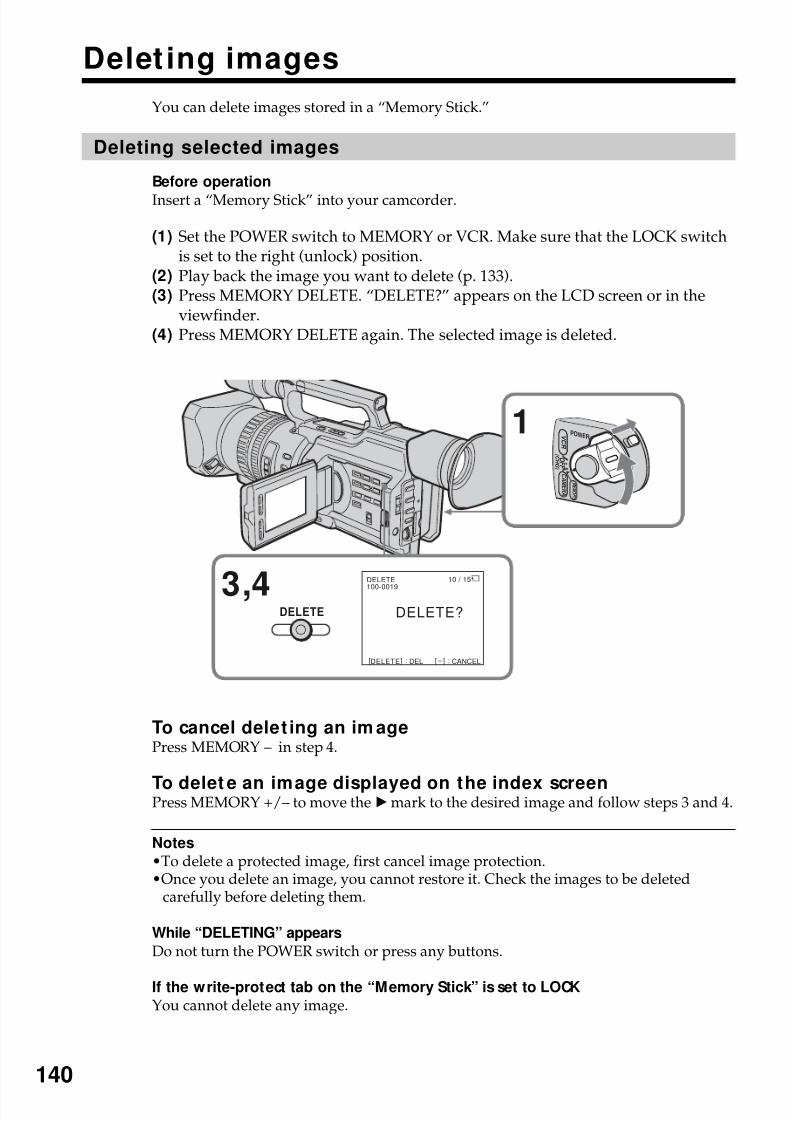
8/8/2019 276ba559b616f0752a9d1ab6240c7e96
http://slidepdf.com/reader/full/276ba559b616f0752a9d1ab6240c7e96 140/176
140
Delet ing images
You can delete images stored in a “Memory Stick.”
Deleting selected images
Before operation
Insert a “Memory Stick” into your camcorder.
(1) Set the POWER switch to MEMORY or VCR. Make sure that the LOCK switchis set to the right (unlock) position.
(2) Play back the image you want to delete (p. 133).(3) Press MEMORY DELETE. “DELETE?” appears on the LCD screen or in the
viewfinder.(4) Press MEMORY DELETE again. The selected image is deleted.
To cancel delet ing an im agePress MEMORY – in step 4.
To delet e an image displayed on the index screenPress MEMORY +/– to move the Bmark to the desired image and follow steps 3 and 4.
Notes
•To delete a protected image, first cancel image protection.•Once you delete an image, you cannot restore it. Check the images to be deleted
carefully before deleting them.
While “DELETING” appears
Do not turn the POWER switch or press any buttons.
If the write-protect tab on the “Memory Stick” is set to LOCKYou cannot delete any image.
3,4DELETE
100-0019
[DELETE] : DEL [ – ] : CANCEL
10 / 15
DELETE?
1
DELETE
ME M O R Y
C A ME R A
V CR
O F F
( CH G )
POWER1
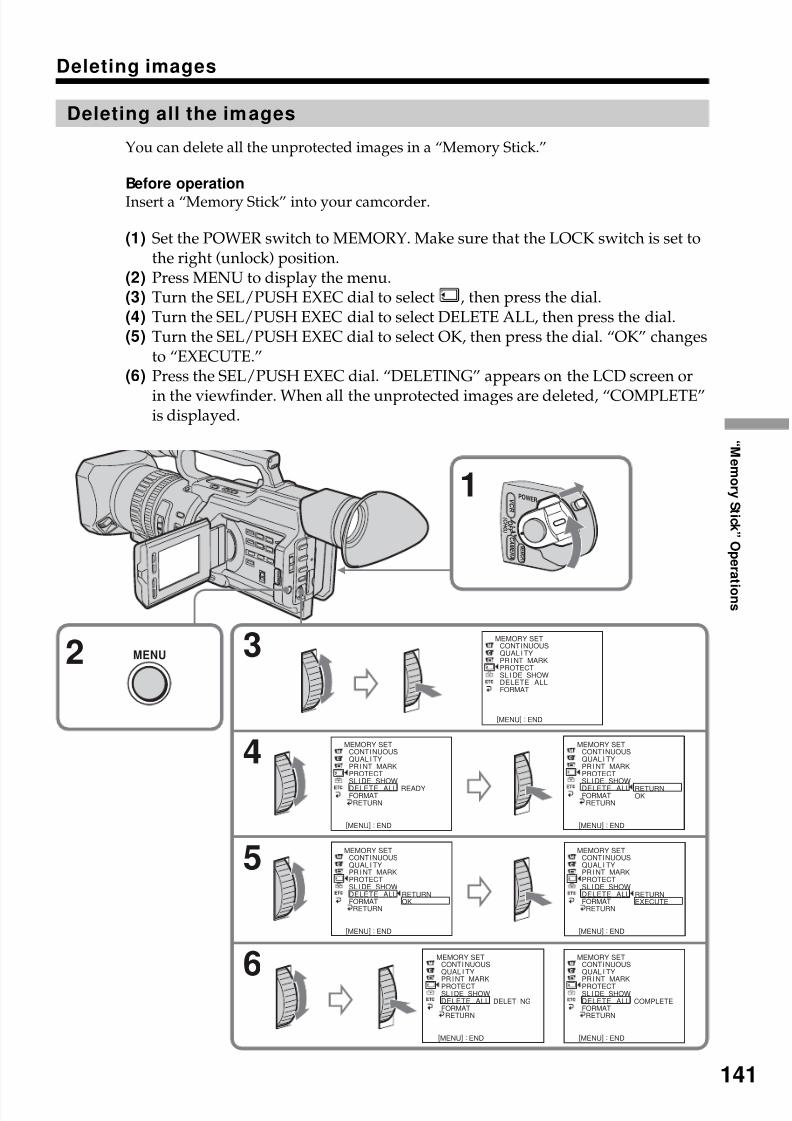
8/8/2019 276ba559b616f0752a9d1ab6240c7e96
http://slidepdf.com/reader/full/276ba559b616f0752a9d1ab6240c7e96 141/176
141
“ M e m or y S t i ck ” O p er a
t i on s
Deleting images
Deleting all the images
You can delete all the unprotected images in a “Memory Stick.”
Before operation
Insert a “Memory Stick” into your camcorder.
(1) Set the POWER switch to MEMORY. Make sure that the LOCK switch is set tothe right (unlock) position.
(2) Press MENU to display the menu.(3) Turn the SEL/PUSH EXEC dial to select , then press the dial.(4) Turn the SEL/PUSH EXEC dial to select DELETE ALL, then press the dial.(5) Turn the SEL/PUSH EXEC dial to select OK, then press the dial. “OK” changes
to “EXECUTE.”(6) Press the SEL/PUSH EXEC dial. “DELETING” appears on the LCD screen or
in the viewfinder. When all the unprotected images are deleted, “COMPLETE”is displayed.
2 3
4
6
5
MEMORY SETCONT I NUOUSQUAL I TYPR I NT MARKPROTECTSL I DE SHOWDELETE ALLFORMAT
[MENU] : END
MEMORY SETCONT I NUOUSQUAL I TYPR I NT MARKPROTECTSL I DE SHOWDELETE ALLFORMAT
RETURN
[MENU] : END
READY
MEMORY SETCONT I NUOUSQUAL I TYPR I NT MARKPROTECTSL I DE SHOWDELETE ALLFORMAT
RETURN
[MENU] : END
RETURNOK
CONT I NUOUSQUAL I TYPR I NT MARKPROTECTSL I DE SHOWDELETE ALLFORMAT
RETURN
[MENU] : END
CONT I NUOUSQUAL I TYPR I NT MARKPROTECTSL I DE SHOWDELETE ALLFORMAT
RETURN
[MENU] : END
RETURNOK
RETURNEXECUTE
CONT I NUOUSQUAL I TY
PR I
NT MARKPROTECT
SL I DE SHOWDELETE ALLFORMAT
RETURN
[MENU] : END
DELET I NG
CONT I NUOUSQUAL I TY
PR I
NT MARKPROTECT
SL I DE SHOWDELETE ALLFORMAT
RETURN
[MENU] : END
COMPLETE
MEMORY SET
MEMORY SETMEMORY SET
MEMORY SET
MENU
1
ME M O R Y
C A ME R A
V CR
O F F
( CH G )
POWER

8/8/2019 276ba559b616f0752a9d1ab6240c7e96
http://slidepdf.com/reader/full/276ba559b616f0752a9d1ab6240c7e96 142/176
142
Deleting images
To cancel delet ing all the images in the “M emory Stick”Select RETURN in step 5 or 6, then press the SEL/PUSH EXEC dial.
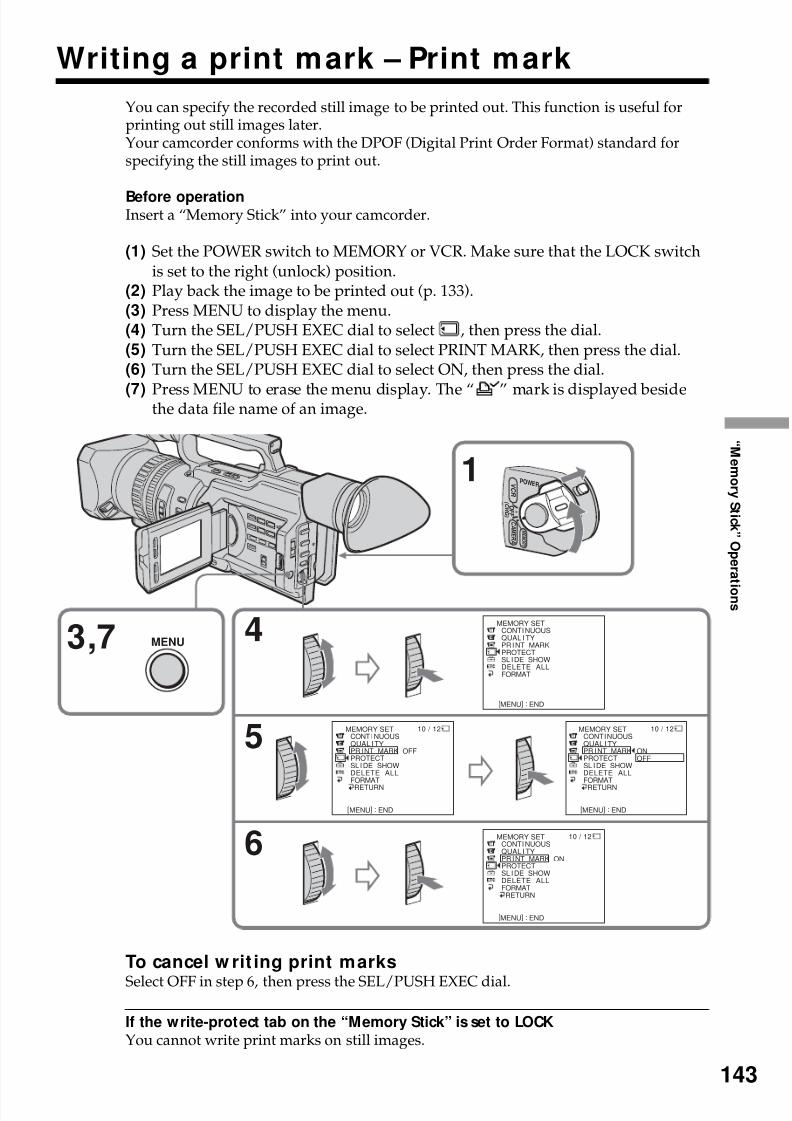
8/8/2019 276ba559b616f0752a9d1ab6240c7e96
http://slidepdf.com/reader/full/276ba559b616f0752a9d1ab6240c7e96 143/176
143
“ M e m or y S t i ck ” O p er a
t i on s
Writing a print mark – Print mark
You can specify the recorded still image to be printed out. This function is useful forprinting out still images later.Your camcorder conforms with the DPOF (Digital Print Order Format) standard forspecifying the still images to print out.
Before operationInsert a “Memory Stick” into your camcorder.
(1) Set the POWER switch to MEMORY or VCR. Make sure that the LOCK switchis set to the right (unlock) position.
(2) Play back the image to be printed out (p. 133).(3) Press MENU to display the menu.(4) Turn the SEL/PUSH EXEC dial to select , then press the dial.(5) Turn the SEL/PUSH EXEC dial to select PRINT MARK, then press the dial.(6) Turn the SEL/PUSH EXEC dial to select ON, then press the dial.
(7) Press MENU to erase the menu display. The “ ” mark is displayed besidethe data file name of an image.
To cancel w rit ing print marks
Select OFF in step 6, then press the SEL/PUSH EXEC dial.
If the write-protect tab on the “Memory Stick” is set to LOCKYou cannot write print marks on still images.
3,7 4
5
6
MEMORY SETCONT I NUOUSQUAL I TYPR I NT MARKPROTECTSL I DE SHOWDELETE ALLFORMAT
[MENU] : END
MEMORY SETCONT I NUOUSQUAL I TYPR I NT MARKPROTECTSL I DE SHOWDELETE ALLFORMATRETURN
[MENU] : END
OFF
MEMORY SETCONT I NUOUSQUAL I TYPR I NT MARKPROTECTSL I DE SHOWDELETE ALLFORMAT
RETURN
[MENU] : END
ONOFF
MEMORY SETCONT I NUOUSQUAL I TYPR I NT MARKPROTECTSL I DE SHOWDELETE ALLFORMAT
RETURN
[MENU] : END
ON
10 / 12 10 / 12
10 / 12
MENU
1
ME M O R Y
C A ME R A
V CR
O F F
( CH G )
POWER
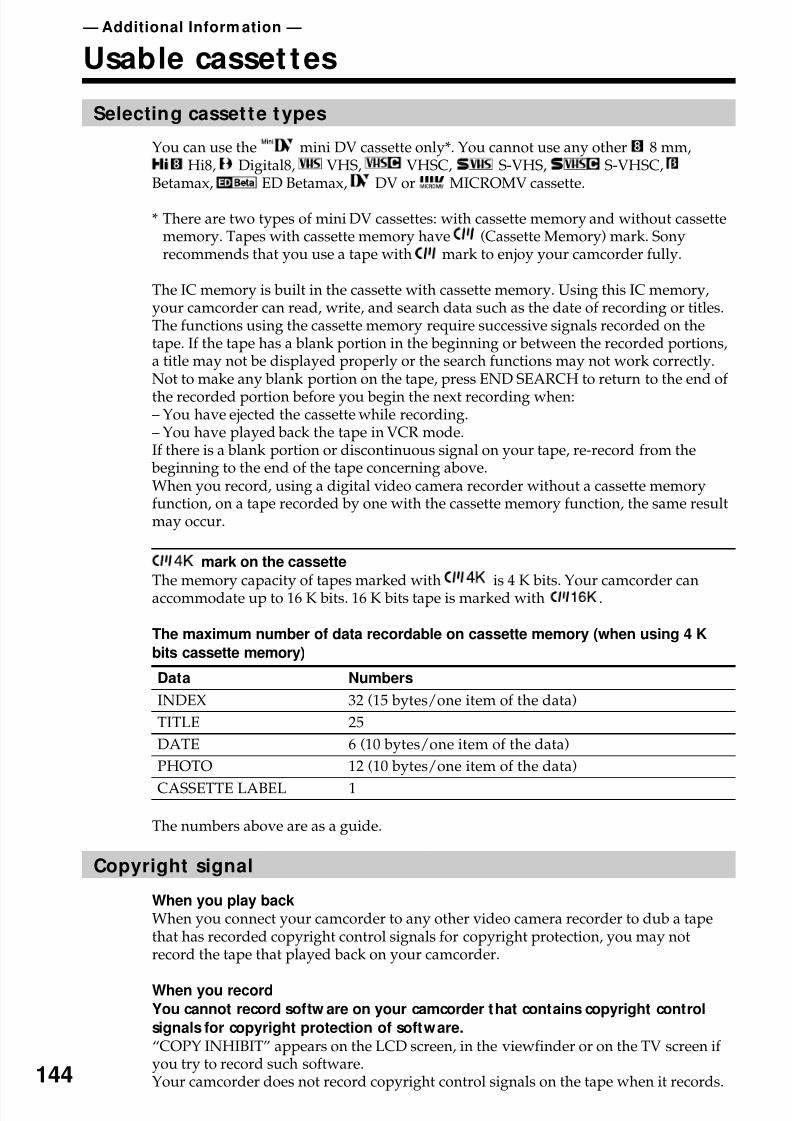
8/8/2019 276ba559b616f0752a9d1ab6240c7e96
http://slidepdf.com/reader/full/276ba559b616f0752a9d1ab6240c7e96 144/176
144
— Additional Inform ation —
Usable casset tes
Selecting casset te types
You can use the mini DV cassette only*. You cannot use any other 8 mm,Hi8, Digital8, VHS, VHSC, S-VHS, S-VHSC,
Betamax, ED Betamax, DV or MICROMV cassette.
* There are two types of mini DV cassettes: with cassette memory and without cassettememory. Tapes with cassette memory have (Cassette Memory) mark. Sonyrecommends that you use a tape with mark to enjoy your camcorder fully.
The IC memory is built in the cassette with cassette memory. Using this IC memory,your camcorder can read, write, and search data such as the date of recording or titles.The functions using the cassette memory require successive signals recorded on thetape. If the tape has a blank portion in the beginning or between the recorded portions,a title may not be displayed properly or the search functions may not work correctly.Not to make any blank portion on the tape, press END SEARCH to return to the end of
the recorded portion before you begin the next recording when:– You have ejected the cassette while recording.– You have played back the tape in VCR mode.If there is a blank portion or discontinuous signal on your tape, re-record from the
beginning to the end of the tape concerning above.When you record, using a digital video camera recorder without a cassette memoryfunction, on a tape recorded by one with the cassette memory function, the same resultmay occur.
mark on the cassette
The memory capacity of tapes marked with is 4 K bits. Your camcorder canaccommodate up to 16 K bits. 16 K bits tape is marked with .
The maximum number of data recordable on cassette memory (when using 4 K
bits cassette memory)
Data Numbers
INDEX 32 (15 bytes/one item of the data)
TITLE 25
DATE 6 (10 bytes/one item of the data)
PHOTO 12 (10 bytes/one item of the data)
CASSETTE LABEL 1
The numbers above are as a guide.
Copyright signal
When you play backWhen you connect your camcorder to any other video camera recorder to dub a tapethat has recorded copyright control signals for copyright protection, you may notrecord the tape that played back on your camcorder.
When you record
You cannot record softw are on your camcorder that contains copyright control
signals for copyright protection of software.
“COPY INHIBIT” appears on the LCD screen, in the viewfinder or on the TV screen if you try to record such software.Your camcorder does not record copyright control signals on the tape when it records.
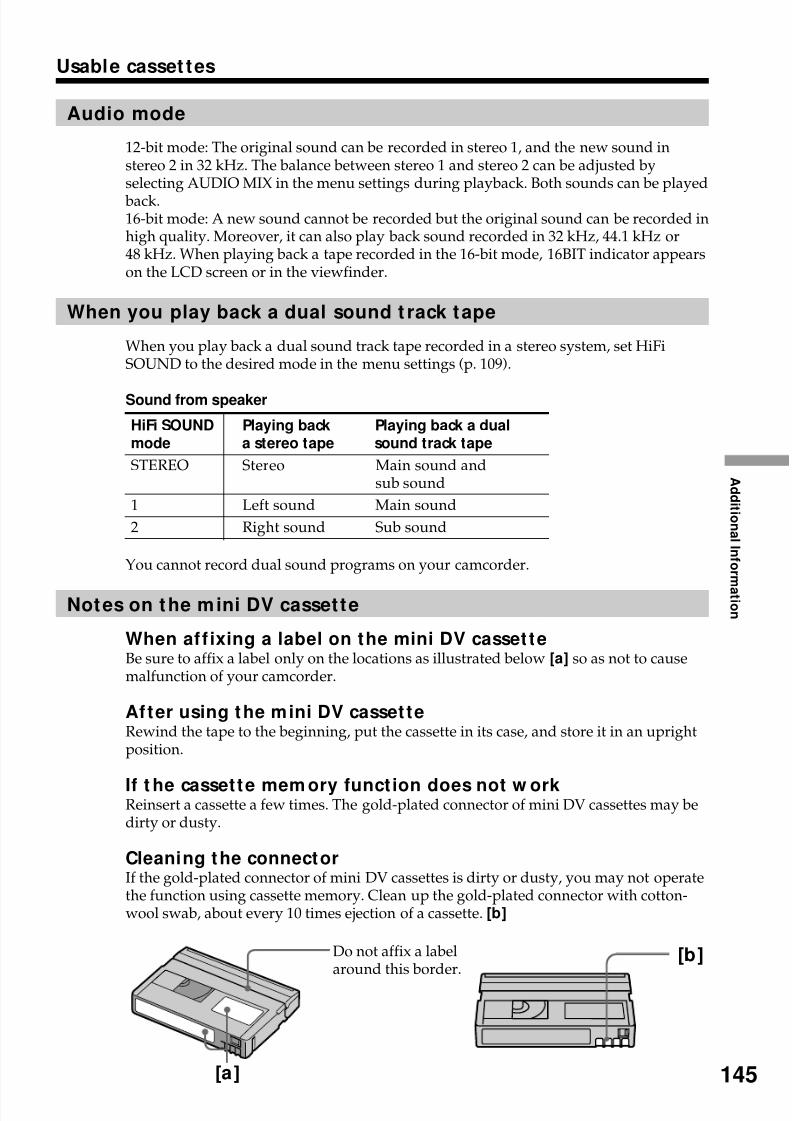
8/8/2019 276ba559b616f0752a9d1ab6240c7e96
http://slidepdf.com/reader/full/276ba559b616f0752a9d1ab6240c7e96 145/176
A d d i t i on al I nf or m
a t i on
145
Usable casset tes
Audio mode
12-bit mode: The original sound can be recorded in stereo 1, and the new sound instereo 2 in 32 kHz. The balance between stereo 1 and stereo 2 can be adjusted byselecting AUDIO MIX in the menu settings during playback. Both sounds can be played
back.16-bit mode: A new sound cannot be recorded but the original sound can be recorded inhigh quality. Moreover, it can also play back sound recorded in 32 kHz, 44.1 kHz or48 kHz. When playing back a tape recorded in the 16-bit mode, 16BIT indicator appearson the LCD screen or in the viewfinder.
When you play back a dual sound t rack tape
When you play back a dual sound track tape recorded in a stereo system, set HiFiSOUND to the desired mode in the menu settings (p. 109).
Sound from speaker
HiFi SOUND Playing back Playing back a dualmode a stereo tape sound track tape
STEREO Stereo Main sound andsub sound
1 Left sound Main sound
2 Right sound Sub sound
You cannot record dual sound programs on your camcorder.
Notes on the mini DV cassette
When aff ixing a label on the mini DV cassetteBe sure to affix a label only on the locations as illustrated below [a] so as not to causemalfunction of your camcorder.
After using the mini DV cassetteRewind the tape to the beginning, put the cassette in its case, and store it in an uprightposition.
If t he cassette mem ory function does not w orkReinsert a cassette a few times. The gold-plated connector of mini DV cassettes may bedirty or dusty.
Cleaning the connectorIf the gold-plated connector of mini DV cassettes is dirty or dusty, you may not operatethe function using cassette memory. Clean up the gold-plated connector with cotton-wool swab, about every 10 times ejection of a cassette. [b]
[a]
[b]Do not affix a labelaround this border.

8/8/2019 276ba559b616f0752a9d1ab6240c7e96
http://slidepdf.com/reader/full/276ba559b616f0752a9d1ab6240c7e96 146/176
146
About i.LINK
Your camcorder is equipped with the DV Interface based on i.LINK (IEEE1394)standard.This section explains the specifications and features of i.LINK.
What is i.LINK?
i.LINK is a digital serial interface designed to integrate the devices equipped withi.LINK connector. By connecting i.LINK devices, i.LINK allows your device to:– Transmit and receive data such as digital audio and digital video signals in two ways– Control other i.LINK devices– Easily connect with another device using just an i.LINK cable.Your i.LINK device is capable of connecting AV devices and perform variousoperations and data transfer. Further availability for connections with versatileequipment and operations will be planned in the future.Other advantages include the following feature. When connecting multiple i.LINKdevices, your device cannot only perform operations and data transfer with the directlyconnected device but also perform them with any of the devices that are connected viaother devices. Therefore, you will not need to concern the order of connecting devices.
However, depending on the features and specifications of the connected devices, youmay need to operate certain functions differently or may not be able to perform certainoperations or data transfer.
NoteYour camcorder can be connected to one device with the i.LINK cable.When you connect with a device that has two or more i.LINK connectors, refer to theoperating instructions supplied with the connected device.
Tips•i.LINK, a nickname for IEEE 1394 that Sony proposed, is a trademark supported by a
majority of companies worldwide.
•IEEE 1394 is an international standard defined by IEEE, The Institute of Electrical andElectronics Engineers, Inc.
About data transfer speed of i.LINKi.LINK defines a maximum data transfer speed of approximately 100, 200 and 400Mbps* that are described as S100, S200 and S400 respectively.For i.LINK devices, a maximum data transfer speed that the device supports isidentified on “Specifications” page of the operating instructions supplied with thedevice or near its i.LINK connector.With a device that does not identify the data transfer speed, the maximum data transferspeed that the device supports is S100.When connecting with the device that support different data transfer speed, the actualdata transfer speed may be different from those described on the i.LINK connectors.
* What is Mbps?Mega bits per second. A measure of the rate at which data is transmitted per second. Incase of 100 Mbps, 100 Mega bits of data can be transmitted per second.

8/8/2019 276ba559b616f0752a9d1ab6240c7e96
http://slidepdf.com/reader/full/276ba559b616f0752a9d1ab6240c7e96 147/176
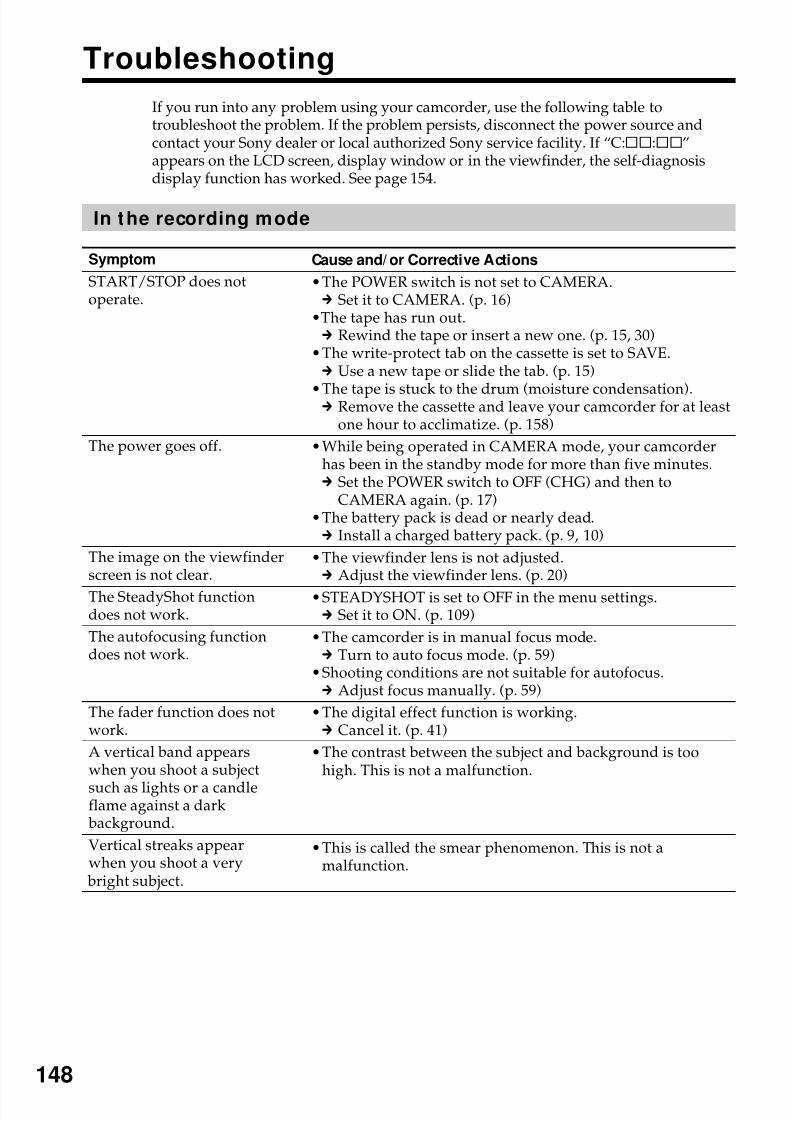
8/8/2019 276ba559b616f0752a9d1ab6240c7e96
http://slidepdf.com/reader/full/276ba559b616f0752a9d1ab6240c7e96 148/176
148
Troubleshooting
If you run into any problem using your camcorder, use the following table totroubleshoot the problem. If the problem persists, disconnect the power source andcontact your Sony dealer or local authorized Sony service facility. If “C:ss:ss”appears on the LCD screen, display window or in the viewfinder, the self-diagnosisdisplay function has worked. See page 154.
In the recording mode
Symptom
START/STOP does notoperate.
The power goes off.
The image on the viewfinderscreen is not clear.
The SteadyShot functiondoes not work.
The autofocusing functiondoes not work.
The fader function does notwork.
A vertical band appearswhen you shoot a subject
such as lights or a candleflame against a dark
background.
Vertical streaks appearwhen you shoot a very
bright subject.
Cause and/ or Corrective Actions
•The POWER switch is not set to CAMERA.c Set it to CAMERA. (p. 16)
•The tape has run out.c Rewind the tape or insert a new one. (p. 15, 30)
•The write-protect tab on the cassette is set to SAVE.c Use a new tape or slide the tab. (p. 15)
•The tape is stuck to the drum (moisture condensation).c Remove the cassette and leave your camcorder for at least
one hour to acclimatize. (p. 158)
•While being operated in CAMERA mode, your camcorderhas been in the standby mode for more than five minutes.c Set the POWER switch to OFF (CHG) and then to
CAMERA again. (p. 17)•The battery pack is dead or nearly dead.c Install a charged battery pack. (p. 9, 10)
•The viewfinder lens is not adjusted.c Adjust the viewfinder lens. (p. 20)
•STEADYSHOT is set to OFF in the menu settings.c Set it to ON. (p. 109)
•The camcorder is in manual focus mode.c Turn to auto focus mode. (p. 59)
•Shooting conditions are not suitable for autofocus.c Adjust focus manually. (p. 59)
•The digital effect function is working.c Cancel it. (p. 41)
•The contrast between the subject and background is toohigh. This is not a malfunction.
•This is called the smear phenomenon. This is not amalfunction.
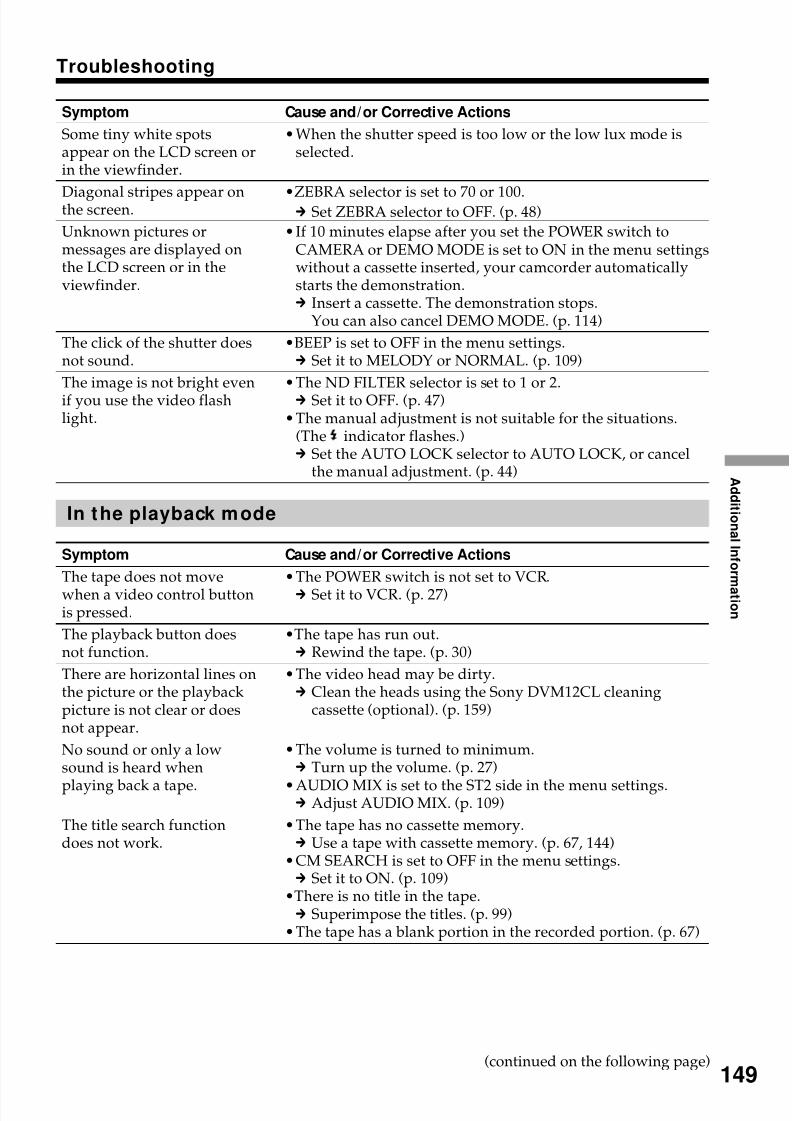
8/8/2019 276ba559b616f0752a9d1ab6240c7e96
http://slidepdf.com/reader/full/276ba559b616f0752a9d1ab6240c7e96 149/176
A d d i t i on al I nf or m
a t i on
149
Troubleshooting
Symptom
Some tiny white spotsappear on the LCD screen orin the viewfinder.
Diagonal stripes appear onthe screen.
Unknown pictures ormessages are displayed onthe LCD screen or in theviewfinder.
The click of the shutter doesnot sound.
The image is not bright evenif you use the video flashlight.
In the playback mode
Symptom
The tape does not movewhen a video control buttonis pressed.
The playback button doesnot function.
There are horizontal lines onthe picture or the playbackpicture is not clear or doesnot appear.
No sound or only a lowsound is heard when
playing back a tape.
The title search functiondoes not work.
Cause and/or Corrective Actions
•When the shutter speed is too low or the low lux mode isselected.
•ZEBRA selector is set to 70 or 100.c Set ZEBRA selector to OFF. (p. 48)
•If 10 minutes elapse after you set the POWER switch toCAMERA or DEMO MODE is set to ON in the menu settingswithout a cassette inserted, your camcorder automaticallystarts the demonstration.c Insert a cassette. The demonstration stops.
You can also cancel DEMO MODE. (p. 114)
•BEEP is set to OFF in the menu settings.c Set it to MELODY or NORMAL. (p. 109)
•The ND FILTER selector is set to 1 or 2.c Set it to OFF. (p. 47)
•The manual adjustment is not suitable for the situations.(The indicator flashes.)c Set the AUTO LOCK selector to AUTO LOCK, or cancel
the manual adjustment. (p. 44)
Cause and/or Corrective Actions
•The POWER switch is not set to VCR.c Set it to VCR. (p. 27)
•The tape has run out.c Rewind the tape. (p. 30)
•The video head may be dirty.c Clean the heads using the Sony DVM12CL cleaning
cassette (optional). (p. 159)
•The volume is turned to minimum.c Turn up the volume. (p. 27)
•AUDIO MIX is set to the ST2 side in the menu settings.c Adjust AUDIO MIX. (p. 109)
•The tape has no cassette memory.c Use a tape with cassette memory. (p. 67, 144)
•CM SEARCH is set to OFF in the menu settings.c Set it to ON. (p. 109)
•There is no title in the tape.c Superimpose the titles. (p. 99)
•The tape has a blank portion in the recorded portion. (p. 67)
(continued on the following page)
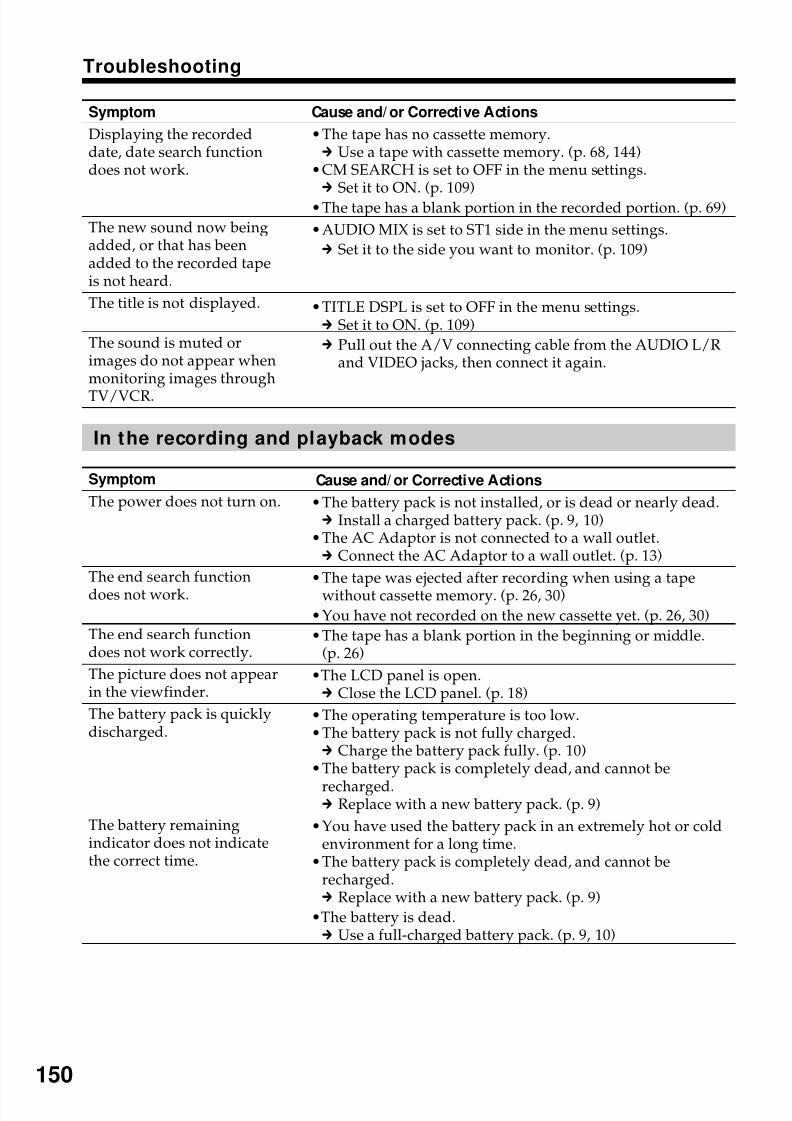
8/8/2019 276ba559b616f0752a9d1ab6240c7e96
http://slidepdf.com/reader/full/276ba559b616f0752a9d1ab6240c7e96 150/176
150
Troubleshooting
Symptom
Displaying the recordeddate, date search functiondoes not work.
The new sound now beingadded, or that has beenadded to the recorded tapeis not heard.
The title is not displayed.
The sound is muted orimages do not appear whenmonitoring images through
TV/VCR.
In the recording and playback modes
Symptom
The power does not turn on.
The end search functiondoes not work.
The end search functiondoes not work correctly.
The picture does not appearin the viewfinder.
The battery pack is quicklydischarged.
The battery remainingindicator does not indicatethe correct time.
Cause and/ or Corrective Actions
•The tape has no cassette memory.c Use a tape with cassette memory. (p. 68, 144)
•CM SEARCH is set to OFF in the menu settings.c
Set it to ON. (p. 109)•The tape has a blank portion in the recorded portion. (p. 69)
•AUDIO MIX is set to ST1 side in the menu settings.
c Set it to the side you want to monitor. (p. 109)
•TITLE DSPL is set to OFF in the menu settings.c Set it to ON. (p. 109)
c Pull out the A/V connecting cable from the AUDIO L/Rand VIDEO jacks, then connect it again.
Cause and/ or Corrective Actions
•The battery pack is not installed, or is dead or nearly dead.c Install a charged battery pack. (p. 9, 10)
•The AC Adaptor is not connected to a wall outlet.c Connect the AC Adaptor to a wall outlet. (p. 13)
•The tape was ejected after recording when using a tapewithout cassette memory. (p. 26, 30)
•You have not recorded on the new cassette yet. (p. 26, 30)
•The tape has a blank portion in the beginning or middle.(p. 26)
•The LCD panel is open.c Close the LCD panel. (p. 18)
•The operating temperature is too low.•The battery pack is not fully charged.c Charge the battery pack fully. (p. 10)
•The battery pack is completely dead, and cannot be
recharged.c Replace with a new battery pack. (p. 9)
•You have used the battery pack in an extremely hot or coldenvironment for a long time.
•The battery pack is completely dead, and cannot berecharged.c Replace with a new battery pack. (p. 9)
•The battery is dead.c Use a full-charged battery pack. (p. 9, 10)
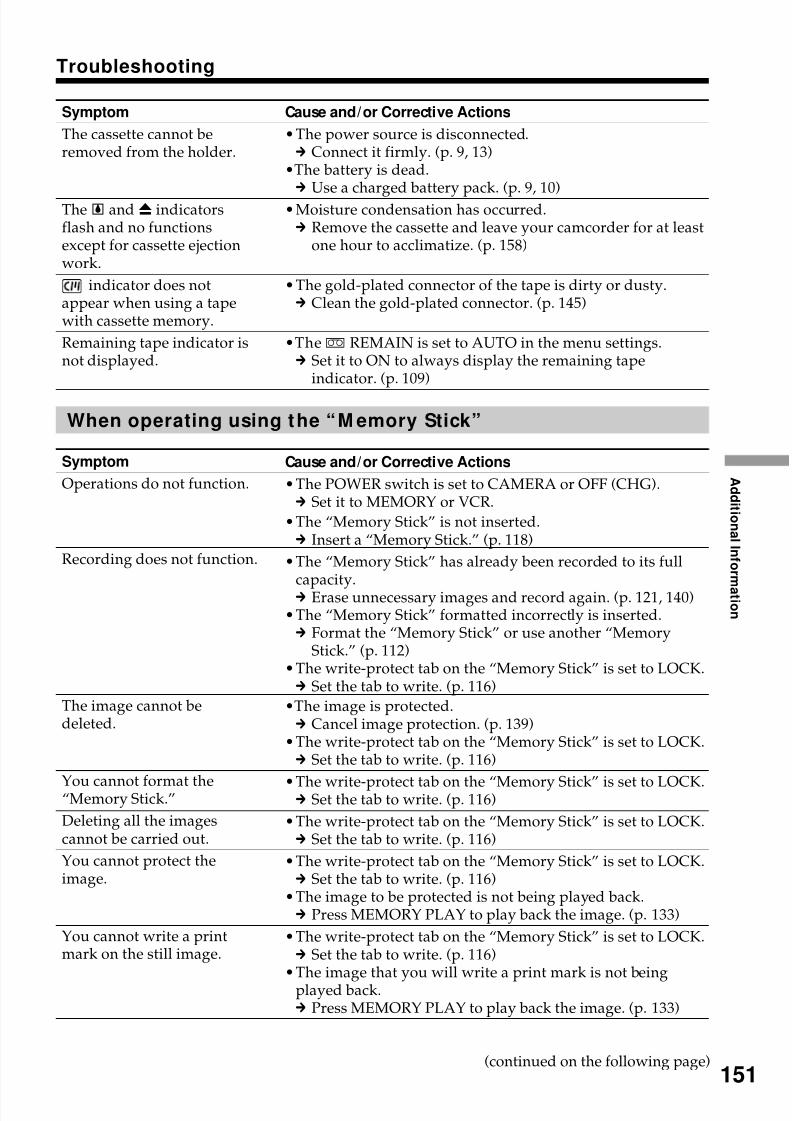
8/8/2019 276ba559b616f0752a9d1ab6240c7e96
http://slidepdf.com/reader/full/276ba559b616f0752a9d1ab6240c7e96 151/176
A d d i t i on al I nf or m
a t i on
151
Troubleshooting
Symptom
The cassette cannot beremoved from the holder.
The % and Z indicatorsflash and no functionsexcept for cassette ejectionwork.
indicator does notappear when using a tapewith cassette memory.
Remaining tape indicator isnot displayed.
When operating using the “M emory Stick”
Symptom
Operations do not function.
Recording does not function.
The image cannot bedeleted.
You cannot format the“Memory Stick.”
Deleting all the imagescannot be carried out.
You cannot protect theimage.
You cannot write a printmark on the still image.
Cause and/or Corrective Actions
•The power source is disconnected.c Connect it firmly. (p. 9, 13)
•The battery is dead.c
Use a charged battery pack. (p. 9, 10)•Moisture condensation has occurred.c Remove the cassette and leave your camcorder for at least
one hour to acclimatize. (p. 158)
•The gold-plated connector of the tape is dirty or dusty.c Clean the gold-plated connector. (p. 145)
•Theq REMAIN is set to AUTO in the menu settings.c Set it to ON to always display the remaining tape
indicator. (p. 109)
Cause and/or Corrective Actions
•The POWER switch is set to CAMERA or OFF (CHG).c Set it to MEMORY or VCR.
•The “Memory Stick” is not inserted.c Insert a “Memory Stick.” (p. 118)
•The “Memory Stick” has already been recorded to its fullcapacity.c Erase unnecessary images and record again. (p. 121, 140)
•The “Memory Stick” formatted incorrectly is inserted.c Format the “Memory Stick” or use another “Memory
Stick.” (p. 112)•The write-protect tab on the “Memory Stick” is set to LOCK.c Set the tab to write. (p. 116)
•The image is protected.c Cancel image protection. (p. 139)
•The write-protect tab on the “Memory Stick” is set to LOCK.c Set the tab to write. (p. 116)
•The write-protect tab on the “Memory Stick” is set to LOCK.c Set the tab to write. (p. 116)
•The write-protect tab on the “Memory Stick” is set to LOCK.c Set the tab to write. (p. 116)
•The write-protect tab on the “Memory Stick” is set to LOCK.c Set the tab to write. (p. 116)
•The image to be protected is not being played back.c Press MEMORY PLAY to play back the image. (p. 133)
•The write-protect tab on the “Memory Stick” is set to LOCK.c Set the tab to write. (p. 116)
•The image that you will write a print mark is not beingplayed back.c Press MEMORY PLAY to play back the image. (p. 133)
(continued on the following page)
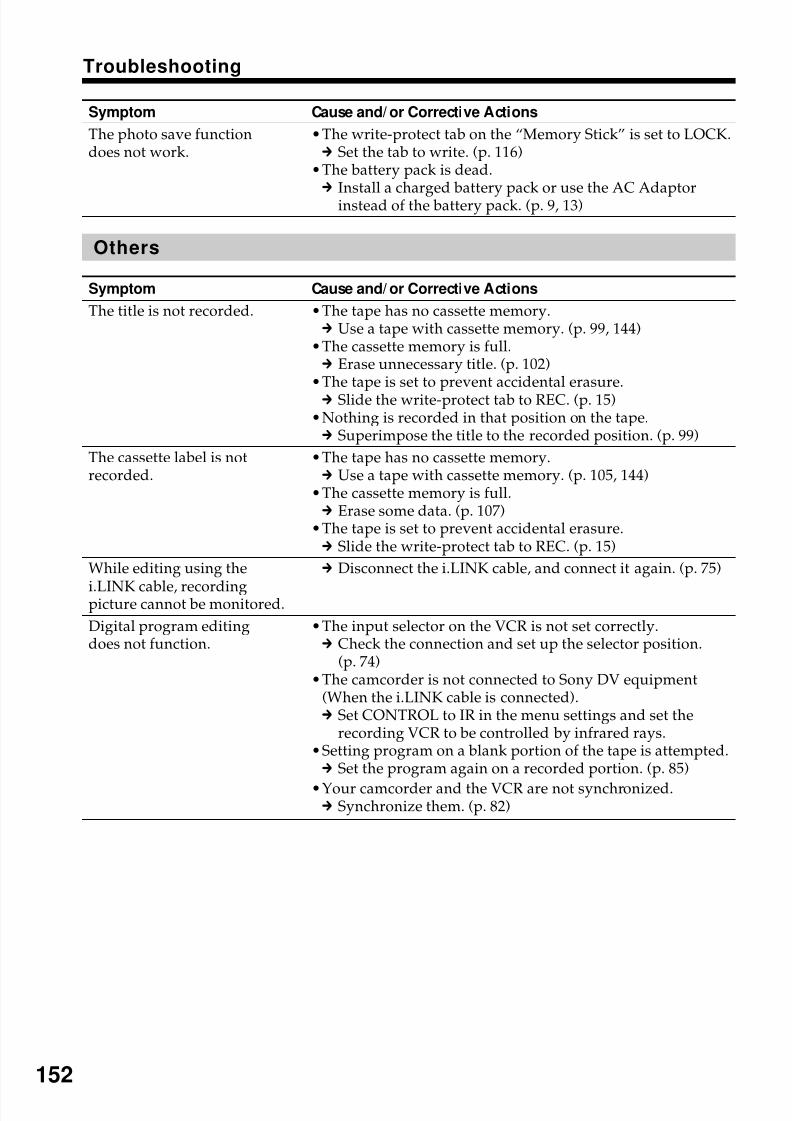
8/8/2019 276ba559b616f0752a9d1ab6240c7e96
http://slidepdf.com/reader/full/276ba559b616f0752a9d1ab6240c7e96 152/176
152
Troubleshooting
Symptom
The photo save functiondoes not work.
Others
Symptom
The title is not recorded.
The cassette label is notrecorded.
While editing using the
i.LINK cable, recordingpicture cannot be monitored.
Digital program editingdoes not function.
Cause and/ or Corrective Actions
•The write-protect tab on the “Memory Stick” is set to LOCK.c Set the tab to write. (p. 116)
•The battery pack is dead.c
Install a charged battery pack or use the AC Adaptorinstead of the battery pack. (p. 9, 13)
Cause and/ or Corrective Actions
•The tape has no cassette memory.c Use a tape with cassette memory. (p. 99, 144)
•The cassette memory is full.c Erase unnecessary title. (p. 102)
•The tape is set to prevent accidental erasure.c Slide the write-protect tab to REC. (p. 15)
•Nothing is recorded in that position on the tape.c Superimpose the title to the recorded position. (p. 99)
•The tape has no cassette memory.c Use a tape with cassette memory. (p. 105, 144)
•The cassette memory is full.c Erase some data. (p. 107)
•The tape is set to prevent accidental erasure.c Slide the write-protect tab to REC. (p. 15)
c Disconnect the i.LINK cable, and connect it again. (p. 75)
•The input selector on the VCR is not set correctly.c Check the connection and set up the selector position.
(p. 74)•The camcorder is not connected to Sony DV equipment
(When the i.LINK cable is connected).c Set CONTROL to IR in the menu settings and set the
recording VCR to be controlled by infrared rays.•Setting program on a blank portion of the tape is attempted.c Set the program again on a recorded portion. (p. 85)
•Your camcorder and the VCR are not synchronized.c Synchronize them. (p. 82)
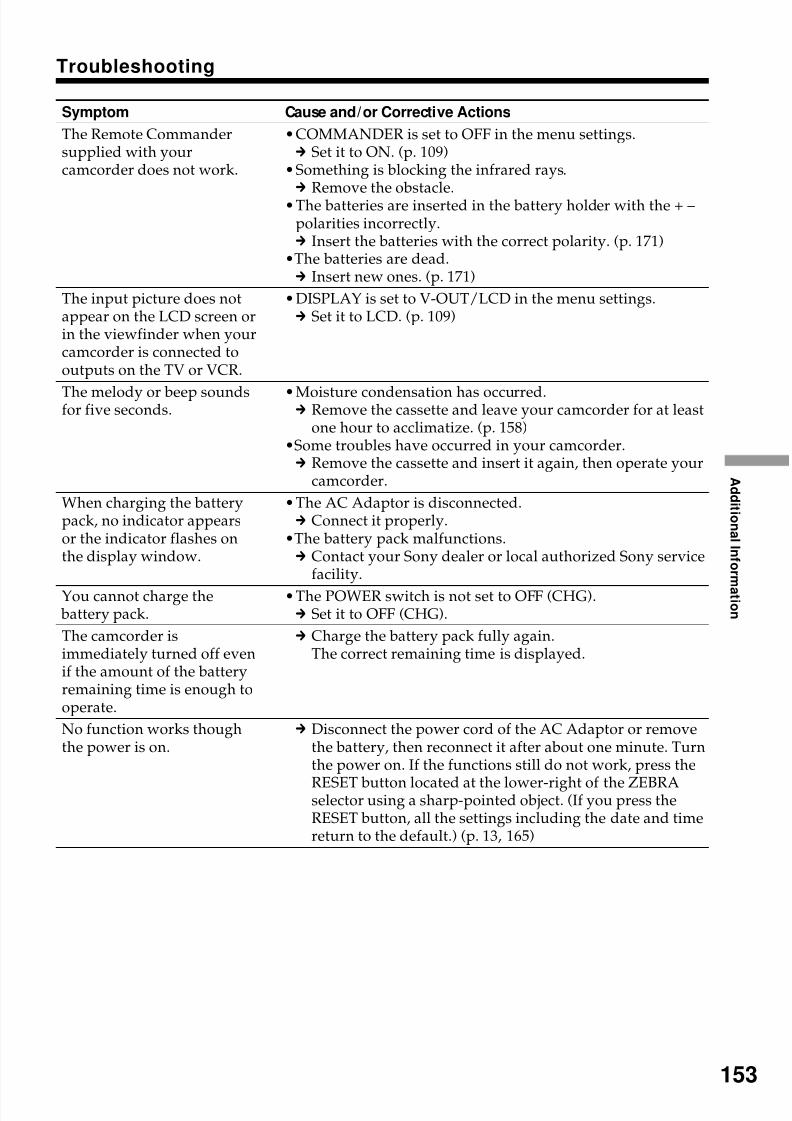
8/8/2019 276ba559b616f0752a9d1ab6240c7e96
http://slidepdf.com/reader/full/276ba559b616f0752a9d1ab6240c7e96 153/176
A d d i t i on al I nf or m
a t i on
153
Troubleshooting
Symptom
The Remote Commandersupplied with yourcamcorder does not work.
The input picture does notappear on the LCD screen orin the viewfinder when yourcamcorder is connected tooutputs on the TV or VCR.
The melody or beep soundsfor five seconds.
When charging the batterypack, no indicator appearsor the indicator flashes onthe display window.
You cannot charge the battery pack.
The camcorder isimmediately turned off evenif the amount of the batteryremaining time is enough tooperate.
No function works thoughthe power is on.
Cause and/or Corrective Actions
•COMMANDER is set to OFF in the menu settings.c Set it to ON. (p. 109)
•Something is blocking the infrared rays.c
Remove the obstacle.•The batteries are inserted in the battery holder with the + –polarities incorrectly.c Insert the batteries with the correct polarity. (p. 171)
•The batteries are dead.c Insert new ones. (p. 171)
•DISPLAY is set to V-OUT/LCD in the menu settings.c Set it to LCD. (p. 109)
•Moisture condensation has occurred.c Remove the cassette and leave your camcorder for at least
one hour to acclimatize. (p. 158)•Some troubles have occurred in your camcorder.c Remove the cassette and insert it again, then operate your
camcorder.
•The AC Adaptor is disconnected.c Connect it properly.
•The battery pack malfunctions.c Contact your Sony dealer or local authorized Sony service
facility.
•The POWER switch is not set to OFF (CHG).c Set it to OFF (CHG).
c Charge the battery pack fully again.The correct remaining time is displayed.
c Disconnect the power cord of the AC Adaptor or removethe battery, then reconnect it after about one minute. Turnthe power on. If the functions still do not work, press the
RESET button located at the lower-right of the ZEBRAselector using a sharp-pointed object. (If you press theRESET button, all the settings including the date and timereturn to the default.) (p. 13, 165)
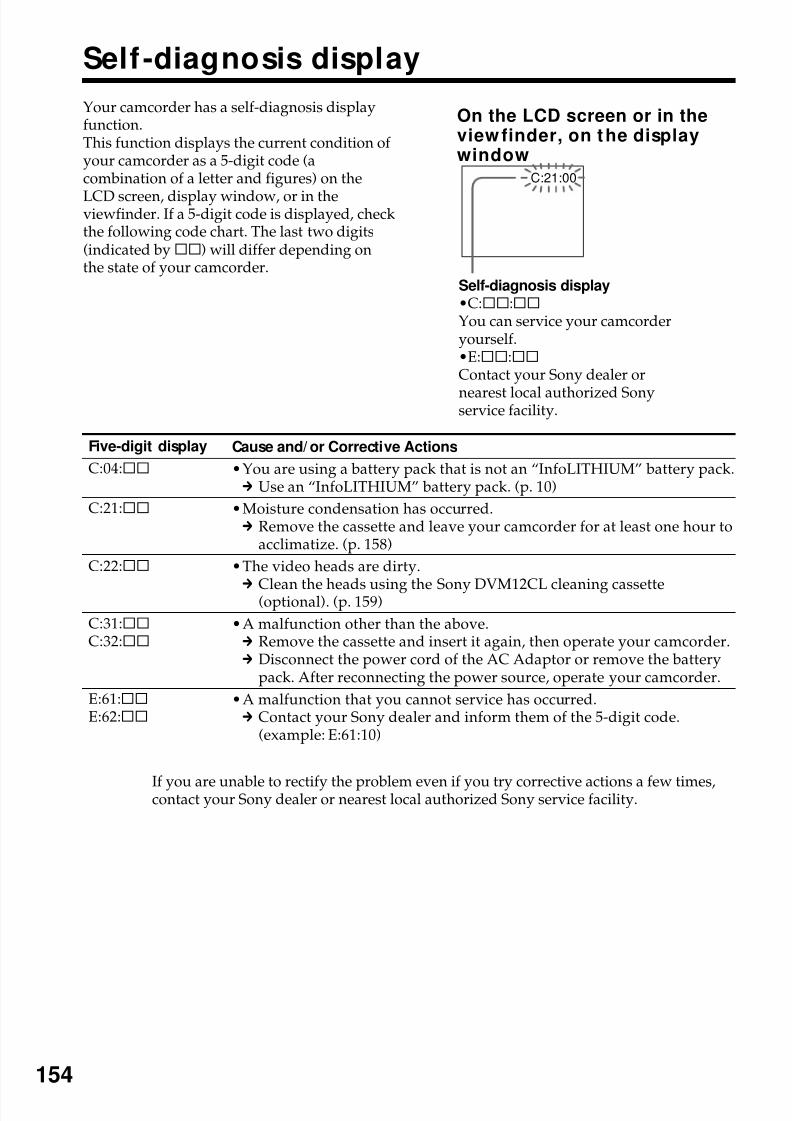
8/8/2019 276ba559b616f0752a9d1ab6240c7e96
http://slidepdf.com/reader/full/276ba559b616f0752a9d1ab6240c7e96 154/176
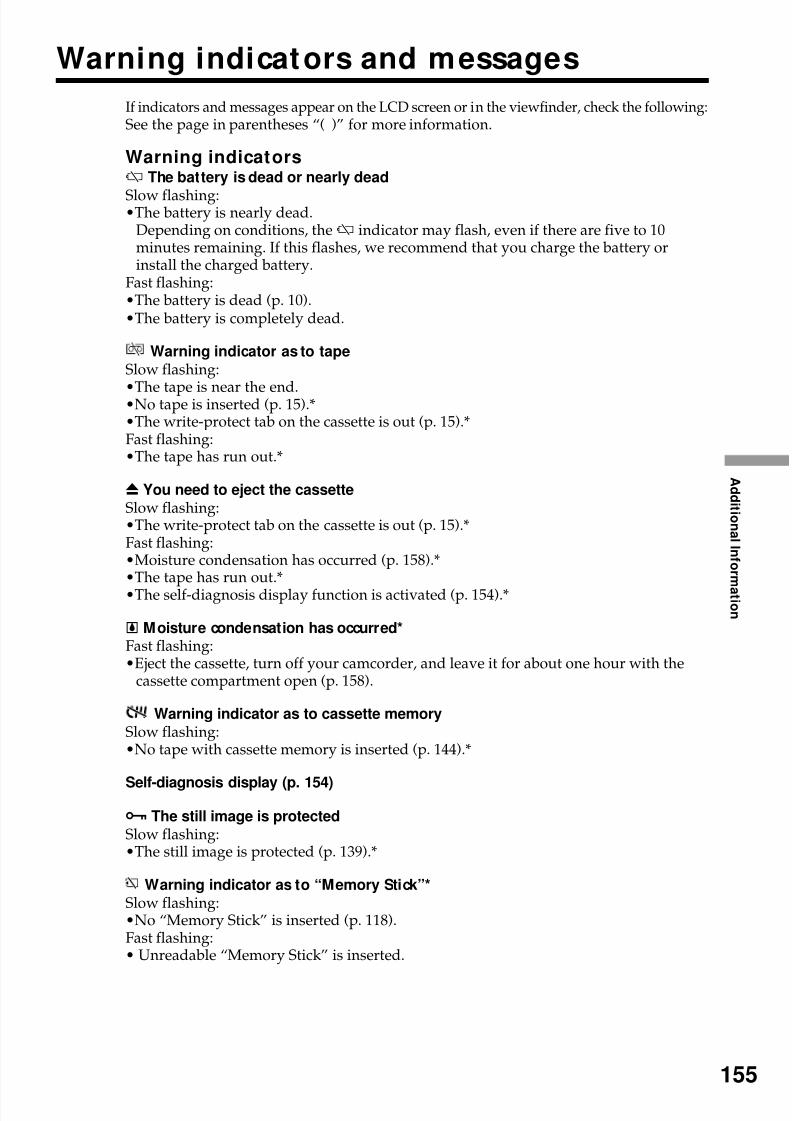
8/8/2019 276ba559b616f0752a9d1ab6240c7e96
http://slidepdf.com/reader/full/276ba559b616f0752a9d1ab6240c7e96 155/176
A d d i t i on al I nf or m
a t i on
155
Warning indicators and messages
If indicators and messages appear on the LCD screen or in the viewfinder, check the following:See the page in parentheses “( )” for more information.
Warning indicatorsE The battery is dead or nearly dead
Slow flashing:•The battery is nearly dead.
Depending on conditions, theE indicator may flash, even if there are five to 10minutes remaining. If this flashes, we recommend that you charge the battery orinstall the charged battery.
Fast flashing:•The battery is dead (p. 10).•The battery is completely dead.
Warning indicator as to tapeSlow flashing:
•The tape is near the end.•No tape is inserted (p. 15).*•The write-protect tab on the cassette is out (p. 15).*Fast flashing:•The tape has run out.*
Z You need to eject the cassetteSlow flashing:•The write-protect tab on the cassette is out (p. 15).*Fast flashing:•Moisture condensation has occurred (p. 158).*•The tape has run out.*•The self-diagnosis display function is activated (p. 154).*
% Moisture condensation has occurred*Fast flashing:•Eject the cassette, turn off your camcorder, and leave it for about one hour with the
cassette compartment open (p. 158).
Warning indicator as to cassette memorySlow flashing:•No tape with cassette memory is inserted (p. 144).*
Self-diagnosis display (p. 154)
- The still image is protectedSlow flashing:•The still image is protected (p. 139).*
Warning indicator as to “Memory Stick”*Slow flashing:•No “Memory Stick” is inserted (p. 118).Fast flashing:• Unreadable “Memory Stick” is inserted.
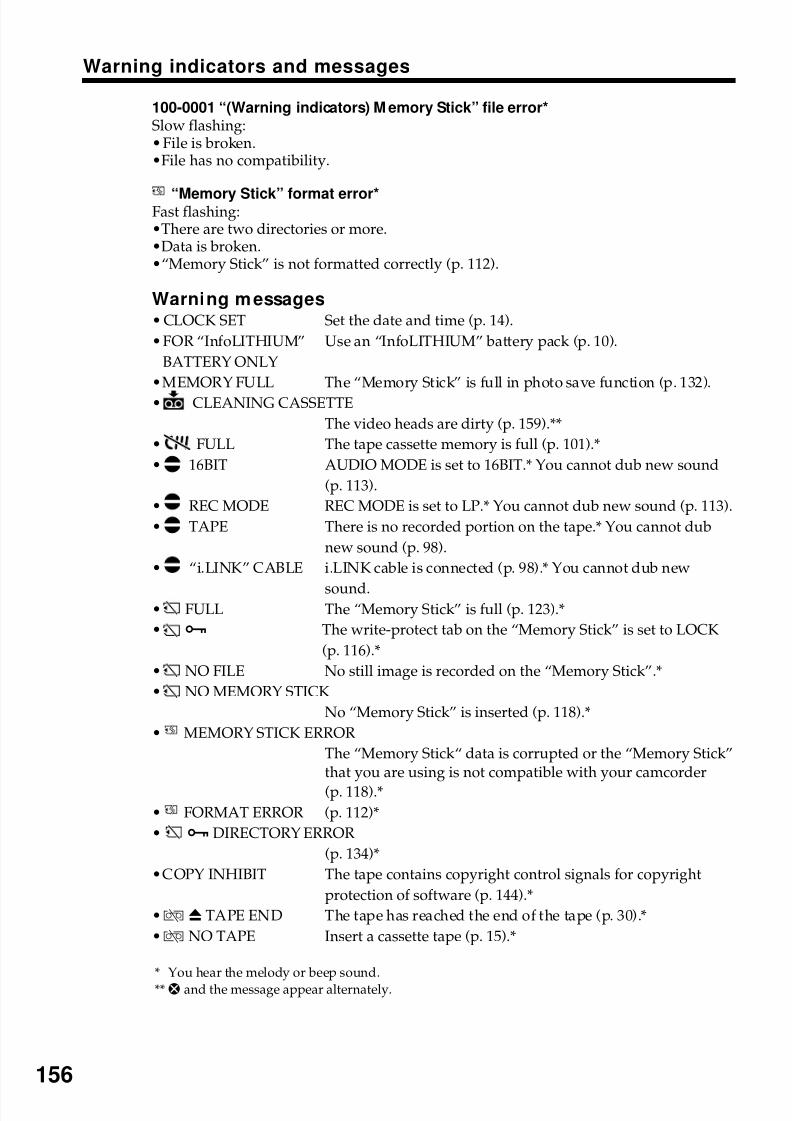
8/8/2019 276ba559b616f0752a9d1ab6240c7e96
http://slidepdf.com/reader/full/276ba559b616f0752a9d1ab6240c7e96 156/176
156
Warning indicators and messages
100-0001 “(Warning indicators) M emory Stick” file error*Slow flashing:•File is broken.•File has no compatibility.
“Memory Stick” format error*Fast flashing:•There are two directories or more.•Data is broken.•“Memory Stick” is not formatted correctly (p. 112).
Warning messages• CLOCK SET Set the date and time (p. 14).
•FOR “InfoLITHIUM” Use an “InfoLITHIUM” battery pack (p. 10).
BATTERY ONLY
•MEMORY FULL The “Memory Stick” is full in photo save function (p. 132).
• CLEANING CASSETTE
The video heads are dirty (p. 159).**
• FULL The tape cassette memory is full (p. 101).*
• 16BIT AUDIO MODE is set to 16BIT.* You cannot dub new sound
(p. 113).
• REC MODE REC MODE is set to LP.* You cannot dub new sound (p. 113).
• TAPE There is no recorded portion on the tape.* You cannot dub
new sound (p. 98).
• “i.LINK” CABLE i.LINK cable is connected (p. 98).* You cannot dub new
sound.• FULL The “Memory Stick” is full (p. 123).*
• - The write-protect tab on the “Memory Stick” is set to LOCK
(p. 116).*
• NO FILE No still image is recorded on the “Memory Stick”.*
• NO MEMORY STICK
No “Memory Stick” is inserted (p. 118).*
• MEMORY STICK ERROR
The “Memory Stick“ data is corrupted or the “Memory Stick”that you are using is not compatible with your camcorder
(p. 118).*
• FORMAT ERROR (p. 112)*
• - DIRECTORY ERROR
(p. 134)*
•COPY INHIBIT The tape contains copyright control signals for copyright
protection of software (p. 144).*
•Q Z TAPE END The tape has reached the end of the tape (p. 30).*
•QNO TAPE Insert a cassette tape (p. 15).*
* You hear the melody or beep sound.
**x and the message appear alternately.
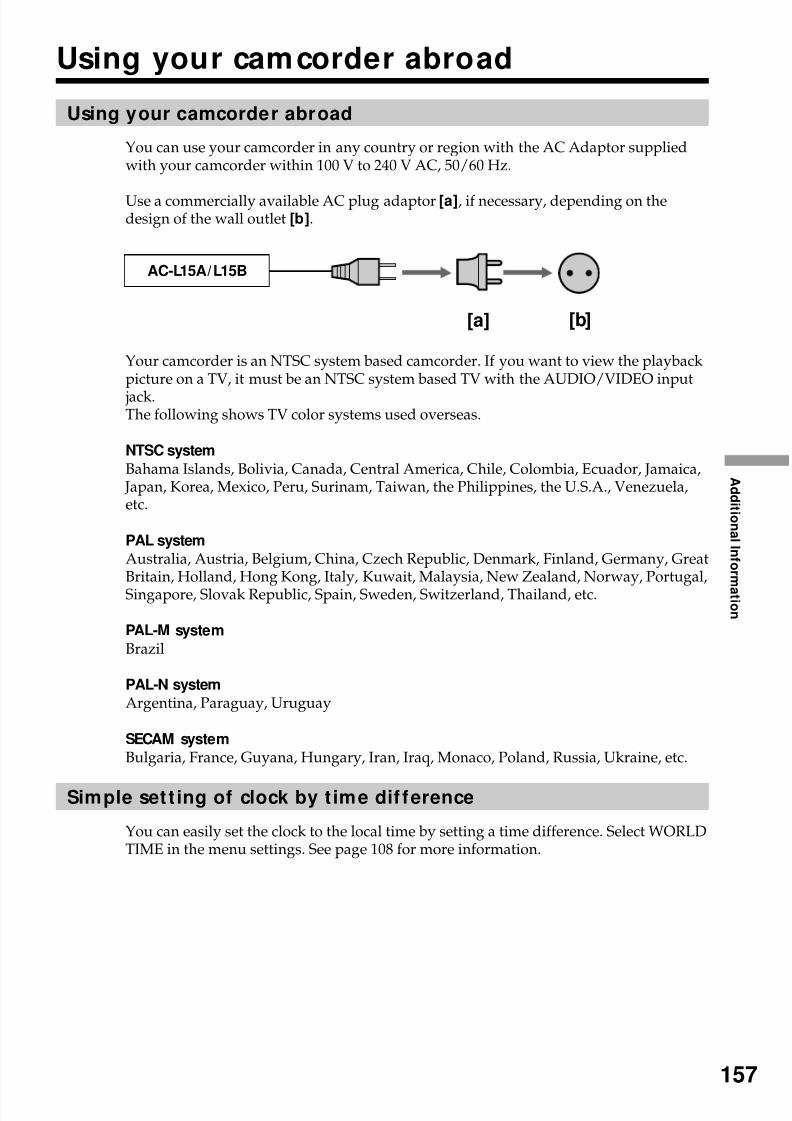
8/8/2019 276ba559b616f0752a9d1ab6240c7e96
http://slidepdf.com/reader/full/276ba559b616f0752a9d1ab6240c7e96 157/176
A d d i t i on al I nf or m
a t i on
157
Using your camcorder abroad
Using your camcorder abroad
You can use your camcorder in any country or region with the AC Adaptor suppliedwith your camcorder within 100 V to 240 V AC, 50/60 Hz.
Use a commercially available AC plug adaptor [a], if necessary, depending on thedesign of the wall outlet [b].
Your camcorder is an NTSC system based camcorder. If you want to view the playbackpicture on a TV, it must be an NTSC system based TV with the AUDIO/VIDEO input
jack.The following shows TV color systems used overseas.
NTSC system
Bahama Islands, Bolivia, Canada, Central America, Chile, Colombia, Ecuador, Jamaica, Japan, Korea, Mexico, Peru, Surinam, Taiwan, the Philippines, the U.S.A., Venezuela,etc.
PAL system
Australia, Austria, Belgium, China, Czech Republic, Denmark, Finland, Germany, GreatBritain, Holland, Hong Kong, Italy, Kuwait, Malaysia, New Zealand, Norway, Portugal,Singapore, Slovak Republic, Spain, Sweden, Switzerland, Thailand, etc.
PAL-M system
Brazil
PAL-N system
Argentina, Paraguay, Uruguay
SECAM system
Bulgaria, France, Guyana, Hungary, Iran, Iraq, Monaco, Poland, Russia, Ukraine, etc.
Simple set t ing of clock by t ime dif ference
You can easily set the clock to the local time by setting a time difference. Select WORLDTIME in the menu settings. See page 108 for more information.
[a] [b]
AC-L15A/L15B
8/8/2019 276ba559b616f0752a9d1ab6240c7e96
http://slidepdf.com/reader/full/276ba559b616f0752a9d1ab6240c7e96 158/176
158
M aintenance information andprecautions
M oisture condensat ion
If your camcorder is brought directly from a cold place to a warm place, moisture maycondense inside your camcorder, on the surface of the tape, or on the lens. In thiscondition, the tape may stick to the head drum and be damaged or your camcorder may
not operate correctly. If there is moisture inside your camcorder, the beep sounds andthe% indicator flashes. When theZ indicator flashes at the same time, the cassette isinserted in your camcorder. If moisture condenses on the lens, the indicator will notappear.
If moisture condensat ion occurredNone of the functions except cassette ejection will work. Eject the cassette, turn off yourcamcorder, and leave it for about one hour with the cassette compartment open. Yourcamcorder can be used again if the% indicator does not appear when the power isturned on again.
Note on moisture condensationMoisture may condense when you bring your camcorder from a cold place into a warmplace (or vice versa) or when you use your camcorder in a hot place as follows:•You bring your camcorder from a ski slope into a place warmed up by a heating
device.•You bring your camcorder from an air-conditioned car or room into a hot place
outside.•You use your camcorder after a squall or a shower.•You use your camcorder in a high temperature and humidity place.
How to prevent moisture condensationWhen you bring your camcorder from a cold place into a warm place, put yourcamcorder in a plastic bag and tightly seal it. Remove the bag when the air temperatureinside the plastic bag has reached the surrounding temperature (after about one hour).
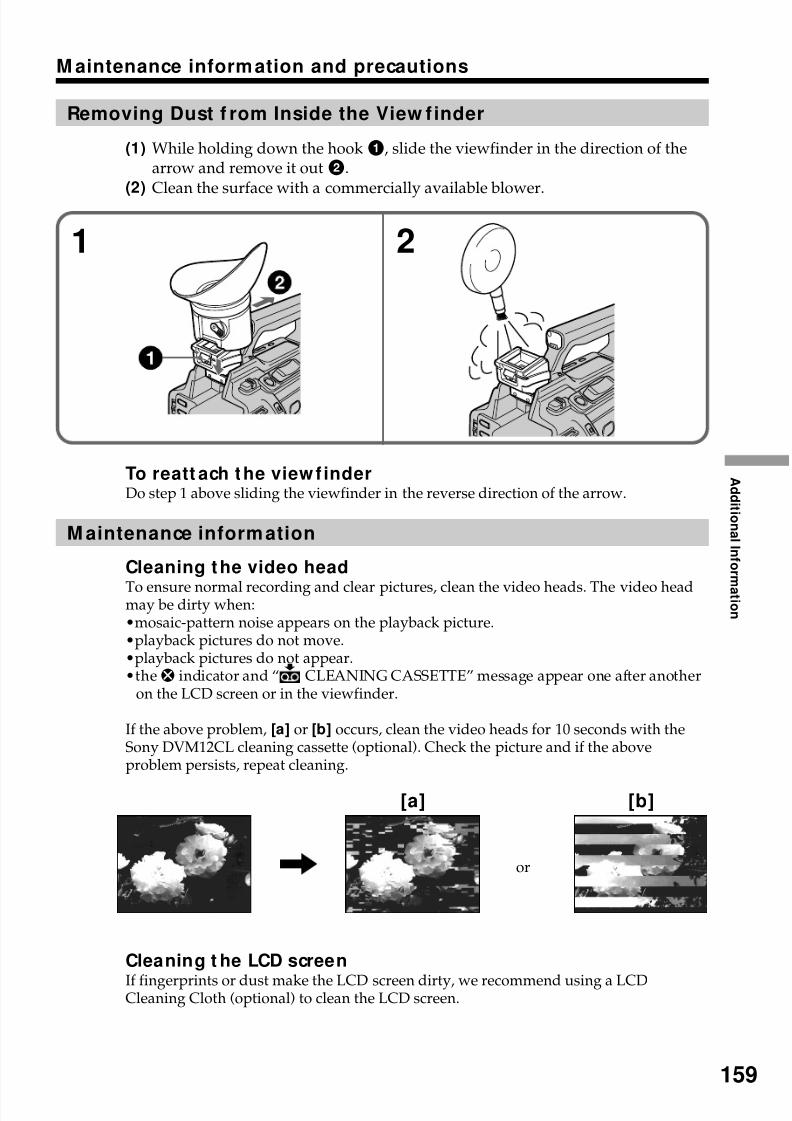
8/8/2019 276ba559b616f0752a9d1ab6240c7e96
http://slidepdf.com/reader/full/276ba559b616f0752a9d1ab6240c7e96 159/176
A d d i t i on al I nf or m
a t i on
159
M aintenance information and precautions
Removing Dust f rom Inside the View finder
(1) While holding down the hook1, slide the viewfinder in the direction of thearrow and remove it out2.
(2)Clean the surface with a commercially available blower.
To reatt ach the viewf inderDo step 1 above sliding the viewfinder in the reverse direction of the arrow.
M aintenance information
Cleaning the video head
To ensure normal recording and clear pictures, clean the video heads. The video headmay be dirty when:•mosaic-pattern noise appears on the playback picture.•playback pictures do not move.•playback pictures do not appear.•thex indicator and “ CLEANING CASSETTE” message appear one after another
on the LCD screen or in the viewfinder.
If the above problem, [a] or [b] occurs, clean the video heads for 10 seconds with theSony DVM12CL cleaning cassette (optional). Check the picture and if the aboveproblem persists, repeat cleaning.
Cleaning t he LCD screen
If fingerprints or dust make the LCD screen dirty, we recommend using a LCDCleaning Cloth (optional) to clean the LCD screen.
[a] [b]
or
1 2

8/8/2019 276ba559b616f0752a9d1ab6240c7e96
http://slidepdf.com/reader/full/276ba559b616f0752a9d1ab6240c7e96 160/176
160
M aintenance information and precautions
Charging the built -in rechargeable bat tery
Your camcorder has a built-in rechargeable battery so that the date, time and othersettings are retained even when the POWER switch is set to OFF (CHG). The built-inrechargeable battery is always charged as long as you are using your camcorder. The
battery, however, will get discharged gradually if you do not use your camcorder. Itwill be completely discharged in about four months if you do not use your camcorderat all. Even if the built-in rechargeable battery is not charged, it will not affect yourcamcorder operation. To retain the date and time, etc., charge the battery if the batteryis discharged.
Charging the built-in rechargeable battery
•Connect your camcorder to the house current using the AC Adaptor supplied withyour camcorder, and leave your camcorder with the POWER switch set to OFF (CHG)for more than 24 hours.
•Or install the fully charged rechargeable battery pack on your camcorder, and leaveyour camcorder with the POWER switch set to OFF (CHG) for more than 24 hours.
Precautions
Camcorder operat ion•Operate your camcorder on 7.2 V (battery pack) or 8.4 V (AC Adaptor).•For DC or AC operation, use the accessories recommended in this operating
instructions.•If any solid object or liquid get inside the casing, unplug your camcorder and have it
checked by a Sony dealer before operating it any further.
•Avoid rough handling or mechanical shock. Be particularly careful of the lens.•Keep the POWER switch set to OFF (CHG) when you are not using your camcorder.•Do not wrap your camcorder with a towel, for example, and operate it. Doing so
might cause heat to build up inside.•Keep your camcorder away from strong magnetic fields or mechanical vibration.
Noise may appear on the image.•Do not touch the LCD screen with a sharp-pointed object.•If your camcorder is used in a cold place, a residual image may appear on the LCD
screen. This is not a malfunction.•While using your camcorder, the back of the LCD screen may heat up. This is not a
malfunction.
On handling tapes•Do not insert anything into the small holes on the rear of the cassette. These holes are
used to sense the type and thickness of the tape and if the recording tab is in or out.•Do not open the tape protect cover or touch the tape.•Avoid touching or damaging the terminals. To remove dust, clean the terminals with
a soft cloth.
Camcorder care•Remove the tape, and periodically turn on the power, operate the CAMERA and VCR
sections and play back a tape for about three minutes when your camcorder is not to
be used for a long time.•Clean the lens with a soft brush to remove dust. If there are fingerprints on the lens,remove them with a soft cloth.
•Clean the camcorder body with a dry soft cloth, or a soft cloth lightly moistened witha mild detergent solution. Do not use any type of solvent which may damage thefinish.
8/8/2019 276ba559b616f0752a9d1ab6240c7e96
http://slidepdf.com/reader/full/276ba559b616f0752a9d1ab6240c7e96 161/176
A d d i t i on al I nf or m
a t i on
161
M aintenance information and precautions
•Do not let sand get into your camcorder. When you use your camcorder on a sandy beach or in a dusty place, protect it from the sand or dust. Sand or dust may causeyour camcorder to malfunction, and sometimes this malfunction cannot be repaired.
AC Adaptor
•Unplug the unit from the wall outlet when you are not using the unit for a long time.To disconnect the power cord, pull it out by the plug. Never pull the power cord itself.
•Do not operate the unit with a damaged cord or if the unit has been dropped ordamaged.
•Do not bend the power cord forcibly, or place a heavy object on it. This will damagethe cord and may cause fire or electrical shock.
•Prevent metallic objects from coming into contact with the metal parts of theconnecting section. If this happens, a short may occur and the unit may be damaged.
•Always keep metal contacts clean.•Do not disassemble the unit.•Do not apply mechanical shock or drop the unit.
•While the unit is in use, particularly during charging, keep it away from AM receiversand video equipment. AM receivers and video equipment disturb AM reception andvideo operation.
•The unit becomes warm during use. This is not a malfunction.•Do not place the unit in locations that are:
– Extremely hot or cold– Dusty or dirty– Very humid– Vibrating
Rechargeable battery pack
•Use only the specified charger or video equipment with the charging function.•To prevent accident from a short circuit, do not allow metal objects to come into
contact with the battery terminals.•Keep the rechargeable battery pack away from fire.•Never expose the rechargeable battery pack to temperatures above 60 °C (140 °F), such
as in a car parked in the sun or under direct sunlight.•Keep the rechargeable battery pack dry.•Do not expose the rechargeable battery pack to any mechanical shock.•Do not disassemble nor modify the rechargeable battery pack.•Attach the rechargeable battery pack to video equipment securely.•Charging while some capacity remains does not affect the original battery capacity.
•The rechargeable battery pack is not resistant to water. Do not wet the rechargeable battery pack.
•Unless you use the rechargeable battery pack for a long period, store the battery packafter you charge it fully and use it completely once a year.
•Store the rechargeable battery pack in a cool, dry place.
(continued on the following page)
8/8/2019 276ba559b616f0752a9d1ab6240c7e96
http://slidepdf.com/reader/full/276ba559b616f0752a9d1ab6240c7e96 162/176
162
Notes on dry batt eriesTo avoid possible damage from battery leakage or corrosion, observe the following:•Be sure to insert the batteries with the + – polarities matched to the + – marks.•Dry batteries are not rechargeable.•Do not use a combination of new and old batteries.
•Do not use different types of batteries.•Current flows from batteries when you are not using them for a long time.•Do not use leaking batteries.
If batteries are leaking
•Wipe off the liquid in the battery compartment carefully before replacing the batteries.•If you touch the liquid, wash it off with water.•If the liquid get into your eyes, wash your eyes with a lot of water and then consult a
doctor.
If any problem occurs, unplug your camcorder and contact your nearest Sony dealer.
M aintenance information and precautions
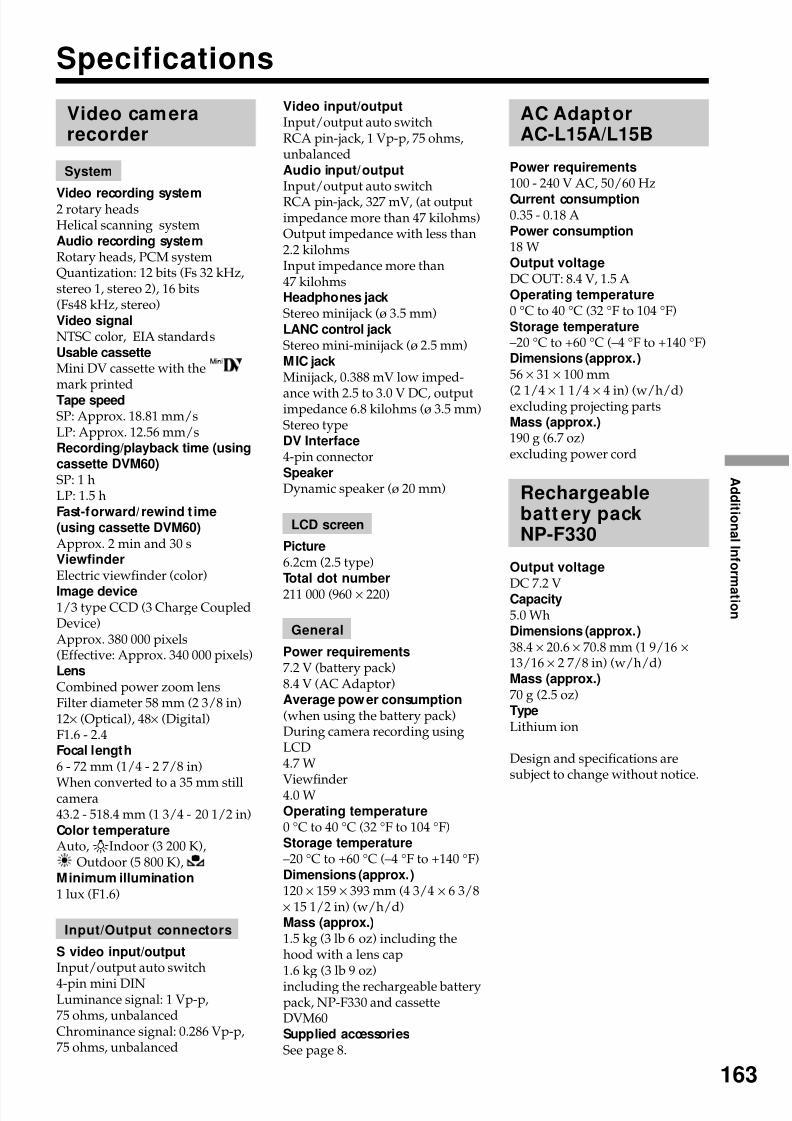
8/8/2019 276ba559b616f0752a9d1ab6240c7e96
http://slidepdf.com/reader/full/276ba559b616f0752a9d1ab6240c7e96 163/176
A d d i t i on al I nf or m
a t i on
163
Specifications
Video camerarecorder
System
Video recording system2 rotary headsHelical scanning systemAudio recording systemRotary heads, PCM systemQuantization: 12 bits (Fs 32 kHz,stereo 1, stereo 2), 16 bits(Fs48 kHz, stereo)Video signalNTSC color, EIA standardsUsable cassetteMini DV cassette with themark printedTape speedSP: Approx. 18.81 mm/sLP: Approx. 12.56 mm/sRecording/playback time (usingcassette DVM60)SP: 1 hLP: 1.5 hFast-forward/rewind t ime(using cassette DVM60)
Approx. 2 min and 30 sViewfinder
Electric viewfinder (color)
Image device1/3 type CCD (3 Charge CoupledDevice)Approx. 380 000 pixels(Effective: Approx. 340 000 pixels)Lens
Combined power zoom lensFilter diameter 58 mm (2 3/8 in)12× (Optical), 48× (Digital)F1.6 - 2.4Focal length
6 - 72 mm (1/4 - 2 7/8 in)
When converted to a 35 mm stillcamera43.2 - 518.4 mm (1 3/4 - 20 1/2 in)Color temperatureAuto,nIndoor (3 200 K),
Outdoor (5 800 K),Minimum illumination
1 lux (F1.6)
Input/Output connectors
S video input/outputInput/output auto switch
4-pin mini DINLuminance signal: 1 Vp-p,75 ohms, unbalancedChrominance signal: 0.286 Vp-p,75 ohms, unbalanced
Video input/outputInput/output auto switchRCA pin-jack, 1 Vp-p, 75 ohms,unbalancedAudio input/outputInput/output auto switchRCA pin-jack, 327 mV, (at outputimpedance more than 47 kilohms)Output impedance with less than2.2 kilohmsInput impedance more than47 kilohmsHeadphones jackStereo minijack (ø 3.5 mm)LANC control jackStereo mini-minijack (ø 2.5 mm)MIC jackMinijack, 0.388 mV low imped-
ance with 2.5 to 3.0 V DC, outputimpedance 6.8 kilohms (ø 3.5 mm)Stereo typeDV Interface4-pin connectorSpeakerDynamic speaker (ø 20 mm)
LCD screen
Picture
6.2cm (2.5 type)Total dot number
211 000 (960 × 220)
General
Power requirements7.2 V (battery pack)8.4 V (AC Adaptor)Average power consumption
(when using the battery pack)During camera recording usingLCD4.7 W
Viewfinder4.0 WOperating temperature0 °C to 40 °C (32 °F to 104 °F)Storage temperature–20 °C to +60 °C (–4 °F to +140 °F)Dimensions (approx.)120 × 159 × 393 mm (4 3/4 × 6 3/8× 15 1/2 in) (w/h/d)Mass (approx.)
1.5 kg (3 lb 6 oz) including thehood with a lens cap1.6 kg (3 lb 9 oz)
including the rechargeable batterypack, NP-F330 and cassetteDVM60Supplied accessories
See page 8.
AC AdaptorAC-L15A/L15B
Power requirements100 - 240 V AC, 50/60 Hz
Current consumption0.35 - 0.18 APower consumption18 WOutput voltageDC OUT: 8.4 V, 1.5 AOperating temperature0 °C to 40 °C (32 °F to 104 °F)Storage temperature–20 °C to +60 °C (–4 °F to +140 °F)Dimensions (approx.)
56 × 31 × 100 mm
(2 1/4 × 1 1/4 × 4 in) (w/h/d)excluding projecting partsMass (approx.)190 g (6.7 oz)excluding power cord
Rechargeablebatt ery packNP-F330
Output voltage
DC 7.2 VCapacity
5.0 WhDimensions (approx.)
38.4 × 20.6 × 70.8 mm (1 9/16 ×
13/16 × 2 7/8 in) (w/h/d)Mass (approx.)
70 g (2.5 oz)Type
Lithium ion
Design and specifications aresubject to change without notice.
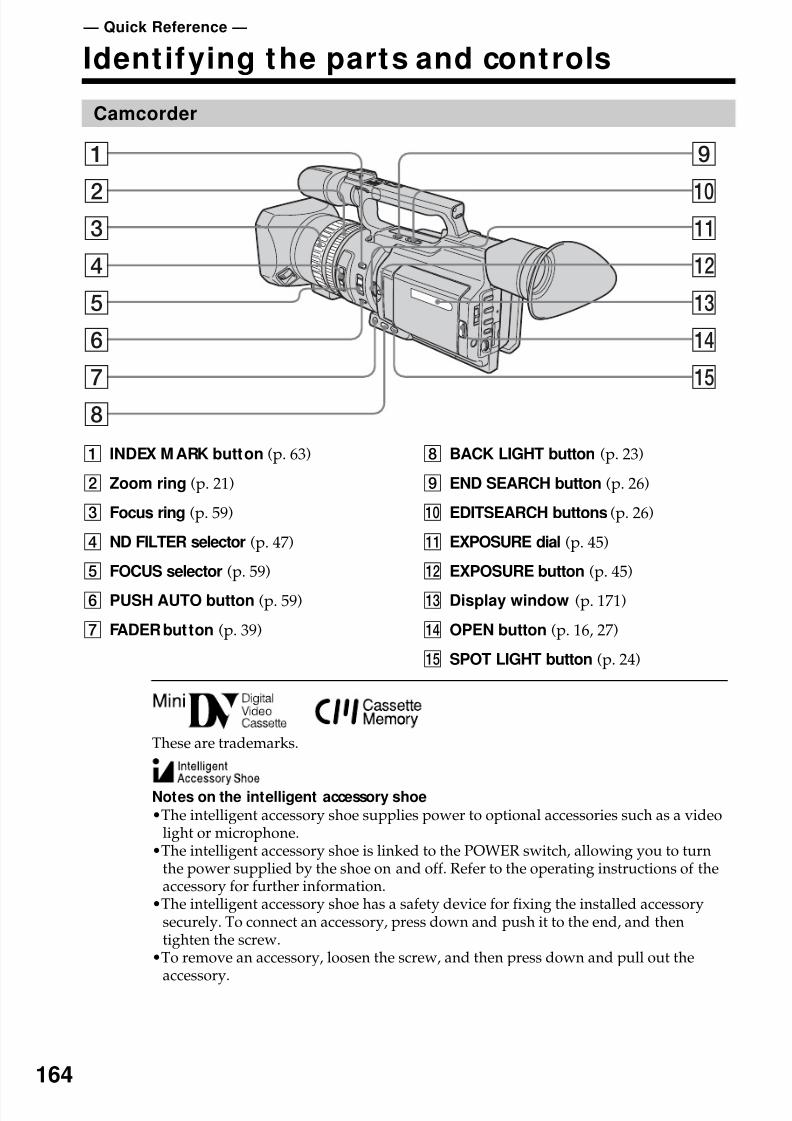
8/8/2019 276ba559b616f0752a9d1ab6240c7e96
http://slidepdf.com/reader/full/276ba559b616f0752a9d1ab6240c7e96 164/176
164
— Quick Reference —
Identifying the parts and controls
1 INDEX M ARK button (p. 63)
2 Zoom ring (p. 21)
3 Focus ring (p. 59)
4 ND FILTER selector (p. 47)
5 FOCUS selector (p. 59)
6 PUSH AUTO button (p. 59)
7 FADER button (p. 39)
These are trademarks.
Notes on the intelligent accessory shoe
•The intelligent accessory shoe supplies power to optional accessories such as a videolight or microphone.
•The intelligent accessory shoe is linked to the POWER switch, allowing you to turnthe power supplied by the shoe on and off. Refer to the operating instructions of theaccessory for further information.
•The intelligent accessory shoe has a safety device for fixing the installed accessorysecurely. To connect an accessory, press down and push it to the end, and thentighten the screw.
•To remove an accessory, loosen the screw, and then press down and pull out the
accessory.
Camcorder
1
23
4
5
6
7
8
9
0qa
qs
qd
qf
qg
8 BACK LIGHT button (p. 23)
9 END SEARCH button (p. 26)
0 EDITSEARCH buttons (p. 26)
qa EXPOSURE dial (p. 45)
qs EXPOSURE button (p. 45)
qd Display window (p. 171)
qf OPEN button (p. 16, 27)
qg SPOT LIGHT button (p. 24)
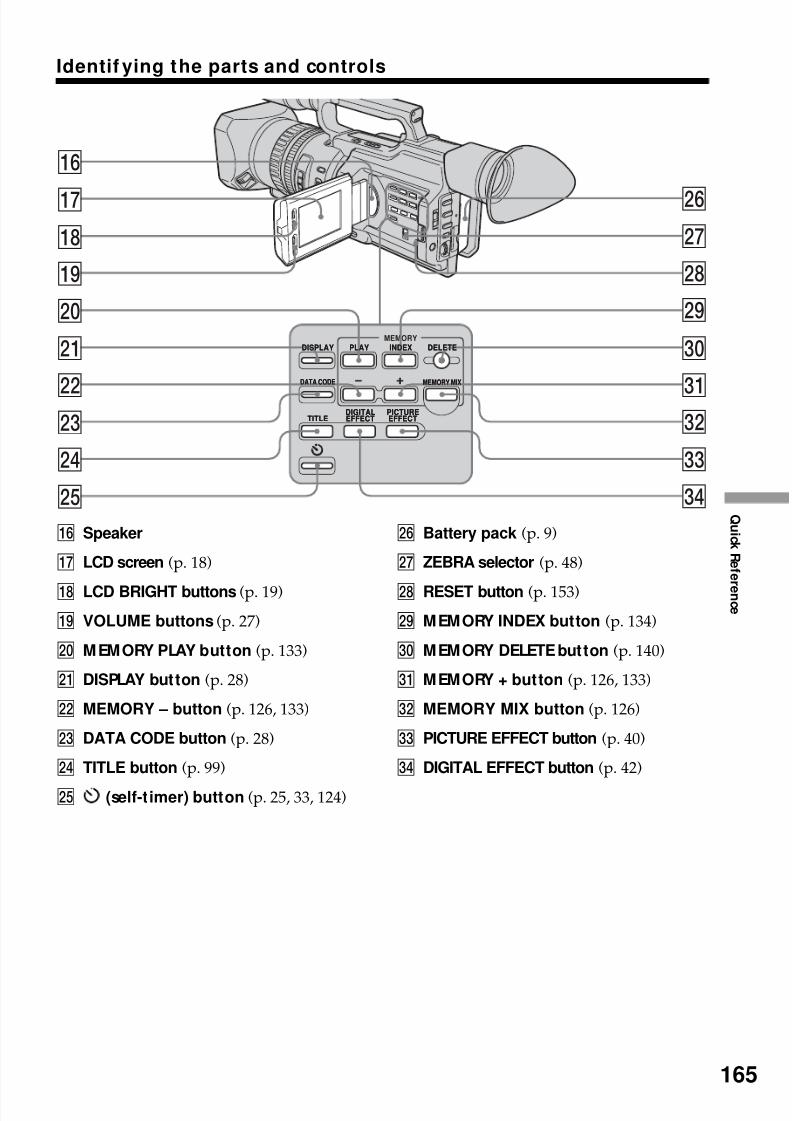
8/8/2019 276ba559b616f0752a9d1ab6240c7e96
http://slidepdf.com/reader/full/276ba559b616f0752a9d1ab6240c7e96 165/176
165
Q ui ck R ef e
r en c e
Identif ying the parts and controls
qh Speaker
qj LCD screen (p. 18)
qk LCD BRIGHT buttons (p. 19)
ql VOLUME buttons (p. 27)
w; MEMORY PLAY button (p. 133)
wa DISPLAY button (p. 28)
ws MEMORY – button (p. 126, 133)
wd DATA CODE button (p. 28)
wf TITLE button (p. 99)
wg (self-timer) button (p. 25, 33, 124)
wh Battery pack (p. 9)
wj ZEBRA selector (p. 48)
wk RESET button (p. 153)
wl MEMORY INDEX button (p. 134)
e; MEMORY DELETE button (p. 140)
ea MEMORY + button (p. 126, 133)
es MEMORY MIX button (p. 126)
ed PICTURE EFFECT button (p. 40)
ef DIGITAL EFFECT button (p. 42)
PLAYDISPLAY
DATA CODE
TITLEDIGITALEFFECT
PICTUREEFFECT
DELETE
MEMORY
INDEX
MEMORY MIX
qh
qjqk
ql
w;
wa
wswd
wf
wg
whwj
wk
wl
e;
eaes
ed
ef
PLAYDISPLAY
DATA CODE
TITLEDIGITALEFFECT
PICTUREEFFECT
DELETEINDEX
MEMORY MIX
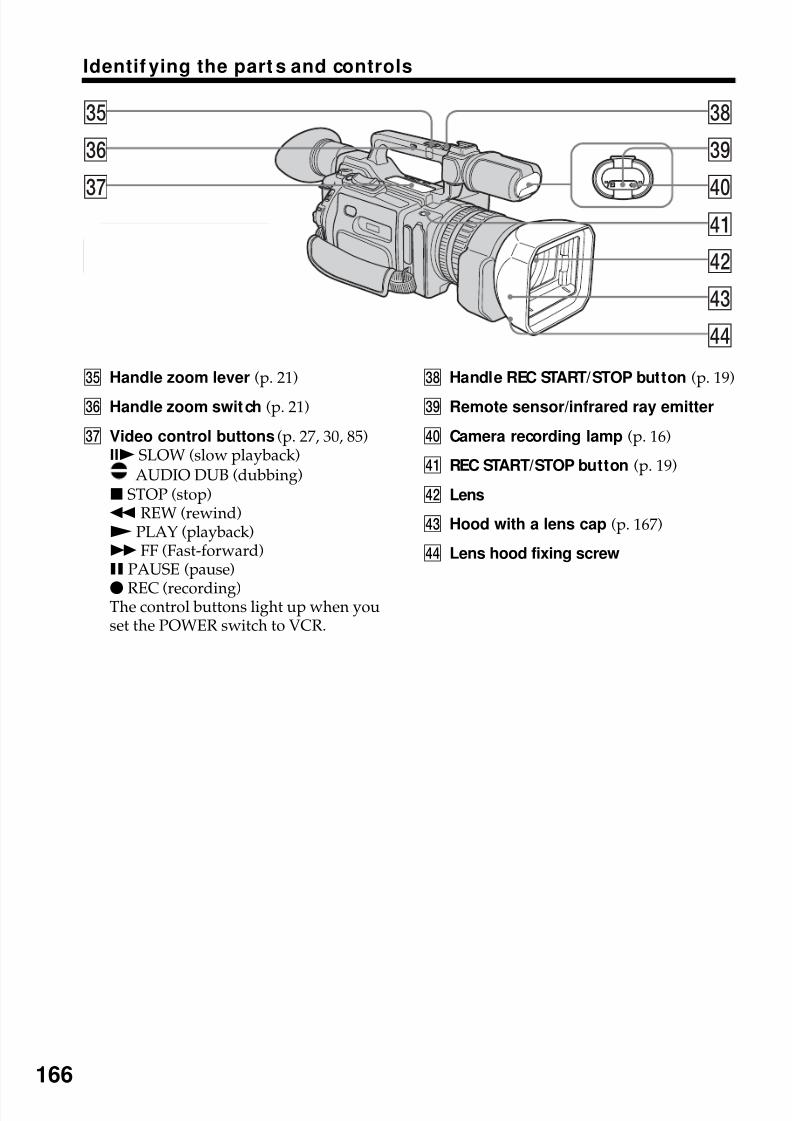
8/8/2019 276ba559b616f0752a9d1ab6240c7e96
http://slidepdf.com/reader/full/276ba559b616f0752a9d1ab6240c7e96 166/176
166
ekeg
eh
ej
el
r;ra
rs
rd
rf
REC
STOP PLAYREW FF PAUSE
SLOW AUDIO DUB
eg Handle zoom lever (p. 21)
eh Handle zoom switch (p. 21)
ej Video control buttons (p. 27, 30, 85)C SLOW (slow playback)
AUDIO DUB (dubbing)x STOP (stop)m REW (rewind)N PLAY (playback)M FF (Fast-forward)X PAUSE (pause)
z REC (recording)The control buttons light up when youset the POWER switch to VCR.
ek Handle REC START/STOP button (p. 19)
el Remote sensor/infrared ray emitter
r; Camera recording lamp (p. 16)
ra REC START/STOP button (p. 19)
rs Lens
rd Hood with a lens cap (p. 167)
rf Lens hood fixing screw
Identif ying the part s and controls
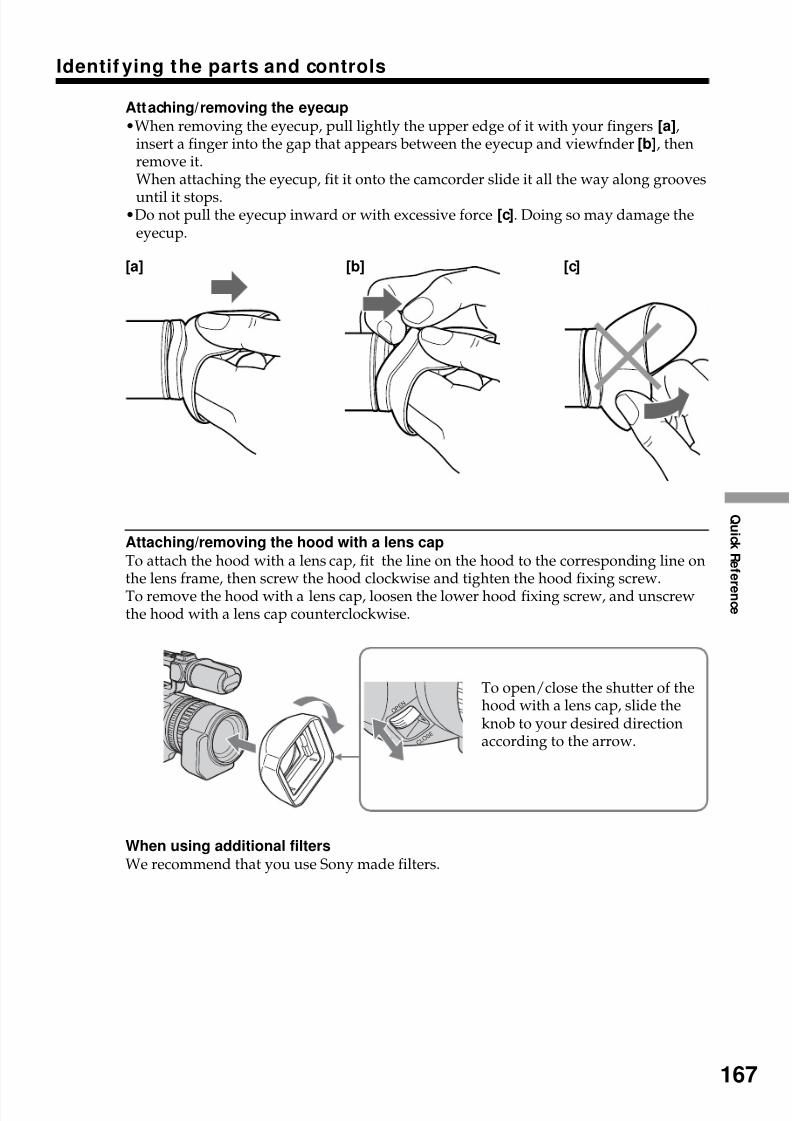
8/8/2019 276ba559b616f0752a9d1ab6240c7e96
http://slidepdf.com/reader/full/276ba559b616f0752a9d1ab6240c7e96 167/176
167
Q ui ck R ef e
r en c e
Attaching/removing the hood with a lens cap
To attach the hood with a lens cap, fit the line on the hood to the corresponding line onthe lens frame, then screw the hood clockwise and tighten the hood fixing screw.To remove the hood with a lens cap, loosen the lower hood fixing screw, and unscrewthe hood with a lens cap counterclockwise.
When using additional filters
We recommend that you use Sony made filters.
[a] [b]
Attaching/removing the eyecup
•When removing the eyecup, pull lightly the upper edge of it with your fingers [a],insert a finger into the gap that appears between the eyecup and viewfnder [b], thenremove it.When attaching the eyecup, fit it onto the camcorder slide it all the way along grooves
until it stops.•Do not pull the eyecup inward or with excessive force [c]. Doing so may damage the
eyecup.
O P E N
C L O S
E
[c]
Identif ying the parts and controls
To open/close the shutter of thehood with a lens cap, slide theknob to your desired directionaccording to the arrow.
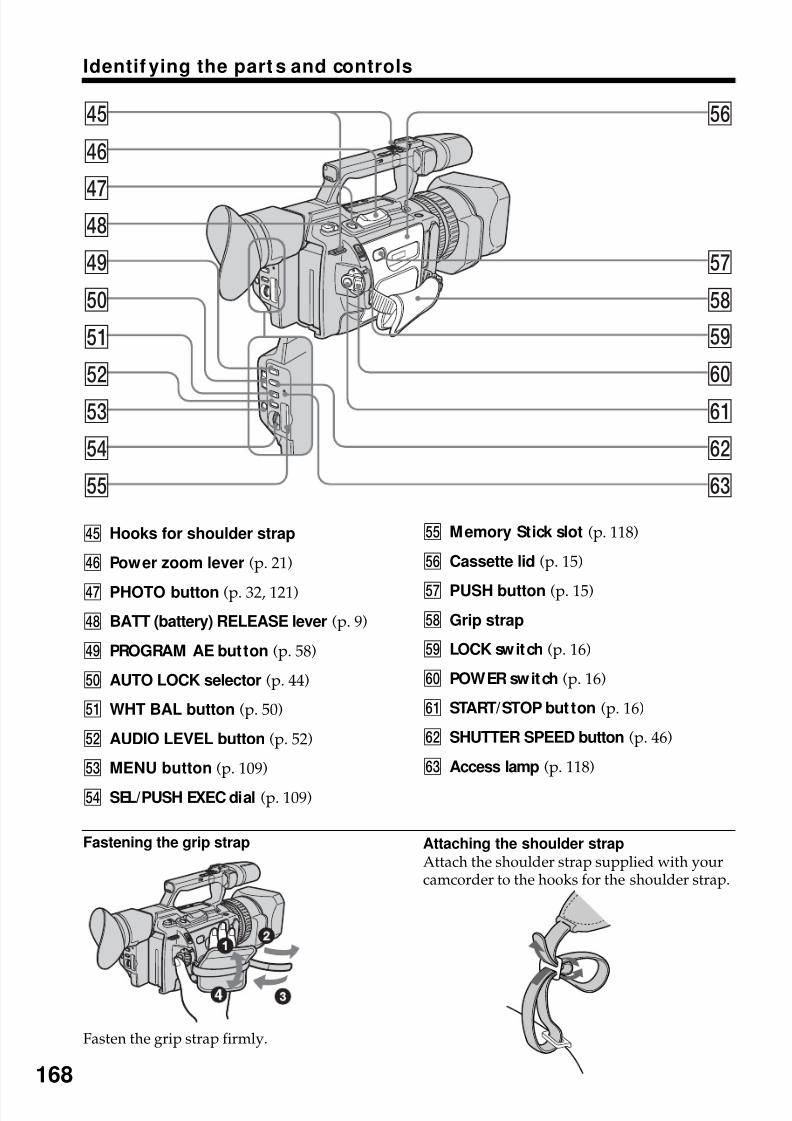
8/8/2019 276ba559b616f0752a9d1ab6240c7e96
http://slidepdf.com/reader/full/276ba559b616f0752a9d1ab6240c7e96 168/176
168
Identif ying the part s and controls
rg
rh
rjrk
rl
tf
tg
th
tj
tk
tl
y;
ya
ys
yd
t;
ta
ts
td
Fastening the grip strap
Fasten the grip strap firmly.
rg Hooks for shoulder strap
rh Power zoom lever (p. 21)
rj PHOTO button (p. 32, 121)
rk BATT (battery) RELEASE lever (p. 9)
rl PROGRAM AE button (p. 58)
t; AUTO LOCK selector (p. 44)
ta WHT BAL button (p. 50)
ts AUDIO LEVEL button (p. 52)
td MENU button (p. 109)
tf SEL/PUSH EXEC dial (p. 109)
tg Memory Stick slot (p. 118)
th Cassette lid (p. 15)
tj PUSH button (p. 15)
tk Grip strap
tl LOCK switch (p. 16)
y; POWER switch (p. 16)
ya START/STOP button (p. 16)
ys SHUTTER SPEED button (p. 46)
yd Access lamp (p. 118)
Attaching the shoulder strap
Attach the shoulder strap supplied with yourcamcorder to the hooks for the shoulder strap.
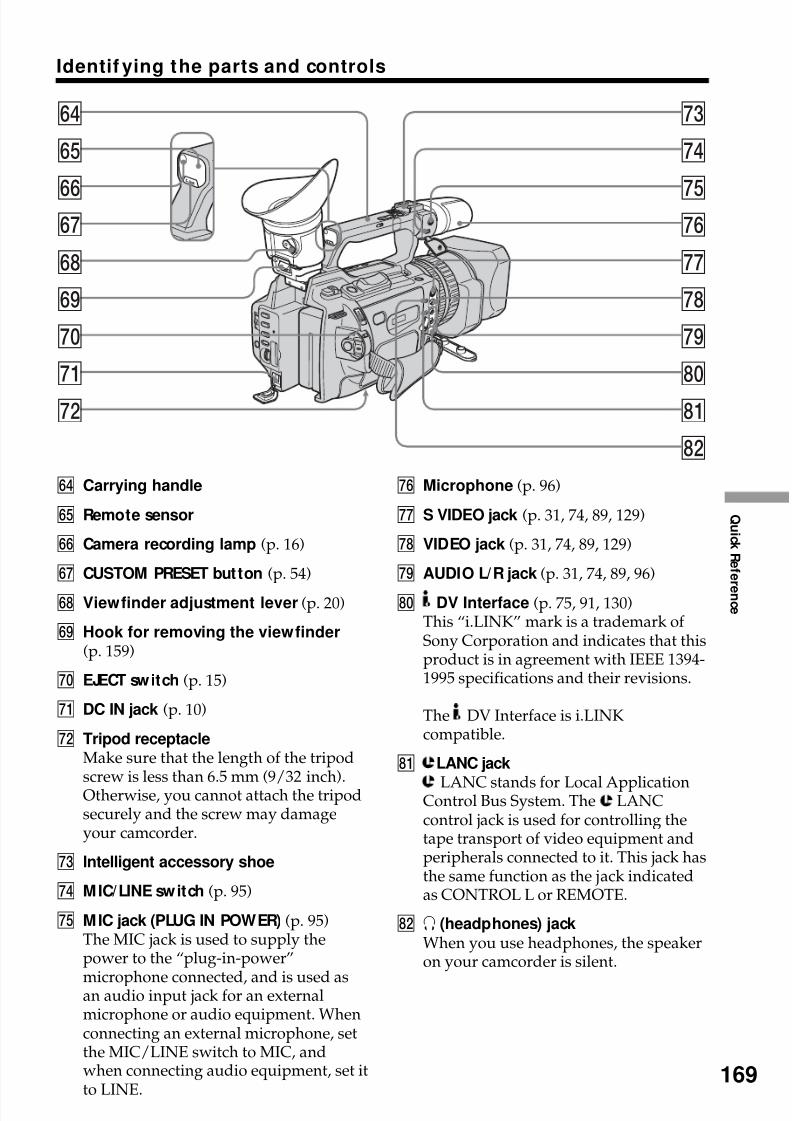
8/8/2019 276ba559b616f0752a9d1ab6240c7e96
http://slidepdf.com/reader/full/276ba559b616f0752a9d1ab6240c7e96 169/176
169
Q ui ck R ef e
r en c e
Identif ying the parts and controls
yf Carrying handle
yg Remote sensor
yh Camera recording lamp (p. 16)
yj CUSTOM PRESET button (p. 54)
yk Viewfinder adjustment lever (p. 20)
yl Hook for removing the viewfinder(p. 159)
u; EJECT switch (p. 15)
ua DC IN jack (p. 10)
us Tripod receptacleMake sure that the length of the tripod
screw is less than 6.5 mm (9/32 inch).Otherwise, you cannot attach the tripodsecurely and the screw may damageyour camcorder.
ud Intelligent accessory shoe
uf MIC/LINE switch (p. 95)
ug MIC jack (PLUG IN POWER) (p. 95)The MIC jack is used to supply thepower to the “plug-in-power”
microphone connected, and is used asan audio input jack for an externalmicrophone or audio equipment. Whenconnecting an external microphone, setthe MIC/LINE switch to MIC, andwhen connecting audio equipment, set itto LINE.
uh Microphone (p. 96)
uj S VIDEO jack (p. 31, 74, 89, 129)
uk VIDEO jack (p. 31, 74, 89, 129)
ul AUDIO L/R jack (p. 31, 74, 89, 96)
i; DV Interface (p. 75, 91, 130)This “i.LINK” mark is a trademark of Sony Corporation and indicates that thisproduct is in agreement with IEEE 1394-1995 specifications and their revisions.
The DV Interface is i.LINKcompatible.
ia LANC jack
LANC stands for Local ApplicationControl Bus System. The LANCcontrol jack is used for controlling thetape transport of video equipment andperipherals connected to it. This jack hasthe same function as the jack indicatedas CONTROL L or REMOTE.
is i (headphones) jackWhen you use headphones, the speakeron your camcorder is silent.
yf
yg
yhyj
yk
yl
u;
ua
us
ud
uf
uguh
uj
uk
ul
ia
i;
is
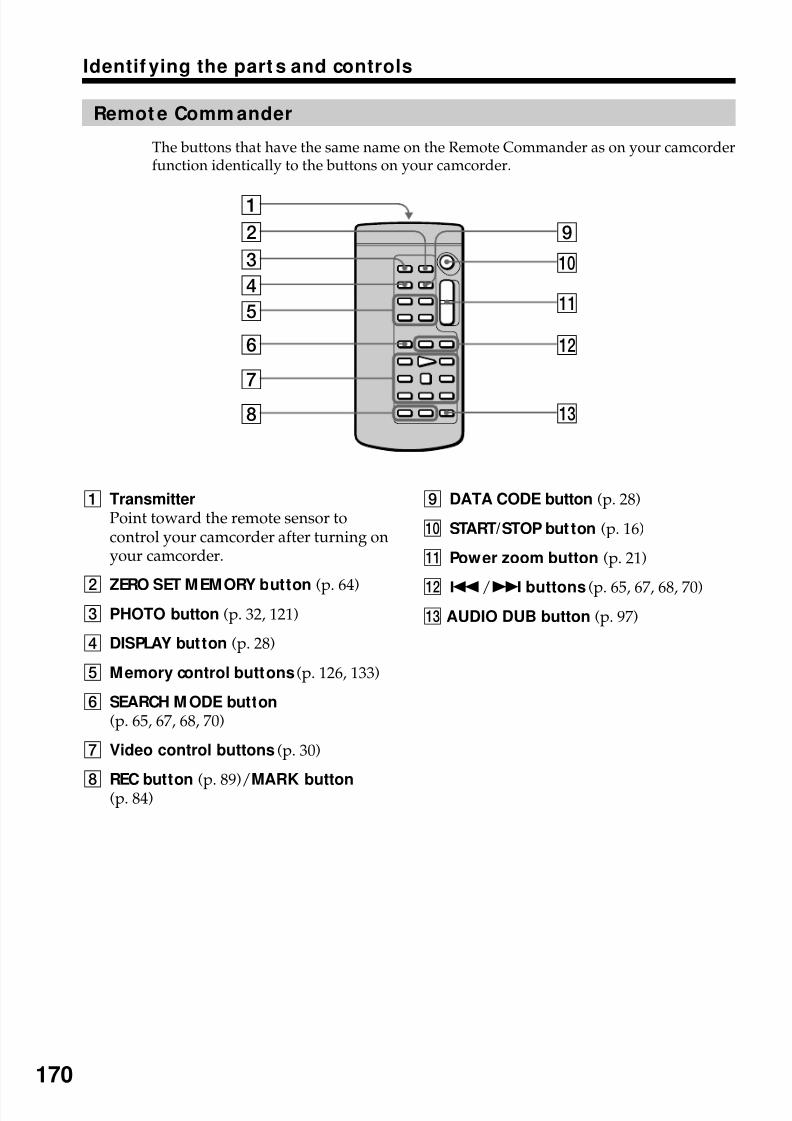
8/8/2019 276ba559b616f0752a9d1ab6240c7e96
http://slidepdf.com/reader/full/276ba559b616f0752a9d1ab6240c7e96 170/176
170
Identif ying the part s and controls
Remot e Comm ander
The buttons that have the same name on the Remote Commander as on your camcorderfunction identically to the buttons on your camcorder.
1 TransmitterPoint toward the remote sensor tocontrol your camcorder after turning onyour camcorder.
2 ZERO SET MEMORY button (p. 64)3 PHOTO button (p. 32, 121)
4 DISPLAY button (p. 28)
5 Memory control buttons(p. 126, 133)
6 SEARCH M ODE button(p. 65, 67, 68, 70)
7 Video control buttons (p. 30)
8 REC button (p. 89)/MARK button(p. 84)
9 DATA CODE button (p. 28)
0 START/STOP button (p. 16)
qa Power zoom button (p. 21)
qs ./> buttons (p. 65, 67, 68, 70)
qd AUDIO DUB button (p. 97)
qs
qd
qa
0
9
8
5
6
4
3
2
1
7
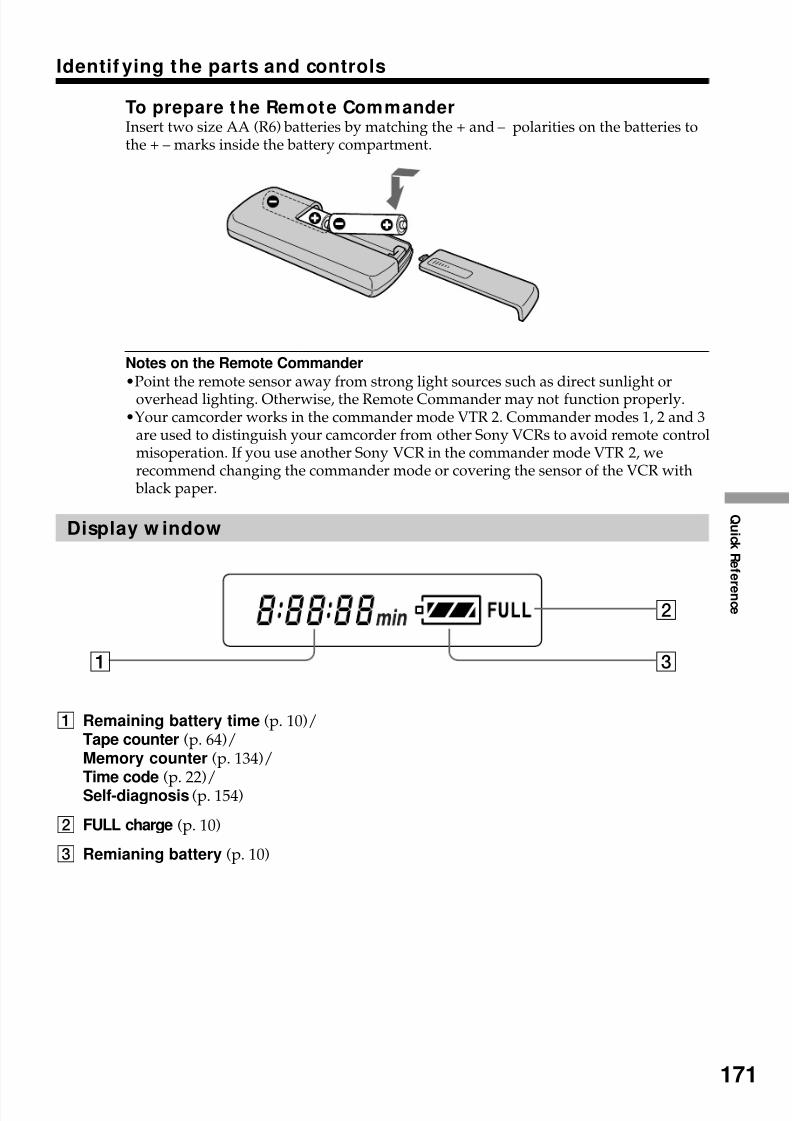
8/8/2019 276ba559b616f0752a9d1ab6240c7e96
http://slidepdf.com/reader/full/276ba559b616f0752a9d1ab6240c7e96 171/176
171
Q ui ck R ef e
r en c e
Identif ying the parts and controls
To prepare the Remote CommanderInsert two size AA (R6) batteries by matching the + and – polarities on the batteries tothe + – marks inside the battery compartment.
Notes on the Remote Commander
•Point the remote sensor away from strong light sources such as direct sunlight oroverhead lighting. Otherwise, the Remote Commander may not function properly.
•Your camcorder works in the commander mode VTR 2. Commander modes 1, 2 and 3are used to distinguish your camcorder from other Sony VCRs to avoid remote controlmisoperation. If you use another Sony VCR in the commander mode VTR 2, werecommend changing the commander mode or covering the sensor of the VCR with
black paper.
Display w indow
1 Remaining battery time (p. 10)/Tape counter (p. 64)/Memory counter (p. 134)/Time code
(p. 22)/Self-diagnosis (p. 154)
2 FULL charge (p. 10)
3 Remianing battery (p. 10)
1 3
2
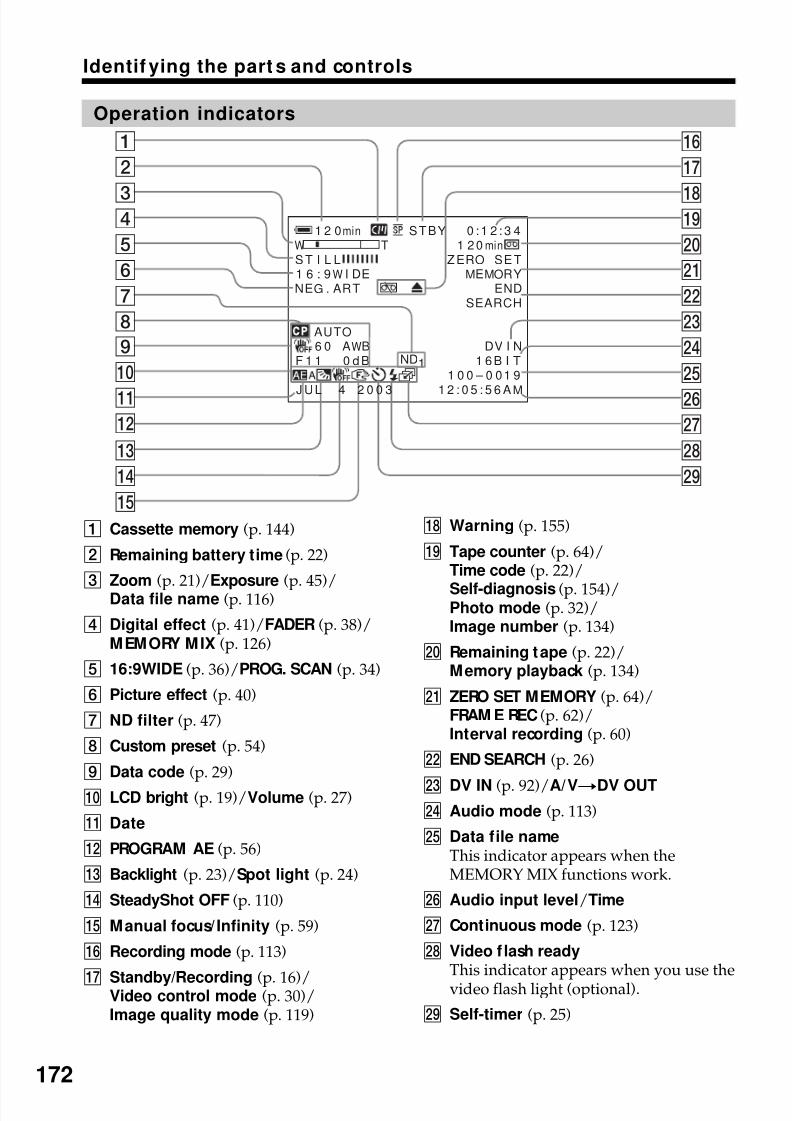
8/8/2019 276ba559b616f0752a9d1ab6240c7e96
http://slidepdf.com/reader/full/276ba559b616f0752a9d1ab6240c7e96 172/176
172
Identif ying the part s and controls
Operation indicators
1 Cassette memory (p. 144)
2 Remaining battery time (p. 22)
3 Zoom(p. 21)/
Exposure(p. 45)/Data file name (p. 116)
4 Digital effect (p. 41)/FADER (p. 38)/MEMORY MIX (p. 126)
5 16:9WIDE (p. 36)/PROG. SCAN (p. 34)
6 Picture effect (p. 40)
7 ND filter (p. 47)
8 Custom preset (p. 54)
9 Data code (p. 29)
0 LCD bright (p. 19)/Volume (p. 27)
qa Date
qs PROGRAM AE (p. 56)
qd Backlight (p. 23)/Spot light (p. 24)
qf SteadyShot OFF (p. 110)
qg Manual focus/ Infinity (p. 59)
qh Recording mode (p. 113)
qj Standby/Recording (p. 16)/Video control mode (p. 30)/Image quality mode (p. 119)
qk Warning (p. 155)
ql Tape counter (p. 64)/Time code (p. 22)/
Self-diagnosis (p. 154)/Photo mode (p. 32)/Image number (p. 134)
w; Remaining tape (p. 22)/Memory playback (p. 134)
wa ZERO SET MEMORY (p. 64)/FRAM E REC (p. 62)/Interval recording (p. 60)
ws END SEARCH (p. 26)
wd DV IN (p. 92)/A/VtDV OUTwf Audio mode (p. 113)
wg Data file nameThis indicator appears when theMEMORY MIX functions work.
wh Audio input level/Time
wj Continuous mode (p. 123)
wk Video f lash readyThis indicator appears when you use thevideo flash light (optional).
wl Self-timer (p. 25)
1 2 : 0 5 : 5 6 AM
1 2 0m i n S T B Y 0 : 1 2 : 3 4W T 1 2 0 m i n
S T I L L Z E RO S E T1 6 : 9W I D E M E M O R YN EG . A R T E N D
S E A R C H
A U TO6 0 AWB D V I N
F 1 1 0 d B 1 6 B I T1 0 0 – 0 0 1 9
ND1
J UL 4 2 0 0 3
6
5
4
8
7
3
2
1
qs
qd
qf
qg
9
qa
0
ws
wa
w;
qlqk
qj
qh
wf
wj
wk
wl
wg
wd
wh
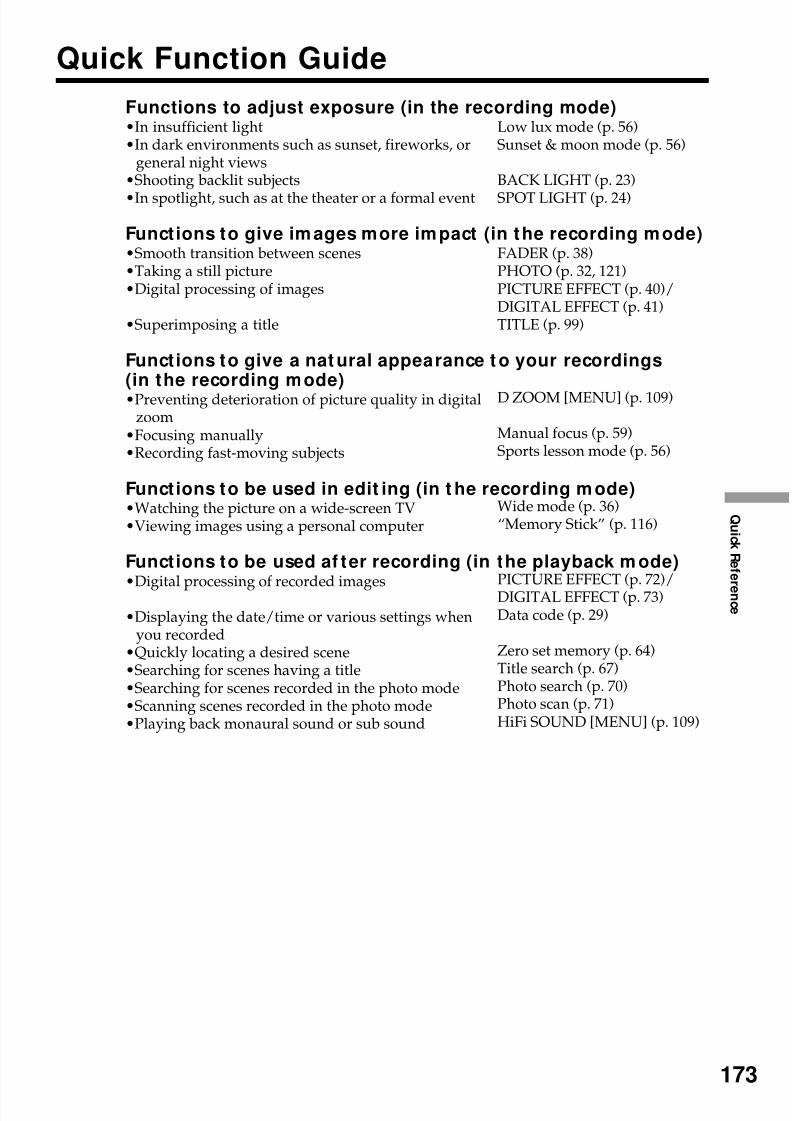
8/8/2019 276ba559b616f0752a9d1ab6240c7e96
http://slidepdf.com/reader/full/276ba559b616f0752a9d1ab6240c7e96 173/176
173
Q ui ck R ef e
r en c e
Quick Function Guide
Functions to adjust exposure (in the recording mode)•In insufficient light•In dark environments such as sunset, fireworks, or
general night views•Shooting backlit subjects
•In spotlight, such as at the theater or a formal event
Functions to give images more impact (in the recording mode)•Smooth transition between scenes•Taking a still picture•Digital processing of images
•Superimposing a title
Functions to give a nat ural appearance t o your recordings(in the recording mode)•Preventing deterioration of picture quality in digital
zoom•Focusing manually•Recording fast-moving subjects
Functions to be used in edit ing (in t he recording mode)•Watching the picture on a wide-screen TV•Viewing images using a personal computer
Functions to be used af ter recording (in the playback m ode)
•Digital processing of recorded images
•Displaying the date/time or various settings whenyou recorded
•Quickly locating a desired scene•Searching for scenes having a title•Searching for scenes recorded in the photo mode•Scanning scenes recorded in the photo mode•Playing back monaural sound or sub sound
Low lux mode (p. 56)Sunset & moon mode (p. 56)
BACK LIGHT (p. 23)
SPOT LIGHT (p. 24)
FADER (p. 38)PHOTO (p. 32, 121)PICTURE EFFECT (p. 40)/DIGITAL EFFECT (p. 41)TITLE (p. 99)
D ZOOM [MENU] (p. 109)
Manual focus (p. 59)Sports lesson mode (p. 56)
Wide mode (p. 36)“Memory Stick” (p. 116)
PICTURE EFFECT (p. 72)/DIGITAL EFFECT (p. 73)Data code (p. 29)
Zero set memory (p. 64)Title search (p. 67)Photo search (p. 70)Photo scan (p. 71)HiFi SOUND [MENU] (p. 109)
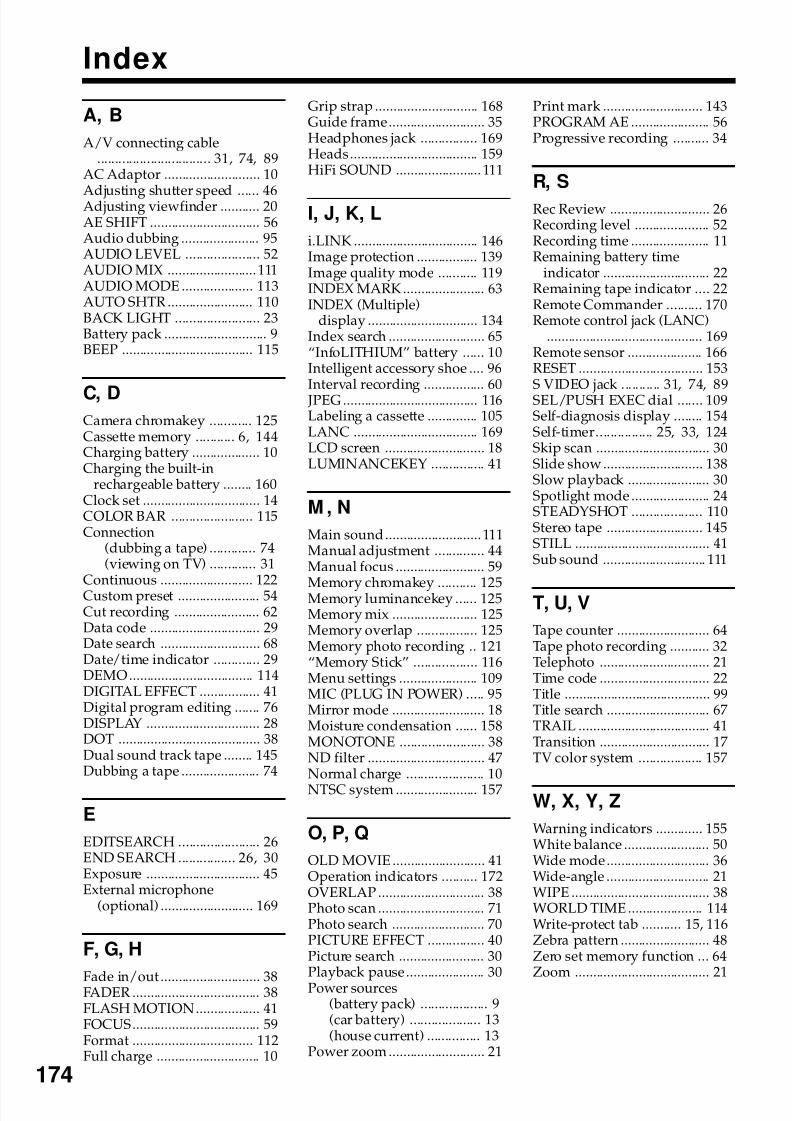
8/8/2019 276ba559b616f0752a9d1ab6240c7e96
http://slidepdf.com/reader/full/276ba559b616f0752a9d1ab6240c7e96 174/176
174
Index
A, B
A/V connecting cable................................ 31, 74, 89
AC Adaptor ........................... 10
Adjusting shutter speed ...... 46Adjusting viewfinder ........... 20AE SHIFT ............................... 56Audio dubbing ...................... 95AUDIO LEVEL ..................... 52AUDIO MIX .........................111AUDIO MODE .................... 113AUTO SHTR ........................ 110BACK LIGHT ........................ 23Battery pack ............................. 9BEEP ..................................... 115
C, DCamera chromakey ............ 125Cassette memory ........... 6, 144Charging battery ................... 10Charging the built-in
rechargeable battery ........ 160Clock set ................................. 14COLOR BAR ....................... 115Connection
(dubbing a tape) ............. 74(viewing on TV) ............. 31
Continuous .......................... 122Custom preset ....................... 54Cut recording ........................ 62Data code ............................... 29Date search ............................ 68Date/time indicator ............. 29DEMO................................... 114DIGITAL EFFECT ................. 41Digital program editing ....... 76DISPLAY ................................ 28DOT ........................................ 38Dual sound track tape ........ 145Dubbing a tape ...................... 74
E
EDITSEARCH ....................... 26END SEARCH ................ 26, 30Exposure ................................ 45External microphone
(optional) .......................... 169
F, G, H
Fade in/out............................ 38FADER .................................... 38FLASH MOTION.................. 41FOCUS.................................... 59Format .................................. 112Full charge ............................. 10
Grip strap ............................. 168Guide frame........................... 35Headphones jack ................ 169Heads.................................... 159HiFi SOUND ........................ 111
I, J, K, L
i.LINK ................................... 146Image protection ................. 139Image quality mode ........... 119INDEX MARK....................... 63INDEX (Multiple)
display ............................... 134Index search ........................... 65“InfoLITHIUM” battery ...... 10Intelligent accessory shoe .... 96Interval recording ................. 60 JPEG ...................................... 116Labeling a cassette .............. 105LANC ................................... 169LCD screen ............................ 18LUMINANCEKEY ............... 41
M , N
Main sound...........................111Manual adjustment .............. 44Manual focus ......................... 59
Memory chromakey ........... 125Memory luminancekey ...... 125Memory mix ........................ 125Memory overlap ................. 125Memory photo recording .. 121“Memory Stick” .................. 116Menu settings ...................... 109MIC (PLUG IN POWER) ..... 95Mirror mode .......................... 18Moisture condensation ...... 158MONOTONE ........................ 38ND filter ................................. 47Normal charge ...................... 10NTSC system ....................... 157
O, P, Q
OLD MOVIE .......................... 41Operation indicators .......... 172OVERLAP .............................. 38Photo scan .............................. 71Photo search .......................... 70PICTURE EFFECT ................ 40Picture search ........................ 30Playback pause ...................... 30Power sources
(battery pack) ................... 9(car battery) .................... 13(house current) ............... 13
Power zoom ........................... 21
Print mark ............................ 143PROGRAM AE ...................... 56Progressive recording .......... 34
R, S
Rec Review ............................ 26Recording level ..................... 52Recording time ...................... 11Remaining battery time
indicator .............................. 22Remaining tape indicator .... 22Remote Commander .......... 170Remote control jack (LANC)
............................................ 169Remote sensor ..................... 166RESET ................................... 153S VIDEO jack ........... 31, 74, 89SEL/PUSH EXEC dial ....... 109Self-diagnosis display ........ 154Self-timer................ 25, 33, 124Skip scan ................................ 30Slide show............................ 138Slow playback ....................... 30Spotlight mode ...................... 24STEADYSHOT .................... 110Stereo tape ........................... 145STILL ...................................... 41Sub sound ............................. 111
T, U, V
Tape counter .......................... 64Tape photo recording ........... 32Telephoto ............................... 21Time code ............................... 22Title ......................................... 99Title search ............................. 67TRAIL ..................................... 41Transition ............................... 17TV color system .................. 157
W, X, Y, Z
Warning indicators ............. 155White balance ........................ 50Wide mode............................. 36Wide-angle ............................. 21WIPE ....................................... 38WORLD TIME ..................... 114Write-protect tab ........... 15, 116Zebra pattern ......................... 48Zero set memory function ... 64Zoom ...................................... 21

8/8/2019 276ba559b616f0752a9d1ab6240c7e96
http://slidepdf.com/reader/full/276ba559b616f0752a9d1ab6240c7e96 175/176

8/8/2019 276ba559b616f0752a9d1ab6240c7e96
http://slidepdf.com/reader/full/276ba559b616f0752a9d1ab6240c7e96 176/176


