Embed Size (px)
Citation preview


©2012 Dynojet Research, Inc. All Rights Reserved.
User Guide for AutoTune with the Power Vision.
This manual is copyrighted by Dynojet Research, Inc., hereafter referred to as Dynojet, and all rights are reserved. This manual is furnished under license and may only be used or copied in accordance with the terms of such license. This manual is furnished for informational use only, is subject to change without notice, and should not be construed as a commitment by Dynojet. Dynojet assumes no responsibility or liability for any error or inaccuracies that may appear in this manual. Except as permitted by such license, no part of this manual may be reproduced, stored in a retrieval system, or transmitted, in any form or by any means, electronic, mechanical, recording, or otherwise, without the prior written permission of Dynojet.
The Dynojet logo is a trademark of Dynojet Research, Inc.
Any trademarks, trade names, service marks, or service names owned or registered by any other company and used in this guide are the property of their respective companies.
Dynojet Research, Inc., 2191 Mendenhall Drive, North Las Vegas, Nevada 89081, USA.
Printed in USA.
Part Number: 2012.10.29.01 Version 1 (10/2012)

AutoTune with the Power Vision User Guide1
USING AUTOTUNE WITH POWER VISION
The Power Vision supports a process to correct your VE tables (and AFR) based on your OEM narrowband O2 sensors (Basic Method) or with wideband O2 sensors from the Dynojet AutoTune Kit (Pro Method). In addition, AutoTune can use the ECM's ion sensing knock control strategy in order to remove timing/adjust spark advance from areas of your calibration where knock was present. Refer to AutoTune Notes and Tips.
There is no longer a need to go through the cumbersome process of exporting value files, logging, processing values and logs in Log Tuner, etc. Power Vision automatically "sets up the tune", logs the correct channels, and applies a correction to your tune. Leave the laptop at home, you now have a full time, professional tuning expert inside your Power Vision.
This document will guide you through enabling AutoTune, starting an AutoTune session, exporting a learned tune, and editing the AutoTune settings.
This section is divided into the following categories:
• Introduction, page 2
• Understanding AutoTune, page 2
• Enabling AutoTune, page 5
• Starting An AutoTune Session, page 10
• Exporting A Learned Tune, page 14
• Editing the AutoTune Settings, page 19

AutoTune with the Power Vision User Guide
U S I N G A U T O TU N E W I T H P O W E R V I S I O NIntroduction
2
Introduction
Notice
Copyright ©2012 Dynojet Research, Inc. All Rights Reserved.
The Dynojet logo is a trademark of Dynojet Research, Inc.
The Power Vision is approved for racing vehicle use only.
AutoTune Supplement 2012.10.29.01
Contacting Dynojet
Please contact us with your questions and comments. If you need assistance with an issue, please contact Dynojet Technical Support.
Telephone
800.992.4993
Website
www.dynojet.com
www.flashyourharley.com
Write to us
2191 Mendenhall Drive
North Las Vegas, NV 89081
Conventions
Power Vision documentation uses consistent conventions to help you identify items. The following table summarizes these conventions.
example of convention description
Bold Highlights items you can select on in the software interface, including buttons and menus.
> The arrow indicates a menu choice. For example, “select File >Open” means “select the File menu, then select the Open choice on the File menu.”
Blue Words highlighted in blue indicate a link.

U S I N G A U T O TU N E W I T H P O W E R V I S I O NUnderstanding AutoTune
Version 1 AutoTune with the Power Vision User Guide
3
Understanding AutoTuneMost modern EFI systems employ closed loop feedback for fuel control. These systems are often based around narrowband O2 sensors that provide feedback to the ECM in regards to how rich or lean the vehicle is running. If there is an error between what the ECM is asking for and what the OEM narrowband sensor measures, a correction is made to adjust the lean or rich condition. These corrections are stored in what are called Adaptive fuel tables. Narrowband sensors are ONLY accurate at, or near, the stoichiometric value of the fuel being used, which is 14.7:1 for gasoline. This value is where complete combustion would occur, however, is not ideal for all operating conditions of an engine.
A typical Harley-Davidson ECM calibration has areas of closed loop and open loop. Open loop means feedback from the O2 sensors is not used. When the engine is in a range that requires precise measurement, but is outside the reliable window of a narrowband sensors operation (considered 14.3 -15.2 AFR), then a tuner/EFI specialist must rely on wideband O2 sensor data. The wideband O2 sensor values provide tuners or electronic tuning devices with data needed to make decisions on how they will address fueling in the open loop areas of the ECM calibration. In the case of a Harley engine management system, we fix the error by adjusting the Volumetric Efficiency tables.
Power Vision offers two methods for AutoTune:
• AutoTune Basic—utilizes the narrowband O2 sensors on bikes that have OEM closed loop fuel control. Refer to AutoTune Basic.
• AutoTune Pro—requires the use of Dynojet's AutoTune wideband O2 control module that has dual wideband O2 sensors. Refer to AutoTune Pro.
The Power Vision can provide meaningful tuning feedback from either the OEM narrowband O2 sensors and/or from the AutoTune module's wideband O2 sensors.
AutoTune Basic
Without any additional modules, the Power Vision will take advantage of what the ECM "sees" from its OEM narrowband O2 sensors and use that data to achieve the target AFR. This method works great in those operating areas where it makes sense to run in a lean state: idle, light load, and cruise conditions. AutoTune Basic will fix the normal closed loop range, but can also temporarily extend the closed loop range to gain insight on the actual AFR in areas that are normally open loop (high load/high RPM). At high load/high RPM ranges this "temporary situation" is not ideal, and this is where it is advantageous to use AutoTune Pro.
Utilizing the AutoTune Basic AFR data and other data from the H-D OEM data bus, the Power Vision can automatically fix the deviation between the target AFR and actual AFR by adjusting the VE tables, instead of storing the changes in an Adaptive fuel table. The data is learned in real time, but processing the data and adjusting the tune is done in an "offline state" (key on/engine off). After the data is collected, the Power Vision can process the data, correct the tune, and then re-flash the corrected tune into the ECM.
Neither AutoTune Basic nor AutoTune Pro requires that you interface with a computer. Power Vision sets up the AutoTune parameters, monitors and logs the data, and then corrects the tune to ensure that the final tune has optimum values in the VE table(s).
AutoTune with the Power Vision User Guide
U S I N G A U T O TU N E W I T H P O W E R V I S I O NUnderstanding AutoTune
4
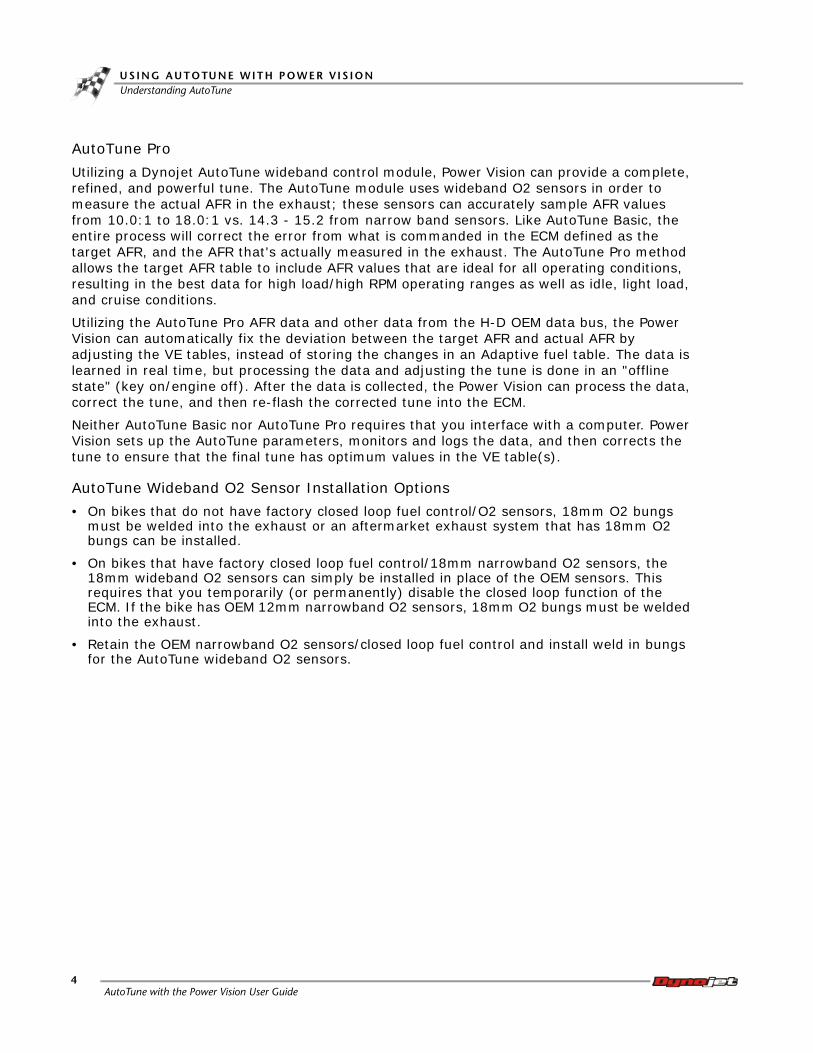
AutoTune Pro
Utilizing a Dynojet AutoTune wideband control module, Power Vision can provide a complete, refined, and powerful tune. The AutoTune module uses wideband O2 sensors in order to measure the actual AFR in the exhaust; these sensors can accurately sample AFR values from 10.0:1 to 18.0:1 vs. 14.3 - 15.2 from narrow band sensors. Like AutoTune Basic, the entire process will correct the error from what is commanded in the ECM defined as the target AFR, and the AFR that's actually measured in the exhaust. The AutoTune Pro method allows the target AFR table to include AFR values that are ideal for all operating conditions, resulting in the best data for high load/high RPM operating ranges as well as idle, light load, and cruise conditions.
Utilizing the AutoTune Pro AFR data and other data from the H-D OEM data bus, the Power Vision can automatically fix the deviation between the target AFR and actual AFR by adjusting the VE tables, instead of storing the changes in an Adaptive fuel table. The data is learned in real time, but processing the data and adjusting the tune is done in an "offline state" (key on/engine off). After the data is collected, the Power Vision can process the data, correct the tune, and then re-flash the corrected tune into the ECM.
Neither AutoTune Basic nor AutoTune Pro requires that you interface with a computer. Power Vision sets up the AutoTune parameters, monitors and logs the data, and then corrects the tune to ensure that the final tune has optimum values in the VE table(s).
AutoTune Wideband O2 Sensor Installation Options
• On bikes that do not have factory closed loop fuel control/O2 sensors, 18mm O2 bungs must be welded into the exhaust or an aftermarket exhaust system that has 18mm O2 bungs can be installed.
• On bikes that have factory closed loop fuel control/18mm narrowband O2 sensors, the 18mm wideband O2 sensors can simply be installed in place of the OEM sensors. This requires that you temporarily (or permanently) disable the closed loop function of the ECM. If the bike has OEM 12mm narrowband O2 sensors, 18mm O2 bungs must be welded into the exhaust.
• Retain the OEM narrowband O2 sensors/closed loop fuel control and install weld in bungs for the AutoTune wideband O2 sensors.

U S I N G A U T O TU N E W I T H P O W E R V I S I O NEnabling AutoTune
Version 1 AutoTune with the Power Vision User Guide
5
Enabling AutoTune
To Enable AutoTune
Use the following steps to enable AutoTune.
1 Touch Program Vehicle >AutoTune.
Note:Verify the Setting for AutoTune is correct for your model of motorcycle. Refer to Editing the AutoTune Settings.
2 Touch Enable AT.

AutoTune with the Power Vision User Guide
U S I N G A U T O TU N E W I T H P O W E R V I S I O NEnabling AutoTune
6
3 Touch a tune file to load.4 Touch Select to continue with the selected tune file.
Or
Touch Cancel to abort the process and return to the program vehicle menu.

U S I N G A U T O TU N E W I T H P O W E R V I S I O NEnabling AutoTune
Version 1 AutoTune with the Power Vision User Guide
7
5 Select the AutoTune mode.
Touch Basic to use the OEM Narrowband O2 sensor, tuning to a temporary stoich (14.6) Air Fuel Ratio.
Or
Touch Pro to use Dynojet Widebands for tuning using a wider Air Fuel Ratio range.
Note:If you do not have Wideband O2 sensors installed (ie. those included in the Dynojet AutoTune kit) select Basic.
The two different methods of AutoTune yield similar results in most areas, but Dynojet recommends using AutoTune Pro for best results in all operating conditions that you would experience while riding.
Or
Touch Cancel to abort the process and return to the tune manager.

AutoTune with the Power Vision User Guide
U S I N G A U T O TU N E W I T H P O W E R V I S I O NEnabling AutoTune
8
6 Touch Continue to send the file to the ECM or touch Cancel to exit the screen without any changes.
The tune is modified to be compatible with the mode you chose from above.
Note:The Power Vision must be connected to the vehicle with the key and run switch in the on position with the engine not running.
WARNING!Do not turn off the ignition or interrupt the power during this process. This can cause irreversible damage to the ECM.
7 Once the process is complete, you will be prompted to turn the key off and wait ten seconds. Touch OK.
8 Turn the ignition key off and wait ten seconds.9 Turn the ignition key back on.AutoTune is set up.

U S I N G A U T O TU N E W I T H P O W E R V I S I O NEnabling AutoTune
Version 1 AutoTune with the Power Vision User Guide
9
Changes Made During AutoTune
The following changes are made to the tune file during the AutoTune process.
AutoTune Pro—automatically applies a .pvv to the tune that does the following:
• Sets the base fuel table to one static value, 13.0 for AFR or .89 lambda.• Disables EITMS/PE/Adaptive Control.• AE/DE are still active in the tune, but there's logic to disable or minimize learning when
they're active.AutoTune Basic—automatically applies a .pvv to the tune that does the following:
• Sets the base fuel table to 14.6 for AFR based calibrations and .982 for lambda based calibrations.
• Disables AE/DE/EITMS/PE/Adaptive Control.• Retards 4 degrees of timing.• Bias the close loop range to .700mv on AFR based calibrations.
General
• Sets calib to PVAT (Session Number).• Clears adaptive fuel tables after flashing.
AutoTune Notes and Tips
• AutoTune can use the ECM's ion sensing knock control strategy in order to remove timing/adjust spark advance from areas of your calibration where knock was present. This feature can only remove timing, it will never add it. It is not recommended to use this feature with AutoTune Basic, only AutoTune Pro. This feature is disabled by default, but changing the "Max Spark Learn" from 0 to a value such as 10 would make it active.
• If you do not have Wideband O2 sensors installed (ie. those included in the Dynojet AutoTune kit) select Basic mode.
• The default values are acceptable for most big twin models. If you have a V-Rod or Sportster, you will need to adjust the temperature (in degrees C) and RPM limit to an acceptable range. Refer to Editing the AutoTune Settings.
• Knock control on Sportsters is not possible; the ECM does not support this feature and AutoTune does not support automated spark adjustment based on knock activity.
• In Pro mode, you can tune fuel and spark simultaneously; however, Dynojet recommends to address fuel first, and then focus on spark. To do this, after you've completed tuning the fuel (via adjustments to your VE tables) and flashed the corrected tune file to your ECM, you can then start a new AutoTune session that's focused on spark corrections. In the settings area of AutoTune you can set Max VE Learn to 0 and Max Spark Learn to 10. This will disable AutoTune's ability to change fuel, but allow it to monitor, record, and eventually correct spark advance based on knock activity.

AutoTune with the Power Vision User Guide
U S I N G A U T O TU N E W I T H P O W E R V I S I O NStarting An AutoTune Session
10
Starting An AutoTune SessionYou can define when AutoTune is active by adjusting various settings. For more information, refer to AutoTune Settings.
The values learned during the AutoTune process will automatically save:
• Every five minutes• When the vehicle comes to a stop during a drive cycle
The values learned during the AutoTune process will also save when you:
• Press the mode button• Turn datalogging on or off• Exit the green screen• Disable AutoTune
To Start an AutoTune Session
Use the following process to start an AutoTune session.
Touch Program Vehicle >AutoTune >Datalog.

U S I N G A U T O TU N E W I T H P O W E R V I S I O NStarting An AutoTune Session
Version 1 AutoTune with the Power Vision User Guide
11
AutoTune is now active and will start learning anytime you are in the AutoTune Datalogger screen (shown below). The AutoTune Datalogger screen indicates the learning process is active and you're on your way to perfecting your tune.
Note:You have the option to create a log file by touching Log Start to log channels required for Log Tuner. You do not need to select Log Start in order to start the AutoTune process.
AutoTune Datalogger monitors various operating conditions to ensure you're ready to start auto tuning and whether or not you're in a state to allow learning. A large message will overlay the screen to indicate the condition that's currently preventing learning. Refer to AutoTune Datalogger Operating Conditions for a list of conditions.

AutoTune with the Power Vision User Guide
U S I N G A U T O TU N E W I T H P O W E R V I S I O NStarting An AutoTune Session
12
AutoTune Datalogger Operating Conditions
The following table lists the various AutoTune Datalogger operating conditions and a description of each condition.
condition description
No Connection The ECM is not responding.
ET:! The engine temperature is not reading.
ET:L The engine temperature is too low.
ET:H The engine temperature is too high.
WARMUP: The ECM is still using warm up tables.
AE: The ECM is using acceleration enrichment tables.
RPM:! The engine speed is not reading.
RPM:L The engine speed is too low.
RPM:H The engine speed is too high.
WBF:! The Wideband O2 sensor (front) is not ready.
WBF:L The Wideband O2 sensor (front) too low (less than lambda 0.68). This is usually during warm up.
WBF:H The Wideband O2 sensor (front) too high (over lambda 1.22). This is usually during heavy deceleration.
WBR:! The Wideband O2 sensor (rear) is not ready.
WBR:L The Wideband O2 sensor (rear) too low (less than lambda 0.68). This is usually during warm up.
WBR:H The Wideband O2 sensor (rear) too high (over lambda 1.22). This is usually during heavy deceleration.
NBF:! The OEM narrowband sensor (front) is not ready.
NBF:O The OEM narrowband sensor (front) in open loop.
NBR:! The OEM narrowband sensor (rear) is not ready.
NBR:O The OEM narrowband sensor (rear) in open loop.
VE:! Unable to match current conditions to a VE table cell.
VE:+ The conditions are changing too rapidly or moving between VE table cells.
MAP:L The map sensor is reading too low (usually deceleration). Map <20 KPA.

U S I N G A U T O TU N E W I T H P O W E R V I S I O NStarting An AutoTune Session
Version 1 AutoTune with the Power Vision User Guide
13
AutoTune Datalogger Modes
The following table lists the various AutoTune Datalogger modes and a description of each mode.
Note:Dynojet recommends viewing AutoTune Datalogger modes only while on a dyno.
mode description
HITS Shows the length of time spent in each VE cell. Shows the entire VE table at once.
VEFront Shows the VE front table as stored in the tune.
VERear Shows the VE rear table as stored in the tune.
LVE-F Learned VE front.
LVE-R Learned VE rear.
LCOR-F Learned correction to VE front (in percent).
LCOR-R Learned correction to VE rear (in percent).
RT Real Time is the same as HITS but zooms in and slides the VE table around as you drive allowing you to target in on cells better.

AutoTune with the Power Vision User Guide
U S I N G A U T O TU N E W I T H P O W E R V I S I O NExporting A Learned Tune
14
Exporting A Learned TuneVersion 1.0.15-1184 of the Power Vision analyzes the learned values ensuring you do not exceed the maximum allowed value for any cell in the VE tables (127.5).
To Export a Learned Tune
Use the following steps to export learned data from the AutoTUne process to a new tune in the tune manager that can be flashed to the ECM.
1 From the AutoTune Session screen, touch Export Learned.

U S I N G A U T O TU N E W I T H P O W E R V I S I O NExporting A Learned Tune
Version 1 AutoTune with the Power Vision User Guide
15
Note:Step #2 will only apply if your tuning session yields learned data that reaches the upper limit of the VE table.
2 Touch Scale to allow the Power Vision AutoTune feature to auto scale the necessary values in your tune to avoid reaching the maximum allowed VE values.
Or
Touch Cap to proceed with the export and understand that some of the required corrections could not be made to your tune.
Or
Touch Exit to exit the screen without any changes.
3 Touch Continue to apply all learned values to the tune and save it to a Custom Tune slot.

AutoTune with the Power Vision User Guide
U S I N G A U T O TU N E W I T H P O W E R V I S I O NExporting A Learned Tune
16
4 Touch a slot to save the tune file.Note:If there is any data in the selected slot, it will be overwritten.
5 Touch Select to continue with the selected slot.
Or
Touch Cancel to abort the process.
6 Touch OK to continue.
A copy of the tune will be saved.
These are full tunes/calibrations, not just the values learned. This is a version of the tune you started with but the VE (and potentially spark tables) will be modified.
It is time to flash the ECM with the new tune you just saved to the tune manager. Once the new tune has been flashed to the ECM, you can ride the bike to feel the results or engage in another tuning session to continue to refine your custom tune. If you do not flash a tune to the ECM, you will still be running on a tune set up by the AutoTune feature.

U S I N G A U T O TU N E W I T H P O W E R V I S I O NExporting A Learned Tune
Version 1 AutoTune with the Power Vision User Guide
17
7 Exit to the Main Menu and load your custom tune. Refer to To Load a Custom Tune File.
To Load a Custom Tune File
1 Turn the ignition key to the On position.2 Verify the Run/Off switch is in the Run position. Do not start the engine.3 Touch Program Vehicle >Load Tune >Custom Tune.

AutoTune with the Power Vision User Guide
U S I N G A U T O TU N E W I T H P O W E R V I S I O NExporting A Learned Tune
18
4 Touch the last tune you saved to the Tune Manager. This will be the tune that contains the AutoTune corrections.Note:A tune saved in the Tune Manager will never have those values that are set up by the AutoTune process included within them, only the values that were learned during the AutoTune process.
5 Touch Select to continue with the selected tune file.
Or
Touch Cancel to abort the process and return to the custom tune screen.
6 Touch Flash to send the file to the ECM.Note:Do not turn off the key while the Power Vision is flashing the ECM. Once the process is complete, you will be prompted to turn the key off and wait ten seconds.
7 Touch OK.8 Turn the ignition key off and wait ten seconds.9 Turn the ignition key back on.
You can ride the bike with the changes from the AutoTune process or you can start a new tuning session to continue to refine your custom tune.

U S I N G A U T O TU N E W I T H P O W E R V I S I O NEditing the AutoTune Settings
Version 1 AutoTune with the Power Vision User Guide
19
Editing the AutoTune Settings
To Edit AutoTune Settings
Use the following steps to edit the AutoTune settings.
1 Touch Program Vehicle >AutoTune >Settings.Note:Changing the settings while AutoTune is active will reset all learned values.
2 Touch Continue.Note:Changing the settings while AutoTune is active will reset all learned values.

AutoTune with the Power Vision User Guide
U S I N G A U T O TU N E W I T H P O W E R V I S I O NEditing the AutoTune Settings
20
3 Touch a setting to edit. In this example we will use Max Spark Learn.
To see a list of all settings and descriptions, refer to AutoTune Settings.
4 Touch Select to continue with the selected setting.
Or
Touch Exit to abort the process.
5 A description of the setting will appear. Touch Continue to edit the selected setting.
To see a list of all settings and descriptions, refer to AutoTune Settings.

U S I N G A U T O TU N E W I T H P O W E R V I S I O NEditing the AutoTune Settings
Version 1 AutoTune with the Power Vision User Guide
21
6 Using the number pad, enter the value for the setting.
The numeric display will show the current value. The default value is shown under the setting title.
In this example, 10 degrees was entered. This will enable spark tuning up to 10 degrees.
7 Touch Save to confirm the value or Cancel to return to the list of settings.
8 Touch Yes to confirm the changes.
Or
Touch No to abort the process.

AutoTune with the Power Vision User Guide
U S I N G A U T O TU N E W I T H P O W E R V I S I O NEditing the AutoTune Settings
22
The setting value is updated. In this example, Max Spark Learn is now 10 degrees.
9 Touch Exit to exit the Setting screen.
If you need assistance on recommended values for different families of bikes, please email [email protected].

U S I N G A U T O TU N E W I T H P O W E R V I S I O NEditing the AutoTune Settings
Version 1 AutoTune with the Power Vision User Guide
23
AutoTune Settings
The following table lists the various AutoTune settings and a description of each setting.
setting description
Min Hit Count (ticks) The minimum number of hits on a cell for learning to take place.
Min VE Learn (Percent) The minimum amount a VE cell needs to learn before a change will take place.
Max VE Learn (Percent) The maximum amount a VE cell is allowed to change, in VE units. Set this to 0 to disable VE learning.
Min Spark Learn (Degrees) The minimum amount a Spark cell needs to learn before a change will take place.
Max Spark Learn (Degrees) The maximum amount, in degrees, that a Spark cell is allowed to change. Set this to 0 to disable Spark learning. A good starting value would 10 degrees.
Min WB Lambda (Lambda) The richest value as measured on the Wideband in Pro Mode that is allowed. This is in Lambda.
Max WB Lambda (Lambda) The leanest value as measured on the Wideband in Pro Mode where learning is allowed. This is in Lambda.
Min Engine Temp (DegC) The coldest engine temperature where learning is allowed, entered in Degrees Celsius or Fahrenheit (depends on Power Vision Unit Setting).
Max Engine Temp (DegC) The maximum engine temperature where learning is allowed, entered in Degrees Celsius or Fahrenheit (depends on Power Vision Unit Setting).
Min RPM (RPM) The minimum engine speed where learning is allowed, in RPM.
Max RPM (RPM) The maximum engine speed where learning is allowed, in RPM.
Min MAP (KPA) The minimum MAP value where learning is allowed. This is used to filter out deceleration events.
Max MAP (KPA) The maximum MAP value where learning is allowed. This is usually marked as not used and set to something high, like 120 KPA.

AutoTune with the Power Vision User Guide
U S I N G A U T O TU N E W I T H P O W E R V I S I O NEditing the AutoTune Settings
24
Default AutoTune Settings
The following table lists the default AutoTune settings for different vehicles.
setting
Big Twin including Softail Dyna and Touring models V-Rod models
Sportster models
Min Hit Count 5 ticks 5 ticks 5 ticks
Min VE Learn 0.01 percent 0.01 percent 0.01 percent
Max VE Learn 15.00 percent 15.00 percent 15.00 percent
Min Spark Learn 1.00 degrees 1.00 degrees 1.00 degrees
Max Spark Learn 0.00 degrees 0.00 degrees 0.00 degrees
Min WB Lambda 0.68 lambda 0.68 lambda 0.68 lambda
Max WB Lambda 1.22 lambda 1.22 lambda 1.22 lambda
Min Engine Temp 167°F 160°F 280°F
Max Engine Temp 300°F 230°F 410°F
Min RPM 900 RPM 1000 RPM 1000 RPM
Max RPM 6000 RPM 10000 RPM 7000 RPM
Min MAP 20 KPA 20 KPA 20 KPA
Max MAP 120 KPA 120 KPA 120 KPA


![Autotune: A Derivative-free Optimization Framework …Autotune is a product within SAS® Visual Data Min-ing and Machine Learning [27], and operates on SAS® Viya® [24], which is](https://img.pdfslide.us/doc/110x75/5f1135eacda34d27e501cacd/autotune-a-derivative-free-optimization-framework-autotune-is-a-product-within.jpg)