Embed Size (px)
Citation preview
1 Initials
2 Stage and Liner Calculations
Module CF111 NL08 Sep 99
2 Initials
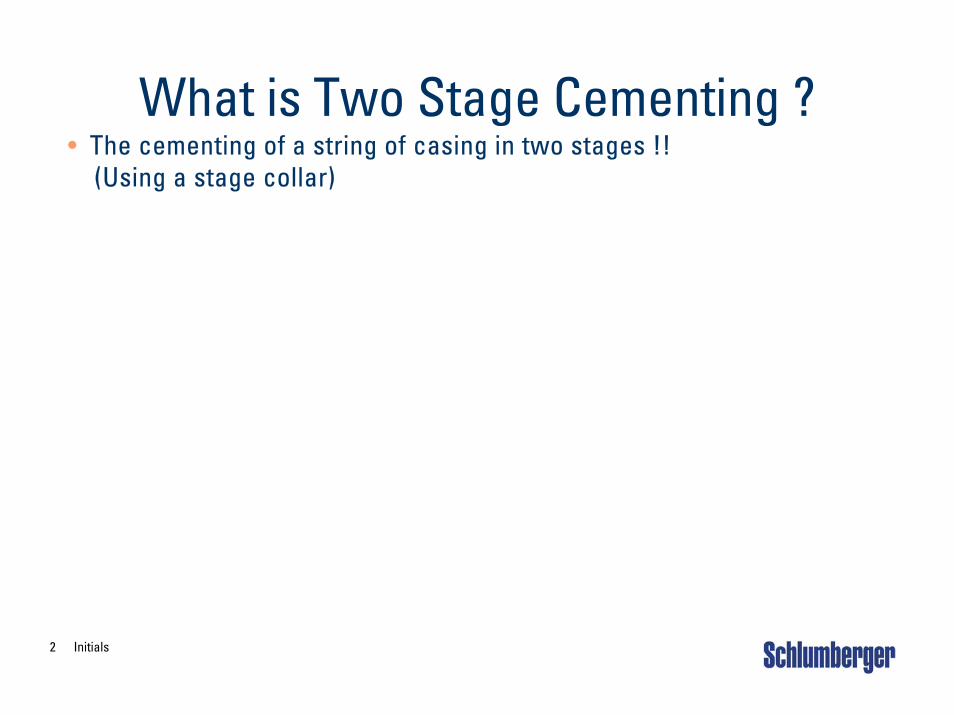
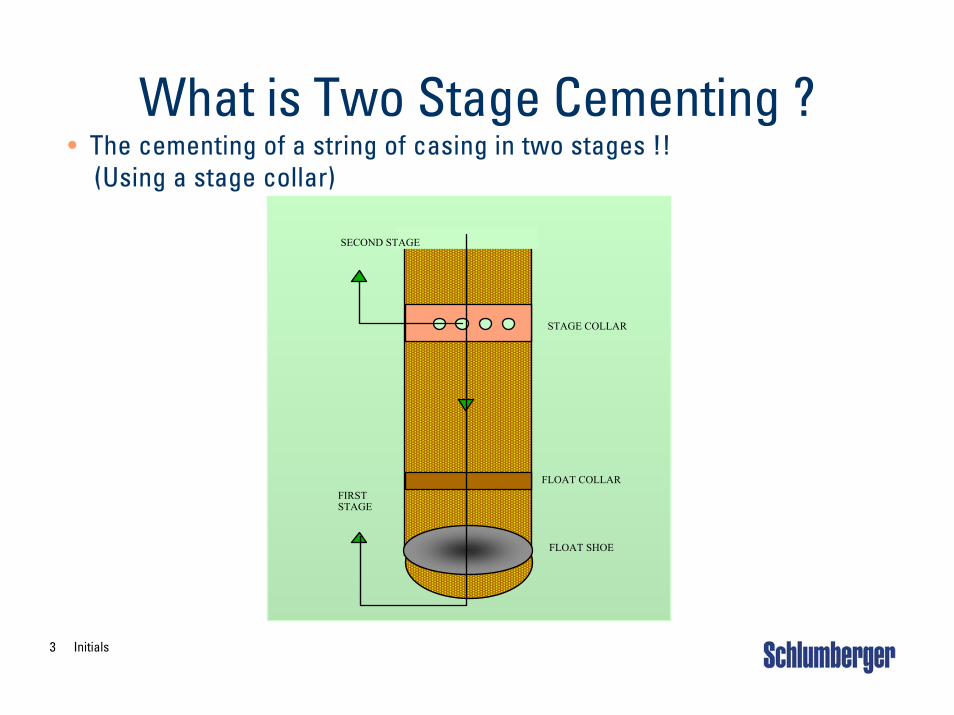
What is Two Stage Cementing ?• The cementing of a string of casing in two stages !!
(Using a stage collar)
3 Initials
What is Two Stage Cementing ?• The cementing of a string of casing in two stages !!
(Using a stage collar)
SECOND STAGE
FIRST STAGE
FLOAT COLLAR
FLOAT SHOE
STAGE COLLAR
4 Initials
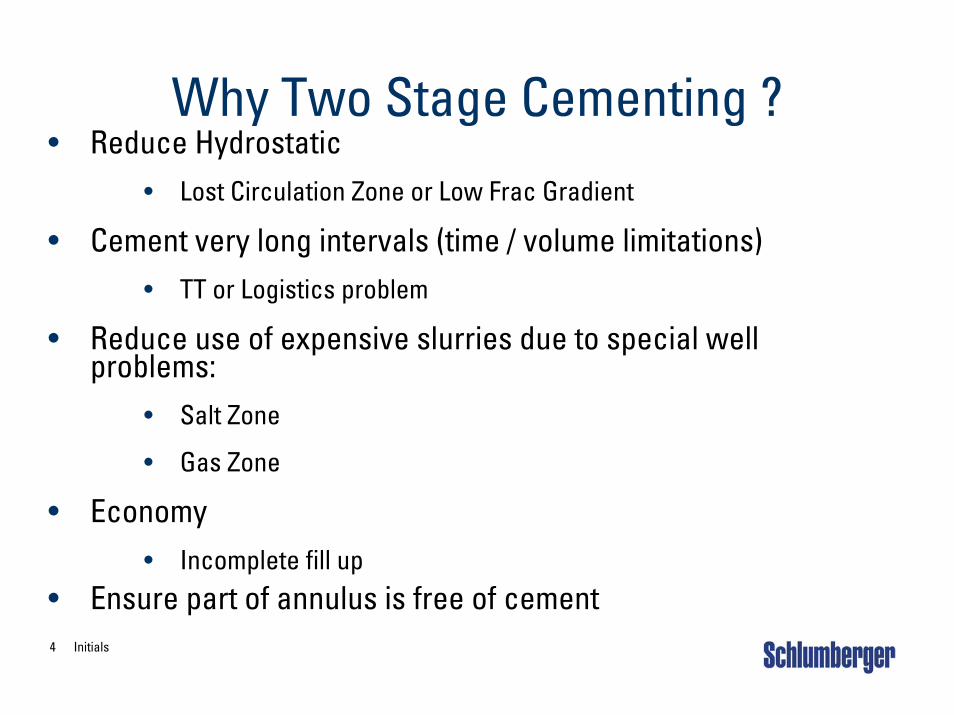
Why Two Stage Cementing ?• Reduce Hydrostatic
• Lost Circulation Zone or Low Frac Gradient
• Cement very long intervals (time / volume limitations)• TT or Logistics problem
• Reduce use of expensive slurries due to special well problems:
• Salt Zone
• Gas Zone
• Economy• Incomplete fill up
• Ensure part of annulus is free of cement
5 Initials
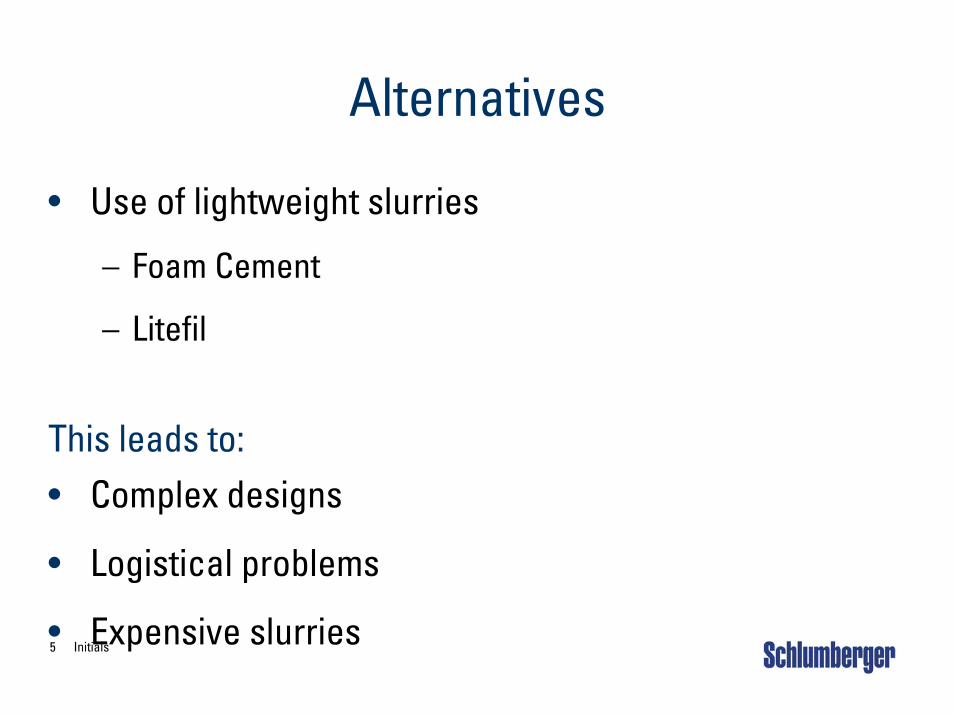
Alternatives
• Use of lightweight slurries
– Foam Cement
– Litefil
This leads to:• Complex designs
• Logistical problems
• Expensive slurries
6 Initials
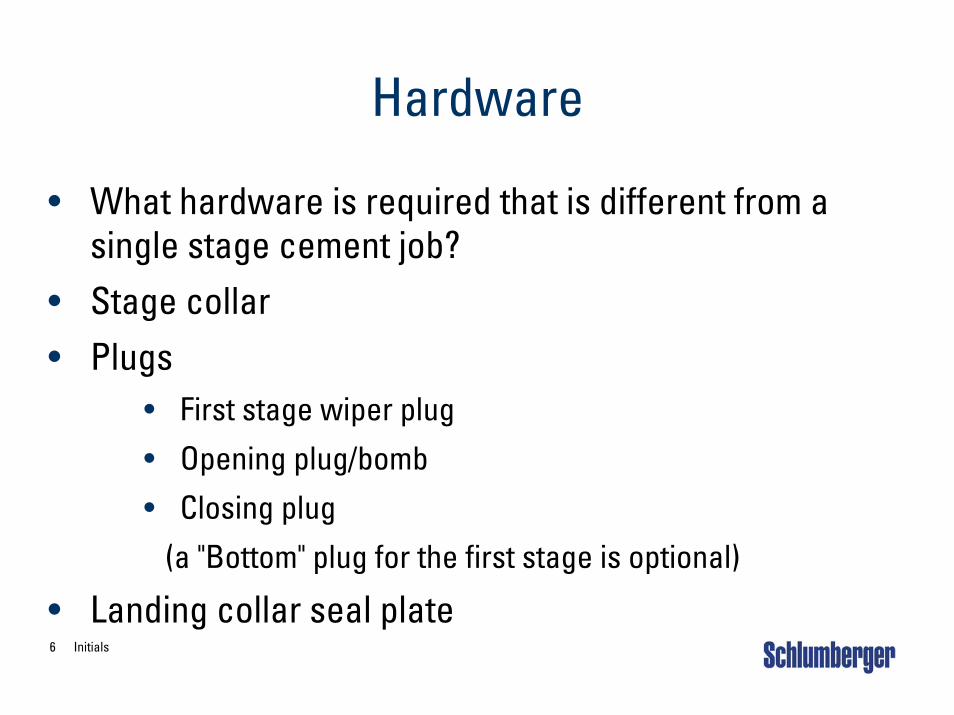
Hardware
• What hardware is required that is different from a single stage cement job?
• Stage collar• Plugs
• First stage wiper plug• Opening plug/bomb• Closing plug
(a "Bottom" plug for the first stage is optional)
• Landing collar seal plate
7 Initials
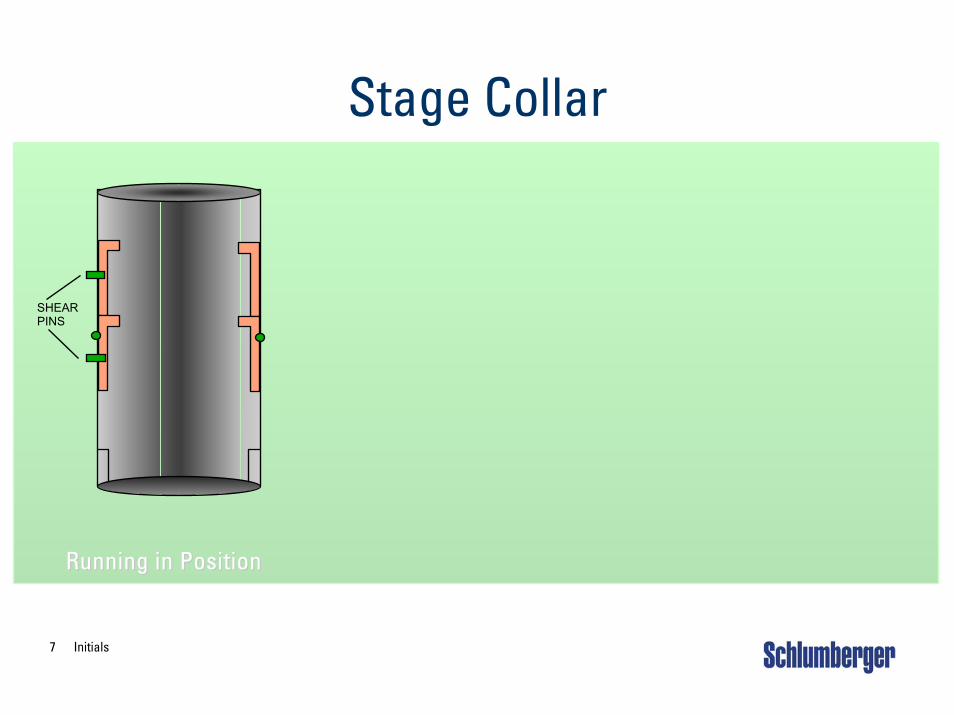
Stage Collar
Running in Position Running in Position
SHEAR PINS
8 Initials
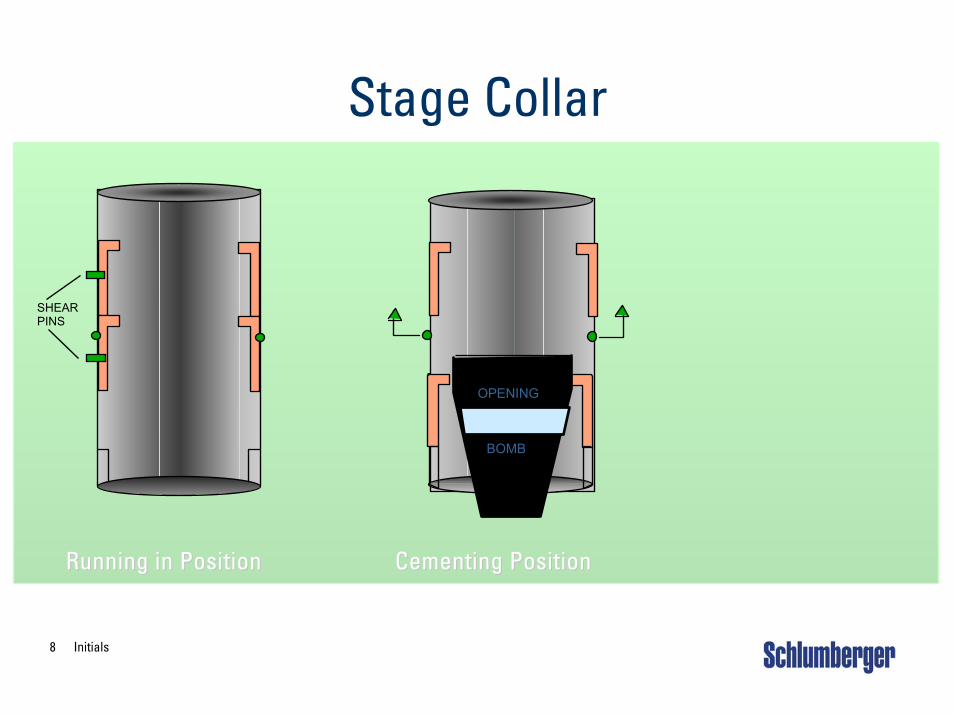
Stage Collar
Running in Position Running in Position Cementing Position Cementing Position
SHEAR PINS
OPENING
BOMB
9 Initials
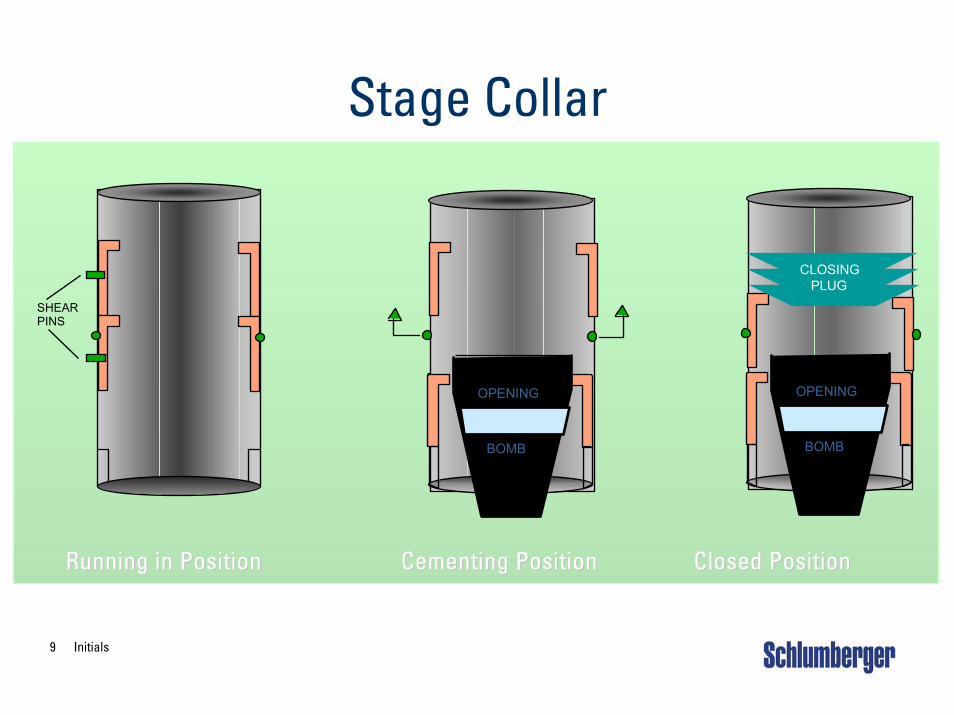
Stage Collar
Running in Position Running in Position Cementing Position Closed Position Cementing Position Closed Position
SHEAR PINS
OPENING
BOMB
OPENING
BOMB
CLOSINGPLUG

10 Initials
Stage Collar Does Not Open !
• Possible Solutions :• Wait: Bomb may not have arrived yet.• Increase Pump Pressure.
• NOTE: Max P. or Burst P. of casing.
• Run D.P. in the hole and try to open mechanically (e.g. weight).
• Perforate above collar and cement.• NOTE: Might perforate through 2 casing.
No mechanical closing.
11 Initials
Where to place 2 Stage Collar• Problem Formation
Lost circulation, Salt zone, etc.

12 Initials
Where to place 2 Stage Collar• Problem Formation
Lost circulation, Salt zone, etc.
STAGE COLLAR
PROBLEM FORMATION
TOC
13 Initials
Collar Inside Previous Casing
• Many clients insist on this .....
14 Initials
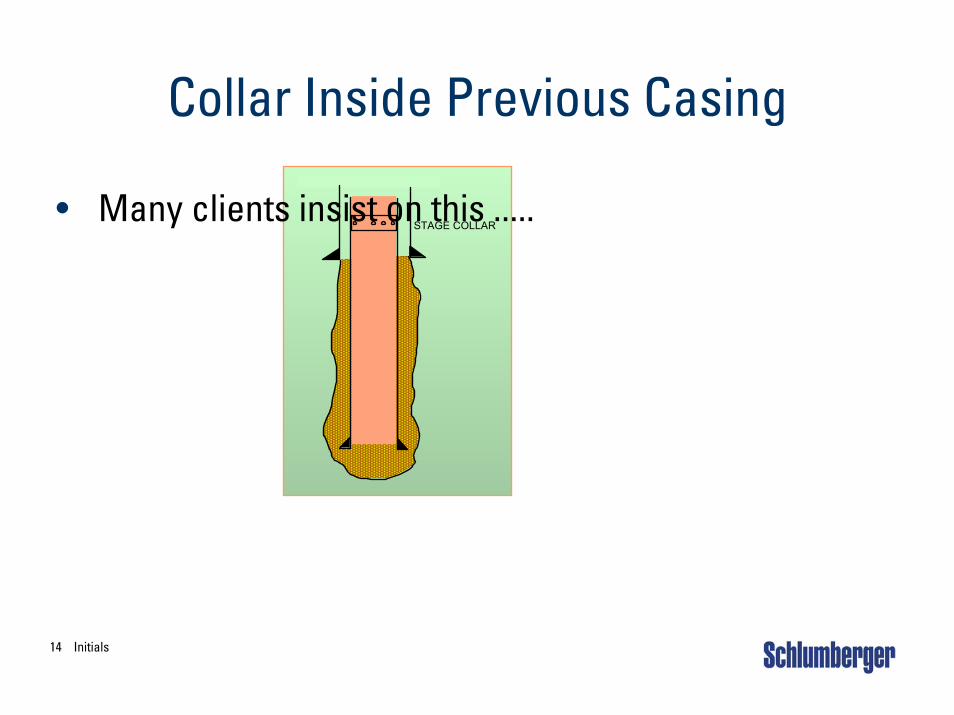
Collar Inside Previous Casing
STAGE COLLAR• Many clients insist on this .....
15 Initials
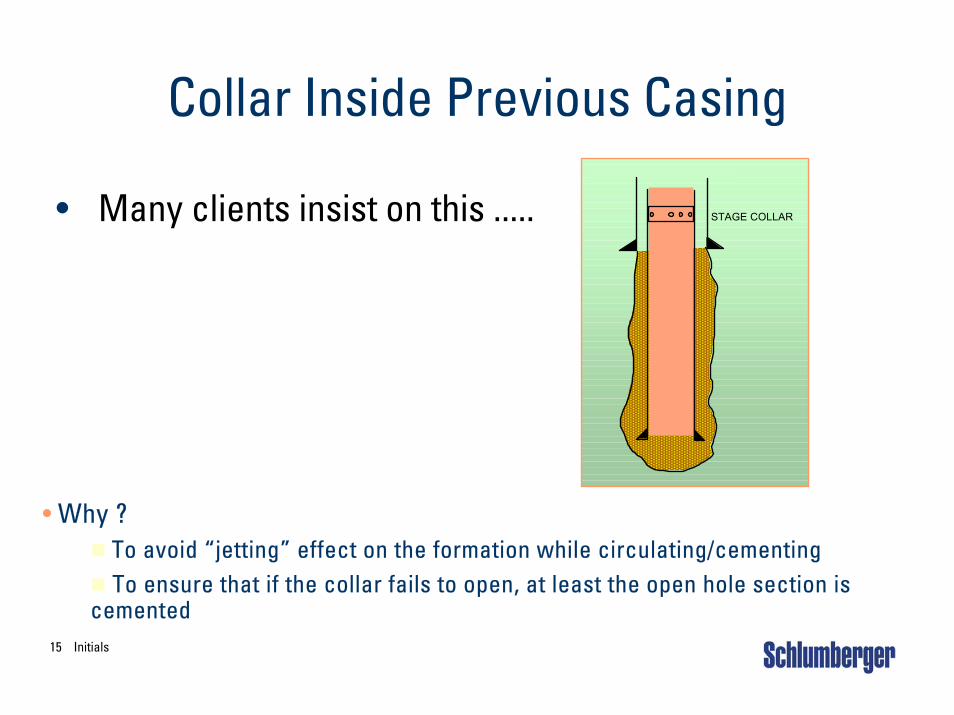
Collar Inside Previous Casing
STAGE COLLAR• Many clients insist on this .....
• Why ?To avoid “jetting” effect on the formation while circulating/cementingTo ensure that if the collar fails to open, at least the open hole section is
cemented
16 Initials
“To WOC or not to WOC”...That is the Question
• Guideline:
• WOC: YES !..Height of the 2nd stage slurry may fracture the "problem formation"
• Otherwise - NO
• ALWAYS - Open collar immediately and circulate out excess cement.
• Note: Control circulating pressures, not to fracture any weak formations.
17 Initials
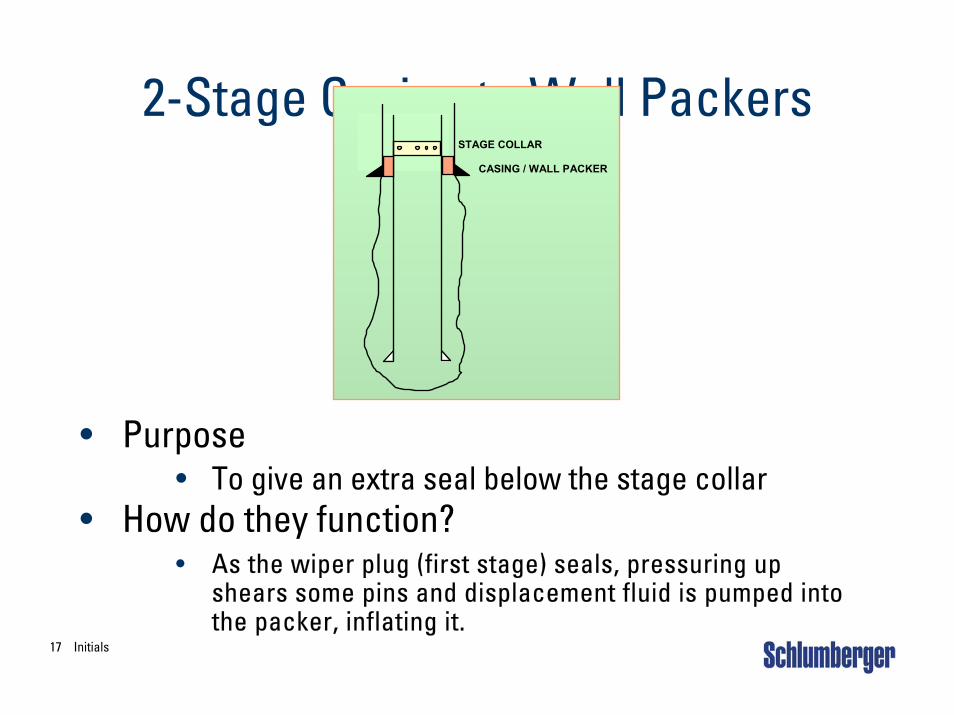
2-Stage Casing to Wall PackersSTAGE COLLAR
CASING / WALL PACKER
• Purpose• To give an extra seal below the stage collar
• How do they function?• As the wiper plug (first stage) seals, pressuring up
shears some pins and displacement fluid is pumped into the packer, inflating it.
18 Initials
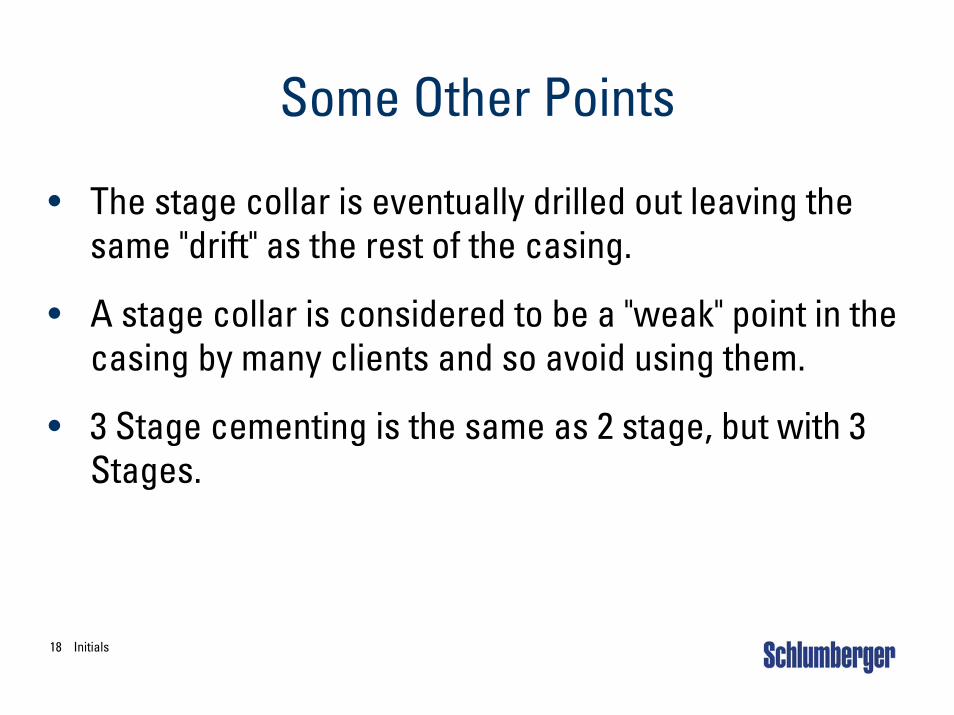
Some Other Points
• The stage collar is eventually drilled out leaving the same "drift" as the rest of the casing.
• A stage collar is considered to be a "weak" point in the casing by many clients and so avoid using them.
• 3 Stage cementing is the same as 2 stage, but with 3 Stages.
19 Initials
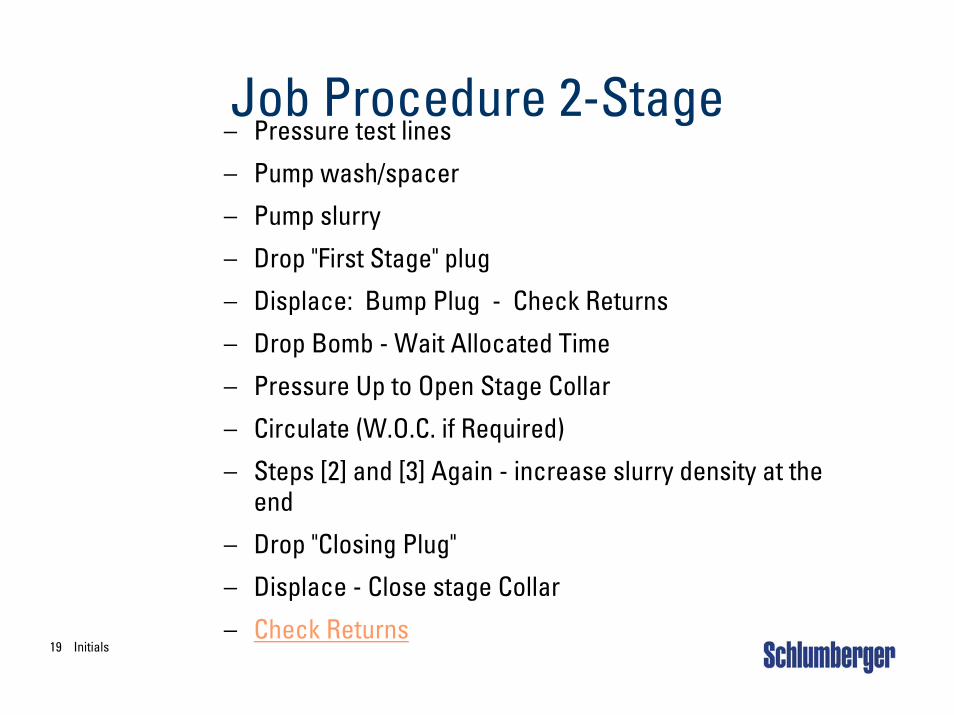
Job Procedure 2-Stage– Pressure test lines
– Pump wash/spacer
– Pump slurry
– Drop "First Stage" plug
– Displace: Bump Plug - Check Returns
– Drop Bomb - Wait Allocated Time
– Pressure Up to Open Stage Collar
– Circulate (W.O.C. if Required)
– Steps [2] and [3] Again - increase slurry density at the end
– Drop "Closing Plug"
– Displace - Close stage Collar
– Check Returns
20 Initials
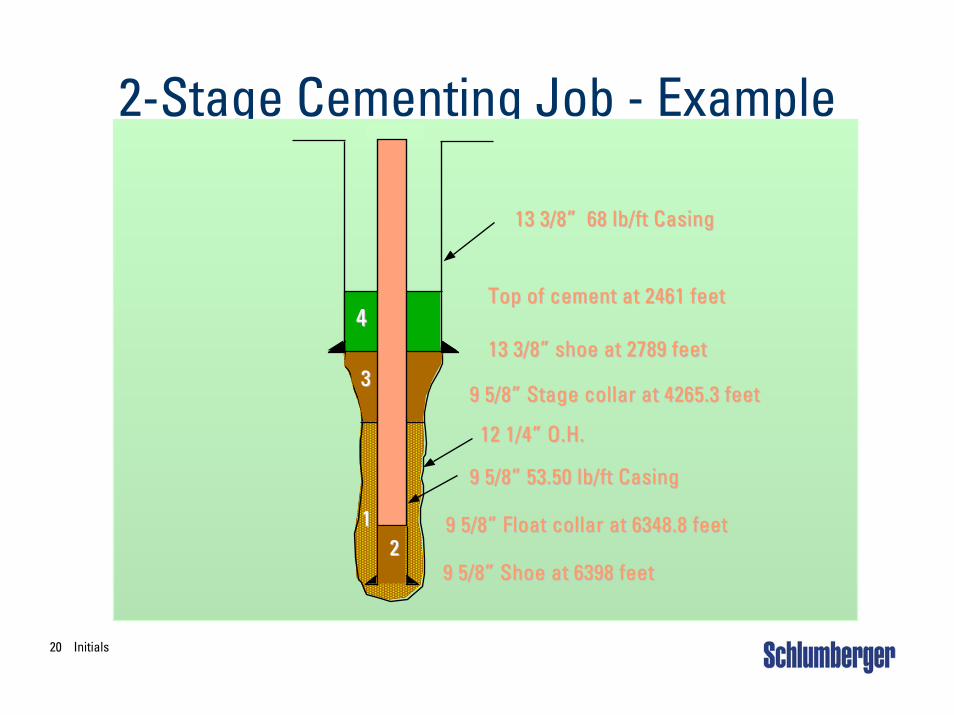
2-Stage Cementing Job - Example
13 3/8” 68 lb/ft Casing13 3/8” 68 lb/ft Casing
Top of cement at 2461 feetTop of cement at 2461 feet
13 3/8” shoe at 2789 feet13 3/8” shoe at 2789 feet
9 5/8” Stage collar at 4265.3 feet9 5/8” Stage collar at 4265.3 feet
12 1/4” O.H.12 1/4” O.H.
9 5/8” 53.50 lb/ft Casing9 5/8” 53.50 lb/ft Casing
9 5/8” Float collar at 6348.8 feet9 5/8” Float collar at 6348.8 feet
9 5/8” Shoe at 6398 feet9 5/8” Shoe at 6398 feet
44
33
1122
21 Initials
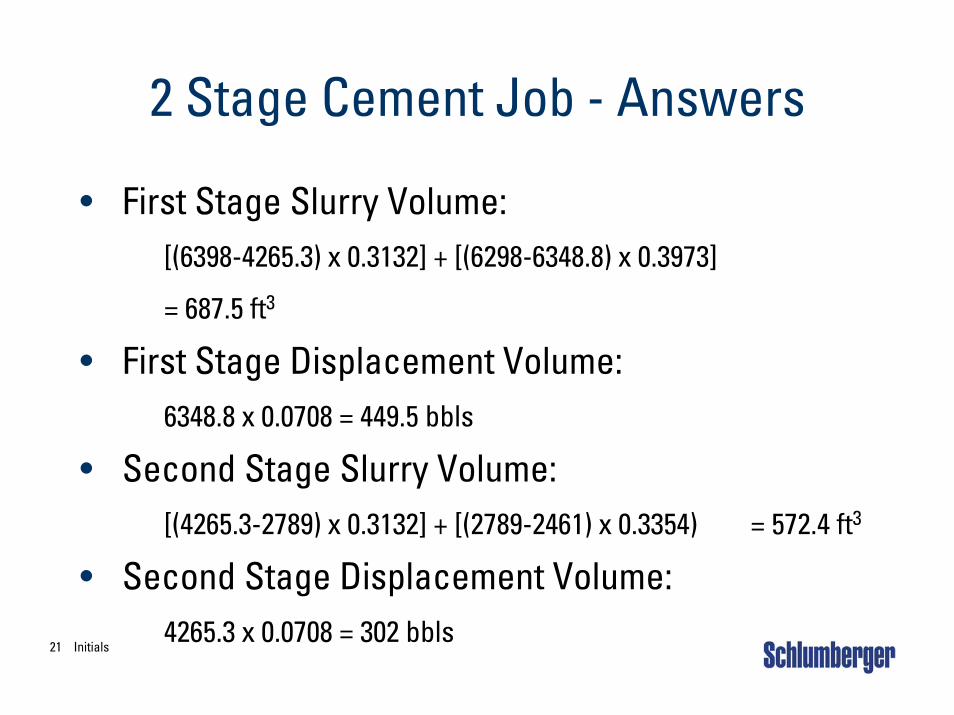
2 Stage Cement Job - Answers
• First Stage Slurry Volume:[(6398-4265.3) x 0.3132] + [(6298-6348.8) x 0.3973]
= 687.5 ft3
• First Stage Displacement Volume:6348.8 x 0.0708 = 449.5 bbls
• Second Stage Slurry Volume:[(4265.3-2789) x 0.3132] + [(2789-2461) x 0.3354) = 572.4 ft3
• Second Stage Displacement Volume:4265.3 x 0.0708 = 302 bbls
22 Initials
weak formation
weak formation
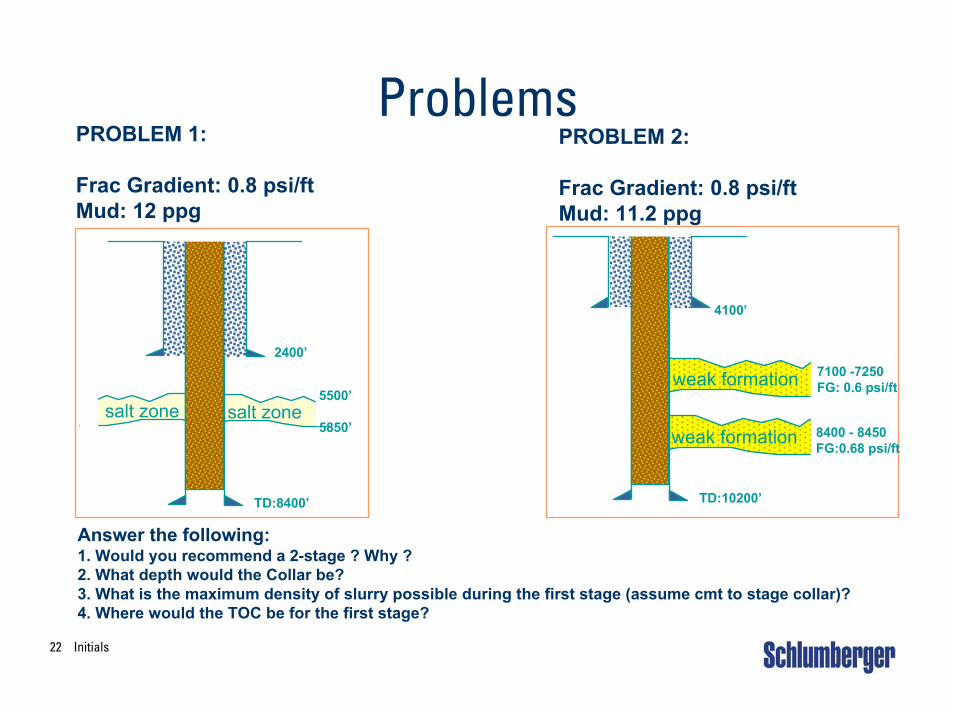
ProblemsPROBLEM 1:
Frac Gradient: 0.8 psi/ftMud: 12 ppg
salt zone salt zone
2400’
5500’
5850’
TD:8400’
4100’
7100 -7250FG: 0.6 psi/ft
TD:10200’
PROBLEM 2:
Frac Gradient: 0.8 psi/ftMud: 11.2 ppg
8400 - 8450FG:0.68 psi/ft
Answer the following:1. Would you recommend a 2-stage ? Why ?2. What depth would the Collar be?3. What is the maximum density of slurry possible during the first stage (assume cmt to stage collar)?4. Where would the TOC be for the first stage?
23 Initials
Liners
• What is a Liner?
24 Initials
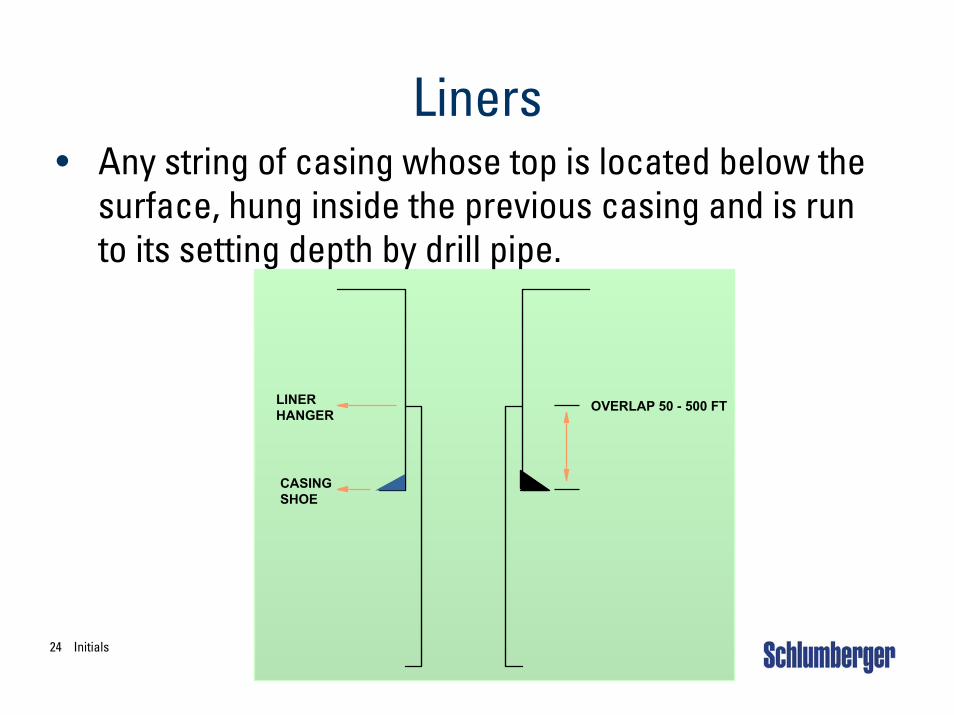
Liners
LINERHANGER
CASINGSHOE
OVERLAP 50 - 500 FT
• Any string of casing whose top is located below the surface, hung inside the previous casing and is run to its setting depth by drill pipe.
25 Initials
Why Liners ?• Prime reason:
• Save $$• (Cost of 1 Joint of Casing can be $3,000!)
• Cover Corroded/Damaged Casing• Cover:
• Lost Circulation Zones.• Shales or Plastic Formations• Salt Zones
• Deep Wells:• Rig Unable to Lift Long String of Casing.
26 Initials
Types of Liners
• Production:• Most common• Save $$• Slotted liner
• Intermediate/drilling:• Cover problem zone in order to be able to continue
drilling
• Tie-back/liner complement:• From top of existing liner to surface, or further up casing
to cover corroded or damaged zone.
27 Initials
Tie-Back (Liner Complement)The integration of the liner with casing run to surface
28 Initials
Tie-Back (Liner Complement)The integration of the liner with casing run to surface
TIE BACKSTINGER WITHSEALS
LINER
29 Initials
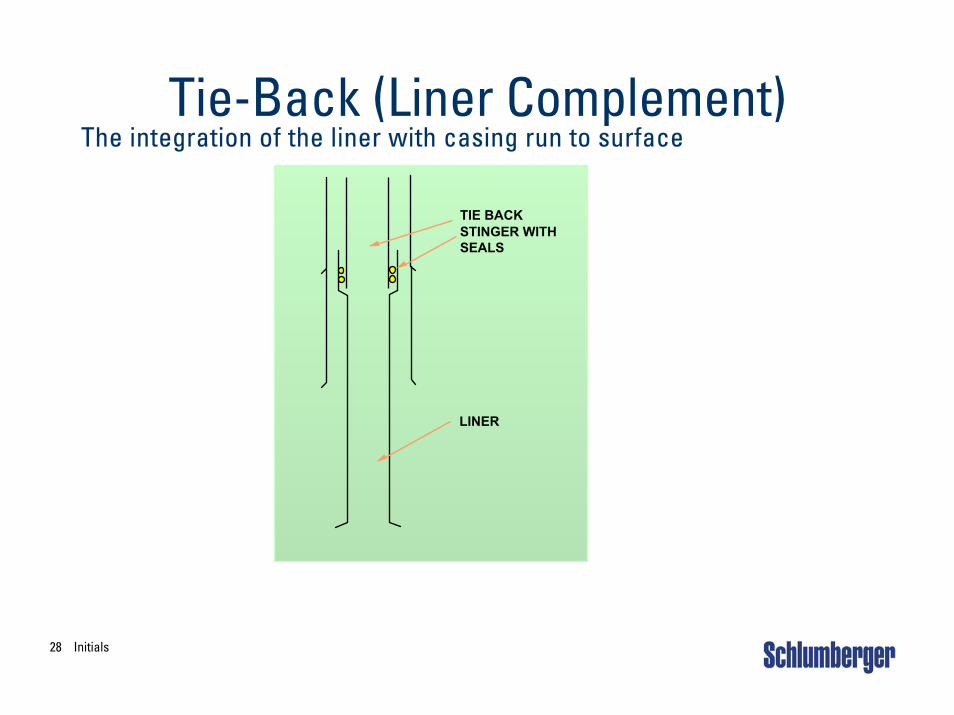
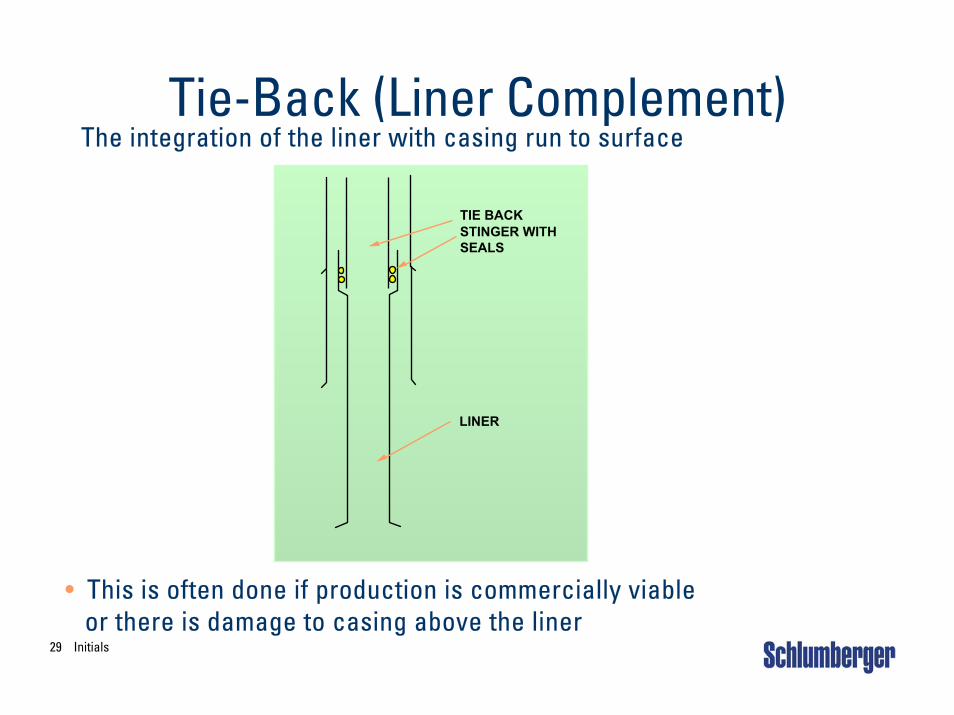
Tie-Back (Liner Complement)The integration of the liner with casing run to surface
TIE BACKSTINGER WITHSEALS
LINER
• This is often done if production is commercially viable or there is damage to casing above the liner

30 Initials
Procedure for Setting Liner• RIH with drillpipe• At liner hanger depth, condition mud
– (Reciprocation / Rotation)
• Release slips (liner hanger)– (Rotation - mechanical pressure - hydraulic)
• Set slips, release liner weight, check to see if running tool is free• Pump mud - to ensure free circulation • Cement / Displace / Bump plug / Bleed off• Release setting tool• POOH above TOC and circulate• NOTE: A liner swivel can be run below the hanger to ensure that
the tool can be rotated even if the liner is stuck or set.
31 Initials
Liner Overlap
• Cementing the liner “lap” is critical .
• Too much cement above the liner hanger is not recommended
• So make sure that “uncontaminated” cement is present at the liner lap - washes and spacers / WELLCLEAN
• If not, there is communication from the annulus to the formation
32 Initials
Recommendations for Liner Cementing
• Ensure rheology of cement system is adequate for 100% mud removal
• Turbulent flow, if possible• Consider 5 - 10 min. “contact time” at liner lap• Batch mix cement• Minimize U-tubing effect• Rotation of liner during cementing (special bearing in
tool)• Adequate mud conditioning prior to cementing
33 Initials
Job Procedure Liner• Pressure test lines.• Pump wash/spacer.• Pump slurry.• Drop "Pump Down" plug (or drill pipe wiper dart).• Displace
– To running tool
– Shear "Wiper Plug”
– Displace to Float Collar
• Bump plug/check for returns.• Release tool.• Pull up to T.O.C. and circulate.
34 Initials
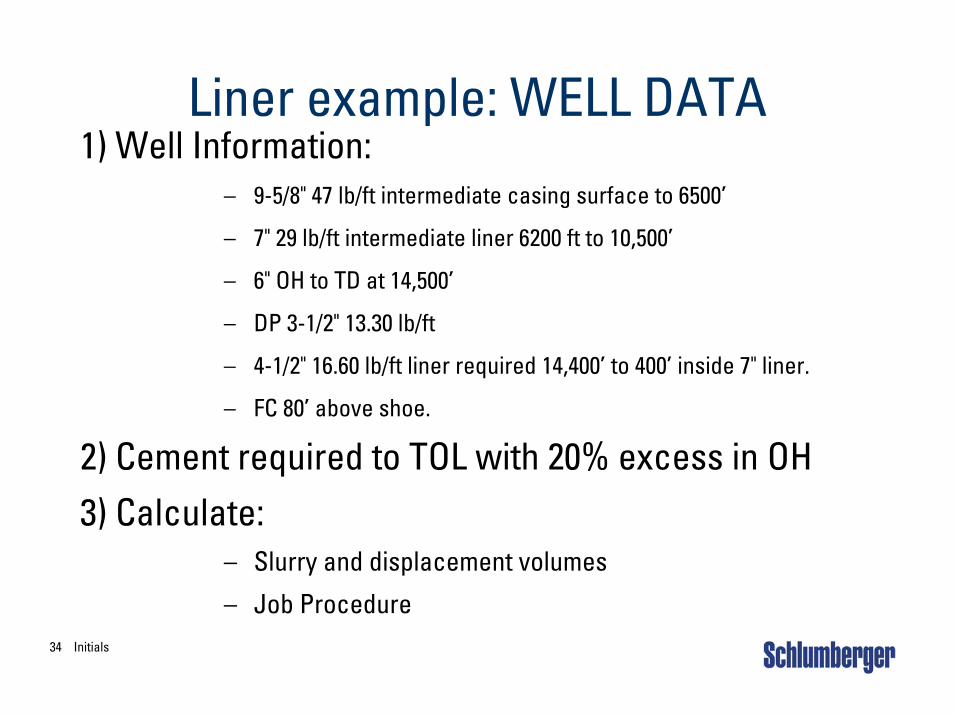
Liner example: WELL DATA1) Well Information:
– 9-5/8" 47 lb/ft intermediate casing surface to 6500’
– 7" 29 lb/ft intermediate liner 6200 ft to 10,500’
– 6" OH to TD at 14,500’
– DP 3-1/2" 13.30 lb/ft
– 4-1/2" 16.60 lb/ft liner required 14,400’ to 400’ inside 7" liner.
– FC 80’ above shoe.
2) Cement required to TOL with 20% excess in OH3) Calculate:
– Slurry and displacement volumes
– Job Procedure
35 Initials
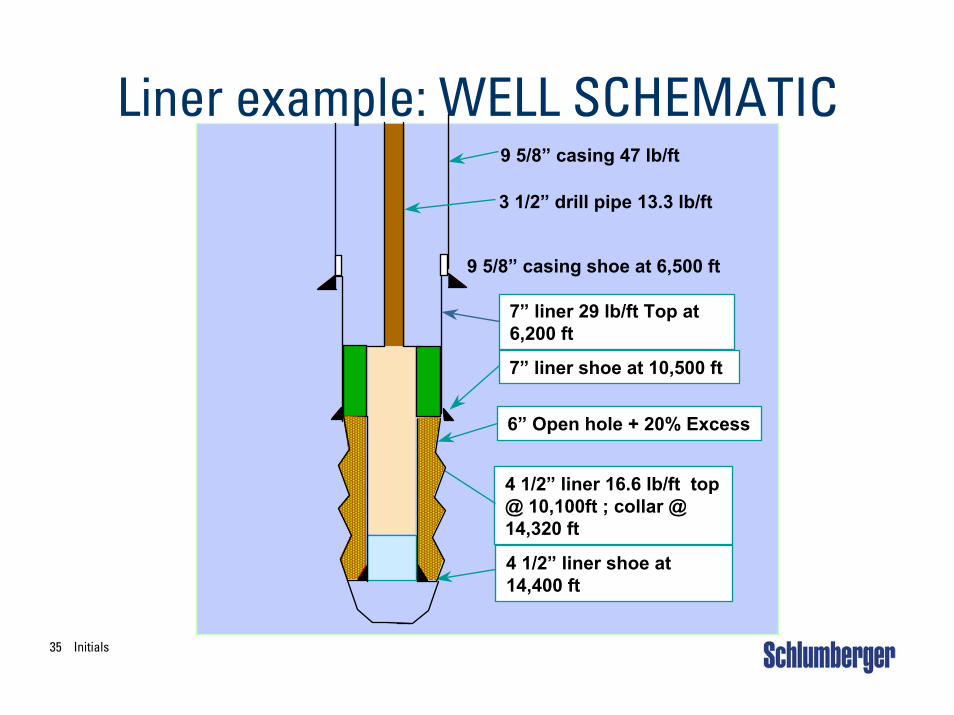
Liner example: WELL SCHEMATIC
3 1/2” drill pipe 13.3 lb/ft
9 5/8” casing shoe at 6,500 ft
9 5/8” casing 47 lb/ft
7” liner 29 lb/ft Top at 6,200 ft
7” liner shoe at 10,500 ft
4 1/2” liner 16.6 lb/ft top @ 10,100ft ; collar @ 14,320 ft
4 1/2” liner shoe at 14,400 ft
6” Open hole + 20% Excess
36 Initials
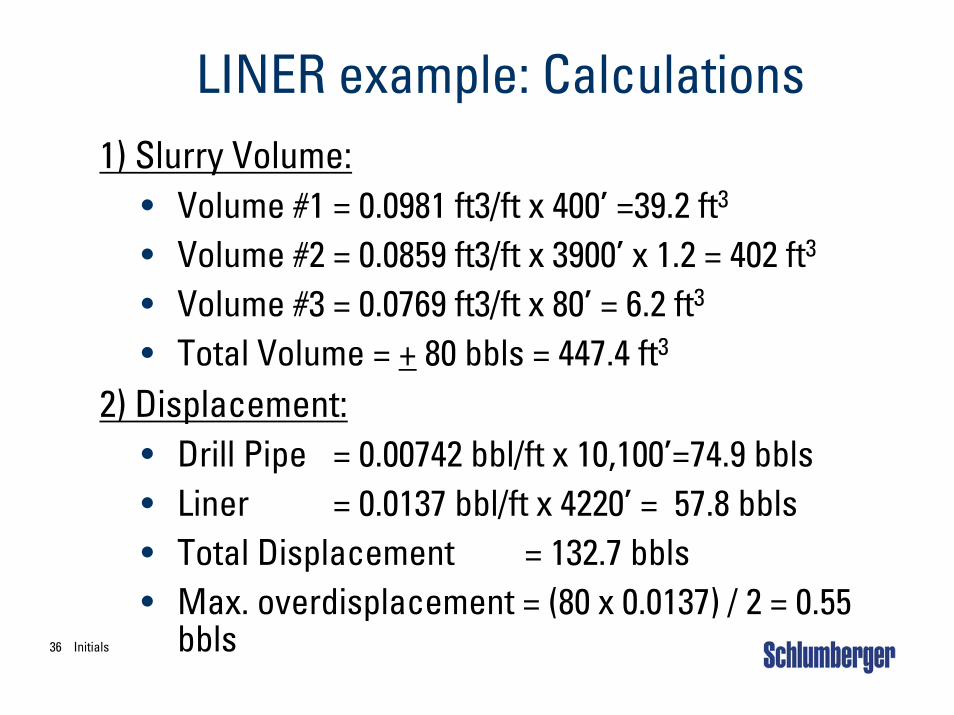
LINER example: Calculations1) Slurry Volume:
• Volume #1 = 0.0981 ft3/ft x 400’ =39.2 ft3
• Volume #2 = 0.0859 ft3/ft x 3900’ x 1.2 = 402 ft3
• Volume #3 = 0.0769 ft3/ft x 80’ = 6.2 ft3
• Total Volume = + 80 bbls = 447.4 ft3
2) Displacement:• Drill Pipe = 0.00742 bbl/ft x 10,100’=74.9 bbls• Liner = 0.0137 bbl/ft x 4220’ = 57.8 bbls• Total Displacement = 132.7 bbls• Max. overdisplacement = (80 x 0.0137) / 2 = 0.55
bbls
37 Initials
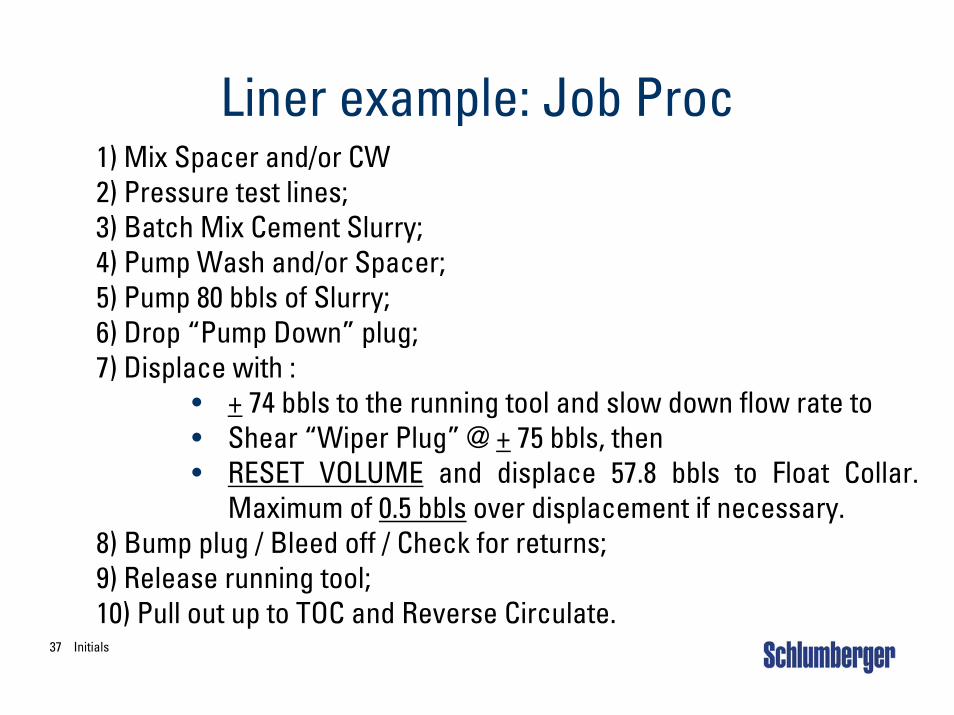
Liner example: Job Proc1) Mix Spacer and/or CW2) Pressure test lines;3) Batch Mix Cement Slurry;4) Pump Wash and/or Spacer;5) Pump 80 bbls of Slurry;6) Drop “Pump Down” plug;7) Displace with :
• + 74 bbls to the running tool and slow down flow rate to• Shear “Wiper Plug” @ + 75 bbls, then• RESET VOLUME and displace 57.8 bbls to Float Collar.
Maximum of 0.5 bbls over displacement if necessary.8) Bump plug / Bleed off / Check for returns;9) Release running tool;10) Pull out up to TOC and Reverse Circulate.
38 Initials
HOMEWORK
Liner Cementing Calculations


40 Initials
Handout

41 Initials
Handout

42 Initials
Handout

43 Initials
Handout
44 Initials
Handout

45 Initials
Handout