Embed Size (px)
Citation preview
2 in 1 Steam Mop & Steam Cleaner
CONTENTS:
2 Safety Instructions
4 Know Your Product
5 Assembly
7 Features And Getting Ready
9 Accessory Attachments
12 Cleaning Bare Floors
12 Storing The Cleaner
13 Troubleshooting
14 Customer Service
14 Warranty
Page 1 of 14
2 in 1 User Manual
IMPORTANT SAFETY INSTRUCTIONS
Read all instructions before using your Steam Cleaner. When using an electrical appliance, basic precautions should be observed, including the following:
WARNING – To reduce the risk of fire, electric shock, of injury:
Do not direct steam at people, animals, at electrical outlets and equipment containing electrical components such as the interior of ovens.
Do not expose to rain. Store indoors. Unplug from outlet when not in use
and before conducting maintenance or troubleshooting.
Do not leave steam cleaner unattended.
Do not use with damaged cord or plug.
Do not use steam cleaner if it has been dropped, damaged, left outdoors, or dropped into water. Take it to a service center for repairs.
Do not handle steam cleaner with wet hands.
Do not pull or carry by cord, use cord as a handle, close door on cord, pull cord around sharp corners or edges.
Do not leave steam cleaner connected to an electrical outlet when not in use.
Not to be used as a toy. Do not use on leather, wax polished
furniture or floors, synthetic fabrics, velvet or other delicate, steam-sensitive materials.
Do not use for any purpose other than described in this User Guide.
Use only manufacturer recommended attachments. Use of attachments not provided or sold by Gruene may cause fire, electric shock or injury.
Never put de-scaling, aromatic, alcoholic, or detergent products into the steam cleaner. This may damage the cleaner or make it unsafe for use.
Unplug by grasping the plug, not the cord.
Close attention is necessary when used by or near children.
Page 2 of 14
THIS MODEL IS FOR HOUSEHOLD USE ONLY Commercial use of this unit voids the manufacturer’s warranty. Never transport or move the device by pulling the cord or carrying it by the
cord. Do not use any solvents or abrasive cleaning agents when cleaning the
device. They could damage the unit’s surface. When needed, wipe the device with a slightly damp cloth.
Test the device for the first time at a discrete place. If you are not sure
whether the device can be used on your floor, please contact your floor’s manufacturer.
Never fill the device with any kind of additives, such as cleaning agents,
de-scaling agents (e.g. vinegar), alcohol, fragrances, etc. Never push objects into the steam vents/nozzles and ensure that they are
never blocked. When using the appliance on laminated floors, the floor should be
professionally installed and should not have any gaps or cracks in which humidity could enter.
Heat and steam damages and removes floor wax.
Never steam at one spot for too long.
This appliance is not suitable for use on unsealed wooden floor coverings,
soft plastics, and wooden furniture. Do not use the appliance on frozen windows. Be careful when using the appliance on glass, as the glass may break.
Page 3 of 14
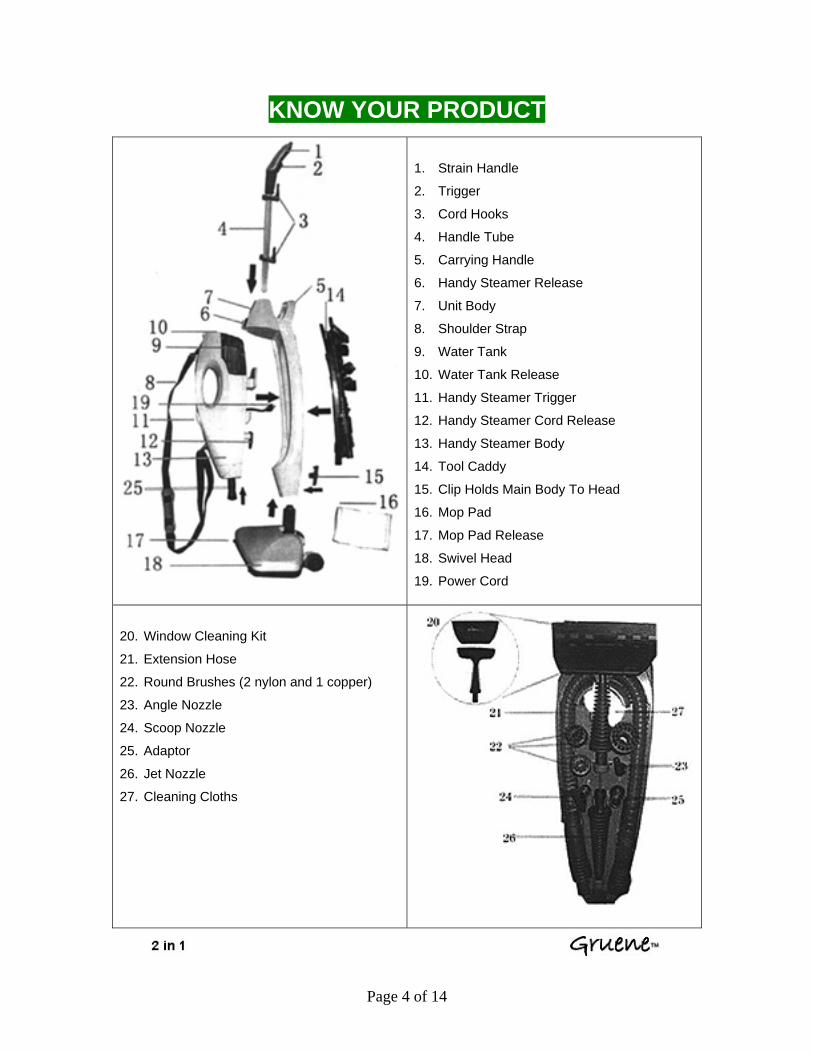
KNOW YOUR PRODUCT
1. Strain Handle
2. Trigger
3. Cord Hooks
4. Handle Tube
5. Carrying Handle
6. Handy Steamer Release
7. Unit Body
8. Shoulder Strap
9. Water Tank
10. Water Tank Release
11. Handy Steamer Trigger
12. Handy Steamer Cord Release
13. Handy Steamer Body
14. Tool Caddy
15. Clip Holds Main Body To Head
16. Mop Pad
17. Mop Pad Release
18. Swivel Head
19. Power Cord
20. Window Cleaning Kit
21. Extension Hose
22. Round Brushes (2 nylon and 1 copper)
23. Angle Nozzle
24. Scoop Nozzle
25. Adaptor
26. Jet Nozzle
27. Cleaning Cloths
Page 4 of 14
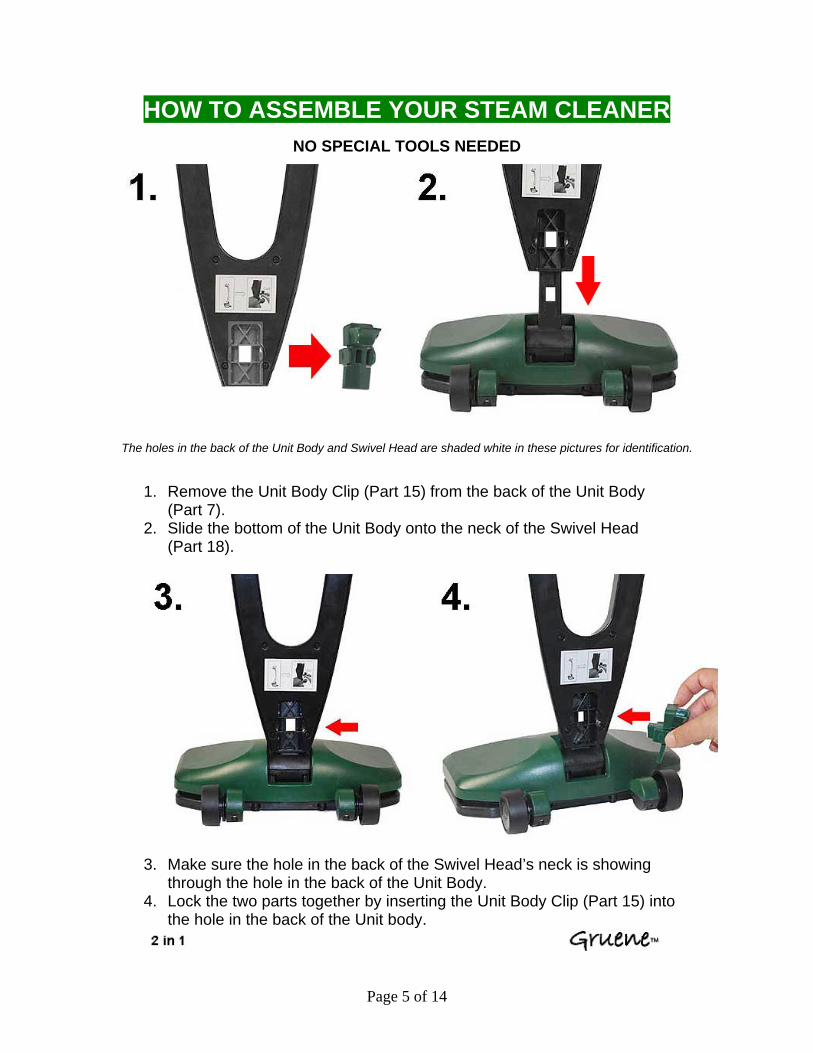
HOW TO ASSEMBLE YOUR STEAM CLEANER
NO SPECIAL TOOLS NEEDED
The holes in the back of the Unit Body and Swivel Head are shaded white in these pictures for identification.
1. Remove the Unit Body Clip (Part 15) from the back of the Unit Body (Part 7).
2. Slide the bottom of the Unit Body onto the neck of the Swivel Head (Part 18).
3. Make sure the hole in the back of the Swivel Head’s neck is showing through the hole in the back of the Unit Body.
4. Lock the two parts together by inserting the Unit Body Clip (Part 15) into the hole in the back of the Unit body.
Page 5 of 14
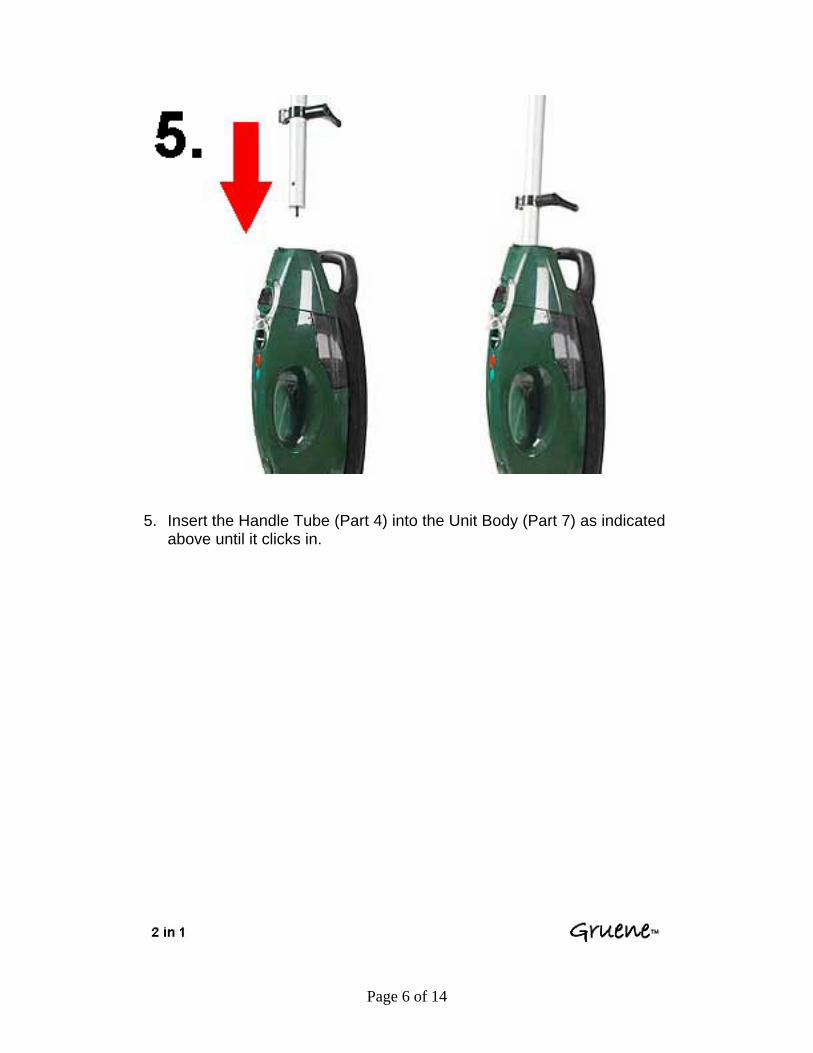
5. Insert the Handle Tube (Part 4) into the Unit Body (Part 7) as indicated
above until it clicks in.
Page 6 of 14
STEAM CLEANER PRODUCT FEATURES
Water Tank: (Part 9) The Water Tank is located on top of the Handy Steamer (Part 13). Distilled or demineralized water can be used instead of tap water.
WARNING: Do not use chemicals with your Steam Cleaner Do not attempt to use your Steam Cleaner without water in the tank
Water Filter is located behind the water tank (Part 9). This removes
minerals and other impurities from tap water. It prevents water deposits from damaging your Steam Cleaner. To maximize the life of your filter, distilled water should be used.
Ready Light is located on the handle of the Handy Steamer (Part 13).
The light will glow when the water has been converted to steam and the Steam Cleaner is ready to use.
Trigger (Part 2 and Part 11): Press to release steam
Swivel Head (Part 18): Allows you to clean in tight spaces and under
cabinets Mop Pad (Part 16): The absorbent terry cloth Mop Pad picks up the dirt
loosened by the steam. The Mop Pad is reusable and machine washable.
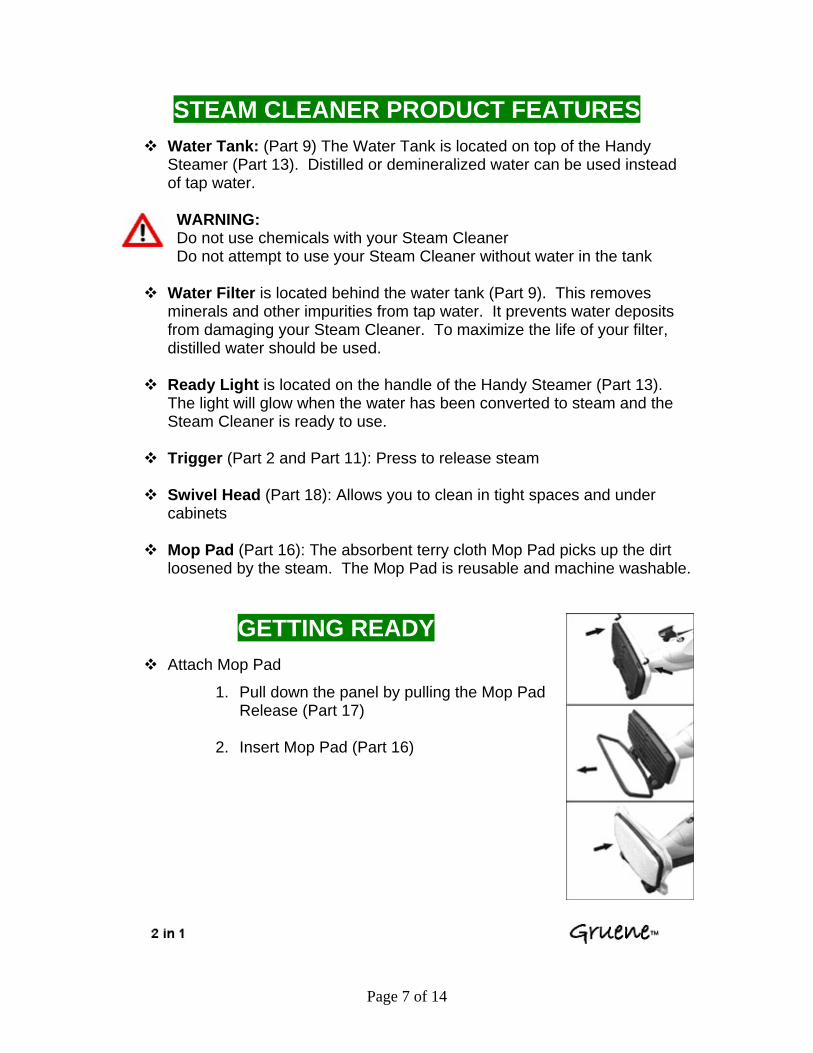
GETTING READY
Attach Mop Pad
1. Pull down the panel by pulling the Mop Pad Release (Part 17)
2. Insert Mop Pad (Part 16)
Page 7 of 14
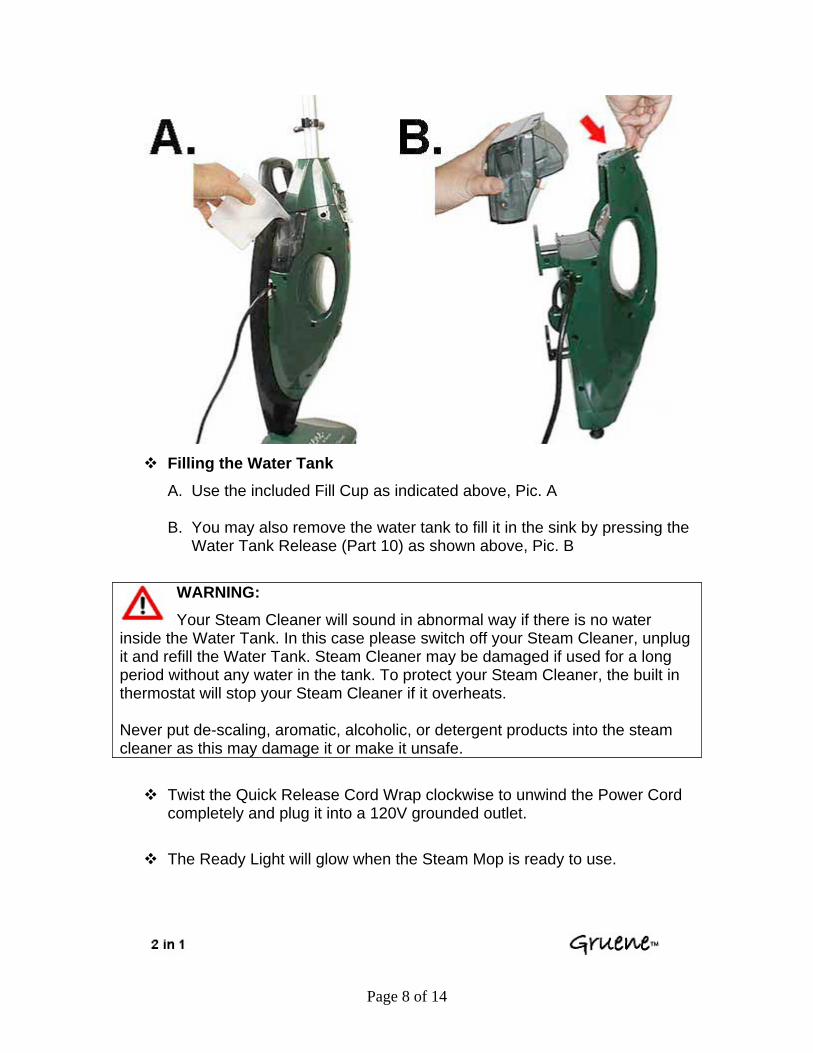
Filling the Water Tank
A. Use the included Fill Cup as indicated above, Pic. A B. You may also remove the water tank to fill it in the sink by pressing the
Water Tank Release (Part 10) as shown above, Pic. B
WARNING:
Your Steam Cleaner will sound in abnormal way if there is no water inside the Water Tank. In this case please switch off your Steam Cleaner, unplug it and refill the Water Tank. Steam Cleaner may be damaged if used for a long period without any water in the tank. To protect your Steam Cleaner, the built in thermostat will stop your Steam Cleaner if it overheats. Never put de-scaling, aromatic, alcoholic, or detergent products into the steam cleaner as this may damage it or make it unsafe.
Twist the Quick Release Cord Wrap clockwise to unwind the Power Cord completely and plug it into a 120V grounded outlet.
The Ready Light will glow when the Steam Mop is ready to use.
Page 8 of 14
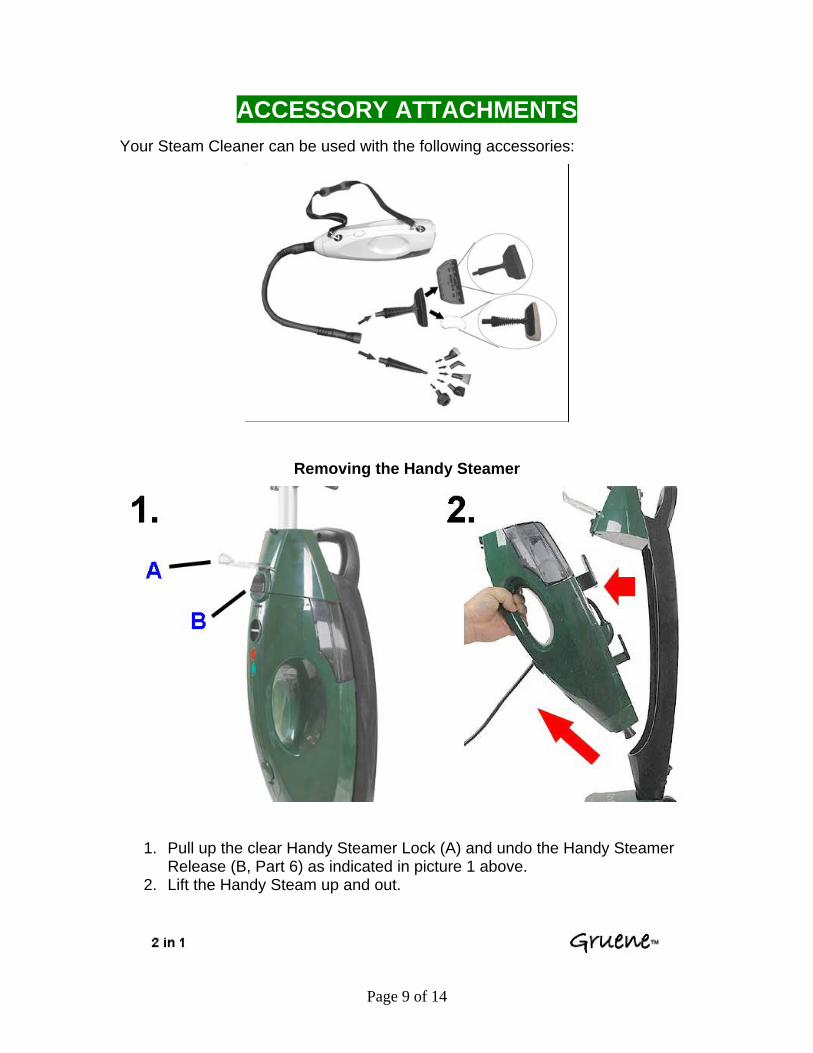
ACCESSORY ATTACHMENTS
Your Steam Cleaner can be used with the following accessories:
Removing the Handy Steamer
1. Pull up the clear Handy Steamer Lock (A) and undo the Handy Steamer Release (B, Part 6) as indicated in picture 1 above.
2. Lift the Handy Steam up and out.
Page 9 of 14
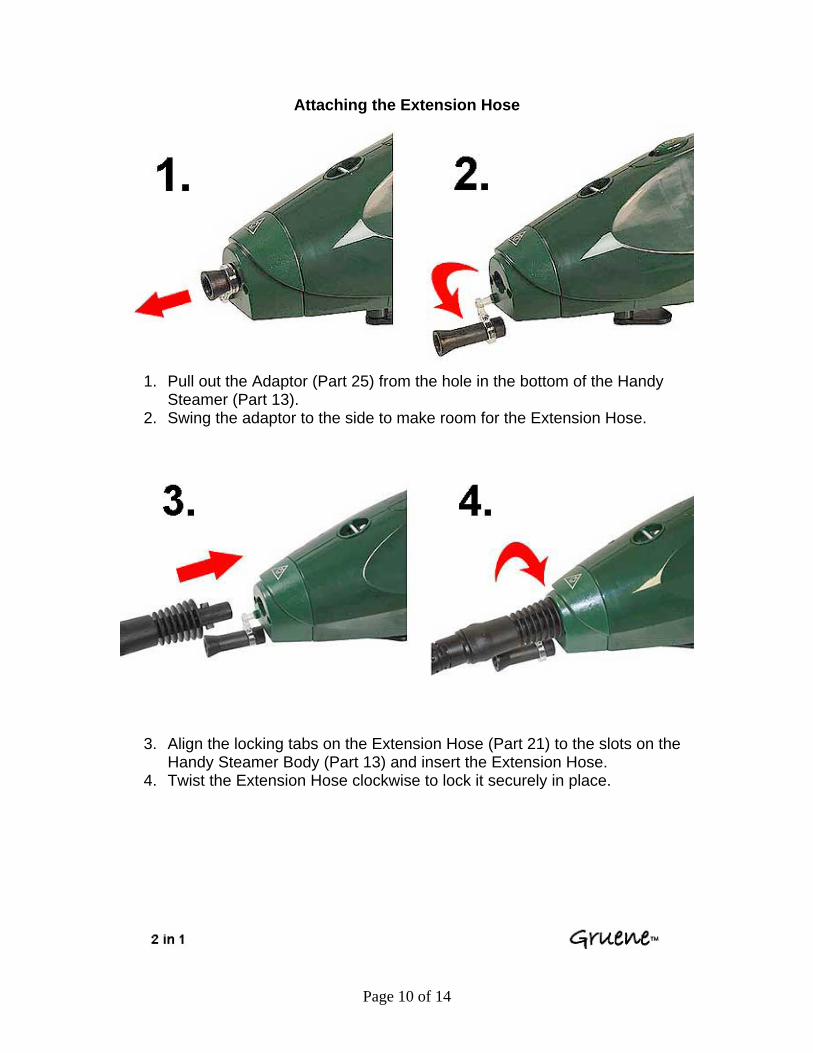
Attaching the Extension Hose
1. Pull out the Adaptor (Part 25) from the hole in the bottom of the Handy Steamer (Part 13).
2. Swing the adaptor to the side to make room for the Extension Hose.
3. Align the locking tabs on the Extension Hose (Part 21) to the slots on the Handy Steamer Body (Part 13) and insert the Extension Hose.
4. Twist the Extension Hose clockwise to lock it securely in place.
Page 10 of 14
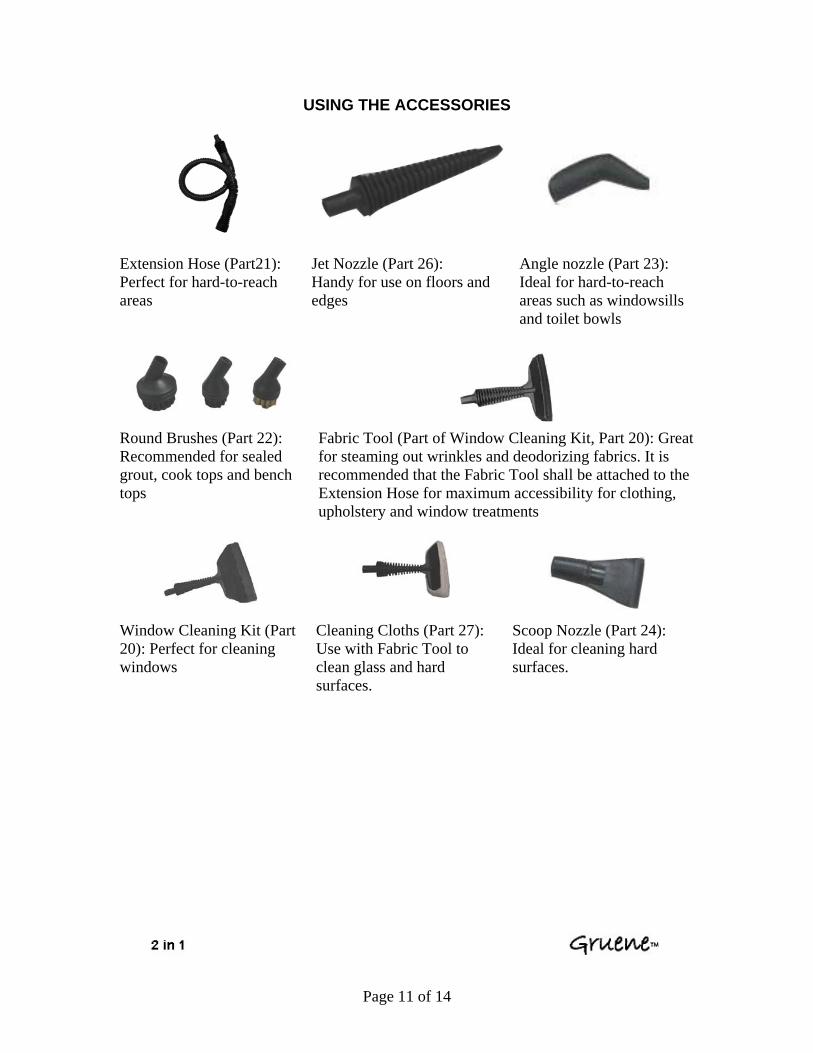
USING THE ACCESSORIES
Extension Hose (Part21): Perfect for hard-to-reach areas
Jet Nozzle (Part 26): Handy for use on floors and edges
Angle nozzle (Part 23): Ideal for hard-to-reach areas such as windowsills and toilet bowls
Round Brushes (Part 22): Recommended for sealed grout, cook tops and bench tops
Fabric Tool (Part of Window Cleaning Kit, Part 20): Great for steaming out wrinkles and deodorizing fabrics. It is recommended that the Fabric Tool shall be attached to the Extension Hose for maximum accessibility for clothing, upholstery and window treatments
Window Cleaning Kit (Part 20): Perfect for cleaning windows
Cleaning Cloths (Part 27): Use with Fabric Tool to clean glass and hard surfaces.
Scoop Nozzle (Part 24): Ideal for cleaning hard surfaces.
Page 11 of 14
CLEANING BARE FLOORS
Your Steam Cleaner is designed to clean bare floors such as ceramic tile, vinyl, laminate, marble, stone and sealed hard wood floors. Use of your Steam Cleaner on waxed or some unwaxed floors may result in a diminished glossiness. The Steam Cleaner should not be used on unsealed wood floors. For best results test in an inconspicuous area or check the care instructions from the flooring manufacturer. Sweep or vacuum floor prior to steam cleaning Slowly pass over surface to be cleaned while pressing trigger to emit
steam. To sanitize an area of your floor, leave the Steam Mop over the area for a
minimum 15 seconds, but no longer than 20 seconds. When the Steam Cleaner stops emitting steam, simply unplug the
Cleaner, remove the Water Tank, refill, and continue cleaning. Note: During first use, it may take several seconds for the Steam Cleaner to produce steam. The water needs to flow through the filter to the heater. This delay will only occur during initial use.
WARNING: Accessories should be attached with Handy Steamer (Part 13) when in use. Unplug your Steam Cleaner and ensure that it has cooled down
before attaching accessories.
STORING THE CLEANER Unplug Power Cord (Part 19) from outlet and let the cleaner cool down
Carefully remove Mop Pad (Part 16) from Swivel Head (Part18).
Any water remaining in the Water Tank (Part 9) should be emptied prior to
storing the unit. Mop Pad (Part 16) can be machine washed in hot water and tumble dried.
Page 12 of 14

Wrap Power Cord (Part 19) around Cord Hooks (Part 3) on side of Steam Cleaner.
Wipe all surfaces of Steam Cleaner with a soft cloth. Store upright in a
protected, dry area.
CAUTION: Upright storage of the Steam Cleaner with a wet Mop Pad may result in the formation of white marks on your floor. To remove the white marks,
clean the affected area with vinegar.
TROUBLESHOOTING
REDUCED STEAM OR NO STEAM Possible Causes Remedies Water Tank Empty
Fill Water Tank (Part 9)
Blocked Steam Nozzle
Remove Swivel Head (Part 18 ) and Clean the Nozzle
The copper ball in Water Tank (Part 9) does not sink into water
Wobble your Steam Cleaner and ensure that the copper ball in Water Tank (Part 9) is immersed in water
WARNING: To reduce the risk of fire, electric shock or injury, unplug appliance from outlet and ensure that the appliance is completely cooled down before
servicing. We are constantly striving to improve our products; therefore, the specifications contained herein are Subject to change without notice.
Page 13 of 14
CUSTOMER SERVICE If you experience any problem with your appliance and you require advice please contact the technical helpline: 1-800-727-7129 Technical Specification Voltage: 120V Power: 1500 Watts
www.gruenesteam.com When contacting Gruene, please have your model number available Please record your model number _____________________________ Please record your purchase date _____________________________ Note: Please keep your original sales report. It provides proof and date of purchase in the event of a warranty claim.
WARRANTY
Gruene Steam Mop and Steam Cleaner Limited One year Warranty IMPORTANT: KEEP YOUR BOX Upon receipt, Gruene will repair or replace the unit free of charge from date of purchase for one year by the original owner. Warranty applies to household use only and not for commercial or rental applications. The warranty does not cover damage or malfunction caused by neglect, negligence, abuse, or unauthorized repair.
Page 14 of 14