Embed Size (px)
Citation preview

3M™ Air Barrier 3015VP with high performance 3M™ Acrylic Adhesive adheres on contact to most exterior building
surfaces without the use of adhesive primer. It can be applied in temperatures between 0ºF and 150ºF (-18ºC and 66ºC) ensuring
that construction projects are not delayed due to severe temperatures. 3M Air Barrier 3015VP is highly UV resistant and does not
need to be covered until after 12 months. It can be installed vertically or horizontally. When product is installed horizontally, it must
be installed starting at the base of the building in a shingled fashion, such that the lower courses are under the upper courses and
water running down the wall will flow over the joints without getting behind the membrane. Each course and butt joints must be
overlapped by 2". All penetrations pipes, ducts, windows and doors must be flashed with 3M™ Air and Vapor Barrier 3015 (elastic
film) such that water drains on top of membrane and not behind it. No primer is needed on most construction surfaces.
3M Air Barrier 3015VP is reverse wound for ease of installation. The impermeable release liner MUST be removed after each lap
has been installed to ensure product performance. Any warranty is null and void if the release liner is not removed from the backing.
The adhesive is very aggressive and quickly bonds to substrates. Do not contaminate the adhesive area with dust or debris before
applying it to the intended surface. Be careful when aligning product on the wall as repositioning may be challenging.
Refer to 3M™ Vapor Permeable Air Barrier 3015VP Specification Guide for detailed application information.
Prepare roll of 3M™ Air Barrier 3015VP by removing
the protective film wrap to expose the adhesive.
Roll the membrane with a rubber roller to ensure a
tight bond to the wall and overlaps.
Unwind the roll with adequate pressure on it, to
ensure a good initial bond to the building substrate,
as you move along the wall.
Ensure that the clear protective film/release liner
is removed from the membrane backing before
installing the next lap of 3015VP.
Wipe the membrane down with a feathering
motion from the middle outward to obtain a
smooth application.
Repeat steps 1–5 for each lap of 3015VP. To ensure
adequate permeability and adhesion remove clear
protective film/release liner before installing next lap.
2 3
4 6

3M™ Air Barrier 3015VP Installation Best Practices
Substrate Surface Requirements
3M™ Air Barrier 3015VP can be applied to a wide variety of sheathing substrates, typically without priming. Substrate condition is
crucial to the adhesion performance of any adhesive membrane.
• Substrate surfaces must be free of grease, oil, un-bonded paint, corrosion or other substances that would adversely affect the
adhesive bond between the membrane and substrate • Substrate surface must be dry to the touch for optimum performance
• Ambient temperature must be between 0ºF and 150ºF (-18ºC and 66ºC)
• Rolls must be stored at a temperature between 0ºF and 150ºF (-18ºC and 66ºC) to ensure initial bond performance
Surface Preparation
• Fill gaps and cracks exceeding 1/4" but less than 1/2" width with 3M™ Polyurethane Construction Sealant 540 (or similar), and tool
the surface flush and smooth
• Fill gaps exceeding 1/2" width with closed cell foam backer rod, seal with 3M Polyurethane Construction Sealant 540 (or similar),
and tool the surface flush and smooth • Concrete substrates shall have fins ground flush and void areas filled
• Masonry substrates must have mortar joints struck flush
Substrate Specific Guidelines
• Exterior gypsum sheathing shall have moisture content below 19%, with no open joints or cracks wider than 1/2"
• Plywood sheathing shall have moisture content below 16%, with no open joints or cracks wider than 1/2"
Details, Penetrations, Windows and Doors
It is recommended to detail window and door penetrations before installing the field membrane, but post-installation is acceptable.
All penetrations, including windows and doors, must be installed in proper sequence for appropriate moisture management. 3M
recommends using 3M™ Air and Vapor Barrier 3015 for flashing and detail work. Penetrations should be additionally sealed with
3M Polyurethane Construction Sealant 540 (or similar) to achieve a weather-tight result. Vertical seams should be staggered from
floor to floor, or separated by a horizontally applied strip of 3M Air Barrier 3015VP.
Membrane Installation
3M Air Barrier 3015VP is wound with the adhesive on the outside surface of the roll to provide easy installation. Follow these steps to
ensure a properly installed product. 1. Prepare roll of 3M Air Barrier 3015VP by removing the protective film wrap to expose the adhesive.
2. Plan the course and once aligned, apply the air barrier by pressing the roll with the exposed adhesive against the building substrate.
3. Unwind the roll with adequate pressure on it, to ensure a good initial bond to the building substrate, as you move along the wall.
4. Wipe the membrane down with a feathering motion from the middle outward to obtain a smooth application.
5. Roll the membrane with a rubber roller to ensure a tight bond to the wall and between overlapped edges.
6. Ensure that the clear protective film/release liner is removed from the membrane backing before the next lap of 3M Air Barrier
3015VP is installed to ensure adequate permeability and lap adhesion.
7. Seal the exposed leading edge of the membrane at the end of each work day using 3M Polyurethane Construction Sealant 540
(or similar). Smooth the bead to the surface to avoid creating areas where water may collect.
Learn about 3M’s advanced technologies for controlling airflow and optimizing the indoor climate at
3M.com/construction or contact your 3M representative at 866-513-4026.
3M Industrial Adhesives and Tapes Division
3M Center, Building 225-3S-06 St. Paul, MN 55144-1000
Phone 866-513-4026
Web 3M.com/construction
Please refer to the Technical Data Page for additional information.
Warranty, Limited Remedy and Disclaimer: Many factors beyond 3M’s control and uniquely within user’s knowledge and control can
affect the use and performance of a 3M product in a particular application User is solely responsible for evaluating the 3M product
and determining whether it is fit for a particular purpose and suitable for user’s method of application. Unless an additional warranty
is specifically stated on the applicable 3M product packaging or product literature, 3M warrants that each 3M product meets the
applicable 3M product specification at the time 3M ships the product. 3M MAKES NO OTHER WARRANTIES OR CONDITIONS,
EXPRESS OR IMPLIED, INCLUDING, BUT NOT LIMITED TO, ANY IMPLIED WARRANTY OR CONDITION OF MERCHANTABILITY OR
FITNESS FOR A PARTICULAR PURPOSE OR ANY IMPLIED WARRANTY OR CONDITION ARISING OUT OF A COURSE OF DEALING,
CUSTOM OR USAGE OF TRADE. If the 3M product does not conform to this warranty, then the sole and exclusive remedy is, at 3M’s
option, replacement of the 3M product or refund of the purchase price. Limitation of Liability: Except where prohibited by law, 3M
will not be liable for any loss or damage arising from the 3M product, whether direct, indirect, special, incidental or consequential,
regardless of the legal theory asserted, including warranty, contract, negligence or strict liability.
3M is a trademark of 3M Company. © 3M 2017. All rights reserved.
Applied to Life.™
M
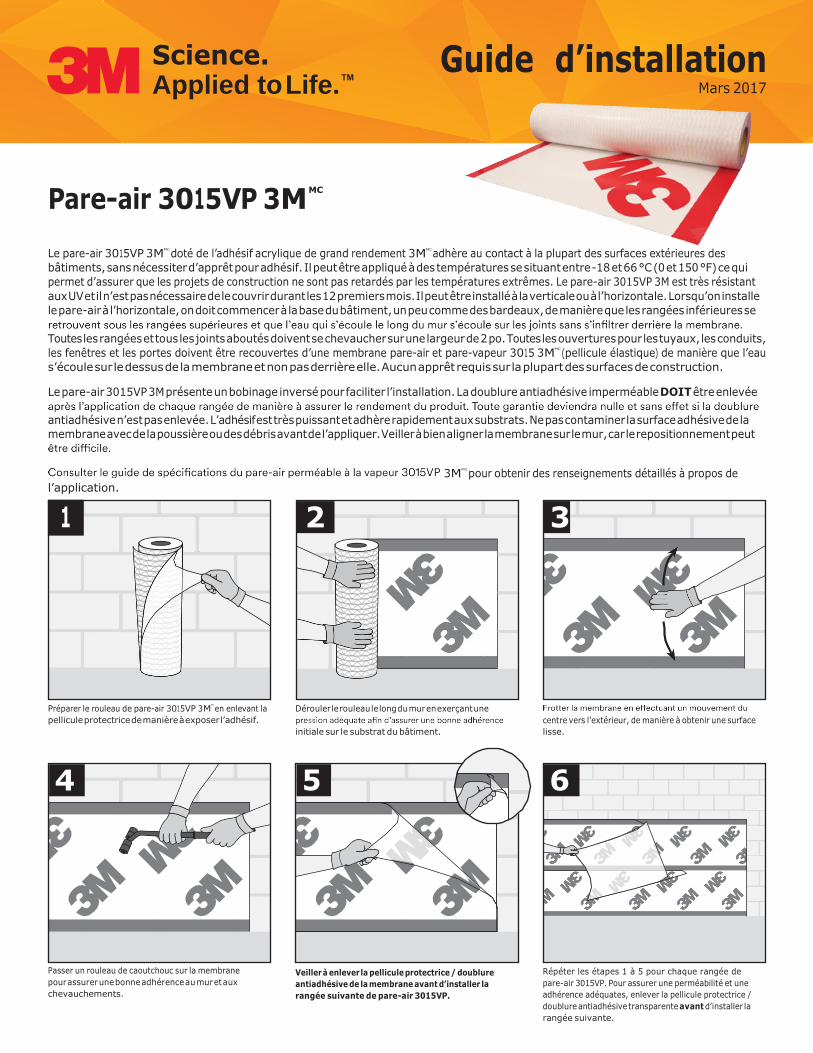
Le pare-air 3015VP 3MMC
doté de l’adhésif acrylique de grand rendement 3MMC
adhère au contact à la plupart des surfaces extérieures des
bâtiments, sans nécessiter d’apprêt pour adhésif. Il peut être appliqué à des températures se situant entre -18 et 66 °C (0 et 150 °F) ce qui
permet d’assurer que les projets de construction ne sont pas retardés par les températures extrêmes. Le pare-air 3015VP 3M est très résistant
aux UV et il n’est pas nécessaire de le couvrir durant les 12 premiers mois. Il peut être installé à la verticale ou à l’horizontale. Lorsqu’on installe
le pare-air à l’horizontale, on doit commencer à la base du bâtiment, un peu comme des bardeaux, de manière que les rangées inférieures se
Toutes les rangées et tous les joints aboutés doivent se chevaucher sur une largeur de 2 po. Toutes les ouvertures pour les tuyaux, les conduits,
les fenêtres et les portes doivent être recouvertes d’une membrane pare-air et pare-vapeur 3015 3MMC
(pellicule élastique) de manière que l’eau
s’écoule sur le dessus de la membrane et non pas derrière elle. Aucun apprêt requis sur la plupart des surfaces de construction.
Le pare-air 3015VP 3M présente un bobinage inversé pour faciliter l’installation. La doublure antiadhésive imperméable DOIT être enlevée
antiadhésive n’est pas enlevée. L’adhésif est très puissant et adhère rapidement aux substrats. Ne pas contaminer la surface adhésive de la
membrane avec de la poussière ou des débris avant de l’appliquer. Veiller à bien aligner la membrane sur le mur, car le repositionnement peut
3MMC
pour obtenir des renseignements détaillés à propos de
l’application.
Préparer le rouleau de pare-air 3015VP 3M
MC
en enlevant la
pellicule protectrice de manière à exposer l’adhésif.
Passer un rouleau de caoutchouc sur la membrane
pour assurer une bonne adhérence au mur et aux
chevauchements.
Dérouler le rouleau le long du mur en exerçant une
initiale sur le substrat du bâtiment.
Veiller à enlever la pellicule protectrice / doublure
antiadhésive de la membrane avant d’installer la
rangée suivante de pare-air 3015VP.
centre vers l’extérieur, de manière à obtenir une surface
lisse.
Répéter les étapes 1 à 5 pour chaque rangée de
pare-air 3015VP. Pour assurer une perméabilité et une
adhérence adéquates, enlever la pellicule protectrice /
doublure antiadhésive transparente avant d’installer la
rangée suivante.
2 3
4 6

Pratiques exemplaires pour l’installation du pare-air 3015VP 3M
MC
Exigences concernant la surface du substrat On peut installer le pare-air 3015VP 3M
MC
sur une grande variété de revêtements extérieurs généralement sans appliquer d’apprêt. L’état du substrat s’avère essentiel à l’adhérence de toute membrane adhésive.
• Ainsi, la surface du substrat doit être exempte de substances qui nuisent à l’adhérence de la membrane (p. ex., graisse, huile, peinture non adhérente, rouille).
• Pour obtenir un rendement optimal, la surface du substrat doit être sèche au toucher • La température ambiante doit être comprise entre -18 et 66 °C (0 et 150 °F) • Les rouleaux doivent être entreposés à une température comprise entre -18 et 66 °C (0 et 150 °F) pour assurer le rendement de l’adhérence
initiale
Préparation de la surface • Remplir de matériau d’étanchéité en polyuréthane pour la construction 540 3M
MC
de 1/4 po et de moins de 1/2 po de largeur, puis façonner le cordon de matériau à égalité avec la surface et le lisser • Remplir les vides de plus de 1/2 po de largeur avec un boudin de calfeutrage en mousse à alvéoles fermées et sceller avec du matériau
d’étanchéité en polyuréthane pour la construction 540 3MMC
(ou un matériau semblable), puis façonner le cordon de matériau à égalité avec la surface et le lisser
• Les bavures et les vides des substrats en béton doivent être respectivement aplanis et remplis. •
Lignes directrices propres au substrat •
plus de 1/2 po de largeur •
de 1/2 po de largeur
Accessoires, éléments passants, fenêtres et portes
dans l’ordre approprié. 3M recommande d’utiliser la membrane pare-air et pare-vapeur 3015 3MMC
pour les travaux d’étanchéisation et de
pare-air 3015VP 3MMC
à l’horizontale.
Installation de la membrane La membrane pare-air 3015VP 3M est enroulée avec l’adhésif vers l’extérieur de manière à faciliter l’installation. Suivre ces étapes pour assurer une installation adéquate du produit. 1. Préparer le rouleau de pare-air 3015VP 3M
MC
en enlevant la pellicule protectrice de manière à exposer l’adhésif. 2. Préparer la rangée et, une fois qu’il est bien aligné, appliquer le pare-air en appuyant sur le rouleau avec l’adhésif exposé contre le substrat
du bâtiment. 3.
bâtiment. 4. 5. Passer un rouleau de caoutchouc sur la membrane pour assurer une bonne adhérence au mur et aux bords qui se chevauchent. 6. Veiller à enlever la pellicule protectrice / doublure antiadhésive transparente de la membrane avant d’appliquer la rangée suivante de
pare-air 3015VP 3M de manière à assurer une perméabilité et une adhérence adéquates. 7.
la construction 540 3M (ou un matériau semblable). Le cas échéant, aplanir le cordon de matériau pour éviter de créer des zones où l’eau peut s’accumuler.
d’air et l’optimisation du climat intérieur en consultant le site Web 3M.com/construction ou en
communiquant avec le représentant de 3M de votre région au 1 866 513-4026.
Veuillez consulter la page Données techniques pour obtenir des renseignements supplémentaires.
Garantie, limite de recours et dénégation de responsabilité :
et le rendement d’un produit 3M dans le cadre d’une application donnée. Il incombe donc à l’utilisateur d’établir si le produit 3M convient à l’usage
Division des rubans et des adhésifs
industriels de 3M
3M Center, Building 225-3S-06
St. Paul, MN 55144-1000
Téléphone 1 866 513-4026
Site Web 3M.com/construction
l’expédition. 3M N’OFFRE AUCUNE AUTRE GARANTIE OU CONDITION EXPLICITE OU IMPLICITE, Y COMPRIS, MAIS SANS S’Y LIMITER, TOUTE
GARANTIE OU CONDITION IMPLICITE DE QUALITÉ MARCHANDE OU D’ADAPTATION À UN USAGE PARTICULIER, OU TOUTE GARANTIE
OU CONDITION IMPLICITE DÉCOULANT DE LA CONDUITE DES AFFAIRES, DES PRATIQUES COURANTES ET DES USAGES DU COMMERCE.
Si le produit 3M n’est pas conforme à cette garantie, le seul et unique recours est, au gré de 3M, d’obtenir le remplacement du produit 3M ou le
remboursement de son prix d’achat. Limite de responsabilité : À moins d’interdiction par la loi, 3M ne saurait être tenue responsable des pertes ou
dommages directs, indirects, spéciaux, fortuits ou conséquents découlant de l’utilisation du produit 3M, quelle que soit la théorie juridique dont on
se prévaut, y compris celles de responsabilité contractuelle, de violation de garantie, de négligence ou de responsabilité stricte.
3M est une marque de commerce de 3M, utilisée sous licence au Canada. © 2017, 3M. Tous droits réservés.
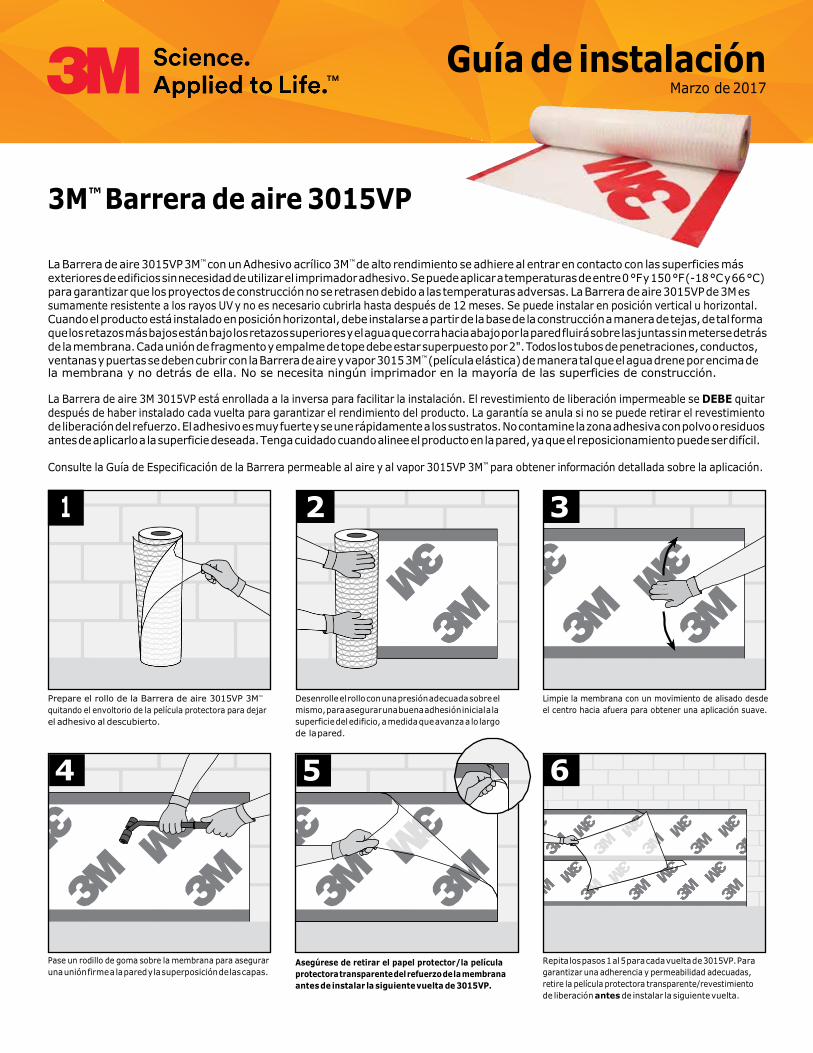
La Barrera de aire 3015VP 3M™ con un Adhesivo acrílico 3M™ de alto rendimiento se adhiere al entrar en contacto con las superficies más exteriores de edificios sin necesidad de utilizar el imprimador adhesivo. Se puede aplicar a temperaturas de entre 0 °F y 150 °F (-18 °C y 66 °C) para garantizar que los proyectos de construcción no se retrasen debido a las temperaturas adversas. La Barrera de aire 3015VP de 3M es sumamente resistente a los rayos UV y no es necesario cubrirla hasta después de 12 meses. Se puede instalar en posición vertical u horizontal. Cuando el producto está instalado en posición horizontal, debe instalarse a partir de la base de la construcción a manera de tejas, de tal forma que los retazos más bajos están bajo los retazos superiores y el agua que corra hacia abajo por la pared fluirá sobre las juntas sin meterse detrás de la membrana. Cada unión de fragmento y empalme de tope debe estar superpuesto por 2". Todos los tubos de penetraciones, conductos, ventanas y puertas se deben cubrir con la Barrera de aire y vapor 3015 3M™ (película elástica) de manera tal que el agua drene por encima de la membrana y no detrás de ella. No se necesita ningún imprimador en la mayoría de las superficies de construcción.
La Barrera de aire 3M 3015VP está enrollada a la inversa para facilitar la instalación. El revestimiento de liberación impermeable se DEBE quitar
después de haber instalado cada vuelta para garantizar el rendimiento del producto. La garantía se anula si no se puede retirar el revestimiento de liberación del refuerzo. El adhesivo es muy fuerte y se une rápidamente a los sustratos. No contamine la zona adhesiva con polvo o residuos antes de aplicarlo a la superficie deseada. Tenga cuidado cuando alinee el producto en la pared, ya que el reposicionamiento puede ser difícil.
Consulte la Guía de Especificación de la Barrera permeable al aire y al vapor 3015VP 3M™ para obtener información detallada sobre la aplicación.
Prepare el rollo de la Barrera de aire 3015VP 3M™
quitando el envoltorio de la película protectora para dejar
el adhesivo al descubierto.
Pase un rodillo de goma sobre la membrana para asegurar
una unión firme a la pared y la superposición de las capas.
Desenrolle el rollo con una presión adecuada sobre el
mismo, para asegurar una buena adhesión inicial a la
superficie del edificio, a medida que avanza a lo largo
de la pared.
Asegúrese de retirar el papel protector/la película
protectora transparente del refuerzo de la membrana
antes de instalar la siguiente vuelta de 3015VP.
Limpie la membrana con un movimiento de alisado desde
el centro hacia afuera para obtener una aplicación suave.
Repita los pasos 1 al 5 para cada vuelta de 3015VP. Para
garantizar una adherencia y permeabilidad adecuadas,
retire la película protectora transparente/revestimiento
de liberación antes de instalar la siguiente vuelta.
2 3
4 6

Prácticas recomendadas de instalación de la Barrera de aire 3015VP 3M™
Requisitos de la superficie de aplicación
La Barrera de aire 3015VP 3M™ se puede aplicar sobre una amplia variedad de sustratos entablados, por lo general sin imprimador.
La condición del sustrato es fundamental para el rendimiento de adherencia de cualquier membrana adhesiva.
• Las superficies del sustrato deben estar libres de grasa, aceite, pintura suelta, corrosión u otras sustancias que pueden afectar adversamente
la adherencia entre la membrana y el sustrato
• La superficie del sustrato debe estar seca al tacto para lograr un rendimiento óptimo
• La temperatura ambiente debe estar entre 0 °F y 150 °F (-18 °C y 66 °C)
• Los rollos deben almacenarse a una temperatura entre 0 °F y 150 °F (-18 °C y 66 °C) para garantizar el rendimiento de adhesión inicial
Preparación de la superficie
• Rellene los huecos y las grietas que superen 1/4" pero tengan menos de 1/2" de ancho con el Sellador poliuretánico para la construcción 540
3M™ (o similar) y use una herramienta para que la superficie quede lisa y suave
• Rellene los huecos superiores a 1/2" de ancho con la barra de respaldo de espuma de celda cerrada, selle con el Sellador poliuretánico para
la construcción 540 de 3M (o similar) y use una herramienta para que la superficie quede lisa y suave
• Los sustratos de hormigón tendrán las aletas al ras de la tierra y se llenarán las áreas vacías
• Los sustratos de mampostería deben tener las juntas de argamasa pulsadas al ras
Pautas específicas según el sustrato
• El entablado exterior de yeso tendrá el contenido de humedad por debajo del 19 %, sin juntas abiertas o grietas mayores a 1/2"
• El revestimiento de contrachapado tendrá el grado de humedad por debajo del 16 %, sin juntas abiertas o grietas mayores a 1/2"
Detalles, penetraciones, ventanas y puertas
Se recomienda detallar las penetraciones de puertas y ventanas antes de instalar la membrana del campo, pero es aceptable hacerlo después
de la instalación. Todas las penetraciones, incluidas las ventanas y puertas, se deben instalar en el orden correcto para el tratamiento de la
humedad adecuada. 3M recomienda usar la Barrera de aire y vapor 3015 3M™ para el trabajo de remate y detalles. Las penetraciones además
se deben sellar con el Sellador poliuretánico para la construcción 540 de 3M (o similar) para lograr un resultado hermético. Las juntas verticales
deben estar escalonadas del piso al piso o separadas por una tira aplicada en posición horizontal de la Barrera de aire 3015VP de 3M.
Instalación de la membrana
La Barrera de aire 3015VP de 3M se enrolla con el adhesivo sobre la superficie externa del rollo para ofrecer una instalación sencilla. Siga estos
pasos para asegurar una instalación correcta del producto.
1. Prepare el rollo de la Barrera de aire 3015VP de 3M quitando el envoltorio de la película protectora para dejar el adhesivo al descubierto.
2. Planifique el curso y una vez alineado, aplique la barrera de aire presionando el rollo con el adhesivo expuesto contra la superficie del edificio.
3. Desenrolle el rollo con una presión adecuada sobre el mismo, para asegurar una buena adhesión inicial a la superficie del edificio, a medida
que avanza a lo largo de la pared.
4. Limpie la membrana con un movimiento de alisado desde el centro hacia afuera para obtener una aplicación suave.
5. Pase un rodillo de goma por la membrana para asegurar una unión firme a la pared y entre los bordes superpuestos.
6. Asegúrese de retirar el papel protector transparente del refuerzo de la membrana antes de instalar la siguiente vuelta de la Barrera de aire
3015VP de 3M para asegurar la adherencia y una permeabilidad adecuada.
7. Selle el borde expuesto de la membrana al final de cada día de trabajo con el Sellador poliuretánico para la construcción 540 de 3M
(o similar). Alise la superficie para evitar que se formen zonas donde pueda acumularse agua.
Aprenda sobre las tecnologías de 3M para controlar el flujo de aire y optimizar el clima interior en
3M.com/construction o póngase en contacto con su representante de 3M al 866-513-4026.
3M Industrial Adhesives and Tapes Division
3M Center, Building 225-3S-06
St. Paul, MN 55144-1000
Teléfono 866-513-4026
Sitio web 3M.com/construction
Remítase a la Ficha de datos técnicos para obtener información adicional.
Garantía, recurso limitado y exención de responsabilidades: Muchos factores que escapan al control de 3M y son de exclusivo control y conocimiento del usuario pueden afectar el uso y desempeño de un producto 3M en una aplicación en particular. El usuario es el único responsable de evaluar si este producto 3M es adecuado para un propósito en particular y si es apto para el método de aplicación del usuario. A menos que se establezca, de manera específica, una garantía adicional en el embalaje o en la literatura relativa al producto pertinente de 3M, 3M garantiza que cada producto de 3M reúne las especificaciones del producto pertinente de 3M en el momento en que 3M envía el producto. 3M NO OTORGA OTRAS GARANTÍAS NI CONDICIONES, EXPRESAS NI IMPLÍCITAS, INCLUYENDO, PERO NO LIMITANDO, CUALQUIER GARANTÍA IMPLÍCITA O CONDICIÓN DE COMERCIABILIDAD O DE APTITUD PARA UN PROPÓSITO EN PARTICULAR O PARA CUALQUIER GARANTÍA IMPLÍCITA O CONDICIÓN EMERGENTE DEL CURSO DE UNA TRANSACCIÓN, COSTUMBRE O USO COMERCIAL. Si el producto 3M no cumple con esta garantía, el único recurso exclusivo es, a criterio de 3M, el reemplazo del producto 3M o el reembolso del precio de compra. Limitación de responsabilidad: Excepto donde la ley lo prohíba, 3M no será responsable por ninguna pérdida o daño resultante de un producto 3M, ya sea directo, indirecto, especial, incidental o consecuente, independientemente de la teoría legal aplicada, incluida la garantía, el contrato, la negligencia o la responsabilidad objetiva.
3M es una marca comercial de 3M Company. © 3M 2017. Todos los derechos reservados.