Embed Size (px)
Citation preview
1987-93 SVE 130 AMP ALTERNATOR INSTALL
1. STOCK ALTERNATOR REMOVAL• Disconnect the battery• Remove the serpentine drive belt (Fig 1.1)• Unplug the voltage regulator connector (Fig 1.2)• Unplug the stator connector• Remove the two attaching bolts that hold the alternator to the bracket• Remove the stock alternator from your Mustang (Fig 1.3)
2. PREPARING WIRING FOR 130 AMP ALTERNATOR• Trim back the harness tape and wire loom (Fig 2.1)• Cut the two black with orange stripe wires from the stock stator plug (Fig 2.1)• Cut the yellow wire and the green wire from the regulator plug (Fig 2.1)• Discard the old regulator and stator plugs (Fig 2.1)• Trim the new stator plug down and strip the wire end (Fig 2.2)• Do the same to the white wire on the center of the new regulator plug• Connect stator plug to the voltage regulator plug with one of the supplied butt crimp connectors (Fig 2.3)• Heat the connector insulation to seal it off (Fig 2.3)• Trim and strip the yellow wire and the green wire on the new regulator connector (Fig 2.3)• Do the same on the harness side (Fig 2.3)• Connect the yellow to yellow and green to green using the supplied butt crimp connectors (Fig 2.3)• Heat the connector insulation to seal them off (Fig 2.3)• Strip the ends of the two black with orange stripe wires (Fig 2.3)• Crimp on the supplied ring terminals (Fig 2.3)• Heat the connector insulation to seal them off (Fig 2.3)
FIG 1.1
FIG 2.1
FIG 1.2
FIG 2.2
FIG 1.3
FIG 2.3
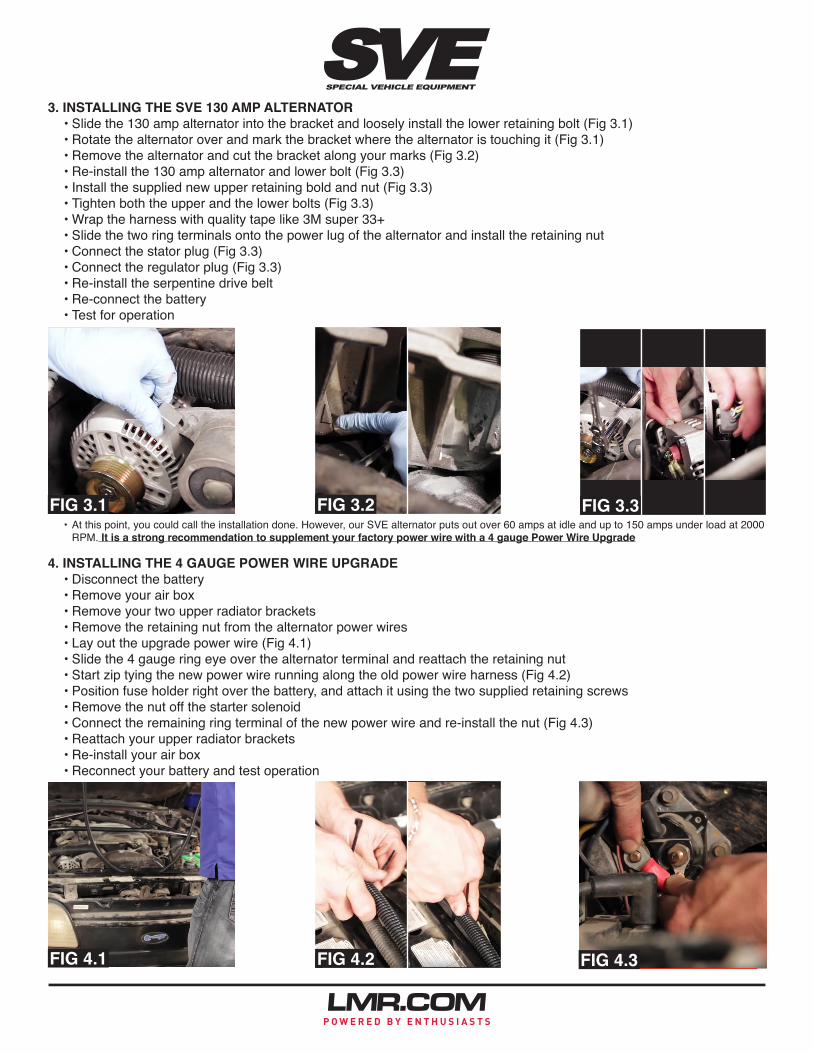
3. INSTALLING THE SVE 130 AMP ALTERNATOR• Slide the 130 amp alternator into the bracket and loosely install the lower retaining bolt (Fig 3.1)• Rotate the alternator over and mark the bracket where the alternator is touching it (Fig 3.1)• Remove the alternator and cut the bracket along your marks (Fig 3.2)• Re-install the 130 amp alternator and lower bolt (Fig 3.3)• Install the supplied new upper retaining bold and nut (Fig 3.3)• Tighten both the upper and the lower bolts (Fig 3.3)• Wrap the harness with quality tape like 3M super 33+• Slide the two ring terminals onto the power lug of the alternator and install the retaining nut• Connect the stator plug (Fig 3.3)• Connect the regulator plug (Fig 3.3)• Re-install the serpentine drive belt• Re-connect the battery• Test for operation
• At this point, you could call the installation done. However, our SVE alternator puts out over 60 amps at idle and up to 150 amps under load at 2000 RPM. It is a strong recommendation to supplement your factory power wire with a 4 gauge Power Wire Upgrade
FIG 3.1
FIG 4.1
FIG 3.2
FIG 4.2
FIG 3.3
FIG 4.3
4. INSTALLING THE 4 GAUGE POWER WIRE UPGRADE• Disconnect the battery• Remove your air box• Remove your two upper radiator brackets• Remove the retaining nut from the alternator power wires• Lay out the upgrade power wire (Fig 4.1)• Slide the 4 gauge ring eye over the alternator terminal and reattach the retaining nut• Start zip tying the new power wire running along the old power wire harness (Fig 4.2)• Position fuse holder right over the battery, and attach it using the two supplied retaining screws• Remove the nut off the starter solenoid• Connect the remaining ring terminal of the new power wire and re-install the nut (Fig 4.3)• Reattach your upper radiator brackets• Re-install your air box• Reconnect your battery and test operation