Embed Size (px)
Citation preview

To play 1942 THE PACIFIC AIR WAR your computer must have:
• a 386SX processor or better (For best play, we recommend at least a full386 with a system speed of 33Mhz or more.);
• at least 594,000 bytes (580Kb) of free conventional memory;
• at least 1.6Mb of free EMS (expanded) memory;
• 14Mb of free space on the hard disk (Note that you can save some spaceby removing some unessential files: open.flc (the title animation) is1,563,324 bytes, mpslogo.flc (the MPS animation) is 794,272 bytes, andanim.cdf (the newsreels) is 1,544,136 bytes.);
• VGA graphics or better;
• a joystick or a mouse.
For ease of play, convenience, and to take advantage of some of 1942 THE PACIFIC
AIR WAR’S advanced viewing features and flight film editing functions, we stronglyrecommend that your computer system include both a joystick and a mouse.
1942 THE PACIFIC AIR WAR supports most of the available flight add-on hardware.We have provided a configuration file for the WCS Mark II — 1942paw.adv. Consultyour Thrustmaster documentation for instructions on using this configuration file. Ifyou have a problem using a particular device with the game, please contactMicroProse Customer Support for assistance.
HARDWARE &SYSTEMREQUIREMENTS
TECHNICAL SUPPLEMENT
1942 PAW Tech Supp 8/15/97 10:07 AM Page 1

COMPATIBILITY ISSUESPlease note that this list includes only the known conflicts and incompatibilities.
Since no test procedure can ever be totally comprehensive, you may run intoundiscovered problems. Please consult with Customer Service if you do.
This game has not been tested under Microsoft Windows; therefore we suggest youdo not use it with Windows. Chances are very good that the two will notwork together.
We strongly recommend that you not have any Terminate-and-Stay-Residentprograms (TSRs) loaded into memory when playing 1942 THE PACIFIC AIR WAR. Notonly will they decrease the amount of free memory available, thus slowing thegame, but there may be unpredictable interactions.
If you experience keyboard response problems using a Tandy computer, the astatus of the keyboard may be reversed. That is, pressing A results in the aA andvice-versa. To fix this problem, tap on the a key until the status returns to normal.We apologize for the inconvenience, but there seems to be something unique to theTandy keyboard BIOS that causes this problem.
In some Packard Bell computers, there may be a conflict between the standardMicroProse boot disk application and some memory configurations. If youexperience a lock up while using a boot disk made by the 1942 installation program,you’ll need to change one line in the config.sys file on the boot disk, thus:
device=c:\dos\emm386.exe ramx=b0000-c400 /d=48 frame =e000 6800
should be:
device=c:\dos\emm386.exe 2048 ram
for DOS version 5.0, and
device=c:\dos\emm386.exe ram highscan
for any version higher than that.
If your hard drive is “doublespaced” and you experience problems using a bootdisk, please add the following line to the end of the config.sys file on the boot disk:
devicehigh= c:\dos\dblspace.sys /move
2
1942 PAW Tech Supp 8/15/97 10:07 AM Page 2

Quick CruiseWhen you’re watching the mission progress from the Pilot Map, sometimesaccelerating time is not enough. For those who want to cut right to the chase, theQuick Cruise feature has been added. Press � to move immediately to the combatarea. As soon as your planes reach cruising altitude, you will be translated to thetarget area. Note that time and fuel will be used, but you won’t have to sit and watchit happen. (Of course, you can not use this feature if you’re already in combat.)
Cycle GunsSometimes, in order to conserve ammunition, you may not want to fire all of yourguns at once. Real fighter pilots had the freedom to fire whichever of their gunsthey thought would be the most effective against a particular target. 1942 THE PACIFIC AIR WAR gives you the same option. Your gun setting at thebeginning of a mission is All, so all of your guns will fire at once. Using the Cyclekey S, you can switch through the three possibilities — All, Primary only, andSecondary only. Note that each model of aircraft follows a different pattern (theyall have different gun set-ups, after all).
TrimmingThe automatic trim feature will cope with most (if not all) of the necessarytrimming. However, there are always those who want to do more or who are notsatisfied with the results of the automated process. For these folks, we haveincluded a manual trim function. Set the controls in the positions you wish to trimthem to and press the Trim key (aT ).
Reality OptionsIn the Carrier Battle, two of these options — Sightings and Battle Reports —have been combined into the Reports option. The flight option Enemy Skill hasbeen added.
A new option, Flight Model, has been added to both of the Realism Optionsmenus. If you choose the Realistic flight model, you will have to contend withengines overheating, wings breaking off when you exceed the structural integrityenvelope of the aircraft, nose trim, effects of engine torque, dive buffeting, andother annoying (but realistic) problems. Arrestor cables will only be strung on therear third of the carrier deck, rather than all over it. If you prefer not to deal withthis sort of thing, select the Unrealistic flight model.
Another new option, Training Mode has been added to the flight list. If Trainingis enabled, you will not get any points for your mission. You will, however, have afew advantages. The enemy planes will be unpiloted drones; they will fly poorlyand will not fire on you. In addition, your aircraft will be supplied with unlimitedbombs or torpedoes. You cannot use Training Mode during career missions.
The Dud Torpedoes option has been removed from the flight options.
3
FEATURESUPDATE
1942 PAW Tech Supp 8/15/97 10:07 AM Page 3

4
Mission Builder NoteWhen creating a mission, it is important that you choose the Home Base andTarget before you begin creating flights. If you change either of these selectionsafter giving orders to any of the flights of planes you have created, those orderswill be re-set. Remember, despite the implication in the manual that you shouldcreate flights first, we recommend that you choose the Home Base and Target first.
Air Search NoteDuring a Carrier Battle, if you decide to change the scope, range, or direction ofan air search while the search is in progress, remember that the change will nottake effect immediately. The aircraft involved must return to the carrier or base toreceive their new orders.
Creating and Editing FlightsIn the Mission Builder, the Nationality button has been removed from the Flight Editing Box. In its place, an Delete Flight button has been added. Use thisbutton to remove the highlighted flight from the flight list. Note that, forconvenience, flights of both nationalities are now listed together on the same list.(Note also that you can not change the nationality of a type of aircraft — no spies.)
The Cockpit Red-LightNight missions without radar are extremely hazardous, and were therefore rare inthe Pacific theater of this war. Nevertheless, you will occasionally begin or end amission in darkness or near-dark conditions. Since the instruments in the cockpittend to be difficult to read in the dark, the designers included a light in the cockpit.This light is red, on the theory that your night vision will be reduced less by a redlight than a white one. To turn this light on and off, use the Lights key, L .
Auto-ScrollThough it is often useful to have the Cockpit Map keep your aircraft on-screen,sometimes you might wish to override this behavior. You can use the Auto-Scrollbuttons on the map key to choose which functionality you prefer. You can alsouse the keyboard shortcut, aS, to toggle Auto-Scroll on and off.
Credit for KillsWhen an aircraft is shot down and a kill is verified and recorded, only one pilot canget credit for the kill. Note that the pilot who got off the last shot does notautomatically get the kill. Whoever did the most damage to the destroyed plane getsthe credit, even though he may have left the job half done. (Who said life was fair?)
Hardware CalibrationAs described in the manual, the calibration of your joystick(s) is automatic. Thisgoes for all of the supported add-on hardware, too. At any time before you enteryour aircraft, move each controller (pedals, throttle, etc.) to the limits of it’smovement to engage the automatic calibration. Note that for joysticks whichinclude the “hat”, you must calibrate the hat as well. A new feature, the Calibratebutton, has been added to the Controls Configuration. This feature allows you tosee the calibration routine working, in case you suspect that a particular controlleris not being recognized or calibrated correctly.
1942 PAW Tech Supp 8/15/97 10:07 AM Page 4

Autopilot NoteThe description in the manual of the way the autopilot controls your plane is validonly in Training Mode. When you are not in that mode, the autopilot will notengage in combat or land the plane. You will be notified when combat is joined,so that you can take control.
DitchingTo successfully ditch your plane in the ocean, you must hit the water at anextremely slow speed. The best bet is to stall below 50 feet. For career andscoring purposes, a ditch will be treated exactly as a bail-out. The chances ofbeing rescued, captured, or killed are the same.
Cruising AltitudesWhen a strike flies to a target, there is always a lead flight that everyone elsefollows. For mutual fire support reasons, the flights in a strike stay close to eachother until they reach their target. Because of this, you may only adjust thecruising altitude of the lead flight. All other flights will automatically adjust theircruising altitudes to match.
The Padlock FeatureThe “Padlock” view is only available when you’re in Virtual Cockpit mode. Toactivate the Padlock feature, you must first choose an enemy to “lock” (just as inreality). Swivel your head around until you can see the enemy. Pressing J willlock the Padlock View onto whatever aircraft is nearest the center of your view.Now, whenever you press Button #2, your virtual view will center on the lockedplane. As long as you hold the button, the view will move to keep the lockedplane centered. Press J again to unlock the target.
Carrier Battle 3-D EngagementIf you abort your piloting in an engagement that is part of a Carrier Battle gamebefore the mission is completed, the computer will finish the attack as though youhad selected to observe the engagement. Keep in mind that, due to limitations tothe number of planes that can be represented in 3-D, damage from large strikeswill be a combination of the damage done in 3-D and damage calculatedstatistically. Your performance in 3-D, however, will have a limited effect on theoutcome of the statistical damage.
Japanese RadiosThis is not a bug — the Japanese pilots do not receive radio messages, as theAmericans do, because the Japanese planes of the time did not carry radios.
Scuttling ShipsIn a Carrier Battle, when a severely damaged ship slows a Task Group down to adegree that is dangerous to the remaining ships, you should scuttle that ship. Thiswas not an uncommon practice during the war, and was used primarily to preventthe enemy from capturing the ship. You can scuttle ships using the Damaged Ships option in the Task Group menu.
5
1942 PAW Tech Supp 8/15/97 10:07 AM Page 5

What could be better than destroying enemy aircraft in a World War II flightsimulation? How about destroying one of your friends in a World War II flight sim?The Modem Play update has been added to this version of 1942 The Pacific Air Warfor those of you who want to fight your friends in the skies over the Pacific Ocean.
Using Modem Play, you can fight in any of the planes that you can pilot in thegame. Note that, if you want to play in a mission that was created with the Mission Builder, it is necessary for that mission to have at least two flyable planesand no more than six planes all together.
SET-UPIn order for two computers to play 1942 The Pacific Air War, it is necessary for
them to be connected via modem or null modem cable. Prior to playing, onecomputer must be designated as the Connect computer. What this means is that thatcomputer will be the one that makes all the final decisions on what type of gameboth computers are going to play.
To begin, click on the new Modem Play button on the Main Menu. The Modem Play Menu appears. At this menu, you must specify which is the Connectcomputer and which computer is going to Wait on Connection. Also, you mustselect a Modem Rate and specify which Comm Port your modem or null modemcable is connected to. (We strongly recommend that both computers use the samebaud rate; in the case of a direct connection, this is mandatory.)
When you finish, the game will check the status of your system. If you are using adirect connection, ignore the “Modem not found” message; the game will connectautomatically and proceed to the mission settings. If you are using a modemconnection, the Dial Menu appears.
The Dial MenuOnce you have gone through setting up your modem for the game, you
have to connect with the person you are going to be playing. At the ModemDial Menu, which appears on the Connect computer, you can enter and use upto ten name and number combinations.
To use or change an existing combination, click on the listing. The name andnumber will be copied into boxes at the bottom of the menu. Click on the Dialbutton to dial the number in the Phone box, or click on either box to edit theinfo in that box.
The Mission SettingsOnce the connection is successful, the person at the Connect computer
decides which type of mission to play and who will fly for which nationality.Clicking on the Head-To-Head button makes the two of you opponents;clicking on Cooperative allows you to play on the same side.
In case you haven’t agreed on settings ahead of time, at the bottom of theMission Settings screen are the Message boxes. Message In shows incomingmessages from the other computer, and Message Out is where you type any
6
MODEM PLAY
1942 PAW Tech Supp 8/15/97 10:07 AM Page 6

message that you want to send to the other computer. To send a message, clickon the Message Out box, type your message, then press e to send it.
The weather selection appears as soon as all of the mission decisions havebeen made. This is exactly the same as the usual weather selection. After youset the weather, you’ll go into the pre-flight check just as in any other mission.
PLAY DIFFERENCESThere are a few Modem Play features that are not available in the standard game.
One is theability to exchange messages with the other player. To do this, press the' (single quote), then type the message. Press e to finish the message.
In the heat of battle, it is rather hard to type a full sentence without getting shotdown. That is why there are pre-set messages, available at a keystroke. After you’vepressed ' to begin a message, use any of the function keys 1 through 0 tosend a pre-set message to the other player. (Note that you can also create your ownpre-set messages by editing the messages.txt file in the 1942 directory.) Be awarethat there are different sets of messages for Head-To-Head and Cooperative play.
You can still pause the game at any time using aP. This will pause the game atboth computers; play will only resume when the player who paused the gamereleases the pause.
Whenever you use 9 to change the Detail Levels, the changes affect only yourcomputer. While you are doing so, the game is paused for both players. The same istrue for 0, the Game Configuration.
Unfortunately, you can not use the Pilot Map while you are in Modem Play. Also,the Time Compression utility is no longer available. In other words, nothing willhappen if you press M, R, or T while in Modem Play.
7
1942 PAW Tech Supp 8/15/97 10:07 AM Page 7

GAME PLAYER’S GUIDE
THE PACIFIC AIR WAR
SIMULATION
1941 PAQ manual 1 cover 8/15/97 10:26 AM Page 1

Ira Wolfert quotes from his book Battle for the Solomons, copyright 1943, North American Newspaper Alliance.
Windows is a registered Trademark of Microsoft, Inc.
1942 THE PACIFIC AIR WARGAME PLAYER’S GUIDE
MicroProse
All rights reserved.Copyright © 1994 MicroProse
This book may not be reproduced in whole or in part, by mimeograph or photocopy or other meanswithout permission, with the exception of quoting brief passages for the purpose of reviews.
1942 PAW manual 1 1-30 8/14/97 3:06 PM Page 1
2
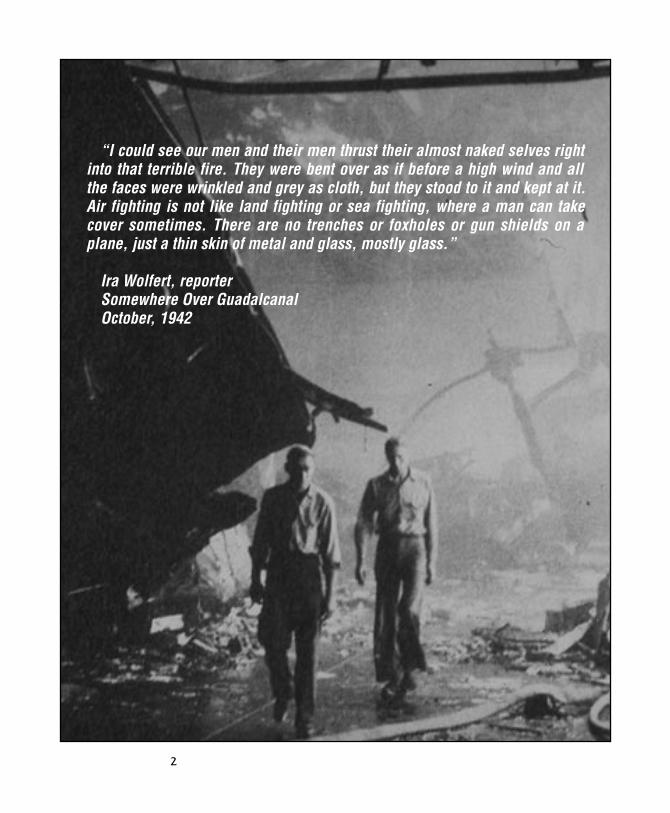
“I could see our men and their men thrust their almost naked selves rightinto that terrible fire. They were bent over as if before a high wind and allthe faces were wrinkled and grey as cloth, but they stood to it and kept at it.Air fighting is not like land fighting or sea fighting, where a man can takecover sometimes. There are no trenches or foxholes or gun shields on aplane, just a thin skin of metal and glass, mostly glass.”
Ira Wolfert, reporterSomewhere Over GuadalcanalOctober, 1942
1942 PAW manual 1 1-30 8/14/97 3:06 PM Page 2

3
INTRODUCTIONFrom December of 1941 through the end of the World War, the combined forces
of Japan fought the armed forces of the United States of America over a broadstretch of ocean peppered with islands. This was the Pacific campaign, one of thebloodiest, toughest-fought campaigns in all of recorded history. Though all of theforces involved were essential parts of the eventual outcome, naval aviation played aspecial part. The carrier forces of both sides proved their worth time and again.
There was nothing pretty and very little funny about the South Pacific campaign,despite what you may have learned from “McHale’s Navy”. Carrier forces didn’thave it any tougher than most, but they didn’t have it any easier, either. The navalaviators, especially, played a risky and daring game with their counterparts on theother side. The miniature wars that they fought out in the skies were a milieu inwhich they were not just faceless, identical soldiers – individual skill made adifference. Your success or failure were in your own hands.
Success, of course, is fleeting; failure was usually final. A flyboy’s “instantretirement” was never easy. To quote an eyewitness to one such event (Ira Wolfert ofthe North American News Alliance), “There must have been twenty acres of flamewhen we first passed over. In the center of the flames lay the frame [of the plane]. Itwas buckling before our eyes. There was nothing left of the plane but the frame, andthe frame looked skinny and black like the bones of a skeleton disintegrating. Twosmall, black objects that could have been men or maybe just round bits of rubble ordebris had been thrown clear of the plane and were on the edge of the oval of flames.”
1942 PAW manual 1 1-30 8/14/97 3:06 PM Page 3

4
The idea behind 1942 THE PACIFIC AIR WAR is to re-create some of the adventureof that time and place and give you a chance to take part in it. To succeed, you haveto avoid that oil- and blood-soaked, fire-on-water grave long enough to be of serviceto your country or your Emperor. As a commanding admiral of the navy, a crackfighter pilot, or just an anonymous Joe tail gunner, you are going to fight forrecognition and just plain survival. The Japanese are moving south and east like asteamroller, trying to take control of the Pacific. The Americans are fighting back,desperately hoping to drain the strength from the Japanese juggernaut.
You decide for which nation you will fight. You decide how you will fight and inwhat capacity. After that, all you can do is give your all and hope that it’s enough.
This book, the Game Player’s Guide, contains complete instructions on installing,running, configuring, and playing 1942 THE PACIFIC AIR WAR. The Keycard is a one-stop reference to all of the keyboard, mouse, joystick, and other controls. TheTechnical Reference includes the hardware requirements for running the game andall of the software compatibility issues discovered before release. Any changes to thegame that were made after this manual was written are also described in theTechnical Reference. As always, the Readme file was written last, so any notationsin that file supersede all other information.
1942 PAW manual 1 1-30 8/14/97 3:06 PM Page 4

STARTUPNow that you’ve bought 1942 THE PACIFIC AIR WAR, you’ll need to install it on yourhard disk before you can play it. Those of you who have purchased and installedrecent MicroProse games are already familiar with the installation process and canprobably just skim this section. The rest of you will want to read carefully. You canavoid a lot of unnecessary complications (and Customer Service calls) that way.
The first step, as always, is to make sure you have enough space on your harddisk to install the game. Consult the Technical Supplement to find outapproximately how much room 1942 THE PACIFIC AIR WAR will fill. If you do not havespace, you will have to clear some files (or find a larger hard disk).
Disk #1 of 1942 THE PACIFIC AIR WAR includes the standard MicroProse installationprogram. To begin the installation process, insert this disk in your drive. Type in theletter of that drive (usually A or B), followed by a colon and the word install, thenpress e. For example, the command:
b:install e
would run the installation program from a disk in drive B.
NOTE: Do not attempt to run the installation program from within MicrosoftWindows or when Windows is running. Install was not designed to interactwith the Windows environment.
5
INSTALLING
1942 PAW manual 1 1-30 8/14/97 3:06 PM Page 5

When the install program starts up, it asks you to verify from which drive you areinstalling and to which drive and directory. By default, the game files are copied fromthe disk drive on which install is running (A: or B:) and to a directory on your C: diskcalled \MPS\1942. You can change either, but if you choose to install from a differentdrive, you’ll have to put disk #1 in that drive. As the installation progresses, you willbe prompted to insert the rest of the game disks. You can specify a new “from” drivefor each disk, which is useful if you have more than one floppy drive.
After the game files have all been installed on your hard drive, install checks yoursystem hardware and suggests a setup based on what it finds. This setup is normallysufficient, but you can modify it if it doesn’t meet your specific requirements.Remember, however, that messing with your setup is probably the most commoncause of unnecessary frustration and Customer Service calls.
NOTE: Some computer systems react badly to the hardware check. Usually, theproblem is caused when install tries to identify your sound card. If youencounter a problem during this portion of the installation, restart installwith the optional switch -s, thus:
install -s
(Note that there must be a space between the command and the switch.)This cancels the sound card check, which should solve the problem. You willneed to select the correct sound card from the menu.
Finally, install checks your free memory. If you don’t have enough, it tells you so.Assuming that your system has enough memory installed (see the TechnicalSupplement for the specific memory requirements), removing some Terminate-and-Stay-Resident programs (TSRs) or loading them into high memory should free upenough to run the game.
Note that you can easily update the installed setup if you change your hardwareconfiguration. All you have to do is run the install program again – this time from thegame directory, not the original disks. Install will not try to re-install the game, andthe setup portion of the program will allow you to update your hardware setup.
If you’ve just finished installing 1942 THE PACIFIC AIR WAR, then the gamedirectory is your current directory. If not, make sure that the directory to which youinstalled the game is your current directory. Normally, this will be C:\MPS\1942.
Type 1942 and press e to start the game. No more than a few seconds shouldpass before the title screen appears.
6
STARTING THEGAME
1942 PAW manual 1 1-30 8/14/97 3:06 PM Page 6
1942 THE PACIFIC AIR WAR is an advanced, complex, historical military simulation.You can not play if you only use keyboard controls. Use of either a joystick or amouse is absolutely necessary. In fact, we strongly recommend you use both.Otherwise, some of the External Camera functions and Flight Film editing features inparticular will be difficult to use.
What follows is a brief introduction to the use of these standard controllers withthis game. Experienced simulation players and those familiar with recent MicroProseproducts will probably want to skim this section. Beginning players will get the mostbenefit from reading it through.
1942 THE PACIFIC AIR WAR is designed to work with most of the available flightsimulation add-on hardware systems. If you follow the installation instructions andthe documentation that came with the add-on system you’re using, you should nothave any problems. Customer Service will likely be able to solve whatever problemsyou do encounter. However, please remember that there is no guarantee that anyparticular piece of non-standard hardware will function with this game.
CONFIGURATIONThe Controls Configuration menu appears the first time you start up 1942 THE
PACIFIC AIR WAR. (You can also call it up as necessary; please refer to the Keycard forthe exact method.) This menu is what you use to specify how you want to controlthe game.
The Primary Flight Control is what you’ll use to control your aircraft. Whichselection you settle on will also affect how you control your weapons. Note that yourchoices for the other options will change (and may be limited) depending on thisselection.
The External Camera (which you’ll learn about later) is moved around using theCamera Control. This can not be the same controller as the primary flight control.
Throttle Control is fairly self-explanatory. The only unusual aspect of this is the“Button 2” option. If you use this control method, pressing and holding the secondbutton on the Primary Flight Control temporarily turns that controller into a throttlecontrol. At that time, moving that control forward increases throttle, while moving itback decreases throttle.
The Rudder Control is used to move the rudder from side to side. As with theThrottle Control, there is a “Button 2” option. If you use this control method,pressing and holding the second button on the Primary Flight Control temporarilyturns that controller into a rudder control. At that time, moving that control to theleft is equivalent to a Rudder Left, while centering the control or moving it to theright cause the corresponding rudder movements.
You can also choose to turn the Sound, Music, and Digitized Sound on or off atthis menu, depending on how you wish the game to sound.
7
THECONTROLS
1942 PAW manual 1 1-30 8/14/97 3:06 PM Page 7
KEYBOARDThe keyboard is the primary control device for your computer, but it is often a
secondary controller while playing 1942 THE PACIFIC AIR WAR. Keystroke commandsare most commonly used to change the viewpoint while flying, to enter text incertain fields (naming pilots, for example), and to control things like the throttle,gear, and brakes.
Keyboard controls are represented in this manual enclosed in boxes. Thus, forexample, Function Key #1 would appear as 1, just as it does on the keyboarditself. Key combinations that should be pressed at the same time are presentedtogether, as in cad. All keys will be capitalized, but you do not need to entercapital letters. (A capital P, for example, would appear as sP, while a lowercasep would be P.) We use the standard abbreviations for the special keys.
Note that if you wish to, you can use the keyboard in place of the mouse orjoystick to select from menus and move on-screen boxes and menus around. Pleaserefer to the Keycard for the exact method.
Though some of the keyboard commands are described in the relevant sections,please refer to the Keycard for the exact keystrokes used in controlling 1942 THE
PACIFIC AIR WAR. There are some keyboard command standards that are shared byvirtually all MicroProse games; those are described here.
PausingAt any time, you can press aP to pause the game. Notification of the pause
will appear, and nothing will happen (in the game) until you release the pause. Theaction in the game will stop until you restart it, but you still have control of theExternal Camera and the viewpoint controls. Note that none of the controls exceptthose relevant to the Camera and viewpoints will have any function. To restart theaction, press aP again.
QuittingThe Main Menu includes an Exit option for leaving the game, but you will not
always have the luxury of enough time to work your way back to this menu to quit.To quit 1942 THE PACIFIC AIR WAR at any time, you can press aQ. The game willprompt you to verify that you want to quit to DOS. If you verify, the game shutsdown and returns you to a DOS prompt. If not, the game continues. Note that if youare in the midst of a career mission when you quit, you will begin again with thatmission when you come back to the game.
If you wish to end your current mission without the hassle of shutting down thewhole game and restarting, press Q. You will be prompted to verify this command.If you were flying a career mission, the mission will be discarded unless youcompleted your objective before quitting.
8
1942 PAW manual 1 1-30 8/14/97 3:06 PM Page 8

MOUSE OR TRACKBALLIf you do not have a joystick attached to your system, the mouse or trackball is
likely to be the primary controller for 1942 THE PACIFIC AIR WAR. (Throughout thismanual, the trackball and mouse are treated as being synonymous and referred to asthe ‘mouse’.) Though it is difficult at first, you can even fly the planes using themouse. Even if you do have both a mouse and a joystick, the mouse is important.The mouse is most often used to select from menus and maps and to move aroundthe briefing screens.
Mouse controls are represented in this manual in bold type and enclosed inbrackets. Thus, for example, the Left Mouse Button would appear as [LMB].Directional controls are represented by “mouse” commands – [Mouse Left], forexample.
The mouse controls for the External Camera are described in the relevant section.You can also use the Keycard as a quick reference. The mouse motions used to flythe plane are summarized here.
9
[RMB] Used as “Button 2”
[LMB] Fire Forward Gun(s)
[Mouse Right] Stick right,bank right (right turn)
[Mouse Left] Stick left,bank left (left turn)
[Mouse Back] Stick back,elevators up, nose up (climb)
[Mouse Fwd] Stick forward,elevators down, nose down (dive)
Note that you can use the mouse to “drag” or “carry” the on-screen menus andboxes around the screen. This can be helpful if one of them overlaps an area you’dlike to see.
1942 PAW manual 1 1-30 8/14/97 3:06 PM Page 9
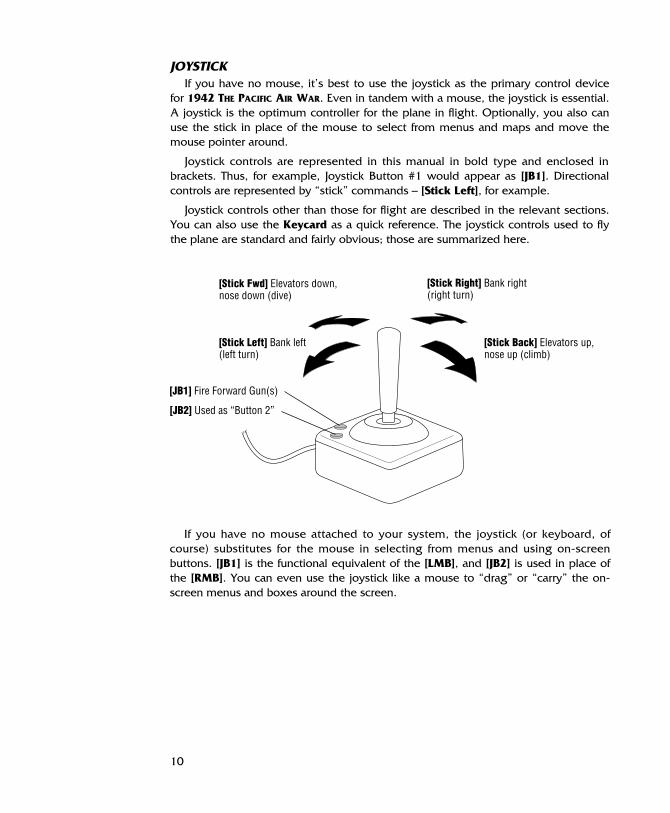
JOYSTICKIf you have no mouse, it’s best to use the joystick as the primary control device
for 1942 THE PACIFIC AIR WAR. Even in tandem with a mouse, the joystick is essential.A joystick is the optimum controller for the plane in flight. Optionally, you also canuse the stick in place of the mouse to select from menus and maps and move themouse pointer around.
Joystick controls are represented in this manual in bold type and enclosed inbrackets. Thus, for example, Joystick Button #1 would appear as [JB1]. Directionalcontrols are represented by “stick” commands – [Stick Left], for example.
Joystick controls other than those for flight are described in the relevant sections.You can also use the Keycard as a quick reference. The joystick controls used to flythe plane are standard and fairly obvious; those are summarized here.
10
[Stick Fwd] Elevators down,nose down (dive)
[JB2] Used as “Button 2”
[Stick Back] Elevators up,nose up (climb)
[Stick Left] Bank left(left turn)
[Stick Right] Bank right(right turn)
[JB1] Fire Forward Gun(s)
If you have no mouse attached to your system, the joystick (or keyboard, ofcourse) substitutes for the mouse in selecting from menus and using on-screenbuttons. [JB1] is the functional equivalent of the [LMB], and [JB2] is used in place ofthe [RMB]. You can even use the joystick like a mouse to “drag” or “carry” the on-screen menus and boxes around the screen.
1942 PAW manual 1 1-30 8/14/97 3:06 PM Page 10
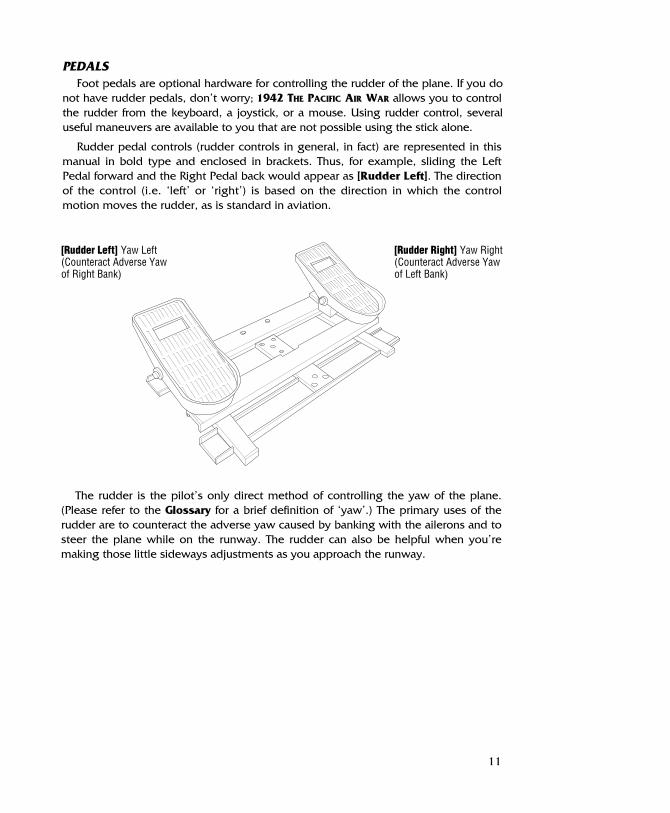
PEDALSFoot pedals are optional hardware for controlling the rudder of the plane. If you do
not have rudder pedals, don’t worry; 1942 THE PACIFIC AIR WAR allows you to controlthe rudder from the keyboard, a joystick, or a mouse. Using rudder control, severaluseful maneuvers are available to you that are not possible using the stick alone.
Rudder pedal controls (rudder controls in general, in fact) are represented in thismanual in bold type and enclosed in brackets. Thus, for example, sliding the LeftPedal forward and the Right Pedal back would appear as [Rudder Left]. The directionof the control (i.e. ‘left’ or ‘right’) is based on the direction in which the controlmotion moves the rudder, as is standard in aviation.
11
The rudder is the pilot’s only direct method of controlling the yaw of the plane.(Please refer to the Glossary for a brief definition of ‘yaw’.) The primary uses of therudder are to counteract the adverse yaw caused by banking with the ailerons and tosteer the plane while on the runway. The rudder can also be helpful when you’remaking those little sideways adjustments as you approach the runway.
[Rudder Left] Yaw Left(Counteract Adverse Yawof Right Bank)
[Rudder Right] Yaw Right(Counteract Adverse Yaw of Left Bank)
1942 PAW manual 1 1-30 8/14/97 3:06 PM Page 11

After the title screen and the opening animations have finished, the 1942 THE
PACIFIC AIR WAR Main Menu is displayed. This is the central control of the game, fromwhich you choose the way you want to fight the Pacific air war. You can commandthe entirety of either carrier fleet, fly historical missions in a fighter or bomber, or liveout a career as a pilot and potentially change the course of the war. 1942 THE PACIFIC
AIR WAR’s special features are also available from this menu, including the flight filmviewer and the custom mission builder.
12
THE MAINMENU
Carrier Battle Command the American or Japanese Navy in the Pacific theater,circa 1942. You can also take over and fly individual missions.
Pilot Career Start your career as a pilot for either side.
Fly Single Mission Fly individual missions for either side. This is the best way to practice in preparation for a piloting career.
High Scores View the scores of the best carrier group commanders and crack pilots.
Flight Films View and edit films of your mission flights. You can save the original films and your edited versions for posterity.
Mission Builder Design and fly “fantasy missions” in the context of the Pacific theater, circa 1942. You can save your missions for later play.
Configure Game Set up the way you want to control the various aspects of the game.
Exit Quit the game and return control to DOS.
1942 PAW manual 1 1-30 8/14/97 3:06 PM Page 12

Veteran flight sim players will notice that the usual “Quick Start” option is missingfrom 1942 THE PACIFIC AIR WAR. Since you can get airborne so quickly using the FlySingle Mission option, including “Quick Start” seemed redundant. For those of youwho want to jump right into the cockpit and leave the details for later, here’s theshortest route:
• On the Main Menu, choose Fly Single Mission.
• Decide whether you want to fly the mission as an American or a Japanese pilot.You can select a nationality by clicking on the appropriate button or flag.
• Next, select the type of mission you want to fly using the buttons in the lower part of the menu. The different types are described under Mission Type, in the Flying A Mission section.
• Choose your mission from the displayed list in the upper part of the menu.
• Accept the default weather and time.
• Read or ignore the mission briefing. Click once anywhere on the screen to proceed.
• Choose your plane’s armament. Click on the Accept button to take thedisplayed load-out.
• Decide which of the Realism Options you want turned on. By default, all ofthese options are off, which is the easiest setting (Difficulty Level 0).
• Take off.
For details on the controls used for piloting your aircraft, please refer to theKeyboard Reference Card (the Keycard) and to the Flying A Mission section.
13
QUICK START
1942 PAW manual 1 1-30 8/14/97 3:06 PM Page 13

CARRIER BATTLECarrier Battle is the part of 1942 THE PACIFIC AIR WAR dedicated to strategy and
tactical play. Most of the other play options, including Single Mission, Career Pilot,and Mission Builder, are primarily flight-oriented. If you’d rather be an admiral thana combat pilot, Carrier Battle is the optimum first choice for you. Those of you whohave played Task Force 1942 Surface Naval Action in the South Pacific will findportions of the command interface familiar, but the tactics quite different.
Resource management – making sure that your ships, aircraft, and pilots are putto best use and are available when and where you need them – is an important partof commanding carrier task groups. Again, Task Force 1942 players will find theyhave experience with this, and it may count as an advantage.
Despite its focus on command and strategy, Carrier Battle does sometimes giveyou the opportunity to push one of the pilots out of the cockpit and fly. You can takeover (in mid-flight!) and fly the “meat” of many of the air strikes you order.
Once you’ve chosen Carrier Battle from the Main Menu, there are still a fewdecisions to make before the battle begins. The first two are fairly obvious – you haveto decide what battle you want to fight and which side you wish to command.Lastly, the Realism Options allow you to make the battle more or less difficult towin, depending on your level of competence.
14
STARTING
1942 PAW manual 1 1-30 8/14/97 3:06 PM Page 14
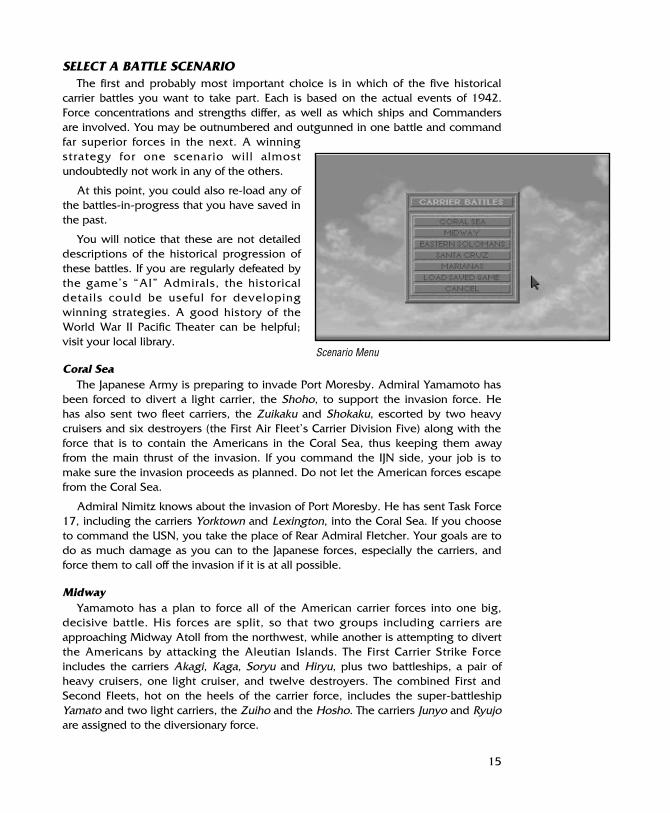
SELECT A BATTLE SCENARIOThe first and probably most important choice is in which of the five historical
carrier battles you want to take part. Each is based on the actual events of 1942.Force concentrations and strengths differ, as well as which ships and Commandersare involved. You may be outnumbered and outgunned in one battle and commandfar superior forces in the next. A winningstrategy for one scenario will almostundoubtedly not work in any of the others.
At this point, you could also re-load any ofthe battles-in-progress that you have saved inthe past.
You will notice that these are not detaileddescriptions of the historical progression ofthese battles. If you are regularly defeated bythe game’s “AI” Admirals, the historicaldetails could be useful for developingwinning strategies. A good history of theWorld War II Pacific Theater can be helpful;visit your local library.
Coral SeaThe Japanese Army is preparing to invade Port Moresby. Admiral Yamamoto has
been forced to divert a light carrier, the Shoho, to support the invasion force. Hehas also sent two fleet carriers, the Zuikaku and Shokaku, escorted by two heavycruisers and six destroyers (the First Air Fleet’s Carrier Division Five) along with theforce that is to contain the Americans in the Coral Sea, thus keeping them awayfrom the main thrust of the invasion. If you command the IJN side, your job is tomake sure the invasion proceeds as planned. Do not let the American forces escapefrom the Coral Sea.
Admiral Nimitz knows about the invasion of Port Moresby. He has sent Task Force17, including the carriers Yorktown and Lexington, into the Coral Sea. If you chooseto command the USN, you take the place of Rear Admiral Fletcher. Your goals are todo as much damage as you can to the Japanese forces, especially the carriers, andforce them to call off the invasion if it is at all possible.
MidwayYamamoto has a plan to force all of the American carrier forces into one big,
decisive battle. His forces are split, so that two groups including carriers areapproaching Midway Atoll from the northwest, while another is attempting to divertthe Americans by attacking the Aleutian Islands. The First Carrier Strike Forceincludes the carriers Akagi, Kaga, Soryu and Hiryu, plus two battleships, a pair ofheavy cruisers, one light cruiser, and twelve destroyers. The combined First andSecond Fleets, hot on the heels of the carrier force, includes the super-battleshipYamato and two light carriers, the Zuiho and the Hosho. The carriers Junyo and Ryujoare assigned to the diversionary force.
15
Scenario Menu
1942 PAW manual 1 1-30 8/14/97 3:06 PM Page 15

Thanks to the codebreaking team, Nimitz knows that the main thrust of theJapanese attack is going to be Midway. Task Force 16, which includes the carriersEnterprise and Hornet, is waiting to the northeast. The unexpected Task Force 17,consisting primarily of the just-repaired Yorktown, is steaming in from Pearl Harbor.
Midway must be protected from invasion at anycost; losing it would mean giving the Japanesecontrol of more than half of the Pacific Ocean.
Eastern SolomonsThe Americans have taken the partially-built
Japanese airfield on Guadalcanal and are rushing tofinish it. Admiral Yamamoto has decided on astrategy to land a great number of reinforcementsand at the same time draw the U.S. carriers to theirdoom. While the carrier Ryojo goes with the landingforce, the Emperor’s last two fleet carriers are taskedwith the destruction of the American carriers.Meanwhile, the admiral himself will lead the mainforce, onboard the flagship Yamato.
Henderson Field is just on the edge of completion, and the Japanese are planningan all-out assault to take it back. Admiral Nimitz has ordered Fletcher to useeverything he has to stop Yamamoto’s Combined Fleet. Only the carrier Hornet is tobe kept in reserve. The Enterprise, the Wasp, and the Saratoga are at his disposal.Protecting the Marines and crippling the IJN carriers are priorities one and two.
Santa CruzThe Japanese forces on Guadalcanal are in need of reinforcements and supplies.
The main body of the Combined Fleet is in the van, with the carriers providingsupport from behind this screen of destroyers and battleships. While the main forcekeeps the Americans occupied, a group of transports will have the opportunity toslip in and drop off sufficient forces. Success in this maneuver should guarantee aquick victory for the Emperor’s troops on Guadalcanal.
Rear Admiral Kinkaid has replaced the injured Fletcher, and he is in command ofTask Force 61 – the Hornet and the Enterprise. He knows that the Japanese havecarriers in the area of Guadalcanal. These ships must be found and destroyed, inorder to prevent Yamamoto’s plan from taking shape. If no extra enemy forces reachGuadalcanal, the U.S. has a very good chance of taking the entire island before theend of the year.
16
USS Yorktown
1942 PAW manual 1 1-30 8/14/97 3:06 PM Page 16

MarianasAmerican submarines have been harassing the Japanese navy’s fuel supply for
months. Most of the IJN ships have to fall back on unrefined fuel all too often. Now,the U.S. has occupied Saipan. If they establish an airbase there, they will be able tolaunch regular attacks directly on the home islands. Admiral Toyoda has devised adesperate plan to thwart the Americans and deny them Saipan. All of Japan’sremaining carriers, split into three carrier groups, are converging on the Marianas.After land-based strikes have weakened the American carrier forces, the Japanesecarriers will launch an all-out attack that should cripple the U.S. fleet.
The massed power of the Fifth Fleet’s Task Force 58 is lying in wait for theJapanese at Saipan. Seven heavy carriers and eight light carriers, plus a multitude ofbattleships, destroyers, cruisers, and other ships have prepared a hammeringambush. Admiral Kelly’s Expeditionary Force includes twelve more escort carriers,just in case. The Americans’ intention is clearly to annihilate the Japanese fleet andtake away the enemy’s ability to fight in the air.
Load Saved GameLeft-click on this button to take up where you left off in a saved battle. You will be
presented with a list of those available from which to choose. Use the arrow keys orthe mouse pointer to find and select the fight you want to rejoin. The battle restartswithout further delay.
Once you have decided on a battle scenario, you must choose a side tocommand. The only options are the major combatants in the theater, the Americansand the Japanese.
Your nationality will determine the number and strength of your forces. Yourcarrier groups and bases will be organized and positioned as the originals were in1942, and will begin following the historicalcourse of events as soon as the curtain goesup. The commanders of your task groups willmake decisions much like their historicalarchetypes, unless you override them with astrategy of your own.
Keep in mind that early in the war theJapanese fighters (Zekes, or “Zeros”) are moreagile and maneuverable than the American,but the American fighters are better armored.At the time of these battles, the Japanesetorpedoes were far superior in accuracy andreliability to the Americans’.
17
NATIONALITY
1942 PAW manual 1 1-30 8/14/97 3:06 PM Page 17
At this point, you are presented with the Difficulty Level Menu. There are severalRealism Options for battle, described below, each of which affects the way thegame plays. All of these options default to the easier setting (Difficulty Level 0), andchanging any of them raises the overall Difficulty Level. A higher Difficulty Levelmakes the game harder, but also increases your final score.
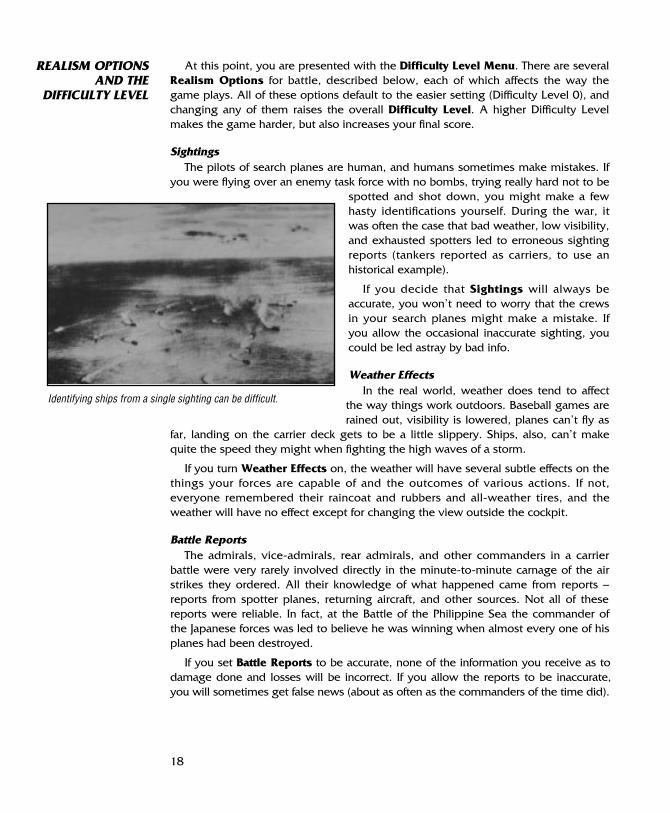
SightingsThe pilots of search planes are human, and humans sometimes make mistakes. If
you were flying over an enemy task force with no bombs, trying really hard not to bespotted and shot down, you might make a fewhasty identifications yourself. During the war, itwas often the case that bad weather, low visibility,and exhausted spotters led to erroneous sightingreports (tankers reported as carriers, to use anhistorical example).
If you decide that Sightings will always beaccurate, you won’t need to worry that the crewsin your search planes might make a mistake. Ifyou allow the occasional inaccurate sighting, youcould be led astray by bad info.
Weather EffectsIn the real world, weather does tend to affect
the way things work outdoors. Baseball games arerained out, visibility is lowered, planes can’t fly as
far, landing on the carrier deck gets to be a little slippery. Ships, also, can’t makequite the speed they might when fighting the high waves of a storm.
If you turn Weather Effects on, the weather will have several subtle effects on thethings your forces are capable of and the outcomes of various actions. If not,everyone remembered their raincoat and rubbers and all-weather tires, and theweather will have no effect except for changing the view outside the cockpit.
Battle ReportsThe admirals, vice-admirals, rear admirals, and other commanders in a carrier
battle were very rarely involved directly in the minute-to-minute carnage of the airstrikes they ordered. All their knowledge of what happened came from reports –reports from spotter planes, returning aircraft, and other sources. Not all of thesereports were reliable. In fact, at the Battle of the Philippine Sea the commander ofthe Japanese forces was led to believe he was winning when almost every one of hisplanes had been destroyed.
If you set Battle Reports to be accurate, none of the information you receive as todamage done and losses will be incorrect. If you allow the reports to be inaccurate,you will sometimes get false news (about as often as the commanders of the time did).
18
REALISM OPTIONSAND THE
DIFFICULTY LEVEL
Identifying ships from a single sighting can be difficult.
1942 PAW manual 1 1-30 8/14/97 3:06 PM Page 18

Force ConfigurationThose of you who have studied the historical context of these battles or played out
each Carrier Battle scenario several times will find few surprises in the position,strength, and configuration of the forces on each side. It is conceivable that youmight want to spice things up a little. The Set-up option lets you do just that. Youcan choose whether the force configurations are based on historical fact or aregenerated by the whim of the game.
Select Historic Set-up to have the two nations’ forces closely match their historicalconfigurations and starting positions. Use the Random Set-up to add a littleuncertainty to the situation.
Skill LevelYou rarely know, when you enter a sea battle, how cunning and experienced your
opponent is. Much of the time, you don’t even know the identity of the enemycommander. In 1942 THE PACIFIC AIR WAR, you normally won’t know who you’re upagainst unless your spotters are pretty good, but you have a chance to decide justhow skillful your opponents are going to be.
If you choose the easier Skill Level, the opposing admirals and other task forcecommanders will be less intelligent and crafty than their historical archetypes. If youchallenge the more difficult level, prepare to have your butt kicked all over the Pacific.
Piloting OptionsSeveral of the Reality Options only affect the way things work when you choose
to enter the cockpit and fly the combat portion of a strike mission. These options aredescribed briefly below. For more details, please refer to Realism Options and theDifficulty Level, in the Flying A Mission section.
Ammunition Loads the plane with either realistic or unlimited ammunition.
The Sun Turns the blinding aspect of facing the sun on and off.
Mid-air Collisions Sets whether or not other aircraft are treated as solid objects.
Ships Evade Determines whether ships will try to dodge bombs and torpedoes.
Blackouts Real pilots black out at high g’s; you have a choice.
Fatal Crashes Makes collisions either harmless or plane-destroying.
Hit Detection Scoring of hits with all types of weapons can be easy or realistic.
Engine Overheating Engine will die out when overheated if this option is selected.
Engine Torque With torgue selected, the aircraft will naturally lean to the left.
Enemy Pilot Skilled Enemy aircraft skill will be higher with this option selected.
Landings Gives you the option to make landings easy or realistic.
Real Flight Model Gives your flight more variants to deal with when selected.
19
1942 PAW manual 1 1-30 8/14/97 3:06 PM Page 19
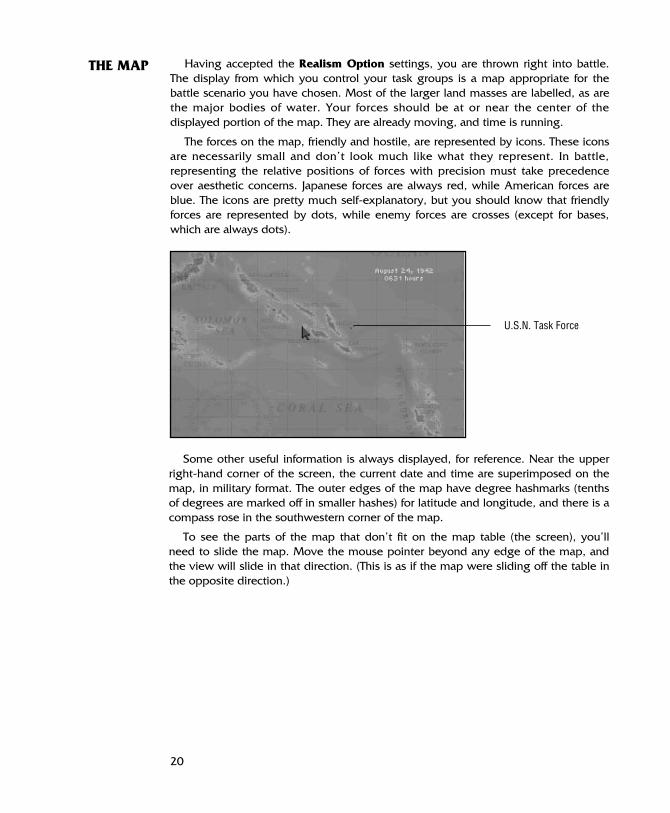
Having accepted the Realism Option settings, you are thrown right into battle.The display from which you control your task groups is a map appropriate for thebattle scenario you have chosen. Most of the larger land masses are labelled, as arethe major bodies of water. Your forces should be at or near the center of thedisplayed portion of the map. They are already moving, and time is running.
The forces on the map, friendly and hostile, are represented by icons. These iconsare necessarily small and don’t look much like what they represent. In battle,representing the relative positions of forces with precision must take precedenceover aesthetic concerns. Japanese forces are always red, while American forces areblue. The icons are pretty much self-explanatory, but you should know that friendlyforces are represented by dots, while enemy forces are crosses (except for bases,which are always dots).
20
THE MAP
Some other useful information is always displayed, for reference. Near the upperright-hand corner of the screen, the current date and time are superimposed on themap, in military format. The outer edges of the map have degree hashmarks (tenthsof degrees are marked off in smaller hashes) for latitude and longitude, and there is acompass rose in the southwestern corner of the map.
To see the parts of the map that don’t fit on the map table (the screen), you’llneed to slide the map. Move the mouse pointer beyond any edge of the map, andthe view will slide in that direction. (This is as if the map were sliding off the table inthe opposite direction.)
U.S.N. Task Force
1942 PAW manual 1 1-30 8/14/97 3:06 PM Page 20

FORCE INFORMATION BOXESWhenever the mouse pointer moves over a group of ships or a base, a Force
Information Box opens. This box summarizes the most important facts known aboutthat fighting force. For a friendly base, this information includes:
Name of BaseLocation (Latitude and Longitude)Damage to the AirfieldList of all Squadrons Currently Based Here
Base Info Box
If the pointer is over one of your task groups, the information in the box willinclude:
Task Group (TG) NumberName of Commanding OfficerCurrent Location (Latitude and Longitude)HeadingSpeedCompositionGun Range
Task Group Info Box
Note: For those of you who may be unfamiliar with the standard military vesseltype abbreviations used in denoting the composition of a task group:
BB = Battleship CA = Heavy Cruiser
CL = Light Cruiser CV = Aircraft Carrier
DD = Destroyer TR = Transport
21
Base Information Box(Friendly)
Task Group Information Box(Friendly)
1942 PAW manual 1 1-30 8/14/97 3:06 PM Page 21

Whenever a Force Information Box is open on one of your task groups or bases,you can give orders to the forces listed in the box. Left-click to open the CommandMenu. Note that time stops while you are giving orders to your forces.
Force Information Boxes for enemy forces will include only the information yourreconnaissance planes were able to collect, plus whatever can be calculated fromthat data. The names of commanding officers, for example, will surely remainunknown. For an enemy base, you will normally get:
Name of BaseLocation (Latitude and Longitude)List of those Squadrons Spotted by Reconnaissance
The standard reconnaissance report on an enemy task group includes:
Time and Date of SightingLocation (Latitude and Longitude) at time of sightingSpeed and Heading at time of sightingComposition at time of sighting
SCALEThere are three levels of scale on the map. When you begin the battle, the map is
at that level which shows the greatest area and the least detail.
To zoom in (view a smaller area in more detail), press Z. Note that the action doespause while you are changing the scale. Use the mouse to move the magnification boxto the area you want to scrutinize more closely, then left-click. Repeat this procedureto zoom to the smallest viewing area (and the highest level of detail).
To zoom out (view a larger area in less detail), press X .
ACCELERATING TIMEAt certain junctions in a battle, you may want to allow things to progress on their
own. Though time is already accelerated during the Carrier Battle (if it weren’t, onebattle could quite literally take weeks to play), sometimes strategy requires lettingsome pretty dull stretches go by. Rather than sitting idle for several minutes (orlonger) just watching, some players may prefer to accelerate the passage of timeeven further. 1942 THE PACIFIC AIR WAR makes this possible in both the Carrier Battleand the flight portions of the game.
To further accelerate time, press the Accelerate Time key. (Please check theKeycard for the exact keystroke.) The new time rate will be displayed on-screen. Foreven more acceleration, simply press the same key again to jump the time rate. Youcan continue to increase time up to the maximum rate.
Time will return to the original rate as soon as you click on a task group, openingthe Command Menu (this will also stop time until you close the menu). If for somereason you would rather not do this, you can press the Reset Time key toimmediately return to 1x time.
22
1942 PAW manual 1 1-30 8/14/97 3:06 PM Page 22

Of the several options on the Command Menu, two are used to control the entiretask group. If there are no carriers in the selected task group, only these options andExit will be available. Neither of these options will ever be available for a base.
23
COMMANDINGTASK GROUPS
Command Menu
SET COURSEFor every task group under your command you have a Command Compass,
which you use to order heading changes.
You can change course as often and as radically as you like. No matter what sortof deranged maneuvers you pull, your search and CAP planes will always be able tofind their way back to their home carrier. If they have enough fuel, that is. Of courseit’s difficult, if not impossible, to land on the deck of a carrier that’s in the midst ofchanging course, so you may want to leave the compass alone once in a while. Onething to note is that the pilots of planes out on a strike mission assume that thecarrier will maintain a roughly steady course and speed while the strike is underway.These planes will not home in on the carrier. Please refer to Launching a Strike formore detail.
When you choose Set Course, your Command Compass is superimposed on themap. In the center of this compass is the task group to which you are giving orders.The compass needle, a thick white line, follows the mouse pointer around the screen.Move the pointer around until the needle points to the new course you plan for thatgroup. Left-click to release the Command Compass, and the ships will begin turningto the new heading immediately.
1942 PAW manual 1 1-30 8/14/97 3:06 PM Page 23

SET SPEEDA beginning commander might think that all of his task groups should be at
maximum speed at all times, to get where they’re going sooner. In fact, sometimesthis is the case. However, most advanced strategies depend more on timing thanspeed. Sometimes, having the enemy believe that a group of ships is slower or moreheavily damaged than it really is can be the advantage that turns defeat into victory.
Then there are the practical considerations. Higher speed means higher fuelconsumption. The speed of each carrier has an enormous effect on how difficult it isfor your aircraft to safely land on the deck. Plus, if you’re making tracks away fromthe direction in which you sent your planes, you could accidentally steam right outof their return range and lose them all! On the other hand, ships at a dead stop havea greatly diminished chance of evading bombs and torpedoes.
When you select Set Speed,the Speed Box opens. You canorder any speed from a Full Stop(0 kts) to the maximum possiblespeed for that particular taskgroup (the top speed of theslowest ship). Hold down theleft mouse button and use thepointer to position the slider atthe speed you want. All speedsare in knots (nautical miles perhour). As soon as you left-clickon the corner box, the SpeedBox closes and the groupcommander orders the changein speed.
Keep in mind that a taskgroup that includes one or moredamaged ships will not be able
to achieve the same maximum speed as it did before the damage. Ships that havelost their engine rooms or are sinking are likely to be left behind, for the safety of therest of the group.
24
This carrier will not be travelling at high speed.
1942 PAW manual 1 1-30 8/14/97 3:06 PM Page 24

If you’ve selected a base or a task group that includes at least one carrier, the restof the command options will be available to you. Of these, two are used primarily forinformation-gathering and defense purposes.
AIR SEARCHOne of the fastest, most reliable ways of reconnoitering a large area is to send out
a spread of search planes. That’s what the Air Search option is for. The enemy iscertainly lurking around out there somewhere, and it’s best if you find him before hefinds you. Until you have a sighting, you have no way of targetting a strike.
First, select Air Search. If the force you’re giving orders toincludes more than one carrier, you will be prompted tochoose from which carrier you would like to launch the search.
Next, you need to decide which squadron will supply thesearch planes. All of the available squadrons will be listed ina window according to the type of aircraft that makes up thatsquadron. There are no mixed squadrons in 1942 THE PACIFIC
AIR WAR. Left-click on a squadron to see how many planesare available.
Once you find the squadron you want for the searchsweep, left-click on the up and down arrows next to thesquadron information to set the number of planes involved in the search. Rememberthat these planes will be unavailable for other duties until the search is called off.
As you raise and lower the number of planes flying the search, the wedgeshowing the optimum search area is adjusted. You can use this wedge as a guide, tohelp you decide how many planes are necessary. Once you’ve settled on a goodtotal, you’ll need to assign a direction to the search. Left-click anywhere on the mapin the direction you want the search to proceed, and the wedge will move. (It mighttake a little fine-tuning to send the search in the exact direction you want.)
When everything is satisfactory, left-click on the square in the upper left-handcorner of the window to launch the search.The search will continue until you return tothis window and cancel it.
25
FINDING THEENEMY:RECON ANDCAP
Air Search Wedge
What some of the search planes at Midway saw.
Search Orders Box
Search Wedge
1942 PAW manual 1 1-30 8/14/97 3:06 PM Page 25

COMBAT AIR PATROLCombat Air Patrol (CAP) is the naval pilot’s version of perimeter guard duty. As
an early warning system, CAP is absolutely necessary for spotting and identifyingenemy aircraft before they threaten the base or task group. In the case of an attack,your CAP also serves as a first line of defense. They may not always stop the enemy,but a good CAP might stall them long enough for the rest of your fighters to get intothe air. Without CAP, you could easily be caught by surprise when the enemy comesafter you.
First, select Combat Air Patrol. If the force you’re giving orders to includes morethan one carrier, you will be prompted to choose on which carrier you would like tobase the patrol.
26
CAP Command
Next, you need to decide which squadron will supply planes for CAP. All of theavailable squadrons will be listed in a window according to the type of aircraft thatmakes up that squadron. Left-click on a squadron to see how many planes are available.
Once you find the squadron you want to fly CAP (preferably a group of fighters),left-click on the up and down arrows next to the squadron information to set thenumber of planes on CAP duty. Remember that these planes will be unavailable forother duties until the CAP is recalled.
When everything is the way you want it, left-click on the square in the upper left-hand corner of the window to order the patrol to begin. Your pilots will fly CAPcontinually until you return to this window and cancel CAP duty.
1942 PAW manual 1 1-30 8/14/97 3:06 PM Page 26

When you have located and identified the enemy surface forces, it remains to takethe offensive to them. This is when resource management becomes essential. Therewill certainly be multiple enemy task groups, and your supply of planes is limited.You might be able to get by without any new search missions, but not maintaining aCAP once battle has begun is sure suicide.
The first step in sending an attack to the enemy is to select the task group or basefrom which to launch the strike. From the Command Menu, choose Carrier Ops(when commanding a task group) or Base Ops (when commanding a base). Gametime is paused, and the Air Operations screen opens.
27
Air Ops
SQUADRON STATUSThe right-hand half of the Air Operations screen is dedicated to squadron status
information. The list in the small box near the top contains all of the squadrons basedon the selected carrier or base. Just to the right of this list is more specific informationabout whichever squadron you select. To view a squadron, left-click on its name inthe list box. For that squadron, you’ll see:
• the squadron name,
• the type of plane of which the squadron is composed, and
• the total number of planes in the squadron.
Below this, in the large box, the assignment and status of every plane in thesquadron is listed. Once you know how many planes you have available for strikes,you can determine the optimum configuration for each strike force. You may find thatyou need to recall some of your search sweeps or CAP planes.
ATTACKINGTHE ENEMY:CARRIER ANDBASE OPS
1942 PAW manual 1 1-30 8/14/97 3:06 PM Page 27

LAUNCHING A STRIKEUse the left-hand side of the Air Operations screen for putting together strike
forces and giving them their orders. The top box lists all of the strike forces presentlyformed. The first time you enter this screen for a particular carrier or base, this box
will be empty. Next to this box are twomouse buttons. Left-clicking on the FormStrike button is the first step to launching astrike on the enemy. If you make a mistakeor just want to disband a strike force, usethe Cancel Strike button.
Obviously, an offensive strike intendedto destroy a base or ship should includebombers. These bombers should beescorted by at least an equal number offighters, preferably more. Many fightershave some limited bombing capability, butyou cannot expect them to do any criticaldamage to surface targets. Sometimes itwill require more than one strike to destroya target.
It is often prudent to send out a preliminary strike consisting exclusively offighters. This is called a “fighter sweep”. If they are successful, the fighters will“sweep the deck”, clearing much of the enemy’s air strength out of the way. Whenthe slow, vulnerable bombers and their escort arrive at the target area, they’ll have amuch easier time completing their mission.
Planes out on a strike are advised of their “return point”. This is the area where thecarrier should be, calculated from its course and speed at the time the strike islaunched. If you change the course or speed of the carrier while a strike is out, thereis a very real risk that you will lose theentire strike. Returning planes rely onvisual detection to find the task groupand the carrier, so you have someleeway. Depending on the weatherand visibility, a difference of less thanforty nautical miles should not be aproblem. Any more than that, though,and you’ll be writing letters to thefamilies of quite a few lost pilots.
Having created a strike force, youhave two more duties, which you canperform in any order. Let’s take them inthe order they’re listed.
28
The captured and repaired base runway at Bougainville, November 1943
Strike aircraft on the deck of the Yorktown, May 1942
1942 PAW manual 1 1-30 8/14/97 3:06 PM Page 28
Select a TargetA newly created strike force has no target. Left-click on the Select Target button to
assign one. The map is displayed for you to find and choose the target for this strike.Move the mouse pointer until it is over the enemy force you want attacked. When theinfo box for that force appears, left-click to make that force the strike target.
The target information area should now list the short description of the target,along with its last known location and its range. This is important information, but itis only as up-to-date as the last sighting of this enemy by a search plane. Keep inmind that some of your planes may have shorter ranges than those flying the search.Sending planes after an out-of-range target is a waste of time and fuel.
Assign PlanesBelow the target selection area is the list of available aircraft. All of your
squadrons appear in the box, but not all of them will have planes free. Left-click on asquadron with available planes to add those planes to the current strike force. Theaircraft information will appear to the left of the squadron list and be added to the listin the Strike Force box. You can use the arrows to the left of the aircraft informationto raise or lower the number of these planes assigned to this strike. The Cancelbutton deletes the current squadron’s planes from the strike force.
When you assign planes to a strike force, always be aware of the type of targetthey’ll be attacking. A strike force made up exclusively of fighters is not likely to bemuch good against any target, but will certainly deplete the air support around thattarget. Bombers flying without escort are sitting ducks for enemy CAP, andtorpedoes are no good at all against bases.
To accept your srtikes as listed and launch them, left-click on the Exit box in thetop right-hand corner of the screen.
JUMPING INTO THE COCKPITAir strikes, once launched, will proceed to their target automatically, while you
take care of other aspects of the battle. Whenever a strike force reaches its target,you will be given the option of taking over for the lead pilot and flying the attackmission yourself. Through the magic of computers, you can step into the cockpit justas the attack is beginning. Of course, if you’d rather not do this, you can choose tolet your pilots fly the mission themselves.
For detailed instructions on flying an attack strike, please refer to Encounteringthe Enemy, in the Flying A Mission section.
Whenever you choose to leave the strike, you are returned to the map and tocommand mode. If your plane is still functional, the original pilot will take back thestick and finish the mission for you.
29
1942 PAW manual 1 1-30 8/14/97 3:06 PM Page 29

There is no time limit on Carrier Battles. Sooner or later, one side will either becompletely decimated or will choose to withdraw. The battle ends when one forcehas retreated beyond the effective attack range of the other. (Sinking is one way toget out of range.) If neither you nor your enemy has completely destroyed the other,which is probable, there is no obvious winner. (Obviously, if one side has beenannihilated, the other wins.)
In reality, judging which side won and which lost is a complex affair. Often, it’simpossible to know until well after the entire war is over who gained whatadvantage during which battle. Since these battles are conducted in a vacuum, so tospeak, it’s much simpler to label one side “winner” and the other “loser”.
1942 THE PACIFIC AIR WAR compares the damage done by each nation andcomputes the points gained and lost by both sides of the conflict. If either sidecompleted its objective, that side gains some extra points. The side with the mostpoints is the winner, but 1942 THE PACIFIC AIR WAR knows the difference between aclose contest and a blow-out. It is possible to fight to a draw.
Damaging and destroying enemyplanes, ships, and bases adds to yourchance of winning. Bases and ships willgive you more points than planes, anddestruction is more profitable thanrepairable damage. Larger ships are morevaluable than smaller ones. Before you goon an all-out rampage, however,remember that losing your own planes,ships, and bases or allowing them to bedamaged costs you in points (as well aslong-term fighting ability).
If you were assigned an objective atthe beginning of the battle, successfullyfulfilling that goal is worth some points.Your score is also modified by theDifficulty Level you chose at thebeginning of the battle. The greater thedifficulty, the higher your score will be.
When the battle is finished, you will be notified of how well (or how poorly) youhave commanded your nation’s forces. If you do not feel that you did well enough,your only recourse is a rematch. Good commanders learn from their mistakes, andthe best learn quickly.
30
WIN, LOSE,OR DRAW
Sometimes winning is a matter of taking your lumps and staying afloat,like the minesweeper Lindsey did at Okinawa.
1942 PAW manual 1 1-30 8/14/97 3:06 PM Page 30
FLYING A MISSIONWhere Carrier Battle is the strategy- and command-oriented portion of 1942 THE
PACIFIC AIR WAR, most of the other play options are flight-oriented. Single Missionand Career Pilot both put you in the air, with none of the worries of command. Allyou have to worry about is your mission – and all those enemy pilots and gunnerswho want to shoot you down.
Testing yourself against the enemy in single missions is one the best ways to trainyourself before embarking on a career as a pilot in the U.S.N. or the I.J.N. Flying thesame mission over and over until you get it right is the bare essence of rote training.You could also train as a specialist, practicing on a specific type of mission or aircraftwhile varying the scenarios – the key to adaptability. Or, if you’re ambitious enoughto want to be an all-round pilot, you could attempt to master every type of mission.
Single missions are also a good option for those of you who don’t want to spendthe time to develop a pilot through a career, or just don’t want to get involved in acampaign yet. It’s the quickest way into the air.
31
1942 PAW manual 1 31-62 8/14/97 3:13 PM Page 31

Several individual mission scenarios, alldifferent, are included under each type. Selectthe type of mission you want to fly accordingto the descriptions below. Once you haveselected, the l ist of individual missionscenarios is displayed.
FIGHTER SWEEPThe carrier group is launching an attack on
an enemy base. In preparation, a force offighters, including your plane, is sent out tominimize the air defenses over the targetbase. Your primary goal is to damage ordestroy as many enemy aircraft as possible,whether you find them in the air or on the
ground. The fewer planes the enemy has in the air when the main force arrives, thebetter chance that the attack will be successful.
Before you can choose your mission, you must decide for which side you wish tofly. The only options are the major combatants in the theater, the Americans andthe Japanese.
Your nationality will limit the types ofaircraft and armament available to you. Keepin mind that the Japanese fighters are moreagile and maneuverable than the Americanearly in the war, but the Americans gained theadvantage with later aircraft designs. Also, theJapanese torpedo bombers are generallyeasier to handle than the American ones, andtheir torpedoes are far superior in accuracyand reliability.
Nationality will also be used to establishwhether you are on the offensive or defensiveduring any particular mission.
There are six basic mission types in 1942 THE PACIFIC AIR WAR. The plane you pilot– fighter, dive bomber, or torpedo bomber – depends on the type of mission youchoose, as follows:
Fighter Dive Bomber Torpedo Bomber
Fighter Sweep Bomb Base Torpedo ShipCAP Bomb Ship Bomb Base
Bomber Escort
32
NATIONALITY
MISSIONTYPES
Mission Selection
1942 PAW manual 1 31-62 8/14/97 3:13 PM Page 32

COMBAT AIR PATROL (CAP)CAP is the only inherently defensive mission type. When flying CAP, your fighter
or group of fighters is assigned to patrol a direction from which the enemy isexpected to attack. Normally, you will fly out a specified distance from the carrier,then screen the assigned area for hostiles. If there is an encounter, it is most likelythat the enemy is either the forefront of a greater force bent on attacking the carrieror a reconnaissance mission preparing for such an attack. In either case, destroyingthe enemy force swiftly and with minimal loss of friendlies is your primary goal.
BOMBER ESCORTThe carrier group has launched an attack on an enemy base or ship. The fighter
sweep (if there was one) went out a few hours ago, and now the bombers are beinglaunched. Your mission is to fly in formation with the bombers, protecting them fromenemy aircraft on their way to the target. Remember, if the bombers are lost, theattack cannot proceed. Minimize your losses, but see that the bombers get through.
BOMB SHIPYou fly the lead dive bomber in an attack on an enemy ship. There may or may
not be torpedo bombers backing you up. Whether it’s a lone target or part of anenemy task force, the ship is sure to be heavily defended. The goal of this missiontype is to get as many bombers through the enemy defenses as possible and do asmuch damage as you can to the designated target ship. Preferably, you’ll sink her.Usually, you’ll have a few fighters flying escort with you; they’ll give you someshielding, but heads up flying is your best defense.
BOMB BASEThe carrier group is launching an attack on an enemy base. Your bomber is
spearheading the backbone of that attack. The goal of this mission type is to getthrough the enemy defenses intact and do as much damage as you can to the enemybase. Under normal circumstances, you’ll have a few fighters flying escort with you;use them to your best advantage. Hopefully, the fighter sweep that went out a fewhours ago downed most of the enemy planes, but you can’t depend on that.
TORPEDO SHIPIn this type of mission, your torpedo bomber is leading the attack on an enemy
ship. Whether that ship is cruising alone or as part of a larger group, it will be welldefended. There may be one or two dive bombers on your side, backing you up. Thegoal of this mission type is to get as many bombers through the enemy defenses aspossible and do as much damage as you can to the designated target ship.Preferably, you’ll sink her. Usually, you’ll have a few fighters flying escort with you;they’ll give you some shielding, but heads up flying is always your best defense.
33
1942 PAW manual 1 31-62 8/14/97 3:13 PM Page 33

Once you select a mission type, the list of available mission scenarios of that typeis retrieved and displayed in the Mission Listing Box. All of these missions arederived from what really took place during the Pacific air war. The only significantdifference is your involvement. These are pieces of the war that you can relive orrewrite, as you choose.
If you’d prefer not to fly an historical mission, you can invent your own missionsusing the Mission Builder. Please refer to the Custom Missions section forinstructions.
Use the arrow keys to highlight the mission you want to fly and press e, orsimply click on that mission with the [LMB].
Note that the Mission Listing Box can display no more than ten listings at onetime, but there are more than ten individual missions to list. Use the scroll bar if youwish to bring the unseen mission listings into the box.
At this point, you have the option of modifying the weather and the starting timeof the mission you are about to fly. You can accept the default settings or customizethe meteorological situation.
You control the weather by clicking the [LMB] on the landscape graphic in theMeteorology Box. Cycle through the various types of cloud cover until you find theone you wish to experience.
34
SPECIFICMISSION
WEATHERAND TIME
Changing the mission starting time only affects the sun. As your missionprogresses, the sun may rise or set, depending on the time. Each part of the startingtime has buttons above and below it. Left-click on the button above to move timeforward, and use the button below to move time backward.
Weather Adjustment
Time Adjustment
1942 PAW manual 1 31-62 8/14/97 3:13 PM Page 34
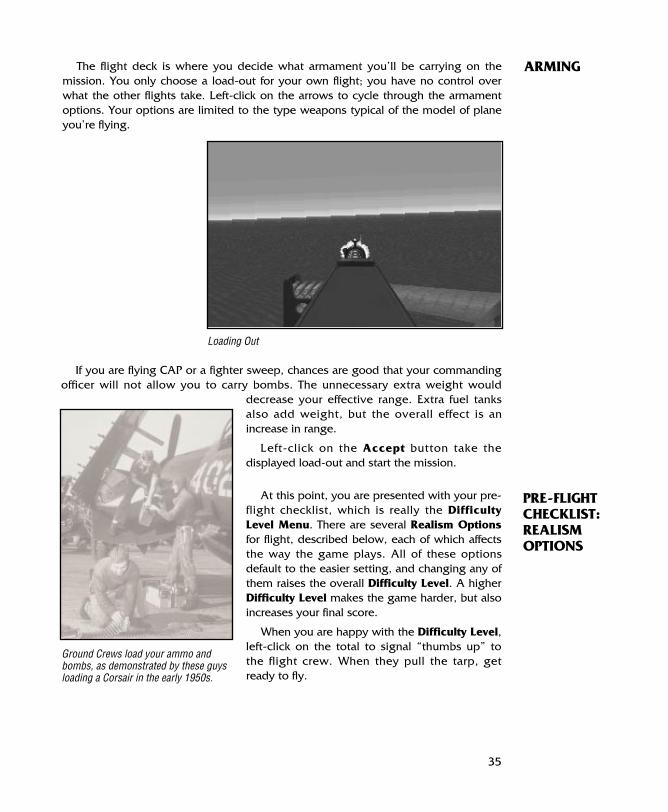
If you are flying CAP or a fighter sweep, chances are good that your commandingofficer will not allow you to carry bombs. The unnecessary extra weight would
decrease your effective range. Extra fuel tanksalso add weight, but the overall effect is anincrease in range.
Left-click on the Accept button take thedisplayed load-out and start the mission.
At this point, you are presented with your pre-flight checklist, which is really the DifficultyLevel Menu. There are several Realism Optionsfor flight, described below, each of which affectsthe way the game plays. All of these optionsdefault to the easier setting, and changing any ofthem raises the overall Difficulty Level. A higherDifficulty Level makes the game harder, but alsoincreases your final score.
When you are happy with the Difficulty Level,left-click on the total to signal “thumbs up” tothe flight crew. When they pull the tarp, getready to fly.
The flight deck is where you decide what armament you’ll be carrying on themission. You only choose a load-out for your own flight; you have no control overwhat the other flights take. Left-click on the arrows to cycle through the armamentoptions. Your options are limited to the type weapons typical of the model of planeyou’re flying.
35
ARMING
Loading Out
Ground Crews load your ammo andbombs, as demonstrated by these guysloading a Corsair in the early 1950s.
PRE-FLIGHTCHECKLIST:REALISMOPTIONS
1942 PAW manual 1 31-62 8/14/97 3:14 PM Page 35

THE SUNFacing into or nearly into the sun causes serious visibility problems for pilots.
Before the advent of radar, enemy pilots would often try to take advantage of thisfact by setting the sun at their backs, thus avoiding visual detection. Since none ofthe aircraft in 1942 THE PACIFIC AIR WAR is equipped with radar, this tactic is viable,useful, and dangerous.
If Sun Blinding is enabled, you and your opponents will be at a serious visibilitydisadvantage whenever facing into the sun. If not, the sun will be no more than alandmark in the sky.
BLACKOUTSOne of the limitations of the human body is that it tends to perform poorly at high
accelerations. Tight turns at high speed, pulling out of dives, and other high-speedmaneuvers can overcome the heart’s ability to get blood to the brain, causing a pilotto lose consciousness. This is called a “blackout”. A partial blackout is known as a“greyout”.
Pushing the stick forward to dive can also be a problem. At a negativeacceleration of about minus 2 g’s, the blood pressure in a pilot’s head becomes toogreat, and the capillaries in the eyes burst. Brain damage and death can also result.This is called a “redout”.
If you have Blackouts enabled, you will be subject to these limitations, thoughredouts will not cause brain damage. If not, you will be able to perform incredible,high-acceleration maneuvers without losing vision or consciousness.
ENEMY SKILLWhen you fly into combat, you never know whether you’re squaring off against a
rookie pilot or a seasoned veteran. In the seconds it takes you to find out, you couldhave already lost the fight. For the sake of those players whose combat flying is alittle rusty, 1942 THE PACIFIC AIR WAR includes a choice of enemy skill level.
If you select Enemy Pilots are Skilled, prepare to face experienced, well-trainedpilots and vicious dogfighting tactics. If not, air-to-air combat against rookie pilotsshould be easier, but don’t expect a turkey shoot.
DUD TORPEDOESIn 1942, torpedo failure was a big factor for the Americans. Failure to explode was
only part of the problem; many torps just went wildly off-course, sometimes turningcompletely around. In air-launched torpedoes, this was usually attributed to theextreme sensitivity of the missile to the drop conditions. Overall, U.S. torpedoes hada failure rate of almost 50%. The Japanese torpedoes, though by no means perfect,had a much lower rate of failure.
If you choose Torpedoes Can Be Duds, any (or all!) of the torpedoes you firecould go astray or fail to explode, according to historical averages. If not, you candepend on a straight shot and a satisfying blast, but only if your aim is good.
36
1942 PAW manual 1 31-62 8/14/97 3:14 PM Page 36

MID-AIR COLLISIONSModern long-range weaponry assures that jet fighters rarely get close enough to
each other to have to worry about the chance of collision. In 1942, however, thiswas not the case. Your only air-to-air weapons are your guns, and you have to getpretty close to use them. Mid-air collisions are a serious risk, especially whendogfighting.
If Mid-air Collisions are enabled, hitting another aircraft will damage your plane,probably fatally. If not, aircraft will pass through one another like ghosts.
HIT DETECTIONThis option has to do with the way the game computes whether or not your
bullets hit an enemy plane. Your target can be represented using a “bulk silhouette”,in which one big geometrical shape is used for the entire plane. This techniquemakes a lot of what would, in reality, be near-misses into hits. A “detail silhouette”,on the other hand, represents the target as an agglomeration of many smallershapes. This more realistic option makes dogfighting just that much more difficult.
If Hit Detection is set to difficult, hits on enemy aircraft will be computed on thesmaller, more realistic silhouette. If not, they will all be a little easier to hit.
SHIPS EVADEWhenever you drop bombs toward a ship, there’s a good chance someone in the
crew will notice. There’s a lesser chance that they’ll spot an incoming torpedo, butthis chance grows the more torpedoes you fire. In either case, once a threat to theship is detected, evasive maneuverscommence. An experienced Captain canminimize the damage and, in manycases, avoid being hit altogether.
If you choose to have Ships Evadeenabled, surface targets may detect yourattack and try to escape it. If not, thespotters are asleep, and the ship willsteam blithely into the path of destruction.
37
This Japanese carrier unsuccessfully attempted to evade destruction.
1942 PAW manual 1 31-62 8/14/97 3:14 PM Page 37
AMMUNITIONNeedless to say, in real life planes flew with a limited supply of ammunition.
Whether it was a matter of weight or storage capacity, the crews could only pack somuch destruction onto one aircraft. If the pilot was profligate with his guns, he’dsoon find himself at a disadvantage in a dogfight – no bullets. Note also that theplanes of the 1940s did not have automatic ammunition counters – pilots had toestimate how many seconds of fire they had left.
If you choose to carry Limited Ammo, you’ll have to take care that your machineguns and cannon do not run out of bullets. If not, the only detriment to firing will bethat you are announcing your position to those enemies who haven’t spotted you yet.
FATAL CRASHESUntil you get some practice under your belt, it’s surprisingly easy to crash into
things (especially after you’ve been shot up a little). Generally speaking, your aircrafttends to break into little pieces when you do this, and no matter how spectacular theexplosion is, none of those pieces really flies very far.
If you decide that Crashes Are Fatal, running into something solid (the ocean, forexample) will be the end of your plane. If not, you will happily bounce off mountains,ships, the ground, et al. Of course, if your plane is damaged already, you might notbounce too high.
Before you take off, there’s something you should know. It is possible to “save” amission in mid-flight and return to it later. This is not an historically accurate feature.
Sooner or later, a situation similar to this arises: you’ve been flying for 45 minutes(real time) and are in the middle of a great battle; you’ve broken out of the pack andare just coming around for another run into the thick of things; out of the blue, somesort of emergency rears it’s ugly head (outside of the game, that is) – somethingcatches fire, somebody’s choking to death, there’s an earthquake, you run out ofcoffee, or whatever; you can’t ignore it, but you really hate to lose all your progresson the mission. What can you do?
Well, obviously, you have to quit the mission. (Those of you who seriouslyconsidered ignoring the fire or the choking person might think about seekingprofessional help.) If you take advantage of the opportunity to save the Flight Film(please refer to Unloading the Black Box: Flight Films for instructions), you will be ableto pick up later where you left off. It’s a slightly cumbersome process, but it’s effective.
After you’ve dealt with the emergency and can return to the game, select FlightFilms from the main menu. It will take some time, but you can run the film throughto the end, then restart the action and finish the mission. (Please refer to the FlightFilms section for more detailed instructions.)
Note that you can not do this with a career mission.
38
HALF AMISSION
1942 PAW manual 1 31-62 8/14/97 3:14 PM Page 38
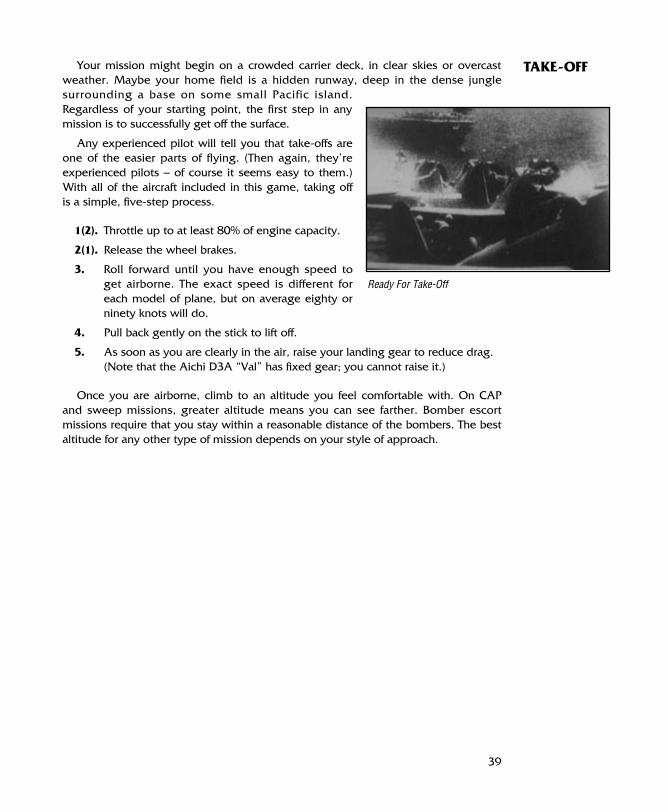
Your mission might begin on a crowded carrier deck, in clear skies or overcastweather. Maybe your home field is a hidden runway, deep in the dense junglesurrounding a base on some small Pacific island.Regardless of your starting point, the first step in anymission is to successfully get off the surface.
Any experienced pilot will tell you that take-offs areone of the easier parts of flying. (Then again, they’reexperienced pilots – of course it seems easy to them.)With all of the aircraft included in this game, taking offis a simple, five-step process.
1(2). Throttle up to at least 80% of engine capacity.
2(1). Release the wheel brakes.
3. Roll forward until you have enough speed toget airborne. The exact speed is different foreach model of plane, but on average eighty orninety knots will do.
4. Pull back gently on the stick to lift off.
5. As soon as you are clearly in the air, raise your landing gear to reduce drag. (Note that the Aichi D3A “Val” has fixed gear; you cannot raise it.)
Once you are airborne, climb to an altitude you feel comfortable with. On CAPand sweep missions, greater altitude means you can see farther. Bomber escortmissions require that you stay within a reasonable distance of the bombers. The bestaltitude for any other type of mission depends on your style of approach.
39
TAKE-OFF
Ready For Take-Off
1942 PAW manual 1 31-62 8/14/97 3:14 PM Page 39

The kind of mission your squadron is sent out on will determine your flight plan.Inexperienced, beginning pilots may want to avoid the lead position. Following themore experienced members of the flight is a good way to learn the ropes.
CAP Fly back and forth in the standard CAP pattern for as long as your fuelsupply allows. Your only responsibility is to protect the carrier groupfrom enemy incursions. Deflect incoming planes and destroy themwhenever possible. If there are bombers in the enemy flight, they areyour preferred target.
Sweep Fly to the assigned area and destroy as many enemy aircraft as possible.Your primary duty is to soften up the enemy for the upcoming attack.Expect heavy resistance, including plenty of anti-aircraft fire.
Escort Follow and protect the bombers. Escort fighters should fly roughly 1000feet above the bombers and the same distance out. Position in relationto the bombers (front, rear, side, etc.) depends on from which directionthe enemy is expected. Position in the formation depends on the rankand experience of the pilot.
Bomber Fly to the area where your target was reported to be, find it, and do asmuch damage as you can. You can depend on your fighter escort for acertain amount of protection, but be careful. Remember that your targetis not defenseless; watch out for flak.
Getting there can take some time (wehave included a function for acceleratingthe passage of time by several times –please refer to the Keycard for themethod). This, the relatively peaceful partof the mission, is an opportunity tofamiliarize yourself with the basics ofcontrolling your aircraft. This is also thebest time to get in some practice with thevarious viewpoints and learn how to usethe External Camera to your advantage.
40
GETTINGTHERE
1942 PAW manual 1 31-62 8/14/97 3:14 PM Page 40

When you’ve got the hang of flying, or at least are pretty sure you can keep fromcrashing for a few minutes, you can try looking around. (If you do have troublecontrolling the aircraft while you’re exploring the other viewpoints, set the autopilotand relax.) 1942 THE PACIFIC AIR WAR provides almost every point of view availableto pilots in actual planes, and quite a few that real combat pilots probably wish theycould have.
Flying around on the way to your mission is a good time to familiarize yourselfwith the various point of view and camera controls. An instinctive command of theseviewpoint controls – especially the Virtual Cockpit Mode – can be very helpfulduring a dogfight.
FKEY VIEWSThe FKey Views are a standard feature of many flight simulations. Pressing one of
the numbered function keys changes your point of view, as follows:
1 Return to the standard cockpit view.
2 Look to the left, out over the wing.
3 Look to the right, out over the other wing.
4 Turn to look over your left shoulder.
5 Turn to look over your right shoulder.
6 Switch to the External Camera, in Chase Mode.
7 Switch to the External Camera, in Tracking Mode.
8 Change Planes. (This option is not always available; see below.)
9 Modify the Detail Levels of the game graphics.
41
VIEWPOINTAND THECAMERA
Lap View
Standard View
Altimeter
Airspeed Indicator
1942 PAW manual 1 31-62 8/14/97 3:14 PM Page 41

42
The Chart
Note: During the time that you have the map open, the “camera” that records yourmission flight film is turned off. Nothing that happens at this time will beavailable for later replay.
Legend
Carrier
Flight
There are a few other keys and controls that affect your point of view. Most ofthese are controls for the External Camera, and are explained in the ExternalCamera subsection, below. The other important ones are listed here.
I Heads Up Look up from the instrument panel to the standard cockpitview.
K Lap View Look down at the instrument panel. (Note that 1 willnot return you from this view.)
M Map Unfold the cockpit map.
a1 Virtual Activate Virtual Cockpit Mode. (This option is only activein fighters.)
a1 Station Change station. (This option is only active in planes withmultiple battle stations.)
a2 Sight Look through the bombsight. (This option is only active inbombers.)
a7 Free Switch to the External Camera, in Free Mode.
THE COCKPIT MAPA map may not seem to be a viewpoint, but this is a special sort of map.
Historical accuracy buffs will want to note that many of the functions of this cockpitmap are not drawn from reality. You can unfold your map at any time, but note thatyour plane keeps flying. The autopilot takes control as soon as you open the map.
1942 PAW manual 1 31-62 8/14/97 3:14 PM Page 42

When you pull out the map and unfold it on your lap, you’ll see the area aroundyour plane. An aircraft icon represents your flight and shows your direction and(roughly) speed. If you are finished taking off, the flight route you’ve been ordered tofollow should also be pencilled onto the map. Ships and other planes – those youknow the location of – are also represented as icons.
Don’t worry about enemy planes sneaking up on you while you fuss with themap; if you encounter any opposition, your combat instincts will take over andreturn your attention to the cockpit. If you unfold the map during combat, the actionwill pause. This last isn’t exactly realistic, but rather is a nod to ease of play. Duringbattle, you will sometimes need to radio orders to other planes (see Giving Orders,below); without this automatic pause, you would often be shot down while trying toorganize your attack.
ZoomingYou can zoom this map out (unfold it further) by pressing X . The map will zoom
out twice from its original range, showing more of the territory around you eachtime. Use Z to zoom in again; your plane will remain in the center of the map. Onceyou’ve unfolded the map a bit, you’ll probably notice that land masses and bases arealso represented on it.
Info BoxesAt this point, there hasn’t been too much deviation from the function of the maps
that were available in 1942 (excluding the autopilot, that is). If you move the mousepointer over any of the icons, you will quickly depart from historical accuracy. Thisdeparture takes the form of a Force Information Box. These boxes list the sameinformation as is listed in the Force Information Boxes described under The Map, inthe Carrier Battles section. In addition, there are Force Information Boxes for flightsof aircraft. These list:
Flight NumberType and Number of AircraftSpeed and AltitudeDistance to the Current Target
Note that the home base is counted as a “target” when flights are returning froma mission, but waypoints in the flight path are not considered “targets”.
43
1942 PAW manual 1 31-62 8/14/97 3:14 PM Page 43
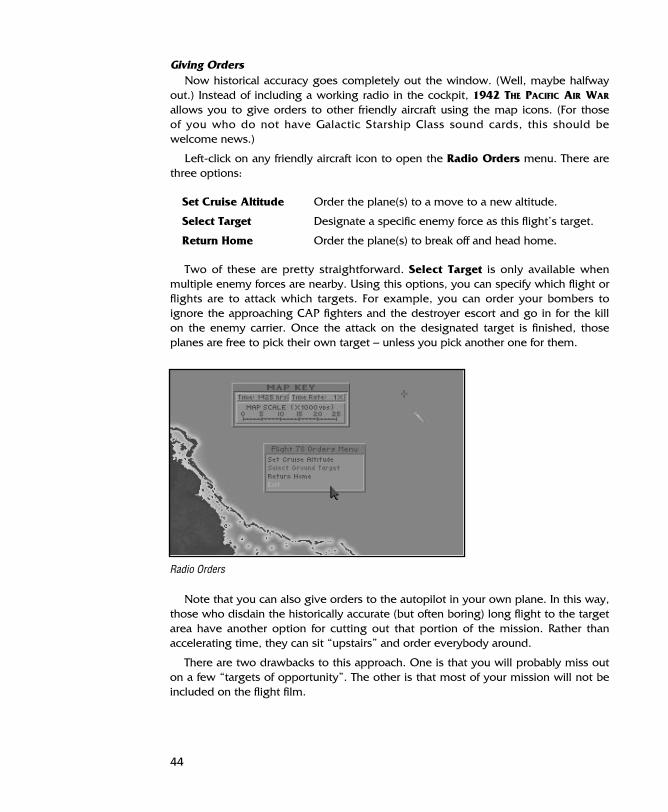
Giving OrdersNow historical accuracy goes completely out the window. (Well, maybe halfway
out.) Instead of including a working radio in the cockpit, 1942 THE PACIFIC AIR WAR
allows you to give orders to other friendly aircraft using the map icons. (For those of you who do not have Galactic Starship Class sound cards, this should be welcome news.)
Left-click on any friendly aircraft icon to open the Radio Orders menu. There arethree options:
Set Cruise Altitude Order the plane(s) to a move to a new altitude.
Select Target Designate a specific enemy force as this flight’s target.
Return Home Order the plane(s) to break off and head home.
Two of these are pretty straightforward. Select Target is only available whenmultiple enemy forces are nearby. Using this options, you can specify which flight orflights are to attack which targets. For example, you can order your bombers toignore the approaching CAP fighters and the destroyer escort and go in for the killon the enemy carrier. Once the attack on the designated target is finished, thoseplanes are free to pick their own target – unless you pick another one for them.
44
Radio Orders
Note that you can also give orders to the autopilot in your own plane. In this way,those who disdain the historically accurate (but often boring) long flight to the targetarea have another option for cutting out that portion of the mission. Rather thanaccelerating time, they can sit “upstairs” and order everybody around.
There are two drawbacks to this approach. One is that you will probably miss outon a few “targets of opportunity”. The other is that most of your mission will not beincluded on the flight film.
1942 PAW manual 1 31-62 8/14/97 3:14 PM Page 44
VIRTUAL COCKPIT MODEVirtual Cockpit Mode is an advanced feature that allows you to swivel your view
around as though you were actually in the fighter cockpit, turning your head. This givesyou a smooth-scrolling range of vision that other games can only hint at. Once you getthe hang of it, Virtual Cockpit Mode is extremely useful during a dogfight, whenkeeping track of the enemy is vital and difficult. Practice in this view will certainly berewarded in combat. Virtual Cockpit Mode is available in any fighter aircraft.
Press a1 (at the pilot’s station) to activate Virtual Cockpit Mode. Now thecamera controls the pilot’s “head”. Press and hold Button 2 on the Camera Controlto swivel your head and look around the cockpit. Move forward to tilt your viewdownward, back to tilt upward, left to pan left, and right to pan right. (Note: forthose unfamiliar with the film terms ‘tilt’ and ‘pan’, please refer to the Glossary forbrief definitions.) By combining these movements, you can scan the entire range of areal fighter pilot’s view. All of the flight and other controls are still functional whileyou’re in Virtual Cockpit Mode.
BOMBSIGHT VIEWNavy bombers with only two stations required the pilot to do double duty as
bombardier. With this in mind, the aircraft designers thoughtfully included abombsight in the dive bombers. They located it (conveniently enough) in thecockpit. Once you’ve begun your bombing run, this sight is quite handy for aiming.
Press a2 (at the pilot’s station) to peer through the bombsight. Note that youare still controlling the plane, unless you have activated the autopilot. As a piloting aid,your artificial horizon and airspeed indicator are reproduced to the side of the sight.Also to the side are the instruments necessary to help you get on target. The sightitself is fairly straightforward; whatever is in the center area is your current target.Please refer to the Using the Bombsight subsection for more detailed instructions.
CHANGING PLANESChanging Planes is one of the options that increases the variety of flight
experience in 1942 THE PACIFIC AIR WAR. Using the 8 key, you can jump from oneplane into another. Whenever you jump into a plane, you become the pilot of thataircraft. This option is not available to career pilots; career pilots must be promotedto change their flight position.
In Single Mission play, you will typically start a mission piloting the lead fighteror bomber (depending on the type of mission you chose). Repeatedly pressing 8will cycle you back through the other planes in your flight. You will not change intoplanes of the other flights. Thus, if you start in a fighter, all of the planes you jumpinto will be fighters, and the same goes for bombers. If you continue through theentire flight, you will return to your original aircraft and start the cycle over again.
45
1942 PAW manual 1 31-62 8/14/97 3:14 PM Page 45

If you jump into the cockpit during a Carrier Battle, you start the attack pilotingthe lead fighter of the lead flight. In this case, 8 will cycle you back through theentire strike, starting with your flight. Once you’ve exhausted the possibilities of thatflight, you will then move through the next. The process will continue until youeither find a plane you like or run out of new planes to jump into. Finally, then, youwill return to your original aircraft and start the cycle over again.
One final note: for the player who doesn’t mind bending the rules a little,changing planes can be a big help when you’ve gotten yourself shot up and need toget out of a badly damaged aircraft. Of course, there’s no guarantee the one youchange into will be in any better shape.
BATTLE STATIONSChanging Stations is another option intended to broaden the horizons of play.
Real bombers of this era had entire crews, not just single pilots. In many cases, thebombers in 1942 THE PACIFIC AIR WAR include a second active battle station – thedorsal gunner, sometimes called the ‘tail gunner’.
46
Dorsal Battle Station
As pilot, you control the plane’s motion, the forward-facing weapons, and thebombs. Press the Station key to move into the dorsal (tail) gunner’s station. Fromhere, you control only one thing – the dorsal-mounted machine gun(s). Yourresponsibility is to protect the “six”,the vulnerable area behind the aircraft.The autopilot has taken over as pilot.Use the Flight Control to aim yourmachine gun and Button 1 to fire.Press 1 if you decide to jump backinto the cockpit.
Ammo Box
“The Gunners’ Creed” (Unofficial)
The pilot’s job is just a chauffeur,it’s his job to fly the plane
But the gunner does the fighting,though he doesn’t get the fame.
1942 PAW manual 1 31-62 8/14/97 3:14 PM Page 46

THE EXTERNAL CAMERAThe External Camera is your roving “eye in the sky”. Though it’s an unrealistic
option (combat aircraft of the 1940s did not have remotely controlled, free-flyingvideo probes), this camera provides an entertaining way to watch dogfights. It canalso be exceedingly helpful when you’re having trouble finding nearby enemies (thetechnical, military aviation term for this is “cheating”). Simulation purists will notwant to use the external camera during missions.
The camera works in three modes, which you can switch between indiscriminately.Note that if you choose to set up an unusual camera angle it can take some time.Rather than doing this while piloting and fighting, pause the action (press aP) sothat you can relax a little. (Note: for those unfamiliar with the film terms used below:‘track’, ‘tilt’, ‘roll’, and ‘pan’, please refer to the Glossary for brief definitions.)
Chase ModeIn Chase Mode, which you call by pressing 6, the camera flies along with the
plane you’re piloting and keeps it in focus. All camera movements in this mode arerelative to the aircraft. The active camera controls in Chase Mode are as follows(Note that buttons must be held down for the duration of the movement, as when“dragging” a mouse.):
Button 2 + [Fwd] Zoom In (Get Closer)
Button 2 + [Back] Zoom Out (Back Off)
Button 2 + [Left] Rotate Left (Track Clockwise) around the plane
Button 1 + [Right] Rotate Right (Track Counter-clockwise) around the plane
Button 1 + [Fwd] Rotate Up (Track Over & Under) and around the plane
Button 1 + [Back] Rotate Down (Track Under & Over) and around the plane
Free ModeOnce you press the Free key (a7), the camera is in Free Mode, and it does
not follow or track your plane. It moves only as you direct it. This is the mode youshould use for setting up unusual angles for Tracking Mode or for close examinationof ships, bases, and enemy planes. The camera controls in Free Mode are as follows(Note that buttons must be held down for the duration of the movement, as when“dragging” a mouse.):
Button 2 + [Fwd] Move Forward (Zoom In or Track Forward)
Button 2 + [Back] Move Backward (Zoom Out or Track Backward)
Button 1 + [Left] Pan Left (Counter-clockwise)
Button 1 + [Right] Pan Right (Clockwise)
Button 1 + [Fwd] Tilt Down
Button 1 + [Back] Tilt Up
47
1942 PAW manual 1 31-62 8/14/97 3:14 PM Page 47

Tracking ModeIn Tracking Mode, which you activate using 7, the camera is fixed in place,
independent of your plane. There are no motion commands in Tracking Mode. Thecamera will automatically tilt, pan, and roll to keep your aircraft in the center of theframe. Use Free Mode to set the camera in the location you like (on the surface orfloating in midair – it doesn’t matter ), then sit back and watch. Tracking Mode hasmany uses, one of the best of which is for setting up a “Reverse Tactical” view fromany stationary target.
GRAPHICS DETAIL LEVELSPressing 9 at any time during a mission calls up the Detail Levels Control
Screen. (The action pauses as long as you are on this screen.) You can use theoptions on this screen to modify the level of detail in which many of the parts of1942 THE PACIFIC AIR WAR are displayed. All of these options default to their highestor “On” settings. The current settings are represented by example in the screendisplayed to the right of the buttons. In brief, the options are:
48
Detail Levels Control Screen
Planes Aircraft detail can be switched from low to high detail. When in lowdetail, all aircraft will be in polygonal form.
Clouds Cloud graphics come in three varieties. At the lowest setting, there areno individual clouds, and an overcast cloud cover appears all white (fromabove or below). The medium setting has the same overcast, but alsoincludes polygonal individual clouds. The highest setting includes adetailed cloud cover, polygonal cumulus puffs, and subtle cirrostratuswisps. Of course, whether or not any clouds are visible at all will dependon the weather.
Ships There are three levels of detail for displaying ships.
1942 PAW manual 1 31-62 8/14/97 3:14 PM Page 48
Waves Choose whether or not waves should be displayed on the surface of thewater. No waves is the lower detail setting.
Wakes Choose whether or not the wakes of ships should be displayed. Thelength of a ship’s wake is proportional to its speed. No wakes is thelower detail setting.
Stars During a mission that involves night flying, you can decide how the starsare displayed. No stars at all is the lowest detail level. The medium detailstars are the familiar twinkling points. High detail stars are the same asmedium, except that they are subject to realistic blurring effects whenyou execute a maneuver.
Land The land, mostly islands, is displayed in one of three ways. The simplestlevel of detail is basic, polygonal land. Next come smoother, Gouraud-shaded land masses. Third and most detailed are the completely texture-mapped islands.
Sprites Set whether or not the sprite graphics are displayed. Sprite graphicsinclude some of the not-quite-essential bits like explosions and splashes.No sprites is the lower detail setting.
Visibility You can adjust the current visibility to be as low as 18 and as high as 34miles. At higher visibilities, you and the other pilots can see farther and,therefore, see more. At lower visibilities, the frame rate should increase.
Whenever you left-click on the button for one of these options, that optionchanges to its next setting. For those options which are not toggles, clicking on thehighest setting will cycle back to the lowest. Every setting change is immediatelyreflected in the example screen, so that you know what you’re getting when youreturn to the mission.
Keep in mind that the more detailed the graphics are when you play (i.e., thehigher each of the settings), the slower your screen refresh rate (frame rate) willbecome. If your frame rate gets too low and the game becomes bogged down or“chunky”, you might want to lower the detail levels until you get a more satisfactory,smoother display. When you are finished, left-click on the Return to Mission buttonto return to the view from which you pressed 9.
49
1942 PAW manual 1 31-62 8/14/97 3:14 PM Page 49
All this sightseeing is wonderful, but completing your mission will undoubtedlyinvolve some interaction with the enemy. Such is the nature of war. Your mission willdetermine exactly what type of interaction you have, but the basic idea is to laythem out for a dirt nap. Whether you fly and fight for the greater glory of the divineEmperor or for apple pie and the American way, your goal is to ruthlessly slaughterthe enemy and destroy their machines. Surviving is also a good idea, preferably withyour plane intact (or at least serviceable).
Remember, this is not the gentlemanly air combat of the First World War; this is adown-and-dirty street fight. Take every advantage you can get and give no quarter.Sympathy for the enemy means probable death for you (and a court martial).
IDENTIFICATIONIdentifying any aircraft you encounter is the first order of business. Modern aircraft
are equipped with radar and IFF (Identification Friend or Foe) systems. These long-distance detection systems are quite effective and useful. Unfortunately, you don’thave them. Unless the position or actions of the aircraft make their identity obvious(shooting at you, for example, or flying CAP over an enemy task group), you mustclose to visual identification range.
If your mission calls for you to bomb or torpedo a ship, identification is a mucheasier and less hazardous process. You can safely assume that any ship or group ofships near the target coordinates is an enemy task group, and it is probably yourtarget. (Note that, since enemy bases are never close enough to friendly bases foryou to confuse the two, identifying base targets is not necessary.) When the targettask group includes a carrier, the carrier must always be your primary target.Identifying the carrier is simple, since it’s the largest ship in any task group. If there isno carrier among the target ships, your goal is to sink as many craft as possible.
Keep in mind that the enemy also do not have radar. Their information, like yours,is limited to what they can gain from visual inspection. If you are a skillful enoughpilot, they may not know you are nearby until it’s too late.
DOGFIGHTING“Dogfight” is the term commonly applied to any close-quarters battle between
combat aircraft. Your objectives, as should be obvious, are to shoot down the enemyplanes and avoid being shot down. When you get into a situation that requires thissort of fighting, speed, maneuverability, and toughness are essential. Mostimportant, however, is the skill of the pilot. No amount of training can truly get youready for real combat, but the more you know in advance, the better prepared you’llbe.
The type of aircraft involved also has a lot to do with the outcome of the dogfight.Bulky, unwieldy bombers simply can’t compete against nimble fighters. On the otherhand, bombers have an advantage when trying to escape; due to their excessiveweight, they can gain speed quickly in a dive and leave any fighters with no options.Any fighter foolish enough to try to follow moves right into the tail gunner’s line offire. If your bomber is attacked by fighters, dive and run. If you stay to fight, you arealmost guaranteed to be shot down.
50
ENCOUNTERINGTHE ENEMY
1942 PAW manual 1 31-62 8/14/97 3:14 PM Page 50
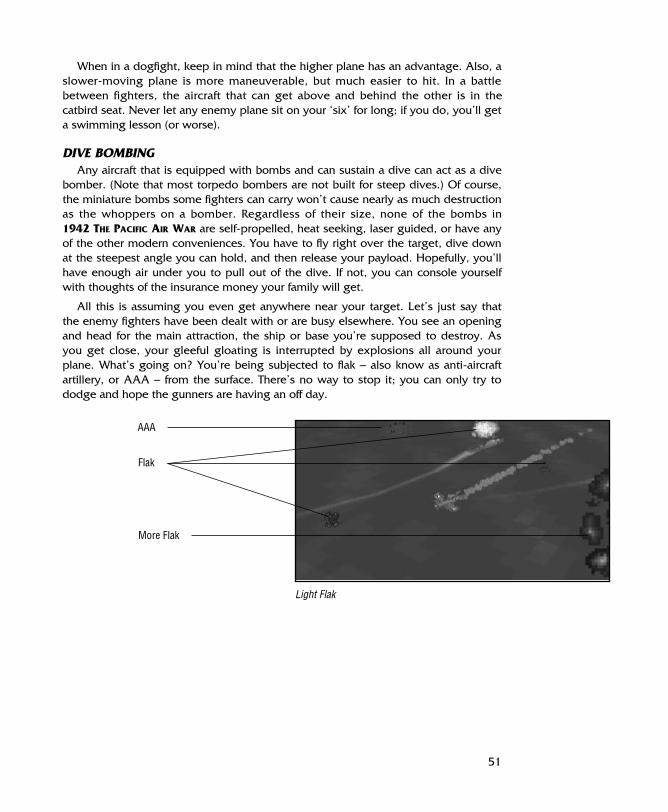
When in a dogfight, keep in mind that the higher plane has an advantage. Also, aslower-moving plane is more maneuverable, but much easier to hit. In a battlebetween fighters, the aircraft that can get above and behind the other is in thecatbird seat. Never let any enemy plane sit on your ‘six’ for long; if you do, you’ll geta swimming lesson (or worse).
DIVE BOMBINGAny aircraft that is equipped with bombs and can sustain a dive can act as a dive
bomber. (Note that most torpedo bombers are not built for steep dives.) Of course,the miniature bombs some fighters can carry won’t cause nearly as much destructionas the whoppers on a bomber. Regardless of their size, none of the bombs in 1942 THE PACIFIC AIR WAR are self-propelled, heat seeking, laser guided, or have anyof the other modern conveniences. You have to fly right over the target, dive downat the steepest angle you can hold, and then release your payload. Hopefully, you’llhave enough air under you to pull out of the dive. If not, you can console yourselfwith thoughts of the insurance money your family will get.
All this is assuming you even get anywhere near your target. Let’s just say thatthe enemy fighters have been dealt with or are busy elsewhere. You see an openingand head for the main attraction, the ship or base you’re supposed to destroy. Asyou get close, your gleeful gloating is interrupted by explosions all around yourplane. What’s going on? You’re being subjected to flak – also know as anti-aircraftartillery, or AAA – from the surface. There’s no way to stop it; you can only try tododge and hope the gunners are having an off day.
51
Light Flak
AAA
Flak
More Flak
1942 PAW manual 1 31-62 8/14/97 3:14 PM Page 51

The traditionally successful method of dive bombing a target starts with youapproaching at an appreciable altitude (dodging flak). Remember, you have to divelong enough to aim, and the closer you are when you drop, the better. Coming upon a moving target from the side is usually a good idea, as it puts you in theiroptimum anti-aircraft range for a shorter time. When you’re just about over thetarget, go into a full dive, as nearly vertical as your aircraft will allow. Experience willteach you just how steeply your plane can dive. Drop the bomb(s) when you arealmost directly over your target. The bombs have the same forward momentum asyour plane, so you must “lag” them a little. Make sure to take any motion of thetarget into account, as well.
52
Standard Dive Approach
1942 PAW manual 1 31-62 8/15/97 12:02 PM Page 52
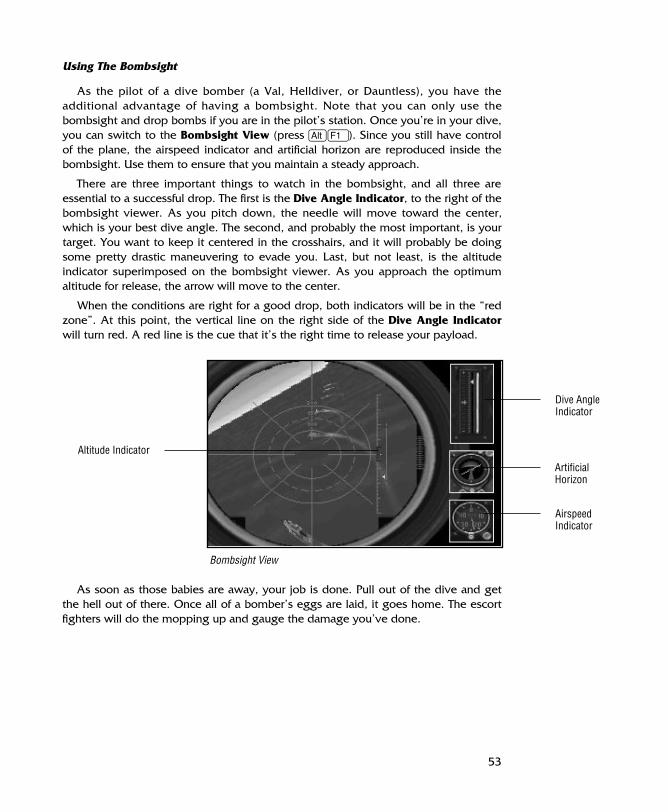
Using The Bombsight
As the pilot of a dive bomber (a Val, Helldiver, or Dauntless), you have theadditional advantage of having a bombsight. Note that you can only use thebombsight and drop bombs if you are in the pilot’s station. Once you’re in your dive,you can switch to the Bombsight View (press a1). Since you still have controlof the plane, the airspeed indicator and artificial horizon are reproduced inside thebombsight. Use them to ensure that you maintain a steady approach.
There are three important things to watch in the bombsight, and all three areessential to a successful drop. The first is the Dive Angle Indicator, to the right of thebombsight viewer. As you pitch down, the needle will move toward the center,which is your best dive angle. The second, and probably the most important, is yourtarget. You want to keep it centered in the crosshairs, and it will probably be doingsome pretty drastic maneuvering to evade you. Last, but not least, is the altitudeindicator superimposed on the bombsight viewer. As you approach the optimumaltitude for release, the arrow will move to the center.
When the conditions are right for a good drop, both indicators will be in the “redzone”. At this point, the vertical line on the right side of the Dive Angle Indicatorwill turn red. A red line is the cue that it’s the right time to release your payload.
53
Bombsight View
Altitude Indicator
Dive AngleIndicator
ArtificialHorizon
AirspeedIndicator
As soon as those babies are away, your job is done. Pull out of the dive and getthe hell out of there. Once all of a bomber’s eggs are laid, it goes home. The escortfighters will do the mopping up and gauge the damage you’ve done.
1942 PAW manual 1 31-62 8/14/97 3:14 PM Page 53
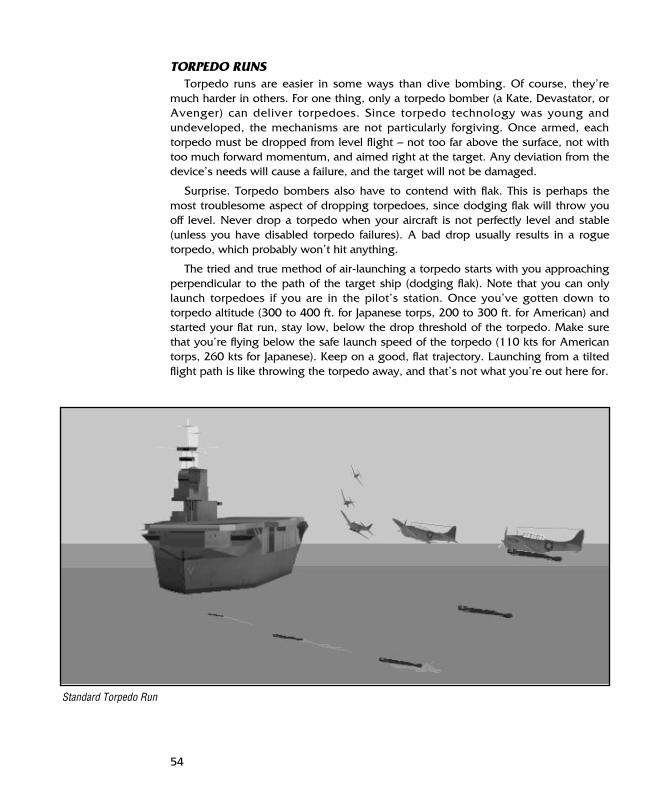
TORPEDO RUNSTorpedo runs are easier in some ways than dive bombing. Of course, they’re
much harder in others. For one thing, only a torpedo bomber (a Kate, Devastator, orAvenger) can deliver torpedoes. Since torpedo technology was young andundeveloped, the mechanisms are not particularly forgiving. Once armed, eachtorpedo must be dropped from level flight – not too far above the surface, not withtoo much forward momentum, and aimed right at the target. Any deviation from thedevice’s needs will cause a failure, and the target will not be damaged.
Surprise. Torpedo bombers also have to contend with flak. This is perhaps themost troublesome aspect of dropping torpedoes, since dodging flak will throw youoff level. Never drop a torpedo when your aircraft is not perfectly level and stable(unless you have disabled torpedo failures). A bad drop usually results in a roguetorpedo, which probably won’t hit anything.
The tried and true method of air-launching a torpedo starts with you approachingperpendicular to the path of the target ship (dodging flak). Note that you can onlylaunch torpedoes if you are in the pilot’s station. Once you’ve gotten down totorpedo altitude (300 to 400 ft. for Japanese torps, 200 to 300 ft. for American) andstarted your flat run, stay low, below the drop threshold of the torpedo. Make surethat you’re flying below the safe launch speed of the torpedo (110 kts for Americantorps, 260 kts for Japanese). Keep on a good, flat trajectory. Launching from a tiltedflight path is like throwing the torpedo away, and that’s not what you’re out here for.
54
Standard Torpedo Run
1942 PAW manual 1 31-62 8/14/97 3:14 PM Page 54

Take the time to calculate how much you needto lead the ship, and get as close as you dare(you must be inside the range of the torpedo, andthe closer you are when you drop, the better).Now comes the hard part – waiting until you’re inrange. Each type of torpedo has a different range,but in general, the closer you are the better.American airborne torpedoes have ranges ofapproximately 6300 yds, while the Japaneseairborne torps must be launched from within2200 yds. Estimating the distance between youand your target is tr icky, but there’s noautomation to help you. (Remember, radar hasbarely been invented.) Good luck, and try to learnfrom experience. When you’re ready to drop,make absolutely certain that you’re f lyinglevel.then fire away.
The planes you can pilot can only carry one torpedo. Once it’s loosed, you canturn around and go home. The fighter pilots will stay as spotters to find out whatkind of damage you did – if any.
55
“Torpedo runs have to be made at suicidally low speeds because aerial torpedoes aredelicate instruments and flop over when dropped too fast or from too high an altitude.Lieutenant Jackson made his run at a hundred and twenty miles an hour about thirtyfeet over the water. He gave the enemy a square shake at a target for a very, very longtime. Every gun in the force was fired at him. The big cannons were fired into the waterto throw up splashes and wreck him. His intended victim kept making violent turns toevade him. But he continued steadily through the maelstrom, dropped his torpedo whenabout four hundred feet away from his target, saw the torpedo land with a soft squashin the black water and proceed correctly on its way, and, as he turned, heard the noisewhich told him his torpedo had arrived at its proper destination.”
Ira Wolfert, 1942, Guadalcanal
Mild AAA (Flak)
1942 PAW manual 1 31-62 8/14/97 3:14 PM Page 55

STRAFINGStrafing is not always the most effective way to attack a ground target, but if you
haven’t any other options, it’ll do. When strafing, you essentially treat the groundtarget as if it were an enemy plane; that is, you shoot bullets at it. You are rathervulnerable when strafing, so this is not normally a good idea if the target is able toshoot back.
56
Strafing Run
Approach your target low enough that you can hit it with bullets, but not so lowthat you chance hitting the deck. Keep in mind that you will probably lose somealtitude during the run. You also want to be moving pretty fast, but not so fast that
you can’t aim well. Fire as you pass, then pullup. If you want to make another pass, performa wing over and go for it.
The effects of a good strafe – note the damage to this hangar – arecomparable to bomb damage.
1942 PAW manual 1 31-62 8/14/97 3:14 PM Page 56
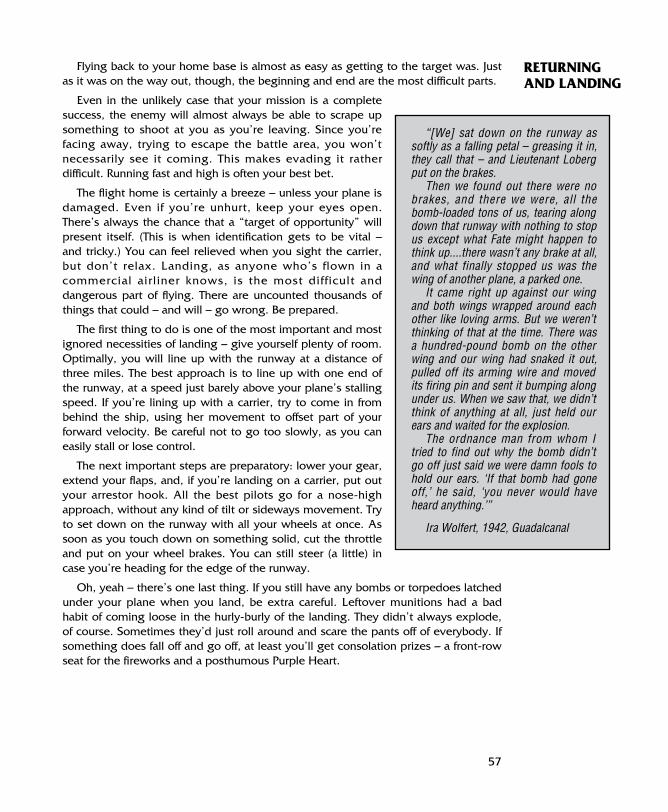
Flying back to your home base is almost as easy as getting to the target was. Justas it was on the way out, though, the beginning and end are the most difficult parts.
Even in the unlikely case that your mission is a completesuccess, the enemy will almost always be able to scrape upsomething to shoot at you as you’re leaving. Since you’refacing away, trying to escape the battle area, you won’tnecessarily see it coming. This makes evading it ratherdifficult. Running fast and high is often your best bet.
The flight home is certainly a breeze – unless your plane isdamaged. Even if you’re unhurt, keep your eyes open.There’s always the chance that a “target of opportunity” willpresent itself. (This is when identification gets to be vital –and tricky.) You can feel relieved when you sight the carrier,but don’t relax. Landing, as anyone who’s flown in acommercial air l iner knows, is the most diff icult anddangerous part of flying. There are uncounted thousands ofthings that could – and will – go wrong. Be prepared.
The first thing to do is one of the most important and mostignored necessities of landing – give yourself plenty of room.Optimally, you will line up with the runway at a distance ofthree miles. The best approach is to line up with one end ofthe runway, at a speed just barely above your plane’s stallingspeed. If you’re lining up with a carrier, try to come in frombehind the ship, using her movement to offset part of yourforward velocity. Be careful not to go too slowly, as you caneasily stall or lose control.
The next important steps are preparatory: lower your gear,extend your flaps, and, if you’re landing on a carrier, put outyour arrestor hook. All the best pilots go for a nose-highapproach, without any kind of tilt or sideways movement. Tryto set down on the runway with all your wheels at once. Assoon as you touch down on something solid, cut the throttleand put on your wheel brakes. You can still steer (a little) incase you’re heading for the edge of the runway.
Oh, yeah – there’s one last thing. If you still have any bombs or torpedoes latchedunder your plane when you land, be extra careful. Leftover munitions had a badhabit of coming loose in the hurly-burly of the landing. They didn’t always explode,of course. Sometimes they’d just roll around and scare the pants off of everybody. Ifsomething does fall off and go off, at least you’ll get consolation prizes – a front-rowseat for the fireworks and a posthumous Purple Heart.
57
RETURNINGAND LANDING
“[We] sat down on the runway assoftly as a falling petal – greasing it in,they call that – and Lieutenant Lobergput on the brakes.
Then we found out there were nobrakes, and there we were, all thebomb-loaded tons of us, tearing alongdown that runway with nothing to stopus except what Fate might happen tothink up....there wasn’t any brake at all,and what finally stopped us was thewing of another plane, a parked one.
It came right up against our wingand both wings wrapped around eachother like loving arms. But we weren’tthinking of that at the time. There wasa hundred-pound bomb on the otherwing and our wing had snaked it out,pulled off its arming wire and movedits firing pin and sent it bumping alongunder us. When we saw that, we didn’tthink of anything at all, just held ourears and waited for the explosion.
The ordnance man from whom Itried to find out why the bomb didn’tgo off just said we were damn fools tohold our ears. ‘If that bomb had goneoff,’ he said, ‘you never would haveheard anything.’”
Ira Wolfert, 1942, Guadalcanal
1942 PAW manual 1 31-62 8/14/97 3:14 PM Page 57
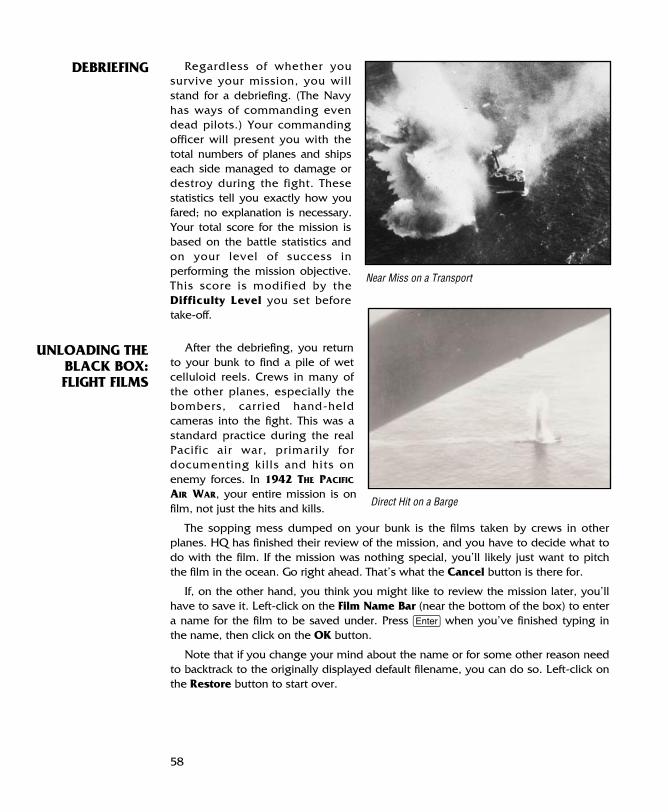
Regardless of whether yousurvive your mission, you willstand for a debriefing. (The Navyhas ways of commanding evendead pilots.) Your commandingofficer will present you with thetotal numbers of planes and shipseach side managed to damage ordestroy during the fight. Thesestatistics tell you exactly how youfared; no explanation is necessary.Your total score for the mission isbased on the battle statistics andon your level of success inperforming the mission objective.This score is modified by theDifficulty Level you set beforetake-off.
After the debriefing, you returnto your bunk to find a pile of wetcelluloid reels. Crews in many ofthe other planes, especially thebombers, carried hand-heldcameras into the fight. This was astandard practice during the realPacif ic air war, primarily fordocumenting kil ls and hits onenemy forces. In 1942 THE PACIFIC
AIR WAR, your entire mission is onfilm, not just the hits and kills.
The sopping mess dumped on your bunk is the films taken by crews in otherplanes. HQ has finished their review of the mission, and you have to decide what todo with the film. If the mission was nothing special, you’ll likely just want to pitchthe film in the ocean. Go right ahead. That’s what the Cancel button is there for.
If, on the other hand, you think you might like to review the mission later, you’llhave to save it. Left-click on the Film Name Bar (near the bottom of the box) to entera name for the film to be saved under. Press e when you’ve finished typing inthe name, then click on the OK button.
Note that if you change your mind about the name or for some other reason needto backtrack to the originally displayed default filename, you can do so. Left-click onthe Restore button to start over.
58
DEBRIEFING
UNLOADING THEBLACK BOX:FLIGHT FILMS
Near Miss on a Transport
Direct Hit on a Barge
1942 PAW manual 1 31-62 8/14/97 3:14 PM Page 58

CAREER PILOTFlying single missions is good training. Sooner or later, though, you’ve got to join
the war. As a career pilot on a tour of duty, you’ll have a chance to do your part. Youmay not single-handedly win victory for your country (though anything is possible),but every contribution is an heroic act. There is honor and glory in the sky, for thosewho have the courage to earn it.
When you’re convinced you’re good enough, you can start a career as a combatpilot. In order to sign on as a pilot in either navy, you have only to apply. (Therecruiting officers are a little desperate; volunteer pilots for Pacific duty are gettinghard to find.)
WHOSE SIDE ARE YOU ON?The first order of business is to pick your nationality. The only options are the
major combatants in the theater, the Americans and the Japanese. Your nationalitywill determine your missions and the types of aircraft and armament available toyou. Left-click on either the flag or the name of the nation for which you wish to fly.
WHAT’S YOUR NAME?Next, left-click twice on any slot on the roster chalkboard. The name currently
occupying that slot will be erased. Type in the name of your pilot and press e.You will, of course, begin your career at the bottom. If you do well, you can expectto be promoted.
59
CREATING APILOT
1942 PAW manual 1 31-62 8/14/97 3:14 PM Page 59

WHAT DO YOU FLY?Last but not least, you must choose a specialty in which to specialize for this tour
of duty. Left-click on the type of aircraft you prefer to fly. The options are fighter,dive bomber, and torpedo bomber. Different planes require different battle skills, sochoose carefully.
You are now ready to start your first tour of duty as a rookie pilot in your navy ofchoice. Left-click on the door to the Briefing Room to proceed to your first briefing.
As a pilot, you have no say in the strategy and planning aspect of the war. Yourcommanding officer tells you what to do, and you do it to the best of your ability.The briefing room is where he outlines your duties for the next mission.
Loitering in the back of the Briefing Room, you have several choices. Move themouse pointer around until you find them all.
60
USN Briefing Room
THE BRIEFINGROOM
BRIEFINGInstead of staring at pin-ups all day, you could try paying attention to the briefing.
This is the only way to find out what your mission is. Left-click on the mission map toview the briefing.
VIEW PILOT STATISTICSCurrent Hit and Kill statistics are posted for every active pilot on the Briefing
Room Kill Sheet. Left-click on the corkboard to view each pilot’s stats. Use thearrow buttons at the bottom of the board to cycle through the various pilots. Theq key returns you to the Briefing Room.
1942 PAW manual 1 31-62 8/14/97 3:14 PM Page 60

HALL OF FAMEClick on the Hall of Fame to see the best of the best – those career pilots who
have gone over the top in successful missions. If you’re incredible, you might evenget your name on the list – someday.
RETURN TO PILOT CAREER ROSTERAt this point, you can still abort the mission without penalty (except perhaps
embarrassment) and return to the pilot roster. Left-click on the blackboard to theright of the map.
FLIGHT DECKThe flight deck is where you instruct the loaders what armament load-out you
want on your plane. When you’re satisfied that you’ve memorized your missionobjectives, this is your next step. In the American Briefing Room, left-click on thedoor to walk out to the flight deck. In the Japanese, click on the plane to the left ofthe blackboard.
For a detailed description of the flight deck and instructions for arming youraircraft, please refer to Arming, in the Flying A Mission section.
When you have accepted a load-out for your aircraft, you suit up and climb intothe cockpit.
Before you take off, you must choose settings for the Realism Options, thusdetermining the Difficulty Level for the upcoming mission. Don’t worry, you are notdeciding on a Difficulty Level for your entire tour of duty (or career). You will havethe chance to modify the Realism Options before every mission. For detaileddescriptions of the various Realism Options and their possible settings, please referto Pre-Flight Checklist: Realism Options, in the Flying A Mission section.
Once you finish the checklist and signal the thumbs up to the flight crew, the tarpis pulled off and you’re ready to start the mission.
61
PRE-FLIGHTCHECK
1942 PAW manual 1 31-62 8/14/97 3:14 PM Page 61

Your commanding officer will assign missions as necessary for carrying out theadmiral’s strategy. It is not in the best interest of the fleet that you or even yoursuperior know the details of that strategy. If you should somehow fall into the handsof the enemy, the less you know, the better – for the fleet and for you. Trust thatevery mission is an important piece of that strategy.
One thing you can rely on is that no mission will be without resistance from theenemy. This is a war, not a mail run. Don’t be lulled by the quiet sea and theseemingly empty sky in the minutes after take-off. Enjoy those few restful moments,because that’s all the peace you’ll get.
Missions will be of the same six basic types as those you flew in training. Pleaserefer to Mission Type, in the Flying A Mission section, for details.
Those pilots and squadrons who distinguish themselves in the line of duty will berewarded for their courage and skill. Only the best will be honored by having theircontributions to their command, their division, and their country recognized.
It is possible that, due to an exemplary service record, one may rise in position.Of course, keep in mind that promotion to a high enough rank will remove you frompiloting duties.
62
PACIFICCAMPAIGNMISSIONS
RECOGNITIONFOR
EXEMPLARYSERVICE
1942 PAW manual 1 31-62 8/14/97 3:14 PM Page 62
CUSTOM MISSIONSThose of you who are not satisfied with the pre-designed missions included in
1942 THE PACIFIC AIR WAR need not yank out your hair in frustration. You’re notlimited to the built-in situations. It doesn’t matter whether you’ve defeated everymission time and again and, therefore, become bored or you just don’t like the waythe missions are set up. You can not only modify the pre-existing missions, but youcan also design your own “fantasy” missions and re-create any of the thousands ofhistorical missions that we couldn’t include.
To begin designing your own missions, select the Mission Builder option fromthe Main Menu.
63
1942 PAW manual 1 63-90 8/14/97 3:12 PM Page 63

The Mission Builder is one of the tools the designers used to generate thenumerous missions that come with the game. It’s included in 1942 THE PACIFIC AIR
WAR so that you can expand the horizons of gameplay. You sit down in thedesigner’s chair and make up your own scenarios.
The options on the main Mission Builder Menu are fairly straightforward; they are:
Load Mission Load an existing custom or pre-set mission into the Mission Builder.
Save Mission Save (and name) the mission that is currently loaded in theMission Builder.
Edit Mission Modify the mission that is currently loaded in the Mission Builder.
New USN Mission Create a new mission for United States Navy pilots.
New IJN Mission Create a new mission for Imperial Japanese Navy pilots.
Cancel Return to the Main Menu and discard any unsaved work.
64
THE MISSIONBUILDER
Mission Builder Menu
You can only work with one mission at a time. If you load a previously savedmission without saving the changes to the mission currently loaded in the MissionBuilder, the unsaved work on the current mission will be lost.
1942 PAW manual 1 63-90 8/14/97 3:12 PM Page 64
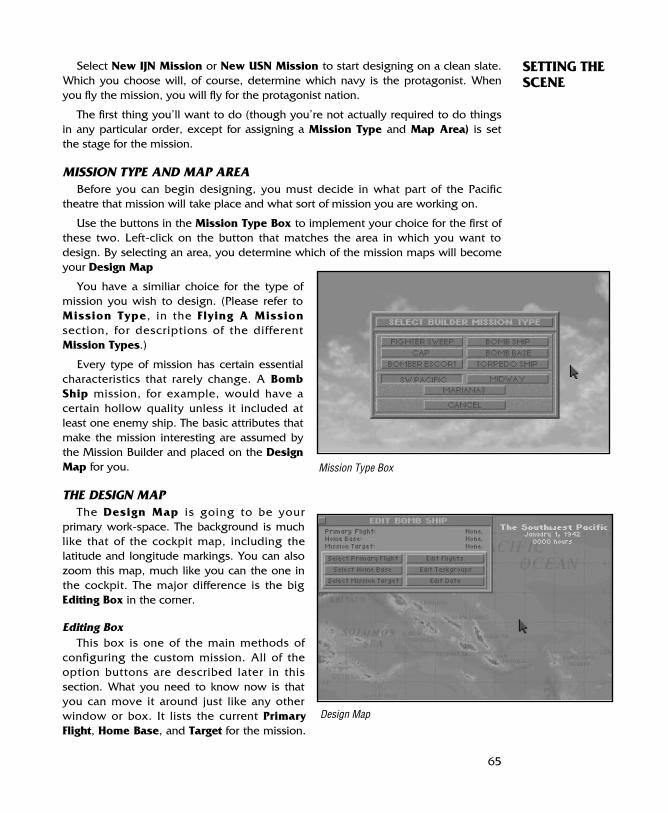
Select New IJN Mission or New USN Mission to start designing on a clean slate.Which you choose will, of course, determine which navy is the protagonist. Whenyou fly the mission, you will fly for the protagonist nation.
The first thing you’ll want to do (though you’re not actually required to do thingsin any particular order, except for assigning a Mission Type and Map Area) is setthe stage for the mission.
MISSION TYPE AND MAP AREABefore you can begin designing, you must decide in what part of the Pacific
theatre that mission will take place and what sort of mission you are working on.
Use the buttons in the Mission Type Box to implement your choice for the first ofthese two. Left-click on the button that matches the area in which you want todesign. By selecting an area, you determine which of the mission maps will becomeyour Design Map
You have a similiar choice for the type ofmission you wish to design. (Please refer toMission Type, in the Flying A Missionsection, for descriptions of the differentMission Types.)
Every type of mission has certain essentialcharacteristics that rarely change. A BombShip mission, for example, would have acertain hollow quality unless it included atleast one enemy ship. The basic attributes thatmake the mission interesting are assumed bythe Mission Builder and placed on the DesignMap for you.
THE DESIGN MAPThe Design Map is going to be your
primary work-space. The background is muchlike that of the cockpit map, including thelatitude and longitude markings. You can alsozoom this map, much like you can the one inthe cockpit. The major difference is the bigEditing Box in the corner.
Editing BoxThis box is one of the main methods of
configuring the custom mission. All of theoption buttons are described later in thissection. What you need to know now is thatyou can move it around just like any otherwindow or box. It lists the current PrimaryFlight, Home Base, and Target for the mission.
65
SETTING THESCENE
Mission Type Box
Design Map
1942 PAW manual 1 63-90 8/14/97 3:12 PM Page 65

Also, if you left-click on the tiny square in the upper left-hand corner, you’ll bereturned to the main Mission Builder Menu.
Starting TimeThe current date and starting time for the mission are always listed in the upper
right-hand corner of the Design Map, directly underneath the name of the battle theater.
ForcesAll bases and any forces that have already been inserted into the mission are
represented on the map. Bases are small red (Axis) and blue (Allied) dots, and maybe hard to find. (Luckily, they’re always in the same places.) Flight Groups look likelittle planes, and Task Forces are represented by little boats. Note that any base orcarrier group could have one or more flight groups ready to launch.
When the mouse pointer moves over any of these icons, an information box opens.This box lists all of the vital statistics for whatever force the pointer is covering.
For a: the box lists:
Base Name and Location.
Task Group Task Group Number, Commander, Location, Heading, Speed,Number of Ships.
Flight Flight Number, Location, Altitude, Speed, Number and Type ofPlanes, Formation, Current Orders.
Instructions for setting the initial positions, attributes, and orders of these forcesare later in this section.
DATE AND TIMEThe time and date on which the mission begins are essential to the “atmosphere” of
the flight. Historical completists will want to make certain that the date of their missionmatches that of its historical counterpart. The time of day that the mission begins will
affect the amount of light, since the sun is notalways around (at 2300 hours, for example, it’spretty dark). Starting a mission near dawn ordusk will cause substantial visibil itycomplications for the pilots.
Left-click on the Edit Date button to set adate and time for the mission to start. In theDate Box, each part of the date and time hasbuttons above and below it. Left-click on thebutton above to move time forward, and usethe button below to move time backward.Any day and time from the beginning of 1942through the end of the war (in 1945) isavailable.
66
Date Box
1942 PAW manual 1 63-90 8/14/97 3:12 PM Page 66
Now that you’ve established the proper setting and mood, you need to populatethe world of the mission. The bases are immutable; those that, historically, were in existence at the date you set for the mission will be there, and you cannot change their positions or ownership. The ships and planes, however, are entirelyunder your control.
TASK GROUPSFor the purposes of the Mission Builder, a Task Group is a bunch of ships that
start at their assigned position and move at a set heading and speed for the durationof the mission. Task groups can act as mobile bases (if there is a carrier in the group),mission targets, or as anti-aircraft obstacles.
When putting together the task groups for a mission, keep in mind that you canhave up to a maximum of 96 ships on the map. That total includes the ships of bothsides. Naturally, this also limits you to a total of no more than 96 task groups. Ofcourse, there is no need to have any surface forces in a mission at all, if that’s howyou want it, but Bomb Ship and Torpedo Ship missions will seem rather pointless.
CompositionThe surface forces for your mission are not pre-determined by history. (What
would be the fun in that?) Left-click on the Edit Task Groups button in the Edit Boxto begin forming the forces for your mission.
The Task Group Editing Box is divided into three sections. All your work is donein the bottom area, where the two Ship Lists sit side by side. At first, the left sidelists all of the ships in the default task group, “Available Ships”. The right side liststhe existing task groups. Note that when you move the mouse pointer over thename of a ship, a graphic representation (picture) of that ship is displayed in the toparea of the box. The vital statistics for the ship are listed in the center area, includingthe name of the Captain, the Class of the ship, the top Speed, any unrepairedDamage, the type of gun in the Main and 2nd gun Batteries, any Torpedoes on-board, and the type of Radar, if any is installed.
Use the Nationality Button to choose the navy with which you want to start. Notethat the numbering of the task groups for the American side starts at #60, while theJapanese task forces are numbered from #10 up. If you left-click on the Select TaskGroup button under either list, that list will show all of the existing task groups forthe current navy. You can left-click on the existing task group to edit it, or click onthe New Task Group button to generate a new, empty task group.
67
THE CASTOF PLAYERS
1942 PAW manual 1 63-90 8/14/97 3:12 PM Page 67

There are some realistic restrictions on the make-up of task groups, but for themost part you have a free hand. When you finish with one navy, use the NationalityButton to switch to the other and complete the process of generating surface forces.When you are done, left-click on the little square in the upper left-hand corner of theTask Group Editing Box. All of your changes are saved automatically.
PositioningAny task group that contains at least one ship is more than just an idea, it’s a
force. As soon as they are created, each force is represented on the Design Map bythe corresponding icon (the little boat). Japanese task groups appear as red boats,and U.S. task groups are blue boats.
Initially, newly created task groups are just plunked down anywhere on the map.It is your responsibility to position them in a meaningful manner. Note that under nocircumstances will opposing task groups interact with each other in any way. This isa game of aerial combat; if you wish to pit groups of ships against each other, tryTask Force 1942 – it’s a great game.
To move a task force, place the mouse pointer over the corresponding icon. Pressand hold the [LMB], then carry the task force to its new position. When you releasethe mouse button, the ships will stay where the pointer was when you did so.
68
Task Group Editing
Ship Graphic
Ship Data
Ship Box 1
Ship Box 2
Left-click on the new task group (or the default group that was already there) tohave the ships in that group listed. There are none. In the other Ship List, left-clickon “Available Ships” to have those ships displayed in that list. Now you cancompose your new task group. When you left-click on any ship on either Ship List,that ship is moved to the other list. So, to place ships into a task group, you clickthem off of the “Available” list. In this way, you can populate as many task groups asyou need.
1942 PAW manual 1 63-90 8/14/97 3:12 PM Page 68
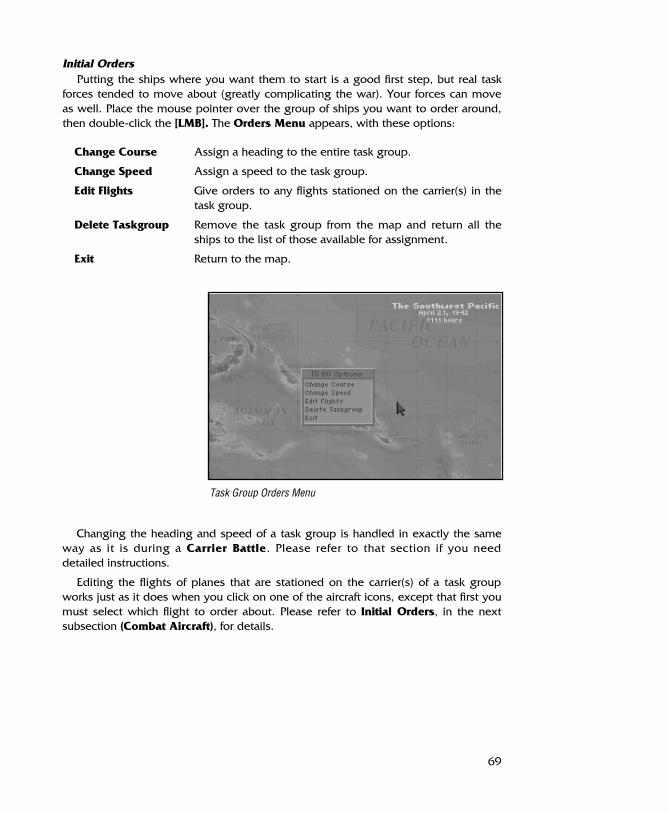
Initial OrdersPutting the ships where you want them to start is a good first step, but real task
forces tended to move about (greatly complicating the war). Your forces can moveas well. Place the mouse pointer over the group of ships you want to order around,then double-click the [LMB]. The Orders Menu appears, with these options:
Change Course Assign a heading to the entire task group.
Change Speed Assign a speed to the task group.
Edit Flights Give orders to any flights stationed on the carrier(s) in thetask group.
Delete Taskgroup Remove the task group from the map and return all theships to the list of those available for assignment.
Exit Return to the map.
69
Changing the heading and speed of a task group is handled in exactly the sameway as it is during a Carrier Battle. Please refer to that section if you need detailed instructions.
Editing the flights of planes that are stationed on the carrier(s) of a task groupworks just as it does when you click on one of the aircraft icons, except that first youmust select which flight to order about. Please refer to Initial Orders, in the nextsubsection (Combat Aircraft), for details.
Task Group Orders Menu
1942 PAW manual 1 63-90 8/14/97 3:12 PM Page 69

COMBAT AIRCRAFTThe aircraft are really the heart of any mission. When you play the mission, you’ll
be piloting a plane in one of the flights you generate. Your opponents will be theenemy flights that you place in the way of your objective. Thus, the choices youmake here are important to how much fun (or how awesomely difficult) your missionwill ultimately be.
When putting together flights of combat aircraft, remember that you can have amaximum of 16 planes involved in any single mission. That total includes friendlyand hostile craft. Obviously, this means that you can create up to, but not more than,16 different flights of planes. (If this seems like too few to make for really interestingmissions, keep in mind that even the best pilots during the war would avoid anengagement – if they could – when faced with 4 to 1 odds.)
Forming FlightsLeft-click on the Edit Flights button to start forming flights of aircraft for your
mission. What you’re left looking at is the Flight Editing Box. The top section of thisbox is reserved for graphic representations of selected plane types. The middle areais similarly reserved for vital statistics on the type of plane. The area in the lower left-hand corner is the Flight List.
70
When you first open this box, the Flight List contains the default flight(s) for thetype of mission you are creating. You have two basic options now: you can left-clickon the New Group button to generate a new flight of aircraft, or you can left-click onone of the existing, default flights to edit that flight group. New flight groups arenumbered automatically.
Flight Editing
Plane Graphic
Plane Data
1942 PAW manual 1 63-90 8/14/97 3:12 PM Page 70

If you select an existing (or new) flight group to edit, the list of aircraft typesshows up. Notice that the upper portions of the Flight Editing Box reflect therelevant information for whichever plane type you move the mouse pointer over.Left-click on the type of plane you want to assign to this flight group. The number ofplanes assigned to the group is listed in parentheses at the end of the plane typelisting. Click on that type again to add another plane to the flight. Remember thatnavy regulations prohibit certain types of plane from flying in large groups; once youreach the maximum of that type of plane, the count will cycle back to one. (On theother hand, the composition of your flights is not limited by historical accuracy. Thus,for example, you could put Corsairs in a mission that takes place before they wereactually built.)
When you are satisfied with the type and number of planes in the flight, left-clickon the Select Formation button. The pilots in that flight group will be ordered to flyin whatever formation you choose. (Of course, you have no such control over thehuman player.) Note that if you wish, you can left-click on the Select Type button atthis point to go back and re-edit the type and number of planes in the group.
Use the Select Group button to return to the list of flight groups. Create and editwhatever flights are necessary to your mission design. Make sure that you createflights containing at least the minimum number and type of aircraft to complete themission. A Torpedo Ship mission, for example, would be impossible without at leastone plane capable of carrying a torpedo.
PositioningEvery flight of aircraft that contains at least one plane is automatically placed on
the Design Map. Each is represented by the proper icon (the little plane). Americantask groups appear as blue planes, and Japanese task groups are red planes.
Newly created flights are strewn about the map pretty much at random. Unlessyou position them somewhere that makes sense, most of them will simply run out offuel and crash when you play the mission. If you expect to station a flight at a baseor on a carrier, position that flight on top of its station. When you give the planestheir initial orders, you can settle them on the ground if you wish.
To move a flight of planes, place the mouse pointer over the corresponding icon.Press and hold the [LMB], then carry the aircraft to their new position. When yourelease the mouse button, the planes will drop into the position where the pointerwas when you did so – in formation, no less.
71
1942 PAW manual 1 63-90 8/14/97 3:12 PM Page 71

Initial OrdersStationing flights of bombers and fighters in their starting positions is only half the
job. Without orders, those flyboys won’t get too far. Place the mouse pointer overthe group of planes you want to order around, then double-click the [LMB]. TheOrders Menu appears, with these options:
Start at Home Order the flight to start on the ground at the nearest baseor carrier.
or
Start in the Air Order the flight to start the mission in the air over the baseor carrier.
Fly Patrol Order the flight to fly a patrol pattern you specify.
Fly CAP Order the flight to fly CAP over the base or carrier at whichit is stationed.
Cruising Altitude Set the altitude at which the flight will fly until they reach atarget or are disturbed by an enemy. Cruising altitude is30,000 ft or below.
Delete Flight Remove the flight from the map and disband the group.
Exit Return to the map.
72
Flight Orders Menu
If you choose to have a flight Fly Patrol, you will have to designate the patrol route.You will notice that lines now emanate from the plane icon in two directions. Theselines and their endpoints, which are called “waypoints”, make up the patrol pattern. Ifyou leave these as they are, the flight will fly from its starting position to one end ofthe route, turn, fly to the other end, turn, and return to the start. The aircraft willrepeat this pattern until they encounter an enemy or run out of fuel and fall. Unlessthis is what you want them to do, you will need to modify the patrol route.
1942 PAW manual 1 63-90 8/14/97 3:12 PM Page 72

The only way to change the starting point of the patrol route is to change theposition of the flight group. To change the route, position the mouse pointer overone of the waypoints (you know the pointer is on the waypoint when a yellowsquare becomes visible around the waypoint). Click and hold the [LMB], then carrythe waypoint to its new position. Release the [LMB] to set the new waypoint. Attimes, you may need to create new waypoints between the existing ones. To dothis, double-click on the waypoint before which you want to insert a new one. At themenu, select the Insert option. To remove a waypoint, double-click on it and selectthe other option. You can set a maximum of 8 waypoints on one route.
Note that planes will only Fly CAP (Combat Air Patrol) over the selected MissionTarget and Mission Home Base. You must choose these sites (instructions for doing soare in the next subsection – The Plot) before you can order a flight group to fly CAP.
Now that the scene is set and the players have been cast, it’s time to hand outscripts. You’ve got to choose the heroes and the villains and instruct them as to theirplans and schemes.
If, as you go through the rest of this process, you find that the cast you havecreated doesn’t quite fill your needs, don’t fret. You can always go back and changethings at any time, even after the mission is completed and saved to your hard disk.
OUR PROTAGONISTSThe player who is going to fly this mission is only one individual, and no one can
fly more than one of these aircraft at once. Therefore, you must decide which of thefriendly flights you have created will be the primary flight for the mission. The playerpilot will start the mission in the lead plane of this flight.
It may seem too obvious to state, but you should remember to assign the righttype of plane as primary. For example, a flight of bombers should not be the primaryon a bomber escort mission; that would be sort of pointless. Fighters cannot torpedoships, and so forth. You get the idea.
Left-click on the Select Primary Flight button to select the flight of aircraft youwish the player of the mission to pilot. The Editing Box will disappear and the FlightSelection Box will open. Move the mouse pointer to the group of planes that youwant as the primary flight and left-click on it. The selected flight will be listed in theEditing Box as the primary flight.
73
THE PLOT
1942 PAW manual 1 63-90 8/14/97 3:12 PM Page 73

THEIR HOME BASENext, the primary flight needs a place to start out from and return to. Otherwise,
the mission will quite literally never end (except in abject failure, of course), and noone will get any recognition for their valorous deeds. Only friendly bases and thosefriendly task groups which include at least one carrier can act as home base for a mission.
Left-click on the Select Home Base button to select a home base for the primaryflight. The Editing Box will disappear and the Base Selection Box will open. Movethe mouse pointer to the carrier or land base that will be the home base for theprimary flight and left-click on it. The flight will start from that runway, and the homebase will be listed as such in the Edit Box.
THE LOFTY GOALWhen designing an offensive type of mission (torpedo ship, for instance), you are
required to assign a target for the primary flight to try to destroy. A good thing tokeep in mind when selecting a target base or groups of ships is the effective range ofthe planes that make up the primary flight. While one-way missions are certainlypossible (especially for the Japanese late in the war), they’re not much fun to pilot.After all, you will be flying this mission, not some red-shirted Ensign Osborn.
Left-click on the Select Mission Target button to choose a main target for theprimary flight. The Editing Box will disappear. Move the mouse pointer over theenemy base or task force that you want to designate as this target. Left-click again toselect the target.
THEIR HEROIC PLANThe Mission Type will have a lot to do with determining the plan of action for the
primary flight group. One decision that does not depend on the type of mission iswhether the pilots start the mission already in the air or on the runway. You havefree reign in making this choice.
Any mission that is not CAP involves some sort of attack on the enemy. As soonas you have chosen the home base, target, and primary flight for an attack mission,the most direct flight route is computed for you. Your pilots, except for the humanplayer, will be tied to this flight plan, except for times when they are defendingthemselves against enemies.
As with almost every other aspect of your mission design, you can customize theattackers’ flight plan. This flight plan has waypoints at either end and at the target; ofcourse, you cannot change these endpoints. (One of them is calculated to return theplanes to their home base.) If you insert other waypoints in the route (refer back toInitial Orders in the Combat Aircraft subsection, for instructions), you can modifythe flight plan. Make sure you don’t overdo it and run your planes out of fuel.
If the Mission Type is CAP, you will not need to design any sort of plan. Theaircraft involved are required to fly a standard CAP pattern.
74
1942 PAW manual 1 63-90 8/14/97 3:12 PM Page 74
THE NEFARIOUS ENEMIESEvery mission should include some enemy forces. If you have not already created
them, then you should do so now. Otherwise, you’re going to be pretty bored justflying around strafing the few palm trees left in the South Pacific.
Enemies should be assigned duties that complement the protagonists’. Forexample, if the goal of the mission is to torpedo a ship, that ship should beprotected by CAP or a patrol flight (or both!). Placing task groups in the way of theattacking planes is also helpful, as flying through lots of flak is certain to make themission more difficult. Defensive Mission Types, such as CAP, should be interruptedby at least one enemy attack. (If you really want to be hard on the protagonist pilots,have a friendly task group timed to steam through the target task group just as theprimary flight arrives. Trying to identify which ships are which can be pretty tricky inthe middle of a hot dogfight.)
Just remember, you can have 16 planes and 96 ships going all at once. Thoughlarger numbers of aircraft and ships will almost certainly slow down the action, theconfusion created by even a moderate number of extra vehicles may be worth the price.
Once you have gone through all the work of creating a customized mission,chances are you’ll want to save that mission to fly (or edit) later. When you finishspecifying all the parameters of a mission, you will be left looking at the mainMissionBuilder Menu. Select Save Mission to store your new mission on the hard disk.
All of the existing missions you have created are listed in the Save Box thatappears next. You have several naming options for saving the new mission. You can:
1) Click on the name bar to type in the whole name manually;
2) Select and confirm an existing name to replace the existing mission with thenew one (note that this will not work if you are modifying one of the pre-setmissions); or
3) Select and edit an existing name to create a new name similar to the old one.
Of course, if you change your mind about saving, you can always click on theCancel button. Note that if you leave the Mission Builder without saving themission you have been working on, all of your work will be lost.
Once saved, the new mission is stored in a file in the missions subdirectory andwill be listed with missions of the same type in the Mission Listing Box.
75
SAVING THESCRIPT
1942 PAW manual 1 63-90 8/14/97 3:12 PM Page 75

Starting any of the missions you have generated is no more difficult than choosingany other mission. When you choose the corresponding mission type in Fly SingleMission, your missions will be listed with all the others.
• On the Main Menu, choose Fly Single Mission.
• Decide whether you want to fly the mission from the American or Japanese side.
• Select the type of mission you want to fly.
• Choose your mission from the displayed list in the upper part of the menu.
Voila! Good hunting!
If one of the missions you’ve created doesn’t measure up to what you thought itwould be, you have the ability to modify it. You can also copy and revise the pre-setmissions that were included with 1942 THE PACIFIC AIR WAR. The process is quite simple.
First, you need to load the mission into the Mission Builder. Choose LoadMission from the Mission Builder Menu. A box similar to the Mission Listing Boxappears. Select the appropriate Mission Type and Nationality, and all of theappropriate missions will be listed, including your custom missions. Select andconfirm the mission you want to modify, and it will be loaded.
Next, select Edit Mission from the menu. When the map is displayed, you’reready to go. Editing the mission is exactly like creating a new one, except that most(or all) of the mission is already in place. When you’re finished, save this mission inthe same way as you would any other.
76
ACTION
MAKINGREVISIONS
1942 PAW manual 1 63-90 8/14/97 3:12 PM Page 76

FLIGHT FILMSAs you fly every mission, cameras record every move you and your opponents
make. Much of the action during the real war was filmed in this way, for variousreasons. The Flight Films in 1942 THE PACIFIC AIR WAR, however, are just a little moreversatile than their historical archetypes.
Using the Flight Film Viewer, you can watch the mission as it appeared to theplayer pilot. Beside the usual slow motion, rapid motion, and pause options, youalso have the ability to “jump through the screen” and take over the mission in themiddle (most likely changing the outcome).
The Editing Board features, in conjunction with all of the various camera functionsand viewpoints that are available, let you build new (more exciting) films from theexisting reels. You can save these for later viewing or further editing.
Select Flight Films from the Main Menu to begin viewing and editing thecinematic records of your missions. First off, you’ll have to choose the film on whichyou want to work. Left-click on the name of the film to select it, then on the Loadbutton to load the film into the Viewer.
Note: Anyone unfamiliar with the film jargon used in this section will find briefdefinitions of most of the terms in the Glossary. If you need more detail, these daysmost good dictionaries include definitions for film terminology.
77
1942 PAW manual 1 63-90 8/14/97 3:12 PM Page 77

Having loaded a flight film, you’ll be presented with the first frame – thebeginning of the mission – and the Camera Info Box. This is probably the best timeto decide how much detail you want displayed in the film. Press 9 to modify theGraphics Detail Levels. The window that appears is exactly the same as the oneused to modify the Graphics Detail Levels during a mission. (Please refer toGraphics Detail Levels, in the Flying A Mission section, for instructions.) Whenyou’ve finished setting the detail options, you’re ready to start watching the mission.
The Camera Info Box is included primarily to give editors information aboutwhat’s going on with the camera. On the left, it shows a graphic of which aircraft theplayer pilot is currently controlling. In the center, little info boxes list what frame theViewer is presently showing and which mode the camera is in for that frame. On theright, the status of the Viewer is displayed at the top. The Original and Capturedboxes are most relevant when editing, and thus are described in the Editingsubsection.
78
VIEWING
To some of you, just sitting and watching a mission you have already flown maynot seem particularly exciting or useful. Maybe you’re right, but during the realPacific war, pilots went over their Flight Films diligently. These films were the onlyimpartial record of the enemy’s strategies in the air; they also pointed up flaws ineach pilot’s tactics. If you didn’t learn from your films, you could be sure that theenemy was learning from his. A mistake that neither of you noticed at the time couldbe fatal next time, because your opponent is waiting for it.
Camera Info Box
Camera View Boxes
1942 PAW manual 1 63-90 8/14/97 3:12 PM Page 78
Those of you who are planning to edit your Flight Films will spend a lot of timeviewing them. Professional film editors are constantly doing so. A good familiaritywith the viewing functions is absolutely indispensable when editing a film. Thesefunctions are listed below. (Please note that the keystrokes listed on the Keycard, ifdifferent, supersede those listed here.)
E (Enter) Enter and play the mission at the displayed frame. This allows youto step into the frame and change what you did during themission, thus creating a new flight film. Note that you can notreturn to the Viewer after entering a mission.
aG (Go) Instruct the Viewer to go to a specified frame without showingthe intervening film. This feature allows you to seek to a particularframe without watching all the film in between. The Viewer willsearch from the first frame until it finds the one you specify, thenpause and display that frame. Note that you can Go to earlierframes in the film (rewind), but the Viewer will always seek fromthe beginning. There are two special frame names you can useinstead of numbers: Last is the end of the film and First is the beginning.
M (Modify) Activate the Editing Board and display it on the screen. Note thatonly the functions appropriate to the current editing status will be available.
aM (Move) Move the Camera Info Box to the next pre-set location. Youcannot move the info box around with the mouse like any otherbox, and it may get in the way sometimes. Move will cycle thebox through several pre-set locations.
N (Next) Step to the next frame; this function is only available when theViewer is paused. The Viewer will remain paused, so that you canstep through as many frames as you wish. This can be very helpfulwhen editing, as you often need to search for an exact moment toget the right shot.
O (Observe) Instruct the Viewer to run the film to a specified frame, showingall of the action to that point. This feature allows you to seek to aparticular frame while observing all that goes before. This isextremely useful when you are editing and want to put an exactlimit on the length of a shot. The Viewer will start at the currentframe and progress to the specified frame, then pause and displaythat frame. Note that you cannot Observe to an earlier frame.
P (Pause) Pause the Viewer at the current frame. The camera remains activeand mobile. Press P again to release the pause and continueviewing.
79
1942 PAW manual 1 63-90 8/14/97 3:12 PM Page 79
Q (Quit) Quit the Viewer and return to the Main Menu. If you havemade any changes at all to the loaded film, quitting willtruncate the edited film at the current frame. This means thatall action after that frame will be lost. If you do not wish totruncate the film, you must Go to the end (the last frame)before quitting.
R (Rapid Motion) Put the Viewer in Rapid Motion Mode. This is, in effect, thefast-forward feature. Press R again to return to normal speedviewing.
S (Slow Motion) Put the Viewer in Slow Motion Mode. This is quite handywhen editing. Press S again to return to normal speedviewing.
Y (Clear Box) Clear the Camera Info Box from the screen. When movingthe box around isn’t enough, you can have it removed fromview. Press Y again to return the info box to the display.
Note that all of these viewing commands are also functional while editing a flight film.
Now that you’re tired of watching the mission happen again from the same point ofview, it’s time to spice it up a little. The editing features let you change the way thefilm is shot, though you can’t change what happens. It might be nice to copy aparticular explosion and show it five times in extreme close-up, but this isn’t video.These films are Navy property, and the sequence of events can not be tampered with(under penalty of court martial). You must limit your creative expression to the way theevents are presented; your superiors will not let you monkey with the flow of time.
Once you put the Viewer into Editing Mode, you can change the way you watchany (or every) part of the mission. In fact, if you’re familiar with controlling theExternal Camera, it is surprisingly simple to do so.
• Pause the film. Use the Next and Go functions to get to exactly the time in themission when you want the shift in viewpoint to occur.
• Now move the camera. You can use any of the pre-set pilot views, the Chase orTracking Modes, and the Free Mode to position the camera and determine howit will move during the shot. Note that you can position the camera anywhere onthe mission map, but that the 6 and 7 modes will always center on theaircraft you were piloting. The original camera view for the segment of film iskept in memory and listed under Original, in the Camera Info Box.
• Release the pause and watch the shot progress. Note that the new viewpointdoes not overwrite the original view for that segment of time until you save thefilm. If you go back and watch the segment again without saving, it will returnto its original viewpoint.
• When you decide to change the viewpoint again for another shot, repeat thisprocedure.
80
EDITING
1942 PAW manual 1 63-90 8/14/97 3:12 PM Page 80

After you’ve recorded and saved a shot (or several), it’s a good idea to load thefilm again and see how the new shots fit in with the film that comes before and after.This can be time-consuming, but well worth it to avoid ugly scenes, empty frames,and other common goof-ups.
There are a few special features available to make editing a little more convenient.Each of these editing features works through a keyboard command or a button onthe on-screen Editing Board. The major editing functions are detailed below.
81
Editing Board
Capture Capture a camera set-up. When you find a position and angle thatreally suits your needs, chances are you’ll use it more than once. TheCapture command lets you keep one particular such set-up in theViewer’s memory, which you can then call up and use at any time.The viewpoint of this camera set-up will be displayed underCaptured in the Camera Info Box.
Use View Use the camera set-up you stored with the last Capture command.The camera will shift to that viewpoint immediately, without anychange in the frame number.
Write Activate Editing Mode. You can not do any editing until the Vieweris put into Editing Mode. This means that you cannot deviate in anysubstantial way from the presentation of the flight film. You gaincontrol of the camera position and angles only by entering thismode. To discontinue editing and return the Viewer to its defaultoperation, press Write again.
You can re-edit (write over, essentially) any scene that you’re not satisfied with asmany times as necessary. None of the edits you make are actually final until you savethe new film. Even so, it’s always a good idea to keep the original reels (especially ifyou cut a lot off of the end), just in case you change your mind about some particularpiece of footage.
1942 PAW manual 1 63-90 8/14/97 3:12 PM Page 81

When you’re finished with your edits or just want to save your progress, you needto exit Flight Films in order to save the modified film. First, you should always Go tothe end of the film; otherwise, it will be truncated at the current frame, and you willlose the rest of the mission film. (Of course, if that’s what you want to do, don’tworry about seeking to the end.)
Press Q to Quit the Viewer. The same save box you used at the end of themission itself appears. All of the functions are the same. Give your edited mission aname, then left-click on the OK button to save it.
You should always rename the first edited version of any flight film. Otherwise,you’ll overwrite and permanently lose the original flight record. If, for someunforeseen reason, you would then find that you needed to refer back to find a lostbit or a shot you really liked, it would be too late.
Some of you may be using the Flight Films option as a way of “restoring” anunfinished stand-alone mission that you “saved” as a film. Here’s how you do it.
• After you select Flight Films from the Main Menu, select and load the film ofthe mission you “saved” and want to finish.
• Use the Go command (aG ), and enter the word Last instead of a framenumber.
• Wait for the Board to run the film through to the end. This may take some time,but it will certainly be a shorter wait than re-playing the entire mission.
• When the Board stops at the final frame, use the Enter command (E ) tocontinue the mission from the point at which you originally stopped.
When you finish the mission, you will exit just as you would any other mission.You’ll even have the option of saving the mission film, as usual. Once you use theEnter command, the Board is deactivated and the entire film manipulation setup isput away.
82
SAVING
FINISHING AMISSION
1942 PAW manual 1 63-90 8/14/97 3:12 PM Page 82

GLOSSARY OF TERMS AND ACRONYMS
Absolute Altitude - Height of the plane above the surface of the ground, as opposed to the height above sea level, which is ‘True Altitude’.
Acceleration - Any change in velocity, whether positive or negative. Generally used to mean an increase in velocity, with the related negative ‘Deceleration’.
Aileron - The aerodynamic control surfaces, usually located in the wing, that are used to produce roll.
Air Strike - An offensive maneuver consisting of aircraft flying to and attacking a target.
Airfoil - Any surface on an aircraft the major function of which is interaction with theair to produce a specific effect.
Airspeed - The plane’s velocity with reference to the air through which it is moving, not the surface of the Earth.
Airspeed Indicator - Cockpit device designed to display the current airspeed of the plane.
Altimeter - A device that measures Altitude.
Altitude - Distance above the surface of the Earth. Altitude may be measured relative to the actual ground surface – ‘Absolute Altitude’ – or as a functionof air pressure, relative to sea level – ‘True Altitude’.
Angle of Attack - The difference, measured in degrees, between the pitch of the plane and level flight.
83
1942 PAW manual 1 63-90 8/14/97 3:12 PM Page 83

Arrestor Hook - A hook-like device attached to the rear of carrier-based aircraft and used to stop the plane on landing.
Artificial Horizon - A cockpit device much like a gyroscope that displays the deflection of the aircraft from level flight.
Attitude - The deflection of the aircraft from level flight.
Attitude Indicator - See Artificial Horizon.
Autopilot - A device for controlling the flight of an aircraft without input from the pilot.
Bank - Leaning, and therefore turning, of an aircraft to one side due to the position of the ailerons. The pilot causes this by pressing sideways on the stick.
BB - The standard naval abbreviation for “battleship”.
Bearing - Horizontal direction to or from any point, measured clockwise in degrees from North.
Bernoulli’s Equation - A mathematical description of the physical effect that causes lift to be generated by airfoils of a certain shapes. Roughly, the idea is thatas air velocity increases, the pressure of that air decreases, and vice versa.
Black-out - Loss of consciousness due to a lack of oxygenating blood flow to the brain; in aircraft this is usually caused by excessive centripetal acceleration.
Brakes, Dive - Airfoils used in dive bombers to allow these planes to dive more steeply without gaining excessive airspeed.
Brakes, Wheel - Devices used to slow an aircraft on the ground by retarding the rotation of the wheels.
CA - The standard naval abbreviation for “heavy cruiser”.
Cannon - Weapons mounted on an aircraft that are too large in caliber or bore size to be considered machine guns.
CAP - The standard naval abbreviation for “combat air patrol”.
Carrier Group - Another name for any task force that includes at least one aircraft carrier.
Ceiling - The greatest altitude a certain aircraft can attain. The related term “ServiceCeiling” is the greatest altitude at which a given aircraft will functioncontrollably. Ceiling is primarily a function of available thrust and the liftpotential of the major airfoil.
Centrifugal Force - A non-existent force, believed by some to be the name for the outward acceleration caused by inertia when turning.
Centripetal Acceleration - The real name for acceleration due to turning; this acceleration is directed inward, toward the center of the turn. Inertial effectscause the “G’s” experienced by pilots.
CH - The standard aviation abbreviation for “compass heading”.
84
1942 PAW manual 1 63-90 8/14/97 3:12 PM Page 84

CL - The standard naval abbreviation for “light cruiser”.
Climb - Aeronautic term for an increase in altitude – i.e. going up.
Cockpit - Where the pilot sits; this area includes all of the devices and instruments necessary for controlling the aircraft.
Combat Air Patrol - A defensive flight pattern intended to spot and deflect incoming aircraft.
Compass - A magnetic device that indicates the direction, measured as a function ofmagnetic North, of the aircraft’s flight.
Compass Heading - The magnetic heading, as different from the Bearing.
Compass Rose - An azimuth circle aligned with magnetic North, the primary use of which is calibrating the cockpit compass.
Compound Emergency - A situation in which a pilot faces more than one emergency condition.
Coordinated Turn - A turn (bank) during which the rudder is used with the ailerons to prevent adverse yaw.
Cowling - The structure that covers and streamlines the plane’s engine and channels cooling air across it.
CV - The standard naval abbreviation for “aircraft carrier”.
DD - The standard naval abbreviation for “destroyer”.
Deceleration - Negative change in velocity; slowing down.
Ditching - A forced landing in the water.
Dive - Any nose-down, substantial loss of altitude.
Dogfight - Combat between aircraft in the air.
Dorsal - Located on the “top” of the aircraft, but behind the pilot and cockpit.
Drag - The force that opposes the movement of the plane through the air, sometimes called air or wind resistance.
Drift - Defelction of the plane from its intended course due to the wind.
Dud - Any explosive device that does not explode when it is supposed to.
Engine, Radial - Any engine with the cylinders arranged in a circular fashion, usually around the lengthwise axis of the aircraft.
Engine, In-line - Any engine with the cylinders arranged in a straight-line or “V” fashion, as in most automobiles.
Engine Temperature Gauge - The cockpit instrument which displays the operating temperature of the aircraft’s engine.
Escort - A defensive flight pattern in which certain planes, normally fighters, fly ahead of (but near) another plane or group of planes in order to detect anddefend from intercepting aircraft.
85
1942 PAW manual 1 63-90 8/14/97 3:12 PM Page 85

External Tank - A fuel tank carried on the outside of the aircraft, usually droppable inflight.
Final Approach - A flight path that is lined up with the runway, in preparation for landing.
Flak - Slang term for anti-aircraft fire (AAA) or other non-missile Surface-to-Air munitions.
Flight Crew - The personnel who prepare the aircraft for take-off; this includes fueling, the service check, and loading munitions.
Frame - One picture of a scene. Several frames, taken in order and at a certain speed, comprise a film or animation.
Fuel Gauge - The cockpit istrument that measures the amount of fuel remaining in the plane’s tanks.
G Force - Acceleration due to gravity. In aeronautics, the term is also used for theforces on the bodies of the crew that are caused by the inertial effects ofhigh-acceleration turns.
Glide - Flight without power or without thrust.
Go-around - An aborted landing attempt, wherein the pilot has to “go around” and begin a new approach.
Grayout - A partial black-out or semi-consciousness.
Ground Effect - An apparent gain in lift when the aircraft is flying at or below one wingspan’s height above the surface. This is caused by the reduction indrag due to the diffusion of the plane’s downwash against the surface.
Ground Speed - Velocity relative to the surface of the Earth; true airspeed corrected for wind effects.
Gunner, Rear - That crewman who mans the dorsal weapon(s).
Gunner, Ventral - That crewman who mans the ventral (belly) weapon(s).
Gunner, Dorsal - Same as the Rear Gunner.
Heading - Essentially the same thing as Bearing.
IAS - The standard aviation abbreviation for “indicated airspeed”.
Identification Friend or Foe - A modern electronic system for determining the identity of an unidentified aircraft at long range, without the necessity forvisual contact.
IFF - The standard aviation abbreviation for “identification friend or foe”.
Immelmann - A maneuver for gaining altitude and changing direction.
Indicated Airspeed - The airspeed displayed by the Airspeed Indicator.
Instrumentation - All the stuff in the cockpit that tells the pilot what’s going on in and around the aircraft; the gauges and dials.
Knot - One nautical mile per hour, abbreviated ‘kt.’.
86
1942 PAW manual 1 63-90 8/14/97 3:12 PM Page 86

Land Flow Turbulence - A turbulent airflow caused at low altitudes by winds passingaround obstacles (hills, buildings, coyotes, tanks, etc.).
Landing Signals Officer - The carrier crewman responsible for guiding aircraft on their final approaches.
Latitude - Distance north or south of the equator, measured in degrees, minutes, and seconds.
Load-out - The ordnance carried on an aircraft, not including ammunition for fixed guns.
Longitude - Distance east or west of the Greenwich Meridian, measured in degrees, minutes, and seconds.
LSO - The standard naval abbreviation for “landing signals officer”.
Missed Approach - See Go-around.
Nacelle - Cowling for a wing-mounted engine.
Nautical Mile - Approximately one minute of latitude; this is equal to 1.15 statute miles.
Negative g’s - G forces acting in the direction opposite that of gravity; these are the g’s that make the pilot feel “lifted” and cause red-outs.
NM - The standard abbreviation for “nautical mile”.
Oil Pressure Gauge - The cockpit instrument that displays the pressure of the oil running through the aircraft engine, a good indicator of the amount ofdamage the engine has taken.
ONC - The standard aviation abbreviation for “operational navigation chart”.
Operational Navigation Chart - The cockpit map.
Ops - Standard military shorthand for “operations”.
Pan - Motion of the camera from left to right or right to left around a center; roughly equivalent to the aircraft motion ‘Yaw’.
Payload - Drop weapons carried on the aircraft; same as load-out.
Pilot - The person who is the primary controller of the aircraft.
Pitch - The angle of the aircraft’s long axis in relation to level flight.
Positive g’s - G forces acting in the direction of gravity; these are the g’s that make the pilot feel “forced into the seat” and cause blackouts.
Propeller - The airfoil attached to the engine, used to generate thrust.
Radar - RAdio Detection And Ranging equipment; this is not standard equipment in the aircraft of 1942.
Radar Altimeter - A modern device used to gauge the Absolute Altitude of an aircraft using radar.
87
1942 PAW manual 1 63-90 8/14/97 3:12 PM Page 87

Red-out - Loss of vision and possibly consciousness due to bursting blood vessels inthe corneas or other parts of the eyes. This is usually caused by excessnegative g’s.
Roll - (1) Motion of the aircraft around its long axis, as when one wing rises and the other falls; (2) Motion of the camera around its parallel horizontal axis,roughly equivalent to the aircraft motion of the same name.
Rudder - The control surface mounted on the tail of the aircraft and used to control the yaw of the plane.
Scissors - A two-plane maneuver in which opposing aircraft repeatedly attempt to out-turn one another in order to get the first shot.
Sea Level - Zero altitude; the altitude at the surface of the ocean.
Shot - General term for the combination of a camera set-up and scene; when either the scene shifts or the camera is ‘cut’ to a new set-up, a new shot begins.
Sink Rate - Vertical speed of descent.
Skid - Sideward motion of an aircraft in flight, generally caused by over-ruddering.
Slip - Motion of the aircraft that is not in line with the long axis, generally caused by intentionally under-ruddering; sideways flight.
Spin - Rotation of the plane around its center of gravity during a prolonged stall, usually coincident with a pronounced loss of altitude.
Split-S - A maneuver similar to an Immelman, but involving a loss of altitude rather than a gain.
Squadron - A group of military aircraft.
Stall - A condition in which the aircraft has lost all of its lift; this is caused by the plane’s angle of attack exceeding that required for maximum lift and thusproducing turbulent airflow around the wing.
Stick - The pilot’s primary device for controlling the ailerons and elevators.
Tachometer - The cockpit instrument that displays the revolutions per minute of the engine crankshaft.
Task Force - A force of ships assigned a specific mission or function; normally, a TaskForce is organized around a group of cruisers, carriers, or battleships.
Task Group - A smaller group of ships that is part of a Task Force; though the Task Groups that make up a Task Force share a common mission, each operatesindependently.
Thach Weave - A three-plane maneuver used by two cooperating planes to bring a third (enemy) plane that is behind the leader repeatedly through the line offire of the wingman.
Throttle - The pilot’s primary device for controlling the RPMs of the engine and, thus, the thrust.
Tilt - Motion of the camera up or down around a center; roughly equivalent to the aircraft motion ‘Pitch’.
88
1942 PAW manual 1 63-90 8/14/97 3:12 PM Page 88
Torque - The twisting effect on the plane of the rotation of the engine crankshaft andpropeller.
TR - The standard naval abbreviation for “transport”.
Track - Motion of the camera from one location to another, as distinct from the motion about a center described in Pan, Tilt, and Roll.
Transverse g’s - G forces acting in a direction perpendicular to that of gravity; these are the g’s that make the pilot feel “pushed to the side”. Transverse g’s aremuch more dangerous than either positive or negative g’s, since theyrapidly cause organ damage.
Trim - Repositioning of the primary control surfaces to correct for tendencies of the aircraft.
True Altitude - Distance from sea level, usually calculated as a function of ambient air pressure.
Velocity - Distance travelled over a period of time. Speed.
Ventral - Located on the lower surface or “belly” of the aircraft, usually behind the wing.
Visibility - The distance the pilot can see from the cockpit; visual range.
Wave-off - A landing attempt that is aborted by the LSO.
Windmilling Propeller - A propeller that is in motion due to the effects of wind and airspeed, rather than impelled by the engine crankshaft. A windmillingpropeller causes excess drag and increases fuel consumption.
Wing - The primary airfoil for generating lift.
Yaw - Movement of the aircraft about its vertical axis.
Zoom - Change in the focus of a camera. Zooming in causes the camera to focus on objects that are smaller or farther away, thus limiting the horizontal scopeof the focus; zooming out causes the camera to focus on closer or largerobjects, thus expanding the horizontal scope and bringing more of thescene into the view.
89
1942 PAW manual 1 63-90 8/14/97 3:12 PM Page 89

90
CREDITSART
Max Remington - 3D ArtSusan Ullrich - 3D ArtTodd Brizzi - Lead Artist & 2D ArtAndy Laken - Opening Sequence,
Animations & 2D ArtErroll Roberts - 2D ArtBarbara Jeznach - 2D Art
QUALITY ASSURANCEAndy Mazurek - LeadFrank BrownWalter CarterJeff DingerJennifer MacLeanMatt ShowalterDestin StraderTammy TalbottJim TricarioBrian Wilson
PRODUCEREd Fletcher
SPECIAL THANKSTom Basham (Thunk)John Bruning, Sr.Lt. Steve Johnson, USAFVice-Adm. William P. Mack (Ret.)Michael ReisLt. Col. George Wargo (Ret.)
GAME DESIGNEd FletcherJohn PaquinMike Rea
PROGRAMMINGEd Fletcher - Simulation & AIJohn Paquin - 3D GraphicsScott Spanburg - 3D Object DriverMike Springer - Carrier BattlesRick Wittstruck - Miscellaneous
SOUNDKen LegaceJim McConkeyMark Reis
MANUALSJohn Possidente - WritingJoe Morel - Design & LayoutCesar Novoa - Design & LayoutNick Rusko-Berger - ArtAndy Laken - ArtMark Behlart - HistoryLawrence Russell - History
PACKAGINGJohn EmoryMoshe Milich
1942 PAW manual 1 63-90 8/14/97 3:12 PM Page 90

PILOT’S HANDBOOK
THE PACIFIC AIR WAR
SIMULATION
1942 PAW manual 2 cover 8/14/97 4:35 PM Page 1

Ira Wolfert quotes from his book Battle for the Solomons, copyright 1943, North American Newspaper Alliance.
Windows is a registered Trademark of Microsoft, Inc.
1942 THE PACIFIC AIR WARPILOT’S HANDBOOK
MicroProse
All rights reserved.Copyright © 1994 MicroProse
This book may not be reproduced in whole or in part, by mimeograph or photocopy or other meanswithout permission, with the exception of quoting brief passages for the purpose of reviews.
1942 PAW manual 2 1-55 8/14/97 4:25 PM Page 1

2
“During the duel, [our plane], with a bullet in one of its motors and twoholes as big and flowering as Derby hats in its wings, made tight turns withhalf-rolls and banks past the vertical. That is, it frequently stood against thesea on one wing like a ballet dancer balancing on one point, and occasionallyit went over even farther than that and started lifting its belly toward the skyin desperate efforts to keep the [Japanese plane] from turning inside it.
It made numerous spiral dives and, at least twice, although in theexcitement of the battle it was difficult to keep accurate count, it dovevertically like a dive bomber and pulled out so rapidly that a curtain of soot-colored gray, indicating the beginning of a black-out, dropped over my eyes.
Throughout the entire forty-four minutes, the plane, one of the oldest beingused in this war, ran at top speed, shaking and rippling all over like a skirt ina gale, so many inches of mercury being blown into its motors by thesuperchargers that the pilot and co-pilot, in addition to all their other worries,had to keep an eye on the cowlings to watch for cylinder heads popping upthrough them.”
Ira Wolfert, reporterSomewhere Over Guadalcanal
1942 PAW manual 2 1-55 8/14/97 4:25 PM Page 2

3
October, 1942
INTRODUCTIONWelcome to 1942, a great year to be a shark in the South Pacific. One of yourprimary goals in 1942 THE PACIFIC AIR WAR is to avoid becoming shark food. Thesupplementary information in this book is intended to help you do just that – bystaying airborne. Though skill and daring and marksmanship are extremely importantfactors in any aerial combat, it has been proven time and again that knowledge is thekey to victory. When you know the enemy’s strengths and weaknesses, you’re readyto go into battle. When you know your own even better, you’re ready to win.
This book, the Pilot’s Handbook, contains a detailed flight tutorial, historicalbackground for the campaigns and missions, statistics on all of the aircraft you canpilot in 1942 THE PACIFIC AIR WAR, and a few basic combat strategies. Completeinstructions on installing, running, configuring, and playing the game are in theGame Player’s Guide. The Keycard is a one-stop reference to all of the keyboard,mouse, joystick, and other controls. The Technical Reference includes the hardware requirements for running the game and all of the software compatibilityissues discovered before release. Any changes to the game that were made after thismanual was written are also described in the Technical Reference. As always, theReadme f i le was written last, so any notations in that fi le supersede all other information.
1942 PAW manual 2 1-55 8/14/97 4:25 PM Page 3

4
FLIGHT SCHOOLThis section is your flight instructor. Any of you who have extensive experience withpiloting, especially combat flying, can probably skip over this part; you’ve beenthrough flight school once already. The rest of you rookies better read up, read close,and pay attention. You can be sure that the enemy already knows all of what’s here –and a lot more.
Despite the differences in design between the several models of aircraft includedin 1942 THE PACIFIC AIR WAR (These differences are discussed in detail in thesubsection entitled “The Cockpits”), there are some features of flight that remainconsistent across the board. It is your responsibility as a pilot to familiarize yourselfwith the essential basics of flight before you even think of getting into one of yournavy’s expensive aircraft.
Those of you who think you know something about flying might find some ofthese lessons overly simplified. Read them anyway. You won’t have this book withyou in combat (even if you do, wiseguy, you can’t read and fly at the same time),and your life will depend on knowing more and being more skilled than your enemy.Besides, you might learn something.
THE BASICS
1942 PAW manual 2 1-55 8/14/97 4:25 PM Page 4

5
ESSENTIAL AERODYNAMICSThis is the physics lecture, but don’t nod off yet. You really need to know this
stuff. Literally hundreds of green pilots have lost their lives because they thoughtthey knew how their plane would react. The only way (let me stress that – the ONLYway) to really be in control of your aircraft is to understand the forces acting on it andthe way the control surfaces manipulate those forces. You don’t need to memorizeBernoulli’s equation, but you’d better understand what it means for your wings. Thepilot who has the aerodynamics ingrained in his head can overcome virtually anyenemy, including the “ace-killer”, an uncontrolled spin.
The Five ForcesThere are five basic physical forces that you have to worry about when you’re
flying a propeller-driven aircraft. Most textbooks say four, but they’re wrong. If youdon’t know about torque, you’ll end up like the many inexperienced pilots whosecareers (and, too often, their lives) were ended trying to land the Vought F4u Corsair– the legendary “Ensign Eliminator”.
Gravity is easy to understand; you deal with it every day. Your plane andeverything in it are attracted to the surface of the Earth. The more weight(technically, mass) is on your plane, the greater the attraction. If there were noother forces acting on your plane, gravity would pull it to the ground and keep it there.
Drag would limit how fast you would fall. In simple terms, drag is the resistancethe air offers to anything trying to move through it. A moving aircraft with noforce impelling it would quickly slow down and stop because of the drag of the airaround it.
Thrust is how you force your plane through all that drag. The spinning propellerpushes air backward, which action results in Newton’s equal and oppositereaction – a forward motion of the entire aircraft. Of course, this just makes youplummet faster.
Lift is what keeps you in the air. The aircraft’s wings are designed to takeadvantage of a side effect of the law of conservation of energy. The curvature ofthe wing causes air to move faster going over the top of the wing than it doesgoing under. The side effect is that this faster-moving air has a lower pressurethan the slower air (the pressure is determined using Bernoulli’s equation), andthe difference in pressure between the bottom and top surfaces of the wing lifts it.When the lift on both wings is great enough, the plane is held aloft. With lift andthrust both working to counteract nature’s attempts to keep your plane frommoving, it flies.
5
1942 PAW manual 2 1-55 8/14/97 4:25 PM Page 5

6
Torque is twisting power. In an aircraft, the torque you need to worry about iscaused by radial engines. These engines rotate in only one direction, and thatdirection coincides with the roll axis of the plane. Some of the torque generated bythe engine’s rotation in transferred to the body of the plane, which makes the planetry to rotate in the opposite direction as the engine (usually counterclockwise – tothe pilot’s left). If the pilot does not compensate for this (using the rudder), thetorque will cause the plane to roll. This is especially dangerous at low airspeeds andwhen landing.
Note: Bernoulli’s equation, as applied to the airflow around a wing (in case youreally want to know) is:
P + 1/2pu2 + pgy = K
That is, for any particular volume of air, the sum of its pressure (P), kineticenergy (1/2pu2), and potential energy (pgy) stays constant (= K). Meaning,roughly, that the faster a volume of air moves, the lower its pressure.
The Three AxesAn aircraft can move in an essentially unlimited number of directions. For
simplicity, however, we use a system of reference based on three axes of motion. Bydesign, these axes correspond to the three main types of aircraft motion that you cancontrol.
6
Axes of Motion
Roll is rotation of the plane around its length, also called the parallel horizontal axis.
Pitch is rotation of the plane around its transverse horizontal axis. The line formedby the wings is a good approximation of this axis.
Yaw is rotation of the plane around its vertical axis. If you stuck a steel rod upthrough the belly of the plane and spun the plane around it, that would be yaw.
Pitch
Yaw
Roll
1942 PAW manual 2 1-55 8/14/97 4:25 PM Page 6

7
Control SurfacesManipulating these basic forces is how you control the movement of your plane.
Your engine provides the thrust, thus you have control over thrust. Two of the forces– drag and lift – do not act on all parts of the plane equally. Aircraft designers havetaken advantage of that fact to build in features that let you control the plane. Thesefeatures are called the “control surfaces”. Note that you do not have any control overgravity.
The Propeller is the surface you use to manipulate thrust. By varying the throttlesetting, you cause the propeller to spin at different speeds. The faster it spins, themore forward thrust you have available.
Elevators are vertically-tilting sections of the horizontal part of the tail. Throughdrag, they affect the pitch of the plane. You control them with the forward and backmovements of the stick. When the elevators are down (stick forward), the imbalancein the drag on the plane makes the nose tilt down. This is called “lessening the angleof attack”, and it causes the plane to dive. Up elevators, conversely, tilt the nose up,and the plane climbs.
Angle of Attack
You can use the Wings, indirectly, as a control surface to manipulate lift. Whenyou change the plane’s angle of attack (using the elevators), the airflow over thewing changes. A greater angle of attack creates more lift – to a point. If this anglegets too big, and the plane’s airspeed is not high enough to maintain a smooth flow,turbulence will take away all of the lift. Without lift, the plane will stall and drop like arock. A lesser angle of attack creates less lift.
The Ailerons are the control surface you will likely pay the most attention to.They’re like the elevators, only they’re on the wings. When you move the stick toeither side, one aileron goes up and the other one goes down. Suddenly, one winggains some extra lift, and the other one gets stuck with more drag. The former wingrises, while the latter drops. This motion is called “roll”. Your aircraft turns (banks) inthe direction of the roll – the direction you moved the stick.
700
00
1942 PAW manual 2 1-55 8/14/97 4:25 PM Page 7
8
Built into the wings are Flaps, which you can extend or retract as necessary. Theseare used most often during landing, but they do have the occasional other purpose.Extending the flaps (“flaps down”) has several results. First, lift is increased, so theplane rises; next, drag is also increased, so the plane slows. Overall (and this is mostimportant), the flaps lower the speed at which the aircraft will stall. This means that,when landing, you can approach more slowly without stalling or, conversely, dive toa landing more steeply (because the flaps slow you), then “flare” – bring the nose upsharply just before touching down – and the flaps will kill most of your speed. Keepin mind that when you retract the flaps (“flaps up”), the plane will drop a bit. Somepilots use partial flaps for extra lift during take-off. If you are one of those, do notraise your flaps too soon after take-off, or you may find yourself at a negativealtitude.
How much you use the Rudder depends on how soon you want to retire, andhow violently. The rudder is a horizontally tilting section of the vertical part of thetail. Through drag, it affects the yaw of the plane, pointing the nose left or right. Notusing the rudder enough will cause a rough ride and a very rough (if not violent)landing. Using the rudder too much or too often can quickly lead to your losingcontrol of the plane. From there, it’s a short downhill ride home.
Brakes come in two types. Dive Brakes (sometimes called Air Brakes) are acontrol surface. Wheel Brakes are like the brakes on a car, and they only work whenyou’re on the runway. The dive brakes aren’t built for fine control; they’re either onor off. When on, they increase the drag on the aircraft, slowing the plane withoutcausing any appreciable deflection from your course. When off, they have no effectat all.
InertiaAll good pilots are aware of the effects of inertia on their aircraft and
on their bodies. Pilots who do not understand inertia crash a lot. Onedefinition of inertia is “the tendency of any object to resist a change toits state of motion”. What that means is that if your body or your planeis sitting still, it wants to stay that way; if it is moving in a particulardirection at a particular velocity, it wants to retain that speed and heading.
Inertia causes all sorts of trouble for pilots. Most importantly, it makesengines necessary. When starting your plane from a dead stop (at take-off, normally), you’ll need much more throttle to accelerate than youwill during flight. The engine has to overcome the inertia of the aircraft,which is trying to keep it still. While in flight, inertia makes maneuversmore difficult at higher speeds. The faster your plane is moving, themore inertia it has in the direction of movement. Thus, the engine andcontrol surfaces have to do more work to get the plane to changedirection.
“We dove straight downso rapidly that my kneesbuckled under me.... Nobodyknows how many times theweight of gravity wasmultiplied by that dive,everybody being too busyto notice. But I could feelmy cheeks pull far downbelow my eyes and couldfeel my eyes sticking out ofmy head and my cheeksresting on my shoulders,and everything that wasinside of me pressed into abundle and forced into mylap.”
Ira Wolfert, 1942,somewhere over theSolomons
1942 PAW manual 2 1-55 8/14/97 4:25 PM Page 8

9
The most noticeable problem inertia causes is g forces. The ‘g’ is a standardabbreviation for acceleration due to gravity; in this case it is used to denote anyacceleration experienced by the plane and pilot. Whenever you change direction,you are subject to g’s. If you turn to the side (as in yawing or banking), you’reputting a centripetal acceleration on the plane and your body. Inertia (oftenmistakenly called “centrifugal force”) tries to keep you moving in your originaldirection, causing “transverse g’s”. When you turn downward, “negative g’s” makeyou feel lighter, as in a dropping elevator. If you turn upwards, as in pulling out of adive, “positive g’s” push you into your seat. Positive and negative g’s have risks –blackouts, greyouts, and redouts – which are described in the Blackouts subsectionin Flying A Mission.
LEVEL FLIGHTLevel flight is simply a matter of compensating for any predisposition the aircraft
may have. For example, planes with radial engines tend to roll to one side, due tothe excess torque inherent in the radial design. To fly straight and level, you need tocounter the tendencies of your plane. A gentle hand on the stick and perhaps a littlerudder is all it takes to maintain level flight. If you find it difficult to level your plane,the control surfaces (rudder, ailerons, and such) may have been damaged. Return tothe carrier or base as soon as possible for repairs.
Pilots generally make level flight easier by setting the “trim” of the aircraft.Trimming is analogous to calibrating a joystick to center. You can “calibrate” theelevators to compensate for lift and the ailerons and rudder to compensate for roll. In1942 THE PACIFIC AIR WAR, all of this is done for you by the automatic trim feature.Though this may seem unrealistic, the theory behind it is simply that trimmingcomes effortlessly to a pilot as skilled as you, like breathing. You don’t think about it,you just do it.
ACCELERATION AND DECELERATIONAcceleration and deceleration – speeding up and slowing down – are controlled
by many factors, few of which are under your control. The throttle is the one factorover which you have the most control. More throttle means higher speed (and fasterfuel use), and less means lower speed. Diving also adds to your airspeed. Climbingand turning both cause your plane to lose speed, as does flying with your geardown. You can also use the Dive Brakes if you want to cut your speed quickly.
1942 PAW manual 2 1-55 8/14/97 4:25 PM Page 9
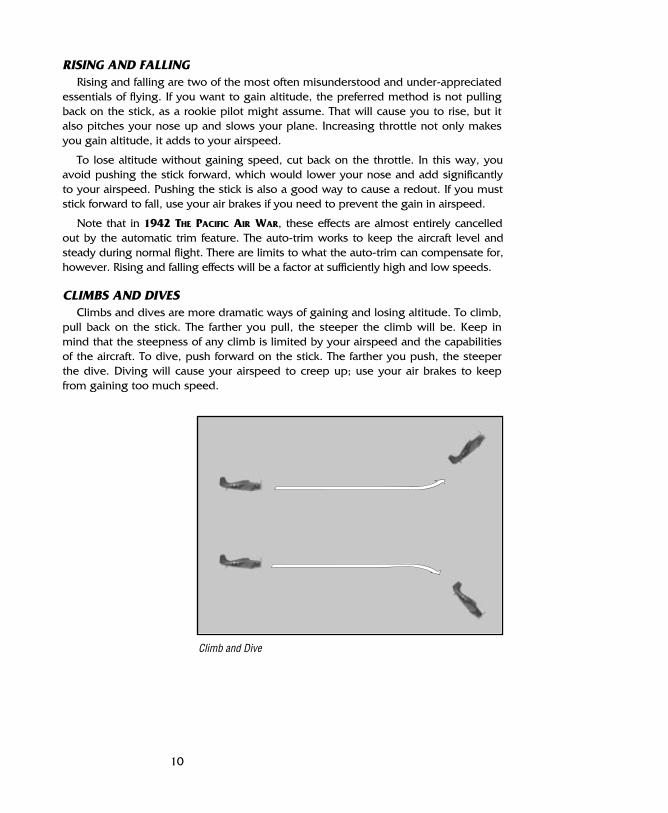
10
RISING AND FALLINGRising and falling are two of the most often misunderstood and under-appreciated
essentials of flying. If you want to gain altitude, the preferred method is not pullingback on the stick, as a rookie pilot might assume. That will cause you to rise, but italso pitches your nose up and slows your plane. Increasing throttle not only makesyou gain altitude, it adds to your airspeed.
To lose altitude without gaining speed, cut back on the throttle. In this way, youavoid pushing the stick forward, which would lower your nose and add significantlyto your airspeed. Pushing the stick is also a good way to cause a redout. If you muststick forward to fall, use your air brakes if you need to prevent the gain in airspeed.
Note that in 1942 THE PACIFIC AIR WAR, these effects are almost entirely cancelledout by the automatic trim feature. The auto-trim works to keep the aircraft level andsteady during normal flight. There are limits to what the auto-trim can compensate for,however. Rising and falling effects will be a factor at sufficiently high and low speeds.
CLIMBS AND DIVESClimbs and dives are more dramatic ways of gaining and losing altitude. To climb,
pull back on the stick. The farther you pull, the steeper the climb will be. Keep inmind that the steepness of any climb is limited by your airspeed and the capabilitiesof the aircraft. To dive, push forward on the stick. The farther you push, the steeperthe dive. Diving will cause your airspeed to creep up; use your air brakes to keepfrom gaining too much speed.
Climb and Dive
1942 PAW manual 2 1-55 8/14/97 4:25 PM Page 10
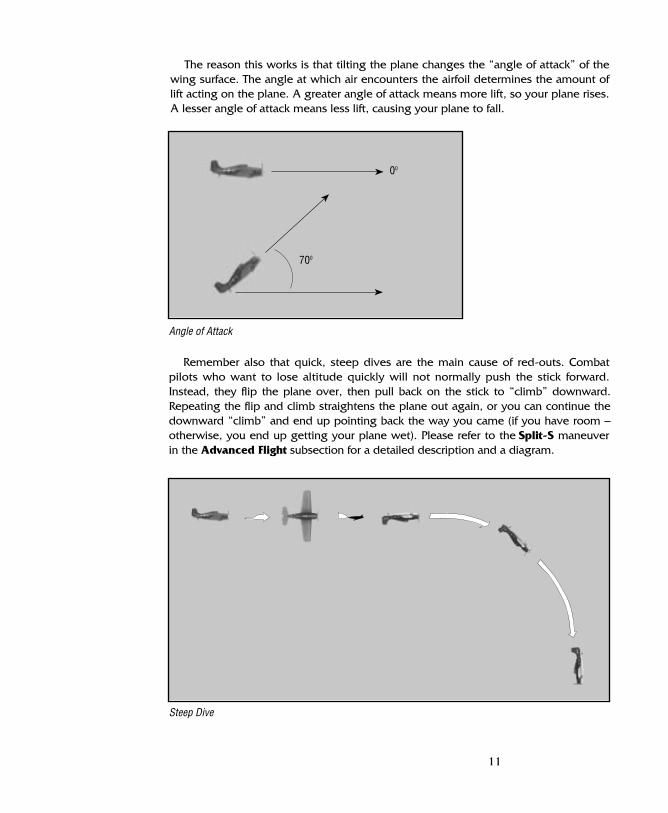
11
The reason this works is that tilting the plane changes the “angle of attack” of thewing surface. The angle at which air encounters the airfoil determines the amount oflift acting on the plane. A greater angle of attack means more lift, so your plane rises.A lesser angle of attack means less lift, causing your plane to fall.
Angle of Attack
Steep Dive
Remember also that quick, steep dives are the main cause of red-outs. Combatpilots who want to lose altitude quickly will not normally push the stick forward.Instead, they flip the plane over, then pull back on the stick to “climb” downward.Repeating the flip and climb straightens the plane out again, or you can continue thedownward “climb” and end up pointing back the way you came (if you have room –otherwise, you end up getting your plane wet). Please refer to the Split-S maneuverin the Advanced Flight subsection for a detailed description and a diagram.
700
00
1942 PAW manual 2 1-55 8/14/97 4:25 PM Page 11

12
SIMPLE TURNSSimple turns are called “banks”. Push the stick to either side to tilt your plane to
that side, thus turning in that direction. You can also push the rudder to that side totighten the turn. You will notice that you lose speed as you turn, the nose starts todrift downward, and you begin to lose altitude. Add throttle to speed up, then pullback on the stick and ease the rudder in the opposite direction to counter this drop.For every aircraft there is an optimum airspeed for making nice, tight turns. If you areflying faster than this optimum, your turn will be more open than necessary; if youare below the optimum airspeed, you will lose altitude more quickly.
AUTOPILOTAutopilot is an option not everyone will want to use. Few of the aircraft you can
pilot in 1942 THE PACIFIC AIR WAR actually had an autopilot installed, and none hadone as sophisticated as this. This feature is included strictly to ease gameplay incertain situations. For example, if you choose to accelerate time (please refer to theGame Player’s Guide for instructions), the plane will become extremely hard for youto control; the autopilot has no such problems. The autopilot will take control of theplane and fly any portion of the mission for you, including combat. Your plane, inessence, becomes just another of the many computer-controlled aircraft. (Of course,if you have gotten your aircraft damaged beyond control, the autopilot can not helpyou. Bail out.) Turn the autopilot off again to regain control of your plane.
Simple Bank
1942 PAW manual 2 1-55 8/14/97 4:25 PM Page 12

13
FINAL ADVICEYou can learn more advanced maneuvers from watching your fellow pilots,
especially your lead. Analyzing the tactics of the enemy is another good way to learn.(According to Sun Tzu, your enemy is the most important teacher of all.) Duringdogfights, though, you’re usually quite busy, and there’s rarely time for analyzing everymove. Later, in the security of your base of operations, you can review flight films atyour leisure. Please refer to the Flight Films section of the Game Player’s Guide fordetailed instructions on viewing and saving these valuable references.
The instruments in the cockpit do not really vary from plane to plane. Everyaircraft in the Pacific theater is outfitted with the same essential instruments, thoughthey are certainly not in the same place in every cockpit. 1942 THE PACIFIC AIR WAR
reproduces the most important instruments, leaving out much of the complexity ofthe cockpit instrumentation to facilitate gameplay. This basic set of gauges and dialsare summarized here.
Remember that many (if not all) of theinstruments in your cockpit will be locatedbelow the “dashboard” visible in the standardcockpit view. Tilt your view down and up or(in fighters) use the Virtual Cockpit Mode viewto get a look at these gauges.
INSTRUMENTS
Sample Cockpit: Std View
Sample Cockpit: Lap View
1942 PAW manual 2 1-55 8/14/97 4:25 PM Page 13
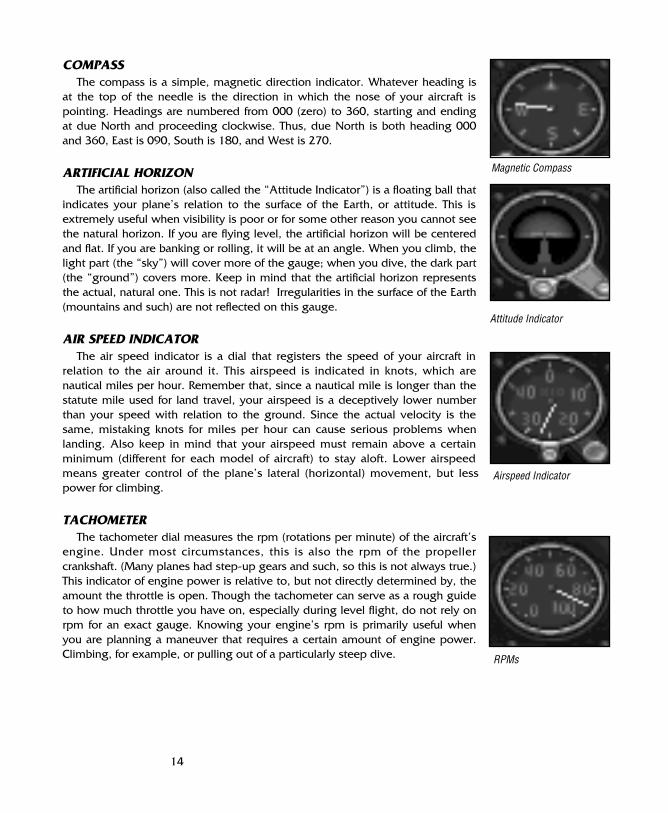
14
COMPASSThe compass is a simple, magnetic direction indicator. Whatever heading is
at the top of the needle is the direction in which the nose of your aircraft ispointing. Headings are numbered from 000 (zero) to 360, starting and endingat due North and proceeding clockwise. Thus, due North is both heading 000and 360, East is 090, South is 180, and West is 270.
ARTIFICIAL HORIZONThe artificial horizon (also called the “Attitude Indicator”) is a floating ball that
indicates your plane’s relation to the surface of the Earth, or attitude. This isextremely useful when visibility is poor or for some other reason you cannot seethe natural horizon. If you are flying level, the artificial horizon will be centeredand flat. If you are banking or rolling, it will be at an angle. When you climb, thelight part (the “sky”) will cover more of the gauge; when you dive, the dark part(the “ground”) covers more. Keep in mind that the artificial horizon representsthe actual, natural one. This is not radar! Irregularities in the surface of the Earth(mountains and such) are not reflected on this gauge.
AIR SPEED INDICATORThe air speed indicator is a dial that registers the speed of your aircraft in
relation to the air around it. This airspeed is indicated in knots, which arenautical miles per hour. Remember that, since a nautical mile is longer than thestatute mile used for land travel, your airspeed is a deceptively lower numberthan your speed with relation to the ground. Since the actual velocity is thesame, mistaking knots for miles per hour can cause serious problems whenlanding. Also keep in mind that your airspeed must remain above a certainminimum (different for each model of aircraft) to stay aloft. Lower airspeedmeans greater control of the plane’s lateral (horizontal) movement, but lesspower for climbing.
TACHOMETERThe tachometer dial measures the rpm (rotations per minute) of the aircraft’s
engine. Under most circumstances, this is also the rpm of the propellercrankshaft. (Many planes had step-up gears and such, so this is not always true.)This indicator of engine power is relative to, but not directly determined by, theamount the throttle is open. Though the tachometer can serve as a rough guideto how much throttle you have on, especially during level flight, do not rely onrpm for an exact gauge. Knowing your engine’s rpm is primarily useful whenyou are planning a maneuver that requires a certain amount of engine power.Climbing, for example, or pulling out of a particularly steep dive.
Attitude Indicator
Airspeed Indicator
RPMs
Magnetic Compass
1942 PAW manual 2 1-55 8/14/97 4:25 PM Page 14

15
ALTIMETERThe altimeter tells you how far above sea level you are. The short needle
indicates thousands of feet, the long needle indicates hundreds. So, forexample, when the long is at “2” and the short is at “4”, you are 4200 feetabove sea level. Since none of the aircraft in 1942 THE PACIFIC AIR WAR isequipped with radar, radar altimeters are out of the question. Your altitude ismeasured as a function of the ambient air pressure, not absolute altitude. Whatthis means to the pilot is that you can only trust your altimeter when flying overthe ocean (which is pretty flat and always very close to sea level). Over land,you must stay alert for changes in the topography. If you are less than 100 feetabove a 2000-foot mountain, your altimeter will still read 2100 feet. Aninattentive pilot might feel safe making a dive and later (assuming he survives)wonder why he crashed.
OIL PRESSURE GAUGEThe oil pressure gauge, like the one in an automobile, keeps track of the
pumping pressure of the oil that lubricates your aircraft’s engine. Since your flightcrew are the best the navy has to offer, you can assume that there is nothingwrong with the engine when you take off. If you start to lose oil pressure, therecan be only one explanation – your engine has been damaged by enemy fire.
The leak may not be a bad one, but you shouldn’t take chances. If you can,return to your take-off point right away. If you do not, the oil will eventually allrun out, and the plane’s engine will seize (stop working suddenly). If you’relucky, you might be able to glide to a safe landing, but it’s much more likely thatyou’ll end up a sitting duck for enemy pilots to shoot down. If you choose to stayin the fight and end up bailing out, fine. Living to fight another day is better thangoing down with your plane. However, unless you had a damn good reason forstaying, expect a reprimand. Bringing your country’s plane home with you ismore important and honorable than seeking personal victories and fame.
ENGINE TEMPERATURE GAUGEThe engine temperature gauge indicates the operating temperature of your
aircraft’s engine. As you warm up prior to taking off, this gauge should rise fromthe bottom to hover approximately in the center of its range. Under normalconditions, engine temperature will not deviate substantially from this center.Note that combat flying at high RPMs is not considered normal conditions.
During combat maneuvers, running the engine without oil, carrying heavyloads, or when the engine has been damaged, the temperature may rise todangerous levels. If the temperature nears the top of the indicator’s range, thereis a good chance your engine will cease functioning. Avoid this if at all possible.Although you will hear stories of cooled-off engines that were restarted in flightafter overheating, these are almost miraculous exceptions to the rule. Mostpilots who overload their engines simply crash and die. Overheating causespermanent damage to the engine which must be repaired before the aircraft isairworthy.
Engine Temp.
Altimeter
Oil Pressure
1942 PAW manual 2 1-55 8/14/97 4:25 PM Page 15
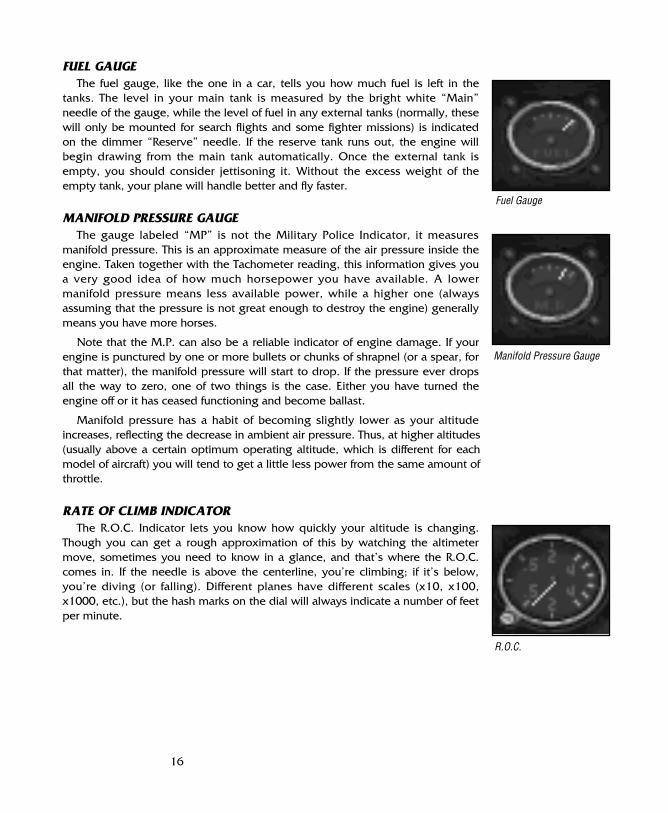
16
FUEL GAUGEThe fuel gauge, like the one in a car, tells you how much fuel is left in the
tanks. The level in your main tank is measured by the bright white “Main”needle of the gauge, while the level of fuel in any external tanks (normally, thesewill only be mounted for search flights and some fighter missions) is indicatedon the dimmer “Reserve” needle. If the reserve tank runs out, the engine willbegin drawing from the main tank automatically. Once the external tank isempty, you should consider jettisoning it. Without the excess weight of theempty tank, your plane will handle better and fly faster.
MANIFOLD PRESSURE GAUGEThe gauge labeled “MP” is not the Military Police Indicator, it measures
manifold pressure. This is an approximate measure of the air pressure inside theengine. Taken together with the Tachometer reading, this information gives youa very good idea of how much horsepower you have available. A lowermanifold pressure means less available power, while a higher one (alwaysassuming that the pressure is not great enough to destroy the engine) generallymeans you have more horses.
Note that the M.P. can also be a reliable indicator of engine damage. If yourengine is punctured by one or more bullets or chunks of shrapnel (or a spear, forthat matter), the manifold pressure will start to drop. If the pressure ever dropsall the way to zero, one of two things is the case. Either you have turned theengine off or it has ceased functioning and become ballast.
Manifold pressure has a habit of becoming slightly lower as your altitudeincreases, reflecting the decrease in ambient air pressure. Thus, at higher altitudes(usually above a certain optimum operating altitude, which is different for eachmodel of aircraft) you will tend to get a little less power from the same amount ofthrottle.
RATE OF CLIMB INDICATORThe R.O.C. Indicator lets you know how quickly your altitude is changing.
Though you can get a rough approximation of this by watching the altimetermove, sometimes you need to know in a glance, and that’s where the R.O.C.comes in. If the needle is above the centerline, you’re climbing; if it’s below,you’re diving (or falling). Different planes have different scales (x10, x100,x1000, etc.), but the hash marks on the dial will always indicate a number of feetper minute.
Fuel Gauge
Manifold Pressure Gauge
R.O.C.
1942 PAW manual 2 1-55 8/14/97 4:25 PM Page 16

17
If you’ve gone ahead against advice and flown a mission or two without readingthis, you probably noticed that the aircraft in your flight are flying in formation.(Excepting you, of course, since you had no idea what was going on.) This isstandard procedure, even if your flight is only yourself and one wingman. Your flightshould stay in formation until the enemy engages you in combat or the missionends. All of the normal formations you will encounter in 1942 THE PACIFIC AIR WAR
are variations on two basic themes.
ECHELONEchelon formations come in two flavors: echelon left and echelon right. The
planes fly behind and to one side of each other, forming a diagonal or “stair-step”line. This type of formation can accommodate any number of aircraft, though it is notsuggested for more than five. A two-plane echelon is the standard lead and wingman formation.
FORMATIONS
Echelons
1942 PAW manual 2 1-55 8/14/97 4:25 PM Page 17

18
VV Formations, or “Vees”, are the standard formation for flights of bombers (and
geese). The front two following planes keep position behind and to each side of thelead aircraft, thus forming the ‘V’. Any further planes extend the legs of theformation; the standard V does not include any aircraft within the legs of the V. Whenthere is an even number of aircraft in a V formation, the flight leader decides whichleg will be extended. The two-plane V is essentially the same formation as the two-plane echelon.
V Formation
1942 PAW manual 2 1-55 8/14/97 4:25 PM Page 18
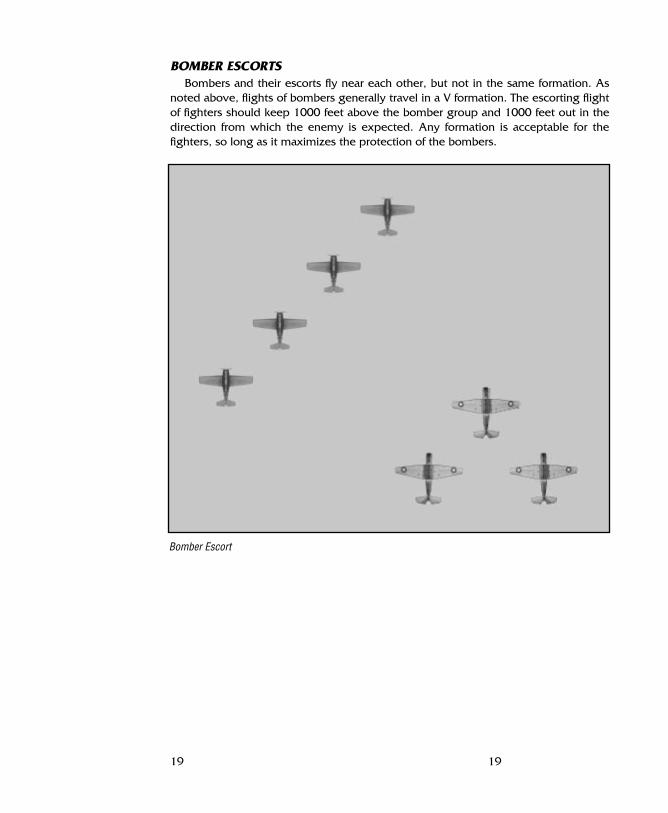
19
BOMBER ESCORTSBombers and their escorts fly near each other, but not in the same formation. As
noted above, flights of bombers generally travel in a V formation. The escorting flightof fighters should keep 1000 feet above the bomber group and 1000 feet out in thedirection from which the enemy is expected. Any formation is acceptable for thefighters, so long as it maximizes the protection of the bombers.
19
Bomber Escort
1942 PAW manual 2 1-55 8/14/97 4:25 PM Page 19

20
There are several easy maneuvers that are not only basic, but essential to combatflying. You may already be familiar with some of them. Regardless, you shouldpractice every time you begin flying a new type of aircraft; every plane reactsdifferently, and you should always adapt to your aircraft – it will not adapt to you.
Aileron RollThe aileron roll is not a maneuver that you are ever likely to use, unless you fly in
an air show after the war. The utility of this simple roll is that it is a basic componentof almost every other possible maneuver, trick, or trap you might use.
Push the stick all the way to either side, hold it there, and you will perform anaileron roll. Center the stick again once you return to an upright attitude. Now roll inthe opposite direction. Notice how your plane acts during the rolls: which direction it“likes” to go in, how much speed and altitude you lose, etcetera. The little things getto be very big during a close-in dogfight.
Now roll into the inverted position and center the stick there. Spend a little timeupside down and see what the plane tries to do. Roll back over whenever you’reready (preferably before you hit the water). The half roll is the first step in many animportant and useful maneuver.
20
Aileron Roll
SIMPLEMANEUVERS
1942 PAW manual 2 1-55 8/14/97 4:25 PM Page 20

21
BARREL ROLLA barrel roll can occasionally be useful in a dogfight, especially if your opponent is
inexperienced or just plain stupid. It is similar to the aileron roll, but has a lateralcomponent that turns it from a spin-in-place to more of a horizontal corkscrewmotion. Unless your enemy is on your tail, performing the full roll may not be of anyvalue. The barrel roll is similar to the aileron roll, however, in that a partial roll isoften used as a part of another, more complex, maneuver.
To perform this roll, you push the stick to one side as in the aileron roll, but youalso pull it back a bit. A perfect barrel roll brings you back to the same position andaltitude, but lowers your airspeed. (Normal pilots will lose some altitude.) It is thelessening in your speed that will sometimes trick your opponent into overshooting.When you recover your position, you will likely be right in his six.
Barrel Roll
1942 PAW manual 2 1-55 8/14/97 4:25 PM Page 21
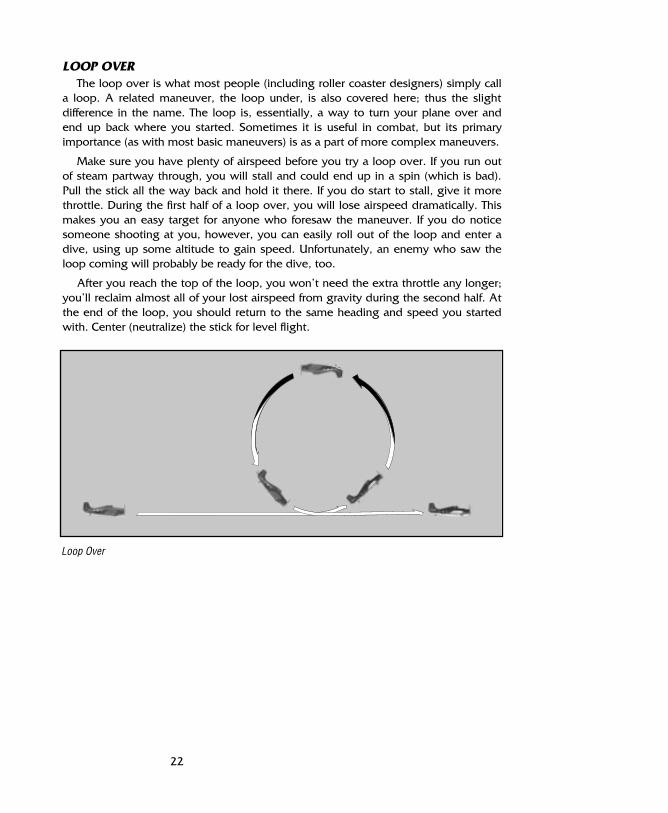
22
LOOP OVERThe loop over is what most people (including roller coaster designers) simply call
a loop. A related maneuver, the loop under, is also covered here; thus the slightdifference in the name. The loop is, essentially, a way to turn your plane over andend up back where you started. Sometimes it is useful in combat, but its primaryimportance (as with most basic maneuvers) is as a part of more complex maneuvers.
Make sure you have plenty of airspeed before you try a loop over. If you run outof steam partway through, you will stall and could end up in a spin (which is bad).Pull the stick all the way back and hold it there. If you do start to stall, give it morethrottle. During the first half of a loop over, you will lose airspeed dramatically. Thismakes you an easy target for anyone who foresaw the maneuver. If you do noticesomeone shooting at you, however, you can easily roll out of the loop and enter adive, using up some altitude to gain speed. Unfortunately, an enemy who saw theloop coming will probably be ready for the dive, too.
After you reach the top of the loop, you won’t need the extra throttle any longer;you’ll reclaim almost all of your lost airspeed from gravity during the second half. Atthe end of the loop, you should return to the same heading and speed you startedwith. Center (neutralize) the stick for level flight.
Loop Over
1942 PAW manual 2 1-55 8/14/97 4:25 PM Page 22
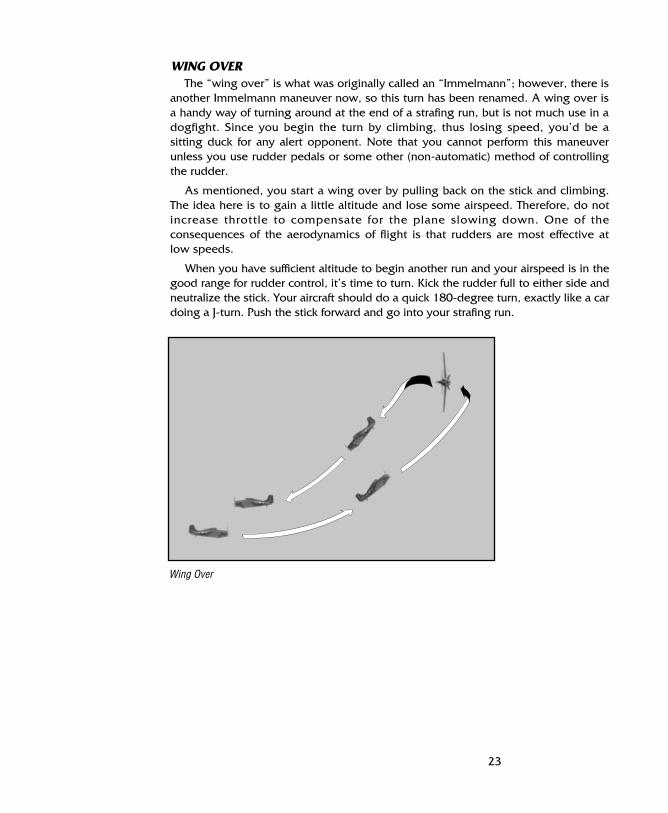
23
WING OVERThe “wing over” is what was originally called an “Immelmann”; however, there is
another Immelmann maneuver now, so this turn has been renamed. A wing over isa handy way of turning around at the end of a strafing run, but is not much use in adogfight. Since you begin the turn by climbing, thus losing speed, you’d be asitting duck for any alert opponent. Note that you cannot perform this maneuverunless you use rudder pedals or some other (non-automatic) method of controllingthe rudder.
As mentioned, you start a wing over by pulling back on the stick and climbing.The idea here is to gain a little altitude and lose some airspeed. Therefore, do notincrease throttle to compensate for the plane slowing down. One of theconsequences of the aerodynamics of flight is that rudders are most effective atlow speeds.
When you have sufficient altitude to begin another run and your airspeed is in thegood range for rudder control, it’s time to turn. Kick the rudder full to either side andneutralize the stick. Your aircraft should do a quick 180-degree turn, exactly like a cardoing a J-turn. Push the stick forward and go into your strafing run.
Wing Over
1942 PAW manual 2 1-55 8/14/97 4:25 PM Page 23

24
LOOP UNDERThe loop under is essentially a reversed loop over, except that it can be more
dangerous. It is also more valuable in combat, since you gain speed quickly earlyin the loop. The loop under is also used as one step in some more complicatedmaneuvers.
You don’t need to worry about airspeed when you start, but you do have toconsider your altitude. If you have less than 5000 feet beneath you, don’t bother(unless you want a swimming lesson). Perform half an aileron roll, so that you’reinverted. Pull back on the stick and hold it there. During the first half of a loop under,you will gain airspeed quickly. This can be pretty handy when trying to elude anopponent. Do not do anything to slow yourself down, or you may not be able tocomplete the loop.
After you reach the bottom of the loop, you’ll stop accelerating and begin to loseairspeed on the way back up. This is when you become vulnerable to any enemywho sees what you’re doing. If it becomes necessary, you can increase throttle tofinish faster or simply roll out of the loop. At the end of an uninterrupted loop, youshould return to the same heading and speed you started with. Neutralize the stickto return to level flight.
Loop Under
1942 PAW manual 2 1-55 8/14/97 4:25 PM Page 24
25
It would be nice to think you’ll never need to know any of the emergencyprocedures outlined in this section, but let’s be realistic. You’re not flying a kiddie rideat Coney Island – this is a war. Since this information could (and probably will) saveyour life and our expensive aircraft, you will learn it. Trust me, it’s for your own good.
RECOVERING FROM A STALLA stall isn’t really an emergency – unless you don’t know how to deal with it. A
wrong move during a stall could easily put you into a spin, and if you can’t copewith a stall, you sure as hell won’t be able to save yourself from a spin.
Your aircraft will stall when it does not have enough lift to balance out the force ofgravity. There are lots of ways this can happen, but two are most common. The firstis a simple lack of thrust. Since thrust is what keeps the air flowing around the wing,and the airflow generates lift, lack of thrust equals lack of lift. The second is morecomplex. Whenever your aircraft is climbing, the angle of attack is increased; if youdo not have enough forward motion (thrust) to compensate for the loss of lift thiscauses, the plane could stall. This is the more dangerous type of stall, partly becauseof its complexity and partly because you were probably climbing for a reason.
If you go into the second type of stall too low, you’d better bail out. Withoutenough sky under you to safely recover and get out of the resulting dive, youhaven’t got a chance.
To recover control from the first type of stall, you don’t really have to do anything.The nose of the plane will dip when you stall, and you will start to gain speed as youdive. The extra speed should cancel the stall, and you’ll regain control of the aircraft.Alternately, you could increase throttle. This is probably the better option, sinceotherwise you’ll just stall again.
The second type of stall is more troublesome. Since you were climbing, your noseis pointed up. The first tendency of the aircraft, then, is to go nose-down and act likea rock. Let it. Neutralize the stick, and you can control the direction in which thenose falls using the rudder. If you’re not at too great an angle, you may even be ableto get the nose to fall forward, into a standard dive.
Once you’re diving, neutralize the rudder and use the stick to straighten out. Pullout of the dive as gently as your altitude and situation allow. Next time, be sure youhave enough airspeed for the climb, or use more throttle to avoid stalling.
GETTING OUT OF A SPINSpins are potentially the most dangerous situation a pilot can get into. The pilot’s
handbook for almost every aircraft warns against entering a spin intentionally, sincethey can be so difficult to escape. Unlike some other ways of “sitting down on thewater”, a spin will almost never conclude with a survivable belly landing. To survivea spin, you must either get out of the spin or get out of the plane.
If you go into a spin at any altitude below 3000 feet, bail out immediately. You donot have enough maneuvering room to save your plane, so you may as well saveyour life.
EMERGENCYPROCEDURES
1942 PAW manual 2 1-55 8/14/97 4:25 PM Page 25

26
If you feel you have enough room below you, your first action should be to jamthe rudder hard (“with a positive motion,” the book says) in the direction oppositethe spin. Hold it there. Half a spin later, push the stick full forward, jamming theelevators to full. Do not move the stick to the side under any circumstances; keep itcentered. Neutral ailerons are essential to stopping the spin. Do not adjust thethrottle at all.
If there is no change in the spin after five turns or so, try something else. Often, ifyou were going exceptionally fast when you entered the spin, you should allowmore time for the recovery. Unless you feel you are getting control, you should bailout when you get too low.
If and when the spin eases and you feel control of the plane returning to you, youwill find yourself in a dive. Ease out of it as gently as your altitude and situationallow, so as to avoid going into another spin.
DAMAGEThere is absolutely nothing you can do to repair damage to your aircraft while in
flight. The instruments in the cockpit will be your warning when your plane takesdamage. Sluggish controls or loss of control of the plane are also reliable signs ofdamage. Your only recourse is knowing how to cope and how to react.
Remember, once you’re airborne youare in command. If the damage to youraircraft is severe enough that you arehaving trouble controlling your flight, youhave a command decision to make. Useyour best judgment as to whether tocontinue on and attempt to completeyour mission. Too much damage willmake your mission impossible, and youmay need to return prematurely. If thedamage is too great, you may even haveto bail out in order to save your life (andthe lives of your crew). Although there isno loss of face in a necessary retreat,keep in mind that you will be heldresponsible if you overestimate thedamage or react out of cowardice.
This B-17 made it home because the pilot knew what he was doing.
1942 PAW manual 2 1-55 8/14/97 4:26 PM Page 26
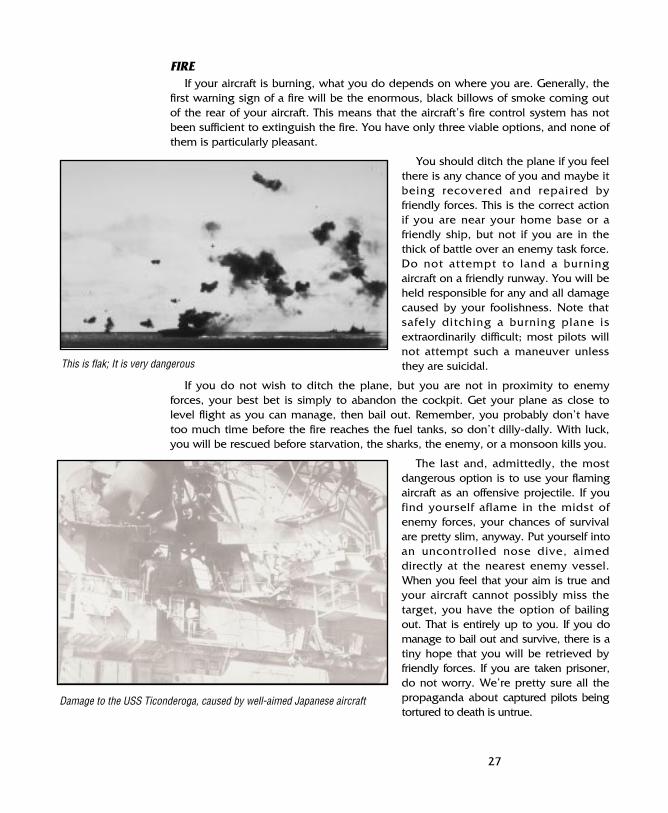
27
FIREIf your aircraft is burning, what you do depends on where you are. Generally, the
first warning sign of a fire will be the enormous, black billows of smoke coming outof the rear of your aircraft. This means that the aircraft’s fire control system has notbeen sufficient to extinguish the fire. You have only three viable options, and none ofthem is particularly pleasant.
You should ditch the plane if you feelthere is any chance of you and maybe itbeing recovered and repaired byfriendly forces. This is the correct actionif you are near your home base or afriendly ship, but not if you are in thethick of battle over an enemy task force.Do not attempt to land a burningaircraft on a friendly runway. You will beheld responsible for any and all damagecaused by your foolishness. Note thatsafely ditching a burning plane isextraordinarily difficult; most pilots willnot attempt such a maneuver unlessthey are suicidal.
If you do not wish to ditch the plane, but you are not in proximity to enemyforces, your best bet is simply to abandon the cockpit. Get your plane as close tolevel flight as you can manage, then bail out. Remember, you probably don’t havetoo much time before the fire reaches the fuel tanks, so don’t dilly-dally. With luck,you will be rescued before starvation, the sharks, the enemy, or a monsoon kills you.
The last and, admittedly, the mostdangerous option is to use your flamingaircraft as an offensive projectile. If youfind yourself aflame in the midst ofenemy forces, your chances of survivalare pretty slim, anyway. Put yourself intoan uncontrolled nose dive, aimeddirectly at the nearest enemy vessel.When you feel that your aim is true andyour aircraft cannot possibly miss thetarget, you have the option of bailingout. That is entirely up to you. If you domanage to bail out and survive, there is atiny hope that you will be retrieved byfriendly forces. If you are taken prisoner,do not worry. We’re pretty sure all thepropaganda about captured pilots beingtortured to death is untrue.
This is flak; It is very dangerous
Damage to the USS Ticonderoga, caused by well-aimed Japanese aircraft
1942 PAW manual 2 1-55 8/14/97 4:26 PM Page 27

28
BAILING OUTBailing out is a simple, last-ditch attempt to save your life after you’ve fouled up
in combat. (This is giving you the benefit of the doubt by assuming that your planewas damaged in combat with the enemy, not by your carelessness.) What you do isabandon the aircraft and parachute to the surface.
If you land in the sea, your life raft will inflate automatically, and you will survivefor quite some time on the rations and water included with the raft. If you land on anisland, your best hope is that you might be spotted and rescued by a friendly shippassing nearby. Remember that any island may be occupied by friendly forces, theenemy, or vicious headhunting natives.
One last bit of advice. Headquarters wants to assure you that helpless,parachuting pilots are not considered viable targets. None of the reports of theenemy shooting down defenseless pilots and their parachutes has been confirmed.You know how these rumors spread.
If you understand everything in the Simple Maneuvers section, then you’re wellon your way to becoming a useful pilot. Useful to the Navy, that is. At this point, youcould probably survive for a few seconds against an experienced opponent.
Now, you’re going to learn a few things that will help you turn that survival timeinto a chance to perforate the enemy’s plane. After all, that’s really the whole ideahere, isn’t it? Note that the potential uses of the techniques described here are onlysuggestions; any maneuver is as versatile as the pilot who undertakes to learn it.
APPROACHAs soon as you identify an aircraft as belonging to the enemy, the conflict has
begun. Even though neither of you can effectively fire on the other yet, one of the keysto aerial combat is the balance of advantage and disadvantage in approach positions.
The first and most important consideration is Awareness. Clearly, you are awareof the existence, the position, and the approximate speed of the other plane.Depending on the angle at which you are approaching, he may not know you arethere. (The converse is also true; if you suddenly see tracers cross your line of flightfrom behind, someone has gained a serious awareness advantage over you.) Youcan usually tell by the other pilot’s action – or inaction – whether or not he hasspotted you.
The next thing to consider is Altitude. Whichever aircraft is flying at a greateraltitude has a distinct tactical and energy advantage. However, approaching mostbombers from above is a mistake, as their tail guns are designed to protect fromexactly that type of threat.
Speed is another vital consideration. The faster plane, like the higher one, has anenergy advantage. More speed means more climbing ability and outrunningpotential. Remember, though, that the slower plane is better able to maneuver (to apoint) when it comes to rudder effects and tight turns. The faster aircraft may also belured into overshooting, thus becoming a rather easy target.
ADVANCEDFLIGHT
1942 PAW manual 2 1-55 8/14/97 4:26 PM Page 28

29
The Deflection at which the attacking aircraft approaches is also critical. A pilotgets his best shot (most likely to do damage) when he fires along the flight path ofthe other plane. Otherwise, the uncertainty factor of leading the enemy comes intothe picture. Deflection is measured by the angle the attacker’s path makes with thepath of the target. The greater the deflection, the less likely the shot will hit.
All told, the more advantages you have (or can create for yourself) before youstart the fight, the more likely you are to be the victor. Putting those advantages togood use, however, is a matter of pilot skill and experience.
DOGFIGHT VS HIT AND RUNThe differences between the two basic types of aerial fighting are analogous to the
contrasts between boxing and wrestling. A pilot with an advantaged approach oftenhas the power to decide what kind of fight it’s going to be, but a fast, maneuverableaircraft with an experienced pilot can force the fight to go the other way.
When most people say ‘dogfight’, they mean any midair conflict between aircraft.For simplicity, that’s a good definition, but a pilot has to know better. A dogfightdevelops when two or more planes close with one another, getting into a close-quarters duel of maneuverability (usually a one- or two-circle fight). Obviously, ifyour aircraft is significantly less maneuverable than your opponent’s, you will want toavoid this kind of close-contact fighting.
The other option here is an open conflict, which is sometimes called a ‘hit-and-run’ fight. In this type of aerial combat, the aircraft involved make repeated strafingpasses (“slashing” attacks) at each other, depending on firepower, strategy, andendurance to win the day. This sort of battle emphasizes the advantages of altitude,speed, and situational awareness (knowing what’s going on around you). Of course,if you know your plane isn’t as tough or as hard-hitting as your enemy’s, you shouldavoid hit and run and try to engage him in a dogfight.
1942 PAW manual 2 1-55 8/14/97 4:26 PM Page 29

30
IMMELMANNThe modern Immelmann is a time-honored method of gaining altitude and
(potentially) changing direction. It is a combat maneuver, but not one that you wantto use when an enemy is on your six. At the beginning of the Immelmann, you losespeed and become vulnerable to attack. For this reason, you should only use thisparticular tactic when there’s no immediate threat. The modern Immelmann is bestused after a nose-to-nose pass, to turn for the next pass and gain altitude for anadvantaged position.
It is important that you have enough airspeed; the Immelmann is a lot like a LoopOver. To start, pull back on the stick as if you are performing a loop. When you areexactly vertical (pointed straight up), you are at the decision point of the maneuver.This is where split-second thinking and reactions come in handy. If you’re on theball, you can roll your aircraft without losing your sense of position. Whateverdirection the top of your head is pointing in when your leave the decision point isthe direction your plane will take when you finish the maneuver.
Modern Immelmann
After the roll, which should take place almost instantly, continue the loop untilyou reach the top. At this point, neutralize (center) the stick. Note that you are, infact, moving in the direction that you chose at the decision point, though you areinverted. Roll the aircraft over. You have gained altitude and changed direction,though now your speed is significantly lower. If your opponent remained at theoriginal level, you now have an altitude advantage and he doesn’t yet know whatdirection you’re going in.
1942 PAW manual 2 1-55 8/14/97 4:26 PM Page 30

31
SPLIT-SThe Split-S is really a vertically-reversed Immelmann, but nobody calls it that. It’s
a great way to drop a lot of altitude, gain speed, and change direction. Thismaneuver is often useful for escaping an opponent who is just about to shoot youdown. Not only is it nearly impossible for your opponent to guess what directionyou’re turning to – making it difficult for him to follow you – but your new airspeedshould give you more than enough juice to run away and end the dogfight.
In this case, airspeed is not important; you’ll be getting plenty right from the start.To begin, invert the aircraft and pull back on the stick as if you are performing a LoopUnder. When you are exactly vertical (pointed straight down), you are at the decisionpoint of the maneuver. This is where split-second thinking and reactions come inhandy. If you’re on the ball, you can roll your aircraft without losing your sense ofposition. Whatever direction the top of your head is pointing in when your leave thedecision point is the direction your plane will take when you finish the maneuver.
After the roll, which you’d better finish quickly, continue the loop until you reachthe bottom. At this point, neutralize (center) the stick. Note that you are, in fact,moving in the direction that you chose at the decision point. You have lost altitude,changed direction, and significantly raised your airspeed. If your opponent remainedat the original level, he now has an altitude advantage, but he doesn’t yet knowwhat direction you’re going in.
INTENTIONAL STALLDespite what you may have read, heard, or seen, there is absolutely no reason to
stall the aircraft intentionally unless you are performing in an airshow. In combat, thiswill get you killed – period.
Split-S
1942 PAW manual 2 1-55 8/14/97 4:26 PM Page 31

32
SKIDSkidding is a rudder maneuver you can use offensively, but it takes some practice.
Sometimes, you’re behind an opponent (at about the same altitude), but not at theright angle to take a shot at him. He knows it, and he’s flying straight, counting on it.You’re both moving at below top speed. If you bank toward him, you’ll get a shortshot, but then you’ll be past and he’ll be on your tail. What you need to do is swingthe nose of the plane around without changing the direction of your motion. Can do!
Jam the rudder in the direction of your enemy (that is, rudder left if he’s on yourleft, rudder right if he’s to your right). If your speed is right (in the range for goodruder control), the nose will drag itself over until you have a clear shot. Bam! What asurprise he’s going to get!
Skidding the Shot In
1942 PAW manual 2 1-55 8/14/97 4:26 PM Page 32

33
SLIPSlipping is another simple rudder maneuver, though you need to use the ailerons
in this one, too. Its primary use is for momentarily dodging out of the line of fire ofan opponent who has gotten the drop on you. You could probably also use it inplace of a skid, to slide in behind the enemy plane.
Rudder hard in either direction, while at the same time banking in the oppositedirection. This is a lot like compensating for a normal bank, but you want to use morerudder. The key here is that the two forces cancel each other as concerns roll; theplane should remain level. Level or not, your aircraft will “slide” to the side youbanked toward. This is as close as you’ll get to flying sideways. Once your enemycatches on, he’ll slip, too, to catch you. You can repeatedly slip back and forth,thereby eluding him for quite some time. (Maybe help will come, maybe he’ll makea mistake and you can escape.)
Slipping Out
1942 PAW manual 2 1-55 8/14/97 4:26 PM Page 33

34
SCISSORSThe Scissors is a basic dogfighting technique. Two planes travelling in roughly the
same direction cannot easily line up for head-to-head passes. Rather, they engage ina criss-crossing pattern of banked turns, each trying to out-turn the other and shootfirst. Since lower airspeeds lead to tighter turns, the scissors is sometimes called the“race to go slow”.
Scissors Fight
The scissors is really just a series of banked turns, as tight as they can get.Whenever the opponents can get a clear shot on each other, they blast away for allthey’re worth. Firepower counts in this sort of fight, but maneuverability is more vital.A Zero will almost always defeat a Wildcat or even a Hellcat in a standard scissors.
1942 PAW manual 2 1-55 8/14/97 4:26 PM Page 34
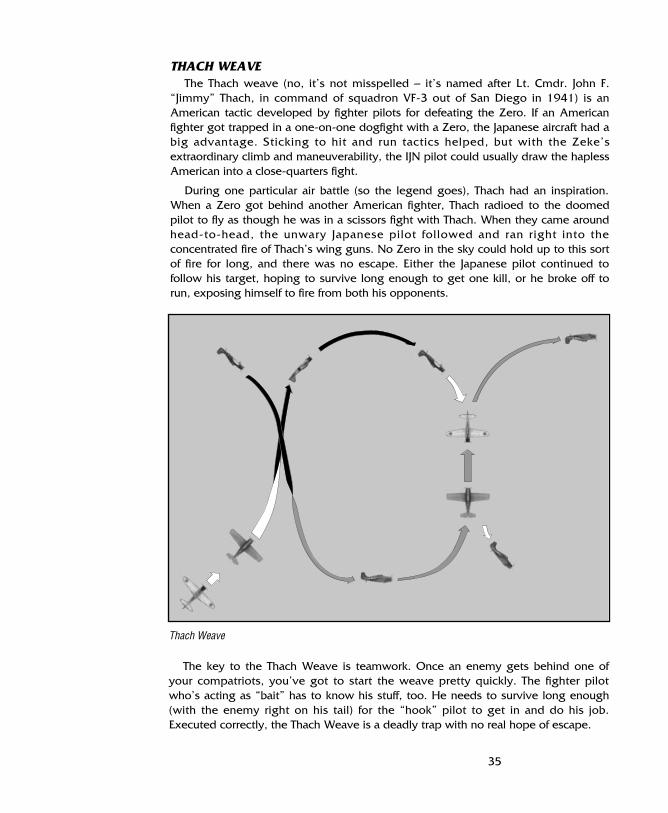
35
THACH WEAVEThe Thach weave (no, it’s not misspelled – it’s named after Lt. Cmdr. John F.
“Jimmy” Thach, in command of squadron VF-3 out of San Diego in 1941) is anAmerican tactic developed by fighter pilots for defeating the Zero. If an Americanfighter got trapped in a one-on-one dogfight with a Zero, the Japanese aircraft had abig advantage. Sticking to hit and run tactics helped, but with the Zeke’sextraordinary climb and maneuverability, the IJN pilot could usually draw the haplessAmerican into a close-quarters fight.
During one particular air battle (so the legend goes), Thach had an inspiration.When a Zero got behind another American fighter, Thach radioed to the doomedpilot to fly as though he was in a scissors fight with Thach. When they came aroundhead-to-head, the unwary Japanese pilot followed and ran right into theconcentrated fire of Thach’s wing guns. No Zero in the sky could hold up to this sortof fire for long, and there was no escape. Either the Japanese pilot continued tofollow his target, hoping to survive long enough to get one kill, or he broke off torun, exposing himself to fire from both his opponents.
Thach Weave
The key to the Thach Weave is teamwork. Once an enemy gets behind one ofyour compatriots, you’ve got to start the weave pretty quickly. The fighter pilotwho’s acting as “bait” has to know his stuff, too. He needs to survive long enough(with the enemy right on his tail) for the “hook” pilot to get in and do his job.Executed correctly, the Thach Weave is a deadly trap with no real hope of escape.
1942 PAW manual 2 1-55 8/14/97 4:26 PM Page 35
36
THE COCKPITSThe following pages contain identification diagrams and important informationconcerning the enemy’s aircraft and all of the planes you might end up piloting. TheAmerican Armed Forces’ official designation names have been included for ease ofreference.
Those familiar with combat flying will want to review the vital statistics of theaircraft they could be running into (or piloting). They know that there’s a reasonthese numbers are called ‘vital’ statistics. You won’t flunk out of flight school for notknowing the Reisen Zeros’ hidden weak points, but you might flunk out of combat –permanently.
Some of our experienced combat and test pilots have written down a few of theirthoughts on each plane. Where these were printable, they are included at the end ofthe statistics list.
1942 PAW manual 2 1-55 8/14/97 4:26 PM Page 36

37
1942 PAW manual 2 1-55 8/14/97 4:26 PM Page 37

38
“ZEKE” - THE MITSUBISHI A6M2 AND A6M5 REISEN
Class: Type 0 Carrier-borne Fighter Model 52Stations: Pilot
Weapons: [Fixed] 2 Cowl-mounted 7.7 mm Machine Guns2 Wing-mounted 20 mm Cannon
[Payload] 2-132 lb. BombsAmmunition: [MGs] 600 rd/gun
[Cannon] 100 rd/gunFiring Rate: [MGs] 950-1000 rd/min (approx. 37 seconds of fire)
[Cannon] 465-480 rd/min (approx. 13 seconds of fire)
Span: 39’ 5” (M2) – 36’ 1”(M5)Length: 29’ 9” (M2) – 29’ 11”(M5)
Wing Area: 22.44 sq. meters (M2) – 21.3 sq. meters (M5)Engine: Nakajima Sakae NK1F (21) (Radial)
Max HPwr: 950 (M2) – 1130 (M5)Ceiling: 32,810 ft (M2) – 38,520 ft (M5)
Cruise Speed: 180 kts (M2) – 200 kts (M5)Max. Spd: 288 kts (M2) – 305 kts (M5)Stall Spd: 71 kts (M2) – 73 kts (M5) [Level Flight]Std Fuel: 156 gal
Max Fuel: 250 gal
Pilots’ Notes: The fuel tanks on the Reisen (“Zeke” or “Zero”) are completelyunprotected and are not self-sealing. As fighters go, these aresleek, fragile machines. The lack of armor is counterbalanced,however, by the Reisen’s excellent maneuverability and climb rate.
Stalls are gentle in the Reisen. A good landing speed is about65 knots (make sure to use your flaps, otherwise you’ll stall). Ifyou come up against a Corsair, try to close with him, don’t lethim have the initiative.
All of the guns on the Reisen have a slower firing rate than theAmerican machine guns, and so will get the worst of any nose-to-nose approach. Dogfighting close with the Wildcats is thepreferred strategy. The Hellcats will try hit and run tactics; do notallow them to stand off at a distance, as they are quite deadly.
1942 PAW manual 2 1-55 8/14/97 4:26 PM Page 38

39
1942 PAW manual 2 1-55 8/14/97 4:26 PM Page 39

40
“KATE” - THE NAKAJIMA B5N
Class: Type 97 Carrier-borne Attack Plane Model 12 (Torpedo bomber)Stations: Pilot, Rear Gunner
Weapons: [Fixed] 1 or 2 Rear-mounted 7.7 mm Machine Guns[Payload] 1 Torpedo -or- 1800 lbs of Bombs
Ammunition: 1200 rd/gunFiring Rate: 950-1000 rd/min (approx. 74 seconds of fire)
Span: 52’ 5”Length: 33’ 9”
Wing Area: 37.7 sq. metersEngine: Nakajima Sakae 11 (Radial)
Max HPwr: 1000Ceiling: 27,100 ft
Cruise Speed: 140 ktsMax. Spd: 204 ktsStall Spd: 66 kts [Level Flight]Std Fuel: 306 gal
Max Fuel: 306 gal
Pilots’ Notes: The Kate is quite a stable platform for torpedo bombing. Themaneuverability is adequate, but certainly no match for a fighterin a one-on-one fight. The stall on the Kate is easily handled andnot at all dramatic. This plane can take more punishment than aReisen, but a successful run requires fighter cover.
1942 PAW manual 2 1-55 8/14/97 4:26 PM Page 40
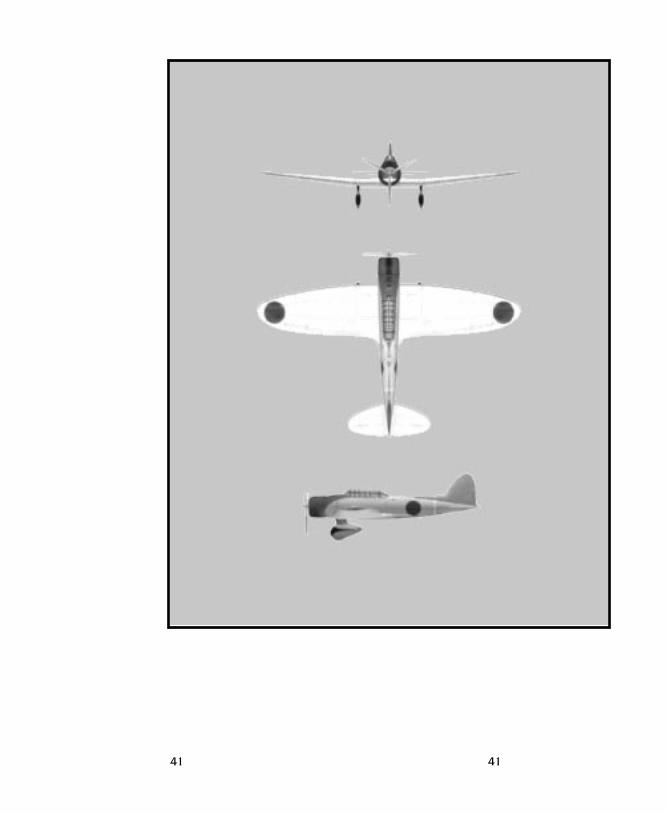
4141
1942 PAW manual 2 1-55 8/14/97 4:26 PM Page 41

42
“VAL” - THE AICHI D3A
Class: Type 99 Carrier-borne Bomber Model 22 (Dive Bomber)Stations: Pilot, Rear Gunner
Weapons: [Fixed] 2 Cowl-mounted 7.7 mm Machine Guns1 or 2 Rear mounted 7.7 mm Machine Guns
[Payload] 850 lbs. of BombsAmmunition: [Cowl] 400 rd/gun
[Rear] 1200 rd/gunFiring Rate: [Cowl] 950-1000 rd/min (approx. 25 seconds of fire)
[Rear] 950-1000 rd/min (approx. 74 seconds of fire)
Span: 47’ 8”Length: 34’ 9”
Wing Area: 34.9 sq. metersEngine: Mitsubishi Kinsei 54 (Radial)
Max HPwr: 1300Ceiling: 34,450 ft
Cruise Speed: 160 ktsMax. Spd: 232 ktsStall Spd: 67 kts [Level Flight]Std Fuel: 206 gal
Max Fuel: 206 gal
Pilots’ Notes: The Val has good handling characteristics, especially in a dive.The maneuverability is fair (better than the Dauntless), and thedives are quite steady. The maximum dive angle is, however,slightly shallower than that of the American bomber. Fixedlanding gear and strong dive brakes make this bomber slow toaccelerate, which is good for your aim in a steep dive.
42
1942 PAW manual 2 1-55 8/14/97 4:26 PM Page 42

43
1942 PAW manual 2 1-55 8/14/97 4:26 PM Page 43

44
“WILDCAT” - THE GRUMMAN F4F-3 AND F4F-4
Class: FighterStations: Pilot
Weapons: [Fixed] 4 (F4F-3) or 6 (F4F-4) Wing-mounted .50 caliber Machine Guns[Payload] 2-100 lb. Bombs
Ammunition: [F4F-3] 430 rd/gun[F4F-4] 240 rd/gun
Firing Rate: 750 rd/min (approx. 34 [F4F-3] and 19 [F4F-4] seconds of fire)
Span: 38’Length: 28’ 9”
Wing Area: 24.15 sq. metersEngine: Pratt and Whitney R-1830-86 (Radial)
Max HPwr: 1200Ceiling: 34,000 ft
Cruise Speed: 140 ktsMax. Spd: 276 ktsStall Spd: 77 kts (F4F-3) – 79 kts (F4F-4) [Level Flight]Std Fuel: 117 gal (w/liner) -or- 130 gal (w/out liner)
Max Fuel: 246 gal
Pilots’ Notes: The F4F is a squat, ugly, tough bird. It’s not as maneuverable as theZeros, but it can take a lot more punishment. She’s got some heavyfirepower, too. Even with the right pilot behind the stick, though, aWildcat is often not a match for a Zero. Take them on in teams only,never one-on-one.
The short take-off distance and strong gear make the Wildcat perfectlysuited for carrier based operations. Be careful not to over-throttle ontake-off, or you can lose steering and dump over the side. Her flyingstability is pretty good, and the roll rate is fast.
1942 PAW manual 2 1-55 8/14/97 4:26 PM Page 44
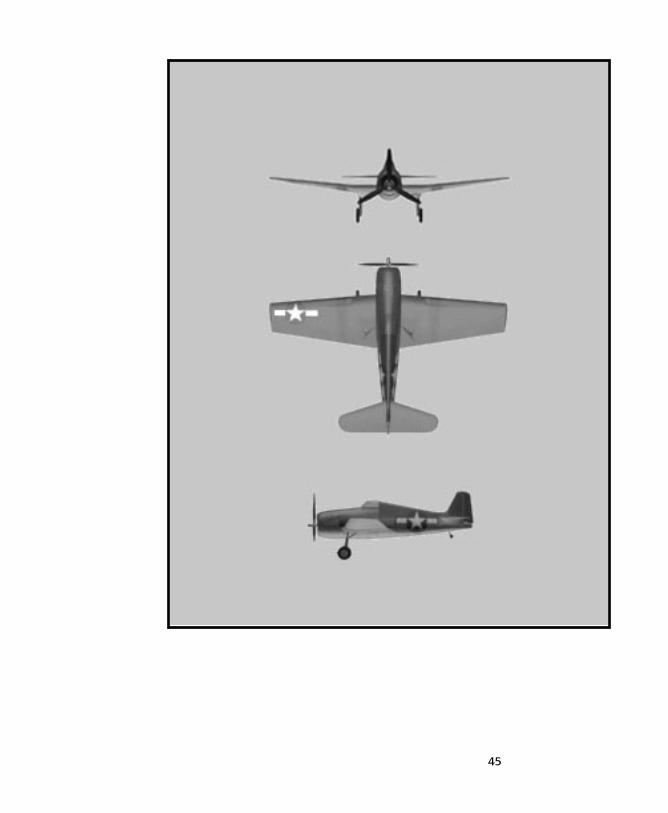
45
1942 PAW manual 2 1-55 8/14/97 4:26 PM Page 45
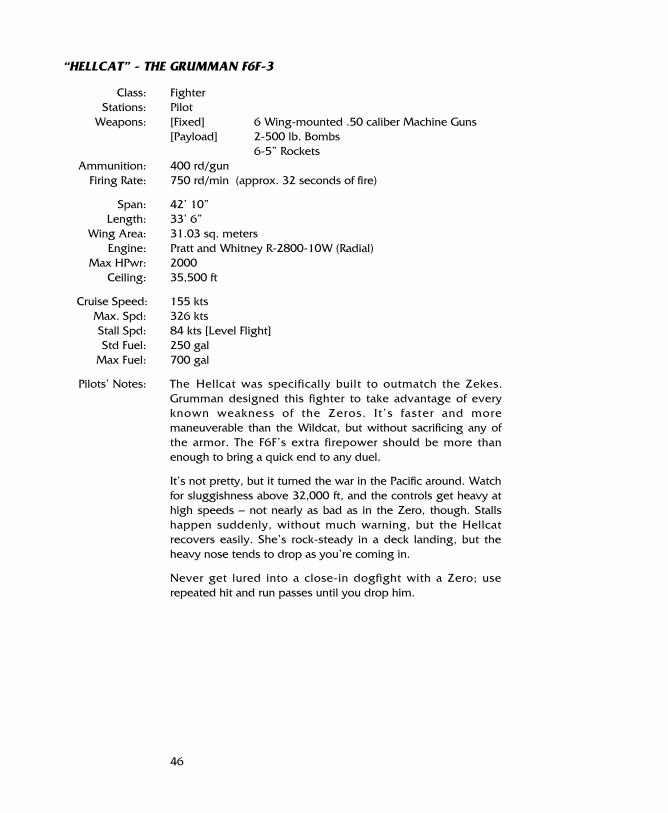
46
“HELLCAT” - THE GRUMMAN F6F-3
Class: FighterStations: Pilot
Weapons: [Fixed] 6 Wing-mounted .50 caliber Machine Guns[Payload] 2-500 lb. Bombs
6-5” RocketsAmmunition: 400 rd/gun
Firing Rate: 750 rd/min (approx. 32 seconds of fire)
Span: 42’ 10”Length: 33’ 6”
Wing Area: 31.03 sq. metersEngine: Pratt and Whitney R-2800-10W (Radial)
Max HPwr: 2000Ceiling: 35,500 ft
Cruise Speed: 155 ktsMax. Spd: 326 ktsStall Spd: 84 kts [Level Flight]Std Fuel: 250 gal
Max Fuel: 700 gal
Pilots’ Notes: The Hellcat was specifically built to outmatch the Zekes.Grumman designed this fighter to take advantage of everyknown weakness of the Zeros. It’s faster and moremaneuverable than the Wildcat, but without sacrificing any ofthe armor. The F6F’s extra firepower should be more thanenough to bring a quick end to any duel.
It’s not pretty, but it turned the war in the Pacific around. Watchfor sluggishness above 32,000 ft, and the controls get heavy athigh speeds – not nearly as bad as in the Zero, though. Stallshappen suddenly, without much warning, but the Hellcatrecovers easily. She’s rock-steady in a deck landing, but theheavy nose tends to drop as you’re coming in.
Never get lured into a close-in dogfight with a Zero; userepeated hit and run passes until you drop him.
1942 PAW manual 2 1-55 8/14/97 4:26 PM Page 46

47
1942 PAW manual 2 1-55 8/14/97 4:26 PM Page 47

48
“CORSAIR” - THE CHANCE VOUGHT F4U
Class: FighterStations: Pilot
Weapons: [Fixed] 6 Wing-mounted .50 caliber Machine Guns[Payload] 1000 lbs. of Bombs
8-5” RocketsAmmunition: [4 Inboard] 400 rd/gun
[2 Outboard] 375 rd/gunFiring Rate: 750 rd/min (approx. 32 seconds of fire)
Span: 40’ 11”Length: 30’ 8”
Wing Area: 29.17 sq. metersEngine: Pratt and Whitney Double Wasp R-2800-18W (Radial)
Max HPwr: 2000Ceiling: 36,900 ft
Cruise Speed: 218 ktsMax. Spd: 360 ktsStall Spd: 88 kts [Level Flight]Std Fuel: 237 gal
Max Fuel: 577 gal
Pilots’ Notes: The Corsair is a forced marriage – the smallest airframe that canaccommodate what was the most powerful radial engine indevelopment at the time it was designed. It’s got greatacceleration, but it’s heavy, so you won’t get the kind of climbrate you might expect. That engine gives out with some mightytorque, too, which is why the Navy avoids putting Corsairs oncarriers. The difficulty of deck landings earned this plane itsnickname – “The Ensign Eliminator”.
The cockpit on the Corsair is set further back than most, so yourview ahead is pretty poor except when looking up. The controlsare not really superbly balanced, either. The handbookrecommends that you not stay inverted for more than 3seconds, and so do I. When this baby stalls, you won’t get anywarning. It stalls rough, and it puts you right into a spin.
The maneuverability is mediocre, especially at low speeds, buther roll rate is great. Corsairs are tough and hard to kill, andthey’ve got the firepower you want up there. Just treat it like aHellcat; don’t close with a Zero, pull hit and run passes.
1942 PAW manual 2 1-55 8/14/97 4:26 PM Page 48

49
1942 PAW manual 2 1-55 8/14/97 4:26 PM Page 49

50
“HELLDIVER” - THE CURTISS SB2
Class: Dive BomberStations: Pilot, Rear Gunner
Weapons: [Fixed] 2 Wing-mounted 20 mm Cannon2 Rear-mounted .30 caliber Machine Guns
[Payload] 2000 lbs. of Bombs6-5” Rockets
Ammunition: [MGs] 2000 rd/gun[Cannon] 400 rd/gun
Firing Rate: [MGs] 825 rd/min (approx. 145 seconds of fire)[Cannon] 450 rd/min (approx. 53 seconds of fire)
Span: 49’ 8.6”Length: 36’ 8”
Wing Area: 39.2 sq. metersEngine: Wright Cyclone GR-2600-8
Max HPwr: 1700Ceiling: 24,200 ft
Cruise Speed: 137 ktsMax. Spd: 244 ktsStall Spd: 77 kts [Level Flight]Std Fuel: 320 gal
Max Fuel: 566 gal
Pilots’ Notes: ”Beast” is the right name for this bomber. Helldivers are plaguedwith handling problems. It’s often unstable, the elevators areheavy, and your forward vision is pretty poor, especially duringtake-off. It’s really not much better, in terms of performance, thanthe Dauntless, which it was designed to replace.
The Helldiver has a reputation among pilots as being hard tohandle. That’s true, it is, but it’s a serviceable bomber. The Beastis very mild in a stall, though there’s really no warning of a stallahead of time. It’s pretty stable in a dive, especially without thedive brakes. When you’re coming in for a landing, the heavynose wants to drop, and most of the controls handle prettypoorly at low speeds. The one clear exception is the rudder. Thegear never bounces, but I wouldn’t want to land one of theseon a carrier deck too often.
1942 PAW manual 2 1-55 8/14/97 4:26 PM Page 50

51
1942 PAW manual 2 1-55 8/14/97 4:26 PM Page 51

52
“DAUNTLESS” - THE DOUGLAS SBD-3
Class: Scout BomberStations: Pilot, Rear Gunner
Weapons: [Fixed] 2 Cowl-mounted .50 caliber Machine Guns2 Rear-mounted .30 caliber Machine Guns
[Payload] 1000 lbs. of BombsAmmunition: [Cowl] 360 rd/gun
[Rear] 2000 rd/gunFiring Rate: [Cowl] 750 rd/min (approx. 29 seconds of fire)
[Rear] 825 rd/min (approx. 145 seconds of fire)
Span: 41’ 6.1”Length: 32’ 1.25”
Wing Area: 30.19 sq. metersEngine: Wright Cyclone R-1820-52 (Radial)
Max HPwr: 1000Ceiling: 27,100 ft
Cruise Speed: 135 ktsMax. Spd: 255 ktsStall Spd: 68 kts [Level Flight]Std Fuel: 260 gal
Max Fuel: 310 gal
Pilots’ Notes: The Dauntless is a workhorse, and has been all the way throughthe war. Even though it was designed before the U.S. got intothings, and it’s probably obsolete, it does the job. The engine’stoo small, so she’s underpowered, but the handling is light andresponsive. One thing you’ve got to remember is that the divebrakes go in and out really slowly. Start them out before you rollinto your dive, and start them back in before you drop yourexplosive eggs. Otherwise, they won’t really do their job.
The underpowered Dauntless is slow and lumbering on thetake-off – her acceleration is not spectacular. The view over thenose is pretty good, though. When you’re in a tight turn,especially to the left, watch out for her vicious g stall;sometimes she’ll just snap out of the turn with no warning andtry to go into a spin. If you’re alert, you can avoid this.Dauntlesses are a dream to land. The gear’s got a little bouncein it, but so what?
1942 PAW manual 2 1-55 8/14/97 4:26 PM Page 52

53
1942 PAW manual 2 1-55 8/14/97 4:26 PM Page 53

54
“DEVASTATOR” - THE DOUGLAS TBD-1
Class: Torpedo BomberStations: Pilot, Rear Gunner
Weapons: [Fixed] 1 Cowl-mounted .50 caliber Machine Gun2 Rear-mounted .30 caliber Machine Guns
[Payload] 1 Torpedo -or- 1000 lbs. of BombsAmmunition: [Cowl] 300 rd
[Rear] 2000 rd/gunFiring Rate: [Cowl] 750 rd/min (approx. 24 seconds of fire)
[Rear] 825 rd/min (approx. 145 seconds of fire)
Span: 50’Length: 32’ 6”
Wing Area: 35.31 sq. metersEngine: Pratt and Whitney R-1830-64
Max HPwr: 900Ceiling: 19,700 ft
Cruise Speed: 128 ktsMax. Spd: 178 ktsStall Spd: 54 kts [Level Flight]Std Fuel: 207 gal
Max Fuel: 207 gal
Pilots’ Notes: Some say that the Devastator was obsolete when it rolled offthe assembly line. That makes sense, since it was designed wayback in ‘34. It’s a stable bombing platform, but the controls areheavy, slow, and not very responsive. Take-off is basicallysound, but slow. The maneuverability stinks on ice. She can’t flyhigh and she can’t fly fast, but you’ve got great control at lowspeeds, which is important in a bomber. The one bright spot isthat it’s really a breeze to land one of these on the deck.
1942 PAW manual 2 1-55 8/14/97 4:26 PM Page 54
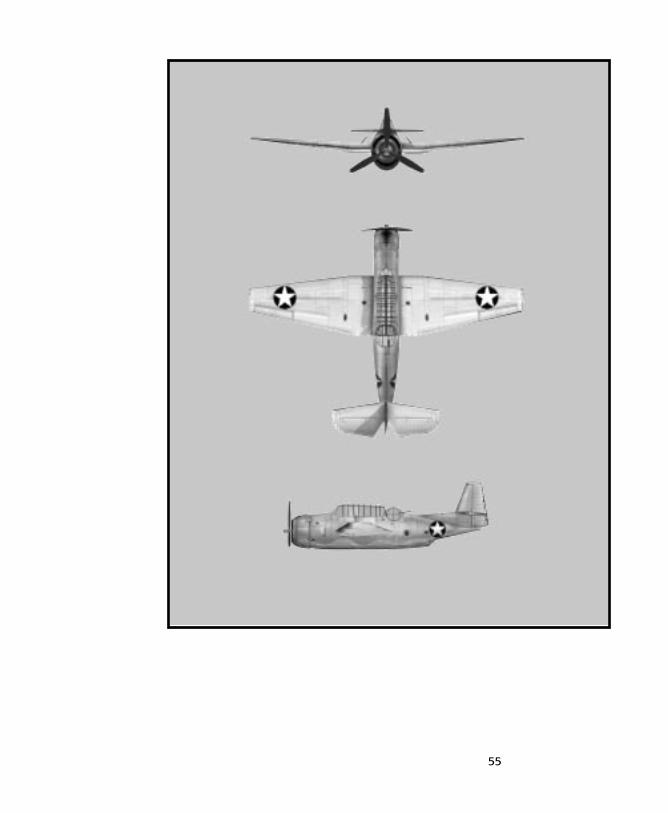
55
1942 PAW manual 2 1-55 8/14/97 4:26 PM Page 55

“AVENGER” - THE GRUMMAN TBF
Class: Torpedo/Dive BomberStations: Pilot, Dorsal Gunner, Ventral Gunner
Weapons: [Fixed] 2 Wing-mounted .50 caliber Machine Guns1 Dorsal .50 caliber Machine Gun1 Ventral .30 caliber Machine Gun
[Payload] 1-22” Torpedo -or- 2000 lbs. of BombsAmmunition: [Wing] 600 rd/gun
[Dorsal] 400 rd[Ventral] 500 rd
Firing Rate: [Wing] 750 rd/min (approx. 48 seconds of fire)[Dorsal] 750 rd/min (approx. 32 seconds of fire)[Ventral] 825 rd/min (approx. 36 seconds of fire)
Span: 54’ 2”Length: 40’
Wing Area: 45.54 sq. metersEngine: Wright Cyclone GR-2600-8 (Radial)
Max HPwr: 1700Ceiling: 21,400 ft
Cruise Speed: 135 ktsMax. Spd: 228 ktsStall Spd: 76 kts [Level Flight]Std Fuel: 380 gal
Max Fuel: 771 gal
Pilots’ Notes: Before I strapped in, they told me the Avenger was a torpedobomber and a “level” dive bomber. I say, baloney. This here’s atorpedo bomber, plain and simple. You get in a steep dive inthis thing and you’ve got almost no maneuverability at all. Youcouldn’t hit the broad side of a barn with the broad side ofanother barn. Now, in a nice, shallow torpedo run, she’s steadyas a rock. Handles a little heavy, but it’s like that no matter howfast or slow you’re going. One bad thing about that is yourbreakaway is kind of tough. You got to stomp all over therudder to get anywhere near a clean break. Watch out, onaccount of she stalls pretty suddenly. There’s no warning at all –just, bloop, and over she goes. When you get home, though,the touchdown’s as easy as a deck landing gets. You can’t misswith that giant arrestor hook.
56
1942 PAW manual 2 1-55 8/14/97 4:26 PM Page 56
57
HISTORICAL OVERVIEWThe air war fought over the Pacific ocean during World War II is unique in militaryhistory. For one thing, the vastness of this theater, stretching thousands of miles fromTokyo to San Francisco, from Australia to the Aleutians, sets it apart from mostbattlefields. The continent of Europe would be lost, swallowed whole, ifsuperimposed over a map of the Pacific. Secondly, neither the Japanese offensive northe subsequent American island-hopping campaign would have been possiblewithout naval aviation.
The airplane came to dominate naval strategy. It became the principal means ofstriking out against the enemy’s ships and land bases. The following overview isintended to place your flight career within the historical context of five Pacific battles.Regardless of which side you choose to play, you’re forced to contend with certainhistorical events that are beyond your control. The information contained within thiscampaign narrative will help you in understanding why your missions play-out theway they do.
After World War I, England and the United States emerged as the leading navalpowers among western nations. With the defeat and dismantling of Germany’s“luxury fleet”, these two nations could fairly claim mastery of the seven seas. Japan,whose navy had crushed the Czar’s fleet at Tsushima in 1905, was clearly thepreeminent naval power in the Pacific (next to the U.S. Pacific fleet).
THE PRE-WARYEARS
1942 PAW manual 2 57-81 8/15/97 11:08 AM Page 57

58
The tactics used by fleets in the Great War had progressed very little since Trafalgar.Admirals simply lined their ships up in long columns and hammered away at eachother. The results were often disappointing, because capital ships were so expensiveand their potential loss so devastating. No admiral was willing to take chances. Adm.Jellicoe, commanding the British ships at Jutland in 1916, was said to be, “the onlyman who could have lost the war in an afternoon.” Naval engagements, therefore,were straightforward slug-fests with all the subtlety of a train wreck.
Early experiments with naval aviation were unimpressive. Despite this newinnovation, the old guard among naval officers the world over continued to swear bythe “big guns” of their capital ships. Ships capable of carrying aircraft wouldaccompany a fleet, but only so that their aircraft could be used for reconnaissance.
After the enemy fleet was spotted from the air, battleships were expected to takeover. Airplanes were considered superfluous once battle was joined. Victory wouldgo to the side with the thickest armor, able to fire the greatest shell-weight atopposing ships.
After World War I, the imperial policies of Great Britain, Japan, and the UnitedStates were steaming a collision course. In 1921, representatives from the threegovernments met in Washington, D.C. to stave off an expensive naval arms race. TheWashington Naval Conference reduced the total amount of tonnage the three nationscould legally own to a simple ratio – 5:5:3. For every five tons of surface shippingpossessed by the United States and Britain, Japan could own three. (France and Italy,the other two signatories, were each limited to a ratio of 1.67 tons under this agreement.)
To comply with the restrictions imposed by the Washington agreements, both theUnited States and Japan started a trend that would ultimately lead to the supremacyof naval aviation over the “big guns” theory. Each nation converted the half-finishedhulls of two would-be battleships into aircraft-carrying ships.
According to the agreement, Britain and the United States were allowed to buildup to 135,000 tons of aircraft-carrying ships. Japan was only allowed 81,000 tons.Each navy could construct two aircraft carriers of 33,000 tons; the rest were limitedto only 27,000 tons.
For the United States, the two large carriers were the U.S.S. Lexington (CV-2) andU.S.S. Saratoga (CV-3). For Japan, the two large carriers were the Akagi and Kaga.Each of these four ships was capable of carrying over sixty (60) aircraft. (The two U.S.vessels eventually went to 36,000 tons, in violation of the agreement, because oftheir armored flight deck and hangars.) These ships formed the nucleus of the navalair war in the Pacific.
Both the United States and Japan continued to view aircraft-carrying ships asauxiliaries throughout the 1920s. Even after the first of the large carriers enteredservice, their aircraft were initially used as scouts. It wasn’t until 1929 that theoffensive potential of naval aviation was realized. (During a training exercise, theSaratoga launched a simulated sneak attack against the Panama Canal.)
1942 PAW manual 2 57-81 8/15/97 11:08 AM Page 58

59
While the United States conducted exercises during the 1930s, Japan wasinvolved in the real thing. The on-going war with China gave its naval officerspractical experience in handling aircraft carriers. Both the Akagi and Kaga were usedto launch raids against the Chinese mainland near Hangchow.
By the mid-30s, the Washington Naval agreements were forgotten. Unhappy withthe 5:5:3 ratio, Japan formally withdrew its compliance in 1936. Six new carriers hadeither already joined the Japanese fleet or were about to enter service. Whenconstruction of these carriers was completed, Japan would have a naval air arm ofover 350 aircraft.
The United States entered World War II on December 7th, 1941, as a result of theJapanese raid on Pearl Harbor. The following list compares the carrier forcesbelonging to the United States and Japan on the eve of hostilities.
THE CARRIERLINE-UP
(DECEMBER 7TH1941)
JAPANESE CARRIER FORCE
Ship Displacement (t) Aircraft Entered Service
Hosho 7,470 15 aircraft 1922Akagi 36,500 60 aircraft 1927Kaga 38,200 65 aircraft 1928Ryujo 10,600 36 aircraft 1933Soryu 18,800 57 aircraft 1937Shoho 11,262 30 aircraft 1939Zuiho 17,260 27 aircraft 1940Hiryu 20,300 62 aircraft 1941Zuikaku 26,000 60 aircraft 1941Shokaku 26,000 60 aircraft 1941Taiyo 17,900 27 aircraft 1941
Totals 232,392 tons 499 aircraft
UNITED STATES CARRIER FORCEShip Displacement (t) Aircraft Entered Service
Lexington 39,000 72 aircraft 1927Saratoga 39,000 72 aircraft 1927Ranger 14,500 68 aircraft 1935Yorktown 25,500 81 aircraft 1938Enterprise 25,500 81 aircraft 1938Hornet 29,100 85 aircraft 1940Wasp 21,000 84 aircraft 1941
Totals 204,650 tons 543 aircraft
(This list does not include the U.S.S Langley, which had been converted to aSeaplane Tender in 1938. At the time of the Japanese attack, only three U.S. carrierswere stationed in the Pacific – the Saratoga, Enterprise, and Lexington.)
1942 PAW manual 2 57-81 8/15/97 11:08 AM Page 59
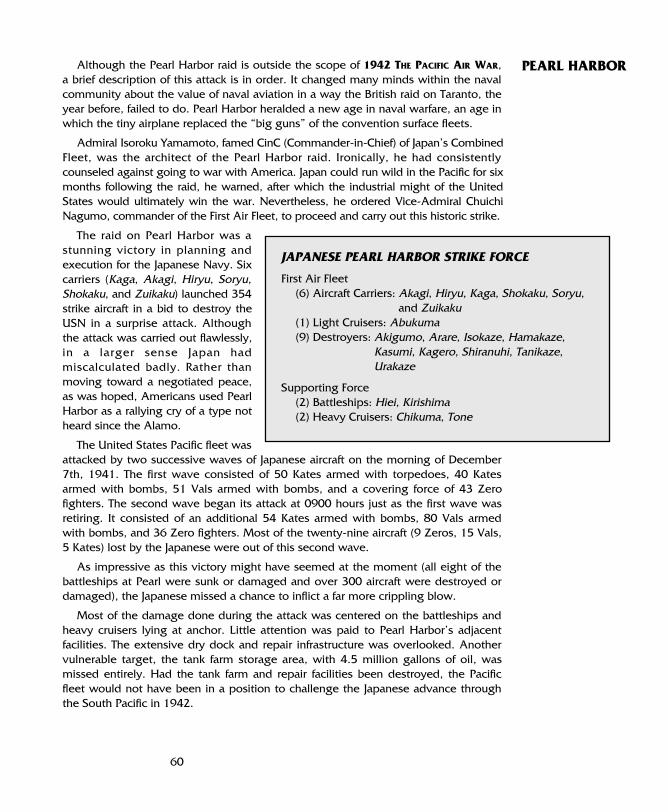
60
Although the Pearl Harbor raid is outside the scope of 1942 THE PACIFIC AIR WAR,a brief description of this attack is in order. It changed many minds within the navalcommunity about the value of naval aviation in a way the British raid on Taranto, theyear before, failed to do. Pearl Harbor heralded a new age in naval warfare, an age inwhich the tiny airplane replaced the “big guns” of the convention surface fleets.
Admiral Isoroku Yamamoto, famed CinC (Commander-in-Chief) of Japan’s CombinedFleet, was the architect of the Pearl Harbor raid. Ironically, he had consistentlycounseled against going to war with America. Japan could run wild in the Pacific for sixmonths following the raid, he warned, after which the industrial might of the UnitedStates would ultimately win the war. Nevertheless, he ordered Vice-Admiral ChuichiNagumo, commander of the First Air Fleet, to proceed and carry out this historic strike.
The raid on Pearl Harbor was astunning victory in planning andexecution for the Japanese Navy. Sixcarriers (Kaga, Akagi, Hiryu, Soryu,Shokaku, and Zuikaku) launched 354strike aircraft in a bid to destroy theUSN in a surprise attack. Althoughthe attack was carried out flawlessly,in a larger sense Japan hadmiscalculated badly. Rather thanmoving toward a negotiated peace,as was hoped, Americans used PearlHarbor as a rallying cry of a type notheard since the Alamo.
The United States Pacific fleet wasattacked by two successive waves of Japanese aircraft on the morning of December7th, 1941. The first wave consisted of 50 Kates armed with torpedoes, 40 Katesarmed with bombs, 51 Vals armed with bombs, and a covering force of 43 Zerofighters. The second wave began its attack at 0900 hours just as the first wave wasretiring. It consisted of an additional 54 Kates armed with bombs, 80 Vals armedwith bombs, and 36 Zero fighters. Most of the twenty-nine aircraft (9 Zeros, 15 Vals,5 Kates) lost by the Japanese were out of this second wave.
As impressive as this victory might have seemed at the moment (all eight of thebattleships at Pearl were sunk or damaged and over 300 aircraft were destroyed ordamaged), the Japanese missed a chance to inflict a far more crippling blow.
Most of the damage done during the attack was centered on the battleships andheavy cruisers lying at anchor. Little attention was paid to Pearl Harbor’s adjacentfacilities. The extensive dry dock and repair infrastructure was overlooked. Anothervulnerable target, the tank farm storage area, with 4.5 million gallons of oil, wasmissed entirely. Had the tank farm and repair facilities been destroyed, the Pacificfleet would not have been in a position to challenge the Japanese advance throughthe South Pacific in 1942.
PEARL HARBOR
JAPANESE PEARL HARBOR STRIKE FORCE
First Air Fleet(6) Aircraft Carriers: Akagi, Hiryu, Kaga, Shokaku, Soryu,
and Zuikaku(1) Light Cruisers: Abukuma(9) Destroyers: Akigumo, Arare, Isokaze, Hamakaze,
Kasumi, Kagero, Shiranuhi, Tanikaze,Urakaze
Supporting Force(2) Battleships: Hiei, Kirishima(2) Heavy Cruisers: Chikuma, Tone
1942 PAW manual 2 57-81 8/15/97 11:08 AM Page 60

Fortunately for the UnitedStates, the most important targetof all, the three Pacif ic f leetcarriers, were away from PearlHarbor at the time of the attack.Had one or more carriers beensunk at the outset, the Japanesewould likely have taken Midwayand the Solomon Islands(including Guadalcanal) in 1942.New Guinea would have beenindefensible, and the Hawaiianislands would have been placedunder siege. The American
counterattack in the Pacific would have started sometime in 1943, along theCalifornia coast.
By concentrating on the battleships, the Japanese had done the United States afavor. Pearl Harbor was a clear demonstration of the power of aircraft over surface
vessels. The attack forced American naval leadership to forgetabout their battleships, as they would take too long to buildanew. Unwittingly, the Japanese had expended their main effortagainst ships that would soon be overshadowed by navalaviation. From now on, all eyes turned to the aircraft carrier as thething of the future.
At Pearl Harbor, the Japanese missed their best opportunity to sink the Americanaircraft carriers. The consequences of this failed attempt would not become apparentuntil several months later, at the battle of Coral Sea. Less than six months later, inMay 1942, the United States stemmed the tide of Japanese expansion, just asYamamoto had predicted.
In an effort to extend their defensive perimeter farther south toward Australia, theJapanese fell victim to what was later termed “victory disease”– the belief in theirown invincibility. To hold on to their conquered territory, military necessity requiredthat they advance beyond their original war aims. Using their base at Rabaul in theBismarck Archipelago as a starting point, the Japanese set in motion an operationdesigned to capture Port Moresby, a key Allied port and airbase. Port Moresby,located on the southwest coast of New Guinea, was the last defensible positionbetween the Japanese and Australia.
The battle of the Coral Sea went down in history as the first naval engagement inwhich ships of the opposing fleets never sighted one other. This battle wasconducted entirely from the air. Naval aviation had made it possible. Success in theupcoming operation in the South Pacific was considered a foregone conclusion.
Admiral Shigeyoshi Inouye, the Japanese commander, divided his forces (asoutlined in the order of battle below) into five task groups. The Port Moresby taskgroups were directed to conduct an amphibious landing and capture the allied base
6161
A Japanese bomb comes very close to hitting a U.S. carrier
THE BATTLEOF THE
CORAL SEA:4-8 MAY
1942
1942 PAW manual 2 57-81 8/15/97 11:08 AM Page 61

62
in mid-May. The remaining ships, including the carriers, hadthe job of seeking out and destroying any allied naval forcedaring to interfere.
Admiral Chester Nimitz, CinC of the U.S. Pacific Fleet, hadbeen warned in advance of the impending attack. (Thecryptographic team at Pearl Harbor had successfully broken theJapanese Navy’s JN25b code.) Realizing that there were too fewland-based aircraft at Port Moresby and Australia to stop thisattack, Nimitz was prepared to gamble with his preciouscarriers.
The Coral Sea campaign opened on May 3rd, with theJapanese landing a small force on the island of Tulagi, north ofGuadalcanal. A seaplane base was immediately established inits protected shallow water anchorage. The very next morning,aircraft from the Yorktown struck the base. Twelve (12) torpedoplanes and twenty-eight (28) dive bombers only managed to
62
A destroyer burns in the Pacific
sink the Kikuzuki and damage the Okinoshima. After launching a secondstrike which sank the transport Tama Maru, Task Force 17 withdrew to thesouth in order to refuel and link up with Task Force 11 (Admiral Fitch’s Lexington group).
Throughout the first week in May, the Japanese Carrier Strike Forcehurried south from its naval base at Truk. By May 5th, it had roundedthe island of San Cristobal and entered the Coral Sea. Now both of theopposing carrier groups were in place, desperately searching for somesign of the enemy. Victory would likely go to the side which found theother first.
JAPANESE ORDER OF BATTLE
Carrier Strike Force (Takagi)(2) Aircraft Carriers: Shokaku, Zuikaku (with 42 VF, 41 VB, 21 VT) (2) Heavy Cruisers: Haguro, Myoko(6) Destroyers: Akebono, Ariake, Shigure, Shiratsuyu, Ushio, Yugure(1) Fleet Oiler: Toho Maru
Support Force (Goto)(4) Heavy Cruisers: Aoba, Furutaka, Kako, Kinugasa
Port Moresby Attack Force (Kajioka)(1) Light Cruisers: Yubari(6) Destroyers: Asanagi, Mochizuki, Mutsuki, Oite, Uzuki, Yayoi
Port Moresby Close Covering Force (Marumo)(2) Light Cruisers: Tatsuta, Tenryu(1) Seaplane Tender: Kamikawa Maru
1942 PAW manual 2 57-81 8/15/97 11:08 AM Page 62

63
Port Moresby Close Support Force (Goto)(1) Light Carrier: Shoho (with 12 VF, 9 VT)(1) Destroyer: Sazanami
Transport Force (Abe)(1) Minelayer: Tsugaru(12) Transports
Tulagi Invasion Force (Shima)(2) Destroyers: Kikuzuki, Yuzuki(2) Minelayers: Koei Maru, Okinoshima(1) Transport: Tama Maru
UNITED STATES ORDER OF BATTLE
Task Group 17.5 (Fletcher and Fitch)(2) Aircraft Carriers: Lexington, Yorktown (with 42 VF, 74 VB, 25 VT)(5) Heavy Cruisers: Astoria, Chester, Minneapolis, New Orleans, Portland
(9) Destroyers: Anderson, Aylwin, Dewey, Farragut, Hammann, Phelps,Monaghan, Morris, Russell
Task Group 17.3 (Crace)(3) Heavy Cruisers: Australia (RAN), Chicago, Hobart (RAN), (2) Destroyers: Perkins, Walke
Task Group 17.6 (Phillips)(2) Oilers: Neosho, Tippecanoe(2) Destroyers: Sims, Worden
Task Group 17.9 (Debaun)(1) Seaplane Tender: Tangier
On the morning of May 7th, search planes from the Japanese carrier force spottedthe fleet oiler Neosho and destroyer Sims. Mistaking the Neosho for an aircraftcarrier, the Japanese launched an all-out strike. The destroyer was sunk immediatelyafter suffering three bomb hits. The oiler was crippled and finally sunk four days laterby friendly ships.
While Takagi’s planes were engaged, however, search planes from the Americancarriers located Goto’s Close Support Force, which included the light carrier Shoho.Thinking they had found the main Japanese carrier force, the two U.S. carrierslaunched a combined strike consisting of ninety-three (93) aircraft. By the timeFletcher discovered his mistake, it was too late. Still, his aircraft attacked and sank theShoho, now only ninety miles north of the American carriers. The sailors aboard theships of Task Force 17 went wild when over the radio came the cry, “Scratch oneFlattop!” The Shoho was gone, giving the Americans their first taste of victory.
1942 PAW manual 2 57-81 8/15/97 11:08 AM Page 63

64
The next day battle was rejoined in earnest.With the sinking of the Shoho, each side nowpossessed two carriers. Overnight, the twoopposing carrier groups had closed to within 200miles of each other – a mere stone’s throw. Bysunrise, search planes from the both groups hadalready found the enemy. The stage was set.
Both sides exchanged strikes on May 8th. TheAmerican planes found the Japanese carriers andattacked first. The strike actually consisted of lessaircraft than had attacked the Shoho the daybefore (39 from the Yorktown, 43 fromLexington). This time the aircraft were destined torun into much heavier opposition. The Zuikakuprotected itself by sailing into a rain squall. Thisleft the Shokaku, about eight miles away, toreceive the full weight of the attack. When it wasover, the Shokaku had suffered several bomb hits,knocking it out of action.
The strike had arrived too late, however. TheJapanese had already launched a strike of theirown, made up of a mix of torpedo and divebombers. Though fewer in number than theAmerican strike (about seventy aircraft), theJapanese crews were experienced, most of themwith over 700 hours of combat flight time.
Arriving over the American fleet, the Japanesestrike broke into well-rehearsed attack formations.The Lexington was hit by two bombs and twotorpedoes, which started fires below deck, forcingher evacuation. The destroyer Phelps was eventually called in to sink the “Lady Lex”.The Yorktown was also hit but the damage was not as severe. A single bomb hadpenetrated its flight deck, but flight operations were unaffected.
After the mutual strikes on May 8th, both sides retired from the field. Accordingto the numbers, Coral Sea was a Japanese victory. They had traded the Shoho (a lightcarrier) for the Lexington and damage to a second carrier. True, both the Zuikaku andShokaku would be out of action for several months (the “Zui” while replacing flightcrews, the “Sho” while repairing damage), but the Americans had lost one of their
A U.S. destroyer with serious damage
1942 PAW manual 2 57-81 8/15/97 11:08 AM Page 64
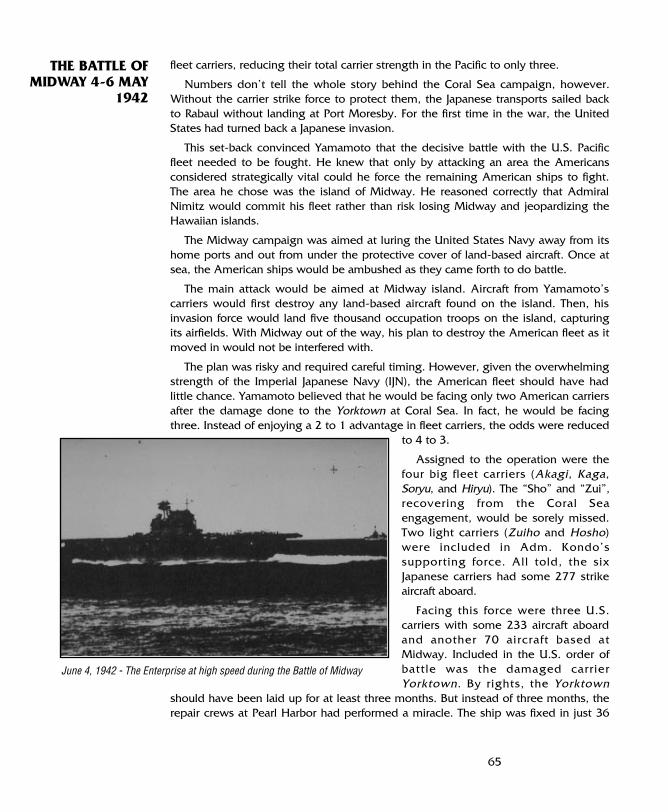
65
fleet carriers, reducing their total carrier strength in the Pacific to only three.
Numbers don’t tell the whole story behind the Coral Sea campaign, however.Without the carrier strike force to protect them, the Japanese transports sailed backto Rabaul without landing at Port Moresby. For the first time in the war, the UnitedStates had turned back a Japanese invasion.
This set-back convinced Yamamoto that the decisive battle with the U.S. Pacificfleet needed to be fought. He knew that only by attacking an area the Americansconsidered strategically vital could he force the remaining American ships to fight.The area he chose was the island of Midway. He reasoned correctly that AdmiralNimitz would commit his fleet rather than risk losing Midway and jeopardizing theHawaiian islands.
The Midway campaign was aimed at luring the United States Navy away from itshome ports and out from under the protective cover of land-based aircraft. Once atsea, the American ships would be ambushed as they came forth to do battle.
The main attack would be aimed at Midway island. Aircraft from Yamamoto’scarriers would first destroy any land-based aircraft found on the island. Then, hisinvasion force would land five thousand occupation troops on the island, capturingits airfields. With Midway out of the way, his plan to destroy the American fleet as itmoved in would not be interfered with.
The plan was risky and required careful timing. However, given the overwhelmingstrength of the Imperial Japanese Navy (IJN), the American fleet should have hadlittle chance. Yamamoto believed that he would be facing only two American carriersafter the damage done to the Yorktown at Coral Sea. In fact, he would be facingthree. Instead of enjoying a 2 to 1 advantage in fleet carriers, the odds were reduced
to 4 to 3.
Assigned to the operation were thefour big fleet carriers (Akagi, Kaga,Soryu, and Hiryu). The “Sho” and “Zui”,recovering from the Coral Seaengagement, would be sorely missed.Two light carriers (Zuiho and Hosho)were included in Adm. Kondo’ssupporting force. All told, the sixJapanese carriers had some 277 strikeaircraft aboard.
Facing this force were three U.S.carriers with some 233 aircraft aboardand another 70 aircraft based atMidway. Included in the U.S. order ofbattle was the damaged carrierYorktown. By rights, the Yorktown
should have been laid up for at least three months. But instead of three months, therepair crews at Pearl Harbor had performed a miracle. The ship was fixed in just 36
THE BATTLE OFMIDWAY 4-6 MAY
1942
June 4, 1942 - The Enterprise at high speed during the Battle of Midway
1942 PAW manual 2 57-81 8/15/97 11:09 AM Page 65

66
hours, in time to put to sea with the others.
Aside from this unexpected addition to its order of battle, the United StatesNavy had another, even more important, ace in the hole. American navalofficers were well informed of the Japanese plans, because U.S. intelligenceanalysts had long since cracked the Japanese naval codes. Only one out ofevery ten words was actually being decoded and translated, but this wasenough to discern Yamamoto’s intentions.
Rear Admiral Raymond Spruance replaced Vice-Admiral Halsey (who hadbeen hospitalized with a skin disease after Coral Sea) as commander of TaskForce 16. Spruance, a former cruiser skipper with no prior experience atcommanding aircraft carriers, would exercise ultimate tactical authority over theAmerican fleet.
JAPANESE ORDER OF BATTLE
First Mobile Force, Carrier Strike Force (Nagumo)(4) Aircraft Carriers: Akagi, Hiryu, Kaga, Soryu (with 93 VF, 85 VB, 93 VT)(2) Battleships: Haruna, Kirishima(2) Heavy Cruisers: Chikuma, Tone(1) Light Cruiser: Nagara(12) Destroyers: Arashi, Akigumo, Hagikaze, Hamakaze, Isokaze, Kazagumo,
Maikaze, Makigumo, Nowaki, Tanikaze, Urakaze, Yugumo
First Fleet, Main Body (Yamamoto)(1) Light Carrier: Hosho (with 8 VT)(3) Battleships: Nagato, Mutsu, Yamato(1) Light Cruiser: Sendai(9) Destroyers: Ayanami, Fubuki, Hatsuyuki, Isonami, Murakumo, Shikinami,
Shirayuki, Uranami, Yukaze
Second Fleet, Main Body (Kondo)(1) Light Carrier: Zuiho (with 12 VF, 11 VB)(2) Battleships: Hiei, Kongo(4) Heavy Cruisers: Atago, Chokai, Haguro, Myoko, (1) Light Cruiser: Yura(8) Destroyers: Asagumo, Harusame, Mikazuki, Minegumo, Murasame,
Natsugumo, Samidare, Yudachi(4) Fleet Oilers
Second Fleet, Escort Force (Tanaka)(1) Light Cruiser: Jintsu(11) Destroyers: Amatsukaze, Arare, Hatsukaze, Kagero, Kasumi, Kuroshio,
1942 PAW manual 2 57-81 8/15/97 11:09 AM Page 66

67
Oyashio, Tokitsukaze, Shiranuhi, Yukikaze, (15) Transport ships with 5,000 troops
Second Fleet, Occupation Support Force (Kurita)(2) Seaplane Tenders: Chitose, Kamikawa Maru (4) Heavy Cruisers: Kumano, Mogami, Mikuma, Suzuya(3) Destroyers: Arashio, Asashio, Hayashio
Special Duty Force(2) Seaplane Tenders: Chiyoda, Nisshin
First Supply Force(1) Destroyer: Ariake(2) Freighters
UNITED STATES ORDER OF BATTLE
Task Force 16.5 (Spruance)(2) Aircraft Carriers: Enterprise, Hornet (with 54 VF, 77 VB, 29 VT)(5) Heavy Cruisers: New Orleans, Minneapolis, Northampton, Pensacola,
Vicennes(1) AA Light Cruiser: Atlanta
Task Group 16.4 (Early)(11) Destroyers: Aylwin, Balch, Benham, Conyngham, Dewey, Ellet, Phelps,
Maury, Monaghan, Monssen, Worden
1942 PAW manual 2 57-81 8/15/97 11:09 AM Page 67

68
Task Force 17 (Fletcher)(1) Aircraft Carrier: Yorktown (with 25 VF, 37 VB, 13 VT)
Task Group 17.2 (Smith)(2) Heavy Cruisers: Astoria, Portland
Task Group 17.4 (Hoover)(6) Destroyers: Anderson, Gwin, Hammann, Hughes, Morris, Russell
Fleet Train (Thurber)(2) Destroyers: Blue, Ralph Talbot(1) Fleet Oiler
French Frigate Shoal Force(1) Destroyer: ClarkAccording to the operational plan, Adm. Nagumo opened the campaign with an
airstrike against Midway. The attack inflicted some damage, but the need for a follow-up strike was immediately recognized. The situation posed somewhat of a tacticaldilemma for Nagumo. Should he order a second attack on Midway or arm his planeswith torpedoes for use against any American ships that might be in the area? Nowdown to 167 operable aircraft, Nagumodecided to attack Midway a secondtime.
While rearming for a second strike,Nagumo’s carriers were spotted byAmerican search planes. Within an hourof this sighting, the Enterprise andHornet had launched an airstrike.Spruance hoped to catch the Japanesecarriers with their guard down, whilethe bulk of their air cover was attackingMidway. Although losses were highamong the attacking aircraft, the strikecaught the decks of the Japanesecarriers full of gas and bombs. It wasdevastating.
In the space of five minutes, three ofYamamoto’s four carriers were ablaze.Only the Hiryu managed to escape this attack by ducking into a rain squall.Secondary explosions aboard the Akagi, Kaga, and Soryu turned them into flaming,sinking wrecks. The odds had been shifted dramatically in favor of the Americans,but the battle was not yet over. The undamaged Hiryu proceeded to launch an attackwhich claimed the Yorktown.
With three Japanese carriers on the way to the bottom, all attention was turned tothe lone Hiryu. In contrast to the great aerial armada that had been assembled to
A damaged Yorktown, listing badly
1942 PAW manual 2 57-81 8/15/97 11:09 AM Page 68

69
deal with Midway only hours before, less than twenty aircraft remained. To fend offfurther American raids, the Hiryu had a mere six Zeros.
Nagumo did not have long to wait. Shortly after he transferred his flag aboard, theHiryu was attacked by dive bombers from the Hornet and Enterprise. After takingfour bomb hits in quick succession, the Hiryu exploded into flames. The last ofNagumo’s carriers was sent to join the others at the bottom of the Pacific. Yamamotonow had no real choice but to order a general withdrawal, otherwise his surfaceships would be at the mercy of American air power.
Midway had turned out to be the decisive naval engagement of the war. Losseshad been inflicted on Japan’s navy that its industrial base could not make good. Fromnow until the end of the war, Japan would assume a defensive posture. Whereas thebattle of the Coral Sea had halted their advance, Midway turned it back.
Guadalcanal sits at the southeastern end of the Solomon Islands archipelago. In1942, the island became the focal point of the whole Pacific war. It was the placewhere Japan had decided to build an airbase, to resume their advance in the SouthPacific. It was also the place where the United States decided to begin rolling backthe Japanese advance.
On August 7, the 1st Marine Division invaded Guadalcanal and captured thepartially completely airbase. After chasing off the few Japanese on the island, theLeathernecks settled in to defend the airstrip they named “Henderson Field”. Most ofthe prisoners taken by the Marines turned out to be Korean laborers working tocomplete the airstrip.
The ease of the initial landing was deceptive. Guadalcanal would not be taken formany more months. The Solomons campaign lasted from August of ‘42 throughFebruary of ‘43. It was one of the toughest, most prolonged contests of the Pacificwar, not only on land but at sea as well.
The fighting on land required a steady stream of reinforcements and supplies.Without domination of the surrounding seas, this stream could be cut at any time,isolating the troops ashore. From August 1942 on, both sides sought to control thesituation at sea. Seven major sea battles were fought during this time, two of thesebattles – the Eastern Solomons engagement and the battle of Santa Cruz – involvedaircraft carriers.
The Battle of the Eastern Solomons began on August 23rd, 1942, just two weeksafter the initial Marine landing. As he had tried to do at Midway, Admiral Yamamotowas determined to lure the American carriers into a decisive engagement anddestroy them. He assigned the destruction of the American carriers to the ThirdFleet’s Carrier Strike Force, commanded by Admiral Nagumo.
A secondary concern was the Marine beachhead on Guadalcanal and the land-based aircraft that would eventually make their way to Henderson Field. It was clearthat the entire campaign would be influenced by whichever side held the tinyairstrip. Accordingly, Yamamoto planned to send reinforcements to the island whilehis carriers kept the Americans busy. Once Henderson Field was in Japanese hands,the Marines on the island would “whither and die on the vine”.
THE BATTLEOF THE
EASTERNSOLOMONS:
24-25AUGUST
1942
1942 PAW manual 2 57-81 8/15/97 11:09 AM Page 69

70
The light carrier Ryujo was assigned to Rear Admiral Chuichi Hara’s DetachedCarrier Strike Force. It was Hara’s job to suppress the American air forces onHenderson Field and support the Japanese landings. In retrospect, it is possible thatYamamoto was using the Ryujo as bait to lure the American carriers out to battle(just as the Shoho had unintentionally done at Coral Sea).
Admiral Nimitz was well aware that the Japanese were committing the bulk oftheir Combined Fleet to battle in the Solomons. On August 23rd, Adm. Fletcher’sships were lying off the eastern end of Guadalcanal, sending out scouts in hopes of
locating the Japanese carriers.
Thinking he had plenty of time before the Japanese force arrived in the area,Fletcher detached the Wasp south to refuel. This move left him with only theEnterprise and Saratoga to oppose the three Japanese carriers. Actually, theJapanese carriers were much closer than he thought.
A PBY (search plane) on reconnaissance patrol from Ndeni Island reportedspotting the Japanese light carrier Ryujo. Fletcher believed the report to be false.Later, a second PBY spotted the Ryujo again. Fletcher could not ignore thissecond sighting and ordered an attack.
The first wave of dive bombers failed to score a hit, but a group of TBFAvengers damaged the Ryujo’s rudder with a torpedo. A second group of divebombers pounded the now helpless carrier with four 1,000 lb. bombs, settingher ablaze. The Ryujo sank four hours later. Not a single American plane waslost in the attack.
JAPANESE ORDER OF BATTLE
Combined Fleet (Yamamoto)Third Fleet, Carrier Strike Force (Nagumo)
(2) Aircraft Carriers: Shokaku, Zuikaku (with 53 VF, 41 VB, 36 VT)(6) Destroyers: Akigumo, Akizuki, Hatsukaze, Kazagumo, Makigumo,
Yugumo
Third Fleet, Detached Carrier Strike Force (Hara)(1) Light Carrier: Ryujo (with 16 VF, 21 VT)(1) Heavy Cruiser: Tone(2) Destroyers: Amatsukaze, Tokitsukaze
Second Fleet, Support Force (Abe)Vanguard Force, Close Support
(2) Battleships: Hiei, Kirishima(3) Heavy Cruisers: Chikuma, Kumano, Suzuya (1) Light Cruiser: Nagara(3) Destroyers: Maikaze, Nowaki, Tanikaze
1942 PAW manual 2 57-81 8/15/97 11:09 AM Page 70
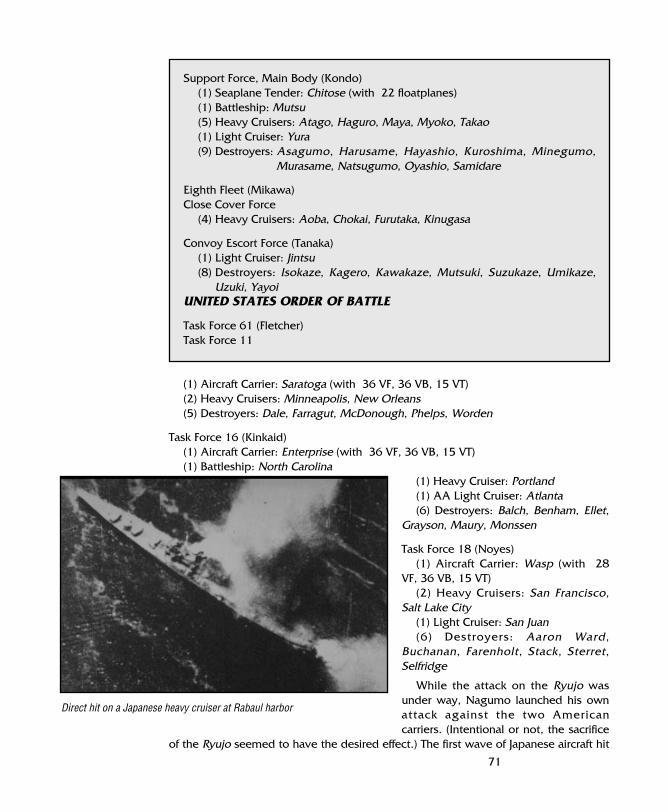
71
Support Force, Main Body (Kondo) (1) Seaplane Tender: Chitose (with 22 floatplanes)(1) Battleship: Mutsu(5) Heavy Cruisers: Atago, Haguro, Maya, Myoko, Takao(1) Light Cruiser: Yura(9) Destroyers: Asagumo, Harusame, Hayashio, Kuroshima, Minegumo,
Murasame, Natsugumo, Oyashio, Samidare
Eighth Fleet (Mikawa)Close Cover Force
(4) Heavy Cruisers: Aoba, Chokai, Furutaka, Kinugasa
Convoy Escort Force (Tanaka)(1) Light Cruiser: Jintsu(8) Destroyers: Isokaze, Kagero, Kawakaze, Mutsuki, Suzukaze, Umikaze,
Uzuki, YayoiUNITED STATES ORDER OF BATTLE
Task Force 61 (Fletcher)Task Force 11
(1) Aircraft Carrier: Saratoga (with 36 VF, 36 VB, 15 VT)(2) Heavy Cruisers: Minneapolis, New Orleans(5) Destroyers: Dale, Farragut, McDonough, Phelps, Worden
Task Force 16 (Kinkaid)(1) Aircraft Carrier: Enterprise (with 36 VF, 36 VB, 15 VT)(1) Battleship: North Carolina
(1) Heavy Cruiser: Portland(1) AA Light Cruiser: Atlanta(6) Destroyers: Balch, Benham, Ellet,
Grayson, Maury, Monssen
Task Force 18 (Noyes)(1) Aircraft Carrier: Wasp (with 28
VF, 36 VB, 15 VT)(2) Heavy Cruisers: San Francisco,
Salt Lake City(1) Light Cruiser: San Juan(6) Destroyers: Aaron Ward,
Buchanan, Farenholt, Stack, Sterret,Selfridge
While the attack on the Ryujo wasunder way, Nagumo launched his ownattack against the two Americancarriers. (Intentional or not, the sacrifice
of the Ryujo seemed to have the desired effect.) The first wave of Japanese aircraft hit
Direct hit on a Japanese heavy cruiser at Rabaul harbor
1942 PAW manual 2 57-81 8/15/97 11:09 AM Page 71

72
the Enterprise with three bombs, causing heavy damage. Although the Enterprisewas on fire, it still maintained hull integrity and was in little danger of sinking.Aircraft from the stricken carrier flew to Guadalcanal to bolster the air defenses there.
In the last major carrier action of the day, two American dive bombers spottedand bombed the Japanese seaplane carrier Chitose. Although they never actually hitthe ship, the near-misses set the planes on deck afire and damaged the engineroom. The Chitose started to list badly. Only quick thinking on the part of her Captainsaved the ship from sinking.
The next day, American aircraft attacked three Japanese troop transports as theymade a daylight run for Guadalcanal. Tanaka’s flagship, the light cruiser Jintsu andone of the transports were damaged. Tanaka was forced to withdraw withoutlanding any reinforcements. The battle was over.
The battle of the Eastern Solomons was a clear tactical victory for the Americans.The Japanese had failed to achieve either one of their two primary objectives. TheAmerican carriers had not been eliminated, and Henderson Field still belonged to the1st Marine Division.
At sea, the Enterprise had been damaged, but only twenty aircraft had been lost.The Japanese, on the other hand, had lost a light carrier and close to 90 planes.Carrier odds that had started out overwhelmingly in Japan’s favor were continuing toeven out after each battle.
On the homefront in both United States and Japan, Guadalcanal came to have asymbolic importance far greater than its real tactical value. Neither side was willingto give an inch; both fed reinforcements into this lengthy battle of attrition.
Yamamoto’s dream of victory following a single great naval clash had long sincepassed. His strategy now was simply to make the American counter-offensive in theSouth Pacific as expensive as possible. Even so, he was willing to commit his navalforces one more time in an effort to retake Guadalcanal. The result was the battle ofSanta Cruz.
THE BATTLEOF SANTACRUZ: 25-27OCTOBER1942
1942 PAW manual 2 57-81 8/15/97 11:09 AM Page 72

73
Yamamoto divided his forces just as he had before, but this time he placedhis non-carrier forces in the lead. His carrier force was kept behind, where theycould launch strikes with relative impunity. He hoped that the American carrierswould expend their energy attacking his leading ships and open themselves toa “Midway-type” riposte.
The plan was reminiscent of one Yamamoto had used earlier during thebattle of the Eastern Solomons. While the carriers dueled, his transport shipsand destroyers would sneak into Iron Bottom Sound and land reinforcementson Guadalcanal. Henderson Field would be put out of commission by navalbombardment and then captured in a land battle. Once the field was inJapanese hands, aircraft from Rabaul would be rushed to Henderson. The key tomaking this plan work was keeping the American carriers at bay.
JAPANESE ORDER OF BATTLE
Combined Fleet (Yamamoto)Third Fleet, Carrier Strike Force (Nagumo)
(2) Aircraft Carriers: Shokaku, Zuikaku (with 45 VF, 47 VB, 41 VT)(1) Light Carrier: Zuiho (with 18 VF, 6 VT)(1) Heavy Cruiser: Kumano(8) Destroyers: Amatsukaze, Arashi, Hatsukaze, Maikaze, Teruzuki,
Tokitsukaze, Yamakaze, Yukikaze
Second Fleet, Advance Force (Kondo)(4) Heavy Cruisers: Atago, Maya, Myoko, Takao(1) Light Cruiser: Isuzu(6) Destroyers: Kawakaze, Makinami, Naganami, Suzukaze, Takanami,
Umikaze
Second Fleet, Close Support Force (Kurita)(2) Battleships: Haruna, Kongo(6) Destroyers: Harusame, Kagero, Murasame, Oyashiro, Samidare, Yudachi
Second Fleet, Vanguard Force (Abe)(2) Battleships: Hiei, Kirishima(3) Heavy Cruisers: Chikuma, Suzuya, Tone(1) Light Cruiser: Nagara(8) Destroyers: Akigumo, Isokaze, Kazagumo, Makigumo, Tanikaze, Teruzuki,
Urakaze, Yugumo
Second Fleet, Air Group Force (Kakuta)(1) Light Carrier: Junyo (with 24 VF, 21 VB, 10 VT)(2) Destroyers: Hayashio, Kuroshio
Support Train(1) Destroyer: Nowaki
1942 PAW manual 2 57-81 8/15/97 11:09 AM Page 73
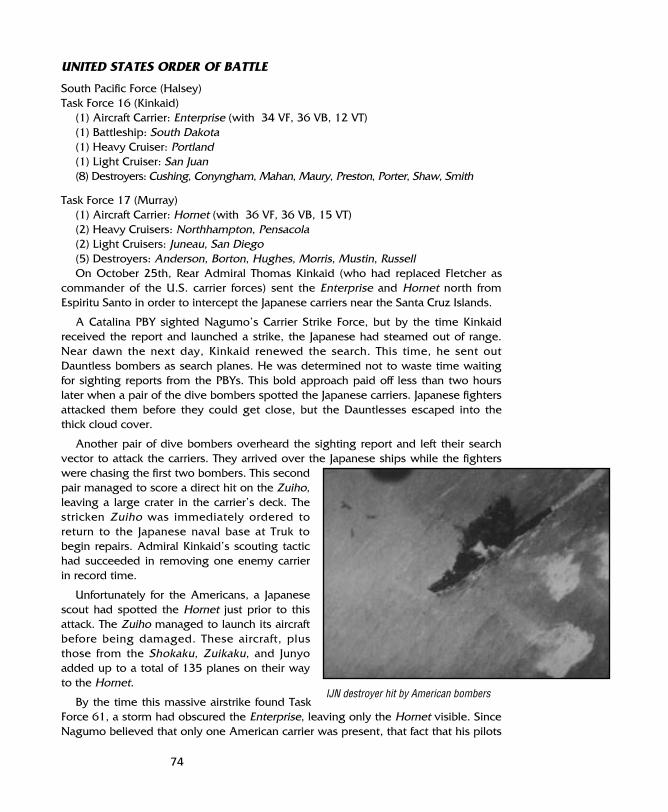
74
UNITED STATES ORDER OF BATTLE
South Pacific Force (Halsey)Task Force 16 (Kinkaid)
(1) Aircraft Carrier: Enterprise (with 34 VF, 36 VB, 12 VT)(1) Battleship: South Dakota(1) Heavy Cruiser: Portland(1) Light Cruiser: San Juan(8) Destroyers: Cushing, Conyngham, Mahan, Maury, Preston, Porter, Shaw, Smith
Task Force 17 (Murray)(1) Aircraft Carrier: Hornet (with 36 VF, 36 VB, 15 VT)(2) Heavy Cruisers: Northhampton, Pensacola(2) Light Cruisers: Juneau, San Diego(5) Destroyers: Anderson, Borton, Hughes, Morris, Mustin, RussellOn October 25th, Rear Admiral Thomas Kinkaid (who had replaced Fletcher as
commander of the U.S. carrier forces) sent the Enterprise and Hornet north fromEspiritu Santo in order to intercept the Japanese carriers near the Santa Cruz Islands.
A Catalina PBY sighted Nagumo’s Carrier Strike Force, but by the time Kinkaidreceived the report and launched a strike, the Japanese had steamed out of range.Near dawn the next day, Kinkaid renewed the search. This time, he sent outDauntless bombers as search planes. He was determined not to waste time waitingfor sighting reports from the PBYs. This bold approach paid off less than two hourslater when a pair of the dive bombers spotted the Japanese carriers. Japanese fightersattacked them before they could get close, but the Dauntlesses escaped into thethick cloud cover.
Another pair of dive bombers overheard the sighting report and left their searchvector to attack the carriers. They arrived over the Japanese ships while the fighterswere chasing the first two bombers. This secondpair managed to score a direct hit on the Zuiho,leaving a large crater in the carrier’s deck. Thestricken Zuiho was immediately ordered toreturn to the Japanese naval base at Truk tobegin repairs. Admiral Kinkaid’s scouting tactichad succeeded in removing one enemy carrierin record time.
Unfortunately for the Americans, a Japanesescout had spotted the Hornet just prior to thisattack. The Zuiho managed to launch its aircraftbefore being damaged. These aircraft, plusthose from the Shokaku, Zuikaku, and Junyoadded up to a total of 135 planes on their wayto the Hornet.
By the time this massive airstrike found TaskForce 61, a storm had obscured the Enterprise, leaving only the Hornet visible. SinceNagumo believed that only one American carrier was present, that fact that his pilots
IJN destroyer hit by American bombers
1942 PAW manual 2 57-81 8/15/97 11:09 AM Page 74

75
only spotted the Hornet confirmed his belief.
For ten minutes, the Hornet took everything that the massive air strike could dishout. It was hit twice by torpedoes, leaving it dead in the water. Four bombs also hitthe carrier, but the most damaging blow came from a Japanese pilot who deliberatelycrashed his crippled aircraft into the ship. The Hornet lay wrecked and abandoned.Although Japanese strikes continued to pound the ship for several more hours, theHornet did not finally sink until the next day.
When a break in the clouds revealed the Enterprise, many of the attacking planeschanged targets. Fortunately for the “Big E”, all of the torpedoes fired at the carriermissed. Two bombs, however, hit the forward flight deck causing the ship to havedifficulties conducting air operations. The Enterprise sent its aircraft to Espiritu Santoand left the battle.
Both American carriers were out of the way at a cost of only twenty-five aircraft.Yamamoto’s plan was on the verge of success. The Japanese were now free to dealwith Henderson Field and the Marines on Guadalcanal. Only one final hurdleremained. The American carriers had launched a strike of their own.
The American strike was not only weaker than the Japanese attack, it wasuncoordinated and due to arrive piecemeal over the Japanese carriers. Even so, elevenof the Hornet’s Dauntless dive bombers found the Shokaku and scored 4 hits. The rest ofthe American planes failed to find the Japanese carriers and went on to other targets.
Now that the Shokaku and Zuiho were stricken, Nagumo had only the Zuikakuand Junyo to continue the attack. Far more costly, however, was the loss of over 100Japanese planes so far in this campaign. Japan could ill afford this drain ofexperienced pilots and front-line aircraft. Production simply could not meet theincreasing demand.
For this reason, Yamamoto decided to withdraw his carrier force along with theirfew remaining pilots. Had he pressed the attack, there’s a real possibility that theEnterprise would have been sunk, removing the last operational American carrierfrom the Pacific. As it was, Japanese pilots had done more than should have beenexpected. They had sunk one carrier and forced the withdrawal of another. In doingso, they made it possible for thousands of troops and tons of supplies to disembarkon Guadalcanal.
The battle of Santa Cruz was a clear tactical victory for the Japanese, their firstcarrier vs. carrier win. It was a Phyrric victory, however, in light of the increasingAmerican material superiority. The losses suffered in trained pilots and aircraft wouldultimately affect the course of war.
At Santa Cruz, the United States came very close to losing both Guadalcanal andits only aircraft carriers in the Pacific. Although reinforcements would soon maketheir way to the South Pacific, for the moment the Marines on Guadalcanal were atthe mercy of the Japanese. Fortunately, the Japanese were equally exhausted.
The 1942 time frame was deliberately chosen by the designers of this simulationbecause at that time in the Pacific war, both sides were still evenly matched. In fact,
75
THE BATTLEOF THE
PHILIPPINESEA 19-21JUNE 1944
1942 PAW manual 2 57-81 8/15/97 11:09 AM Page 75
76
if one was to be honest, the Japanese held a slight qualitative advantage. Theiraircraft, especially fighters, were technically superior to those in the U.S. inventory.
It could also be argued that, man for man, Japanese pilots were better trained thantheir American counterparts. After all, Japan had been at war with China for years. Allthis practical experience gave them many more hours in the cockpit than the averagepilot trainee in the U.S.
By 1944, the preponderance of American naval and air strength made an ultimateJapanese victory in the war highly unlikely. The two big advantages the Japanese heldin 1942 – better pilots and better aircraft – were gone. The pool of trained Japanesepilots, which had never been very large to begin with, had been expended atMidway and Santa Cruz. The Zero, which had been such a factor in the early years,had been surpassed by the latest generation of U.S. fighters, like the new F4u Corsairand the Hellcat.
This scenario has been included despite the fact that it occurs two years after theothers. The air engagement which took place during this battle was the largest of theentire war. For eight straight hours, Japanese and American aircraft were locked in acontest for control of the sky. This being the case, no flight game on the Pacific airwar would be considered complete without simulating this battle.
For all you players who, as American pilots, are tired of getting pushed around byZeros, this scenario allows you to fly the Corsair and do some pushing of your own.For those of you who like a challenge, this scenario allows you to pit youroutnumbered, but trusty, old Zero against the best the Americans can throw at you.
In June of 1944, the Japanese faced American advances on two fronts. MacArthur’sforces were preparing to invade the Philippines, and in the Central Pacific, Nimitz’sforces were moving on the Marianas Islands. Admiral Soemu Toyoda, who would bethe last CinC of the Japanese Combined Fleet, argued against taking up a strictlydefensive stance. He sought to bring about the decisive battle as Yamamoto hadtried to do for several years.
When the U.S. invaded Saipan, one of the Marianas Islands, Toyoda’s hand wasforced. If Saipan fell, enemy long-range bombers based on Saipan would be able tolaunch raids against the Japanese home islands. This was a threat that Toyoda couldnot ignore. In this respect, the invasion of Saipan was a “Midway in reverse.” TheUnited States Navy had lured the Japanese out to fight by attacking an islandstrategically important to their defense line.
76
1942 PAW manual 2 57-81 8/15/97 11:09 AM Page 76

77
The Japanese plan of battle, code named A-GO, required at least 500 land-based aircraft, primarily because of the superiority of the American aircraftcarriers. Vice-Admiral Jisaburo Ozawa was to command the First Mobile Fleet inthe Marianas. His strategy was to soften up the American naval forces by firstattacking with land-based air strikes from Guam, Tinian, Saipan, and Yap.Ozawa’s carriers would then move in and finish off the survivors whileremaining out of range of American aircraft.
In the eighteen months since the big carrier battles in 1942, the Japanesenavy had done its best to rebuild and recover. Many new aircraft-carrying shipswere either purpose-built or converted from other hulls. The shortage of trainedpilots was still haunting their war effort, however. Losses continued to outpaceproduction. For this battle, Ozawa scrapped together every last pilot he couldfind. All told, the Japanese carrier force could launch over 400 aircraft, thoughmany would be flown by only partially trained pilots.
JAPANESE ORDER OF BATTLE
Mobile Force, Vanguard (Ozawa)(3) Light Carriers: Chitose, Chiyoda, Zuiho (with 62 VF, 9 VB, 17 VT)(4) Battleships: Haruna, Kongo, Musashi, Yamato(7) Heavy Cruisers: Atago, Chikuma, Chokai, Kumano, Maya, Takao, Tone(1) Light Cruiser: Noshiro(7) Destroyers: Asashimo, Fujinami, Hamakaze, Kishinami, Okinami,
Shimakaze, Tamanami
“A” Force(3) Heavy Carriers: Shokaku, Taiho, Zuikaku (with 79 VF, 77 VB, 51 VT)(2) Heavy Cruisers: Haguro, Myoko(1) Light Cruiser: Yahagi(7) Destroyers: Akizuki, Asagumo, Isokaze, Hatsuyuki, Shimotsuki, Urakaze,
1942 PAW manual 2 57-81 8/15/97 11:09 AM Page 77

78
Wakatsuki
“B” Force (Joshima)(2) Converted Carriers: Hiyo, Junyo (with 81 VF, 36 VB, 18 VT)(1) Light Carrier: Ryuho(1) Battleship: Nagato(1) Heavy Cruiser: Mogami(8) Destroyers: Akishimo, Hayashio, Hamakaze, Michishio, Nowaki,
Samidare, Shigure, Yamagumo
1st Supply Force(4) Destroyers: Hatsushimo, Hibiki, Tsuga, Yunagi(4) Fleet Oilers
2nd Supply Force(2) Destroyers: Uzuki, Yukikaze(2) Fleet Oilers
UNITED STATES ORDER OF BATTLE
Fifth Fleet (Spruance)Task Force 58 (Mitscher)Task Group 58.1 (Clark)
(2) Aircraft Carriers: Hornet, Yorktown (with 85 VF, 77 VB, 35 VT)(2) Light Carriers: Bataan, Belleau Wood (with 50 VF, 19 VT)(3) Heavy Cruisers: Baltimore, Boston, Canberra(2) AA Light Cruisers: Oakland, San Juan (14) Destroyers: Bell, Boyd, Bradford, Brown, Burns, Charrette, Conner,
Cowell, Craven, Gridley, Helm, Izard, Maury, McCall
Task Group 58.2 (Montgomery)(2) Aircraft Carriers: Bunker Hill, Wasp (with 79 VF, 35 VB, 36 VT)(2) Light Carriers: Cabot, Monterey (with 45 VF, 17 VT)(3) Light Cruisers: Sante Fe, Mobile, Biloxi(12) Destroyers: Dewey, Hickox, Hull, Hunt, Lewis Hancock, Owen, Miller,
Stephen Potter, The Sullivans, Tingley, Macdonough,Marshall
Task Group 58.3 (Reeves)(2) Aircraft Carriers: Enterprise, Lexington (with 75 VF, 55 VB, 32 VT)(2) Light Carriers: San Jacinto, Princeton (with 48 VF, 17 VT)(4) Heavy Cruisers: Indianapolis, Cleveland, Montpelier, Birmingham(1) AA Light Cruiser: Reno(13) Destroyers: Anthony, Braine, Bronson, Caperton, Cogswell, Cotten,
Dortch, Gatling, Healy, Ingersoll, Knapp, Terry, Wadsworth
1942 PAW manual 2 57-81 8/15/97 11:09 AM Page 78

79
Task Group 58.4 (Harrill)(1) Aircraft Carrier: Essex (with 42 VF, 36 VB, 20 VT)(2) Light Carriers: Cowpens, Langley (with 46 VF, 18 VT)(1) Heavy Cruiser: Vincennes(1) AA Light Cruiser: San Diego
(2) Light Cruisers: Houston, Miami(14) Destroyers: Ausburne, Case, Converse, Dyson, Ellet, Lang, Lansdowne,
Lardner, McCalla, Spence, Stanly, Sterret, Thatcher, Wilson
Task Group 58.7 (Lee)Battleline
(7) Battleships: Alabama, Indiana, Iowa, New Jersey, North Carolina, South Dakota,Washington
(4) Heavy Cruisers: Minneapolis, NewOrleans, San Francisco, Wichita
(14) Destroyers: Bagley, Bennett,Conyngham, Fullam,Halford, Hudson,Monssen, Mugford,Patterson, Quest,Selfridge, Stockham,Twinning, Yarnall
COMPARISON OF AVAILABLEAIRCRAFT
Fighters Dive BombTorp Bomb Total
Japan 222 11395 430
United States 475 232 184 891
Lying in wait for the Japanese response was the U.S. Fifth Fleet’s massive TaskForce 58, commanded by Vice-Admiral Marc Mitscher. Mitscher’s four task groupsnumbered seven heavy carriers, including some of the new Essex class (the BunkerHill, Enterprise, Essex, Hornet, and the new Wasp, Yorktown, and Lexington) andeight light carriers (Belleau Wood, Bataan, Monterey, Cabot, San Jacinto, Princeton,Langley, and Cowpens). Taken together, these ships could launch almost 900 aircraft.
The Japanese plan to utilize land-based aircraft was stillborn. Between June 15thand 19th, Task Force 58 raided the Japanese airbases on Iwo Jima, Chichi Jima, Guam,and Rota. On Guam and Rota, the airfields were rendered completely useless, sorather than the 500 land-based aircraft needed for A-GO, the Japanese were left withonly 50.
The plan had assumed that land-based aircraft would destroy at least a third of the
IJN transports and cruiser under attack by U.S. bombers
1942 PAW manual 2 57-81 8/15/97 11:09 AM Page 79

80
American carrier fleet before Ozawa’sMobile Force arrived. Now, Ozawa wouldhave to face the full complement of theFifth Fleet’s carriers. Despite the fact thatAmerican carrier aircraft dominated theskies over the Marianas, the plan wentforward.
As the Japanese fleet left thePhilippines to challenge the U.S. FifthFleet, American subs found it andreported its general position. Adm.Spruance knew that the Japanese weremounting a major operation againsthim, so he decided to hold his forces tothe west of Guam. Althoughsubmarines had located the on-comingJapanese ships, scout planes from theAmerican carriers failed to find them. Japanese scout planes, however, found theAmerican carriers.
Ozawa launched his first airstrike, unaware that the 500 plane land-based forcehad been decimated. As this strike proceeded toward Task Force 58, planes from theAmerican carriers were attacking Guam. Unfortunately for Ozawa, his airstrike wasdetected on radar, a relatively new invention. This gave Spruance time to recall hisattacking aircraft. Spruance also positioned a picket line of battleships, cruisers, anddestroyers that the Japanese planes would have to cross in order to get to the U.S.carriers. Fighters and anti-aircraft fire from these ships knocked down 42 out of the69 planes. Not a single aircraft reached the American carriers.
The second Japanese strike of the morning ran into the same resistance as itspredecessor. Only 20 planes made it past the picket defense line, and none scoredany hits. Only two aircraft from the strikes made their way to Guam. The plannedattack on the U.S. carriers, which was supposed to take place after they had rearmedon Guam, clearly would not take place.
The Bunker Hill, screened by destroyers, after a kamikaze attack
1942 PAW manual 2 57-81 8/15/97 11:09 AM Page 80
81
Throughout the battle, Ozawa remained in the dark about the losses suffered byhis strike groups. Vice-Admiral Kakuji Kakuta, commander of the land-based aircontingent, was feeding Ozawa false reports. He assured Ozawa that his aircraft hadinflicted heavy damage on the American task force. Ozawa therefore ordered a thirdstrike. This wave of 47 planes avoided the picket line of anti-aircraft ships but gotlost in the process and was forced to return.
A fourth strike was ordered, 82 planes in all, but these aircraft fared no better. Ofthese, 33 planes found the southernmost of the American task groups (58.2) andwere all shot down for their trouble. The others failed to find the American carriersand headed for Guam. Thirty of these were shot down before they reached theisland, leaving the final 19 Japanese planes to discover that American bombers haddestroyed the airfield at which they were supposed to land.
Just after noon, the U.S. submarine Cavalla hit the fleet carrier Shokaku with threetorpedoes. Several hours later, the “Sho” rolled over and sank. Twenty minutes later,the Taijo also received a torpedo hit from the submarine Albacore and suddenlyblew up. In both cases, ignition of the fumes from the unrefined fuel oil was themajor factor in the demise of the carrier. Mitscher had not yet launched a single airstrike against the Japanese carriers, yet Ozawa had already lost two of his fleetcarriers.
Ozawa remained unaware of the true situation. Though he in fact had barely 100planes still airworthy, he continued to believe that the day was his. Kakuta reportedthat many Japanese planes were safely on Guam and that reinforcements were onthe way. These false reports, coupled with other incorrect ones stating that fourAmerican carriers had been sunk, convinced Ozawa to regroup his forces andcontinue the attack the next day. In reality, his forces had already suffered a decisivedefeat. The Americans had lost only 29 planes, while they had destroyed a total of346 Japanese aircraft.
Late in the afternoon of the next day, June 20, Spruance’s search planes finallylocated Ozawa’s Mobile Force. Mitscher ordered a full airstrike of 216 planes, eventhough it was already late in the day. The returning American aircraft would beforced to attempt difficult night landings. Over half of the U.S. planes, 130 aircraft inall, were lost, but the damage to the Japanese fleet was absolutely devastating.
Because of the famous “dusk raid”, the light carrier Hiyo was sunk; the lightcarriers Junyo and Chiyoda were heavily damaged. The fleet carrier Zuikaku, last ofthe Pearl Harbor raiders, continued to lead a charmed existence. Although damaged,it remained afloat.
More than half of the remaining Japanese aircraft were destroyed, leaving only 35planes in Ozawa’s entire fleet. The battle of the Philippine Sea would forever beknown among American pilots as the “Great Marinas Turkey Shoot”. The longsought-after great naval battle of the war had finally occurred. Unfortunately for theJapanese, it had come two years too late. By 1944, the industrial might of the UnitedStates had built a carrier force many times that of Japan’s.
1942 PAW manual 2 57-81 8/15/97 11:09 AM Page 81

T H E PAC I F I C A I R W A R
The 1942 The Pacific Air War scenario supports most of the available flightadd-on hardware. We have provided a configuration file for the WCS Mark II(1942paw.adv). Consult your Thrustmaster documentation for instructions onusing this configuration file. If you have a problem using a particular devicewith the game, please contact MicroProse Customer Support for assistance.
COMPATIBILITY ISSUESPlease note that this list includes only the known conflicts and
incompatibilities. Since no test procedure can ever be totally comprehensive,you may run into undiscovered problems. Please consult with CustomerService if you do.
This game has not been tested under Microsoft Windows; therefore wesuggest you do not use it with Windows. Chances are very good that the twowill not work together. If you desire to use a mouse with this game, the mousedriver must be compatible with the 8.20a version of the Microsoft Driver.
We strongly recommend that you not have any Terminate-and-Stay-Resident programs (TSRs) other than memory managers loaded into memorywhen playing the 1942 The Pacific Air War scenario. Not only will theydecrease the amount of free memory available, thus slowing the game, butthere may be unpredictable interactions.
TECHNICAL SUPPLEMENT
1942 PAW Scenario Tech Supp 8/14/97 5:04 PM Page i

If you experience keyboard response problems using a Tandy computer, thea status of the keyboard may be reversed. That is, pressing A results in theaA and vice-versa. To fix this problem, tap on the a key until the statusreturns to normal. We apologize for the inconvenience, but there seems to besomething unique to the Tandy keyboard BIOS that causes this problem.
In some Packard Bell, Gateways, and PS\1 computers, there may be aconflict between the standard MicroProse boot disk application and somememory configurations. If you experience a lock up while using a boot diskmade by the 1942 installation program, you’ll need to change one line in theconfig.sys file on the boot disk, thus:
device=c:\dos\emm386.exe ramx=b0000-c400 /d=48 frame =e000 6800should be:
device=c:\dos\emm386.exe 2048 ramfor DOS version 5.0, and
device=c:\dos\emm386.exe ram highscanfor any version higher than that.
If your hard drive is “doublespaced” and you experience problems using a bootdisk, please add the following line to the end of the config.sys file on the boot disk:
devicehigh= c:\dos\dblspace.sys /move
If you are using any other kind of disk compression software, refer to thatmanual for questions on boot disk creation.
FEATURES UPDATESome of the following are changes that originated in the 1942 The Pacific
Air War update, all of which are also included with the scenario. Since manyof you may not have acquired the update, the new features are described hereas well. The rest are new to the Scenario.
NEW CAREERSAdded into the Scenario are the two careers American Army Airforce and
Japanese Army Airforce. To choose either one of these careers, click on the PilotCareer button in the Main Menu. There, you can now select either AmericanNavy, American Army Airforce, Japanese Navy, and Japanese Army Airforce.
DitchingTo successfully ditch your plane in the ocean, you must hit the water at an
extremely slow speed. The best bet is to stall below 50 feet. For career andscoring purposes, a ditch will be treated exactly as a bail-out. The chances ofbeing rescued, captured, or killed are the same.
1942 PAW Scenario Tech Supp 8/14/97 5:04 PM Page ii

Cruising AltitudesWhen a strike flies to a target, there is always a lead flight that everyone else
follows. For mutual fire support reasons, the flights in a strike stay close to eachother until they reach their target. Because of this, you may only adjust thecruising altitude of the lead flight. All other flights will automatically adjust theircruising altitudes to match.
The Padlock FeatureThe “Padlock” view is only available when you’re in Virtual Cockpit mode.
To activate the Padlock feature, you must first choose an enemy to “lock” (justas in reality). Swivel your head around until you can see the enemy. PressingJ will lock the Padlock View onto whatever aircraft is nearest the center ofyour view. Now, whenever you press Button #2, your virtual view will centeron the locked plane. As long as you hold the button, the view will move tokeep the locked plane centered.
Carrier Battle 3-D EngagementIf you abort your piloting in an engagement that is part of a Carrier Battle
game before the mission is completed, the computer will finish the attack asthough you had selected to observe the engagement. Keep in mind that, dueto limitations to the number of planes that can be represented in 3-D, damagefrom large strikes will be a combination of the damage done in 3-D anddamage calculated statistically. Your performance in 3-D, however, will have alimited effect on the outcome of the statistical damage.
Japanese RadiosThis is not a bugæthe Japanese pilots in this game do not receive radio
messages, as the Americans do, because the Japanese pilots do not carry largeand bulky radios in their planes. However, this does not effect the messagesthat are sent while in Modem Play. This in no way states that Japanese pilotsdid not actually carry radios in their planes during the War.
Scuttling ShipsIn a Carrier Battle, when a severely damaged ship slows a Task Group down
to a degree that is dangerous to the remaining ships, you should scuttle thatship. This was not an uncommon practice during the war, and was usedprimarily to prevent the enemy from capturing the ship. You can scuttle shipsusing the Damaged Ships option in the Task Group menu.
Engine TorqueAs is noted in the original manual for 1942, all planes have a slight engine
torque to the left. It is possible to remove the torque so that the planes beingflown are more controllable.
1942 PAW Scenario Tech Supp 8/14/97 5:04 PM Page iii
SpinsWhen a plane stalls or when it begins to fall, it starts to spin. It is possible to
get out of a spin but it is very difficult. Check the Pilot’s Handbook in theoriginal 1942 game for more information.
Speed and ElevationWhile in a dive, it becomes harder for a plane to pull out of the dive as the
speed of the plane goes up. This represents the wind resistance on theelevators which are the primary tool that is used to elevate the plane. To offsetthis resistance, pull the throttle back before you enter the dive.
1942 PAW Scenario Tech Supp 8/14/97 5:04 PM Page iv
®
S I M U L A T I O N
INSTRUCTION MANUAL
SC
EN
AR
IO
T H E PAC I F I C A I R W A R
1942 PAW Scenario manual cover 8/14/97 4:45 PM Page 1
1942 THE PACIFIC AIR WAR SCENARIO
i
T H E PAC I F I C A I R W A R
MICROPROSE SOFTWARE
All rights reserved. Copyright©1994 MicroProse Software.
This book may not be reproduced in part or in whole, by mimeogram or photocopy or other means without permission, with the exception of
quoting brief passages for the purpose of review.
1942 PAW Scenario manual 8/14/97 4:37 PM Page i
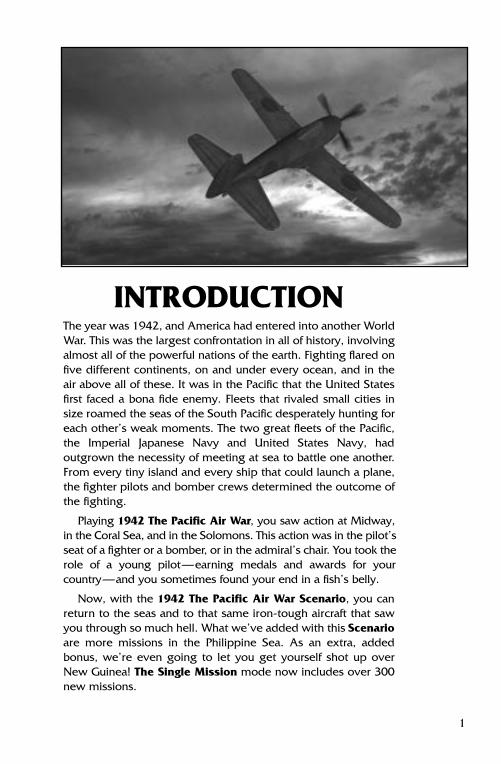
1
INTRODUCTIONThe year was 1942, and America had entered into another WorldWar. This was the largest confrontation in all of history, involvingalmost all of the powerful nations of the earth. Fighting flared onfive different continents, on and under every ocean, and in theair above all of these. It was in the Pacific that the United Statesfirst faced a bona fide enemy. Fleets that rivaled small cities insize roamed the seas of the South Pacific desperately hunting foreach other’s weak moments. The two great fleets of the Pacific,the Imperial Japanese Navy and United States Navy, hadoutgrown the necessity of meeting at sea to battle one another.From every tiny island and every ship that could launch a plane,the fighter pilots and bomber crews determined the outcome ofthe fighting.
Playing 1942 The Pacific Air War, you saw action at Midway,in the Coral Sea, and in the Solomons. This action was in the pilot’sseat of a fighter or a bomber, or in the admiral’s chair. You took therole of a young pilot—earning medals and awards for your country—and you sometimes found your end in a fish’s belly.
Now, with the 1942 The Pacific Air War Scenario, you canreturn to the seas and to that same iron-tough aircraft that sawyou through so much hell. What we’ve added with this Scenarioare more missions in the Philippine Sea. As an extra, addedbonus, we’re even going to let you get yourself shot up overNew Guinea! The Single Mission mode now includes over 300new missions.
1942 PAW Scenario manual 8/14/97 4:37 PM Page 1
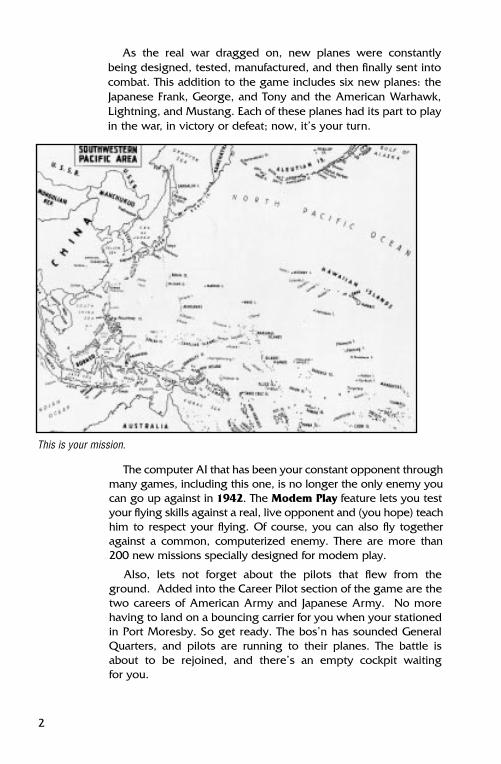
The computer AI that has been your constant opponent throughmany games, including this one, is no longer the only enemy youcan go up against in 1942. The Modem Play feature lets you testyour flying skills against a real, live opponent and (you hope) teachhim to respect your flying. Of course, you can also fly togetheragainst a common, computerized enemy. There are more than200 new missions specially designed for modem play.
Also, lets not forget about the pilots that flew from theground. Added into the Career Pilot section of the game are thetwo careers of American Army and Japanese Army. No morehaving to land on a bouncing carrier for you when your stationedin Port Moresby. So get ready. The bos’n has sounded GeneralQuarters, and pilots are running to their planes. The battle isabout to be rejoined, and there’s an empty cockpit waiting for you.
2
As the real war dragged on, new planes were constantlybeing designed, tested, manufactured, and then finally sent intocombat. This addition to the game includes six new planes: theJapanese Frank, George, and Tony and the American Warhawk,Lightning, and Mustang. Each of these planes had its part to playin the war, in victory or defeat; now, it’s your turn.
This is your mission.
1942 PAW Scenario manual 8/14/97 4:37 PM Page 2

3
The more you know, the less often you’ll“take a bath”. That’s as true now as it wasthen, so we’ve provided a littlebackground—a little additional history
that’s relevant to this scenario. The scope of this manual is,unfortunately, limited. You’ll find a lot more detail in thehistory books, and we’d like to encourage you to do just that.
CHENNAULT’S FLYING TIGERSTwo weeks after the bombing of Pearl Harbor, a squadron that
had named itself the “Flying Tigers” encountered and destroyedmost of a Japanese bomber squadron. It wasn’t over the PacificOcean, and it wasn’t over one of the tiny islands like Midway orTruk where most of the fighting in the Pacific Theater took place.It was in the skies over a place much closer to Japanese soil: China.
HISTORICALBACKGROUND
Up and away!
To understand how this encounter came about, we must startseveral years before the United States declared war on Japan andall of her allies. Japan had invaded China in the early nineteen-thirties, in an attempt to form something the Emperor called theGreater East Asia Co-Prosperity Sphere. It was Japan’s statedgoal to capture by conquest or by treaty all of the eastern Asiancountries, to gain access to their natural resources—resourcesthat, even then, Japan either did not have or had depleted fromits own lands. The Emperor wanted materials such as oil for themilitary and mineral ores to build weapons—to build weaponsthat Japan could use to expand even further.
1942 PAW Scenario manual 8/14/97 4:37 PM Page 3

4
The United States had been helping the Chinese prepare adefense against the advancing Japanese armies. Several militaryadvisors had been sent to develop a proper Chinese Air Force, aswell as to train several units of Chinese infantry. The year was1932 when Colonel John H. Jouett and nine other American pilotscame to China to build a training school for combat pilots. Theyalso had to arrange for the purchase of several modernwarplanes, for at that time the Chinese Air Force was made up offighters that were little more than decaying remnants of the firstWorld War. Not unexpectedly, the Japanese were not pleasedwith the American interference in there plans.
Zeroes sometimes don’t make it.
Using diplomatic and political pressures, Japan forcedAmerica to remove its soldiers from China in 1934. With theAmericans out of the picture, the leader of China, Chiang Kai-shek, looked to other nations for the men and machines that hewould need to fight off the coming Japanese offensive. Hefound that the Russians and Italians were more than happy tohelp his cause—for a price—and soon most of the planes thatColonel Jouett had arranged for had been shot down.Understanding that help from the United States would be crucialto any effective defense against the Japanese, Madame ChiangKai-shek hired three pilots. These former U.S. Army Air Corpsstunt fliers were to act as instructors for the Chinese Air Force.
1942 PAW Scenario manual 8/14/97 4:37 PM Page 4
5
The leader of this small group was Claire Lee Chennault,famed writer of The Role of Defensive Pursuit. Chennault wasdismayed at the ineptitude of China’s fighter pilots. Eleven of thetwenty-two planes that remained from 1932 had been destroyedin landing attempts, and all of the Martin bombers had been lostin similar accidents. In order to protect the rest of the planesfrom Japanese attacks, Chennault organized an early warningsystem of lookout stations. Stations across China were linked byradio to each other and Chennault’s headquarters.
With the experienced Chennault running the show, thebattered Chinese Air Force earned its first air victory in thesummer of 1937. Chinese pilots engaged and destroyed a groupof Japanese bombers that were attacking the city of Nanking. Inthe end, though, Chennault knew, the availability of resupplywould determine the outcome of the war. When the Nazi forcesinvaded Russian 1941, one route of supply was destroyed. TheRussians had problems of their own to deal with and could notspare anything for the Chinese effort. The Japanese, in turn,already controlled the eastern seaports of China. This left only oneother path for supplies to reach Chennault: Rangoon, Burma. Thislast line of resupply was quite dangerous, even without theattacks by the Japanese. The infamous Burma Road, a swerving,seven-hundred-mile roller coaster route through mountainousterrain, was the easiest route. The frequent Japanese bombingsdidn’t do the road any good, not to mention the supply vehiclesand their drivers. A defense for this supply line was badly needed.
Touchdown.
1942 PAW Scenario manual 8/14/97 4:37 PM Page 5

6
In the Spring of 1941, Chennault returned to the United Statesto ask for better planes and experienced pilots to protect hisresupply line for China. After speaking with President Roosevelt,who was at that time learning of the danger that the Japaneseposed to the Pacific, Chennault received a hundred P-40’s—Warhawks—planes that had been turned down by Sweden. TheP-40 was considered obsolete. In addition, Chennault was givenpermission to visit various Army and Navy bases and try topersuade troops to volunteer for the effort in China. The cannycommander’s photos of sunny beaches, tennis courts, andresort-like conditions persuaded many a military and civilian manto volunteer for such a duty.
Ninety pilots from the Navy and the Marines joined upbetween the months of May and July of 1941. Chennault alsorecruited one hundred and fifty ground crewmen and other non-flying personnel. Late that July, the first contingent of theAmerican Volunteer Group left for Burma in relative secrecy. Itwas not until September that the AVG arrived at Rangoon,Burma. When the young pilots left the train that picked them upfrom the port, they felt ill at ease—there was neither countryclub nor golf course, and Rangoon wasn’t exactly a tropicalparadise. What there was was excessive heat, stultifyinghumidity, vicious insects, and a lot of hard work.
Chennault was also somewhat surprised at the extent of workthat needed to be done at Rangoon in order to shake it into aproper military base. He said of what he found there, “Therunway was surrounded by quagmire and pestilential jungle.Matted masses of rotting vegetation carpeted the jungle andfilled the air with a sour, sickening smell.” Five resignations werehanded to him before he had even gotten his training sessionsunder way.
1942 PAW Scenario manual 8/14/97 4:37 PM Page 6
7
During the intensive training, Chennault taught his pilots allabout the Zero. He showed them how it had been designed toout-maneuver most fighters. He also showed them its everyweakness—chief among them that it lacked self-sealing fueltanks and that the pilot had no armor to protect himself. In thesame sessions, he would praise the obsolete P-40, though he didnot particularly like the plane. He wound on about theTomakawk’s ruggedness and its ability to outdive a Zero in adogfight. He taught unorthodox fighting styles, making out theromantic chivalry of battle in the skies for exactly what it hadbecome after the First World War—foolishness. He showed hispilots how to use the speed of the P-40 for scathing hit-and-runtactics on highly maneuverable planes like the Mitsubishi Zero.Also, he taught his pilots to fight in pairs, how one plane, acting as a target, could allow his partner to destroy thepreoccupied enemy.
The British and the Chinese found his teaching styles to bedishonorable. The British promised a swift court martial for anypilot that even considered running away from a fight, and it wasunderstood that the Chinese would simply execute such acoward. Although such talk led to a few more pilot resignations,Chennault proved to his pilots that they could defeat theJapanese with their P-40’s if they used them properly.
During training, men died and equipment failed. Since therewere no spare parts, salvageable material was taken from wrecksand reused in those planes that could be fixed. Finding replace-ments for the men, however, proved to be a nearly impossibletask. Considering these problems, the United States military didnot believe that Chennault and his AVG could be ready beforeFebruary of 1942. They also were not convinced that his forcecould last more than two weeks against the vastly outnumberingJapanese force.
1942 PAW Scenario manual 8/14/97 4:37 PM Page 7
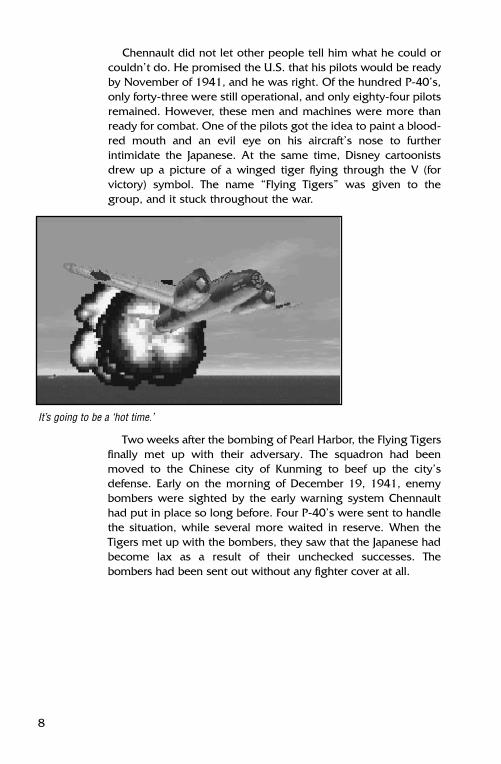
Two weeks after the bombing of Pearl Harbor, the Flying Tigersfinally met up with their adversary. The squadron had beenmoved to the Chinese city of Kunming to beef up the city’sdefense. Early on the morning of December 19, 1941, enemybombers were sighted by the early warning system Chennaulthad put in place so long before. Four P-40’s were sent to handlethe situation, while several more waited in reserve. When theTigers met up with the bombers, they saw that the Japanese hadbecome lax as a result of their unchecked successes. Thebombers had been sent out without any fighter cover at all.
8
Chennault did not let other people tell him what he could orcouldn’t do. He promised the U.S. that his pilots would be readyby November of 1941, and he was right. Of the hundred P-40’s,only forty-three were still operational, and only eighty-four pilotsremained. However, these men and machines were more thanready for combat. One of the pilots got the idea to paint a blood-red mouth and an evil eye on his aircraft’s nose to furtherintimidate the Japanese. At the same time, Disney cartoonistsdrew up a picture of a winged tiger flying through the V (forvictory) symbol. The name “Flying Tigers” was given to thegroup, and it stuck throughout the war.
It’s going to be a ‘hot time.’
1942 PAW Scenario manual 8/14/97 4:37 PM Page 8
9
One of the pilots in that first attack, Fritz E. Wolf, reported onthe events of that day. “Attacked the outside bomber of the vee.Diving down below him, I came up underneath, guns ready forthe minute I could get in range. At 500 yards I let go with a quickburst from all my guns. I could see my bullets rip into the reargunner. My plane bore in closer. At 100 yards I let go with aburst into the bomber’s gas tanks and engine. A wing folded,and a motor tore loose. Then the bomber exploded. I yankedback on the stick to get out of the way and went upstairs.”When one bomber fell out of the Japanese formation, anothermoved into its place. The Japanese flew in a mechanical waythat led to them losing six of their bombers while onlyshooting down one Tiger. Chennault had been proven rightonce again
The Tigers met with the Japanese again on December 23rd,when the Empire returned to bomb their base in Rangoon. Thistime, with the aid of the British and their lumbering Buffalofighters, the Flying Tigers went up to meet with the fabled Zero.Many of the British fell victim to the attacks of the fastmaneuvering Zero, but only four P-40’s were lost in theconfrontation. A total of six bombers and four Zeroes were lostby the Japanese, and most of those had been shot down by therugged P-40’s.
Their victory was, as is too often the case, incomplete. The cityhad been heavily bombed, and the death toll ran high. TheBurmese felt the sting of war, a great loss of morale, and beganto harbor serious reservations about the British and Chinese whowere supposedly fighting for them. Two days later, on ChristmasDay, the Japanese returned in force to finish the job. There wasno advance warning, for the warning system had been severelydamaged by previous Japanese attacks. The total attacking forceincluded over a hundred fighters and bombers. The Tigers, assoon as they heard of the incoming attack, sent twenty-sixplanes up to stop the oncoming juggernaut.
Of the one-hundred Japanese planes that had been sent tobomb Rangoon again, thirteen bombers and ten fighters weredestroyed. Only two Tigers were lost. As further demonstration ofthe incredible sturdiness of the P-40, one of the Tigers’ pilots whohad jammed all of his guns rammed one of the Zeroes. He thenreturned home—and landed safely—having lost only about fourfeet of wing material. The Japanese decided to change tactics.
1942 PAW Scenario manual 8/14/97 4:37 PM Page 9
10
This small force that had destroyed so many Japanese planeswas to be decoyed. On their first attack of the New Year, fifteenFlying Tigers and British Buffaloes did not return from theirattempt to fend off about sixty Japanese fighters and bombers.The Japanese trap was the only time that the Japanese were ableto destroy a significant number of P-40’s. It was a continuingtestament to Chennault’s versatility as a trainer.
Although they were graceful and cool under fire in the air, themembers of the Flying Tigers lived an unenviable life on theground. Often, they were attacked by illness and ravaged byhunger. Many members of the AVG swore that when their timewas up, they would leave the country and never return. It wasobvious to them that their air victories got only minor notice,even though they had won almost every battle that they wereinvolved in. Parts and supplies received were often alreadybroken and defective. Engines would smoke in their first test run,and machine guns would misfire and jam.
It was under these conditions that the men that made up theFighting Tigers went up in the air day after day after day, fightinga battle that no one seemed to care about. History has proventhat in the military aspect, the trials and tribulations of thesefighting men really did not add up to much when compared withthe war as a whole. If you look at what they did and what theywent through, though, you cannot be anything but be amazed.
Between December 18, 1941 and July 4, 1942, the squadrondubbed the Fighting Tigers accounted for over 286 confirmedJapanese kills, although the true total may be much higher (manyshot down planes were lost in the ocean or in the vast junglesthat make up southern China). The total cost to the AVG was ninepilots and less than fifty P-40s. Through their successes, theUnited States saw that the experienced Japanese fighters couldbe defeated and that their aura of invulnerability was but afacade. Through them as men, we can see that anyone can makea difference if only they try hard enough.
1942 PAW Scenario manual 8/14/97 4:37 PM Page 10
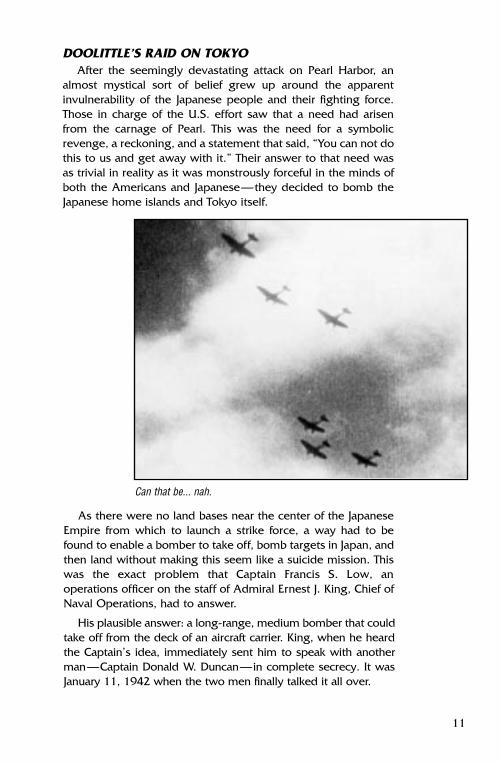
11
DOOLITTLE’S RAID ON TOKYOAfter the seemingly devastating attack on Pearl Harbor, an
almost mystical sort of belief grew up around the apparentinvulnerability of the Japanese people and their fighting force.Those in charge of the U.S. effort saw that a need had arisenfrom the carnage of Pearl. This was the need for a symbolicrevenge, a reckoning, and a statement that said, “You can not dothis to us and get away with it.” Their answer to that need wasas trivial in reality as it was monstrously forceful in the minds ofboth the Americans and Japanese—they decided to bomb theJapanese home islands and Tokyo itself.
As there were no land bases near the center of the JapaneseEmpire from which to launch a strike force, a way had to befound to enable a bomber to take off, bomb targets in Japan, andthen land without making this seem like a suicide mission. Thiswas the exact problem that Captain Francis S. Low, anoperations officer on the staff of Admiral Ernest J. King, Chief ofNaval Operations, had to answer.
His plausible answer: a long-range, medium bomber that couldtake off from the deck of an aircraft carrier. King, when he heardthe Captain’s idea, immediately sent him to speak with anotherman—Captain Donald W. Duncan—in complete secrecy. It wasJanuary 11, 1942 when the two men finally talked it all over.
Can that be... nah.
1942 PAW Scenario manual 8/14/97 4:37 PM Page 11
12
At the time, there was no medium bomber that could fit thebill. All of the existing bombers needed a much longer runwayfrom which to take off, plus they did not have an arrestor hookto help them land on the short deck of a carrier. Low and Duncancame up with the idea that a bomber might be able to take offfrom a deck, perform its mission, then land on another runwaysomewhere inland. It might just work—if they could only find abomber small enough and yet powerful enough to do the job.
On January 17, both men went to see General Henry H.Arnold, Commanding General of the Army Air Forces, abouttheir idea. The general was thrilled with the idea, and assignedan AAF man to begin training pilots and modifying existingbombers. That man was James H. Doolittle. Doolittle had alreadybroken several speed records and had won several awards foraerobatics. He also had been the first man to land his plane usingonly the instruments in his cockpit (a common, though stilldangerous, practice today). Doolittle drew on his considerableexpertise and decided that the best plane for this particularmission was the Mitchell B-25 medium bomber. With someslight modifications, he believed that this bomber could besuccessfully launched from an aircraft carrier.
Ten targets had been selected for the B-25 attacks. The citiesincluded Tokyo, Yokohama, Kobe, and Nagoya. In order to provethat bombers could be launched from an aircraft carrier, two B-25shad been hoisted aboard the carrier Hornet and launched into theair. Most of the aircrews had no idea how or why such a thingwould be necessary; such was the complete secrecy thatprevailed over the mission. Once it was proven that it could bedone, Duncan wired General Arnold to tell, “Johnny to get on hishorse”. This was the code giving Doolittle the go-ahead toprepare his crew for the attack.
1942 PAW Scenario manual 8/14/97 4:37 PM Page 12

13
As soon as Doolittle had been assigned the mission, he hadimmediately begun to select the crews that would go. Onlypilots with plenty of experience with the operations of a B-25would be chosen for the mission, since only those withexperience would have any chance of completing it. Even withall this expertise, the modified versions of the bomber proved tobe difficult to work with. First off, the tail and belly guns wereremoved in order to provide space for the necessary extra fueltanks that would allow them to fly over Japan and then landsomewhere in China or Russia. Next, the heavy radio equipmentwas removed; there would be complete radio silence once themission had begun. Finally, the new and totally secret Nordenbombsight was removed. If a bomber was shot down, thetechnology would not be confiscated from the wreckage.
To recapitulate, the new B-25 had no communications gear,only a twin .50 caliber machine gun turret on top and a single.30 caliber gun in its nose, and a twenty-cent bombsight thatwas put together with a few pieces of metal found lying around.(As a side note, the sight proved quite effective in the raid overTokyo.) Add to that the fact that the plane was going to beoverloaded with both bombs and fuel and that the runway wasgoing to be less than one tenth the normal length, and you’llunderstand why the air crews had a lot of training to get inbefore they left for the mission.
Even though the only thing anyone knew about the missionwas that it was very hazardous and therefore very important,volunteers came in droves. At the last, twenty-four crews werepicked and then sent to Englin Field, Florida, to begin theirtraining. One of their first lessons would be how to take off in anextremely short space. After many weeks of training, they all wereable to pull the B-25s into the air fast enough to scrape the backof the tail wheel. They practiced bombing runs by flying the B-25sas close as possible to surrounding houses and telephone lines.
1942 PAW Scenario manual 8/14/97 4:37 PM Page 13
14
During the time of training, Doolittle had one overridingfear—that he would not be allowed to join in the actual mission.Around mid-March, he went to speak with General Arnold tosee if he could see this thing through to the end. Using what helater called his “sales pitch”, he got permission to fly the leadbomber of the squadron. On March 23, twenty-two planes leftEnglin Field for Sacramento, California, for some last minutechecks and then for their transfer onto the Hornet, the carrierassigned to the task force.
Sixteen of the bombers were transferred with the othersstaying stateside for training purposes. As soon as the carrierforce was under way, Doolittle was able to let all those onboard in on the secret. “This force is bound for Tokyo,” was allhe had to say. Instantly, a cheer rumbled throughout the carrierand her task force. Vengeance was at hand.
While discussing targets, Doolittle decided against bombingthe Emperor’s “Temple of Heaven”. Only military targets such asindustrial centers, oil factories, and power stations were selectedfor this attack. Everyone involved knew that the damage would,at best, be light, but the strike to the morale of the Japanesepeople could lead them to pressure for an early cease-fire. Eachplane was to carry a bomb load of four 500-pound bombs—three being demolition and one for the incendiary work. It wasstressed again and again that the residential districts and theEmperor’s palace were not to be touched.
The last problem that they needed to confront was where theywere going to land. The only two likely places were China andRussia. Russia, however, was still at peace with the Japaneseforces and would not be pleased by this encouragement of aretaliatory strike by the Japanese. China was also not verycooperative. Due to personality conflicts, the leaders of theChinese government felt they had been intentionally left out ofthe planning for this secret mission. They had.
1942 PAW Scenario manual 8/14/97 4:37 PM Page 14

At 8:00, three full hours ahead of schedule, the message forthe B-25s to launch was sent. One after another pulled off theflight deck, with Doolittle out in front. Only the last plane hadany difficulty taking off, and it got airborne slightly less than anhour behind the first B-25. The Nitto Maru, three other patrolboats, and three American aircraft were sacrificed to keep thetake-off a secret.
15
The “First Special Aviation Project” was hidden from theChinese for a simple reason; anything that the Chinese knewabout, the Japanese found out about a short time later. China wasan intelligence sieve, and was also uncooperative because they,too, feared reprisals. Though it is less widely known, the horrorsthat the Japanese had already inflicted on the captive Chinesepeople equalled in proportion to the European Holocaust. In all,more than nine million people were killed, and whole townswere being used as test targets for chemical weapons; theChinese did not want to know how much worse it could get. Asfar as Doolittle knew, he was going to land in a country that didnot want him, but he had no other choice.
Early on the morning of April 19th, the carrier group soundedGeneral Quarters. Men scrambled to fighters, and those of theFirst Special Aviation Project had begun to suit up for take-offwhen the All Clear sounded—false alarm. Two hours later, ascouting SBD sighted a Japanese patrol craft coming toward thetask force. The SBD quickly hid inside a cloud bank, but it was toolate. At 7:30 AM, the Japanese patrol boat Nitto Maru reportedin saying, “Three enemy aircraft carriers sighted out position 650nautical miles east of Inubo Saki at 0630.”
Talk about a traffic jam...
1942 PAW Scenario manual 8/14/97 4:37 PM Page 15

16
Doolittle wrote about the attack in one of his later reports.“Took off at 8:20 AM ship time. Take-off was easy. Night take-offwould have been possible and practicable....Was somewhatnorth of desired course but decided to take advantage of errorand approach from a northerly direction, thus avoidinganticipated strong opposition to the west....Encountered ninefighters in three flights of three...was not spotted...dropped firstbomb 1:30...Anti-aircraft very active, but only one near hit.”Further on, he wrote, “Passed on out to sea flying low. Was soonjoined by Hoover who followed us to the Chinese coast... Sawthree large naval vessels just before passing west end ofJapan...Decided to abandon ship (over China)... left airplaneabout 9:30 AM after 13 hours in air.”
The mission had been completed, though all but one of theplucky B-25s had been destroyed. Three of the aircraft had beenshot down while over Japan. Their crews were subsequentlytortured, and the pilots were put to death. Through propaganda,Radio Tokyo called the attack a “Do Nothing Raid”; thatstatement could not have been farther from the truth. TheDoolittle Raid proved to the Japanese people that they were nolonger fighting a war of offense only, that now they were fightingagainst an enemy who could and would bomb their towns andcities. Even despite all of the propaganda used by the Japaneseto call the raid a “coward’s act” and minimize the effects, theattack had accomplished what its planners had hoped it would.The effect on the people of Japan was so great that it influencedAdmiral Yamamoto—he decided to push for a similar all-outattack on an island important to his enemy. That island wasMidway, where many believe Japan lost the war for the Pacific.
1942 PAW Scenario manual 8/14/97 4:37 PM Page 16

THE NEW COCKPITSOn the following pages are identification diagrams and
important information concerning the new enemy aircraft and allof the new planes you might end up piloting. The AmericanArmed Forces’ official designation names have been includedfor ease of reference.
As with the information provided on the original planes, ourexperienced combat and test pilots have written down a few oftheir thoughts on each plane. Where these were printable, theyare included at the end of the statistics list.
17
P-40 Cockpit.
1942 PAW Scenario manual 8/14/97 4:37 PM Page 17
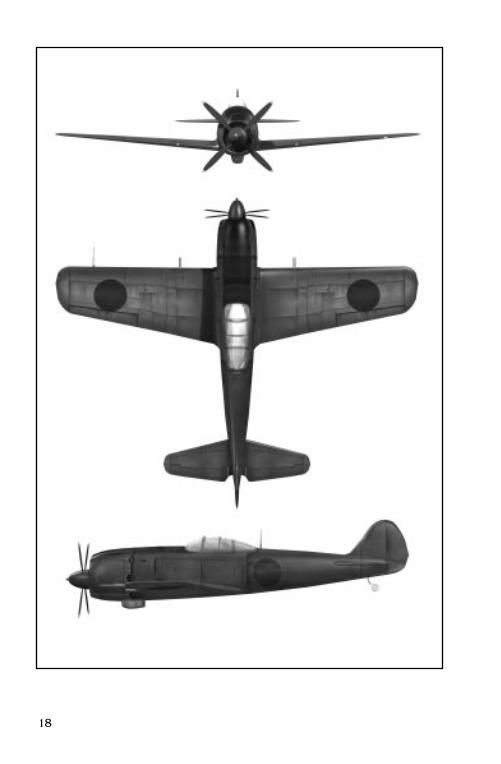
18
1942 PAW Scenario manual 8/14/97 4:37 PM Page 18
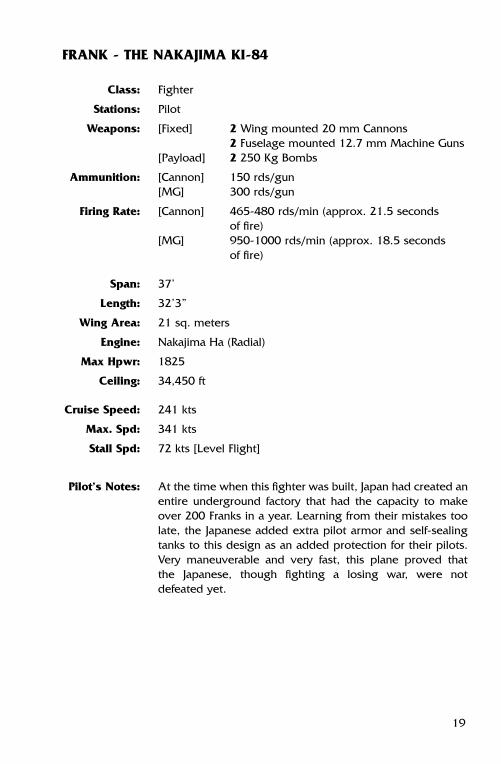
FRANK - THE NAKAJIMA KI-84
Class: Fighter
Stations: Pilot
Weapons: [Fixed] 2 Wing mounted 20 mm Cannons2 Fuselage mounted 12.7 mm Machine Guns
[Payload] 2 250 Kg Bombs
Ammunition: [Cannon] 150 rds/gun[MG] 300 rds/gun
Firing Rate: [Cannon] 465-480 rds/min (approx. 21.5 seconds of fire)
[MG] 950-1000 rds/min (approx. 18.5 seconds of fire)
Span: 37’
Length: 32’3”
Wing Area: 21 sq. meters
Engine: Nakajima Ha (Radial)
Max Hpwr: 1825
Ceiling: 34,450 ft
Cruise Speed: 241 kts
Max. Spd: 341 kts
Stall Spd: 72 kts [Level Flight]
Pilot’s Notes: At the time when this fighter was built, Japan had created anentire underground factory that had the capacity to makeover 200 Franks in a year. Learning from their mistakes toolate, the Japanese added extra pilot armor and self-sealingtanks to this design as an added protection for their pilots.Very maneuverable and very fast, this plane proved that the Japanese, though fighting a losing war, were notdefeated yet.
19
1942 PAW Scenario manual 8/14/97 4:37 PM Page 19

20
1942 PAW Scenario manual 8/14/97 4:37 PM Page 20

GEORGE - THE KAWANISHI N1K1-J
Class: Fighter
Stations: Pilot
Weapons: [Fixed] 4 Wing mounted 20mm Cannons[Payload] 2 60 Kg bombs
2 250 Kg bombs
Ammunition: 200 rds/gun
Firing Rate: 465-480 rds/min (approx. 26 seconds of fire)
Span: 39’4”
Length: 29’4”
Wing Area: 23.5 sq. meters
Engine: Nakajima Homare 21 (Radial)
Max Hpwr: 1990
Ceiling: 35,300
Cruise Speed: 200 kts
Max. Spd: 315 kts
Stall Spd: 71 kts [Level Flight]
Pilot’s Notes: The war would have had a completely different ending ifthis plane had shown up earlier than it did. In almost everyway, this plane was better than the Mitsubishi Zero. It hadself-sealing fuel tanks, as well as pilot armor for addedprotection. The George was the Zero’s equivalent inmaneuverability and diving speed. The plane came too lateand and too few to prove any help in the war effort, but ifthings had been a little different...
21
1942 PAW Scenario manual 8/14/97 4:37 PM Page 21

22
1942 PAW Scenario manual 8/14/97 4:38 PM Page 22

TONY - THE KAWASAKI KI-61
Class: Fighter
Stations: Pilot
Weapons: [Fixed] 2 Fuselage 12.7 mm Machine Guns2 Wing mounted 20 mm Cannons
[Payload] 2 250 kg Bombs
Ammunition: [Cannon] 150 rds/gun[MG] 300 rds/gun
Firing Rate: [Cannon] 465-485 rds/min (approx. 21.5 seconds of fire)
[MG] 950-1000 rds/min (approx. 18.5 seconds of fire)
Span: 39’4”
Length: 30’1”
Wing Area: 20 sq. meters
Engine: Kawasaki Type 2
Max Hpwr: 1450
Ceiling: 37,730
Cruise Speed: 216 kts
Max. Spd: 320 kts
Stall Spd: 75 kts [Level Flight]
Pilot’s Notes: The Kawasaki Type 2 engine, with its liquid cooling system,became a serious handicap for this already problem-riddledaircraft. The Tony’s two main advantages—its diveacceleration and its ability to perform a tight turn—proveduseful mainly when it needed to retreat from Americanaircraft. When coming up against a Tony, use high speed tooutrun it, then hit and run tactics.
23
1942 PAW Scenario manual 8/14/97 4:38 PM Page 23
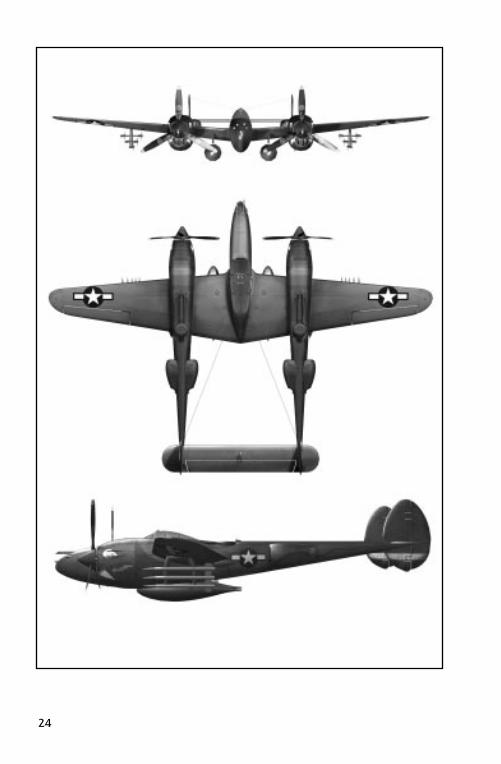
24
1942 PAW Scenario manual 8/14/97 4:38 PM Page 24

LIGHTNING - THE LOCKHEED P-38F
Class: Fighter
Stations: Pilot
Weapons: [Fixed] 1 20 mm Cannon on nose4 .50 caliber Machine Guns on fuselage
[Payload] 2 500 lb bombs2 1000 lb bombs
Ammunition: [Cannon] 400 rds[Machine Guns] 360 rds/gun
Firing Rate: [Cannon] 450 rds/min (approx. 53 seconds of fire)[Machine Guns] 750 rds/min (approx. 29 seconds of fire)
Span: 52’
Length: 37’10”
Wing Area: 30.4 sq. meters
Engine: Two Allison V-1710s
Max Hpwr: 1250
Ceiling: 35,000 ft
Cruise Speed: 250 kts
Max. Spd: 375 kts
Stall Spd: 74 kts [Level Flight]
Pilot’s Notes: The plane that was called the Fork-tailed Devil was releasedin 1937. It shot down more Japanese planes than any otherfighter throughout the entirety of World War II. With itscombination of pilot armor, .50 caliber machine guns, and20 mm cannons, it quite easily outmuscled any Japanesefighter. It could also outmaneuver one without muchtrouble. Originally designed as a bomber, this plane sawaction throughout the entire War (and has been a favorite atair shows ever since).
25
1942 PAW Scenario manual 8/14/97 4:38 PM Page 25

26
1942 PAW Scenario manual 8/14/97 4:38 PM Page 26
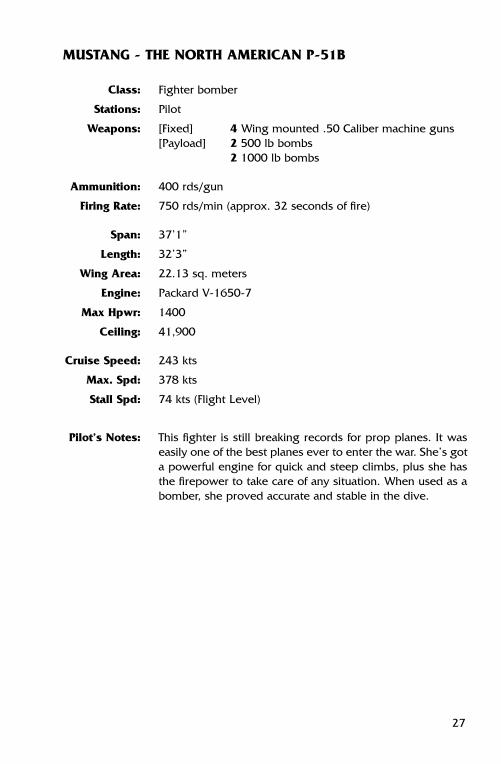
MUSTANG - THE NORTH AMERICAN P-51B
Class: Fighter bomber
Stations: Pilot
Weapons: [Fixed] 4 Wing mounted .50 Caliber machine guns[Payload] 2 500 lb bombs
2 1000 lb bombs
Ammunition: 400 rds/gun
Firing Rate: 750 rds/min (approx. 32 seconds of fire)
Span: 37’1”
Length: 32’3”
Wing Area: 22.13 sq. meters
Engine: Packard V-1650-7
Max Hpwr: 1400
Ceiling: 41,900
Cruise Speed: 243 kts
Max. Spd: 378 kts
Stall Spd: 74 kts (Flight Level)
Pilot’s Notes: This fighter is still breaking records for prop planes. It waseasily one of the best planes ever to enter the war. She’s gota powerful engine for quick and steep climbs, plus she hasthe firepower to take care of any situation. When used as abomber, she proved accurate and stable in the dive.
27
1942 PAW Scenario manual 8/14/97 4:38 PM Page 27
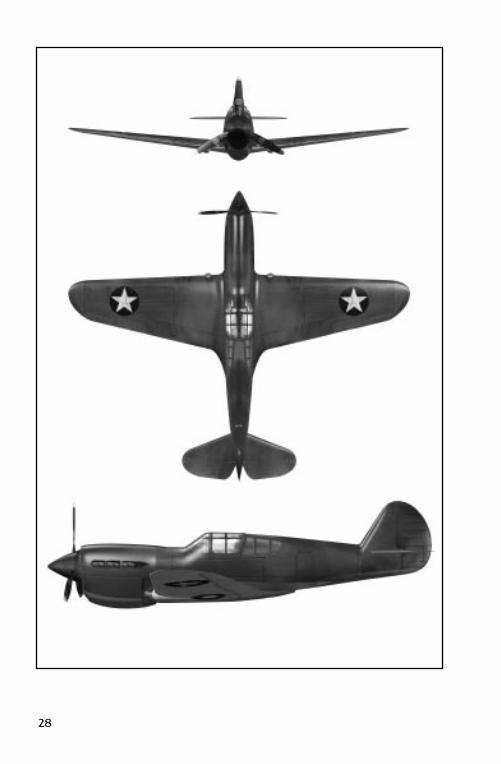
28
1942 PAW Scenario manual 8/14/97 4:38 PM Page 28

29
WARHAWK - THE CURTISS P-40F
Class: Fighter bomber
Stations: Pilot
Weapons: [Fixed] 6 Wing Mounted .50 caliber Machine Guns[Payload] 6 30 lb bombs
2 500 lb bombs
Ammunition: 275 rds/gun
Firing Rate: 750 rds/min (approx. 20 seconds of fire)
Span: 37’3”
Length: 31’8”
Wing Area: 21.9 sq. meters
Engine: Allison V-1710
Max Hpwr: 1150
Ceiling: 33,000 ft
Cruise Speed: 240 kts
Max. Spd: 320 kts
Stall Spd: 71 kts [Level Flight]
Pilot’s Notes: This plane saw action in all arenas during World War II. Itcould take severe punishment because of its thick pilotarmor and its self-sealing fuel tanks. Many pilots feltoverwhelmed by the amount of space in the roomy cockpit(it’s a lot like the front seat of a car). However, the Warhawkis easily outmaneuvered in a dogfight. It was not until theFlying Tigers of China and Burma that this plane began tosee victories instead of defeat. How you fly will make all thedifference in this baby.
1942 PAW Scenario manual 8/14/97 4:38 PM Page 29

30
What could be better than destroying enemy aircraft ina World War II flight simulation? How about fightingside-by-side with one of your friends in a World War II
flight simulation? How about shooting each other down? One ofthe new features added with the 1942 The Pacific Air WarScenario is Modem Play for those of you who want to fight withor against your friends in the skies over the Pacific Ocean.
MODEM PLAY
Main Menu.
Using Modem Play, you can fight in any of the planes that youcan pilot in the game, including the six new planes providedwith the scenario. Modem-specific missions have beendeveloped, or you can design your own using the MissionBuilder. Just remember, if you want to play in a mission that youcreate, it is necessary for that mission to have at least two planesthat players can pilot and no more than six planes all together.
1942 PAW Scenario manual 8/14/97 4:38 PM Page 30

31
If you think no preparation is necessary, goahead and skip over this section. Unlessyou’re already pretty good with a modem,you’ll be back.
In order for you to play 1942 The Pacific AirWar over a two-computer connection, it is necessary that thecomputers be connected by modems or a direct connection (suchas a null modem cable). Prior to starting the game, both playersshould agree which computer will be designated as the Connectcomputer and which will Wait on Connection. The player at theConnect computer will make all the selections as to what type ofgame both players are going to play. Discussing these selectionsahead of time will help to prevent disagreements.
PREPARINGFORMODEMPLAY
Play Menu.
Both players must be aware of which Comm Port their modem(or direct connection) is attached to, and should know the baudrate of both of the modems being used. The slower of these tworates is the one that must be used. It’s also a good idea, if you’reusing modems over a telephone line, for the Connect player toknow the other player’s phone number. (This might seemobvious, but you’d be surprised how often the most elementarythings get forgotten.)
1942 PAW Scenario manual 8/14/97 4:38 PM Page 31

Both players must also let the game know which Comm Portthe connection is attached to by clicking the corresponding button.
Use the same process to choose the Modem Rate at whichyou are going to be communicating. This rate should be thesame for both machines—the speed of the slower modem.
When you’ve finished all of this, click on the Done button. Ifyou are communicating through a direct connection, that’s all youneed to do; you’ll see a “Modem Not Found” message, but you canignore it. If you are communicating via modems, there’s a littlemore to it. The Dial Menu will appear on the Connect computer;the other just has to wait.
32
Once you know everything you need to know and both ofyou are ready to go, both players should left-click on theModem Play button on the Main Menu. The ModemSettings screen appears. At this point, each player must
specify whether his is the Connect or the Wait on Connectioncomputer; click on the appropriate button.
THE MODEMSETTINGSSCREEN
Searching for Modem.
1942 PAW Scenario manual 8/14/97 4:38 PM Page 32

Now, the player at the Connect machinehas to initiate the communication–youhave to call up the other computer. The
Dial Menu includes a storage area where you can keep a list often names and numbers. There are also boxes labeled Phoneand Name near the bottom of the screen.
To add a number to the list or edit an existing listing, left-clickon the listing you want to modify. The name and number will becopied into the two boxes. Simply type in the new number in thePhone box. If you want to, you can also enter a name or someother reminder in the Name box.
When the number you want to call is correct and is displayedin the Phone box, click on the Dial button to call that number. (Iffor some strange reason you decide to do something else, clickon the Cancel button instead) If the connection is successful, theMission Settings screen will appear.
33
THE DIAL MENU
Dial Menu.
1942 PAW Scenario manual 8/14/97 4:38 PM Page 33

Once the connection is successful, the player on theConnect computer must select which type ofmission both players will be involved in. Just in case
the two of you did not discuss this ahead of time, there are “chat”communication boxes at the bottom of the screen. Click on theMessage Out area to be able to type a message to the otherplayer. To send this message, press e. Incoming messagesfrom that person will appear in the Message In area.
34
MISSION SETTINGS
Mission Settings Screen.
Near the top of the screen is a list of the missions available forthe two of you to play. Select a mission by left-clicking on it. Next,the Connect player decides which nation he (and the other player)will fly for. If you are playing cooperatively, both of you will fly forthe same nation; otherwise, the Wait On Connection player will flyfor the side not selected.
Next, but not least, select the type of play. To play one againstthe other, click on the Head-To-Head button; to fly as a teamagainst the computer AI, click on the Cooperative button.
The weather selection appears as soon as all of the otherdecisions for the mission set-up are complete. This is exactly thesame as the weather selection for the normal game After theConnect player sets the weather, the pre-flight check begins.There is no difference in the way this part of the game operates.
1942 PAW Scenario manual 8/14/97 4:38 PM Page 34

A few features of the game work differentlyduring Modem Play, and there are a coupleof new bits that are not available in theregular game. These are detailed here.
One feature is the ability to send messages between the twoplayer pilots. To do this, press ' (the apostrophe) and begintyping your message. A small window appears at the bottom ofthe screen allowing you to see the message that you are typing.Messages sent to you by the other player will also appear here.Press e to send the completed message.
35
GAME PLAYDIFFERENCES
Chatting between players.
In the heat of battle, it can be rather hard to type a fullsentence without getting shot down. That’s why we’ve includeda group of pre-set messages, which you can send at the touchof a function key. After you press ' to begin sending, each ofthe keys 1 through 0 will send a different pre-set messageto the other player. (Note that there are different messages forHead-To-Head an Cooperative play.) You can even use yourown pre-set messages by editing the file messages.txt in the1942 directory (using any text editing software). Simply typeyour messages in place of any of the existing ones; when youuse the F-key, you’ll get the new text.
1942 PAW Scenario manual 8/14/97 4:38 PM Page 35

During Modem play, either player can pause the game at anytime using aP. This pauses the game on both computers, andplay will only restart when the player who paused the gamereleases the pause.
When either player uses 9 to modify the Graphic DetailLevels, the game will pause for both players. The adjustmentsto the graphics, however, affect only the computer on whichthe modification were done. You can not affect the otherplayer’s graphics.
The Game Configuration Menu works in the same way.Whenever either player presses 0 the game pauses for both.
For better or worse, you cannot use the Pilot Map duringModem Play. This takes away the ability to find your opponent asswiftly as you may like, but that’s the nature of war, right? Also,the Time Compression feature is not available. In other words,nothing happens if you press M, R, or T in a modem mission.
36
1942 PAW Scenario manual 8/14/97 4:38 PM Page 36
37
Game Design Ed Fletcher Mike Rea Chris Clark
Programming Ed Fletcher Mike Springer
Sound Roland Rizzo Ken Legace Jim McConkey Mark Reis
Manual Ted Paulsen - History & WritingJohn Possidente - EditorFinley Weatherford - Design & Layout Joe Morel - Design & LayoutAndy Laken - ArtTodd Brizzi - Art John Cameron - Art
Packaging John Emory
Producer Ed Fletcher
Art Errol Roberts - Lead Artist & 2D ArtMax Remington - 3D Art Susan Clausen - 3D Art Todd Brizzi - 2D Art Andy Laken - 3D ArtLt. Steve Johnson - 3D Models Barbara Jeznach - 2D Art John Cameron - 2D Art Walter Carter - 2D Art Vince Thomas - 2D Art
Quality Assurance Manager David Ginsburg
Quality Assurance Andy Mazurek - Lead Jeff Dinger Jim Smith Damon Harris Russel Clark Matt Showalter Tammy Talbott
Special Thanks Lt. Col George Wargo (USAF Ret.)Col Martin Joe Johnasen (USAF Ret.)
Thanks you for your ideas and yourknowledge that helped in the creationof the game.
CREDITS
1942 PAW Scenario manual 8/14/97 4:39 PM Page 37
Flight ControlsJoystick Mouse Keyboard Pedals
Pitch Up Stick Back Mouse Back Z ——Pitch Down Stick Forward Mouse Forward W ——Roll Left Stick Left Mouse Left A ——Roll Right Stick Right Mouse Right S ——Rudder Left [JB2]+[Left] [RMB]+[Left] , LeftCenter Rudder [JB2]+[Center] [RMB]+[Center] . CenterRudder Right [JB2]+[Right] [RMB]+[Right] / RightFire Guns [JB1] [LMB] s ——
KEYREFERENCECARD
Ordnance ControlsDrop Primary Ordnance eDrop Secondary Ordnance BJettison External Tank BFire Rocket t
Keyboard Throttle ControlMax Throttle s=
Add 10% Throttle =
Throttle Back 10% -
Min Throttle (Engine Off) s-
Go to 10% Throttle 1
Go to 20% Throttle 2
Go to 30% Throttle 3
Go to 40% Throttle 4
Go to 50% Throttle 5
Go to 60% Throttle 6
Go to 70% Throttle 8
Go to 80% Throttle 9
Go to 90% Throttle 9
Go to 100% Throttle 0
Aircraft ControlsAutopilot On/Off A
Wheel Brakes On/Off B
Dive Brakes On/Off D
Lower/Raise Landing Gear G
Lower/Raise Arrestor Hook H
Cockpit Red-light L
Nose Trim N
Cycle Guns S
Retract Flaps 1/3 [
Extend Flaps 1/3 ]
Bail Out aB
Clear Nose Trim aN
Game ControlsQuit Mission or Battle Q
Decelerate Time R
Accelerate Time T
Configure Flight Controls 0
Max Time Rate sT
Normal (1x) Time Rate sR
Pause Game aP
Quit to DOS aQ
Cycle Menu/Box Choices c + Arrows
THE PACIFIC AIR WAR
COPYRIGHT © 1994 MICROPROSE
1942 PAW key card 8/14/97 4:49 PM Page 1

Pilot View ControlsHead Max Up
(Std Cockpit View) sI
Tilt Head Up I
Tilt Head Down KHead Max Down
(Lap View) sK
Map M
Face Front 1
Face Left 2
Face Right 3
Left Shoulder 4
Right Shoulder 5
External Chase 6
External Track 7
Change Plane 8
Detail Levels 9
Station (Rear Gunner) a1
Virtual Cockpit (Fighters) a1
Bombsight a2
External Free a7
External Camera ControlsChase Mode 6
Track Mode 7
Free Camera a7Rotate/Pan Button 1 Left/Right
or c A SZoom/Move Button 2 Forward/Back
or c Z W
®
Map ControlsSlide Map Down I
Slide Map Right J
Slide Map Left K
Slide Map Up M
Zoom Out X
Zoom In Z
Leave Map [RMB] or qPilot Map Commands
Quick Cruise C
Toggle Auto-scroll aS
Carrier Battle Map CommandsPause Carrier Battle P
Weather Visibility On/Off W
Save Game 0
Flight Film CommandsMotion Controls
Enter Mission E
Next Frame N
Observe to Frame O
Pause P
Rapid Motion R
Slow Motion S
Go to Frame aG
Editing ControlsCapture Camera Viewpoint C
Activate Editing Board M
Use Captured Viewpoint U
Write Toggle W
Clear Box Y
Move Box aM
1942 PAW key card 8/14/97 4:49 PM Page 2


![[Arnold Toynbee]Nationality and War.pdf](https://img.pdfslide.us/doc/110x75/577cbfe11a28aba7118e5970/arnold-toynbeenationality-and-warpdf.jpg)