Embed Size (px)
DESCRIPTION
cisco works lms lab guide
Citation preview
!"#$%&'"()*+,-!!"!!"#$%&#'()*+!
!" #$%&'()&*The objective of this lab is to discover some of the Cisco Prime LMS advanced capabilities. Basic knowledge of Cisco Prime LMS is a prerequisite This document will cover the following topics :
! Lifecycle Report (EoX, EoS) ! Compliance Checking ! Template Center ! IPSLA ! EnergyWise WorkCenter ! CiscoPrime Widget
+" ,-../)&0.1*&-*&2/*3($*We have 7 pods on the lab, numbered from 1 to 7 (pod1 is reserved for instructor) Lab is on a DMZ and you must install anyconnect vpn client on your laptop first.
+"!*4-5*6-.7&*2(8/*(.9*)-../)&* If you don’t have anyconnect installed , launch your browser to https://entnmsvpn-eu.cisco.com Username/password are pod1/pod1 , pod2/pod2 , pod3/pod3 and so on…
Click AnyConnect in left column , then StartAnyConnect on the main window
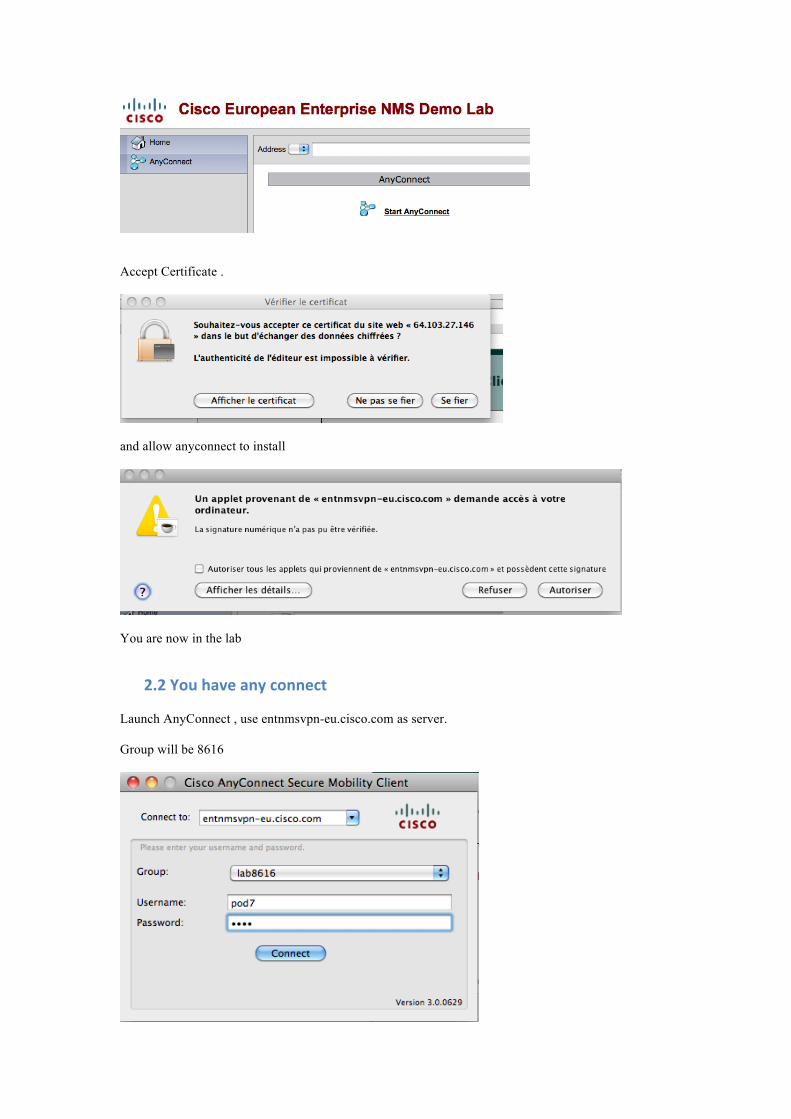
Accept Certificate .
and allow anyconnect to install
You are now in the lab
+"+*4-5*2(8/*(.9*)-../)&* Launch AnyConnect , use entnmsvpn-eu.cisco.com as server. Group will be 8616
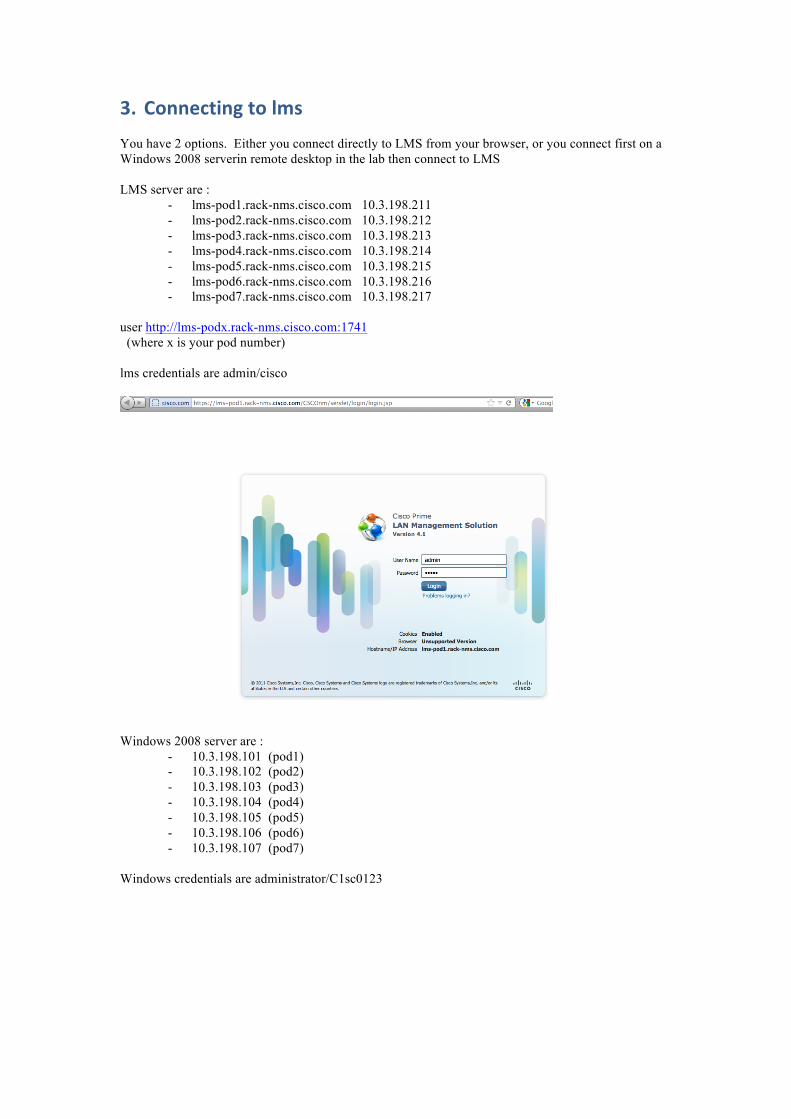
:" ,-../)&0.1*&-*3;%* You have 2 options. Either you connect directly to LMS from your browser, or you connect first on a Windows 2008 serverin remote desktop in the lab then connect to LMS LMS server are :
- lms-pod1.rack-nms.cisco.com 10.3.198.211 - lms-pod2.rack-nms.cisco.com 10.3.198.212 - lms-pod3.rack-nms.cisco.com 10.3.198.213 - lms-pod4.rack-nms.cisco.com 10.3.198.214 - lms-pod5.rack-nms.cisco.com 10.3.198.215 - lms-pod6.rack-nms.cisco.com 10.3.198.216 - lms-pod7.rack-nms.cisco.com 10.3.198.217
user http://lms-podx.rack-nms.cisco.com:1741 (where x is your pod number) lms credentials are admin/cisco
Windows 2008 server are :
- 10.3.198.101 (pod1) - 10.3.198.102 (pod2) - 10.3.198.103 (pod3) - 10.3.198.104 (pod4) - 10.3.198.105 (pod5) - 10.3.198.106 (pod6) - 10.3.198.107 (pod7)
Windows credentials are administrator/C1sc0123
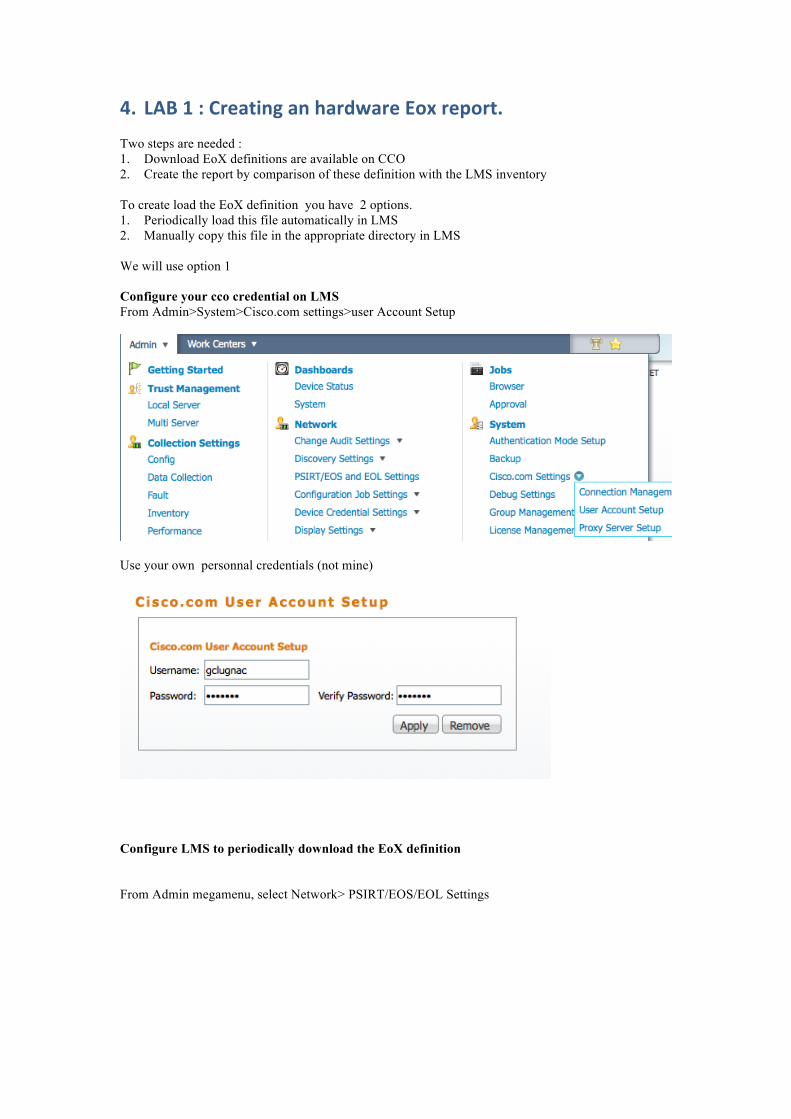
<" =#>*!*?*,'/(&0.1*(.*2('6@('/*A-B*'/C-'&"* Two steps are needed : 1. Download EoX definitions are available on CCO 2. Create the report by comparison of these definition with the LMS inventory
To create load the EoX definition you have 2 options. 1. Periodically load this file automatically in LMS 2. Manually copy this file in the appropriate directory in LMS We will use option 1 Configure your cco credential on LMS From Admin>System>Cisco.com settings>user Account Setup
Use your own personnal credentials (not mine)
Configure LMS to periodically download the EoX definition From Admin megamenu, select Network> PSIRT/EOS/EOL Settings
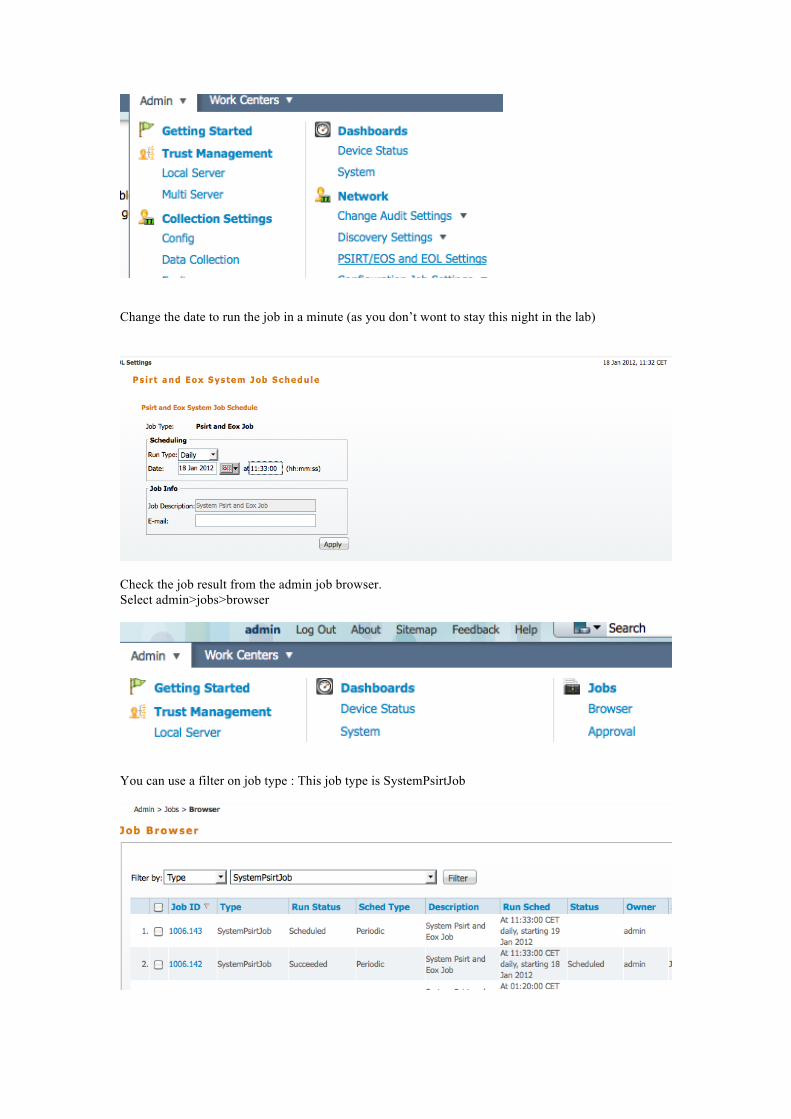
Change the date to run the job in a minute (as you don’t wont to stay this night in the lab)
*** Check the job result from the admin job browser. Select admin>jobs>browser
You can use a filter on job type : This job type is SystemPsirtJob
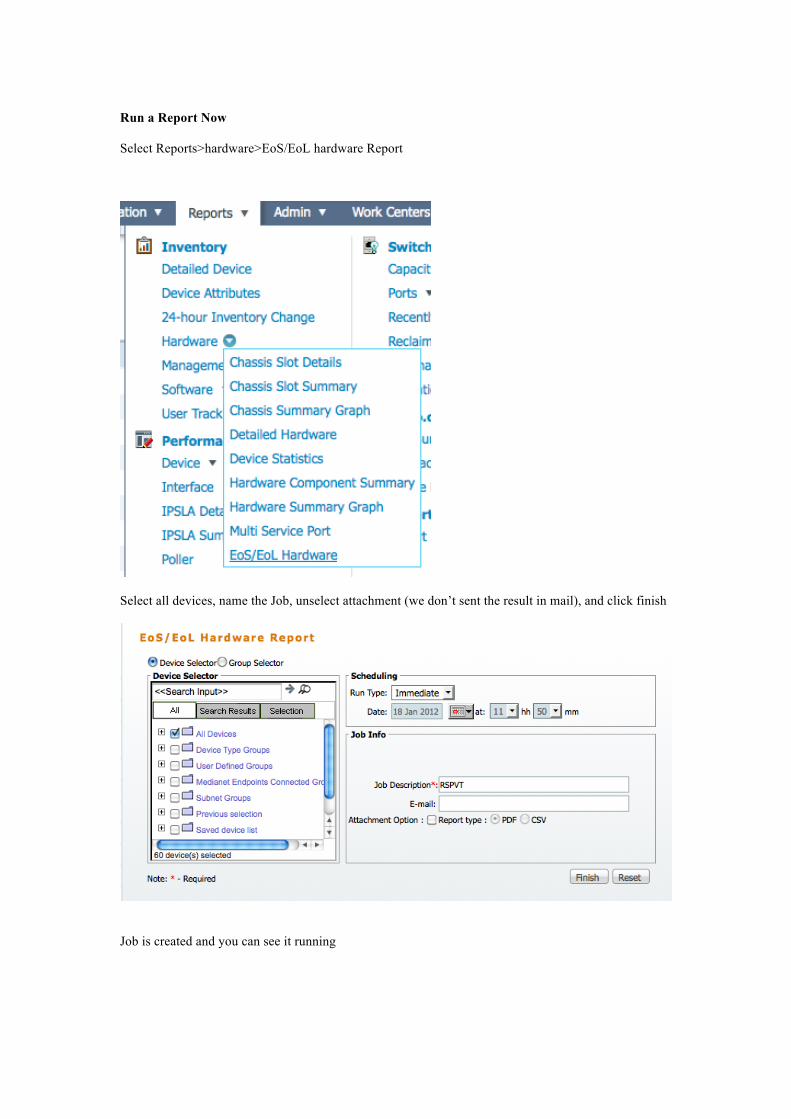
Run a Report Now Select Reports>hardware>EoS/EoL hardware Report
Select all devices, name the Job, unselect attachment (we don’t sent the result in mail), and click finish
Job is created and you can see it running

Wait until status becomes succeded
Click to view to see the report
Click one number on the left column to launch the product bulletin
D" =($*+*?*)-;C30(.)/*)2/)E0.1*
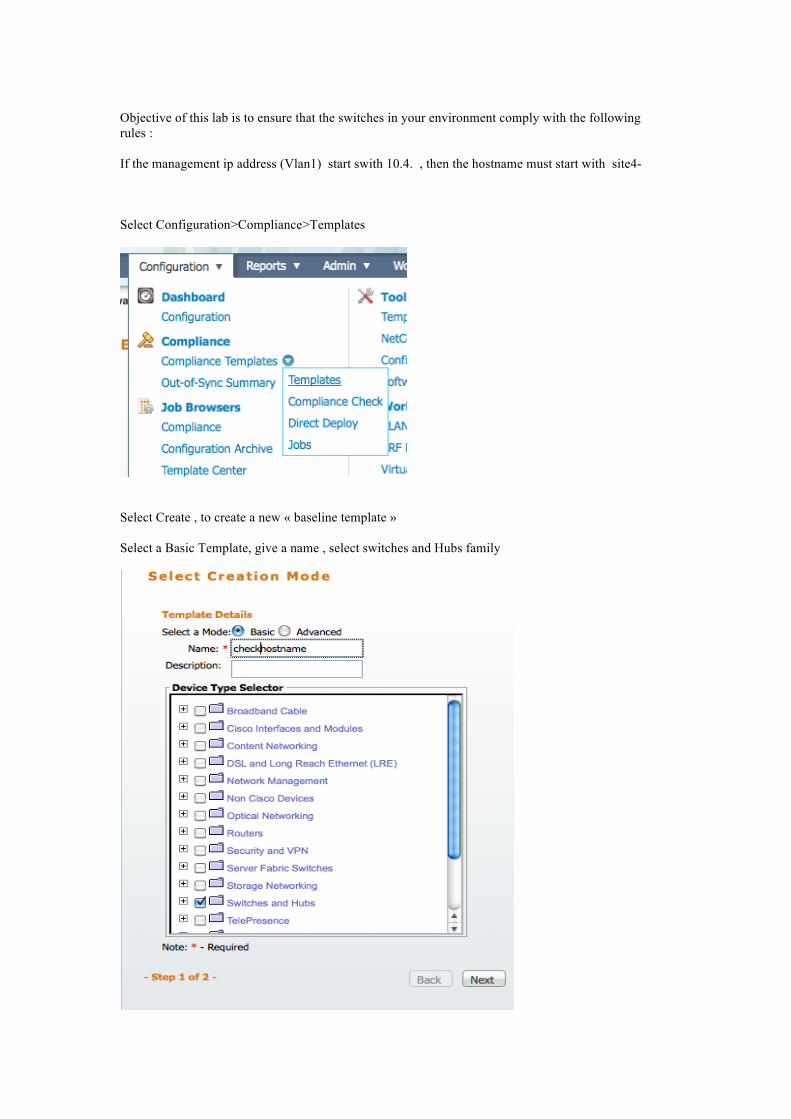
Objective of this lab is to ensure that the switches in your environment comply with the following rules : If the management ip address (Vlan1) start swith 10.4. , then the hostname must start with site4- Select Configuration>Compliance>Templates
Select Create , to create a new « baseline template » Select a Basic Template, give a name , select switches and Hubs family

Create the template . It’s a conditional template , with a test on submode , interface Vlan1 In this test we must find (« + » in the beginning of the line) an ip address starting with 10.4. To do that create a regex placeholder between the delimiters [# #] « \ » is an escape character , needed because « . » has a special meaning in regex (. Means any character). « * » in regex means any number of times. So « .* » means any character , any number of times
validate Check Compliance now Select your template and click compliance check (bottom right)
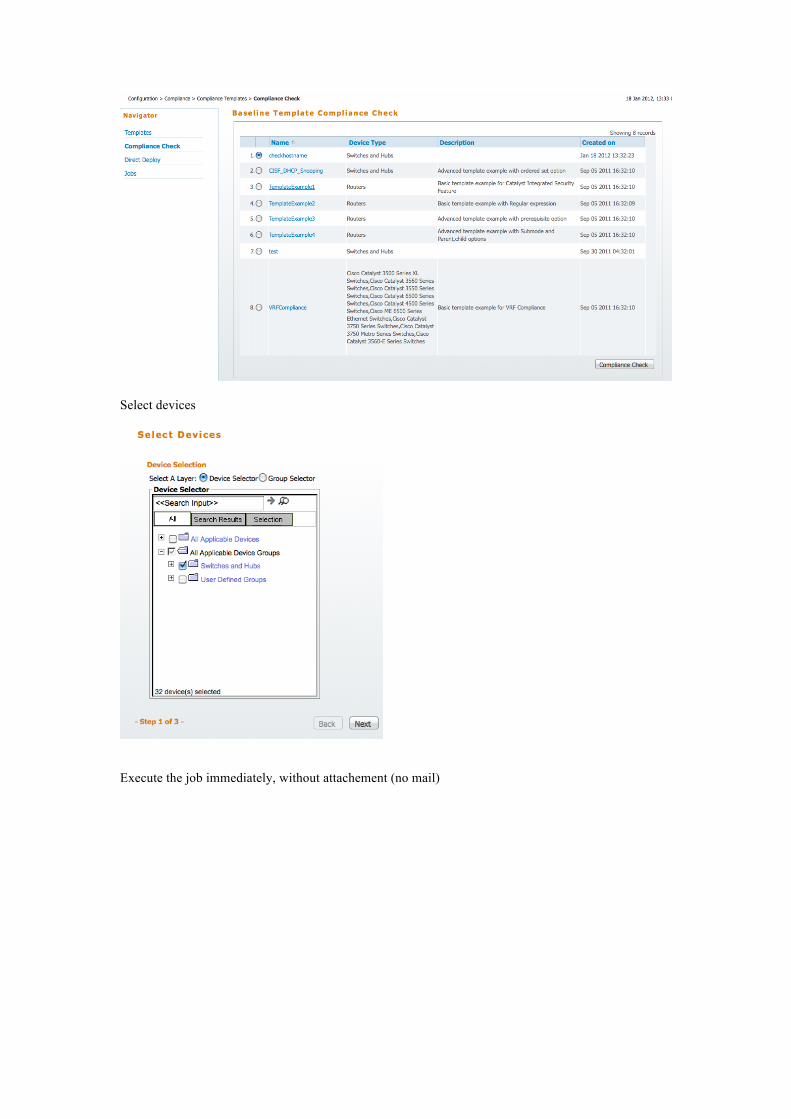
Select devices
Execute the job immediately, without attachement (no mail)
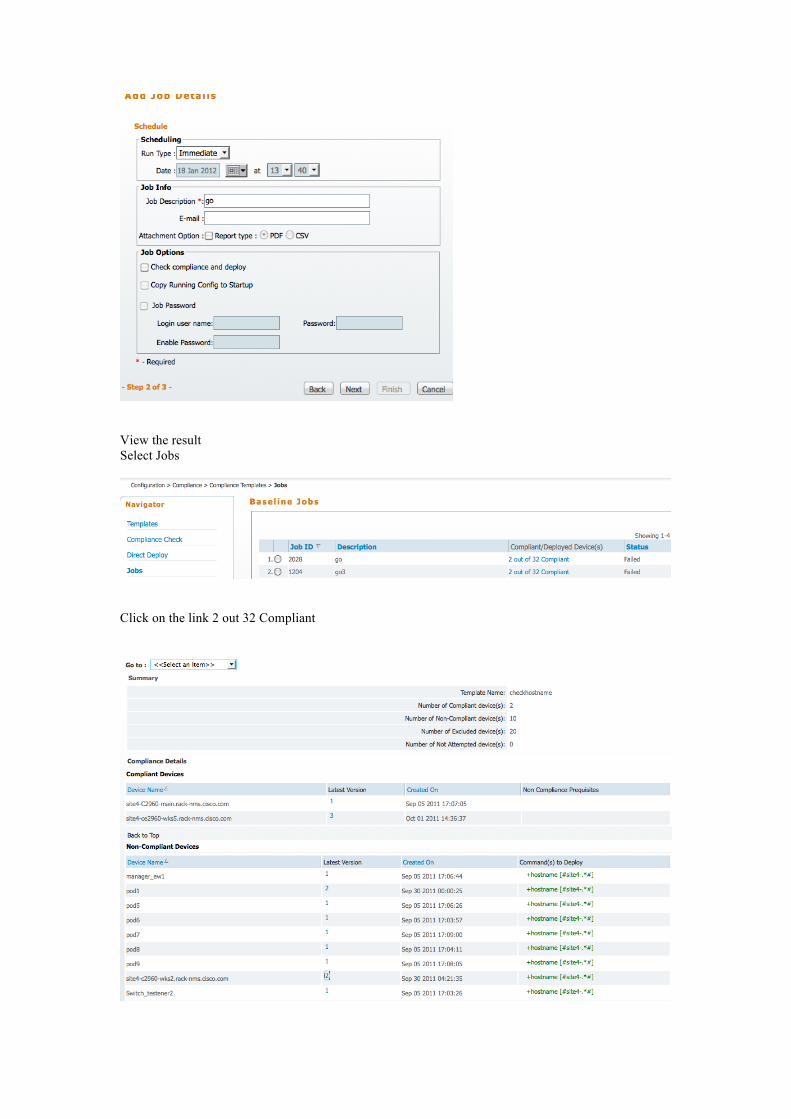
View the result Select Jobs
Click on the link 2 out 32 Compliant
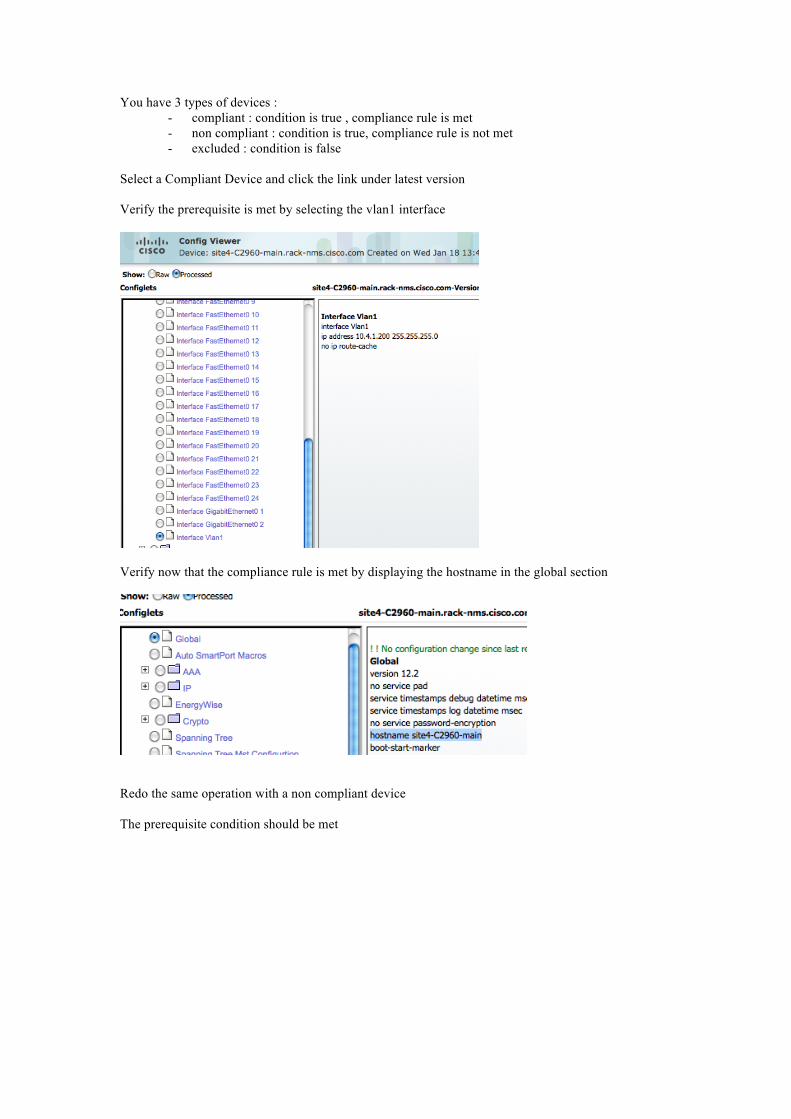
You have 3 types of devices : - compliant : condition is true , compliance rule is met - non compliant : condition is true, compliance rule is not met - excluded : condition is false
Select a Compliant Device and click the link under latest version Verify the prerequisite is met by selecting the vlan1 interface
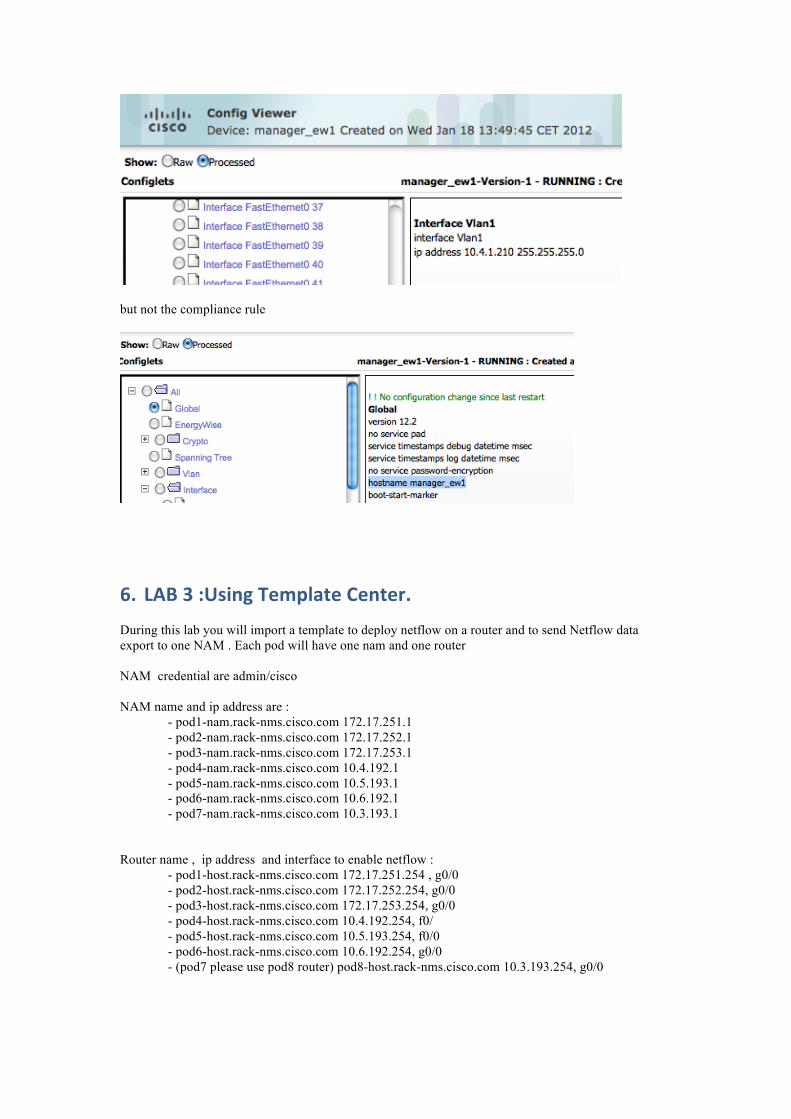
Verify now that the compliance rule is met by displaying the hostname in the global section
Redo the same operation with a non compliant device The prerequisite condition should be met
but not the compliance rule
F" =#>*:*?G%0.1*H/;C3(&/*,/.&/'"* During this lab you will import a template to deploy netflow on a router and to send Netflow data export to one NAM . Each pod will have one nam and one router NAM credential are admin/cisco NAM name and ip address are :
- pod1-nam.rack-nms.cisco.com 172.17.251.1 - pod2-nam.rack-nms.cisco.com 172.17.252.1 - pod3-nam.rack-nms.cisco.com 172.17.253.1 - pod4-nam.rack-nms.cisco.com 10.4.192.1 - pod5-nam.rack-nms.cisco.com 10.5.193.1 - pod6-nam.rack-nms.cisco.com 10.6.192.1 - pod7-nam.rack-nms.cisco.com 10.3.193.1
Router name , ip address and interface to enable netflow : - pod1-host.rack-nms.cisco.com 172.17.251.254 , g0/0 - pod2-host.rack-nms.cisco.com 172.17.252.254, g0/0 - pod3-host.rack-nms.cisco.com 172.17.253.254, g0/0 - pod4-host.rack-nms.cisco.com 10.4.192.254, f0/ - pod5-host.rack-nms.cisco.com 10.5.193.254, f0/0 - pod6-host.rack-nms.cisco.com 10.6.192.254, g0/0 - (pod7 please use pod8 router) pod8-host.rack-nms.cisco.com 10.3.193.254, g0/0
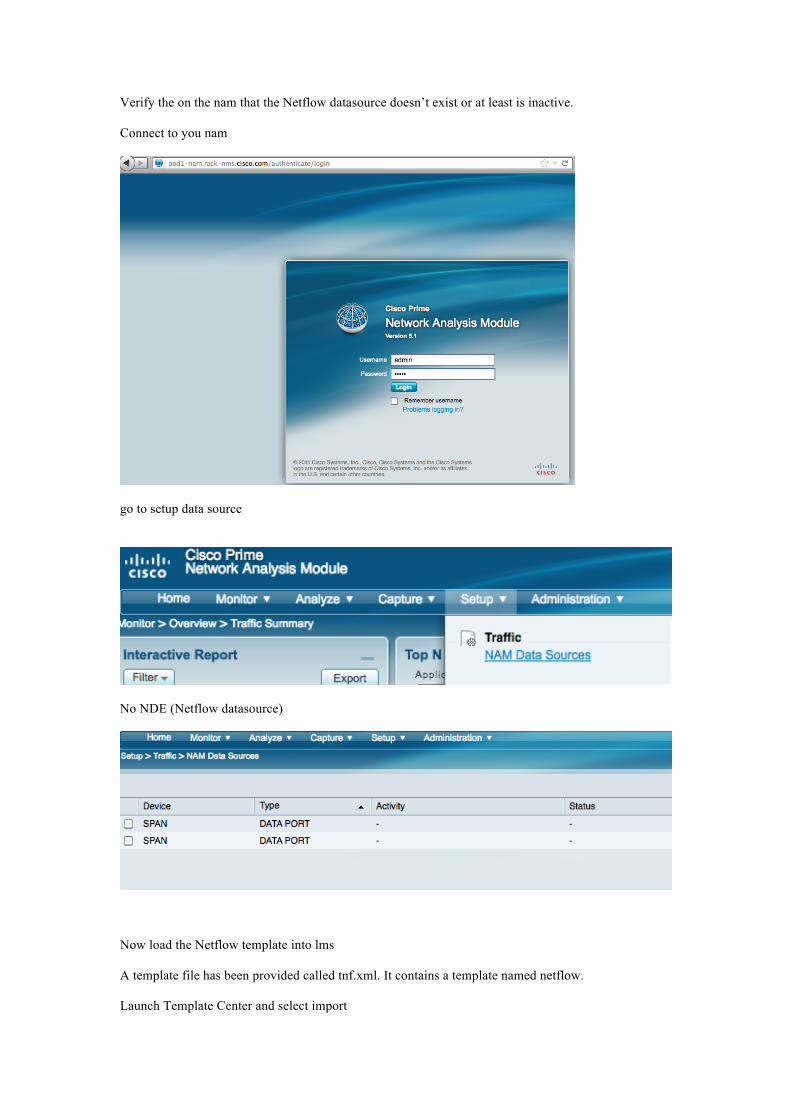
Verify the on the nam that the Netflow datasource doesn’t exist or at least is inactive. Connect to you nam
go to setup data source
No NDE (Netflow datasource)
Now load the Netflow template into lms A template file has been provided called tnf.xml. It contains a template named netflow. Launch Template Center and select import
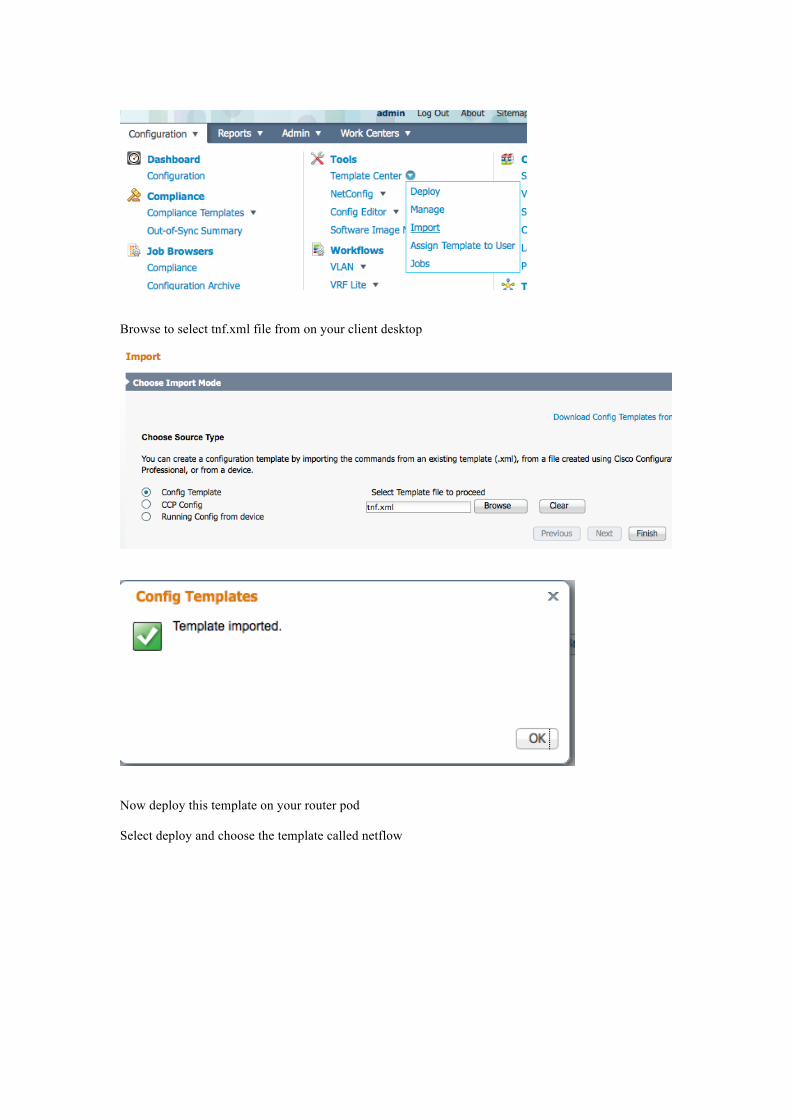
Browse to select tnf.xml file from on your client desktop
Now deploy this template on your router pod Select deploy and choose the template called netflow
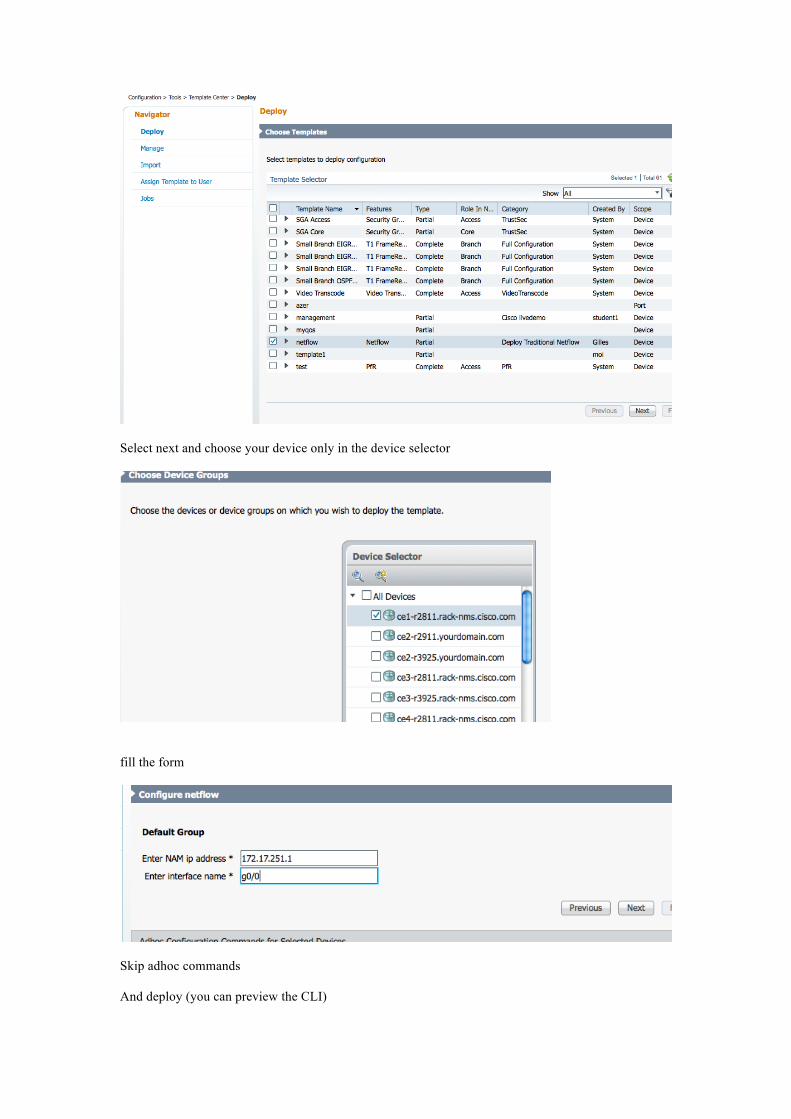
Select next and choose your device only in the device selector
fill the form
Skip adhoc commands And deploy (you can preview the CLI)
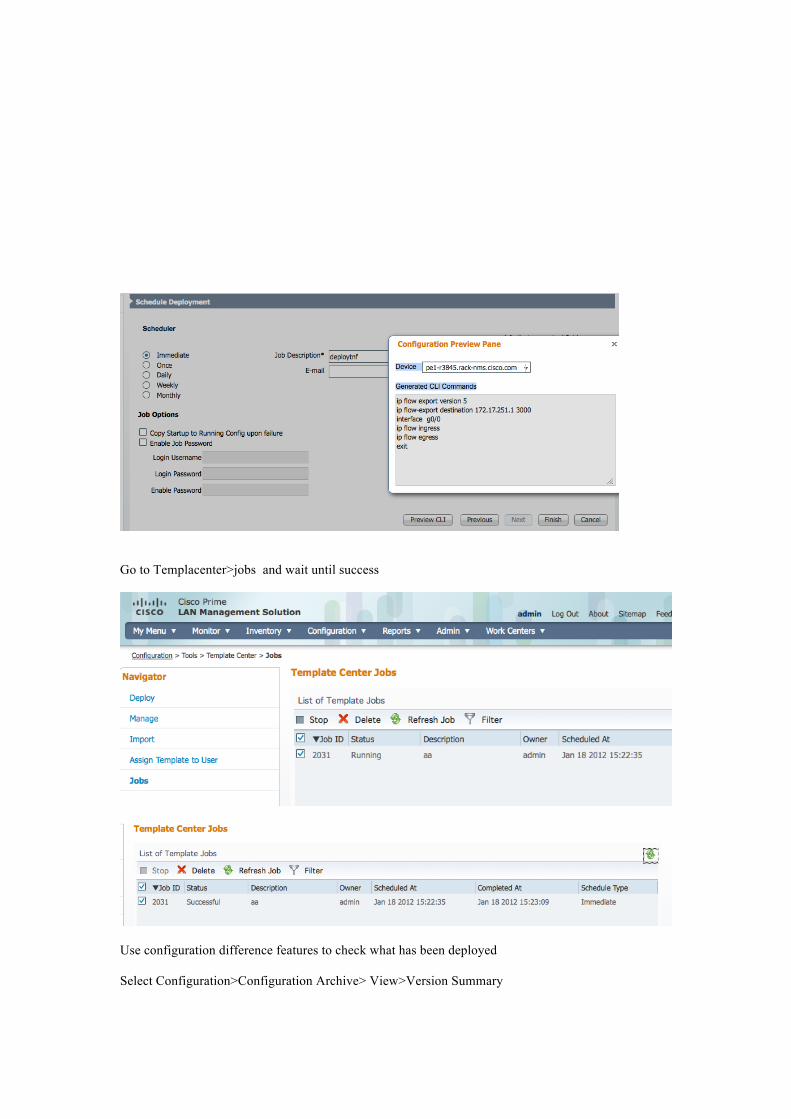
Go to Templacenter>jobs and wait until success
Use configuration difference features to check what has been deployed Select Configuration>Configuration Archive> View>Version Summary

Select your device then select config difference between latest and latest-1
Launch the NAM and see if you now have a Netflow datasource
I" =#>*<*?G%0.1*JKL=#* In this lab you will use the following routers as IPSLA source ;
- pod1-host.rack-nms.cisco.com 172.17.251.254 - pod2-host.rack-nms.cisco.com 172.17.252.254 - pod3-host.rack-nms.cisco.com 172.17.253.254 - pod4-host.rack-nms.cisco.com 10.4.192.254
- pod5-host.rack-nms.cisco.com 10.5.193.254 - pod6-host.rack-nms.cisco.com 10.6.192.254 - (pod7 please use pod8 router) pod8-host.rack-nms.cisco.com 10.3.193.254
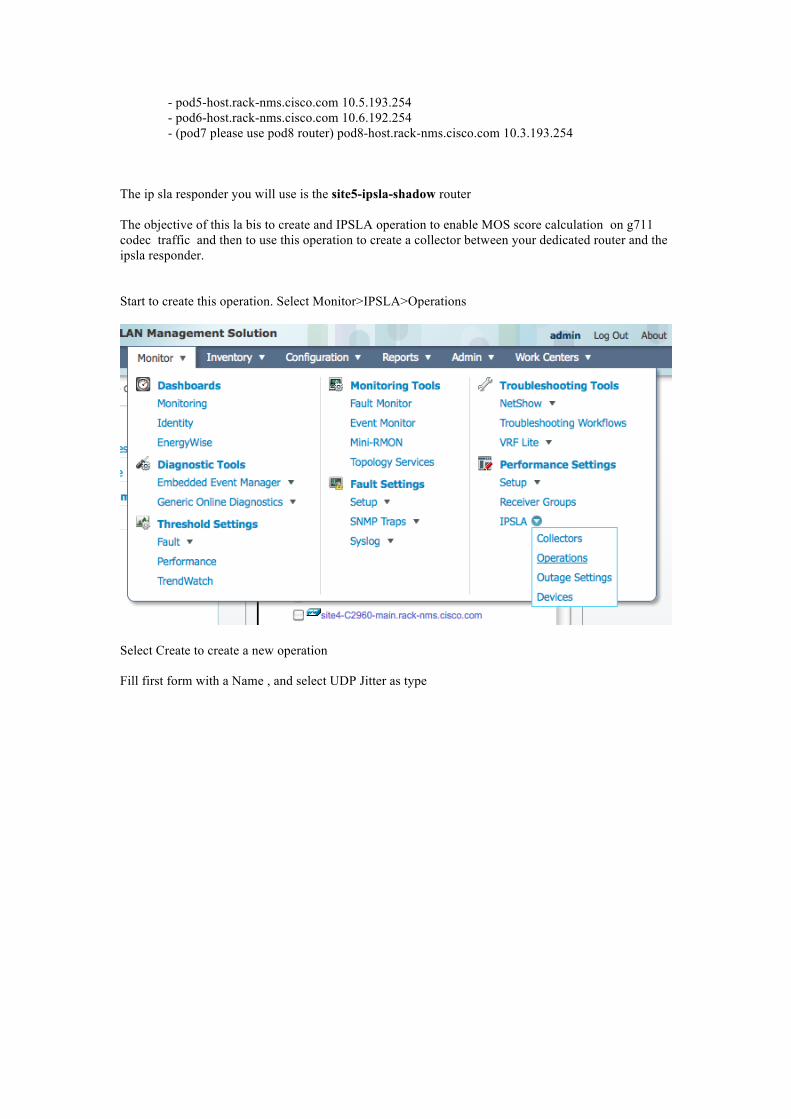
The ip sla responder you will use is the site5-ipsla-shadow router The objective of this la bis to create and IPSLA operation to enable MOS score calculation on g711 codec traffic and then to use this operation to create a collector between your dedicated router and the ipsla responder. Start to create this operation. Select Monitor>IPSLA>Operations
Select Create to create a new operation Fill first form with a Name , and select UDP Jitter as type
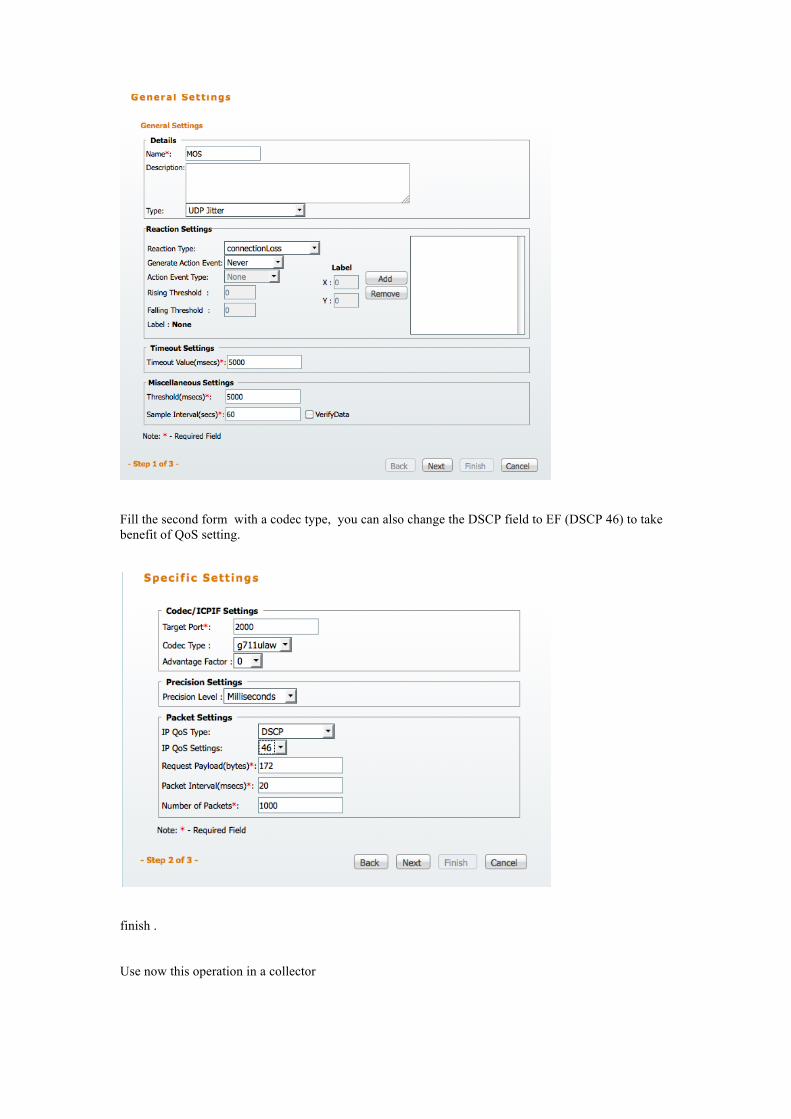
Fill the second form with a codec type, you can also change the DSCP field to EF (DSCP 46) to take benefit of QoS setting.
finish . Use now this operation in a collector
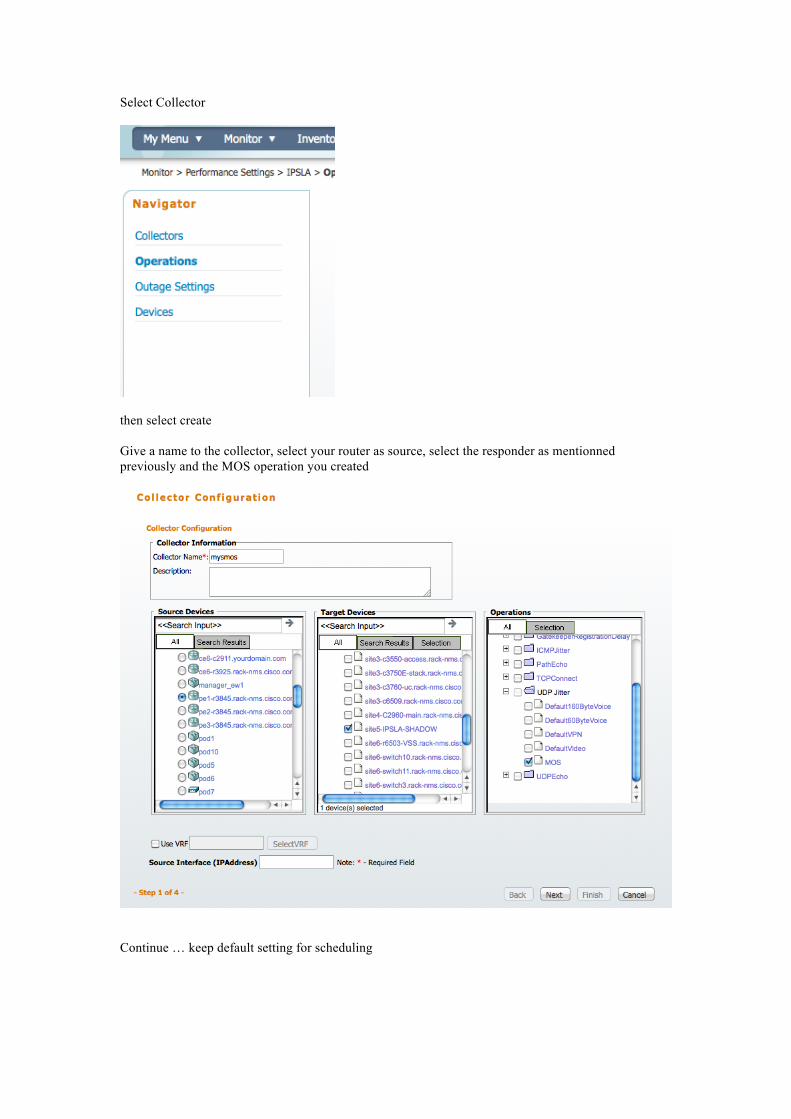
Select Collector
then select create Give a name to the collector, select your router as source, select the responder as mentionned previously and the MOS operation you created
Continue … keep default setting for scheduling

Continue until finish Now you can monitor in real time From the collector page, select your collector and click monitor
Wait a couple of minutes. Real-time monitoring display is refreshed every minute.
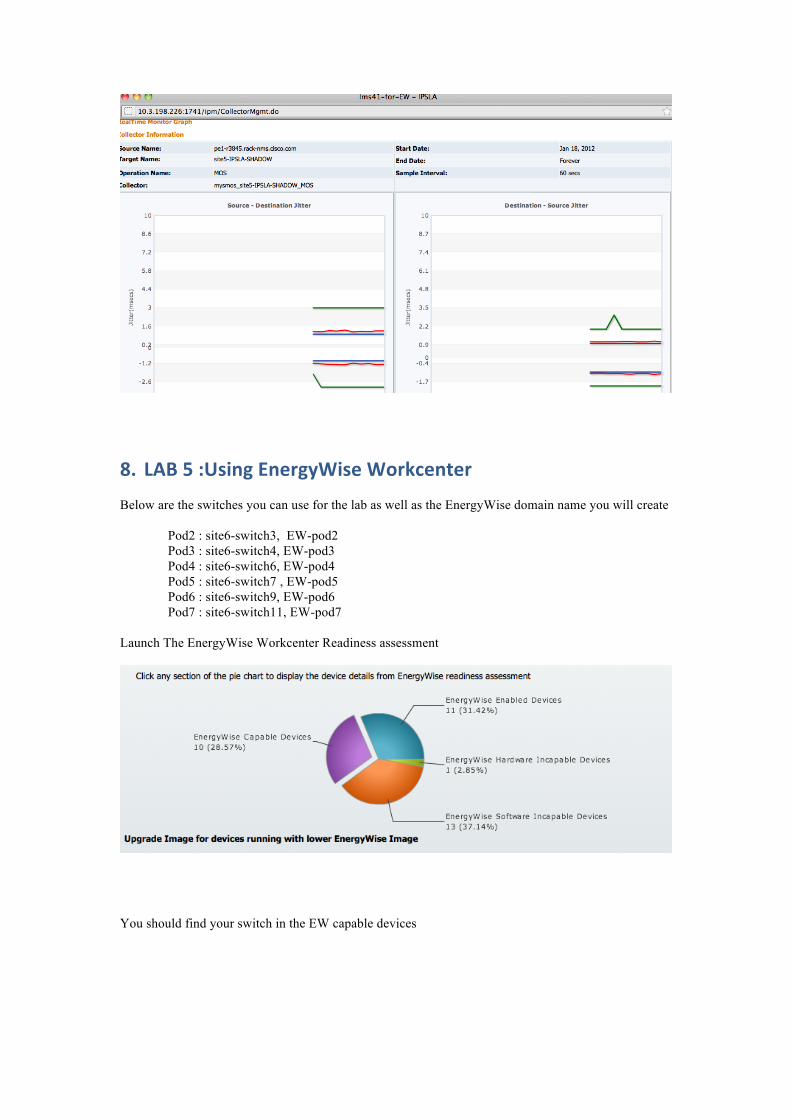
M" =#>*D*?G%0.1*A./'19N0%/*N-'E)/.&/'* Below are the switches you can use for the lab as well as the EnergyWise domain name you will create Pod2 : site6-switch3, EW-pod2 Pod3 : site6-switch4, EW-pod3 Pod4 : site6-switch6, EW-pod4 Pod5 : site6-switch7 , EW-pod5 Pod6 : site6-switch9, EW-pod6 Pod7 : site6-switch11, EW-pod7 Launch The EnergyWise Workcenter Readiness assessment
You should find your switch in the EW capable devices
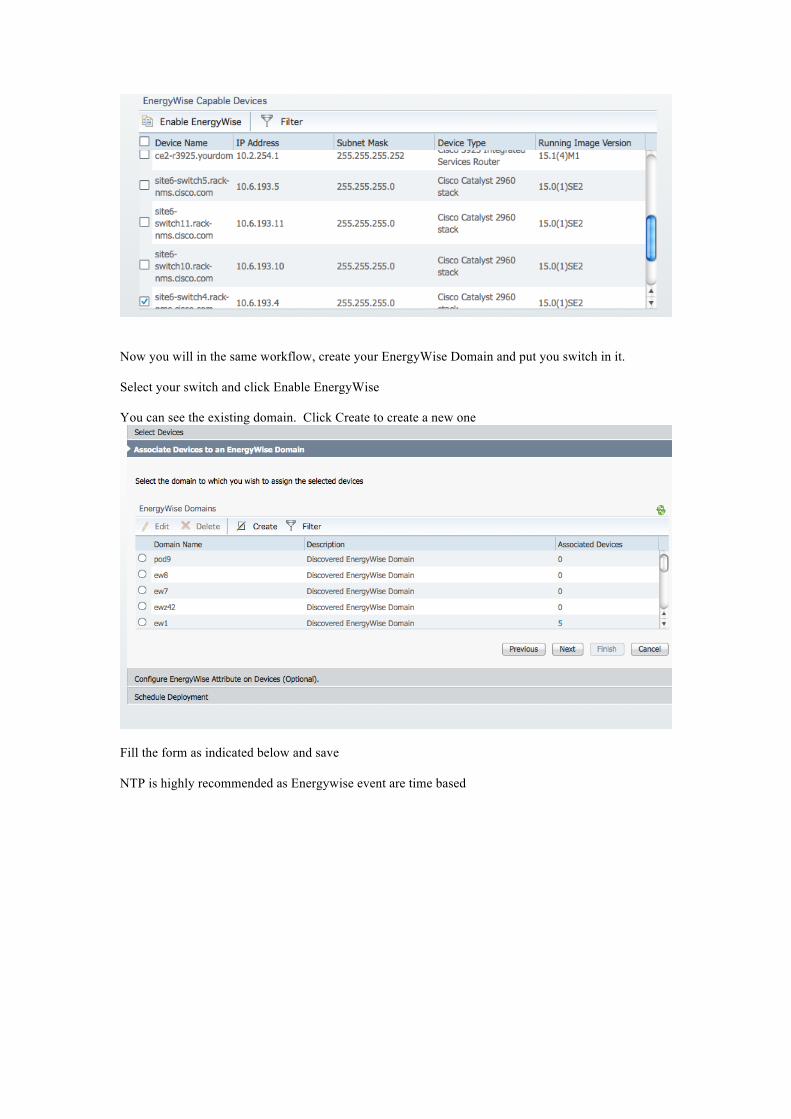
Now you will in the same workflow, create your EnergyWise Domain and put you switch in it. Select your switch and click Enable EnergyWise You can see the existing domain. Click Create to create a new one
Fill the form as indicated below and save NTP is highly recommended as Energywise event are time based
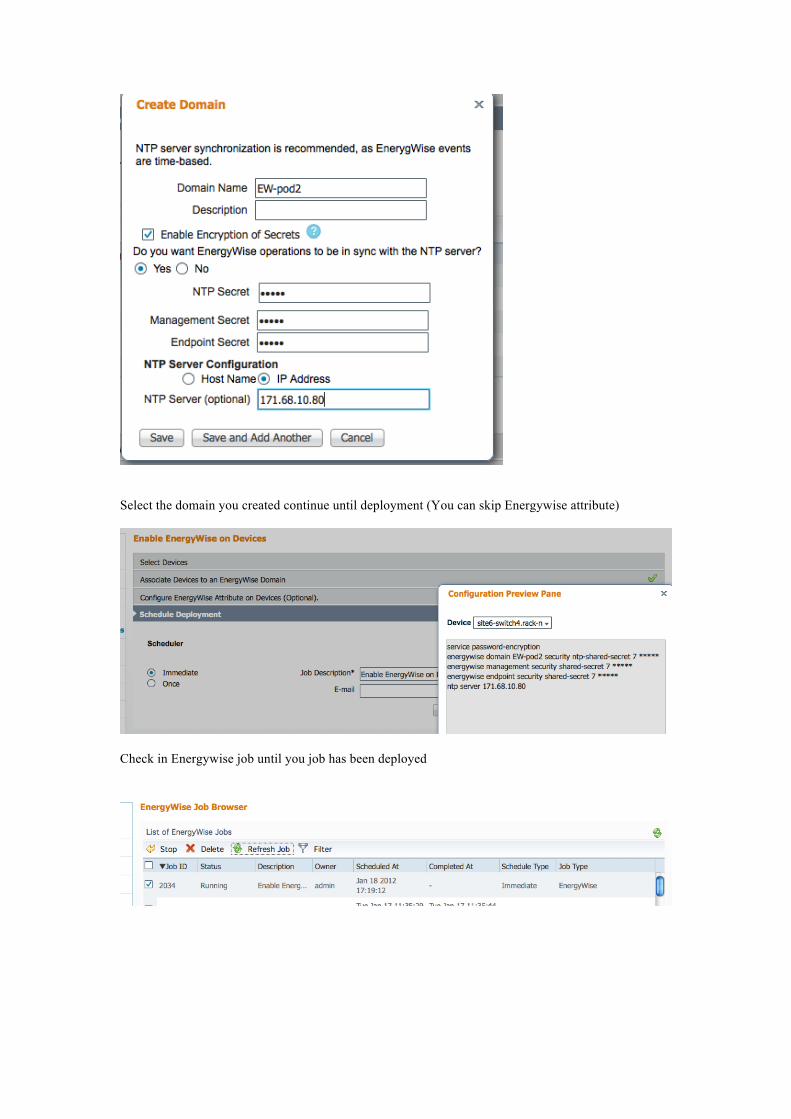
Select the domain you created continue until deployment (You can skip Energywise attribute)
Check in Energywise job until you job has been deployed
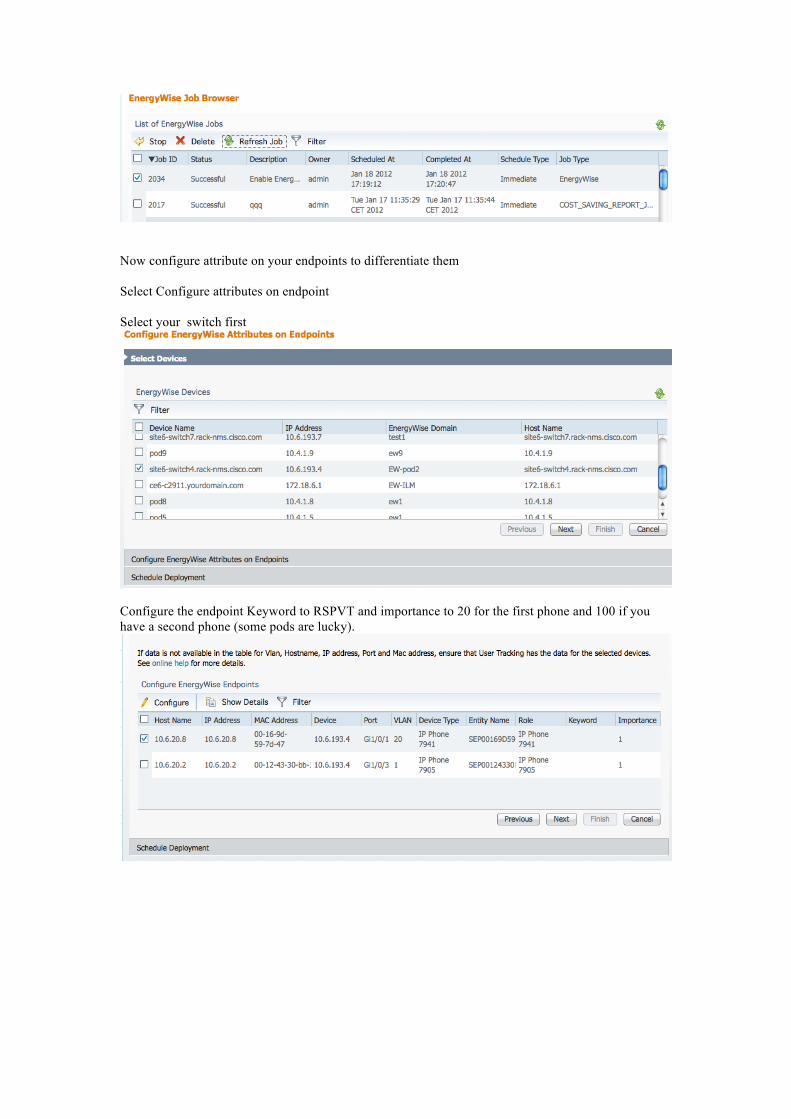
Now configure attribute on your endpoints to differentiate them Select Configure attributes on endpoint Select your switch first
Configure the endpoint Keyword to RSPVT and importance to 20 for the first phone and 100 if you have a second phone (some pods are lucky).
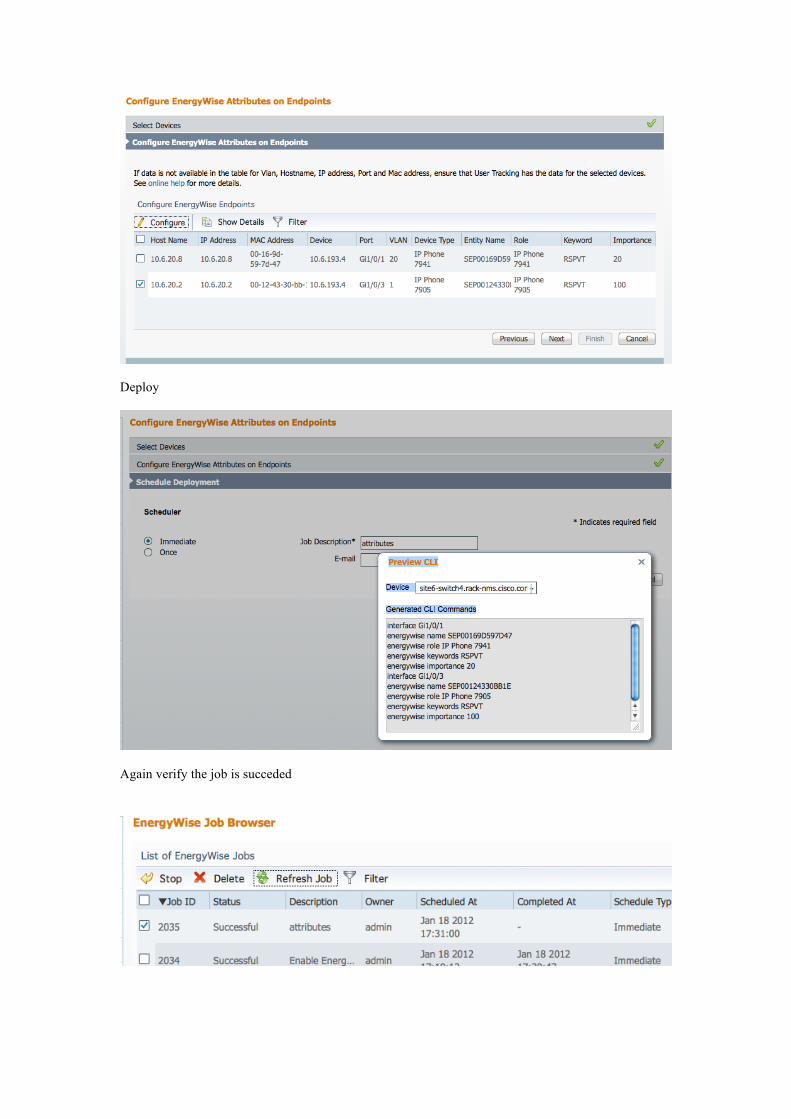
Deploy
Again verify the job is succeded
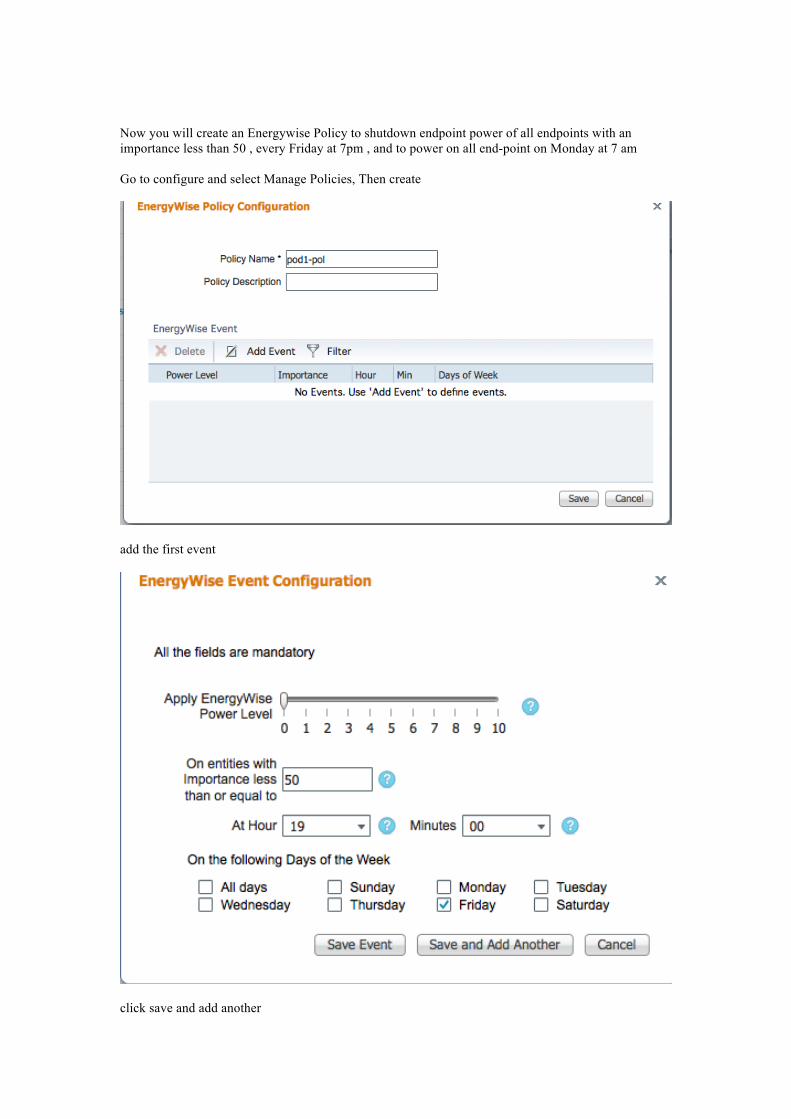
Now you will create an Energywise Policy to shutdown endpoint power of all endpoints with an importance less than 50 , every Friday at 7pm , and to power on all end-point on Monday at 7 am Go to configure and select Manage Policies, Then create
add the first event
click save and add another
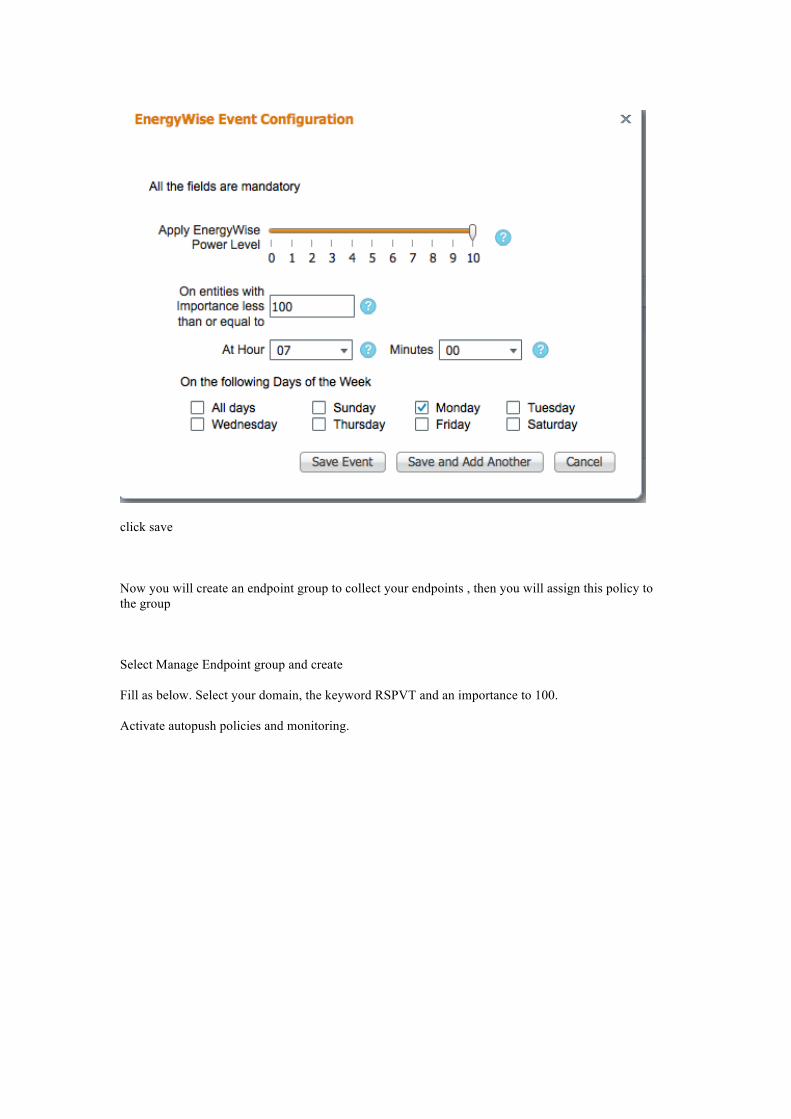
click save Now you will create an endpoint group to collect your endpoints , then you will assign this policy to the group Select Manage Endpoint group and create Fill as below. Select your domain, the keyword RSPVT and an importance to 100. Activate autopush policies and monitoring.
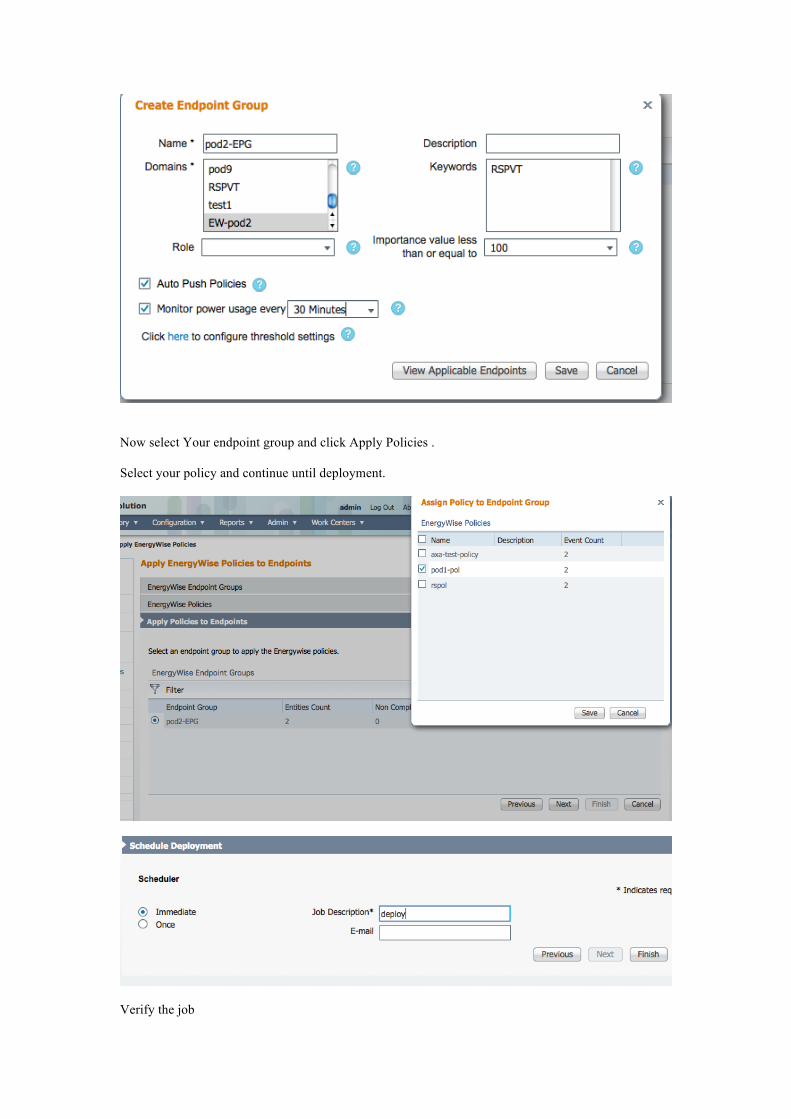
Now select Your endpoint group and click Apply Policies . Select your policy and continue until deployment.
Verify the job

You have successfully configured EnergyWise. Configure the Dasboard with your settings (click the weel to enter configuration of portlets)
Below the portlets you should get
O" =#>*F*?,0%)-*K'0;/*=PL*N061/&* Download Adobe Air from Adobe site and install it
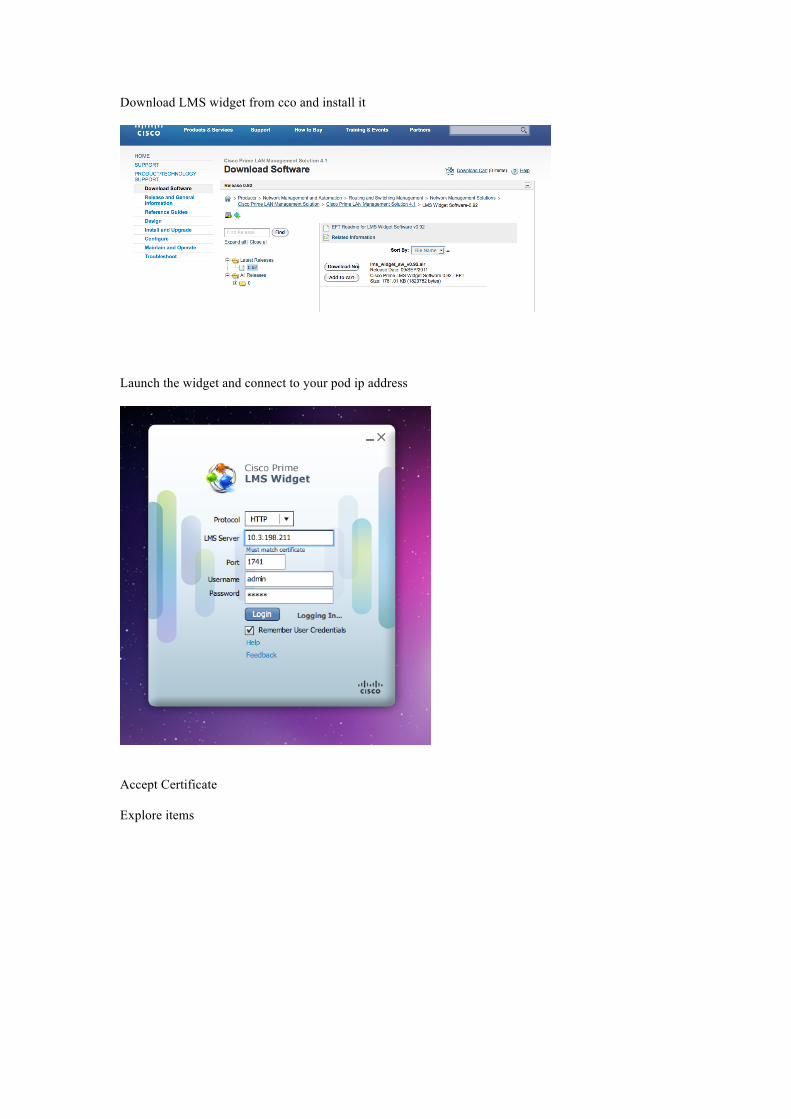
Download LMS widget from cco and install it
Launch the widget and connect to your pod ip address
Accept Certificate Explore items


![LMS Imagine[1].Lab AMESim Brochure](https://img.pdfslide.us/doc/110x75/5536ad494a79595b138b4afa/lms-imagine1lab-amesim-brochure.jpg)