Embed Size (px)
Citation preview

Lightweight Manual Wheelchair
Models: 1500 & 1530
USER MANUAL
Please ensure this manual is read and understood before using the scooter.
March 2012
Contents Page Introduction 3 Intended Use 3 Technical Specification 3 Feature Guide 4 Safety Advice 5 Opening and Folding 6 Reaching and Stretching 6 & 7 Reclining and Tilting 7 & 8 General Use / Maintenance 8 - 10 Warranty
2
Introduction Congratulations on the purchase of your new ROMA MEDICAL wheelchair. Extensive research and development combined with high quality components and stringent testing ensure that ROMA MEDICAL wheelchairs are of the highest standards. This user guide will help you to operate your wheelchair with confidence. It is important to follow the safety information in this guide, taking note of the various warnings and recommendations. Ensure that you understand these user instructions and follow the maintenance advice given. Intended Use The ROMA MEDICAL 1500 / 1530 wheelchair was designed to provide a lightweight means of mobility for users up to 110kgs (17st). The folding backrest and removable footrests make it easily transportable when not in use. Technical Specification Self Propel (1500 model) Length 107cm 42” Width 65cm 25” Height 89cm 35” Seat Height 52cm 20” (incl 2” cushion) Seat Depth 40cm 16” Seat Width 45cm 18” Seat to Footrest 40 – 50cm 16 – 20” Overall Weight 13kgs 29lbs Maximum User Weight 110 kgs 17 stone Attendant Propel (1530 model) Length 92cm 36” Width 62cm 24” Height 89cm 35” Seat Height 52cm 20” (incl 2” cushion) Seat Depth 40cm 16” Seat Width 45cm 18” Seat to Footrest 40 – 50cm 16 – 20” Overall Weight 13kgs 29lbs Maximum User Weight 110 kgs 17 stone
3
Feature Guide
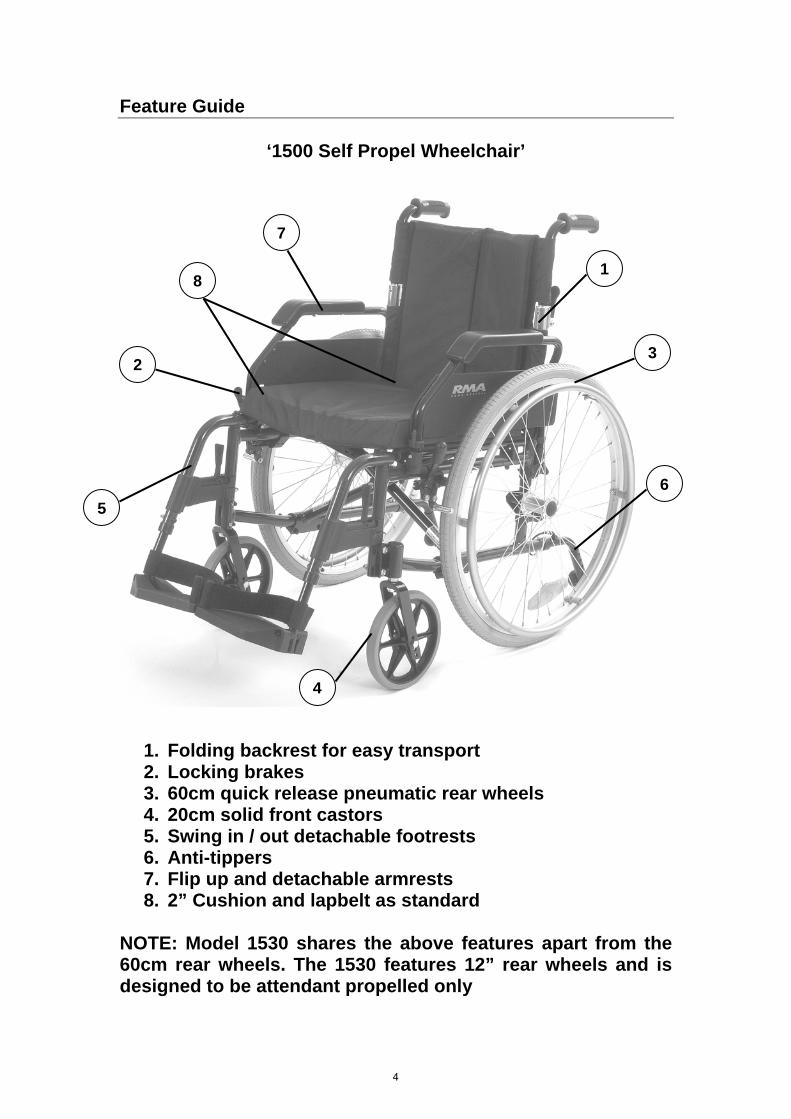
‘1500 Self Propel Wheelchair’
1. Folding backrest for easy transport 2. Locking brakes 3. 60cm quick release pneumatic rear wheels 4. 20cm solid front castors 5. Swing in / out detachable footrests 6. Anti-tippers 7. Flip up and detachable armrests 8. 2” Cushion and lapbelt as standard
NOTE: Model 1530 shares the above features apart from the 60cm rear wheels. The 1530 features 12” rear wheels and is designed to be attendant propelled only
7
8 1
4
6
5
2 3
4
Safety Advice This user manual gives guide points to the most common procedures and techniques involved in the safe operation and maintenance of your wheelchair. Please practice these techniques until you are competent in manoeuvring around obstacles and feel at ease in controlling your wheelchair. The techniques described in this booklet are a starting point for a new wheelchair user, with safety being the prime consideration. Use this booklet as a basic guide. Many wheelchair users successfully use the techniques suggested on the following pages. It is also advisable that a health care professional be involved prior to your wheelchair being operated. ALWAYS ENSURE that the brakes are applied when entering or leaving the wheelchair and that when travelling in a motor vehicle the wheelchair user transfers to the motor vehicles seat and uses the safety restraints provided in the motor vehicle. SAFETY PRECAUTIONS Do not exceed the weight capacity • Do not attempt steep inclines unless your wheelchair is fitted with anti
tipping wheels and you have assistance. • Do not adjust the footrests lower than 6.5cms (2½ins) from the ground. • Do not stand on the footplates when transferring to or from the
wheelchair. This could cause the chair to tip. • Do not lean on the wheelchair or use it as a walking aid, this could
result in a loss of balance. • Do not lean / reach forward unless you have ensured the castors are in
a forward position. • Do not attempt to lift the wheelchair by the armrests or leg rests if they
are of the removable type. • Do not replace or fit any other parts other than ROMA MEDICAL parts
to your wheelchair. • Do not fix any restraints to the wheels of the wheelchair. • Ensure that the brakes are clean and adjusted correctly. Brakes can
fail if the tyres are not inflated correctly. • Do not carry bags on the push handles as this may compromise
stability on inclines and uneven surfaces. Removing the wheelchair from its carton Tip the carton on to its side (narrow edge) with the wheelchair’s pushing handles pointing to the floor. Slightly raise the pushing handles and wheel the chair from its carton. This procedure alleviates the need to lift the wheelchair above waist height.
5
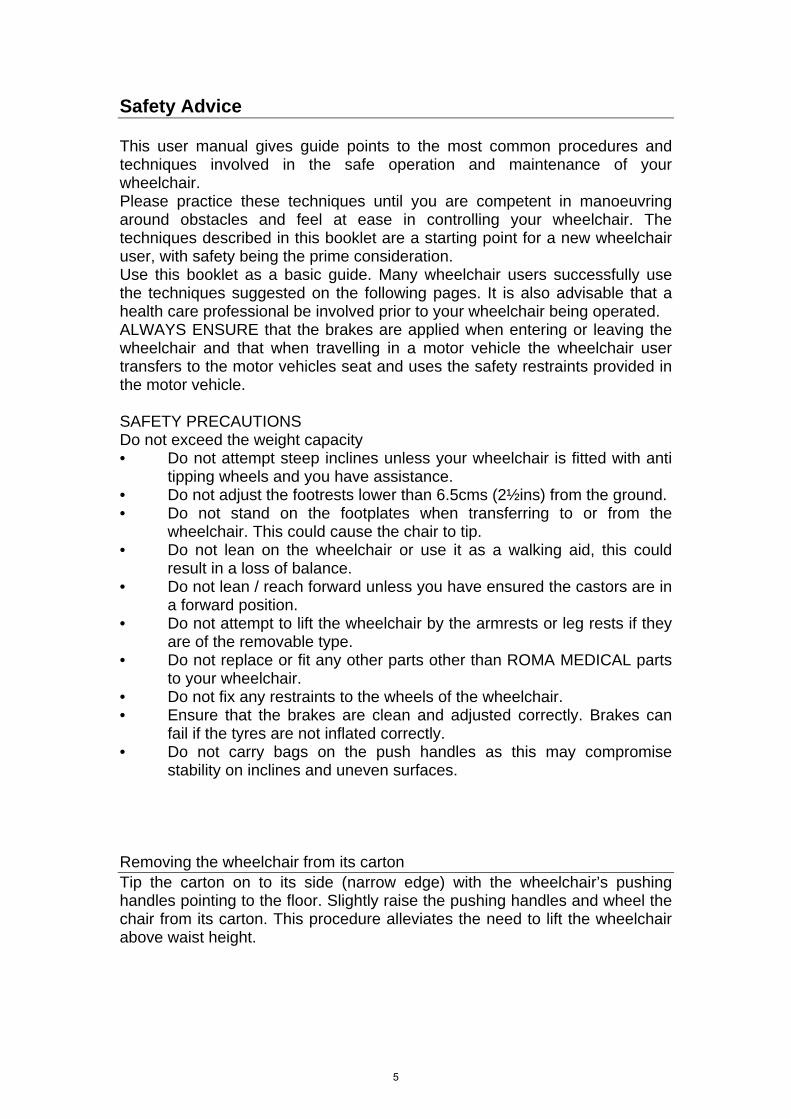
OPENING AND FOLDING THE WHEELCHAIR Opening the wheelchair Remove all outer packaging from the wheelchair. Gently pull the arms apart and the wheelchair should open. Push down on the sides of the seat to ensure that the chair is fully opened. Ensure the cross brace seat rails locate fully into the seat guides and the seat rails lie parallel with the frame tubes. Folding the wheelchair The wheelchair footplates should be lifted to the vertical position and the detachable footrests removed prior to folding. Also fold down the backrest. Grip the front edge of the seat upholstery and pull upwards. The crossbars of the wheelchair will come together closing the wheelchair. On fold down back models, fold the backrest prior to folding the chair. Reaching, leaning and bending If you find yourself having to reach lean or bend, it is important to ensure that the front castors are used to give extra stability. Position the front castors in a forward position and apply the brakes.
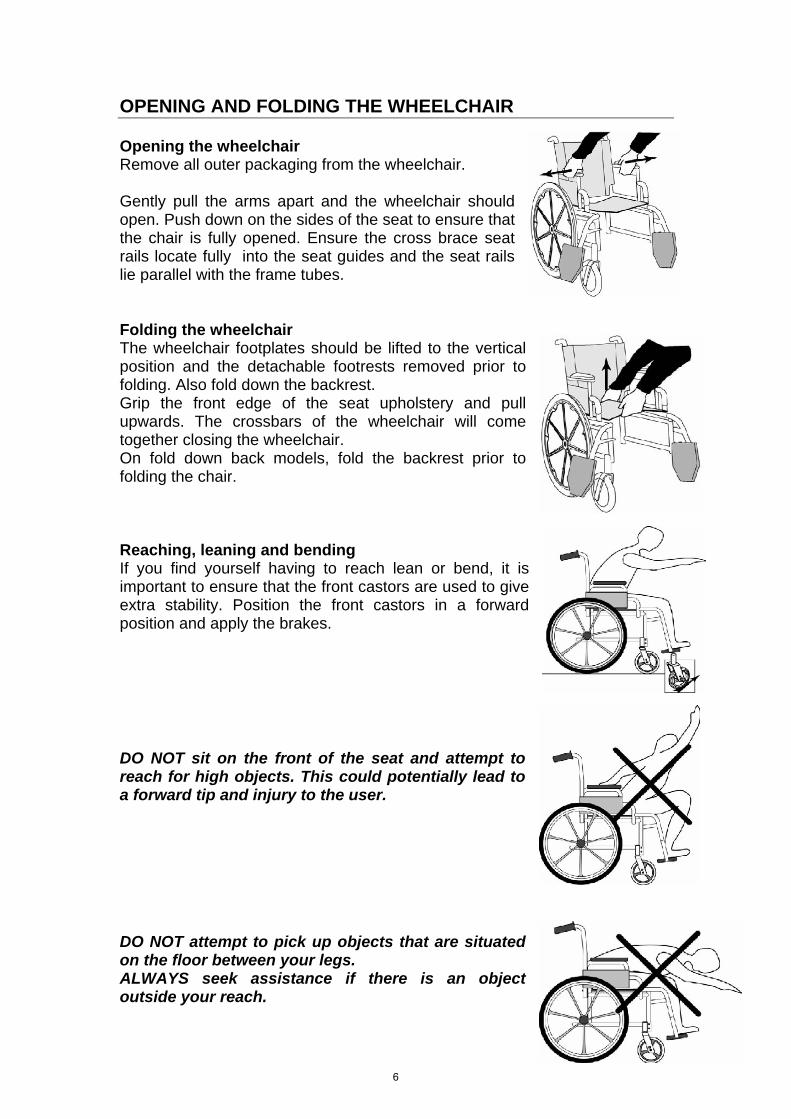
DO NOT sit on the front of the seat and attempt to reach for high objects. This could potentially lead to a forward tip and injury to the user. DO NOT attempt to pick up objects that are situated on the floor between your legs. ALWAYS seek assistance if there is an object outside your reach.
6
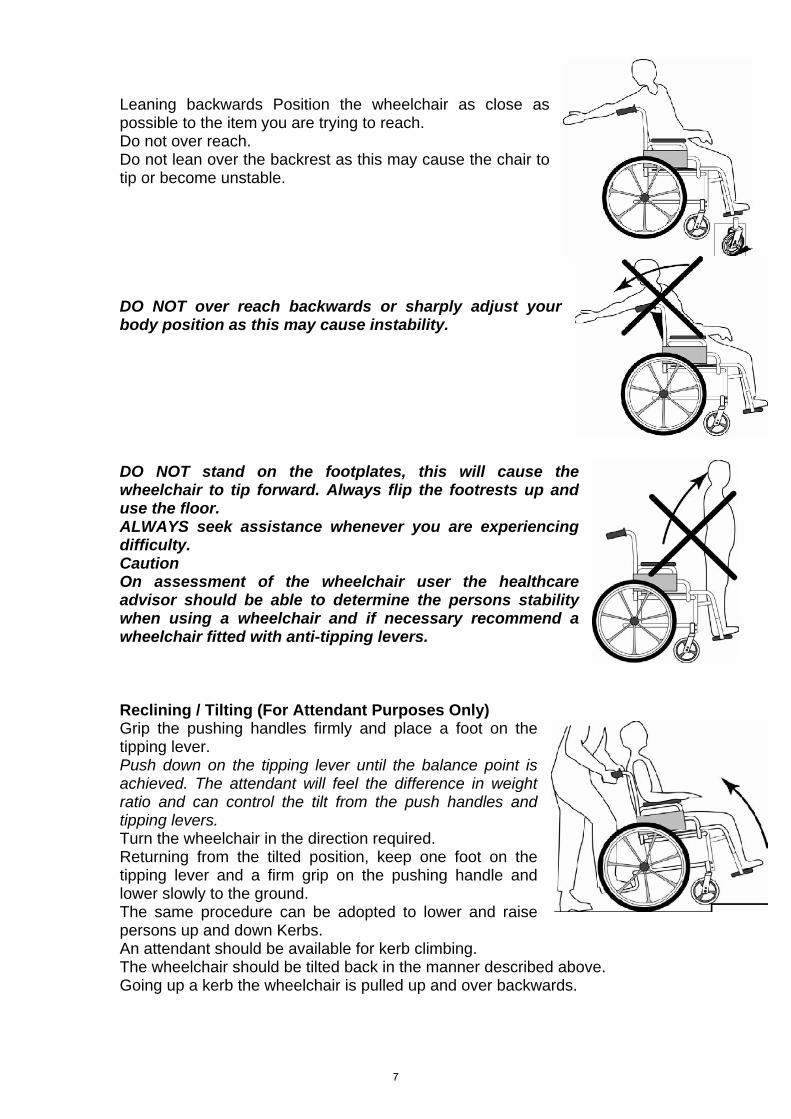
Leaning backwards Position the wheelchair as close as possible to the item you are trying to reach. Do not over reach. Do not lean over the backrest as this may cause the chair to tip or become unstable. DO NOT over reach backwards or sharply adjust your body position as this may cause instability. DO NOT stand on the footplates, this will cause the wheelchair to tip forward. Always flip the footrests up and use the floor. ALWAYS seek assistance whenever you are experiencing difficulty. Caution On assessment of the wheelchair user the healthcare advisor should be able to determine the persons stability when using a wheelchair and if necessary recommend a wheelchair fitted with anti-tipping levers. Reclining / Tilting (For Attendant Purposes Only) Grip the pushing handles firmly and place a foot on the tipping lever. Push down on the tipping lever until the balance point is achieved. The attendant will feel the difference in weight ratio and can control the tilt from the push handles and tipping levers. Turn the wheelchair in the direction required. Returning from the tilted position, keep one foot on the tipping lever and a firm grip on the pushing handle and lower slowly to the ground. The same procedure can be adopted to lower and raise persons up and down Kerbs. An attendant should be available for kerb climbing. The wheelchair should be tilted back in the manner described above. Going up a kerb the wheelchair is pulled up and over backwards.
7
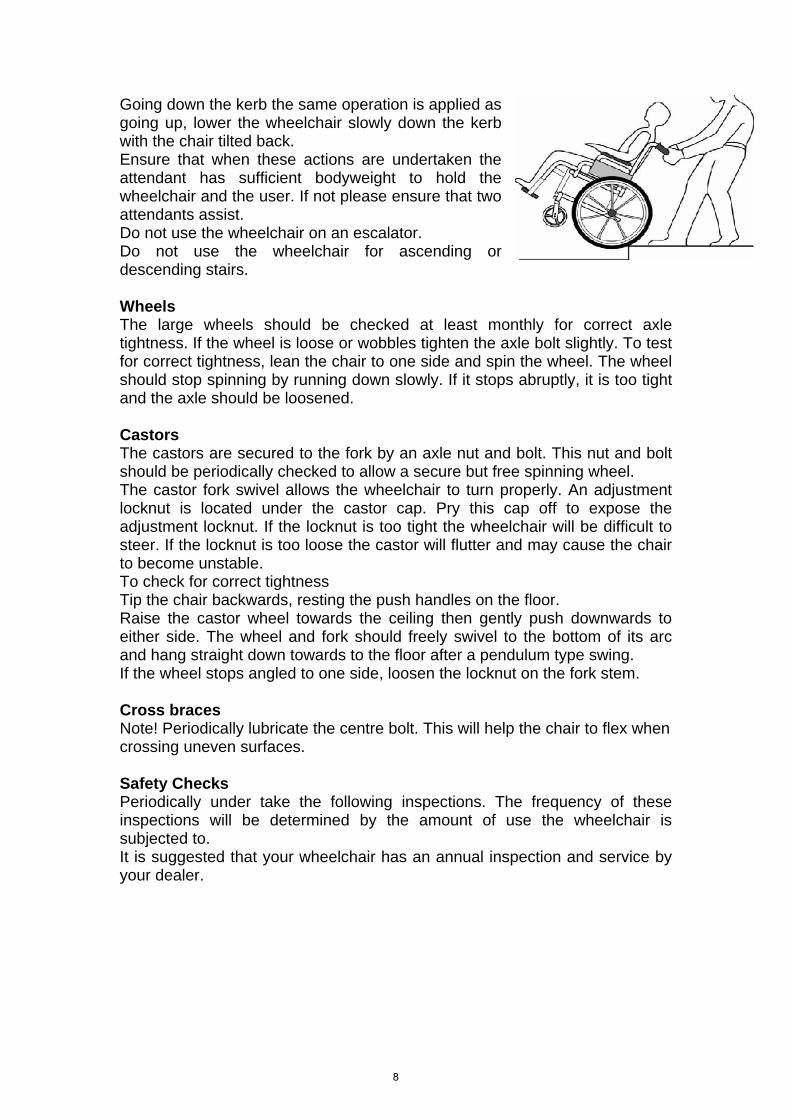
Going down the kerb the same operation is applied as going up, lower the wheelchair slowly down the kerb with the chair tilted back. Ensure that when these actions are undertaken the attendant has sufficient bodyweight to hold the wheelchair and the user. If not please ensure that two attendants assist. Do not use the wheelchair on an escalator. Do not use the wheelchair for ascending or descending stairs. Wheels The large wheels should be checked at least monthly for correct axle tightness. If the wheel is loose or wobbles tighten the axle bolt slightly. To test for correct tightness, lean the chair to one side and spin the wheel. The wheel should stop spinning by running down slowly. If it stops abruptly, it is too tight and the axle should be loosened. Castors The castors are secured to the fork by an axle nut and bolt. This nut and bolt should be periodically checked to allow a secure but free spinning wheel. The castor fork swivel allows the wheelchair to turn properly. An adjustment locknut is located under the castor cap. Pry this cap off to expose the adjustment locknut. If the locknut is too tight the wheelchair will be difficult to steer. If the locknut is too loose the castor will flutter and may cause the chair to become unstable. To check for correct tightness Tip the chair backwards, resting the push handles on the floor. Raise the castor wheel towards the ceiling then gently push downwards to either side. The wheel and fork should freely swivel to the bottom of its arc and hang straight down towards to the floor after a pendulum type swing. If the wheel stops angled to one side, loosen the locknut on the fork stem. Cross braces Note! Periodically lubricate the centre bolt. This will help the chair to flex when crossing uneven surfaces. Safety Checks Periodically under take the following inspections. The frequency of these inspections will be determined by the amount of use the wheelchair is subjected to. It is suggested that your wheelchair has an annual inspection and service by your dealer.
8
General Wheelchair opens and closes smoothly Wheelchair runs straight (no excessive drag or pull to one side) Brakes Brakes do not rub on the wheels when moving. Brakes are easy to apply. No loose linkages on the brake Cross braces Inspect for wear or bends. Pivot bolt is secure, but slides freely. Skirt guards Inspect for damage, broken panels or sharp edges. Self-taping screws or rivets are secure. Armrests Check for damage Ensure armpads are screwed firmly in place. Seat and back Check edges for tears Check for excessive stretch. 24" & 12" wheels No excessive side movement when wheels are spun. Axle lock nuts are secure. 8" castor wheel bushes
Inspect stem for correct tension by spinning the castor. Castor should come to a gradual stop. Adjust tension on lock nut. If wobble persists replace bearings.
Tyres Inspect for wear. Ensure tyres are inflated to the correct pressure. (25psi)
9
Maintenance Whenever any part of your wheelchair is not functioning properly, a hazardous situation could result. Periodic inspection, adjustment and replacement of worn parts will provide many years of trouble free performance. Upholstery cleaning Use hand warm soapy water. Caution! Do not use paint remover, or solvents on the upholstery. Metal Parts Clean all metal parts with warm soapy water. Caution! Do not use strong detergents, abrasive cleaner or any other material that will scratch the finish Tyres Periodically examine tyres for wear and replace as needed. Pneumatic tyres should be checked weekly and kept properly inflated (see tyre side wall for recommended inflation level). Solid tyres should be replaced when they become loose on the rim or when they are cracked or worn. Stability You should always be aware of your surroundings and take care not to enter a situation where your wheelchair may become unstable. This would generally be due to adverse inclines or uneven ground. Lap Belt Adjustment Your lap belt is a standard feature on your wheelchair which has been factory fitted. Your dealer should demonstrate how the lap belt should be adjusted. The purpose of the lap belt is to ensure that the user is seated in their most comfortable, safe position. Adjustment of your lap belt Ensure that you are sitting back fully into the seat with the pelvis as upright as possible and not leaning to one side. Close the buckle and position the belt so that the hip bones can be felt above the lap belt. Adjust the strap length by pulling on the open end of the belt. As a guide, the belt should be adjusted so that there is sufficient room for two fingers to slide between your body and the belt. Warning: Should any damage occur to the lapbelt, please replace immediately. The user should transfer to a bespoke vehicle seat whilst being transported. DO NOT sit in the wheelchair whilst in any moving vehicle.
10
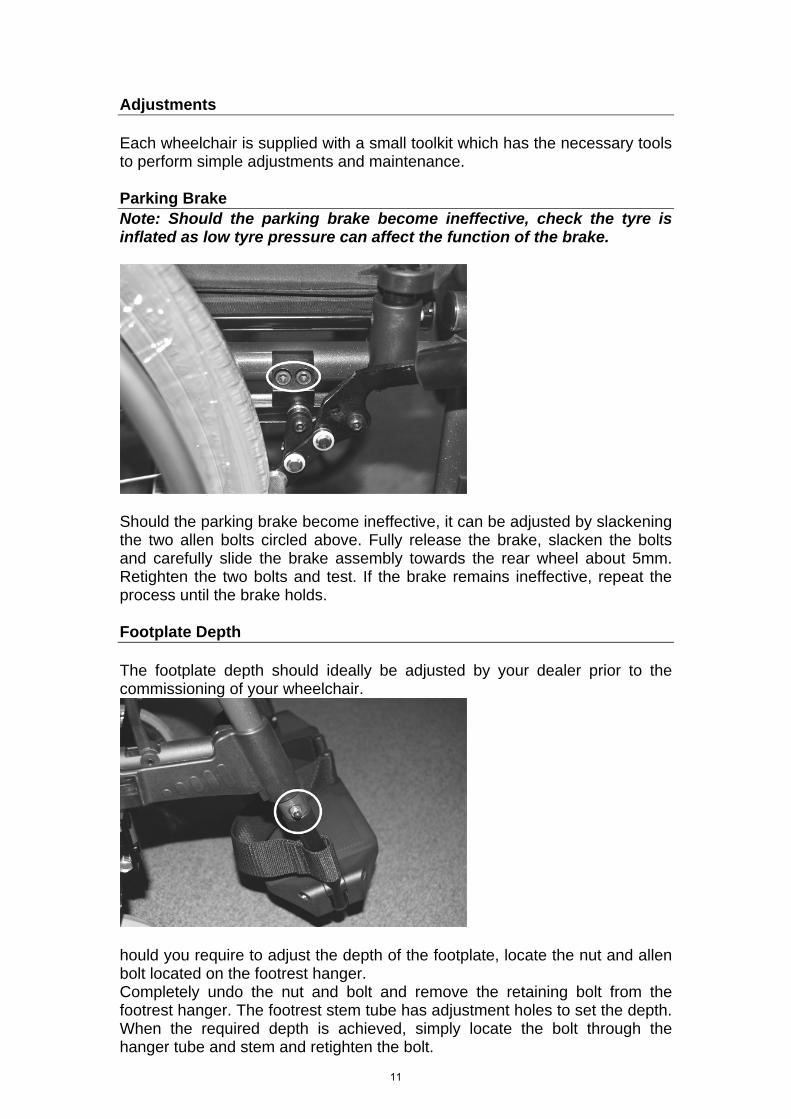
Adjustments Each wheelchair is supplied with a small toolkit which has the necessary tools to perform simple adjustments and maintenance. Parking Brake Note: Should the parking brake become ineffective, check the tyre is inflated as low tyre pressure can affect the function of the brake.
Should the parking brake become ineffective, it can be adjusted by slackening the two allen bolts circled above. Fully release the brake, slacken the bolts and carefully slide the brake assembly towards the rear wheel about 5mm. Retighten the two bolts and test. If the brake remains ineffective, repeat the process until the brake holds. Footplate Depth The footplate depth should ideally be adjusted by your dealer prior to the commissioning of your wheelchair.
hould you require to adjust the depth of the footplate, locate the nut and allen bolt located on the footrest hanger. Completely undo the nut and bolt and remove the retaining bolt from the footrest hanger. The footrest stem tube has adjustment holes to set the depth. When the required depth is achieved, simply locate the bolt through the hanger tube and stem and retighten the bolt.
11
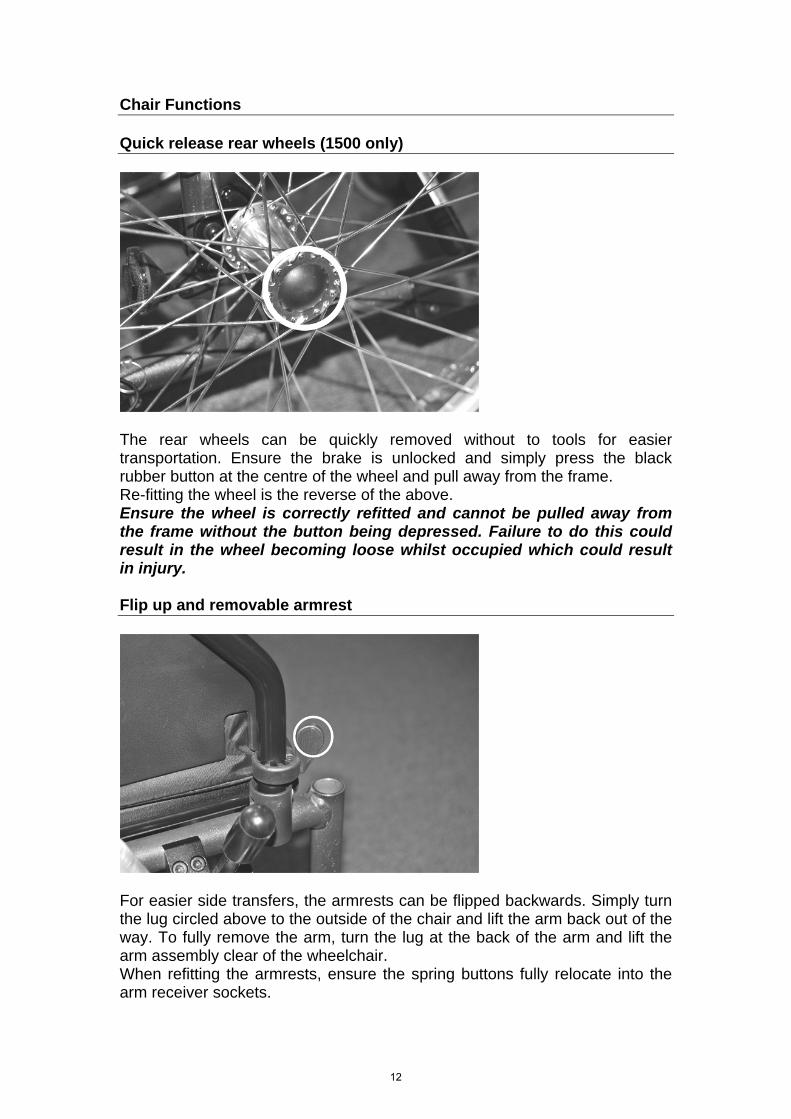
Chair Functions Quick release rear wheels (1500 only)
The rear wheels can be quickly removed without to tools for easier transportation. Ensure the brake is unlocked and simply press the black rubber button at the centre of the wheel and pull away from the frame. Re-fitting the wheel is the reverse of the above. Ensure the wheel is correctly refitted and cannot be pulled away from the frame without the button being depressed. Failure to do this could result in the wheel becoming loose whilst occupied which could result in injury. Flip up and removable armrest
For easier side transfers, the armrests can be flipped backwards. Simply turn the lug circled above to the outside of the chair and lift the arm back out of the way. To fully remove the arm, turn the lug at the back of the arm and lift the arm assembly clear of the wheelchair. When refitting the armrests, ensure the spring buttons fully relocate into the arm receiver sockets.
12
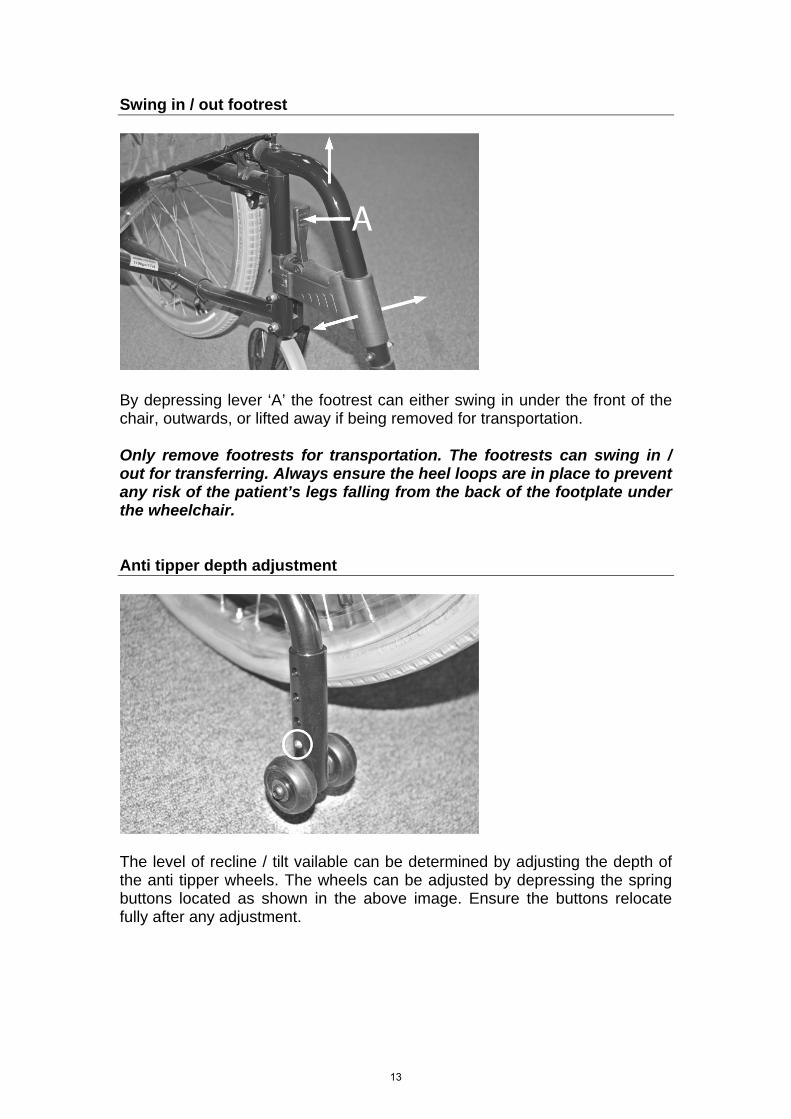
Swing in / out footrest
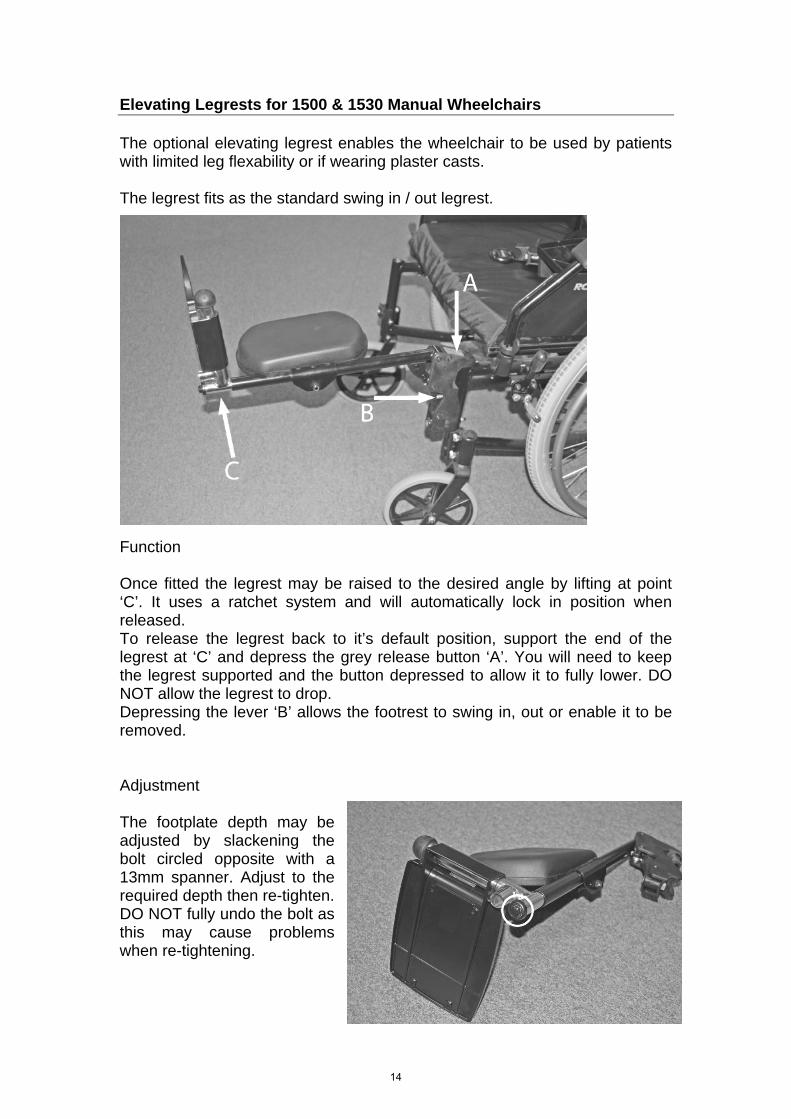
By depressing lever ‘A’ the footrest can either swing in under the front of the chair, outwards, or lifted away if being removed for transportation. Only remove footrests for transportation. The footrests can swing in / out for transferring. Always ensure the heel loops are in place to prevent any risk of the patient’s legs falling from the back of the footplate under the wheelchair. Anti tipper depth adjustment
The level of recline / tilt vailable can be determined by adjusting the depth of the anti tipper wheels. The wheels can be adjusted by depressing the spring buttons located as shown in the above image. Ensure the buttons relocate fully after any adjustment.
13
Elevating Legrests for 1500 & 1530 Manual Wheelchairs The optional elevating legrest enables the wheelchair to be used by patients with limited leg flexability or if wearing plaster casts. The legrest fits as the standard swing in / out legrest.
Function Once fitted the legrest may be raised to the desired angle by lifting at point ‘C’. It uses a ratchet system and will automatically lock in position when released. To release the legrest back to it’s default position, support the end of the legrest at ‘C’ and depress the grey release button ‘A’. You will need to keep the legrest supported and the button depressed to allow it to fully lower. DO NOT allow the legrest to drop. Depressing the lever ‘B’ allows the footrest to swing in, out or enable it to be removed.
Adjustment The footplate depth may be adjusted by slackening the bolt circled opposite with a 13mm spanner. Adjust to the required depth then re-tighten. DO NOT fully undo the bolt as this may cause problems when re-tightening.
14

Notes
15
WARRANTY TERMS AND CONDITIONS
Standard Terms This is to certify that your ROMA MEDICAL wheelchair is guaranteed for a period of one year from the date of purchase. The warranty is not transferable. Should a defect or operating fault arise within this period the Dealer from where the product was originally purchased should be notified immediately. Failure to register the fault may invalidate the warranty. The Dealer from where the product was purchased is responsible for any warranty repairs. Roma Medical warrants that if a fault occurs within this period due to faulty workmanship or materials that the product will be repaired (or replaced at the Companys discretion) free of charge. The manufacturer will not accept liability for damage caused by any misuse, unauthorised alterations or non-observance of the instructions set out in this user manual. The guarantee excludes parts, which have been subjected to natural wear and tear during this period (Tyres, upholstery and plastic parts) Model No:…………………………… Serial No:……………………………. Purchase Date:……………………..
Roma Medical Aids Ltd York Road, Bridgend Industrial Estate, Bridgend, CF31 3TB.
T: 01656 674488 F: 01656 674499
Dealer’s Stamp
KB&S16311