Embed Size (px)
DESCRIPTION
C4C 1311 guide
Citation preview
Product Documentation PUBLICSAP Cloud for Customer November 2013
SAP Cloud for Customer Administrator Guide

Table Of Contents
1 About SAP Cloud for Customer . . . . . . . . . . . . . . . . . . . . . . . . . . . . . . . . . . . . . . . . . . . 8
2 What's New for Administrators in SAP Cloud for Customer . . . . . . . . . . . . . . . . . . 14
3 Getting Started . . . . . . . . . . . . . . . . . . . . . . . . . . . . . . . . . . . . . . . . . . . . . . . . . . . . . . . . . 203.1 Getting Started for SAP Cloud for Social Engagement Administrators . . . . . . . . . . . . . . . . . . . . . . 203.2 Getting Started for SAP Cloud for Service Administrators . . . . . . . . . . . . . . . . . . . . . . . . . . . . . . 253.3 Getting Started for SAP Cloud for Sales and Marketing Administrators . . . . . . . . . . . . . . . . . . . . . 293.4 Adding Company-Specific Help . . . . . . . . . . . . . . . . . . . . . . . . . . . . . . . . . . . . . . . . . . . . . . . . . 33
4 Business Configuration . . . . . . . . . . . . . . . . . . . . . . . . . . . . . . . . . . . . . . . . . . . . . . . . . . 354.1 Configuring Your SAP Solution . . . . . . . . . . . . . . . . . . . . . . . . . . . . . . . . . . . . . . . . . . . . . . . . . 354.2 Implementing a Project . . . . . . . . . . . . . . . . . . . . . . . . . . . . . . . . . . . . . . . . . . . . . . . . . . . . . . . 37
Implementation Projects Quick Guide . . . . . . . . . . . . . . . . . . . . . . . . . . . . . . . . . . . . . . . . . . . 37Make Changes to Your SAP Solution . . . . . . . . . . . . . . . . . . . . . . . . . . . . . . . . . . . . . . . . . . . 39Scoping Tasks . . . . . . . . . . . . . . . . . . . . . . . . . . . . . . . . . . . . . . . . . . . . . . . . . . . . . . . . . . . 42Activity List . . . . . . . . . . . . . . . . . . . . . . . . . . . . . . . . . . . . . . . . . . . . . . . . . . . . . . . . . . . . . 57Marketing Activities . . . . . . . . . . . . . . . . . . . . . . . . . . . . . . . . . . . . . . . . . . . . . . . . . . . . . . . 67Service Activities . . . . . . . . . . . . . . . . . . . . . . . . . . . . . . . . . . . . . . . . . . . . . . . . . . . . . . . . . 75Data Migration . . . . . . . . . . . . . . . . . . . . . . . . . . . . . . . . . . . . . . . . . . . . . . . . . . . . . . . . . . . 78
4.3 Reports View . . . . . . . . . . . . . . . . . . . . . . . . . . . . . . . . . . . . . . . . . . . . . . . . . . . . . . . . . . . . . . 88Configuration Change History . . . . . . . . . . . . . . . . . . . . . . . . . . . . . . . . . . . . . . . . . . . . . . . . 88Solution Proposal . . . . . . . . . . . . . . . . . . . . . . . . . . . . . . . . . . . . . . . . . . . . . . . . . . . . . . . . . 90Current Scope . . . . . . . . . . . . . . . . . . . . . . . . . . . . . . . . . . . . . . . . . . . . . . . . . . . . . . . . . . . 90Your Notes Summary . . . . . . . . . . . . . . . . . . . . . . . . . . . . . . . . . . . . . . . . . . . . . . . . . . . . . . 91
5 General Settings . . . . . . . . . . . . . . . . . . . . . . . . . . . . . . . . . . . . . . . . . . . . . . . . . . . . . . . . 935.1 HTML5 for Cloud for Customer . . . . . . . . . . . . . . . . . . . . . . . . . . . . . . . . . . . . . . . . . . . . . . . . . 93
Choosing a Default Client . . . . . . . . . . . . . . . . . . . . . . . . . . . . . . . . . . . . . . . . . . . . . . . . . . . 93Getting Started for HTML5 . . . . . . . . . . . . . . . . . . . . . . . . . . . . . . . . . . . . . . . . . . . . . . . . . . 94Creating Interactive Dashboards . . . . . . . . . . . . . . . . . . . . . . . . . . . . . . . . . . . . . . . . . . . . . . 95
5.2 Company . . . . . . . . . . . . . . . . . . . . . . . . . . . . . . . . . . . . . . . . . . . . . . . . . . . . . . . . . . . . . . . . . 97About Job Definitions . . . . . . . . . . . . . . . . . . . . . . . . . . . . . . . . . . . . . . . . . . . . . . . . . . . . . . 97VIDEO: Setting Up Service Teams . . . . . . . . . . . . . . . . . . . . . . . . . . . . . . . . . . . . . . . . . . . . . 98Setting Up Teams For Ticket Handling . . . . . . . . . . . . . . . . . . . . . . . . . . . . . . . . . . . . . . . . . . 98Setting Up Organizational Management . . . . . . . . . . . . . . . . . . . . . . . . . . . . . . . . . . . . . . . . . 101
5.3 Users . . . . . . . . . . . . . . . . . . . . . . . . . . . . . . . . . . . . . . . . . . . . . . . . . . . . . . . . . . . . . . . . . . . 104Creating Administrators in SAP Cloud for Customer . . . . . . . . . . . . . . . . . . . . . . . . . . . . . . . . 104
SAP Cloud for Customer November 2013Table Of Contents P U B L I C • © 2011, 2012, 2013 SAP AG. All rights reserved. 3
Creating or Editing Employee Data . . . . . . . . . . . . . . . . . . . . . . . . . . . . . . . . . . . . . . . . . . . . . 106Business Users Quick Guide . . . . . . . . . . . . . . . . . . . . . . . . . . . . . . . . . . . . . . . . . . . . . . . . . 107Configure Your Solution for Single Sign-On . . . . . . . . . . . . . . . . . . . . . . . . . . . . . . . . . . . . . . . 112Handling Authorization Restrictions . . . . . . . . . . . . . . . . . . . . . . . . . . . . . . . . . . . . . . . . . . . . 113Business Roles . . . . . . . . . . . . . . . . . . . . . . . . . . . . . . . . . . . . . . . . . . . . . . . . . . . . . . . . . . . 118Security Policies Quick Guide . . . . . . . . . . . . . . . . . . . . . . . . . . . . . . . . . . . . . . . . . . . . . . . . . 125Data Privacy Management . . . . . . . . . . . . . . . . . . . . . . . . . . . . . . . . . . . . . . . . . . . . . . . . . . . 128
5.4 Products . . . . . . . . . . . . . . . . . . . . . . . . . . . . . . . . . . . . . . . . . . . . . . . . . . . . . . . . . . . . . . . . . 130Creating or Editing Products . . . . . . . . . . . . . . . . . . . . . . . . . . . . . . . . . . . . . . . . . . . . . . . . . 130About Product Categories . . . . . . . . . . . . . . . . . . . . . . . . . . . . . . . . . . . . . . . . . . . . . . . . . . . 131
5.5 System Administration . . . . . . . . . . . . . . . . . . . . . . . . . . . . . . . . . . . . . . . . . . . . . . . . . . . . . . . 133About Incidents . . . . . . . . . . . . . . . . . . . . . . . . . . . . . . . . . . . . . . . . . . . . . . . . . . . . . . . . . . 133Business Communication Monitoring . . . . . . . . . . . . . . . . . . . . . . . . . . . . . . . . . . . . . . . . . . . 142Web Service Message Monitoring Quick Guide . . . . . . . . . . . . . . . . . . . . . . . . . . . . . . . . . . . . 147
5.6 Integration . . . . . . . . . . . . . . . . . . . . . . . . . . . . . . . . . . . . . . . . . . . . . . . . . . . . . . . . . . . . . . . . 149Communication Systems Quick Guide . . . . . . . . . . . . . . . . . . . . . . . . . . . . . . . . . . . . . . . . . . 149Communication Arrangements Quick Guide . . . . . . . . . . . . . . . . . . . . . . . . . . . . . . . . . . . . . . 151SAP Jam . . . . . . . . . . . . . . . . . . . . . . . . . . . . . . . . . . . . . . . . . . . . . . . . . . . . . . . . . . . . . . . 155Enabling SAP Jam Integration . . . . . . . . . . . . . . . . . . . . . . . . . . . . . . . . . . . . . . . . . . . . . . . . 156Configuring an External Customer Service Portal . . . . . . . . . . . . . . . . . . . . . . . . . . . . . . . . . . . 159Integration with SAP Real-Time Offer Management . . . . . . . . . . . . . . . . . . . . . . . . . . . . . . . . . 161
5.7 Work Distribution . . . . . . . . . . . . . . . . . . . . . . . . . . . . . . . . . . . . . . . . . . . . . . . . . . . . . . . . . . . 166VIDEO: Defining Routing Rules for Tickets . . . . . . . . . . . . . . . . . . . . . . . . . . . . . . . . . . . . . . . . 166Defining Rules for Ticket Routing . . . . . . . . . . . . . . . . . . . . . . . . . . . . . . . . . . . . . . . . . . . . . . 166
6 Workflow . . . . . . . . . . . . . . . . . . . . . . . . . . . . . . . . . . . . . . . . . . . . . . . . . . . . . . . . . . . . . . . 1696.1 About Business Task Management . . . . . . . . . . . . . . . . . . . . . . . . . . . . . . . . . . . . . . . . . . . . . . . 1696.2 Notification – Lead Aging . . . . . . . . . . . . . . . . . . . . . . . . . . . . . . . . . . . . . . . . . . . . . . . . . . . . . 1696.3 Notification – Opportunity Stalled . . . . . . . . . . . . . . . . . . . . . . . . . . . . . . . . . . . . . . . . . . . . . . . 1696.4 Notification Rules Quick Guide . . . . . . . . . . . . . . . . . . . . . . . . . . . . . . . . . . . . . . . . . . . . . . . . . . 1706.5 Quick Guide for Approval Processes . . . . . . . . . . . . . . . . . . . . . . . . . . . . . . . . . . . . . . . . . . . . . . 173
7 Service and Social Settings . . . . . . . . . . . . . . . . . . . . . . . . . . . . . . . . . . . . . . . . . . . . . . 1757.1 SLA Setup . . . . . . . . . . . . . . . . . . . . . . . . . . . . . . . . . . . . . . . . . . . . . . . . . . . . . . . . . . . . . . . . 175
VIDEO: Prioritizing Tickets with Service Level Agreements . . . . . . . . . . . . . . . . . . . . . . . . . . . . 175About Service Levels . . . . . . . . . . . . . . . . . . . . . . . . . . . . . . . . . . . . . . . . . . . . . . . . . . . . . . . 175About Service Categories . . . . . . . . . . . . . . . . . . . . . . . . . . . . . . . . . . . . . . . . . . . . . . . . . . . 177
7.2 Communication Channels . . . . . . . . . . . . . . . . . . . . . . . . . . . . . . . . . . . . . . . . . . . . . . . . . . . . . 179VIDEO: Setting Up E-mail Channels . . . . . . . . . . . . . . . . . . . . . . . . . . . . . . . . . . . . . . . . . . . . 179Configuring E-Mail Channels . . . . . . . . . . . . . . . . . . . . . . . . . . . . . . . . . . . . . . . . . . . . . . . . . 179Document-Based E-Mail Templates . . . . . . . . . . . . . . . . . . . . . . . . . . . . . . . . . . . . . . . . . . . . 183
7.3 Social Media . . . . . . . . . . . . . . . . . . . . . . . . . . . . . . . . . . . . . . . . . . . . . . . . . . . . . . . . . . . . . . 184Enabling Social Media Features . . . . . . . . . . . . . . . . . . . . . . . . . . . . . . . . . . . . . . . . . . . . . . . 184Social Media Channels . . . . . . . . . . . . . . . . . . . . . . . . . . . . . . . . . . . . . . . . . . . . . . . . . . . . . 185Custom Channels . . . . . . . . . . . . . . . . . . . . . . . . . . . . . . . . . . . . . . . . . . . . . . . . . . . . . . . . . 191
4 © 2011, 2012, 2013 SAP AG. All rights reserved. • P U B L I CSAP Cloud for Customer November 2013
Table Of Contents
Social Media Message Import Runs . . . . . . . . . . . . . . . . . . . . . . . . . . . . . . . . . . . . . . . . . . . . 195Configuring Social Media Message Prioritization Settings . . . . . . . . . . . . . . . . . . . . . . . . . . . . . 199
7.4 CTI . . . . . . . . . . . . . . . . . . . . . . . . . . . . . . . . . . . . . . . . . . . . . . . . . . . . . . . . . . . . . . . . . . . . . 202Enabling the Live Activity Pane . . . . . . . . . . . . . . . . . . . . . . . . . . . . . . . . . . . . . . . . . . . . . . . . 202Creating a Security Certificate for HTTPS-Enabled Computer Telephony Integration (CTI) . . . . . 202
7.5 Portal Adaptation . . . . . . . . . . . . . . . . . . . . . . . . . . . . . . . . . . . . . . . . . . . . . . . . . . . . . . . . . . . 203Adapting Support Portal Screens . . . . . . . . . . . . . . . . . . . . . . . . . . . . . . . . . . . . . . . . . . . . . . 203
7.6 Marking an Individual Customer as Obsolete . . . . . . . . . . . . . . . . . . . . . . . . . . . . . . . . . . . . . . . . 205
8 Sales and Marketing Settings . . . . . . . . . . . . . . . . . . . . . . . . . . . . . . . . . . . . . . . . . . . . 2078.1 Configuring Sales Leads . . . . . . . . . . . . . . . . . . . . . . . . . . . . . . . . . . . . . . . . . . . . . . . . . . . . . . 2078.2 Opportunities . . . . . . . . . . . . . . . . . . . . . . . . . . . . . . . . . . . . . . . . . . . . . . . . . . . . . . . . . . . . . . 210
Configuring Opportunities . . . . . . . . . . . . . . . . . . . . . . . . . . . . . . . . . . . . . . . . . . . . . . . . . . . 210Maintaining Approval Settings for Opportunities . . . . . . . . . . . . . . . . . . . . . . . . . . . . . . . . . . . 213
8.3 Sales Quotes . . . . . . . . . . . . . . . . . . . . . . . . . . . . . . . . . . . . . . . . . . . . . . . . . . . . . . . . . . . . . . 215Configuring Sales Quotes . . . . . . . . . . . . . . . . . . . . . . . . . . . . . . . . . . . . . . . . . . . . . . . . . . . 215Maintaining Approval Settings for Sales Quotes . . . . . . . . . . . . . . . . . . . . . . . . . . . . . . . . . . . . 216
8.4 Sales Target Planning . . . . . . . . . . . . . . . . . . . . . . . . . . . . . . . . . . . . . . . . . . . . . . . . . . . . . . . . 2178.5 Territory Management . . . . . . . . . . . . . . . . . . . . . . . . . . . . . . . . . . . . . . . . . . . . . . . . . . . . . . . 2198.6 Realignment of Accounts and Territories . . . . . . . . . . . . . . . . . . . . . . . . . . . . . . . . . . . . . . . . . . 2228.7 Quick Guide for Price Lists . . . . . . . . . . . . . . . . . . . . . . . . . . . . . . . . . . . . . . . . . . . . . . . . . . . . . 2268.8 Retail Execution . . . . . . . . . . . . . . . . . . . . . . . . . . . . . . . . . . . . . . . . . . . . . . . . . . . . . . . . . . . . 230
About Retail Execution . . . . . . . . . . . . . . . . . . . . . . . . . . . . . . . . . . . . . . . . . . . . . . . . . . . . . 230Activity Planner . . . . . . . . . . . . . . . . . . . . . . . . . . . . . . . . . . . . . . . . . . . . . . . . . . . . . . . . . . 231Surveys . . . . . . . . . . . . . . . . . . . . . . . . . . . . . . . . . . . . . . . . . . . . . . . . . . . . . . . . . . . . . . . . 232Enabling the Route Planner for Visits . . . . . . . . . . . . . . . . . . . . . . . . . . . . . . . . . . . . . . . . . . . 234
8.9 Response Options for Campaigns . . . . . . . . . . . . . . . . . . . . . . . . . . . . . . . . . . . . . . . . . . . . . . . 2348.10 E-Mail Templates . . . . . . . . . . . . . . . . . . . . . . . . . . . . . . . . . . . . . . . . . . . . . . . . . . . . . . . . . . . 2358.11 Create Business Data Using Microsoft Excel® . . . . . . . . . . . . . . . . . . . . . . . . . . . . . . . . . . . . . . . 2378.12 Approval Processes . . . . . . . . . . . . . . . . . . . . . . . . . . . . . . . . . . . . . . . . . . . . . . . . . . . . . . . . . 237
Enabling Approval Processes . . . . . . . . . . . . . . . . . . . . . . . . . . . . . . . . . . . . . . . . . . . . . . . . . 237Approval Processes . . . . . . . . . . . . . . . . . . . . . . . . . . . . . . . . . . . . . . . . . . . . . . . . . . . . . . . 240
9 Business Flexibility . . . . . . . . . . . . . . . . . . . . . . . . . . . . . . . . . . . . . . . . . . . . . . . . . . . . . . 2429.1 Adapting the User Interface for Your Company . . . . . . . . . . . . . . . . . . . . . . . . . . . . . . . . . . . . . . 2429.2 Administrator Adaptation Quick Guide . . . . . . . . . . . . . . . . . . . . . . . . . . . . . . . . . . . . . . . . . . . . 2439.3 VIDEO: Adapting the User Interface . . . . . . . . . . . . . . . . . . . . . . . . . . . . . . . . . . . . . . . . . . . . . . 2489.4 VIDEO: Adding Custom Fields to Reports . . . . . . . . . . . . . . . . . . . . . . . . . . . . . . . . . . . . . . . . . . 2489.5 Mashups and Web Services . . . . . . . . . . . . . . . . . . . . . . . . . . . . . . . . . . . . . . . . . . . . . . . . . . . . 2489.6 Tasks in Business Flexibility . . . . . . . . . . . . . . . . . . . . . . . . . . . . . . . . . . . . . . . . . . . . . . . . . . . . 252
Setting Up the 360 Overview . . . . . . . . . . . . . . . . . . . . . . . . . . . . . . . . . . . . . . . . . . . . . . . . . 252Adding Custom Reports to SAP Customer Insight . . . . . . . . . . . . . . . . . . . . . . . . . . . . . . . . . . 255Configuring External Search Sources . . . . . . . . . . . . . . . . . . . . . . . . . . . . . . . . . . . . . . . . . . . 256Service and Social: Tasks in Business Flexibility . . . . . . . . . . . . . . . . . . . . . . . . . . . . . . . . . . . . 257Sales: Tasks in Business Flexibility . . . . . . . . . . . . . . . . . . . . . . . . . . . . . . . . . . . . . . . . . . . . . 267
SAP Cloud for Customer November 2013Table Of Contents P U B L I C • © 2011, 2012, 2013 SAP AG. All rights reserved. 5
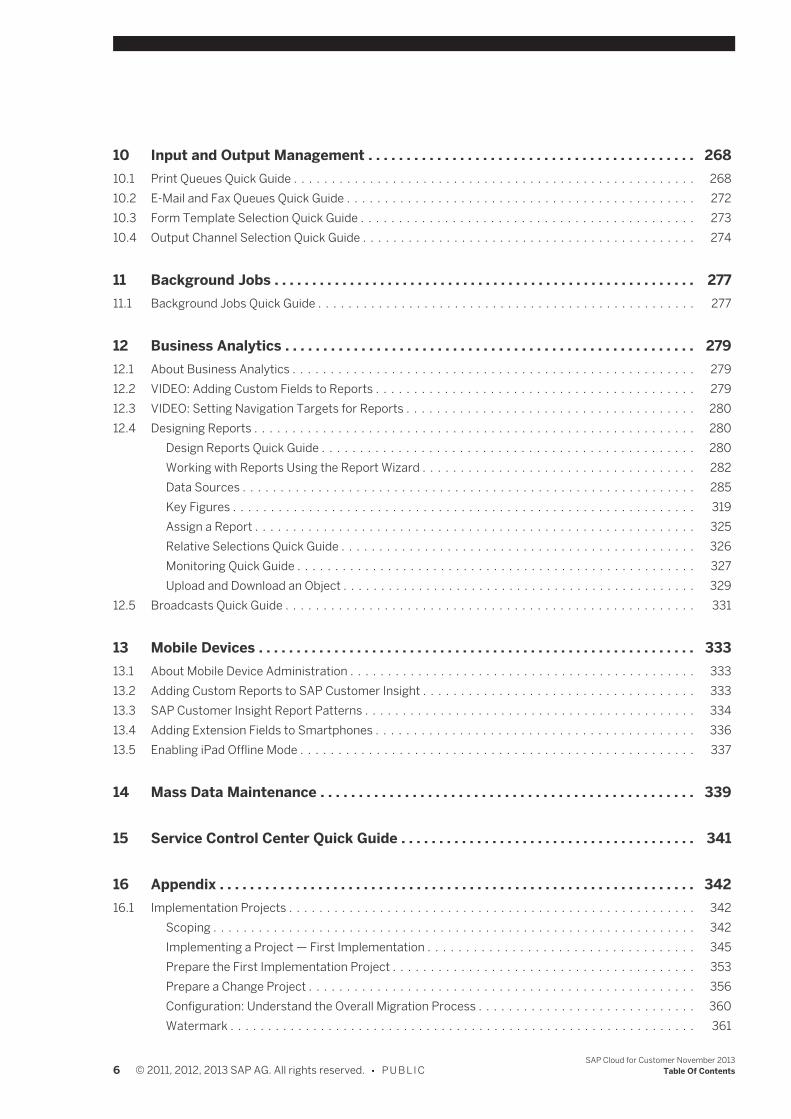
10 Input and Output Management . . . . . . . . . . . . . . . . . . . . . . . . . . . . . . . . . . . . . . . . . . . 26810.1 Print Queues Quick Guide . . . . . . . . . . . . . . . . . . . . . . . . . . . . . . . . . . . . . . . . . . . . . . . . . . . . . 26810.2 E-Mail and Fax Queues Quick Guide . . . . . . . . . . . . . . . . . . . . . . . . . . . . . . . . . . . . . . . . . . . . . . 27210.3 Form Template Selection Quick Guide . . . . . . . . . . . . . . . . . . . . . . . . . . . . . . . . . . . . . . . . . . . . 27310.4 Output Channel Selection Quick Guide . . . . . . . . . . . . . . . . . . . . . . . . . . . . . . . . . . . . . . . . . . . . 274
11 Background Jobs . . . . . . . . . . . . . . . . . . . . . . . . . . . . . . . . . . . . . . . . . . . . . . . . . . . . . . . . 27711.1 Background Jobs Quick Guide . . . . . . . . . . . . . . . . . . . . . . . . . . . . . . . . . . . . . . . . . . . . . . . . . . 277
12 Business Analytics . . . . . . . . . . . . . . . . . . . . . . . . . . . . . . . . . . . . . . . . . . . . . . . . . . . . . . 27912.1 About Business Analytics . . . . . . . . . . . . . . . . . . . . . . . . . . . . . . . . . . . . . . . . . . . . . . . . . . . . . 27912.2 VIDEO: Adding Custom Fields to Reports . . . . . . . . . . . . . . . . . . . . . . . . . . . . . . . . . . . . . . . . . . 27912.3 VIDEO: Setting Navigation Targets for Reports . . . . . . . . . . . . . . . . . . . . . . . . . . . . . . . . . . . . . . 28012.4 Designing Reports . . . . . . . . . . . . . . . . . . . . . . . . . . . . . . . . . . . . . . . . . . . . . . . . . . . . . . . . . . 280
Design Reports Quick Guide . . . . . . . . . . . . . . . . . . . . . . . . . . . . . . . . . . . . . . . . . . . . . . . . . 280Working with Reports Using the Report Wizard . . . . . . . . . . . . . . . . . . . . . . . . . . . . . . . . . . . . 282Data Sources . . . . . . . . . . . . . . . . . . . . . . . . . . . . . . . . . . . . . . . . . . . . . . . . . . . . . . . . . . . . 285Key Figures . . . . . . . . . . . . . . . . . . . . . . . . . . . . . . . . . . . . . . . . . . . . . . . . . . . . . . . . . . . . . 319Assign a Report . . . . . . . . . . . . . . . . . . . . . . . . . . . . . . . . . . . . . . . . . . . . . . . . . . . . . . . . . . 325Relative Selections Quick Guide . . . . . . . . . . . . . . . . . . . . . . . . . . . . . . . . . . . . . . . . . . . . . . . 326Monitoring Quick Guide . . . . . . . . . . . . . . . . . . . . . . . . . . . . . . . . . . . . . . . . . . . . . . . . . . . . . 327Upload and Download an Object . . . . . . . . . . . . . . . . . . . . . . . . . . . . . . . . . . . . . . . . . . . . . . . 329
12.5 Broadcasts Quick Guide . . . . . . . . . . . . . . . . . . . . . . . . . . . . . . . . . . . . . . . . . . . . . . . . . . . . . . 331
13 Mobile Devices . . . . . . . . . . . . . . . . . . . . . . . . . . . . . . . . . . . . . . . . . . . . . . . . . . . . . . . . . . 33313.1 About Mobile Device Administration . . . . . . . . . . . . . . . . . . . . . . . . . . . . . . . . . . . . . . . . . . . . . . 33313.2 Adding Custom Reports to SAP Customer Insight . . . . . . . . . . . . . . . . . . . . . . . . . . . . . . . . . . . . 33313.3 SAP Customer Insight Report Patterns . . . . . . . . . . . . . . . . . . . . . . . . . . . . . . . . . . . . . . . . . . . . 33413.4 Adding Extension Fields to Smartphones . . . . . . . . . . . . . . . . . . . . . . . . . . . . . . . . . . . . . . . . . . 33613.5 Enabling iPad Offline Mode . . . . . . . . . . . . . . . . . . . . . . . . . . . . . . . . . . . . . . . . . . . . . . . . . . . . 337
14 Mass Data Maintenance . . . . . . . . . . . . . . . . . . . . . . . . . . . . . . . . . . . . . . . . . . . . . . . . . 339
15 Service Control Center Quick Guide . . . . . . . . . . . . . . . . . . . . . . . . . . . . . . . . . . . . . . . 341
16 Appendix . . . . . . . . . . . . . . . . . . . . . . . . . . . . . . . . . . . . . . . . . . . . . . . . . . . . . . . . . . . . . . . 34216.1 Implementation Projects . . . . . . . . . . . . . . . . . . . . . . . . . . . . . . . . . . . . . . . . . . . . . . . . . . . . . . 342
Scoping . . . . . . . . . . . . . . . . . . . . . . . . . . . . . . . . . . . . . . . . . . . . . . . . . . . . . . . . . . . . . . . . 342Implementing a Project — First Implementation . . . . . . . . . . . . . . . . . . . . . . . . . . . . . . . . . . . 345Prepare the First Implementation Project . . . . . . . . . . . . . . . . . . . . . . . . . . . . . . . . . . . . . . . . 353Prepare a Change Project . . . . . . . . . . . . . . . . . . . . . . . . . . . . . . . . . . . . . . . . . . . . . . . . . . . 356Configuration: Understand the Overall Migration Process . . . . . . . . . . . . . . . . . . . . . . . . . . . . . 360Watermark . . . . . . . . . . . . . . . . . . . . . . . . . . . . . . . . . . . . . . . . . . . . . . . . . . . . . . . . . . . . . . 361
6 © 2011, 2012, 2013 SAP AG. All rights reserved. • P U B L I CSAP Cloud for Customer November 2013
Table Of Contents
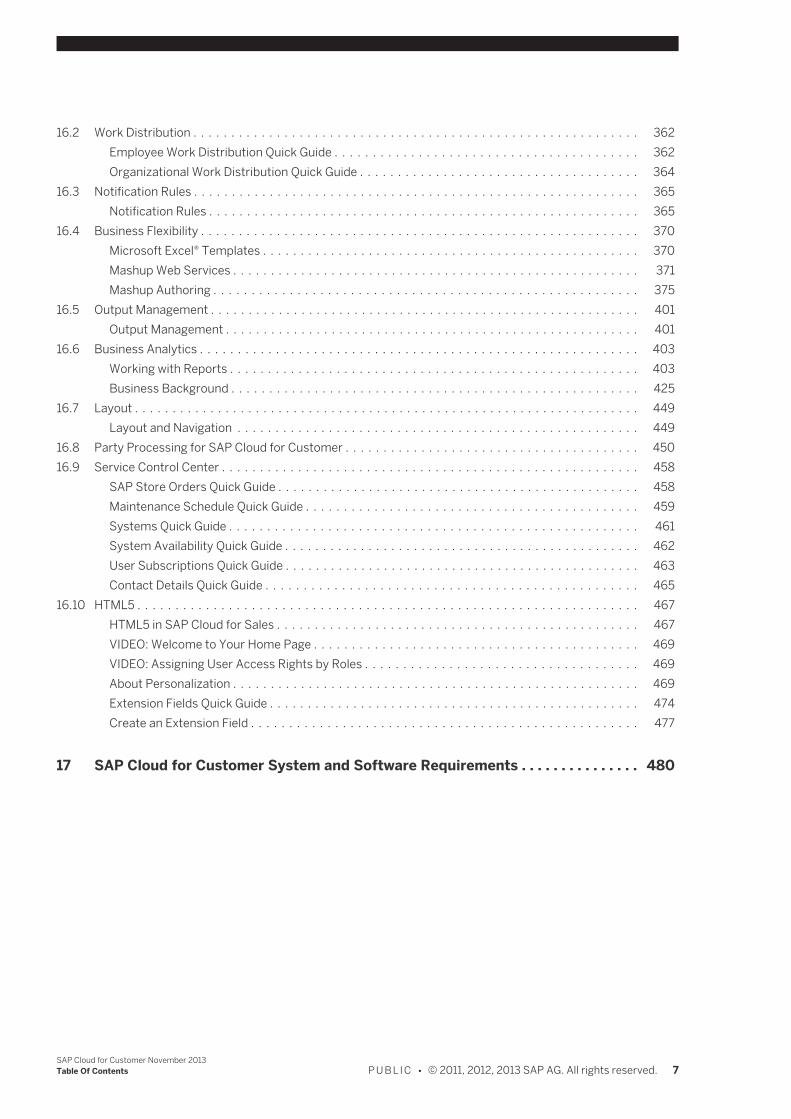
16.2 Work Distribution . . . . . . . . . . . . . . . . . . . . . . . . . . . . . . . . . . . . . . . . . . . . . . . . . . . . . . . . . . . 362Employee Work Distribution Quick Guide . . . . . . . . . . . . . . . . . . . . . . . . . . . . . . . . . . . . . . . . 362Organizational Work Distribution Quick Guide . . . . . . . . . . . . . . . . . . . . . . . . . . . . . . . . . . . . . 364
16.3 Notification Rules . . . . . . . . . . . . . . . . . . . . . . . . . . . . . . . . . . . . . . . . . . . . . . . . . . . . . . . . . . . 365Notification Rules . . . . . . . . . . . . . . . . . . . . . . . . . . . . . . . . . . . . . . . . . . . . . . . . . . . . . . . . . 365
16.4 Business Flexibility . . . . . . . . . . . . . . . . . . . . . . . . . . . . . . . . . . . . . . . . . . . . . . . . . . . . . . . . . . 370Microsoft Excel® Templates . . . . . . . . . . . . . . . . . . . . . . . . . . . . . . . . . . . . . . . . . . . . . . . . . . 370Mashup Web Services . . . . . . . . . . . . . . . . . . . . . . . . . . . . . . . . . . . . . . . . . . . . . . . . . . . . . . 371Mashup Authoring . . . . . . . . . . . . . . . . . . . . . . . . . . . . . . . . . . . . . . . . . . . . . . . . . . . . . . . . 375
16.5 Output Management . . . . . . . . . . . . . . . . . . . . . . . . . . . . . . . . . . . . . . . . . . . . . . . . . . . . . . . . . 401Output Management . . . . . . . . . . . . . . . . . . . . . . . . . . . . . . . . . . . . . . . . . . . . . . . . . . . . . . . 401
16.6 Business Analytics . . . . . . . . . . . . . . . . . . . . . . . . . . . . . . . . . . . . . . . . . . . . . . . . . . . . . . . . . . 403Working with Reports . . . . . . . . . . . . . . . . . . . . . . . . . . . . . . . . . . . . . . . . . . . . . . . . . . . . . . 403Business Background . . . . . . . . . . . . . . . . . . . . . . . . . . . . . . . . . . . . . . . . . . . . . . . . . . . . . . 425
16.7 Layout . . . . . . . . . . . . . . . . . . . . . . . . . . . . . . . . . . . . . . . . . . . . . . . . . . . . . . . . . . . . . . . . . . . 449Layout and Navigation . . . . . . . . . . . . . . . . . . . . . . . . . . . . . . . . . . . . . . . . . . . . . . . . . . . . . 449
16.8 Party Processing for SAP Cloud for Customer . . . . . . . . . . . . . . . . . . . . . . . . . . . . . . . . . . . . . . . 45016.9 Service Control Center . . . . . . . . . . . . . . . . . . . . . . . . . . . . . . . . . . . . . . . . . . . . . . . . . . . . . . . 458
SAP Store Orders Quick Guide . . . . . . . . . . . . . . . . . . . . . . . . . . . . . . . . . . . . . . . . . . . . . . . . 458Maintenance Schedule Quick Guide . . . . . . . . . . . . . . . . . . . . . . . . . . . . . . . . . . . . . . . . . . . . 459Systems Quick Guide . . . . . . . . . . . . . . . . . . . . . . . . . . . . . . . . . . . . . . . . . . . . . . . . . . . . . . 461System Availability Quick Guide . . . . . . . . . . . . . . . . . . . . . . . . . . . . . . . . . . . . . . . . . . . . . . . 462User Subscriptions Quick Guide . . . . . . . . . . . . . . . . . . . . . . . . . . . . . . . . . . . . . . . . . . . . . . . 463Contact Details Quick Guide . . . . . . . . . . . . . . . . . . . . . . . . . . . . . . . . . . . . . . . . . . . . . . . . . 465
16.10 HTML5 . . . . . . . . . . . . . . . . . . . . . . . . . . . . . . . . . . . . . . . . . . . . . . . . . . . . . . . . . . . . . . . . . . 467HTML5 in SAP Cloud for Sales . . . . . . . . . . . . . . . . . . . . . . . . . . . . . . . . . . . . . . . . . . . . . . . . 467VIDEO: Welcome to Your Home Page . . . . . . . . . . . . . . . . . . . . . . . . . . . . . . . . . . . . . . . . . . . 469VIDEO: Assigning User Access Rights by Roles . . . . . . . . . . . . . . . . . . . . . . . . . . . . . . . . . . . . 469About Personalization . . . . . . . . . . . . . . . . . . . . . . . . . . . . . . . . . . . . . . . . . . . . . . . . . . . . . . 469Extension Fields Quick Guide . . . . . . . . . . . . . . . . . . . . . . . . . . . . . . . . . . . . . . . . . . . . . . . . . 474Create an Extension Field . . . . . . . . . . . . . . . . . . . . . . . . . . . . . . . . . . . . . . . . . . . . . . . . . . . 477
17 SAP Cloud for Customer System and Software Requirements . . . . . . . . . . . . . . . 480
SAP Cloud for Customer November 2013Table Of Contents P U B L I C • © 2011, 2012, 2013 SAP AG. All rights reserved. 7

1 About SAP Cloud for Customer
SAP Cloud for Customer can be purchased along with one or more of the following separate products: ● SAP Cloud for Sales ● SAP Cloud for Service ● SAP Cloud for Social Engagement
SAP Cloud for Customer Feature MatrixThe following provides an overview of which features are available within each product.
8 © 2011, 2012, 2013 SAP AG. All rights reserved. • P U B L I CSAP Cloud for Customer November 2013
About SAP Cloud for Customer
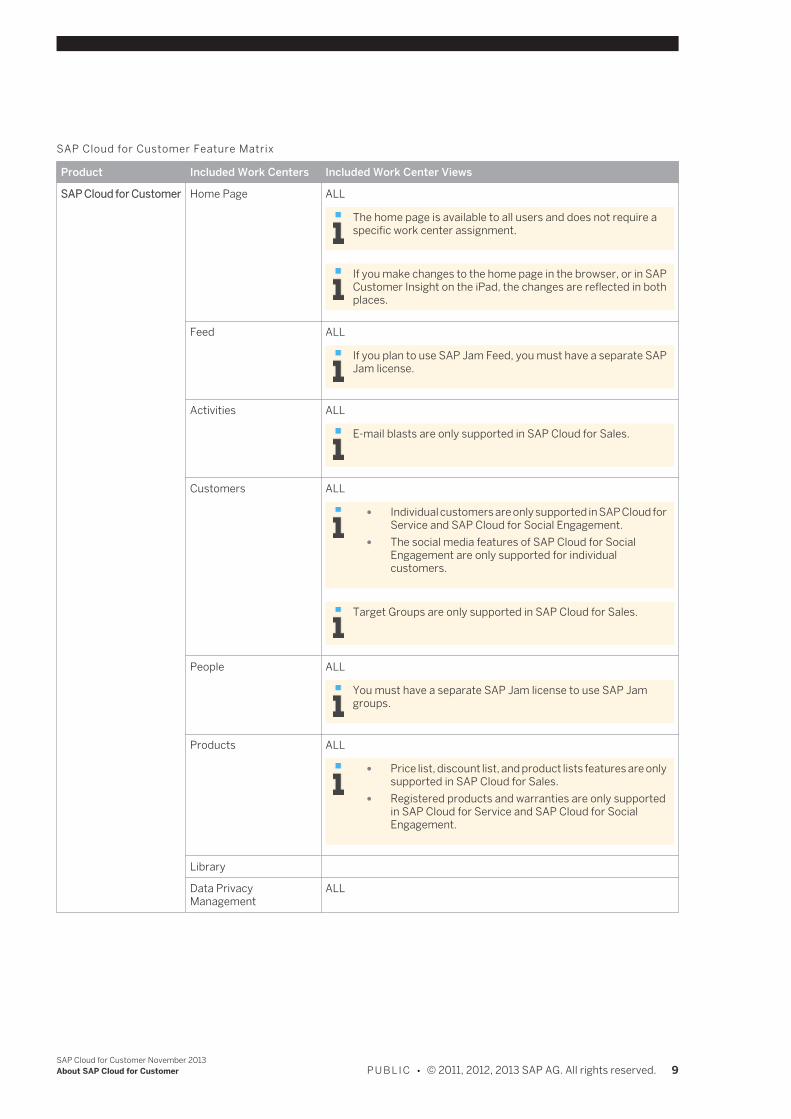
SAP Cloud for Customer Feature Matrix
Product Included Work Centers Included Work Center Views
SAP Cloud for Customer Home Page ALL
The home page is available to all users and does not require aspecific work center assignment.
If you make changes to the home page in the browser, or in SAPCustomer Insight on the iPad, the changes are reflected in bothplaces.
Feed ALL
If you plan to use SAP Jam Feed, you must have a separate SAPJam license.
Activities ALL
E-mail blasts are only supported in SAP Cloud for Sales.
Customers ALL
● Individual customers are only supported in SAP Cloud forService and SAP Cloud for Social Engagement.
● The social media features of SAP Cloud for SocialEngagement are only supported for individualcustomers.
Target Groups are only supported in SAP Cloud for Sales.
People ALL
You must have a separate SAP Jam license to use SAP Jamgroups.
Products ALL
● Price list, discount list, and product lists features are onlysupported in SAP Cloud for Sales.
● Registered products and warranties are only supportedin SAP Cloud for Service and SAP Cloud for SocialEngagement.
Library
Data PrivacyManagement
ALL
SAP Cloud for Customer November 2013About SAP Cloud for Customer P U B L I C • © 2011, 2012, 2013 SAP AG. All rights reserved. 9
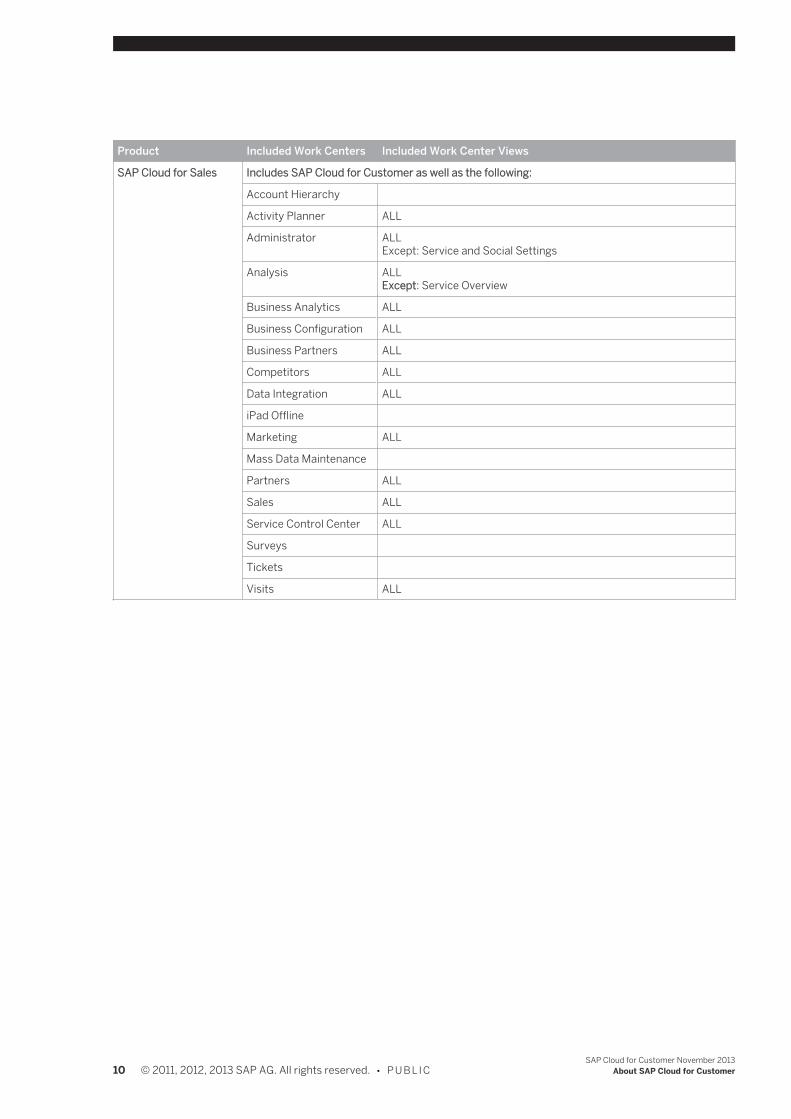
Product Included Work Centers Included Work Center Views
SAP Cloud for Sales Includes SAP Cloud for Customer as well as the following:
Account Hierarchy
Activity Planner ALL
Administrator ALLExcept: Service and Social Settings
Analysis ALLExcept: Service Overview
Business Analytics ALL
Business Configuration ALL
Business Partners ALL
Competitors ALL
Data Integration ALL
iPad Offline
Marketing ALL
Mass Data Maintenance
Partners ALL
Sales ALL
Service Control Center ALL
Surveys
Tickets
Visits ALL
10 © 2011, 2012, 2013 SAP AG. All rights reserved. • P U B L I CSAP Cloud for Customer November 2013
About SAP Cloud for Customer
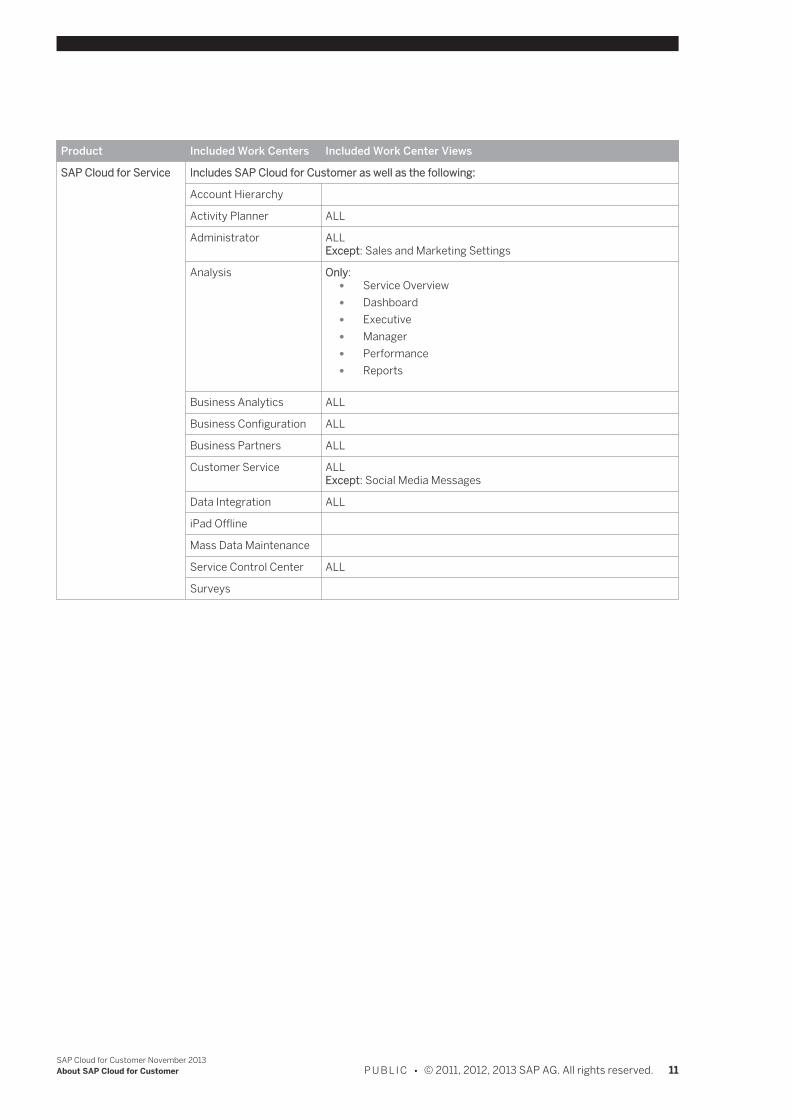
Product Included Work Centers Included Work Center Views
SAP Cloud for Service Includes SAP Cloud for Customer as well as the following:
Account Hierarchy
Activity Planner ALL
Administrator ALLExcept: Sales and Marketing Settings
Analysis Only: ● Service Overview ● Dashboard ● Executive ● Manager ● Performance ● Reports
Business Analytics ALL
Business Configuration ALL
Business Partners ALL
Customer Service ALLExcept: Social Media Messages
Data Integration ALL
iPad Offline
Mass Data Maintenance
Service Control Center ALL
Surveys
SAP Cloud for Customer November 2013About SAP Cloud for Customer P U B L I C • © 2011, 2012, 2013 SAP AG. All rights reserved. 11
Product Included Work Centers Included Work Center Views
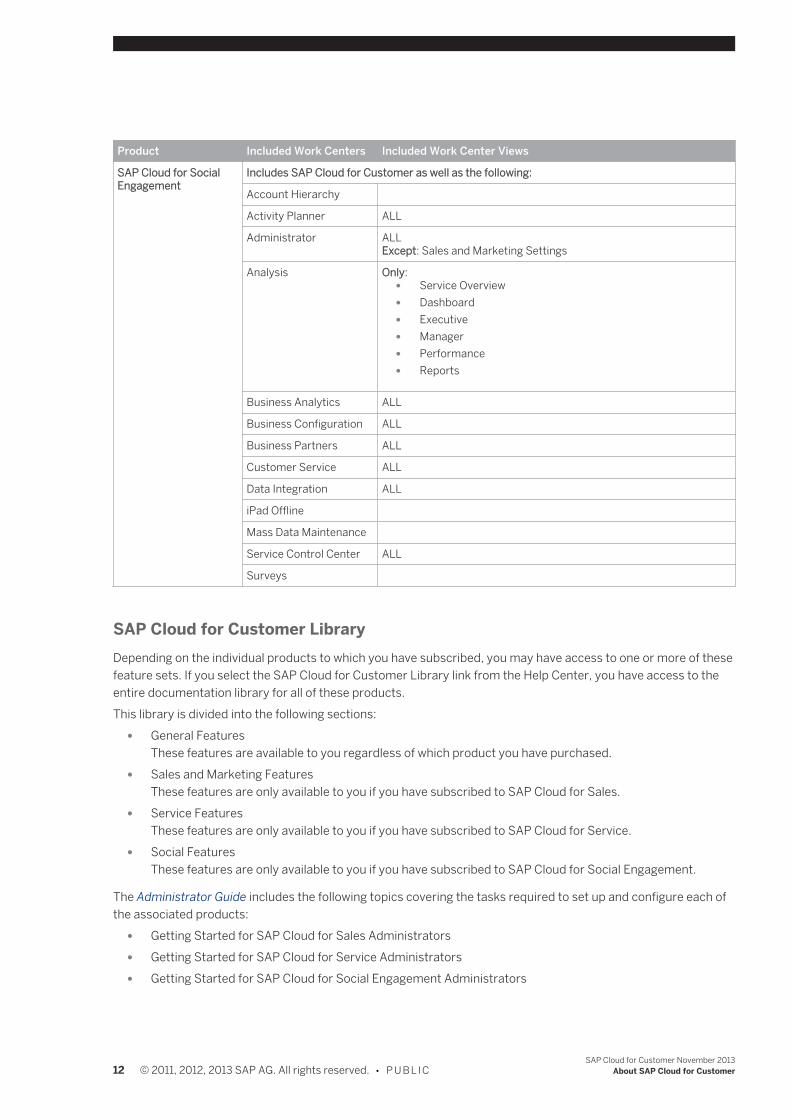
SAP Cloud for SocialEngagement
Includes SAP Cloud for Customer as well as the following:
Account Hierarchy
Activity Planner ALL
Administrator ALLExcept: Sales and Marketing Settings
Analysis Only: ● Service Overview ● Dashboard ● Executive ● Manager ● Performance ● Reports
Business Analytics ALL
Business Configuration ALL
Business Partners ALL
Customer Service ALL
Data Integration ALL
iPad Offline
Mass Data Maintenance
Service Control Center ALL
Surveys
SAP Cloud for Customer LibraryDepending on the individual products to which you have subscribed, you may have access to one or more of thesefeature sets. If you select the SAP Cloud for Customer Library link from the Help Center, you have access to theentire documentation library for all of these products.This library is divided into the following sections:
● General FeaturesThese features are available to you regardless of which product you have purchased.
● Sales and Marketing FeaturesThese features are only available to you if you have subscribed to SAP Cloud for Sales.
● Service FeaturesThese features are only available to you if you have subscribed to SAP Cloud for Service.
● Social FeaturesThese features are only available to you if you have subscribed to SAP Cloud for Social Engagement.
The Administrator Guide includes the following topics covering the tasks required to set up and configure each ofthe associated products:
● Getting Started for SAP Cloud for Sales Administrators ● Getting Started for SAP Cloud for Service Administrators ● Getting Started for SAP Cloud for Social Engagement Administrators
12 © 2011, 2012, 2013 SAP AG. All rights reserved. • P U B L I CSAP Cloud for Customer November 2013
About SAP Cloud for Customer
Even though the documentation may describe a specific feature, you will not be able to access or use thisfeature unless you have subscribed to the specific product to which it pertains as outlined in the featurematrix above.
User Interface Layout and NavigationFor more information on the UI layout and navigation of SAP Cloud for Customer, see Layout and Navigation.[page 449]
System and Software RequirementsSee: SAP Cloud for Customer System and Software Requirements [page 480]
Copyright and Trademarks© Copyright 2011, 2012, 2013 SAP AG. All rights reserved.To view the copyright in its entirety, along with important disclaimers and trademark information, see Copyrightsand Trademarks .
SAP Cloud for Customer November 2013About SAP Cloud for Customer P U B L I C • © 2011, 2012, 2013 SAP AG. All rights reserved. 13
2 What's New for Administrators in SAP Cloudfor Customer
This document provides information about what’s new and what's changed for administrators of SAP Cloud forCustomer.For more information on the new and changed features in this release, see What's New in SAP Cloud for Customer.
New and Changed Features
General FeaturesWhat's New
● Tickets Work CenterA new work center, Tickets (COD_SEOD_COLLABORATOR_WCF), is available to assign to non-agent roles inservice and sales scenarios. This work center is optimized for SAP Cloud for Customer for iPad, includingoffline mode, and allows users to view tickets as well as edit basic information.For agents who need access to full ticket processing, you still need to assign the Customer Service work center.
● Activity Planner ○ You can now create and assign activity plans for tickets under Activity Planner. Activity plans can include
tasks and surveys. This allows you to create workflows based on the ticket attributes. ○ Extension fields that exist in the Activity Planner tab can now be carried over into tasks, provided that
you enable such extension fields in the extension scenario Activity Planner — Tasks to Visit — Tasks. Formore information, see Add an Extension Field to an Extension Scenario.
● SurveysYou can now adapt the survey categories to your own needs with the Surveys fine-tune activity. It is alsopossible to delete pre-delivered categories in case you don't use them. For more information, see Surveys[page 232].
● Business Analytics: Relative SelectionsIn the Relative Selections work center view of the Business Analytics work center, administrators can createrelative selections for reports. Relative selections are useful if you do not always want to change your filter orselection values every time business users start a report. Admin-created relative selections are useful if youwant to make a specific value or range of values available and want to be able to change them centrally. Formore information, see the Relative Selections Quick Guide [page 326].
● New Determination Steps for Employee ResponsibleWhen you are activating determination steps for the Employee Responsible party role in one section of theinvolved parties in the Activities fine-tune activity of the Business Configuration work center, the followingdetermination steps are new: ○ Employee Responsible of Account Team ○ Employee Responsible of Territory Team
● Current User Determination for Custom Party RolesWhen you are activating determination steps in the corresponding Involved Parties for ... section of yourbusiness configuration for any of your custom party roles, you can now activate the determination, CurrentUser.
14 © 2011, 2012, 2013 SAP AG. All rights reserved. • P U B L I CSAP Cloud for Customer November 2013
What's New for Administrators in SAP Cloud for Customer
For more information, see Party Processing for SAP Cloud for Customer [page 450].
What's Changed ● Name and Address Changes Automatically Reflected in Related Business Documents
Now, when an agent or sales representative changes a customer or contact name or address, any existingdocuments associated with that customer or contact, like opportunities or tickets, are updated to reflect thechanges.If you do not want your solution to automatically update documents with name and address changes, thenyou need to deselect the option in scoping.You'll find the associated scoping question under General Business Data Business Partners Handlingof Business Partners .
● Business Analytics: Separate Work CenterThe Business Analytics work center has been removed from the Administrator dashboard, and is now aseparate work center. You can now assign the Business Analytics work center to non-administrators. Thisallows users working in an analyst role to create reports and design data sources without providing accessto full administrator functions. See Recommended Business Roles [page 118] for more information.
● Notification RulesThe following changes have been made to the Define Conditions step of the Notification Rules view:
● Sending of E-MailsFor notification rules of type E-Mail, you can define whether you want to receive an e-mail each timethe business object affected by the rule is changed. If you want to be notified each time the businessobject is changed, select the Always Send E-Mail checkbox. If the checkbox is not selected, the e-mailwill only be sent once.
● Cancellation of TasksFor notification rules of type Task, you can now determine whether a task is cancelled if the conditionsare no longer met. To do this, select the required value from the dropdown list of the Cancellation ofTask field.
● Value Before Object Change ComparisonYou can now compare the value of a field with the value it had before the related business object waschanged. To do this, select the Value Before Object Change checkbox while maintaining a condition.
○ Terminology Changes
Old Term New Term
expression condition
condition group (of conditions)
● Approval ProcessesThe condition maintenance in the Approval Processes view has been enhanced: You can now define ORconditions for an approval process.Conditions are structured in groups. Groups of conditions are linked with an OR. If all the conditions in at leastone of the groups are met, approval will be required.To add an OR condition to an approval process, click Add Group at the bottom of the screen under ProcessSteps. In the popup window that opens select a field and a compare operator to define a comparison with avalue or a field. The fields and values available for selection depend on the related business document. Youcan also add, edit, or remove conditions within a group (AND conditions).
The new condition maintenance is only available for newly copied approval processes. Editing ofconditions for approval processes that already exist is done in the same way as before.
● SAP Jam Feed
SAP Cloud for Customer November 2013What's New for Administrators in SAP Cloud for Customer P U B L I C • © 2011, 2012, 2013 SAP AG. All rights reserved. 15
If you have enabled SAP Jam Feed as a separate view under Feed SAP Jam Feed , you should deselectthis view (ROBUSFEEDS_WCVIEW) for all your users, as it is no longer required, and will result in two identicalviews with the same content.
● E-Mail Integration: IBM Lotus Notes® VersionThe SAP Add-In for IBM Lotus Notes supports IBM Lotus Notes 8.5.3 or higher. For more information, seeWorking from IBM Lotus Notes.
● Authorization RestrictionsTwo restriction rules for accessing activities, such as appointments or tasks, have been renamed, as follows: ○ 1 - Assigned Territories, Accounts and Employees (for Managers) has been renamed 1 - Obsolete: Assigned
Territories, Accounts and Employees (for Managers).Although this rule can still be used, we recommend that you avoid it, since it can adversely impactperformance, particularly if employees are directly assigned to account teams for many accounts.
○ 2 - Assigned Territories and Employees (for Managers) has been renamed 2 - Recommended: AssignedTerritories and Employees (for Managers).With this rule you grant access to activities using employee and/or territory assignments in the activity.We strongly recommend that you use this rule, instead of rule 1, if some of your employees are directlyassigned to many accounts.
For more information, see Handling Authorization Restrictions [page 113].
Sales FeaturesWhat's New
● SAP Cloud for Sales in HTML5You can decide how your organization accesses the solution: either with HTML5 browsers or with theMicrosoft Silverlight plug-in. For more details on the advantages of each option, see Choosing a Default Client
[page 93]. ● Multiple Territories to an Account in Territory Management
You can now scope the solution to assign multiple territories to a single account.
If you enable this feature, then opportunities and leads are no longer considered during realignmentruns, since the associated account can be assigned to more than one territory. In addition, users willhave to manually select the correct territory when creating an opportunity, sales lead, sales quote, oractivity.
For more information, see Territory Management [page 219] and Realignment of Accounts and Territories [page 222].
● Tours for Retail ExecutionYou can now allow users to organize their account visits into tours. Assign the Tours view under the Visitswork center to your relevant business users.
● Approval Processes for Opportunities and Sales QuotesYou can now use extension fields to define additional new conditions for approval processes that relate toopportunities and sales quotes items. These extension fields are supported at the item level, rather than inthe header alone, for the field types Indicator and Text. As a result, you can now define, for example, texts ofyour own choosing, and include these as conditions in the approval processes that you create for opportunitiesand sales quotes.
Extensions of numeric fields in the approval processes of opportunities and sales quotes are notsupported.
● Approval Conditions for Sales Quote EnhancedThe approval conditions for sales quotes are enhanced by the following attributes:
16 © 2011, 2012, 2013 SAP AG. All rights reserved. • P U B L I CSAP Cloud for Customer November 2013
What's New for Administrators in SAP Cloud for Customer
○ Payment Terms ○ Incoterm and Incoterms Location ○ Delivery Priority ○ Customer Group ○ Product Category
These attributes are also conditions to define flexible notifications for sales quotes. ● Flexible Notification Attributes for Opportunities Enhanced
The flexible notifications are enhances by the attributes Sales Unit Total, Negotiated Value, and Owner.
What's Changed ● Deleting Marketing Leads and Opportunities
You can now enable users, by business role, to delete certain marketing leads, as well as opportunities. Youcan also restrict users, by business role, from deleting these items. To do so, proceed as follows:1. Choose Administrator Business Roles .2. Open the applicable business role, then choose View All on the subsequent screen.3. Choose Fields & Actions.4. Under Business Action Restrictions, choose Add Row .
a. For marketing leads, specify LEAN_LEAD_DELETE, then specify the access restrictionUnrestricted or Disabled.
b. For opportunities, specify DELETE_OPPORTUNITY, then specify the appropriate access restriction.
5. Check the access rights consistency of the assignment, then save and close the business role.
If you follow this procedure to assigned unrestricted authorizations to the business role, then its users cannow choose Actions Delete from the worklist to delete certain marketing leads, as well as opportunities.
● Business Configuration: Question RenamedUnder Sales Account and Activity Management Activity Management , the Visit Reports question hasbeen renamed Summaries. For more information, see Activating Summaries.
Marketing FeaturesWhat's New
● Extension Fields for Marketing LeadsExtension fields that exist in the Marketing Leads tab can now be carried over into sales accounts, so that ifusers convert a marketing lead into an account and contact, they can continue to use extension fields fromthe marketing lead in the resultant sales account and contact. If you want such extension fields to be carriedover, then you must enable them in the extension scenario Lead — General Information to Account — GeneralInformation. For more information, see Add an Extension Field to an Extension Scenario.
● Defining Rules for Lead AssignmentThe work center view Define Rules for Lead Assignment has been relocated from the Marketing work centerto the Administrator work center, under Common Tasks.
Service FeaturesWhat's New
● Duplicate Checks for Individual CustomersThe duplicate check for business partners now includes individual customers, in addition to accounts andcontacts. You can enable this feature in scoping.
● Support Portal Features
SAP Cloud for Customer November 2013What's New for Administrators in SAP Cloud for Customer P U B L I C • © 2011, 2012, 2013 SAP AG. All rights reserved. 17
If your solution includes the SAP HANA Cloud Portal, Support Site Option, then the following new featuresare available: ○ Your customers can now create and view tickets for registered products. ○ Product and issue categories now support multiple category levels. ○ Ticket comments now include the name of the customer who commented.
What's Changed ● Support Portal Features
If your solution includes the SAP HANA Cloud Portal, Support Site Option, the following changes are available: ○ Date and time are now displayed in users' local time zones according to their system settings.
● Business Configuration: Fine-Tune Activity RenamedThe Document Types and Status for Tickets fine-tune activity has been renamed Tickets and enhanced toallow maintenance of involved parties. For more information, see Tickets [page 75].
Social FeaturesWhat's New
● Social Media Channel DetailsA new screen for viewing and editing social media channel details includes both the channel details and themessage import run details.
What's Changed ● Social Media Channel Setup
To simplify social media channel setup, the associated screens have been redesigned to provide informationon both the channel and the message import run associated with it. ○ The list of social media channels now includes an additional table of job logs for the selected channel's
import run. ○ After creating a new social media channel, you can open the channel details to create the message import
run, schedule the run, and view the jobs associated with the run.
We recommend that for each social media channel, you create a separate message import run.
● Listen Only Mode RenamedThe option for disabling responses when creating or editing a social media channel has been renamed BlockResponses.
● Facebook Channels ○ SAP no longer ships a default Facebook app so you need to map your Facebook channels to your own
Facebook apps and provide the associated app IDs and app secrets for each. ○ The URL for RSS notifications is no longer required.
● Monitoring Social Media Import RunsYou can now view the import logs directly from the list of social media channels as well as from the importrun and scheduling screens.
Integration FeaturesWhat's New
● Integration with SAP Real-Time Offer ManagementIntegration with SAP Real-Time Offer Management (RTOM) is now supported via SAP Cloud ApplicationsStudio, also known as the SDK. If you integrate SAP Cloud for Customer with RTOM via the SDK, then youcan now adapt the Accounts tab to include fields for offers, then import offers that reside in RTOM into these
18 © 2011, 2012, 2013 SAP AG. All rights reserved. • P U B L I CSAP Cloud for Customer November 2013
What's New for Administrators in SAP Cloud for Customer
accounts. Sales representatives can then identify offers that the account has accepted, and create sales leadsfrom them.For additional information, see Integration with SAP Real-Time Offer Management [page 161].
● Data Integration Work CenterYou can now use the new Data Integration work center to monitor data replication requests between SAPCloud for Customer and an integrated back-end system. To enable the work center, you must first activateit in your project scoping before you can assign it to a user. For more information about how to activate anduse the work center, refer to the relevant integration guide for your system landscape, available on SAPService Marketplace at http://service.sap.com/cloud4customer .
● Web Service Message MonitoringUnder the Input and Output Management work center view of the Application and User Management workcenter, you can now monitor and process asynchronous incoming and outgoing messages. For moreinformation, see the Web Service Message Monitoring Quick Guide [page 147].
What's ChangedIn business configuration, scoping element Microsoft Outlook Integration is now called Integration with Local E-MailApplications. This change reflects the fact that the SAP cloud solution can integrate with either Microsoft Outlook®or IBM Lotus Notes®.
How-To VideosAdditional training videos for administrators have been published. To watch them, see How-To Videos.
See AlsoEnabling Features in Scoping for SAP Cloud for Sales [page 42]Enabling Features in Scoping for SAP Cloud for Service or Social Engagement [page 47]
SAP Cloud for Customer November 2013What's New for Administrators in SAP Cloud for Customer P U B L I C • © 2011, 2012, 2013 SAP AG. All rights reserved. 19
3 Getting Started
3.1 Getting Started for SAP Cloud for Social EngagementAdministrators
As an administrator, you are responsible for setting up the system and making all the necessary initial settings, suchas creating users, setting up social media channels, and establishing teams for ticket routing. After you go live, youare also responsible for regular day-to-day tasks like user management and handling incidents, as well as makingsure the system runs smoothly.
About SAP Cloud for Social EngagementSAP Cloud for Social Engagement includes all the customer service and social media features of SAP Cloud forCustomer. For more information on the work centers and work center views included in the solution, see About SAPCloud for Customer [page 8].For information on the system and software requirements, see here [page 480].For information on the solution landscape and security, refer to the SAP Cloud for Customer Security Guide availableon the SAP Service Marketplace at http://service.sap.com/cloud4customer .
Setup and Configuration Tasks
Create AdministratorsYou must create one or more administrators from your initial user before proceeding with the rest of the tasks below.For more information, see Creating Administrators in SAP Cloud for Customer [page 104].
Prepare and Configure Your First Implementation Project
Business Configuration Implementation Projects is your starting point for setting up and configuring your SAPCloud for Customer solution. Administrators can set up and adapt the SAP Cloud for Customer solution to meetyour company's specific business requirements by selecting capabilities to incorporate into your solution duringscoping. For more information about the general settings and procedures for editing your project scope, see Preparethe First Implementation Project [page 353].See AlsoImplementation Projects Quick Guide [page 37]Implementing a Project - First Implementation [page 345]
20 © 2011, 2012, 2013 SAP AG. All rights reserved. • P U B L I CSAP Cloud for Customer November 2013
Getting Started
Key Tasks and Activities for Customer Service and Social Media Features
Phase Activity
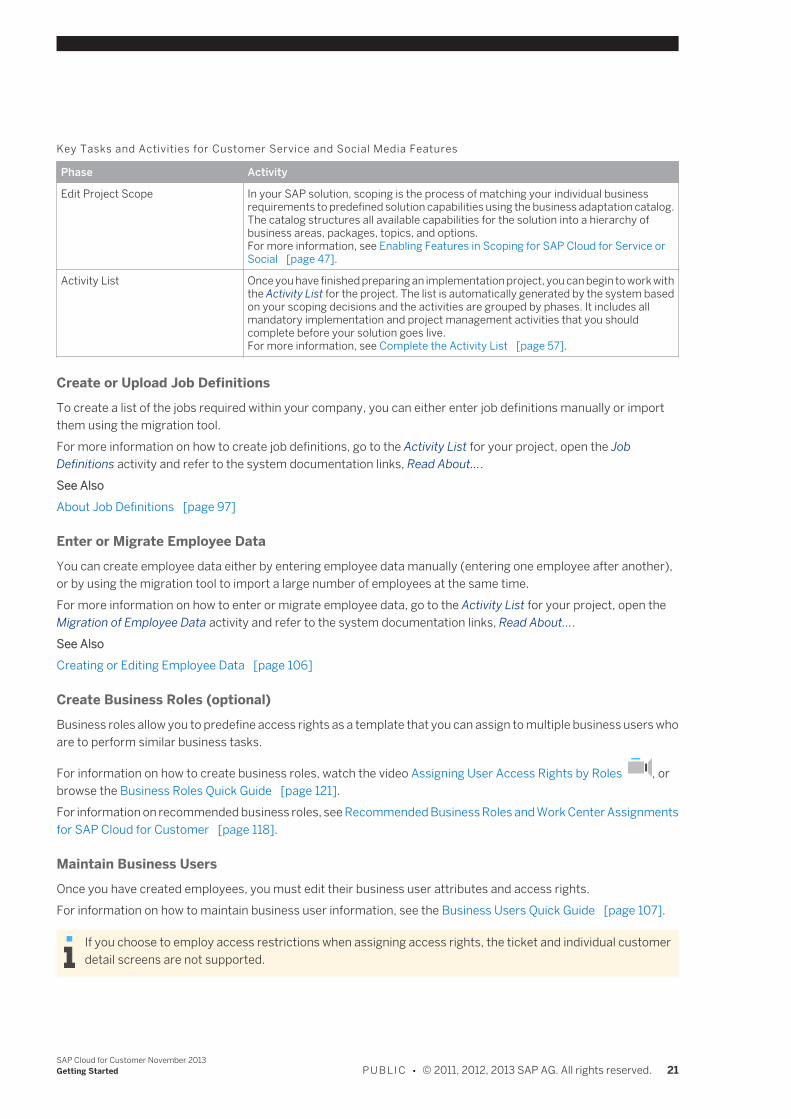
Edit Project Scope In your SAP solution, scoping is the process of matching your individual businessrequirements to predefined solution capabilities using the business adaptation catalog.The catalog structures all available capabilities for the solution into a hierarchy ofbusiness areas, packages, topics, and options.For more information, see Enabling Features in Scoping for SAP Cloud for Service orSocial [page 47].
Activity List Once you have finished preparing an implementation project, you can begin to work withthe Activity List for the project. The list is automatically generated by the system basedon your scoping decisions and the activities are grouped by phases. It includes allmandatory implementation and project management activities that you shouldcomplete before your solution goes live.For more information, see Complete the Activity List [page 57].
Create or Upload Job DefinitionsTo create a list of the jobs required within your company, you can either enter job definitions manually or importthem using the migration tool.For more information on how to create job definitions, go to the Activity List for your project, open the JobDefinitions activity and refer to the system documentation links, Read About....See AlsoAbout Job Definitions [page 97]
Enter or Migrate Employee DataYou can create employee data either by entering employee data manually (entering one employee after another),or by using the migration tool to import a large number of employees at the same time.For more information on how to enter or migrate employee data, go to the Activity List for your project, open theMigration of Employee Data activity and refer to the system documentation links, Read About....See AlsoCreating or Editing Employee Data [page 106]
Create Business Roles (optional)Business roles allow you to predefine access rights as a template that you can assign to multiple business users whoare to perform similar business tasks.
For information on how to create business roles, watch the video Assigning User Access Rights by Roles , orbrowse the Business Roles Quick Guide [page 121].For information on recommended business roles, see Recommended Business Roles and Work Center Assignmentsfor SAP Cloud for Customer [page 118].
Maintain Business UsersOnce you have created employees, you must edit their business user attributes and access rights.For information on how to maintain business user information, see the Business Users Quick Guide [page 107].
If you choose to employ access restrictions when assigning access rights, the ticket and individual customerdetail screens are not supported.
SAP Cloud for Customer November 2013Getting Started P U B L I C • © 2011, 2012, 2013 SAP AG. All rights reserved. 21
Set Up Your Organizational StructureYou can use organizational units to establish teams for ticket processing. Once you have created your org units, youcan define work distribution rules for ticket and escalation routing.For more information on how to manually set up or import your organizational structure, go to the Activity List foryour project, open the Perform Organizational Structure Setup activity and refer to the system documentation link,Read About....For information that is specific to the customer service and social media features of SAP Cloud for Customer, watch
the video Setting Up Service Teams , or see Setting Up Teams for Ticket Handling [page 98].
Add Social Media ChannelsEnabling Social Media FeaturesYour system is delivered with the social media features available but hidden. In order to access the social mediarelated administrator activities as well as enable social media related fields for agent views, you must adapt thesystem and enable the social media features.For more information, see Enabling Social Media Features [page 184].Add Twitter ChannelsIn order for the system to retrieve messages from and enable agents to respond via a Twitter handle, you must setup a social media channel for that handle.For information on how to set up this channel, see Adding a Twitter Social Media Channel [page 187].Add SAP Social Media Analytics ChannelsSAP Cloud for Social Engagement can be used with SAP Social Media Analytics for monitoring topics on Twitter andother sources. You must set up a web service for each of your SAP Social Media Analytics topics and then a socialmedia channel for each of those web services.For information on how to set up this web service, watch the video Configuring an SAP Social Media Analytics Web
Service , or see Setting up a Mashup Web Service for SAP Social Media Analytics by NetBase [page 264].For information on how to set up this channel, see Adding an SAP Social Media Analytics Channel [page 189].Add Facebook ChannelsIn order for the system to retrieve messages from a Facebook page and to enable agents to post responses back tothat page, you must set up a social media channel for the Facebook page.For information on how to set up this channel, see Adding a Facebook Social Media Channel [page 185].Add Custom ChannelsYour system can retrieve messages from custom channels created by your partners. This process also allows agentsto post responses back to the custom channel. In order to set up a custom channel in your system you must deliverdevelopment specifications to your partner and then set up the custom channel in your system.For information on how to set up custom channels, see Create A Custom Channel Type [page 191].
Schedule Social Media Message Import RunsIn order for the system to retrieve messages from your defined social media channels, you need to create and thenschedule a social media message import runs.For information, see Creating or Editing a Social Media Message Import Run [page 195].
Add E-Mail as a Communication ChannelIn order for the system to convert incoming e-mails to tickets and to allow agents to respond via e-mail, you need tomaintain the associated e-mail settings.
22 © 2011, 2012, 2013 SAP AG. All rights reserved. • P U B L I CSAP Cloud for Customer November 2013
Getting Started
For more information, watch the video Setting Up E-Mail channels , or see Configuring E-Mail Channels[page 179].
Configure Your Customer Service Portal (optional)If your system includes integration to SAP HANA Cloud Portal, Support Site Edition, you can adapt the widgets using
the Portal Adaptation screens. For more information, watch the video Support Portal Administration , or seeAdapting Support Portal Screens [page 203].If your system does not include integration to SAP HANA Cloud Portal, Support Site Edition, you can still include anexternal customer service portal integration in your scoping. You also need to add a communication system andcreate a communication arrangement for that portal.For more information see, Configuring an External Customer Service Portal [page 159].
Configure Chat (optional)To enable chat as a communication channel using your SnapEngage account, you can configure the system to includea link when you open a ticket in the workspace. The agent can then insert an automatically generated chat URL to aresponse.For information on how to configure the chat URL generator, watch the video Enabling Chat for SAP Cloud for
Customer or see Configuring the Chat URL Generator [page 263].
Create a Security Certificate for HTTPS-Enabled CTI (optional)If you have scoped your system to have HTTPS security for computer telephony integration, you need to create asecurity certificate. For an example of how to create the security certificate, see Creating a Security Certificate forHTTPS—Enabled Computer Telephony Integration (CTI) [page 202].
Create Ticket Types and Manage Statuses (optional)Ticket types are an attribute of tickets that you can use, for example, when defining service level agreements. Youcan define ticket types as well as edit or define new ticket statuses based on your company's business processes.For more information about creating ticket types, see Tickets [page 75].
Define Service Levels and Service CategoriesService levels are used to calculate reaction times and due dates for incoming customer messages.For information on how to create service levels and define service level determination rules, watch the video
Prioritizing Tickets with Service Level Agreements , or see the document About Service Levels [page 175].Service categories are classifications of customers that are used throughout the system to determine service levels.For information on how to create service categories, see About Service Categories [page 177].
Create or Migrate Product Categories and Product DataIt is important to have complete and accurate information on all the materials your company offers. This requiresyou to maintain both product categories and product data—either can be done manually or using the migration tool.For more information on how to maintain product categories, go to the Activity List for your project, open the ProductCategory Hierarchy activity and refer to the system documentation link, Read About....For more information on how to maintain product data, go to the Activity List for your project, open the Migration ofMaterials activity and refer to the system documentation link, Read About....See AlsoAbout Product Categories [page 131]
SAP Cloud for Customer November 2013Getting Started P U B L I C • © 2011, 2012, 2013 SAP AG. All rights reserved. 23
Creating or Editing Products [page 130]
Define Work Distribution Rules for Ticket RoutingWork distribution rules assign work to an organizational unit or employee. You can define rules that route tickets tospecific agent or team queues.
For more information, watch the video Defining Routing Rules for Tickets Using the Work Distribution Rules ,or see Defining Rules for Ticket Routing [page 166].
Configure Message PrioritizationYou can configure the system to automatically assign priority to messages posted by your customers via any of yoursocial media channels.For more information, see Configuring Social Media Message Prioritization Settings [page 199].
Configure Knowledge Base IntegrationBy integrating an external knowledge base, you enable agents to search for solutions, review recommendedsolutions, and attach articles to responses directly while working on the ticket.
For more information, watch the video Creating a Knowledge Base Mashup , or see Configuring KnowledgeBase Integration [page 257].
Configure Knowledge Base Integration with Single Sign-OnBy integrating an external knowledge base, you enable agents to search for solutions, review recommendedsolutions, and attach articles to responses directly while working on the ticket. By enabling single sign-on, you restrictthe type of knowledge base articles that will be visible to an agent, reducing the amount of articles an agent will haveto search through.For more information, see Configuring Knowledge Base Integration with Single Sign-On Capability [page 259].
Configure the URL ShortenerYou can configure the URL shortener so that agents can attach knowledge base articles to ticket responses.For information, see Configuring the URL Shortener [page 264].
Configure KloutYou can configure the system to retrieve and display the Klout score and other information for customer profilescreated from Twitter messages.For more information, see Configuring Klout [page 266].
Enable SAP Jam IntegrationIntegrating your solution with SAP Jam allows you to create and use groups for accounts, opportunities, products,and service tickets. It will also enable you to use the SAP Jam feed. For more information, including detailed stepsto enable integration, see SAP Jam [page 155].
Create Notification RulesYou can create and edit rules for both task and e-mail notifications. Notifications are sent to users to inform themwhen business objects have been changed in the system and about any tasks resulting from these changes.
For more information, watch the video Defining Notification Rules , or see the Notification Rules Quick Guide[page 170].
24 © 2011, 2012, 2013 SAP AG. All rights reserved. • P U B L I CSAP Cloud for Customer November 2013
Getting Started
Enable E-Mail Notification Templates (optional)You can create document-based e-mail templates for use with the enhancement optionSEND_EMAIL_NOTIFICATION, implemented via the SDK.
For more information, see Enabling Document-Based E-Mail Templates for Notifications.
Configure External Search SourcesYou can configure the global search feature to include external sources. Several external sources (URL mashups)are shipped with the solution and can be activated or deactivated as desired. You can also add new external sources.For more information, see Configuring External Search Sources [page 256].
3.2 Getting Started for SAP Cloud for Service Administrators
As an administrator, you are responsible for setting up the system and making all the necessary initial settings, suchas creating users, integrating an external knowledge base, and establishing teams for ticket routing. After you golive, you are also responsible for regular day-to-day tasks like user management and handling incidents as well asgenerally making sure the system runs smoothly.
About SAP Cloud for ServiceSAP Cloud for Service includes the customer service features of SAP Cloud for Customer. For more information onthe work centers and work center views included in the solution, see About SAP Cloud for Customer [page 8].For information on the system and software requirements, see here [page 480].For information on the solution landscape and security, refer to the SAP Cloud for Customer Security Guide availableon the SAP Service Marketplace at http://service.sap.com/cloud4customer .
Setup and Configuration Tasks
Create AdministratorsYou must create one or more administrators from your initial user before proceeding with the rest of the tasks below.For more information, see Creating Administrators in SAP Cloud for Customer [page 104].
Prepare and Configure Your First Implementation Project
Business Configuration Implementation Projects is your starting point for setting up and configuring your SAPCloud for Customer solution. Administrators can set up and adapt the SAP Cloud for Customer solution to meetyour company's specific business requirements by selecting capabilities to incorporate into your solution duringscoping. For more information about the general settings and procedures for editing your project scope, see Preparethe First Implementation Project [page 353].See AlsoImplementation Projects Quick Guide [page 37]Implementing a Project - First Implementation [page 345]
SAP Cloud for Customer November 2013Getting Started P U B L I C • © 2011, 2012, 2013 SAP AG. All rights reserved. 25
Key Tasks and Activities for Customer Service Features
Phase Activity
Edit Project Scope In your SAP solution, scoping is the process of matching your individual businessrequirements to predefined solution capabilities using the business adaptation catalog.The catalog structures all available capabilities for the solution into a hierarchy ofbusiness areas, packages, topics, and options.For more information, see Enabling Features in Scoping for SAP Cloud for Service orSocial [page 47].
Activity List Once you have finished preparing an implementation project, you can begin to work withthe Activity List for the project. The list is automatically generated by the system basedon your scoping decisions and the activities are grouped by phases. It includes allmandatory implementation and project management activities that you need tocomplete before your solution can go live.For more information, see Complete the Activity List [page 57].
Create or Upload Job DefinitionsTo create a list of the jobs required within your company, you can either enter job definitions manually or importthem using the migration tool.For more information on how to create job definitions, go to the Activity List for your project, open the JobDefinitions activity and refer to the system documentation links, Read About....See AlsoAbout Job Definitions [page 97]
Enter or Migrate Employee DataYou can create employee data either by entering employee data manually (entering one employee after another),or by using the migration tool to import a large number of employees at the same time.For more information on how to enter or migrate employee data, go to the Activity List for your project, open theMigration of Employee Data activity and refer to the system documentation links, Read About....See AlsoCreating or Editing Employee Data [page 106]
Create Business Roles (optional)Business roles allow you to predefine access rights as a template that you can assign to multiple business users whoare to perform similar business tasks.
For information on how to create business roles, watch the video Assigning User Access Rights by Roles , orbrowse the Business Roles Quick Guide [page 121].For information on recommended business roles for SAP Cloud for Service, see Recommended Business Roles andWork Center Assignments for SAP Cloud for Customer [page 118].
Maintain Business UsersOnce you have created employees, you must edit their business user attributes and access rights.For information on how to maintain business user information, see the Business Users Quick Guide [page 107].
Set Up Your Organizational StructureYou can use organizational units to establish teams for ticket processing. Once you have created your org units, youcan also define work distribution rules for ticket and escalation routing.
26 © 2011, 2012, 2013 SAP AG. All rights reserved. • P U B L I CSAP Cloud for Customer November 2013
Getting Started
For more information on how to manually set up or import your organizational structure, go to the Activity List foryour project, open the Perform Organizational Structure Setup activity and refer to the system documentation link,Read About....For information that is specific to the customer service features of SAP Cloud for Customer, watch the video Setting
Up Service Teams , or see Setting Up Teams for Ticket Handling [page 98].
Add E-Mail as a Communication ChannelIn order for the system to convert incoming e-mails to tickets and to allow agents to respond via e-mail, you need tomaintain the associated e-mail settings.
For more information, watch the video Setting Up E-Mail channels , or see Configuring E-Mail Channels[page 179].
Configure Your Customer Service Portal (optional)If your system includes integration to SAP HANA Cloud Portal, Support Site Edition, you can adapt the widgets using
the Portal Adaptation screens. For more information, watch the video Support Portal Administration , or seeAdapting Support Portal Screens [page 203].If your system does not include integration to SAP HANA Cloud Portal, Support Site Edition, you can still include anexternal customer service portal integration in your scoping. You also need to add a communication system andcreate a communication arrangement for that portal.For more information see, Configuring an External Customer Service Portal [page 159].
Configure Chat (optional)To enable chat as a communication channel using your SnapEngage account, you can configure the system to includea link when you open a ticket in the workspace. The agent can then insert an automatically generated chat URL to aresponse.
For more information, watch the video Enabling Chat for SAP Cloud for Customer or see Configuring the ChatURL Generator [page 263].
Create a Security Certificate for HTTPS-Enabled CTI (optional)If you have scoped your system to have HTTPS security for computer telephony integration, you need to create asecurity certificate. For an example of how to create the security certificate, see Creating a Security Certificate forHTTPS-Enabled Computer Telephony Integration (CTI) [page 202].
Create Ticket Types and Manage Statuses (optional)Ticket types are an attribute of tickets that you can use, for example, when defining service level agreements. Youcan define ticket types as well as edit or define new ticket statuses based on your company's business processes.For more information, see Tickets [page 75].
Define Service Levels and Service CategoriesService levels are used to calculate reaction times and due dates for incoming customer messages.For information on how to create service levels and define service level determination rules, watch the video
Prioritizing Tickets with Service Level Agreements , or see the document About Service Levels [page 175].Service categories are classifications of customers that are used throughout the system to determine service levels.For information on how to create service categories, see About Service Categories [page 177].
SAP Cloud for Customer November 2013Getting Started P U B L I C • © 2011, 2012, 2013 SAP AG. All rights reserved. 27
Create or Migrate Product Categories and Product DataIt is important to have complete and accurate information on all the materials your company offers. This requiresyou to maintain both product categories and product data—either can be done manually or using the migration tool.For more information on how to maintain product categories, go to the Activity List for your project, open the ProductCategory Hierarchy activity and refer to the system documentation link, Read About....For more information on how to maintain product data, go to the Activity List for your project, open the Migration ofMaterials activity and refer to the system documentation link, Read About....See AlsoAbout Product Categories [page 131]Creating or Editing Products [page 130]
Define Work Distribution Rules for Ticket RoutingWork distribution rules assign work to an organizational unit or employee. You can define rules that route tickets tospecific agent or team queues.
For more information, watch the video Defining Routing Rules for Tickets Using the Work Distribution Rules ,or see Defining Rules for Ticket Routing [page 166].
Configure Knowledge Base IntegrationBy integrating an external knowledge base, you enable agents to search for solutions, review recommendedsolutions, and attach articles to responses directly while working on the ticket.
For more information, watch the video Creating a Knowledge Base Mashup , or see Configuring KnowledgeBase Integration [page 257].
Configure Knowledge Base Integration With Single Sign-OnBy integrating an external knowledge base, you enable agents to search for solutions, review recommendedsolutions, and attach articles to responses directly while working on the ticket. By enabling single sign-on, you restrictthe type of knowledge base articles that will be visible to an agent, reducing the amount of articles an agent will haveto search through.For more information, see Configuring Knowledge Base Integration with Single Sign-On Capability [page 259].
Configure the URL ShortenerYou can configure the URL shortener so that agents can attach knowledge base articles to ticket responses.For more information, see Configuring the URL Shortener [page 264].
Enable SAP Jam IntegrationIntegrating your solution with SAP Jam allows you to create and use groups for accounts, opportunities, products,and service tickets. It will also enable you to use the SAP Jam feed. For more information, including detailed stepsto enable integration, see SAP Jam [page 155].
Create Notification RulesYou can create and edit rules for both task and e-mail notifications. Notifications are sent to users to inform themwhen business objects have been changed in the system and about any tasks resulting from these changes.
For more information, watch the video Defining Notification Rules , or see the Notification Rules Quick Guide[page 170].
28 © 2011, 2012, 2013 SAP AG. All rights reserved. • P U B L I CSAP Cloud for Customer November 2013
Getting Started
Enable E-Mail Notification Templates (optional)You can also use your document-based e-mail templates with the enhancement optionSEND_EMAIL_NOTIFICATION, implemented via the SDK.
For more information, see Enabling Document-Based E-Mail Templates for Notifications.
Configure External Search SourcesYou can configure the global search feature to include external sources. Several external sources (URL mashups)are shipped with the solution and can be activated or deactivated as desired. You can also add new external sources.For more information, see Configuring External Search Sources [page 256].
Configure TicketsTo work with the work orders in tickets you have to activate the involved parties Service Technician and ServiceTechnician Team in the Tickets fine-tune activity in Business Configuration work center.For more information, see Tickets [page 75].
3.3 Getting Started for SAP Cloud for Sales and MarketingAdministrators
As an administrator, you are responsible for setting up the solution and performing the necessary configuration,such as creating users. After you go live, you are also responsible for day-to-day support tasks, like user managementand incident handling, and for making certain that the solution runs smoothly.
About SAP Cloud for SalesSAP Cloud for Sales includes the sales and marketing features of SAP Cloud for Customer.For information about system and software requirements, see SAP Cloud for Customer System and SoftwareRequirements [page 480].For information about security considerations for your solution, refer to the SAP Cloud for Customer Security Guide,located on SAP Service Marketplace, at http://service.sap.com/cloud4customer .
Setup and Configuration Tasks
Create AdministratorsBefore you proceed with the tasks below, you must create one or more administrators from your initial user. Formore information, see Creating Administrators in SAP Cloud for Customer [page 104].
Prepare and Configure Your First Implementation Project
Business Configuration Implementation Projects is your starting point for setting up and configuring your SAPCloud for Customer solution. Administrators can set up and adapt the SAP Cloud for Customer solution to meetyour company's specific business requirements by selecting capabilities to incorporate into your solution duringscoping. For more information about the general settings and procedures for editing your project scope, see Preparethe First Implementation Project [page 353].
SAP Cloud for Customer November 2013Getting Started P U B L I C • © 2011, 2012, 2013 SAP AG. All rights reserved. 29
See AlsoImplementation Projects Quick Guide [page 37]Implementing a Project - First Implementation [page 345]
Key Tasks and Activities for Sales and Marketing Features
Phase Activity
Edit Project Scope In your SAP solution, scoping is the process of matching your individual businessrequirements to predefined solution capabilities using the business adaptation catalog.The catalog structures all available capabilities for the solution into a hierarchy ofbusiness areas, packages, topics, and options.For more information, see Enabling Features in Scoping for SAP Cloud for Sales[page 42].
Activity List Once you have finished preparing an implementation project, you can begin to work withthe project's Activity List. The list is automatically generated by the solution, based onyour scoping decisions, and its activities are grouped by phases. It includes allmandatory implementation and project management activities to be completed beforeyour solution can go live.For more information, see Complete the Activity List [page 57].
Create or Upload Job DefinitionsTo create a list of the jobs required within your company, you can either enter job definitions manually or importthem using the migration tool.For more information on how to create job definitions, review the Activity List for your project, open the JobDefinitions activity and refer to the system documentation links, Read About....See AlsoAbout Job Definitions [page 97]
Set Up Your Organizational StructureYou can use organizational units to establish sales and marketing teams.For more information on how to manually set up or import your organizational structure, go to the Activity List foryour project, open the Perform Organizational Structure Setup activity and refer to the system documentation link,Read About....For information that is specific to the sales and marketing features of SAP Cloud for Customer, see Setting UpOrganizational Management [page 101].
Enter or Migrate Employee DataYou can create employee data either by entering employee data manually (entering one employee after another),or by using the migration tool to import a large number of employees at the same time.For more information on how to enter or migrate employee data, review the Activity List for your project, open theMigration of Employee Data activity and refer to the system documentation links, Read About....See AlsoCreating or Editing Employee Data [page 106]
Change the Default Client to HTML5 (optional)If you only use SAP Cloud for Sales, then you can set your users' default client to HTML5. For more information, seeChoosing a Default Client [page 93] and Getting Started for HTML5 [page 94].
30 © 2011, 2012, 2013 SAP AG. All rights reserved. • P U B L I CSAP Cloud for Customer November 2013
Getting Started
Create Business Roles (optional)Business roles allow you to predefine access rights as a template that you can assign to multiple business users whoare to perform similar business tasks.
For information on how to create business roles, watch the video Assigning User Access Rights by Roles orbrowse the Business Roles Quick Guide [page 121].For information on the business roles that are recommended for the sales and marketing features of SAP Cloud forCustomer, see Recommended Business Roles and Work Center Assignments for SAP Cloud for Customer[page 118].
Maintain Business UsersOnce you have created employees, you must edit their business user attributes and access rights.For information on how to maintain business user information, see the Business Users Quick Guide [page 107].
Set Up Retail Execution (optional)Using this feature, you can plan, execute, and track in-store activities by sales personnel. You can plan visits,activities, and create site surveys in the browser interface. Field sales personnel can use the mobile solution, SAPCloud for Customer for iPad, to check in and check out of a site visit, fill out surveys, set tasks to complete, and createsales quotes that include a graphical customer signature.To turn on this feature, see Enabling Features in Scoping for SAP Cloud for Sales [page 42].To expose the preconfigured mashup so your users can use the route planner, see Enabling the Route Planner forVisits [page 234].For more information on using retail execution, see Visits, Activity Planner [page 231], Surveys [page 232], andSAP Cloud for Customer for iPad.
Activate and Set Up Territory Management (optional)Territory Management encompasses all activities that are required to create and configure a hierarchy of salesterritories, and to delegate responsibility at each level of this hierarchy to the appropriate sales representatives.To learn how to activate Territory Management, see Enabling Features in Scoping for SAP Cloud for Sales[page 42]. For setup instructions, see Territory Management [page 219].
Define Rules for Marketing Lead Assignment (optional)To ensure that all your incoming marketing leads are processed efficiently, you can use lead assignment. For moreinformation, see Defining Rules for Marketing Lead Assignment.
Enable Deletion of Marketing Leads and Opportunities (optional)You can enable users, by business role, to delete certain marketing leads, as well as opportunities. You can alsorestrict users, by business role, from deleting these items. To do so, proceed as follows:
1. Choose Administrator Business Roles .2. Open the applicable business role, then choose View All on the subsequent screen.3. Choose Fields & Actions .4. Under Business Action Restrictions, choose Add Row .
a. For marketing leads, specify LEAN_LEAD_DELETE, then specify the access restriction Unrestricted orDisabled.
b. For opportunities, specify DELETE_OPPORTUNITY, then specify the appropriate access restriction.
SAP Cloud for Customer November 2013Getting Started P U B L I C • © 2011, 2012, 2013 SAP AG. All rights reserved. 31
5. Check the access rights consistency of the assignment, then save and close the business role.
If you follow this procedure to assigned unrestricted authorizations to the business role, then its users can choose Actions Delete from the worklist to delete certain marketing leads, as well as opportunities.
Even if users possess the appropriate authorizations, they cannot delete marketing leads that have beenconverted to sales leads or to accounts and contacts. Users also cannot delete marketing leads that havebeen created with the Use Existing Account option.
Create Notification RulesYou can create and edit rules for notifications. Notifications are sent to users to inform them when business objectshave been changed in the system and about any tasks resulting from these changes.
For more information, watch the video Defining Notification Rules , or read the Notification Rules Quick Guide [page 170].
You can also enable notifications about accounts, activity tasks, opportunities, marketing leads and sales leads tobe sent via e-mail.For more information, see Enabling Features in Scoping for SAP Cloud for Sales [page 42].
Create or Migrate Product Categories and Product DataIt is important to have complete and accurate information about all the materials your company offers. This requiresyou to maintain both product categories and product data — either manually, or by using the migration tool.For more information on how to maintain product categories, review the Activity List for your project, open theProduct Category Hierarchy activity and refer to the system documentation link, Read About....For more information on how to maintain product data, review the Activity List for your project, open the Migrationof Materials activity and refer to the system documentation link, Read About....See AlsoAbout Product Categories [page 131]Creating or Editing Products [page 130]
Configure PricingYou can define pricing lists and customer discount lists so that pricing is automatically calculated in your businessdocuments.For more information about pricing lists, see the Quick Guide for Price Lists [page 226].For more information about discount lists, see the Quick Guide for Overall Customer Discount.
You must have customers in the system to configure an overall customer discount.
Configure 360 OverviewIf your solution is integrated with SAP on-premise systems, you can set up a bridge to connect to those systems andshare data for analysis.For more information, see Setting Up the 360 Overview [page 252].
Enable Map View
You can enable the use of the Map View option that is located under Customers Accounts and Visits VisitPlanner .
32 © 2011, 2012, 2013 SAP AG. All rights reserved. • P U B L I CSAP Cloud for Customer November 2013
Getting Started
For more information, see Configuring Bing Maps for Accounts [page 267].
We recommend that you review the data security considerations that relate to this activity, which aredescribed in the Security Guide for SAP Cloud for Customer, located on SAP Service Marketplace at http://service.sap.com/cloud4customer .
Add Reports to SAP Customer InsightYou can configure which reports are visible in the SAP Customer Insight mobile application for iPad. For more
information, watch the video Enabling SAP Customer Insight .You can also add custom reports that you have created. For more information, see Adding Custom Reports to SAPCustomer Insight [page 255].
Enable SAP Jam IntegrationIntegrating your solution with SAP Jam allows you to create and use groups for accounts, opportunities, products,and service tickets. It will also enable you to use the SAP Jam feed. For more information, including detailed stepsto enable integration, see SAP Jam [page 155].
Enable Integration with SAP Real-Time Offer Management (optional)Integration with SAP Real-Time Offer Management (RTOM) is supported via SAP Cloud Applications Studio, alsoknown as the SDK. If you integrate SAP Cloud for Customer with RTOM via the SDK, then you can adapt theAccounts tab to include fields for offers, then import offers that reside in RTOM into these accounts. Salesrepresentatives can then identify offers that the account has accepted, and create sales leads from them.For additional information, see Integration with SAP Real-Time Offer Management [page 161].
Configure Business Task ManagementYou can configure notifications to be sent for stalled leads and opportunities.For more information, see About Business Task Management [page 169].
Activate and Configure E-Mail CampaignsIf you plan to use e-mail marketing campaigns, you must first activate campaigns in project scoping. For moreinformation, see Activating E-Mail Campaigns [page 71].You can set up e-mail templates to use for your campaigns. For more information, see Templates for E-MailCampaigns [page 72].You also need to set export file formats for target group contacts used in e-mail campaigns. For more information,see Creating Campaign Export File Formats [page 72].
3.4 Adding Company-Specific Help
The Help Center contains the solution-specific Help documentation delivered by SAP. As an administrator, you canalso add company-specific documentation in any workset, for example process descriptions or general businessrules. It is also possible to add a file to all screens within the system.
SAP Cloud for Customer November 2013Getting Started P U B L I C • © 2011, 2012, 2013 SAP AG. All rights reserved. 33
PrerequisitesYou have written your help document in one of the following formats:
● Any Microsoft Office format (such as .docx or .xlsx)
Steps1. Navigate to the screen where you would like to add a document.2. Open the Help Center.3. You can add your document to this screen, or to all screens in the system.
● To add your document to this screen, click Add Company-Specific Content under You Can Also. ● To add your document to all screens, click Add Company-Specific Content for all Screens under You Can
Also.4. You can upload a document directly or link to an online document.
● To upload a document, click New , then File.
You can upload files up to 500 MB in size. However, for performance reasons we recommendnot uploading files larger than 20 MB.
● To link to an online document, click New , then Link.5. In the dialog window, enter the following details:
● URL ● Name
This is the name that will appear as the link in the Help Center. ● Description
6. Save your entries.
ResultYour company-specific help document is added to the Help Center, and can be accessed by all users in your company.
34 © 2011, 2012, 2013 SAP AG. All rights reserved. • P U B L I CSAP Cloud for Customer November 2013
Getting Started
4 Business Configuration
4.1 Configuring Your SAP Solution
OverviewBusiness configuration enables you as a prospective or existing customer administrator to evaluate and quickly setup the SAP solution to meet the specific requirements of your company. It also allows you to adapt and improve yoursolution at any time as your needs change.
Business Adaptation CatalogThe full set of solution capabilities are outlined in a central business adaptation catalog. This catalog organizes andstructures the capabilities into a hierarchy of business areas, packages, topics, and options. SAP and its partnershave already defined the technical system settings and the content that is needed to accommodate each elementof the catalog. This predefined content is based on industry-specific best practices developed from the extensiveknowledge and experience that SAP, with the help of its partners and customers, has acquired over the years.The process of selecting solution capabilities that are stored in the business adaptation catalog is called Scoping.You begin scoping by providing some basic information about your company, namely the countries and type ofbusiness you operate in. This instantly causes the system to preselect the relevant elements of the businessadaptation catalog and the corresponding predefined content. Since each company has unique requirements, thesystem then enables you to make a series of business decisions to adjust the preselected content and determinewhich of the available features and functions you want to incorporate into your solution.The catalog has built-in rules to ensure that all selections you make are logical and consistent, from a business andtechnical point of view. Thus, when you make a selection, the system makes the necessary additional selections ordeselections automatically. Also, when you make a selection that creates a conflict, the system identifies the involvedelements so that you can decide which selection to reverse.The system provides you with embedded decision support throughout business configuration to simplify theprocess. For example, brief on-screen explanations are used to describe the functionality and relevance of eachcatalog element. If you do not make any explicit selections for a specific element of the catalog, the systemautomatically uses default settings based on best practices. This minimizes the number of decisions you have tomake manually, while always ensuring that your scoping is complete and consistent.
Your Solution ProfileFrom the very first time you begin to adapt the SAP solution to suit the needs of your company, the information youprovide and the decisions you make are stored in a unique solution profile. SAP stores this profile along the entirelife cycle of your solution and updates it each time you make changes. If you decide to purchase the solution, thesystem uses this profile in conjunction with your activity list as the basis for creating a live solution for your company.After your solution has gone live for the first time, the same solution profile allows you to make changes to yoursolution.
BenefitsThe benefits of the new approach to configuration used in the SAP solution are described below.
SAP Cloud for Customer November 2013Business Configuration P U B L I C • © 2011, 2012, 2013 SAP AG. All rights reserved. 35
General ● Simplifies the configuration process, allowing it to be performed centrally for the entire solution at any stage
of the life cycle. ● Increases transparency by exposing the full set of solution capabilities in a comprehensive, business-oriented
catalog that is used along the life cycle to evaluate, build, and change each customer’s solution. Prospects,customers, partners, and SAP all use the same catalog.
● Reduces total cost of ownership (TCO) by enabling rapid implementations, which require significantly lesseffort than other solutions on the market today.
● Automates the assessment of your requirements, matching requirements to available solution capabilitiesand translating them into the necessary system settings.
● Speeds up the configuration process by providing predefined content and system settings, based on industry-specific and country-specific best practices.
Customer ● Speaks business language, enabling you to create your own solution by making a series of logical decisions,
without having to rely on external consultants or delve into complex system settings. ● Adopts a user-centered approach, giving you the highest possible level of control to autonomously shape the
future of your business – both during the initial implementation and as changes are made to your solutionthroughout the life cycle.
● Records all the decisions you make and stores them in your own unique solution profile, which is seamlesslycarried forward through the life of your solution. This ensures that you are never asked the same questiontwice.
● Increases long-term flexibility by enabling you to adapt your solution at any time by following the same processthat you completed during the initial setup. In this way, midsize customers can quickly innovate and respondto, or anticipate, changing business requirements. This increases their chance of success in highly-competitive and rapidly-changing markets.
● Provides a high level of decision support through embedded services and continuous knowledge transfer. ● Facilitates collaboration between the customer, SAP, and other interested parties.
Process
The First Implementation ProjectWith the first implementation project, you select the initial scope of your solution and then work through the activitylist to get your solution up and running for the first time.
● ScopingWhen you want to begin evaluating the SAP solution, you carry out a scoping workshop with the assistanceof an SAP or partner solution adviser. The solution adviser guides you through the process of defining theinitial scope of your solution with the first implementation project. You can procure an implementation projecttemplate or you provide some basic information about your company, namely the countries and type ofbusiness you operate in. This instantly causes the system to preselect the relevant elements of the businessadaptation catalog and the corresponding predefined content. Since each company has unique requirements,the system then enables you to make a series of business decisions to adjust the preselected content anddetermine which of the available features and functions you want to incorporate into your solution.For more information, see Prepare the First Implementation Project [page 353].
● Activity List
36 © 2011, 2012, 2013 SAP AG. All rights reserved. • P U B L I CSAP Cloud for Customer November 2013
Business Configuration
Based on your scoping decisions, the system generates an activity list of the mandatory implementation andproject management activities that you need to complete before your solution can go live for the first time.Once you have decided to purchase the SAP solution, you can begin to work through these activities. Also,even after the activity list has been generated, you can review your scoping decisions and, if necessary, adjustyour solution capabilities.For more information, see Complete the Activity List [page 57].
Changes After Go LiveThe ability to make changes to your solution after it has gone live is a key feature in the SAP solution. It ensures thatyour company can anticipate and respond quickly to changing business requirements at any time during the lifecycle of your solution. There are two ways to change your solution after it has gone live: small changes and changeprojects.
● Small ChangesYou can make changes to configuration elements or add them to the current scope. These changes can beapplied right away.For more information, see Make Changes to Your Solution [page 39].
● Change ProjectsFor more complex changes to your solution, you can prepare a change project. Just as in the firstimplementation project, the main part of preparing a change project is selecting or adjusting solutioncapabilities and reviewing scoping questions. Based on your decisions, the system generates an activity listfor your change project containing all mandatory activities that need to be completed in order to use yourchanges productively in your solution.If you are making many detailed changes at once, you can request a separate test system in which you cantest your changes. You can also use this system as a migration test system to define the necessary migrationsettings. When you are ready, the activity list allows you to merge your changes back to the production systemand finalize your change project.For more information, see Prepare a Change Project [page 356].
4.2 Implementing a Project
4.2.1 Implementation Projects Quick Guide
In the Implementation Projects view of the Business Configuration work center, administrators can set up and adaptthe SAP solution to meet the company's specific business requirements. With the first implementation project, youselect the capabilities to incorporate into your solution and then perform project management and implementationactivities to get your solution up and running. After going live for the first time, you can create change projects toadapt and improve your solution as required.In the details part of the view you have an overview of the progress of your project. When you select a project in thetable, you see the number of activities and completed activities per phase, and the status of the milestones in yourproject.
SAP Cloud for Customer November 2013Business Configuration P U B L I C • © 2011, 2012, 2013 SAP AG. All rights reserved. 37
Business Background
Configuring Your SAP SolutionBusiness configuration enables you as a prospective or existing customer administrator to evaluate and quickly setup the SAP solution to meet the specific requirements of your company. It also allows you to adapt and improve yoursolution at any time as your needs change.For more information, see here [page 35].
ScopingIn the SAP solution, scoping is the process of matching your individual business requirements to predefined solutioncapabilities using the business adaptation catalog. The catalog structures all available capabilities for the solutioninto a hierarchy of business areas, packages, topics, and options. SAP and its partners have already defined thetechnical system settings and the content needed to accommodate each element of the catalog and to support yourrequirements. This predefined content is based on industry-specific and country-specific best practices. During thescoping process, all of your decisions are stored in a unique solution proposal. This document is available when youhave finished scoping and contains detailed information about your scoping selections.For more information, see here [page 342].
Implementing a ProjectThe implementation of your SAP solution includes all steps required for getting the system, the data, and the peoplein your company ready for Go Live. The Activity List is derived from the agreed solution scope and includes all activitiesthe project team has to complete. The activities are structured by different project phases. Simple status andprogress reporting per activity and phase enable you to easily track the progress of your project as you work throughthe activity list.For more information, see Implementing a Project — First Implementation [page 345] and Implementing a Project— Change Projects.
Implementation Project TemplateYou can apply an implementation project template to your SAP solution. You procure these templates in the SAPStore. The templates contain scoping elements suited for specific requirements and business needs, usuallydesigned by SAP and its partner for specific industries and lines of business. After the implementation projecttemplate is applied, you can refine your solution further.For more information, see here.
Understand the Overall Migration ProcessEfficient and reliable data migration is a key success factor for the implementation of the SAP solution. The datamigration self-service for the SAP solution enables you to perform all migration tasks on your own and minimizesconventional issues, such as data mapping and transformation.For more information, see here [page 360].
Tasks
Scope Your SolutionPrepare the First Implementation Project — For information about this task, see here[page 353].
38 © 2011, 2012, 2013 SAP AG. All rights reserved. • P U B L I CSAP Cloud for Customer November 2013
Business Configuration
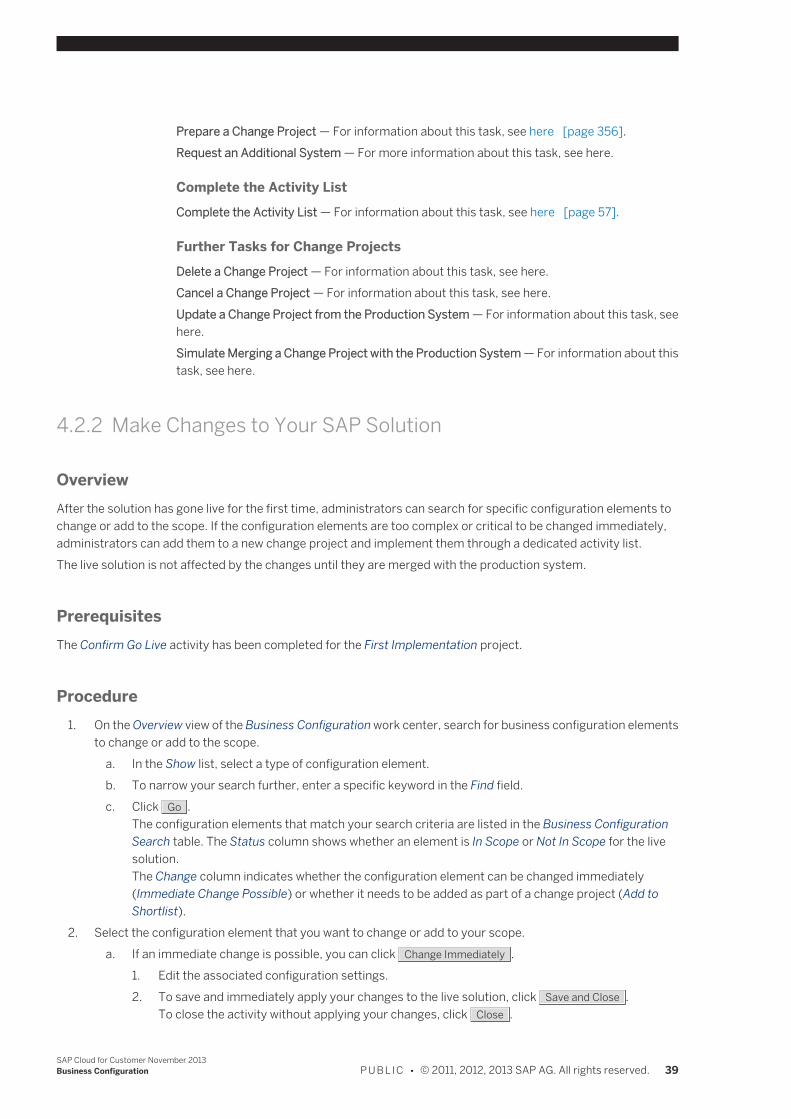
Prepare a Change Project — For information about this task, see here [page 356].Request an Additional System — For more information about this task, see here.
Complete the Activity ListComplete the Activity List — For information about this task, see here [page 57].
Further Tasks for Change ProjectsDelete a Change Project — For information about this task, see here.Cancel a Change Project — For information about this task, see here.Update a Change Project from the Production System — For information about this task, seehere.Simulate Merging a Change Project with the Production System — For information about thistask, see here.
4.2.2 Make Changes to Your SAP Solution
OverviewAfter the solution has gone live for the first time, administrators can search for specific configuration elements tochange or add to the scope. If the configuration elements are too complex or critical to be changed immediately,administrators can add them to a new change project and implement them through a dedicated activity list.The live solution is not affected by the changes until they are merged with the production system.
PrerequisitesThe Confirm Go Live activity has been completed for the First Implementation project.
Procedure1. On the Overview view of the Business Configuration work center, search for business configuration elements
to change or add to the scope.a. In the Show list, select a type of configuration element.b. To narrow your search further, enter a specific keyword in the Find field.c. Click Go .
The configuration elements that match your search criteria are listed in the Business ConfigurationSearch table. The Status column shows whether an element is In Scope or Not In Scope for the livesolution.The Change column indicates whether the configuration element can be changed immediately(Immediate Change Possible) or whether it needs to be added as part of a change project (Add toShortlist).
2. Select the configuration element that you want to change or add to your scope.a. If an immediate change is possible, you can click Change Immediately .
1. Edit the associated configuration settings.2. To save and immediately apply your changes to the live solution, click Save and Close .
To close the activity without applying your changes, click Close .
SAP Cloud for Customer November 2013Business Configuration P U B L I C • © 2011, 2012, 2013 SAP AG. All rights reserved. 39
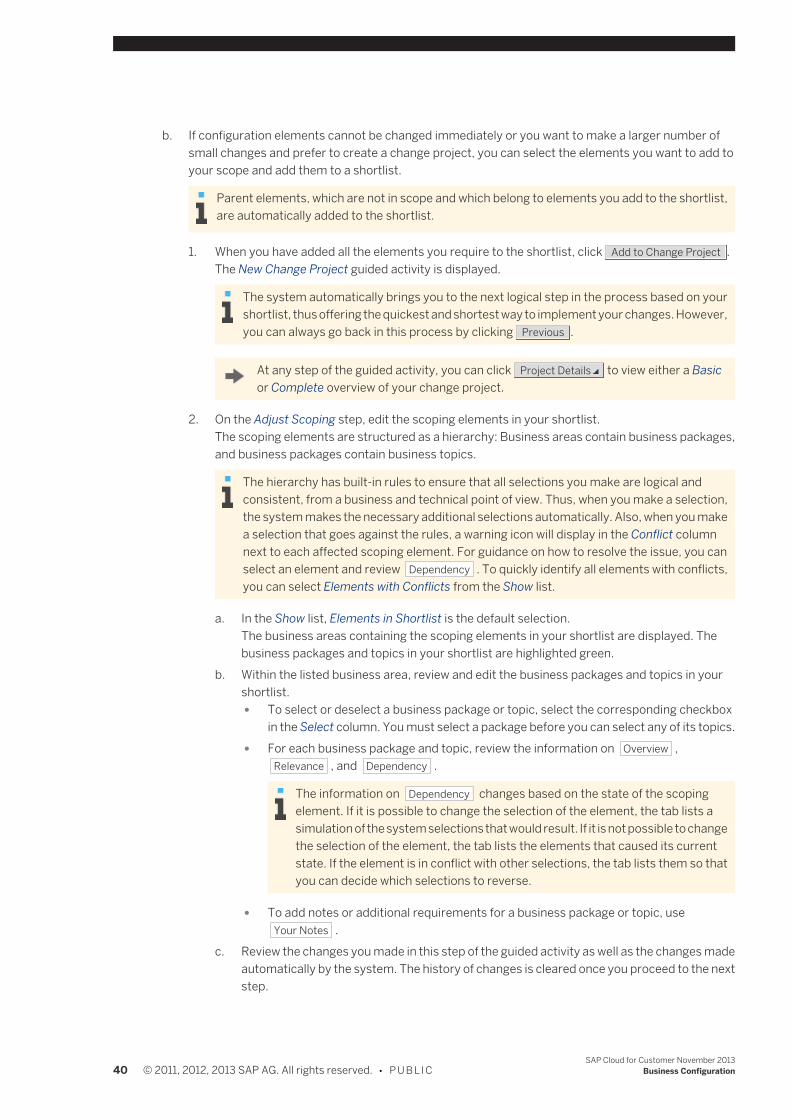
b. If configuration elements cannot be changed immediately or you want to make a larger number ofsmall changes and prefer to create a change project, you can select the elements you want to add toyour scope and add them to a shortlist.
Parent elements, which are not in scope and which belong to elements you add to the shortlist,are automatically added to the shortlist.
1. When you have added all the elements you require to the shortlist, click Add to Change Project .The New Change Project guided activity is displayed.
The system automatically brings you to the next logical step in the process based on yourshortlist, thus offering the quickest and shortest way to implement your changes. However,you can always go back in this process by clicking Previous .
At any step of the guided activity, you can click Project Details to view either a Basicor Complete overview of your change project.
2. On the Adjust Scoping step, edit the scoping elements in your shortlist.The scoping elements are structured as a hierarchy: Business areas contain business packages,and business packages contain business topics.
The hierarchy has built-in rules to ensure that all selections you make are logical andconsistent, from a business and technical point of view. Thus, when you make a selection,the system makes the necessary additional selections automatically. Also, when you makea selection that goes against the rules, a warning icon will display in the Conflict columnnext to each affected scoping element. For guidance on how to resolve the issue, you canselect an element and review Dependency . To quickly identify all elements with conflicts,you can select Elements with Conflicts from the Show list.
a. In the Show list, Elements in Shortlist is the default selection.The business areas containing the scoping elements in your shortlist are displayed. Thebusiness packages and topics in your shortlist are highlighted green.
b. Within the listed business area, review and edit the business packages and topics in yourshortlist. ● To select or deselect a business package or topic, select the corresponding checkbox
in the Select column. You must select a package before you can select any of its topics. ● For each business package and topic, review the information on Overview ,
Relevance , and Dependency .
The information on Dependency changes based on the state of the scopingelement. If it is possible to change the selection of the element, the tab lists asimulation of the system selections that would result. If it is not possible to changethe selection of the element, the tab lists the elements that caused its currentstate. If the element is in conflict with other selections, the tab lists them so thatyou can decide which selections to reverse.
● To add notes or additional requirements for a business package or topic, use Your Notes .
c. Review the changes you made in this step of the guided activity as well as the changes madeautomatically by the system. The history of changes is cleared once you proceed to the nextstep.
40 © 2011, 2012, 2013 SAP AG. All rights reserved. • P U B L I CSAP Cloud for Customer November 2013
Business Configuration
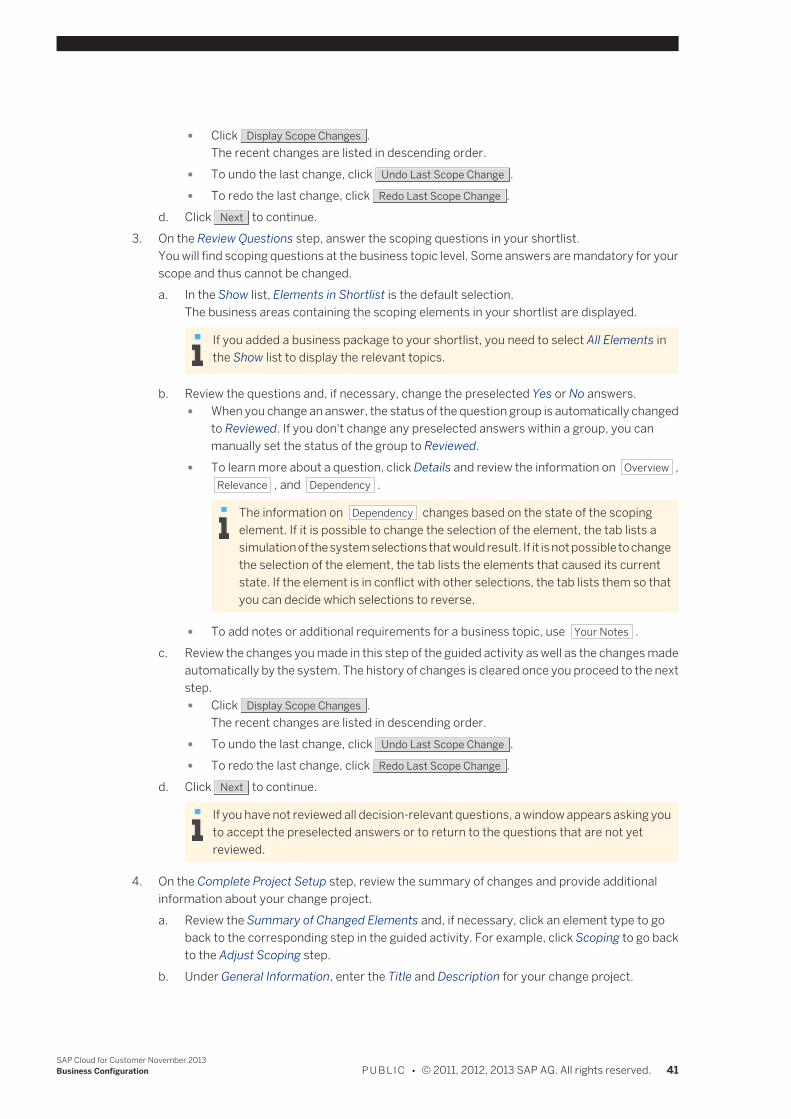
● Click Display Scope Changes .The recent changes are listed in descending order.
● To undo the last change, click Undo Last Scope Change . ● To redo the last change, click Redo Last Scope Change .
d. Click Next to continue.3. On the Review Questions step, answer the scoping questions in your shortlist.
You will find scoping questions at the business topic level. Some answers are mandatory for yourscope and thus cannot be changed.a. In the Show list, Elements in Shortlist is the default selection.
The business areas containing the scoping elements in your shortlist are displayed.
If you added a business package to your shortlist, you need to select All Elements inthe Show list to display the relevant topics.
b. Review the questions and, if necessary, change the preselected Yes or No answers. ● When you change an answer, the status of the question group is automatically changed
to Reviewed. If you don't change any preselected answers within a group, you canmanually set the status of the group to Reviewed.
● To learn more about a question, click Details and review the information on Overview , Relevance , and Dependency .
The information on Dependency changes based on the state of the scopingelement. If it is possible to change the selection of the element, the tab lists asimulation of the system selections that would result. If it is not possible to changethe selection of the element, the tab lists the elements that caused its currentstate. If the element is in conflict with other selections, the tab lists them so thatyou can decide which selections to reverse.
● To add notes or additional requirements for a business topic, use Your Notes .c. Review the changes you made in this step of the guided activity as well as the changes made
automatically by the system. The history of changes is cleared once you proceed to the nextstep. ● Click Display Scope Changes .
The recent changes are listed in descending order. ● To undo the last change, click Undo Last Scope Change . ● To redo the last change, click Redo Last Scope Change .
d. Click Next to continue.
If you have not reviewed all decision-relevant questions, a window appears asking youto accept the preselected answers or to return to the questions that are not yetreviewed.
4. On the Complete Project Setup step, review the summary of changes and provide additionalinformation about your change project.a. Review the Summary of Changed Elements and, if necessary, click an element type to go
back to the corresponding step in the guided activity. For example, click Scoping to go backto the Adjust Scoping step.
b. Under General Information, enter the Title and Description for your change project.
SAP Cloud for Customer November 2013Business Configuration P U B L I C • © 2011, 2012, 2013 SAP AG. All rights reserved. 41
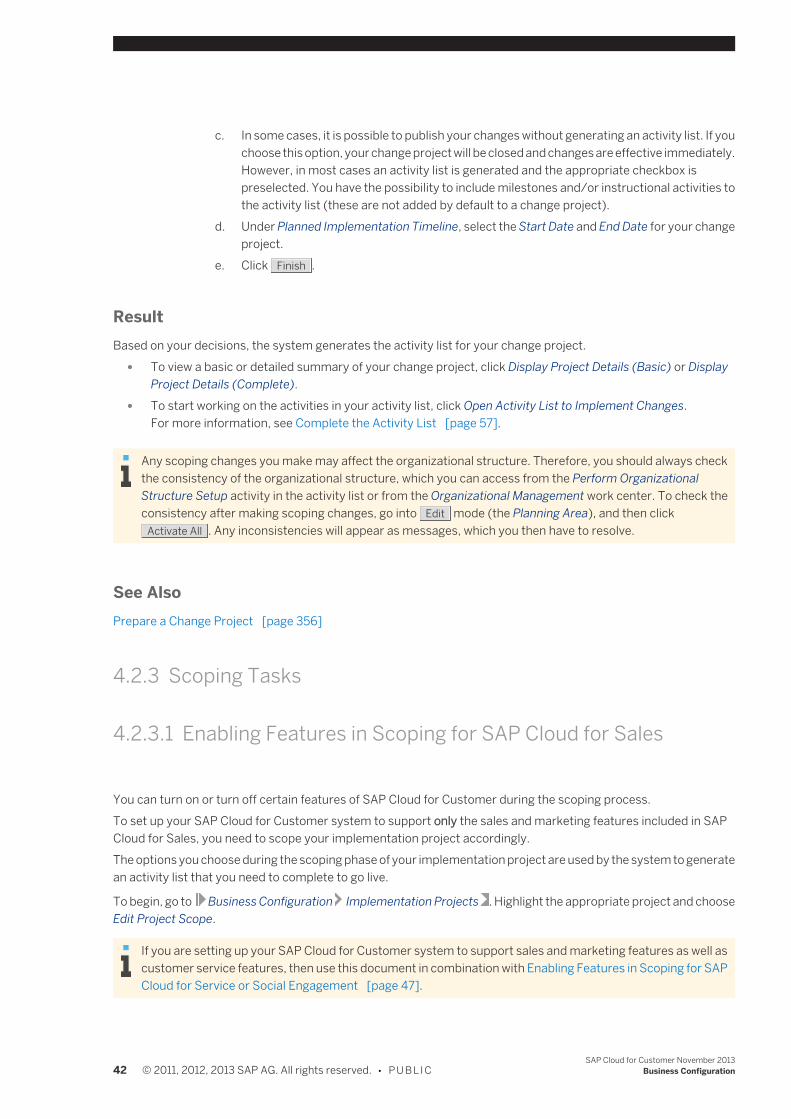
c. In some cases, it is possible to publish your changes without generating an activity list. If youchoose this option, your change project will be closed and changes are effective immediately.However, in most cases an activity list is generated and the appropriate checkbox ispreselected. You have the possibility to include milestones and/or instructional activities tothe activity list (these are not added by default to a change project).
d. Under Planned Implementation Timeline, select the Start Date and End Date for your changeproject.
e. Click Finish .
ResultBased on your decisions, the system generates the activity list for your change project.
● To view a basic or detailed summary of your change project, click Display Project Details (Basic) or DisplayProject Details (Complete).
● To start working on the activities in your activity list, click Open Activity List to Implement Changes.For more information, see Complete the Activity List [page 57].
Any scoping changes you make may affect the organizational structure. Therefore, you should always checkthe consistency of the organizational structure, which you can access from the Perform OrganizationalStructure Setup activity in the activity list or from the Organizational Management work center. To check theconsistency after making scoping changes, go into Edit mode (the Planning Area), and then click
Activate All . Any inconsistencies will appear as messages, which you then have to resolve.
See AlsoPrepare a Change Project [page 356]
4.2.3 Scoping Tasks
4.2.3.1 Enabling Features in Scoping for SAP Cloud for Sales
You can turn on or turn off certain features of SAP Cloud for Customer during the scoping process.To set up your SAP Cloud for Customer system to support only the sales and marketing features included in SAPCloud for Sales, you need to scope your implementation project accordingly.The options you choose during the scoping phase of your implementation project are used by the system to generatean activity list that you need to complete to go live.
To begin, go to Business Configuration Implementation Projects . Highlight the appropriate project and chooseEdit Project Scope.
If you are setting up your SAP Cloud for Customer system to support sales and marketing features as well ascustomer service features, then use this document in combination with Enabling Features in Scoping for SAPCloud for Service or Social Engagement [page 47].
42 © 2011, 2012, 2013 SAP AG. All rights reserved. • P U B L I CSAP Cloud for Customer November 2013
Business Configuration

Tasks
Country and Type of BusinessEnsure only the countries you support are selected in the list.To edit the list of selected countries, click Edit Countries.
ScopingMany of the scoping elements are automatically selected and cannot be deselected.The following is a list of the scoping elements you may select.
Refer to the descriptions in the system for more information on each of the business topics.
Marketing ● Under Market Development,
○ Competitor Information ● Campaign Management ● Under Marketing Lead Management,
○ Marketing Leads
Deselect: ○ Analysis for Lead Management
Sales ● Under Account and Activity Management,
○ Activity Management
This option is required for e-mail blast and marketing campaigns.
○ Sales Territory Management ● Under Product and Service Portfolio,
○ Sell Standard Products ● Under New Business,
○ Sales Lead Management ○ Opportunities ○ Sales Quotes
● Sales Planning (SAP Cloud for Customer)
ServiceDeselect the following optional elements:
● Entitlement Management ● Customer Care
Communication and Information ExchangeIf you want to enable a connection between your legacy system and SAP Cloud for Customer,
SAP Cloud for Customer November 2013Business Configuration P U B L I C • © 2011, 2012, 2013 SAP AG. All rights reserved. 43
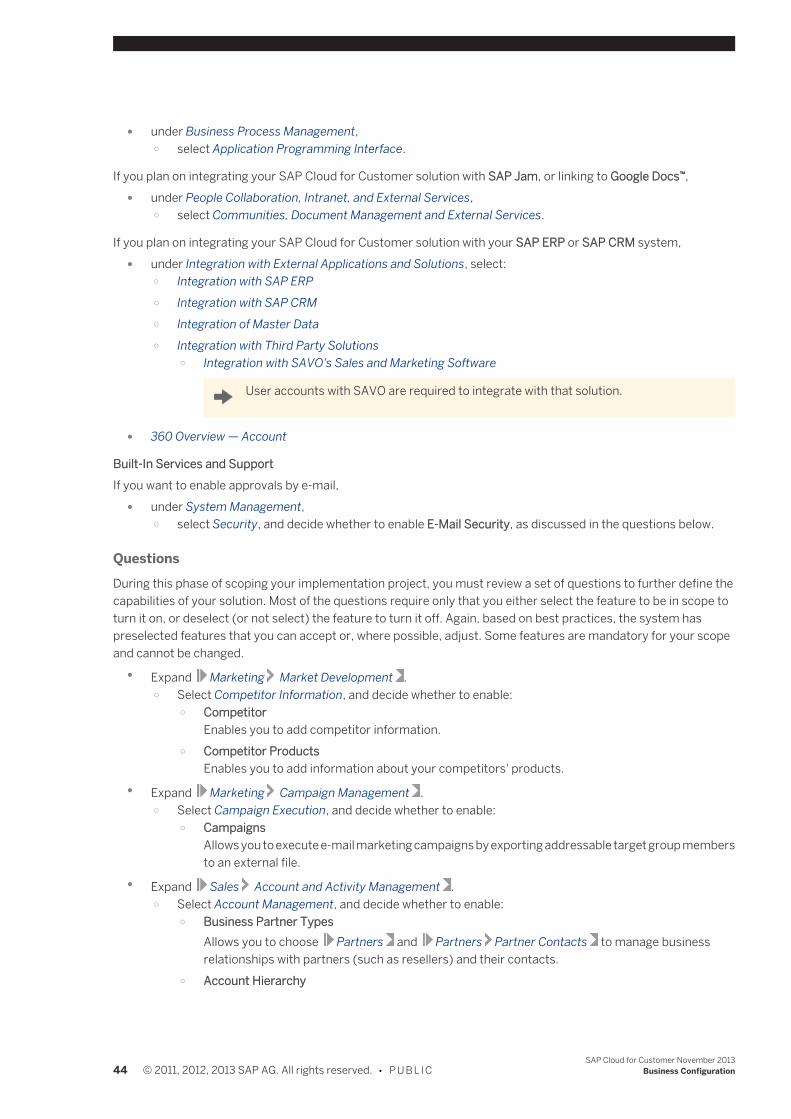
● under Business Process Management, ○ select Application Programming Interface.
If you plan on integrating your SAP Cloud for Customer solution with SAP Jam, or linking to Google Docs™, ● under People Collaboration, Intranet, and External Services,
○ select Communities, Document Management and External Services.
If you plan on integrating your SAP Cloud for Customer solution with your SAP ERP or SAP CRM system, ● under Integration with External Applications and Solutions, select:
○ Integration with SAP ERP ○ Integration with SAP CRM ○ Integration of Master Data ○ Integration with Third Party Solutions
○ Integration with SAVO's Sales and Marketing Software
User accounts with SAVO are required to integrate with that solution.
● 360 Overview — Account
Built-In Services and SupportIf you want to enable approvals by e-mail,
● under System Management, ○ select Security, and decide whether to enable E-Mail Security, as discussed in the questions below.
QuestionsDuring this phase of scoping your implementation project, you must review a set of questions to further define thecapabilities of your solution. Most of the questions require only that you either select the feature to be in scope toturn it on, or deselect (or not select) the feature to turn it off. Again, based on best practices, the system haspreselected features that you can accept or, where possible, adjust. Some features are mandatory for your scopeand cannot be changed.
● Expand Marketing Market Development . ○ Select Competitor Information, and decide whether to enable:
○ CompetitorEnables you to add competitor information.
○ Competitor ProductsEnables you to add information about your competitors' products.
● Expand Marketing Campaign Management . ○ Select Campaign Execution, and decide whether to enable:
○ CampaignsAllows you to execute e-mail marketing campaigns by exporting addressable target group membersto an external file.
● Expand Sales Account and Activity Management . ○ Select Account Management, and decide whether to enable:
○ Business Partner TypesAllows you to choose Partners and Partners Partner Contacts to manage businessrelationships with partners (such as resellers) and their contacts.
○ Account Hierarchy
44 © 2011, 2012, 2013 SAP AG. All rights reserved. • P U B L I CSAP Cloud for Customer November 2013
Business Configuration
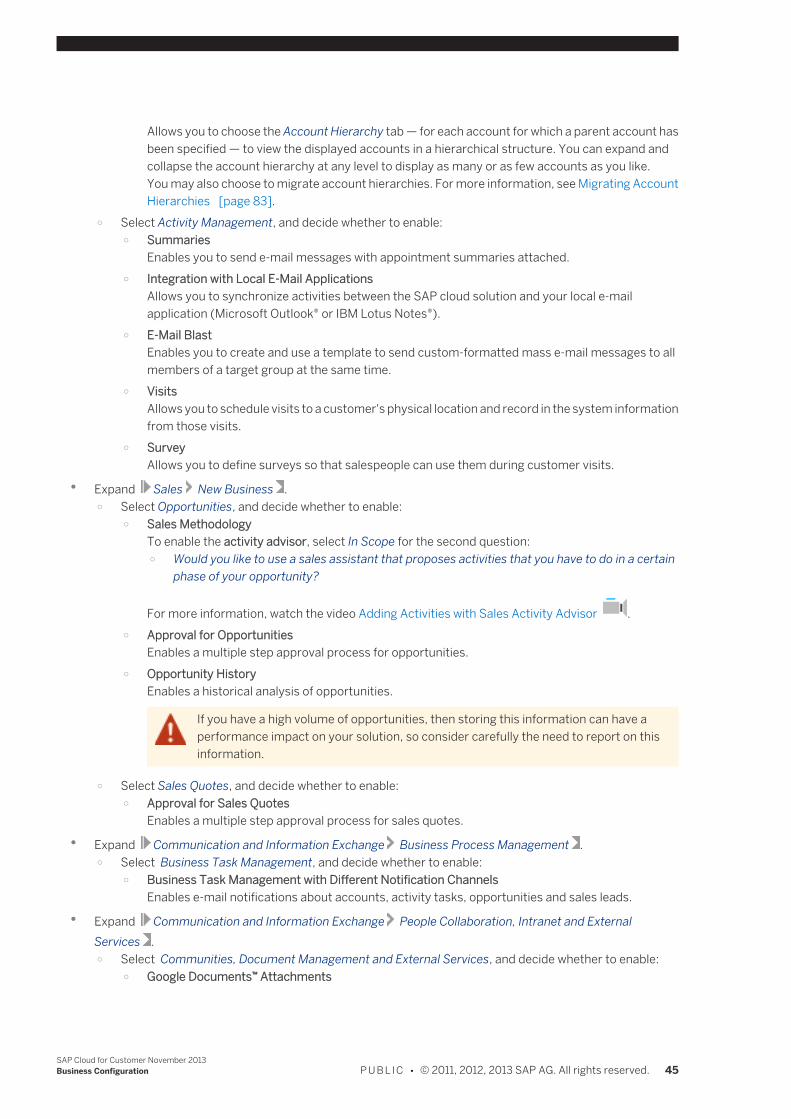
Allows you to choose the Account Hierarchy tab — for each account for which a parent account hasbeen specified — to view the displayed accounts in a hierarchical structure. You can expand andcollapse the account hierarchy at any level to display as many or as few accounts as you like.You may also choose to migrate account hierarchies. For more information, see Migrating AccountHierarchies [page 83].
○ Select Activity Management, and decide whether to enable: ○ Summaries
Enables you to send e-mail messages with appointment summaries attached. ○ Integration with Local E-Mail Applications
Allows you to synchronize activities between the SAP cloud solution and your local e-mailapplication (Microsoft Outlook® or IBM Lotus Notes®).
○ E-Mail BlastEnables you to create and use a template to send custom-formatted mass e-mail messages to allmembers of a target group at the same time.
○ VisitsAllows you to schedule visits to a customer's physical location and record in the system informationfrom those visits.
○ SurveyAllows you to define surveys so that salespeople can use them during customer visits.
● Expand Sales New Business . ○ Select Opportunities, and decide whether to enable:
○ Sales MethodologyTo enable the activity advisor, select In Scope for the second question: ○ Would you like to use a sales assistant that proposes activities that you have to do in a certain
phase of your opportunity?
For more information, watch the video Adding Activities with Sales Activity Advisor . ○ Approval for Opportunities
Enables a multiple step approval process for opportunities. ○ Opportunity History
Enables a historical analysis of opportunities.
If you have a high volume of opportunities, then storing this information can have aperformance impact on your solution, so consider carefully the need to report on thisinformation.
○ Select Sales Quotes, and decide whether to enable: ○ Approval for Sales Quotes
Enables a multiple step approval process for sales quotes. ● Expand Communication and Information Exchange Business Process Management .
○ Select Business Task Management, and decide whether to enable: ○ Business Task Management with Different Notification Channels
Enables e-mail notifications about accounts, activity tasks, opportunities and sales leads. ● Expand Communication and Information Exchange People Collaboration, Intranet and External
Services . ○ Select Communities, Document Management and External Services, and decide whether to enable:
○ Google Documents™ Attachments
SAP Cloud for Customer November 2013Business Configuration P U B L I C • © 2011, 2012, 2013 SAP AG. All rights reserved. 45

Allows you to link to existing or new Google documents in SAP Cloud for Customer. ○ SAP Jam Integration
Allows integration with SAP Jam for collaboration.You can also choose to use SAP Jam as the primary source for the Feed.For information, see Getting Started for SAP Cloud for Sales and Marketing Administrators —>Enable SAP Jam Integration [page 29].
● Expand Communication and Information Exchange Integration with External Applications andSolutions . ○ After you have integrated SAP CRM, select Integration of Master Data and decide whether to enable:
○ Organization StructuresEnables the Data Integration work center to replicate organization structures into SAP Cloud forCustomer from an external application or solution.
○ Select Integration of Sales, Service, and Marketing Processes, and decide whether to enable: ○ Integration with Service Request Processing from SAP Cloud for Customer to SAP CRM
For more information, see Enabling SAP CRM Integration [page 52].
● Expand General Business Data Business Partners . ○ Select Handling of Business Partners, and decide whether to enable:
○ Duplicate Checks for Business PartnersWhen you attempt to create an account or contact whose information resembles that of an existingone, you are notified that potential duplicate items were found.1. Specify whether duplicate checks are to be performed with strong, medium or weak rules.2. Deselect In Scope for the fourth question, Do you want to disable the duplicate check for
business partners?.
You cannot scope the solution to check only for duplicate accounts or contacts. If youenable duplicate checks, then the solution will check both accounts and contacts forduplicates.
● Expand General Business Data Product and Service Pricing . ○ Select Sales Price and Discount Lists, and decide whether to enable:
○ Base Price ListsAllows you to maintain base prices for your products and services.
○ Specific Price Lists ○ Discount Lists ○ Approval Processing for Price & Discount Lists
● Expand Built-in Services and Support System Management . ○ Select Security, and decide whether to enable:
○ E-Mail SecurityTo use approvals via e-mail, you must enable encryption and signatures for e-mails.
ReviewBefore you confirm your scoping, review your scoping results and provide a description and a plannedimplementation timeline for your project.Available scoping results to review:
● Your Solution Proposal — Executive Summary contains your company profile information and an overview ofyour scoping decisions.
46 © 2011, 2012, 2013 SAP AG. All rights reserved. • P U B L I CSAP Cloud for Customer November 2013
Business Configuration

● Your Solution Proposal is a comprehensive report containing your company profile information and thedetailed results of your scoping session.
● Your Notes Summary is a summary of all of the notes you made during your scoping session.
ConfirmationOnce you're satisfied with the scoping of your solution, click Finish .As a result, based on your scoping decisions, the system generates an activity list of the implementation and projectmanagement activities that you need to complete in order to go live. However, even after the activity list has beengenerated, you can still go back and review your scoping decisions and, if necessary, adjust your solution capabilities.
See AlsoGetting Started for SAP Cloud for Sales Administrators [page 29]Scoping [page 342]
4.2.3.2 Enabling Features in Scoping for SAP Cloud for Service orSocial Engagement
You can turn on or turn off certain features of SAP Cloud for Customer during the scoping process.To set up your SAP Cloud for Customer system to support only the customer service features included with SAPCloud for Service or SAP Cloud for Social Engagement, you must scope your implementation project accordingly.The options you choose during the scoping phase of your implementation project are used by the system to generatean activity list that you need to complete to go live.
To begin, go to Business Configuration Implementation Projects . Highlight the appropriate project and chooseEdit Project Scope.
If you are setting up your SAP Cloud for Customer system to support customer service features as well assales and marketing features, then use this document in combination with Enabling Features in Scoping forSAP Cloud for Sales [page 42].
Tasks
Country and Type of BusinessEnsure only the countries you support are selected in the list.To edit the list of selected countries, click Edit Countries.
ScopingMany of the scoping elements are automatically selected and cannot be deselected.The following is a list of scoping elements you may select to turn on certain features (refer to the descriptions in thesystem for more information on each of the business topics):Service
● Entitlement Management
SAP Cloud for Customer November 2013Business Configuration P U B L I C • © 2011, 2012, 2013 SAP AG. All rights reserved. 47
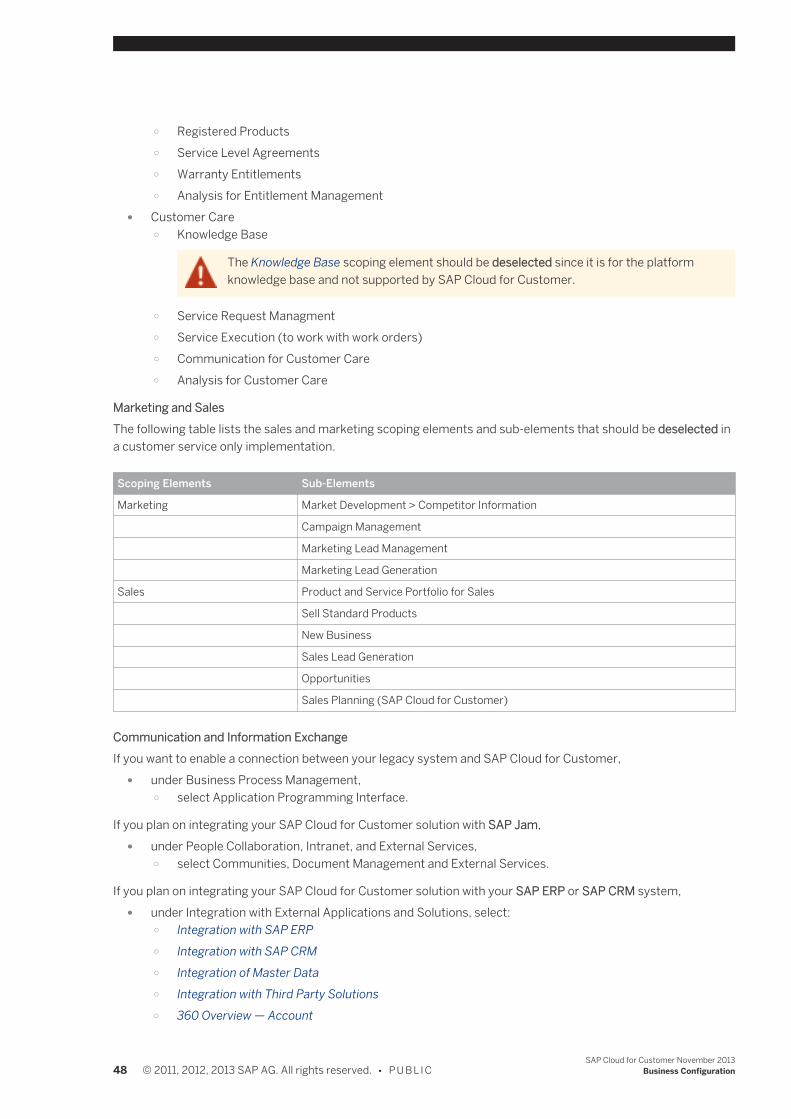
○ Registered Products ○ Service Level Agreements ○ Warranty Entitlements ○ Analysis for Entitlement Management
● Customer Care ○ Knowledge Base
The Knowledge Base scoping element should be deselected since it is for the platformknowledge base and not supported by SAP Cloud for Customer.
○ Service Request Managment ○ Service Execution (to work with work orders) ○ Communication for Customer Care ○ Analysis for Customer Care
Marketing and SalesThe following table lists the sales and marketing scoping elements and sub-elements that should be deselected ina customer service only implementation.
Scoping Elements Sub-Elements
Marketing Market Development > Competitor Information
Campaign Management
Marketing Lead Management
Marketing Lead Generation
Sales Product and Service Portfolio for Sales
Sell Standard Products
New Business
Sales Lead Generation
Opportunities
Sales Planning (SAP Cloud for Customer)
Communication and Information ExchangeIf you want to enable a connection between your legacy system and SAP Cloud for Customer,
● under Business Process Management, ○ select Application Programming Interface.
If you plan on integrating your SAP Cloud for Customer solution with SAP Jam, ● under People Collaboration, Intranet, and External Services,
○ select Communities, Document Management and External Services.
If you plan on integrating your SAP Cloud for Customer solution with your SAP ERP or SAP CRM system, ● under Integration with External Applications and Solutions, select:
○ Integration with SAP ERP ○ Integration with SAP CRM ○ Integration of Master Data ○ Integration with Third Party Solutions ○ 360 Overview — Account
48 © 2011, 2012, 2013 SAP AG. All rights reserved. • P U B L I CSAP Cloud for Customer November 2013
Business Configuration
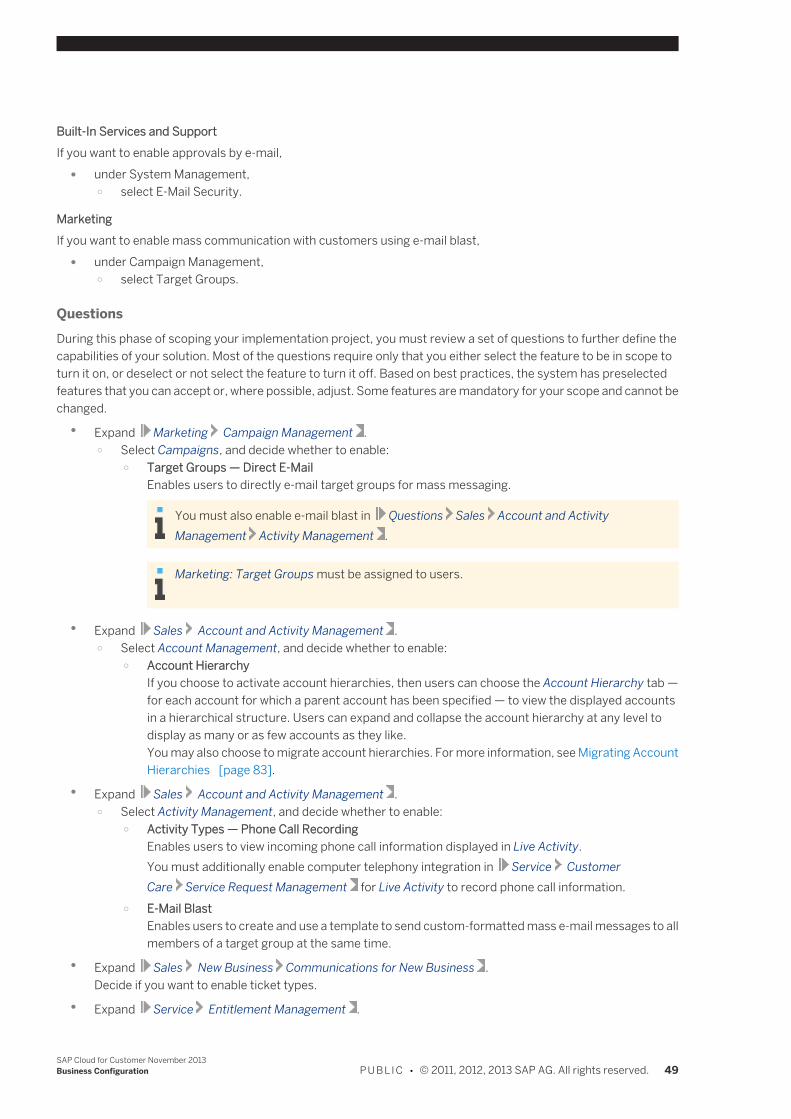
Built-In Services and SupportIf you want to enable approvals by e-mail,
● under System Management, ○ select E-Mail Security.
MarketingIf you want to enable mass communication with customers using e-mail blast,
● under Campaign Management, ○ select Target Groups.
QuestionsDuring this phase of scoping your implementation project, you must review a set of questions to further define thecapabilities of your solution. Most of the questions require only that you either select the feature to be in scope toturn it on, or deselect or not select the feature to turn it off. Based on best practices, the system has preselectedfeatures that you can accept or, where possible, adjust. Some features are mandatory for your scope and cannot bechanged.
● Expand Marketing Campaign Management . ○ Select Campaigns, and decide whether to enable:
○ Target Groups — Direct E-MailEnables users to directly e-mail target groups for mass messaging.
You must also enable e-mail blast in Questions Sales Account and ActivityManagement Activity Management .
Marketing: Target Groups must be assigned to users.
● Expand Sales Account and Activity Management . ○ Select Account Management, and decide whether to enable:
○ Account HierarchyIf you choose to activate account hierarchies, then users can choose the Account Hierarchy tab —for each account for which a parent account has been specified — to view the displayed accountsin a hierarchical structure. Users can expand and collapse the account hierarchy at any level todisplay as many or as few accounts as they like.You may also choose to migrate account hierarchies. For more information, see Migrating AccountHierarchies [page 83].
● Expand Sales Account and Activity Management . ○ Select Activity Management, and decide whether to enable:
○ Activity Types — Phone Call RecordingEnables users to view incoming phone call information displayed in Live Activity.You must additionally enable computer telephony integration in Service CustomerCare Service Request Management for Live Activity to record phone call information.
○ E-Mail BlastEnables users to create and use a template to send custom-formatted mass e-mail messages to allmembers of a target group at the same time.
● Expand Sales New Business Communications for New Business .Decide if you want to enable ticket types.
● Expand Service Entitlement Management .
SAP Cloud for Customer November 2013Business Configuration P U B L I C • © 2011, 2012, 2013 SAP AG. All rights reserved. 49
○ Select Registered Products, and decide whether to enable: ○ Manual Product Registration
Allows agents to manually register serialized products for customers. ○ Select Service Level Agreements, then review and decide whether to enable the following:
○ Common Service Level AgreementsAllows agents to define service level objectives for calculating due dates.
● Expand Service Customer Care . ○ Select Service Request Management, and decide whether to enable:
○ Facebook Response to Comments ○ Enabling agents to respond to Facebook comments on original posts requires that you have
also enabled your Facebook page(s) to supported nested comments. ○ Creating sales quotes from tickets makes it possible for an agent to create a sales quote based
on a ticket, directly from the workspace. ○ Enabling the knowledge base integration feature exposes an external knowledge base to agents
via the workspace.For more information, see Configuring Knowledge Base Integration [page 257].
○ Enabling single sign-on for the knowledge base integration feature allows you to restrict thearticles an agent can access. Agents will only be presented with articles that are relevant totheir role. If single sign-on is not enabled, a knowledge base all articles in a knowledge base willbe available to agents. For more information, see Configuring Knowledge Base Integration withSingle Sign-On Capability [page 259].
○ E-Mail Integration with Service Request Management for Corporate AccountsEnables e-mail channel support for corporate accounts.For more information, see Configuring E-Mail Channels [page 179].
○ Maintain Service Requests Automatically from Incoming E-Mails Incoming E-MailsEnables the automatic creation and updating of tickets from incoming e-mails.For more information, see Configuring E-Mail Channels [page 179].
○ E-Mail Integration with Service Request Management for Individual CustomersEnables e-mail channel support for individual customers.For more information, see Configuring E-Mail Channels [page 179].
○ CTI Integration ○ Enables users to make and receive phone calls and to view call information displayed in Live
Activity.
○ Enables secure encryption of your communications with HTTPS. For more information, seeCreating a Security Certificate for HTTPS—Enabled Computer Telephony Integration (CTI)[page 202].
You must additionally enable phone call recording in Sales Account and ActivityManagement Activity Management for Live Activity to record phone call information.
○ Facebook Direct Message IntegrationEnables direct messaging support for Facebook channels.
50 © 2011, 2012, 2013 SAP AG. All rights reserved. • P U B L I CSAP Cloud for Customer November 2013
Business Configuration
If you are upgrading from an earlier version and you choose to enable direct messagingsupport, you must repeat the authentication step (when you log on to Facebook) for eachof your existing Facebook channels.For more information, see Adding a Facebook Social Media Channel [page 185].
○ Entitlement Usage for Service RequestsEnables warranty entitlements and automatic assignment of service level agreements for tickets.
○ Service Request HistoryEnables the historical analysis of service requests so that you are able to evaluate and compare thehistorical data of tickets.
Storing this information can have a performance impact on your solution if you have ahigh volume of tickets so consider carefully the need for reporting on this information.
○ Profanity CheckDisables the profanity check on outbound response messages and allows all messages to be sent.
○ Select Communication for Customer Care, and decide whether to enable: ○ Customer Service Portal Integration
This business option enables Integration with an external customer service portal, including chat.For more information, see External Customer Service Portal Integration [page 57].
● Expand Communication and Information Exchange People Collaboration, Intranet and ExternalServices . ○ Select Communities, Document Management and External Services, and decide whether to enable:
○ SAP Jam IntegrationAllows integration with SAP Jam for collaboration.You can also choose to use SAP Jam as the primary source for the Feed.For information detailing the next steps in the integration process, see Getting Started for SAP Cloudfor Service Administrators —> Enabling SAP Jam Integration [page 25] or Getting Started for SAPCloud for Social Engagement Administrators —> Enabling SAP Jam Integration [page 20].
● Expand Communication and Information Exchange Integration with External Applications andSolutions . ○ After you have integrated SAP CRM, select Integration of Master Data and decide whether to enable:
○ Organization StructuresEnables the Data Integration work center to replicate organization structures into SAP Cloud forCustomer from an external application or solution.
○ Select Integration of Marketing, Sales, and Service Processes, and decide whether to enable: ○ Integration with Service Request Processing from Cloud to SAP CRM
For more information, see Enabling SAP CRM Integration [page 52]. ● Expand General Business Data Business Partners .
○ Select Handling of Business Partners, and decide whether to enable: ○ Duplicate Checks for Business Partners
Enables the system to check for duplicate accounts, individual accounts, and contacts. When youattempt to create an account, individual account, or contact whose information resembles that ofan existing one, you are notified that potential duplicates were found.1. Specify whether duplicate checks are to be performed with strong, medium or weak rules.
SAP Cloud for Customer November 2013Business Configuration P U B L I C • © 2011, 2012, 2013 SAP AG. All rights reserved. 51
2. Deselect In Scope for the fourth question, Do you want to disable the duplicate check forbusiness partners?.
You cannot scope the solution to check only for duplicate accounts, or duplicateindividual accounts, or duplicate contacts. If you enable duplicate checks, then thesolution will check all accounts, individual accounts, and contacts.
● Expand Built-in Services and Support System Management . ○ Select Security, and decide whether to enable:
○ E-Mail SecurityEnables encryption and signature approval for e-mail.
ReviewBefore you confirm your scoping, review your scoping results and provide a description and a plannedimplementation timeline for your project.Available scoping results to review:
● Your Solution Proposal — Executive Summary contains your company profile information and an overview ofyour scoping decisions.
● Your Solution Proposal is a comprehensive report containing your company profile information and thedetailed results of your scoping session.
● Your Notes Summary is a summary of all of the notes you made during your scoping session.
ConfirmationOnce you're satisfied with the scoping of your solution, click Finish .As a result, based on your scoping decisions, the system generates an activity list of the implementation and projectmanagement activities that you need to complete in order to go live. However, even after the activity list has beengenerated, you can still go back and review your scoping decisions and, if necessary, adjust your solution capabilities.Scoping [page 342]
See AlsoGetting Started for SAP Cloud for Service Administrators [page 25]Getting Started for SAP Cloud Social Engagement Administrators [page 20]Scoping [page 342]
4.2.3.3 Enabling SAP CRM Integration
PrerequisitesYou must decide whether your organization wants to enable the integration of SAP Cloud for Customer with SAPCustomer Relationship Management (SAP CRM). If your organization does want to enable this integration, then SAPCRM 7.0 with SAP enhancement package 0 or above is required, as well as the following SAP CRM add-on component:
● CRMPCD01 700
For additional technical information about integrating SAP Cloud for Customer with SAP CRM, reference the guidesfor integration using SAP NetWeaver PI and SAP NetWeaver Cloud Integration available on SAP Service Marketplaceat http://service.sap.com/cloud4customer . An SAP Service Marketplace user ID is required to access this
52 © 2011, 2012, 2013 SAP AG. All rights reserved. • P U B L I CSAP Cloud for Customer November 2013
Business Configuration
information. If you, as an administrator, do not have a user ID, then visit SAP Service Marketplace — at http://service.sap.com/request-user — to request one.
Scoping for integration with SAP CRM can only occur during the first implementation of SAP Cloud forCustomer. Integration with SAP CRM at a later date is not supported, because serious datainconsistencies can arise if identical sales accounts and contacts exist both in SAP Cloud for Customerand in SAP CRM.Therefore, before you implement SAP Cloud for Customer, you must decide whether integration with SAPCRM lies in scope, so that you can enable it, if desired, during first implementation.
OverviewIf your organization does want to enable SAP CRM Integration in its planned scope, then proceed as follows:
Procedure1. Choose Business Configuration Implementation Projects .2. Select the implementation project entitled First Implementation.
The Project Overview: First Implementation screen appears.
3. Choose Edit Project Scope.The Edit Project Scope: First Implementation screen appears.
● Under Country and Type of Business, select Next.
● Under Implementation Focus, select Next.
4. On the Scoping screen, expand the Communication and Information Exchange scoping element, then selectthe Integration with SAP CRM checkbox.
5. Choose Save Draft.6. Close the Edit Project Scope: First Implementation screen.
Integrating SAP Cloud for Social Engagement with a CRM On Premise SolutionIf you are using SAP Cloud for Social Engagement and you would like to copy tickets to an on premise solution, finishthe steps above and then proceed as follows:
Procedure1. Choose Next until you reach 3. Scoping.2. Select Integration with SAP CRM from the list Scoping Element.3. Choose Next until you reach 4. Questions.4. Select Integration with SAP CRM from the list Scoping Element.5. Select Yes in Integration with Service Request Processing from On-Demand to SAP CRM.6. Save your changes.
SAP Cloud for Customer November 2013Business Configuration P U B L I C • © 2011, 2012, 2013 SAP AG. All rights reserved. 53
4.2.3.4 Enabling SAP ERP Integration
PrerequisitesYou must decide whether your organization wants to enable the integration of SAP Cloud for Customer with SAPERP. If your organization does want to enable this integration, then SAP ERP Central Component (SAP ECC) 6.0with SAP enhancement package 0 or above is required, as well as the following SAP ERP add-on component:
● CODERINT 600 SP 2 or above
For additional technical information about integrating SAP Cloud for Customer with SAP ERP, visit SAP ServiceMarketplace at http://service.sap.com/cloud4customer . An SAP Service Marketplace user ID is required to accessthis information. If you, as an administrator, do not have a user ID, then visit SAP Service Marketplace — at http://service.sap.com/request-user — to request one.
Scoping for integration with SAP ERP can only occur during the first implementation of SAP Cloud forCustomer. Integration with SAP ERP at a later date is not supported, because serious data inconsistenciescan arise if identical sales accounts and contacts exist both in SAP Cloud for Customer and in SAP ERP.Therefore, before you implement SAP Cloud for Customer, you must decide whether integration with SAPERP lies in scope, so that you can enable it, if desired, during first implementation.
OverviewIf your organization does want to enable SAP ERP Integration in its planned scope, then proceed as follows:
Procedure1. Choose Business Configuration Implementation Projects .2. Select the implementation project entitled First Implementation.
The Project Overview: First Implementation screen appears.
3. Choose Edit Project Scope.The Edit Project Scope: First Implementation screen appears.
● Under Country and Type of Business, select Next.
● Under Implementation Focus, select Next.
4. On the Scoping screen, expand the Communication and Information Exchange scoping element, then selectthe Integration with SAP ERP checkbox.
5. Choose Save Draft.6. Close the Edit Project Scope: First Implementation screen.
54 © 2011, 2012, 2013 SAP AG. All rights reserved. • P U B L I CSAP Cloud for Customer November 2013
Business Configuration
4.2.3.5 Configuration: Integration with SAVO
Overview
This document contains details and instructions regarding configuration settings. Such settings are normallyperformed by an administrator. If you do not have the required authorization, contact your administrator.
To find this activity, go to Business Configuration Implementation Projects . Select your implementation projectand click Open Activity List. Select the Fine-Tune phase, then select the activity from the activity list.SAVO is a third-party Web service provider that specializes in Business Document Management. You can use thisconfiguration activity to allow users to open a business object such as an account or an opportunity, and to viewrelated business objects directly on the SAVO Web site. In addition, the user can upload these documents to the Attachments tab of the business object.
PrerequisitesThe following prerequisites apply:
● During scoping, you have selected Integration with SAVO’s Sales and Marketing Software under Communication and Information Exchange Integration with Third-Party Solutions .
● The user must have an account with SAVO to use this feature. Before using this feature for the first time, theuser must log on to the SAVO Web site.
FeaturesA user opens a screen for a business object such as an account, and goes to SAVO . This tab is activated after youhave set up fine-tuning.You can activate the SAVO tab for the following business objects:
● Account ● Competitor Product ● Competitor ● Lead ● Opportunity ● Campaign
SAP Cloud for Customer searches the SAVO Web site for documents related to the account, and displays thesedocuments on the SAVO tab as links. The user can click these links to view these documents on the SAVO Website.In addition, this feature can be used to search for documents on the SAVO Web site based on attributes specifiedfor a business object. For example, it can search for documents that are related to accounts that have the statusOpen.Each time the user opens the account and goes to SAVO , the search in SAVO is repeated, so the list of documentscould vary. However, if required, the user can attach a document to an account by clicking the Options icon andselecting Add as Attachment. The document is then displayed permanently on the Attachments tab.
SAP Cloud for Customer November 2013Business Configuration P U B L I C • © 2011, 2012, 2013 SAP AG. All rights reserved. 55
Process Flow1. Under Business Objects, select the business objects for which you would like to activate this feature.2. For each business object, you can enter attribute names to be used as tags when SAP Cloud for Customer
triggers the search on the SAVO Web site. To do this, select a business object, and enter the attribute namesin the Attribute Name fields under Search Parameters.
The length of the field extends automatically when you enter an attribute name.
3. The name of the Web site is proposed automatically In the SAVO URL field. If required, you can change it.
ExamplesThe following examples illustrate how these attributes can be used:Example 1This example uses an attribute name that is not a field in the business object.
1. As an administrator, you enter MY_VIP_ACCOUNT as attribute name for the business object ACCOUNT.
MY_VIP_ACCOUNT is not a field in the ACCOUNT business object.
2. In SAVO, a user sets MY_VIP_ACCOUNT as tag for a document:
3. In SAP Cloud for Customer, a user selects an account and goes to SAVO .Since MY_VIP_ACCOUNT is not a field in the ACCOUNT business object, the system simply uses the attributename MY_VIP_ACCOUNT from fine-tuning to search SAVO. The document in SAVO with the tagMY_VIP_ACCOUNT is displayed on the SAVO tab.
Example 2This example uses an attribute name that is a field in the business object.
1. As an administrator, you enter STATUS as attribute name for the business object ACCOUNT.
STATUS is a field in the ACCOUNT business object.
2. In SAVO, a user sets ACCOUNT_STATUS_OPEN as tag for a document:
3. In SAP Cloud for Customer, a user selects an account and goes to SAVO .Since Status is a field in the business object ACCOUNT, the system concatenates the name of the businessobject (ACCOUNT), the attribute name (STATUS), and the value of the Status field (OPEN), and searches theSAVO Web site with ACCOUNT_STATUS_OPEN.The document in SAVO with the tag ACCOUNT_STATUS_OPEN is displayed on the SAVO tab.
See AlsoEnabling Integration with Third-Party Solutions
56 © 2011, 2012, 2013 SAP AG. All rights reserved. • P U B L I CSAP Cloud for Customer November 2013
Business Configuration

4.2.3.6 External Customer Service Portal Integration
If your SAP Cloud for Customer system is not integrated with SAP HANA Cloud Portal, Support Site Edition, you canchoose to include integration with an external customer service portal during the scoping phase of yourimplementation project. This option allows you to extend your customer service capabilities to include a self-serviceoffering provided by a partner over the Internet.For information on integrating your SAP Cloud for Customer system with SAP HANA Cloud Portal, Support SiteEdition, contact your SAP Cloud Services representative.
PrerequisitesYour system has been provisioned with the Add-On for External Customer Service Portal Integration.
Activating External Customer Service Portal Integration1. Go to Business Configuration Implementation Projects and select the relevant implementation project.2. Click Edit Project Scope .3. Click Next > until you reach 4 Questions.4. In the Scoping Elements list, select Service > Customer Care > Communication for Customer Care.5. To enable External Customer Service Portal Integration, select Yes.6. Click Next > .7. Review and confirm your project scope.
Follow-On Activities1. Create a new communication system to connect to your partner system for the customer service portal.2. Create and maintain communication arrangements settings for the customer service portal communication
system.
For more information, see Configuring an External Customer Service Portal [page 159].
4.2.4 Activity List
4.2.4.1 Complete the Activity List
Once you have finished preparing an implementation project, you can begin to work with the Activity List for theproject. The Activity List is automatically generated by the system based on your scoping decisions and the activitiesare grouped by phases. It includes all mandatory implementation and project management activities that you needto complete before your solution can go live for the first time, in the case of your first implementation project, orbefore your changes can be merged with your live solution, in the case of a change project. You can also add optionalactivities to the Activity List and complete them; most of these optional activities relate to the Fine-Tune phase but
SAP Cloud for Customer November 2013Business Configuration P U B L I C • © 2011, 2012, 2013 SAP AG. All rights reserved. 57
may also relate to other phases. Milestones have to be confirmed for your first implementation project and yourchange projects (if you have included milestones to the activity list of your change project) — these milestones giveyou guidance and allow you to track the status of your implementation.
PrerequisitesYou have completed the following:
● First Implementation: You have finished preparing the first implementation project. For more information,see Prepare the First Implementation Project [page 353].
● Change Project: You have finished preparing a change project. For more information, see Prepare a ChangeProject [page 356].
Steps
Complete the Activity List — First Implementation1. To access the Activity List, open the Implementation Projects view in the Business Configuration work center.2. Select the implementation project First Implementation and click Open Activity List .
The Activity List guided activity opens on the Prepare phase tab.
Prepare Phase1. In the Prepare phase, in the Show filter select My Activities in Project to find all activities that are assigned to
you.
You can change the owner of an activity in the list. For more details, see Further Tasks below.
2. Complete the activities in the correct sequence as follows:a. Select your first activity and click Open .b. Read the instructions accompanying the activity, and complete the activity as specified.c. Click Save if required, and close the activity.d. Repeat the above steps for each of your activities.
● Prerequisites ExistSome activities have to be completed before others. If there are prerequisites for anactivity, you can see which activities have to be completed by clicking on Yes in thePrerequisites Exist column; a dialog box opens and lists the prerequisite activities.
● Repetition RequiredSome activities in your Activity List have to be repeated in other systems because the datain these activities cannot be copied automatically to another system. For example, if youmaintain an activity in your test system, you must also repeat this activity in yourproduction system. In the Activity List, you can see which activities have to be repeated inthe Repetition Required column.
3. On the Activity List screen, change the status of each completed activity to Closed. To do this, select eachactivity, click Change Status , and select Closed.
58 © 2011, 2012, 2013 SAP AG. All rights reserved. • P U B L I CSAP Cloud for Customer November 2013
Business Configuration
Each activity has a status indicator showing whether the activity is open, in process, or closed.At the top of the screen, you can see the total number of activities in the Activity List for the selectedphase, as well as how many are open, in process, and closed.
4. Confirm Milestone: Design AcceptedYou cannot move on to the next phases of the Activity List until you have confirmed this milestone.
Fine-Tune Phase1. On the Activity List screen, click the Fine-Tune phase tab.2. Complete the activities in the Fine-Tune phase in the correct sequence as described for the Prepare phase
above.
● Additional InformationSome of the activities in this phase have additional information to assist you in completing them.You can access the additional information directly in the Help Center of the relevant activityunder Help Resources by clicking Help Center in the Infobar.
● Mandatory and Optional ActivitiesBy default, the Activity List contains only mandatory activities. You can also add optionalactivities to your Activity List.
● Translate Configuration SettingsYou can translate your configuration settings in fine-tuning activities into other languages, ifrequired.
● Restore Default Fine-Tuning SettingsYou can delete predefined fine-tuning settings. To do this, select a fine-tuning setting and click
Delete .You can also restore the predefined fine-tuning settings that you have deleted. To do this, click
Restore Defaults . A window appears, listing the fine-tuning settings that can be restored. Selectthe fine-tuning setting you want to restore and click Restore .
For more information, see Further Tasks below.
3. Confirm Milestone: Solution Accepted
Integrate and Extend Phase1. On the Activity List screen, click the Integrate and Extend phase tab.2. In the Integrate and Extend phase, complete the activities in the correct sequence as described for the
Prepare phase above.3. Adapt forms, reports, user interfaces, and third party connectivity to meet your company's specific needs.4. Maintain basic data.
Test Phase1. On the Activity List screen, click the Test phase tab.2. In the Test phase, complete the activities in the correct sequence as described for the Prepare phase above.3. On finalizing testing successfully, confirm Confirm Milestone: Go Live Readiness Accepted.
Go Live Phase1. On the Activity List screen, click the Go Live phase tab.2. Compete the activities to prepare and perform cutover.3. To finalize your implementation project, complete the following activities:
SAP Cloud for Customer November 2013Business Configuration P U B L I C • © 2011, 2012, 2013 SAP AG. All rights reserved. 59
● Confirm Go LiveAfter completing this activity, your solution is live and ready for use. You can still view all previous phasesand activities of your project, but you cannot make changes to them. Once completed, you cannot changethe status of this activity. The project status is set to Live and all phases except Go Live are set to read-only.
There are two ways to make changes to your live solution. You can make smaller changes toconfiguration elements, or, for more complex changes, you can create change projects. For moreinformation, see Make Changes to Your SAP Solution [page 39] and Prepare a Change Project
[page 356].
● Close ProjectAfter completing this activity, your implementation project is officially closed. The status of the projectis changed to Closed, the Go Live phase is set to read-only, and you cannot make any further changes tothe project. However, you can still view the project in read-only mode.
You can also complete this activity from the Implementation Projects view. If your firstimplementation project is live and you select this project on this view, Close Project appears.When you click this button, you essentially complete the same activity as described here withoutthe need to go into the Activity List.
At the end of the Go Live phase, you and the project team have: ● Resolved all mandatory and open configuration issues ● Migrated all legacy data to your production system ● Completed knowledge transfer ● Signed off the project
Complete the Activity List — Change Project
If your change project includes the Add Country change scenario, you have to manually add businessoptions that are affected by this change scenario, but were already completed as part of your firstimplementation project and therefore not automatically added to the activity list of your change project.For a list of activities you need to add, see Change Scenario: Add Country.
1. To access the Activity List, open the Implementation Projects view in the Business Configuration work center.2. Select the change project and click Open Activity List .
The Activity List guided activity opens on All . All the activities are displayed in one list and the Phase columnindicates which phase the activity belongs to.If you prefer, you can work through the activity list per phase by using the tabs as in the first implementationproject
Activities Grouped in the Prepare Phase1. In the Show filter select My Activities in Project to find all activities that are assigned to you.
You can change the owner of an activity in the list. For more details, see Further Tasks below.
2. Complete the activities in the correct sequence as follows:a. Select your first activity and click Open .b. Read the instructions accompanying the activity, and complete the activity as specified.
60 © 2011, 2012, 2013 SAP AG. All rights reserved. • P U B L I CSAP Cloud for Customer November 2013
Business Configuration
c. Click Save if required, and close the activity.d. Repeat the above steps for each of your activities.
● Prerequisites ExistSome activities have to be completed before others. If there are prerequisites for anactivity, you can see which activities have to be completed by clicking on Yes in thePrerequisites Exist column; a dialog box opens and lists the prerequisite activities.
● Repetition RequiredSome activities in your Activity List have to be repeated in other systems because the datain these activities cannot be copied automatically to another system. For example, if youmaintain an activity in your test system, you must also repeat this activity in yourproduction system. In the Activity List, you can see which activities have to be repeated inthe Repetition Required column.
3. On the Activity List screen, change the status of each completed activity to Closed. To do this, select eachactivity, click Change Status , and select Closed.If you included milestones to the activity list of you change project, you need to close the Confirm Milestone:Design Accepted milestone as well.
Each activity has a status indicator showing whether the activity is open, in process, or closed.At the top of the screen, you can see the total number of activities in the Activity List for the selectedphase, as well as how many are open, in process, and closed.
Activities Grouped in the Fine-Tune PhaseComplete the activities in the correct sequence as described above.If you included milestones to the activity list of your change project, you need to close the Confirm Milestone: SolutionAccepted milestone as well.
● Additional InformationSome of the activities in this phase have additional information to assist you in completing them. Youcan access the additional information directly in the Help Center of the relevant activity under HelpResources by clicking Help Center in the Infobar.
● Mandatory and Optional ActivitiesThe Activity List contains the mandatory activities derived from the scope of your change project aswell as optional activities you selected for inclusion while preparing the change project. You can addmore optional activities to your Activity List.
● Translate Configuration SettingsYou can translate your configuration settings in fine-tuning activities into other languages, if required.
● Restore Default Fine-Tuning SettingsYou can delete predefined fine-tuning settings. To do this, select a fine-tuning setting and click
Delete .You can also restore the predefined fine-tuning settings that you have deleted. To do this, click
Restore Defaults . A window appears, listing the fine-tuning settings that can be restored. Select thefine-tuning setting you want to restore and click Restore .
For more information, see Further Tasks below.
Activities Grouped in the Integrate and Extend PhaseIf you are using a separate test system, the process is as follows:
1. Complete all migration activities.
SAP Cloud for Customer November 2013Business Configuration P U B L I C • © 2011, 2012, 2013 SAP AG. All rights reserved. 61
2. Complete and close the Activate Solution Capabilities activity.This triggers the activation of work centers and views that you changed with your change project.
3. Perform tests in your test system.4. Merge your changes back to the production system.5. All migration activities need to be repeated in your production system:
a. Migrate your basic data and master data.b. Open the Activate Solution Capabilities activity.
This triggers the activation of work centers and views that you changed with your change project.Click Confirm to adapt and expand your business processes to incorporate the newly configuredfunctionality.Click Close to return to the activity list.
6. Migrate your transaction data.
If you are not using a separate test system, the process is as follows:1. Complete all migration activities.2. Complete and close the Activate Solution Capabilities activity.
This triggers the activation of work centers and views that you changed with your change project.3. Merge your changes back to the production system.4. Migrate your basic data and master data.5. Open the Activate Solution Capabilities activity.
This triggers the activation of work centers and views that you changed with your change project.Click Confirm to adapt and expand your business processes to incorporate the newly configuredfunctionality.Click Close to return to the activity list.
6. Migrate your transaction data.7. Complete any other activities grouped in this phase.
Activities Grouped in the Test Phase
Before continuing to work on activities grouped in the Test phase, we recommend you update the projectwith scoping and fine-tuning changes that have been made to the production system since the changeproject was created. For more information, see Update a Change Project from Production.
If required, complete the activities in the correct sequence as described above.If you included milestones to the activity list of your change project, you need to close the Confirm Milestone: Go-Live Readiness Accepted milestone as well.Activities Grouped in the Go Live Phase
Before continuing to work on activities grouped in the Go Live phase, we recommend you simulate themerge back to the production system to ensure your changes do not contradict decisions made already.For more information, see Simulate Merging a Change Project with the Production System.
Merge your changes back to the production system.1. Open the Merge Changes with Production System activity and click Start Merge .
If your changes contradict decisions made in the production system since your project was created, you havethe opportunity to either keep the project settings or cancel the merge process.When you cancel the merge process, you can manually synchronize the settings in your production system.In addition, you need to repeat the activities related to master data. These are automatically reopened afterthe merge.
62 © 2011, 2012, 2013 SAP AG. All rights reserved. • P U B L I CSAP Cloud for Customer November 2013
Business Configuration
If the merge process was canceled previously, you can click Merge Reports to see the automaticallycreated reports.
2. Click Close to return to the Activity List.
In the Reports view, you can run the Configuration Change History report to display a complete change historyfor all fine-tuning settings that are in scope for your solution and that you have fine-tuned or that have beenchanged by an update. The report also displays the change history for fine-tuning settings that weredeselected and, thus, that are not in scope.
Further Tasks
Change the Owner of an Activity1. Select the activity for which you want to change the owner.2. Click Actions and select Change Owner.3. Enter the name of the new owner or use the value help to search for a name.4. Click OK to save your changes.
Create a Manual ActivityIf you require further activities for your implementation project, you can create them directly in the Activity List. Forexample, if you want to include your implementation project schedule, you can create an activity in the Prepare phaseand attach the project schedule.
1. Go to the phase of the activity list where you want to add the manual activity.2. Click Actions and select Create Manual Activity.3. On the Edit Manual Activity screen, proceed as follows:
● Enter the required details.The system proposes an Activity Group — you can change the proposal using the value help.The Phase is entered automatically and matches the phase you are in when you create the manualactivity.
● Add attachments.You can upload files or links.
● Click Save and Close .
The manual activity is added to the Activity List.
Delete a Manual ActivityTo delete a manual activity from the Activity List, select the manual activity, click Actions and then select DeleteManual Activity.The manual activity is removed from the Activity List.
Add or Remove Optional ActivitiesThe Activity List automatically contains all mandatory activities you need to work though based on the scopingdecisions made by your company. You can check if there are any optional activities that you might want to implementor remove.
1. In the Show filter, select Activities not in Project, Instructional Activities, or All Activities.The available activities are displayed.
SAP Cloud for Customer November 2013Business Configuration P U B L I C • © 2011, 2012, 2013 SAP AG. All rights reserved. 63
2. The column In Project indicates whether or not an activity is already included in your project.3. To add an activity to your activity list, select the activity and click Add to Project . This button is greyed out if
the selected activity cannot be added to your project.To remove an activity from your activity list, select the activity and click Remove from Project . This button isgreyed out if the selected activity cannot be removed from your project.
Add a Note to an ActivityYou can attach notes to an activity for future reference. In addition, any notes that were made during scoping appearin the Activity List. Notes are useful, for example, if you want to change the owner of an activity and you want toprovide information to the new owner, or you want to add a comment about why an activity has been completed ina certain way.
1. Select the activity to which you want to add a note, click Actions , and select Add or Edit Notes.2. On the Add or Edit Notes screen in the Notes section, click Add Row and enter a name and description for
the note.You can add several notes for the activity. You can also edit or remove existing notes.
3. In the Attachments section, click Add to upload the relevant attachment, which can be a file or a link.You can add more than one attachment, and you can also view, delete, or replace attachments.
4. Click Save and Close to return to the Activity List.The system updates the Notes column to show that a note for the activity exists.
Translate Fine-Tuning SettingsYou can translate your fine-tuning settings into other languages.
1. For activities in the Fine-Tune phase of the activity list, open the activity for which you would like settingstranslated.
2. On the relevant fine-tuning screen, click Translate .The Translate screen is displayed.
3. Select the Source Language and Target Language for translation. The list of source languages consists of thesystem languages. The list of target languages consists of the system languages and any additional languageyou have selected in the optional fine-tuning activity Additional Communication Languages.
4. The default settings delivered with your solution are translated automatically. If necessary, edit the TargetLanguage translations.
5. For settings that you or other users added to your solution manually, enter Target Language translations andthen click OK .
Restore Default Fine-Tuning SettingsYour fine-tuning settings initially include default values provided by SAP or partners. In some cases, if these valueswere removed from a fine-tuning screen, you can restore them.
1. In the Fine-Tune phase of the activity list, open the activity for which you would like to restore default settings.2. On the relevant fine-tuning screen, click Restore Defaults .
The Restore Defaults screen is displayed.
If the Restore Defaults button is not available on a fine-tuning screen, it is not possible to restore thoseparticular default fine-tuning settings.
3. Select the settings that you want to include in your solution and click Restore .
64 © 2011, 2012, 2013 SAP AG. All rights reserved. • P U B L I CSAP Cloud for Customer November 2013
Business Configuration
4.2.4.2 Configuring Activities
In this activity you can do configuration settings required for activities.To find this activity, go to the Business Configuration work center and choose the Implementation Projects view.Select your implementation project and click Open Activity List . Select the Fine-Tune phase, then select theActivities activity from the activity list.
Business Background
Party ProcessingBusiness partners is the superordinate term for all of the companies and people with whom you are in contact inyour daily business. Business partners can be, for example, accounts, contacts, partners, or employees. When youcreate a document such as a sales quote, you can indicate that business partners you created in the master dataare involved parties for this specific document. Roles are assigned to each party to define the party’s purpose.Business partners can take on multiple party roles in a business document. For example, often in sales quotes theaccount, ship-to, and bill-to party roles are identical.In SAP Cloud for Customer, you can automatically determine all involved parties for business transactions anddocuments using roles, determination rules, parties, addresses, and master data. The Involved Parties tab, forexample in a sales quote, displays all parties and contacts.For more information, see Party Processing for Cloud for Customer [page 450].
Tasks
Maintaining CategoriesWith this activity you can add and delete your own categories for your documents. You canuse the categories to classify your documents.
This list is used for activities, marketing leads, opportunities, and sales leads dependingon your scoping. Though if you change an entry in one context it is also changed in theothers.
Adding a Category1. Click Add Row .2. Enter a Category Code beginning with a Z.
3. Save your entries.
Deleting a Category1. Select a line and click Delete .2. Save your changes.
You cannot delete all category assignments. At least one category must be assigned.If you delete entries here that are used in documents, the technical codes are stayingin the documents and only the code descriptions are removed.
SAP Cloud for Customer November 2013Business Configuration P U B L I C • © 2011, 2012, 2013 SAP AG. All rights reserved. 65
Assigning CategoriesWith this activity you specify which of the categories you want to use to classify your activities.Adding a Category
1. To add a category select first the Activity Type and then click Add Row .2. Select the Category you want to use.3. Save your changes.
Deleting a Category1. To delete a category select it and click Delete .2. Then save your changes.
A defaulting does only work with the following categories: ● Customer visit (Appointment) ● Business e-mail (E-Mail) ● Telephone call (Phone Call) ● Preparation (Activity Task)
Maintaining Document TypesWith this activity you can create own document types and use them in the system to filter yourdocuments and within the reports.Adding a Document Type
1. Click Maintain Document Types.2. Click Add Row and enter the required document type code and a description.3. Save your changes.
Deleting a Document Type1. Select the entry you want to delete and click Delete .2. Save your changes.
You can't delete used document types.
Maintaining Involved Parties for Appointments, Tasks, E-Mails, and PhoneCallsThe following steps are valid for maintaining the involved parties for all activity types:Appointments, Tasks, E-Mails, and Phone Calls. Therefore they are not repeated separatelyfor each fine-tune activity.
● Adding or editing party roles1. Click Maintain Involved Parties.2. Under Party Role Assignments click Add Row .3. Select a Party Role from the drop-down list.
66 © 2011, 2012, 2013 SAP AG. All rights reserved. • P U B L I CSAP Cloud for Customer November 2013
Business Configuration
4. Decide whether the role should be, for example, active, mandatory, unique, orshould be forbidden for manual changes.
5. Save your changes.6. Then click Maintain Determinations where you can edit the determination for the
newly added party role. ● Deleting role assignments
1. Select the line you want to delete.2. Click Delete .
You can delete only self-created assignments. Pre-delivered content cannot bedeleted.
4.2.4.3 Marketing Activities
4.2.4.3.1 Configuring Marketing Leads
In this activity you can do the configuration settings for marketing leads.To find this activity, go to the Business Configuration work center and choose the Implementation Projects view.Select your implementation project and click Open Activity List . Select the Fine-Tune phase, then select theMarketing Leads activity from the activity list.
Tasks
Maintaining SourcesHere you can specify the origin of you documents, such as trade fair, campaign, and roadshow.
This list is used for marketing leads, opportunities, and sales leads depending on yourscoping. Though if you change an entry in one context it is also changed in the others.
Adding a Source1. Click Add Row .2. Enter a source code beginning with a Z and a description.
3. Save your entries.
Deleting a Source1. Select the entry you want to delete and click Delete .2. Save your changes.
If you delete entries here that are used in documents, the technical codes are stayingin the documents and only the code descriptions are removed.
SAP Cloud for Customer November 2013Business Configuration P U B L I C • © 2011, 2012, 2013 SAP AG. All rights reserved. 67
Maintaining CategoriesWith this activity you can add and delete your own categories for your documents. You canuse the categories to classify your documents.
This list is used for activities, marketing leads, opportunities, and sales leads dependingon your scoping. Though if you change an entry in one context it is also changed in theothers.
Adding a Category1. Click Add Row .2. Enter a Category Code beginning with a Z.
3. Save your entries.
Deleting a Category1. Select a line and click Delete .2. Save your changes.
You cannot delete all category assignments. At least one category must be assigned.If you delete entries here that are used in documents, the technical codes are stayingin the documents and only the code descriptions are removed.
Assigning CategoriesWith this activity you specify which of the categories you want to use to classify yourdocuments.
1. To add a category click Add Row and select the category you want to use.To delete a category select it and click Delete.
2. Then save your changes.
Maintaining QualificationsWith this activity you can adapt the qualifications that you use to classify how promising a leadis for your business.
This list is used for marketing and sales leads depending on your scoping. Though if youchange an entry in one context it is also changed in the other.
Adding or Editing Qualifications1. To add a qualification click Add Row .2. Enter a Qualification Code beginning with a Z and a Description.
You can also change the descriptions of the existing qualifications.3. Save your entries.
Deleting Qualifications1. Select the row you want to delete and click Delete .2. Save your changes.
68 © 2011, 2012, 2013 SAP AG. All rights reserved. • P U B L I CSAP Cloud for Customer November 2013
Business Configuration
If you delete entries here that are used in documents, the technical codes are stayingin the documents and only the code descriptions are removed.
Maintaining Marketing Lead StatusFor more information, see here [page 69].
4.2.4.3.2 Marketing Lead Status
In this activity, you can edit existing or pre-delivered statuses for marketing leads, or add new statuses of your own,in accordance with your business needs. Any new statuses you create are based on an internal status. You can alsocontrol which conversion actions shall be available for a certain status.Initially, it is possible to enable all conversion actions for the internal statuses Open and Qualified. However, withthis activity, it is possible to create new statuses (based on the internal statuses Open and Qualified) where youcan enable certain conversion actions.Internal Lifecycle of Marketing LeadsThe internal lifecycle of marketing leads proceeds as follows:
● Open: When the user creates a marketing lead, the solution assigns it the internal status Open.
● Qualified: Once the user qualifies the marketing lead, its internal status changes to Qualified. If youchoose to define more than one status that uses Qualified, then the solution must determine which statusto display when a marketing lead is qualified. As delivered, the solution displays the status with internal statusQualified and the lowest sequence number.
● Converted: When the user converts the marketing lead into a sales lead, opportunity or account and contact,the internal status changes to Converted, and the marketing lead cannot be reopened. Once the statusConverted is assigned to a marketing lead, the user cannot modify the lead, or assign a new status to it.
The pre-delivered statuses are similar to the internal status.Status Converted
● Users cannot perform conversion actions for marketing leads assigned the internal status Converted,because this status represents the final step within the lifecycle of a marketing lead. Therefore, users alsocannot set the Initial Status indicator for the internal status Converted.
● A converted marketing lead also cannot be modified. ● The status Converted does not appear in the status drop-down list. Users cannot set this status manually;
the status is automatically set when a marketing lead is converted through one of the available conversionactions.
● Users can search for the status Converted in the Marketing Leads overview of the Marketing work center.
To find this activity, go to Business Configuration Implementation Projects . Select your implementation projectand click Open Activity List . Select the Fine-Tune phase, then select the Marketing Leads activity from the activitylist and click Maintain Status under Marketing Lead Status.
SAP Cloud for Customer November 2013Business Configuration P U B L I C • © 2011, 2012, 2013 SAP AG. All rights reserved. 69
Tasks
Creating a New Status1. Enter a number as Sort Sequence. With the Sort Sequence you determine where the
new status shall appear in the drop-down list of your marketing lead. The sequence canbe modified for all statuses, and has no influence on the processing of marketing leads.
2. New status codes will begin with the identifier Z; this identifier cannot be changed.
3. Assign the corresponding Internal Status in which your new status shall be active.
You can only create a new status for the internal statuses Open or Qualified.
4. Enter a description.5. Specify whether your new status shall be the initial status for newly created marketing
leads.6. To make the status visible, select the Active checkbox.7. With the conversion checkboxes, you can specify which conversion actions shall be
available for marketing leads that attain your new status.8. Save your changes.
Changing a Status1. You can change the following fields:
● Sort SequenceWith the Sort Sequence you determine where the new status shall appear in thedrop-down list. The sequence can also be modified for pre-delivered statuses, andhas no influence on the processing of marketing leads.
● Description ● Initial Status ● Active
To remove a status from the application, deselect the Active checkbox.In response, the status will no longer appear, and users cannot search formarketing leads with this status in the Marketing Leads overview. However,marketing leads that are assigned to this status will continue to display it.
● Conversion actions2. Save your changes.
Deleting a Status1. Select the line you want to delete and click Delete .2. Save your changes.
● You can only delete a status that is not used in any marketing lead. ● You cannot delete any pre-delivered status, but you can deactivate a pre-
delivered status by deselecting the Active checkbox.
70 © 2011, 2012, 2013 SAP AG. All rights reserved. • P U B L I CSAP Cloud for Customer November 2013
Business Configuration
4.2.4.3.3 E-Mail Campaigns
4.2.4.3.3.1 Activating E-Mail Campaigns
PrerequisitesYou must decide whether your organization wants to activate direct e–mail marketing campaigns – enabling yourorganization to send marketing e-mail directly to a selected target group.
OverviewActivating e-mail campaigns is a two part process:
● Selecting the correct options in the Business Configuration scoping ● Adding allowed sender domains for outgoing e-mail
Set Scoping OptionsFor information on selecting the necessary scoping options to enable e-mail campaigns, refer to the followingdocument: Enabling Features in Scoping for SAP Cloud for Sales [page 42]
Add Outgoing E-mail Domains for CampaignsYou must add allowed e-mail domains for your outbound marketing e-mail messages. Messages from these domainswill be certified as legitimate messages and avoid filtering by anti-spam services.
1. Go to Business Configuration Implementation Projects .2. Select your project and click Open Activity List .3. Select the Fine-Tune tab.4. Go to the E-Mail and Fax Settings activity.5. Select E-Mail and Fax Settings.6. In the table for Allowed Sender E-Mail Domains, click Add .7. Add the domain for your outbound e-mails.8. Ensure that Send all e-mails to business partners is selected.9. Save your entries.
You can also maintain a default sender address here.
See AlsoEnabling Features in Scoping for SAP Cloud for Sales [page 42]Templates for E-Mail Campaigns [page 72]
SAP Cloud for Customer November 2013Business Configuration P U B L I C • © 2011, 2012, 2013 SAP AG. All rights reserved. 71

Creating Campaign Export File Formats [page 72]
4.2.4.3.3.2 Creating Campaign Export File Formats
PrerequisitesYou must activate e-mail campaigns before users can send direct e-mail marketing messages. See Activating E-MailCampaigns [page 71] for more information. You will also need to create one or more templates for the campaigne-mail message. See Templates for E-Mail Campaigns [page 72] for more information on creating messagetemplates.
OverviewWhen a user executes a campaign, the target group contact information is exported to a comma separated value(CSV) file compatible with Microsoft Excel®. You can define one or more file formats for the CSV file that determineswhich information is exported and the order in which it appears in the file.
Procedure1. Select Marketing Campaign File Formats .2. Select New.3. Enter a description for the file format.4. Select the Campaign Type.
For example: E-Mail using file export.You also have the options to set the file format as default, and to add a header row, if desired.
5. Select a separator character.For example, a comma, or a semicolon.
6. Select Save and Open.7. Use the controls to move desired fields to the Selected Fields box and move the fields up or down in the list
to change the order in which they appear in the export file.8. Select Save and Close.
See AlsoActivating E-Mail Campaigns [page 71]Templates for E-Mail Campaigns [page 72]
4.2.4.3.3.3 E-Mail Templates
OverviewTo send out a mass e-mail message to a defined target group, you must first create an HTML template with themessage text and placeholders for the various fields to be populated with contact information from the target groupmembers. You can use any HTML editor to create this template.
72 © 2011, 2012, 2013 SAP AG. All rights reserved. • P U B L I CSAP Cloud for Customer November 2013
Business Configuration
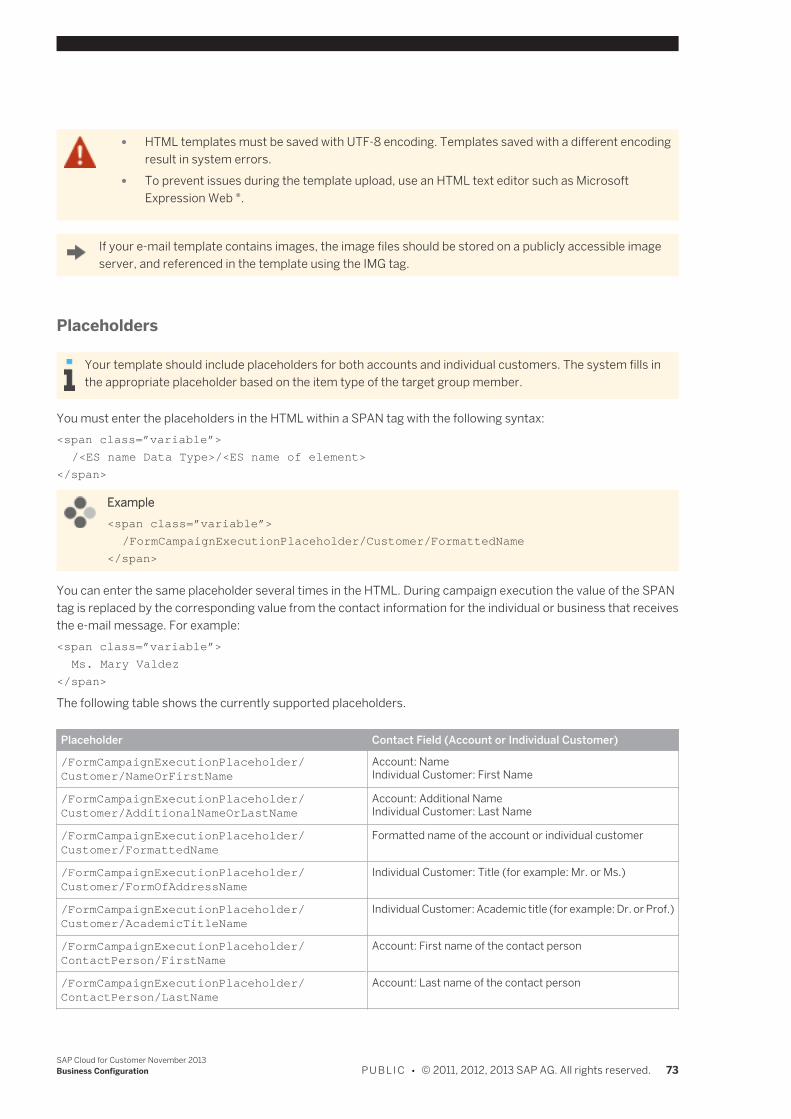
● HTML templates must be saved with UTF-8 encoding. Templates saved with a different encodingresult in system errors.
● To prevent issues during the template upload, use an HTML text editor such as MicrosoftExpression Web ®.
If your e-mail template contains images, the image files should be stored on a publicly accessible imageserver, and referenced in the template using the IMG tag.
Placeholders
Your template should include placeholders for both accounts and individual customers. The system fills inthe appropriate placeholder based on the item type of the target group member.
You must enter the placeholders in the HTML within a SPAN tag with the following syntax:<span class=”variable”>
/<ES name Data Type>/<ES name of element>
</span>
Example<span class=”variable”>
/FormCampaignExecutionPlaceholder/Customer/FormattedName
</span>
You can enter the same placeholder several times in the HTML. During campaign execution the value of the SPANtag is replaced by the corresponding value from the contact information for the individual or business that receivesthe e-mail message. For example:<span class=”variable”>
Ms. Mary Valdez
</span>
The following table shows the currently supported placeholders.
Placeholder Contact Field (Account or Individual Customer)
/FormCampaignExecutionPlaceholder/Customer/NameOrFirstName
Account: NameIndividual Customer: First Name
/FormCampaignExecutionPlaceholder/Customer/AdditionalNameOrLastName
Account: Additional NameIndividual Customer: Last Name
/FormCampaignExecutionPlaceholder/Customer/FormattedName
Formatted name of the account or individual customer
/FormCampaignExecutionPlaceholder/Customer/FormOfAddressName
Individual Customer: Title (for example: Mr. or Ms.)
/FormCampaignExecutionPlaceholder/Customer/AcademicTitleName
Individual Customer: Academic title (for example: Dr. or Prof.)
/FormCampaignExecutionPlaceholder/ContactPerson/FirstName
Account: First name of the contact person
/FormCampaignExecutionPlaceholder/ContactPerson/LastName
Account: Last name of the contact person
SAP Cloud for Customer November 2013Business Configuration P U B L I C • © 2011, 2012, 2013 SAP AG. All rights reserved. 73
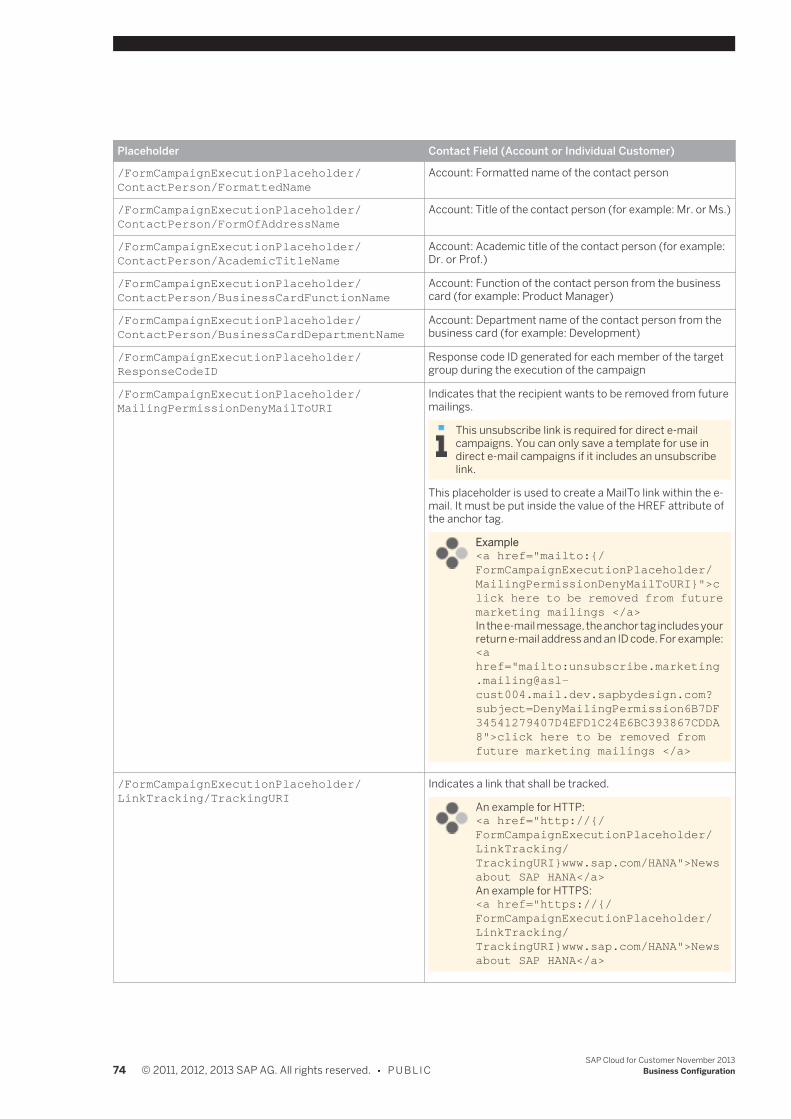
Placeholder Contact Field (Account or Individual Customer)
/FormCampaignExecutionPlaceholder/ContactPerson/FormattedName
Account: Formatted name of the contact person
/FormCampaignExecutionPlaceholder/ContactPerson/FormOfAddressName
Account: Title of the contact person (for example: Mr. or Ms.)
/FormCampaignExecutionPlaceholder/ContactPerson/AcademicTitleName
Account: Academic title of the contact person (for example:Dr. or Prof.)
/FormCampaignExecutionPlaceholder/ContactPerson/BusinessCardFunctionName
Account: Function of the contact person from the businesscard (for example: Product Manager)
/FormCampaignExecutionPlaceholder/ContactPerson/BusinessCardDepartmentName
Account: Department name of the contact person from thebusiness card (for example: Development)
/FormCampaignExecutionPlaceholder/ResponseCodeID
Response code ID generated for each member of the targetgroup during the execution of the campaign
/FormCampaignExecutionPlaceholder/MailingPermissionDenyMailToURI
Indicates that the recipient wants to be removed from futuremailings.
This unsubscribe link is required for direct e-mailcampaigns. You can only save a template for use indirect e-mail campaigns if it includes an unsubscribelink.
This placeholder is used to create a MailTo link within the e-mail. It must be put inside the value of the HREF attribute ofthe anchor tag.
Example<a href="mailto:{/FormCampaignExecutionPlaceholder/MailingPermissionDenyMailToURI}">click here to be removed from futuremarketing mailings </a>In the e-mail message, the anchor tag includes yourreturn e-mail address and an ID code. For example:<ahref="mailto:unsubscribe.marketing.mailing@asl-cust004.mail.dev.sapbydesign.com?subject=DenyMailingPermission6B7DF34541279407D4EFD1C24E6BC393867CDDA8">click here to be removed fromfuture marketing mailings </a>
/FormCampaignExecutionPlaceholder/LinkTracking/TrackingURI
Indicates a link that shall be tracked.
An example for HTTP:<a href="http://{/FormCampaignExecutionPlaceholder/LinkTracking/TrackingURI}www.sap.com/HANA">Newsabout SAP HANA</a>An example for HTTPS:<a href="https://{/FormCampaignExecutionPlaceholder/LinkTracking/TrackingURI}www.sap.com/HANA">Newsabout SAP HANA</a>
74 © 2011, 2012, 2013 SAP AG. All rights reserved. • P U B L I CSAP Cloud for Customer November 2013
Business Configuration
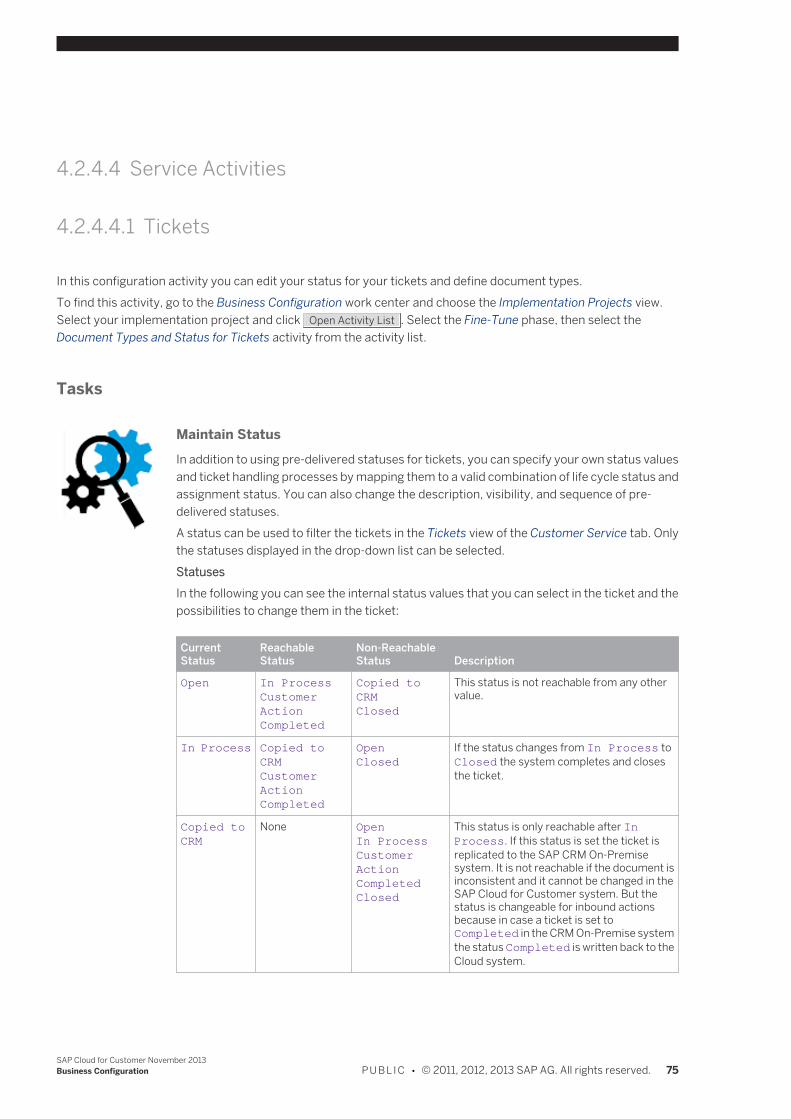
4.2.4.4 Service Activities
4.2.4.4.1 Tickets
In this configuration activity you can edit your status for your tickets and define document types.To find this activity, go to the Business Configuration work center and choose the Implementation Projects view.Select your implementation project and click Open Activity List . Select the Fine-Tune phase, then select theDocument Types and Status for Tickets activity from the activity list.
Tasks
Maintain StatusIn addition to using pre-delivered statuses for tickets, you can specify your own status valuesand ticket handling processes by mapping them to a valid combination of life cycle status andassignment status. You can also change the description, visibility, and sequence of pre-delivered statuses.A status can be used to filter the tickets in the Tickets view of the Customer Service tab. Onlythe statuses displayed in the drop-down list can be selected.StatusesIn the following you can see the internal status values that you can select in the ticket and thepossibilities to change them in the ticket:
CurrentStatus
ReachableStatus
Non-ReachableStatus Description
Open In ProcessCustomerActionCompleted
Copied toCRMClosed
This status is not reachable from any othervalue.
In Process Copied toCRMCustomerActionCompleted
OpenClosed
If the status changes from In Process toClosed the system completes and closesthe ticket.
Copied toCRM
None OpenIn ProcessCustomerActionCompletedClosed
This status is only reachable after InProcess. If this status is set the ticket isreplicated to the SAP CRM On-Premisesystem. It is not reachable if the document isinconsistent and it cannot be changed in theSAP Cloud for Customer system. But thestatus is changeable for inbound actionsbecause in case a ticket is set toCompleted in the CRM On-Premise systemthe status Completed is written back to theCloud system.
SAP Cloud for Customer November 2013Business Configuration P U B L I C • © 2011, 2012, 2013 SAP AG. All rights reserved. 75
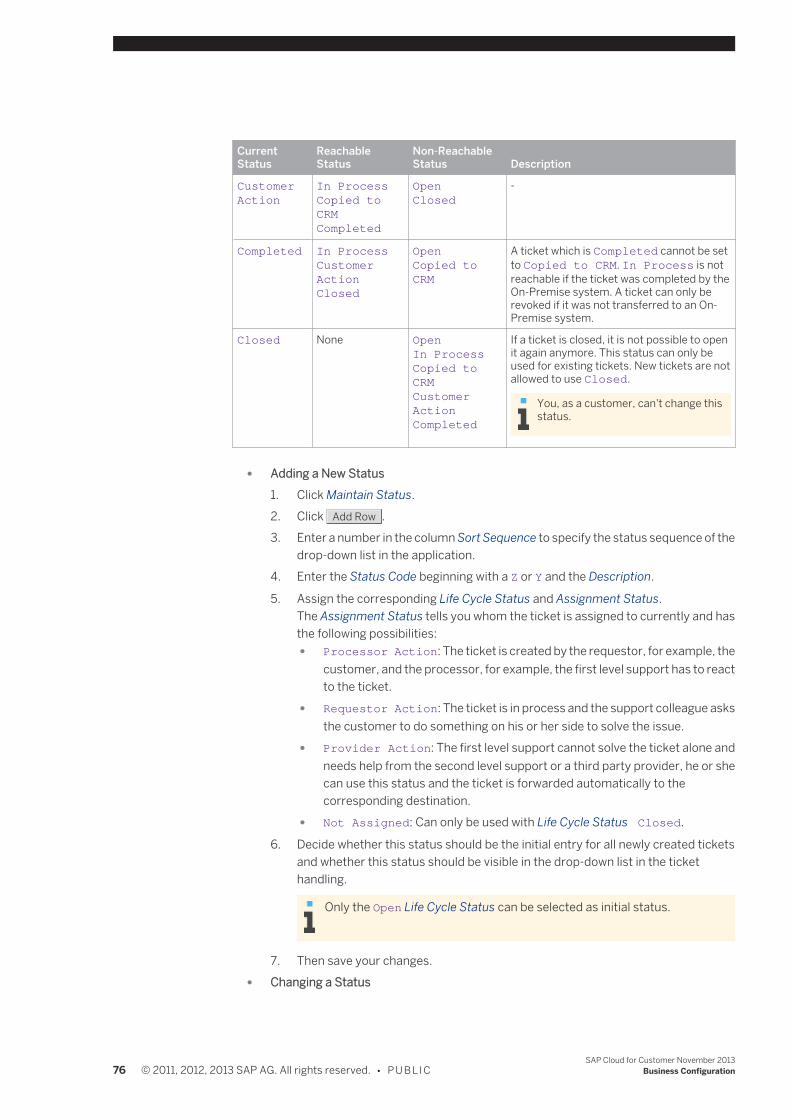
CurrentStatus
ReachableStatus
Non-ReachableStatus Description
CustomerAction
In ProcessCopied toCRMCompleted
OpenClosed
-
Completed In ProcessCustomerActionClosed
OpenCopied toCRM
A ticket which is Completed cannot be setto Copied to CRM. In Process is notreachable if the ticket was completed by theOn-Premise system. A ticket can only berevoked if it was not transferred to an On-Premise system.
Closed None OpenIn ProcessCopied toCRMCustomerActionCompleted
If a ticket is closed, it is not possible to openit again anymore. This status can only beused for existing tickets. New tickets are notallowed to use Closed.
You, as a customer, can't change thisstatus.
● Adding a New Status1. Click Maintain Status.2. Click Add Row .3. Enter a number in the column Sort Sequence to specify the status sequence of the
drop-down list in the application.4. Enter the Status Code beginning with a Z or Y and the Description.
5. Assign the corresponding Life Cycle Status and Assignment Status.The Assignment Status tells you whom the ticket is assigned to currently and hasthe following possibilities: ● Processor Action: The ticket is created by the requestor, for example, the
customer, and the processor, for example, the first level support has to reactto the ticket.
● Requestor Action: The ticket is in process and the support colleague asksthe customer to do something on his or her side to solve the issue.
● Provider Action: The first level support cannot solve the ticket alone andneeds help from the second level support or a third party provider, he or shecan use this status and the ticket is forwarded automatically to thecorresponding destination.
● Not Assigned: Can only be used with Life Cycle Status Closed.
6. Decide whether this status should be the initial entry for all newly created ticketsand whether this status should be visible in the drop-down list in the tickethandling.
Only the Open Life Cycle Status can be selected as initial status.
7. Then save your changes. ● Changing a Status
76 © 2011, 2012, 2013 SAP AG. All rights reserved. • P U B L I CSAP Cloud for Customer November 2013
Business Configuration
You can change the Sort Sequence, Description, and the check boxes Initial Status andStatus Visibility.
● Deleting a StatusSelect the line that you want delete and click Delete .
Only statuses that are not used can be deleted.
Maintain Document Types
Creating a Document Type results in creating a new Ticket Type that is a ticket attribute.
You can create custom ticket types that can use in your solution to: ● filter your tickets, ● define reports, ● use to define service levels and flexible notifications. For more information, see About
Service Levels [page 175] and Notification Rules Quick Guide [page 170].
Adding a Document Type1. Click Maintain Document Types.2. Click Add Row and enter the required document type code and a description.3. Save your changes.
Deleting a Document Type1. Select the entry you want to delete and click Delete .2. Save your changes.
You can't delete document types that are in use in your solution.
Maintain Involved Parties ● Adding or editing party roles
1. Click Maintain Involved Parties.2. Under Party Role Assignments click Add Row .3. Select a Party Role from the drop-down list.4. Decide whether the role should be, for example, active, mandatory, unique, or
should be forbidden for manual changes.5. Save your changes.6. Then click Maintain Determinations where you can edit the determination for the
newly added party role. ● Deleting role assignments
1. Select the line you want to delete.2. Click Delete .
SAP Cloud for Customer November 2013Business Configuration P U B L I C • © 2011, 2012, 2013 SAP AG. All rights reserved. 77
You can delete only self-created assignments. Pre-delivered content cannot bedeleted.
4.2.4.5 Data Migration
4.2.4.5.1 Configuration: Prepare for Data Migration in a FirstImplementation
To find this activity, go to the Business Configuration work center and choose the Implementation Projects view.Select your implementation project and click Open Activity List . Select the Prepare phase, then select the Preparefor Data Migration activity from the activity list.The purpose of this activity is to set up the migration project.For information about migrating data in a change project, see Prepare for Data Migration in a Change Project.
PrerequisitesIf you want to make field extensions that are also relevant for data migration, make sure that the extensions arecompleted.
Tasks
1. Setting up the migration projectData migration requires the user to have full authorizations in order to import data intovarious business areas. Therefore, provide each member of the migration project withan additional, temporary service agent user. In the Application and User Managementwork center, assign the Business Configuration work center including Data Migrationto these users.
When the migration project is completed, you must block the service agentusers in the Application and User Management work center to guaranteesegregation of duties. For more information, see Segregation of Duties.For more information, see Request Migration User.
2. Downloading the migration templatesAll data you want to migrate with tool-support must be entered in the migrationtemplates. Download the required migration templates in the Prepare for DataMigration activity. Familiarize yourself with your migration templates and the sheets ofeach template: ● Read the Introduction sheet explaining the general rules how to fill a template. ● Read the Documentation sheet to read the migration object documentation. ● Expand line seven on the template sheets to read the input help for every column.
For early migration tests, create a small sample file by filling a few records into thetemplate. Use this sample file to get started with the migration tool.
78 © 2011, 2012, 2013 SAP AG. All rights reserved. • P U B L I CSAP Cloud for Customer November 2013
Business Configuration
3. Creating a migration scheduleIn the Prepare for Data Migration activity, under Create a project schedule for datamigration, you can download the Data Migration Scope and Planning Template to setup a personal migration project plan. Adjust the template according to your ownsituation, resources, and data quality and integrate it into your overall project plan.
4.2.4.5.2 Recommended Sequence for Uploading Data
Because certain kinds of master data is dependent on other master data — for example, organizational managementand job function data that must be defined before employee information can be uploaded — we recommend thatyou observe the following sequence when uploading data into the system:
a. Job Functions
We recommend that you enter this data manually.
b. Organizational Structure
We recommend that you enter this data manually, as described under Setting Up OrganizationalManagement [page 101]. When you are finished, activate the organizational model.
c. Employeesd. Product Category Hierarchy
We recommend that you enter this data manually.
e. Materials
If SAP ERP Integration lies in scope, note that materials in SAP ERP become products in SAP Cloud forCustomer.
f. Price Listsg. Customersh. Territory Hierarchyi. Account Territory Mappingj. Leadsk. Opportunitiesl. Service Requests
Service requests become tickets in SAP Cloud for Customer.
See AlsoData Migration
SAP Cloud for Customer November 2013Business Configuration P U B L I C • © 2011, 2012, 2013 SAP AG. All rights reserved. 79

4.2.4.5.3 Uploading Data
PrerequisitesYou have downloaded the required templates and entered the necessary data into them.
OverviewTo upload data into the system, proceed as follows.
Procedure1. Choose Business Configuration Implementation Projects .2. Select the implementation project entitled First Implementation, then choose Open Activity List.
The Activity List appears. For more information, see Complete the Activity List.
3. In the Integrate and Extend phase, select the object type for which data is to be uploaded into the system.
To upload customer information, choose Migration of Customers.
The remainder of this procedure describes how to upload data for customers, as an example. Theprocess for uploading data for other object types is comparable to the procedure described below.
4. Choose Migrate customers using the migration tool.A dialog box appears.
5. Choose Upload, then specify the location of the template file containing the customer data to be uploaded.6. Choose Execute Migration.
A dialog box appears, enabling you to monitor the progress of the system validation of the data.7. Validation steps are displayed, along with any errors, where applicable. If no errors are reported, choose
Next.The value conversions step appears.
8. Choose Convert to perform conversion for any applicable values. If no conversions are required, chooseNext.A simulation of the data import is performed, and a dialog box appears, enabling you to monitor the progressof the data import simulation. Any errors that occurred during the simulation are displayed.
9. If no errors are reported, choose Next.A dialog box appears, prompting you to confirm that you want to import the data.
10. Confirm that you want to proceed with the data import.A dialog box appears, enabling you to monitor the progress of the data import. When the data import isfinished, any applicable errors are displayed.
11. To complete the process, choose Finish Close .
80 © 2011, 2012, 2013 SAP AG. All rights reserved. • P U B L I CSAP Cloud for Customer November 2013
Business Configuration
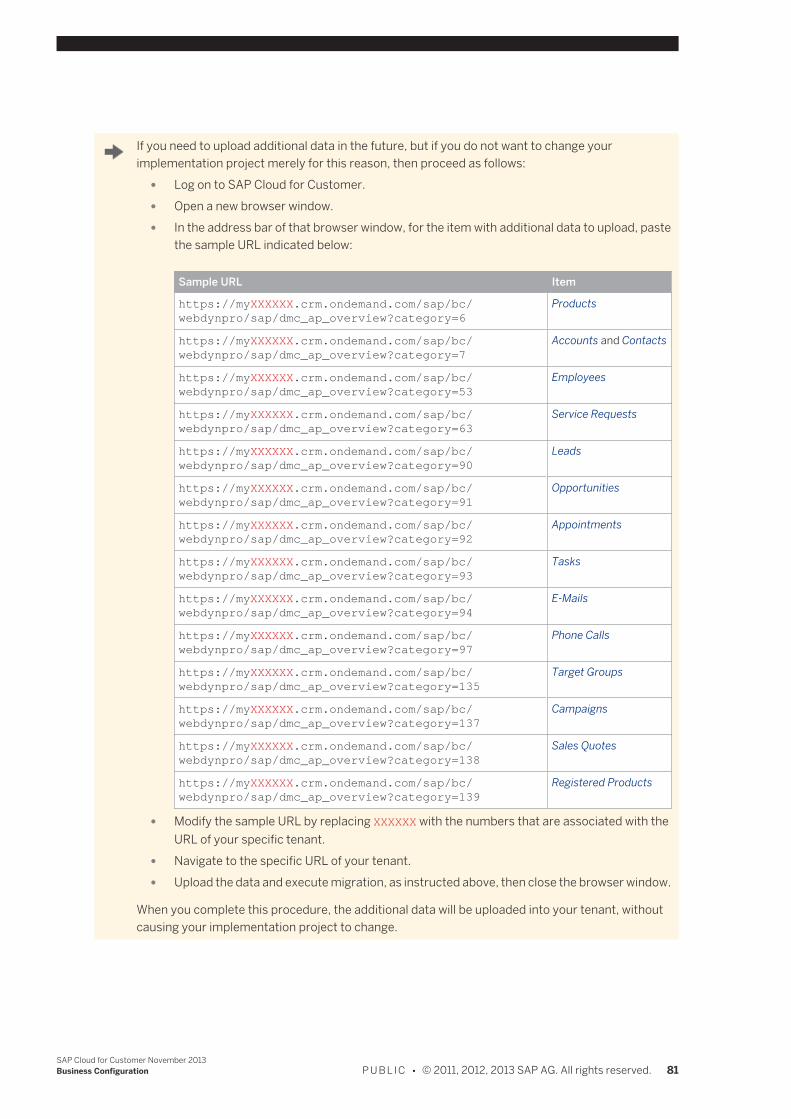
If you need to upload additional data in the future, but if you do not want to change yourimplementation project merely for this reason, then proceed as follows:
● Log on to SAP Cloud for Customer. ● Open a new browser window. ● In the address bar of that browser window, for the item with additional data to upload, paste
the sample URL indicated below:
Sample URL Item
https://myXXXXXX.crm.ondemand.com/sap/bc/webdynpro/sap/dmc_ap_overview?category=6
Products
https://myXXXXXX.crm.ondemand.com/sap/bc/webdynpro/sap/dmc_ap_overview?category=7
Accounts and Contacts
https://myXXXXXX.crm.ondemand.com/sap/bc/webdynpro/sap/dmc_ap_overview?category=53
Employees
https://myXXXXXX.crm.ondemand.com/sap/bc/webdynpro/sap/dmc_ap_overview?category=63
Service Requests
https://myXXXXXX.crm.ondemand.com/sap/bc/webdynpro/sap/dmc_ap_overview?category=90
Leads
https://myXXXXXX.crm.ondemand.com/sap/bc/webdynpro/sap/dmc_ap_overview?category=91
Opportunities
https://myXXXXXX.crm.ondemand.com/sap/bc/webdynpro/sap/dmc_ap_overview?category=92
Appointments
https://myXXXXXX.crm.ondemand.com/sap/bc/webdynpro/sap/dmc_ap_overview?category=93
Tasks
https://myXXXXXX.crm.ondemand.com/sap/bc/webdynpro/sap/dmc_ap_overview?category=94
E-Mails
https://myXXXXXX.crm.ondemand.com/sap/bc/webdynpro/sap/dmc_ap_overview?category=97
Phone Calls
https://myXXXXXX.crm.ondemand.com/sap/bc/webdynpro/sap/dmc_ap_overview?category=135
Target Groups
https://myXXXXXX.crm.ondemand.com/sap/bc/webdynpro/sap/dmc_ap_overview?category=137
Campaigns
https://myXXXXXX.crm.ondemand.com/sap/bc/webdynpro/sap/dmc_ap_overview?category=138
Sales Quotes
https://myXXXXXX.crm.ondemand.com/sap/bc/webdynpro/sap/dmc_ap_overview?category=139
Registered Products
● Modify the sample URL by replacing XXXXXX with the numbers that are associated with theURL of your specific tenant.
● Navigate to the specific URL of your tenant. ● Upload the data and execute migration, as instructed above, then close the browser window.
When you complete this procedure, the additional data will be uploaded into your tenant, withoutcausing your implementation project to change.
SAP Cloud for Customer November 2013Business Configuration P U B L I C • © 2011, 2012, 2013 SAP AG. All rights reserved. 81
4.2.4.5.4 Configuration: Migration of Products
This document describes tool-supported migration and also contains useful information for manual data entry.
This document contains details and instructions regarding configuration settings. Such settings are made byan administrator. If you do not have the required authorization, contact your administrator.
To find this activity, go to Business Configuration Implementation Projects . Select your implementation projectand click Open Activity List . Select the Integrate and Extend phase, then select the Migration of Materials activityfrom the activity list.Using this activity, you can migrate the following information:
● Basic data that describes and categorizes the product, such as its physical dimensions or assigned productcategories.
● Identification data, for example, material ID, global trade item number (GTIN), or product ID used by acustomer.
Regarding product valuation, note that migration of product specification valuation for products is not supported.
PrerequisitesYou have created the following data in the system:
● Number Ranges for Materials in the Fine-Tune phase of the Activity List. ● Product categories (using the Migration of Product Category Hierarchy activity or manually under Product
Categories)
If you plan to use extension fields in the work center views that are associated with this migration object, werecommend that you create the extension fields before you migrate any data for this object. For more informationon how to create extension fields, see the following document: Create an Extension Field.The extension fields you create in the work center views will be integrated in the corresponding migration templatesautomatically. Once you finish creating the extension fields, you can download the updated migration templatesusing the Prepare for Data Migration activity in the Prepare phase, or using the Perform Data Extraction activity inthe Fine-Tune phase of the activity list. The extension fields are displayed as new columns at the end of the relevantsheets. Note that if you created an extension field in a work center view that is associated with multiple migrationobjects, this field is not necessarily included in every migration template.When you upload a source file to the migration tool, the migration tool automatically checks whether additionalextension fields have been added to the corresponding work center views. If so, you can add them to your sourcefile and decide whether you want to enter any legacy data in the new columns.
Tasks
Fill the Migration Template for Tool-Supported MigrationTo create a valid source file, enter your legacy data in the migration template for materials. You can download themigration template using the Prepare for Data Migration activity in the Prepare phase, or using the Perform DataExtraction activity in the Fine-Tune phase of the activity list.
82 © 2011, 2012, 2013 SAP AG. All rights reserved. • P U B L I CSAP Cloud for Customer November 2013
Business Configuration
If you use extension fields in the work center views that are associated with this migration object, make surethat all extensions fields have been implemented before you download the migration template. Otherwise, theextensions fields will not be available in the migration template.
For more information about how to enter legacy data into migration templates, see the Introduction sheet and the Field List sheet of the template.Note the following directions when filling the sheets of the migration template:
● Material IDs can be numeric or alphanumeric. If alphanumeric, use uppercase letters only. ● For descriptions, enter plain text only (including formatting information like carriage returns and line feeds). ● On the Attachments sheet, you can define server or internet links to attachments. You can also use this sheet
to upload product images.
Migrate Data Using the Migration ToolProcess your source file with legacy data as follows:
1. Make sure that you have created a valid source file using an up-to-date migration template filled with legacydata.
2. Go to the Business Configuration Implementation Projects view. Select your implementation projectand click Open Activity List . Select the Integrate and Extend phase, then select the relevant activity (Migrationof... from the Migrate Master Data group or Migrate Transaction Data group.Note that data migration requires special user authorization. Your administrator can grant the requiredauthorization (Business Configuration including the Data Migration view) in the Application and UserManagement work center.
3. Carry out the work steps in the migration tool.For more information, click the help link within the migration tool.
4. After you have imported the source file successfully, set the migration activity in the activity list toCompleted.
Enter Data ManuallyYou can enter products manually under Products. For more information, see Creating or Editing Products[page 130].
Follow-On ActivitiesYou can verify migrated records under Products. Compare the data in your legacy system with the data that hasbeen migrated to the SAP system. Check some of the records to ensure that the values in both systems match.
4.2.4.5.5 Migrating Account Hierarchies
Prerequisites
ConfigurationCustomer accounts have been created in the solution, or migrated into it.If sales representatives are to see the migrated account hierarchies, then account hierarchy visibility must be active.For more information, see Activating Account Hierarchy Visibility.
SAP Cloud for Customer November 2013Business Configuration P U B L I C • © 2011, 2012, 2013 SAP AG. All rights reserved. 83
Business BackgroundMaster data for sales accounts is maintained under Customers Accounts . For information about creating andediting accounts, see Accounts.
Tasks
Downloading the Migration TemplateTo migrate account hierarchies into the solution, first download the predefined migration template that is providedfor this purpose. To do so, proceed as follows:
1. Choose Business Configuration Implementation Projects .2. Select the implementation project entitled First Implementation, then choose Open Activity List.
The Activity List appears. For more information, see Complete the Activity List.
3. In the Prepare phase, select the activity entitled Prepare for Data Migration.4. On the subsequent screen, select Download Migration Templates.5. On the resultant screen, find the migration object entitled Customer Hierarchies.6. Click Download.7. Save the migration template to your preferred directory.
Entering Legacy Data into the TemplateNow enter data in each of the following columns:
● Hierarchy ID, on the Hierarchies worksheet ● Account ID, on the Accounts worksheet ● Parent Account, on the Accounts worksheet
For additional instructions on how to enter legacy data into the template, review the Introduction and FieldList worksheets.
As you enter data in the migration template, remember the following points: ● The Hierarchy ID does not appear in the Account Hierarchy view. However, all of the hierarchy node entries
that are assigned to the same Hierarchy ID form a single account hierarchy. ● The Hierarchy ID represents the grouping of all nodes within a single hierarchy. Therefore, if you want to
migrate three separate account hierarchies, then you must enter three distinct Hierarchy IDs. ● The Hierarchy ID to be entered may correspond to some degree with the ID of the top-level node of the account
hierarchy. Although this is not a requirement, the consistent designation of nodes throughout the hierarchyfacilitates the migration process.
● Each hierarchy must have exactly one top-level node.If you enter multiple hierarchy top-level nodes or no top-level node at all, an error message will be displayed.
84 © 2011, 2012, 2013 SAP AG. All rights reserved. • P U B L I CSAP Cloud for Customer November 2013
Business Configuration
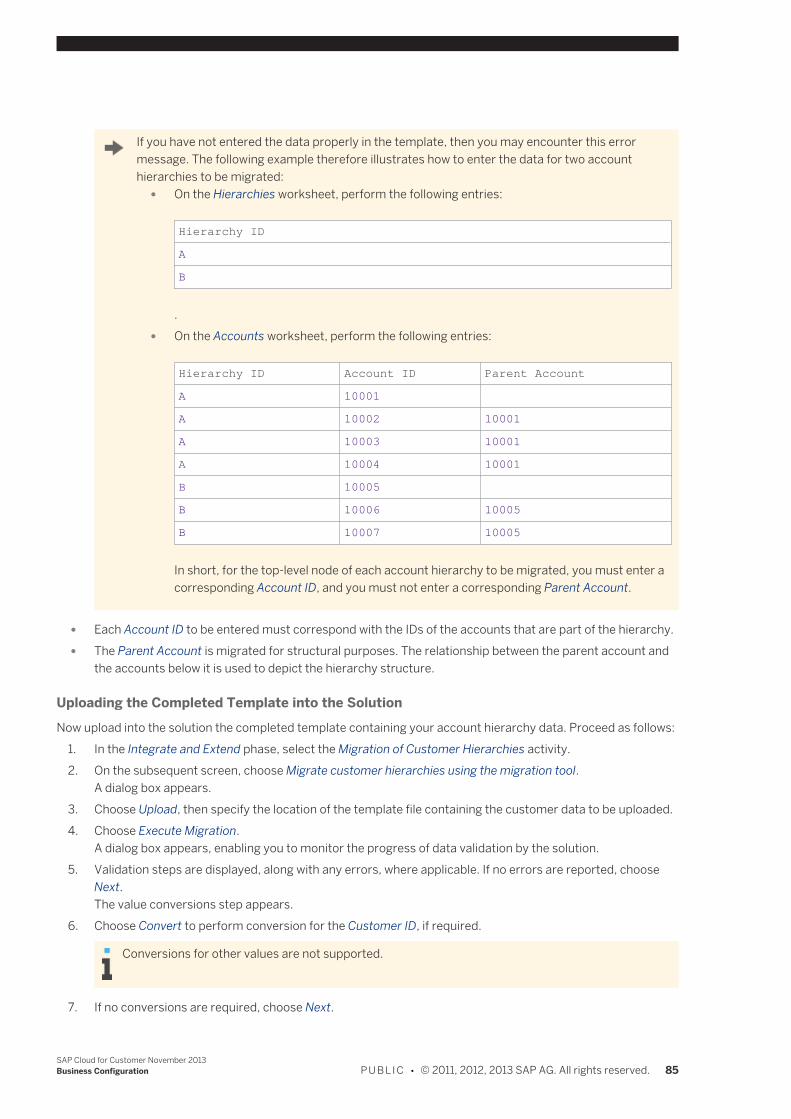
If you have not entered the data properly in the template, then you may encounter this errormessage. The following example therefore illustrates how to enter the data for two accounthierarchies to be migrated:
● On the Hierarchies worksheet, perform the following entries:
Hierarchy ID
A
B
. ● On the Accounts worksheet, perform the following entries:
Hierarchy ID Account ID Parent Account
A 10001
A 10002 10001
A 10003 10001
A 10004 10001
B 10005
B 10006 10005
B 10007 10005
In short, for the top-level node of each account hierarchy to be migrated, you must enter acorresponding Account ID, and you must not enter a corresponding Parent Account.
● Each Account ID to be entered must correspond with the IDs of the accounts that are part of the hierarchy. ● The Parent Account is migrated for structural purposes. The relationship between the parent account and
the accounts below it is used to depict the hierarchy structure.
Uploading the Completed Template into the SolutionNow upload into the solution the completed template containing your account hierarchy data. Proceed as follows:
1. In the Integrate and Extend phase, select the Migration of Customer Hierarchies activity.2. On the subsequent screen, choose Migrate customer hierarchies using the migration tool.
A dialog box appears.3. Choose Upload, then specify the location of the template file containing the customer data to be uploaded.4. Choose Execute Migration.
A dialog box appears, enabling you to monitor the progress of data validation by the solution.5. Validation steps are displayed, along with any errors, where applicable. If no errors are reported, choose
Next.The value conversions step appears.
6. Choose Convert to perform conversion for the Customer ID, if required.
Conversions for other values are not supported.
7. If no conversions are required, choose Next.
SAP Cloud for Customer November 2013Business Configuration P U B L I C • © 2011, 2012, 2013 SAP AG. All rights reserved. 85
A simulation of the data import is performed, and a dialog box appears, enabling you to monitor the progressof the data import simulation. Any errors that occurred during the simulation are displayed.
8. If no errors are reported, choose Next.A dialog box appears, prompting you to confirm that you want to import the data.
9. Confirm that you want to proceed with the data import.A dialog box appears, enabling you to monitor the progress of the data import. When the data import isfinished, any applicable errors are displayed.
10. To complete the process, choose Finish Close .
Entering Data ManuallyAfter migration is complete, if account hierarchy visibility is active, account hierarchies can also be manually editedunder Customers Accounts Account Hierarchy .
Follow-On ActivitiesOnce the data entered in the template is migrated into the solution, the hierarchical relationship between accountsand their parent accounts becomes visible. You can now verify migrated account hierarchy data under Customers Accounts Account Hierarchy .Compare the data in your legacy system with the data that you have migrated into SAP Cloud for Customer. Reviewvarious records to ensure that the values in each system are in agreement.
4.2.4.5.6 Uploading Territories
OverviewTo upload territories into the system, proceed as follows.
Procedure1. Choose Territory Management New Territories from Microsoft Excel .2. To download the required template, select the language in the resultant dialog box, then choose Download.3. Open or save the template file, as appropriate.4. Enter your data into the template file.5. In the template in Microsoft Excel ®, choose SAP Business ByDesign Logon .6. In the resultant dialog box, log on by entering the SAP Cloud for Customer URL, your user ID, and your
password.7. Save your entries.
ResultThe territory data in Microsoft Excel is uploaded into the system.
86 © 2011, 2012, 2013 SAP AG. All rights reserved. • P U B L I CSAP Cloud for Customer November 2013
Business Configuration
See AlsoData Migration
4.2.4.5.7 Migration of Social Media User Profiles
To find this activity, go to Business Configuration Implementation Projects . Select your implementation projectand click Open Activity List . Select the Integrate and Extend phase, then select the activity from the activity list.You can migrate the following information for existing social media user profiles of your individual customers:
● Name ● Gender ● Social media ID ● Channel type ● Screen name (social media handle) ● E-mail address ● Link to user’s image ● Category code ● Sentiment code ● Klout score ● Aggregated importance score
This value combines the customers' social influence (Klout score) with their customer category assignment.It is not reflected directly in the solution but is used by the algorithm for calculating ticket priority and isconsidered in the weighting of the original customer message, if a weight has been assigned.For more information on the settings for social media message prioritization, see here [page 199].
● Individual customer ID (account ID) related to the social media user profile data
PrerequisitesIndividual customer data have been created or migrated into the system.
Tasks
Fill the Migration TemplateTo create a valid source file, enter your legacy data in the migration template for Social Media User Profile. You candownload the migration template using the Prepare for Data Migration activity in the Prepare phase, or using thePerform Data Extraction activity in the Fine-Tune phase of the activity list. For detailed information on how to enterlegacy data into migration templates, see the Introduction sheet and the Field List sheet of the template.On the Attachment sheet you can define server or internet links to attachments, but you cannot upload attachmentsdirectly to your system.
Migrate Data Using the Migration ToolProcess your source file with legacy data as follows:
SAP Cloud for Customer November 2013Business Configuration P U B L I C • © 2011, 2012, 2013 SAP AG. All rights reserved. 87

1. Make sure you have created a valid source file using an up-to-date migration template filled with legacy data.2. Go to Business Configuration Implementation Projects . Select your implementation project and click
Open Activity List . Select the Integrate and Extend phase, then select Migration of Social Media UserProfiles from the activity list.
3. Carry out the work steps in the migration tool.For more information, click the Help link within the migration tool.
4. After you have imported the source file successfully, set the migration activity in the activity list toCompleted.
Follow-On Activities1. To verify migrated data, go to Administrator Service and Social Settings then under Social Media, click
Social Media Customers.2. Compare the data in your legacy system with the data that has been migrated to your solution.3. Check a certain number of records to ensure that the values in both systems match.
Check the following attributes: ● Name ● Channel type ● Social media handle ● Account ID
4.3 Reports View
4.3.1 Configuration Change History
The Configuration Change History report provides a complete history of changes for scoping decisions, businessoptions, and fine-tuning decisions made to your SAP solution. The report includes the elements for which the SAPdefaults are still in place, as well as the elements that have been changed, either immediately or as part of animplementation project.
ViewsThe following views are available with this report: Scoping Decisions
● Elements Deployed Last 31 DaysShows scoping decisions that were deployed to your solutions within the last 31 days.
● All ElementsShows all scoping decisions that were deployed to your solution.
Questions ● Elements Deployed Last 31 Days
Shows business options that were deployed to your solution within the last 31 days. ● All Elements
88 © 2011, 2012, 2013 SAP AG. All rights reserved. • P U B L I CSAP Cloud for Customer November 2013
Business Configuration
Shows all business options that were deployed to your solution.
Fine-Tuning Settings ● Activities Deployed Last 31 Days
Shows fine-tuning settings that were deployed to your solution within the last 31 days. ● All Activities
Shows all fine-tuning settings that have been deployed to your solution.
Features
Running the ReportYou can access this report from the Reports view of the Business Configuration work center.
Report Content Scoping Decisions This shows basic information about the scoping decisions that have been applied to your solutions. The ChangeHistory of Scoping Decisions table displays the name of each scoping element, the action related to the element, theproject it applies to, the hierarchy in the business adaptation catalog the element belongs to, and when the elementwas deployed to your solution.In addition, you can see the actions that caused the system to automatically select or deselect a scoping element.To do this, select a scoping element with action Selected by System from the table and click View Dependencies . Awindow now appears, listing the elements that caused the automatic selection or deselection of the scoping element. Questions This shows basic information about the business options that have been applied to your solution. The Change Historyof Questions table displays the name of each scoping element, the action related to the element, the project it appliesto, the hierarchy in the business adaptation catalog the element belongs to, and when the element was deployed toyour solution.In addition, you can see the actions that caused the system to automatically select or deselect a scoping element.To do this, select a scoping element with action Selected by System from the table and click View Dependencies . Awindow now appears, listing the elements that caused the automatic selection or deselection of the scoping element. Fine-Tuning Settings This shows basic information about the fine-tuning settings that have been applied to your solution. The ChangeHistory of Fine-Tuning Settings table displays the name of each setting, when the setting was last deployed to yoursolution, and whether the SAP defaults are still in place for the setting. If you have adjusted a setting during fine-tuning, it will list No in the SAP Default column. A Yes in this column indicates that you have not adjusted this settingduring fine-tuning and have kept the SAP default. When a setting is selected, the Details table displays the name ofeach implementation project that included the setting, the date and time when each project was deployed, and theuser who deployed each project.You can also view the exact values either for each fine-tuning setting:
1. Select a setting in the Change History of Fine-Tuning Settings table and click View Change Details .This exports all the details of the fine-tuning setting to Microsoft Office Excel.
2. A window appears allowing you to save the exported data.When you click Save, a .zip file is created and the window is closed.
3. You can now open the saved file and view the detailed information in that file.
The Details table reflects the various instances a fine-tuning activity is saved during the course of a change project.Every time the fine-tuning activity is saved, the project is listed in this table with a different date and time in DeployedOn column.
SAP Cloud for Customer November 2013Business Configuration P U B L I C • © 2011, 2012, 2013 SAP AG. All rights reserved. 89

To view these values, select a project in the Details table and click View Change Details in that table.Then complete the steps as described above for viewing values for fine-tuning settings to view the values maintainedfor the selected instance.
4.3.2 Solution Proposal
During your SAP solution scoping session, you reviewed and selected specific business packages, topics, and optionsfor your company. As a result, your business requirements have been matched with specific capabilities. The SolutionProposal report contains the results of your scoping session and is a record of your most recent decisions as well asthe basis for your individual sales quote.
PrerequisitesScoping has been started for the First Implementation project.
Features
Running the ReportYou can access this report from two locations:
● The Review step of the Edit Project Scope guided activity for your first implementation project ● The Reports view of the Business Configuration work center
Before running the report, you can decide whether you want to access the executive summary or the detailed report.
Report ContentThe Solution Proposal - Executive Summary report includes basic details about your company, the countries andtypes of business for which you want to implement your SAP solution, as well as a list of the business areas, workcenters, and business packages that were selected for your SAP solution. It also includes overview statistics on thecountries, types of business, business areas, and business packages selected and any additional requirements thatyou specified for implementing and running your solution.The Solution Proposal - Detailed report includes the following additional information:
● A breakdown of business packages into topics and options, with descriptions of each selected element ● Information about the data you need to migrate from your legacy system(s) ● A summary of the countries, types of business, and capabilities not in scope for your SAP solution
See AlsoPrepare the First Implementation Project [page 353]
4.3.3 Current Scope
The Current Scope report provides a comprehensive overview of the scope and capabilities of your SAP solution,highlighting the changes that have taken place since your solution first went live.
90 © 2011, 2012, 2013 SAP AG. All rights reserved. • P U B L I CSAP Cloud for Customer November 2013
Business Configuration
PrerequisitesThe Close Project activity has been completed for the First Implementation project.
Features
Running the ReportYou can access this report from the Reports view of the Business Configuration work center.
Report ContentThe Current Scope report is organized as follows:
● Your Scoping Results contains the countries, types of business, and an overview of the scope of your solution.It also contains an overview of the work centers included.
● Your SAP Solution in Detail contains detailed information about the business areas selected, as well as thecorresponding work centers. It also contains detailed information about the business packages, topics, andoptions selected.
● Your SAP Solution Statistical Summary contains overview statistics on the countries, types of business, andbusiness areas, packages, topics, and options selected.
● Items Not in Scope contains a summary of countries, types of business, and capabilities not in scope for yoursolution.
For each solution capability in scope, the report indicates whether the capability has been changed and, if so, when.
4.3.4 Your Notes Summary
The Your Notes Summary report shows the notes added to business areas, packages, topics, and options duringyour SAP solution scoping session. This includes notes made by you, other administrators in your company, andpotentially your SAP or partner solution advisor where issues arose or further clarification is required, for example,where a selection or a change needs to be discussed with colleagues. The report ensures that everyone working onthe configuration of your SAP solution is kept informed of such issues.
PrerequisitesScoping has been started for the First Implementation project.
Features
Running the ReportYou can access this report from the Review step of the Edit Project Scope guided activity for your first implementationproject.For more information, see Prepare the First Implementation Project [page 353].
SAP Cloud for Customer November 2013Business Configuration P U B L I C • © 2011, 2012, 2013 SAP AG. All rights reserved. 91
Report ContentThis report provides a quick overview of all notes that were created during your SAP solution scoping session,grouped by business area. For each element that has a note, the report indicates whether the element is in scopefor your solution.
92 © 2011, 2012, 2013 SAP AG. All rights reserved. • P U B L I CSAP Cloud for Customer November 2013
Business Configuration
5 General Settings
5.1 HTML5 for Cloud for Customer
5.1.1 Choosing a Default Client
The default client for your organization's users is preset. New customers using this SAP cloud solution for the firsttime in this release have HTML5 as the default client. Existing customers have Microsoft Silverlight® as the defaultclient. You can change this setting.
We recommend using Microsoft Silverlight as the default client. You should only use HTML5 if yourorganization has mobile requirements beyond Apple iPad®.
HTML5 technology is only available for SAP Cloud for Sales. Therefore, if you use SAP Cloud for Service orSAP Cloud for Social Engagement, you must use Microsoft Silverlight as the default client.
PrerequisitesYou have ensured that your users have access to the Web browsers that are supported. For more information seeSAP Cloud for Customer System and Software Requirements [page 480].
Feature ComparisonsIf you only use SAP Cloud for Sales, you must decide whether your sales users log on to the system with HTML5 orMicrosoft Silverlight. To help you decide, we have created the following comparison.
MicrosoftSilverlight HTML5
Software must beinstalled on eachclient.
Plug-and-play solution (no additional software download required for each user)
Interactivedashboards onlyavailable on the SAPCustomer Insightapp for iPad.
Additional analytics features available in interactive dashboards. For more information, see UsingInteractive Dashboards.
Proven, stablesolution: Existingtechnology for SAPCloud for Customer
Latest standard for internet technology
Cache size must beincreased by users
Faster response times
SAP Cloud for Customer November 2013General Settings P U B L I C • © 2011, 2012, 2013 SAP AG. All rights reserved. 93
MicrosoftSilverlight HTML5
Administrators andusers all useMicrosoft Silverlight.
Administrators must switch to Microsoft Silverlight to do administration and adaptation tasks. Formore information, see Adapting the User Interface for Your Company [page 242].
You can use thecalendar pane. Formore informationabout the calendarpane, see Activities.
The work centers for all recommended sales and marketing roles are available in HTML5. For a list ofwork centers that are not yet supported in HTML5, see Getting Started for HTML5 [page 94].
The following browsers are not supported: ● Microsoft Internet Explorer® 8 or below ● Firefox
Personalization, tabs, inline editing, and incident reporting work differently in HTML5. For moreinformation, see HTML5 in SAP Cloud for Sales [page 467].
5.1.2 Getting Started for HTML5
As an administrator, you are responsible for setting up the solution and performing the necessary configuration.After you go live, you are also responsible for day-to-day support tasks, and for making certain that the solution runssmoothly.
Business BackgroundHTML5 is the new standard for internet technology. It has open standards and runs on multiple platforms includingmobile-device platforms. Using HTML5 in SAP Cloud for Sales creates a plug-and-play solution, meaning that it isnot necessary to install additional software on each user’s machine.
Setup and Configuration Tasks
Set the Default Client to HTML5If you only use SAP Cloud for Sales, you can set your users' default client to HTML5. For more information, seeChoosing a Default Client [page 93] and Adapting the User Interface for Your Company [page 242].
Create Business Roles for Sales (optional)The work centers for all recommended sales and marketing roles are available in HTML5.
For information on how to create business roles, watch the video Assigning User Access Rights by Roles orbrowse the Business Roles Quick Guide [page 121].For information on the business roles that are recommended for the sales and marketing features of SAP Cloud forCustomer, see Recommended Business Roles and Work Center Assignments for SAP Cloud for Customer[page 118].
94 © 2011, 2012, 2013 SAP AG. All rights reserved. • P U B L I CSAP Cloud for Customer November 2013
General Settings
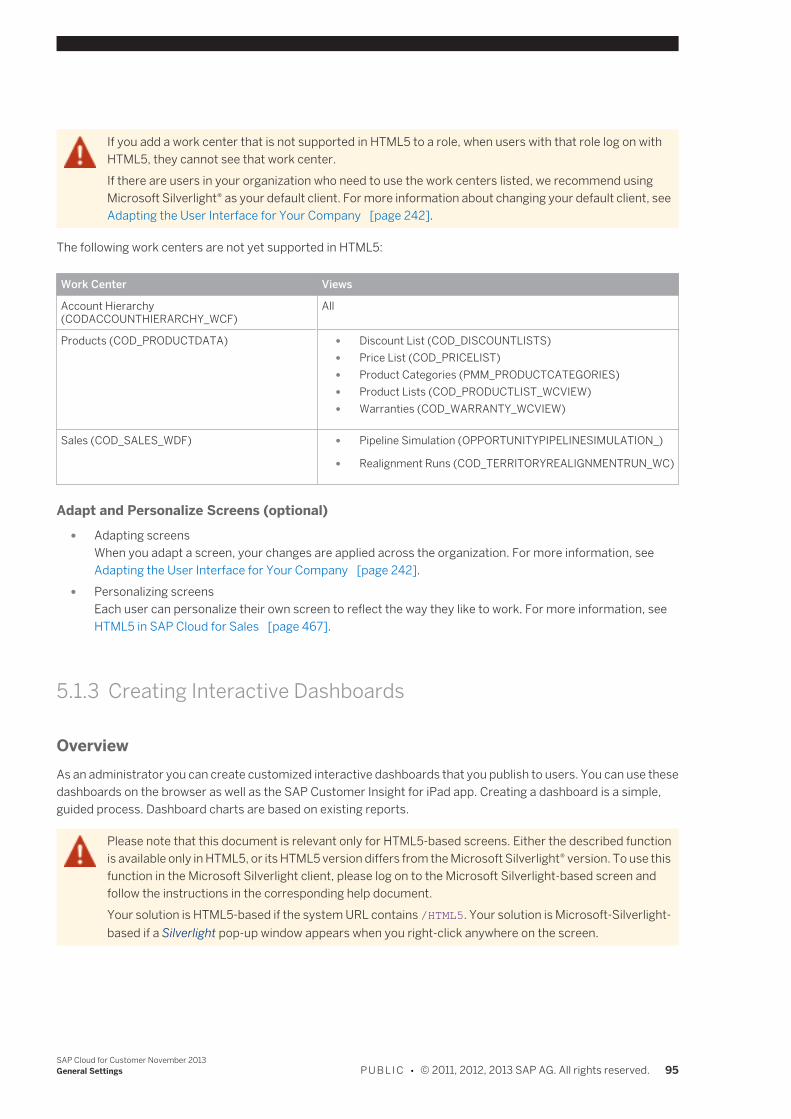
If you add a work center that is not supported in HTML5 to a role, when users with that role log on withHTML5, they cannot see that work center.If there are users in your organization who need to use the work centers listed, we recommend usingMicrosoft Silverlight® as your default client. For more information about changing your default client, seeAdapting the User Interface for Your Company [page 242].
The following work centers are not yet supported in HTML5:
Work Center Views
Account Hierarchy(CODACCOUNTHIERARCHY_WCF)
All
Products (COD_PRODUCTDATA) ● Discount List (COD_DISCOUNTLISTS) ● Price List (COD_PRICELIST) ● Product Categories (PMM_PRODUCTCATEGORIES) ● Product Lists (COD_PRODUCTLIST_WCVIEW) ● Warranties (COD_WARRANTY_WCVIEW)
Sales (COD_SALES_WDF) ● Pipeline Simulation (OPPORTUNITYPIPELINESIMULATION_)
● Realignment Runs (COD_TERRITORYREALIGNMENTRUN_WC)
Adapt and Personalize Screens (optional) ● Adapting screens
When you adapt a screen, your changes are applied across the organization. For more information, seeAdapting the User Interface for Your Company [page 242].
● Personalizing screensEach user can personalize their own screen to reflect the way they like to work. For more information, seeHTML5 in SAP Cloud for Sales [page 467].
5.1.3 Creating Interactive Dashboards
OverviewAs an administrator you can create customized interactive dashboards that you publish to users. You can use thesedashboards on the browser as well as the SAP Customer Insight for iPad app. Creating a dashboard is a simple,guided process. Dashboard charts are based on existing reports.
Please note that this document is relevant only for HTML5-based screens. Either the described functionis available only in HTML5, or its HTML5 version differs from the Microsoft Silverlight® version. To use thisfunction in the Microsoft Silverlight client, please log on to the Microsoft Silverlight-based screen andfollow the instructions in the corresponding help document.Your solution is HTML5-based if the system URL contains /HTML5. Your solution is Microsoft-Silverlight-based if a Silverlight pop-up window appears when you right-click anywhere on the screen.
SAP Cloud for Customer November 2013General Settings P U B L I C • © 2011, 2012, 2013 SAP AG. All rights reserved. 95
PrerequisitesBefore creating a custom dashboard, you should decide which reports you want to include as charts. Also considerhow you want the charts to respond when the user selects a data element in a linked chart. You should be familiarwith reports and report variants.
Procedures
Starting Guided Dashboard Creation1. Go to Analysis and choose Dashboard.2. Choose the Add icon at the upper right of the dashboard area.
Creating a New DashboardOnce you begin the guided dashboard creation process, enter the required information at each step. Use the Nextbutton to move to the next step and the Previous button to return to a prior step.
1. Start — Enter a name and optional description for your new dashboard.2. Sources — Select reports to include as charts or tables on the dashboard. Use the search box to find a specific
report. Choose All to show all available reports, Selected to show only selected reports, and Unselected todisplay only the reports you have not selected.
3. Variants — Select report variants to use on the dashboard, if more than one variant exists for the selectedreports.
4. Layout — Define the layout by arranging the reports on the dashboard.Drag and drop to reposition tiles. Use the +/- buttons to expand tiles horizontally or vertically.
5. Connections — Set up the interactions between tiles. Choose Auto Mapping to connect default mappingbetween two reports. You can also manually select a Source and a Target , if desired. If necessary you canalso remove connections.When the user selects a characteristic in one chart, linked charts update to reflect the selection.
6. Preview — Preview and save the new dashboard.This screen shows how the dashboard will appear in the browser or in the SAP Customer Insight app.Remember to save the dashboard when you are finished. Once saved, your new dashboard is available toselect from the menu on the Dashboard tab.Close the window at any time before you save to stop the process and discard changes.
Editing DashboardsOnce you create a dashboard you can add, change or remove functionality.
● To edit a dashboard, choose the pencil icon at the top right of the page.Editing a dashboard uses the same guided steps as creating a new dashboard. Step through the process andmodify attributes as desired.
● To remove a dashboard completely, open it for editing, then choose the delete icon.
Dashboards provided by SAP cannot be edited or removed from the list.
96 © 2011, 2012, 2013 SAP AG. All rights reserved. • P U B L I CSAP Cloud for Customer November 2013
General Settings
See AlsoUsing Interactive Dashboards
5.2 Company
5.2.1 About Job Definitions
A job is a textual description of the duties of an employee as you would find it in the employment contract. The jobconsists of an ID and a name. It also has an expiry date, which initially is set to unlimited, but can be set to a specificdate if a job should no longer be used.When employees are assigned or hired to an org unit, they require an association with a job in the system. The jobthen characterizes the employee assignment and is also used in to fulfill service-related tasks.In the Show dropdown in this view, you can display jobs according to the following criteria:
● Active (Unlimited Validity): Shows jobs that have no expiry date. ● Active (Limited Validity): Shows jobs that have an expiry date in the future. ● Inactive: Shows jobs that are outside their validity period. ● All: Shows all jobs.
Tasks
Create a New Job1. Click New . The Define Job screen appears.2. Enter a Job Name and a Job ID.
You cannot change the Job ID once the job has been saved.
3. Attach a Job Description, if required. To do this, click Add , and then attach your file or link.You can replace a job description later, by editing the job and clicking Replace .
4. Click Save or Save and Close to save the new job.
You can also create the next new job directly from this screen by clicking New .
The new job has been saved to the system and added to the Job Definition overview list that appears whenyou first access the work center view. Whether the job is Active, Inactive, or Deprecated depends on the expirydate.
SAP Cloud for Customer November 2013General Settings P U B L I C • © 2011, 2012, 2013 SAP AG. All rights reserved. 97
5.2.2 VIDEO: Setting Up Service Teams
Video
Setting Up Service Teams (5m 12s)For Administrators: find out how to set up service teams.
5.2.3 Setting Up Teams For Ticket Handling
As part of your implementation project you must define your company's organizational structure, including thestructure of your service teams who will handle customer messages.
Go to Administrator General Settings then under Company, click Org Structures.The org structure is comprised of units and provides a unified, graphical representation of your service team'sorganizational data. This structure is also used by the system for routing incoming customer messages to team andagent queues if the corresponding work distribution rules have been defined. For more information, see DefiningRules for Ticket Routing [page 166].
General PrinciplesAs you set up your organizational structure, you should observe the following general principles:
● The uppermost node you create should be a Company. ● The node directly below the company node should be a Service Organization. ● The nodes you create below the service organization should be Customer Service org units—these are your
teams of agents.
Within your org structure, you can define multiple levels of customer service units—either below theservice organization or below other customer service nodes.
● All nodes to which you plan to assign employees must be below an org unit with the Reporting Line Unitdefinition—so any and all org units above a customer service unit with employees assigned must have thatdefinition selected.
Prerequisites ● You have created or uploaded employee and product data.
For more information, see Creating or Editing Employee Data [page 106] and Creating or Editing Products [page 130].
● You have reviewed the business background documents outlined in the Org Structures Quick Guide.The guide provides the information you need to set up a consistent structure.
● You have gathered all data relevant for organizational management, such as the legal, managerial, andfunctional data of your enterprise.You use your existing organizational structure plan as a basis for creating the org structure in the system.When you start creating the structure, we recommend that you build from the top down; that is, start with
98 © 2011, 2012, 2013 SAP AG. All rights reserved. • P U B L I CSAP Cloud for Customer November 2013
General Settings

companies and business residences, and then add the business divisions or departments, including yourservice teams. When editing your org structure, always enter the effective-from date for your changes.
Creating Your Org StructureThe following sections outline specific settings or considerations for setting up your service org structure in SAP
Cloud for Customer. You can also watch the video Setting Up Service Teams . For detailed step-by-stepinstructions, see the following documentation:
● Create and Edit the Org Structure ●
During initial maintenance of the org structure, prior to go live, always choose the same, future, fixed date forthe Effective From field when changing nodes or properties.
Creating the CompanyThe uppermost node that you create should be a Company.
1. Create a new org unit.2. Under Definitions, select Company.3. Under Functions, select Human Resources.4. Maintain your other company details and save your entries.
Creating the Service OrganizationThe node you create directly below the company node should be a Service Organization org unit. A serviceorganization represents the uppermost service unit within a service hierarchy.
1. From the editing view for the org structure, select the company org unit and click New then Org Unit.2. Under Definitions, select the following:
● Business Residence ● Reporting Line Unit ● Segment ● Profit Center ● Cost Center
3. Under Functions, select the following: ● Service Organization ● Customer Service ● Sales Organization ● Sales
4. If your system is configured to include e-mail as a channel for tickets, you need to maintain the outbound e-mail address under Addresses.For more information, see Configuring E-Mail Channels [page 179].
5. Specify any other required data and save your entries.
Creating Service Teams (Customer Service Units)You create the nodes for service teams below the service organization. You can also create service teams belowother service teams.
SAP Cloud for Customer November 2013General Settings P U B L I C • © 2011, 2012, 2013 SAP AG. All rights reserved. 99
1. From the editing view for the org structure, select the service organization org unit (or a customer serviceorg unit) and click New then Org Unit.
2. Under Definitions, select Reporting Line Unit.3. Under Functions, select Customer Service.4. Specify any other required data and save your entries.
The org unit ID you specify will be the one that appears in the selection box for choosing a teamqueue when reassigning messages.
5. Continue creating service team org units as described until you are satisfied with the service hierarchy itrepresents.
Adding Employees to Customer Service UnitsPrerequisitesThe employees you want to assign to the org unit have been created in the system. For more information, see Creatingor Editing Employee Data [page 106].Alternatively, you can assign employees to org units when you create the employee data in the system.
You can only assign employees to org units that have a business residence in the hierarchy above them. Thismeans that employees cannot be assigned at company and at business residence levels.
1. From the editing view for the org structure, select the relevant customer service org unit and choose theEmployees tab.
2. Click Add . The system adds a line to the table.3. In the Employee ID column, select the employee you want to assign to the org unit. The system automatically
transfers the details of that employee to the table.4. You can also assign a job to the employee using the Job ID column of the table.
You create jobs in the Job Definition view. For more information, see About Job Definitions [page 97].5. Choose Save and choose one of the options under Activate to activate your changes.
You can assign several employees to one org unit.
Activating the Organizational StructureOnce you have checked your org structure, resolved any inconsistency error messages, and are otherwise satisfiedwith your structure, you can activate it. Activation also saves your data.Click Activate and choose one of the following options:
● Activate All: Activates all org structures that are currently being displayed in the planning area. ● Activate Selected Structure: Activates the complete org structure related to the org unit that is currently
selected. ● Activate Selected and Dependent Org Units: Activates the org structure from the org unit that is currently
selected downwards.
If, for any reason, you need to undo changes you have already saved, you must use the Roll Back button, which willalso undo all other changes you have made in the planning area since the last save or activation. You must thenrebuild your org structure. Roll Back rolls the planning area back to the last active version. It discards all changesmade in the planning area since the last activation and copies the active area into the planning area.
100 © 2011, 2012, 2013 SAP AG. All rights reserved. • P U B L I CSAP Cloud for Customer November 2013
General Settings
ResultYou have activated your org structure. It will now appear in the active area. You can now use the org structure in allprocesses and applications that refer to org data.
Next StepDefining Rules for Ticket Routing [page 166]
See AlsoSetting Up User Access Rights [page 125]
5.2.4 Setting Up Organizational Management
Under Administrator Org Structures , you establish your organizational sales structure as a prerequisite togoing live. As you set up your org structure, we recommend that you observe the following principles:
● The uppermost node of your org structure must be a Company.
● The node that you create directly below the Company node must be a Sales Organization.
Because a sales organization is required to process all corresponding sales documents – forexample, sales leads, opportunities, and so on — we recommend that you define only one salesorganization per org structure.
● The nodes that you create below the Sales Organization node must be Sales Units.
Within the org structure, multiple levels of sales units may be defined. Sales units represent the salesdepartments or offices where sales documents are initiated. Nodes for Sales Units can be definedbelow the Sales Organization node, or below the nodes of other sales units.
TasksTo establish your organizational structure, proceed as follows:
Creating the Company1. Select Administrator Org Structures .2. In the Effective From field, specify today's date.3. Choose New Org Unit .4. Under Definitions, select the Company checkbox for this org unit.5. Under Definitions, specify the Country of Registration and Default Currency for this org unit.
SAP Cloud for Customer November 2013General Settings P U B L I C • © 2011, 2012, 2013 SAP AG. All rights reserved. 101
The default currency that you specify will cascade downward to all subordinate sales units, andwill appear, by default, on all sales documents.
6. Under Addresses, specify a main address for this company.
We recommend that no functions be maintained for this company.
7. Choose Save and Close .
Creating the Sales or Marketing Organization1. Select Administrator Org Structures .2. Select the org unit of the Company, then choose Edit.3. Choose New Org Unit 4. Specify the required entries under General, Definitions, and Addresses.5. Under Functions, select the appropriate checkboxes from the following: Sales, Sales Organization, and
Marketing.6. Save your changes.
Creating Sales Units or Marketing Units1. Select Administrator Org Structures .2. Select the org unit under which you want to create a sales or marketing unit and choose Edit Org Unit .3. Choose New Org Unit .4. Specify the required entries under General, Definitions, and Addresses.5. Under Functions, select Sales or Marketing or both.6. Save your changes.
Activating the Organizational Structure1. Select Administrator Org Structures .2. Select the org structure to be activated.3. Choose Check Check Selected Structure to ensure that the org structure is correct and consistent.4. Choose Activate Activate Selected Structure .
Creating Job DefinitionsA job is a textual description of the duties of an employee as you would find it in the employment contract. The jobconsists of an ID and a name. It also has an expiry date, which initially is set to unlimited, but can be set to a specificdate if a job should no longer be used.When employees are assigned or hired to an org unit, they require an association with a job in the system. The jobthen characterizes the employee assignment and is also used in to fulfill service-related tasks.In the Show dropdown in this view, you can display jobs according to the following criteria:
● Active (Unlimited Validity)Shows jobs that have no expiry date.
● Active (Limited Validity)Shows jobs that have an expiry date in the future.
102 © 2011, 2012, 2013 SAP AG. All rights reserved. • P U B L I CSAP Cloud for Customer November 2013
General Settings
● InactiveShows jobs that are outside their validity period.
● AllShows all jobs.To create job definitions, proceed as follows.1. Choose New . The Define Job screen appears.2. Enter a Job Name and a Job ID.
You cannot change the Job ID once the job has been saved.
3. Attach a Job Description, if required. To do this, click Add , and then attach your file or link.You can replace a job description later, by editing the job and clicking Replace .
4. Click Save or Save and Close to save the new job.
You can also create the next new job directly from this screen by clicking New .
The new job has been saved to the system and added to the Job Definition overview list that appearswhen you first access the work center view. Whether the job is Active, Inactive, or Deprecated dependson the expiry date.
Assigning Managers to Organizational UnitsAs an administrator, you can identify an employee as a manager by defining that employee as the manager of an orgunit. The manager of an org unit enjoys unique access privileges, and can access the data of his or her subordinates,using the My Team filter.
Only one manager can be assigned to a particular org unit. Moreover, before an employee can be identifiedas the manager of an org unit, the employee must be assigned to that org unit. You can fulfill this requirementwhen the employee is created. For more information, see Creating or Editing Employee Data [page 106].If this requirement is not fulfilled, ensure that the appropriate org unit and job definition are assigned to theemployee. For more information, see About Job Definitions [page 97].
To assign managers to org units, proceed as follows.1. Select Administrator Org Structures .2. In the details section of the General tab, assign managers to the org units of your org structure.3. On the Definitions tab, select the Reporting Line Unit checkbox for all org units to which you have assigned a
manager.4. Activate the org structure.
If Territory Management is in scope, then ensure that the Territory Management work center is assignedto the business user of the manager.
SAP Cloud for Customer November 2013General Settings P U B L I C • © 2011, 2012, 2013 SAP AG. All rights reserved. 103
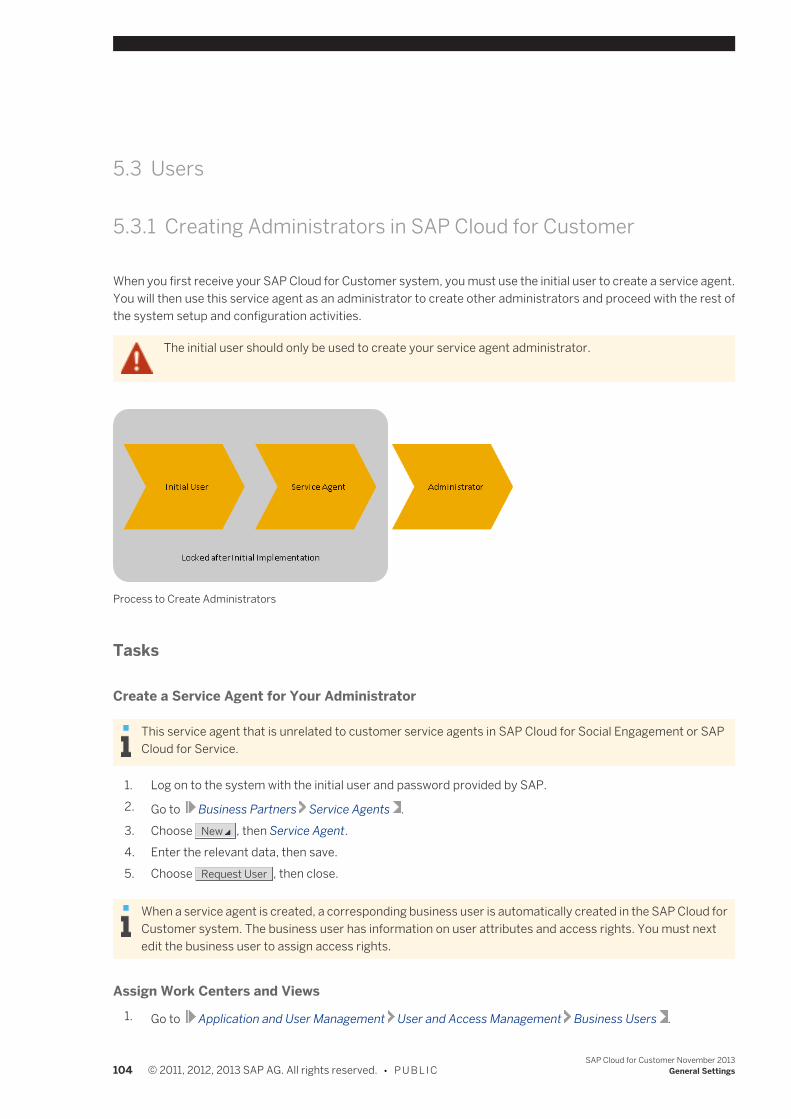
5.3 Users
5.3.1 Creating Administrators in SAP Cloud for Customer
When you first receive your SAP Cloud for Customer system, you must use the initial user to create a service agent.You will then use this service agent as an administrator to create other administrators and proceed with the rest ofthe system setup and configuration activities.
The initial user should only be used to create your service agent administrator.
Process to Create Administrators
Tasks
Create a Service Agent for Your Administrator
This service agent that is unrelated to customer service agents in SAP Cloud for Social Engagement or SAPCloud for Service.
1. Log on to the system with the initial user and password provided by SAP.2. Go to Business Partners Service Agents .3. Choose New , then Service Agent.4. Enter the relevant data, then save.5. Choose Request User , then close.
When a service agent is created, a corresponding business user is automatically created in the SAP Cloud forCustomer system. The business user has information on user attributes and access rights. You must nextedit the business user to assign access rights.
Assign Work Centers and Views1. Go to Application and User Management User and Access Management Business Users .
104 © 2011, 2012, 2013 SAP AG. All rights reserved. • P U B L I CSAP Cloud for Customer November 2013
General Settings
After setting up the first administrator, you can access this same work center view under Administrator General Settings Business Users .
2. From the Show dropdown list, select All Business Users, then choose Go to execute the query.3. Highlight the business user you want to edit.4. Choose Edit and select Attributes.5. Enter and confirm the initial password.6. Save your changes and choose Edit Access Rights .7. Assign the relevant work centers and views and maintain the necessary access rights. Expand a work center
to see all the associated views. You can then assign a subset of the views within a work center.You can grant the administrator access to specific activities in the activity list by allowing access only to thecorresponding business areas in the Business Configuration work center.
You must assign access rights to all work centers where the administrator will be required to performactivities.
For more information, review the Recommended Business Roles and Work Center Assignments for SAP Cloudfor Customer [page 118].For more general information on managing users and assigning access rights, see the Business Users QuickGuide [page 107].
Create Other AdministratorsYou must now use the service agent administrator to create one or more administrators. Proceed as follows:
1. Create an employee for each additional administrator. For more information, see Creating or EditingEmployee Data [page 106].
When an employee is created, a corresponding business user is also automatically created in the SAPCloud for Customer system. The business user has information on user attributes and access rights.
2. We recommend that you create one or more administrator business roles to streamline access rightsassignment and maintenance.
For more information, watch the video Assigning User Access Rights by Roles and review the BusinessRoles Quick Guide [page 121] and the Recommended Business Roles and Work Center Assignments forSAP Cloud for Customer [page 118].
3. Assign the newly created business users access rights by performing the steps in the Assign Work Centersand Views task above. If you have created administrator business roles, you can assign them under theBusiness Role Assignment tab while editing access rights.
4. Use these administrators to continue your first implementation project by completing the tasks in thefollowing topics: ● Getting Started for SAP Cloud for Social Engagement Administrators [page 20] ● Getting Started for SAP Cloud for Service Administrators [page 25] ● Getting Started for SAP Cloud for Sales Administrators [page 29]
Lock the Initial User and the Service Agent Administrator ● You can lock the initial user and assign contact types to service agents in the Define Administrators for Project
Team activity.
SAP Cloud for Customer November 2013General Settings P U B L I C • © 2011, 2012, 2013 SAP AG. All rights reserved. 105
Go to Business Configuration Implementation Projects . Select your implementation project and chooseOpen Activity List . Find Define Administrators for Project Team under Prepare or All.
● If you do not lock the initial user manually, it will be locked automatically upon completion of the ConfirmMilestone: Go Live activity.
● The service agent administrator should be used only for the First Implementation Project.If the service agent is also an employee in your company, you need to create an additional employee for himor her during migration. After you go live, the service agent administrator should be locked.
Before locking the service agent administrator, ensure that at least one employee has unrestrictedwrite access to the Business Users view in the Administrator work center.
5.3.2 Creating or Editing Employee Data
As an administrator, you can create employee records manually or upload the data using the migration tool availablethrough the implementation project activity, Migration of Employee Data.
Go to Administrator General Settings , then under Users, click Employees. This view allows you to view, create,and update the most essential employee data. It provides an overview of an employee’s work details including in-house address and communication data. When you create a new employee, an inactive user login profile is created.You can view organizational details, such as the organizational unit, the job title, the reporting line unit, and themanager.
Tasks
Create and Edit Employee Data1. In the worklist of the Employees view, click New , then choose Employee.2. Enter the employee's name, in-house address, communication details and other employee-specific details,
such as the employee’s organizational assignments.
You can also add more information to a particular employee by selecting the employee in the worklistand clicking Edit .
3. If you are using the sales and marketing features of SAP Cloud for Customer and have implemented theintegration with Microsoft Outlook, then it is important that you specify a unique e-mail address for eachemployee.For more information, see Working from Microsoft Outlook.
4. Click Save to save the new employee.
For data protection reasons, personal data of employees can be removed by an administrator responsible fordata privacy, if requested. If the personal data of an employee has been deleted, you can still display thebusiness partner in question, for example, in related business documents or overviews. The ID of the businesspartner will then be shown in an anonymized form.For more information, see Data Privacy Management.
106 © 2011, 2012, 2013 SAP AG. All rights reserved. • P U B L I CSAP Cloud for Customer November 2013
General Settings
Delimit the Validity of an EmployeeIf you want to delimit the validity of an employee record, enter the appropriate date in the Valid To field. From thisdate, you can no longer use this employee in new business processes.
The value in the field is set to Unlimited by default.
Follow-On TasksOnce employee data is created, you can also assign business roles and maintain business user attributes and accessrights.For more information see:
● Business Roles Quick Guide [page 121] ● Business Users Quick Guide [page 107]
5.3.3 Business Users Quick Guide
The Business Users view allows you to manage users and assign access rights. You can create and edit userattributes, assign access rights, and define security policies. In addition, the business users view provides you withpersonal information about users, for example, employee ID, org unit, e-mail address, phone number, and theirlocation.Depending on your solution, you can access the Business Users view from the Administrator or the Application andUser Management work center.
Business Background
User and Access ManagementUser and access management allows you, as an administrator, to manage users and assign access rights. It enablesyou to lock and unlock users, assign work centers and work center views, and restrict read and write access to specificdata.For more information, see User and Access Management
Segregation of DutiesSegregation of duties is designed to minimize the risk of fraud and errors, and protect company assets such as dataor inventories. This is done through the appropriate assignment of access rights by distributing responsibility forbusiness processes and procedures among several users. For example, the requirement to have two employeesresponsible for the payment process. One employee creates a check and second employee signs it, ensuring thatthe responsibility for spending company finances is shared between two users.The segregation of duties check helps administrators in user and access administration do their job by enabling themto assign access rights which are free of conflicts. This check enables them inform business process owners ofexisting conflicts, so that they can implement process controls to mitigate conflicts.For more information, see Segregation of Duties.
SAP Cloud for Customer November 2013General Settings P U B L I C • © 2011, 2012, 2013 SAP AG. All rights reserved. 107
Tasks
Unlock Password1. In the Business Users subview, select the user for whom you want to unlock the
password.2. Click Edit , then choose Attributes.3. Deselect the Password Locked checkbox.4. Save your changes.
Generate or Deactivate Password1. Click Actions , then choose Generate Password.2. On the dialog box, click OK . An e-mail containing a new password is sent to the user’s
workplace e-mail address. If no e-mail address has been entered in the system, thepassword is displayed at the bottom of the screen.
3. To deactivate a user's password, click Actions , then choose Deactivate Password.
If you deactivate a user's password, the employee can no longer log on to thesystem using a password.
Unlock and Lock a Business User1. In the Business Users subview, select the user you want to lock or unlock.2. Click Lock User or Unlock User .
You cannot lock your own user in the Business Users subview.
Edit User Attributes1. In the Business Users subview, select the user you want to edit.2. Click Edit , then choose Attributes.3. You can enter or change the employee's user ID, validity period, password, and global
settings, such as language and time zone. If you enter or change the password, theemployee is prompted to change the password the next time he or she logs on to thesystem.
For information about language settings, see the section Regional Settings in thedocument Personalizing My Settings.
You can also specify the security policy that should apply to the password of the user.If you do not specify a security policy, the default security policy is used.
You cannot change your own password in the Business Users subview. You canonly change your password on the logon screen or in personalization, under Personalize My Settings .
4. If you want to edit the certificates that are assigned to the user, click Actions andthen choose Manage Certificates.
108 © 2011, 2012, 2013 SAP AG. All rights reserved. • P U B L I CSAP Cloud for Customer November 2013
General Settings
Here you can remove certificates from the user and block certificates that were issuedprior to a specified date and time. The block date enables you to protect the systemagainst system access by unauthorized persons who have a valid user certificate. Youcan also upload S/MIME certificates. For more information, see the documentation onE-Mail Security.
5. Save your changes.
Assign and Edit Access Rights
We recommend that you use business roles to assign access rights to users. Youcan assign a business role to the user on the Business Role Assignment tab on theEdit Access Rights screen in the Business Users view.For more information, see the Business Roles Quick Guide [page 121].
If you have a small number of users to whom you want to give individualized access rights, youcan also directly assign access rights to the user.
1. In the Business Users subview, select the user you want to edit, click Edit , thenchoose Access Rights.
2. Then choose one of the following options: ● Copy from Business Role (choose Actions ,Copy from Business Role)
Using Copy from Business Role does not assign the business role to the user.
Choose this option if the following applies: ○ You do not want to create an assignment between the business user and
business role as described above.
AND ○ No business roles are currently assigned to the user.
When you choose this option you can also choose to Retain ExistingAuthorizations. In this case the user keeps his or her existingauthorizations and gains the authorizations in the business role. Again,this does not create an assignment between the business role andbusiness user.
● Edit Without Business Roles (choose Edit Without Business Roles )Choose this option if the following applies: ○ You have previously granted access rights to a business user via a business
role and want the user to retain these access rights.
This option removes all assigned business roles but retains the existingaccess rights.
● Copy from User (choose Actions ,Copy from User)Select the user from whom you want to copy the access rights. This copies workcenter and view assignments as well as access restrictions.
● Assigned All Proposed Work Centers and Views (choose Actions ,Assigned AllProposed Work Centers and Views)
SAP Cloud for Customer November 2013General Settings P U B L I C • © 2011, 2012, 2013 SAP AG. All rights reserved. 109
The system proposes the work center according to the function of the orgunit to which the user is assigned. If you want to assign all proposed workcenters and their views, click Actions and choose Assign All ProposedWork Centers and Views.If no function is assigned to the org unit of the user, no work centers andviews are proposed. In this case, the option Assign All Proposed WorkCenters and Views is disabled.
● Assign Access Rights Manually to User (choose Work Center and View Assignment )1. Choose the work centers you want to assign to the user from the list of
Available Work Centers, and select the Assigned to User checkbox.2. To remove a work center, deselect the corresponding checkbox.3. For each selected work center, the system displays the associated views in
the list of Available Work Centers and Views. Choose the views you want toassign to the user and select the Assigned to User checkbox. You can alsoremove views by deselecting the corresponding checkbox.Note that when you assign a work center view to a user, you also assign thecorresponding mobile view to the user. There are some exceptions for certainmobile applications. For more information, see the documentation of yourSAP mobile application.
4. Check whether the assignments conflict with segregation of duties. Conflictswith segregation of duties are displayed with a red traffic light. If there are anysegregation of duty conflicts, see the solution section for resolving theconflict.
5. If you want to restrict read and write access, choose Access Restrictions .a. Select the view for which you want to restrict access rights and choose
the corresponding access restriction in the Read Access and WriteAccess column. You can choose between the following settings foraccess restrictions: ● No Access (only available as restriction for write access)
The user has no write access. ● Unrestricted
The user has access to all business data related to the view. ● Restricted
The user only has access to specific business data, depending onthe access context. If you select Restricted, you can further restrictread and write access on the basis of the access group under Detailed Restrictions . For example, if a view has the Site accesscontext, you can restrict write access in this view for businessdocuments that belong to a specific site. To do so, select or deselectthe corresponding checkbox in the Read Access or Write Accesscolumn.
b. If you want to grant the user access to data that is no longer in use,choose Historic Restrictions . Select or deselect the correspondingcheckbox in the Read Access or Write Access column.
3. Check Access Rights Consistency
110 © 2011, 2012, 2013 SAP AG. All rights reserved. • P U B L I CSAP Cloud for Customer November 2013
General Settings
1. To check whether the access rights are consistent, click Actions , then chooseCheck Access Rights Consistency.Each view provides specific activities that can be performed by a user withcorresponding access rights. Note that in some cases the same activities can beperformed in multiple views.It may happen that you define different access restrictions for views that providethe same activities. When users perform these activities, the access rights thattake effect consist of the sum of the different access restrictions for all views thatinclude the activities.Checking consistency enables you to identify these views and activities.
2. If there are any activities displayed on the Check Access Rights Consistencyscreen, some access rights are inconsistent. In this case, check whether you needto redefine the access rights.Using the Show list box on the Check Access Rights Consistency screen, you canchoose between the following options: ● Inconsistencies Excluding Common Authorizations View ● All Inconsistencies ● Inconsistencies Excluding All Views of Home
4. Save your changes.
Update Users/Simulate User UpdateIf a user is assigned to a business role, the user should have all the access rights defined in theassigned business role. If the access rights deviate from the assigned business roles, you cansimulate or start a user update to identify these deviations. Deviations may occur if the userwas locked for editing the last time the user update was started or if a business role has beenchanged without starting the user update. Deviations may also occur if the user has accessrights that were previously granted manually. You can see the effects a user update wouldhave by simulating a user update.In the Business Users view, choose Update Access Rights , then Simulate Update of SingleUser or Simulate Update or All Users. To view the results of the update or the simulation of theupdate, choose Update Access Rights , Show Background Runs of All Users. Here you can seethe processing status of any update runs. Click on Display Log to see detailed informationabout the update run.Once you have solved any issues that may have arisen during the simulation, you can start theactual update from either the Business Roles or the Business Users view:
● From the Business Users view, choose Update Access Rights , Update Single User orUpdate All Users.
● From the Business Roles view, select the relevant business role, then chooseAssigned Users , Update Users.
If you have not resolved any deviations that occurred during the simulation, thesolution will issue error messages about these deviations. You can review thesemessages in the Application Log.
Edit Security PoliciesStart the Edit Security Policies common task. For more information, see Security Policies QuickGuide [page 125].
SAP Cloud for Customer November 2013General Settings P U B L I C • © 2011, 2012, 2013 SAP AG. All rights reserved. 111
5.3.4 Configure Your Solution for Single Sign-On
OverviewThis document describes how to set up your solution to use front-end Single Sign-On (SSO). You configure SSO inyour system using the Configure Single Sign-On common task, which can be started from Application and UserManagement Common Tasks .For more information, see Front-End Single Sign-On.
PrerequisitesYou have downloaded the XML file of the metadata of your identity provider (IdP).
Procedure1. Choose My System .2. Click Download Metadata and save the XML file for upload into the IdP.
Some IdPs can upload all information from the metadata XML file. Other require manual entry of theinformation contained in the file.
3. Specify whether the employee can manually choose between logging on with user ID and password or SSOby selecting the Manual Identity Provider Selection checkbox.
4. In the SSO URL section, specify which URL should be used by the employee to logon to the system.In the URL Sent to Employee dropdown list, you can choose between the following options:
● Non-SSO URLThe system sends only the normal system URL to the employee. The employee cannot log on usingSSO, and must use password or certificate instead.
● SSO URLThe system sends only the SSO URL to the employee. The employee can log on using SSO.Authentication request is redirected through the IdP.
● Automatic SelectionIf SSO is not active, the system sends the normal system URL to the employee. If SSO is active, thesystem checks whether the employee has a password. If a password is available, both SSO URL andNon-SSO URL are sent to the employee. However, if the employee has no password, only the SSO URLis sent to the employee.
5. Choose Identity Provider .6. Click New Identity Provider and select the metadata XML file that you have downloaded from your IdP. By
importing the metadata, the system automatically uploads the required signature certificate and encryptioncertificate.
7. If you have multiple identity providers configured and you have not selected the Manual Identity ProviderSelection checkbox in step 2, you have to specify the default IdP, which is automatically selected when loggingon to the system. To do so, select the corresponding IdP and click Actions , then choose Set To Default.
8. If required, you can specify the Alias, which defines the displayed name of the IdP that appears in the logonscreen.
112 © 2011, 2012, 2013 SAP AG. All rights reserved. • P U B L I CSAP Cloud for Customer November 2013
General Settings
9. If your IdP requires the element Assertion Consumer Service URL in the SAML request, select theInclude Assertion Consumer Service URL checkbox.
10. Once you have configured your IdP, activate SSO in your solution. To do so, click Activate Single Sign-On .11. Save your changes.
5.3.5 Handling Authorization Restrictions
The ability to grant and restrict authorizations is supported for the following items: ● Accounts ● Contacts ● Marketing Leads ● Sales Leads ● Opportunities ● Sales Quotes ● Activities (that is, e-mails, tasks, appointments and phone calls)
Authorizations for these items can be restricted either to the employees associated with the specific item, or to theterritory that is automatically determined or manually maintained for that item.Moreover, for activities, the 360 Overview is supported, allowing authorizations for activities to be granted to theassociated account.
Tasks
Maintaining Authorizations in Identity and Access ManagementWithin Identity and Access Management, authorizations can be granted – using the accessgroup IDs Employees and Territories – for all employees in your organization, or for allterritories in your model. You, as an administrator, can access Identity and AccessManagement for employees and territories as follows:
1. Choose Administrator, then Business Users.2. Specify the business users who are to receive the authorizations.3. For each applicable user, choose Edit Access Rights .
The access group IDs Employees and Territories are primarily used to structure thedisplay of the employees and territories in your organization. We recommend that youdo not maintain authorization restrictions for all employees or all territories in yourorganization, but rather define the corresponding work center views as unrestricted, ifrequired.
For the access group ID Employees, you can restrict authorizations for the access contextEmployee (code 1010) as described below, under Restricting Authorizations by Employees.For the access group ID Territories, you can restrict authorizations as described below, underRestricting Authorizations by Territories.Authorizations for activities are automatically granted to an employee at the time that he orshe is defined as the employee responsible for the account associated with the activity. Thisfeature is enabled for activities by the 360 Overview.
SAP Cloud for Customer November 2013General Settings P U B L I C • © 2011, 2012, 2013 SAP AG. All rights reserved. 113
Restricting Authorizations by EmployeesBy editing the access group ID Employees, you, as an administrator, can grant authorizationsto employees to see items of their own, or of other employees. Employees who have beengranted the appropriate authorizations can see or update each item, as described below:
● Provided that they belong to the account team, meaning that they are directlyassociated with an account by means of any role (including a customer-defined one),authorized employees can view or update accounts.
● Provided that they belong to the account team of an account that is associated with acontact, authorized employees can view or update contacts.
● Provided that they are assigned the role Employee Responsible or Sales Employee,authorized employees can view or update marketing leads, sales leads, opportunities,or sales quotes.
● Provided that they are assigned the role Employee Responsible or Sales Employee,authorized employees can view or update opportunities or sales quotes.
● Provided that they are assigned the role Employee Responsible, authorized employeescan view or update activities.
Employees who are authorized to view the items of other employees can also see theitems of those employees.Moreover, items for which no employee has been assigned the role EmployeeResponsible can be accessed by any employee. By the same token, marketing leadsand sales leads for which no employee has been assigned the role EmployeeResponsible or Sales Employee can also be accessed by any employee.
Within Identity and Access Management, employees can be displayed either in simple listformat, or in the corresponding organizational hierarchy, which indicates the employeesresponsible for each organizational unit. You, as an administrator, can therefore choose tomodify either the authorizations of an individual employee, or of the employees who areassigned to the relevant organizational unit.If you choose to modify authorizations in relation to a particular organizational unit, then theauthorization changes will be applied to all employees who belong to that organizational unit,or to any subordinate unit. At a later date, you can also modify the authorizations of individualemployees on this organizational unit, if desired.
Although changes in the assignment of employees to a particular item are automaticallyconsidered in relation to their authorizations, additional action is required in the eventthat responsibility for an organizational unit changes from one manager to another. Inthis case, you, as an administrator, must reassign authorizations, as follows:
● For managers, all organizational units for which the manager is responsible areproposed, including the employees who are assigned to subordinateorganizational units. Managers themselves are also included in this proposal,since they are also employees who are assigned to the uppermost organizationalunit.
● For employees, only employees are proposed.
114 © 2011, 2012, 2013 SAP AG. All rights reserved. • P U B L I CSAP Cloud for Customer November 2013
General Settings
Restricting Authorizations by TerritoriesAuthorizations for the items named above can also be restricted on the basis of the territorythat is automatically determined or manually maintained for that item.
Only one territory can be assigned to any item at a given time. The universal uniqueidentifier (UUID) of that territory is recorded within the access control list of thecorresponding item.If an employee is assigned to a particular item, but no territory is indicated for that item,then only the employees who have inherited the corresponding employee authorizationrestrictions of that item can view or update it.
By editing the access group ID Territories, you, as an administrator, can grant authorizationsto the business users that are associated with the territories in question. If you modify theauthorization of a business user in relation to a territory, then that user can view or update theitems that are assigned to that territory, or to any corresponding subterritory. For example, ifyou assign authorization to an employee to view or update items that are related to a certainterritory – for example, the United States, or Germany – then that employee can also view orupdate items that are related to subordinate territories – for example, California or Florida (forthe United States), or Berlin or Bavaria (for Germany).
Although changes in the assignment of territories to a particular item are automaticallyconsidered in relation to their authorizations, additional action is required in the eventthat the responsibility for a territory is reassigned from one manager to another. In thiscase, you, as an administrator, must reassign authorizations for the items that areassociated with that territory, and with all associated subterritories. If you accept thedefault proposal for the reassignment of authorizations, then the correspondingemployees can view or update items for all associated subterritories.
Restricting Authorizations for Activities in the 360 OverviewFor e-mails, tasks, appointments and phone calls, the 360 Overview is supported, meaningthat an employee who is responsible for an account shall see all activities that are related tothat account, even if the employee is not one of the involved parties in the activity, and evenif the employee lacks the authorizations that are inherited from employee or territoryauthorization restrictions. The 360 Overview is only active, if the authorization restriction isperformed using a business role with the restriction rule 1 - Assigned Territories, Accounts,and Employees (for Manager) on the corresponding work center view: Appointments, E-Mails, Phone Calls, or Tasks.If you want to assign an employee to an account, it is not necessary to maintain both theaccount master data and the authorizations. Consequently, any updates that are performedfor the authorizations of an account in relation to an employee occur automatically.For example, suppose that an employee is responsible for three accounts, meaning that onlythose accounts appear for the user of that employee within Identity and Access Management.If you edit the access restrictions for the user of this employee and select Assign Proposed,then the solution proposes that the employee receives access to the appointments for all threeaccounts. If the same user is assigned, under Customers Accounts , as the employeeresponsible for a second account, then it is not necessary, within Identity and AccessManagement, to edit the access restrictions for the user of the employee in relation to thesecond account, because the corresponding restrictions for that account are processedautomatically at the time that the assignment as employee responsible is saved. The
SAP Cloud for Customer November 2013General Settings P U B L I C • © 2011, 2012, 2013 SAP AG. All rights reserved. 115
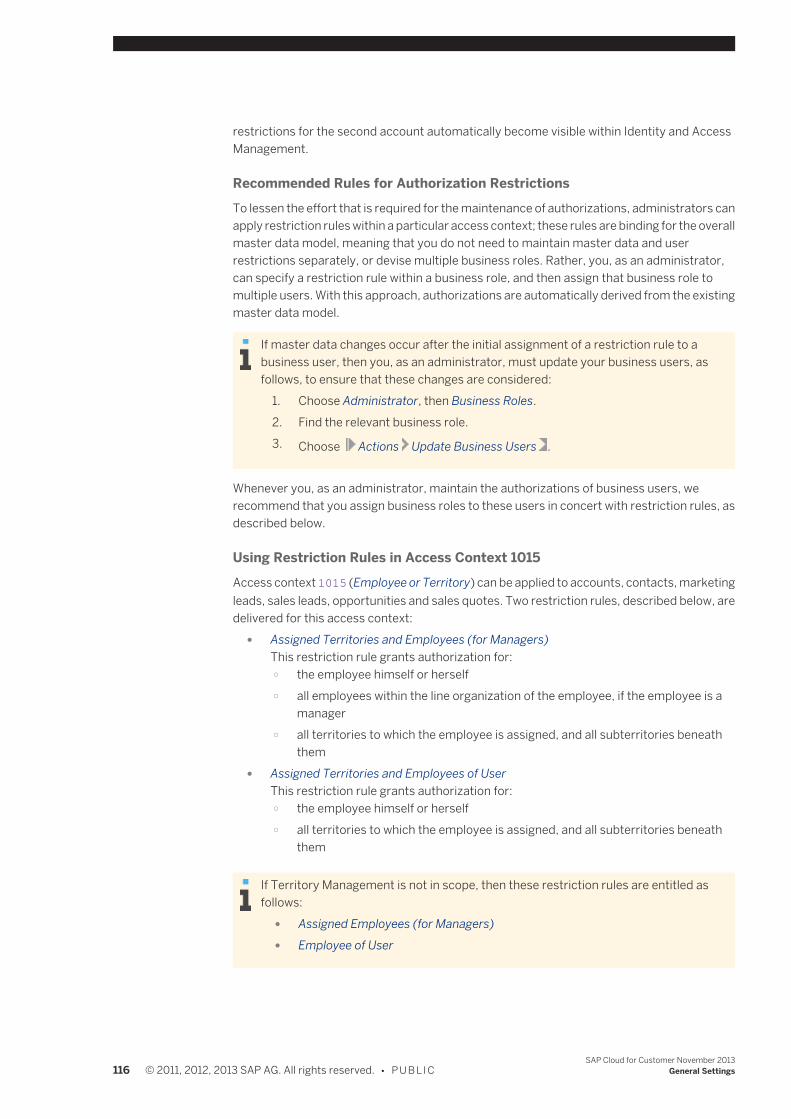
restrictions for the second account automatically become visible within Identity and AccessManagement.
Recommended Rules for Authorization RestrictionsTo lessen the effort that is required for the maintenance of authorizations, administrators canapply restriction rules within a particular access context; these rules are binding for the overallmaster data model, meaning that you do not need to maintain master data and userrestrictions separately, or devise multiple business roles. Rather, you, as an administrator,can specify a restriction rule within a business role, and then assign that business role tomultiple users. With this approach, authorizations are automatically derived from the existingmaster data model.
If master data changes occur after the initial assignment of a restriction rule to abusiness user, then you, as an administrator, must update your business users, asfollows, to ensure that these changes are considered:
1. Choose Administrator, then Business Roles.2. Find the relevant business role.3. Choose Actions Update Business Users .
Whenever you, as an administrator, maintain the authorizations of business users, werecommend that you assign business roles to these users in concert with restriction rules, asdescribed below.
Using Restriction Rules in Access Context 1015Access context 1015 (Employee or Territory) can be applied to accounts, contacts, marketingleads, sales leads, opportunities and sales quotes. Two restriction rules, described below, aredelivered for this access context:
● Assigned Territories and Employees (for Managers)This restriction rule grants authorization for: ○ the employee himself or herself ○ all employees within the line organization of the employee, if the employee is a
manager ○ all territories to which the employee is assigned, and all subterritories beneath
them ● Assigned Territories and Employees of User
This restriction rule grants authorization for: ○ the employee himself or herself ○ all territories to which the employee is assigned, and all subterritories beneath
them
If Territory Management is not in scope, then these restriction rules are entitled asfollows:
● Assigned Employees (for Managers) ● Employee of User
116 © 2011, 2012, 2013 SAP AG. All rights reserved. • P U B L I CSAP Cloud for Customer November 2013
General Settings
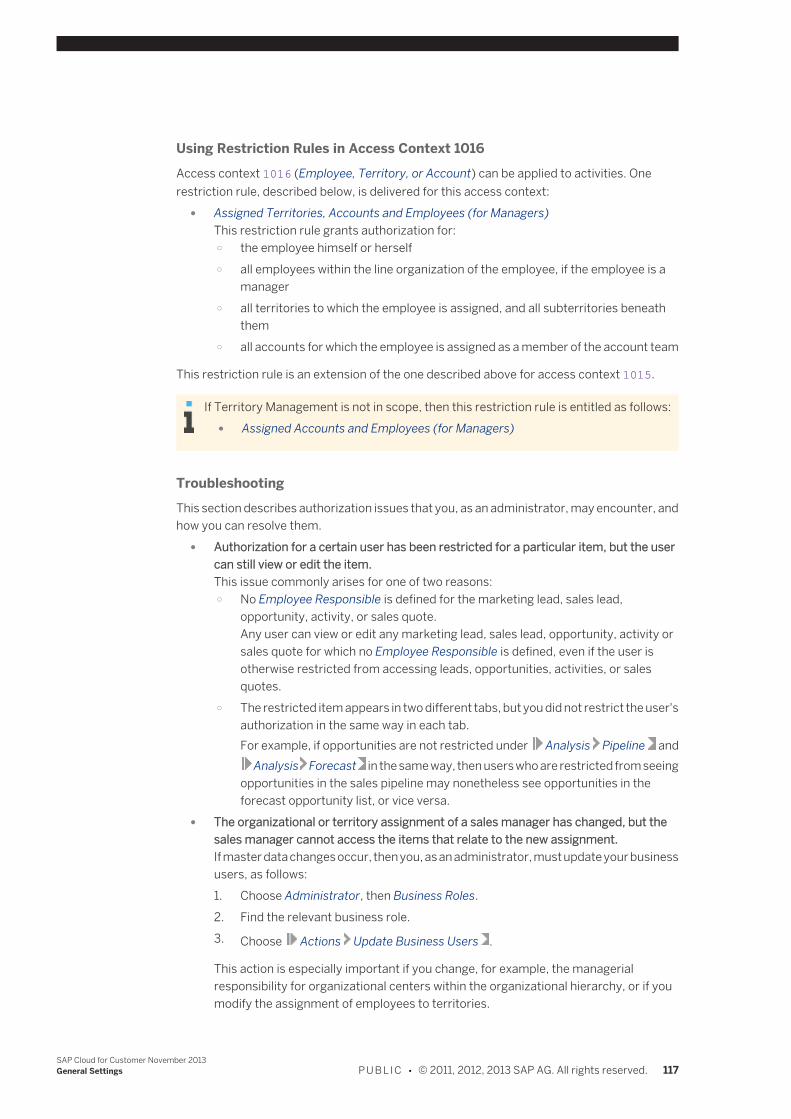
Using Restriction Rules in Access Context 1016Access context 1016 (Employee, Territory, or Account) can be applied to activities. Onerestriction rule, described below, is delivered for this access context:
● Assigned Territories, Accounts and Employees (for Managers)This restriction rule grants authorization for: ○ the employee himself or herself ○ all employees within the line organization of the employee, if the employee is a
manager ○ all territories to which the employee is assigned, and all subterritories beneath
them ○ all accounts for which the employee is assigned as a member of the account team
This restriction rule is an extension of the one described above for access context 1015.
If Territory Management is not in scope, then this restriction rule is entitled as follows: ● Assigned Accounts and Employees (for Managers)
TroubleshootingThis section describes authorization issues that you, as an administrator, may encounter, andhow you can resolve them.
● Authorization for a certain user has been restricted for a particular item, but the usercan still view or edit the item.This issue commonly arises for one of two reasons: ○ No Employee Responsible is defined for the marketing lead, sales lead,
opportunity, activity, or sales quote.Any user can view or edit any marketing lead, sales lead, opportunity, activity orsales quote for which no Employee Responsible is defined, even if the user isotherwise restricted from accessing leads, opportunities, activities, or salesquotes.
○ The restricted item appears in two different tabs, but you did not restrict the user'sauthorization in the same way in each tab.For example, if opportunities are not restricted under Analysis Pipeline and Analysis Forecast in the same way, then users who are restricted from seeingopportunities in the sales pipeline may nonetheless see opportunities in theforecast opportunity list, or vice versa.
● The organizational or territory assignment of a sales manager has changed, but thesales manager cannot access the items that relate to the new assignment.If master data changes occur, then you, as an administrator, must update your businessusers, as follows:1. Choose Administrator, then Business Roles.2. Find the relevant business role.3. Choose Actions Update Business Users .
This action is especially important if you change, for example, the managerialresponsibility for organizational centers within the organizational hierarchy, or if youmodify the assignment of employees to territories.
SAP Cloud for Customer November 2013General Settings P U B L I C • © 2011, 2012, 2013 SAP AG. All rights reserved. 117
5.3.6 Business Roles
5.3.6.1 Recommended Business Roles and Work Center Assignmentsfor SAP Cloud for Customer
Access rights for SAP Cloud for Customer are based on work centers and the views within each work center. Tosimplify maintenance and assignment of access rights to users, SAP recommends that you define business roles towhich you assign work centers and views. You can then assign one or more roles to each employee who has a userin the system.
The Home page is accessible by all users and not assigned via a work center.The content and tiles available on the home page are determined by the work centers and authorizationsassigned to each user.
For more information on how to create business roles, see the Business Roles Quick Guide [page 121].The following tables outline the recommended business roles and the standard set of work centers and work centerviews they should include. You can of course create your own set of business roles and assign them access rightsthat suit your particular business processes.
Not all work centers listed in the system are supported or required by SAP Cloud for Customer.For a complete list of the supported work centers and work center views for SAP Cloud for Service, see AboutSAP Cloud for Customer [page 8].
The administrator role described below should be used for most of the setup and configuration activitiesoutlined in Getting Started for SAP Cloud for Sales Administrators [page 29], Getting Started for SAPCloud for Service Administrators [page 25], or Getting Started for SAP Cloud for Social EngagementAdministrators [page 20].To set up an administrator with the initial user, see Creating Administrators in SAP Cloud for Customer[page 104].
118 © 2011, 2012, 2013 SAP AG. All rights reserved. • P U B L I CSAP Cloud for Customer November 2013
General Settings
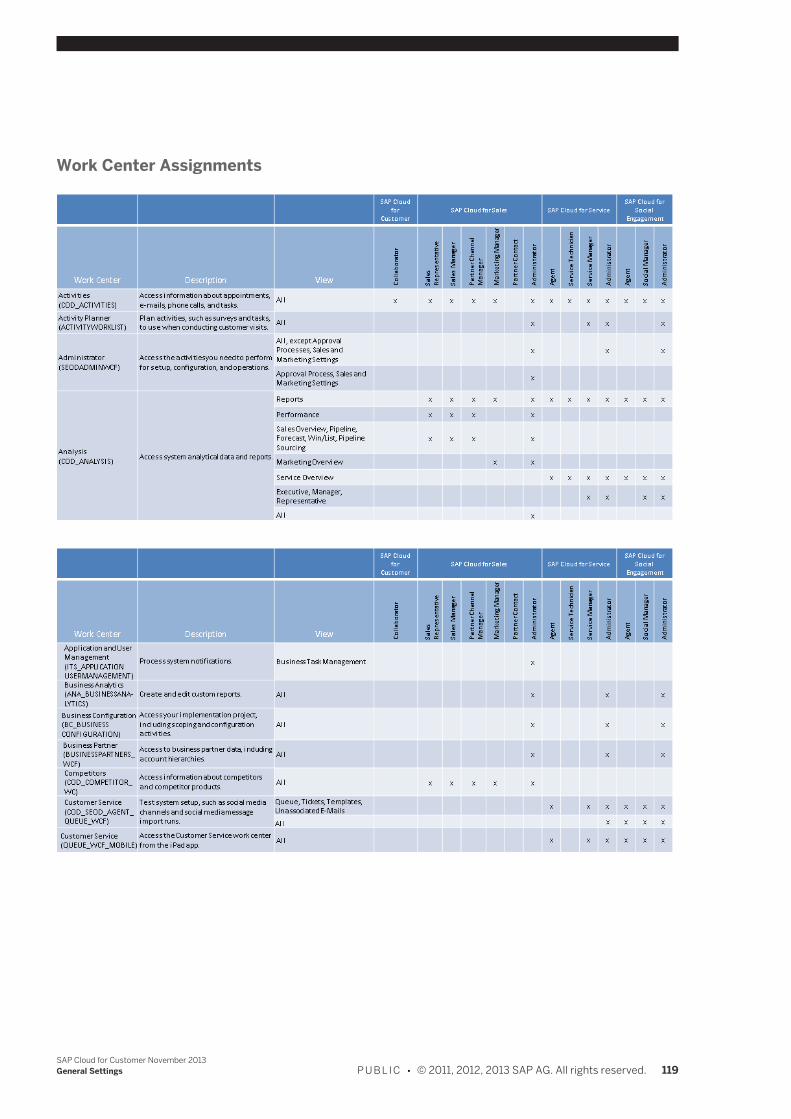
Work Center Assignments
SAP Cloud for Customer November 2013General Settings P U B L I C • © 2011, 2012, 2013 SAP AG. All rights reserved. 119
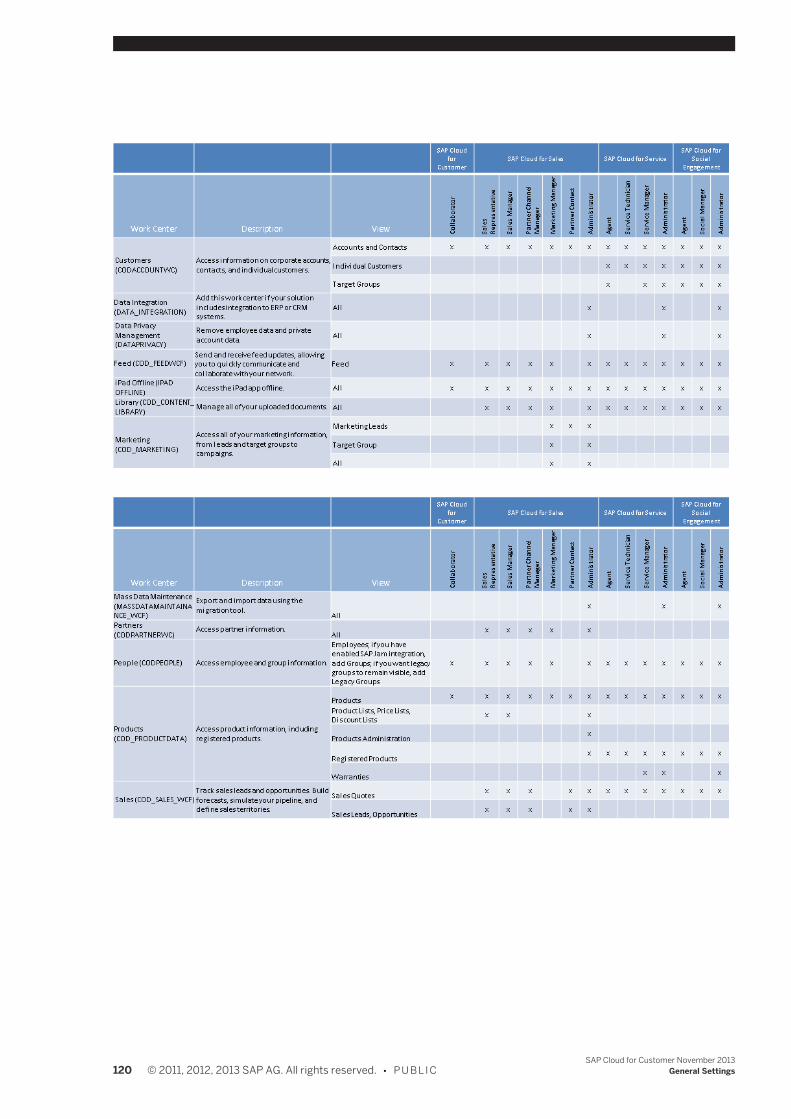
120 © 2011, 2012, 2013 SAP AG. All rights reserved. • P U B L I CSAP Cloud for Customer November 2013
General Settings
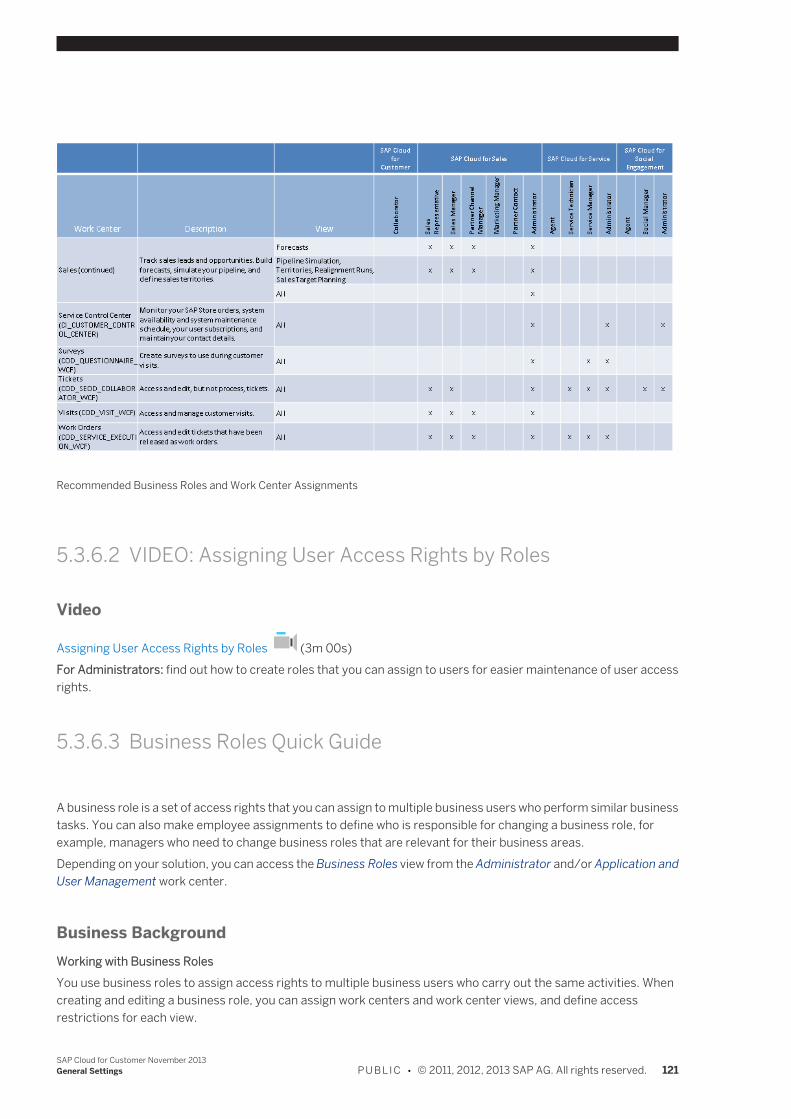
Recommended Business Roles and Work Center Assignments
5.3.6.2 VIDEO: Assigning User Access Rights by Roles
Video
Assigning User Access Rights by Roles (3m 00s)For Administrators: find out how to create roles that you can assign to users for easier maintenance of user accessrights.
5.3.6.3 Business Roles Quick Guide
A business role is a set of access rights that you can assign to multiple business users who perform similar businesstasks. You can also make employee assignments to define who is responsible for changing a business role, forexample, managers who need to change business roles that are relevant for their business areas.Depending on your solution, you can access the Business Roles view from the Administrator and/or Application andUser Management work center.
Business BackgroundWorking with Business RolesYou use business roles to assign access rights to multiple business users who carry out the same activities. Whencreating and editing a business role, you can assign work centers and work center views, and define accessrestrictions for each view.
SAP Cloud for Customer November 2013General Settings P U B L I C • © 2011, 2012, 2013 SAP AG. All rights reserved. 121
For more information, see Working with Business Roles.
Tasks
Create a Business Role1. In the Business Roles view, click New , then choose Business Role.2. Choose General .
Enter the ID, Name, and Description of the business role.3. Under Users Responsible you can enter other users to whom you want to give
responsibility for the business role. These users will then see the business role whenthey choose Show - My Business Roles in the business role worklist. Note that the userwho creates the business role is automatically added to this list. However, anyone whois authorized to make changes in the Business Roles view can change the business role.
4. Choose Work Center and View Assignment and from the list of Available Work Centers,choose the work centers you want to assign to the business role and select the Assignedto Business Role checkbox. You can also remove work centers by deselecting thecorresponding checkbox. ● If you want to copy the access rights from a business user or from another business
role, click Copy , then choose From User or From Business Role.5. For each selected work center, the system displays the associated views in the list of
Available Work Centers and Views. Choose the views you want to assign to the businessrole and select the Assigned to Business Role checkbox. You can also remove views bydeselecting the corresponding checkbox.Note that when you assign a work center view to a business role, you also assign thecorresponding mobile view to the business role. There are some exceptions for certainmobile applications. For more information, see the documentation of your SAP mobileapplication.
6. Check whether the assignments conflict with segregation of duties. Conflicts withsegregation of duties are displayed with a red traffic light. If there are any segregationof duty conflicts, see the solution at the bottom of the screen in the Segregation of DutyConflicts table.
7. If you want to restrict read and write access for users to whom this business role isassigned, choose Access Restrictions .a. Select the view for which you want to restrict access rights and choose the
corresponding access restriction in the Read Access and Write Access column.You can choose between the following settings for access restrictions: ● No Access (only available as a restriction for write access)
The user has no write access. ● Unrestricted
The user has access to all business data related to the view. ● Restricted
The user only has access to specific business data, depending on the accesscontext. If you select Restricted, you can restrict read and write access on thebasis of predefined restriction rules that you can choose from the RestrictionRule dropdown list.
122 © 2011, 2012, 2013 SAP AG. All rights reserved. • P U B L I CSAP Cloud for Customer November 2013
General Settings
If you choose the Define Specific Restrictions restriction rule, another listappears in which you can restrict the access to specific data, which is definedby the access group. For example, if a view has the Site access context, youcan restrict write access in this view for business documents that belong toa specific site.To do so, choose Detailed Restrictions and select or deselect thecorresponding checkbox in the Read Access or Write Access column.
b. If you want to grant the user access to data that is no longer in use, choose Historic Restrictions . Select or deselect the corresponding checkbox in the ReadAccess or Write Access column.
8. To check whether the access rights are consistent, click Actions and choose CheckAccess Rights Consistency.Each view contains specific activities that can be carried out by a user with thenecessary access rights for the view. Note that some activities can be carried out inmultiple views. Therefore, when you grant access rights, you should be aware that ifthere is a conflict, unrestricted access rights override any restrictions you have defined.
View A and view B both contain activity C. For view A, a user has unrestrictedread and write access but for view B, the same user has read-only access.Because unrestricted access rights override restricted access rights, theuser will actually have both read and write access to both views.Checking consistency enables you to identify these views and activities.
9. If there are activities displayed on the Check Access Rights Consistency screen, theaccess rights are inconsistent. Check whether you need to redefine the access rights.
10. Before you can assign the business role to a business user, you must first activate it,by clicking Actions , then choosing Activate.The status of the business role changes from In Preparation to Active.You can also save the business role without activating it.
Assign a Business Role to a Business User1. Go to the Business Users work center view.2. Select the business user to whom you want to grant the access rights defined in the
business role.3. Click Edit , then choose Access Rights.4. Choose Business Role Assignment .5. Under Available Business Roles, you can see all active business roles that are available
in the system. To assign a business role to the user select the corresponding checkboxin the Assigned to User column.
Selecting the Assigned to User checkbox creates an assignment between thebusiness user and the business role. This ensures that the access rights of thebusiness user are updated when the business role is changed and a user updaterun is started. For more information about the user update run, see the sectionEdit a Business Role below.
The system copies the access rights from the business role to the user.
SAP Cloud for Customer November 2013General Settings P U B L I C • © 2011, 2012, 2013 SAP AG. All rights reserved. 123
If a business role is assigned to a user and you save the user's access rights,the access rights in the business role overwrite any access rights that youhave previously given to the user manually.If you want keep the user's current access rights, you can either work withoutbusiness roles or you can update the business roles with the missing accessrights.For more information about assigning access rights without assigningbusiness roles, see the Business Users Quick Guide [page 107].
6. Save your changes.
Edit a Business Role1. In the Business Roles view, select the business role you want to edit.2. Click Edit and make the required changes as described above under Create a
Business Role.3. Save your changes:
Before starting a user update, we recommend that you simulate the update.You do this in the Business Users view. For more information see theBusiness Users Quick Guide [page 107].
1. To save your changes and start a user update, choose Save and in the UpdateAssigned Business Users popup choose Confirm.
2. To save your changes without starting a user update, choose Save and in theUpdate Assigned Business Users popup choose Save Without User Update.
If one or more business users cannot be updated when the user update run is started,the solution issues error messages detailing the problems specific to those businessusers.For example, this can occur if a business user is assigned to a business role and hasadditional access rights that were assigned manually.If you want keep the user's current access rights, you can either work without businessroles or you can update the business roles with the missing access rights. For moreinformation about assigning access rights without assigning business roles, see theBusiness Users Quick Guide [page 107]. All other business users are updated with thechanged access rights.
4. To view the results of the update, choose Assigned Users , Show Background Runs.Here you can see the processing status of any update runs. Click on Display Log to seedetailed information about the update run.On the General tab, you can see messages summarizing the results of the update run.For more detailed information, go to the Results tab where you can see details oferrors that occurred per business user. Based on this information, you can choosewhether to change the business role, create a new business role, or edit the user’saccess rights without a business role.
Delete a Business Role1. In the Business Roles view, select the business role you want to delete.2. Click Actions , then choose Set to Obsolete.
The status of the business role changes to Obsolete.3. To delete the business role, click Delete .
124 © 2011, 2012, 2013 SAP AG. All rights reserved. • P U B L I CSAP Cloud for Customer November 2013
General Settings
An obsolete business role can only be deleted if it is no longer assigned to anybusiness user. To reactivate a business role with the status obsolete, choose
Actions , Undo Obsolete.
Modify the Self-Services OverviewFor information about this task, see here.
5.3.6.4 Setting Up User Access Rights
Allowing employees to edit tickets gives an employee the ability to engage with customers. You can limit employeeaccess to tickets to ensure that only qualified employees may engage with customers. You can limit the access of asingle employee or group of employees.It is recommended that you use roles to enable access restriction. Assigning access using roles allows you to createone set of access definitions that can be copied to multiple users.
Tasks
Defining User Access for a Group1. Create the organization that will contain the employees that you assign to this group. For more information,
see Setting Up Teams For Ticket Handling [page 98].2. After you have created the organization, create routing rules to define which tickets are assigned to the
organization. For more information, see Defining Rules for Ticket Routing [page 166].3. Next, you make a role. A role contains permissions that are inherited by each employee assigned to the role.
For more information, see the Business Roles Quick Guide [page 121].a. In the Access Restrictions facet, restrict read and write access for Tickets and Queue in the Assigned
Work Center Views list.Assign access rights to users according to your business needs: ● To restrict employee access to the employee's organization, go to the Detailed Restrictions list and
ensure the checkboxes for Read Access and Write Access are checked only for the employee'sorganization.The employee will only be able to read and edit tickets that are routed to his or her organization.
● To allow employees to read tickets in other organizations, go to the Detailed Restrictions list andensure that the Read Access and Write Access checkboxes list are checked for the employee'sorganization. Select Read Access the allow the employee to read the tickets of that organization.
4. Assign the role to all applicable employees.
5.3.7 Security Policies Quick Guide
In the Security Policies view, you can edit and create security policies for system access from desktops and laptopsand from mobile devices, according to the security requirements of your company.
SAP Cloud for Customer November 2013General Settings P U B L I C • © 2011, 2012, 2013 SAP AG. All rights reserved. 125
You can access the Edit Security Policies common task in the Administrator/Application and User Management workcenter.
Business BackgroundA security policy is a set of rules that define password complexity, such as including numerical digits, and passwordvalidity, such as requiring a password change after a certain period. You can define multiple security policies becausework areas or departments of a company may have different password security requirements.
Tasks
Create a New Security Policy1. To create a new security policy, you have the following options:
● Click Add Row .The system creates a new security policy and generates the associated policy ID.
● To create a new security policy similar to an existing one, select an existing securitypolicy and click Copy .
2. If necessary, change the Policy ID.3. Enter a Policy Name and Description for the new security policy.4. Define the complexity and validity rules for passwords that are to be assigned to the
security policy.For complexity rules, the following values are allowed: ● Minimum Number of Characters: 3 - 40 ● Minimum Number of Changed Characters: 1 - 40 ● Minimum Number of Lowercase Letters: 0 - 40 ● Minimum Number of Uppercase Letters: 0 - 40 ● Minimum Number of Digits: 0 - 40 ● Minimum Number of Special Characters: 0 - 40
For validity rules, the following values are allowed: ● Password History: 1 - 100
You can specify how many new passwords must have been used before an oldpassword may be reused.
● Minimum Password Change Waiting Time1 - 1000 days ● Maximum Password Validity: 0 - 1000 days ● Unused Initial Password Validity: 0 - 24000 days ● Unused Productive Password Validity: 0 - 24000 days
5. If required, define the settings for mobile devices.You can make the following settings for mobile devices:General ● App Password Enabled
Activate the app password enabled mode to allow users to set an app password.When a user connects to the system from a mobile device, the app passwordautomatically supplies the user ID and system logon password to the system. Thesystem then supplies the mobile device with the additional app data that isrequired to use offline mode.
126 © 2011, 2012, 2013 SAP AG. All rights reserved. • P U B L I CSAP Cloud for Customer November 2013
General Settings
Offline mode enables users to access app data even when they do not haveaccess to the server and the app password encrypts data that is stored onthe mobile device. Without an app password, users cannot use offline modeon their mobile devices.
Mobile App Password Complexity ● Minimum Number of Characters: 3 - 40 ● Minimum Number of Lowercase Letters: 0 - 40 ● Minimum Number of Uppercase Letters: 0 - 40 ● Minimum Number of Digits: 0 - 40 ● Minimum Number of Special Characters: 0 - 40
Mobile App Password Validity ● Prompt for Password After
You can specify the length of time after which the mobile user must reenter theapp password to log on to the system when the app has been inactive. If you setthis value to 0 minutes the user must reenter their password every time they startthe app.
● Maximum Number of Password Attempts: 3 - 20You can specify the maximum number of times in succession a user can enter anincorrect password before mobile app data is deleted from the mobile device.
6. Save your changes.
Edit an Existing Security Policy1. Choose the security policy you want to edit.
You cannot change policies that begin with S_; these are default security policiesdelivered by SAP.
2. Change the complexity and validity rules for passwords assigned to the security policy.3. Save your changes.
If a user´s password does not comply with the changed password rules, the user isprompted to change the password with the next system logon.
Define the Default Security PolicyWhen a business user is created, the system automatically assigns the default security policyto the business user. To define the default security policy, perform the following steps:
1. In the Default column, set the checkbox for the security policy you want to define asdefault security policy.
2. Save your changes.
You can change the security policy assignment in the Business Users view. For moreinformation, see Business Users Quick Guide [page 107].
SAP Cloud for Customer November 2013General Settings P U B L I C • © 2011, 2012, 2013 SAP AG. All rights reserved. 127
Delete an Existing Security Policy1. Choose the security policy you want to delete.
Note the following: ● If you have selected a security policy beginning with S_ the Remove is
deactivated because the deletion of a default security policy delivered bySAP is not permitted.
● You cannot delete a security policy that is currently assigned to users.
2. Click Remove .3. Save your changes.
5.3.8 Data Privacy Management
OverviewData processing systems store master data or transactional data used to perform business processes and todocument them. In many cases, personal data of employees or other private persons is involved. In many countries,the storage, disclosure, and removal of such personal data from data storage systems must be in accordance withstatutory data protection laws. One requirement in many countries is that such personal data can only be stored ifa clear business reason for this data retention exists. Much data protection legislation defines fixed retention periodsfor how long data can be stored in data systems, after which it must be deleted. Only in certain cases can organizationsmake data anonymous, rather than completely remove it. In addition, legislation in many countries stipulates thatemployers must disclose the personal data stored on an individual, when that employee expressly requests this. TheData Privacy Management work center allows those responsible for data protection issues in an organization torespond to employee requests to disclose personal information and remove it.The Data Privacy Management work center allows those responsible for data protection issues in an organization torespond to requests to fulfil the following requirements regarding personal data of employees and customers (privateaccounts):
● Disclose personal data for employees and private persons ● Remove employee personal data once the retention period for all relevant data is expired. ● Monitor and manage the automatic data removal processes using an application log. ● Display log data detailing each access made to the Disclose Employee Data and Remove Employee Data
overview screens containing personal data.
PrerequisitesThe legally required retention periods relevant for your country have been maintained in your system configuration.You can find the relevant configuration activities for Data Retention Rules in the Business ConfigurationImplementation Projects view. Here you can set one retention period per country. For more information about systemconfiguration for data privacy management, see Configuration: Data Retention Rule for Employees andConfiguration: Data Retention Rule for Private Accounts
128 © 2011, 2012, 2013 SAP AG. All rights reserved. • P U B L I CSAP Cloud for Customer November 2013
General Settings
Users with authorization to access the Data Privacy Management work center can perform all data privacyfunctions within this work center, including the disclosure and deletion personal data belonging toemployees and private persons. Access to this work center is granted in the Application and UserManagement work center. You must ensure that only employees with authorization to disclose/deletepersonal data are granted access to the Data Privacy Management work center. If your corporate groupconsists of more then one company, you can set access to this work center at a company level. Forexample, you can assign one user with data privacy rights for the employees in one company, and assigna different user with these same rights for a separate company in your group.To support auditing of data protection actions in the system, the system logs every access made to theDisclose Employee Data and Remove Employee Data overview screens of a selected employee.
FeaturesThe Data Privacy Management work center helps your company to fulfil requests to disclose and/or delete personaldata.
Personal Data DisclosureThe obligation to disclose personal data is set in legislation in many countries where data protection regulation hasbeen adopted. An employee can request to view the personal data held by his or her employer and the employermust confirm whether such personal data exists. The employee can then request a description of any such personaldata, and in some legal jurisdictions, why the data is being stored or processed and who the recipients of this dataare, or have been.The Personal Data Disclosure view allows employees responsible for data protection to administer data disclosureof personal data upon request. For more information see Personal Data Disclosure Quick Guide.
Personal Data RemovalAn employee can request if personal data are held by the employing organization. If such data exists, the employeecan request a description of this data, and request its deletion. You can delete a complete work agreement, whichincludes all dependent application-relevant data within an employee's work agreement.In the Personal Data Removal view, you can delete personal data on request from the system, once the applicablerequired retention periods have expired. For more information see Personal Data Removal Quick Guide.
Logging Access InformationTo support auditing of data protection actions in the system, the system logs every access made to the DiscloseEmployee Data and Remove Employee Data overview screens of a selected employee.Employees, such as Data Protection Officers with responsibility for data protection have full access rights for theData Privacy Management work center. These access rights allow an authorized user to access personal data forthe selected employee in all work centers where such data exists. Because of the ability for an individual user toaccess large volumes of personal employee data across many work centers, the access log is provided to allowtransparency and traceability of user access to personal data. The log does not contain detailed personal data, butrather a summary of the types of data accessed, by whom and when.
SAP Cloud for Customer November 2013General Settings P U B L I C • © 2011, 2012, 2013 SAP AG. All rights reserved. 129
5.4 Products
5.4.1 Creating or Editing Products
The products that you define are used throughout SAP Cloud for Customer. They can be added to leads oropportunities, identified by text analysis for tickets, or used as one of the criteria for categorizing and routingcustomer tickets. You can either create products manually, or upload data for products using the migration tool thatis available through the implementation project activity Migration of Materials. For more information, see About DataMigration.You can also add an image to a product, or edit the product by changing the image that is currently associated withit, as described below.
Tasks
Creating Products1. Choose Products Product Administration .2. On the following screen, choose New .3. Enter the required information, plus any additional information that you want to provide.
Once you have saved your entries, you can no longer change the ID.
4. Save your entries.
ResultThe product is created and is available for use as a criterion for routing. For more information, see Defining Rulesfor Ticket Routing [page 166].
Adding or Changing Product ImagesTo add an image to the product, or to change the existing image associated with it, proceed as follows:
1. Open the product.2. In the product details, choose Actions , then Change Image.3. Choose Browse .4. Select the image file to be assigned to the product from now on.5. Choose OK .6. Save your entries.
ResultThe image that you added or changed appears from now on in the product details.
See AlsoAbout Product Categories [page 131]
130 © 2011, 2012, 2013 SAP AG. All rights reserved. • P U B L I CSAP Cloud for Customer November 2013
General Settings
5.4.2 About Product Categories
The Product Categories view provides a central entry point for creating and editing your product categories andorganizing them into a multi-level hierarchy.You can maintain product categories manually or upload the data using the migration tool available through theimplementation project activity, Product Category Hierarchy.
Product categories can be used as one of the criteria for routing customer service tickets. For moreinformation on defining rules for ticket routing, see here [page 166].
Tasks
Create the Root Product Category1. Click New Hierarchy .2. In the first row of the table, enter the Product Category ID.3. In the Details section, specify the additional details for the root product category:
● In the Product Category field, enter the product category description. ● Choose the Language for the new product category.
It is not best practice to allow users to assign products to the root product category. It is thereforerecommended that you clear the Product Assignment Allowed check box of the root productcategory.
4. Click Save .You can now add subcategories and organize them into a multi-level hierarchy.
Create a Product Category1. Click Maintain Product Categories to open the Product Categories editor.
The Table view of the Product Categories editor is displayed by default.2. Select the product category to which you want to add a subcategory.3. Click Actions and then Add Subcategory.
The new category is added as a blank row.4. Enter the Product Category ID in the new row.5. In the Details section, specify the additional details for the product category:
● In the Product Category field, enter the product category description. ● Choose the Language for the new product category. ● To allow products to be assigned to the product category, select the Product Assignment Allowed check
box.6. Click Save .
Organize Product Categories Using the Table View1. Click Maintain Product Categories to open the Product Categories editor.
SAP Cloud for Customer November 2013General Settings P U B L I C • © 2011, 2012, 2013 SAP AG. All rights reserved. 131
The Table view of the Product Categories editor is displayed by default.2. You can expand and collapse the various levels of the product category hierarchy.
● To show all the product categories in the hierarchy, click Actions and then Expand All. ● To show only the root product category, click Actions and then Collapse All. ● To expand or collapse a particular product category, click the arrow icon next to the product category
ID.3. You can reorganize product categories by moving them up or down the product category hierarchy.
a. Select the product category you want to move.b. Click Actions and then Move Product Category.c. Enter the product category ID of the destination product category.
The product category is now a subcategory of the destination product category.4. Click Save .
Organize Product Categories Using the Chart View1. Click Maintain Product Categories to open the Product Categories editor.
The Table view of the Product Categories editor is displayed by default.2. Click Chart to display the Chart view of the Product Categories editor.3. You can expand and collapse the various levels of the product category hierarchy.
● To show all the product categories in the hierarchy, click Actions and then Expand All. ● To show only the root product category, click Actions and then Collapse All. ● To expand a particular product category, click the plus sign in the lower left corner of the category. ● To collapse a particular product category, click the minus sign in the lower left corner of the category.
4. You can adjust your view of the product category hierarchy by zooming in or out. ● To focus on a particular category, select the category and click Actions and then Zoom In. Alternately,
you can click the arrow in the lower right corner of the category and select Zoom In. ● To zoom out after focusing on a particular category, select the category and click Actions and then
Zoom Out. Alternately, you can click the arrow in the lower right corner of the category and select ZoomOut.
5. You can reorganize product categories by moving them up or down the product category hierarchy.a. Select the product category you want to move.b. Click Actions and then Move Product Category. Alternately, you can click the arrow in the lower right
corner of the category and select Move Product Category.c. Enter the product category ID of the destination product category.
The product category is now a subcategory of the destination product category.6. Click Save .
Delete a Product Category1. Click Maintain Product Categories to open the Product Categories editor.
The Table view of the Product Categories editor is displayed by default. To display the Chart view, clickChart .
2. Select the product category that you want to delete.3. Click Actions and then Delete.
You can delete a product category only if no products are assigned to it or any of its subordinatecategories.
132 © 2011, 2012, 2013 SAP AG. All rights reserved. • P U B L I CSAP Cloud for Customer November 2013
General Settings
4. Click Save .
5.5 System Administration
5.5.1 About Incidents
As an administrator, you are responsible for managing incidents reported by users in your company and, in somecases, for those reported automatically as a result of health checks. If you are unable to solve an incident yourself,you can forward it to your provider to request assistance. Since the provider and requester cannot communicatedirectly with one another, you as the processor of the incident are responsible for information flow, for example, forforwarding a solution proposed by the provider to the requester of the incident.The Incidents view provides all the tools you require to manage incidents.
Business Background
Incidents OverviewAn incident is a non-standard occurrence in the system that interrupts the operation of a service, or may reduce thequality of a service immediately or in the near future. An incident appears to the user as unexpected system behavior,such as:
● An unexpected or unclear error message on the screen ● Incorrect or missing data ● System performance problems
If you encounter a problem in the application, you can search existing knowledge bases for a solution. If no solutionis available, you can report an incident to your key user to request help in solving the problem.
Incident PrioritiesWhen a user reports an incident, he or she must assign it a category and priority so that you as the processor cansee at a glance what kind of problem has occurred and what impact it has on business productivity.The following priorities are available:
Business Impact for Incident Priorities
Priority Business Impact
Very High Critical business processes are affected and crucial tasks cannot be carried out. The incidentrequires immediate attention because it could result in business downtime for the organization.Security-related incidents must always be assigned this priority.
High Key business processes are affected and important tasks cannot be carried out. The incidentrequires prompt attention because it could delay business processes.
Medium Business processes are affected, but the incident has only a minor impact on business productivity.
Low The issue has little or no effect on business processes.
SAP Cloud for Customer November 2013General Settings P U B L I C • © 2011, 2012, 2013 SAP AG. All rights reserved. 133
Incident StatusesThe status of an incident changes depending on the actions performed on it by the requester, you as the processor,and your provider if you forward the incident to him or her. The statuses visible to you differ slightly from those visibleto the requester. The following statuses are visible to you as the processor of the incident:
Incident Status Descriptions
Status Description
New The incident has recently been reported and has not yet been taken over for processing.
In Process The incident is being processed.
In Process – Provider Action The processor has forwarded the incident to the provider, from whom action is now required.
In Process – Requester Action Action is required on the part of the requester of the incident.
In Process – Solution Proposed A solution has been proposed to the requester, from whom action is now required.
In Process – Reopened The requester has rejected a proposed solution and the incident requires further action onthe part of the processor.
Completed – Solution Accepted The requester has accepted a proposed solution and the incident is resolved from his or herpoint of view.
Completed – Solution Rejected The requester has rejected a proposed solution, but has canceled the incident because it isno longer valid or has been solved by other means, or the processor has completed theincident on behalf of the requester after the requester rejected the proposed solution.
Completed The requester has canceled the incident, the processor has completed the incident on behalfof the requester, or no changes have been made to the incident for 90 days and it has beencompleted automatically.
Closed The processor has closed the incident after the requester canceled it or after the incidentwas completed automatically because no changes were made to it for 90 days.
Closed – Solution Accepted The processor has closed the incident after the requester accepted a proposed solution.
For information about the statuses visible to the requester, see Track Your Incidents in the Tasks section of thedocumentation on Working with Incidents.
Health Check IncidentsThe system can report incidents as a result of health checks. Health checks are automated tests that proactivelymonitor the system and alert administrators or providers when a problem is detected. Most health check incidentsare routed directly to the provider for processing. When a health check detects a problem that requires the attentionof the administrator, the incident appears in the Incidents view.
Support: General InformationSupport is available 24 hours a day, 7 days a week for all administrators and is offered in the local language duringbusiness hours (9:00 a.m. – 5:00 p.m. local customer time). Outside of business hours, support is provided in Englishfor Very High priority incidents only.
Tasks and NotificationsWhen a new incident is reported or changes are made to an incident you are working on, you receive a task ornotification.Configuration SettingsIt is possible to configure certain elements of some of the notifications in the Business Task Management for IncidentManagement business configuration activity. To find this activity, go to the activity list of your project from theImplementation Projects view.
134 © 2011, 2012, 2013 SAP AG. All rights reserved. • P U B L I CSAP Cloud for Customer November 2013
General Settings
If the activity is not part of your project, you must add it. For more information, see Add or Remove OptionalActivities in the Further Tasks section of Complete the Activity List.
TasksTrack and Take Over Incidents
Track IncidentsAll incidents reported by users, and some health check incidents, are forwarded to the Incidents view where you canview them in detail. You can control which incidents are displayed in the Incidents view by selecting one of thefollowing values from the Show dropdown list:
Incident Status Descriptions
Status Description
New Incidents Incidents that have not yet been taken over for processing.
My Open Incidents Open incidents for which you are specified as the processor.
Incidents Where Provider Needs MoreInformation
Incidents that the provider has returned to the processor with a request for additionalinformation to help resolve the issue.
Incidents with Solution Proposal fromProvider
Incidents for which the provider has proposed a solution to the issue reported butthat the processor has not yet proposed to the requester.
Incidents in Process Incidents that require action on the part of the processor, that is, incidents that theprocessor has taken over for processing and those that have been returned to theprocessor by the requester.
My Team's Open Incidents Incidents for which your team is responsible. (The team is based on yourorganizational assignment.)
Incidents in Process by Provider Incidents that have been forwarded to your provider, who is currently attempting tofind a solution to the issue reported.
Incidents Requiring Action by Requester Incidents that have been returned to the requester with a proposed solution or arequest for additional information.
Completed Incidents Incidents that are resolved from the requester's point of view, that is, incidents thatthe requester has canceled because they are no longer relevant or have been solvedby some other means, or for which the requester has accepted a proposed solution.Incidents that the processor has completed on behalf of the requester or that havebeen completed automatically because no changes were made to them for 90 daysare also displayed in this list.
Closed Incidents Incidents that are resolved from the processor's point of view, that is, incidents thatthe processor has closed.Once an incident has been closed, it can no longer be edited in any way.
All Incidents All incidents, regardless of their current status.
If you select Incidents with Solution Proposal from Provider, you can further refine the incidents displayed by filteringthe Provider Solution field. The following statuses are available:
Status Description
Blank The provider has not proposed a solution.
Proposed The provider has proposed a solution.
Rejected The processor has rejected the provider's solution and returned the incident to the provider for furtheranalysis.
More Info Needed Your provider requires more information from you (or the requester) to resolve the incident.
SAP Cloud for Customer November 2013General Settings P U B L I C • © 2011, 2012, 2013 SAP AG. All rights reserved. 135
To view the details of an incident, click its ID.
Assign an Incident to Another UserIf, for example, you are going on vacation and need to ensure that incidents you are currently working on or newincidents you would normally process yourself are processed by one of your colleagues, you can assign a specificprocessor to an incident. You can also use this option if you are unable to solve an incident you are working on andwant to assign it to a colleague for further analysis.
1. Open the incident for editing by selecting it from the list on the Incidents view and clicking Edit .2. In the Processor field, enter the name of the colleague to whom you want to assign the incident.3. Enter information for this colleague if necessary by clicking Add , then choosing Internal Comment.
Click Save .The key user to whom you have assigned the incident is informed that he or she must start processing theincident.
Take Over a New Incident for Processing1. From the Show dropdown list, select New Incidents.2. Select the incident you want to process, and click Edit .3. From the Action dropdown list, select Start Processing.
Click Save .Your name appears in the Processor field and the status of the incident changes from New to In Process.
Take Over an Incident with Any Status for ProcessingIf, for example, one of your colleagues is ill and you need to take on his or her tasks at short notice, you can take overan incident that your colleague has already started processing.From the list on the Incidents view, select the incident you want to process and click Take Over .Your name appears in the Processor field but the status of the incident does not change.
Process an Incident
Search for a Solution1. Take over the incident and open it for editing.
If you want to search for a solution without first taking it over for processing, for example, to scan through alist of new incidents to see which ones you can solve quickly and which ones require more effort and mayneed to be distributed among other administrators, click the ID of an incident to view its details and then click
Start Solution Search. You can then search for a solution as described below.2. Look at the incident details and determine whether you can solve the incident immediately. Especially helpful
is the information on the Screenshot tab, which shows a screenshot of the system at the time at which theproblem occurred. The requester can annotate this screenshot to further illustrate the problem and help youto understand it more quickly.
The Screenshot tab is only displayed if a screenshot has been attached to the incident. A screenshotis attached automatically to each incident when it is reported unless:
● The requester deselected the Screenshot Relevant checkbox in the Enter Incident Informationstep when reporting the incident.
● The requester reported the incident from the Add-In for Microsoft Excel. ● The system could not take a screenshot for technical reasons.
136 © 2011, 2012, 2013 SAP AG. All rights reserved. • P U B L I CSAP Cloud for Customer November 2013
General Settings
3. If you cannot solve the incident immediately, click Solution Search to search existing knowledge bases for asolution to the problem.
4. On the Search tab, in the Find field, enter key terms relating to the incident (for example, sales order).To refine your search, you can click Advanced and define additional search criteria such as the work centerand work center view on which the problem occurred.It is possible that the system has prefilled some of the additional search criteria fields that are displayed whenyou click Advanced. To increase the number of hits your search returns, clear the values in these fields.Click Go .The system searches the following repositories for solutions to the problem:
Repository Types
Repository Description
CommunityResources
Discussion forums in which users can post questions and discuss topics
Troubleshooting A collection of common problems, along with their solutions or workarounds
Built-In Help The documents and learning content delivered with the solution
The system displays the documents that match your key terms. The solution search is not language-specific,which means that the results list may contain documents in languages other than your application languageif your key terms were found in these documents.The display language of your Web browser determines the language in which the documents are displayed.This means that if you click a document in the results list that has an English title, but your Web browserlanguage is German, when you open the document it is displayed in German if the document is available inGerman. To change the language in which documents are displayed, change the language of your Webbrowser.To group the search results by repository type, from the Group By dropdown list, choose Repository Type.
If you enter keywords in a language other than English and you receive too few hits, repeat yoursearch using English keywords to increase the chance of receiving a larger number of hits.
Another reason for which you may receive too few hits is that the system has prefilled some of theadditional search criteria fields that are displayed when you click Advanced. To increase the numberof hits your search returns, clear the values in these fields.
5. Click the title of the document you want to read and determine whether it solves the problem.6. If you find a document that solves the problem, add it to the incident by selecting the In Collection checkbox.
Documents that you attach to the incident as solution proposals are listed on the Solution Collection tab.If you cannot find a document that resolves the incident, forward the incident to your provider with a requestfor assistance as described below under Forward an Incident to the Provider.
Ask the Requester for More InformationIf you have a question about the issue, you can return the incident to the requester asking for more information.
1. Open the incident for editing.2. From the Action dropdown list, select Send to Requester.3. Click Add , then choose Note for Requester and enter your question in the text field.
If you require a record of the exact steps the requester carried out immediately prior to the issue occurring,enter a note in the text field asking the requester to use the trace function to reproduce the issue. Anexplanation of this function is provided as a rollover explanation for the Start Trace button on the screen forediting the incident.
SAP Cloud for Customer November 2013General Settings P U B L I C • © 2011, 2012, 2013 SAP AG. All rights reserved. 137
Click Save .The status of the incident changes to In Process — Requester Action and the requester is informedthat action is required on his or her part.
Edit an Incident Without Changing Its StatusIf you have already started to process an incident, you can add information to it without changing its status.
1. Open the incident for editing.2. Click Add , then choose Note for Provider, Internal Comment, or Note for Requester as appropriate, and
enter your comment in the text field.Click Save .If you choose Note for Provider, the provider is informed that you have added information to the incident, andcan open the incident to view the information you have added.If you choose Internal Comment, only you can see the information you add. If you then return the incident tothe requester or forward it to another key user, however, the information is also visible to this user. This optionis also useful, for example, if the status of an incident is Completed, Completed – Solution Accepted,or Completed – Solution Rejected and you want to add a note for yourself with information that helpedyou to solve the incident.If you choose Note for Requester, the requester is informed that you have added information to the incident,and can open the incident to view the information you have added.
Forward an Incident to the ProviderIf you cannot find a solution to an issue, forward the incident to your provider to request assistance.
If you forward the incident to the provider, he or she may forward it to SAP for further analysis. If SAP’s rootcause analysis shows that the incident results from a partner product which has been licensed, SAP mayforward this incident, including all corresponding context data, to the support organization of the partnerresponsible.
PrerequisitesYou have maintained your contact information. You must provide a telephone number and E-mail address so thatthe provider can contact you directly.
1. Open the incident for editing.2. From the Action dropdown list, select Send to Provider.3. Check that the entry in the Application Area field is correct and change it if required.4. Click Add , then choose Note for Provider.5. In the text field, enter information about why you are sending the incident to the provider.
If the incident you are forwarding has Very High priority, document the business impact in this field so that itis immediately apparent to the provider.
For security reasons, never include your password or that of the requester anywhere in the incident.
Click Save .The status of the incident changes to In Process — Provider Action.Receipt of the incident by the provider is indicated in two ways: ● A value is displayed in the External Reference ID field. This is the ID that has been assigned to the incident
in the provider's system. ● A Note from Provider is displayed on the General tab to the effect that the incident has arrived at
the provider.
138 © 2011, 2012, 2013 SAP AG. All rights reserved. • P U B L I CSAP Cloud for Customer November 2013
General Settings
Send Additional Information to the ProviderIf you have already forwarded an incident to your provider and want to provide him or her with additional information,perform the following steps:
1. Open the incident for editing.2. Click Add , then choose Note for Provider.3. Enter the information you want to provide in the text field.
If relevant, add a file or link to the incident as an attachment.Click Save .The status of the incident does not change.
Reply to a Question from the ProviderIf the provider has returned the incident to you with a request for more information, reply to the question byperforming the following steps:
1. Open the incident for editing.2. From the Action dropdown list, select Send to Provider.3. Click Add , then choose Note for Provider.4. Enter the information you want to provide in the text field.
If relevant, add a file or link to the incident as an attachment.Click Save .The status of the incident changes to In Process — Provider Action.
Propose a Solution to the RequesterIf you have found a solution to the issue, or your provider has proposed a solution, return the incident to the requesteralong with this solution.
1. Open the incident for editing.2. From the Action dropdown list, select Propose Solution.3. Click Add , then choose Note for Requester and enter an explanation in the text field.
If you have found a document that describes the solution you want to propose, add it to the incident asdescribed above under Search for a Solution.Click Save .The status of the incident changes to In Process — Solution Proposed and the requester is notifiedthat action is required on his or her part.
Return an Incident to the ProviderIf the solution proposed by your provider does not solve the problem, return the incident to him or her.
1. Open the incident for editing.2. From the Action dropdown list, select Send to Provider.3. Click Add , then choose Note for Provider.4. In the text field, enter the reason for which you are returning the incident.
Click Save .The status of the incident changes to In Process — Provider Action.
Close an IncidentIf the status of an incident is Completed, Completed — Solution Accepted, or Completed — SolutionRejected, the Close option becomes available to you in the Action dropdown list so that you can indicate that theincident is resolved from your point of view.
SAP Cloud for Customer November 2013General Settings P U B L I C • © 2011, 2012, 2013 SAP AG. All rights reserved. 139
1. From the Show dropdown list, select Completed Incidents.2. Open the incident for editing.3. From the Action dropdown list, select Close.4. If necessary, click Add , then choose Internal Comment and enter a note in the text field.
Click Save .If the status of the incident was Completed — Solution Accepted, it now changes to Closed —Solution Accepted.If the status of the incident was Completed or Completed — Solution Rejected, it now changes toClosed.The incident is now closed and can no longer be edited.
Use Application SharingThe provider can initiate a secure application sharing session with you or any user in your company. To do this, theprovider sends you a session request that includes the session number. When you receive a request, start the sessionat the appointed time by performing the following steps:
1. Open the incident for editing.2. Click Start Remote Support .
A new browser session opens and the Netviewer Web page appears.3. Select the language for your session, then click the icon under Click to start the Netviewer one2meet
participant program.4. Click Run.
Depending on your security settings, you might have to click Run more than once.
The Start session screen appears.5. Enter the session number that appears in the request from your provider. (You do not need a password to
join the session.)6. Click Connect.
The Netviewer screen appears.7. Follow the steps on the screen and agree to share the content of your screen with the provider.8. If you want to keep a copy of the Netviewer session log file, click Save.
To view the log file, you need the Netviewer NetPlayer, which you can download from the same Webpage from which you started the session.
Process a Health Check IncidentWhen you receive a health check incident, the steps you need to follow to solve the issue are listed in the message.Health checks appear in your application language.
The description appears in English by default. This ensures that the provider can understand it. You can viewthe information in your application language by clicking Health Check .
To resolve the incident, perform the following steps:1. Take over the incident and open it for editing.2. Read the instructions in the health check message and perform the steps listed there.3. If completing the steps solves the incident, from the Action dropdown list, select Complete.
140 © 2011, 2012, 2013 SAP AG. All rights reserved. • P U B L I CSAP Cloud for Customer November 2013
General Settings
Click Save .The status of the incident changes to Completed and you can then close it.
4. If completing the steps does not solve the incident, from the Action dropdown list, select Send to Provider toforward the incident to the provider.If you want to include additional information in the health check incident you are forwarding, you can add orupdate attachments or click Add , then choose Note for All Parties Involved to enter additional informationin the text field.
If you add text using this feature, everyone involved in processing the incident (the processor andprovider) is able to read it.
If necessary, you can also change the priority of the incident.Click Save .The status of the incident changes to In Process — Provider Action.
Exceptional Cases
Escalate an IncidentIncident Escalation Management is an exceptional process for handling critical incidents that cannot be solvedsatisfactorily or within a reasonable period of time by the Incident Management process.PrerequisitesYou have submitted an incident with Very High priority and its initial response time (IRT) has been exceeded.A Very High priority incident is justified in the following situations:
● You cannot access your application at all. ● The go live of your application or an upgrade of your system is endangered. ● Your core business processes are suspended and no alternative processes are available. ● Your incident requires immediate attention because the current issue leads to serious losses for your
business.
To request escalation, call the emergency hotline for your country and provide the following information: ● The incident ID ● The business impact of the incident ● The name of at least one contact person and his or her telephone number and E-mail address (ensure that
this person can be contacted 24 hours a day, 7 days a week)
Complete an Incident on Behalf of the RequesterIf it is not possible for the requester to complete an incident, for example, because he or she has left the company,you as the processor must complete the incident on the requester's behalf.
1. Open the incident for editing.2. From the Action dropdown list, select Complete.
Click Save .The status of the incident changes to Completed (or Completed – Solution Rejected if the requesterhas already rejected a proposed solution) and you can then close it.
SAP Cloud for Customer November 2013General Settings P U B L I C • © 2011, 2012, 2013 SAP AG. All rights reserved. 141
5.5.2 Business Communication Monitoring
5.5.2.1 Business Communication Monitoring Quick Guide
An SAP cloud solution sends a business message to an external system or business partner when a businessdocument is saved in this solution. It receives a business message when an external system or business partnersends a business document to it. The Business Communication Monitoring view allows you to monitor thesemessages, and if necessary, restart or cancel them.In addition, you can monitor errors that cannot be assigned to a specific business message. These includeconnectivity errors, authorization errors, and communication configuration inconsistencies as well as errors thatoccurred during synchronous communication.You can access this view from the Administrator and/or Application and User Management work center.
There is also another view that helps you resolve errors within your system. The Process CommunicationErrors view allows you to monitor errors that occur within the applications. It provides error resolution help,which can be used by the IT administrator to correct an error.For more information, see Process Communication Errors Quick Guide.
Business Background
Business Communication MonitoringBusiness communication monitoring enables you to verify whether business-to-business (B2B) messages and third-party application-to-application (A2A) messages have been sent or received successfully, and informs you whichprocesses were used to send or receive these messages. If technical errors have occurred, business communicationmonitoring helps you to identify and resolve them. You can also monitor rejected Web service calls that includeconnectivity errors, authorization errors, and communication configuration inconsistencies as well as errors thatoccurred during synchronous communication.For more information, see Business Communication Monitoring [page 143].
Connectivity Errors - TroubleshootingConnectivity errors can occur on the client or the server side. Errors that occur on the client side usually mean thatit was not possible to establish the technical HTTP(S) connection to the server on network level. Errors that occuron the server side are usually reported through an HTTP error code.You can find the error codes in the Business Communication Monitoring view from the Administrator and/orApplication and User Management work center.For more information, see Connectivity Errors - Troubleshooting.
Web ServicesFor information on issues with Web service calls, see Web Services.
142 © 2011, 2012, 2013 SAP AG. All rights reserved. • P U B L I CSAP Cloud for Customer November 2013
General Settings
Tasks
Complete MonitoringWhen you have finished monitoring a business document, and no longer wish to see it in thework list, click Mark as Complete .The document is removed from the worklist, but you can retrieve it using the AdvancedSearch for the All Messages query. To have the document visible in the worklist again, click
Mark as Pending .
Restart a MessageIf a message could not be processed due to temporary issues or missing master data, click
Restart to restart the message communication after you have corrected the error.Note that if the error cannot be corrected, you can cancel the message.
Cancel a MessageTo stop the processing of a message that contains wrong or missing data, click Cancel .Note that you can only cancel messages in status Technical Error, Content Error, or TimedOut. Depending on the service interface, the action may not be available.Note that it is not possible to resend a canceled message. In such a case, a new transmissionneeds to be initiated.
Refresh ListTo update the status of existing messages in the worklist and check for new ones, click
Refresh List .
Show PayloadTo view the information that was sent with the message, you can display the message payload.The following options are available:
● To display the payload for the communication with the SAP® Business Suite, clickShow Payload and then choose IDOC.
● To display the payload for communication with all other systems, clickShow Payload and then choose SAP ESD.
Note that depending on the service interface, the action may not be available.
Export Messages to Microsoft Excel®For more information about this task, see here.
5.5.2.2 Business Communication Monitoring
OverviewBusiness communication monitoring enables you to verify whether business-to-business (B2B) messages and third-party application-to-application (A2A) messages have been sent or received successfully, and informs you whichprocesses were used to send or receive these messages. If technical errors have occurred, business communication
SAP Cloud for Customer November 2013General Settings P U B L I C • © 2011, 2012, 2013 SAP AG. All rights reserved. 143
monitoring helps you to identify and resolve them. You can also monitor rejected Web service calls that includeconnectivity errors, authorization errors, and communication configuration inconsistencies as well as errors thatoccurred during synchronous communication.
To be able to send B2B or third-party messages, you must set up a communication arrangement for eachlocation of your business partner, business document, and communication method. The details of thecommunication arrangement, including business partner or communication system, collaboration template,and authentication is configured in the Communication Arrangements view in the Administrator and/orApplication and User Management work center.For more information, see Communication Arrangements Quick Guide [page 151] and CommunicationSystems Quick Guide [page 149].
Searching for MessagesThere are different queries that you can select to search for messages, such as:
● Open TasksThe system displays all Business Task Management (BTM) tasks that were created and have not been solvedyet. Note that tasks that were created for mapping errors are not included in the search result.
● Messages Exchanged with SAPThe system displays, for example, the incidents that were reported by the customer.
● All Business MessagesThe system displays all business messages with tasks and errors, as well as success messages. Examplesinclude purchase orders or invoices. Note that rejected Web service calls are not included in the search result.
● Business Messages with ErrorsThe system displays the business messages for which an error occurred and which therefore have the statusContent Error, Technical Error, or Timed Out. This is the default query.
● Business Messages with TasksThe system displays the business messages for which connectivity errors or mapping errors occurred andfor which a BTM task in status New or In Progress exists.
● Rejected Web Service CallsThe system displays errors that cannot be assigned to specific business messages. These includeconnectivity errors, authorization errors, and inconsistencies in communication configuration as well aserrors that occurred during synchronous communication.
You can search for a message using different parameters: ● Business Document: The type of the business document that has been transmitted. The value help offers all
those documents that can be transmitted by a business message. ● Direction: The possible selections are incoming or outgoing. ● Business Partner Name: The name of the business partner involved in the communication. ● Business Partner ID: The ID of the business partner involved in the communication. This must be an internal
ID when the query is executed. However, it is possible to also enter a DUNS ID into this field. The value helpwill then look for the parties with this ID. If an entry is selected from the value help, the internal ID will be copiedinto this field.
● Status: The transmission status of the message. If you select Business Messages with Errors in the Show field,the system filters the messages with a specific error status.
● Document ID: The ID of the document as it is known within the system. If the ID of a transmitted businessdocument transmitted cannot be determined, for example, due to a technical error, the correspondingmessage cannot be found using this field.
144 © 2011, 2012, 2013 SAP AG. All rights reserved. • P U B L I CSAP Cloud for Customer November 2013
General Settings
● Company Name: The name of the company that sent or received a message. This field is only available whenyou select All Business Messages in the Show field.
● Company ID: The ID of the local company; default is the company you work for. This field is only availablewhen you select All Business Messages in the Show field.
● Created On: The date when the message was created.For rejected Web service calls, the default is four weeks previous to the current date.
● Status Changed On: The date when the status of the message was changed the last time. The default for thisis four weeks previous to the current date, since messages older than that are most likely no longer relevant.
● Pending Messages Only: If selected, the query will return only those messages that have not been marked ascomplete. A message transmission is considered complete when it is received by the recipient. All othermessages are therefore considered to be pending. This field is only available when you select All BusinessMessages in the Show field.
● Service Interface: The service interface where the error occurred. This field is only available when you selectRejected Web Service Calls.
Displaying Message DetailsTo see details about a business document, you can select the document in the worklist, and view the information atthe bottom of the screen.On the General tab, you can see specific information, such as:
● Message Type: The name of the message. ● Company ID: The ID of the company that sent the outgoing message or received the incoming message. ● Business Partner ID: The ID of the remote business partner that received the outgoing message or sent the
incoming message. ● Alternative Company ID/Type: The standard identifier used for the company in the communication and the
type of the identifier. The type corresponds to the type selected in the communication arrangement whensetting up the connection.
● Alternative Business Partner ID/Type: The standard identifier used for the business partner in thecommunication and the type of the identifier. The type corresponds to the type selected in the communicationarrangement when setting up the connection.
● Status Changed On: The date and time the status was changed last. This can be either: ○ The date and time the message status was changed last by the system automatically, for example, when
a previously erroneous message was restarted. ○ The date and time the message status was changed by the monitor, for example, when a message
received the Timed Out status. ○ The date and time the message status was changed by the user, for example, by clicking
Mark as Complete . ● Status Information: In some error cases, additional information concerning the message status is available,
which is then shown in this field. ● Timeout Interval: The time interval after which a message with the status In Process is assigned the status
Timed Out. This currently occurs after 120 minutes. ● Error Handling Method: When an error occurs in the application during the processing of an incoming message,
the application assigns an error handling method to the error. This can be either a task or incident. In the firstcase, it is possible to navigate to the task.
● Processor: This is only visible if a task was created. It shows the current processor of the task, if one is assigned.
SAP Cloud for Customer November 2013General Settings P U B L I C • © 2011, 2012, 2013 SAP AG. All rights reserved. 145
On the Message Details tab, you can see additional information about an error, such as an error long text, a list ofbusiness objects that may help you to solve the error (Communication Arrangement, Business Partner, and so on),and additional errors that may have occurred beside the main error.On the History tab, you can see the status of the message, as well as every status the message has been through,and when. The columns correspond to the respective columns or fields of the main table or the General tab. Eachtime a status value changes, a new entry in the history occurs. The top entry of the history list always shows thecurrent values.On the Document Flow tab, you can see the message shown as an object within the document flow. You can clickthe icon within the object to open the fact sheet from the work center from which the message originates. You canalso click on the Document ID link in the work list to access the fact sheet.
Status DescriptionsThe following status values of the message transmission are possible:
● In Process: The message transmission has been initiated, but is not yet complete. This means that either thetechnical communication is still in process or the message processing on the receiver side is not yet complete.
● Received: The message has been successfully received by the receiver. Usually, this means that the messagetransmission is also completed, and the message will not appear when you select Pending Messages Only inthe Show field.
● Timed Out: The message has been in process longer than the system may try to send (outgoing) or process(incoming) messages. The period after which a message that is in process is considered to be timed out isshown in the Message Status group section of the General tab.
● Content Error: The message could be transmitted successfully on a technical level, but the recipientconsidered the message content to be invalid. Normally, this status appears only for incoming messages. Inthis case, the Status Information field in the details section shows the error messages created by theapplication.
● Technical Error: There was a technical problem during the message transmission. However, in some casesyou can still resolve the issue.
● Canceled: The message transmission was canceled by the user. Messages can only be canceled in statusContent Error, Technical Error, or Timed Out. The cancellation of a message transmission cannot be revoked.This means it is not possible to resend a canceled message. In such a case, a new transmission needs to beinitiated.
● Obsolete: The message is considered not relevant for the business process by the system.
For rejected Web service calls, only statuses Content Error and Technical Error are available.
Error HandlingThe following types of error may occur:
● Technical errorsErrors may occur for technical reasons, if a message takes too long to complete, or if there is an error in thecontent. For obsolete messages, the system has considered a message to be not relevant (or no longerrelevant) for the business process. Several causes of these errors are possible, such as incorrect master datafor the business partner or in the communication arrangement or even possible server downtime. To try toresolve an issue without first creating an incident, you can try to verify that the master data is set up correctlyor check that there are no errors in the communication arrangement, and then restart the message.
146 © 2011, 2012, 2013 SAP AG. All rights reserved. • P U B L I CSAP Cloud for Customer November 2013
General Settings
For more information about how to troubleshoot connectivity errors, see Connectivity Errors -Troubleshooting.
● Content errorsIf a message cannot be delivered to your business partner due to a content error, you can navigate to thework center from which the business document originated and edit it there. In addition, you can correct thecode or ID mapping, or the master data (see Message Details tab).When an error occurs in the application during the processing of an incoming message, the application assignsan error handling method to the error. This can be either a task or an incident. If a task is created, then it ispossible to navigate to the task.
● Rejected Web Service CallsThe Error Description window in the details section provides a more detailed description of the error. Notethat the description is only available in English.
For more information, see the Business Communication Monitoring Quick Guide in the Help Center of your solution.
5.5.3 Web Service Message Monitoring Quick Guide
The Web Service Message Monitoring view allows you to monitor and process asynchronous incoming and outgoingmessages. These messages can be either internal or external. ITSAM and groupware messages aren’t displayed.When you scope the Web Service Message Monitor, a job is scheduled, which checks for incoming and outgoingmessages periodically. Completed messages are automatically cleaned up after a certain lapse of time.
The Web Service Message Monitor is intended for technically skilled persons with in-depth knowledge ofSOA technology.
The following features are available: ● You can handle large volumes of incoming and outgoing messages. ● You can search, sort, and filter messages using multiple criteria. ● You can group messages with, for example, the same status, and process them. ● You can view detailed technical information about an error message and navigate to the related task in
Business Task Management, if applicable. ● You can view child messages and jump to the parent message. ● You can view and download the content of a specific message (payload view).
If you activate this function in Business Configuration, the person running the Web Service MessageMonitor will have access to messages that may contain confidential data, for example, payroll andbusiness partner data.
Tasks
Export Data to Microsoft Excel ®For more information, see Export Business Data Using Microsoft Excel ®.
SAP Cloud for Customer November 2013General Settings P U B L I C • © 2011, 2012, 2013 SAP AG. All rights reserved. 147
Restart a MessageIf a message could not be processed due to temporary issues, for example, locked data or missing master data, click
Restart to restart the message communication after you have corrected the error. If the error cannot be corrected,you can cancel the message.
To view the new status of a restarted message, click Refresh .
Cancel a MessageTo stop the processing of a message, click Cancel .You can only cancel messages with the status Application Error or System Error. Application errors are due to invalidor missing data, whereas system errors are due to configuration or integration issues.You can’t resend a canceled message. A canceled message is permanently canceled. In such a case, a newtransmission needs to be initiated.
Refresh the Results ListTo update the status of existing messages in the results list and check for new ones, click Refresh .
View Detailed Error InformationTo view detailed error information for a specific message, select an error message in the results list.You can navigate to the related task in Business Task Management, if applicable.The error counter displays the number of errors for which detailed information is available, whereas the retry counterthe number of messages that are automatically restarted.
View Error LogTo view the error log of a message, proceed as follows:
1. Select a message in the results list.2. In the Web Service Message Monitoring view, choose View Error Log . A popup is displayed. It contains
the error message text, the detailed error, and, whenever applicable, a procedure for solving the error.
View PayloadTo view the information that was sent with the message, proceed as follows:
1. Select a message in the results list.2. In the Web Service Message Monitoring view, choose View Payload . A window containing the message
in XML format is displayed.3. Click Download to save the message for further analysis and error solving.4. On the popup, specify a location and click OK .5. Click OK to close the Payload window.
View Child MessagesTo view the child messages of a message that has been split, proceed as follows:
1. Select a message that contains a parent ID.2. In the Web Service Message Monitoring view, choose View Child Messages .
148 © 2011, 2012, 2013 SAP AG. All rights reserved. • P U B L I CSAP Cloud for Customer November 2013
General Settings
5.6 Integration
5.6.1 Communication Systems Quick Guide
In the Communication Systems view, you can create and edit communication systems to exchange businessdocuments electronically.
You can access this view from the Administrator tab under General Settings Integration and/or from theApplication and User Management work center.
Business Background
Communication Systems and Communication ArrangementsA communication system represents an external system which is used for application integration. Communicationsystems can be, for example, external time recording or master data systems. Before you can use a communicationsystem in an application integration scenario, you need to create a communication arrangement. For moreinformation about communication arrangements, see Communications Arrangements Quick Guide [page 151].
Tasks
Create a Communication System1. In the Communication Systems view, click New .2. In the Basic Information section, enter the details of the communication system.
a. In the ID field, enter a unique ID for the communication system.b. If the communication system is part of the SAP Business Suite, select the SAP Business Suite checkbox.
In the System Instance section, the columns Business System ID, IDoc Logical System ID, and SAPClient are displayed.
c. In the Host Name field, enter the host name for the communication system.d. In the System Access Type list, choose the correct communication method for your communication
system.If you want to connect a cloud solution to an on-premise system, choose VPN Tunnel.
3. If you use a VPN Tunnel, enter the VPN tunnel details used for connections between the cloud solution andthe on-premise system in the VPN Tunnel section.a. In the Host field, enter the host of the SAP solution Web dispatcher.b. In the Port Number field, enter the host port number of SAP solution Web dispatcher.c. In the User field, click Edit to open the Authentication screen and enter the relevant information under
User ID (tunnel name) and Password (tunnel password name) and click OK. Your password is notdisplayed on the screen.
4. In the Technical Contact section, enter the details of the communication systems contact.5. Optional: In the Internal Comment section, enter a note.6. In the System Instance section, enter a unique ID in the System Instance ID column.
SAP Cloud for Customer November 2013General Settings P U B L I C • © 2011, 2012, 2013 SAP AG. All rights reserved. 149
If you use an SAP system, enter the following data:a. In the Business System ID column, enter the ID of the business system as defined in the System
Landscape Directory (SLD), for example PRD_999.
b. In the IDoc Logical System ID column, enter the ID of the IDoc Logical System, which participates in IDocmessage exchange either as a sending or receiving SAP system, for example PRDCLNT999.
c. In the SAP Client column, enter the SAP client of the SAP system, for example 999.
7. When you have entered all the details, click Save and Close to return to the Communication Systems view.The communication system you just created has the status In Preparation.
8. In the Communication Systems view, select the communication system you have created and clickActions , then choose Set to Active.
If the status changes to Active, the configuration is ready to be used.
Edit a Communication System1. In the Communication Systems view, select a line and click Edit to open the Communication System screen.2. Change the relevant settings.3. Save your changes and close the screen to return to the worklist.
Set a Communication System to ObsoleteIf a communication system has the status Active, and you no longer wish to use it, you can set it to Obsolete.
You must set a communication system to Obsolete before you can delete it.
In the Communication Systems view, select a line and click Actions , then choose Set to Obsolete.In the Status column, the status changes to Obsolete.
If you have set a communication system to Obsolete, you can undo this action. To do this, click Actions ,then choose Undo Obsolescence. In the Status column, the status changes to Active.
Delete a Communication SystemIf a communication system has the status In Preparation:
1. In the Communication Systems view, select a line and click Delete .2. In the dialog box that opens, click Delete to confirm the deletion.
If a communication system has the status Active:1. In the Communication Systems view, select a line and click Actions then choose Set to Obsolete.2. If the In Use checkbox is selected, it means that communication arrangements are assigned to the
communication system. Delete these communication arrangements in the Communication Arrangementsview.
3. In the Communication Systems view, select the line again and click Delete .4. In the dialog box that opens, click Delete to confirm the deletion.
150 © 2011, 2012, 2013 SAP AG. All rights reserved. • P U B L I CSAP Cloud for Customer November 2013
General Settings
5.6.2 Communication Arrangements Quick Guide
The Communication Arrangements view enables administrators to create and edit communication arrangementsthat your company has set up with a communication partner.
You can access this view from the Administrator work center, under General Settings Integration and/or fromthe Application and User Management work center.
Business Background
Communication ArrangementsCommunication arrangements help you to configure the electronic data exchange between the solution and acommunication partner. Communication arrangements can be set up for multiple business documents andcommunication methods. The solution provides communication scenarios for inbound and outboundcommunication that you can use to create communication arrangements. Inbound communication defines howbusiness documents are received from a communication partner, whereas outbound communication defines howbusiness documents are sent to a communication partner.In the Communication Arrangements view the following communication types are supported:
● Business-to-business (B2B)This communication type defines an electronic data exchange with a business partner.
● Application integrationThis communication type defines an electronic data exchange with a communication system. For moreinformation about communication systems, see the Communication Systems Quick Guide [page 149].
Some communication arrangements are automatically created in your solution configuration. This is indicatedby the selected Predefined checkbox in the worklist of the Communication Arrangements view. For predefinedcommunication arrangements with inbound communication, you only have to define the communicationaccount.
Tasks
Create a Communication Arrangement1. To open the New Communication Arrangement guided activity in the Communication Arrangements view,
click New .2. In the Select Scenario step, select the communication scenario for which you want to create a communication
arrangement and click Next .
Based on the communication scenario you selected, the system presets the fields in the next stepswith default values. Where possible, you can change the default values if necessary.
3. In the Define Business Data step, enter business data.The entry fields on the screen depend on the communication type of the selected communication scenario.
SAP Cloud for Customer November 2013General Settings P U B L I C • © 2011, 2012, 2013 SAP AG. All rights reserved. 151
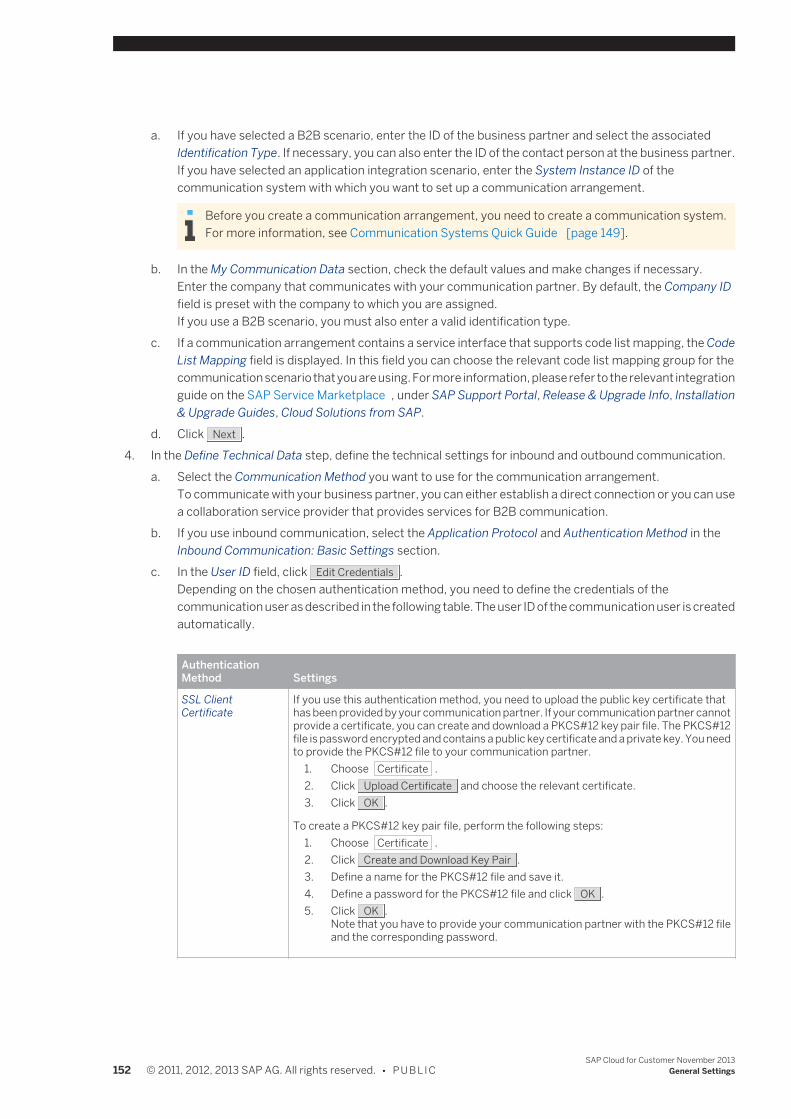
a. If you have selected a B2B scenario, enter the ID of the business partner and select the associatedIdentification Type. If necessary, you can also enter the ID of the contact person at the business partner.If you have selected an application integration scenario, enter the System Instance ID of thecommunication system with which you want to set up a communication arrangement.
Before you create a communication arrangement, you need to create a communication system.For more information, see Communication Systems Quick Guide [page 149].
b. In the My Communication Data section, check the default values and make changes if necessary.Enter the company that communicates with your communication partner. By default, the Company IDfield is preset with the company to which you are assigned.If you use a B2B scenario, you must also enter a valid identification type.
c. If a communication arrangement contains a service interface that supports code list mapping, the CodeList Mapping field is displayed. In this field you can choose the relevant code list mapping group for thecommunication scenario that you are using. For more information, please refer to the relevant integrationguide on the SAP Service Marketplace , under SAP Support Portal, Release & Upgrade Info, Installation& Upgrade Guides, Cloud Solutions from SAP.
d. Click Next .4. In the Define Technical Data step, define the technical settings for inbound and outbound communication.
a. Select the Communication Method you want to use for the communication arrangement.To communicate with your business partner, you can either establish a direct connection or you can usea collaboration service provider that provides services for B2B communication.
b. If you use inbound communication, select the Application Protocol and Authentication Method in theInbound Communication: Basic Settings section.
c. In the User ID field, click Edit Credentials .Depending on the chosen authentication method, you need to define the credentials of thecommunication user as described in the following table. The user ID of the communication user is createdautomatically.
AuthenticationMethod Settings
SSL ClientCertificate
If you use this authentication method, you need to upload the public key certificate thathas been provided by your communication partner. If your communication partner cannotprovide a certificate, you can create and download a PKCS#12 key pair file. The PKCS#12file is password encrypted and contains a public key certificate and a private key. You needto provide the PKCS#12 file to your communication partner.
1. Choose Certificate .2. Click Upload Certificate and choose the relevant certificate.3. Click OK .
To create a PKCS#12 key pair file, perform the following steps:1. Choose Certificate .2. Click Create and Download Key Pair .3. Define a name for the PKCS#12 file and save it.4. Define a password for the PKCS#12 file and click OK .5. Click OK .
Note that you have to provide your communication partner with the PKCS#12 fileand the corresponding password.
152 © 2011, 2012, 2013 SAP AG. All rights reserved. • P U B L I CSAP Cloud for Customer November 2013
General Settings
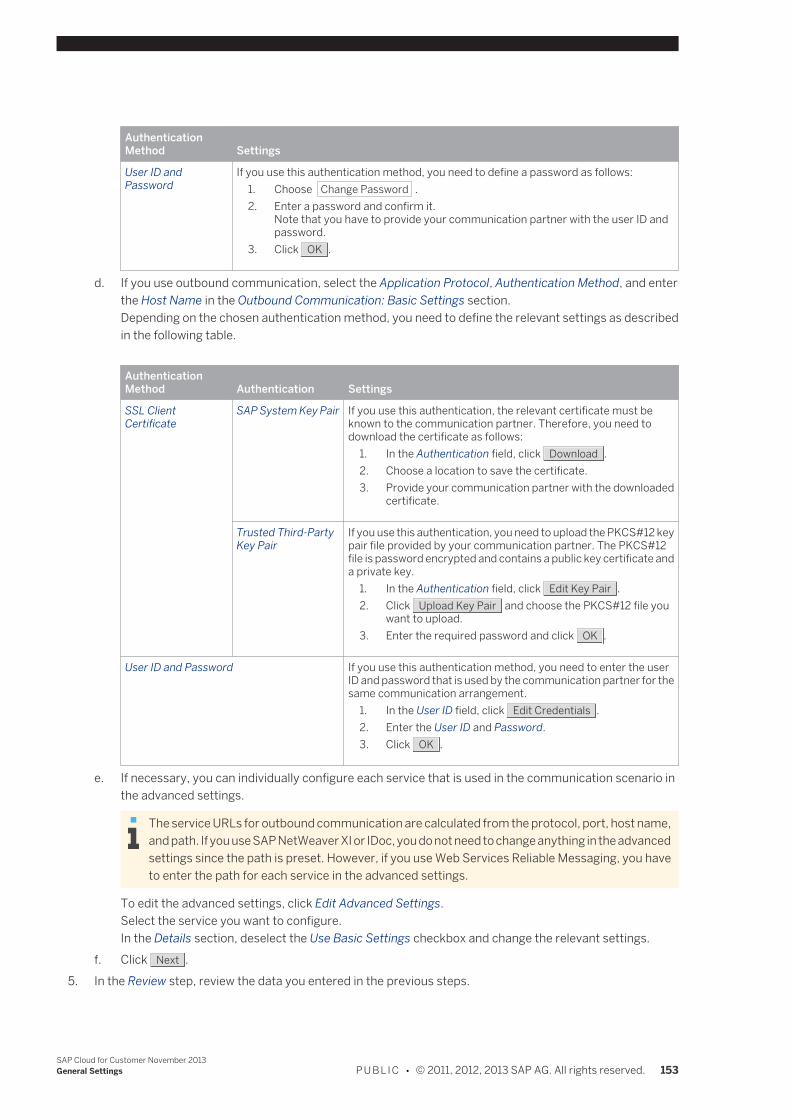
AuthenticationMethod Settings
User ID andPassword
If you use this authentication method, you need to define a password as follows:1. Choose Change Password .2. Enter a password and confirm it.
Note that you have to provide your communication partner with the user ID andpassword.
3. Click OK .
d. If you use outbound communication, select the Application Protocol, Authentication Method, and enterthe Host Name in the Outbound Communication: Basic Settings section.Depending on the chosen authentication method, you need to define the relevant settings as describedin the following table.
AuthenticationMethod Authentication Settings
SSL ClientCertificate
SAP System Key Pair If you use this authentication, the relevant certificate must beknown to the communication partner. Therefore, you need todownload the certificate as follows:
1. In the Authentication field, click Download .2. Choose a location to save the certificate.3. Provide your communication partner with the downloaded
certificate.
Trusted Third-PartyKey Pair
If you use this authentication, you need to upload the PKCS#12 keypair file provided by your communication partner. The PKCS#12file is password encrypted and contains a public key certificate anda private key.
1. In the Authentication field, click Edit Key Pair .2. Click Upload Key Pair and choose the PKCS#12 file you
want to upload.3. Enter the required password and click OK .
User ID and Password If you use this authentication method, you need to enter the userID and password that is used by the communication partner for thesame communication arrangement.
1. In the User ID field, click Edit Credentials .2. Enter the User ID and Password.3. Click OK .
e. If necessary, you can individually configure each service that is used in the communication scenario inthe advanced settings.
The service URLs for outbound communication are calculated from the protocol, port, host name,and path. If you use SAP NetWeaver XI or IDoc, you do not need to change anything in the advancedsettings since the path is preset. However, if you use Web Services Reliable Messaging, you haveto enter the path for each service in the advanced settings.
To edit the advanced settings, click Edit Advanced Settings.Select the service you want to configure.In the Details section, deselect the Use Basic Settings checkbox and change the relevant settings.
f. Click Next .5. In the Review step, review the data you entered in the previous steps.
SAP Cloud for Customer November 2013General Settings P U B L I C • © 2011, 2012, 2013 SAP AG. All rights reserved. 153
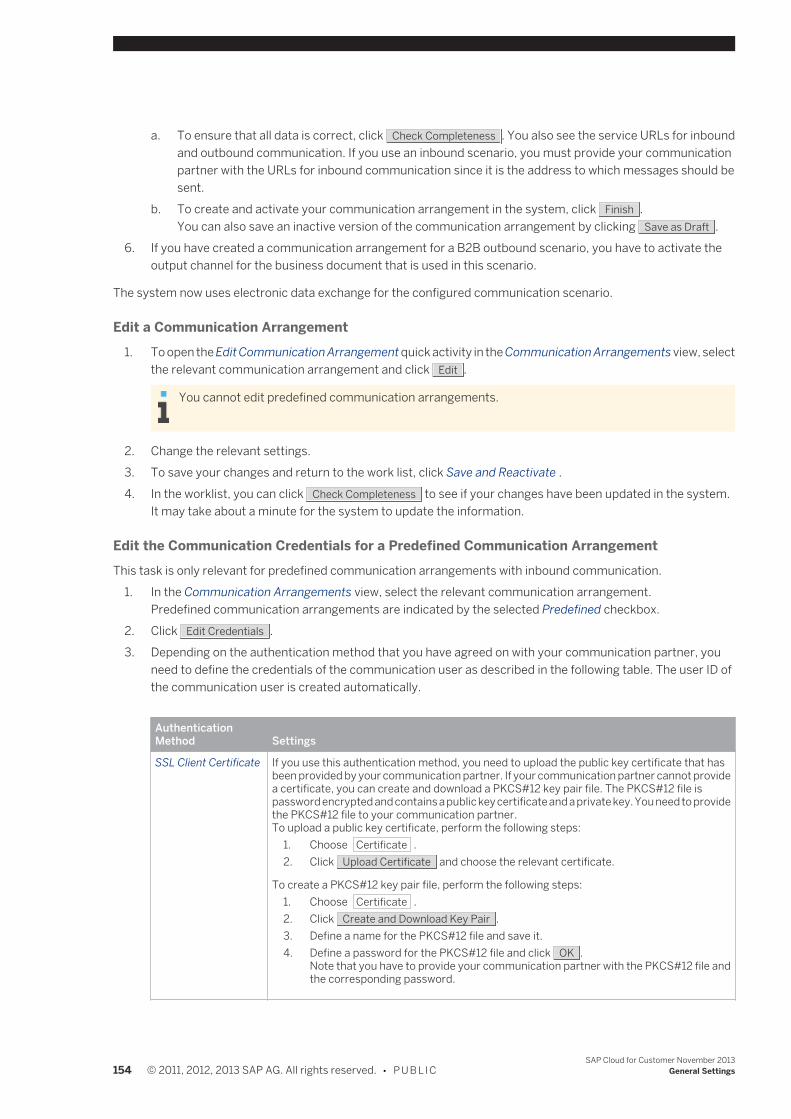
a. To ensure that all data is correct, click Check Completeness . You also see the service URLs for inboundand outbound communication. If you use an inbound scenario, you must provide your communicationpartner with the URLs for inbound communication since it is the address to which messages should besent.
b. To create and activate your communication arrangement in the system, click Finish .You can also save an inactive version of the communication arrangement by clicking Save as Draft .
6. If you have created a communication arrangement for a B2B outbound scenario, you have to activate theoutput channel for the business document that is used in this scenario.
The system now uses electronic data exchange for the configured communication scenario.
Edit a Communication Arrangement1. To open the Edit Communication Arrangement quick activity in the Communication Arrangements view, select
the relevant communication arrangement and click Edit .
You cannot edit predefined communication arrangements.
2. Change the relevant settings.3. To save your changes and return to the work list, click Save and Reactivate .4. In the worklist, you can click Check Completeness to see if your changes have been updated in the system.
It may take about a minute for the system to update the information.
Edit the Communication Credentials for a Predefined Communication ArrangementThis task is only relevant for predefined communication arrangements with inbound communication.
1. In the Communication Arrangements view, select the relevant communication arrangement.Predefined communication arrangements are indicated by the selected Predefined checkbox.
2. Click Edit Credentials .3. Depending on the authentication method that you have agreed on with your communication partner, you
need to define the credentials of the communication user as described in the following table. The user ID ofthe communication user is created automatically.
AuthenticationMethod Settings
SSL Client Certificate If you use this authentication method, you need to upload the public key certificate that hasbeen provided by your communication partner. If your communication partner cannot providea certificate, you can create and download a PKCS#12 key pair file. The PKCS#12 file ispassword encrypted and contains a public key certificate and a private key. You need to providethe PKCS#12 file to your communication partner.To upload a public key certificate, perform the following steps:
1. Choose Certificate .2. Click Upload Certificate and choose the relevant certificate.
To create a PKCS#12 key pair file, perform the following steps:1. Choose Certificate .2. Click Create and Download Key Pair .3. Define a name for the PKCS#12 file and save it.4. Define a password for the PKCS#12 file and click OK .
Note that you have to provide your communication partner with the PKCS#12 file andthe corresponding password.
154 © 2011, 2012, 2013 SAP AG. All rights reserved. • P U B L I CSAP Cloud for Customer November 2013
General Settings
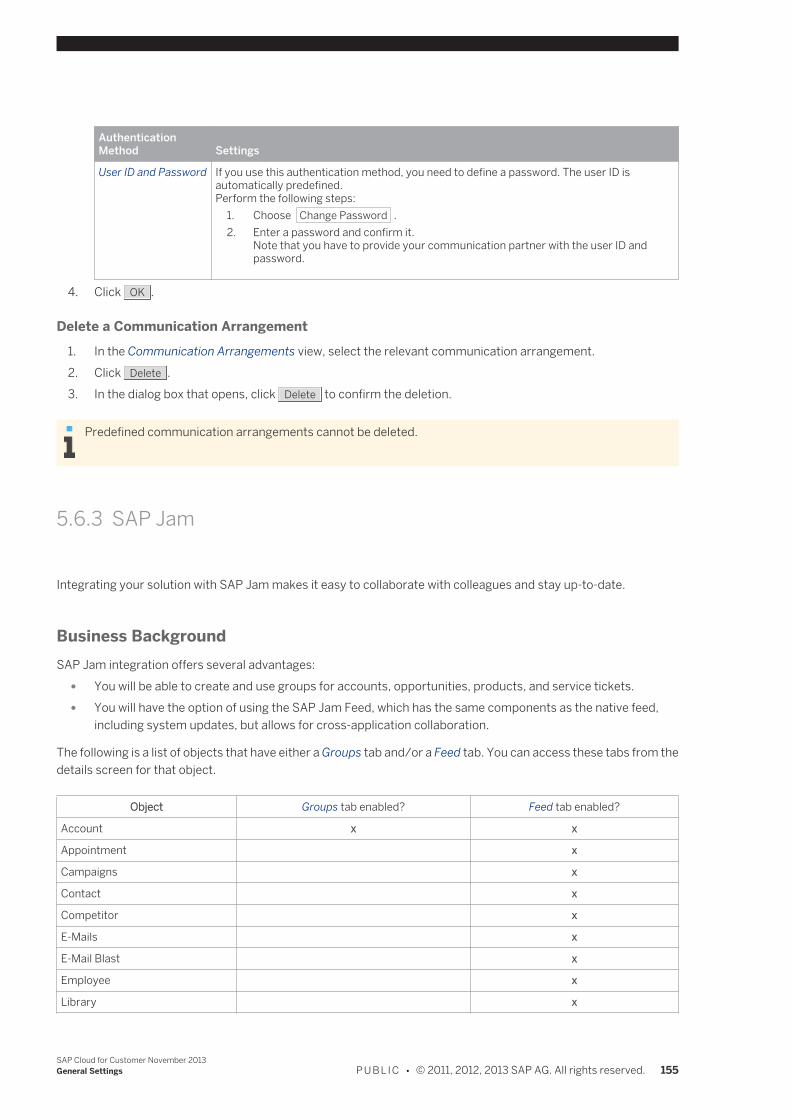
AuthenticationMethod Settings
User ID and Password If you use this authentication method, you need to define a password. The user ID isautomatically predefined.Perform the following steps:
1. Choose Change Password .2. Enter a password and confirm it.
Note that you have to provide your communication partner with the user ID andpassword.
4. Click OK .
Delete a Communication Arrangement1. In the Communication Arrangements view, select the relevant communication arrangement.2. Click Delete .3. In the dialog box that opens, click Delete to confirm the deletion.
Predefined communication arrangements cannot be deleted.
5.6.3 SAP Jam
Integrating your solution with SAP Jam makes it easy to collaborate with colleagues and stay up-to-date.
Business BackgroundSAP Jam integration offers several advantages:
● You will be able to create and use groups for accounts, opportunities, products, and service tickets. ● You will have the option of using the SAP Jam Feed, which has the same components as the native feed,
including system updates, but allows for cross-application collaboration.
The following is a list of objects that have either a Groups tab and/or a Feed tab. You can access these tabs from thedetails screen for that object.
Object Groups tab enabled? Feed tab enabled?
Account x x
Appointment x
Campaigns x
Contact x
Competitor x
E-Mails x
E-Mail Blast x
Employee x
Library x
SAP Cloud for Customer November 2013General Settings P U B L I C • © 2011, 2012, 2013 SAP AG. All rights reserved. 155
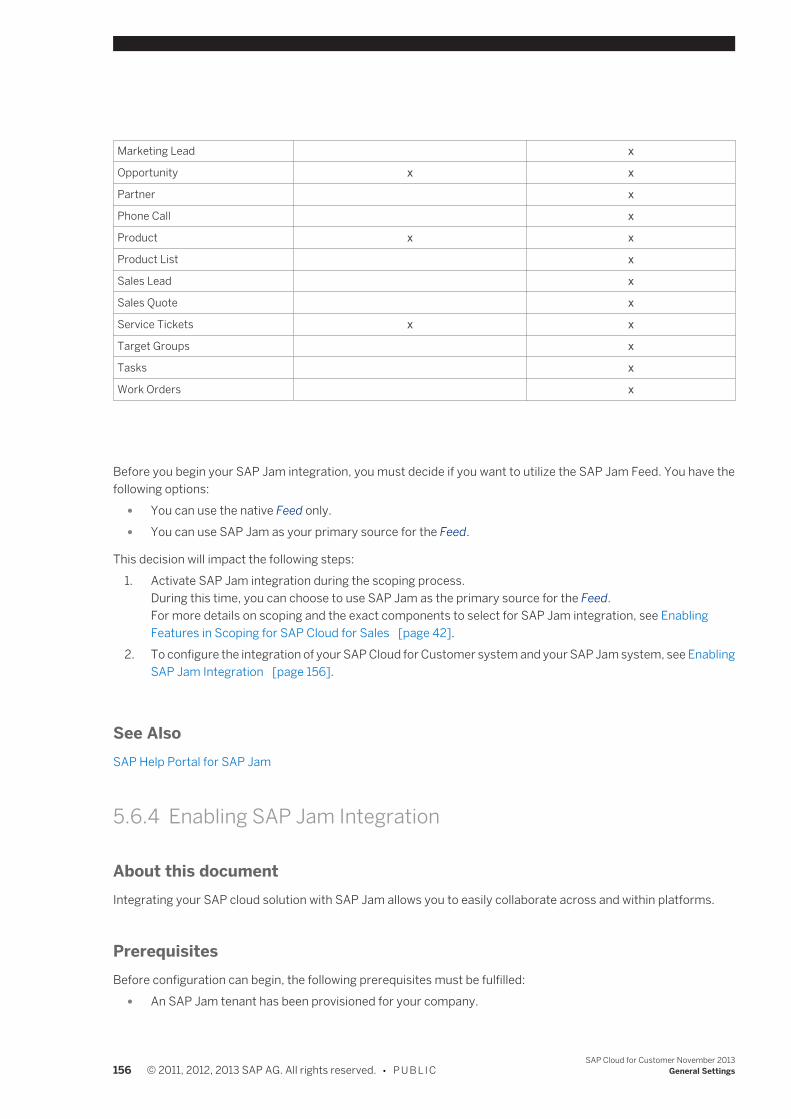
Marketing Lead x
Opportunity x x
Partner x
Phone Call x
Product x x
Product List x
Sales Lead x
Sales Quote x
Service Tickets x x
Target Groups x
Tasks x
Work Orders x
Before you begin your SAP Jam integration, you must decide if you want to utilize the SAP Jam Feed. You have thefollowing options:
● You can use the native Feed only. ● You can use SAP Jam as your primary source for the Feed.
This decision will impact the following steps:1. Activate SAP Jam integration during the scoping process.
During this time, you can choose to use SAP Jam as the primary source for the Feed.For more details on scoping and the exact components to select for SAP Jam integration, see EnablingFeatures in Scoping for SAP Cloud for Sales [page 42].
2. To configure the integration of your SAP Cloud for Customer system and your SAP Jam system, see EnablingSAP Jam Integration [page 156].
See AlsoSAP Help Portal for SAP Jam
5.6.4 Enabling SAP Jam Integration
About this documentIntegrating your SAP cloud solution with SAP Jam allows you to easily collaborate across and within platforms.
PrerequisitesBefore configuration can begin, the following prerequisites must be fulfilled:
● An SAP Jam tenant has been provisioned for your company.
156 © 2011, 2012, 2013 SAP AG. All rights reserved. • P U B L I CSAP Cloud for Customer November 2013
General Settings
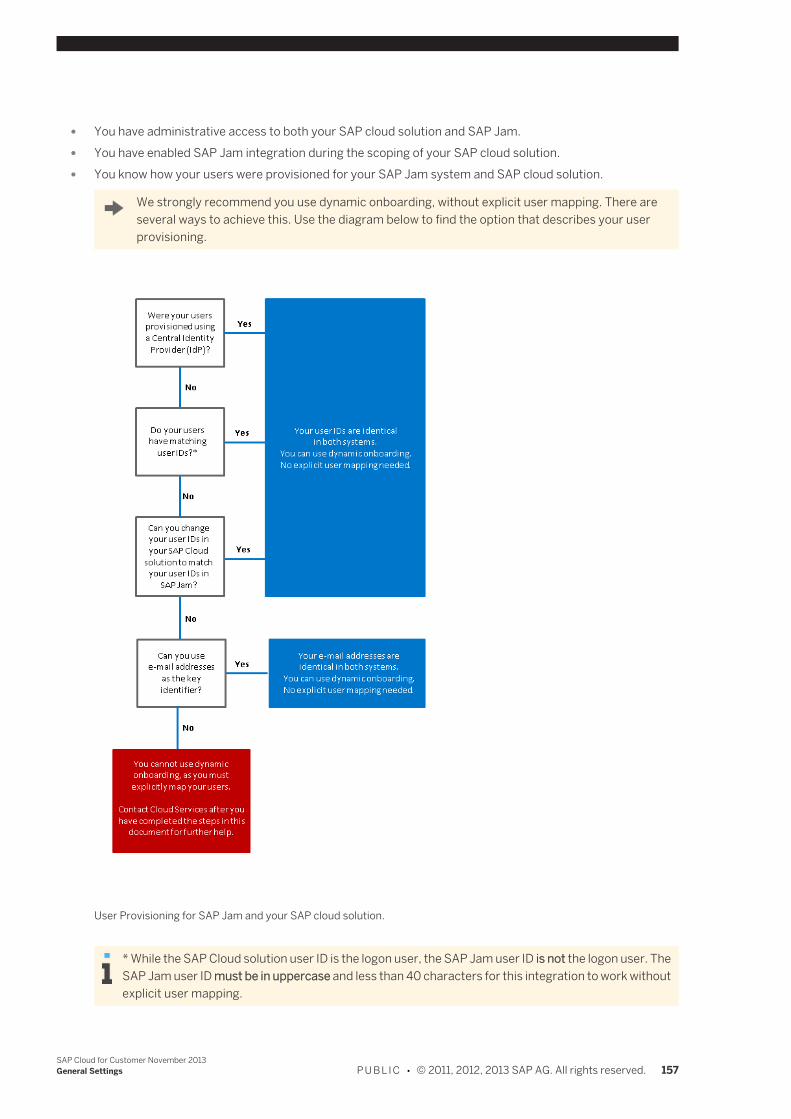
● You have administrative access to both your SAP cloud solution and SAP Jam. ● You have enabled SAP Jam integration during the scoping of your SAP cloud solution. ● You know how your users were provisioned for your SAP Jam system and SAP cloud solution.
We strongly recommend you use dynamic onboarding, without explicit user mapping. There areseveral ways to achieve this. Use the diagram below to find the option that describes your userprovisioning.
User Provisioning for SAP Jam and your SAP cloud solution.
* While the SAP Cloud solution user ID is the logon user, the SAP Jam user ID is not the logon user. TheSAP Jam user ID must be in uppercase and less than 40 characters for this integration to work withoutexplicit user mapping.
SAP Cloud for Customer November 2013General Settings P U B L I C • © 2011, 2012, 2013 SAP AG. All rights reserved. 157
Your user provisioning will affect the option you choose in section B. In the SAP Cloud Solution: Register YourSAP Jam System, [page 158] step four, under Account Name Origin.
Tasks
A. In SAP Jam: Register Your SAP Cloud Solution as an OAuth Client1. Log in as an administrator and go to Admin OAuth Clients to register your SAP cloud solution as a new
OAuth client. ● The Name is the URL for your SAP cloud solution without the https://, such as
my0123456.crm.ondemand.com.
● The Integration URL is the URL for your SAP cloud solution, such as https://my0123456.crm.ondemand.com.
● The X509 Certificate does not need to be uploaded.2. Save your registration and choose View.3. Note the Key and Secret . These will be the Client ID and the Client Secret, respectively, in step B3 below.4. Go to Admin Security . Under Domains, note the Domain Name, such as yourcompany.com. This will
be your company ID in step B4.
B. In the SAP Cloud Solution: Register Your SAP Jam System1. Log in as an administrator and go to the relevant Implementation Project's Activity List. In the Fine Tune phase,
choose the SAP Jam Integration activity.2. Select the Jam Integration service and choose Register Client.3. Under OAuth Client Settings, enter the Client ID (the Key you obtained from SAP Jam in step A3) and the
Client Secret (the Secret from step 3 of the previous section).4. Under OAuth Server Settings, fill in the necessary information.
● The Authentication Server URL and API Server URL are the URLs of your SAP Jam system, such ashttps://jam4.sapjam.com.
You must enter the URL beginning with https, not http, to ensure a secure connection.
● The Company ID is the Domain Name from step A4. ● The Account Name Origin is determined by how your SAP Jam system and SAP cloud solution users
were provisioned (see the diagram under Prerequisites). Select: ○ E-Mail Address if you used the e-mail address as the key identifier. ○ Service Provider Account Name if the user IDs in SAP Jam and the SAP cloud solution are not the
same.
This is the scenario that will require explicit mapping to match users between SAP Jam andthe SAP cloud solution. If possible, use one of the other options in the diagram above to enabledynamic onboarding.
○ User ID if the users in SAP Jam and the SAP cloud solution are the same.
Do not select None. It is a technical value and not relevant. ● The SAML NameID Format is dependent on your selection for the Account Name Origin.
158 © 2011, 2012, 2013 SAP AG. All rights reserved. • P U B L I CSAP Cloud for Customer November 2013
General Settings
○ Select E-Mail Address if you chose E-Mail Address for the Account Name Origin ○ Select Unspecified if you chose any other option for the Account Name Origin
5. Choose OK.6. Under Client Information, note the Local IDP ID and the Default Name ID Format for steps C2 and C3.
The Local IDP ID and Default Name ID Format from this section must match the IDP ID and DefaultName ID Format used in C2 and C3.
7. Under Client Information, choose Show Client Signing Certificate8. Copy the Client Signing Certificate for use in the next section.
C. In SAP Jam: Register your SAP Cloud Solution as a SAML Identity Provider1. Log back into SAP Jam as an administrator and go to Admin SAML Trusted IDPs to register your SAP
cloud solution.2. The IDP ID must match the Local IDP ID from your SAP cloud solution in step 6 of the previous section.3. For the Default Name ID Format, you must use a specific format, depending on your selection for the SAML
NameID Format in the previous section. ● Use urn:oasis:names:tc:SAML:1.1:nameid-format:unspecified if you chose Unspecified for
the SAML Name ID Format ● Use urn:oasis:names:tc:SAML:1.1:nameid-format:emailAddress if you chose E-Mail for the
SAML Name ID Format4. For the Default Name ID Policy, use the URL of your SAP cloud tenant, without the https://, such as
my0123456.crm.ondemand.com.
5. For the X509 Certificate, paste the certificate you copied from your SAP cloud solution in step 7 of the previoussection.
After you have completed the above steps, if your user IDs in both systems were identical, or if you used e-mail addresses as the key identifier, then your SAP Jam and SAP cloud solution are now integrated. There isno need to explicitly map the users, making dynamic onboarding now possible.If your user IDs were not the same and you were not able to use e-mail addresses as key identifier, then youmust now contact Cloud Services for more information on how to explicitly map your users.
5.6.5 Configuring an External Customer Service Portal
If your SAP Cloud for Customer system is not configured with integration to SAP HANA Cloud Portal, Support SiteEdition, you can still configure your system to communicate with an external customer service portal.For information on integrating your SAP Cloud for Customer system with SAP HANA Cloud Portal, Support SiteEdition, contact your SAP Cloud Services representative.
PrerequisitesYou selected to include an external customer service portal integration in your implementation project scope. Formore information, see External Customer Service Portal Integration [page 57].
SAP Cloud for Customer November 2013General Settings P U B L I C • © 2011, 2012, 2013 SAP AG. All rights reserved. 159
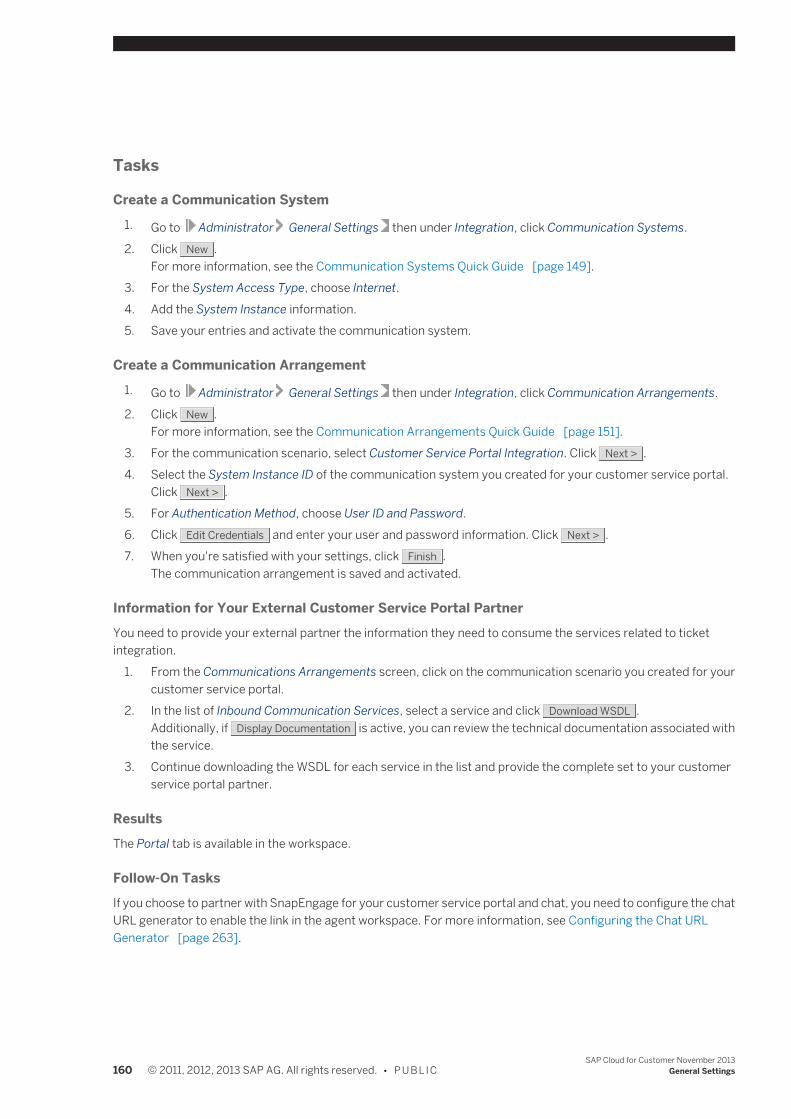
Tasks
Create a Communication System1. Go to Administrator General Settings then under Integration, click Communication Systems.2. Click New .
For more information, see the Communication Systems Quick Guide [page 149].3. For the System Access Type, choose Internet.4. Add the System Instance information.5. Save your entries and activate the communication system.
Create a Communication Arrangement1. Go to Administrator General Settings then under Integration, click Communication Arrangements.2. Click New .
For more information, see the Communication Arrangements Quick Guide [page 151].3. For the communication scenario, select Customer Service Portal Integration. Click Next > .4. Select the System Instance ID of the communication system you created for your customer service portal.
Click Next > .5. For Authentication Method, choose User ID and Password.6. Click Edit Credentials and enter your user and password information. Click Next > .7. When you're satisfied with your settings, click Finish .
The communication arrangement is saved and activated.
Information for Your External Customer Service Portal PartnerYou need to provide your external partner the information they need to consume the services related to ticketintegration.
1. From the Communications Arrangements screen, click on the communication scenario you created for yourcustomer service portal.
2. In the list of Inbound Communication Services, select a service and click Download WSDL .Additionally, if Display Documentation is active, you can review the technical documentation associated withthe service.
3. Continue downloading the WSDL for each service in the list and provide the complete set to your customerservice portal partner.
ResultsThe Portal tab is available in the workspace.
Follow-On TasksIf you choose to partner with SnapEngage for your customer service portal and chat, you need to configure the chatURL generator to enable the link in the agent workspace. For more information, see Configuring the Chat URLGenerator [page 263].
160 © 2011, 2012, 2013 SAP AG. All rights reserved. • P U B L I CSAP Cloud for Customer November 2013
General Settings
5.6.6 Integration with SAP Real-Time Offer Management
OverviewSAP Real-Time Offer Management (RTOM) is a real-time decision solution that provides intelligent product offersand messages during customer interactions.Integration of SAP Cloud for Customer with RTOM is supported via SAP Cloud Applications Studio, also known asthe SDK. If you integrate SAP Cloud for Customer with RTOM via the SDK, then you can adapt the work center view Customers Accounts to include fields for offers, then import offers that reside in RTOM into these accounts.Sales representatives can then identify offers that the account has accepted, and create sales leads from them.
Prerequisites ● You have successfully implemented RTOM. For additional information, visit SAP Help Portal . ● You have successfully installed the SDK. For additional information, visit SAP Help Portal as well, at http://
help.sap.com/studio_cloud .
IntegrationWhen the above prerequisites are met, integration of SAP Cloud for Customer with RTOM via the SDK is enabled asfollows:
● SAP Cloud for Customer allows the persistence of offers, as a standard business object, as well as a userinterface in which to render them.
● Within the SDK, you, as an administrator, must create and configure a customer-specific solution to meetyour business requirements. A sample template for RTOM integration is provided for you to import into yourcustomer-specific solution and adapt to meet your business requirements. Through the customer-specificsolution that you configure with your adapted template, requests are sent to RTOM, and offers from RTOMare received in SAP Cloud for Customer and rendered in the standard solution format.
● Communication between SAP Cloud for Customer and RTOM is realized through a BAdI (Business Add-In)interface that you, as an administrator, implement in the SDK as part of your customer-specific solution.When your implementation is complete, you define the communication system and communicationarrangements in SAP Cloud for Customer as the final steps to completing integration with RTOM.
In this document, RTOM is discussed as the standard engine from which you can import offers intoSAP Cloud for Customer. However, in the SDK, you can configure your customer-specific solution toimport offers from other engines as well.
● Once you, as an administrator, have completed the integration and set up and tested data to your satisfaction,sales representatives can choose Customers Accounts , then Offers, to access the offers that areimported from RTOM into SAP Cloud for Customer.
Process FlowPerform the following procedures, in the sequence indicated below, to integrate SAP Cloud for Customer with RTOMvia the SDK.
SAP Cloud for Customer November 2013General Settings P U B L I C • © 2011, 2012, 2013 SAP AG. All rights reserved. 161
The name of each procedure indicates whether it is to be performed in the SDK or in SAP Cloud for Customer.
In SAP Cloud for Customer: Create and Configure Service AgentsBefore you start to develop in the SDK, you have created the required development users with the relevantadministration or developer rights. (You do this by creating service agents in SAP Cloud for Customer, and assigningthe relevant user ID, password, and work centers to those service agents.)To do so, consult the User Setup Quick Guide, which is delivered with the user resources on SAP Help Portal, athttp://help.sap.com/studio_cloud , and complete the following three activities described therein:
● Create a Service Agent and Request a User (for Development Users) ● Assign a User ID and a Password to the Service Agent (for Development Users) ● Assign Work Centers to the Service Agent (for Development Users)
In the SDK: Connect to the Repository1. Open the SDK.2. Specify the following entries:
● System
From the dropdown, choose the technical name and URL of your SAP Cloud for Customer tenant. ● User ID
Enter the user ID of the service agent that you created and configured in the previous activity. ● Password
Enter the password of that service agent.3. Choose OK .
In the SDK: Identify Additional TenantsIf you intend to perform integration or testing activities in an SAP Cloud for Customer tenant other than the tenantspecified in the previous activity, proceed as follows:
1. Open the SDK.2. Choose Administration Options and Settings... .3. In the dialog box that follows, enter the Name and Host of the repository system of your SAP Cloud for
Customer tenant.4. Choose Save .5. Choose OK to close the dialog box.
In the SDK: Create a New Customer-Specific Solution1. On the My Solutions screen, choose Create Solution.2. In the dialog box that follows, in each field indicated, perform the corresponding entry.
Field Entry
Solution Type Choose Customer-Specific Solution.
Description: Enter a description of your choosing — for example, RTOM_SOLUTION.
Deployment Unit: Choose Customer Relationship Management.
162 © 2011, 2012, 2013 SAP AG. All rights reserved. • P U B L I CSAP Cloud for Customer November 2013
General Settings
Field Entry
Company: Enter the name of your company.
Contact Person: Enter the name of the contact person.
E-Mail: Enter the e-mail address of the contact person.
In the remainder of this document, it is assumed that RTOM_SOLUTION is the description of thecustomer-specific solution.
3. Choose OK to close the dialog box.
Download the Sample Template for RTOM Integration1. Open SAP Note 1923364.2. On the resultant screen, choose Attachments, where the sample template for RTOM integration resides.3. In the Filename column, click on the RTOM_SAMPLE_TEMPLATE link.
4. In the dialog box that follows, choose Save Save as .5. Save the sample template in your preferred directory.
In the SDK: Import and Adapt the Sample Template1. On the My Solutions screen of the SDK, select the RTOM_SOLUTION node.
2. Choose Administration Implementation Manager .3. On the Implementation Manager screen, under Current Version, choose Import Solution Template.4. Navigate to your preferred directory, then select the sample template.5. Choose Open .
When the import is complete, the contents of the sample template are displayed on the Solution Explorerscreen.
6. Adapt the sample template to meet your business requirements.
In the SDK: Adjust and Deploy the Customer-Specific Solution1. On the Solution Explorer screen of the SDK, right-click on the RTOM_SOLUTION node, then choose
Activate All Items .2. On the same screen, right-click on the AccountExtension.xbo node, then choose Enhance Screen.
a. In the dialog box that follows, select the checkbox COD_Account_TI.b. Choose OK .
In response, the UI Designer opens. The remainder of this procedure describes how to add the CreditRating extension field — which is delivered with the sample template — to the account header.
3. On the Extensibility Explorer screen of the UI Designer, select the Header entity, then chooseAdd Extension Field to Section Group .
a. In the dialog box that follows, select the checkbox Add, then choose Apply .4. On the Extensibility Explorer screen of the UI Designer, select the Undefined entity, then choose
Add View with Embedded Component .a. In the dialog box that follows, enter the tab title OFFERS.
SAP Cloud for Customer November 2013General Settings P U B L I C • © 2011, 2012, 2013 SAP AG. All rights reserved. 163
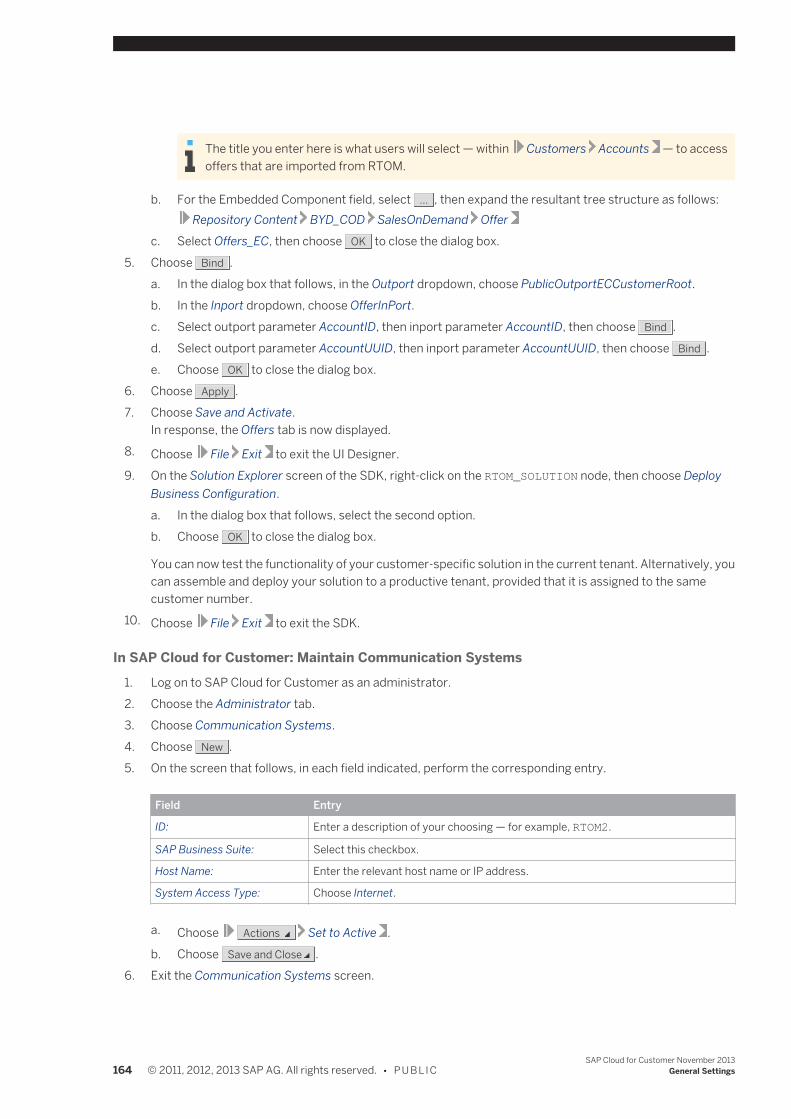
The title you enter here is what users will select — within Customers Accounts — to accessoffers that are imported from RTOM.
b. For the Embedded Component field, select ... , then expand the resultant tree structure as follows: Repository Content BYD_COD SalesOnDemand Offer
c. Select Offers_EC, then choose OK to close the dialog box.5. Choose Bind .
a. In the dialog box that follows, in the Outport dropdown, choose PublicOutportECCustomerRoot.b. In the Inport dropdown, choose OfferInPort.c. Select outport parameter AccountID, then inport parameter AccountID, then choose Bind .d. Select outport parameter AccountUUID, then inport parameter AccountUUID, then choose Bind .e. Choose OK to close the dialog box.
6. Choose Apply .7. Choose Save and Activate.
In response, the Offers tab is now displayed.8. Choose File Exit to exit the UI Designer.9. On the Solution Explorer screen of the SDK, right-click on the RTOM_SOLUTION node, then choose Deploy
Business Configuration.a. In the dialog box that follows, select the second option.b. Choose OK to close the dialog box.
You can now test the functionality of your customer-specific solution in the current tenant. Alternatively, youcan assemble and deploy your solution to a productive tenant, provided that it is assigned to the samecustomer number.
10. Choose File Exit to exit the SDK.
In SAP Cloud for Customer: Maintain Communication Systems1. Log on to SAP Cloud for Customer as an administrator.2. Choose the Administrator tab.3. Choose Communication Systems.4. Choose New .5. On the screen that follows, in each field indicated, perform the corresponding entry.
Field Entry
ID: Enter a description of your choosing — for example, RTOM2.
SAP Business Suite: Select this checkbox.
Host Name: Enter the relevant host name or IP address.
System Access Type: Choose Internet.
a. Choose Actions Set to Active .b. Choose Save and Close .
6. Exit the Communication Systems screen.
164 © 2011, 2012, 2013 SAP AG. All rights reserved. • P U B L I CSAP Cloud for Customer November 2013
General Settings
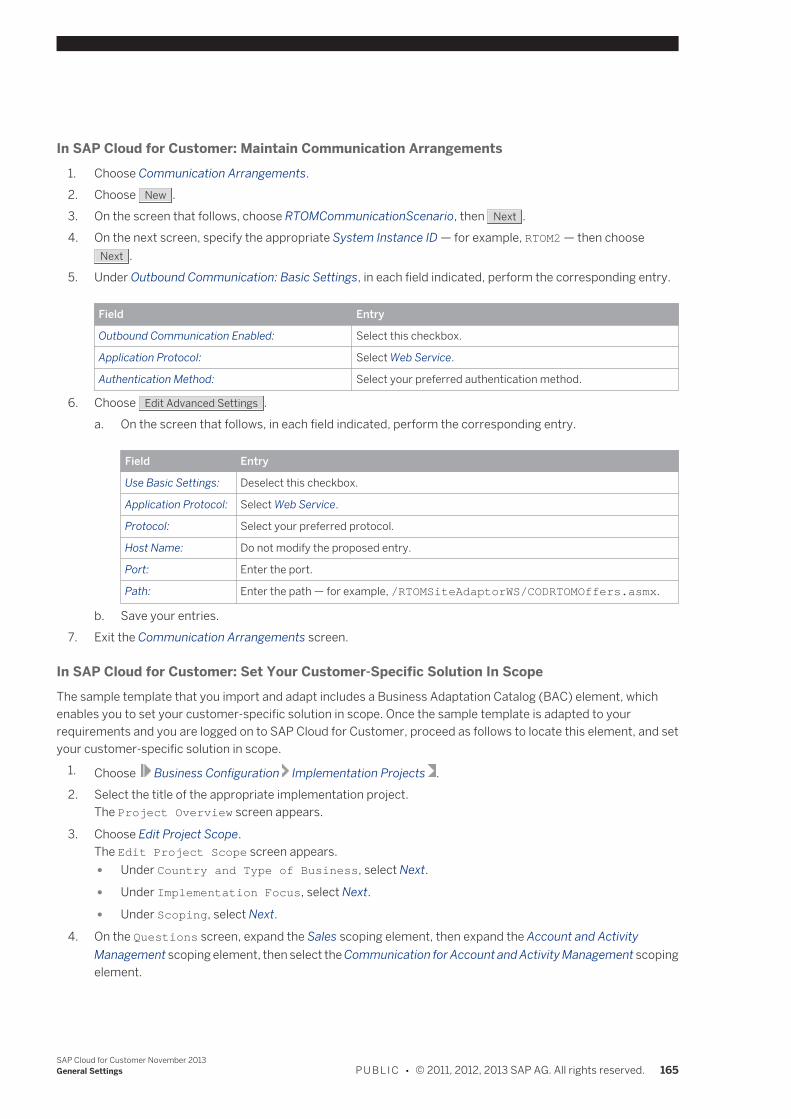
In SAP Cloud for Customer: Maintain Communication Arrangements1. Choose Communication Arrangements.2. Choose New .3. On the screen that follows, choose RTOMCommunicationScenario, then Next .4. On the next screen, specify the appropriate System Instance ID — for example, RTOM2 — then choose
Next .5. Under Outbound Communication: Basic Settings, in each field indicated, perform the corresponding entry.
Field Entry
Outbound Communication Enabled: Select this checkbox.
Application Protocol: Select Web Service.
Authentication Method: Select your preferred authentication method.
6. Choose Edit Advanced Settings .a. On the screen that follows, in each field indicated, perform the corresponding entry.
Field Entry
Use Basic Settings: Deselect this checkbox.
Application Protocol: Select Web Service.
Protocol: Select your preferred protocol.
Host Name: Do not modify the proposed entry.
Port: Enter the port.
Path: Enter the path — for example, /RTOMSiteAdaptorWS/CODRTOMOffers.asmx.
b. Save your entries.7. Exit the Communication Arrangements screen.
In SAP Cloud for Customer: Set Your Customer-Specific Solution In ScopeThe sample template that you import and adapt includes a Business Adaptation Catalog (BAC) element, whichenables you to set your customer-specific solution in scope. Once the sample template is adapted to yourrequirements and you are logged on to SAP Cloud for Customer, proceed as follows to locate this element, and setyour customer-specific solution in scope.
1. Choose Business Configuration Implementation Projects .2. Select the title of the appropriate implementation project.
The Project Overview screen appears.
3. Choose Edit Project Scope.The Edit Project Scope screen appears. ● Under Country and Type of Business, select Next.
● Under Implementation Focus, select Next.
● Under Scoping, select Next.
4. On the Questions screen, expand the Sales scoping element, then expand the Account and ActivityManagement scoping element, then select the Communication for Account and Activity Management scopingelement.
SAP Cloud for Customer November 2013General Settings P U B L I C • © 2011, 2012, 2013 SAP AG. All rights reserved. 165
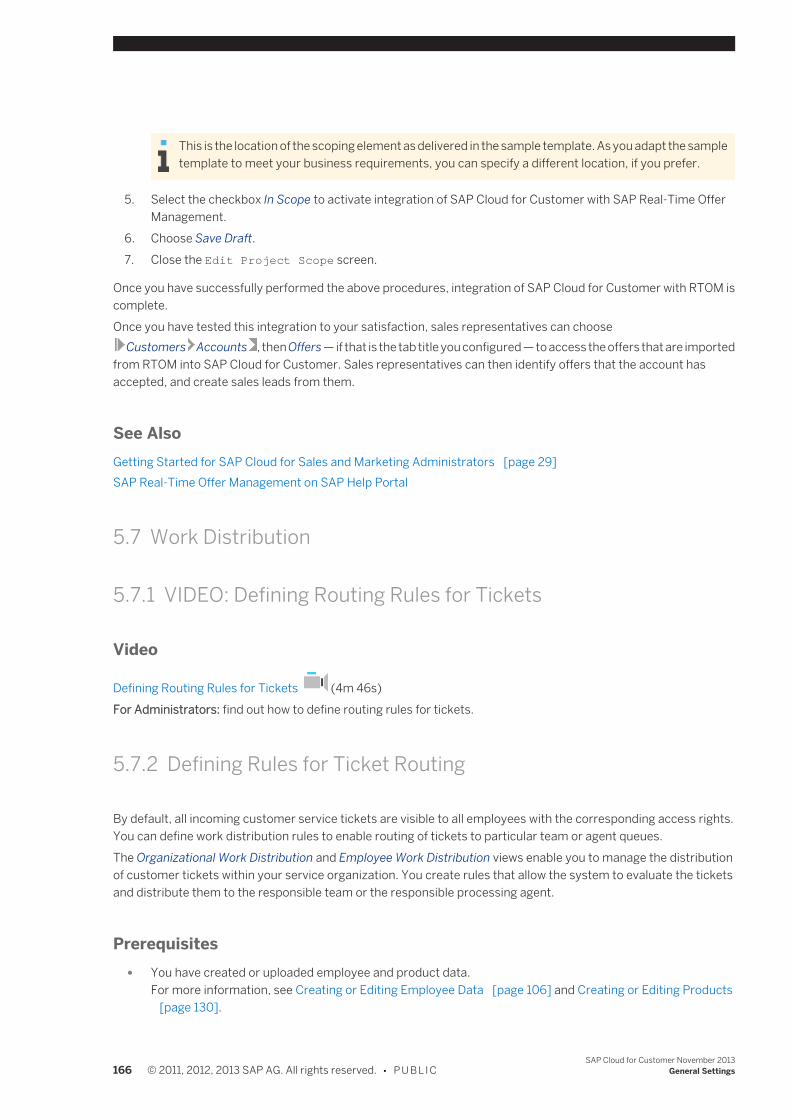
This is the location of the scoping element as delivered in the sample template. As you adapt the sampletemplate to meet your business requirements, you can specify a different location, if you prefer.
5. Select the checkbox In Scope to activate integration of SAP Cloud for Customer with SAP Real-Time OfferManagement.
6. Choose Save Draft.7. Close the Edit Project Scope screen.
Once you have successfully performed the above procedures, integration of SAP Cloud for Customer with RTOM iscomplete.Once you have tested this integration to your satisfaction, sales representatives can choose Customers Accounts , then Offers — if that is the tab title you configured — to access the offers that are importedfrom RTOM into SAP Cloud for Customer. Sales representatives can then identify offers that the account hasaccepted, and create sales leads from them.
See AlsoGetting Started for SAP Cloud for Sales and Marketing Administrators [page 29]SAP Real-Time Offer Management on SAP Help Portal
5.7 Work Distribution
5.7.1 VIDEO: Defining Routing Rules for Tickets
Video
Defining Routing Rules for Tickets (4m 46s)For Administrators: find out how to define routing rules for tickets.
5.7.2 Defining Rules for Ticket Routing
By default, all incoming customer service tickets are visible to all employees with the corresponding access rights.You can define work distribution rules to enable routing of tickets to particular team or agent queues.The Organizational Work Distribution and Employee Work Distribution views enable you to manage the distributionof customer tickets within your service organization. You create rules that allow the system to evaluate the ticketsand distribute them to the responsible team or the responsible processing agent.
Prerequisites ● You have created or uploaded employee and product data.
For more information, see Creating or Editing Employee Data [page 106] and Creating or Editing Products [page 130].
166 © 2011, 2012, 2013 SAP AG. All rights reserved. • P U B L I CSAP Cloud for Customer November 2013
General Settings

● You have created and activated your organizational structure.For more information, see Setting Up Teams for Ticket Handling [page 98].
● If your system is configured to support social media channels and you want to use social media channels asrouting criteria, you have configured those channels.
● If your system is configured to support e-mail as a channel and you want to use e-mail as routing criteria, youhave configured e-mail and added the corresponding inbound e-mail addresses.For more information, see Configuring E-Mail Channels [page 179].
Defining Ticket Distribution RulesThe following sections outline specific settings or considerations for defining work distribution rules for the customerservice and social media features of SAP Cloud for Customer. You can also watch the video Defining Routing Rules
for Tickets Using the Work Distribution Rules .For general step-by-step instructions, see the following:
● Organizational Work Distribution Quick Guide [page 364] ● Employee Work Distribution Quick Guide [page 362]
Create Organizational Work Distribution RulesOrganizational work distribution rules allow the system to evaluate work items — in this case, customer messagesthat are created as service requests — and to determine the responsible service team (customer service org unit).You can also create organizational work distribution rules to manage escalation routing and routing based on socialmedia channels.
1. Go to Administrator Service and Social Settings Organizational Work Distribution .2. Select the work category: Service and Support Team for Service Requests - Social Media and click Edit .3. Click Add Rule or Copy Rule .
The system processes work distribution rules for organizational work distribution according to their priorities.If you have maintained multiple rules for a work category, the system only uses the first rule that applies. Bydefault, new rules are added to the bottom of the list, and so have the lowest priority. To change the priorityof a rule move it up or down in the table.
To avoid that no applicable organizational work distribution rule can be found, we recommend youcreate one default rule at the bottom of the rule list which applies to the properties of any incomingcustomer message.
4. Enter the name, choose or enter the ID of the responsible customer service org unit, and enter the validityperiod for the rule.
5. Go to the Rule Details section and specify the parameters for the rule.Each of the following parameters appears as a tab. Using the parameters, you can specify which parameteris to be included in the rule or excluded from the rule. ● ABC Classification ● Country ● Product Category ● Service Category ● Account
Includes all individual customers and customer accounts ● Service Priority Code
SAP Cloud for Customer November 2013General Settings P U B L I C • © 2011, 2012, 2013 SAP AG. All rights reserved. 167
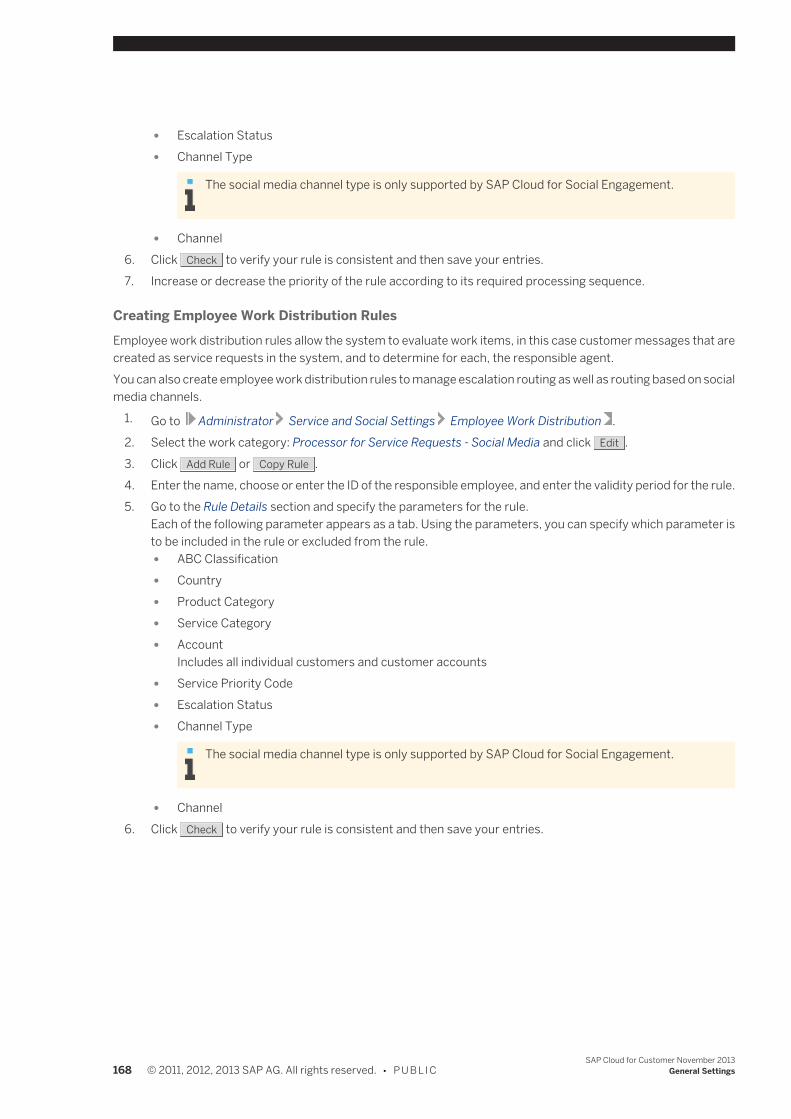
● Escalation Status ● Channel Type
The social media channel type is only supported by SAP Cloud for Social Engagement.
● Channel6. Click Check to verify your rule is consistent and then save your entries.7. Increase or decrease the priority of the rule according to its required processing sequence.
Creating Employee Work Distribution RulesEmployee work distribution rules allow the system to evaluate work items, in this case customer messages that arecreated as service requests in the system, and to determine for each, the responsible agent.You can also create employee work distribution rules to manage escalation routing as well as routing based on socialmedia channels.
1. Go to Administrator Service and Social Settings Employee Work Distribution .2. Select the work category: Processor for Service Requests - Social Media and click Edit .3. Click Add Rule or Copy Rule .4. Enter the name, choose or enter the ID of the responsible employee, and enter the validity period for the rule.5. Go to the Rule Details section and specify the parameters for the rule.
Each of the following parameter appears as a tab. Using the parameters, you can specify which parameter isto be included in the rule or excluded from the rule. ● ABC Classification ● Country ● Product Category ● Service Category ● Account
Includes all individual customers and customer accounts ● Service Priority Code ● Escalation Status ● Channel Type
The social media channel type is only supported by SAP Cloud for Social Engagement.
● Channel6. Click Check to verify your rule is consistent and then save your entries.
168 © 2011, 2012, 2013 SAP AG. All rights reserved. • P U B L I CSAP Cloud for Customer November 2013
General Settings
6 Workflow
6.1 About Business Task Management
Notifications can be sent to a user to inform him or her of preceding process steps which have been carried out inthe system or special milestones that have been reached in a business process. Neither the user nor the system hasto perform any activity to keep the business process running. Notifications always appear under Notifications.If notifications are acknowledged by the user, they are removed from Notifications. If the user does not acknowledgethem, they expire after a specified amount of time.During the fine-tuning phase of your First Implementation Project, you can configure Business Task Managementin the Activity List to send notifications at certain milestones, such as for aging leads and stalled opportunities.
6.2 Notification – Lead Aging
OverviewIf a lead remains too long in a certain phase, then it is said to be aging. In this case, the system notifies the managerof the sales representative who is responsible for the lead.This type of notification has priority high as a default.A notification of this type expires automatically 14 days after it has been created.
RelevanceThe relevant sales manager receives this notification under Notifications.
ResponseSince this notification is used for information purposes only, no further action is required.
6.3 Notification – Opportunity Stalled
OverviewIf an opportunity remains too long in a certain phase, then it is said to be stalled. In this case, the system notifies themanager of the sales representative who is responsible for the opportunity.
SAP Cloud for Customer November 2013Workflow P U B L I C • © 2011, 2012, 2013 SAP AG. All rights reserved. 169
This type of notification has priority high as a default.A notification of this type expires automatically 14 days after it has been created.
RelevanceThe relevant sales manager receives this notification under Notifications.
ResponseSince this notification is used for information purposes only, no further action is required.
6.4 Notification Rules Quick Guide
Under Administrator Notification Rules , you as an administrator can create, define and activate rules forflexible notifications, which are sent to business users to inform them when items have changed under variousconditions, and to notify them of tasks to complete as the result of such changes. As you define rules for flexiblenotifications, you specify basic data for each rule, the conditions under which the notification is sent, and therecipients of the notification.
Business BackgroundIn Business Task Management (BTM), tasks, alerts, and notifications are pre-defined. Notification rules allow you tocreate user-defined notifications thus giving you more flexibility for the use of notifications.For more information, see Notification Rules [page 365].In addition to the predefined notification rules that are delivered with BTM, you can define flexible notifications inSAP Cloud for Customer for the following items:
● Accounts ● Activity tasks ● Marketing leads ● Opportunities ● Sales leads ● Sales quotes ● Tickets ● Social Media Message Import Runs ● Ticket Types
170 © 2011, 2012, 2013 SAP AG. All rights reserved. • P U B L I CSAP Cloud for Customer November 2013
Workflow
Tasks
PrerequisitesTo use approvals via e-mail, you must do the following:
● enable e-mail security during the scoping process ● complete the fine-tuning activity E-Mail Encryption and Signature Check ● complete the integrate and extend activity Load Certificates and Activate Signing and Encryption for E-Mails
to maintain trust lists, import certificates, and activate S/MIME
Entering the Basic Data for Notification RulesFrom the notification rules worklist, click New and for the Enter Basic Data step, define the following:
1. Enter the Description to identify the notification rule in the worklist. (This description is not seen by therecipient of the notification.)
2. You can also enter the description in other available languages by clicking . For every additional descriptionto be entered, click Add Row , select the language, specify the description, then click OK .In response, the solution will display this description to users who log on in that language.
3. Select the Business Object — such as opportunity or ticket — for which the notification is to be sent.4. Select the Notification Type.
● Task notifications result in a new item in the Notifications list available from the toolbar. ● E-Mail notifications result in an e-mail being sent to the list of recipients and requires an HTML file for
use as the e-mail template.
For notifications of the type 'e-mail', you need to add HTML files to the list of allowed MIMEtypes in the Allowed MIME Types for Document Upload fine-tuning activity, if you want to usepredefined HTML templates for e-mails.
5. Enter the subject to be seen by the recipient of the notification.You can also enter the subject in other available languages by clicking .
6. If you're creating an e-mail notification, browse to and upload the HTML file to be used as the Template File.7. If you're creating an e-mail notification, you must map any placeholders used in the template to fields in the
solution.a. Click Add Row .b. Enter the placeholder as it appears in your chosen template file.
All placeholders included in e-mail notification templates must be in all caps, contain no specialcharacters, and begin and end with a hash tag (#).For example:
● #ID# ● #ACCOUNT# ● #100#
c. Select from the available list of fields.The list is dependent upon the business object you selected for the notification rule.
d. You may also use your defined placeholders in the subject line of the e-mail notification.8. If you're creating a task notification, you also have the option of defining placeholders which can be used in
the subject line.
SAP Cloud for Customer November 2013Workflow P U B L I C • © 2011, 2012, 2013 SAP AG. All rights reserved. 171
Select a field value next to the predefined placeholder name (limited to four in total), then include theplaceholder in the text of the subject.
For example, you create a notification rule for opportunities and define the predefined placeholdersas follows:
Placeholder Field
&1 Status
&2 Opportunity ID
Then as the subject line, you include the placeholders as follows: Check Opportunity &2;Opportunity has Status &1.
9. Click Next to define the conditions of the notification rule.
Defining Conditions for Notification Rules (Optional)1. In the Define Conditions step, click Add Row to define a condition.2. In the dialog box, select the field — such as Status — for the expression of the condition.
Then specify an operator (such as Equal to) and a value (such as Converted).3. If desired, specify an additional expression with the following options:
● To add an OR expression, click Add Row . ● To add an AND expression, click Add Expression .
4. To remove or edit an expression, click the corresponding icons.Alternatively, to remove an expression, click Remove Row .
5. If you're creating a task notification, you can specify the expiration period for the notification — for example10 Day(s).If you do not enter an expiration period, then the notification will expire after 30 days.
6. Click Next to define the recipients of the notification.
Defining Recipients of Notifications (Required)1. For task notifications, perform one or both of the following options:
a. To define a particular employee as the recipient, click Add Employee. Repeat this selection until allrecipients of the notification are defined.
b. To define employees of a particular responsibility category as the recipients, click Add Determination.Then select from the available list and repeat this selection as necessary.
2. For e-mail notifications, perform one or both of the following options:a. To define a particular employee as the recipient, click Add Employee. Repeat this selection until all
recipients of the notification are defined.b. To define employees of a particular responsibility category as the recipients, click Add Determination.
Then select from the available list and repeat this selection as necessary.3. Click Next to review and activate the notification rule.
Reviewing and Activating Notification Rules1. Review the basic data, conditions and recipients that you have defined for the notification rule.2. If you are satisfied with the notification rule, choose Activate .
172 © 2011, 2012, 2013 SAP AG. All rights reserved. • P U B L I CSAP Cloud for Customer November 2013
Workflow
You can also activate or deactivate notification rules directly from the worklist.
3. Choose Finish .4. In the Confirmation step, choose Close .
ResultOnce a flexible notification rule has been defined and activated, and once its conditions have been met, then thedefined recipients receive the notification via e-mail for e-mail notifications, or in the toolbar, under Notifications fortask notifications.
You can also enable task notifications to be sent via e-mail. For more information, see the section on Questions ◦Business Task Management with Different Notification Channels in Enabling Features inScoping for SAP Cloud for Sales [page 42].
See AlsoQuick Guide for Business Task ManagementWorking with Tasks, Notifications, and Alerts
6.5 Quick Guide for Approval Processes
In the Approval Processes work center view, administrators can create and edit approval processes to suit businessrequirements.You can access the Approval Processes work center view from the Application and User Management work centerunder Task Distribution.
Business Background ● By default, the approval process related to a business document in the solution always consists of one step.
However, business processes may require more than one approval step in the approval process.For example, a sales order for building materials requires approval by both an architect and a stress analystbefore the sales order can be released. You may require that conditions be incorporated into the approvalprocesses, such as the amount that an approver is allowed to approve. You may also require the approval ofa specified employee, such as a controller if a shopping cart contains items for which a payment card is used.For more information, see Approval Processes.
● For more information about approval rules in purchasing, see, Approval Rules
Tasks
Monitor Approval ProcessesYou can view and monitor approval processes. From the Show dropdown list, the following options are available:
SAP Cloud for Customer November 2013Workflow P U B L I C • © 2011, 2012, 2013 SAP AG. All rights reserved. 173
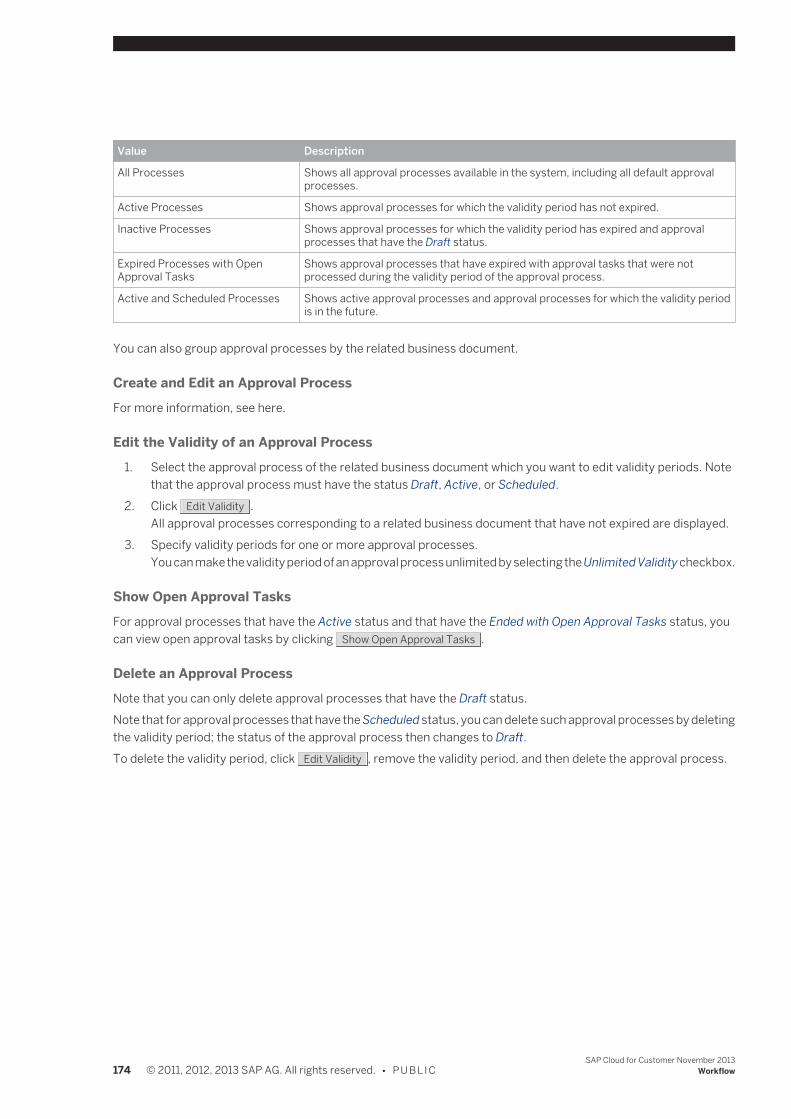
Value Description
All Processes Shows all approval processes available in the system, including all default approvalprocesses.
Active Processes Shows approval processes for which the validity period has not expired.
Inactive Processes Shows approval processes for which the validity period has expired and approvalprocesses that have the Draft status.
Expired Processes with OpenApproval Tasks
Shows approval processes that have expired with approval tasks that were notprocessed during the validity period of the approval process.
Active and Scheduled Processes Shows active approval processes and approval processes for which the validity periodis in the future.
You can also group approval processes by the related business document.
Create and Edit an Approval ProcessFor more information, see here.
Edit the Validity of an Approval Process1. Select the approval process of the related business document which you want to edit validity periods. Note
that the approval process must have the status Draft, Active, or Scheduled.2. Click Edit Validity .
All approval processes corresponding to a related business document that have not expired are displayed.3. Specify validity periods for one or more approval processes.
You can make the validity period of an approval process unlimited by selecting the Unlimited Validity checkbox.
Show Open Approval TasksFor approval processes that have the Active status and that have the Ended with Open Approval Tasks status, youcan view open approval tasks by clicking Show Open Approval Tasks .
Delete an Approval ProcessNote that you can only delete approval processes that have the Draft status.Note that for approval processes that have the Scheduled status, you can delete such approval processes by deletingthe validity period; the status of the approval process then changes to Draft.To delete the validity period, click Edit Validity , remove the validity period, and then delete the approval process.
174 © 2011, 2012, 2013 SAP AG. All rights reserved. • P U B L I CSAP Cloud for Customer November 2013
Workflow
7 Service and Social Settings
7.1 SLA Setup
7.1.1 VIDEO: Prioritizing Tickets with Service Level Agreements
Video
Prioritizing Tickets with Service Level Agreements (3m 35s)For Administrators: find out how to use Service Level Agreements to prioritize tickets.
7.1.2 About Service Levels
You can create service levels to define the time when the customer must be contacted or the ticket must becompleted. These service levels are used to specify the performance objectives for handling customer messages,and based on this you can measure the performance and the quality of your customer service. They ensure thatadequate levels of service are delivered to all customers in accordance with business priorities and a competitivecost model.In addition to defining the service levels, you also need to define determination rules so that whenever a new customermessage comes into the system, the system can determine the service level based on those rules, and then basedon that service level, the initial response and completion due time points are calculated.
Go to Administrator Service and Social Settings then choose Service Levels.
Tasks
Create a Service Level1. Click New , then Service Level to open the New Service Level editor.2. On the General tab, enter the service level name, ID, and description.3. On the Reaction Times tab, enter the milestones for this service level:
a. Under Milestones, click Add Row .b. In the new row, in the Milestone column, select Due Date for Completion, Due Date for Initial Response,
or Due Date for Response.You can select Recurring for the Due Date for Response option. Each time a customer responds to aticket, Due Date for Response will be recalculated according to the time you define for this milestone.
Automatic alerts for overdue milestones are not currently supported in SAP Cloud for Customer.
SAP Cloud for Customer November 2013Service and Social Settings P U B L I C • © 2011, 2012, 2013 SAP AG. All rights reserved. 175
c. To view details for the milestone, select the row in the Milestones table. To enter these details, underDetails for Milestone, click Add Row . Choose the type of service and priority, and enter the duration inhours.
You must add a separate row for each priority and for each type of service which you select.For example if you have two types of service and four priorities, you should create a total ofeight rows.
4. On the Operating Hours tab, enter the hours when you will be able to deliver the service.a. Choose the working day calendar and time zone to specify a particular region or company.b. To specify the days of the week when your service operates, under Weekly Configuration, click Add .
Select the days of the week, for example, Monday to Friday.c. To specify the times of the day when your service operates, select the appropriate row under Weekly
Configuration. Under Time Ranges, click Add , then choose the times when your service starts and ends.
Operating hours may not be available depending on your configuration. If you do not enter operatinghours, the system assumes that the service is available 24/7.
5. At the top of the New Service Level editor, click Save to save the service level.6. A service level can use the statuses In Preparation, Active, Blocked, or Obsolete. You must set the status to
Active before you can determine the usage of the service level within the system.To activate the service level, click Change Status , then choose Active.
7. Click Close to return to the Service Levels view.8. The service level is saved in the system and added to the Service Levels view. If the service level is activated,
you can now assign the determination rules so the service level can be used to specify and measure theperformance objectives for the delivery of services to your customers.
To restrict a service level to a particular product category, service category, or incident category, orparticular country or customer group, open the Determine Service Level quick activity (from the servicelevel details, click You Can Also then Determine Service Level) and create a rule that includes the relevantconditions and service level.To restrict a service level to a particular service type or priority, open the Service Level editor and edit thedetails on the Reaction Times tab.
Define Service Level Determination Rules1. From the service level details, click You Can Also then Determine Service Level.
Or under Administrator Common Tasks , choose Determine Service Level.2. Add a determination rule to the table and assign a service level.
a. Add a row by clicking Add Row .b. In the Service Level column of the new row, click Add to assign the service level.c. Enter the name of a released service level – if necessary, click the Open Selection Dialog icon or press
F4 to search for the service level – and click OK .
3. You can make the service level conditional on a specific country, customer group, product category, servicecategory catalog, service category, or incident category. For each condition that you want to set:a. Click the asterisk * in the appropriate column.b. Select the operator, for example, = or IN.
176 © 2011, 2012, 2013 SAP AG. All rights reserved. • P U B L I CSAP Cloud for Customer November 2013
Service and Social Settings
c. Enter the value or value range.d. Click OK .e. Place the service level rule in the correct position of the table by selecting the rule and clicking the up or
down arrow.
The default asterisk ( * ) value means that this parameter has no impact on service level determination.For example, an asterisk in the Country column means that this service level determination is notaffected by the country in a service request.Note that even if you exclude a service catalog, the system still displays its incident and service categoryvalues; it does not filter these columns out. Although the incident and service category values aredisplayed, they are not taken into consideration for determining the service level objectives.
4. You can adapt the fields of the decision table using the Decision Table Configuration Wizard.a. Click Adapt Columns.b. Under Available Columns, select the fields that you want to use as conditions to apply service levels. Your
extension fields are also displayed under Available Columns.c. To add them to the decision table, choose the arrow buttons, then click OK .
The determination rules are evaluated in the order they appear in the table, and once the system hasmade a match all other rules are ignored. Therefore you should position specific rules for exceptionsat the top of the table followed by more general rules.
5. At the top of the Determine Service Levels quick activity, click Save and Activate .6. The service levels determination rules, are now active and ready to be used in the system. When you create
or edit a service request or order, the system uses the rules to evaluate which service level to apply. When arule is found that matches the service request or order, the appropriate service level is applied and executed,including details about reaction times and due date calculation.
7.1.3 About Service Categories
Service categories are used throughout the system to capture consistent information, to allow for reporting andbenchmarking, and for determining service level assignments.To create and organize service categories and incident categories (subcategories) within service category catalogs,go to Administrator Service and Social Settings then choose Service Categories.
Tasks
Create a Service Category Catalog1. Click New , then choose Service Category Catalog to open the New Service Category Catalog editor.2. On the General tab, enter the following data:
1. In the General section, enter the catalog name, valid from/to date, and description.2. In the Usage section, select the business documents that use the catalog.
SAP Cloud for Customer November 2013Service and Social Settings P U B L I C • © 2011, 2012, 2013 SAP AG. All rights reserved. 177
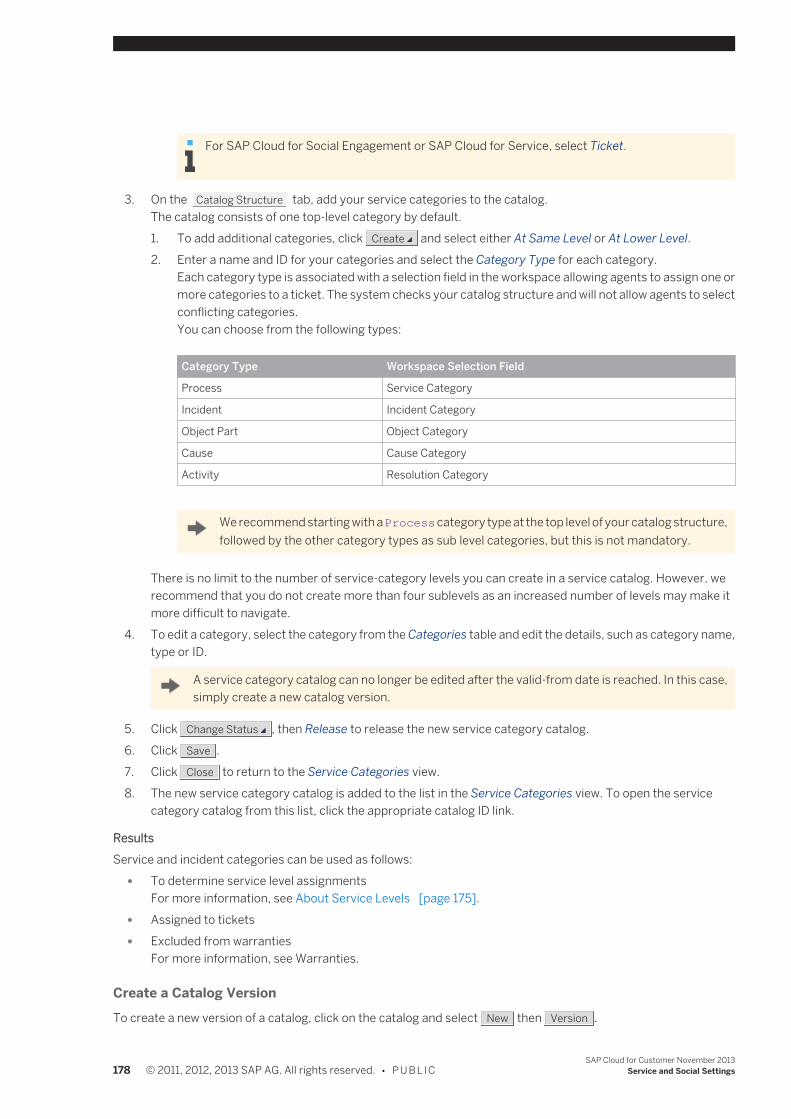
For SAP Cloud for Social Engagement or SAP Cloud for Service, select Ticket.
3. On the Catalog Structure tab, add your service categories to the catalog.The catalog consists of one top-level category by default.1. To add additional categories, click Create and select either At Same Level or At Lower Level.2. Enter a name and ID for your categories and select the Category Type for each category.
Each category type is associated with a selection field in the workspace allowing agents to assign one ormore categories to a ticket. The system checks your catalog structure and will not allow agents to selectconflicting categories.You can choose from the following types:
Category Type Workspace Selection Field
Process Service Category
Incident Incident Category
Object Part Object Category
Cause Cause Category
Activity Resolution Category
We recommend starting with a Process category type at the top level of your catalog structure,followed by the other category types as sub level categories, but this is not mandatory.
There is no limit to the number of service-category levels you can create in a service catalog. However, werecommend that you do not create more than four sublevels as an increased number of levels may make itmore difficult to navigate.
4. To edit a category, select the category from the Categories table and edit the details, such as category name,type or ID.
A service category catalog can no longer be edited after the valid-from date is reached. In this case,simply create a new catalog version.
5. Click Change Status , then Release to release the new service category catalog.6. Click Save .7. Click Close to return to the Service Categories view.8. The new service category catalog is added to the list in the Service Categories view. To open the service
category catalog from this list, click the appropriate catalog ID link.
ResultsService and incident categories can be used as follows:
● To determine service level assignmentsFor more information, see About Service Levels [page 175].
● Assigned to tickets ● Excluded from warranties
For more information, see Warranties.
Create a Catalog VersionTo create a new version of a catalog, click on the catalog and select New then Version .
178 © 2011, 2012, 2013 SAP AG. All rights reserved. • P U B L I CSAP Cloud for Customer November 2013
Service and Social Settings
Consider the following when managing catalog versions: ● You can have only one active catalog per usage, for example for service requests, at any one time.
● Catalogs with overlapping periods and overlapping usages are not allowed.
The following example shows the correct way to use catalog versions.
Catalog 1 V1 from 1.1.2010 to 31.12.2010 for service requestsCatalog 1 V2 from 1.1.2011 to 31.12.9999 also for service requests
The following example shows the wrong way to use catalog versions. In this case, there are overlapping periods forthe same usage, service requests.
Catalog 1 V1 from 1.1.2010 to 31.12.2010 for service requestsCatalog 1 V2 from 1.8.2010 to 31.12.2010 also for service requests
Change Statuses and Delete a CatalogConsider the following when deleting a catalog or changing the status of a catalog:
● You can delete only catalogs that are In Preparation.
● You can set a released catalog back to In Preparation if the valid-from date has not yet been reached.
● Catalogs that have already been released and are in use cannot be deleted or modified. To remove the catalogfrom use, create a new version of the catalog, limit the valid-to date to today’s date, and release it.
7.2 Communication Channels
7.2.1 VIDEO: Setting Up E-mail Channels
Video
Setting Up E-Mail Channels (6m 15s)For Administrators: find out how to set up e-mail channels in your solution.
7.2.2 Configuring E-Mail Channels
You can set up your SAP Cloud for Customer system to include e-mail as a communication channel for creating andresponding to customer service tickets. Anytime a customer sends an e-mail to one of the defined addresses, a ticketis created and routed to a team or agent queue, based on the rules defined.
You have to set up the necessary mail relay in your e-mail server to map the system technical address, oraddresses if you're supporting both corporate and individual customers, to your customer facing e-mailaddresses. This basically routes e-mails sent to your addresses to a technical system address provided bySAP.
SAP Cloud for Customer November 2013Service and Social Settings P U B L I C • © 2011, 2012, 2013 SAP AG. All rights reserved. 179
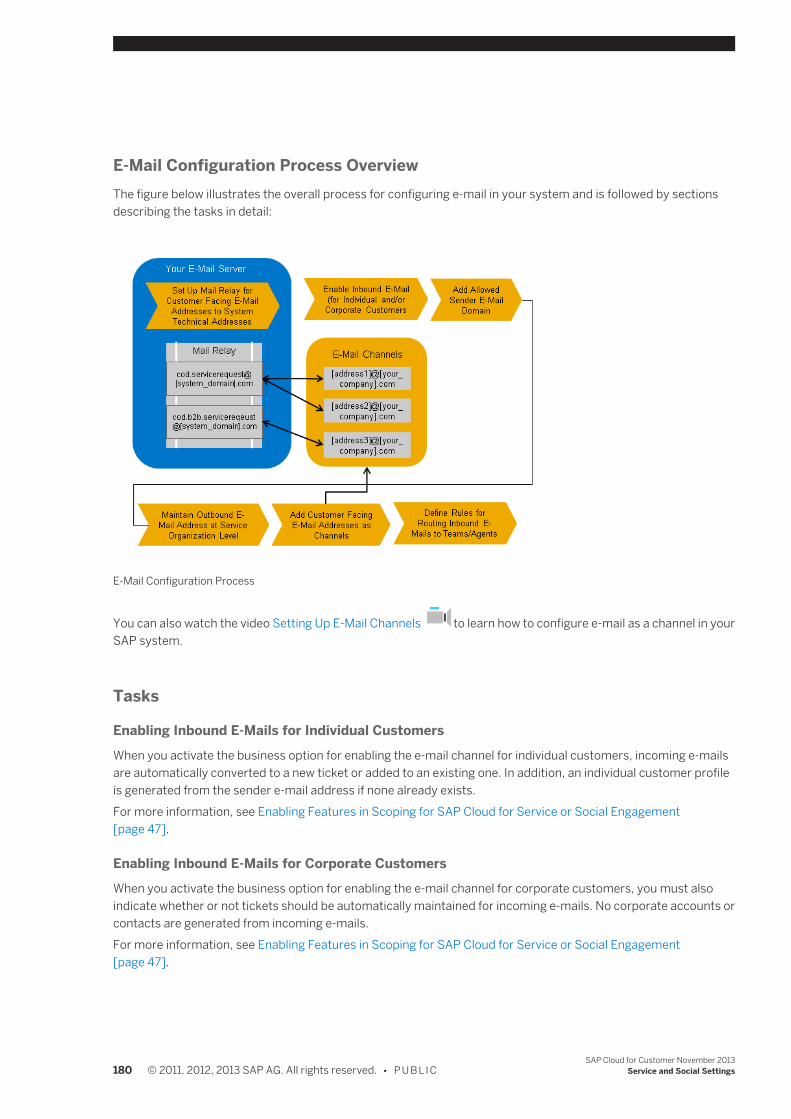
E-Mail Configuration Process OverviewThe figure below illustrates the overall process for configuring e-mail in your system and is followed by sectionsdescribing the tasks in detail:
E-Mail Configuration Process
You can also watch the video Setting Up E-Mail Channels to learn how to configure e-mail as a channel in yourSAP system.
Tasks
Enabling Inbound E-Mails for Individual CustomersWhen you activate the business option for enabling the e-mail channel for individual customers, incoming e-mailsare automatically converted to a new ticket or added to an existing one. In addition, an individual customer profileis generated from the sender e-mail address if none already exists.For more information, see Enabling Features in Scoping for SAP Cloud for Service or Social Engagement[page 47].
Enabling Inbound E-Mails for Corporate CustomersWhen you activate the business option for enabling the e-mail channel for corporate customers, you must alsoindicate whether or not tickets should be automatically maintained for incoming e-mails. No corporate accounts orcontacts are generated from incoming e-mails.For more information, see Enabling Features in Scoping for SAP Cloud for Service or Social Engagement[page 47].
180 © 2011, 2012, 2013 SAP AG. All rights reserved. • P U B L I CSAP Cloud for Customer November 2013
Service and Social Settings
Add Allowed Sender E-Mail DomainWhether you have opted to support incoming e-mails for corporate accounts or individual customers, you must addthe allowed e-mail domain for your outbound e-mail address—the e-mail address used to respond to customers.
1. Go to Business Configuration Implementation Projects .2. Select your project and click Open Activity List .3. Select the Fine-Tune tab.4. Go to the E-Mail and Fax Settings activity.5. Select E-Mail and Fax Settings.6. In the table for Allowed Sender E-Mail Domains, click Add .7. Add the domain for your outbound e-mails.8. Ensure that Send all e-mails to business partners is selected.9. Save your entries.
Maintain the Outbound E-Mail Address for Your Service OrganizationWhether you have opted to support incoming e-mails for corporate accounts or individual customers, you must addthe outbound e-mail address at the service organization level of your org structure to enable agents to respond viae-mail to customers.
1. Go to Administrator General Settings , then under Company, click Org Structures.For information on using org structures to set up teams for ticket handling, see here [page 98].
2. For the service organization node in your structure, define the outbound e-mail address—make sure it hasthe same domain as the sender e-mail domain you defined in fine-tuning.
If you want to define more than one outbound e-mail address, then you must set up multiple serviceorganization nodes in your org structure. A service organization is defined by selecting both the ServiceOrganization and Customer Service functions for the node.
a. Select the node and click Edit .b. On the Addresses tab, maintain the E-Mail.c. Save and activate your entries.
Enabling S/MIME SecurityTo add encryption security to e-mail channels, you can enable S/MIME to your solution.
1. Add e-mail security to your project scope. For more information, see Enabling Features in Scoping for SAPCloud for Service or Social Engagement [page 47].
2. Implement e-mail security for your solution.a. Choose Business Configuration, select your project from the list, and then click Open Activity List .b. Click Fine-Tune.c. Open E-Mail Encryption and Signature Check.d. In the list of incoming e-mails, set the Signature for SEOD Email Security - Business to Business
Scenario and SEOD Email Security - Business to Customer Scenario.Choose Check (and Reject if Untrusted) if you require a high level of security or choose Do Not Check ifyou do not have security requirements.
e. In the list of outgoing e-mails, set the Encryption and Signature for SEOD Email Security - Business toBusiness Scenario and SEOD Email Security - Business to Customer Scenario.
SAP Cloud for Customer November 2013Service and Social Settings P U B L I C • © 2011, 2012, 2013 SAP AG. All rights reserved. 181
The suggested settings are Encrypt if possible for Encryption, and Sign for Signature.f. Save your settings.
3. Activate your settings.a. Choose Administrator Common Tasks Configure S/MIME .b. Click Activate S/MIME.c. Select Check Signature of Incoming E-Mails to encrypt incoming e-mails.
Select Encrypt Outgoing E-Mails to encrypt outgoing e-mails. Select Signing Outgoing E-Mails for yoursolution to provide a signature to other systems.
The settings that you selected in Fine-Tuning will only be enabled if you activate them. If you do notactivate your settings, your system will not have security enabled.
4. Save your settings.
Adding E-Mail ChannelsYou need to add the inbound e-mail addresses you maintain for customer interaction as channels in the system inorder to enable routing of tickets based on those addresses.Once an e-mail is received by the system, the original inbound address is identified and a ticket is created for thecorresponding e-mail channel. Then, if you've defined them, routing rules based on that channel are implemented.
1. Go to Administrator Service and Social Settings , then under Communication Channels, click E-MailAddresses.
2. Click New.3. Enter the channel details and save your entries.
The e-mail address is now added as a channel in the system and can be used when defining ticket routing rules.
Adding a Default Account to an E-Mail ChannelIf your solution does not recognize the sender address of an incoming e-mail, the message is designated as anUnassociated E-Mail and no ticket is created. You have the option of adding a default e-mail account to each e-mailchannel so that whenever the sender address is unknown, the default account is assigned to the message and ticketis created.
The type of default e-mail account you assign must match the E-Mail Address type that you select for your e-mail channel.If your e-mail channel receives e-mail from individual customers, then you need to specify a default individualcustomers for the channel.If your e-mail channel receives e-mail from accounts, then you need to specify a default account for thechannel.
1. You need to create the default account or individual customer that will be assigned to unassociated e-mails.1. To create a default individual customer, see Individual Customers.2. To create a default account, see Accounts. Additionally, you need to create a default contact for the
default account. To create a default contact, see Contacts.2. After creating the default account or individual customer, go to Administrator Service and Social
Settings , then under Communication Channels, click E-Mail Addresses.3. Click New or Edit.
182 © 2011, 2012, 2013 SAP AG. All rights reserved. • P U B L I CSAP Cloud for Customer November 2013
Service and Social Settings
Enter or edit any necessary information. Select the default account or individual customer that you createdin Account Name and save your entries.
4. It is recommended that you discontinue the use of the Unassociated E-Mail view if you use a default accountfor e-mails.For more information about assigning work centers views, see Assign Access Rights in Business Users QuickGuide [page 107] .
The default account will now be added to unassociated e-mails and tickets will be created for these messages.
Adding a Branding Template to an E-Mail ChannelIn order to control the look and feel of e-mails sent by agents, you can add a branding template to your e-mailchannels. Then every time an e-mail is sent from one of those channels, the content is embedded within the brandingHTML.
1. You need to create the branding template to be used for the channel. For more information, see Document-Based E-Mail Templates [page 183].
2. Go to Administrator Service and Social Settings , then under Communication Channels, click E-MailAddresses.
3. Click New or Edit.4. Select the branding template you created from the available list for Template and save your changes.
Setting Up Routing Rules for Tickets from E-MailOnce you've added your e-mail channels, you can create work distribution rules to route the resulting tickets to theteams or agents assigned to work on them.For more information, see Defining Rules for Ticket Routing [page 166].
Business Communication Monitoring for E-MailYou can use business communication monitoring to verify whether e-mail messages have been transmittedsuccessfully or not. It creates transparency in that you know whether your business documents were sent as wellas received and by which process. If technical errors occur, they can be identified and resolved to prevent problemsin follow-on processes or with your business partner.For more information, see the Business Communication Monitoring Quick Guide [page 142].
7.2.3 Document-Based E-Mail Templates
Document-based e-mail templates use an uploaded HTML file as the body of outbound e-mails.
These can be used as follows: ● As part of the workflow notifications rules you define in the system
For information about creating e-mail templates for use with workflow notification rules, see Notification RulesQuick Guide [page 170].
● As branding templates that you assign to e-mail channelsFor more information about assigning branding templates to e-mail channels, see Configuring E-MailChannels [page 179].
● In conjunction with an enhancement option enabled via the SDK
SAP Cloud for Customer November 2013Service and Social Settings P U B L I C • © 2011, 2012, 2013 SAP AG. All rights reserved. 183
For more information about creating e-mail templates for use with the enhancement option, see EnablingDocument-Based E-Mail Templates for Notifications.
Tasks
Creating a Branding TemplateAs an administrator, you can create branding templates In order to control the look and feel of e-mails sent by agents.You then assign the branding template to an e-mail channel so that every time an e-mail is sent from that channel,the content is embedded within the branding HTML.Only document-based e-mail templates can be designated as branding templates.
1. Go to Customer Service Templates .2. Click New.3. Enter the template name.4. Select E-Mail as the template's channel type.5. Select Document-Based as the template's type.6. Select Branding Template.7. Enter the e-mail Subject line.8. Browse to the HTML file to be used as the template and save your entries.
The template is now available for selection when creating or editing e-mail channels to include a brandingtemplate.
Replacing or Previewing Document-Based E-Mail TemplatesRegardless of whether you created a document-based e-mail template as part of workflow notification rules, for usewith the enhancement option, or as a branding template, you can preview and replace the HTML file under Customer Service Templates .
1. From the list of templates, open the template you want to preview by clicking the template name.2. To change the file used for the template, click Replace , then browse to and select the new file.3. Save your changes.
7.3 Social Media
7.3.1 Enabling Social Media Features
Your SAP Cloud for Social Engagement solution is delivered with the social media features available but hidden. Asan administrator, you need to enable the social media features of the solution using Adaptation Mode.
1. To enter adaptation mode click Adapt, then choose Enter Adaptation Mode.2. Navigate to each of the screens listed below and make the screen edits indicated for each.
1. When you're on the screen you want to edit, click Adapt, then choose Edit Screen.2. Add or remove elements on the Screen Layout tab.3. Save your changes.
184 © 2011, 2012, 2013 SAP AG. All rights reserved. • P U B L I CSAP Cloud for Customer November 2013
Service and Social Settings
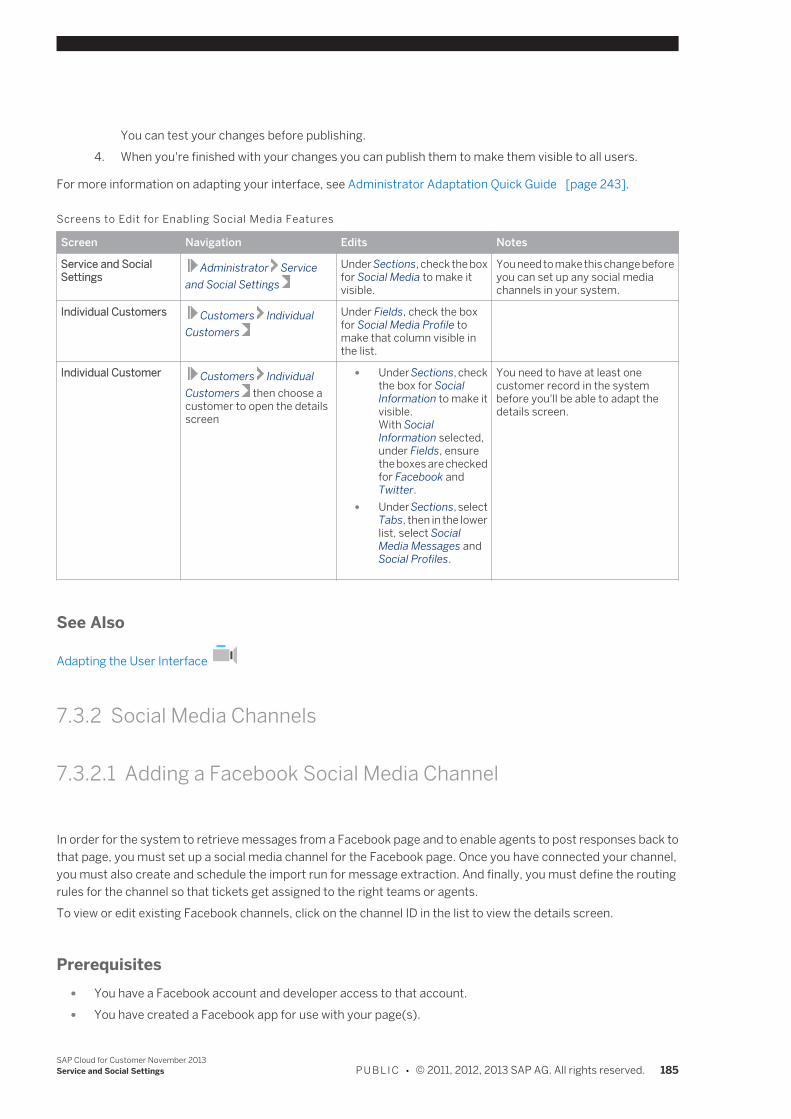
You can test your changes before publishing.4. When you're finished with your changes you can publish them to make them visible to all users.
For more information on adapting your interface, see Administrator Adaptation Quick Guide [page 243].
Screens to Edit for Enabling Social Media Features
Screen Navigation Edits Notes
Service and SocialSettings
Administrator Serviceand Social Settings
Under Sections, check the boxfor Social Media to make itvisible.
You need to make this change beforeyou can set up any social mediachannels in your system.
Individual Customers Customers IndividualCustomers
Under Fields, check the boxfor Social Media Profile tomake that column visible inthe list.
Individual Customer Customers IndividualCustomers then choose acustomer to open the detailsscreen
● Under Sections, checkthe box for SocialInformation to make itvisible.With SocialInformation selected,under Fields, ensurethe boxes are checkedfor Facebook andTwitter.
● Under Sections, selectTabs, then in the lowerlist, select SocialMedia Messages andSocial Profiles.
You need to have at least onecustomer record in the systembefore you'll be able to adapt thedetails screen.
See Also
Adapting the User Interface
7.3.2 Social Media Channels
7.3.2.1 Adding a Facebook Social Media Channel
In order for the system to retrieve messages from a Facebook page and to enable agents to post responses back tothat page, you must set up a social media channel for the Facebook page. Once you have connected your channel,you must also create and schedule the import run for message extraction. And finally, you must define the routingrules for the channel so that tickets get assigned to the right teams or agents.To view or edit existing Facebook channels, click on the channel ID in the list to view the details screen.
Prerequisites ● You have a Facebook account and developer access to that account. ● You have created a Facebook app for use with your page(s).
SAP Cloud for Customer November 2013Service and Social Settings P U B L I C • © 2011, 2012, 2013 SAP AG. All rights reserved. 185
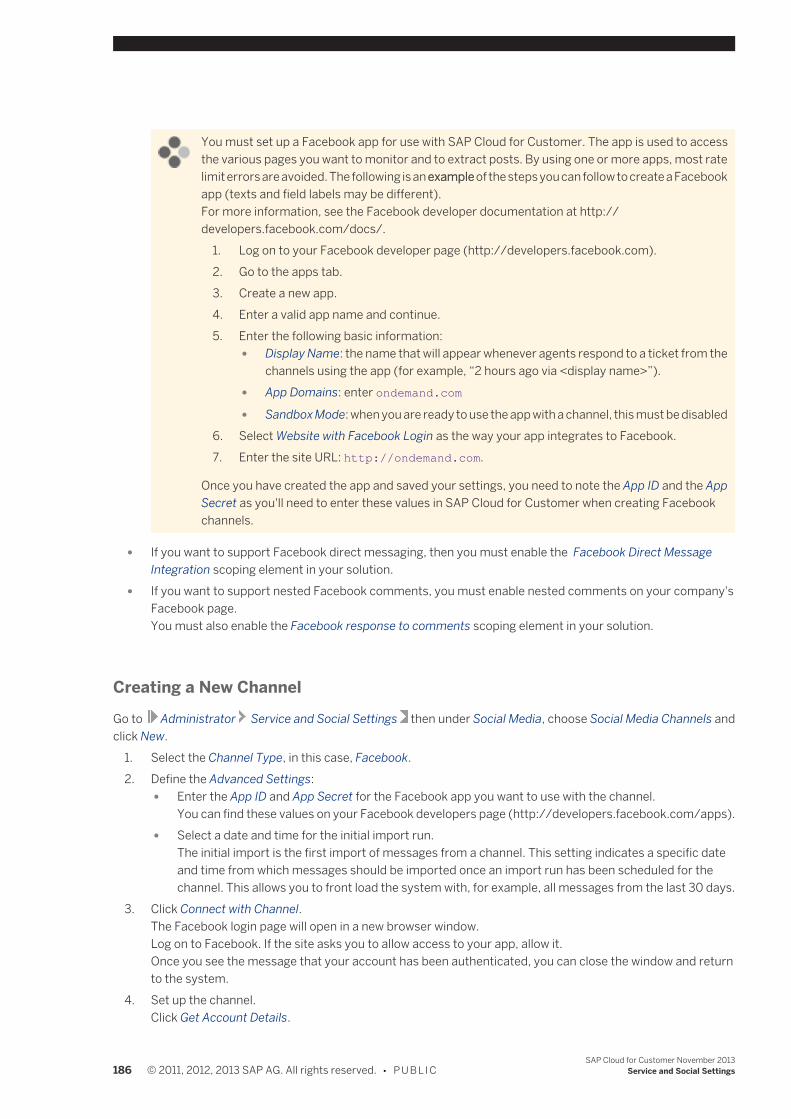
You must set up a Facebook app for use with SAP Cloud for Customer. The app is used to accessthe various pages you want to monitor and to extract posts. By using one or more apps, most ratelimit errors are avoided. The following is an example of the steps you can follow to create a Facebookapp (texts and field labels may be different).For more information, see the Facebook developer documentation at http://developers.facebook.com/docs/.
1. Log on to your Facebook developer page (http://developers.facebook.com).2. Go to the apps tab.3. Create a new app.4. Enter a valid app name and continue.5. Enter the following basic information:
● Display Name: the name that will appear whenever agents respond to a ticket from thechannels using the app (for example, “2 hours ago via <display name>”).
● App Domains: enter ondemand.com
● Sandbox Mode: when you are ready to use the app with a channel, this must be disabled6. Select Website with Facebook Login as the way your app integrates to Facebook.7. Enter the site URL: http://ondemand.com.
Once you have created the app and saved your settings, you need to note the App ID and the AppSecret as you'll need to enter these values in SAP Cloud for Customer when creating Facebookchannels.
● If you want to support Facebook direct messaging, then you must enable the Facebook Direct MessageIntegration scoping element in your solution.
● If you want to support nested Facebook comments, you must enable nested comments on your company'sFacebook page.You must also enable the Facebook response to comments scoping element in your solution.
Creating a New ChannelGo to Administrator Service and Social Settings then under Social Media, choose Social Media Channels andclick New.
1. Select the Channel Type, in this case, Facebook.2. Define the Advanced Settings:
● Enter the App ID and App Secret for the Facebook app you want to use with the channel.You can find these values on your Facebook developers page (http://developers.facebook.com/apps).
● Select a date and time for the initial import run.The initial import is the first import of messages from a channel. This setting indicates a specific dateand time from which messages should be imported once an import run has been scheduled for thechannel. This allows you to front load the system with, for example, all messages from the last 30 days.
3. Click Connect with Channel.The Facebook login page will open in a new browser window.Log on to Facebook. If the site asks you to allow access to your app, allow it.Once you see the message that your account has been authenticated, you can close the window and returnto the system.
4. Set up the channel.Click Get Account Details.
186 © 2011, 2012, 2013 SAP AG. All rights reserved. • P U B L I CSAP Cloud for Customer November 2013
Service and Social Settings
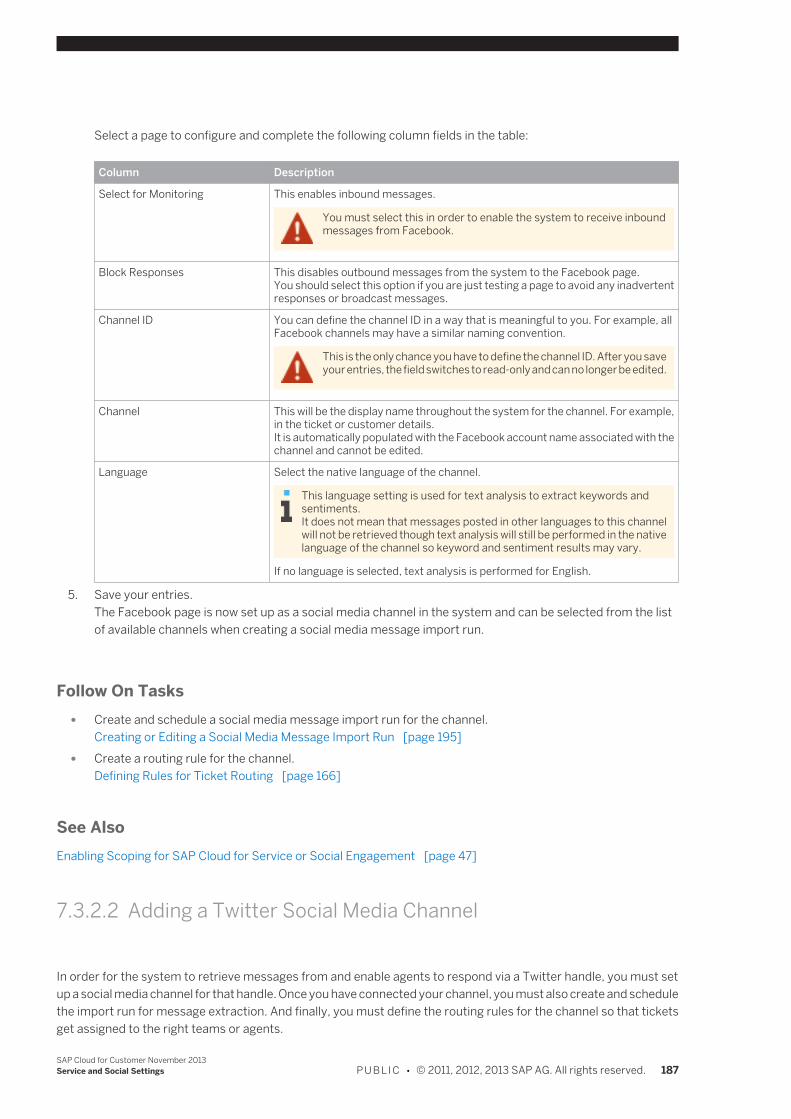
Select a page to configure and complete the following column fields in the table:
Column Description
Select for Monitoring This enables inbound messages.
You must select this in order to enable the system to receive inboundmessages from Facebook.
Block Responses This disables outbound messages from the system to the Facebook page.You should select this option if you are just testing a page to avoid any inadvertentresponses or broadcast messages.
Channel ID You can define the channel ID in a way that is meaningful to you. For example, allFacebook channels may have a similar naming convention.
This is the only chance you have to define the channel ID. After you saveyour entries, the field switches to read-only and can no longer be edited.
Channel This will be the display name throughout the system for the channel. For example,in the ticket or customer details.It is automatically populated with the Facebook account name associated with thechannel and cannot be edited.
Language Select the native language of the channel.
This language setting is used for text analysis to extract keywords andsentiments.It does not mean that messages posted in other languages to this channelwill not be retrieved though text analysis will still be performed in the nativelanguage of the channel so keyword and sentiment results may vary.
If no language is selected, text analysis is performed for English.
5. Save your entries.The Facebook page is now set up as a social media channel in the system and can be selected from the listof available channels when creating a social media message import run.
Follow On Tasks ● Create and schedule a social media message import run for the channel.
Creating or Editing a Social Media Message Import Run [page 195] ● Create a routing rule for the channel.
Defining Rules for Ticket Routing [page 166]
See AlsoEnabling Scoping for SAP Cloud for Service or Social Engagement [page 47]
7.3.2.2 Adding a Twitter Social Media Channel
In order for the system to retrieve messages from and enable agents to respond via a Twitter handle, you must setup a social media channel for that handle. Once you have connected your channel, you must also create and schedulethe import run for message extraction. And finally, you must define the routing rules for the channel so that ticketsget assigned to the right teams or agents.
SAP Cloud for Customer November 2013Service and Social Settings P U B L I C • © 2011, 2012, 2013 SAP AG. All rights reserved. 187

To view or edit existing Twitter channels, click on the channel ID in the list to view the details screen.
PrerequisitesYou have the logon information for the Twitter handle.
● You have a Twitter account and developer access to that account. ● You have created a Twitter application for use with your handle(s).
You must set up a Twitter application for use with SAP Cloud for Customer. The application is usedto access your Twitter account and to extract Tweets. By using one or more applications, mostrate limit errors are avoided. The following is an example of the steps you can follow to create aTwitter application (texts and field labels may be different).For more information, see the Twitter developer documentation http://dev.twitter.com/docs.
1. Log on to your Twitter developer page (http://dev.twitter.com).2. Go to your applications page.3. Create a new application.4. Complete the application details and save your entries.
For both the Website and the Callback URL, you should enter your SAP Cloud for Customertenant URL (http://<your tenant>.ondemand.com)
Once you have created the application and saved your settings, you need to note the Consumerkey and Consumer secret as you'll need to enter these values in SAP Cloud for Customer whencreating Twitter channels.
Creating a New ChannelGo to Administrator Service and Social Settings then under Social Media, choose Social Media Channels andclick New.
1. Select the Channel Type, in this case, Twitter.2. Define the Advanced Settings.
Enter the Consumer Key and Consumer Secret for the Twitter application you want to use with the channel.You can find these values on your Twitter developers page (http://dev.twitter.com/apps).
3. Click Connect with Channel.The Twitter logon page will open in a new browser window.Log on to your Twitter account and authorize the application.Once you see the message that your account has been authenticated, you can close the window and returnto the system
4. Set up the channel.Click Get Account Details.Complete the following channel settings:
188 © 2011, 2012, 2013 SAP AG. All rights reserved. • P U B L I CSAP Cloud for Customer November 2013
Service and Social Settings
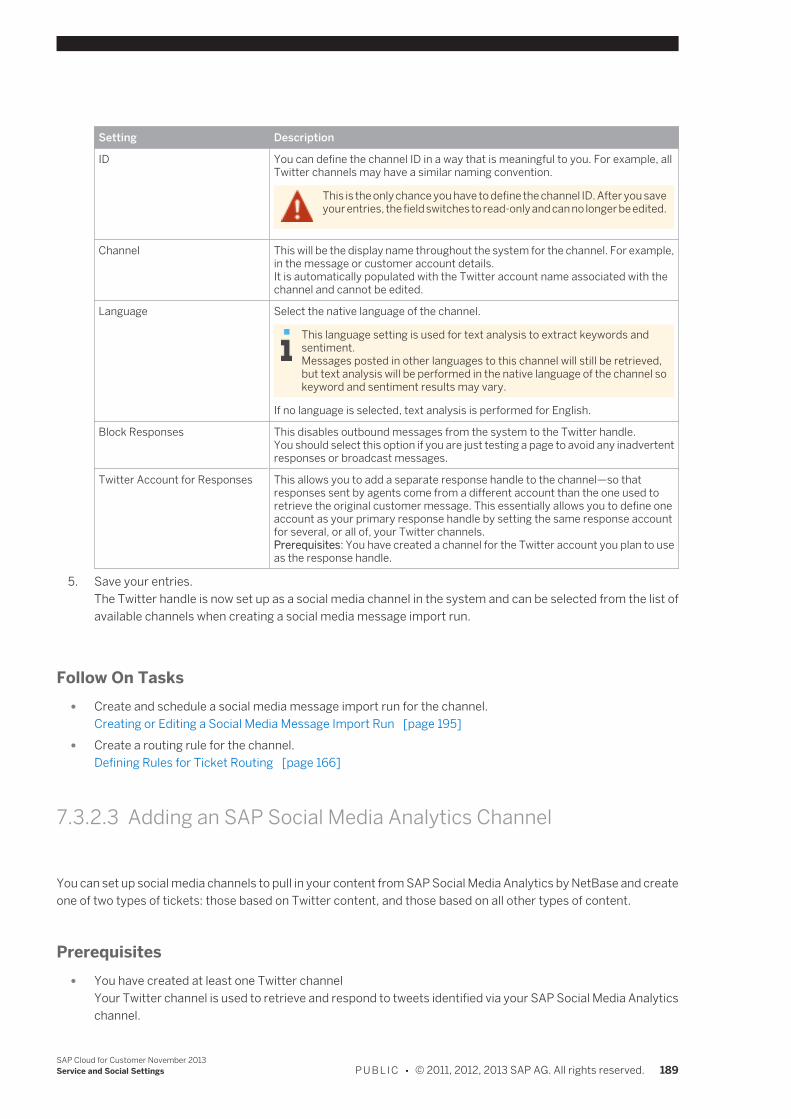
Setting Description
ID You can define the channel ID in a way that is meaningful to you. For example, allTwitter channels may have a similar naming convention.
This is the only chance you have to define the channel ID. After you saveyour entries, the field switches to read-only and can no longer be edited.
Channel This will be the display name throughout the system for the channel. For example,in the message or customer account details.It is automatically populated with the Twitter account name associated with thechannel and cannot be edited.
Language Select the native language of the channel.
This language setting is used for text analysis to extract keywords andsentiment.Messages posted in other languages to this channel will still be retrieved,but text analysis will be performed in the native language of the channel sokeyword and sentiment results may vary.
If no language is selected, text analysis is performed for English.
Block Responses This disables outbound messages from the system to the Twitter handle.You should select this option if you are just testing a page to avoid any inadvertentresponses or broadcast messages.
Twitter Account for Responses This allows you to add a separate response handle to the channel—so thatresponses sent by agents come from a different account than the one used toretrieve the original customer message. This essentially allows you to define oneaccount as your primary response handle by setting the same response accountfor several, or all of, your Twitter channels.Prerequisites: You have created a channel for the Twitter account you plan to useas the response handle.
5. Save your entries.The Twitter handle is now set up as a social media channel in the system and can be selected from the list ofavailable channels when creating a social media message import run.
Follow On Tasks ● Create and schedule a social media message import run for the channel.
Creating or Editing a Social Media Message Import Run [page 195] ● Create a routing rule for the channel.
Defining Rules for Ticket Routing [page 166]
7.3.2.3 Adding an SAP Social Media Analytics Channel
You can set up social media channels to pull in your content from SAP Social Media Analytics by NetBase and createone of two types of tickets: those based on Twitter content, and those based on all other types of content.
Prerequisites ● You have created at least one Twitter channel
Your Twitter channel is used to retrieve and respond to tweets identified via your SAP Social Media Analyticschannel.
SAP Cloud for Customer November 2013Service and Social Settings P U B L I C • © 2011, 2012, 2013 SAP AG. All rights reserved. 189
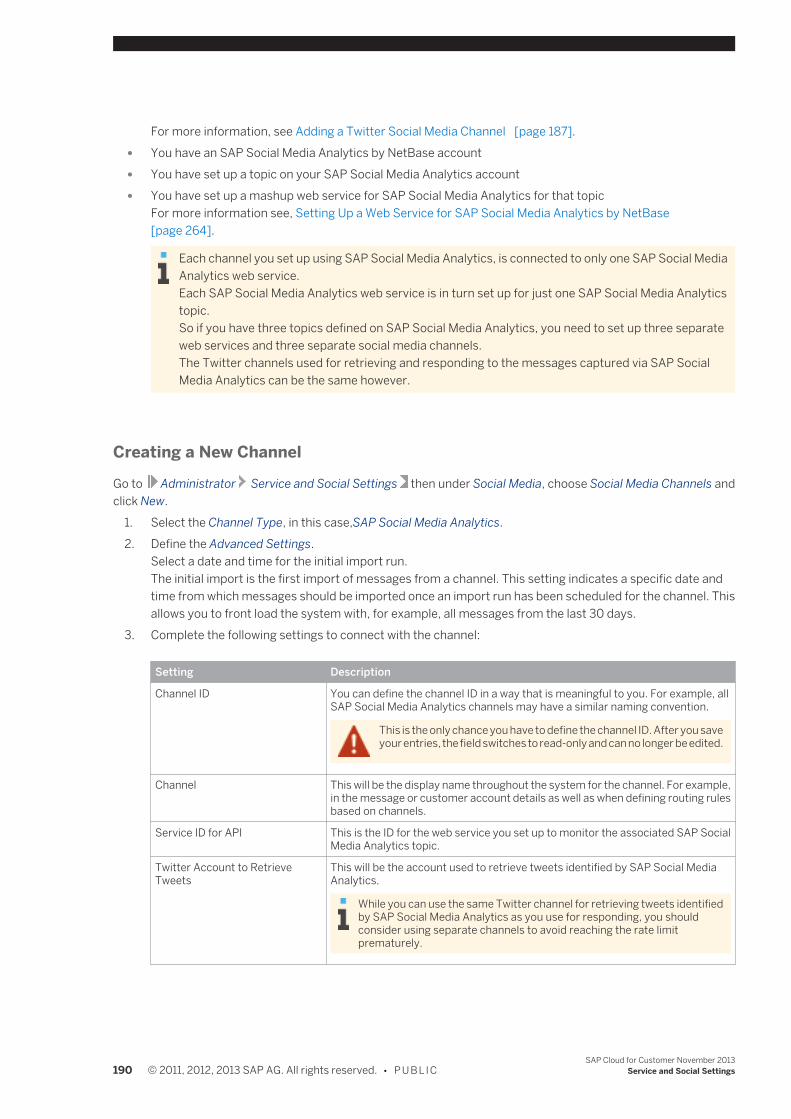
For more information, see Adding a Twitter Social Media Channel [page 187]. ● You have an SAP Social Media Analytics by NetBase account ● You have set up a topic on your SAP Social Media Analytics account ● You have set up a mashup web service for SAP Social Media Analytics for that topic
For more information see, Setting Up a Web Service for SAP Social Media Analytics by NetBase[page 264].
Each channel you set up using SAP Social Media Analytics, is connected to only one SAP Social MediaAnalytics web service.Each SAP Social Media Analytics web service is in turn set up for just one SAP Social Media Analyticstopic.So if you have three topics defined on SAP Social Media Analytics, you need to set up three separateweb services and three separate social media channels.The Twitter channels used for retrieving and responding to the messages captured via SAP SocialMedia Analytics can be the same however.
Creating a New ChannelGo to Administrator Service and Social Settings then under Social Media, choose Social Media Channels andclick New.
1. Select the Channel Type, in this case,SAP Social Media Analytics.2. Define the Advanced Settings.
Select a date and time for the initial import run.The initial import is the first import of messages from a channel. This setting indicates a specific date andtime from which messages should be imported once an import run has been scheduled for the channel. Thisallows you to front load the system with, for example, all messages from the last 30 days.
3. Complete the following settings to connect with the channel:
Setting Description
Channel ID You can define the channel ID in a way that is meaningful to you. For example, allSAP Social Media Analytics channels may have a similar naming convention.
This is the only chance you have to define the channel ID. After you saveyour entries, the field switches to read-only and can no longer be edited.
Channel This will be the display name throughout the system for the channel. For example,in the message or customer account details as well as when defining routing rulesbased on channels.
Service ID for API This is the ID for the web service you set up to monitor the associated SAP SocialMedia Analytics topic.
Twitter Account to RetrieveTweets
This will be the account used to retrieve tweets identified by SAP Social MediaAnalytics.
While you can use the same Twitter channel for retrieving tweets identifiedby SAP Social Media Analytics as you use for responding, you shouldconsider using separate channels to avoid reaching the rate limitprematurely.
190 © 2011, 2012, 2013 SAP AG. All rights reserved. • P U B L I CSAP Cloud for Customer November 2013
Service and Social Settings
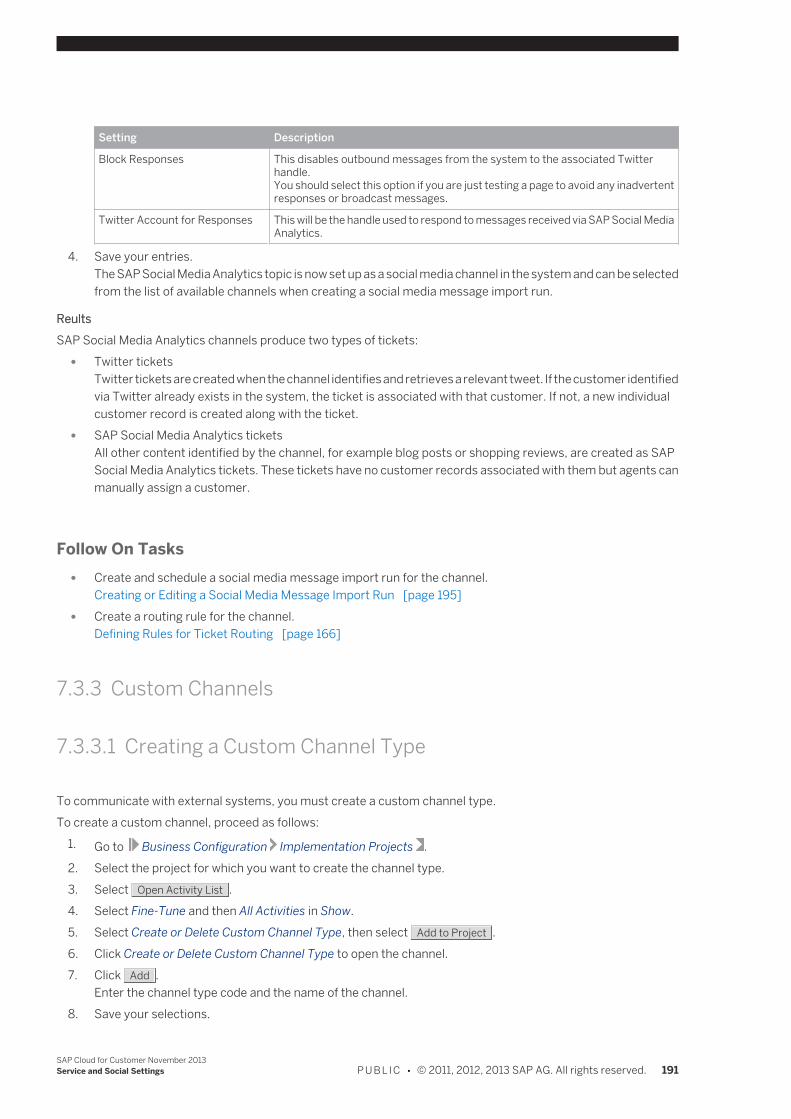
Setting Description
Block Responses This disables outbound messages from the system to the associated Twitterhandle.You should select this option if you are just testing a page to avoid any inadvertentresponses or broadcast messages.
Twitter Account for Responses This will be the handle used to respond to messages received via SAP Social MediaAnalytics.
4. Save your entries.The SAP Social Media Analytics topic is now set up as a social media channel in the system and can be selectedfrom the list of available channels when creating a social media message import run.
ReultsSAP Social Media Analytics channels produce two types of tickets:
● Twitter ticketsTwitter tickets are created when the channel identifies and retrieves a relevant tweet. If the customer identifiedvia Twitter already exists in the system, the ticket is associated with that customer. If not, a new individualcustomer record is created along with the ticket.
● SAP Social Media Analytics ticketsAll other content identified by the channel, for example blog posts or shopping reviews, are created as SAPSocial Media Analytics tickets. These tickets have no customer records associated with them but agents canmanually assign a customer.
Follow On Tasks ● Create and schedule a social media message import run for the channel.
Creating or Editing a Social Media Message Import Run [page 195] ● Create a routing rule for the channel.
Defining Rules for Ticket Routing [page 166]
7.3.3 Custom Channels
7.3.3.1 Creating a Custom Channel Type
To communicate with external systems, you must create a custom channel type.To create a custom channel, proceed as follows:
1. Go to Business Configuration Implementation Projects .2. Select the project for which you want to create the channel type.3. Select Open Activity List .4. Select Fine-Tune and then All Activities in Show.5. Select Create or Delete Custom Channel Type, then select Add to Project .6. Click Create or Delete Custom Channel Type to open the channel.7. Click Add .
Enter the channel type code and the name of the channel.8. Save your selections.
SAP Cloud for Customer November 2013Service and Social Settings P U B L I C • © 2011, 2012, 2013 SAP AG. All rights reserved. 191
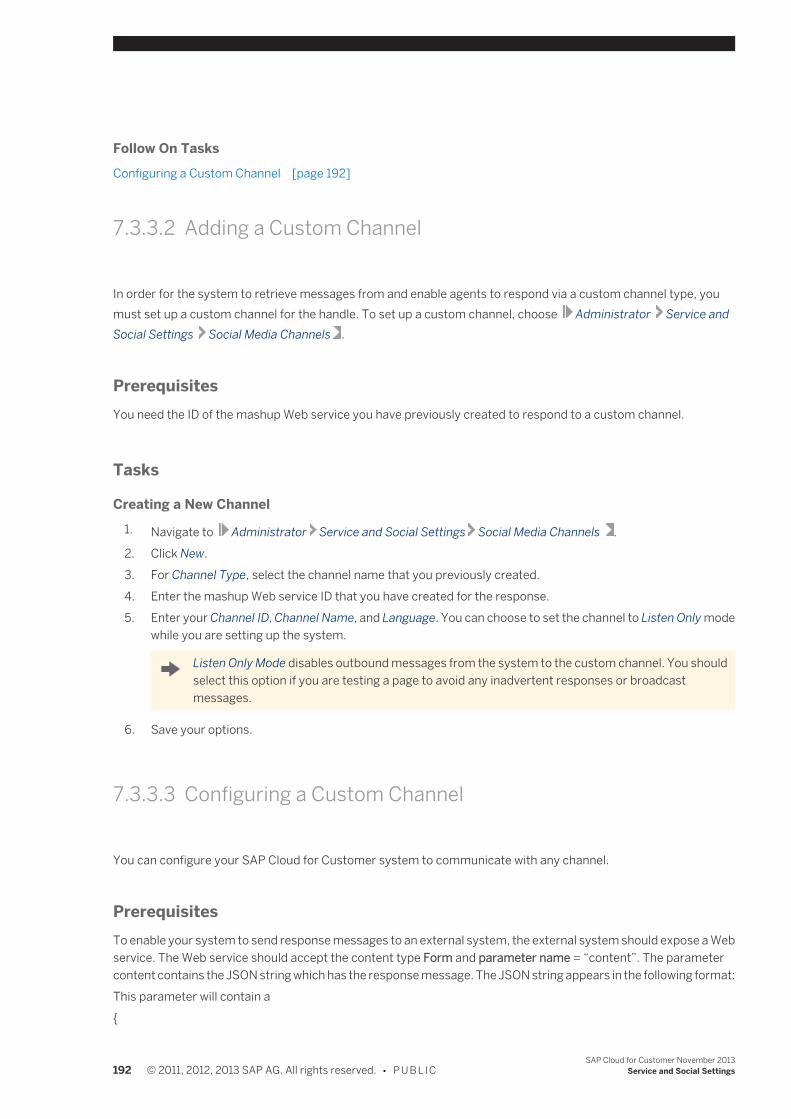
Follow On TasksConfiguring a Custom Channel [page 192]
7.3.3.2 Adding a Custom Channel
In order for the system to retrieve messages from and enable agents to respond via a custom channel type, youmust set up a custom channel for the handle. To set up a custom channel, choose Administrator Service andSocial Settings Social Media Channels .
PrerequisitesYou need the ID of the mashup Web service you have previously created to respond to a custom channel.
Tasks
Creating a New Channel1. Navigate to Administrator Service and Social Settings Social Media Channels .2. Click New.3. For Channel Type, select the channel name that you previously created.4. Enter the mashup Web service ID that you have created for the response.5. Enter your Channel ID, Channel Name, and Language. You can choose to set the channel to Listen Only mode
while you are setting up the system.
Listen Only Mode disables outbound messages from the system to the custom channel. You shouldselect this option if you are testing a page to avoid any inadvertent responses or broadcastmessages.
6. Save your options.
7.3.3.3 Configuring a Custom Channel
You can configure your SAP Cloud for Customer system to communicate with any channel.
PrerequisitesTo enable your system to send response messages to an external system, the external system should expose a Webservice. The Web service should accept the content type Form and parameter name = “content”. The parametercontent contains the JSON string which has the response message. The JSON string appears in the following format:This parameter will contain a{
192 © 2011, 2012, 2013 SAP AG. All rights reserved. • P U B L I CSAP Cloud for Customer November 2013
Service and Social Settings
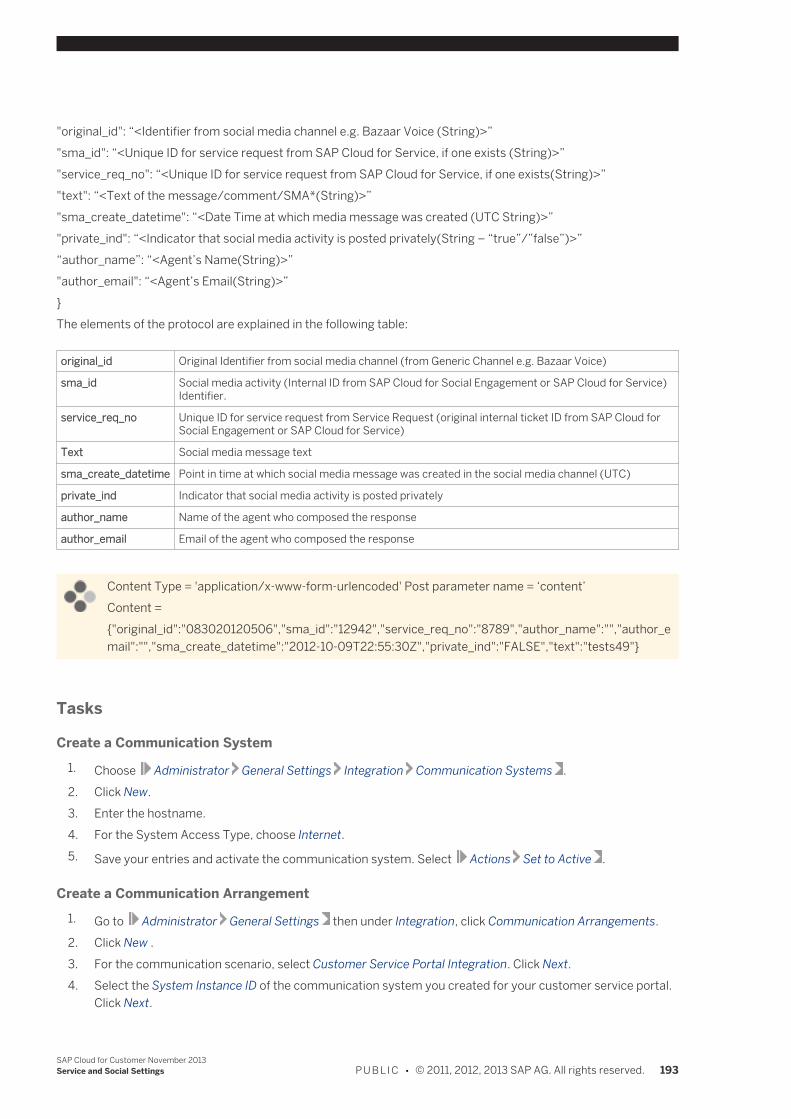
"original_id": “<Identifier from social media channel e.g. Bazaar Voice (String)>”"sma_id": “<Unique ID for service request from SAP Cloud for Service, if one exists (String)>”"service_req_no": “<Unique ID for service request from SAP Cloud for Service, if one exists(String)>”"text": “<Text of the message/comment/SMA*(String)>”"sma_create_datetime": “<Date Time at which media message was created (UTC String)>”"private_ind": “<Indicator that social media activity is posted privately(String – “true”/”false”)>”“author_name”: “<Agent’s Name(String)>”"author_email": “<Agent’s Email(String)>”}The elements of the protocol are explained in the following table:
original_id Original Identifier from social media channel (from Generic Channel e.g. Bazaar Voice)
sma_id Social media activity (Internal ID from SAP Cloud for Social Engagement or SAP Cloud for Service)Identifier.
service_req_no Unique ID for service request from Service Request (original internal ticket ID from SAP Cloud forSocial Engagement or SAP Cloud for Service)
Text Social media message text
sma_create_datetime Point in time at which social media message was created in the social media channel (UTC)
private_ind Indicator that social media activity is posted privately
author_name Name of the agent who composed the response
author_email Email of the agent who composed the response
Content Type = 'application/x-www-form-urlencoded' Post parameter name = ‘content’Content ={"original_id":"083020120506","sma_id":"12942","service_req_no":"8789","author_name":"","author_email":"","sma_create_datetime":"2012-10-09T22:55:30Z","private_ind":"FALSE","text":"tests49"}
Tasks
Create a Communication System1. Choose Administrator General Settings Integration Communication Systems .2. Click New.3. Enter the hostname.4. For the System Access Type, choose Internet.5. Save your entries and activate the communication system. Select Actions Set to Active .
Create a Communication Arrangement1. Go to Administrator General Settings then under Integration, click Communication Arrangements.2. Click New .3. For the communication scenario, select Customer Service Portal Integration. Click Next.4. Select the System Instance ID of the communication system you created for your customer service portal.
Click Next.
SAP Cloud for Customer November 2013Service and Social Settings P U B L I C • © 2011, 2012, 2013 SAP AG. All rights reserved. 193
5. For Authentication Method, User ID and Password is the recommended option.6. Click Edit Credentials and enter the user and password information for the Web site. Click Next.7. A check for completeness is recommended.8. Click Finish. The communication arrangement is saved and activated.
Information for Your Customer Service Portal PartnerIf you partner with another provider, you need to provide them with the information they need to consume theservices related to chat and ticket integration.
1. From the Communications Arrangements screen, click on the communication scenario you created for yourcustomer service portal.
2. In the list of Inbound Communication Services, select a service and click Download WSDL. Additionally, ifDisplay Documentation is active, you can review the technical documentation associated with the service.
3. Continue downloading the WSDL for each service in the list and provide the complete set to your customerservice portal partner.
Follow-On TasksSetting up a Mashup Web Service for a Custom Channel [page 194]
7.3.3.4 Setting up a Mashup Web Service for a Custom Channel
This mashup is required to respond to a custom channel.
Each channel you set up using SAP Social Media Analytics is connected to only one SAP Social MediaAnalytics topic. Each SAP Social Media Analytics topic also needs a separate Web service. For example,if you have three topics defined on SAP Social Media Analytics that you want to use to monitor your customchannel, you need to set up three separate Web services and three separate social media channels.The custom channel used for responding to the messages captured via SAP Social Media Analytics canbe the same.For more information on setting up Twitter social media channels using SAP Social Media Analytics, seeAdding an SAP Social Media Analytics Social Media Channel.
Prerequisites• You have set up the channel type• You have a Web service URL that accepts the standard response JSON interface.
Tasks
Creating the Mashup Web Service1. Choose Administrator Business Flexibility Mashup Web Services .2. Click New. The recommended service to select is the REST Service.
194 © 2011, 2012, 2013 SAP AG. All rights reserved. • P U B L I CSAP Cloud for Customer November 2013
Service and Social Settings
A SOAP service can be used, but the REST service is recommended.
3. Enter the required information as follows: ● Enter the Service Name ● Choose an Authentication Method based on your needs. Fields for user name and password will appear. ● Enter your SAP Social Media Analytics user name and password. ● For Service Protocol, choose XML. ● For HTTP Method, choose POST. ● Enter the URL from the Web service that you have setup.
4. In the Input Parameters section, add rows to the table for each parameter defined for your channel.5. Save your entries.
The Service ID for the newly created Web service must be entered manually when creating the associatedcustom channel. For more information, see Adding an SAP Social Media Analytics Social Media Channel.
Follow On TasksAdding A Custom Channel Type [page 192]
7.3.4 Social Media Message Import Runs
7.3.4.1 Creating or Editing a Social Media Message Import Run
In order for the system to extract messages from your social media channels, you need to first create and thenschedule a social media message import run for each channel.We recommend creating just one import run for each social media channel. Once you've create a channel, click onthe channel ID to go to the channel details where you can create, schedule, and monitor the import run.
PrerequisitesYou have created and activated the social media channel for which you plan to create an import run.For more information see:
● Adding a Facebook Social Media Channel [page 185] ● Adding a Twitter Social Media Channel [page 187] ● Adding an SAP Social Media Analytics by NetBase Social Media Channel [page 189]
SAP Cloud for Customer November 2013Service and Social Settings P U B L I C • © 2011, 2012, 2013 SAP AG. All rights reserved. 195
Tasks
Creating an Import Run1. Choose the channel for which you want to create the import run by clicking the associated Channel ID in the
list of social media channels. Administrator Service and Social Media Settings Social Media Social Media Channels
2. Click Create Run.If this option is not available, then the channel already has an import run associated with it. You can still makechanges to the run by clicking the Run ID.
3. Enter a Run Description and in the table, click Add Row .4. If you know the Channel ID, begin typing it and the system will suggest matches—select one and press
Enter . Otherwise, click the value help icon to choose from the list of available channels.
5. Save your entries.Your import run is saved and set to status, In Preparation.
6. To activate the import run so that you can schedule it, click Actions , then Activate.
Editing an Import Run1. Click the Run ID and on the run details screen, click Edit .2. Make your changes to the run and save your entries.
The status is not changed when you edit an import run. So if you add a channel to an active run,for example, and that run has already been scheduled, the newly added channel will be includedduring the next scheduled message import.
Setting an Import Run to ObsoleteIf you have a social media message import run that you no longer need or want to have available for scheduling, youcannot delete it but must instead set the status to obsolete.Click the Run ID and on the run details screen, click Actions , then Set to Obsolete.
Any scheduled jobs for this run will be cancelled and the run can no longer be scheduled.
Reactivating an Obsolete Import Run1. Click on the Run ID and on the run details screen, click Actions , then Set to In Revision.
This sets the status to In Revision.2. Click Actions , then Set to Active.
See AlsoScheduling a Social Media Message Import Run [page 197]Monitoring a Social Media Message Import Run [page 198]
196 © 2011, 2012, 2013 SAP AG. All rights reserved. • P U B L I CSAP Cloud for Customer November 2013
Service and Social Settings
7.3.4.2 Scheduling a Social Media Message Import Run
Once you have created a social media message import run, you need to schedule it to retrieve the messages fromthe associated channel. Once you have set up a schedule for an import run, each instance of that run is an individualjob that you can review, cancel or reschedule.
PrerequisitesThe import run is active.
Tasks
Scheduling an Import Run1. Choose the channel for which you want to schedule the import run by clicking the associated Channel ID in
the list of social media channels. Administrator Service and Social Settings Social Media Social Media Channels
2. Click Schedule.3. Select one of the scheduling options described in the table below and save your entries.
Schedule Description
StartImmediately
This option will run the import job immediately and only once.
Run After Job This option will run the import job after the designated job each time that job is run.If you know the Run ID of the job you want your import job to run after, begin typing it and the systemwill suggest matches—select one and press Enter . Alternatively, click the value help icon tochoose from the list of available jobs.
Single Run This option will run the import job exactly once on the specified date and time.
Recurrence This option will run the import job on a regular schedule based on the specified parameters.
In order to reduce system load, import jobs for a single import run should not be scheduledto run any less than every five minutes.You can schedule multiple import runs in parallel however.
Rescheduling or Cancelling an Import Run Job1. From the channel details, click View Jobs.2. Ensure the list is filtered to show the Scheduled Jobs for this run.
These are the import run jobs that are scheduled to take place in the future. The other filter, Run Jobs, arethe import run jobs that have already taken place.
3. To reschedule a job, click Reschedule .Specify the scheduling options and save your entries.
4. To cancel a job, click Cancel Job .
SAP Cloud for Customer November 2013Service and Social Settings P U B L I C • © 2011, 2012, 2013 SAP AG. All rights reserved. 197
See AlsoMonitoring a Social Media Message Import Run [page 198]Creating or Editing a Social Media Message Import Run [page 195]
7.3.4.3 Monitoring a Social Media Message Import Run
Once you have created and scheduled a social media message import run, you can review the individual job detailsfor more information, for example, how many new messages were created. Also, if anything goes wrong during aspecific job, the log will include messages with additional information.
Tasks
Reviewing Import Run JobsFor each social media message import run you have scheduled, there are the jobs which have already finished andthose that are still scheduled. For more information on rescheduling or cancelling scheduled jobs, see Scheduling aSocial Media Message Import Run [page 197].
1. Choose the channel for which you want to review the import run jobs by clicking the associated Channel ID inthe list of social media channels. Administrator Service and Social Settings Social Media Social Media Channels .
2. Click View Job.3. In the list filter, select Run Jobs from the drop down menu.
All finished or running jobs for the import run are displayed in the table along with their start and end datesand times as well as a brief description of any errors that may have occurred.
4. To look at the technical details of a job, select the table row for that job and click View Job Log .For more details, for example if an error occurred during the import or how many new messages were created,review the execution logs for the import run.
Reviewing Import Run Execution LogsThe execution logs contain detailed information about each of the jobs finished for a specific import run. For example,if an error occurred during message import or if the import was successful, how many new messages were createdor updated with comments.
1. You can quickly review the latest execution logs for each social media channel directly from the list of channels.2. Select the table row for the channel you want to review.
The table below the list will show the last 5 logs for the import run for that channel.3. You can also review the execution logs for an import run from the channel details screen.4. Click the Application Log ID of the job you want to review.
The detail view of the log opens.
Log Details
Tab Description
General Displays summary and administrative data for the job.
198 © 2011, 2012, 2013 SAP AG. All rights reserved. • P U B L I CSAP Cloud for Customer November 2013
Service and Social Settings
Tab Description
Settings Displays settings, if any are defined.
Results Displays the detailed results of the job execution, for example how many new messages were created orhow many messages were updated with comments, as well as any error messages.
TroubleshootingIf errors occur during the execution of a social media message import run, the execution log details will include theassociated error messages on the Results tab. In some cases, the errors are specific enough to provide you withinformation on what may have gone wrong so that you can make corrections. In other cases, the errors are too broador are just unknown, for example an error occurs on the social media provider side and little or no information ispassed to your SAP solution on what may have gone wrong. The table below describes some of the more commonerrors you may experience and information on what you can check in the system.If an error occurs that you cannot correct, report an incident for support.
Import Run Execution Errors
Error Message More Information
An error occurred forsocial media activityprovider:(there may be severalvariations of thismessage, someincludingabbreviations like SMAprovider)
Check the social media channel indicated to make sure it has been configured properly.For information on setting up a Facebook channel, see here [page 185].For information on setting up a Twitter channel, see here [page 187].For information on setting up an SAP Social Media Analytics by NetBase channel, see here[page 189].
Exception duringadaptorcommunication withsocial media channels
There may have been an interruption in the communication between the solution and the social mediaprovider.
● Try rescheduling the job to see if the exception is cleared.For more information, see here [page 197].
● Check the social media channels included in the import run to make sure they have beenconfigured properly.
Message prioritizationfailed
Check that the message prioritization settings have been maintained.For more information, see here [page 199].
Processing of userprofile informationfailed
The user profile information was not retrieved from the social media provider. This may be due to atemporary communication issue with the social media provider.Try rescheduling the job to see if the exception is cleared.
Unable to fetch Kloutscore
This may be due to a temporary communication issue with Klout.Try rescheduling the job to see if the exception is cleared.
An error occurredduring text analysis
There may be an issue with the configuration of the integrated text analysis service.Try rescheduling the job to see if the exception is cleared before contacting support.
7.3.5 Configuring Social Media Message Prioritization Settings
When the system retrieves the messages posted by your customers via any of your social media channels, itautomatically assigns priority based on several factors. As part of your initial system setup, you need to configurethose prioritization settings. After go live, you may find it necessary to adjust your settings from time to time in orderto better reflect the actual message traffic and patterns.
SAP Cloud for Customer November 2013Service and Social Settings P U B L I C • © 2011, 2012, 2013 SAP AG. All rights reserved. 199
1. Go to Administrator Service and Social Settings , then under Social Media, click Maintain ActivityPrioritization Settings.
2. Enter the Customer Message values and the Message Priority Range values.For information on the settings and how they affect prioritization, refer to the following table:
Value Description
Original Message Weight Defines the weight assigned to the original customer message based on thefollowing factors:
● The sentiment identified, via text analysis, in the customer'smessage.For more information on how sentiment is assigned, see the TextAnalysis section below.
● The social influence of the customer.
We recommend an initial setting of 60%.
Crowd Weight Defines the weight assigned to the likes and comments associated with theoriginal message based on the following factors:
● The number of likes and comments on the message. ● The social influence of the people who liked or commented on the
message. ● The sentiment identified, via text analysis, in the comments
associated with the message.For more information on how sentiment is assigned, see the TextAnalysis section below.
We recommend an initial setting of 40%.
Multiplier for Major Problems Defines the proportional effect on the priority score of messages that areidentified, via text analysis, as major problems. The multiplier can be anywhole number between 1 and 5.For more information on how major problems are identified, see the TextAnalysis section below.
We recommend an initial setting of 2.
Lower Boundary for Medium Priority Defines the priority score above which a message will be assigned mediumpriority and below which a message will be assigned low priority.
We recommend an initial setting of 3.With the other recommended initial settings, the average messagewill have a score of 3.This value may need to shift over time as you see how theprioritization is effected by both your settings and the social influenceof customers and those who like and comment on the messages.
200 © 2011, 2012, 2013 SAP AG. All rights reserved. • P U B L I CSAP Cloud for Customer November 2013
Service and Social Settings
Value Description
Upper Boundary for Medium Priority Defines the priority score above which a message will be assigned highpriority and below which a message will be assigned medium priority.
We recommend an initial setting of 10.With the other recommended initial settings, a message with anegative sentiment and either a problem indicated or a high Kloutscore will have a score of 10. Setting the upper boundary higher than10 in this case would make the Klout score the main factor forcalculating message priority.This value may need to shift over time as you see how theprioritization is effected by both your settings and the social influenceof customers and those who like and comment on the messages.
3. Save your entries.
Only messages coming into the system after you save your settings will be prioritized based on thenew settings. The priority assigned to all existing messages will remain unchanged.
Text AnalysisSAP Cloud for Customer uses the linguistic analysis and extraction features of SAP BusinessObjects Data Servicesto perform text analysis on incoming customer messages. As a result, the following are identified:
● Sentiment ● Minor or Major Problem ● Keywords (such as product mentions)
The following table provides information about how sentiment is assigned according to patterns identified in amessage that express customer feelings:
Sentiment Description
Positive A positive opinion, such as: ● Great ● Excellent ● Nice ● Fine
Neutral An opinion that is neither positive nor negative, such as: ● OK ● Acceptable
Negative A negative opinion, such as: ● Bad ● Dislike ● Hate ● Terrible
Minor or Major Problem
Minor Problem Major Problem
An opinion describing an impediment the customer can workaround, such as “useless” or “faulty”
An opinion describing an impediment the customer cannotwork around, such as “broke down” or “not working”
SAP Cloud for Customer November 2013Service and Social Settings P U B L I C • © 2011, 2012, 2013 SAP AG. All rights reserved. 201
7.4 CTI
7.4.1 Enabling the Live Activity Pane
OverviewThe Live Activity pane allows agents to see detailed information for a telephone call in progress and make notes tothe phone activity generated for the call, if the agent has installed the SAP Cloud for Customer CTI Client Adapter.To enable the Live Activity pane, you need to enable two scoping questions and also assign the agent the PhoneActivity view.
Tasks
Scoping QuestionsAnswer the scoping questions for computer telephony integration according to Enabling Features in Scoping forSAP Cloud for Service or Social Engagement [page 47].
Phone Activities AssignmentAssign your employees the Phone Calls view of Activities. For more information, see Assign and Edit Access Rightsin Business Users Quick Guide [page 107].
7.4.2 Creating a Security Certificate for HTTPS-Enabled ComputerTelephony Integration (CTI)
PrerequisitesTo make outbound calls, you must have a partner CTI provider.
OverviewYou can enable HTTPS security for outbound phone calls made from your solution. To fully enable this feature, youwill need to create a security certificate using the command line.After you complete this process, end-users will be able to call customers directly from the solution without havingto navigate to another system.
202 © 2011, 2012, 2013 SAP AG. All rights reserved. • P U B L I CSAP Cloud for Customer November 2013
Service and Social Settings
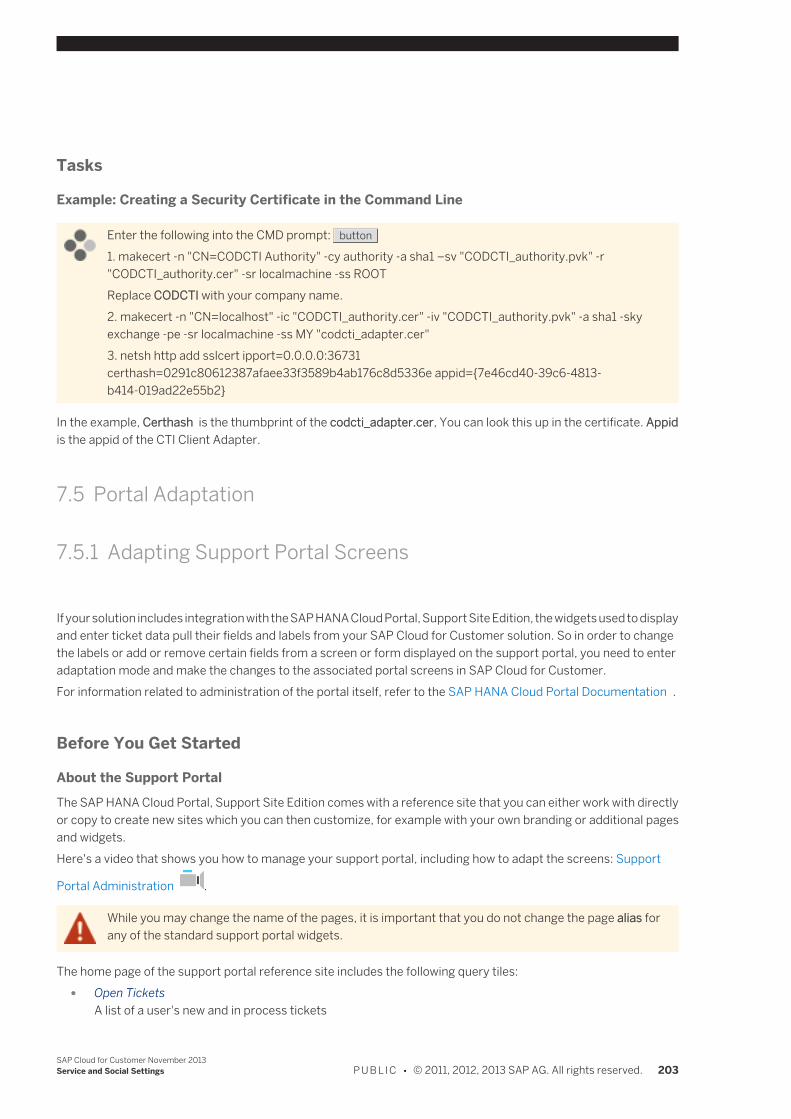
Tasks
Example: Creating a Security Certificate in the Command Line
Enter the following into the CMD prompt: button
1. makecert -n "CN=CODCTI Authority" -cy authority -a sha1 –sv "CODCTI_authority.pvk" -r"CODCTI_authority.cer" -sr localmachine -ss ROOTReplace CODCTI with your company name.2. makecert -n "CN=localhost" -ic "CODCTI_authority.cer" -iv "CODCTI_authority.pvk" -a sha1 -skyexchange -pe -sr localmachine -ss MY "codcti_adapter.cer"3. netsh http add sslcert ipport=0.0.0.0:36731certhash=0291c80612387afaee33f3589b4ab176c8d5336e appid={7e46cd40-39c6-4813-b414-019ad22e55b2}
In the example, Certhash is the thumbprint of the codcti_adapter.cer, You can look this up in the certificate. Appidis the appid of the CTI Client Adapter.
7.5 Portal Adaptation
7.5.1 Adapting Support Portal Screens
If your solution includes integration with the SAP HANA Cloud Portal, Support Site Edition, the widgets used to displayand enter ticket data pull their fields and labels from your SAP Cloud for Customer solution. So in order to changethe labels or add or remove certain fields from a screen or form displayed on the support portal, you need to enteradaptation mode and make the changes to the associated portal screens in SAP Cloud for Customer.For information related to administration of the portal itself, refer to the SAP HANA Cloud Portal Documentation .
Before You Get Started
About the Support PortalThe SAP HANA Cloud Portal, Support Site Edition comes with a reference site that you can either work with directlyor copy to create new sites which you can then customize, for example with your own branding or additional pagesand widgets.Here's a video that shows you how to manage your support portal, including how to adapt the screens: Support
Portal Administration .
While you may change the name of the pages, it is important that you do not change the page alias forany of the standard support portal widgets.
The home page of the support portal reference site includes the following query tiles: ● Open Tickets
A list of a user's new and in process tickets
SAP Cloud for Customer November 2013Service and Social Settings P U B L I C • © 2011, 2012, 2013 SAP AG. All rights reserved. 203
● Need ConfirmationA list of a user's tickets that need to be confirmed by the user
● High PriorityA list of a user's high priority, unsolved tickets
● No Recent UpdatesA list of a user's unsolved tickets with no agent activity for the last 7 days
● All TicketsA list of all tickets a user created via the portal (new, in process, and completed)
● Create New TicketA form allowing portal users to enter data and create new tickets
PrerequisitesSAP Cloud Services has set up and configured the integration between your SAP Cloud for Customer system andthe SAP HANA Cloud Portal, Support Site Edition, a separately licensed solution.For information on integrating your SAP Cloud for Customer system with SAP HANA Cloud Portal, Support SiteEdition, contact your SAP Cloud Services representative.
Tasks
Exposing Portal AdaptationThe screens you need to access for portal administration are hidden by default so you need to personalize yourService and Social Settings view of the Administrator tab.
1. Go to Administrator Service and Social Settings .2. Click Personalize, then choose This Screen.3. Under Sections, select Portal Configuration.4. Save your changes and close the personalization pane.
Adapting Screens1. Go to Administrator Service and Social Settings Portal Queue .2. Click Adapt, then choose Enter Adaptation Mode.3. Navigate to the screen you want to work with and then click Adapt Edit Screen .
The adaptation pane opens where you can select, deselect, reorder, and add screen elements.4. To add extension fields to support portal widgets, open the Extension Fields section.
You can create new fields or use existing extension fields.a. To create a new field, click Add .
● Extension fields are supported for the support portal widgets with the exception ofQuantity and Amount
● All dates displayed in the support portal widgets are in UTC format ● All number fields displayed in the support portal widgets use a period decimal separator
b. To add an existing field, select the Visible check box.c. For each extension field you want to make visible on the support portal widgets, select the field in the list
and review the field details displayed at the bottom of the pane.
204 © 2011, 2012, 2013 SAP AG. All rights reserved. • P U B L I CSAP Cloud for Customer November 2013
Service and Social Settings
d. Click Further Usage and go to the Services tab.e. Select the following services and click Add Field:
● Manage Service Request — General Information ● Manage tickets
5. Save your changes and review them before publishing them.Once you publish your changes, the screens and forms displayed by the support portal widgets will reflectyour adaptations.
Adaptations to this screen... ...are reflected in this Support Portal widget
Portal Queue TicketsHistorical Tickets
In order to allow your customers' portal site administrators tosee the e-mail address of the contact who created each ticket,you need to make the E-Mail field visible in the Portal Queuescreen.
New TicketFrom the list of tickets, click New to open thequick create. Then click to open theadaptation pane for the quick create form.
Create Ticket
Ticket DetailsFrom the list of tickets, click a ticket ID to openthe ticket details screen.
Ticket DetailA detailed view of a ticket
7.6 Marking an Individual Customer as Obsolete
By marking an individual customer as obsolete, for example if you find a duplicate record in your system, you disableany further processing of tickets for that individual customer. You can still review the customer record and anyassociated completed tickets.For SAP Cloud for Social Engagement, in order to support data privacy policies of the social media sites with whichthe system communicates, you need to be able to delete a customer's social media profile—typically upon requestby that customer. In this case, marking an individual customer record created as a result of an incoming social mediamessage as obsolete essentially deletes the social media profile. Any messages involving that customer can still bereviewed and displayed, but the customer-specific information will be removed and the customer field will indicatethat the customer record is now obsolete.
PrerequisitesAlthough the system does not require it, you should either transfer to other customers or close all new or in processtickets associated with the individual customer you intend to mark as obsolete.
Tasks1. Go to Administrator Common Tasks Manage Individual Customers .2. Select the table row for the individual customer you want to mark as obsolete and choose Mark as Obsolete.
No further processing is allowed for any tickets associated with the obsolete individual customer.If the individual customer was created via an incoming social media message:
SAP Cloud for Customer November 2013Service and Social Settings P U B L I C • © 2011, 2012, 2013 SAP AG. All rights reserved. 205
● The customer record and all identifying information are deleted from the system. ● Any associated tickets are updated to remove all customer-specific information and the customer details
link. ● Any associated tickets are updated to indicate that the ticket was originated by a now obsolete customer.
206 © 2011, 2012, 2013 SAP AG. All rights reserved. • P U B L I CSAP Cloud for Customer November 2013
Service and Social Settings
8 Sales and Marketing Settings
8.1 Configuring Sales Leads
With this activity you can do the configuration settings for sales leads.To find this activity, go to the Business Configuration work center and choose the Implementation Projects view.Select your implementation project and click Open Activity List . Select the Fine-Tune phase, then select the SalesLeads activity from the activity list.
Business Background
Party ProcessingBusiness partners is the superordinate term for all of the companies and people with whom you are in contact inyour daily business. Business partners can be, for example, accounts, contacts, partners, or employees. When youcreate a document such as a sales quote, you can indicate that business partners you created in the master dataare involved parties for this specific document. Roles are assigned to each party to define the party’s purpose.Business partners can take on multiple party roles in a business document. For example, often in sales quotes theaccount, ship-to, and bill-to party roles are identical.In SAP Cloud for Customer, you can automatically determine all involved parties for business transactions anddocuments using roles, determination rules, parties, addresses, and master data. The Involved Parties tab, forexample in a sales quote, displays all parties and contacts.For more information, see Party Processing for Cloud for Customer [page 450].
Tasks
Maintaining Involved Parties ● Adding or editing party roles
1. Click Maintain Involved Parties.2. Under Party Role Assignments click Add Row .3. Select a Party Role from the drop-down list.4. Decide whether the role should be, for example, active, mandatory, unique, or
should be forbidden for manual changes.5. Save your changes.6. Then click Maintain Determinations where you can edit the determination for the
newly added party role. ● Deleting role assignments
1. Select the line you want to delete.2. Click Delete .
SAP Cloud for Customer November 2013Sales and Marketing Settings P U B L I C • © 2011, 2012, 2013 SAP AG. All rights reserved. 207
You can delete only self-created assignments. Pre-delivered content cannot bedeleted.
Maintaining SourcesHere you can specify the origin of you documents, such as trade fair, campaign, and roadshow.
This list is used for marketing leads, opportunities, and sales leads depending on yourscoping. Though if you change an entry in one context it is also changed in the others.
Adding a Source1. Click Add Row .2. Enter a source code beginning with a Z and a description.
3. Save your entries.
Deleting a Source1. Select the entry you want to delete and click Delete .2. Save your changes.
If you delete entries here that are used in documents, the technical codes are stayingin the documents and only the code descriptions are removed.
Maintaining ReasonsWith this activity you can add and edit reasons for the success of a business case.
This list is used for sales leads and opportunities depending on your scoping. Though ifyou change an entry in one context it is also changed in the others.
Adding and Editing a Reason1. Click Add Row .2. Enter a Reason Code beginning with a Z and a Description.
You can also edit existing descriptions.3. Save your entries.
Deleting a Reason1. Select a line and click Delete .2. Save your changes.
If you delete entries here that are used in documents, the technical codes are stayingin the documents and only the code descriptions are removed.
Assigning ReasonsWith this activity you can assign reasons to a particular status. Depending of the documentstatus the assigned reasons are displayed.Assigning a Reason
1. To add a reason to a status select first an available Status and then click Add Row .
208 © 2011, 2012, 2013 SAP AG. All rights reserved. • P U B L I CSAP Cloud for Customer November 2013
Sales and Marketing Settings
2. Select a reason from the Assigned Reasons drop-down list you want to use.3. Save your changes.
Deleting a Reason Assignment1. To delete a reason assignment select it and click Delete .2. Then save your changes.
Maintaining CategoriesWith this activity you can add and delete your own categories for your documents. You canuse the categories to classify your documents.
This list is used for activities, marketing leads, opportunities, and sales leads dependingon your scoping. Though if you change an entry in one context it is also changed in theothers.
Adding a Category1. Click Add Row .2. Enter a Category Code beginning with a Z.
3. Save your entries.
Deleting a Category1. Select a line and click Delete .2. Save your changes.
You cannot delete all category assignments. At least one category must be assigned.If you delete entries here that are used in documents, the technical codes are stayingin the documents and only the code descriptions are removed.
Assigning CategoriesWith this activity you specify which of the categories you want to use to classify yourdocuments.
1. To add a category click Add Row and select the category you want to use.To delete a category select it and click Delete.
2. Then save your changes.
Maintaining QualificationsWith this activity you can adapt the qualifications that you use to classify how promising a leadis for your business.
This list is used for marketing and sales leads depending on your scoping. Though if youchange an entry in one context it is also changed in the other.
Adding or Editing Qualifications1. To add a qualification click Add Row .2. Enter a Qualification Code beginning with a Z and a Description.
You can also change the descriptions of the existing qualifications.3. Save your entries.
SAP Cloud for Customer November 2013Sales and Marketing Settings P U B L I C • © 2011, 2012, 2013 SAP AG. All rights reserved. 209
Deleting Qualifications1. Select the row you want to delete and click Delete .2. Save your changes.
If you delete entries here that are used in documents, the technical codes are stayingin the documents and only the code descriptions are removed.
8.2 Opportunities
8.2.1 Configuring Opportunities
In this activity you can do configuration settings required for opportunities.To find this activity, go to the Business Configuration work center and choose the Implementation Projects view.Select your implementation project and click Open Activity List . Select the Fine-Tune phase, then select theOpportunities activity from the activity list.
Business Background
Party ProcessingBusiness partners is the superordinate term for all of the companies and people with whom you are in contact inyour daily business. Business partners can be, for example, accounts, contacts, partners, or employees. When youcreate a document such as a sales quote, you can indicate that business partners you created in the master dataare involved parties for this specific document. Roles are assigned to each party to define the party’s purpose.Business partners can take on multiple party roles in a business document. For example, often in sales quotes theaccount, ship-to, and bill-to party roles are identical.In SAP Cloud for Customer, you can automatically determine all involved parties for business transactions anddocuments using roles, determination rules, parties, addresses, and master data. The Involved Parties tab, forexample in a sales quote, displays all parties and contacts.For more information, see Party Processing for Cloud for Customer [page 450].
Tasks
Maintaining Involved Parties ● Adding or editing party roles
1. Click Maintain Involved Parties.2. Under Party Role Assignments click Add Row .3. Select a Party Role from the drop-down list.4. Decide whether the role should be, for example, active, mandatory, unique, or
should be forbidden for manual changes.5. Save your changes.
210 © 2011, 2012, 2013 SAP AG. All rights reserved. • P U B L I CSAP Cloud for Customer November 2013
Sales and Marketing Settings
6. Then click Maintain Determinations where you can edit the determination for thenewly added party role.
● Deleting role assignments1. Select the line you want to delete.2. Click Delete .
You can delete only self-created assignments. Pre-delivered content cannot bedeleted.
Maintaining SourcesHere you can specify the origin of you documents, such as trade fair, campaign, and roadshow.
This list is used for marketing leads, opportunities, and sales leads depending on yourscoping. Though if you change an entry in one context it is also changed in the others.
Adding a Source1. Click Add Row .2. Enter a source code beginning with a Z and a description.
3. Save your entries.
Deleting a Source1. Select the entry you want to delete and click Delete .2. Save your changes.
If you delete entries here that are used in documents, the technical codes are stayingin the documents and only the code descriptions are removed.
Maintaining ReasonsWith this activity you can add and edit reasons for the success of a business case.
This list is used for sales leads and opportunities depending on your scoping. Though ifyou change an entry in one context it is also changed in the others.
Adding and Editing a Reason1. Click Add Row .2. Enter a Reason Code beginning with a Z and a Description.
You can also edit existing descriptions.3. Save your entries.
Deleting a Reason1. Select a line and click Delete .2. Save your changes.
If you delete entries here that are used in documents, the technical codes are stayingin the documents and only the code descriptions are removed.
SAP Cloud for Customer November 2013Sales and Marketing Settings P U B L I C • © 2011, 2012, 2013 SAP AG. All rights reserved. 211
Assigning ReasonsWith this activity you can assign reasons to a particular status. Depending of the documentstatus the assigned reasons are displayed.Assigning a Reason
1. To add a reason to a status select first an available Status and then click Add Row .2. Select a reason from the Assigned Reasons drop-down list you want to use.3. Save your changes.
Deleting a Reason Assignment1. To delete a reason assignment select it and click Delete .2. Then save your changes.
Maintaining CategoriesWith this activity you can add and delete your own categories for your documents. You canuse the categories to classify your documents.
This list is used for activities, marketing leads, opportunities, and sales leads dependingon your scoping. Though if you change an entry in one context it is also changed in theothers.
Adding a Category1. Click Add Row .2. Enter a Category Code beginning with a Z.
3. Save your entries.
Deleting a Category1. Select a line and click Delete .2. Save your changes.
You cannot delete all category assignments. At least one category must be assigned.If you delete entries here that are used in documents, the technical codes are stayingin the documents and only the code descriptions are removed.
Assigning CategoriesWith this activity you specify which of the categories you want to use to classify yourdocuments.
1. To add a category click Add Row and select the category you want to use.To delete a category select it and click Delete.
2. Then save your changes.
Maintaining Contact RolesWith this activity you can create new contact roles for your opportunities.Adding or Editing Contact Roles
1. To create a new contact role, click Add Row .2. Enter a Contact Role Code beginning with a Z and a Description.
212 © 2011, 2012, 2013 SAP AG. All rights reserved. • P U B L I CSAP Cloud for Customer November 2013
Sales and Marketing Settings
You can also edit existing descriptions.3. Save your entries.
Deleting Contact Roles1. Select the row you want to delete and click Delete .2. Save your changes.
Maintaining Document TypesWith this activity you can create own document types and use them in the system to filter yourdocuments and within the reports.Adding a Document Type
1. Click Maintain Document Types.2. Click Add Row and enter the required document type code and a description.3. Save your changes.
Deleting a Document Type1. Select the entry you want to delete and click Delete .2. Save your changes.
You can't delete used document types.
8.2.2 Maintaining Approval Settings for Opportunities
In this configuration activity, you perform settings that determine how opportunities in your system are approved,and whether a multiple step approval process for opportunities is to be active. You can also perform settings, in anassociated activity, that determine whether the system shall notify users via e-mail about opportunities for approval.By default, the approval process related to a business document in SAP Cloud for Customer always consists of onestep. However, some business processes may require more than one step to attain approval. Business processesthat consist of more than one step are called multistep approval processes.For more information, see Approval Processes [page 240].To maintain approval settings for opportunities, go to the Business Configuration work center and choose theImplementation Projects view. Select your implementation project and click Open Activity List . Select the Fine-Tune phase, then select the Approval for Opportunities activity from the activity list.
Prerequisites ● Activating Opportunities
Opportunities are enabled in your solution configuration. To find this business option, go to the BusinessConfiguration work center and choose the Implementation Projects view. Select your implementation projectand click Edit Project Scope . In the Scoping phase of the project, ensure that New Business is selected withinSales.
SAP Cloud for Customer November 2013Sales and Marketing Settings P U B L I C • © 2011, 2012, 2013 SAP AG. All rights reserved. 213
Configuration settings are usually performed by an administrator. If you do not have the requiredauthorization, contact your administrator.
● Activating Multistep Approval for OpportunitiesIn the Questions phase, expand the Sales scoping element and select New Business. Select Opportunities,then determine whether you want your system to use a multiple step approval process for opportunities. Also,determine whether you want your system to automatically submit opportunities for approval.
If you include a multiple step approval process for opportunities in your project scope, then werecommend that you exclude from your project scope the automatic submission of opportunities forapproval.
● Activating Notification RulesIn the Scoping phase of the project, ensure that Business Task Management is selected under BusinessProcess Management within Communication and Information Exchange.In the Questions phase, expand the Communication and Information Exchange and Business ProcessManagement scoping elements and select Business Task Management, then determine whether you wantyour system to use e-mail to notify business users about Business Task Management items.
● Configuring Approval Processes and Notification RulesTo complete configuration, select Administrator Workflow Approval Processes and, under Administrator Workflow Notification Rules .
To perform configuration settings for approval processes, ensure that you have assigned theApproval Processes work center view (APPROVALPROCESSES_WCVIEW) to the Administrator workcenter (SEODADMINWCF). To perform configuration settings for notification rules, ensure that youhave assigned the Notification Rules work center view (NOTIFICATION_DEFINITION) to theAdministrator work center.
Business Background
Approval ProcessesBy default, the approval process related to a business document in SAP Cloud for Customer always consists of onestep. However, some business processes may require more than one step to attain approval. Business processesthat consist of more than one step are called multistep approval processes.For more information, see Approval Processes [page 240].
Tasks
Edit the Available Task Types1. To adapt the task types for the approval of opportunities, select under Available Task
Types the task that you want to change.2. Change the Task Type Details as required.3. Save your changes.
214 © 2011, 2012, 2013 SAP AG. All rights reserved. • P U B L I CSAP Cloud for Customer November 2013
Sales and Marketing Settings
8.3 Sales Quotes
8.3.1 Configuring Sales Quotes
In this configuration activity you can edit your number ranges for your sales quotes, define document types in caseyou use A2X services for sales quotes, and decide which party roles you want to use in sales quotes.To find this activity, go to the Business Configuration work center and choose the Implementation Projects view.Select your implementation project and click Open Activity List . Select the Fine-Tune phase, then select the SalesQuotes activity from the activity list.
Business Background
Sales Quote ProcessingSales quote processing is used to offer products to customers according to specific terms with fixed conditions. Theseller is bound by the sales quote for a specific period of time. The sales quote is usually created by a salesrepresentative of the company. The system supports pricing capabilities.For more information, see Sales Quote Processing.
Party ProcessingBusiness partners is the superordinate term for all of the companies and people with whom you are in contact inyour daily business. Business partners can be, for example, accounts, contacts, partners, or employees. When youcreate a document such as a sales quote, you can indicate that business partners you created in the master dataare involved parties for this specific document. Roles are assigned to each party to define the party’s purpose.Business partners can take on multiple party roles in a business document. For example, often in sales quotes theaccount, ship-to, and bill-to party roles are identical.In SAP Cloud for Customer, you can automatically determine all involved parties for business transactions anddocuments using roles, determination rules, parties, addresses, and master data. The Involved Parties tab, forexample in a sales quote, displays all parties and contacts.For more information, see Party Processing for SAP Cloud for Customer [page 450].
Tasks
Maintaining the Number RangeIn this activity you can define within which number range your sales quotes should get theirdocument numbers.
1. Click Maintain Number Range.2. Adapt the Begin Number and End Number.3. Save your changes.
Maintaining Document TypesWith this activity you can create own document types and use them in the system to filter yourdocuments and within the reports.
SAP Cloud for Customer November 2013Sales and Marketing Settings P U B L I C • © 2011, 2012, 2013 SAP AG. All rights reserved. 215
Adding a Document Type1. Click Maintain Document Types.2. Click Add Row and enter the required document type code and a description.3. Save your changes.
Deleting a Document Type1. Select the entry you want to delete and click Delete .2. Save your changes.
You can't delete used document types.
Here you can also decide whether or not you want to use the process variant WithDirect Customer Acceptance. This variant means that a quote does not need anyprint out or a confirmation because the customer has already accepted the quotedirectly during the sales representative's visit.
Maintaining Involved Parties ● Adding or editing party roles
1. Click Maintain Involved Parties.2. Under Party Role Assignments click Add Row .3. Select a Party Role from the drop-down list.4. Decide whether the role should be, for example, active, mandatory, unique, or
should be forbidden for manual changes.5. Save your changes.6. Then click Maintain Determinations where you can edit the determination for the
newly added party role. ● Deleting role assignments
1. Select the line you want to delete.2. Click Delete .
You can delete only self-created assignments. Pre-delivered content cannot bedeleted.
8.3.2 Maintaining Approval Settings for Sales Quotes
This configuration activity is to maintain the settings for the required business task management.The Business Task Management view allows you to adapt the tasks for sales quotes to your processes.To find this activity, go to the Business Configuration work center and choose the Implementation Projects view.Select your implementation project and click Open Activity List . Select the Fine-Tune phase, then select the Approvalfor Sales Quotes activity from the activity list.
216 © 2011, 2012, 2013 SAP AG. All rights reserved. • P U B L I CSAP Cloud for Customer November 2013
Sales and Marketing Settings
Prerequisites ● Configuration Settings
Configuration settings are usually performed by an administrator. If you do not have the requiredauthorization, contact your administrator.
Sales quotes are enabled in your solution configuration. To find this business option, go to the BusinessConfiguration work center and choose the Implementation Projects view. Select your implementation projectand click Edit Project Scope . In the Scoping step of the project, ensure that New Business is selected withinSales.In the Questions step, expand the Sales scoping element and select New Business. Select Sales Quotes andinclude the question related to the multi step approval for sale quotes to the scope.
● To complete the scoping you need to do settings in the Administrator work center under ApprovalProcesses in order to define the approval process. Please consider that through scoping the approval processis already active.
Business Background
Approval ProcessesBy default, the approval process related to a business document in SAP Cloud for Customer always consists of onestep. However, some business processes may require more than one step to attain approval. Business processesthat consist of more than one step are called multistep approval processes.For more information, see Approval Processes [page 240].
Tasks
Edit the Available Task Types1. To adapt the task types for the approval of sales quotes, select under Available Task
Types the task that you want to change.2. Change the Task Type Details as required.3. Save your changes.
8.4 Sales Target Planning
Sales planning functions are performed by sales managers.
Although sales representatives cannot perform sales planning functions, they can review reports that containdata that is associated with these functions. For more information, see Working with Sales Planning Data.
PrerequisitesSales planning is activated. For more information, see Activating Sales Planning.
SAP Cloud for Customer November 2013Sales and Marketing Settings P U B L I C • © 2011, 2012, 2013 SAP AG. All rights reserved. 217
Business Background
Business PlanningPlanning for your business involves three different elements: strategic planning, financial planning, and operationalplanning. While strategic planning is a high-level management task and therefore takes place outside of the system,financial and operational planning are supported by tools and applications that have been designed to guide andsupport you in mastering your company’s planning and budgeting tasks. Compared with traditional spreadsheet-based approaches, the system's planning features improve the efficiency and quality of the planning process byenhancing collaboration between planners, ensuring the consistency of planning data, and enabling drilldowns intovarious data dimensions.
Sales PlanningSales planning offers a solution that enables you to define and monitor sales targets. It promotes seamlessmonitoring of sales targets, forecasts, and revenues and also makes it easy to create new plans.
Tasks
Creating a Sales Plan1. Choose Sales Sales Target Planning New .2. On the Set General Properties screen, enter the necessary data - such as Sales Unit, Horizon From/To, Plan
Name, and Currency - then choose Next.
You can only have one plan for a certain sales unit and horizon. The overlapping of horizons for thesame sales unit is not allowed.By default, the currency of the sales unit's company is used. However, as long as the sales plan remainsin preparation, you may change this currency, if desired.
3. Specify the granularity of your plan on the Select Planning Dimensions screen. You can select the accounts,employees, product categories, and products that you want to be shown in the plan. You can also select theplanning items to be planned, for example, certain employees, accounts, or products. Then choose Next.
4. You can enter a description for the active version or you can create a new version on the Manage PlanVersions screen. Then choose Next.
5. You can select the data on which your planning is to be based and where it should be copied to on the CopyActual Data screen. First choose the plan data from existing sales plans that are created for the correspondingsales units in general data and the selected planning dimensions and time period that should be taken intoaccount. Then select the plan version into which the data should be copied.
6. On the Review screen, review your entries.7. To confirm your changes, choose Finish.8. On the Confirmation screen, you can open the plan data in Microsoft Excel® or close the guided activity.
Editing a Sales Plan Structure1. To edit sales plan data in Microsoft Excel, select the appropriate plan.
Before you use Microsoft Excel to edit sales plan data, choose Download to download the Add-In forMicrosoft Excel®.
218 © 2011, 2012, 2013 SAP AG. All rights reserved. • P U B L I CSAP Cloud for Customer November 2013
Sales and Marketing Settings
2. Choose Edit, then select Plan Data in Excel.The sales targets are opened in Microsoft Excel. Now you can adjust the targets for your planning horizon.
3. To show or hide dimensions, open the View pane. To this end, choose the SAP Business ByDesign tab, findthe View area, and choose Change the Current View of the Report.
You can also open and save views with different dimensions and settings in the panel.
4. Select a desired dimension and drag and drop it to the rows and columns as necessary.5. You can also define how the data should appear on the user interface for each planning dimension by selecting
the row or column label in the panel and changing the selections underneath.6. Enter your sales targets in the plan.7. After you have finished the planning, to recalculate the planning data in the workbook choose Refresh on the
SAP Business ByDesign tab in the Microsoft Excel ribbon.
If you enter a total target for a dimension, the sum is distributed to the unchanged items. Changeditems are not affected during the recalculation.
8. To finalize the planning, save your data by choosing Save All on the SAP Business ByDesign tab.
Activating a Sales Plan1. Select the sales target plan under New Sales Target Planning .2. Select Change Status Active .
The plan is now activated.
See AlsoAbout Analysis
8.5 Territory Management
Territory Management encompasses all activities that are required to create and configure a hierarchy of salesterritories, and to delegate responsibility at each level of this hierarchy to the appropriate sales representatives.Administrators perform these tasks under Sales Territories .
PrerequisitesTerritory Management is activated. To learn how to activate Territory Management, see Enabling Features in Scopingfor SAP Cloud for Sales [page 42].
You can also enable multiple territories per account in scoping.
SAP Cloud for Customer November 2013Sales and Marketing Settings P U B L I C • © 2011, 2012, 2013 SAP AG. All rights reserved. 219
Tasks
Defining the Territory HierarchyAfter territory management has been activated, define the territory hierarchy — the hierarchical levels that form thestructure of your sales organization. To do so, proceed as follows:
1. Choose Business Configuration Implementation Projects .2. Choose the title of the appropriate implementation project.
The Project Overview screen appears.
3. Choose Open Activity List.The activity list wizard appears.
4. Choose Fine-Tune Sales Territory Hierarchy Level .5. On the subsequent screen, define the codes and descriptions of the sales territory levels to be used by your
organization.6. Save your entries.
Defining the Root TerritoryAfter the territory hierarchy has been activated, define the root territory — a single territory that represents theuppermost node of your sales hierarchy, and the basis for all subsequent territory assignments. After you define theroot territory, every other territory that you create is subordinate to the root territory.Define the root territory as follows:
1. Choose Business Configuration Implementation Projects .2. Select the title of the appropriate implementation project.
The Project Overview screen appears.
3. Choose Open Activity List.The Activity List screen appears.
4. Choose Fine-Tune.5. Under Activity Group: Sales, select Sales Territory Management Root Setup.6. Follow the corresponding instructions to define the root territory for your sales organization.
Creating Individual Territories1. Choose Sales Territories .2. Choose New New Territory , or New New Subterritory .3. On the subsequent screen, specify the territory name.
A unique territory ID is generated automatically.4. Specify the parent territory in relation to the territory hierarchy that has been established for your
organization.
If you selected New Subterritory , the parent territory is populated automatically.
5. Under Territory Team, choose Add Row.6. In the resultant row, to identify the territory owner, specify the Employee Responsible-Sales role, then select
the corresponding employee.7. Under Accounts in Territory, choose Add Row.
220 © 2011, 2012, 2013 SAP AG. All rights reserved. • P U B L I CSAP Cloud for Customer November 2013
Sales and Marketing Settings
In the Account ID field, specify each account to be assigned to the new territory.8. Save your entries.
Uploading a List of Territories, Using Microsoft Excel®1. Choose Sales Territories .2. Choose New Territories from Microsoft Excel .
Before you use Microsoft Excel to upload data, choose Download to download the Add-In for MicrosoftExcel®.
3. To export a blank Microsoft Excel template to a local file, choose Download, then specify a directory.4. Open the Microsoft Excel template from the directory that you specified.5. For each territory that you want to create, make an entry in each of the following columns:
● External ID (of six characters, maximum) ● Territory Name ● Parent Territory ID ● Owner Employee ID
6. Save your entries.7. From the standard Microsoft Excel workbook you have modified, log on to the on-demand system by using
the appropriate URL, user, and password.8. In your modified workbook, select Save Data To.
The data in your modified workbook is automatically uploaded.9. To display the imported territories in the on-demand system, choose Refresh.
Changing Territory TeamsFor any territory, administrators can designate or re-assign the territory owner, and specify additional territory teammembers, as follows:
1. Choose Sales Territories .The Territories work center appears.
2. Expand the territory tree structure until you find the territory of interest.3. To open the territory, choose the territory name.4. On the screen that appears, choose Edit.5. Under Territory Team, choose Add Row.6. In the row that appears, specify each territory team member, and their corresponding role.7. Save your entries.
Editing Territories1. Choose Sales Territories .
The Territories work center appears.2. Use one of the predefined filters to display the territory you want to edit, select it in the list, and choose Edit.3. Edit the information in the territory.4. To modify the sales territory team, proceed as follows:
a. Under Territory Team, for each employee to be removed from the territory team, choose Remove .b. For each employee to be added to the territory team, choose Add Row .
SAP Cloud for Customer November 2013Sales and Marketing Settings P U B L I C • © 2011, 2012, 2013 SAP AG. All rights reserved. 221
In the resultant row, specify the role, then select the corresponding employee.c. For each existing territory team member who requires a new role, assign the new role accordingly.
5. Save your entries.6. To allow the updated territory owners to see their new assignments on the user interface, perform a
realignment run.For more information, see Realignment of Accounts and Territories [page 222].
Restricting Authorizations by TerritoriesIf desired, you can restrict authorizations for various items on the basis of the sales territory that is automaticallydetermined or manually maintained for the item. For more information, see Handling Authorization Restrictions[page 113].
Deleting Territories1. Choose Sales Territories .
The Territories work center appears.2. Use one of the predefined filters to display the territory you want to delete.3. Select the table entry of the territory that you want to delete.
If any account remains assigned to a territory, or any subterritory below it, then that territory cannotbe deleted.
4. Choose Delete.
8.6 Realignment of Accounts and Territories
If the locations or responsibilities of employees change, it is necessary to align their responsibilities in the systemaccordingly. Realignment is performed in batch jobs to partially automate the process, and to improve performance.Realignment is performed by administrators.
ExampleA company realigns their personnel in the system once each quarter. Sometimes thousands of accounts,territories, leads, and opportunities are changed during a single realignment.
Tasks
Defining a Realignment Run for Accounts and TerritoriesTo realign account owners and territories, territory management must be activated.
222 © 2011, 2012, 2013 SAP AG. All rights reserved. • P U B L I CSAP Cloud for Customer November 2013
Sales and Marketing Settings
To determine whether territory management is activated, the administrator should check whether theTerritories appear under Sales. If so, then territory management is activated. If not, then territory managementis not activated.If territory management is not activated, then you can perform one of the following actions:
● Realign accountsTo do so, see the Defining a Realignment Run for Accounts task.
● Activate territory managementFor more information, see Enabling Features in Scoping for SAP Cloud for Sales [page 42].
To define a realignment run for accounts and territories, proceed as follows:1. Choose Sales Define New Realignment Run .
A wizard appears to help you create a realignment run.2. In the first step, define rules for calculating territory owners. These rules determine how accounts are assigned
to territories.
You can configure the condition columns within the rules, as desired – for example, by adding orremoving them.
Only one set of rules is currently active for each tenant (company). In other words, if there is morethan one person in your company with administration rights for rules, any change made by you oranother administrator affects the company's rule set. For example, if you disable a rule in the ruleset, it is disabled in the company's rule set. We recommend coordinating your rule-definition effortsto avoid overwriting one another’s changes.
In this step, you have the following options: ● Add, insert, remove, copy, or paste rules
To change the value in each column, click the contents or asterisk ( * ) in that column.
When you add a new rule, define it as follows:
If the cell is... Specify...
White Selection criteria to define which items should be assigned
Orange People or items to which the items defined in this rule should be assigned
● Move rules up or down in the sequence
We recommend that you keep specific rules at the top of the list and generic rules at the bottom.The system processes rules according to their priorities. By default, new rules are added to thebottom of the list, and so have the lowest priority. To change the priority of a rule, move it up ordown in the list.
● If you have allowed only one territory per account, the system uses the first rule that applieswhen making territory assignments.
● If you have allowed multiple territories per account, the system uses all rules that applywhen making territory assignments.
● Adapt the available columns in the decision table using Decision Table Configuration as follows:a. Click Adapt Columns.
SAP Cloud for Customer November 2013Sales and Marketing Settings P U B L I C • © 2011, 2012, 2013 SAP AG. All rights reserved. 223
b. Under Available Columns, select the fields that you want to use in your rules.c. To add or delete fields, choose the arrow buttons and click OK .
Your extension fields are also displayed under Available Columns.
The fields Customer Group, Distribution Channel, Division, Sales Group, Sales Office, andSales Organization are only available if you have enabled multiple territories per account. Ifyou enable multiple territories, but later disable this feature, you must remove any rules withthese fields.
● View historical sets of rules ● Activate the set of rules as the current version
● Enable or disable individual rules by making the appropriate entry in the Enabled column. ● Save a draft of the set of rules
3. Choose Next.4. In this step, you can add accounts that you want to maintain manually as exceptions to the rules you defined.
The Define Exceptions step is only available if multiple territories per account is disabled.
Accounts in this list are not affected by the rules.This list includes all individual exceptions, or accounts that sales users have marked as Override Territory andmanually assigned to a territory or owner.In this step, you have the following options: ● Upload a list of accounts as exceptions by choosing New Upload from Microsoft Excel . ● Remove an account from the list of exceptions so that the territory and owner are calculated by the rules
instead.To do so, select the account and choose Remove Exceptions.
● Search the list of exceptions with the basic search or the advanced search.
You cannot add individual exceptions manually on this screen. To mark an existing individual accountas an exception, open the account and choose Override Territory. To enter a new individual account asan exception, upload it from Microsoft Excel.
5. Choose Next.6. In this step of the wizard, enter a title for the realignment run.7. Choose Create.
In the last step of the wizard, the system displays the ID of your realignment run and provides informationabout where to find it.
8. To display the realignment run, choose the title of the realignment run, which appears as a link.On the overview screen that appears, you can see the status, details, and results of the realignment. You canalso access your realignment run as described in the task Realigning Accounts and Territories.
9. To make the changes you defined in this realignment run, realign accounts and territories.
Realigning Accounts and TerritoriesRealignment is performed in batch jobs to partially automate the process, and to improve performance.
1. Choose Sales Realignment Runs .2. Find your realignment run in the list and open it by clicking the run ID.3. On the tabs on this screen, you have the following options:
224 © 2011, 2012, 2013 SAP AG. All rights reserved. • P U B L I CSAP Cloud for Customer November 2013
Sales and Marketing Settings
● Check the status of the rules calculation. ● Review the details.
When the rules calculation is complete, check the opportunities and leads that appear below the account.All the open leads and opportunities are listed here.By default, during realignment, the owners of these opportunities and leads will be changed to the newaccount owner. If you do not want the owner of certain opportunities or leads to change, select the KeepCurrent Owner checkbox.
For example, you see that Lead C will be switched to John Miller when this realignment is run.However, Donna Moore, who currently owns this lead, has nearly converted it to anopportunity. So, you want to keep Lead C under Donna, and not hand it over to John. To doso, choose Keep Current Owner.
Even if you do not change the owner of an account, the system compares the owners defined forleads and opportunities with those of the assigned account. If the owners are different, the systemreplaces the owners of the leads and opportunities with the owner of the assigned account.
● Use the Edit button to make any necessary changes. ● After you have run this realignment, you can view the results.
4. Close this screen.5. When you are ready to make these changes, select your realignment run and set it to active.6. Choose Schedule and enter the appropriate information to schedule your realignment run.7. Save your entries.
The realignment batch job runs according to the schedule you defined. When the realignment run is finished,if you select it, its details appear on the lower half of this screen. For more information, see the DisplayingDetails About a Realignment Run task.
Realigning AccountsRealignment is performed in batch jobs to partially automate the process, and to improve performance.
1. Choose Sales Realignment Runs .2. Find your realignment run in the list and open it by clicking the run ID.3. On the tabs on this screen, you have the following options:
● Review the details.Check the opportunities and leads that appear below the account. All the open leads and opportunitiesare listed here.By default, during realignment, the owners of these opportunities and leads will be changed to the newaccount owner. If you do not want the owner of certain opportunities or leads to change, select the KeepCurrent Owner checkbox.
For example, you see that Lead C will be switched to John Miller when this realignment is run.However, Donna Moore, who currently owns this lead, has nearly converted it to anopportunity. So, you want to keep Lead C under Donna, and not hand it over to John. To doso, choose Keep Current Owner.
Even if you do not change the owner of an account, the system compares the owners defined forleads and opportunities with those of the assigned account. If the owners are different, the systemreplaces the owners of the leads and opportunities with the owner of the assigned account.
● Use the Edit button to make any necessary changes.
SAP Cloud for Customer November 2013Sales and Marketing Settings P U B L I C • © 2011, 2012, 2013 SAP AG. All rights reserved. 225

● After you have run this realignment, you can view the results.4. Close this screen.5. When you are ready to make these changes, select your realignment run and set it to active.6. Choose Schedule and enter the appropriate information to schedule your realignment run.7. Save your entries.
The realignment batch job runs according to the schedule you defined. When the realignment run is finished,its details appear on the lower half of this screen. For more information, see the Displaying Details About aRealignment Run task.
Displaying Details About a Realignment Run1. Choose or Sales Realignment Runs .
All the realignment runs that you are authorized to view appear on the screen.2. Select a realignment run.
If the realignment run is finished, its details appear on the realignment run screen. To update the screen toshow the latest status of the realignment run, choose Refresh.To view the results, choose the application log ID number.
3. For more details, open the realignment run by choosing the run ID.On the tabs on this screen, you have the following options: ● Check the status of the rules calculation.
This tab only appears if you have defined a realignment run for accounts and territories using rules. ● Review the details.
When the rules calculation is complete, check the opportunities and leads that appear below the account.All the open leads and opportunities are listed here.By default, during realignment, the owners of these opportunities and leads will be changed to the newaccount owner. If you do not want the owner of certain opportunities or leads to change, select the KeepCurrent Owner checkbox.
For example, you see that Lead C will be switched to John Miller when this realignment is run.However, Donna Moore, who currently owns this lead, has nearly converted it to anopportunity. So, you want to keep Lead C under Donna, and not hand it over to John. To doso, choose Keep Current Owner.
Even if you do not change the owner of an account, the system compares the owners defined forleads and opportunities with those of the assigned account. If the owners are different, the systemreplaces the owners of the leads and opportunities with the owner of the assigned account.
● Use the Edit button to make any necessary changes. ● After you have run this realignment, you can view the results.
8.7 Quick Guide for Price Lists
The Price Lists view in the Product and Service Portfolio work center enables you, within sales and service documents,to determine the list price. Depending on your configuration, you can create and maintain base price lists, distributionchain-specific price lists, and customer-specific price lists. We recommend that you create at least a base price listfor the products and services that you sell to customers.
226 © 2011, 2012, 2013 SAP AG. All rights reserved. • P U B L I CSAP Cloud for Customer November 2013
Sales and Marketing Settings
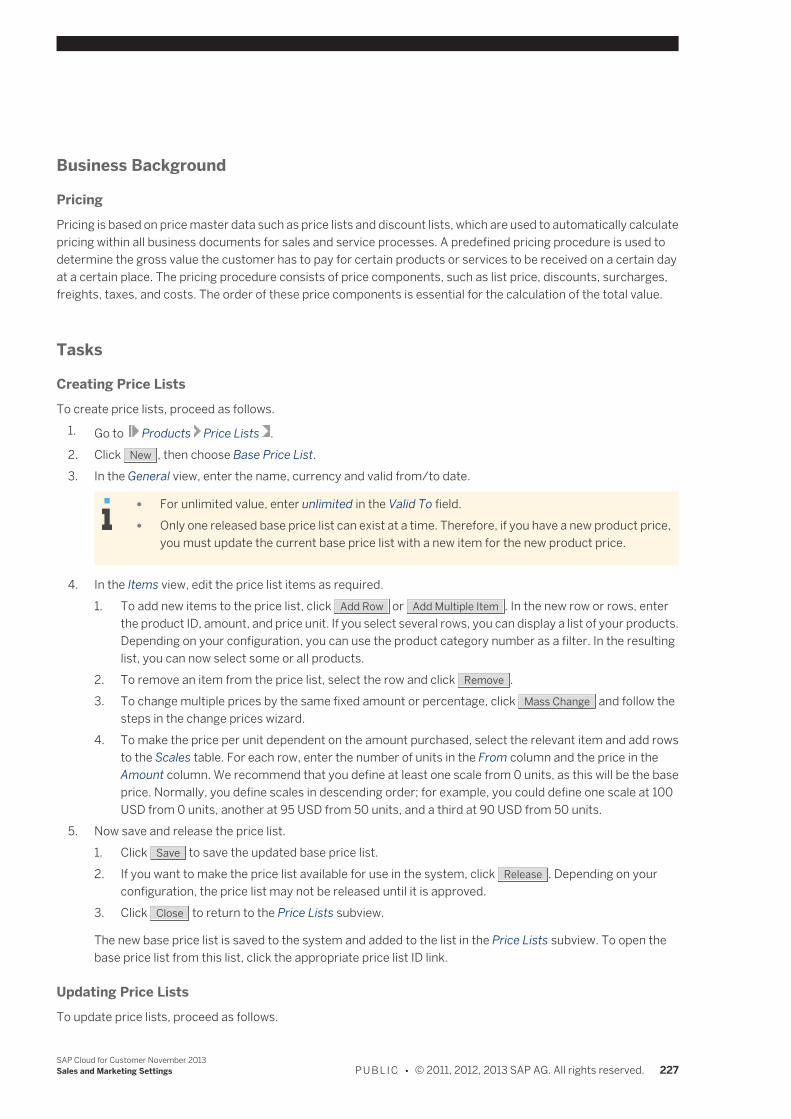
Business Background
PricingPricing is based on price master data such as price lists and discount lists, which are used to automatically calculatepricing within all business documents for sales and service processes. A predefined pricing procedure is used todetermine the gross value the customer has to pay for certain products or services to be received on a certain dayat a certain place. The pricing procedure consists of price components, such as list price, discounts, surcharges,freights, taxes, and costs. The order of these price components is essential for the calculation of the total value.
Tasks
Creating Price ListsTo create price lists, proceed as follows.
1. Go to Products Price Lists .2. Click New , then choose Base Price List.3. In the General view, enter the name, currency and valid from/to date.
● For unlimited value, enter unlimited in the Valid To field. ● Only one released base price list can exist at a time. Therefore, if you have a new product price,
you must update the current base price list with a new item for the new product price.
4. In the Items view, edit the price list items as required.1. To add new items to the price list, click Add Row or Add Multiple Item . In the new row or rows, enter
the product ID, amount, and price unit. If you select several rows, you can display a list of your products.Depending on your configuration, you can use the product category number as a filter. In the resultinglist, you can now select some or all products.
2. To remove an item from the price list, select the row and click Remove .3. To change multiple prices by the same fixed amount or percentage, click Mass Change and follow the
steps in the change prices wizard.4. To make the price per unit dependent on the amount purchased, select the relevant item and add rows
to the Scales table. For each row, enter the number of units in the From column and the price in theAmount column. We recommend that you define at least one scale from 0 units, as this will be the baseprice. Normally, you define scales in descending order; for example, you could define one scale at 100USD from 0 units, another at 95 USD from 50 units, and a third at 90 USD from 50 units.
5. Now save and release the price list.1. Click Save to save the updated base price list.2. If you want to make the price list available for use in the system, click Release . Depending on your
configuration, the price list may not be released until it is approved.3. Click Close to return to the Price Lists subview.
The new base price list is saved to the system and added to the list in the Price Lists subview. To open thebase price list from this list, click the appropriate price list ID link.
Updating Price ListsTo update price lists, proceed as follows.
SAP Cloud for Customer November 2013Sales and Marketing Settings P U B L I C • © 2011, 2012, 2013 SAP AG. All rights reserved. 227
You can also copy an existing price list for a new period, and then make your changes in the new price list.
1. In the Product and Service Portfolio work center, choose Pricing Price Lists .2. Select the price list that you wish to update, and click Edit to open the Price List detailed view.3. In the General view, you can edit the validity date and description, if required.4. In the Items view, edit the price list items as required.
1. To add new items to the price list, click Add Single Row or Add Multiple Rows . In the new row or rows,enter the product ID, amount, and price unit. If you select several rows, you can display a list of yourproducts. Depending on your configuration, you can use the product category number as a filter. In theresulting list, you can now select some or all products.
2. To remove an item from the price list, select the row and click Remove .3. You can change prices directly in the item table, or use the mass change function to adapt prices for
multiple items. Price changes can be executed through the mass change function by a fixed amount orbased on a percentage.To perform a mass change, click Mass Change and follow the steps in the mass change wizard.
228 © 2011, 2012, 2013 SAP AG. All rights reserved. • P U B L I CSAP Cloud for Customer November 2013
Sales and Marketing Settings
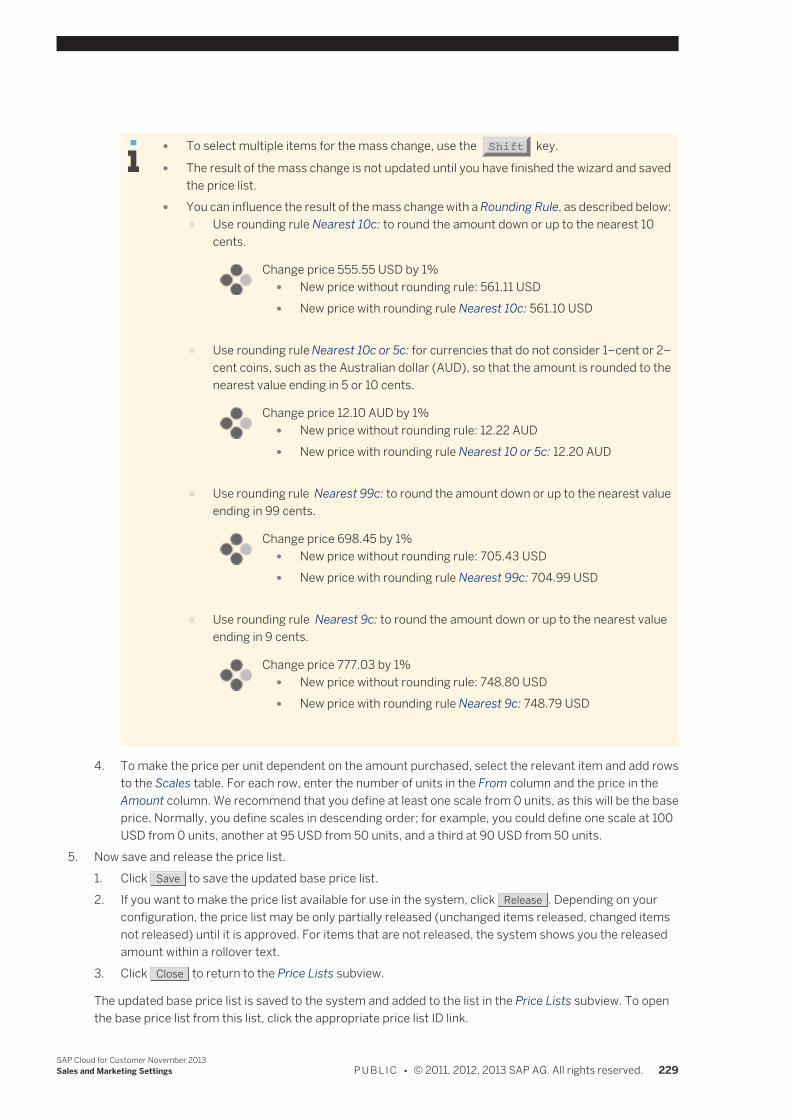
● To select multiple items for the mass change, use the Shift key.
● The result of the mass change is not updated until you have finished the wizard and savedthe price list.
● You can influence the result of the mass change with a Rounding Rule, as described below: ○ Use rounding rule Nearest 10c: to round the amount down or up to the nearest 10
cents.
Change price 555.55 USD by 1% ● New price without rounding rule: 561.11 USD ● New price with rounding rule Nearest 10c: 561.10 USD
○ Use rounding rule Nearest 10c or 5c: for currencies that do not consider 1–cent or 2–cent coins, such as the Australian dollar (AUD), so that the amount is rounded to thenearest value ending in 5 or 10 cents.
Change price 12.10 AUD by 1% ● New price without rounding rule: 12.22 AUD ● New price with rounding rule Nearest 10 or 5c: 12.20 AUD
○ Use rounding rule Nearest 99c: to round the amount down or up to the nearest valueending in 99 cents.
Change price 698.45 by 1% ● New price without rounding rule: 705.43 USD ● New price with rounding rule Nearest 99c: 704.99 USD
○ Use rounding rule Nearest 9c: to round the amount down or up to the nearest valueending in 9 cents.
Change price 777.03 by 1% ● New price without rounding rule: 748.80 USD ● New price with rounding rule Nearest 9c: 748.79 USD
4. To make the price per unit dependent on the amount purchased, select the relevant item and add rowsto the Scales table. For each row, enter the number of units in the From column and the price in theAmount column. We recommend that you define at least one scale from 0 units, as this will be the baseprice. Normally, you define scales in descending order; for example, you could define one scale at 100USD from 0 units, another at 95 USD from 50 units, and a third at 90 USD from 50 units.
5. Now save and release the price list.1. Click Save to save the updated base price list.2. If you want to make the price list available for use in the system, click Release . Depending on your
configuration, the price list may be only partially released (unchanged items released, changed itemsnot released) until it is approved. For items that are not released, the system shows you the releasedamount within a rollover text.
3. Click Close to return to the Price Lists subview.
The updated base price list is saved to the system and added to the list in the Price Lists subview. To openthe base price list from this list, click the appropriate price list ID link.
SAP Cloud for Customer November 2013Sales and Marketing Settings P U B L I C • © 2011, 2012, 2013 SAP AG. All rights reserved. 229
8.8 Retail Execution
8.8.1 About Retail Execution
Retail execution is a set of features that enables field sales personal to plan and record site visits and activities whileon site at the account.Retail execution is set up by a system administrator through the following process:
1. Create surveys. For more information see Surveys [page 232].Surveys are used for site checklists, customer surveys, and more.
2. Create activity plans. For more information see Activity Planner [page 231].Activity plans are lists of recommended or mandatory activities that the sales representative is tasked withwhile at a customer site.
3. Create Activity plan routing rules.Routing rules enable the administrator to automatically assign activity plans to different accounts, locations,or employees.
Once the administrator has set up the necessary surveys, activity plans, and routing rules, sales users can work inSAP Cloud for Customer for iPad to plan site visits and collect visit information while on site. For sales users theprocess is:
1. Plan site visits. For more information see Visits.This can be done on the browser, or via SAP Cloud for Customer for iPad. You can use the included systemtools to plan the most efficient route between locations, check which sites are due for a visit, and review pastvisit notes.
2. Record visit information.Use SAP Cloud for Customer for iPad to record visit information. This can include, for example: ● Check in/check out times ● Record tasks (from activity plan) ● Complete site checklists and customer surveys and attach photos when required ● Create sales quotes and orders ● Order site assets
See AlsoSurveys [page 232]Activity Planner [page 231]VisitsSAP Cloud for Customer for iPad
230 © 2011, 2012, 2013 SAP AG. All rights reserved. • P U B L I CSAP Cloud for Customer November 2013
Sales and Marketing Settings
8.8.2 Activity Planner
Use Activity Planner to create lists of activities that can be added to site visits. You can create standard lists ofactivities to be used with different accounts, or by different sales personnel. Use activity routing rules to associateplans with specific accounts, locations, or employees.You can also create and assign activity plans for tickets. Activity plans can include tasks and surveys. This allowsyou to create workflows based on the ticket attributes.
Tasks
Create Activity Plans1. View existing activity plans and create new plans under Activity Planner Plans .2. To create a new Activity Plan, choose New.
Enter a name for the plan. If desired, you can also choose a date range when the plan is valid, and designatethe plan as mandatory.
3. To open your new plan, choose Save and Open.4. Add a task to the plan by choosing New under Tasks.
Enter the required information, and choose OK when finished.5. Create additional tasks as required.
If desired, you can add notes for each task, and attachments such as a detailed instructions document.6. To attach surveys to the activity plan, choose Surveys, then choose Add.
Once you create the activity plan, you can create routing rules to associate the plan with specific territories, accountsor employees.
Create Routing Rules1. View existing routing rules and create new rules under Activity Planner Routing Rules .2. Enter a name for the routing rule.3. To open your new routing rule, choose Save and Open.4. To set up the conditions that define this routing rule, under Conditions, choose Add Row.
Select the criteria for this condition by comparing data with a desired value. Construct your routing rule byadding more conditions using logical OR/ AND operators.
5. To select the activity plans that follow this routing rule, on the Activity Plans tab, choose Add.6. Save your changes when you have finished defining the routing rule.7. To start using the routing rule, set the status to active by choosing Actions Set as Active .
Once active, the system uses the routing rule to associate the specified activity plans with site visits.
See AlsoAbout Retail Execution [page 230]Surveys [page 232]
SAP Cloud for Customer November 2013Sales and Marketing Settings P U B L I C • © 2011, 2012, 2013 SAP AG. All rights reserved. 231
Visits
8.8.3 Surveys
You can create surveys for store visits and tickets to complete during a store visit or a service appointment. Usesurveys as checklists, or to answer questions about the store and how your products or the competitor productsare presented there.
Business Background
CategoriesCategories are attributes for surveys, questions, and answers. They are used when generating reports from surveyresponses to help you understand survey data.For surveys, the category controls which of the product tabs is visible. Normally the Products tab is visible. But incase of Competitor Products category the Competitor Products tab is visible.In the Survey fine-tune activity in business configuration you can add, maintain or delete categories. Also you canadd your own combinations for the survey categories there.
Survey Statuses ● In Preparation (initial status): In this status you can add, change or delete questions and answers. Surveys
with status In Preparation cannot be assigned to an activity plan or a visit.From In Preparation you can switch to Active.
● Active: Indicates that the survey is finished. You can use the survey for activity plans and store visits. If asurvey is active you can't change, add or delete questions from it.From Active you can switch to In Preparation and Obsolete.
● Obsolete: The survey can no longer be assigned to new visits or activity plans. If the survey is already usedfor open, or in process store visits, the survey can still be completed during the visit.From Obsolete you can switch to In Preparation and Active.
Set the survey status from the Actions menu.
You can switch from Obsolete and Active to In Preparation only when there are no answers available for thissurvey.
Using Previous AnswersWith the Previous Answers check box you can pre-populate answers from the previous response for that customerwhen the employee fills out a survey, for example, in a store or at the customer site.
ScoringFor multiple-choice questions you can use a scoring for the questions and the answers.With the screen personalization you can make the fields visible for the maximum, minimum, and total scores thatcan be reached. The fields are available on the Editor tab, Results tab, and survey header.On the Editor tab you can also see the Maximum Score and the Minimum Score for each multiple-choice questionthat are calculated as follows:
232 © 2011, 2012, 2013 SAP AG. All rights reserved. • P U B L I CSAP Cloud for Customer November 2013
Sales and Marketing Settings
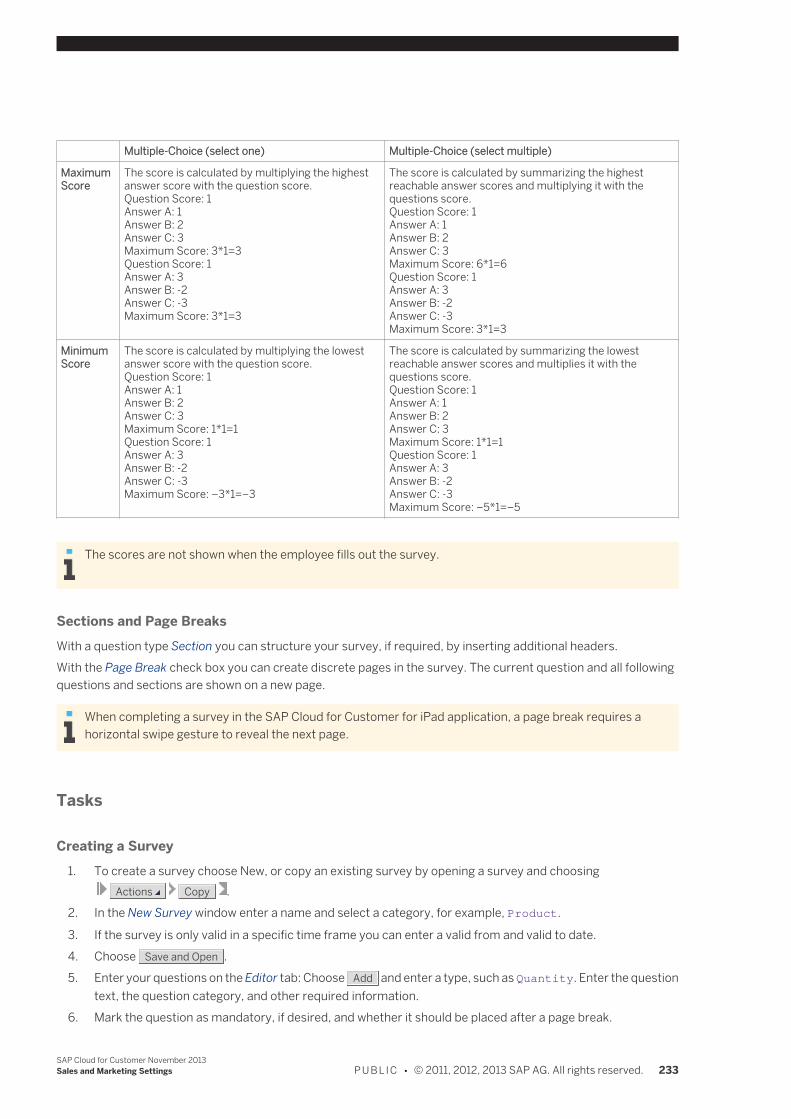
Multiple-Choice (select one) Multiple-Choice (select multiple)
MaximumScore
The score is calculated by multiplying the highestanswer score with the question score.Question Score: 1Answer A: 1Answer B: 2Answer C: 3Maximum Score: 3*1=3Question Score: 1Answer A: 3Answer B: -2Answer C: -3Maximum Score: 3*1=3
The score is calculated by summarizing the highestreachable answer scores and multiplying it with thequestions score.Question Score: 1Answer A: 1Answer B: 2Answer C: 3Maximum Score: 6*1=6Question Score: 1Answer A: 3Answer B: -2Answer C: -3Maximum Score: 3*1=3
MinimumScore
The score is calculated by multiplying the lowestanswer score with the question score.Question Score: 1Answer A: 1Answer B: 2Answer C: 3Maximum Score: 1*1=1Question Score: 1Answer A: 3Answer B: -2Answer C: -3Maximum Score: –3*1=–3
The score is calculated by summarizing the lowestreachable answer scores and multiplies it with thequestions score.Question Score: 1Answer A: 1Answer B: 2Answer C: 3Maximum Score: 1*1=1Question Score: 1Answer A: 3Answer B: -2Answer C: -3Maximum Score: –5*1=–5
The scores are not shown when the employee fills out the survey.
Sections and Page BreaksWith a question type Section you can structure your survey, if required, by inserting additional headers.With the Page Break check box you can create discrete pages in the survey. The current question and all followingquestions and sections are shown on a new page.
When completing a survey in the SAP Cloud for Customer for iPad application, a page break requires ahorizontal swipe gesture to reveal the next page.
Tasks
Creating a Survey1. To create a survey choose New, or copy an existing survey by opening a survey and choosing
Actions Copy .2. In the New Survey window enter a name and select a category, for example, Product.
3. If the survey is only valid in a specific time frame you can enter a valid from and valid to date.4. Choose Save and Open .5. Enter your questions on the Editor tab: Choose Add and enter a type, such as Quantity. Enter the question
text, the question category, and other required information.6. Mark the question as mandatory, if desired, and whether it should be placed after a page break.
SAP Cloud for Customer November 2013Sales and Marketing Settings P U B L I C • © 2011, 2012, 2013 SAP AG. All rights reserved. 233
7. If you selected survey category Products or Competitor Products, add the products or a whole productcategory for which the questions must be answered. Choose Preview to see an HTML preview with a roughstructuring of your survey.
8. To activate your survey choose Actions Activate .
Views and further tasksAfter you created your survey you have to create activity plans and routing rules to be able to use the survey, forexample, in visits and tickets. For more information, see Activity Planner [page 231].
8.8.4 Enabling the Route Planner for Visits
As an administrator, you must adapt a screen to expose a preconfigured URL mashup so that users can access theroute planner for visits.
1. Go to Visits Visit Planner .2. From the upper right corner, adapt the screen by choosing Adapt Enter Adapatation Mode , then
Adapt Edit Screen .3. From the adaptation panel on the right side of the screen, choose Mashups and Web Services.4. Select the Route Planner (google.com), ID TM00040.5. Choose Publish to make the change visible to all users, then leave adaptation mode.
See AlsoVisitsAdministrator Adaptation Quick Guide [page 243]Personalize a Mashup
8.9 Response Options for Campaigns
If you want to classify responses that you capture when executing campaigns, an administrator can create responseoptions that can be assigned to campaigns. A response option can be assigned a positive, negative, or neutralclassification.
Creating Response Options1. Choose Marketing Response Options New .2. Enter a name for the response option and select a classification.3. Save your entries.
The response option is saved with status Active and can be assigned to campaigns that have not yet beenexecuted.
234 © 2011, 2012, 2013 SAP AG. All rights reserved. • P U B L I CSAP Cloud for Customer November 2013
Sales and Marketing Settings
8.10 E-Mail Templates
OverviewTo send out a mass e-mail message to a defined target group, you must first create an HTML template with themessage text and placeholders for the various fields to be populated with contact information from the target groupmembers. You can use any HTML editor to create this template.
● HTML templates must be saved with UTF-8 encoding. Templates saved with a different encodingresult in system errors.
● To prevent issues during the template upload, use an HTML text editor such as MicrosoftExpression Web ®.
If your e-mail template contains images, the image files should be stored on a publicly accessible imageserver, and referenced in the template using the IMG tag.
Placeholders
Your template should include placeholders for both accounts and individual customers. The system fills inthe appropriate placeholder based on the item type of the target group member.
You must enter the placeholders in the HTML within a SPAN tag with the following syntax:<span class=”variable”>
/<ES name Data Type>/<ES name of element>
</span>
Example<span class=”variable”>
/FormCampaignExecutionPlaceholder/Customer/FormattedName
</span>
You can enter the same placeholder several times in the HTML. During campaign execution the value of the SPANtag is replaced by the corresponding value from the contact information for the individual or business that receivesthe e-mail message. For example:<span class=”variable”>
Ms. Mary Valdez
</span>
The following table shows the currently supported placeholders.
Placeholder Contact Field (Account or Individual Customer)
/FormCampaignExecutionPlaceholder/Customer/NameOrFirstName
Account: NameIndividual Customer: First Name
/FormCampaignExecutionPlaceholder/Customer/AdditionalNameOrLastName
Account: Additional NameIndividual Customer: Last Name
SAP Cloud for Customer November 2013Sales and Marketing Settings P U B L I C • © 2011, 2012, 2013 SAP AG. All rights reserved. 235
Placeholder Contact Field (Account or Individual Customer)
/FormCampaignExecutionPlaceholder/Customer/FormattedName
Formatted name of the account or individual customer
/FormCampaignExecutionPlaceholder/Customer/FormOfAddressName
Individual Customer: Title (for example: Mr. or Ms.)
/FormCampaignExecutionPlaceholder/Customer/AcademicTitleName
Individual Customer: Academic title (for example: Dr. or Prof.)
/FormCampaignExecutionPlaceholder/ContactPerson/FirstName
Account: First name of the contact person
/FormCampaignExecutionPlaceholder/ContactPerson/LastName
Account: Last name of the contact person
/FormCampaignExecutionPlaceholder/ContactPerson/FormattedName
Account: Formatted name of the contact person
/FormCampaignExecutionPlaceholder/ContactPerson/FormOfAddressName
Account: Title of the contact person (for example: Mr. or Ms.)
/FormCampaignExecutionPlaceholder/ContactPerson/AcademicTitleName
Account: Academic title of the contact person (for example:Dr. or Prof.)
/FormCampaignExecutionPlaceholder/ContactPerson/BusinessCardFunctionName
Account: Function of the contact person from the businesscard (for example: Product Manager)
/FormCampaignExecutionPlaceholder/ContactPerson/BusinessCardDepartmentName
Account: Department name of the contact person from thebusiness card (for example: Development)
/FormCampaignExecutionPlaceholder/ResponseCodeID
Response code ID generated for each member of the targetgroup during the execution of the campaign
/FormCampaignExecutionPlaceholder/MailingPermissionDenyMailToURI
Indicates that the recipient wants to be removed from futuremailings.
This unsubscribe link is required for direct e-mailcampaigns. You can only save a template for use indirect e-mail campaigns if it includes an unsubscribelink.
This placeholder is used to create a MailTo link within the e-mail. It must be put inside the value of the HREF attribute ofthe anchor tag.
Example<a href="mailto:{/FormCampaignExecutionPlaceholder/MailingPermissionDenyMailToURI}">click here to be removed from futuremarketing mailings </a>In the e-mail message, the anchor tag includes yourreturn e-mail address and an ID code. For example:<ahref="mailto:unsubscribe.marketing.mailing@asl-cust004.mail.dev.sapbydesign.com?subject=DenyMailingPermission6B7DF34541279407D4EFD1C24E6BC393867CDDA8">click here to be removed fromfuture marketing mailings </a>
236 © 2011, 2012, 2013 SAP AG. All rights reserved. • P U B L I CSAP Cloud for Customer November 2013
Sales and Marketing Settings
Placeholder Contact Field (Account or Individual Customer)
/FormCampaignExecutionPlaceholder/LinkTracking/TrackingURI
Indicates a link that shall be tracked.
An example for HTTP:<a href="http://{/FormCampaignExecutionPlaceholder/LinkTracking/TrackingURI}www.sap.com/HANA">Newsabout SAP HANA</a>An example for HTTPS:<a href="https://{/FormCampaignExecutionPlaceholder/LinkTracking/TrackingURI}www.sap.com/HANA">Newsabout SAP HANA</a>
8.11 Create Business Data Using Microsoft Excel®
You can use Microsoft Excel to create business data in your solution.
PrerequisitesTo use Microsoft Excel with your solution, ensure that the Add-In for Microsoft Excel is correctly installed, as follows:
1. Choose Downloads, then download the Add-In for Microsoft Excel®.2. Run the installation and setup wizards that appear.3. Open Microsoft Excel, then ensure that the add-in is active. If needed, consult the documentation in Microsoft
Excel for instructions on how to activate add-ins.4. Ensure that your Web browser is set to prompt automatically for file downloads. If needed, consult the
documentation in your Web browser for additional information.
For an example of how Microsoft Excel is used to create business data, see: ● Territory Management [page 219] Uploading a List of Territories, Using Microsoft Excel®
8.12 Approval Processes
8.12.1 Enabling Approval Processes
In the Approval Processes view, key users can create and edit approval processes to suit business requirements.
SAP Cloud for Customer November 2013Sales and Marketing Settings P U B L I C • © 2011, 2012, 2013 SAP AG. All rights reserved. 237
Business Background
Approval ProcessesBy default, the approval process related to a business document in SAP Cloud for Customer always consists of onestep. However, some business processes may require more than one step to attain approval. Business processesthat consist of more than one step are called multistep approval processes.For more information, see Approval Processes [page 240].
Tasks
Monitor Approval ProcessesYou can view and monitor approval processes. From the Show dropdown list, the followingoptions are available:
Value Description
All Processes Shows all approval processes available in the system,including all default approval processes.
Active Processes Shows approval processes for which the validityperiod has not expired.
Inactive Processes Shows approval processes for which the validityperiod has expired and approval processes that havethe Draft status.
Expired Processes with Open Approval Tasks Shows approval processes that have expired withapproval tasks that were not processed during thevalidity period of the approval process.
Active and Scheduled Processes Shows active approval processes and approvalprocesses for which the validity period is in the future.
You can also group approval processes by the related business document.
Create and Edit an Approval ProcessIn the Approval Processes view, key users can create and edit approval processes to suitbusiness requirements. You can access the Approval Processes view from the Application andUser Management work center under Task Distribution.
1. For the relevant business document, select the approval process and click Copy .The system copies the selected approval process.
2. On the following screen, enter a name for the approval process.3. Specify the steps involved in the approval process.
By default, each approval process contains one step.1. Specify the number of steps by clicking Add Row and Remove accordingly.
You must also specify the sequence of the steps. Note that more than one stepcan have the same sequence number in order to have parallel steps.
2. Specify the name of the process step.3. Specify work distribution for each step by selecting the relevant entry from the
Work Distribution dropdown list.
238 © 2011, 2012, 2013 SAP AG. All rights reserved. • P U B L I CSAP Cloud for Customer November 2013
Sales and Marketing Settings
Note that if you select Direct Approver, you must select an employeeresponsible by clicking Edit. On the following screen, select one or more employeesresponsible.
4. Optional: Create and edit a condition.Select the process step for which you want to create or edit conditions and click
Edit Conditions to set-up your conditions.
Note that the attributes available depend on the corresponding businessdocument.
5. Optional: Approve a Step AutomaticallyIf you select the Automatic Approval checkbox, the system does automaticallyapproves the step if no employee can be found.
6. Optional: Create Business Task Management ItemBusiness Task Management (BTM) ensures that activities related to a businessprocesses within or across your organization are completed in order to fulfill definedbusiness objectives.You can create Business Task Management items so that users check, change, clarifyinformation, complete items, or make a decision as part of an approval process.
Edit the Validity of an Approval Process1. Select the approval process of the related business document which you want to edit
validity periods. Note that the approval process must have the status Draft, Active, orScheduled.
2. Click Edit Validity .All approval processes corresponding to a related business document that have notexpired are displayed.
3. Specify validity periods and the corresponding time zones for one or more approvalprocesses.Note that you can make the validity period of an approval process unlimited by selectingthe Unlimited Validity checkbox.
Show Open Approval TasksFor approval processes that have the Active status and that have the Ended with Open ApprovalTasks status, you can view open approval tasks by clicking Show Open Approval Tasks .
Delete an Approval ProcessNote that you can only delete approval processes that have the Draft status.
Note that for approval processes that have the Scheduled status, you can delete such approvalprocesses by deleting the validity period; the status of the approval process then changes toDraft.To delete the validity period, click Edit Validity , remove the validity period, and then deletethe approval process.
Follow-On Activities ● Approval for Sales Quotes [page 216]
SAP Cloud for Customer November 2013Sales and Marketing Settings P U B L I C • © 2011, 2012, 2013 SAP AG. All rights reserved. 239
8.12.2 Approval Processes
OverviewBy default, the approval process related to a business document in SAP Cloud for Customer always consists of onestep. However, some business processes may require more than one step to attain approval. Business processesthat consist of more than one step are called multistep approval processes.In the Approval Processes view, key users can define approval processes to suit business requirements. Differentapprovers and attributes for conditions are available depending on the related business document.
Multi Step Approval ProcessesYou can activate and define multi step approval processes for business documents, for example, sales quotes andopportunities:
● Activate Approval ProcessIn scoping you can activate an approval process in the questions for the corresponding business document.This is done by a key user.
● Define Approval ProcessIn the Administrator under Approval Processes you can define an approval process for the documents withthe following possibilities: ○ A multi step approval considering several approving parties ○ You can define certain approval conditions
ApproversThe following options are available to define an approver:
● Direct Approvers: You can select specific employees responsible as approvers who must give their approval.Employees responsible must have the corresponding access rights to the task type and business document.Employees responsible must have read access to the relevant business document data and write access tothe notes of the business document.
● Functional Unit Manager: For example, if the business process needs to identify a cost center manager for ashopping cart that has been created in the system, the system accesses the hierarchy at the level of theemployee who created the shopping cart and searches up the hierarchy until it finds the responsible functionalunit manager.
● Reporting Line Manager: The system accesses the organizational structure at the level of the employee whosubmitted the approval task and searches up the hierarchy until it finds the manager who above the employeeof the employee.
● Responsible for Account
Special Cases ● The approver is the requester.
The requester of an approval task is also the employee who submitted the document to be approved. Foreach approval step, the system checks if one of the approvers is the same as the requester. If this is the case,and the approver has the authorization to approve the document, the system does not generate an approvaltask, and the step is automatically approved.
● Same approver for different steps.
240 © 2011, 2012, 2013 SAP AG. All rights reserved. • P U B L I CSAP Cloud for Customer November 2013
Sales and Marketing Settings
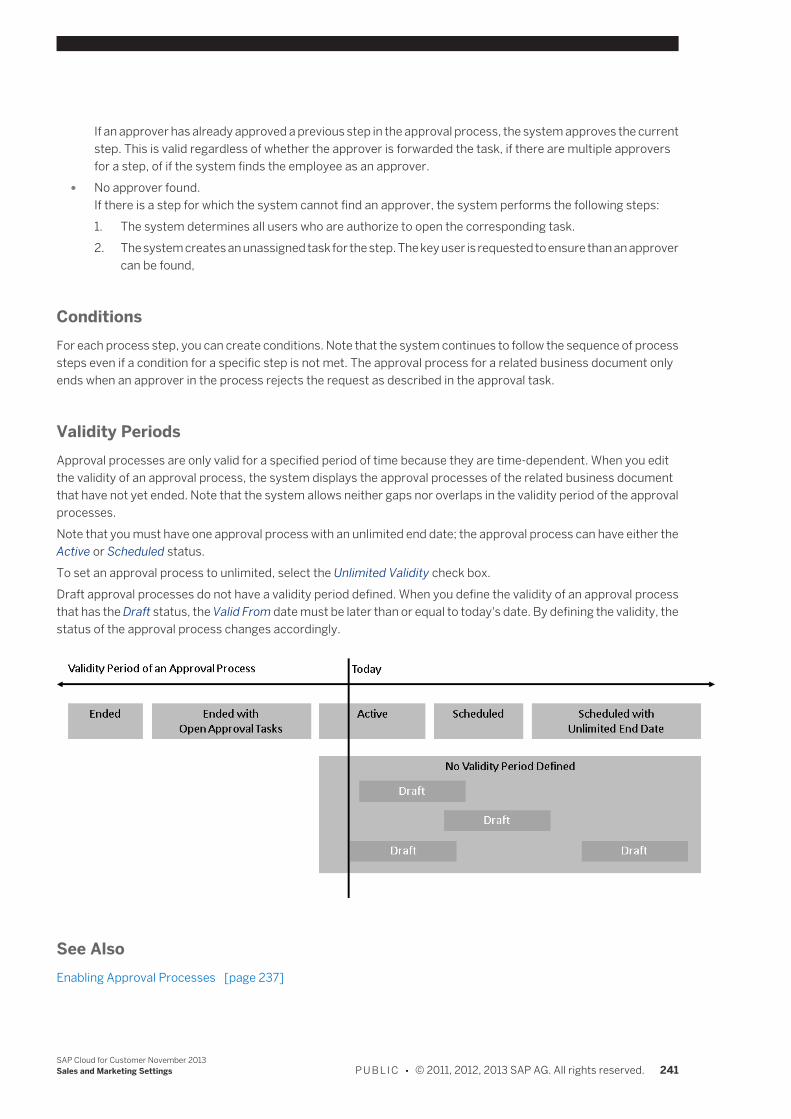
If an approver has already approved a previous step in the approval process, the system approves the currentstep. This is valid regardless of whether the approver is forwarded the task, if there are multiple approversfor a step, of if the system finds the employee as an approver.
● No approver found.If there is a step for which the system cannot find an approver, the system performs the following steps:1. The system determines all users who are authorize to open the corresponding task.2. The system creates an unassigned task for the step. The key user is requested to ensure than an approver
can be found,
ConditionsFor each process step, you can create conditions. Note that the system continues to follow the sequence of processsteps even if a condition for a specific step is not met. The approval process for a related business document onlyends when an approver in the process rejects the request as described in the approval task.
Validity PeriodsApproval processes are only valid for a specified period of time because they are time-dependent. When you editthe validity of an approval process, the system displays the approval processes of the related business documentthat have not yet ended. Note that the system allows neither gaps nor overlaps in the validity period of the approvalprocesses.Note that you must have one approval process with an unlimited end date; the approval process can have either theActive or Scheduled status.To set an approval process to unlimited, select the Unlimited Validity check box.Draft approval processes do not have a validity period defined. When you define the validity of an approval processthat has the Draft status, the Valid From date must be later than or equal to today's date. By defining the validity, thestatus of the approval process changes accordingly.
See AlsoEnabling Approval Processes [page 237]
SAP Cloud for Customer November 2013Sales and Marketing Settings P U B L I C • © 2011, 2012, 2013 SAP AG. All rights reserved. 241
9 Business Flexibility
9.1 Adapting the User Interface for Your Company
To create company-wide branding consistency, administrators can update the user interface by adding logos,changing colors and images, and selecting a theme that best fits your company's logo and colors.
Tasks
Add a company logo, color, and background imageYou can adapt the SAP solution to suit your company’s needs by adding your company logo and changing the colorof the title bar. You can also set a default background image for the solution. For more information, see AdaptingCompany Branding Images. If your default client is HTML5, users cannot personalize their background image. Formore information, see Choosing a Default Client [page 93].If you have set your default client to Microsoft Silverlight, each user can change the default image that you set. Formore information, see Personalizing My Background Image.
If you use the skyline theme and users have screens larger than 14 in, more of the background image appearsat the right and left edges of the screen.If you have not specified a default background image and users have not defined a personalized image, theworkspace spans the width of the screen.
Change the theme
If you use the skyline theme and users have screens larger than 14 in, more of the background image appearsat the right and left edges of the screen.If you have not specified a default background image and users have not defined a personalized image, theworkspace spans the width of the screen.
You can choose a theme that best fits your company's logo or colors as follows:1. Choose Adapt Company Settings .2. Select the theme.
A preview of the theme you selected appears.3. Save your changes.
The theme you chose appears for all users the next time they log on to the system.
Change the default client1. Choose Adapt Company Settings Client .2. Choose the default client for your end users.
For more information about deciding which client is best for your organization, see Choosing a Default Client [page 93].
242 © 2011, 2012, 2013 SAP AG. All rights reserved. • P U B L I CSAP Cloud for Customer November 2013
Business Flexibility
Adapt screensWhen you adapt a screen, your changes are applied across the organization.
● Home pageYou can adapt the home page layout per role in HTML5 or in Microsoft Silverlight®.
● All other screensAdaptations for screens other than the home page should be done in Microsoft Silverlight.1. Go to Microsoft Silverlight.
If your default client is HTML5, users with administration rights can switch to Microsoft Silverlight bychoosing Adapt Launch in Microsoft Silverlight® .
2. Enter adaptation mode and make your changes.
For more information, see Administrator Adaptation Quick Guide [page 243].
9.2 Administrator Adaptation Quick Guide
This document describes all changes that can be made by an administrator using the Adapt menu. Administratorscan change the look and feel of the SAP solution user interface by changing the theme and adapting companybranding images. Adaptation mode allows administrators to make changes to a screen, try out the changes, andthen publish the changes so that they are available to other users.The following changes can be made in adaptation mode:
● Screen LayoutYou can show and hide fields and screen sections, rename fields and sections, change the order of fields andsections, and adapt the way in which tables are displayed.
● Extension FieldsYou can create an extension field and add it to screens, form templates, analytical data sources and reports,extension scenarios, and Enterprise Search categories.
● Mashups and Web ServicesYou can make preconfigured mashups or mashups that have been created by an administrator visible onscreens. You can also access the activities for creating new mashups.
The administrator must be assigned to the Flexibility Change Log view in the Application and UserManagement work center. Administrators who are not assigned to this view are not authorized to use theAdapt menu.
After completing the first steps in the Silverlight version of your solution (for example, setting up BusinessConfiguration, User Management), you can change the default client for all users. To change the defaultclient for all users, please see Change Preferred Client [page 244].
Business Background
Business FlexibilityBusiness flexibility enables administrators to adapt and extend the SAP solution as well as integrating it with externalservices.
SAP Cloud for Customer November 2013Business Flexibility P U B L I C • © 2011, 2012, 2013 SAP AG. All rights reserved. 243
For more information, see Business Flexibility.
Extension FieldsAdministrators can create extension fields using the adaptation function, which allows you to create an extensionfield for a specific screen and then add that field to other screens, form templates, data sources and reports, andenterprise search categories.For more information, see the Extension Fields Quick Guide.
Mashups and Web ServicesMashups are used to integrate data from the SAP solution with data provided by an online Web service or application.Users can access the content provided by these Web services and applications and use it in their daily work. Mashupscan include Web searches, company or industry business information or online map searches.For more information, see Mashups and Web Services in the Help Center of your solution.
Tasks
Adapt Company SettingsYou can replace the default SAP solution logo with your company logo. You can also add a new image to the GettingStarted section of the Overview view in the Home work center.For more information, see here.
Change Preferred ClientAs an administrator, you can change the client type used by all users. This way, you can determine whether all usersuse either HTML5 or Silverlight.
To change the client type for your company, please follow these steps:1. Go to the Adapt menu in the title bar and select Company Settings.2. In the Client tab, open the dropdown list and select the preferred client for all users.
You can choose between HTML and Silverlight.3. Click Save and Close to save your changes.
Note that the preferred client will be used for all users the next time they log on to the system.
Adapt Company Branding ImagesYou can adapt the company logo and related settings in the title bar. You can also set a default background imagefor your SAP solution.For more information, see here.Adaptation Mode
Enter Adaptation Mode1. Navigate to the screen where you want to make your changes.2. From the Adapt menu, select Enter Adaptation Mode.
You are now in adaptation mode and can see any administrator changes that were made previously and whichhave not yet been published. You can navigate through different screens while still in adaptation mode and
244 © 2011, 2012, 2013 SAP AG. All rights reserved. • P U B L I CSAP Cloud for Customer November 2013
Business Flexibility
see how your changes look. Note that you are still working in your productive system so any changes youmake will have an immediate effect on your data.
3. While in adaptation mode, from the Adapt menu, choose Edit Screen.The adaptation panel opens on the right side of the screen. It has the following sections: ● Screen Layout: In this section, you can adapt the content and layout of the screen.
If you save your changes to the screen layout, then make further changes and click Save, anexception may occur. In this case, proceed as follows:Close the Adaptation side panel and reopen it via Adapt Enter Adaptation Mode . Makeyour changes and save them.
● Extension Fields: In this section, you can view and edit existing extension fields and create new extensionfields.
● Mashups and Web Services: In this section, you can add mashups to the screen and access the activitiesfor creating new mashups.
For more information about how to make changes to the screen layout, extension fields, and mashups, seethe corresponding sections below. For more information about managing your changes, see the ManagingYour Changes section of this document
Hide a Screen Section1. From the Adapt menu, select Enter Adaptation Mode.2. In adaptation mode, from the Adapt menu in the screen that you want to adapt, select Edit Screen.
The adaptation panel opens.3. In the Screen Layout section of the adaptation panel, in the Sections table, select a screen section that you
want to hide. The selected section is marked in yellow on the screen to the left of the adaptation panel.4. To hide the screen section, in the Section table, deselect the Visible checkbox.
Under the Sections table, you can adjust the title of the screen section.
5. To save your changes to the current screen, click Save .6. To make your changes visible to all users, click Publish .
Display and Rename a Field1. From the Adapt menu, select Enter Adaptation Mode.2. In adaptation mode, from the Adapt menu in the screen that you want to adapt, select Edit Screen.
The adaptation panel opens.3. In the Screen Layout section of the adaptation panel, in the Sections table, select the screen section where
the field that you want to adapt is located. The selected section is marked in yellow on the screen to the leftof the adaptation panel.
4. In the Fields table, select the field that you want to display.5. To display the field in the screen, in the Fields table, select the Visible checkbox.6. To adjust the display sequence of the field, in the Fields table, use the arrow buttons to move the field up or
down.7. Under the Fields table, rename the title of the field as needed.
You can also rename a field displayed in the identification region at the top of your businessdocuments. However, you cannot make a hidden field visible in the identification region.
SAP Cloud for Customer November 2013Business Flexibility P U B L I C • © 2011, 2012, 2013 SAP AG. All rights reserved. 245
8. To save your changes to the current screen, click Save .9. To make your changes visible to all users, click Publish .
Adapt a Table1. From the Adapt menu, select Enter Adaptation Mode.2. In adaptation mode, from the Adapt menu in the screen that you want to adapt, select Edit Screen.
The adaptation panel opens.3. In the Screen Layout section of the adaptation panel, in the Sections table, select the screen section that
corresponds to the table that you want to personalize. The selected section is marked in yellow on the screento the left of the adaptation panel.In the List of Fields table, all visible and hidden columns in the table are displayed.
4. To display a hidden column in the table, select the Visible checkbox of the column.5. To adjust the display sequence of the column, use the arrow buttons to move the field up or down.6. To adjust the appearance of the table, click Display Settings.
In the Display Settings dialog box, you can define the number of rows that should be displayed, select a tabledesign and show or hide grid lines.
7. To configure the sort order of each column, click Configure Sorting.In the Configure Sorting dialog box, select a column for which you want to define a sort order and use thearrow keys add it to the list. Select a sort option from the dropdown list.
8. If the table contains values, for example, the total amount of a sales order, you can configure calculationsettings by clicking Configure Calculations.In the Configure Calculations dialog box, select a column that contains a calculation and select one of thefollowing options: ● Count Table Entries: When you group the table by a given value, the number of items found belonging to
each grouping value is displayed on the grouping row. ● Display Result Rows at Top of Table: Display the result row of calculations at the top of the table instead
of at the bottom. ● Display Intermediate Results for Sorted Columns: Display calculation results for grouped rows. ● Display Intermediate Results Only: Display intermediate result rows only.
Note that if the table does not contain calculations, the list of columns in this dialog box is empty.
9. To save your changes to the current screen, click Save .10. To make your changes visible to all users, click Publish .
Create an Extension FieldFor more information about creating and using extension fields, see the Extension Fields Quick Guide.
Make a Mashup Visible on a ScreenFor more information, see here [page 379].
Create a New MashupYou can create a new data, URL, or HTML mashup by selecting an option from the New menu.For more information, see the Mashup Authoring Quick Guide [page 375].Managing Your Changes in Adaptation Mode
246 © 2011, 2012, 2013 SAP AG. All rights reserved. • P U B L I CSAP Cloud for Customer November 2013
Business Flexibility
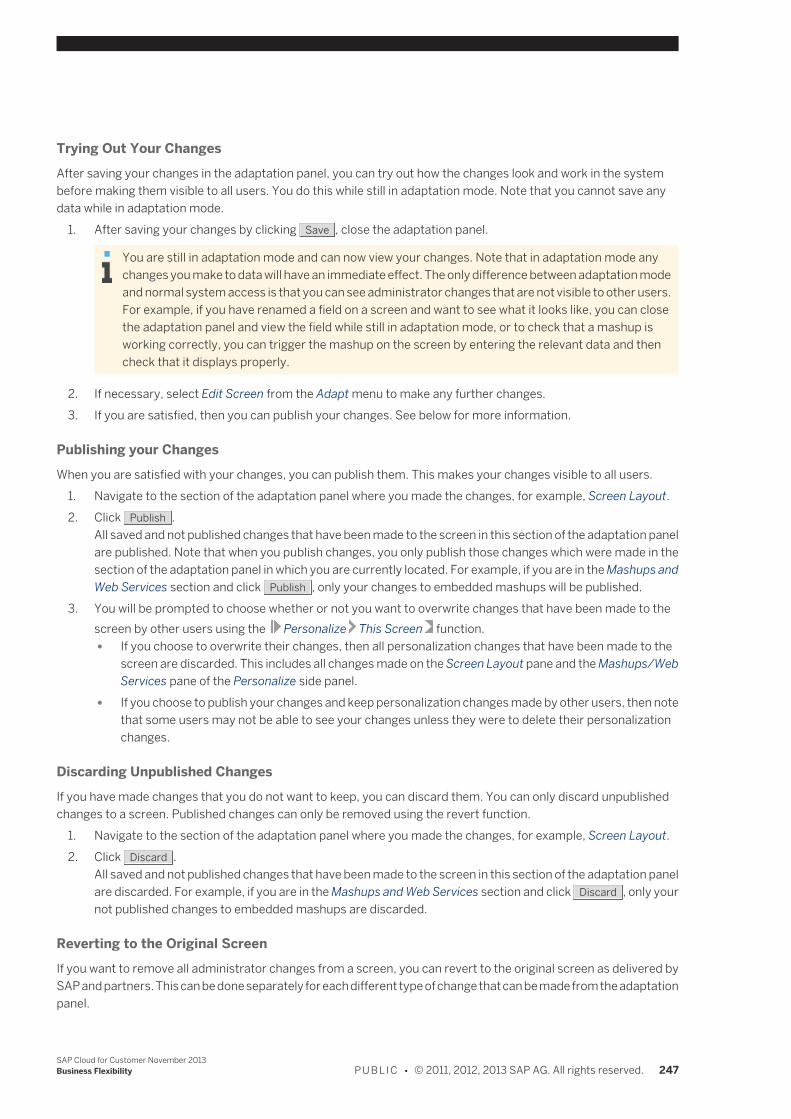
Trying Out Your ChangesAfter saving your changes in the adaptation panel, you can try out how the changes look and work in the systembefore making them visible to all users. You do this while still in adaptation mode. Note that you cannot save anydata while in adaptation mode.
1. After saving your changes by clicking Save , close the adaptation panel.
You are still in adaptation mode and can now view your changes. Note that in adaptation mode anychanges you make to data will have an immediate effect. The only difference between adaptation modeand normal system access is that you can see administrator changes that are not visible to other users.For example, if you have renamed a field on a screen and want to see what it looks like, you can closethe adaptation panel and view the field while still in adaptation mode, or to check that a mashup isworking correctly, you can trigger the mashup on the screen by entering the relevant data and thencheck that it displays properly.
2. If necessary, select Edit Screen from the Adapt menu to make any further changes.3. If you are satisfied, then you can publish your changes. See below for more information.
Publishing your ChangesWhen you are satisfied with your changes, you can publish them. This makes your changes visible to all users.
1. Navigate to the section of the adaptation panel where you made the changes, for example, Screen Layout.2. Click Publish .
All saved and not published changes that have been made to the screen in this section of the adaptation panelare published. Note that when you publish changes, you only publish those changes which were made in thesection of the adaptation panel in which you are currently located. For example, if you are in the Mashups andWeb Services section and click Publish , only your changes to embedded mashups will be published.
3. You will be prompted to choose whether or not you want to overwrite changes that have been made to thescreen by other users using the Personalize This Screen function. ● If you choose to overwrite their changes, then all personalization changes that have been made to the
screen are discarded. This includes all changes made on the Screen Layout pane and the Mashups/WebServices pane of the Personalize side panel.
● If you choose to publish your changes and keep personalization changes made by other users, then notethat some users may not be able to see your changes unless they were to delete their personalizationchanges.
Discarding Unpublished ChangesIf you have made changes that you do not want to keep, you can discard them. You can only discard unpublishedchanges to a screen. Published changes can only be removed using the revert function.
1. Navigate to the section of the adaptation panel where you made the changes, for example, Screen Layout.2. Click Discard .
All saved and not published changes that have been made to the screen in this section of the adaptation panelare discarded. For example, if you are in the Mashups and Web Services section and click Discard , only yournot published changes to embedded mashups are discarded.
Reverting to the Original ScreenIf you want to remove all administrator changes from a screen, you can revert to the original screen as delivered bySAP and partners. This can be done separately for each different type of change that can be made from the adaptationpanel.
SAP Cloud for Customer November 2013Business Flexibility P U B L I C • © 2011, 2012, 2013 SAP AG. All rights reserved. 247
1. Navigate to the section of the adaptation panel where you made the changes, for example, Screen Layout.2. Click Revert .
All published and not published changes that have been made to the screen in this section of the adaptationpanel are discarded and the original set up provided by SAP or the partner is displayed. For example, if youare in the Mashups and Web Services section and click Revert , only the published and not published changesto embedded mashups are discarded and the original set up for embedded mashups is displayed.
Note that it is possible to track changes made by administrators in adaptation mode in the flexibility changelog. Navigate to Application and User Management Business Flexibility Flexibility Change Log . For moreinformation, see the Flexibility Change Log Quick Guide.
9.3 VIDEO: Adapting the User Interface
Video
Adapting the User Interface (5m 18s)For Administrators: find out how to adapt the user interface by renaming and reordering fields, as well as how todetermine which fields are visible.
9.4 VIDEO: Adding Custom Fields to Reports
Video
Adding Custom Fields to Reports (4m 21s)For Administrators: find out how to add custom fields to objects in the solution and add those fields to reports.
9.5 Mashups and Web Services
OverviewMashups are used to integrate data from SAP's cloud solution with data provided by an online Web service orapplication. Users can access the content provided by these Web services and applications, and use it in their dailywork. Mashups can include Web searches, company or industry business information, or online map searches.
Prerequisites
Configuration settings are usually performed by an administrator. If you do not have the requiredauthorization, contact your administrator.
You have enabled Communities, Document Management and External Services in your system configuration. To findthis business option, go to the Business Configuration work center and choose the Implementation Projects view.
248 © 2011, 2012, 2013 SAP AG. All rights reserved. • P U B L I CSAP Cloud for Customer November 2013
Business Flexibility
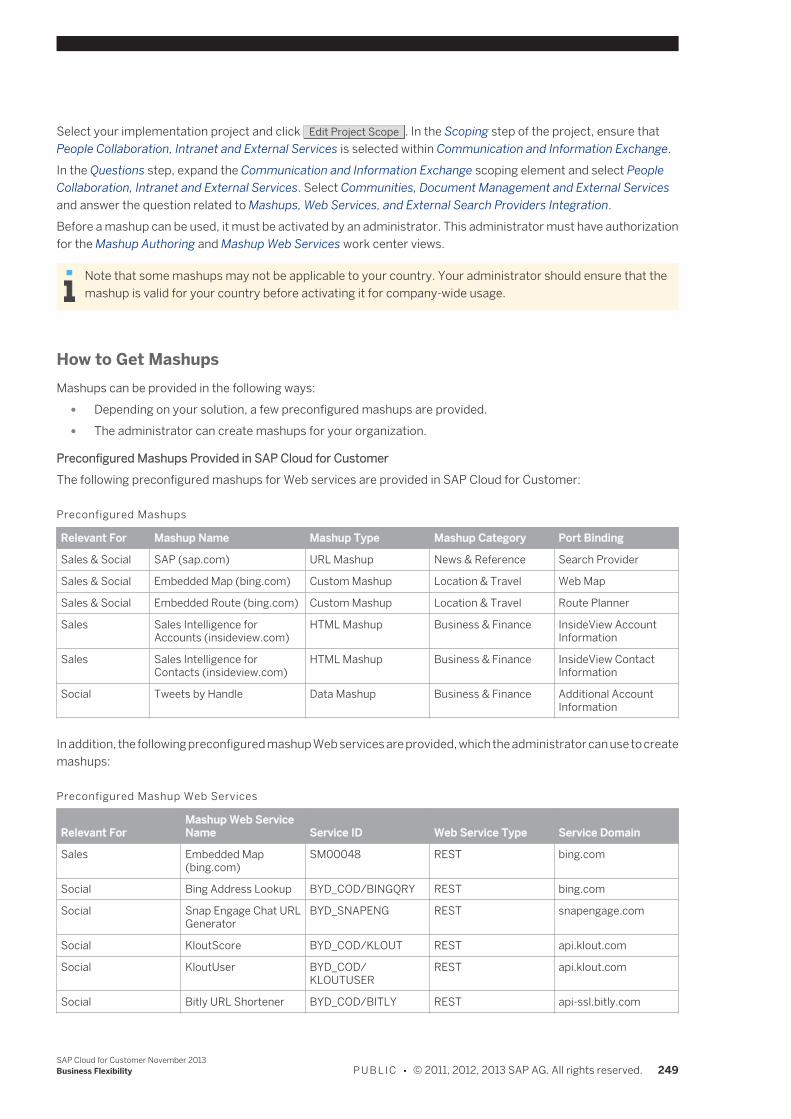
Select your implementation project and click Edit Project Scope . In the Scoping step of the project, ensure thatPeople Collaboration, Intranet and External Services is selected within Communication and Information Exchange.In the Questions step, expand the Communication and Information Exchange scoping element and select PeopleCollaboration, Intranet and External Services. Select Communities, Document Management and External Servicesand answer the question related to Mashups, Web Services, and External Search Providers Integration.Before a mashup can be used, it must be activated by an administrator. This administrator must have authorizationfor the Mashup Authoring and Mashup Web Services work center views.
Note that some mashups may not be applicable to your country. Your administrator should ensure that themashup is valid for your country before activating it for company-wide usage.
How to Get MashupsMashups can be provided in the following ways:
● Depending on your solution, a few preconfigured mashups are provided. ● The administrator can create mashups for your organization.
Preconfigured Mashups Provided in SAP Cloud for CustomerThe following preconfigured mashups for Web services are provided in SAP Cloud for Customer:
Preconfigured Mashups
Relevant For Mashup Name Mashup Type Mashup Category Port Binding
Sales & Social SAP (sap.com) URL Mashup News & Reference Search Provider
Sales & Social Embedded Map (bing.com) Custom Mashup Location & Travel Web Map
Sales & Social Embedded Route (bing.com) Custom Mashup Location & Travel Route Planner
Sales Sales Intelligence forAccounts (insideview.com)
HTML Mashup Business & Finance InsideView AccountInformation
Sales Sales Intelligence forContacts (insideview.com)
HTML Mashup Business & Finance InsideView ContactInformation
Social Tweets by Handle Data Mashup Business & Finance Additional AccountInformation
In addition, the following preconfigured mashup Web services are provided, which the administrator can use to createmashups:
Preconfigured Mashup Web Services
Relevant ForMashup Web ServiceName Service ID Web Service Type Service Domain
Sales Embedded Map(bing.com)
SM00048 REST bing.com
Social Bing Address Lookup BYD_COD/BINGQRY REST bing.com
Social Snap Engage Chat URLGenerator
BYD_SNAPENG REST snapengage.com
Social KloutScore BYD_COD/KLOUT REST api.klout.com
Social KloutUser BYD_COD/KLOUTUSER
REST api.klout.com
Social Bitly URL Shortener BYD_COD/BITLY REST api-ssl.bitly.com
SAP Cloud for Customer November 2013Business Flexibility P U B L I C • © 2011, 2012, 2013 SAP AG. All rights reserved. 249
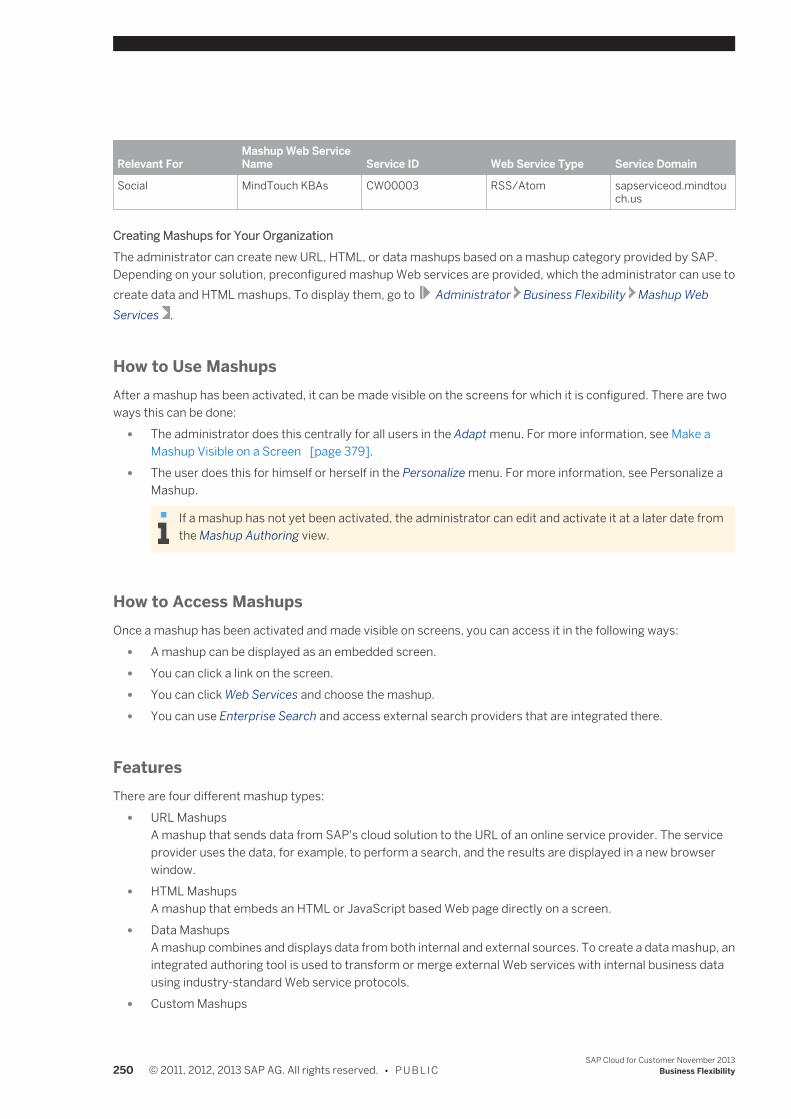
Relevant ForMashup Web ServiceName Service ID Web Service Type Service Domain
Social MindTouch KBAs CW00003 RSS/Atom sapserviceod.mindtouch.us
Creating Mashups for Your OrganizationThe administrator can create new URL, HTML, or data mashups based on a mashup category provided by SAP.Depending on your solution, preconfigured mashup Web services are provided, which the administrator can use tocreate data and HTML mashups. To display them, go to Administrator Business Flexibility Mashup WebServices .
How to Use MashupsAfter a mashup has been activated, it can be made visible on the screens for which it is configured. There are twoways this can be done:
● The administrator does this centrally for all users in the Adapt menu. For more information, see Make aMashup Visible on a Screen [page 379].
● The user does this for himself or herself in the Personalize menu. For more information, see Personalize aMashup.
If a mashup has not yet been activated, the administrator can edit and activate it at a later date fromthe Mashup Authoring view.
How to Access MashupsOnce a mashup has been activated and made visible on screens, you can access it in the following ways:
● A mashup can be displayed as an embedded screen. ● You can click a link on the screen. ● You can click Web Services and choose the mashup. ● You can use Enterprise Search and access external search providers that are integrated there.
FeaturesThere are four different mashup types:
● URL MashupsA mashup that sends data from SAP's cloud solution to the URL of an online service provider. The serviceprovider uses the data, for example, to perform a search, and the results are displayed in a new browserwindow.
● HTML MashupsA mashup that embeds an HTML or JavaScript based Web page directly on a screen.
● Data MashupsA mashup combines and displays data from both internal and external sources. To create a data mashup, anintegrated authoring tool is used to transform or merge external Web services with internal business datausing industry-standard Web service protocols.
● Custom Mashups
250 © 2011, 2012, 2013 SAP AG. All rights reserved. • P U B L I CSAP Cloud for Customer November 2013
Business Flexibility
A mashup that has been created as an add-on solution by SAP.
Administrators can create new data, URL, and HTML mashups. Custom mashups can be created only by SAP.In particular, mashups are distinguished by the following characteristics:
● Mashup CategoriesMashups are grouped together into categories according to the type of service or information that theyprovide.
● Port BindingCertain fields on screens are predefined as screen out-ports and in-ports. These screen out-ports and in-ports are grouped together as a port binding.The port binding defines the type of information that can be used in the mashup and defines on which screensyou can use the mashup. The mashup category specifies which port bindings are available.
For more information, see Mashup Categories [page 390].
API Keys and Authentication ● API Keys
Some Web services require a unique API key to allow you to access their services. You can generate acompany-specific API key on the service provider's Web site and then use this key to authenticate access tothe service from SAP's cloud solution.You can identify which mashups require an API key by the icon displayed in the API Keys column. The EnterAPI Keys dialog box displays the API keys that are required by the selected mashup.
● Basic AuthenticationBasic authentication allows you to enter a user name and password for authenticating access to a Web service.This user name and password is then used to automatically authenticate all other users accessing the service.
● Secure AuthenticationFor Web services that support the OAuth authentication protocol, you can set up secure authentication. TheOAuth protocol enables secure, user-based access to Web services from SAP's cloud solution. Unlike otherauthentication methods, OAuth gives the user full control of his or her own authentication details. To use amashup based on an OAuth authenticated Web service, users need to authenticate themselves on the serviceprovider's web site, where they are given a unique PIN code. This PIN code is then used to authenticate accessto the service from SAP's cloud solution.
Configuring MashupsAdministrators can configure mashups in the following ways:
● CentrallyDepending on your solution, go to Application and User Management Business Flexibility MashupAuthoring or Administrator Business Flexibility Mashup Authoring
● On a particular screenUse the Adapt function on any screen enabled for mashups to access the adaptation sidecar.
Administrators can configure mashups as follows: ● Activate mashups for use by all users or deactivate unwanted mashups ● Activate mashup partner solutions from the SAP Store ● Change the way in which mashups are displayed, and test and publish the changes to all users ● Create new mashups by copying an existing mashup and adapting the settings in the copied mashup
SAP Cloud for Customer November 2013Business Flexibility P U B L I C • © 2011, 2012, 2013 SAP AG. All rights reserved. 251
● Add new Web services for use in data mashups ● Create new URL, HTML, or data mashups based on a mashup category provided by SAP
See AlsoMashup Authoring Quick Guide [page 375]Mashup Web Services Quick Guide [page 371]
9.6 Tasks in Business Flexibility
9.6.1 Setting Up the 360 Overview
If your company has SAP on-premise systems such as SAP ERP, SAP CRM, or SAP NetWeaver Business Warehouse,you already have additional information about many items, such as accounts or sales orders. You can bring thisinformation into your SAP cloud solution.To set up the 360 overview, administrators must set up a bridge so that the SAP on-premise system cancommunicate with the SAP cloud solution. When both halves of the bridge are in place, information from your SAPon-premise system appears in your SAP cloud solution, providing a broader perspective for your users.
TasksTo build the SAP Cloud for Customer half of this bridge, do the following:
Add 360 Overview to ScopingAdd the 360 overview scoping element to your implementation project.For more information, see Activate ERP Integration Using Cloud Scoping.
Create a Communication SystemFor information, see Setup of Communication System for ERP Client.
Set Up Communication ArrangementsTo retrieve information from SAP ERP for 360 overview for accounts, download the following WSDLs:
● Manage Recent Order Data ● Query Recent Order Data
To retrieve information from SAP NetWeaver Business Warehouse for 360 overview for accounts, download thefollowing WSDLs:
● Manage Revenue Data ● Query Revenue Data
Also create a communication arrangement with communication scenario Analytics Integration.For information, see Configuration of Communication Arrangements.
252 © 2011, 2012, 2013 SAP AG. All rights reserved. • P U B L I CSAP Cloud for Customer November 2013
Business Flexibility
Expose the Data Source for ID MappingThe communication arrangement for the Analytics Subsidiaries Integration communication scenario that you justcreated is a data source. Exposing this data source allows the SAP on-premise system to get the ID mapping fromSAP Cloud for Customer.To expose the data source for ID mapping, do the following:
1. Go to Administrator Business Analytics Data Sources and search for Object ID Mapping.
2. Choose the Object ID Mapping data source and expose it.
To build the SAP on-premise half of the bridge, do the following:
Create Consumer Proxies in SAP SystemsYou have downloaded the appropriate WSDL files for the corresponding SAP system. For more information, see theSet Up Communication Arrangements task.To create consumer proxies in an SAP system, do the following:
1. Log on to the SAP system and go to transaction SE80.2. In the topmost selection field, choose Local Objects, and in the second selection field, enter your user name.3. Create an enterprise service by right-clicking on the top node ($TMP_<your user name>) and choosing
Create Enterprise Service .A creation wizard appears.
4. For the object type, select Service Consumer and continue to the next step.5. For the generation source, select external WSDL and continue to the next step.6. For the WSDL source, select Local File and continue to the next step.7. Browse your files and choose the WSDL file that corresponds to one of the communication arrangement that
you set up. Continue to the next step.8. For the transport, use package $TMP and select Local Object.
You can leave the prefix blank. An error message appears, prompting you to enter a prefix. Dismiss the errormessage and continue.
Depending on the release of the SAP system to which you are integrating, you may be required to enterthe customer namespace Z as the prefix before you continue. If your integration is based on ECC 7.0,enter Z as the prefix.
9. Complete the process and activate the consumer proxy.
Repeat the steps in this task to create consumer proxies for the other inbound services required for yourcommunication arrangements. For a list, see the Set Up Communication Arrangements task.Also create a consumer proxy for the Analytics Subsidiaries Integration inbound service.
Create Logical Ports with SOAMANAGER in SAP systems1. Log on to the SAP system and go to transaction SOAMANAGER.2. Choose Service Administration Web Service Configuration .3. Copy the technical names of the consumer proxies you set up in the previous step and search for consumer
proxies.4. Select one of the consumer proxies that you created and choose Apply Selection.5. Choose Configurations Create .6. Enter the following information, along with any other appropriate information and choose Apply Settings.
SAP Cloud for Customer November 2013Business Flexibility P U B L I C • © 2011, 2012, 2013 SAP AG. All rights reserved. 253
Field Select
Configuration Type WSDL Based Configuration
WSDL Base Via File
File with WSDL Document <navigate to the appropriate file>
7. Configure the consumer security settings for this logical port by doing the following:1. Enter the user name and password.
The user name and password are the same as the ones specified for the communication arrangementin SAP Cloud for Customer.
2. Under Transport Settings, enter the appropriate proxy access information and save your entries.8. To confirm that the logical port was created and configured correctly, ping the Web service.
If the ping was successful, a confirmation message appears.9. Repeat this task for the remaining consumer proxies.
Use a Z-Report to Get Data from the SAP System1. Log on to the SAP system and go to transaction SE38.2. Create a report by copying and pasting the contents of the sample report template located in SAP Note
1724752.3. To ensure that the activation was successful, cross-check the data types for the signature parameters of
proxy methods created by the system during local proxy creation.4. Make the following changes in the report:
Reference Name in Report Change To
Method fetch_data_direct zco_operational_data_provision Technicalname of yourproxy
Input type odp_input zoperational_data_provisioni62 Technicalname of yourinput type
Output type odp_output zoperational_data_provisioni61 Technicalname of youroutput type
Method FIND_SYSTEM_ADMINISTRATIVE_DAT ZCO_QUERY_EXTERNAL_AGGREGATED Technicalname of yourproxy forquerying data
Input type ls_sd_query_input zexternal_aggregated_customer9 Technicalname of yourinput type
Output type ls_sd_query_output zexternal_aggregated_custome10 Technicalname of youroutput type
Method MAINTAIN_BUNDLE ZCO_MANAGE_EXTERNAL_AGGREGATED Technicalname of yourproxy formanaging data
Input type ls_sd_update_serv_data zexternal_aggregated_customer7 Technicalname of yourinput type
254 © 2011, 2012, 2013 SAP AG. All rights reserved. • P U B L I CSAP Cloud for Customer November 2013
Business Flexibility
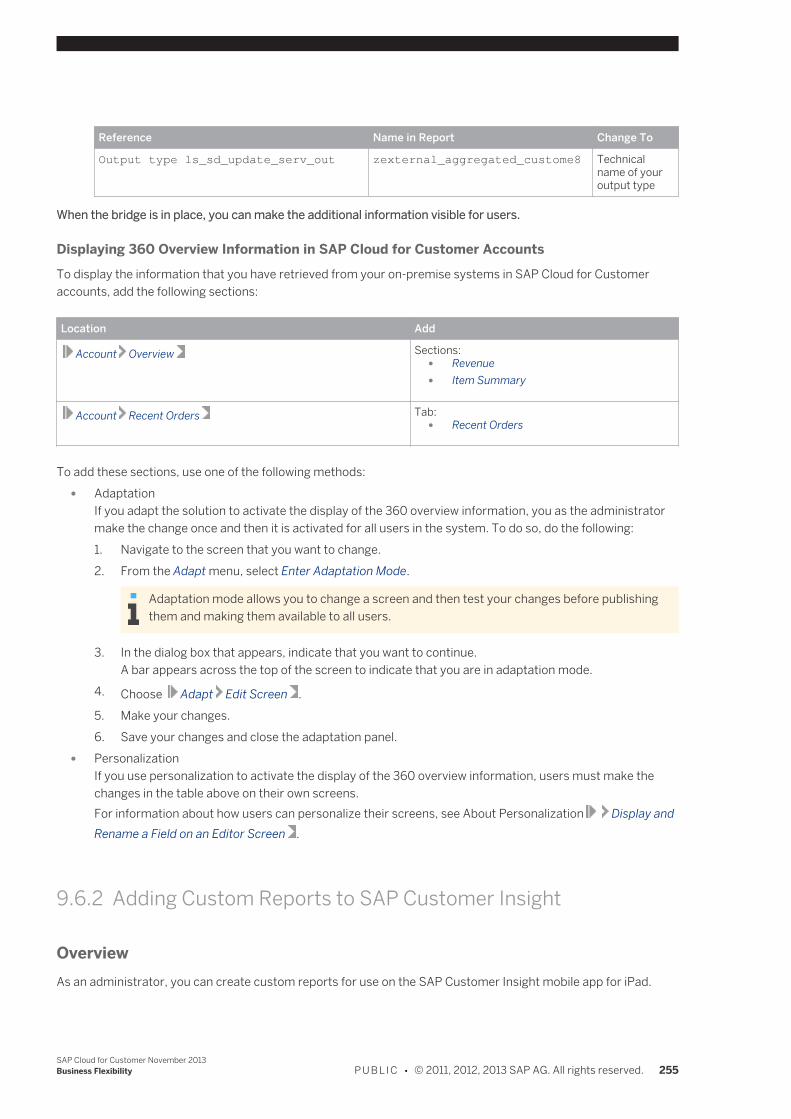
Reference Name in Report Change To
Output type ls_sd_update_serv_out zexternal_aggregated_custome8 Technicalname of youroutput type
When the bridge is in place, you can make the additional information visible for users.
Displaying 360 Overview Information in SAP Cloud for Customer AccountsTo display the information that you have retrieved from your on-premise systems in SAP Cloud for Customeraccounts, add the following sections:
Location Add
Account Overview Sections: ● Revenue ● Item Summary
Account Recent Orders Tab: ● Recent Orders
To add these sections, use one of the following methods: ● Adaptation
If you adapt the solution to activate the display of the 360 overview information, you as the administratormake the change once and then it is activated for all users in the system. To do so, do the following:1. Navigate to the screen that you want to change.2. From the Adapt menu, select Enter Adaptation Mode.
Adaptation mode allows you to change a screen and then test your changes before publishingthem and making them available to all users.
3. In the dialog box that appears, indicate that you want to continue.A bar appears across the top of the screen to indicate that you are in adaptation mode.
4. Choose Adapt Edit Screen .5. Make your changes.6. Save your changes and close the adaptation panel.
● PersonalizationIf you use personalization to activate the display of the 360 overview information, users must make thechanges in the table above on their own screens.For information about how users can personalize their screens, see About Personalization Display andRename a Field on an Editor Screen .
9.6.2 Adding Custom Reports to SAP Customer Insight
OverviewAs an administrator, you can create custom reports for use on the SAP Customer Insight mobile app for iPad.
SAP Cloud for Customer November 2013Business Flexibility P U B L I C • © 2011, 2012, 2013 SAP AG. All rights reserved. 255
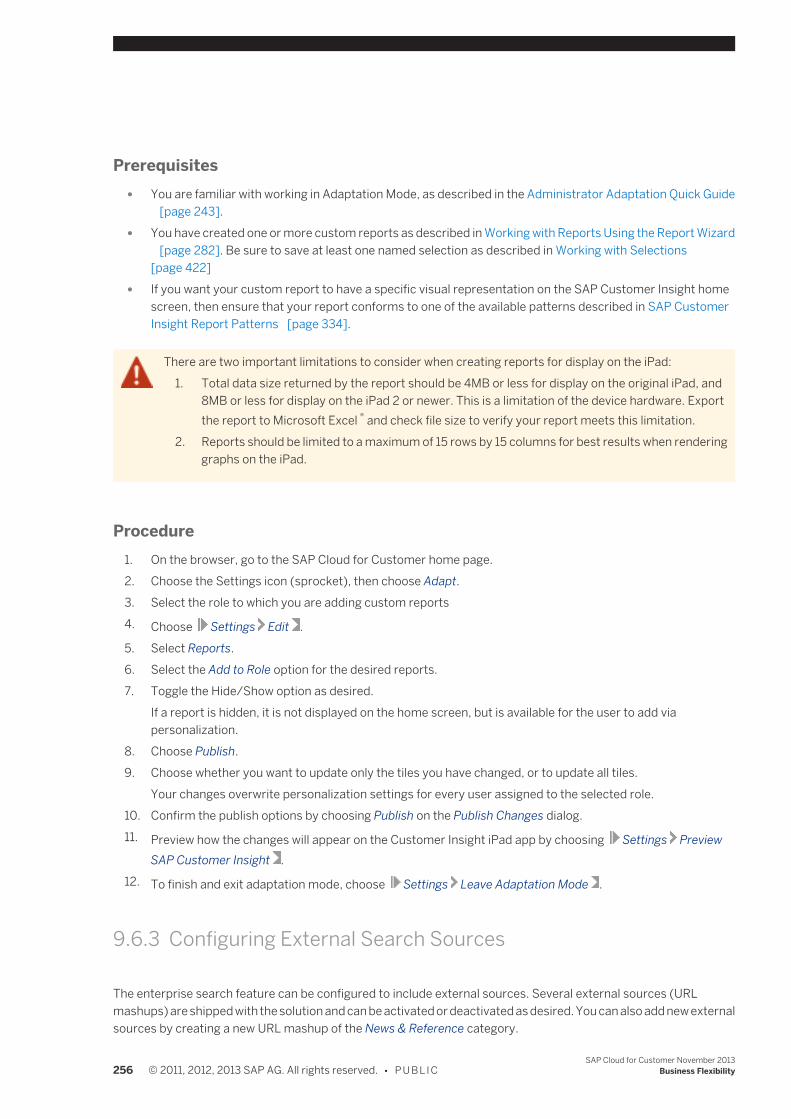
Prerequisites ● You are familiar with working in Adaptation Mode, as described in the Administrator Adaptation Quick Guide
[page 243]. ● You have created one or more custom reports as described in Working with Reports Using the Report Wizard
[page 282]. Be sure to save at least one named selection as described in Working with Selections[page 422]
● If you want your custom report to have a specific visual representation on the SAP Customer Insight homescreen, then ensure that your report conforms to one of the available patterns described in SAP CustomerInsight Report Patterns [page 334].
There are two important limitations to consider when creating reports for display on the iPad:1. Total data size returned by the report should be 4MB or less for display on the original iPad, and
8MB or less for display on the iPad 2 or newer. This is a limitation of the device hardware. Exportthe report to Microsoft Excel ® and check file size to verify your report meets this limitation.
2. Reports should be limited to a maximum of 15 rows by 15 columns for best results when renderinggraphs on the iPad.
Procedure1. On the browser, go to the SAP Cloud for Customer home page.2. Choose the Settings icon (sprocket), then choose Adapt.3. Select the role to which you are adding custom reports4. Choose Settings Edit .5. Select Reports.6. Select the Add to Role option for the desired reports.7. Toggle the Hide/Show option as desired.
If a report is hidden, it is not displayed on the home screen, but is available for the user to add viapersonalization.
8. Choose Publish.9. Choose whether you want to update only the tiles you have changed, or to update all tiles.
Your changes overwrite personalization settings for every user assigned to the selected role.10. Confirm the publish options by choosing Publish on the Publish Changes dialog.11. Preview how the changes will appear on the Customer Insight iPad app by choosing Settings Preview
SAP Customer Insight .12. To finish and exit adaptation mode, choose Settings Leave Adaptation Mode .
9.6.3 Configuring External Search Sources
The enterprise search feature can be configured to include external sources. Several external sources (URLmashups) are shipped with the solution and can be activated or deactivated as desired. You can also add new externalsources by creating a new URL mashup of the News & Reference category.
256 © 2011, 2012, 2013 SAP AG. All rights reserved. • P U B L I CSAP Cloud for Customer November 2013
Business Flexibility
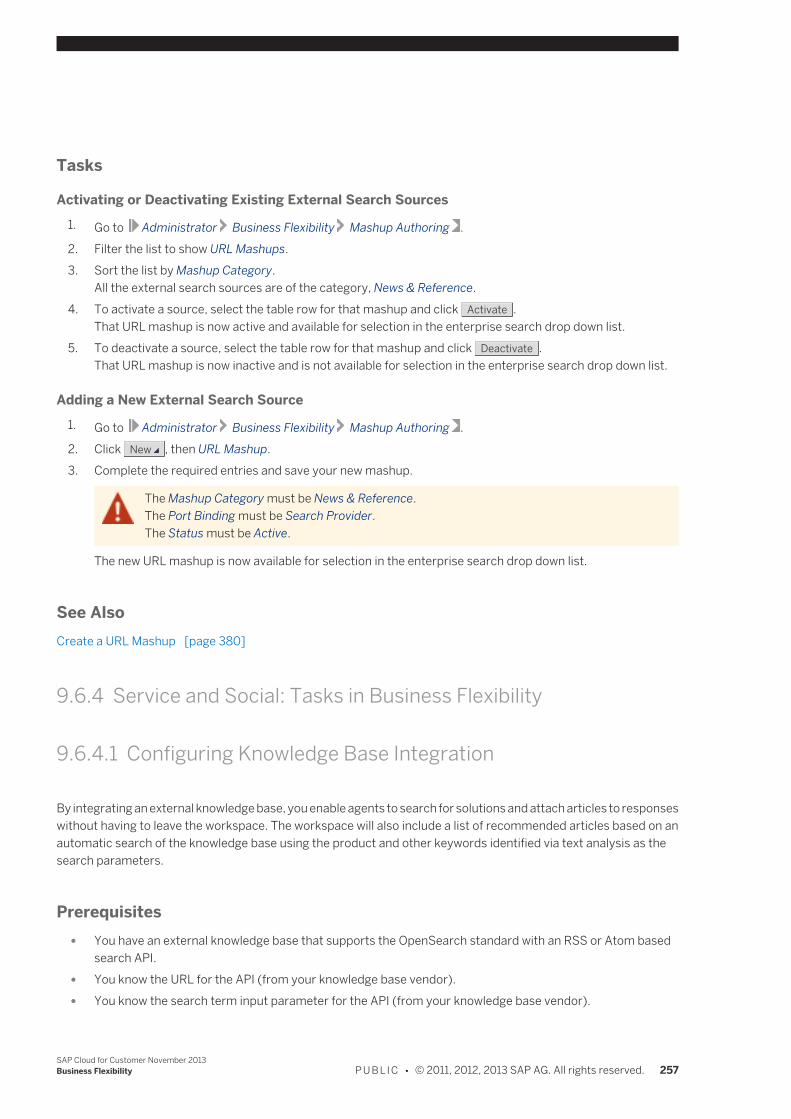
Tasks
Activating or Deactivating Existing External Search Sources1. Go to Administrator Business Flexibility Mashup Authoring .2. Filter the list to show URL Mashups.3. Sort the list by Mashup Category.
All the external search sources are of the category, News & Reference.4. To activate a source, select the table row for that mashup and click Activate .
That URL mashup is now active and available for selection in the enterprise search drop down list.5. To deactivate a source, select the table row for that mashup and click Deactivate .
That URL mashup is now inactive and is not available for selection in the enterprise search drop down list.
Adding a New External Search Source1. Go to Administrator Business Flexibility Mashup Authoring .2. Click New , then URL Mashup.3. Complete the required entries and save your new mashup.
The Mashup Category must be News & Reference.The Port Binding must be Search Provider.The Status must be Active.
The new URL mashup is now available for selection in the enterprise search drop down list.
See AlsoCreate a URL Mashup [page 380]
9.6.4 Service and Social: Tasks in Business Flexibility
9.6.4.1 Configuring Knowledge Base Integration
By integrating an external knowledge base, you enable agents to search for solutions and attach articles to responseswithout having to leave the workspace. The workspace will also include a list of recommended articles based on anautomatic search of the knowledge base using the product and other keywords identified via text analysis as thesearch parameters.
Prerequisites ● You have an external knowledge base that supports the OpenSearch standard with an RSS or Atom based
search API. ● You know the URL for the API (from your knowledge base vendor). ● You know the search term input parameter for the API (from your knowledge base vendor).
SAP Cloud for Customer November 2013Business Flexibility P U B L I C • © 2011, 2012, 2013 SAP AG. All rights reserved. 257
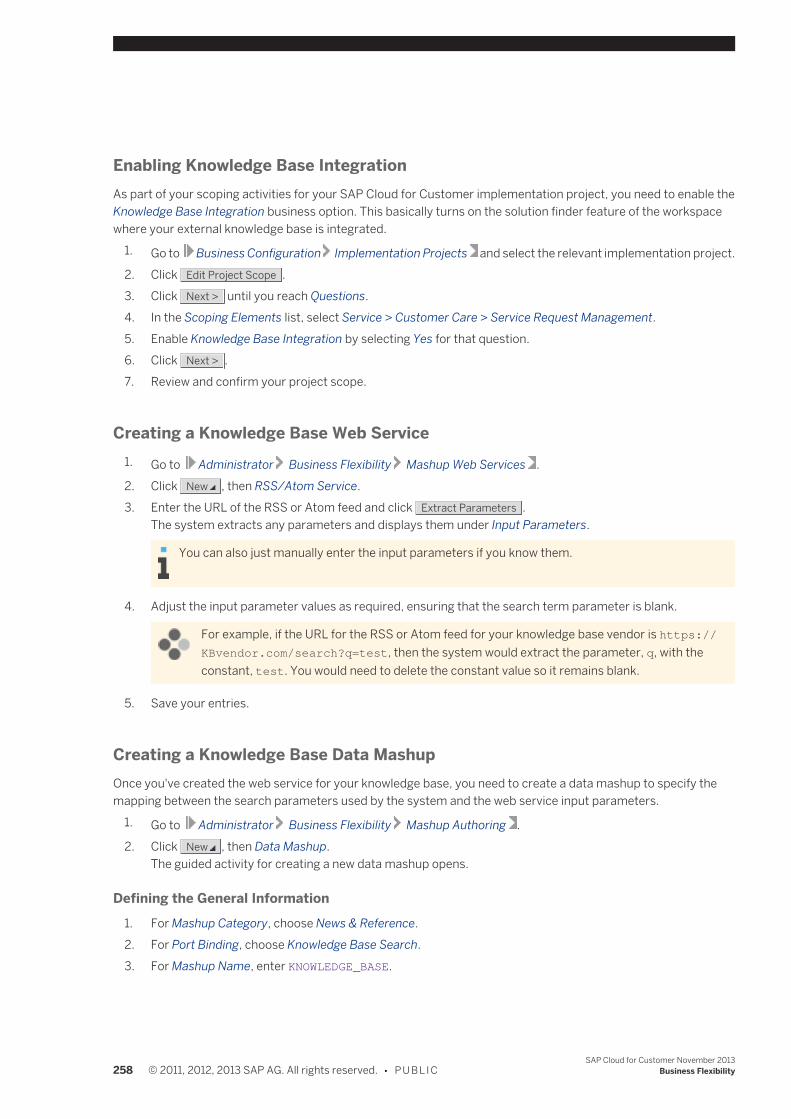
Enabling Knowledge Base IntegrationAs part of your scoping activities for your SAP Cloud for Customer implementation project, you need to enable theKnowledge Base Integration business option. This basically turns on the solution finder feature of the workspacewhere your external knowledge base is integrated.
1. Go to Business Configuration Implementation Projects and select the relevant implementation project.2. Click Edit Project Scope .3. Click Next > until you reach Questions.4. In the Scoping Elements list, select Service > Customer Care > Service Request Management.5. Enable Knowledge Base Integration by selecting Yes for that question.6. Click Next > .7. Review and confirm your project scope.
Creating a Knowledge Base Web Service1. Go to Administrator Business Flexibility Mashup Web Services .2. Click New , then RSS/Atom Service.3. Enter the URL of the RSS or Atom feed and click Extract Parameters .
The system extracts any parameters and displays them under Input Parameters.
You can also just manually enter the input parameters if you know them.
4. Adjust the input parameter values as required, ensuring that the search term parameter is blank.
For example, if the URL for the RSS or Atom feed for your knowledge base vendor is https://KBvendor.com/search?q=test, then the system would extract the parameter, q, with theconstant, test. You would need to delete the constant value so it remains blank.
5. Save your entries.
Creating a Knowledge Base Data MashupOnce you've created the web service for your knowledge base, you need to create a data mashup to specify themapping between the search parameters used by the system and the web service input parameters.
1. Go to Administrator Business Flexibility Mashup Authoring .2. Click New , then Data Mashup.
The guided activity for creating a new data mashup opens.
Defining the General Information1. For Mashup Category, choose News & Reference.2. For Port Binding, choose Knowledge Base Search.3. For Mashup Name, enter KNOWLEDGE_BASE.
258 © 2011, 2012, 2013 SAP AG. All rights reserved. • P U B L I CSAP Cloud for Customer November 2013
Business Flexibility
The name must be KNOWLEDGE_BASE.
4. Set the status to Active and click Next > .
Defining the Mashup Details1. The knowledge base web service you created needs to be added as a source for the data mashup.
Click on the Sources tab.
Depending on the size of your screen, you may have to scroll within the left pane to see theSources tab. By default, the Parameters tab is active.
2. Drag and drop the RSS/Atom Services building block onto the central authoring canvas.3. In the dialog box, select the web service you created for your knowledge base.4. Using the cursor, draw a connection between the bottom of Mashup In-Port and the top of Fetch Feed boxes
of the new service.5. With Fetch Feed selected, in the properties pane on the right, select SearchExpression for the search term
parameter.6. Now with Mashup In-Port selected, in the properties pane on the right, enter a search expression that you're
sure will return results.7. Click Preview Result .
The results of your search expression are displayed in the result pane.8. If the results are what you expected, click Next > .
Reviewing the MashupIf all the information for the mashup is correct and OK, save it by clicking Finish .
Make sure the status is active.
See AlsoConfiguring the URL Shortener [page 264]Create a Data Mashup [page 382]Create a Mashup Web Service [page 373]
9.6.4.2 Configuring Knowledge Base Integration with Single Sign-OnCapability
By integrating an external knowledge base that is enabled for single sign-on, you enable agents to search for solutionsand attach articles to responses without having to leave the workspace. The articles presented to the agent with thesingle sign-on feature enabled are restricted to articles that are pertinent to the agent. The workspace will also includea list of recommended articles based on an automatic search of the knowledge base using the product and otherkeywords identified via text analysis as the search parameters.
SAP Cloud for Customer November 2013Business Flexibility P U B L I C • © 2011, 2012, 2013 SAP AG. All rights reserved. 259
You need to deactivate any active knowledge base mashups before you enable the knowledge base mashupwith single sign-on.
Prerequisites ● You have an external knowledge base that supports the OpenSearch standard with an RSS or Atom based
search API. ● You know the URL for the knowledge base vendor API. This is typically provided by your knowledge base
vendor. ● You know the search term input parameter for your knowledge base vendor API. This is typically provided by
your knowledge base vendor. ● You know the URL for the authentication API. This is typically provided by your knowledge base vendor. ● You know the authorization token parameter for your html base API. This is typically provided by your
knowledge base vendor.
Enabling Knowledge Base Integration and Single Sign-OnAs part of your scoping activities for your SAP Cloud for Customer implementation project, you need to enable theKnowledge Base Integration business option. This basically turns on the solution finder feature of the workspacewhere your external knowledge base is integrated.
1. Go to Business Configuration Implementation Projects and select the relevant implementation project.2. Click Edit Project Scope .3. Click Next > until you reach Questions.4. In the Scoping Elements list, select Service > Customer Care > Service Request Management.5. Enable Knowledge Base Integration by selecting Yes for that question.6. Enable single sign-on by selecting Yes for the Enable SSO for knowledge base integration question.7. Click Next > .8. Review and confirm your project scope.
Creating a Knowledge Base Web Service1. Go to Administrator Business Flexibility Mashup Web Services .2. Click New , then RSS/Atom Service.3. Enter the URL of the RSS or Atom feed and click Extract Parameters .
The system extracts any parameters and displays them under Input Parameters.
You can also manually enter the input parameters if you know them.
4. Adjust the input parameter values as required, ensuring that the search term parameter is blank.
For example, if the URL for the RSS or Atom feed for your knowledge base vendor is https://KBvendor.com/search?q=test, then the system would extract the parameter, q, with theconstant, test. You would need to delete the constant value so it remains blank.
260 © 2011, 2012, 2013 SAP AG. All rights reserved. • P U B L I CSAP Cloud for Customer November 2013
Business Flexibility
5. Enter the API key provided for your vendor for the api key parameter.6. Save your entries.
Creating a Knowledge Base Data MashupOnce you've created the web service for your knowledge base, you need to create a data mashup to specify themapping between the search parameters used by the system and the web service input parameters.
1. Go to Administrator Business Flexibility Mashup Authoring .2. Click New , then Data Mashup.
The guided activity for creating a new data mashup opens.
Defining the General Information1. For Mashup Category, choose News & Reference.2. For Port Binding, choose Knowledge Base Search.3. For Mashup Name, enter KNOWLEDGE_BASE_SSO.
The name must be KNOWLEDGE_BASE_SSO.
4. Set the status to Active and click Next > .
Defining the Mashup Details1. The knowledge base web service you created needs to be added as a source for the data mashup.
Click on the Sources tab.
Depending on the size of your screen, you may have to scroll within the left pane to see theSources tab. By default, the Parameters tab is active.
2. Drag and drop the RSS/Atom Services building block onto the central authoring canvas.3. In the dialog box, select the web service you created for your knowledge base.4. Using the cursor, draw a connection between the bottom of Mashup In-Port and the top of Fetch Feed boxes
of the new service.5. With Fetch Feed selected, in the properties pane on the right, select SearchExpression for the search term
parameter and either UserID or UserEmail for the user authorization parameter.6. Select the Mashup In-Port in the canvas, and enter a term in Search Expression that you're sure will return
results.7. Click Preview Result .
The results of your search expression are displayed in the result pane.8. If the results are what you expected, click Next > .
Reviewing the MashupIf all the information for the mashup is correct and OK, save it by clicking Finish .
Make sure the status is active.
SAP Cloud for Customer November 2013Business Flexibility P U B L I C • © 2011, 2012, 2013 SAP AG. All rights reserved. 261
Creating the Authentication Mashup
1. Go to Administrator Business Flexibility Mashup Authoring .2. Click New , then HTML Mashup.
The guided activity for creating a new html mashup opens.3. For Mashup Category, choose News & Reference.4. For Port Binding, choose Knowledge Base Authentication.5. For Mashup Name, enter a name.6. Ensure that the mashup is set to Active.7. Ensure that the type is set to URL.8. Enter the URL and click Extract Parameters .
The system extracts any parameters and displays them under Input Parameters.
You can also manually enter the input parameters.
9. Set the height of the mashup appropriately, the minimum height is 30.
A second mashup will be shown below the solution finder.
10. Set the parameter binding for the authentication token parameter to Token. Ensure that the Token checkboxis selected.
11. Add any additional parameters as needed.12. Save your settings.
Adding the Authentication Token
1. Go to Customer Service Tickets and then open a ticket.2. Click Adapt and then Enter Adaptation Mode.3. Click Adapt and then Edit Screen.4. Click Mashups and Web Services.5. Find the newly defined authentication mashup in the list and select the Visible option.6. Select Save and then Publish.
Once you publish the changes, they will affect all users of the system. You can undo these changesusing Adaptation Mode, if necessary.
7. Perform a search in the solution finder to ensure the solution finder is working.
Check that the API key is still populated in the RSS/Atom service that you created.
262 © 2011, 2012, 2013 SAP AG. All rights reserved. • P U B L I CSAP Cloud for Customer November 2013
Business Flexibility
See AlsoConfiguring the URL Shortener [page 264]Create a Data Mashup [page 382]Create a Mashup Web Service [page 373]
9.6.4.3 Configuring the Chat URL Generator
The chat URL generator enables an agent to send the customer an invitation and link to a chat session. It is configuredusing an existing mashup web service.
Prerequisites ● You have an account with SnapEngage. ● You have enabled the Application Programming Interfaces (APIs) scoping element.
1. Go to Business Configuration Implementation Projects then select your project and clickEdit Project Scope .
2. Click Next until you get to Adjust Scoping.3. Then under Communication and Information Exchange Business Process Management , select
Application Programming Interfaces (APIs).
Configuring the Web Service1. Go to Administrator Business Flexibility Mashup Web Services .2. Search for the BYD_COD/SNAPENG service.
3. Select the service and click Enter API Keys .The Enter API Keys dialog box opens.
4. Click Show API Keys .5. Enter the API Key Value provided by SnapEngage for each of the following API keys:
● wThis is the API key GUID and will look something like this: ad02xxx1-fax3-xxx7-axxxd-4xx2f1e64xxx
● bThis is the URL of the page you want to display behind the SnapEngage chat client when a customeropens the chat link sent by an agent. For example: http://www.<your company>.com/<productsupport>.
6. Save your changes.
ResultsThe insert chat link option is now available in the workspace.
SAP Cloud for Customer November 2013Business Flexibility P U B L I C • © 2011, 2012, 2013 SAP AG. All rights reserved. 263
See Also
Enabling Chat for SAP Cloud for CustomerAbout Mashup Web Services [page 371]
9.6.4.4 VIDEO: Enabling Chat
Video
Enabling Chat (7m 23s)Find out how to enable chat using SnapEngage so that your service agents can chat with customers.
9.6.4.5 Configuring the URL Shortener
The URL Shortener is used when attaching knowledge base articles to message responses. It is configured using anexisting web service.
1. Go to Administrator Business Flexibility Mashup Web Services .2. Search for the BYD_COD/BITLY service.
3. Select the service and click Enter API Keys .The Enter API Keys dialog box opens.
4. Click Show API Keys and, in the API Key Value column, enter the Bitly login and API key provided by the serviceprovider.
For example, you can find the Bitly values at http://bitly.com/a/your_api_key/.
5. Save your changes.
See AlsoConfiguring Knowledge Base Integration [page 257]About Mashup Web Services [page 371]
9.6.4.6 Setting up a Mashup Web Service for SAP Social MediaAnalytics by NetBase
SAP Cloud for Social Engagement can be used with SAP Social Media Analytics by NetBase to set up social mediachannels that extract messages and create tickets based on those messages. Before you create those social mediachannels, you have to set up mashup web services that will extract the content identified for your defined SAP SocialMedia Analytics topics.
264 © 2011, 2012, 2013 SAP AG. All rights reserved. • P U B L I CSAP Cloud for Customer November 2013
Business Flexibility
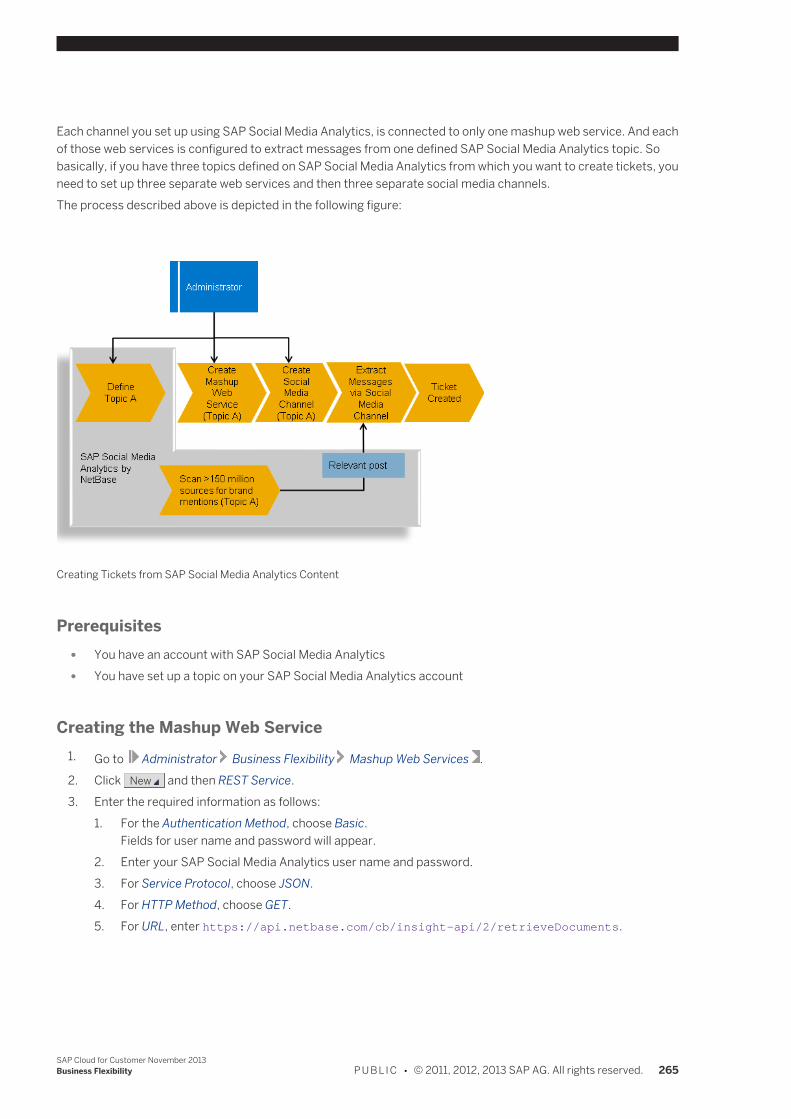
Each channel you set up using SAP Social Media Analytics, is connected to only one mashup web service. And eachof those web services is configured to extract messages from one defined SAP Social Media Analytics topic. Sobasically, if you have three topics defined on SAP Social Media Analytics from which you want to create tickets, youneed to set up three separate web services and then three separate social media channels.The process described above is depicted in the following figure:
Creating Tickets from SAP Social Media Analytics Content
Prerequisites ● You have an account with SAP Social Media Analytics ● You have set up a topic on your SAP Social Media Analytics account
Creating the Mashup Web Service1. Go to Administrator Business Flexibility Mashup Web Services .2. Click New and then REST Service.3. Enter the required information as follows:
1. For the Authentication Method, choose Basic.Fields for user name and password will appear.
2. Enter your SAP Social Media Analytics user name and password.3. For Service Protocol, choose JSON.4. For HTTP Method, choose GET.5. For URL, enter https://api.netbase.com/cb/insight-api/2/retrieveDocuments.
SAP Cloud for Customer November 2013Business Flexibility P U B L I C • © 2011, 2012, 2013 SAP AG. All rights reserved. 265
You may find it useful to adjust the parameters used by the SAP Social Media Analytics API toidentify those messages to be extracted by SAP Cloud for Social Engagement. For example,you can use the API explorer (requires authorized log on to your SAP Social Media Analyticsaccount) to expand the methods used for retrieving documents.Then you can just copy and paste the related API call URL to the URL value and click
Extract Parameters to automatically extract the Input Parameters described in the next step.
4. In the Input Parameters section, add rows to the table for each of the input parameters listed below.
The following parameter values will be used to call the SAP Social Media Analytics by NetBase API for thedefined topic (case-sensitive)
Parameter Constant Additional Information
topics Your Topic Name The topic variable, Your TopicName, should be equal to the topic youhave configured on SAP Social MediaAnalytics.
sizeNeeded Up to 1000 max
publishedDate
YYYY—MM—DD Enter today's date. This is replaced atruntime.
sort daynumber
5. Save your entries.
The Service ID for the newly created web service must be entered manually when creating theassociated social media channel. For more information, see Adding an SAP Social Media AnalyticsSocial Media Channel [page 189].
6. Enter the API keys for the mashup web service.1. Select the mashup web service for SAP Social Media Analytics you just created.2. Click Enter API Keys .3. Click Show API Keys .4. Enter your user name and password information for your SAP Social Media Analytics account and save
your entries.
Next StepsOnce you've created the mashup web service for your SAP Social Media Analytics topic, you can create the socialmedia channel that will be used to extract content and create tickets.For more information, see Adding an SAP Social Media Analytics Channel [page 189].
9.6.4.7 Configuring Klout
The Klout web services are used for Twitter social media customer profiles to retrieve the customers' Klout scoresand associated information. There are two existing web services for which you need to maintain the API keys.
1. Go to Administrator Business Flexibility Mashup Web Services .2. First, search for the BYD_COD/KLOUT service.
266 © 2011, 2012, 2013 SAP AG. All rights reserved. • P U B L I CSAP Cloud for Customer November 2013
Business Flexibility
3. Select the service and click Enter API Keys .The Enter API Keys dialog box opens.
4. Click Show API Keys and, in the API Key Value column, enter the API key provided by the service provider.5. Save your changes.6. Next, search for the BYD_COD/KLOUTUSER service.
7. Select the service and click Enter API Keys .8. Click Show API Keys and, in the API Key Value column, enter the API key provided by the service provider.9. Save your changes.
See AlsoAbout Mashup Web Services [page 371]
9.6.5 Sales: Tasks in Business Flexibility
9.6.5.1 Configuring Bing Maps for Accounts
Under Customers Accounts and Visits Visit Planner , users can choose Map View to see the geographicallocation of each of the addresses of the displayed accounts — both individually, and in relation to one another. Userscan also zoom in, zoom out, and pan in any direction.
Configuring the Bing MashupTo enable maps, you must enter the API keys for the custom mashup.
1. Choose Administrator Business Flexibility Mashup Authoring .2. Search for the SM00048 mashup.
3. Select the mashup and click Enter API Keys .The Enter API Keys dialog box opens.
4. Click Show API Keys and, in the API Key Value column, enter the API key that you received from the serviceprovider.
5. Save your changes.
See AlsoMashup Web Services Quick Guide [page 371]Mashup Authoring Quick Guide [page 375]
SAP Cloud for Customer November 2013Business Flexibility P U B L I C • © 2011, 2012, 2013 SAP AG. All rights reserved. 267
10 Input and Output Management
10.1 Print Queues Quick Guide
In the Print Queues view, administrators can set up print queues to manage the process-integrated printing ofdocuments, and monitor the print jobs in each print queue. Print queues are used to collect all documents that areoutput to the output channel Printing.Depending on your solution, you can access this view from the Application and User Management or Administratorwork center under Input and Output Management.
Print QueuesDefault Print QueueSAP provides a default printing scenario where all document owners manually print their own documents. By default,the print jobs of all users are collected in the default print queue from which they are sent to each user's individualManual Print Tasks view. Each user can view and print his or her print jobs by navigating to Home Work ManualPrint Tasks . The queue usage of the default print queue can be changed to Central Printing via the Print Manager,but not to Central Printing by Dedicated User.User Assignment to Print QueuesA print queue can be assigned to the following users:
● No userIf a print queue has the queue usage Printing by Document Owner and consequently has no user assigned, alldocuments sent to the queue are shown in the Manual Print Tasks view of the document owner until the statusof the document is changed manually by the document owner to Successful. If the document owner hasinstalled and signed in to the Collaboration Window, the documents are retrieved and printed by theCollaboration Window immediately. In this case the documents do not appear in the Manual Print Tasks view.The default print queue has the queue usage Printing By Document Owner. Unless you require multiple printerlanguages, it is usually only necessary to have one print queue with this queue usage.
● A print userIf a print queue has the queue usage Central Printing via the Print Manager, it must be assigned to a print user.As each print queue with this queue usage is later assigned to a physical printer in the Print Manager, eachqueue represents a physical printer.
● A business userIf a print queue has the queue usage Central Printing by Dedicated User, it must be assigned to a businessuser. This business user can view and print all documents in this queue by navigating to Home Work Manual Print Tasks . This user prints on-behalf of the document owner.
Print Queue StatusBy default, all new print queues have the status Started. This means that documents sent to these print queues willbe immediately processed, for example, documents will be sent to a user’s Manual Print Tasks view. You can pausea print queue in order to fix errors.
Print JobsFor each print queue, you can view all print jobs and check the status of each job by selecting the queue and clicking
Edit .
268 © 2011, 2012, 2013 SAP AG. All rights reserved. • P U B L I CSAP Cloud for Customer November 2013
Input and Output Management
A print job can have one of the following statuses: ● Queued
The document is waiting in the print queue. ● Printing
The document has been collected by the Collaboration Window or the Print Manager and they have not yetreturned a status.
● ErrorThe document has been collected by the Collaboration Window or the Print Manager and an error has beenreturned, alternatively, an error occurs when a document has had the status Printing for more than 12 hours.
Note that if an error occurs, an output error task is created and sent to the document owner, who canview the tasks under Home Work Inbox . It is also possible for administrators to take over andresolve a task belonging to another user.
● SuccessfulThe document has been collected by the Collaboration Window or the Print Manager and the statussuccessfully has been returned. Alternatively, a user has manually set the status to Successful.
Queued print jobs can be viewed on the Queued Documents tab of the print queue editor. Print jobs with the statusprinting, failed or successful can be viewed on the Processed Documents tab.
Business Background
Output ManagementOutput management comprises all activities related to the output of documents in print, e-mail, or fax format. Form-based documents can be output on an ad hoc basis or as an integrated part of a business process.For more information, see Output Management [page 401].
TasksPrint Queues
Set Up Printing Using the Print ManagerIf the Print Manager is available for your solution, you can use it to set up printing. For more information, see PrintManager Quick Guide in the Help Center.
Set Up Printing By a Dedicated UserFor more information, see here.
Create a Print Queue for a Specific Printing ScenarioYou can create additional print queues to support the Printing by Document Owner, Central Printing via the PrintManager, and Central Printing by a Dedicated User printing scenarios. These print queues can then be assigned toa business document using an output channel rule or can be selected by a user in a document's output settings.
1. In the Print Queues view, click New .2. In the New Print Queue dialog box, enter a queue ID.
The queue ID is displayed in output settings for a business document when a user selects the output channelPrinting therefore, the queue should be given an ID that can be understood by all users. For example, if youare setting up a print queue for central printing via the print manager, you could give the print queue the name
SAP Cloud for Customer November 2013Input and Output Management P U B L I C • © 2011, 2012, 2013 SAP AG. All rights reserved. 269
of the printer on which the documents are going to be printed. Alternatively, if you are creating a print queuefor central printing by a dedicated user, you could give the print queue the name of the user.
3. Select a printer language.The following printer languages are supported: ● PDF - This printer language can be used to print on all printers supported by a Microsoft ® Windows
operating system. ● PCL 5c (Color) ● PCL 5e (Monochrome) ● Adobe® PostScript® Level 2 ● Adobe® PostScript® Level 3 ● Datamax 203 dpi ● Datamax 300 dpi ● Datamax 406 dpi ● Datamax 600 dpi ● Intermec 203 dpi ● Intermec 300 dpi ● Intermec 400 dpi ● Toshiba 203 dpi ● Toshiba 305 dpi ● Toshiba 600 dpi ● ZPL 203 dpi ● ZPL 300 dpi ● ZPL 600 dpi
Note that if you are creating a print queue for manual printing by the document owner or by a dedicated user,you should select the printer language PDF as this is required for manual printing.
4. Select the queue usage.5. Do one of the following:
● If you selected Central Printing via the Print Manager, you must specify a print user.This user is required to authenticate the Print Manager when it accesses SAP's cloud solution.
● If you selected Central Printing by a Dedicated User, you must select the user of the employee who shouldprint the documents. This is the business user ID of the user in SAP's cloud solution.
6. Save your changes.7. To create an output channel rule to define when this print queue should be used, navigate to Application
and User Management Input and Output Management Output Channel Selection .8. In the Output Channel Selection view, select a business document and create an output channel rule to define
when this print queue should be used as the output channel. For more information about output channel rules,see the Output Channel Selection Quick Guide [page 274].
Pause a Print Queue1. In the Print Queues view, select a print queue.2. Click Pause .
The print queue is paused. This allows you to stop documents being collected by the Print Manager while youare carrying out repairs or changing the printer assignment in the Print Manager.
3. Click Start to restart the print queue.
270 © 2011, 2012, 2013 SAP AG. All rights reserved. • P U B L I CSAP Cloud for Customer November 2013
Input and Output Management
Clean Up a Print Queue1. In the Print Queues view, select a print queue.2. Click Clean Up .
All print jobs with the status Successful are deleted from the print queue. You can use this function, forexample, to remove completed print jobs from a frequently used print queue, or to remove old print jobs froma queue that you want to delete.
Delete a Print QueueA print queue can be deleted if it contains no documents in it and if it is not being used by any output channel rules.In order to remove a print queue you must take it out of the output rules in which it is used, and you must clean upthe queue or have all documents processed or deleted somehow. The DEFAULT queue cannot be deleted.
1. In the Print Queues view, check that the print queue does not contain any print jobs.To remove old print jobs with the status Successful, use the Clean Up button. To remove any other remainingprint jobs, open the print queue and manually delete the print jobs.
2. Under Details, check whether the print queue is used in any output channel rules.You must remove the print queue from the output channel rules before you can delete it.
3. Select the print queue and click Delete .
Change the Print User Password1. On the computer on which the Print Manager is installed, stop the SAP Print Service.2. In SAP's cloud solution, navigate to the Print Queues view, and select the print queue and click Edit .3. In the Print Queue editor, navigate to the Details tab, and click Edit beside the Assigned User field.4. Enter a new password and confirm the password.5. Save your changes.6. On the computer on which the Print Manager is installed, restart the SAP Print Service.
If you change the password without stopping the SAP Print Service, the print user will be locked. To unlockthe print user, on the Edit Print User screen, deselect the Locked checkbox.
Print Jobs
Reprint a Print Job1. In the Print Queues view, select a print queue.2. Click Edit .3. On the Processed tab, select a document with the status Failed and click Reprint .
The document in the print job is resent to the printer or Manual Print Tasks view depending on the type ofprinting that has been set up for the print queue. This does not affect the output settings of the document.
Delete a Print Job1. In the Print Queues view, select a print queue.2. Click Edit .3. On the Queued or Processed tab, select a document and click Delete.
You can delete documents with the status Queued, Printing, or Failed.
SAP Cloud for Customer November 2013Input and Output Management P U B L I C • © 2011, 2012, 2013 SAP AG. All rights reserved. 271
Set the Status of a Print Job to Successful1. In the Print Queues view, select a print queue.2. Click Edit .3. On the Processed tab, select a document with the status Failed and click Change Status to Successful.
The output status of the document in the print job is set to Successful.
10.2 E-Mail and Fax Queues Quick Guide
In the E-Mail and Fax Queues view, administrators can manage all documents that are output to the output channelsfax and e-mail. You can view all jobs that are waiting to be processed and which have already been processed andcheck the status of each job. A job can have one of the following statuses:
● WaitingThe job has not yet been processed by the system.
● In ProcessThe system is processing the job.
● On HoldThe job has been manually put on hold, for example, while a technical error is being corrected.
● FailedThere was an error while processing the job. To view the cause, select the document from the list. An errordescription is displayed under Output Details.
● CompletedThe job has been processed and the document sent by e-mail or fax.
If an error occurs, an output error task is created and sent to the document owner, who can view the tasksunder Home Work Inbox . It is also possible for administrators to take over and resolve a task belongingto another user.
Depending on your solution, you can access this view from the Application and User Management or Administratorwork center under Input and Output Management.
Business Background
Output ManagementOutput management comprises all activities related to the output of documents in print, e-mail, or fax format. Form-based documents can be output on an ad hoc basis or as an integrated part of a business process.For more information, see Output Management in the Help Center of your solution.
Tasks
Delete a Job1. In the E-Mail and Fax Queues view, select a job with the status Waiting, On Hold, or Failed.
272 © 2011, 2012, 2013 SAP AG. All rights reserved. • P U B L I CSAP Cloud for Customer November 2013
Input and Output Management
2. Click Delete .The job is deleted.
Restart a Job1. In the E-Mail and Fax Queues view, select a job with the status Failed.2. Click Restart .
The job is resent to the business partner’s e-mail address or fax number.
Put a Job on Hold1. In the E-Mail and Fax Queues view, select a job with the status Queued.2. Click Hold .
The job is put on hold until you manually resume the job.
Resume a Job1. In the E-Mail and Fax Queues view, select a job with the status On Hold.2. Click Resume .
The document is sent to the output channel defined in the document's output settings.
10.3 Form Template Selection Quick Guide
In the Form Template Selection view, administrators can create rules that are used to determine which form templateis used for the output of a business document under a defined set of conditions. A default assignment of formtemplates to documents is provided by SAP. If you create new templates, you must create a form template rule todefine when the templates are used.You can either define a form template rule that applies to all instances of the selected business document, or youcan use the parameters provided to create more complex rules. If you have created more than one rule for adocument, you also need to define the sequence of the rules. The system processes the rules in the order in whichthey appear in the table until a rule is found for which the conditions are met. Therefore, enter more specific rules atthe top of the list and generic rules at the bottom. Note that if you create a rule and leave a parameter blank, thenthis is handled as a wildcard, and any value is considered as having fulfilled the condition.
Note that in some cases, a business document represents a group of related document types. For example,the business document Customer Invoice includes invoices, credit memos, correction invoices, and downpayments.
Depending on your solution, you can access this view from the Application and User Management or Administratorwork center under Input and Output Management.
Business Background
Output ManagementOutput management comprises all activities related to the output of documents in print, e-mail, or fax format. Form-based documents can be output on an ad hoc basis or as an integrated part of a business process.For more information, see Output Management in the Help Center of your solution.
SAP Cloud for Customer November 2013Input and Output Management P U B L I C • © 2011, 2012, 2013 SAP AG. All rights reserved. 273
FormsForm templates are used to define the content and layout of documents that can be output from the system.For more information, see Forms.
Tasks
Create a Form Template Rule1. In the Form Template Selection view, select the business document for which you want to create a form
template rule from the Show Rules For drop-down list and click Go .2. Click New .
The Create Form Template Rule activity opens.3. From the Form Template drop-down list, select a form template.4. Under Parameter Settings, enter the parameters for which you want this rule to apply.
The parameters available to you depend on the business document selected. These parameters determinewhen the form template selected in the previous step is used to output the document. Note that if you leavea parameter blank, this acts as a wildcard.
5. Save your changes.Note that you may now have to adjust the sequence in which the form template rules are applied in order toensure that the rule is applied by the system correctly. See Change the Sequence of Form Template Rulesbelow.
Change the Sequence of Form Template Rules1. In the Form Template Selection view, select the business document for which you want to change the
sequence of form template rules from the Show Rules For drop-down list and click Go .2. Click Change Sequence .3. On the Change Sequence screen, use the Move Up and Move Down buttons to change the order of the rules.
The system processes the rules in order of their appearance in the list starting at the top. The more specificthe rule, the higher it should be placed in the list.
4. Save your changes.
10.4 Output Channel Selection Quick Guide
In the Output Channel Selection view, administrators can create rules that are used to determine which outputchannel should be used for the output of a business document under a defined set of conditions. By default, alldocuments are sent to the output channel printing where they are collected in the default print queue. Documentssent to the default print queue can be printed manually by the document owner.You can either define an output channel rule that applies to all instances of the selected business document, or youcan use the parameters provided to create more complex rules. If you have created more than one rule for adocument, you also need to define the sequence of the rules. The system processes the rules in the order in whichthey appear in the table until a rule is found for which the conditions are met. Therefore, enter more specific rules atthe top of the list and generic rules at the bottom. Note that if you create a rule and leave a parameter blank, thenthis is handled as a wildcard, and any value is considered as having fulfilled the condition.
274 © 2011, 2012, 2013 SAP AG. All rights reserved. • P U B L I CSAP Cloud for Customer November 2013
Input and Output Management
For example, an output channel rule has already been created specifying that all sales orders should be output as e-mail. You now want to ensure that all sales orders sent to a particular business partner are output as fax. To do this,you need to create a new output channel rule for the Sales Order business document. Specify fax as the outputchannel and in the parameter settings enter the name of the business partner. After you have created the rule, youneed to change the order of the rules in the table to ensure that this rule is applied by the system before the genericrule. To do this change the sequence of the rules and move the new rule to the top of the list.
Note that in some cases, a business document represents a group of related document types. For example,the business document Customer Invoice includes invoices, credit memos, correction invoices, and downpayments.
Depending on your solution, you can access this view from the Application and User Management or Administratorwork center under Input and Output Management.
Business Background
Output ManagementOutput management comprises all activities related to the output of documents in print, e-mail, or fax format. Form-based documents can be output on an ad hoc basis or as an integrated part of a business process.For more information, see Output Management in the Help Center of your solution.
Tasks
Create an Output Channel Rule1. In the Output Channel Selection view, select the business document for which you want to create an output
channel rule from Show Rules For drop-down list and click Go .2. Click New .
The Create Output Channel Rule dialog box opens.3. From the Output Channel drop-down list, select an output channel.
The list of output channels that are available depends on the business document you selected. In general,you can send business documents electronically by fax or e-mail, or you can send the document to a printer.If you choose printer as the output channel, you need to specify a print queue and the number of copies youwant to print.
4. Under Parameter Settings, enter the parameters for which you want this rule to apply.The parameters available to you depend on the business document selected. These parameters determinewhen the output channel selected in the previous step is used to output the document. Note that if you leavea parameter blank, this acts as a wildcard.
5. Save your changes.Note that you may now have to adjust the sequence in which the output channel rules are applied in order toensure that the rule is applied by the system correctly. See Change the Sequence of Output Channel Rulesbelow.
Change the Sequence of Output Channel Rules1. In the Output Channel Selection view, select the business document for which you want to change the
sequence of rules from the Show Rules For drop-down list and click Go .2. Click Change Sequence .3. On the Change Sequence screen, use the Move Up and Move Down buttons to change the order of the rules.
SAP Cloud for Customer November 2013Input and Output Management P U B L I C • © 2011, 2012, 2013 SAP AG. All rights reserved. 275
The system processes the rules in order of their appearance in the list starting at the top. The more specificthe rule, the higher it should be placed in the list.
4. Save your changes.
276 © 2011, 2012, 2013 SAP AG. All rights reserved. • P U B L I CSAP Cloud for Customer November 2013
Input and Output Management
11 Background Jobs
11.1 Background Jobs Quick Guide
Jobs are an important part of how the application operates. A job is a scheduled instance of a mass data run. Userscreate mass data runs in the solution and then schedule them to run immediately, or regularly at a set time, or afteranother specified job. When the user schedules the run, the solution represents it as a job. There may be multiplejobs scheduled for one mass data run.The Background Jobs view in the Administrator and/or Application and User Managementwork center allows you toview the jobs in the solution. You can adjust the list to display all scheduled jobs, all failed jobs, all jobs that arecurrently running, and all jobs that ran the week before. The status of each job is displayed in the Status column.There you can see if a job failed, finished, or if its release was cancelled.
Business Background
Mass Data RunsA Mass Data Run (MDR) is the automatic mass processing of a task or a business transaction. MDRs enable massprocessing of business data and are used in business processes, for example, invoice runs, payment authorizationruns, or balance confirmation runs. When a user schedules an MDR the system represents it as a background job.During scoping, it is possible to provide default variants of the MDRs.MDRs are created and maintained in the work centers. Using the Job Scheduler, users schedule the run to executeonce or regularly at specified times.In the Background Jobs view, you can monitor and reschedule MDR jobs that are created by users in other workcenters.For more information, see the documentation about mass data runs.
Application LogApplication logs are created as a result of business processes that require logging of business steps, for example,the execution of mass data runs. The application log displays detailed information about business process steps andtheir results allowing you to review these at a later point in time.For more information, see the documentation about the application log.
Tasks
View the Job LogYou can view the job log for any job that was scheduled and ran in the solution. In the job log you can see, for example,the reasons why a job failed and what must be corrected before a job is rescheduled.
1. Select the Background Jobs view.2. In the Show field, select All failed Jobs or Jobs run in last week to see the runs for which you can view the job
log.
SAP Cloud for Customer November 2013Background Jobs P U B L I C • © 2011, 2012, 2013 SAP AG. All rights reserved. 277
3. Select the job for which you want to see the job log and choose View Job Log to open the Job Log screen.4. Check the job log.5. Choose Close to close the job log and return to the background job overview
Reschedule a JobYou can reschedule a job that has been created and scheduled by another user.
1. Select the Background Jobs view.2. In the Show field select All Scheduled Jobs and click Go .3. To reschedule a job, select the job you want to reschedule, and click Reschedule . The Reschedule Job screen
opens.4. Under Schedule, choose one of the following options for the job run time:
● Click Run Immediately . ● Enter the date and time for the job to run.
In the Recurrence list, choose how often this job occurs. ● Select the job it should run after.
5. Click Save and Close to save the new job schedule, and return to the Background Jobs overview.The rescheduled job is saved to the solution. The job runs when scheduled.
Cancel a JobYou can cancel any scheduled job or any job that is currently running.
1. Select the Background Jobs view.2. In the Show field select All Running Jobs or All Scheduled Jobs and click Go .3. To cancel a job, select the job that you want to cancel and choose Cancel Job .
The job is now canceled and the status of the job is set to Obsolete in the Background Jobs list.
278 © 2011, 2012, 2013 SAP AG. All rights reserved. • P U B L I CSAP Cloud for Customer November 2013
Background Jobs
12 Business Analytics
12.1 About Business Analytics
Administrator Business Analytics is a group of views and tasks that enable you to design or modify your reports.
Tasks
Designing and Assigning Reports
Go to Administrator Business Analytics Design Reports .To create a new report using the report wizard, click New and choose either Report or Report as Copy. For moreinformation, see here [page 282].To assign an unassigned report or one you have just created, select it and click Assign . For more information, seehere [page 325].
Designing Data Sources
Go to Administrator Business Analytics Design Data Sources .As an administrator, you can create your own combined and joined data sources that merge data from different datasources. For more information, see the Design Data Sources Quick Guide [page 291].
Designing Key Figures
Go to Administrator Business Analytics Design Key Figures .As an administrator, you can create your own calculated and restricted key figures for use in reports. For moreinformation, see here [page 319].
Uploading or Downloading ObjectsAs an administrator, you can upload or download objects you have created, such as data sources, key figures, andreports. You can upload from and download to a source, such as your computer or an external storage device. Formore information, see here.
12.2 VIDEO: Adding Custom Fields to Reports
Video
Adding Custom Fields to Reports (4m 21s)For Administrators: find out how to add custom fields to objects in the solution and add those fields to reports.
SAP Cloud for Customer November 2013Business Analytics P U B L I C • © 2011, 2012, 2013 SAP AG. All rights reserved. 279
12.3 VIDEO: Setting Navigation Targets for Reports
Video
Setting Navigation Targets for Reports (4m 10s)For Administrators: find out how to set up navigation targets for reports so users can quickly navigate from reportto report.
12.4 Designing Reports
12.4.1 Design Reports Quick Guide
In the Design Reports view, administrators can create and edit their own reports to suit business requirements andprocesses.You can access the Design Reports view from the Business Analytics and/or Administrator work center.
BackgroundYou use Analytics objects in the system to create your reports. Data from key figures and characteristics in a datasource or a key figure group serves as the basis for your reports. For more information, see Overview of Analytics[page 403].
Note that you can decide if report data sent by e-mail is to be encrypted. If you want to encrypt outgoing e-mails,you must make changes to your scoping. From the E-mail Encryption and Signature Check fine-tune activity, you canspecify for the Analytics - Send Report Data, Broadcasting outgoing e-mail scenario whether outgoing e-mails areencrypted and whether they are signed.For more information, see the following documents: Configuration: Load Certificates and Activate Signing andEncryption for E-Mails and Configuration: E-Mail Encryption and Signature Check.
Tasks
Create a ReportBy clicking New , the following options are available.
● ReportAllows you to create a browser-based report based on a data source or key figure groupusing the Report Wizard.For more information, see Working with Reports Using the Report Wizard[page 282].
● Report As CopyAllows you to create a report based on a selected report using the Report Wizard.
280 © 2011, 2012, 2013 SAP AG. All rights reserved. • P U B L I CSAP Cloud for Customer November 2013
Business Analytics
When you create a report based on a selected browser-based report, if you do notassign a valid report ID, the system generates a report ID.For more information, see Working with Reports Using the Report Wizard[page 282].
● Microsoft Excel-Based ReportAllows you to create a Microsoft Excel-based report using Microsoft Excel.For more information, see Working with Reports and Plans in Microsoft Excel[page 413].
Edit a ReportBy clicking Edit With , the following options are available depending on the report type.
● Report WizardAllows you to edit browser-based reports that you or other administrators havecreated. For more information, see Working with Reports Using the Report Wizard[page 282].
● Web BrowserAllows you to execute ad hoc analyses and to change the layout of delivered reportsand reports that you or other administrators have created.Note that when administrators open reports in a Web browser in the BusinessAnalytics work center, only generated test data is displayed to ensure that they do nothave access to sensitive data. Business users see real data when they open reportsfrom the relevant Reports work center view.For more information, see Working with Reports in a Web Browser [page 408].
● Microsoft ExcelAllows you to execute ad hoc analyses and to edit Microsoft Excel-based reports.Note that when administrators open reports in Microsoft Excel in the BusinessAnalytics work center, only generated test data is displayed to ensure that they do nothave access to sensitive data. Business users see real data when they open reportsfrom the relevant Reports work center view.For more information, see Working with Reports in Microsoft Excel [page 413].
Assign a ReportAfter you have created a report, you must assign it to make it available to business users andother administrators.You can create and maintain report assignments by clicking Assign .For more information, see Assign a Report [page 325].
Create a Navigation TargetYou can create navigation targets in a selected target report to which business users cannavigate from a source report. For more information, see Create or Edit a Navigation Target.
Review Report AssignmentsFrom the Design Reports work center view, by clicking Assignment Overview , you can reviewthe report assignments made by you and SAP by sorting, grouping, or filtering the list.Note that from the list, you can only delete report assignments in the current version of thesolution. You can remove up to 20 assignments at a time. To make assignments, see the Assigna Report section of the document.
SAP Cloud for Customer November 2013Business Analytics P U B L I C • © 2011, 2012, 2013 SAP AG. All rights reserved. 281
If you require the report ID, you can personalize the list by clicking Personalize ThisScreen .
See AlsoAdd an Extension Field to a Data Source or Report [page 306]
12.4.2 Working with Reports Using the Report Wizard
OverviewAdministrators can create and edit reports that they create using the Report Wizard.The Report Wizard guided activity is available from the following locations:
● From the Design Reports work center view by clicking New , and then choosing Report or Report As Copy. ● From the Design Data Sources work center view by clicking New , and then choosing Report.
After you have assigned reports to work center views, they are available in the Reports work center view of the relevantwork centers. Business users can then create their own personal report views.
Administrators can create public report views and public selections, that is, a saved set of value selections forvariables and filter values, in the Business Analytics work center. Administrators create public report viewsand public selections with the report in a Web browser.The public report views and public selections are then available with the corresponding reports. For moreinformation, see Working with Reports in a Web Browser [page 408] and Working with Selections[page 422].
Procedure1. Define Report and Select Data Source
Note that due to the complexity of some SAP delivered Analytics content, not all data sources and the objectsthey include are available to administrators to create key figures, data sources, and reports.
You do not have to complete all steps; only the first step is mandatory. This is indicated by an asterisk(*).You can create a report by entering a name, selecting a data source, and clicking Finish .
a. Enter a name and description for the report.We recommend providing a description for the report so that the business user can identify the use ofthe report after you have assigned the report to the relevant work center views and correspondingwork centers.
b. Select a data source for the report. A data source provides the characteristics and key figures used ina report. It also serves as the basis for further reporting objects, such as key figure structures or grids.For more information about objects in Analytics, see Overview of Analytics [page 403].To select a data source, you can either enter the ID or select a data source from the value selection.
282 © 2011, 2012, 2013 SAP AG. All rights reserved. • P U B L I CSAP Cloud for Customer November 2013
Business Analytics
When you select a data source, one or more supported access context are displayed. When youassign the report to a work center or work center view, the access context of the report and thework center or work center view should match.
c. You can also set further properties for the report: ● Enable for Mobile Device
By selecting the checkbox, the report type is set to Mobile Report. For more information, seeWorking with Mobile Reports.
● Only for Master DataBy selecting the checkbox, you can create a report without any key figures. The system then skipsstep 2. This is useful if you want to create list reports, such as a list of customers.
● If the report you want to create is a copy of a report that has navigation targets, the Copy WithNavigation checkbox is also available. By selecting the checkbox, the system also copies thenavigation targets in the source report to your report.For information about creating navigation targets, see Create or Edit a Navigation Target.For information about how business users navigate in reports, see Analytical Navigation[page 437].
2. Select Key FiguresIn this step, you select the key figures to be used in the report. From the Show dropdown list, you have thefollowing options:
● AllAll key figures and key figure groups available in a data source are displayed.
● Customer Created Key FiguresKey figures created by administrators are displayed.
● Key Figure GroupUsing this selection option, you can choose either a key figure structure or a key figure grid.
● Key Figures ● Selected Key Figure Group / Key Figures
You can also create calculated and restricted key figures by clicking Create . For more information, seeCreate and Edit a Key Figure [page 320].
3. Select CharacteristicsThe characteristics that are available in the data source are listed. Dimensions, that is, the criterion by whichcharacteristics are categorized, can assist you in selecting relevant characteristics. Characteristics may beselected by default.To determine whether the characteristic has a predefined restriction or if it has a variable associated with it,you can add the Has Variable and Value Selection columns.To add the columns, click Personalize, choose the This Page option, and select the fields from the list.If the characteristic has No Value Selection, there are no predefined restrictions. You can create restrictionsor add a variable in the next step.
4. Define Characteristic PropertiesFor each characteristic available, maintain the following properties.
● Display Settings ○ The Display in Report checkbox shows whether a characteristic is displayed in the Not Currently
Shown list in the navigation pane when the report is displayed in a Web browser. If the checkbox
SAP Cloud for Customer November 2013Business Analytics P U B L I C • © 2011, 2012, 2013 SAP AG. All rights reserved. 283
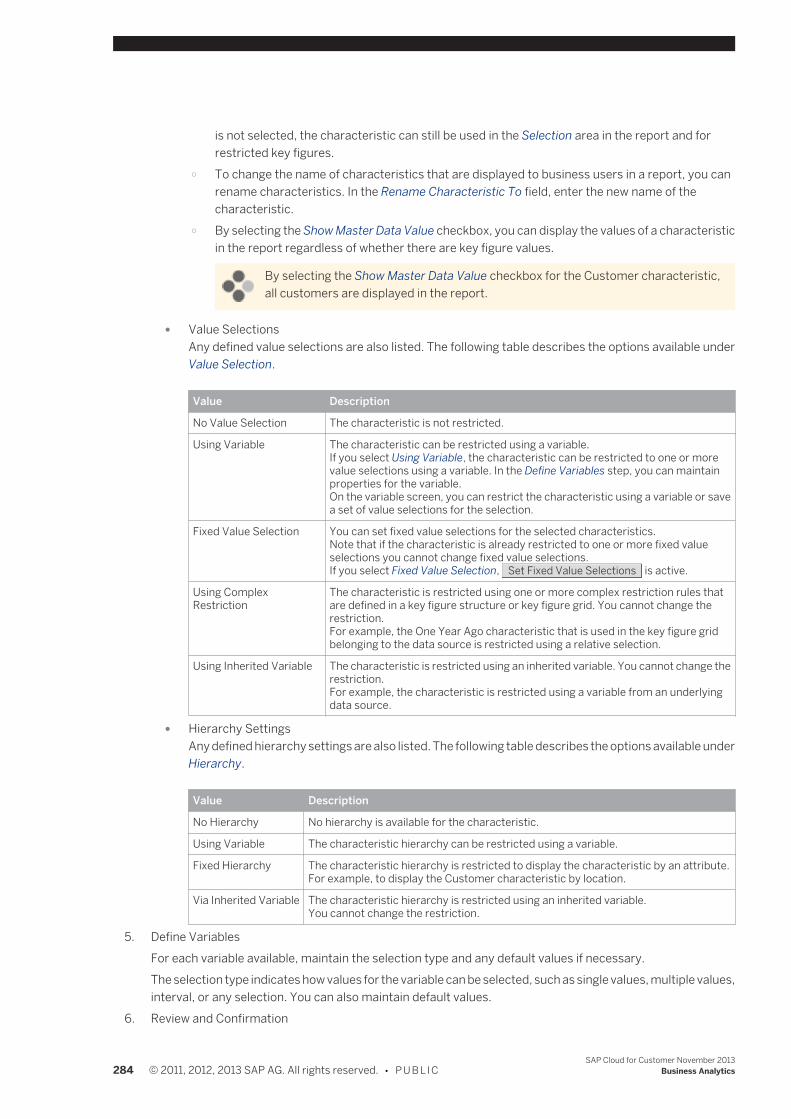
is not selected, the characteristic can still be used in the Selection area in the report and forrestricted key figures.
○ To change the name of characteristics that are displayed to business users in a report, you canrename characteristics. In the Rename Characteristic To field, enter the new name of thecharacteristic.
○ By selecting the Show Master Data Value checkbox, you can display the values of a characteristicin the report regardless of whether there are key figure values.
By selecting the Show Master Data Value checkbox for the Customer characteristic,all customers are displayed in the report.
● Value SelectionsAny defined value selections are also listed. The following table describes the options available underValue Selection.
Value Description
No Value Selection The characteristic is not restricted.
Using Variable The characteristic can be restricted using a variable.If you select Using Variable, the characteristic can be restricted to one or morevalue selections using a variable. In the Define Variables step, you can maintainproperties for the variable.On the variable screen, you can restrict the characteristic using a variable or savea set of value selections for the selection.
Fixed Value Selection You can set fixed value selections for the selected characteristics.Note that if the characteristic is already restricted to one or more fixed valueselections you cannot change fixed value selections.If you select Fixed Value Selection, Set Fixed Value Selections is active.
Using ComplexRestriction
The characteristic is restricted using one or more complex restriction rules thatare defined in a key figure structure or key figure grid. You cannot change therestriction.For example, the One Year Ago characteristic that is used in the key figure gridbelonging to the data source is restricted using a relative selection.
Using Inherited Variable The characteristic is restricted using an inherited variable. You cannot change therestriction.For example, the characteristic is restricted using a variable from an underlyingdata source.
● Hierarchy SettingsAny defined hierarchy settings are also listed. The following table describes the options available underHierarchy.
Value Description
No Hierarchy No hierarchy is available for the characteristic.
Using Variable The characteristic hierarchy can be restricted using a variable.
Fixed Hierarchy The characteristic hierarchy is restricted to display the characteristic by an attribute.For example, to display the Customer characteristic by location.
Via Inherited Variable The characteristic hierarchy is restricted using an inherited variable.You cannot change the restriction.
5. Define VariablesFor each variable available, maintain the selection type and any default values if necessary.The selection type indicates how values for the variable can be selected, such as single values, multiple values,interval, or any selection. You can also maintain default values.
6. Review and Confirmation
284 © 2011, 2012, 2013 SAP AG. All rights reserved. • P U B L I CSAP Cloud for Customer November 2013
Business Analytics
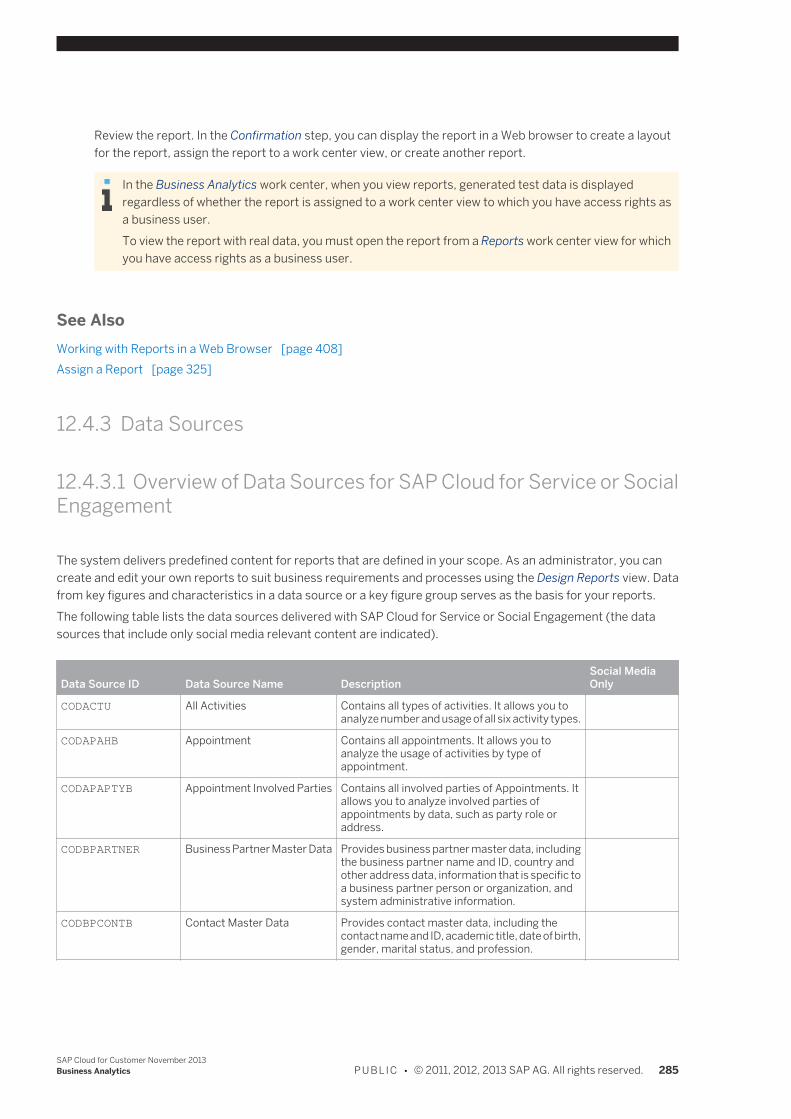
Review the report. In the Confirmation step, you can display the report in a Web browser to create a layoutfor the report, assign the report to a work center view, or create another report.
In the Business Analytics work center, when you view reports, generated test data is displayedregardless of whether the report is assigned to a work center view to which you have access rights asa business user.To view the report with real data, you must open the report from a Reports work center view for whichyou have access rights as a business user.
See AlsoWorking with Reports in a Web Browser [page 408]Assign a Report [page 325]
12.4.3 Data Sources
12.4.3.1 Overview of Data Sources for SAP Cloud for Service or SocialEngagement
The system delivers predefined content for reports that are defined in your scope. As an administrator, you cancreate and edit your own reports to suit business requirements and processes using the Design Reports view. Datafrom key figures and characteristics in a data source or a key figure group serves as the basis for your reports.The following table lists the data sources delivered with SAP Cloud for Service or Social Engagement (the datasources that include only social media relevant content are indicated).
Data Source ID Data Source Name DescriptionSocial MediaOnly
CODACTU All Activities Contains all types of activities. It allows you toanalyze number and usage of all six activity types.
CODAPAHB Appointment Contains all appointments. It allows you toanalyze the usage of activities by type ofappointment.
CODAPAPTYB Appointment Involved Parties Contains all involved parties of Appointments. Itallows you to analyze involved parties ofappointments by data, such as party role oraddress.
CODBPARTNER Business Partner Master Data Provides business partner master data, includingthe business partner name and ID, country andother address data, information that is specific toa business partner person or organization, andsystem administrative information.
CODBPCONTB Contact Master Data Provides contact master data, including thecontact name and ID, academic title, date of birth,gender, marital status, and profession.
SAP Cloud for Customer November 2013Business Analytics P U B L I C • © 2011, 2012, 2013 SAP AG. All rights reserved. 285
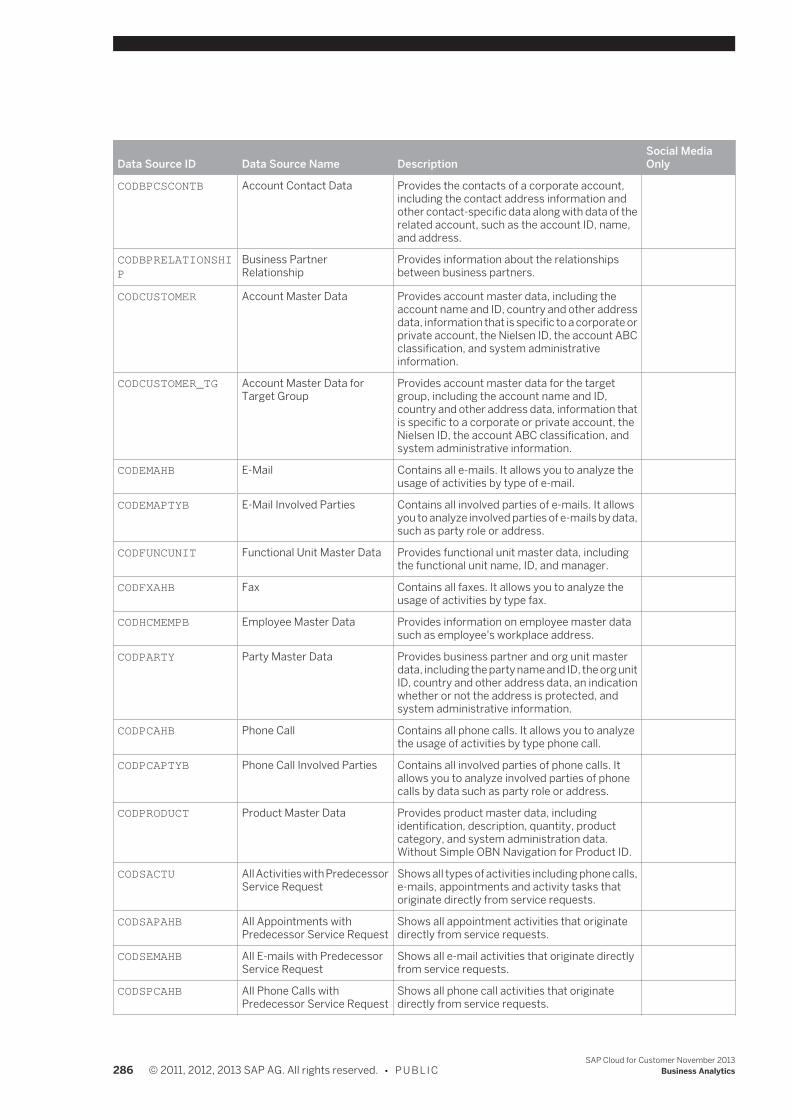
Data Source ID Data Source Name DescriptionSocial MediaOnly
CODBPCSCONTB Account Contact Data Provides the contacts of a corporate account,including the contact address information andother contact-specific data along with data of therelated account, such as the account ID, name,and address.
CODBPRELATIONSHIP
Business PartnerRelationship
Provides information about the relationshipsbetween business partners.
CODCUSTOMER Account Master Data Provides account master data, including theaccount name and ID, country and other addressdata, information that is specific to a corporate orprivate account, the Nielsen ID, the account ABCclassification, and system administrativeinformation.
CODCUSTOMER_TG Account Master Data forTarget Group
Provides account master data for the targetgroup, including the account name and ID,country and other address data, information thatis specific to a corporate or private account, theNielsen ID, the account ABC classification, andsystem administrative information.
CODEMAHB E-Mail Contains all e-mails. It allows you to analyze theusage of activities by type of e-mail.
CODEMAPTYB E-Mail Involved Parties Contains all involved parties of e-mails. It allowsyou to analyze involved parties of e-mails by data,such as party role or address.
CODFUNCUNIT Functional Unit Master Data Provides functional unit master data, includingthe functional unit name, ID, and manager.
CODFXAHB Fax Contains all faxes. It allows you to analyze theusage of activities by type fax.
CODHCMEMPB Employee Master Data Provides information on employee master datasuch as employee's workplace address.
CODPARTY Party Master Data Provides business partner and org unit masterdata, including the party name and ID, the org unitID, country and other address data, an indicationwhether or not the address is protected, andsystem administrative information.
CODPCAHB Phone Call Contains all phone calls. It allows you to analyzethe usage of activities by type phone call.
CODPCAPTYB Phone Call Involved Parties Contains all involved parties of phone calls. Itallows you to analyze involved parties of phonecalls by data such as party role or address.
CODPRODUCT Product Master Data Provides product master data, includingidentification, description, quantity, productcategory, and system administration data.Without Simple OBN Navigation for Product ID.
CODSACTU All Activities with PredecessorService Request
Shows all types of activities including phone calls,e-mails, appointments and activity tasks thatoriginate directly from service requests.
CODSAPAHB All Appointments withPredecessor Service Request
Shows all appointment activities that originatedirectly from service requests.
CODSEMAHB All E-mails with PredecessorService Request
Shows all e-mail activities that originate directlyfrom service requests.
CODSPCAHB All Phone Calls withPredecessor Service Request
Shows all phone call activities that originatedirectly from service requests.
286 © 2011, 2012, 2013 SAP AG. All rights reserved. • P U B L I CSAP Cloud for Customer November 2013
Business Analytics
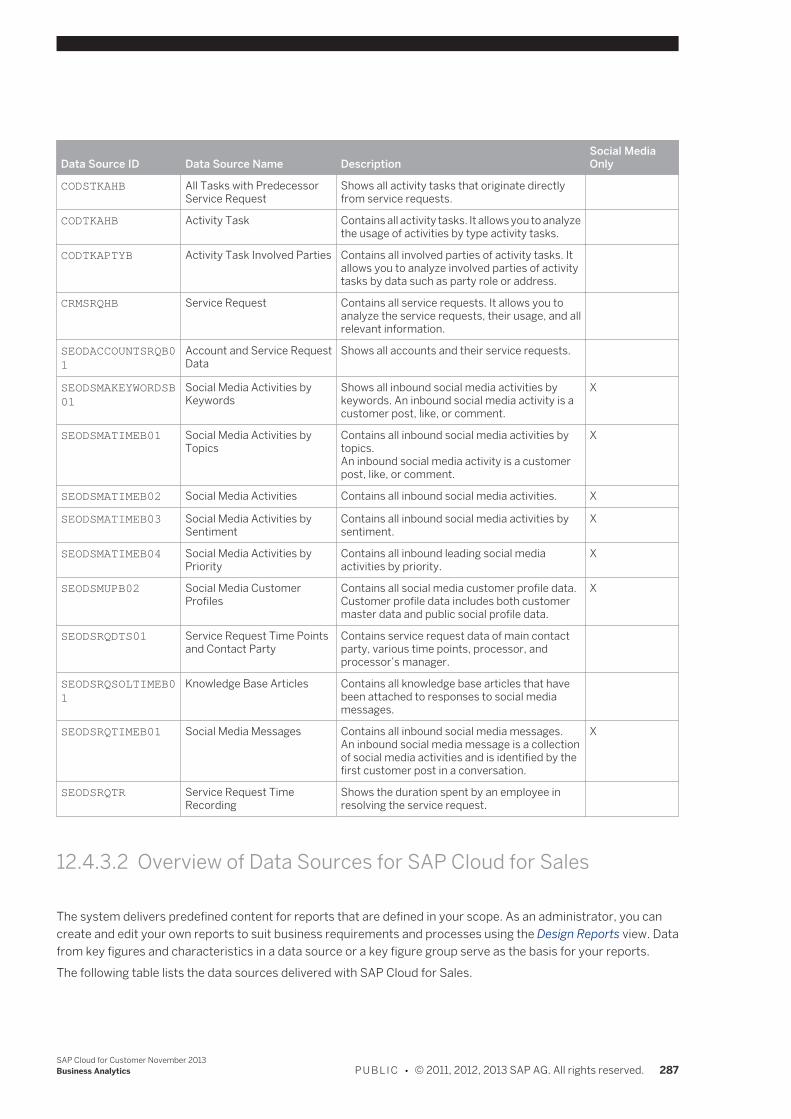
Data Source ID Data Source Name DescriptionSocial MediaOnly
CODSTKAHB All Tasks with PredecessorService Request
Shows all activity tasks that originate directlyfrom service requests.
CODTKAHB Activity Task Contains all activity tasks. It allows you to analyzethe usage of activities by type activity tasks.
CODTKAPTYB Activity Task Involved Parties Contains all involved parties of activity tasks. Itallows you to analyze involved parties of activitytasks by data such as party role or address.
CRMSRQHB Service Request Contains all service requests. It allows you toanalyze the service requests, their usage, and allrelevant information.
SEODACCOUNTSRQB01
Account and Service RequestData
Shows all accounts and their service requests.
SEODSMAKEYWORDSB01
Social Media Activities byKeywords
Shows all inbound social media activities bykeywords. An inbound social media activity is acustomer post, like, or comment.
X
SEODSMATIMEB01 Social Media Activities byTopics
Contains all inbound social media activities bytopics.An inbound social media activity is a customerpost, like, or comment.
X
SEODSMATIMEB02 Social Media Activities Contains all inbound social media activities. X
SEODSMATIMEB03 Social Media Activities bySentiment
Contains all inbound social media activities bysentiment.
X
SEODSMATIMEB04 Social Media Activities byPriority
Contains all inbound leading social mediaactivities by priority.
X
SEODSMUPB02 Social Media CustomerProfiles
Contains all social media customer profile data.Customer profile data includes both customermaster data and public social profile data.
X
SEODSRQDTS01 Service Request Time Pointsand Contact Party
Contains service request data of main contactparty, various time points, processor, andprocessor’s manager.
SEODSRQSOLTIMEB01
Knowledge Base Articles Contains all knowledge base articles that havebeen attached to responses to social mediamessages.
SEODSRQTIMEB01 Social Media Messages Contains all inbound social media messages.An inbound social media message is a collectionof social media activities and is identified by thefirst customer post in a conversation.
X
SEODSRQTR Service Request TimeRecording
Shows the duration spent by an employee inresolving the service request.
12.4.3.2 Overview of Data Sources for SAP Cloud for Sales
The system delivers predefined content for reports that are defined in your scope. As an administrator, you cancreate and edit your own reports to suit business requirements and processes using the Design Reports view. Datafrom key figures and characteristics in a data source or a key figure group serve as the basis for your reports.The following table lists the data sources delivered with SAP Cloud for Sales.
SAP Cloud for Customer November 2013Business Analytics P U B L I C • © 2011, 2012, 2013 SAP AG. All rights reserved. 287
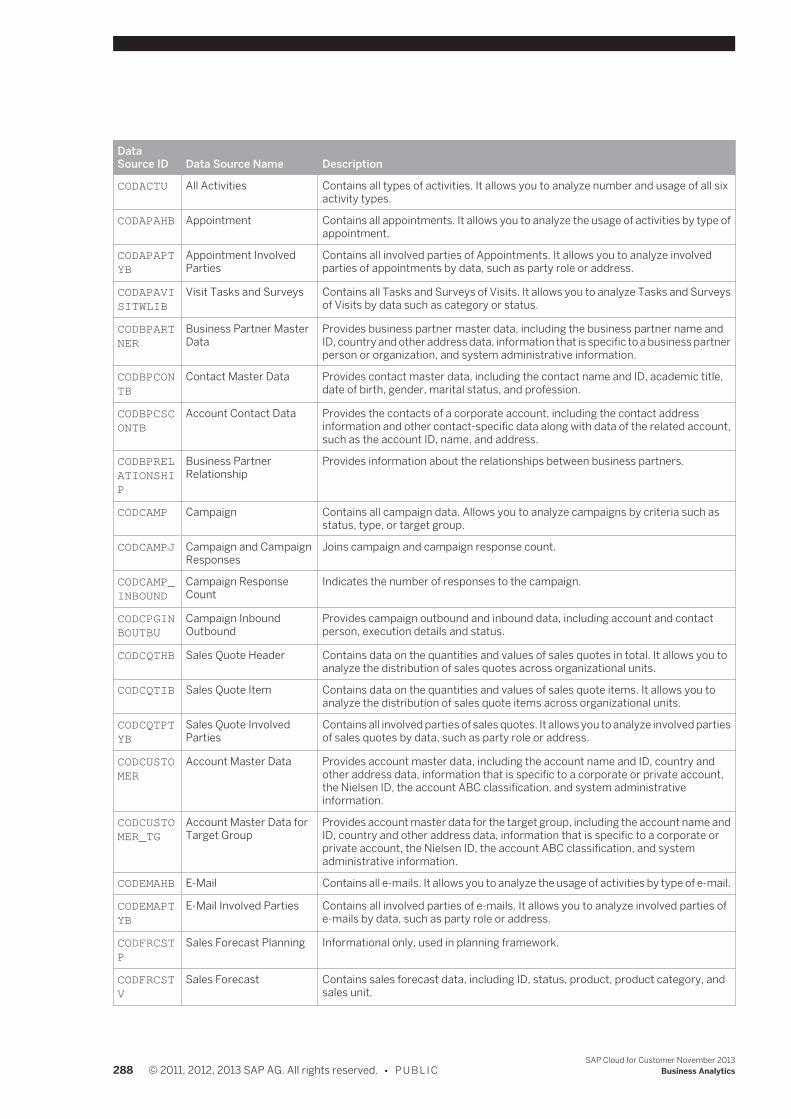
DataSource ID Data Source Name Description
CODACTU All Activities Contains all types of activities. It allows you to analyze number and usage of all sixactivity types.
CODAPAHB Appointment Contains all appointments. It allows you to analyze the usage of activities by type ofappointment.
CODAPAPTYB
Appointment InvolvedParties
Contains all involved parties of Appointments. It allows you to analyze involvedparties of appointments by data, such as party role or address.
CODAPAVISITWLIB
Visit Tasks and Surveys Contains all Tasks and Surveys of Visits. It allows you to analyze Tasks and Surveysof Visits by data such as category or status.
CODBPARTNER
Business Partner MasterData
Provides business partner master data, including the business partner name andID, country and other address data, information that is specific to a business partnerperson or organization, and system administrative information.
CODBPCONTB
Contact Master Data Provides contact master data, including the contact name and ID, academic title,date of birth, gender, marital status, and profession.
CODBPCSCONTB
Account Contact Data Provides the contacts of a corporate account, including the contact addressinformation and other contact-specific data along with data of the related account,such as the account ID, name, and address.
CODBPRELATIONSHIP
Business PartnerRelationship
Provides information about the relationships between business partners.
CODCAMP Campaign Contains all campaign data. Allows you to analyze campaigns by criteria such asstatus, type, or target group.
CODCAMPJ Campaign and CampaignResponses
Joins campaign and campaign response count.
CODCAMP_INBOUND
Campaign ResponseCount
Indicates the number of responses to the campaign.
CODCPGINBOUTBU
Campaign InboundOutbound
Provides campaign outbound and inbound data, including account and contactperson, execution details and status.
CODCQTHB Sales Quote Header Contains data on the quantities and values of sales quotes in total. It allows you toanalyze the distribution of sales quotes across organizational units.
CODCQTIB Sales Quote Item Contains data on the quantities and values of sales quote items. It allows you toanalyze the distribution of sales quote items across organizational units.
CODCQTPTYB
Sales Quote InvolvedParties
Contains all involved parties of sales quotes. It allows you to analyze involved partiesof sales quotes by data, such as party role or address.
CODCUSTOMER
Account Master Data Provides account master data, including the account name and ID, country andother address data, information that is specific to a corporate or private account,the Nielsen ID, the account ABC classification, and system administrativeinformation.
CODCUSTOMER_TG
Account Master Data forTarget Group
Provides account master data for the target group, including the account name andID, country and other address data, information that is specific to a corporate orprivate account, the Nielsen ID, the account ABC classification, and systemadministrative information.
CODEMAHB E-Mail Contains all e-mails. It allows you to analyze the usage of activities by type of e-mail.
CODEMAPTYB
E-Mail Involved Parties Contains all involved parties of e-mails. It allows you to analyze involved parties ofe-mails by data, such as party role or address.
CODFRCSTP
Sales Forecast Planning Informational only, used in planning framework.
CODFRCSTV
Sales Forecast Contains sales forecast data, including ID, status, product, product category, andsales unit.
288 © 2011, 2012, 2013 SAP AG. All rights reserved. • P U B L I CSAP Cloud for Customer November 2013
Business Analytics
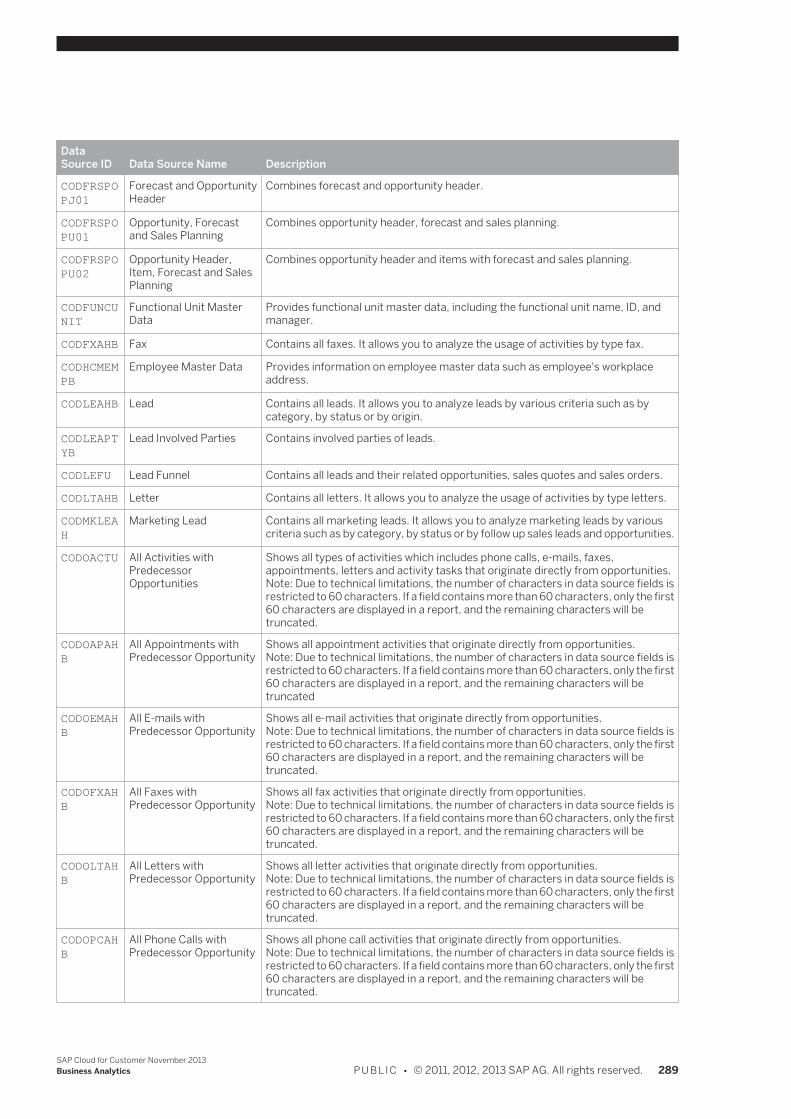
DataSource ID Data Source Name Description
CODFRSPOPJ01
Forecast and OpportunityHeader
Combines forecast and opportunity header.
CODFRSPOPU01
Opportunity, Forecastand Sales Planning
Combines opportunity header, forecast and sales planning.
CODFRSPOPU02
Opportunity Header,Item, Forecast and SalesPlanning
Combines opportunity header and items with forecast and sales planning.
CODFUNCUNIT
Functional Unit MasterData
Provides functional unit master data, including the functional unit name, ID, andmanager.
CODFXAHB Fax Contains all faxes. It allows you to analyze the usage of activities by type fax.
CODHCMEMPB
Employee Master Data Provides information on employee master data such as employee's workplaceaddress.
CODLEAHB Lead Contains all leads. It allows you to analyze leads by various criteria such as bycategory, by status or by origin.
CODLEAPTYB
Lead Involved Parties Contains involved parties of leads.
CODLEFU Lead Funnel Contains all leads and their related opportunities, sales quotes and sales orders.
CODLTAHB Letter Contains all letters. It allows you to analyze the usage of activities by type letters.
CODMKLEAH
Marketing Lead Contains all marketing leads. It allows you to analyze marketing leads by variouscriteria such as by category, by status or by follow up sales leads and opportunities.
CODOACTU All Activities withPredecessorOpportunities
Shows all types of activities which includes phone calls, e-mails, faxes,appointments, letters and activity tasks that originate directly from opportunities.Note: Due to technical limitations, the number of characters in data source fields isrestricted to 60 characters. If a field contains more than 60 characters, only the first60 characters are displayed in a report, and the remaining characters will betruncated.
CODOAPAHB
All Appointments withPredecessor Opportunity
Shows all appointment activities that originate directly from opportunities.Note: Due to technical limitations, the number of characters in data source fields isrestricted to 60 characters. If a field contains more than 60 characters, only the first60 characters are displayed in a report, and the remaining characters will betruncated
CODOEMAHB
All E-mails withPredecessor Opportunity
Shows all e-mail activities that originate directly from opportunities.Note: Due to technical limitations, the number of characters in data source fields isrestricted to 60 characters. If a field contains more than 60 characters, only the first60 characters are displayed in a report, and the remaining characters will betruncated.
CODOFXAHB
All Faxes withPredecessor Opportunity
Shows all fax activities that originate directly from opportunities.Note: Due to technical limitations, the number of characters in data source fields isrestricted to 60 characters. If a field contains more than 60 characters, only the first60 characters are displayed in a report, and the remaining characters will betruncated.
CODOLTAHB
All Letters withPredecessor Opportunity
Shows all letter activities that originate directly from opportunities.Note: Due to technical limitations, the number of characters in data source fields isrestricted to 60 characters. If a field contains more than 60 characters, only the first60 characters are displayed in a report, and the remaining characters will betruncated.
CODOPCAHB
All Phone Calls withPredecessor Opportunity
Shows all phone call activities that originate directly from opportunities.Note: Due to technical limitations, the number of characters in data source fields isrestricted to 60 characters. If a field contains more than 60 characters, only the first60 characters are displayed in a report, and the remaining characters will betruncated.
SAP Cloud for Customer November 2013Business Analytics P U B L I C • © 2011, 2012, 2013 SAP AG. All rights reserved. 289
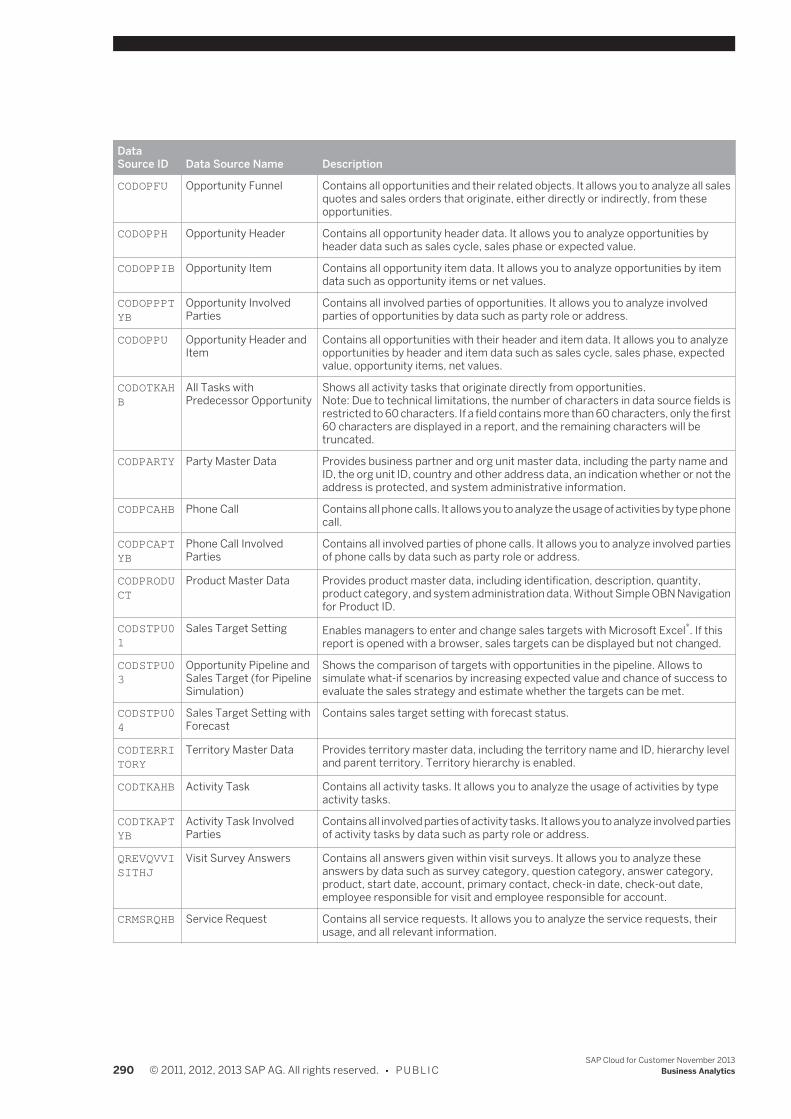
DataSource ID Data Source Name Description
CODOPFU Opportunity Funnel Contains all opportunities and their related objects. It allows you to analyze all salesquotes and sales orders that originate, either directly or indirectly, from theseopportunities.
CODOPPH Opportunity Header Contains all opportunity header data. It allows you to analyze opportunities byheader data such as sales cycle, sales phase or expected value.
CODOPPIB Opportunity Item Contains all opportunity item data. It allows you to analyze opportunities by itemdata such as opportunity items or net values.
CODOPPPTYB
Opportunity InvolvedParties
Contains all involved parties of opportunities. It allows you to analyze involvedparties of opportunities by data such as party role or address.
CODOPPU Opportunity Header andItem
Contains all opportunities with their header and item data. It allows you to analyzeopportunities by header and item data such as sales cycle, sales phase, expectedvalue, opportunity items, net values.
CODOTKAHB
All Tasks withPredecessor Opportunity
Shows all activity tasks that originate directly from opportunities.Note: Due to technical limitations, the number of characters in data source fields isrestricted to 60 characters. If a field contains more than 60 characters, only the first60 characters are displayed in a report, and the remaining characters will betruncated.
CODPARTY Party Master Data Provides business partner and org unit master data, including the party name andID, the org unit ID, country and other address data, an indication whether or not theaddress is protected, and system administrative information.
CODPCAHB Phone Call Contains all phone calls. It allows you to analyze the usage of activities by type phonecall.
CODPCAPTYB
Phone Call InvolvedParties
Contains all involved parties of phone calls. It allows you to analyze involved partiesof phone calls by data such as party role or address.
CODPRODUCT
Product Master Data Provides product master data, including identification, description, quantity,product category, and system administration data. Without Simple OBN Navigationfor Product ID.
CODSTPU01
Sales Target Setting Enables managers to enter and change sales targets with Microsoft Excel®. If thisreport is opened with a browser, sales targets can be displayed but not changed.
CODSTPU03
Opportunity Pipeline andSales Target (for PipelineSimulation)
Shows the comparison of targets with opportunities in the pipeline. Allows tosimulate what-if scenarios by increasing expected value and chance of success toevaluate the sales strategy and estimate whether the targets can be met.
CODSTPU04
Sales Target Setting withForecast
Contains sales target setting with forecast status.
CODTERRITORY
Territory Master Data Provides territory master data, including the territory name and ID, hierarchy leveland parent territory. Territory hierarchy is enabled.
CODTKAHB Activity Task Contains all activity tasks. It allows you to analyze the usage of activities by typeactivity tasks.
CODTKAPTYB
Activity Task InvolvedParties
Contains all involved parties of activity tasks. It allows you to analyze involved partiesof activity tasks by data such as party role or address.
QREVQVVISITHJ
Visit Survey Answers Contains all answers given within visit surveys. It allows you to analyze theseanswers by data such as survey category, question category, answer category,product, start date, account, primary contact, check-in date, check-out date,employee responsible for visit and employee responsible for account.
CRMSRQHB Service Request Contains all service requests. It allows you to analyze the service requests, theirusage, and all relevant information.
290 © 2011, 2012, 2013 SAP AG. All rights reserved. • P U B L I CSAP Cloud for Customer November 2013
Business Analytics
12.4.3.3 Design Data Sources Quick Guide
In the Design Data Sources work center view, administrators can create and edit their own data sources to suitbusiness requirements and processes and use the data sources for reporting.You can access the Design Data Sources view from the Business Analytics and/or Administrator work center.
Business BackgroundYou use Analytics objects in the system to create your own reports. Data from key figures and characteristics in datasources serves as the basis for reports. For more information, see Overview of Analytics [page 403].For information about data sources, see Data Sources [page 292].
Tasks
Create a Combined Data SourceFor information about this task, see Create or Edit a Combined Data Source [page 295].
Create a Joined Data SourceFor information about this task, see Create and Edit a Joined Data Source [page 296].
Preview a Data SourceYou can preview the data of data sources in a Web browser. In the preview mode,administrators can view the data similar to how end users view the data in a report. From thepreview mode, administrators can then navigate to the Report Wizard from which they cancreate a report based on the data source.By default, key figures available with a data source are displayed in columns, rows are empty,and characteristics available with the data source are listed in the Not Currently Shown list.Since you preview the data similar to how end users view the data in a report, the functionsavailable are the same as those available when working with a report in a Web browser; therange of functions available however are limited to those required to preview data in the datasource. For example, when previewing a data source, the functions available for saving andmanaging report views are not available. For more information, see Viewing Reports with theWeb Browser Option [page 408].
Create a Key FigureFor information about this task, see Create and Edit a Key Figure [page 320].
Create a ReportFor information about this task, see Working with Reports Using the Report Wizard[page 282].
SAP Cloud for Customer November 2013Business Analytics P U B L I C • © 2011, 2012, 2013 SAP AG. All rights reserved. 291
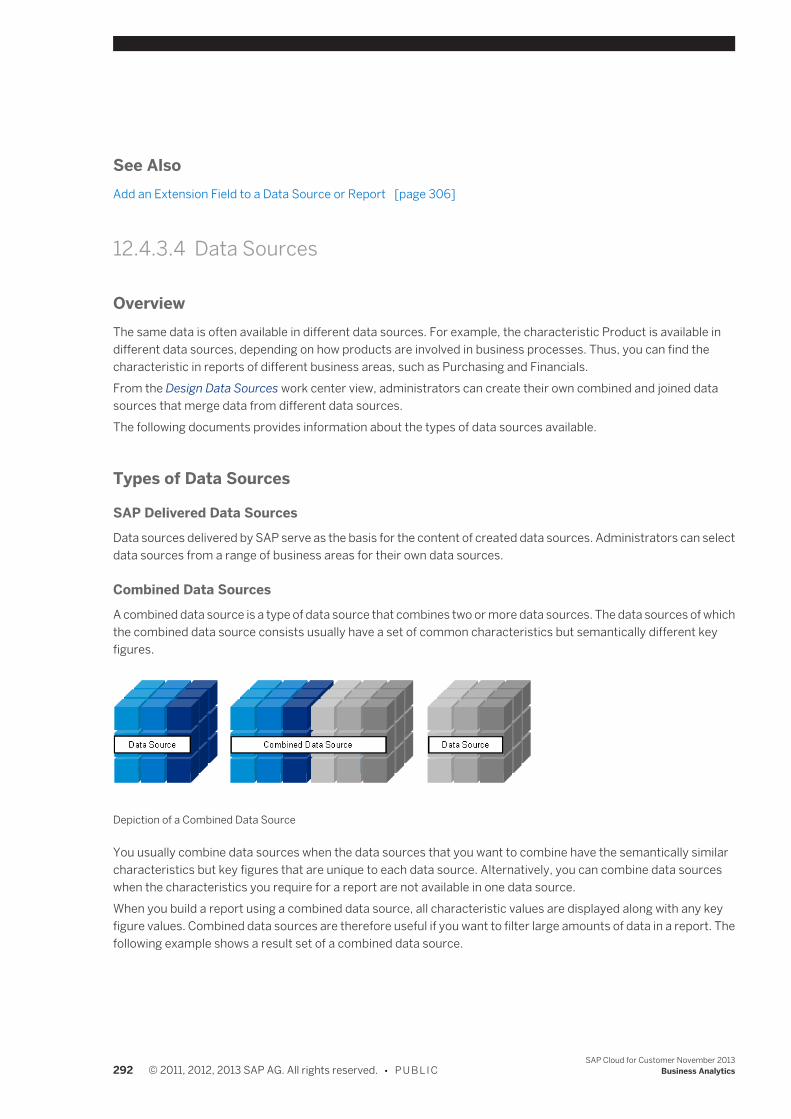
See AlsoAdd an Extension Field to a Data Source or Report [page 306]
12.4.3.4 Data Sources
OverviewThe same data is often available in different data sources. For example, the characteristic Product is available indifferent data sources, depending on how products are involved in business processes. Thus, you can find thecharacteristic in reports of different business areas, such as Purchasing and Financials.From the Design Data Sources work center view, administrators can create their own combined and joined datasources that merge data from different data sources.The following documents provides information about the types of data sources available.
Types of Data Sources
SAP Delivered Data SourcesData sources delivered by SAP serve as the basis for the content of created data sources. Administrators can selectdata sources from a range of business areas for their own data sources.
Combined Data SourcesA combined data source is a type of data source that combines two or more data sources. The data sources of whichthe combined data source consists usually have a set of common characteristics but semantically different keyfigures.
Depiction of a Combined Data Source
You usually combine data sources when the data sources that you want to combine have the semantically similarcharacteristics but key figures that are unique to each data source. Alternatively, you can combine data sourceswhen the characteristics you require for a report are not available in one data source.When you build a report using a combined data source, all characteristic values are displayed along with any keyfigure values. Combined data sources are therefore useful if you want to filter large amounts of data in a report. Thefollowing example shows a result set of a combined data source.
292 © 2011, 2012, 2013 SAP AG. All rights reserved. • P U B L I CSAP Cloud for Customer November 2013
Business Analytics
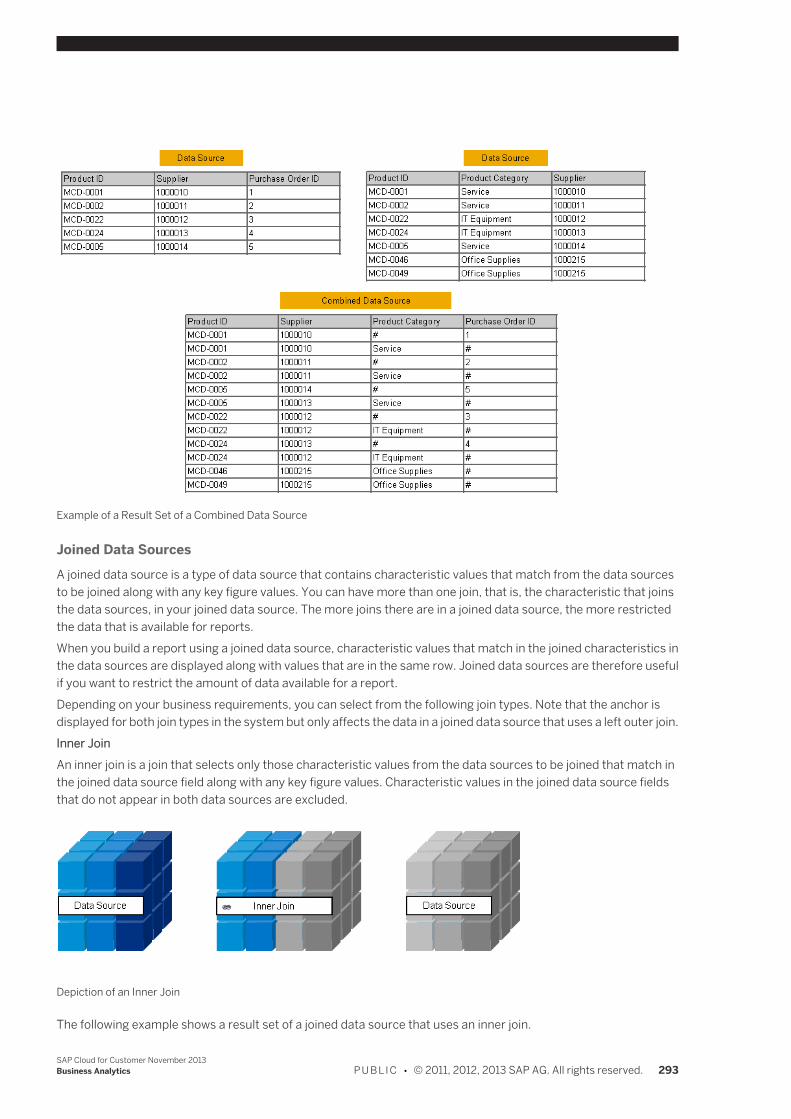
Example of a Result Set of a Combined Data Source
Joined Data SourcesA joined data source is a type of data source that contains characteristic values that match from the data sourcesto be joined along with any key figure values. You can have more than one join, that is, the characteristic that joinsthe data sources, in your joined data source. The more joins there are in a joined data source, the more restrictedthe data that is available for reports.When you build a report using a joined data source, characteristic values that match in the joined characteristics inthe data sources are displayed along with values that are in the same row. Joined data sources are therefore usefulif you want to restrict the amount of data available for a report.Depending on your business requirements, you can select from the following join types. Note that the anchor isdisplayed for both join types in the system but only affects the data in a joined data source that uses a left outer join.Inner JoinAn inner join is a join that selects only those characteristic values from the data sources to be joined that match inthe joined data source field along with any key figure values. Characteristic values in the joined data source fieldsthat do not appear in both data sources are excluded.
Depiction of an Inner Join
The following example shows a result set of a joined data source that uses an inner join.
SAP Cloud for Customer November 2013Business Analytics P U B L I C • © 2011, 2012, 2013 SAP AG. All rights reserved. 293
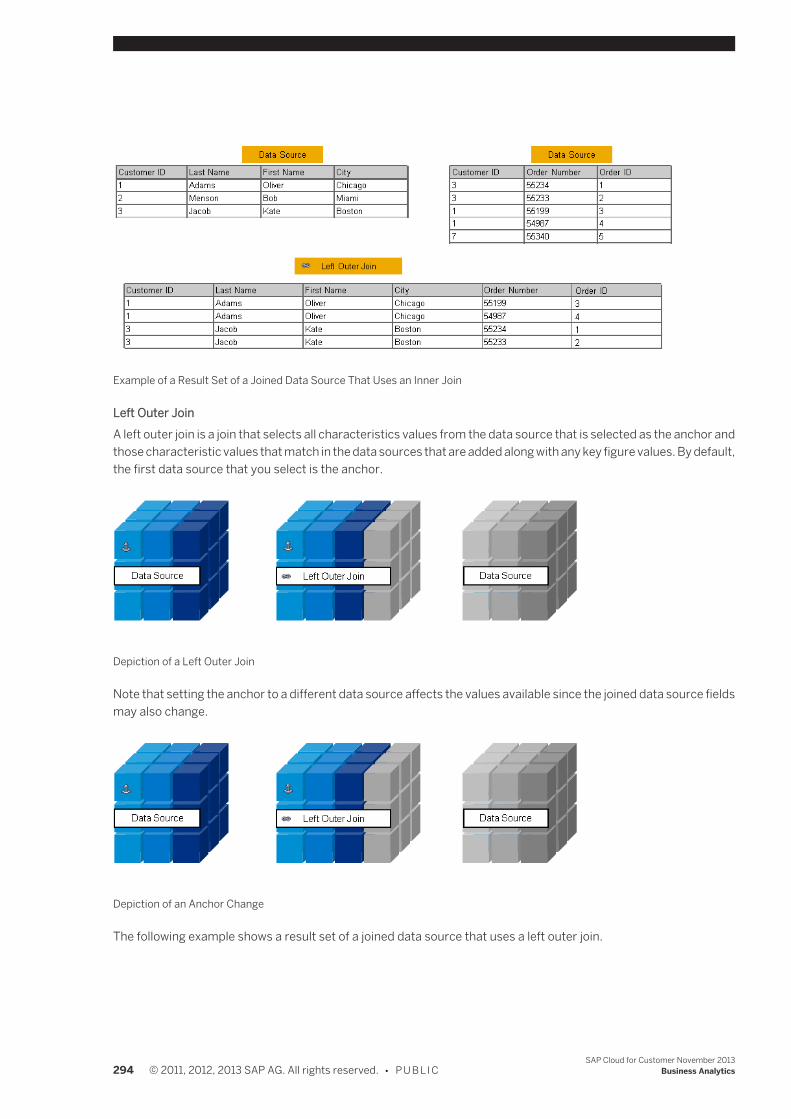
Example of a Result Set of a Joined Data Source That Uses an Inner Join
Left Outer JoinA left outer join is a join that selects all characteristics values from the data source that is selected as the anchor andthose characteristic values that match in the data sources that are added along with any key figure values. By default,the first data source that you select is the anchor.
Depiction of a Left Outer Join
Note that setting the anchor to a different data source affects the values available since the joined data source fieldsmay also change.
Depiction of an Anchor Change
The following example shows a result set of a joined data source that uses a left outer join.
294 © 2011, 2012, 2013 SAP AG. All rights reserved. • P U B L I CSAP Cloud for Customer November 2013
Business Analytics
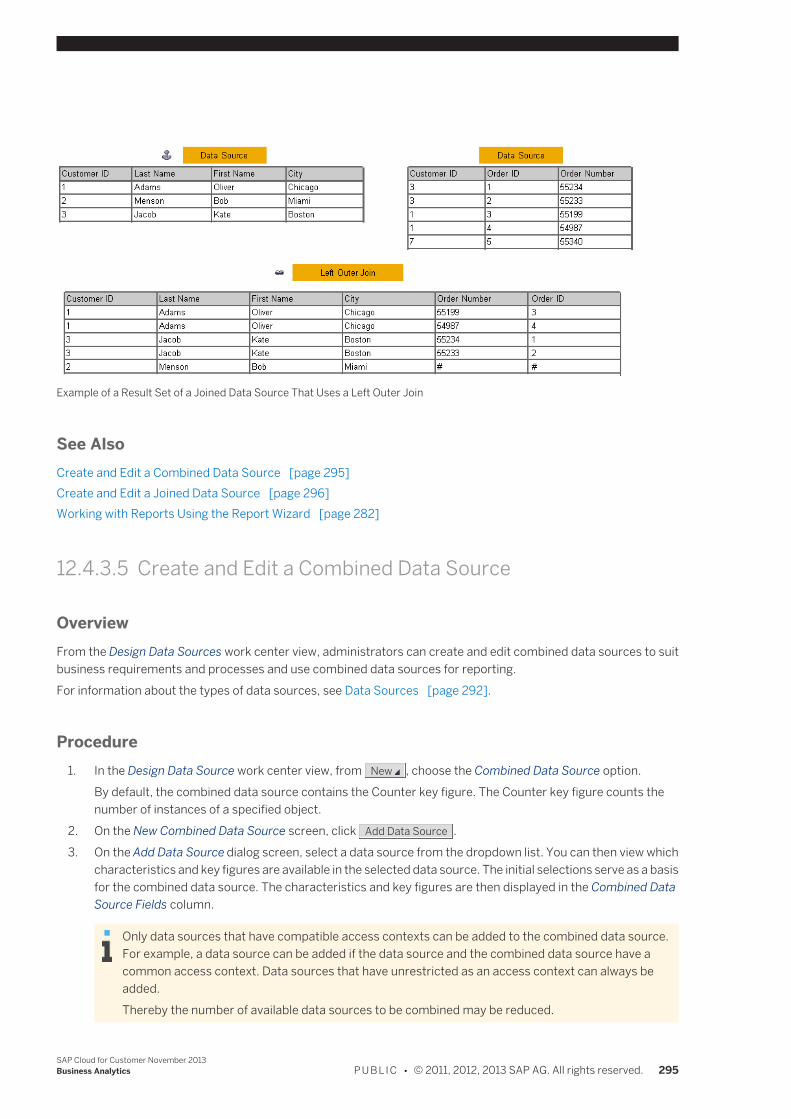
Example of a Result Set of a Joined Data Source That Uses a Left Outer Join
See AlsoCreate and Edit a Combined Data Source [page 295]Create and Edit a Joined Data Source [page 296]Working with Reports Using the Report Wizard [page 282]
12.4.3.5 Create and Edit a Combined Data Source
OverviewFrom the Design Data Sources work center view, administrators can create and edit combined data sources to suitbusiness requirements and processes and use combined data sources for reporting.For information about the types of data sources, see Data Sources [page 292].
Procedure1. In the Design Data Source work center view, from New , choose the Combined Data Source option.
By default, the combined data source contains the Counter key figure. The Counter key figure counts thenumber of instances of a specified object.
2. On the New Combined Data Source screen, click Add Data Source .3. On the Add Data Source dialog screen, select a data source from the dropdown list. You can then view which
characteristics and key figures are available in the selected data source. The initial selections serve as a basisfor the combined data source. The characteristics and key figures are then displayed in the Combined DataSource Fields column.
Only data sources that have compatible access contexts can be added to the combined data source.For example, a data source can be added if the data source and the combined data source have acommon access context. Data sources that have unrestricted as an access context can always beadded.Thereby the number of available data sources to be combined may be reduced.
SAP Cloud for Customer November 2013Business Analytics P U B L I C • © 2011, 2012, 2013 SAP AG. All rights reserved. 295
4. Select one or more additional data sources for the combined data source and add the data sourcesaccordingly.
When you add data sources to the combined data source, the system checks whether thecharacteristics and key figures in the additional data sources are also available in the data source thatyou selected as a basis for the combined data source.If the characteristic or key figure is already available in the combined data source, the system mapsthe characteristic or key figure and positions the characteristic or key figure in the same row acrossall data sources.If the characteristic or key figure is not already available in the combined data source, the system addsthe characteristic or key figure to the combined data source.
Other Functions
● Remove Data SourceThe Remove Data Source dialog screen appears, showing the data sources that you have added. You canremove data sources by clicking the relevant checkbox.
● Add RowAdds a row to be defined by you. Once you have added a characteristic or key figure, the system adds thecharacteristic or key figure to the relevant field type group.
● Remove RowDeletes the selected row. Note that the selected characteristic or key figure is only removed from thecombined data source.
● Check MappingChecks whether characteristics and key figures semantically match in the selected data sources.Note you can change the mapping. It is not necessary characteristics have the same name, but they mustmatch semantically. For example, in your company, sales units and cost centers are one and the same.
ResultThe combined data source is available for reporting. You can create reports using data from the combined datasource. For information about creating reports, see Working with Reports Using the Report Wizard [page 282].
12.4.3.6 Create and Edit a Joined Data Source
OverviewFrom the Design Data Sources work center view, administrators can create and edit joined data sources to suitbusiness requirements and processes and use joined data sources for reporting.For information about the types of data sources, see Data Sources [page 292].
Procedure1. In the Design Data Source work center view, from New , choose the Joined Data Source option.
By default, the joined data source contains the Counter key figure. The Counter key figure counts the numberof instances of a specified object.
296 © 2011, 2012, 2013 SAP AG. All rights reserved. • P U B L I CSAP Cloud for Customer November 2013
Business Analytics
2. On the New Joined Data Source screen, click Add Data Source .Note that a maximum of 5 data sources can be joined.
3. On the Add Data Source dialog screen, select a data source from the dropdown list. You can then view whichcharacteristics and key figures are available in the selected data source. The initial selections serve as a basisfor the joined data source. The characteristics and key figures are then displayed in the Joined Data SourceFields column.
4. Select one or more additional data sources for the joined data source and add the data sources accordingly.
When you add data sources to the joined data source, the system checks whether the characteristicsand key figures in the additional data sources are also available in the data source that you selected asa basis for the joined data source.If the characteristic or key figure is already available in the joined data source, the system positionsthe characteristic or key figure in the same row across all data sources.If the characteristic or key figure is not already available in the joined data source, the system adds thecharacteristic or key figure to the joined data source.Note that if the characteristic is already available in the data source that is the anchor, the systemcreates a join. The more joins there are in a joined data source, the more restricted the data that isavailable for reports.
Other Functions ● Remove Data Source
The Remove Data Source dialog screen appears, showing the data sources that you have added. You canremove data sources by clicking the relevant checkbox.
● Add RowAdds a row to be defined by you. Once you have added a characteristic or key figure, the system adds thecharacteristic or key figure to the relevant field type group.
● Remove RowDeletes the selected row. Note that the selected characteristic or key figure is only removed from the joineddata source.
● CheckChecks whether the joined data source is consistent.
● Set AnchorSets the anchor to the selected data source.The data source that is the anchor is the basis for any joins. Depending on the type of join, changing the anchorto a different data source can change the joined data source fields.
● Set Access ContextSets the access context to the access context of the selected data source.
ResultThe joined data source is available for reporting. You can create reports using data from the joined data source. Forinformation about creating reports, see Working with Reports Using the Report Wizard [page 282].By default, all fields in the joined data source are visible. Note that you can further influence the visibility ofcharacteristics and key figures. Under Personalize This Screen , you can add the Visibility column to the table.
SAP Cloud for Customer November 2013Business Analytics P U B L I C • © 2011, 2012, 2013 SAP AG. All rights reserved. 297
Value Description
Visible for End User Personalization Business users can add characteristics along with their attributes as well as key figureswhen working with reports in a Web browser using Add Fields .
Visible for Report Modeling Only administrators can view characteristics along with their attributes as well as keyfigures. Characteristics and key figures for which this value is set are visible in the ReportWizard guided activity and when working with the report in a Web browser.
Always Hidden Fields are not visible when creating or working with reports. This value is useful if youhave a field in a joined data source that is only used to join two data sources; you are notinterested in the actual data.
See AlsoAdd a Field to a Report [page 436]
12.4.3.7 Create and Edit a Cloud Data Source
OverviewCloud data sources are useful if you want to upload analytical data from external sources into your solution forreporting purposes.You can create and edit Cloud data sources from the Design Data Sources work center view.
Access ContextData that originates in solution is access context sensitive. This means that SAP delivered data sources areassociated with access contexts to ensure that data is directed to users who are allowed to view the data.Since the data for a Cloud data source originates from an external source, Cloud data sources have no access contextassigned. This means that the data is unrestricted. You should therefore ensure that the data is suitable for all usersif you build reports using only Cloud data sources as a basis.Note that if you use a Cloud data source in a joined or combined data source with SAP delivered data sources, theaccess context of the corresponding SAP delivered data source serves as access context of the joined or combineddata source.
Upload Options
Manual UploadTo upload data manually to your solution, when creating or editing a Cloud data source, ensure that the Manual DataUpload checkbox is selected.The data to be uploaded must be saved as a CSV file.When uploading CSV files, note the following:
298 © 2011, 2012, 2013 SAP AG. All rights reserved. • P U B L I CSAP Cloud for Customer November 2013
Business Analytics
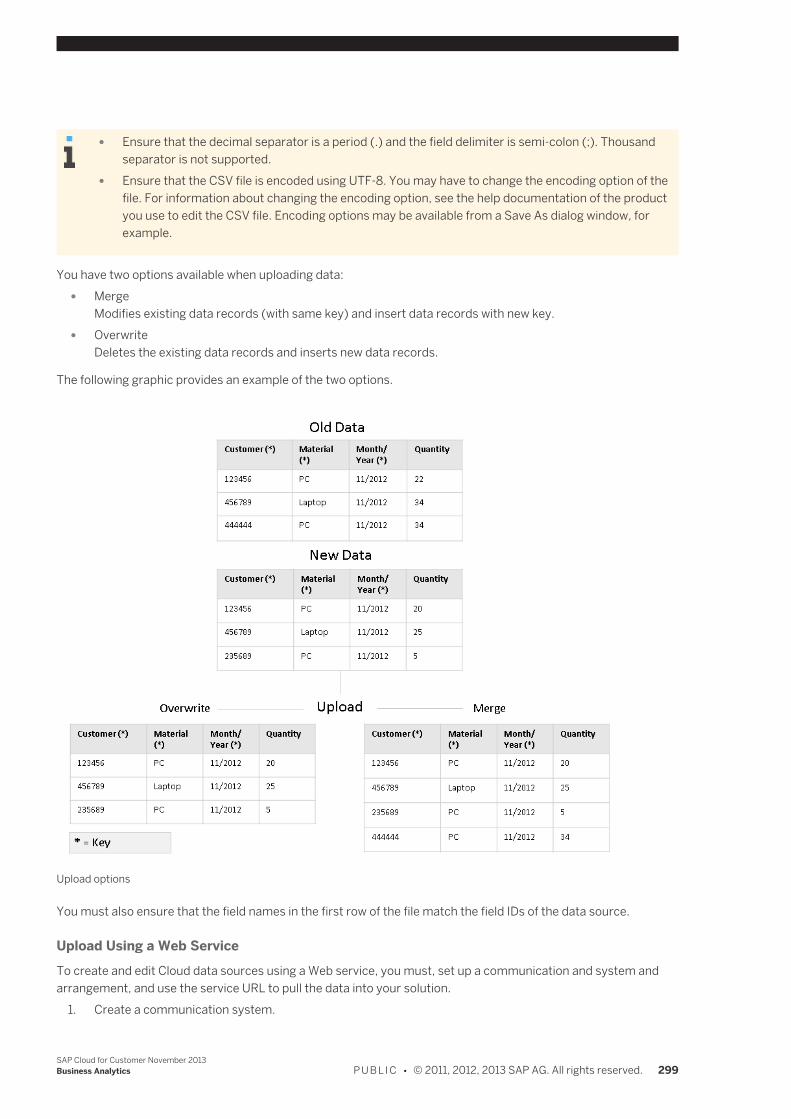
● Ensure that the decimal separator is a period (.) and the field delimiter is semi-colon (;). Thousandseparator is not supported.
● Ensure that the CSV file is encoded using UTF-8. You may have to change the encoding option of thefile. For information about changing the encoding option, see the help documentation of the productyou use to edit the CSV file. Encoding options may be available from a Save As dialog window, forexample.
You have two options available when uploading data: ● Merge
Modifies existing data records (with same key) and insert data records with new key. ● Overwrite
Deletes the existing data records and inserts new data records.
The following graphic provides an example of the two options.
Upload options
You must also ensure that the field names in the first row of the file match the field IDs of the data source.
Upload Using a Web ServiceTo create and edit Cloud data sources using a Web service, you must, set up a communication and system andarrangement, and use the service URL to pull the data into your solution.
1. Create a communication system.
SAP Cloud for Customer November 2013Business Analytics P U B L I C • © 2011, 2012, 2013 SAP AG. All rights reserved. 299
1. In the Application and User Management work center, Under Input and Output Management, choose theCommunication Systems view.
2. In the Communication Systems view, click New .3. In the Communication System section, enter the details of the communication system:
● ID is used as the template for the technical user in the communication arrangement. ● Host Name has to be supplied, but is not used. ● For the System Access Type, select Internet.
4. When you have entered all the details, click Save and Close to return to the Communication Systemsview. The communication system you just created has the status In Preparation.
5. In the Communication Systems view, select the communication system you have created and clickActions , then choose Set to Active.
If the status changes to Active, the configuration is ready to be used.
For more information, see Communication Systems Quick Guide [page 149].2. Create a communication arrangement.
1. In the Application and User Management work center, Under Input and Output Management, choose theCommunication Arrangements view.
2. To open the New Communication Arrangement guided activity, in the Communication Arrangementsview, click New .
3. In the Select Scenario step, select Analytics Data Upload and click Next .4. In the Define Business Data step, enter business data.
● In the System Instance ID field, choose or enter the communication system ID that you created.5. In the Define Technical Data step, define the technical settings for inbound communication.
● For a communication method, select Direct Connection. ● For an application protocol, select Web Service. ● For an authentication method, select User ID and Password. ● Next to the User ID field, click Edit Credentials .
The user ID is automatically predefined but you need to create a password.Perform the following steps:1. Choose Change Password .2. Enter a password and confirm it.
● Click Edit Advanced Settings and note the service URL. You require the service URL to upload data.
For more information, see Communication Arrangements Quick Guide [page 151].3. Download a Web Services Description Language (WSDL) file.
The WSDL file is used to set up a Web service in the target system.1. In the Application and User Management work center, under Input and Output Management, choose the
Communication Arrangements view.2. Choose the relevant communication arrangement and click Edit .3. Click the Technical Data tab page.4. Click Edit Advanced Settings .5. Click Download WSDL .6. Name and save the WSDL file; the file is required for setting up communication.
4. Ensure that the solution URL is a trusted site.You can check whether the solution URL is a trusted site by, for example, checking the security report or bychecking the list of trusted sites of the Internet browser.
300 © 2011, 2012, 2013 SAP AG. All rights reserved. • P U B L I CSAP Cloud for Customer November 2013
Business Analytics
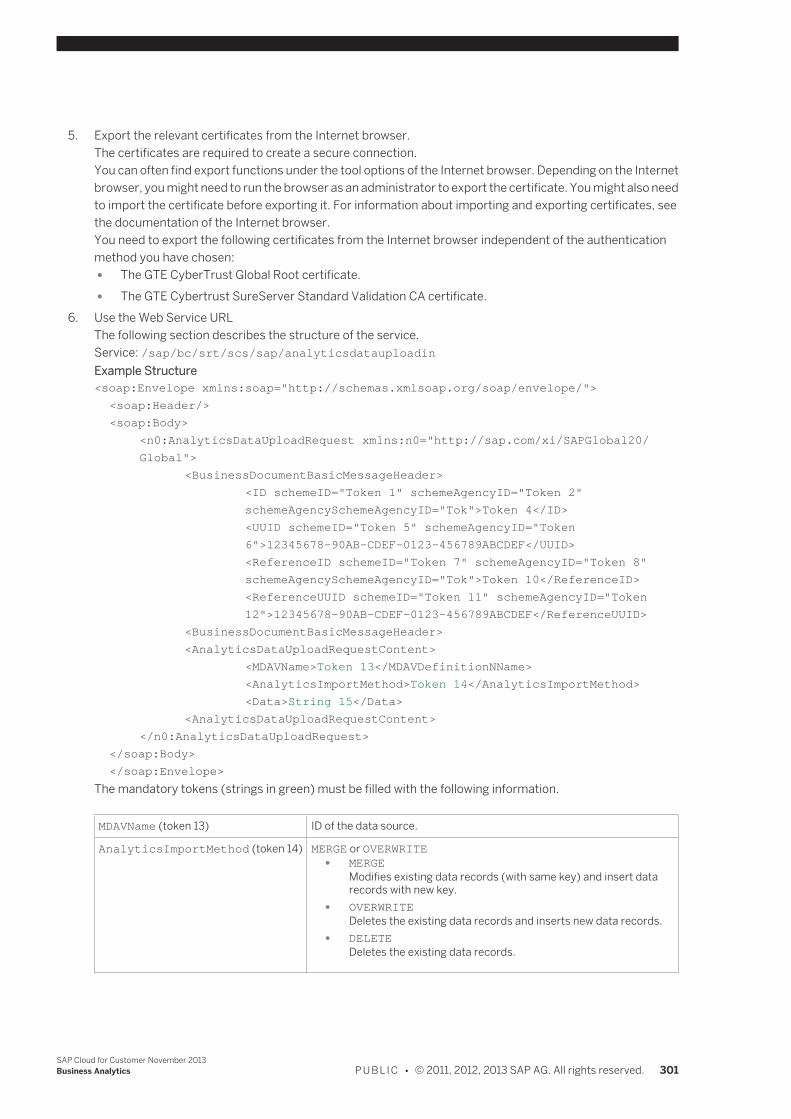
5. Export the relevant certificates from the Internet browser.The certificates are required to create a secure connection.You can often find export functions under the tool options of the Internet browser. Depending on the Internetbrowser, you might need to run the browser as an administrator to export the certificate. You might also needto import the certificate before exporting it. For information about importing and exporting certificates, seethe documentation of the Internet browser.You need to export the following certificates from the Internet browser independent of the authenticationmethod you have chosen: ● The GTE CyberTrust Global Root certificate. ● The GTE Cybertrust SureServer Standard Validation CA certificate.
6. Use the Web Service URLThe following section describes the structure of the service.Service: /sap/bc/srt/scs/sap/analyticsdatauploadinExample Structure<soap:Envelope xmlns:soap="http://schemas.xmlsoap.org/soap/envelope/">
<soap:Header/>
<soap:Body>
<n0:AnalyticsDataUploadRequest xmlns:n0="http://sap.com/xi/SAPGlobal20/
Global">
<BusinessDocumentBasicMessageHeader>
<ID schemeID="Token 1" schemeAgencyID="Token 2"
schemeAgencySchemeAgencyID="Tok">Token 4</ID>
<UUID schemeID="Token 5" schemeAgencyID="Token
6">12345678-90AB-CDEF-0123-456789ABCDEF</UUID>
<ReferenceID schemeID="Token 7" schemeAgencyID="Token 8"
schemeAgencySchemeAgencyID="Tok">Token 10</ReferenceID>
<ReferenceUUID schemeID="Token 11" schemeAgencyID="Token
12">12345678-90AB-CDEF-0123-456789ABCDEF</ReferenceUUID>
<BusinessDocumentBasicMessageHeader>
<AnalyticsDataUploadRequestContent>
<MDAVName>Token 13</MDAVDefinitionNName>
<AnalyticsImportMethod>Token 14</AnalyticsImportMethod>
<Data>String 15</Data>
<AnalyticsDataUploadRequestContent>
</n0:AnalyticsDataUploadRequest>
</soap:Body>
</soap:Envelope>
The mandatory tokens (strings in green) must be filled with the following information.
MDAVName (token 13) ID of the data source.
AnalyticsImportMethod (token 14) MERGE or OVERWRITE ● MERGE
Modifies existing data records (with same key) and insert datarecords with new key.
● OVERWRITEDeletes the existing data records and inserts new data records.
● DELETEDeletes the existing data records.
SAP Cloud for Customer November 2013Business Analytics P U B L I C • © 2011, 2012, 2013 SAP AG. All rights reserved. 301
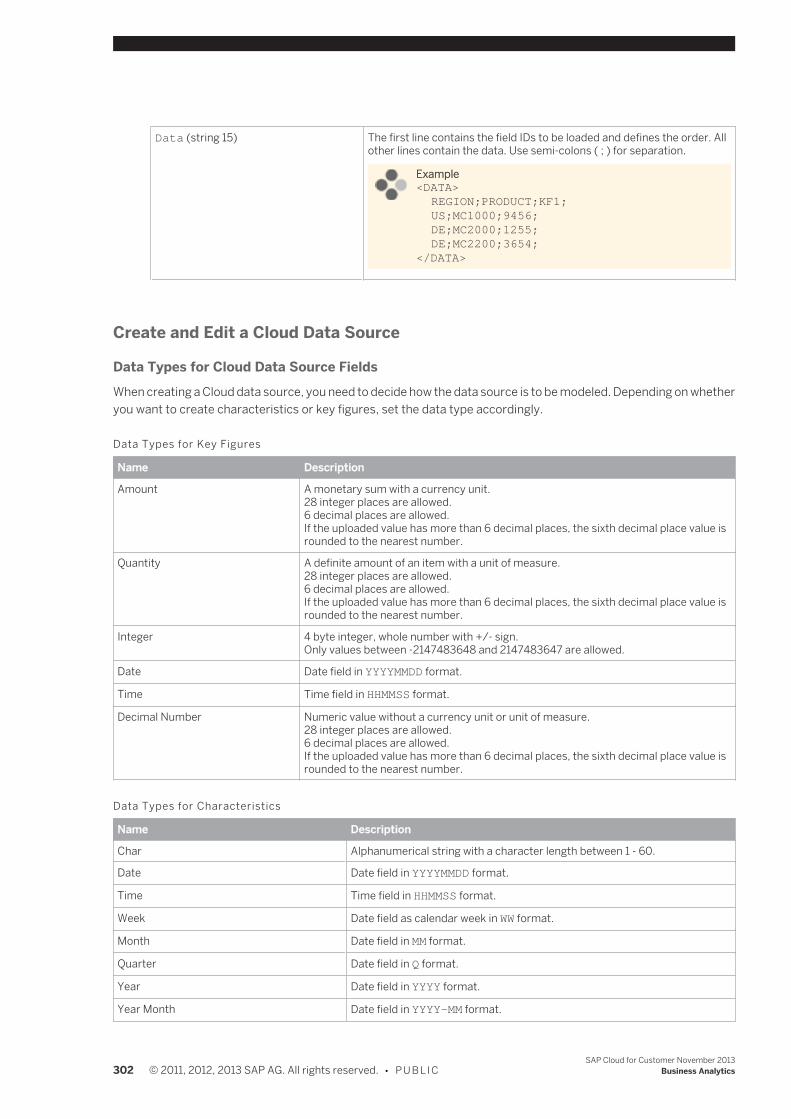
Data (string 15) The first line contains the field IDs to be loaded and defines the order. Allother lines contain the data. Use semi-colons ( ; ) for separation.
Example<DATA>
REGION;PRODUCT;KF1;US;MC1000;9456;DE;MC2000;1255;DE;MC2200;3654;
</DATA>
Create and Edit a Cloud Data Source
Data Types for Cloud Data Source FieldsWhen creating a Cloud data source, you need to decide how the data source is to be modeled. Depending on whetheryou want to create characteristics or key figures, set the data type accordingly.
Data Types for Key Figures
Name Description
Amount A monetary sum with a currency unit.28 integer places are allowed.6 decimal places are allowed.If the uploaded value has more than 6 decimal places, the sixth decimal place value isrounded to the nearest number.
Quantity A definite amount of an item with a unit of measure.28 integer places are allowed.6 decimal places are allowed.If the uploaded value has more than 6 decimal places, the sixth decimal place value isrounded to the nearest number.
Integer 4 byte integer, whole number with +/- sign.Only values between -2147483648 and 2147483647 are allowed.
Date Date field in YYYYMMDD format.
Time Time field in HHMMSS format.
Decimal Number Numeric value without a currency unit or unit of measure.28 integer places are allowed.6 decimal places are allowed.If the uploaded value has more than 6 decimal places, the sixth decimal place value isrounded to the nearest number.
Data Types for Characteristics
Name Description
Char Alphanumerical string with a character length between 1 - 60.
Date Date field in YYYYMMDD format.
Time Time field in HHMMSS format.
Week Date field as calendar week in WW format.
Month Date field in MM format.
Quarter Date field in Q format.
Year Date field in YYYY format.
Year Month Date field in YYYY-MM format.
302 © 2011, 2012, 2013 SAP AG. All rights reserved. • P U B L I CSAP Cloud for Customer November 2013
Business Analytics
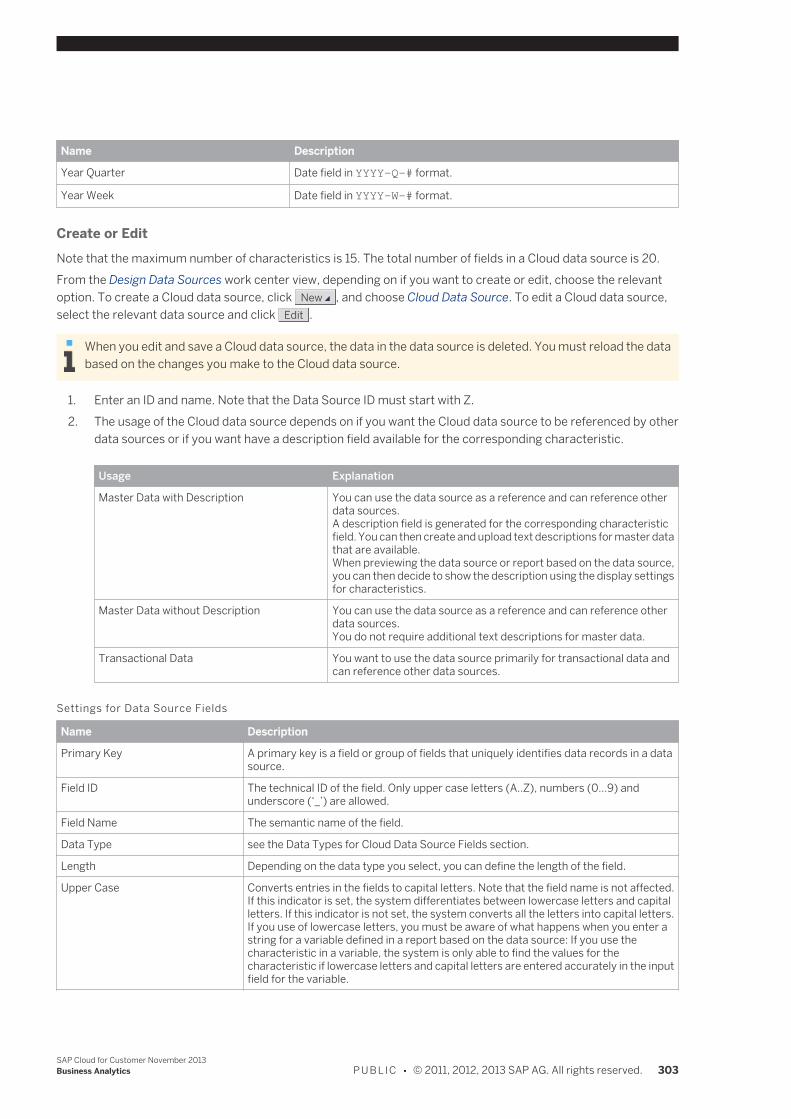
Name Description
Year Quarter Date field in YYYY-Q-# format.
Year Week Date field in YYYY-W-# format.
Create or EditNote that the maximum number of characteristics is 15. The total number of fields in a Cloud data source is 20.From the Design Data Sources work center view, depending on if you want to create or edit, choose the relevantoption. To create a Cloud data source, click New , and choose Cloud Data Source. To edit a Cloud data source,select the relevant data source and click Edit .
When you edit and save a Cloud data source, the data in the data source is deleted. You must reload the databased on the changes you make to the Cloud data source.
1. Enter an ID and name. Note that the Data Source ID must start with Z.2. The usage of the Cloud data source depends on if you want the Cloud data source to be referenced by other
data sources or if you want have a description field available for the corresponding characteristic.
Usage Explanation
Master Data with Description You can use the data source as a reference and can reference otherdata sources.A description field is generated for the corresponding characteristicfield. You can then create and upload text descriptions for master datathat are available.When previewing the data source or report based on the data source,you can then decide to show the description using the display settingsfor characteristics.
Master Data without Description You can use the data source as a reference and can reference otherdata sources.You do not require additional text descriptions for master data.
Transactional Data You want to use the data source primarily for transactional data andcan reference other data sources.
Settings for Data Source Fields
Name Description
Primary Key A primary key is a field or group of fields that uniquely identifies data records in a datasource.
Field ID The technical ID of the field. Only upper case letters (A..Z), numbers (0…9) andunderscore (‘_’) are allowed.
Field Name The semantic name of the field.
Data Type see the Data Types for Cloud Data Source Fields section.
Length Depending on the data type you select, you can define the length of the field.
Upper Case Converts entries in the fields to capital letters. Note that the field name is not affected.If this indicator is set, the system differentiates between lowercase letters and capitalletters. If this indicator is not set, the system converts all the letters into capital letters.If you use of lowercase letters, you must be aware of what happens when you enter astring for a variable defined in a report based on the data source: If you use thecharacteristic in a variable, the system is only able to find the values for thecharacteristic if lowercase letters and capital letters are entered accurately in the inputfield for the variable.
SAP Cloud for Customer November 2013Business Analytics P U B L I C • © 2011, 2012, 2013 SAP AG. All rights reserved. 303
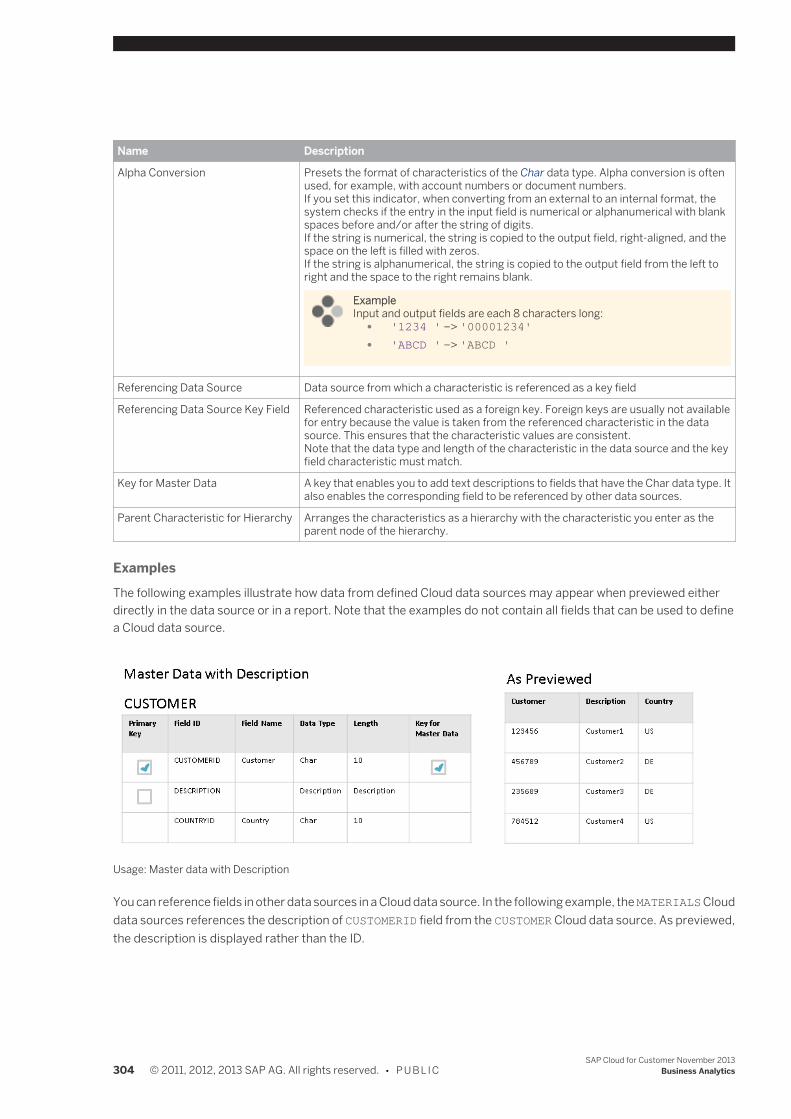
Name Description
Alpha Conversion Presets the format of characteristics of the Char data type. Alpha conversion is oftenused, for example, with account numbers or document numbers.If you set this indicator, when converting from an external to an internal format, thesystem checks if the entry in the input field is numerical or alphanumerical with blankspaces before and/or after the string of digits.If the string is numerical, the string is copied to the output field, right-aligned, and thespace on the left is filled with zeros.If the string is alphanumerical, the string is copied to the output field from the left toright and the space to the right remains blank.
ExampleInput and output fields are each 8 characters long:
● '1234 ' –> '00001234' ● 'ABCD ' –> 'ABCD '
Referencing Data Source Data source from which a characteristic is referenced as a key field
Referencing Data Source Key Field Referenced characteristic used as a foreign key. Foreign keys are usually not availablefor entry because the value is taken from the referenced characteristic in the datasource. This ensures that the characteristic values are consistent.Note that the data type and length of the characteristic in the data source and the keyfield characteristic must match.
Key for Master Data A key that enables you to add text descriptions to fields that have the Char data type. Italso enables the corresponding field to be referenced by other data sources.
Parent Characteristic for Hierarchy Arranges the characteristics as a hierarchy with the characteristic you enter as theparent node of the hierarchy.
ExamplesThe following examples illustrate how data from defined Cloud data sources may appear when previewed eitherdirectly in the data source or in a report. Note that the examples do not contain all fields that can be used to definea Cloud data source.
Usage: Master data with Description
You can reference fields in other data sources in a Cloud data source. In the following example, the MATERIALS Clouddata sources references the description of CUSTOMERID field from the CUSTOMER Cloud data source. As previewed,the description is displayed rather than the ID.
304 © 2011, 2012, 2013 SAP AG. All rights reserved. • P U B L I CSAP Cloud for Customer November 2013
Business Analytics
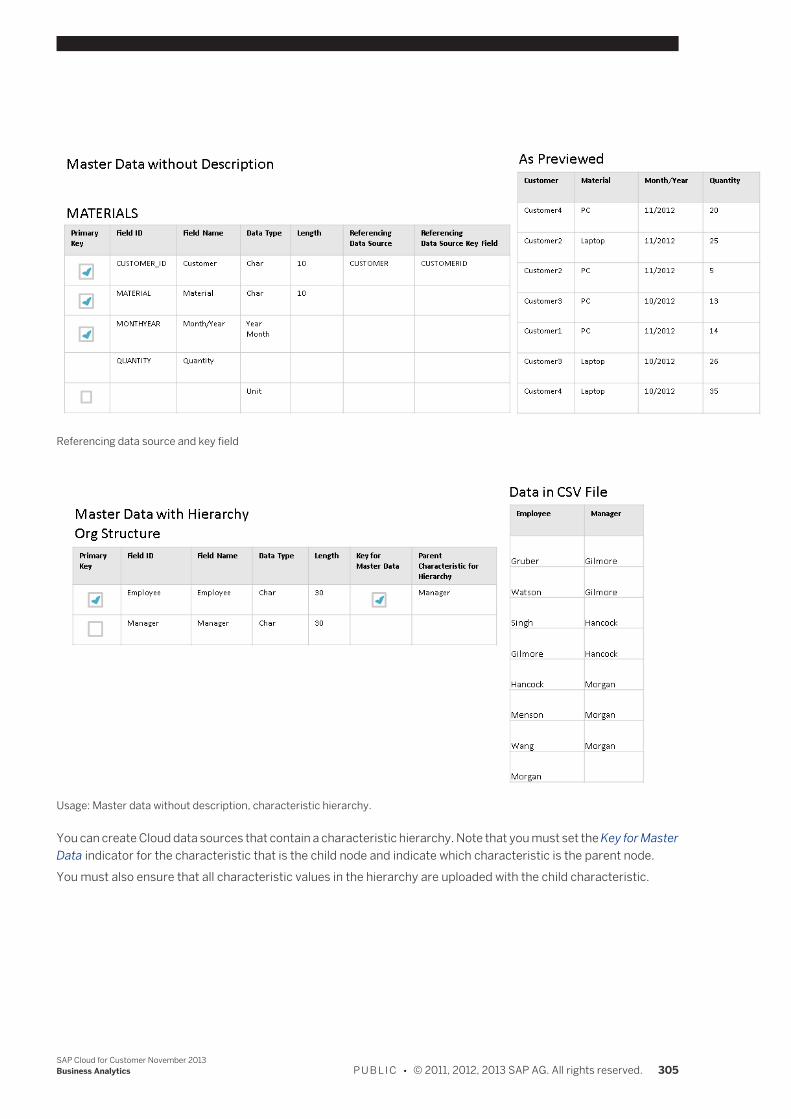
Referencing data source and key field
Usage: Master data without description, characteristic hierarchy.
You can create Cloud data sources that contain a characteristic hierarchy. Note that you must set the Key for MasterData indicator for the characteristic that is the child node and indicate which characteristic is the parent node.You must also ensure that all characteristic values in the hierarchy are uploaded with the child characteristic.
SAP Cloud for Customer November 2013Business Analytics P U B L I C • © 2011, 2012, 2013 SAP AG. All rights reserved. 305
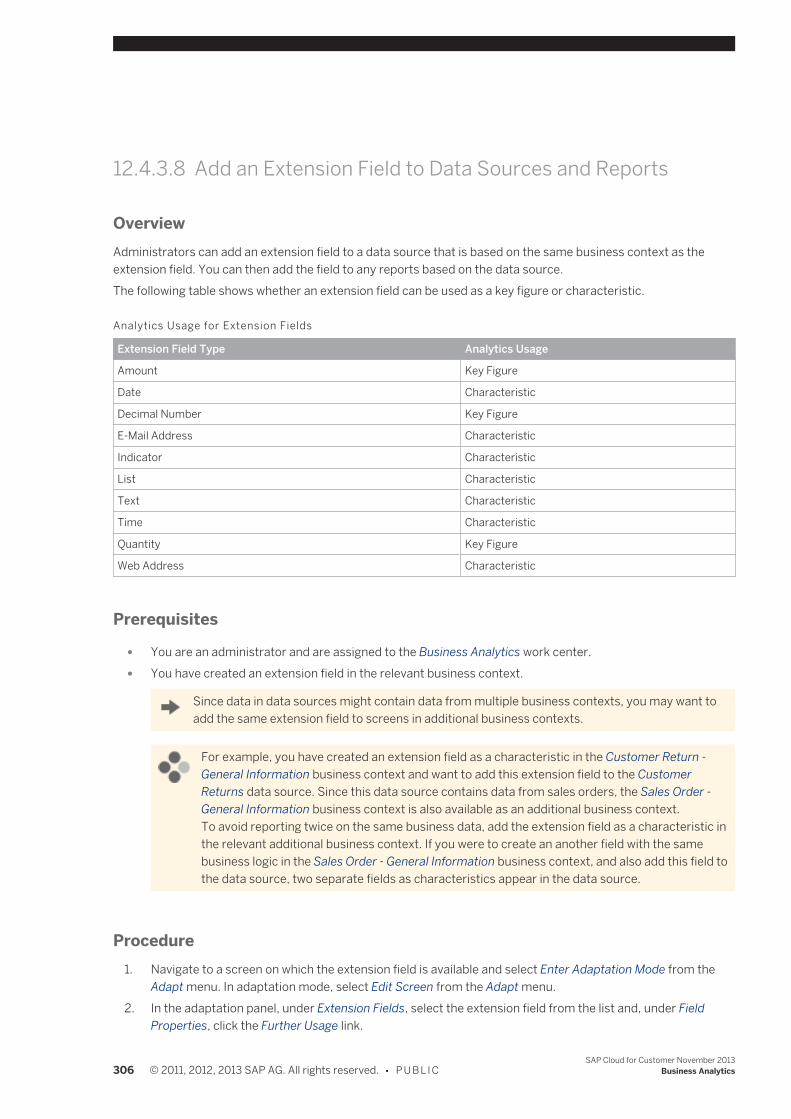
12.4.3.8 Add an Extension Field to Data Sources and Reports
OverviewAdministrators can add an extension field to a data source that is based on the same business context as theextension field. You can then add the field to any reports based on the data source.The following table shows whether an extension field can be used as a key figure or characteristic.
Analytics Usage for Extension Fields
Extension Field Type Analytics Usage
Amount Key Figure
Date Characteristic
Decimal Number Key Figure
E-Mail Address Characteristic
Indicator Characteristic
List Characteristic
Text Characteristic
Time Characteristic
Quantity Key Figure
Web Address Characteristic
Prerequisites
● You are an administrator and are assigned to the Business Analytics work center. ● You have created an extension field in the relevant business context.
Since data in data sources might contain data from multiple business contexts, you may want toadd the same extension field to screens in additional business contexts.
For example, you have created an extension field as a characteristic in the Customer Return -General Information business context and want to add this extension field to the CustomerReturns data source. Since this data source contains data from sales orders, the Sales Order -General Information business context is also available as an additional business context.To avoid reporting twice on the same business data, add the extension field as a characteristic inthe relevant additional business context. If you were to create an another field with the samebusiness logic in the Sales Order - General Information business context, and also add this field tothe data source, two separate fields as characteristics appear in the data source.
Procedure1. Navigate to a screen on which the extension field is available and select Enter Adaptation Mode from the
Adapt menu. In adaptation mode, select Edit Screen from the Adapt menu.2. In the adaptation panel, under Extension Fields, select the extension field from the list and, under Field
Properties, click the Further Usage link.
306 © 2011, 2012, 2013 SAP AG. All rights reserved. • P U B L I CSAP Cloud for Customer November 2013
Business Analytics
3. On the Data Sources and Reports tab, you can view all data sources available for the business context in whichyou created the field. When you select a data source, all reports based on that data source are displayed inthe lower table.Additional business contexts are listed on the Additional Business Context tab.
4. To add the field to a data source, select the data source and click Add Field .5. You have the following options:
● To add the field to an existing report based on this data source, select the report from the lower tableand click Add Field .The report opens in an administrator mode. In the Add Fields dialog box, select the Display in Reportcheckbox next to the extension field. Characteristics are added to the report under Not CurrentlyShown and key figures are available under Columns. Click OK and close the report without saving.The field will be available to all business users when they next access the report.Note that if you want to make further changes to the report, such as changing the layout, you need tocreate a new report view. For more information, see Working with Reports in a Web Browser[page 408].
● To create a new report based on the data source, navigate to the Business Analytics work center,Design Reports view and create a new report that uses this extension field.For more information, see the Design Reports Quick Guide [page 280].
If an error occurs while adding the extension field to the data source, the Field Status column displaysa red icon. Click Repair to fix the error.
ResultThe extension field as a characteristic is added to the data source or report.The extension field as a key figure is only added to the data source or report if the aggregation of the extension fieldas a key figure and of the data source or report match. For more information about extension fields as key figures,see here [page 322].
12.4.3.9 Integrating Analytics with an SAP NetWeaver BusinessWarehouse System
OverviewThe following documentation describes how to replicate data from the solution to an existing SAP NetWeaverBusiness Warehouse (BW) system. These processes support a series of process steps across two different systemsbased on preconfigured communication scenarios between the solution and SAP NetWeaver BW. The datareplication is done using operational data provisioning (ODP).
When configuring the integration of your solution with SAP NetWeaver BW, there are dependencies betweenthe activities in the different systems. Execute the procedures in the sequence as outlined.
SAP Cloud for Customer November 2013Business Analytics P U B L I C • © 2011, 2012, 2013 SAP AG. All rights reserved. 307
Prerequisites ● You have contacted SAP and have signed a contract to use this functionality. ● SAP Business Warehouse 7.30, SP8 ● Authorization to use the following transactions in the SAP NetWeaver BW system:
○ STRUST.For more information, see the following SAP documentation: Trust Manager .
○ Common BW transactions, such as RSA1.
For more information, see the following SAP documentation: Authorizations .
Source System: Implementation Sequence in the Solution1. Make changes to your scoping.
Integration with SAP ERP for Subsidiaries must be included in the solution scope.1. To find this business option, go the Business Configuration work center and choose the Implementation
Projects view.For more information, see Implementation Projects Quick Guide [page 37].
2. Select your implementation project and click Edit Project Scope. The system will open a guided procedureto lead you through the scoping steps.
3. On the Country and Type of Business screen, review the settings and choose Next.4. In the Scoping step of the project, choose Communication and Information Exchange Business
Process Management .On the Scoping screen, all possible scoping elements, which are in the focus of your solution, are selectedby default. Choose Next.
5. On the Questions screen, choose Communication and Information Exchange Business ProcessManagement Integration with ERP for Subsidiaries .
6. In the Questions for Integration with ERP for Subsidiaries section, expand the Integration with CentralAnalytics in SAP ERP, and choose Integration with Central Analytics in SAP ERP.
7. After you have reviewed and confirmed your entries, choose Finish.
You have defined the scoping of the solution. However, you have not yet deployed the scoping. Todeploy the scoping, make sure that you confirm the Design Accepted milestone in the activity list ofthe project. You generally do this after you have completed all your activities. The system will displaya message once the deployment is finished. If the milestone was completed earlier, the deploymentwill be done automatically.
Results: ● The Analytics Subsidiaries Integration communication scenario is available for creating communication
arrangements. ● The Monitoring work center view is available as an entry on the Access Rights screen when editing the
access rights of business users. ● The Monitoring work center view is available in the Business Analytics work center. ● In the Design Data Sources work center, the Exposed column appears in the table. You can expose or not
expose data sources accordingly by clicking Expose .
308 © 2011, 2012, 2013 SAP AG. All rights reserved. • P U B L I CSAP Cloud for Customer November 2013
Business Analytics
By exposing data sources, you make them available to a SAP NetWeaver BW system for data replication. ● In the Design Data Sources work center, under Details, the Referenced Data Sources tab page appears.
The tab page shows data sources containing master data that is referenced by the selected data source.2. Create a communication system.
1. In the Application and User Management work center, Under Input and Output Management, choose theCommunication Systems view.
2. In the Communication Systems view, click New .3. In the Communication System section, enter the details of the communication system:
● ID is used as the template for the technical user in the communication arrangement. ● Host Name has to be supplied, but is not used. ● For the System Access Type, select Internet.
4. When you have entered all the details, click Save and Close to return to the Communication Systemsview. The communication system you just created has the status In Preparation.
5. In the Communication Systems view, select the communication system you have created and clickActions , then choose Set to Active.
If the status changes to Active, the configuration is ready to be used.
For more information, see Communication Systems Quick Guide [page 149].3. Create a communication arrangement.
1. In the Application and User Management work center, Under Input and Output Management, choose theCommunication Arrangements view.
2. To open the New Communication Arrangement guided activity, in the Communication Arrangementsview, click New .
3. In the Select Scenario step, select Analytics Subsidiaries Integration and click Next .4. In the Define Business Data step, enter business data.
● In the System Instance ID field, choose or enter the communication system ID that you created.5. In the Define Technical Data step, define the technical settings for inbound and outbound
communication. ● In the Application Protocol field, choose Web Service. ● Choose the relevant entry from the Authentication Method field.
Depending on the authentication method that you have agreed on with the SAP NetWeaver BWadministrator, you need to define the credentials of the communication user as described in thefollowing table. The user ID of the communication user is created automatically.Using user ID and password as an authentication method is in general less secure than SSL clientcertificates since the information must be shared in order to create a communication arrangement.If you decide to use SSL client certificate as the authentication method, since the PKCS#12 key pairfile is only valid for a specified period of time, you must download a new PKCS#12 key pair file oncethe existing one has expired; The BW administrator must import the new PKCS#12 key pair file andoverride the existing imported one.If you decide to use user ID and password as the authentication method, ensure that it is accordancewith the security requirements of your company. Note that in order to avoid downtime, you mustupdate the passwords in both systems at the same time.Next to the User ID field, click Edit Credentials .
SAP Cloud for Customer November 2013Business Analytics P U B L I C • © 2011, 2012, 2013 SAP AG. All rights reserved. 309
AuthenticationMethod Settings
SSL ClientCertificate
If you use this authentication method, you need to upload the public key certificate thathas been provided by your SAP NetWeaver BW administrator. If your SAP NetWeaverBW administrator cannot provide a certificate, you can create and download a PKCS#12key pair file. The PKCS#12 file is password encrypted and contains a public key certificateand a private key. You need to provide the PKCS#12 file to your SAP NetWeaver BWadministrator.To upload a public key certificate, perform the following steps:
1. Choose Certificate .2. Click Upload Certificate and choose the relevant certificate.
To create a PKCS#12 key pair file, perform the following steps:1. Choose Certificate .2. Click Create and Download Key Pair .3. Define a name for the PKCS#12 file and save it.4. Define a password for the PKCS#12 file and click OK .5. Note that you have to provide your SAP NetWeaver BW administrator with the
PKCS#12 file and the corresponding password.
User ID andPassword
If you use this authentication method, you need to define a password. The user ID isautomatically predefined.Perform the following steps:
1. Choose Change Password .2. Enter a password and confirm it.
Note that you have to provide your SAP NetWeaver BW administrator with theuser ID and password.
6. Note the authentication method and corresponding information for reference; they are required forsetting up communication between SAP NetWeaver BW and the solution; the SAP NetWeaver BWadministrator requires the information.
For more information, see Communication Arrangements Quick Guide [page 151].4. Download a Web Services Description Language (WSDL) file.
The WSDL file is used to set up a Web service in the SOA Manager of the target BW system.1. In the Application and User Management work center, Under Input and Output Management, choose the
Communication Arrangements view.2. Choose the relevant communication arrangement and click Edit .3. Click the Technical Data tab page.4. Click Edit Advanced Settings .5. Click Download WSDL .6. Name and save the WSDL file; the file is required for setting up communication between SAP NetWeaver
BW and the solution; the SAP NetWeaver BW administrator requires the file.5. Ensure that the solution URL is a trusted site.
You can check whether the solution URL is a trusted site by, for example, checking the security report or bychecking the list of trusted sites of the Internet browser.
6. Export the relevant certificates from the Internet browser.The certificates are required to create a secure connection between the SAP NetWeaver BW system and thesolution; the SAP NetWeaver BW administrator requires the certificates.You can often find export functions under the tool options of the Internet browser. Depending on the Internetbrowser, you might need to run the browser as an administrator to export the certificate. You might also needto import the certificate before exporting it. For information about importing and exporting certificates, seethe documentation of the Internet browser.
310 © 2011, 2012, 2013 SAP AG. All rights reserved. • P U B L I CSAP Cloud for Customer November 2013
Business Analytics
You need to export the following certificates from the Internet browser independent of the authenticationmethod you have chosen: ● The GTE CyberTrust Global Root certificate. ● The GTE Cybertrust SureServer Standard Validation CA certificate.
7. Assign the Monitoring work center view to the relevant administrators.1. In the Application and User Management work center, choose the Business Users view.2. Select the relevant business users, then click Edit , and choose Access Rights.3. Select the Monitoring view of the Business Analytics work center and save your changes.
Note that the user must log on again to view the changes in the authorization.For more information, see Business Users Quick Guide [page 107].
Checklist of Information for SAP NetWeaver BW AdministratorThe administrator of the solution must provide the following information, as created from the steps above, to theSAP NetWeaver BW administrator:
● If you have chosen SSL client certificate as the authentication method: ○ PKCS#12 key pair file ○ WSDL file ○ GTE CyberTrust Global Root certificate ○ Cybertrust SureServer Standard Validation CA certificate
● If you have chosen user ID and password as the authentication method: ○ Technical user ID and password ○ WSDL file ○ GTE CyberTrust Global Root certificate ○ Cybertrust SureServer Standard Validation CA certificate
Target System: Implementation Sequence in the SAP NetWeaver BusinessWarehouse
Before importing the certificates to the SAP NetWeaver system, determine whether the release of your SAPNetWeaver BW system supports .p12 as a Personal Security Environment (PSE) file type.
If it does not, you must download the SAPGENPSE cryptography tool as part of SAP cryptographic softwarein order to convert the file type of the certificates to .pse.
For more information, see the following SAP documentation: Downloading the SAP Cryptographic Libraryand Configuring SAPGENPSE for Use .
1. Import certificates to the SAP NetWeaver BW system.1. Call transaction STRUST.
For more information, see the following SAP documentation: Getting Started with the Trust Manager . ● If you have chosen SSL client certificate as the authentication method:
1. You have the SSLC/DFAULT identify available, import the GTE CyberTrust Global Rootcertificate and the Cybertrust SureServer Standard Validation CA certificates to the identifyfolder.
SAP Cloud for Customer November 2013Business Analytics P U B L I C • © 2011, 2012, 2013 SAP AG. All rights reserved. 311

If the identity folder, is not available, we recommend creating a new identity SSL client identity.From Environment, choose the SSL Client Identity entry.From the PSE status frame (left frame), double-click the relevant identity folder..
2. Under Certificate, click the import certificate icon.3. Add the GTE CyberTrust Global Root certificate and the Cybertrust SureServer Standard
Validation CA certificate that you exported from the solution to the certificate list.4. Save your changes.5. Import the PKCS#12 key pair file.
1. From PSE, choose Import.2. Select the relevant key pair file.3. From PSE, choose Save As.4. Select the relevant PSE, for example, SSLC/DFAULT.5. Save your changes.
Result: The key pair file certificate is displayed in the Own Certificates pane. ● If you have chosen user ID and password as the authentication method:
1. You have the SSLC/ANONYM identify available, import the GTE CyberTrust Global Rootcertificate and the Cybertrust SureServer Standard Validation CA certificates to the identifyfolder.If the identity folder, is not available, we recommend creating a new identity SSL client identity.From Environment, choose the SSL Client Identity entry.
2. Under Certificate, click the import certificate icon.3. Add the GTE CyberTrust Global Root certificate that you exported from the solution to the
certificate list.4. Save your changes.
2. Ensure that the application SOAP management service is activated.To ensure that ODP can be activated in SOA Manager, you must ensure that the corresponding Web servicefor SOA Manager is activated. For more information, see the following SAP documentation: InternetCommunication Framework .1. Call transaction SICF.
2. Ensure that SERVICE is entry in the Hierarchy Type field.
3. Click the execute icon.4. In the Service field, enter APPL_SOAP_MANAGEMENT.
5. Click Apply .The service appears in the Virtual Hosts / Services hierarchy.
6. Ensure that the service is activated. For more information, see the following SAP documentation:Activating and Deactivating ICF Services .
3. Add Operational Data Provisioning (ODP) as a source system.Using the ODP framework, you can replicate data from SAP repositories to a SAP NetWeaver BW system.
Note that ODP does not support real-time data acquisition, hierarchies, nor VirtualProviders based ona data transfer process.
1. Call transaction rsa1 and check if ODP is available as a source system under Source Systems in theModeling view.If ODP does not appear as a source system, complete the following steps:
312 © 2011, 2012, 2013 SAP AG. All rights reserved. • P U B L I CSAP Cloud for Customer November 2013
Business Analytics
1. Call transaction se38.
2. Run report SAP_RSADMIN_MAINTAIN.
3. In the Object field, enter ODP.
4. In the Value field, enter X.
5. Click the execute icon.In Modeling view of the Data Warehousing Workbench, the system creates ODP under SourceSystems.
4. Create an ODP source system.1. Call transaction rsa1.
2. Click Modeling Source Systems , and from the context menu of ODP, click Create.3. In the Logical System Name field, enter a technical name for the source system.4. In the Source System Name field, enter a name for the source system.5. Click the continue icon.6. On the Select Communication Channel screen, click HTTP/SOAP .7. On the Web Service Configuration screen, click SOA Manager .8. On the following logon screen, enter your SAP NetWeaver BW user ID and password.
5. Configure logical port for the consumer proxy in SOA Manager.For each source system, a consumer proxy is generated, for example, CO_RSDSPX_ODP_IN.To configure a consumer proxy to access the Web service of the solution, you need to create and configureone or more logical ports. A logical port references an endpoint, which is available at a unique location in thesolution system. You can create one or more logical ports for the same consumer proxy.For more information about the SOA Manager, see the following SAP documentation: Working with SOAManager .1. In the SOA Manager, select the relevant consumer proxy and click Apply Selection .2. Go to the Configurations tab page.3. Click Create .4. On the SOA Management screen, enter the logical port name in the Logical Port Name field.
Note that the logical port name must be the same as you entered for the ODP source system inthe Data Warehousing Workbench.
5. For the configuration type, choose WSDL Based Configuration.6. For the WSDL base, choose Via File.7. Load the WSDL file that you downloaded from the solution and click Apply Settings .8. On the following screen click Apply Settings .9. Under Configuration of Logical Port, on the Consumer Security tab page, enter the user name and
password that have been created in the solution for the technical user in the communicationarrangement.
10. On the Transport Settings tab page, ensure if the proxy settings are correct. Check whether there areentries in the Name of Proxy Host and Port Number of Proxy Host fields.
11. Ensure that the for the Maximum Wait for WS Consumer field, the value is set to 900. For more informationsee the SAP documentation: Configuring a Consumer Proxy .
12. Click Save .13. To check whether the settings you made are correct, on the Configurations tab page, click
Ping Web Service .
SAP Cloud for Customer November 2013Business Analytics P U B L I C • © 2011, 2012, 2013 SAP AG. All rights reserved. 313
The SAP NetWeaver BW system calls the Web service of the solution.If unsuccessful, the following errors might occur. Possible solutions to the corresponding error areprovided. ● Error when calling SOAP Runtime functions: SRT: HTTP-Code 500: ("SRT:
Unexpected failure in SOAP processing occurred: ("No Web service)
The password of the technical user for the solution might no longer be valid. ● Error when calling SOAP Runtime functions: SRT: Unsupported xstream found:
("HTTP Code 401 : Unauthorized")
The technical user of the solution might be locked. ● SRT Framework exception. Service Ping ERROR: Error when calling SOAP
Runtime functions: SRT: Processing error in Internet Communication
Framework: ("ICF Error when receiving the response: ICM_HTTP_SSL_ERROR")
The GTE CyberTrust Global Root certificate has not been imported. ● SRT Framework exception: Service Ping ERROR: Error when calling SOAP
Runtime functions: SRT: Processing error in Internet Communication
Framework: ("ICF Error when receiving the response:
ICM_HTTP_CONNECTION_FAILED")
The proxy may not be valid or not entered. Check your proxy settings.14. If successful, go back to the SAP NetWeaver BW system and for the ODP source system, right mouse
click the ODP source system, and click Check .The system checks and saves the ODP source system.
15. Close the SOA Manager.
Source System: Expose Data Sources in the SolutionIn the Design Data Sources work center view, administrators for Analytics can expose or not expose data sourcesfor data replication accordingly. To expose or hide data sources for data replication, click Expose and choose therelevant entry.Expose as transactional data or master dataOn the screen that appears, you can choose whether to expose the data source as a master data, as a transactiondata source, or both in the SAP NetWeaver BW system. Your choice only affects how the data source is maintainedin the BW system and how the data source is called by the Web service.
314 © 2011, 2012, 2013 SAP AG. All rights reserved. • P U B L I CSAP Cloud for Customer November 2013
Business Analytics
The following is an example of the Web service.P is for master data.F is for transactional data.If exposed as master data:<NodeStructure>
<NodeID>/MOM/JOB$P</NodeID>
<Description>Job Master Data</Description>
<SemanticsCode>P</SemanticsCode>
<DisplayID>/MOM/JOB</DisplayID>
</NodeStructure>
If exposed as master data and as transactional data:<NodeStructure>
<NodeID>/MOM/JOB$P</NodeID>
<Description>Job Master Data</Description>
<SemanticsCode>P</SemanticsCode>
<DisplayID>/MOM/JOB</DisplayID>
</NodeStructure>
<NodeStructure>
<NodeID>/MOM/JOB$F</NodeID>
<Description>Job Master Data</Description>
<SemanticsCode>F</SemanticsCode>
<DisplayID>/MOM/JOB</DisplayID>
</NodeStructure>
For data sources that you expose, ensure that you also expose data sources that contain master data that isreferenced by the selected data source.You can find a list of referenced data sources for the data source to be exposed under Details on the ReferencedData Sources tab page.
Target System: Extraction, Transformation and Loading (ETL) Process in theSAP NetWeaver Business WarehouseIn the SAP NetWeaver BW system, you prepare the system to use the replicated data from the solution sourcesystem.The SAP NetWeaver BW administrator can define the objects and data flow modeling to support company reportingrequirements. Note that the steps outlined below are meant as an example.
1. Create an InfoArea for objects containing source system data.You can create an InfoArea for the InfoCubes, DataStore objects and InfoObjects by which the objects canbe grouped.
2. Create an application component.Create application component to group your data sources, for example, ByD_Data_Sources_01.
3. Create a DataSourceWe recommend creating a DataSource for each solution system and solution data source. For example,BPARTNER_QLCCLNT901.The DataSource type is transactional data even in the case of SAP NetWeaver master data.For more information, see the following SAP documentation: DataSources .1. Maintain GeneralInfo. tab page.
SAP Cloud for Customer November 2013Business Analytics P U B L I C • © 2011, 2012, 2013 SAP AG. All rights reserved. 315
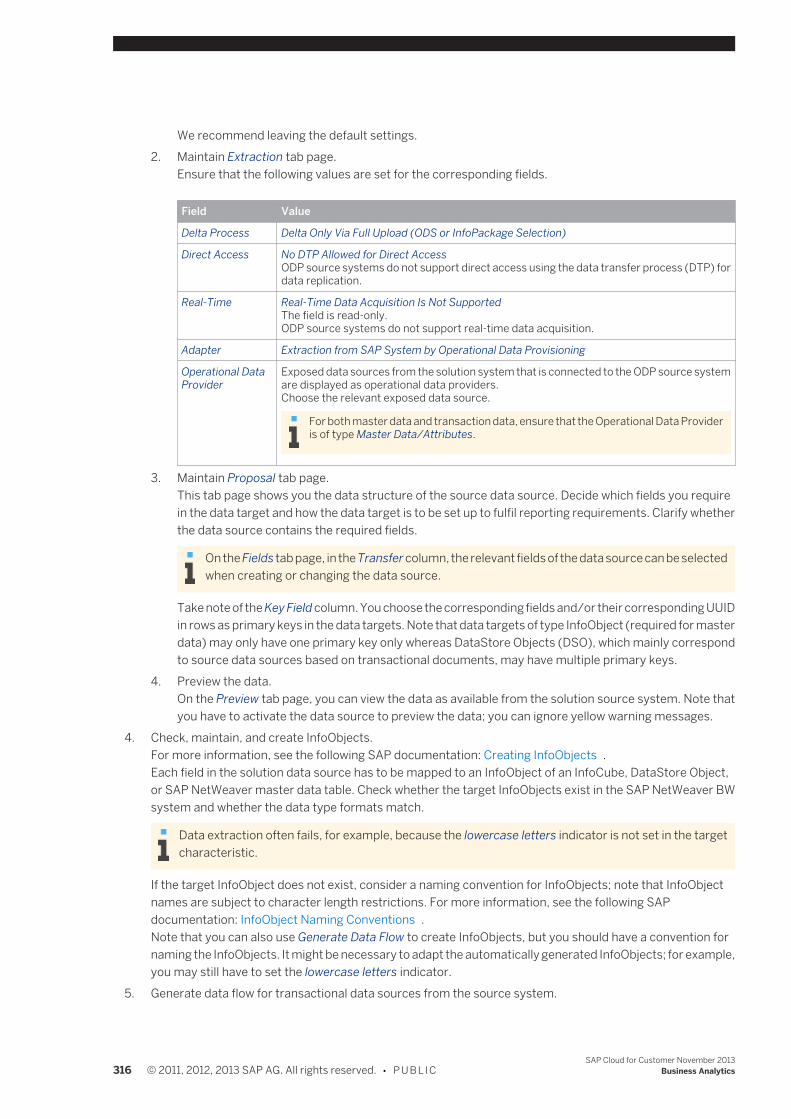
We recommend leaving the default settings.2. Maintain Extraction tab page.
Ensure that the following values are set for the corresponding fields.
Field Value
Delta Process Delta Only Via Full Upload (ODS or InfoPackage Selection)
Direct Access No DTP Allowed for Direct AccessODP source systems do not support direct access using the data transfer process (DTP) fordata replication.
Real-Time Real-Time Data Acquisition Is Not SupportedThe field is read-only.ODP source systems do not support real-time data acquisition.
Adapter Extraction from SAP System by Operational Data Provisioning
Operational DataProvider
Exposed data sources from the solution system that is connected to the ODP source systemare displayed as operational data providers.Choose the relevant exposed data source.
For both master data and transaction data, ensure that the Operational Data Provideris of type Master Data/Attributes.
3. Maintain Proposal tab page.This tab page shows you the data structure of the source data source. Decide which fields you requirein the data target and how the data target is to be set up to fulfil reporting requirements. Clarify whetherthe data source contains the required fields.
On the Fields tab page, in the Transfer column, the relevant fields of the data source can be selectedwhen creating or changing the data source.
Take note of the Key Field column. You choose the corresponding fields and/or their corresponding UUIDin rows as primary keys in the data targets. Note that data targets of type InfoObject (required for masterdata) may only have one primary key only whereas DataStore Objects (DSO), which mainly correspondto source data sources based on transactional documents, may have multiple primary keys.
4. Preview the data.On the Preview tab page, you can view the data as available from the solution source system. Note thatyou have to activate the data source to preview the data; you can ignore yellow warning messages.
4. Check, maintain, and create InfoObjects.For more information, see the following SAP documentation: Creating InfoObjects .Each field in the solution data source has to be mapped to an InfoObject of an InfoCube, DataStore Object,or SAP NetWeaver master data table. Check whether the target InfoObjects exist in the SAP NetWeaver BWsystem and whether the data type formats match.
Data extraction often fails, for example, because the lowercase letters indicator is not set in the targetcharacteristic.
If the target InfoObject does not exist, consider a naming convention for InfoObjects; note that InfoObjectnames are subject to character length restrictions. For more information, see the following SAPdocumentation: InfoObject Naming Conventions .Note that you can also use Generate Data Flow to create InfoObjects, but you should have a convention fornaming the InfoObjects. It might be necessary to adapt the automatically generated InfoObjects; for example,you may still have to set the lowercase letters indicator.
5. Generate data flow for transactional data sources from the source system.
316 © 2011, 2012, 2013 SAP AG. All rights reserved. • P U B L I CSAP Cloud for Customer November 2013
Business Analytics
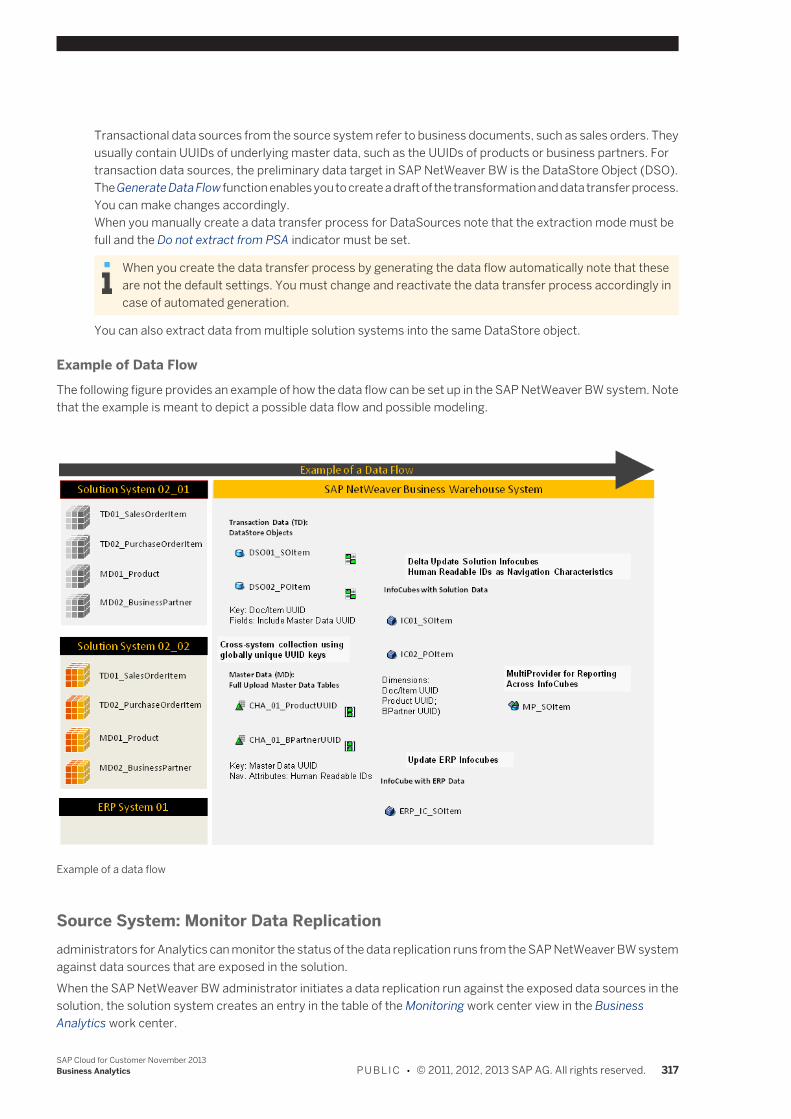
Transactional data sources from the source system refer to business documents, such as sales orders. Theyusually contain UUIDs of underlying master data, such as the UUIDs of products or business partners. Fortransaction data sources, the preliminary data target in SAP NetWeaver BW is the DataStore Object (DSO).The Generate Data Flow function enables you to create a draft of the transformation and data transfer process.You can make changes accordingly.When you manually create a data transfer process for DataSources note that the extraction mode must befull and the Do not extract from PSA indicator must be set.
When you create the data transfer process by generating the data flow automatically note that theseare not the default settings. You must change and reactivate the data transfer process accordingly incase of automated generation.
You can also extract data from multiple solution systems into the same DataStore object.
Example of Data FlowThe following figure provides an example of how the data flow can be set up in the SAP NetWeaver BW system. Notethat the example is meant to depict a possible data flow and possible modeling.
Example of a data flow
Source System: Monitor Data Replicationadministrators for Analytics can monitor the status of the data replication runs from the SAP NetWeaver BW systemagainst data sources that are exposed in the solution.When the SAP NetWeaver BW administrator initiates a data replication run against the exposed data sources in thesolution, the solution system creates an entry in the table of the Monitoring work center view in the BusinessAnalytics work center.
SAP Cloud for Customer November 2013Business Analytics P U B L I C • © 2011, 2012, 2013 SAP AG. All rights reserved. 317
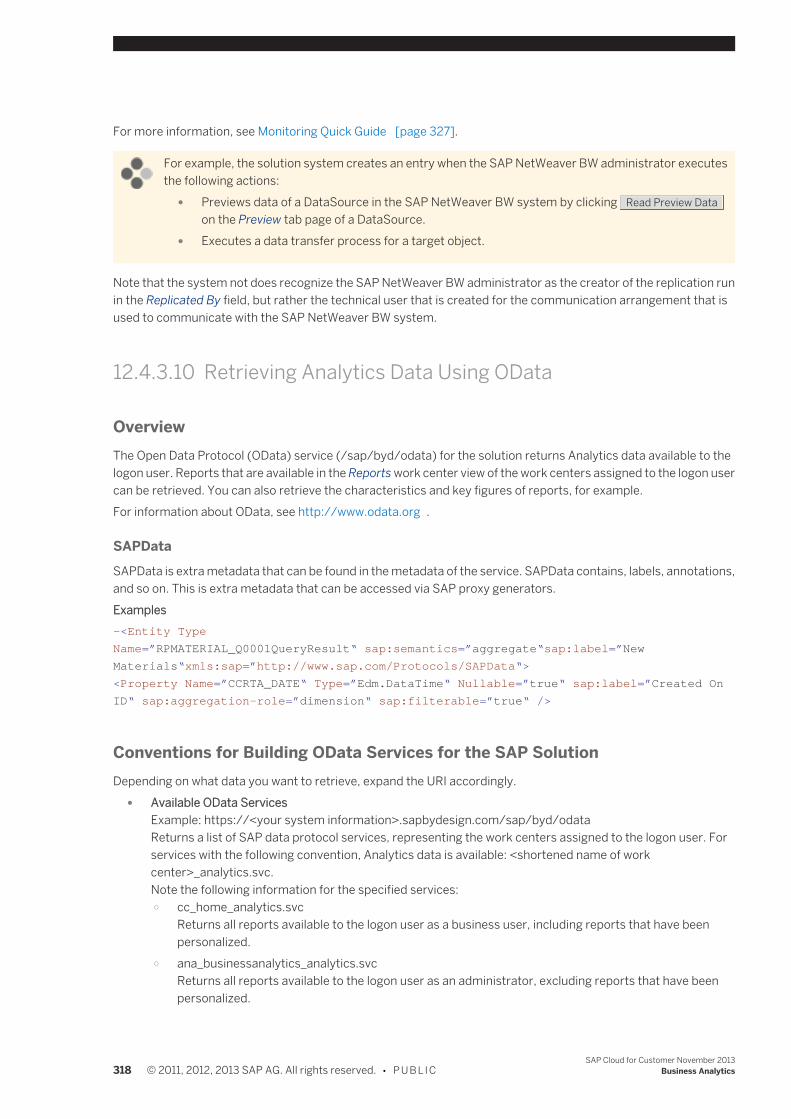
For more information, see Monitoring Quick Guide [page 327].
For example, the solution system creates an entry when the SAP NetWeaver BW administrator executesthe following actions:
● Previews data of a DataSource in the SAP NetWeaver BW system by clicking Read Preview Dataon the Preview tab page of a DataSource.
● Executes a data transfer process for a target object.
Note that the system not does recognize the SAP NetWeaver BW administrator as the creator of the replication runin the Replicated By field, but rather the technical user that is created for the communication arrangement that isused to communicate with the SAP NetWeaver BW system.
12.4.3.10 Retrieving Analytics Data Using OData
OverviewThe Open Data Protocol (OData) service (/sap/byd/odata) for the solution returns Analytics data available to thelogon user. Reports that are available in the Reports work center view of the work centers assigned to the logon usercan be retrieved. You can also retrieve the characteristics and key figures of reports, for example.For information about OData, see http://www.odata.org .
SAPDataSAPData is extra metadata that can be found in the metadata of the service. SAPData contains, labels, annotations,and so on. This is extra metadata that can be accessed via SAP proxy generators.Examples-<Entity Type
Name=”RPMATERIAL_Q0001QueryResult“ sap:semantics=”aggregate“sap:label=”New
Materials“xmls:sap=”http://www.sap.com/Protocols/SAPData“>
<Property Name=”CCRTA_DATE“ Type=”Edm.DataTime“ Nullable=”true“ sap:label=”Created On
ID“ sap:aggregation-role=”dimension“ sap:filterable=”true“ />
Conventions for Building OData Services for the SAP SolutionDepending on what data you want to retrieve, expand the URI accordingly.
● Available OData ServicesExample: https://<your system information>.sapbydesign.com/sap/byd/odataReturns a list of SAP data protocol services, representing the work centers assigned to the logon user. Forservices with the following convention, Analytics data is available: <shortened name of workcenter>_analytics.svc.Note the following information for the specified services: ○ cc_home_analytics.svc
Returns all reports available to the logon user as a business user, including reports that have beenpersonalized.
○ ana_businessanalytics_analytics.svcReturns all reports available to the logon user as an administrator, excluding reports that have beenpersonalized.
318 © 2011, 2012, 2013 SAP AG. All rights reserved. • P U B L I CSAP Cloud for Customer November 2013
Business Analytics
● Metadata Document of an Analytics ServiceExample: https://<your system information>.sapbydesign.com/sap/byd/odata/<shortened name of workcenter>_analytics.svc/$metadataReturns the reports assigned to the specified work center along with the corresponding fields in the reports.
● Data of a ReportExample: https://<your system information>.sapbydesign.com/sap/byd/odata/<shortened name of workcenter>_analytics.svc/RP<report ID>QueryResultsReturns the first 50 lines of data of the specified report
● Supported Query OptionsFor the following supported query options, the example base of the URI is the same:Example: https://<your system information>.sapbydesign.com/sap/byd/odata/<shortened name of workcenter>_analytics.svc/RP<report ID>QueryResults? ○ $select
Expansion: $select=<one or more specified characteristics separated by commas> ○ $orderby (ascending)
Expansion: $orderby=<one or more specified characteristics followed by asc, separated by commas>
○ $orderby (descending)Expansion: $orderby=<one or more specified characteristics followed by desc, separated by commas>
○ totalsExpansion: $totals=<one or more specified characteristics separated by commas>
○ $filterExpansion: $filter=<specified characteristic> eq '<filter value>'
○ $topExpansion: $top=<specified number>
12.4.4 Key Figures
12.4.4.1 Design Key Figures Quick Guide
In the Design Key Figures work center view, administrators have an overview of calculated and restricted key figuresand key figure structures available in data sources.You can access the Design Key Figures view from the Business Analytics and/or Administrator work center.
Business BackgroundAn overview of calculated and restricted key figures in the system enables administrators to determine which datasources suit the business requirements for reports. It also enables administrators to determine whether they needto create any restricted or calculated key figures. For more information, see Overview of Analytics [page 403].
SAP Cloud for Customer November 2013Business Analytics P U B L I C • © 2011, 2012, 2013 SAP AG. All rights reserved. 319

Tasks
Create and Edit a Key FigureFor more information about this task, see here [page 320].
12.4.4.2 Create and Edit a Key Figure
OverviewYou can create your own calculated and restricted key figures for use in reports.You can access this task from one of the following:
● Under Common Tasks ● From the Design Reports work center view, in the Select Key Figures step of the Report Wizard ● From the Design Key Figures work center view
You do not have to complete all steps in the New Key Figure task: only the first two steps are mandatory. Thisis indicated by an asterisk (*).You can create a key figure by entering a name, selecting a data source, defining a restriction or calculation,and clicking Finish .
Procedure1. Define Key Figure and Select Data Source
We recommend providing a name and description for the key figure so that the business user can identify itsuse in reports.Select a data source from which the key figure is to be selected. Note that if you have navigated to this activityfrom the Report Wizard, the data source is prefilled with the selection you made.Depending on the type of key figure you want to create, make the appropriate selection.
2. Restrict/Calculate Key Figure ● Create a Restricted Key Figure
A restricted key figure is a key figure that is restricted to a specified characteristic value.For the key figure you have selected to restrict, make settings for the relevant characteristics. Differentrestriction settings are available depending on the restriction type you choose for the selectedcharacteristic. The following restriction types are available: ○ Variable
Restricts the selected characteristic using the variable you have specified.
320 © 2011, 2012, 2013 SAP AG. All rights reserved. • P U B L I CSAP Cloud for Customer November 2013
Business Analytics
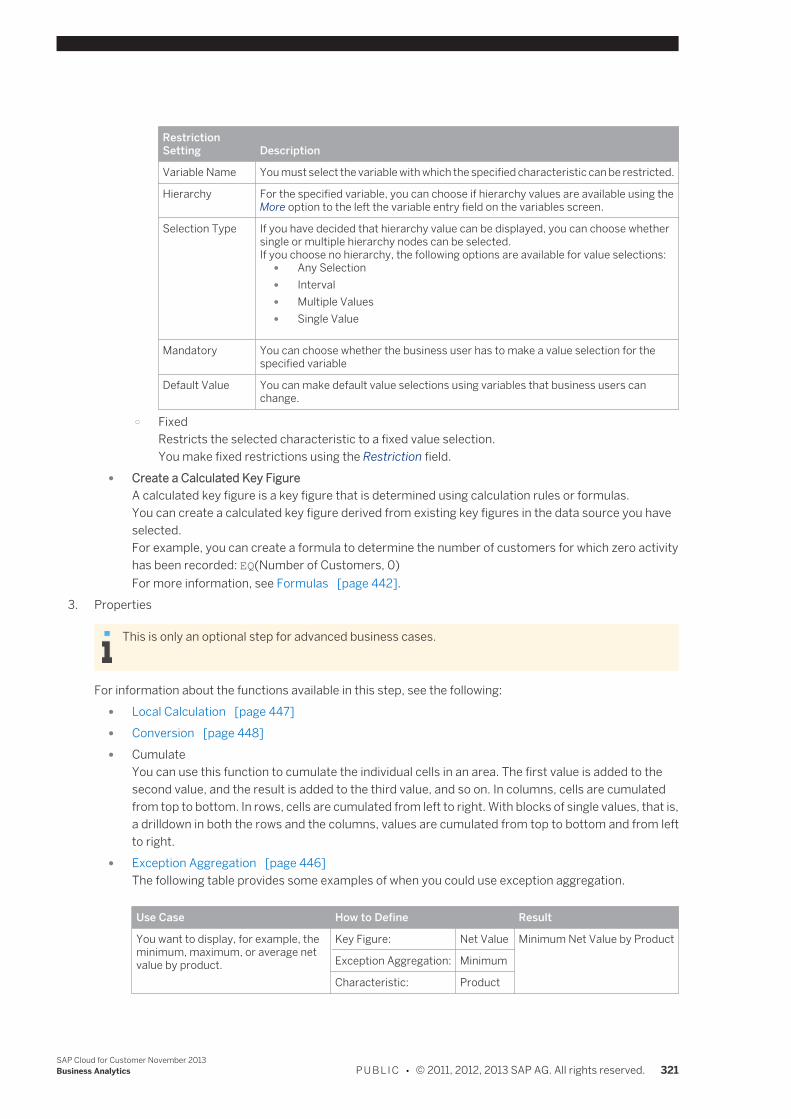
RestrictionSetting Description
Variable Name You must select the variable with which the specified characteristic can be restricted.
Hierarchy For the specified variable, you can choose if hierarchy values are available using theMore option to the left the variable entry field on the variables screen.
Selection Type If you have decided that hierarchy value can be displayed, you can choose whethersingle or multiple hierarchy nodes can be selected.If you choose no hierarchy, the following options are available for value selections:
● Any Selection ● Interval ● Multiple Values ● Single Value
Mandatory You can choose whether the business user has to make a value selection for thespecified variable
Default Value You can make default value selections using variables that business users canchange.
○ FixedRestricts the selected characteristic to a fixed value selection.You make fixed restrictions using the Restriction field.
● Create a Calculated Key FigureA calculated key figure is a key figure that is determined using calculation rules or formulas.You can create a calculated key figure derived from existing key figures in the data source you haveselected.For example, you can create a formula to determine the number of customers for which zero activityhas been recorded: EQ(Number of Customers, 0)For more information, see Formulas [page 442].
3. Properties
This is only an optional step for advanced business cases.
For information about the functions available in this step, see the following: ● Local Calculation [page 447] ● Conversion [page 448] ● Cumulate
You can use this function to cumulate the individual cells in an area. The first value is added to thesecond value, and the result is added to the third value, and so on. In columns, cells are cumulatedfrom top to bottom. In rows, cells are cumulated from left to right. With blocks of single values, that is,a drilldown in both the rows and the columns, values are cumulated from top to bottom and from leftto right.
● Exception Aggregation [page 446]The following table provides some examples of when you could use exception aggregation.
Use Case How to Define Result
You want to display, for example, theminimum, maximum, or average netvalue by product.
Key Figure: Net Value Minimum Net Value by Product
Exception Aggregation: Minimum
Characteristic: Product
SAP Cloud for Customer November 2013Business Analytics P U B L I C • © 2011, 2012, 2013 SAP AG. All rights reserved. 321
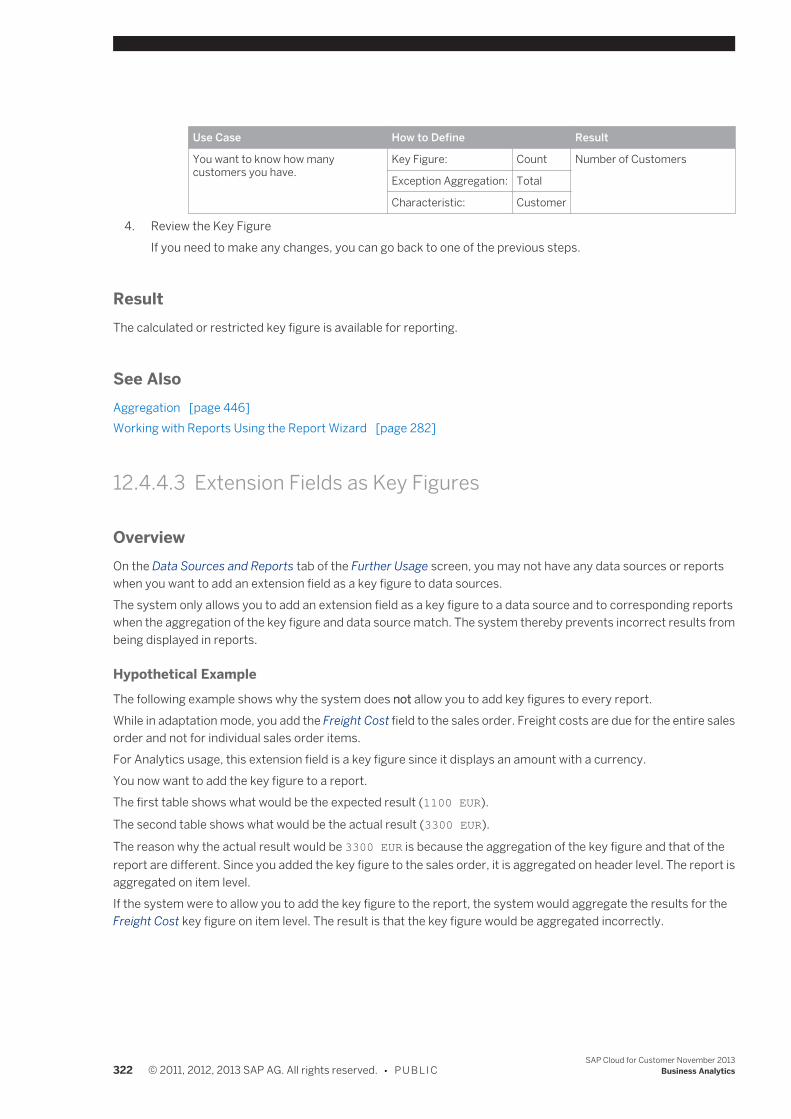
Use Case How to Define Result
You want to know how manycustomers you have.
Key Figure: Count Number of Customers
Exception Aggregation: Total
Characteristic: Customer
4. Review the Key FigureIf you need to make any changes, you can go back to one of the previous steps.
ResultThe calculated or restricted key figure is available for reporting.
See AlsoAggregation [page 446]Working with Reports Using the Report Wizard [page 282]
12.4.4.3 Extension Fields as Key Figures
OverviewOn the Data Sources and Reports tab of the Further Usage screen, you may not have any data sources or reportswhen you want to add an extension field as a key figure to data sources.The system only allows you to add an extension field as a key figure to a data source and to corresponding reportswhen the aggregation of the key figure and data source match. The system thereby prevents incorrect results frombeing displayed in reports.
Hypothetical ExampleThe following example shows why the system does not allow you to add key figures to every report.While in adaptation mode, you add the Freight Cost field to the sales order. Freight costs are due for the entire salesorder and not for individual sales order items.For Analytics usage, this extension field is a key figure since it displays an amount with a currency.You now want to add the key figure to a report.The first table shows what would be the expected result (1100 EUR).
The second table shows what would be the actual result (3300 EUR).
The reason why the actual result would be 3300 EUR is because the aggregation of the key figure and that of thereport are different. Since you added the key figure to the sales order, it is aggregated on header level. The report isaggregated on item level.If the system were to allow you to add the key figure to the report, the system would aggregate the results for theFreight Cost key figure on item level. The result is that the key figure would be aggregated incorrectly.
322 © 2011, 2012, 2013 SAP AG. All rights reserved. • P U B L I CSAP Cloud for Customer November 2013
Business Analytics
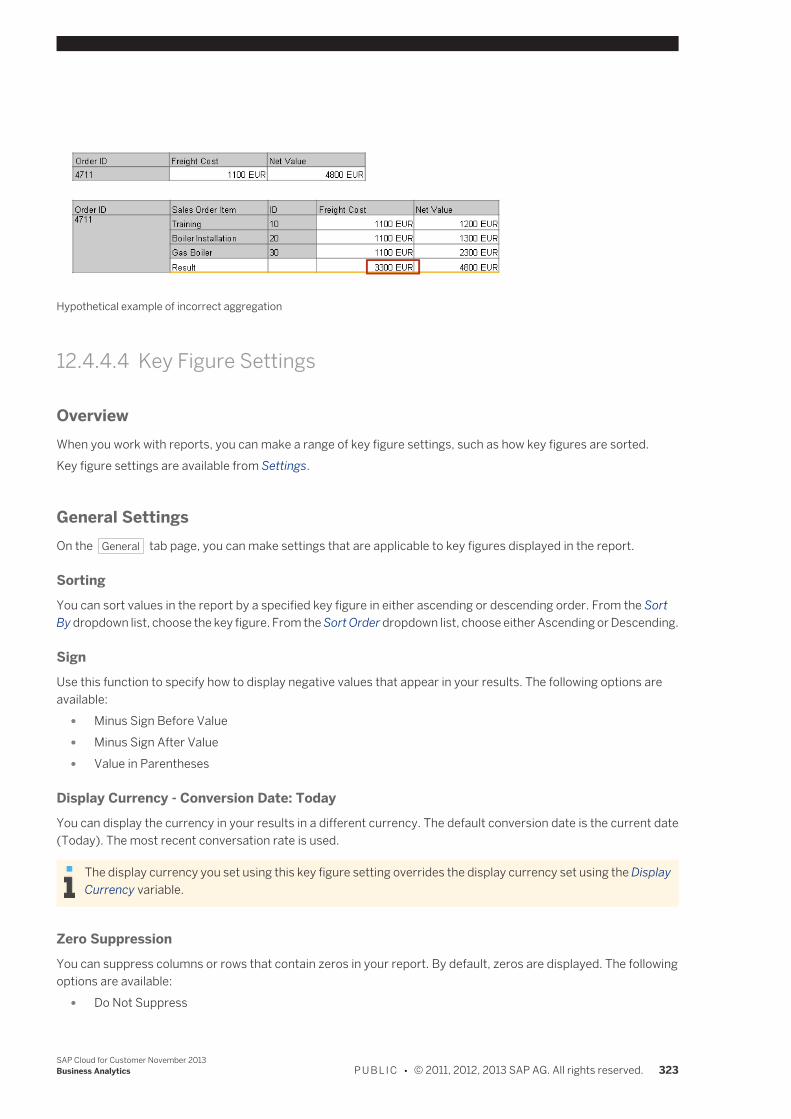
Hypothetical example of incorrect aggregation
12.4.4.4 Key Figure Settings
OverviewWhen you work with reports, you can make a range of key figure settings, such as how key figures are sorted.Key figure settings are available from Settings.
General SettingsOn the General tab page, you can make settings that are applicable to key figures displayed in the report.
SortingYou can sort values in the report by a specified key figure in either ascending or descending order. From the SortBy dropdown list, choose the key figure. From the Sort Order dropdown list, choose either Ascending or Descending.
SignUse this function to specify how to display negative values that appear in your results. The following options areavailable:
● Minus Sign Before Value ● Minus Sign After Value ● Value in Parentheses
Display Currency - Conversion Date: TodayYou can display the currency in your results in a different currency. The default conversion date is the current date(Today). The most recent conversation rate is used.
The display currency you set using this key figure setting overrides the display currency set using the DisplayCurrency variable.
Zero SuppressionYou can suppress columns or rows that contain zeros in your report. By default, zeros are displayed. The followingoptions are available:
● Do Not Suppress
SAP Cloud for Customer November 2013Business Analytics P U B L I C • © 2011, 2012, 2013 SAP AG. All rights reserved. 323
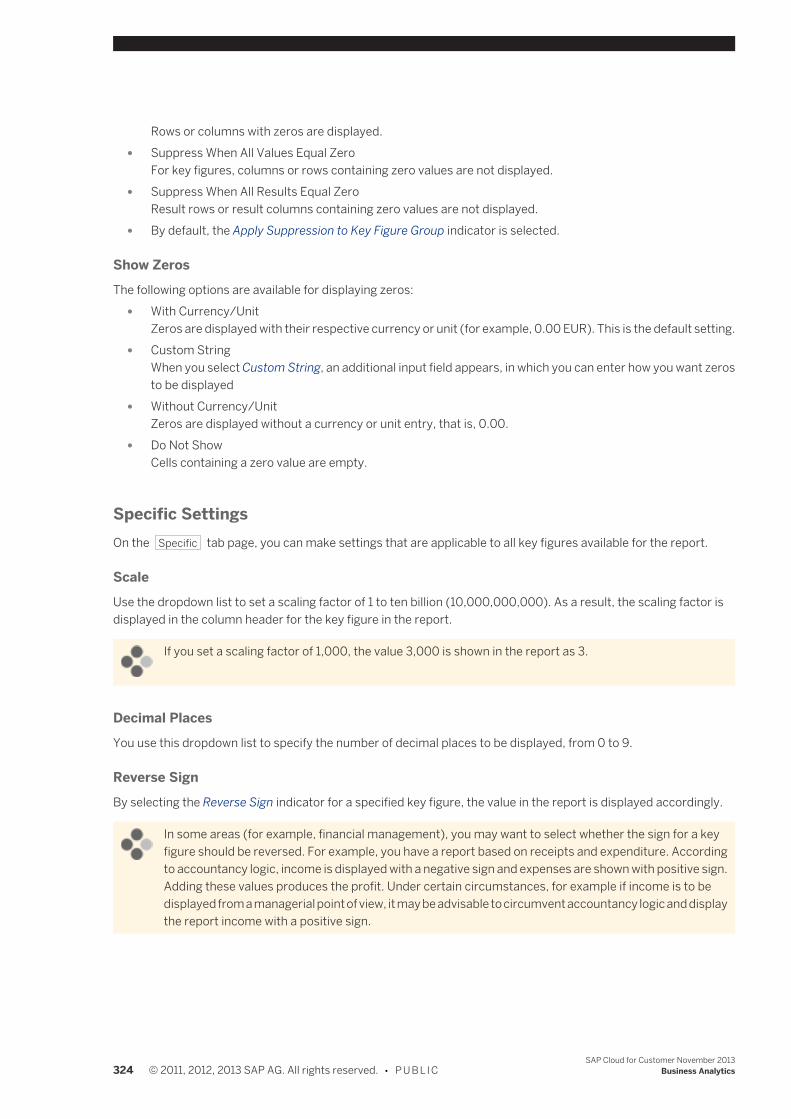
Rows or columns with zeros are displayed. ● Suppress When All Values Equal Zero
For key figures, columns or rows containing zero values are not displayed. ● Suppress When All Results Equal Zero
Result rows or result columns containing zero values are not displayed. ● By default, the Apply Suppression to Key Figure Group indicator is selected.
Show ZerosThe following options are available for displaying zeros:
● With Currency/UnitZeros are displayed with their respective currency or unit (for example, 0.00 EUR). This is the default setting.
● Custom StringWhen you select Custom String, an additional input field appears, in which you can enter how you want zerosto be displayed
● Without Currency/UnitZeros are displayed without a currency or unit entry, that is, 0.00.
● Do Not ShowCells containing a zero value are empty.
Specific SettingsOn the Specific tab page, you can make settings that are applicable to all key figures available for the report.
ScaleUse the dropdown list to set a scaling factor of 1 to ten billion (10,000,000,000). As a result, the scaling factor isdisplayed in the column header for the key figure in the report.
If you set a scaling factor of 1,000, the value 3,000 is shown in the report as 3.
Decimal PlacesYou use this dropdown list to specify the number of decimal places to be displayed, from 0 to 9.
Reverse SignBy selecting the Reverse Sign indicator for a specified key figure, the value in the report is displayed accordingly.
In some areas (for example, financial management), you may want to select whether the sign for a keyfigure should be reversed. For example, you have a report based on receipts and expenditure. Accordingto accountancy logic, income is displayed with a negative sign and expenses are shown with positive sign.Adding these values produces the profit. Under certain circumstances, for example if income is to bedisplayed from a managerial point of view, it may be advisable to circumvent accountancy logic and displaythe report income with a positive sign.
324 © 2011, 2012, 2013 SAP AG. All rights reserved. • P U B L I CSAP Cloud for Customer November 2013
Business Analytics

12.4.5 Assign a Report
OverviewAs an administrator, after you have created a report, you can assign it to work centers and work center views, makingit available to business users.
Procedure1. From the Design Reports work center view, select the relevant report with the status Unassigned.2. Click Assign .3.
Note that the system checks whether the access context of the report and the access context of thework center view conflict. The Conflict column indicates whether a conflict exists.A check mark indicates that the access contexts match.An exclamation mark indicates that the access contexts conflict.If you want to assign reports to work center view regardless of conflicting access rights, you must makechanges to your fine tuning in the Business Configuration work center using the optional activityAdministrator Analytics — Settings. For more information, see Configuration: Administrator Analytics- Settings.
For reports, the system assigns the report categories from the underlying data source to the report. You canchange the report category assignment by selecting the corresponding work center view and making changesto the report category assignment in list.
4. For reports, select the report categories by which the report can be grouped in the Reports work center view.
Some delivered content has the Hidden status by default. For example, reports that are only displayed asembedded reports. If you want to have the report displayed in the Reports work center view, deselect the Hidein Reports View indicator.
ResultThe report is available to business users who have been assigned to the work center views.
When you assign Microsoft Excel®-based reports, that is, workbooks, ensure that the reports embedded inthe workbook are also assigned to the same work centers and work center views as the workbook to ensurethat business users can view all reports embedded in the workbook. For each embedded report, note thereport name and ID in the Report Name dropdown list of the workbook header and compare its assignmentagainst the reports used in the workbook.
For example, the administrator has assigned a Microsoft Excel-based report, that is, a workbook, to awork center view. The workbook is available to all users assigned to that work center view. A user executesthe workbook but receives an error message, stating that she/he is not authorized to execute a report.The user received this error message because the report is not assigned to the same work center view asthe workbook.
SAP Cloud for Customer November 2013Business Analytics P U B L I C • © 2011, 2012, 2013 SAP AG. All rights reserved. 325
12.4.6 Relative Selections Quick Guide
In the Relative Selections work center view of the Business Analytics work center, administrators can create relativeselections for reports.Relative selections are useful if you do not always want to change your filter or selection values every time businessusers start a report.
Business BackgroundThere are two types of relative selections: SAP-delivered and admin-created, both of which are available from thevalue help of fields in the Selection area of reports under Relative Select.SAP-delivered relative selections are useful if you do not want to always change your filter or selection values everytime business users start a report. The values are calculated and filtered according to specified criteria.
● SAP-delivered
Let's take the example of relative selection Last Week.It is calendar week 27; last week is therefore 26. If it were in calendar week 26, last week would be25.In a report, for Calendar Week , a user chooses the relative selection Last Week, the systemtherefore filters data accordingly, depending on the current calendar week.
● Admin-createdAdmin-created relative selections are created by you and are useful if you want to make a specific value orrange of values available and want to be able to change them centrally.
Let's take the example of the relative selection Financial Reporting Quarter.Your fiscal quarters are the same as calendar quarters, and your reports always show the data ofthe current quarter.You create a relative selection called Financial Reporting Quarter and set the available values tothe current quarter. In the next quarter, you can change the value to the following quarter; thesystem therefore filters data accordingly.
Create and Edit Relative Selections1. Click New or select the relative selection and click Edit.2. Enter a name and description for the relative selection.3. Select an appropriate type.
The type determines in which basic time characteristic the relative selection is available.
The relative selection is available in all data sources in which the time characteristic or currency variableis available.
326 © 2011, 2012, 2013 SAP AG. All rights reserved. • P U B L I CSAP Cloud for Customer November 2013
Business Analytics
If you select Data Source as type, you make the relative selection only available with data sources thatyou specify.Under Data Sources, the first data source you choose is the primary data source. If you choose to addthe relative selection to further data sources, the data type of the characteristics in the further datasources must match that of the primary data source.The characteristic of primary data source also determines the values that are available for the relativeselection.
4. Select a value entry.The value entry type determines how the user can make the value selections.
5. Under Values, select the relevant value entries to make available to business users.
Tips and Tricks
You want to add a relative selection to a specific report.In the Selection area of a report, you have a specific field for which you want to create a relative selection.
1. Note the data source that serves as a basis for the report.2. Decide if you want to add the relative selection only to the data source or if you want the relative selection to
be added to all applicable data sources.3. Once you've created the relative selection, go to the report and start it. From Add Fields , select the
corresponding characteristic and click Display in Selection Area.The field is added to the Selection area.
4. Open the value selection help of the field. Click Relative Select. Your relative selection is available from theSelect dropdown list box.
You want to find out if your relative selection might be available in a specific data source.1. From the Design Data Sources work center view, check the documentation of the specific data source.2. In the documentation, check whether one or more characteristics with an appropriate data type are available.3. Start a report that uses the data source.
If you do not know of a report, you can find a report from the Design Reports work center view. You can seethe name of the underlying data source in the Data Source column.
4. From Add Fields , select the corresponding characteristic and click Display in Selection Area.The field is added to the Selection area.
5. Open the value selection help of the field. Click Relative Select. Your relative selection is available from theSelect dropdown list box.
12.4.7 Monitoring Quick Guide
The Monitoring work center view enables administrators to monitor data sources that have been exposed for datareplication to an external SAP NetWeaver Business Warehouse (BW) system.You can access the Monitoring view from the Business Analytics work center.Exposing data sources for data replication to an external SAP NetWeaver BW system is useful, for example, when aparent company, which runs an SAP ERP system, wants to create and run reports on the data gathered from its
SAP Cloud for Customer November 2013Business Analytics P U B L I C • © 2011, 2012, 2013 SAP AG. All rights reserved. 327
subsidiary companies, which run the solution. The data from data sources in the solution is replicated to the SAPNetWeaver BW system of the parent company.
Tasks
Expose Data Sources in the Design Data Sources Work Center ViewIn the Design Data Sources work center view, administrators can expose or not expose datasources for data replication accordingly. To expose or hide data sources for data replication,click Expose and choose the relevant entry.
For data sources that you expose, ensure that you also expose data sources that containmaster data that is referenced by the selected data source.You can find a list of any referenced data sources for the data source to be exposedunder Details on the Referenced Data Sources tab page.
Monitor the Replication of Data of Exposed Data SourcesYou can monitor the status of the data replication runs from the SAP NetWeaver BW systemagainst data sources that are exposed in the solution.When the SAP NetWeaver BW administrator initiates a data replication run against theexposed data sources in the solution, the solution system creates an entry in the table of theMonitoring work center view.
For example, the SAP NetWeaver BW administrator previews data of a DataSourcein the SAP NetWeaver BW system by clicking Read Preview Data on the Preview tabpage of a DataSource. The solution system creates an entry accordingly.Note that the system not does recognize the SAP NetWeaver BW administrator asthe creator of the replication run in the Replicated By field, but rather the technicaluser that is created for the communication arrangement that is used tocommunicate with the SAP NetWeaver BW system.
When you monitor the status of replication runs against data sources that are exposed in thesolution, the following statuses are possible:
Status Description
OK The run is successful.
Open The run is not yet complete.
Errors The run cannot be completed. You can check the log of the run by selecting the relevant entryand clicking Details .Possible reasons for errors are:
● The relevant data source is no longer exposed.Check in the Design Data Sources work center view if the data source is still exposed.
● The SAP NetWeaver BW administrator stopped the run. ● A technical error has occurred either in the SAP NetWeaver BW system. ● The fine-tune activity for the function is no longer in scope for the solution.
328 © 2011, 2012, 2013 SAP AG. All rights reserved. • P U B L I CSAP Cloud for Customer November 2013
Business Analytics
See AlsoDesign Data Sources Quick Guide [page 280]Integrating Analytics with an SAP NetWeaver Business Warehouse System [page 307]
12.4.8 Upload and Download an Object
OverviewYou can upload from and download to a source, such as your computer or an external storage device. You can uploadand download Analytics objects that you have created, such as data sources, key figures, and reports.This function is useful, for example, if you want to upload objects from your test system to your productive system.Depending on your solution, you can access this function from the Common Tasks of the Business Analytics and/orAdministrator work center.
Note that uploading and downloading customer- and partner-created extension fields is not supported.
Note that when you upload or download an object, related objects you have created are also downloaded oruploaded. That is, objects used to create the object in question or objects that are built using the object inquestion.For example, you created a data source and built a report using the data source. When you download the datasource, the report is also downloaded.
The following table provides an overview of objects that can be uploaded or downloaded. Note that when you uploador download an object, related objects are also downloaded or uploaded. That is, objects used to create the objectin question or objects that are built using the object in question. For example, you created a data source and built areport using the data source. When you download the data source, the report is also downloaded.
Object Possible Related Objects
Data Source ● Data source ● Report ● Key figure
Key figure None
KPIKPIs are relevant if you use theSAP Business in Focus app.
● Report view ● Selection
Report Data source ● Report views ● Selections ● Personalization
Personalization objects are report views or selections that you have personalized.
SAP Cloud for Customer November 2013Business Analytics P U B L I C • © 2011, 2012, 2013 SAP AG. All rights reserved. 329
Object Possible Related Objects
DashboardDashboards are relevant if youuse the SAP Business in Focusapp.
● Data source ● Report ● Report view ● Selection
Download an ObjectYou can download objects that you have created from your system to a source.
Steps
1. Choose the Download screen.2. From the Object Type dropdown list, select the object type to be downloaded.3. In the Name field, click the value selection help to select the relevant object.4. Click Download .5. Select a location to which the object and any related objects are to be downloaded.6. Enter a name for the file.
Note that the system only creates one file for each object type.
Upload an ObjectYou can upload objects that you have created from a source to your system.Note that you can also delete objects that you have uploaded on the Delete Upload screen.
Steps
1. Choose the Upload screen.2. Click Upload Object .3. Select the file that contains the object and any related objects to be uploaded.4. To save the objects and make them available in the system, click Save .
ResultThe object and any related objects are available in the system. You can view the objects in the corresponding workcenter views.
Tips ● If you upload an object that already exists, the existing object is overwritten. ● If you upload an existing cloud data source, the data of the existing Cloud data source is deleted. ● If you change an existing data source, any reports using the data source may be inconsistent if you upload
the changes.
330 © 2011, 2012, 2013 SAP AG. All rights reserved. • P U B L I CSAP Cloud for Customer November 2013
Business Analytics
For example, the report has 5 characteristics in its layout; these 5 characteristics are no longer in the changeddata source. If you upload the changed data source and try to start the report, the report cannot display thecorrect data.
12.5 Broadcasts Quick Guide
In the Broadcasts work center view, you can immediately broadcast reports by e-mail and create schedules for whenyou want reports to be broadcast.You can access the Broadcasts work center view from the Business Analytics work center.
Business BackgroundBroadcasting reports by e-mail enables business users to frequently analyze report data without necessarily havingto log on to the system and navigate to the report.There are two scenarios:
● Periodic SchedulingPeriodic scheduling is useful if you want to broadcast a report on a regular basis.For example, a sales manager want to send sales reports to his field sales representatives on a monthly basis.He informs his administrator to set up a schedule by which the report is broadcast each month.
● Ad-Hoc BroadcastingAd-hoc broadcasting is useful if a specific report requires the attention of multiple users.
Note that you can decide if report data sent by e-mail is to be encrypted. If you want to encrypt outgoing e-mails,you must make changes to your scoping. From the E-mail Encryption and Signature Check fine-tune activity, you canspecify for the Analytics - Send Report Data, Broadcasting outgoing e-mail scenario whether outgoing e-mails areencrypted and whether they are signed.For more information, see the following documents: Configuration: Load Certificates and Activate Signing andEncryption for E-Mails and Configuration: E-Mail Encryption and Signature Check.
Tasks
Create a Broadcast1. From the Broadcasts work center view, click New
2. On the following screen, enter a name for the broadcast and select the relevant report.3. Add recipients.
For recipients who have a user in the solution, you can decide if the recipientsare to receive data according to their authorizations or according to theauthorizations of the user who creates the broadcast by checking the Userspecific indicator.Note that if the report is to be broadcast using the authorizations of the user whocreates the broadcast, ensure that the user has access rights to the work centerviews to which the report is assigned in order to start the report.
SAP Cloud for Customer November 2013Business Analytics P U B L I C • © 2011, 2012, 2013 SAP AG. All rights reserved. 331
4. Under Format and Content, select if the report is to be broadcast as an attachment oras a link. ● If you want to broadcast the report as an attachment, note that reports broadcast
in XML and CSV format open by default using Microsoft Excel®. ● If you want to broadcast the report as a URL, you must also specify how the report
is to be viewed. Reports can viewed in one of the Web browser options or usingMicrosoft Excel®.
● If the broadcast report is to be viewed on a mobile device, we recommend theHTML format.
5. Decide if the report is to be broadcast now or if it is to be broadcast periodically. ● If you want broadcast the report ad-hoc, select No Schedule. ● If you want to schedule the broadcast for the report, select Periodically, and set
how frequently the report is to be broadcast along with the start and end date forthe schedule.The system saves the broadcast or schedule. You can then view the broadcast orschedule from the Broadcasts work center view.
Manage Broadcasts and SchedulesFrom the Broadcasts work center view, under Actions, you can edit, delete, or change thestatus of a schedule. You can also start, pause, or resume broadcasts and schedules.You can also edit broadcasts and schedules by clicking Edit .
332 © 2011, 2012, 2013 SAP AG. All rights reserved. • P U B L I CSAP Cloud for Customer November 2013
Business Analytics
13 Mobile Devices
13.1 About Mobile Device Administration
There are two categories of devices for Administrators:
iPadThere are currently two native apps for iPad: Cloud for Customer and Customer Insight.
● Cloud for Customer for iPadUses the same layout information as the browser-based interface, and only requires configuration by thesystem administrator to enable offline mode.For more information see Enabling iPad Offline Mode [page 337].
● Customer Insight for iPadAs an administrator, you can configure which tiles/reports appear for user. Can also create custom reports.For more information see: ○ Adding Reports to SAP Customer Insight [page 255] ○ SAP Customer Insight Report Patterns [page 334]
SmartphonesAs an administrator, you must configure extension fields specifically for smartphone apps.For more information see:
● Extension Fields Quick Guide ● Adding Extension Fields to Smartphones [page 336]
13.2 Adding Custom Reports to SAP Customer Insight
OverviewAs an administrator, you can create custom reports for use on the SAP Customer Insight mobile app for iPad.
Prerequisites ● You are familiar with working in Adaptation Mode, as described in the Administrator Adaptation Quick Guide
[page 243]. ● You have created one or more custom reports as described in Working with Reports Using the Report Wizard
[page 282]. Be sure to save at least one named selection as described in Working with Selections[page 422]
● If you want your custom report to have a specific visual representation on the SAP Customer Insight homescreen, then ensure that your report conforms to one of the available patterns described in SAP CustomerInsight Report Patterns [page 334].
SAP Cloud for Customer November 2013Mobile Devices P U B L I C • © 2011, 2012, 2013 SAP AG. All rights reserved. 333
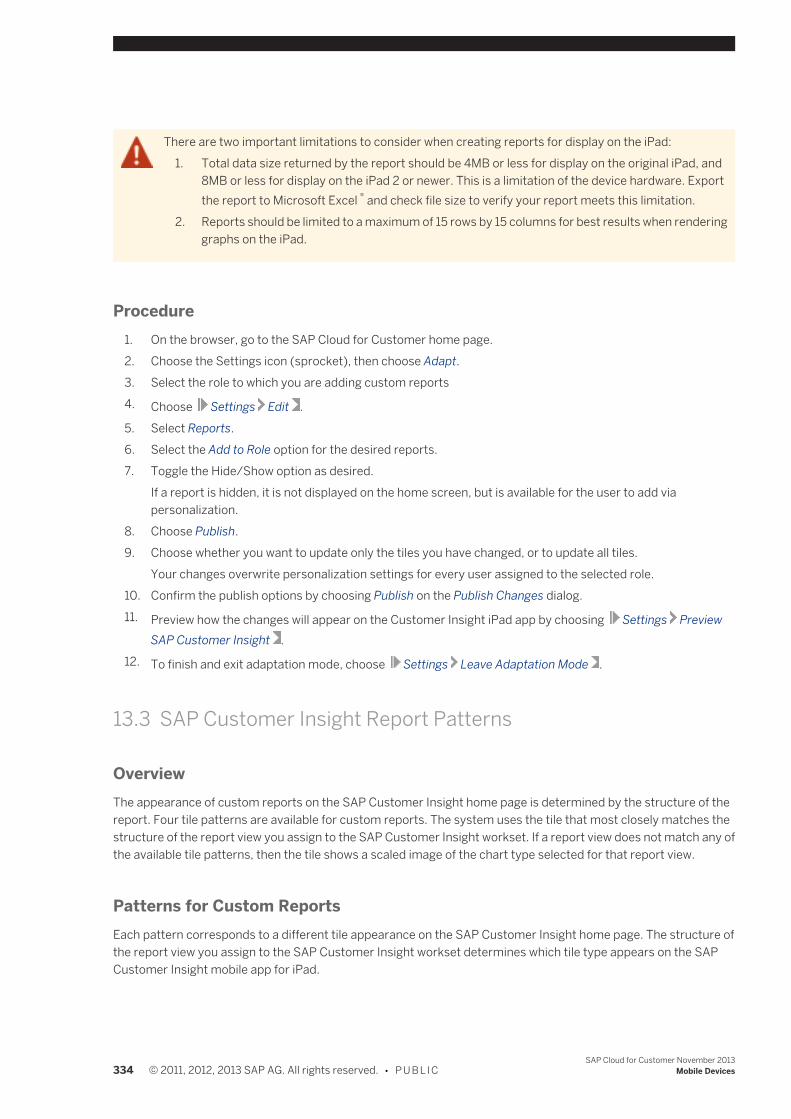
There are two important limitations to consider when creating reports for display on the iPad:1. Total data size returned by the report should be 4MB or less for display on the original iPad, and
8MB or less for display on the iPad 2 or newer. This is a limitation of the device hardware. Exportthe report to Microsoft Excel ® and check file size to verify your report meets this limitation.
2. Reports should be limited to a maximum of 15 rows by 15 columns for best results when renderinggraphs on the iPad.
Procedure1. On the browser, go to the SAP Cloud for Customer home page.2. Choose the Settings icon (sprocket), then choose Adapt.3. Select the role to which you are adding custom reports4. Choose Settings Edit .5. Select Reports.6. Select the Add to Role option for the desired reports.7. Toggle the Hide/Show option as desired.
If a report is hidden, it is not displayed on the home screen, but is available for the user to add viapersonalization.
8. Choose Publish.9. Choose whether you want to update only the tiles you have changed, or to update all tiles.
Your changes overwrite personalization settings for every user assigned to the selected role.10. Confirm the publish options by choosing Publish on the Publish Changes dialog.11. Preview how the changes will appear on the Customer Insight iPad app by choosing Settings Preview
SAP Customer Insight .12. To finish and exit adaptation mode, choose Settings Leave Adaptation Mode .
13.3 SAP Customer Insight Report Patterns
OverviewThe appearance of custom reports on the SAP Customer Insight home page is determined by the structure of thereport. Four tile patterns are available for custom reports. The system uses the tile that most closely matches thestructure of the report view you assign to the SAP Customer Insight workset. If a report view does not match any ofthe available tile patterns, then the tile shows a scaled image of the chart type selected for that report view.
Patterns for Custom ReportsEach pattern corresponds to a different tile appearance on the SAP Customer Insight home page. The structure ofthe report view you assign to the SAP Customer Insight workset determines which tile type appears on the SAPCustomer Insight mobile app for iPad.
334 © 2011, 2012, 2013 SAP AG. All rights reserved. • P U B L I CSAP Cloud for Customer November 2013
Mobile Devices
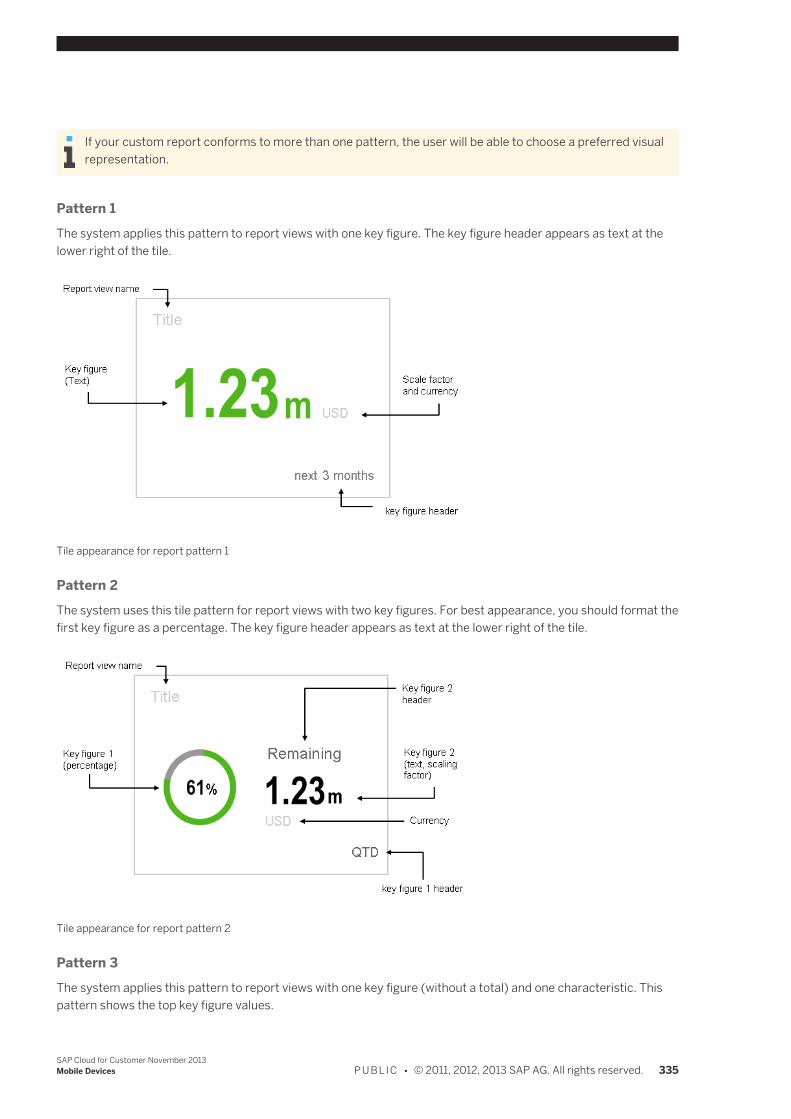
If your custom report conforms to more than one pattern, the user will be able to choose a preferred visualrepresentation.
Pattern 1The system applies this pattern to report views with one key figure. The key figure header appears as text at thelower right of the tile.
Tile appearance for report pattern 1
Pattern 2The system uses this tile pattern for report views with two key figures. For best appearance, you should format thefirst key figure as a percentage. The key figure header appears as text at the lower right of the tile.
Tile appearance for report pattern 2
Pattern 3The system applies this pattern to report views with one key figure (without a total) and one characteristic. Thispattern shows the top key figure values.
SAP Cloud for Customer November 2013Mobile Devices P U B L I C • © 2011, 2012, 2013 SAP AG. All rights reserved. 335
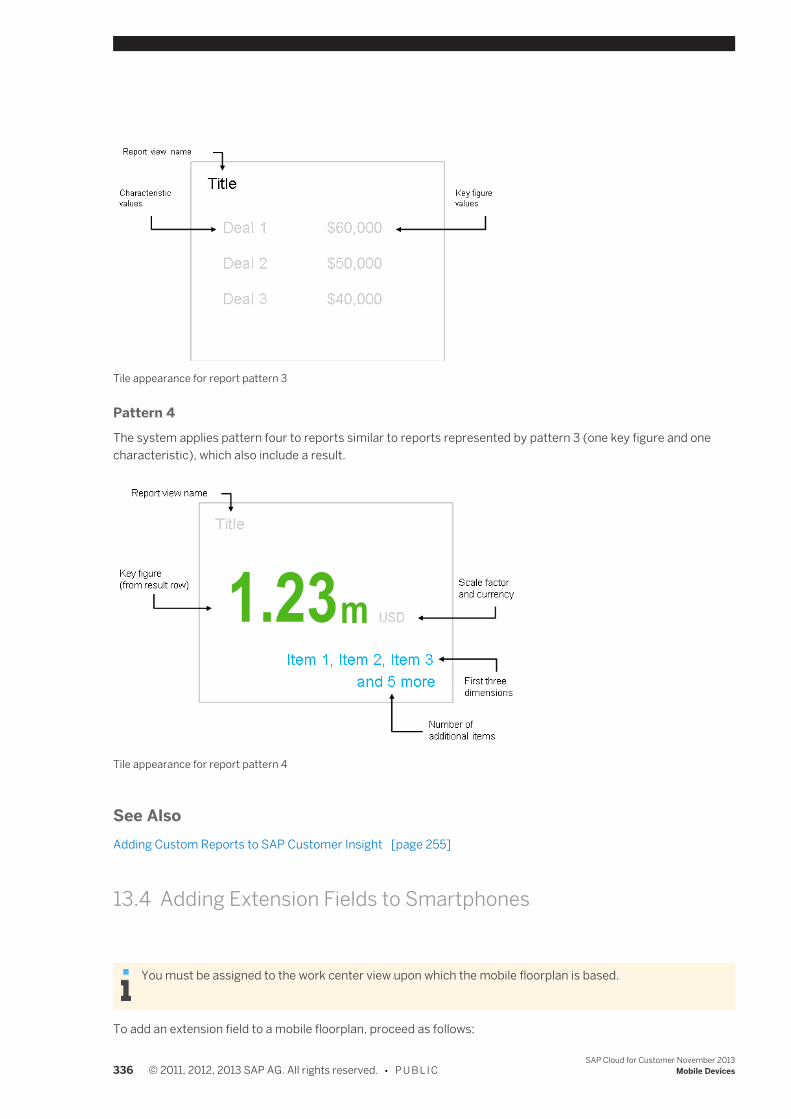
Tile appearance for report pattern 3
Pattern 4The system applies pattern four to reports similar to reports represented by pattern 3 (one key figure and onecharacteristic), which also include a result.
Tile appearance for report pattern 4
See AlsoAdding Custom Reports to SAP Customer Insight [page 255]
13.4 Adding Extension Fields to Smartphones
You must be assigned to the work center view upon which the mobile floorplan is based.
To add an extension field to a mobile floorplan, proceed as follows:
336 © 2011, 2012, 2013 SAP AG. All rights reserved. • P U B L I CSAP Cloud for Customer November 2013
Mobile Devices
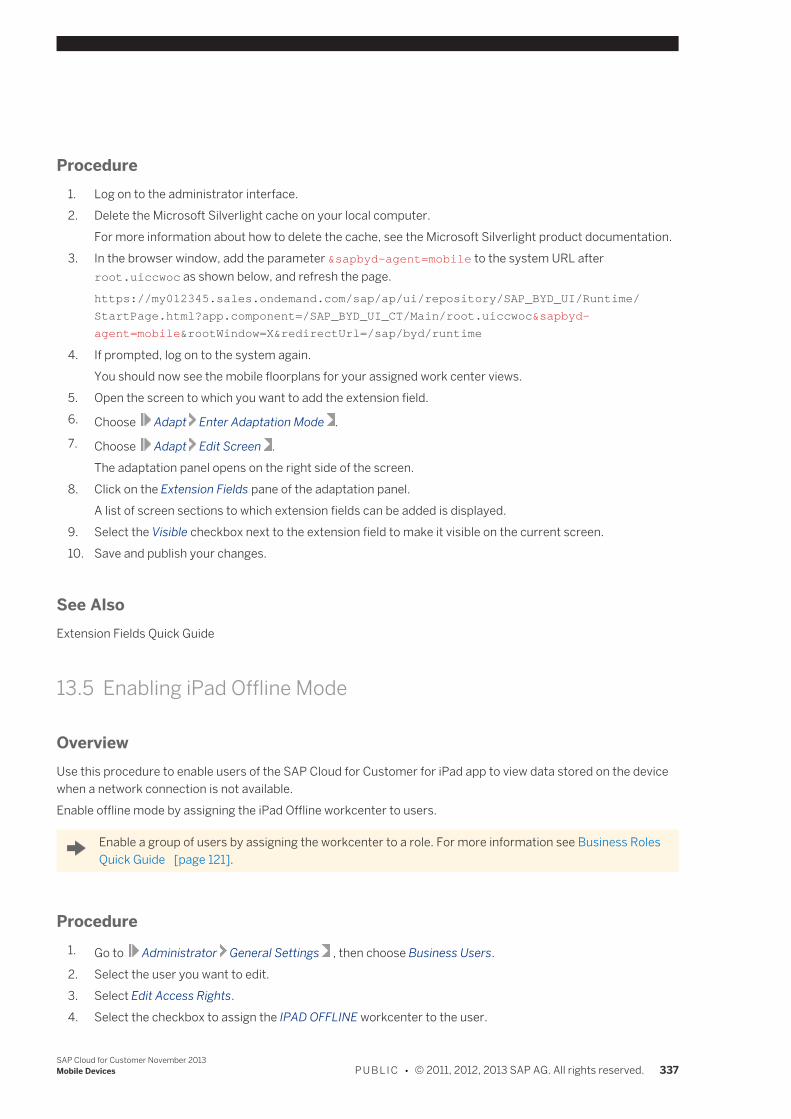
Procedure1. Log on to the administrator interface.2. Delete the Microsoft Silverlight cache on your local computer.
For more information about how to delete the cache, see the Microsoft Silverlight product documentation.3. In the browser window, add the parameter &sapbyd-agent=mobile to the system URL after
root.uiccwoc as shown below, and refresh the page.https://my012345.sales.ondemand.com/sap/ap/ui/repository/SAP_BYD_UI/Runtime/
StartPage.html?app.component=/SAP_BYD_UI_CT/Main/root.uiccwoc&sapbyd-
agent=mobile&rootWindow=X&redirectUrl=/sap/byd/runtime
4. If prompted, log on to the system again.You should now see the mobile floorplans for your assigned work center views.
5. Open the screen to which you want to add the extension field.6. Choose Adapt Enter Adaptation Mode .7. Choose Adapt Edit Screen .
The adaptation panel opens on the right side of the screen.8. Click on the Extension Fields pane of the adaptation panel.
A list of screen sections to which extension fields can be added is displayed.9. Select the Visible checkbox next to the extension field to make it visible on the current screen.10. Save and publish your changes.
See AlsoExtension Fields Quick Guide
13.5 Enabling iPad Offline Mode
OverviewUse this procedure to enable users of the SAP Cloud for Customer for iPad app to view data stored on the devicewhen a network connection is not available.Enable offline mode by assigning the iPad Offline workcenter to users.
Enable a group of users by assigning the workcenter to a role. For more information see Business RolesQuick Guide [page 121].
Procedure1. Go to Administrator General Settings , then choose Business Users.2. Select the user you want to edit.3. Select Edit Access Rights.4. Select the checkbox to assign the IPAD OFFLINE workcenter to the user.
SAP Cloud for Customer November 2013Mobile Devices P U B L I C • © 2011, 2012, 2013 SAP AG. All rights reserved. 337
5. Select Actions Check Access Rights Consistency , then save and close.
Users must provide an additional password for offline data encryption and perform an initial synchronizationof data before using offline mode.
338 © 2011, 2012, 2013 SAP AG. All rights reserved. • P U B L I CSAP Cloud for Customer November 2013
Mobile Devices
14 Mass Data Maintenance
OverviewWith the Mass Data Maintenance work center you can correct some details of your business data on a large scale.The maintenance process is divided into three steps, during which you export, change, and import your data. Thisallows you to update a large amount of data in your SAP solution.
Exporting Data1. In the Export Data to Local File area, click the link of the data you want to export from the solution.
A new window opens.2. Enter the selection criteria for the data you want to export. You can add criteria to the standard selection by
clicking Additional Fields.3. Click Go .
The system returns the data, based on your selection criteria, in a table.If you want to select data for another data sheet, select the relevant tab and continue the process from there.By default, all the columns are included in the export. However, you can select Skip Export for any columnyou do not want to include in the export. You can do this on every tab in the table. If you click
Skip All for Export , only the key and technical ID fields remain visible. You can select those fields you wouldlike to export afterwards.Click Select All for Export to see all the fields in the table again.
4. After you made your selection, click Export Data to CSV File .The selected data is downloaded to your local machine.
Changing DataOn your machine, open the CSV file you downloaded and make any changes you require. After you have made yourchanges, save the CSV file again on your machine.
Importing Data1. In the Update Data from Local File area, click the link of the data you want to import into the solution.
A new window opens.2. Select your data file and continue upload.3. During the upload your data are validated. In case of incorrect formatting, missing data, or unexpected
content, you are directed to the Validate Data screen. Here, every cell containing an error is highlighted. Selectthe highlighted cell and follow the step-by-step process to correct the content.Click OK to return to the Update screen.You can rerun the data validation process several times.
4. Click Execute Data Import .You can either immediately start a background job, or schedule the program to run during night time byselecting the appropriate option.You are notified about the success of the data update.
SAP Cloud for Customer November 2013Mass Data Maintenance P U B L I C • © 2011, 2012, 2013 SAP AG. All rights reserved. 339
Running very big data files may take some time.You can see the progress in the progress bar, or select Run in Background to return to the Mass DataMaintenance work center. The work center lists all files that have not been processed completely. If your jobis still running, you can refresh the screen and check the record counters to see the progress.If your job has the import status Finished with Errors, click on the file name and go to the Update screenagain. All the records will show an update status. If you click on the status text, for example Failed, you cansee the error message that describes the problem with the update.If you only want to see the records with errors, you need to change the display layout in the Show field. Youcan then try to correct your data and start Execute Import Data again. Only the records that you have changedor that were not imported already will be processed again.
File Overview: Files for ProcessingOn the lower section of the screen, you see all the files that have been processed but not completed successfully.When you select the linked file name, you open the update process again.If you process a large data file in the background, you can refresh the screen to see the progress of the mass dataupdate.You can see the results of the import linked in the Import Log column.To see the files that were imported successfully, use the Show filter and change the way the table is displayed.
See AlsoFor more information on the specific data object, see the related document under You Can Also Show MigrationObject Documentation in the migration tool.
340 © 2011, 2012, 2013 SAP AG. All rights reserved. • P U B L I CSAP Cloud for Customer November 2013
Mass Data Maintenance
15 Service Control Center Quick Guide
About this documentThe Service Control Center enables you to monitor your SAP Store orders, system availability and systemmaintenance schedule, your user subscriptions, and maintain your contact details.
Views in the Service Control CenterSAP Store Orders [page 458]Maintenance Schedule [page 459]Systems [page 461]System Availability [page 462]User Subscriptions [page 463]Contact Details [page 465]
SAP Cloud for Customer November 2013Service Control Center Quick Guide P U B L I C • © 2011, 2012, 2013 SAP AG. All rights reserved. 341
16 Appendix
16.1 Implementation Projects
16.1.1 Scoping
OverviewIn the SAP solution, scoping is the process of matching your individual business requirements to predefined solutioncapabilities using the business adaptation catalog. The catalog structures all available capabilities for the solutioninto a hierarchy of business areas, packages, topics, and options. SAP and its partners have already defined thetechnical system settings and the content needed to accommodate each element of the catalog and to support yourrequirements. This predefined content is based on industry-specific and country-specific best practices. During thescoping process, all of your decisions are stored in a unique solution proposal. This document is available when youhave finished scoping and contains detailed information about your scoping selections.
PrerequisitesIt is important to understand the dependencies that exist between the elements of the catalog and the constraintsthat are applied by the selections you make during scoping.
Constraints and DependenciesSome elements of the catalog are mandatory. For example, if you select the Selling Products and Services businesspackage, you will also need the Sales Order business topic, which provides the core functionality associated with thepackage. The system automatically selects this topic for you, reducing the number of manual selections you haveto make. The Customer Returns topic, on the other hand, is optional. You have to decide whether you want to selectthis and implement the additional functionality.The catalog has built-in rules to ensure that all of the selections you make are logical and consistent, from a businessand technical point of view. Thus, when you make a selection, the system makes the necessary additional selectionsor deselections automatically. For example, if you are a German customer and you select the GKR business optionwithin the Local Chart of Accounts topic in the Financials area, the system automatically disables the IKR option,since you can use only one chart of accounts for local reporting within your company. Also, when you make a selectionthat creates a conflict, the system identifies the involved elements so that you can decide which selection to reverse.
Default SettingsThe system has predefined content behind each catalog element. If you do not make an explicit selection for a specificelement of the catalog, the system automatically uses default settings that are based on best practices for yourindustry and country. You can choose to accept these recommendations and skip straight to your scoping results,or you can adjust the preselections.
342 © 2011, 2012, 2013 SAP AG. All rights reserved. • P U B L I CSAP Cloud for Customer November 2013
Appendix
Process FlowScoping is relevant for prospects who want to learn more about the SAP solution or customers who want to defineand adapt their solution as they work with it. Depending on what point you are at in evaluating or using the solution,there are different routes through which you can process your scoping.
First Implementation ProjectWhen you want to begin evaluating the SAP solution, you carry out a scoping workshop with the assistance of anSAP or partner solution adviser. The solution adviser guides you through the process of defining the initial scope ofyour solution with the first implementation project.
1. You select the countries and the types of business in which your company operates. With this initial input,the system already begins to anticipate your requirements based on best practices for your country andindustry. It is also possible to procure an implementation project template. This is a solution profile thatcontains scoping elements to suit specific requirements and business needs.
2. The system instantly preselects the relevant elements of the business adaptation catalog and thecorresponding predefined content.
3. You review the scoping elements that the system preselected based on your country and type of business.You can accept these recommendations or you can adjust the preselections to determine which of theavailable capabilities you want to incorporate into your solution. Certain elements are mandatory for yourscope and cannot be deselected.
Built-in rules ensure that all selections you make are logical and consistent, from a business andtechnical point of view. Thus, when you make a selection, the system makes the necessary additionalselections automatically. Also, when you make a selection that creates a conflict, the system identifiesthe involved elements so that you can decide which selection to reverse.
4. You answer scoping questions to make more detailed decisions about the capabilities of your solution. Mostof the questions require only a simple Yes or No answer. Again, based on best practices, the system haspreselected answers that you can accept or, where possible, adjust. Some answers are mandatory for yourscope and cannot be changed.
5. You review your scoping results: ● Your Solution Proposal — Executive Summary contains your company profile information and an
overview of your scoping decisions. ● Your Solution Proposal is a comprehensive report containing your company profile information and the
detailed results of your scoping session. ● Your Notes Summary is a summary of all of the notes you made during your scoping session.
6. You provide a description and a planned implementation timeline for your first implementation project.7. Based on your scoping decisions, the system generates an activity list of the implementation and project
management activities that you need to complete in order to go live. Once you have decided to purchase thesolution, you can start working on these activities. Also, even after the activity list has been generated, youcan review your scoping decisions and, if necessary, adjust your solution capabilities.
For step-by-step instructions about defining the initial scope of your solution, see Prepare the First ImplementationProject [page 353].
SAP Cloud for Customer November 2013Appendix P U B L I C • © 2011, 2012, 2013 SAP AG. All rights reserved. 343
Catherine Kennedy-Wood, the CEO of Akron Heating Technologies, Inc., meets Laura Ellis, an SAP solutionadviser, for the first time at a solution info day. During this meeting, Laura helps Catherine to define acompany profile for Akron with basic contact information, and specify the countries and industries thatAkron operates in.Laura schedules a scoping workshop with Catherine. A small group of Akron employees representingdifferent areas of the company also attend the session.They begin by confirming the decisions that Catherine made about the country and business type. Next,Laura takes a few minutes to introduce the idea of the catalog to the group. She explains that the systemhas already determined and highlighted the relevant business areas, packages, and topics from thecatalog, based on their country and business type. At this point, they review and verify these preselections,making some adjustments.When they have finalized the business areas, packages, and topics, they move on to the list of preselectedbusiness options. Laura explains that SAP has already defined the technical system settings that areneeded to accommodate each business option. All that Catherine and her team have to do is review thepreselected business options and answer the corresponding questions.To make things even easier, Laura informs the group that they can simply decide to accept SAPrecommendations and skip straight to the results, without reviewing each individual business option.These recommendations are based on industry-specific best practices, developed from the knowledgeand experience that SAP, along with its partners and customers, has acquired over the years. Catherinechooses to accept the recommendations.The results provide Catherine and her team with a summary of the decisions made to-date that can beused as the basis for an initial proposal.
Change ProjectsAfter working with your solution for a period of time, if you need to adjust your scope to meet changing businessrequirements, you can create a change project. You prepare and implement a change project in a separate projectarea. This means that your business processes are not interrupted and that you can have several change projectsin progress at once. It is important to note that your changes do not take affect until you merge them with yoursolution.Preparing a change project is similar to preparing your first implementation project. Just as in the firstimplementation project, the main part of preparing a change project is selecting scoping elements and reviewingscoping questions. In addition, you identify mandatory and optional activities for implementing your changes.
You can make smaller changes without creating and implementing a change project. For more information,see Make Changes to Your SAP Solution [page 39].
1. You select a change scenario that SAP has defined for typical business-driven changes, for example, addinga country.
2. You adjust the capabilities of your solution by selecting or deselecting scoping elements. Certain elementsare mandatory for your scope and cannot be deselected.
Built-in rules ensure that all selections you make are logical and consistent, from a business andtechnical point of view. Thus, when you make a selection, the system makes the necessary additionalselections automatically. Also, when you make a selection that creates a conflict, the system identifiesthe involved elements so that you can decide which selection to reverse.
3. You answer the scoping questions for the adjustments you have made. Based on best practices, the systemhas preselected answers that you can accept or, where possible, adjust. Some answers are mandatory foryour scope and cannot be changed.
344 © 2011, 2012, 2013 SAP AG. All rights reserved. • P U B L I CSAP Cloud for Customer November 2013
Appendix
4. You review the summary of changes and provide a title, description, and planned implementation timelinefor your change project. You also decide whether you want to include milestones and instructional activitiesin the activity list for your change project.
5. Based on your decisions, the system generates an activity list for your change project containing allmandatory activities that need to be completed in order to use your changes productively in your solution.
For step-by-step instructions about changing the scope of your solution with a change project, see Prepare a ChangeProject [page 356].
FeaturesAs you perform scoping for the first implementation project or for a change project, you can:
● Add a requirement to a business area if you feel a particular business area is missing some functionality. Later,an SAP solution adviser or partner will go through the catalog with you to check if any other catalog items fillthe gap. If not, SAP or partners can define and create the new catalog items and underlying content that yourequire.
● Attach a note to any element of the catalog regardless of whether it is in or out of scope. You may want to dothis for various reasons, for example to discuss a specific business option with a colleague from a differentarea of your company. At the end of scoping, you can see a summary of all your notes and deal with themefficiently.
● Use the embedded decision-support tools and documentation to see how certain selections affect yoursolution and to ensure consistency across all business areas. For example, the system provides you with ashort explanation of each element of the catalog. You can also access information about the implications andconsequences of selecting each element. For business topics, the system displays an icon beside each topicto illustrate which of the following categories it belongs to: Master Data, Processes and Functions, Forms andMessages, or Reports.
See AlsoConfiguring Your SAP Solution [page 35]Implementing a Project — First Implementation [page 345]Implementing a Project — Change Projects
16.1.2 Implementing a Project — First Implementation
OverviewThe implementation of your SAP solution includes all steps required for getting the system, the data, and the peoplein your company ready for Go Live. The Activity List is derived from the agreed solution scope and includes all activitiesthe project team has to complete. The activities are structured by different project phases. Simple status andprogress reporting per activity and phase enable you to easily track the progress of your project as you work throughthe activity list.Once you have finished scoping, you can begin to work with the Activity List in the Business Configuration work center.The Activity List is automatically generated by the system based on your scoping decisions, and it is divided intoseparate phases. It includes all mandatory implementation and project management activities that you need tocomplete before your solution can go live for the first time and be used in your production system
SAP Cloud for Customer November 2013Appendix P U B L I C • © 2011, 2012, 2013 SAP AG. All rights reserved. 345
You have to complete the activities in each phase of the Activity List - instructional activities describe how you cancomplete them and what has to be done. In general you have to complete the phases in sequence, and within eachphase you have to complete the activities in sequence.ActivitiesWhen you open an activity, you can potentially be brought to a number of different places that support you incompleting the associated task. This includes:
● Documentation – instructional activities and most project management activities display documentation toexplain what you need to do to complete the selected activity. These activities often involve completing tasksoutside of the solution itself, for example, creating the project plan in SAP Go-Live Navigator or preparing fordata migration. This style of activity can be found in each phase of the Activity List.
● A single screen with settings that are associated with one or more options and that can be configured for yoursolution.
● A guided activity that consists of multiple screens, each with settings that are associated with one or moreoptions and that can be configured for your solution.
● A direct link to an application screen associated with a work center that is specific to the selected activity. ● An activity details screen – this is a screen that displays a list of links. These links can bring you to
documentation, fine-tuning screens, or application screens. It may not always be necessary to open each linkand complete each task. On-screen explanations explain clearly where alternatives exist, for example, youcan either migrate your legacy data using data entry or using a built-in migration tool.
MilestonesVarious milestones are integrated in the activity list. These milestones are project activities that have to be checkedand confirmed, as they provide you with guidance and allow you to track the status of your implementation.Prerequisites ExistSome activities are dependent on the completion of other activities. In some cases, you cannot proceed with anactivity until another activity has been completed. In other cases, it is simply recommended that you complete anactivity before proceeding with another activity. In the Activity List, you can see which activities are dependent in thePrerequisites Exist column.Repetition RequiredSome activities in the Activity List have to be repeated in other systems because the data in these activities cannotbe copied automatically to another system. For example, if you maintain an activity in your test system, you mustalso repeat this activity in your production system. In the Activity List, you can see which activities have to be repeatedin the Repetition Required column
PrerequisitesYou have finished preparing your first implementation project.
Process Flow1. Prepare Phase
The Prepare phase contains the entire preliminary activities project managers need to carry out to get yourcompany ready to use the solution productively. The activities in this phase are mainly related to projectmanagement and include activities like reviewing the project plan, confirming the milestone that the designhas been accepted and scoping has been completed, preparing for data migration, maintaining youradministrators, and transferring knowledge to administrators. You can also create your own activitiesmanually and add them to the Activity List. Confirming the milestone that the design has been accepted
346 © 2011, 2012, 2013 SAP AG. All rights reserved. • P U B L I CSAP Cloud for Customer November 2013
Appendix
deploys the relevant business content based on the scoping decisions, opens the other phases in the ActivityList, and changes the status of the implementation project to Started.In this phase, the process is as follows:a. You prepare the project.
The project manager sets up a project team for the targeted solution and ensures that adequate on-sitefacilities are available to them.The foundation of the SAP Solution Go Live project is established during the Prepare Project activity. Byusing complementary tools and accelerators that are related to project management, you can savesignificant time in setting up the project.At this stage in the project, the project manager has to set up the project organization and define theproject schedule. To do this, you can use the Go-Live Navigator to accommodate the specific activities,owners, and project timeline. In addition, you can review and adapt other accelerators, such as a risk log,change management guide, and communication plan. At the end of the project preparation phase,project managers schedule and conduct a project kick-off workshop with key stakeholders and the entireproject team.
b. You verify scoping and confirm the milestone that the design has been accepted.You verify that the scoping that you completed before starting the project accurately reflects the fullscope of the project. Any business decisions that are made drive the fine-tuning of your solution. Afterverifying scoping, you confirm the milestone that the design is accepted, indicating that you have finisheddefining your scope and preparing your project. Confirmation of the milestone triggers the deploymentof the relevant business content to your test system and opens up the next phases of the Activity List.
Before you confirm this milestone, we recommend that you complete the Verify Scoping activityand set it to Closed.
You can confirm this milestone only once and you cannot reverse the confirmation. However, even afterconfirming this milestone, you can still edit the scope of your project. Confirmation of this milestone: ● Assumes a signed contract exists that provides the initial user (that is, the project manager) with
the deployment authorization. ● Changes the status of the project to Started. ● Automatically sets the status of the milestone to Closed. ● Grants additional authorizations to the initial user, allowing him/her to define the administrators
for the project team.c. You define the administrators for the project team.
In addition to defining the administrators, the initial user (usually the project manager) also maintainsthe administrators as service agents in the system and provides them with the authorizations for thework centers and work center views that they need to use to perform their project tasks. The initial useralso must create an administrator for himself or herself. For compliance reasons, you have to lock theinitial user after defining and maintaining the administrators. You can continue working in the project byusing your administrator details.
The service agent administrators should only be used for implementing the project. If theservice agents are also employees in your company, you need to create additional users forthem during migration and lock the service agent administrators after you go live.Ensure that at least one employee has unrestricted write access to the Business Users viewin the Application and User Management work center.
To define and maintain the administrators, follow the steps in the activity documentation, which appearswhen you click on the Define Administrators for Project Team activity in the Activity List.
SAP Cloud for Customer November 2013Appendix P U B L I C • © 2011, 2012, 2013 SAP AG. All rights reserved. 347
Before you start this activity, you have to confirm the milestone Design Accepted.
d. You prepare your organizational structure setup.The preparation of the organizational structure setup is also part of the Prepare phase. OrganizationalManagement (OM) is the central source of a company’s organizational structure within the SAP solution.The OM contains the organizational structure for one or more companies and comprises organizationalunits or departments.Each organizational structure contains information on the legal, financial, reporting line (peoplemanagement), and functional responsibilities in the company and provides a unified, graphicalrepresentation in the style of an organizational chart. The SAP solution references the organizationalstructure in all business processes, such as determining responsible approvers, available cost centers,and invoicing addresses. Therefore, establishing the organizational structure is mandatory and aprerequisite for all subsequent implementation activities related to fine-tuning, master data migration,and user management. All objects of the structure are time-dependent, meaning each organizationalunit exists in the structure for a specified duration only.To prepare for the actual maintenance of your organizational setup in the Fine-Tune phase, you have togather information about your company’s organizational structure, including: ● Companies (legal entities) ● Business residences ● Departments located at business residences ● Departmental responsibilities for the scoped functionality ● Financial reporting structure, such as segment, cost centers, and profit centers ● Reporting lines including departmental managers
e. You prepare data migration.During the Prepare phase, the project manager also starts to prepare for the Integrate and Extend phaseby setting up the migration project team and giving authorizations for data migration to each user. Theproject manager also sets up the project schedule for data migration.Data migration allows you to prepare and move all data from existing legacy system(s) to your SAPsolution. For example, this includes migration objects like products, services, and business partners, aswell as transaction data specific to individual sales orders or financial postings. Some of these objectshave dependencies and need to be imported in a defined sequence.The SAP solution provides a tool-supported migration approach that is based on migration templates.You need to extract the required data from your legacy system(s) into the migration templates providedby SAP.To prepare for the actual data extraction in the Fine-Tune phase, you can download migration templatesand a migration schedule template directly from the Activity List. You can use the migration templatesto understand which information can be migrated with the templates and which data structure ismandatory for data migration.The project schedule contains information on when to perform which migration activity in the overallmigration process. To achieve a realistic timeframe for the overall migration process, you can adjust thepredefined schedule according to your situation, resources, and data quality.In addition, you can also use a manual data entry option to enter test data or, if required, migration data.
f. You transfer knowledge to administrators.Administrators learn about the solution by using the material in the solution. The content covers all ofthe features and functions the project team decided were relevant. In addition to learning, administratorsplan how to train or transfer knowledge to the end users within the company.
2. Fine-Tune Phase
348 © 2011, 2012, 2013 SAP AG. All rights reserved. • P U B L I CSAP Cloud for Customer November 2013
Appendix

This phase organizes all mandatory configuration activities that you need to complete in a logical sequence.It allows you to tailor the solution to your specific needs before going live by checking predefined settings andentering additional settings for your selected scope. You can also add optional configuration activities to theActivity List. In this phase, you need to complete your company's organizational management structure andconfirm the milestone that the solution is accepted, indicating the completion of the Fine-Tune phase.In this phase, the process is as follows:a. You prepare fine-tuning.
While preparing for fine-tuning, all administrators review the learning module related to the BusinessConfiguration work center, you assign all fine-tuning activities to the responsible administrators, and youinclude any optional activities that you also require in the Activity List.
b. You perform the organizational structure setup for your company.You maintain the organizational structure of your company in the system in alignment with yourpreparation during the Prepare phase. You can create the organizational structure by dragging anddropping organizational units from the Org Unit pane into the Planning Area. Afterwards, to documentthe meaning of each organizational unit in your company, for each organizational unit you have tomaintain: ● Operational properties
These properties describe which function an organizational unit has in your company’s businessprocesses from a functional perspective. For example, an organizational unit represents thefunctional unit Customer Service.
● Structural propertiesThese properties describe what the organizational unit represents in the structure of your company.For example, the organizational unit Procurement represents also a cost center and a reportingunit.
Along with the organizational structure setup, you check and adapt the departmental responsibilities.For example, Purchasing Department A is responsible for direct materials purchasing, andPurchasing Department B processes only purchase requests related to indirect materials.By completing the Perform Organizational Structure Setup activity, you confirm that you have finishedsetting up your organizational structure. This is important for determining reporting lines, as well as thelegal and financial aspects within your company. You can adjust your organizational structure as oftenas necessary until you complete the Confirm Go Live activity in the Go Live phase, as it simply helps youto track the progress of your project.
c. You perform fine-tuning for each business area, and you confirm the milestone that the solution isaccepted, indicating that fine-tuning is completed.Fine-tuning is the most important step in the Fine-Tune phase and it spans all mandatory configurationactivities that have to be completed. Before going live, fine-tuning allows you to tailor the solution to thespecific needs of your company by checking and adjusting the predefined settings of the elementsselected during scoping — this is known as performing mandatory checks. Fine-tuning also allows youto enter your own settings in cases where no predefined settings exist — this is known as performingmandatory maintenance. Typical activities include setting up payment strategies in Sales andmaintaining charts of accounts in Financial Management.By default, this phase only contains mandatory activities that must be completed before the solutioncan go live. However, you can add activities to your project by selecting a different option in the Showfilter, selecting any activity not yet included in your project, and clicking Add to Project .By confirming the milestone Solution Accepted, you confirm that your fine-tuning settings have beentested properly and meet your business requirements. During your implementation project, you canadjust your fine-tuning settings as often as necessary, so you can cancel and reconfirm this milestoneuntil you confirm the Confirm Go Live activity in the Go Live phase, as it simply helps you to track theprogress of your project.
SAP Cloud for Customer November 2013Appendix P U B L I C • © 2011, 2012, 2013 SAP AG. All rights reserved. 349
d. You finalize forms, reports, user interfaces, and third-party integration requirements.If this is within the scope of your project, you review the requirements that have been documented in theService Assessment Documents (SAD), complete the necessary specifications, provide SAP with theupdated SAD together with any required clarification, and confirm the delivery date of the content withSAP.
e. You perform data extraction.After completing all other mandatory activities in the Fine-Tune phase, you can trigger data extraction.As a first step, you have to complete development and test of the data extraction programs.Depending on whether you use the migration templates for tool-supported migration, you can performdata extraction as follows ● Tool-Supported Migration Based on Migration Templates
The required data from your legacy system(s) is extracted in the migration templates provided bySAP. (See the substep You prepare data migration in the step for the Prepare phase above.)
● Tool-Supported Migration Without Migration TemplatesYou provide the SAP Service Center with a full extract of the required data from your legacysystem(s) together with source data field descriptions. The descriptions allow the SAP ServiceCenter to implement customized mapping rules that fit your specific legacy data structures.
3. Integrate and Extend PhaseThis phase allows you to transfer your configured solution to your company to start using it productively. Youdo this by integrating with third party applications that already operate in your company, and moving yourbasic, master, and transaction data from your legacy system(s) to your new solution. You also decide whichform, report, and user interface extensions you require to meet your company's specific needs.In this phase, the process is as follows:a. You migrate master data and maintain basic data.
You migrate your data using the inherent migration tool (data migration self-service), or you decide onmigration object level whether you want to enter the data manually instead.
We recommend you use the inherent migration tool regardless of the size of the data volumethat needs to be migrated.
Before migrating all master data, you have to create all mandatory basic data in the new system. Thisdata is required by different master data objects and comprises, for example, the bank directory,transport lanes, or tax authorities.
After migrating the data, you cannot delete it from your SAP solution. Therefore you canperform any migration tests on a separate test system.For more information, see Request an Additional System.
b. You adapt forms, reports, user interfaces, and third-party connectivity.You also have to decide on the extensions that you require for your company’s specific needs. Theseextensions include form adaptation or creation, report modification or development, field extension anduser interface adjustments, as well as adaptation of the built-in learning environment. During this activity,after mutually agreeing on the SAD: ● SAP performs the development or adaptation work required. ● Upon completion of this, the project manager is notified that the new content is ready to be deployed
into the system. ● The project manager confirms this notification and the new content is deployed into the system. ● The administrators perform acceptance tests.
350 © 2011, 2012, 2013 SAP AG. All rights reserved. • P U B L I CSAP Cloud for Customer November 2013
Appendix
● Depending on the acceptance test results, the new content is accepted or test incidents are providedto SAP. Any test incidents are reviewed and resolved, the updated content is deployed again, andyou perform a final acceptance test.
4. Test PhaseThis phase contains activities that allow you to define test scenarios and guides, verify that your core businessprocesses are running as desired, and transfer knowledge to end users before your solution goes live. Youalso need to confirm the milestone that go-live readiness is accepted, indicating that testing is completed,which changes the status of the implementation project to Tested.In this phase, the process is as follows:a. You prepare integration tests.
Before performing any integration tests, you create the required documents, guidelines, and test plan.This includes scenario documents containing all processes, roles, and data required to test an end-to-end business scenario according to your business requirements, test documents containing guidelinesfor specific business processes, and a finalized test plan incorporating project-specific information,assigned testers, and a plan for test execution.
b. You transfer knowledge to end users.You have to ensure that all end users are properly trained before the solution goes live. In this activity,you provide clear instructions on accessing embedded learning, ensure learning materials are availablefor the core business processes, and upload any company-specific learning materials to the system.
You can also allow end users to execute test guides during integration testing under thesupervision of administrators. This enables end users to get hands-on experience of the systemprior to Go Live.
c. You perform integration tests.After the test plan is finalized and the test cases have been distributed, you perform the integration testaccording to the test schedule, and based on the scenario documents and guidelines.If the test results do not match the expected results, you document any deviations as incidents. Onceall incidents have been reviewed and resolved or acceptable workarounds identified, and all test stepshave been completed, you sign off the test document and change the status of this activity to Closed.
d. You finalize the integration tests and confirm the milestone that go-live readiness is accepted, indicatingthat testing is completed.To finalize the integration tests, you verify that all test guides have been successfully completed, the testplan has been updated, and changes made in the test system have been merged into the productionsystem.By confirming the milestone Go-Live Readiness Accepted, you confirm that your integration test hasbeen completed successfully and you indicate you are ready to go live with your solution. During yourproject, you can continue testing, so you can also cancel and reconfirm this milestone as necessary, asit simply helps you to track the progress of your project. On confirming the milestone, the project statusis set to Tested.
Before confirming this milestone, we recommend that you confirm the milestone SolutionAccepted and set it to Closed in the Fine-Tune phase.
5. Go Live PhaseThis phase includes the final activities that you must complete to enable your solution to be used productivelyin your company. Typical activities include preparing and performing cutover, setting up internal supportteams, and confirming that you are ready to go live. At the end of this phase, all mandatory and outstandingconfiguration issues are resolved, legacy data is migrated to the production system, knowledge transfer iscomplete, and the project is signed off. The final activity confirms the implementation project is officiallyclosed. The project status is set to Closed and the implementation project is set to read-only.In this phase, the process is as follows:
SAP Cloud for Customer November 2013Appendix P U B L I C • © 2011, 2012, 2013 SAP AG. All rights reserved. 351
a. You prepare cutover.The Go Live phase starts with the preparation for the execution of the cutover activity. This includessteps related to the creation of the cutover plan and cutover schedule, while ensuring system, data, andpeople readiness.
b. You request Go Live.By requesting Go Live and closing this activity, you trigger the Go Live Health Check service. This is aprerequisite for using the solution productively. The SAP support team verifies that you are ready to golive in terms of organization, business solution, technical infrastructure, and supportability.
c. You perform cutover and Go Live.After setting up the internal support team and their responsibilities, you perform the cutover followingall tasks outlined in the cutover schedule. Usually the cutover starts with the performance of the finaloperational transactions in your legacy system(s), the extraction of your latest master and transactiondata, and the migration to the production system, and ends with the release of the production systemto all administrators.
d. You complete the activity for Go Live.In the activity for the Go Live confirmation, the activity guides you through setting your SAP solution live.During this activity, you check and verify that all activities in all five phases have the status Closed. Youalso verify that all mandatory activities in the Fine-Tune phase are fine-tuned and deployed.After completing this activity, your solution is live and ready for use. Completing this activity also informsSAP that you want to use your solution productively. You can still view all previous phases and activities,but you cannot make changes to them. You can complete this activity only once, and it cannot be revokedfor the project.The project status is set to Completed and the phases Prepare, Fine-Tune, Integrate and Extend, andTest are set to read-only in the Activity List. At the end of the Go Live phase, you have resolved allmandatory and outstanding configuration issues, migrated all legacy data, and completed knowledgetransfer.
After going live with your first implementation project, there are two ways to change your solution.You can make small changes to a selection of configuration elements, or, for more complexchanges, you can create change projects. For more information, see Make Changes to Your SAPSolution [page 39] and Prepare a Change Project [page 356].
e. You complete the activity to close the project.By completing this activity, you confirm that your project is officially closed. The status of the project ischanged to Closed, and you cannot make any further changes to the project. You can complete thisactivity only once, and it cannot be revoked for the project.
Before you complete this activity, you have to complete the activity Confirm Go Live and setit to Closed.
After confirming this milestone, the Go Live phase is set to read only, and the entire project remains inread only mode in the Activity List.
Before closing your project, you should consider executing the following activities: ● Issue internal and external go live announcements ● Inform your support team about open issues, the process for handling incidents, and
the main contacts for important topics ● Receive official acceptance of the solution
352 © 2011, 2012, 2013 SAP AG. All rights reserved. • P U B L I CSAP Cloud for Customer November 2013
Appendix
See AlsoConfiguring Your SAP Solution [page 35]Prepare Your First Implementation Project [page 353]Complete the Activity List [page 57]
16.1.3 Prepare the First Implementation Project
OverviewWhen you want to begin evaluating the SAP solution, you can carry out a scoping workshop with the assistance ofan SAP or partner solution adviser. The solution adviser guides you through the process of defining the scope of yourfirst implementation project. You can return to this activity later to adapt the scope of your first implementationproject as well.
PrerequisitesA system has been set up for you and your First Implementation project has been created automatically.
AlternativesIf you procured an implementation project template, you can apply this as the first step. If required, you can thenfurther refine the scope of your solution by following the steps described below. For more information, seeImplementation Project Template.
Procedure1. On the Implementation Projects view of the Business Configuration work center, select the First
Implementation project and click Edit Project Scope .The Edit Project Scope guided activity is displayed.
At any step of the guided activity, if you need to pause or postpone the process, you can clickSave Draft to ensure that the decisions you have made are saved for when you resume your work.
2. On the Country and Type of Business step, review the countries and types of business for your solution. Basedon best practices for the selected countries and types of business, the system preselects relevant scopingelements.
a. To change the countries where you will run the solution, click Edit Countries.b. To change the types of business for which you want to run the solution, click Edit Type of Business.c. Click Next to continue.
3. On the Implementation Focus step, you indicate that you want to implement capabilities from the completeSAP solution.
a. Select Complete Solution and click Select for Implementation .b. Click Next to continue.
4. On the Scoping step, select the capabilities that you want to incorporate into your solution.
SAP Cloud for Customer November 2013Appendix P U B L I C • © 2011, 2012, 2013 SAP AG. All rights reserved. 353

The solution capabilities are structured as a hierarchy of scoping elements: Business areas contain businesspackages, and business packages contain business topics. Based on best practices for your country and typeof business, the system has preselected the relevant scoping elements. You can accept theserecommendations or you can adjust the preselected content and determine which of the available featuresand functions you want to incorporate into your solution. Certain elements are mandatory for your scope andcannot be deselected; the corresponding checkboxes in the Select column are thus selected and grayed out.Add-on solutions procured in the SAP Store are added as capabilities and can be selected here in addition tothe standard capabilities.
The hierarchy has built-in rules to ensure that all selections you make are logical and consistent, froma business and technical point of view. Thus, when you make a selection, the system makes thenecessary additional selections automatically. Also, when you make a selection that goes against therules, a warning icon is displayed in the Conflict column next to each affected scoping element. Forguidance on how to resolve the issue, you can select an element and review Dependency . To quicklyidentify all elements with conflicts, you can select Elements with Conflicts from the Show list.
a. Open the first business area in the hierarchy.
To expand the complete hierarchy of scoping elements, click Actions and select ExpandAll.
● For detailed background information about the business area, review Overview , Relevance , and Benefits .
● You cannot select or deselect the business area directly. Rather, the business area is selectedautomatically if at least one of its business packages is selected. For information about why thebusiness area is selected or deselected, review Dependency .
● To add notes or additional requirements for the business area, use Your Notes . All notes andrequirements are summarized in reports available from the Review step of the guided activity.
b. Within the first business area, choose the business packages and topics that you want to include inyour solution. ● To include a business package or topic in your solution, select the corresponding checkbox in the
Select column. You must select a package before you can select any of its topics. ● For each business package and topic, review the information on Overview , Relevance , and
Dependency .
The information on Dependency changes based on the state of the scoping element. If itis possible to change the selection of the element, the tab lists a simulation of the systemselections that would result. If it is not possible to change the selection of the element, thetab lists the elements that caused its current state. If the element is in conflict with otherselections, the tab lists them so that you can decide which selections to reverse.
● To add notes and additional requirements for a business package or topic, use Your Notes . Allnotes and requirements are summarized in reports available from the Review step of the guidedactivity.
● For each business package and topic you can see the available add-on solutions on SAP Store .When you click on the link of the add-on solution in this tab, you are directed to the SAP Store.There you can procure the add-on solution.Once this is completed, the add-on solution is added to the list of solution capabilities, where youcan select it.
c. Repeat the steps above for each subsequent business area.
354 © 2011, 2012, 2013 SAP AG. All rights reserved. • P U B L I CSAP Cloud for Customer November 2013
Appendix
d. Review the changes you made in this step of the guided activity as well as the changes madeautomatically by the system. Once you proceed to the next step, the history of changes will be cleared. ● Click Display Scope Changes .
The recent changes are listed in descending order. ● To undo the last change, click Undo Last Scope Change . ● To redo the last change, click Redo Last Scope Change .
e. Click Next to continue.5. On the Questions step, answer the scoping questions to make more detailed decisions about the capabilities
you want in your solution.You will find scoping questions at the business topic level. Based on best practices for your country and typeof business, the system has preselected answers. You can accept these recommendations or, where possible,you can adjust the preselected answers. Some answers are mandatory for your scope and thus cannot bechanged.To expand the complete hierarchy of scoping elements, click Actions and select Expand All.
By default, the Show list is set to Decision-Relevant Elements; only scoping questions that you cananswer are displayed. To filter the scoping questions differently, select another option from theShow list.
a. Within the first business area, select a business topic that you are interested in.The related groups of scoping questions are displayed to the right. Each group initially displays theNot Reviewed status.
b. Review the questions within each group and, if necessary, change the preselected Yes or No answers. ● When you change an answer, the status of the question group is automatically changed to
Reviewed. If you do not change any preselected answers within a group, you can manually set thestatus of the group to Reviewed.
● To learn more about a question, review the information on Overview , Relevance , and Dependency .
The information on Dependency changes based on the state of the scoping element. If itis possible to change the selection of the element, the tab lists a simulation of the systemselections that would result. If it is not possible to change the selection of the element, thetab lists the elements that caused its current state. If the element is in conflict with otherselections, the tab lists them so that you can decide which selections to reverse.
● To add notes and additional requirements for a business topic, use Your Notes . All notes andrequirements are summarized in reports available from the Review step of the guided activity.
c. Repeat the steps above for each subsequent business area.d. Review the changes you made in this step of the guided activity as well as the changes made
automatically by the system. The history of changes will be cleared once you proceed to the next step. ● Click Display Scope Changes .
The recent changes are listed in descending order. ● To undo the last change, click Undo Last Scope Change . ● To redo the last change, click Redo Last Scope Change .
e. Click Next to continue.
If you have not reviewed all decision-relevant questions, a window appears asking you to accept thepreselected answers or to return to the questions that are not yet reviewed.
SAP Cloud for Customer November 2013Appendix P U B L I C • © 2011, 2012, 2013 SAP AG. All rights reserved. 355
6. On the Review step, review your scoping results and provide additional information about your firstimplementation project.
a. Under Scoping Results, click the links provided to view the results of your scoping decisions.b. Under General Information, enter the Description for your first implementation project.c. Under Planned Implementation Timeline, select the Start Date and End Date for your first
implementation project.d. Click Finish .
7. On the Confirmation step you have another chance to review your scoping results. Click Close to return tothe Implementation Projects view and start implementing you project.
ResultBased on your scoping decisions, the system generates an activity list of the implementation and projectmanagement activities that you need to perform in order to go live. You can start working on the activities in thePrepare phase of the activity list.For more information, see Complete the Activity List — First Implementation [page 57].
Your scoping decisions are initially deployed when you complete the Confirm Milestone: Design Acceptedactivity in the Prepare phase of the activity list. After confirming this milestone, if you return to the Edit ProjectScope guided activity and make any scoping changes, the changes are deployed only once you click Finishagain.Also, any scoping changes you make may affect the organizational structure. Therefore, you should alwayscheck the consistency of the organizational structure, which you can access from the Perform OrganizationalStructure Setup activity in the Fine-Tune phase of the activity list or from the Organizational Management workcenter. To check the consistency after making scoping changes, go into Edit mode (the Planning Area), andthen click Activate All . Any inconsistencies will appear as messages, which you then have to resolve.
16.1.4 Prepare a Change Project
OverviewAfter the solution has gone live for the first time, administrators can prepare a change project to adapt the capabilitiesand behavior of the solution. Just as in the first implementation project, the main part of preparing a change projectis selecting scoping elements and reviewing scoping questions. In addition, you identify mandatory and optionalactivities for implementing the changes, and you provide additional information about the project.The live solution is not affected by the changes until they are merged with the production system.
Administrators can make smaller changes without creating and implementing a change project. For moreinformation, see Make Changes to Your SAP Solution [page 39].
PrerequisitesThe Confirm Go Live activity has been completed for the First Implementation project.
356 © 2011, 2012, 2013 SAP AG. All rights reserved. • P U B L I CSAP Cloud for Customer November 2013
Appendix
Procedure1. On the Implementation Projects view of the Business Configuration work center, click New to create a new
change project.To edit the scope of a change project you created previously, select the project and click Edit Project Scope .The New Change Project or Edit Change Project guided activity is displayed.
2. Optional: On the Select Scenario step, select a change scenario that SAP has defined for typical business-driven changes, for example, adding or removing a country.
a. To learn about a particular change scenario, click the title of the change scenario.b. To add a scenario to your change project, click Select Scenario and complete the task that is displayed.
The scoping elements, questions, and activities related to the selected change scenario will be availableto you in the steps that follow.For more information, see Change Scenario: Add Country.
c. Click Next to continue.
At this or any subsequent step of the guided activity, you can click Project Details to view either aBasic or Complete overview of your change project.
3. On the Adjust Scoping step, adjust the capabilities that you want in your solution.The solution capabilities are structured as a hierarchy of scoping elements: Business areas contain businesspackages, and business packages contain business topics. Certain elements are mandatory for your scopeand cannot be deselected; the corresponding checkboxes in the Select column are thus selected and grayedout.Add-on solutions procured in the SAP Store are added as capabilities and can be selected here in addition tothe standard capabilities.
The hierarchy has built-in rules to ensure that all selections you make are logical and consistent, froma business and technical point of view. Thus, when you make a selection, the system makes thenecessary additional selections automatically. Also, when you make a selection that goes against therules, a warning icon will display in the Conflict column next to each affected scoping element. Forguidance on how to resolve the issue, you can select an element and review Dependency . To quicklyidentify all elements with conflicts, you can select Elements with Conflicts from the Show list.
a. Open the first business area in the hierarchy.
To expand the complete hierarchy of scoping elements, click Actions and select ExpandAll.
● For detailed background information about the business area, review Overview , Relevance , and Benefits .
● You cannot select or deselect the business area directly. Rather, the business area is selectedautomatically if at least one of its business packages is selected. For information about why thebusiness area is selected or deselected, review Dependency .
● To add notes or additional requirements for the business area, use Your Notes .b. Within the first business area, choose the business packages and topics that you want to adjust.
● To select or deselect a business package or topic, select the corresponding checkbox in theSelect column. You must select a package before you can select any of its topics.
SAP Cloud for Customer November 2013Appendix P U B L I C • © 2011, 2012, 2013 SAP AG. All rights reserved. 357
● For each business package and topic, review the information on Overview , Relevance , and Dependency .
The information on Dependency changes based on the state of the scoping element. If itis possible to change the selection of the element, the tab lists a simulation of the systemselections that would result. If it is not possible to change the selection of the element, thetab lists the elements that caused its current state. If the element is in conflict with otherselections, the tab lists them so that you can decide which selections to reverse.
● To add notes or additional requirements for a business package or topic, use Your Notes . ● For each business package and topic you can see the available add-on solutions on SAP Store .
When you click on the link of the add-on solution in this tab, you are directed to the SAP Store.There you can procure the selected add-on solution.Once this is completed, the add-on solution is added to the list of solution capabilities, where youcan select it.
c. Repeat the steps above for each subsequent business area as required.d. Review the changes you made in this step of the guided activity as well as the changes made
automatically by the system. The history of changes is cleared once you proceed to the next step. ● Click Display Scope Changes .
The recent changes are listed in descending order. ● To undo the last change, click Undo Last Scope Change . ● To redo the last change, click Redo Last Scope Change .
e. Click Next to continue.4. On the Review Questions step, answer the scoping questions for the adjustments you've made.
You will find scoping questions at the business topic level. Some answers are mandatory for your scope andthus cannot be changed.To expand the complete hierarchy of scoping elements, click Actions and select Expand All.
a. Within the first business area, select a business topic that you are interested in.The related groups of scoping questions are displayed to the right. Each new group initially displaysthe Not Reviewed status.
b. Review the questions within each group and, if necessary, change the preselected Yes or No answers. ● When you change an answer, the status of the question group is automatically changed to
Reviewed. If you do not change any preselected answers within a group, you can manually set thestatus of the group to Reviewed.
● To learn more about a question, click Details and review the information on Overview , Relevance , and Dependency .
The information on Dependency changes based on the state of the scoping element. If itis possible to change the selection of the element, the tab lists a simulation of the systemselections that would result. If it is not possible to change the selection of the element, thetab lists the elements that caused its current state. If the element is in conflict with otherselections, the tab lists them so that you can decide which selections to reverse.
● To add notes or additional requirements for a business topic, use Your Notes .c. Repeat the steps above for each subsequent business area.d. Review the changes you made in this step of the guided activity as well as the changes made
automatically by the system. The history of changes is cleared once you proceed to the next step. ● Click Display Scope Changes .
358 © 2011, 2012, 2013 SAP AG. All rights reserved. • P U B L I CSAP Cloud for Customer November 2013
Appendix
The recent changes are listed in descending order. ● To undo the last change, click Undo Last Scope Change . ● To redo the last change, click Redo Last Scope Change .
e. Click Next to continue.
If you have not reviewed all decision-relevant questions, a window appears asking you to accept thepreselected answers or to return to the questions that are not yet reviewed.
5. On the Complete Project Setup step, review the summary of changes and provide additional information aboutyour change project.
a. Review the Summary of Changed Elements and, if necessary, click an element type to go back to thecorresponding step in the guided activity. For example, click Scoping to go back to the AdjustScoping step.
b. Under General Information, enter the Title and Description for your change project.c. Under How to Proceed, decide whether you want to include two additional types of activities to the
activity list for your change project: ● Milestones:
Milestones serve as markers of the progress of your change project. They are not necessary forthe successful implementation of your change project and there not included in the activity listby default. To include milestones in the activity list, select Include Milestones in Activity List.
● Instructional Activities:The purpose of some activities is to provide instruction and guidance. To include all such activitiesin the activity list, select Include Instructional Activities in Activity List.
d. Under Planned Implementation Timeline, select the Start Date and End Date for your change project.e. Click Finish .
Scope changes can lead to inconsistencies in the solution profile that have to be resolved beforeyou can start the implementation of your changes. In case inconsistencies are detected, awindow appears giving you two options:
1. Cancel the finalization of the change project.To do this, click Cancel and navigate back through the steps to make changes andresolve errors in your project.
2. Continue to the next step, save the project with inconsistencies, and resolve these at alater stage.To do this, click Continue .
6. On the Confirmation step you have another chance to review your scoping results. Click Close to return tothe Implementation Projects view and start implementing you project
ResultBased on your decisions, the system generates the activity list for your change project.
● To start working on the activities in your activity list, click Open Activity List to Implement Changes.For more information, see Complete the Activity List — Change Project [page 57].
SAP Cloud for Customer November 2013Appendix P U B L I C • © 2011, 2012, 2013 SAP AG. All rights reserved. 359
If inconsistencies occur, a message is displayed stating the change project has been saved, but withinconsistencies in some fine-tuning settings. Instead of a link to Open Activity List to ImplementChanges, a link to Resolve Inconsistencies is displayed. When you click this link, you are directed to theResolve Inconsistencies screen, which provides recommended actions for you to resolve the errors.
● To view a basic or detailed summary of your change project, click Display Project Details (Basic) or DisplayProject Details (Complete).
Any scoping decisions you make as part of your change project are deployed when you complete the MergeChanges with Production System activity in the activity list. After completing this activity you cannot adjustthe scope of this change project.Also, any scoping changes you make may affect the organizational structure. Therefore, you should alwayscheck the consistency of the organizational structure, which you can access from the Perform OrganizationalStructure Setup activity in the Fine-Tune phase of the activity list or from the Organizational Management workcenter. To check the consistency after making scoping changes, go into Edit mode (the Planning Area), andthen click Activate All . Any inconsistencies will appear as messages, which you then have to resolve.
16.1.5 Configuration: Understand the Overall Migration Process
To find this activity, go to the Business Configuration work center and choose the Implementation Projects view.Select your implementation project and click Open Activity List . Select the Prepare phase, then select the Preparefor Data Migration activity from the activity list.You need to understand the migration-related steps in the activity list and you must be able to plan the migrationproject in detail. This is a brief overview:
Tasks
1. Prepare PhaseThe Prepare for Data Migration activity (including Prepare for Data Migration in a First Implementation andPrepare for Data Migration in a Change Project) contains the following initial tasks: ● Set up user accounts for migration administrators and assign the Business Configuration work center
including the Data Migration view to each migration administrator. ● Create a project schedule for data migration, using the Data Migration Scope and Planning Template. ● Download Migration Templates. All legacy data you want to migrate with tool-support must be filled in
the migration templates.2. Fine-Tune Phase
Extract your legacy data from your legacy system and fill it into the migration templates. For more information,see the Perform Data Extraction activity.
3. Integrate and Extend PhaseThis phase contains the major part of the migration activities. Each migration activity serves as a startingpoint for tool-supported migration. In the migration tool you perform the following steps:1. Upload your filled migration template. The system checks the formal consistency of the source file.2. Validate the source file. This step enables you to verify whether the migration template was filled
correctly.
360 © 2011, 2012, 2013 SAP AG. All rights reserved. • P U B L I CSAP Cloud for Customer November 2013
Appendix
3. Convert source values to solution values. During this step, the system automatically proposes new targetvalues, based on the business configuration of your solution.
4. Simulate the data import. This step allows you to correct any issues before data is actually written to thesolution.
5. Import your legacy data into the solution.
Check the imported data for quality and integrity (acceptance test, integration test). For more information,see the Validate Data Quality and Integrity activity.
4. Migration Phases and System EnvironmentsDuring the implementation project, you can perform the described steps in two different environments: ● Test System
The first system that you are provided with is your test system.In the test system you can:a. Start fine-tuning your business processes and execute the first business process tests.b. Perform early migration tests. The goal of the early migration tests is that you familiarize yourself
with the migration templates and the overall migration process. For example, you can migrate smallsample files and use the results to improve data extraction from your legacy system.
c. Test the migration process with a complete set of data. The goal of the migration tests in the testsystem is to elaborate the right settings for successful migration. After you complete migration inthe test system, you can test your business processes using the migrated data.For more information, see the Validate Data Quality and Integrity activity.After you completed your migration tests, you can download the value conversion from themigration tool for reuse in the production system.For more information, see the Perform Migration in Test System activity.
● Final Migration in Production SystemYou can upload the value conversion (you downloaded from your migration test system) to import yourcomplete set of data into your production system. Follow your cutover plan to import the data into yourSAP solution. Focus on the data import sequence including manual tasks.For more information, see the Perform Migration in Production System activity.You can also request a restore point before you start your migration. This will allow you to restore yourdata to the status before the data migration.For more information, see Restore Point.
16.1.6 Watermark
OverviewA watermark is an indication in the title bar of your solution to show the nature of your system. It indicates, forexample, whether the implementation of your solution is closed or whether you are working in a test system.If there is no watermark, it means that you are working in a production system and that you have closed your firstimplementation project or activated your change project.
Types of WatermarkThere are four different types of watermarks:
● Test System
SAP Cloud for Customer November 2013Appendix P U B L I C • © 2011, 2012, 2013 SAP AG. All rights reserved. 361
This watermark indicates you are working in a test system. ● Implementation Project Not Yet Live
This watermark indicates you are working in a production system, but your first implementation project isnot yet live.
● Implementation Project Not ClosedThis watermark indicates you are working in a production system. Your project is live, but you have not yetclosed the first implementation project.
● Change Project Not Yet ActivatedThis watermark indicates that you have merged the changed solution scope into your solution profile, but youhave not yet activated it. You need to complete the Activate Solution Capabilities activity to do so.For more information, see Complete the Activity List [page 57].
16.2 Work Distribution
16.2.1 Employee Work Distribution Quick Guide
The Employee Work Distribution view enables you to manage the distribution of work to employees by creating workdistribution rules that allow the system to evaluate work items and to determine the employee responsible for thesework items. Depending on the work category, the system directs the work items to the determined employee, orprovides the employee as a proposal in the relevant business document.You can access the Employee Work Distribution view from the Application and User Management work center underTask Distribution.
Business Background
Work DistributionWork distribution defines the process of assigning work to an org unit or employee. By default, work items in thesolution are visible to all users that have the corresponding access rights. However, for some business processesthe org unit or employee responsible for a work item has to be determined. For these areas, you can define workdistribution rules that enable you to automatically assign business documents and tasks to dedicated org units oremployees.For more information, see Work Distribution.
Work CategoriesThe work category is the central element for work distribution. A work category represents a specific part of workin a business area and is related to one or more business documents. Each work category provides parameters thatyou can use to define work distribution rules, according to which the system determines the responsible org unit oremployee for a business document.For more information, see Work Categories.
362 © 2011, 2012, 2013 SAP AG. All rights reserved. • P U B L I CSAP Cloud for Customer November 2013
Appendix
Tasks
Create a Work Distribution Rule1. In the Employee Work Distribution view, select a work category.2. Click Edit .
You cannot change work distribution for past dates. If the Edit button isdisabled, check the Effective Date and ensure that you have not entered a datethat occurs in the past.
3. Choose Work Distribution Rules , then click Add .If you want to copy an existing rule, click Copy .By adding a rule you are creating a new rule that is added to the bottom of the list. Ifyou wish to insert a rule of a higher priority, then change priority by moving the rulesup and down in the table.
4. Enter the name of the rule.5. Enter the ID of the responsible employee.6. Enter the validity period of the rule.
If you change or delete a work distribution rule that begins before the effectivedate, the rule is only valid to the date before the effective date. If you only changethe rule, the system creates a new rule based on the existing rule and includesthe changes you make. The new rule is valid as of the effective date.
7. Go to the Rule Details section and specify the parameters for the rule.Each parameter appears as a tab, for example, Company . Using the parameters, youcan specify exactly both which parameter is to be included in the rule or excluded fromthe rule.
8. Click Check to verify whether your rule is consistent.9. Click Save or Save and Close .
Delete a Work Distribution Rule1. In the Employee Work Distribution view, select a work category.2. Click Edit .
You cannot change work distribution for past dates. If the Edit button isdisabled, check the Effective Date and ensure that you have not entered a datethat occurs in the past.
3. Choose Work Distribution Rules .4. Select the work distribution rule you want to delete and click Delete .5. Click Save or Save and Close .
Set a Work Category to Undefined1. In the Employee Work Distribution view, select a work category that has the status
Defined Work Distribution.2. Click Action and select the option Set to Undefined.
SAP Cloud for Customer November 2013Appendix P U B L I C • © 2011, 2012, 2013 SAP AG. All rights reserved. 363
16.2.2 Organizational Work Distribution Quick Guide
The Organizational Work Distribution view enables you to manage the distribution of work within your organizationby creating work distribution rules that allow the system to evaluate work items and to determine the org unitresponsible for these work items. Depending on the work category, the system directs the work item to thedetermined org unit, or provides the org unit as a proposal in the relevant business document.You can access this view from the Organizational Management work center under Work Distribution.
Business Background
Work DistributionWork distribution defines the process of assigning work to an org unit or employee. By default, work items in thesolution are visible to all users that have the corresponding access rights. However, for some business processesthe org unit or employee responsible for a work item has to be determined. For these areas, you can define workdistribution rules that enable you to automatically assign business documents and tasks to dedicated org units oremployees.For more information, see Work Distribution.
Work CategoriesThe work category is the central element for work distribution. A work category represents a specific part of workin a business area and is related to one or more business documents. Each work category provides parameters thatyou can use to define work distribution rules, according to which the system determines the responsible org unit oremployee for a business document.For more information, see Work Categories.
Tasks
Create a Work Distribution Rule1. In the Organizational Work Distribution view, select a work category.2. Click Edit .
You cannot change work distribution for past dates. If the Edit button isdisabled, check the Effective Date and ensure that you have not entered a datethat occurs in the past.
3. Choose Work Distribution Rules , then click Add .If you want to copy an existing rule, click Copy .The system processes work distribution rules for organizational work distribution alongtheir priorities. If you have maintained multiple rules for a work category, the systemonly uses the first rule that applies to the properties of the evaluated businessdocument. By adding a rule you are creating a new rule that is added to the bottom ofthe list. If you wish to insert a rule of a higher priority, then change priority by movingthe rules up and down in the table.
4. Enter the name of the rule.
364 © 2011, 2012, 2013 SAP AG. All rights reserved. • P U B L I CSAP Cloud for Customer November 2013
Appendix
5. Enter the ID of the responsible org unit.6. Enter the validity period of the rule.
If you change or delete a work distribution rule that begins before the effectivedate, the rule is only valid to the date before the effective date. If you only changethe rule, the system creates a new rule based on the existing rule and includesthe changes you make. The new rule is valid as of the effective date.
7. Go to the Rule Details section and specify the parameters for the rule.Each parameter appears as a tab, for example, Company . Using the parameters, youcan specify exactly both which parameter is to be included in the rule or excluded fromthe rule.
8. Click Check to verify whether your rule is consistent.9. Click Save or Save and Close .
Delete a Work Distribution Rule1. In the Organizational Work Distribution view, select a work category.2. Click Edit .
You cannot change work distribution for past dates. If the Edit button isdisabled, check the Effective Date and ensure that you have not entered a datethat occurs in the past.
3. Choose Work Distribution Rules .4. Select the work distribution rule you want to delete and click Delete .5. Click Save or Save and Close .
Set a Work Category to Global Work Distribution1. In the Organizational Work Distribution view, select a work category that has the status
Defined Work Distribution.2. Click Action and select the option Set to Global Work Distribution.
16.3 Notification Rules
16.3.1 Notification Rules
OverviewIn Business Task Management (BTM), tasks, alerts, and notifications are pre-defined. Notification rules allow you tocreate user-defined notifications thus giving you more flexibility for the use of notifications.After a notification rule has been defined for a specific business object, a notification is sent to a user if the followingapplies:
● The business document or object has been created or changed in the system. ● The business user is required to perform a certain task or to review master data or a business document.
Due to the changes, the user might have to check or complete data in the system.
SAP Cloud for Customer November 2013Appendix P U B L I C • © 2011, 2012, 2013 SAP AG. All rights reserved. 365
Notifications can be sent to a user as a task in the system or as an e-mail.Notification rules allow an administrator to define the following for notifications:
● Detailed conditionsConditions for notification rules are based on attributes related to the business object that is affected by thenotification rule and determine under which circumstances a notification is sent.
● RecipientsRecipients are defined by selecting individual employees or using recipient determination by the system.
Prerequisites
Configuration SettingsTo send notifications of the type 'task' via e-mail, you have checked and adapted the settings for e-mail notificationsto ensure that the e-mail channel is selected in your solution configuration. To find this business option, go to theBusiness Configuration work center and choose the Implementation Projects view. Select your implementationproject and click Edit Project Scope . In the Scoping step of the project, ensure that Business Process Managementis selected within Communication and Information Exchange.In the Questions step, expand the Communication and Information Exchange scoping element and select BusinessProcess Management. Select Business Task Management and answer the question related to the notificationchannel.For notifications of the type 'e-mail', you need to add HTML files to the list of allowed MIME types in the Allowed MIMETypes for Document Upload fine-tuning activity, if you want to use predefined HTML templates for e-mails.
Basic DataThe basic data for a notification rule contains the following information:
● DescriptionThe description is used to identify the notification rule in the worklist and will not be displayed in the actualnotification.
● Business objectA notification is sent to the business user if the selected business object is created or changed.A number of business objects is available for use in the definition of notification rules, such as: ○ Opportunity ○ Sales Lead ○ Account
● Notification typeA notification rule can be of the following types: ○ Task ○ E-mail
If this type is selected, the system will automatically send the notification as an e-mail based on theconditions defined in the rule.
Depending on the type selected, different attributes will be available for the notification rule in thevarious steps. Not all fields are available for e-mail notifications.
● SubjectThe text of the subject will be displayed in the actual notification or in the e-mail, if this notification type hasbeen selected.
366 © 2011, 2012, 2013 SAP AG. All rights reserved. • P U B L I CSAP Cloud for Customer November 2013
Appendix
● Template fileFor notification rules for e-mails, predefined HTML templates can be used.They can be uploaded for use in the e-mail resulting from the rule.
● PlaceholdersDepending on the selected business object, a selection of fields with pre-defined placeholders is available foruse in the subject text, for example, the service category and service category catalog for the service request.For e-mail notifications, it is possible to define placeholders in the predefined templates that have to beidentical with the ones defined in the subject of the notification rule.
Placeholders for e-mail notifications must begin and end with #, can be alphanumeric, and must containcapital letters only and no special characters.
ConditionsIn a notification rule, the defined conditions determine under which circumstances a notification is sent and thusbecomes visible to the recipient. The notification rule is related to one business object, for example, an opportunity.If an opportunity is created or changed in the system, and the terms of the condition defined for opportunities apply,the user receives a notification.Conditions are structured in groups. They offer a number of attributes depending on the business object selectedfor a notification rule, such as the status or phase progress for an opportunity. These attributes can be used to defineAND and OR conditions.Conditions within a group are AND conditions. If all of them are met, the whole group of conditions is met, and thenotification is sent.Groups of conditions are linked by OR. If all conditions in at least one of the groups are met, a notification is sent. Ifno conditions are defined, the notification is sent once the data is saved.
Definition of Conditions
Conditions Maintained Reaction
All conditions in one group met (AND conditions) Notification is sent
Only one or no condition in one group met (AND conditions) Notification is not sent
All conditions in at least one of the groups met (OR conditions) Notification is sent
No condition defined Notification is sent when data is saved
Whenever a business object is created or changed, the conditions that are defined for this object are checkedby the system. If the conditions are met for the first time, a notification is sent to the recipient. If the conditionsare subsequently met, the same notification is updated with new information, such as placeholders. If abusiness object is changed and the conditions are no longer met, the same notification is deleted. In case abusiness object is deleted, the notification is also deleted.
Compare OperatorsIn a condition, you can select a compare operator and compare with the following:
● A valueYou can define a comparison using a value, such as a status.
SAP Cloud for Customer November 2013Appendix P U B L I C • © 2011, 2012, 2013 SAP AG. All rights reserved. 367
For example, you select the Status field for defining a condition related to opportunities. In theCompare Operator field, you select Equal to. In the With field, you select Value and then InProcess. You add an OR condition by clicking Add Group . For this condition, you again select theStatus field. In the Compare Operator field, you select Equal to. In the With field, you select Valueand Open. Based on the conditions that you defined, a notification will be sent to a user if the statusof an opportunity is changed to In Process or Open.
● A fieldYou can define a comparison using a field in a business object. For example, a user is responsible for a businessobject and wants to receive a notification if another user changes the business object.
For example, you select the Employee Responsible field for defining a condition related toopportunities. In the Compare Operator field, you select Not equal to. In the With field, you selectField and then Last Changed By. Based on the condition that you defined, a notification will be sentto a user if the opportunity for which the user has been entered as the employee responsible ischanged by another user.
You can only compare similar fields in a condition, for example, you cannot compare a date field with a currencyfield. You can only compare field values that occur only once in the related business object, that is you cannot selecta field value that has brackets next to it, such as product category [].
If a field value that you select from the dropdown list in a condition has brackets next to it, for example, productcategory [], this attribute occurs more than once in the related business object, for example, at item level ofa business document. If you use Contains as a compare operator, the condition is met only if at least one ofthe values in the business object is identical with the one in the condition.
You can also compare the value of a field with the value it had before the related business object was changed.
For example, a user wants to be notified when the total amount for a sales quote increases. You selectthe Total field and the Value before Object Change checkbox. In the Compare Operator field, you selectLess than. In the With field, you select Field and then Total. Based on the condition that you defined, anotification will be sent to a user if the total amount for a sales quote has increased compared against thetotal amount when it was last saved.
For the compare operators Contains/Does not contain and Contains pattern/Does not contain pattern, youcan use the following wildcard characters:
● *Use this character for character strings including a blank; for example, A*A matches AxxxA and AA.
● +Use this character for exactly one single character; for example, A+A matches AAA and ABA, but notAA.
● #Use this character as an escape character for the special characters *, + and #; for example, A+Amatches AAA, ABA, and A+A, whereas A#+A matches only A+A.
Attributes for Notification Type 'Task'You can define the following task-specific attributes:
● Time-based condition
368 © 2011, 2012, 2013 SAP AG. All rights reserved. • P U B L I CSAP Cloud for Customer November 2013
Appendix
A time-based condition determines when a notification is sent to the recipient of the notification, for example,a notification can be sent to the recipient three days after a business object was changed if the conditiondefined for the business object is met.
● Expiration periodThe notification expires after a specified period of time and will be closed by the system after that time.
● Cancellation of taskA task can remain in the system until it expires or be cancelled if the conditions are no longer met.
Attributes for Notification Type 'E-Mail'You can define the following e-mail-specific attributes:
● Sending of e-mailsIf the conditions are met, the e-mail will be sent each time the business object in question is changed, or onlyonce, if this is the desired behavior.
Currency and Quantity ConversionIf a currency field is selected in a condition, currency conversion will be performed during runtime. The currencyamount in the condition will be converted into the currency used in the related business object.
For example, the condition specifies that a notification will be sent if the net value is greater than 100 EUR.The net value in the related business object is 80 USD. The system will convert 100 EUR into USD andcompare the value in the condition with the one in the business object to determine whether to send anotification.
If a quantity field is selected in a condition, quantity conversion will be performed during runtime.If the quantity in the condition is product-related, quantity conversion will not be performed. For example, theconversion will not be performed if the quantity unit in the condition is “each” and the quantity unit in the businessobject is “pallet.”If there is just one quantity in the related business object, for example, in the header of a business document, quantityconversion will be performed if the quantity unit is not product-related. For example, the conversion will be performedif the quantity unit in the condition is “meters” and the quantity unit in the business object is “centimeters.”
Determination of RecipientsIn a notification rule, the recipients of the notification are defined. One or more individual employees can be therecipients of a notification.Recipients can also be determined by the system based on the organizational functions in a company and theirresponsibilities, such as a functional unit manager.Defining either employees as direct recipients or using the recipient determination as well as a combination of thesetwo is possible.
SAP Cloud for Customer November 2013Appendix P U B L I C • © 2011, 2012, 2013 SAP AG. All rights reserved. 369

16.4 Business Flexibility
16.4.1 Microsoft Excel® Templates
16.4.1.1 Maintain Microsoft Excel® Templates
OverviewIn your solution there are various predefined templates that you can use when you export data or create new datafrom Microsoft Excel®.As an administrator, you can change the existing templates according to your company's specific requirements byadapting the properties of a template, such as the formatting or the sequence of columns. You can also create newtemplates, for example, for different languages that you require. In addition, you can add charts, diagrams, orformulas to the template.
PrerequisitesYou have installed the latest Add-In for Microsoft Excel® from the Download area.
Procedure1. In the Microsoft Office® Template Maintenance view, under Business Flexibility of the Administrator or
Application and User Management work center, go to the template group that you require for your worklistor floorplan.
If you want to change a pre-delivered template, export the template from the relevant application workcenter by clicking Export and To Microsoft Excel.Delete the data records that have been exported from the system before changing the template.
2. Choose the type of template depending on whether you want to export data or create new data from MicrosoftExcel and the language you require.
3. Download the template that you want to change to your local machine by selecting the template and clickingDownload .
4. Use the Microsoft Excel functions to adapt the template according to your needs by changing the columnsequence, the texts for the different fields, or the formatting.
● If you want to change the general layout of the Microsoft Excel template , such as the fonts of individualcells or the date format or other styles for cells, go to the Master Template Maintenance view . For moreinformation, see Maintain Microsoft Office® Master Templates.
● When you download a Microsoft Excel template of the type Export, any extension fields for the businesscontext are automatically included in the template and you can map these fields as additional columns.When you have added the new field, you can format the column heading and the column itself as yourequire. For more information on enabling and starting the XML tools and adding the Developer tabrequired to do this mapping, see the Microsoft Excel help.
370 © 2011, 2012, 2013 SAP AG. All rights reserved. • P U B L I CSAP Cloud for Customer November 2013
Appendix
Note that this function is not available for Microsoft Excel files of the type Write-Back. ● If you want to import any additional data using XML maps, refer to the Microsoft Office Excel help for
more information.5. Upload the adapted template from your local machine to the system by clicking Upload .
You have the following options: ● Overwrite an existing template by choosing Replace Existing Language Variant ● Create a new template by choosing New Template or New Language Variant, if you want to create a
new template in a new language6. Select the file from your local machine.7. If you create a new template, you have to enter the name of the template, the description, the language and
whether you want to use the master template. Office Master Template Used is selected by default.
You can also change the name and description of a template in the worklist by selecting the templateand clicking Actions and Maintain General Information.Likewise, you can change the master template setting for a template by selecting the template andclicking Actions and Change Master Template Usage.
8. If you want to make the template that you created or changed available for all users, you have to publish it byclicking Publish .
1. Once you have published a template in various versions, you can go back to an older version of thetemplate. Select the version that you want to use and click Versions and then Revert To .
2. Publish the valid version to make it available for use.9. If you want to delete a template, select the template and click Delete .
If you delete a template with the status Not Published, you cannot restore this template.
16.4.2 Mashup Web Services
16.4.2.1 Mashup Web Services Quick Guide
The Mashup Web Services view allows administrators to integrate third-party Web services for use in data and HTMLmashups.SAP provides preconfigured Web services that are used in mashups provided by SAP. You can view the configurationsettings of preconfigured Web services by clicking on the service name in the list. The following types of Web serviceare supported:
● REST ● SOAP ● RSS and Atom feeds
Depending on your solution, go to the Application and User Management or Administrator work center. Then choose Business Flexibility Mashup Web Services .
SAP Cloud for Customer November 2013Appendix P U B L I C • © 2011, 2012, 2013 SAP AG. All rights reserved. 371
Business Background
Mashups and Web ServicesMashups are used to integrate data from your SAP cloud solution with data provided by an online Web service orapplication. Users can access the content provided by these Web services and applications, and use it in their dailywork. Mashups can include Web searches, company or industry business information, or online map searches.For more information, see Mashups and Web Services in the Help Center of your solution.
Tasks
Create a Mashup Web ServiceFor more information, see here [page 373].
Activate a Web Service1. In the Mashup Web Services view, select a Web service.2. Click Activate .
The Web service becomes available for use in mashups. For more information about creatingmashups, see the About Mashup Authoring [page 375].
Deactivate a Web Service1. In the Mashup Web Services view, select a Web service.2. Click Deactivate .
The Web service is no longer available for use in mashups.
Delete a Web ServiceYou can delete Web services that have been created by other users.
1. In the Mashup Web Services view, select a Web service.Web services that were created by other users in your company can be identified bythe service ID, which starts with CW*.
2. Click Delete .
The Web service is deleted from the list.
Enter API Keys1. In the Mashup Web Services view, select a Web service that requires an API key and
click Enter API Keys .The Enter API Keys dialog box displays the API keys that are required by the selectedWeb service. Under API Key Details a link is provided to the Business Center. Here youcan find a list of all SAP partners and a link to their respective Web sites. You have togenerate the API key on the service provider's Web site.
2. Click Show API Keys and, in the API Key Value column, enter the API key provided bythe service provider.
3. Save your changes.
372 © 2011, 2012, 2013 SAP AG. All rights reserved. • P U B L I CSAP Cloud for Customer November 2013
Appendix
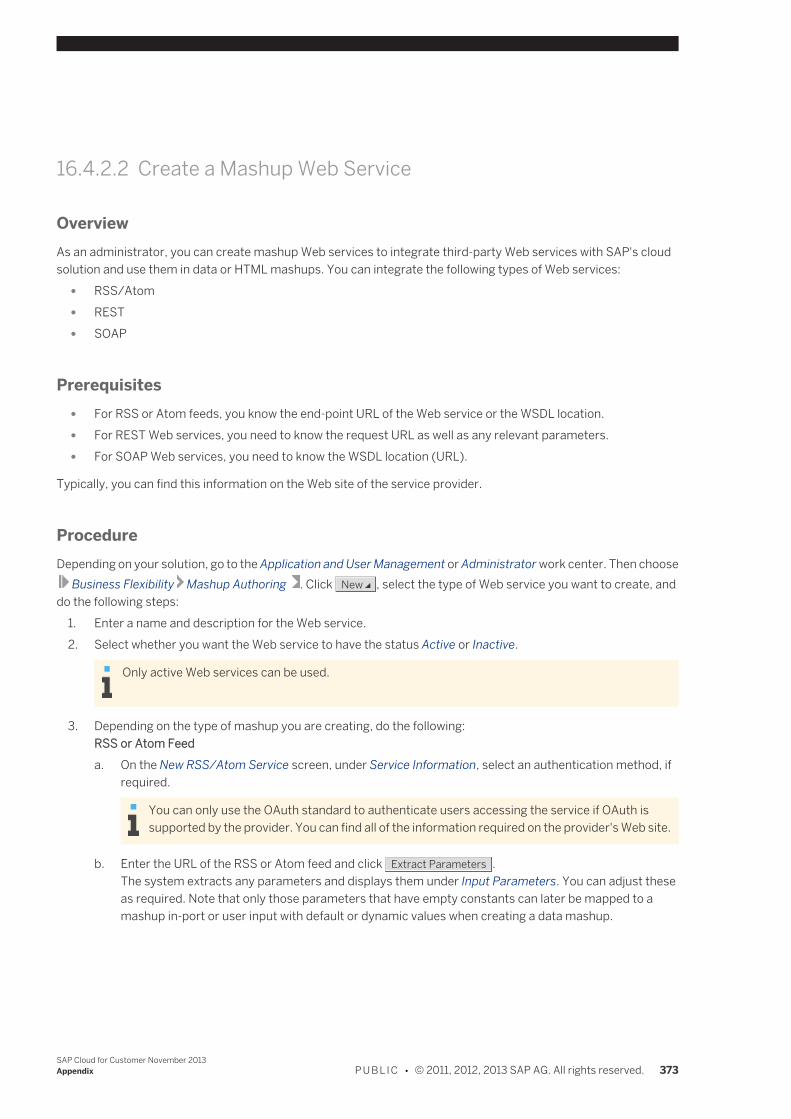
16.4.2.2 Create a Mashup Web Service
OverviewAs an administrator, you can create mashup Web services to integrate third-party Web services with SAP's cloudsolution and use them in data or HTML mashups. You can integrate the following types of Web services:
● RSS/Atom ● REST ● SOAP
Prerequisites ● For RSS or Atom feeds, you know the end-point URL of the Web service or the WSDL location. ● For REST Web services, you need to know the request URL as well as any relevant parameters. ● For SOAP Web services, you need to know the WSDL location (URL).
Typically, you can find this information on the Web site of the service provider.
ProcedureDepending on your solution, go to the Application and User Management or Administrator work center. Then choose Business Flexibility Mashup Authoring . Click New , select the type of Web service you want to create, anddo the following steps:
1. Enter a name and description for the Web service.2. Select whether you want the Web service to have the status Active or Inactive.
Only active Web services can be used.
3. Depending on the type of mashup you are creating, do the following:RSS or Atom Feeda. On the New RSS/Atom Service screen, under Service Information, select an authentication method, if
required.
You can only use the OAuth standard to authenticate users accessing the service if OAuth issupported by the provider. You can find all of the information required on the provider's Web site.
b. Enter the URL of the RSS or Atom feed and click Extract Parameters .The system extracts any parameters and displays them under Input Parameters. You can adjust theseas required. Note that only those parameters that have empty constants can later be mapped to amashup in-port or user input with default or dynamic values when creating a data mashup.
SAP Cloud for Customer November 2013Appendix P U B L I C • © 2011, 2012, 2013 SAP AG. All rights reserved. 373

For URLs that do not use queries you can manually add curly brackets around terms that should actas placeholders. For example, in the URL https://mail.google.com/mail/#search/SAP, youcan replace the word SAP with a search term in curly brackets, for example, {term}. If you then enterhttps://mail.google.com/mail/#search/{term} in the URL field and click
Extract Parameters , the word in brackets is extracted as a parameter.
RESTa. On the New REST Service screen, under Service Information, select an authentication method, if required.
You can only use the OAuth standard to authenticate users accessing the service if OAuth issupported by the provider. You can find all of the information required on the provider's Web site.
b. Select an HTTP method.c. Depending on the method you selected, do the following:
If you selected GET:1. Enter the URL of the Web service and click Extract Parameters .2. The system extracts any parameters and displays them under Input Parameters. You can adjust
these as required.
For URLs that do not use queries you can manually add curly brackets around terms thatshould act as placeholders. For more information, see the related note in the RSS or AtomFeed section above.
If you selected POST:1. Select a content type. If you select Form, proceed as described above for the GET method. If you
select XML Body, proceed as follows.2. Enter the URL of the Web service and the XML code.3. Click Generate Body Parameters to extract the parameters from the code, if applicable.
The system extracts any parameters and displays them under Input Parameters. You can adjustthese as required. Note that only those parameters that have empty constants can later be mappedto a mashup in-port or user input with default or dynamic values when creating a data mashup.
You can also use curly brackets to define parameters in POST XML bodies. For example, youcan replace a value returned by the REST service with a placeholder, for example{placeholder}, which can then be mapped to a screen out port in a mashup.
d. Under Output Parameters, click Simulate to preview the information that is returned by the Web service.
SOAPa. On the New SOAP Service screen, under Service Information, enter the WSDL URL and click Import .
The system extracts the WSDL content.b. Select a service operation.c. If required, click Copy Description to copy the service operation description into the mashup’s Service
Description under General Information.d. Enter constants, if required.
Only those parameters that have empty constants can later be mapped to a mashup in-port or user inputwith default or dynamic values when creating a data mashup.
374 © 2011, 2012, 2013 SAP AG. All rights reserved. • P U B L I CSAP Cloud for Customer November 2013
Appendix
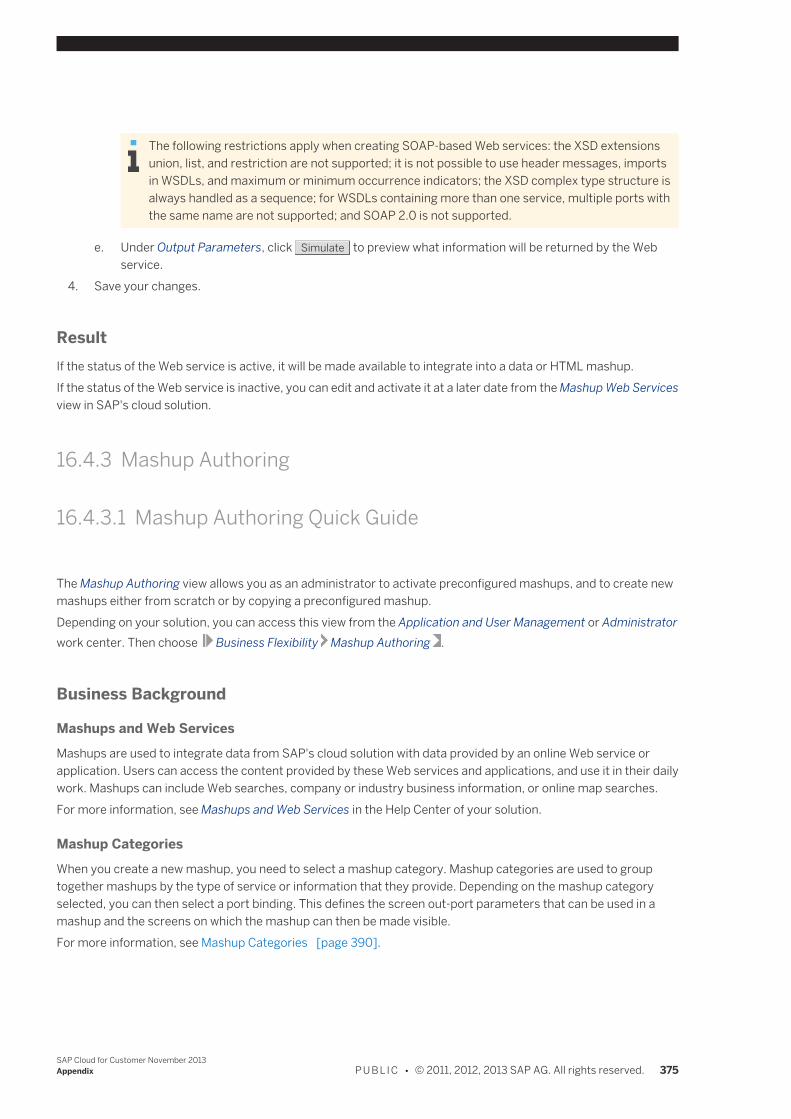
The following restrictions apply when creating SOAP-based Web services: the XSD extensionsunion, list, and restriction are not supported; it is not possible to use header messages, importsin WSDLs, and maximum or minimum occurrence indicators; the XSD complex type structure isalways handled as a sequence; for WSDLs containing more than one service, multiple ports withthe same name are not supported; and SOAP 2.0 is not supported.
e. Under Output Parameters, click Simulate to preview what information will be returned by the Webservice.
4. Save your changes.
ResultIf the status of the Web service is active, it will be made available to integrate into a data or HTML mashup.If the status of the Web service is inactive, you can edit and activate it at a later date from the Mashup Web Servicesview in SAP's cloud solution.
16.4.3 Mashup Authoring
16.4.3.1 Mashup Authoring Quick Guide
The Mashup Authoring view allows you as an administrator to activate preconfigured mashups, and to create newmashups either from scratch or by copying a preconfigured mashup.Depending on your solution, you can access this view from the Application and User Management or Administratorwork center. Then choose Business Flexibility Mashup Authoring .
Business Background
Mashups and Web ServicesMashups are used to integrate data from SAP's cloud solution with data provided by an online Web service orapplication. Users can access the content provided by these Web services and applications, and use it in their dailywork. Mashups can include Web searches, company or industry business information, or online map searches.For more information, see Mashups and Web Services in the Help Center of your solution.
Mashup CategoriesWhen you create a new mashup, you need to select a mashup category. Mashup categories are used to grouptogether mashups by the type of service or information that they provide. Depending on the mashup categoryselected, you can then select a port binding. This defines the screen out-port parameters that can be used in amashup and the screens on which the mashup can then be made visible.For more information, see Mashup Categories [page 390].
SAP Cloud for Customer November 2013Appendix P U B L I C • © 2011, 2012, 2013 SAP AG. All rights reserved. 375
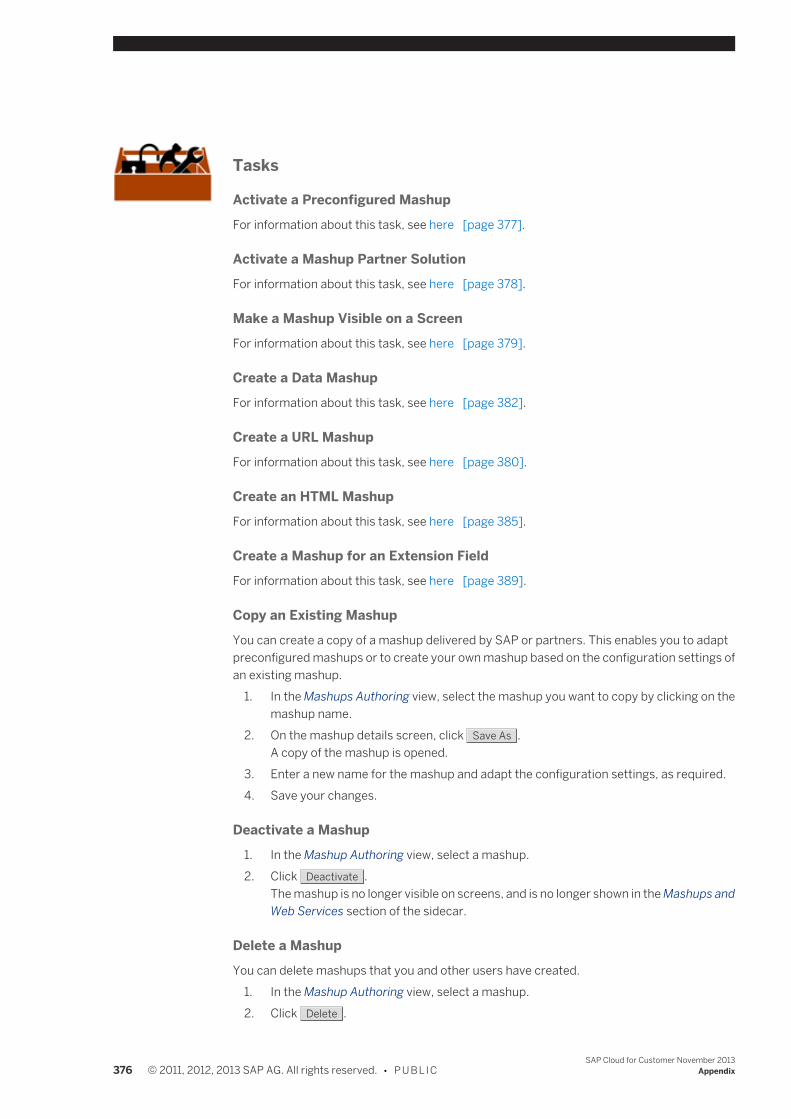
Tasks
Activate a Preconfigured MashupFor information about this task, see here [page 377].
Activate a Mashup Partner SolutionFor information about this task, see here [page 378].
Make a Mashup Visible on a ScreenFor information about this task, see here [page 379].
Create a Data MashupFor information about this task, see here [page 382].
Create a URL MashupFor information about this task, see here [page 380].
Create an HTML MashupFor information about this task, see here [page 385].
Create a Mashup for an Extension FieldFor information about this task, see here [page 389].
Copy an Existing MashupYou can create a copy of a mashup delivered by SAP or partners. This enables you to adaptpreconfigured mashups or to create your own mashup based on the configuration settings ofan existing mashup.
1. In the Mashups Authoring view, select the mashup you want to copy by clicking on themashup name.
2. On the mashup details screen, click Save As .A copy of the mashup is opened.
3. Enter a new name for the mashup and adapt the configuration settings, as required.4. Save your changes.
Deactivate a Mashup1. In the Mashup Authoring view, select a mashup.2. Click Deactivate .
The mashup is no longer visible on screens, and is no longer shown in the Mashups andWeb Services section of the sidecar.
Delete a MashupYou can delete mashups that you and other users have created.
1. In the Mashup Authoring view, select a mashup.2. Click Delete .
376 © 2011, 2012, 2013 SAP AG. All rights reserved. • P U B L I CSAP Cloud for Customer November 2013
Appendix
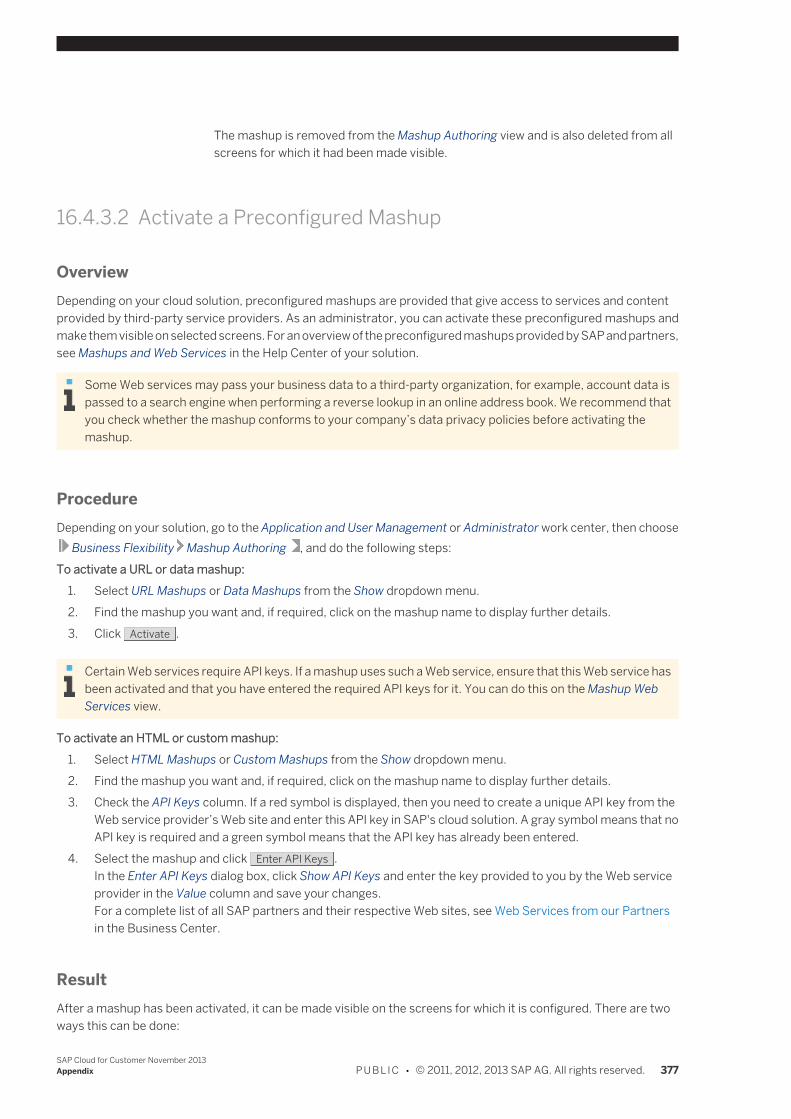
The mashup is removed from the Mashup Authoring view and is also deleted from allscreens for which it had been made visible.
16.4.3.2 Activate a Preconfigured Mashup
OverviewDepending on your cloud solution, preconfigured mashups are provided that give access to services and contentprovided by third-party service providers. As an administrator, you can activate these preconfigured mashups andmake them visible on selected screens. For an overview of the preconfigured mashups provided by SAP and partners,see Mashups and Web Services in the Help Center of your solution.
Some Web services may pass your business data to a third-party organization, for example, account data ispassed to a search engine when performing a reverse lookup in an online address book. We recommend thatyou check whether the mashup conforms to your company’s data privacy policies before activating themashup.
ProcedureDepending on your solution, go to the Application and User Management or Administrator work center, then choose Business Flexibility Mashup Authoring , and do the following steps:To activate a URL or data mashup:
1. Select URL Mashups or Data Mashups from the Show dropdown menu.2. Find the mashup you want and, if required, click on the mashup name to display further details.3. Click Activate .
Certain Web services require API keys. If a mashup uses such a Web service, ensure that this Web service hasbeen activated and that you have entered the required API keys for it. You can do this on the Mashup WebServices view.
To activate an HTML or custom mashup:1. Select HTML Mashups or Custom Mashups from the Show dropdown menu.2. Find the mashup you want and, if required, click on the mashup name to display further details.3. Check the API Keys column. If a red symbol is displayed, then you need to create a unique API key from the
Web service provider’s Web site and enter this API key in SAP's cloud solution. A gray symbol means that noAPI key is required and a green symbol means that the API key has already been entered.
4. Select the mashup and click Enter API Keys .In the Enter API Keys dialog box, click Show API Keys and enter the key provided to you by the Web serviceprovider in the Value column and save your changes.For a complete list of all SAP partners and their respective Web sites, see Web Services from our Partnersin the Business Center.
ResultAfter a mashup has been activated, it can be made visible on the screens for which it is configured. There are twoways this can be done:
SAP Cloud for Customer November 2013Appendix P U B L I C • © 2011, 2012, 2013 SAP AG. All rights reserved. 377
● The administrator does this centrally for all users in the Adapt menu. For more information, see Make aMashup Visible on a Screen [page 379].
● The user does this for himself or herself in the Personalize menu. For more information, see Personalize aMashup.
If a mashup has not yet been activated, the administrator can edit and activate it at a later date fromthe Mashup Authoring view.
16.4.3.3 Activate a Mashup Partner Solution
OverviewAs an administrator, you can activate a mashup partner solution in your SAP cloud solution.
PrerequisitesYou have procured a mashup partner solution from the SAP Store at store.sap.com .
ProcedureCheck Scoping Element
1. Go to the Business Configuration work center, Implementation Projects view.2. Select your project and click Edit Project Scope .3. On step 3 of the Edit Project Scope activity, check that the Communication and Information
Exchange People Collaboration, Intranet and External Services Communities, Document Management andExternal Services scoping element has been selected.
Answer Scoping Question1. On step 4 of the activity, go to Communication and Information Exchange People Collaboration, Intranet
and External Services Communities, Document Management and External Services .2. Select Yes beside the scoping question for the mashup partner solution.3. Complete and deploy your project.
Check Mashup Settings
Depending on your solution, go to Application and User Management Business Flexibility or Administrator Business Flexibility , and do the following steps:
1. In the Mashup Web Services view, check that any Web services belonging to the mashup partner solution areactivated and that API keys have been maintained.
2. In the Mashup Authoring view, check that the mashups belonging to the mashup partner solution are activatedand that any necessary API keys have been maintained.
Note that if the mashup partner solution contains multiple mashups and you only want one of these tobe available to business users, you can deactivate the unwanted mashups in the Mashup Authoringview by selecting the mashup and clicking Deactivate .
378 © 2011, 2012, 2013 SAP AG. All rights reserved. • P U B L I CSAP Cloud for Customer November 2013
Appendix
ResultAfter a mashup has been activated, it can be made visible on the screens for which it is configured. There are twoways this can be done:
● The administrator does this centrally for all users in the Adapt menu. For more information, see Make aMashup Visible on a Screen [page 379].
● The user does this for himself or herself in the Personalize menu. For more information, see Personalize aMashup.
If a mashup has not yet been activated, the administrator can edit and activate it at a later date fromthe Mashup Authoring view.
16.4.3.4 Make a Mashup Visible on a Screen
OverviewAs an administrator, you can add a mashup to a screen and make it visible to all users. Each mashup can be addedto a predefined set of screens based on the mashup category and port binding.
Alternatively, if you do not want to make a mashup visible to all users who have access to a screen, thenindividual users can add the mashups by going to Personalize This Screen . This means that only userswho have personalized the screen will be able to use it. For more information, see Personalize a Mashup.
PrerequisitesThe following prerequisites apply:
● The mashup has been activated. ● The administrator has been assigned to the Flexibility Change Log view in the Application and User
Management work center. This is required to use adaptation mode.
Procedure1. Navigate to the screen on which you want to make the mashup available to all users.2. From the Adapt menu, select Enter Adaptation Mode.
Adaptation mode allows you to make changes to a screen and then test your changes before publishingthem and making them available to all users.
A dialog box is displayed, asking you whether you want to continue.3. Click Yes to confirm.
The Adaptation Mode bar is displayed at the top of the screen.4. From the Adapt menu, select Edit Screen.
The adaptation panel opens on the right side of the screen.5. Click on the Mashups and Web Services pane.
SAP Cloud for Customer November 2013Appendix P U B L I C • © 2011, 2012, 2013 SAP AG. All rights reserved. 379
6. Select the Visible checkbox next to the mashup that you want to be made visible.7. If required, you can adjust the appearance of the mashup by selecting one of the following options under
Properties.
The options available to you will vary depending on the mashup.
● Web Services MenuThe mashup can be accessed from the Web Services menu button that is typically located in themenu bar at the top of a screen.
● Web Services Menu in <name of section> SectionThe mashup can be accessed from a Web Services menu button located in a section of a screen.
● Link in <name of section> SectionThe mashup can be accessed using a link directly embedded in a screen section.
● New Screen SectionThe mashup is embedded directly into the screen as a new section.
● Embedded Near <name of section> SectionThe mashup is embedded directly into the screen as a new section. This section is located beside orbelow the named section.To display an embedded mashup across the full width of the screen rather than the default setting ofhalf screen width, select the Full Width checkbox.
8. If you want to allow the user to display or hide the mashup directly on the screen without needing to go toPersonalize, you can first create an extension field of the type Indicator and make it visible on the screen. Werecommend that the name of the extension field reflects the name of the mashup.Afterwards, you can select this extension field from the dropdown list in the Toggle Display field. This field willthen be displayed on the screen as a checkbox that the user can select or deselect as required.
9. If the Input Binding or Output Binding section is displayed, select the extension fields that should be mappedto the parameters.
10. Save your changes and close the adaptation panel.The screen is refreshed.
11. Test the mashup while still in adaptation mode. For example, you can run the mashup from Web Services .For an embedded mashup, you can view the result directly on the screen.
12. If you are satisfied with the result, select Edit Screen from the Adapt menu.13. In the Mashups and Web Services pane of the adaptation panel, click Publish to publish your adaptation
changes to all users.14. Close the adaptation panel.15. From the Adapt menu, choose Leave Adaptation Mode.
16.4.3.5 Create a URL Mashup
OverviewAs an administrator, you can create URL mashups to send data from your cloud solution to a URL of a Web serviceprovider. The results are displayed on the Web service provider’s Web site, which is opened in a new browser window.
380 © 2011, 2012, 2013 SAP AG. All rights reserved. • P U B L I CSAP Cloud for Customer November 2013
Appendix
Some Web services may pass your business data to a third-party organization, for example, account data ispassed to a search engine when performing a reverse lookup in an online address book. We recommend thatyou check whether the mashup conforms to your company’s data privacy policies before activating themashup.
PrerequisitesYou know the end-point URL of the Web site providing the service. This could be, for example, the search resultspage of an online search provider.
ProcedureGo to the Application and User Management or Administrator work center. Then choose BusinessFlexibility Mashup Authoring . Click New New URL Mashup , and do the following steps:
1. Select a mashup category.The mashup category is used to group mashups by the type of information they provide. It is shown to businessusers when they personalize mashups in the side panel.
2. For the mashup category, you then select the port binding that you want to use in the mashup. This informationis not shown to business users.The port binding defines which screen out-ports or in-ports can be used in the mashup and on which screensthe mashup can be used.
3. Enter a name and a description for the mashup.The mashup name will be displayed to business users when using the mashup.
By default, the mashup has the status Active. This means it will be available for use when saved. If youwant to prevent users from accessing the mashup immediately, change the status to Inactive.
4. Under URL Information, enter the URL of the Web service and click Extract Parameters .The URL can be taken directly, for example, from the search results Web page of an online search provider.Copy and paste this URL directly into the field. The system then extracts all parameters from the URL anddisplays them in the table.
Note that for URLs that do not use queries you can manually add curly brackets around terms thatshould act as placeholders. For example, in the URL https://mail.google.com/mail/#search/SAP, you can replace the word SAP with a search term in curly brackets, for example, {term}.If you then enter https://mail.google.com/mail/#search/{term} in the URL field and click
Extract Parameters , the word in brackets is extracted as a parameter.
5. For any parameters that require a fixed value, check and adjust the value in the Constant column.6. For dynamic parameters, in the Parameter Binding column, map the dynamic parameters to screen out-ports
by selecting an out-port from the value help.The Parameter Binding dialog box displays a list of screen out-ports that have been configured for the selectedmashup category and screen. Select the parameter you want to bind to the URL parameter.Note that If you are creating a mashup for the category route planner, you can also define the following optionalsettings: ● Code Format Conversion: For parameters that contain a code, you can change how code formats are
converted. ● Start Index for List: You can define whether the array parameter starts with 0 or 1.
SAP Cloud for Customer November 2013Appendix P U B L I C • © 2011, 2012, 2013 SAP AG. All rights reserved. 381

● Prefix for First Value/Prefix for Next Value: You can only define prefixes for URLs that have the indexpattern $I and for which the start index has been set to zero.
7. Click the Preview link to display the end result of the mashup.8. Save your changes.
ResultAfter a mashup has been activated, it can be made visible on the screens for which it is configured. There are twoways this can be done:
● The administrator does this centrally for all users in the Adapt menu. For more information, see Make aMashup Visible on a Screen [page 379].
● The user does this for himself or herself in the Personalize menu. For more information, see Personalize aMashup.
If a mashup has not yet been activated, the administrator can edit and activate it at a later date fromthe Mashup Authoring view.
16.4.3.6 Create a Data Mashup
OverviewAs an administrator, you can create data mashups for integrating data provided by third-party Web services withbusiness data from your SAP cloud solution.
Some Web services may pass your business data to a third-party organization, for example, account data ispassed to a search engine when performing a reverse lookup in an online address book. We recommend thatyou check whether the mashup conforms to your company’s data privacy policies before activating themashup.
PrerequisitesYou have either integrated a new Web service or have decided to base your mashup on one or more of thepreconfigured Web services provided by SAP or partners.
Web services that you have integrated for use in data mashups must use the XML service protocol.
Depending on your solution, you can display a list of available Web services in the Application and UserManagement or Administrator work center. Go to Business Flexibility Mashup Web Services .For more information about integrating a new Web service, see Create a Mashup Web Service [page 373].
ProcedureDepending on your solution, go to the Application and User Management or Administrator work center. Then choose Business Flexibility Mashup Authoring . Click New New Data Mashup , and do the following steps:
382 © 2011, 2012, 2013 SAP AG. All rights reserved. • P U B L I CSAP Cloud for Customer November 2013
Appendix
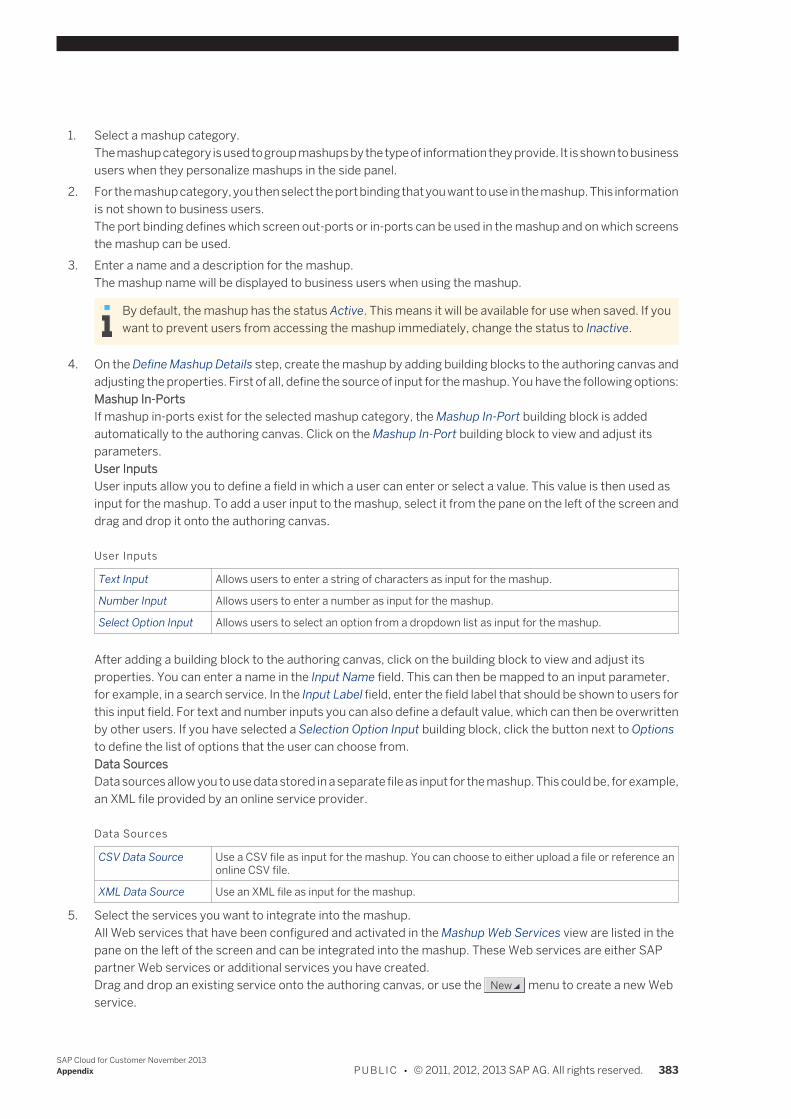
1. Select a mashup category.The mashup category is used to group mashups by the type of information they provide. It is shown to businessusers when they personalize mashups in the side panel.
2. For the mashup category, you then select the port binding that you want to use in the mashup. This informationis not shown to business users.The port binding defines which screen out-ports or in-ports can be used in the mashup and on which screensthe mashup can be used.
3. Enter a name and a description for the mashup.The mashup name will be displayed to business users when using the mashup.
By default, the mashup has the status Active. This means it will be available for use when saved. If youwant to prevent users from accessing the mashup immediately, change the status to Inactive.
4. On the Define Mashup Details step, create the mashup by adding building blocks to the authoring canvas andadjusting the properties. First of all, define the source of input for the mashup. You have the following options:Mashup In-PortsIf mashup in-ports exist for the selected mashup category, the Mashup In-Port building block is addedautomatically to the authoring canvas. Click on the Mashup In-Port building block to view and adjust itsparameters.User InputsUser inputs allow you to define a field in which a user can enter or select a value. This value is then used asinput for the mashup. To add a user input to the mashup, select it from the pane on the left of the screen anddrag and drop it onto the authoring canvas.
User Inputs
Text Input Allows users to enter a string of characters as input for the mashup.
Number Input Allows users to enter a number as input for the mashup.
Select Option Input Allows users to select an option from a dropdown list as input for the mashup.
After adding a building block to the authoring canvas, click on the building block to view and adjust itsproperties. You can enter a name in the Input Name field. This can then be mapped to an input parameter,for example, in a search service. In the Input Label field, enter the field label that should be shown to users forthis input field. For text and number inputs you can also define a default value, which can then be overwrittenby other users. If you have selected a Selection Option Input building block, click the button next to Optionsto define the list of options that the user can choose from.Data SourcesData sources allow you to use data stored in a separate file as input for the mashup. This could be, for example,an XML file provided by an online service provider.
Data Sources
CSV Data Source Use a CSV file as input for the mashup. You can choose to either upload a file or reference anonline CSV file.
XML Data Source Use an XML file as input for the mashup.
5. Select the services you want to integrate into the mashup.All Web services that have been configured and activated in the Mashup Web Services view are listed in thepane on the left of the screen and can be integrated into the mashup. These Web services are either SAPpartner Web services or additional services you have created.Drag and drop an existing service onto the authoring canvas, or use the New menu to create a new Webservice.
SAP Cloud for Customer November 2013Appendix P U B L I C • © 2011, 2012, 2013 SAP AG. All rights reserved. 383
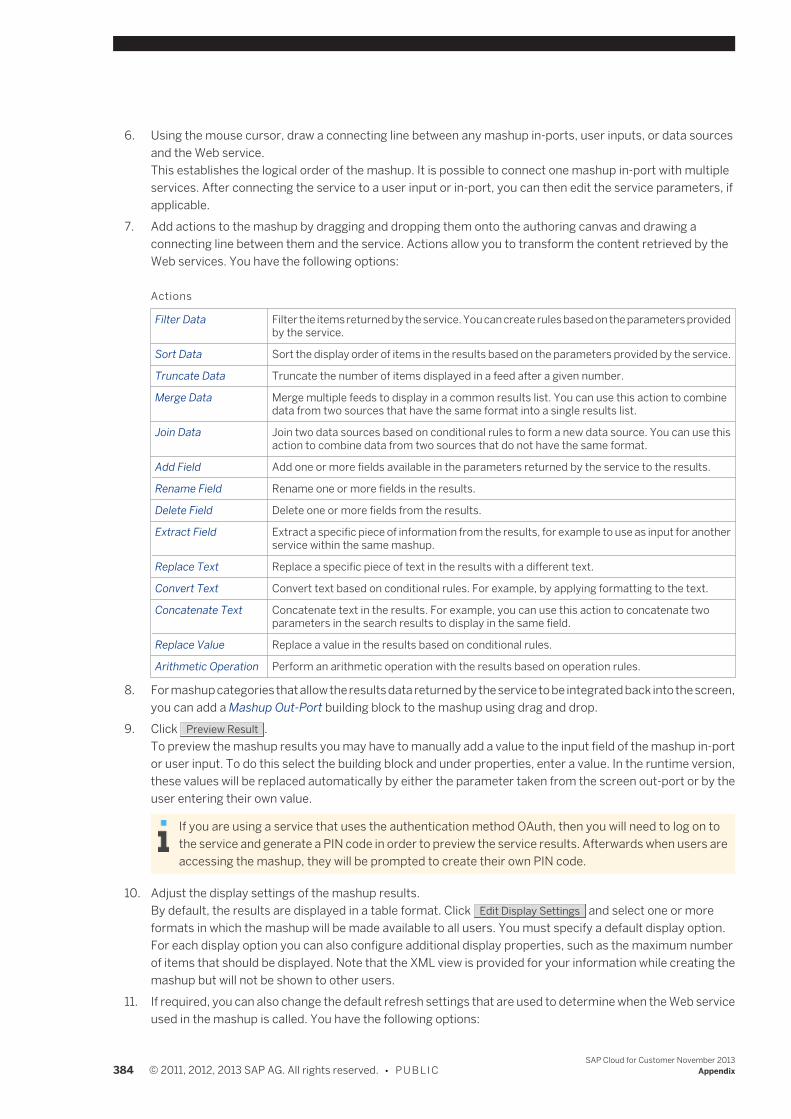
6. Using the mouse cursor, draw a connecting line between any mashup in-ports, user inputs, or data sourcesand the Web service.This establishes the logical order of the mashup. It is possible to connect one mashup in-port with multipleservices. After connecting the service to a user input or in-port, you can then edit the service parameters, ifapplicable.
7. Add actions to the mashup by dragging and dropping them onto the authoring canvas and drawing aconnecting line between them and the service. Actions allow you to transform the content retrieved by theWeb services. You have the following options:
Actions
Filter Data Filter the items returned by the service. You can create rules based on the parameters providedby the service.
Sort Data Sort the display order of items in the results based on the parameters provided by the service.
Truncate Data Truncate the number of items displayed in a feed after a given number.
Merge Data Merge multiple feeds to display in a common results list. You can use this action to combinedata from two sources that have the same format into a single results list.
Join Data Join two data sources based on conditional rules to form a new data source. You can use thisaction to combine data from two sources that do not have the same format.
Add Field Add one or more fields available in the parameters returned by the service to the results.
Rename Field Rename one or more fields in the results.
Delete Field Delete one or more fields from the results.
Extract Field Extract a specific piece of information from the results, for example to use as input for anotherservice within the same mashup.
Replace Text Replace a specific piece of text in the results with a different text.
Convert Text Convert text based on conditional rules. For example, by applying formatting to the text.
Concatenate Text Concatenate text in the results. For example, you can use this action to concatenate twoparameters in the search results to display in the same field.
Replace Value Replace a value in the results based on conditional rules.
Arithmetic Operation Perform an arithmetic operation with the results based on operation rules.
8. For mashup categories that allow the results data returned by the service to be integrated back into the screen,you can add a Mashup Out-Port building block to the mashup using drag and drop.
9. Click Preview Result .To preview the mashup results you may have to manually add a value to the input field of the mashup in-portor user input. To do this select the building block and under properties, enter a value. In the runtime version,these values will be replaced automatically by either the parameter taken from the screen out-port or by theuser entering their own value.
If you are using a service that uses the authentication method OAuth, then you will need to log on tothe service and generate a PIN code in order to preview the service results. Afterwards when users areaccessing the mashup, they will be prompted to create their own PIN code.
10. Adjust the display settings of the mashup results.By default, the results are displayed in a table format. Click Edit Display Settings and select one or moreformats in which the mashup will be made available to all users. You must specify a default display option.For each display option you can also configure additional display properties, such as the maximum numberof items that should be displayed. Note that the XML view is provided for your information while creating themashup but will not be shown to other users.
11. If required, you can also change the default refresh settings that are used to determine when the Web serviceused in the mashup is called. You have the following options:
384 © 2011, 2012, 2013 SAP AG. All rights reserved. • P U B L I CSAP Cloud for Customer November 2013
Appendix
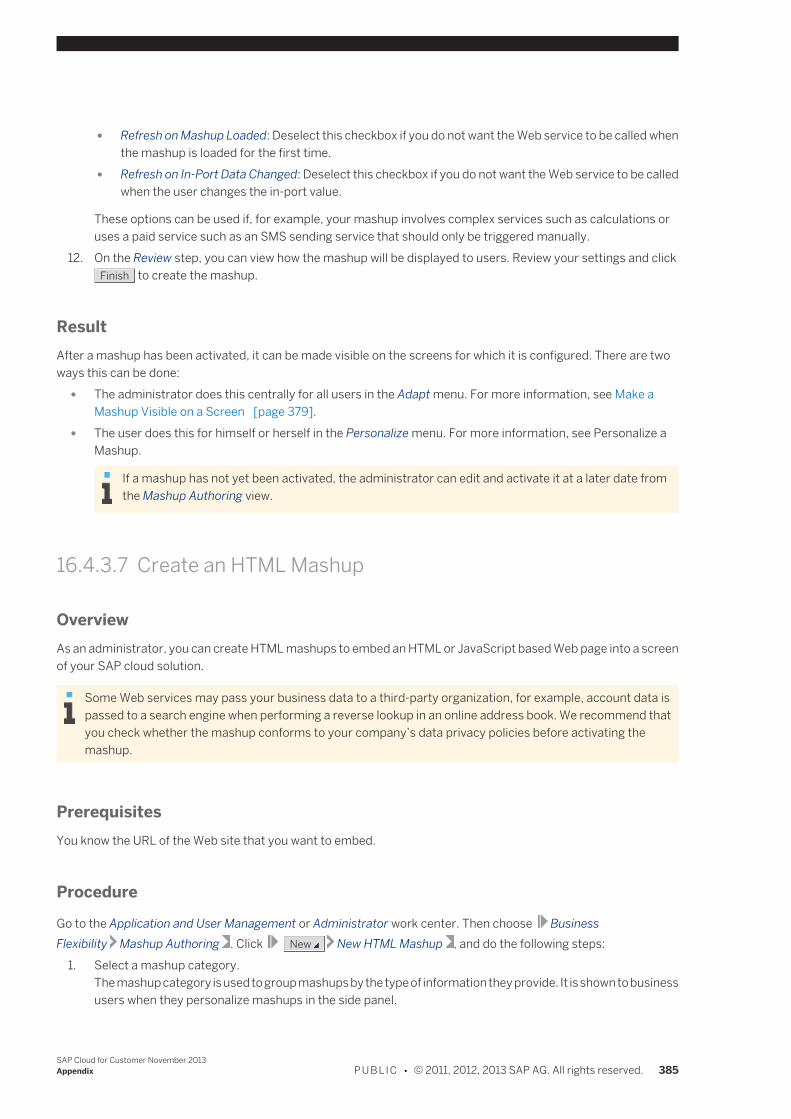
● Refresh on Mashup Loaded: Deselect this checkbox if you do not want the Web service to be called whenthe mashup is loaded for the first time.
● Refresh on In-Port Data Changed: Deselect this checkbox if you do not want the Web service to be calledwhen the user changes the in-port value.
These options can be used if, for example, your mashup involves complex services such as calculations oruses a paid service such as an SMS sending service that should only be triggered manually.
12. On the Review step, you can view how the mashup will be displayed to users. Review your settings and clickFinish to create the mashup.
ResultAfter a mashup has been activated, it can be made visible on the screens for which it is configured. There are twoways this can be done:
● The administrator does this centrally for all users in the Adapt menu. For more information, see Make aMashup Visible on a Screen [page 379].
● The user does this for himself or herself in the Personalize menu. For more information, see Personalize aMashup.
If a mashup has not yet been activated, the administrator can edit and activate it at a later date fromthe Mashup Authoring view.
16.4.3.7 Create an HTML Mashup
OverviewAs an administrator, you can create HTML mashups to embed an HTML or JavaScript based Web page into a screenof your SAP cloud solution.
Some Web services may pass your business data to a third-party organization, for example, account data ispassed to a search engine when performing a reverse lookup in an online address book. We recommend thatyou check whether the mashup conforms to your company’s data privacy policies before activating themashup.
PrerequisitesYou know the URL of the Web site that you want to embed.
ProcedureGo to the Application and User Management or Administrator work center. Then choose BusinessFlexibility Mashup Authoring . Click New New HTML Mashup , and do the following steps:
1. Select a mashup category.The mashup category is used to group mashups by the type of information they provide. It is shown to businessusers when they personalize mashups in the side panel.
SAP Cloud for Customer November 2013Appendix P U B L I C • © 2011, 2012, 2013 SAP AG. All rights reserved. 385
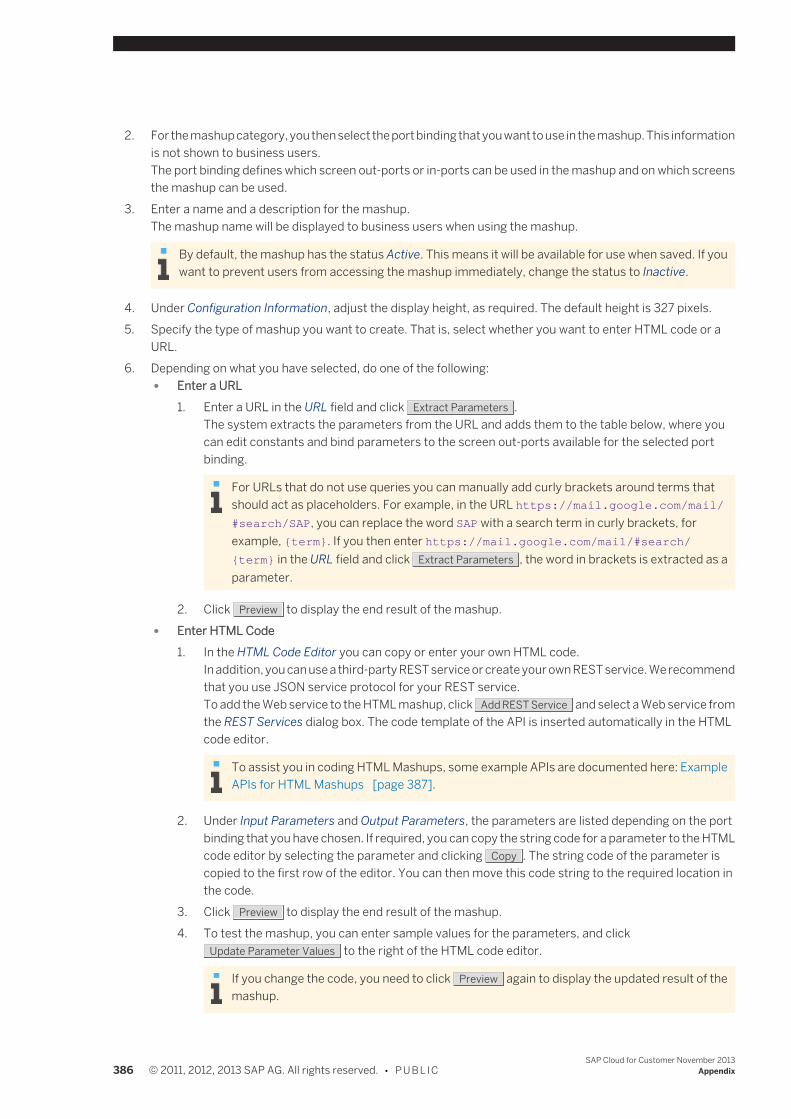
2. For the mashup category, you then select the port binding that you want to use in the mashup. This informationis not shown to business users.The port binding defines which screen out-ports or in-ports can be used in the mashup and on which screensthe mashup can be used.
3. Enter a name and a description for the mashup.The mashup name will be displayed to business users when using the mashup.
By default, the mashup has the status Active. This means it will be available for use when saved. If youwant to prevent users from accessing the mashup immediately, change the status to Inactive.
4. Under Configuration Information, adjust the display height, as required. The default height is 327 pixels.5. Specify the type of mashup you want to create. That is, select whether you want to enter HTML code or a
URL.6. Depending on what you have selected, do one of the following:
● Enter a URL1. Enter a URL in the URL field and click Extract Parameters .
The system extracts the parameters from the URL and adds them to the table below, where youcan edit constants and bind parameters to the screen out-ports available for the selected portbinding.
For URLs that do not use queries you can manually add curly brackets around terms thatshould act as placeholders. For example, in the URL https://mail.google.com/mail/#search/SAP, you can replace the word SAP with a search term in curly brackets, forexample, {term}. If you then enter https://mail.google.com/mail/#search/{term} in the URL field and click Extract Parameters , the word in brackets is extracted as aparameter.
2. Click Preview to display the end result of the mashup. ● Enter HTML Code
1. In the HTML Code Editor you can copy or enter your own HTML code.In addition, you can use a third-party REST service or create your own REST service. We recommendthat you use JSON service protocol for your REST service.To add the Web service to the HTML mashup, click Add REST Service and select a Web service fromthe REST Services dialog box. The code template of the API is inserted automatically in the HTMLcode editor.
To assist you in coding HTML Mashups, some example APIs are documented here: ExampleAPIs for HTML Mashups [page 387].
2. Under Input Parameters and Output Parameters, the parameters are listed depending on the portbinding that you have chosen. If required, you can copy the string code for a parameter to the HTMLcode editor by selecting the parameter and clicking Copy . The string code of the parameter iscopied to the first row of the editor. You can then move this code string to the required location inthe code.
3. Click Preview to display the end result of the mashup.4. To test the mashup, you can enter sample values for the parameters, and click
Update Parameter Values to the right of the HTML code editor.
If you change the code, you need to click Preview again to display the updated result of themashup.
386 © 2011, 2012, 2013 SAP AG. All rights reserved. • P U B L I CSAP Cloud for Customer November 2013
Appendix
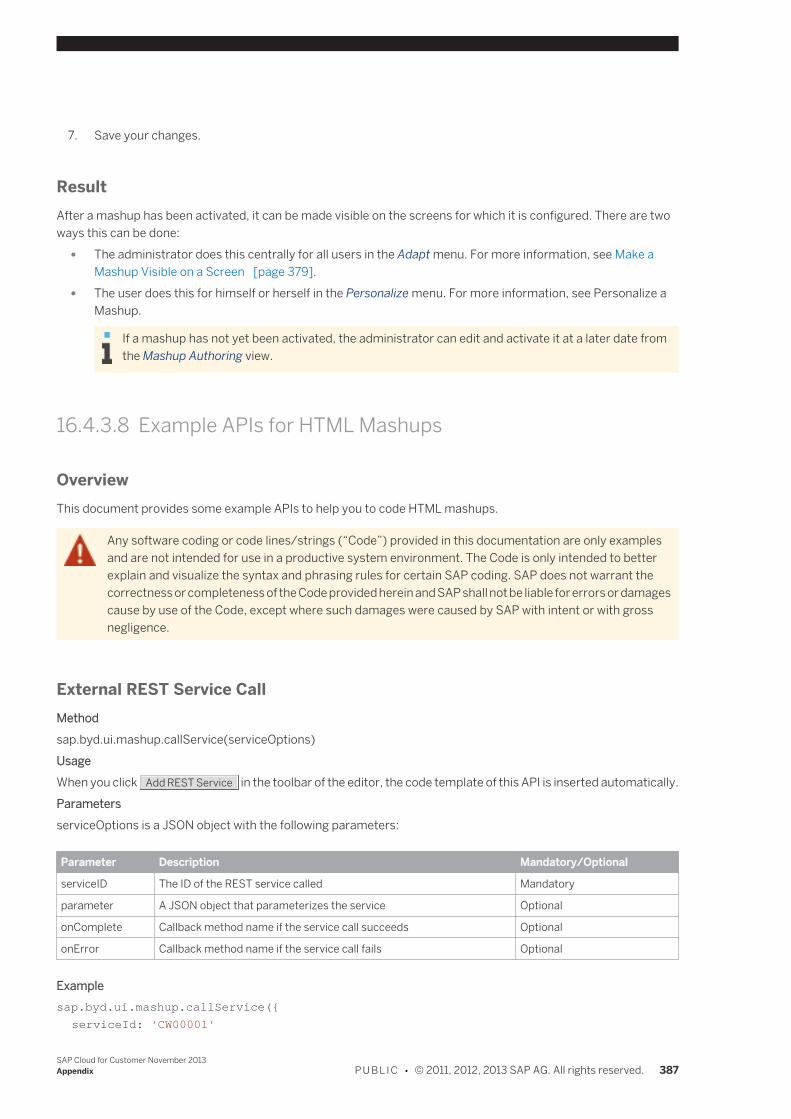
7. Save your changes.
ResultAfter a mashup has been activated, it can be made visible on the screens for which it is configured. There are twoways this can be done:
● The administrator does this centrally for all users in the Adapt menu. For more information, see Make aMashup Visible on a Screen [page 379].
● The user does this for himself or herself in the Personalize menu. For more information, see Personalize aMashup.
If a mashup has not yet been activated, the administrator can edit and activate it at a later date fromthe Mashup Authoring view.
16.4.3.8 Example APIs for HTML Mashups
OverviewThis document provides some example APIs to help you to code HTML mashups.
Any software coding or code lines/strings (“Code”) provided in this documentation are only examplesand are not intended for use in a productive system environment. The Code is only intended to betterexplain and visualize the syntax and phrasing rules for certain SAP coding. SAP does not warrant thecorrectness or completeness of the Code provided herein and SAP shall not be liable for errors or damagescause by use of the Code, except where such damages were caused by SAP with intent or with grossnegligence.
External REST Service CallMethodsap.byd.ui.mashup.callService(serviceOptions)UsageWhen you click Add REST Service in the toolbar of the editor, the code template of this API is inserted automatically.ParametersserviceOptions is a JSON object with the following parameters:
Parameter Description Mandatory/Optional
serviceID The ID of the REST service called Mandatory
parameter A JSON object that parameterizes the service Optional
onComplete Callback method name if the service call succeeds Optional
onError Callback method name if the service call fails Optional
Examplesap.byd.ui.mashup.callService({
serviceId: 'CW00001'
SAP Cloud for Customer November 2013Appendix P U B L I C • © 2011, 2012, 2013 SAP AG. All rights reserved. 387
parameter: {'query': 'SAP',},
onComplete: 'serviceCallback_CW00001',
onError: 'exceptionHandler_CW00001'
});
Responding to Application Context UpdateMethodsap.byd.ui.mashup.onContextUpdate()UsageIf a port binding is assigned in the mashup, all the context parameters from out-port of the application and the pre-defined system parameters are displayed in the Input Parameters table. If you select an input parameter and click
Copy , the system automatically copies the parameter in the selected row as a code string to the first line of theeditor. You can then move this code string to the required location in the code.After you have finished entering the code and clicked Preview to preview the results of the mashup, you can testthe onContextUpdate API. Enter sample values for the input parameters and then click Update Parameter Values .ParametersThe context can be accessed via sap.byd.ui.mashup.context, which is a JSON object with the following objects:
● In-portif the mashup defines port binding, the values from the corresponding application out-port can be accessedby using inport.ParameterName.
● SystemMashup system parameters
Parameter Description
system.LogonLanguage Current display language in your SAP solution
system.ProductVersion Current version of your SAP solution
system.ShortHostname Short host name of your SAP solution
Examplesap.byd.ui.mashup.onContextUpdate = function() {
var ctx = sap.byd.ui.mashup.context;
// context parameters
console.log('Logon language:' + ctx.system.LogonLanguage);
// whole list of parameters for Port Binding Reverse Lookup
console.log('Company name:' + ctx.inport.CompanyName);
console.log('Address:' + ctx.inport.Address);
console.log('Street:' + ctx.inport.AddressStreet);
console.log('Street with house No.:' + ctx.inport.AddressStreetHouseNumber);
console.log('House No.:' + ctx.inport.AddressHouseNumber);
console.log('City:' + ctx.inport.AddressCity);
console.log('Country:' + ctx.inport.AddrssCountry);
console.log('Country code:' + ctx.inport.AddressCountryCode);
console.log('Postal code:' + ctx.inport.AddressPostalCode);
console.log('State/province:' + ctx.inport.AddressStateProvince);
console.log('State/province code:' + ctx.inport.AddressStateProvinceCode);
};
388 © 2011, 2012, 2013 SAP AG. All rights reserved. • P U B L I CSAP Cloud for Customer November 2013
Appendix
Write Back Data to Application UIMethodsap.byd.ui.mashup.fireResultUpdate(resultObject)UsageTo consume this API, a writeback port binding (for example, Reverse Lookup) should be specified in the mashup.The Output Parameters table contains the parameters used to write back data to the corresponding application in-port. Click Copy to copy the corresponding parameter of the selected row to the editor. Using this API method, thepreview values are filled with the values from the HTML application.ParametersresultObject is a JSON object which reflects the corresponding in-port of the application UI.Example// Example: Port Binding Reverse Lookup
// Address is a local object.
sap.byd.ui.mashup.fireResultUpdate({
'CompanyName': address.name,
'AddressStreetHouseNumber': address.street,
'AddressStreet': address.street,
'AddressCountryCode': address.country,
'AddressStateProvinceCode': address.state,
'AddressCity': address.city,
'AddressPostalCode': address.zipCode
});
See AlsoCreate an HTML Mashup [page 385]
16.4.3.9 Create a Mashup for an Extension Field
OverviewAs an administrator, you can create a mashup and use an existing extension field as a parameter in the mashup.After you have activated the mashup and made it visible on the screen, an end user can enter data in the extensionfield to call up the Web service for this mashup. For a data mashup, the result of the mashup is transferred back tothe extension field in SAP's cloud solution.
PrerequisitesAn extension field has been created and made visible on the screen to which you want to add the mashup.
SAP Cloud for Customer November 2013Appendix P U B L I C • © 2011, 2012, 2013 SAP AG. All rights reserved. 389
ProcedureFirst create the mashup, then add it to a screen. Depending on your solution, go to the Application and UserManagement or Administrator work center. Then choose Business Flexibility Mashup Authoring ,and do thefollowing steps:Create the Mashup
1. In the Mashup Authoring view, click New and select the required mashup type.2. Select a mashup category that reflects the type of content that the mashup will contain. The mashup category
is displayed to business users when they personalize the mashup.3. Leave the Port Binding field empty.4. Continue creating the mashup and then save your changes.5. Check that the mashup has been activated.
Add Mashup to Screen1. To add the mashup to a screen, go to the screen where the extension field is visible and where you want to
add the mashup.2. Click Adapt , then choose Enter Adaptation Mode.3. Click Adapt again, then choose Edit Screen.4. In the side panel, click Mashups and Web Services.5. Select the mashup that you created. Under Input Binding or Output Binding, select the extension field from
the dropdown list beside the parameter name.
Only extension fields that have been made visible on the screen are available in the dropdown list.
6. Adjust the appearance of the mashup, as required.The appearance options may vary depending on the extension field that you selected.
7. Make the mashup visible and publish your changes.
16.4.3.10 Mashup Categories
OverviewWhen you create a new mashup, you need to select a mashup category. Mashup categories are used to grouptogether mashups by the type of service or information that they provide. Depending on the mashup categoryselected, you can then select a port binding. This defines the screen out-port parameters that can be used in amashup and the screens on which the mashup can then be made visible.
FeaturesThe following table gives an overview of the different mashup categories available in SAP's cloud solutions, and thetype of information available for use in each mashup category. The out-port type corresponds to one or moreparameters that can be used when creating a mashup.
390 © 2011, 2012, 2013 SAP AG. All rights reserved. • P U B L I CSAP Cloud for Customer November 2013
Appendix
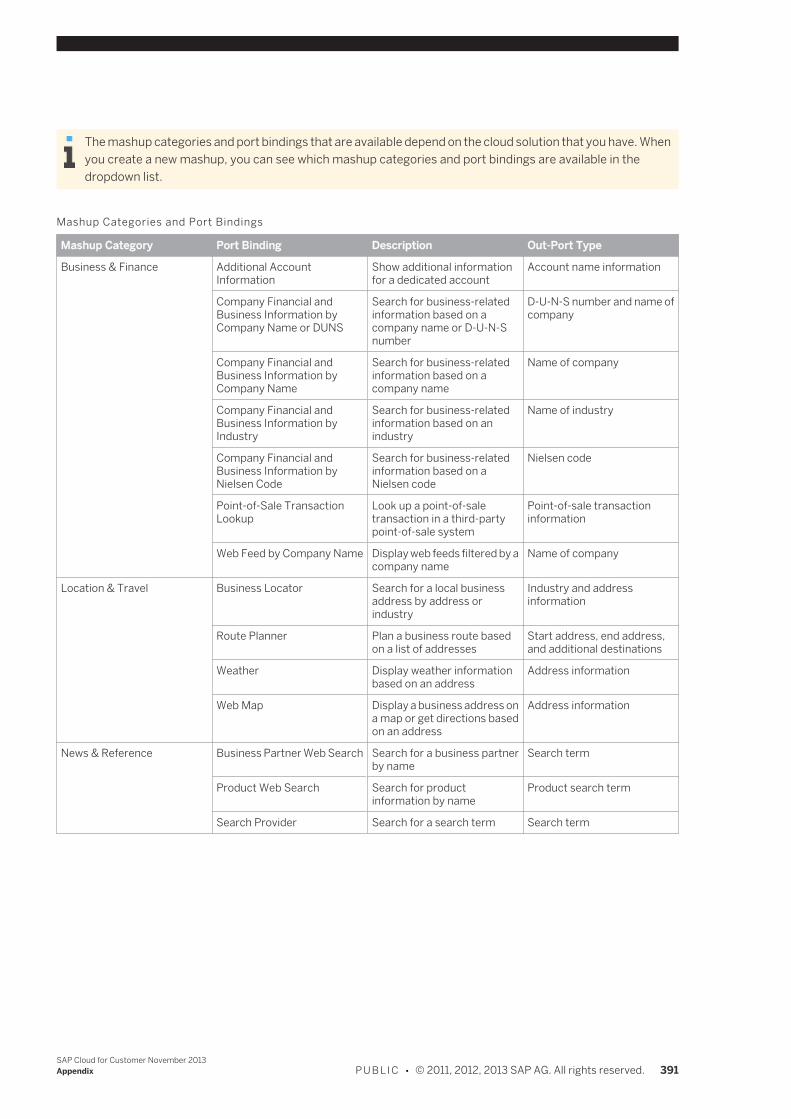
The mashup categories and port bindings that are available depend on the cloud solution that you have. Whenyou create a new mashup, you can see which mashup categories and port bindings are available in thedropdown list.
Mashup Categories and Port Bindings
Mashup Category Port Binding Description Out-Port Type
Business & Finance Additional AccountInformation
Show additional informationfor a dedicated account
Account name information
Company Financial andBusiness Information byCompany Name or DUNS
Search for business-relatedinformation based on acompany name or D-U-N-Snumber
D-U-N-S number and name ofcompany
Company Financial andBusiness Information byCompany Name
Search for business-relatedinformation based on acompany name
Name of company
Company Financial andBusiness Information byIndustry
Search for business-relatedinformation based on anindustry
Name of industry
Company Financial andBusiness Information byNielsen Code
Search for business-relatedinformation based on aNielsen code
Nielsen code
Point-of-Sale TransactionLookup
Look up a point-of-saletransaction in a third-partypoint-of-sale system
Point-of-sale transactioninformation
Web Feed by Company Name Display web feeds filtered by acompany name
Name of company
Location & Travel Business Locator Search for a local businessaddress by address orindustry
Industry and addressinformation
Route Planner Plan a business route basedon a list of addresses
Start address, end address,and additional destinations
Weather Display weather informationbased on an address
Address information
Web Map Display a business address ona map or get directions basedon an address
Address information
News & Reference Business Partner Web Search Search for a business partnerby name
Search term
Product Web Search Search for productinformation by name
Product search term
Search Provider Search for a search term Search term
SAP Cloud for Customer November 2013Appendix P U B L I C • © 2011, 2012, 2013 SAP AG. All rights reserved. 391
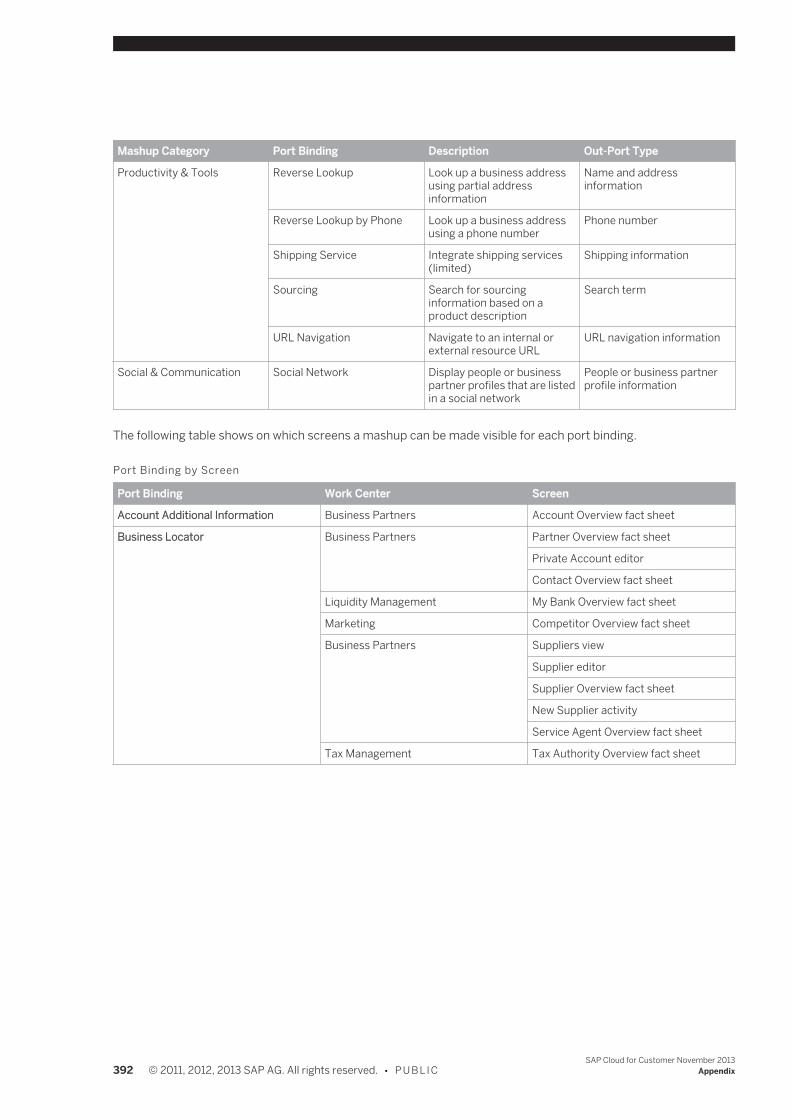
Mashup Category Port Binding Description Out-Port Type
Productivity & Tools Reverse Lookup Look up a business addressusing partial addressinformation
Name and addressinformation
Reverse Lookup by Phone Look up a business addressusing a phone number
Phone number
Shipping Service Integrate shipping services(limited)
Shipping information
Sourcing Search for sourcinginformation based on aproduct description
Search term
URL Navigation Navigate to an internal orexternal resource URL
URL navigation information
Social & Communication Social Network Display people or businesspartner profiles that are listedin a social network
People or business partnerprofile information
The following table shows on which screens a mashup can be made visible for each port binding.
Port Binding by Screen
Port Binding Work Center Screen
Account Additional Information Business Partners Account Overview fact sheet
Business Locator Business Partners Partner Overview fact sheet
Private Account editor
Contact Overview fact sheet
Liquidity Management My Bank Overview fact sheet
Marketing Competitor Overview fact sheet
Business Partners Suppliers view
Supplier editor
Supplier Overview fact sheet
New Supplier activity
Service Agent Overview fact sheet
Tax Management Tax Authority Overview fact sheet
392 © 2011, 2012, 2013 SAP AG. All rights reserved. • P U B L I CSAP Cloud for Customer November 2013
Appendix
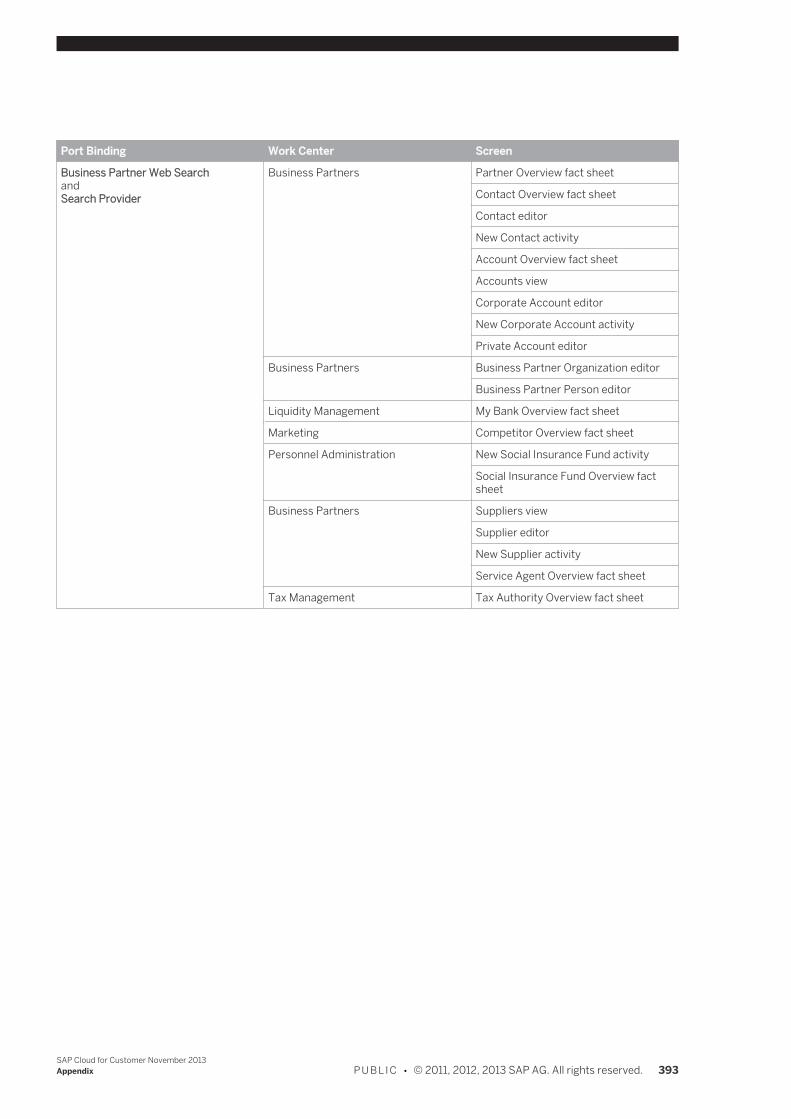
Port Binding Work Center Screen
Business Partner Web SearchandSearch Provider
Business Partners Partner Overview fact sheet
Contact Overview fact sheet
Contact editor
New Contact activity
Account Overview fact sheet
Accounts view
Corporate Account editor
New Corporate Account activity
Private Account editor
Business Partners Business Partner Organization editor
Business Partner Person editor
Liquidity Management My Bank Overview fact sheet
Marketing Competitor Overview fact sheet
Personnel Administration New Social Insurance Fund activity
Social Insurance Fund Overview factsheet
Business Partners Suppliers view
Supplier editor
New Supplier activity
Service Agent Overview fact sheet
Tax Management Tax Authority Overview fact sheet
SAP Cloud for Customer November 2013Appendix P U B L I C • © 2011, 2012, 2013 SAP AG. All rights reserved. 393
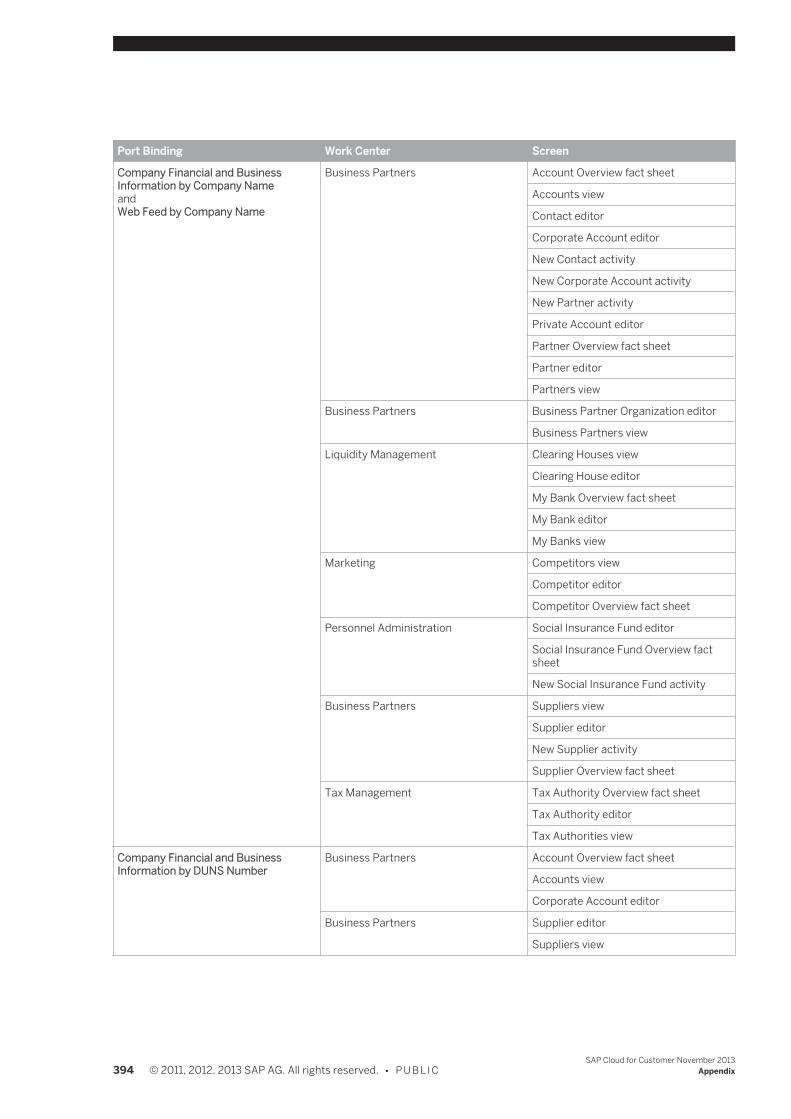
Port Binding Work Center Screen
Company Financial and BusinessInformation by Company NameandWeb Feed by Company Name
Business Partners Account Overview fact sheet
Accounts view
Contact editor
Corporate Account editor
New Contact activity
New Corporate Account activity
New Partner activity
Private Account editor
Partner Overview fact sheet
Partner editor
Partners view
Business Partners Business Partner Organization editor
Business Partners view
Liquidity Management Clearing Houses view
Clearing House editor
My Bank Overview fact sheet
My Bank editor
My Banks view
Marketing Competitors view
Competitor editor
Competitor Overview fact sheet
Personnel Administration Social Insurance Fund editor
Social Insurance Fund Overview factsheet
New Social Insurance Fund activity
Business Partners Suppliers view
Supplier editor
New Supplier activity
Supplier Overview fact sheet
Tax Management Tax Authority Overview fact sheet
Tax Authority editor
Tax Authorities view
Company Financial and BusinessInformation by DUNS Number
Business Partners Account Overview fact sheet
Accounts view
Corporate Account editor
Business Partners Supplier editor
Suppliers view
394 © 2011, 2012, 2013 SAP AG. All rights reserved. • P U B L I CSAP Cloud for Customer November 2013
Appendix
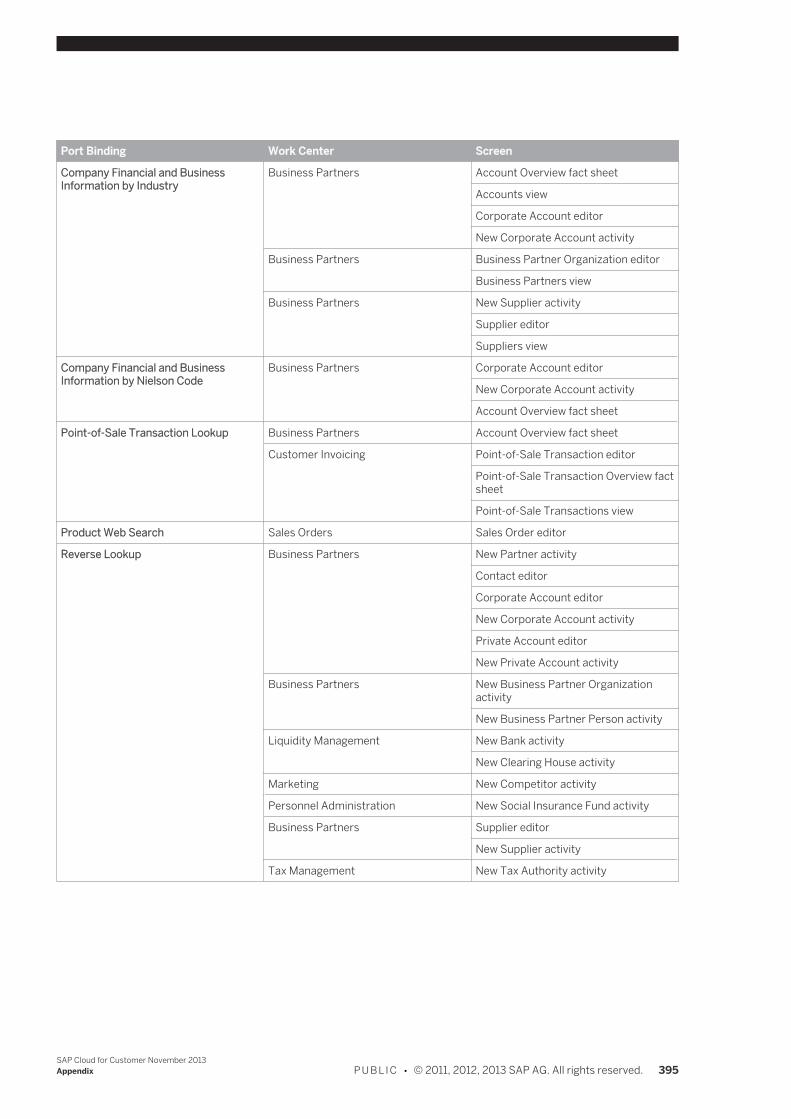
Port Binding Work Center Screen
Company Financial and BusinessInformation by Industry
Business Partners Account Overview fact sheet
Accounts view
Corporate Account editor
New Corporate Account activity
Business Partners Business Partner Organization editor
Business Partners view
Business Partners New Supplier activity
Supplier editor
Suppliers view
Company Financial and BusinessInformation by Nielson Code
Business Partners Corporate Account editor
New Corporate Account activity
Account Overview fact sheet
Point-of-Sale Transaction Lookup Business Partners Account Overview fact sheet
Customer Invoicing Point-of-Sale Transaction editor
Point-of-Sale Transaction Overview factsheet
Point-of-Sale Transactions view
Product Web Search Sales Orders Sales Order editor
Reverse Lookup Business Partners New Partner activity
Contact editor
Corporate Account editor
New Corporate Account activity
Private Account editor
New Private Account activity
Business Partners New Business Partner Organizationactivity
New Business Partner Person activity
Liquidity Management New Bank activity
New Clearing House activity
Marketing New Competitor activity
Personnel Administration New Social Insurance Fund activity
Business Partners Supplier editor
New Supplier activity
Tax Management New Tax Authority activity
SAP Cloud for Customer November 2013Appendix P U B L I C • © 2011, 2012, 2013 SAP AG. All rights reserved. 395
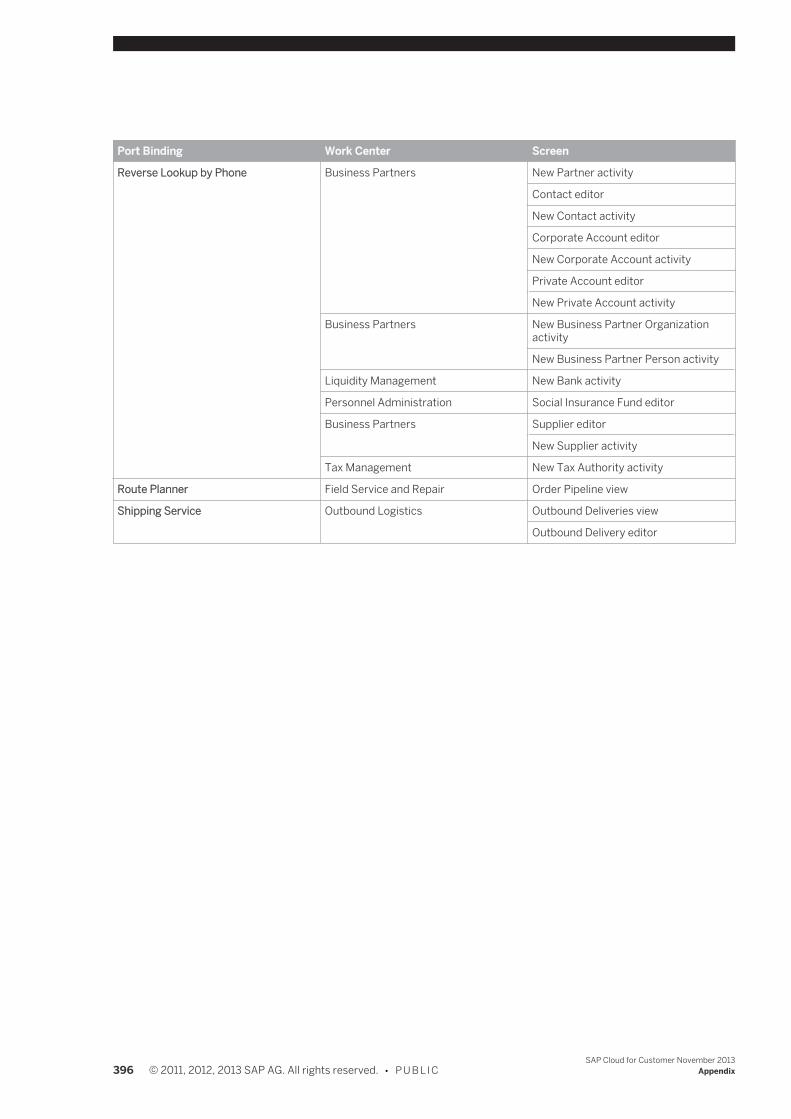
Port Binding Work Center Screen
Reverse Lookup by Phone Business Partners New Partner activity
Contact editor
New Contact activity
Corporate Account editor
New Corporate Account activity
Private Account editor
New Private Account activity
Business Partners New Business Partner Organizationactivity
New Business Partner Person activity
Liquidity Management New Bank activity
Personnel Administration Social Insurance Fund editor
Business Partners Supplier editor
New Supplier activity
Tax Management New Tax Authority activity
Route Planner Field Service and Repair Order Pipeline view
Shipping Service Outbound Logistics Outbound Deliveries view
Outbound Delivery editor
396 © 2011, 2012, 2013 SAP AG. All rights reserved. • P U B L I CSAP Cloud for Customer November 2013
Appendix
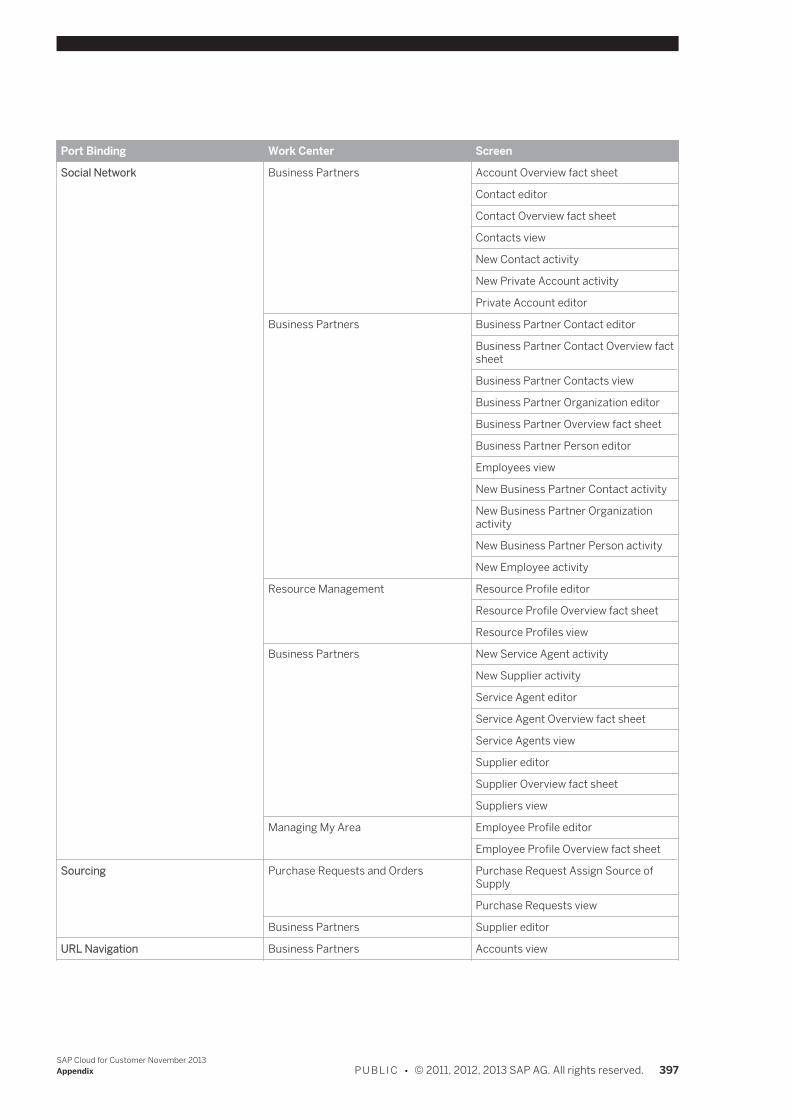
Port Binding Work Center Screen
Social Network Business Partners Account Overview fact sheet
Contact editor
Contact Overview fact sheet
Contacts view
New Contact activity
New Private Account activity
Private Account editor
Business Partners Business Partner Contact editor
Business Partner Contact Overview factsheet
Business Partner Contacts view
Business Partner Organization editor
Business Partner Overview fact sheet
Business Partner Person editor
Employees view
New Business Partner Contact activity
New Business Partner Organizationactivity
New Business Partner Person activity
New Employee activity
Resource Management Resource Profile editor
Resource Profile Overview fact sheet
Resource Profiles view
Business Partners New Service Agent activity
New Supplier activity
Service Agent editor
Service Agent Overview fact sheet
Service Agents view
Supplier editor
Supplier Overview fact sheet
Suppliers view
Managing My Area Employee Profile editor
Employee Profile Overview fact sheet
Sourcing Purchase Requests and Orders Purchase Request Assign Source ofSupply
Purchase Requests view
Business Partners Supplier editor
URL Navigation Business Partners Accounts view
SAP Cloud for Customer November 2013Appendix P U B L I C • © 2011, 2012, 2013 SAP AG. All rights reserved. 397
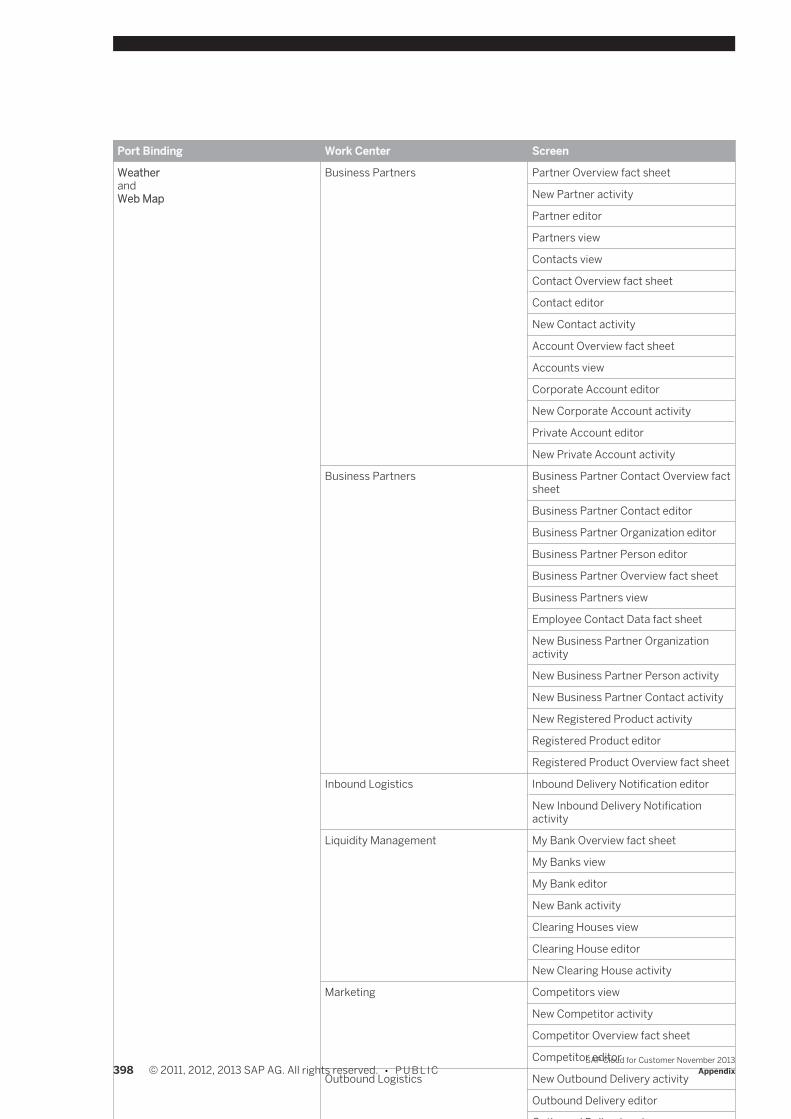
Port Binding Work Center Screen
WeatherandWeb Map
Business Partners Partner Overview fact sheet
New Partner activity
Partner editor
Partners view
Contacts view
Contact Overview fact sheet
Contact editor
New Contact activity
Account Overview fact sheet
Accounts view
Corporate Account editor
New Corporate Account activity
Private Account editor
New Private Account activity
Business Partners Business Partner Contact Overview factsheet
Business Partner Contact editor
Business Partner Organization editor
Business Partner Person editor
Business Partner Overview fact sheet
Business Partners view
Employee Contact Data fact sheet
New Business Partner Organizationactivity
New Business Partner Person activity
New Business Partner Contact activity
New Registered Product activity
Registered Product editor
Registered Product Overview fact sheet
Inbound Logistics Inbound Delivery Notification editor
New Inbound Delivery Notificationactivity
Liquidity Management My Bank Overview fact sheet
My Banks view
My Bank editor
New Bank activity
Clearing Houses view
Clearing House editor
New Clearing House activity
Marketing Competitors view
New Competitor activity
Competitor Overview fact sheet
Competitor editor
Outbound Logistics New Outbound Delivery activity
Outbound Delivery editor
Outbound Deliveries view
Personnel Administration New Social Insurance Fund activity
Social Insurance Fund editor
Social Insurance Fund Overview factsheet
New Business New Sales Quote activity
Sales Quote editor
Sales Quote Overview fact sheet
Sales Orders New Sales Order activity
Sales Order editor
Sales Order Overview fact sheet
Service Orders Service Order Overview fact sheet
Business Partners Service Agent Overview fact sheet
New Service Agent activity
Service Agent editor
Service Agents view
Supplier Overview fact sheet
Supplier editor
Suppliers view
New Supplier activity
Supply Chain Design Master Data Location editor
Location Overview fact sheet
Locations view
Tax Management New Tax Authority activity
Tax Authority editor
Tax Authority Overview fact sheet
Tax Authorities view
398 © 2011, 2012, 2013 SAP AG. All rights reserved. • P U B L I CSAP Cloud for Customer November 2013
Appendix
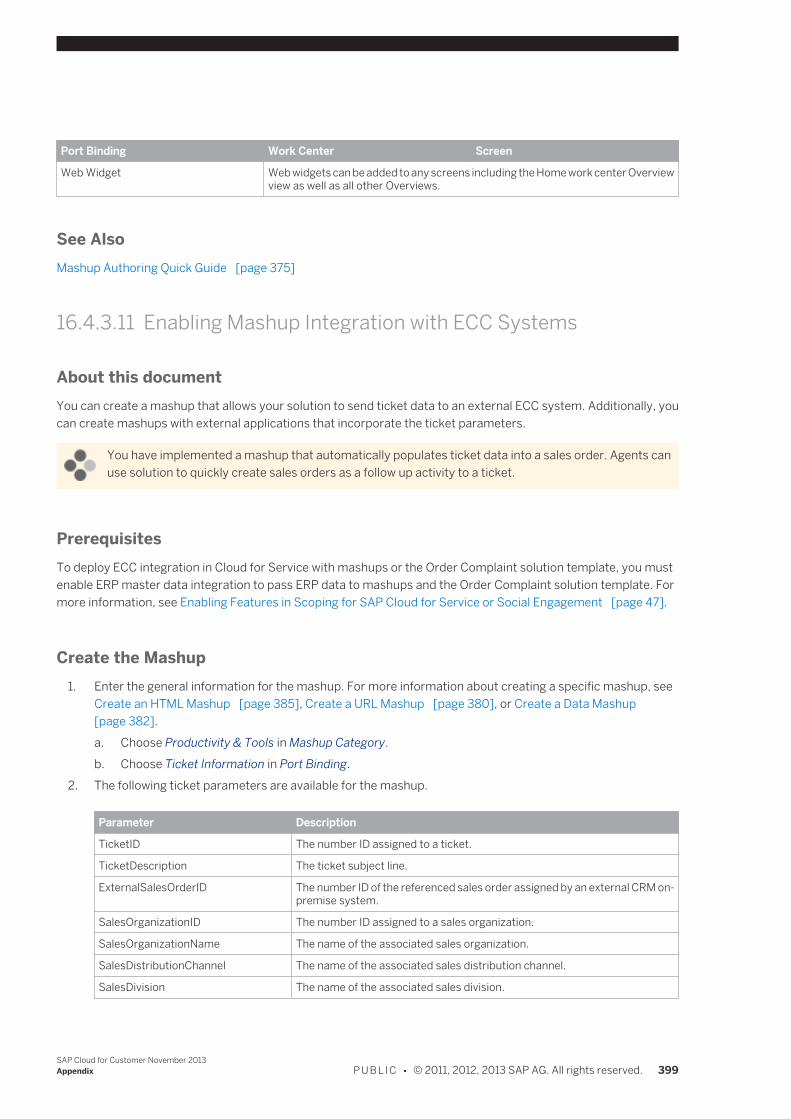
Port Binding Work Center Screen
Web Widget Web widgets can be added to any screens including the Home work center Overviewview as well as all other Overviews.
See AlsoMashup Authoring Quick Guide [page 375]
16.4.3.11 Enabling Mashup Integration with ECC Systems
About this documentYou can create a mashup that allows your solution to send ticket data to an external ECC system. Additionally, youcan create mashups with external applications that incorporate the ticket parameters.
You have implemented a mashup that automatically populates ticket data into a sales order. Agents canuse solution to quickly create sales orders as a follow up activity to a ticket.
PrerequisitesTo deploy ECC integration in Cloud for Service with mashups or the Order Complaint solution template, you mustenable ERP master data integration to pass ERP data to mashups and the Order Complaint solution template. Formore information, see Enabling Features in Scoping for SAP Cloud for Service or Social Engagement [page 47].
Create the Mashup1. Enter the general information for the mashup. For more information about creating a specific mashup, see
Create an HTML Mashup [page 385], Create a URL Mashup [page 380], or Create a Data Mashup[page 382].a. Choose Productivity & Tools in Mashup Category.b. Choose Ticket Information in Port Binding.
2. The following ticket parameters are available for the mashup.
Parameter Description
TicketID The number ID assigned to a ticket.
TicketDescription The ticket subject line.
ExternalSalesOrderID The number ID of the referenced sales order assigned by an external CRM on-premise system.
SalesOrganizationID The number ID assigned to a sales organization.
SalesOrganizationName The name of the associated sales organization.
SalesDistributionChannel The name of the associated sales distribution channel.
SalesDivision The name of the associated sales division.
SAP Cloud for Customer November 2013Appendix P U B L I C • © 2011, 2012, 2013 SAP AG. All rights reserved. 399
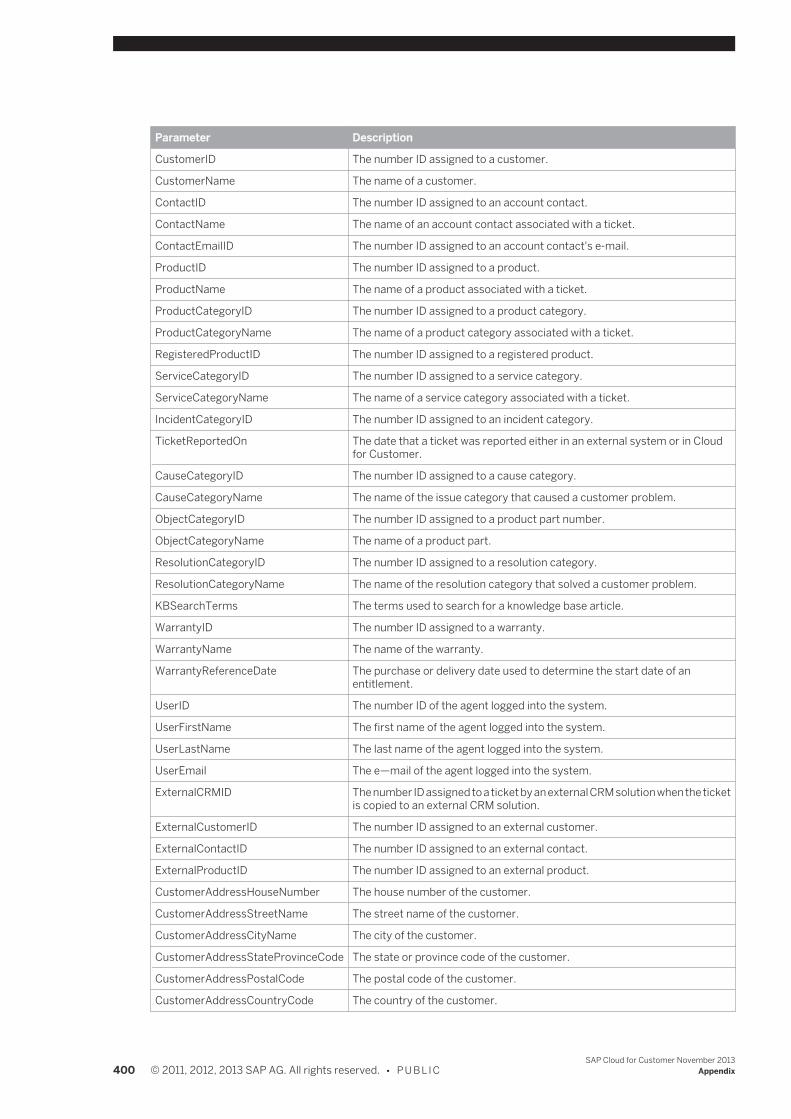
Parameter Description
CustomerID The number ID assigned to a customer.
CustomerName The name of a customer.
ContactID The number ID assigned to an account contact.
ContactName The name of an account contact associated with a ticket.
ContactEmailID The number ID assigned to an account contact's e-mail.
ProductID The number ID assigned to a product.
ProductName The name of a product associated with a ticket.
ProductCategoryID The number ID assigned to a product category.
ProductCategoryName The name of a product category associated with a ticket.
RegisteredProductID The number ID assigned to a registered product.
ServiceCategoryID The number ID assigned to a service category.
ServiceCategoryName The name of a service category associated with a ticket.
IncidentCategoryID The number ID assigned to an incident category.
TicketReportedOn The date that a ticket was reported either in an external system or in Cloudfor Customer.
CauseCategoryID The number ID assigned to a cause category.
CauseCategoryName The name of the issue category that caused a customer problem.
ObjectCategoryID The number ID assigned to a product part number.
ObjectCategoryName The name of a product part.
ResolutionCategoryID The number ID assigned to a resolution category.
ResolutionCategoryName The name of the resolution category that solved a customer problem.
KBSearchTerms The terms used to search for a knowledge base article.
WarrantyID The number ID assigned to a warranty.
WarrantyName The name of the warranty.
WarrantyReferenceDate The purchase or delivery date used to determine the start date of anentitlement.
UserID The number ID of the agent logged into the system.
UserFirstName The first name of the agent logged into the system.
UserLastName The last name of the agent logged into the system.
UserEmail The e—mail of the agent logged into the system.
ExternalCRMID The number ID assigned to a ticket by an external CRM solution when the ticketis copied to an external CRM solution.
ExternalCustomerID The number ID assigned to an external customer.
ExternalContactID The number ID assigned to an external contact.
ExternalProductID The number ID assigned to an external product.
CustomerAddressHouseNumber The house number of the customer.
CustomerAddressStreetName The street name of the customer.
CustomerAddressCityName The city of the customer.
CustomerAddressStateProvinceCode The state or province code of the customer.
CustomerAddressPostalCode The postal code of the customer.
CustomerAddressCountryCode The country of the customer.
400 © 2011, 2012, 2013 SAP AG. All rights reserved. • P U B L I CSAP Cloud for Customer November 2013
Appendix
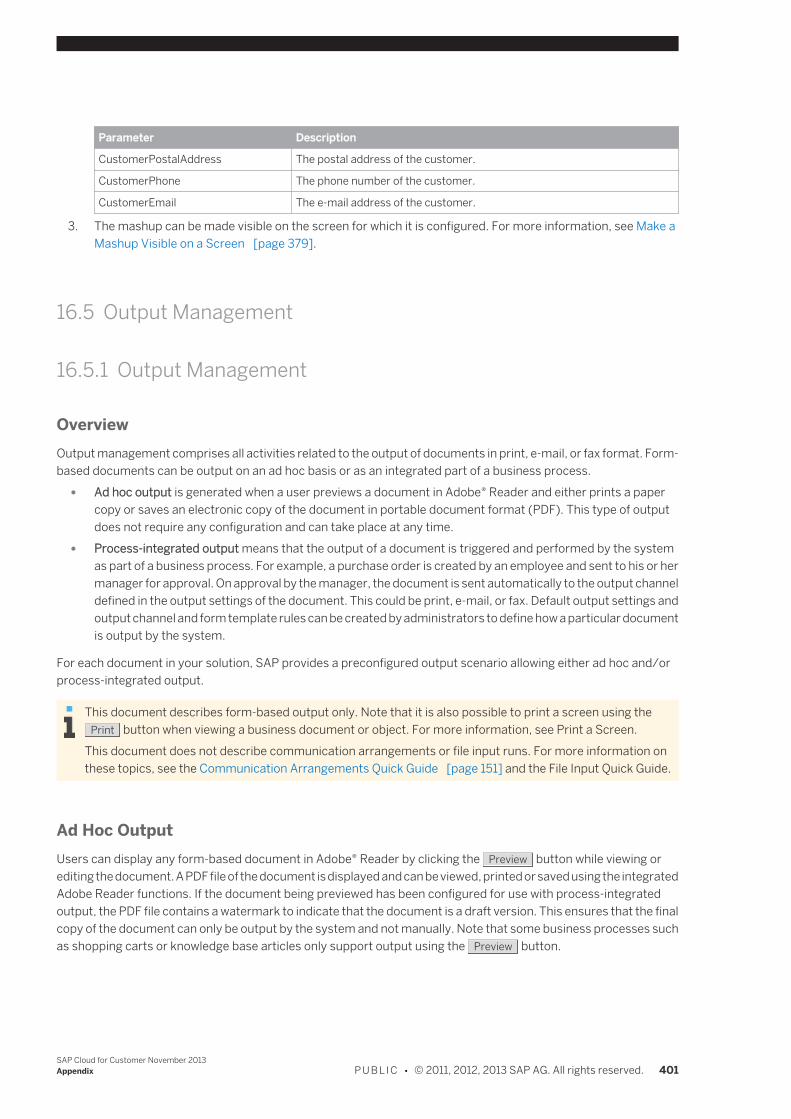
Parameter Description
CustomerPostalAddress The postal address of the customer.
CustomerPhone The phone number of the customer.
CustomerEmail The e-mail address of the customer.
3. The mashup can be made visible on the screen for which it is configured. For more information, see Make aMashup Visible on a Screen [page 379].
16.5 Output Management
16.5.1 Output Management
OverviewOutput management comprises all activities related to the output of documents in print, e-mail, or fax format. Form-based documents can be output on an ad hoc basis or as an integrated part of a business process.
● Ad hoc output is generated when a user previews a document in Adobe® Reader and either prints a papercopy or saves an electronic copy of the document in portable document format (PDF). This type of outputdoes not require any configuration and can take place at any time.
● Process-integrated output means that the output of a document is triggered and performed by the systemas part of a business process. For example, a purchase order is created by an employee and sent to his or hermanager for approval. On approval by the manager, the document is sent automatically to the output channeldefined in the output settings of the document. This could be print, e-mail, or fax. Default output settings andoutput channel and form template rules can be created by administrators to define how a particular documentis output by the system.
For each document in your solution, SAP provides a preconfigured output scenario allowing either ad hoc and/orprocess-integrated output.
This document describes form-based output only. Note that it is also possible to print a screen using thePrint button when viewing a business document or object. For more information, see Print a Screen.
This document does not describe communication arrangements or file input runs. For more information onthese topics, see the Communication Arrangements Quick Guide [page 151] and the File Input Quick Guide.
Ad Hoc OutputUsers can display any form-based document in Adobe® Reader by clicking the Preview button while viewing orediting the document. A PDF file of the document is displayed and can be viewed, printed or saved using the integratedAdobe Reader functions. If the document being previewed has been configured for use with process-integratedoutput, the PDF file contains a watermark to indicate that the document is a draft version. This ensures that the finalcopy of the document can only be output by the system and not manually. Note that some business processes suchas shopping carts or knowledge base articles only support output using the Preview button.
SAP Cloud for Customer November 2013Appendix P U B L I C • © 2011, 2012, 2013 SAP AG. All rights reserved. 401
Process-Integrated OutputProcess-integrated output ensures that the documents sent to your business partners only contain complete andapproved data as part of a defined business process. It also allows the output history of the document to be tracked.The process-integrated output of a document is triggered, for example, when a document is released by thedocument owner or when a manager has approved the document. This process varies depending on the underlyingbusiness process configuration. When the output of a document is triggered, the system uses the output settingsof the document to determine which output channel and form template to use when creating the document.Depending on the defined output channel, the document is either sent to a print queue, e-mailed as a PDF attachment,or sent by fax. The appearance and content of the document is defined by a form template. For each businessdocument type, a default output channel and form template can be configured by the administrator. The employeeresponsible for a document can override the default settings of the document prior to submission.For more information about the configuration of process-integrated output, see Process-Integrated OutputSettings in the Help Center of your solution.
Process-Integrated PrintingThe default printing set up of SAP's cloud solution requires that each employee who is responsible for the output ofa document is also responsible for manually printing the document. If you want a document to be printed by a userother than the document owner, or automatically without any involvement of the document owner, then you mustset up an alternative printing scenario. For more information, see Process-Integrated Printing in the Help Center ofyour solution.
Output ChannelsThe following output channels are supported:
● Print QueuesPrint queues are used to collect documents to be printed either automatically by the system or manually bya user. For more information about the printing concept, see Process-Integrated Printing in the Help Centerof your solution.
● E-MailThe system generates the document as a PDF file and e-mails it as an attachment to your business partner’se-mail address. E-mail output settings are configured during go live and can be changed in the BusinessConfiguration work center using the E-Mail and Fax Output Settings activity in the Fine Tune phase of theactivity list. For more information, see Configuration: E-Mail and Fax Output Settings in the Help Center.Note that the maximum size for an entire e-mail is 10 MB, and the maximum size for an attachment is 8 MB.To increase security, your SAP solution enables you to encrypt outgoing e-mails and check the signature ofincoming e-mails by using the Secure/Multipurpose Internet Mail Extensions (S/MIME) standard. For moreinformation, see E-Mail Security in the Help Center.
● FaxThe system generates the document as a PDF file and sends the document as an e-mail to a fax serviceprovider, which converts the content and sends it to your business partner’s fax number. Fax settings areconfigured during go live and can be changed in the Business Configuration work center using the E-Mail andFax Output Settings activity in the Fine Tune phase of the activity list. For more information, see Configuration:E-Mail and Fax Output Settings in the Help Center.
402 © 2011, 2012, 2013 SAP AG. All rights reserved. • P U B L I CSAP Cloud for Customer November 2013
Appendix
AttachmentsYou can choose whether attachments should be included when a business document is output. You can do this eitherwhen adding the attachment to the business document or by adjusting the output settings of a business documentthat already has attachments. For documents that are going to be printed, note that the Print Manager can only printPDF attachments. For documents that are going to be e-mailed or sent by fax, all types of attachments can beincluded.For business documents that are output on an ad hoc basis using the Preview button, this means that theattachments will be made available in the Preview screen for the business document. For business documents thatare output as process-integrated output, the attachment is automatically added to the e-mail or fax, or, for printing,it is automatically sent to the defined print queue.
ExampleA sales employee has created and released a sales order. The system determines from the output settings of thedocument that the document should be sent by e-mail to the customer. The system creates a PDF file using the formtemplate defined in the output settings, and then sends the PDF as an e-mail attachment to the customer. If no erroris returned by the mail server, the output status is recorded as “Successful” in the Output History tab of the salesorder editor.
16.6 Business Analytics
16.6.1 Working with Reports
16.6.1.1 Overview of Analytics
OverviewAnalytics is integrated in the solution to support and monitor business processes, helping you to make informeddecisions. Reports can be accessed from the Reports work center view of work centers and are also embedded intoOverview work center views, enabling transparency of data in system.The Analytics data in the solution is real time. There is no persistency in a separate Business Warehouse layer.Analytics data in the solution is also access context sensitive. This means that data sources are associated withaccess contexts to ensure that data is directed to users who are allowed to view the data.
Types of Objects in Analytics
CharacteristicA field according to which values are selected. Characteristics are alphanumeric, numeric, or text values. Examplesinclude Product ID, Supplier, and Purchase Order Status. Variables are often associated with specifiedcharacteristics. Variables restrict characteristics to one or more specified value selections.
SAP Cloud for Customer November 2013Appendix P U B L I C • © 2011, 2012, 2013 SAP AG. All rights reserved. 403
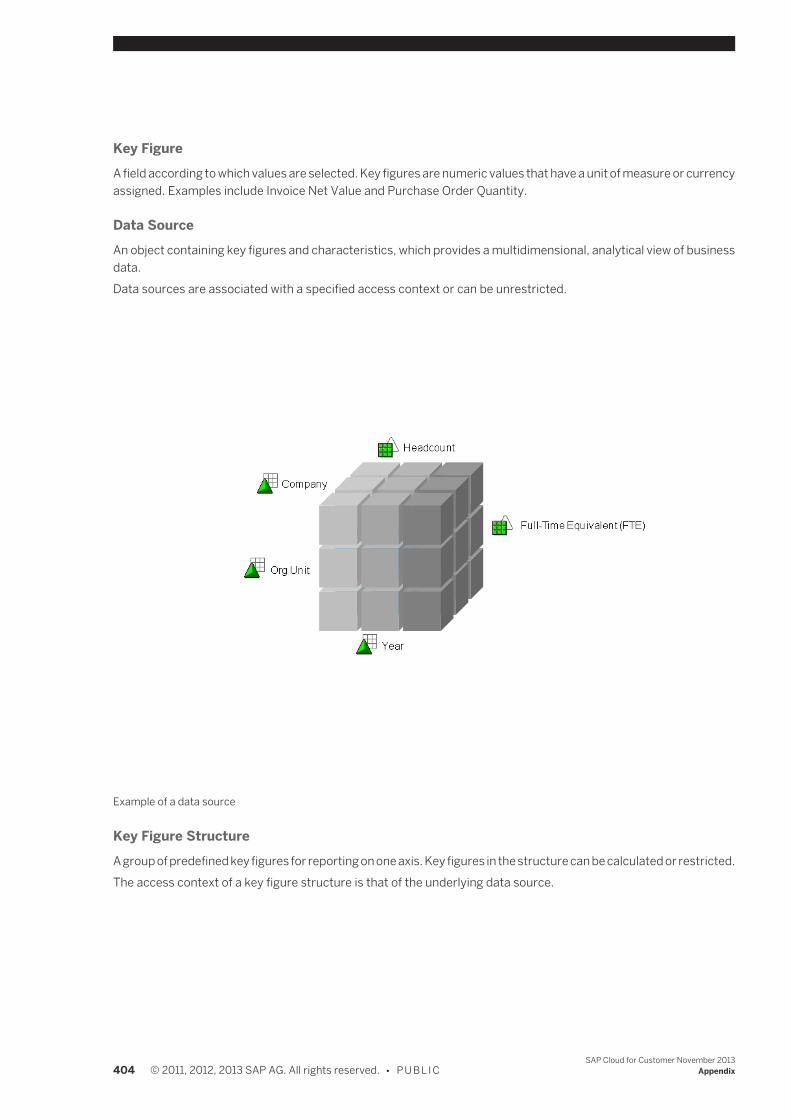
Key FigureA field according to which values are selected. Key figures are numeric values that have a unit of measure or currencyassigned. Examples include Invoice Net Value and Purchase Order Quantity.
Data SourceAn object containing key figures and characteristics, which provides a multidimensional, analytical view of businessdata.Data sources are associated with a specified access context or can be unrestricted.
Example of a data source
Key Figure StructureA group of predefined key figures for reporting on one axis. Key figures in the structure can be calculated or restricted.The access context of a key figure structure is that of the underlying data source.
404 © 2011, 2012, 2013 SAP AG. All rights reserved. • P U B L I CSAP Cloud for Customer November 2013
Appendix
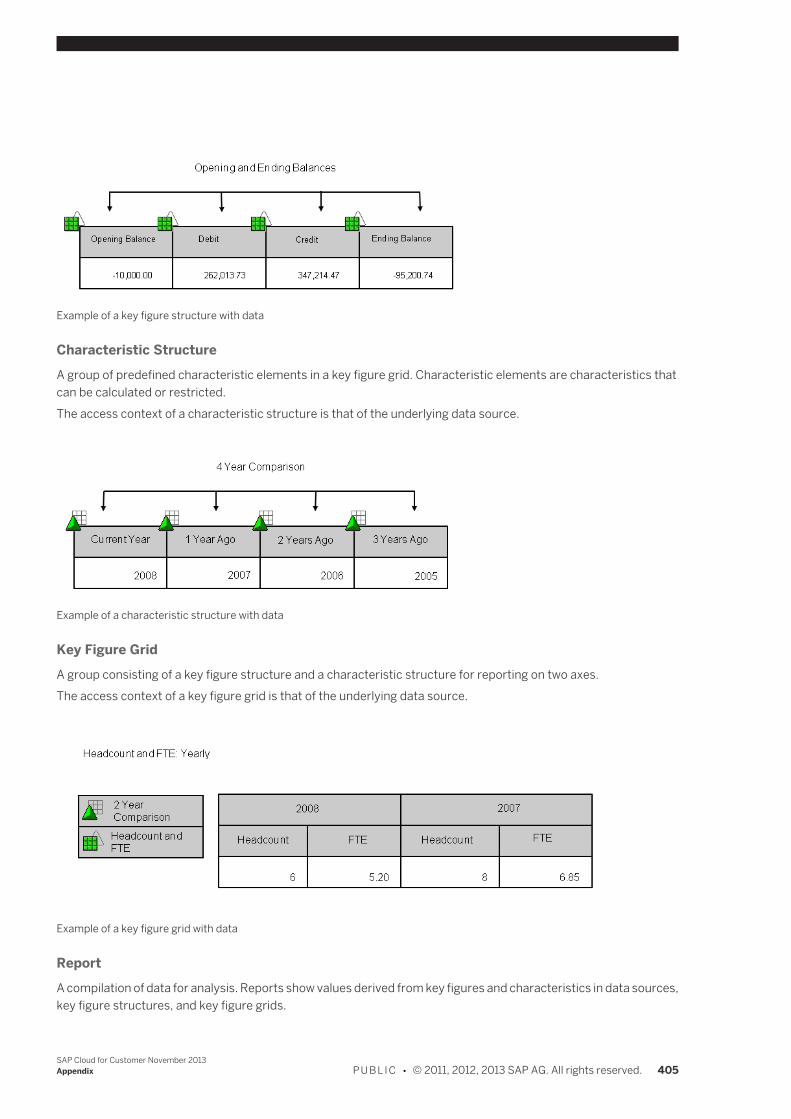
Example of a key figure structure with data
Characteristic StructureA group of predefined characteristic elements in a key figure grid. Characteristic elements are characteristics thatcan be calculated or restricted.The access context of a characteristic structure is that of the underlying data source.
Example of a characteristic structure with data
Key Figure GridA group consisting of a key figure structure and a characteristic structure for reporting on two axes.The access context of a key figure grid is that of the underlying data source.
Example of a key figure grid with data
ReportA compilation of data for analysis. Reports show values derived from key figures and characteristics in data sources,key figure structures, and key figure grids.
SAP Cloud for Customer November 2013Appendix P U B L I C • © 2011, 2012, 2013 SAP AG. All rights reserved. 405
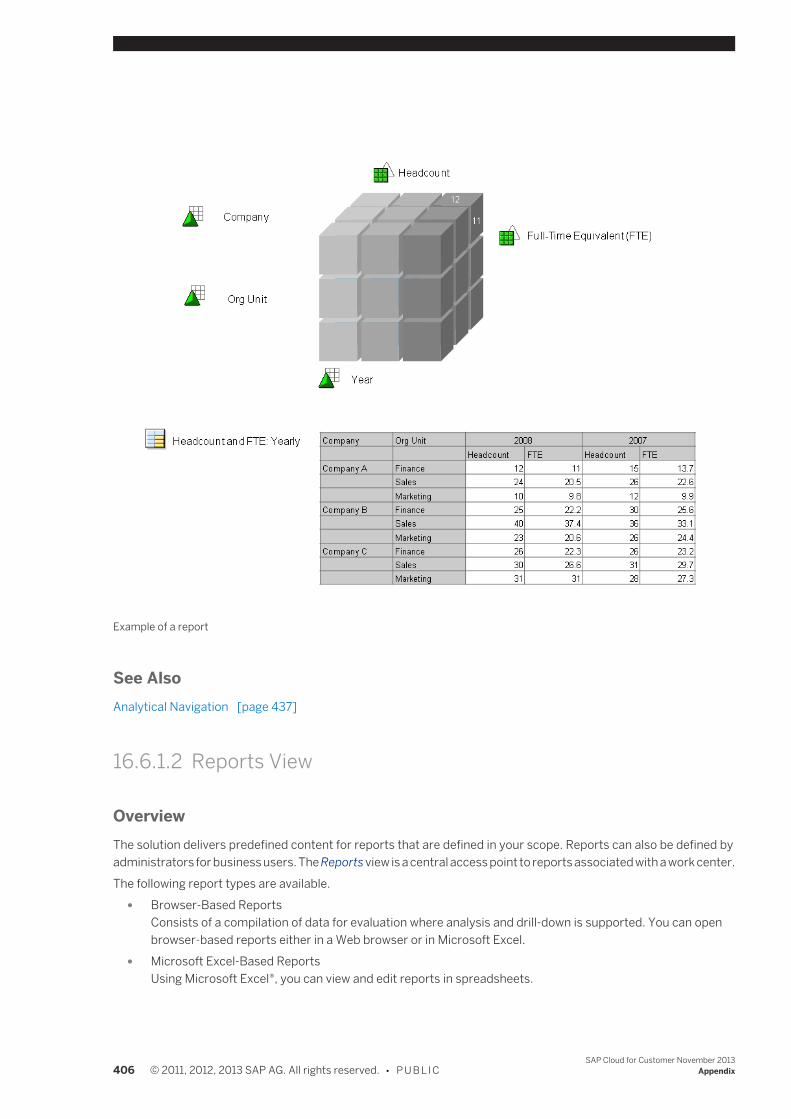
Example of a report
See AlsoAnalytical Navigation [page 437]
16.6.1.2 Reports View
OverviewThe solution delivers predefined content for reports that are defined in your scope. Reports can also be defined byadministrators for business users. The Reports view is a central access point to reports associated with a work center.The following report types are available.
● Browser-Based ReportsConsists of a compilation of data for evaluation where analysis and drill-down is supported. You can openbrowser-based reports either in a Web browser or in Microsoft Excel.
● Microsoft Excel-Based ReportsUsing Microsoft Excel®, you can view and edit reports in spreadsheets.
406 © 2011, 2012, 2013 SAP AG. All rights reserved. • P U B L I CSAP Cloud for Customer November 2013
Appendix
To view and work with Microsoft Excel-Based reports, ensure that the add-in for Microsoft Excel isinstalled.Depending on your authorization, you can download the add-in from the following locations:
● From the top right corner of the screen by clicking Download. ● From the Download Center work center view of the Application and User Management work
center. ● From the Self-Services work center view of the Home work center
● Mobile ReportsMobile reports are browser-based reports that are enabled for mobile devices.
Features
Opening ReportsThe report names are displayed as links. To open the report, click the relevant link . By clicking View With , you canopen a report either in a Web browser or in Microsoft Excel®.You can also open reports from the Gallery work center view in which you can browse reports.
Organizing ReportsBy default, all reports associated with the work center are displayed and the Advanced find feature is closed.From the Show dropdown list, you can choose whether to display reports by the following criteria:
● By Report Category ● My Priority Reports
To include or remove a report from your priority list, select the report row, click Priority , and choose Markas Priority or Remove from Priority.
● All Reports ● All Reports - Quick List
Displays a list of reports, providing only the names and descriptions of reports.
By default, the system displays reports grouped by report category.
DetailsIn the Details section below the reports list, you can find additional information about the selected report. There arethree tab pages in the Details area of the Reports view.
● Report ViewsA report view is a modified view of the data available with a report. The Report Views tab page displays allexisting views associated with a report. These are divided into three categories: views created by you; viewscreated by an administrator; views delivered by SAP; views created by SAP partners.Report views aredisplayed as links and can be opened directly from this tab page by clicking the corresponding link.
● Report DetailsDisplays general information about a report, including creation and change data. Under Report Categories,all of the report categories to which a report is assigned are listed, for example, Supply Chain – PhysicalInventory.
● Report Assignment
SAP Cloud for Customer November 2013Appendix P U B L I C • © 2011, 2012, 2013 SAP AG. All rights reserved. 407
Displays the work center views and subviews with which the selected report is associated. Note that the listcan also include views and subviews from work centers other than the work center in which the report iscurrently displayed.
See AlsoWorking with Reports in a Web Browser [page 408]Working with Reports and Plans in Microsoft Excel® [page 413]Working with Mobile ReportsWorking with Selections [page 422]Working with Embedded Reports [page 422]
16.6.1.3 Working with Reports in a Web Browser
OverviewWorking with reports in a Web browser allows you to execute ad hoc analyses. You can open reports from the reportslist in the Reports view and from embedded reports.The following two options are available to work with reports in a Web browser:
● Web BrowserThe Web Browser option provides standard functionality for working with reports.For more information, see Viewing Reports with the Web Browser Option [page 408].
● Web Browser — Quick FilterThe Web Browser — Quick Filter option is an alternative display that is intended to allow you to quickly analyzereport data by filtering characteristics.The Web Browser — Quick Filter option offers fewer functions compared to the standard option. For example,you cannot define the layout of the report data or add fields.For more information, see Viewing Reports with Web Browser — Quick Filter [page 411].
To preview data sources, administrators use a limited range of available functions. For more information, see DesignData Sources Quick Guide [page 291].
16.6.1.4 Viewing Reports with the Web Browser Option
OverviewViewing reporting with the Web Browser option allows you to execute ad hoc analyses. You can open reports fromthe reports list in the Reports view and from embedded reports.Administrators use a limited range of functions as described below to preview data sources.
Functions in the Content Area
DisplayIn the content area for the report, data is displayed in a table or chart depending on settings. You can switch thedisplay format of the report. You can also undo a step or revert to the last saved state of the report.
408 © 2011, 2012, 2013 SAP AG. All rights reserved. • P U B L I CSAP Cloud for Customer November 2013
Appendix

You can also sort data in ascending or descending order.
Analytical NavigationIn cells of reports displayed in table format, you can use the context menu for further navigation and analysis. Usingthe context menu, you can view existing documents related to a value. When you double-click a cell, the documentsand reports to which you can navigate are displayed. For example, you can navigate to a preceding document, suchas a purchase request, an overview document that provides information about a customer, or to another report.
Functions in the Navigation PaneIn the navigation pane, you can find functions to make display settings. Analysis functions are also available to displaycertain values.The following table provides an overview of display settings and analysis functions available for key figures andcharacteristics:
Key Figures Characteristics
Display Display
Hide Hide
Decimals Adding Attributes
Scaling Displaying Hierarchies
Conditions Conditions
Exceptions Exceptions
Sorting Sorting
Display SettingsBy clicking Settings , you can determine how characteristics and key figures are displayed in the report along withmaking settings for charts and tables.
Creating Exceptions and ConditionsTo create conditions and exceptions for the report, under Columns, click the dropdown list for Key Figures. You cancreate, edit, and delete exceptions and conditions by choosing Manage Exceptions or Manage Conditions accordingly.
Selecting Key FiguresTo add additional key figures to the report from the available key figures or to remove them from the report, from
Settings , choose Key Figures.You can determine the order in which key figures appear as columns in your report by moving them up or down inthe list accordingly.You can also decide if you want to display technical IDs by clicking Show ID .
Displaying Characteristics and Key FiguresYou can drag and drop characteristics and key figures in columns and rows to the Not Currently Shown list. To dragand drop, you use the Move function. This function is available from the dropdown list from the characteristics andkey figures. If you select Remove, the characteristic or key figure is moved to the Not Currently Shown list.
Toolbar Functions
SAP Cloud for Customer November 2013Appendix P U B L I C • © 2011, 2012, 2013 SAP AG. All rights reserved. 409
● CloseCloses the Web browser window.
● View You can save the current report view, save the report view under a different name, and manage the reportviews.Under Manage Views, you can set a report view as default, rename, or delete personal report views.
● Settings You can determine how characteristics and key figures are displayed in the report along with making settingsfor charts and tables.
● Selections You can set values for filter and variables in the Selection area, and manage selections. You can decide whetherto hide or show the Selection area before starting a report using the start options.The start options indicate whether the Selection area is displayed. By default, the Selection area is displayed,but the report is not started. Note that if you set the start option to Hide Selection Area and Start Report, thenext time you start the report, the system uses the existing set of variables with the current value selections.To close the selection area, click the icon to the right of the Start Options dropdown list.
● Add FieldsYou can add fields, such as characteristics and attributes of a characteristic, to the report. You can also addvariables and hierarchies as variables. For more information, see Add a Field to a Report [page 436].
● PrintAllows you to print the report using one of the printers connected to your computer.
● Download Downloads the report to Microsoft Excel® in XML or CSV format. Note that the report opens in read only mode.You can also download data sources in CSV format.The format and the available fields of the downloaded data source differ from a downloaded report. Forexample, in a downloaded report, the value and unit of measure are combined in one field whereas in thedownloaded data source, the fields are separate. Another example is that there may be key figures onlydefined for the report, which are not available in the underlying data source.To perform ad-hoc analyses, you must open the report in Microsoft Excel®. From the Reports work centerview, click View With , and choose the Microsoft Excel option.
● Send You can send the report as an e-mail attachment or as a link.
● Chart and Table Switch the display of the report to a table, chart, or display both formats.
● Navigate To You can navigate to a different tool with which to view and analyze the report.
● ViewShows the report view that is displayed in the Web browser. The dropdown list displays the report views thatare available with the corresponding report. A report view is a modified view of the data available with a report.You can also define one or more views for a report. You define a view by saving the current status of a report.
● SelectionShows the saved set of values for the filter and variables currently used with the report. The dropdown listshows the selections available with the report.
● Set as DefaultSets the current report view and defined selection as default. Selections can also be set as default in theSelection area. For selections, the last set default is valid whether the default is set in the Web browser orfrom the Selection area.
410 © 2011, 2012, 2013 SAP AG. All rights reserved. • P U B L I CSAP Cloud for Customer November 2013
Appendix
Report HeaderThe report header is located to the right of the toolbar. By clicking the Show Report Header icon, the system displaysthe access context, selection ID, and any filters set. If available, any information and warnings are also displayed.For example, if the display currency is set using key figure settings or variables.You can also view technical information about the report, such as the report ID and the data source for the report.Note that you can also undo the last step or go back to the default view and selection.
16.6.1.5 Viewing Reports with Web Browser — Quick Filter
OverviewViewing reports with the Web Browser – Quick Filter option allows you to quickly filter data that can be displayed asa chart, table or both. You can open reports from the reports list in the Reports view and from embedded reports.
Toolbar Functions
● CloseCloses the report.
● View You can save the current report view, save the report view under a different name, and manage the reportviews.Under Manage Views, you can set a report view as default, rename, or delete personal report views.
● Save You can save the displayed report view and selection as default.
● Settings Enables you to change the layout of the report and make display settings. The following options are available: ○ Characteristics
On the Edit tab page, you can select characteristics to be displayed in the report.For information about other characteristic settings, see here [page 425].
○ Key FiguresOn the Edit tab page, you can select key figures to be displayed in the report.For information about other key figure settings, see here [page 323].
○ ExceptionsEnables you to identify deviations from threshold values or intervals.For more information about exceptions, see here [page 440].
○ ConditionsEnables you to restrict the results area of a report in accordance with certain criteria.Note that conditions only restrict the results displayed in a report; they do not restrict the value availablewith characteristics in the quick filter area.For more information about conditions, see here [page 439].
○ TableEnables you to make display settings for the report when displayed as a table.For information about table settings, see here [page 426].
○ Chart
SAP Cloud for Customer November 2013Appendix P U B L I C • © 2011, 2012, 2013 SAP AG. All rights reserved. 411
Enables you to make display settings for the report when displayed as a chart.For information about chart settings, see here [page 428].
● Selections You can set values for filter and variables in the Selection area, and manage selections. By default, theSelection area is closed.For more information about working with selections, see here [page 422].
● Print Allows you to print the report using one of the printers connected to your computer as a table or chart,independent of the current display.
● Download Exports the report to Microsoft Excel® in XML or CSV format. Note that the report opens in read only mode.The format and the available fields of the downloaded data source differ from a downloaded report. Forexample, in a downloaded report, the value and unit of measure are combined in one field whereas in thedownloaded data source, the fields are separate. Another example is that there may be key figures onlydefined for the report, which are not available in the underlying data source.To perform ad-hoc analyses, you must open the report in Microsoft Excel. From the Reports work center view,click View With , and choose the Microsoft Excel® option.
● Send You can send the report as an e-mail attachment or as a link.
● Table and Chart Switch the display to a table, chart, or both table and chart.
● Navigate To You can navigate to a different tool with which to view and analyze the report.
● ViewShows the report view that is displayed in the Web browser. The dropdown list displays the report views thatare available with the corresponding report. A report view is a modified view of the data available with a report.You can also define one or more views for a report. You define a view by saving the current status of a report.
● SelectionsShows the saved set of values for filter and variables currently used with the report. The dropdown list showsthe selections available with the report.By clicking Selections , and choosing Manage , you can set a selection as default, rename, or delete selections.Note that the Initial selection cannot be deleted and is not available on the Manage tab page.
● Set As DefaultSets the current report view and defined selection as default. Selections can also be set as default in theSelection area. For selections, the last set default is valid whether the default is set in the Web browser orfrom the Selection area.
Quick Filter AreaIn the Quick Filter area, from the Characteristics list box, you can select from all characteristics available with a report.The Characteristics list box contains the characteristics available with the report. To display the values available witha characteristic, click the characteristic. The characteristic then appears to the right of the Characteristics list box.Values can then be selected and deselected. To support a quick selection of values, the list boxes provide sortingand filter functions for values. The report data which is displayed in the chart and table changes when you changevalues in the Quick Filter area.Note that when you remove a characteristic from the Quick Filter area, any values that you have selected for the filterare removed.
412 © 2011, 2012, 2013 SAP AG. All rights reserved. • P U B L I CSAP Cloud for Customer November 2013
Appendix
The values available with the characteristics are restricted to the value selections that you set using thevariables in the Selection area.Any changes you make to the value selections for variables in the selection affect the value selections availableto be filtered for characteristic. The system resets any filter value selections you have made if you change thevalues selections set in the selection and start the report again by clicking Go .
The order of characteristics in the Characteristics list box and the order as displayed in the report is set usingcharacteristic settings. The order of characteristics in the Characteristics list box is alphabetical, starting withselected characteristics, and then the available characteristics.The order of characteristics that you have selected to filter in the Quick Filter area has no effect on the order ofcharacteristics as displayed in the report.
Content AreaIn the content area for the report, data is displayed as a table, chart, or both, depending on settings. You can switchthe display format of the report.
Analytical NavigationIn cells of reports displayed in table format, you can use the context menu for further navigation and analysis. Usingthe context menu, you can view existing documents related to a value. When you click a cell, the documents andreports to which you can navigate are displayed. For example, you can navigate to a preceding document, such asa purchase request, an overview document that provides information about a customer, or to another report.
16.6.1.6 Working with Reports and Plans in Microsoft Excel®
OverviewThe SAP add-in for Microsoft Excel enables you to execute ad hoc analyses, create workbooks, create plan data, anddefine sales targets.
● Microsoft Excel-Based ReportingYou can open reports from the workbooks and reports list in a Reports work center view by clicking
View With and choosing the Microsoft Excel option. You can also open reports directly in Microsoft Excelby logging on the SAP system.Administrators can create design workbooks and make them available for business users from the BusinessAnalytics work center.
● Microsoft Excel-Based PlanningTo overcome the limitations of the conventional approach of planning in spreadsheets, business planningconsists of features to enable planners to efficiently obtain and work with planning data in businessenvironments.
SAP Cloud for Customer November 2013Appendix P U B L I C • © 2011, 2012, 2013 SAP AG. All rights reserved. 413
Analytic Features
To view and work with Microsoft Excel-based reports and plans, ensure that the add-in for Microsoft Excel isinstalled.Depending on your authorization, you can download the add-in from the following locations:
● By clicking Download in the top right corner of the solution. ● From the Self-Services Overview work center view of the Home work center under Install Additional
Software. ● From the Download Center work center view of the Application and User Management work center.
The analytic features in the add-in tab enables you to save workbooks to the solution system. You can also useavailable Microsoft Excel functions. Depending on your access rights, different workbooks and reports are available.Saved workbooks are then available from different work center views. Note that the functions available to you dependon your access rights and work center and work center view assignments; the reports you work with in a Web browserare also available using the add-in for Microsoft Excel.
AdministratorsAdministrators can create and edit public workbooks as follows:
1. Open the public or personal workbook.2. Switch to design mode by clicking Design Workbook.
If you want to view the workbook with generated test data, refresh the workbook.3. Make any relevant changes and save.4. Assign the workbook to the relevant work center views to make it public.
Note that if the workbook has already been assigned and is public, you do not need to assign the workbookagain.
Workbook GroupThe workbook group provides functions to open and save workbooks and reports. You can also copy, remove, andprotect reports and worksheets.
● OpenDownloads and opens a workbook from the solution system.
● SaveSaves the workbook back to the solution system as a public workbook. You have the following options to saveworkbooks to the solution system.
● Save AllThe following options are available ○ Save All ○ Save Workbook ○ Save Plan Data ○ Save Workbook As New
● Switch Workbook TypeThe follow table provides an overview of the workbooks available.
414 © 2011, 2012, 2013 SAP AG. All rights reserved. • P U B L I CSAP Cloud for Customer November 2013
Appendix
Workbook Type Description
Personal workbook A workbook that is adapted to the individual business needs of a user. A personalworkbook is only available to the user who creates it. Any change to a personalworkbook is saved back to the solution system.
Public workbook A workbook that can be consumed by all users who have the corresponding workcenter views assigned. Public workbooks are read-only and can be adapted withpersonalized views and selections to the business needs of the user.Note that before a created workbook can be made public, administrators mustfirst save the workbook as a design workbook.
Design workbook A workbook that only includes the layout without data and is only available fromthe Business Analytics work center. Since administrators in general are not allowedto view business data, the data is deleted whenever you store a design workbook.As soon as a design workbook is assigned to a work center view, business userscan use it as a public workbook with real data.
● Insert ReportInserts a report into the worksheet starting in the active cell.
By selecting the Paging checkbox, the system displays the first 50 rows of the report including thecolumn headers. Paging down shows the next 50 lines. This is useful if you want to start a report thathas large amounts of data.By limiting the number of rows displayed, the system can display the report more quickly. You can stillfilter or make value selections in order to display the data you want. Note that if you filter or make valueselections, the system displays the first page with the specified number of rows.
● Copy ReportCopies the report and any report views and variable values in order to paste it in a different location.
● Paste ReportPastes the report and any report views and variable values that was last cut or copied into the active cell.
● Remove ReportRemoves the report and any report views and variable values in order to paste it in a different location.
● ProtectUses the Microsoft Excel function to protect the worksheet to prevent changes to all cells containing datafrom the solution system.
Refresh GroupRefreshes the data in the report. You can also defer refreshing the report.
● RefreshRefreshes the data in the report. ○ Refresh Current Report
Refreshes the data in the report that is currently selected. ○ Refresh Worksheet When Activated
If this feature is active for a workbook, any reports on a sheet in the workbook are automatically refreshedwhen the sheet is activated.
○ Refresh ReportYou can select a report to refresh from the list.
○ Refresh All ● Defer Refresh
Defers refreshing the report until you refresh it manually. This function is useful, for example, if you makemultiple changes to a report, such as to the layout or you add another key figure or column.
● Paging
SAP Cloud for Customer November 2013Appendix P U B L I C • © 2011, 2012, 2013 SAP AG. All rights reserved. 415
You can enter the number of rows you want to display. For example, rows 10 to 40. If you click the down arrow,the system displays the next page with 30 rows, including the column headers.
View GroupDisplays the report views that are available with a report. You can change the current report view.In the view pane, you can save changes as a new report view. The view pane also enables you to select thecharacteristics and key figures that are shown in the report.
● Displaying Characteristics and HierarchiesFor characteristics and hierarchies, you can specify in which format the individual characteristic values of thecharacteristic are displayed. You can display characteristics and hierarchies as name, ID, or a combinationthereof.
● SortingYou can also specify how characteristic values are sorted. You can sort characteristics displayed in rows andcolumns according to the description or ID in ascending or descending order.
● Results RowUsing the values from the dropdown list, you can decide how the result is to be displayed. You can decide ifresults are to be displayed or if results are to be displayed when there are at least two single values.
You can also activate and deactivate conditions that are either delivered with a report or that have been defined forthe report or report view in a Web browser. For more information, see Conditions [page 439].
Selection GroupYou can display the set of value selections for variables that are available with a report. You can change the currentset of value selections. In the Selection pane, you can save changes as a new set of value selections for variables.You can also set filter values by selecting values in the report and clicking the Filter icon in the Selection group. Toremove the filter, click the corresponding icon.
If you have multiple reports in a workbook and want to apply the same set of value selections, you can usevalues from dedicated cells.For example, you have multiple reports that all contain customers. You want to filter the data in the reportsto show data related to customer 1001.On sheet 2, in cell D14, you enter 1001. In the Selection pane of the report, in the Customer variable entryfield, you enter =Sheet2!D14. After refreshing the report, data is filtered to customers 1001. Alternatively,using Microsoft Excel® functionality, you can define a name for the referenced cell, such as Customer, andenter the name instead of the address of the referenced cell in the Customer variable entry field; in thiscase, you enter =Customer.
Note that this tip does not work for advanced restrictions, such as excluding a value or using intervals.Also note that data in the workbook is not automatically refreshed if you change the entry in the referencedcell.
Header GroupEnables you to insert a report header.You can specify if the report name is to be displayed along with technical information about the report. The headercan be inserted either as a range of cells above the report or as a text box.
Report GroupEnables you to make further display settings.
416 © 2011, 2012, 2013 SAP AG. All rights reserved. • P U B L I CSAP Cloud for Customer November 2013
Appendix
● NavigateEnables you to navigate to another report or to an overview document.
● Insert ChartEnables you to insert a chart using Microsoft Excel functions. For information about Microsoft Excel charttypes and functions, see Microsoft Excel documentation.
● Switch Display Mode of Current Report ○ Grid Display
Displays the report using the solution cell styles in the Microsoft Excel grid. ○ PivotTable Display
Enables you to display the report as a PivotTable using Microsoft Excel functions. For information aboutMicrosoft Excel PivotTable functions, see Microsoft Excel documentation.
○ Excel Table DisplayEnables you to display the report as a Microsoft Excel table. Note that if you select this display mode,the Microsoft Excel Design tab is displayed.This display mode is useful, for example, if you want to filter or to sort data using Microsoft Excelfunctions. For information, see Microsoft Excel documentation.
● Settings ○ Freeze Panes
Uses the Microsoft Excel freeze pane function to fix the header columns and rows. ○ Format Report
Formats the report using the default SAP Business solution cell styles as listed under the Microsoft ExcelHome tab.
○ Adjust to Complete ColumnAdjusts the width of columns to the width of the longest value in each column.
○ Adjust to Report ResultAdjusts the column width to the width of the longest value in the column.
○ Use Outline for HierarchiesUses the Microsoft Excel outline function to group characteristic hierarchies by expansion level.
○ Expand Rows to LevelYou can choose the hierarchy level up to which the hierarchy is to be displayed when it is expanded.
○ Merge Repeated CellsYou can specify whether every instance of a characteristic value is displayed in a row or column.
○ Show Results FirstYou can specify how results are to be displayed. You can decide if they are to be displayed above rowsor to the left of columns.
○ Arrange As HierarchyThe system arranges characteristics in rows and in columns as a hierarchy. The row or column furtherleft serves as the tree structure into which characteristics to the right are inserted.
○ Invert HierarchiesThe system inverts the hierarchy so that the hierarchy is displayed from bottom to top or from right toleft. You can decide to invert a hierarchy in rows and in columns.
○ Suppress Zero ValuesYou can suppress columns or rows that contain zeros in your report.
● Show / Hide ○ View ○ Variables
SAP Cloud for Customer November 2013Appendix P U B L I C • © 2011, 2012, 2013 SAP AG. All rights reserved. 417
○ Planning ○ Header ○ Messages
You can specify if all messages or only errors are displayed. You can also decide if messages are displayedon user request.
Assigning WorkbooksAdministrators can assign workbooks to work center views, make them available to business users.For more information, access the Help Center from the relevant screen.
Planning FeaturesThe planning features of the add-in tab enables you to create and edit plan data. Cells that are enabled for input havea white background and become yellow when you change their value. Cell that are gray are read-only.
Refresh Group ● Refresh
Refreshes the data in the plan.Depending on the planning application you are using, when you make entries in cells, the changes you makeare sent either synchronously or asynchronously. ○ Upload Input (Asynchronous Sending including save)
When you click Upload Input, the changes you make to the plan data are transferred to the systemasynchronously, values are calculated, and the data is saved. You may need to wait before you can makefurther changes to the plan.While the system is calculating and saving, the related data in the cells is locked and is read only. Althoughyou can still change values in the sheet, you cannot upload the new values.The only option is to refresh the data. If the system has completed the upload when you refresh, thesystem reads the data again and overwrites all values. In this case, cells are available again for entries.If the calculation is still in progress, a message about the progress of the upload is displayed.Note that if you want all read-only cells to be protected against changes, click Protect in the Workbookgroup.
Tips and Tricks When Uploading Input ● When you create a plan, reduce the amount of data to the relevant characteristic value
combinations, for example, account and cost center, that are required from a businessperspective.
● Before changing plan values, restrict the amount of data as much as possible by usingselection criteria for characteristic values in the Selection pane.
● If when changing plan values, the system takes a long time to transfer the data, considerchanging less data at one time. For example, you want to change the plan data in 500 cells;change the data of the first 250 cells, upload, and then change the next 250 cells.
● If not needed from business perspective, avoid changing rows containing the Not Assignedcharacteristic value. If the value is required, upload rows containing this value separatelyfrom the rest of the data.
● If not needed from business perspective, avoid entering data on different aggregationlevels, such as subtotals and totals in Result rows.
418 © 2011, 2012, 2013 SAP AG. All rights reserved. • P U B L I CSAP Cloud for Customer November 2013
Appendix
○ Send Input (Synchronous Sending excluding Save)The changes you make to the plan data are sent to the system synchronously. You can continue to makechanges to the plan as soon as the system has finished calculating and is ready for data entry again. ClickSave Plan Data to save the data in the system.
○ Refresh Current ReportRefreshes the data in the report that is currently selected.
○ Refresh Worksheet When ActivatedIf this feature is active for a workbook, reports on a sheet in the workbook are automatically refreshedwhen the sheet is activated.
○ Refresh ReportYou can select a report to refresh from the list.
○ Refresh All ● Defer Refresh
Defers refreshing the report until you refresh it manually. This function is useful, for example, if you makemultiple changes to a report, such as to the layout or you add another key figure or column.
● PagingYou can enter the number of rows you want to display. For example, rows 10 to 40. If you click the down arrow,the system displays the next page with 30 rows, including the column headers.
Planning GroupEnables you to plan at different levels and adjust values accordingly.
● Mark SelectedMarks cells that you select to be sent back to the system. By marking selected cells, you set the value for thecell. The value therefore does not change when you redistribute values by clicking Refresh.
● Unmark AllUnmarks all selected cells.
The following example illustrates how values for sales and target planning can be distributed. Note that thecharacteristics available for financial planning may differ.
You want to project revenue for your products and create a plan that contains the characteristics“Product” and “Customer”. Each product is sold to several different customers but you only want to seehow much money you received for each product. You therefore choose a view that displays the aggregatedrevenue for your products. Any changes that you make to the product revenue on this aggregated vieware distributed down to the individual customers for the relevant product.
The following figures are used to illustrate how the data is distributed. ● The estimated revenue for your Product 1 is USD 1000, for Product 2 USD 2000, and for Product 3 USD 3000.
In the system, this information is distributed down to the customer level:
SAP Cloud for Customer November 2013Appendix P U B L I C • © 2011, 2012, 2013 SAP AG. All rights reserved. 419
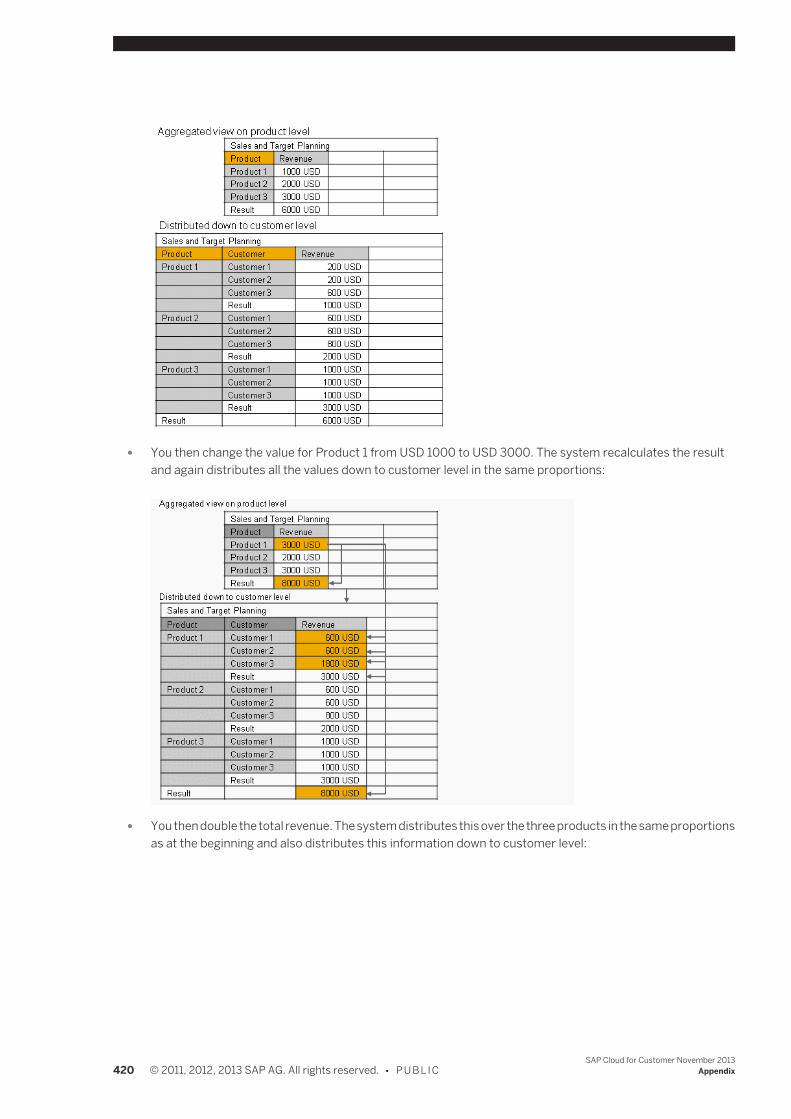
● You then change the value for Product 1 from USD 1000 to USD 3000. The system recalculates the resultand again distributes all the values down to customer level in the same proportions:
● You then double the total revenue. The system distributes this over the three products in the same proportionsas at the beginning and also distributes this information down to customer level:
420 © 2011, 2012, 2013 SAP AG. All rights reserved. • P U B L I CSAP Cloud for Customer November 2013
Appendix
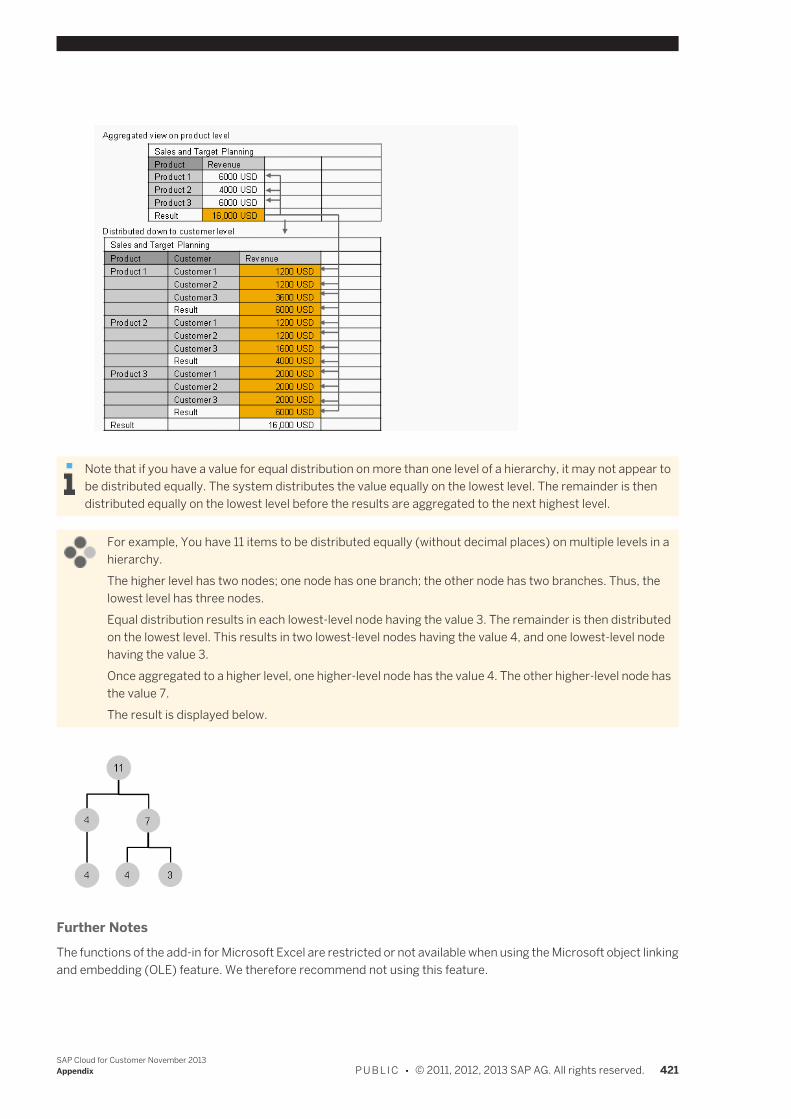
Note that if you have a value for equal distribution on more than one level of a hierarchy, it may not appear tobe distributed equally. The system distributes the value equally on the lowest level. The remainder is thendistributed equally on the lowest level before the results are aggregated to the next highest level.
For example, You have 11 items to be distributed equally (without decimal places) on multiple levels in ahierarchy.The higher level has two nodes; one node has one branch; the other node has two branches. Thus, thelowest level has three nodes.Equal distribution results in each lowest-level node having the value 3. The remainder is then distributedon the lowest level. This results in two lowest-level nodes having the value 4, and one lowest-level nodehaving the value 3.Once aggregated to a higher level, one higher-level node has the value 4. The other higher-level node hasthe value 7.The result is displayed below.
Further NotesThe functions of the add-in for Microsoft Excel are restricted or not available when using the Microsoft object linkingand embedding (OLE) feature. We therefore recommend not using this feature.
SAP Cloud for Customer November 2013Appendix P U B L I C • © 2011, 2012, 2013 SAP AG. All rights reserved. 421
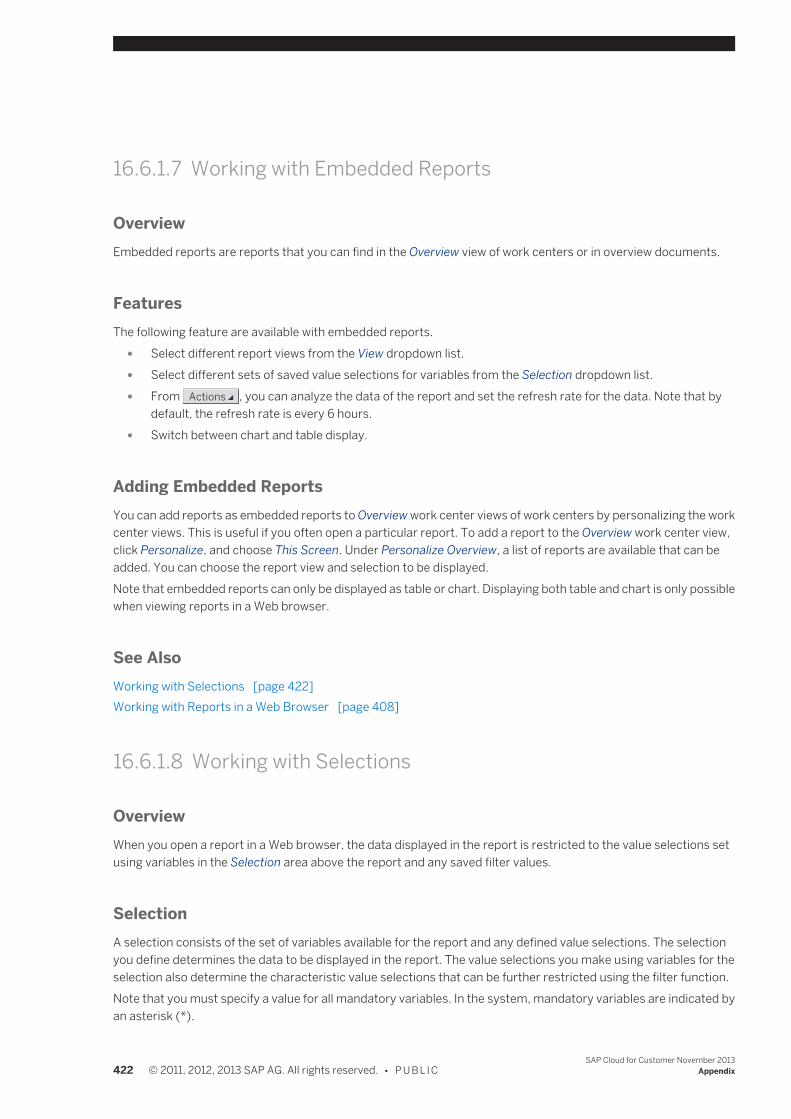
16.6.1.7 Working with Embedded Reports
OverviewEmbedded reports are reports that you can find in the Overview view of work centers or in overview documents.
FeaturesThe following feature are available with embedded reports.
● Select different report views from the View dropdown list. ● Select different sets of saved value selections for variables from the Selection dropdown list. ● From Actions , you can analyze the data of the report and set the refresh rate for the data. Note that by
default, the refresh rate is every 6 hours. ● Switch between chart and table display.
Adding Embedded ReportsYou can add reports as embedded reports to Overview work center views of work centers by personalizing the workcenter views. This is useful if you often open a particular report. To add a report to the Overview work center view,click Personalize, and choose This Screen. Under Personalize Overview, a list of reports are available that can beadded. You can choose the report view and selection to be displayed.Note that embedded reports can only be displayed as table or chart. Displaying both table and chart is only possiblewhen viewing reports in a Web browser.
See AlsoWorking with Selections [page 422]Working with Reports in a Web Browser [page 408]
16.6.1.8 Working with Selections
OverviewWhen you open a report in a Web browser, the data displayed in the report is restricted to the value selections setusing variables in the Selection area above the report and any saved filter values.
SelectionA selection consists of the set of variables available for the report and any defined value selections. The selectionyou define determines the data to be displayed in the report. The value selections you make using variables for theselection also determine the characteristic value selections that can be further restricted using the filter function.Note that you must specify a value for all mandatory variables. In the system, mandatory variables are indicated byan asterisk (*).
422 © 2011, 2012, 2013 SAP AG. All rights reserved. • P U B L I CSAP Cloud for Customer November 2013
Appendix
The Access Context variable is mandatory for all reports. This variable is defaulted to the access context to whichthe you are assigned. The system fills the variable with the access context available for the report. In this case, onlyone access context is assigned, and therefore the variable is not displayed.If the report supports multiple access contexts, you must specify which access context is to be used to select data.
For reports opened with Microsoft Excel®, the system also fills the variable with the initially saved accesscontext.
For example, you open the Project Cost – Overview report in two work centers and have saved the AccessContext variable with different value selections in both work centers: in the first work center, you savedthe access context as Company; in the second work center, you saved the access context as Project. Thesystem proposes one of the two access contexts.
FilterThe value selections you make using variables for the selection also determine the characteristic value selectionsthat can be further restricted using the filter function.Note that you can filter data for all characteristics available with the report regardless of whether they are shown inthe report.
If you change the values selections set in the selection and start the report again by clicking Go , the systemresets any filter value selections you have made. Changes you make to the value selections for variables inthe selection affect the value selections available to be filtered for characteristic.
For example, for the Product variable in the selection, you select the following values: 10, 20, 30, 40, 50.These are the values available to be filtered with the Product characteristic after you start the report.You change the value selections set for the Product variable in the selection and make all values available.After clicking Go , you can now filter the Product characteristic to any available value selection.
Note that if you save a selection, the filter value selections you set are also saved.
General Functions
Making Value SelectionsNote that if you want to display the descriptions of values that you have selected, in the Selection area, click
Show Text .Note that if you want to enter values manually, the system supports manual entry of only the ID of variable orcharacteristic values.For example, you know that you want to restrict the Supplier variable to 500001 (You cannot enter Miller andSon). You therefore enter 500001 in the Supplier variable field.
You can delete value selections by clicking the X icon. The delete function is always active.
Value Selection HelpBy opening the value selection for a variable or for a characteristic, you can select single values, exclude values, setan interval, or a set of values, depending on how the content has been defined, or if you have set filter values.The following options are available depending on the variable or characteristic selected:
SAP Cloud for Customer November 2013Appendix P U B L I C • © 2011, 2012, 2013 SAP AG. All rights reserved. 423
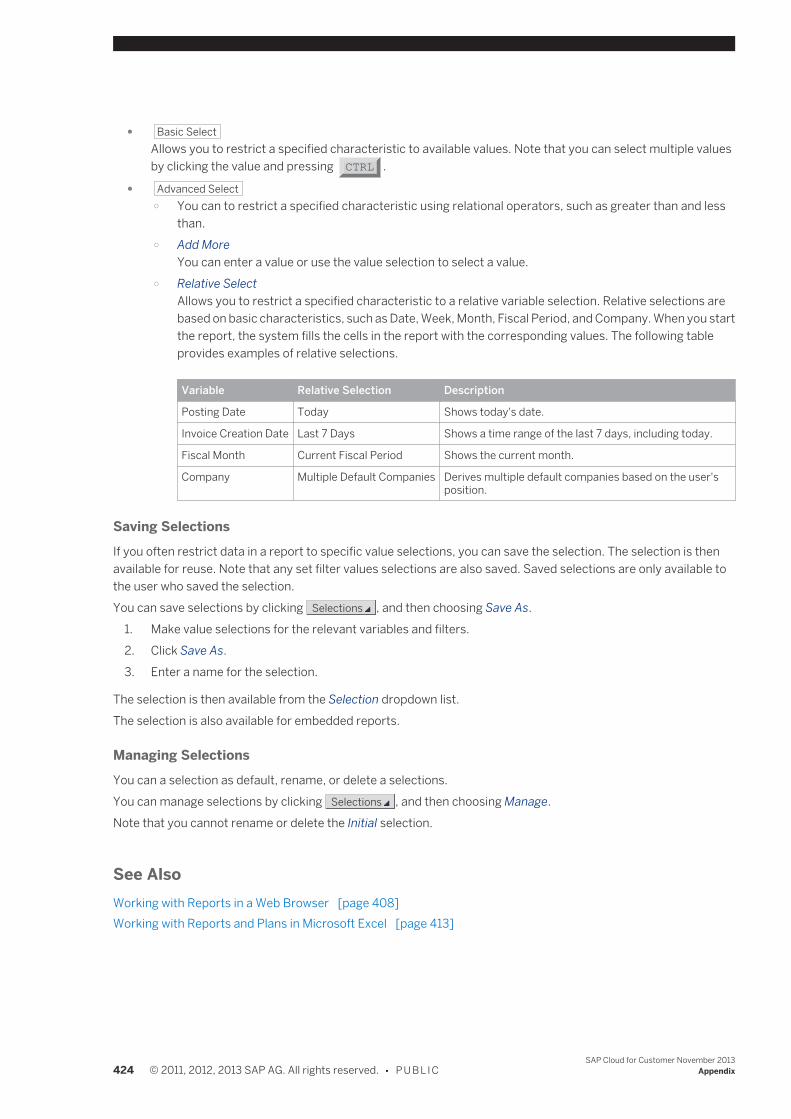
● Basic Select Allows you to restrict a specified characteristic to available values. Note that you can select multiple valuesby clicking the value and pressing CTRL .
● Advanced Select ○ You can to restrict a specified characteristic using relational operators, such as greater than and less
than. ○ Add More
You can enter a value or use the value selection to select a value. ○ Relative Select
Allows you to restrict a specified characteristic to a relative variable selection. Relative selections arebased on basic characteristics, such as Date, Week, Month, Fiscal Period, and Company. When you startthe report, the system fills the cells in the report with the corresponding values. The following tableprovides examples of relative selections.
Variable Relative Selection Description
Posting Date Today Shows today's date.
Invoice Creation Date Last 7 Days Shows a time range of the last 7 days, including today.
Fiscal Month Current Fiscal Period Shows the current month.
Company Multiple Default Companies Derives multiple default companies based on the user'sposition.
Saving SelectionsIf you often restrict data in a report to specific value selections, you can save the selection. The selection is thenavailable for reuse. Note that any set filter values selections are also saved. Saved selections are only available tothe user who saved the selection.You can save selections by clicking Selections , and then choosing Save As.
1. Make value selections for the relevant variables and filters.2. Click Save As.3. Enter a name for the selection.
The selection is then available from the Selection dropdown list.The selection is also available for embedded reports.
Managing SelectionsYou can a selection as default, rename, or delete a selections.You can manage selections by clicking Selections , and then choosing Manage.Note that you cannot rename or delete the Initial selection.
See AlsoWorking with Reports in a Web Browser [page 408]Working with Reports and Plans in Microsoft Excel [page 413]
424 © 2011, 2012, 2013 SAP AG. All rights reserved. • P U B L I CSAP Cloud for Customer November 2013
Appendix
16.6.2 Business Background
16.6.2.1 Characteristic Settings
OverviewWhen you work with reports, you can make a range of characteristic settings, such as how characteristics aredisplayed.Characteristic settings are available from Settings.
General SettingsOn the General tab page, you can make settings that are applicable to characteristics displayed in the report.
Displaying Characteristics and HierarchiesIf hierarchies are enabled for the characteristic, you can decide how the hierarchy is displayed along with up to whichlevel the hierarchy is displayed. Only when hierarchies are enabled for the characteristic is the dropdown list for theDisplay Hierarchy column enabled and is set by default to Do Not Show.
For characteristics to be displayed in hierarchies, the hierarchy should be displayed in rows.
Under Display As and Display Hierarchy, you can specify whether and in which format the individual characteristicvalues of the characteristic are displayed. You can display characteristics and hierarchies as name, ID, or acombination thereof.By choosing Do Not Show under Display As, the characteristic is hidden. This function is useful, for example, withcurrency characteristics, since the currencies are also displayed in the key figures. You select this option if you wantto show attributes or sort by the characteristic but do not want it to be displayed.
Expansion LevelChoose the hierarchy level up to which the hierarchy is to be displayed when it is expanded. 3 is default.
Result RowUsing the values from the dropdown list, you can decide how the result is to be displayed:
● ShowA result row is displayed, starting at the characteristic following the selected characteristic.
● Do Not ShowNo result row is displayed at the corresponding characteristic in the row.
● Show If More Than One ValueResults rows are displayed when there are at least two single values, and any results row that only aggregatesone value is suppressed.
Attribute ShownUnder Attribute Shown, you can add additional rows and columns to the report.
SAP Cloud for Customer November 2013Appendix P U B L I C • © 2011, 2012, 2013 SAP AG. All rights reserved. 425
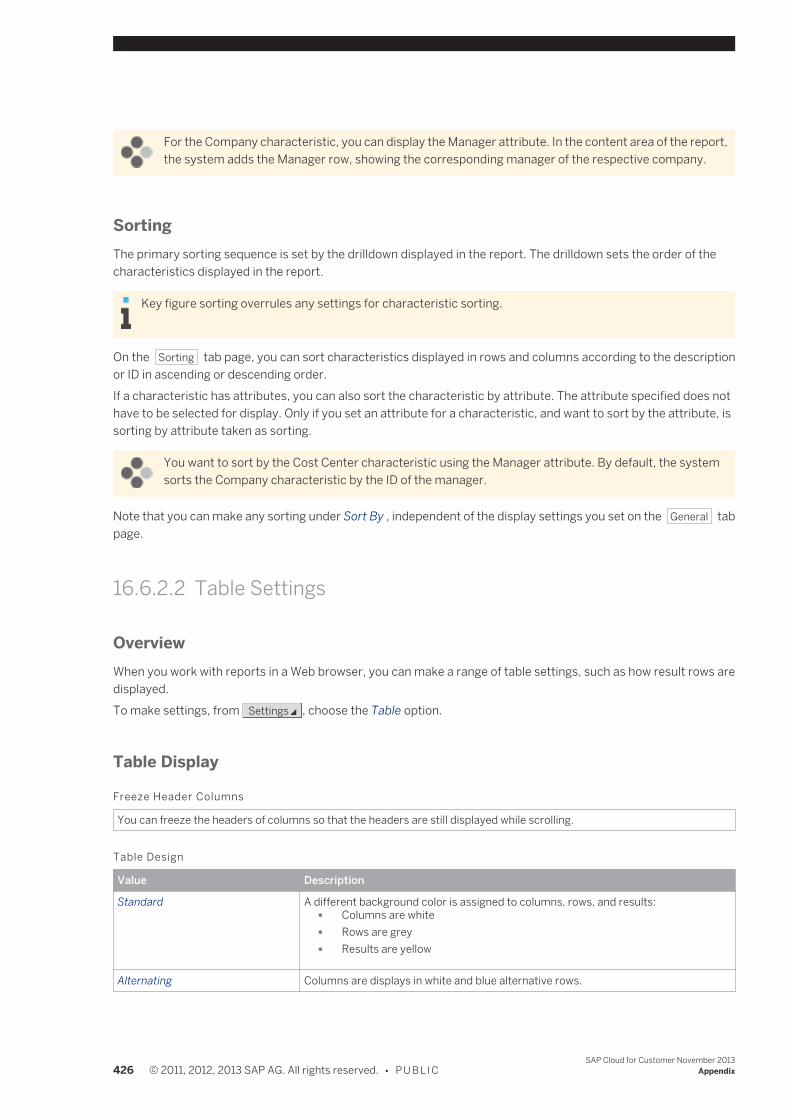
For the Company characteristic, you can display the Manager attribute. In the content area of the report,the system adds the Manager row, showing the corresponding manager of the respective company.
SortingThe primary sorting sequence is set by the drilldown displayed in the report. The drilldown sets the order of thecharacteristics displayed in the report.
Key figure sorting overrules any settings for characteristic sorting.
On the Sorting tab page, you can sort characteristics displayed in rows and columns according to the descriptionor ID in ascending or descending order.If a characteristic has attributes, you can also sort the characteristic by attribute. The attribute specified does nothave to be selected for display. Only if you set an attribute for a characteristic, and want to sort by the attribute, issorting by attribute taken as sorting.
You want to sort by the Cost Center characteristic using the Manager attribute. By default, the systemsorts the Company characteristic by the ID of the manager.
Note that you can make any sorting under Sort By , independent of the display settings you set on the General tabpage.
16.6.2.2 Table Settings
OverviewWhen you work with reports in a Web browser, you can make a range of table settings, such as how result rows aredisplayed.To make settings, from Settings , choose the Table option.
Table Display
Freeze Header Columns
You can freeze the headers of columns so that the headers are still displayed while scrolling.
Table Design
Value Description
Standard A different background color is assigned to columns, rows, and results: ● Columns are white ● Rows are grey ● Results are yellow
Alternating Columns are displays in white and blue alternative rows.
426 © 2011, 2012, 2013 SAP AG. All rights reserved. • P U B L I CSAP Cloud for Customer November 2013
Appendix
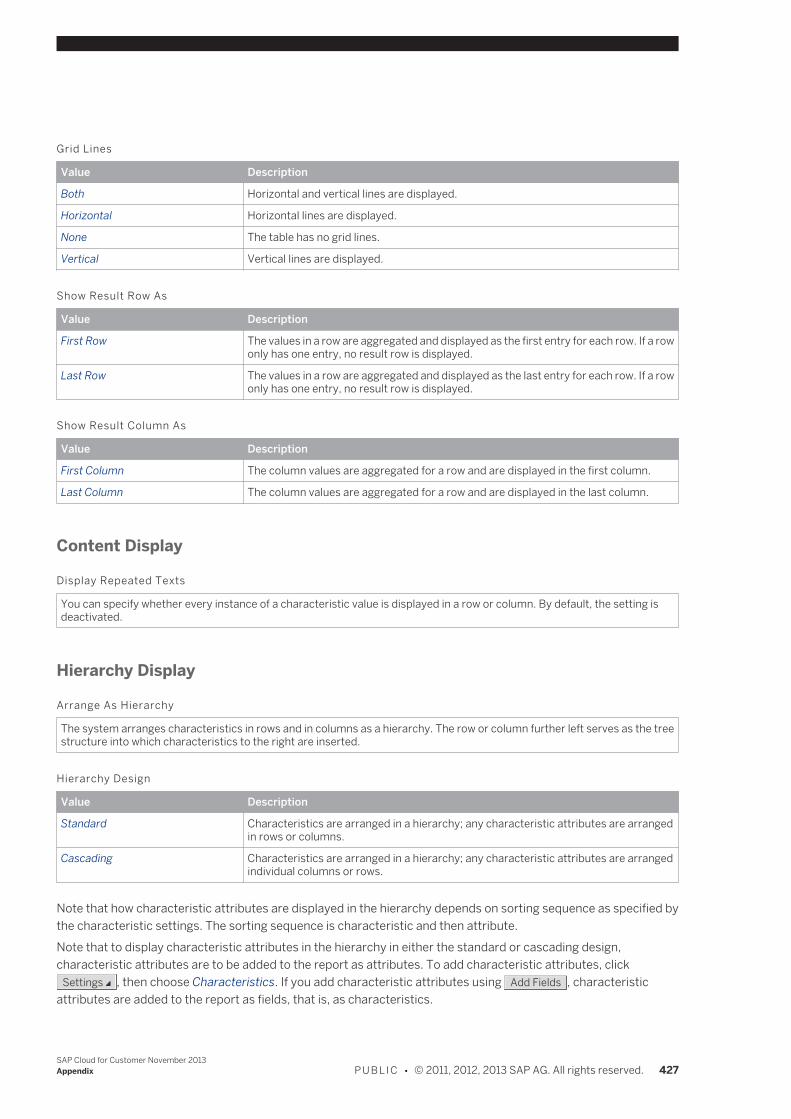
Grid Lines
Value Description
Both Horizontal and vertical lines are displayed.
Horizontal Horizontal lines are displayed.
None The table has no grid lines.
Vertical Vertical lines are displayed.
Show Result Row As
Value Description
First Row The values in a row are aggregated and displayed as the first entry for each row. If a rowonly has one entry, no result row is displayed.
Last Row The values in a row are aggregated and displayed as the last entry for each row. If a rowonly has one entry, no result row is displayed.
Show Result Column As
Value Description
First Column The column values are aggregated for a row and are displayed in the first column.
Last Column The column values are aggregated for a row and are displayed in the last column.
Content Display
Display Repeated Texts
You can specify whether every instance of a characteristic value is displayed in a row or column. By default, the setting isdeactivated.
Hierarchy Display
Arrange As Hierarchy
The system arranges characteristics in rows and in columns as a hierarchy. The row or column further left serves as the treestructure into which characteristics to the right are inserted.
Hierarchy Design
Value Description
Standard Characteristics are arranged in a hierarchy; any characteristic attributes are arrangedin rows or columns.
Cascading Characteristics are arranged in a hierarchy; any characteristic attributes are arrangedindividual columns or rows.
Note that how characteristic attributes are displayed in the hierarchy depends on sorting sequence as specified bythe characteristic settings. The sorting sequence is characteristic and then attribute.Note that to display characteristic attributes in the hierarchy in either the standard or cascading design,characteristic attributes are to be added to the report as attributes. To add characteristic attributes, click
Settings , then choose Characteristics. If you add characteristic attributes using Add Fields , characteristicattributes are added to the report as fields, that is, as characteristics.
SAP Cloud for Customer November 2013Appendix P U B L I C • © 2011, 2012, 2013 SAP AG. All rights reserved. 427
Hierarchy Initial Expansion Level
The hierarchy level up to which the hierarchy is to be displayed when it is expanded.
Invert Hierarchy
The system inverts the hierarchy so that the hierarchy is displayed from bottom to top or from right to left. You can decide toinvert a hierarchy in rows, columns, or both.
Data Display
Limit Data
By default, the records of data displayed are limited to the value in the specified field. You can change this value. Note thatthis setting is only valid for reports displayed as a table.
See AlsoWorking with Reports in a Web Browser [page 408]Working with Reports and Plans in Microsoft Excel® [page 413]
16.6.2.3 Chart Settings
OverviewWhen you work with reports in a Web browser, you can make a range of chart settings, such as providing a legendfor the chart.To make settings, from Settings , choose the Chart option.
Not all reports are suitable to be displayed as a chart. For example, if the report to be displayed as a chartcontains large amounts of data with multiple key figures and characteristics, you may want to restrict thenumber of characteristics and key figures in the report so that the display of data in the chart iscomprehensible.
Chart TypesThe examples in the chart type descriptions are based on the following set of hypothetical data.
428 © 2011, 2012, 2013 SAP AG. All rights reserved. • P U B L I CSAP Cloud for Customer November 2013
Appendix
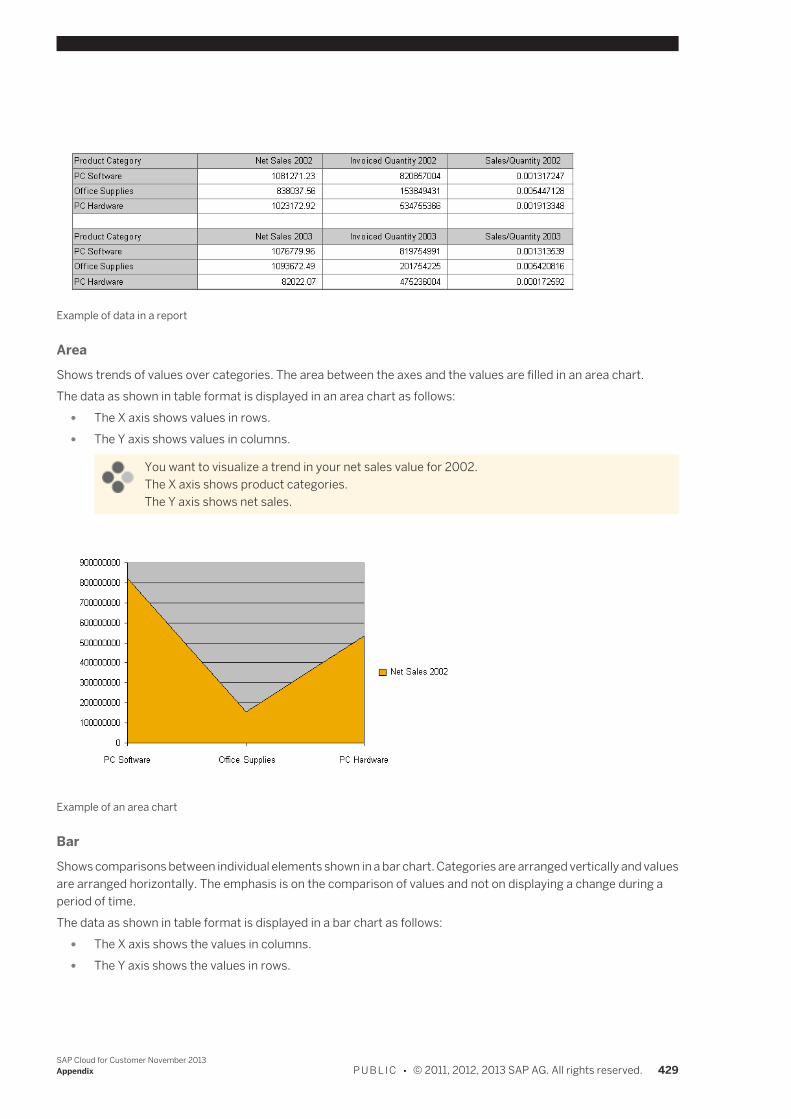
Example of data in a report
AreaShows trends of values over categories. The area between the axes and the values are filled in an area chart.The data as shown in table format is displayed in an area chart as follows:
● The X axis shows values in rows. ● The Y axis shows values in columns.
You want to visualize a trend in your net sales value for 2002.The X axis shows product categories.The Y axis shows net sales.
Example of an area chart
BarShows comparisons between individual elements shown in a bar chart. Categories are arranged vertically and valuesare arranged horizontally. The emphasis is on the comparison of values and not on displaying a change during aperiod of time.The data as shown in table format is displayed in a bar chart as follows:
● The X axis shows the values in columns. ● The Y axis shows the values in rows.
SAP Cloud for Customer November 2013Appendix P U B L I C • © 2011, 2012, 2013 SAP AG. All rights reserved. 429
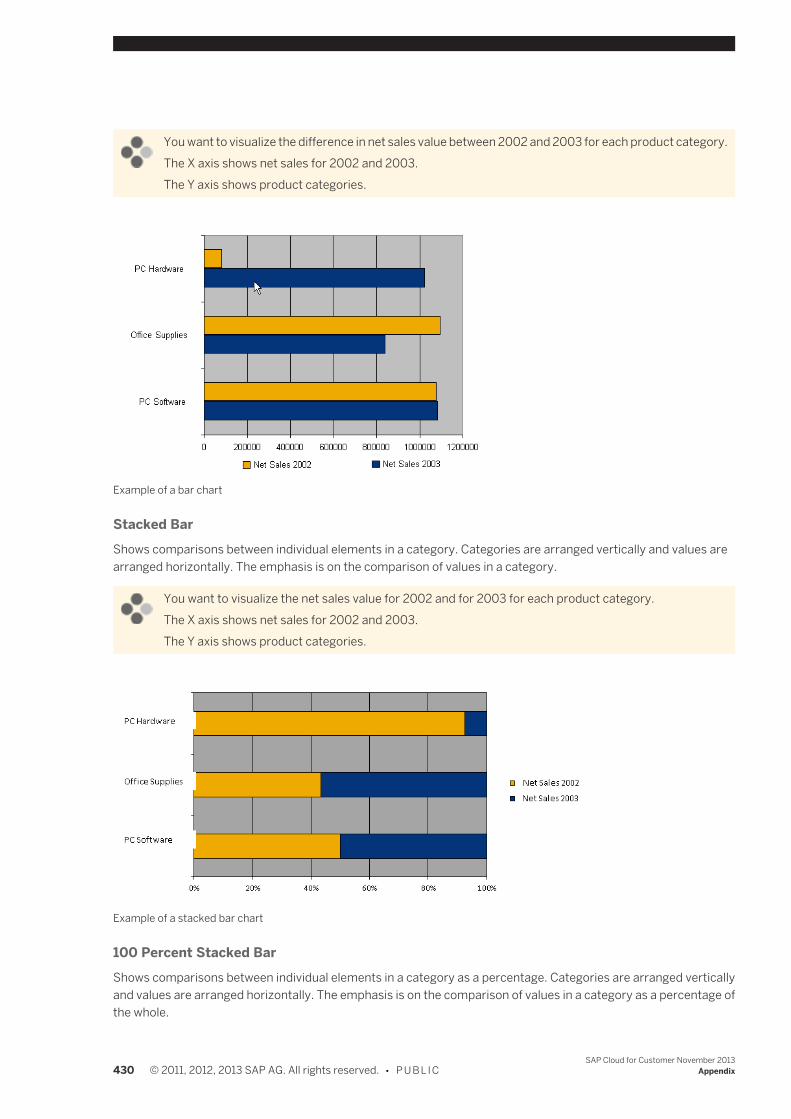
You want to visualize the difference in net sales value between 2002 and 2003 for each product category.The X axis shows net sales for 2002 and 2003.The Y axis shows product categories.
Example of a bar chart
Stacked BarShows comparisons between individual elements in a category. Categories are arranged vertically and values arearranged horizontally. The emphasis is on the comparison of values in a category.
You want to visualize the net sales value for 2002 and for 2003 for each product category.The X axis shows net sales for 2002 and 2003.The Y axis shows product categories.
Example of a stacked bar chart
100 Percent Stacked BarShows comparisons between individual elements in a category as a percentage. Categories are arranged verticallyand values are arranged horizontally. The emphasis is on the comparison of values in a category as a percentage ofthe whole.
430 © 2011, 2012, 2013 SAP AG. All rights reserved. • P U B L I CSAP Cloud for Customer November 2013
Appendix
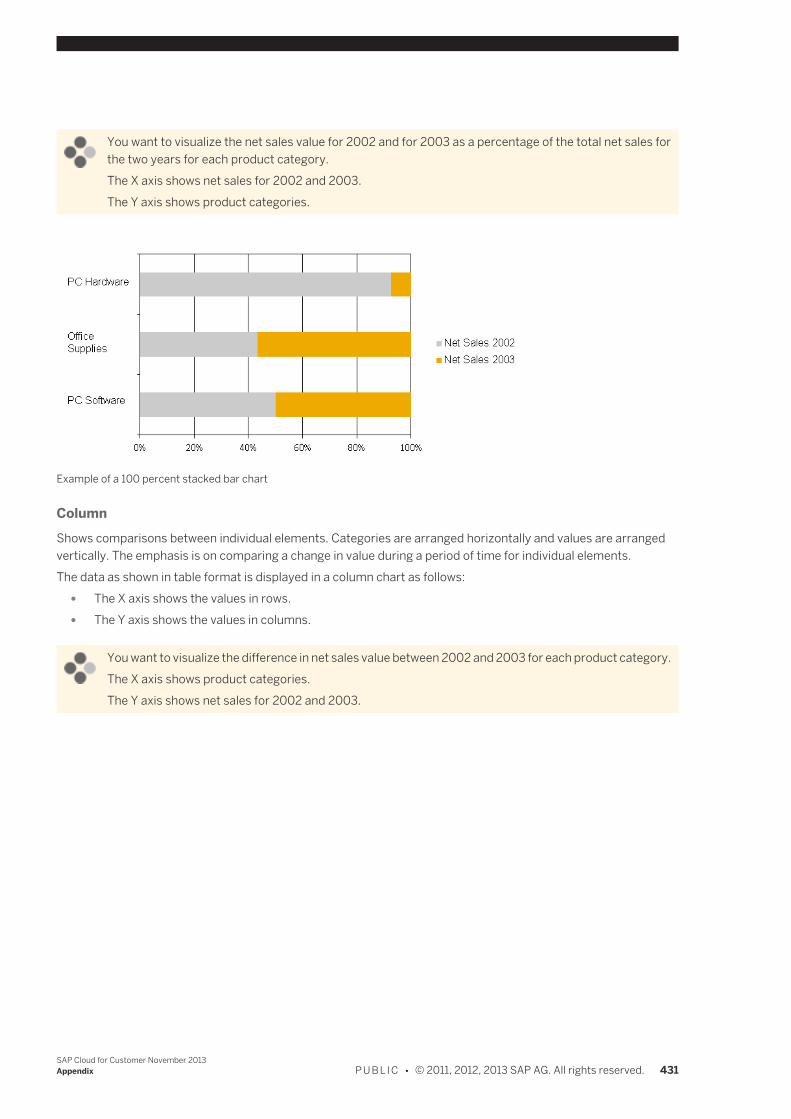
You want to visualize the net sales value for 2002 and for 2003 as a percentage of the total net sales forthe two years for each product category.The X axis shows net sales for 2002 and 2003.The Y axis shows product categories.
Example of a 100 percent stacked bar chart
ColumnShows comparisons between individual elements. Categories are arranged horizontally and values are arrangedvertically. The emphasis is on comparing a change in value during a period of time for individual elements.The data as shown in table format is displayed in a column chart as follows:
● The X axis shows the values in rows. ● The Y axis shows the values in columns.
You want to visualize the difference in net sales value between 2002 and 2003 for each product category.The X axis shows product categories.The Y axis shows net sales for 2002 and 2003.
SAP Cloud for Customer November 2013Appendix P U B L I C • © 2011, 2012, 2013 SAP AG. All rights reserved. 431
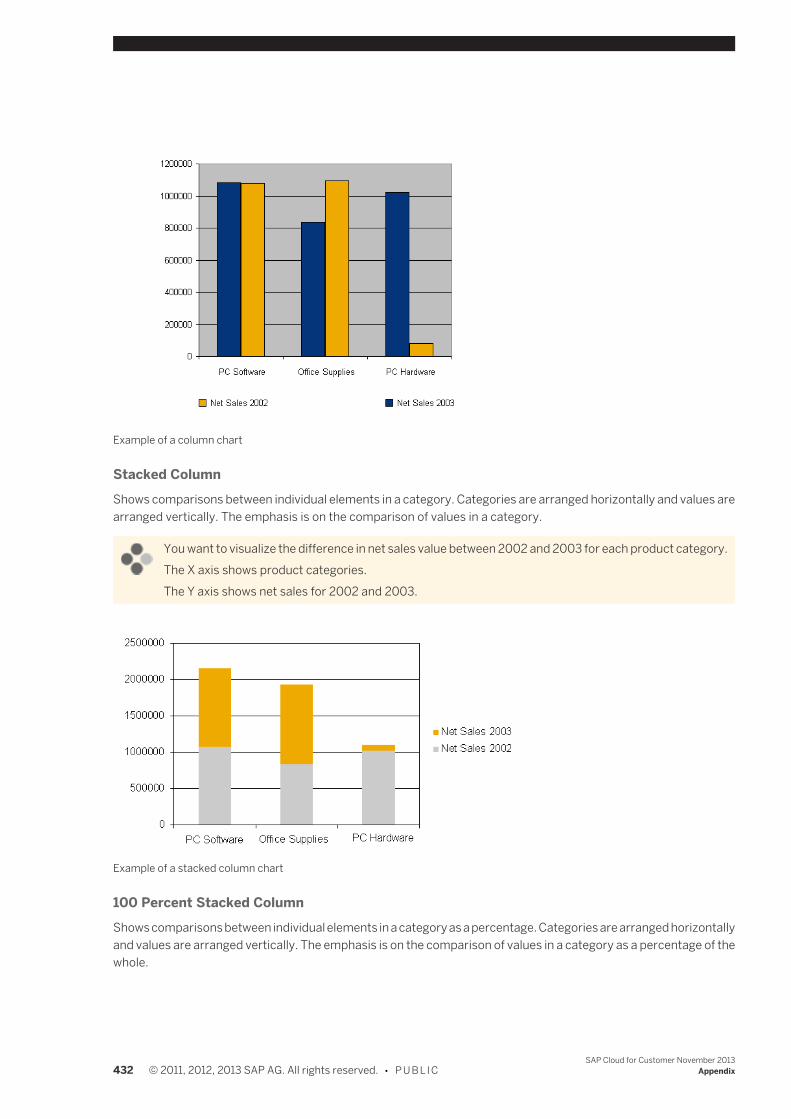
Example of a column chart
Stacked ColumnShows comparisons between individual elements in a category. Categories are arranged horizontally and values arearranged vertically. The emphasis is on the comparison of values in a category.
You want to visualize the difference in net sales value between 2002 and 2003 for each product category.The X axis shows product categories.The Y axis shows net sales for 2002 and 2003.
Example of a stacked column chart
100 Percent Stacked ColumnShows comparisons between individual elements in a category as a percentage. Categories are arranged horizontallyand values are arranged vertically. The emphasis is on the comparison of values in a category as a percentage of thewhole.
432 © 2011, 2012, 2013 SAP AG. All rights reserved. • P U B L I CSAP Cloud for Customer November 2013
Appendix
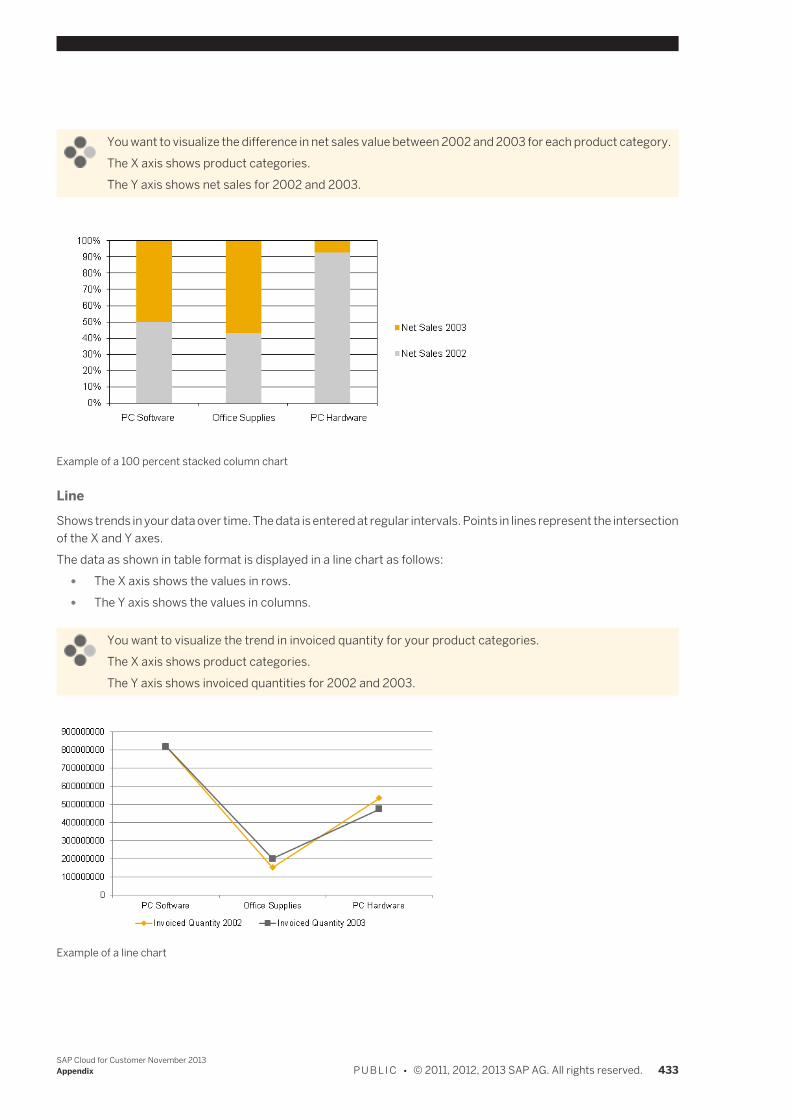
You want to visualize the difference in net sales value between 2002 and 2003 for each product category.The X axis shows product categories.The Y axis shows net sales for 2002 and 2003.
Example of a 100 percent stacked column chart
LineShows trends in your data over time. The data is entered at regular intervals. Points in lines represent the intersectionof the X and Y axes.The data as shown in table format is displayed in a line chart as follows:
● The X axis shows the values in rows. ● The Y axis shows the values in columns.
You want to visualize the trend in invoiced quantity for your product categories.The X axis shows product categories.The Y axis shows invoiced quantities for 2002 and 2003.
Example of a line chart
SAP Cloud for Customer November 2013Appendix P U B L I C • © 2011, 2012, 2013 SAP AG. All rights reserved. 433
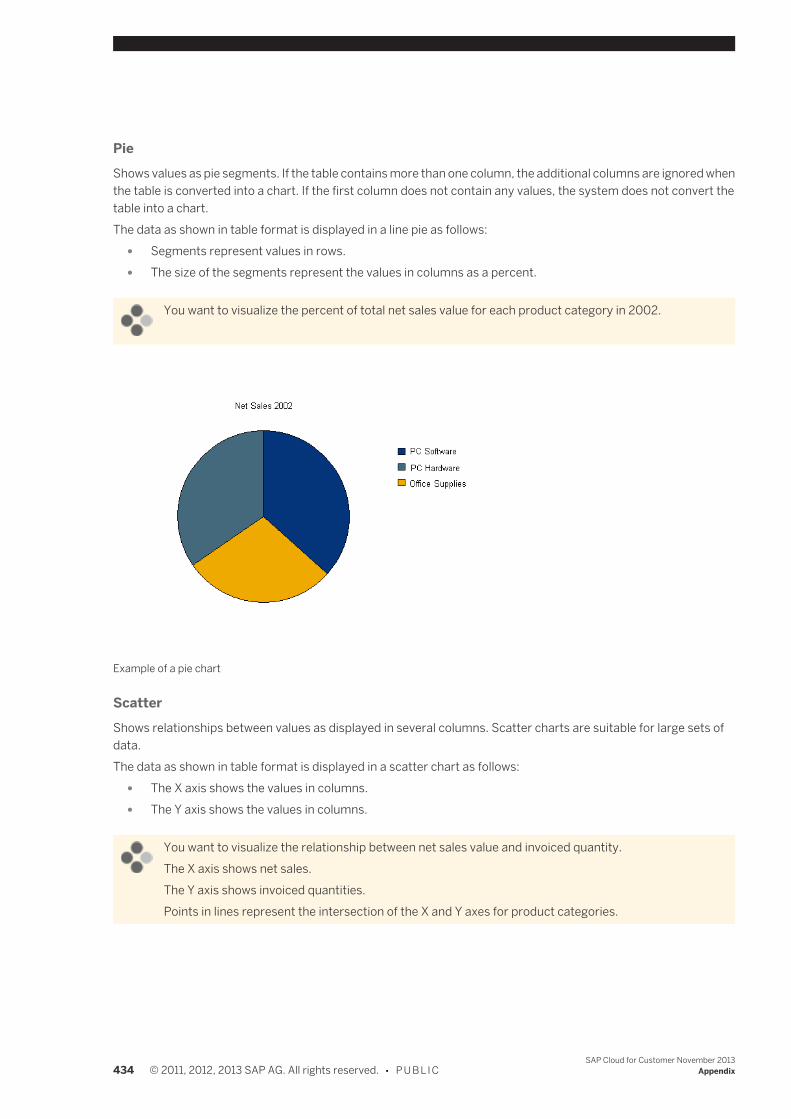
PieShows values as pie segments. If the table contains more than one column, the additional columns are ignored whenthe table is converted into a chart. If the first column does not contain any values, the system does not convert thetable into a chart.The data as shown in table format is displayed in a line pie as follows:
● Segments represent values in rows. ● The size of the segments represent the values in columns as a percent.
You want to visualize the percent of total net sales value for each product category in 2002.
Example of a pie chart
ScatterShows relationships between values as displayed in several columns. Scatter charts are suitable for large sets ofdata.The data as shown in table format is displayed in a scatter chart as follows:
● The X axis shows the values in columns. ● The Y axis shows the values in columns.
You want to visualize the relationship between net sales value and invoiced quantity.The X axis shows net sales.The Y axis shows invoiced quantities.Points in lines represent the intersection of the X and Y axes for product categories.
434 © 2011, 2012, 2013 SAP AG. All rights reserved. • P U B L I CSAP Cloud for Customer November 2013
Appendix
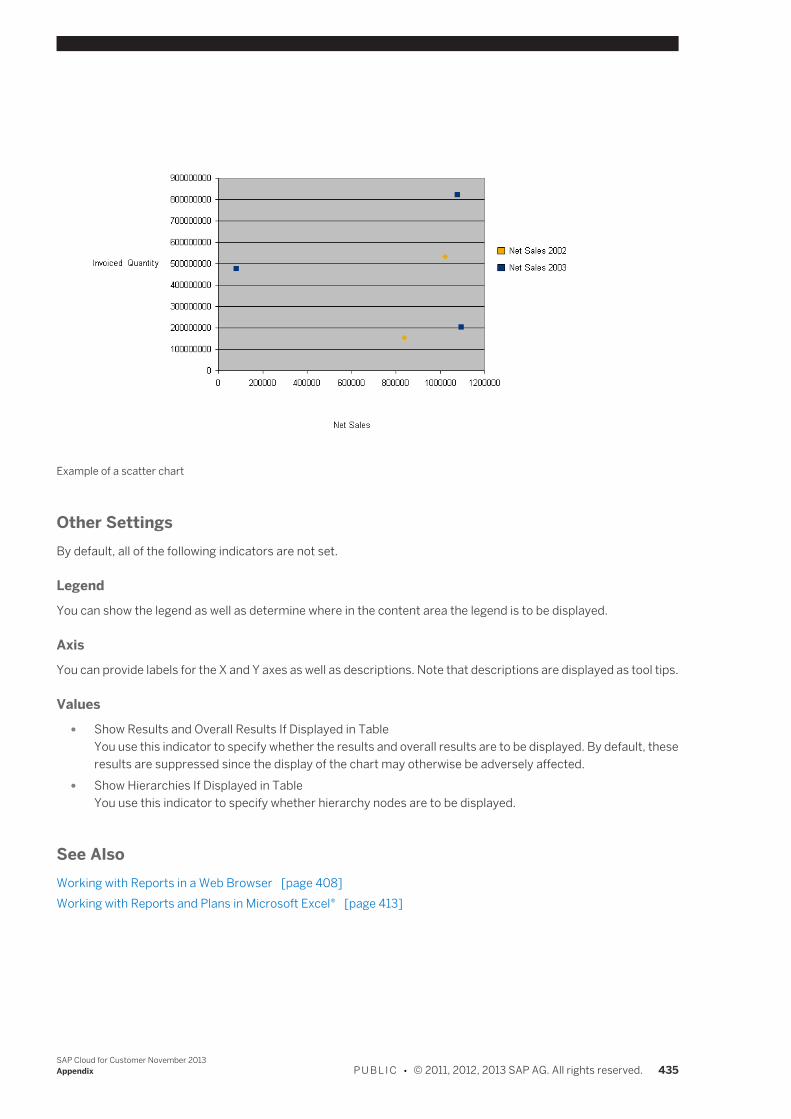
Example of a scatter chart
Other SettingsBy default, all of the following indicators are not set.
LegendYou can show the legend as well as determine where in the content area the legend is to be displayed.
AxisYou can provide labels for the X and Y axes as well as descriptions. Note that descriptions are displayed as tool tips.
Values ● Show Results and Overall Results If Displayed in Table
You use this indicator to specify whether the results and overall results are to be displayed. By default, theseresults are suppressed since the display of the chart may otherwise be adversely affected.
● Show Hierarchies If Displayed in TableYou use this indicator to specify whether hierarchy nodes are to be displayed.
See AlsoWorking with Reports in a Web Browser [page 408]Working with Reports and Plans in Microsoft Excel® [page 413]
SAP Cloud for Customer November 2013Appendix P U B L I C • © 2011, 2012, 2013 SAP AG. All rights reserved. 435
16.6.2.4 Add a Field to a Report
OverviewWhen working with reports in a Web browser, business users can add characteristic attributes to and remove themfrom reports by clicking Add Fields . On the following screen, fields are group by specified criteria. For example,characteristics are grouped by dimensions.Note that you cannot select all fields as characteristic or variable to add to or to remove from a report. Fields thatyou cannot select indicate that they are part of the report as it is defined, either as delivered content or as definedby administrators. Note that you also cannot override or extend any additions made by administrators. For example,business users cannot remove a characteristic that has been added by the administrator, nor can business usersadd a characteristic attribute to a variable that has been added by the administrator.Note that hierarchies can only be added if available with the characteristic.When you add and remove fields, the system modifies the current report. The characteristic attributes are thenavailable from the Not Currently Shown list. You can then add the new fields to rows and columns and save thepersonalized report view.
Adding Date FieldsFor characteristics that are based on calendar date, you can add fields to aggregate by quarter, month, and so on.This feature is only available for characteristics based on calendar date, not fiscal year, fiscal period, accountingperiod/year, or time.Examples of using such data fields are as follows:
● Aggregate by quarter, if you fiscal year is the same as the calendar year. ● From the table settings, if you arrange the characteristics in a hierarchy, you can drilldown in the hierarchy
from quarter to month to date.
Note that non-cumulated key figures, such as opening balance, ending balance, or inventory stock quantity, shouldnot be aggregated using such date fields since this leads to unexpected total results.
ExampleYou are working with the Invoice Volume report. Invoice date is available as a field, but you want to viewthe data by quarter. You click Add Fields . Under the Customer Invoice dimension, you expand the InvoiceDate characteristic, and add Quarter.
Adding Fields Versus Characteristic SettingsNote that by clicking Settings and then choosing Characteristics, attributes of characteristics are only shown inthe report; they are not added as fields. This means that you cannot filter the characteristic by characteristic attributevalues. You can only filter data in the report by characteristic attribute values if you add the characteristic attributeas a field to the report.
Adding Fields As an AdministratorWhen administrators start a report from the Design Reports work center view and click Add Fields , they see morefields related to the data source which serves as the basis for the report than business users. This includes morecharacteristics, characteristic attributes, and key figures.
436 © 2011, 2012, 2013 SAP AG. All rights reserved. • P U B L I CSAP Cloud for Customer November 2013
Appendix
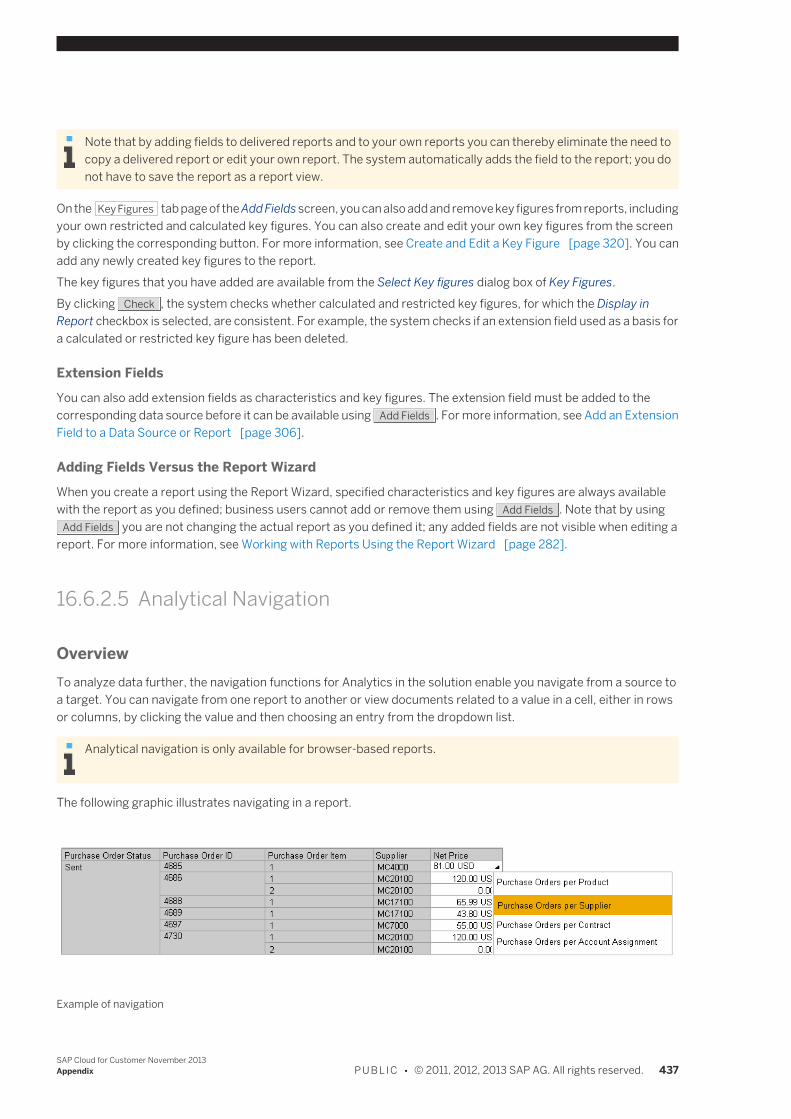
Note that by adding fields to delivered reports and to your own reports you can thereby eliminate the need tocopy a delivered report or edit your own report. The system automatically adds the field to the report; you donot have to save the report as a report view.
On the Key Figures tab page of the Add Fields screen, you can also add and remove key figures from reports, includingyour own restricted and calculated key figures. You can also create and edit your own key figures from the screenby clicking the corresponding button. For more information, see Create and Edit a Key Figure [page 320]. You canadd any newly created key figures to the report.The key figures that you have added are available from the Select Key figures dialog box of Key Figures.By clicking Check , the system checks whether calculated and restricted key figures, for which the Display inReport checkbox is selected, are consistent. For example, the system checks if an extension field used as a basis fora calculated or restricted key figure has been deleted.
Extension FieldsYou can also add extension fields as characteristics and key figures. The extension field must be added to thecorresponding data source before it can be available using Add Fields . For more information, see Add an ExtensionField to a Data Source or Report [page 306].
Adding Fields Versus the Report WizardWhen you create a report using the Report Wizard, specified characteristics and key figures are always availablewith the report as you defined; business users cannot add or remove them using Add Fields . Note that by using
Add Fields you are not changing the actual report as you defined it; any added fields are not visible when editing areport. For more information, see Working with Reports Using the Report Wizard [page 282].
16.6.2.5 Analytical Navigation
OverviewTo analyze data further, the navigation functions for Analytics in the solution enable you navigate from a source toa target. You can navigate from one report to another or view documents related to a value in a cell, either in rowsor columns, by clicking the value and then choosing an entry from the dropdown list.
Analytical navigation is only available for browser-based reports.
The following graphic illustrates navigating in a report.
Example of navigation
SAP Cloud for Customer November 2013Appendix P U B L I C • © 2011, 2012, 2013 SAP AG. All rights reserved. 437
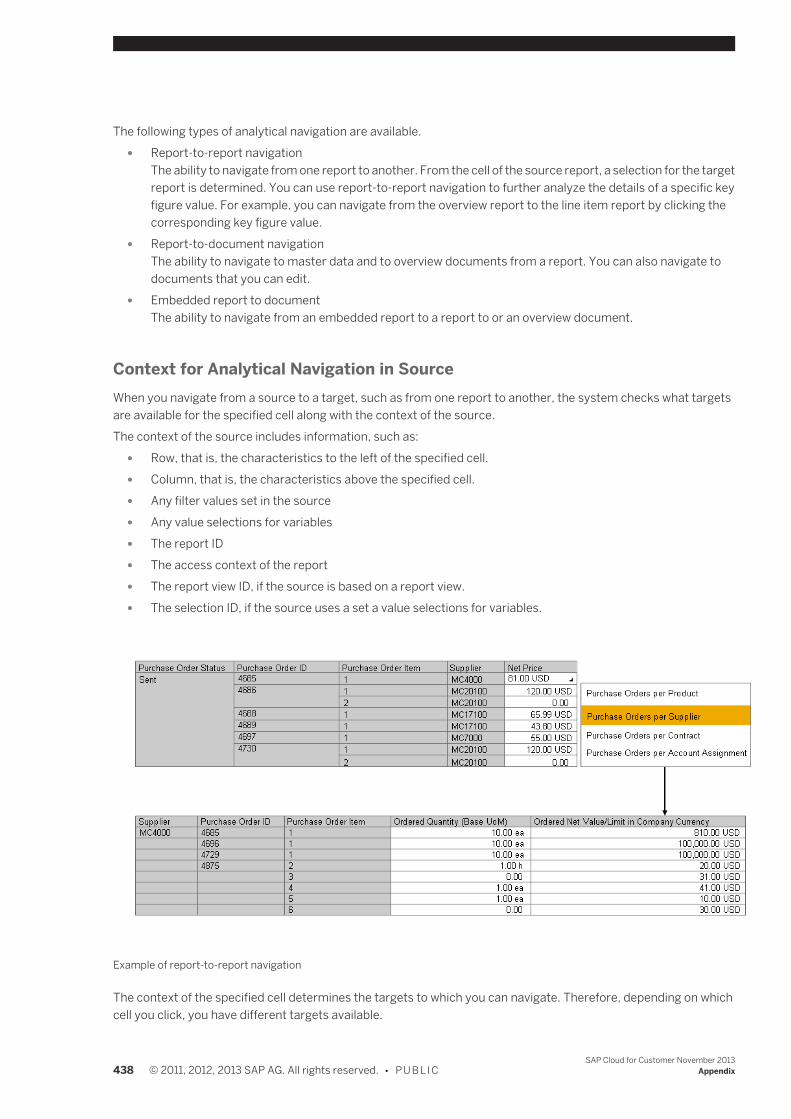
The following types of analytical navigation are available. ● Report-to-report navigation
The ability to navigate from one report to another. From the cell of the source report, a selection for the targetreport is determined. You can use report-to-report navigation to further analyze the details of a specific keyfigure value. For example, you can navigate from the overview report to the line item report by clicking thecorresponding key figure value.
● Report-to-document navigationThe ability to navigate to master data and to overview documents from a report. You can also navigate todocuments that you can edit.
● Embedded report to documentThe ability to navigate from an embedded report to a report to or an overview document.
Context for Analytical Navigation in SourceWhen you navigate from a source to a target, such as from one report to another, the system checks what targetsare available for the specified cell along with the context of the source.The context of the source includes information, such as:
● Row, that is, the characteristics to the left of the specified cell. ● Column, that is, the characteristics above the specified cell. ● Any filter values set in the source ● Any value selections for variables ● The report ID ● The access context of the report ● The report view ID, if the source is based on a report view. ● The selection ID, if the source uses a set a value selections for variables.
Example of report-to-report navigation
The context of the specified cell determines the targets to which you can navigate. Therefore, depending on whichcell you click, you have different targets available.
438 © 2011, 2012, 2013 SAP AG. All rights reserved. • P U B L I CSAP Cloud for Customer November 2013
Appendix

For example, the targets in a Results row may be different than the targets for individual values in the column sincetargets are also based on rows. The result value may be a different row than the individual values. Likewise, a cell inthe same row may have different targets because the system also checks the column of the specified cell.The targets available also depend on the access rights granted to the user. The reports for which users have noaccess right are not displayed in the context menu.The following explanatory graphic shows the targets for two different cells; note that you can only check the targetsfor one cell at a time.
Examples of targets
See AlsoWorking with Reports in a Web Browser [page 408]
16.6.2.6 Conditions
OverviewWhen you work with reports, you can create conditions to restrict the results area of a report in accordance withcertain criteria. For example, you can create a condition so that you only see products that have net sales above acertain threshold value. You can also create a condition to display the five lowest selling products. In other words,you can use conditions to restrict the results area of a report so that you only see a part of the result area for whichyou are interested.You create, edit, and delete conditions using the Manage Conditions dialog box. You can find the ManageConditions dialog box by clicking Key Figure.When you activate conditions for a report, you are not changing any values; you are just hiding the values that arenot relevant for you. Conditions therefore have no effect on the values displayed in result rows. The result rows of areport with an active condition are the same as the result rows of a report without this condition.You can define multiple conditions for a report.
Any conditions you define are only available with the report or report view in which you created the condition.
SAP Cloud for Customer November 2013Appendix P U B L I C • © 2011, 2012, 2013 SAP AG. All rights reserved. 439
Simple ConditionsWhen you create a simple condition, you set thresholds for a specified key figure related to a characteristic usingrelational operators.
You want to see all products for which invoiced net value is greater than 100 EUR. You set a condition onthe Product characteristic for the Invoiced Net Value key figure. As an operator, you select Greater than,and enter 100 as the From Value. Result: The system returns a list of products for which invoiced net valueis greater than 100 EUR and hides other values.
Ranked ConditionsThe system compares all values for a specified key figure related to a characteristic that you set. All values thatadhere to the rules that you define are displayed in a ranked list.You use the following operators to define rules for ranked conditions:
● Bottom count / Top countThe ranked list is arranged according to a specified number.
Top 5 Customers by Net SalesThe system displays a ranked list of the 5 customers having the highest net sales.
● Bottom percent / Top percentThe ranked list is arranged according to a specified percent.
Top 25% of Customers by Net SalesThe system displays a ranked list of the highest net sales by customer until 25 percent of the totalnet sales is reached.
● Bottom sum / Top sumThe ranked list is arranged according to a particular results value.
Customers - Top Total 20,000 EUR of Net SalesThe system displays a ranked list of customers, sorted by net sales in descending order, until anaggregated net sales total greater than or equal to 20,000 EUR is reached.The result can be greater than 20,000 EUR if the system has to add another customer to the rankedlist to reach the threshold value but whose net sales then makes the aggregated net sales resultgreater than 20,000 EUR.
16.6.2.7 Exceptions
OverviewWhen you work with reports, you can create exceptions for key figures. An exception is a deviation from definedthreshold values. You create exceptions by setting threshold values or intervals, for which you set an alert. Usingexceptions, the system emphasizes key figure values that deviate from or adhere to threshold values or intervals.Key figure values that deviate from or adhere to the threshold are indicated using symbols or are highlighted in color.This enables you to identify immediately all relevant values.
440 © 2011, 2012, 2013 SAP AG. All rights reserved. • P U B L I CSAP Cloud for Customer November 2013
Appendix
You create, edit, and delete exceptions using the Manage Exceptions dialog box. You can find the ManageExceptions dialog box by clicking Key Figure.When you activate exceptions for a report, the system applies the exception to the data in the report.You can define multiple exceptions for a report.
Any exceptions you define are only available with the report or report view in which you created the exception.
Defining ExceptionsTo define an exception, you select a key figure, decide how the exception is to be displayed and how it is to be applied.
Key FigureFrom the dropdown list, you select the key figure for which you want to define an exception.
Alert IndicatorThe following options are available for displaying exceptions in the report:
● ArrowThe alert level is represented as an arrow with five varying degrees of slant, corresponding to different levelsof priority.
● Background ColorThe alert level is represented by the value highlighted in various shades of green, yellow, and red. For eachcolor, there are three shades, corresponding to different levels of priority.
● Traffic LightThe alert level is represented as a traffic light.
Apply ToThe following options are available for applying exceptions to values that deviate from thresholds:
● Data and ResultThe exception is applied to key figure values and result rows.
● DataThe exception is applied to key figure values but not result rows.
● ResultThe exception is only applied to result rows.
Defining ThresholdsYou can restrict a specified key figure using relational operators, such as greater than and less than.
You want to emphasize all products for which invoiced net value is greater than 100 EUR, which is a goodvalue. You create an exception for the Invoiced Net Value key figure. As an operator, you select Greaterthan, and enter 100 as the From Value with an alert level as green. You have defined the alert indicator asbackground color. Result: The system highlights in green all values in the Invoiced Net Value column thatare greater than 100 EUR.
SAP Cloud for Customer November 2013Appendix P U B L I C • © 2011, 2012, 2013 SAP AG. All rights reserved. 441
16.6.2.8 Formulas
OverviewUsing the formula editor, you can create calculated key figures derived from existing key figures, such as basic keyfigures, restricted key figures, and calculated key figures using the available operands, operators, and a numerickeypad. For more information, see Create and Edit a Key Figure [page 320].Only numerical values are compared without taking units into account.
The system only checks the syntactic correctness of the formula. The system does not check whether theformula makes sense semantically.
Basic Functions ● Add ( + )
Calculates the sum of operand 1 and operand 2. ● Subtract ( - )
Subtracts operand 2 from operand 1. ● Multiply ( * )
Calculates the product of operand 1 and operand 2. ● Divide ( / )
Divides operand 1 by operand 2. ● Power ( ^ )
Returns the value of operand 1 raised to the power operand 2. ● Percentage Deviation (%)
Calculates the percentage deviation between operand 1 and operand 2.
Plan Sales % Actual Sales shows the difference between the plan sales and the actual salesexpressed as a percentage.
● Percentage Share (%A)Calculates the percentage share of operand 1 and operand 2.
Fixed Costs %A Costs shows fixed costs as a percentage share of total costs.
● ParenthesesGroups and sets the order of operators.
● CommaDenotes a series in a list
Boolean OperatorsA boolean value is one that can be either true or false. No other values are allowed.For relational operators, such as Greater Than, the result is 1 if the relationship denoted by operator between operand1 and operand 2 is true. Otherwise, the result is 0.
442 © 2011, 2012, 2013 SAP AG. All rights reserved. • P U B L I CSAP Cloud for Customer November 2013
Appendix
Costs < Sales returns 1 if sales are greater than costs, and returns 0 if costs are greater than or equalto sales.
● EQEqual To
● GEGreater Than or Equal To
● GTGreater Than
● LELess Than or Equal To
● LTLess Than
● NENot Equal To
● ANDLogical ANDThe result is 1 if both operand 1 and operand 2 do not equal 0. Otherwise, the result is 0.
● NOTLogical NOTThe result is 1 if the operand is 0. Otherwise, the result is 0.
● ORLogical ORThe result is 1 if operand 1 or operand 2 does not equal 0. Otherwise, the result is 0.
● XORLogical Exclusive ORThe result is 1 if either operand 1 or operand 2 (but not both) does not equal 0. Otherwise, the result is 0.
● LEAFValues in HierarchyThe result is 0 for results rows or real (inner) nodes of a hierarchy, and the value 1 for elementary rows or theleaves of a hierarchy. This operator allows you to carry out various calculations on results rows and elementaryrows.
Mathematical Functions ● ABS
Absolute ValueReturns the value of the operand irrespective of its sign (+/-).
● SIGNSign of OperandReturns the value of the operand along with its sign (+/-).
● CEILCeilingReturns the next smallest integer value that is greater than the operand.
● DIVDivisionInteger division operator: for example, 6 DIV 4 returns 1.
SAP Cloud for Customer November 2013Appendix P U B L I C • © 2011, 2012, 2013 SAP AG. All rights reserved. 443
● EXPExponentialAn operand is raised to a variable power.
● FLOORFloorReturns the next greatest integer value that is less than the operand.
● FRACFractionReturns decimal part of the X.
● LOGLogarithmReturns the natural logarithm of X.
● LOG10Base 10 LogarithmReturns the logarithm to the base 10 of X .
● MAXMaximumReturns the greatest value in a range.
● MAX0Maximum of 0 and the Operand
● MINMinimumReturns the smallest value in a range.
● MIN0Minimum of 0 and the Operand
● MODRemainderInteger remainder operator: for example, 6 MOD 4 returns 0.5.
● SQRTSquare RootReturns the square root.
● TRUNCTruncateReturns the integer part of X.
Data Functions ● COUNTER
CountValue equals 1 if operand equals 0. Otherwise, the result is 0
● NDIV0Divide by ZeroEquals 0 when divided by 0. Otherwise, the result is the value of the operand.
● NOERRZero If ErrorEquals 0 if the calculation of operand leads to an arithmetical error. Otherwise, the result is the value of theoperand.
444 © 2011, 2012, 2013 SAP AG. All rights reserved. • P U B L I CSAP Cloud for Customer November 2013
Appendix
● %CTPercentage Share of ResultShows results as a percentage share of the overall result.
● %GTPercentage Share of Overall ResultShows values as a percentage share of the overall result.
● %RTPercentage Share of Report ResultCalculates a result similar to (%GT).
● DATEValue as DateReturns the integer value in date format.
● DELTADeltaReturns the value 1 if the expression is 0, else 1.
● NODIMNo Unit or CurrencyReturns numeric values of the operand and suppresses units and currencies.
● SUMCTSum of ResultReturns the result of the operands to all rows or columns.
● SUMGTSum of Overall ResultReturns the overall results of the operands.
● SUMRTSum of Report ResultReturns the report result of the operand.
● TIMEValue As TimeReturns the integer value in time format.The system cuts off the decimal places, interprets the value as seconds, and displays the value in the form+-hh:mm:ss. For example, 4812 is displayed as 1:20:12.
Trigonometric Functions ● ACOS
Arc Cosine ● ASIN
Arc Sine ● ATAN
Arc Tangent ● COS
Cosine ● COSH
Hyperbolic Cosine ● SIN
Sine
SAP Cloud for Customer November 2013Appendix P U B L I C • © 2011, 2012, 2013 SAP AG. All rights reserved. 445
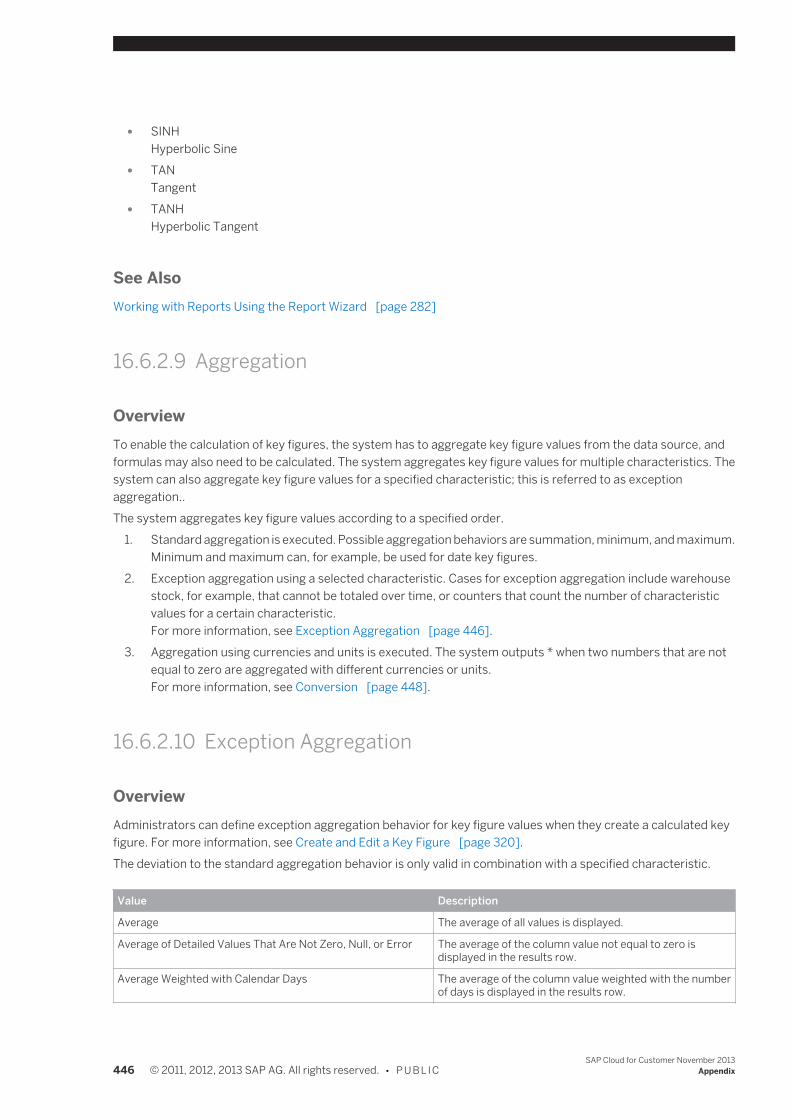
● SINHHyperbolic Sine
● TANTangent
● TANHHyperbolic Tangent
See AlsoWorking with Reports Using the Report Wizard [page 282]
16.6.2.9 Aggregation
OverviewTo enable the calculation of key figures, the system has to aggregate key figure values from the data source, andformulas may also need to be calculated. The system aggregates key figure values for multiple characteristics. Thesystem can also aggregate key figure values for a specified characteristic; this is referred to as exceptionaggregation..The system aggregates key figure values according to a specified order.
1. Standard aggregation is executed. Possible aggregation behaviors are summation, minimum, and maximum.Minimum and maximum can, for example, be used for date key figures.
2. Exception aggregation using a selected characteristic. Cases for exception aggregation include warehousestock, for example, that cannot be totaled over time, or counters that count the number of characteristicvalues for a certain characteristic.For more information, see Exception Aggregation [page 446].
3. Aggregation using currencies and units is executed. The system outputs * when two numbers that are notequal to zero are aggregated with different currencies or units.For more information, see Conversion [page 448].
16.6.2.10 Exception Aggregation
OverviewAdministrators can define exception aggregation behavior for key figure values when they create a calculated keyfigure. For more information, see Create and Edit a Key Figure [page 320].The deviation to the standard aggregation behavior is only valid in combination with a specified characteristic.
Value Description
Average The average of all values is displayed.
Average of Detailed Values That Are Not Zero, Null, or Error The average of the column value not equal to zero isdisplayed in the results row.
Average Weighted with Calendar Days The average of the column value weighted with the numberof days is displayed in the results row.
446 © 2011, 2012, 2013 SAP AG. All rights reserved. • P U B L I CSAP Cloud for Customer November 2013
Appendix
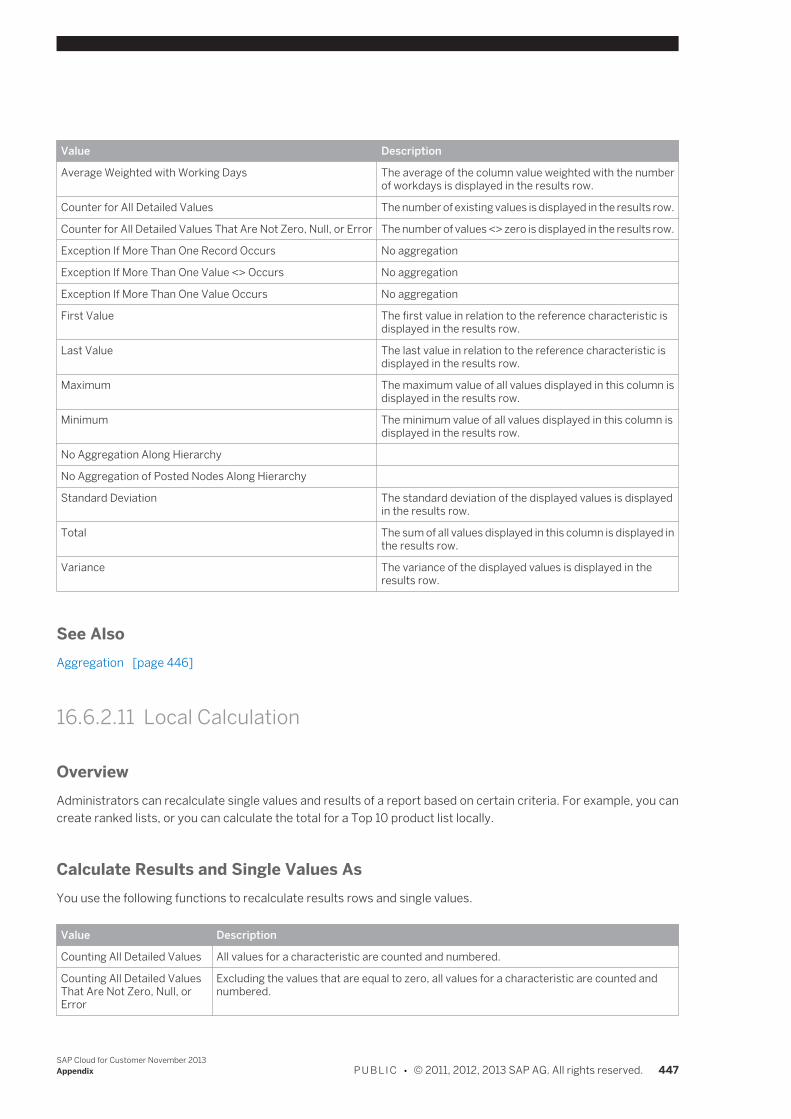
Value Description
Average Weighted with Working Days The average of the column value weighted with the numberof workdays is displayed in the results row.
Counter for All Detailed Values The number of existing values is displayed in the results row.
Counter for All Detailed Values That Are Not Zero, Null, or Error The number of values <> zero is displayed in the results row.
Exception If More Than One Record Occurs No aggregation
Exception If More Than One Value <> Occurs No aggregation
Exception If More Than One Value Occurs No aggregation
First Value The first value in relation to the reference characteristic isdisplayed in the results row.
Last Value The last value in relation to the reference characteristic isdisplayed in the results row.
Maximum The maximum value of all values displayed in this column isdisplayed in the results row.
Minimum The minimum value of all values displayed in this column isdisplayed in the results row.
No Aggregation Along Hierarchy
No Aggregation of Posted Nodes Along Hierarchy
Standard Deviation The standard deviation of the displayed values is displayedin the results row.
Total The sum of all values displayed in this column is displayed inthe results row.
Variance The variance of the displayed values is displayed in theresults row.
See AlsoAggregation [page 446]
16.6.2.11 Local Calculation
OverviewAdministrators can recalculate single values and results of a report based on certain criteria. For example, you cancreate ranked lists, or you can calculate the total for a Top 10 product list locally.
Calculate Results and Single Values AsYou use the following functions to recalculate results rows and single values.
Value Description
Counting All Detailed Values All values for a characteristic are counted and numbered.
Counting All Detailed ValuesThat Are Not Zero, Null, orError
Excluding the values that are equal to zero, all values for a characteristic are counted andnumbered.
SAP Cloud for Customer November 2013Appendix P U B L I C • © 2011, 2012, 2013 SAP AG. All rights reserved. 447
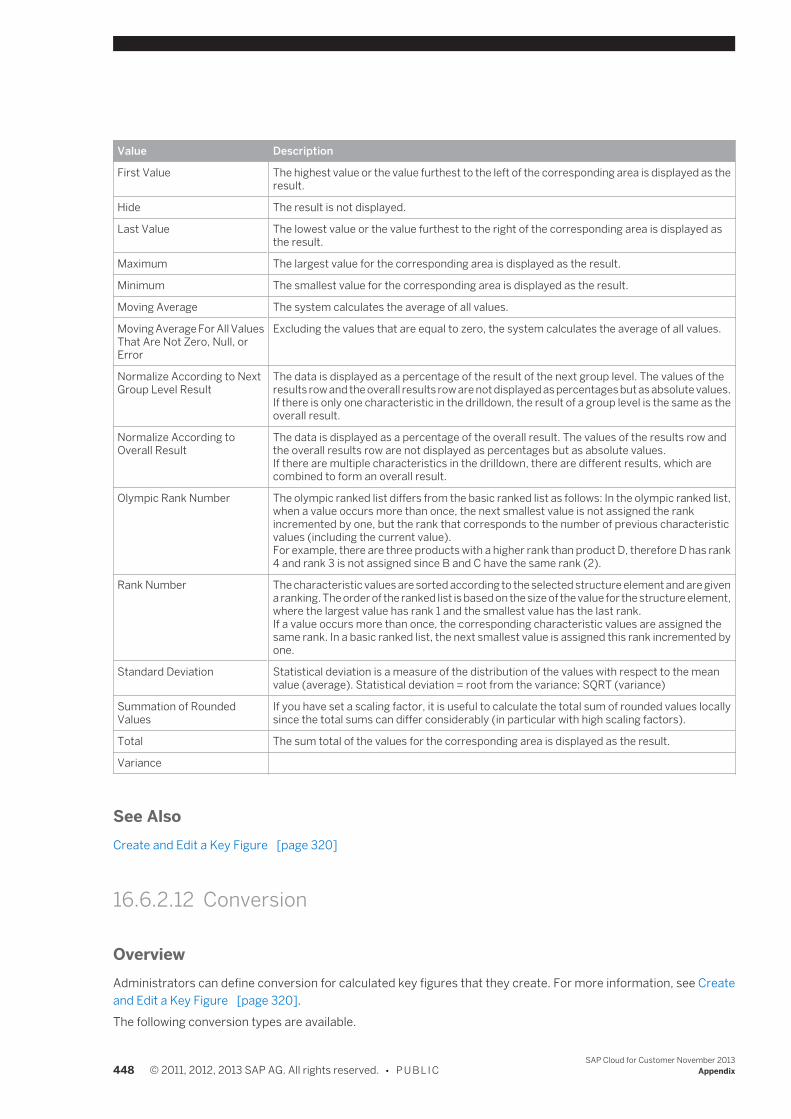
Value Description
First Value The highest value or the value furthest to the left of the corresponding area is displayed as theresult.
Hide The result is not displayed.
Last Value The lowest value or the value furthest to the right of the corresponding area is displayed asthe result.
Maximum The largest value for the corresponding area is displayed as the result.
Minimum The smallest value for the corresponding area is displayed as the result.
Moving Average The system calculates the average of all values.
Moving Average For All ValuesThat Are Not Zero, Null, orError
Excluding the values that are equal to zero, the system calculates the average of all values.
Normalize According to NextGroup Level Result
The data is displayed as a percentage of the result of the next group level. The values of theresults row and the overall results row are not displayed as percentages but as absolute values.If there is only one characteristic in the drilldown, the result of a group level is the same as theoverall result.
Normalize According toOverall Result
The data is displayed as a percentage of the overall result. The values of the results row andthe overall results row are not displayed as percentages but as absolute values.If there are multiple characteristics in the drilldown, there are different results, which arecombined to form an overall result.
Olympic Rank Number The olympic ranked list differs from the basic ranked list as follows: In the olympic ranked list,when a value occurs more than once, the next smallest value is not assigned the rankincremented by one, but the rank that corresponds to the number of previous characteristicvalues (including the current value).For example, there are three products with a higher rank than product D, therefore D has rank4 and rank 3 is not assigned since B and C have the same rank (2).
Rank Number The characteristic values are sorted according to the selected structure element and are givena ranking. The order of the ranked list is based on the size of the value for the structure element,where the largest value has rank 1 and the smallest value has the last rank.If a value occurs more than once, the corresponding characteristic values are assigned thesame rank. In a basic ranked list, the next smallest value is assigned this rank incremented byone.
Standard Deviation Statistical deviation is a measure of the distribution of the values with respect to the meanvalue (average). Statistical deviation = root from the variance: SQRT (variance)
Summation of RoundedValues
If you have set a scaling factor, it is useful to calculate the total sum of rounded values locallysince the total sums can differ considerably (in particular with high scaling factors).
Total The sum total of the values for the corresponding area is displayed as the result.
Variance
See AlsoCreate and Edit a Key Figure [page 320]
16.6.2.12 Conversion
OverviewAdministrators can define conversion for calculated key figures that they create. For more information, see Createand Edit a Key Figure [page 320].The following conversion types are available.
448 © 2011, 2012, 2013 SAP AG. All rights reserved. • P U B L I CSAP Cloud for Customer November 2013
Appendix
Unit ConversionUnit conversion allows you to convert the quantity unit of key figure values that represent a quantity to another unit.You apply unit conversion when you define the key figure.
You have a key figure, representing ordered stock quantities.You require this function, for example, if you want to report on key figures, such as ordered stock that usequantities in units common to different countries or industries. By converting the quantity unit to acommon unit, such as kilograms for weight, you can compare ordered stock.
Currency ConversionCurrency conversion allows you to convert the currency unit of key figure values.Note that you do not apply currency conversion when creating the calculated key figure but rather define thatcurrency conversion can be applied to the key figure if the key figure is used in reports.When you define that currency conversion can be applied to the key figure, the system creates variables that areavailable with reports in which the key figure is used. The variables enable users to apply currency conversion to thekey figure. Depending on how the report is defined, the variables may already exist.The variables are as follows:
● Display CurrencyDepending on how the underlying data is defined, the variable may be defaulted to the company currency.
● Display Currency - Conversion Date
For example, you want to report on key figures, such as net sales that balance in a different currency. Byconverting the currency unit to a common currency, such as the company currency, you can comparenet sales.
16.7 Layout
16.7.1 Layout and Navigation
The layout of the user interface (UI) in SAP Cloud for Customer is organized by item type into various views, whichappear across the top of the screen.
Tasks
Understanding the Layout of the SAP Cloud for Customer User InterfaceThe following figure illustrates the placement of the work centers and work center views on the user interface of SAP Cloud for Customer.The table below describes each element shown in the figure:
SAP Cloud for Customer November 2013Appendix P U B L I C • © 2011, 2012, 2013 SAP AG. All rights reserved. 449
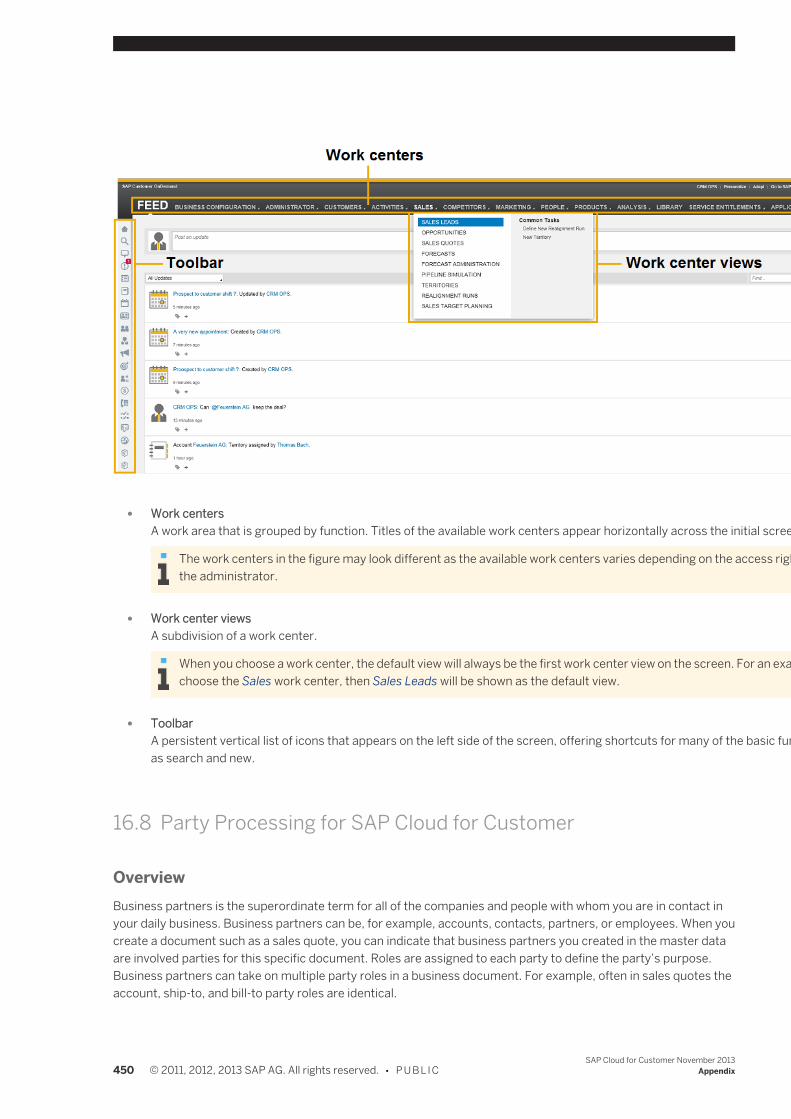
● Work centersA work area that is grouped by function. Titles of the available work centers appear horizontally across the initial screen.
The work centers in the figure may look different as the available work centers varies depending on the access rights given bythe administrator.
● Work center viewsA subdivision of a work center.
When you choose a work center, the default view will always be the first work center view on the screen. For an example, if youchoose the Sales work center, then Sales Leads will be shown as the default view.
● ToolbarA persistent vertical list of icons that appears on the left side of the screen, offering shortcuts for many of the basic functions, suchas search and new.
16.8 Party Processing for SAP Cloud for Customer
OverviewBusiness partners is the superordinate term for all of the companies and people with whom you are in contact inyour daily business. Business partners can be, for example, accounts, contacts, partners, or employees. When youcreate a document such as a sales quote, you can indicate that business partners you created in the master dataare involved parties for this specific document. Roles are assigned to each party to define the party’s purpose.Business partners can take on multiple party roles in a business document. For example, often in sales quotes theaccount, ship-to, and bill-to party roles are identical.
450 © 2011, 2012, 2013 SAP AG. All rights reserved. • P U B L I CSAP Cloud for Customer November 2013
Appendix
In SAP Cloud for Customer, you can automatically determine all involved parties for business transactions anddocuments using roles, determination rules, parties, addresses, and master data. The Involved Parties tab, forexample in a sales quote, displays all parties and contacts.
Business Partner and Parties ● Business Partners
Business partners are all the companies and people with whom you are in contact in your daily business.When you begin your work, you first create master data in the system by entering kinds of the businesspartners that you require for your daily work, and the term 'business partner' is the superordinate term forthe following entities in your system: ○ Accounts ○ Individual Customers ○ Contacts ○ Partners ○ Partner Contacts ○ Competitors ○ Employees
Business partners can also be used for: ○ Storage and display of information in a business transaction. The information collected from the business
partner does not affect the behavior of the system. ○ Relevance in business processes: the way a business process performs depends on the business partner.
This means that the system behaves differently or uses different data depending on the selectedbusiness partner.
○ Analytics and Reporting: here you can drill down on several business partner attributes and party roles.For example, sales manager Bob Menson wants to drill down the sales per sales unit in reporting. Heassigns the party role Sales Unit to every sales quote to enable the drill down.
● PartiesIf you create a document, for example, a sales quote, you can indicate that business partners you created inthe master data are involved parties for this specific document. Parties use business partners that have aspecial purpose in a document. Party roles are assigned to each party to define the party’s purpose.
● Party RolesBusiness partners often take on multiple party roles in a business document such as a business documentsales quote. Business partners are assigned to party roles in a specific document to indicate the purpose ofthe business partner in that document. It is often the case in a sales quote that the account, ship-to, and bill-to are identical: if Silverstar Wholesales Inc. wants to purchase the heating installation, receives the goods,gets the invoice, it has all four party roles in the sales quote.
● Party Role for EmployeesWith the Employee Responsible role you can define which employee in your organization is responsible oraccountable for a single document. Often, this employee also has tasks to fulfill or is responsible for updatingthe document.
● Party Roles for Organizational UnitsOrganizational units reflect the organizational structure of the company. Organizational units can definecompanies, sales organization, and sales units.
● Special Case: CompaniesCompanies occur both as an internal and external business partner in your master data.
SAP Cloud for Customer November 2013Appendix P U B L I C • © 2011, 2012, 2013 SAP AG. All rights reserved. 451
Once you enter a company into the organizational hierarchy, a corresponding business partner with Accountas business partner role is created automatically.
The company ID in organizational management does not need to be the same as the account ID in themaster data.
● Contact Role in Documents and Master DataYou can enter one or several contacts for an account in your master data. This allows you, for instance, tocall the right person in a particular company directly instead of using the central company phone number.However, it might be helpful to enter a contact person for a party into the document as well.Contacts are always related to a party in a document. That means this person is the one you contact if youhave questions about this party for the party role.
Parties in Documents ● Consistency Checks on Parties Used in Documents
There are several consistency checks performed when a business partner is used in a party role for adocument. These checks ensure that the document created is correct and consistent and are done for thefollowing reasons: ○ The checks guarantee that the complete business process runs smoothly without interruption, for
example, due to missing data ○ Legal compliance for accounts ○ The checks help the employee to create the document according to the business rules entered in the
master data
There are other checks that affect whether you can change a party role. Some of the parties are neverchangeable, which means the field is always read-only or the will become read-only under certain conditions,or in a certain document status. In some cases parties that were once read-only can become editable, forexample, if a change was reverted. Parties are set to read-only to guarantee the consistency of the businessprocesses or since this has been defined by you in business configuration.
● Determination of PartiesIf you are creating a new document in the system, such as a sales quote, the document initially has no partiesassigned. Once the account or contact party has been entered, other party roles, such as employeeresponsible, ship-to or bill-to are determined automatically. These automatically determined parties are onlyproposals and you can change them if the status of the document allows it.Parties are automatically re-determined when a document is changed. Re-determining means that a party ina party role has been already found. When the user changes certain data, the system determines that anotherparty is better suited for this party role.Automatic re-determination of parties is disabled in the following cases: ○ Parties for this party role cannot be changed anymore. ○ If a party role has been changed manually by the user. This is based on the following: if the user already
changed the data manually, he or she does not want to allow further automatic changes since this wouldcause confusion. Thus, the system does not change parties of a party role that were changed manuallyby the user.
● Error HandlingIf you often encounter the problem that the system finds the wrong party or none at all, here are a fewsuggestions: ○ The configuration of the party determination steps do not match your business case. In this case you
can enable and disable party determination rules.
452 © 2011, 2012, 2013 SAP AG. All rights reserved. • P U B L I CSAP Cloud for Customer November 2013
Appendix
○ The master data required to automatically determine the parties is missing, insufficient, or inconsistent:check the different steps for determining a party role for a certain document type in the correspondingbusiness configuration and enhance or correct the master data as described for the differentdetermination rules.
You can create a new document based on an existing document.In this case the data, including the parties from the existing document, is copied to the new document.However, there are fixed rules for copying parties from one document to another document. You cannotchange the rules. They depend on the following: ○ What kind of document the source document is, for example, sales quote, opportunity, or e-mail activity. ○ What kind of document the target document is. ○ Which party roles exist in the source document, for example, an e-mail activity has no bill-to party to be
copied. ○ Which party roles exist in the target document, for example, if there is no Bill-to in the target document.
The rules are as follows: ○ A party role is copied one-to-one from the source document to the target document, for instance, the
ship-to party of a sales quote is copied to the ship-to party of the sales quote. ○ A party role is not copied to the target document due to organizational reassignment. This is basically
the case for the party roles employee responsible or sales unit. The employee responsible or sales unitof a sales quote is not copied to any copied document. The system will trigger a new party determinationfor those roles.
Party Roles in Documents ● Using a New Party Role in a Document
The prerequisite for using a party role in a document is adding it to the parties relevant for this documenttype. You can then add a party with the newly created party role on the Involved Parties tab of thecorresponding document. Automatic determination occurs when the Responsibility checkbox is selected inthe party role.You then have to maintain a responsibility as follows: ○ Maintain a directly responsible party in the account master data ○ Maintain an employee who is indirectly responsible: This can be achieved if the employees are not directly
responsible (manual assignment) for the accounts. Responsibility depends on customer attributes suchas country, region or postal code. You enter a responsibility for the employee party role, such as a region.If a sales quote is created with a region that matches this responsibility, the corresponding employeebecomes the default.
● New Party Roles in Copied or Follow-Up DocumentsA new party role that you introduce can be copied from one document to another. The prerequisite is simplythat the new party role you defined has been added to both the source and target document.
Direct responsibilities are more important than indirect relationships. That is, if there is a direct responsibility enteredfor an account in the corresponding party role, the indirect responsibility becomes irrelevant.
Usage of AddressesIn order to describe how addresses are used, it is useful to distinguish between the address of a business partnerthat is only valid for this business partner and the relationship address which makes sense on a relationship betweentwo business partners.Types of Addresses
SAP Cloud for Customer November 2013Appendix P U B L I C • © 2011, 2012, 2013 SAP AG. All rights reserved. 453
● Address of a PartyAddress of a party means that this address is related to one party only: ○ There is no relation to a second party for this address. ○ The address can have several purposes. For example, an address might be suitable for delivering goods
or it might be the relevant address for sending invoices to a customer. ○ An address might also have several simultaneous uses.
● Relationship AddressRelationship addresses are never for only one party, but describe an address for a relationship between twoparties. The relationship address data comes from both parties. There are two kinds of relationship address: ○ Employee relationship address
This describes the address where an employee works. The first party of the relationship is theorganizational unit, for example, a company, a sales unit, or a service unit. The second party is theemployee. Address data, such as country, city or postal code, is derived from the organizational unit.Address data, such as building, e-mail address or direct telephone number belong to the employee.Together they build the relationship address of the employee at this organizational unit.
○ Contact relationship addressThis is similar to the employee relationship address, but represents the external view. That is, the personin the relationship is a contact in another company. The first party is typically an account. The secondparty is the contact. The contact relationship address describes where this contact works in thiscompany and how you can contact him or her. Note that account and contact can have more than onerelationship address to another party. For example, a consultant works for several accounts and hasseveral workplaces at those companies and an account can have several contacts.
Automatically Defaulted Address of a PartyWhen you add a party or a party is automatically determined by the system, the system defaults to the standardaddress that is generally the most suitable, depending on the role of the party and the available addresses of thebusiness partner in the master data. You can change the default address.Note that if there is no default address and you do not enter an address, only the party name is used. However, youcan add an address for the party within the master data or choose it manually.
Setting Up Party ProcessingTo support the automatic determination of the party roles in your party schema, you must perform the followingactivities:
1. Define new party roles, such as internal and external involved parties, with the Party Role Definition fine-tuneactivity. These new roles can be used for specific documents, for example, sales quote or opportunity, asadditional involved parties. A party role describes a person or an organization that is involved in your specifictransaction.The configuration delivers pre-defined party roles that are marked as Responsibility Role, which containsfrequently used internal party roles such as employee responsible or service performer. ● Party Role Code: The code, which can be up to ten characters in length, used to identify the party role.
Enter the code to identify the party role. This code must begin with a Z — for example, Z123456789.
● Description: The text to describe the party role used in a document and account assignment. ● Party Category ● Responsibility Role: Indicates whether a party role should be used to assign employees to accounts. This
checkbox should only be selected for internal party roles, such as employees. Pre-defined party rolesfrom SAP for which the Responsibility Role checkbox is selected cannot be deleted or renamed. Theseparty roles are available for responsibility assignment of employees. The pre-defined roles are also
454 © 2011, 2012, 2013 SAP AG. All rights reserved. • P U B L I CSAP Cloud for Customer November 2013
Appendix
already defined in the party schemas and cannot be added or changed. In addition, the assignment ofresponsibility roles can be defined as follows: ○ Directly through manual assignment in the account master data. ○ The party with the corresponding Z-role is assigned to a territory. And in case a document falls in
the responsibility of the corresponding territory, the appropriate party and Z-role are assigned tothe document. But this is only valid if the account has not a party with the Z-role.
○ Indirectly through rule-based definitions — for example, regional attributes, such as postal code.
Responsibility roles used in the party schema will be determined based on the account assignments.If you don’t identify a role as a responsibility role, the role can be maintained manually in the documentunder Involved Parties if the new party role has been assigned to the party schema.
2. Add these party roles to your party schema, for example, add the party roles for sales quotes in InvolvedParties in the Sales Quotes fine-tune activity. This activity is also available under Opportunities and SalesLeads.
● Adding or editing party roles1. Click Maintain Involved Parties.2. Under Party Role Assignments click Add Row .3. Select a Party Role from the drop-down list.4. Decide whether the role should be, for example, active, mandatory, unique, or should be forbidden
for manual changes.5. Save your changes.6. Then click Maintain Determinations where you can edit the determination for the newly added
party role. ● Deleting role assignments
1. Select the line you want to delete.2. Click Delete .
You can delete only self-created assignments. Pre-delivered content cannot be deleted.
Party roles pre-delivered by SAP cannot be renamed or assigned to other party schemas.If you add a new role the following determinations are added automatically: ● Direct Responsible of Account ● <Party Role> assigned to Territory
● Responsibility <Party Role>
3. If you use the Responsibility Role checkbox, maintain the account assignment of employees in master dataor territory assignment.Note that the Responsibility Role checkbox should only be applied to party roles for employees.If the Responsibility Role checkbox has been selected, you can maintain the following types of responsibilitiesfor this party role: ● Maintain a direct responsibility for an account. The party role is proposed in a drop down list in account
master data, under Responsibilities. For example, employee Kate Jacob is directly responsible in a partyrole for the account Silverstar Wholesales Inc.
● Maintain a territory responsibility for an account. Though, for example, Bill Smith, the employeeresponsible for accounts in Florida, is automatically assigned to sales quotes with accounts in Florida.
SAP Cloud for Customer November 2013Appendix P U B L I C • © 2011, 2012, 2013 SAP AG. All rights reserved. 455
● Maintain an indirect responsibility for accounts. For example, employee Susan Thomas is responsiblefor all accounts in Nevada. You do this in the Administrator work center under General WorkDistribution Employee Work Distribution .
Determination RulesYou can display the determination rules of a document in the corresponding fine-tuning activity. The followingparagraphs describe how to influence the determination by entering master data, if applicable, for the determinationrule.
● Business partner relationship of <Party Role>
Example: Business partner relationship of AccountIn the Contact view in the master data of accounts, you can enter different relationships types, such as HasShip-to Party, for other business partners. The relationships are then used to automatically determine relatedbusiness partners when a document is created.What to do if the wrong party or no party is found with this step: ○ Add or remove a relationship in the master data of the account. ○ Change the default relationship in the master data of the account. ○ Disable the determination rule in the Business Partner Relationship of 'party role' fine-tuning activity.
● Functional Organizational Unit of <Party Role>
Example: Functional Organizational Unit of Employee ResponsibleYou can determine the sales unit by the sales unit assigned to the employee responsible for a document; forexample, Kate Jacob is assigned to the reporting line unit “Sales Office New York”. With this step, the partyrole “Sales Unit” is preset for the employee responsible.
● Organizational Unit from Org Model if only One Suitable Functional Unit Exists
If only one organizational unit is set up in organizational management with the relevant functional unit, theorganizational unit is selected as the relevant party.Example: Only one sales unit is set up in the organizational model. This single sales unit is automaticallydetermined as the relevant sales unit in a sales quote.
● Copied from <Party Role>
Example: Copied from AccountThis determination step copies the business partner from one party role to another party role, as required.For example, the Ship-to, Bill-to or Payer party is automatically derived from the Account party, if they areidentical, for example, it is the same customer.
● Responsibility ”<Name of Responsibility>”
Example: Responsibility “Employee Responsible for Sales”This determination step sets the default for the organizational unit or employee role according to the rulesdefined in the responsibilities for employees and organizational units. For example, you defined adetermination rule by region for customers located in New York. For these customers only, a certain salesunit or certain employee is responsible. Then all documents with accounts that have an address in “New York”are assigned to this sales unit or employee responsible according to the determination rule entered previously.
● <Name of Party Role> of Account or <Name of Party Role> of Territory TeamThis determination step can be set for party role Employee Responsible, Sales Employee, and customer-specific party roles. This determination step sets the default for the role to the employee entered directly inthe account master data under Account Team.You can find the territory data either on the Account Team or on the Sales Team tab, in case there are morethen one territory.
● Current User
456 © 2011, 2012, 2013 SAP AG. All rights reserved. • P U B L I CSAP Cloud for Customer November 2013
Appendix
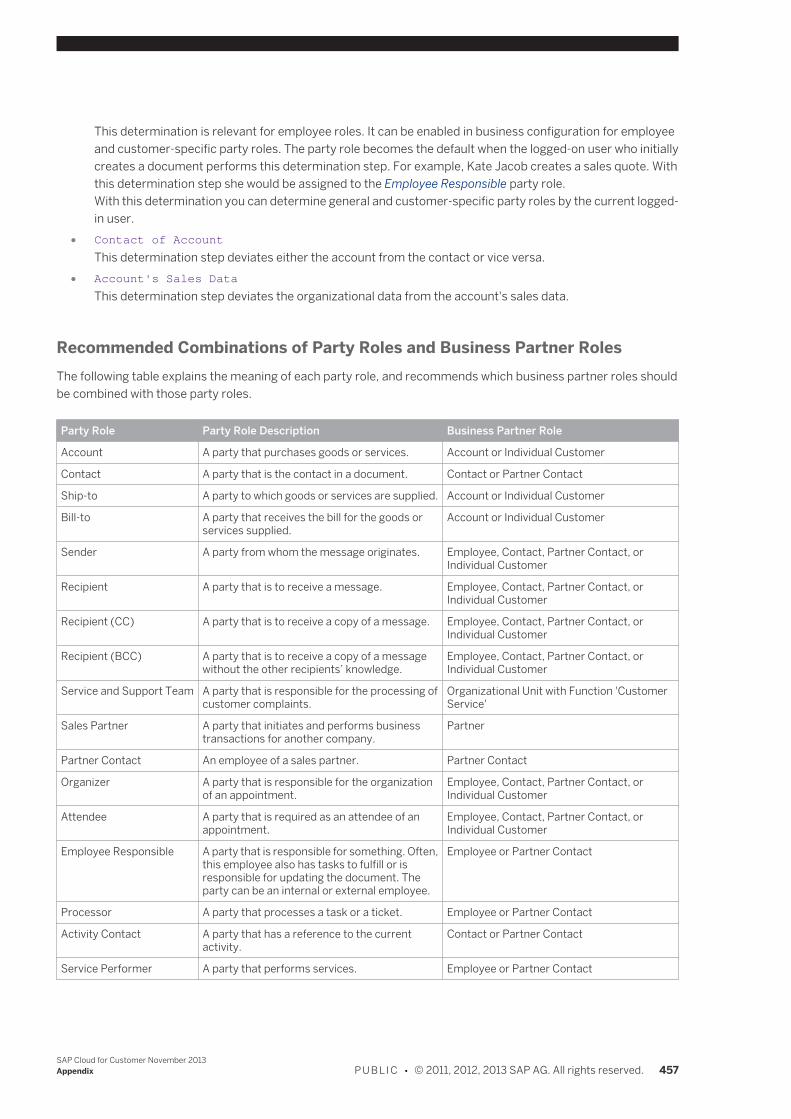
This determination is relevant for employee roles. It can be enabled in business configuration for employeeand customer-specific party roles. The party role becomes the default when the logged-on user who initiallycreates a document performs this determination step. For example, Kate Jacob creates a sales quote. Withthis determination step she would be assigned to the Employee Responsible party role.With this determination you can determine general and customer-specific party roles by the current logged-in user.
● Contact of Account
This determination step deviates either the account from the contact or vice versa. ● Account's Sales Data
This determination step deviates the organizational data from the account's sales data.
Recommended Combinations of Party Roles and Business Partner RolesThe following table explains the meaning of each party role, and recommends which business partner roles shouldbe combined with those party roles.
Party Role Party Role Description Business Partner Role
Account A party that purchases goods or services. Account or Individual Customer
Contact A party that is the contact in a document. Contact or Partner Contact
Ship-to A party to which goods or services are supplied. Account or Individual Customer
Bill-to A party that receives the bill for the goods orservices supplied.
Account or Individual Customer
Sender A party from whom the message originates. Employee, Contact, Partner Contact, orIndividual Customer
Recipient A party that is to receive a message. Employee, Contact, Partner Contact, orIndividual Customer
Recipient (CC) A party that is to receive a copy of a message. Employee, Contact, Partner Contact, orIndividual Customer
Recipient (BCC) A party that is to receive a copy of a messagewithout the other recipients’ knowledge.
Employee, Contact, Partner Contact, orIndividual Customer
Service and Support Team A party that is responsible for the processing ofcustomer complaints.
Organizational Unit with Function 'CustomerService'
Sales Partner A party that initiates and performs businesstransactions for another company.
Partner
Partner Contact An employee of a sales partner. Partner Contact
Organizer A party that is responsible for the organizationof an appointment.
Employee, Contact, Partner Contact, orIndividual Customer
Attendee A party that is required as an attendee of anappointment.
Employee, Contact, Partner Contact, orIndividual Customer
Employee Responsible A party that is responsible for something. Often,this employee also has tasks to fulfill or isresponsible for updating the document. Theparty can be an internal or external employee.
Employee or Partner Contact
Processor A party that processes a task or a ticket. Employee or Partner Contact
Activity Contact A party that has a reference to the currentactivity.
Contact or Partner Contact
Service Performer A party that performs services. Employee or Partner Contact
SAP Cloud for Customer November 2013Appendix P U B L I C • © 2011, 2012, 2013 SAP AG. All rights reserved. 457
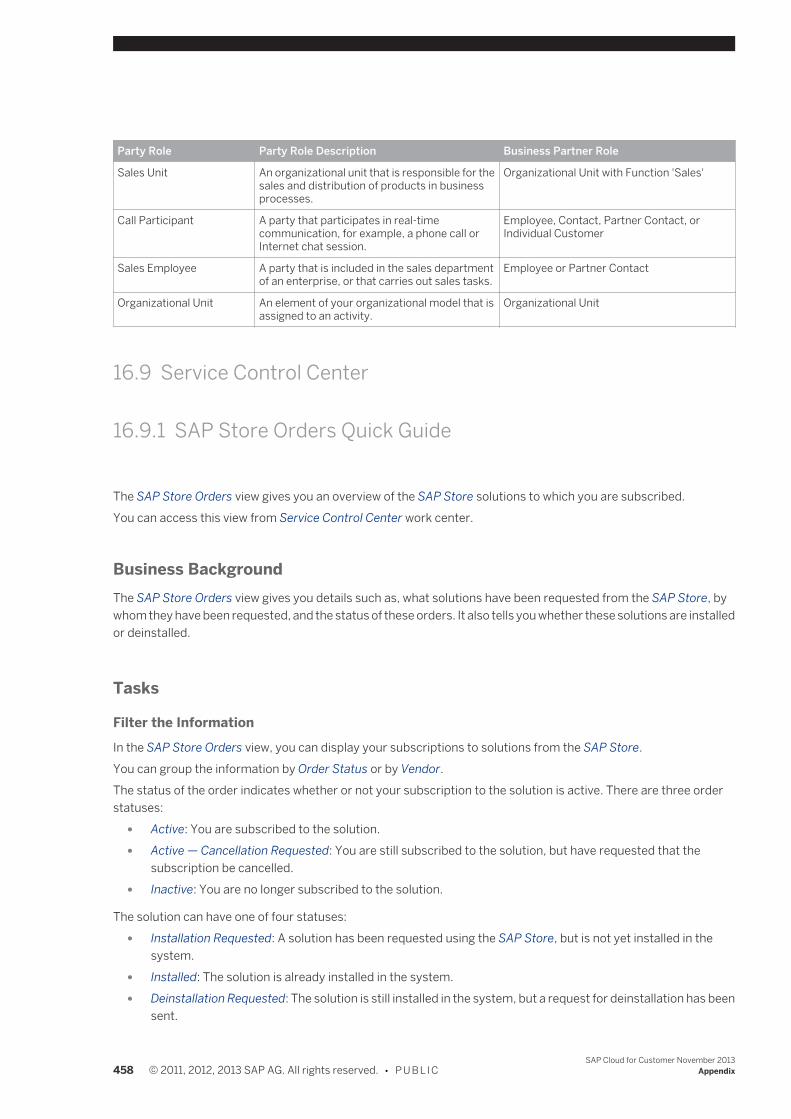
Party Role Party Role Description Business Partner Role
Sales Unit An organizational unit that is responsible for thesales and distribution of products in businessprocesses.
Organizational Unit with Function 'Sales'
Call Participant A party that participates in real-timecommunication, for example, a phone call orInternet chat session.
Employee, Contact, Partner Contact, orIndividual Customer
Sales Employee A party that is included in the sales departmentof an enterprise, or that carries out sales tasks.
Employee or Partner Contact
Organizational Unit An element of your organizational model that isassigned to an activity.
Organizational Unit
16.9 Service Control Center
16.9.1 SAP Store Orders Quick Guide
The SAP Store Orders view gives you an overview of the SAP Store solutions to which you are subscribed.You can access this view from Service Control Center work center.
Business BackgroundThe SAP Store Orders view gives you details such as, what solutions have been requested from the SAP Store, bywhom they have been requested, and the status of these orders. It also tells you whether these solutions are installedor deinstalled.
Tasks
Filter the InformationIn the SAP Store Orders view, you can display your subscriptions to solutions from the SAP Store.You can group the information by Order Status or by Vendor.The status of the order indicates whether or not your subscription to the solution is active. There are three orderstatuses:
● Active: You are subscribed to the solution. ● Active — Cancellation Requested: You are still subscribed to the solution, but have requested that the
subscription be cancelled. ● Inactive: You are no longer subscribed to the solution.
The solution can have one of four statuses: ● Installation Requested: A solution has been requested using the SAP Store, but is not yet installed in the
system. ● Installed: The solution is already installed in the system. ● Deinstallation Requested: The solution is still installed in the system, but a request for deinstallation has been
sent.
458 © 2011, 2012, 2013 SAP AG. All rights reserved. • P U B L I CSAP Cloud for Customer November 2013
Appendix
● Deinstalled: The solution has been deinstalled from the system.
Even when a solution has been installed in the system, it may still be necessary to activate it. To do so, go tothe Business Configuration work center and choose the Implementation Projects view. Select yourimplementation project and choose Edit Project Scope.For more information, see the documentation on preparing your first implementation project.
Change Your SAP Store OrderYou can change your subscription to a SAP Store solution at any time.To do so, select the order you want to change and click Change SAP Store Order .
To change a SAP Store order, you must be an authorized SAP Store buyer. You can find your SAP Store buyersin the Contact Details view.
Cancel Your Subscription to a SolutionIf you no longer wish to subscribe to a particular solution from the SAP Store, and want to have it deinstalled, youfirst have to deactivate the solution in the Business Configuration work center of your systems. Note that thecancellation can only be carried out according to the terms and conditions you have agreed on with the provider ofthe solution.To deactivate the solution, go to the Business Configuration work center and choose the Implementation Projectsview. Select your implementation project and choose Edit Project Scope.For more information, see the documentation on preparing your first implementation project.Then proceed as follows:
1. Click on Request Cancellation .2. Click OK to confirm that you have already deactivated the solution in the business configuration settings of
your productive system.Note that processing the cancellation of the subscription to a solution may take up to two working days.
3. Refresh the list. The order status has now changed from Active to Active – Cancellation Requested.
16.9.2 Maintenance Schedule Quick Guide
The Maintenance Schedule view gives you an overview of the maintenance activities for your productive and non-productive systems. The schedule is available in both calendar and list format, each as subview of the MaintenanceSchedule view.You can access this view from the Service Control Center work center.
Tasks
Work with the Maintenance Schedule: CalendarHere you can get a clear overview of the maintenance schedule for you systems in a calendar format. Themaintenance activities are color-coded, so you can see at a glance what events have been scheduled for whichsystem.
SAP Cloud for Customer November 2013Appendix P U B L I C • © 2011, 2012, 2013 SAP AG. All rights reserved. 459
There are four different types of maintenance activities: ● Maintenance: A regular period of maintenance, as agreed in your contract. ● Upgrade: A period of downtime that is required when installing a newer version of your SAP solution. ● Emergency: A non-schedule period of maintenance that is required due to issues with the system. ● Service Operations: A downtime scheduled due to additional service requests, such as copying a system, or
a request for a test system.
Work with the Maintenance Schedule: List (Basic)There are two versions of the List subview — basic and advanced. The default is advanced.You can change from the Basic version by clicking on Advanced, which is in the top right corner of the content areaof the screen.Use the Show function to display information for productive systems, non-productive systems, or for all systems.Use the Group By function and select System ID to display the maintenance schedule by system ID, and get anoverview for each system.To see more information about a maintenance schedule item, simply highlight one of the items in the list. The detailsare automatically displayed at the bottom of the content area.
Work with the Maintenance Schedule: List (Advanced)In addition to the functions available in the basic version of this view, you can also restrict the information that isshown by choosing Productive, Non-Productive, or All Systems , entering dates in the Date From/To fields and thenclicking Go .The default selection is usually for the current month and productive systems. If you select alternative dates andsystem types, but then wish to display the default selection, click Reset and then Go .Create QueriesWhen you use the selection criteria to restrict the information to be displayed it is called a query. You can save thisquery to view again in the future.To restrict the information to be displayed:
1. From the Show dropdown list select a system type.2. Enter the period for which you want to restrict the schedule information.3. Click Go .
The information displayed is for the period and system type that you selected.4. To save this particular set of selection criteria, click Save Query .5. In the dialog, enter a name for the query.
To set this query as the default that is shown each time you log on, check the box Use As Default Query.
Organize QueriesHere you can delete a query if you no longer require it, or you can change the default query that is displayed.To delete a query, click Organize Queries , select the query you want to delete and then click on Delete .Note that you can only delete queries that you have created yourself. The three standard queries ProductiveSystems, Non-Productive Systems, and All Systems cannot be deleted and the Delete button will be deactivated ifyou select one of them.To change the default query that is displayed when you go into the Maintenance Schedule view, click
Organize Queries . In the dialog, under Select Query Name, select the query that you want to set as default from thedropdown list. Then click OK . The next time you go into the Maintenance Schedule view, this query will be displayed.
460 © 2011, 2012, 2013 SAP AG. All rights reserved. • P U B L I CSAP Cloud for Customer November 2013
Appendix
16.9.3 Systems Quick Guide
In the Service Control Center work center, the Systems view gives you an overview of your active and decommissionedsystems, and their current status.
Tasks
Sort System InformationActive and Decommissioned SystemsYou can display all of your systems, or the active or decommissioned systems. Select what you want to display fromShow dropdown list, and then click Go .An active system is one that is available for use. A decommissioned system is one that has been taken out ofcommission and can no longer be used.You can group the information by choosing System Type from the Group By dropdown list.System TypesThe systems will either be productive or non-productive systems. Non-productive systems include test systems anddevelopment systems, for example.System StatusThis refers to the operational and request status of a system.Operational Status
● Running: The system is operational and running as normal. ● Maintenance: The system is operational but is currently being maintained, for example, due to an upgrade or
repairs.
Request Status ● Requested: The system has been requested, but is not yet operational. ● Decommissioned: The system is not operational and is no longer being used.
View System DetailsTo get more information about a system, select the required system and click on View , or click directly on thesystem ID.In the System Overview screen you see more detailed information about the system.General InformationHere you can see the system status, how long the system has been running and on what date it was requested. Italso contains a URL to the system, which you can click on to take you directly to the system itself.Next Maintenance ActivityThis section gives some details on the next maintenance event for the system, including the dates for when it isplanned and the type of maintenance that will be carried out. If you need more information on the maintenanceevents for this system, go to the Maintenance Schedule view.Contractual Maintenance PeriodHere you have a summary of the maintenance period, as agreed in your contract. The maintenance period consistsof the day the maintenance is to be carried out, the start time, and the duration of the maintenance.
SAP Cloud for Customer November 2013Appendix P U B L I C • © 2011, 2012, 2013 SAP AG. All rights reserved. 461
Service Requests for this SystemAll service requests for this particular system are detailed in this section. Here you can see the initial request for thesystem, if you have requested that the system be maintained, or decommissioned, as well as any requests for restorepoints, setting a system back to a restore point, or deletion of a restore point. Use Show to display All Requests, orones that are In Process or Completed.Available Restore PointsA restore point is a snapshot of the system data that is saved at a specific point in time. In the event of a problem,you can request that the system data be restored to this point in time. This section shows the restore points thatare available to you and when exactly they were created.
Manage SystemsThere are three functions in your productive system that allow you to easily manage your productive and testsystems.Request CreationYou can request creation of a new system from Business Configuration, or directly in the Systems view of the ServiceControl Center. For more information related to Business Configuration, see here.
As of August 2013, there is a new procedure for requesting systems.For existing customers, there is no change. For new customers, you are provided a test system first andcan request a productive system on the basis of the test system. The number of systems that you canrequest free of charge depends on your systems package.The standard system package includes one productive system and one test system.Customers with the Enterprise Private Edition can have up to ten productive systems and are allowed onetest system per productive system.You can acquire additional systems at any time. For more information on the above system packages andadditional services, please contact your SAP sales representative.
Request TerminationUse this function to delete a system.
Ensure that you do not have any partner solutions in the system before deleting it. Once you delete asystem, all partner solutions in that system are irretrievably lost.
Copy Solution ProfileThis function allows you to easily copy a solution profile to a new system. You can use this function for your changeprojects, when copying your implementation project to a test system for example.
16.9.4 System Availability Quick Guide
In the Service Control Center work center, the System Availability view shows the average availability of yourproductive system and also gives details on any downtimes.
462 © 2011, 2012, 2013 SAP AG. All rights reserved. • P U B L I CSAP Cloud for Customer November 2013
Appendix
Tasks
View the Average Availability of the Productive SystemThe average availability of the productive system for the previous twelve months is displayed here in an embeddedreport. Here you can ensure the availability of the system is in accordance with the availability percentage as definedin the service level agreement of your customer contract.You can view the data in chart or table format. To switch formats, simply click on the table or chart icon in the topleft corner of the embedded report.For more information, see the documentation about embedded reports.
View Productive System DowntimesThe downtimes of your productive system for the current month are displayed here in an embedded report. Hereyou can check to see if the system downtimes exceed those agreed upon in the service level agreement of yourcustomer contract.You can view the data in chart or table format. To switch formats, simply click on the table or chart icon in the topleft corner of the embedded report.For more information, see the documentation about embedded reports.
16.9.5 User Subscriptions Quick Guide
Here you can monitor the number of users of your SAP solution and group them by user type. This view enables youto check whether you have enough of subscriptions for users assigned to the solution.You can access this view from the Service Control Center work center.
Tasks
Display Your User Subscriptions By TypeYour can display your subscriptions by user type. To do so, select User Type from the Group By dropdown list box,and click Go .There are 6 types of user subscriptions. They are as follows:
● Standard Self-Service User ● Standard Enterprise User ● SCM Enterprise User ● CRM Sales Team User ● SCM Self-Service User ● Project Manager Self-Service User
A summary of the functionality available for each user subscription is in the table below.
User Type Description of Functionality
SAP Cloud for Customer November 2013Appendix P U B L I C • © 2011, 2012, 2013 SAP AG. All rights reserved. 463
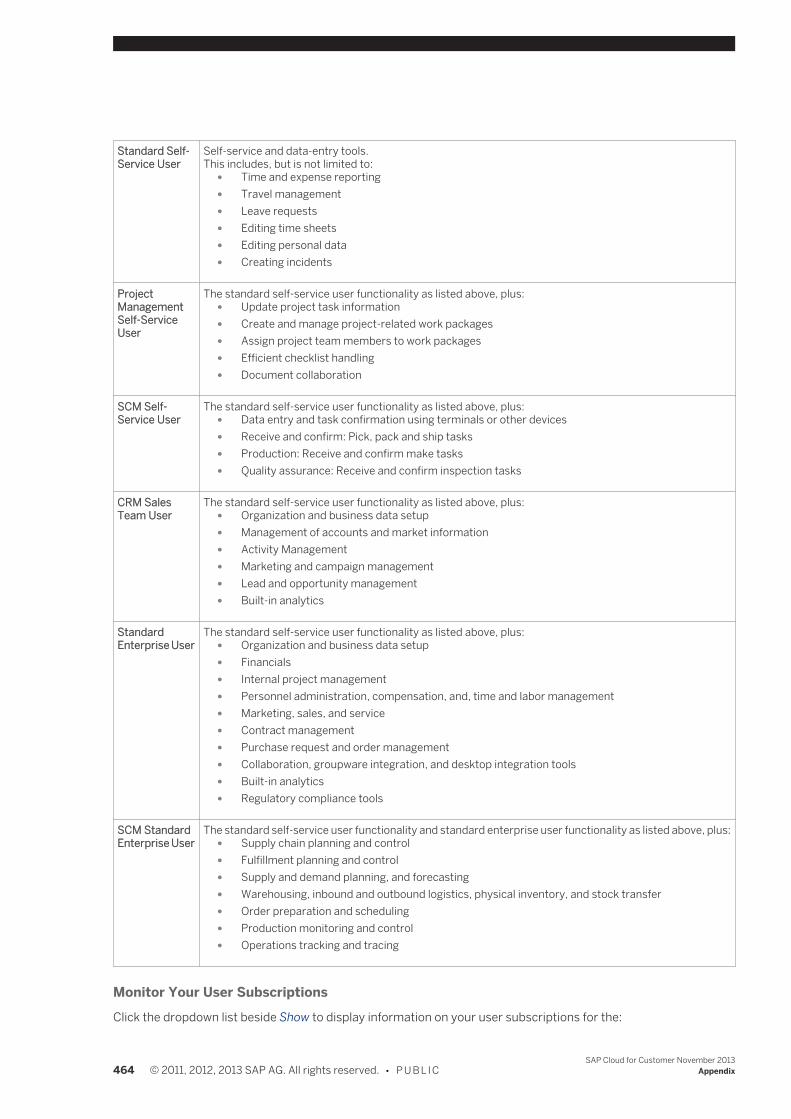
Standard Self-Service User
Self-service and data-entry tools.This includes, but is not limited to:
● Time and expense reporting ● Travel management ● Leave requests ● Editing time sheets ● Editing personal data ● Creating incidents
ProjectManagementSelf-ServiceUser
The standard self-service user functionality as listed above, plus: ● Update project task information ● Create and manage project-related work packages ● Assign project team members to work packages ● Efficient checklist handling ● Document collaboration
SCM Self-Service User
The standard self-service user functionality as listed above, plus: ● Data entry and task confirmation using terminals or other devices ● Receive and confirm: Pick, pack and ship tasks ● Production: Receive and confirm make tasks ● Quality assurance: Receive and confirm inspection tasks
CRM SalesTeam User
The standard self-service user functionality as listed above, plus: ● Organization and business data setup ● Management of accounts and market information ● Activity Management ● Marketing and campaign management ● Lead and opportunity management ● Built-in analytics
StandardEnterprise User
The standard self-service user functionality as listed above, plus: ● Organization and business data setup ● Financials ● Internal project management ● Personnel administration, compensation, and, time and labor management ● Marketing, sales, and service ● Contract management ● Purchase request and order management ● Collaboration, groupware integration, and desktop integration tools ● Built-in analytics ● Regulatory compliance tools
SCM StandardEnterprise User
The standard self-service user functionality and standard enterprise user functionality as listed above, plus: ● Supply chain planning and control ● Fulfillment planning and control ● Supply and demand planning, and forecasting ● Warehousing, inbound and outbound logistics, physical inventory, and stock transfer ● Order preparation and scheduling ● Production monitoring and control ● Operations tracking and tracing
Monitor Your User SubscriptionsClick the dropdown list beside Show to display information on your user subscriptions for the:
464 © 2011, 2012, 2013 SAP AG. All rights reserved. • P U B L I CSAP Cloud for Customer November 2013
Appendix
● Current Month ● Last Month ● Last 6 Months
You can further group the information by selecting User Type from the Group By dropdown list box. The defaultsetting is None, in which case the most recently updated subscriptions are displayed first.Check the number of Licensed Users against the number of Active Users. If the number of active users exceeds thenumber of licensed users, this will be indicated by a red traffic light under the Status column. The number of excessusers is detailed in the Over Usage column.To get more information on what to do if you if the number of active users exceeds the number of licensed users,select the row where there is over usage, and information is displayed at the bottom of the screen.
Display List of Users per User TypeYou can display a list of all users that are assigned to a user type. If you click on the user ID, the system displays theBusiness User fact sheet. In the fact sheet, you can see which work center views are assigned to that business user.You can also remove assignments to work centers that the business user does not need.
Adjust Active Users and User SubscriptionsIf the number of active users exceeds the number of licensed users, either adjust the number of users assigned towork centers and views or request additional user licenses.
To adjust the number of active users, go to Application and User Management User and Access Management Business Users .For more information, see the documentation on Business Users.To request more user subscriptions, contact the representative of your SAP solution, or your SAP partner.
16.9.6 Contact Details Quick Guide
In the Service Control Center work center, the Contact Details view gives you an overview of the informationmaintained for your contacts.You can access this view from the Service Control Center work center.There are three contact types:
● IT Contact: A contact person in your organization who gives you system information and to whom you reportdowntimes.
● SAP Store Buyer: A contact person in your organization who is authorized to procure solutions on your behalfin the SAP Store.During initial implementation, you can assign service agents as contacts of the type SAP Store Buyer to allowthem to purchase partner solutions. Once employees are available, we strongly recommend that you changethe contact assignment to an employee assignment. After go-live, we recommend that you only assignemployees as SAP Store buyers.
● Commercial Contact: A contact person in your organization who is authorized to order services from SAP,such as purchasing additional licenses.
SAP Cloud for Customer November 2013Appendix P U B L I C • © 2011, 2012, 2013 SAP AG. All rights reserved. 465

Tasks
Assign a Contact to a Contact TypeTo assign contacts to contact types in this view, do the following:
1. Click Create Contact Assignment The Assign Contact to Contact Type screen opens.
2. From the Contact Type dropdown list box, choose the contact type.3. Under Contact Information, click on the value help icon and then select the contact to whom you want to
assign this type.4. Ensure that all mandatory fields have been filled out.
Ensure that the contact has an e-mail address. If it is not maintained, get the contact in question to add thee-mail address under Home Self-Services Self-Services Overview Company Address Book Edit MyContact Data
5. Then click Send Changes to save the changes or Send Changes and Close to save the changes and close thescreen.
Not every user or employee is automatically available as a contact in the value help. If you want to assign acontact and they are not available in the list you have the following options:If you are an administrator
● Assign the person you wish to be a contact to the Incident view of the Application and UserManagement work center. This will ensure they are then automatically available for selection as acontact person in the value help.
● If you cannot assign the contact because their details are incomplete, update the details in thePersonnel Administration work center, in the Regular Tasks view under Personal Changes. Changes tocontact person details may take several hours to appear in the system.
If you are not an administrator ● Report an incident to get the person included as a contact in the value help. For more information, see
Report an Incident. ● Register the person as a contact in the Business Center .
Create a New ContactTo create a new contact:
1. Click on Create Contact Assignment
2. In the Assign Contact to Contact Type screen, click on Assign to New Contact .3. In the Assign New Contact to Contact Type screen, select the contact type from the dropdown list box, fill in
the details in the mandatory fields (marked with an *) under General Information, and, under CommunicationDetails, ensure that you enter an e-mail address and select a correspondence language from the dropdownlist box.
4. Click Send Changes or Send Changes and Close .5. In the Contact Details view click Refresh. The contact you created now appears in the list with the status
Requested.
466 © 2011, 2012, 2013 SAP AG. All rights reserved. • P U B L I CSAP Cloud for Customer November 2013
Appendix
Edit the Details of a ContactTo edit the details of a contact select a contact in the list and click Edit .If you have already requested changes for a particular contact, then it is not possible to edit this contact until therequest has been processed.It is also not possible to edit the contact details of an administrator.
Remove a Contact AssignmentTo deassign a contact from a contact type, click on Remove Contact Assignment . Then click on Confirm in theconfirmation dialog to send the changes.
There must always be at least one commercial contact, one IT contact, and one SAP Store buyer assigned inthe Contact Details view.
View Company Details for a ContactTo view the company address and communication details of a contact, select the contact and click on
View Company Details .The address details are used for the purpose of delivering SAP services, such as sending a quote or invoices by mail.Ensure that the details are correct. If they are not correct, create an incident.For more information, see Report an Incident.
16.10 HTML5
16.10.1 HTML5 in SAP Cloud for Sales
Please note that this document is relevant only for HTML5-based screens. Either the described functionis available only in HTML5, or its HTML5 version differs from the Microsoft Silverlight® version. To use thisfunction in the Microsoft Silverlight client, please log on to the Microsoft Silverlight-based screen andfollow the instructions in the corresponding help document.Your solution is HTML5-based if the system URL contains /HTML5. Your solution is Microsoft-Silverlight-based if a Silverlight pop-up window appears when you right-click anywhere on the screen.
SAP Cloud for Sales uses HTML5 technology.
PrerequisiteYour administrator has set the default client to HTML5.
Business BackgroundHTML5 is the new standard for internet technology. It has open standards and runs on multiple platforms includingmobile-device platforms. Using HTML5 in SAP Cloud for Sales creates a plug-and-play solution, meaning that it isnot necessary to install additional software on each user’s machine.
SAP Cloud for Customer November 2013Appendix P U B L I C • © 2011, 2012, 2013 SAP AG. All rights reserved. 467
Tasks
Use Interactive DashboardsHTML5 has enabled some additional features in analytics. For more information, see Using Interactive Dashboards.
Personalize Your Screens
Each user can personalize their own screen to reflect the way they like to work. ● Home page
For information about personalizing your home page, see Welcome to Your Home Page (3m 40s). ● All other screens
You cannot personalize your background image in HTML5.
1. Start personalization.Stripes appear in the title bar of the solution to indicate personalization mode.
2. Hover on the area you want to change.For information about adding a mashup to a screen, see Personalize a Mashup.
3. Select one of the options that appears in the hover tooltip and make your change.4. End personalization.
The stripes disappear from the title bar.
For more information about personalizing HTML5 screens, see About Personalization [page 469].
Use Updated ElementsCompared to the Microsoft Silverlight® client, some elements of the screen appear and work differently in HTML5.The following are a few examples:
● TabsTo open multiple items at the same time, such as an account, opportunity, and lead, right-click the item's linkand choose Open link in new tab. You can use the tabs to navigate between the open objects.
● Inline editing
In the HTML5 version, the editor opens in display mode. Click Edit to make changes to the entries inthe fields. Ensure that you have saved your changes by clicking Save. In the Silverlight version, inlineediting is available. This means that you need to double-click on a field to edit its content. TheSave button only appears when you have made a change.
For more information about adding or changing fields, see Extension Fields Quick Guide [page 474]. ● Reporting an incident
For more information, see Reporting an Incident.
468 © 2011, 2012, 2013 SAP AG. All rights reserved. • P U B L I CSAP Cloud for Customer November 2013
Appendix
16.10.2 VIDEO: Welcome to Your Home Page
Video
Welcome to Your Home Page (2m 52s)Find out how to personalize your Home page.
16.10.3 VIDEO: Assigning User Access Rights by Roles
Video
Assigning User Access Rights by Roles (3m 00s)For Administrators: find out how to create roles that you can assign to users for easier maintenance of user accessrights.
16.10.4 About Personalization
Please note that this document is relevant only for HTML5-based screens. Either the described functionis available only in HTML5, or its HTML5 version differs from the Microsoft Silverlight® version. To use thisfunction in the Microsoft Silverlight client, please log on to the Microsoft Silverlight-based screen andfollow the instructions in the corresponding help document.Your solution is HTML5-based if the system URL contains /HTML5. Your solution is Microsoft-Silverlight-based if a Silverlight pop-up window appears when you right-click anywhere on the screen.
You can personalize the SAP solution with your preferences regarding system settings, navigation settings, content,and layout settings of a screen. You can also change labels, add mashups and fields to further personalize yoursolution.To personalize your solution, you enter the Personalization mode. Go to the Personalize menu in the title bar andselect the Start Personalization option. Once you are in the Personalization mode, you can hover over the contentarea and see that editable areas are highlighted and marked by a frame.When you hover over the area you want to personalize, icons with available functions will be displayed in the uppercorner of each framed area. You can select the icon which allows you to make the corresponding personalizedchanges.
In the Personalize mode, you can make various changes to the current screen such as: ● Personalize the layout
● Change labels and field names
● Hide labels and field names
● Add fields and mashups
SAP Cloud for Customer November 2013Appendix P U B L I C • © 2011, 2012, 2013 SAP AG. All rights reserved. 469
● Personalize queries ● Edit tabs on an editor screen
After completing the personalization of your screen, you can exit the Personalization mode by selecting the EndPersonalization option from the Personalize menu in the title bar.Apart from the personalized changes mentioned above, you can make changes to your screen without enteringPersonalization mode. For example, you can sort columns, adjust column width, and rearrange the order of yourwork centers directly on your screen. If you want to remove any of these changes, you have to select StartPersonalization from the Personalize menu in the title bar. Go to Personalize again, select Discard Screen and all yourpersonalized changes will be removed.
Note that any changes on the screen take effect immediately.
Note that any changes that you make to screen sections, tables, or fields are your responsibility. If youchange the name of a field or section, the help documents do not reflect your changes.
Tasks
Personalize Screen LayoutYou can personalize your screen layout in the Personalization mode. With drag-and-drop you can easily move screensections to another location within the current content area.The drag-and-drop feature also allows you to change the display sequence of fields within the current section. Thisway you can easily move fields up or down and sort fields by your own preferences.
To move a screen section to another location, go to Personalize Start Personalization and follow these steps:1. Go to the screen that you want to personalize.2. Hover over the highlighted section you want to move.3. Press the left mouse button and then drag-and-drop the section into the desired location of your screen.
When you have finished, select Personalize End Personalization .
Note that you can only drag-and-drop objects within one screen area and not to other areas of your screen.Your changes are saved automatically.
Personalize My SettingsYou can personalize your system settings, such as regional settings, help content and related settings, in MySettings from the Personalize menu.
● In the Regional Settings tab you can select default settings such as date format, time zone, decimal notation,and system language.
● In the Onscreen Help tab, you select whether to display additional onscreen explanatory texts and country-specific help. Onscreen explanatory texts consist of text boxes that are shown at the top of a screen or screensection, and short help texts that are displayed when you move the cursor over a field that is underlined. Inaddition, you can activate country-specific online help content to view content specific to your country in theHelp Center.
470 © 2011, 2012, 2013 SAP AG. All rights reserved. • P U B L I CSAP Cloud for Customer November 2013
Appendix
● For a better accessibility, you can choose screen reader support in the Accessibility tab. Screen readers willread UI texts and mouse-over texts in all screens.
● In My Settings, you can also change the password you use to log on to the system. Click the ChangePassword button to change your current password.
● By clicking the Manage Certificate button, you can access functions to manage logon certificates for youruser. Logon certificates enable you to log on to the system without entering your user ID and password.
Note that you must log off and then log on again for all changes in My Settings to take effect.
Add a Field or a ColumnYou can add hidden existing fields or columns to sections and tables. New fields can only be created by the systemadministrator. You can add these fields, make them visible and use them.
To add a hidden existing field or column to a screen, go to Personalize Start Personalization and follow thesesteps:
1. Open the Editor screen, Quick Create or Quick View window that you want to personalize.2. Place your cursor over a field or column header and the area becomes highlighted and icons with available
functions appear.3. To add a hidden field or column, click followed by Add Fields.
A dialog box with available additional fields appears.4. Select a field and click Apply to add this field or column to your Editor screen, Quick Create or Quick View
window.
When you have finished, select Personalize End Personalization .
Rename a Field, Section or Column
To rename a field, section or column on a screen, go to Personalize Start Personalization and follow thesesteps:
1. Open the Editor screen, Quick Create or Quick View window that you want to personalize.2. Go to the field, section or column header you want to rename.3. Once you place your cursor over the item, the area becomes highlighted and icons with available functions
appear.4. To change the label, click and an editable field appears into which you can enter the changes.5. After entering the new name, press ENTER to save your changes.
When you have finished, select Personalize End Personalization .
Hide a Field, Section or Column
To hide a field, section or column on a screen, go to Personalize Start Personalization and follow these steps:1. Open the Editor Screen, Quick Create or Quick View window that you want to personalize.2. Go to the field, section or column you want to hide.3. Once you place your cursor over the item, the area becomes highlighted and icons with available functions
appear.4. Click to hide the field, section or column from your screen.
When you have finished, select Personalize End Personalization .
SAP Cloud for Customer November 2013Appendix P U B L I C • © 2011, 2012, 2013 SAP AG. All rights reserved. 471
You can make hidden items visible again by clicking followed by Add Fields. All hidden and available itemswill appear in the list and you can add them again.
If there are any hidden sections on your screen, an Add icon appears in the corresponding location of yourscreen. You can make the section visible by clicking .
Edit Tabs on an Editor ScreenYou can work with tabs and personalize them to suit your needs. In Personalization mode, you can change the taborder by dragging and dropping a tab into the desired location of your header.Place your cursor over a tab and click to rename it, or click to hide a tab.
To add an additional tab to an Editor screen, go to Personalize Start Personalization and follow these steps:1. Go to the Editor screen where you want to add a tab.
By hovering over the header, it becomes highlighted and icons with available functions appear.2. Click and a dialog box with available additional tabs appears.3. Select a tab title from the list and click Apply.4. The new tab is saved and appears in your header.
When you have finished, select Personalize End Personalization .
Edit Queries on an Editor ScreenIn Personalization mode, you can work with queries and personalize them to suit your needs. You can organizequeries, add new queries, or remove queries from your selection list.
To organize your queries, go to Personalize Start Personalization and follow these steps:1. Go to the Editor screen where you want to organize the queries of your selection list.2. Click next to your selection list.
All your filter categories are displayed.3. Place your cursor over a field, the area becomes highlighted and icons with available functions appear.4. Click and a dialog box opens.5. In the dialog box, you can select your default query or remove any queries from the selection list.6. Click Apply to save your changes.
To add a new query to your selection list, go to Personalize Start Personalization and follow these steps:1. Go to the Editor screen where you want to add a new query to your selection list.2. Click next to your selection list.
All your filter categories are displayed.3. Place your cursor over a field, the area becomes highlighted and icons with available functions appear.4. Click followed by Add Query.
A dialog box opens.5. In the dialog box, you can add the name of your new query and set it as default if necessary.6. Click Apply to save your changes.
When you have finished organizing your queries, select Personalize End Personalization .
472 © 2011, 2012, 2013 SAP AG. All rights reserved. • P U B L I CSAP Cloud for Customer November 2013
Appendix
Personalize a Mashup1. From the Personalize menu in the screen that you want to personalize, select This Screen.
The personalize panel opens.2. Click Mashups and Web Services to open this section of the personalize panel.
A list of all mashups that can be used in the current screen is displayed.3. Click on a mashup to view more information and adjust settings.4. To make a hidden mashup visible, select the Visible checkbox next to the mashup name.
Note that the mashup will be visible on the screen the next time you open it.
5. If required, you can adjust the appearance of the mashup by selecting one of the following options underProperties.
The options available to you will vary depending on the mashup.
● Web Services MenuThe mashup can be accessed from the Web Services menu button that is typically located in themenu bar at the top of a screen.
● Web Services Menu in <name of section> SectionThe mashup can be accessed from a Web Services menu button located in a section of a screen.
● Link in <name of section> SectionThe mashup can be accessed using a link directly embedded in a screen section.
● New Screen SectionThe mashup is embedded directly into the screen as a new section.
● Embedded Near <name of section> SectionThe mashup is embedded directly into the screen as a new section. This section is located beside orbelow the named section.To display an embedded mashup across the full width of the screen rather than the default setting ofhalf screen width, select the Full Width checkbox.
6. Save your changes and close the personalize panel.
You can personalize your screen by selecting from a list of available mashups. Afterwards, they are either displayedon your screen, or you can access them by clicking Web Services . If you need a new mashup, you can ask youradministrator to procure it from the SAP Store or to create a new mashup.
For more information on how to personalize a mashup, see here.
Discard Your Personalization ChangesThe changes you’ve made are reversible. You can undo the personalization of the current screen and set it back todefault. Navigate to the screen, go to Personalize in the title bar and select Discard Screen. This discards all changesthat you have made to the current screen. For example, if you added new sections, fields and mashups to a screenand click Discard Screen, all changes to screen layout and embedded mashups are discarded.While working in the Personalization mode, you will also find a Discard Changes icon in sections and tables. By clicking
, you will undo the personalization for the highlighted section or table only. For example, if you’ve added fields toa section, you can remove them by clicking , but the rest of the personalized screen remains the same.
SAP Cloud for Customer November 2013Appendix P U B L I C • © 2011, 2012, 2013 SAP AG. All rights reserved. 473
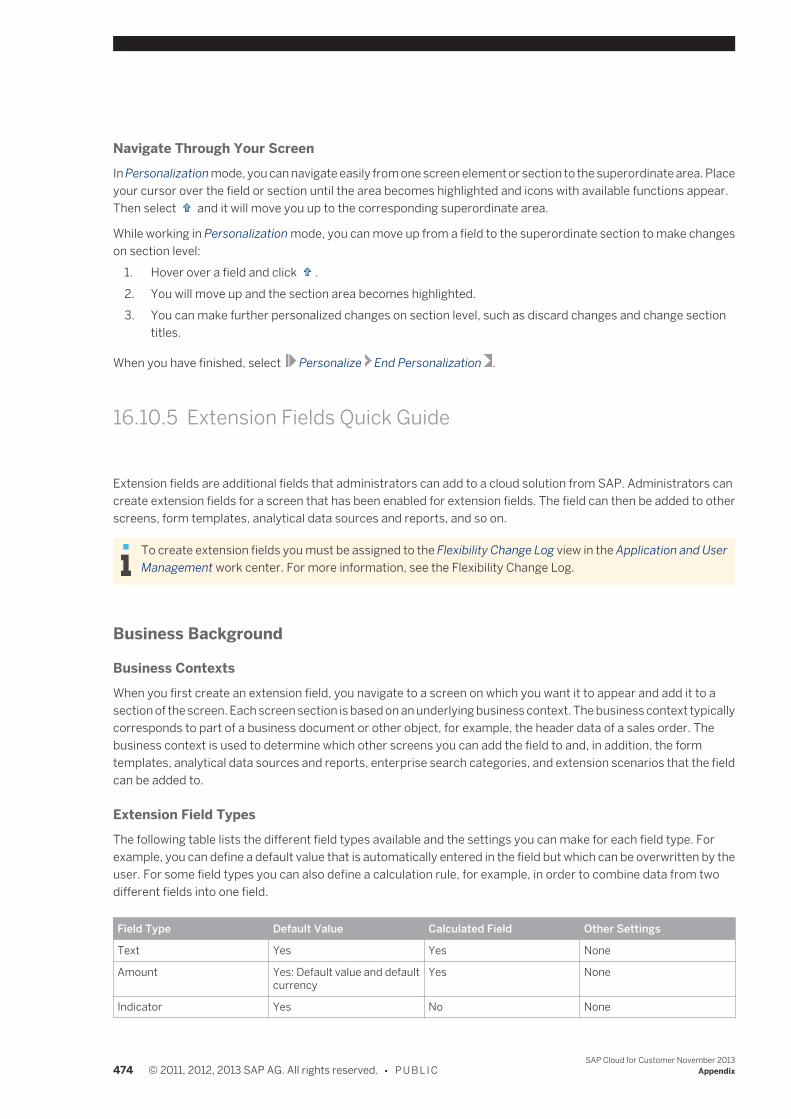
Navigate Through Your ScreenIn Personalization mode, you can navigate easily from one screen element or section to the superordinate area. Placeyour cursor over the field or section until the area becomes highlighted and icons with available functions appear.Then select and it will move you up to the corresponding superordinate area.
While working in Personalization mode, you can move up from a field to the superordinate section to make changeson section level:
1. Hover over a field and click .2. You will move up and the section area becomes highlighted.3. You can make further personalized changes on section level, such as discard changes and change section
titles.
When you have finished, select Personalize End Personalization .
16.10.5 Extension Fields Quick Guide
Extension fields are additional fields that administrators can add to a cloud solution from SAP. Administrators cancreate extension fields for a screen that has been enabled for extension fields. The field can then be added to otherscreens, form templates, analytical data sources and reports, and so on.
To create extension fields you must be assigned to the Flexibility Change Log view in the Application and UserManagement work center. For more information, see the Flexibility Change Log.
Business Background
Business ContextsWhen you first create an extension field, you navigate to a screen on which you want it to appear and add it to asection of the screen. Each screen section is based on an underlying business context. The business context typicallycorresponds to part of a business document or other object, for example, the header data of a sales order. Thebusiness context is used to determine which other screens you can add the field to and, in addition, the formtemplates, analytical data sources and reports, enterprise search categories, and extension scenarios that the fieldcan be added to.
Extension Field TypesThe following table lists the different field types available and the settings you can make for each field type. Forexample, you can define a default value that is automatically entered in the field but which can be overwritten by theuser. For some field types you can also define a calculation rule, for example, in order to combine data from twodifferent fields into one field.
Field Type Default Value Calculated Field Other Settings
Text Yes Yes None
Amount Yes: Default value and defaultcurrency
Yes None
Indicator Yes No None
474 © 2011, 2012, 2013 SAP AG. All rights reserved. • P U B L I CSAP Cloud for Customer November 2013
Appendix
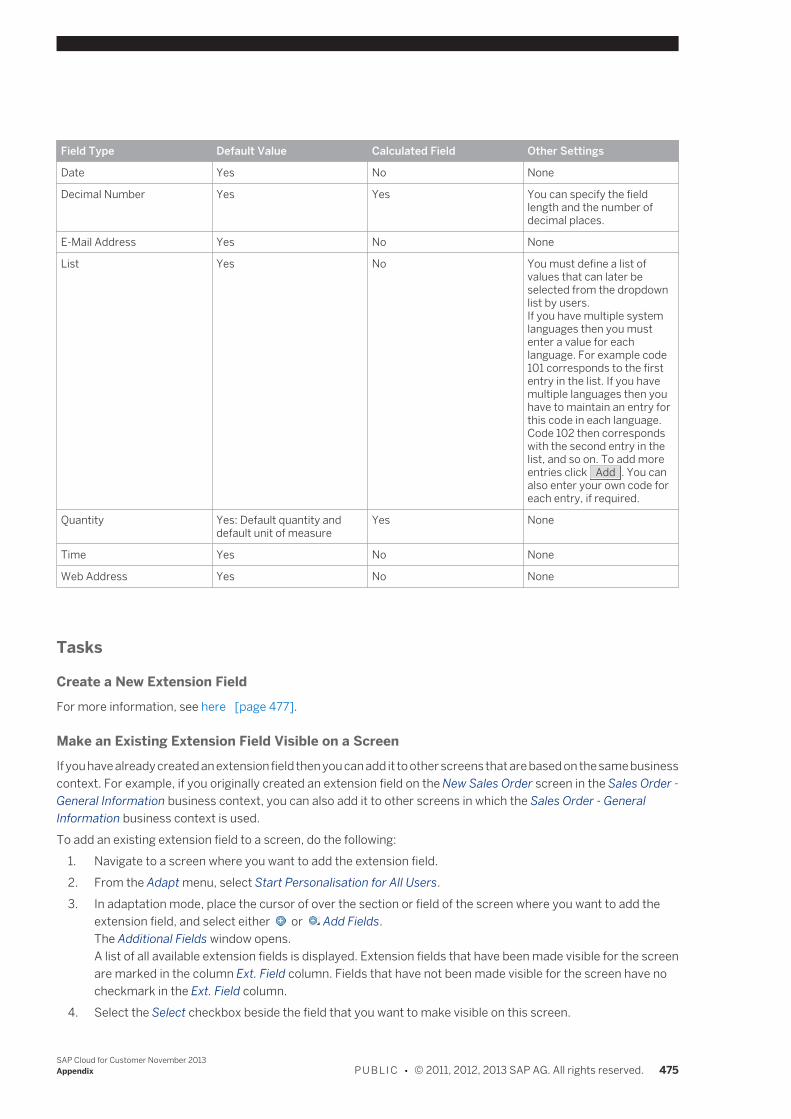
Field Type Default Value Calculated Field Other Settings
Date Yes No None
Decimal Number Yes Yes You can specify the fieldlength and the number ofdecimal places.
E-Mail Address Yes No None
List Yes No You must define a list ofvalues that can later beselected from the dropdownlist by users.If you have multiple systemlanguages then you mustenter a value for eachlanguage. For example code101 corresponds to the firstentry in the list. If you havemultiple languages then youhave to maintain an entry forthis code in each language.Code 102 then correspondswith the second entry in thelist, and so on. To add moreentries click Add . You canalso enter your own code foreach entry, if required.
Quantity Yes: Default quantity anddefault unit of measure
Yes None
Time Yes No None
Web Address Yes No None
Tasks
Create a New Extension FieldFor more information, see here [page 477].
Make an Existing Extension Field Visible on a ScreenIf you have already created an extension field then you can add it to other screens that are based on the same businesscontext. For example, if you originally created an extension field on the New Sales Order screen in the Sales Order -General Information business context, you can also add it to other screens in which the Sales Order - GeneralInformation business context is used.To add an existing extension field to a screen, do the following:
1. Navigate to a screen where you want to add the extension field.2. From the Adapt menu, select Start Personalisation for All Users.3. In adaptation mode, place the cursor of over the section or field of the screen where you want to add the
extension field, and select either or Add Fields.The Additional Fields window opens.A list of all available extension fields is displayed. Extension fields that have been made visible for the screenare marked in the column Ext. Field column. Fields that have not been made visible for the screen have nocheckmark in the Ext. Field column.
4. Select the Select checkbox beside the field that you want to make visible on this screen.
SAP Cloud for Customer November 2013Appendix P U B L I C • © 2011, 2012, 2013 SAP AG. All rights reserved. 475
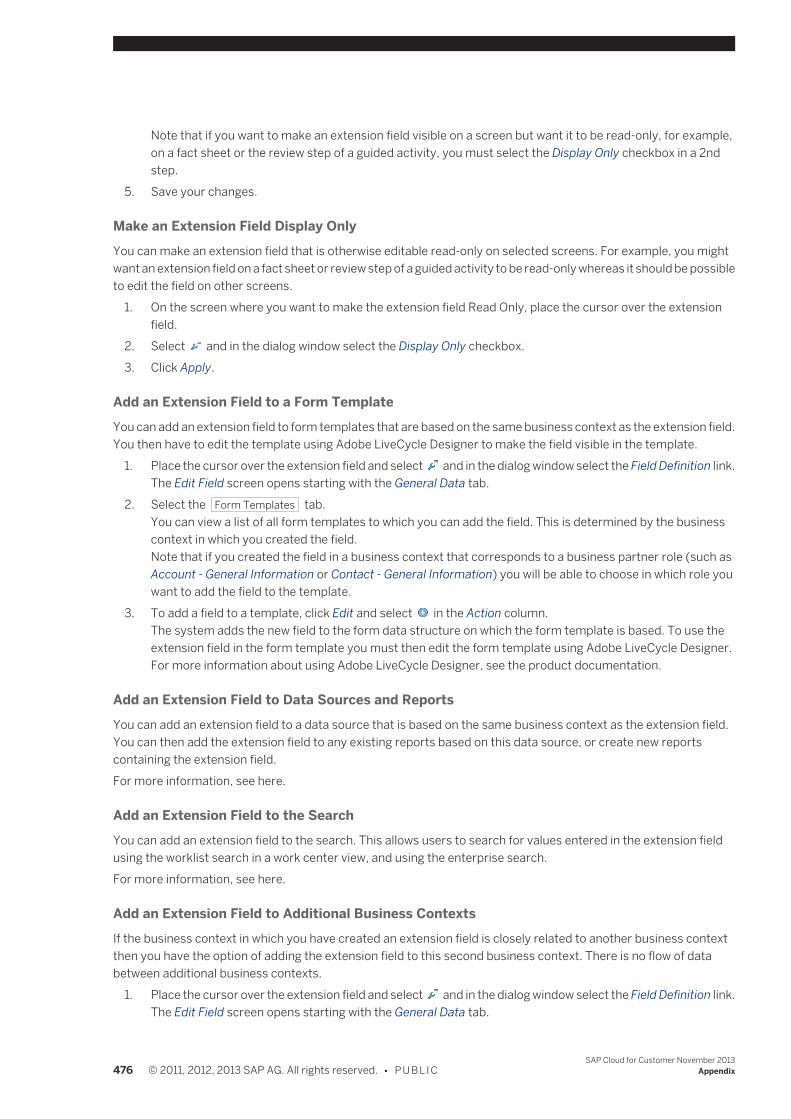
Note that if you want to make an extension field visible on a screen but want it to be read-only, for example,on a fact sheet or the review step of a guided activity, you must select the Display Only checkbox in a 2ndstep.
5. Save your changes.
Make an Extension Field Display OnlyYou can make an extension field that is otherwise editable read-only on selected screens. For example, you mightwant an extension field on a fact sheet or review step of a guided activity to be read-only whereas it should be possibleto edit the field on other screens.
1. On the screen where you want to make the extension field Read Only, place the cursor over the extensionfield.
2. Select and in the dialog window select the Display Only checkbox.3. Click Apply.
Add an Extension Field to a Form TemplateYou can add an extension field to form templates that are based on the same business context as the extension field.You then have to edit the template using Adobe LiveCycle Designer to make the field visible in the template.
1. Place the cursor over the extension field and select and in the dialog window select the Field Definition link.The Edit Field screen opens starting with the General Data tab.
2. Select the Form Templates tab.You can view a list of all form templates to which you can add the field. This is determined by the businesscontext in which you created the field.Note that if you created the field in a business context that corresponds to a business partner role (such asAccount - General Information or Contact - General Information) you will be able to choose in which role youwant to add the field to the template.
3. To add a field to a template, click Edit and select in the Action column.The system adds the new field to the form data structure on which the form template is based. To use theextension field in the form template you must then edit the form template using Adobe LiveCycle Designer.For more information about using Adobe LiveCycle Designer, see the product documentation.
Add an Extension Field to Data Sources and ReportsYou can add an extension field to a data source that is based on the same business context as the extension field.You can then add the extension field to any existing reports based on this data source, or create new reportscontaining the extension field.For more information, see here.
Add an Extension Field to the SearchYou can add an extension field to the search. This allows users to search for values entered in the extension fieldusing the worklist search in a work center view, and using the enterprise search.For more information, see here.
Add an Extension Field to Additional Business ContextsIf the business context in which you have created an extension field is closely related to another business contextthen you have the option of adding the extension field to this second business context. There is no flow of databetween additional business contexts.
1. Place the cursor over the extension field and select and in the dialog window select the Field Definition link.The Edit Field screen opens starting with the General Data tab.
476 © 2011, 2012, 2013 SAP AG. All rights reserved. • P U B L I CSAP Cloud for Customer November 2013
Appendix
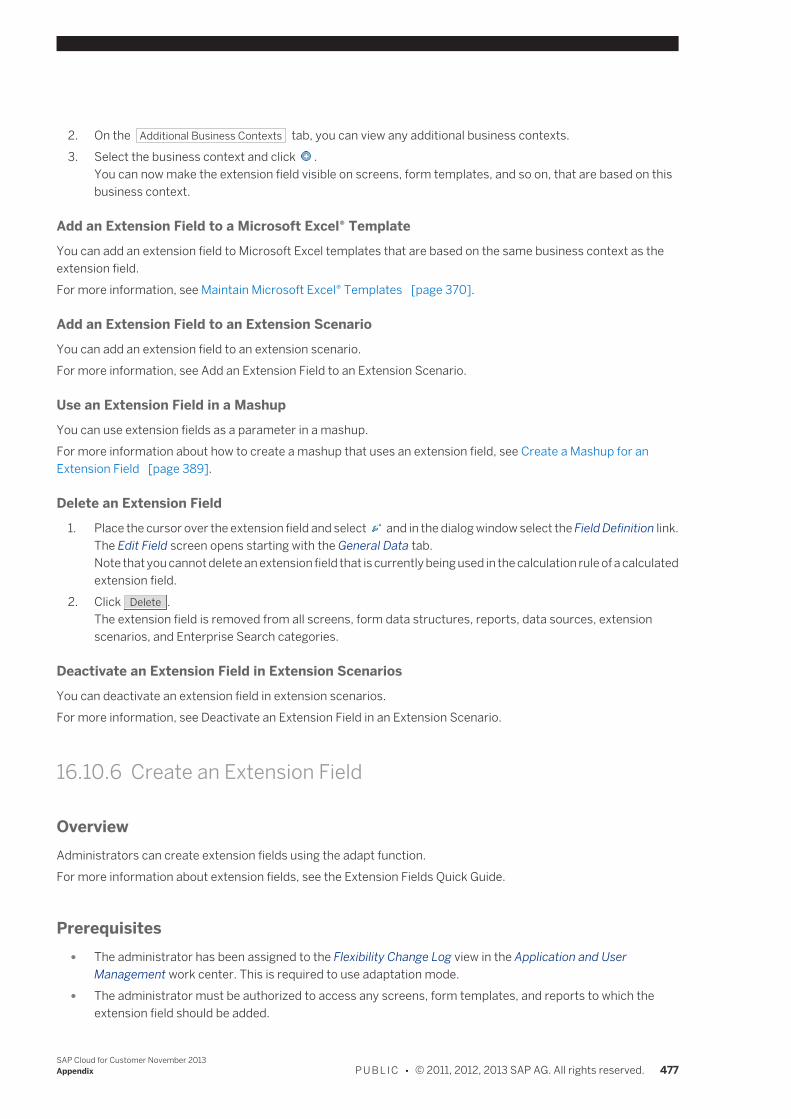
2. On the Additional Business Contexts tab, you can view any additional business contexts.3. Select the business context and click .
You can now make the extension field visible on screens, form templates, and so on, that are based on thisbusiness context.
Add an Extension Field to a Microsoft Excel® TemplateYou can add an extension field to Microsoft Excel templates that are based on the same business context as theextension field.For more information, see Maintain Microsoft Excel® Templates [page 370].
Add an Extension Field to an Extension ScenarioYou can add an extension field to an extension scenario.For more information, see Add an Extension Field to an Extension Scenario.
Use an Extension Field in a MashupYou can use extension fields as a parameter in a mashup.For more information about how to create a mashup that uses an extension field, see Create a Mashup for anExtension Field [page 389].
Delete an Extension Field1. Place the cursor over the extension field and select and in the dialog window select the Field Definition link.
The Edit Field screen opens starting with the General Data tab.Note that you cannot delete an extension field that is currently being used in the calculation rule of a calculatedextension field.
2. Click Delete .The extension field is removed from all screens, form data structures, reports, data sources, extensionscenarios, and Enterprise Search categories.
Deactivate an Extension Field in Extension ScenariosYou can deactivate an extension field in extension scenarios.For more information, see Deactivate an Extension Field in an Extension Scenario.
16.10.6 Create an Extension Field
OverviewAdministrators can create extension fields using the adapt function.For more information about extension fields, see the Extension Fields Quick Guide.
Prerequisites ● The administrator has been assigned to the Flexibility Change Log view in the Application and User
Management work center. This is required to use adaptation mode. ● The administrator must be authorized to access any screens, form templates, and reports to which the
extension field should be added.
SAP Cloud for Customer November 2013Appendix P U B L I C • © 2011, 2012, 2013 SAP AG. All rights reserved. 477
Procedure1. Navigate to a screen where you want to add the new field.2. From the Adapt menu, select Start Personalization for All Users.
At the top of the screen the message Changes will be applied for All Users is displayed.Adaptation mode allows you, as an administrator, to make changes to a screen and then try out your changesbefore publishing them and making them available to all users.
3. In adaptation mode, place your cursor over the screen element where you want to add an extension field andchoose or Add Fields.The Additional Fields dialog box appears.
4. In the Additional Fields dialog box choose New Field.The Extension Field dialog box opens.
5. 1. In the Extension Field dialog box, the system displays the business context to which you have chosento add the field. The business context is determined based on the screen section that you selected.If you have tried to create an extension field in a screen section that is based on two different businesscontexts then you can choose which one better suits your purpose. For example, you may have tochoose between adding an extension field at header level of a business document or at item level.The business context is used to determine which other screens you can add the field to and, in addition,the form templates, analytical data sources and reports, enterprise search categories, and extensionscenarios that the field can be added to.
2. Enter a label.The label is the text that will appear next to the field on the screen.
3. Enter a technical name, if necessary.4. If required, you can define a simple calculation rule for selected field types.
To define a calculation rule, select the Calculated checkbox. Under Calculation Rule, either enter aconstant value manually or select a value from the dropdown list. The values available to you from thedropdown list are proposed by the system based on the type of field you are creating and the businesscontext of the field. Text fields can be concatenated and numerical fields can be added, subtracted,multiplied, or divided.Note that when creating a calculation rule based on another field it is recommended that you checkwhether users that have access to this extension field are also authorized to view the data displayedas a result of the calculation rule.
5. Select a field type.For more information about the different field types available, see the Extension Fields Quick Guide.
6. Enter a default value, if required.If you enter a default value, this value will always be entered into the field by the system when usersedit or display the data on the screen.
6. Save your changes.The dialog box closes and the new field is visible on the screen.
7. To change additional properties of the field you have just created, place your cursor over the field and choose.
In the dialog box that appears, define whether the field is Mandatory which means that the user has to entersomething in the field, or Display only which means that the user cannot enter any data into the field.Select Apply.The dialog box closes.
478 © 2011, 2012, 2013 SAP AG. All rights reserved. • P U B L I CSAP Cloud for Customer November 2013
Appendix
8. To change additional properties of the field you have just created, place your cursor over the field and choose again.
In the dialog box that appears, select Field Definition.The Edit Field screen opens starting with the General Data section.
9. If required, you can also enter translations which will be used when users log on using a different logonlanguage. You can also add a tooltip in the different languages for the field labelClick on the Edit button and then choose Add Row for every language that you want to enter a translation for.A new row is displayed in the Screen Texts tab. In the new row, choose the language for which you want toenter the translation of the field label. Type the translation into the label field for each language.If required, enter a tooltip for the field.This will be displayed when users move the cursor over the field.
10. Click Save .To leave the Edit Field screen, choose Close.
ResultThe field and all settings have been saved. You can now do the following:
● Try out the field while still in adaptation mode and, if satisfied, leave the adaptation mode by choosing fromthe Adapt menu, End Personalization for All Users. The field and your changes are now published to all users.
● Try our the field while still in adaptation mode and, if not satisfied, choose Discard screen for all users. ● Add the new extension field to other screens, form templates, analytical data sources and reports, enterprise
search categories, and extension scenarios.
SAP Cloud for Customer November 2013Appendix P U B L I C • © 2011, 2012, 2013 SAP AG. All rights reserved. 479
17 SAP Cloud for Customer System andSoftware Requirements
Minimum Hardware Requirements ● Pentium 4, 2.4 gigahertz (GHz) or faster
(Recommended: Intel Core 2 Duo (2.4 GHz with a 1066 megahertz (MHz) front-side bus) ● At least 1 gigabyte (GB) of RAM; 2 gigabytes (GB) of RAM is recommended.
Network RequirementsRequirements by number of users:
● Small, trial: 1 mbps, ● Medium, 50 users: 2 mbps ● Large, 100 users: 4 mbps, ● Extra large, 250 users: 10 mbps, ● XXL, 500 users: 20 mbps minimum
Minimum requirements: ● Upstream: 1 mbps ● Downstream: 1 mbps ● Latency: 200ms or better
SAP Support may request wired networking during investigation of incidents.
Supported Operating Systems/Browsers
See below for supported browsers for HTML5 access to the solution.
Microsoft Windows® 8 with the currently available versions of the following browsers, except where otherwise noted: ● Internet Explorer 8 (except compatibility mode), or higher
We recommend Internet Explorer 9 or higher for best performance.
Internet Explorer settings for ActiveX controls and plug-ins must be set to the following: ○ Download signed ActiveX controls: Prompt ○ Run ActiveX controls and plug-ins: Enable
● Firefox ● Chrome
○ Mash-ups are not supported ○ Chrome 24 is not supported
480 © 2011, 2012, 2013 SAP AG. All rights reserved. • P U B L I CSAP Cloud for Customer November 2013
SAP Cloud for Customer System and Software Requirements
Microsoft Windows® 7 (32 bit or 64 bit) with the currently available versions of the following browsers, except whereotherwise noted:
● Internet Explorer 8 (except compatibility mode), or higher
We recommend Internet Explorer 9 or higher for best performance.
Internet Explorer settings for ActiveX controls and plug-ins must be set to the following: ○ Download signed ActiveX controls: Prompt ○ Run ActiveX controls and plug-ins: Enable
● Firefox ● Chrome
○ Mash-ups are not supported ○ Chrome 24 is not supported
Microsoft Windows XP (32 bit) ● Internet Explorer 8 (except compatibility mode), or higher
We recommend Internet Explorer 9 or higher for best performance.
● Firefox
Microsoft Windows Vista (32 bit) ● Internet Explorer 8 (except compatibility mode), or higher
We recommend Internet Explorer 9 or higher for best performance.
● Firefox
Mac OS X 10.6 or higher with the currently available versions of the following browser: ● Safari ● Firefox ● Internet Explorer 8 (except compatibility mode), or higher
We recommend Internet Explorer 9 or higher for best performance.
For Microsoft Windows operating systems we recommend Internet Explorer; for Mac OS, Safari isrecommended. Administrators or Key Users should have access to a Windows PC with Internet Explorer.
Supported Browsers for HTML5You can use HTML5 compliant browsers to access the HTML5 version of the solution from a desktop, laptop, or atablet running MS Windows 8 or Android operating system. Recent versions of specific browsers are required.
● Microsoft Internet Explorer: version 9 or higher ● Google Chrome: current version
For Mac OS X 10.6 or higher: ● Safari: current version
SAP Cloud for Customer November 2013SAP Cloud for Customer System and Software Requirements P U B L I C • © 2011, 2012, 2013 SAP AG. All rights reserved. 481
Firefox is not supported for accessing SAP Cloud for Sales using HTML5 browsers. You must access thesolution using the Microsoft Silverlight® plug-in.
Required Browser SettingsThe following browser settings are applicable to your cloud solution.DownloadsDownloading files should be enabled in your browser since the SAP cloud solution can export files to your PC. If yourbrowser supports restricting downloads by file type, you should enable at least the XML and CSV file types.If your browser supports trusted sites, we recommend maintaining the download settings only for the Trusted Sitessecurity zone and adding the following URLs to this zone:
● Your system URL, or alternatively the general pattern to which the URL adheres, such as http://*.ondemand.com
● The pattern https://*.sap.com
Pop-UpsThe pop-up blocker should either be disabled, or the system URL should be registered as an exceptional site for thepop-up blocker. The remark about Trusted Sites from the Downloads section applies here as well.Advanced Internet Option Settings in Internet ExplorerIf you use Internet Explorer, make the following advanced Internet option settings:
● The browser should be configured to use HTTP 1.1, both for connections in general and for connectionsthrough a proxy.
● The user interface of the on-demand solution may react more quickly if you disable the “Do not save encryptedpages to disk” setting.
Target ResolutionSAP Cloud for Customer is best displayed at a screen resolution of 1280 X 768.
Additional Software ● Microsoft Silverlight® (minimum version 5.0) ● Adobe Reader 8.1.3 or higher
Language SupportSAP Cloud for Customer is currently supported in the following languages:
● English ● German ● Spanish ● French ● Portuguese ● Italian ● Dutch
482 © 2011, 2012, 2013 SAP AG. All rights reserved. • P U B L I CSAP Cloud for Customer November 2013
SAP Cloud for Customer System and Software Requirements
● Simplified Chinese ● Japanese
General Language SettingsTo ensure that SAP Cloud for Customer texts appear consistently in the same logon language, review the followingthree language settings:
● Before you log on to SAP Cloud for Customer, choose the preferred language from the Language dropdownlist.
● After you log on, to define the preferred language, choose Personalize My Settings RegionalSettings Language .
● In the operating system itself, ensure that the preferred language is defined as the display language.
If English is defined as the display language both of the operating system and under Personalize MySettings Regional Settings Language , and if you log on to SAP Cloud for Customer in Spanish, thenthe texts that you see may not consistently appear in Spanish. Instead, a mixture of texts — in Spanishand English — may appear.
Portal Language SettingsIf your solution includes the SAP HANA Cloud Portal, Support Site Option, only one language pack per browser isfully supported. If more than one language is defined in the browser settings, widget and page content may notdisplay as fully translated.
Software RequirementsSAP Cloud for Customer delivers additional software to be installed (via the Downloads screen) for specific businesspurposes and end-users. When you launch the installer, you are prompted to install all the prerequisites packageslisted for each below.
Add-In for Microsoft Excel® (version 4.0 or higher) ● Microsoft Office 2007, Microsoft Office 2010 (32-Bit) ● Microsoft .Net Framework 4.0 (Web Installer) ● Microsoft Visual Studio 2010 Tools for Office Runtime (VSTOR 2010) Redistributable (x86) ● Microsoft Visual Studio 2010 Tools for Office Runtime (VSTOR 2010) Redistributable (x64) ● Microsoft Windows Operating System
Add-In for Microsoft Outlook® (version 4.0 or higher) ● Microsoft Office 2007 or Microsoft Office 2010 (32-Bit or 64-Bit) ● Microsoft Office 2007 Primary Interop Assemblies or Microsoft Office 2010 Primary Interop Assemblies ● Microsoft .Net Framework 4.0 (Web Installer) ● Microsoft Visual Studio 2010 Tools for Office Runtime (VSTOR 2010) Redistributable (x86) ● Microsoft Visual Studio 2010 Tools for Office Runtime (VSTOR 2010) Redistributable (x64) ● Microsoft Windows Operating System
SAP Cloud for Customer November 2013SAP Cloud for Customer System and Software Requirements P U B L I C • © 2011, 2012, 2013 SAP AG. All rights reserved. 483
Add-In for IBM Lotus Notes® ● Lotus Notes 8.5.3
Add-In for CTI Client Adapter ● Microsoft Windows Operating System
Mobile SupportSAP Cloud for Customer is currently supported on the following mobile devices and operating systems:
● Apple iPad, on iOS 6.0 and above ● Apple iPhone, on iOS 6.0 and above ● BlackBerry, on BlackBerry OS 4.5 to 7.x, but not OS10 ● Android devices, on Android 2.3 and higher
Software IntegrationTo increase sales efficiency, large enterprises can integrate existing SAP ERP systems with SAP Cloud for Customer.Existing installations of SAP Customer Relationship Management (SAP CRM) can also be integrated with SAP Cloudfor Customer, where desired.For more information about SAP ERP Integration with SAP Cloud for Customer, or about SAP CRM Integration withSAP Cloud for Customer, see SAP Service Marketplace, at http://service.sap.com/cloud4customer .
An SAP Service Marketplace user ID is required to access this information. If you do not have a user ID, thenvisit SAP Service Marketplace — at http://service.sap.com/request-user — to request one.
For information about enabling integration for these solutions during Scoping, see Enabling SAP ERP Integration[page 54] and Enabling SAP CRM Integration [page 52].
484 © 2011, 2012, 2013 SAP AG. All rights reserved. • P U B L I CSAP Cloud for Customer November 2013
SAP Cloud for Customer System and Software Requirements

www.sap.com/contactsap
© 2011, 2012, 2013 SAP AG. All rights reserved.No part of this publication may be reproduced ortransmitted in any form or for any purpose without theexpress permission of SAP AG. The informationcontained herein may be changed without prior notice.Some software products marketed by SAP AG and itsdistributors contain proprietary software componentsof other software vendors. National productspecifications may vary.These materials are provided by SAP AG and itsaffiliated companies ("SAP Group") for informationalpurposes only, without representation or warranty ofany kind, and SAP Group shall not be liable for errors oromissions with respect to the materials. The onlywarranties for SAP Group products and services arethose that are set forth in the express warrantystatements accompanying such products andservices, if any. Nothing herein should be construed asconstituting an additional warranty.SAP and other SAP products and services mentionedherein as well as their respective logos are trademarksor registered trademarks of SAP AG in Germany andother countries.Please see http://www.sap.com/corporate-en/legal/copyright/index.epx#trademark for additionaltrademark information and notices.