Embed Size (px)
Citation preview
CONFIDENTIAL
Hosted PBX Administrator Guide
V9.2.10 / Release 1
Apr 2016
CONFIDENTIAL
Notices
Copyright 2000 –2015 Metaswitch Networks. All rights reserved.
This document contains Metaswitch Confidential Information and is provided to the recipient under the terms of the Non-Disclosure Agreement currently in force.
This manual is issued on a controlled basis to a specific person on the understanding that no part of the Metaswitch Networks product code or documentation (including this manual) will be copied or distributed without prior agreement in writing from Metaswitch Networks.
Metaswitch Networks reserves the right to, without notice, modify or revise all or part of this document and/or change product features or specifications and shall not be responsible for any loss, cost, or damage, including consequential damage, caused by reliance on these materials.
Metaswitch and the Metaswitch logo are trademarks of Metaswitch Networks. Other brands and products referenced herein are the trademarks or registered trademarks of their respective holders.
Hosted PBX Administrator Guide CONFIDENTIAL Hosted PBX Administrator Guide Apr 2016 V9.2.10 / Release 1
i
Contents 1 Introduction .................................................................................................................... 1-1
1.1 Purpose of this guide .................................................................................................. 1-1
1.2 Other guides ............................................................................................................... 1-1
2 CommPortal Business Group Administrator (BG Admin) ....................................... 2-1
2.1 Accessing the CommPortal BG Admin interface ...................................................... 2-1
2.2 Logging into CommPortal BG Admin ....................................................................... 2-2
2.3 Using CommPortal BG Admin .................................................................................. 2-3
3 Managing lines with BG Admin ................................................................................... 3-1
3.1 Working with your Business Group Lines................................................................. 3-1 3.1.1 Resetting a Business Group Line ................................................................... 3-2 3.1.2 Moving lines between departments ............................................................... 3-2 3.1.3 Logging into a user's account ......................................................................... 3-3
3.2 Departments ............................................................................................................... 3-3 3.2.1 Managing Departments .................................................................................. 3-3 3.2.2 Adding Departments ...................................................................................... 3-4
4 Managing phones with BG Admin ............................................................................... 4-1
4.1 Modify phone description .......................................................................................... 4-1
4.2 Moving phones between departments ........................................................................ 4-2
4.3 Assigning a phone to a line ........................................................................................ 4-2
4.4 Removing a phone from a line ................................................................................... 4-2
4.5 Phone profiles - built-in phones ................................................................................. 4-3 4.5.1 Managing phone profiles ............................................................................... 4-3 4.5.2 Adding a new phone profile ........................................................................... 4-4 4.5.3 Modifying a phone profile ............................................................................. 4-5 4.5.4 Logging out of the Phone Profile Editor ...................................................... 4-11
4.6 Phone profiles - Endpoint Pack phones ................................................................... 4-11 4.6.1 Managing phone profiles ............................................................................. 4-11 4.6.2 Adding a new phone profile ......................................................................... 4-12 4.6.3 Modifying a phone profile ........................................................................... 4-12 4.6.4 Logging out of the Phone Profile Editor ...................................................... 4-14
4.7 Modifying phone configuration as a user ................................................................ 4-14
4.8 Copying phone configuration .................................................................................. 4-14
4.9 Installing a new phone ............................................................................................. 4-15
4.10 Replacing with an identical phone model ................................................................ 4-15 4.10.1 Replacing with a different phone model ...................................................... 4-16
Hosted PBX Administrator Guide CONFIDENTIAL Hosted PBX Administrator Guide V9.2.10 / Release 1 Apr 2016
ii
5 Managing Multiple Appearance Directory Numbers (MADNs) ............................... 5-1
5.1 Viewing MADNs ....................................................................................................... 5-1
5.2 Viewing and modifying a MADN ............................................................................. 5-2 5.2.1 MADN lines ................................................................................................... 5-2 5.2.2 Other settings ................................................................................................. 5-3
5.3 Changing MADN settings.......................................................................................... 5-3
6 Managing Multi Line Hunt Groups (MLHGs) ........................................................... 6-1
6.1 Viewing MLHGs ....................................................................................................... 6-1
6.2 Moving MLHGs to another department .................................................................... 6-1
6.3 Viewing and modifying MLHGs ............................................................................... 6-2 6.3.1 MLHG pilots .................................................................................................. 6-2 6.3.2 MLHG lines ................................................................................................... 6-2 6.3.3 Settings ........................................................................................................... 6-4
6.4 Integrated ACD .......................................................................................................... 6-5
7 Managing Call Pickup Groups ..................................................................................... 7-1
7.1 Viewing Call Pickup Groups ..................................................................................... 7-1
7.2 Moving Call Pickup Groups to another department .................................................. 7-1
7.3 Adding Call Pickup Groups ....................................................................................... 7-2
7.4 Deleting Call Pickup Groups ..................................................................................... 7-2
7.5 Viewing and Modifying Call Pickup Groups ............................................................ 7-3 7.5.1 Managing Call Pick Up Group lines .............................................................. 7-3 7.5.2 Settings ........................................................................................................... 7-4
8 Managing Short Codes .................................................................................................. 8-1
8.1 Viewing Short Codes ................................................................................................. 8-1
8.2 Moving Short Codes to another department .............................................................. 8-1
8.3 Adding Short Codes ................................................................................................... 8-2
8.4 Adding Short Code ranges ......................................................................................... 8-3
8.5 Deleting Short Codes and Short Code ranges ............................................................ 8-3
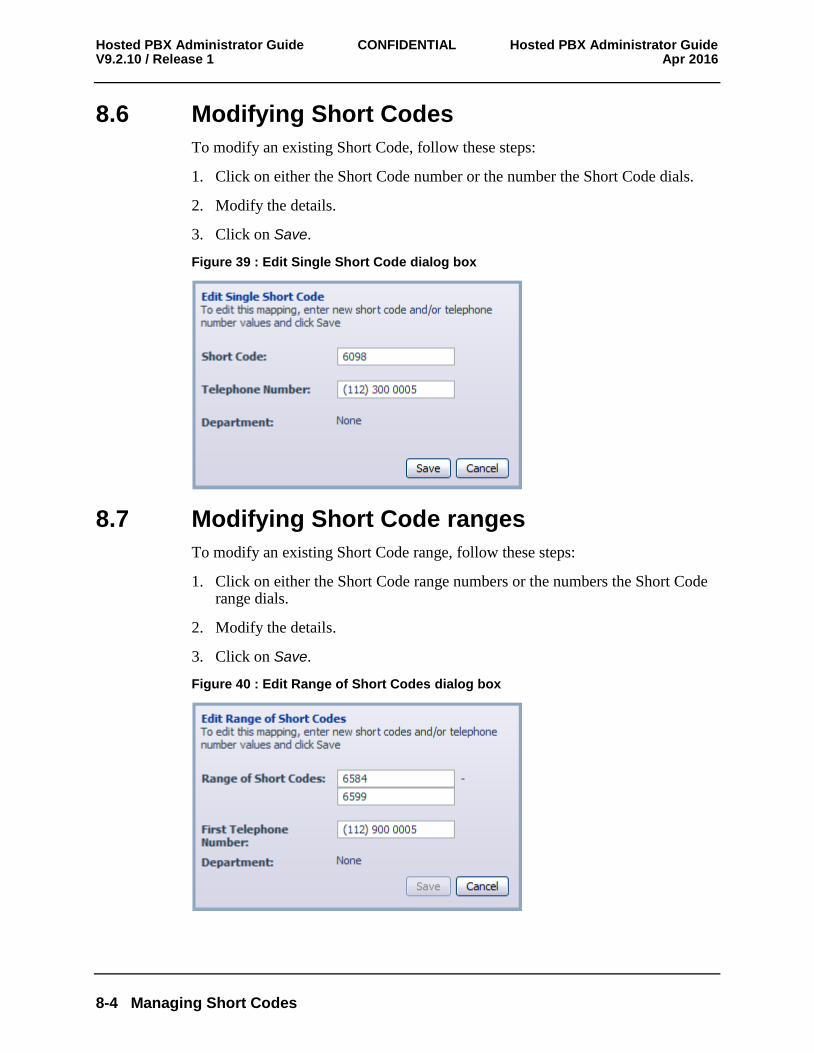
8.6 Modifying Short Codes .............................................................................................. 8-4
8.7 Modifying Short Code ranges .................................................................................... 8-4
9 Managing Extensions ..................................................................................................... 9-1
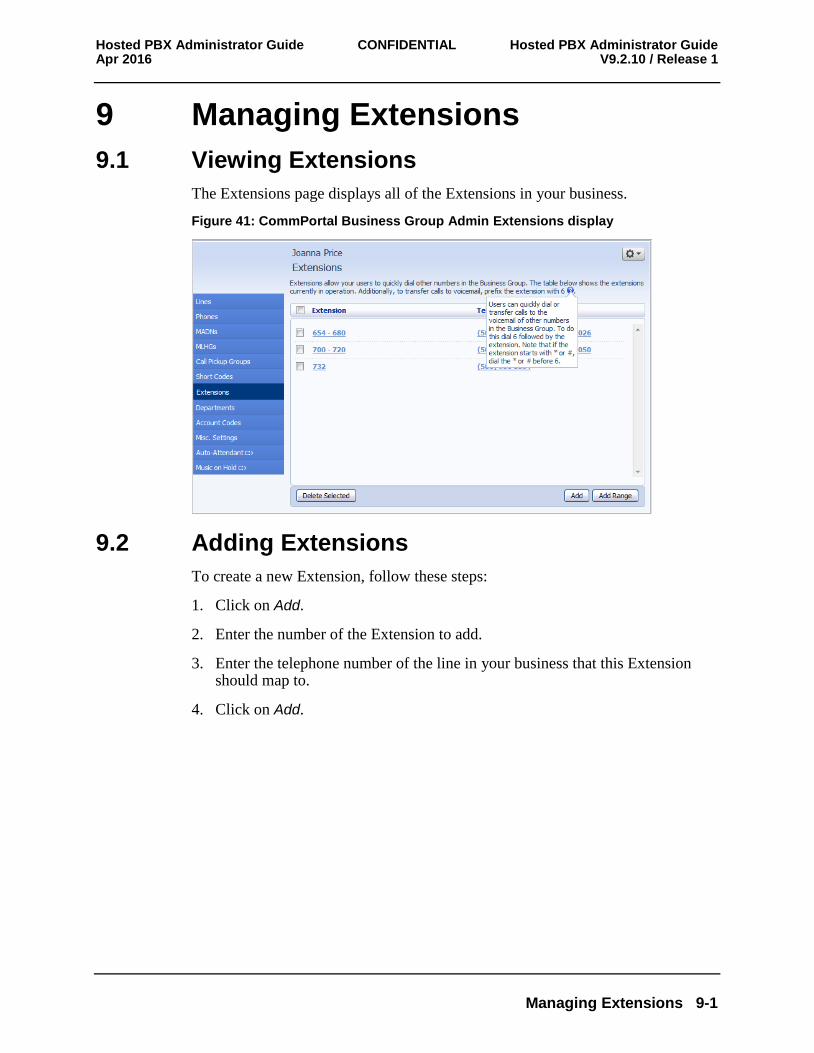
9.1 Viewing Extensions ................................................................................................... 9-1
9.2 Adding Extensions ..................................................................................................... 9-1
9.3 Adding Extension ranges ........................................................................................... 9-2
9.4 Deleting Extensions and Extension ranges ................................................................ 9-2
Hosted PBX Administrator Guide CONFIDENTIAL Hosted PBX Administrator Guide Apr 2016 V9.2.10 / Release 1
iii
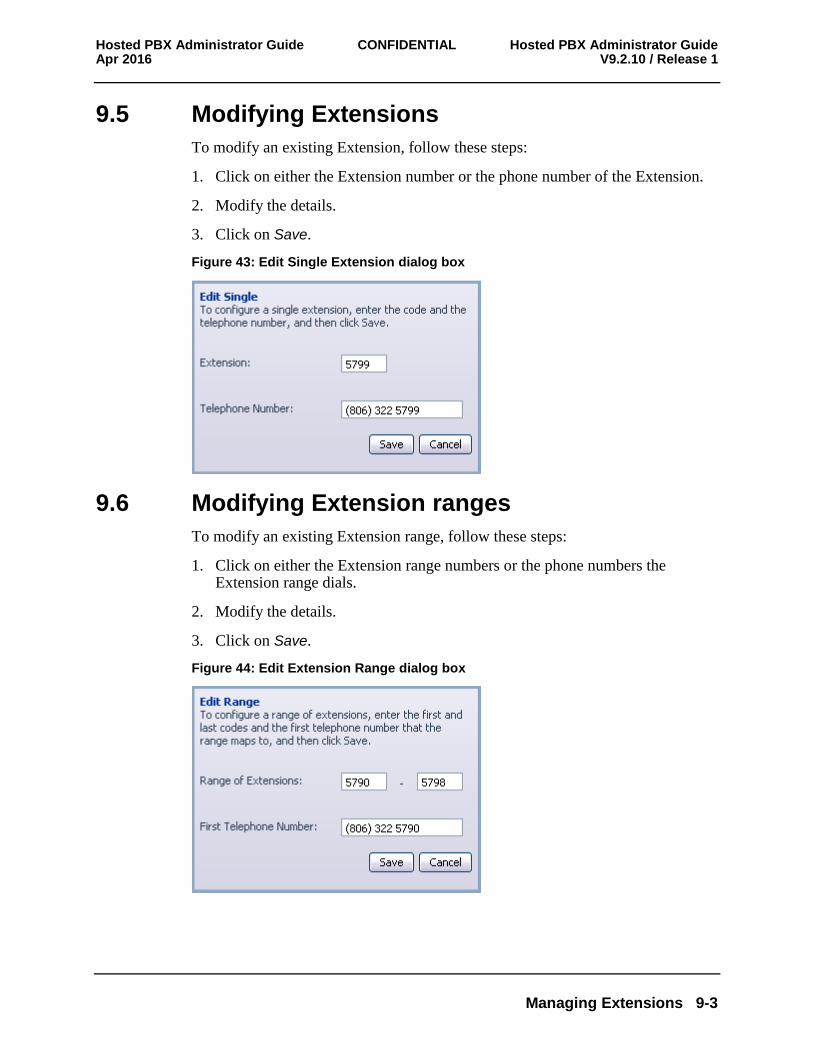
9.5 Modifying Extensions ................................................................................................ 9-3
9.6 Modifying Extension ranges ...................................................................................... 9-3
10 Managing account codes.............................................................................................. 10-1
10.1 Viewing and modifying account code settings ........................................................ 10-1
10.2 Modifying settings ................................................................................................... 10-1 10.2.1 Modifying call types requiring account codes ............................................. 10-1 10.2.2 Choosing Validated or Non-validated Account Codes ................................ 10-2 10.2.3 Setting account code length ......................................................................... 10-2 10.2.4 Blocking access after incorrect account codes ............................................. 10-2 10.2.5 Setting individual line properties ................................................................. 10-3 10.2.6 Configuring account codes .......................................................................... 10-3
10.3 Viewing and modifying account code settings for a line ......................................... 10-4
10.4 Viewing Business Group Call Logs ......................................................................... 10-4
11 Viewing miscellaneous settings ................................................................................... 11-1
11.1 Viewing Number Block settings .............................................................................. 11-1
11.2 Viewing External Call settings ................................................................................ 11-1
11.3 Configuring Call Notifications ................................................................................ 11-3
11.4 Viewing other settings ............................................................................................. 11-4
12 Auto-Attendant – Easy Attendant / Premium Attendant ........................................ 12-1
12.1 Overview .................................................................................................................. 12-1
12.2 Easy Attendant ......................................................................................................... 12-2 12.2.1 Planning your Easy Attendant ..................................................................... 12-2 12.2.2 Logging on to Easy Attendant ..................................................................... 12-3 12.2.3 Configuring Easy Attendant menus and schedules ...................................... 12-4 12.2.4 Configuring your Easy Attendant extensions .............................................. 12-7 12.2.5 Activating Easy Attendant ........................................................................... 12-8
12.3 Premium Attendant .................................................................................................. 12-9 12.3.1 Planning your Premium Attendant............................................................... 12-9 12.3.2 Logging into Premium Attendant .............................................................. 12-10 12.3.3 Configuring Premium Attendant Schedule ................................................ 12-10 12.3.4 Configuring Premium Attendant Announcements..................................... 12-12 12.3.5 Configuring Premium Attendant Menus .................................................... 12-14 12.3.6 Configuring Premium Attendant extensions .............................................. 12-16 12.3.7 Configuring Premium Attendant advanced options ................................... 12-17 12.3.8 Activating Premium Attendant .................................................................. 12-18
13 Music On Hold ............................................................................................................. 13-1
13.1 CommPortal access .................................................................................................. 13-1 13.1.1 Logging in .................................................................................................... 13-1 13.1.2 Viewing and changing your security settings .............................................. 13-1 13.1.3 Managing recordings ................................................................................... 13-2
Hosted PBX Administrator Guide CONFIDENTIAL Hosted PBX Administrator Guide V9.2.10 / Release 1 Apr 2016
iv
13.1.4 Assigning recordings to lines ....................................................................... 13-4
13.2 Phone access ............................................................................................................ 13-7 13.2.1 Logging in .................................................................................................... 13-7 13.2.2 Using the telephone interface ....................................................................... 13-7
14 Call Recording .............................................................................................................. 14-1
14.1 Enabling or disabling Call Recording for an individual line ................................... 14-1
14.2 Accessing your Call Recording administration system ........................................... 14-1
A Glossary ......................................................................................................................... A-1
A.1 CommPortal .............................................................................................................. A-1
A.2 Logging into CommPortal as another user ............................................................... A-1
A.3 Phones ....................................................................................................................... A-1
A.4 Phone numbers .......................................................................................................... A-2
A.5 MAC addresses ......................................................................................................... A-2
A.6 Departments .............................................................................................................. A-3
A.7 Phone profiles ........................................................................................................... A-3 A.7.1 Modifying Phone profiles ............................................................................. A-3 A.7.2 Copying phone configuration ....................................................................... A-4
A.8 Network..................................................................................................................... A-4
A.9 Multiple Appearance Directory Numbers ................................................................. A-5
A.10 Multi Line Hunt Groups............................................................................................ A-5
A.11 Call Pickup Groups ................................................................................................... A-6
A.12 Short Codes ............................................................................................................... A-7
A.13 Extensions ................................................................................................................. A-7
A.14 Account codes ........................................................................................................... A-7
A.15 Auto Attendant – Easy Attendant / Premium Attendant ........................................... A-8
A.16 Music On Hold .......................................................................................................... A-8 A.16.1 Music On Hold performing rights................................................................. A-8

Hosted PBX Administrator Guide CONFIDENTIAL Hosted PBX Administrator Guide Apr 2016 V9.2.10 / Release 1
Introduction 1-1

Hosted PBX Administrator Guide CONFIDENTIAL Hosted PBX Administrator Guide Apr 2016 V9.2.10 / Release 1
Introduction 1-1
1 Introduction
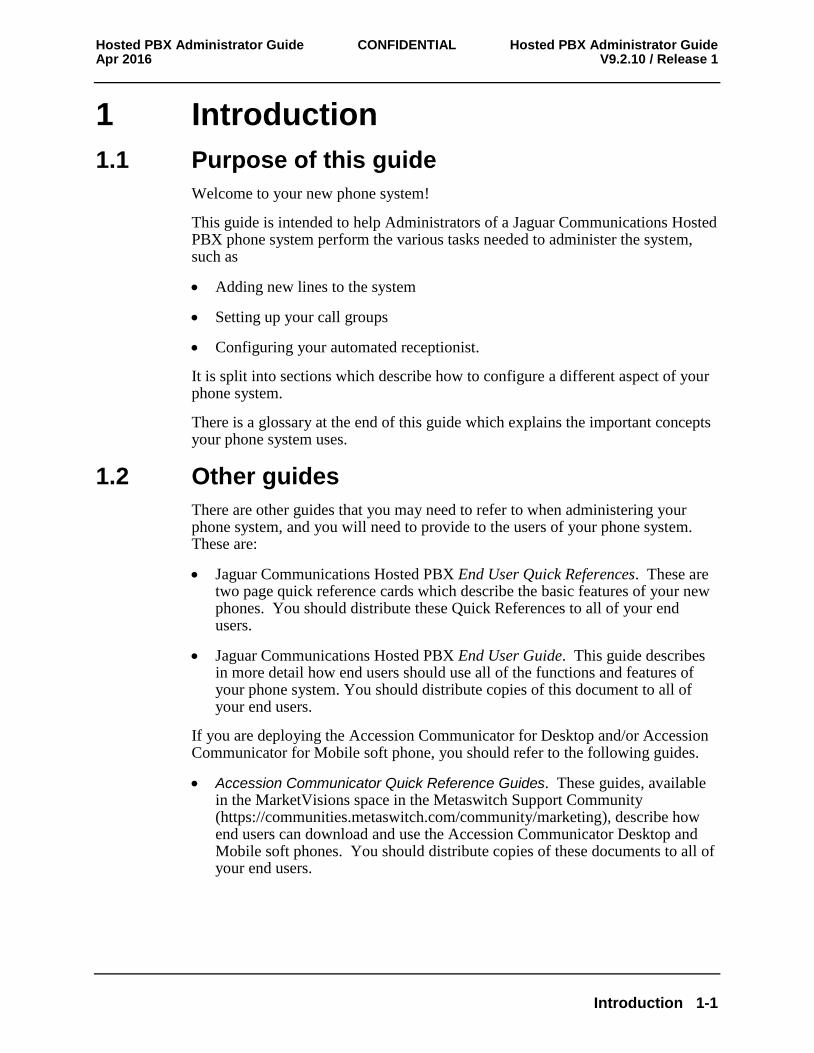
1.1 Purpose of this guide
Welcome to your new phone system!
This guide is intended to help Administrators of a Jaguar Communications Hosted PBX phone system perform the various tasks needed to administer the system, such as
Adding new lines to the system
Setting up your call groups
Configuring your automated receptionist.
It is split into sections which describe how to configure a different aspect of your phone system.
There is a glossary at the end of this guide which explains the important concepts your phone system uses.
1.2 Other guides
There are other guides that you may need to refer to when administering your phone system, and you will need to provide to the users of your phone system. These are:
Jaguar Communications Hosted PBX End User Quick References. These are two page quick reference cards which describe the basic features of your new phones. You should distribute these Quick References to all of your end users.
Jaguar Communications Hosted PBX End User Guide. This guide describes in more detail how end users should use all of the functions and features of your phone system. You should distribute copies of this document to all of your end users.
If you are deploying the Accession Communicator for Desktop and/or Accession Communicator for Mobile soft phone, you should refer to the following guides.
Accession Communicator Quick Reference Guides. These guides, available in the MarketVisions space in the Metaswitch Support Community (https://communities.metaswitch.com/community/marketing), describe how end users can download and use the Accession Communicator Desktop and Mobile soft phones. You should distribute copies of these documents to all of your end users.


Hosted PBX Administrator Guide CONFIDENTIAL Hosted PBX Administrator Guide Apr 2016 V9.2.10 / Release 1
CommPortal Business Group Administrator (BG Admin) 2-1
2 CommPortal Business Group Administrator (BG Admin) CommPortal provides a web interface to your phone system, and allows end users and Business Administrators to modify their settings. There are two CommPortal interfaces.
The first is for regular users to manage their business telephony settings.
The second is for Business Group Administrators to modify both global settings for the business and to modify end-users' settings.
The second of these interfaces is the one which you will use to administer the phone system and is described by this document. For more details on using the first interface, please see the Jaguar Communications Hosted PBX End User Guide.
2.1 Accessing the CommPortal BG Admin interface
To configure BG lines, and to manage their BG's lines and services, a BG Administrator should log in to the CommPortal BG Admin interface using a separate login page to regular users. For example, if BG Line Users log in at http://www.example.com/business, a BG Administrator might log in at http://www.example.com/business/bg. The BG Administrator login page sends the BG Administrator to the BG Administrator section of the default web UI.
CommPortal is supported on the latest versions of all major browsers and operating systems. This includes:
Microsoft Internet Explorer version 6 or later (IE 8 or later is required for some functions)
Firefox version 3 or later
Google Chrome version 4 or later (Windows only)
Safari version 5 or later (Mac OS X only)
It is supported on the following operating systems:
Microsoft Windows 2000
Microsoft Windows XP
Microsoft Windows Vista
Microsoft Windows 7
Microsoft Windows 8

Hosted PBX Administrator Guide CONFIDENTIAL Hosted PBX Administrator Guide V9.2.10 / Release 1 Apr 2016
2-2 CommPortal Business Group Administrator (BG Admin)
Mac OS X 10.6, Snow Leopard (does not support Accession Communicator for Desktop)
Mac OS X 10.7 (Lion)
JavaScript must be enabled.
2.2 Logging into CommPortal BG Admin
The following shows a sample CommPortal login page.
Figure 1: CommPortal login page
To log into CommPortal, follow these steps:
1. Enter a phone number with administrative access
2. Enter the password
3. Click on Login.
Hosted PBX Administrator Guide CONFIDENTIAL Hosted PBX Administrator Guide Apr 2016 V9.2.10 / Release 1
CommPortal Business Group Administrator (BG Admin) 2-3
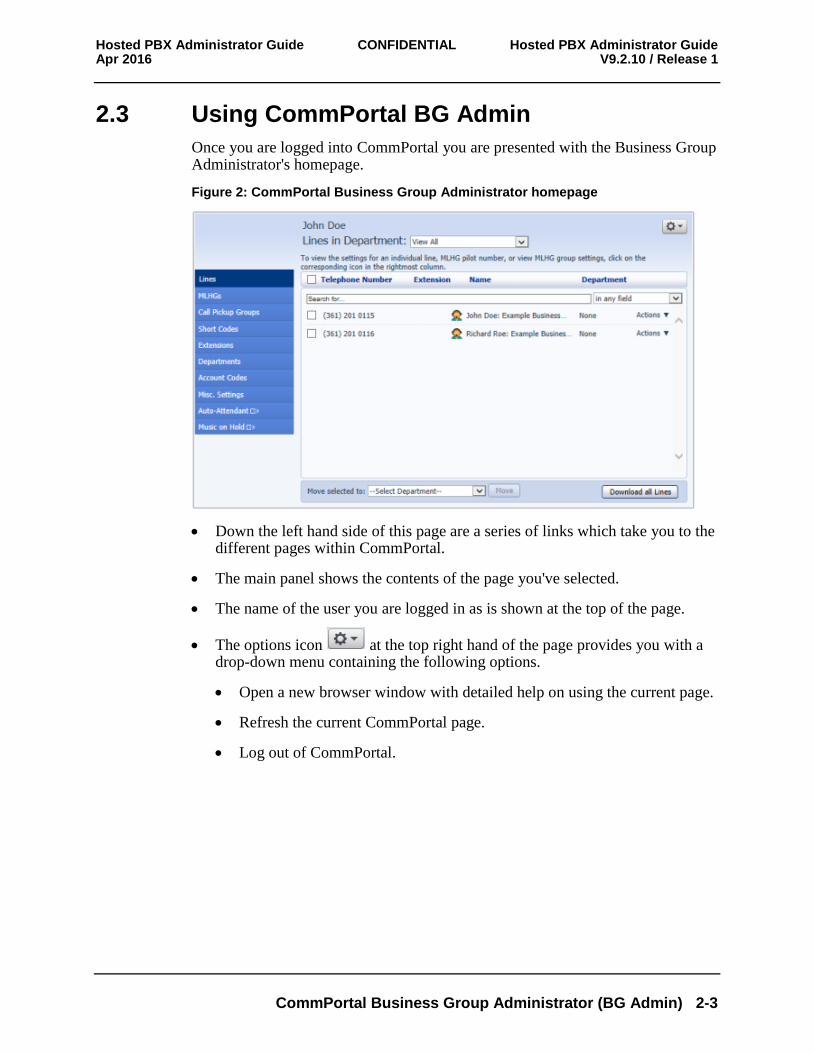
2.3 Using CommPortal BG Admin
Once you are logged into CommPortal you are presented with the Business Group Administrator's homepage.
Figure 2: CommPortal Business Group Administrator homepage
Down the left hand side of this page are a series of links which take you to the different pages within CommPortal.
The main panel shows the contents of the page you've selected.
The name of the user you are logged in as is shown at the top of the page.
The options icon at the top right hand of the page provides you with a drop-down menu containing the following options.
Open a new browser window with detailed help on using the current page.
Refresh the current CommPortal page.
Log out of CommPortal.

Hosted PBX Administrator Guide CONFIDENTIAL Hosted PBX Administrator Guide Apr 2016 V9.2.10 / Release 1
Managing lines with BG Admin 3-1
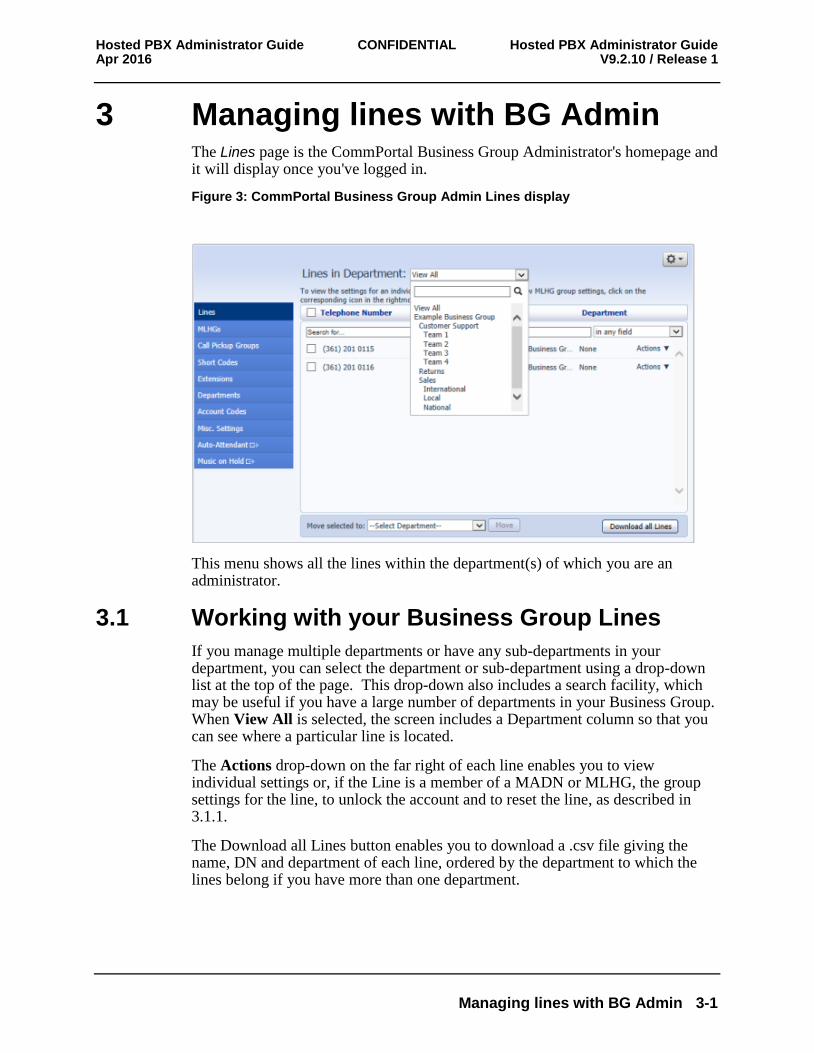
3 Managing lines with BG Admin The Lines page is the CommPortal Business Group Administrator's homepage and it will display once you've logged in.
Figure 3: CommPortal Business Group Admin Lines display
This menu shows all the lines within the department(s) of which you are an administrator.
3.1 Working with your Business Group Lines
If you manage multiple departments or have any sub-departments in your department, you can select the department or sub-department using a drop-down list at the top of the page. This drop-down also includes a search facility, which may be useful if you have a large number of departments in your Business Group. When View All is selected, the screen includes a Department column so that you can see where a particular line is located.
The Actions drop-down on the far right of each line enables you to view individual settings or, if the Line is a member of a MADN or MLHG, the group settings for the line, to unlock the account and to reset the line, as described in 3.1.1.
The Download all Lines button enables you to download a .csv file giving the name, DN and department of each line, ordered by the department to which the lines belong if you have more than one department.
Hosted PBX Administrator Guide CONFIDENTIAL Hosted PBX Administrator Guide V9.2.10 / Release 1 Apr 2016
3-2 Managing lines with BG Admin
3.1.1 Resetting a Business Group Line
You can use a reset line option on a Business Group line if you need to allocate this line to a different subscriber. Resetting the line removes all the current data associated with the line, including any call lists.
To reset the line:
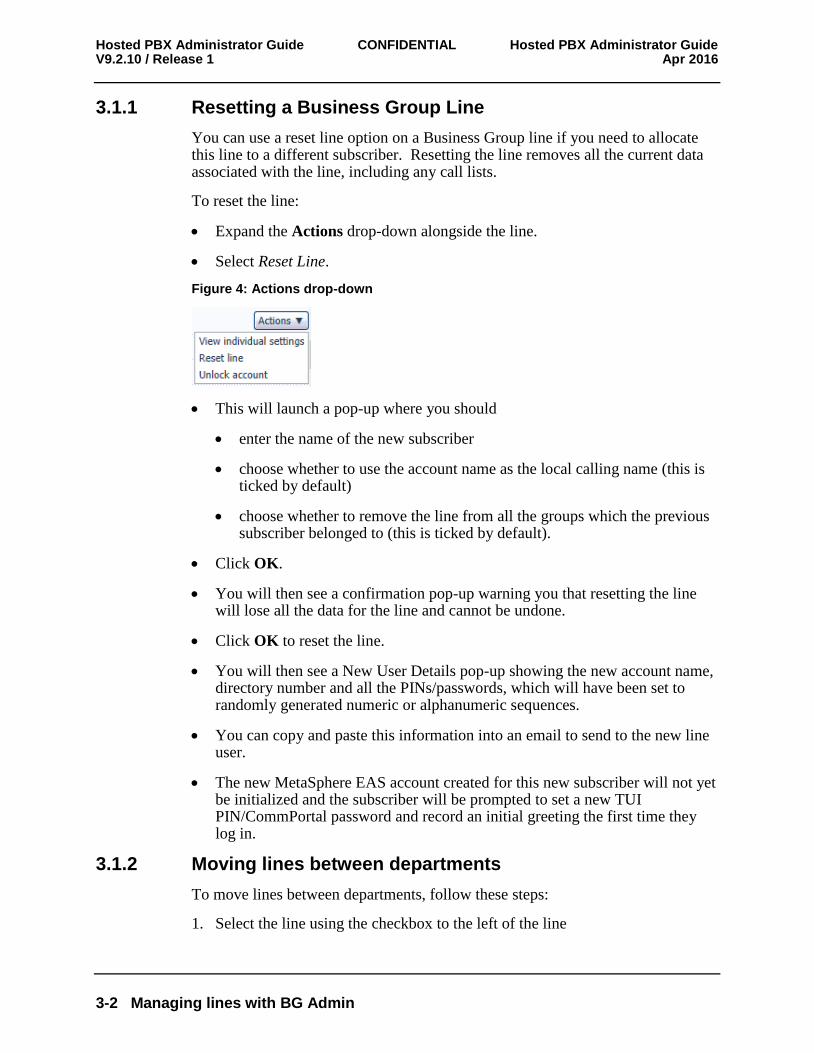
Expand the Actions drop-down alongside the line.
Select Reset Line.
Figure 4: Actions drop-down
This will launch a pop-up where you should
enter the name of the new subscriber
choose whether to use the account name as the local calling name (this is ticked by default)
choose whether to remove the line from all the groups which the previous subscriber belonged to (this is ticked by default).
Click OK.
You will then see a confirmation pop-up warning you that resetting the line will lose all the data for the line and cannot be undone.
Click OK to reset the line.
You will then see a New User Details pop-up showing the new account name, directory number and all the PINs/passwords, which will have been set to randomly generated numeric or alphanumeric sequences.
You can copy and paste this information into an email to send to the new line user.
The new MetaSphere EAS account created for this new subscriber will not yet be initialized and the subscriber will be prompted to set a new TUI PIN/CommPortal password and record an initial greeting the first time they log in.
3.1.2 Moving lines between departments
To move lines between departments, follow these steps:
1. Select the line using the checkbox to the left of the line
Hosted PBX Administrator Guide CONFIDENTIAL Hosted PBX Administrator Guide Apr 2016 V9.2.10 / Release 1
Managing lines with BG Admin 3-3
2. Select the department you wish to move the line to using the drop-down list at the bottom of the page.
3. Click on the Move button.
3.1.3 Logging into a user's account
To log on as a regular user, follow these steps:
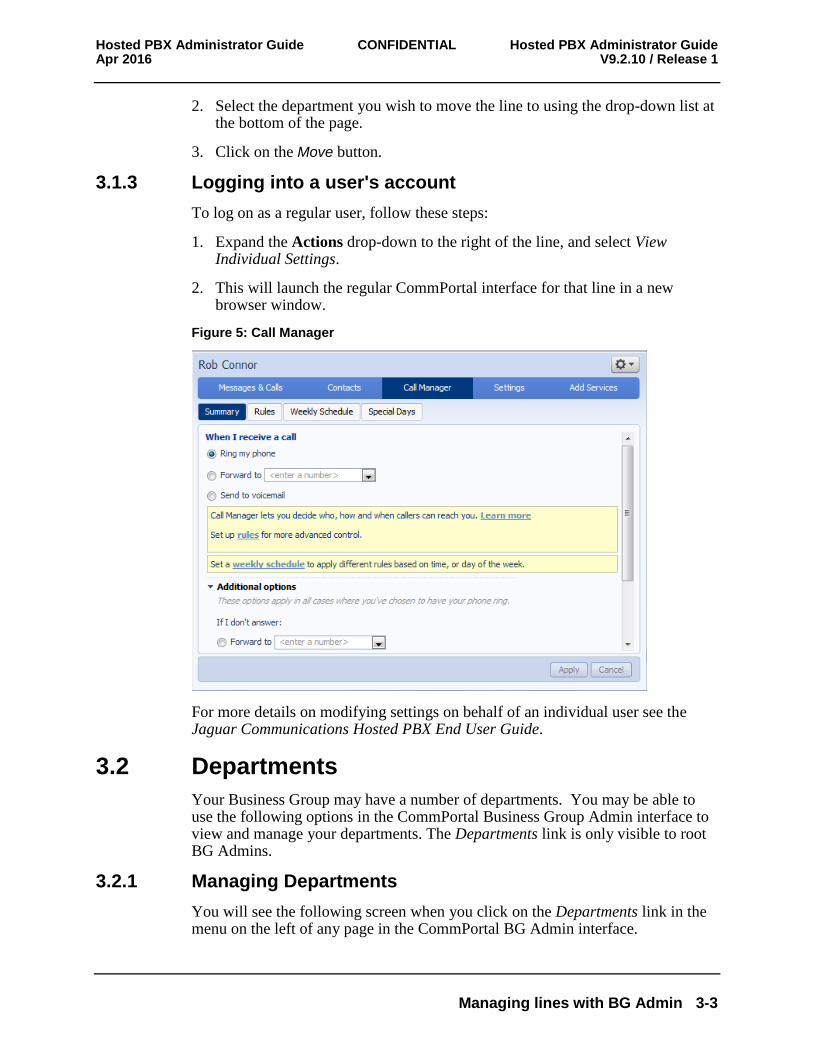
1. Expand the Actions drop-down to the right of the line, and select View Individual Settings.
2. This will launch the regular CommPortal interface for that line in a new browser window.
Figure 5: Call Manager
For more details on modifying settings on behalf of an individual user see the Jaguar Communications Hosted PBX End User Guide.
3.2 Departments
Your Business Group may have a number of departments. You may be able to use the following options in the CommPortal Business Group Admin interface to view and manage your departments. The Departments link is only visible to root BG Admins.
3.2.1 Managing Departments
You will see the following screen when you click on the Departments link in the menu on the left of any page in the CommPortal BG Admin interface.
Hosted PBX Administrator Guide CONFIDENTIAL Hosted PBX Administrator Guide V9.2.10 / Release 1 Apr 2016
3-4 Managing lines with BG Admin
This displays all the departments in your Business Group, along with any configured restrictions on the number of incoming, outgoing or incoming/outgoing calls.
Figure 6: Departments page
If you have a very large number of departments, you can use the Search for box to find a department. As you type, matching departments are shown, with the matching text highlighted in yellow.
3.2.2 Adding Departments
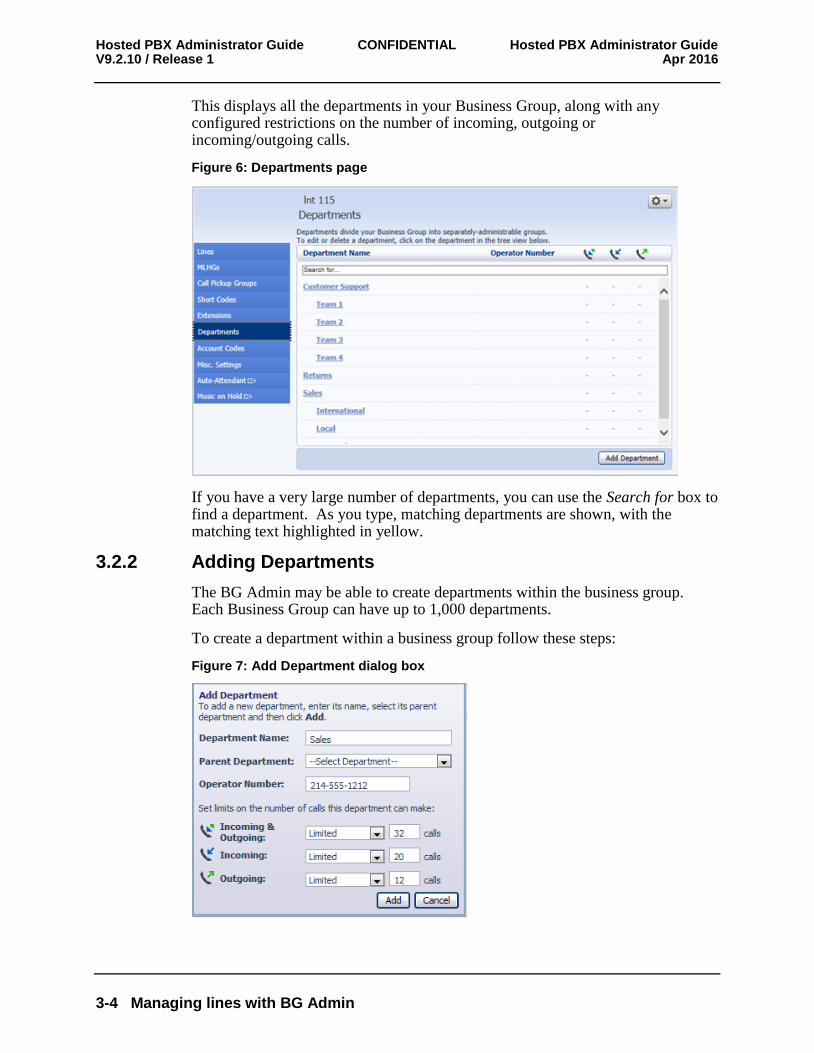
The BG Admin may be able to create departments within the business group. Each Business Group can have up to 1,000 departments.
To create a department within a business group follow these steps:
Figure 7: Add Department dialog box
Hosted PBX Administrator Guide CONFIDENTIAL Hosted PBX Administrator Guide Apr 2016 V9.2.10 / Release 1
Managing lines with BG Admin 3-5
1. From the BG Admin Page select the Departments link on the left of the page. Click the Add Department button at the bottom of the page and the dialog shown above will appear.
2. Enter the following information.
1. Department Name
2. Parent Directory – If this is a top level department, you will use the Business Group Name. If this is a sub department, this will be the upper level department
3. Operator Number – Enter the number of the line that will act as operator for this department
4. If you plan to limit the number of calls allowed for this department, enter the following information
1. Incoming & Outgoing – Enter the total number of combined concurrent calls that this department will be permitted to have active at any given time.
2. Incoming – Enter the total number of concurrent incoming calls that this department will be permitted to have active at any given time.
3. Outgoing – Enter the number of concurrent outgoing calls that this department will be permitted to have active at any given time.
NOTE: To allow any mix of incoming & outgoing enter the same value in all three fields, or set both the Incoming and the Outgoing fields to Unlimited.
Some example departments are shown in 3.2.1.

Hosted PBX Administrator Guide CONFIDENTIAL Hosted PBX Administrator Guide Apr 2016 V9.2.10 / Release 1
Managing phones with BG Admin 4-1
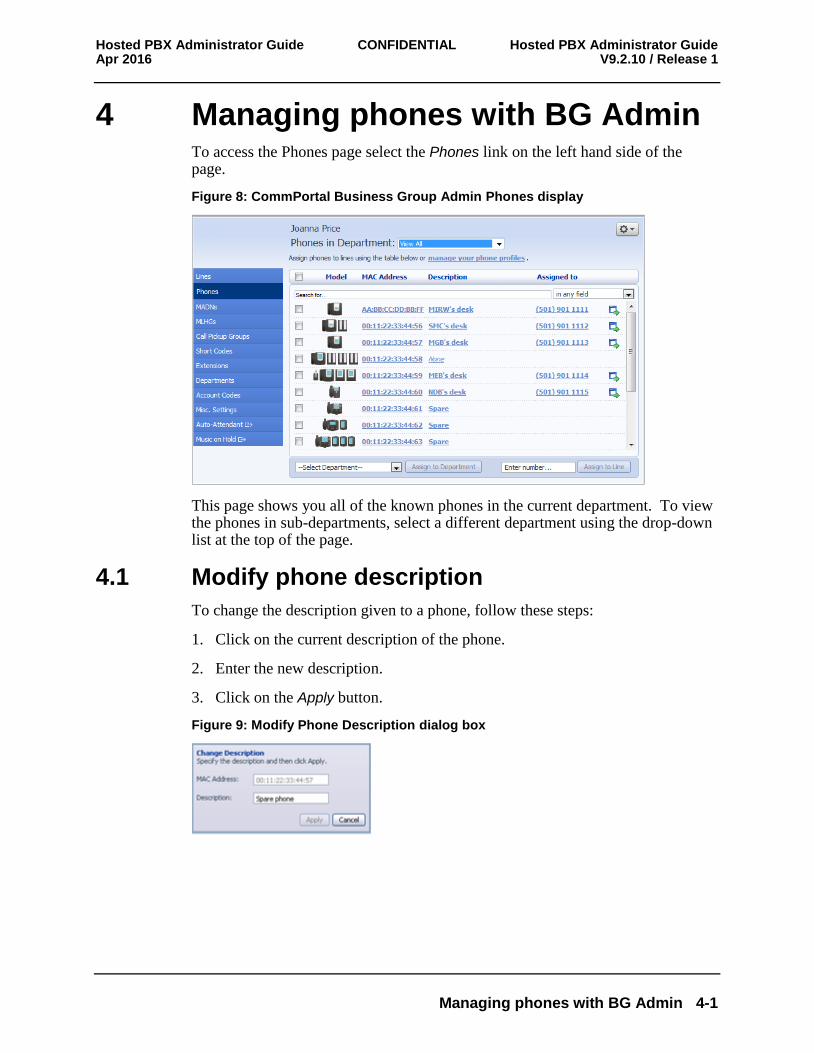
4 Managing phones with BG Admin To access the Phones page select the Phones link on the left hand side of the page.
Figure 8: CommPortal Business Group Admin Phones display
This page shows you all of the known phones in the current department. To view the phones in sub-departments, select a different department using the drop-down list at the top of the page.
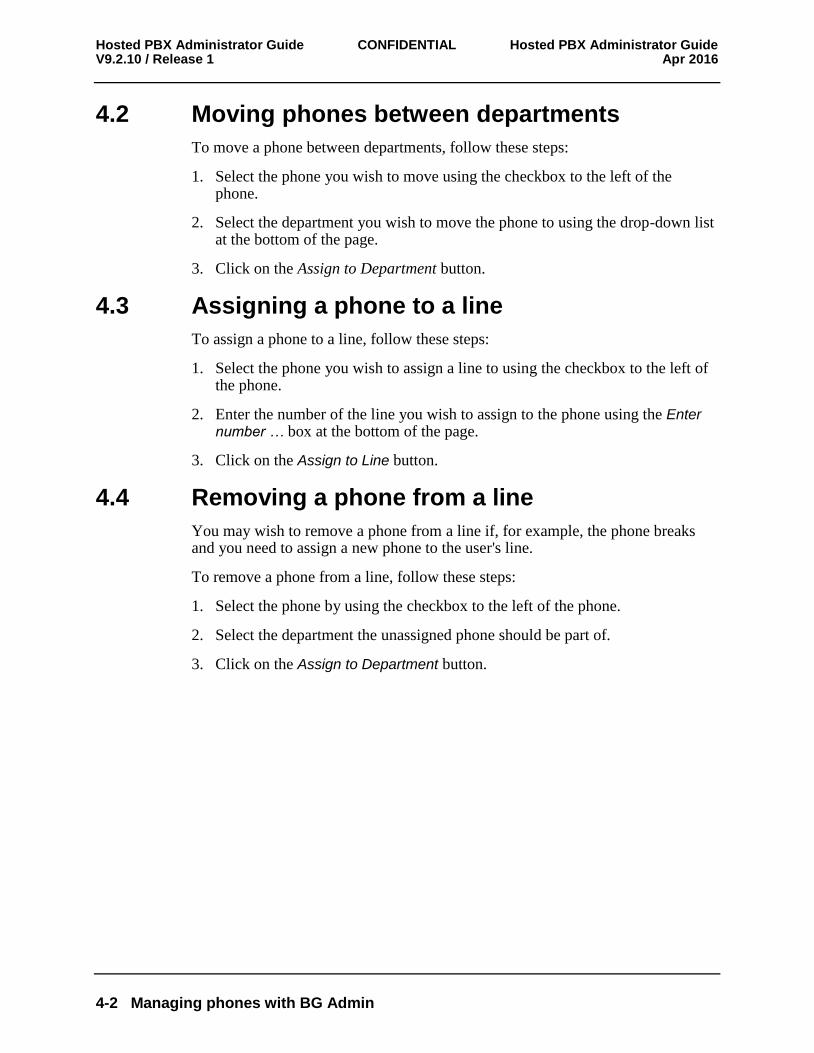
4.1 Modify phone description
To change the description given to a phone, follow these steps:
1. Click on the current description of the phone.
2. Enter the new description.
3. Click on the Apply button.
Figure 9: Modify Phone Description dialog box
Hosted PBX Administrator Guide CONFIDENTIAL Hosted PBX Administrator Guide V9.2.10 / Release 1 Apr 2016
4-2 Managing phones with BG Admin
4.2 Moving phones between departments
To move a phone between departments, follow these steps:
1. Select the phone you wish to move using the checkbox to the left of the phone.
2. Select the department you wish to move the phone to using the drop-down list at the bottom of the page.
3. Click on the Assign to Department button.
4.3 Assigning a phone to a line
To assign a phone to a line, follow these steps:
1. Select the phone you wish to assign a line to using the checkbox to the left of the phone.
2. Enter the number of the line you wish to assign to the phone using the Enter number … box at the bottom of the page.
3. Click on the Assign to Line button.
4.4 Removing a phone from a line
You may wish to remove a phone from a line if, for example, the phone breaks and you need to assign a new phone to the user's line.
To remove a phone from a line, follow these steps:
1. Select the phone by using the checkbox to the left of the phone.
2. Select the department the unassigned phone should be part of.
3. Click on the Assign to Department button.
Hosted PBX Administrator Guide CONFIDENTIAL Hosted PBX Administrator Guide Apr 2016 V9.2.10 / Release 1
Managing phones with BG Admin 4-3
4.5 Phone profiles - built-in phones
This section describes how to work with phone profiles for SIP phones provisioned using the Built-In provisioning method. If your phones are provisioned using an Endpoint Pack, or have just been migrated to use Endpoint Pack provisioning, you should refer to section 4.6.
This section describes how to use the Phone Profile Editor (also called the CommPortal Phone Configurator) to work with Built-In phone profiles. Note that managing Built-In phone profiles requires Adobe Flash version 9.0 or greater.
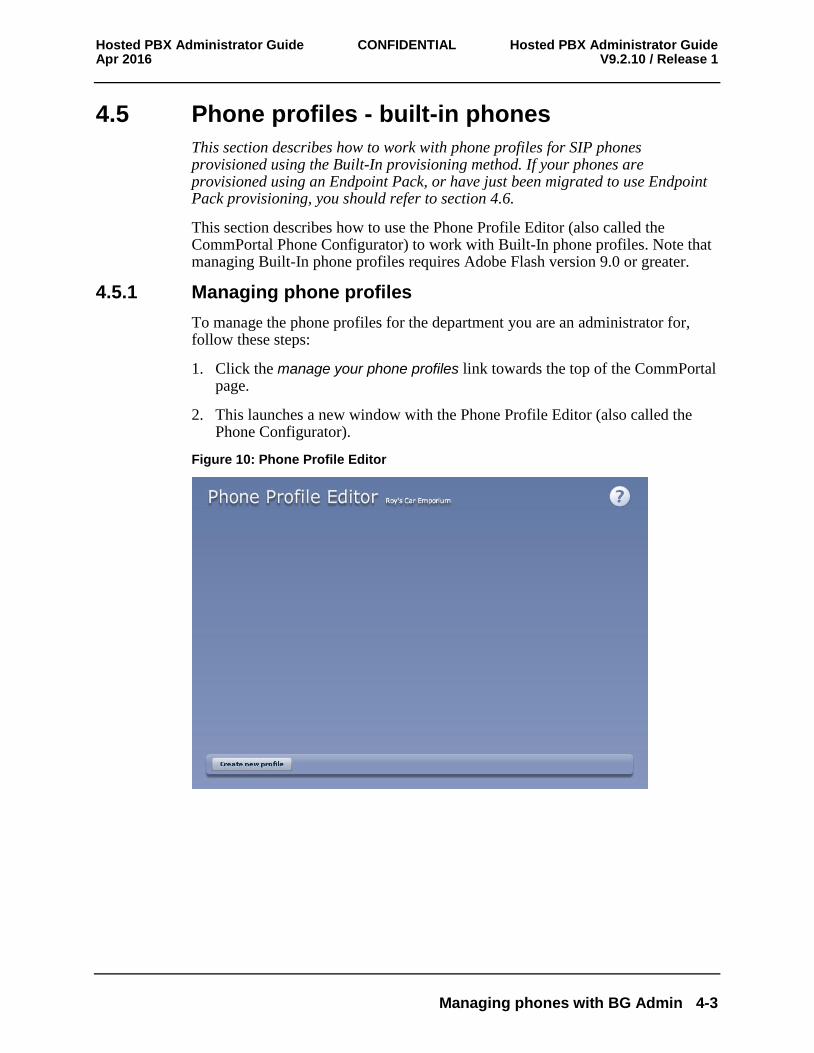
4.5.1 Managing phone profiles
To manage the phone profiles for the department you are an administrator for, follow these steps:
1. Click the manage your phone profiles link towards the top of the CommPortal page.
2. This launches a new window with the Phone Profile Editor (also called the Phone Configurator).
Figure 10: Phone Profile Editor
Hosted PBX Administrator Guide CONFIDENTIAL Hosted PBX Administrator Guide V9.2.10 / Release 1 Apr 2016
4-4 Managing phones with BG Admin
4.5.2 Adding a new phone profile
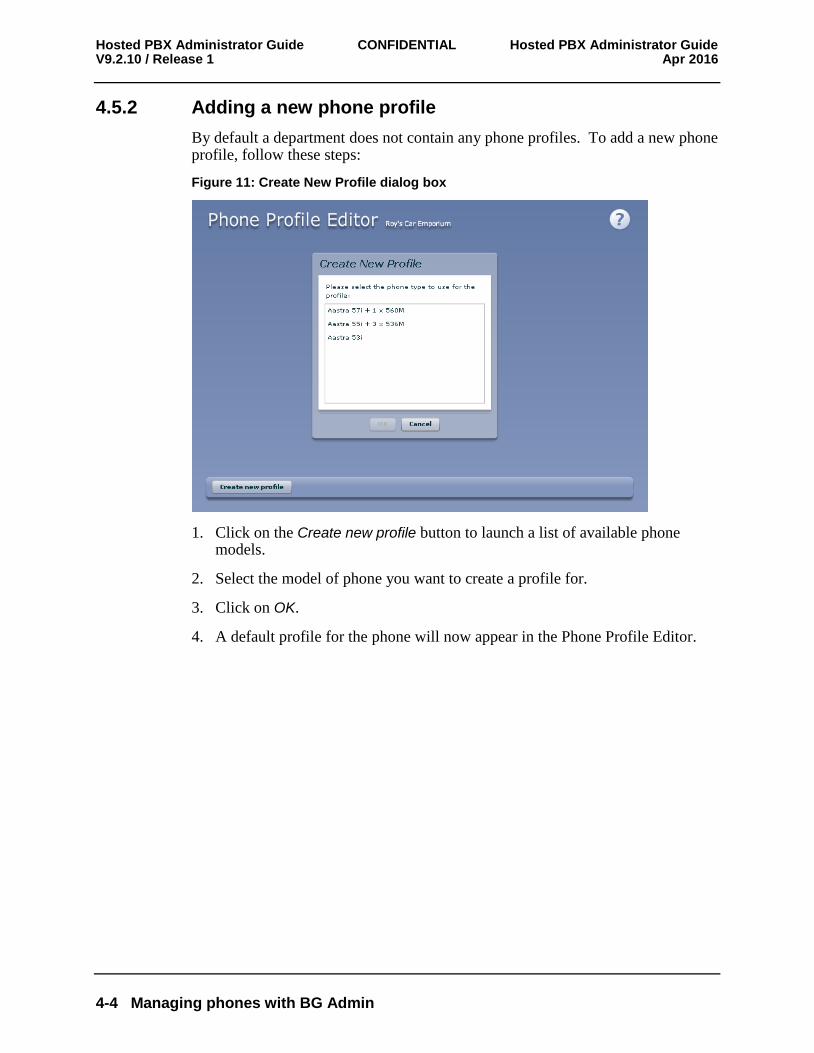
By default a department does not contain any phone profiles. To add a new phone profile, follow these steps:
Figure 11: Create New Profile dialog box
1. Click on the Create new profile button to launch a list of available phone models.
2. Select the model of phone you want to create a profile for.
3. Click on OK.
4. A default profile for the phone will now appear in the Phone Profile Editor.
Hosted PBX Administrator Guide CONFIDENTIAL Hosted PBX Administrator Guide Apr 2016 V9.2.10 / Release 1
Managing phones with BG Admin 4-5
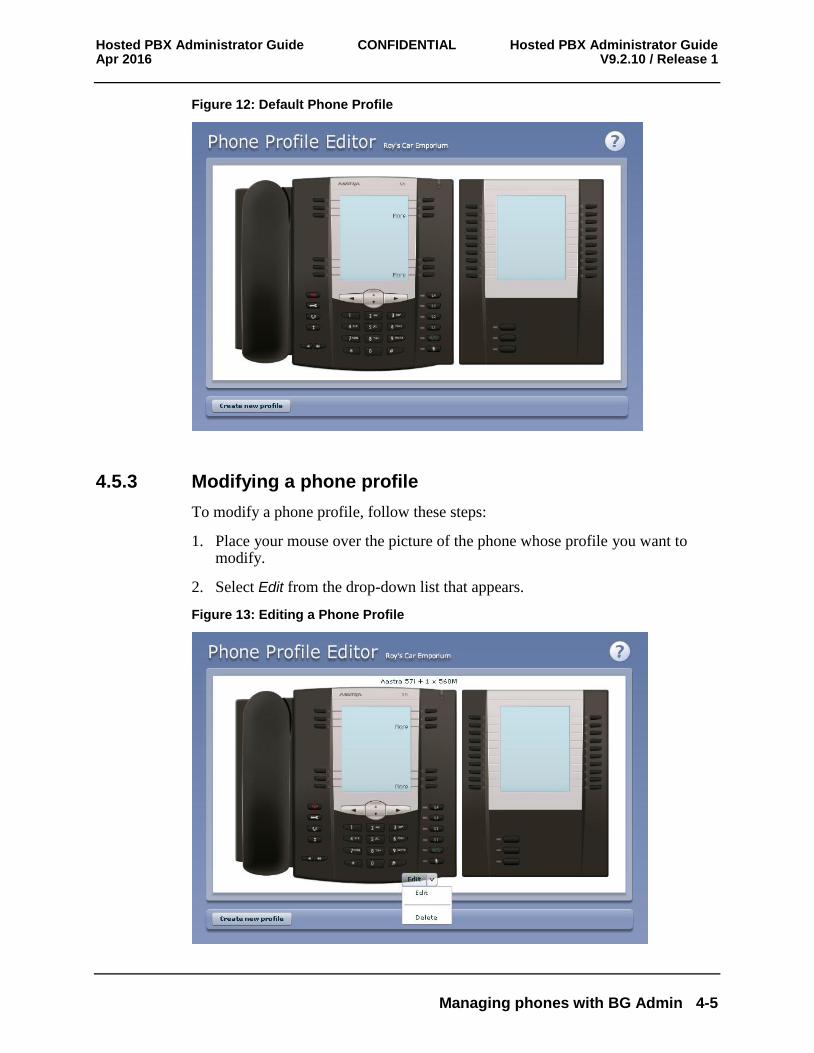
Figure 12: Default Phone Profile
4.5.3 Modifying a phone profile
To modify a phone profile, follow these steps:
1. Place your mouse over the picture of the phone whose profile you want to modify.
2. Select Edit from the drop-down list that appears.
Figure 13: Editing a Phone Profile
Hosted PBX Administrator Guide CONFIDENTIAL Hosted PBX Administrator Guide V9.2.10 / Release 1 Apr 2016
4-6 Managing phones with BG Admin
Configuration views
There are two views of the phone profile configuration:
1. The graphical phone view. To select this view, click on the phone icon at the bottom right of the window. This is the default view.
2. A table view. To select the table view click on the table icon at the bottom right of the window.
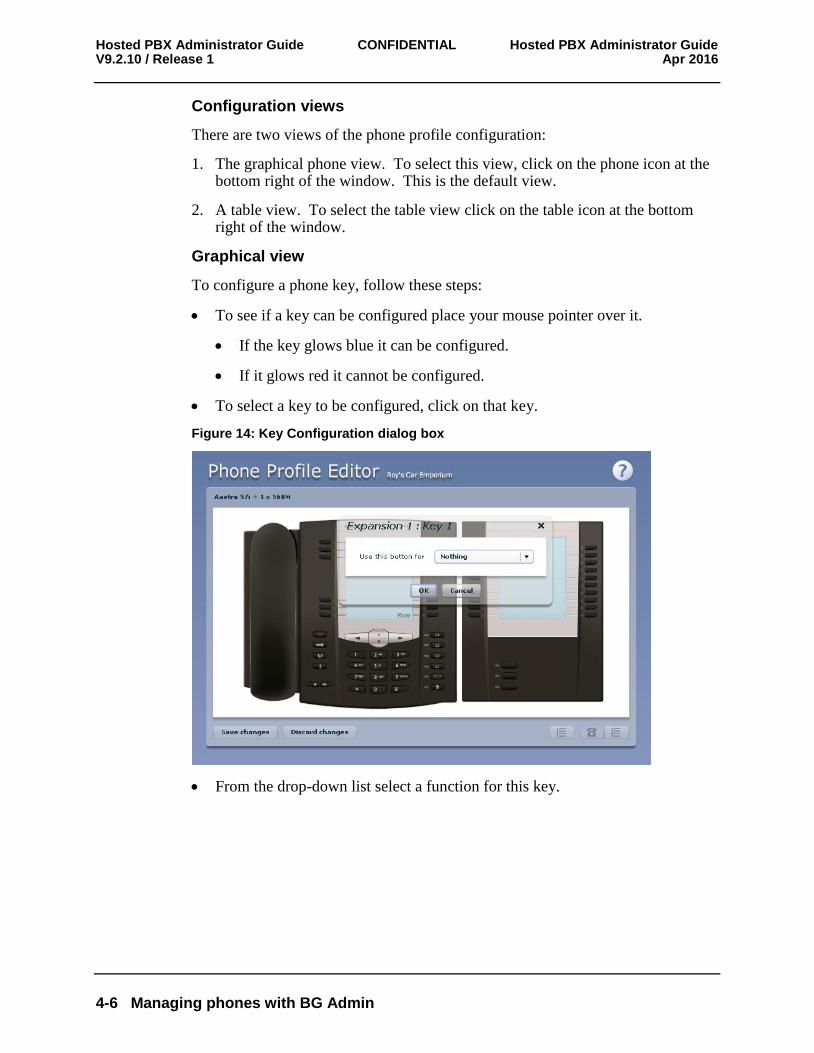
Graphical view
To configure a phone key, follow these steps:
To see if a key can be configured place your mouse pointer over it.
If the key glows blue it can be configured.
If it glows red it cannot be configured.
To select a key to be configured, click on that key.
Figure 14: Key Configuration dialog box
From the drop-down list select a function for this key.
Hosted PBX Administrator Guide CONFIDENTIAL Hosted PBX Administrator Guide Apr 2016 V9.2.10 / Release 1
Managing phones with BG Admin 4-7
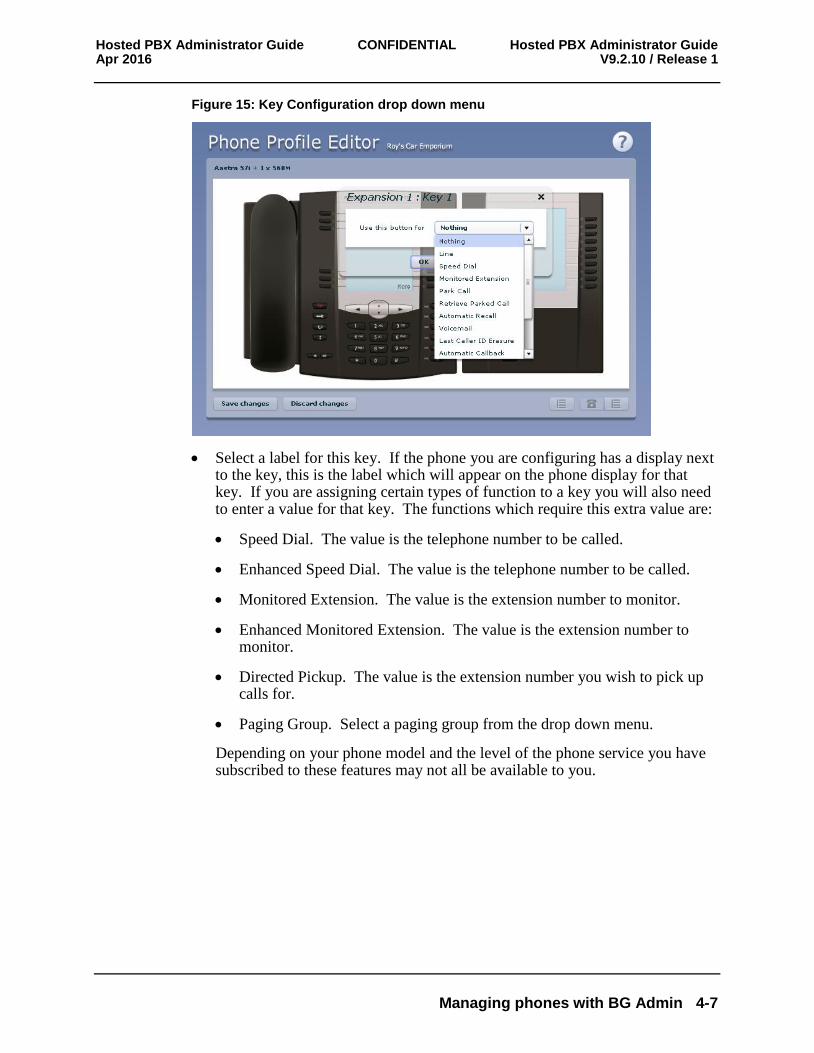
Figure 15: Key Configuration drop down menu
Select a label for this key. If the phone you are configuring has a display next to the key, this is the label which will appear on the phone display for that key. If you are assigning certain types of function to a key you will also need to enter a value for that key. The functions which require this extra value are:
Speed Dial. The value is the telephone number to be called.
Enhanced Speed Dial. The value is the telephone number to be called.
Monitored Extension. The value is the extension number to monitor.
Enhanced Monitored Extension. The value is the extension number to monitor.
Directed Pickup. The value is the extension number you wish to pick up calls for.
Paging Group. Select a paging group from the drop down menu.
Depending on your phone model and the level of the phone service you have subscribed to these features may not all be available to you.
Hosted PBX Administrator Guide CONFIDENTIAL Hosted PBX Administrator Guide V9.2.10 / Release 1 Apr 2016
4-8 Managing phones with BG Admin
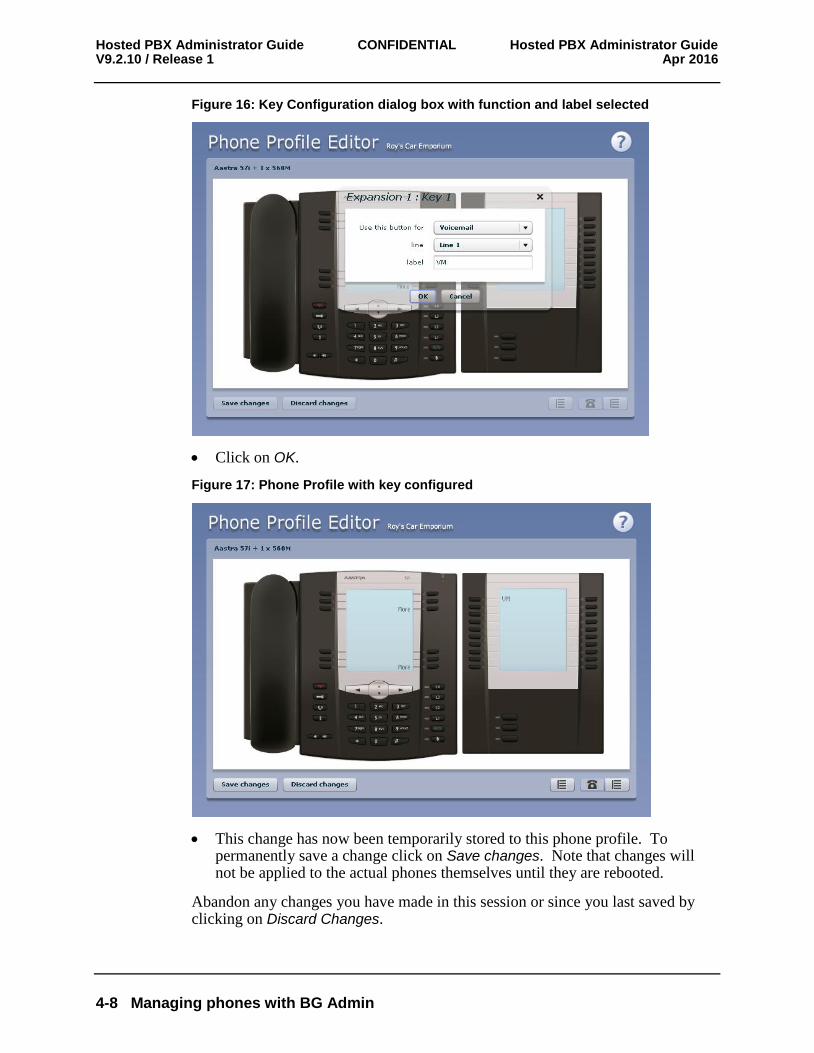
Figure 16: Key Configuration dialog box with function and label selected
Click on OK.
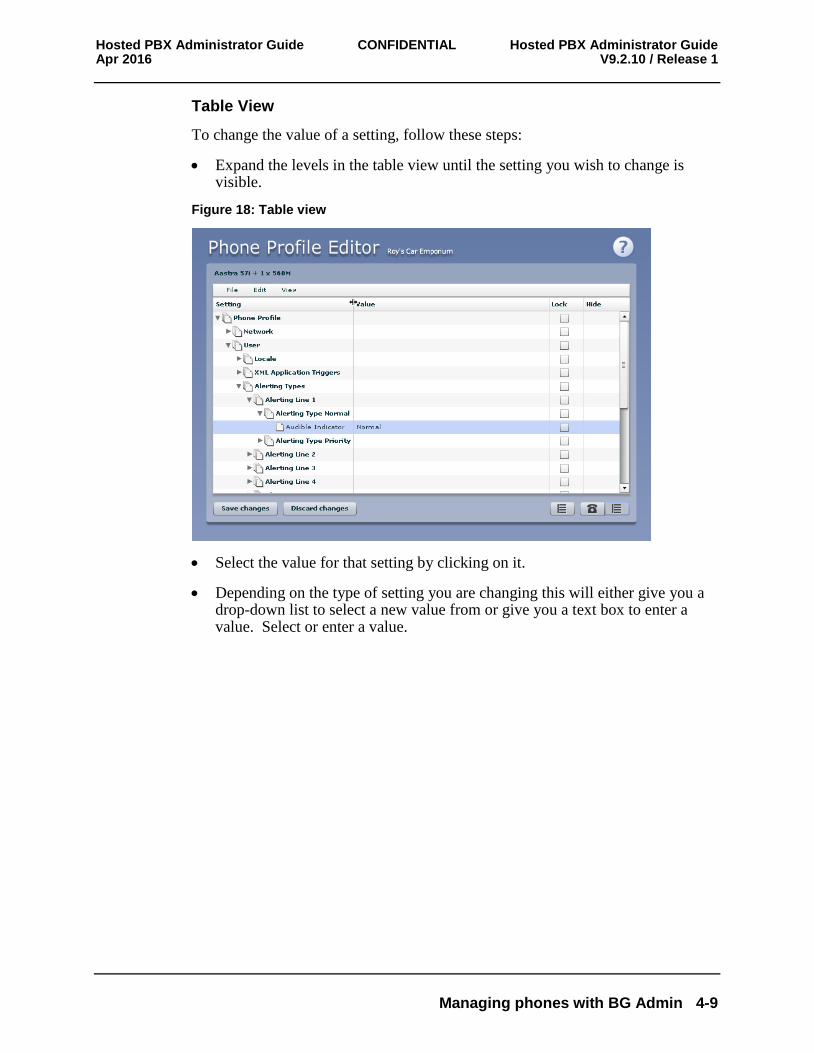
Figure 17: Phone Profile with key configured
This change has now been temporarily stored to this phone profile. To permanently save a change click on Save changes. Note that changes will not be applied to the actual phones themselves until they are rebooted.
Abandon any changes you have made in this session or since you last saved by clicking on Discard Changes.
Hosted PBX Administrator Guide CONFIDENTIAL Hosted PBX Administrator Guide Apr 2016 V9.2.10 / Release 1
Managing phones with BG Admin 4-9
Table View
To change the value of a setting, follow these steps:
Expand the levels in the table view until the setting you wish to change is visible.
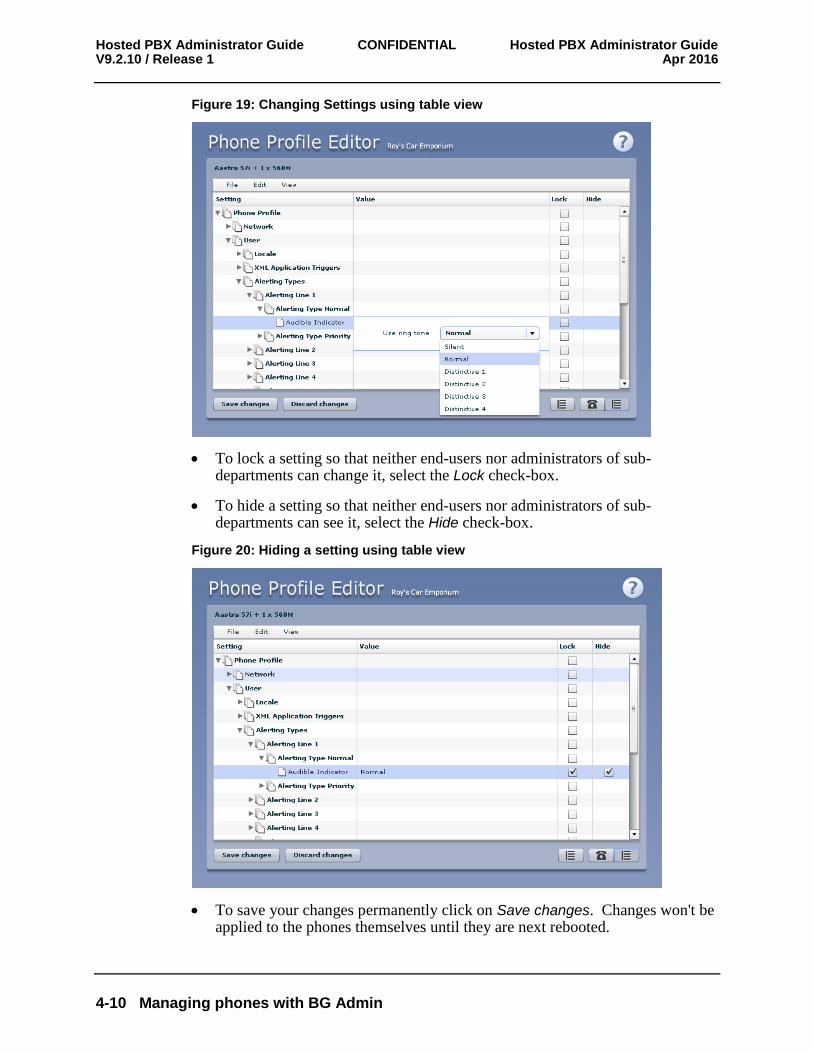
Figure 18: Table view
Select the value for that setting by clicking on it.
Depending on the type of setting you are changing this will either give you a drop-down list to select a new value from or give you a text box to enter a value. Select or enter a value.
Hosted PBX Administrator Guide CONFIDENTIAL Hosted PBX Administrator Guide V9.2.10 / Release 1 Apr 2016
4-10 Managing phones with BG Admin
Figure 19: Changing Settings using table view
To lock a setting so that neither end-users nor administrators of sub-departments can change it, select the Lock check-box.
To hide a setting so that neither end-users nor administrators of sub-departments can see it, select the Hide check-box.
Figure 20: Hiding a setting using table view
To save your changes permanently click on Save changes. Changes won't be applied to the phones themselves until they are next rebooted.
Hosted PBX Administrator Guide CONFIDENTIAL Hosted PBX Administrator Guide Apr 2016 V9.2.10 / Release 1
Managing phones with BG Admin 4-11
To abandon any changes you have made in this session, or since you last saved, click on Discard Changes.
4.5.4 Logging out of the Phone Profile Editor
Close your browser window to log out of the Phone Profile Editor.
4.6 Phone profiles - Endpoint Pack phones
This section describes how to work with phone profiles for SIP phones provisioned using an Endpoint Pack. If your phones are provisioned using Built-In provisioning, you should refer to section 4.5.
This section describes how to use the Phone Profile Editor (also called the CommPortal Phone Configurator) to work with Endpoint Pack phone profiles.
If you only have Endpoint Pack phone profiles, you do not need Adobe Flash. However, if you have any Built-In phone profiles, you must have Adobe Flash version 9.0 or greater.
4.6.1 Managing phone profiles
To manage the Endpoint Pack phone profiles for the department you are an administrator for, follow these steps:
1. Click the manage your phone profiles link towards the top of the CommPortal page.
2. This launches a new window with the Phone Profile Editor (also called the CommPortal Phone Configurator).
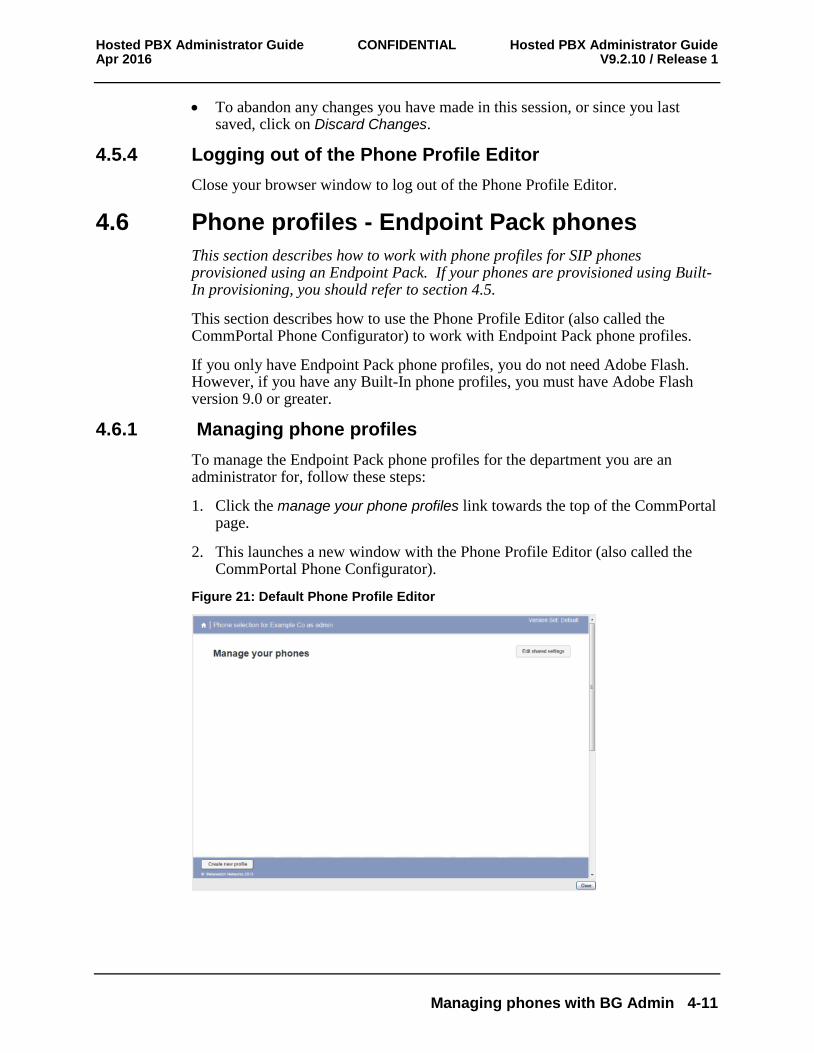
Figure 21: Default Phone Profile Editor
Hosted PBX Administrator Guide CONFIDENTIAL Hosted PBX Administrator Guide V9.2.10 / Release 1 Apr 2016
4-12 Managing phones with BG Admin
4.6.2 Adding a new phone profile
By default a department does not contain any phone profiles. To add a new phone profile, follow these steps:
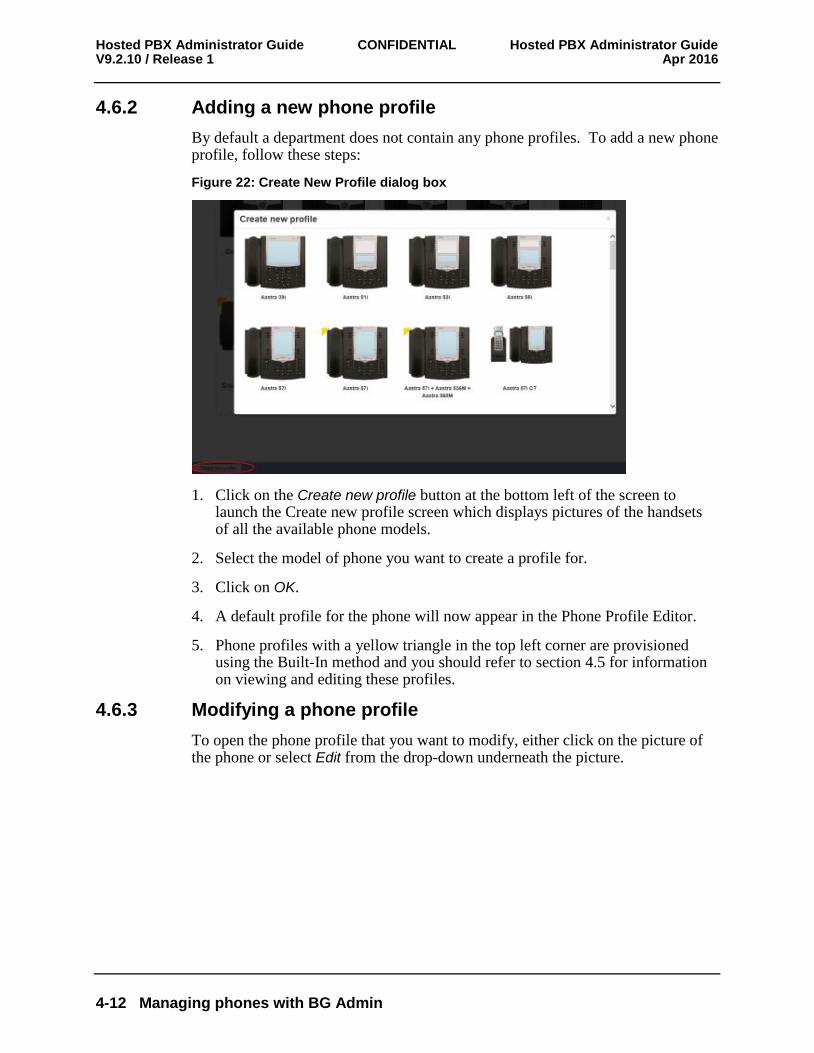
Figure 22: Create New Profile dialog box
1. Click on the Create new profile button at the bottom left of the screen to launch the Create new profile screen which displays pictures of the handsets of all the available phone models.
2. Select the model of phone you want to create a profile for.
3. Click on OK.
4. A default profile for the phone will now appear in the Phone Profile Editor.
5. Phone profiles with a yellow triangle in the top left corner are provisioned using the Built-In method and you should refer to section 4.5 for information on viewing and editing these profiles.
4.6.3 Modifying a phone profile
To open the phone profile that you want to modify, either click on the picture of the phone or select Edit from the drop-down underneath the picture.
Hosted PBX Administrator Guide CONFIDENTIAL Hosted PBX Administrator Guide Apr 2016 V9.2.10 / Release 1
Managing phones with BG Admin 4-13
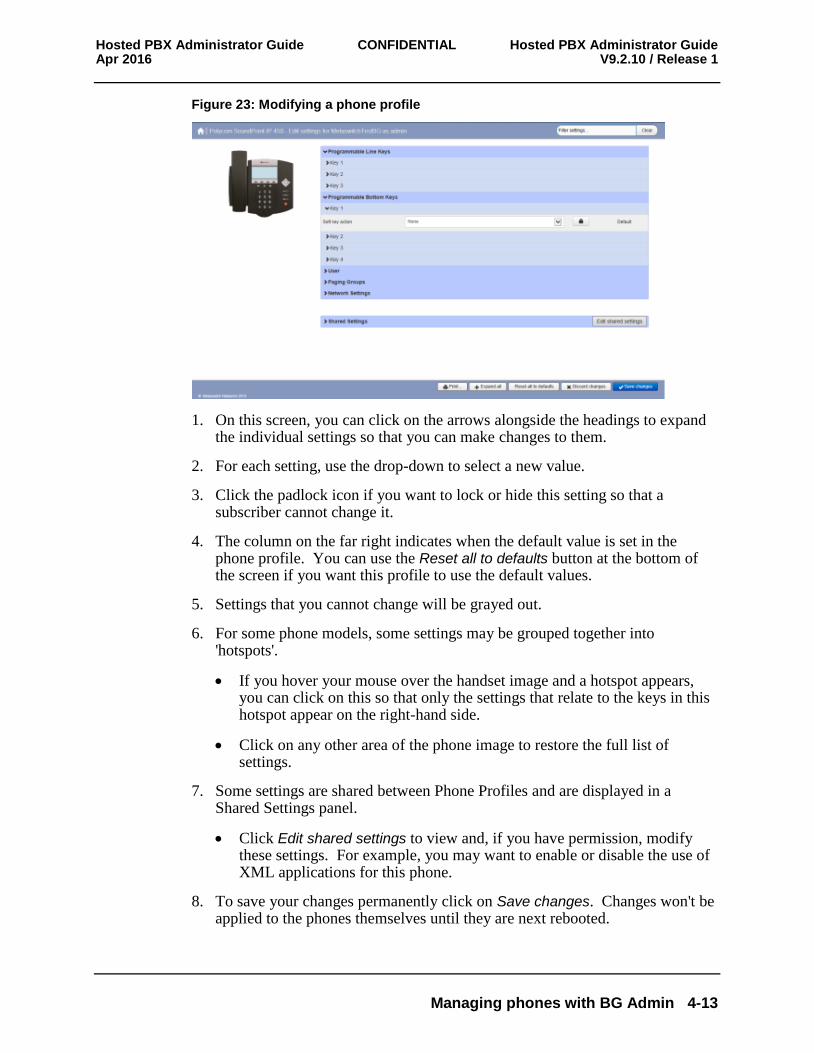
Figure 23: Modifying a phone profile
1. On this screen, you can click on the arrows alongside the headings to expand the individual settings so that you can make changes to them.
2. For each setting, use the drop-down to select a new value.
3. Click the padlock icon if you want to lock or hide this setting so that a subscriber cannot change it.
4. The column on the far right indicates when the default value is set in the phone profile. You can use the Reset all to defaults button at the bottom of the screen if you want this profile to use the default values.
5. Settings that you cannot change will be grayed out.
6. For some phone models, some settings may be grouped together into 'hotspots'.
If you hover your mouse over the handset image and a hotspot appears, you can click on this so that only the settings that relate to the keys in this hotspot appear on the right-hand side.
Click on any other area of the phone image to restore the full list of settings.
7. Some settings are shared between Phone Profiles and are displayed in a Shared Settings panel.
Click Edit shared settings to view and, if you have permission, modify these settings. For example, you may want to enable or disable the use of XML applications for this phone.
8. To save your changes permanently click on Save changes. Changes won't be applied to the phones themselves until they are next rebooted.
Hosted PBX Administrator Guide CONFIDENTIAL Hosted PBX Administrator Guide V9.2.10 / Release 1 Apr 2016
4-14 Managing phones with BG Admin
9. To abandon any changes you have made in this session, or since you last saved, click on Discard Changes.
4.6.4 Logging out of the Phone Profile Editor
Close your browser window to log out of the Phone Profile Editor.
4.7 Modifying phone configuration as a user
To log into and modify the phone settings as one of your users, follow these steps:
1. Click on the Individual Line icon to the right of the phone.
2. Follow the instructions on using the Phone Configurator to manage the configuration of individual phones which are given in the Jaguar Communications Hosted PBX End User Guide.
4.8 Copying phone configuration
To copy the configuration from one phone to another, follow these steps:
1. Modify the old phone as the user, by clicking on the Individual Line icon to the right of the phone.
2. Go to the table view, using the table view icon to the bottom right of the screen.
3. Select the Phone Profile object.
4. Select Edit->Copy.
5. Exit the Phone Configurator by closing the window.
6. Now log into the new phone as the user.
7. Go to the table view.
8. Select the Phone Profile object.
9. Select Edit->Paste.
10. Click on Save Changes.
Hosted PBX Administrator Guide CONFIDENTIAL Hosted PBX Administrator Guide Apr 2016 V9.2.10 / Release 1
Managing phones with BG Admin 4-15
4.9 Installing a new phone
To install a new phone, follow these steps.
1. Ensure the phone is compatible with our service. If you have bought the phone from Jaguar Communications or one of our approved partners it will be compatible.
2. If you need to connect a PC to the network through the phone, connect the computer's Ethernet cable into the PC jack of the phone.
3. Connect a spare telephone Ethernet cable into the LAN or Network socket of the new phone and connect to you network jack.
4. The phone should now power up and retrieve its configuration from our server.
5. Once the phone has fully powered up, if there is no phone number configured on the phone you will need to assign the phone to a spare line to the phone using CommPortal. See section 4.3 for instructions on how to do this.
4.10 Replacing with an identical phone model
To replace a phone with one of an identical model, follow these steps:
1. Using CommPortal, copy the configuration of the existing phone to the new phone by following the instructions in Section 4.8.
2. Using CommPortal, remove the existing phone from the phone line, by following the instructions in section 4.4.
3. Using CommPortal, add the new phone to the line which was removed from the old line, by following the instructions in section 4.3.
Note: The new phone must be in the same department as the phone being replaced. If it isn't, you or another administrator with sufficient permissions must move the phone to the appropriate department before you can assign the line to it. Follow the instructions in section 4.2 to perform this task.
4. Unplug the computer's Ethernet cable from the old phone if one is plugged in.
5. Unplug the telephone Ethernet cable from the old phone.
6. Plug the computer's Ethernet cable into the PC socket of the new phone.
7. Plug the telephone Ethernet cable into the new phone.
8. The new phone should now power up and retrieve its configuration from the server. The new phone will be configured identically to the old phone.
Hosted PBX Administrator Guide CONFIDENTIAL Hosted PBX Administrator Guide V9.2.10 / Release 1 Apr 2016
4-16 Managing phones with BG Admin
4.10.1 Replacing with a different phone model
To replace a phone with one of a different model, follow these steps:
1. Using CommPortal, remove the existing phone from the phone line, by following the instructions in section 4.4.
2. Using CommPortal, add the new phone to the line which was removed from the old line, by following the instructions in section 4.3.
Note: The new phone must be in the same department as the phone being replaced. If it isn't, you or another administrator with sufficient permissions must move the phone to the appropriate department before you can assign the line to it.
Follow the instructions in section 4.2 to perform this task.
3. Unplug the computer's Ethernet cable from the old phone if one is plugged in.
4. Unplug the telephone Ethernet cable from the old phone.
5. Plug the computer's Ethernet cable into the PC socket of the new phone.
6. Plug the telephone Ethernet cable into the new phone.
7. The new phone should now power up and retrieve its configuration from the server. It will have the default configuration defined by any department profiles, and can now be configured by the phone user. For more information on department phone profiles, see section 4.5.
Hosted PBX Administrator Guide CONFIDENTIAL Hosted PBX Administrator Guide Apr 2016 V9.2.10 / Release 1
Managing Multiple Appearance Directory Numbers (MADNs) 5-1
5 Managing Multiple Appearance Directory Numbers (MADNs)
From V7.4 onwards, MLHGs are enhanced to provide the same function as MADNs by providing a ring all distribution algorithm. MADNs will continue to work as in previous versions. However, for new configuration, you should use MLHGs instead. For more information on MLHGs, see section 6.
5.1 Viewing MADNs
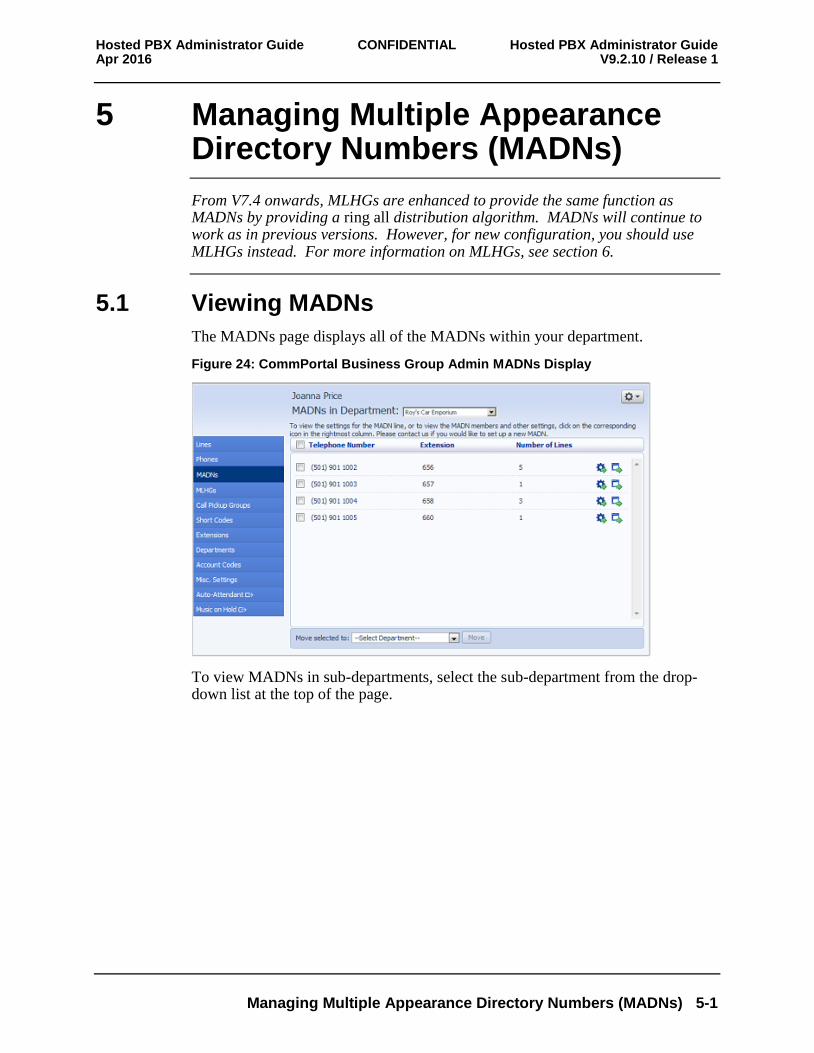
The MADNs page displays all of the MADNs within your department.
Figure 24: CommPortal Business Group Admin MADNs Display
To view MADNs in sub-departments, select the sub-department from the drop-down list at the top of the page.
Hosted PBX Administrator Guide CONFIDENTIAL Hosted PBX Administrator Guide V9.2.10 / Release 1 Apr 2016
5-2 Managing Multiple Appearance Directory Numbers (MADNs)
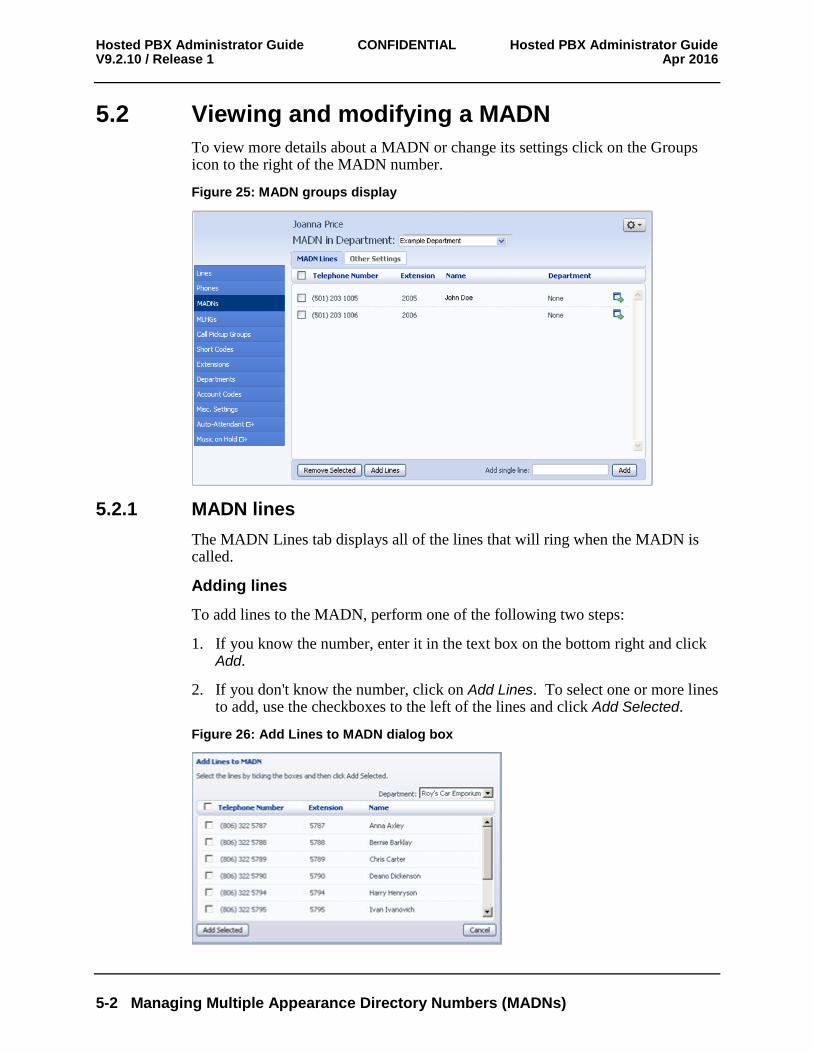
5.2 Viewing and modifying a MADN
To view more details about a MADN or change its settings click on the Groups icon to the right of the MADN number.
Figure 25: MADN groups display
5.2.1 MADN lines
The MADN Lines tab displays all of the lines that will ring when the MADN is called.
Adding lines
To add lines to the MADN, perform one of the following two steps:
1. If you know the number, enter it in the text box on the bottom right and click Add.
2. If you don't know the number, click on Add Lines. To select one or more lines to add, use the checkboxes to the left of the lines and click Add Selected.
Figure 26: Add Lines to MADN dialog box
Hosted PBX Administrator Guide CONFIDENTIAL Hosted PBX Administrator Guide Apr 2016 V9.2.10 / Release 1
Managing Multiple Appearance Directory Numbers (MADNs) 5-3
Removing lines
To remove a line from the MADN, follow these steps:
1. Select the line to remove using the checkbox to the left of it.
2. Click on the Remove Selected button.
5.2.2 Other settings
The Other Settings tab shows you the Call Limit Algorithm in use for this MADN.
5.3 Changing MADN settings
To view and change the settings for the MADN line, follow these steps:
1. Click on the Individual Line icon to the right of the MADN number.
2. This will open a new browser window and automatically log you into CommPortal for this number. Follow the instructions for configuring settings given in the Jaguar Communications Hosted PBX End User Guide.

Hosted PBX Administrator Guide CONFIDENTIAL Hosted PBX Administrator Guide Apr 2016 V9.2.10 / Release 1
Managing Multi Line Hunt Groups (MLHGs) 6-1
6 Managing Multi Line Hunt Groups (MLHGs) If you are using the Integrated ACD (Automated Call Distribution) feature, you should refer to the Integrated ACD End User Guide for more information on how to administer the MLHGs making up your Call Center.
6.1 Viewing MLHGs
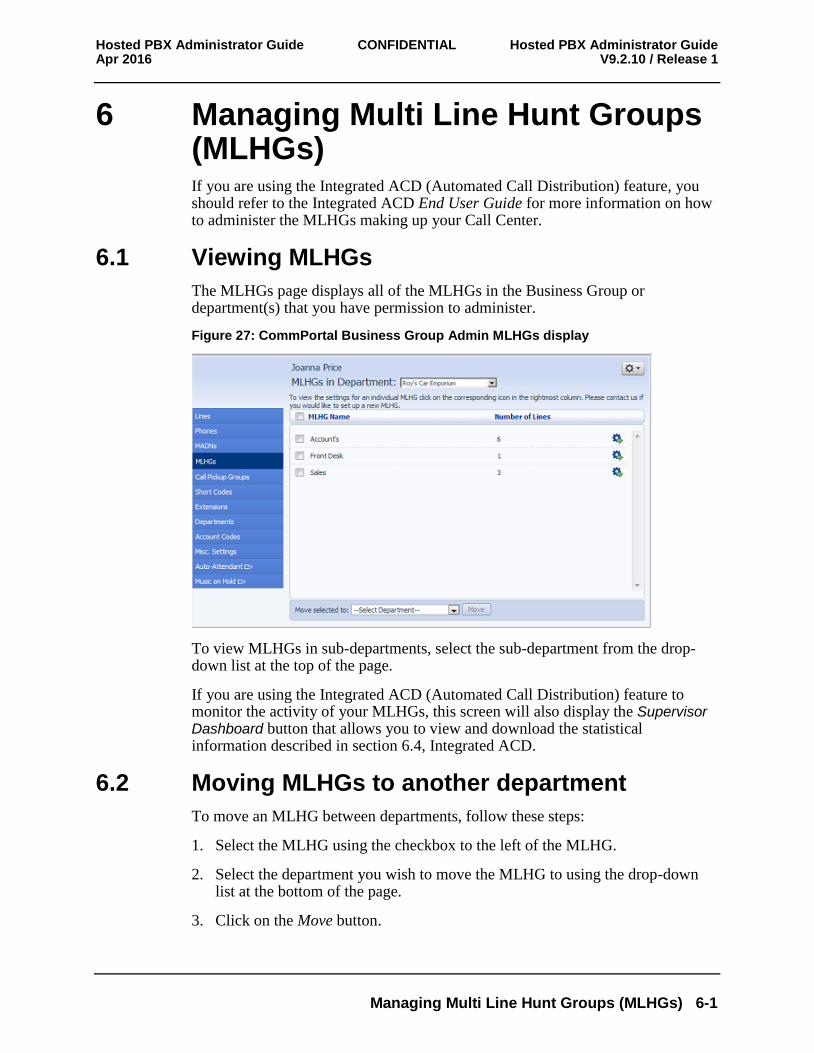
The MLHGs page displays all of the MLHGs in the Business Group or department(s) that you have permission to administer.
Figure 27: CommPortal Business Group Admin MLHGs display
To view MLHGs in sub-departments, select the sub-department from the drop-down list at the top of the page.
If you are using the Integrated ACD (Automated Call Distribution) feature to monitor the activity of your MLHGs, this screen will also display the Supervisor Dashboard button that allows you to view and download the statistical information described in section 6.4, Integrated ACD.
6.2 Moving MLHGs to another department
To move an MLHG between departments, follow these steps:
1. Select the MLHG using the checkbox to the left of the MLHG.
2. Select the department you wish to move the MLHG to using the drop-down list at the bottom of the page.
3. Click on the Move button.
Hosted PBX Administrator Guide CONFIDENTIAL Hosted PBX Administrator Guide V9.2.10 / Release 1 Apr 2016
6-2 Managing Multi Line Hunt Groups (MLHGs)
6.3 Viewing and modifying MLHGs
To view the details of an MLHG and to modify its settings you first need to select that MLHG. Do this by selecting the Group icon to the right of the MLHG.
This takes you to a series of tabs for that MLHG.
6.3.1 MLHG pilots
The MLHG Pilots tab displays any pilot numbers for this MLHG. A pilot number is one which when called, enters this MLHG.
On this tab, you can click on the far right of the screen to access the CommPortal interface for this line. This allows you to carry out any configuration on the Pilot line, for example you can enable or disable the Unavailable Call Forwarding service for this line and configure the forwarding number that would be used if all your lines were unavailable, for example because there was a power outage at your site.
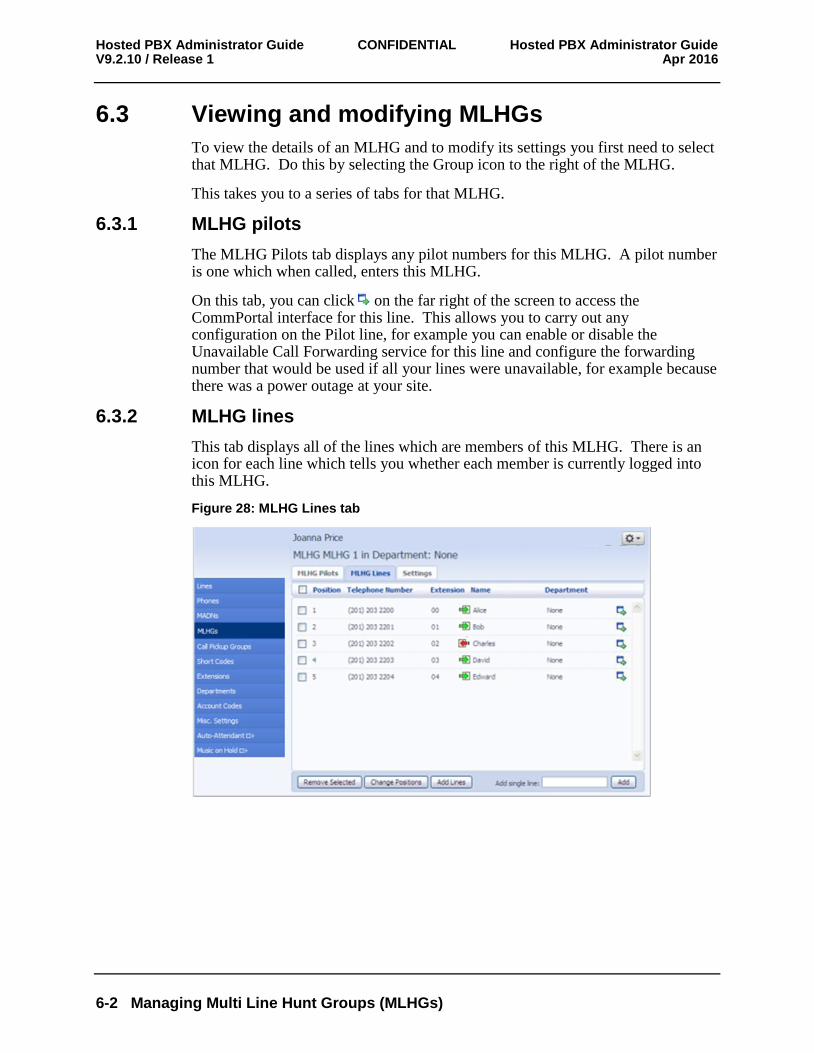
6.3.2 MLHG lines
This tab displays all of the lines which are members of this MLHG. There is an icon for each line which tells you whether each member is currently logged into this MLHG.
Figure 28: MLHG Lines tab
Hosted PBX Administrator Guide CONFIDENTIAL Hosted PBX Administrator Guide Apr 2016 V9.2.10 / Release 1
Managing Multi Line Hunt Groups (MLHGs) 6-3
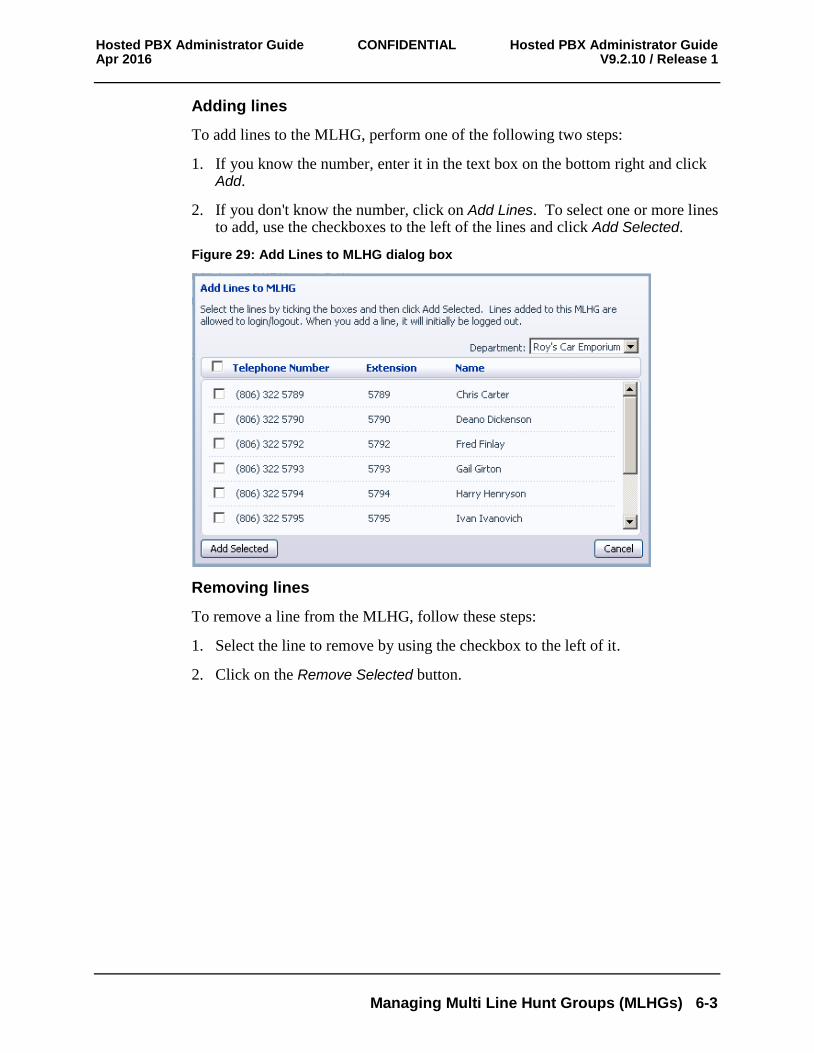
Adding lines
To add lines to the MLHG, perform one of the following two steps:
1. If you know the number, enter it in the text box on the bottom right and click Add.
2. If you don't know the number, click on Add Lines. To select one or more lines to add, use the checkboxes to the left of the lines and click Add Selected.
Figure 29: Add Lines to MLHG dialog box
Removing lines
To remove a line from the MLHG, follow these steps:
1. Select the line to remove by using the checkbox to the left of it.
2. Click on the Remove Selected button.
Hosted PBX Administrator Guide CONFIDENTIAL Hosted PBX Administrator Guide V9.2.10 / Release 1 Apr 2016
6-4 Managing Multi Line Hunt Groups (MLHGs)
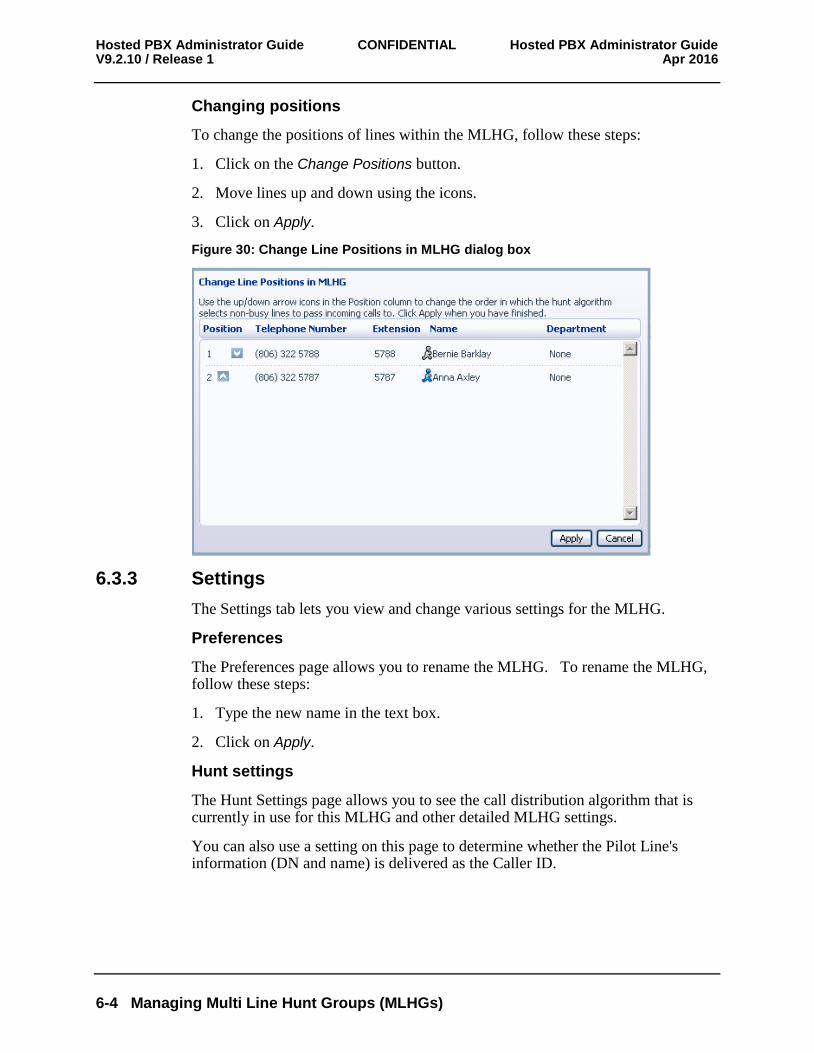
Changing positions
To change the positions of lines within the MLHG, follow these steps:
1. Click on the Change Positions button.
2. Move lines up and down using the icons.
3. Click on Apply.
Figure 30: Change Line Positions in MLHG dialog box
6.3.3 Settings
The Settings tab lets you view and change various settings for the MLHG.
Preferences
The Preferences page allows you to rename the MLHG. To rename the MLHG, follow these steps:
1. Type the new name in the text box.
2. Click on Apply.
Hunt settings
The Hunt Settings page allows you to see the call distribution algorithm that is currently in use for this MLHG and other detailed MLHG settings.
You can also use a setting on this page to determine whether the Pilot Line's information (DN and name) is delivered as the Caller ID.
Hosted PBX Administrator Guide CONFIDENTIAL Hosted PBX Administrator Guide Apr 2016 V9.2.10 / Release 1
Managing Multi Line Hunt Groups (MLHGs) 6-5
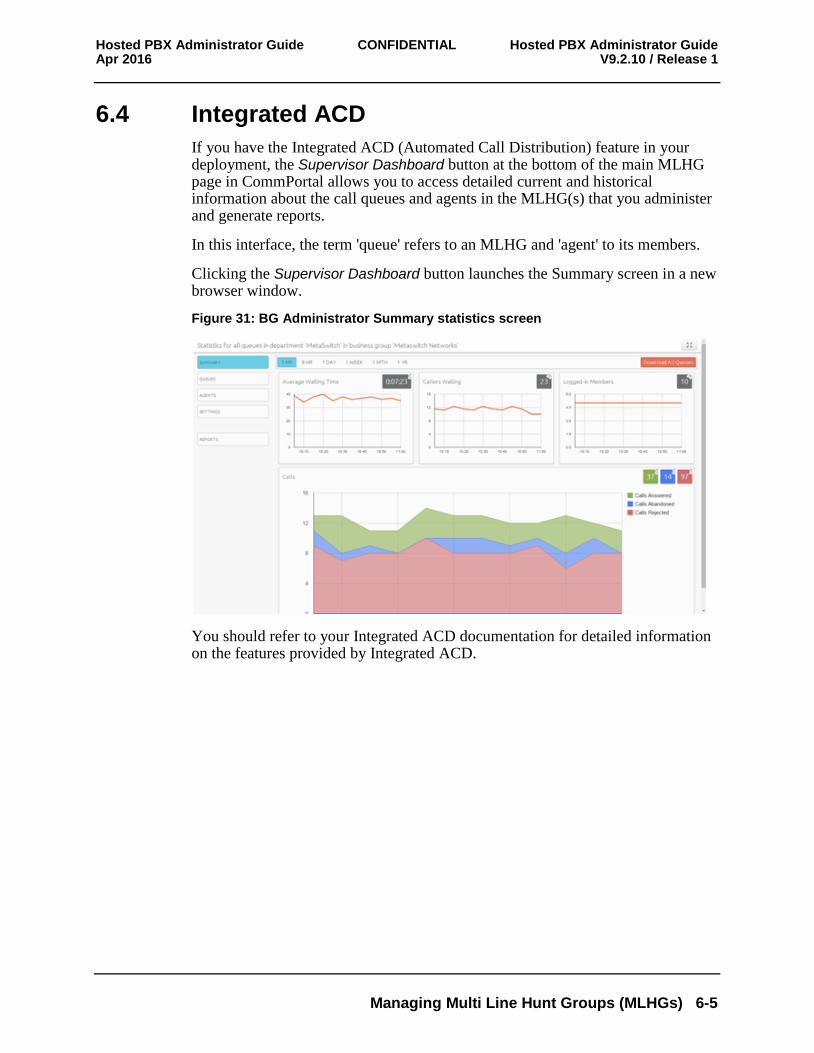
6.4 Integrated ACD
If you have the Integrated ACD (Automated Call Distribution) feature in your deployment, the Supervisor Dashboard button at the bottom of the main MLHG page in CommPortal allows you to access detailed current and historical information about the call queues and agents in the MLHG(s) that you administer and generate reports.
In this interface, the term 'queue' refers to an MLHG and 'agent' to its members.
Clicking the Supervisor Dashboard button launches the Summary screen in a new browser window.
Figure 31: BG Administrator Summary statistics screen
You should refer to your Integrated ACD documentation for detailed information on the features provided by Integrated ACD.

Hosted PBX Administrator Guide CONFIDENTIAL Hosted PBX Administrator Guide Apr 2016 V9.2.10 / Release 1
Managing Call Pickup Groups 7-1
7 Managing Call Pickup Groups
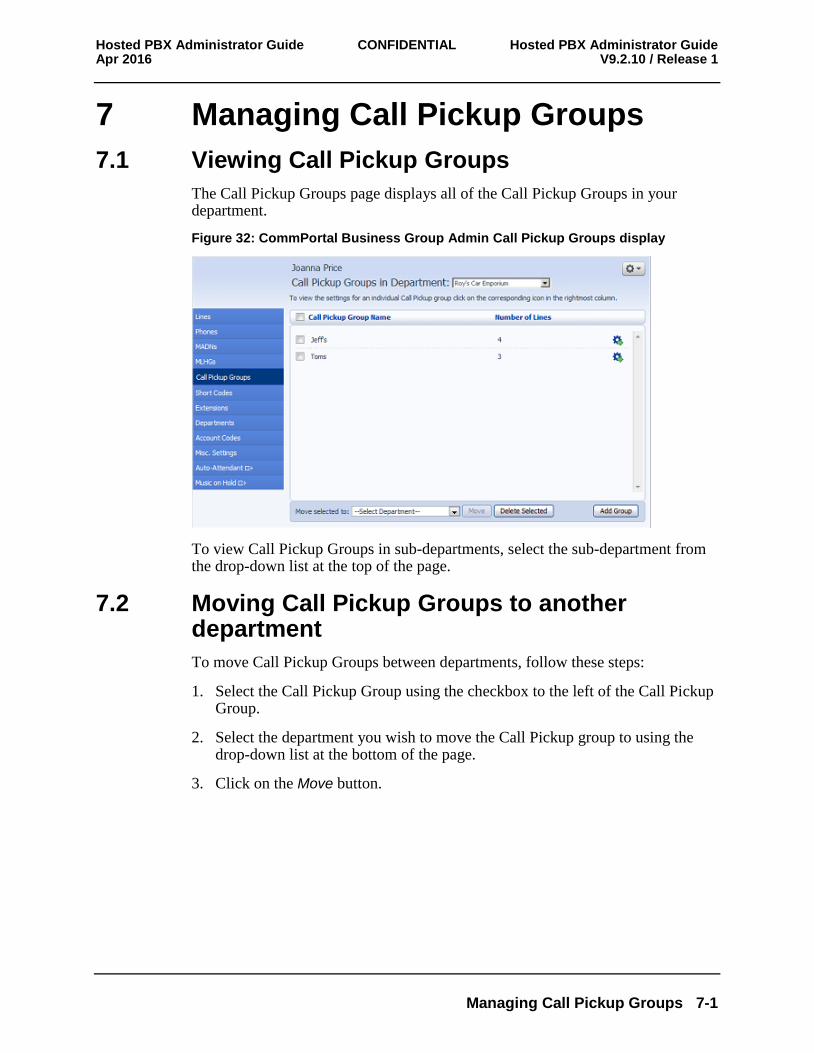
7.1 Viewing Call Pickup Groups
The Call Pickup Groups page displays all of the Call Pickup Groups in your department.
Figure 32: CommPortal Business Group Admin Call Pickup Groups display
To view Call Pickup Groups in sub-departments, select the sub-department from the drop-down list at the top of the page.
7.2 Moving Call Pickup Groups to another department
To move Call Pickup Groups between departments, follow these steps:
1. Select the Call Pickup Group using the checkbox to the left of the Call Pickup Group.
2. Select the department you wish to move the Call Pickup group to using the drop-down list at the bottom of the page.
3. Click on the Move button.
Hosted PBX Administrator Guide CONFIDENTIAL Hosted PBX Administrator Guide V9.2.10 / Release 1 Apr 2016
7-2 Managing Call Pickup Groups
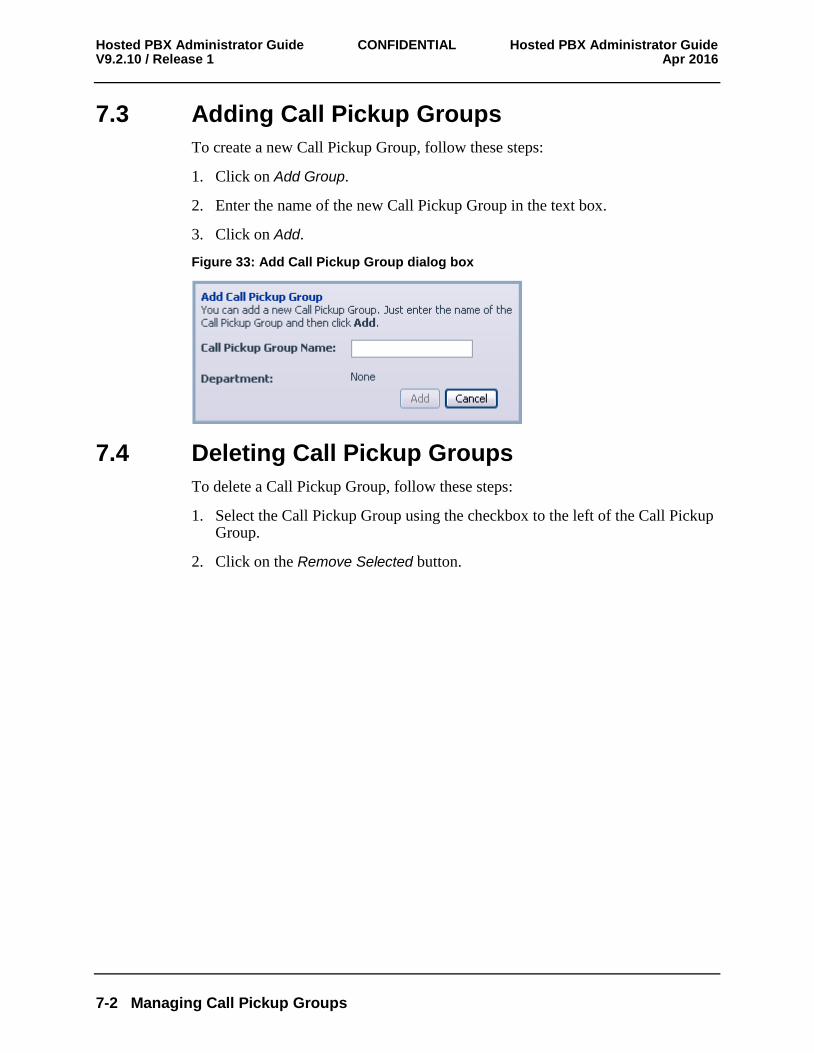
7.3 Adding Call Pickup Groups
To create a new Call Pickup Group, follow these steps:
1. Click on Add Group.
2. Enter the name of the new Call Pickup Group in the text box.
3. Click on Add.
Figure 33: Add Call Pickup Group dialog box
7.4 Deleting Call Pickup Groups
To delete a Call Pickup Group, follow these steps:
1. Select the Call Pickup Group using the checkbox to the left of the Call Pickup Group.
2. Click on the Remove Selected button.
Hosted PBX Administrator Guide CONFIDENTIAL Hosted PBX Administrator Guide Apr 2016 V9.2.10 / Release 1
Managing Call Pickup Groups 7-3
7.5 Viewing and Modifying Call Pickup Groups
To view the details of a Call Pickup Group and to modify its settings, follow these steps:
1. Select that Call Pickup Group by selecting the Group icon to the right of the Call Pickup Group.
2. This takes you to a series of tabs for that Call Pickup Group.
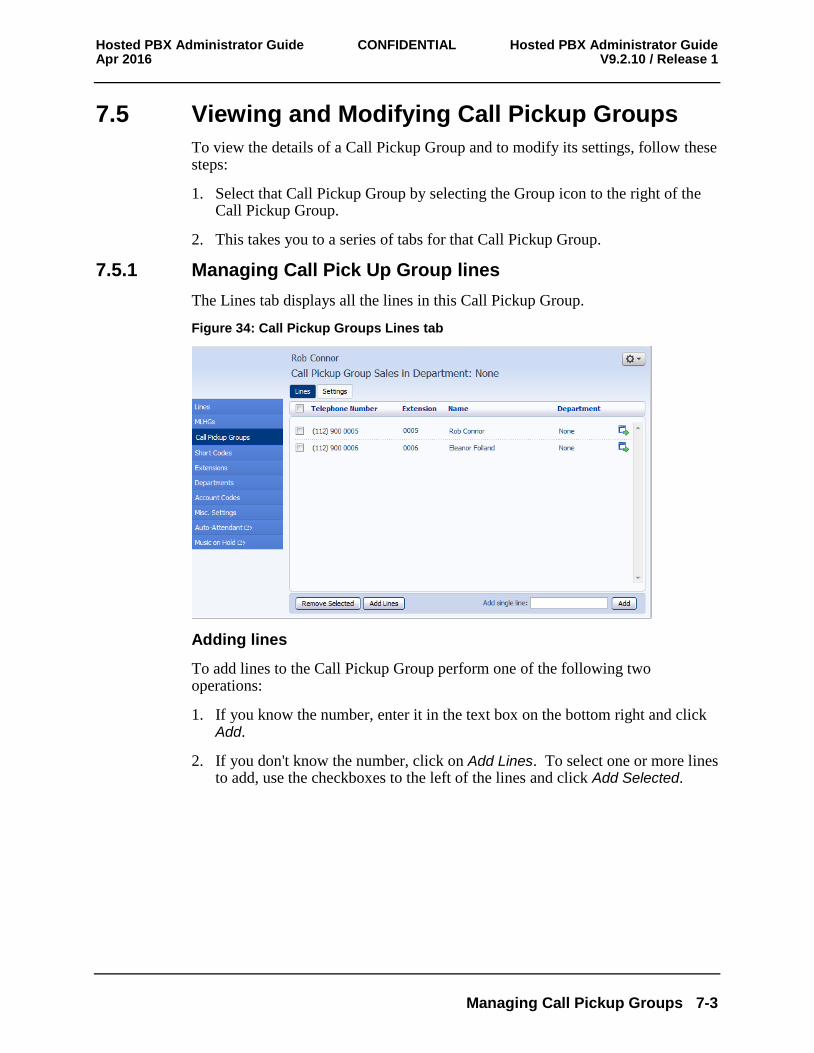
7.5.1 Managing Call Pick Up Group lines
The Lines tab displays all the lines in this Call Pickup Group.
Figure 34: Call Pickup Groups Lines tab
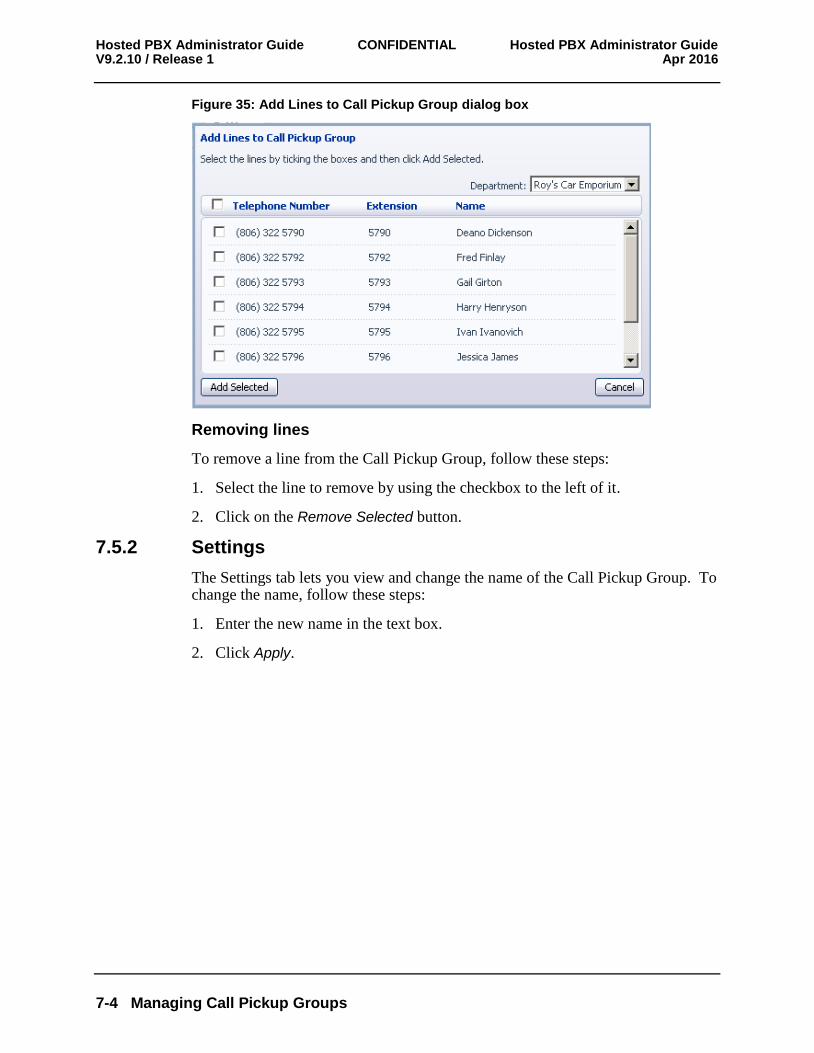
Adding lines
To add lines to the Call Pickup Group perform one of the following two operations:
1. If you know the number, enter it in the text box on the bottom right and click Add.
2. If you don't know the number, click on Add Lines. To select one or more lines to add, use the checkboxes to the left of the lines and click Add Selected.
Hosted PBX Administrator Guide CONFIDENTIAL Hosted PBX Administrator Guide V9.2.10 / Release 1 Apr 2016
7-4 Managing Call Pickup Groups
Figure 35: Add Lines to Call Pickup Group dialog box
Removing lines
To remove a line from the Call Pickup Group, follow these steps:
1. Select the line to remove by using the checkbox to the left of it.
2. Click on the Remove Selected button.
7.5.2 Settings
The Settings tab lets you view and change the name of the Call Pickup Group. To change the name, follow these steps:
1. Enter the new name in the text box.
2. Click Apply.
Hosted PBX Administrator Guide CONFIDENTIAL Hosted PBX Administrator Guide Apr 2016 V9.2.10 / Release 1
Managing Short Codes 8-1
8 Managing Short Codes
8.1 Viewing Short Codes
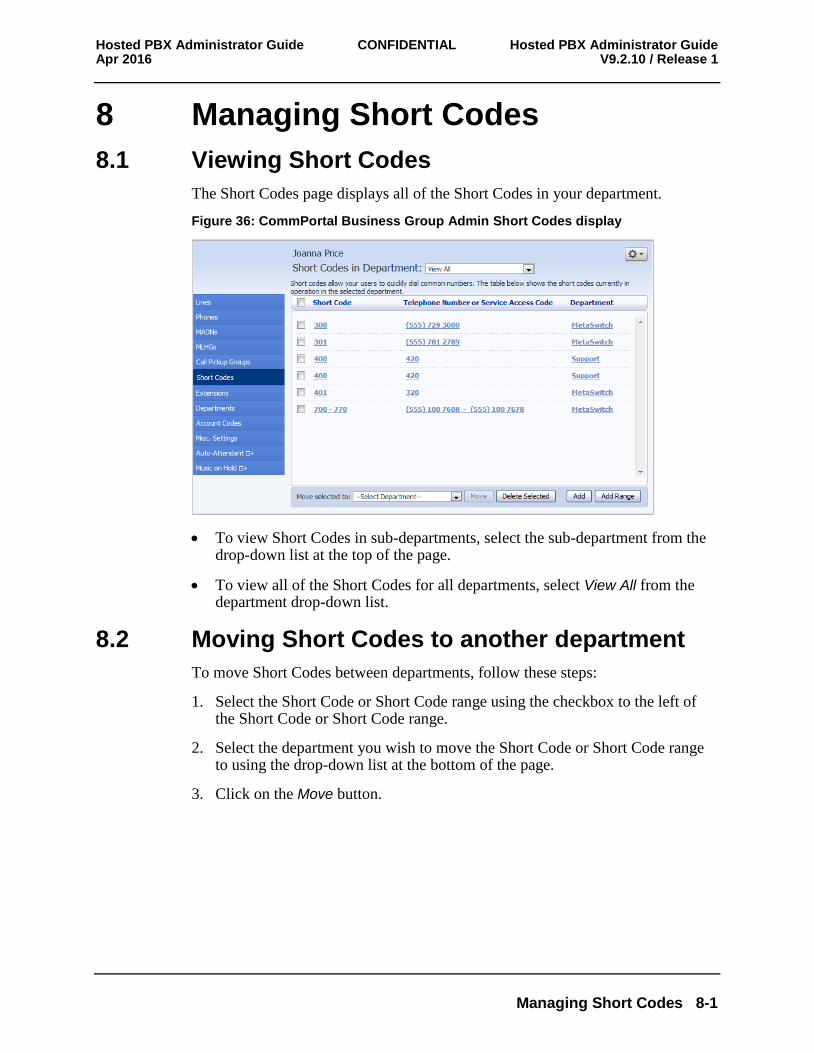
The Short Codes page displays all of the Short Codes in your department.
Figure 36: CommPortal Business Group Admin Short Codes display
To view Short Codes in sub-departments, select the sub-department from the drop-down list at the top of the page.
To view all of the Short Codes for all departments, select View All from the department drop-down list.
8.2 Moving Short Codes to another department
To move Short Codes between departments, follow these steps:
1. Select the Short Code or Short Code range using the checkbox to the left of the Short Code or Short Code range.
2. Select the department you wish to move the Short Code or Short Code range to using the drop-down list at the bottom of the page.
3. Click on the Move button.
Hosted PBX Administrator Guide CONFIDENTIAL Hosted PBX Administrator Guide V9.2.10 / Release 1 Apr 2016
8-2 Managing Short Codes
8.3 Adding Short Codes
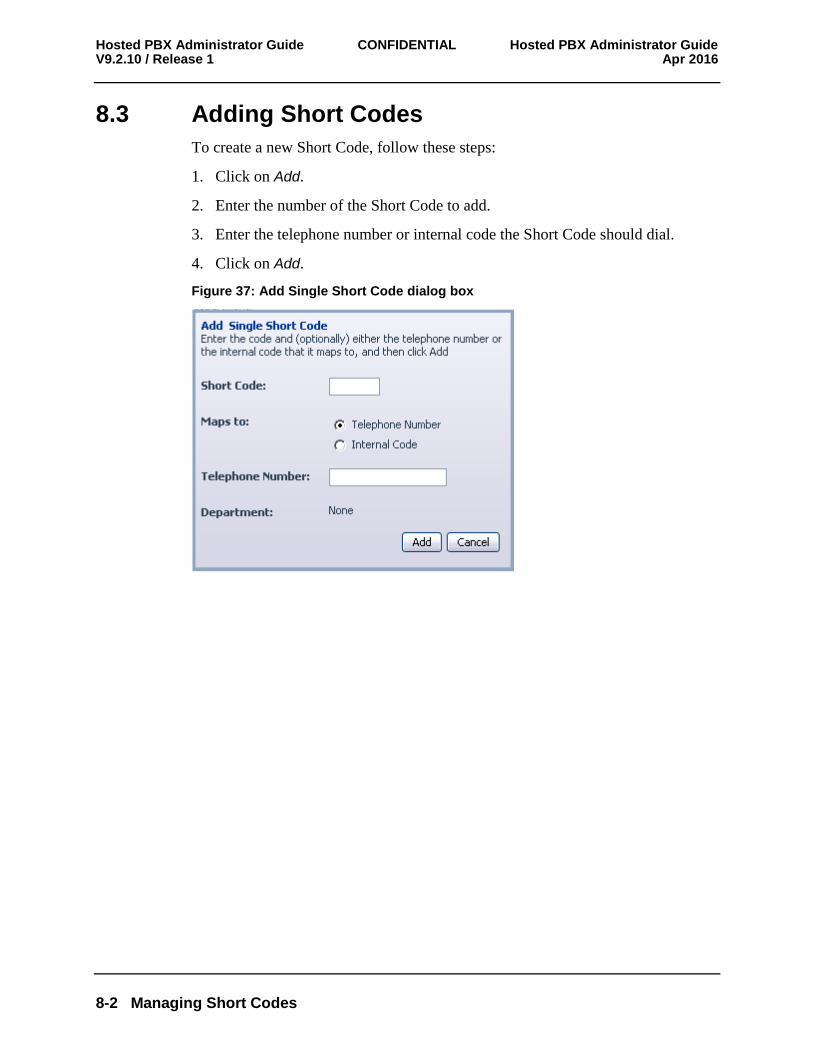
To create a new Short Code, follow these steps:
1. Click on Add.
2. Enter the number of the Short Code to add.
3. Enter the telephone number or internal code the Short Code should dial.
4. Click on Add.
Figure 37: Add Single Short Code dialog box
Hosted PBX Administrator Guide CONFIDENTIAL Hosted PBX Administrator Guide Apr 2016 V9.2.10 / Release 1
Managing Short Codes 8-3
8.4 Adding Short Code ranges
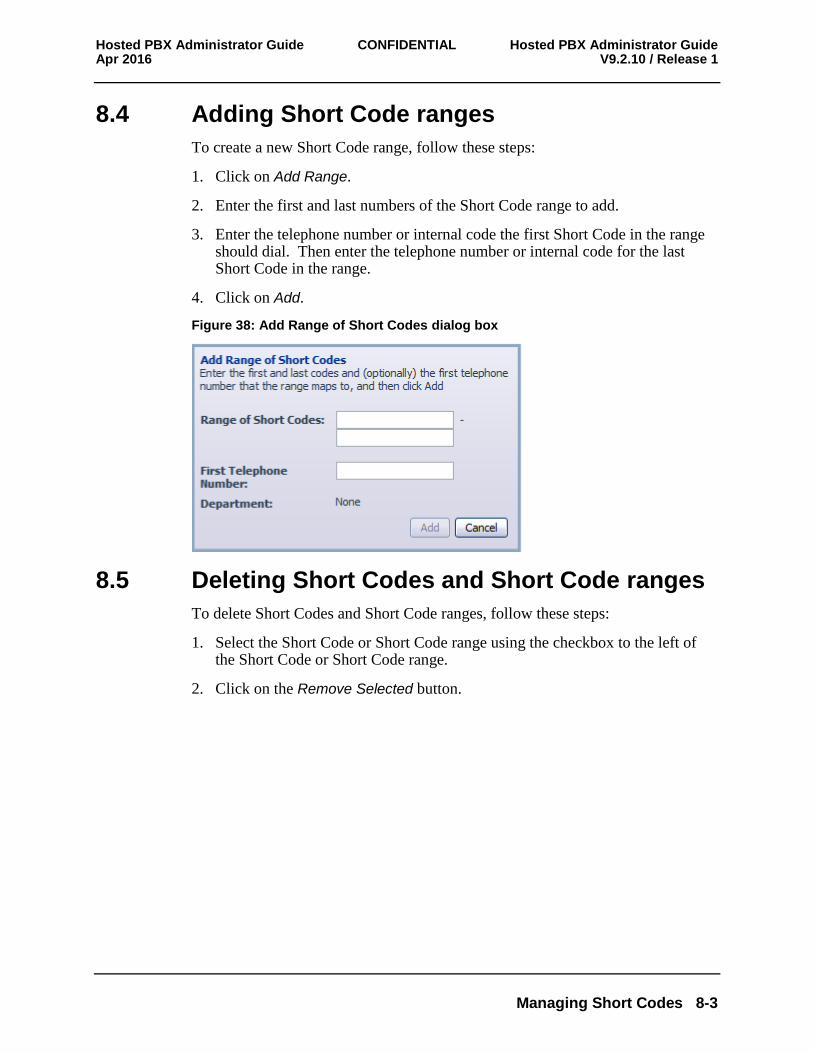
To create a new Short Code range, follow these steps:
1. Click on Add Range.
2. Enter the first and last numbers of the Short Code range to add.
3. Enter the telephone number or internal code the first Short Code in the range should dial. Then enter the telephone number or internal code for the last Short Code in the range.
4. Click on Add.
Figure 38: Add Range of Short Codes dialog box
8.5 Deleting Short Codes and Short Code ranges
To delete Short Codes and Short Code ranges, follow these steps:
1. Select the Short Code or Short Code range using the checkbox to the left of the Short Code or Short Code range.
2. Click on the Remove Selected button.
Hosted PBX Administrator Guide CONFIDENTIAL Hosted PBX Administrator Guide V9.2.10 / Release 1 Apr 2016
8-4 Managing Short Codes
8.6 Modifying Short Codes
To modify an existing Short Code, follow these steps:
1. Click on either the Short Code number or the number the Short Code dials.
2. Modify the details.
3. Click on Save.
Figure 39 : Edit Single Short Code dialog box
8.7 Modifying Short Code ranges
To modify an existing Short Code range, follow these steps:
1. Click on either the Short Code range numbers or the numbers the Short Code range dials.
2. Modify the details.
3. Click on Save.
Figure 40 : Edit Range of Short Codes dialog box
Hosted PBX Administrator Guide CONFIDENTIAL Hosted PBX Administrator Guide Apr 2016 V9.2.10 / Release 1
Managing Extensions 9-1
9 Managing Extensions
9.1 Viewing Extensions
The Extensions page displays all of the Extensions in your business.
Figure 41: CommPortal Business Group Admin Extensions display
9.2 Adding Extensions
To create a new Extension, follow these steps:
1. Click on Add.
2. Enter the number of the Extension to add.
3. Enter the telephone number of the line in your business that this Extension should map to.
4. Click on Add.
Hosted PBX Administrator Guide CONFIDENTIAL Hosted PBX Administrator Guide V9.2.10 / Release 1 Apr 2016
9-2 Managing Extensions
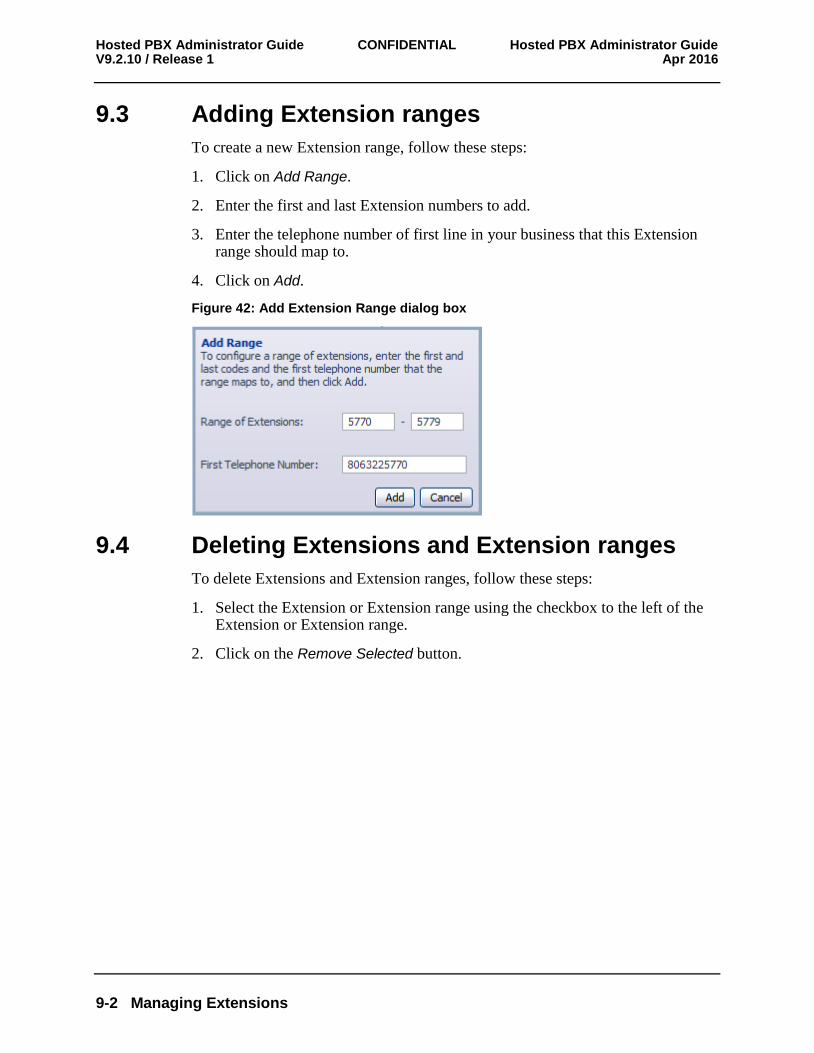
9.3 Adding Extension ranges
To create a new Extension range, follow these steps:
1. Click on Add Range.
2. Enter the first and last Extension numbers to add.
3. Enter the telephone number of first line in your business that this Extension range should map to.
4. Click on Add.
Figure 42: Add Extension Range dialog box
9.4 Deleting Extensions and Extension ranges
To delete Extensions and Extension ranges, follow these steps:
1. Select the Extension or Extension range using the checkbox to the left of the Extension or Extension range.
2. Click on the Remove Selected button.
Hosted PBX Administrator Guide CONFIDENTIAL Hosted PBX Administrator Guide Apr 2016 V9.2.10 / Release 1
Managing Extensions 9-3
9.5 Modifying Extensions
To modify an existing Extension, follow these steps:
1. Click on either the Extension number or the phone number of the Extension.
2. Modify the details.
3. Click on Save.
Figure 43: Edit Single Extension dialog box
9.6 Modifying Extension ranges
To modify an existing Extension range, follow these steps:
1. Click on either the Extension range numbers or the phone numbers the Extension range dials.
2. Modify the details.
3. Click on Save.
Figure 44: Edit Extension Range dialog box

Hosted PBX Administrator Guide CONFIDENTIAL Hosted PBX Administrator Guide Apr 2016 V9.2.10 / Release 1
Managing account codes 10-1
10 Managing account codes
10.1 Viewing and modifying account code settings
The Account Codes page displays all of your business's account code settings.
10.2 Modifying settings
10.2.1 Modifying call types requiring account codes
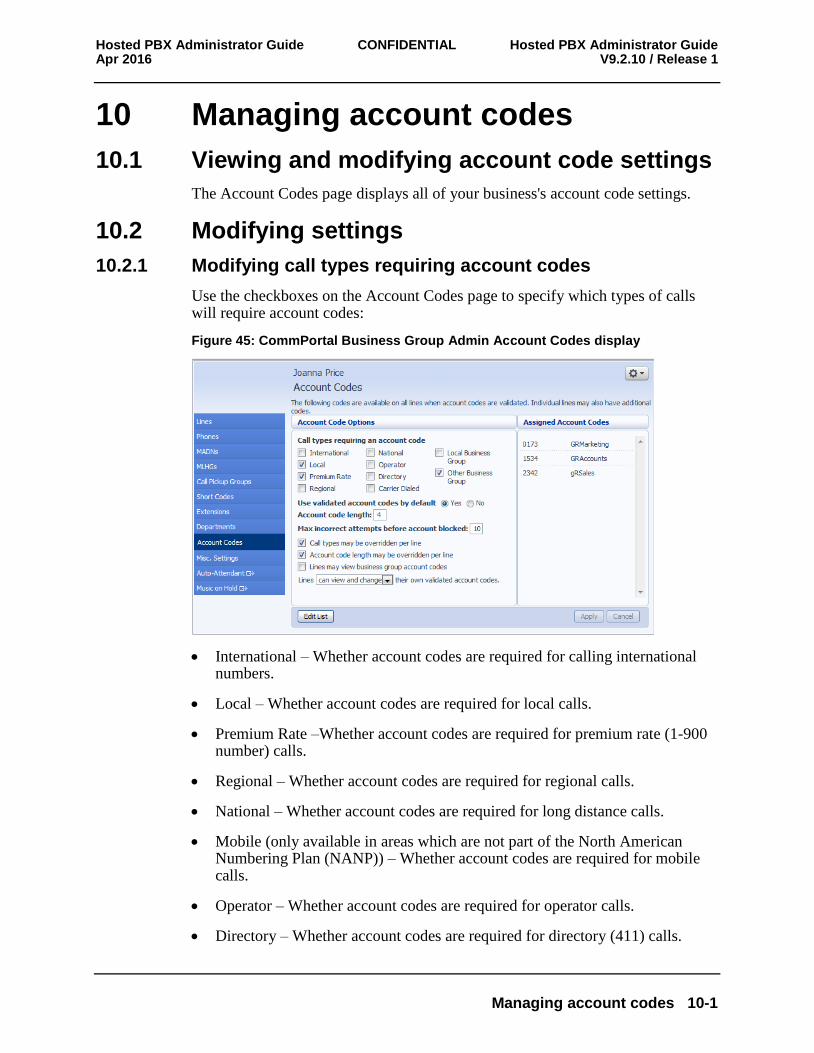
Use the checkboxes on the Account Codes page to specify which types of calls will require account codes:
Figure 45: CommPortal Business Group Admin Account Codes display
International – Whether account codes are required for calling international numbers.
Local – Whether account codes are required for local calls.
Premium Rate –Whether account codes are required for premium rate (1-900 number) calls.
Regional – Whether account codes are required for regional calls.
National – Whether account codes are required for long distance calls.
Mobile (only available in areas which are not part of the North American Numbering Plan (NANP)) – Whether account codes are required for mobile calls.
Operator – Whether account codes are required for operator calls.
Directory – Whether account codes are required for directory (411) calls.
Hosted PBX Administrator Guide CONFIDENTIAL Hosted PBX Administrator Guide V9.2.10 / Release 1 Apr 2016
10-2 Managing account codes
Carrier Dialed – Whether account codes are required to make calls when dialing a carrier code (such as 1010000).
Local Business Group – Whether account codes are required for local calls to other numbers within your business. Normally calls within your business will be local calls, but if you have multiple sites calls between numbers may be regional or national calls. In this case you need to use the Other Business Group setting.
Other Business Group – Whether account codes are required for non-local calls to other numbers within your business
Note: You cannot require an account code for emergency calls, toll-free calls, or calls to service access codes.
Once you have selected the call types, click Apply to save your changes.
10.2.2 Choosing Validated or Non-validated Account Codes
To use Validated Account Codes, follow these steps:
1. Check Yes after User validated account codes.
2. Click Apply.
To use Non-validated Account Codes, follow these steps:
1. Check No after User validated account codes.
2. Click Apply.
10.2.3 Setting account code length
To specify the length that should be used by your account codes, follow these steps:
1. Enter the length in the text box after Account code length:
2. Click Apply.
10.2.4 Blocking access after incorrect account codes
If you are using Validated Account Codes, a user's phone line will be blocked after an incorrect account code is entered too many times in succession. To change the number of incorrect entries the user is allowed, follow these steps:
1. Enter the value in the text box after Max incorrect attempts before account is blocked:
2. Click Apply.
Hosted PBX Administrator Guide CONFIDENTIAL Hosted PBX Administrator Guide Apr 2016 V9.2.10 / Release 1
Managing account codes 10-3
10.2.5 Setting individual line properties
To specify whether various settings can also be specified for each line in your business, perform one of the following operations.
To allow which types of calls require account codes to be changed for each line, check Call types may be overridden per line.
To allow the length of account codes to be changed for each line, check Account code length may be overridden per line.
To allow lines to view the account codes that you have defined for the whole business, check Lines may view business group account codes.
Set whether each line should be able to view, or both view and change, or not view their own account codes by selecting the relevant setting from the dropdown list at the bottom of the Account Code Options section.
If you want to have per line account codes, but don't want the user to be able to configure these, configure these by logging on to CommPortal as that user. This is described in Section 10.3. Once you have made your changes, click Apply to save them.
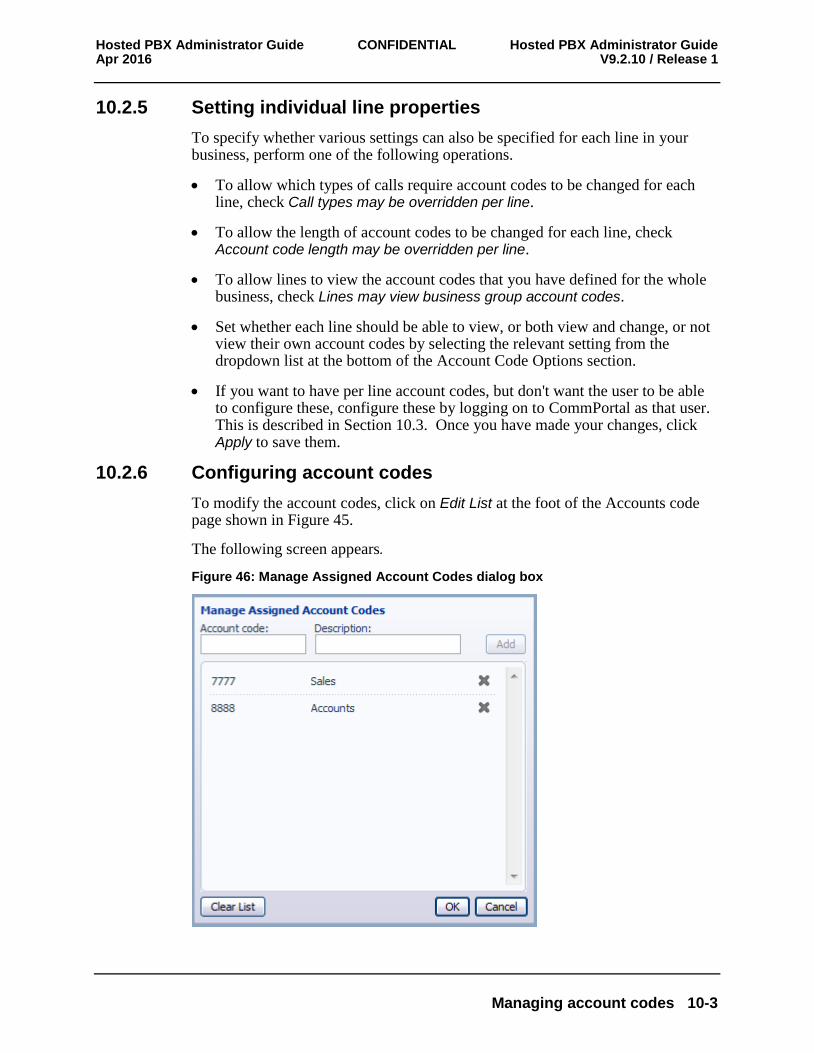
10.2.6 Configuring account codes
To modify the account codes, click on Edit List at the foot of the Accounts code page shown in Figure 45.
The following screen appears.
Figure 46: Manage Assigned Account Codes dialog box
Hosted PBX Administrator Guide CONFIDENTIAL Hosted PBX Administrator Guide V9.2.10 / Release 1 Apr 2016
10-4 Managing account codes
1. To add an account code, follow these steps:
Enter the code in the Account code text box.
Enter the description in the Description text box.
Click on Add.
2. To remove an account code, click the delete icon to the right of the account code.
3. To change the description of an account code, remove it and then re-add it with the new description.
4. Once you have finished making changes, click on OK.
5. To save your changes you must now click Apply.
10.3 Viewing and modifying account code settings for a line
If you want to view or change a particular line's account code settings, follow these steps:
1. Change the settings to allow you to do this as described in Section 10.2.5.
2. Go to the Lines page in CommPortal and log in as the line whose settings you wish to change, as described in Section 3.1.3.
3. Once you have logged in as this user, follow the instructions for modifying account codes in Jaguar Communications Hosted PBX End User Guide.
10.4 Viewing Business Group Call Logs
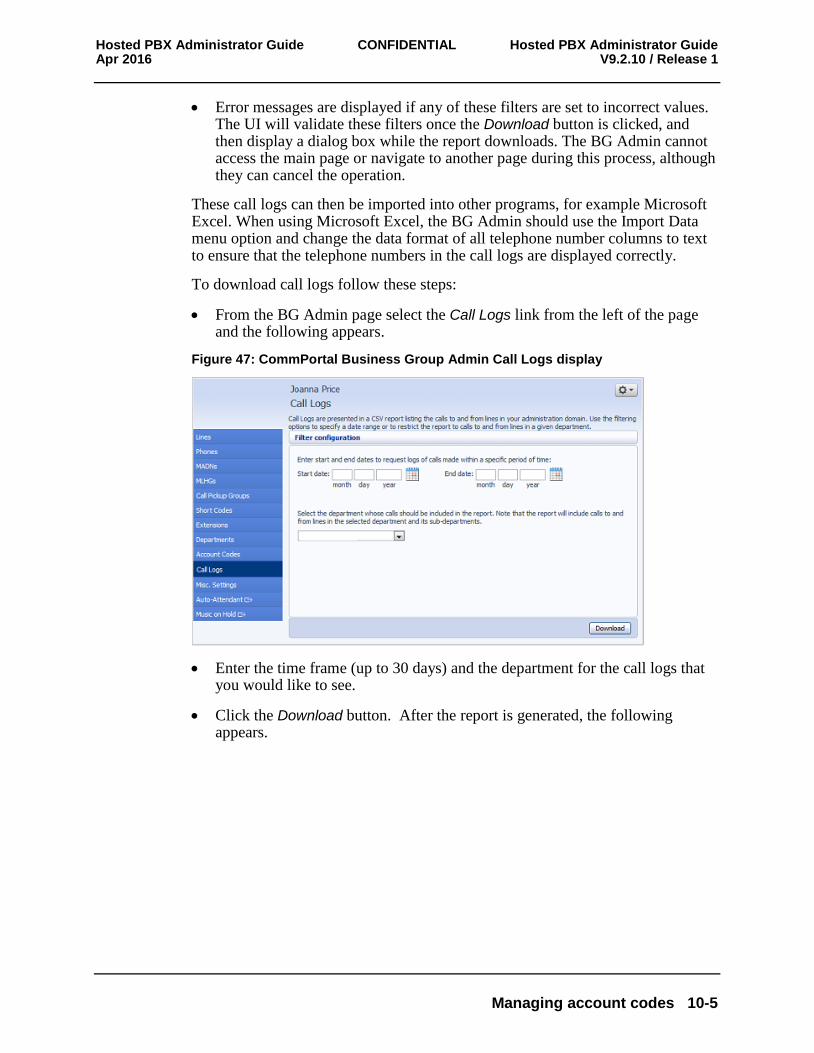
The Call Logs page enables Business Group Administrators with the appropriate permissions to access Business Group Call Logs. The Call Logs menu button is only available if the associated MetaSphere CFS has Business Group Call Logs enabled.
The BG Administrator can click on the Call Logs menu button to launch a new page that allows them to export call logs for their Business Group fragment, and any departments under their control within their Business Group fragment, including.
Request a report containing the logs of all calls made (up to a month at a time) to and from lines within their administration domain (whole business group or department and sub-departments)
Filter call logs specifying a date range, and/or by department domain if the Business Group has them.
Hosted PBX Administrator Guide CONFIDENTIAL Hosted PBX Administrator Guide Apr 2016 V9.2.10 / Release 1
Managing account codes 10-5
Error messages are displayed if any of these filters are set to incorrect values. The UI will validate these filters once the Download button is clicked, and then display a dialog box while the report downloads. The BG Admin cannot access the main page or navigate to another page during this process, although they can cancel the operation.
These call logs can then be imported into other programs, for example Microsoft Excel. When using Microsoft Excel, the BG Admin should use the Import Data menu option and change the data format of all telephone number columns to text to ensure that the telephone numbers in the call logs are displayed correctly.
To download call logs follow these steps:
From the BG Admin page select the Call Logs link from the left of the page and the following appears.
Figure 47: CommPortal Business Group Admin Call Logs display
Enter the time frame (up to 30 days) and the department for the call logs that you would like to see.
Click the Download button. After the report is generated, the following appears.

Hosted PBX Administrator Guide CONFIDENTIAL Hosted PBX Administrator Guide V9.2.10 / Release 1 Apr 2016
10-6 Managing account codes
Figure 48: Call log download dialog box
Select the program to open the file or select save file.
Hosted PBX Administrator Guide CONFIDENTIAL Hosted PBX Administrator Guide Apr 2016 V9.2.10 / Release 1
Viewing miscellaneous settings 11-1
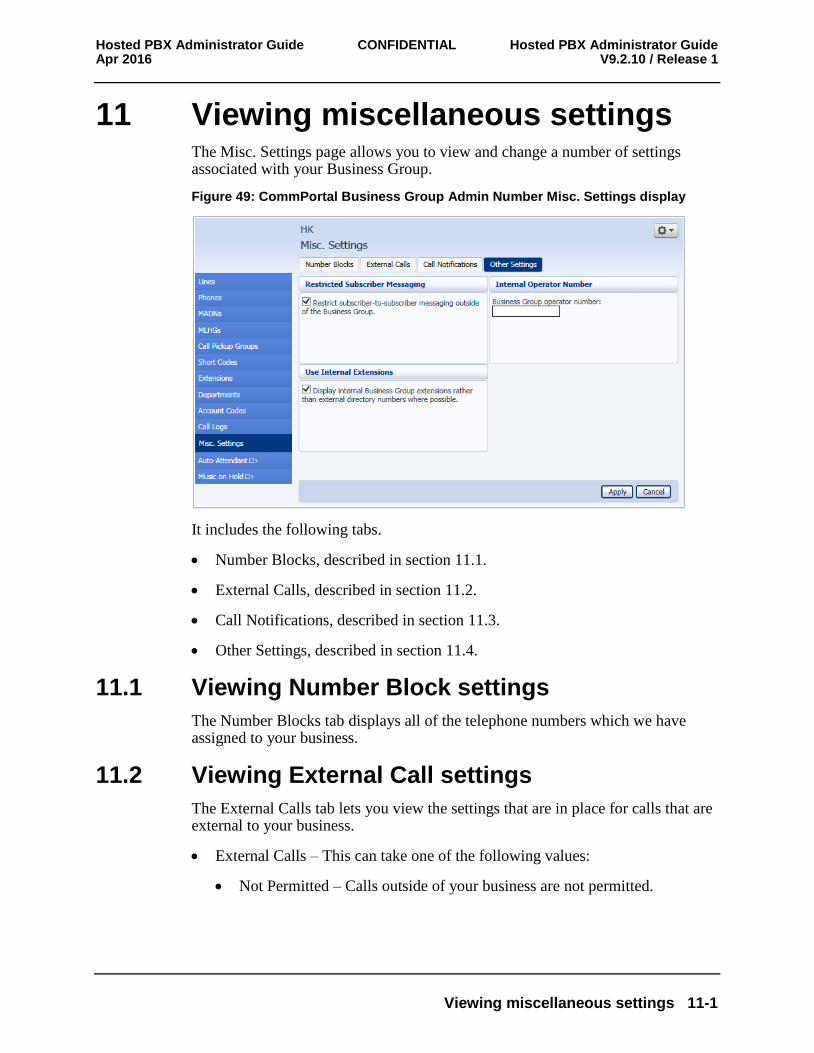
11 Viewing miscellaneous settings The Misc. Settings page allows you to view and change a number of settings associated with your Business Group.
Figure 49: CommPortal Business Group Admin Number Misc. Settings display
It includes the following tabs.
Number Blocks, described in section 11.1.
External Calls, described in section 11.2.
Call Notifications, described in section 11.3.
Other Settings, described in section 11.4.
11.1 Viewing Number Block settings
The Number Blocks tab displays all of the telephone numbers which we have assigned to your business.
11.2 Viewing External Call settings
The External Calls tab lets you view the settings that are in place for calls that are external to your business.
External Calls – This can take one of the following values:
Not Permitted – Calls outside of your business are not permitted.
Hosted PBX Administrator Guide CONFIDENTIAL Hosted PBX Administrator Guide V9.2.10 / Release 1 Apr 2016
11-2 Viewing miscellaneous settings
Unlimited – There is no explicit limit to the number of concurrent external calls you can have, but there may be a limit to either the number of Incoming or Outgoing Calls you can make.
Limited – There is a limit to the number of concurrent calls you can have to numbers outside of your business.
Maximum number of external calls – If the value of External Calls is Limited, the value of this setting specifies how many concurrent external calls there may be at any time.
Incoming Calls – This can take one of the following values:
Not Permitted – Inbound calls from outside of your business are not permitted.
Unlimited – There is no limit to the number of concurrent incoming external calls you can have, although you are still subject to any Maximum number of external calls.
Limited – There is a limit to the number of concurrent calls you can have from outside of your business.
Maximum number of simultaneous incoming calls – If the value of Incoming Calls is Limited, the value of this setting specifies how many concurrent incoming external calls there may be at any time.
Outgoing Calls – This can take one of the following values:
Not Permitted – Outgoing calls to outside your business are not permitted.
Unlimited – There is no limit to the number of concurrent outgoing external calls you can have, although you are still subject to any Maximum number of external calls.
Limited – There is a limit to the number of concurrent calls you can have to numbers outside of your business.
Maximum number of simultaneous outgoing calls – If the value of Outgoing Calls is Limited, the value of this setting specifies how many concurrent incoming external calls there may be at any time.
Local carrier code – This is a code that identifies which carrier will be used for any local calls your business makes. It is sometimes called PIC2.
Long distance carrier code – This is a code that identifies which carrier will be used for any long distance calls your business makes. It is sometimes called PIC1.
International carrier code – This is a code that identifies which carrier will be used for any international calls your business makes. It is sometimes called PIC3.
Hosted PBX Administrator Guide CONFIDENTIAL Hosted PBX Administrator Guide Apr 2016 V9.2.10 / Release 1
Viewing miscellaneous settings 11-3
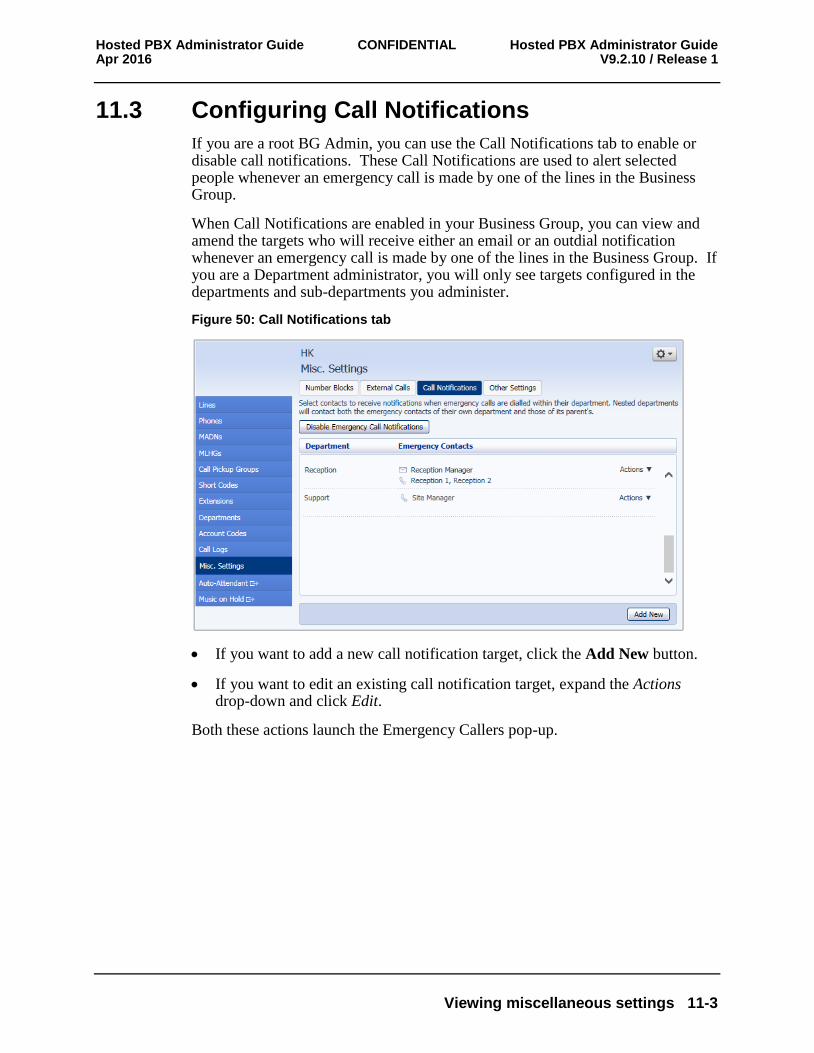
11.3 Configuring Call Notifications
If you are a root BG Admin, you can use the Call Notifications tab to enable or disable call notifications. These Call Notifications are used to alert selected people whenever an emergency call is made by one of the lines in the Business Group.
When Call Notifications are enabled in your Business Group, you can view and amend the targets who will receive either an email or an outdial notification whenever an emergency call is made by one of the lines in the Business Group. If you are a Department administrator, you will only see targets configured in the departments and sub-departments you administer.
Figure 50: Call Notifications tab
If you want to add a new call notification target, click the Add New button.
If you want to edit an existing call notification target, expand the Actions drop-down and click Edit.
Both these actions launch the Emergency Callers pop-up.
Hosted PBX Administrator Guide CONFIDENTIAL Hosted PBX Administrator Guide V9.2.10 / Release 1 Apr 2016
11-4 Viewing miscellaneous settings
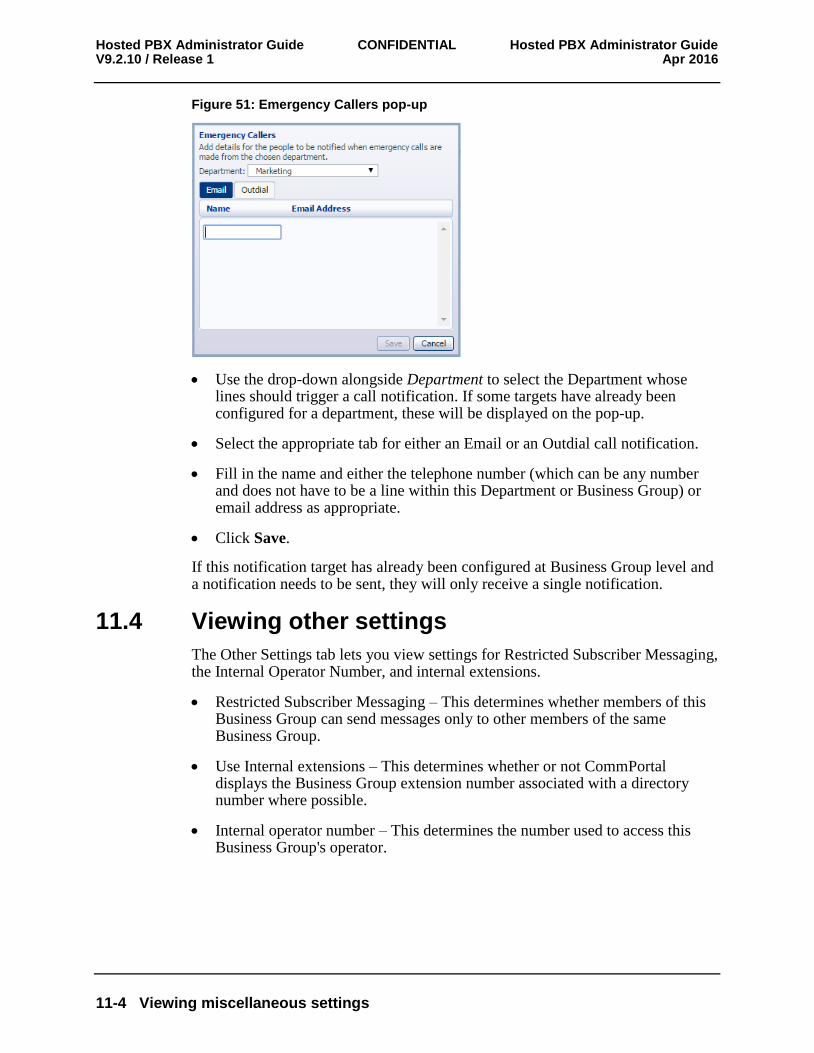
Figure 51: Emergency Callers pop-up
Use the drop-down alongside Department to select the Department whose lines should trigger a call notification. If some targets have already been configured for a department, these will be displayed on the pop-up.
Select the appropriate tab for either an Email or an Outdial call notification.
Fill in the name and either the telephone number (which can be any number and does not have to be a line within this Department or Business Group) or email address as appropriate.
Click Save.
If this notification target has already been configured at Business Group level and a notification needs to be sent, they will only receive a single notification.
11.4 Viewing other settings
The Other Settings tab lets you view settings for Restricted Subscriber Messaging, the Internal Operator Number, and internal extensions.
Restricted Subscriber Messaging – This determines whether members of this Business Group can send messages only to other members of the same Business Group.
Use Internal extensions – This determines whether or not CommPortal displays the Business Group extension number associated with a directory number where possible.
Internal operator number – This determines the number used to access this Business Group's operator.
Hosted PBX Administrator Guide CONFIDENTIAL Hosted PBX Administrator Guide Apr 2016 V9.2.10 / Release 1
Auto-Attendant – Easy Attendant / Premium Attendant 12-1
12 Auto-Attendant – Easy Attendant / Premium Attendant
12.1 Overview
MetaSphere provides two solutions for Auto Attendant functionality.
Easy Attendant offers a very simple automated telephone menu.
Callers to a business are directed to the automated TUI, providing key options to transfer to specific departments or individuals in the business, to transfer to a voicemail account directly, or to listen to a recorded announcement.
You can choose to either have a single menu that plays when Easy Attendant is turned on, or two different menus for business and non-business hours that are used according to a pre-defined schedule.
When Easy Attendant is turned off, you can either forward callers to another telephone number or play a message informing the caller that your business is currently closed.
Premium Attendant, aimed at small and medium business subscribers, offers an increased level of service compared to Easy Attendant.
In addition to all the features offered by Easy Attendant, Premium Attendant allows multiple menus with a finer scheduling control.
It also includes more call handling options, such as Voicemail by Name and Voicemail by Extension, as well as greater control over the actions taken for any given key press.
Both Easy and Premium Attendant can also be configured to allow callers to dial an extension at any point in the menu and not just on a Dial by Extension menu option. If you want to use this option, you must enable it as described in 12.2.4 and you should also ensure that your initial greeting mentions the option that a caller who knows the extension they require can dial it immediately.
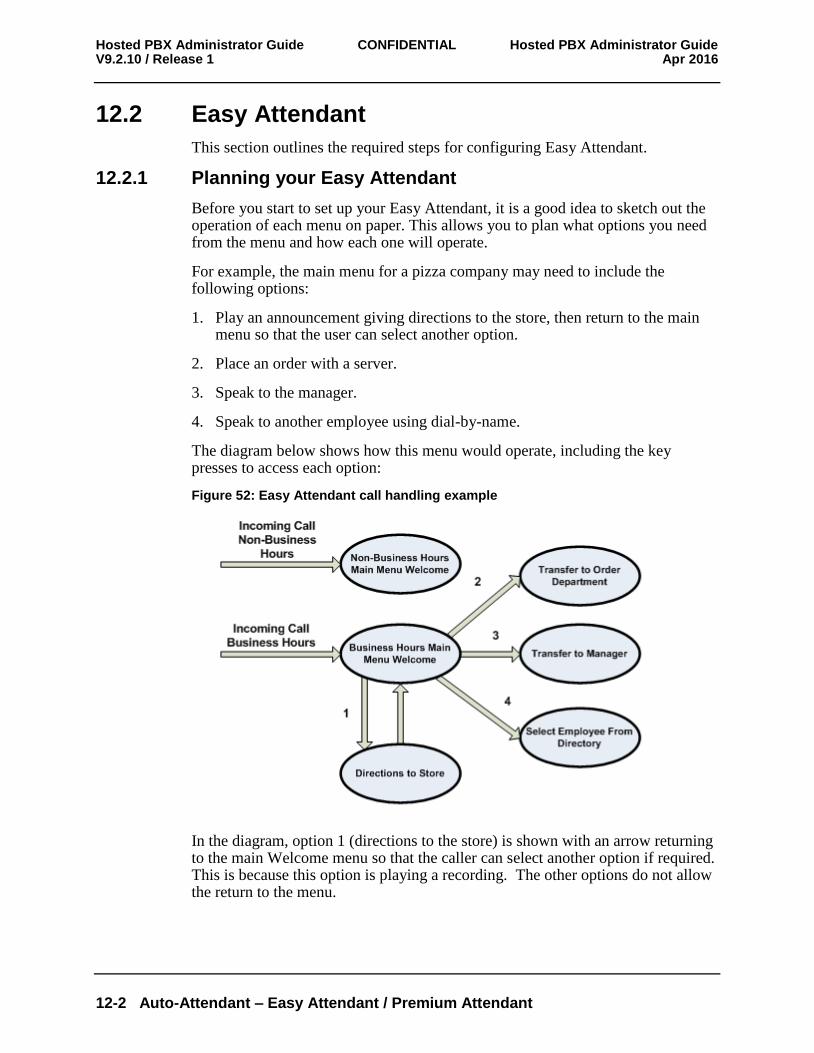
Hosted PBX Administrator Guide CONFIDENTIAL Hosted PBX Administrator Guide V9.2.10 / Release 1 Apr 2016
12-2 Auto-Attendant – Easy Attendant / Premium Attendant
12.2 Easy Attendant
This section outlines the required steps for configuring Easy Attendant.
12.2.1 Planning your Easy Attendant
Before you start to set up your Easy Attendant, it is a good idea to sketch out the operation of each menu on paper. This allows you to plan what options you need from the menu and how each one will operate.
For example, the main menu for a pizza company may need to include the following options:
1. Play an announcement giving directions to the store, then return to the main menu so that the user can select another option.
2. Place an order with a server.
3. Speak to the manager.
4. Speak to another employee using dial-by-name.
The diagram below shows how this menu would operate, including the key presses to access each option:
Figure 52: Easy Attendant call handling example
In the diagram, option 1 (directions to the store) is shown with an arrow returning to the main Welcome menu so that the caller can select another option if required. This is because this option is playing a recording. The other options do not allow the return to the menu.
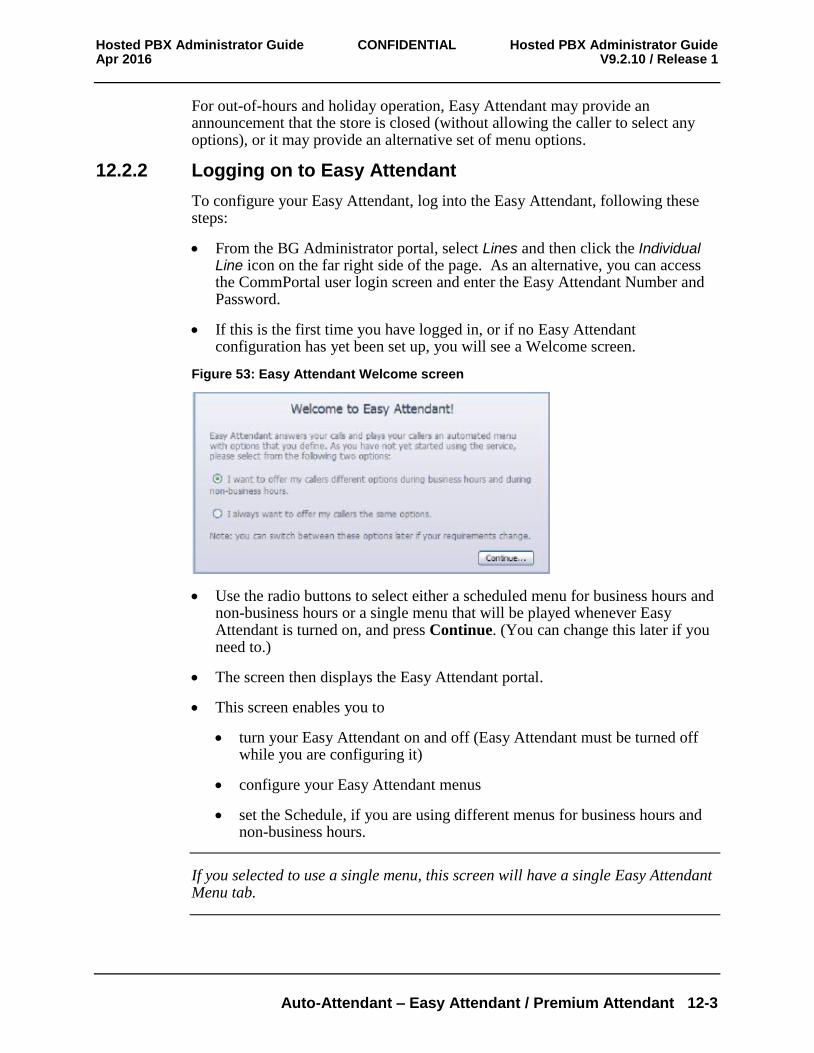
Hosted PBX Administrator Guide CONFIDENTIAL Hosted PBX Administrator Guide Apr 2016 V9.2.10 / Release 1
Auto-Attendant – Easy Attendant / Premium Attendant 12-3
For out-of-hours and holiday operation, Easy Attendant may provide an announcement that the store is closed (without allowing the caller to select any options), or it may provide an alternative set of menu options.
12.2.2 Logging on to Easy Attendant
To configure your Easy Attendant, log into the Easy Attendant, following these steps:
From the BG Administrator portal, select Lines and then click the Individual Line icon on the far right side of the page. As an alternative, you can access the CommPortal user login screen and enter the Easy Attendant Number and Password.
If this is the first time you have logged in, or if no Easy Attendant configuration has yet been set up, you will see a Welcome screen.
Figure 53: Easy Attendant Welcome screen
Use the radio buttons to select either a scheduled menu for business hours and non-business hours or a single menu that will be played whenever Easy Attendant is turned on, and press Continue. (You can change this later if you need to.)
The screen then displays the Easy Attendant portal.
This screen enables you to
turn your Easy Attendant on and off (Easy Attendant must be turned off while you are configuring it)
configure your Easy Attendant menus
set the Schedule, if you are using different menus for business hours and non-business hours.
If you selected to use a single menu, this screen will have a single Easy Attendant Menu tab.
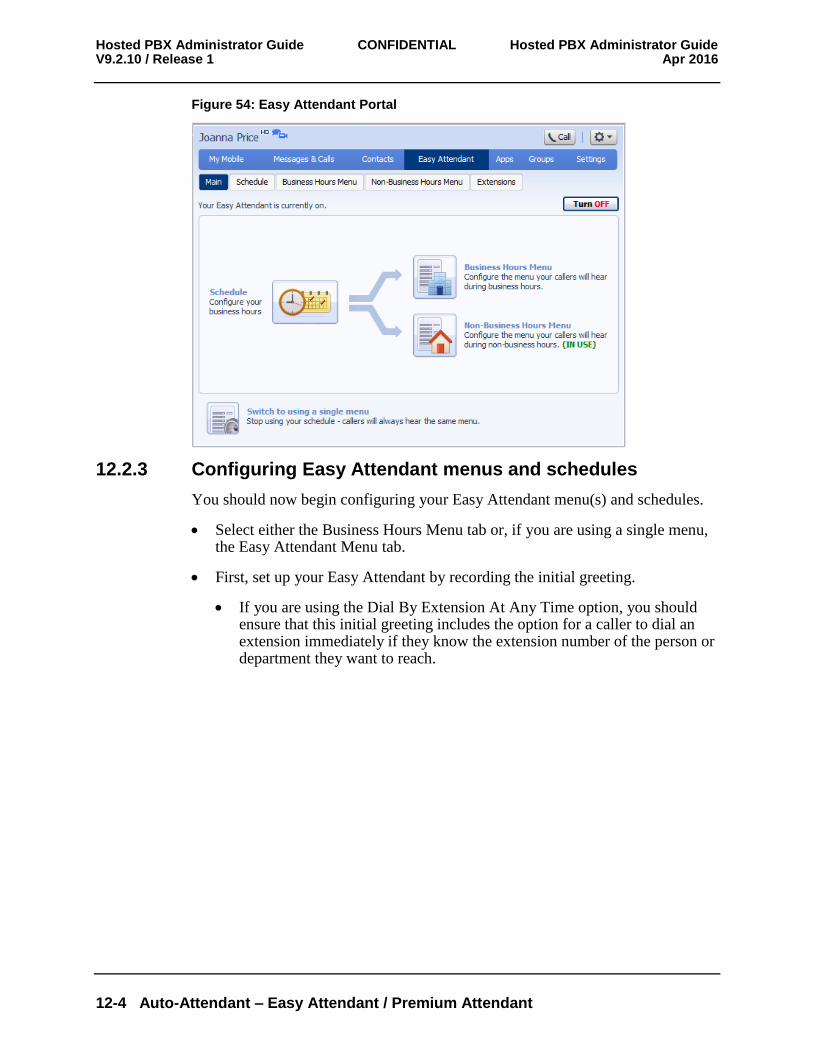
Hosted PBX Administrator Guide CONFIDENTIAL Hosted PBX Administrator Guide V9.2.10 / Release 1 Apr 2016
12-4 Auto-Attendant – Easy Attendant / Premium Attendant
Figure 54: Easy Attendant Portal
12.2.3 Configuring Easy Attendant menus and schedules
You should now begin configuring your Easy Attendant menu(s) and schedules.
Select either the Business Hours Menu tab or, if you are using a single menu, the Easy Attendant Menu tab.
First, set up your Easy Attendant by recording the initial greeting.
If you are using the Dial By Extension At Any Time option, you should ensure that this initial greeting includes the option for a caller to dial an extension immediately if they know the extension number of the person or department they want to reach.
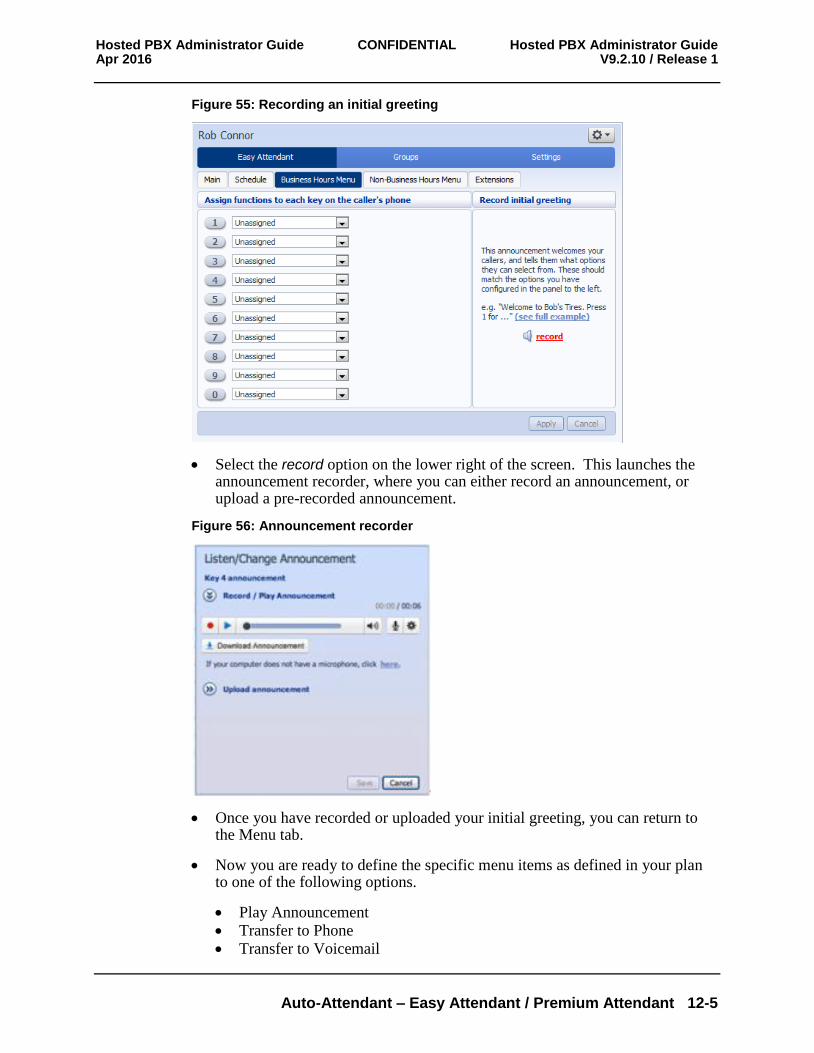
Hosted PBX Administrator Guide CONFIDENTIAL Hosted PBX Administrator Guide Apr 2016 V9.2.10 / Release 1
Auto-Attendant – Easy Attendant / Premium Attendant 12-5
Figure 55: Recording an initial greeting
Select the record option on the lower right of the screen. This launches the announcement recorder, where you can either record an announcement, or upload a pre-recorded announcement.
Figure 56: Announcement recorder
Once you have recorded or uploaded your initial greeting, you can return to the Menu tab.
Now you are ready to define the specific menu items as defined in your plan to one of the following options.
Play Announcement
Transfer to Phone
Transfer to Voicemail
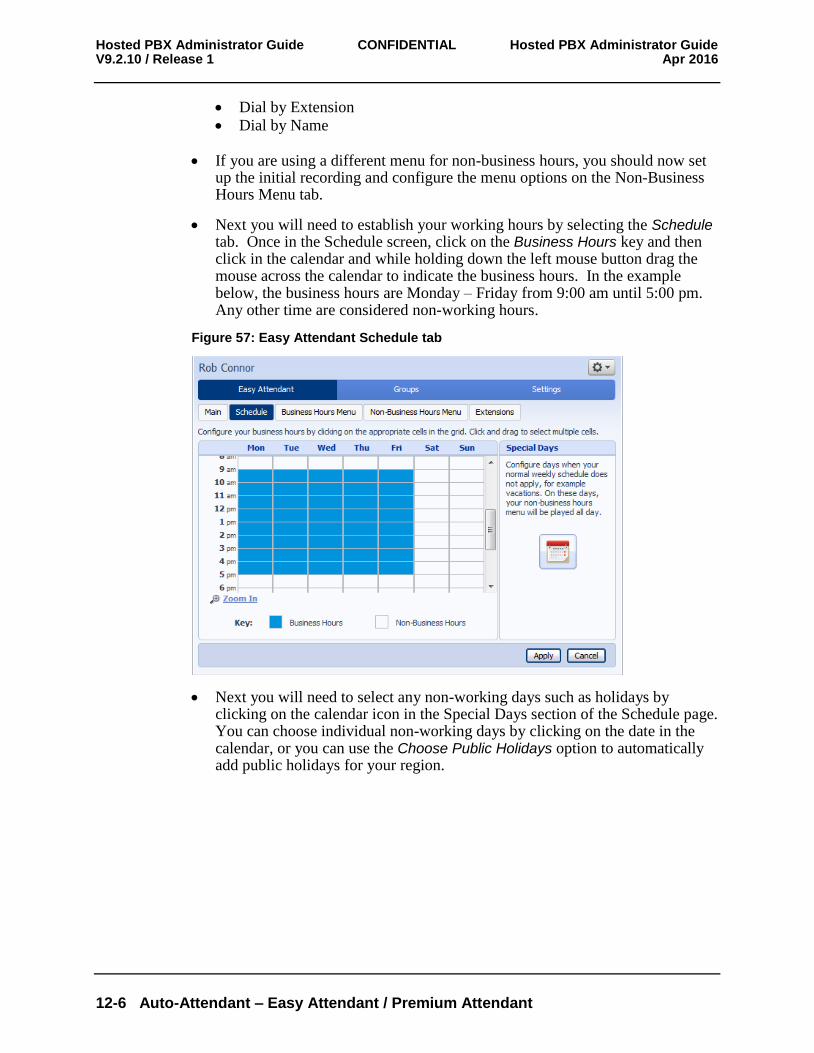
Hosted PBX Administrator Guide CONFIDENTIAL Hosted PBX Administrator Guide V9.2.10 / Release 1 Apr 2016
12-6 Auto-Attendant – Easy Attendant / Premium Attendant
Dial by Extension
Dial by Name
If you are using a different menu for non-business hours, you should now set up the initial recording and configure the menu options on the Non-Business Hours Menu tab.
Next you will need to establish your working hours by selecting the Schedule tab. Once in the Schedule screen, click on the Business Hours key and then click in the calendar and while holding down the left mouse button drag the mouse across the calendar to indicate the business hours. In the example below, the business hours are Monday – Friday from 9:00 am until 5:00 pm. Any other time are considered non-working hours.
Figure 57: Easy Attendant Schedule tab
Next you will need to select any non-working days such as holidays by clicking on the calendar icon in the Special Days section of the Schedule page. You can choose individual non-working days by clicking on the date in the calendar, or you can use the Choose Public Holidays option to automatically add public holidays for your region.
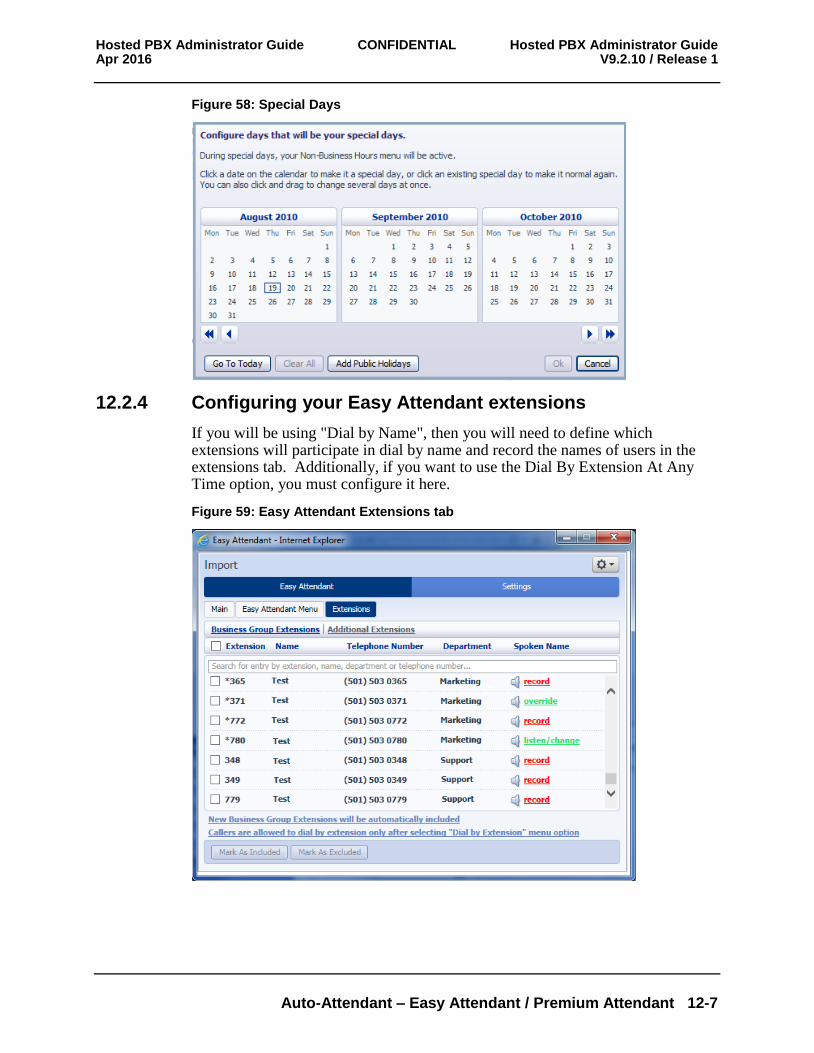
Hosted PBX Administrator Guide CONFIDENTIAL Hosted PBX Administrator Guide Apr 2016 V9.2.10 / Release 1
Auto-Attendant – Easy Attendant / Premium Attendant 12-7
Figure 58: Special Days
12.2.4 Configuring your Easy Attendant extensions
If you will be using "Dial by Name", then you will need to define which extensions will participate in dial by name and record the names of users in the extensions tab. Additionally, if you want to use the Dial By Extension At Any Time option, you must configure it here.
Figure 59: Easy Attendant Extensions tab
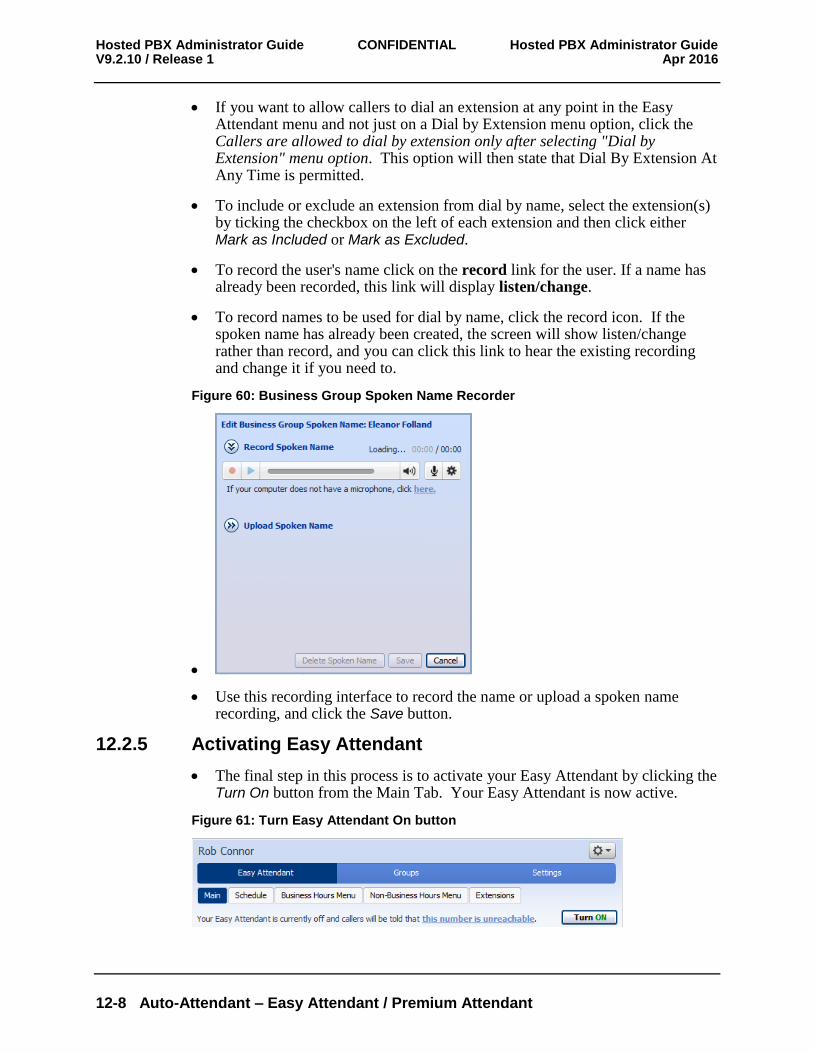
Hosted PBX Administrator Guide CONFIDENTIAL Hosted PBX Administrator Guide V9.2.10 / Release 1 Apr 2016
12-8 Auto-Attendant – Easy Attendant / Premium Attendant
If you want to allow callers to dial an extension at any point in the Easy Attendant menu and not just on a Dial by Extension menu option, click the Callers are allowed to dial by extension only after selecting "Dial by Extension" menu option. This option will then state that Dial By Extension At Any Time is permitted.
To include or exclude an extension from dial by name, select the extension(s) by ticking the checkbox on the left of each extension and then click either Mark as Included or Mark as Excluded.
To record the user's name click on the record link for the user. If a name has already been recorded, this link will display listen/change.
To record names to be used for dial by name, click the record icon. If the spoken name has already been created, the screen will show listen/change rather than record, and you can click this link to hear the existing recording and change it if you need to.
Figure 60: Business Group Spoken Name Recorder
Use this recording interface to record the name or upload a spoken name recording, and click the Save button.
12.2.5 Activating Easy Attendant
The final step in this process is to activate your Easy Attendant by clicking the Turn On button from the Main Tab. Your Easy Attendant is now active.
Figure 61: Turn Easy Attendant On button
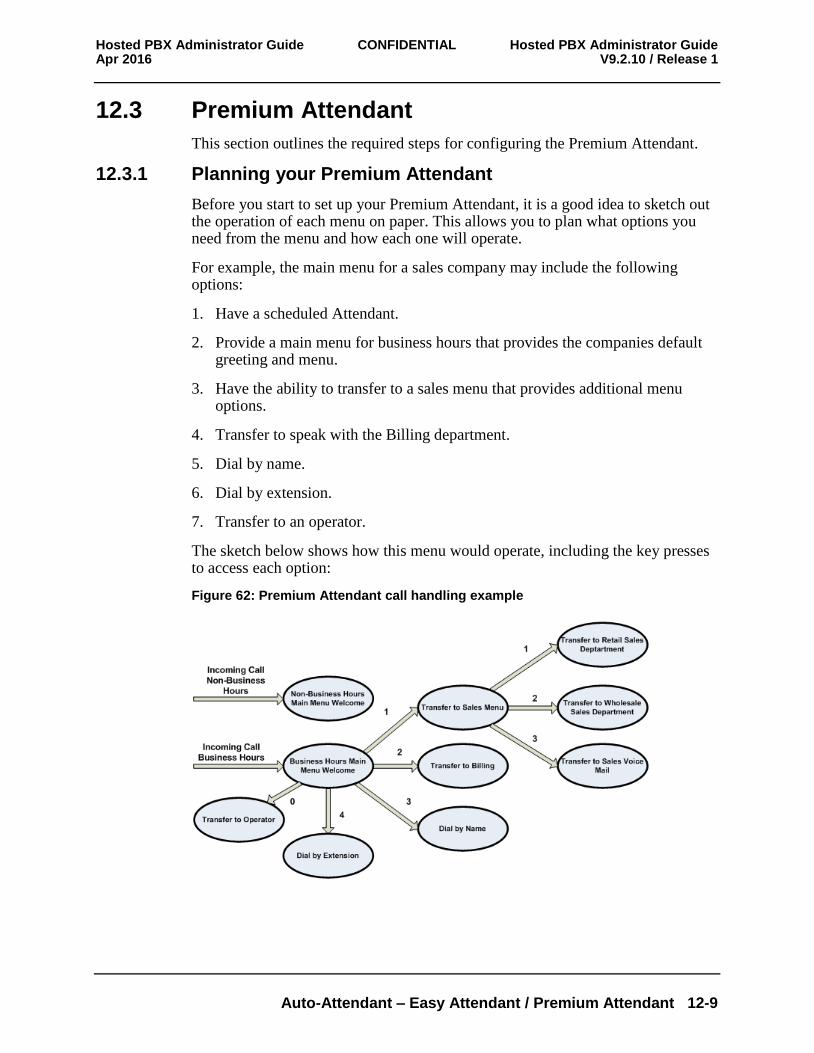
Hosted PBX Administrator Guide CONFIDENTIAL Hosted PBX Administrator Guide Apr 2016 V9.2.10 / Release 1
Auto-Attendant – Easy Attendant / Premium Attendant 12-9
12.3 Premium Attendant
This section outlines the required steps for configuring the Premium Attendant.
12.3.1 Planning your Premium Attendant
Before you start to set up your Premium Attendant, it is a good idea to sketch out the operation of each menu on paper. This allows you to plan what options you need from the menu and how each one will operate.
For example, the main menu for a sales company may include the following options:
1. Have a scheduled Attendant.
2. Provide a main menu for business hours that provides the companies default greeting and menu.
3. Have the ability to transfer to a sales menu that provides additional menu options.
4. Transfer to speak with the Billing department.
5. Dial by name.
6. Dial by extension.
7. Transfer to an operator.
The sketch below shows how this menu would operate, including the key presses to access each option:
Figure 62: Premium Attendant call handling example
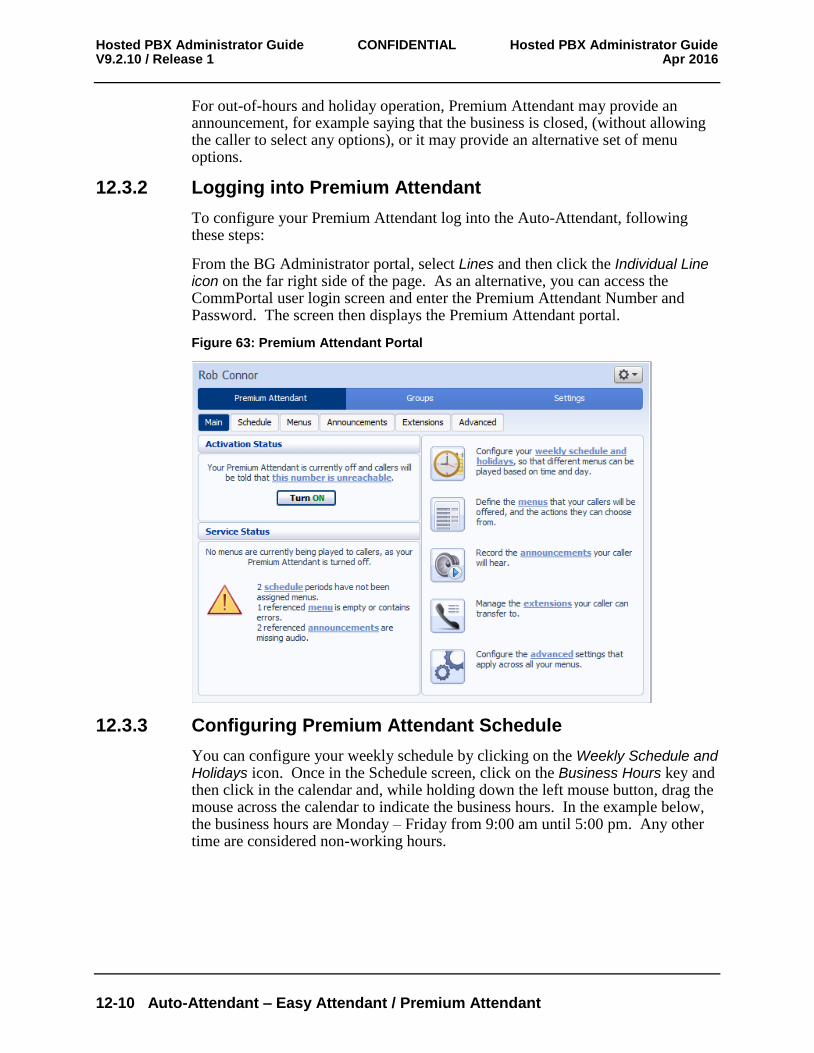
Hosted PBX Administrator Guide CONFIDENTIAL Hosted PBX Administrator Guide V9.2.10 / Release 1 Apr 2016
12-10 Auto-Attendant – Easy Attendant / Premium Attendant
For out-of-hours and holiday operation, Premium Attendant may provide an announcement, for example saying that the business is closed, (without allowing the caller to select any options), or it may provide an alternative set of menu options.
12.3.2 Logging into Premium Attendant
To configure your Premium Attendant log into the Auto-Attendant, following these steps:
From the BG Administrator portal, select Lines and then click the Individual Line icon on the far right side of the page. As an alternative, you can access the CommPortal user login screen and enter the Premium Attendant Number and Password. The screen then displays the Premium Attendant portal.
Figure 63: Premium Attendant Portal
12.3.3 Configuring Premium Attendant Schedule
You can configure your weekly schedule by clicking on the Weekly Schedule and Holidays icon. Once in the Schedule screen, click on the Business Hours key and then click in the calendar and, while holding down the left mouse button, drag the mouse across the calendar to indicate the business hours. In the example below, the business hours are Monday – Friday from 9:00 am until 5:00 pm. Any other time are considered non-working hours.
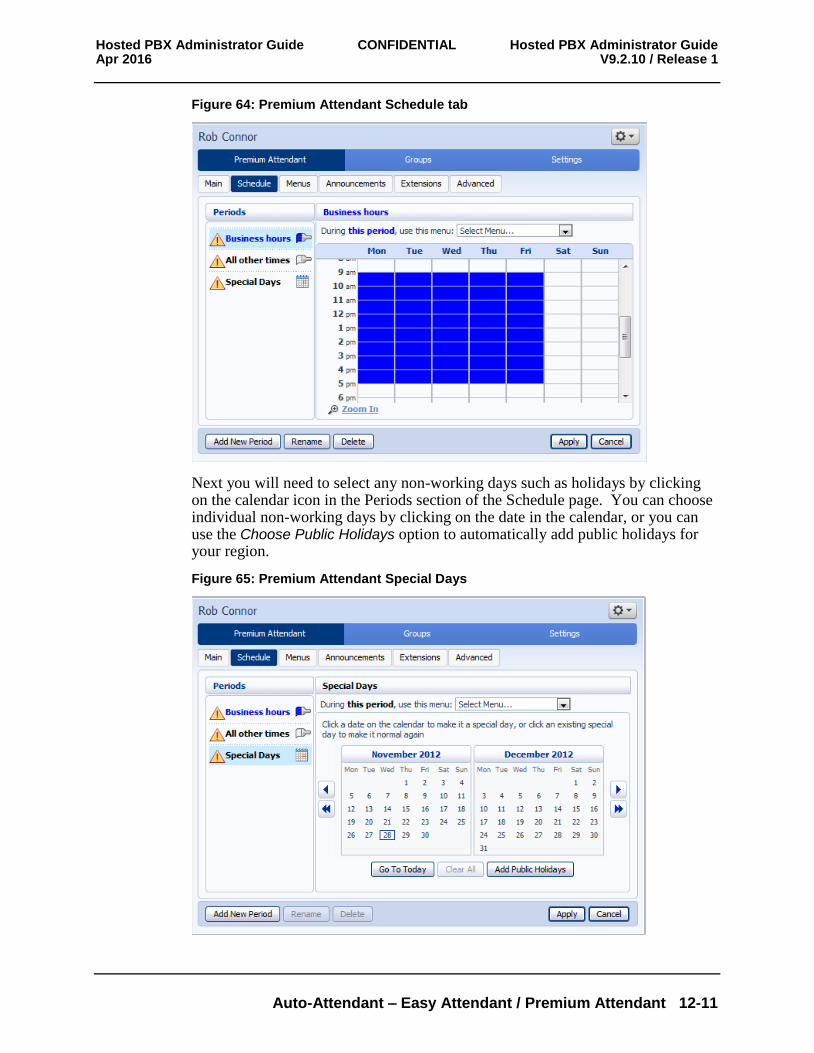
Hosted PBX Administrator Guide CONFIDENTIAL Hosted PBX Administrator Guide Apr 2016 V9.2.10 / Release 1
Auto-Attendant – Easy Attendant / Premium Attendant 12-11
Figure 64: Premium Attendant Schedule tab
Next you will need to select any non-working days such as holidays by clicking on the calendar icon in the Periods section of the Schedule page. You can choose individual non-working days by clicking on the date in the calendar, or you can use the Choose Public Holidays option to automatically add public holidays for your region.
Figure 65: Premium Attendant Special Days
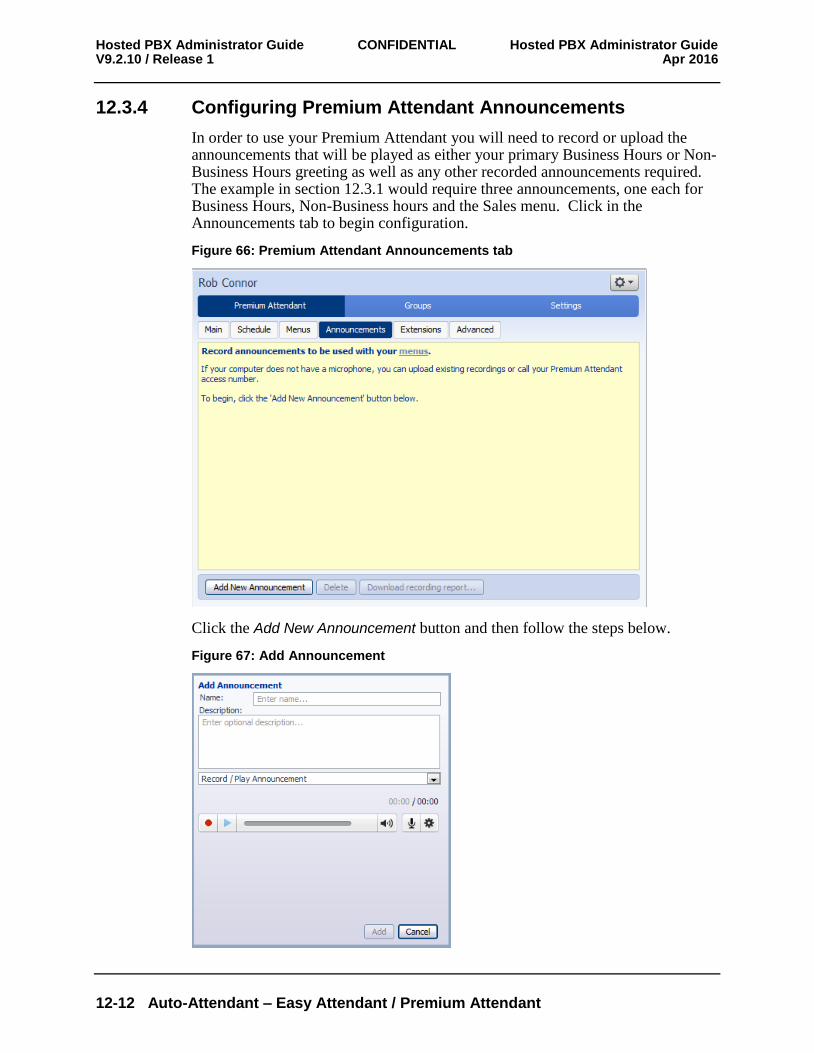
Hosted PBX Administrator Guide CONFIDENTIAL Hosted PBX Administrator Guide V9.2.10 / Release 1 Apr 2016
12-12 Auto-Attendant – Easy Attendant / Premium Attendant
12.3.4 Configuring Premium Attendant Announcements
In order to use your Premium Attendant you will need to record or upload the announcements that will be played as either your primary Business Hours or Non-Business Hours greeting as well as any other recorded announcements required. The example in section 12.3.1 would require three announcements, one each for Business Hours, Non-Business hours and the Sales menu. Click in the Announcements tab to begin configuration.
Figure 66: Premium Attendant Announcements tab
Click the Add New Announcement button and then follow the steps below.
Figure 67: Add Announcement
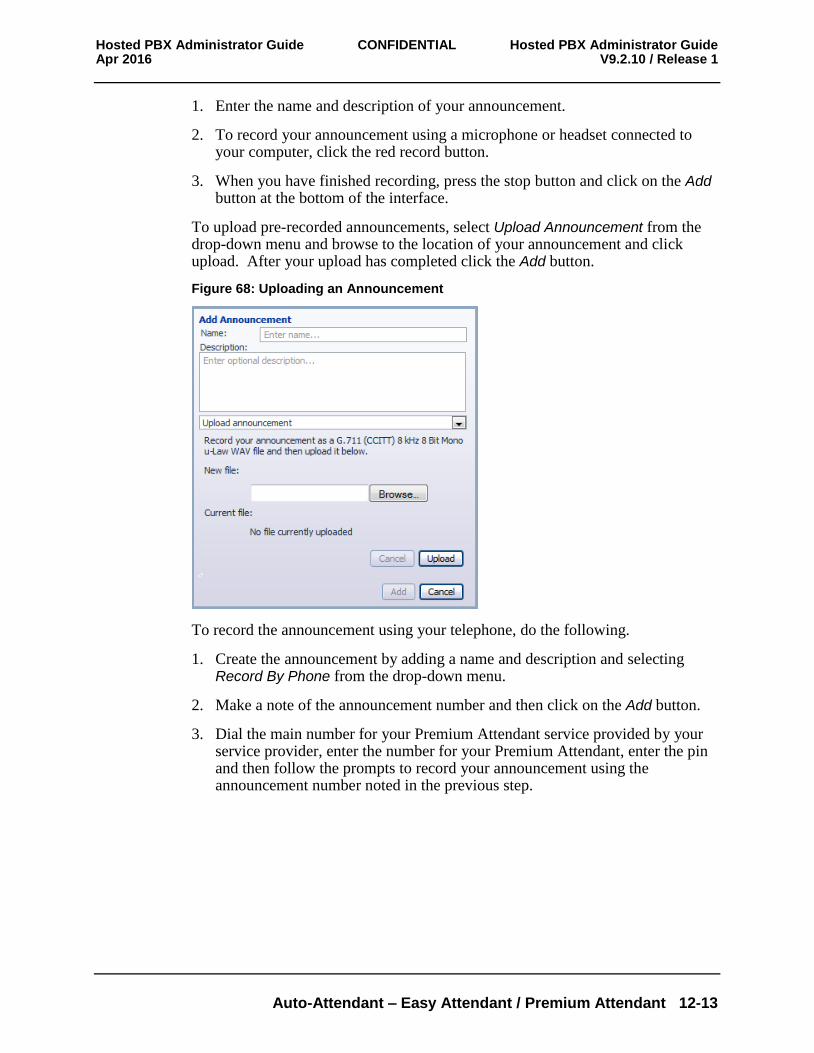
Hosted PBX Administrator Guide CONFIDENTIAL Hosted PBX Administrator Guide Apr 2016 V9.2.10 / Release 1
Auto-Attendant – Easy Attendant / Premium Attendant 12-13
1. Enter the name and description of your announcement.
2. To record your announcement using a microphone or headset connected to your computer, click the red record button.
3. When you have finished recording, press the stop button and click on the Add button at the bottom of the interface.
To upload pre-recorded announcements, select Upload Announcement from the drop-down menu and browse to the location of your announcement and click upload. After your upload has completed click the Add button.
Figure 68: Uploading an Announcement
To record the announcement using your telephone, do the following.
1. Create the announcement by adding a name and description and selecting Record By Phone from the drop-down menu.
2. Make a note of the announcement number and then click on the Add button.
3. Dial the main number for your Premium Attendant service provided by your service provider, enter the number for your Premium Attendant, enter the pin and then follow the prompts to record your announcement using the announcement number noted in the previous step.
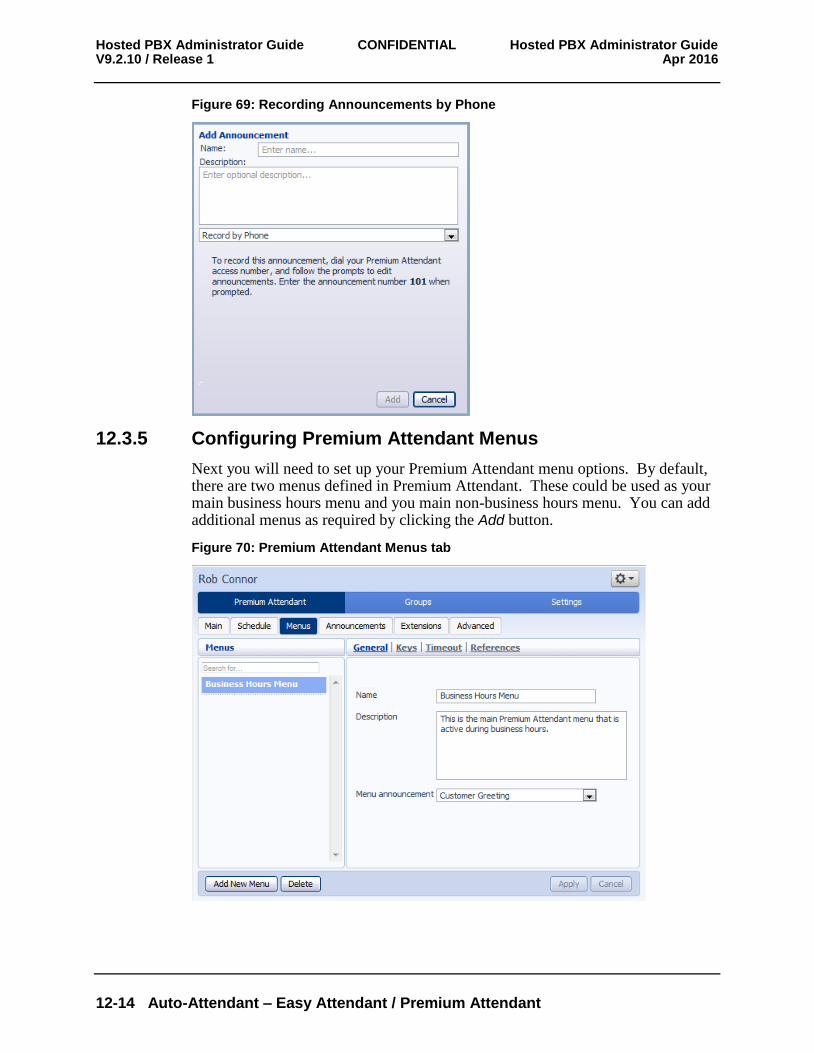
Hosted PBX Administrator Guide CONFIDENTIAL Hosted PBX Administrator Guide V9.2.10 / Release 1 Apr 2016
12-14 Auto-Attendant – Easy Attendant / Premium Attendant
Figure 69: Recording Announcements by Phone
12.3.5 Configuring Premium Attendant Menus
Next you will need to set up your Premium Attendant menu options. By default, there are two menus defined in Premium Attendant. These could be used as your main business hours menu and you main non-business hours menu. You can add additional menus as required by clicking the Add button.
Figure 70: Premium Attendant Menus tab

Hosted PBX Administrator Guide CONFIDENTIAL Hosted PBX Administrator Guide Apr 2016 V9.2.10 / Release 1
Auto-Attendant – Easy Attendant / Premium Attendant 12-15
Begin to configure your menu by providing a name and description and selecting the Menu announcement to be used by this menu, and then click Apply.
Next you will need to configure the action for each key pressed for your menu by selecting the Keys link and then selecting an option using the dropdown menus for each key pressed in the menu.
Figure 71: Premium Attendant key configuration menu
The options available for each key are as follows:
Use Default (This option is default for all keys for new menus)
Transfer to Phone
Transfer to Voicemail (CoS controlled)
Dial by Extension (CoS controlled including whether an announcement is automatically played giving initial instructions when this key is pressed, or whether these instructions must be recorded by the subscriber in the menu announcement)
Self-care by Extension (CoS controlled, allows subscribers with mailboxes only identified by extension numbers to dial in to their mailbox)
Dial by Name (CoS controlled)
Voicemail by Extension (CoS controlled)
Voicemail by Name (CoS controlled)
Transfer to Operator (CoS controlled, and only available for Premium Attendants in a Business Group)
Intercept mailbox (CoS controlled)
Go to Menu
Return to Previous Menu
Replay Menu
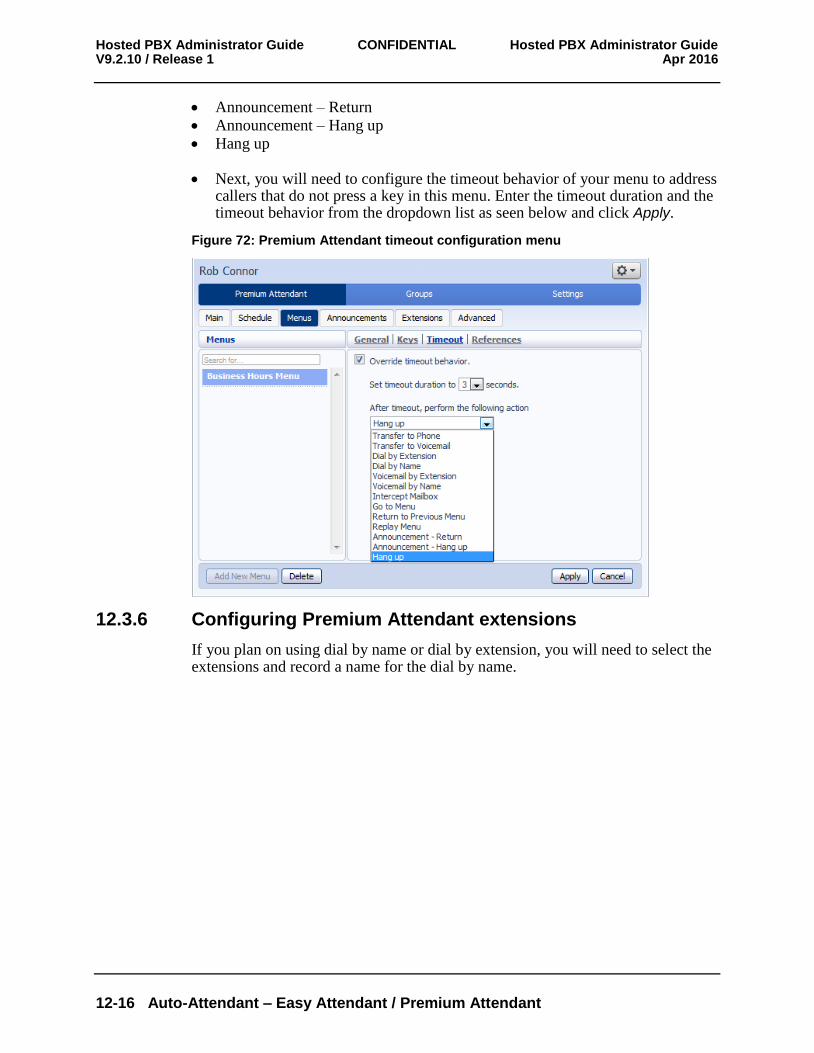
Hosted PBX Administrator Guide CONFIDENTIAL Hosted PBX Administrator Guide V9.2.10 / Release 1 Apr 2016
12-16 Auto-Attendant – Easy Attendant / Premium Attendant
Announcement – Return
Announcement – Hang up
Hang up
Next, you will need to configure the timeout behavior of your menu to address callers that do not press a key in this menu. Enter the timeout duration and the timeout behavior from the dropdown list as seen below and click Apply.
Figure 72: Premium Attendant timeout configuration menu
12.3.6 Configuring Premium Attendant extensions
If you plan on using dial by name or dial by extension, you will need to select the extensions and record a name for the dial by name.
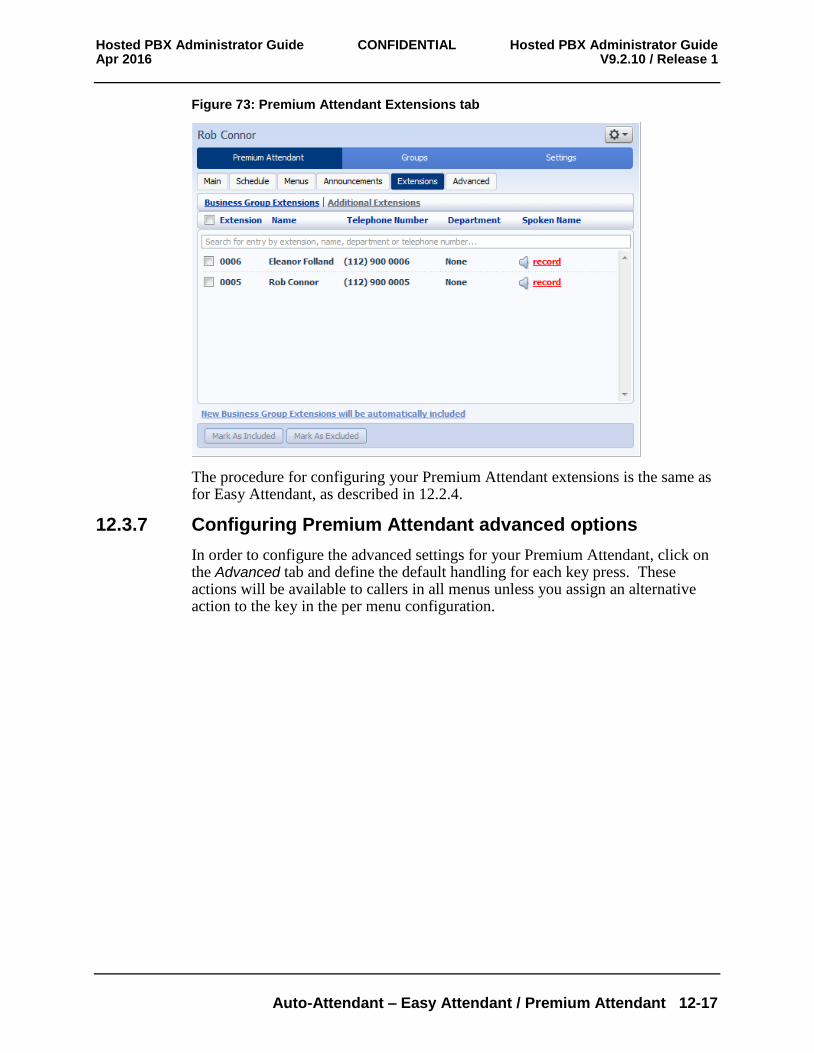
Hosted PBX Administrator Guide CONFIDENTIAL Hosted PBX Administrator Guide Apr 2016 V9.2.10 / Release 1
Auto-Attendant – Easy Attendant / Premium Attendant 12-17
Figure 73: Premium Attendant Extensions tab
The procedure for configuring your Premium Attendant extensions is the same as for Easy Attendant, as described in 12.2.4.
12.3.7 Configuring Premium Attendant advanced options
In order to configure the advanced settings for your Premium Attendant, click on the Advanced tab and define the default handling for each key press. These actions will be available to callers in all menus unless you assign an alternative action to the key in the per menu configuration.
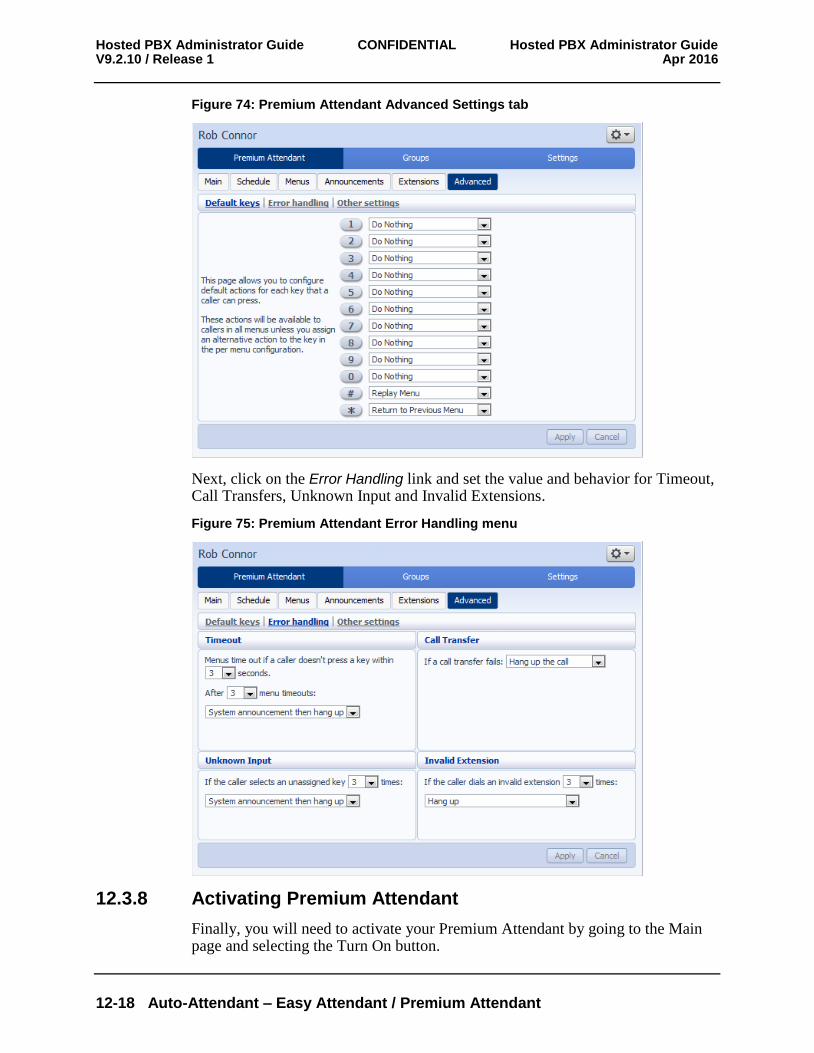
Hosted PBX Administrator Guide CONFIDENTIAL Hosted PBX Administrator Guide V9.2.10 / Release 1 Apr 2016
12-18 Auto-Attendant – Easy Attendant / Premium Attendant
Figure 74: Premium Attendant Advanced Settings tab
Next, click on the Error Handling link and set the value and behavior for Timeout, Call Transfers, Unknown Input and Invalid Extensions.
Figure 75: Premium Attendant Error Handling menu
12.3.8 Activating Premium Attendant
Finally, you will need to activate your Premium Attendant by going to the Main page and selecting the Turn On button.
Hosted PBX Administrator Guide CONFIDENTIAL Hosted PBX Administrator Guide Apr 2016 V9.2.10 / Release 1
Auto-Attendant – Easy Attendant / Premium Attendant 12-19
The Premium Attendant interface uses the following error messages and icons to alert you to incorrect or missing configuration. These are produced on page load, and are not updated dynamically.
The Main tab has a Service Status panel that states your current schedule period and the menu that callers will hear. It also reports if you have errors in any menus, or one or more announcements is missing audio.
The Schedule and Menus pages use a banner line to report any errors.
The following icons are used to indicate incorrect or incomplete configuration
error icon
warning icon
If there are any errors in your configuration, you will be warned against turning on Premium Attendant, and in some cases this will be prohibited. You should therefore resolve the configuration errors before attempting to turn Premium Attendant on.

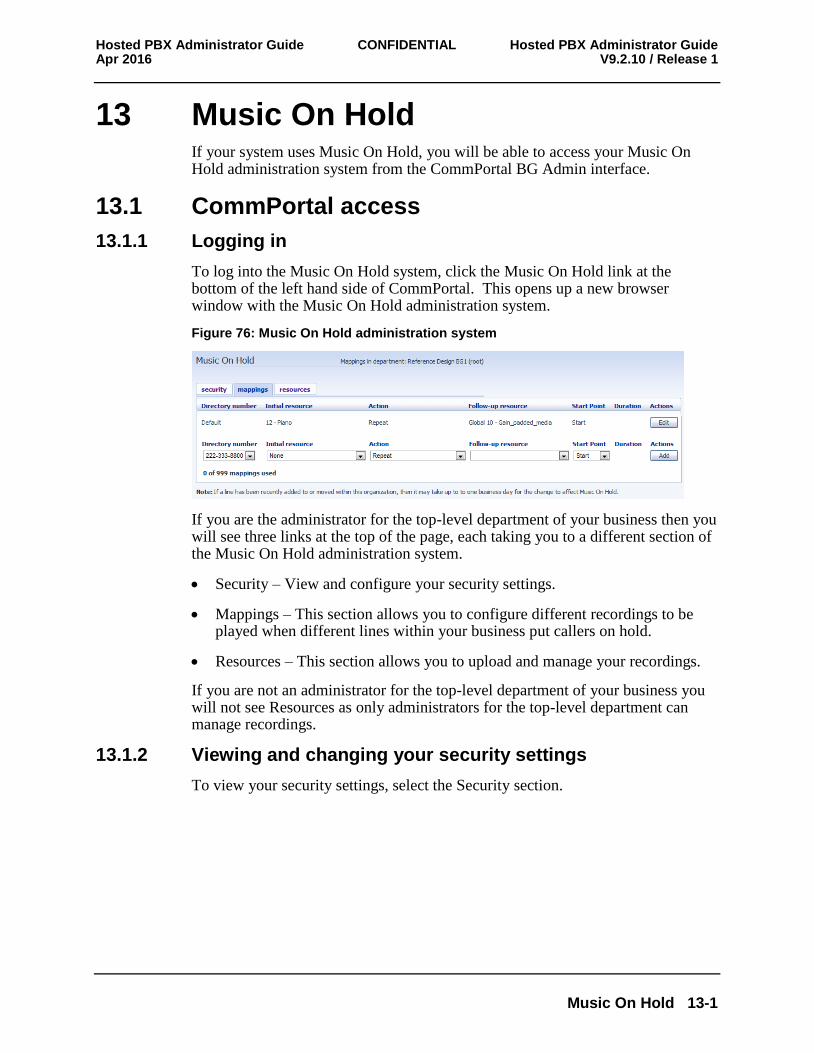
Hosted PBX Administrator Guide CONFIDENTIAL Hosted PBX Administrator Guide Apr 2016 V9.2.10 / Release 1
Music On Hold 13-1
13 Music On Hold If your system uses Music On Hold, you will be able to access your Music On Hold administration system from the CommPortal BG Admin interface.
13.1 CommPortal access
13.1.1 Logging in
To log into the Music On Hold system, click the Music On Hold link at the bottom of the left hand side of CommPortal. This opens up a new browser window with the Music On Hold administration system.
Figure 76: Music On Hold administration system
If you are the administrator for the top-level department of your business then you will see three links at the top of the page, each taking you to a different section of the Music On Hold administration system.
Security – View and configure your security settings.
Mappings – This section allows you to configure different recordings to be played when different lines within your business put callers on hold.
Resources – This section allows you to upload and manage your recordings.
If you are not an administrator for the top-level department of your business you will not see Resources as only administrators for the top-level department can manage recordings.
13.1.2 Viewing and changing your security settings
To view your security settings, select the Security section.
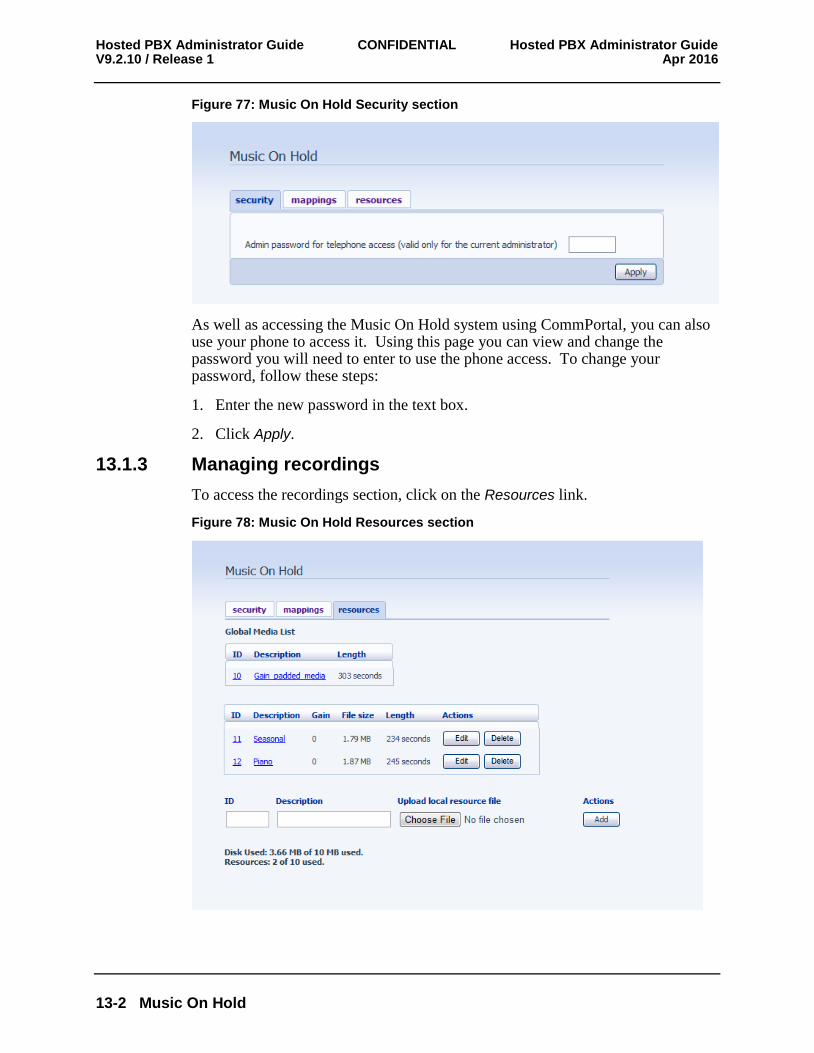
Hosted PBX Administrator Guide CONFIDENTIAL Hosted PBX Administrator Guide V9.2.10 / Release 1 Apr 2016
13-2 Music On Hold
Figure 77: Music On Hold Security section
As well as accessing the Music On Hold system using CommPortal, you can also use your phone to access it. Using this page you can view and change the password you will need to enter to use the phone access. To change your password, follow these steps:
1. Enter the new password in the text box.
2. Click Apply.
13.1.3 Managing recordings
To access the recordings section, click on the Resources link.
Figure 78: Music On Hold Resources section
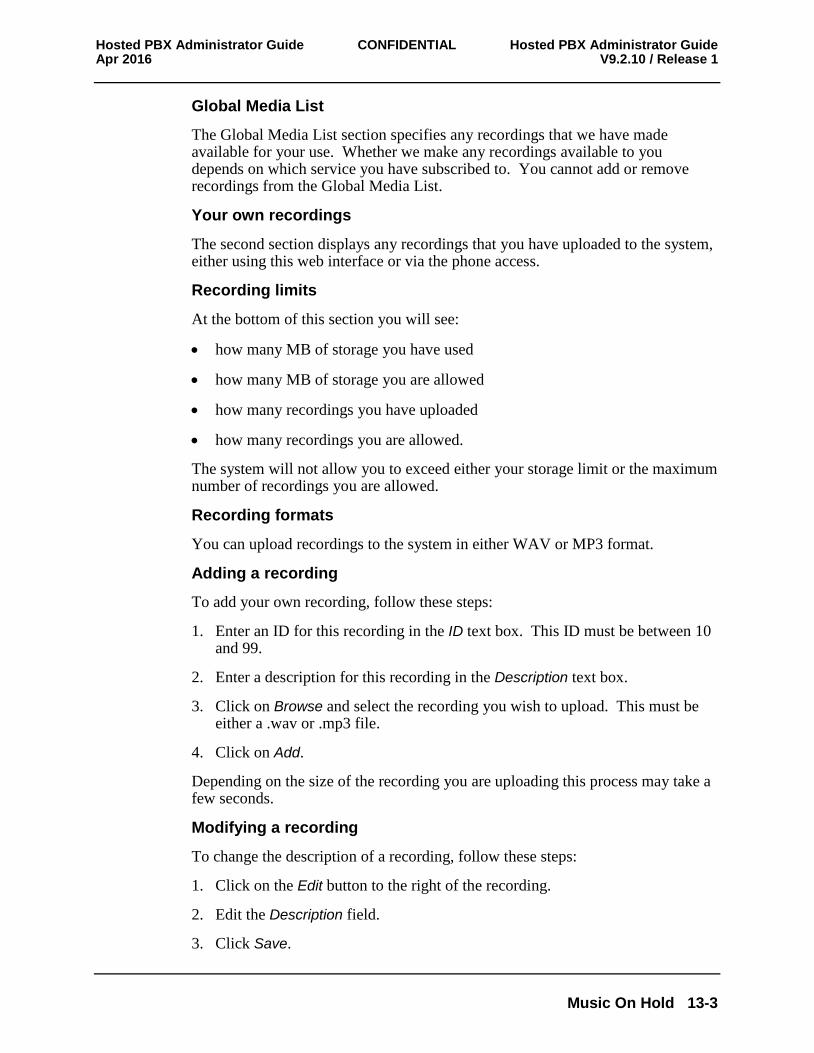
Hosted PBX Administrator Guide CONFIDENTIAL Hosted PBX Administrator Guide Apr 2016 V9.2.10 / Release 1
Music On Hold 13-3
Global Media List
The Global Media List section specifies any recordings that we have made available for your use. Whether we make any recordings available to you depends on which service you have subscribed to. You cannot add or remove recordings from the Global Media List.
Your own recordings
The second section displays any recordings that you have uploaded to the system, either using this web interface or via the phone access.
Recording limits
At the bottom of this section you will see:
how many MB of storage you have used
how many MB of storage you are allowed
how many recordings you have uploaded
how many recordings you are allowed.
The system will not allow you to exceed either your storage limit or the maximum number of recordings you are allowed.
Recording formats
You can upload recordings to the system in either WAV or MP3 format.
Adding a recording
To add your own recording, follow these steps:
1. Enter an ID for this recording in the ID text box. This ID must be between 10 and 99.
2. Enter a description for this recording in the Description text box.
3. Click on Browse and select the recording you wish to upload. This must be either a .wav or .mp3 file.
4. Click on Add.
Depending on the size of the recording you are uploading this process may take a few seconds.
Modifying a recording
To change the description of a recording, follow these steps:
1. Click on the Edit button to the right of the recording.
2. Edit the Description field.
3. Click Save.
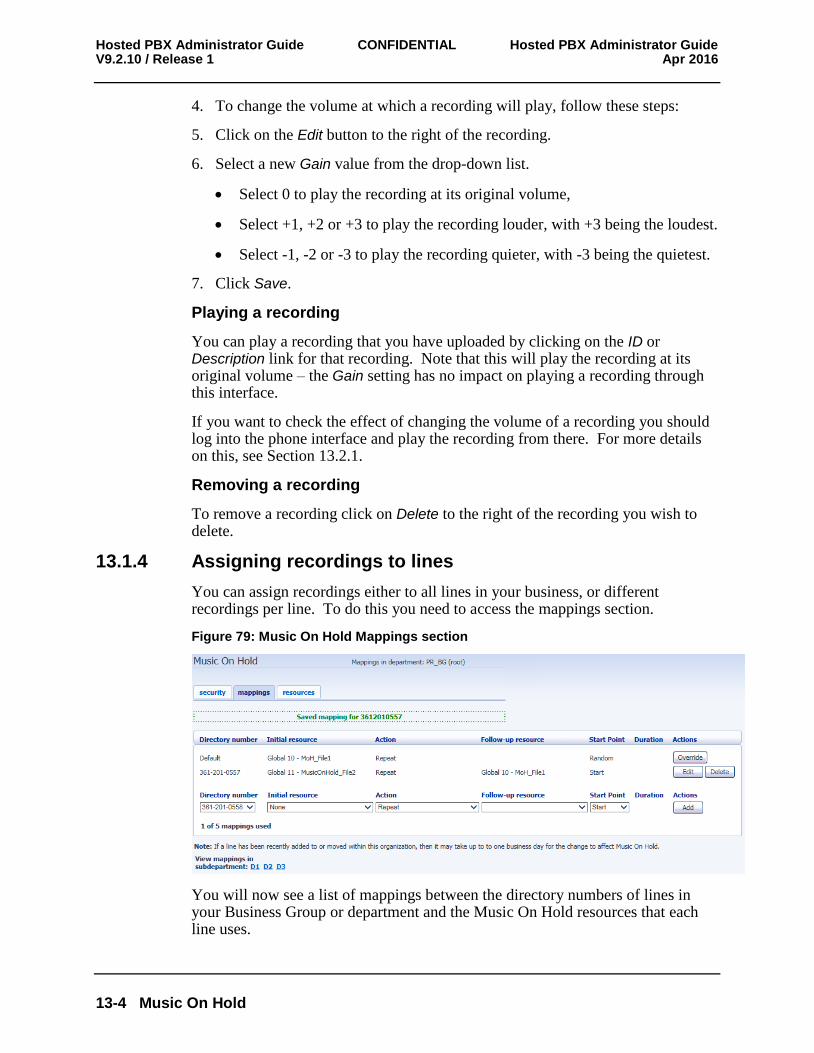
Hosted PBX Administrator Guide CONFIDENTIAL Hosted PBX Administrator Guide V9.2.10 / Release 1 Apr 2016
13-4 Music On Hold
4. To change the volume at which a recording will play, follow these steps:
5. Click on the Edit button to the right of the recording.
6. Select a new Gain value from the drop-down list.
Select 0 to play the recording at its original volume,
Select +1, +2 or +3 to play the recording louder, with +3 being the loudest.
Select -1, -2 or -3 to play the recording quieter, with -3 being the quietest.
7. Click Save.
Playing a recording
You can play a recording that you have uploaded by clicking on the ID or Description link for that recording. Note that this will play the recording at its original volume – the Gain setting has no impact on playing a recording through this interface.
If you want to check the effect of changing the volume of a recording you should log into the phone interface and play the recording from there. For more details on this, see Section 13.2.1.
Removing a recording
To remove a recording click on Delete to the right of the recording you wish to delete.
13.1.4 Assigning recordings to lines
You can assign recordings either to all lines in your business, or different recordings per line. To do this you need to access the mappings section.
Figure 79: Music On Hold Mappings section
You will now see a list of mappings between the directory numbers of lines in your Business Group or department and the Music On Hold resources that each line uses.
Hosted PBX Administrator Guide CONFIDENTIAL Hosted PBX Administrator Guide Apr 2016 V9.2.10 / Release 1
Music On Hold 13-5
If the department you are an administrator of has one or more sub-departments, you will see links to these at the bottom of the screen.
To manage resources for a line that is in a sub-department, click on the link for that sub-department.
When you have followed the link to a sub-department, an additional link appears at the top of the screen, allowing you to move back up to the parent department.
There is always a default mapping, which is used if you don't specify a mapping for a particular line. This is shown first in the list with Default instead of a Directory number and applies to all directory numbers except for those with their own individual mappings in the list. The mappings screen also shows how many individual mappings you are allowed to create.
Each mapping consists of a series of fields which you can set:
An Initial resource, or recording, which is played when the call is put on hold.
Optionally a Follow-up resource, or recording, which may be played depending on the Action.
An Action, which can be one of:
Repeat – The initial recording is played continually.
Play Once – The initial recording is played once, and then the follow-up recording is playing continually.
Repeat – Initial Interrupted – The initial recording should be interrupted at set intervals by the follow-up recording. This could be used to interrupt music with an announcement indicating that the user is in a queue.
Repeat – Follow-up Interrupted – The initial recording is played first. Then the follow-up recording plays continually being interrupted by the first recording.
The Start point field indicates whether the recording will start at the beginning (the value Start indicates this) or whether it should start at a random point of the recording (the value Random indicates this).
The Duration field which is used by the Repeat – Initial Interrupted and Repeat – Follow-up Interrupted actions to indicate how often the repeated recording should be interrupted.
In general, your Service Provider will configure a Default resource to be played as a single, repeating resource.
If you are an administrator for the whole Business Group, you can override this mapping for the whole group and all its departments, to use a different resource or a combination of resources.
Hosted PBX Administrator Guide CONFIDENTIAL Hosted PBX Administrator Guide V9.2.10 / Release 1 Apr 2016
13-6 Music On Hold
If you are an administrator for a department within the group, you can override the default mapping for your department and any sub-departments.
If you have not changed the default, it appears with an Override button to the right (instead of the Edit button shown for other mappings).
Adding a mapping
To add a mapping for a particular line, follow these steps:
1. Use the Directory number, Initial resource, Action, Follow-up resource, Start Point, and Duration drop-downs to set these fields (located to the left of the Add button).
2. Click on Add.
Modifying a mapping
To modify either the default mapping, or the mapping for a line, follow these steps:
1. To change the default mapping that was supplied by your Service Provider or inherited from a higher-level department, click the Override button to the right of the mapping.
If you were overriding the default mapping, the Override button is now replaced by Edit and Use Default buttons.
To change any other existing mapping, including the default mapping if you have already overridden it, click Edit to the right of the mapping.
2. Modify the fields.
To revert to the existing default mapping that was supplied by your Service Provider for the whole Business Group, or the default mapping for your department if you are a department administrator, click the Use Default button.
3. Click on Save.
You cannot modify the telephone number that a mapping applies to. If you need to do this, remove the mapping and add a new one.
Removing a mapping
To remove a mapping click on the Delete button to the right of the mapping. You cannot delete the default mapping but you can override it, edit it, or revert to the original default that was inherited from Service Provider settings or from a higher-level department.
Hosted PBX Administrator Guide CONFIDENTIAL Hosted PBX Administrator Guide Apr 2016 V9.2.10 / Release 1
Music On Hold 13-7
13.2 Phone access
Using this interface you can:
Listen to the music or other recordings for the default mapping or the mapping you have configured for any of your lines.
Listen to the Global Media Resources we have made available.
Create, change or delete your own recordings.
13.2.1 Logging in
To access the telephone interface for Music On Hold, dial 555-555-5555 from your phone. To log in you need to enter:
1. Your telephone number.
2. Your Music On Hold password. You can view or change this by using CommPortal as described in Section 13.1.2.
13.2.2 Using the telephone interface
The telephone interface is menu driven with voice prompts, so listen to the prompts and then press the keys on your phone to select which option you would like.
For your convenience the top-level menus provided by the telephone interface are documented here:
*. Press * at any time to go back to the previous menu.
1. Listen to resource for default mapping. This will play you the recording which is played to callers on hold for extensions which do not have their own mappings.
If you have logged in using an administrator line assigned to the top-level Business Group, you will hear the default mapping for the Business Group. If you have logged in as a department administrator, you will hear the default mapping for your department
2. Listen to resource for particular extension. This will play the recording which is played to callers on hold on a particular extension.
If you type a valid extension number, you will hear the resources that are mapped to this line, or the resources for the default mapping that it uses if it does not have its own explicit mapping. You will hear these resources in the same pattern as a caller would hear them.
3. Listen to global resources. This allows you to listen to the recordings in the Global Media List, described in Section 13.1.3. You will need the 2 digit resource ID of the recording you want to listen to.

Hosted PBX Administrator Guide CONFIDENTIAL Hosted PBX Administrator Guide V9.2.10 / Release 1 Apr 2016
13-8 Music On Hold
4. Manage existing local resources. This allows you to modify or delete recordings you have added to the Music On Hold system, including recording a new resource to replace an existing one. You will need the 2 digit resource ID of the recording you want to modify or delete.
5. Record new local resource. This allows you to record a new resource over the phone.
Hosted PBX Administrator Guide CONFIDENTIAL Hosted PBX Administrator Guide Apr 2016 V9.2.10 / Release 1
Call Recording 14-1
14 Call Recording If your system uses Call Recording, you will be able to use the CommPortal BG Admin interface to access this configuration.
14.1 Enabling or disabling Call Recording for an individual line
You can enable or disable call recording for an individual line.
Follow the instructions in 3.1.3 to access the CommPortal for that account.
On the Settings tab, select the Calls tab.
Use the checkboxes on the General panel to enable or disable
call recording for this line
intra-Business Group call recording
If you enable intra-Business Group call recording, calls made between two subscribers within the same Business Group will be recorded.
call recording warning tones.
If you enable Call Recording warning tones, a warning tone is played at the start of, and during, all recorded calls.
14.2 Accessing your Call Recording administration system
To log into the Call Recording administration system, click the Call Recording link at the bottom of the left hand side of CommPortal. This opens up a new browser window with the Call Recording administration system, where you can manage your recordings.
The operation of your Call Recording administration system is beyond the scope of this document.

Hosted PBX Administrator Guide CONFIDENTIAL Hosted PBX Administrator Guide Apr 2016 V9.2.10 / Release 1
Glossary A-1
A Glossary This appendix describes the important concepts used in your phone system.
A.1 CommPortal
CommPortal provides a web interface to your phone system, and allows end users and Business Administrators to modify their settings. There are two CommPortal interfaces.
1. The first is for regular users to manage their business telephony settings.
2. The second is for Business Administrators to modify both global settings for the business and to modify end-users' settings.
The second of these interfaces is the one which you will use to administer the phone system and is described by this document. For more details on using the first interface, please see the Jaguar Communications Hosted PBX End User Guide.
A.2 Logging into CommPortal as another user
You may at times need to log into CommPortal on behalf of another user. This will enable you to view and modify the user's settings just as that user can by using the regular CommPortal interface. Here are some examples of when this would come in useful.
If a user has forgotten their password you can log on and change the password to a new value.
If the user is unable to access CommPortal but needs a setting changed urgently, such as Call Forwarding, you can log on and do it for them.
There are a few differences between the regular CommPortal interface and what you will get to see when you log in as another user.
The Dashboard page is not available so by default CommPortal takes you to the Call Manager page.
The Voicemail page is not available for privacy reasons.
A.3 Phones
The Hosted PBX VoIP solution supports a number of different types of phone. These have different keys from each other and differ in their operation. For specific instructions on using the phones, please see the Jaguar Communications Hosted PBX End User Guide.
Hosted PBX Administrator Guide CONFIDENTIAL Hosted PBX Administrator Guide V9.2.10 / Release 1 Apr 2016
A-2 Glossary
A.4 Phone numbers
Every phone line within your business has its own DID (Direct Inward Dial) number, which is a regular 10 digit number including the area code, such as 555-555-5556. Within your business you are able to assign extension codes to these phone numbers. These are shorter numbers (typically 3 or 4 digits although they can be longer) which enable your employees to quickly call each other.
Your phone system is capable of having multiple lines configured on a single phone. You could configure one line on a phone which is that employee's personal DID, and another line which is your business's main switchboard number. Calls to both numbers will make this one phone ring.
Your phone system is also capable of sharing lines between phones. This means that in the example above, each phone in your business could have its own DID line, and a second line which is your business's main switchboard number. Then every phone would ring when a call came into your switchboard.
We will assign your business one or more blocks of numbers which you can then assign to phones as you wish. You can then define your own extension codes which map to these numbers. Alternatively, if you have asked us to, we will have pre-configured your system so that the phone numbers and extension codes are already assigned.
A.5 MAC addresses
Every phone has a unique identifier called a MAC address. The phone system uses this identifier to uniquely identify a phone.
This MAC address is printed on a sticker on the phone, usually underneath. It consists of 6 groups of 2 letters or numbers, and will be printed in one of two forms:
FE:DC:BA:12:34:56
FEDCBA123456
Hosted PBX Administrator Guide CONFIDENTIAL Hosted PBX Administrator Guide Apr 2016 V9.2.10 / Release 1
Glossary A-3
A.6 Departments
Many smaller businesses will only have a single administrator, or a number of administrators who all manage the entire phone system. However, if you work in a larger enterprise you may have different administrators each with responsibilities for the phones of different parts of your organization.
Therefore our Hosted PBX solution supports the concept of departments. Every phone line and phone is a member of a department. Departments are hierarchical, with some departments having sub-departments. An administrator of a department is permitted to manage all phones, lines and other resources within that department. They are also allowed to manage the sub-departments.
Even the smallest business will have at least one department in the phone system, known as the top-level or root department, and where there is only one department all of the phone lines and phones will be part of this.
Larger businesses will have multiple departments, and phones and lines can be moved around these departments to allow different administrators to manage them.
An administrator's phone line is always part of the department he is the administrator for. Moving the administrator's line to a different department will remove his permissions for managing the department he used to be in, and give him permissions to manage his new department.
A.7 Phone profiles
A department's phone profiles consist of default phone configuration which will be automatically applied to all phones within that department. There is a different profile for each type of phone within the department.
As an example, a department may deploy three types of phones:
Aastra 53i
Aastra 55i with 3 560M sidecars
Aastra 57i with a 536M sidecar In this case the department will have up to three profiles – one for each type of phone.
A department inherits the phone profiles from any parent departments, so parent departments can specify some elements of a phone's configuration, and the sub-department can configure others.
A.7.1 Modifying Phone profiles
The Phone Profile Editor allows you to make a range of changes to these phone profiles.
Hosted PBX Administrator Guide CONFIDENTIAL Hosted PBX Administrator Guide V9.2.10 / Release 1 Apr 2016
A-4 Glossary
You can configure the keys of the phone so that the phones used by people in your department will contain these settings by default. For example you can configure a key to access voicemail which will be configured on every phone of this model in your department.
You can also modify other configuration in a phone profile. .
Lock settings so that neither end-users nor administrators in sub-departments can override settings.
Hide settings so that neither end-users nor administrators in sub-departments can view settings.
Configure ringtones.
Configure the phone display.
Configure the time and date format, and time zone.
Note: the exact options available to you will depend on your phone model and the level of phone service you have subscribed to. In some cases there may be more advanced features available to you.
Making changes to your phone configuration is described in Chapter 4.
A.7.2 Copying phone configuration
If you need to replace a user's phone for them, because the old one breaks, you may have to copy the configuration of the old phone to the new phone. This is described in section 4.8.
Note: Copying phone settings is only supported if you are replacing the old phone with a new phone of exactly the same model. If you are upgrading the phone, you or the user will need to manually apply any settings to the new phone.
A.8 Network
The phones for your Hosted PBX use an Ethernet-based network to communicate with our systems. This is the same technology that provides computers with access to a network. These phones are also powered via Ethernet so if you have a compatible Ethernet switch there is no need for separate power connections to the phones.
Most of the phone models can also provide network access to the computers at users' desks. This means only a single network connection needs to be run to each desk.
As your telephone calls travel over an IP network the quality of the network in your offices is very important. Normally we or one of our partners will either supply and install your network, or verify that your network is suitable for Hosted VoIP.
Hosted PBX Administrator Guide CONFIDENTIAL Hosted PBX Administrator Guide Apr 2016 V9.2.10 / Release 1
Glossary A-5
However, it's very important that you only connect the right type of network device to the right network connection. If you connect the wrong type of equipment to your network then it may reduce the quality of your telephone calls, or even stop your telephone system working altogether. We will tell you when we install or verify your network which connections can be used for what.
A.9 Multiple Appearance Directory Numbers
From V7.4 onwards, MLHGs are enhanced to provide the same function as MADNs by providing a 'ring all' distribution algorithm. MADNs will continue to work as in previous versions. However, for new configuration, you should use MLHGs instead. For more information on MLHGs, see section A.10.
A Multiple Appearance Directory Number (MADN) is a telephone number with no phone or line associated with it. Instead the MADN is configured to have a number of MADN members, each of which is a number with a line associated with it. Whenever a call comes in to the MADN all of the lines whose directory numbers are MADN members will be rung. When any of these phones is answered the rest of the phones will stop ringing.
A line may be a member of one more than one MADN. In this case it rings when a call comes in to any of the MADNs that the line is a member of.
MADNs can also be configured to enable queuing. If configured, calls which come in to a MADN whose members are all busy will be queued. These queued calls will receive Music On Hold if you have subscribed to this feature.
You can configure to allow calls direct to a MADN member's directory number (rather than to the MADN itself). If permitted, these calls bypass the MADN and use the called number's services. Similarly, calls made from the MADN member's phone use the line's caller ID and call services rather than those of the MADN, although you can configure the calling party number on these lines to match the MADN number if required.
A.10 Multi Line Hunt Groups
A Multi Line Hunt Group allows sequential ringing of available phones for use in applications such as call centers. An MLHG consists of a number of lines within the business group, known as members. When a call comes into the hunt group, a hunt algorithm will decide which phone to ring. If this phone is busy or is not answered the hunt algorithm will move on to another phone.
Hunt groups have a pilot number, which is a directory number associated with the MLHG. When this pilot number is called the members of the MLHG are alerted in turn.
Alternatively, a hunt group can be configured to hunt if any member of the hunt group is called directly using its DID number and doesn't answer.
Hosted PBX Administrator Guide CONFIDENTIAL Hosted PBX Administrator Guide V9.2.10 / Release 1 Apr 2016
A-6 Glossary
There are various distribution algorithms available:
Linear – hunting starts at the first configured line and goes sequentially through the members in the list in the order they were configured.
Circular – hunting starts at the line which has been called, and then goes through as in the linear case.
Uniform – hunting starts at the first line after the line which was called the last time this MLHG was called.
Most idle – hunting starts at the line which has been idle for the longest period of time. After this it tries the line which has been idle the next longest period, etc.
Ring all – all free MLHG members ring simultaneously until one member answers the call.
MLHGs can also be configured to enable queuing. If configured, calls which come in to an MLHG whose members are all busy will be queued. These queued calls will receive Music On Hold if this feature is configured. You can also offer callers the option to press 0 to exit the queue and have their call diverted to voicemail or forwarded to another number.
If you have Integrated ACD that allows you to view and download statistics for activity in your MLHGs from the main MLHG page and generate reports, the interface will use slightly different terminology within the Integrated ACD UI.
A Queue refers to a MLHG.
An Agent refers to a member of a MLHG.
A.11 Call Pickup Groups
Group Call Pickup allows users to pick up calls that are ringing on other phones (in a pre-defined pickup group within the same business group by picking up their own phones and dialing an access code). Note that if two or more phones within the pickup group are ringing at the same time, the user cannot control which call is picked up.
You can have multiple groups in your business. A line can be in multiple Call Pickup Groups. If a call is ringing on lines in both groups simultaneously and the user who is in both groups picks up a call, then they will pick up the call which started ringing first.
Directed Call Pickup is similar, but allows the user to pick up the call that is ringing on a specific phone within the group. Users pick up their own phones, and dial an access code followed by the extension code for the line which is ringing.
Hosted PBX Administrator Guide CONFIDENTIAL Hosted PBX Administrator Guide Apr 2016 V9.2.10 / Release 1
Glossary A-7
A.12 Short Codes
Short codes are speed dials that are defined at the scope of your organization – so everyone in your business can use these speed dials.
A.13 Extensions
Extensions are the codes you can dial to reach other people in your business.
A.14 Account codes
Account codes:
authorize employees to make outbound phone calls
associate a reference number to outgoing phone calls that your business makes.
Once you have dialed a number that requires an account code you will hear a tone. This is the prompt to enter the account code. Once the account code has been correctly entered the call will be made.
There are two types of account codes.
1. Validated Account Codes. When the user making a phone call enters the account code it is checked against a list of valid account codes. If the account code matches one on the list the call will continue. If the account code doesn't match any on the list then an error is played.
You should use Validated Account Codes when you want to stop any unauthorized personnel from making outbound calls.
2. Unvalidated Account Codes. When the user making a phone call enters the account code this account code is marked against the call in our billing system and the call continues. The account code isn't checked for validity.
You can use Unvalidated Account Codes where you want to be able to record an account code against outgoing calls that you make. If you have signed up to the service with us then when we provide you with your phone bill the account code for each call will be marked on your bill. This is useful, for example, if you are billing your clients for all of your phone calls.
You can set up either type of account code either for your whole business, or select from either validated and unvalidated for each line individually. You can allow your users to manage their account codes.
Hosted PBX Administrator Guide CONFIDENTIAL Hosted PBX Administrator Guide V9.2.10 / Release 1 Apr 2016
A-8 Glossary
A.15 Auto Attendant – Easy Attendant / Premium Attendant
MetaSphere provides two solutions for Auto Attendant functionality. Easy Attendant offers a very simple automated telephone menu. Callers to a business are directed to the automated TUI, providing key options to transfer to specific departments or individuals in the business, to transfer to a voicemail account directly, or to listen to a recorded announcement. You can choose either to have a single menu that plays when Easy Attendant is turned on, or two different menus for business and non-business hours that are used according to a pre-defined schedule. When Easy Attendant is turned off, you can either forward callers to another telephone number or play a message informing the caller that your business is currently closed.
Premium Attendant, aimed at small and medium business subscribers, offers an increased level of service compared to Easy Attendant. In addition to all the features offered by Easy Attendant, Premium Attendant allows multiple menus with a finer scheduling control. It also includes more call handling options, such as Voicemail by Name and Voicemail by Extension, as well as greater control over the actions taken for any given key press.
A.16 Music On Hold
The Music On Hold system lets you configure music and recordings to be played to your callers when you put them on hold. You can either use recordings we have made available, or upload and make your own recordings.
You can access the Music On Hold system either using CommPortal, or using your telephone. The CommPortal interface is more powerful and easier to use, but you can use the telephone interface to record your own announcements to be played to callers.
A.16.1 Music On Hold performing rights
Playing music to callers on hold may constitute “public performance” of the music and therefore risks infringing the copyrights of composers or artists. Therefore you may need to obtain appropriate licenses to play any material that you plan to use as Music On Hold.
You can obtain these licenses from licensors such as Broadcast Music Inc (http://www.bmi.com/) and the American Society of Composers, Authors and Publishers (http://www.ascap.com/).
We do not accept any legal liability arising from copyright infringements associated with your use of Music On Hold, except where you use the Global Media Resources described in Section 13.1.3.