Embed Size (px)
Citation preview

11- Exploring File Explorer
Computers run programs that manipulate information. In our ultra-connected internet age, desktop and laptop computers in homes crunch through data and information at a rate that would have humbled the supercomputers of the past. Never before has it been easier and quicker to manipulate your pictures, videos and music files. In the next few lessons, we will show you how you can work with files and folders. The program you will be using to do this is called File Explorer. File Explorer was known as Windows Explorer in previous versions of Windows. It was upgraded with a new interface in Windows 8 and has had a few tweaks in Windows 10 too. Once mastered, File Explorer makes working with files as easy as organising a filing cabinet, easier in fact, since it does all the lifting and refiling for you!
11.1 – Your personal folders
Your personal folder contains four sub-folders by default. The folders are “Documents”, “Music”, “Pictures” and “Videos”. You can access these folders from File Explorer or from the search bar. To access your Documents folder, for instance, search for “documents” and click the first icon that appears in the results. You can also start File Explorer from the taskbar and then click on the “Documents” icon in the window. Your Documents folder will then be open in File Explorer and will look something like figure 11.1.
Figure 11.1 – A users Documents folder open in File Explorer
On a clean installation of Windows 10, the Documents folder will be empty. The items shown in figure 11.1 have been added just as an example.
In the left of the File Explorer window, we can jump quickly to several folders. Figure 11.2 shows the left hand column (or Navigation pane to give it its correct name) in more detail.
Figure 11.2 – The Navigation pane
Using the Navigation pane in File Explorer, we can jump to several folders. At the top of the list, the “Quick access” section gives us access to several folders including the Downloads folder, where files that you download from the web are stored. You can customise which folders appear in Quick access by right clicking on any folder you work with in File Explorer and choosing “Pin to Quick access”.
Underneath the Quick access section we can see OneDrive. OneDrive is a cloud (online) storage service that is available to all Windows 10 users, we cover it in detail in lesson 32.
You can also jump directly to Homegroup and Network, which take you to resources on the network you’re currently connected to, if they are available.
Notice the small arrows (>) next to the icons in the Navigation pane. These appear when you hover your mouse pointer over the Navigation pane. You can click these arrows to expand that particular location. For instance, clicking on the arrow next to “This PC” will show you the folders or locations that are available directly from “This PC”. Figure 11.3 illustrates this.

Figure 11.3 – Expanding out “This PC” in the Navigation pane
The contents you will see under “This PC” will vary depending on what drives you have in your PC and what compatible devices there are on your network. We cover “This PC” in more detail in lesson 19.
To open folders in the Navigation pane, single click on them. File Explorer will then open the folder and show the contents in the main area on the right. To open files or folders in the main working area of File Explorer, we double click on them. So to see the contents of the folder “Example Folder” shown in figure 11.1 for example, we would double click on it.
11.2 – The individual elements of a File Explorer window
Figure 11.4 shows the basic controls from the top of a typical File Explorer window.
Figure 11.4 – Elements of a File Explorer window
Back/forward navigation controls:- As you browse through folders, you can use the back button (the arrow pointing to the left) to go back to the folder you were previously viewing. Similarly, the forward button (the arrow pointing to the right) will take you forward again.

Parent directory:- This control was new in Windows 8, if you can’t make it out easily in the picture, it just looks like an up-pointing arrow. The button will take you to the parent directory, so for instance if you were in the “Videos” folder inside the “Documents” folder, clicking this arrow would take you back up to Documents.
Address bar:- The Address bar shows the address of the file on your computer. This is often referred to as the file path. Expert users can even type the address or path of a file directly into the address bar.
Search tool:- If you need to search through the contents of a folder, enter your search query here. Note that searching like this will only search through the contents of the current folder and its sub-folders, not through the entire computer.
Context sensitive ribbon:- The new ribbon replaces the toolbar in the new File Explorer. Tabs appear at the very top of the window as you work with files and folders in File Explorer. These tabs will change based on the content you are working with. Figure 11.5 shows an example of the tab that will appear when working with music in your music folder.
Figure 11.5 – Tabs on the ribbon interface will change as you work with different content
11.3 – Introducing the ribbon
In figure 11.5 the ribbon interface was hidden, but by clicking the tabs at the top of the window at any time you can open the ribbon. Figure 11.6 shows what happens when the “Music Tools/Play” tab is clicked.

Figure 11.6 – The music tools ribbon
From the Music Tools ribbon you can play all music in the current folder. By clicking once on a media file, the option to play the currently selected file will become available. You can always access the different categories on the ribbon by using the individual tabs too. For instance we can see “File”, “Home”, Share” etc in figure 11.6. We will be seeing more of the ribbon in later lessons. Remember that at any point you can use the minimise/maximise ribbon control near the top right of the Explorer window to show or hide the ribbon. Figure 11.7 shows this control.
Figure 11.7 – The minimise/maximise ribbon control is circled
11.4 – Breadcrumbs
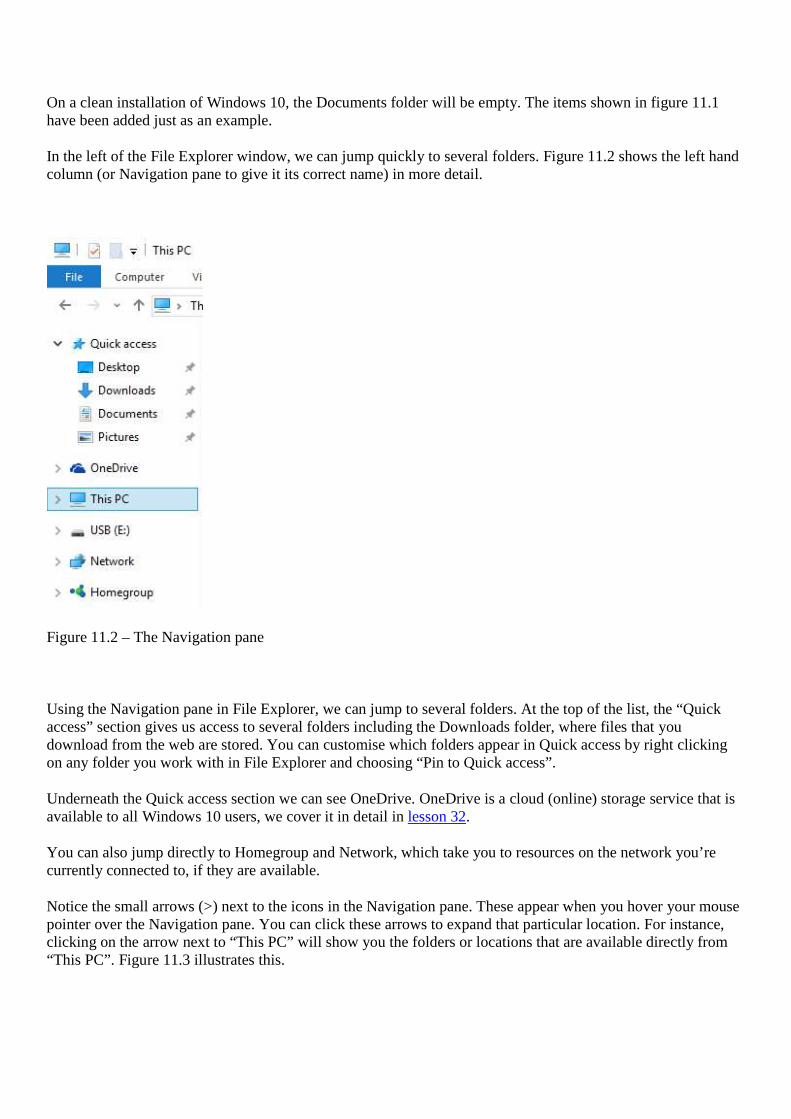
If you want to find your way back along a path, then leaving a trail of breadcrumbs might work, provided there’s nothing around to eat them. Since birds and other animals don’t eat digital breadcrumbs, you can rely on them for finding your way back down the path and off in other directions. To use breadcrumbs, click on the > shaped icons on the address bar. Take a look at figure 11.8, it shows an example of using the breadcrumbs feature to navigate around the personal folders.
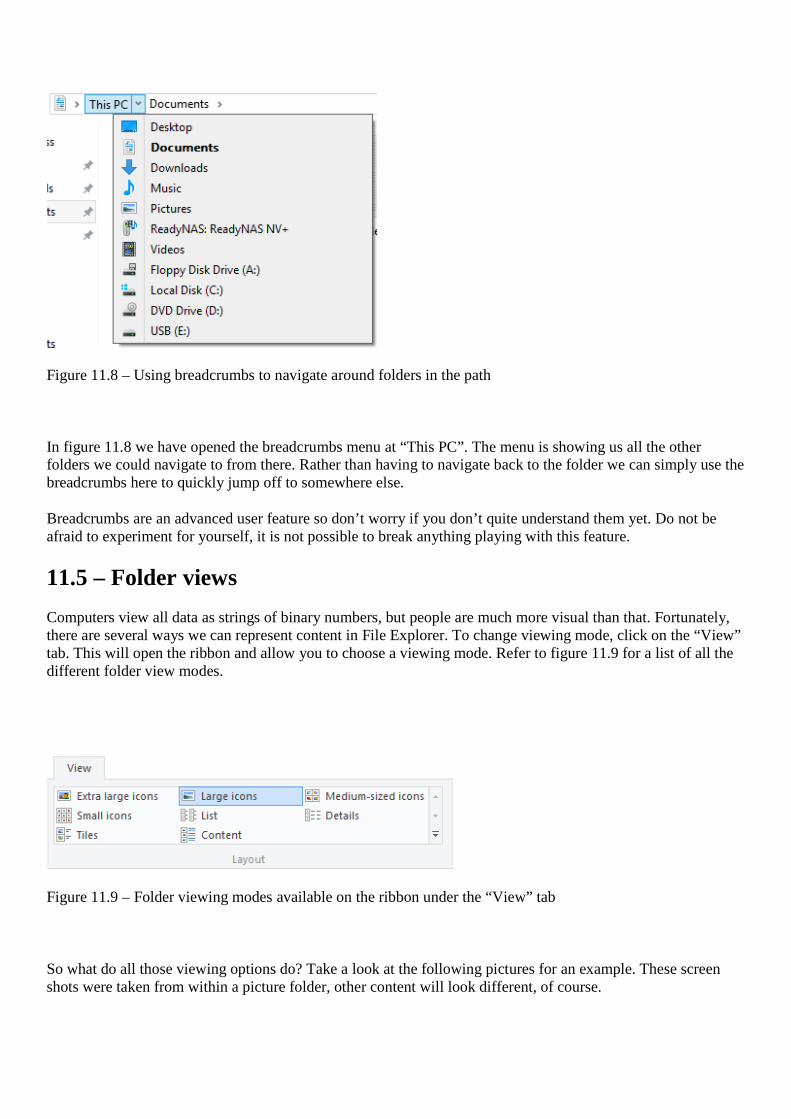
Figure 11.8 – Using breadcrumbs to navigate around folders in the path
In figure 11.8 we have opened the breadcrumbs menu at “This PC”. The menu is showing us all the other folders we could navigate to from there. Rather than having to navigate back to the folder we can simply use the breadcrumbs here to quickly jump off to somewhere else.
Breadcrumbs are an advanced user feature so don’t worry if you don’t quite understand them yet. Do not be afraid to experiment for yourself, it is not possible to break anything playing with this feature.
11.5 – Folder views
Computers view all data as strings of binary numbers, but people are much more visual than that. Fortunately, there are several ways we can represent content in File Explorer. To change viewing mode, click on the “View” tab. This will open the ribbon and allow you to choose a viewing mode. Refer to figure 11.9 for a list of all the different folder view modes.
Figure 11.9 – Folder viewing modes available on the ribbon under the “View” tab
So what do all those viewing options do? Take a look at the following pictures for an example. These screen shots were taken from within a picture folder, other content will look different, of course.

Figure 11.10.1 – Details view, the power users favourite
Details view is used most often when working with large numbers of files. You can easily see important information such as file types and sizes. We will be looking at details view in more detail in the next lesson.

Figure 11.10.2 – Extra large icons view
An icon is a visual representation of a file or folder on your computer. In File Explorer, we can choose four different sizes of icon. Picture files will display as a thumbnail preview as seen in figure 11.10.2 if the icon size is large enough.

Figure 11.10.3 – Small icons view
In small icons view, the icons become too small to show a thumbnail picture preview and so simply revert to this small representation of a picture. Small icons view and list view, which we look at next, are very similar. You can only see the difference between these views when you have a folder with several files, hence the screen shots here are from a more crowded Windows 10 picture folder.

Figure 11.10.4 – List view
List view is similar to small icons view but lays things out slightly differently.

Figure 11.10.5 – Tiles view
Tiles view is similar to medium icons view except some information about the file is placed on the right next to the icon.

Figure 11.10.6 – Content view
Content view aims to strike a balance between details view and icon view. Files are arranged in a list with their file sizes shown on the right.