Embed Size (px)
Citation preview

1 Working with FrameMaker Documents
Color and Commercial Printing: The properties of color
Chapter 1: Color and Commercial Printing
When you create a multi-color publication, you want the colors in the final printed piece to match your expec-tations as closely as possible. To accomplish this, you need three things: a clear understanding of color and how it’s displayed and printed on different devices, knowledge of the commercial printing process, and close communication with your commercial printer.
This chapter presents fundamental color and printing concepts, defines printing terminology, and introduces new technologies. We also recommend browsing in your local library, bookstore, or graphic arts supply store for books on graphic arts and commercial printing. The more you know about printing color, the better you can prepare your publication.
The properties of colorObjects appear to be certain colors because of their
ability to reflect, absorb, or transmit light, which we per-ceive as color. Our eyes are sensitive enough to per-ceive thousands of different colors in the spectrum of visible light—including many colors that cannot be dis-played on a color monitor or printed on a commercial printing press.
1
The FrameMaker document window
contains aids for writing, illustrating,
viewing, and navigating within a docu-
ment. The look of a document is deter-
mined by its template, which provides
page layouts and predefined formats for
paragraphs and selected text.

LESSON 18Working with FrameMaker Documents
In this lesson, you’ll learn how to do the following:
• Show and hide document window guides
• Display pages and zoom in on them
• Format paragraphs by applying formats from a document’s Paragraph Catalog
• Format words and phrases by applying formats from a document’s Character Catalog
• Create a document from a standard template
Getting startedDuring this lesson, you’ll save documents as you work on them. If you haven’t already
done so, you should copy the folder containing the sample documents, and then start
FrameMaker.
1 Copy the lessons folders as described in “Installing the program” on page 2.
2 If FrameMaker isn’t already running, do one of the following to start it:
• (Windows) Double-click the FrameMaker icon, if it is visible, or choose Start >
Programs > Adobe > FrameMaker 6.0> Adobe FrameMaker 6.0. (If you installed
FrameMaker in a folder other than Adobe, choose that folder from the Start > Programs
menu.) After a few moments, the FrameMaker application window appears.
• (Macintosh) Double-click the FrameMaker icon. After a few moments, the
FrameMaker menus appear.
• (UNIX) In a UNIX window, change to your home directory. Enter maker to start the
U.S. Edition, or maker –l (lowercase L) ukenglish to start the English-language version of
the International Edition. After a few moments, the main FrameMaker window appears.
Exploring the document windowBefore you begin work on a document of your own, you’ll take a quick look at the
FrameMaker document window. This window appears when you create or open a
document.

9ADOBE FRAMEMAKER 6.0Classroom in a Book
Opening a document
First, you’ll open a sample document.
1 Do one of the following:
• (Windows and Macintosh) Choose File > Open.
• (UNIX) In the main FrameMaker window, click Open.
2 Select Sample.fm in the Lesson01 folder and click Open.
The document appears in a document window.
Document window
3 Choose File > Save As, enter the filename Sample1.fm, and click Save.
You’ll rename and save the documents you use in the lessons so that you can return to the
unchanged originals, if you wish, without recopying them from the CD-ROM. It’s good
practice to save new documents when you create them, and to save frequently when you’re
editing documents.
Color and Commercial Printing: The properties of color
Chapter 1: Color and Commercial Printing
When you create a multi-color publication, you want the colors in the final printed piece to match your expec-tations as closely as possible. To accomplish this, you need three things: a clear understanding of color and how it’s displayed and printed on different devices, knowledge of the commercial printing process, and close communication with your commercial printer.
This chapter presents fundamental color and printing concepts, defines printing terminology, and introduces new technologies. We also recommend browsing in your local library, bookstore, or graphic arts supply store for books on graphic arts and commercial printing. The more you know about printing color, the better you can prepare your publication.
The properties of colorObjects appear to be certain colors because of their
ability to reflect, absorb, or transmit light, which we per-ceive as color. Our eyes are sensitive enough to per-ceive thousands of different colors in the spectrum of visible light—including many colors that cannot be dis-played on a color monitor or printed on a commercial printing press.
1

LESSON 110Working with FrameMaker Documents
Adjusting your view
Several controls and guides appear around the edge of the document window. The
window also contains text symbols, such as the end-of-paragraph symbol ( ), and a
dotted border around the editable part of the document.
You can use the top ruler to set paragraph indents and tabs.
Top ruler
You can use the formatting bar to format text. When the formatting bar is visible, it
appears below the menu bar (Windows) or below the document window’s title bar
(Macintosh and UNIX).
Formatting bar in Windows
You can also display the QuickAccess bar by choosing View > QuickAccess Bar. This
contains shortcuts to commonly used commands.
QuickAccess bar
The status bar at the bottom of the window contains information about the document
and controls for zooming and for moving through the document.
Status bar
Right now, you’re just looking at the document, so you’ll hide the formatting bar, the
rulers, and the QuickAccess bar (if it’s visible). You’ll also adjust the window size and use
a command in a context-sensitive pop-up menu to turn off the text symbols.
1 If the formatting bar is visible, do one of the following to hide it:
• (Windows) Choose View > Formatting Bar.

11ADOBE FRAMEMAKER 6.0Classroom in a Book
• (Macintosh and UNIX) Click the formatting bar toggle on the left side of the format-
ting bar.
Formatting bar toggle
2 Choose View > Rulers to hide the rulers.
3 If the QuickAccess bar is visible, do one of the following to hide it:
• (Windows) Choose View > QuickAccess Bar.
• (Macintosh) Click the close box.
• (UNIX) Put the pointer on the bar and press Control+c.
Because you hid the rulers, the document window may now be larger than the page. If so,
you’ll change the window size to fit the page dimensions.
4 If the document window is wider or taller than the page it contains (that is, if you see
a gray or black area at the right side of the window, or the top of page 2 at the bottom of
the window), choose Fit Window to Page from the Zoom pop-up menu ( ) in the
status bar.
Zoom pop-up menu
To see how the document looks without the text symbols, you’ll turn them off. You could
do this by using the Text Symbols command on the View menu, but instead you’ll use the
same command on a context menu (a pop-up menu that contains commands that depend
on the location of the pointer).
LESSON 112Working with FrameMaker Documents
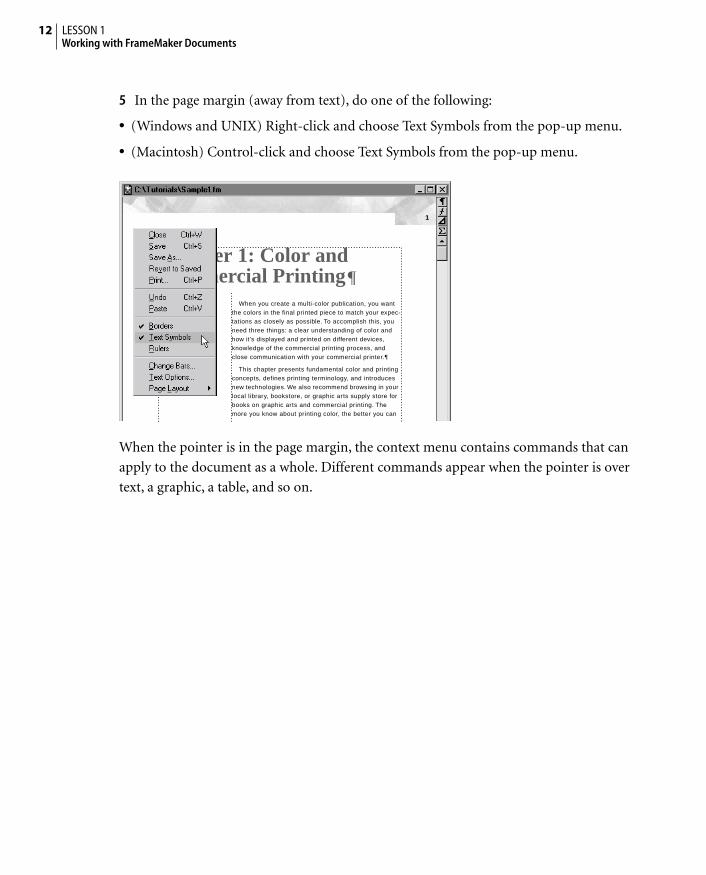
5 In the page margin (away from text), do one of the following:
• (Windows and UNIX) Right-click and choose Text Symbols from the pop-up menu.
• (Macintosh) Control-click and choose Text Symbols from the pop-up menu.
When the pointer is in the page margin, the context menu contains commands that can
apply to the document as a whole. Different commands appear when the pointer is over
text, a graphic, a table, and so on.
Chapter 1: Color and Commercial Printing
When you create a multi-color publication, you want the colors in the final printed piece to match your expec-tations as closely as possible. To accomplish this, you need three things: a clear understanding of color and how it’s displayed and printed on different devices, knowledge of the commercial printing process, and close communication with your commercial printer.
This chapter presents fundamental color and printing concepts, defines printing terminology, and introduces new technologies. We also recommend browsing in your local library, bookstore, or graphic arts supply store for books on graphic arts and commercial printing. The more you know about printing color, the better you can
1

13ADOBE FRAMEMAKER 6.0Classroom in a Book
Looking at the pages
FrameMaker documents appear the same on-screen as in print. You work on pages whose
page numbers, margins, headers, and footers are always visible. You add or edit contents
in a text frame, marked by a rectangular dotted border in the document window. You
don’t need to edit the headers and footers as you work; the headers and footers—and the
entire page design—are usually set up in a template. FrameMaker adds pages and adjusts
the header and footer text for you as you work.
A. Page number in header B. Text frame C. Page footer
Next, you’ll take a quick look at a few pages of the document.
1 In the status bar, click the Next Page button ( ) to display page 2 of the document.
Notice that the page number, which was at the top right of page 1, appears at the top left
of this page. (You may need to scroll up to see the page number.)
Color and Commercial Printing: The properties of color
Chapter 1: Color and Commercial Printing
When you create a multi-color publication, you want the colors in the final printed piece to match your expec-tations as closely as possible. To accomplish this, you need three things: a clear understanding of color and how it’s displayed and printed on different devices, knowledge of the commercial printing process, and close communication with your commercial printer.
This chapter presents fundamental color and printing concepts, defines printing terminology, and introduces new technologies. We also recommend browsing in your local library, bookstore, or graphic arts supply store for books on graphic arts and commercial printing. The more you know about printing color, the better you can prepare your publication.
The properties of colorObjects appear to be certain colors because of their
ability to reflect, absorb, or transmit light, which we per-ceive as color. Our eyes are sensitive enough to per-ceive thousands of different colors in the spectrum of visible light—including many colors that cannot be dis-played on a color monitor or printed on a commercial printing press.
1 A
B
C
Color and Commercial Printing: The properties of color

LESSON 114Working with FrameMaker Documents
2 Click the Next Page button three more times to display page 5. Notice that the text in
the page footer changes to reflect the first-level heading on the page (the heading Printing
terminology). You may need to scroll down to see the page footer.
Note: If the page footer is “greeked” and appears as a gray bar rather than as text, click the
Zoom In button ( ) in the status bar until the footer appears as text.
The text frame is split into two areas:
• The area on the left is set up for side heads—headings that stand to one side of the
body text.
• The area on the right is for body text.
The first-level headings straddle both areas.
A. Side-head area B. Body-text area C. First-level heading straddles both areas
Even though the headings and the body text appear in different areas, they’re all part of a
single text flow that begins on page 1 and continues to the end of the document. You can
create a document that contains several independent text flows (such as a newsletter), but
most FrameMaker documents have just one main flow.
Next, you’ll select some text to see how the text flows through the document.
5
available on a video monitor may not be printable on a press.
Printing terminologyYou’ll find printing technology easier to understand if
you’re familiar with the printing terminology discussed on the next few pages.
Continuous-tone art
An original photograph, drawing, or painting is called continuous-tone art. If you look closely at continuous-tone art, you will see that it consists of shades of gray or color that blend smoothly. Scanned images that con-tain a range of color tones are called continuous-tone images.
Halftone screens To reproduce continuous-tone images and process colors on a commercial printing press, the image or color must be broken into a series of dots of various sizes and colors, called a halftone screen. Black dots are used to re-create black-and-white images. Cyan, magenta, yellow, and black dots are printed at different screen angles to re-create color images on the press. The four colored dots form a rosette pattern when cor-rectly registered.
When printed, small halftone dots make up lighter areas of an image while larger halftone dots make up
C
BA

15ADOBE FRAMEMAKER 6.0Classroom in a Book
3 Place the pointer on the text in the first paragraph on page 5. (If you had to scroll down
to see the footer, you may need to scroll up to see the first paragraph.) Then press the
mouse button and drag slowly downward without releasing it.
Text is selected as you drag.
4 Continue dragging downward until the pointer moves into the status bar. The
document scrolls downward to page 6, and the text continues to be selected. The graphic
at the top of the text frame is also selected.
Selection crosses the page boundary.
5 Release the mouse button.
6 Click anywhere on the page to deselect the text that you selected.
5
available on a video monitor may not be printable on a press.
Printing terminologyYou’ll find printing technology easier to understand if
you’re familiar with the printing terminology discussed on the next few pages.
Continuous-tone art
An original photograph, drawing, or painting is called continuous-tone art. If you look closely at continuous-tone art, you will see that it consists of shades of gray or color that blend smoothly. Scanned images that con-tain a range of color tones are called continuous-tone images.
Halftone screens To reproduce continuous-tone images and process colors on a commercial printing press, the image or color must be broken into a series of dots of various sizes and colors, called a halftone screen. Black dots are used to re-create black-and-white images. Cyan, magenta, yellow, and black dots are printed at different screen angles to re-create color images on the press. The four colored dots form a rosette pattern when cor-rectly registered.
When printed, small halftone dots make up lighter areas of an image while larger halftone dots make up
sizes and colors, called a halftone screen. Black dots are used to re-create black-and-white images. Cyan, magenta, yellow, and black dots are printed at different screen angles to re-create color images on the press. The four colored dots form a rosette pattern when cor-rectly registered.
When printed, small halftone dots make up lighter areas of an image while larger halftone dots make up
6
Process screens at different angles.
Spot colors and tints. Spot colors and tints are printed with premixed inks on a printing press. (You can choose from among hundreds of different spot-color inks.) Each spot color is reproduced using
Color and Commercial Printing: Printing terminology
areas of an image while larger halftone dots make up dark or color saturated areas.
a single printing plate.
LESSON 116Working with FrameMaker Documents
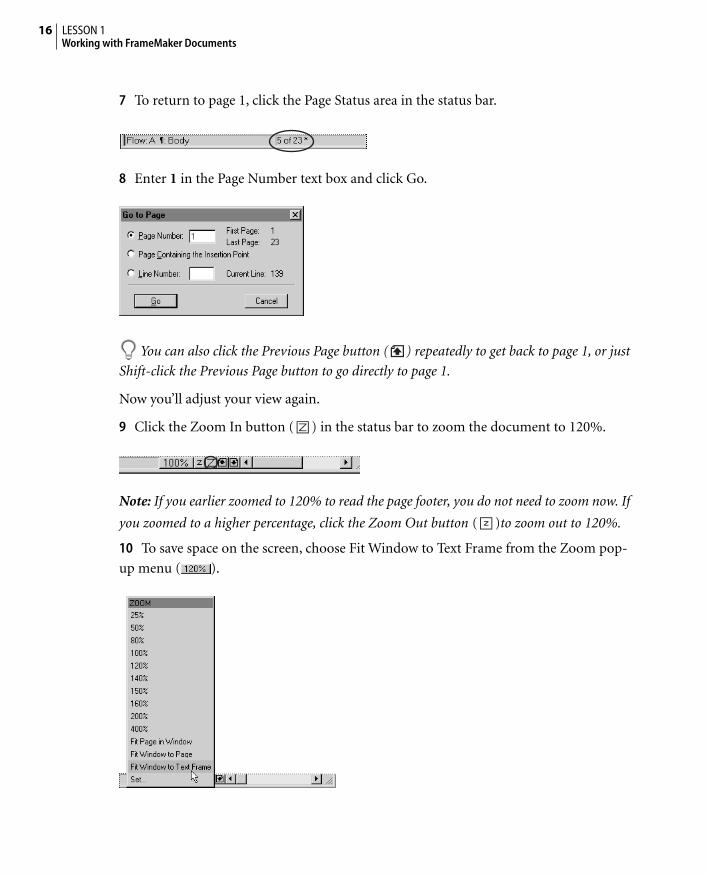
7 To return to page 1, click the Page Status area in the status bar.
8 Enter 1 in the Page Number text box and click Go.
You can also click the Previous Page button ( ) repeatedly to get back to page 1, or just
Shift-click the Previous Page button to go directly to page 1.
Now you’ll adjust your view again.
9 Click the Zoom In button ( ) in the status bar to zoom the document to 120%.
Note: If you earlier zoomed to 120% to read the page footer, you do not need to zoom now. If
you zoomed to a higher percentage, click the Zoom Out button ( )to zoom out to 120%.
10 To save space on the screen, choose Fit Window to Text Frame from the Zoom pop-
up menu ( ).

17ADOBE FRAMEMAKER 6.0Classroom in a Book
11 Choose View > Borders to hide the borders of the text frame.
Applying predefined paragraph formats Each FrameMaker document contains paragraph formats (styles) in a Paragraph Catalog.
Each format consists of many properties—such as line and paragraph spacing, indents,
alignment, tab stops, and font properties—and each format has a name, or tag. You can
change the appearance of paragraphs one property at a time, but you’ll find it easier to use
the formats in the catalog so that you can change many properties at once.
Looking at paragraph formats
Now you’ll display the Paragraph Catalog and look at some of the formats used in the
document.
1 At the upper right of the document window, click the Paragraph Catalog button ( ).
Paragraph Catalog button
The Paragraph Catalog appears in a palette. The initial size of the palette depends on your
system; you can drag a corner to resize it as needed (for example, to display more
format tags).
Paragraph Catalog
The Paragraph Catalog for this document includes paragraph formats for headings (for
example, ChapterTitle, Heading1, and Heading2), bulleted and numbered lists (Bullet,
Step, and Step1), and ordinary paragraphs of text (Body).
2 If the catalog blocks your view of the document, drag it out of the way. (You can move
any FrameMaker catalog or dialog box as needed.)

LESSON 118Working with FrameMaker Documents
3 Click in the chapter title Color and Commercial Printing on page 1 of the document.
The insertion point appears in the title, and the tag of the current paragraph appears in
the Tag area of the status bar.
Paragraph tag in the Tag area of the status bar
4 Try to click in the word Chapter at the beginning of the title paragraph. Notice that the
insertion point appears to the right of the chapter number and colon.
This is because the word Chapter, the chapter number, and the colon are inserted
automatically as part of the chapter title’s paragraph format. You can’t place the insertion
point in automatically inserted text or edit that text in the document window. (You’ll
learn more about automatically inserted text and automatic numbering in the next
lesson.)
5 Click in a paragraph of ordinary (body) text. The tag Body appears in the Tag area of
the status bar.
6 If you like, click elsewhere in the document to see the tags of other formats used by
different paragraphs. When you’re finished, return to page 1 of the document.
Chapter 1: Color and Commercial Printing
When you create a multi-color publication, you want the colors in the final printed piece to match your expec-tations as closely as possible. To accomplish this, you

19ADOBE FRAMEMAKER 6.0Classroom in a Book
Applying formats to paragraphs
Next, you’ll apply some of the formats to paragraphs. It’s usually easier to work with text
when text symbols and borders are visible, so you’ll display them again.
1 Choose View > Text Symbols and then View > Borders.
2 Click to place the insertion point at the end of the first body paragraph, between the
period and the end-of-paragraph symbol.
3 Press the Return key (which may be labeled Enter on a PC keyboard) to insert an empty
paragraph. The new paragraph’s tag is Body.
The new paragraph is a Body paragraph.
4 In the Paragraph Catalog, click Heading1. This tags the empty paragraph as a Heading1
paragraph. The properties of the Heading1 format are applied to the paragraph, and
Heading1 appears in the Tag area of the status bar.
need three things: a clear understanding of color and how it’s displayed and printed on different devices, knowledge of the commercial printing process, and close communication with your commercial printer.
Chapter 1: Color and Commercial Printing
When you create a multi-color publication, you want the colors in the final printed piece to match your expec-tations as closely as possible. To accomplish this, you need three things: a clear understanding of color and how it’s displayed and printed on different devices, knowledge of the commercial printing process, and close communication with your commercial printer.
This chapter presents fundamental color and printing concepts, defines printing terminology, and introduces new technologies. We also recommend browsing in your local library, bookstore, or graphic arts supply store for books on graphic arts and commercial printing. The more you know about printing color, the better you can prepare your publication.

LESSON 120Working with FrameMaker Documents
5 In the document window, type Introduction. The text appears at the insertion point.
6 Choose Fit Window to Page from the Zoom pop-up menu to display as much of the
document as possible at the current zoom setting. Notice that the page footer now
contains the text of the new first-level heading, Introduction. (You may need to scroll
down to see the page footer.)
The page footer contains the text of the first Heading1 paragraph on the page.
7 Close the Paragraph Catalog.
Applying predefined character formatsAlong with a Paragraph Catalog that contains formats for entire paragraphs of text, a
document contains a Character Catalog with formats you can apply to selected text, such
as words or phrases. A single character format can specify several font properties, such as
the font family, size, weight, angle, and color.
You can change the appearance of words or phrases one property at a time, but you’ll
usually find it easier to use the formats in the Character Catalog.
IntroductionThis chapter presents fundamental color and printing
concepts, defines printing terminology, and introduces new technologies. We also recommend browsing in your local library, bookstore, or graphic arts supply store for books on graphic arts and commercial printing. The more you know about printing color, the better you can prepare your publication.
how it’s displayed and printed on different devices, knowledge of the commercial printing process, and close communication with your commercial printer.
Color and Commercial Printing: Introduction
IntroductionThis chapter presents fundamental color and printing
concepts, defines printing terminology, and introduces new technologies. We also recommend browsing in your local library, bookstore, or graphic arts supply store for books on graphic arts and commercial printing. The more you know about printing color, the better you can prepare your publication.
The properties of colorObjects appear to be certain colors because of their
ability to reflect, absorb, or transmit light, which we per-ceive as color. Our eyes are sensitive enough to per-ceive thousands of different colors in the spectrum of visible light—including many colors that cannot be dis-

21ADOBE FRAMEMAKER 6.0Classroom in a Book
1 Display page 4 (page 5 on the Macintosh) of the sample document. The words in color
and italics at the top and bottom of the page are technical terms. They’re formatted using
a character format in the Character Catalog.
2 Click to put the insertion point in the phrase additive primaries that appears in color at
the top of the page. Notice that the Tag area now contains the name of the character
format—the character tag—in addition to the paragraph tag.
A. Paragraph tag B. Character tag
3 At the upper right of the document window, click the Character Catalog button ( ).
Character Catalog button
The Character Catalog appears in a palette. The initial size of the palette depends on your
system; you can drag to resize it as needed (for example, to display more tags for formats).
Character Catalog
blue are called the additive primaries. If you combine 100% of red, green, and blue, you perceive the color as white. If none of the additive primaries are present, you perceive black.
A B

LESSON 122Working with FrameMaker Documents
4 Double-click the word visible (at the beginning of the last paragraph on the page), and
then Shift-click the word spectrum to select both words. (You can also drag to select
both words.)
5 Click FirstUse in the Character Catalog, and then click anywhere else on the page to
deselect the text so you can see that it now appears in color and italics.
6 Close the Character Catalog.
You’re finished with the sample document.
7 Choose File > Save and then choose File > Close.
Writing a short memoTo finish this lesson, you’ll use one of the standard templates that come with FrameMaker
to write a short memo for a sales report. When you create a new document from a
standard template, that document is an untitled copy of the template. The template itself
doesn’t change when you modify and save the new document.
Creating the memo from a template
First you’ll create a blank memo from a template.
1 Do one of the following:
• (Windows and Macintosh) Choose File > New > Document.
• (UNIX) In the main FrameMaker window, click New.
Color gamuts The visible spectrum contains millions of colors; each device used in commercial printing can reproduce a unique subset of this range known as its color gamut or
Color gamuts contains millions of colors; each device used in commercial printing can reproduce a unique subset of this range known as its color gamut or
The visible spectrum

23ADOBE FRAMEMAKER 6.0Classroom in a Book
The contents of the Templates folder appear in the dialog box.
2 If the contents of the Templates folder don’t appear in the dialog box, do one of the
following:
• (Windows and Macintosh) Navigate to the Templates folder in the FrameMaker 6.0
folder.
• (UNIX) Click Cancel, click Exit in the main FrameMaker window, restart FrameMaker,
and then repeat step 1.
You’ll use the Memo template in the Business folder.
3 Double-click Business and then double-click Memo.fm.
Untitled memo
The memo appears as an untitled new document.
4 Choose File > Save, make sure you are in the Lesson01 folder, and then enter the
filename SalesMemo.fm and click Save.
Date: July 22, 2000
memo
To:
Your Company Name
1000 Main Street
City, State 99999
444.555.1212
Fax 444.555.2222
LESSON 124Working with FrameMaker Documents
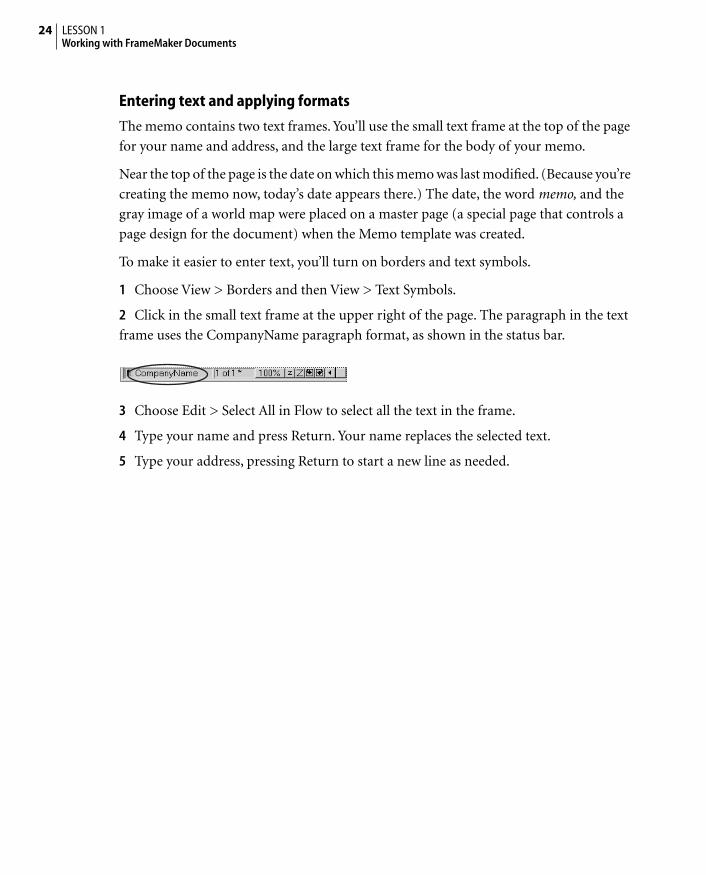
Entering text and applying formats
The memo contains two text frames. You’ll use the small text frame at the top of the page
for your name and address, and the large text frame for the body of your memo.
Near the top of the page is the date on which this memo was last modified. (Because you’re
creating the memo now, today’s date appears there.) The date, the word memo, and the
gray image of a world map were placed on a master page (a special page that controls a
page design for the document) when the Memo template was created.
To make it easier to enter text, you’ll turn on borders and text symbols.
1 Choose View > Borders and then View > Text Symbols.
2 Click in the small text frame at the upper right of the page. The paragraph in the text
frame uses the CompanyName paragraph format, as shown in the status bar.
3 Choose Edit > Select All in Flow to select all the text in the frame.
4 Type your name and press Return. Your name replaces the selected text.
5 Type your address, pressing Return to start a new line as needed.

25ADOBE FRAMEMAKER 6.0Classroom in a Book
6 To redisplay the page, press Control+l (lowercase L). A FrameMaker variable on the
master page causes your name to appear in large bold type along the left side of the page.
(You may need to scroll down the page to see your name along the side.)
7 Click to the right of the word To in the large text frame.
The word To—like the word Chapter and the chapter number in the sample document
you looked at earlier—is inserted automatically as part of the paragraph’s format
(MemoTo).
8 Type Sales Department Staff and press Return.
Date: July 22, 2000
memo
Necia
Do
ug
hty
To:
Necia Doughty
492 Holly Street
San Jose, CA
95126
Date: July 22, 2000
memo
To: Sales Department Staff
From:
Necia Doughty
492 Holly Street
San Jose, CA
95126
LESSON 126Working with FrameMaker Documents
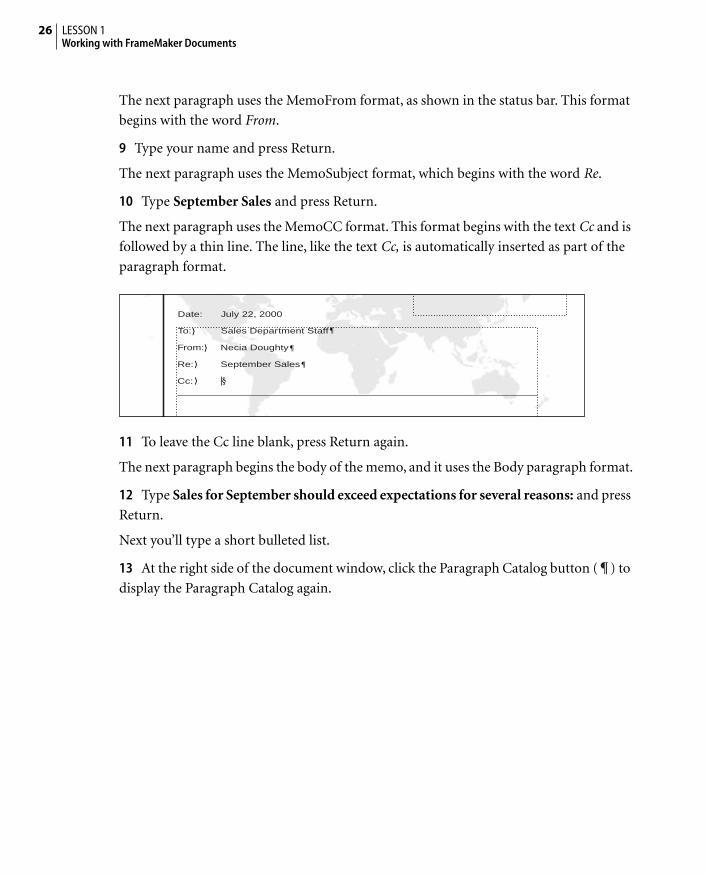
The next paragraph uses the MemoFrom format, as shown in the status bar. This format
begins with the word From.
9 Type your name and press Return.
The next paragraph uses the MemoSubject format, which begins with the word Re.
10 Type September Sales and press Return.
The next paragraph uses the MemoCC format. This format begins with the text Cc and is
followed by a thin line. The line, like the text Cc, is automatically inserted as part of the
paragraph format.
11 To leave the Cc line blank, press Return again.
The next paragraph begins the body of the memo, and it uses the Body paragraph format.
12 Type Sales for September should exceed expectations for several reasons: and press
Return.
Next you’ll type a short bulleted list.
13 At the right side of the document window, click the Paragraph Catalog button ( ) to
display the Paragraph Catalog again.
Date: July 22, 2000
To: Sales Department Staff
From: Necia Doughty
Re: September Sales
Cc:

27ADOBE FRAMEMAKER 6.0Classroom in a Book
14 In the catalog, click the Bulleted format.
The Body paragraph changes to Bulleted.
15 Type Strong sales of existing products and press Return.
16 Type Rapid acceptance of our new products and press Return.
17 Type Favorable exchange rates. The memo is finished.
18 Close the Paragraph Catalog and save and close the document.
Moving onYou’ve completed this lesson. For in-depth information about the document window,
entering and editing text, and applying paragraph and character formats, see Chapter 2,
“Working with FrameMaker Documents”; Chapter 3, “Word Processing”; and Chapter 4,
“Text Formatting,” in the Adobe FrameMaker User Guide.
Review questionsFor answers to these questions, see page 371.
1 How do you show and hide rulers, borders, and text symbols?
2 How do you zoom in for a closer look at a document’s contents?
3 What is the primary difference between paragraph formats and character formats?
4 How do you open the Paragraph Catalog and the Character Catalog?
5 How do you apply a paragraph format from the catalog?
6 How do you apply a character format from the catalog?
7 What happens when you create a document from a template?
Date: July 22, 2000
To: Sales Department Staff
From: Necia Doughty
Re: September Sales
Cc:
Sales for September should exceed expectations for several reasons:
•