Embed Size (px)
Citation preview
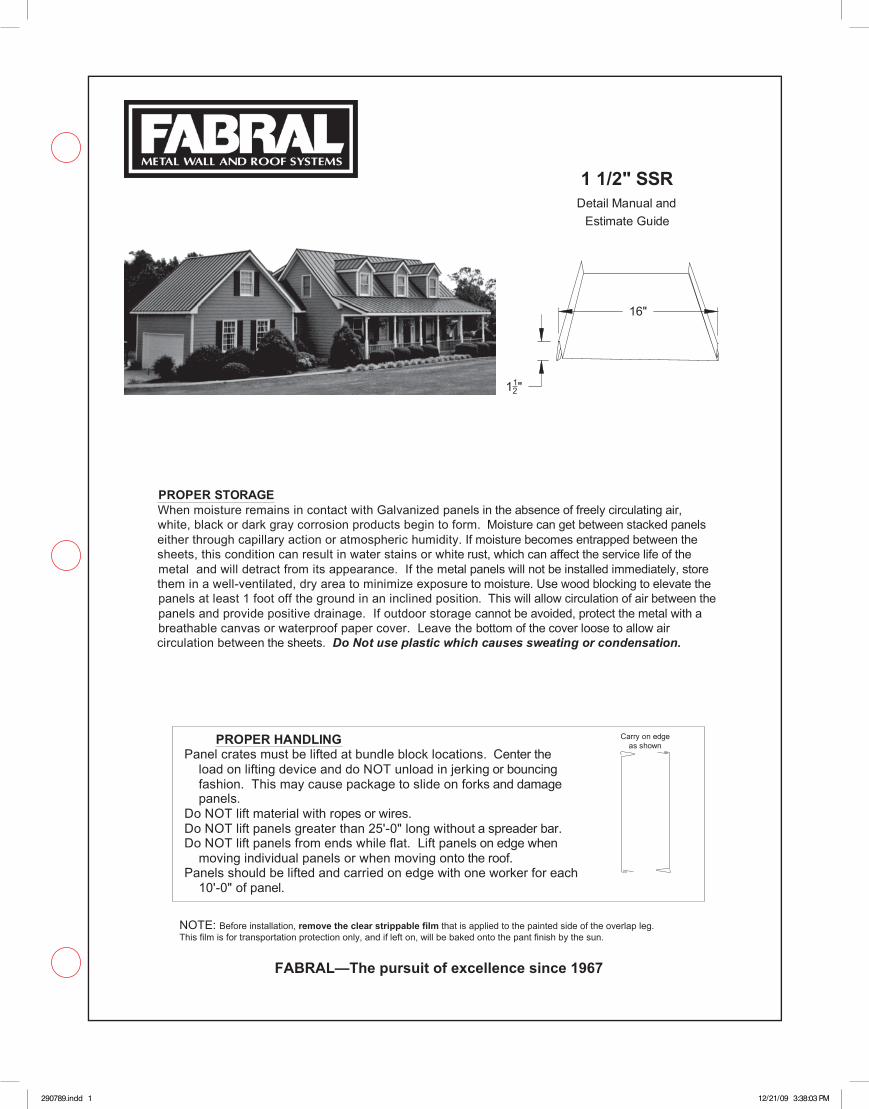
16"
112"
1 1/2" SSRDetail Manual and
Estimate Guide
PROPER STORAGEWhen moisture remains in contact with Galvanized panels in the absence of freely circulating air, white, black or dark gray corrosion products begin to form. Moisture can get between stacked panels either through capillary action or atmospheric humidity. If moisture becomes entrapped between the sheets, this condition can result in water stains or white rust, which can affect the service life of the metal and will detract from its appearance. If the metal panels will not be installed immediately, store them in a well-ventilated, dry area to minimize exposure to moisture. Use wood blocking to elevate the panels at least 1 foot off the ground in an inclined position. This will allow circulation of air between the panels and provide positive drainage. If outdoor storage cannot be avoided, protect the metal with a breathable canvas or waterproof paper cover. Leave the bottom of the cover loose to allow air circulation between the sheets. Do Not use plastic which causes sweating or condensation.
Carry on edgeas shown PROPER HANDLING
Panel crates must be lifted at bundle block locations. Center the load on lifting device and do NOT unload in jerking or bouncing fashion. This may cause package to slide on forks and damage panels. Do NOT lift material with ropes or wires. Do NOT lift panels greater than 25'-0" long without a spreader bar. Do NOT lift panels from ends while flat. Lift panels on edge when moving individual panels or when moving onto the roof. Panels should be lifted and carried on edge with on worker for each 10'-0" of panel.
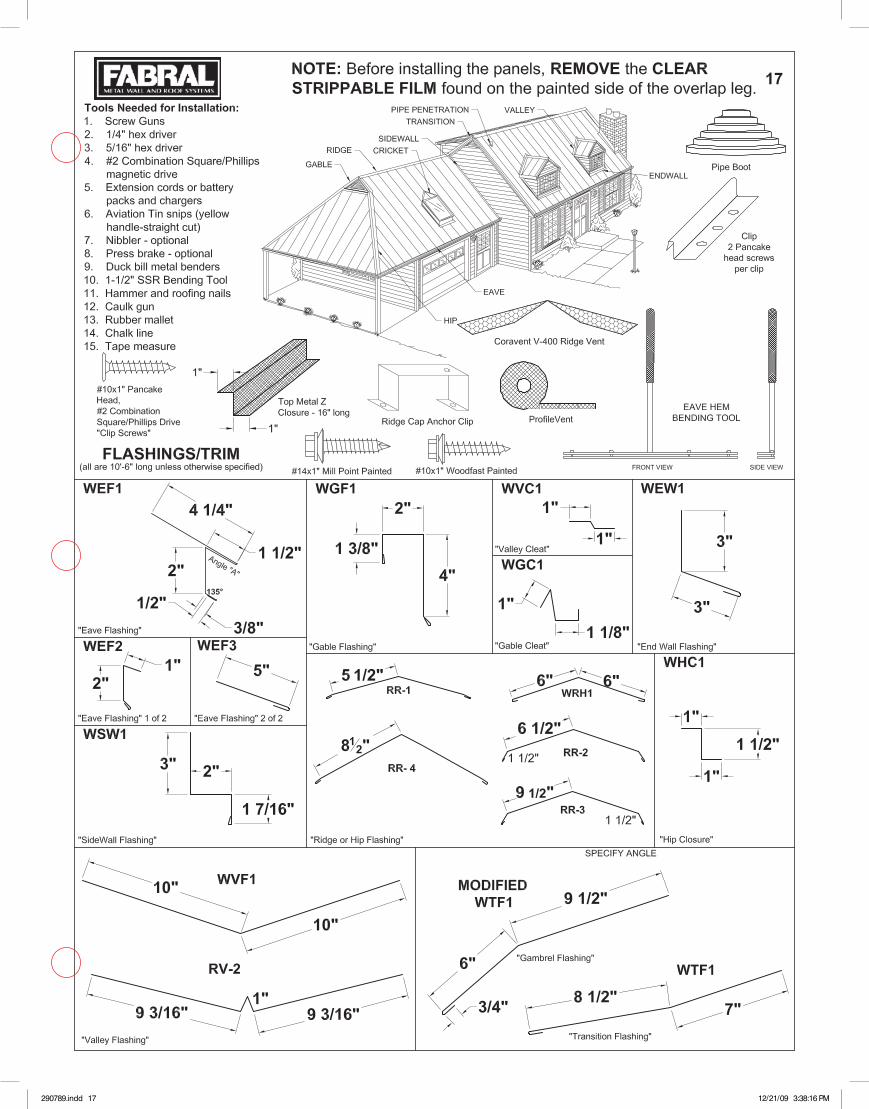
NOTE: Before installation, remove the clear strippable film that is applied to the painted side of the overlap leg. This film is for transportation protection only, and if left on, will be baked onto the pant finish by the sun.
FABRAL—The pursuit of excellence since 1967
with one worker for each
290789 work file.indd 1 12/21/09 3:32:59 PM290789.indd 1 12/21/09 3:38:03 PM
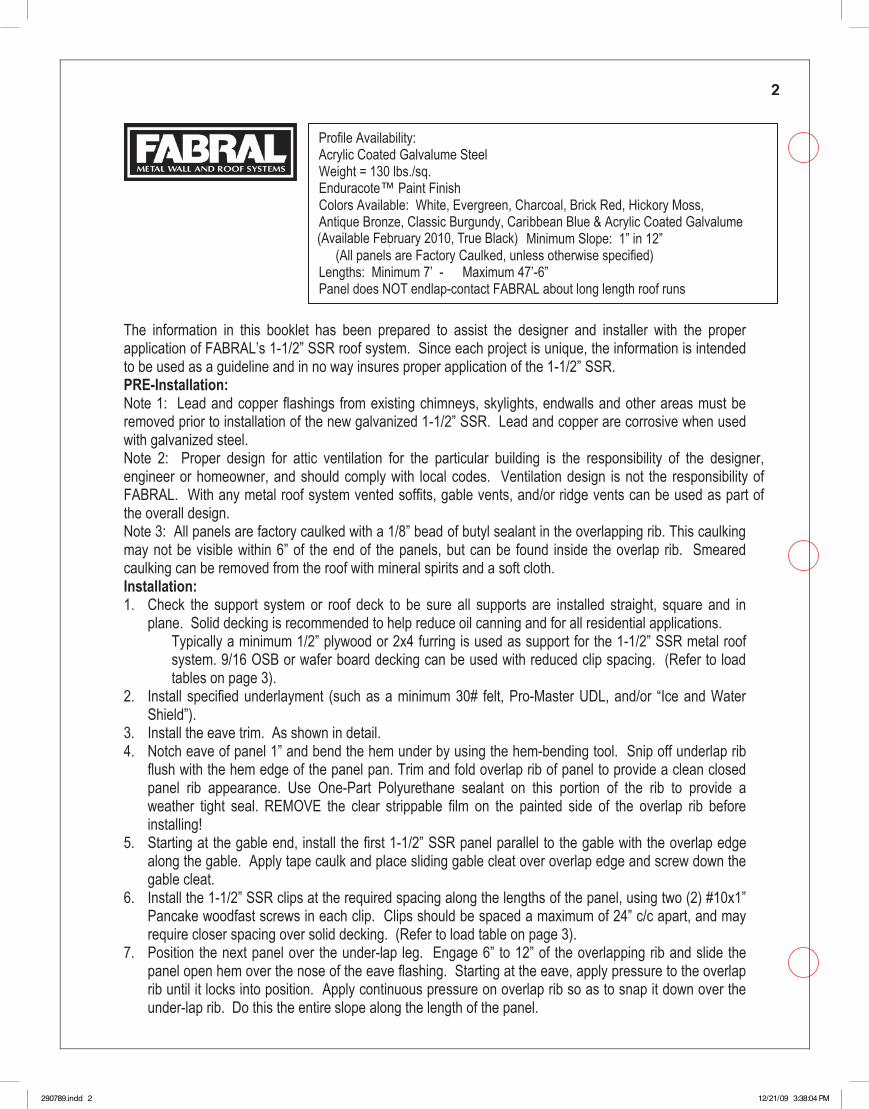
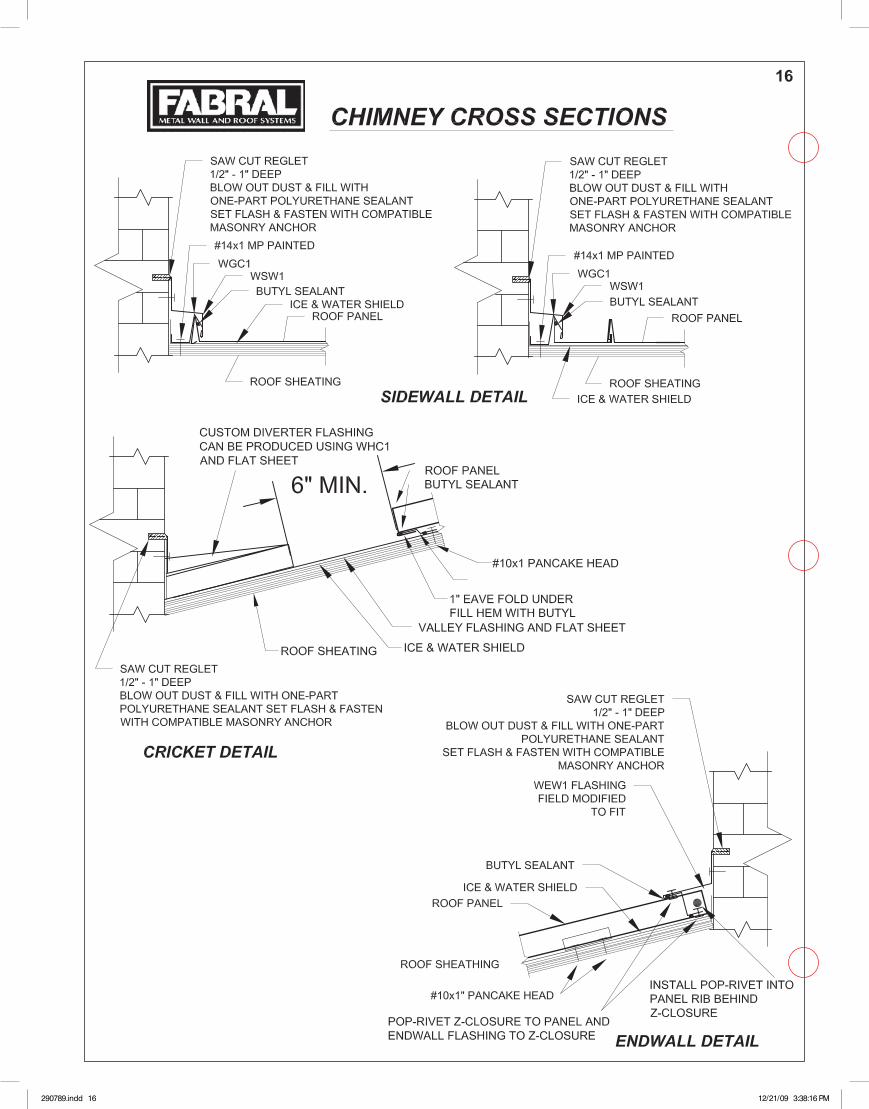
The information in this booklet has been prepared to assist the designer and installer with the proper application of FABRAL’s 1-1/2” SSR roof system. Since each project is unique, the information is intended to be used as a guideline and in no way insures proper application of the 1-1/2” SSR. PRE-Installation: Note 1: Lead and copper flashings from existing chimneys, skylights, endwalls and other areas must be removed prior to installation of the new galvanized 1-1/2” SSR. Lead and copper are corrosive when used with galvanized steel. Note 2: Proper design for attic ventilation for the particular building is the responsibility of the designer, engineer or homeowner, and should comply with local codes. Ventilation design is not the responsibility of FABRAL. With any metal roof system vented soffits, gable vents, and/or ridge vents can be used as part of the overall design. Note 3: All panels are factory caulked with a 1/8” bead of butyl sealant in the overlapping rib. This caulking may not be visible within 6” of the end of the panels, but can be found inside the overlap rib. Smeared caulking can be removed from the roof with mineral spirits and a soft cloth. Installation: 1. Check the support system or roof deck to be sure all supports are installed straight, square and in
plane. Solid decking is recommended to help reduce oil canning and for all residential applications. Typically a minimum 1/2” plywood or 2x4 furring is used as support for the 1-1/2” SSR metal roof system. 9/16 OSB or wafer board decking can be used with reduced clip spacing. (Refer to load tables on page 3).
2. Install specified underlayment (such as a minimum 30# felt, Pro-Master UDL, and/or “Ice and Water Shield”).
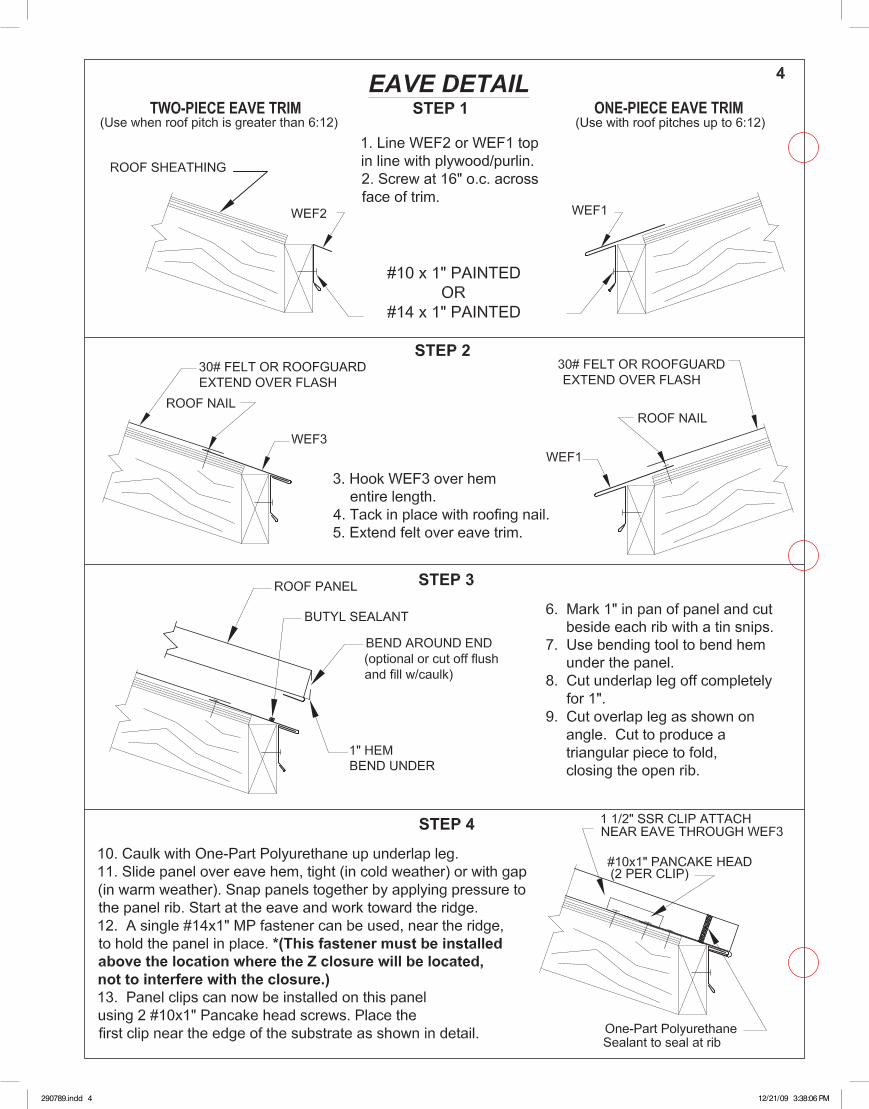
3. Install the eave trim. As shown in detail. 4. Notch eave of panel 1” and bend the hem under by using the hem-bending tool. Snip off underlap rib
flush with the hem edge of the panel pan. Trim and fold overlap rib of panel to provide a clean closed panel rib appearance. Use One-Part Polyurethane sealant on this portion of the rib to provide a weather tight seal. REMOVE the clear strippable film on the painted side of the overlap rib before installing!
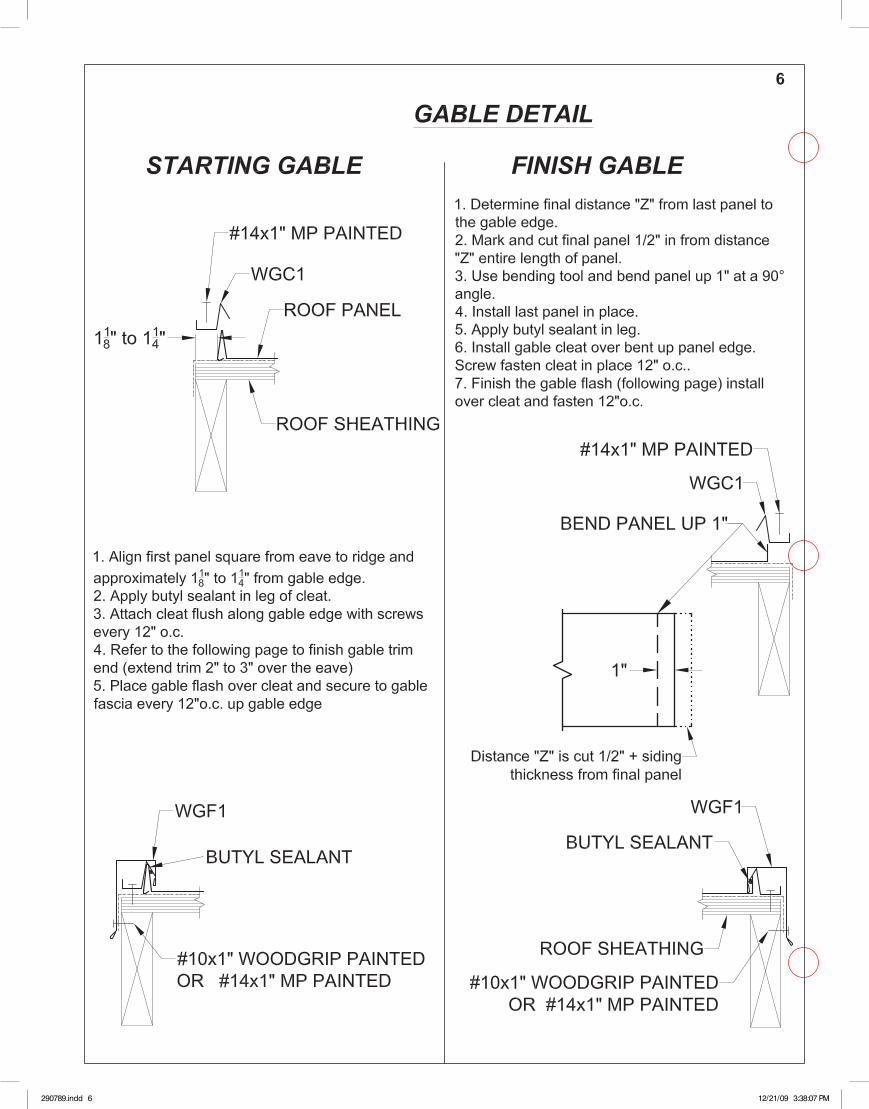
5. Starting at the gable end, install the first 1-1/2” SSR panel parallel to the gable with the overlap edge along the gable. Apply tape caulk and place sliding gable cleat over overlap edge and screw down the gable cleat.
6. Install the 1-1/2” SSR clips at the required spacing along the lengths of the panel, using two (2) #10x1” Pancake woodfast screws in each clip. Clips should be spaced a maximum of 24” c/c apart, and may require closer spacing over solid decking. (Refer to load table on page 3).
7. Position the next panel over the under-lap leg. Engage 6” to 12” of the overlapping rib and slide the panel open hem over the nose of the eave flashing. Starting at the eave, apply pressure to the overlap rib until it locks into position. Apply continuous pressure on overlap rib so as to snap it down over the under-lap rib. Do this the entire slope along the length of the panel.
Profile Availability: Acrylic Coated Galvalume Steel Weight = 130 lbs./sq. Enduracote™ Paint Finish Colors Available: White, Evergreen, Charcoal, Brick Red, Hickory Moss, Antique Bronze, Classic Burgundy, Caribbean Blue & Acrylic Coated Galvalume Minimum Slope: 1” in 12” (All panels are Factory Caulked, unless otherwise specified) Lengths: Minimum 7’ - Maximum 47’-6” Panel does NOT endlap-contact FABRAL about long length roof runs
2
The information in this booklet has been prepared to assist the designer and installer with the proper application of FABRAL’s 1-1/2” SSR roof system. Since each project is unique, the information is intended to be used as a guideline and in no way insures proper application of the 1-1/2” SSR. PRE-Installation: Note 1: Lead and copper flashings from existing chimneys, skylights, endwalls and other areas must be removed prior to installation of the new galvanized 1-1/2” SSR. Lead and copper are corrosive when used with galvanized steel. Note 2: Proper design for attic ventilation for the particular building is the responsibility of the designer, engineer or homeowner, and should comply with local codes. Ventilation design is not the responsibility of FABRAL. With any metal roof system vented soffits, gable vents, and/or ridge vents can be used as part of the overall design. Note 3: All panels are factory caulked with a 1/8” bead of butyl sealant in the overlapping rib. This caulking may not be visible within 6” of the end of the panels, but can be found inside the overlap rib. Smeared caulking can be removed from the roof with mineral spirits and a soft cloth. Installation: 1. Check the support system or roof deck to be sure all supports are installed straight, square and in
plane. Solid decking is recommended to help reduce oil canning and for all residential applications. Typically a minimum 1/2” plywood or 2x4 furring is used as support for the 1-1/2” SSR metal roof system. 9/16 OSB or wafer board decking can be used with reduced clip spacing. (Refer to load tables on page 3).
2. Install specified underlayment (such as a minimum 30# felt, Pro-Master UDL, and/or “Ice and Water Shield”).
3. Install the eave trim. As shown in detail. 4. Notch eave of panel 1” and bend the hem under by using the hem-bending tool. Snip off underlap rib
flush with the hem edge of the panel pan. Trim and fold overlap rib of panel to provide a clean closed panel rib appearance. Use One-Part Polyurethane sealant on this portion of the rib to provide a weather tight seal. REMOVE the clear strippable film on the painted side of the overlap rib before installing!
5. Starting at the gable end, install the first 1-1/2” SSR panel parallel to the gable with the overlap edge along the gable. Apply tape caulk and place sliding gable cleat over overlap edge and screw down the gable cleat.
6. Install the 1-1/2” SSR clips at the required spacing along the lengths of the panel, using two (2) #10x1” Pancake woodfast screws in each clip. Clips should be spaced a maximum of 24” c/c apart, and may require closer spacing over solid decking. (Refer to load table on page 3).
7. Position the next panel over the under-lap leg. Engage 6” to 12” of the overlapping rib and slide the panel open hem over the nose of the eave flashing. Starting at the eave, apply pressure to the overlap rib until it locks into position. Apply continuous pressure on overlap rib so as to snap it down over the under-lap rib. Do this the entire slope along the length of the panel.
Profile Availability: Acrylic Coated Galvalume Steel Weight = 130 lbs./sq. Enduracote™ Paint Finish Colors Available: White, Evergreen, Charcoal, Brick Red, Hickory Moss, Antique Bronze, Classic Burgundy, Caribbean Blue & Acrylic Coated Galvalume Minimum Slope: 1” in 12” (All panels are Factory Caulked, unless otherwise specified) Lengths: Minimum 7’ - Maximum 47’-6” Panel does NOT endlap-contact FABRAL about long length roof runs
2
(Available February 2010, True Black)
290789.indd 2 12/21/09 3:38:04 PM
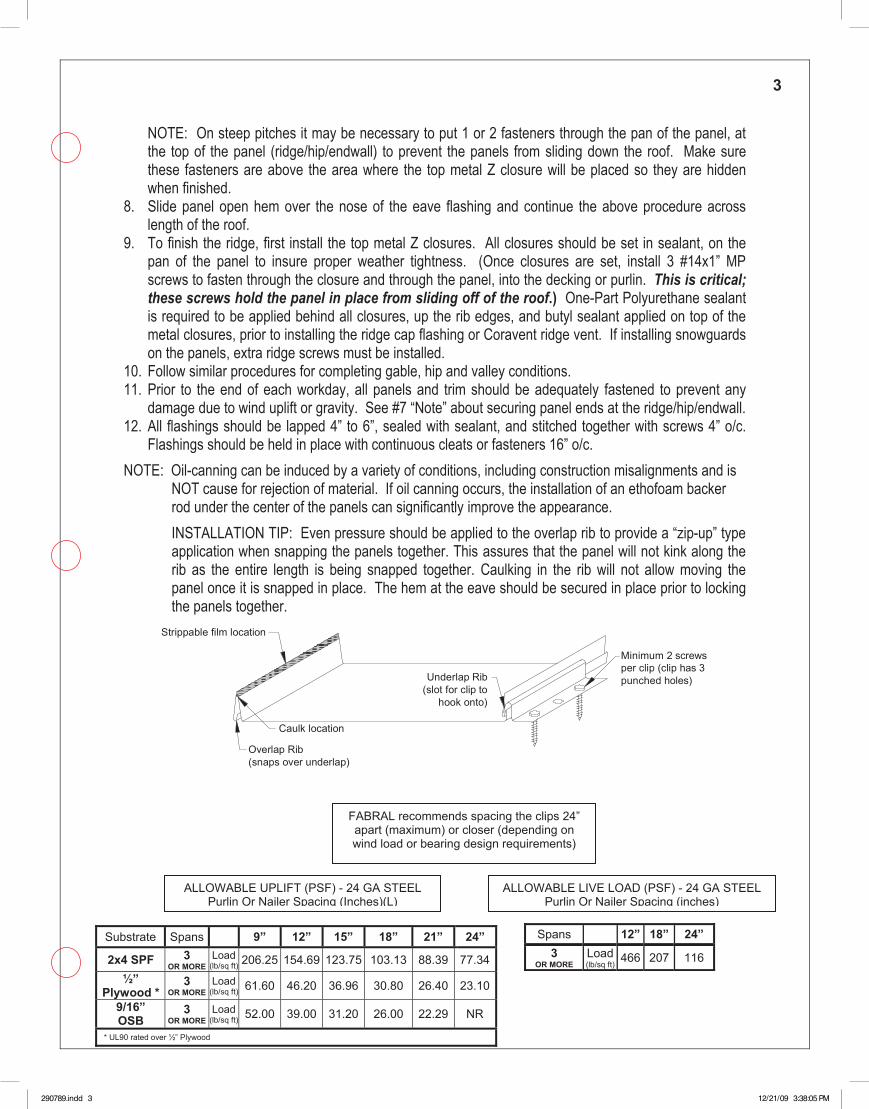
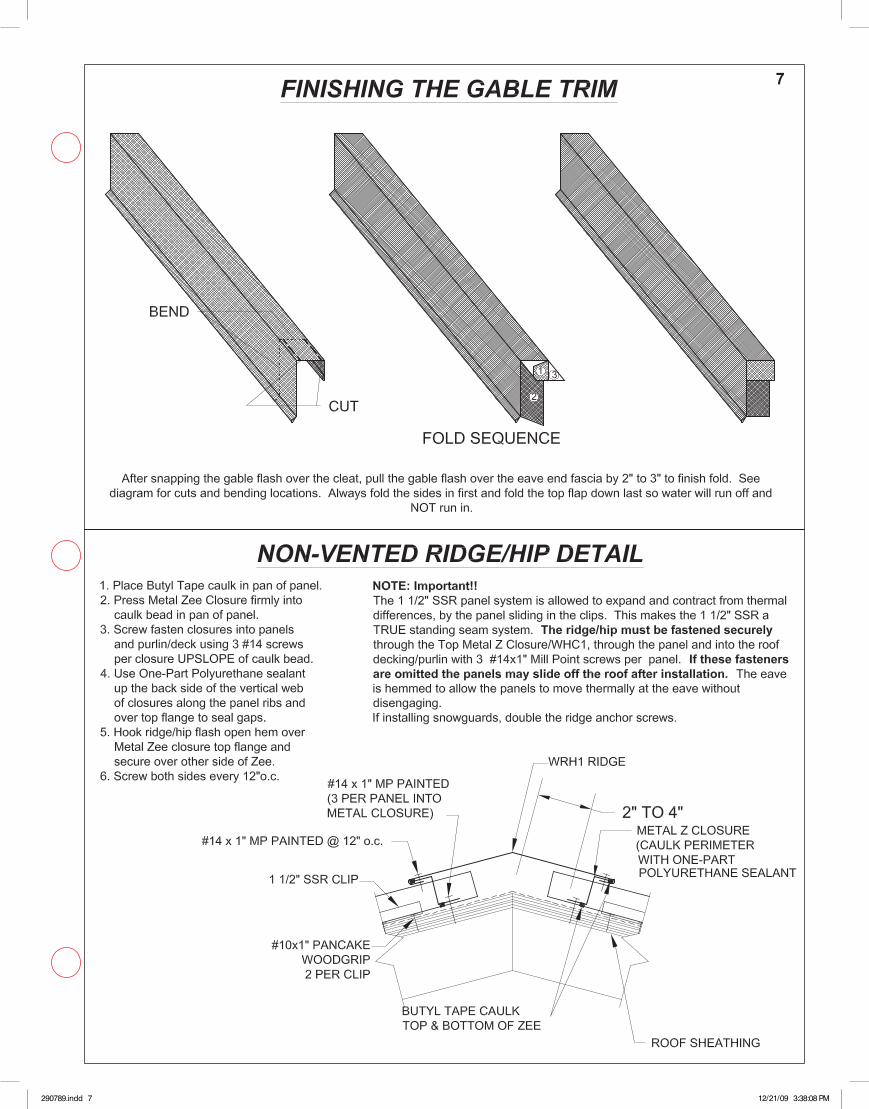
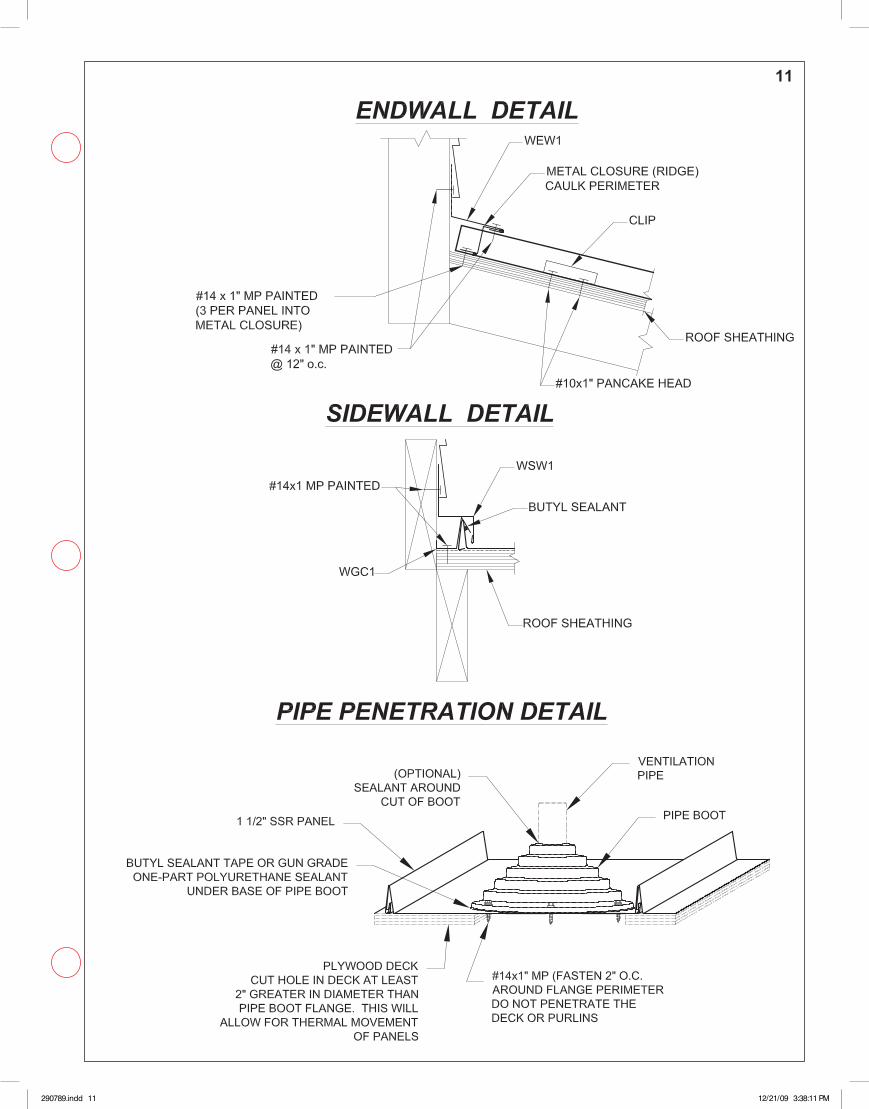
NOTE: On steep pitches it may be necessary to put 1 or 2 fasteners through the pan of the panel, at the top of the panel (ridge/hip/endwall) to prevent the panels from sliding down the roof. Make sure these fasteners are above the area where the top metal Z closure will be placed so they are hidden when finished.
8. Slide panel open hem over the nose of the eave flashing and continue the above procedure across length of the roof.
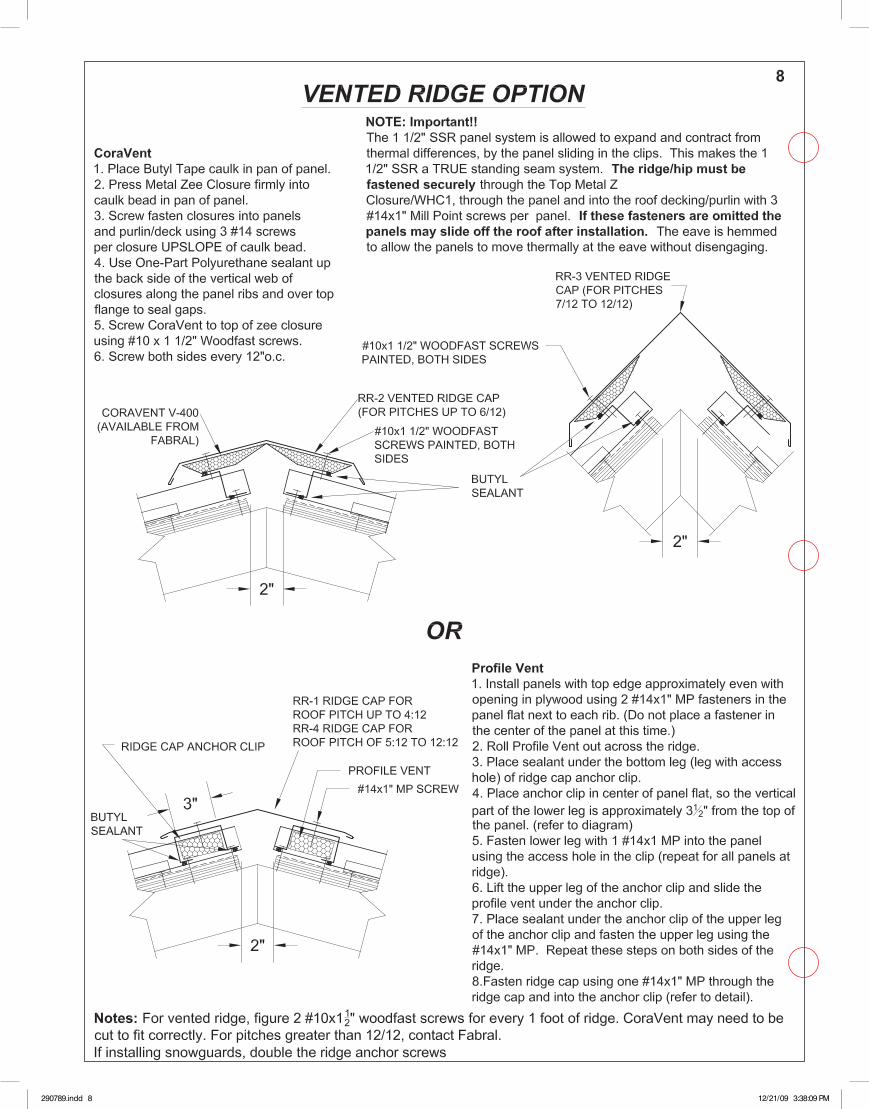
9. To finish the ridge, first install the top metal Z closures. All closures should be set in sealant, on the pan of the panel to insure proper weather tightness. (Once closures are set, install 3 #14x1” MP screws to fasten through the closure and through the panel, into the decking or purlin. This is critical; these screws hold the panel in place from sliding off of the roof.) One-Part Polyurethane sealant is required to be applied behind all closures, up the rib edges, and butyl sealant applied on top of the metal closures, prior to installing the ridge cap flashing or Coravent ridge vent. If installing snowguards on the panels, extra ridge screws must be installed.
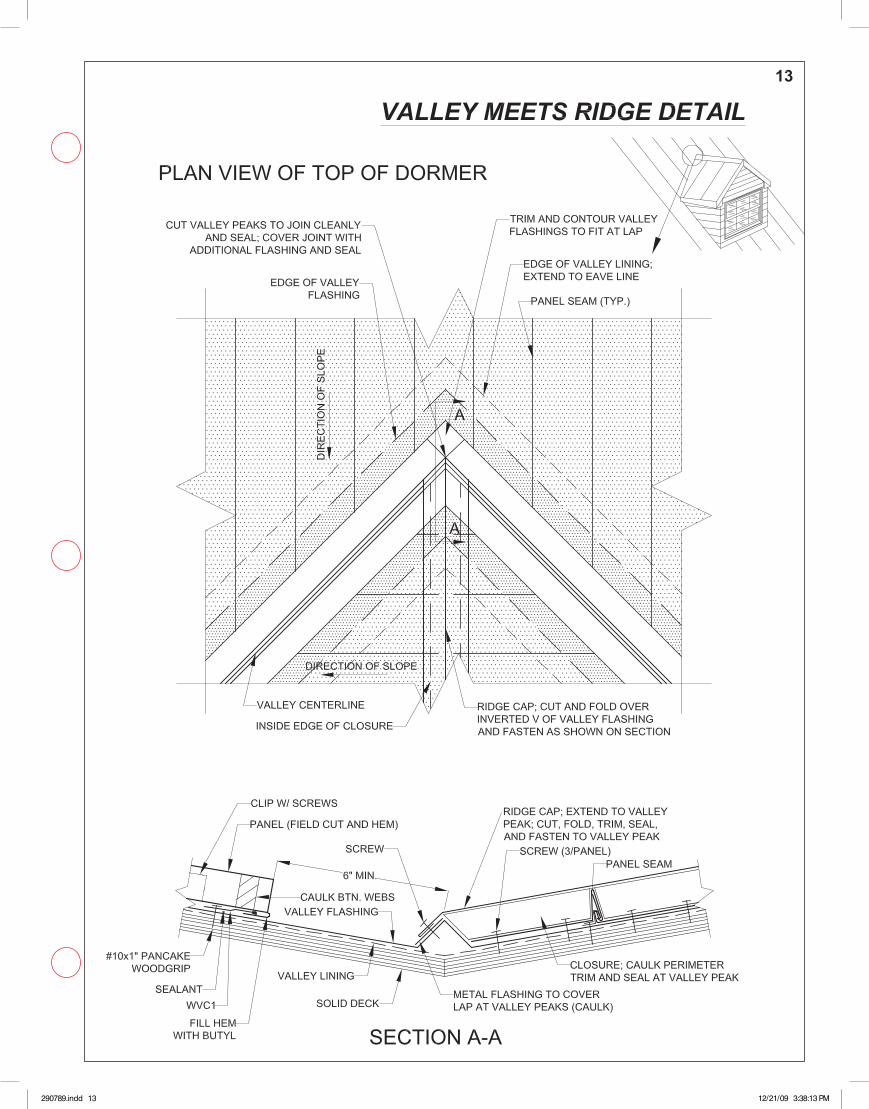
10. Follow similar procedures for completing gable, hip and valley conditions. 11. Prior to the end of each workday, all panels and trim should be adequately fastened to prevent any
damage due to wind uplift or gravity. See #7 “Note” about securing panel ends at the ridge/hip/endwall. 12. All flashings should be lapped 4” to 6”, sealed with sealant, and stitched together with screws 4” o/c.
Flashings should be held in place with continuous cleats or fasteners 16” o/c.
NOTE: Oil-canning can be induced by a variety of conditions, including construction misalignments and is NOT cause for rejection of material. If oil canning occurs, the installation of an ethofoam backer rod under the center of the panels can significantly improve the appearance.
INSTALLATION TIP: Even pressure should be applied to the overlap rib to provide a “zip-up” type application when snapping the panels together. This assures that the panel will not kink along the rib as the entire length is being snapped together. Caulking in the rib will not allow moving the panel once it is snapped in place. The hem at the eave should be secured in place prior to locking the panels together.
Minimum 2 screwsper clip (clip has 3punched holes)Underlap Rib
(slot for clip tohook onto)
Overlap Rib(snaps over underlap)
Caulk location
Strippable film location
Spans 12” 18” 24” 3
OR MORE Load (lb/sq ft)
466 207 116
Substrate Spans 9” 12” 15” 18” 21” 24”
2x4 SPF 3 OR MORE
Load (lb/sq ft) 206.25 154.69 123.75 103.13 88.39 77.34
½” Plywood *
3 OR MORE
Load (lb/sq ft) 61.60 46.20 36.96 30.80 26.40 23.10
9/16” OSB
3 OR MORE
Load (lb/sq ft) 52.00 39.00 31.20 26.00 22.29 NR
* UL90 rated over ½” Plywood
FABRAL recommends spacing the clips 24” apart (maximum) or closer (depending on wind load or bearing design requirements)
ALLOWABLE LIVE LOAD (PSF) - 24 GA STEEL Purlin Or Nailer Spacing (inches)
ALLOWABLE UPLIFT (PSF) - 24 GA STEEL Purlin Or Nailer Spacing (Inches)(L)
3
290789.indd 3 12/21/09 3:38:05 PM
290789.indd 4 12/21/09 3:38:06 PM
290789.indd 5 12/21/09 3:38:06 PM
290789.indd 6 12/21/09 3:38:07 PM
290789.indd 7 12/21/09 3:38:08 PM
290789.indd 8 12/21/09 3:38:09 PM
290789.indd 9 12/21/09 3:38:10 PM
290789.indd 10 12/21/09 3:38:10 PM
290789.indd 11 12/21/09 3:38:11 PM

FASTEN UPSLOPE AND DOWN SLOPEPANELS TOGETHER WITH
RIVETS IN SEAM
290789 work file.indd 2 12/21/09 3:33:00 PM290789.indd 12 12/21/09 3:38:11 PM
290789.indd 13 12/21/09 3:38:13 PM
290789.indd 14 12/21/09 3:38:14 PM
290789.indd 15 12/21/09 3:38:15 PM
290789.indd 16 12/21/09 3:38:16 PM
290789.indd 17 12/21/09 3:38:16 PM
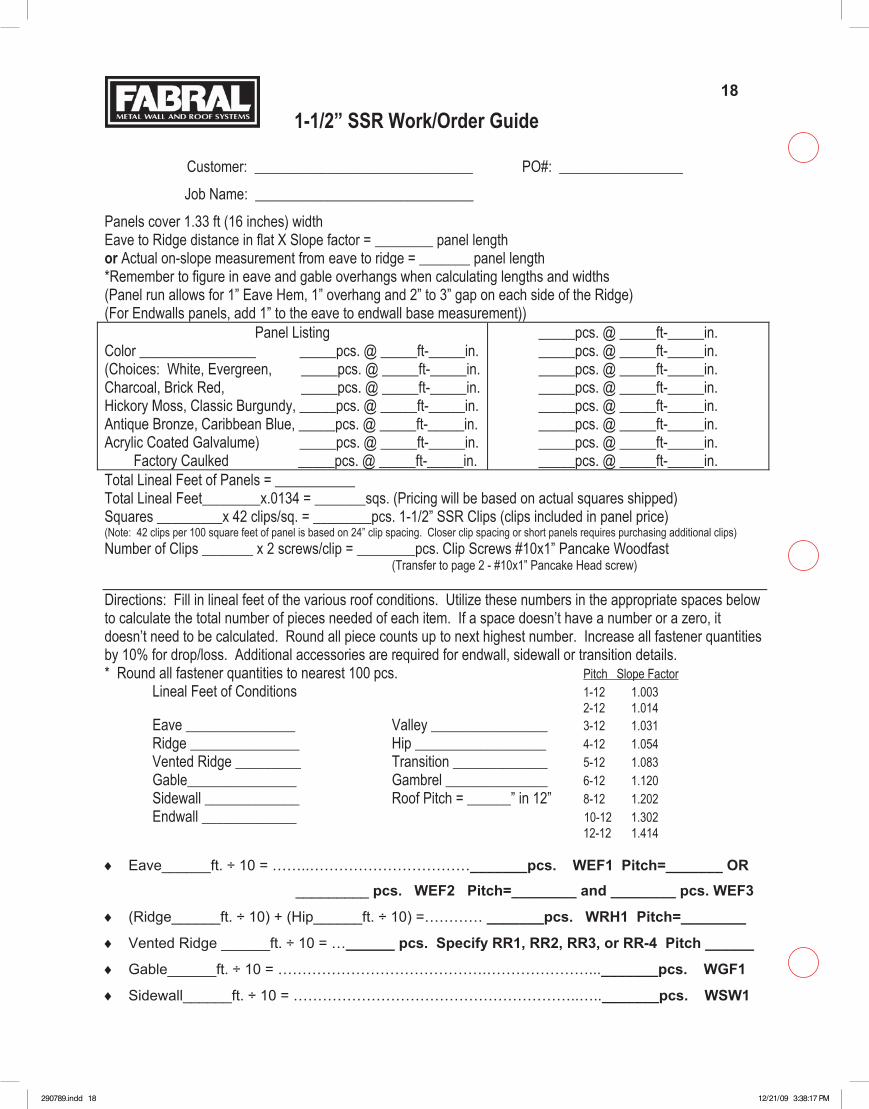
1-1/2” SSR Work/Order Guide
Customer: ______________________________ PO#: _________________ Job Name: ______________________________ Panels cover 1.33 ft (16 inches) width Eave to Ridge distance in flat X Slope factor = ________ panel length or Actual on-slope measurement from eave to ridge = _______ panel length *Remember to figure in eave and gable overhangs when calculating lengths and widths (Panel run allows for 1” Eave Hem, 1” overhang and 2” to 3” gap on each side of the Ridge) (For Endwalls panels, add 1” to the eave to endwall base measurement))
Panel Listing Color ________________ _____pcs. @ _____ft-_____in. (Choices: White, Evergreen, _____pcs. @ _____ft-_____in.Charcoal, Brick Red, _____pcs. @ _____ft-_____in.Hickory Moss, Classic Burgundy, _____pcs. @ _____ft-_____in. Antique Bronze, Caribbean Blue, _____pcs. @ _____ft-_____in. Acrylic Coated Galvalume) _____pcs. @ _____ft-_____in. Factory Caulked _____pcs. @ _____ft-_____in.
_____pcs. @ _____ft-_____in. _____pcs. @ _____ft-_____in. _____pcs. @ _____ft-_____in. _____pcs. @ _____ft-_____in. _____pcs. @ _____ft-_____in. _____pcs. @ _____ft-_____in. _____pcs. @ _____ft-_____in. _____pcs. @ _____ft-_____in.
Total Lineal Feet of Panels = ___________ Total Lineal Feet________x.0134 = _______sqs. (Pricing will be based on actual squares shipped) Squares _________x 42 clips/sq. = ________pcs. 1-1/2” SSR Clips (clips included in panel price) (Note: 42 clips per 100 square feet of panel is based on 24” clip spacing. Closer clip spacing or short panels requires purchasing additional clips) Number of Clips _______ x 2 screws/clip = ________pcs. Clip Screws #10x1” Pancake Woodfast (Transfer to page 2 - #10x1” Pancake Head screw) Directions: Fill in lineal feet of the various roof conditions. Utilize these numbers in the appropriate spaces below to calculate the total number of pieces needed of each item. If a space doesn’t have a number or a zero, it doesn’t need to be calculated. Round all piece counts up to next highest number. Increase all fastener quantities by 10% for drop/loss. Additional accessories are required for endwall, sidewall or transition details. * Round all fastener quantities to nearest 100 pcs. Pitch Slope Factor Lineal Feet of Conditions 1-12 1.003
2-12 1.014 Eave _______________ Valley ________________ 3-12 1.031 Ridge _______________ Hip __________________ 4-12 1.054 Vented Ridge _________ Transition _____________ 5-12 1.083 Gable_______________ Gambrel ______________ 6-12 1.120 Sidewall _____________ Roof Pitch = ______” in 12” 8-12 1.202 Endwall _____________ 10-12 1.302
12-12 1.414 ♦ Eave______ft. ÷ 10 = ……..……………………………_______pcs. WEF1 Pitch=_______ OR _________ pcs. WEF2 Pitch=________ and ________ pcs. WEF3
♦ (Ridge______ft. ÷ 10) + (Hip______ft. ÷ 10) =………… _______pcs. WRH1 Pitch=________
♦ Vented Ridge ______ft. ÷ 10 = …______ pcs. Specify RR1, RR2, RR3, or RR-4 Pitch ______
♦ Gable______ft. ÷ 10 = …………………………………….…………………..._______pcs. WGF1
♦ Sidewall______ft. ÷ 10 = …………………………………………………..….._______pcs. WSW1
18
290789.indd 18 12/21/09 3:38:17 PM
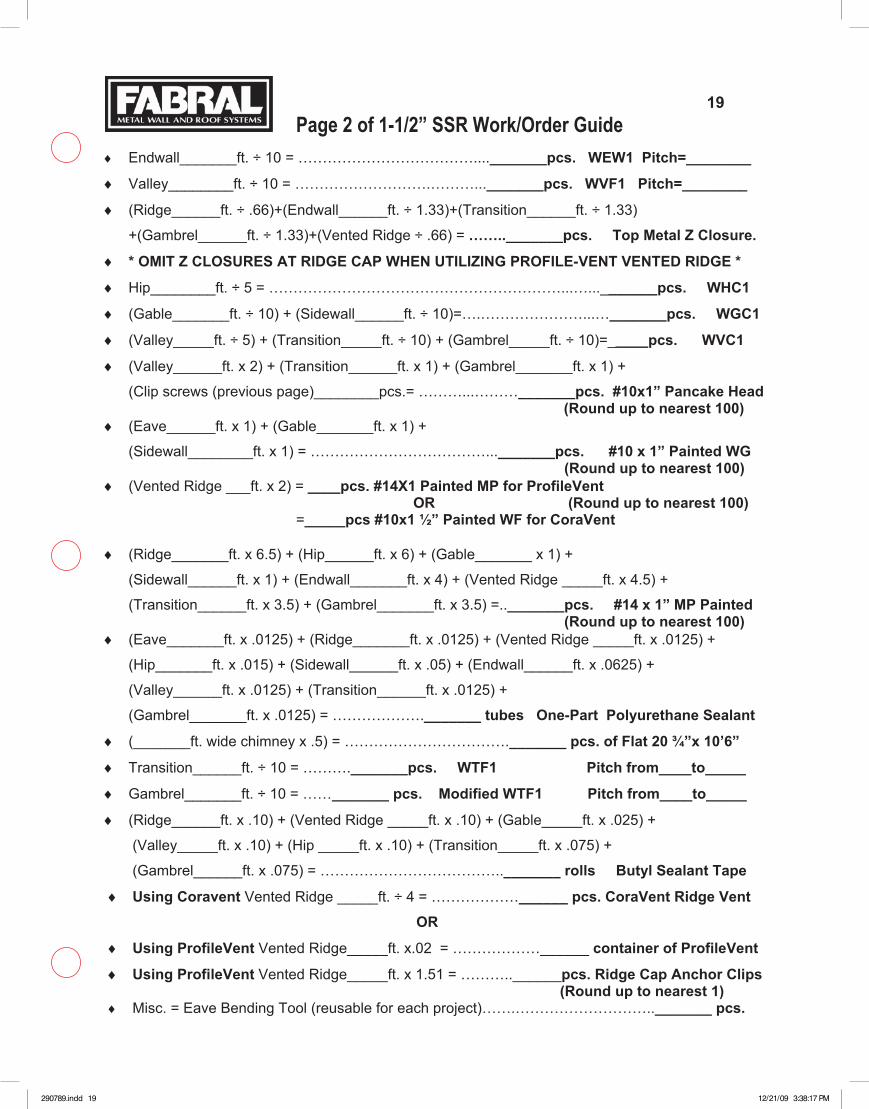
Page 2 of 1-1/2” SSR Work/Order Guide
♦ Endwall_______ft. ÷ 10 = ………………………………...._______pcs. WEW1 Pitch=________
♦ Valley________ft. ÷ 10 = ……………………….………..._______pcs. WVF1 Pitch=________
♦ (Ridge______ft. ÷ .66)+(Endwall______ft. ÷ 1.33)+(Transition______ft. ÷ 1.33)
+(Gambrel______ft. ÷ 1.33)+(Vented Ridge ÷ .66) = …….._______pcs. Top Metal Z Closure.
♦ * OMIT Z CLOSURES AT RIDGE CAP WHEN UTILIZING PROFILE-VENT VENTED RIDGE *
♦ Hip________ft. ÷ 5 = ……………………………………………………...…..._______pcs. WHC1
♦ (Gable_______ft. ÷ 10) + (Sidewall______ft. ÷ 10)=….…………………...…_______pcs. WGC1
♦ (Valley_____ft. ÷ 5) + (Transition_____ft. ÷ 10) + (Gambrel_____ft. ÷ 10)=_____pcs. WVC1
♦ (Valley______ft. x 2) + (Transition______ft. x 1) + (Gambrel_______ft. x 1) +
(Clip screws (previous page)________pcs.= ………...………_______pcs. #10x1” Pancake Head (Round up to nearest 100)
♦ (Eave______ft. x 1) + (Gable_______ft. x 1) +
(Sidewall________ft. x 1) = ………………………………..._______pcs. #10 x 1” Painted WG (Round up to nearest 100)
♦ (Vented Ridge ___ft. x 2) = ____pcs. #14X1 Painted MP for ProfileVent OR (Round up to nearest 100)
=_____pcs #10x1 ½” Painted WF for CoraVent
♦ (Ridge_______ft. x 6.5) + (Hip______ft. x 6) + (Gable_______ x 1) +
(Sidewall______ft. x 1) + (Endwall_______ft. x 4) + (Vented Ridge _____ft. x 4.5) +
(Transition______ft. x 3.5) + (Gambrel_______ft. x 3.5) =.._______pcs. #14 x 1” MP Painted (Round up to nearest 100)
♦ (Eave_______ft. x .0125) + (Ridge_______ft. x .0125) + (Vented Ridge _____ft. x .0125) +
(Hip_______ft. x .015) + (Sidewall______ft. x .05) + (Endwall______ft. x .0625) +
(Valley______ft. x .0125) + (Transition______ft. x .0125) +
(Gambrel_______ft. x .0125) = ………………._______ tubes One-Part Polyurethane Sealant
♦ (_______ft. wide chimney x .5) = ……………………………._______ pcs. of Flat 20 ¾”x 10’6”
♦ Transition______ft. ÷ 10 = ………._______pcs. WTF1 Pitch from____to_____
♦ Gambrel_______ft. ÷ 10 = ……_______ pcs. Modified WTF1 Pitch from____to_____
♦ (Ridge______ft. x .10) + (Vented Ridge _____ft. x .10) + (Gable_____ft. x .025) +
(Valley_____ft. x .10) + (Hip _____ft. x .10) + (Transition_____ft. x .075) +
(Gambrel______ft. x .075) = ……………………………….._______ rolls Butyl Sealant Tape
♦ Using Coravent Vented Ridge _____ft. ÷ 4 = ………………______ pcs. CoraVent Ridge Vent OR
♦ Using ProfileVent Vented Ridge_____ft. x.02 = ………………______ container of ProfileVent
♦ Using ProfileVent Vented Ridge_____ft. x 1.51 = ………..______pcs. Ridge Cap Anchor Clips (Round up to nearest 1)
♦ Misc. = Eave Bending Tool (reusable for each project)…….……………………….._______ pcs.
19
290789.indd 19 12/21/09 3:38:17 PM
Headquarters:
Lancaster PA Plant: (800)477-2741/Fax: (800)283-4289
Other Manufacturing Facilities:
Gridley IL Plant: (800)451-3974/Fax: (800)289-3383
Tifton GA Plant: (800)339-8311/Fax: (800)380-4784
Marshfield WI Plant: (800)528-0878/Fax: (715)387-2424
Cedar City UT Plant: (800)432-2725/Fax: (800)632-2725
Spokane WA Plant: (800)456-9124/ Fax: (509)535-3939
Salem OR Plant: (800)477-8028/ Fax: (503)393-5813
St. Joseph MN Plant: (800)873-3440/ Fax: (320)363-0553
Grapevine TX Plant: (800)477-0066/ Fax: (817)488-0446
Jackson GA Plant: (800)884-4484/Fax: (800)765-4484
Idabel OK Plant: (800)926-8509/Fax: (800)289-6007
F-153 © 2000 Fabral 98-32-153 4/09 6K98-32-153 1/10 12K
290789 work file.indd 3 12/21/09 3:33:00 PM290789.indd 20 12/21/09 3:38:17 PM