Embed Size (px)
Citation preview
Informatica®
10.4.0
Upgrading from Version 10.1 (10.4.0)

Informatica Upgrading from Version 10.1 (10.4.0)10.4.0December 2019
© Copyright Informatica LLC 2006, 2020
This software and documentation are provided only under a separate license agreement containing restrictions on use and disclosure. No part of this document may be reproduced or transmitted in any form, by any means (electronic, photocopying, recording or otherwise) without prior consent of Informatica LLC.
Informatica, the Informatica logo, PowerCenter, and PowerExchange are trademarks or registered trademarks of Informatica LLC in the United States and many jurisdictions throughout the world. A current list of Informatica trademarks is available on the web at https://www.informatica.com/trademarks.html. Other company and product names may be trade names or trademarks of their respective owners.
U.S. GOVERNMENT RIGHTS Programs, software, databases, and related documentation and technical data delivered to U.S. Government customers are "commercial computer software" or "commercial technical data" pursuant to the applicable Federal Acquisition Regulation and agency-specific supplemental regulations. As such, the use, duplication, disclosure, modification, and adaptation is subject to the restrictions and license terms set forth in the applicable Government contract, and, to the extent applicable by the terms of the Government contract, the additional rights set forth in FAR 52.227-19, Commercial Computer Software License.
Portions of this software and/or documentation are subject to copyright held by third parties. Required third party notices are included with the product.
The information in this documentation is subject to change without notice. If you find any problems in this documentation, report them to us at [email protected].
Informatica products are warranted according to the terms and conditions of the agreements under which they are provided. INFORMATICA PROVIDES THE INFORMATION IN THIS DOCUMENT "AS IS" WITHOUT WARRANTY OF ANY KIND, EXPRESS OR IMPLIED, INCLUDING WITHOUT ANY WARRANTIES OF MERCHANTABILITY, FITNESS FOR A PARTICULAR PURPOSE AND ANY WARRANTY OR CONDITION OF NON-INFRINGEMENT.
Publication Date: 2020-02-13
Table of Contents
Preface . . . . . . . . . . . . . . . . . . . . . . . . . . . . . . . . . . . . . . . . . . . . . . . . . . . . . . . . . . . . . . . . . . . . . . 8Informatica Resources. . . . . . . . . . . . . . . . . . . . . . . . . . . . . . . . . . . . . . . . . . . . . . . . . . . 8
Informatica Network. . . . . . . . . . . . . . . . . . . . . . . . . . . . . . . . . . . . . . . . . . . . . . . . . 8
Informatica Knowledge Base. . . . . . . . . . . . . . . . . . . . . . . . . . . . . . . . . . . . . . . . . . . . 8
Informatica Documentation. . . . . . . . . . . . . . . . . . . . . . . . . . . . . . . . . . . . . . . . . . . . . 9
Informatica Product Availability Matrices. . . . . . . . . . . . . . . . . . . . . . . . . . . . . . . . . . . . 9
Informatica Velocity. . . . . . . . . . . . . . . . . . . . . . . . . . . . . . . . . . . . . . . . . . . . . . . . . . 9
Informatica Marketplace. . . . . . . . . . . . . . . . . . . . . . . . . . . . . . . . . . . . . . . . . . . . . . . 9
Informatica Global Customer Support. . . . . . . . . . . . . . . . . . . . . . . . . . . . . . . . . . . . . . 9
Chapter 1: Upgrade Overview. . . . . . . . . . . . . . . . . . . . . . . . . . . . . . . . . . . . . . . . . . . . . . . . 10Informatica Upgrade. . . . . . . . . . . . . . . . . . . . . . . . . . . . . . . . . . . . . . . . . . . . . . . . . . . . 10
Informatica Upgrade Support. . . . . . . . . . . . . . . . . . . . . . . . . . . . . . . . . . . . . . . . . . . . . . 10
Upgrade Process. . . . . . . . . . . . . . . . . . . . . . . . . . . . . . . . . . . . . . . . . . . . . . . . . . . . . . 10
Business Glossary Upgrade. . . . . . . . . . . . . . . . . . . . . . . . . . . . . . . . . . . . . . . . . . . . . . . 12
Chapter 2: Before You Upgrade the Domain on Linux. . . . . . . . . . . . . . . . . . . . . . . . . 13Read the Release Notes. . . . . . . . . . . . . . . . . . . . . . . . . . . . . . . . . . . . . . . . . . . . . . . . . 13
Verify System Requirements. . . . . . . . . . . . . . . . . . . . . . . . . . . . . . . . . . . . . . . . . . . . . . . 13
Verify the Domain Upgrade Requirements. . . . . . . . . . . . . . . . . . . . . . . . . . . . . . . . . . . 13
Verify Temporary Disk Space and Permissions. . . . . . . . . . . . . . . . . . . . . . . . . . . . . . . . 14
Verify the Distributions. . . . . . . . . . . . . . . . . . . . . . . . . . . . . . . . . . . . . . . . . . . . . . . 14
Review Patch Requirements on Linux. . . . . . . . . . . . . . . . . . . . . . . . . . . . . . . . . . . . . . 14
Install the Java Runtime Environment. . . . . . . . . . . . . . . . . . . . . . . . . . . . . . . . . . . . . . 16
Review the Environment Variables. . . . . . . . . . . . . . . . . . . . . . . . . . . . . . . . . . . . . . . . 16
Extract the Installer Files. . . . . . . . . . . . . . . . . . . . . . . . . . . . . . . . . . . . . . . . . . . . . . . . . 17
Run the Informatica Upgrade Advisor. . . . . . . . . . . . . . . . . . . . . . . . . . . . . . . . . . . . . . . . . 17
Chapter 3: Before You Upgrade the Domain on UNIX. . . . . . . . . . . . . . . . . . . . . . . . . 19Read the Release Notes. . . . . . . . . . . . . . . . . . . . . . . . . . . . . . . . . . . . . . . . . . . . . . . . . 19
Verify System Requirements. . . . . . . . . . . . . . . . . . . . . . . . . . . . . . . . . . . . . . . . . . . . . . . 19
Review Patch Requirements on UNIX. . . . . . . . . . . . . . . . . . . . . . . . . . . . . . . . . . . . . . . . . 20
Install the Java Runtime Environment. . . . . . . . . . . . . . . . . . . . . . . . . . . . . . . . . . . . . . . . . 20
Install the Java Runtime Environment for AIX. . . . . . . . . . . . . . . . . . . . . . . . . . . . . . . . . 20
Verify the Distributions. . . . . . . . . . . . . . . . . . . . . . . . . . . . . . . . . . . . . . . . . . . . . . . . . . 21
Verify the Domain Upgrade Requirements. . . . . . . . . . . . . . . . . . . . . . . . . . . . . . . . . . . . . . 21
Temporary Disk Space Requirements. . . . . . . . . . . . . . . . . . . . . . . . . . . . . . . . . . . . . . 21
Review the Environment Variables. . . . . . . . . . . . . . . . . . . . . . . . . . . . . . . . . . . . . . . . . . . 21
Extract the Installer Files. . . . . . . . . . . . . . . . . . . . . . . . . . . . . . . . . . . . . . . . . . . . . . . . . 22
Run the Informatica Upgrade Advisor. . . . . . . . . . . . . . . . . . . . . . . . . . . . . . . . . . . . . . . . . 22
Table of Contents 3

Chapter 4: Before You Upgrade the Domain on Windows. . . . . . . . . . . . . . . . . . . . . 24Read the Release Notes. . . . . . . . . . . . . . . . . . . . . . . . . . . . . . . . . . . . . . . . . . . . . . . . . 24
Verify System Requirements. . . . . . . . . . . . . . . . . . . . . . . . . . . . . . . . . . . . . . . . . . . . . . . 24
Verify the Distributions. . . . . . . . . . . . . . . . . . . . . . . . . . . . . . . . . . . . . . . . . . . . . . . . . . 25
Verify the Domain Upgrade Requirements. . . . . . . . . . . . . . . . . . . . . . . . . . . . . . . . . . . . . . 25
Verify Temporary Disk Space and Permissions. . . . . . . . . . . . . . . . . . . . . . . . . . . . . . . . 25
Review the Environment Variables. . . . . . . . . . . . . . . . . . . . . . . . . . . . . . . . . . . . . . . . . . . 26
Extract the Installer Files. . . . . . . . . . . . . . . . . . . . . . . . . . . . . . . . . . . . . . . . . . . . . . . . . 26
Run the Informatica Upgrade Advisor. . . . . . . . . . . . . . . . . . . . . . . . . . . . . . . . . . . . . . . . . 27
Chapter 5: Prepare for the Upgrade. . . . . . . . . . . . . . . . . . . . . . . . . . . . . . . . . . . . . . . . . . 28Back Up the Data Transformation Files. . . . . . . . . . . . . . . . . . . . . . . . . . . . . . . . . . . . . . . . 28
Prepare the PowerCenter Repository. . . . . . . . . . . . . . . . . . . . . . . . . . . . . . . . . . . . . . . . . 29
Prepare the Model Repository. . . . . . . . . . . . . . . . . . . . . . . . . . . . . . . . . . . . . . . . . . . . . . 29
Prepare the Data Integration Service. . . . . . . . . . . . . . . . . . . . . . . . . . . . . . . . . . . . . . . . . 29
Prepare the Profiling Warehouse. . . . . . . . . . . . . . . . . . . . . . . . . . . . . . . . . . . . . . . . . . . . 29
Prepare the Reference Data Directories. . . . . . . . . . . . . . . . . . . . . . . . . . . . . . . . . . . . . . . . 29
Prepare Metadata Manager. . . . . . . . . . . . . . . . . . . . . . . . . . . . . . . . . . . . . . . . . . . . . . . 30
Back Up the Metadata Manager Warehouse. . . . . . . . . . . . . . . . . . . . . . . . . . . . . . . . . . 30
Back Up the Metadata Manager Properties File. . . . . . . . . . . . . . . . . . . . . . . . . . . . . . . . 30
Back Up Databases. . . . . . . . . . . . . . . . . . . . . . . . . . . . . . . . . . . . . . . . . . . . . . . . . . . . 31
Back Up the odbc.ini File for Informatica Cassandra ODBC Driver. . . . . . . . . . . . . . . . . . . . . . . 31
Prepare the Domain. . . . . . . . . . . . . . . . . . . . . . . . . . . . . . . . . . . . . . . . . . . . . . . . . . . . 31
Verify Database User Account Requirements . . . . . . . . . . . . . . . . . . . . . . . . . . . . . . . . . 31
Shut Down the Domain. . . . . . . . . . . . . . . . . . . . . . . . . . . . . . . . . . . . . . . . . . . . . . . 31
Back Up the Domain. . . . . . . . . . . . . . . . . . . . . . . . . . . . . . . . . . . . . . . . . . . . . . . . . 32
Chapter 6: Upgrade the Domain. . . . . . . . . . . . . . . . . . . . . . . . . . . . . . . . . . . . . . . . . . . . . . 34Domain Upgrade Overview . . . . . . . . . . . . . . . . . . . . . . . . . . . . . . . . . . . . . . . . . . . . . . . 34
Upgrading in Graphical Mode. . . . . . . . . . . . . . . . . . . . . . . . . . . . . . . . . . . . . . . . . . . . . . 34
Upgrading in Console Mode. . . . . . . . . . . . . . . . . . . . . . . . . . . . . . . . . . . . . . . . . . . . . . . 42
Upgrading in Silent Mode. . . . . . . . . . . . . . . . . . . . . . . . . . . . . . . . . . . . . . . . . . . . . . . . . 44
Encrypting Passwords in the Properties File. . . . . . . . . . . . . . . . . . . . . . . . . . . . . . . . . . 44
Creating the Properties File. . . . . . . . . . . . . . . . . . . . . . . . . . . . . . . . . . . . . . . . . . . . 45
Running the Silent Installer. . . . . . . . . . . . . . . . . . . . . . . . . . . . . . . . . . . . . . . . . . . . . 46
Troubleshooting the Domain Upgrade. . . . . . . . . . . . . . . . . . . . . . . . . . . . . . . . . . . . . . . . . 47
Chapter 7: Upgrade the Domain with Changes to Node Configuration. . . . . . . . . 48Upgrade the Domain with Changes to Node Configuration Overview. . . . . . . . . . . . . . . . . . . . . 48
Migrating to a Different Database. . . . . . . . . . . . . . . . . . . . . . . . . . . . . . . . . . . . . . . . . . . 49
Migrating the Installation to a Different Machine. . . . . . . . . . . . . . . . . . . . . . . . . . . . . . . . . . 49
Copy the Installation Directories. . . . . . . . . . . . . . . . . . . . . . . . . . . . . . . . . . . . . . . . . 50
4 Table of Contents
Determine Port Availability on Windows. . . . . . . . . . . . . . . . . . . . . . . . . . . . . . . . . . . . 50
Step 3. Create a System User Account. . . . . . . . . . . . . . . . . . . . . . . . . . . . . . . . . . . . . 50
Step 4. Configure Native Connectivity on Service Machines. . . . . . . . . . . . . . . . . . . . . . . . 51
Step 5. Install Database Client Software. . . . . . . . . . . . . . . . . . . . . . . . . . . . . . . . . . . . 52
Step 6. Configure Database Client Environment Variables on UNIX. . . . . . . . . . . . . . . . . . . 52
Upgrading in Graphical Mode. . . . . . . . . . . . . . . . . . . . . . . . . . . . . . . . . . . . . . . . . . . . . . 53
Upgrading in Console Mode. . . . . . . . . . . . . . . . . . . . . . . . . . . . . . . . . . . . . . . . . . . . . . . 64
Upgrading in Silent Mode. . . . . . . . . . . . . . . . . . . . . . . . . . . . . . . . . . . . . . . . . . . . . . . . . 69
Complete Changing the Node Configuration. . . . . . . . . . . . . . . . . . . . . . . . . . . . . . . . . . . . . 69
Clear the Browser Cache. . . . . . . . . . . . . . . . . . . . . . . . . . . . . . . . . . . . . . . . . . . . . . 70
Configure Locale Environment Variables. . . . . . . . . . . . . . . . . . . . . . . . . . . . . . . . . . . . 70
Configure Library Path Environment Variables. . . . . . . . . . . . . . . . . . . . . . . . . . . . . . . . 71
Verify the Range of Dynamic Port Numbers. . . . . . . . . . . . . . . . . . . . . . . . . . . . . . . . . . 71
Verify the Node Backup Directory. . . . . . . . . . . . . . . . . . . . . . . . . . . . . . . . . . . . . . . . 71
Configure PowerExchange Adapters. . . . . . . . . . . . . . . . . . . . . . . . . . . . . . . . . . . . . . 71
Chapter 8: Before You Upgrade the Application Services. . . . . . . . . . . . . . . . . . . . . 72Configure POSIX Asynchronous I/O. . . . . . . . . . . . . . . . . . . . . . . . . . . . . . . . . . . . . . . . . . 72
Configure Informatica Environment Variables. . . . . . . . . . . . . . . . . . . . . . . . . . . . . . . . . . . . 72
Configure Locale Environment Variables. . . . . . . . . . . . . . . . . . . . . . . . . . . . . . . . . . . . . . . 73
Verify the Keystore File Location for the Administrator Tool. . . . . . . . . . . . . . . . . . . . . . . . . . 74
Clear the Browser Cache. . . . . . . . . . . . . . . . . . . . . . . . . . . . . . . . . . . . . . . . . . . . . . . . . 74
Chapter 9: Application Service Upgrade. . . . . . . . . . . . . . . . . . . . . . . . . . . . . . . . . . . . . 75Application Service Upgrade Overview. . . . . . . . . . . . . . . . . . . . . . . . . . . . . . . . . . . . . . . . 75
Privileges to Upgrade Services. . . . . . . . . . . . . . . . . . . . . . . . . . . . . . . . . . . . . . . . . . 75
Service Upgrade from Previous Versions. . . . . . . . . . . . . . . . . . . . . . . . . . . . . . . . . . . . 76
Running the Service Upgrade Wizard. . . . . . . . . . . . . . . . . . . . . . . . . . . . . . . . . . . . . . . . . 76
Verify the Model Repository Service Upgrade. . . . . . . . . . . . . . . . . . . . . . . . . . . . . . . . . . . . 77
Object Dependency Graph. . . . . . . . . . . . . . . . . . . . . . . . . . . . . . . . . . . . . . . . . . . . . 77
Advanced Properties for the Model Repository Service. . . . . . . . . . . . . . . . . . . . . . . . . . . 78
Chapter 10: Informatica Client Upgrade. . . . . . . . . . . . . . . . . . . . . . . . . . . . . . . . . . . . . . 79Informatica Client Upgrade Overview. . . . . . . . . . . . . . . . . . . . . . . . . . . . . . . . . . . . . . . . . 79
Informatica Client Upgrade Options. . . . . . . . . . . . . . . . . . . . . . . . . . . . . . . . . . . . . . . . . . 80
Profiles. . . . . . . . . . . . . . . . . . . . . . . . . . . . . . . . . . . . . . . . . . . . . . . . . . . . . . . . . . . . 80
Import Data Domains. . . . . . . . . . . . . . . . . . . . . . . . . . . . . . . . . . . . . . . . . . . . . . . . 80
Restore Profiles and Scorecards. . . . . . . . . . . . . . . . . . . . . . . . . . . . . . . . . . . . . . . . . 81
Run the Existing Scorecards. . . . . . . . . . . . . . . . . . . . . . . . . . . . . . . . . . . . . . . . . . . . 81
Upgrading in Graphical Mode. . . . . . . . . . . . . . . . . . . . . . . . . . . . . . . . . . . . . . . . . . . . . . 81
Upgrading in Silent Mode. . . . . . . . . . . . . . . . . . . . . . . . . . . . . . . . . . . . . . . . . . . . . . . . . 82
Creating the Properties File. . . . . . . . . . . . . . . . . . . . . . . . . . . . . . . . . . . . . . . . . . . . 82
Running the Silent Installer. . . . . . . . . . . . . . . . . . . . . . . . . . . . . . . . . . . . . . . . . . . . . 83
Table of Contents 5

Chapter 11: After You Upgrade. . . . . . . . . . . . . . . . . . . . . . . . . . . . . . . . . . . . . . . . . . . . . . 84Dropped Support for Reports. . . . . . . . . . . . . . . . . . . . . . . . . . . . . . . . . . . . . . . . . . . . . . 84
Informatica Domain. . . . . . . . . . . . . . . . . . . . . . . . . . . . . . . . . . . . . . . . . . . . . . . . . . . . 84
Update the Log Events Directory. . . . . . . . . . . . . . . . . . . . . . . . . . . . . . . . . . . . . . . . . 85
Migrating to PostgreSQL . . . . . . . . . . . . . . . . . . . . . . . . . . . . . . . . . . . . . . . . . . . . . . . . . 85
Secure Client Connections to the Domain. . . . . . . . . . . . . . . . . . . . . . . . . . . . . . . . . . . . . . 86
Upgrade the Connection Provider Type for Microsoft SQL Server. . . . . . . . . . . . . . . . . . . . . . . 87
PowerCenter Integration Service. . . . . . . . . . . . . . . . . . . . . . . . . . . . . . . . . . . . . . . . . . . . 87
Configure Umask for Operating System Profiles. . . . . . . . . . . . . . . . . . . . . . . . . . . . . . . 88
Data Integration Service. . . . . . . . . . . . . . . . . . . . . . . . . . . . . . . . . . . . . . . . . . . . . . . . . 88
Reset the HTTP Proxy Server Password. . . . . . . . . . . . . . . . . . . . . . . . . . . . . . . . . . . . 88
Update the Log Events Directory. . . . . . . . . . . . . . . . . . . . . . . . . . . . . . . . . . . . . . . . . . . . 88
Metadata Access Service. . . . . . . . . . . . . . . . . . . . . . . . . . . . . . . . . . . . . . . . . . . . . . . . 88
Create the Metadata Access Service. . . . . . . . . . . . . . . . . . . . . . . . . . . . . . . . . . . . . . 89
Scheduler Service. . . . . . . . . . . . . . . . . . . . . . . . . . . . . . . . . . . . . . . . . . . . . . . . . . . . . 90
Analyst Service. . . . . . . . . . . . . . . . . . . . . . . . . . . . . . . . . . . . . . . . . . . . . . . . . . . . . . . 90
Upgrade Business Glossary. . . . . . . . . . . . . . . . . . . . . . . . . . . . . . . . . . . . . . . . . . . . 90
Verify the Flat File Cache Location. . . . . . . . . . . . . . . . . . . . . . . . . . . . . . . . . . . . . . . . 90
Verify the Temporary Export File Location. . . . . . . . . . . . . . . . . . . . . . . . . . . . . . . . . . . 91
Verify the Business Glossary Attachments Directory. . . . . . . . . . . . . . . . . . . . . . . . . . . . 91
Recycle the Analyst Service. . . . . . . . . . . . . . . . . . . . . . . . . . . . . . . . . . . . . . . . . . . . 91
Metadata Manager Agent. . . . . . . . . . . . . . . . . . . . . . . . . . . . . . . . . . . . . . . . . . . . . . . . 92
Metadata Manager Service. . . . . . . . . . . . . . . . . . . . . . . . . . . . . . . . . . . . . . . . . . . . . . . 92
Update the Metadata Manager Properties File. . . . . . . . . . . . . . . . . . . . . . . . . . . . . . . . 92
Verify the ODBCINST Environment Variable on UNIX. . . . . . . . . . . . . . . . . . . . . . . . . . . . 93
Upgrade Informatica Platform Resources. . . . . . . . . . . . . . . . . . . . . . . . . . . . . . . . . . . 93
Regenerate the Plug-ins for Universal Resources. . . . . . . . . . . . . . . . . . . . . . . . . . . . . . . 94
Update Multiple Threads for Business Intelligence Resources. . . . . . . . . . . . . . . . . . . . . . 94
Update the DataDirect Drivers . . . . . . . . . . . . . . . . . . . . . . . . . . . . . . . . . . . . . . . . . . 95
Upgrade the Informatica Cassandra ODBC Data Sources. . . . . . . . . . . . . . . . . . . . . . . . . 96
Copy the Data Transformation Files. . . . . . . . . . . . . . . . . . . . . . . . . . . . . . . . . . . . . . . 96
Update Profiles for Dropped Hive Engine Support. . . . . . . . . . . . . . . . . . . . . . . . . . . . . . 96
Read the Release Guide. . . . . . . . . . . . . . . . . . . . . . . . . . . . . . . . . . . . . . . . . . . . . . . 96
Appendix A: Upgrade Checklist. . . . . . . . . . . . . . . . . . . . . . . . . . . . . . . . . . . . . . . . . . . . . . 97Upgrade Checklist Overview. . . . . . . . . . . . . . . . . . . . . . . . . . . . . . . . . . . . . . . . . . . . . . . 97
Before You Upgrade the Domain. . . . . . . . . . . . . . . . . . . . . . . . . . . . . . . . . . . . . . . . . . . . 97
Domain Upgrade. . . . . . . . . . . . . . . . . . . . . . . . . . . . . . . . . . . . . . . . . . . . . . . . . . . . . . 98
Before You Upgrade the Application Services. . . . . . . . . . . . . . . . . . . . . . . . . . . . . . . . . . . . 99
Application Service Upgrade. . . . . . . . . . . . . . . . . . . . . . . . . . . . . . . . . . . . . . . . . . . . . . . 99
Informatica Client Upgrade. . . . . . . . . . . . . . . . . . . . . . . . . . . . . . . . . . . . . . . . . . . . . . . 100
After You Upgrade. . . . . . . . . . . . . . . . . . . . . . . . . . . . . . . . . . . . . . . . . . . . . . . . . . . . 100
6 Table of Contents

Index. . . . . . . . . . . . . . . . . . . . . . . . . . . . . . . . . . . . . . . . . . . . . . . . . . . . . . . . . . . 102
Table of Contents 7
PrefaceFollow the instructions in this upgrade guide to upgrade the product.
In addition to upgrade steps, the guide also includes pre- and post-requisite tasks.
This guide is written for the system administrator who is responsible for upgrading the product.
Review the upgrade guide to upgrade the services and clients for the Informatica domain. Verify the database requirements and set up the databases for the domain. You can verify the distributions for the supported products in the native and non-native environments. Verify that your environment meets the minimum system requirements for the installation process, temporary disk space, port availability, databases, and application service hardware.
You can upgrade the product services and clients on one or more machines. Run the server installer to upgrade on all nodes. After you upgrade the domain, you must log into the Administrator tool and upgrade the application services. You can then upgrade the Informatica clients on all machines.
Informatica ResourcesInformatica provides you with a range of product resources through the Informatica Network and other online portals. Use the resources to get the most from your Informatica products and solutions and to learn from other Informatica users and subject matter experts.
Informatica NetworkThe Informatica Network is the gateway to many resources, including the Informatica Knowledge Base and Informatica Global Customer Support. To enter the Informatica Network, visit https://network.informatica.com.
As an Informatica Network member, you have the following options:
• Search the Knowledge Base for product resources.
• View product availability information.
• Create and review your support cases.
• Find your local Informatica User Group Network and collaborate with your peers.
Informatica Knowledge BaseUse the Informatica Knowledge Base to find product resources such as how-to articles, best practices, video tutorials, and answers to frequently asked questions.
8
To search the Knowledge Base, visit https://search.informatica.com. If you have questions, comments, or ideas about the Knowledge Base, contact the Informatica Knowledge Base team at [email protected].
Informatica DocumentationUse the Informatica Documentation Portal to explore an extensive library of documentation for current and recent product releases. To explore the Documentation Portal, visit https://docs.informatica.com.
If you have questions, comments, or ideas about the product documentation, contact the Informatica Documentation team at [email protected].
Informatica Product Availability MatricesProduct Availability Matrices (PAMs) indicate the versions of the operating systems, databases, and types of data sources and targets that a product release supports. You can browse the Informatica PAMs at https://network.informatica.com/community/informatica-network/product-availability-matrices.
Informatica VelocityInformatica Velocity is a collection of tips and best practices developed by Informatica Professional Services and based on real-world experiences from hundreds of data management projects. Informatica Velocity represents the collective knowledge of Informatica consultants who work with organizations around the world to plan, develop, deploy, and maintain successful data management solutions.
You can find Informatica Velocity resources at http://velocity.informatica.com. If you have questions, comments, or ideas about Informatica Velocity, contact Informatica Professional Services at [email protected].
Informatica MarketplaceThe Informatica Marketplace is a forum where you can find solutions that extend and enhance your Informatica implementations. Leverage any of the hundreds of solutions from Informatica developers and partners on the Marketplace to improve your productivity and speed up time to implementation on your projects. You can find the Informatica Marketplace at https://marketplace.informatica.com.
Informatica Global Customer SupportYou can contact a Global Support Center by telephone or through the Informatica Network.
To find your local Informatica Global Customer Support telephone number, visit the Informatica website at the following link: https://www.informatica.com/services-and-training/customer-success-services/contact-us.html.
To find online support resources on the Informatica Network, visit https://network.informatica.com and select the eSupport option.
Preface 9

C h a p t e r 1
Upgrade OverviewThis chapter includes the following topics:
• Informatica Upgrade, 10
• Informatica Upgrade Support, 10
• Upgrade Process, 10
• Business Glossary Upgrade, 12
Informatica UpgradeThe Informatica platform consists of a server component and one or more client components. Informatica provides separate installers to upgrade the Informatica services and clients.
When you upgrade each node in the domain, you can choose to change the node configuration to allow changes to the node host name, port numbers, or domain configuration repository database.
Informatica Upgrade SupportYou can directly upgrade to 10.4.0 from Informatica 10.0, 10.1, 10.1.1, 10.2, 10.2.1, and 10.2.2.
If the product version that is currently installed cannot be upgraded to Informatica 10.4.0, you must first upgrade to a supported version. To determine the Informatica product version that is currently installed, click Help > About Informatica Administrator in the Informatica Administrator header area.
Note: For information about Support EOL statements, contact Informatica Global Customer Support or see, https://network.informatica.com/docs/DOC-16182.
Upgrade ProcessThe upgrade of the Informatica services and Informatica clients consists of multiple phases.
The upgrade consists of the following phases:
1. Complete the pre-upgrade tasks for the domain to ensure that you can successfully run the installer.
10

2. Upgrade the domain. To upgrade the domain, run the Informatica server installer and select the upgrade option. The domain upgrade wizard installs the server files and configures the domain. If the domain has multiple nodes, you must upgrade all nodes. When you upgrade each node in the domain, you can choose to change the node configuration to allow changes to the node host name, port numbers, or domain configuration repository database.The following table describes the actions that the installer performs when you upgrade the domain:
Tasks Descriptions
Runs Informatica Upgrade Advisor.
Installer runs the pre-upgrade to validate the services and checks for obsolete services, supported database, and supported operating system in the domain.Resolve the conflicts before you proceed with the upgrade.
Installs Informatica. Installs Informatica directories and files into the new directory.
Copies infa_shared directory. Copies the contents of the infa_shared directory from the existing installation directory into the new installation directory.
Copies the encryption key file. Copies the domain encryption key file from the existing installation directory into the directory that you specify when you upgrade.
If the existing domain uses Kerberos authentication, copies the Kerberos configuration file and keytab files.
Copies the Kerberos configuration file from the existing installation directory into the new installation directory. Copies the keytab files from the existing installation directory into the encryption key directory that you specify when you upgrade.
If the existing domain uses the Metadata Manager Service, copies mm_files directory.
Copies the contents of the mm_files directory from the default location in the existing installation directory into the new installation directory.
Upgrades the domain. The upgrade retains the user and administrator accounts in the domain.
Starts Informatica Services. Starts Informatica Services on the node.
3. Upgrade the application services. After you upgrade the domain, log in to the Administrator tool and upgrade the application services. The service upgrade wizard provides a list of all application services that must be upgraded. It upgrades the services based on the order required by the dependent objects.
4. Upgrade the Informatica clients. Use the client installer to upgrade the following Informatica client tools:
• PowerCenter Client
• Informatica Developer
Upgrade Informatica Developer to the Informatica version, including the hotfix version, of the domain upgrade.
Note: You cannot connect to the Informatica domain using the Developer tool from a previous version.
To upgrade Informatica clients, run the Informatica client installer and select the upgrade option. If the clients are installed on multiple machines, upgrade the clients on all machines.
5. Perform the post-upgrade tasks.
Note: If you upgrade the Informatica installation on more than one machine, complete the first upgrade with the detailed instructions in this guide. You can use the upgrade checklist in the appendix to perform subsequent upgrades.
Upgrade Process 11

Business Glossary UpgradeBusiness glossary functionality is moved from Metadata Manager to the Analyst tool. Before you upgrade the domain, you must export and delete business glossaries from Metadata Manager. You use the Metadata Manager glossary export files to create corresponding business glossaries in the Analyst tool after upgrade.
Analyst tool business glossaries contain multiple features that Metadata Manager business glossaries do not have. For example, Analyst tool business glossaries provide business policies that govern the business practices related to business terms. Analyst tool glossaries can be used by a wide range of business users. Business users that do not need to see data lineage no longer have to use Metadata Manager to create and view business terms and categories.
Perform the following steps to upgrade business glossaries:
1. Complete pre-upgrade tasks in Metadata Manager.
a. Back up the Metadata Manager repository.
b. Optionally, back up each glossary that uses enumerated links or rule-based links, back up the enumerated links and linking rules files.
c. Optional. If custom attributes were added to the business glossary model, export the business glossary model.
d. Export each business glossary to a Microsoft Excel file or an XML file.
Note: Contact Informatica Global Customer Support to ensure that you have the latest patches before you export the business glossaries to XML files.
e. In each Microsoft Excel file, add a worksheet contains the Metadata Manager Service name.
f. Purge and delete each business glossary from Metadata Manager.
2. Upgrade the domain.
a. Optional. In the Analyst tool, if custom attributes were added to the business glossary model in Metadata Manager, import the Metadata Manager model export file.
b. Optional. In the Analyst tool, if business terms or categories were linked across glossaries in Metadata Manager, merge the glossary export files. If you exported glossaries to Microsoft Excel files, delete the duplicate business terms.
c. In the Analyst tool, import each business glossary file.
d. Optional. In the Analyst tool, publish any unpublished business terms and categories that you want to see in Metadata Manager.
e. Create one business glossary resource for each Analyst tool business glossary.
f. Optional. For each glossary that uses enumerated links or rule-based links, associate the enumerated links and linking rules files with the business glossary resource.
g. Load each business glossary resource and check each glossary.
3. Import business glossaries into the Analyst tool, and complete post-upgrade tasks in the Analyst tool.
4. Create and load resources in Metadata Manager that are based on the Analyst tool business glossaries, and complete post-upgrade tasks in Metadata Manager.
For more information about Analyst tool business glossaries, see the Informatica Business Glossary Guide. For more information about creating and configuring business glossary resources in Metadata Manager, see the Metadata Manager Administrator Guide.
12 Chapter 1: Upgrade Overview
C h a p t e r 2
Before You Upgrade the Domain on Linux
This chapter includes the following topics:
• Read the Release Notes, 13
• Verify System Requirements, 13
• Extract the Installer Files, 17
• Run the Informatica Upgrade Advisor, 17
Read the Release NotesRead the Release Notes for updates to the installation and upgrade process. You can also find information about known and fixed limitations for the release.
Verify System RequirementsVerify that your environment meets the minimum system requirements for the installation process, temporary disk space, port availability, databases, and application service hardware.
For more information about product requirements and supported platforms, see the Product Availability Matrix on Informatica Network: https://network.informatica.com/community/informatica-network/product-availability-matrices
Verify the Domain Upgrade RequirementsVerify that your machine meets the minimum system requirements to upgrade the Informatica domain.
Ensure that you have a minimum disk space of 13 GB and a RAM of 4 GB to upgrade the Informatica domain.
Note: When you upgrade, the installer requires an additional disk space used by the existing infa_shared directory.
For more information about product requirements and supported platforms, see the Product Availability Matrix on Informatica Network: https://network.informatica.com/community/informatica-network/product-availability-matrices
13

Verify Temporary Disk Space and PermissionsVerify that your environment meets the minimum system requirements for the temporary disk space, permissions for the temporary files, and the Informatica client tools.
Disk space for the temporary files
The installer writes temporary files to the hard disk. Verify that you have 1 GB disk space on the machine to support the installation. When the installation completes, the installer deletes the temporary files and releases the disk space.
To install Informatica with the application services enabled, verify a minimum disk space of 18 GB and a memory of 6 GB RAM. Out of the 18 GB disk space, 14 GB disk space is required for the product installation binaries. Based on the runtime configurations that you perform, the Informatica services might use a disk space around 13,846 MB. 1 GB disk space is the temporary disk space used.
Permissions for the temporary files
Verify that you have read, write, and execute permissions on the /tmp directory.
For more information about product requirements and supported platforms, see the Product Availability Matrix on Informatica Network: https://network.informatica.com/community/informatica-network/product-availability-matrices
Verify the DistributionsVerify the distributions for the non-native environments.
In each release, Informatica can add, defer, and drop support for the non-native distributions and distribution versions. Informatica might reinstate support for deferred versions in a future release. To see a list of the latest supported versions, see the Product Availability Matrix on the Informatica Customer Portal: https://network.informatica.com/community/informatica-network/product-availability-matrices
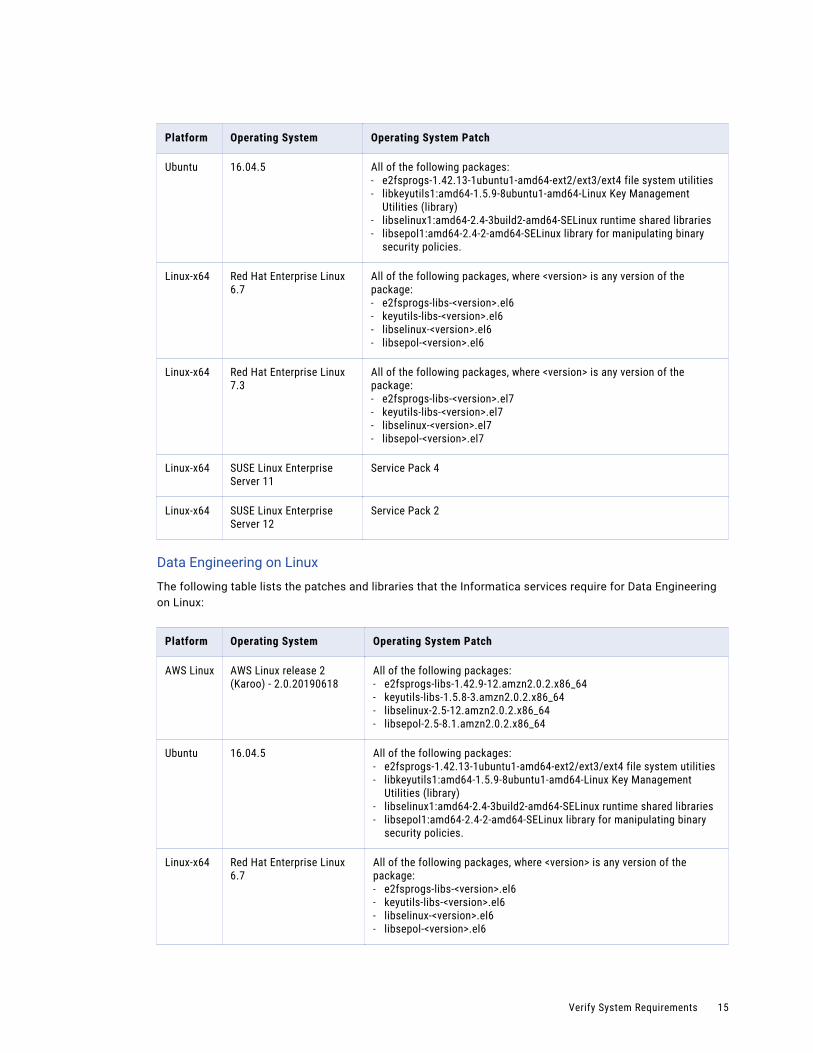
Review Patch Requirements on LinuxBefore you install the Informatica services, verify that the machine has the required operating system patches and libraries.
PowerCenter on Linux
The following table lists the patches and libraries that the Informatica services require for PowerCenter on Linux:
Platform Operating System Operating System Patch
zLinux Red Hat Enterprise Linux 6.9
All of the following packages, where <version> is any version of the package:- e2fsprogs-libs-<version>.el6.s390- keyutils-libs-<version>.el6.s390- libselinux-<version>.el6.s390- libsepol-<version>.el6.s390
AWS Linux AWS Linux release 2 (Karoo) - 2.0.20190618
All of the following packages:- e2fsprogs-libs-1.42.9-12.amzn2.0.2.x86_64- keyutils-libs-1.5.8-3.amzn2.0.2.x86_64- libselinux-2.5-12.amzn2.0.2.x86_64- libsepol-2.5-8.1.amzn2.0.2.x86_64
14 Chapter 2: Before You Upgrade the Domain on Linux
Platform Operating System Operating System Patch
Ubuntu 16.04.5 All of the following packages:- e2fsprogs-1.42.13-1ubuntu1-amd64-ext2/ext3/ext4 file system utilities- libkeyutils1:amd64-1.5.9-8ubuntu1-amd64-Linux Key Management
Utilities (library)- libselinux1:amd64-2.4-3build2-amd64-SELinux runtime shared libraries- libsepol1:amd64-2.4-2-amd64-SELinux library for manipulating binary
security policies.
Linux-x64 Red Hat Enterprise Linux 6.7
All of the following packages, where <version> is any version of the package:- e2fsprogs-libs-<version>.el6- keyutils-libs-<version>.el6- libselinux-<version>.el6- libsepol-<version>.el6
Linux-x64 Red Hat Enterprise Linux 7.3
All of the following packages, where <version> is any version of the package:- e2fsprogs-libs-<version>.el7- keyutils-libs-<version>.el7- libselinux-<version>.el7- libsepol-<version>.el7
Linux-x64 SUSE Linux Enterprise Server 11
Service Pack 4
Linux-x64 SUSE Linux Enterprise Server 12
Service Pack 2
Data Engineering on Linux
The following table lists the patches and libraries that the Informatica services require for Data Engineering on Linux:
Platform Operating System Operating System Patch
AWS Linux AWS Linux release 2 (Karoo) - 2.0.20190618
All of the following packages:- e2fsprogs-libs-1.42.9-12.amzn2.0.2.x86_64- keyutils-libs-1.5.8-3.amzn2.0.2.x86_64- libselinux-2.5-12.amzn2.0.2.x86_64- libsepol-2.5-8.1.amzn2.0.2.x86_64
Ubuntu 16.04.5 All of the following packages:- e2fsprogs-1.42.13-1ubuntu1-amd64-ext2/ext3/ext4 file system utilities- libkeyutils1:amd64-1.5.9-8ubuntu1-amd64-Linux Key Management
Utilities (library)- libselinux1:amd64-2.4-3build2-amd64-SELinux runtime shared libraries- libsepol1:amd64-2.4-2-amd64-SELinux library for manipulating binary
security policies.
Linux-x64 Red Hat Enterprise Linux 6.7
All of the following packages, where <version> is any version of the package:- e2fsprogs-libs-<version>.el6- keyutils-libs-<version>.el6- libselinux-<version>.el6- libsepol-<version>.el6
Verify System Requirements 15

Platform Operating System Operating System Patch
Linux-x64 Red Hat Enterprise Linux 7.3
All of the following packages, where <version> is any version of the package:- e2fsprogs-libs-<version>.el7- keyutils-libs-<version>.el7- libselinux-<version>.el7- libsepol-<version>.el7
Linux-x64 SUSE Linux Enterprise Server 11
Service Pack 4
Linux-x64 SUSE Linux Enterprise Server 12
Service Pack 2
Install the Java Runtime EnvironmentInformatica does not ship the Java libraries for AIX or zLinux. Before you install Informatica on AIX or zLinux, you must download and install the Java Runtime Environment (JRE). The required JRE version depends on the platform where you install Informatica.
The software available for download at the referenced links belongs to a third party or third parties, not Informatica LLC. The download links are subject to the possibility of errors, omissions or change. Informatica assumes no responsibility for such links and/or such software, disclaims all warranties, either express or implied, including but not limited to, implied warranties of merchantability, fitness for a particular purpose, title and non-infringement, and disclaims all liability relating thereto.
Install the Java Runtime Environment for zLinuxThe PowerCenter Integration Service, the PowerCenter Repository Service, and the Web Services Hub support the 1.8.0_181 Java sub version for zLinux. Informatica does not ship the Java libraries for zLinux.
The PowerCenter Integration Service, the PowerCenter Repository Service, and the Web Services Hub on zLinux are certified on the following Java version:
Java(TM) SE Runtime Environment (build 8.0.5.20 - pxz6480sr5fp20 - 20180802_01 (SR5_FP20))
Before you install the PowerCenter Integration Service, the PowerCenter Repository Service, and the Web Services Hub on zLinux, download the jdk-8u181-bl2 Java runtime environment file from the following link:
https://developer.ibm.com/javasdk/downloads/sdk8/
If you have problems installing the JRE, contact the JRE vendor.
Review the Environment VariablesConfigure the environment variables to work with the Informatica installation.
16 Chapter 2: Before You Upgrade the Domain on Linux
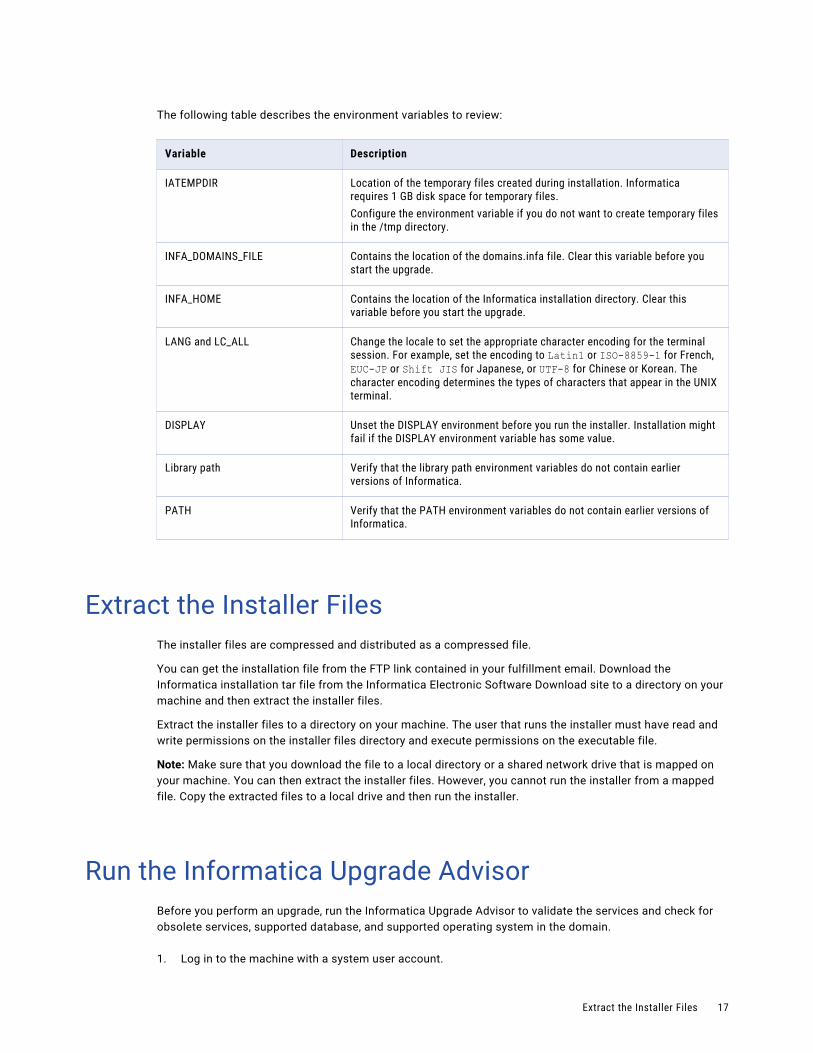
The following table describes the environment variables to review:
Variable Description
IATEMPDIR Location of the temporary files created during installation. Informatica requires 1 GB disk space for temporary files.Configure the environment variable if you do not want to create temporary files in the /tmp directory.
INFA_DOMAINS_FILE Contains the location of the domains.infa file. Clear this variable before you start the upgrade.
INFA_HOME Contains the location of the Informatica installation directory. Clear this variable before you start the upgrade.
LANG and LC_ALL Change the locale to set the appropriate character encoding for the terminal session. For example, set the encoding to Latin1 or ISO-8859-1 for French, EUC-JP or Shift JIS for Japanese, or UTF-8 for Chinese or Korean. The character encoding determines the types of characters that appear in the UNIX terminal.
DISPLAY Unset the DISPLAY environment before you run the installer. Installation might fail if the DISPLAY environment variable has some value.
Library path Verify that the library path environment variables do not contain earlier versions of Informatica.
PATH Verify that the PATH environment variables do not contain earlier versions of Informatica.
Extract the Installer FilesThe installer files are compressed and distributed as a compressed file.
You can get the installation file from the FTP link contained in your fulfillment email. Download the Informatica installation tar file from the Informatica Electronic Software Download site to a directory on your machine and then extract the installer files.
Extract the installer files to a directory on your machine. The user that runs the installer must have read and write permissions on the installer files directory and execute permissions on the executable file.
Note: Make sure that you download the file to a local directory or a shared network drive that is mapped on your machine. You can then extract the installer files. However, you cannot run the installer from a mapped file. Copy the extracted files to a local drive and then run the installer.
Run the Informatica Upgrade AdvisorBefore you perform an upgrade, run the Informatica Upgrade Advisor to validate the services and check for obsolete services, supported database, and supported operating system in the domain.
1. Log in to the machine with a system user account.
Extract the Installer Files 17

2. Verify that the domain and the services are running before you run the Informatica Upgrade Advisor.
3. On a shell command line, run the install.sh file from the root directory.
The installer displays the message to verify that the locale environment variables are set.
4. If the environment variables are not set, press n to exit the installer and set them as required.
If the environment variables are set, press y to continue.
5. Press 2 to Upgrade Informatica.
6. Press 1 to run the Informatica Upgrade Advisor.
The Welcome section appears.
7. Press Enter.
The Installation Directory section appears.
8. Enter the current installation directory.
9. Press Enter.
The Domain and Node Configuration section appears.
10. Enter the following domain information:
Property Description
Domain name Name of the domain. The default domain name is Domain_<MachineName>. The name must not exceed 128 characters and must be 7-bit ASCII only. It cannot contain a space or any of the following characters: ` % * + ; " ? , < > \ /
Gateway node host name
Host name of the machine that hosts the gateway node for the domain.
Gateway node port name
Port number of the gateway node.
Domain user name
User name for the domain administrator. You can use this user name to initially log in to Informatica Administrator. Use the following guidelines:The name is not case sensitive and cannot exceed 128 characters.The name cannot include a tab, newline character, or the following special characters: % * + / ? ; < >-The name can include an ASCII space character except for the first and last character. Other space characters are not allowed.
Domain password
Password for the domain administrator. The password must be more than 2 characters and must not exceed 16 characters.Not available if you configure the Informatica domain to run on a network with Kerberos authentication.
11. Press Enter.
The Infomatica Upgrade Advisor Summary section appears.
12. Review the results of the advisor in the following log file: Summary_<timestamp>.log 13. Press Enter to close the Informatica Upgrade Advisor.
18 Chapter 2: Before You Upgrade the Domain on Linux
C h a p t e r 3
Before You Upgrade the Domain on UNIX
This chapter includes the following topics:
• Read the Release Notes, 19
• Verify System Requirements, 19
• Review Patch Requirements on UNIX, 20
• Install the Java Runtime Environment, 20
• Verify the Distributions, 21
• Verify the Domain Upgrade Requirements, 21
• Review the Environment Variables, 21
• Extract the Installer Files, 22
• Run the Informatica Upgrade Advisor, 22
Read the Release NotesRead the Release Notes for updates to the installation and upgrade process. You can also find information about known and fixed limitations for the release.
Verify System RequirementsVerify that your environment meets the minimum system requirements for the installation process, temporary disk space, port availability, databases, and application service hardware.
For more information about product requirements and supported platforms, see the Product Availability Matrix on Informatica Network: https://network.informatica.com/community/informatica-network/product-availability-matrices
19
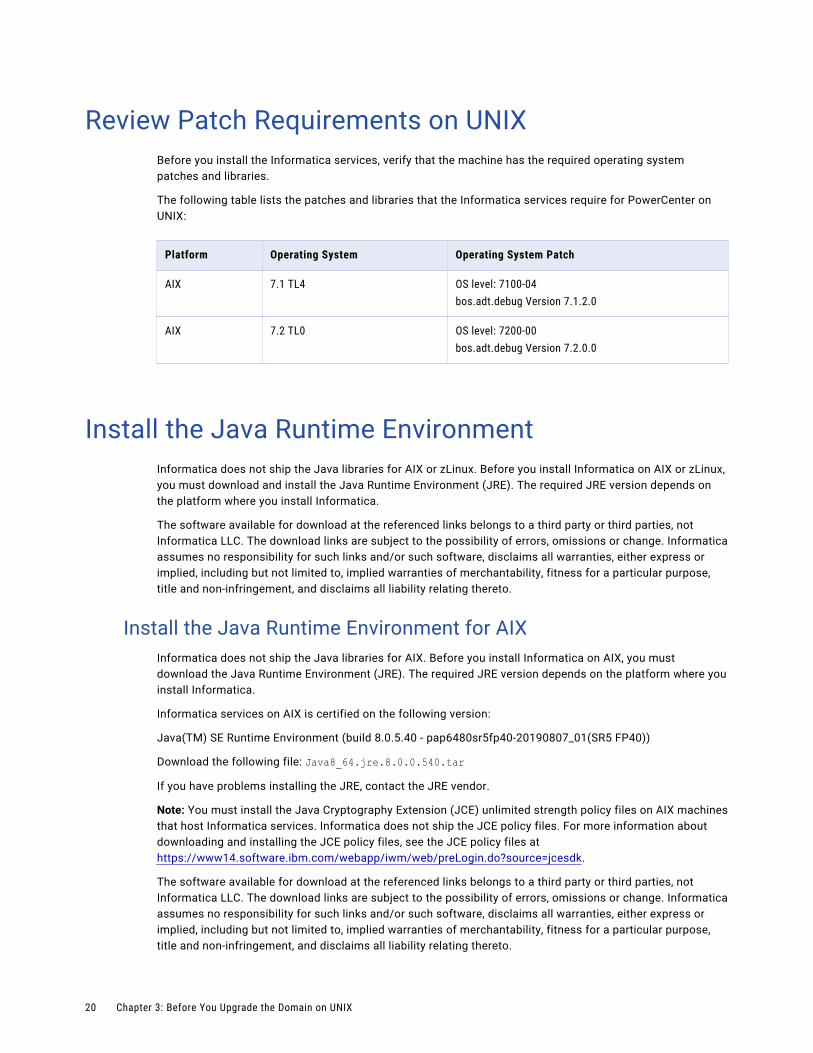
Review Patch Requirements on UNIXBefore you install the Informatica services, verify that the machine has the required operating system patches and libraries.
The following table lists the patches and libraries that the Informatica services require for PowerCenter on UNIX:
Platform Operating System Operating System Patch
AIX 7.1 TL4 OS level: 7100-04bos.adt.debug Version 7.1.2.0
AIX 7.2 TL0 OS level: 7200-00bos.adt.debug Version 7.2.0.0
Install the Java Runtime EnvironmentInformatica does not ship the Java libraries for AIX or zLinux. Before you install Informatica on AIX or zLinux, you must download and install the Java Runtime Environment (JRE). The required JRE version depends on the platform where you install Informatica.
The software available for download at the referenced links belongs to a third party or third parties, not Informatica LLC. The download links are subject to the possibility of errors, omissions or change. Informatica assumes no responsibility for such links and/or such software, disclaims all warranties, either express or implied, including but not limited to, implied warranties of merchantability, fitness for a particular purpose, title and non-infringement, and disclaims all liability relating thereto.
Install the Java Runtime Environment for AIXInformatica does not ship the Java libraries for AIX. Before you install Informatica on AIX, you must download the Java Runtime Environment (JRE). The required JRE version depends on the platform where you install Informatica.
Informatica services on AIX is certified on the following version:
Java(TM) SE Runtime Environment (build 8.0.5.40 - pap6480sr5fp40-20190807_01(SR5 FP40))
Download the following file: Java8_64.jre.8.0.0.540.tar
If you have problems installing the JRE, contact the JRE vendor.
Note: You must install the Java Cryptography Extension (JCE) unlimited strength policy files on AIX machines that host Informatica services. Informatica does not ship the JCE policy files. For more information about downloading and installing the JCE policy files, see the JCE policy files at https://www14.software.ibm.com/webapp/iwm/web/preLogin.do?source=jcesdk.
The software available for download at the referenced links belongs to a third party or third parties, not Informatica LLC. The download links are subject to the possibility of errors, omissions or change. Informatica assumes no responsibility for such links and/or such software, disclaims all warranties, either express or implied, including but not limited to, implied warranties of merchantability, fitness for a particular purpose, title and non-infringement, and disclaims all liability relating thereto.
20 Chapter 3: Before You Upgrade the Domain on UNIX
Verify the DistributionsVerify the distributions for the non-native environments.
In each release, Informatica can add, defer, and drop support for the non-native distributions and distribution versions. Informatica might reinstate support for deferred versions in a future release. To see a list of the latest supported versions, see the Product Availability Matrix on the Informatica Customer Portal: https://network.informatica.com/community/informatica-network/product-availability-matrices
Verify the Domain Upgrade RequirementsVerify that your machine meets the minimum system requirements to upgrade the Informatica domain.
Ensure that you have a minimum disk space of 13 GB and a RAM of 4 GB to upgrade the Informatica domain.
Note: When you upgrade, the installer requires an additional disk space used by the existing infa_shared directory.
For more information about product requirements and supported platforms, see the Product Availability Matrix on Informatica Network: https://network.informatica.com/community/informatica-network/product-availability-matrices
Temporary Disk Space RequirementsThe installer writes temporary files to the hard disk. Verify that you have enough available disk space on the machine to support the installation. When the installation completes, the installer deletes the temporary files and releases the disk space.
The installer requires 1 GB of temporary disk space.
Review the Environment VariablesConfigure the environment variables to work with the Informatica installation.
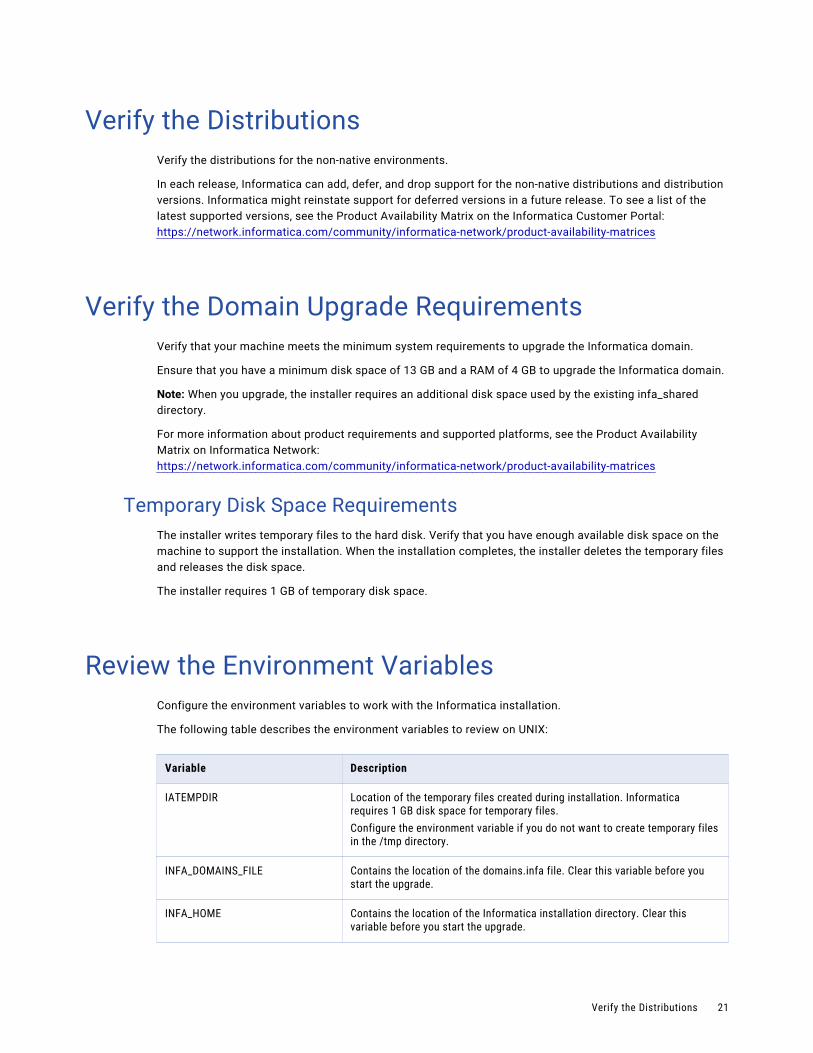
The following table describes the environment variables to review on UNIX:
Variable Description
IATEMPDIR Location of the temporary files created during installation. Informatica requires 1 GB disk space for temporary files.Configure the environment variable if you do not want to create temporary files in the /tmp directory.
INFA_DOMAINS_FILE Contains the location of the domains.infa file. Clear this variable before you start the upgrade.
INFA_HOME Contains the location of the Informatica installation directory. Clear this variable before you start the upgrade.
Verify the Distributions 21
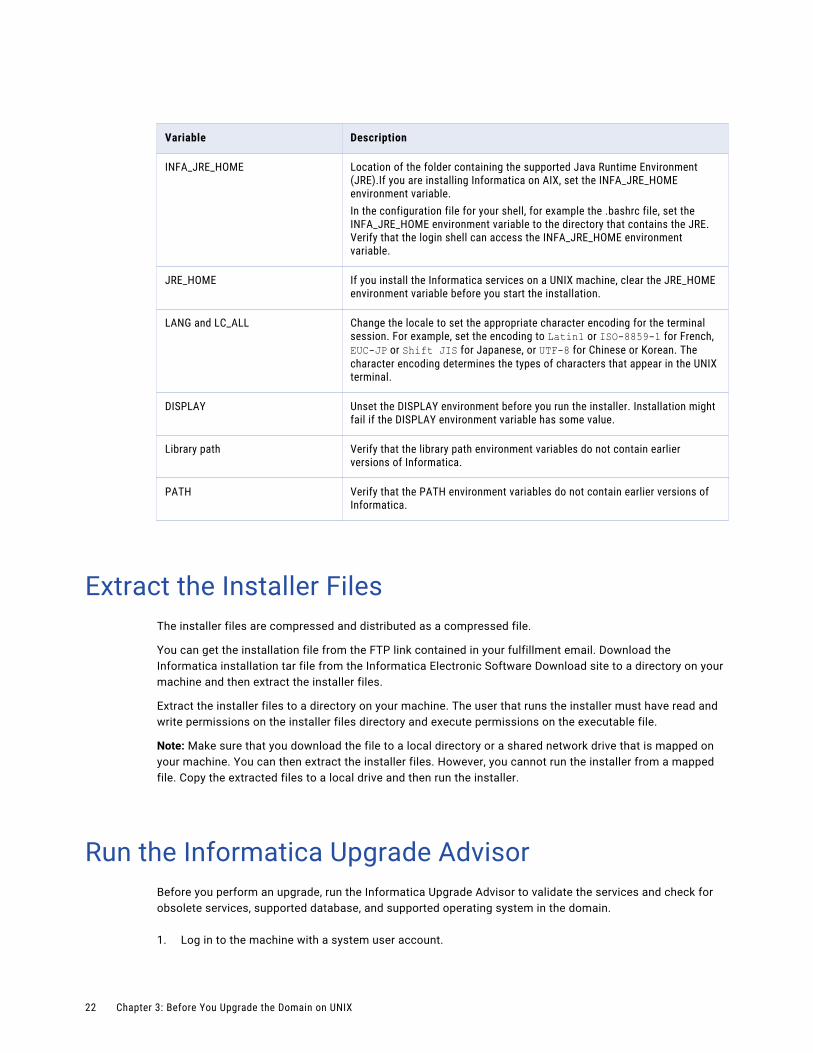
Variable Description
INFA_JRE_HOME Location of the folder containing the supported Java Runtime Environment (JRE).If you are installing Informatica on AIX, set the INFA_JRE_HOME environment variable.In the configuration file for your shell, for example the .bashrc file, set the INFA_JRE_HOME environment variable to the directory that contains the JRE. Verify that the login shell can access the INFA_JRE_HOME environment variable.
JRE_HOME If you install the Informatica services on a UNIX machine, clear the JRE_HOME environment variable before you start the installation.
LANG and LC_ALL Change the locale to set the appropriate character encoding for the terminal session. For example, set the encoding to Latin1 or ISO-8859-1 for French, EUC-JP or Shift JIS for Japanese, or UTF-8 for Chinese or Korean. The character encoding determines the types of characters that appear in the UNIX terminal.
DISPLAY Unset the DISPLAY environment before you run the installer. Installation might fail if the DISPLAY environment variable has some value.
Library path Verify that the library path environment variables do not contain earlier versions of Informatica.
PATH Verify that the PATH environment variables do not contain earlier versions of Informatica.
Extract the Installer FilesThe installer files are compressed and distributed as a compressed file.
You can get the installation file from the FTP link contained in your fulfillment email. Download the Informatica installation tar file from the Informatica Electronic Software Download site to a directory on your machine and then extract the installer files.
Extract the installer files to a directory on your machine. The user that runs the installer must have read and write permissions on the installer files directory and execute permissions on the executable file.
Note: Make sure that you download the file to a local directory or a shared network drive that is mapped on your machine. You can then extract the installer files. However, you cannot run the installer from a mapped file. Copy the extracted files to a local drive and then run the installer.
Run the Informatica Upgrade AdvisorBefore you perform an upgrade, run the Informatica Upgrade Advisor to validate the services and check for obsolete services, supported database, and supported operating system in the domain.
1. Log in to the machine with a system user account.
22 Chapter 3: Before You Upgrade the Domain on UNIX

2. Verify that the domain and the services are running before you run the Informatica Upgrade Advisor.
3. On a shell command line, run the install.sh file from the root directory.
The installer displays the message to verify that the locale environment variables are set.
4. If the environment variables are not set, press n to exit the installer and set them as required.
If the environment variables are set, press y to continue.
5. Press 2 to Upgrade Informatica.
6. Press 1 to run the Informatica Upgrade Advisor.
The Welcome section appears.
7. Press Enter.
The Installation Directory section appears.
8. Enter the current installation directory.
9. Press Enter.
The Domain and Node Configuration section appears.
10. Enter the following domain information:
Property Description
Domain name Name of the domain. The default domain name is Domain_<MachineName>. The name must not exceed 128 characters and must be 7-bit ASCII only. It cannot contain a space or any of the following characters: ` % * + ; " ? , < > \ /
Gateway node host name
Host name of the machine that hosts the gateway node for the domain.
Gateway node port name
Port number of the gateway node.
Domain user name
User name for the domain administrator. You can use this user name to initially log in to Informatica Administrator. Use the following guidelines:The name is not case sensitive and cannot exceed 128 characters.The name cannot include a tab, newline character, or the following special characters: % * + / ? ; < >-The name can include an ASCII space character except for the first and last character. Other space characters are not allowed.
Domain password
Password for the domain administrator. The password must be more than 2 characters and must not exceed 16 characters.Not available if you configure the Informatica domain to run on a network with Kerberos authentication.
11. Press Enter.
The Infomatica Upgrade Advisor Summary section appears.
12. Review the results of the advisor in the following log file: Summary_<timestamp>.log 13. Press Enter to close the Informatica Upgrade Advisor.
Run the Informatica Upgrade Advisor 23
C h a p t e r 4
Before You Upgrade the Domain on Windows
This chapter includes the following topics:
• Read the Release Notes, 24
• Verify System Requirements, 24
• Verify the Distributions, 25
• Verify the Domain Upgrade Requirements, 25
• Review the Environment Variables, 26
• Extract the Installer Files, 26
• Run the Informatica Upgrade Advisor, 27
Read the Release NotesRead the Release Notes for updates to the installation and upgrade process. You can also find information about known and fixed limitations for the release.
Verify System RequirementsVerify that your environment meets the minimum system requirements for the installation process, temporary disk space, port availability, databases, and application service hardware.
For more information about product requirements and supported platforms, see the Product Availability Matrix on Informatica Network: https://network.informatica.com/community/informatica-network/product-availability-matrices
24
Verify the DistributionsVerify the distributions for the non-native environments.
In each release, Informatica can add, defer, and drop support for the non-native distributions and distribution versions. Informatica might reinstate support for deferred versions in a future release. To see a list of the latest supported versions, see the Product Availability Matrix on the Informatica Customer Portal: https://network.informatica.com/community/informatica-network/product-availability-matrices
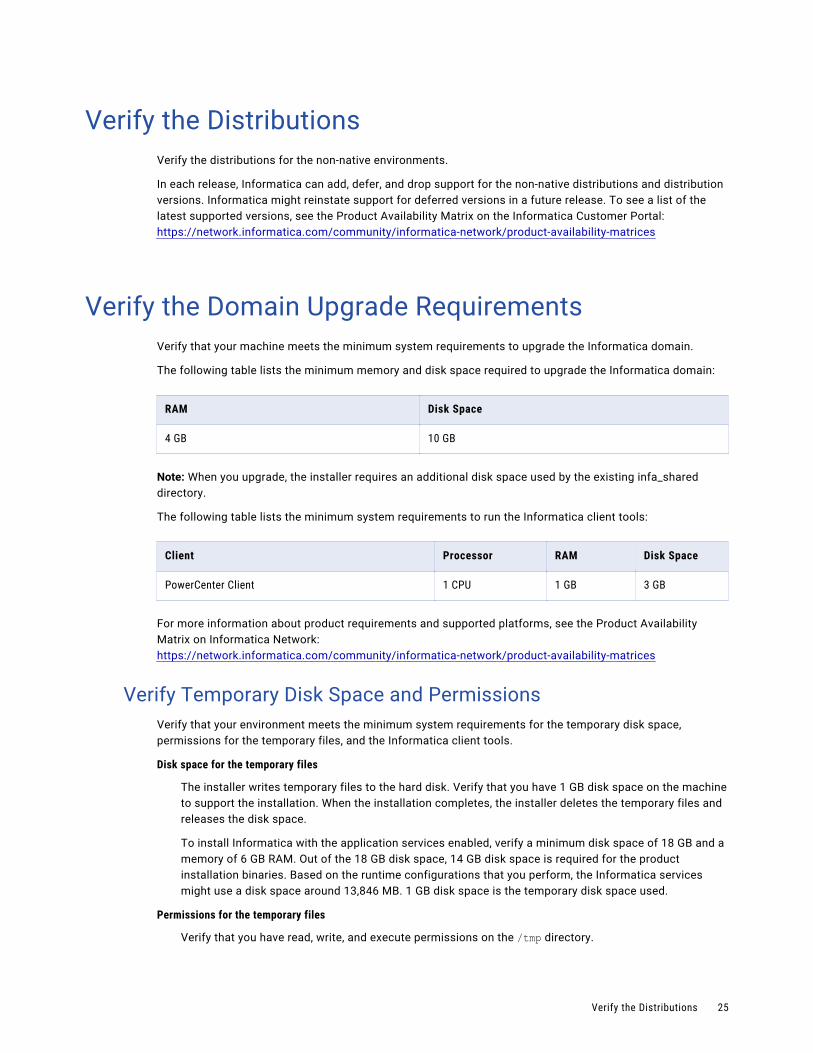
Verify the Domain Upgrade RequirementsVerify that your machine meets the minimum system requirements to upgrade the Informatica domain.
The following table lists the minimum memory and disk space required to upgrade the Informatica domain:
RAM Disk Space
4 GB 10 GB
Note: When you upgrade, the installer requires an additional disk space used by the existing infa_shared directory.
The following table lists the minimum system requirements to run the Informatica client tools:
Client Processor RAM Disk Space
PowerCenter Client 1 CPU 1 GB 3 GB
For more information about product requirements and supported platforms, see the Product Availability Matrix on Informatica Network: https://network.informatica.com/community/informatica-network/product-availability-matrices
Verify Temporary Disk Space and PermissionsVerify that your environment meets the minimum system requirements for the temporary disk space, permissions for the temporary files, and the Informatica client tools.
Disk space for the temporary files
The installer writes temporary files to the hard disk. Verify that you have 1 GB disk space on the machine to support the installation. When the installation completes, the installer deletes the temporary files and releases the disk space.
To install Informatica with the application services enabled, verify a minimum disk space of 18 GB and a memory of 6 GB RAM. Out of the 18 GB disk space, 14 GB disk space is required for the product installation binaries. Based on the runtime configurations that you perform, the Informatica services might use a disk space around 13,846 MB. 1 GB disk space is the temporary disk space used.
Permissions for the temporary files
Verify that you have read, write, and execute permissions on the /tmp directory.
Verify the Distributions 25

For more information about product requirements and supported platforms, see the Product Availability Matrix on Informatica Network: https://network.informatica.com/community/informatica-network/product-availability-matrices
Review the Environment VariablesConfigure the environment variables to work with the Informatica installation.
The following table describes environment variables to review on Windows:
Variable Description
%TEMP% Location of the temporary files created during installation. Informatica requires 1 GB disk space for temporary files.Configure the environment variable if you do not want to create temporary files in the default drive.
PATH Verify that the PATH environment variables do not contain earlier versions of Informatica.
Library path Verify that the library path environment variables do not contain earlier versions of Informatica.
INFA_HOME Contains the location of the Informatica installation directory. Clear this variable before you start the upgrade.
INFA_DOMAINS_FILE Contains the location of the domains.infa file. Clear this variable before you start the upgrade.
DISPLAY Unset the DISPLAY environment before you run the installer. Installation might fail if the DISPLAY environment variable has some value.
Extract the Installer FilesThe installer files are compressed and distributed as a zip file.
Use a zip utility to extract the installer files to a directory on your machine. Verify the zip utility version is compatible with the Windows operating system version. When you unzip the file, verify that the zip utility also extracts empty folders.
You can extract the installer files through FTP download. Download the Informatica installation zip file from the Informatica Electronic Software Download site to a directory on your machine and then extract the installer files.
Note: Make sure that you download the file to a local directory or a shared network drive that is mapped on your machine. You can then extract the installer files. However, you cannot run the installer from a mapped file. Copy the extracted files to a local drive and then run the installer.
26 Chapter 4: Before You Upgrade the Domain on Windows
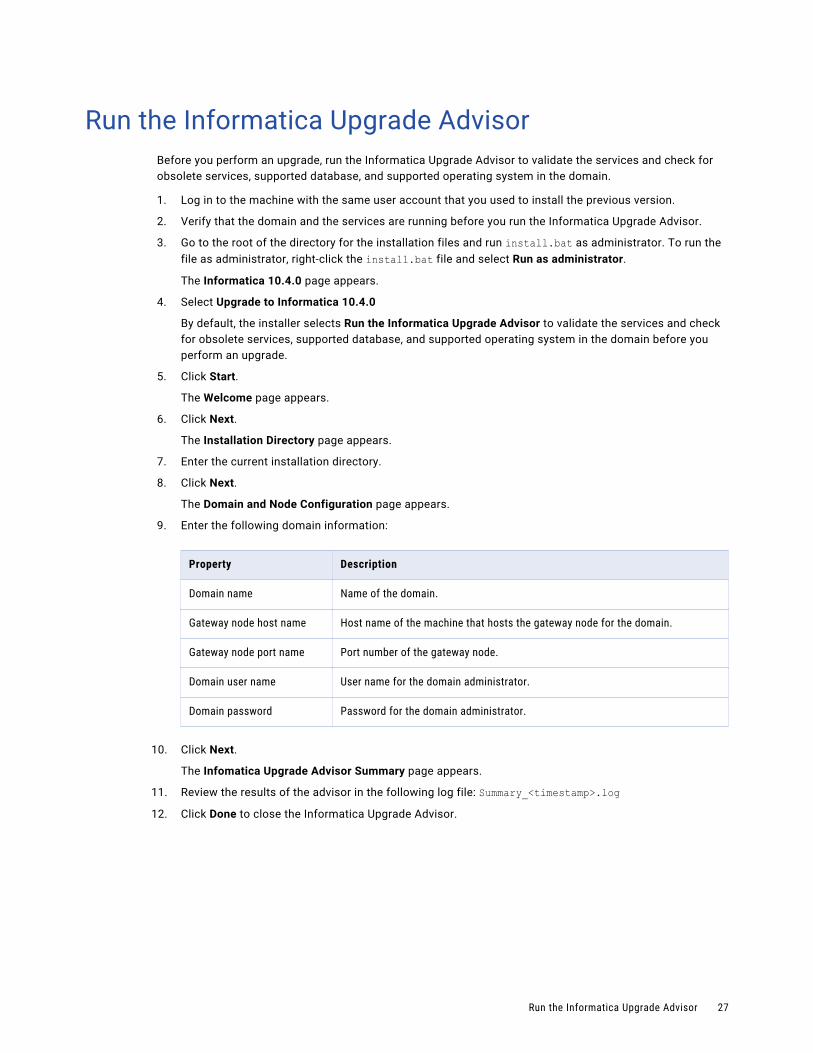
Run the Informatica Upgrade AdvisorBefore you perform an upgrade, run the Informatica Upgrade Advisor to validate the services and check for obsolete services, supported database, and supported operating system in the domain.
1. Log in to the machine with the same user account that you used to install the previous version.
2. Verify that the domain and the services are running before you run the Informatica Upgrade Advisor.
3. Go to the root of the directory for the installation files and run install.bat as administrator. To run the file as administrator, right-click the install.bat file and select Run as administrator.
The Informatica 10.4.0 page appears.
4. Select Upgrade to Informatica 10.4.0
By default, the installer selects Run the Informatica Upgrade Advisor to validate the services and check for obsolete services, supported database, and supported operating system in the domain before you perform an upgrade.
5. Click Start.
The Welcome page appears.
6. Click Next.
The Installation Directory page appears.
7. Enter the current installation directory.
8. Click Next.
The Domain and Node Configuration page appears.
9. Enter the following domain information:
Property Description
Domain name Name of the domain.
Gateway node host name Host name of the machine that hosts the gateway node for the domain.
Gateway node port name Port number of the gateway node.
Domain user name User name for the domain administrator.
Domain password Password for the domain administrator.
10. Click Next.
The Infomatica Upgrade Advisor Summary page appears.
11. Review the results of the advisor in the following log file: Summary_<timestamp>.log 12. Click Done to close the Informatica Upgrade Advisor.
Run the Informatica Upgrade Advisor 27
C h a p t e r 5
Prepare for the UpgradeThis chapter includes the following topics:
• Back Up the Data Transformation Files, 28
• Prepare the PowerCenter Repository, 29
• Prepare the Model Repository, 29
• Prepare the Data Integration Service, 29
• Prepare the Profiling Warehouse, 29
• Prepare the Reference Data Directories, 29
• Prepare Metadata Manager, 30
• Back Up Databases, 31
• Back Up the odbc.ini File for Informatica Cassandra ODBC Driver, 31
• Prepare the Domain, 31
Back Up the Data Transformation FilesBefore you upgrade, you must back up the Data Transformation files that were created under previous versions. After you complete the upgrade, copy the files to the new installation directories to get the same custom global components as in the previous version.
The following table lists the files or directories that you must back up:
File or Directory Default Location
Repository <Informatica installation directory>\DataTransformation\ServiceDB
Custom Global Components directory (TGP files)
<Informatica installation directory>\DataTransformation\autoInclude\user
Custom Global Components directory (DLL and JAR files)
<Informatica installation directory>\DataTransformation\externLibs\user
Configuration file <Informatica installation directory>\DataTransformation\CMConfig.xml
License file <Informatica installation directory>\DataTransformation\CDELicense.cfg
28
Do not copy the Data Transformation Library files. Instead, install the Data Transformation Libraries again.
Prepare the PowerCenter RepositoryBefore you upgrade the domain, back up the PowerCenter repository.
To back up a PowerCenter repository, select the PowerCenter Repository Service in the Administrator tool. On the Domain actions menu, select Repository Contents > Back Up.
Prepare the Model RepositoryBefore you upgrade the domain, back up the Model repository.
To back up each Model repository, select the Model Repository Service in the Administrator tool. Then, on the Domain Actions menu, click Repository Contents > Backup.
Prepare the Data Integration ServiceBefore you upgrade the domain, verify that all the running jobs are complete. The Data Integration Service cannot recover a workflow that you interrupt during the upgrade process.
Prepare the Profiling WarehouseBefore you upgrade the domain, back up the profiling warehouse.
Use the native database backup option to back up the profiling warehouse.
Prepare the Reference Data DirectoriesIf you install or copy any reference data file to a non-default directory, back up the directory before you upgrade.
If you install or copy any reference data file to a directory outside the installation directory structure, you do not need to back up the directory.
By default, the upgrade operation preserves the contents of the following reference data directories:
• <Informatica installation directory>/services/DQContent/INFA_Content/dictionaries/Parent directory for the reference dictionary files.
• <Informatica installation directory>/services/DQContent/INFA_Content/av/
Prepare the PowerCenter Repository 29
Parent directory for the address reference data files.
• <Informatica installation directory>/services/DQContent/INFA_Content/identity/Parent directory for the identity population data files.
Record the directory location, so that you can restore the directory to the directory structure after you upgrade.
Prepare Metadata ManagerBefore you upgrade the domain, prepare Metadata Manager.
1. Back up the Metadata Manager warehouse.
2. Disable the Metadata Manager Service.
3. Back up the Metadata Manager properties file.
Back Up the Metadata Manager WarehouseBefore you upgrade the domain, back up the Metadata Manager warehouse.
Use the native database backup option or the Metadata Manager mmRepoCmd command line program to back up the Metadata Manager warehouse.
mmRepoCmd includes commands to back up and restore the Metadata Manager warehouse. mmRepoCmd is in the following directory:
<Informatica services installation directory>\services\MetadataManagerService\utilities\mmrepocmd
To back up the Metadata Manager warehouse, use the mmRepoCmd backupRepository command. The backupRepository command uses the following syntax:
mmRepoCmd backupRepository [<-dn|--domainName> domainName] [<-hp|--gateway> gateway_host1:port gateway_host2:port...] [<-mm|--mmServiceName> mmServiceName] <<-url> http(s)://<host>:<port>> <<-u|--user> user> [-ep|--encryptedPassword] [<-pw|--password> password] [<-n|--namespace> namespace] [<-kt|--keyTab> keyTab] <<-f|--file> file> [<-nt|--numThreads> numThreads]
Back Up the Metadata Manager Properties FileBefore you upgrade the domain, back up the Metadata Manager properties file.
The imm.properties file is in the following directory:
<Informatica installation directory>\services\shared\jars\pc\classes
30 Chapter 5: Prepare for the Upgrade
Back Up DatabasesBefore you upgrade the domain, back up the profiling warehouse, reference data warehouse, and workflow databases.
Back Up the odbc.ini File for Informatica Cassandra ODBC Driver
Effective in version 10.2.1, Informatica upgrades the Cassandra ODBC file.
Before you upgrade, you must back up the odbc.ini file located in the following location:
<Informatica installation directory>/tools/cassandra/lib
Prepare the DomainBefore you upgrade the domain, complete the steps to prepare the domain.
Verify Database User Account RequirementsPerform the following tasks for the domain configuration repository database:
• Set the OPEN_CURSORS parameter to 4000 or higher.
• Set permissions on the view $parameter in the Oracle database.
• Set the privileges to run show parameter open_cursors in the Oracle database.When you run the pre-installation (i10Pi) system check tool, i10Pi runs the command against the database to identify the OPEN_CURSORS parameter with the domain database user credentials.
You can run the following query to determine the open cursors setting for the domain database user account:
SELECT VALUE OPEN_CURSORS FROM V$PARAMETER WHERE UPPER(NAME)=UPPER('OPEN_CURSORS')• Set the DynamicSections parameter to 3000 or higher in the IBM DB2 database.
The default value for DynamicSections is too low for the Informatica repositories. Informatica requires a larger DB2 package than the default. When you set up the DB2 database for the domain configuration repository or a Model repository, you must set the DynamicSections parameter to at least 3000. If the DynamicSections parameter is set to a lower number, you can encounter problems when you install or run Informatica services.
Shut Down the DomainYou can stop all the application services before you shut down the domain.You must shut down the domain before you back up domain and then upgrade the domain.
To shut down the domain, stop the Informatica service process on each node in the domain.
Back Up Databases 31

You can stop the Informatica service process on each node using one of the following methods based on the supported environment:
• To stop the Informatica from the Windows Start menu, click Programs > Informatica[Version] > Server > Stop Informatica Services.
• To stop Informatica on UNIX, you use the infaservice command. By default, the infaservice executable file is installed in the following directory:
<Informatica installation directory>/tomcat/bin Enter the following command to stop the daemon:
infaservice shutdownYou can also stop the Informatica service from the Windows control panel or from the Administrator tool based on the supported environment.
Back Up the DomainBefore you upgrade the domain, you must back up the configuration metadata for the domain.
Complete the following steps to back up the domain:
• Run the infasetup BackupDomain command to back up the domain configuration database tables to a file.
• Back up the metadata configuration files to any directory accessible by the machines where you install Informatica.
Informatica infasetup includes command line programs to back up and restore the domain. infasetup is located in the following directory:
<Informatica installation directory>/isp/binTo back up the domain with infasetup, use the following syntax:
BackupDomain <<-DatabaseAddress|-da> database_hostname:database_port|
<-DatabaseConnectionString|-cs> database_connection_string>
<-DatabaseUserName|-du> database_user_name
<-DatabasePassword|-dp> database_password
<-DatabaseType|-dt> database_type
[<-DatabaseServiceName|-ds> database_service_name]
<-BackupFile|-bf> backup_file_name
[<-Force|-f>]
<-DomainName|-dn> domain_name
[<-Tablespace|-ts> tablespace_name (used for IBM DB2 only)]
[<-SchemaName|-sc> schema_name (used for Microsoft SQL Server only)]
[<-DatabaseTlsEnabled|-dbtls> database_tls_enabled]
[<-DatabaseTruststorePassword|-dbtp> database_truststore_password]
[<-TrustedConnection|-tc> trusted_connection (used for Microsoft SQL Server only)]
[<-EncryptionKeyLocation|-kl> encryption_key_location]
32 Chapter 5: Prepare for the Upgrade

Back up the metadata configuration files to any directory accessible by the machines where you install Informatica. The following table describes the metadata files and the locations where you can find them:
Metadata File Description Location
nodemeta.xml Contains metadata for a node.
Stored in the isp/config directory on each node in the domain.If you use the same backup directory name on all the nodes, rename nodemeta.xml before copying it to the backup location. For example, you back up nodemeta.xml to the /nodebak directory on nodeA and nodeB. Rename the configuration files so that on nodeA the file is backed up to /nodebak/nodemeta_A.xml, and on nodeB the file is backed up to /nodebak/nodemeta_B.xml.
domains.infa Contains connectivity information for the gateway nodes.
Stored in one of the following locations:- The Informatica installation directory on the client and server machines.- The location configured through the INFA_DOMAINS_FILE environment
variable.
Prepare the Domain 33
C h a p t e r 6
Upgrade the DomainThis chapter includes the following topics:
• Domain Upgrade Overview , 34
• Upgrading in Graphical Mode, 34
• Upgrading in Console Mode, 42
• Upgrading in Silent Mode, 44
• Troubleshooting the Domain Upgrade, 47
Domain Upgrade OverviewUse the server installer to upgrade the domain of a previous version of Informatica services. The server installer provides a domain upgrade wizard to guide you through the upgrade process.
The upgrade wizard installs Informatica in the directory you specify. It does not modify the files in the directory of the previous version.
The upgrade wizard reads the domain information from files in the previous version and uses the same settings to configure the domain and server files for the upgrade. It upgrades the tables of the domain configuration repository in the same database as the previous version.
Complete the pre-upgrade tasks before you start the upgrade. Run the installer on all machines that host previous versions of Informatica that you want to upgrade.
Note: In a multi-node domain, upgrade the master gateway node before you upgrade other nodes.
You can perform the upgrade from the root of the directory where you download the installation files.
After you upgrade the domain, upgrade the Informatica client tool to the same Informatica version.
Upgrading in Graphical ModeYou can upgrade in graphical mode to upgrade the domain on the same machine and on the same domain configuration repository database. You can upgrade the domain in graphical mode on Windows.
34

On Windows, if you encounter problems when you run the install.bat file from the root directory, run the following file:
<Informatica installation directory>/server/install.exe1. Log in to the machine with the same user account that you used to install the previous version.
2. Stop all processes that access the directory and subdirectories of the Informatica product to upgrade, including command prompts and tail logs.
3. Go to the root of the directory for the installation files and run install.bat as administrator.
To run the file as administrator, right-click the install.bat file and select Run as administrator.On Windows, if you encounter problems when you run the install.bat file from the root directory, run the following file:
<Informatica installation directory>/server/install.exeNote: If you do not run the installer as administrator, the Windows system administrator might encounter issues when accessing files in the Informatica installation directory.
The Informatica 10.4.0 page appears.
4. Select Upgrade to Informatica 10.4.0.
Informatica provides utilities to facilitate the Informatica services installation process. You must run the following utility before you install Informatica services:Informatica Upgrade Advisor.
Validates the services and checks for obsolete services in the domain before you perform an upgrade. For more information about the Informatica Upgrade Advisor, see “Run the Informatica Upgrade Advisor” on page 27.
5. Click Start.
Upgrading in Graphical Mode 35
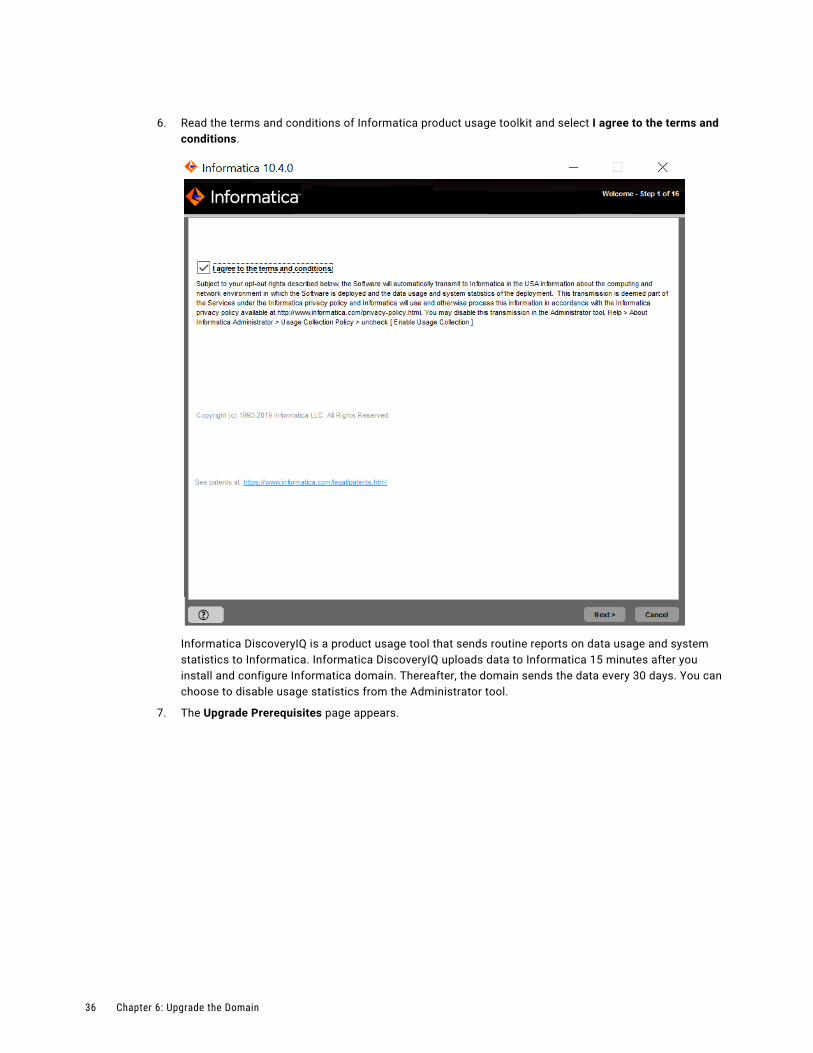
6. Read the terms and conditions of Informatica product usage toolkit and select I agree to the terms and conditions.
Informatica DiscoveryIQ is a product usage tool that sends routine reports on data usage and system statistics to Informatica. Informatica DiscoveryIQ uploads data to Informatica 15 minutes after you install and configure Informatica domain. Thereafter, the domain sends the data every 30 days. You can choose to disable usage statistics from the Administrator tool.
7. The Upgrade Prerequisites page appears.
36 Chapter 6: Upgrade the Domain
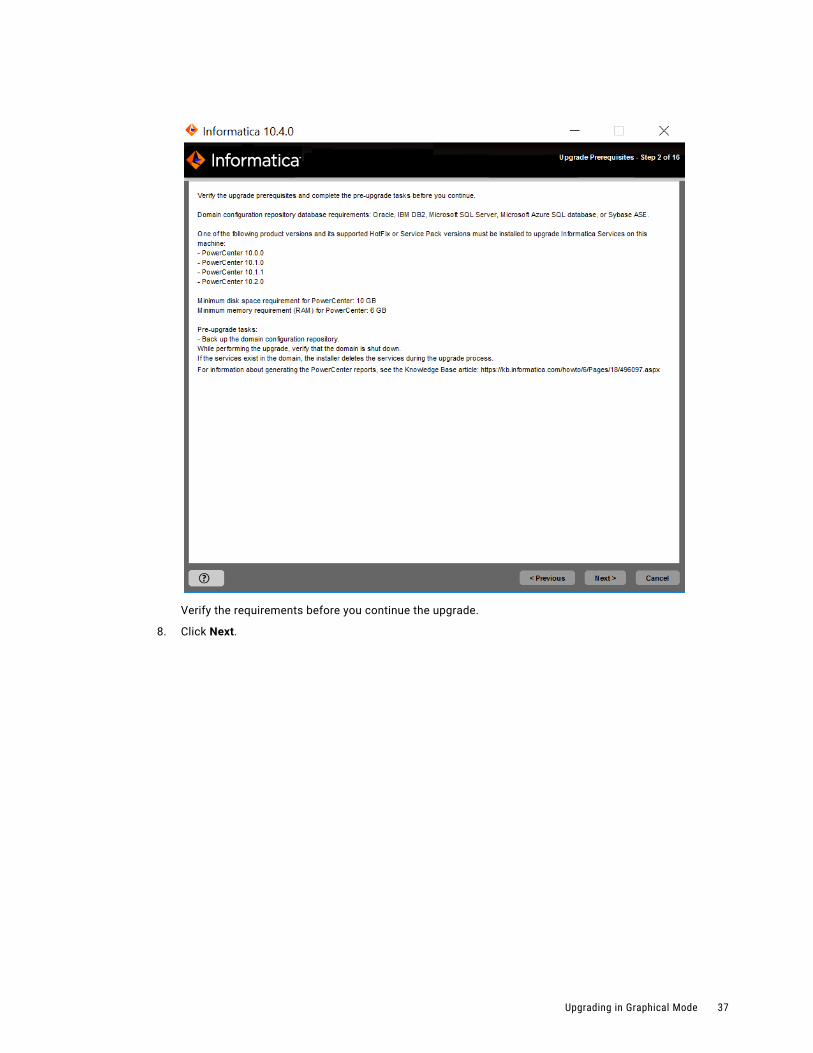
Verify the requirements before you continue the upgrade.
8. Click Next.
Upgrading in Graphical Mode 37
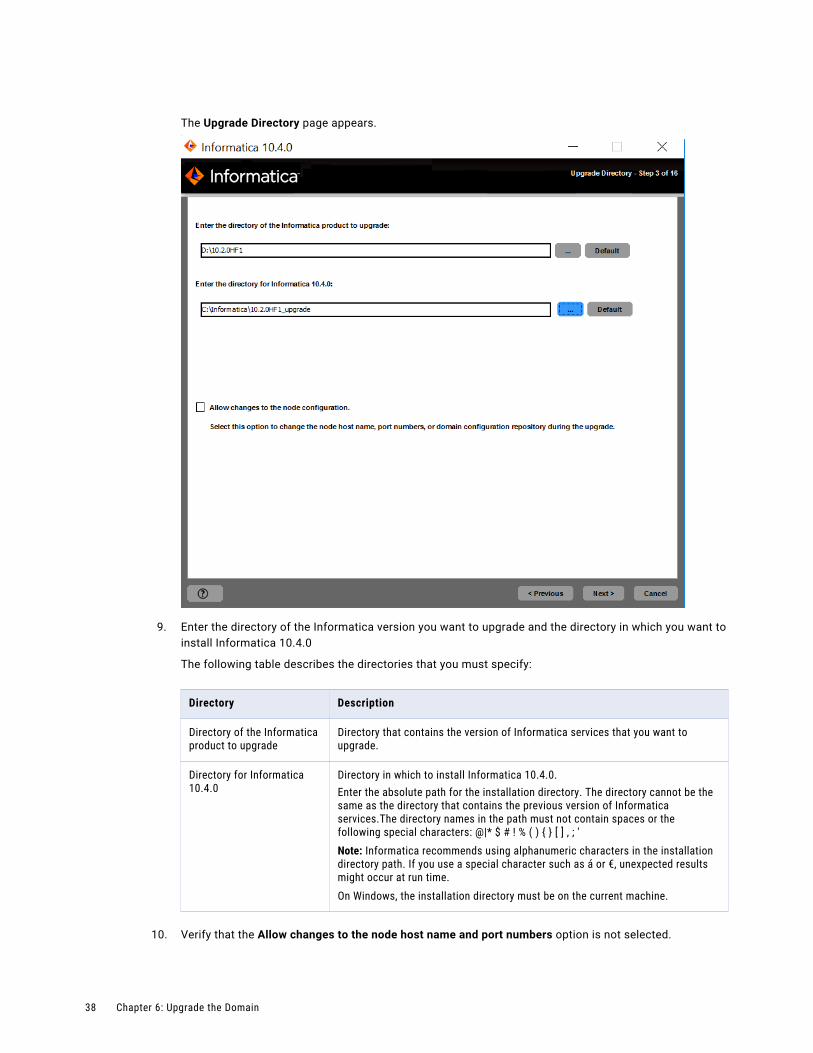
The Upgrade Directory page appears.
9. Enter the directory of the Informatica version you want to upgrade and the directory in which you want to install Informatica 10.4.0
The following table describes the directories that you must specify:
Directory Description
Directory of the Informatica product to upgrade
Directory that contains the version of Informatica services that you want to upgrade.
Directory for Informatica 10.4.0
Directory in which to install Informatica 10.4.0.Enter the absolute path for the installation directory. The directory cannot be the same as the directory that contains the previous version of Informatica services.The directory names in the path must not contain spaces or the following special characters: @|* $ # ! % ( ) { } [ ] , ; 'Note: Informatica recommends using alphanumeric characters in the installation directory path. If you use a special character such as á or €, unexpected results might occur at run time.On Windows, the installation directory must be on the current machine.
10. Verify that the Allow changes to the node host name and port numbers option is not selected.
38 Chapter 6: Upgrade the Domain
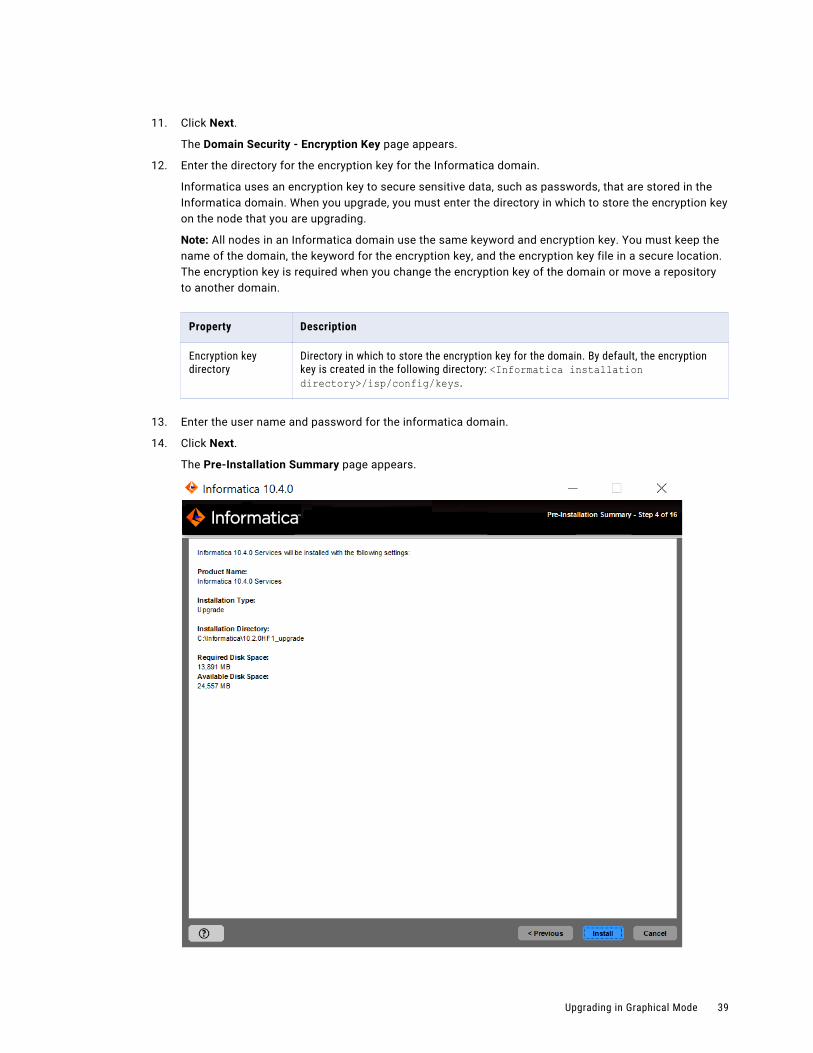
11. Click Next.
The Domain Security - Encryption Key page appears.
12. Enter the directory for the encryption key for the Informatica domain.
Informatica uses an encryption key to secure sensitive data, such as passwords, that are stored in the Informatica domain. When you upgrade, you must enter the directory in which to store the encryption key on the node that you are upgrading.
Note: All nodes in an Informatica domain use the same keyword and encryption key. You must keep the name of the domain, the keyword for the encryption key, and the encryption key file in a secure location. The encryption key is required when you change the encryption key of the domain or move a repository to another domain.
Property Description
Encryption key directory
Directory in which to store the encryption key for the domain. By default, the encryption key is created in the following directory: <Informatica installation directory>/isp/config/keys.
13. Enter the user name and password for the informatica domain.
14. Click Next.
The Pre-Installation Summary page appears.
Upgrading in Graphical Mode 39
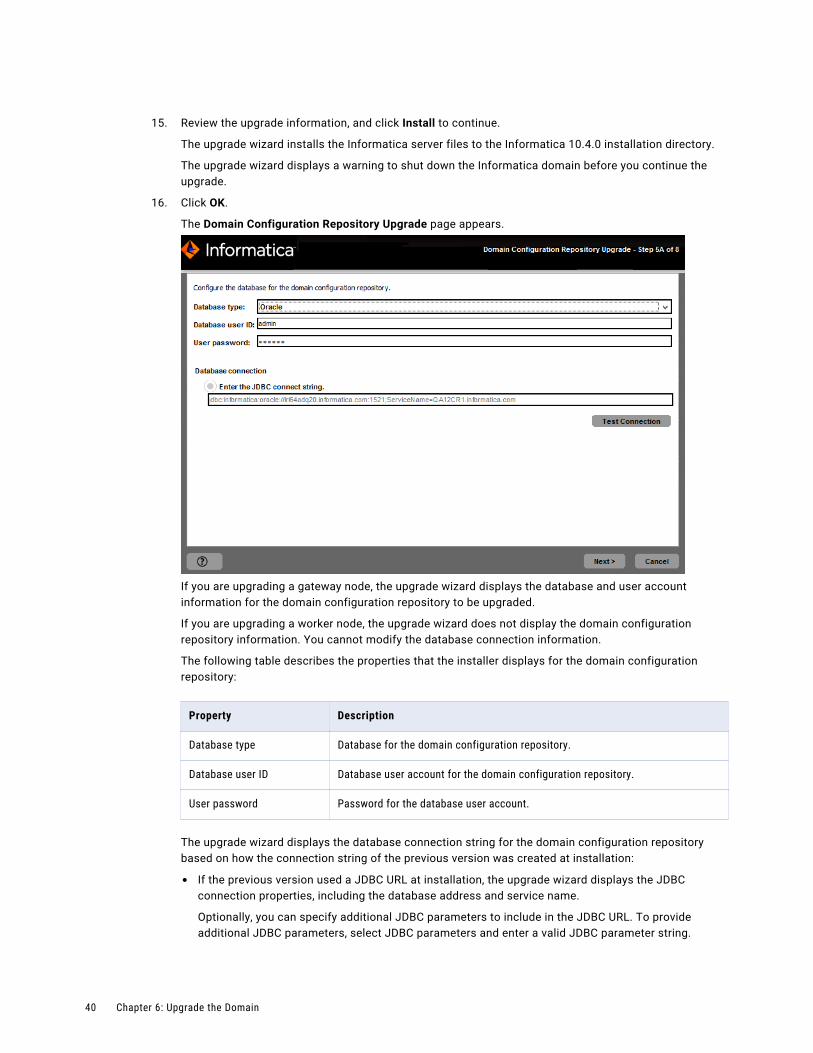
15. Review the upgrade information, and click Install to continue.
The upgrade wizard installs the Informatica server files to the Informatica 10.4.0 installation directory.
The upgrade wizard displays a warning to shut down the Informatica domain before you continue the upgrade.
16. Click OK.
The Domain Configuration Repository Upgrade page appears.
If you are upgrading a gateway node, the upgrade wizard displays the database and user account information for the domain configuration repository to be upgraded.
If you are upgrading a worker node, the upgrade wizard does not display the domain configuration repository information. You cannot modify the database connection information.
The following table describes the properties that the installer displays for the domain configuration repository:
Property Description
Database type Database for the domain configuration repository.
Database user ID Database user account for the domain configuration repository.
User password Password for the database user account.
The upgrade wizard displays the database connection string for the domain configuration repository based on how the connection string of the previous version was created at installation:
• If the previous version used a JDBC URL at installation, the upgrade wizard displays the JDBC connection properties, including the database address and service name.
Optionally, you can specify additional JDBC parameters to include in the JDBC URL. To provide additional JDBC parameters, select JDBC parameters and enter a valid JDBC parameter string.
40 Chapter 6: Upgrade the Domain

• If the previous version used a custom JDBC connection string at installation, the upgrade wizard displays the custom connection string.
You cannot specify additional JDBC parameters.
17. Click Test Connection to verify that you can connect to the database, and then click OK to continue.
18. Click Next.
The Windows Service Configuration page appears.
On Windows, the upgrade wizard creates a service to start Informatica. By default, the service runs under the same user account as the account used for installation. You can run the Windows service under a different user account.
19. Select whether to run the Windows service under a different user account.
Upgrading in Graphical Mode 41

Enter the following user account information:
Property Description
Run Informatica under a different user account
Indicates whether to run the Windows service under a different user account.
User name User account with which to run the Informatica Windows service.Use the following format:<domain name>\<user account>This user account must have the Act as operating system permission.
Password Password for the user account with which to run the Informatica Windows service.
20. Click Next.
The Post-Installation Summary page appears.
21. Click Done to complete the installation procedure and exit the installer.
Review the upgrade.log file to get more information about the tasks performed by the upgrade wizard and to view the configuration of installed components.
Upgrading in Console ModeYou can upgrade in console mode to upgrade the domain on the same machine and on the same domain configuration repository database. You can upgrade the domain in console mode.
When you run the installer in console mode, the words quit, back, and help are reserved words. Do not use them as input text.
1. Log in to the machine with the same user account that you used to install the previous version.
2. Stop all processes that access the directory and subdirectories of the Informatica product to upgrade, including command prompts and tail logs.
3. On a shell command line, run the install file from the root directory.
The installer displays the message to verify that the locale environment variables are set.
4. If the environment variables are not set, press n to exit the installer and set them as required.
If the environment variables are set, press y to continue.
5. Press 2 to upgrade Informatica.
6. Optionally, run the Informatica Upgrade Advisor.
Informatica provides utilities to facilitate the Informatica services installation process. You can run the utility before you upgrade Informatica services. The Informatica Upgrade Advisor helps to validate the services and checks for obsolete services in the domain before you perform an upgrade.
The installer displays a warning to shut down the Informatica domain that you want to upgrade before you continue the upgrade.
7. Read the terms and conditions of Informatica product usage toolkit and press 2 to continue the upgrade.
Subject to your opt-out rights described below, the software will automatically transmit to Informatica in the USA information about the computing and network environment in which the Software is deployed
42 Chapter 6: Upgrade the Domain

and the data usage and system statistics of the deployment. This transmission is deemed part of the Services under the Informatica privacy policy and Informatica will use and otherwise process this information in accordance with the Informatica privacy policy available at https://www.informatica.com/in/privacy-policy.html. You may disable usage collection in Administrator tool.
8. The Upgrade Prerequisites page displays the upgrade system requirements.
Verify the requirements before you continue the upgrade.
9. At the prompt, enter the directory of the Informatica version you want to upgrade and the directory in which you want to install Informatica 10.4.0.
The following table describes the directories you must specify:
Directory Description
Directory of the Informatica product to upgrade
Directory that contains the version of Informatica services that you want to upgrade.
Directory for Informatica 10.4.0
Directory in which to install Informatica 10.4.0.Enter the absolute path for the installation directory. The directory cannot be the same as the directory that contains the previous version of Informatica services.The directory names in the path must not contain spaces or the following special characters: @|* $ # ! % ( ) { } [ ] , ; 'Note: Informatica recommends using alphanumeric characters in the installation directory path. If you use a special character such as á or €, unexpected results might occur at run time.
10. Select if you want to change the node host name, port numbers, or domain configuration repository. Press 1 to use the same node configuration as the previous version. Press 2 to change the node configuration.
11. Press 1 to upgrade Informatica services.
12. Enter the directory for the encryption key for the Informatica domain.
Informatica uses an encryption key to secure sensitive data, such as passwords, that are stored in the Informatica domain. When you upgrade, you must enter the directory in which to store the encryption key on the node that you are upgrading.
Note: All nodes in an Informatica domain use the same keyword and encryption key. You must keep the name of the domain, the keyword for the encryption key, and the encryption key file in a secure location. The encryption key is required when you change the encryption key of the domain or move a repository to another domain.
Property Description
Encryption key directory
Directory in which to store the encryption key for the domain. By default, the encryption key is created in the following directory: <Informatica installation directory>/isp/config/keys.
13. Enter the user name and password for the Informatica domain.
14. Review the upgrade information and press Enter to continue.
The installer copies the server files to the Informatica 10.4.0 installation directory.
Upgrading in Console Mode 43
The installer displays the database and user account information for the domain configuration repository to upgrade. It displays the database connection string for the domain configuration repository based on how the connection string of the previous version was created at installation:
• If the previous version used a JDBC URL at installation, the installer displays the JDBC connection properties, including the database address and service name.
• If the previous version used a custom JDBC connection string at installation, the installer displays the custom connection string.
15. Press Enter.
16. If you use a JDBC URL, you can specify additional parameters to include in the connection string.
If you use a custom connection string, you cannot specify additional parameters.
17. Press Enter.
The Post-Installation section appears.
18. Press Enter to complete the installation procedure and exit the installer.
Review the upgrade.log file to get more information about the tasks performed by the upgrade wizard and to view the configuration of installed components.
Upgrading in Silent ModeYou can upgrade in silent mode to upgrade the domain on the same machine and on the same domain configuration repository database.
To upgrade the Informatica domain services without user interaction, upgrade in silent mode. Use a properties file to specify the upgrade options. The installer reads the file to determine the upgrade options. You can use silent mode upgrade to upgrade the Informatica domain services on multiple machines on the network or to standardize the upgrade process across machines.
Copy the Informatica installation files to the machine that hosts the Informatica instance you plan to upgrade.
To upgrade in silent mode, complete the following tasks:
1. Create the upgrade properties file and specify the upgrade options.
2. Run the installer with the upgrade properties file.
3. Secure the passwords in the upgrade properties file.
Encrypting Passwords in the Properties FileThe installer includes a utility that you can use to encrypt passwords you set in the properties file you use to specify options when you run the installer in silent mode. Informatica uses AES encryption with multiple 128-bit keys to encrypt passwords.
You run the utility for each password you want to encrypt. When you run the utility, you specify the value of the password in plain text at the command prompt. The utility generates the password in encrypted format as output. The output includes the following prefix: =INSTALLER:CIPHER:AES:128=
44 Chapter 6: Upgrade the Domain

Copy the complete output string, including the prefix, and then paste it into the properties file as the value for the password property. When you run the installer in silent mode, the installation framework decrypts the password.
1. Go to the utility directory:
<Installer directory>/properties/utils/passwd_encryption2. Run the utility. Specify the plain text password you want to encrypt as the value for <password>.
• On Linux and UNIX, run the following command:
sh install.sh <password>• On Windows, run the following command:
install.bat <password> 3. Copy the encrypted password string from the output, and then paste the string into the .properties file as
the value for the corresponding password.
The following example shows the encrypted password set as the value for the DOMAIN_PSSWD property:
DOMAIN_PSSWD==INSTALLER:CIPHER:AES:128=mjkjmDR2kzFJiizfRWIOPg==
Creating the Properties FileInformatica provides two versions of the properties file. Use either file to specify options for your installation.Silent input upgrade new config properties file
Use the silent input upgrade new configuration properties file to upgrade Informatica domain services with changes to the node configuration and without user interaction.
The silent input upgrade new configuration properties file contains the configuration properties required to upgrade the Informatica domain services in silent mode. Use the file if you want to consider the appropriate value to set for each property in the file.
Default silent input upgrade properties file
Use the silent input upgrade properties file to upgrade Informatica domain services without user interaction.
The default silent input properties file contains default values for many configuration properties. Use the file if you plan to upgrade the Informatica domain services using the default property values, and do not want to read through all of the properties in the file.
Informatica provides a sample properties file that includes the upgrade parameters that are required by the installer. You can customize the sample properties file to specify the options for your upgrade.
The sample upgrade properties file is named SilentInput_upgrade.properties and is located in the installer download location. After you customize the file, save it with the file name SilentInput.properties.
1. Go to the root of the directory that contains the installation files.
2. Find the file named SilentInput_upgrade.properties.
Back up the file before you modify it.
3. Use a text editor to open the file and modify the values of the upgrade parameters.
Upgrading in Silent Mode 45
The following table describes the upgrade parameters that you can modify:
Property Name Description
INSTALL_TYPE Indicates whether to install or upgrade Informatica.If the value is 0, the installer performs a fresh installation of Informatica. If the value is 1, the installer upgrades a previous version of Informatica.
USER_INSTALL_DIR Directory in which to install the new version of Informatica services. The directory cannot be the same as the directory that contains the previous version of Informatica services.
UPG_BACKUP_DIR Directory that contains the previous version of Informatica services that you want to upgrade.
KEY_DEST_LOCATION Directory in which to store the encryption key for the node created during the installation.
DOMAIN_USER User name for the Informatica domain.
DOMAIN_PSSWD Password for the Informatica domain.
ENABLE_USAGE_COLLECTION Enables Informatica DiscoveryIQ, a product usage tool that sends routine reports on data usage and system statistics to Informatica. Informatica DiscoveryIQ uploads data to Informatica 15 minutes after you install and configure Informatica domain. Thereafter, the domain sends the data every 30 days. You can choose to not send any usage statistics to Informatica. For more information on how to disable sending usage statistics, see the Informatica Administrator Guide.You must set the value to 1 to upgrade.
4. Save the properties file with the name SilentInput.properties.
Running the Silent InstallerAfter you create the properties file, open a command prompt to start the silent upgrade.
1. Open a command prompt.
On Windows, open the command prompt as administrator. If you do not open the command prompt as administrator, the Windows system administrator might encounter issues when accessing files in the Informatica installation directory.
2. Go to the root of the server installer directory.
3. Verify that the directory contains the file SilentInput.properties with the upgrade options.
4. Run the silentInstall executable.
The silent upgrade runs in the background. The process can take a while. The silent upgrade process is complete when the Informatica_<Version>_Services_InstallLog<timestamp>.log is created in the installation directory.
The silent upgrade fails if you incorrectly configure the properties file or if the installation directory is not accessible. If the upgrade fails, view the silent upgrade log file and correct the errors. Then run the silent installer again. The silent upgrade log file name is silentErrorLog.log.
The installer creates the log file in the root directory on Windows and in the user home directory on UNIX.
46 Chapter 6: Upgrade the Domain
Troubleshooting the Domain UpgradeIf the upgrade does not complete successfully, review log files to determine the cause of the failure. The upgrade log files are in the root of the directory where the new version of Informatica is installed. Review the following log file: Informatica_<Version>_Services_Upgrade.log.
If the upgrade fails, restore the domain configuration repository database from the backup and run the installer again.
If the Administrator tool is configured for secure communication, you might receive a 404 Not Found message when you access the Administrator tool. This issue occurs when the machine that runs the gateway node cannot access the keystore file used for the HTTPS connection to the Administrator tool. Copy the file to an accessible location, and then shut down the domain. Run the infasetup UpdateGatewayNode command to update the gateway node with the location of the keystore file. You must run the command on each gateway node in the domain.
Troubleshooting the Domain Upgrade 47

C h a p t e r 7
Upgrade the Domain with Changes to Node Configuration
This chapter includes the following topics:
• Upgrade the Domain with Changes to Node Configuration Overview, 48
• Migrating to a Different Database, 49
• Migrating the Installation to a Different Machine, 49
• Upgrading in Graphical Mode, 53
• Upgrading in Console Mode, 64
• Upgrading in Silent Mode, 69
• Complete Changing the Node Configuration, 69
Upgrade the Domain with Changes to Node Configuration Overview
Before you upgrade the domain with changes to the node configuration, you must perform steps to prepare for the upgrade. The steps that you perform depend on the kind of change that you plan to make to the node configuration. You can migrate the domain configuration repository to a different database. Or, you can migrate the Informatica services installation to a different machine.
When you upgrade the domain, you can choose to change the node configuration to allow changes to the node host name, port numbers, or domain configuration repository database.
If you migrated an Informatica services installation to a different machine, choose to change the node configuration to upgrade the domain and configure the node on the new machine. If you migrated the domain configuration repository to a different database, choose to change the node configuration to upgrade the domain and configure the new database.
Complete the pre-upgrade tasks before you run the installer.
On Windows, you can run the installer in graphical or silent mode. On UNIX or Linux, you can run the installer in console or silent mode.
48
Migrating to a Different DatabaseIf the domain configuration repository database type or version is no longer supported, you must migrate the repository to a different database. Migrate the repository in the previous Informatica instance before you upgrade the domain.
For example, if the domain configuration repository is in a Sybase ASE 15.0.3 database, migrate the repository to a Sybase ASE 15.7 database.
For more information about product requirements and supported platforms, see the Product Availability Matrix on Informatica Network: https://network.informatica.com/community/informatica-network/product-availability-matrices
1. Verify that you have shut down the domain.
2. Verify that you have backed up the domain configuration database tables to a file with the infasetup BackupDomain command.
3. Create a database schema and a user account in a supported database.
4. Restore the domain configuration in the backup file to the specified database schema with the infasetup RestoreDomain command.
5. When you upgrade a gateway node, select the Allow changes to the node host name and port number option. When you select this option, you can configure the gateway node to connect to the new domain configuration repository database. All gateway nodes must have a connection to the domain configuration repository to retrieve and update domain configuration. When you upgrade a worker node, clear the Allow changes to the node host name and port number option.
Migrating the Installation to a Different MachineIf the Informatica services are installed on a machine with an operating system that is no longer supported, you must migrate the installation to a different machine before you upgrade the domain.
For more information about product requirements and supported platforms, see the Product Availability Matrix on Informatica Network: https://network.informatica.com/community/informatica-network/product-availability-matrices
Before you upgrade the domain, complete the following steps on the machine where you want the new version of Informatica to run:
1. Copy the installation directory.
2. Verify port requirements.
3. Create a system user account.
4. Configure native connectivity for all services that require access to databases.
When you upgrade the migrated node, select the Allow changes to the node host name and port number option. When you select this option, you can update the configuration of the node on the new machine. When you upgrade other nodes in the domain that you did not migrate to different machines, clear the Allow changes to the node host name and port number option.
Migrating to a Different Database 49
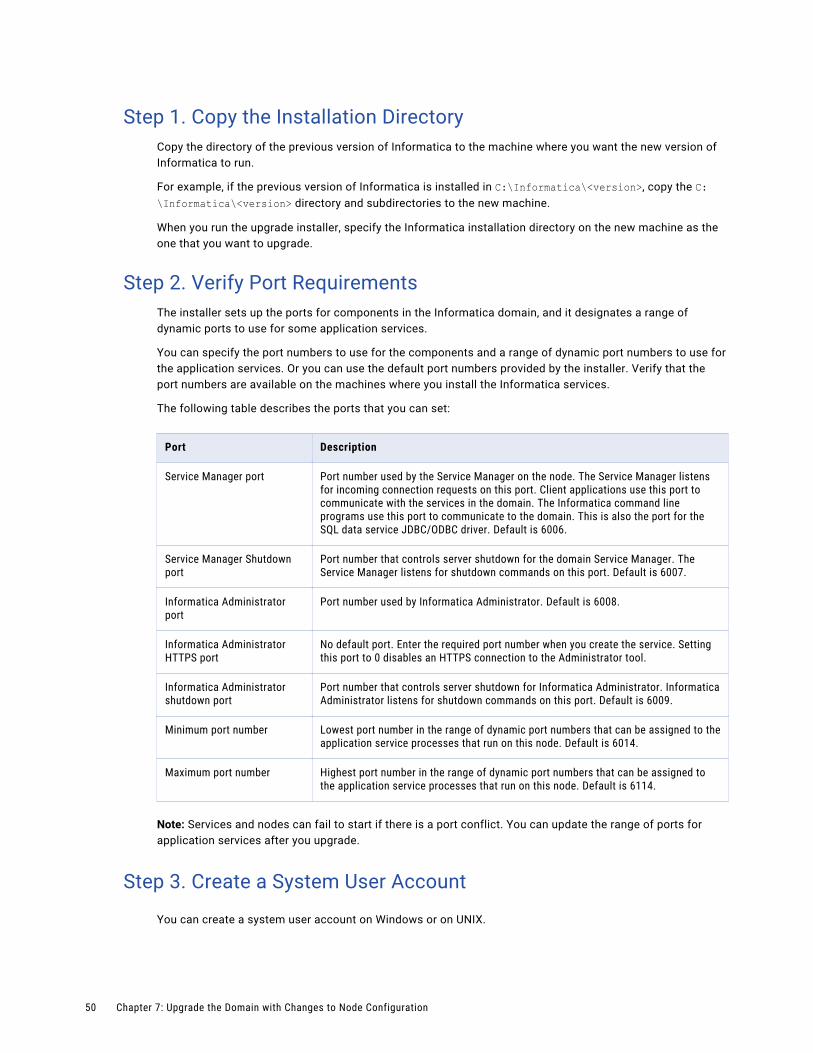
Step 1. Copy the Installation DirectoryCopy the directory of the previous version of Informatica to the machine where you want the new version of Informatica to run.
For example, if the previous version of Informatica is installed in C:\Informatica\<version>, copy the C:\Informatica\<version> directory and subdirectories to the new machine.
When you run the upgrade installer, specify the Informatica installation directory on the new machine as the one that you want to upgrade.
Step 2. Verify Port RequirementsThe installer sets up the ports for components in the Informatica domain, and it designates a range of dynamic ports to use for some application services.
You can specify the port numbers to use for the components and a range of dynamic port numbers to use for the application services. Or you can use the default port numbers provided by the installer. Verify that the port numbers are available on the machines where you install the Informatica services.
The following table describes the ports that you can set:
Port Description
Service Manager port Port number used by the Service Manager on the node. The Service Manager listens for incoming connection requests on this port. Client applications use this port to communicate with the services in the domain. The Informatica command line programs use this port to communicate to the domain. This is also the port for the SQL data service JDBC/ODBC driver. Default is 6006.
Service Manager Shutdown port
Port number that controls server shutdown for the domain Service Manager. The Service Manager listens for shutdown commands on this port. Default is 6007.
Informatica Administrator port
Port number used by Informatica Administrator. Default is 6008.
Informatica Administrator HTTPS port
No default port. Enter the required port number when you create the service. Setting this port to 0 disables an HTTPS connection to the Administrator tool.
Informatica Administrator shutdown port
Port number that controls server shutdown for Informatica Administrator. Informatica Administrator listens for shutdown commands on this port. Default is 6009.
Minimum port number Lowest port number in the range of dynamic port numbers that can be assigned to the application service processes that run on this node. Default is 6014.
Maximum port number Highest port number in the range of dynamic port numbers that can be assigned to the application service processes that run on this node. Default is 6114.
Note: Services and nodes can fail to start if there is a port conflict. You can update the range of ports for application services after you upgrade.
Step 3. Create a System User Account
You can create a system user account on Windows or on UNIX.
50 Chapter 7: Upgrade the Domain with Changes to Node Configuration
On Windows
Create a system user account to perform the installation and to run the Informatica service. Verify that the user account that you use to install the Informatica services has write permission on the installation directory.
You can install Informatica with the user account logged in to the machine and run it under another user account. You can create a local account or a domain account to install Informatica or run the Informatica Windows service.
Note: To access a repository on Microsoft SQL Server that uses a Windows trusted connection, create a domain account.
The user accounts require the following permissions to run the installer or to run the Informatica Windows service:
• Logged in user account. The user account must be a member of the Administrators group and have the Log on as a service permission. Log in with this user account before you install Informatica.
• Another user account. The user account must be a member of the Administrators group and have Log on as a service and Act as operating system permissions. You do not have to log in with this user account before you install Informatica. During installation, you can specify the user account to run the Informatica Windows service.
On UNIX
Verify that the user account you use to install Informatica has write permission on the installation directory.
Step 4. Configure Native Connectivity on Service MachinesTo establish native connectivity between an application service and a database, install the database client software for the database that you want to access.
Native drivers are packaged with the database server and client software. Configure connectivity on the machines that need to access the databases. To ensure compatibility between the application service and the database, install a client software that is compatible with the database version and use the appropriate database client libraries.
The Data Integration Service uses native database drivers to connect to the following databases:
• Source and target databases. Reads data from source databases and writes data to target databases.
• Data object cache database. Stores the data object cache.
• Profiling source databases. Reads from relational source databases to run profiles against the sources.
• Profiling warehouse. Writes the profiling results to the profiling warehouse.
• Reference tables. Runs mappings to transfer data between the reference tables and the external data sources.
When the Data Integration Service runs on a single node or on primary and back-up nodes, install database client software and configure connectivity on the machines where the Data Integration Service runs.
When the Data Integration Service runs on a grid, install database client software and configure connectivity on each machine that represents a node with the compute role or a node with both the service and compute roles.
Migrating the Installation to a Different Machine 51
Step 5. Install Database Client SoftwareYou must install the database clients on the required machines based on the types of databases that the application services access.
To ensure compatibility between the application service and the database, use the appropriate database client libraries and install a client software that is compatible with the database version.
When you upgrade Informatica services, ensure that you install the appropriate database client on the machine that runs the Data Integration Service.
Install the following database client software based on the type of database that the application service accesses:
IBM DB2 Client Application Enabler (CAE)
Configure connectivity on the required machines by logging in to the machine as the user who starts Informatica services.
Microsoft SQL Server 2014 Native Client
You must install the Microsoft SQL Server 2014 Native Client for the existing mappings to work.
Download the client from the following Microsoft website: http://www.microsoft.com/en-in/download/details.aspx?id=42295.
Oracle client
Install compatible versions of the Oracle client and Oracle database server. You must also install the same version of the Oracle client on all machines that require it. To verify compatibility, contact Oracle.
Sybase Open Client (OCS)
Install an Open Client version that is compatible with the Sybase ASE database server. You must also install the same version of Open Client on the machines hosting the Sybase ASE database and Informatica. To verify compatibility, contact Sybase.
Step 6. Configure Database Client Environment Variables on UNIXConfigure database client environment variables on the machines that run the PowerCenter Integration Service process.
After you configure the database environment variables, you can test the connection to the database from the database client.
52 Chapter 7: Upgrade the Domain with Changes to Node Configuration
The following table lists the database environment variables you need to set:
Database Environment Variable Name
Database Utility
Value
Oracle ORACLE_HOMEPATHLD_LIBRARY_PATHTNS_ADMININFA_TRUSTSTORE
sqlplus Set to: <Client InstallDatabasePath>Add: <DatabasePath>/bin and USER_INSTALL_DIR/server/bin:$PATHSet to: $Oracle_HOME/lib and USER_INSTALL_DIR/server/bin:$LD_LIBRARY_PATHSet to location of the tnsnames.ora file: $ORACLE_HOME/network/adminFor default SSL domain, add to: USER_INSTALL_DIR/services/shared/securityFor custom SSL domain, set INFA_TRUSTSTORE and INFA_TRUSTSTORE_PASSWORD
SQL Server ODBCHOMEODBCINIODBCINSTPATHLD_LIBRARY_PATHINFA_TRUSTSTORE
Set to: USER_INSTALL_DIR/ODBC7.1Set to: $ODBCHOME/odbc.iniSet to: $ODBCHOME/odbcinst.iniAdd to: /opt/mssql-tools/bin:$PATH$PATHUSER_INSTALL_DIR/ODBC7.1:$PATHUSER_INSTALL_DIR/server/bin:$PATHAdd to: $ODBCHOME/libUSER_INSTALL_DIR/server/bin:$LD_LIBRARY_PATHFor default SSL domain, add to: USER_INSTALL_DIR/services/shared/securityFor custom SSL domain, set INFA_TRUSTSTORE and INFA_TRUSTSTORE_PASSWORD
Upgrading in Graphical ModeWhen you upgrade in graphical mode, you can change the node configuration to upgrade the domain to a different machine or to a different domain configuration repository database. You can upgrade the domain in graphical mode on Windows.
To upgrade the domain on the same machine and on the same domain configuration repository database, see “Upgrading in Graphical Mode” on page 34.
On Windows, if you encounter problems when you run the install.bat file from the root directory, run the following file:
<Informatica installation directory>/server/install.exe1. Log in to the machine with the same user account that you used to install the previous version.
2. Stop all processes that access the directory and subdirectories of the Informatica product to upgrade, including command prompts and tail logs.
3. Go to the root of the directory for the installation files and run install.bat as administrator.
To run the file as administrator, right-click the install.bat file and select Run as administrator.
Upgrading in Graphical Mode 53

On Windows, if you encounter problems when you run the install.bat file from the root directory, run the following file:
<Informatica installation directory>/server/install.exeNote: If you do not run the installer as administrator, the Windows system administrator might encounter issues when accessing files in the Informatica installation directory.
The Informatica 10.4.0 page appears.
4. Select Upgrade to Informatica 10.2.
Informatica provides utilities to facilitate the Informatica services installation process. You can run the following utility before you upgrade Informatica services:Pre-Installation (i10Pi) System Check Tool.
Verifies whether the machine on which you are installing Informatica services meets the system requirements for installation. For more information about running the Pre-Installation (i10Pi) System Check Tool, see GUID-41DD6761-B1F3-4021-824D-545DBE1796A0.
Informatica Upgrade Advisor.
Validates the services and checks for obsolete services in the domain before you perform an upgrade. Fore more information about the Informatica Upgrade Advisor, see “Run the Informatica Upgrade Advisor” on page 27.
5. Click Start.
54 Chapter 7: Upgrade the Domain with Changes to Node Configuration

6. Read the terms and conditions of Informatica product usage toolkit and select I agree to the terms and conditions.
Informatica DiscoveryIQ is a product usage tool that sends routine reports on data usage and system statistics to Informatica. Informatica DiscoveryIQ uploads data to Informatica 15 minutes after you install and configure Informatica domain. Thereafter, the domain sends the data every 30 days. You can choose to disable usage statistics from the Administrator tool.
7. The Upgrade Prerequisties page appears.
Verify the requirements before you continue the upgrade.
Upgrading in Graphical Mode 55
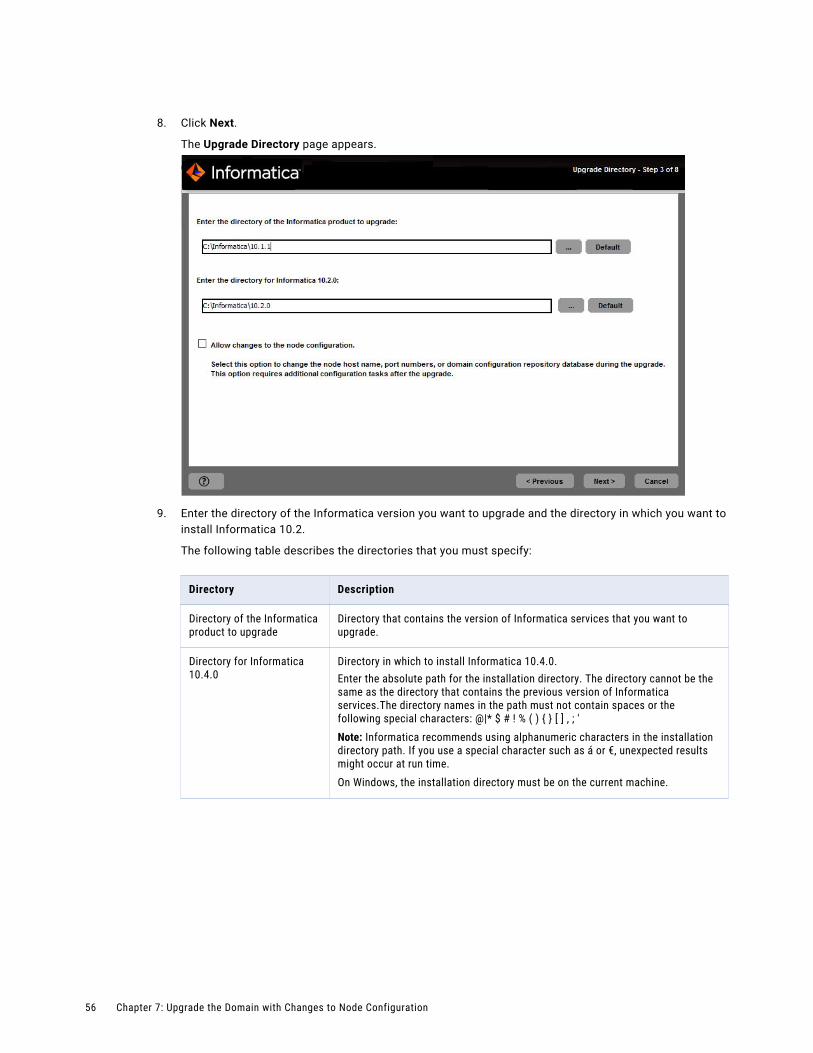
8. Click Next.
The Upgrade Directory page appears.
9. Enter the directory of the Informatica version you want to upgrade and the directory in which you want to install Informatica 10.2.
The following table describes the directories that you must specify:
Directory Description
Directory of the Informatica product to upgrade
Directory that contains the version of Informatica services that you want to upgrade.
Directory for Informatica 10.4.0
Directory in which to install Informatica 10.4.0.Enter the absolute path for the installation directory. The directory cannot be the same as the directory that contains the previous version of Informatica services.The directory names in the path must not contain spaces or the following special characters: @|* $ # ! % ( ) { } [ ] , ; 'Note: Informatica recommends using alphanumeric characters in the installation directory path. If you use a special character such as á or €, unexpected results might occur at run time.On Windows, the installation directory must be on the current machine.
56 Chapter 7: Upgrade the Domain with Changes to Node Configuration
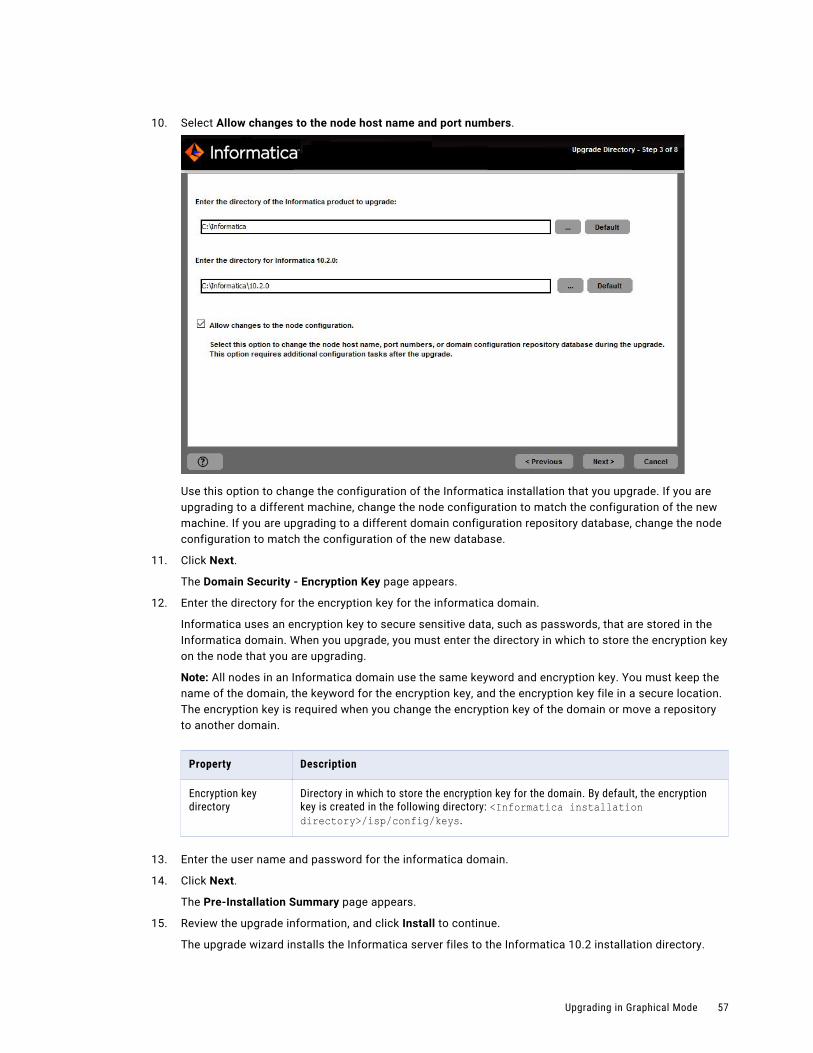
10. Select Allow changes to the node host name and port numbers.
Use this option to change the configuration of the Informatica installation that you upgrade. If you are upgrading to a different machine, change the node configuration to match the configuration of the new machine. If you are upgrading to a different domain configuration repository database, change the node configuration to match the configuration of the new database.
11. Click Next.
The Domain Security - Encryption Key page appears.
12. Enter the directory for the encryption key for the informatica domain.
Informatica uses an encryption key to secure sensitive data, such as passwords, that are stored in the Informatica domain. When you upgrade, you must enter the directory in which to store the encryption key on the node that you are upgrading.
Note: All nodes in an Informatica domain use the same keyword and encryption key. You must keep the name of the domain, the keyword for the encryption key, and the encryption key file in a secure location. The encryption key is required when you change the encryption key of the domain or move a repository to another domain.
Property Description
Encryption key directory
Directory in which to store the encryption key for the domain. By default, the encryption key is created in the following directory: <Informatica installation directory>/isp/config/keys.
13. Enter the user name and password for the informatica domain.
14. Click Next.
The Pre-Installation Summary page appears.
15. Review the upgrade information, and click Install to continue.
The upgrade wizard installs the Informatica server files to the Informatica 10.2 installation directory.
Upgrading in Graphical Mode 57

The upgrade wizard displays a warning to shut down the Informatica domain before you continue the upgrade.
16. Click OK.
17. If you are upgrading a gateway node, enter the database and user account information for the domain configuration repository on the Domain Configuration Repository Upgrade page.
If you are upgrading a worker node, the upgrade wizard does not display the domain configuration repository information. You cannot modify the database connection information. Skip to step 21.
Enter the following database and user account :
Property Description
Database type Database for the domain configuration repository. Select Oracle, IBM DB2, Microsoft SQL Server, PostgreSQL, or Sybase ASE.
Database user ID Database user account for the domain configuration repository.
User password Password for the database user account.
Tablespace Available for IBM DB2. Name of the tablespace in which to create the tables. Specify a tablespace that meets the pageSize requirement of 32768 bytes.In a single partition database, if this option is not selected, the installer creates the tables in the default tablespace.In a multipartition database, select this option and specify the name of the tablespace that resides in the catalog partition of the database.
58 Chapter 7: Upgrade the Domain with Changes to Node Configuration
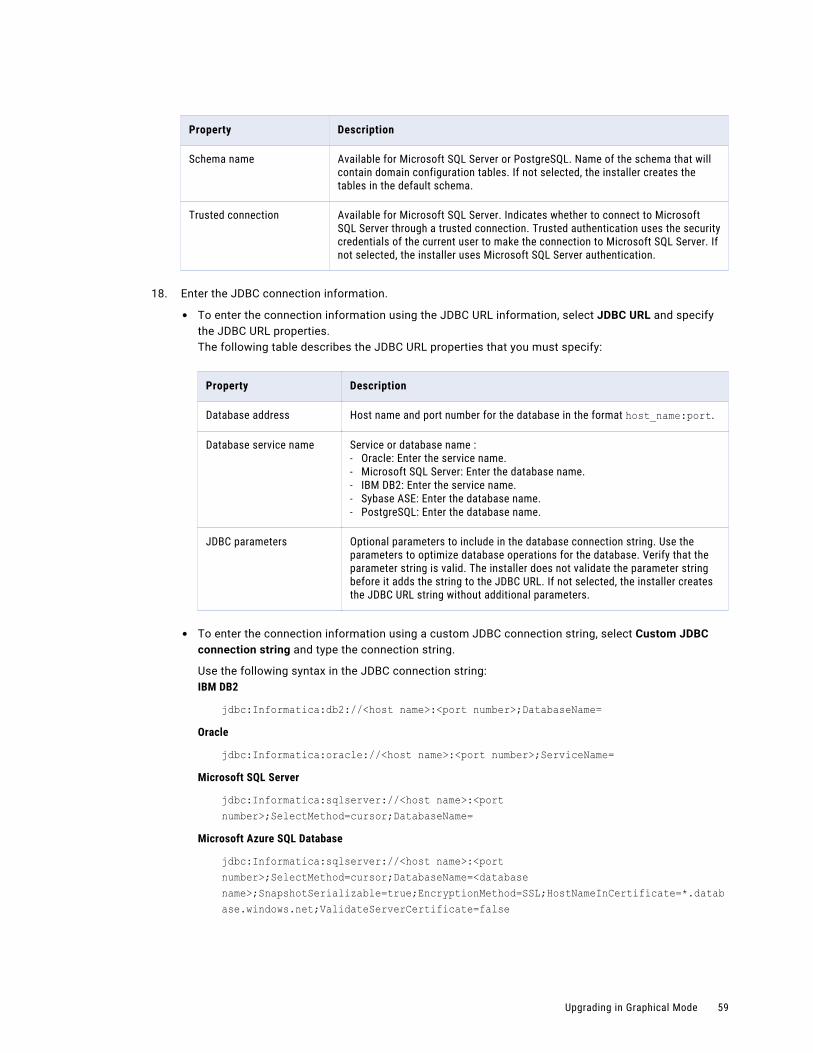
Property Description
Schema name Available for Microsoft SQL Server or PostgreSQL. Name of the schema that will contain domain configuration tables. If not selected, the installer creates the tables in the default schema.
Trusted connection Available for Microsoft SQL Server. Indicates whether to connect to Microsoft SQL Server through a trusted connection. Trusted authentication uses the security credentials of the current user to make the connection to Microsoft SQL Server. If not selected, the installer uses Microsoft SQL Server authentication.
18. Enter the JDBC connection information.
• To enter the connection information using the JDBC URL information, select JDBC URL and specify the JDBC URL properties.The following table describes the JDBC URL properties that you must specify:
Property Description
Database address Host name and port number for the database in the format host_name:port.
Database service name Service or database name :- Oracle: Enter the service name.- Microsoft SQL Server: Enter the database name.- IBM DB2: Enter the service name.- Sybase ASE: Enter the database name.- PostgreSQL: Enter the database name.
JDBC parameters Optional parameters to include in the database connection string. Use the parameters to optimize database operations for the database. Verify that the parameter string is valid. The installer does not validate the parameter string before it adds the string to the JDBC URL. If not selected, the installer creates the JDBC URL string without additional parameters.
• To enter the connection information using a custom JDBC connection string, select Custom JDBC connection string and type the connection string.
Use the following syntax in the JDBC connection string:IBM DB2
jdbc:Informatica:db2://<host name>:<port number>;DatabaseName=Oracle
jdbc:Informatica:oracle://<host name>:<port number>;ServiceName=Microsoft SQL Server
jdbc:Informatica:sqlserver://<host name>:<port number>;SelectMethod=cursor;DatabaseName=
Microsoft Azure SQL Database
jdbc:Informatica:sqlserver://<host name>:<port number>;SelectMethod=cursor;DatabaseName=<database name>;SnapshotSerializable=true;EncryptionMethod=SSL;HostNameInCertificate=*.database.windows.net;ValidateServerCertificate=false
Upgrading in Graphical Mode 59

PostgreSQL
jdbc:Informatica:postgresql://<host name>:<port number>;DatabaseName=Sybase
jdbc:Informatica:sybase://<host name>:<port number>;DatabaseName=Verify that the connection string contains all the connection parameters required by your database system.
19. Click Test Connection to verify that you can connect to the database, and then click OK to continue.
20. Click Next.
The Domain and Node Configuration page appears.
21. Modify the node host name and port number to match the configuration of the new version of Informatica.
The following table describes the domain and node properties that you can specify:
Property Description
Domain name Name of the domain. The default domain name is Domain_<MachineName>. The name must not exceed 128 characters and must be 7-bit ASCII only. It cannot contain a space or any of the following characters: ` % * + ; " ? , < > \ /
Node name Name of the node that you are upgrading.
60 Chapter 7: Upgrade the Domain with Changes to Node Configuration
Property Description
Node host name Host name of the machine that hosts the node for the new version of Informatica. If the machine has a single network name, use the default host name. If the machine has multiple network names, you can modify the default host name to use an alternate network name. Optionally, you can use the IP address.Note: Do not use localhost. The host name must explicitly identify the machine.
Node port number Port number for the node you are upgrading. The default port number for the node is 6005.
Gateway node host name Host name of the machine that hosts the gateway node for the domain.Available if you upgrade a worker node.
Gateway node port number Port number of the gateway node.Available if you upgrade a worker node.
22. Enter the custom keystore file password and location if you are securing the Informatica Administrator with a custom keystore file and you are upgrading to a different gateway node configuration.
The following table describes the properties for the Informatica Administrator custom keystore:
Property Description
Custom Keystore Password Plain text password for the custom keystore file.
Custom Keystore File Path and file name of the custom keystore file. If you leave this field blank, the installer looks for the keystore file in the following directory:<Informatica installation directory>\tomcat\conf\
23. Click Next.
Upgrading in Graphical Mode 61
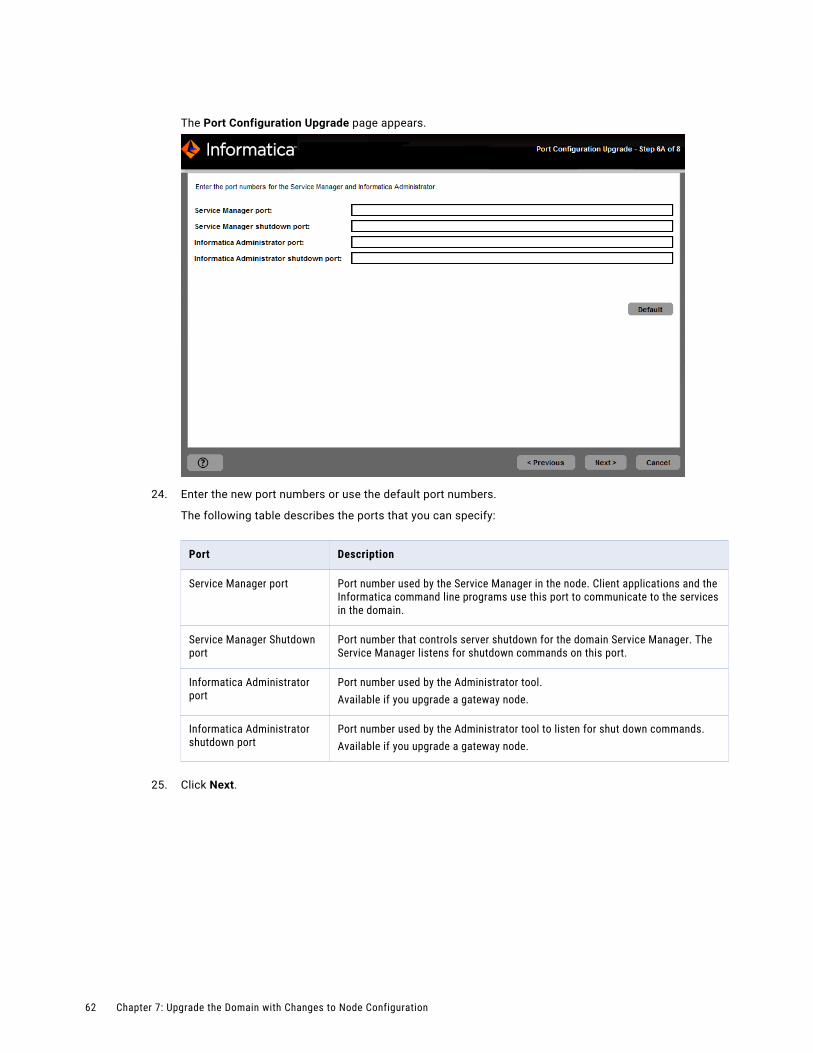
The Port Configuration Upgrade page appears.
24. Enter the new port numbers or use the default port numbers.
The following table describes the ports that you can specify:
Port Description
Service Manager port Port number used by the Service Manager in the node. Client applications and the Informatica command line programs use this port to communicate to the services in the domain.
Service Manager Shutdown port
Port number that controls server shutdown for the domain Service Manager. The Service Manager listens for shutdown commands on this port.
Informatica Administrator port
Port number used by the Administrator tool.Available if you upgrade a gateway node.
Informatica Administrator shutdown port
Port number used by the Administrator tool to listen for shut down commands.Available if you upgrade a gateway node.
25. Click Next.
62 Chapter 7: Upgrade the Domain with Changes to Node Configuration
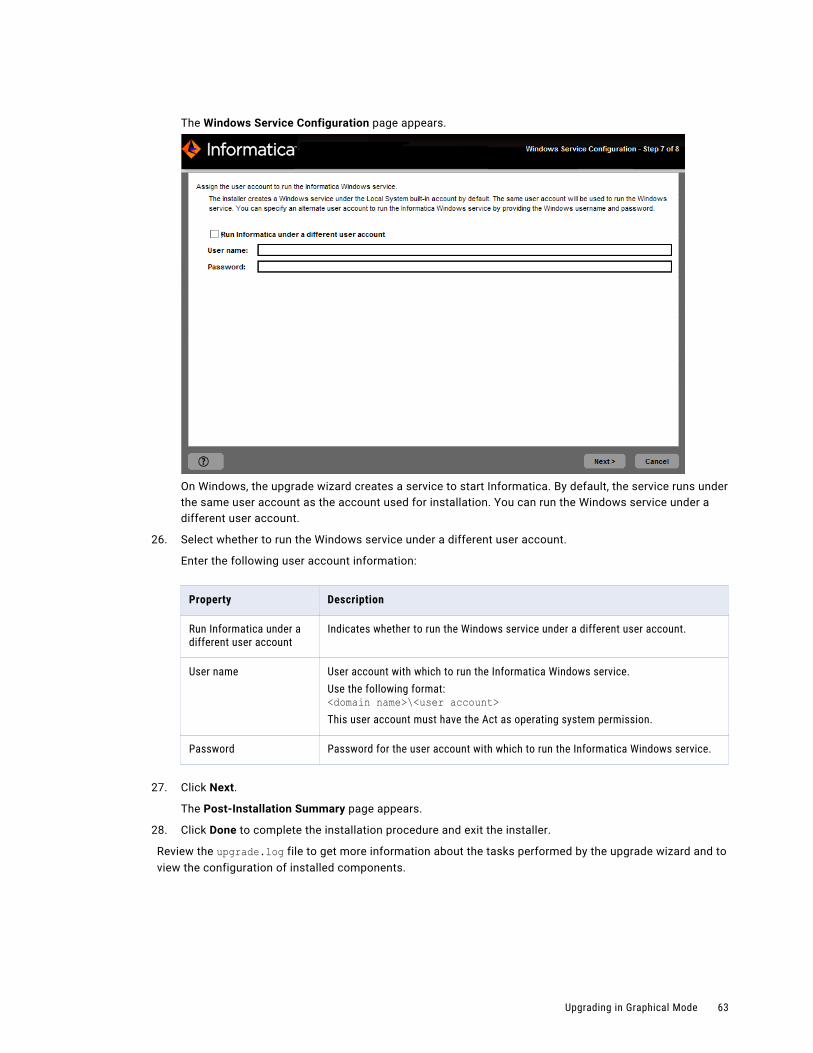
The Windows Service Configuration page appears.
On Windows, the upgrade wizard creates a service to start Informatica. By default, the service runs under the same user account as the account used for installation. You can run the Windows service under a different user account.
26. Select whether to run the Windows service under a different user account.
Enter the following user account information:
Property Description
Run Informatica under a different user account
Indicates whether to run the Windows service under a different user account.
User name User account with which to run the Informatica Windows service.Use the following format:<domain name>\<user account>This user account must have the Act as operating system permission.
Password Password for the user account with which to run the Informatica Windows service.
27. Click Next.
The Post-Installation Summary page appears.
28. Click Done to complete the installation procedure and exit the installer.
Review the upgrade.log file to get more information about the tasks performed by the upgrade wizard and to view the configuration of installed components.
Upgrading in Graphical Mode 63
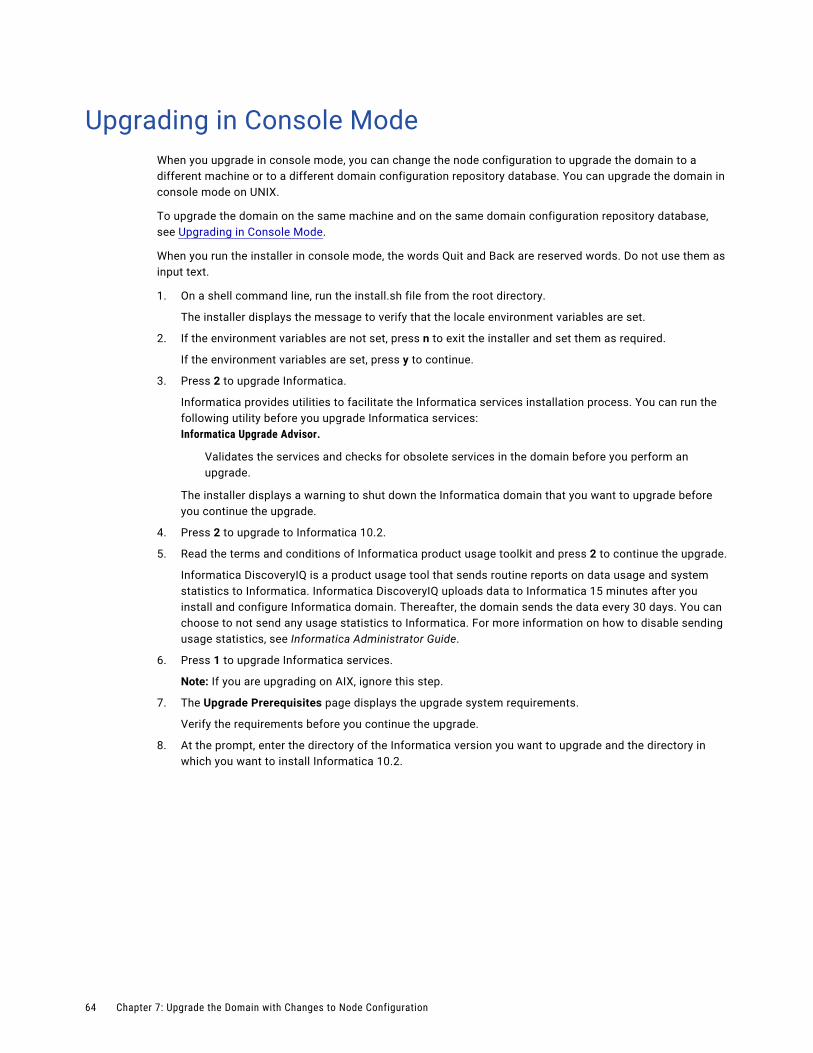
Upgrading in Console ModeWhen you upgrade in console mode, you can change the node configuration to upgrade the domain to a different machine or to a different domain configuration repository database. You can upgrade the domain in console mode on UNIX.
To upgrade the domain on the same machine and on the same domain configuration repository database, see Upgrading in Console Mode.
When you run the installer in console mode, the words Quit and Back are reserved words. Do not use them as input text.
1. On a shell command line, run the install.sh file from the root directory.
The installer displays the message to verify that the locale environment variables are set.
2. If the environment variables are not set, press n to exit the installer and set them as required.
If the environment variables are set, press y to continue.
3. Press 2 to upgrade Informatica.
Informatica provides utilities to facilitate the Informatica services installation process. You can run the following utility before you upgrade Informatica services:Informatica Upgrade Advisor.
Validates the services and checks for obsolete services in the domain before you perform an upgrade.
The installer displays a warning to shut down the Informatica domain that you want to upgrade before you continue the upgrade.
4. Press 2 to upgrade to Informatica 10.2.
5. Read the terms and conditions of Informatica product usage toolkit and press 2 to continue the upgrade.
Informatica DiscoveryIQ is a product usage tool that sends routine reports on data usage and system statistics to Informatica. Informatica DiscoveryIQ uploads data to Informatica 15 minutes after you install and configure Informatica domain. Thereafter, the domain sends the data every 30 days. You can choose to not send any usage statistics to Informatica. For more information on how to disable sending usage statistics, see Informatica Administrator Guide.
6. Press 1 to upgrade Informatica services.
Note: If you are upgrading on AIX, ignore this step.
7. The Upgrade Prerequisites page displays the upgrade system requirements.
Verify the requirements before you continue the upgrade.
8. At the prompt, enter the directory of the Informatica version you want to upgrade and the directory in which you want to install Informatica 10.2.
64 Chapter 7: Upgrade the Domain with Changes to Node Configuration
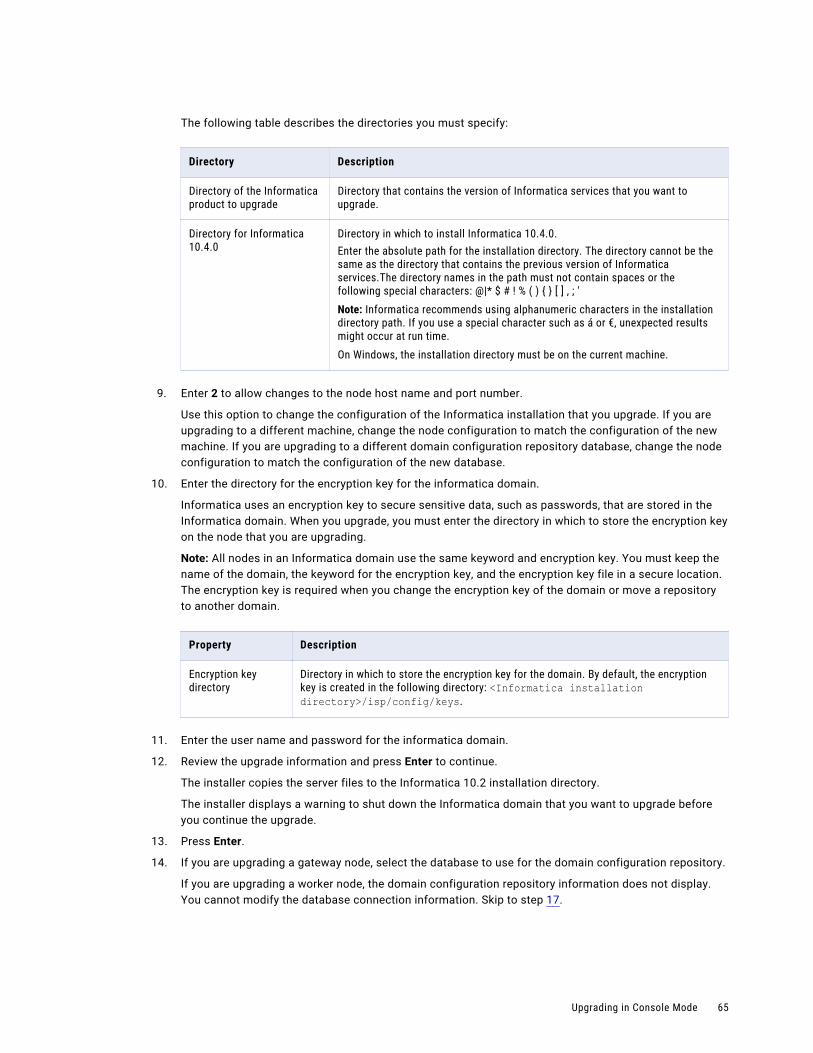
The following table describes the directories you must specify:
Directory Description
Directory of the Informatica product to upgrade
Directory that contains the version of Informatica services that you want to upgrade.
Directory for Informatica 10.4.0
Directory in which to install Informatica 10.4.0.Enter the absolute path for the installation directory. The directory cannot be the same as the directory that contains the previous version of Informatica services.The directory names in the path must not contain spaces or the following special characters: @|* $ # ! % ( ) { } [ ] , ; 'Note: Informatica recommends using alphanumeric characters in the installation directory path. If you use a special character such as á or €, unexpected results might occur at run time.On Windows, the installation directory must be on the current machine.
9. Enter 2 to allow changes to the node host name and port number.
Use this option to change the configuration of the Informatica installation that you upgrade. If you are upgrading to a different machine, change the node configuration to match the configuration of the new machine. If you are upgrading to a different domain configuration repository database, change the node configuration to match the configuration of the new database.
10. Enter the directory for the encryption key for the informatica domain.
Informatica uses an encryption key to secure sensitive data, such as passwords, that are stored in the Informatica domain. When you upgrade, you must enter the directory in which to store the encryption key on the node that you are upgrading.
Note: All nodes in an Informatica domain use the same keyword and encryption key. You must keep the name of the domain, the keyword for the encryption key, and the encryption key file in a secure location. The encryption key is required when you change the encryption key of the domain or move a repository to another domain.
Property Description
Encryption key directory
Directory in which to store the encryption key for the domain. By default, the encryption key is created in the following directory: <Informatica installation directory>/isp/config/keys.
11. Enter the user name and password for the informatica domain.
12. Review the upgrade information and press Enter to continue.
The installer copies the server files to the Informatica 10.2 installation directory.
The installer displays a warning to shut down the Informatica domain that you want to upgrade before you continue the upgrade.
13. Press Enter.
14. If you are upgrading a gateway node, select the database to use for the domain configuration repository.
If you are upgrading a worker node, the domain configuration repository information does not display. You cannot modify the database connection information. Skip to step 17.
Upgrading in Console Mode 65
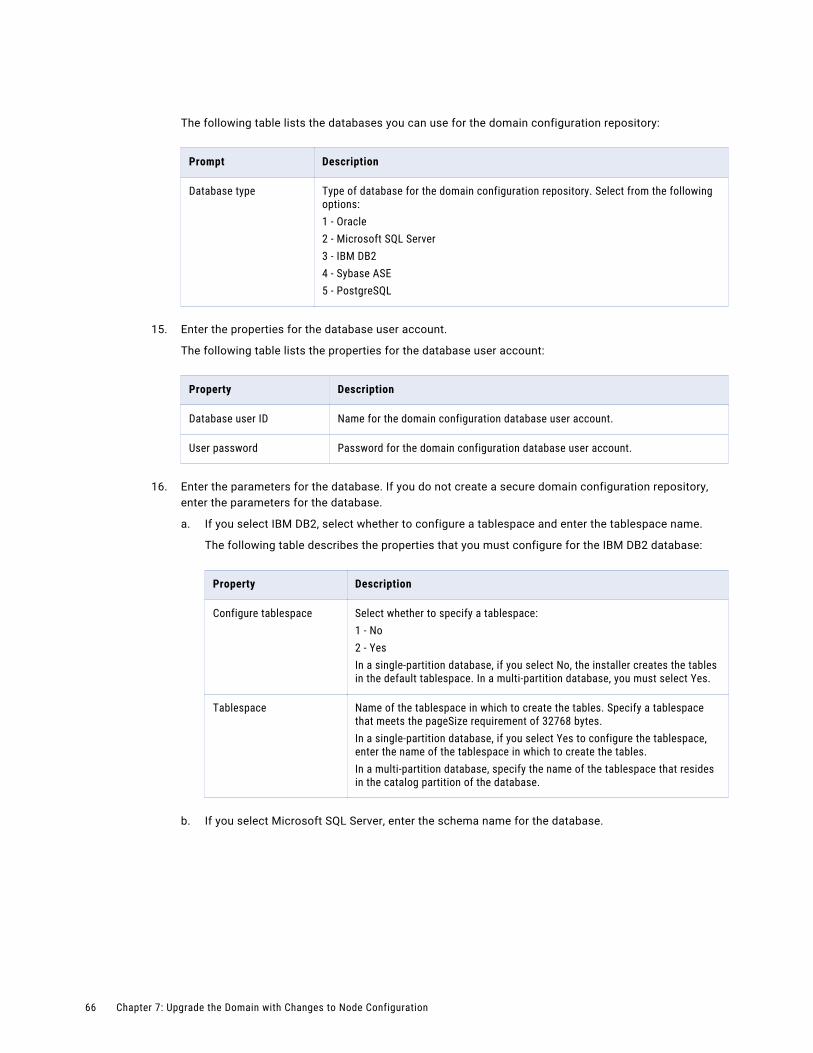
The following table lists the databases you can use for the domain configuration repository:
Prompt Description
Database type Type of database for the domain configuration repository. Select from the following options:1 - Oracle2 - Microsoft SQL Server3 - IBM DB24 - Sybase ASE5 - PostgreSQL
15. Enter the properties for the database user account.
The following table lists the properties for the database user account:
Property Description
Database user ID Name for the domain configuration database user account.
User password Password for the domain configuration database user account.
16. Enter the parameters for the database. If you do not create a secure domain configuration repository, enter the parameters for the database.
a. If you select IBM DB2, select whether to configure a tablespace and enter the tablespace name.
The following table describes the properties that you must configure for the IBM DB2 database:
Property Description
Configure tablespace Select whether to specify a tablespace:1 - No2 - YesIn a single-partition database, if you select No, the installer creates the tables in the default tablespace. In a multi-partition database, you must select Yes.
Tablespace Name of the tablespace in which to create the tables. Specify a tablespace that meets the pageSize requirement of 32768 bytes.In a single-partition database, if you select Yes to configure the tablespace, enter the name of the tablespace in which to create the tables.In a multi-partition database, specify the name of the tablespace that resides in the catalog partition of the database.
b. If you select Microsoft SQL Server, enter the schema name for the database.
66 Chapter 7: Upgrade the Domain with Changes to Node Configuration
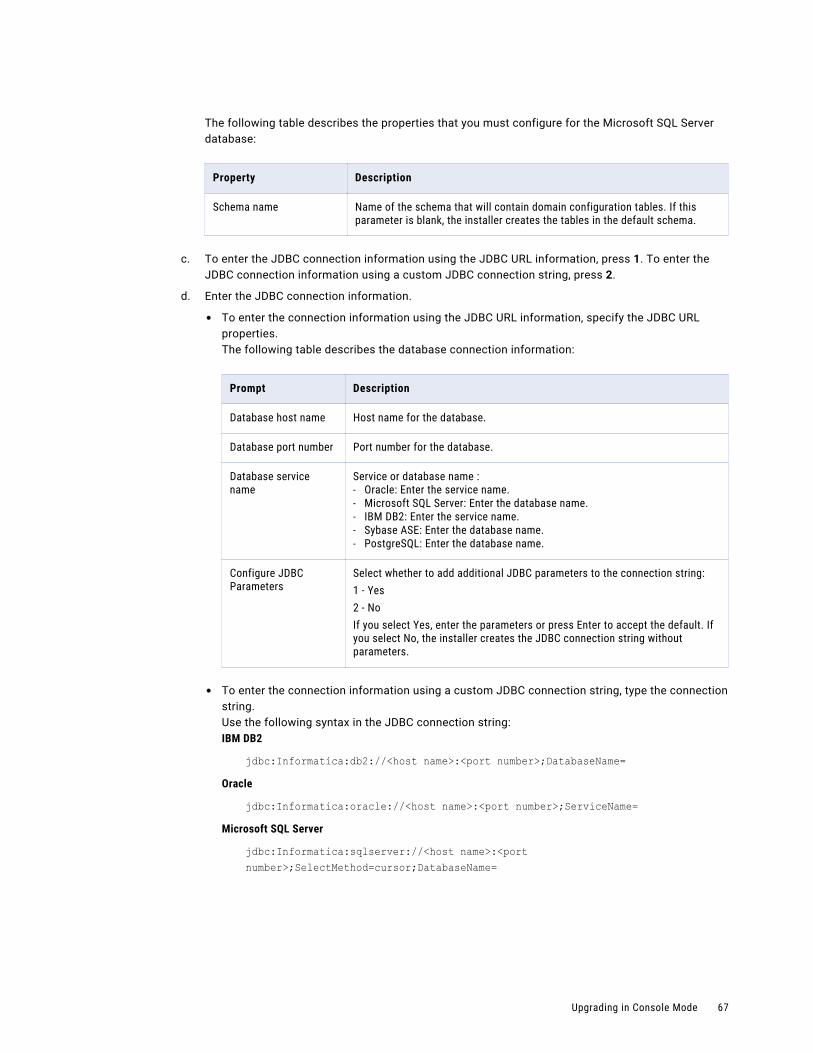
The following table describes the properties that you must configure for the Microsoft SQL Server database:
Property Description
Schema name Name of the schema that will contain domain configuration tables. If this parameter is blank, the installer creates the tables in the default schema.
c. To enter the JDBC connection information using the JDBC URL information, press 1. To enter the JDBC connection information using a custom JDBC connection string, press 2.
d. Enter the JDBC connection information.
• To enter the connection information using the JDBC URL information, specify the JDBC URL properties.The following table describes the database connection information:
Prompt Description
Database host name Host name for the database.
Database port number Port number for the database.
Database service name
Service or database name :- Oracle: Enter the service name.- Microsoft SQL Server: Enter the database name.- IBM DB2: Enter the service name.- Sybase ASE: Enter the database name.- PostgreSQL: Enter the database name.
Configure JDBC Parameters
Select whether to add additional JDBC parameters to the connection string:1 - Yes2 - NoIf you select Yes, enter the parameters or press Enter to accept the default. If you select No, the installer creates the JDBC connection string without parameters.
• To enter the connection information using a custom JDBC connection string, type the connection string.Use the following syntax in the JDBC connection string:IBM DB2
jdbc:Informatica:db2://<host name>:<port number>;DatabaseName=Oracle
jdbc:Informatica:oracle://<host name>:<port number>;ServiceName=Microsoft SQL Server
jdbc:Informatica:sqlserver://<host name>:<port number>;SelectMethod=cursor;DatabaseName=
Upgrading in Console Mode 67
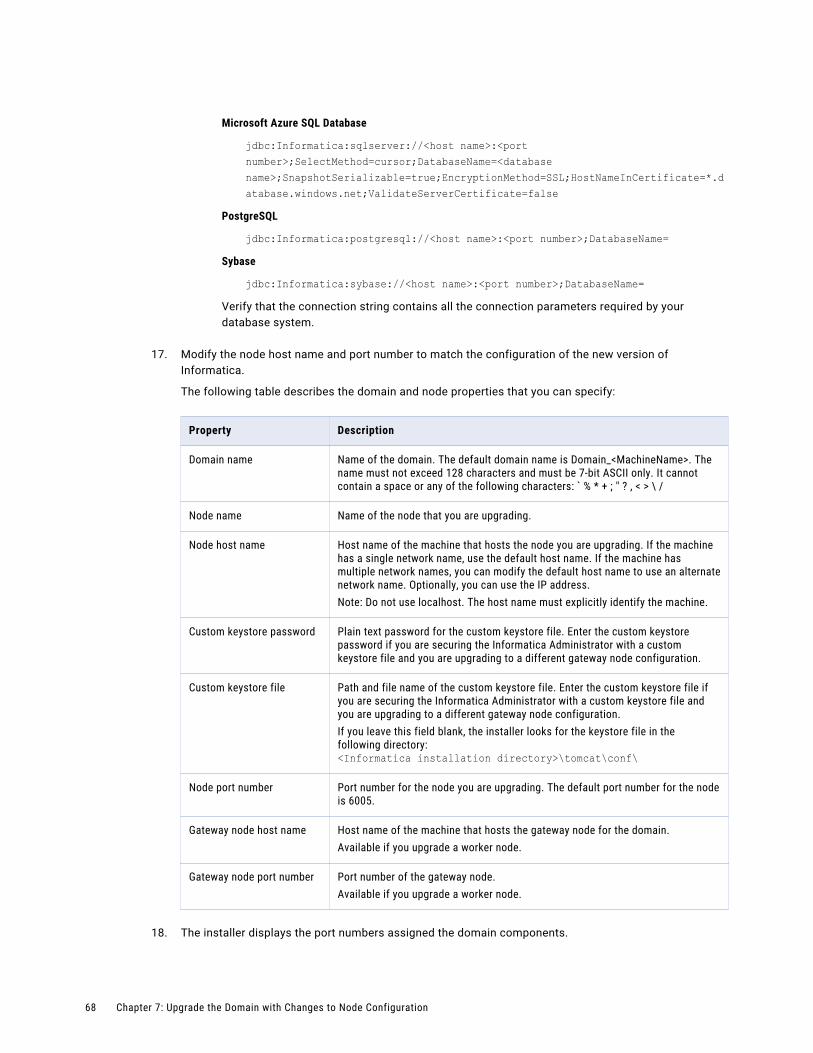
Microsoft Azure SQL Database
jdbc:Informatica:sqlserver://<host name>:<port number>;SelectMethod=cursor;DatabaseName=<database name>;SnapshotSerializable=true;EncryptionMethod=SSL;HostNameInCertificate=*.database.windows.net;ValidateServerCertificate=false
PostgreSQL
jdbc:Informatica:postgresql://<host name>:<port number>;DatabaseName=Sybase
jdbc:Informatica:sybase://<host name>:<port number>;DatabaseName=Verify that the connection string contains all the connection parameters required by your database system.
17. Modify the node host name and port number to match the configuration of the new version of Informatica.
The following table describes the domain and node properties that you can specify:
Property Description
Domain name Name of the domain. The default domain name is Domain_<MachineName>. The name must not exceed 128 characters and must be 7-bit ASCII only. It cannot contain a space or any of the following characters: ` % * + ; " ? , < > \ /
Node name Name of the node that you are upgrading.
Node host name Host name of the machine that hosts the node you are upgrading. If the machine has a single network name, use the default host name. If the machine has multiple network names, you can modify the default host name to use an alternate network name. Optionally, you can use the IP address.Note: Do not use localhost. The host name must explicitly identify the machine.
Custom keystore password Plain text password for the custom keystore file. Enter the custom keystore password if you are securing the Informatica Administrator with a custom keystore file and you are upgrading to a different gateway node configuration.
Custom keystore file Path and file name of the custom keystore file. Enter the custom keystore file if you are securing the Informatica Administrator with a custom keystore file and you are upgrading to a different gateway node configuration.If you leave this field blank, the installer looks for the keystore file in the following directory:<Informatica installation directory>\tomcat\conf\
Node port number Port number for the node you are upgrading. The default port number for the node is 6005.
Gateway node host name Host name of the machine that hosts the gateway node for the domain.Available if you upgrade a worker node.
Gateway node port number Port number of the gateway node.Available if you upgrade a worker node.
18. The installer displays the port numbers assigned the domain components.
68 Chapter 7: Upgrade the Domain with Changes to Node Configuration
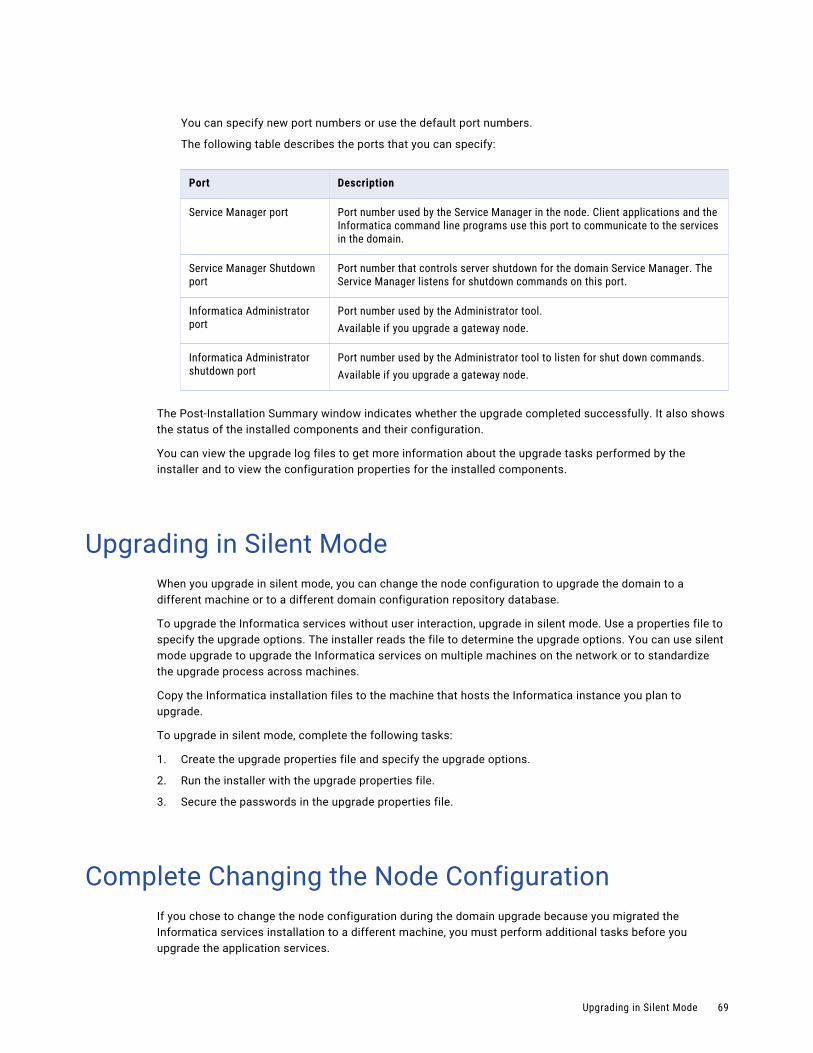
You can specify new port numbers or use the default port numbers.
The following table describes the ports that you can specify:
Port Description
Service Manager port Port number used by the Service Manager in the node. Client applications and the Informatica command line programs use this port to communicate to the services in the domain.
Service Manager Shutdown port
Port number that controls server shutdown for the domain Service Manager. The Service Manager listens for shutdown commands on this port.
Informatica Administrator port
Port number used by the Administrator tool.Available if you upgrade a gateway node.
Informatica Administrator shutdown port
Port number used by the Administrator tool to listen for shut down commands.Available if you upgrade a gateway node.
The Post-Installation Summary window indicates whether the upgrade completed successfully. It also shows the status of the installed components and their configuration.
You can view the upgrade log files to get more information about the upgrade tasks performed by the installer and to view the configuration properties for the installed components.
Upgrading in Silent ModeWhen you upgrade in silent mode, you can change the node configuration to upgrade the domain to a different machine or to a different domain configuration repository database.
To upgrade the Informatica services without user interaction, upgrade in silent mode. Use a properties file to specify the upgrade options. The installer reads the file to determine the upgrade options. You can use silent mode upgrade to upgrade the Informatica services on multiple machines on the network or to standardize the upgrade process across machines.
Copy the Informatica installation files to the machine that hosts the Informatica instance you plan to upgrade.
To upgrade in silent mode, complete the following tasks:
1. Create the upgrade properties file and specify the upgrade options.
2. Run the installer with the upgrade properties file.
3. Secure the passwords in the upgrade properties file.
Complete Changing the Node ConfigurationIf you chose to change the node configuration during the domain upgrade because you migrated the Informatica services installation to a different machine, you must perform additional tasks before you upgrade the application services.
Upgrading in Silent Mode 69
Note: If you chose to change the node configuration during the domain upgrade because you migrated the domain configuration repository to a different database, you do not need to perform additional tasks.
You must perform the following additional tasks:
1. Configure the environment variables.
2. Verify the range of dynamic port numbers.
3. Verify the location of the node backup directory.
4. Configure PowerExchange® adapters.
Clear the Browser CacheBefore you access the Administrator tool, clear the browser cache.
On Windows Internet Explorer, delete the browsing history, including temporary files, cookies, and history.
If you do not clear the browser cache, the previous Administrator tool URL is not redirected to the latest URL and some menu options may not appear.
Configure Locale Environment VariablesUse LANG, LC_CTYPE, or LC_ALL to set the UNIX code page.
Different UNIX operating systems require different values for the same locale. The value for the locale variable is case sensitive.
Use the following command to verify that the value for the locale environment variable is compatible with the language settings for the machine and the type of code page you want to use for the repository:
locale -aThe command returns the languages installed on the UNIX operating system and the existing locale settings.
Locale on Linux
All UNIX operating systems except Linux have a unique value for each locale. Linux allows different values to represent the same locale. For example, “utf8,” “UTF-8,” “UTF8,” and “utf-8” represent the same locale on a Linux machine. Informatica requires that you use a specific value for each locale on a Linux machine. Make sure that you set the LANG environment variable appropriately for all Linux machines.
Locale for Oracle database clients
For Oracle database clients, set NLS_LANG to the locale that you want the database client and server to use with the login. A locale setting consists of the language, territory, and character set. The value of NLS_LANG depends on the configuration.
For example, if the value is american_america.UTF8, set the variable in a C shell with the following command:
setenv NLS_LANG american_america.UTF8To read multibyte characters from the database, set the variable with the following command:
setenv NLS_LANG=american_america.AL32UTF8You must set the correct variable on the Data Integration Service machine so that the Data Integration Service can read the Oracle data correctly.
70 Chapter 7: Upgrade the Domain with Changes to Node Configuration
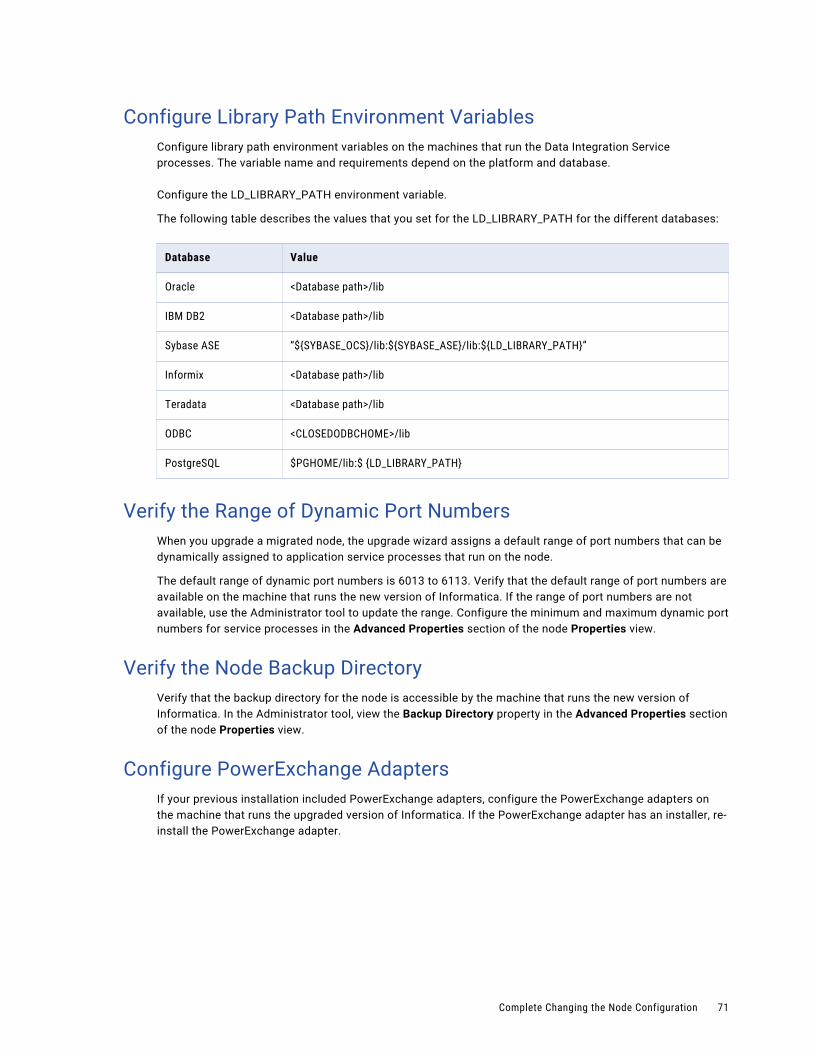
Configure Library Path Environment VariablesConfigure library path environment variables on the machines that run the Data Integration Service processes. The variable name and requirements depend on the platform and database.
Configure the LD_LIBRARY_PATH environment variable.
The following table describes the values that you set for the LD_LIBRARY_PATH for the different databases:
Database Value
Oracle <Database path>/lib
IBM DB2 <Database path>/lib
Sybase ASE “${SYBASE_OCS}/lib:${SYBASE_ASE}/lib:${LD_LIBRARY_PATH}”
Informix <Database path>/lib
Teradata <Database path>/lib
ODBC <CLOSEDODBCHOME>/lib
PostgreSQL $PGHOME/lib:$ {LD_LIBRARY_PATH}
Verify the Range of Dynamic Port NumbersWhen you upgrade a migrated node, the upgrade wizard assigns a default range of port numbers that can be dynamically assigned to application service processes that run on the node.
The default range of dynamic port numbers is 6013 to 6113. Verify that the default range of port numbers are available on the machine that runs the new version of Informatica. If the range of port numbers are not available, use the Administrator tool to update the range. Configure the minimum and maximum dynamic port numbers for service processes in the Advanced Properties section of the node Properties view.
Verify the Node Backup DirectoryVerify that the backup directory for the node is accessible by the machine that runs the new version of Informatica. In the Administrator tool, view the Backup Directory property in the Advanced Properties section of the node Properties view.
Configure PowerExchange AdaptersIf your previous installation included PowerExchange adapters, configure the PowerExchange adapters on the machine that runs the upgraded version of Informatica. If the PowerExchange adapter has an installer, re-install the PowerExchange adapter.
Complete Changing the Node Configuration 71

C h a p t e r 8
Before You Upgrade the Application Services
This chapter includes the following topics:
• Configure POSIX Asynchronous I/O, 72
• Configure Informatica Environment Variables, 72
• Configure Locale Environment Variables, 73
• Verify the Keystore File Location for the Administrator Tool, 74
• Clear the Browser Cache, 74
Configure POSIX Asynchronous I/OIf you install Informatica on IBM AIX, make POSIX Asynchronous I/O available on any node where you want to run a PowerCenter Integration Service. A PowerCenter Integration Service running on an IBM AIX machine can fail to start if POSIX Asynchronous I/O is not available.
Configure Informatica Environment VariablesYou can configure the INFA_DOMAINS_FILE and INFA_HOME environment variables to store the domain and installation location settings.
INFA_DOMAINS_FILE
The installer creates a domains.infa file in the Informatica installation directory. The domains.infa file contains the connectivity information for the gateway nodes in a domain, including the domain names, domain host names, and domain host port numbers.
Set the value of the INFA_DOMAINS_FILE variable to the path and file name of the domains.infa file.
Configure the INFA_DOMAINS_FILE variable on the machine where you install the Informatica services. On Windows, configure INFA_DOMAINS_FILE as a system variable.
72
INFA_HOME
Use INFA_HOME to designate the Informatica installation directory. If you modify the Informatica directory structure, you need to set the environment variable to the location of the Informatica installation directory or the directory where the installed Informatica files are located.
For example, you use a softlink for any of the Informatica directories. To configure INFA_HOME so that any Informatica application or service can locate the other Informatica components it needs to run, set INFA_HOME to the location of the Informatica installation directory.
Configure Locale Environment VariablesUse LANG, LC_CTYPE, or LC_ALL to set the UNIX code page.
Different UNIX operating systems require different values for the same locale. The value for the locale variable is case sensitive.
Use the following command to verify that the value for the locale environment variable is compatible with the language settings for the machine and the type of code page you want to use for the repository:
locale -aThe command returns the languages installed on the UNIX operating system and the existing locale settings.
Locale on Linux
All UNIX operating systems except Linux have a unique value for each locale. Linux allows different values to represent the same locale. For example, “utf8,” “UTF-8,” “UTF8,” and “utf-8” represent the same locale on a Linux machine. Informatica requires that you use a specific value for each locale on a Linux machine. Make sure that you set the LANG environment variable appropriately for all Linux machines.
Locale for Oracle database clients
For Oracle database clients, set NLS_LANG to the locale that you want the database client and server to use with the login. A locale setting consists of the language, territory, and character set. The value of NLS_LANG depends on the configuration.
For example, if the value is american_america.UTF8, set the variable in a C shell with the following command:
setenv NLS_LANG american_america.UTF8To read multibyte characters from the database, set the variable with the following command:
setenv NLS_LANG=american_america.AL32UTF8You must set the correct variable on the Data Integration Service machine so that the Data Integration Service can read the Oracle data correctly.
Configure Locale Environment Variables 73

Verify the Keystore File Location for the Administrator Tool
If you used a keystore file that you created to secure the connection to the Administrator tool, you must verify the keystore file location before you access the Administrator tool. The upgrade process does not update this location.
If you used the default keystore file generated by the installer in the previous domain, you do not need to verify the keystore file location.
The tasks that you must perform depend on the following locations where you previously stored the keystore file:
A location inside the previous Informatica installation directory structure
If you stored the keystore file in a location inside the previous Informatica installation directory structure, perform the following steps:
1. Copy the file to another location.
2. Update the gateway node with the copied keystore file location.
Run the infasetup UpdateGatewayNode command to update the gateway node with the location of the keystore file. You must run the command on each gateway node in the domain.
A location outside the previous Informatica installation directory structure
If you stored the keystore file in a location outside the previous Informatica installation directory structure, verify that the machine that runs the gateway node can access the file.
Clear the Browser CacheBefore you access the Administrator tool, clear the browser cache.
On Windows Internet Explorer, delete the browsing history, including temporary files, cookies, and history.
If you do not clear the browser cache, the previous Administrator tool URL is not redirected to the latest URL and some menu options may not appear.
74 Chapter 8: Before You Upgrade the Application Services
C h a p t e r 9
Application Service UpgradeThis chapter includes the following topics:
• Application Service Upgrade Overview, 75
• Running the Service Upgrade Wizard, 76
• Verify the Model Repository Service Upgrade, 77
Application Service Upgrade OverviewInformatica services version that you upgrade from determines the application service upgrade process.
Some Informatica services versions require that you upgrade the application services. When you upgrade an application service, you must also upgrade the dependent services. When you upgrade an application service, the upgrade process upgrades the database contents of the databases associated with the service.
Use the service upgrade wizard, the actions menu of each service, or the command line to upgrade application services. The service upgrade wizard upgrades multiple services in the appropriate order and checks for dependencies. If you use the actions menu of each service or the command line to upgrade application services, you must upgrade the application services in the correct order and verify that you upgrade dependent services.
The privileges required to upgrade application services depend on the service.
Privileges to Upgrade ServicesThe privileges required to upgrade application services depend on the application service.
A user with the Administrator role on the domain can access the service upgrade wizard.
A user must have these roles, privileges, and permissions to upgrade the following application services:
Model Repository Service
To upgrade the Model Repository Service using the service upgrade wizard, a user must have the following credentials:
• Administrator role on the domain.
• Create, Edit, and Delete Projects privilege for the Model Repository Service and write permission on projects.
75

To upgrade the Model Repository Service from the Actions menu or from the command line, a user must have the following credentials:
• Manage Services privilege for the domain and permission on the Model Repository Service.
• Create, Edit, and Delete Projects privilege for the Model Repository Service and write permission on projects.
Data Integration Service
To upgrade the Data Integration Service, a user must have the Administrator role on the Data Integration Service.
Content Management Service
To upgrade the Content Management Service, a user must have the Administrator role on the Content Management Service.
PowerCenter Repository Service
To upgrade the PowerCenter Repository Service, a user must have the Manage Services privilege for the domain and permission on the PowerCenter Repository Service.
Metadata Manager Service
To upgrade the Metadata Manager Service, a user must have the Manage Services privilege for the domain and permission on the Metadata Manager Service.
Service Upgrade from Previous VersionsWhen you upgrade from a previous version, some application services require an upgrade. Upgrade the application services that you used in the previous version.
Before you upgrade, verify that the Metadata Manager Service is disabled. Verify that all other application services are enabled.
To upgrade application services, upgrade the following services and associated databases in this order:
1. Model Repository Service
2. Data Integration Service
3. Profiling warehouse for the Data Integration Service
4. Metadata Manager Service
5. PowerCenter Repository Service
Note: When you upgrade all other application services, the upgrade process upgrades the database contents of the databases associated with the service.
Running the Service Upgrade WizardUse the service upgrade wizard to upgrade application services and the database contents of the databases associated with the services. The service upgrade wizard displays upgraded services in a list along with
76 Chapter 9: Application Service Upgrade

services and associated databases that require an upgrade. You can also save the current or previous upgrade report.
Note: The Metadata Manager Service must be disabled before the upgrade. All other services must be enabled before the upgrade.
1. In the Informatica Administrator header area click Manage > Upgrade.
2. Select the application services and associated databases to upgrade.
3. Optionally, specify if you want to Automatically recycle services after upgrade.
If you choose to automatically recycle application services after the upgrade, the upgrade wizard restarts the services after they have been upgraded.
4. Click Next.
5. If dependency errors exist, the Dependency Errors dialog box appears. Review the dependency errors and click OK. Then, resolve dependency errors and click Next.
6. Enter the repository login information.
7. Click Next.
The service upgrade wizard upgrades each application service and associated database and displays the status and processing details.
8. When the upgrade completes, the Summary section displays the list of application services and their upgrade status. Click each service to view the upgrade details in the Service Details section.
9. Optionally, click Save Report to save the upgrade details to a file.
If you choose not to save the report, you can click Save Previous Report the next time you launch the service upgrade wizard.
10. Click Close.
11. If you did not choose to automatically recycle application services after the upgrade, restart the upgraded services.
You can view the upgrade report and save the upgrade report. The second time you run the service upgrade wizard, the Save Previous Report option appears in the service upgrade wizard. If you did not save the upgrade report after upgrading services, you can select this option to view or save the previous upgrade report.
Verify the Model Repository Service UpgradeAfter you upgrade the Model Repository Service, check the Model Repository Service log to verify that the upgrade completed successfully.
Object Dependency GraphWhen you upgrade a Model Repository Service, the upgrade process upgrades the contents of the Model repository and rebuilds the object dependency graph.
If the upgrade process encounters a fatal error while upgrading the Model repository contents, then the service upgrade fails. The Administrator tool or the command line program informs you that you must perform the upgrade again.
Verify the Model Repository Service Upgrade 77

If the upgrade process encounters a fatal error while rebuilding the object dependency graph, then the upgrade of the service succeeds. You cannot view object dependencies in the Developer tool until you rebuild the object dependency graph.
After you upgrade the Model Repository Service, verify that the Model Repository Service log includes the following message:
MRS_50431 "Finished rebuilding the object dependency graph for project group '<project group>'."
If the message does not exist in the log, run the infacmd mrs rebuildDependencyGraph command to rebuild the object dependency graph. Users must not access Model repository objects until the rebuild process completes, or the object dependency graph might not be accurate. Ask the users to log out of the Model Repository Service before service upgrade.
The infacmd mrs rebuildDependencyGraph command uses the following syntax:
rebuildDependencyGraph <-DomainName|-dn> domain_name[<-SecurityDomain|-sdn> security_domain]<-UserName|-un> user_name<-Password|-pd> password<-ServiceName|-sn> service_name[<-ResilienceTimeout|-re> timeout_period_in_seconds]
Advanced Properties for the Model Repository ServiceYou can configure the Maximum Heap Size and MaxMetaspaceSize values after Model Repository Service upgrade. Set the -Xss value before you upgrade the service. You need to reset the -Xss value after you upgrade the service.
Configure the following advanced properties for the Model Repository Service:
Maximum Heap Size
Before the upgrade process, you can configure the Maximum Heap Size property value for the Model Repository Service to 4GB if the property value is lower than 4GB. After the upgrade, reset the property value to the previous value before the upgrade or to a value that Global Customer Support recommends for your environment.
JVM Command Line Options
Configure the following JVM command line options:
• -Xss. Configure the -Xss value to 1m before you upgrade the Model Repository Service upgrade. After the upgrade, reset the -Xss option back to the value before upgrade. The default value is 512k.
To configure the advanced properties for a Model Repository Service, navigate to Manage > Services and Nodes, select a Model Repository Service, and edit the Properties > Advanced Properties section.
78 Chapter 9: Application Service Upgrade
C h a p t e r 1 0
Informatica Client UpgradeThis chapter includes the following topics:
• Informatica Client Upgrade Overview, 79
• Informatica Client Upgrade Options, 80
• Profiles, 80
• Upgrading in Graphical Mode, 81
• Upgrading in Silent Mode, 82
Informatica Client Upgrade OverviewUse the client installer to upgrade a previous version of Informatica Developer. Informatica Developer is installed on the installation directory you specify. The client installer configures the newly installed Informatica Developer with the same settings as the previous version. The client installer does not modify the files of the previous version of the client tools.
Complete the pre-upgrade tasks before you start the upgrade. Run the installer on all machines that host previous versions of Informatica Developer that you want to upgrade. You can upgrade the Informatica clients in graphical or silent mode.
When you run the client installer, you can select the following Informatica client tools to upgrade:
Informatica Developer
Informatica Developer is a client application that you use to create and run mappings, data objects, and virtual databases. Objects created in Informatica Developer are stored in a Model repository and are run by a Data Integration Service. If you upgrade Informatica Developer, verify that the Informatica version, including the hotfix version, matches the version of the domain upgrade.
PowerCenter Client tools
The PowerCenter Client is a set of tools you can use to manage the PowerCenter repository, mappings, and sessions. The client upgrade also upgrades the following client tools:
• Mapping Architect for Visio
• Mapping Analyst for Excel
When you run the client installer, you can upgrade Informatica Developer.
The following entries describe the minimum system requirements to run the Informatica Developer:Processor
Requires at least 1 CPU.
79
RAM
Requires at least 1 GB.
Disk Space
Requires at least 6 GB.
The following entries describe the minimum system requirements to run the PowerCenter Client:Processor
Requires at least 1 CPU.
RAM
Requires at least 1 GB.
Disk Space
Requires at least 3GB.
If you upgrade Informatica Developer, verify that the Informatica version exactly matches the version of the domain upgrade.
When you upgrade the Informatica client tools, the following components are also upgraded:
• DataDirect ODBC drivers
• Java Runtime Environment libraries
You can perform the upgrade from the root of the directory where you download the installation files.
On Windows, the length of the entire installation directory path, including the zip file name, must be 60 characters or less. Verify that the zip utility version is compatible with the Windows operating system version. When you unzip the file, verify that the zip utility also extracts empty folders.
Informatica Client Upgrade OptionsYou can upgrade the Informatica client tools in one of the following ways:
• Upgrade in graphical mode. Upgrades the Informatica client tools in graphical mode. The installer guides you through the upgrade process.
• Upgrade in silent mode. Upgrades the Informatica client tools using a properties file that contains the upgrade options.
ProfilesAfter you upgrade, complete the post-upgrade tasks for profiles and scorecards.
Import Data DomainsTo add predefined data domain groups and related data domains to the data domain glossary, import the Informatica_IDE_DataDomain.xml file into the Developer tool using the Windows > Preferences > Informatica > Data Domain Glossary > Import menu option.
80 Chapter 10: Informatica Client Upgrade
To view and make changes to rules associated with data domains, import the Informatica_IDE_DataDomainRule.xml file using the File > Import menu option in the Developer tool.
Restore Profiles and ScorecardsRun infacmd ps restoreProfilesAndScorecards command to restore the profiles and scorecards from a previous version to the current version. Make sure that you back up the Model repository content before you run the command.
Run the Existing ScorecardsTo view the statistics in the Cumulative Metrics Trend pane for the scorecards that you created in version 10.1.0 or earlier, you can run the scorecards. You can view the Cumulative Metrics Trend pane in the scorecard dashboard in the Analyst tool.
Upgrading in Graphical ModeIf you encounter problems when you run the install.bat file from the root directory, run the following file:
<Informatica installation directory>\client\install.exe1. Close all applications.
2. Run install.bat from the root directory.
3. On the Installation Type page, select Upgrade to Informatica 10.4.0 Clients and click Next.
4. Read the terms and conditions for Informatica installation and the product usage toolkit and select I agree to the terms and conditions.
Subject to your opt-out rights described below, the software will automatically transmit to Informatica in the USA information about the computing and network environment in which the Software is deployed and the data usage and system statistics of the deployment. This transmission is deemed part of the Services under the Informatica privacy policy and Informatica will use and otherwise process this information in accordance with the Informatica privacy policy available at https://www.informatica.com/in/privacy-policy.html. You may disable usage collection in Administrator tool.
a. Press 1 if you do not want to accept the terms and conditions.
b. Press 2 to accept the terms and conditions.
5. On the Upgrade Pre-Requisites page, verify the system requirements before you continue the installation and click Next.
6. Click Next.
7. On the Select Directory page, enter the directory of the Informatica version you want to upgrade and the directory in which you want to install Informatica 10.4.0.
Upgrading in Graphical Mode 81
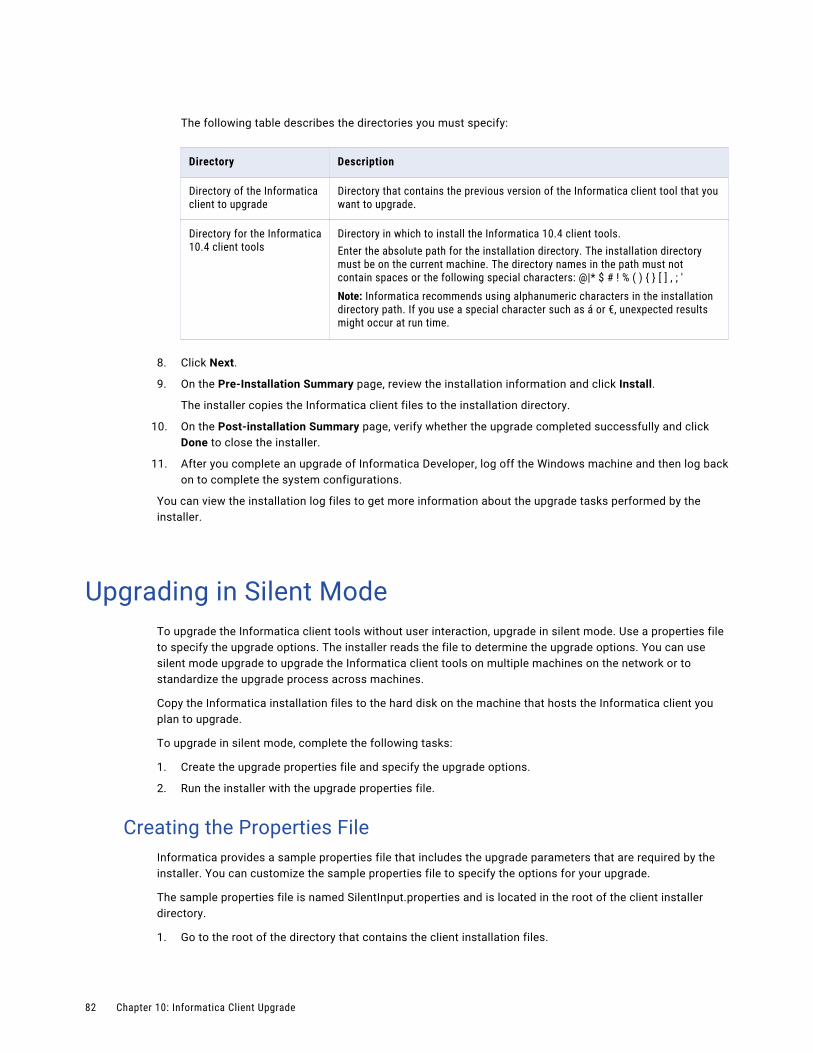
The following table describes the directories you must specify:
Directory Description
Directory of the Informatica client to upgrade
Directory that contains the previous version of the Informatica client tool that you want to upgrade.
Directory for the Informatica 10.4 client tools
Directory in which to install the Informatica 10.4 client tools.Enter the absolute path for the installation directory. The installation directory must be on the current machine. The directory names in the path must not contain spaces or the following special characters: @|* $ # ! % ( ) { } [ ] , ; 'Note: Informatica recommends using alphanumeric characters in the installation directory path. If you use a special character such as á or €, unexpected results might occur at run time.
8. Click Next.
9. On the Pre-Installation Summary page, review the installation information and click Install.
The installer copies the Informatica client files to the installation directory.
10. On the Post-installation Summary page, verify whether the upgrade completed successfully and click Done to close the installer.
11. After you complete an upgrade of Informatica Developer, log off the Windows machine and then log back on to complete the system configurations.
You can view the installation log files to get more information about the upgrade tasks performed by the installer.
Upgrading in Silent ModeTo upgrade the Informatica client tools without user interaction, upgrade in silent mode. Use a properties file to specify the upgrade options. The installer reads the file to determine the upgrade options. You can use silent mode upgrade to upgrade the Informatica client tools on multiple machines on the network or to standardize the upgrade process across machines.
Copy the Informatica installation files to the hard disk on the machine that hosts the Informatica client you plan to upgrade.
To upgrade in silent mode, complete the following tasks:
1. Create the upgrade properties file and specify the upgrade options.
2. Run the installer with the upgrade properties file.
Creating the Properties FileInformatica provides a sample properties file that includes the upgrade parameters that are required by the installer. You can customize the sample properties file to specify the options for your upgrade.
The sample properties file is named SilentInput.properties and is located in the root of the client installer directory.
1. Go to the root of the directory that contains the client installation files.
82 Chapter 10: Informatica Client Upgrade
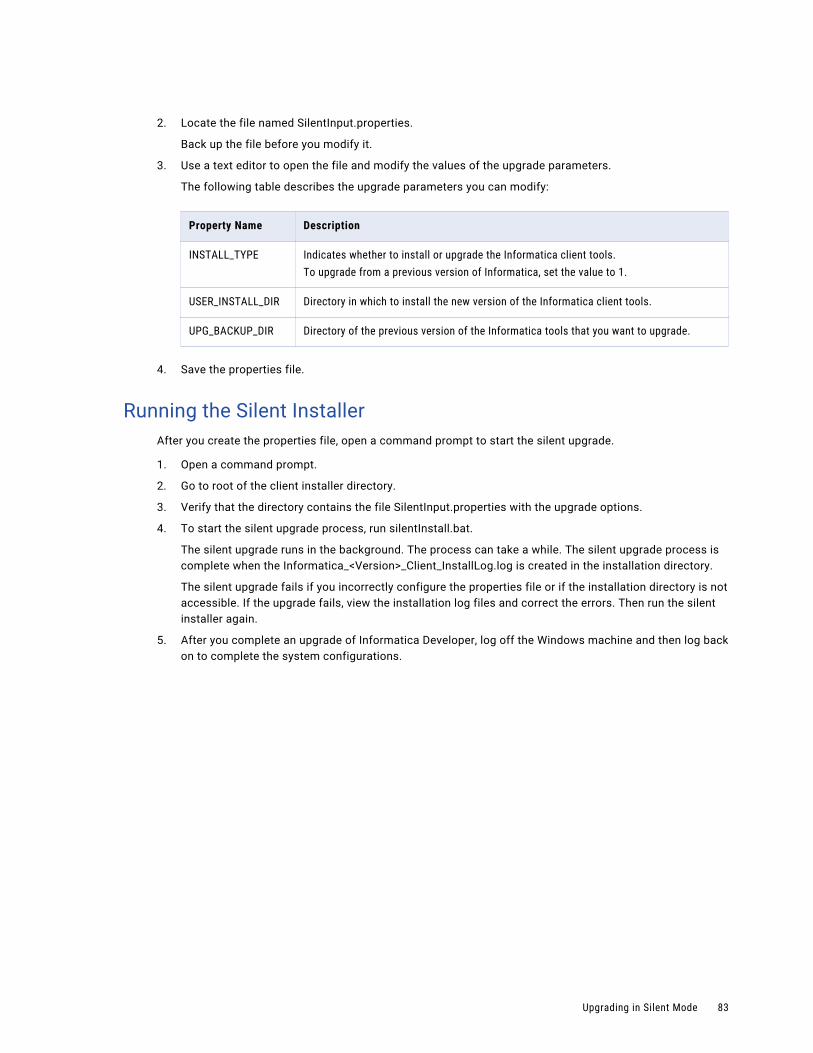
2. Locate the file named SilentInput.properties.
Back up the file before you modify it.
3. Use a text editor to open the file and modify the values of the upgrade parameters.
The following table describes the upgrade parameters you can modify:
Property Name Description
INSTALL_TYPE Indicates whether to install or upgrade the Informatica client tools.To upgrade from a previous version of Informatica, set the value to 1.
USER_INSTALL_DIR Directory in which to install the new version of the Informatica client tools.
UPG_BACKUP_DIR Directory of the previous version of the Informatica tools that you want to upgrade.
4. Save the properties file.
Running the Silent InstallerAfter you create the properties file, open a command prompt to start the silent upgrade.
1. Open a command prompt.
2. Go to root of the client installer directory.
3. Verify that the directory contains the file SilentInput.properties with the upgrade options.
4. To start the silent upgrade process, run silentInstall.bat.
The silent upgrade runs in the background. The process can take a while. The silent upgrade process is complete when the Informatica_<Version>_Client_InstallLog.log is created in the installation directory.
The silent upgrade fails if you incorrectly configure the properties file or if the installation directory is not accessible. If the upgrade fails, view the installation log files and correct the errors. Then run the silent installer again.
5. After you complete an upgrade of Informatica Developer, log off the Windows machine and then log back on to complete the system configurations.
Upgrading in Silent Mode 83

C h a p t e r 1 1
After You UpgradeThis chapter includes the following topics:
• Dropped Support for Reports, 84
• Informatica Domain, 84
• Migrating to PostgreSQL , 85
• Secure Client Connections to the Domain, 86
• Upgrade the Connection Provider Type for Microsoft SQL Server, 87
• PowerCenter Integration Service, 87
• Data Integration Service, 88
• Update the Log Events Directory, 88
• Metadata Access Service, 88
• Scheduler Service, 90
• Analyst Service, 90
• Metadata Manager Agent, 92
• Metadata Manager Service, 92
Dropped Support for ReportsEffective in version 10.1.1, Informatica dropped support for Data Analyzer, the Reporting Service, and the Reporting and Dashboards Service.
For information about generating reports that are no longer available through the Reporting and Dashboards Service or the Reporting Service, see the Knowledge Base article 496097: https://kb.informatica.com/howto/6/Pages/18/496097.aspx
Informatica DomainAfter you upgrade, complete the post-upgrade tasks for the domain.
84
Update the Log Events DirectoryAfter you upgrade, you might want to update the log events directory for the domain.
The default value of the log events directory after an upgrade depends on the following upgrade types:
Upgrade the domain without changes to the node configuration.
The log events directory points to the location that you specified in the previous version.
Upgrade the domain with changes to the node configuration.
The log events directory points to the isp/logs directory in the new installation directory.
To use a different directory for the logs, update the Log Directory Path property for the domain in the Administrator tool. You can also use the infasetup updateGatewaynode command to update the directory. For example, you can configure the log events directory as the server/infa_shared/logs directory in the new installation directory.
Migrating to PostgreSQLEffective in version 10.4.0, you can use PostgreSQL for the domain configuration repository database, PowerCenter repository database, the monitoring Model repository database, or for the Model repository database.
To use the PostgreSQL database for the existing services, complete the following tasks after you upgrade the domain and services to version 10.4.0:
1. Create a PostgreSQL database. For more information about creating a database, see the Informatica 10.4.0 Application Service Guide.
2. Enter the required commands to configure the domain and repositories:Domain
To back up the domain, enter the following command:
infasetup BackupDomainTo update the domain with PostgreSQL database, enter the following command:
infacmd isp UpdateRepositoryServiceTo restore the domain to PostgreSQL, enter the following command and set the database type and schema name to PostgreSQL :
infasetup RestoreDomainPowerCenter Repository
To back up the PowerCenter repository, enter the following command:
pmrep backup To update the PowerCenter Repository Service with PostgreSQL database, enter the following command:
infacmd isp UpdateRepositoryServiceTo recycle the service, enter the following command:
infacmd isp EnableService
Migrating to PostgreSQL 85
To restore the PowerCenter repository with PostgreSQL database type, enter the following command:
pmrep restoreModel Repository
To back up the Model Repository Service, enter the following command:
infacmd mrs BackupContentsTo update the Model Repository Service with PostgreSQL database, enter the following command:
infacmd mrs UpdateServiceOptionsTo recycle the service, enter the following command:
infacmd isp EnableServiceTo restore the Model Repository Service with PostgreSQL database type, enter the following command:
infacmd mrs restoreContents3. Set the following environment variable for PostgreSQL for the PowerCenter Repository Service:
PGSERVICE: Set to the location of the pg_service.conf file:<pg_service.conf file directory>/pg_service.confPGHOME: Set to PostgreSQL client install location. For example, /usr/pgsql -10Add to PATH: $PGHOME:${PATH}Add to LD_LIBRARY_PATH: $PGHOME/lib:${LD_LIBRARY_PATH}
Secure Client Connections to the DomainIf you enabled secure communication between client applications and the Informatica domain in the previous version, you must verify the keystore file locations or generate a new keystore after you upgrade. If you use Metadata Manager, you must generate a new keystore file after you upgrade. If you use other client applications, you must verify the keystore file locations after you upgrade
When you configure a secure connection between a client application and a service, you specify the keystore file that contains the keys and certificates for the secure HTTPS connection. After you upgrade, you must generate a new keystore file or verify the keystore file locations. The upgrade process does not update the keystore file or locations.
Note: If you used RSA encryption with fewer than 512 bits to create the private key and SSL certificate, you must create new SSL certificate files. Due to the FREAK vulnerability, Informatica does not support RSA encryption with fewer than 512 bits.
The tasks that you must perform depend on which client applications you use.Metadata Manager
If you use Metadata Manager, generate a new keystore file after you upgrade. Regenerate the keystore file to ensure that the Java version used to generate the keystore file matches the Java version installed with Informatica. If the Java versions do not match, users that perform operations in Metadata Manager might get a "Cannot connect to Metadata Manager Service" error.
86 Chapter 11: After You Upgrade
To generate a new keystore file, perform the following steps:
1. Generate a new keystore file that contains the keys and certificates required to secure the connection for the Metadata Manager web application. Use the keytool utility installed with the current version of Informatica to generate the keystore file.
Note: The Metadata Manager Service uses RSA encryption. Therefore, Informatica recommends that you use a security certificate that was generated with the RSA algorithm.
2. Save the keystore file in a directory that can be accessed from the machine where the Metadata Manager Service runs.
3. Use the Administrator tool to update the keystore file for the Metadata Manager Service.
Other Web Client Applications
If you use other web client applications, the tasks that you must perform depend on the following locations where you previously stored the keystore files:
A location inside the previous Informatica installation directory structure
If you stored the keystore file in a location inside the previous Informatica installation directory structure, perform the following steps:
1. Copy the file to another location.
2. Update the application service with the copied keystore file location.
Use the Administrator tool to update the location of the keystore file for the appropriate application service. For example, if the keystore file is used for Analyst tool security, update the keystore file location in the Analyst Service properties.
A location outside the previous Informatica installation directory structure
If you stored the keystore file in a location outside the previous Informatica installation directory structure, verify that the keystore file can be accessed from the machine where the application service runs.
Upgrade the Connection Provider Type for Microsoft SQL Server
After you upgrade, the Microsoft SQL Server connection is set to the OLEDB provider type by default.
It is recommended that you upgrade all your Microsoft SQL Server connections to use the ODBC provider type. You can upgrade all your Microsoft SQL Server connections to the ODBC provider type by using the Informatica services in the following format:
ODBCINST=<INFA_HOME>/ODBC7.1/odbcinst.ini After you set the environment variable, you must restart the node that hosts the Informatica services.
PowerCenter Integration ServiceAfter you upgrade, complete the post-upgrade task for the PowerCenter Integration Service.
Upgrade the Connection Provider Type for Microsoft SQL Server 87
Configure Umask for Operating System ProfilesIf you upgraded from a version that used operating system profiles, set the umask setting to change the security on files that the DTM writes.
For example, you can change umask to 077 for maximum security. You must restart Informatica services if you change the umask setting.
Data Integration ServiceAfter you upgrade, complete the post-upgrade tasks for each Data Integration Service.
Reset the HTTP Proxy Server PasswordIf the Data Integration Service runs Web Service Consumer transformations and is configured to use an HTTP proxy server with authentication, reset the HTTP proxy server password.
If you do not reset the password, then the Data Integration Service cannot successfully process Web Service Consumer transformations.
Reset the HTTP Proxy Server Password for the Data Integration Service in the Administrator tool.
Update the Log Events DirectoryAfter you upgrade, you might want to update the log events directory for the domain.
The default value of the log events directory after an upgrade depends on the following upgrade types:
Upgrade the domain without changes to the node configuration.
The log events directory points to the location that you specified in the previous version.
Upgrade the domain with changes to the node configuration.
The log events directory points to the isp/logs directory in the new installation directory.
To use a different directory for the logs, update the Log Directory Path property for the domain in the Administrator tool. You can also use the infasetup updateGatewaynode command to update the directory. For example, you can configure the log events directory as the server/infa_shared/logs directory in the new installation directory.
Metadata Access ServiceAfter you upgrade, you can create a Metadata Access Service for Data Engineering Integration. The Metadata Access Service is an application service that allows the Developer tool to access Hadoop connection information to import and preview metadata.
The Metadata Access Service contains information about the Service Principal Name (SPN) and keytab information if the Hadoop cluster uses Kerberos authentication.
88 Chapter 11: After You Upgrade

The Metadata Access Service is not dependent on other services. You can create a Metadata Access Service in any order. When you import an object from a Hadoop cluster, the HBase, the Hive, and the HDFS connections use Metadata Access Service to extract the object metadata at design time.
Create the Metadata Access ServiceThe Metadata Access Service allows the Developer tool to access Hadoop connection information to import and preview metadata from the Hadoop environment. The Metadata Access Service is required for design-time access to the Hadoop environment.
1. In the Administrator tool, click the Manage tab.
2. Click the Services and Nodes view.
3. In the Domain Navigator, select the domain.
4. Click Actions > New > Metadata Access Service.
The New Metadata Access Service wizard appears.
5. On the New Metadata Access Service - Step 1 of 3 page, enter the following properties:
Property Description
Name Name of the service. The name is not case sensitive and must be unique within the domain. It cannot exceed 128 characters or begin with @. It also cannot contain spaces or the following special characters:` ~ % ^ * + = { } \ ; : ' " / ? . , < > | ! ( ) ] [
Description Description of the service. The description cannot exceed 765 characters.
Location Domain and folder where the service is created. Click Browse to choose a different folder. You can move the service after you create it.
License License object that allows use of the service.
Node Node on which the service runs.
Backup Nodes If your license includes high availability, nodes on which the service can run if the primary node is unavailable.
6. Click Next.
The New Metadata Access Service - Step 2 of 3 page appears.
7. Select the HTTP Protocol Type and enter the respective port number to use for the Metadata Access Service.
8. Accept the default values for the remaining security properties. You can configure the security properties after you create the Metadata Access Service.
9. Select Enable Service.
The Metadata Access Service does not have any other service dependency.
10. Click Next.
The New Metadata Access Service - Step 3 of 3 page appears.
11. If applicable, specify the execution options for impersonation user, Kerberos cluster, logging options, and click Next.
Metadata Access Service 89
12. Click Finish.
The domain creates and enables the Metadata Access Service.
Scheduler ServiceAfter you upgrade, you might need to copy files for the Scheduler Service from a previous installation to the upgraded installation.
The default location for the Scheduler Service temporary files is ./scheduler/temp. If you changed this path in the Scheduler Service properties, you need to manually copy all the files from the previous location to the location in the upgraded domain.
You do not have to copy the files if the Scheduler Service uses the default location or if you changed the path to a directory outside the domain.
Note: If the Scheduler Service cannot find the files, a scheduler instance that uses a parameter file does not run in the upgraded domain.
Analyst ServiceAfter you upgrade, complete the post-upgrade tasks for each Analyst Service.
Upgrade Business GlossaryYou must run the upgradeRepository command line program to complete the upgrade of Business Glossary.
Before you run the command line program, ensure that the Analyst Service is running.
1. Run the upgradeRepository command line program from the following directory:
<Informatica installation directory>\isp\bin>2. To complete upgrading the Model repository in addition to upgrading existing Business Glossary data,
use the following syntax for the upgradeRepository command line program:
<Informatica installation directory>\isp\bin>infacmd.bat bg upgradeRepository -dn <Domain Name> -un <Administrator tool username> -pd <Administrator tool password> -sdn <Security Domain> -atn <Analyst service name>
3. If you had Business Glossary data in the Model repository, view the Analyst Service log file to verify that the upgrade of data has completed successfully.
The Analyst Service log file is in the following directory:
<Informatica installation directory>\logs\<node name>\services\AnalystService\<Analyst service name>
Verify the Flat File Cache LocationYou must verify the location of the flat file cache directory after you upgrade. The upgrade process does not update this location.
90 Chapter 11: After You Upgrade

If you created the flat file cache directory within the previous Informatica installation directory, copy the directory to the upgraded Informatica installation directory and update the Analyst Service property with the new location.
If you created the directory outside of the previous Informatica installation directory, verify that both the Analyst Service and the Data Integration Service can access the directory.
If the Analyst Service and the Data Integration Service run on different nodes, configure the flat file directory to use a shared directory. If the Data Integration Service runs on primary and back-up nodes or on a grid, each Data Integration Service process must be able to access the files in the shared directory.
To verify the location of the flat file cache directory, view the Flat File Cache Location property in the run-time properties for the Analyst Service.
Verify the Temporary Export File LocationYou must verify or provide the location of the temporary export file directory after you upgrade. The Analyst tool uses this location to store business glossaries that you export. The upgrade process does not update this location.
If you created the temporary export file directory within the previous Informatica installation directory, copy the directory to the upgraded Informatica installation directory and update the Analyst Service property with the new location. If you created the directory outside of the previous Informatica installation directory, verify that the machine that runs the Analyst Service can access the directory. If you have not configured the location of the temporary export file directory, provide a location where the Analyst tool can store glossaries during export.
To verify or provide the location of the temporary export file directory, view the Temporary Export File Directory property in the Business Glossary properties for the Analyst Service.
Verify the Business Glossary Attachments DirectoryYou must verify or provide the location of the Business Glossary asset attachments directory after you upgrade. The upgrade process does not update this location.
If you created the asset attachments directory within the previous Informatica installation directory, copy the directory to the upgraded Informatica installation directory and update the Analyst Service property with the new location. If you created the asset attachments directory outside of the previous Informatica installation directory, verify that the machine that runs the Analyst Service can access the directory. If you have not configured the location of the asset attachments directory, provide a location where the Analyst tool can store attachments that content managers add to assets.
To verify or configure the location of the asset attachments directory, view the Asset Attachments Directory property in the Business Glossary properties for the Analyst Service.
Recycle the Analyst ServiceTo access the Analyst tool after you upgrade, recycle the Analyst Service. Before you recycle the Analyst Service, complete the upgrade and post-upgrade steps for the Model Repository Service and Data Integration Service.
After you recycle the Analyst Service, wait for at least 10 minutes before you access the Glossary workspace.
Before you recycle the Analyst Service, verify that you have performed the following tasks:
• Upgrade the Model Repository Service.
• Upgrade the Data Integration Service.
Analyst Service 91

Note: The Model Repository Service and the Data Integration Service must be running before you recycle the Analyst Service.
Metadata Manager AgentAfter you upgrade, you must uninstall and reinstall each Metadata Manager Agent so that Metadata Manager can extract metadata from the metadata sources. Install the latest version of the Metadata Manager Agent before you migrate resources.
1. Stop the Metadata Manager Agent.
2. Reinstall the Metadata Manager Agent.
For information about installing the Metadata Manager Agent, see the Metadata Manager Administrator Guide.
Metadata Manager ServiceAfter you reinstall the Metadata Manager Agent, perform the following post-upgrade tasks for each Metadata Manager Service:
1. Update the Metadata Manager properties file to include any customization.
2. If the Metadata Manager repository is a Microsoft SQL Server database and the Metadata Manager Service runs on UNIX, verify that the ODBCINST environment variable is set.
3. Enable the Metadata Manager Service.
4. Re-create Netezza resources.
5. Purge and reload database management, Tableau, and PowerCenter resources.
6. Upgrade Informatica Platform resources.
7. Regenerate the plug-in for each universal resource.
After you regenerate the plug-ins, copy them to the Metadata Manager Service plug-ins directory, and then recycle the Metadata Manager Service.
8. If you set the Worker Threads configuration property for any Business Intelligence resource in the previous version, set the Multiple Threads configuration property to the same value.
Update the Metadata Manager Properties FileCompare the imm.properties file in the previous installation directory with the current version. Update the current version of the imm.properties file as required.
The imm.properties file is in the following directory:
<Informatica installation directory>\services\shared\jars\pc\classes
The changes take effect when you enable the Metadata Manager Service.
92 Chapter 11: After You Upgrade
Verify the ODBCINST Environment Variable on UNIXIf the Metadata Manager repository is a Microsoft SQL Server database and the Metadata Manager Service runs on UNIX, verify that the ODBCINST environment variable is set on the machine that runs the PowerCenter Integration Service.
The PowerCenter Integration Service runs the workflows that extract metadata from the IME-based files and load it into the Metadata Manager warehouse. The PowerCenter Integration Service uses ODBC to connect to the Microsoft SQL Server database. On UNIX, the ODBCINST environment variable must be set to the location of the odbcinst.ini file. Otherwise, the PowerCenter Integration Service cannot access the ODBC driver.
On the machine that runs the PowerCenter Integration Service, verify that the ODBCINST environment variable is set to the following value:
ODBCINST=<INFA_HOME>/ODBC7.1/odbcinst.ini
If the environment variable is not set, set the environment variable, and then restart the domain.
Upgrade Informatica Platform ResourcesIf you created an Informatica Platform resource that extracts metadata from an Informatica 10.0 or 10.1 application, you must upgrade the resource. To upgrade the resource, you either re-create the resource or configure the resource to use the 10.0 or 10.1 Command Line Utilities.
You upgrade the resource differently based on whether you upgraded the services on which the application is based:
You upgraded the Data Integration Service and Model Repository Service to version 10.1.1.
If you upgraded the services on which the application is based to version 10.1.1, you must re-create the resource after upgrade. After you create the new resource, you can purge and delete the old resource.
You did not upgrade the Data Integration Service and Model Repository Service.
If you did not upgrade the services on which the application is based, you must configure the resource to use the previous version of the Command Line Utilities. For example, if the application is deployed to a 10.1 Data Integration Service, you must configure the resource to use the 10.1 Command Line Utilities.
To configure the resource to use the 10.0 or 10.1 Command Line Utilities, perform the following steps:
1. Contact Informatica Global Customer Support to get the Command Line Utilities zip file for version 10.0 or 10.1.
2. Extract the files to a directory that the 10.1.1 Metadata Manager Service can access.
For best performance, extract the files to a directory on the machine that runs the Metadata Manager Service. If you extract the files to a different machine, the Metadata Manager Service can take several minutes to access the directory.
3. Edit the resource and configure the 10.0 Command Line Utilities Directory or 10.1 Command Line Utilities Directory property.
Set the property to the directory where you installed the Command Line Utilities, for example, C:\Informatica\101_CLU.
After you configure the 10.0 or 10.1 Command Line Utilities directory, you can load the resource.
For more information about creating Informatica Platform resources and installing the Command Line Utilities for Informatica Platform resources, see the "Data Integration Resources" chapter in the Metadata Manager Administrator Guide.
Metadata Manager Service 93
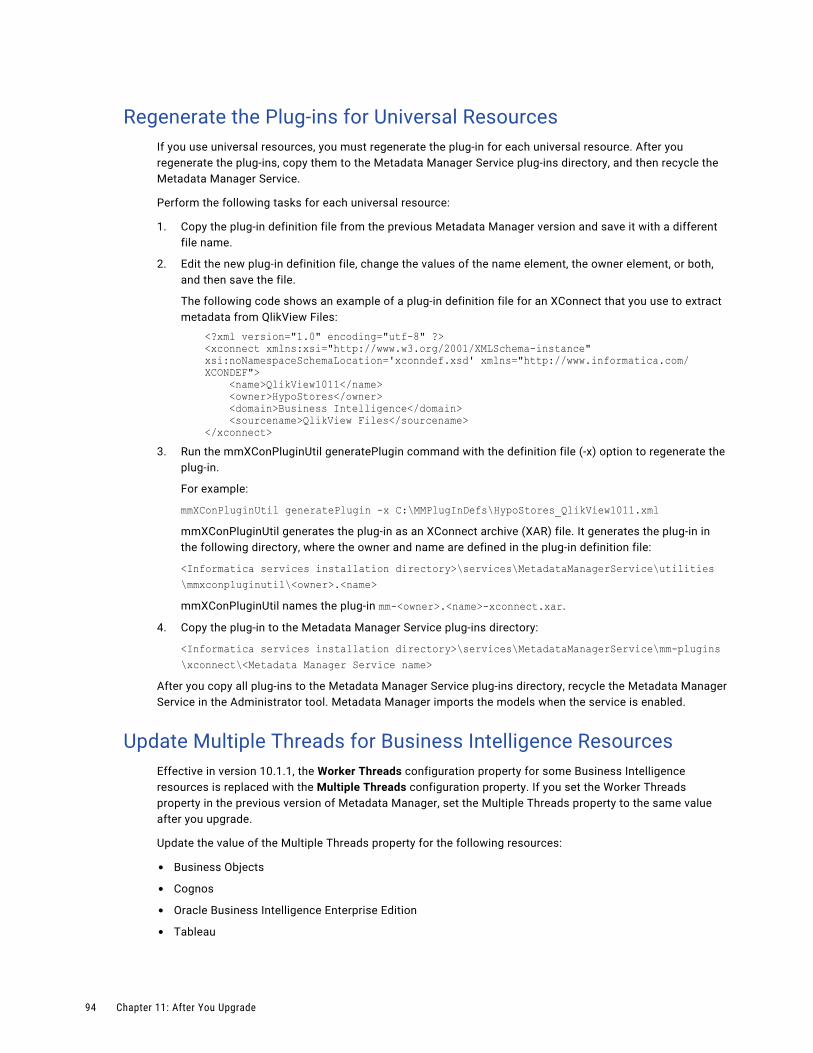
Regenerate the Plug-ins for Universal ResourcesIf you use universal resources, you must regenerate the plug-in for each universal resource. After you regenerate the plug-ins, copy them to the Metadata Manager Service plug-ins directory, and then recycle the Metadata Manager Service.
Perform the following tasks for each universal resource:
1. Copy the plug-in definition file from the previous Metadata Manager version and save it with a different file name.
2. Edit the new plug-in definition file, change the values of the name element, the owner element, or both, and then save the file.
The following code shows an example of a plug-in definition file for an XConnect that you use to extract metadata from QlikView Files:
<?xml version="1.0" encoding="utf-8" ?><xconnect xmlns:xsi="http://www.w3.org/2001/XMLSchema-instance" xsi:noNamespaceSchemaLocation='xconndef.xsd' xmlns="http://www.informatica.com/XCONDEF"> <name>QlikView1011</name> <owner>HypoStores</owner> <domain>Business Intelligence</domain> <sourcename>QlikView Files</sourcename></xconnect>
3. Run the mmXConPluginUtil generatePlugin command with the definition file (-x) option to regenerate the plug-in.
For example:
mmXConPluginUtil generatePlugin -x C:\MMPlugInDefs\HypoStores_QlikView1011.xmlmmXConPluginUtil generates the plug-in as an XConnect archive (XAR) file. It generates the plug-in in the following directory, where the owner and name are defined in the plug-in definition file:
<Informatica services installation directory>\services\MetadataManagerService\utilities\mmxconpluginutil\<owner>.<name>mmXConPluginUtil names the plug-in mm-<owner>.<name>-xconnect.xar.
4. Copy the plug-in to the Metadata Manager Service plug-ins directory:
<Informatica services installation directory>\services\MetadataManagerService\mm-plugins\xconnect\<Metadata Manager Service name>
After you copy all plug-ins to the Metadata Manager Service plug-ins directory, recycle the Metadata Manager Service in the Administrator tool. Metadata Manager imports the models when the service is enabled.
Update Multiple Threads for Business Intelligence ResourcesEffective in version 10.1.1, the Worker Threads configuration property for some Business Intelligence resources is replaced with the Multiple Threads configuration property. If you set the Worker Threads property in the previous version of Metadata Manager, set the Multiple Threads property to the same value after you upgrade.
Update the value of the Multiple Threads property for the following resources:
• Business Objects
• Cognos
• Oracle Business Intelligence Enterprise Edition
• Tableau
94 Chapter 11: After You Upgrade

The Multiple Threads configuration property controls the number of worker threads that the Metadata Manager Agent uses to extract metadata asynchronously. If you do not update the Multiple Threads property after upgrade, the Metadata Manager Agent calculates the number of worker threads. The Metadata Manager Agent allocates between one and six threads based on the JVM architecture and the number of available CPU cores on the machine that runs the Metadata Manager Agent.
For more information about the Multiple Threads configuration property, see the "Business Intelligence Resources" chapter in the Metadata Manager Administrator Guide.
Update the DataDirect DriversUpdate the DataDirect Oracle ODBC and SQL Server ODBC driver files. If an existing connection is using the DataDirect SQL Server Legacy ODBC driver, you must use the DataDirect 8.0 New SQL Server Wire Protocol.
DataDirect Oracle ODBC Driver
The DataDirect Oracle Wire Protocol is upgraded from version 7.1 to 8.0. On Windows, the DataDirect Oracle ODBC driver is upgraded from DWora27.dll to DWora28.dll. On Linux, the driver is upgraded from DWora27.so to DWora28.so. Existing ODBC connections that use the Oracle ODBC driver DWora27.so fail.
After the upgrade, perform the following tasks:
• On Linux, if you want to use an existing ODBC connection to connect to an Oracle database, you must update the odbc.ini file to point to the ODBC driver path that contains the DWora28.so file.
• On Windows, if you want to use an existing ODBC connection to connect to an Oracle database, you must create a new data source using the DataDirect 8.0 Oracle Wire Protocol driver.
DataDirect SQL Server Legacy ODBC Driver
Informatica dropped support for the DataDirect SQL Server Legacy ODBC Driver file DWmsss27.x because DataDirect no longer supports this driver. After you upgrade, existing ODBC connections that use the DataDirect SQL Server Legacy ODBC Driver file DWmsss27.x fail. You must use the DataDirect 8.0 New SQL Server Wire Protocol packaged with the Informatica installer, or any ODBC driver from a third-party vendor.
DataDirect SQL Server ODBC driver
The DataDirect SQL Server ODBC driver is upgraded from DWsqls27.so to DWsqls28.so on Linux. On Windows, the DataDirect SQL Server ODBC driver is upgraded from DWsqls27.dll to DWsqls28.dll. Existing connections that use the DataDirect SQL Server ODBC driver DWsqls27.so on Linux or DWsqls27.dll on Windows fail.
After the upgrade, perform the following tasks on Linux:
• To use an existing Microsoft SQL Server connection with the Use DSN property enabled in the connection, you must update the odbc.ini file to point to the ODBC driver path that contains the DWsqls28.so file.
• To use an existing ODBC connection that used the DWsqls27.so driver, you must update the odbc.ini file to point to the ODBC driver path that contains the DWsqls28.so file.
After the upgrade, perform the following tasks on Windows:
• To use an existing Microsoft SQL Server connection with the Use DSN property enabled in the connection, you must create a new data source for the Microsoft SQL Server database using the DataDirect 8.0 New SQL Server Wire Protocol driver.
• To use an existing ODBC connection that used the DataDirect 7.1 New SQL Server Wire Protocol driver, you must create a new data source for the Microsoft SQL Server database using the DataDirect 8.0 New SQL Server Wire Protocol driver.
Metadata Manager Service 95
Upgrade the Informatica Cassandra ODBC Data SourcesAfter you upgrade, you must replace the odbc.ini file with the back up copy of the odbc.ini file and change the Cassandra ODBC driver name.
After you replace the odbc.ini file, you must update the value of the Driver property in the odbc.ini file to <Informatica installation directory>\tools\cassandra\lib\libcassandraodbc_sb64.so.
Copy the Data Transformation FilesAfter you upgrade Data Transformation, copy the files from the previous installation directories to the new installation directories, to get the same workspace, repository, and custom global components as in the previous version.
File or Directory Default Location
Repository <Informatica installation directory>\DataTransformation\ServiceDB
Custom Global Components directory (TGP files)
<Informatica installation directory>\DataTransformation\autoInclude\user
Custom Global Components directory (DLL and JAR files)
<Informatica installation directory>\DataTransformation\externLibs\user
Do not copy the Data Transformation Library files. Instead, install the Data Transformation Libraries again.
Update Profiles for Dropped Hive Engine SupportEffective in version 10.2.2, Informatica dropped support for the Hive engine. If you have profiles configured to run on the Hive engine, you need to update them to run on a different engine. Informatica continues to support the Blaze engine in the Hadoop environment.
You must manually identify and change profiles configured to run on the Hive engine.
Read the Release GuideThe Informatica Release Guide lists new features and enhancements, behavior changes between versions, and tasks that you might need to perform after you upgrade. Read the Informatica Release Guide to view the list of new functionality that you might want to implement or new options that you might want to enable.
96 Chapter 11: After You Upgrade

A p p e n d i x A
Upgrade ChecklistThis appendix includes the following topics:
• Upgrade Checklist Overview, 97
• Before You Upgrade the Domain, 97
• Domain Upgrade, 98
• Before You Upgrade the Application Services, 99
• Application Service Upgrade, 99
• Informatica Client Upgrade, 100
• After You Upgrade, 100
Upgrade Checklist OverviewThe upgrade checklist summarizes the tasks that you must perform to complete an upgrade. If you upgrade the Informatica product on more than one machine, complete the first upgrade using the detailed instructions in this guide. You can use this checklist to perform subsequent upgrades.
Before You Upgrade the DomainBefore you upgrade the domain, perform the following pre-upgrade tasks:
Read the Informatica Release Notes.
Split the Domain.
Perform the following tasks to set up the machine to meet the requirements on UNIX:
•Verify that the machine has the required operating system patches and libraries.
•Verify that the machine meets the minimum system requirements to upgrade the domain.
•Verify that the machine meets the hardware requirements to upgrade the application services.
•Review the environment variables.
•Verify that the operating system meets the file descriptor requirement.
•Review the maximum heap size setting.
97
•Extract the installer files.
•Run the pre-installation (i10Pi) system check tool.
•Run the Informatica Upgrade Advisor.
Back up the Data Transformation Files.
Disable the Analyst Service through Administrator tool or through infacmd DisableService.
Perform the following tasks to prepare the Model repository:
•Back up the Model repository.
•Verify the user account requirements for the Model repository database.
Perform the following tasks to prepare the Data Integration Service:
•Record the execution options for each Data Integration Service process.
•Verify that all workflows are complete.
Perform the following tasks to prepare the profiling warehouse:
•Use the native database back up option to back up the profiling warehouse.
•Verify the user account permissions for the database.
Use the native database back-up option to back up profiling warehouse, reference data warehouse, and workflow database.
Back Up the odbc.ini File for Informatica Cassandra ODBC Driver.
Perform the following tasks to prepare the domain:
•Shut down the domain. To shut down the domain, stop the Informatica service process on each node in the domain.
•Back up the domain.
Prepare to change the node configuration.Perform the additional pre-upgrade tasks if you choose to change the node configuration for the following reasons:
Domain UpgradeUse the server installer to upgrade the domain. The server installer provides a domain upgrade wizard to guide you through the upgrade process.
The upgrade wizard installs the Informatica files in the installation directory that you specify. It does not modify the files in the directory of the previous version.
When you run the upgrade wizard, select the option to change the node configuration if you upgrade the domain to a different machine or to a different domain configuration repository database.
98 Appendix A: Upgrade Checklist
Before You Upgrade the Application ServicesBefore you upgrade application services, perform the following pre-upgrade tasks:
Configure locale environment variables.Verify that the locale setting is compatible with the code page for the repository.
Clear the browser cache.
If you chose the option to change the node configuration to migrate the Informatica installation to a different machine, perform the following tasks:
•Configure the environment variables.
•Configure Library Path Environment Variables.
•Verify the range of port numbers that can be dynamically assigned to application service processes that run on the node.
•Verify that the backup directory for the node is accessible by the node.
•Configure PowerExchange adapters. If the PowerExchange adapter has an installer, re-install the PowerExchange adapter.
Application Service UpgradeSome service versions require a service upgrade. You can use the service upgrade wizard to upgrade services.
Verify the privileges required to upgrade for the following application services:
•Model Repository Service
•Data Integration Service
•Content Management Service
Upgrade the following services and associated databases:
•Model Repository Service
•Data Integration Service
•Profiling warehouse for the Data Integration Service
Run the Service Upgrade Wizard to upgrade application services and the database contents of the databases associated with the services.
Verify the Model Repository Service Upgrade.
•Object dependency graph.
•Maximum heap size
Before You Upgrade the Application Services 99

Informatica Client UpgradeUse the client installer to upgrade the client tools. The client tools are installed in the installation directory you specify. The client installer configures the newly installed client tools with the same settings as the previous version.
After You UpgradeAfter you upgrade the domain, application services, and client files, perform the following post-upgrade tasks:
Perform the following tasks for the domain:
• If you used your SSL certificate files to enable secure communication in the previous domain, verify the keystore and truststore file locations. The upgrade process does not update these locations.
•You can optionally configure the domain configuration repository on a database that is secured with the SSL protocol.
Create the Metadata Access Service to access Hadoop connection information to import and preview metadata from the Hadoop environment.
Perform the following tasks for each Data Integration Service:
•Reset the HTTP proxy server password.If the Data Integration Service runs Web Service Consumer transformations and is configured to use an HTTP proxy server with authentication, reset the HTTP proxy server password.
• If the Data Integration Service runs on multiple nodes and you configured the execution options differently for each service process, verify that the Execution Options on the Properties view use the correct values.
• If you work with rule specifications in the Analyst tool or the Developer tool, verify the Maximum Heap Size value.
•Verify that the Maximum Memory Per Request property uses the correct value for each Data Integration Service module.
Perform the following tasks for each Analyst Service:
• If you use Business Glossary approval workflow in a domain with Kerberos authentication, enter the user name and password for the Model Repository Service.
•Verify the location of the flat file cache directory. The upgrade process does not update this location.
•Verify or configure the location of the temporary export file directory for Business Glossary files. The upgrade process does not update this location.
•Verify or configure the location of the asset attachment directory for Business Glossary files. The upgrade process does not update this location.
• If you will run workflows that contain Human tasks, optionally specify an exception management audit database and schema.
•Recycle the Analyst Service.Before you recycle the Analyst Service, complete the upgrade and post-upgrade steps for the Model Repository Service, Data Integration Service, and Content Management Service.
100 Appendix A: Upgrade Checklist
Perform the following tasks for profiles and scorecards:
• Import data domain groups and related data domains to the data domain glossary. If you want to add predefined data domain groups and their related data domains to the data domain glossary, import the Informatica_IDE_DataDomain.xml file.
•Run infacmd ps restoreProfilesAndScorecards command to restore the profiles and scorecards from a previous version to the current version.
•Run the scorecards to view the statistics in the Cumulative Metrics Trend pane for the scorecards that you had created.
Upgrade all your Microsoft SQL Server connections to use the ODBC provider type.
Upgrade the Informatica Drivers for SQL Data Service.
Upgrade the Informatica Cassandra ODBC Data Sources.
Copy the Data Transformation files from the previous installation directories to the new installation directories, to get the same workspace, repository, and custom global components as in the previous version.
Read the Informatica Release Guide to view the list of new functionality that you might want to implement or new options that you might want to enable.
After You Upgrade 101

I n d e x
AAIX
Java Cryptography Extension 20Java Runtime Environment 20
application service upgrade privileges 75
application services ports 50
Bback up files
before installing 28before upgrading 28
Cconfiguration
environment variables on UNIX 71console mode
upgrading Informatica services 42, 64copy files
after upgrade 96
Ddatabase clients
configuring 52environment variables 52IBM DB2 client application enabler 52Microsoft SQL Server native clients 52Oracle clients 52Sybase open clients 52
databases testing connections 52
dbs2 connect testing database connections 52
dependency graph rebuilding 77
disk space requirements installation requirements 21
DISPLAY environment variables 26
domains ports 50
Eenvironment variables
configuring on UNIX 71database clients 52
environment variables (continued)installation 16, 21, 26library paths on UNIX 71UNIX database clients 52
Ggraphical mode
upgrading Informatica services 34
IIATEMPDIR
environment variables 16, 21, 26Informatica Cassandra ODBC Driver
back up odbc.ini file 31Informatica process
user accounts 50Informatica services
upgrading in console mode 42upgrading in console mode with changes to node 64upgrading in graphical mode 34upgrading in silent mode 44
installation backing up files before 28
installation requirements disk space 21environment variables 16, 21, 26minimum system requirements 13, 21port requirements 50
isql testing database connections 52
JJava Runtime Environment 16JRE_HOME
environment variables 16, 21, 26
LLANG
locale environment variables 16, 21, 26LC_ALL
locale environment variables 16, 21, 26library paths
environment variables 16, 21Linux
database client environment variables 52
102

MMetadat Access Service
creating 88Metadata Access Service
configuring 88creating 89
Model Repository Service upgrade error 77
Nnode
migrating during upgrade 69node configuration
completing the change process 69
Oobject dependency graph
rebuilding 77operating system
dropped support 49
Ppatch requirements
installation 14, 20PATH
environment variables 16, 21port requirements
installation requirements 50ports
application services 50domains 50requirements 50
Rrepositories
installing database clients 52
SScheduler
copying files after upgrade 90silent mode
upgrading Informatica services 44sqlplus
testing database connections 52system requirements
minimum 13, 14, 19, 24, 25minimum installation requirements 13, 21
UUNIX
database client environment variables 52database client variables 52library paths 71upgrading in console mode with changes to node 64upgrading Informatica services in console mode 42
upgrade copying files after 96
upgrade error Model Repository Service 77
upgrade paths 10upgrades
backing up files before 28user accounts
Informatica process 50Windows 50
Wwindows
upgrading Informatica services in graphical mode 34Windows
user accounts 50
ZzLinux 16
Index 103


![I · D:,S[ VFc,F ChZTG]\ VÔ[0 D]B5+PPPPPPP IFcG[0 0 0 0 0 0 AOIŸh[ ~CFGL ;]](https://img.pdfslide.us/doc/110x75/5eb68ac9d984a412d91b0d1a/i-ds-vfcf-chztg-v0-db5ppppppp-ifcg0-0-0-0-0-0-aoih-cfgl-.jpg)