Embed Size (px)
Citation preview
1
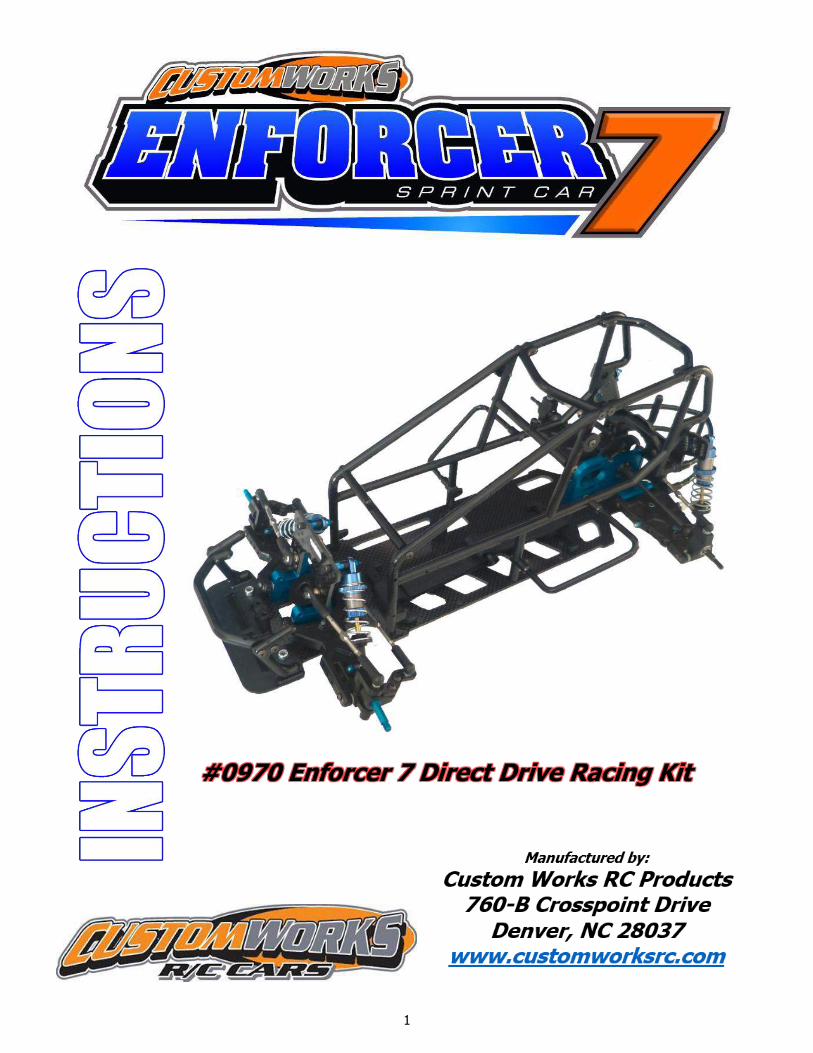
#0970 Enforcer 7 Direct Drive Racing Kit
2
Thank you for purchasing the Enforcer 7 Sprint Car! Since its introduction in 1991 the Enforcer has consistently been the most successful 1/10th scale sprint car competing on “high bite” dirt ovals across North America. The continued evolution
of the car over 25 years has led to the exciting new Enforcer 7, building on the strength of prior versions and adding many new features.
This kit includes most of the parts required for the build. The following additional equipment must be added to complete the car. (Be sure to check if the track you plan on racing at has any motor, battery or speed control restrictions.)
Surface transmitter and receiver (minimum 2 channel.)
1/10th scale electronic speed control
540 size brushless motor
Pinion gear (48 pitch, appropriate size for motor)
2S hard case LiPo battery
Low profile servo (1 inch or 25.4mm case height)
Front and rear wheels and tires (2.0” diameter wheel)
Silicone shock oil (30 weight recommended)
Lexan paint and/or vinyl wrap for body
Tools The following tools are provided in the kit and will get you started. We suggest that you purchase higher quality tools for
future maintenance.
•.050 Allen key •1.5mm Allen key •1/16 Allen key •5/64 Allen key •3/32 Allen key •Turnbuckle & 3/16 wrench
Additional tools
These tools are recommended for the build and may be required to complete.
•Curved scissors •Needle nose pliers •Hobby knife •Blue thread-lock •Assorted sandpaper •11/32 hex driver
Building tips
Parts are made with tight tolerance and held to the side of a “snug” fit as wear is expected over time. Try as we may, occasionally a burr may remain in a part and fit more tightly than desired. It is ok to use 400 Grit Sandpaper
or a .125” drill to SLOWLY relieve a part from time to time. Suspension components should always pivot and swivel
freely but without too much slop.
A lite to medium strength (usually the blue variety) thread locking fluid is suggested for all parts where metal screws thread into other metal parts. This will keep the screws from vibrating loose during operation and still allow the screw to
be removed if needed. Remember it only takes a very small amount of thread-lock to secure the screw.
Do NOT use power screwdrivers to drive screws into parts. The fast rotation speed can melt and strip plastic parts
or cross-thread into the aluminum parts.
Lightly sand the edges of the carbon fiber pieces using a medium grade sandpaper to avoid splinters. A thin bead of
Super Glue can be used to seal the edges of the carbon fiber for more protection against chips and splinters.
3
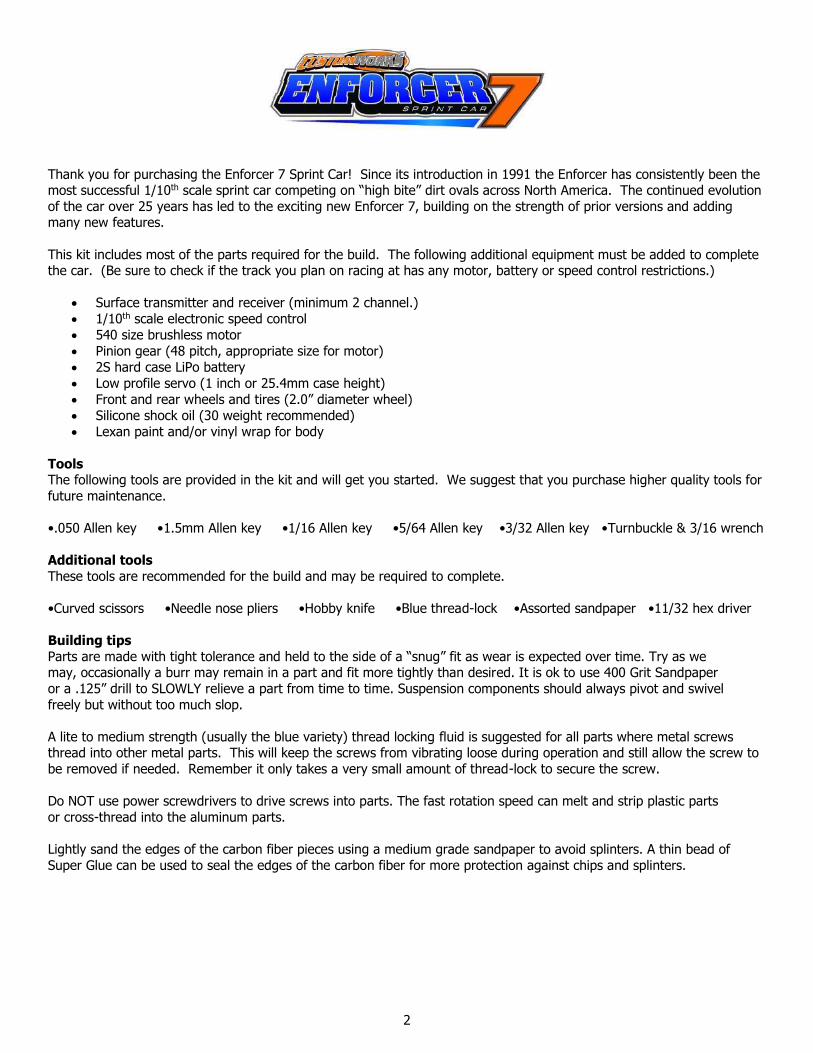
Front Arm Assembly
Front Kick-Up Assembly
Caster Block Assembly
4
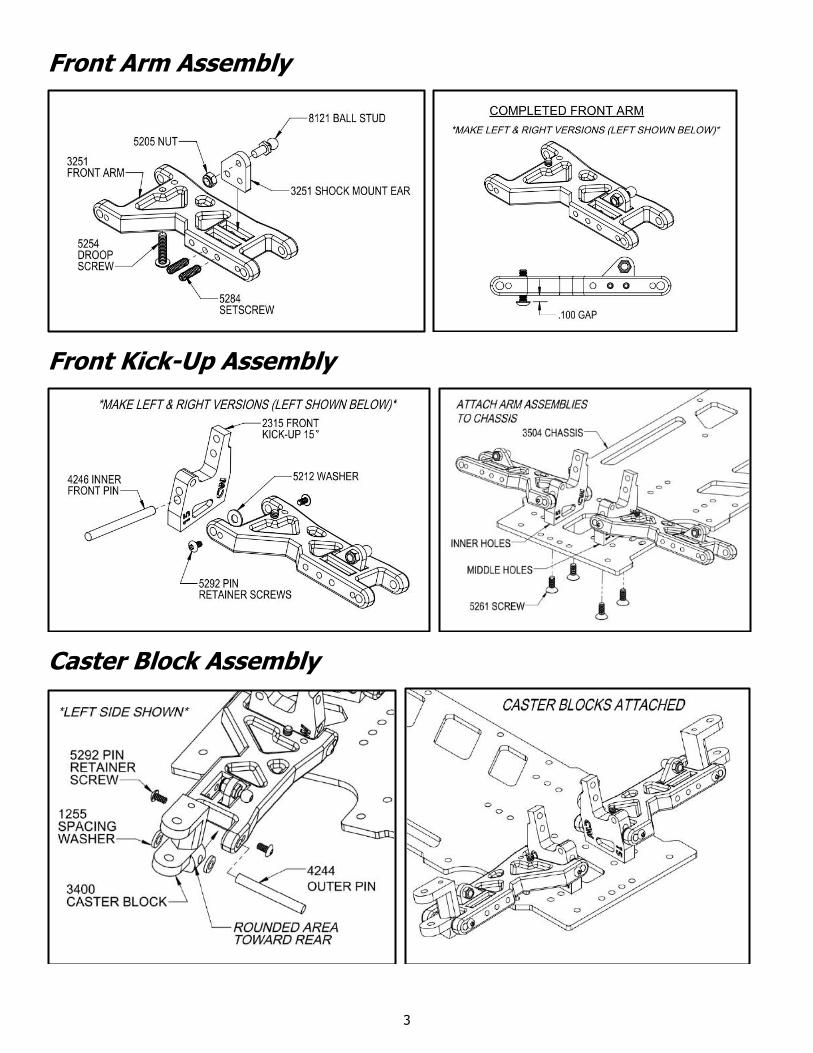
Steering Servo Mounting
Servo Saver Assembly
Steering Block Assembly

5
Steering/Front Camber Links
Front Shock Tower Assembly
Front Bumper Assembly
6
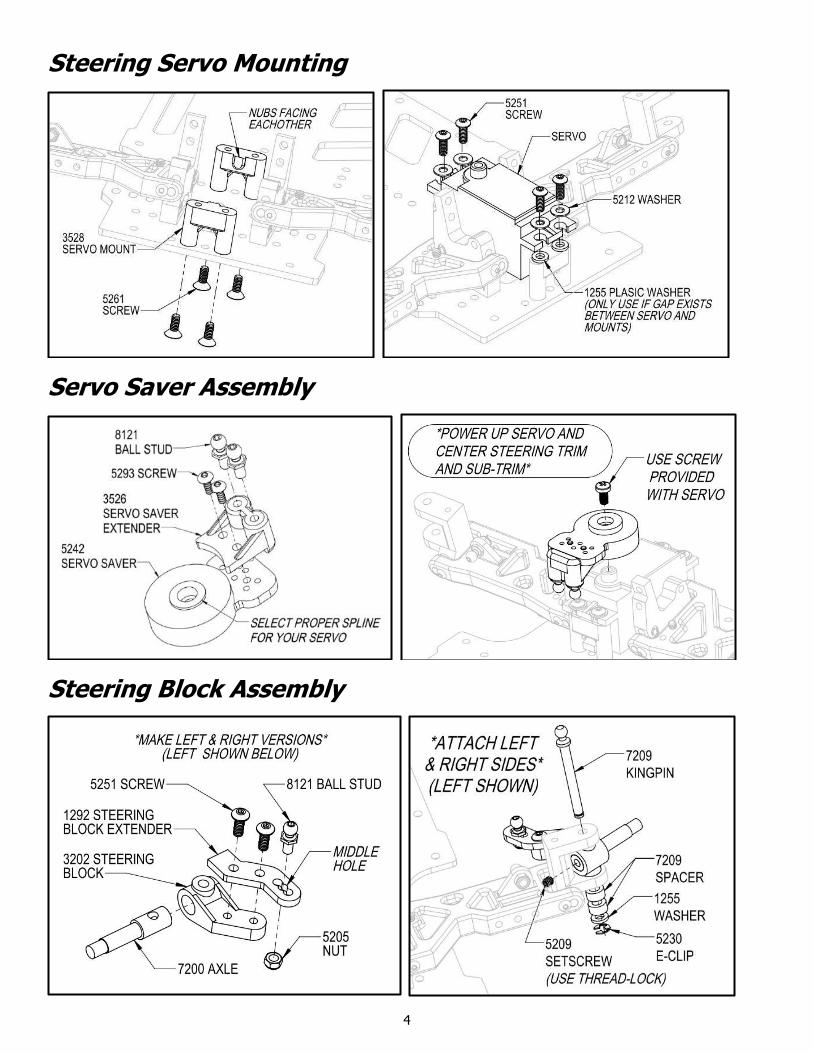
Rear Adjustable Arm Assembly
Rear Suspension Mount Assembly
7
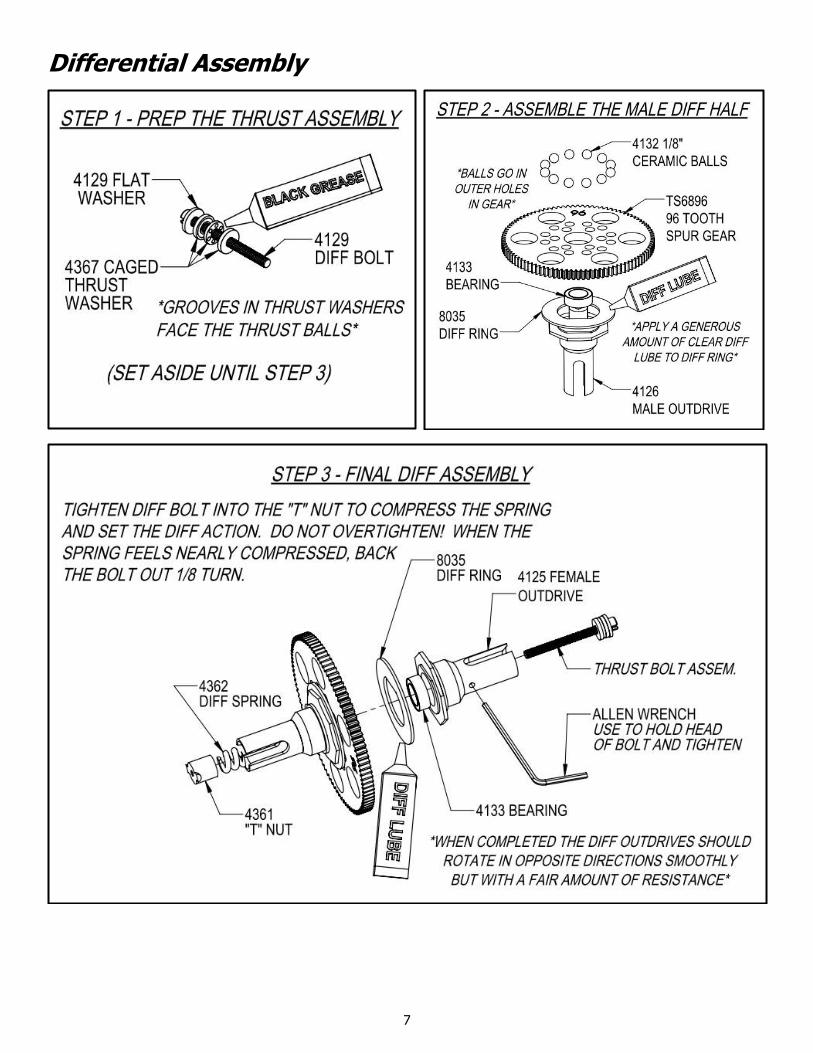
Differential Assembly

8
Transmission Assembly
Rear Shock Tower Assembly
Rear Hub Carrier Assembly

9
Rear Camber Link Assembly
Drivetrain (CVD) Assembly
Shock Assembly

10
Shock Assembly continued

11
Shock Mounting
Electronics Mounting

12
Cage Assembly

13
Cage Assembly continued

14
Cage Attachment
Body Assembly
Body pieces are shown painted for ease of viewing. Trim pieces and drill all holes BEFORE painting. On most pieces, a protective green film will keep overspray from getting on the outside of the body. Clean pieces with a mild detergent and dry before painting. 1. Hood – Cut on trim lines and drill ¼” holes on (2) dimples front and back. 2. Nose piece – Cut as shown and drill ¼” hole on the rear dimple as shown (do not follow trim lines).
15
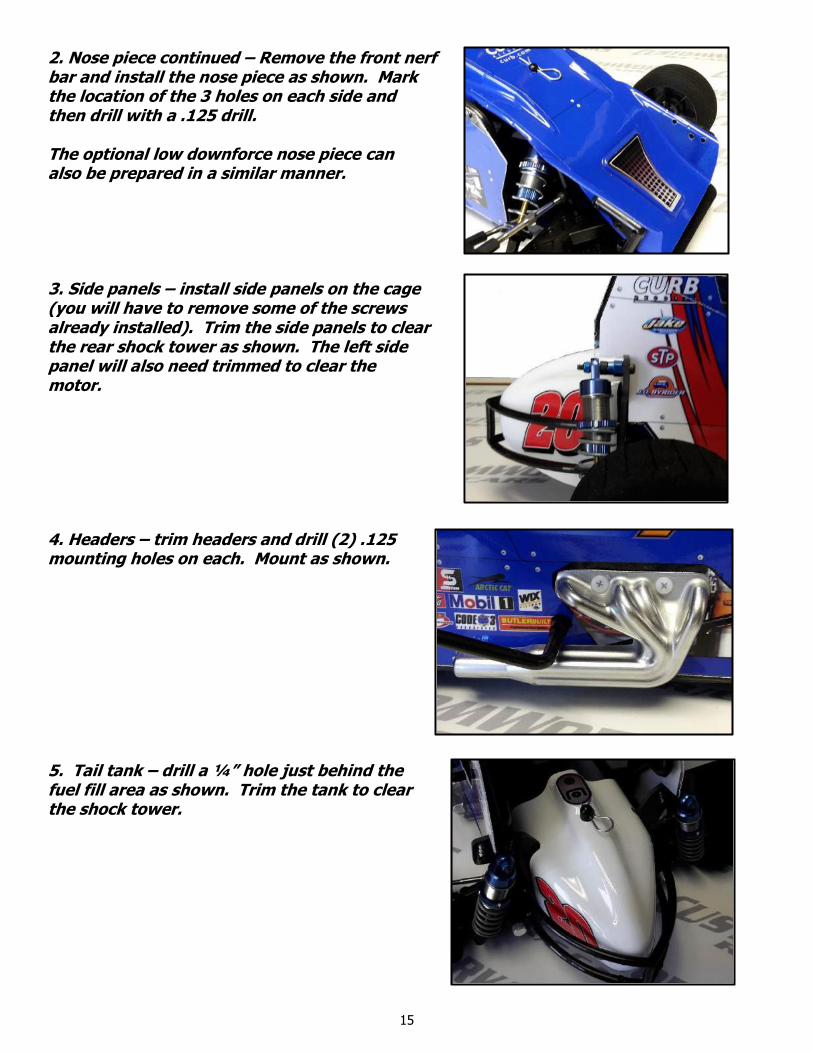
2. Nose piece continued – Remove the front nerf bar and install the nose piece as shown. Mark the location of the 3 holes on each side and then drill with a .125 drill. The optional low downforce nose piece can also be prepared in a similar manner. 3. Side panels – install side panels on the cage (you will have to remove some of the screws already installed). Trim the side panels to clear the rear shock tower as shown. The left side panel will also need trimmed to clear the motor. 4. Headers – trim headers and drill (2) .125 mounting holes on each. Mount as shown. 5. Tail tank – drill a ¼” hole just behind the fuel fill area as shown. Trim the tank to clear the shock tower.

16
6. Top wing – build the top wing using the instructions included. Mount in the location shown on the cage. 7. Front wing – Assemble the front wing and mount to the front nerf bar as shown. Congratulations! The assembly process is nearly complete. Install wheels and tires of your choice using the included wheel nuts and bearings. Install the 1/8” spacers on the OUTSIDE of the front wheels and the black flat washers on the OUTSIDE of the rear wheels before tightening the nuts. Do not overtighten the nuts. Basic set-up – use the included turnbuckle wrench to fine tune the steering and camber links. Begin with a slight amount of toe-out on the front wheels. Make sure the servo saver is centered when the wheels are centered. Adjust the camber links so that all 4 tires lean to the left slightly (1 degree.)
Setup and Tuning The standard build settings for the kit will provide a good starting point for an average high-bite track. We’ve done our
best to provide the racer with the best possible car, however it is the tuning of the car to the particular driver and track
conditions that will make it a consistent winner. The following tuning tips can be used to dial the car into a specific track
and situation. Each section is listed by order of importance.
1. Tires Handling is the most important factor in dirt oval racing when it comes to lower lap times and winning races and at least
50% of handling is in the tires. For rubber tire racing, the Custom Works Sticker tires are good for high bite tracks and
can be run with very little preparation. For foam tire racing we recommend the Custom Works X2 compound as the
starting point for most setups. Foam tires must be grooved to get maximum traction. If you don’t have the equipment to
groove tires, check with your local hobby shop or track for help and advice. Most will have a tire truer/groover available
for use and can show you how to use it. Tires should trued down to roughly 2.7” and grooved 1/16” deep using the

17
patterns below to start. Cross-grooves on the rear tires should be roughly ¼” apart for medium bite tracks and 3/8”
apart for higher bite surfaces. Next the tires should be prepped with a traction additive. We have found Dr. Witt’s Magic
“It” to be one of the most consistent traction additives available. Other more aggressive traction additives can over-
soften the tires and are often not consistent over the length of a race. The final step is to scuff the tires. This can be
accomplished by driving counter clockwise on a slightly abrasive concrete or paved surface but it best done on the track
where the tires are going to be used. Usually the drier the track is the more quickly the tires will break in. The tire
grooves will develop a slight taper when properly broken in, and should have noticeably more grip on the track compared
to when they were new. After a race, tires should be cleaned with a mild degreaser spray and rag, allowed to dry, and
traction additive re-applied. When the tires wear, re-cut the grooves to the original depth. If tires are wearing out
quickly, consider using a harder compound tire.
2. Shocks If tires are 50% of handling, shocks are probably the next 30%. Now that you’ve done all the work to make a great set
of tires, it’s the shock’s job to keep them on the track as much as possible. We’ve found the 9lb rear and 8lb front
springs to be the best combination for this car and honestly we don’t change them too often. Stiffer or softer springs can
be used to achieve different results. Too stiff or too soft can quickly move the car’s set up out of the ballpark, so test
accordingly and go back to the stock springs if you are struggling. Another important adjustment in the shocks is the
dampening which is controlled by the pistons and shock oil. The smaller the piston holes and the heavier the oil, the
greater the dampening. Dampening requirements will vary from track to track depending on how bumpy the track is and
the size and spacing of the bumps. If your car appears to be skidding as it enters a turn, you likely have too much
dampening and should change to a lighter oil or larger hole piston. If the tires appear to be oscillating and bouncing, the
problem is likely not enough dampening. Fix by using a smaller hole piston or heavier shock oil. Getting the dampening
right for a given track will require some trial and error but is critical in keeping the tires on the ground allowing the car to
accelerate and turn effectively. Try to use shock tuning to get the car through the bumps smoothly before attempting to
use it to tighten or loosen the car.
3. Wing adjustment The stock wing placement should be used as the starting point for most tracks. The wing can be moved into the farthest
forward position on extremely high-bite tracks where rear bite is plentiful. When looking for more rear bite on a slick
track, the wing should be moved toward the rear of the car. The wing angle can also be increased and will give the car a
more “planted” feel but at the expense of aerodynamic drag.
4. Camber links and Roll Centers The hinge pin and camber link positions described in the kit instructions provide the standard roll center locations for this
car. Both front and rear camber links can be shortened by using optional holes included. Shortening the camber links
will cause the car to react quicker at the expense of stability. Front and rear can be adjusted independently to achieve
the proper chassis balance for a given track condition.
Lowering the inner camber link location will raise the roll center and cause the chassis to roll less in corners. Less roll is
generally better for conditions where traction is very high. Also be aware that lowering and/or shortening the camber
links will increase camber gain as the suspension compresses.
18
5. Ride height The ride height is the distance between the track and the bottom of the chassis. For most tracks the normal ride height
should be 12mm in the rear and 11mm in the front. A little more ride height in the rear is usually good because the rear
of the car will squat under acceleration. Ride height is adjusted using the threaded collars on the springs. Ride height
can be lowered for extremely smooth high bite tracks, and can be raised if the chassis is bottoming out.
6. Cross-weight Cross-weight which is sometimes referred to as “wedge” can help tighten or loosen the car. Since oval racing consists
only of left turns, there is less need to keep the weight of the car equally balanced between the left and right side tires.
Increasing the spring tension on the left rear and right front shocks will add weight to those corners and make the car
tighter. Doing the opposite will make it looser. Be careful not to go too far, excessive cross-weight can upset the ride
height and not allow the suspension to work properly. A set of scales is required to measure cross-weight and should be
measured on a level surface with the car “ready to race”.
7. Droop Droop is the distance the tires can drop before they lose contact with the track when the chassis is lifted. Droop can be
limited by the use of droop screws or spacers inside the shocks. Limiting the droop in the front suspension will give the
car more steering and limiting rear droop can provide more rear side bite. However a car with little or no droop will not
handle the bumps in the track as well and can cause a car to be erratic. A typical high bite dirt oval car will be set up
with less droop in the front compared to the rear.
8. Rear steer Rear steer is created with the use of the adjustable rear arms. Because the car spends a great amount of time turning
left, it is more efficient to have the rear tires help with the steering. The amount of rear steer needed largely depends on
the track. Tighter turns require more rear steer. The most common setting is 4 degrees in on the left rear and 0 degrees
on the right rear. To help the car turn more, try 6 degrees in on the left and 1 degree out on the right. To make the car
drive straighter try 3 degrees in on the left rear and 1 degree in on the right rear. This is also a very easy adjustment to
make before a race to quickly adapt to a changing track surface.
9. Other adjustments The adjustments above account for most of the changes needed to dial the car into a given track. Other adjustments are
included in the car such as camber, Ackermann, wheelbase, front track, shock angle, etc. Even more option parts are
available such as sway bars, optional caster blocks and front suspension mounts. Please visit the Tech Center page at
www.customworksrc.com for the full setup glossary and explanation of these options. Also you will find a PDF copy of
this manual as well as blank set-up sheets and proven racer’s set-ups.
Preventive Maintenance RC cars have many moving parts which will wear over time. The normal wear of these parts as well as dirt from the track
and occasional crashes require you to keep your car well maintained for optimal performance. Weekly maintenance
should include:
Remove and clean wheels and tires. Re-groove if needed.
Check for “gritty” ball bearings. Clean and re-lube or replace as needed.
Remove shocks from the car, remove springs from the shocks and check for normal movement.
With the tires and shocks removed, check suspension movement and make sure it moves freely but without too
much slop. Even a small amount of binding caused by a bent pin, dirt, etc can cause erratic handling.
Remove CVDs and check for excess slop or wear. Clean and re-lube.
If differential is not smooth, sand or replace rings and rebuild. Make sure differential is not slipping on the track.
Check for loose screws.
Check for any bent or broken parts.

19