Embed Size (px)
Citation preview

1HW(SLF�����$UP\�%RRN�
�!�"�
%\�WKH�1HW(SLF�'LVFXVVLRQ�*URXS� Disclaimer: If you cannot differentiate between fantasy and reality, or cannot conceive that others may do so, please put this book down, walk away and don’t approach the subject of tabletop wargaming again until you grow up a bit. This rulebook is completely unofficial and in no way endorsed by Games Workshop Limited. Warhammer 40,000, Adeptus Titanicus, Space Marine, Epic 40,000, Epic: Armageddon and other names, races, characters, illustrations and images from the Warhammer 40,000 universe are either ®, TM and/or © Copyright Games Workshop Ltd 2000-2005, used without permission and their use should not be construed as a challenge to said ownership. NetEpic is a non-profit work intended for personal use and cannot be distributed with intent of profit. Concepts and ideas not owned by Games Workshop are the property of the NetEpic Discussion Group.
NetEpic 5.0 Ork Army Book 1
Table of Contents
BACKGROUND......................................................................................................................................................... 2
THE ORK ARMY ...................................................................................................................................................... 3
SPECIAL RULES....................................................................................................................................................... 4
ARMY CONSTRUCTION & MOBZ................................................................................................................................ 4 MEKBOY KUSTOM REPAIR CARDS ............................................................................................................................ 4 NOB COMMAND & NATURAL INSTINCTS................................................................................................................... 5
SAMPLE ARMY: ORKS........................................................................................................................................... 6
UNIT DESCRIPTIONS ............................................................................................................................................. 7
SPECIAL UNITS .......................................................................................................................................................... 7 INFANTRY.................................................................................................................................................................. 8 CAVALRY .................................................................................................................................................................. 9 WALKERS ................................................................................................................................................................ 10 VEHICLES................................................................................................................................................................ 10 MEKBOY VEHICLES................................................................................................................................................. 11 LIGHT ARTILLERY ................................................................................................................................................... 12 HEAVY ARTILLERY ................................................................................................................................................. 13 FLIERS..................................................................................................................................................................... 14 SUPERHEAVIES........................................................................................................................................................ 15
GARGANTS.............................................................................................................................................................. 17
GARGANT WEAPON DESCRIPTIONS......................................................................................................................... 17 WEAPON COSTS....................................................................................................................................................... 20 WEAPON SUMMARY ................................................................................................................................................ 20 GREAT GARGANT TEMPLATE .................................................................................................................................. 21 SLASHA GARGANT TEMPLATE................................................................................................................................. 22
THE MEKBOY GARGANT ................................................................................................................................... 23
MEKBOY GARGANT TEMPLATE............................................................................................................................... 24
THE MEGA-GARGANT.........................................................................................................................................25
MEKBOY KUSTOM REPAIR CARDS ................................................................................................................ 32
ORK ARMY CARDS............................................................................................................................................... 34
SUMMARY OF UNIT STATISTICS ..................................................................................................................... 37
NetEpic 5.0 Ork Army Book 2
Background The Orkish race is savage and brutal, and very successful. Tribal in nature, Orks will happily fight each other if they can’t find another opponent. They seem to be able to survive, expand and prosper almost effortlessly compared to struggling humanity. On the whole they seem to have a more pragmatic attitude to life than many other races, and seem better able to cope with the realities of a harsh universe. The secret is that they just don’t care. Orks simply follow the natural life they were intended for: wild adventure, warfare, raiding and violent death. Their remarkable progress has been achieved mostly by trial and error, without pause to count the cost or question the meaning of it all. Orks need a regular supply of weapons and spare parts to pursue their chosen lifestyle. The Mekboys do a good job, but it is often not enough. The only solution (to the Orks) is to conquer and enslave industrial communities, mount raids or demand tribute. A planet may be visited periodically by a space hulk demanding goods, while other planets are ruled by a uncouth warrior aristocracy that forces the population to manufacture arms and equipment for them. Ork raids are a constant hazard for all intelligent races, but every two or three centuries the frequently of raiding increases, closely followed by invasion and wars of conquest. This is known as Waa-Ork. Orks are latently psychic, and over time the collective psychic energy of the Ork race becomes agitated, disturbed and dynamic. This is a time of tribes coming together, of great works, of migrations, wars and conquests as Orks throughout the galaxy take to the warpath. Eventually this reaches a fever pitch and Ork armies go off in all directions, bringing war to every corner of the galaxy.
�������#����
NetEpic 5.0 Ork Army Book 3
The Ork Army There is no Standard / Codex differentiation for Orks, as no group of Orks has the organization required to qualify as a Codex Army. Orks appear throughout the galaxy and are willing to fight in any sort of battle, at any time, against anyone, no matter what the odds. Orks may be taken as an ally to another Standard Army, or you can take them as your main force and put up to 50% of your points into any one other Standard List. Either way, army construction follows the same rules and has the same requirements.
Standard Army At least 50% of your points into… Up to 50% into… Orks Standard Ork List Any one Standard List
Orks love to fight, and will cheerfully fight each other if they aren’t pointed in another direction. It takes a strong leader to tell Orks what to do and the few that manage to survive the process are known as Warbosses. Rarely a Warboss rises to lead half a dozen clans and becomes known as a Warlord. The presence of these leaders allows an army to consist of more and more clans without disintegrating into a chaotic free-for-all. In order for an Ork army to consist of more than two clans (different ones or all the same), you must include one of these strong leaders. These required leaders do not take up a Special Card slot. You may buy additional Warbosses or have a Warlord in a smaller army, but in that case they do take up Special Card slots.
Number of Clans you want Leader you must buy... 1-2 Nothing special 2-4 Warboss or a Gargant 5-6 Warlord or a Gargant 7+ Gargant
Special Rule: Gargants These units are akin to religious icons and attract huge followings whether they’re wanted or not. You may only purchase Gargant Big Mobz, Mega-Gargants and Mekboy Gargants if at least 50% of your army is Orks.
Definition: Mobz The Ork term for a detachment is the Mob. Anywhere in this book you see “Mob”, think “detachment” – they’re the same thing. The term Mob is used because the Victory Points and Break Points of Ork units vary with size, while the term detachment implies a more constant and organized structure. And if there’s one thing that Orks aren’t, it’s constant.
Optional Rule: Ork Hordes Unlike other armies that are limited to 5 Support Cards per Company, Ork Clans have the option of purchasing an additional 5 Support Cards above and beyond the normal limit (10 in all). These additional Support Cards may only be Extra Boyz, allowing large hordes of greenskins in a single clan.
NetEpic 5.0 Ork Army Book 4
Special Rules
Army Construction & Mobz In most armies, Support Cards form their own detachments that are separate from other units in the army. Orks form Mobz and they just get bigger. Adding Support Cards changes both the Break Point and the Victory Points of a Mob, which must be calculated before the game. All Ork units of a given type (Nobz, Boyz, Boarboys, etc.) from a Clan Card will form their own Mob. When support is added to a company it will add to existing Mobz of the same type. Example: The Bad Moon Clan card provides a Mob of 15 Boyz and a Mob of 4 Nobz. If an ‘Extra Boyz’ Support Card is added (4 more Boyz), instead of forming an independent detachment the Boyz are added to the existing Boyz Mob. The Boyz Mob is then made up of 19 Boyz, and the Clan has a new Break Point of 12 (10 base plus 2 from the Extra Boyz card). All 19 Boyz will be activated as a single unit for movement and shooting. If there is no existing Mob of the new unit type, the new units form a new Mob and more units of the same type will be added to the now-existing Mob. All Mobz are treated as single detachments, i.e. they must observe coherency, are activated, make all break and morale tests as a group, and must observe the normal coherency rules. Example: The Bad Moon Clan above adds two ‘Battlewagons’ Support Cards (3 Battlewagons each). The first card creates a new Mob consisting of three Battlewagons, and the second card adds to this. The final Battlewagons Mob consists of 6 Battlewagons with a Break Point of 4 (2 base +2 from the second card) and is worth 4 Victory Points (again, 2 base +2 from the second card). Again, all 6 Battlewagons form a single detachment. Mobz may not break up during the game. The only way to get multiple Mobz of the same unit is to buy them for different Clans, as Support Cards that are attached to one Clan do not form Mobz with those from another Clan. Certain units are Clan specific and therefore may only be attached to that Clan (e.g. Goff Lungburstas may only be attached to the Goff Clan). Mega-Gargants may be of any Clan – choose one when you buy it.
Special Rule: Deathskull Clan Support The Deathskull Clan, due to their thieving ways, may take any support card even if it is clan specific to a different clan.
Optional Rule: Evil Suns Transports When buying extra Boyz or extra Nobz for an Evil Suns Clan, they can take three Boyz stands plus a Battlewagon rather than four Boyz stands.
Mekboy Kustom Repair Cards Orks possess in their numbers a group who specialize in making, repairing, creating and improving equipment. They are called Mekboys and play the role of the “mad scientist” without the torch-and-pitchfork armed townsfolk to put a stop to it. This is represented in the game by Mekboy Kustom Repair cards. The Ork player receives 2 Kustom Repair cards for every Mekboy unit he purchases. These units are identified by a wrench symbol on the Support, Special or Company Card. After you’ve purchased your army, count up how many cards you’re allowed, shuffle the Kustom Repair cards and draw at random. Kustom cards are assigned to units before the battle begins. The text on each card details when it may be played, what units it may be played on and what it does. Cards that affect infantry formations (like Nobz or Boyz) will affect the entire Mob. However, cards concerning vehicles can only be played on squadrons of up to 5 vehicles. If the Mob includes more than 5 vehicles then choose 5 of them. The Ork player must designate recipients of all Kustom cards (he cannot leave cards unassigned) and multiple cards can be played on the same unit without limit, but they cannot be used to modify the same ability more than once. Once a card is allocated it may not be transferred to another unit during the game. Some cards can only be placed on specific units, and if that type of unit is not in play the card is wasted.
NetEpic 5.0 Ork Army Book 5
Special Rule: Limited Mekboys Since there are a limited number of Mekboys each Clan may only attach one Mekboy Support Card. Some clans attract more Mekboys than others: the Blood Axes and Evil Sunz may add 2 Mekboy Support Cards. If a Clan purchases the Renegade Mekboyz Special Card, it may also take up to 5 Mekboy Support Cards.
Nob Command & Natural Instincts Orks are by nature very boisterous and erratic creatures and they need a strong presence to order them properly. This presence is personified by the Ork Nob (noble). In order for a Mob to receive orders it must be within 10 cm of a Nob at the beginning of the Orders Phase. The Nob does not have to be from the same Clan to issue orders, as Orks respect Nobz regardless of clan affiliations (might makes right). When Ork formations are outside this Nob command radius they adopt distinct behaviors according to the clan they belong. Units with the Independent ability ignore this restriction and may always be given any orders. Clan Natural Instinct Bad Moons May not move and will shoot at the nearest enemy on First Fire.
Blood Axes They will move towards the nearest table edge at Advance speed and will only shoot at enemies within 25 cm on Advance Fire. When they reach the edge they will sit and watch.
Deathskulls They will move towards the nearest objective at normal rate and will shoot at any enemy within 25 cm on Advance Fire.
Evil Sunz & Renegade Mekboys
They will move towards the furthest table edge between normal and double rate and enter Close Combat with anything that gets in the way. They may not shoot.
Goffs They must move between normal and double rate towards the enemy and must charge the enemy if they are within range. They may not shoot.
Kult of Speed They will move at double rate in any direction specified by the Ork player in as straight a line as possible and enter Close Combat with anybody dumb enough to get in the way. They may not shoot.
Snakebites & Wildboyz
They may move towards the nearest enemy at up to their normal rate and will fight Close Combat normally. They may not shoot.
Special Rule: Blood Axe Clan Nobz Due to Blood Axe dealings with humans, other Orks view them with suspicion and do not follow orders from their Nobz. To reflect this Blood Axe Nobz may only issue orders to Blood Axe formations.
Special Ability: Deathrolla This is a large, spiked wheel pushed ahead of a vehicle. It will squish any infantry or cavalry model encountered on a 4+ at 0 TSM. If the victim is not killed the Deathrolla unit will end movement.
NetEpic 5.0 Ork Army Book 6
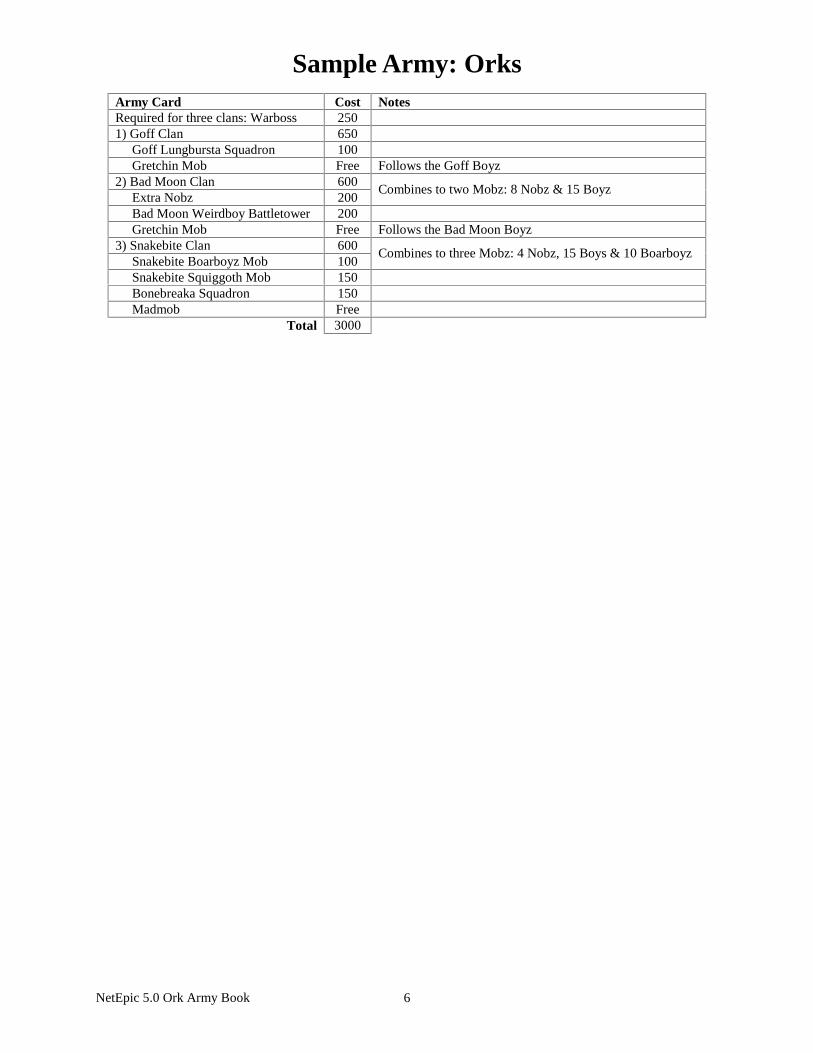
Sample Army: Orks
Army Card Cost Notes Required for three clans: Warboss 250 1) Goff Clan 650 Goff Lungbursta Squadron 100 Gretchin Mob Free Follows the Goff Boyz 2) Bad Moon Clan 600 Extra Nobz 200
Combines to two Mobz: 8 Nobz & 15 Boyz
Bad Moon Weirdboy Battletower 200 Gretchin Mob Free Follows the Bad Moon Boyz 3) Snakebite Clan 600 Snakebite Boarboyz Mob 100
Combines to three Mobz: 4 Nobz, 15 Boys & 10 Boarboyz
Snakebite Squiggoth Mob 150 Bonebreaka Squadron 150 Madmob Free
Total 3000
NetEpic 5.0 Ork Army Book 7
Unit Descriptions
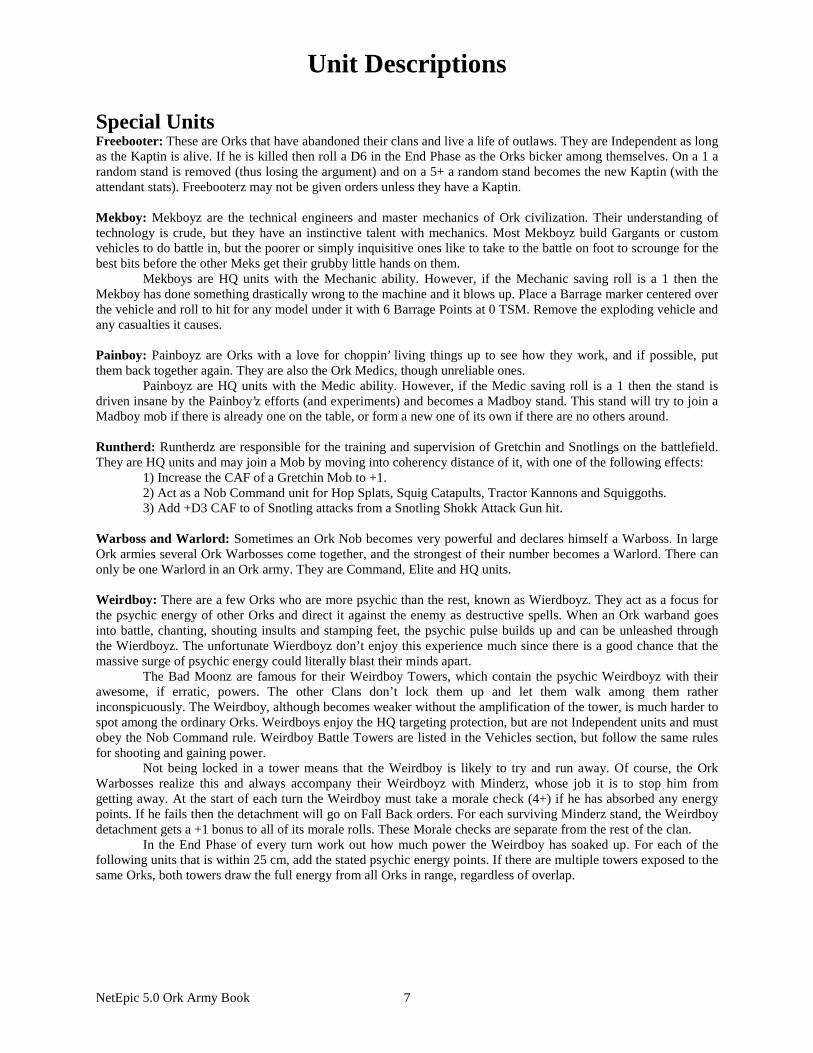
Special Units Freebooter: These are Orks that have abandoned their clans and live a life of outlaws. They are Independent as long as the Kaptin is alive. If he is killed then roll a D6 in the End Phase as the Orks bicker among themselves. On a 1 a random stand is removed (thus losing the argument) and on a 5+ a random stand becomes the new Kaptin (with the attendant stats). Freebooterz may not be given orders unless they have a Kaptin. Mekboy: Mekboyz are the technical engineers and master mechanics of Ork civilization. Their understanding of technology is crude, but they have an instinctive talent with mechanics. Most Mekboyz build Gargants or custom vehicles to do battle in, but the poorer or simply inquisitive ones like to take to the battle on foot to scrounge for the best bits before the other Meks get their grubby little hands on them. Mekboys are HQ units with the Mechanic ability. However, if the Mechanic saving roll is a 1 then the Mekboy has done something drastically wrong to the machine and it blows up. Place a Barrage marker centered over the vehicle and roll to hit for any model under it with 6 Barrage Points at 0 TSM. Remove the exploding vehicle and any casualties it causes. Painboy: Painboyz are Orks with a love for choppin’ living things up to see how they work, and if possible, put them back together again. They are also the Ork Medics, though unreliable ones. Painboyz are HQ units with the Medic ability. However, if the Medic saving roll is a 1 then the stand is driven insane by the Painboy’z efforts (and experiments) and becomes a Madboy stand. This stand will try to join a Madboy mob if there is already one on the table, or form a new one of its own if there are no others around. Runtherd: Runtherdz are responsible for the training and supervision of Gretchin and Snotlings on the battlefield. They are HQ units and may join a Mob by moving into coherency distance of it, with one of the following effects: 1) Increase the CAF of a Gretchin Mob to +1. 2) Act as a Nob Command unit for Hop Splats, Squig Catapults, Tractor Kannons and Squiggoths. 3) Add +D3 CAF to of Snotling attacks from a Snotling Shokk Attack Gun hit. Warboss and Warlord: Sometimes an Ork Nob becomes very powerful and declares himself a Warboss. In large Ork armies several Ork Warbosses come together, and the strongest of their number becomes a Warlord. There can only be one Warlord in an Ork army. They are Command, Elite and HQ units. Weirdboy: There are a few Orks who are more psychic than the rest, known as Wierdboyz. They act as a focus for the psychic energy of other Orks and direct it against the enemy as destructive spells. When an Ork warband goes into battle, chanting, shouting insults and stamping feet, the psychic pulse builds up and can be unleashed through the Wierdboyz. The unfortunate Wierdboyz don’t enjoy this experience much since there is a good chance that the massive surge of psychic energy could literally blast their minds apart. The Bad Moonz are famous for their Weirdboy Towers, which contain the psychic Weirdboyz with their awesome, if erratic, powers. The other Clans don’t lock them up and let them walk among them rather inconspicuously. The Weirdboy, although becomes weaker without the amplification of the tower, is much harder to spot among the ordinary Orks. Weirdboys enjoy the HQ targeting protection, but are not Independent units and must obey the Nob Command rule. Weirdboy Battle Towers are listed in the Vehicles section, but follow the same rules for shooting and gaining power. Not being locked in a tower means that the Weirdboy is likely to try and run away. Of course, the Ork Warbosses realize this and always accompany their Weirdboyz with Minderz, whose job it is to stop him from getting away. At the start of each turn the Weirdboy must take a morale check (4+) if he has absorbed any energy points. If he fails then the detachment will go on Fall Back orders. For each surviving Minderz stand, the Weirdboy detachment gets a +1 bonus to all of its morale rolls. These Morale checks are separate from the rest of the clan. In the End Phase of every turn work out how much power the Weirdboy has soaked up. For each of the following units that is within 25 cm, add the stated psychic energy points. If there are multiple towers exposed to the same Orks, both towers draw the full energy from all Orks in range, regardless of overlap.
NetEpic 5.0 Ork Army Book 8
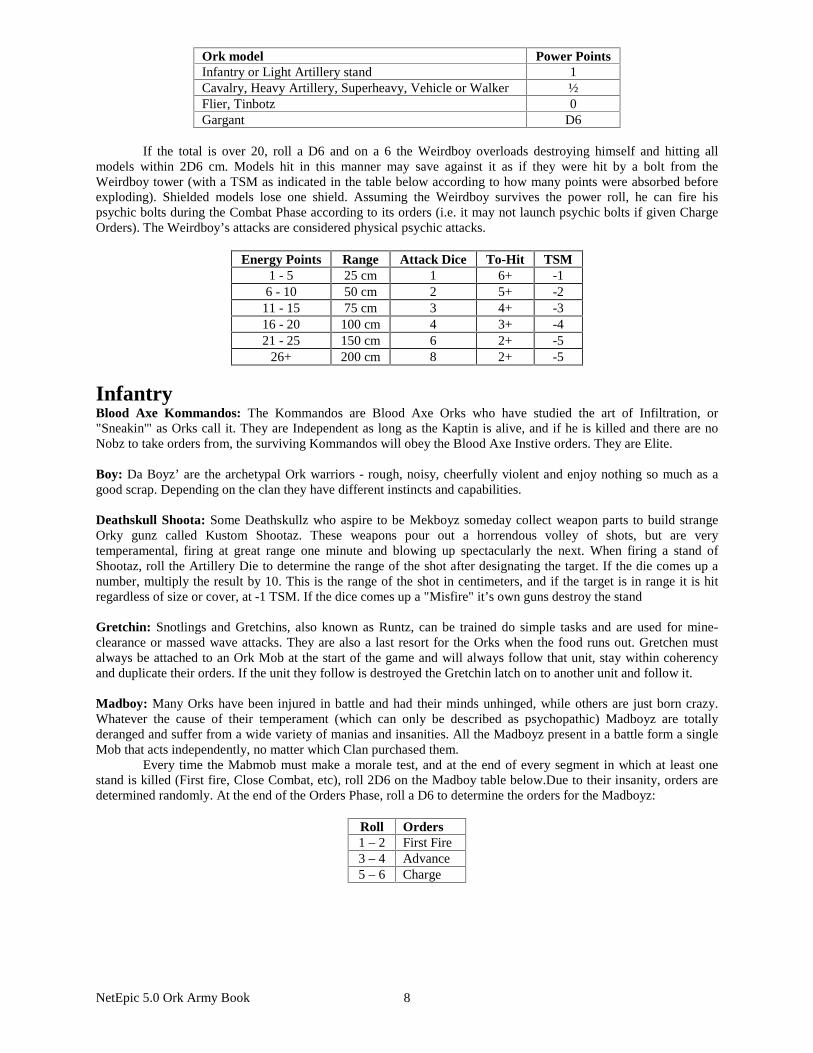
Ork model Power Points Infantry or Light Artillery stand 1 Cavalry, Heavy Artillery, Superheavy, Vehicle or Walker ½ Flier, Tinbotz 0 Gargant D6
If the total is over 20, roll a D6 and on a 6 the Weirdboy overloads destroying himself and hitting all models within 2D6 cm. Models hit in this manner may save against it as if they were hit by a bolt from the Weirdboy tower (with a TSM as indicated in the table below according to how many points were absorbed before exploding). Shielded models lose one shield. Assuming the Weirdboy survives the power roll, he can fire his psychic bolts during the Combat Phase according to its orders (i.e. it may not launch psychic bolts if given Charge Orders). The Weirdboy’s attacks are considered physical psychic attacks.
Energy Points Range Attack Dice To-Hit TSM 1 - 5 25 cm 1 6+ -1 6 - 10 50 cm 2 5+ -2 11 - 15 75 cm 3 4+ -3 16 - 20 100 cm 4 3+ -4 21 - 25 150 cm 6 2+ -5
26+ 200 cm 8 2+ -5
Infantry Blood Axe Kommandos: The Kommandos are Blood Axe Orks who have studied the art of Infiltration, or "Sneakin'" as Orks call it. They are Independent as long as the Kaptin is alive, and if he is killed and there are no Nobz to take orders from, the surviving Kommandos will obey the Blood Axe Instive orders. They are Elite. Boy: Da Boyz’ are the archetypal Ork warriors - rough, noisy, cheerfully violent and enjoy nothing so much as a good scrap. Depending on the clan they have different instincts and capabilities. Deathskull Shoota: Some Deathskullz who aspire to be Mekboyz someday collect weapon parts to build strange Orky gunz called Kustom Shootaz. These weapons pour out a horrendous volley of shots, but are very temperamental, firing at great range one minute and blowing up spectacularly the next. When firing a stand of Shootaz, roll the Artillery Die to determine the range of the shot after designating the target. If the die comes up a number, multiply the result by 10. This is the range of the shot in centimeters, and if the target is in range it is hit regardless of size or cover, at -1 TSM. If the dice comes up a "Misfire" it’s own guns destroy the stand Gretchin: Snotlings and Gretchins, also known as Runtz, can be trained do simple tasks and are used for mine-clearance or massed wave attacks. They are also a last resort for the Orks when the food runs out. Gretchen must always be attached to an Ork Mob at the start of the game and will always follow that unit, stay within coherency and duplicate their orders. If the unit they follow is destroyed the Gretchin latch on to another unit and follow it. Madboy: Many Orks have been injured in battle and had their minds unhinged, while others are just born crazy. Whatever the cause of their temperament (which can only be described as psychopathic) Madboyz are totally deranged and suffer from a wide variety of manias and insanities. All the Madboyz present in a battle form a single Mob that acts independently, no matter which Clan purchased them. Every time the Mabmob must make a morale test, and at the end of every segment in which at least one stand is killed (First fire, Close Combat, etc), roll 2D6 on the Madboy table below.Due to their insanity, orders are determined randomly. At the end of the Orders Phase, roll a D6 to determine the orders for the Madboyz:
Roll Orders 1 – 2 First Fire 3 – 4 Advance 5 – 6 Charge
NetEpic 5.0 Ork Army Book 9
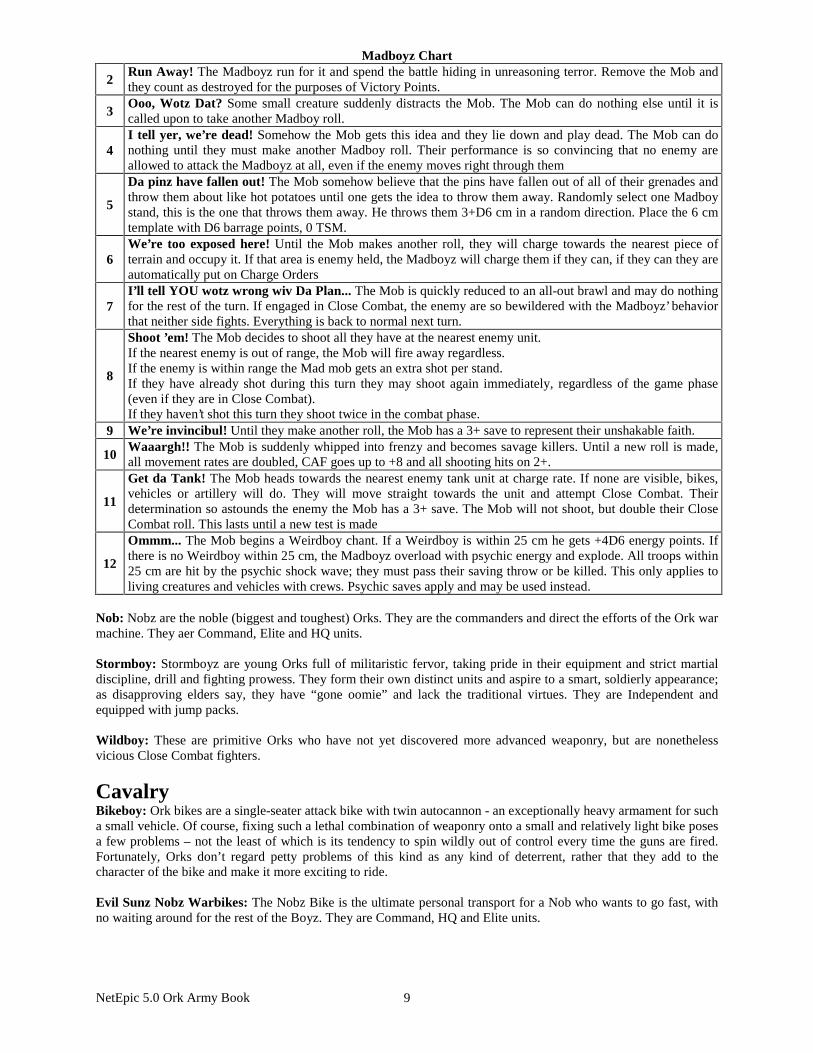
Madboyz Chart
2 Run Away! The Madboyz run for it and spend the battle hiding in unreasoning terror. Remove the Mob and they count as destroyed for the purposes of Victory Points.
3 Ooo, Wotz Dat? Some small creature suddenly distracts the Mob. The Mob can do nothing else until it is called upon to take another Madboy roll.
4 I tell yer, we’re dead! Somehow the Mob gets this idea and they lie down and play dead. The Mob can do nothing until they must make another Madboy roll. Their performance is so convincing that no enemy are allowed to attack the Madboyz at all, even if the enemy moves right through them
5
Da pinz have fallen out! The Mob somehow believe that the pins have fallen out of all of their grenades and throw them about like hot potatoes until one gets the idea to throw them away. Randomly select one Madboy stand, this is the one that throws them away. He throws them 3+D6 cm in a random direction. Place the 6 cm template with D6 barrage points, 0 TSM.
6 We’re too exposed here! Until the Mob makes another roll, they will charge towards the nearest piece of terrain and occupy it. If that area is enemy held, the Madboyz will charge them if they can, if they can they are automatically put on Charge Orders
7 I’ll tell YOU wotz wrong wiv Da Plan... The Mob is quickly reduced to an all-out brawl and may do nothing for the rest of the turn. If engaged in Close Combat, the enemy are so bewildered with the Madboyz’ behavior that neither side fights. Everything is back to normal next turn.
8
Shoot ’em! The Mob decides to shoot all they have at the nearest enemy unit. If the nearest enemy is out of range, the Mob will fire away regardless. If the enemy is within range the Mad mob gets an extra shot per stand. If they have already shot during this turn they may shoot again immediately, regardless of the game phase (even if they are in Close Combat). If they haven’t shot this turn they shoot twice in the combat phase.
9 We’re invincibul! Until they make another roll, the Mob has a 3+ save to represent their unshakable faith.
10 Waaargh!! The Mob is suddenly whipped into frenzy and becomes savage killers. Until a new roll is made, all movement rates are doubled, CAF goes up to +8 and all shooting hits on 2+.
11
Get da Tank! The Mob heads towards the nearest enemy tank unit at charge rate. If none are visible, bikes, vehicles or artillery will do. They will move straight towards the unit and attempt Close Combat. Their determination so astounds the enemy the Mob has a 3+ save. The Mob will not shoot, but double their Close Combat roll. This lasts until a new test is made
12
Ommm... The Mob begins a Weirdboy chant. If a Weirdboy is within 25 cm he gets +4D6 energy points. If there is no Weirdboy within 25 cm, the Madboyz overload with psychic energy and explode. All troops within 25 cm are hit by the psychic shock wave; they must pass their saving throw or be killed. This only applies to living creatures and vehicles with crews. Psychic saves apply and may be used instead.
Nob: Nobz are the noble (biggest and toughest) Orks. They are the commanders and direct the efforts of the Ork war machine. They aer Command, Elite and HQ units. Stormboy: Stormboyz are young Orks full of militaristic fervor, taking pride in their equipment and strict martial discipline, drill and fighting prowess. They form their own distinct units and aspire to a smart, soldierly appearance; as disapproving elders say, they have “gone oomie” and lack the traditional virtues. They are Independent and equipped with jump packs. Wildboy: These are primitive Orks who have not yet discovered more advanced weaponry, but are nonetheless vicious Close Combat fighters.
Cavalry Bikeboy: Ork bikes are a single-seater attack bike with twin autocannon - an exceptionally heavy armament for such a small vehicle. Of course, fixing such a lethal combination of weaponry onto a small and relatively light bike poses a few problems – not the least of which is its tendency to spin wildly out of control every time the guns are fired. Fortunately, Orks don’t regard petty problems of this kind as any kind of deterrent, rather that they add to the character of the bike and make it more exciting to ride. Evil Sunz Nobz Warbikes: The Nobz Bike is the ultimate personal transport for a Nob who wants to go fast, with no waiting around for the rest of the Boyz. They are Command, HQ and Elite units.
NetEpic 5.0 Ork Army Book 10
Snakebite Boarboy: The Snakebite Clan distinguishes itself by following more primitive ways and some of the Boyz mount ferocious boars to ride into combat.
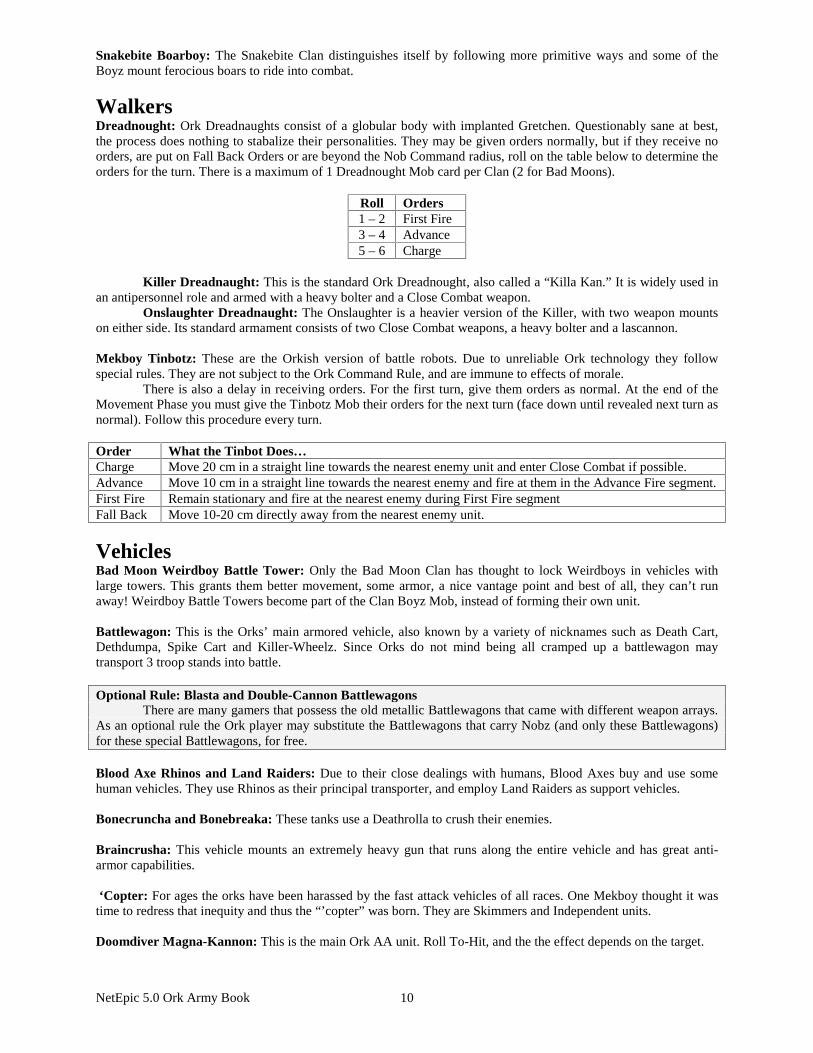
Walkers Dreadnought: Ork Dreadnaughts consist of a globular body with implanted Gretchen. Questionably sane at best, the process does nothing to stabalize their personalities. They may be given orders normally, but if they receive no orders, are put on Fall Back Orders or are beyond the Nob Command radius, roll on the table below to determine the orders for the turn. There is a maximum of 1 Dreadnought Mob card per Clan (2 for Bad Moons).
Roll Orders 1 – 2 First Fire 3 – 4 Advance 5 – 6 Charge
Killer Dreadnaught: This is the standard Ork Dreadnought, also called a “Killa Kan.” It is widely used in an antipersonnel role and armed with a heavy bolter and a Close Combat weapon. Onslaughter Dreadnaught: The Onslaughter is a heavier version of the Killer, with two weapon mounts on either side. Its standard armament consists of two Close Combat weapons, a heavy bolter and a lascannon. Mekboy Tinbotz: These are the Orkish version of battle robots. Due to unreliable Ork technology they follow special rules. They are not subject to the Ork Command Rule, and are immune to effects of morale. There is also a delay in receiving orders. For the first turn, give them orders as normal. At the end of the Movement Phase you must give the Tinbotz Mob their orders for the next turn (face down until revealed next turn as normal). Follow this procedure every turn. Order What the Tinbot Does… Charge Move 20 cm in a straight line towards the nearest enemy unit and enter Close Combat if possible. Advance Move 10 cm in a straight line towards the nearest enemy and fire at them in the Advance Fire segment. First Fire Remain stationary and fire at the nearest enemy during First Fire segment Fall Back Move 10-20 cm directly away from the nearest enemy unit.
Vehicles Bad Moon Weirdboy Battle Tower: Only the Bad Moon Clan has thought to lock Weirdboys in vehicles with large towers. This grants them better movement, some armor, a nice vantage point and best of all, they can’t run away! Weirdboy Battle Towers become part of the Clan Boyz Mob, instead of forming their own unit. Battlewagon: This is the Orks’ main armored vehicle, also known by a variety of nicknames such as Death Cart, Dethdumpa, Spike Cart and Killer-Wheelz. Since Orks do not mind being all cramped up a battlewagon may transport 3 troop stands into battle. Optional Rule: Blasta and Double-Cannon Battlewagons There are many gamers that possess the old metallic Battlewagons that came with different weapon arrays. As an optional rule the Ork player may substitute the Battlewagons that carry Nobz (and only these Battlewagons) for these special Battlewagons, for free. Blood Axe Rhinos and Land Raiders: Due to their close dealings with humans, Blood Axes buy and use some human vehicles. They use Rhinos as their principal transporter, and employ Land Raiders as support vehicles. Bonecruncha and Bonebreaka: These tanks use a Deathrolla to crush their enemies. Braincrusha: This vehicle mounts an extremely heavy gun that runs along the entire vehicle and has great anti-armor capabilities. ‘Copter: For ages the orks have been harassed by the fast attack vehicles of all races. One Mekboy thought it was time to redress that inequity and thus the “’copter” was born. They are Skimmers and Independent units. Doomdiver Magna-Kannon: This is the main Ork AA unit. Roll To-Hit, and the the effect depends on the target.
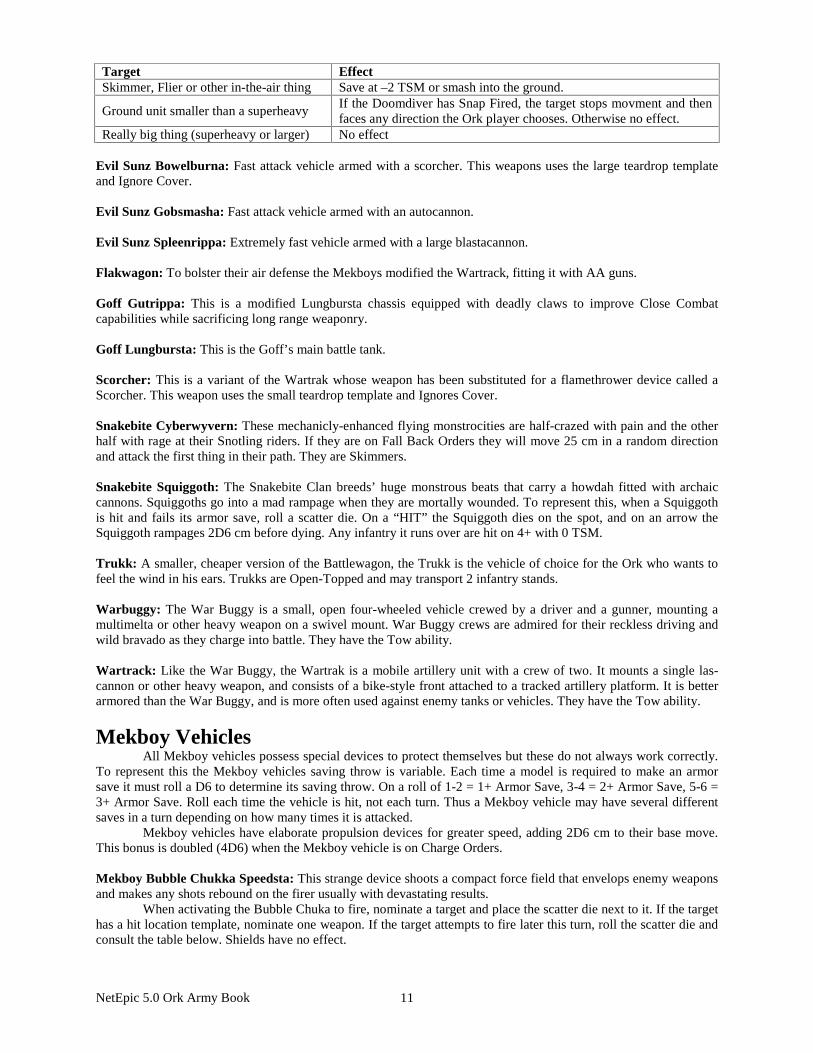
NetEpic 5.0 Ork Army Book 11
Target Effect Skimmer, Flier or other in-the-air thing Save at –2 TSM or smash into the ground.
Ground unit smaller than a superheavy If the Doomdiver has Snap Fired, the target stops movment and then faces any direction the Ork player chooses. Otherwise no effect.
Really big thing (superheavy or larger) No effect Evil Sunz Bowelburna: Fast attack vehicle armed with a scorcher. This weapons uses the large teardrop template and Ignore Cover. Evil Sunz Gobsmasha: Fast attack vehicle armed with an autocannon. Evil Sunz Spleenrippa: Extremely fast vehicle armed with a large blastacannon. Flakwagon: To bolster their air defense the Mekboys modified the Wartrack, fitting it with AA guns. Goff Gutrippa: This is a modified Lungbursta chassis equipped with deadly claws to improve Close Combat capabilities while sacrificing long range weaponry. Goff Lungbursta: This is the Goff’s main battle tank. Scorcher: This is a variant of the Wartrak whose weapon has been substituted for a flamethrower device called a Scorcher. This weapon uses the small teardrop template and Ignores Cover. Snakebite Cyberwyvern: These mechanicly-enhanced flying monstrocities are half-crazed with pain and the other half with rage at their Snotling riders. If they are on Fall Back Orders they will move 25 cm in a random direction and attack the first thing in their path. They are Skimmers. Snakebite Squiggoth: The Snakebite Clan breeds’ huge monstrous beats that carry a howdah fitted with archaic cannons. Squiggoths go into a mad rampage when they are mortally wounded. To represent this, when a Squiggoth is hit and fails its armor save, roll a scatter die. On a “HIT” the Squiggoth dies on the spot, and on an arrow the Squiggoth rampages 2D6 cm before dying. Any infantry it runs over are hit on 4+ with 0 TSM. Trukk: A smaller, cheaper version of the Battlewagon, the Trukk is the vehicle of choice for the Ork who wants to feel the wind in his ears. Trukks are Open-Topped and may transport 2 infantry stands. Warbuggy: The War Buggy is a small, open four-wheeled vehicle crewed by a driver and a gunner, mounting a multimelta or other heavy weapon on a swivel mount. War Buggy crews are admired for their reckless driving and wild bravado as they charge into battle. They have the Tow ability. Wartrack: Like the War Buggy, the Wartrak is a mobile artillery unit with a crew of two. It mounts a single las-cannon or other heavy weapon, and consists of a bike-style front attached to a tracked artillery platform. It is better armored than the War Buggy, and is more often used against enemy tanks or vehicles. They have the Tow ability.
Mekboy Vehicles All Mekboy vehicles possess special devices to protect themselves but these do not always work correctly. To represent this the Mekboy vehicles saving throw is variable. Each time a model is required to make an armor save it must roll a D6 to determine its saving throw. On a roll of 1-2 = 1+ Armor Save, 3-4 = 2+ Armor Save, 5-6 = 3+ Armor Save. Roll each time the vehicle is hit, not each turn. Thus a Mekboy vehicle may have several different saves in a turn depending on how many times it is attacked. Mekboy vehicles have elaborate propulsion devices for greater speed, adding 2D6 cm to their base move. This bonus is doubled (4D6) when the Mekboy vehicle is on Charge Orders. Mekboy Bubble Chukka Speedsta: This strange device shoots a compact force field that envelops enemy weapons and makes any shots rebound on the firer usually with devastating results. When activating the Bubble Chuka to fire, nominate a target and place the scatter die next to it. If the target has a hit location template, nominate one weapon. If the target attempts to fire later this turn, roll the scatter die and consult the table below. Shields have no effect.
NetEpic 5.0 Ork Army Book 12
Hit
All the attacks of the weapon rebound and hit the firing model automatically. In the case of hit location targets the shot hits the weapon that fired with no scatter roll required. Since the shot is rebounded close to the firing weapon shield protection never comes into play, therefore no shields are lost nor do they protect the target from it’s own weapons.
Arrow The bubble did not work and the weapon fires normally. Mekboy Destrukta Rokkits Speedsta: These fire a Kustom Destruktor Rokkits barrage. The weapon may only be fired at models in line of sight (cannot be fired indirectly). Roll the artillery die to give number of barrage points in the attack. A Misfire means that the Speedsta must make a save at -2 TSM or be destroyed. Mekboy Dragsta: This vehicle emanates a powerful force field that rebounds shots that trace their fire through it. Mekboy Dragstas do not have a variable saving throw, but do enjoy the extra speed from custom engines. The Deflektor field has a 6 cm radius (use the large barrage template). Whenever any shot traces its path through the field and hits it’s target, roll the scatter die:
Hit The origional target is hit as normal.
Arrow The shot is deflected from the edge of the field in the direction indicated and travels the remainder of it’s maximum range or until it hits something. Work out damage as normal. Barrages are deflected 4D6 cm in the indicated direction.
Barrages can be fired over the field but anything fired through the field will be deflected. Models can fire out from within the field with no penalty. The field cannot protect titans or praetorians since they are too large. Weapons that ignore shields will automatically penetrate this shield. Dragsta fields may not overlap and if this occurs during the battle, both will cease to function until the models are again far enough apart. Mekboy Kustom Kannon Speedsta: This mounts an autocannon with varying number of attacks. Roll the artillery die to give the number of attack dice this turn. Each shot hits on a 5+ with -2 TSM. A Misfire roll means that a shell exploded in the breach and the Speedsta is hit with a -2 TSM. If the Speedsta survives it can fire normally next turn. Mekboy Lifta-Droppa Speedsta: This weapon uses power field energy to encase and lift the target off the ground. The Orks then cut the power so that the victim falls to the ground and is destroyed. The Mekboys have some limited control as to where to move the lifted model thus hopefully making it fall on another target, destroying both. Roll to hit the nominated target and on a 4+ you hit at -4 TSM. If the target fails its Armor Save, it is lifted into the air and can be dropped anywhere within 6 cm. Place the dropped model in the desired location and scatter it 2D6 cm. The falling victim is always destroyed, and anything it lands on is destroyed unless it’s saving throw is better than that of the model that fell on it. The area of effect of the drop is equal to the size of the model that is dropped. Models with a hit location template cannot be picked up but can have models dropped on them. Shielded models lose a shield if hit, or will suffer a normal hit if no shields are operating. Determine the location as normal, and the location is damaged unless the save for the area is better than the save of the dropped model. Buildings can be damaged if hit by a superheavy vehicle that has been picked up.
Light Artillery Hop Splat Gun: This strange artillery piece fires a shell that bounces several times before finally stopping, inflicting casualties on every bounce. If the Hop Splat is out of the Nob Command radius it will go on First Fire orders and fire at the nearest visible enemy unit. This unit may not move and shoot in the same turn and may not fire indirect barrages. To fire the barrage, place a barrage template on the intended target and work out damage as per any other barrage, then scatter the template 3D6 cm and work out damage again, finally, scatter 3D6 from the second point and work out damage a third time. The energy of the attack is then expended and no further attacks occur. The Hop Splat battery can be towed into battle as normal. Vehicles may unlimber Hop Splats as normal, or they may choose to let them go at any point in the towing vehicle’s move. However, Orks are quite fond of unlimbering Hop Splats by simply knocking the coupling bolt out while the towing vehicle is moving at full speed. This can be hazardous, particularly to the gun crew. If the artillery is unlimbered during the towing vehicle’s move, the artillery bounces 2D6 cm in a random direction. If it bounces into a vehicle, infantry or other small-to-medium object, both are hit on a 4+ with 0 TSM. If it bounces into a titan, praetorian, building or other other immovable obstacle, the Hop-Splat is destroyed.
NetEpic 5.0 Ork Army Book 13
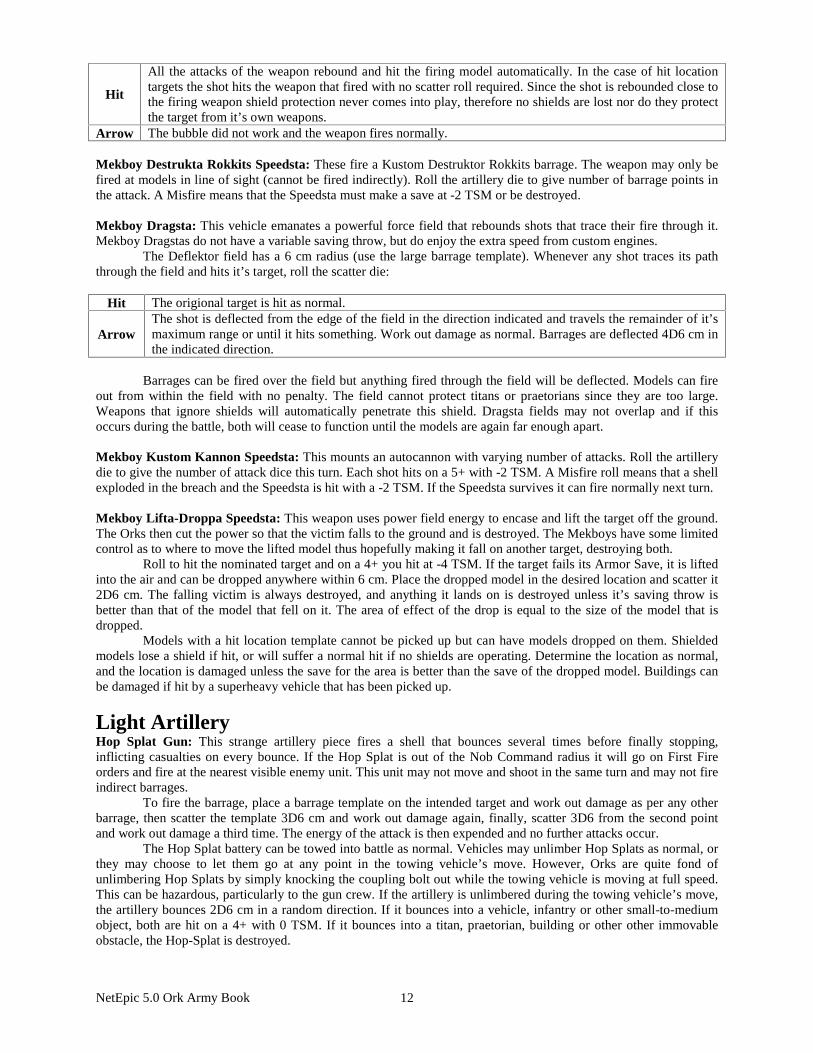
Lobba: Mekboys have duplicated the cream of 15th century artillery! An unfortunate Gretchen is strapped to a large explosive charge and chukked at the enemy. When the excited Gretchen sees the enemy getting close he detonates the charge, creating an air-burst effect. Shokk Attack Gun: This strange device opens a controlled warp gate that permits Snotlings to be teleported close to a target. The Snotlings become crazed and violent when subjected to the warp and viciously attack the nearest model. With some luck, the warp tunnel opens inside the target with disastrous results for the victim. Although this is a light artillery piece, it may not be towed. This weapon can only be fired if on First Fire orders. Nominate any target within line of sight (unlimited range) and roll a scatter die and 2D6, and consult the following table:
Hit + Double Target destroyed with no save. Pick a location on a hit location template and scatter normally, then roll for damage to that location.
Hit + Other
Fight a round of Close Combat with target. Roll 2D6 for the Snotling Close Combat score, the target makes a normal combat roll (2D6+CAF). If target wins it cannot shoot for the rest of the turn. If the target can be pinned by infantry stands, the target counts as having already fought one opponent in Close Combat.
Arrow The Snotlings appear 2D6 cm in the indicated direction. The Snotlings attack the closest model within 5 cm (friend or foe) as above. If there is no model within 5 cm there is no effect.
Zzap Gun: A heavy-duty laser on wheels.
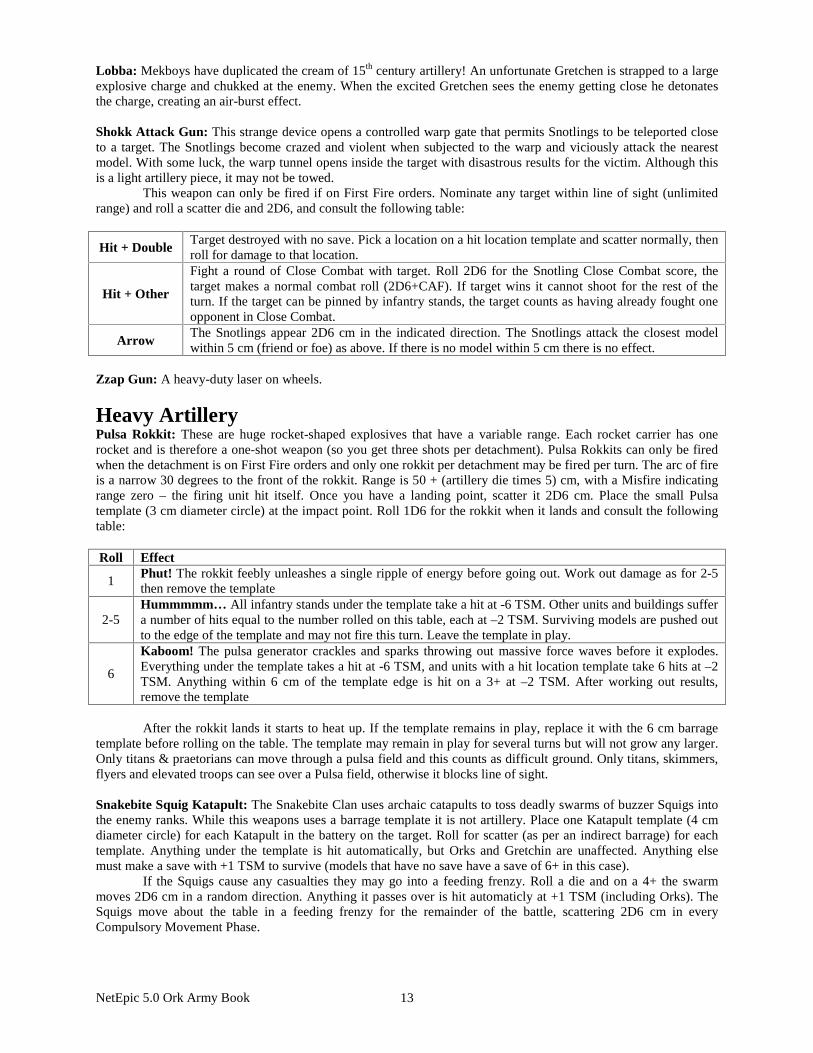
Heavy Artillery Pulsa Rokkit: These are huge rocket-shaped explosives that have a variable range. Each rocket carrier has one rocket and is therefore a one-shot weapon (so you get three shots per detachment). Pulsa Rokkits can only be fired when the detachment is on First Fire orders and only one rokkit per detachment may be fired per turn. The arc of fire is a narrow 30 degrees to the front of the rokkit. Range is 50 + (artillery die times 5) cm, with a Misfire indicating range zero – the firing unit hit itself. Once you have a landing point, scatter it 2D6 cm. Place the small Pulsa template (3 cm diameter circle) at the impact point. Roll 1D6 for the rokkit when it lands and consult the following table: Roll Effect
1 Phut! The rokkit feebly unleashes a single ripple of energy before going out. Work out damage as for 2-5 then remove the template
2-5 Hummmmm… All infantry stands under the template take a hit at -6 TSM. Other units and buildings suffer a number of hits equal to the number rolled on this table, each at –2 TSM. Surviving models are pushed out to the edge of the template and may not fire this turn. Leave the template in play.
6
Kaboom! The pulsa generator crackles and sparks throwing out massive force waves before it explodes. Everything under the template takes a hit at -6 TSM, and units with a hit location template take 6 hits at –2 TSM. Anything within 6 cm of the template edge is hit on a 3+ at –2 TSM. After working out results, remove the template
After the rokkit lands it starts to heat up. If the template remains in play, replace it with the 6 cm barrage template before rolling on the table. The template may remain in play for several turns but will not grow any larger. Only titans & praetorians can move through a pulsa field and this counts as difficult ground. Only titans, skimmers, flyers and elevated troops can see over a Pulsa field, otherwise it blocks line of sight. Snakebite Squig Katapult: The Snakebite Clan uses archaic catapults to toss deadly swarms of buzzer Squigs into the enemy ranks. While this weapons uses a barrage template it is not artillery. Place one Katapult template (4 cm diameter circle) for each Katapult in the battery on the target. Roll for scatter (as per an indirect barrage) for each template. Anything under the template is hit automatically, but Orks and Gretchin are unaffected. Anything else must make a save with +1 TSM to survive (models that have no save have a save of 6+ in this case). If the Squigs cause any casualties they may go into a feeding frenzy. Roll a die and on a 4+ the swarm moves 2D6 cm in a random direction. Anything it passes over is hit automaticly at +1 TSM (including Orks). The Squigs move about the table in a feeding frenzy for the remainder of the battle, scattering 2D6 cm in every Compulsory Movement Phase.

NetEpic 5.0 Ork Army Book 14
Soopa Gun: This is a gigantic titan-killer gun devised by Mekboyz to engage those pesky heavily armored targets. Traktor Kannon: Using force field technology, this fiendish Ork device uses its energy to immobilize and sometimes destroy enemy models. Roll to hit and on a 5+ the target takes a hit at -1 TSM. If the target fails its save, roll a D6 on the table below. Add +1 if the target has no basic save.
1-5 Immobilized: the model may do nothing next turn. 6+ Squashed: the model is destroyed.
Shields offer no protection against this attack, but a target with a hit location template may use the highest saving throw from any of its areas to save against the effects. Units with a hit location template roll for damage to a random location. A Traktor Kannon may only hold a single target at any one time, but if it maintains the same target for a second turn simply have the target make a save – no To-Hit roll is necessary. Trapped models may be fired at, but in all other respects are consitered destroyed; e.g. for coherency, Break Points, Chain of Command, etc. If they are engaged in Close Combat they do not roll dice and simply use their base CAF. Their shields work normally but repairs and raising shields may not be attempted. Rokkit Barrage: Orks love big explosions that wreak havoc of the battlefield, better yet if it happens on top of their enemies. To aid the effect of their great variety of weapons on the ground, they sometimes fire volleys of rockets from their makeshift spaceships in the orbit. As they lack sophisticated targeting equipment and expert observers, these shots go rather erratic and more often than not hit their own troops, which is considered as a great joke by the Mekboys firing the rounds. As Ork ground troops do not have any forward observers trained for the job, Warbosses and Warlords call in these barrages. These calls must abide by the general rules on the artillery barrages (see Core Rules) and are subject to the restrictions imposed by the Forward Observer rules given in the Off-Table Barrage rules. However, as the Warbosses and Warlords lack targeting expertise, the barrages directed by them scatter 3D6 centimetres (“Drop a big’un on yonder humies! ...Koord wot? You wanna keep yourz earz Mekboy, stop asking thingz an’ drop it NOW!”)
Fliers Bomma: After flying the fighta-bommas, some Orcs wanted bigger explosions and added more guns. Fighta-Boma: Mekboys of the Kult of Speed, unsatisfied with the speeds attained by their ground vehicles, have designed flyers to challenge Imperial air superiority. These are Independent units and armed with the following: Kustom Destruktor Rokkits: Roll the artillery die to give number of barrage points in the attack. A Misfire roll means that the rokkits fail to fire this turn. Kustom Kannon: Roll the artillery die to give the number of attack dice this turn, each hitting on a 5+ at -2 TSM. A Misfire means that a shell exploded in the breach and the Fighta-Bomma is hit at -2 TSM. Landa: After seeing the effectiveness of Thunderhawk Gunships, the Orks decided to come up with their own version of the craft. However, in typical Ork style, it isn't the most reliable of craft. Landas may Deep Strike and land in any Compulsory Movement Phase. Place the model anywhere on the table, and roll both the Scatter and Artillery dice. Once on the ground, Landas may not move again and act as fire support for local troops. They are Independent, and are destroyed if they fail a Morale check. They may Transport 7. Artillery Die Scatter Die What Happens
HIT Landa is on target. Number
Arrow Double the scatter distance rolled on the dice.
MISFIRE Anything Landa is on target, but has crashed. On a 4+ the units inside are shaken but may still deploy as a HIT (above). Otherwise the Landa is lost with all hands.
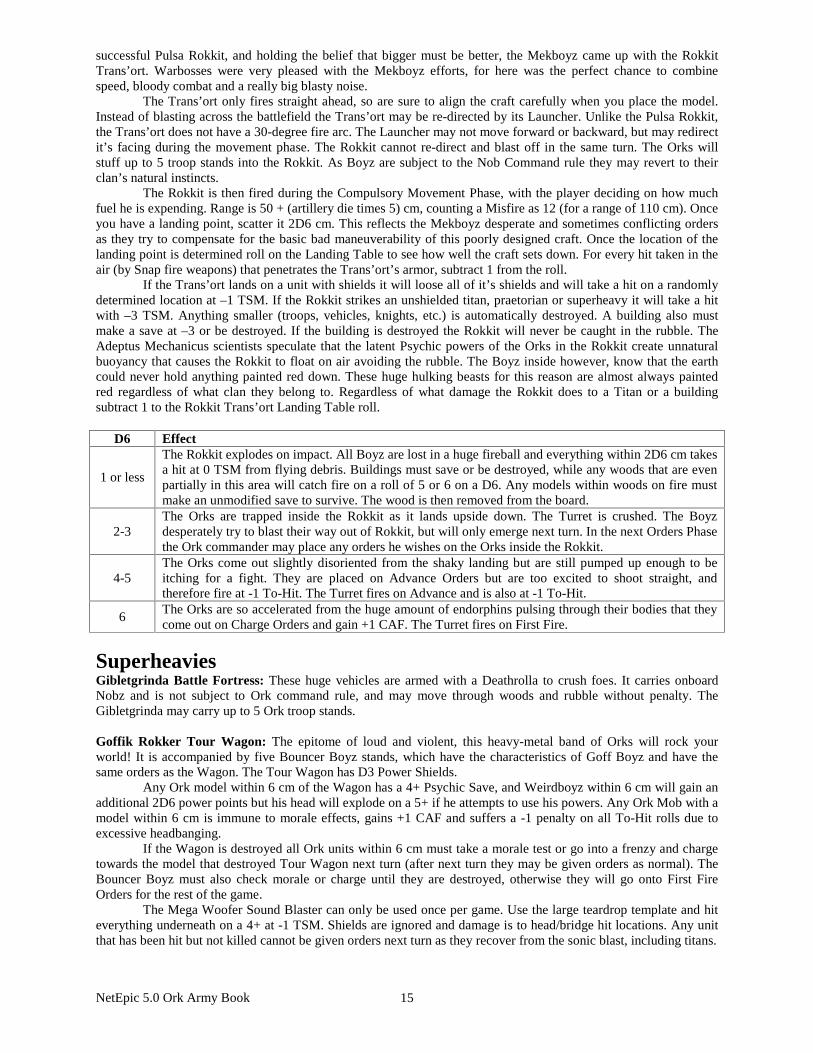
Supa Rokkit Trans’ort: The Ork love of great speed is known across the galaxy. They find immense pleasure in accelerating out across vast distances in short amounts of time. Speediness is best mixed with some good head smashing however, and Orks favored modes of transportation get them into the fray as soon as possible. After seeing Thunder Hawk Gunship streaking across the sky and deposit their Humie cargo right into the thick of it, Warbosses were quick to order their Mekboyz into building something equally effective. After experimenting on transporting Gretchen and Snotlings, the Boyz finally came up with a structure sound enough to get a large amount of Orks across the battlefield, most of the time. Expanding on the moderately
NetEpic 5.0 Ork Army Book 15
successful Pulsa Rokkit, and holding the belief that bigger must be better, the Mekboyz came up with the Rokkit Trans’ort. Warbosses were very pleased with the Mekboyz efforts, for here was the perfect chance to combine speed, bloody combat and a really big blasty noise. The Trans’ort only fires straight ahead, so are sure to align the craft carefully when you place the model. Instead of blasting across the battlefield the Trans’ort may be re-directed by its Launcher. Unlike the Pulsa Rokkit, the Trans’ort does not have a 30-degree fire arc. The Launcher may not move forward or backward, but may redirect it’s facing during the movement phase. The Rokkit cannot re-direct and blast off in the same turn. The Orks will stuff up to 5 troop stands into the Rokkit. As Boyz are subject to the Nob Command rule they may revert to their clan’s natural instincts. The Rokkit is then fired during the Compulsory Movement Phase, with the player deciding on how much fuel he is expending. Range is 50 + (artillery die times 5) cm, counting a Misfire as 12 (for a range of 110 cm). Once you have a landing point, scatter it 2D6 cm. This reflects the Mekboyz desperate and sometimes conflicting orders as they try to compensate for the basic bad maneuverability of this poorly designed craft. Once the location of the landing point is determined roll on the Landing Table to see how well the craft sets down. For every hit taken in the air (by Snap fire weapons) that penetrates the Trans’ort’s armor, subtract 1 from the roll. If the Trans’ort lands on a unit with shields it will loose all of it’s shields and will take a hit on a randomly determined location at –1 TSM. If the Rokkit strikes an unshielded titan, praetorian or superheavy it will take a hit with –3 TSM. Anything smaller (troops, vehicles, knights, etc.) is automatically destroyed. A building also must make a save at –3 or be destroyed. If the building is destroyed the Rokkit will never be caught in the rubble. The Adeptus Mechanicus scientists speculate that the latent Psychic powers of the Orks in the Rokkit create unnatural buoyancy that causes the Rokkit to float on air avoiding the rubble. The Boyz inside however, know that the earth could never hold anything painted red down. These huge hulking beasts for this reason are almost always painted red regardless of what clan they belong to. Regardless of what damage the Rokkit does to a Titan or a building subtract 1 to the Rokkit Trans’ort Landing Table roll.
D6 Effect
1 or less
The Rokkit explodes on impact. All Boyz are lost in a huge fireball and everything within 2D6 cm takes a hit at 0 TSM from flying debris. Buildings must save or be destroyed, while any woods that are even partially in this area will catch fire on a roll of 5 or 6 on a D6. Any models within woods on fire must make an unmodified save to survive. The wood is then removed from the board.
2-3 The Orks are trapped inside the Rokkit as it lands upside down. The Turret is crushed. The Boyz desperately try to blast their way out of Rokkit, but will only emerge next turn. In the next Orders Phase the Ork commander may place any orders he wishes on the Orks inside the Rokkit.
4-5 The Orks come out slightly disoriented from the shaky landing but are still pumped up enough to be itching for a fight. They are placed on Advance Orders but are too excited to shoot straight, and therefore fire at -1 To-Hit. The Turret fires on Advance and is also at -1 To-Hit.
6 The Orks are so accelerated from the huge amount of endorphins pulsing through their bodies that they come out on Charge Orders and gain +1 CAF. The Turret fires on First Fire.
Superheavies Gibletgrinda Battle Fortress: These huge vehicles are armed with a Deathrolla to crush foes. It carries onboard Nobz and is not subject to Ork command rule, and may move through woods and rubble without penalty. The Gibletgrinda may carry up to 5 Ork troop stands. Goffik Rokker Tour Wagon: The epitome of loud and violent, this heavy-metal band of Orks will rock your world! It is accompanied by five Bouncer Boyz stands, which have the characteristics of Goff Boyz and have the same orders as the Wagon. The Tour Wagon has D3 Power Shields. Any Ork model within 6 cm of the Wagon has a 4+ Psychic Save, and Weirdboyz within 6 cm will gain an additional 2D6 power points but his head will explode on a 5+ if he attempts to use his powers. Any Ork Mob with a model within 6 cm is immune to morale effects, gains +1 CAF and suffers a -1 penalty on all To-Hit rolls due to excessive headbanging. If the Wagon is destroyed all Ork units within 6 cm must take a morale test or go into a frenzy and charge towards the model that destroyed Tour Wagon next turn (after next turn they may be given orders as normal). The Bouncer Boyz must also check morale or charge until they are destroyed, otherwise they will go onto First Fire Orders for the rest of the game. The Mega Woofer Sound Blaster can only be used once per game. Use the large teardrop template and hit everything underneath on a 4+ at -1 TSM. Shields are ignored and damage is to head/bridge hit locations. Any unit that has been hit but not killed cannot be given orders next turn as they recover from the sonic blast, including titans.
NetEpic 5.0 Ork Army Book 16
Mega-Squiggoth: These are gigantic monsters much larger than the standard Squiggoth. They do not roll on the Superheavy Damage table, but instead have 3 wounds. They may transport 6 infantry stands and are Open-Topped, so the transported stands may fire out in any direction. Every time the Mega-Squiggoth loses a wound it must pass a morale check or immediately go on a rampage in a random direction. It will move its maximum charge distance (30 cm) and engage the first unit it encounters in Close Combat. Skullhamma Battle Fortress: This is another of the Orkish superheavy vehicles and this one has troop carrier capabilities as well as impressive speed. It is not subject to the Ork command rule (onboard Nob), but is not a command unit in. When on Charge Orders it can move up to triple rate (i.e. up to 45 cm). It may carry up to 5 stands. Stomper: These are miniature versions of Gargants. These are armed with various Close Combat and potent long-range cannons. Stompers ignore any morale tests they would normally be forced to take.
NetEpic 5.0 Ork Army Book 17
Gargants Gargants are the titans of the Ork armies. They are large, fat war machines walking on short legs, lacking the agility of Imperial and Eldar Titans. Like many products of Orkoid military engineering, the Gargant relies on comparatively simple technology and devastatingly heavy firepower, an attitude summed up by Boss-Mek Badlug One-Leg in his oft-quoted dictum “S’gorra be dead shooty, wiv loadza gunz all over.” Gargant Power Fields Ork Gargants, with their inferior technology, use Power Fields to protect themselves from enemy fire in place of Imperial Titan Void Shields. As void shields, weapons must have a -1 TSM in order to be damaged when struck. Unlike void shields they cannot be repaired during battle. Ork technology is notoriously unreliable, and their generators have a tendency to momentarily flicker during combat. To represent this roll a D6 for each shot that hits. On a roll of a 6 the field flickers in the instant the shot was fired and thus hits the Gargant (roll for scatter, saves and damage as normal). The field that flickered remains in use, as it was not struck itself. Make this flicker roll for every shot that hits the Gargant before ignoring those with a TSM of zero - some of those might get through the shields and require an Armor Save. Ork Gargant Types There are four main types of Gargants: Great, Slasha, Mekboy and Mega-Gargants. The Slasha and the Great Gargants both carry a belly gun mount, typically occupied by the dreadful Gutbuster cannon. In addition, Slashas have 2 weapon mounts plus an optional head variant and Great Gargants have 4 weapons plus a head. These Gargants are purchased according to the Purchasing Titans rules in the Titans chapter of the Core Rules booklet. The gigantic Mega-Gargant and the hastily built Mekboy Gargant have fixed costs and are not bought by the Purchasing Titans rules. All Gargants are Independent models, and are not subject to the Nob Command rule.
Optional Rule: Big Mobz Big Mobz are battle groups for Orks, where you can have both Great Gargants and Slasha Gargants. Choose a mix of Great and Slasha hulls, and the most expensive model becomes the Boss Gargant and automatically receives a full compliment of power fields (12 in case of the Great Gargant). All Gargants in the Big Mobz must be within 25 cm of the Boss Gargant to receive orders for the turn. If the Boss Gargant is destroyed another takes it place in the following turn.
Gargant Weapon Descriptions Battle Cannon Head: Many Great Gargants carry a heavy, quick-fire battle cannon mounted in their heads. Adding a gun to the Gargant’s head means that fewer armor plates can be fitted, and those used are thinner. Because of this the saving throw for a battle cannon head is 1 point lower than that shown on the hit location template on the Gargant data sheet. Battle Cannon Turret: Battle cannons can be mounted on the upper shoulders (only) of Great Gargants. They represent a good long-range weapon with armor penetrating capability. Cluster Buster: This weapon can be fitted to Slasha Gargants only. It consists of a long armor-piercing gun surrounded by several smaller rapid-fire guns that fire in a tight cluster. When the main gun is fired the smaller guns fire as well in the same area, which is useful for scoring multiple hits on a large target like Titans/Praetorians or for breaking up mixed groups of vehicles and supporting infantry. Regardless of the main gun hits or not, place a barrage template centered over the target and roll To-Hit (from the smaller cluster guns) against targets under the template at 0 TSM. If the target is superheavy or larger roll To-Hit 6 times. Gork and Mork Heads: Gargants are the physical embodiment of the Ork gods. To emphasize their idol-like nature they are sometimes ornately designed. Gargants fitted with Gork or Mork heads inspire Ork units within 25 cm and these ignore any Morale checks they may be required to make. To have this head blown off the Gargant is very demoralizing and causes all Ork Mobz within 25 cm of the Gargant to immediately test morale regardless if it has reached it’s Break Point or not. The Mork head has a scorcher turret fitted on top. The Gork head is fitted with an observation turret and Traktor Kannons as eyes. All weapons on special Gargant heads have a 360° firing arc. Traktor Kannon: The weapon ignores all Shields, but Holo-fields function normally. Titans, praetorians & superheavies use the best armor value on their lit location templates. Models immobilized may not perform any
NetEpic 5.0 Ork Army Book 18
actions, and if engaged in Close Combat may only use their CAF value (e.g. they don’t get the 2D6 roll). Any model hit and failing to save must roll on the following table, adding +1 for models with no normal Armor Save.
1 – 4 Target is immobilized and may do nothing until next turn. 5+ Squashed! Target is destroyed.
Deth Kannon: This weapon is fitted on to Slasha Gargants to deal with heavily armed targets like titans and others. Gatling Cannon: This is a rapid-fire multi-barreled gun commonly mounted on Great Gargants. Do to the huge expenditures of ammunition only one of these may be fitted on any Great Gargant. GutBuster Mega-Cannon: This is a huge cannon that may fire an array of specialized ammunition. It is loaded one shot at a time so the Ork player must state (or write down) what type of shot is loaded at the start of the turn. This weapon, due to its lengthy loading process, can only be fired once every other turn. There are three types of shots: Ball-rounds are immense cannonballs. Place the special 3 cm template over your target and roll for scatter as for an indirect barrage (note that this may only be fired if target is in line of sight, and it always scatters). Anything under the template is automatically hit and must save at a -4 modifier. After the location of the template is determined the cannonball will roll 4 D6 cm (use the special rolling ball template for this) along the line of fire (directly away from the Gargant). Any model in the ball's path will be struck automatically and must save with a -4 modifier. Moreover, if fired at a titan or passing over it’s base, the ball-round blows down all its shields and continues its way to destruction. Chainshot consists of two or more medium sized projectiles linked together by heavy chains, which spread out like bolas when fired. These only damage humanoid-shaped titans (e.g. things with legs), and has not affect on other models. An eligible target hit with this weapon receives an automatic damage to the leg location (no save) and +3 is added to the damage roll. Unfortunately any intervening terrain between the Gargant and the target will block the shot. Therefore a clear line of sight is needed for this weapon to work. High Explosive rounds are huge cannon shells packed with hundreds of pounds of explosive. The large 12 cm template is used for the attack. The blast is less effective against armored opponents; to represent this model may add +1 to their armor saves against this attack (assuming they have a save to begin with of course). Magnum Mega-Cannon: This is an enormous gun fitted on the lower arm mounts of Great Gargants. The firing mechanism is similar to the GutBuster, but it fires two different types of shots: Armor piercing shells (Klangerz) and high explosive shots (Bangerz). Observation Turret: The turret is packed with all sorts of “Orky” devices to enable the Gargant crew to target the enemy better. A Gargant fitted with this weapon may add +1 to all To-Hit rolls against one target each turn. This bonus applies to the weapons fired by the Gargant. Ripper Fist: This is a motorized saw blade with a huge cannon attached to it. A Gargant armed with this weapon receives an +1D6 CAF and adds +2 to damage rolls. This weapon may not be used as a Close Combat weapon and a ranged weapon in the same turn. Scorcher Turret: These turrets fire long gout of flame that ignores cover modifiers. Slasha Attack Gun: This weapon is only fitted on the Slasha Gargant. It has a high rate of fire and shoots hefty explosive shells. Due to the prodigious amounts of ammunition it consumes only one per model may be fitted. Snapper: This weapon is a mechanical jaw powered by a reinforced boiler in the Gargants Belly. When it opens, a high-pressure steam pipe spouts out boiling fluid and masses of super-heated steam. The Snapper may make a special grab attack if it wins Close Combat instead of rolling for normal damage. If the player selects to make a grab attack, he must select a location (from the hit location chart) and roll a D6 with a +2 modifier. The defending player also rolls a D6, but with no modifiers. If the player making the grab attacks scores higher, the location the player selected receives maximum damage (the most damaging result). If the result is a tie the defender has slipped out of the grasp, but receives normal damage (resolve normally by rolling once on the damage table for that location). If the defenders score is higher, it has broken free and receives no damage. Gargants in base-to-base contact with buildings may elect, in addition to normal attacks, to hit the building once. The building must make a save with a -4 modifier or be destroyed. The Snapper’s boiler provides the Gargant with extra movement. It can add 1D6 cm to movement on Advance Orders and 3D6 on Charge Orders. Roll for the extra movement every time the Gargant moves.
NetEpic 5.0 Ork Army Book 19
The Snapper can also fire a blast of super heated steam. To represent this use the special triangular shaped template for this. All models under the template are hit on a 2+ and models hit must make an unmodified saving throw to survive. This weapon ignores cover modifiers. Supa Lifta-Droppa: Great, Mekboy and Mega-Gargants may be fitted with this shoulder-mounted weapon. Place a barrage template within 75 cm and line of sight, and any models under the template are hit on a 4+ with a -4 TSM. Models that fail their save are lifted and may be "dropped" on another model within 6 cm. Place each dropped model in the desired location and scatter it 2D6 cm. The falling victim is always destroyed, and anything it lands on is destroyed unless it’s saving throw is better than that of the model that fell on it. The area of effect of the drop is equal to the size of the model that is dropped. Models with a hit location template (titans & praetorians) cannot be picked up but can have models dropped on them. Shielded models lose a shield if hit, or will suffer a normal hit if no shields are operating. Determine the location as normal (the Ork player chooses a location and rolls for scatter), and the location is damaged unless the save for the area is better than the save of the dropped model. Buildings can be damaged if hit by a superheavy vehicle that has been picked up. The building must make an unmodified armor save or be damaged.

NetEpic 5.0 Ork Army Book 20
Weapon Costs
Location Description Who Can Use It * Cost Deth Cannon S 85 Gatling Cannon G 75 Magnum Mega Cannon G 85 Ripper Fist G, S 65 Slasha Attack Gun S 75
Arm
Supa Lifta-Droppa G 75 Cluster Buster S 65 Gutbuster G, S 100 Centerline Snapper G, S 25 Battle Cannon Head G 65
Head Gork/Mork Head G, S 50 Battle Cannon Turret G 50 Observation Turret G 50 Turret Scorcher Turret G 25 Magna Kannon ** G, S 50
Anti-Aircraft Flak Kannon ** G, S 35
* G = Great Gargant, S = Slasha Gargant ** Optional unit. These require the consent of all players to use.
Weapon Summary Weapon Range Attack Dice To-Hit TSM Notes Battle Cannon Head 75 cm 2 4+ -2 Head Armor reduced by 1 Cluster Buster 75 cm 1 4+ -2 Use the barrage template at 0 TSM Deth Kannon 100 cm 1 3+ -3 Penetrating +2 Gatling Cannon 50 cm 8 5+ -1 No more then one per model
Gork Head Traktor Kannon 50 cm 2 4+ -2 Orks within 25 cm ignore morale tests. Carries observation turret.
Mork Head with Scorcher 35 cm 2 3+ 0 Ignores Cover GutBuster Ball 100 cm Template Auto -4 Special Gutbuster Chain 75 cm 1 3+ NA Only affects titans Gutbuster Explosive 100 cm 8 BP 3+ +1 Use 12 cm template Magnum Mega-Cannon Klanger 100 cm 1 3+ -3 Magnum Mega-Cannon Banger 75 cm 8 BP 3+ 0 Fires barrage. May not indirect fire. Observation Turret Adds +1 to all To-Hit rolls versus one target Ripper Fist 75 cm 2 4+ -2 +1D6 CAF, Penetrating +2 Scorcher Turret 35 cm 2 3+ 0 Ignores Cover Slasha Attack Gun 50 cm 5 4+ -2 No more than one per model Snapper Special - 2+ 0 Use special triangular template Supa Lifta-Droppa 75 cm Template 4+ -4 Special Magna Kannon LOS 1 5+ 0 AA, always on FF against Flyers. Flak Kannon 50 2 5+ -1 AA, always on FF against Flyers.

NetEpic 5.0 Ork Army Book 21
Great Gargant Template
Move CAF Shields Notes 0-10 cm on Advance 11-15 cm on Charge
+15 6 + D6 Power Fields If given Charge orders, the Gargant must move towards the nearest enemy.
Weapon Slot Range Attack Dice To-Hit TSM Notes
Right Arm Right Shoulder Left Arm Left Shoulder
Ball 100 cm Template Auto -4 Special Chain 75 cm 1 3+ NA Only affects titans Gutbuster Explosive 100 cm 8 BP 3+ +1 Use 12 cm template
FRONT SIDE REAR
Weapon 2+
Head 2+
Weapon
2+ Weapon
2+ Weapon
2+ Head 2+
Weapon
2+
Weapon 2+
Ammo 1+
Hull 3+
Ammo 1+
Weapon 2+
Hull 3+
Weapon 2+
Hull 3+
Weapon
2+ Ammo
1+ Hull 3+
Ammo 1+
Weapon 2+
Weapon 2+
Hull 3+
Hull 3+
Hull 3+
Weapon 2+
Hull 3+
Weapon 3+
Hull 3+
Weapon
2+ Hull 3+
Hull 3+
Hull 3+
Weapon 2+
Hull 3+
Boiler 2+
Hull 3+
Hull 3+
Boiler 3+
Hull 3+
Hull 3+
Boiler 3+
Hull 3+
Foot 3+
Hull 3+
B.Gun 3+
Hull 3+
Foot 3+
Hull 3+
Foot 3+
B.Gun 3+
B.Gun 3+
Foot 3+
Hull 3+
Hull 3+
Hull 3+
Foot 3+
Head Belly Gun 1-2 Add +1 to future damage rolls against the head. 1-2 Add +1 to future damage rolls against the belly gun. 3 Kaptin killed. The Gargant must follow the same orders next
turn while the krew “elects” a new Kaptin. 3-5 The gun is destroyed and may not be used for the rest of the
game, and the explosion starts a fire. 4 The head is blown off the Gargant, starting a fire. It must
follow the same orders as it used last turn, and any weapons mounted in the head may not be used for the remainder of the battle. After the next turn, you must roll a 4+ before changing the Gargant’s orders.
5-6 The magazine explodes, starting 1D3 fires. The gun is destroyed and the explosion rips into the boiler, so roll for damage against it as well. After you have made this extra damage roll, immediately total up all the fires on the Gargant and roll on the Fire Table.
Foot Boiler 1-3 Add +1 to any future damage rolls against this foot. 1-2 Add +1 to future damage rolls against the boiler. 4-5 Foot is destroyed. If the other foot is intact, the Gargant may
turn in place. If both are destroyed it may not move at all. 3-4 The boiler is holed and starts to lose pressure. The Gargant’s
move rates are halved from now on. 6 The foot is blown apart and starts a fire. The Gargant may no
longer move or turn even if the other foot is undamaged. 5-6 The boiler is destroyed, and a fire is started. The Gargant
may no longer move.
Weapon Magazine 1-2 Add +1 to any future damage rolls against this weapon. 1-3 3-4 Weapon destroyed.
A large explosion starts a fire. Roll on the Fire Table immediately.
5-6 The weapon is blown off the Gargant, starting a fire. It lands 2D6 cm away in a random direction. Any vehicles or infantry underneath it take a hit at 0 TSM.
4-6 The magazine detonates spectacularly, starting 1D3 fires. Roll for damage against the Weapon location as well. After you have rolled this damage, immediately total up all the fires on the Gargant and roll on the Fire Table.
Fire Table: Roll on this table as required and at the start of the End Phase if any fires are burning. Add +1 to the roll for each fire burning on the Gargant in excess of one. Results last until the next roll is made on the fire table
1-3 With a few scorched Gretchin the fires are brought under control and put out. 4-5 The fire is getting out of control. The Gargant may not move, but may fire normally. 6 The fire is out of control! Add one to the number of fires already burning. The Gargant may not move or fire its belly gun, and any
other weapons fired are on a -1 To-Hit modifier due to the clouds of smoke. 7 The fire reaches the magazines! Roll on the Magazine Damage Table for each intact magazine. The Gargant also can’t move or fire its
belly gun and suffers -1 on firing as in 4 above. 8 Huge internal explosions wreck the Gargant destroying it and leaving a smoking, blackened heap. All units within 2D6 cm are hit by
the flying debris and must make an unmodified save to avoid damage 9+ A massive explosion rips the Gargant apart. Remove the model from the table and replace it with a crater if you’ve got one. Any units
within 4D6 cm are hit by the flying debris and must make an unmodified save to avoid damage
NetEpic 5.0 Ork Army Book 22
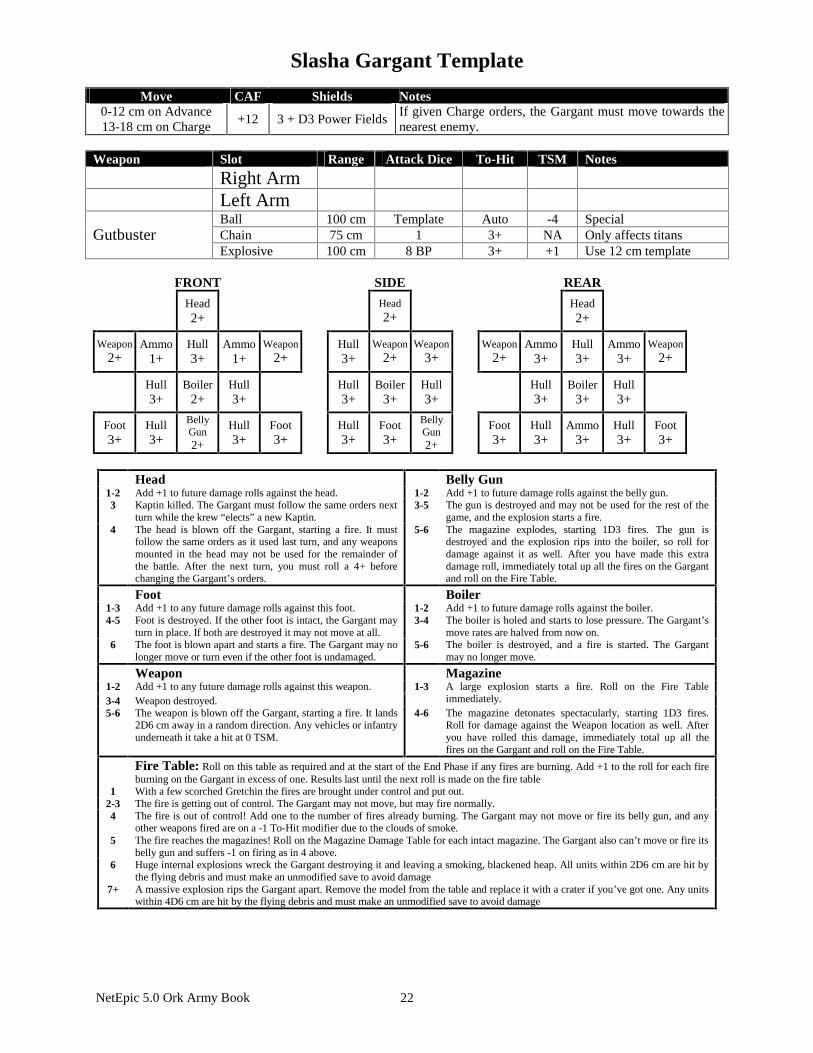
Slasha Gargant Template
Move CAF Shields Notes 0-12 cm on Advance 13-18 cm on Charge
+12 3 + D3 Power Fields If given Charge orders, the Gargant must move towards the nearest enemy.
Weapon Slot Range Attack Dice To-Hit TSM Notes
Right Arm Left Arm
Ball 100 cm Template Auto -4 Special Chain 75 cm 1 3+ NA Only affects titans Gutbuster Explosive 100 cm 8 BP 3+ +1 Use 12 cm template
FRONT SIDE REAR
Head 2+
Head 2+
Head 2+
Weapon 2+
Ammo 1+
Hull 3+
Ammo 1+
Weapon 2+
Hull 3+
Weapon 2+
Weapon 3+
Weapon 2+
Ammo 3+
Hull 3+
Ammo 3+
Weapon 2+
Hull 3+
Boiler 2+
Hull 3+
Hull 3+
Boiler 3+
Hull 3+
Hull 3+
Boiler 3+
Hull 3+
Foot 3+
Hull 3+
Belly Gun 2+
Hull 3+
Foot 3+
Hull 3+
Foot 3+
Belly Gun 2+
Foot 3+
Hull 3+
Ammo 3+
Hull 3+
Foot 3+
Head Belly Gun 1-2 Add +1 to future damage rolls against the head. 1-2 Add +1 to future damage rolls against the belly gun. 3 Kaptin killed. The Gargant must follow the same orders next
turn while the krew “elects” a new Kaptin. 3-5 The gun is destroyed and may not be used for the rest of the
game, and the explosion starts a fire. 4 The head is blown off the Gargant, starting a fire. It must
follow the same orders as it used last turn, and any weapons mounted in the head may not be used for the remainder of the battle. After the next turn, you must roll a 4+ before changing the Gargant’s orders.
5-6 The magazine explodes, starting 1D3 fires. The gun is destroyed and the explosion rips into the boiler, so roll for damage against it as well. After you have made this extra damage roll, immediately total up all the fires on the Gargant and roll on the Fire Table.
Foot Boiler 1-3 Add +1 to any future damage rolls against this foot. 1-2 Add +1 to future damage rolls against the boiler. 4-5 Foot is destroyed. If the other foot is intact, the Gargant may
turn in place. If both are destroyed it may not move at all. 3-4 The boiler is holed and starts to lose pressure. The Gargant’s
move rates are halved from now on. 6 The foot is blown apart and starts a fire. The Gargant may no
longer move or turn even if the other foot is undamaged. 5-6 The boiler is destroyed, and a fire is started. The Gargant
may no longer move.
Weapon Magazine 1-2 Add +1 to any future damage rolls against this weapon. 1-3 3-4 Weapon destroyed.
A large explosion starts a fire. Roll on the Fire Table immediately.
5-6 The weapon is blown off the Gargant, starting a fire. It lands 2D6 cm away in a random direction. Any vehicles or infantry underneath it take a hit at 0 TSM.
4-6 The magazine detonates spectacularly, starting 1D3 fires. Roll for damage against the Weapon location as well. After you have rolled this damage, immediately total up all the fires on the Gargant and roll on the Fire Table.
Fire Table: Roll on this table as required and at the start of the End Phase if any fires are burning. Add +1 to the roll for each fire burning on the Gargant in excess of one. Results last until the next roll is made on the fire table
1 With a few scorched Gretchin the fires are brought under control and put out. 2-3 The fire is getting out of control. The Gargant may not move, but may fire normally. 4 The fire is out of control! Add one to the number of fires already burning. The Gargant may not move or fire its belly gun, and any
other weapons fired are on a -1 To-Hit modifier due to the clouds of smoke. 5 The fire reaches the magazines! Roll on the Magazine Damage Table for each intact magazine. The Gargant also can’t move or fire its
belly gun and suffers -1 on firing as in 4 above. 6 Huge internal explosions wreck the Gargant destroying it and leaving a smoking, blackened heap. All units within 2D6 cm are hit by
the flying debris and must make an unmodified save to avoid damage 7+ A massive explosion rips the Gargant apart. Remove the model from the table and replace it with a crater if you’ve got one. Any units
within 4D6 cm are hit by the flying debris and must make an unmodified save to avoid damage
NetEpic 5.0 Ork Army Book 23
The Mekboy Gargant Mekboyz sometimes construct miniature versions of Great Gargants that feature many kustom weapons and fields. A Mekboy Gargant has a Kustom Force Field and may select any two Mekboy weapons. Mekboy Gargants are not purchased according to the Purchasing Titans rules: you pay for it and there it is. The cost is fixed regardless of weapons selected, as they have been deemed of the same effectiveness and cost. Kustom Force Field This is a special, sustained power field. While the field is operational the Mekboy Gargant is impervious to damage. At the start of each turn in the Orders Phase you may choose to shut down the field, but once shut down it remains so for the rest of the game. Every turn that the field is on there is a chance that it will overload and shut down permanently. Roll a D6 in the End Phase of each turn it is functional, and on a roll of 10 or more the field overheats and causes damage. An additional D6 is added each turn (2D6 in the second turn, 3D6 in the third, and so on) to make this check. If 10 or more is rolled, roll immediately for damage in the Force Field Generator hit location and apply the results. Mekboy Gargants destroyed this way earn VPs to the opponent in the same turn the check was made. Weapons that bypass shield will also penetrate this shield without affecting it. In case of a vortex missile the field is inactive while it remains in the area of effect of the vortex blast. As with other Ork shields the Kustom Force Field also flickers on a roll of 6 on a D6. For every hit, roll a D6 and on a 6 the shot ignores the shield and hits the Gargant as normal. Mekboy Gargant Weapons: Pick 2 Supa Lifta-Droppa: Follows the same rules as the standard Gargant weapon. Krusher Arm: This is a Close Combat weapon designed to knock down buildings and smash Titans, with an attached ranged weapon. It may not fire and be used as a Close Combat weapon in the same turn. Vs. Titans: If the Mega-Gargant wins Close Combat, it may make a grab attack. Both players roll a D6 and the Mega-Gargant adds +1 to the roll. If the Mega-Gargant scores higher it has ripped off the desired location and the enemy Titan suffers the highest result on the damage table. If the scores are equal roll for damage to the enemy Titan as normal. If the Mega-Gargant scores lower the enemy Titan has pulled away and suffers no damage. Vs. Vehicles: The Mega-Gargant may pick up and throw the enemy vehicle up to 10 cm. Pick a location and roll for scatter as per an indirect barrage. The falling victim is always destroyed, and anything it lands on is destroyed unless it’s saving throw is better than the model that fell on it. Vs. Buildings: If the Mega-Gargant is in contact with a building during the Close Combat segment, it may make a free attack on the building with a -4 TSM. If the building fails its save it is destroyed. A Mega-Gargant may not use this free attack if it is engaged in Close Combat – it can still attack the building, but must dedicate the arm to the attack. Buzz Saw Arm: This is a Close Combat weapon that adds +D6 CAF and also +2 to the damage roll. This weapon also has a ranged weapon but may not fire and be used in Close Combat in the same turn Deluxe Kustom Kannon: Roll artillery die to give the number of attack dice for the shot. A misfire means that a shell explodes in the breach and the Mekboy Gargant must roll for damage immediately on the weapons damage table and apply the result. Weapon Range Attack Dice To-Hit TSM Notes Supa Lifta-Droppa 75 cm Template 4+ -4 Special Buzz Saw Arm 50 cm 3 5+ -1 +D6 CAF, Penetrating +2 Krusher Arm 50 cm 2 5+ 0 Use as Close Combat or ranged weapon Deluxe Kustom Kannon 50 cm Varies 4+ -2 Roll artillery die for # of shots.
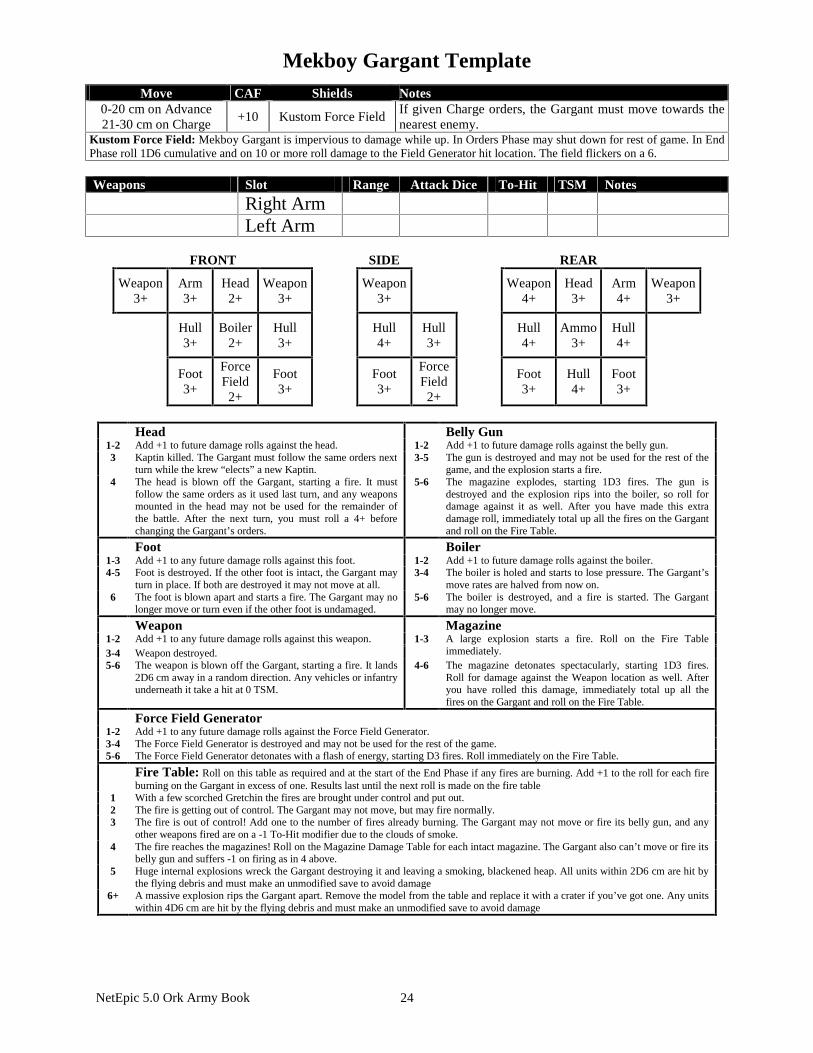
NetEpic 5.0 Ork Army Book 24
Mekboy Gargant Template
Move CAF Shields Notes 0-20 cm on Advance 21-30 cm on Charge
+10 Kustom Force Field If given Charge orders, the Gargant must move towards the nearest enemy.
Kustom Force Field: Mekboy Gargant is impervious to damage while up. In Orders Phase may shut down for rest of game. In End Phase roll 1D6 cumulative and on 10 or more roll damage to the Field Generator hit location. The field flickers on a 6. Weapons Slot Range Attack Dice To-Hit TSM Notes
Right Arm Left Arm
FRONT SIDE REAR
Weapon 3+
Arm 3+
Head 2+
Weapon 3+
Weapon
3+
Weapon 4+
Head 3+
Arm 4+
Weapon 3+
Hull 3+
Boiler 2+
Hull 3+
Hull 4+
Hull 3+
Hull 4+
Ammo 3+
Hull 4+
Foot 3+
Force Field 2+
Foot 3+
Foot 3+
Force Field 2+
Foot 3+
Hull 4+
Foot 3+
Head Belly Gun 1-2 Add +1 to future damage rolls against the head. 1-2 Add +1 to future damage rolls against the belly gun. 3 Kaptin killed. The Gargant must follow the same orders next
turn while the krew “elects” a new Kaptin. 3-5 The gun is destroyed and may not be used for the rest of the
game, and the explosion starts a fire. 4 The head is blown off the Gargant, starting a fire. It must
follow the same orders as it used last turn, and any weapons mounted in the head may not be used for the remainder of the battle. After the next turn, you must roll a 4+ before changing the Gargant’s orders.
5-6 The magazine explodes, starting 1D3 fires. The gun is destroyed and the explosion rips into the boiler, so roll for damage against it as well. After you have made this extra damage roll, immediately total up all the fires on the Gargant and roll on the Fire Table.
Foot Boiler 1-3 Add +1 to any future damage rolls against this foot. 1-2 Add +1 to future damage rolls against the boiler. 4-5 Foot is destroyed. If the other foot is intact, the Gargant may
turn in place. If both are destroyed it may not move at all. 3-4 The boiler is holed and starts to lose pressure. The Gargant’s
move rates are halved from now on. 6 The foot is blown apart and starts a fire. The Gargant may no
longer move or turn even if the other foot is undamaged. 5-6 The boiler is destroyed, and a fire is started. The Gargant
may no longer move.
Weapon Magazine 1-2 Add +1 to any future damage rolls against this weapon. 1-3 3-4 Weapon destroyed.
A large explosion starts a fire. Roll on the Fire Table immediately.
5-6 The weapon is blown off the Gargant, starting a fire. It lands 2D6 cm away in a random direction. Any vehicles or infantry underneath it take a hit at 0 TSM.
4-6 The magazine detonates spectacularly, starting 1D3 fires. Roll for damage against the Weapon location as well. After you have rolled this damage, immediately total up all the fires on the Gargant and roll on the Fire Table.
Force Field Generator 1-2 Add +1 to any future damage rolls against the Force Field Generator. 3-4 The Force Field Generator is destroyed and may not be used for the rest of the game. 5-6 The Force Field Generator detonates with a flash of energy, starting D3 fires. Roll immediately on the Fire Table.
Fire Table: Roll on this table as required and at the start of the End Phase if any fires are burning. Add +1 to the roll for each fire burning on the Gargant in excess of one. Results last until the next roll is made on the fire table
1 With a few scorched Gretchin the fires are brought under control and put out. 2 The fire is getting out of control. The Gargant may not move, but may fire normally. 3 The fire is out of control! Add one to the number of fires already burning. The Gargant may not move or fire its belly gun, and any
other weapons fired are on a -1 To-Hit modifier due to the clouds of smoke. 4 The fire reaches the magazines! Roll on the Magazine Damage Table for each intact magazine. The Gargant also can’t move or fire its
belly gun and suffers -1 on firing as in 4 above. 5 Huge internal explosions wreck the Gargant destroying it and leaving a smoking, blackened heap. All units within 2D6 cm are hit by
the flying debris and must make an unmodified save to avoid damage 6+ A massive explosion rips the Gargant apart. Remove the model from the table and replace it with a crater if you’ve got one. Any units
within 4D6 cm are hit by the flying debris and must make an unmodified save to avoid damage
NetEpic 5.0 Ork Army Book 25
The Mega-Gargant Mega-Gargants come with fixed weapons and are not purchased according to the Purchasing Titans rules: you pay for one and there it is. A special data card and set of counters are used for operating the Mega-Gargant. These items should be available at the same place you got this book, but the following rules should get you by. Set Up Power Field Counter: The Mega-Gargant starts the battle with D6+6 operational power fields. Place the Power Field counter on the appropriate numbered space on the track. Hull Damage Counters: These represent accumulated damage on the hull. As damage is built up the chance being destroyed increases. Place these to the side, as the Mega-Gargant is undamaged at the start of the game. Krew Counters: These represent the various infantry troop types which man the Mega-Gargant. The various systems of the Mega-Gargant must be crewed in order to function. The effects of empty squad boxes are noted on the Mega-Gargant datacard. At the beginning of the game place the Kapitan counter in the Bridge section of the datacard. Next, select tokens for four each of Boyz, Nobz and Riggers and randomly draw nine of them. This is your starting Krew and are placed in the boiler room, gun decks, and guardroom at the player’s discretion. There are four types of krew: Kapitan: The Kapitan is the Warboss of the Mega-Gargant. You always get one Kapitan. Riggers: Squads of Gretchin that fight fires and repair damage to the Mega-Gargant. Boyz: Troops which operate the guns and movement functions as well as repel boarders. Nobz: Nobz are used to order around the other crew, fire weapons, repel boarders and lead Mobz if they dismount from the Mega-Gargant. Shouting Counters: These represent special orders given by the Kapitan, and you start the game with D3 of them at random. There is only one of each and it may only be used once. You may play one shouting counter per turn. Waaagh: This counter is played during the Close Combat segment. When played all the Orks on the Mega-Gargant are filled with the 'Waaagh!' For the rest of the turn roll one extra dice for any Close Combats fought by the Mega-Gargant itself and the Boyz and Nobz in the krew. Additionally, for the rest of the turn all firing by the Mega-Gargant and the krew suffers a -1 To-Hit penalty. Let ‘em ‘ave it! This counter can be played during the Combat Phase. When played the Mega-Gargant can fire one segment earlier than it normally would. E.g. if the Mega-Gargant were going to fire in the Advance Fire segment it could now fire in the First Fire segment. Any To-Hit penalties for the Mega-Gargant’s speed are applied as normal. Full Zoggin' Speed Ahead: This counter can only be played in the Movement Phase before the Mega-Gargant moves. The Mega-Gargant immediately moves 3D6 cm and can make one 45° turn to port or starboard regardless of its speed and direction orders, even if it is on stop orders. There is no penalty to firing for this movement. Mega-Gargant Weapons Gun Decks: Each gun deck location on the data card that is not occupied by a Boyz or Nobz stand, or has become damaged or destroyed, reduces the attack dice by two. Turrets: Each point of hull damage reduces the attack dice by one. Skullcrusha Mega-Cannon: The Skullcrusha can fire two types of ammunition: Bangerz and Klangerz. It fires a variable number of shots per turn, represented by the artillery die. Declare the ammunition you want to fire, roll the artillery, and if the result is a number then that is number of shots fired. If the result is a misfire the cannon cannot be fired this turn, but will function normally next turn. Bangerz: All templates fired must touch at least one other template fired in the barrage. This weapon cannot be fired indirectly. Modifiers for the Mega-Gargant's movement do not apply to to-hit rolls for barrages. Klangerz: These fire as normal and are affected by all modifiers including the Mega-Gargant's speed. Krusher Arm: This is a Close Combat weapon designed to knock down buildings and smash Titans. Vs. Titans: If the Mega-Gargant wins Close Combat, it may make a grab attack. Both players roll a D6 and the Mega-Gargant adds +1 to the roll. If the Mega-Gargant scores higher it has ripped off the desired location and
NetEpic 5.0 Ork Army Book 26
the enemy Titan suffers the highest result on the damage table. If the scores are equal roll for damage to the enemy Titan as normal. If the Mega-Gargant scores lower the enemy Titan has pulled away and suffers no damage. Vs. Vehicles: The Mega-Gargant may pick up and throw the enemy vehicle up to 10 cm. Pick a location and roll for scatter as per an indirect barrage. The falling victim is always destroyed, and anything it lands on is destroyed unless it’s saving throw is better than the model that fell on it. Vs. Buildings: If the Mega-Gargant is in contact with a building during the Close Combat segment, it may make a free attack on the building with a -4 TSM. If the building fails its save it is destroyed. A Mega-Gargant may not use this free attack if it is engaged in Close Combat – it can still attack the building, but must dedicate the arm to the attack. Mega Weapons: Roll D3 in the Combat Phase to see how many Mega-Weapons may fire. 1. Big Lobba: Fires a massive barrage. Roll the artillery die to determine the strength of the barrage: A number indicates the barrage points of the attack; a misfire indicates the shell has gone off in the weapon - roll once on the Damage Table for the weapon adding +1 if the Mega-Gargant moved at all this turn. The strength of the attack is so great it ignores cover, is –2 TSM versus normal targets and -4 TSM versus buildings and fortifications. The barrage must be placed within line of sight, cannot be fired indirectly and has a minimum range of 25 cm. 2. Weirdboy Tower: Fires physical psychic bolts. The tower has one attack die for every Krew on board. 3. Krooz Missulls: The Mega-Gargant only caries two Krooz Missulls, and only one may be fired per turn. The Krooz Missull may be fired at any target within range, as long as at least one Ork stand can see it. This does not count as calling in an indirect barrage, and the template will not scatter. Mekboy Weapons: There are two Mekboy weapons on the Mega-Gargant, but only one may be fired per turn 1. Deth Ray: Fires a powerful beam of energy that ignores void and power shields 2. Supa Lifta-Droppa: Follows the same rules as the standard Gargant weapon.
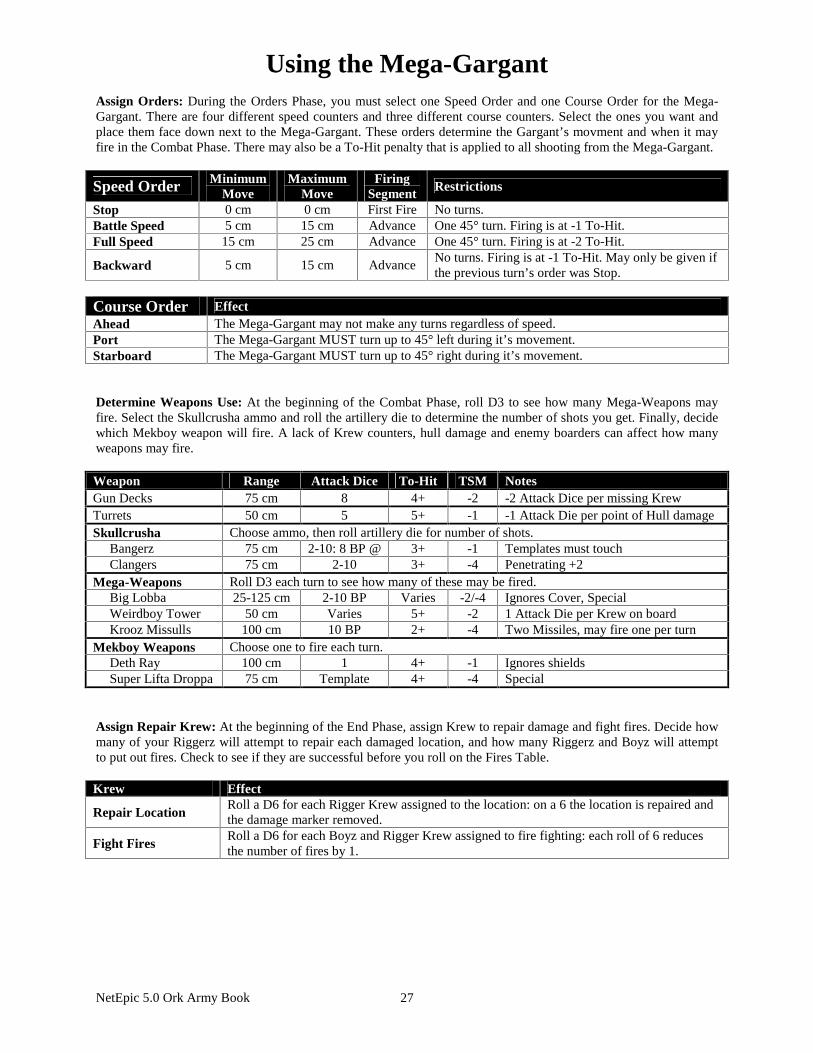
NetEpic 5.0 Ork Army Book 27
Using the Mega-Gargant Assign Orders: During the Orders Phase, you must select one Speed Order and one Course Order for the Mega-Gargant. There are four different speed counters and three different course counters. Select the ones you want and place them face down next to the Mega-Gargant. These orders determine the Gargant’s movment and when it may fire in the Combat Phase. There may also be a To-Hit penalty that is applied to all shooting from the Mega-Gargant.
Speed Order Minimum Move
Maximum Move
Firing Segment Restrictions
Stop 0 cm 0 cm First Fire No turns. Battle Speed 5 cm 15 cm Advance One 45° turn. Firing is at -1 To-Hit. Full Speed 15 cm 25 cm Advance One 45° turn. Firing is at -2 To-Hit.
Backward 5 cm 15 cm Advance No turns. Firing is at -1 To-Hit. May only be given if the previous turn’s order was Stop.
Course Order Effect Ahead The Mega-Gargant may not make any turns regardless of speed. Port The Mega-Gargant MUST turn up to 45° left during it’s movement. Starboard The Mega-Gargant MUST turn up to 45° right during it’s movement. Determine Weapons Use: At the beginning of the Combat Phase, roll D3 to see how many Mega-Weapons may fire. Select the Skullcrusha ammo and roll the artillery die to determine the number of shots you get. Finally, decide which Mekboy weapon will fire. A lack of Krew counters, hull damage and enemy boarders can affect how many weapons may fire. Weapon Range Attack Dice To-Hit TSM Notes Gun Decks 75 cm 8 4+ -2 -2 Attack Dice per missing Krew Turrets 50 cm 5 5+ -1 -1 Attack Die per point of Hull damage Skullcrusha Choose ammo, then roll artillery die for number of shots. Bangerz 75 cm 2-10: 8 BP @ 3+ -1 Templates must touch Clangers 75 cm 2-10 3+ -4 Penetrating +2 Mega-Weapons Roll D3 each turn to see how many of these may be fired. Big Lobba 25-125 cm 2-10 BP Varies -2/-4 Ignores Cover, Special Weirdboy Tower 50 cm Varies 5+ -2 1 Attack Die per Krew on board Krooz Missulls 100 cm 10 BP 2+ -4 Two Missiles, may fire one per turn Mekboy Weapons Choose one to fire each turn. Deth Ray 100 cm 1 4+ -1 Ignores shields Super Lifta Droppa 75 cm Template 4+ -4 Special Assign Repair Krew: At the beginning of the End Phase, assign Krew to repair damage and fight fires. Decide how many of your Riggerz will attempt to repair each damaged location, and how many Riggerz and Boyz will attempt to put out fires. Check to see if they are successful before you roll on the Fires Table. Krew Effect
Repair Location Roll a D6 for each Rigger Krew assigned to the location: on a 6 the location is repaired and the damage marker removed.
Fight Fires Roll a D6 for each Boyz and Rigger Krew assigned to fire fighting: each roll of 6 reduces the number of fires by 1.
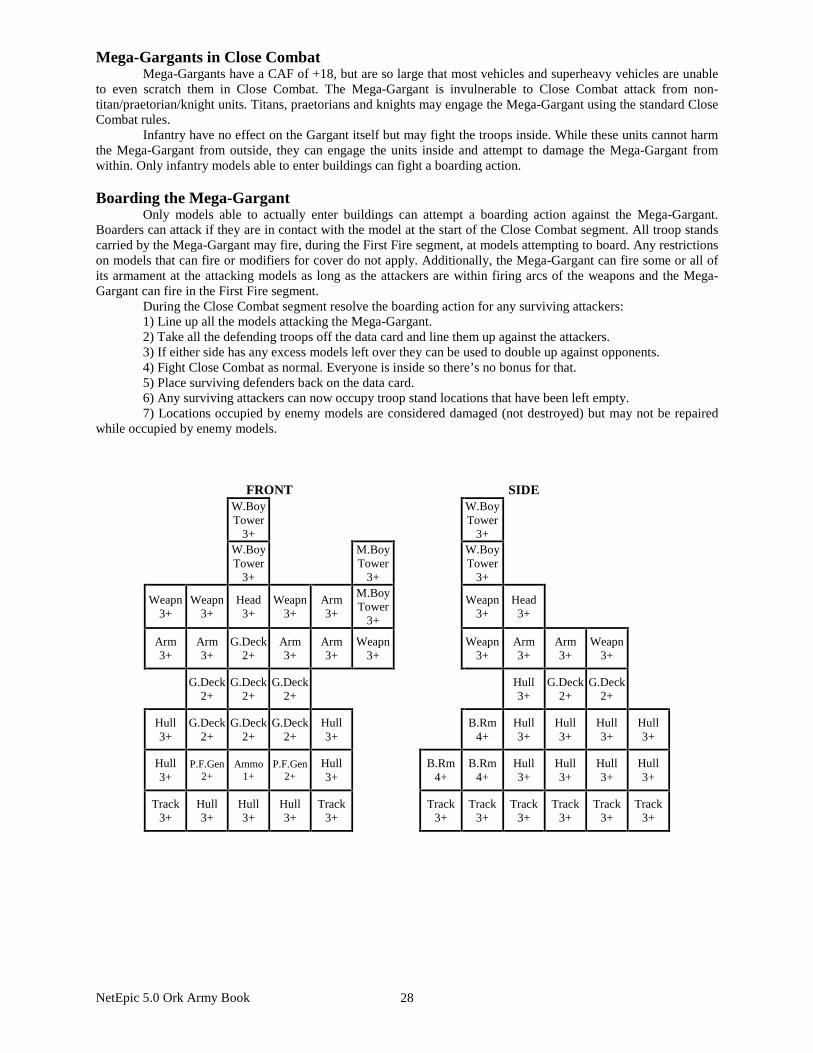
NetEpic 5.0 Ork Army Book 28
Mega-Gargants in Close Combat Mega-Gargants have a CAF of +18, but are so large that most vehicles and superheavy vehicles are unable to even scratch them in Close Combat. The Mega-Gargant is invulnerable to Close Combat attack from non-titan/praetorian/knight units. Titans, praetorians and knights may engage the Mega-Gargant using the standard Close Combat rules. Infantry have no effect on the Gargant itself but may fight the troops inside. While these units cannot harm the Mega-Gargant from outside, they can engage the units inside and attempt to damage the Mega-Gargant from within. Only infantry models able to enter buildings can fight a boarding action. Boarding the Mega-Gargant Only models able to actually enter buildings can attempt a boarding action against the Mega-Gargant. Boarders can attack if they are in contact with the model at the start of the Close Combat segment. All troop stands carried by the Mega-Gargant may fire, during the First Fire segment, at models attempting to board. Any restrictions on models that can fire or modifiers for cover do not apply. Additionally, the Mega-Gargant can fire some or all of its armament at the attacking models as long as the attackers are within firing arcs of the weapons and the Mega-Gargant can fire in the First Fire segment. During the Close Combat segment resolve the boarding action for any surviving attackers: 1) Line up all the models attacking the Mega-Gargant. 2) Take all the defending troops off the data card and line them up against the attackers. 3) If either side has any excess models left over they can be used to double up against opponents. 4) Fight Close Combat as normal. Everyone is inside so there’s no bonus for that. 5) Place surviving defenders back on the data card. 6) Any surviving attackers can now occupy troop stand locations that have been left empty. 7) Locations occupied by enemy models are considered damaged (not destroyed) but may not be repaired while occupied by enemy models.
FRONT SIDE
W.Boy Tower
3+
W.Boy Tower
3+
W.Boy Tower
3+
M.Boy Tower
3+
W.Boy Tower
3+
Weapn 3+
Weapn 3+
Head 3+
Weapn 3+
Arm 3+
M.Boy Tower
3+
Weapn 3+
Head 3+
Arm 3+
Arm 3+
G.Deck 2+
Arm 3+
Arm 3+
Weapn 3+
Weapn
3+ Arm 3+
Arm 3+
Weapn 3+
G.Deck
2+ G.Deck
2+ G.Deck
2+
Hull 3+
G.Deck 2+
G.Deck 2+
Hull 3+
G.Deck 2+
G.Deck 2+
G.Deck 2+
Hull 3+
B.Rm
4+ Hull 3+
Hull 3+
Hull 3+
Hull 3+
Hull 3+
P.F.Gen 2+
Ammo 1+
P.F.Gen 2+
Hull 3+
B.Rm
4+ B.Rm
4+ Hull 3+
Hull 3+
Hull 3+
Hull 3+
Track 3+
Hull 3+
Hull 3+
Hull 3+
Track 3+
Track
3+ Track
3+ Track
3+ Track
3+ Track
3+ Track
3+
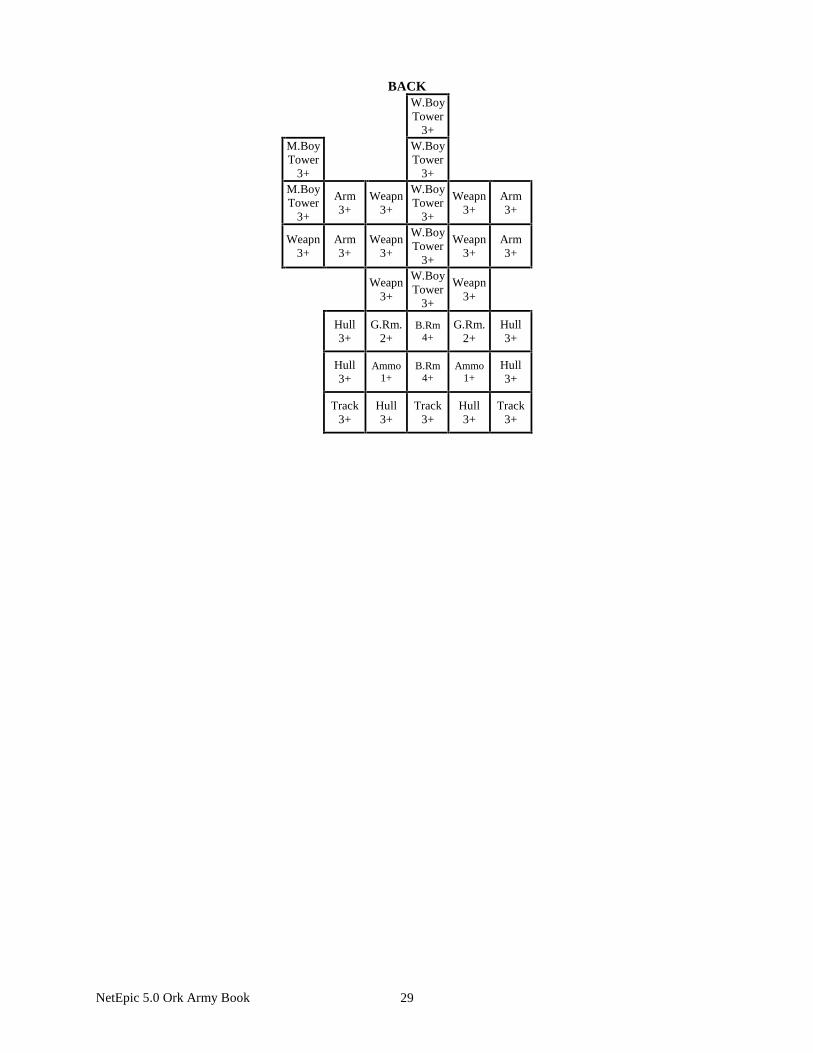
NetEpic 5.0 Ork Army Book 29
BACK
W.Boy Tower
3+
M.Boy Tower
3+
W.Boy Tower
3+
M.Boy Tower
3+
Arm 3+
Weapn 3+
W.Boy Tower
3+
Weapn 3+
Arm 3+
Weapn 3+
Arm 3+
Weapn 3+
W.Boy Tower
3+
Weapn 3+
Arm 3+
Weapn
3+
W.Boy Tower
3+
Weapn 3+
Hull 3+
G.Rm. 2+
B.Rm 4+
G.Rm. 2+
Hull 3+
Hull 3+
Ammo 1+
B.Rm 4+
Ammo 1+
Hull 3+
Track
3+ Hull 3+
Track 3+
Hull 3+
Track 3+
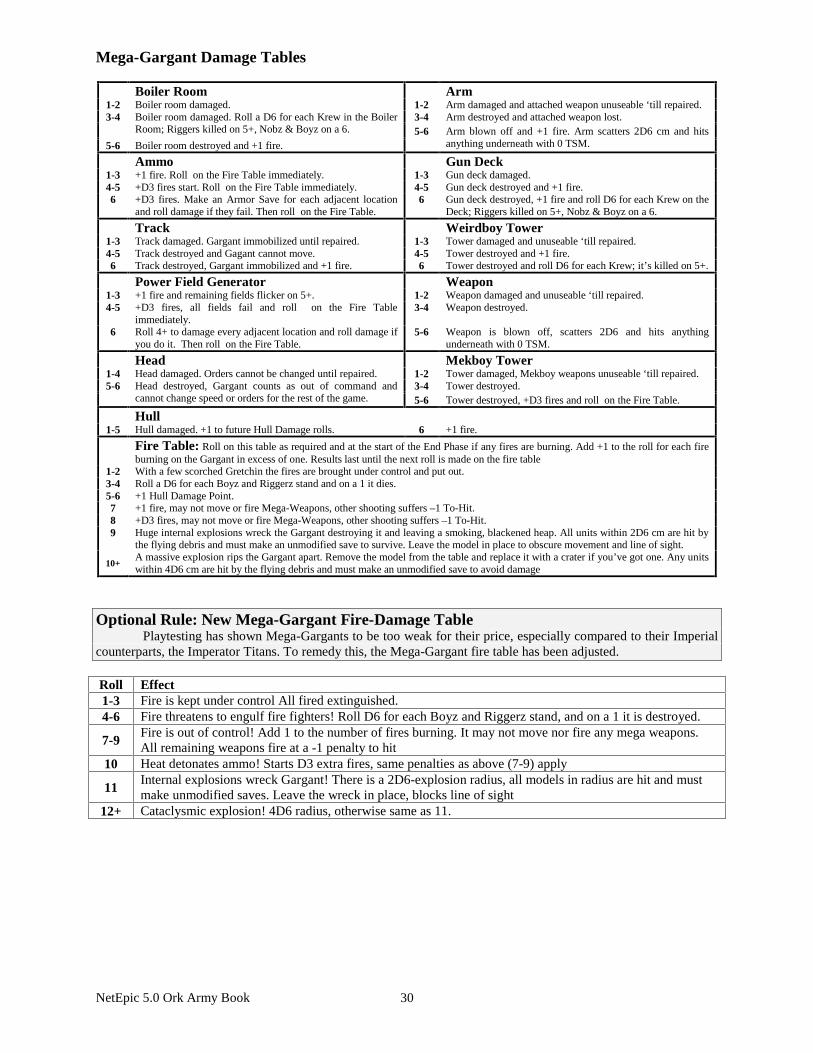
NetEpic 5.0 Ork Army Book 30
Mega-Gargant Damage Tables
Boiler Room Arm 1-2 Boiler room damaged. 1-2 Arm damaged and attached weapon unuseable ‘till repaired. 3-4 3-4 Arm destroyed and attached weapon lost.
Boiler room damaged. Roll a D6 for each Krew in the Boiler Room; Riggers killed on 5+, Nobz & Boyz on a 6. 5-6
5-6 Boiler room destroyed and +1 fire. Arm blown off and +1 fire. Arm scatters 2D6 cm and hits anything underneath with 0 TSM.
Ammo Gun Deck 1-3 +1 fire. Roll on the Fire Table immediately. 1-3 Gun deck damaged. 4-5 +D3 fires start. Roll on the Fire Table immediately. 4-5 Gun deck destroyed and +1 fire. 6 +D3 fires. Make an Armor Save for each adjacent location
and roll damage if they fail. Then roll on the Fire Table. 6 Gun deck destroyed, +1 fire and roll D6 for each Krew on the
Deck; Riggers killed on 5+, Nobz & Boyz on a 6.
Track Weirdboy Tower 1-3 Track damaged. Gargant immobilized until repaired. 1-3 Tower damaged and unuseable ‘till repaired. 4-5 Track destroyed and Gagant cannot move. 4-5 Tower destroyed and +1 fire. 6 Track destroyed, Gargant immobilized and +1 fire. 6 Tower destroyed and roll D6 for each Krew; it’s killed on 5+.
Power Field Generator Weapon 1-3 +1 fire and remaining fields flicker on 5+. 1-2 Weapon damaged and unuseable ‘till repaired. 4-5 +D3 fires, all fields fail and roll on the Fire Table
immediately. 3-4 Weapon destroyed.
6 Roll 4+ to damage every adjacent location and roll damage if you do it. Then roll on the Fire Table.
5-6 Weapon is blown off, scatters 2D6 and hits anything underneath with 0 TSM.
Head Mekboy Tower 1-4 Head damaged. Orders cannot be changed until repaired. 1-2 Tower damaged, Mekboy weapons unuseable ‘till repaired. 5-6 3-4 Tower destroyed.
Head destroyed, Gargant counts as out of command and cannot change speed or orders for the rest of the game. 5-6 Tower destroyed, +D3 fires and roll on the Fire Table.
Hull 1-5 Hull damaged. +1 to future Hull Damage rolls. 6 +1 fire.
Fire Table: Roll on this table as required and at the start of the End Phase if any fires are burning. Add +1 to the roll for each fire burning on the Gargant in excess of one. Results last until the next roll is made on the fire table
1-2 With a few scorched Gretchin the fires are brought under control and put out. 3-4 Roll a D6 for each Boyz and Riggerz stand and on a 1 it dies. 5-6 +1 Hull Damage Point. 7 +1 fire, may not move or fire Mega-Weapons, other shooting suffers –1 To-Hit. 8 +D3 fires, may not move or fire Mega-Weapons, other shooting suffers –1 To-Hit. 9 Huge internal explosions wreck the Gargant destroying it and leaving a smoking, blackened heap. All units within 2D6 cm are hit by
the flying debris and must make an unmodified save to survive. Leave the model in place to obscure movement and line of sight.
10+ A massive explosion rips the Gargant apart. Remove the model from the table and replace it with a crater if you’ve got one. Any units within 4D6 cm are hit by the flying debris and must make an unmodified save to avoid damage
Optional Rule: New Mega-Gargant Fire-Damage Table Playtesting has shown Mega-Gargants to be too weak for their price, especially compared to their Imperial counterparts, the Imperator Titans. To remedy this, the Mega-Gargant fire table has been adjusted. Roll Effect 1-3 Fire is kept under control All fired extinguished. 4-6 Fire threatens to engulf fire fighters! Roll D6 for each Boyz and Riggerz stand, and on a 1 it is destroyed.
7-9 Fire is out of control! Add 1 to the number of fires burning. It may not move nor fire any mega weapons. All remaining weapons fire at a -1 penalty to hit
10 Heat detonates ammo! Starts D3 extra fires, same penalties as above (7-9) apply
11 Internal explosions wreck Gargant! There is a 2D6-explosion radius, all models in radius are hit and must make unmodified saves. Leave the wreck in place, blocks line of sight
12+ Cataclysmic explosion! 4D6 radius, otherwise same as 11.
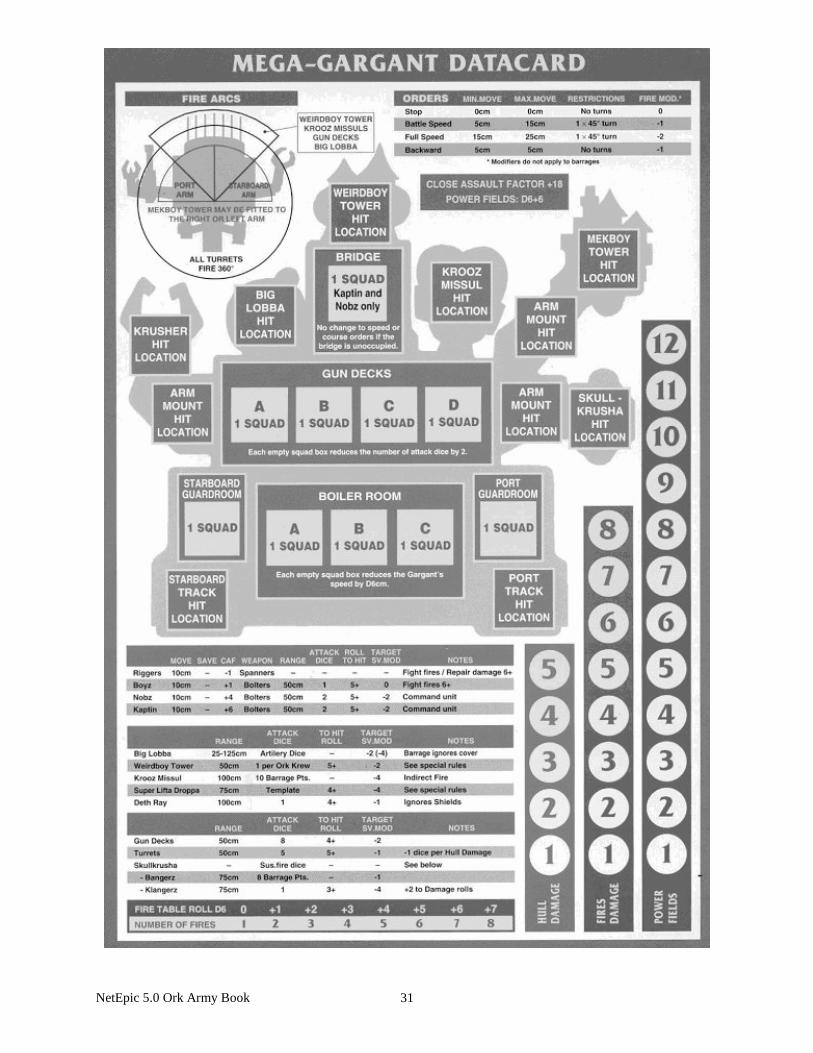
NetEpic 5.0 Ork Army Book 31
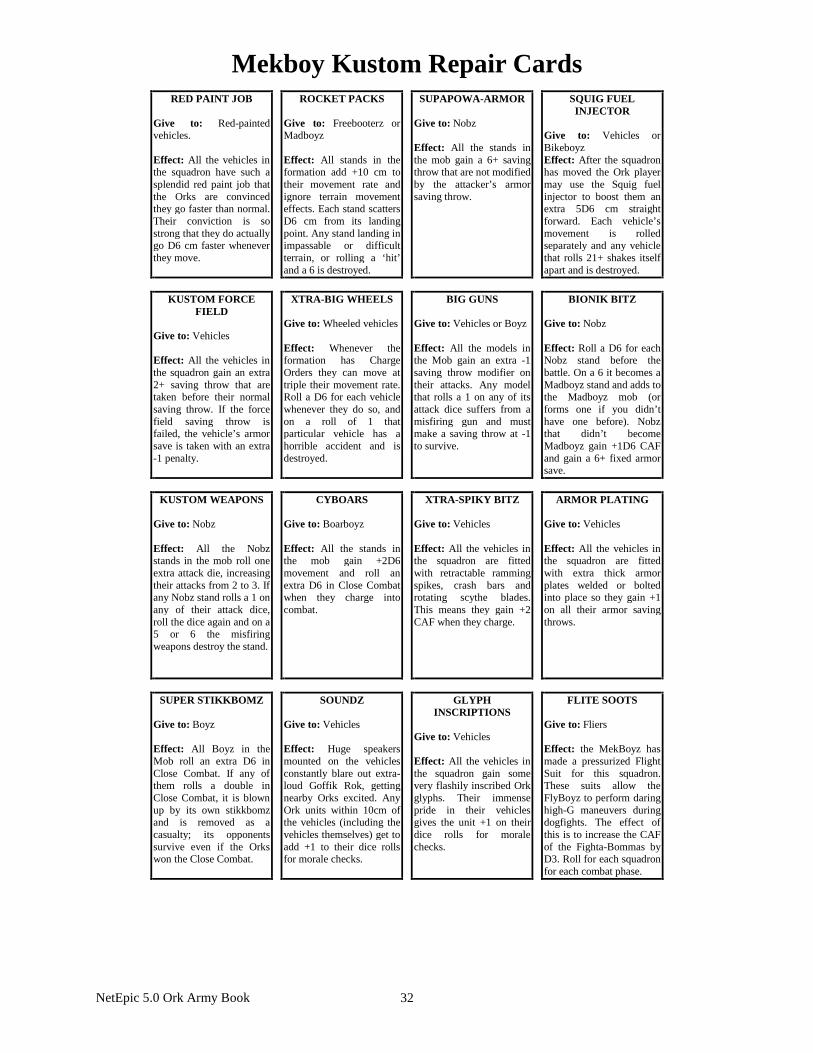
NetEpic 5.0 Ork Army Book 32
Mekboy Kustom Repair Cards
RED PAINT JOB Give to: Red-painted vehicles. Effect: All the vehicles in the squadron have such a splendid red paint job that the Orks are convinced they go faster than normal. Their conviction is so strong that they do actually go D6 cm faster whenever they move.
ROCKET PACKS Give to: Freebooterz or Madboyz Effect: All stands in the formation add +10 cm to their movement rate and ignore terrain movement effects. Each stand scatters D6 cm from its landing point. Any stand landing in impassable or difficult terrain, or rolling a ‘hit’ and a 6 is destroyed.
SUPAPOWA-ARMOR Give to: Nobz Effect: All the stands in the mob gain a 6+ saving throw that are not modified by the attacker’s armor saving throw.
SQUIG FUEL INJECTOR
Give to: Vehicles or Bikeboyz Effect: After the squadron has moved the Ork player may use the Squig fuel injector to boost them an extra 5D6 cm straight forward. Each vehicle’s movement is rolled separately and any vehicle that rolls 21+ shakes itself apart and is destroyed.
KUSTOM FORCE
FIELD Give to: Vehicles Effect: All the vehicles in the squadron gain an extra 2+ saving throw that are taken before their normal saving throw. If the force field saving throw is failed, the vehicle’s armor save is taken with an extra -1 penalty.
XTRA-BIG WHEELS Give to: Wheeled vehicles Effect: Whenever the formation has Charge Orders they can move at triple their movement rate. Roll a D6 for each vehicle whenever they do so, and on a roll of 1 that particular vehicle has a horrible accident and is destroyed.
BIG GUNS Give to: Vehicles or Boyz Effect: All the models in the Mob gain an extra -1 saving throw modifier on their attacks. Any model that rolls a 1 on any of its attack dice suffers from a misfiring gun and must make a saving throw at -1 to survive.
BIONIK BITZ Give to: Nobz Effect: Roll a D6 for each Nobz stand before the battle. On a 6 it becomes a Madboyz stand and adds to the Madboyz mob (or forms one if you didn’t have one before). Nobz that didn’t become Madboyz gain +1D6 CAF and gain a 6+ fixed armor save.
KUSTOM WEAPONS
Give to: Nobz Effect: All the Nobz stands in the mob roll one extra attack die, increasing their attacks from 2 to 3. If any Nobz stand rolls a 1 on any of their attack dice, roll the dice again and on a 5 or 6 the misfiring weapons destroy the stand.
CYBOARS Give to: Boarboyz Effect: All the stands in the mob gain +2D6 movement and roll an extra D6 in Close Combat when they charge into combat.
XTRA-SPIKY BITZ Give to: Vehicles Effect: All the vehicles in the squadron are fitted with retractable ramming spikes, crash bars and rotating scythe blades. This means they gain +2 CAF when they charge.
ARMOR PLATING Give to: Vehicles Effect: All the vehicles in the squadron are fitted with extra thick armor plates welded or bolted into place so they gain +1 on all their armor saving throws.
SUPER STIKKBOMZ
Give to: Boyz Effect: All Boyz in the Mob roll an extra D6 in Close Combat. If any of them rolls a double in Close Combat, it is blown up by its own stikkbomz and is removed as a casualty; its opponents survive even if the Orks won the Close Combat.
SOUNDZ Give to: Vehicles Effect: Huge speakers mounted on the vehicles constantly blare out extra-loud Goffik Rok, getting nearby Orks excited. Any Ork units within 10cm of the vehicles (including the vehicles themselves) get to add +1 to their dice rolls for morale checks.
GLYPH INSCRIPTIONS
Give to: Vehicles Effect: All the vehicles in the squadron gain some very flashily inscribed Ork glyphs. Their immense pride in their vehicles gives the unit +1 on their dice rolls for morale checks.
FLITE SOOTS Give to: Fliers Effect: the MekBoyz has made a pressurized Flight Suit for this squadron. These suits allow the FlyBoyz to perform daring high-G maneuvers during dogfights. The effect of this is to increase the CAF of the Fighta-Bommas by D3. Roll for each squadron for each combat phase.
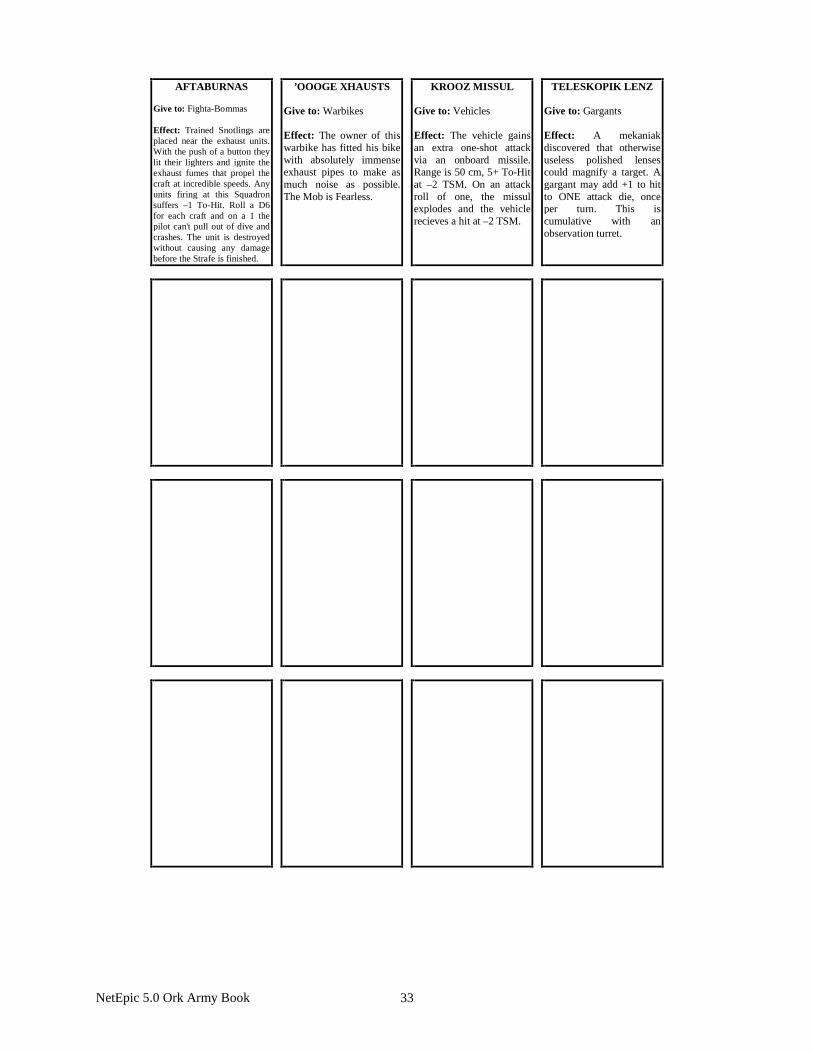
NetEpic 5.0 Ork Army Book 33
AFTABURNAS Give to: Fighta-Bommas Effect: Trained Snotlings are placed near the exhaust units. With the push of a button they lit their lighters and ignite the exhaust fumes that propel the craft at incredible speeds. Any units firing at this Squadron suffers –1 To-Hit. Roll a D6 for each craft and on a 1 the pilot can't pull out of dive and crashes. The unit is destroyed without causing any damage before the Strafe is finished.
’OOOGE XHAUSTS Give to: Warbikes Effect: The owner of this warbike has fitted his bike with absolutely immense exhaust pipes to make as much noise as possible. The Mob is Fearless.
KROOZ MISSUL Give to: Vehicles Effect: The vehicle gains an extra one-shot attack via an onboard missile. Range is 50 cm, 5+ To-Hit at –2 TSM. On an attack roll of one, the missul explodes and the vehicle recieves a hit at –2 TSM.
TELESKOPIK LENZ Give to: Gargants Effect: A mekaniak discovered that otherwise useless polished lenses could magnify a target. A gargant may add +1 to hit to ONE attack die, once per turn. This is cumulative with an observation turret.
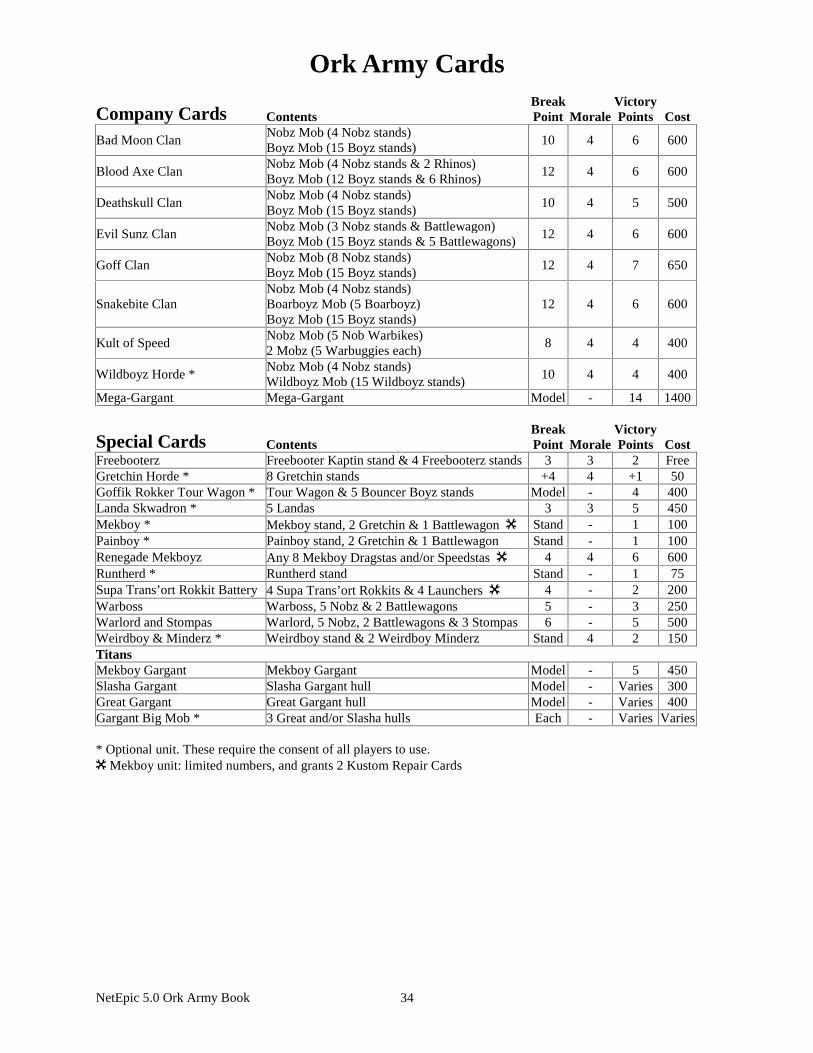
NetEpic 5.0 Ork Army Book 34
Ork Army Cards
Company Cards Contents Break Point Morale
Victory Points Cost
Bad Moon Clan Nobz Mob (4 Nobz stands) Boyz Mob (15 Boyz stands)
10 4 6 600
Blood Axe Clan Nobz Mob (4 Nobz stands & 2 Rhinos) Boyz Mob (12 Boyz stands & 6 Rhinos)
12 4 6 600
Deathskull Clan Nobz Mob (4 Nobz stands) Boyz Mob (15 Boyz stands)
10 4 5 500
Evil Sunz Clan Nobz Mob (3 Nobz stands & Battlewagon) Boyz Mob (15 Boyz stands & 5 Battlewagons)
12 4 6 600
Goff Clan Nobz Mob (8 Nobz stands) Boyz Mob (15 Boyz stands)
12 4 7 650
Snakebite Clan Nobz Mob (4 Nobz stands) Boarboyz Mob (5 Boarboyz) Boyz Mob (15 Boyz stands)
12 4 6 600
Kult of Speed Nobz Mob (5 Nob Warbikes) 2 Mobz (5 Warbuggies each)
8 4 4 400
Wildboyz Horde * Nobz Mob (4 Nobz stands) Wildboyz Mob (15 Wildboyz stands)
10 4 4 400
Mega-Gargant Mega-Gargant Model - 14 1400
Special Cards Contents Break Point Morale
Victory Points Cost
Freebooterz Freebooter Kaptin stand & 4 Freebooterz stands 3 3 2 Free Gretchin Horde * 8 Gretchin stands +4 4 +1 50 Goffik Rokker Tour Wagon * Tour Wagon & 5 Bouncer Boyz stands Model - 4 400 Landa Skwadron * 5 Landas 3 3 5 450 Mekboy * Mekboy stand, 2 Gretchin & 1 Battlewagon ) Stand - 1 100 Painboy * Painboy stand, 2 Gretchin & 1 Battlewagon Stand - 1 100 Renegade Mekboyz Any 8 Mekboy Dragstas and/or Speedstas ) 4 4 6 600 Runtherd * Runtherd stand Stand - 1 75 Supa Trans’ort Rokkit Battery 4 Supa Trans’ort Rokkits & 4 Launchers ) 4 - 2 200 Warboss Warboss, 5 Nobz & 2 Battlewagons 5 - 3 250 Warlord and Stompas Warlord, 5 Nobz, 2 Battlewagons & 3 Stompas 6 - 5 500 Weirdboy & Minderz * Weirdboy stand & 2 Weirdboy Minderz Stand 4 2 150 Titans Mekboy Gargant Mekboy Gargant Model - 5 450 Slasha Gargant Slasha Gargant hull Model - Varies 300 Great Gargant Great Gargant hull Model - Varies 400 Gargant Big Mob * 3 Great and/or Slasha hulls Each - Varies Varies * Optional unit. These require the consent of all players to use. ) Mekboy unit: limited numbers, and grants 2 Kustom Repair Cards
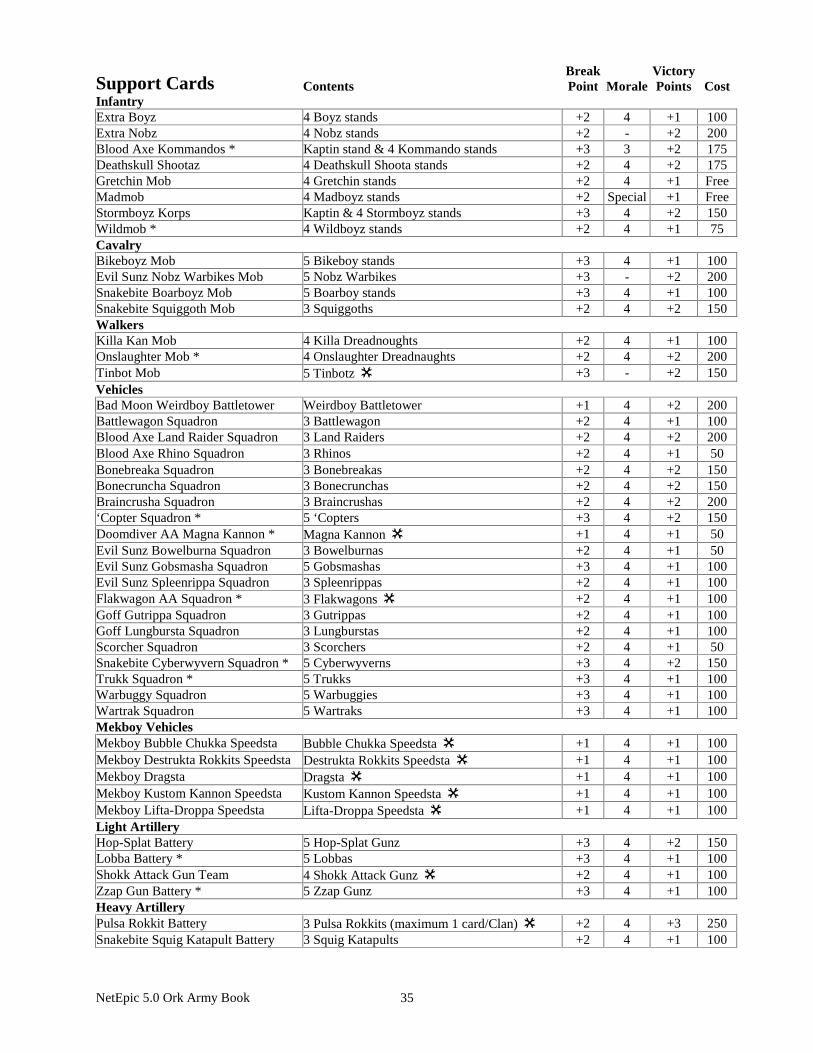
NetEpic 5.0 Ork Army Book 35
Support Cards Contents Break Point Morale
Victory Points Cost
Infantry Extra Boyz 4 Boyz stands +2 4 +1 100 Extra Nobz 4 Nobz stands +2 - +2 200 Blood Axe Kommandos * Kaptin stand & 4 Kommando stands +3 3 +2 175 Deathskull Shootaz 4 Deathskull Shoota stands +2 4 +2 175 Gretchin Mob 4 Gretchin stands +2 4 +1 Free Madmob 4 Madboyz stands +2 Special +1 Free Stormboyz Korps Kaptin & 4 Stormboyz stands +3 4 +2 150 Wildmob * 4 Wildboyz stands +2 4 +1 75 Cavalry Bikeboyz Mob 5 Bikeboy stands +3 4 +1 100 Evil Sunz Nobz Warbikes Mob 5 Nobz Warbikes +3 - +2 200 Snakebite Boarboyz Mob 5 Boarboy stands +3 4 +1 100 Snakebite Squiggoth Mob 3 Squiggoths +2 4 +2 150 Walkers Killa Kan Mob 4 Killa Dreadnoughts +2 4 +1 100 Onslaughter Mob * 4 Onslaughter Dreadnaughts +2 4 +2 200 Tinbot Mob 5 Tinbotz ) +3 - +2 150 Vehicles Bad Moon Weirdboy Battletower Weirdboy Battletower +1 4 +2 200 Battlewagon Squadron 3 Battlewagon +2 4 +1 100 Blood Axe Land Raider Squadron 3 Land Raiders +2 4 +2 200 Blood Axe Rhino Squadron 3 Rhinos +2 4 +1 50 Bonebreaka Squadron 3 Bonebreakas +2 4 +2 150 Bonecruncha Squadron 3 Bonecrunchas +2 4 +2 150 Braincrusha Squadron 3 Braincrushas +2 4 +2 200 ‘Copter Squadron * 5 ‘Copters +3 4 +2 150 Doomdiver AA Magna Kannon * Magna Kannon ) +1 4 +1 50 Evil Sunz Bowelburna Squadron 3 Bowelburnas +2 4 +1 50 Evil Sunz Gobsmasha Squadron 5 Gobsmashas +3 4 +1 100 Evil Sunz Spleenrippa Squadron 3 Spleenrippas +2 4 +1 100 Flakwagon AA Squadron * 3 Flakwagons ) +2 4 +1 100 Goff Gutrippa Squadron 3 Gutrippas +2 4 +1 100 Goff Lungbursta Squadron 3 Lungburstas +2 4 +1 100 Scorcher Squadron 3 Scorchers +2 4 +1 50 Snakebite Cyberwyvern Squadron * 5 Cyberwyverns +3 4 +2 150 Trukk Squadron * 5 Trukks +3 4 +1 100 Warbuggy Squadron 5 Warbuggies +3 4 +1 100 Wartrak Squadron 5 Wartraks +3 4 +1 100 Mekboy Vehicles Mekboy Bubble Chukka Speedsta Bubble Chukka Speedsta ) +1 4 +1 100 Mekboy Destrukta Rokkits Speedsta Destrukta Rokkits Speedsta ) +1 4 +1 100 Mekboy Dragsta Dragsta ) +1 4 +1 100 Mekboy Kustom Kannon Speedsta Kustom Kannon Speedsta ) +1 4 +1 100 Mekboy Lifta-Droppa Speedsta Lifta-Droppa Speedsta ) +1 4 +1 100 Light Artillery Hop-Splat Battery 5 Hop-Splat Gunz +3 4 +2 150 Lobba Battery * 5 Lobbas +3 4 +1 100 Shokk Attack Gun Team 4 Shokk Attack Gunz ) +2 4 +1 100 Zzap Gun Battery * 5 Zzap Gunz +3 4 +1 100 Heavy Artillery Pulsa Rokkit Battery 3 Pulsa Rokkits (maximum 1 card/Clan) ) +2 4 +3 250 Snakebite Squig Katapult Battery 3 Squig Katapults +2 4 +1 100
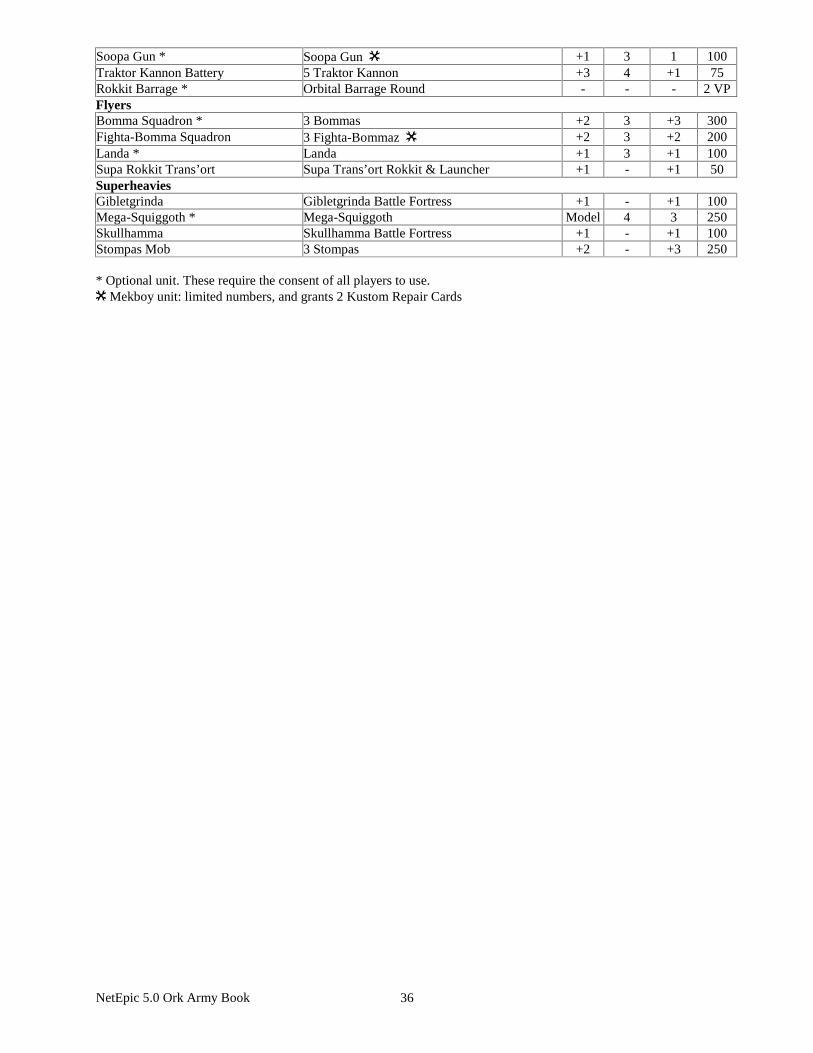
NetEpic 5.0 Ork Army Book 36
Soopa Gun * Soopa Gun ) +1 3 1 100 Traktor Kannon Battery 5 Traktor Kannon +3 4 +1 75 Rokkit Barrage * Orbital Barrage Round - - - 2 VP Flyers Bomma Squadron * 3 Bommas +2 3 +3 300 Fighta-Bomma Squadron 3 Fighta-Bommaz ) +2 3 +2 200 Landa * Landa +1 3 +1 100 Supa Rokkit Trans’ort Supa Trans’ort Rokkit & Launcher +1 - +1 50 Superheavies Gibletgrinda Gibletgrinda Battle Fortress +1 - +1 100 Mega-Squiggoth * Mega-Squiggoth Model 4 3 250 Skullhamma Skullhamma Battle Fortress +1 - +1 100 Stompas Mob 3 Stompas +2 - +3 250 * Optional unit. These require the consent of all players to use. ) Mekboy unit: limited numbers, and grants 2 Kustom Repair Cards
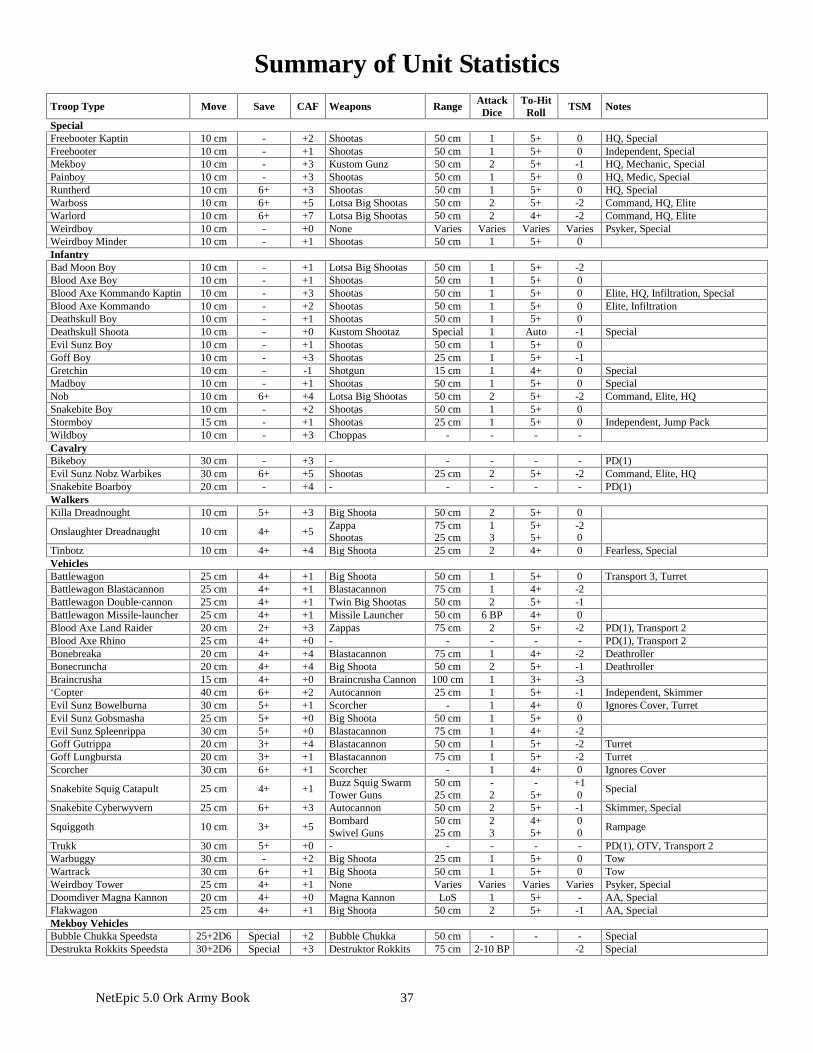
NetEpic 5.0 Ork Army Book 37
Summary of Unit Statistics
Troop Type Move Save CAF Weapons Range Attack Dice
To-Hit Roll
TSM Notes
Special Freebooter Kaptin 10 cm - +2 Shootas 50 cm 1 5+ 0 HQ, Special Freebooter 10 cm - +1 Shootas 50 cm 1 5+ 0 Independent, Special Mekboy 10 cm - +3 Kustom Gunz 50 cm 2 5+ -1 HQ, Mechanic, Special Painboy 10 cm - +3 Shootas 50 cm 1 5+ 0 HQ, Medic, Special Runtherd 10 cm 6+ +3 Shootas 50 cm 1 5+ 0 HQ, Special Warboss 10 cm 6+ +5 Lotsa Big Shootas 50 cm 2 5+ -2 Command, HQ, Elite Warlord 10 cm 6+ +7 Lotsa Big Shootas 50 cm 2 4+ -2 Command, HQ, Elite Weirdboy 10 cm - +0 None Varies Varies Varies Varies Psyker, Special Weirdboy Minder 10 cm - +1 Shootas 50 cm 1 5+ 0 Infantry Bad Moon Boy 10 cm - +1 Lotsa Big Shootas 50 cm 1 5+ -2 Blood Axe Boy 10 cm - +1 Shootas 50 cm 1 5+ 0 Blood Axe Kommando Kaptin 10 cm - +3 Shootas 50 cm 1 5+ 0 Elite, HQ, Infiltration, Special Blood Axe Kommando 10 cm - +2 Shootas 50 cm 1 5+ 0 Elite, Infiltration Deathskull Boy 10 cm - +1 Shootas 50 cm 1 5+ 0 Deathskull Shoota 10 cm - +0 Kustom Shootaz Special 1 Auto -1 Special Evil Sunz Boy 10 cm - +1 Shootas 50 cm 1 5+ 0 Goff Boy 10 cm - +3 Shootas 25 cm 1 5+ -1 Gretchin 10 cm - -1 Shotgun 15 cm 1 4+ 0 Special Madboy 10 cm - +1 Shootas 50 cm 1 5+ 0 Special Nob 10 cm 6+ +4 Lotsa Big Shootas 50 cm 2 5+ -2 Command, Elite, HQ Snakebite Boy 10 cm - +2 Shootas 50 cm 1 5+ 0 Stormboy 15 cm - +1 Shootas 25 cm 1 5+ 0 Independent, Jump Pack Wildboy 10 cm - +3 Choppas - - - - Cavalry Bikeboy 30 cm - +3 - - - - - PD(1) Evil Sunz Nobz Warbikes 30 cm 6+ +5 Shootas 25 cm 2 5+ -2 Command, Elite, HQ Snakebite Boarboy 20 cm - +4 - - - - - PD(1) Walkers Killa Dreadnought 10 cm 5+ +3 Big Shoota 50 cm 2 5+ 0
Onslaughter Dreadnaught 10 cm 4+ +5 Zappa Shootas
75 cm 25 cm
1 3
5+ 5+
-2 0
Tinbotz 10 cm 4+ +4 Big Shoota 25 cm 2 4+ 0 Fearless, Special Vehicles Battlewagon 25 cm 4+ +1 Big Shoota 50 cm 1 5+ 0 Transport 3, Turret Battlewagon Blastacannon 25 cm 4+ +1 Blastacannon 75 cm 1 4+ -2 Battlewagon Double-cannon 25 cm 4+ +1 Twin Big Shootas 50 cm 2 5+ -1 Battlewagon Missile-launcher 25 cm 4+ +1 Missile Launcher 50 cm 6 BP 4+ 0 Blood Axe Land Raider 20 cm 2+ +3 Zappas 75 cm 2 5+ -2 PD(1), Transport 2 Blood Axe Rhino 25 cm 4+ +0 - - - - - PD(1), Transport 2 Bonebreaka 20 cm 4+ +4 Blastacannon 75 cm 1 4+ -2 Deathroller Bonecruncha 20 cm 4+ +4 Big Shoota 50 cm 2 5+ -1 Deathroller Braincrusha 15 cm 4+ +0 Braincrusha Cannon 100 cm 1 3+ -3 ‘Copter 40 cm 6+ +2 Autocannon 25 cm 1 5+ -1 Independent, Skimmer Evil Sunz Bowelburna 30 cm 5+ +1 Scorcher - 1 4+ 0 Ignores Cover, Turret Evil Sunz Gobsmasha 25 cm 5+ +0 Big Shoota 50 cm 1 5+ 0 Evil Sunz Spleenrippa 30 cm 5+ +0 Blastacannon 75 cm 1 4+ -2 Goff Gutrippa 20 cm 3+ +4 Blastacannon 50 cm 1 5+ -2 Turret Goff Lungbursta 20 cm 3+ +1 Blastacannon 75 cm 1 5+ -2 Turret Scorcher 30 cm 6+ +1 Scorcher - 1 4+ 0 Ignores Cover
Snakebite Squig Catapult 25 cm 4+ +1 Buzz Squig Swarm Tower Guns
50 cm 25 cm
- 2
- 5+
+1 0
Special
Snakebite Cyberwyvern 25 cm 6+ +3 Autocannon 50 cm 2 5+ -1 Skimmer, Special
Squiggoth 10 cm 3+ +5 Bombard Swivel Guns
50 cm 25 cm
2 3
4+ 5+
0 0
Rampage
Trukk 30 cm 5+ +0 - - - - - PD(1), OTV, Transport 2 Warbuggy 30 cm - +2 Big Shoota 25 cm 1 5+ 0 Tow Wartrack 30 cm 6+ +1 Big Shoota 50 cm 1 5+ 0 Tow Weirdboy Tower 25 cm 4+ +1 None Varies Varies Varies Varies Psyker, Special Doomdiver Magna Kannon 20 cm 4+ +0 Magna Kannon LoS 1 5+ - AA, Special Flakwagon 25 cm 4+ +1 Big Shoota 50 cm 2 5+ -1 AA, Special Mekboy Vehicles Bubble Chukka Speedsta 25+2D6 Special +2 Bubble Chukka 50 cm - - - Special Destrukta Rokkits Speedsta 30+2D6 Special +3 Destruktor Rokkits 75 cm 2-10 BP -2 Special
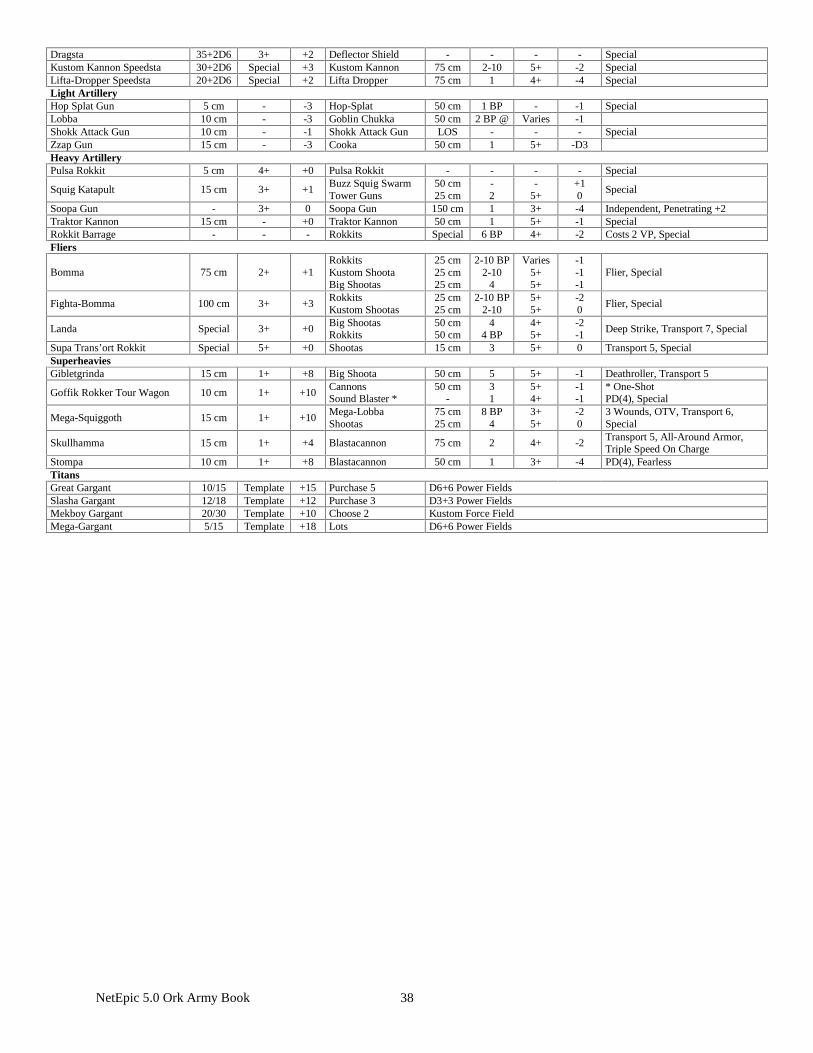
NetEpic 5.0 Ork Army Book 38
Dragsta 35+2D6 3+ +2 Deflector Shield - - - - Special Kustom Kannon Speedsta 30+2D6 Special +3 Kustom Kannon 75 cm 2-10 5+ -2 Special Lifta-Dropper Speedsta 20+2D6 Special +2 Lifta Dropper 75 cm 1 4+ -4 Special Light Artillery Hop Splat Gun 5 cm - -3 Hop-Splat 50 cm 1 BP - -1 Special Lobba 10 cm - -3 Goblin Chukka 50 cm 2 BP @ Varies -1 Shokk Attack Gun 10 cm - -1 Shokk Attack Gun LOS - - - Special Zzap Gun 15 cm - -3 Cooka 50 cm 1 5+ -D3 Heavy Artillery Pulsa Rokkit 5 cm 4+ +0 Pulsa Rokkit - - - - Special
Squig Katapult 15 cm 3+ +1 Buzz Squig Swarm Tower Guns
50 cm 25 cm
- 2
- 5+
+1 0
Special
Soopa Gun - 3+ 0 Soopa Gun 150 cm 1 3+ -4 Independent, Penetrating +2 Traktor Kannon 15 cm - +0 Traktor Kannon 50 cm 1 5+ -1 Special Rokkit Barrage - - - Rokkits Special 6 BP 4+ -2 Costs 2 VP, Special Fliers
Bomma 75 cm 2+ +1 Rokkits Kustom Shoota Big Shootas
25 cm 25 cm 25 cm
2-10 BP 2-10
4
Varies 5+ 5+
-1 -1 -1
Flier, Special
Fighta-Bomma 100 cm 3+ +3 Rokkits Kustom Shootas
25 cm 25 cm
2-10 BP 2-10
5+ 5+
-2 0
Flier, Special
Landa Special 3+ +0 Big Shootas Rokkits
50 cm 50 cm
4 4 BP
4+ 5+
-2 -1
Deep Strike, Transport 7, Special
Supa Trans’ort Rokkit Special 5+ +0 Shootas 15 cm 3 5+ 0 Transport 5, Special Superheavies Gibletgrinda 15 cm 1+ +8 Big Shoota 50 cm 5 5+ -1 Deathroller, Transport 5
Goffik Rokker Tour Wagon 10 cm 1+ +10 Cannons Sound Blaster *
50 cm -
3 1
5+ 4+
-1 -1
* One-Shot PD(4), Special
Mega-Squiggoth 15 cm 1+ +10 Mega-Lobba Shootas
75 cm 25 cm
8 BP 4
3+ 5+
-2 0
3 Wounds, OTV, Transport 6, Special
Skullhamma 15 cm 1+ +4 Blastacannon 75 cm 2 4+ -2 Transport 5, All-Around Armor, Triple Speed On Charge
Stompa 10 cm 1+ +8 Blastacannon 50 cm 1 3+ -4 PD(4), Fearless Titans Great Gargant 10/15 Template +15 Purchase 5 D6+6 Power Fields Slasha Gargant 12/18 Template +12 Purchase 3 D3+3 Power Fields Mekboy Gargant 20/30 Template +10 Choose 2 Kustom Force Field Mega-Gargant 5/15 Template +18 Lots D6+6 Power Fields