Embed Size (px)
Citation preview
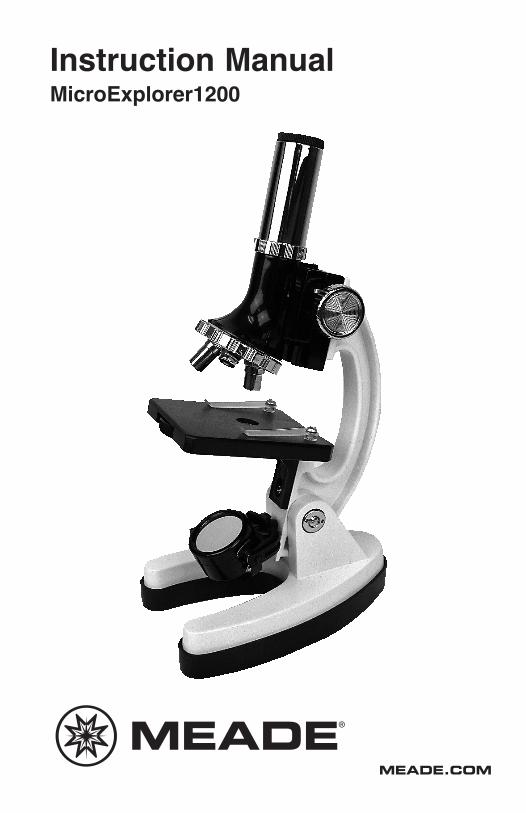
Instruction ManualMicroExplorer1200
MEADE.COM
08033DI_MicroExplorer1200_Manual_042412_REV0.qxd 5/1/12 4:24 PM Page 1

2
Battery Safety Instructions
• Always purchase the correct size (2 x 1.5V AA, 15A/15AC/15CD/15D ANSI,LR6/R6C IEC) and grade of battery most suitable for the intended use.
• Replace all batteries of a set at the same time.
• Do not mix old batteries and new batteries.
• Do not mix alkaline, standard (Carbon Zinc), or rechargeable (NickelCadmium) batteries.
• Ensure the batteries are installed correctly with regard to polarity (+ and -). • Clean the battery contacts and also those of the device prior to
battery installation. • Remove batteries from equipment which is not to be used for an extended
period of time. • Remove used batteries promptly. • Never attempt to recharge primary batteries as this may cause leakage,
fire, or explosion. • Never short-circuit batteries as this may lead to high temperatures, leak-
age, or explosion. • Never heat batteries in order to revive them. • Remember to switch off devices after use. • Keep batteries out of the reach of children; small batteries may
be ingested. Caution:
• If batteries or parts are swallowed, see a doctor immediately.
WARNING:CHOKING HAZARD Small Parts.
Not for children under 8 years.WARNING: This set contains chemicals that may be harmful if misused. Read cautions in the
Instruction Manual and on individual containers carefully. Not to be used by children except
under adult supervision. Do not allow chemicals to come into contact with any part of the
body, particularly the mouth and eyes. Keep small children and animals away from experi-
ments. This kit also contains instruments and other materials with sharp edges and points that
may be harmful if misused. Eye protection is recommended.
!
Emergency contact information:
08033DI_MicroExplorer1200_Manual_042412_REV0.qxd 5/1/12 4:24 PM Page 2
3
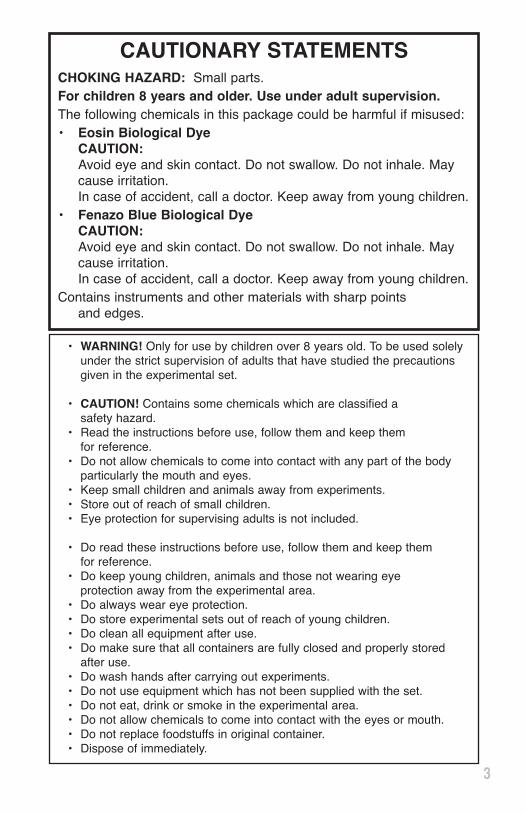
CAUTIONARY STATEMENTSCHOKING HAZARD: Small parts.For children 8 years and older. Use under adult supervision.The following chemicals in this package could be harmful if misused:• Eosin Biological Dye
CAUTION:Avoid eye and skin contact. Do not swallow. Do not inhale. Maycause irritation.In case of accident, call a doctor. Keep away from young children.
• Fenazo Blue Biological DyeCAUTION:Avoid eye and skin contact. Do not swallow. Do not inhale. Maycause irritation.In case of accident, call a doctor. Keep away from young children.
Contains instruments and other materials with sharp pointsand edges.
• WARNING! Only for use by children over 8 years old. To be used solelyunder the strict supervision of adults that have studied the precautionsgiven in the experimental set.
• CAUTION! Contains some chemicals which are classified a safety hazard.
• Read the instructions before use, follow them and keep them for reference.
• Do not allow chemicals to come into contact with any part of the bodyparticularly the mouth and eyes.
• Keep small children and animals away from experiments. • Store out of reach of small children.• Eye protection for supervising adults is not included.
• Do read these instructions before use, follow them and keep them for reference.
• Do keep young children, animals and those not wearing eye protection away from the experimental area.
• Do always wear eye protection. • Do store experimental sets out of reach of young children. • Do clean all equipment after use. • Do make sure that all containers are fully closed and properly stored
after use. • Do wash hands after carrying out experiments. • Do not use equipment which has not been supplied with the set. • Do not eat, drink or smoke in the experimental area. • Do not allow chemicals to come into contact with the eyes or mouth. • Do not replace foodstuffs in original container. • Dispose of immediately.
08033DI_MicroExplorer1200_Manual_042412_REV0.qxd 5/1/12 4:24 PM Page 3

4
SAFETY INFORMATION
General First Aid Information
a) In case of eye contact: Wash out eye with plenty of water, holdingeye open if necessary. Seek immediate medical advice.
b) If swallowed: Wash out mouth with water, drink some fresh water. Donot induce vomiting. Seek immediate medical advice.
c) In case of inhalation: Remove person to fresh air.
d) In case of skin contact and burns: Wash affected area with plenty ofwater for 15 minutes.
e) In case of a cut: Wash the cut with antiseptic solution (if unavailable,use clean water). Next, carefully place a bandage over the wound. Incase of serious injury, you should seek first aid and inform a doctoras soon as possible.
f) If in doubt or serious injury occurs, seek medical attention immedi-ately. In addition to the container, take these instructions and anymaterial used in the slide preparation with you.
ADVICE FOR SUPERVISING ADULTS
a) Read and follow the instructions, the safety information and the firstaid information carefully. Keep them on hand for reference.
b) The incorrect use of chemicals can cause injury and damage to one’s health. Use only the slide preparations listed in the instructions.
c) This microscope is for children 8 years and older, and only with adultsupervision.To be used solely under the strict supervision of adultsthat have studied the precautions provided.
d) Because children’s abilities vary, even within age groups, supervising adults should exercise discretion regarding which slidepreparations are suitable and safe for children. The instructionsshould aid adults in assessing slide preparations to discern their suit-ability for each child.
e) Supervising adults should discuss the warnings and safety informa-tion with the child before commencing the preparation of slides. Payparticular attention to the safe handling of chemicals (if used).
f) Your preparation space should be kept clean, clear and away fromany food storage areas. Prepare your slides in a well-lit area andclose to a water supply. A solid table with a heat resistant top shouldalso be used.
g) A separate tin or bucket should be used for the disposal of solidwaste materials. Any wasted solution should be poured directly downa drain, but never into a sink basin.
08033DI_MicroExplorer1200_Manual_042412_REV0.qxd 5/1/12 4:24 PM Page 4
5
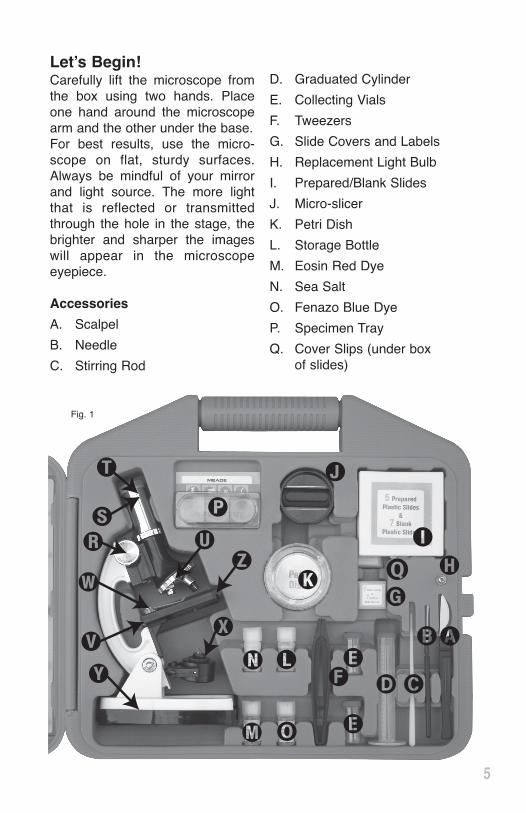
Let’s Begin!Carefully lift the microscope fromthe box using two hands. Placeone hand around the microscopearm and the other under the base. For best results, use the micro-scope on flat, sturdy surfaces.Always be mindful of your mirrorand light source. The more lightthat is reflected or transmittedthrough the hole in the stage, thebrighter and sharper the imageswill appear in the microscope eyepiece.
Accessories
A. Scalpel
B. Needle
C. Stirring Rod
D. Graduated Cylinder
E. Collecting Vials
F. Tweezers
G. Slide Covers and Labels
H. Replacement Light Bulb
I. Prepared/Blank Slides
J. Micro-slicer
K. Petri Dish
L. Storage Bottle
M. Eosin Red Dye
N. Sea Salt
O. Fenazo Blue Dye
P. Specimen Tray
Q. Cover Slips (under boxof slides)
��
���
�
�
�
�
�
�
�
��
�
�
�
�
�
�
��
� �
Fig. 1
08033DI_MicroExplorer1200_Manual_042412_REV0.qxd 5/1/12 4:24 PM Page 5
Microscope Features
R. Focus Knob. Slowly turn the knob backand forth to focus an object in the eyepiece.Notice what happens to the power indicator (U,Fig. 1) as you turn the knob.
S. The Body Tube. Connected to the eye-piece and helps focus the lenses.
T. The Eyepiece with fixed lens that has a10X magnification. Remove the dust cover fromthe eyepiece and put it aside in a safe place.
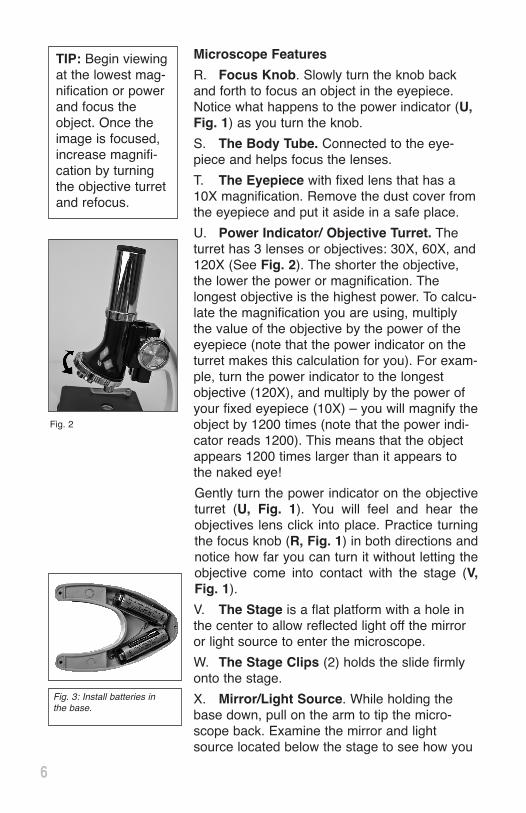
U. Power Indicator/ Objective Turret. Theturret has 3 lenses or objectives: 30X, 60X, and120X (See Fig. 2). The shorter the objective,the lower the power or magnification. Thelongest objective is the highest power. To calcu-late the magnification you are using, multiplythe value of the objective by the power of theeyepiece (note that the power indicator on theturret makes this calculation for you). For exam-ple, turn the power indicator to the longestobjective (120X), and multiply by the power ofyour fixed eyepiece (10X) – you will magnify theobject by 1200 times (note that the power indi-cator reads 1200). This means that the objectappears 1200 times larger than it appears tothe naked eye!
Gently turn the power indicator on the objectiveturret (U, Fig. 1). You will feel and hear theobjectives lens click into place. Practice turningthe focus knob (R, Fig. 1) in both directions andnotice how far you can turn it without letting theobjective come into contact with the stage (V,Fig. 1).
V. The Stage is a flat platform with a hole inthe center to allow reflected light off the mirroror light source to enter the microscope.
W. The Stage Clips (2) holds the slide firmlyonto the stage.
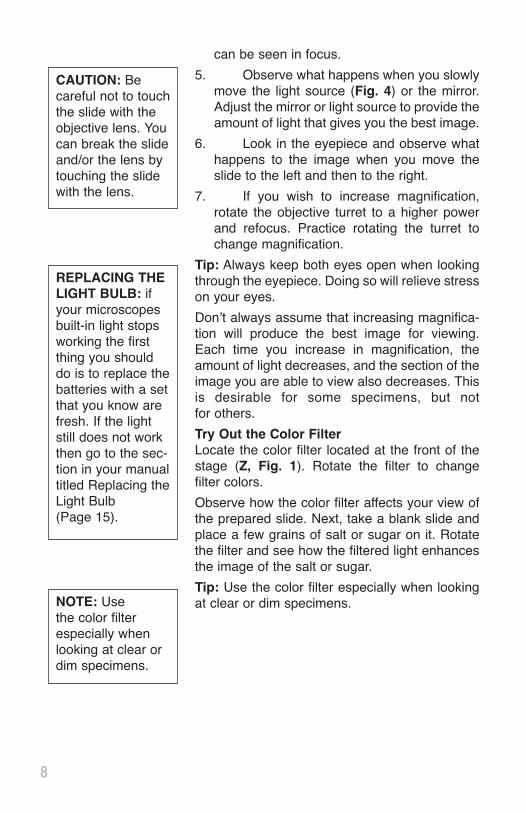
X. Mirror/Light Source. While holding thebase down, pull on the arm to tip the micro-scope back. Examine the mirror and lightsource located below the stage to see how you
TIP: Begin viewingat the lowest mag-nification or powerand focus theobject. Once theimage is focused,increase magnifi-cation by turningthe objective turretand refocus.
Fig. 2
6
Fig. 3: Install batteries inthe base.
08033DI_MicroExplorer1200_Manual_042412_REV0.qxd 5/1/12 4:24 PM Page 6
7
can adjust them, and choose one or the other.The light source turns on automatically whentipped upwards toward the stage. The mirrorgathers and reflects light into the microscope.
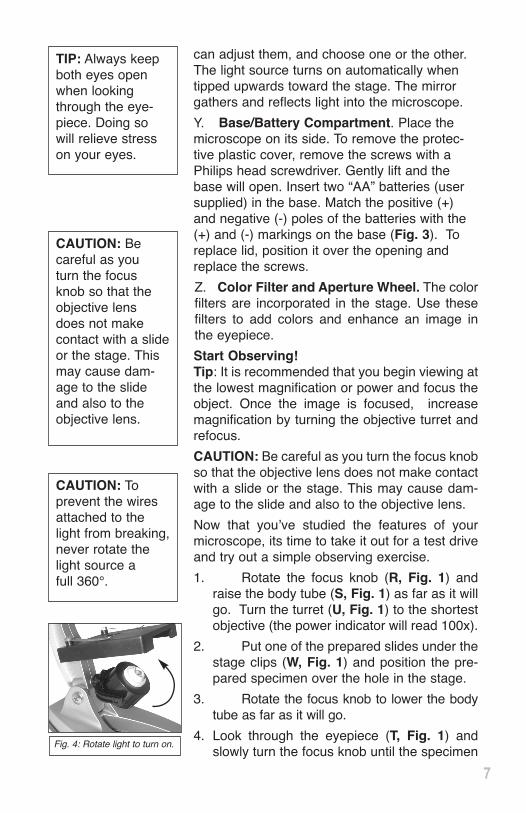
Y. Base/Battery Compartment. Place themicroscope on its side. To remove the protec-tive plastic cover, remove the screws with aPhilips head screwdriver. Gently lift and thebase will open. Insert two “AA” batteries (usersupplied) in the base. Match the positive (+)and negative (-) poles of the batteries with the(+) and (-) markings on the base (Fig. 3). Toreplace lid, position it over the opening andreplace the screws.
Z. Color Filter and Aperture Wheel. The colorfilters are incorporated in the stage. Use thesefilters to add colors and enhance an image in the eyepiece.
Start Observing!Tip: It is recommended that you begin viewing atthe lowest magnification or power and focus theobject. Once the image is focused, increasemagnification by turning the objective turret andrefocus.
CAUTION: Be careful as you turn the focus knobso that the objective lens does not make contactwith a slide or the stage. This may cause dam-age to the slide and also to the objective lens.
Now that you’ve studied the features of yourmicroscope, its time to take it out for a test driveand try out a simple observing exercise.
1. Rotate the focus knob (R, Fig. 1) andraise the body tube (S, Fig. 1) as far as it willgo. Turn the turret (U, Fig. 1) to the shortestobjective (the power indicator will read 100x).
2. Put one of the prepared slides under thestage clips (W, Fig. 1) and position the pre-pared specimen over the hole in the stage.
3. Rotate the focus knob to lower the bodytube as far as it will go.
4. Look through the eyepiece (T, Fig. 1) andslowly turn the focus knob until the specimen
TIP: Always keepboth eyes openwhen lookingthrough the eye-piece. Doing sowill relieve stresson your eyes.
CAUTION: To prevent the wiresattached to thelight from breaking,never rotate thelight source a full 360°.
Fig. 4: Rotate light to turn on.
CAUTION: Becareful as you turn the focus knob so that theobjective lens does not makecontact with a slideor the stage. Thismay cause dam-age to the slideand also to theobjective lens.
08033DI_MicroExplorer1200_Manual_042412_REV0.qxd 5/1/12 4:24 PM Page 7
8
can be seen in focus.
5. Observe what happens when you slowlymove the light source (Fig. 4) or the mirror.Adjust the mirror or light source to provide theamount of light that gives you the best image.
6. Look in the eyepiece and observe whathappens to the image when you move theslide to the left and then to the right.
7. If you wish to increase magnification,rotate the objective turret to a higher powerand refocus. Practice rotating the turret tochange magnification.
Tip: Always keep both eyes open when lookingthrough the eyepiece. Doing so will relieve stresson your eyes.
Don’t always assume that increasing magnifica-tion will produce the best image for viewing.Each time you increase in magnification, theamount of light decreases, and the section of theimage you are able to view also decreases. Thisis desirable for some specimens, but not for others.
Try Out the Color FilterLocate the color filter located at the front of thestage (Z, Fig. 1). Rotate the filter to change filter colors.
Observe how the color filter affects your view ofthe prepared slide. Next, take a blank slide andplace a few grains of salt or sugar on it. Rotatethe filter and see how the filtered light enhancesthe image of the salt or sugar.
Tip: Use the color filter especially when lookingat clear or dim specimens.NOTE: Use
the color filterespecially whenlooking at clear ordim specimens.
REPLACING THELIGHT BULB: ifyour microscopesbuilt-in light stopsworking the firstthing you shoulddo is to replace thebatteries with a setthat you know arefresh. If the lightstill does not workthen go to the sec-tion in your manualtitled Replacing theLight Bulb (Page 15).
CAUTION: Becareful not to touchthe slide with theobjective lens. Youcan break the slideand/or the lens bytouching the slidewith the lens.
08033DI_MicroExplorer1200_Manual_042412_REV0.qxd 5/1/12 4:24 PM Page 8
9
Make Your Own SlidesIt’s so easy to make slides that the variety ofslides you can create will be limited only by yourown imagination.
A section of almost any material can be placedon a slide and observed with a microscope. Allyou need is the proper equipment and a littlepatience, and you’ll be making slides in no time.
Everything you need for the following experi-ments can be found in this kit or around yourhome (make sure to ask a parent first before youborrow any of his or her items, such as themeasuring cup).
Locate the follow items:• Petroleum jelly• Wide mouth jar and lid• A measuring cup• Paper towels• A potato, uncooked corn kernels, an apple, andother foods• 3 or 4 paper cups, or any small containers
which can be discarded after use.
Next, set up your work area: the kitchen table(make sure to ask a parent for his or her permis-sion), the desk in your room or any place whereyou can work undisturbed.
Label 3 of your cups: clean, flush, and waste. Fillthe flush cup with clean water. Next, you willobtain a specimen and make your first slide.
Want to See Crystals?Use the measuring cup to measure one or twoounces of hot (but not boiling) water and pour itinto the clean cup. Slowly add as much table saltto the water as will dissolve. Stir the solution withthe stirring rod (C, Fig. 1) while adding the salt.
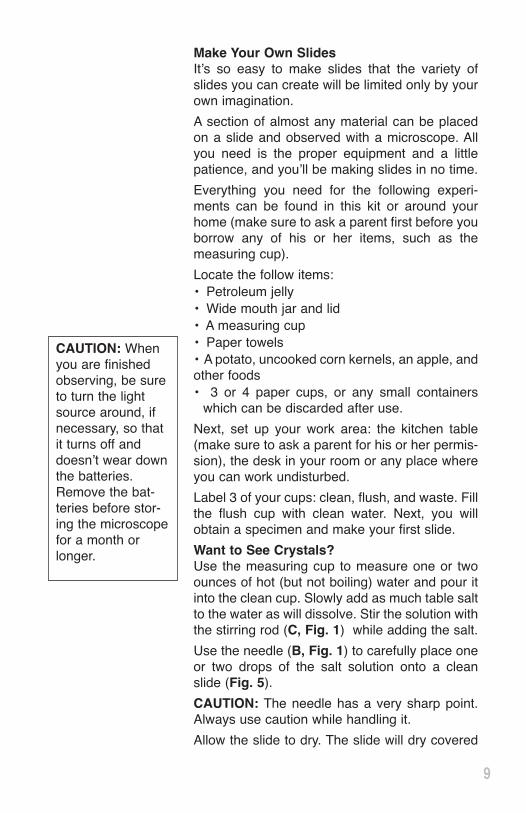
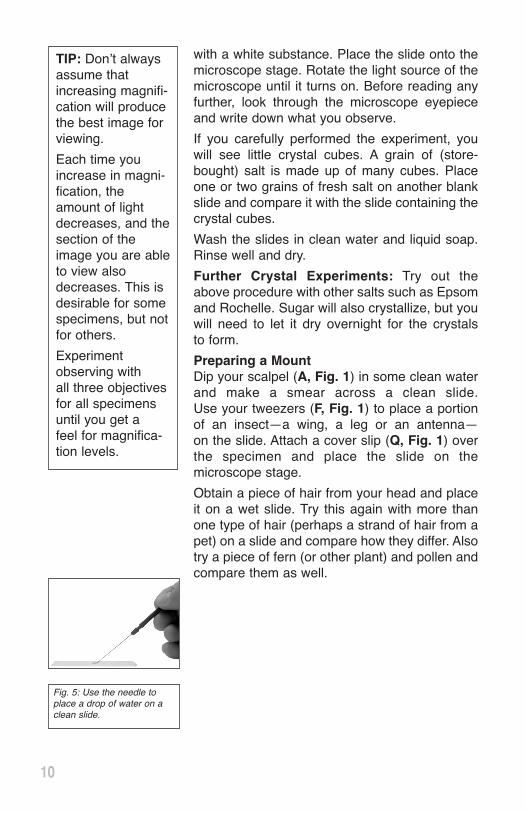
Use the needle (B, Fig. 1) to carefully place oneor two drops of the salt solution onto a cleanslide (Fig. 5).
CAUTION: The needle has a very sharp point.Always use caution while handling it.
Allow the slide to dry. The slide will dry covered
CAUTION: Whenyou are finishedobserving, be sureto turn the lightsource around, ifnecessary, so thatit turns off anddoesn’t wear downthe batteries.Remove the bat-teries before stor-ing the microscopefor a month orlonger.
08033DI_MicroExplorer1200_Manual_042412_REV0.qxd 5/1/12 4:24 PM Page 9
10
with a white substance. Place the slide onto themicroscope stage. Rotate the light source of themicroscope until it turns on. Before reading anyfurther, look through the microscope eyepieceand write down what you observe.
If you carefully performed the experiment, youwill see little crystal cubes. A grain of (store-bought) salt is made up of many cubes. Placeone or two grains of fresh salt on another blankslide and compare it with the slide containing thecrystal cubes.
Wash the slides in clean water and liquid soap.Rinse well and dry.
Further Crystal Experiments: Try out theabove procedure with other salts such as Epsomand Rochelle. Sugar will also crystallize, but youwill need to let it dry overnight for the crystalsto form.
Preparing a MountDip your scalpel (A, Fig. 1) in some clean waterand make a smear across a clean slide. Use your tweezers (F, Fig. 1) to place a portionof an insect—a wing, a leg or an antenna—on the slide. Attach a cover slip (Q, Fig. 1) overthe specimen and place the slide on the microscope stage.
Obtain a piece of hair from your head and placeit on a wet slide. Try this again with more thanone type of hair (perhaps a strand of hair from apet) on a slide and compare how they differ. Alsotry a piece of fern (or other plant) and pollen andcompare them as well.
TIP: Don’t alwaysassume thatincreasing magnifi-cation will producethe best image forviewing.
Each time youincrease in magni-fication, theamount of lightdecreases, and thesection of theimage you are ableto view alsodecreases. This isdesirable for somespecimens, but notfor others.
Experimentobserving withall three objectivesfor all specimensuntil you get a feel for magnifica-tion levels.
Fig. 5: Use the needle toplace a drop of water on aclean slide.
08033DI_MicroExplorer1200_Manual_042412_REV0.qxd 5/1/12 4:24 PM Page 10
11
Creating SmearsUse your scalpel (A, Fig. 1) to gently scrape offsmall shavings from the surface of a freshly cutpotato.
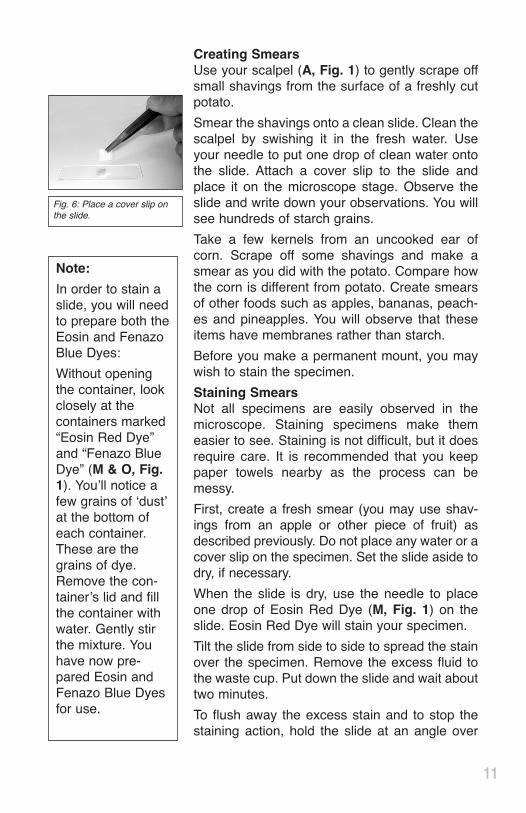
Smear the shavings onto a clean slide. Clean thescalpel by swishing it in the fresh water. Useyour needle to put one drop of clean water ontothe slide. Attach a cover slip to the slide andplace it on the microscope stage. Observe theslide and write down your observations. You willsee hundreds of starch grains.
Take a few kernels from an uncooked ear ofcorn. Scrape off some shavings and make asmear as you did with the potato. Compare howthe corn is different from potato. Create smearsof other foods such as apples, bananas, peach-es and pineapples. You will observe that theseitems have membranes rather than starch.
Before you make a permanent mount, you maywish to stain the specimen.
Staining SmearsNot all specimens are easily observed in themicroscope. Staining specimens make themeasier to see. Staining is not difficult, but it doesrequire care. It is recommended that you keeppaper towels nearby as the process can bemessy.
First, create a fresh smear (you may use shav-ings from an apple or other piece of fruit) asdescribed previously. Do not place any water or acover slip on the specimen. Set the slide aside todry, if necessary.
When the slide is dry, use the needle to placeone drop of Eosin Red Dye (M, Fig. 1) on theslide. Eosin Red Dye will stain your specimen.
Tilt the slide from side to side to spread the stainover the specimen. Remove the excess fluid tothe waste cup. Put down the slide and wait abouttwo minutes.
To flush away the excess stain and to stop thestaining action, hold the slide at an angle over
Fig. 6: Place a cover slip onthe slide.
Note:
In order to stain aslide, you will needto prepare both theEosin and FenazoBlue Dyes:
Without openingthe container, lookclosely at the containers marked“Eosin Red Dye”and “Fenazo BlueDye” (M & O, Fig.1). You’ll notice afew grains of ‘dust’at the bottom ofeach container.These are thegrains of dye.Remove the con-tainer’s lid and fillthe container withwater. Gently stirthe mixture. Youhave now pre-pared Eosin andFenazo Blue Dyesfor use.
08033DI_MicroExplorer1200_Manual_042412_REV0.qxd 5/1/12 4:24 PM Page 11
12
the waste cup. Using the needle, touch the slidejust above the specimen area and slowly let thewater drain into the cup.
With a paper towel, pat the underside of the slidedry. Be very careful and try not to touch thespecimen. Allow the specimen to air dry for sev-eral minutes.
Some of the specimen will be flushed away, butenough will remain on the slide to make goodobservations.
You can repeat the staining process on a newsample, but substituting the Fenazo Blue (O,Fig. 1) for Eosin Red Dye. Note that the blue dyewill stain the sample differently revealing differ-ent details. It is not uncommon for one stain towork better in revealing detail, than the otherstain.
The Micro-SlicerInsert specimens you wish to study into the holesof the micro-slicer (J, Fig. 1). Rotate the knob tocut your specimen into thin slices. The Micro-slicer is an ideal tool in the making of sectionslides.
CAUTION: The blade of the micro-slicer is verysharp. Handle the micro-slicer with care.
A Simple Section SlideSection slides are extremely thin slices of tissuesof skin, leaves, flower stems and other materials.Generally, section slides are very difficult tomake without special equipment and proce-dures. However, there is one common house-hold item which can be sectioned without specialequipment: the common onion, made up of lay-ers of tissue.
Peel off the very thinnest layer you can. One thatis nearly transparent will make an ideal section.Slice into a piece about 1/4 x 1/4 inch (7 x 7 mm).
Put two drops of Eosin Red Dye (M, Fig. 1) in acollecting vial (E, Fig. 1). Pick up the piece ofonion with your tweezers and place it in the vial.
Wait for a minute or two. Remove the piece fromthe stain and flush it with clean water, holding it
CAUTION: Theblade of the micro-slicer is verysharp. Handle themicro-slicer withcare.
NOTE: The viewpresented in theeyepiece isupside-down andreversed from leftto right of theobject. In otherwords, if you wishto examine moreof the left side,move the slide tothe right. Or if youwish to examinemore of the top ofthe image, movethe slide down—and vice-versa.
08033DI_MicroExplorer1200_Manual_042412_REV0.qxd 5/1/12 4:24 PM Page 12

13
with tweezers over the waste cup. Place it on aclean slide.
You can repeate the process on a new sample,using the Fenazo Blue Dye (O, Fig. 1)
Use your micro-slicer to slice off very thin slicesof other types of foods.
Life Under GlassFill a wide mouth jar with fresh water. Let it standfor three or four days without the lid. Then dropa handful of dry grass and a pinch or two of dirtinto the jar. Put the cap on the jar and keep it ina place where it will receive light (but not directsunlight).
In about five days, you may examine the water.First make a special slide: Using the needle orstirring rod, make a ring of petroleum jelly on aclean slide. The ring should be smaller than acover slip and be about half as thick as a slide.
Put a drop of water from the jar onto the slideinside the ring. Use the lowest power of yourmicroscope and write down your observations.Did you detect any movement in the water? Themovement is caused by microscopic animals.Try to focus on one of the animals – this may notbe very easy as a drop of water is like an oceanto a microscopic creature.
If the animals seem to be moving too fast tostudy or don’t stay in focus for very long, soak upa little bit of water with a corner of a paper towel.
Remember, you can make a specimen slide outof almost any material. When you are on a play-ground, at school, in a park, or just sitting aroundat home, train yourself to look at all the materialaround you. Keep an eye out for what mightmake a good specimen and discover the hiddenmicroscopic world that surrounds us all.
Specimen TrayYou can also place samples in to the SpecimenTray (P, Fig. 1). There are three (3), generouslysized compartments. These compartments areideal for comparing samples next to each other.
Note: Your set contains both glass slips and sta-
Start thinking like ascientist as youperform yourexperiments.Observe carefully,take notes (makesure you datethem), and mostimportantly, keepyour equipmentand the workingenvironment clean.Experiments workbest with cleanand uncontaminat-ed equipment.Parents appreciatea clean work area.
08033DI_MicroExplorer1200_Manual_042412_REV0.qxd 5/1/12 4:24 PM Page 13
14
tical (thin plastic) slips. Statical slips are thinplastic sheets that will stick to your slide usingstatic electricity. They are ideal for temporaryslides. Use a glass slip if you wish to make apermanent slide.
Remember to Turn Off the Light SourceWhen you are finished observing, be sure to turnthe light source around, if necessary, so that itturns off and doesn’t wear down the batteries.Remove the batteries before storing the micro-scope for a month or longer.
Make a Record of Your ExperimentsBegin to start thinking like a scientist as you per-form your experiments. Observe carefully andmake records of your experiments (make sureyou date them). Record the types of specimensyou observe; their colors, shapes and patterns;how they look through each objective; how youprepare your slides; what tools you use; how dif-ferent specimens compare with each other; andso forth.
Experiment observing with all three objectivesfor all specimens until you get a feel for magnifi-cation levels.
And most importantly, keep your equipment andthe working environment clean. Experimentswork best with clean and uncontaminated equip-ment.
Care for Your Equipment
The MicroExplorer1200 Microscope is a preci-sion optical instrument and, when treated with care, will provide you with years of use and discovery fun.
• Always carry the microscope with two hands– one around its arm and one under the base.
• Always remove slides from the stage beforeputting the microscope away.
• Do not use anything except lens cleaning tis-sue to clean the lenses.
• Never touch a slide with the objective lensesof the turret.
Remember, youcan make a speci-men slide out ofalmost any materi-al. When you areon a playground,at school, in apark, or just sittingaround at home,train yourself tolook at all thematerial aroundyou. Keep an eyeout for what mightmake a good spec-imen and discoverthe hidden micro-scopic world thatsurrounds us all.
08033DI_MicroExplorer1200_Manual_042412_REV0.qxd 5/1/12 4:24 PM Page 14
15
• Remove the batteries before storing themicroscope for a month or longer.
Replacing the Light Bulb
If your microscope’s built-in light stops workingthe first thing you should do is to replace the bat-teries with a set that you know are fresh. If thelight still does not work you will need to replacethe light bulb:
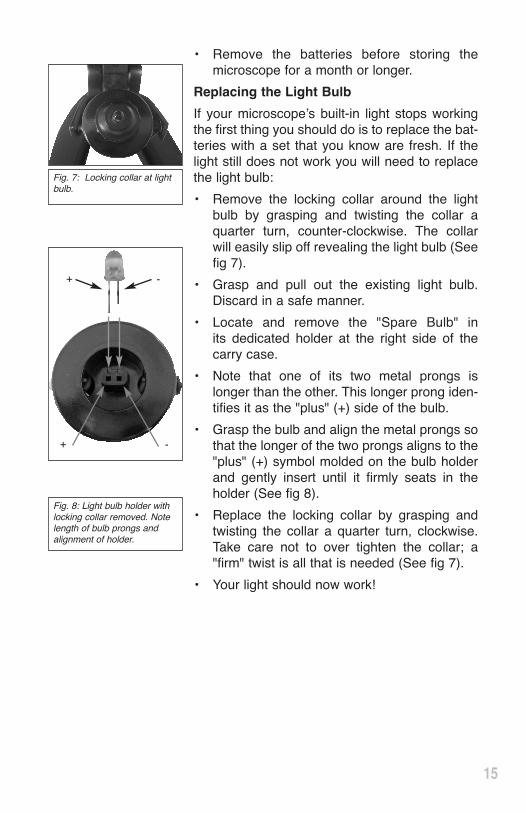
• Remove the locking collar around the lightbulb by grasping and twisting the collar aquarter turn, counter-clockwise. The collarwill easily slip off revealing the light bulb (Seefig 7).
• Grasp and pull out the existing light bulb.Discard in a safe manner.
• Locate and remove the "Spare Bulb" in its dedicated holder at the right side of thecarry case.
• Note that one of its two metal prongs islonger than the other. This longer prong iden-tifies it as the "plus" (+) side of the bulb.
• Grasp the bulb and align the metal prongs sothat the longer of the two prongs aligns to the"plus" (+) symbol molded on the bulb holderand gently insert until it firmly seats in theholder (See fig 8).
• Replace the locking collar by grasping andtwisting the collar a quarter turn, clockwise.Take care not to over tighten the collar; a"firm" twist is all that is needed (See fig 7).
• Your light should now work!
Fig. 7: Locking collar at lightbulb.
Fig. 8: Light bulb holder withlocking collar removed. Notelength of bulb prongs andalignment of holder.
+ -
+ -
08033DI_MicroExplorer1200_Manual_042412_REV0.qxd 5/1/12 4:24 PM Page 15

08033 REV0 (04/12)27 Hubble, Irvine, California 92618(800) 626-3233 www.meade.com
Limited WarrantyEvery Meade microscope and microscope accessory is warranted by Meade InstrumentsCorporation (“Meade”) to be free of defects in materials and workmanship for a period ofONE YEAR from the date of original purchase in the U.S.A. Meade will repair or replace aproduct, or part thereof, found by Meade to be defective, provided the defective part isreturned to Meade, freight-prepaid, with proof of purchase. This warranty applies to theoriginal purchaser only and is non-transferable. Meade products purchased outsideNorth America are not included in this warranty, but are covered under separate war-ranties issued by Meade international distributors.
RGA Number Required: Prior to the return of any product or part, a Return GoodsAuthorization (RGA) number must be obtained from Meade by writing, or by calling (800)626-3233. Each returned part or product must include a written statement detailing thenature of the claimed defect, as well as the owner’s name, address, and phone number.
This warranty is not valid in cases where the product has been abused or mishandled, whereunauthorized repairs have been attempted or performed, or where depreciation of the prod-uct is due to normal wear-and-tear. Meade specifically disclaims special, indirect, or conse-quential damages or lost profit which may result from a breach of this warranty. Any impliedwarranties which cannot be disclaimed are hereby limited to a term of one year from the dateof original retail purchase.
This warranty gives you specific rights. You may have other rights which vary from state tostate.
Meade reserves the right to change product specifications or to discontinue products with-out notice.
This warranty supersedes all previous Meade product warranties.
® The name “Meade” and the Meade logo are trademarks registered withthe U.S. Patent Office and in principal countries throughout the world. Allrights reserved.
© 2012 Meade Instruments Corp
08033DI_MicroExplorer1200_Manual_042412_REV0.qxd 5/1/12 4:24 PM Page 16