Embed Size (px)
Citation preview
1
Paper 041-2010
Using Dynamic and Cascading Prompts in SAS® Enterprise Guide® Kevin Davidson and Minh Duong
University of Houston, Houston, TX
ABSTRACT SAS 9.2 Phase 2 and Enterprise Guide 4.2 offer new and improved ways of parameterizing your programs. Prompted selection lists can be linked to data sets so that the lists change with the contents of the data. Prompts can also be connected to each other so that the value of a 2nd prompt depends on the value of the 1st prompt. Groups of prompts can be arranged so that end-users see prompts only if an earlier prompt is answered in a pre-specified manner. This paper will show examples of the various prompts you can establish in Enterprise Guide.
INTRODUCTION Developing reports that are customized, data-driven, and with intelligent subsetting rules is always a goal of application development. With the introduction of SAS 9.2 Phase 2 (available since early 2009), dynamic and cascading prompts can now be developed and utilized with relative ease. Dynamic prompting refers to the ability to have prompts populated with the current contents of the data. For example, if you have a data set that contains dates and you want to prompt the end-user with a list of dates, a dynamic prompt will read from the data set and populate a selection list based on the dates in the data. When new dates are added to the data, the selection list will automatically display those new dates as well. Cascading prompts refers to the ability to have one prompts values dependent on the value of a previous prompt. For example, if prompt #1 asks you to select between FRUITS and VEGETABLES and you select FRUITS, the 2nd prompt may contain APPLES, BANANAS, and ORANGES. Enterprise Guide will be the development tool that will be used in this paper to show the development and use of the prompting framework. However, the same prompt development capabilities are available in SAS Management Console.
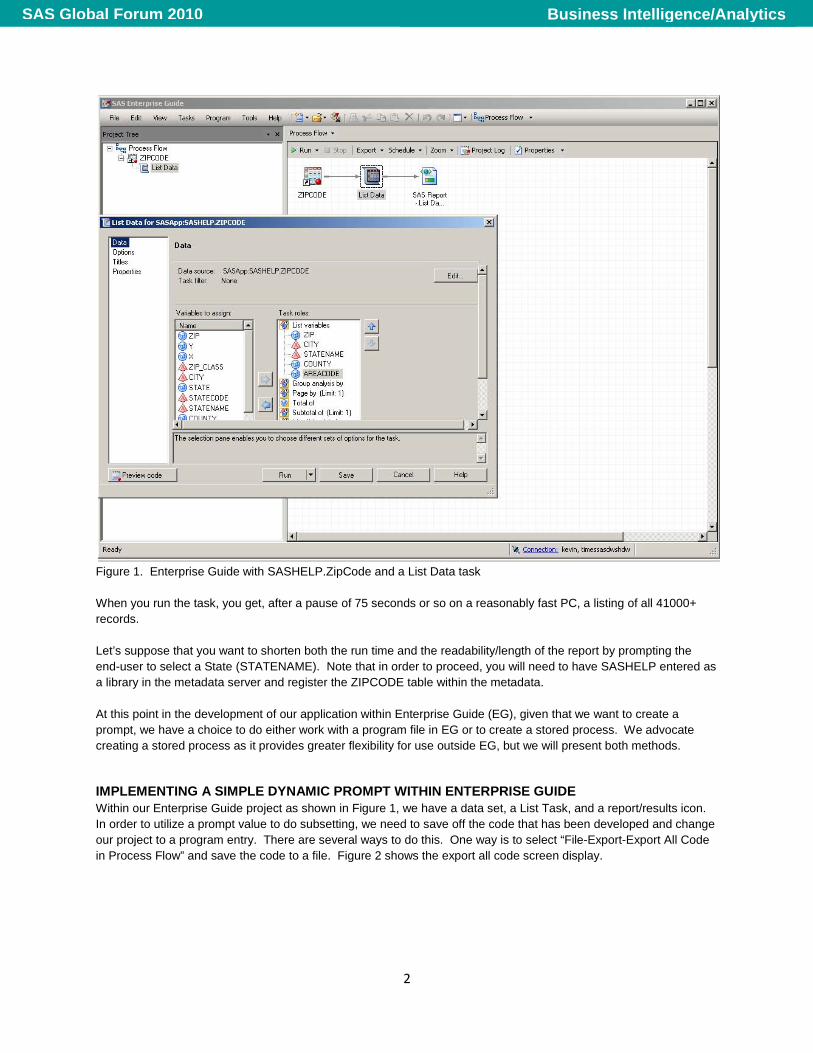
DEVELOPING A SIMPLE DYNAMIC PROMPT Let’s dive into an example. We have chosen to use the SASHELP.ZIPCODE file as most readers of this paper should have access to the data set with their SAS installations and thus can reproduce the results as a tutorial. Figure 1 shows Enterprise Guide with the SASHELP.ZIPCODE file loaded and a List Task (PROC PRINT) associated with it.
Business Intelligence/AnalyticsSAS Global Forum 2010
2
Figure 1. Enterprise Guide with SASHELP.ZipCode and a List Data task When you run the task, you get, after a pause of 75 seconds or so on a reasonably fast PC, a listing of all 41000+ records. Let’s suppose that you want to shorten both the run time and the readability/length of the report by prompting the end-user to select a State (STATENAME). Note that in order to proceed, you will need to have SASHELP entered as a library in the metadata server and register the ZIPCODE table within the metadata. At this point in the development of our application within Enterprise Guide (EG), given that we want to create a prompt, we have a choice to do either work with a program file in EG or to create a stored process. We advocate creating a stored process as it provides greater flexibility for use outside EG, but we will present both methods.
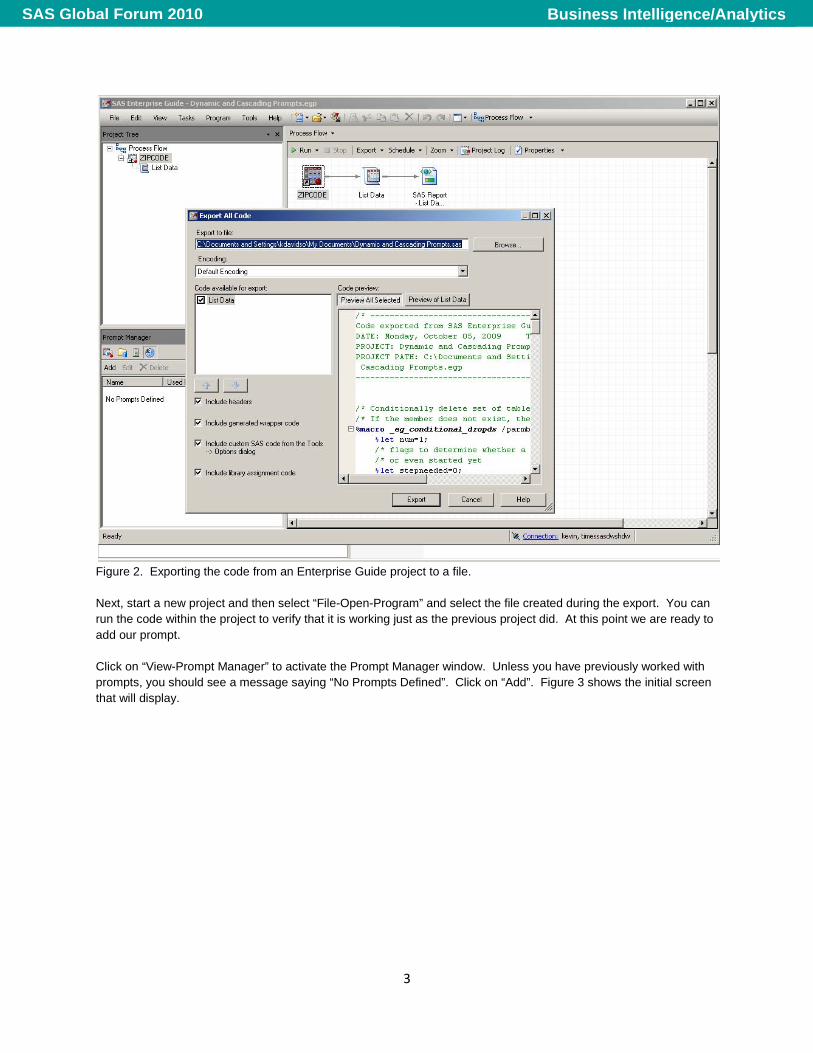
IMPLEMENTING A SIMPLE DYNAMIC PROMPT WITHIN ENTERPRISE GUIDE Within our Enterprise Guide project as shown in Figure 1, we have a data set, a List Task, and a report/results icon. In order to utilize a prompt value to do subsetting, we need to save off the code that has been developed and change our project to a program entry. There are several ways to do this. One way is to select “File-Export-Export All Code in Process Flow” and save the code to a file. Figure 2 shows the export all code screen display.
Business Intelligence/AnalyticsSAS Global Forum 2010
3
Figure 2. Exporting the code from an Enterprise Guide project to a file. Next, start a new project and then select “File-Open-Program” and select the file created during the export. You can run the code within the project to verify that it is working just as the previous project did. At this point we are ready to add our prompt. Click on “View-Prompt Manager” to activate the Prompt Manager window. Unless you have previously worked with prompts, you should see a message saying “No Prompts Defined”. Click on “Add”. Figure 3 shows the initial screen that will display.
Business Intelligence/AnalyticsSAS Global Forum 2010
4
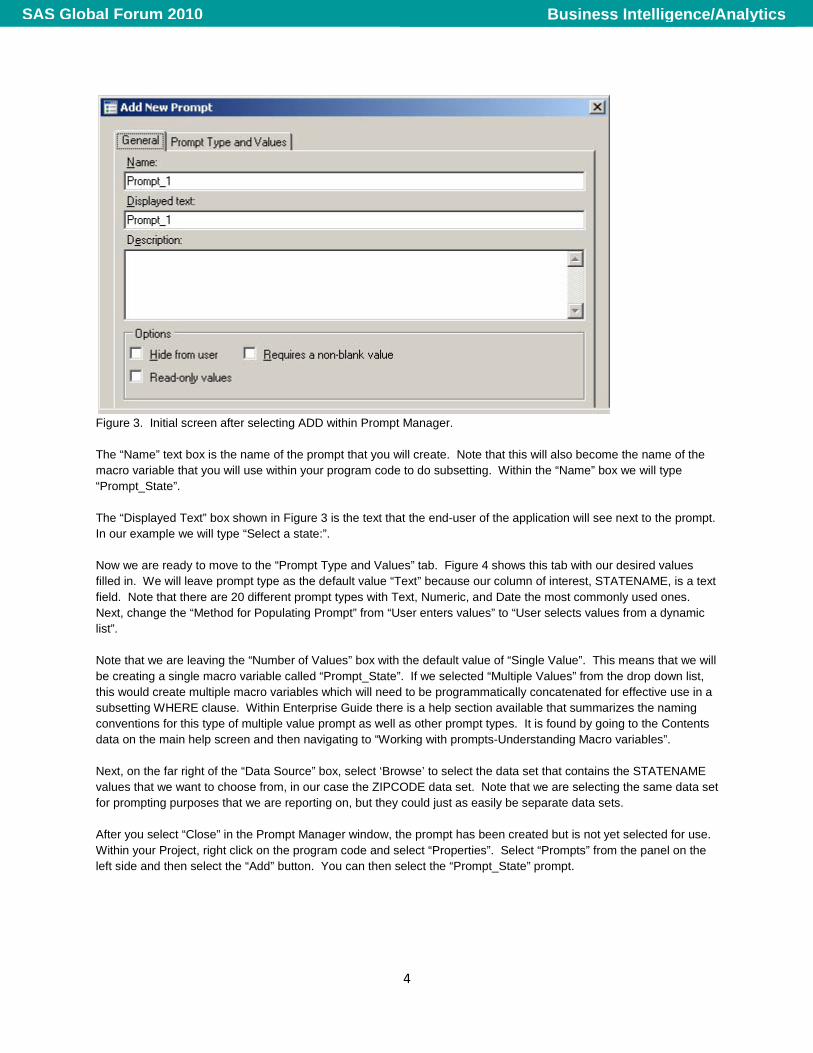
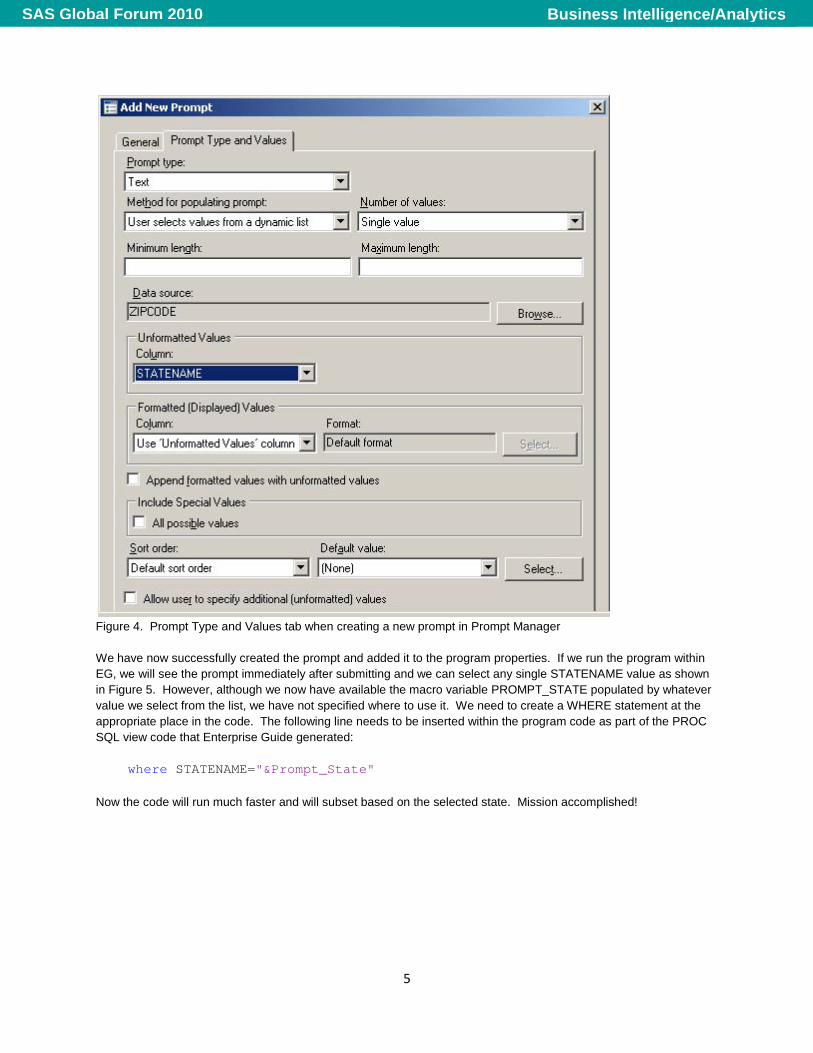
Figure 3. Initial screen after selecting ADD within Prompt Manager. The “Name” text box is the name of the prompt that you will create. Note that this will also become the name of the macro variable that you will use within your program code to do subsetting. Within the “Name” box we will type “Prompt_State”. The “Displayed Text” box shown in Figure 3 is the text that the end-user of the application will see next to the prompt. In our example we will type “Select a state:”. Now we are ready to move to the “Prompt Type and Values” tab. Figure 4 shows this tab with our desired values filled in. We will leave prompt type as the default value “Text” because our column of interest, STATENAME, is a text field. Note that there are 20 different prompt types with Text, Numeric, and Date the most commonly used ones. Next, change the “Method for Populating Prompt” from “User enters values” to “User selects values from a dynamic list”. Note that we are leaving the “Number of Values” box with the default value of “Single Value”. This means that we will be creating a single macro variable called “Prompt_State”. If we selected “Multiple Values” from the drop down list, this would create multiple macro variables which will need to be programmatically concatenated for effective use in a subsetting WHERE clause. Within Enterprise Guide there is a help section available that summarizes the naming conventions for this type of multiple value prompt as well as other prompt types. It is found by going to the Contents data on the main help screen and then navigating to “Working with prompts-Understanding Macro variables”. Next, on the far right of the “Data Source” box, select ‘Browse’ to select the data set that contains the STATENAME values that we want to choose from, in our case the ZIPCODE data set. Note that we are selecting the same data set for prompting purposes that we are reporting on, but they could just as easily be separate data sets. After you select “Close” in the Prompt Manager window, the prompt has been created but is not yet selected for use. Within your Project, right click on the program code and select “Properties”. Select “Prompts” from the panel on the left side and then select the “Add” button. You can then select the “Prompt_State” prompt.
Business Intelligence/AnalyticsSAS Global Forum 2010
5
Figure 4. Prompt Type and Values tab when creating a new prompt in Prompt Manager We have now successfully created the prompt and added it to the program properties. If we run the program within EG, we will see the prompt immediately after submitting and we can select any single STATENAME value as shown in Figure 5. However, although we now have available the macro variable PROMPT_STATE populated by whatever value we select from the list, we have not specified where to use it. We need to create a WHERE statement at the appropriate place in the code. The following line needs to be inserted within the program code as part of the PROC SQL view code that Enterprise Guide generated: where STATENAME="&Prompt_State" Now the code will run much faster and will subset based on the selected state. Mission accomplished!
Business Intelligence/AnalyticsSAS Global Forum 2010
6
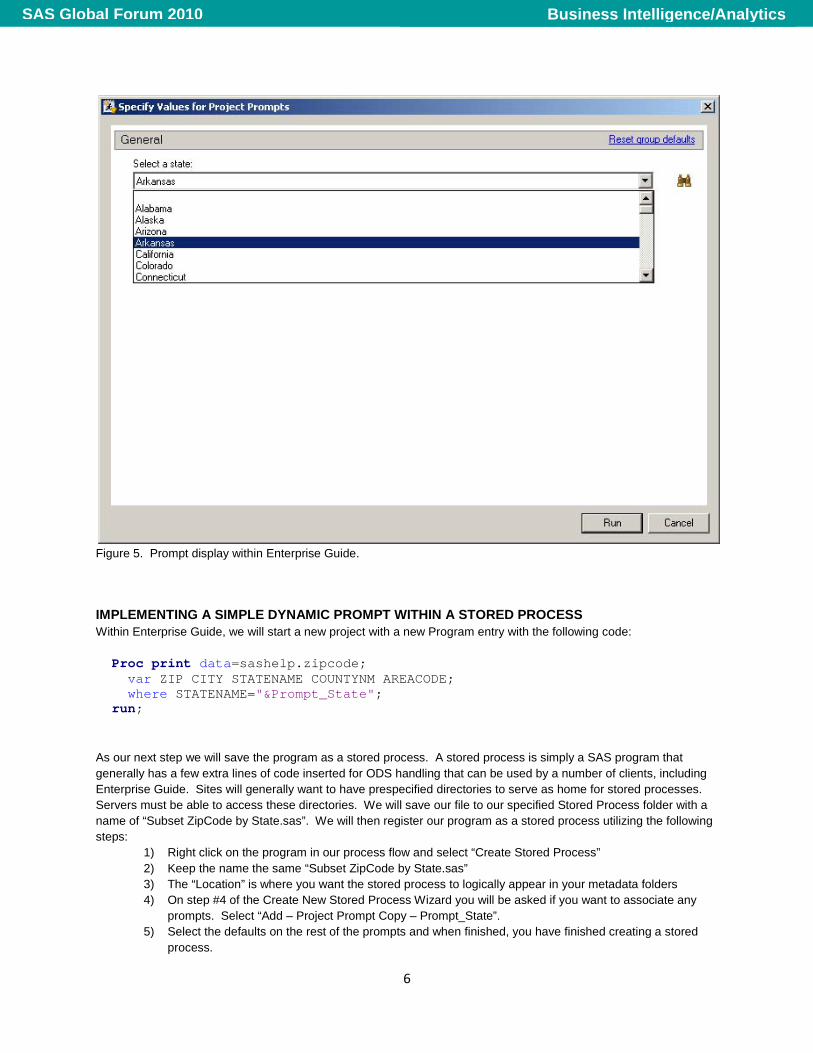
Figure 5. Prompt display within Enterprise Guide.
IMPLEMENTING A SIMPLE DYNAMIC PROMPT WITHIN A STORED PROCESS Within Enterprise Guide, we will start a new project with a new Program entry with the following code: Proc print data=sashelp.zipcode; var ZIP CITY STATENAME COUNTYNM AREACODE; where STATENAME="&Prompt_State"; run; As our next step we will save the program as a stored process. A stored process is simply a SAS program that generally has a few extra lines of code inserted for ODS handling that can be used by a number of clients, including Enterprise Guide. Sites will generally want to have prespecified directories to serve as home for stored processes. Servers must be able to access these directories. We will save our file to our specified Stored Process folder with a name of “Subset ZipCode by State.sas”. We will then register our program as a stored process utilizing the following steps:
1) Right click on the program in our process flow and select “Create Stored Process” 2) Keep the name the same “Subset ZipCode by State.sas” 3) The “Location” is where you want the stored process to logically appear in your metadata folders 4) On step #4 of the Create New Stored Process Wizard you will be asked if you want to associate any
prompts. Select “Add – Project Prompt Copy – Prompt_State”. 5) Select the defaults on the rest of the prompts and when finished, you have finished creating a stored
process.
Business Intelligence/AnalyticsSAS Global Forum 2010
7
You can now run this stored process in isolation. Within Enterprise Guide, select ‘File-New Project’ and decline to save the existing project. Within the new project, select ‘File-Open-Stored Process’ and then navigate to and select your newly created stored process. You can then run your stored process and it should be fully functional. One of the benefits of having created a stored process is that you can run the same exact code without modification with other client applications such as SAS Web Report Studio, SAS Stored Process Web Application, and SAS Add-In for Microsoft Office.
DEVELOPING A CASCADING PROMPT An additional advantage of creating a stored process is that you can create cascading prompts, where the values listed in a 2nd prompt are dependent on the value(s) selected in the first prompt. Cascading prompts are not supported within Enterprise Guide program entries. In order to demonstrate a cascading prompt, we will add a 2nd prompt to our stored process. Let’s suppose that our end-users need to create reports only for certain counties within a state. Thus we will add a prompt that allows selection of counties such that the prompt list only displays counties within the state selected in prompt #1. In the Process Flow window, right click on the stored process icon and then select “Modify Subset ZipCode by State”. The Stored Process Manager window will appear. In the left-hand pane, select “Prompts”. Then click on the ‘Add’ button and select “New Prompt”. The Add New Prompt window will appear similar to the prompt creation window you saw before, but because this is the 2nd prompt attached to the stored process, you will also see a “Dependencies” tab that allows you to define dependencies between prompts. Within the “General” tab, name the new prompt “Prompt_County” and in the “Displayed Text” box enter “Select county(ies) of interest”. Click on the “Prompt Type and Values” tab. In the “Method for populating prompt” box, select “User selects values from a dynamic list”. In the “Number of Values” box, select “Multiple Values”. Next click on the Browse button next to the Data Source box and navigate to and select the ZipCode data set. In the “Unformatted Values” box, select COUNTYNM as the column to be used to populated the selection list. Next, click on the “Dependencies” tab. In order to make the values of the Prompt_County list box only show the values within the state selected in the Prompt_State list box, do the following:
1) Click the Add button. Because there is only one other prompt that Prompt_County can be dependent upon, the Prompt_State (or “Select a state:”) will automatically be selected.
2) The Dependency box will likewise be automatically filled in for you. It is essentially saying that we are only going to use the records subsetted by the state selected in prompt #1 to populate prompt #2.
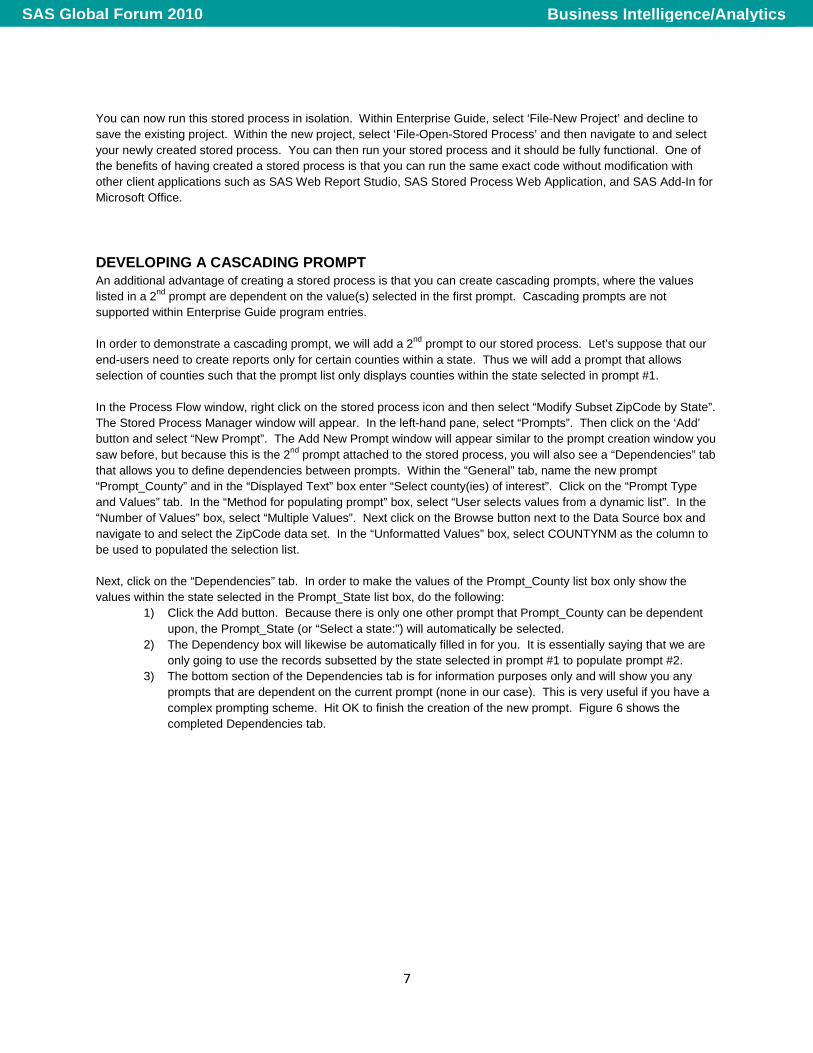
3) The bottom section of the Dependencies tab is for information purposes only and will show you any prompts that are dependent on the current prompt (none in our case). This is very useful if you have a complex prompting scheme. Hit OK to finish the creation of the new prompt. Figure 6 shows the completed Dependencies tab.
Business Intelligence/AnalyticsSAS Global Forum 2010
8
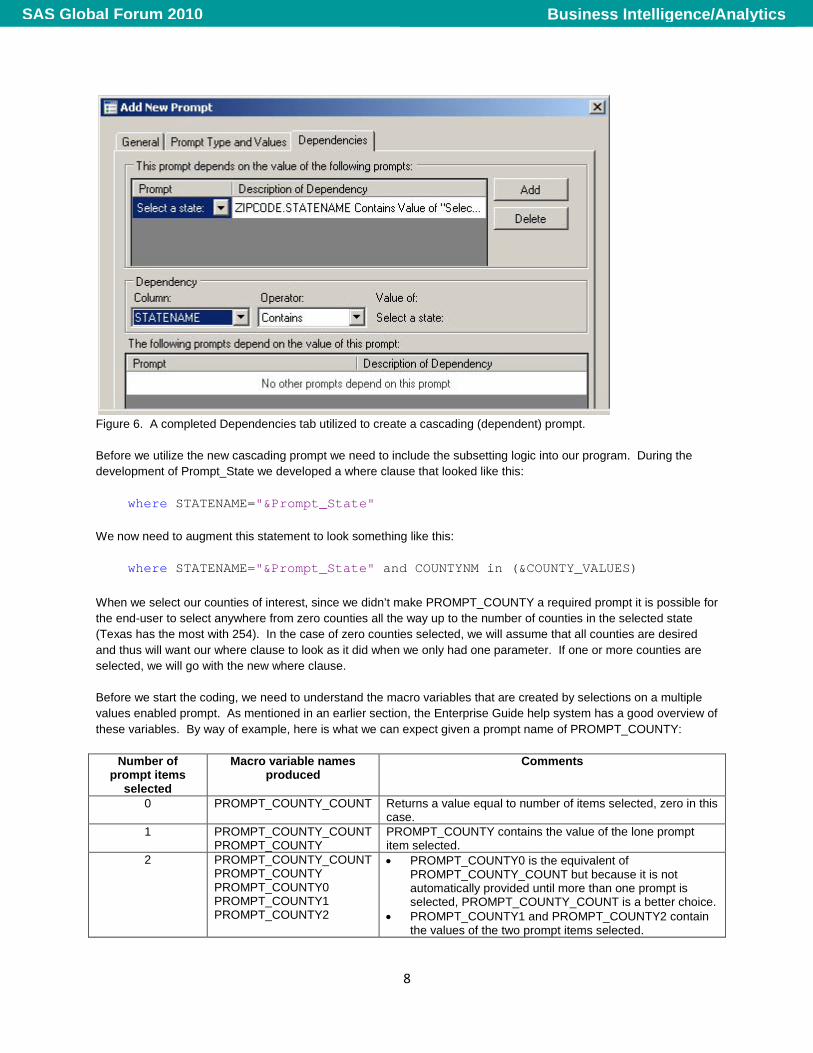
Figure 6. A completed Dependencies tab utilized to create a cascading (dependent) prompt. Before we utilize the new cascading prompt we need to include the subsetting logic into our program. During the development of Prompt_State we developed a where clause that looked like this: where STATENAME="&Prompt_State" We now need to augment this statement to look something like this: where STATENAME="&Prompt_State" and COUNTYNM in (&COUNTY_VALUES) When we select our counties of interest, since we didn’t make PROMPT_COUNTY a required prompt it is possible for the end-user to select anywhere from zero counties all the way up to the number of counties in the selected state (Texas has the most with 254). In the case of zero counties selected, we will assume that all counties are desired and thus will want our where clause to look as it did when we only had one parameter. If one or more counties are selected, we will go with the new where clause. Before we start the coding, we need to understand the macro variables that are created by selections on a multiple values enabled prompt. As mentioned in an earlier section, the Enterprise Guide help system has a good overview of these variables. By way of example, here is what we can expect given a prompt name of PROMPT_COUNTY:
Number of prompt items
selected
Macro variable names produced
Comments
0 PROMPT_COUNTY_COUNT Returns a value equal to number of items selected, zero in this case.
1 PROMPT_COUNTY_COUNT PROMPT_COUNTY
PROMPT_COUNTY contains the value of the lone prompt item selected.
2 PROMPT_COUNTY_COUNT PROMPT_COUNTY PROMPT_COUNTY0 PROMPT_COUNTY1 PROMPT_COUNTY2
• PROMPT_COUNTY0 is the equivalent of PROMPT_COUNTY_COUNT but because it is not automatically provided until more than one prompt is selected, PROMPT_COUNTY_COUNT is a better choice.
• PROMPT_COUNTY1 and PROMPT_COUNTY2 contain the values of the two prompt items selected.
Business Intelligence/AnalyticsSAS Global Forum 2010
9
Note that for every additional prompt item selected above two, there is simply another macro variable generated. A third prompt item selected creates PROMPT_COUNTY3, a fourth PROMPT_COUNTY4, etc. The following short program was developed to handle the various scenarios shown in the table above to create a single usable macro variable (COUNTY_WHERE_CLAUSE) within our full where clause.
*Always a good idea to declare as global macro fields; %global PROMPT_COUNTY_COUNT PROMPT_COUNTY; %let COUNTY_WHERE_CLAUSE=; *Initialize our new where clause to missing; data _null_; length COUNTY_LIST $10000; *long enough to hold all counties in a state; if symget('PROMPT_COUNTY_COUNT')=1 then
COUNTY_LIST=quote(trim(symget('PROMPT_COUNTY'))); else do i=1 to symget('PROMPT_COUNTY_COUNT'); COUNTY_LIST= catx(' ' ,COUNTY_LIST, quote(trim(symget(cats('PROMPT_COUNTY',i))))); end; *if at least one county selected, write to COUNTY_WHERE_CLAUSE macro value; if missing(COUNTY_LIST)=0 then call symputx('COUNTY_WHERE_CLAUSE',cats('and COUNTYNM in (',COUNTY_LIST,')')); run;
We can now augment our where clause within our stored process program with the following statement and we should be ready to go.
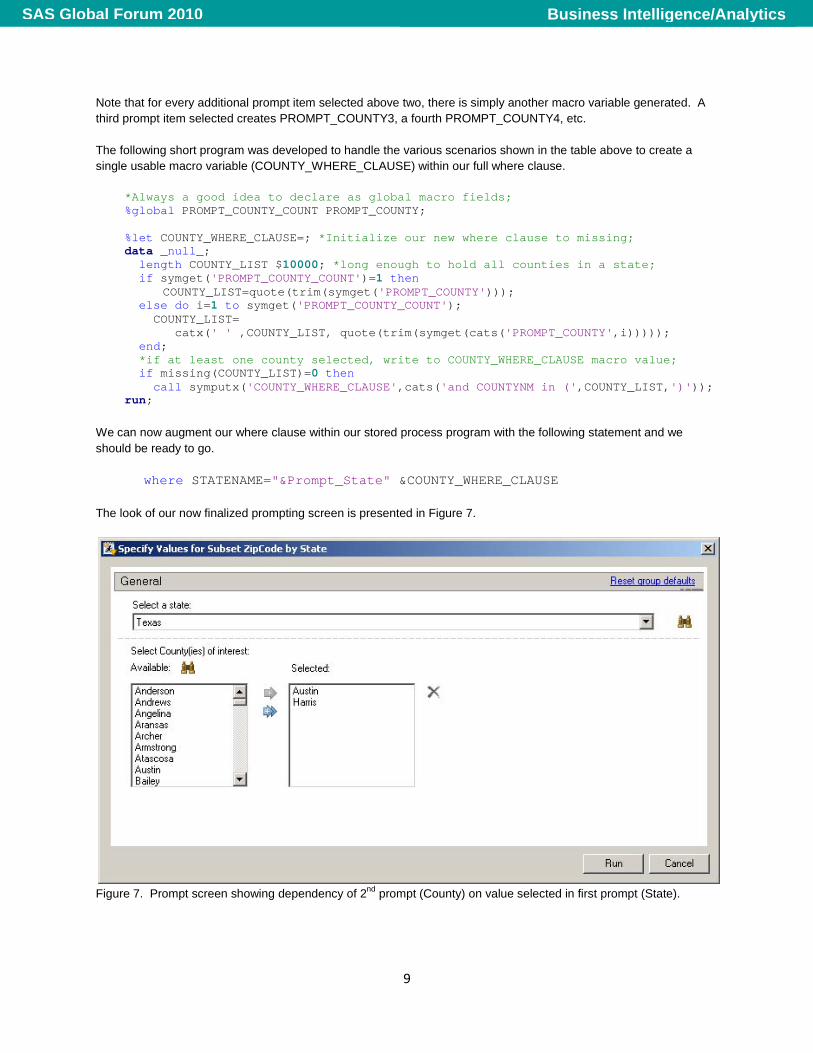
where STATENAME="&Prompt_State" &COUNTY_WHERE_CLAUSE The look of our now finalized prompting screen is presented in Figure 7.
Figure 7. Prompt screen showing dependency of 2nd prompt (County) on value selected in first prompt (State).
Business Intelligence/AnalyticsSAS Global Forum 2010
10
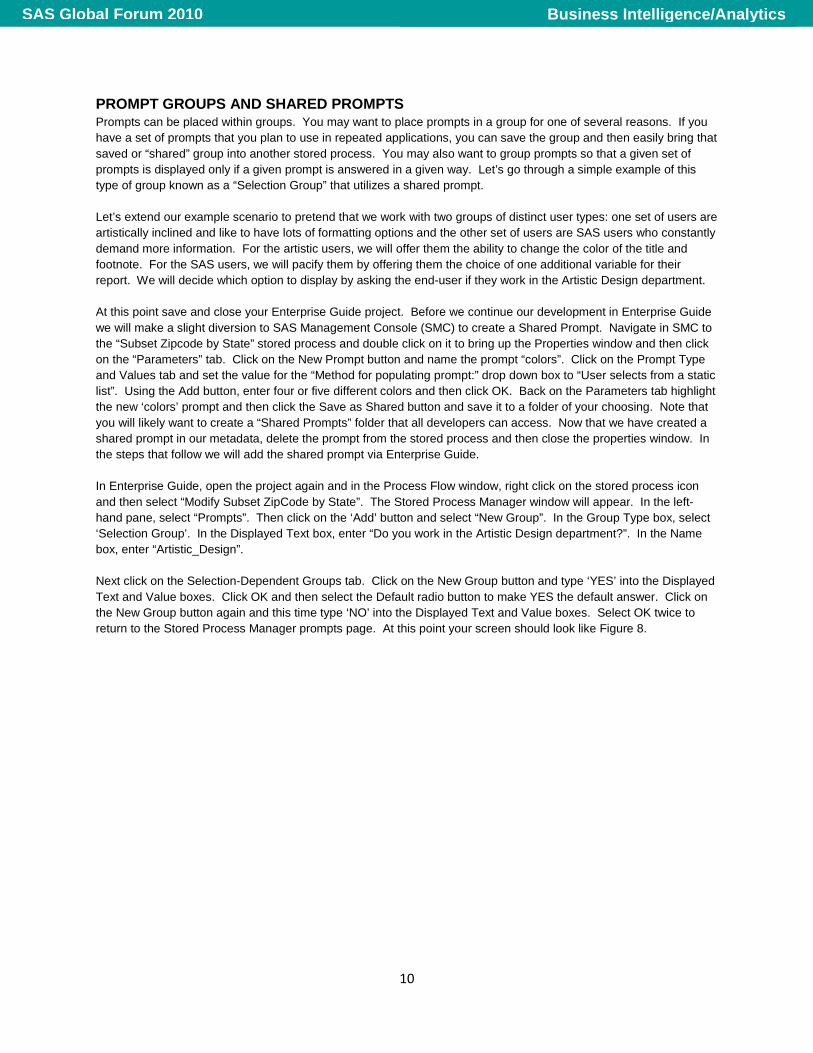
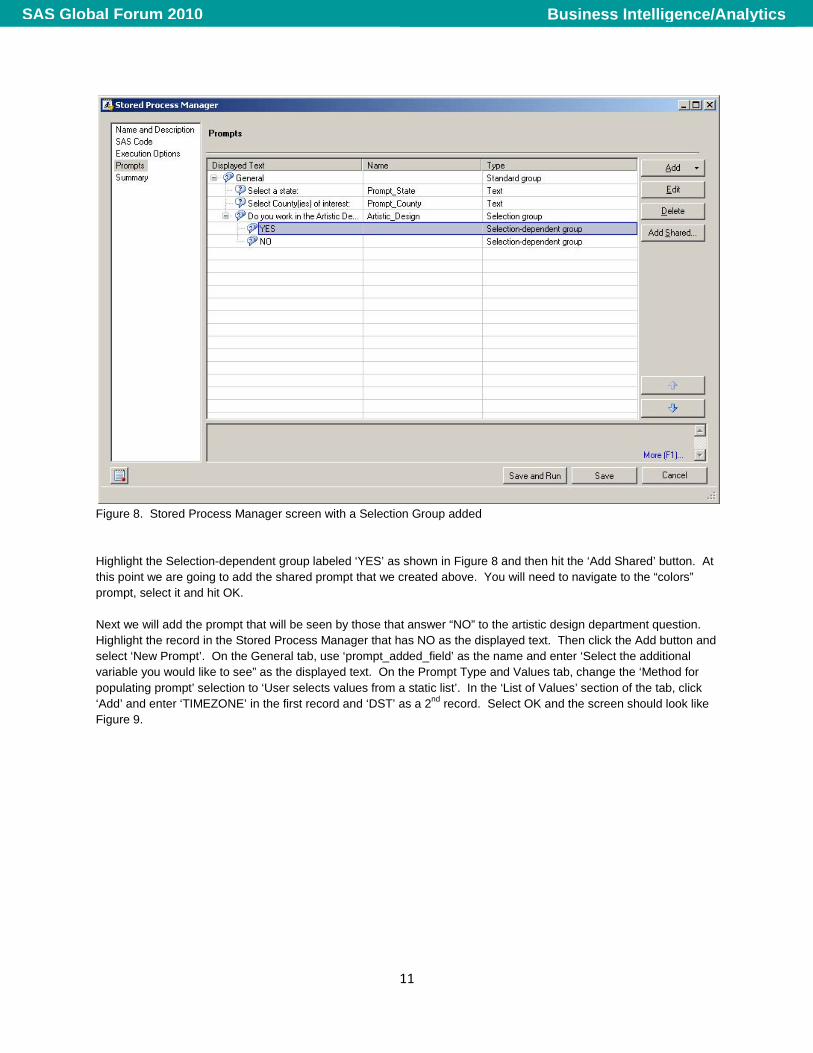
PROMPT GROUPS AND SHARED PROMPTS Prompts can be placed within groups. You may want to place prompts in a group for one of several reasons. If you have a set of prompts that you plan to use in repeated applications, you can save the group and then easily bring that saved or “shared” group into another stored process. You may also want to group prompts so that a given set of prompts is displayed only if a given prompt is answered in a given way. Let’s go through a simple example of this type of group known as a “Selection Group” that utilizes a shared prompt. Let’s extend our example scenario to pretend that we work with two groups of distinct user types: one set of users are artistically inclined and like to have lots of formatting options and the other set of users are SAS users who constantly demand more information. For the artistic users, we will offer them the ability to change the color of the title and footnote. For the SAS users, we will pacify them by offering them the choice of one additional variable for their report. We will decide which option to display by asking the end-user if they work in the Artistic Design department. At this point save and close your Enterprise Guide project. Before we continue our development in Enterprise Guide we will make a slight diversion to SAS Management Console (SMC) to create a Shared Prompt. Navigate in SMC to the “Subset Zipcode by State” stored process and double click on it to bring up the Properties window and then click on the “Parameters” tab. Click on the New Prompt button and name the prompt “colors”. Click on the Prompt Type and Values tab and set the value for the “Method for populating prompt:” drop down box to “User selects from a static list”. Using the Add button, enter four or five different colors and then click OK. Back on the Parameters tab highlight the new ‘colors’ prompt and then click the Save as Shared button and save it to a folder of your choosing. Note that you will likely want to create a “Shared Prompts” folder that all developers can access. Now that we have created a shared prompt in our metadata, delete the prompt from the stored process and then close the properties window. In the steps that follow we will add the shared prompt via Enterprise Guide. In Enterprise Guide, open the project again and in the Process Flow window, right click on the stored process icon and then select “Modify Subset ZipCode by State”. The Stored Process Manager window will appear. In the left-hand pane, select “Prompts”. Then click on the ‘Add’ button and select “New Group”. In the Group Type box, select ‘Selection Group’. In the Displayed Text box, enter “Do you work in the Artistic Design department?”. In the Name box, enter “Artistic_Design”. Next click on the Selection-Dependent Groups tab. Click on the New Group button and type ‘YES’ into the Displayed Text and Value boxes. Click OK and then select the Default radio button to make YES the default answer. Click on the New Group button again and this time type ‘NO’ into the Displayed Text and Value boxes. Select OK twice to return to the Stored Process Manager prompts page. At this point your screen should look like Figure 8.
Business Intelligence/AnalyticsSAS Global Forum 2010
11
Figure 8. Stored Process Manager screen with a Selection Group added Highlight the Selection-dependent group labeled ‘YES’ as shown in Figure 8 and then hit the ‘Add Shared’ button. At this point we are going to add the shared prompt that we created above. You will need to navigate to the “colors” prompt, select it and hit OK. Next we will add the prompt that will be seen by those that answer “NO” to the artistic design department question. Highlight the record in the Stored Process Manager that has NO as the displayed text. Then click the Add button and select ‘New Prompt’. On the General tab, use ‘prompt_added_field’ as the name and enter ‘Select the additional variable you would like to see” as the displayed text. On the Prompt Type and Values tab, change the ‘Method for populating prompt’ selection to ‘User selects values from a static list’. In the ‘List of Values’ section of the tab, click ‘Add’ and enter ‘TIMEZONE’ in the first record and ‘DST’ as a 2nd record. Select OK and the screen should look like Figure 9.
Business Intelligence/AnalyticsSAS Global Forum 2010
12
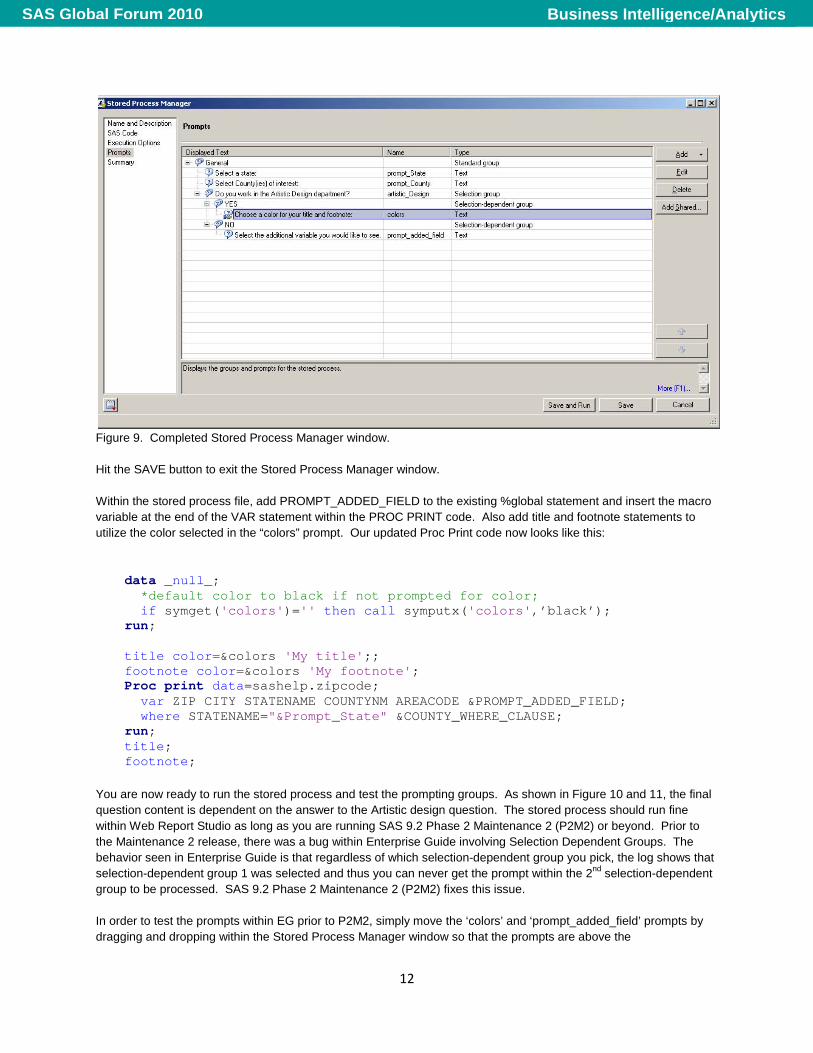
Figure 9. Completed Stored Process Manager window. Hit the SAVE button to exit the Stored Process Manager window. Within the stored process file, add PROMPT_ADDED_FIELD to the existing %global statement and insert the macro variable at the end of the VAR statement within the PROC PRINT code. Also add title and footnote statements to utilize the color selected in the “colors” prompt. Our updated Proc Print code now looks like this:
data _null_; *default color to black if not prompted for color; if symget('colors')='' then call symputx('colors',’black’); run; title color=&colors 'My title';; footnote color=&colors 'My footnote'; Proc print data=sashelp.zipcode; var ZIP CITY STATENAME COUNTYNM AREACODE &PROMPT_ADDED_FIELD; where STATENAME="&Prompt_State" &COUNTY_WHERE_CLAUSE; run; title; footnote;
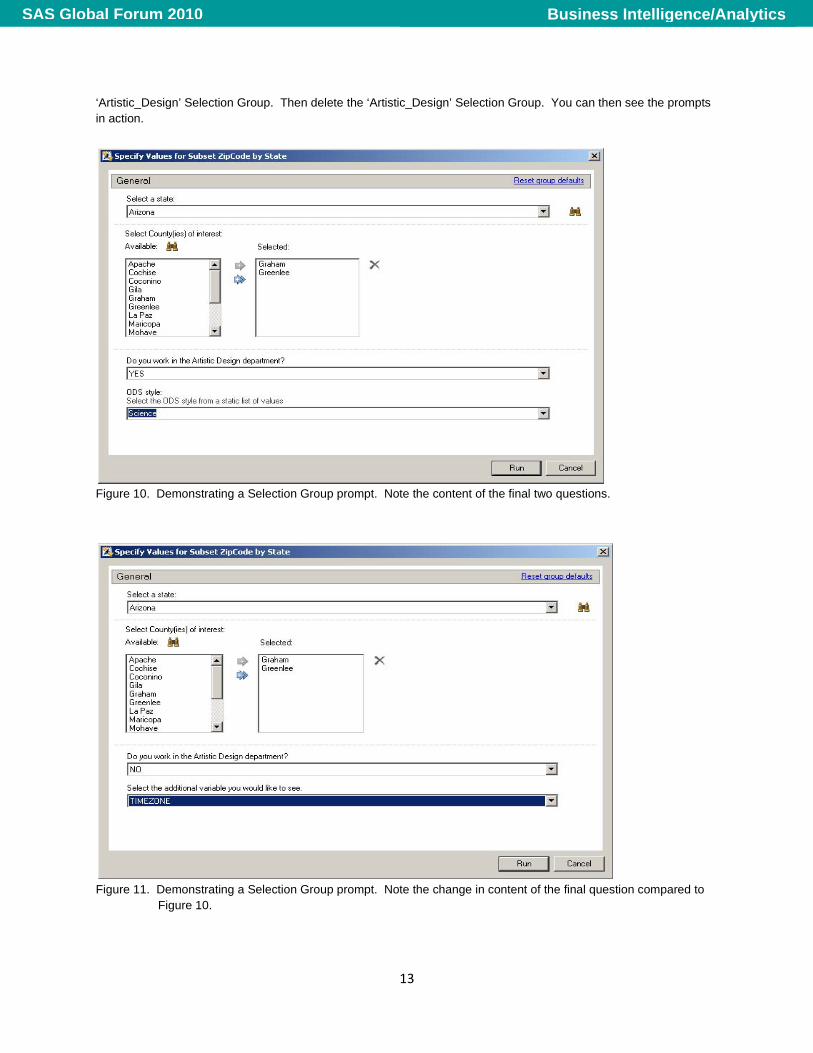
You are now ready to run the stored process and test the prompting groups. As shown in Figure 10 and 11, the final question content is dependent on the answer to the Artistic design question. The stored process should run fine within Web Report Studio as long as you are running SAS 9.2 Phase 2 Maintenance 2 (P2M2) or beyond. Prior to the Maintenance 2 release, there was a bug within Enterprise Guide involving Selection Dependent Groups. The behavior seen in Enterprise Guide is that regardless of which selection-dependent group you pick, the log shows that selection-dependent group 1 was selected and thus you can never get the prompt within the 2nd selection-dependent group to be processed. SAS 9.2 Phase 2 Maintenance 2 (P2M2) fixes this issue. In order to test the prompts within EG prior to P2M2, simply move the ‘colors’ and ‘prompt_added_field’ prompts by dragging and dropping within the Stored Process Manager window so that the prompts are above the
Business Intelligence/AnalyticsSAS Global Forum 2010
13
‘Artistic_Design’ Selection Group. Then delete the ‘Artistic_Design’ Selection Group. You can then see the prompts in action.
Figure 10. Demonstrating a Selection Group prompt. Note the content of the final two questions.
Figure 11. Demonstrating a Selection Group prompt. Note the change in content of the final question compared to
Figure 10.
Business Intelligence/AnalyticsSAS Global Forum 2010
14
CONCLUSIONS The advent of cascading and dynamic prompts within organizations that are targeting utilizing either Enterprise Guide, or stored processes in general are good candidates for benefitting from the new features available with SAS 9.2 Phase 2 and Enterprise Guide 4.2. With a fairly small time investment for training, developers and end-users can create intelligent report templates with prompt values that can be linked to other prompt values and to values that currently exist in the data being queried. Prompts that are to be used in many applications can be saved and easily reused.
REFERENCES Davidson, Kevin (2006). “An Introduction to SAS® Information Map Studio.” Proceedings of the 2006 South-Central SAS Users Group, Irvine, Texas.
Davidson, Kevin (2007). “SAS® Web Report Studio - Enabling Flexible Reporting for End-Users.” Proceedings of the 2007 South-Central SAS Users Group, Austin, Texas.
Davidson, Kevin (2008). “Using SAS® Business Intelligence Server and SAS® Data Integration Studio with academic research data”. Proceedings of the 2008 South-Central SAS Users Group, Houston, Texas.
Hatcher, Dianne and Leslie, Scott (2007). “Ask Me Anything: New SAS Prompting Architecture.” Proceedings of the SAS Global Forum 2007 Conference, Orlando, Florida.
CONTACT INFORMATION Your comments and questions are valued and encouraged. Contact the authors at: Kevin Davidson, Ph.D. Minh Duong Texas Institute for Measurement, Evaluation, and Statistics University of Houston 100 TLCC Annex Houston, TX 77204-6022 832-842-7050 [email protected] [email protected] SAS and all other SAS Institute Inc. product or service names are registered trademarks or trademarks of SAS Institute Inc. in the USA and other countries. ® indicates USA registration.
Business Intelligence/AnalyticsSAS Global Forum 2010


![Fractional Cascading Fractional Cascading I: A Data Structuring Technique Fractional Cascading II: Applications [Chazaelle & Guibas 1986] Dynamic Fractional](https://img.pdfslide.us/doc/110x75/56649ea25503460f94ba64dd/fractional-cascading-fractional-cascading-i-a-data-structuring-technique-fractional.jpg)