Embed Size (px)
Citation preview

The Great Purbeck Scratch-Off.
Rules: You have 4 periods to make a playable game, quiz, art installation, synthesiser or animation that connects with the real world in some way. It should be played and enjoyed by other people and your project will be judged on criteria shared below.
Working in your teams, you will have to: o Decide on a concept based on your task brief. o Divide up the jobs to be done in your team. o Communicate with and support each other throughout the process.
All projects will require a construction aspect, a coding aspect and a creative aspect. You will be using Scratch to program your games.
Each team will be assigned a Code Expert to help them with their scratch program during the day. They will help you with turning your ideas into working code and overcoming any technical difficulties you may encounter. They are also volunteers, and humans so be nice to them. Each task will have a number of extra challenges that can be met for extra team points. You will be able to get code hints at any point during the day from Mr Cox or Mr Davids, but relying on your teachers may result in you losing points for Problem Solving. Getting help from other teams is free though, and assisting other teams gives you bonus points. Your Coding Experts will be with you, and will assign you extra team points in the following categories, and record evidence of these activities during the day. These will count towards your final judgment during Period 5.
You will be judged on:
Problem Solving Solving problems is key to coding. Debugging and ironing out problems leads to a better software experience.
Communication Successful teams can communicate their ideas, and give constructive feedback to colleagues. Inter-team communication is key to nurturing talent.

Creativity Excellent artwork, thought, construction, or just the linking of two ideas into new ones are all creative endeavour.
Teamwork Making sure all team members are involved, valued, active. Awesomeness. Discretionary points available for inspirational awesomeness
from individuals or a whole team. Fun A key part of today is enjoyment. Your games should be
fun, and you should enjoy the process as much as the product.
The judges will interview you on your projects, and you will have to explain how your code works, as well as the concepts behind your installation.
All projects should be saved regularly, not just to the network folder, but if possible they should be uploaded using the Purbeck STEM scratch account.
The day will run something like this: P1 Brainstorming Discuss the task; write down loads of ideas on
a big sheet of paper.Nominate a team leader/sub leaders. Divide tasks between coders and makers
P1+2 Designing and prototyping
Get things set up quickly. Decide on the scale of your installation. Work out where it will be situated on the floor. See how far the cables stretch. Gather the materials you will need.
P3+4 Coding, making This is where you will spend most of the day, creating your installations and getting them to work properly. Save your project often to avoid losing all of your work in the event of a computer crash.
P4, Iterating, improving.
Once you have got to a working prototype stage, you have to keep improving your build and making it more refined.
P5+P6 Judgement, showcase, feedback.
The room will be open for visiting classes and judges. Clear-up and feedback have to happen!

The Task: Make a game/ quiz / synth using a fruit-based controller
Kit List: Makey Makey Crocodile clipsWires x 10Bananas / assorted fruit or vegetables
Background: The Makey Makey is a device that lets you use any conductive object as a controller. It plugs into a USB port, and will cause a keyboard stroke when you close the connection between the ground (negative) and the button of choice. A PC will see Makey Makey like a keyboard. You can use bananas as a substitute for keys if you wish. http://makeymakey.com/howto.php Instructions here.
Suggestions:Art / Doodling programs. By coding a short looping script using the pen tool, you can make a sprite move around the screen drawing as it goes. You could change the colour to the fruit that is pressed, or you change the type of motion it produces using the fruit as input. Snake. Snake is a relatively simple game to code in scratch. You need to be able to control 4-way movement, and make the snake speed up when it eats fruit. You can make a more complicated version that makes the snake get longer.
Maze games. You can use a picture of a simple maze, or generate your own online. If you use simple collision detection (If touching colour <black>), you can make a maze game controlled by fruit. Quiz games – Use the vegetables that you have available to you to make a fruit-based quiz. Which has a second letter that is an ‘a’Which has more vitamin C in it?
Beatbox / Bop it games. Code a game where you have to remember an ever-increasingly difficult sequence of fruits that appear on screen. If the player does not input the correct sequence, they lose and have to go back to level one.Or you could play it like BopIt, where there is a sound cue, and the player has to press the right fruit within a certain amount of time. The time allowed can get quicker as the game progresses!

Build Challenges.Plug in the Makey Makey via the USB port. Wire one cable to the ‘ground’ terminal of the Makey Makey, and clamp a crocodile clip to any one of the other holes. Open up Microsoft word and see what button is pressed. Rig up the Makey Makey with fruit attached to a croc clip, plugged into a key, and touch the ground terminal with your finger. Now touch the fruit. Rig up multiple fruits and spell a word in Microsoft Word. Start Scratch and see if the same keyblocks are sensing the Makey Makey.
Code Challenges.Use the ‘When <space> pressed’ block from the control menu to get a sprite to say something when you press a button. Make at least two different sprites that will respond to different fruits/inputs from the makey makey. Make a single sprite that can move in 4 directions by linking different fruits to keypresses to movement using blocks from the ‘motion’ menu. Use variables to store different aspects of your game, like level, player score, sprite speed. Use player input to change the value of the variable by using mathematical operators.
Create a variable that displays the score / status of the current playerGame which accepts keyboard input, scoring, variables (lives) and different stage backgrounds
Extra Challenges:Create a title screen for your game with basic instructions using the text tool.
Begin your game by pressing a button or a combination of fruitsAsk for a player name, and tell the player what their score is at the end of the game by using broadcast messages.

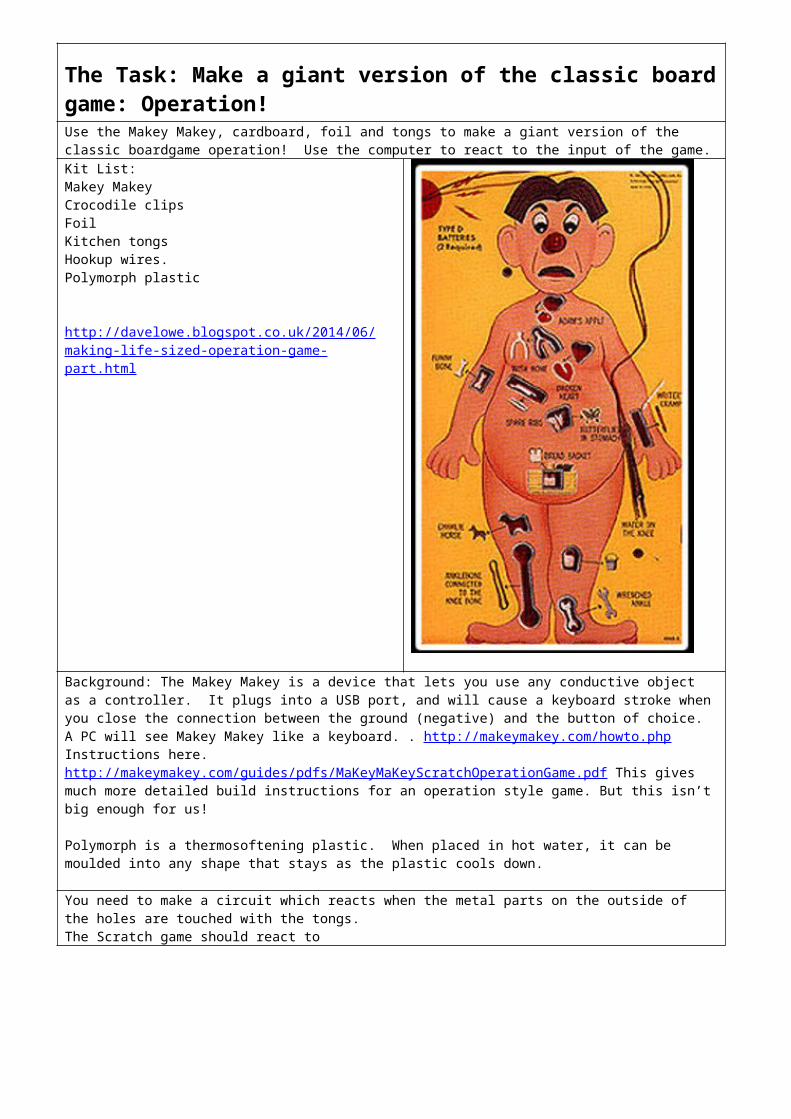
The Task: Make a giant version of the classic board game: Operation! Use the Makey Makey, cardboard, foil and tongs to make a giant version of the classic boardgame operation! Use the computer to react to the input of the game. Kit List: Makey Makey Crocodile clipsFoil Kitchen tongs Hookup wires. Polymorph plastic
http://davelowe.blogspot.co.uk/2014/06/making-life-sized-operation-game-part.html
Background: The Makey Makey is a device that lets you use any conductive object as a controller. It plugs into a USB port, and will cause a keyboard stroke when you close the connection between the ground (negative) and the button of choice. A PC will see Makey Makey like a keyboard. . http://makeymakey.com/howto.php Instructions here. http://makeymakey.com/guides/pdfs/MaKeyMaKeyScratchOperationGame.pdf This gives much more detailed build instructions for an operation style game. But this isn’t big enough for us!
Polymorph is a thermosoftening plastic. When placed in hot water, it can be moulded into any shape that stays as the plastic cools down.
You need to make a circuit which reacts when the metal parts on the outside of the holes are touched with the tongs.The Scratch game should react to
Build Challenges
Create an image for the front of the board to replace ‘Cavity Sam’. (You can download an image, or draw one from scratch) Use cardboard to make a single front piece for the game with holes for the cavities cut in. Heat polymorph plastic to soften the plastic and then mould your ‘bones’ to remove from the gaps. Create individual holes in the cardboard for players to remove the bones. Line the holes with aluminium and connect each hole to a different hookup wire with crocodile clips.
Code Challenges
o Show a representation of your patient on the screen.o Make the game respond to touching one of the outside of one of the cavities. o Set up a bar or a variable that shows the health left for the patient o Code a variable that removes patient health when a button press is detected from the
Makey Makey. o Set up a game timer that ticks down during the operation. o Make the patient moan or show pain with a facial expression when you touch the edge of
the cavity. o Set up a variable for ‘lives left’ that detects how many times you have touched the sides
of the patient. o Set up a choice of different game types – easy, medium, hard that affects the speed of
the timer, patient health.
o Give the patient a particular order to remove the bones in.
Extra Challenges.Include secret keyboard cheat codes that give the player extra health, or include a ‘sudden death’ mode that will cause the patient to lose all health in a single error. Code a scoreboard that remembers the top 5 and worst 5 surgeons. (You might need access to www.scratch.mit.edu to record a cloud variable for your script.Code game hints that appear every 4 games or so. Find a way of working out which bone has been removed. Create a title screen with instructions for your game.

The Task: Make a game or synthesizer that responds to your movement.Use the Microsoft Kinect to sense the position of your skeleton. Import the co-ordinates into scratch and then use these to create a game, a reactive art program, or a synthesizer.
Kit:
Microsoft Kinect
Projector
Speakers
Background:
The Microsoft Kinect is a technological marvel: It is able to accurately work out where your limbs and joints are located in space by using a grid of infrared light. It works rapidly and reliably, fast enough so that the lag is under 1/5 second!
We can use an application called Kinect2Scratch which will import the x,y co-ordinates of various body joints parts:
Head position, position of Arms, Elbows, Wrists, Hips, Knees, feet.
We can use the co-ordinates as input for our programs, either as co-ordinates, or we can use the numerical values in variables.

These are all the different skeleton points that can be sent to Scratch from the Kinect2Scratch handler.
Build Challenges:Setup the computer with a Kinect, and projector and get the Kinect talking to scratch by running Kinect2Scratch. Use masking tape to mark out a play area where one or two players can use the Kinect without interference. Run some sample programs located in the Kinect2Scratch directory.
Code Challenges:Make a title screen for your installation. Make a sprite react to the x and y positions of some Kinect input. Make 2 sprites react to different to different Kinect Variables. Create multiple backdrops for different levels to provide a bit of variety to your program. Include multiple levels of difficulty/interactivity.
Extra ChallengesMake a start pose that players have to get into to start the game. Make a secret level or cheat mode that can be accessed with a special pose when held for 5 seconds.

Task: Make a Giant pianoMake a giant floor piano using cardboard-based pressure pads and a Makey Makey.
Watch this video for inspiration: https://www.youtube.com/watch?v=0Yu62StlsMY (search for ‘Big piano film scene’).
Kit List: Makey Makey
Foil
Foam
Coroplast board+cardboard
Hookup wires
Crocodile clips
Bubblewrap.
Paint
Desktop speakers
Metal rule
Stanley blades.
Background:
You will be triggering a Makey Makey with floor pressure pads. Scratch will then read the keypresses and convert them to sound.
This youtube video shows you how to make a pressure sensitive floor switch. You’ll need to modify the dimensions of the pressure switch to be more like a piano switch.
https://www.youtube.com/watch?v=9YZ7KQ-g6lw.
(The Makey Makey is a device that lets you use any conductive object as a controller. It plugs into a USB port, and will cause a keyboard stroke when you close the connection between the ground (negative) and the button of choice. A PC will see Makey Makey like a keyboard.. http://makeymakey.com/howto.php Instructions here.
You will have to work together well as a team and design a robust, sensitive floor keyboard that will be able to deal with people jumping and running on your keys.
This build is the most challenging, requiring a lot of thought to be put into the sizes of the keys, but it will be one of the most rewarding.
http://scratch.mit.edu/projects/1119694/ This scratch program is quite simple and you can have a look at the code for inspiration.
Build Challenges:Design your keyboard around a one octave piano keyboard with black and white keysDesign the size of the keys so that most people can fit their feet on the keyboard. Make a single pressure pad switch based around the instructable here: https://www.youtube.com/watch?v=9YZ7KQ-g6lwUse your first pressure pad to make 7 identical copies of the parts you need. Make a floor keyboard that is safe, and is unlikely to trip anyone up. (You might want to use a single piece piece of carboard on the top to help you with this. Make your keyboard look like a keyboard by using white and black (or blue) keys.
Code Challenges:o Get input on the keyboard to play different notes in scratch.
Make a screen keyboard that reacts to the keys being pressed.Make a variable or switch that can change the instrument soundMake a variable that can change the length of the sound playedMake a beatbox mode for your game so that instead of piano keys, it makes drum sounds. Program your piano to play a demo song whenever you press the d button.
Extra Challenges:Sample random sounds using a microphone and get your program to play random sounds or catchphrases. Get two people to play chopsticks on the piano. Get the whole team together and play a well-known tune on your keyboard.Make a rhythm action keyboard game that gets players to play a song by reacting to guides on the screen (Think Piano-Hero!).

Task: Make an interactive gunnery rangeKit list:
Makey Makey
USB-controlled gun Turret: Thunder
X-arcade joystick.
Aluminium Foil
Wires
Crocodile clips
Glue, scissors, cardboard, coroboard.
Background:
The Thunder missile launcher is controlled by USB. Control it and set up an interactive gun range that can time people and give different scores for different targets.
https://www.youtube.com/watch?v=Xy19IhJsxk0 This is an example of someone operating the Thunder Cannon from a laptop.
https://www.youtube.com/watch?v=mxRJvs30iYk This is a quick example of someone’s gun range that reacts in scratch using foil and a makey makey to trigger a sound and a point in Scratch.
https://www.youtube.com/watch?v=6_z45vhnkMs

Build ChallengesConnect the turret and operate it using the software provided.
Operate the target with key presses with the software running in the background.
o Design a target range with different value scores in different areas. (Make it fun but hard too!)
Use a single piece of coroboard or cardboard to make the target front plate.
Use or build a box for the main part of the target range. Stick a sheet of aluminium foil to the back of the box. Connect this to the ground input of the makey makey.
Make small hanging targets by covering pieces of card with foil and hanging them from slits near the back of the box. Connect each target to a different key on the makey makey board.
o Make sure each target is able to touch the foil backing in the box when it is shot with a foam dart. This picture shows the hanging card with foil backing.
Code challenges:Make a variable that can keep the score of the current player.
Create a timer that can count down the time taken for 4 shots. Make a message that pops up telling the player to reload after 4 shots (There are 8 darts total). Make the program play a sound whenever a target is hit. Make the program play a different sound whenever a different target is hit. Create different costumes so you can show targets that react whenever they are shot.
Extra Challengeso Create different modes for your game – A high score challenge, or a shoot the targets in
the right sequence challenge. o Increase the risk reward balance of your game by making the scores change on screen, so
that they cycle through available values. o Create a cloud variable that can store the top 5 players on a high score table.

Make a sound, light and touch responsive programPicoboard (light sensor, button, slider, sound and 4 inputs for switches.
Hookup cables
Mini USB cable.
Tilt Switches
Background. Use the Picoboard to make a game, creature, synthesizer or art doodler that reacts to a player input. In this task, you will have to use the Picoboard as your input basis for a scratch game or installation.
It is versatile, and can sense input by light, sound and touch in different ways. It can also be hooked up to other external sensors using crocodile clips .
Code Suggestions:
‘Tamagotchi’ style creature game.
Make an animated creature that can react to light (does it need more shade), can be ‘stroked’ with the fader, or you can sing it a song to cheer it up in the microphone.
Light and Sound Responsive Kaleidoscope
Using the light and sound inputs, you can create some very eye-catching art that responds to player input. Use the (Set ‘Colour effect’ to) block to change the appearance of your sprites. Link these to the volume of the sound for a reactive Kaliedoscope.
Heart Monitor
Create a tiny sprite that crawls from left to right, and bounces at the edge of the screen.
Put the pen down and let it draw a line. Link the Y position of the sprite to the microphone reading to get a ‘heart monitor’ that will react when people say ‘beep!’.

Build Challenges
Load up the picoboard drivers and launch scratch. Enable ‘remote sensor connections’ by right clicking on the sensor block (Version 1.4) or clicking on ‘More Blocks’ > enable Picoboard (Version 2.0) Right click on Slider-Sensor value block and enable ‘display Scratchboard input’Get the picoboard working and sensing different inputs. Hook up two crocodile clips to one of the A,B,C or D inputs. Make it register a connection.
Code ChallengesCreate a variable that stores the current value of the microphone reading. Make a sprite that responds to the microphone reading by rotating by different amounts. Get your sprite to respond to the slider input by using Looks > Set size to (Slider value) Get a sprite to change the way it moves in response to pressing the button.
Extra ChallengesMake a title screen for your script with instructions to play. Make your sprite say something if it receives no user input for more than 2 minutes. Create more than one game or interactive piece of software in the same script to provide variety for the player.Make two sprites say ‘bonk’ if they accidentally bump into each other.

Code Expert Assessment Sheet. Use this during the day to help you decide on how your group has performed. Code Expert Name: Dream Job:
Team Name:
Members:
Points awarded /10 Periods1-2 (Any notes)
Points awarded /10 Periods 3-4
(Any notes)
Prob
lem
Sol
ving
(reas
onin
g,
resil
ienc
e)
How good were they at solving problems? Could they work it out between them? Did they try to resolve problems before asking for help?
Com
mun
icatio
n(re
latio
nshi
ps) How well did they divide up the
tasks? How often did they get together and check on their progress?
Crea
tivity
.
Did they have any great ideas, or original twists to add to the concepts? Are there any examples of creative uses of code, or attention to detail?
Team
work
(Rel
atio
nshi
ps) Were all team members involved
and active? Did they have any group awareness of the time remaining? Did some team members go to help other teams?
Awes
omen
ess.
(Refl
ectiv
e)
How awesome were they? Can they justify their awesomeness? Use your judgement to allow them 10 points maximum for being awesome. (Highly subjective measure)
Fun
How much fun did they get out of the process? How much fun did they put into their creation? How much fun was their creation to play with?