Embed Size (px)
Citation preview
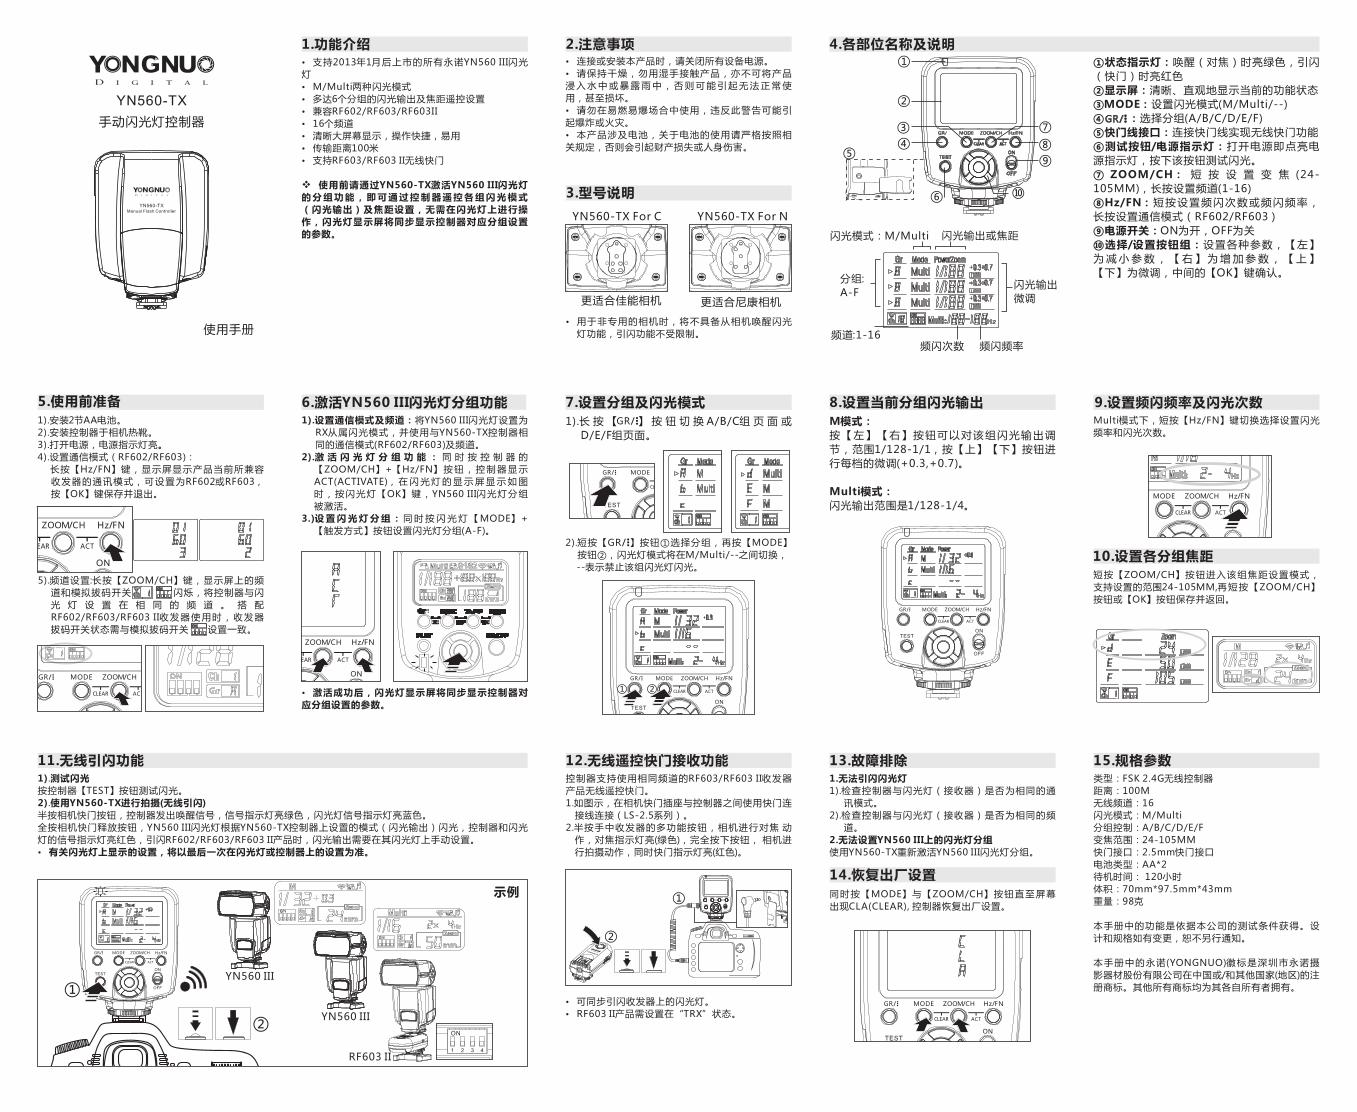
�支持2013年1月后上市的 永诺YN560 III闪光
灯
�M/Multi两种闪光模式
�多达6个分组的闪光输出及焦距遥控设置
�兼容RF602/RF603/RF603II
�16个频道
�清晰大屏幕显示,操作快捷,易用
�传输距离100米
�支持RF603/RF603 II无线快门
v使用前请
的 分 组 功 能 , 即 可 通 过 控 制 器 遥 控 各 组 闪 光 模 式
(闪光输出)及焦距设置,无需在闪光灯上进行操
作,闪光灯显示屏将同步显示控制器对应分组设置
的参数。
所有
通过YN560-TX激活YN560 III闪光灯
1).安装2节AA电池。
2).安装控制器于相机热靴。
3).打开电源,电源指示灯亮。
4).设置通信模式(RF602/RF603):
长按【Hz/FN】键,显示屏显示产品当前所兼容
收发器的通讯模式,可设置为RF602或RF603,
按【OK】键保存并退出。
1).设置通信模式及频道:将YN560 III闪光灯设置为
RX从属闪光模式,并使用与YN560-TX控制器相
同的通信模式(RF602/RF603)及频道。
2).激 活 闪 光 灯 分 组 功 能 : 同 时 按 控 制 器 的
【ZOOM/CH】+【Hz/FN】 按 钮 , 控 制 器 显 示
ACT(ACTIVATE), 在 闪 光 灯 的 显 示 屏 显 示 如 图
时,按闪光灯【OK】键,YN560 III闪光灯分组
被激活。
3.)设 置 闪 光 灯 分 组 : 同 时 按 闪 光 灯 【MODE】+
【触发方式】按钮设置闪光灯分组(A-F)。
1).长 按 【 】 按 钮 切 换 A/B/C组 页 面 或
D/E/F组页面。
M模式:
按【左】【右】按钮可以对该组闪光输出调
节,范围1/128-1/1,按【上】【下】按钮进
行每档的微调(+0.3,+0.7)。
Multi模式:
闪光输出范围是1/128-1/4。
短按【ZOOM/CH】按钮进入该组焦距设置模式,
支持设置的范围24-105MM,再短按【ZOOM/CH】
按钮或【OK】按钮保存并返回。
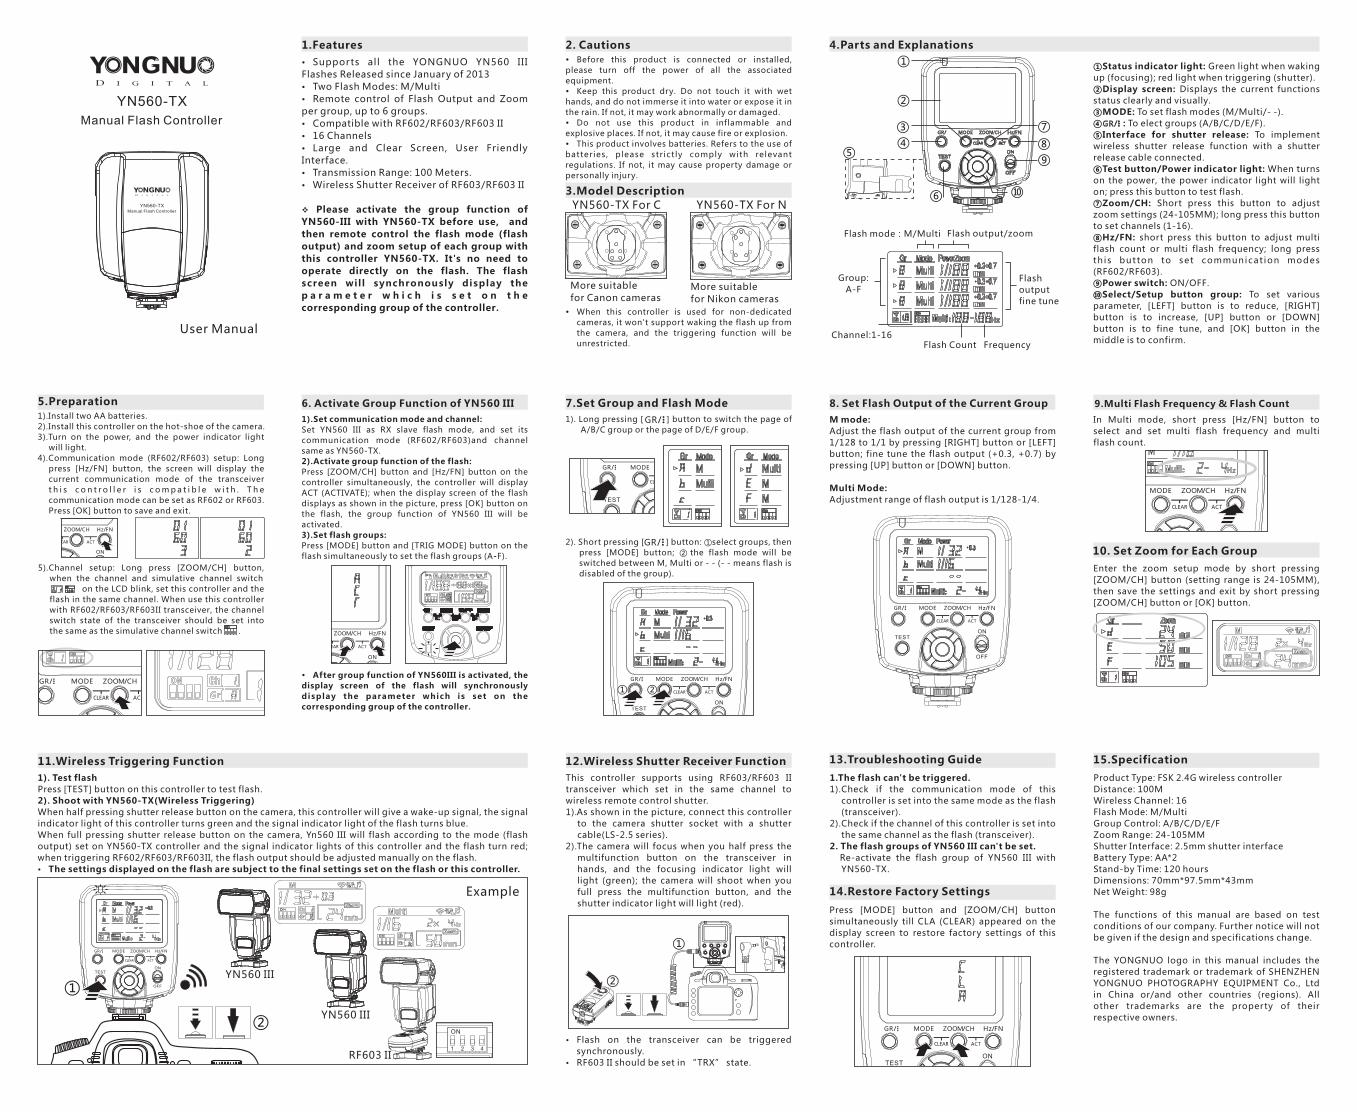
1).测试闪光
按控制器【TEST】按钮测试闪光。
2).使用YN560-TX进行拍摄(无线引闪)
半按相机快门按钮,控制器发出唤醒信号,信号指示灯亮绿色,闪光灯信号指示灯亮蓝色。
全按相机快门释放按钮,YN560 III闪光灯根据YN560-TX控制器上设置的模式(闪光输出)闪光,控制器和闪光
灯的信号指示灯亮红色,引闪RF602/RF603/RF603 II产品时,闪光输出需要在其闪光灯上手动设置。
�有关闪光灯上显示的设置,将以最后一次在闪光灯或控制器上的设置为准。
类型:FSK 2.4G无线控制器
距离:100M
无线频道:16
闪光模式:M/Multi
分组控制:A/B/C/D/E/F
变焦范围:24-105MM
快门接口:2.5mm快门接口
电池类型:AA*2
待机时间: 120小时
体积:70mm*97.5mm*43mm
重量:98克
本手册中的功能是依据本公司的测试条件获得。设
计和规格如有变更,恕不另行通知。
本手册中的永诺(YONGNUO)徽标是深圳市永诺摄
影器材股份有限公司在中国或/和其他国家(地区)的注
册商标。其他所有商标均为其各自所有者拥有。
分组:
A-F
频道:1-16频闪次数 频闪频率
闪光模式:M/Multi 闪光输出或焦距
闪光输出
微调
1.无法引闪闪光灯
1).检查控制器与闪光灯(接收器)是否为相同的通
讯模式。
2).检查控制器与闪光灯(接收器)是否为相同的频
道。
2.无法设置YN560 III上的闪光灯分组
使用YN560-TX重新激活YN560 III闪光灯分组。
�可同步引闪收发器上的闪光灯。
�RF603 II产品需设置在“TRX”状态。
①状态指示灯:唤醒(对焦)时亮绿色,引闪
(快门)时亮红色
②显示屏:清晰、直观地显示当前的功能状态
③MODE:设置闪光模式(M/Multi/--)
④ :选择分组(A/B/C/D/E/F)
⑤快门线接口:连接快门线实现无线快门功能
⑥测试按钮/电源指示灯:打开电源即点亮电
源指示灯,按下该按钮测试闪光。
⑦ ZOOM/CH: 短 按 设 置 变 焦 (24-
105MM),长按设置频道(1-16)
⑧Hz/FN:短按设置频闪次数或频闪频率,
长按设置通信模式(RF602/RF603)
⑨电源开关:ON为开,OFF为关
⑩选择/设置按钮组:设置各种参数,【左】
为 减 小 参 数 , 【 右 】 为 增 加 参 数 , 【 上 】
【下】为微调,中间的【OK】键确认。
更适合佳能相机 更适合尼康相机
同时按【MODE】与【ZOOM/CH】按钮直至屏幕
出现CLA(CLEAR), 控制器恢复出厂设置。
控制器支持使用相同频道的RF603/RF603 II收发器
产品无线遥控快门。
1.如图示,在相机快门插座与控制器之间使用快门连
接线连接(LS-2.5系列)。
2.半按手中收发器的多功能按钮,相机进行对焦 动
作,对焦指示灯亮(绿色),完全按下按钮, 相机进
行拍摄动作,同时快门指示灯亮(红色)。
�连接或安装本产品时,请关闭所有设备电源。
�请保持干燥,勿用湿手接触产品,亦不可将产品
浸 入 水 中 或 暴 露 雨 中 , 否 则 可 能 引 起 无 法 正 常 使
用,甚至损坏。
�请勿在易燃易爆场合中使用,违反此警告可能引
起爆炸或火灾。
�本产品涉及电池,关于电池的使用请严格按照相
关规定,否则会引起财产损失或人身伤害。
⑩
①
②
③
④⑤
⑥
⑦
⑧
⑨
Multi模式下,短按【Hz/FN】键切换选择设置闪光
频率和闪光次数。
5).频道设置:长按【ZOOM/CH】键,显示屏上的频
道和模拟拔码开关 闪烁,将控制器与闪
光 灯 设 置 在 相 同 的 频 道 。 搭 配
RF602/RF603/RF603 II收发器使用时,收发器
拔码开关状态需与模拟拔码开关 设置一致。
2).短按【 】按钮①选择分组,再按【MODE】
按钮②,闪光灯模式将在M/Multi/--之间切换,
--表示禁止该组闪光灯闪光。
�用于非专用的相机时,将不具备从相机唤醒闪光
灯功能,引闪功能不受限制。
2.注意事项
3.型号说明
5.使用前准备 7.设置分组及闪光模式 8.设置当前分组闪光输出 9.设置频闪频率及闪光次数
10.设置各分组焦距
11.无线引闪功能 12.无线遥控快门接收功能 13.故障排除
14.恢复出厂设置
15.规格参数
4.各部位名称及说明
6.激活YN560 III闪光灯分组功能
1.功能介绍
①
②
使用手册
YN560 III
YN560 III
RF603 II
示例
�激活成功后,闪光灯显示屏将同步显示控制器对
应分组设置的参数。
�Supports all the YONGNUO YN560 III
Flashes Released since January of 2013
�Two Flash Modes: M/Multi
�Remote control of Flash Output and Zoom
per group, up to 6 groups.
�Compatible with RF602/RF603/RF603 II
�16 Channels
�Large and Clear Screen, User Friendly
Interface.
�Transmission Range: 100 Meters.
�Wireless Shutter Receiver of RF603/RF603 II
vPlease activate the group function of
YN560-III with YN560-TX before use, and
then remote control the flash mode (flash
output) and zoom setup of each group with
this controller YN560-TX. It's no need to
operate directly on the flash. The flash
screen will synchronously display the
p a r a m e t e r w h i c h i s s e t o n t h e
corresponding group of the controller.
1).Install two AA batteries.
2).Install this controller on the hot-shoe of the camera.
3).Turn on the power, and the power indicator light
will light.
4).Communication mode (RF602/RF603) setup: Long
press [Hz/FN] button, the screen will display the
current communication mode of the transceiver
t h i s c o n t r o l l e r i s c o m p a t i b l e w i t h . T h e
communication mode can be set as RF602 or RF603.
Press [OK] button to save and exit.
1).Set communication mode and channel:
Set YN560 III as RX slave flash mode, and set its
communication mode (RF602/RF603)and channel
same as YN560-TX.
2).Activate group function of the flash:
Press [ZOOM/CH] button and [Hz/FN] button on the
controller simultaneously, the controller will display
ACT (ACTIVATE); when the display screen of the flash
displays as shown in the picture, press [OK] button on
the flash, the group function of YN560 III will be
activated.
3).Set flash groups:
Press [MODE] button and [TRIG MODE] button on the
flash simultaneously to set the flash groups (A-F).
1). Long pressing [ ] button to switch the page of
A/B/C group or the page of D/E/F group.M mode:
Adjust the flash output of the current group from
1/128 to 1/1 by pressing [RIGHT] button or [LEFT]
button; fine tune the flash output (+0.3, +0.7) by
pressing [UP] button or [DOWN] button.
Multi Mode:
Adjustment range of flash output is 1/128-1/4.
Enter the zoom setup mode by short pressing
[ZOOM/CH] button (setting range is 24-105MM),
then save the settings and exit by short pressing
[ZOOM/CH] button or [OK] button.
1). Test flash
Press [TEST] button on this controller to test flash.
2). Shoot with YN560-TX(Wireless Triggering)
When half pressing shutter release button on the camera, this controller will give a wake-up signal, the signal
indicator light of this controller turns green and the signal indicator light of the flash turns blue.
When full pressing shutter release button on the camera, Yn560 III will flash according to the mode (flash
output) set on YN560-TX controller and the signal indicator lights of this controller and the flash turn red;
when triggering RF602/RF603/RF603II, the flash output should be adjusted manually on the flash.
�The settings displayed on the flash are subject to the final settings set on the flash or this controller.
Product Type: FSK 2.4G wireless controller
Distance: 100M
Wireless Channel: 16
Flash Mode: M/Multi
Group Control: A/B/C/D/E/F
Zoom Range: 24-105MM
Shutter Interface: 2.5mm shutter interface
Battery Type: AA*2
Stand-by Time: 120 hours
Dimensions: 70mm*97.5mm*43mm
Net Weight: 98g
The functions of this manual are based on test
conditions of our company. Further notice will not
be given if the design and specifications change.
The YONGNUO logo in this manual includes the
registered trademark or trademark of SHENZHEN
YONGNUO PHOTOGRAPHY EQUIPMENT Co., Ltd
in China or/and other countries (regions). All
other trademarks are the property of their
respective owners.
Group:
A-F
Channel:1-16Flash Count Frequency
Flash mode:M/Multi Flash output/zoom
Flash
output
fine tune
1.The flash can't be triggered.
1).Check if the communication mode of this
controller is set into the same mode as the flash
(transceiver).
2).Check if the channel of this controller is set into
the same channel as the flash (transceiver).
2. The flash groups of YN560 III can't be set.
Re-activate the flash group of YN560 III with
YN560-TX.
�Flash on the transceiver can be triggered
synchronously.
�RF603 II should be set in “TRX” state.
①Status indicator light: Green light when waking
up (focusing); red light when triggering (shutter).
②Display screen: Displays the current functions
status clearly and visually.
③MODE: To set flash modes (M/Multi/- -).
④ : To elect groups (A/B/C/D/E/F).
⑤Interface for shutter release: To implement
wireless shutter release function with a shutter
release cable connected.
⑥Test button/Power indicator light: When turns
on the power, the power indicator light will light
on; press this button to test flash.
⑦Zoom/CH: Short press this button to adjust
zoom settings (24-105MM); long press this button
to set channels (1-16).
⑧Hz/FN: short press this button to adjust multi
flash count or multi flash frequency; long press
th is button to set communicat ion modes
(RF602/RF603).
⑨Power switch: ON/OFF.
⑩Select/Setup button group: To set various
parameter, [LEFT] button is to reduce, [RIGHT]
button is to increase, [UP] button or [DOWN]
button is to fine tune, and [OK] button in the
middle is to confirm.
More suitable
for Canon camerasMore suitable
for Nikon cameras
Press [MODE] button and [ZOOM/CH] button
simultaneously till CLA (CLEAR) appeared on the
display screen to restore factory settings of this
controller.
This controller supports using RF603/RF603 II
transceiver which set in the same channel to
wireless remote control shutter.
1).As shown in the picture, connect this controller
to the camera shutter socket with a shutter
cable(LS-2.5 series).
2).The camera will focus when you half press the
multifunction button on the transceiver in
hands, and the focusing indicator light will
light (green); the camera will shoot when you
full press the multifunction button, and the
shutter indicator light will light (red).
�Before this product is connected or installed,
please turn off the power of all the associated
equipment.
�Keep this product dry. Do not touch it with wet
hands, and do not immerse it into water or expose it in
the rain. If not, it may work abnormally or damaged.
�Do not use this product in inflammable and
explosive places. If not, it may cause fire or explosion.
�This product involves batteries. Refers to the use of
batteries , please str ict ly comply with relevant
regulations. If not, it may cause property damage or
personally injury.
⑩
①
②
③
④⑤
⑥
⑦
⑧
⑨
In Multi mode, short press [Hz/FN] button to
select and set multi flash frequency and multi
flash count.
2). Short pressing [ ] button: ①select groups, then
press [MODE] button; ② the flash mode will be
switched between M, Multi or - - (- - means flash is
disabled of the group).
�When this controller is used for non-dedicated
cameras, it won't support waking the flash up from
the camera, and the triggering function will be
unrestricted.
2. Cautions
3.Model Description
5.Preparation 7.Set Group and Flash Mode 8. Set Flash Output of the Current Group 9.Multi Flash Frequency & Flash Count
10. Set Zoom for Each Group
11.Wireless Triggering Function 12.Wireless Shutter Receiver Function 13.Troubleshooting Guide
14.Restore Factory Settings
15.Specification
4.Parts and Explanations
6. Activate Group Function of YN560 III
1.Features
①
②
User Manual
YN560 III
YN560 III
RF603 II
YN560-TX For C YN560-TX For N
5).Channel setup: Long press [ZOOM/CH] button,
when the channel and simulative channel switch
on the LCD blink, set this controller and the
flash in the same channel. When use this controller
with RF602/RF603/RF603II transceiver, the channel
switch state of the transceiver should be set into
the same as the simulative channel switch .
�After group function of YN560III is activated, the
display screen of the flash will synchronously
display the parameter which is set on the
corresponding group of the controller.