Embed Size (px)
Citation preview


iii

Immunization Handbook for Health Workers (2018)
iv

v

Immunization Handbook for Health Workers (2018)
vi

vii
Compiled and Edited by:
Dr. M K Aggarwal, MoHFWDr. Leonard Machado, WHO India
Advisors:
Dr Vandana Gurnani, MoHFWDr. Pradeep Haldar, MoHFWDr. Veena Dhawan, MoHFW
Acknowledging contributions and inputs:
AEFI Secretariat : Dr Deepak Polpakara, Dr Nidhi Gupta, Dr Ajit ShewaleBMGF : Dr Bhupendra TripathiCORE : Dr Roma Solomon, Ms Rina Dey ITSU : Dr Sachin Rewaria, Ms Monica ChaturvediMMP Cell, MoHFW : Mr Sanjay Kumar, Dr Priyanka SinghMoHFW : Dr Sheenu Chaudhary, ITSU, Dr Kapil Singh, GAVIUNICEF : Dr Satish Gupta, Dr Bhrigu Kapuria, Dr Priti ChaudharyWHO India : Dr Arun Kumar, Dr Ashutosh Aggarwal, Dr Satyabrata Routray, Dr Sudhir Joshi
Recognizing the contributions of Dr Renu Paruti, author-first edition and for the valuable inputs of Dr Madhulekha Bhattacharya – Prof (Retd), NIHFW
Acknowledgements

Immunization Handbook for Health Workers (2018)
viii

ix
x | Acronyms
1 | Unit 1 : Introduction and role of health workers in immunization
9 | Unit 2 : Diseases prevented by vaccination
17 | Unit 3 : National immunization schedule and frequently asked questions
27 | Unit 4 : Micro-planning for immunization services
67 | Unit 5 : Managing the cold chain and the vaccine carrier
79 | Unit 6 : Safe injections and waste disposal
87 | Unit 7 : Managing an immunization session
107 | Unit 8 : Adverse Events Following Immunization (AEFI)
127 | Unit 9 : Records, reports and using data for action
135 | Unit 10 : Mother and Child Tracking System (MCTS)/ Reproductive and Child Health (RCH) Portal and ANMOL Application
143 | Unit 11 : Partnering with communities to increase coverage
151 | Unit 12 : Surveillance of vaccine preventable diseases
Contents
Immunization Handbook for Health Workers (2018)
x
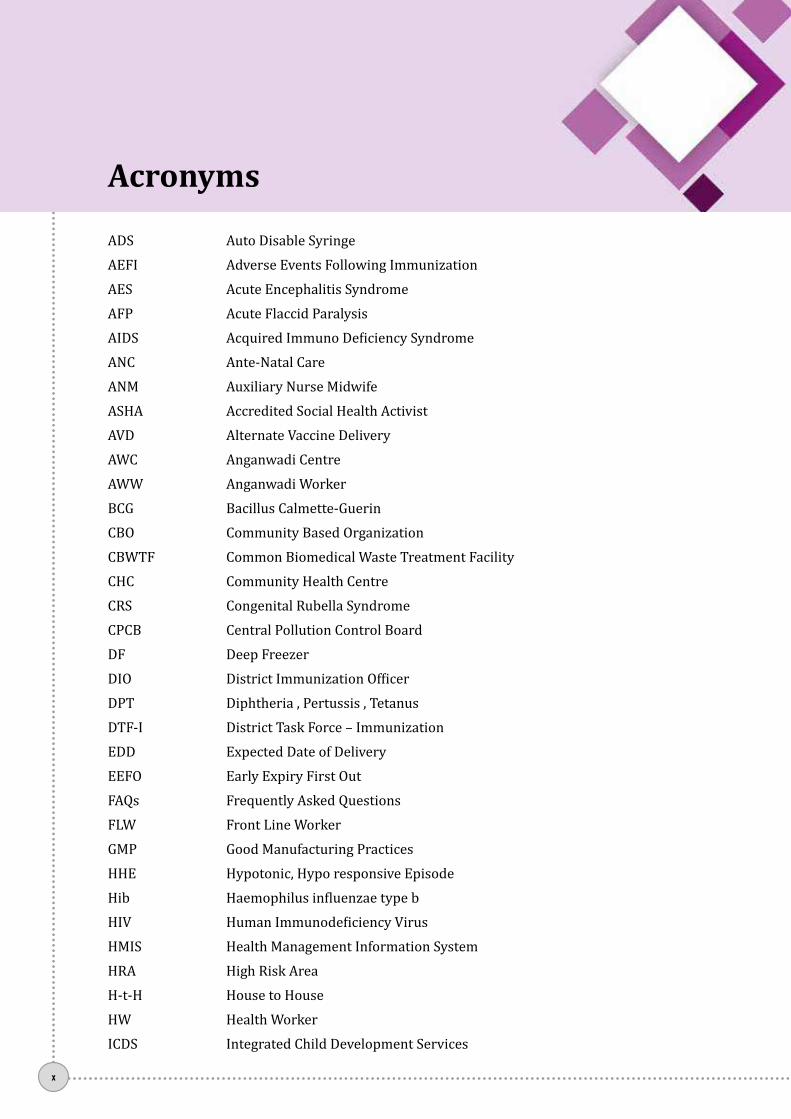
ADS Auto Disable SyringeAEFI Adverse Events Following ImmunizationAES Acute Encephalitis SyndromeAFP Acute Flaccid ParalysisAIDS Acquired Immuno Deficiency SyndromeANC Ante-Natal CareANM Auxiliary Nurse MidwifeASHA Accredited Social Health ActivistAVD Alternate Vaccine DeliveryAWC Anganwadi CentreAWW Anganwadi WorkerBCG Bacillus Calmette-GuerinCBO Community Based OrganizationCBWTF Common Biomedical Waste Treatment FacilityCHC Community Health CentreCRS Congenital Rubella SyndromeCPCB Central Pollution Control BoardDF Deep FreezerDIO District Immunization OfficerDPT Diphtheria , Pertussis , TetanusDTF-I District Task Force – ImmunizationEDD Expected Date of DeliveryEEFO Early Expiry First OutFAQs Frequently Asked QuestionsFLW Front Line WorkerGMP Good Manufacturing PracticesHHE Hypotonic, Hypo responsive EpisodeHib Haemophilus influenzae type bHIV Human Immunodeficiency VirusHMIS Health Management Information SystemHRA High Risk AreaH-t-H House to HouseHW Health WorkerICDS Integrated Child Development Services
Acronyms

xi
IEC Information, Education, CommunicationILR Ice Lined RefrigeratorIM Intra MuscularIPC Inter Personal CommunicationIPV Inactivated Poliovirus VaccineJE Japanese EncephalitisLHV Lady Health VolunteerLMP Last Menstrual PeriodLS Lady SupervisorLW Link WorkerMCH Maternal and Child HealthMCP Mother and Child ProtectionMCTS Mother and Child Tracking SystemMO Medical OfficerMOIC Medical Officer In-ChargeMR Measles RubellaNGO Non-Government OrganizationNIS National Immunization ScheduleOPV Oral Polio VaccineOVP Open Vial PolicyPenta PentavalentPHC Primary Health CentrePIP Project Implementation PlanPRI Panchayat Raj InstitutionPW Pregnant WomenRCH Reproductive and Child HealthRI Routine ImmunizationRVV Rotavirus VaccineSC Sub CentreSHG Self Help GroupSOP Standard Operating ProcedureTT Tetanus ToxoidUHC Urban Health CentreUIP Universal Immunization ProgramVHSC Village Health and Sanitation CommitteeVHND Village Health and Nutrition DayVPD Vaccine Preventable DiseaseVVM Vaccine Vial MonitorWMF Wastage Multiplication FactorWPV Wild Polio Virus

Immunization Handbook for Health Workers (2018)
xii
Welcome to your guide to effective immunization!!!
This book has been designed to provide all the information needed to better understand the activities and technical aspects of immunization.
The topics in this handbook will guide you in understanding your roles and the activities which help to ensure that all children and pregnant women are vaccinated. The chapters will cover not only how to plan immunization sessions but also strengthen your knowledge and provide you guidance on how to improve your skills.
This book is your companion and is a reference book. The chapters are colour coded to make it easier to go directly to a particular chapter.
The training program on immunization also follows the information in this book and all the exercises and needed reference material are to be found here.
There is also synchronization of many areas and chapters with the Medical Officers (MO) handbook which will make it easier for you to discuss some topics with your MO or during the monthly meetings.

Uni
t 1
1
Unit 1: Introduction and role of health workers in immunization

Immunization Handbook for Health Workers (2018)
2
Unit 1:Introduction and role of health workers in immunization
Learning ObjectivesAt the end of the unit, you should be able to:
zz Describe the importance of immunization and reasons for low immunization coverage.zz List the responsibilities of Health Workers in Routine Immunization.
Contentsz¾ Importance of immunization and reasons for low immunization coverage.z¾ Responsibilities of Health Workers in Routine Immunization.
1.1 Immunization and its importance
Immunization is the process whereby a person is made immune or resistant to an infectious disease, typically by the administration of a vaccine. Vaccines stimulate the body’s own immune system to protect the person against later infection or disease.
Immunization is a proven tool for controlling and eliminating life-threatening infectious diseases and is estimated to prevent between 2 and 3 million deaths each year. It is one of the most cost-effective health investments, with proven strategies that make it accessible to even the most hard-to-reach and vulnerable populations. It has clearly defined target groups; it can be delivered effectively through outreach activities; and vaccination does not require any major lifestyle change.
Over the years various strategies to make vaccines available to all beneficiaries across the community/ area, including to the most hard-to-reach and vulnerable populations have saved countless lives. The benefits to the individual include not only the prevention of disease and disabilities but also the opportunity for a healthier and a more productive life.
Each vaccine provides immunity against a particular disease; therefore, a number of vaccines are administered to children and women to protect them from many vaccine-preventable diseases.
India’s Universal Immunization Programme (UIP) is one of the largest immunization programs in the world. The UIP targets to vaccinate nearly 2.7 crore new-borns each year with all primary doses and an additional ~10 crore children of 1- 5 year age with booster doses. In addition, nearly 3 crore pregnant mothers are targeted for TT vaccination each year. Every year ~90 lakh immunization sessions are conducted to vaccinate the beneficiaries, majority of which are at village level.
Who is a beneficiary?
All children and pregnant women in your area should receive the benefits of immunization. This includes all imgrants populations temporarily staying in your sub-centre area even if they are not in your list or records.

Uni
t 1
3
1.2 Key achievements of the Immunization Programme in India
The immunization programme in India has grown over the years, various new vaccines have been introduced and many mile stones achieved. The health workers in the field, the ANMs and the ASHA and AWW continuously contribute to making these milestones and sustaining them. See Table 1.1 below to know how the system evolved and some important activities and events in immunization.
Table 1.1 Key achievements under UIP
1978 Expanded programme of immunization BCG, DPT, OPV, typhoid (urban areas)
1983 TT vaccine for pregnant women
1985 Universal Immunization Programme - measles added, typhoid removed, focus on children less than 1yr of age
1990 Vitamin-A supplementation
1995 Polio National Immunization Days
1997 VVM introduced on vaccines in UIP
2002 zz National Rural Health Mission Launchedzz Auto Disable (AD) Syringes introduced into UIP
2006 JE vaccine introduced after campaigns in endemic districts
2007-08 Hep B expanded to all districts in 10 states & schedule revised to 4 doses from 3 doses
2010 Measles 2nd dose introduced in RI and MCUP (14 states)
2011 zz Hepatitis B universalized and Haemophilus influenza types b introduced as pentavalent in 2 states
zz Open Vial Policy for vaccines in UIPz
2013 zz Pentavalent expanded to 9 stateszz Second dose of JE vaccine
2014 India and South east Asia Region certified POLIO-FREE
2015 zz India validated for Maternal and Neonatal Tetanus eliminationzz Pentavalent expanded to all stateszz IPV introduced
2016 zz Rotavirus vaccine introduced in 4 states in Phase 1zz tOPV to bOPV Switchzz Switch to fractional IPV (Phased)zz Rotavirus vaccine introduced (Phased launch)
2017 zz MR vaccine introduced (Phased launch)zz PCV (Phased launch)zz Use of adrenaline single dose IM by ANM for anaphylaxis

Immunization Handbook for Health Workers (2018)
4
1.3 Responsibilities of Health Workers in Routine Immunization
As Health workers, you play a very important role in providing Immunization services to mothers & children. You are expected to vaccinate all children and pregnant women according to the National Immunization Schedule. Your responsibilities can be highlighted under the following headings
a) Planning for Immunizationb) Managing the Cold chain c) On receiving the vaccine carrier and logistics or at the immunization session site, you mustd) Preparing and conducting the immunization sessione) Communicating with caregiversf) Recording, Reporting and tracking of dropoutsg) Capacity building of ASHAs and AWWs to perform their roles in UIPh) Coordination with ICDS supervisorThe lists under each heading will guide and help you to understand the processes and activities needed to enable all beneficiaries to be vaccinated correctly and in time. Some of the points such as managing cold chain are listed to remind you of the importance of ensuring safety and quality while you are administering vaccines.
a) Planning for Immunization
Once a year:
Actively participate in preparing and generating new RI microplans including house to house survey and head counting:
z� Ensure that all areas are included into the list, confirm the master list of villages and HRAs; Form 1;
z� Prepare map of areas under SC with names of villages, urban areas including all hamlets (tola), subvillages, sub-wards, sector, mohalla, hard to reach areas, etc. showing exact boundaries and areas for ASHAs and AWWs; Form 2;
z� Ensure that migratory populations, temporary settlements are also listed and included in the map;
z� Provide actual population and beneficiary counts through house to house survey and head counting; Form 3, 4 & 5;
z� Generate needed information for planning sessions, vaccine and logistic calculations. Forms 6 & 7.
Every six months:
Conduct only the house-to-house survey and head counting. This activity in coordination with ICDS and partners will help to:
z� Identify any new sites for inclusion / mobilization (add into Form 1) and;z� Update the beneficiary due lists for effective mobilization (add into Form 3, 4 & 5).
Every three months:
Participate in RI microplan review to help:
z� Update the plans to incorporate information on sub centres where staff are on leave or if vacant and;
z� Respond to changes in vaccine delivery and inclusion of new areas - nomads / HRAs and other issues based on monitoring results.

Uni
t 1
5
Every month:
At Sub centre: with ASHA/AWW
z� Review due lists of all the sessions held in the previous month;z� Make use of the tracking bag and place counterfoils as needed (see page 126)z� Update coverage monitoring chart to quantify leftouts and dropouts;z� At PHC share important issues with the sector medical officer, so that MO can make plans to
visit your sub-centre and support you.
After every RI session take help of ASHA/AWW to:
z� Review the session due list and;z� Identify dropout / left-out beneficiaries and enter their names into the next session’s due
list for follow-up and mobilization;z� Ensure follow-up visits to beneficiaries to identify minor vaccine reactions or AEFIs; z� Guide ASHA/mobilizer to identify, newborns/pregnant women for inclusion in next due
list;z� Guide ASHA/mobilizer to visit these houses during other field visits and remind beneficiaries
of immunization.
b) Managing the Cold chain (if applicable)
As vaccine and cold chain handler at the cold chain point, you are responsible for:
z� Daily maintenance and cleanliness of cold chain equipment; z� Twice daily temperature recording; z� Monthly vaccine and logistics indenting, receipt and storage; z� Timely issue of vaccine to the lower store/sessions as per microplan; z� Timely update of stock and issue registers for vaccines and logistics; z� Breakdown reporting immediately; z� Monthly vaccine utilization including wastage reporting;z� Refer and follow eVIN guidelines (if launched in your state).
c) On receiving the vaccine carrier and logistics or at the immunization session site, you must:
z� Ensure that vaccines are brought in a vaccine carrier with 4 well-sealed conditioned ice packs;
z� Ensure vaccine carriers are kept in shade and are not opened frequently;z� Check the labels for expiry date and VVM of the vaccine vials before use;z� Ensure Open Vial Policy applicable vaccine vials have readable labels with date and time of
opening / reconstitution; z� Check that T-Series and HepB vaccines are not frozen;z� Follow the guidelines for use of open vaccine vials;z� Check that required diluents are placed in separate bag and in cold chain;z� Required number of syringes are available;z� AEFI / Anaphylaxis kit contains all needed items as per checklist.

Immunization Handbook for Health Workers (2018)
6
d) Preparing and conducting the immunization session
z� Prepare for the session by selecting appropriate site; arranging for required equipment and supplies; review due list of beneficiaries and sharing with AWW and ASHA to mobilize beneficiaries to bring them for the session and also to help you in arranging the vaccination session site;
z� Involve community influences and leaders to support you;z� Assess infants for vaccination and possible contraindications before vaccinations;z� Use aseptic technique to prepare and reconstitute vaccines;z� After reconstitution, write the date and time of reconstitution on the label of vaccine vial;z� Use Auto Disable Syringe (ADS) for each injection; z� Explain to the caregiver the correct positioning to keep the child still and the caregiver and
vaccinator comfortable;z� Administer the vaccines by using correct technique; z� After the session, store opened vials based on open vial policy guidelines;z� Ensure separate packing of used vials with Session site name and date;z� Pack the vaccine carrier and return vaccines to the ILR;z� Follow immunization waste disposal as per guidelines.
e) Communicating with caregivers
At the start
z� Greet the caregiver in a friendly manner. Thank them for coming for vaccination and for their patience if they had to wait;
z� Ask the caregiver if they have any questions or concerns and answer them politely.During assessment - Key messages
z� Explain what vaccine(s) will be given and the disease it prevents;z� Mention possible adverse events (minor AEFIs) and explain how to handle them; z� Explain the need for the child to return for each contact in the immunization schedule to be
fully protected. Write the date for the next vaccination on the immunization card and tell the caregiver;
z� Remind the caregiver to bring the immunization card when they bring the child back for the next vaccination;
z� Explain the importance of waiting for 30 minutes after vaccination;z� Check vaccine name and sure the correct vaccine is being given.
After vaccination
z� Ask the beneficiaries to wait for half an hour after vaccination to observe for any AEFI;z� Explain how to manage mild fever and local reactions and to contact ASHA/AWW if needed;z� Remind the caregiver when to return with the infant;z� In the event of any out-of-stocks of vaccine at the time of the session, inform the caregiver
where and when to return for the next doses;z� Ask the caregiver if they have any questions or concerns and answer them politely.
f) Recording, Reporting and tracking of dropouts
z� Record all vaccinations in a due list cum tally sheet, immunization card and immunization register;

Uni
t 1
7
z� Mark the date of vaccination and the next due date on the card if another dose is needed, and ensure that the caregiver understands when and where to return for the next dose(s) of vaccine(s);
z� Keep the updated counter foil of the immunization card in tracking bag;z� Share the list of dropouts with AWW and ASHA and ensure they track them;z� Maintain immunization coverage monitoring chart at the sub center;z� Report all suspected cases of TB, Diphtheria, Pertussis, Neonatal Tetanus, Measles, AES and
AFP to the medical officer;z� Report all AEFIs. Ensure recording of all AEFIs in the Block AEFI register.
g) Capacity building of ASHAs and AWWs to perform their roles in UIP
For Immunization planning - train them to:
z� Describe the national immunization schedule and address FAQs;z� Conduct the house-to-house survey to undertake head count and generate beneficiary list;z� Contribute to finalizing master list of villages/areas, including HRAs and underserved
population;z� Confirm area demarcation between ASHA, AWW /LW/ surveyor;z� Help to create working maps for each area;z� Help in preparing the beneficiary due list;z� Help in planning and selection of the site, day and time of the session in the village;z� Share the list of newborns in the area with the ANM every month;z� Suggest community mobilization activities for each session site and sub centre area;z� Visit households to inform the due beneficiaries for vaccination day and site;z� Report all suspected VPDs.
For managing immunization session - train them to:
z� Assist in setting up RI session site;z� Ensure that all beneficiaries are brought to the session site as per due beneficiary list;z� Assist in conducting the immunization session. (Control the crowd, assist in recording etc.);z� Remind caregivers of the 4 key messages about immunization;z� Ensure beneficiaries wait for 30 minutes at the session site after immunization;z� Help with preparing the due list for next session.
For post immunization follow-up - train them to:
z� Report any AEFI i.e. a case of High fever, any allergic reaction or convulsions after immunization to the ANM and ensure the treatment;
z� Visit the houses of dropouts and leftouts to counsel the mothers to immunize their children;z� To contact you for any advise or questions.
h) Coordination with ICDS supervisor
Use the following sources of information in planning immunization:
z� List and map of villages including hamlets /urban areas /wards;z� 0-6 years registers, eligible couple register, etc for total and beneficiary population;z� VHND microplans;z� AWW/Helper list;z� Panchayath records or lists.

Immunization Handbook for Health Workers (2018)
8
Involve the ICDS supervisors to:
z� Visit field to monitor the house-to-house survey conducted by AWWs;z� Supervise the filling of forms 3, 4 and 5;z� Support in review of all survey forms and consolidation of sub centre microplans during
meeting at SC;z� Be aware of Health and ICDS sector boundaries for joint planning, implementation and
monitoring of immunization activities;z� Contribute in development of communication plan;z� Ensure that the AWWs are regularly trained in immunization/mobilization.
1.4 Reasons for low immunization coverage
Low immunization coverage puts the entire community and area at risk of disease. This low coverage can be because of drop-outs or left-outs.
Drop-outs – those beneficiaries who have been identified and have been receiving vaccines but do not complete the vaccinations as per the schedule.
Left-outs – those beneficiaries who have not been identified or listed and are not receiving any vaccination.
There are many factors that influence the immunization coverage. Listed in the table below are some of the issues identified by the health service providers across many states.
Table 1.2 Common issues affecting the immunization coverage
Immunization services zz vacant SCs (some areas remain without immunization services)zz weak tracking of children (large number of dropout and leftout children) zz fixed timing of sessions (not suitable for the some communities)zz stock out of vaccines, diluents, AD syringes, hubcutters, immunization cards
etc.
Staffing zz vacancies of ANMs and doctors zz irrational distribution of ANMs
Training zz lack of supervision and guidance by MOs zz absence of regular training and refresher training zz poor availability of trainers and quality of training
Planning zz weak or absent RI microplans, absence of validation of areas zz lack of involvement of MOs in RI microplanning zz lack of involvement of other departments like Integrated Child Development
Services (ICDS) and urban bodieszz difficulties in urban areas planning
Community involvement and communication
zz poor understanding and misconceptions about immunization in the community (weak interpersonal communication skills or lack of efforts to meet the community members)
zz four key messages not delivered (fear of minor reactions and AEFIs not addressed)
zz IEC material not displayed at session site
In addition to the above, geographical, cultural and social factors have an impact on the communities faith in the immunization delivery system and thus also affects immunization coverage.

Uni
t 2
9
Unit 2: Diseases prevented by vaccination
Immunization Handbook for Health Workers (2018)
10
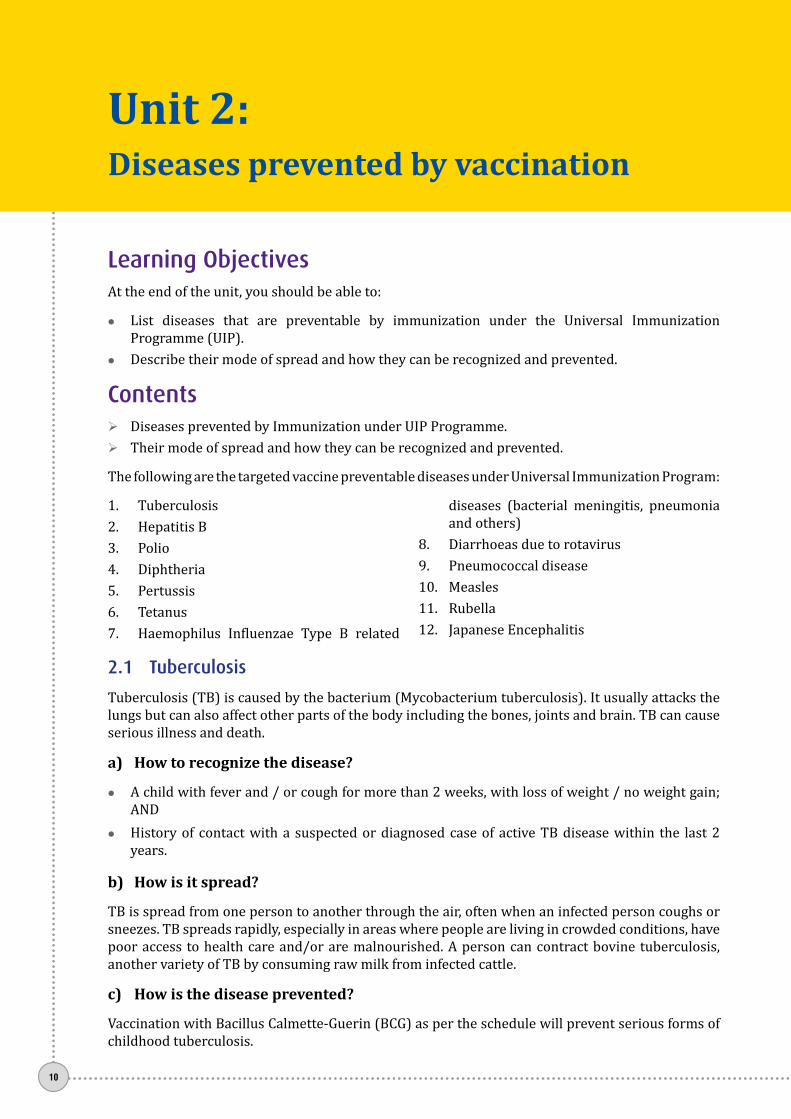
Unit 2:Diseases prevented by vaccination
2.1 Tuberculosis
Tuberculosis (TB) is caused by the bacterium (Mycobacterium tuberculosis). It usually attacks the lungs but can also affect other parts of the body including the bones, joints and brain. TB can cause serious illness and death.
a) How to recognize the disease?
zz A child with fever and / or cough for more than 2 weeks, with loss of weight / no weight gain; AND
zz History of contact with a suspected or diagnosed case of active TB disease within the last 2 years.
b) How is it spread?
TB is spread from one person to another through the air, often when an infected person coughs or sneezes. TB spreads rapidly, especially in areas where people are living in crowded conditions, have poor access to health care and/or are malnourished. A person can contract bovine tuberculosis, another variety of TB by consuming raw milk from infected cattle.
c) How is the disease prevented?
Vaccination with Bacillus Calmette-Guerin (BCG) as per the schedule will prevent serious forms of childhood tuberculosis.
Learning ObjectivesAt the end of the unit, you should be able to:
zz List diseases that are preventable by immunization under the Universal Immunization Programme (UIP).
zz Describe their mode of spread and how they can be recognized and prevented.
Contentsz¾ Diseases prevented by Immunization under UIP Programme.z¾ Their mode of spread and how they can be recognized and prevented.
The following are the targeted vaccine preventable diseases under Universal Immunization Program:
1. Tuberculosis 2. Hepatitis B3. Polio 4. Diphtheria5. Pertussis6. Tetanus7. Haemophilus Influenzae Type B related
diseases (bacterial meningitis, pneumonia and others)
8. Diarrhoeas due to rotavirus9. Pneumococcal disease 10. Measles11. Rubella 12. Japanese Encephalitis

Uni
t 2
11
2.2 Hepatitis B
Hepatitis B is caused by a virus that affects the liver. Infants who get infected during birth or before one year of age, 90% develop chronic disease. It is a highly infectious disase (50-100 times more infectious than HIV) and is the leading cause of jaundice, cirrhosis or liver cancer.
a) How to recognize the disease?
An acute illness typically including acute jaundice, dark urine, anorexia, malaise, extreme fatigue and right upper quadrant tenderness.
b) How is it spread?
The disease spreads through contact with infected blood or other body fluids in various situations:
a) from mother to child during birth; b) during social interaction between children with cuts, scrapes, bites and/or scratches; c) from person to person during sexual intercourse; and d) through unsafe injections and/or
transfusions, or needle stick accidents with infected blood.
c) How is the disease prevented?
By vaccinating children with HepB vaccine as per the Immunization schedule (contained in Pentavalent vaccine), we can prevent infection and its complications.
2.3 Poliomyelitis
Poliomyelitis, or polio, is a highly infectious disease caused by poloivirus types 1, 2 or 3. It mainly affects children of less than five years of age. One in 200 infections causes irreversible paralysis when the virus attacks the spinal cord nerve cells that control the muscles.
India continues to be polio free since 2011. It is important that all polio vaccinations and immunization campaigns continue until the world is polio free.
a) How to recognize the disease?
Sudden onset of weakness and floppiness in any part of the body in a child less than 15 yrs of age or paralysis in a person of any age in whom polio is suspected.
b) How is it spread?
Polio is transmitted by the faecal-to-oral route. In areas with poor sanitation, it enters the body through the mouth when people eat food or drink water that is contaminated with faeces.
c) How is the disease prevented?
Vaccination with the oral polio vaccine (OPV) and inactivated polio vaccine (IPV) administered as per the immunization schedule will effectively prevent infection.
d) Why AFP should still be reported?
As the world is not yet polio free, it is important that all AFP cases be reported even though India is polio free. Surveillance for polio must continue to ensure that we will be able to detect cases if they occour.

Immunization Handbook for Health Workers (2018)
12
2.4 Diphtheria
Diphtheria is caused by the bacterium (Corynebacterium diphtheriae). Diphtheria is an infectious disease that commonly affects the throat and the tonsils, forming a membrane that can lead to obstructed breathing and death.
a) How to recognize the disease?
An illness of the upper respiratory tract characterized by the following: laryngitis or pharyngitis or tonsillitis, AND adherent membranes of tonsils, pharynx and/or nose.
b) How is it spread?
The bacteria causing diphtheria inhabit the mouth, nose and throat of an infected person. It spreads from person to person by coughing and sneezing.
c) How is the disease prevented?
Giving DPT (contained in Pentavalent vaccine) and DPT boosters as per the immunization schedule is the most effective method of prevention.
2.5 Pertussis (whooping cough)
Pertussis or whooping cough, is a disease of the respiratory tract caused by Bordetella pertussis bacteria that live in mouth, nose and throat. It is highly communicable disease characterized by repeated cough that may lead to pneumonia and other complications leading to death especially in infants and young children.
a) How to recognize the disease?
A person with a cough lasting at least two weeks with at least one of the following: a) paroxysms (i.e. fits) of coughing; b) inspiratory whooping; c) post-tussive vomiting (i.e. vomiting immediately after coughing); d) without other apparent causes.
b) How is it spread?
Pertussis spreads very easily from person to person in droplets produced by coughing or sneezing.
c) How is the disease prevented?
Giving DPT (contained in Pentavalent vaccine) and DPT boosters as per the immunization schedule will prevent pertussis.
2.6 Tetanus
Tetanus is caused by the bacterium Clostridium tetani, which is present in soil everywhere. Infection with this bacterium occurs when soil enters a wound or cut. A toxin released by the bacterium causes severe, painful muscle spasms that can lead to death. Neonatal tetanus (in newborns) and maternal tetanus (in mothers) is a serious problem in areas where home deliveries conducted without sterile procedures are common.
a) How to recognize the disease?
Neonatal Tetanus: Any neonate with a normal ability to suck and cry during the first 2 days of life, and who thereafter cannot suck normally between 3 and 28 days of age and becomes stiff or has convulsions/spasms (jerking of the muscles), or both.
Uni
t 2
13
b) How is it spread?
Tetanus is not transmitted from person to person. In people of all ages, the bacterium can enter a wound or cut from items such as dirty nails, knives, tools, wood splinters, dirty tools used during childbirth, or deep puncture wounds from animal bites.
In newborn babies, infection can occur when delivery occurs on dirty mats or floors, a dirty tool is used to cut the umbilical cord, dirty material is used to dress the cord or when the hands of the person delivering the baby are not clean.
c) How is the disease prevented?
Vaccinating pregnant women with TT during pregnancy with the primary doses and booster doses wehre needed, prevents Matenal and Neonatal Tetanus. All children must also receive TT/DPT (contained in Pentavalent Vaccine / DPT boosters) as per the immunization schedule to prevent tetanus in other age groups.
2.7 Haemophilus influenzae type b disease
Haemophilus influenzae is a bacterium found commonly in the nose and throat of children. There are six types of Haemophilus influenzae. Out of these six types, Haemophilus influenzae type b, or Hib, causes 90% of all serious Haemophilus influenzae infections. Hib can lead to severe pneumonia and meningitis in children aged less than 5 years.
a) How to recognize the disease?
Clinical signs and symptoms of pneumonia include fever, chills, cough, rapid breathing and chest wall retractions. Children with meningitis can have fever, headache, sensitivity to light, neck stiff ness and sometimes confusion or altered consciousness.
b) How is it spread?
The disease spreads from person to person in droplets released when sneezing and coughing. Healthy children carrying the virus in their noses and throats can also infect others.
c) How is the disease prevented?
By vaccinating children with Hib vaccine (contained in Pentavalent vaccine) as per the Immunization schedule, we can prevent Hib infection and its complications.
2.8 Rotavirus gastroenteritis
Rotavirus gastroenteritis is a highly infectious diarrhoeal disease caused by rotavirus infecting the small intestines. It causes severe diarrhoea in infants and young children. Infants between three and 12 months of age may die due to severe dehydration.
a) How to recognize the disease?
Clinical symptoms and signs range from mild loose stools to severe watery diarrhoea and vomiting leading to dehydration.
b) How is it spread?
The disease spreads by the faecal-to-oral route. It is stable in the environment and can spread via contaminated food, water and objects.
c) How is the disease prevented?
By vaccinating children with rotavirus vaccine as per the Immunization schedule, we can prevent infection and its complications. Remember to give ORS during any diarrhoea.

Immunization Handbook for Health Workers (2018)
14
2.9 Pneumococcal disease
a) What is pneumococcal disease?
Pneumococcal disease is a group of diseases caused by a bacterium Streptococcus pneumoniae (also known as pneumococcus). The most serious of these diseases are pneumonia, meningitis, and blood stream infections. Streptococcus pneumoniae is the leading cause of bacterial pneumonia in children under 5 years of age.
b) What diseases does pneumococcus cause?
Diseases that are often caused by pneumococci include:
zz Pneumonia,zz Bacteraemia, sepsis: bloodstream infection, zz Bacterial meningitis: infection of the membranes and fluid that covers and protects the spinal
cord and brainzz Middle ear infection (otitis media)zz Sinusitis, Bronchitis
c) How is pneumococcal disease spread?
Pneumococcus spreads from person to person (coughing, sneezing or close contact). Many people have pneumococcus in their nasopharynx for days or weeks at a time. In most cases the pneumococcus disappears from the nasopharynx without causing any symptoms, but sometimes disease develops.
d) Who is at increased risk of pneumococcal disease?
Young children and elderly individuals are most at risk.
zz The children most at risk of pneumococcal disease are: z� Children under 5 years of age, especially those under 2 years of agez� Immunocompromised children z� Those with influenza or other respiratory virus infections can get a second infection with
pneumococcus.z� Malnutrition, lack of breastfeeding, exposure to indoor smoke and crowded living conditions.z� Poor and marginalized populations with poor access to health care.
e) How is the disease prevented?
These diseases can be prevented by administering PCV in three doses - 2 primary doses and at 6 & 14 weeks and 1 booster dose at 9 months of age along with MR first dose.
2.10 Measles/Rubella
Measles is a highly infectious disease caused by a virus. It is an important cause of death among children who are poorly nourished and live in crowded conditions. Complications include dehydration due to severe diarrhoea, malnutrition, inflammation of middle ear, pneumonia, blindness and encephalitis (brain infection).
Rubella is generally a mild disease in children but when infection occurs in early pregnancy, it has the potential to cause spontaneous abortions, fetal deaths, still births and serious congenital defects (congenital rubella syndrome – CRS) in the child causing lifelong disabilities.

Uni
t 2
15
a) How to recognize the disease?
Any person with fever and maculopapular rash, i.e. non-vesicular AND cough, coryza (runny nose), or conjunctivitis (red eyes)
b) How is it spread?
The virus is spread through nose and throat secretions of infected people and in airborne droplets released when an infected person sneezes or coughs.
c) How is the disease prevented?
The Measles/Rubella containing vaccine (MR) is effective in preventing measles and should be given according to the immunization schedule.
2.11 Japanese Encephalitis
Japanese encephalitis (JE) is an infection of the brain caused by a virus. It is prevalent in certain geographical areas in some of the states. JE is fatal in 20-30% of cases, with young children (less than 10 years) having a greater risk of severe disease and death.
a) How to recognize the disease?
A person of any age, at any time of the year with acute onset of fever and change in mental status (including symptoms as confusion, disorientation, coma or inability to talk) AND/OR new onset of seizures (excluding simple febrile seizures).
b) How is it spread?
JE virus is spread by mosquitoes. The virus normally infects birds and domestic animals, especially pigs, which serve as its reservoirs. Humans may contract the disease when a mosquito that has bitten an infected animal then bites a person.
c) How is the disease prevented?
Following the campaigns targeting all children in the age group of 1-15 years in the high risk districts, the vaccine is integrated into the UIP of the district. Children between 9 months - 2 years are targeted for two doses of JE.

Immunization Handbook for Health Workers (2018)
16

Uni
t 3
17
Unit 3: National Immunization Schedule and Frequently Asked Questions

Immunization Handbook for Health Workers (2018)
18
Unit 3:National Immunization Schedule and Frequently Asked Questions
Learning ObjectivesAt the end of the unit, you should be able to:
zz List vaccines administered in the National Immunization Programme, the due ages for vaccination, the number of doses along with the site and route of administration.
zz Answer the Frequently Asked Questions (FAQs) on the Immunization schedule
Contentsz¾ National Immunization Schedule (NIS)z¾ Frequently Asked Questions (FAQs) on the Immunization schedule
The goal of Universal Immunization Programme is to administer vaccines safely to:
Fig 3.1 Different needle positions for vaccine administration
Pregnant women• As early as possible - appropriate TT doses
Infants & children • At birth - HepB, BCG, OPV • Before age 1 year - for Full Immunization
� 3 doses of OPV, 3 doses of Rotavirus (where applicable), 3 doses of Pentavalent, 2 doses of fractional IPV, 3 doses of PCV (where applicable), MR vacccine -1st dose , JE 1st dose (where applicable)
• Before age 2 years - for Complete Immunization � MR vaccine - 2nd dose, DPT booster, OPV booster, PCV booster (where applicable) and
JE - 2nd dose (where applicable)

Uni
t 3
19
3.1 National Immunization Schedule
Table 3.1. National Immunization Schedule for infants, children and pregnant women
For Pregnant WomenVaccine Due age Max age Dose Diluent Route Site
TT-1 Early in pregnancy
Give as early as
possible in pregnancy
0.5 ml NO Intra-muscular
Upper Arm
TT-2* 4 weeks after TT-1*
0.5 ml NO Intra-muscular
Upper Arm
TT- Booster If received 2 TT doses in a pregnancy within the
last 3 years*
0.5 ml NO Intra-muscular
Upper Arm
For InfantsVaccine Due age Max age Dose Diluent Route Site
BCG At birth till one year of age
(0.05 ml until 1 month)
0.1ml Beyond age 1
month
YESManufacturer
supplied diluent
(Sodium chloride)
Intra- dermal
Upper Arm - LEFT
Hepatitis B - Birth dose At birth within 24
hours 0.5 ml NO Intra- muscular
Antero-lateral side
of mid-thigh - LEFT
OPV-0 At birth within the
first 15 days
2 drops - Oral Oral
OPV 1, 2 & 3At 6 weeks, 10 weeks &
14 weeks
till 5 years of age 2 drops - Oral Oral
Pentavalent1, 2 & 3**
(Diphtheria+ Pertussis + Tetanus +
Hepatitis B + Hib)
At 6 weeks, 10 weeks & 14 weeks**
1 year of age 0.5 ml NO Intra-
muscular
Antero-lateral side
of mid-thigh - LEFT
Fractional IPV (Inactivated
Polio Vaccine)
At 6 & 14 weeks
1 year of age 0.1 ml NO Intra-
dermal Upper Arm
- RIGHT
Rotavirus‡(Where
applicable)
At 6 weeks, 10 weeks &
14 weeks
1 year of age 5 drops NO Oral Oral
Pneumococcal Conjugate
Vaccine (PCV) (Where
applicable)
At 6 weeks & 14 weeks
At 9 completed months - booster
1 year of age 0.5 ml NO Intra-
muscular
Antero-lateral side of
mid-thigh - RIGHT

Immunization Handbook for Health Workers (2018)
20
Measles / Rubella 1st
dose ##
At 9 completed months-12
months.
5 years of age 0.5 ml
YES Manufacturer
supplied diluent
(Sterile water)
Sub- cutaneous
Upper Arm - RIGHT
Japanese Encephalitis –
1 @(Where
applicable)
At 9 months-12 months@
15 years of age 0.5 ml
YES - Manufacturer
supplied diluent
(Phosphate Buffer
Solution)
Sub- cutaneous
Upper Arm - LEFT
Vitamin A(1st dose) At 9 months
5 years of age
( 1 lakh IU)1 ml - Oral Oral
For ChildrenVaccine When to give Max age Dose Diluent Route Site
DPT Booster-1 16-24 months
7 years of age 0.5 ml NO Intra-
muscular
Antero-lateral side
of mid-thigh – LEFT
Measles / Rubella 2nd
dose ##
16-24 months
5 years of age 0.5 ml
YES Manufacturer
supplied diluent
(Sterile water)
Sub- cutaneous
Upper Arm - RIGHT
OPV Booster 16-24 months 5 Years 2 drops NO Oral Oral
Japanese Encephalitis –
2 @(Where
applicable)
16-24 months @
till 15 years of age 0.5 ml
YES Manufacturer
supplied diluent
(Phosphate Buffer
Solution)
Sub- cutaneous
Upper Arm - LEFT
Vitamin A $(2nd to 9th
dose)
At 16 months.
Then, one dose every 6
months.
up to the age of 5
years
2 ml(2 lakh IU) - Oral Oral
DPT Booster-2 5-6 years 7 Years of age 0.5 ml NO Intra-
muscular Upper Arm
TT 10 years & 16 years 16 Years 0.5 ml NO Intra-
muscular Upper Arm
* Give TT-2 or Booster doses before 36 weeks of pregnancy. However, give these even if more than 36 weeks have passed. Give TT to a woman in labour, if she has not previously received TT.
** Pentavalent vaccine is introduced in place of DPT and HepB 1, 2 and 3.
‡ Rotavirus vaccine is being introduced in phases.
## MR vaccine introduced in phases replacing measles vaccine in the UIP schedule. If first dose delayed beyond 12 months ensure minimum 1 month gap between 2 MR doses.
@ JE Vaccine has been introduced in select endemic districts. If first dose delayed beyond 12 months ensure minimum 3 months gap between 2 JE doses.
$ The 2nd to 9th doses of Vitamin A can be administered to children 1-5 years old during biannual rounds, in collaboration with ICDS.
¾ Human Papilloma Virus (HPV) Vaccine – presently not in schedule.
¾ Td - Tetanus diphtheria to replace TT - to be added in schedule

Uni
t 3
21
3.2 Frequently Asked Questions on the Immunization schedule
a) General queries
Why are vaccines administered at specific sites on the body?
Vaccines are administered at specific sites on the body to maintain uniformity and for helping you or anyone in checking that the vaccine was given. e.g BCG on left upper arm.
Why should there be a minimum gap of 4 weeks between two doses of most vaccines?
There should be a minimum of 4 weeks gap between two doses because decreasing the interval between doses may not achieve the needed antibody production to give protection.
How long can a bottle of Vitamin A be used, once opened?
A Vitamin A bottle, once opened, should be used within 8 weeks. Write the date of opening on the bottle. It is important that the date of opening is clearly written on the bottle. It must be kept away from direct sunlight.
What is the dose of Zinc to be used along with ORS in the treatment of diarrhoea?
The dose of zinc for infants aged 2–6 months is 10 mg of dispersible tablet in expressed breast milk for 14 days. For children 6 months to 5 years of age, it is 20 mg of dispersible tablet for 14 days.
b) Vaccine schedule related queries
If a child is brought late for a subsequent dose, should one re-start with the first dose of a vaccine?
No, do not restart the schedule again; pick up where the schedule was left off. For example, If a child who has received BCG, penta1 and OPV1 at 5 months of age returns at 11 months of age, then vaccinate the child with penta 2, OPV2 , measles, Rotavirus vaccine (where applicable) and JE (where applicable).
If a child who has never been vaccinated is brought in at 9 completed months but before 12 completed months of age, then, can all the due vaccines be given to a child on the same day?
Yes, all the due vaccines can be given during the same session but at recommended injection sites, using separate AD syringes. It is safe and effective to give BCG, penta, OPV, IPV, MR, RVV (where applicable), PCV (where applicable) JE (where applicable) vaccines and Vitamin A at the same time to a 9-month-old child who has never been vaccinated. If more than one injection has to be given in one limb then ensure that the distance between the two injection sites is at least 1 inch apart.
If a child who has never been vaccinated is brought in immediately after completing 12 months of age, (beyond one year) what vaccines would you give?
As per the national immunization schedule this child need not be given – BCG, Hepatitis B, Rotavirus, Penta and IPV. This child should be administered DPT 1, OPV 1, Measles 1, JE 1(if applicable) and also Vitamin A solution. The subsequent doses of DPT and OPV should be given at an interval of 4 weeks. Administer Measles 2, JE 2 (If applicable), Vitamin A and a booster dose of DPT at recommended age as per national immunization schedule.
Which vaccines can be given to a child between 1 and 5 years of age who has never been vaccinated?
Such a child will not receive BCG, Hepatitis B, Rotavirus, Penta and IPV. Give DPT1, OPV1, measles 1, JE 1 (where applicable) and 2ml of Vitamin A solution. Then follow with the second and third doses of DPT and OPV at 1-month intervals.

Immunization Handbook for Health Workers (2018)
22
Give Measles 2 as per the schedule /1 month later*. Give booster dose of OPV/DPT at a minimum of 6 months after administering OPV 3/DPT 3. Also give Vit A at 6 months interval till 5 years of age.
*Note: In an unvaccinated child more than 16 months of age remember the interval between Measles 1 and Measles 2 is 4 weeks and for JE 1 and JE 2 (where applicable) the interval is 3 months.
Which vaccines can be given to a child between 5 and 7 years of age who has never been vaccinated?
Give of DPT 1, 2 and 3 at 1-month intervals. Give booster dose of DPT at a minimum of 6 months after administering DPT 3 up to the age of 7 years.
Why are the DPT, HepB (birth dose), IPV and pentavalent vaccines given in the anterolateral mid-thigh and not the gluteal region (buttocks)?
This is done to prevent damage to the sciatic nerve. Moreover, vaccine deposited in the fat of the gluteal region does not bring about the appropriate immune response to protect the child.
c) BCG
Why is BCG given only up to 1 year of age?
Most children acquire natural clinical/sub-clinical tuberculosis infection by the age of 1 year. This protects against severe forms of childhood tuberculosis, e.g. TB meningitis and miliary disease.
If no scar appears after administering BCG, should one re-vaccinate the child?
There is no need to re-vaccinate the child even if there is no scar.
Why do we give 0.05 ml dose of BCG to new borns (below 1 month of age)?
This is because the skin of newborns is thin and an intra-dermal injection of 0.1 ml may break the skin or penetrate into the deeper tissue and cause local abscess and enlarged axillary lymph nodes. Dose of 0.05 ml is sufficient to elicit adequate protection.
d) Hepatitis B
What is the “birth dose” of hepatitis B?
This refers to the dose given within 24 hours of birth. A child vaccinated with Hep B after more than 24 hours of birth is not considered to have received the birth dose.
Why is the birth dose of hepatitis B vaccine given only within 24 hours of birth?
The birth dose of hepatitis B vaccine is most effective in preventing peri-natal transmission of hepatitis B only if given within the first 24 hours.
Why is hepatitis B vaccine given only till 1 year of age in the UIP schedule?
Hepatitis B vaccine is given till 1 year of age because infections during first year of age have a 90% chance of becoming chronic as compared to 30% during 1–5 years and 6% after 5 years. Persons with chronic infection have 15–25% risk of dying prematurely due to HBV related liver cirrhosis and cancer.
Adult Hep B vaccination is not part of the UIP.
e) Pentavalent vaccine
What is pentavalent vaccine?
Pentavalent vaccine is a vaccine that contains five antigens (diphtheria + pertussis + tetanus+ hepatitis B + Haemophilus influenzae type b).

Uni
t 3
23
How is pentavalent vaccine more advantageous?
zz The addition of Hib vaccine provides protection against Haemophilus influenzae type b related diseases (bacterial meningitis, pneumonia and others)
zz The number of injections administered under UIP during the first year of life reduces. zz It does not require reconstitution.
What vaccine will be given to a child who has received at least one dose of pentavalent vaccine before his/her first birthday?
If a child has received at least one dose of pentavalent vaccine before his/her first birthday, the child should be administered the due pentavalent doses at a minimum interval of 4 weeks, at the earliest available opportunity.
After introduction of pentavalent vaccine, will DPT and Hep B be required?
Yes, Hep B birth dose (within 24 hours) for institutional deliveries and DPT boosters at 16–24 months and 5–7 years will continue as before introduction.
f) Rotavirus vaccine – Introduced in Feb 2016 – roll out in phases
How effective is the Rotavirus vaccine?
The available Rotavirus Vaccines are observed to be effective in preventing severe rotavirus diarrhea by 54-60%. The protective effect of Rotavirus vaccine lasts through 2nd year of life.
Will vaccination with Rotavirus vaccine prevent all diarrheas?
No it does not prevent all diarrheas. Diarrhea is caused by many organisms of which Rotavirus is one of the leading causes for diarrhea in children. Rotavirus vaccine is effective in preventing diarrhea due to Rotavirus only. So the child may still get diarrhea due to other germs and causes even after receiving Rotavirus vaccine.
What is the maximum age limit for giving the first dose of Rotavirus vaccine?
The upper age limit for the first dose of Rotavirus vaccine is one year of age. If a child has received only the first dose of Rotavirus vaccine by 12 months of age, two more doses of the vaccine should be given at an interval of 4 weeks between the two doses to complete the course.
Is a booster dose required for Rotavirus vaccine?
No booster dose of Rotavirus vaccine is recommended. Only three doses at 6, 10 and 14 weeks are required to complete the schedule of vaccination for a child.
Should Rotavirus vaccine be given to children who have already received first dose of OPV and Pentavalent vaccine?
No, during the initial period of Rotavirus vaccine introduction, only the infants coming for the first dose of OPV and pentavalent vaccine will be administered Rotavirus vaccine. These children will be given 2nd and 3rd doses in subsequent visits as per the schedule. Infants, who are coming for their second or third dose of OPV and pentavalent vaccine, will complete the schedule with OPV and pentavalent vaccine only. Rotavirus vaccine is not to be started with second or third dose of OPV and Pentavalent vaccine.
What should be done if a child has received one or two doses of Rotavirus vaccine in a private facility?
If the parents want to vaccinate their child from the public sector after receiving one or two doses of Rotavirus vaccine in a private facility, a new course of Rotavirus vaccine must be started with all three doses at one month intervals provided the child is less than one year old.

Immunization Handbook for Health Workers (2018)
24
g) Inactivated Poliovirus vaccine
What is IPV?
IPV refers to Inactivated Polio Vaccine administered by injection. Evidence suggests that this vaccine, when used along with OPV, increases the protection to the individual as well as the community. IPV together with OPV prevents re-emergence and reinfection of wild poliovirus (WPV).
Will IPV (injection) replace OPV (drops)?
No, IPV (injection) will not replace OPV (polio drops), since IPV is recommended for administration in addition to OPV.
Is it safe to give IPV and OPV together?
Yes, it is absolutely safe to give IPV and OPV together. It is also important – and best – for a child to receive both IPV and OPV. Together, these two vaccines provide safe and strong protection against polio. If a child only receives one of the vaccines it will not be as well protected as the child that has received both the vaccines. Primary doses of OPV (OPV1, OPV2 and OPV 3) should be completed as per schedule.
When is IPV to be administered?
IPV has to be administered as a two-dose fractional intradermal schedule at 6 & 14 weeks.
How should you vaccinate if a child has not received the vaccine at 6th week?
If missed, the Fractional IPV 1st dose should be given as early as possible after the 6th week. The 2nd dose must be given with 8 weeks interval.
h) Measles / Rubella
What are Measles / Rubella diseases?
Measles is a highly infectious disease causing illness and death due to complications in the form of diarrhea, pneumonia or brain infection mostly among the children less than five years of age. Rubella is a mild disease but when infection occurs in early pregnancy, it has the potential to cause spontaneous abortions, fetal deaths, still births and serious congenital defects in the child causing lifelong disabilities.
What is CRS?
CRS, (Congenital Rubella syndrome) is a set of serious congenital defects a child may be born with when a pregnant women gets Rubella infection in early pregnancy , causing blindness, deafness, heart defects, mental retardation, liver disorders and other hematological disorder, incompatible with normal living.
Why is Measles-Rubella vaccine given?
This Measles –Rubella vaccine is given for preventing both measles and rubella disease in the child, as these diseases can be only prevented by vaccination.
Does a child need to be vaccinated if she or he has history of any fever-rash illness including measles or rubella disease?
Yes, every child must be vaccinated with two doses, as per the national immunization schedule with MR vaccine at the recommended ages, irrespective of any past fever-rash illness or measles/rubella disease.

Uni
t 3
25
If a child has received the Measles Rubella vaccine before 9 months of age, is it necessary to repeat the vaccine later?
Yes, the Measles Rubella vaccine needs to be administered, according to the National Immunization Schedule, after the completion of 9 months until 12 months of age as 1st dose and at 16-24 months as 2nd dose in RI.
If a child comes after 2 years for the first dose, then can he/she get the second dose?
All efforts should be made to immunize all children at the right age i.e. first dose at completed 9 months to 12 months and second dose at 16-24 months. However if a child comes late (beyond 2 years),then two doses of the vaccine can be given at one month interval until 5 years of age under UIP.
If a child has received all vaccines as per the national immunization schedule, dose she or he need to be vaccinated during supplementary MR campaigns?
Yes, in addition to the recommended national immunization schedule the child (if eligible as per age group targeted) must be vaccinated with supplementary MR vaccines during campaigns.
As measles and JE vaccine doses are recommended for the same age group, can they be given together?
Yes, two live injectable vaccines can be administered simultaneously at different sites.
Remember – if two live injectable vaccines are not given together as per schedule there must be a minimum interval of 28 days.
i) Japanese Encephalitis
What if someone misses receiving JE vaccine during catch-up campaigns?
Those children aged 9 months to 15 years who have missed receiving JE vaccine during the catch-up campaigns can receive it at the nearest PHC/CHC or district hospital.
If a child more than 9 months but less than 24 months who has never received any JE vaccine comes for immunization, how should JE vaccine be administered?
The first dose should be given at first contact and the second dose should be given with an interval of 3 months following the first dose.
J ) Pneumococcal Conjugate Vaccine (PCV)
What should be done if a PCV dose is delayed?
The two primary doses and one booster dose of PCV should be given during the first year of life.
If the doses are delayed within the first year, Doses (both primary and booster) must be separated by a minimum interval of at least 2 months, to be given at the next scheduled immunization visit.
In delayed cases beyond 1 year of age, due doses can be given to a child only if a child has received at least one dose of PCV before his/her first birthday.
For those with at least one previous PCV dose, the series should be completed at the earliest available opportunity.
Can only two PCV doses be given?
No, two PCV doses are not sufficient to confer long lasting immunity, especially for protecting against pneumococcal colonization which is essential for the full public health benefit.

Immunization Handbook for Health Workers (2018)
26
The benefit of the PCV booster dose is not only in providing additional duration of immunity against pneumocococcal disease, but it also serves to reduce carriage, thus having an indirect benefit for the other community members.
Can PCV be given to a sick child?
Yes, PCV can be safely administered to a child with immunodeficiency (e.g., HIV/AIDS, congenital or acquired immunodeficiency, sickle cell disease), malnutrition, or other underlying illnesses, using the same schedule as for any other child.
These children are in particular need of PCV because their risk of pneumococcal disease is high.
Children with mild acute illnesses can and should be immunized with PCV on time
Are there any contraindications for use of PCV?
The pneumococcal vaccine should not be given to the following persons:
zz those who have had severe allergic reactions to a prior dose.zz those who are known to have had a severe reaction to another vaccine containing diphtheria
toxoid. zz those who have a severe illness; vaccination should be delayed until the condition improves in
part so as to not mistakenly attribute any clinical changes with the vaccination.

Uni
t 4
27
Unit 4: Micro-planning for immunization services

Immunization Handbook for Health Workers (2018)
28
Unit 4:Micro-planning for immunization services
Learning ObjectivesAt the end of the unit, you should be able to:
zz Describe the components and activities involved in developing RI microplans zz Describe the utility of formats in RI microplanning zz Prepare sub-centre/urban area micro-plans including maps
Contentsz¾ Importance of RI microplanningz¾ Components of RI microplan at SC level z¾ RI microplanning tasks for ANMs with time-lines z¾ Process/steps of Microplanningz¾ Overview and utility of RI microplanning formats
4.1 RI microplanning – Importance
Microplanning ensures that the immunization services reach every community. It starts at the Sub Centre (SC) level. This is the most important component and forms the base for the planning and management of immunization services. Microplans from the subcentres are compiled to prepare the PHC microplan. Information from PHCs is consolidated at the district or may be at the taluk and then to the district level in some states. Fig 4.1 shows the RI microplanning from subcentre to district level.
Fig. 4.1 RI microplanning from subcentre to district level
Sub Centres RI Microplan
PHC/UHC RI Microplan
PHC/UHC RI Microplan
Taluk / Block RI
Microplan
District RI Microplan
PHC/UHC RI Microplan
Sub Centres RI Microplan
Sub Centres RI Microplan
As an ANM you are responsible to prepare the SC-microplan in coordination with ASHA and AWW.
Uni
t 4
29
4.2 Subcentre RI microplan
A microplan at the subcentre should have the following components:
a) Map of area under SC with names of villages, urban areas including all hamlets (tola), subvillages, sub-wards, sector, mohalla, hard to reach areas, etc.
b) Demarcation map – allocating areas for each ANM if more than 2 ANMs are present in a SC. It can also show the exact boundaries and areas for ASHAs and AWWs
c) Master list of the area– this list includes all villages/tolas/HRAs/wards/mohallsd) An estimation of beneficiaries (who has to be vaccinated and with which antigen)e) An estimation of vaccines and logistics (for each planned session)f) ANM work plan including mobilization plan
HRAs and urban areas form an important component of the master list of the areas for preparing RI-Microplan.
High risk areas/populations
HRAs are special sites/areas, which may be one or more of the following types of areas:
zz Hard-to-reach areaszz Unserved or underserved areas/areas with shortage of health workerszz Urban areas, especially slumszz Migratory populations including temporary harvesters, brick kiln workers and construction
labourers in large construction siteszz Security compromised areas.
Characteristics of urban areas – why they need special attention
Urban areas face a number of challenges and issues as follows:
zz Large volume of transit / migrant populationzz Expanding borders and peri-urban areaszz HRA with a higher number of construction and nomadic siteszz Manpower shortage zz Unrecognized slums

Immunization Handbook for Health Workers (2018)
30
4.3 RI microplanning activities and timelines
Actively participate in preparing and generating new RI microplans including house to house survey and head counting:zz Ensure that all areas are included into the list, confirm the master list
of villages and HRAs; Form 1zz Prepare map of areas under SC with names of villages, urban areas
including all hamlets (tola), subvillages, sub-wards, sector, mohalla, hard to reach areas, etc. showing exact boundaries and areas for ASHAs and AWWs; Form 2
zz Ensure that migratory populations, temporary settlements are also listed and included in the map.
zz Provide actual population and beneficiary counts through house to house survey and head counting; Form 3, 4 & 5
zz Generate needed information for planning sessions, vaccine and logistic calculations. Forms 6 & 7.
Conduct only the house-to-house survey and head counting. This activity in coordination with ICDS and partners will help to:zz Identify any new sites for inclusion / mobilization andzz Update the beneficiary due lists for effective mobilization.
Participate in RI microplan review to help:zz Update the plans to incorporate information on sub centres where
staff is on leave or if it has become vacant andzz Respond to changes in vaccine delivery and inclusion of new areas -
nomads / HRAs and other issues based on monitoring results.
At Sub centre: with ASHA/AWWzz Review due lists of all the sessions held in the previous month;zz Update coverage monitoring chart to quantify leftouts and dropouts;zz At PHC share the salient points with the sector medical officer, so that
MO can make plans to visit sub centre during this activity
After every RI session take help of ASHA/AWW to:zz Review the session due list andzz Identify dropout / left-out beneficiaries and enter their names into
the next session’s due list for follow-up and mobilization.zz Ensure follow-up visits to beneficiaries to identify minor vaccine
reactions or AEFIs. zz Guide ASHA/mobilizer to identify, newborns/pregnant women for
inclusion in next due list.zz Guide ASHA/mobilizer to visit these houses during other field visits
and remind beneficiaries of immunization.
Every Year
Half yearly
Quarterly
Monthly
Weekly

Uni
t 4
31
4.4 Process/steps of Microplanning
For preparing a new RI microplan, you should plan the activity during March and conduct the house-to-house survey during April-May of every year (or as per timeline decided by State/district). The steps in the process of developing RI microplans are shown in Fig. 4.2 while Fig. 4.3 gives an overview of major activities in RI microplanning.
Fig. 4.2 Steps for developing RI microplans
Step 1
Step 2
Step 3
Step 4
Step 5
zz Block PHC/UHC meeting – Sensitization and review of existing microplans
zz Planning for subcentre head count survey and training of ASHA/AWW/Link worker/surveyor
zz Conducting head count survey at village /ward level
zz Review & consolidation of the Subcentre microplan
zz Review and finalization of SC and finalization of session due lists
STEP 1Block PHC/UHC
meetingszzSensitization
meeting with MO/ANMs/ staff
z Sub centre ANM RI microplan review meeting
STEP 2Sub Centre level
Planningz Planning for
head count survey
z Training of ASHA/AWW/surveyor for head count /survey
STEP 3Head count
survey at village / ward
z Conducting the house to house survey / head counting
STEP 4Review &
consolidation of SC microplan
z Review of field formats
z Review SC master list
z Develop draft SC RI microplan in formats for finalization
STEP 5Finalization at
PHC/UHCz Review of SC
formats z Finalize the
master list of areas in the SC
z Finalization of SC RI microplan
z SC final beneficary due list and relevant formats
z Develop PHC/UHC RI microplan
Fig. 4.3 Overview of major activities in RI microplanning

Immunization Handbook for Health Workers (2018)
32
Step 1 of the process for developing/updating the RI microplans involves 2 meetings:
a) A sensitization meeting of all ANMs and other staff b) ANM RI microplan review meeting
a) During the sensitization meeting with MO of PHC/UHC, you will be:
zz Briefed on the process and your role in RI microplanning. zz Trained on the use of RI-Formats and conduction of head count / survey.zz Informed about dates and schedule for your next meeting with MO at PHC.
b) ANM RI microplan review meeting:
This meeting with MO PHC (small batches of 2 or 3 ANMs) will be conducted in to finalize the:
zz Area demarcation for each subcentre and ANM areazz Master list of all areas for each sub centre in Form 1 zz Plan for conducting house to house survey for each Sub centrezz Timeline for conducting the house to house survey / head counting
Prepare for the review meeting
zz Work with your ASHAs and AWWs to generate the village list for your SC. Use the following sources of information for listing of areas and beneficiaries: z� List & map of villages including hamlets /urban areas/wards (SC catchment area)z� Total & beneficiary population (service records), migrants listing (if available)z� Existing sub centre RI microplans, polio microplans, monitoring feedback, Mission
Indradhanush microplans (where applicable), list of HRAs, VHND microplansz� ASHA/ Mobilisers listz� VPD data z� Influencers, possible locations for session sites (if new or needed)
zz Plan to address the following questions:z{ Are all areas identified and included in the SC plan?z{ Are there areas/villages with large population?z{ Border/peri-urban areas?
z� Where are the unreached populations?z{ Areas with highest number of unimmunized childrenz{ Areas with mobile/migrant populationsz{ Areas with resistance
z� Where are the hard-to-reach populations?z{ Low coverage areasz{ Accessibility compromised areas
Step 1zz Block PHC/UHC meeting – Sensitization and review of existing
microplans

Uni
t 4
33
z� Are there problems with access to immunization services?z{ Catchment areas with DPT 3 / MR 2 is <80%
z� Where is utilization of services low?z{ Areas with high dropouts
4.5 Overview of RI microplanning formats
A set of formats have been developed to collect and compile information and data to prepare RI microplans for an area. The table 4.1 below enlists these formats and the information they collect.
Table 4.1 RI microplanning formats and use
Level of use RIMP Form Used for
PLANNING FORMS to be filled by ANM
1 zz Master list of all the villages in sub centre areazz Plan for conduction of survey
2 Sub centre map
SURVEY FORMSUsed in the Survey by ASHA / assessor area
3 Enlists all houses and occupants with focus on pregnant women and children in the age group of 0 to 2 years
4 Enlists details of identified pregnant women 5 Enlists details of infants / children identified
SUB CENTRE FORMSTo be filled by ANM
6 RI Session beneficiary due list (to be made after SC microplan is approved by MO)
7 RI session plan 8 RI session injection load and vaccine distribution plan9 Per Session estimation of vaccines & logistics
10 ANM work plan / roster11 Communication plan for SC
Fig. 4.4 Overview of RI Forms 1 and 2
RI Form 1 Village / area Master list
Area Survey planning template
Basis for conducting house to house survey
Map of Sub centre areaRI Form 2

Immunization Handbook for Health Workers (2018)
34
RI Microplan Form 1 – Sub-centre area survey planning form & Master List
Sub
Cent
re A
rea
Mas
ter L
ist a
nd S
urve
y Pla
nnin
g Fo
rm
Sub
cent
re n
ame:
ANM
Nam
e/Ph
No.
:PH
C Na
me:
Dist
rict:
S. no
Nam
e of
Villa
ges/
Ham
lets/
Tola
s/HR
A#To
tal n
umbe
r of
hous
ehol
ds in
th
is ar
ea?
High
Ri
sk
Area
#
Nam
e of
ASHA
de
signa
ted
for
this
area
?
Nam
e an
d co
ntac
t num
ber
of p
erso
n do
ing
surve
yDe
signa
tion
(enc
ircle
appl
icabl
e)
Date
s of S
urve
y - F
rom
/ To
FILL A
FTER
Sur
vey -
FOR
ANM
USE
ONL
Y
Tota
l Po
pula
tion
Tota
l Pr
egna
nt
Wom
en
Num
ber o
f new
bo
rn
(0 to
1 m
onth
) of
age
Num
ber o
f In
fant
s (1
mon
th to
1
yr of
age
)
Num
ber o
f ch
ildre
n (1
to 2
yr
of a
ge)
AB
CD
EF
GH
I
Y/N
ASHA
/AW
W/O
ther
Y/N
ASHA
/AW
W/O
ther
Y/N
ASHA
/AW
W/O
ther
Y/N
ASHA
/AW
W/O
ther
Y/N
ASHA
/AW
W/O
ther
Y/N
ASHA
/AW
W/O
ther
Y/N
ASHA
/AW
W/O
ther
Y/N
ASHA
/AW
W/O
ther
Y/N
ASHA
/AW
W/O
ther
Y/N
ASHA
/AW
W/O
ther
Y/N
ASHA
/AW
W/O
ther
Y/N
ASHA
/AW
W/O
ther
Y/N
ASHA
/AW
W/O
ther
Y/N
ASHA
/AW
W/O
ther
Y/N
ASHA
/AW
W/O
ther
TOTA
LTO
TAL
Sig
natu
re o
f ANM
: S
igna
ture
of M
edic
al O
ffice
r:
# 1
- Slu
ms w
ith m
igrat
ion;
2 -
Nom
ads;
3 - B
rick
Kiln
; 4 -
Cons
truct
ion
Site
; 5 -
Othe
rs (fi
sher
man
villa
ges,
river
ine
area
s with
shift
ing
popu
latio
ns, e
tc.);
6 -
Non
migr
ator
y (se
ttled
pop
ulat
ion)
, har
d to
reac
h ar
eas
RI F
orm
1

Uni
t 4
35
This format is to be used for each sub centre area. Each ANM should list the areas in her sub centre including HRAs/nomadic sites in separate rows. This format contains all the information needed to plan all activities including area demarcation.
Column A: Serial numbers are to be allotted to each area. Numbers are not to be repeated and must be in serial for one sub-centre area. If the areas per sub-centre need to be entered on more than one sheet, the numbering will continue until the last area for that sub-centre.
Column B: Ensure all the Villages / Hamlets / Tolas / High Risk Areas (HRAs) details are entered. The classification of the HRAs is given as footer and the relevant number to be entered in brackets along with the name of HRA.
Column C: Enter the total number of houses as per information available. If information is not available an approximate number can be entered. For areas such as nomadic sites and brick kilns household numbers are important or approximations must be entered.
zz For HRAs, (including brick kilns or nomadic/construction sites) each site must be entered into a separate row. Refer to existing polio microplans, census lists, maps, high-risk area lists, and interactions with ASHA / AWW or Panchayat Raj Institution (PRI) members to ensure the inclusion of all areas in the sub centre area. This will form the master list for each sub centre. This is a very important activity.
Column D: If the entered area is an HRA then encircle yes.
Column E: Enter the name of the ASHA responsible for the area.
Column F: Enter the name and contact number of the person who will conduct the survey. If the area does not have an ASHA or the position is vacant then, name of the person who will conduct the survey should be entered.
Column G: The survey can be done by the local AWW / link worker / others in consultation with the Medical Officer (MO) and only after they have been trained to do the survey. Enter their relevant designation.
Column H: The area survey is to be completed in seven to 10 days. The dates for conducting this activity will be decided by the ANM and the persons who will conduct the survey in consultation with the MO. The “From” and “To” dates are to be entered here.
Columns I: The last shaded columns are for the use AFTER the survey.
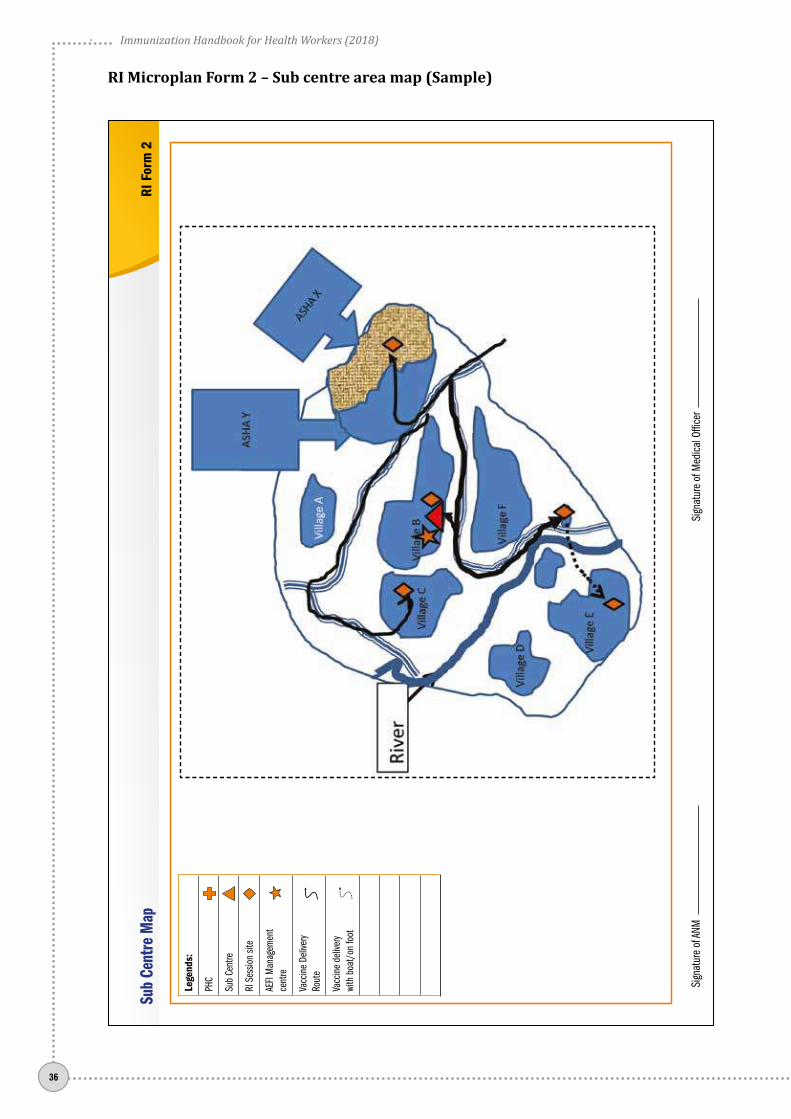
RI Form 2– Sub-centre map
This form provides space for drawing a map of the SC area. A sample map is also given and health workers are encouraged to put forward simple drawings. The maps should be able to show at least the following:
zz All the villages in the SC area, with nameszz Shading of parts of a village to demonstrate the ASHA demarcation areaszz Location of the SCzz Location of all RI session siteszz Major roadszz Rivers streams.zz AEFI management centres
Each SC should have a map, which helps to clearly demarcate the villages and areas to ensure that the frontline workers have clarity in operations, and avoid overlap or loss of services to the beneficiaries.
In urban areas discuss with your medical officer on how to use maps from the internet to easily print out the areas.
Immunization Handbook for Health Workers (2018)
36
RI Microplan Form 2 – Sub centre area map (Sample)
Le
gend
s:
PHC
Sub
Cent
re
RI S
essio
n sit
e
AEFI
Man
agem
ent
cent
re
Vacc
ine
Deliv
ery
Rout
e
Vacc
ine
deliv
ery
with
boa
t/on
foot
Sub
Cent
re M
apRI
For
m 2
Sign
atur
e of
ANM
Sign
atur
e of
Med
ical O
ffice
r
Uni
t 4
37
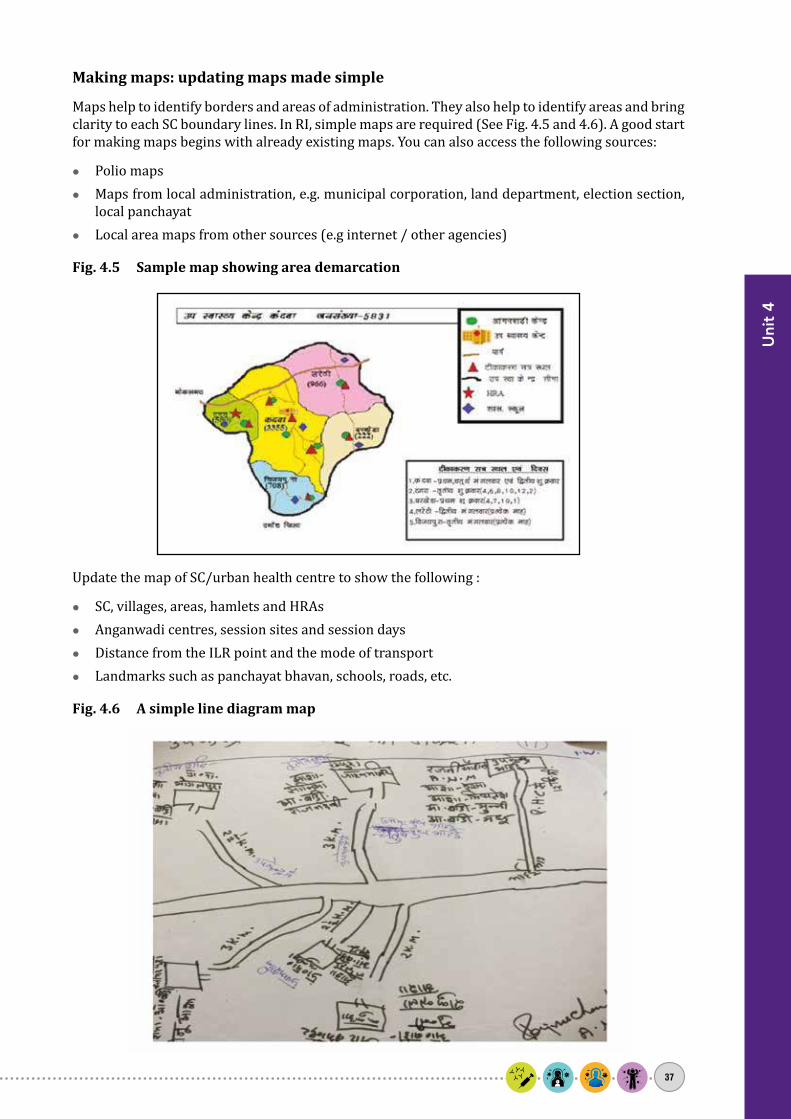
Making maps: updating maps made simple
Maps help to identify borders and areas of administration. They also help to identify areas and bring clarity to each SC boundary lines. In RI, simple maps are required (See Fig. 4.5 and 4.6). A good start for making maps begins with already existing maps. You can also access the following sources:
zz Polio mapszz Maps from local administration, e.g. municipal corporation, land department, election section,
local panchayatzz Local area maps from other sources (e.g internet / other agencies)
Fig. 4.5 Sample map showing area demarcation
Update the map of SC/urban health centre to show the following :
zz SC, villages, areas, hamlets and HRAszz Anganwadi centres, session sites and session dayszz Distance from the ILR point and the mode of transportzz Landmarks such as panchayat bhavan, schools, roads, etc.
Fig. 4.6 A simple line diagram map

Immunization Handbook for Health Workers (2018)
38
SC survey planning meeting
ACTIVITIES• Area listing• Area demarcation• Training• Walk through• Head count / survey
Link Worker / Surveyor
ASHA
AWW
Step 2 zz Planning for subcentre head count survey and training of ASHA/AWW/Link worker/surveyor
The finalization of the head count survey plan and the training of the ASHAs/AWWs/Link workers/surveyors is the second step in the process for developing RI microplans. Your role as an ANM is to guide the ASHAs and AWWs of the area in order to conduct the survey in the best way and to use their close ties with the community to identify all beneficiaries. This meeting can take place at any of the following places:
zz At the PHC in batches - for 2 to 3 sub centres per batch – about 15 to 20 ASHA/AWW/Link workers in each batch, OR
zz At the additional PHC, ORzz At the Sub centre.
ANM is required to take a lead role in this step with support of medical officer.
Sub center survey planning meeting – Who is to attend and what is to be done?
Who will attend?
Sector medical officers, sub centre ANM, ICDS- lady supervisor, all ASHAs, AWWs, link workers, mobilizers as well as ASHA facillitator of the villages in the sub centre / urban area. In some cases, the meeting may be conducted in batches to allow for detailed discussions with the workers.
Prepare for the survey-planning meeting
zz Share the information and requirements for the meeting with respective ASHAs/AWWs/link workers at least a week in advance. Encourage them to identify any new areas that may not have been included or any new nomadic or construction sites in their areas.
zz Ask each ASHA and AWW to prepare a list of villages/areas as per the available information. This list should also include the HRAs and any other identified populations that require special services. Cross check and finalize the master list.
zz Discuss and plan for logistics for the survey – have enough number of formats (Forms 3, 4, 5); chalk for house marking.
Key activities for this step include:
zz Review area demarcation between ASHA, AWW & surveyors as per Form 1zz Share dates of survey and finalize with ASHAs/AWWs/link workerszz Create working maps for each area

Uni
t 4
39
zz Train and explain to ASHAs/AWWs/link workers how to undertake head count & generate beneficiary list
zz If required plan to walk through areas to ensure clear area demarcation/HRA identification
On meeting day
Start the meeting by sharing the status of RI in your area. Explain the importance of RI microplanning and conduct the following activities:
a) Area demarcation between ASHA, AWW, link worker and mobilizer: Ask each ASHA/link worker to read out the list of villages/urban areas she visits/has been
allocated. The AWWs of these areas can refer to the list they have prepared and add to or clarify the list of the ASHA. In some urban areas where AWW workers are not available, other key local persons can be approached for creating a list of areas.
Identify areas in each SC for a walk-through to verify demarcation and that all HRAs are included in the list of areas.
Take Form 1 used in the PHC meeting. Finalize the personnel who will conduct the head counting and the approximate dates of completion (if not already done). Allow for corrections of the master list at all times. Any information is important and will benefit the area.
b) Train and explain ASHA/AWW how to undertake head count: Distribute copies of Forms 3, 4 and 5 to each ASHA/AWW. Explain the process (use SOPs of
each form) for conducting the house-to-house survey of the areas, the process for filling up Forms 3, 4 and 5 and the information to be collected.
Develop a practical timeline considering that a maximum of 25 houses are to be covered in one day. This will ensure quality and allow the workers to collect detailed information on each family. Do not rush through this process so that you can ensure a good quality survey and thus a good quality of planning for immunization.
c) Create working maps for each area: Working maps are simple maps that need not be to scale, but provide a bird’s eye view of the
areas and also show the demarcations in areas with more than one HW. These maps should be developed before going out into the area. Finer details may be added to this map during or in the next part of the process.
d) Walk through areas to ensure clear area demarcation/HRA identification: Once the training is completed, you along with the MO and the ICDS LS should visit some areas
where confusion of area demarcation exists or to verify HRAs. A walk through will ensure demarcation is verified and all HRAs are included in the list of areas. If there are a large number of areas, or the identified areas are accessibility compromised, the field visit can be covered as per a practical timeline over a few days.
Before closing the meeting, confirm the dates for the area survey by each person as per Form 1 and clear any doubts of the participants. Coordinate with ICDS supervisors to ensure monitoring and oversight. Working maps generated can be strengthened with additional information during the survey. Any changes should be intimated to the concerned ANM and ICDS supervisors.
Outputs expected
zz Confirmed plan for area survey with timelines and names mentioned in Form 1.zz Refined master list of all areas in the SCzz Simple area maps for each ASHA area

Immunization Handbook for Health Workers (2018)
40
Roles and responsibilities
Personnel Activities to be performed SupervisorANM zz Area demarcation for ASHAs/AWWs
zz Develop a reasonable timeline for surveyzz Will support the ASHA/AWW for surveyzz Supervise the survey with field visits
Sector MO/LHV/ designated ANM
ASHA zz Contribute to finalizing the master listzz Conduct the house-to-house survey
SC ANM/ASHA facilitator
AWW zz Conduct/assist in the house to house surveyzz Identify beneficiaries/HRAs/missed areas/dropouts/leftouts
SC ANM/LS
Step 3 zz Conducting head count survey at village /ward level
The head count survey or house-to-house survey is the third step of the RI microplanning process. This survey will ensure enrolment of all beneficiaries in an area. It is to be conducted by the ASHA/AWW/ Link worker / surveyor (after training) as specified in Form 1. You will have a list of the SC areas and the dates for conduct of the visits, share with the LHV/ICDS supervisors to allow them to support during their field visits and monitoring.
Key activities to be conducted:
zz ASHA/AWW will conduct the survey as per the plan in Form 1. Support may be sought from local residents while conducting the survey. This survey is NOT to be done on RI days.
zz During the survey z� A maximum of 25 houses should be covered per day.z� Information of ALL households to be entered in Form 3.z� On identifying a pregnant woman in a household, enter her information into Form 4z� On identifying infants and children up to 2 years of age, enter information in Form 5.z� Process to be completed in 7 to 10 days per area.
zz Monitoring of the process by ANM/ LHV/ICDS supervisors (LS)/Sector Medical Officer/Medical Officer In-charge / DIO.
zz Involve other departments (e.g. education, PRI, etc.) and block/district administration in supervision of this activity.
Who will attend?
Designated ANM, ASHA, AWW or identified person for conducting the survey, Sector MO, ASHA supervisor, ICDS supervisor, others.
Prepare for the head count/survey
zz Review the available lists and maps from Step 2 before beginning Step 3. zz Involve the mobilizers and encourage other influencers in the village to participate in the survey
activity.zz During the period of survey, along with LS (ICDS), make coordinated visits to ensure that the
ASHAs/AWWs/surveyors conduct the activity as per the training given.

Uni
t 4
41
zz You along with ASHA facilitator/LS should verify at least 5 households. zz Keep adequate number of formats to allow for maximum use of available resources in the field. zz Address all queries at the earliest.
Fig. 4.8. Overview of RI Forms 3 to 5
RI Form 3
RI Form 5
Area house-to-house survey format
Infant/child information
Used by ASHA/AWW/LW
during survey
Information on pregnant womenRI Form 4
Outputs expected
zz ASHA/AWW/ Trained person conducting the survey as per training zz Completion of house-to-house surveyzz Forms 3, 4 and 5 identifying all beneficiaries for each area.
Roles and responsibilities
Personnel Activities to be performed SupervisorANM Supervise with field visits Sector MO/LHV/designated ANMASHA Conduct survey and fill Forms 3,4,5 SC ANM/ASHA facilitatorAWW Conduct survey and fill Forms 3, 4 and
5/assist in surveySC ANM/LS

Immunization Handbook for Health Workers (2018)
42
RI Microplan Form 3 – Area survey/ house to house survey form
ASHA
/AW
W/S
urve
yor N
ame/
Ph N
o.:
Sub-
Cent
re n
ame:
Nam
e of
ANM
:
ASHA
/AW
W/
Nam
e/Ph
No.
:Ar
ea N
ame
and
No a
s per
Form
1:
Date
of V
isit :
dd/
mm
/yy
“Firs
t hou
se vi
sited
toda
y -Ho
use
No.:
Nam
e:
Addr
ess w
ith la
ndm
ark:
Last
hous
e vis
ited
toda
y -Ho
use
No.:
Nam
e:
Addr
ess w
ith la
ndm
ark:
Fam
ily D
etai
lsPr
egna
nt W
oman
Child
ren
0 to
2 ye
ars -
(if Y
ES ,
go to
form
5)
Hous
e nu
mbe
r (a
s per
chu
llah)
Nam
e of
hea
d of
fam
ilyFa
ther
s nam
eHo
w m
any f
amily
mem
bers
are
livin
g in
th
is ho
use?
(In
clude
All a
dults
& c
hild
ren
inclu
ding
new
bor
ns)
Is th
ere
any w
oman
pr
egna
nt in
the
fam
ily ?
(If YE
S, go
to fo
rm 4
)
“Is th
ere
any N
ewbo
rn/c
hild
ag
ed le
ss th
an 1
mon
th
in th
e fa
mily
(if
YES,
go to
form
5)”
“Is th
ere
any
child
age
d be
twee
n 1
mon
th a
nd 1
year
in
the
fam
ily
(if YE
S, go
to fo
rm 5
)”
“Is th
ere
any c
hild
age
d be
twee
n 1
to 2
Year
s in
the
fam
ily
(if YE
S, go
to fo
rm 5
)”
AB
CD
EF
GH
Yes
/ N
oYe
s /
No
Yes
/ N
oYe
s /
No
Tota
lTO
TAL
Tota
l Yes
Tota
l Yes
Tota
l Yes
Tota
l Yes
Sign
atur
e of
ASHA
/ass
esso
r:Ve
rified
by
ASHA
Facil
itato
r (Si
gnat
ure)
:Ve
rified
by A
NM (S
ignat
ure)
:SH
EET N
UMBE
R :
Hous
e to
Hou
se S
urve
y For
mRI
For
m 3

Uni
t 4
43
SOPs for using RI Form 3
zz Form 3 is to be used when conducting the house-to-house survey. zz Each sheet must have the area name and number as given in Form 1. The ANM must instruct the
surveyor to enter this. This information will help to easily identify the sheet.zz This assessment is not to be done on RI days.zz A household is defined based on “Kitchen“ or “Chullah” (like in polio microplans) zz Each sheet has information for 15 households. Multiple sheets for each area will be required
and must be made available.zz A maximum of 25 houses should be covered per day.
Details of the first house visited and the last house on each sheet must be entered in the space provided. When multiple sheets are used in an area, each sheet must be numbered in the space provided at the bottom right of the form. The working map of the area prepared will help in identifying the roads and location of houses. Changes to this map can be made during the survey.
All houses in the area must be visited and information entered into the form. Each household is to be identified by a number (Column A). This is the household identification number.
zz The numbering of households is to be continuous until the area is completed.zz The assessment of the area may take more than one day but the numbering of the houses will be
in serial order for the entire area.zz Restart of numbering will be done when the same person is assessing a new area.zz House marking should be done with chalk/geru indicating the serial No of the household and
date of survey, as shown below.
Fig. 4.9 House marking during house-to-house survey for RI
Interview each household and gather information on the head of household (Column B), father’s name (Column C) and the total number of members in each household (Column D). This must include all newborn children.
Next, enquire if there is any currently pregnant woman in this household. This does not depend on if she is a resident / visitor to the area. Include all pregnant women, as each is a beneficiary. If yes, then encircle yes (Column E) and collect information on the pregnant woman and enter in Form 4.
Similarly for Columns F, G and H enquire if there is a:
zz Newborn childzz Child up to 1 month of agezz Child between 1 month and 1 year of agezz Child between 1 and 2 years of age.
If a child is identified in any of these columns, encircle “Yes” and enter information on the newborn/infant/child in Form 5.

Immunization Handbook for Health Workers (2018)
44
RI Form 4 – Pregnant women information
Nam
e of
ASHA
/AW
W/
Surve
yor:
Area
Nam
e an
d No
as I
N Fo
rm 3
:
Nam
e of
ANM
:
Hous
e No
as
in Fo
rm 3
Na
me
of th
e pr
egna
nt w
oman
Age
in
year
s Hu
sban
ds n
ame
Mob
ile /
Telep
hone
Num
ber
Is
MCP
ca
rd
avai
labl
e:
Yes /
No
Expe
cted
da
te o
f de
liver
y/
LMP
Teta
nus T
oxoi
d Va
ccin
atio
n An
te N
atal
Che
ck U
p FO
R AN
M O
NLY
TT-1
TT
-2
TT-B
ooste
r (If
2 do
ses
of TT
hav
e be
en g
iven
with
in 3
year
s of t
he
curre
nt p
regn
ancy
)
1st
ANC
2nd
ANC
3rd
ANC
4th
ANC
TT d
ue -
Y/N
ANC
due
- Y/
N
AB
CD
EF
GH
IJ
Date
/Y/N
/DNK
Date
/Y/N
/DNK
Date
/Y/N
/DNK
Date
Date
Date
Date
Y /
N
Y /
N
Y /
N
Y /
N
Y /
N
Y /
N
Y /
N
Y /
N
Y /
N
Y /
N
Y /
N
Y /
N
Y /
N
Y /
N
Y /
N
TOTA
LS
Sign
atur
e of
ASHA
Verifi
ed b
y AS
HA Fa
cilita
tor (
Sign
atur
e):
Verifi
ed b
y ANM
(Sign
atur
e):
VILL
AGE/
ARE
A - P
regn
ant W
omen
Sur
vey L
istin
gRI
For
m 4

Uni
t 4
45
SOPs for using RI Form 4
Form 4 has to be filled when a pregnant woman is identified in Form 3 Column E.
The number in Column A must be the same as that used to identify the household in Form 3.
This number is a unique number that will link the pregnant woman to the house details.
Columns B, C, D and E are for information that identifies the pregnant woman.
Column F: Enquire from the woman if she has been issued a mother and child protection (MCP) card and accordingly encircle Yes or No. If she does not have a card, then information should be shared with the ANM of the area to ensure that a card is issued to her during the next visit.
Column G: Determine the expected date of delivery (EDD) of the child. This can be sourced from the RI/MCP card if available or from the mother herself. If she is unaware, then determine the EDD as best as possible by assessing her date of last menstrual period (LMP). (Surveyor can consult ANM who can refer to the EDD ready reckoner from RCH register/training manual).
The administration of TT vaccine to PW as per the UIP schedule prevents maternal and neonatal tetanus; details of the same are to be entered in the three H Columns.
Antenatal check-ups help to identify a high-risk pregnancy and reduce chances of any complications. Details of these check-ups should be entered in the four I Columns.
Column J: this is for the ANM to enter if the woman is due for any ANC or TT vaccination. These two columns make it easier for the ANM to extract the information and develop the beneficiary due list for each RI session.
The dates of administration of TT injections and ANC check-ups should be obtained from the RI/MCP card.
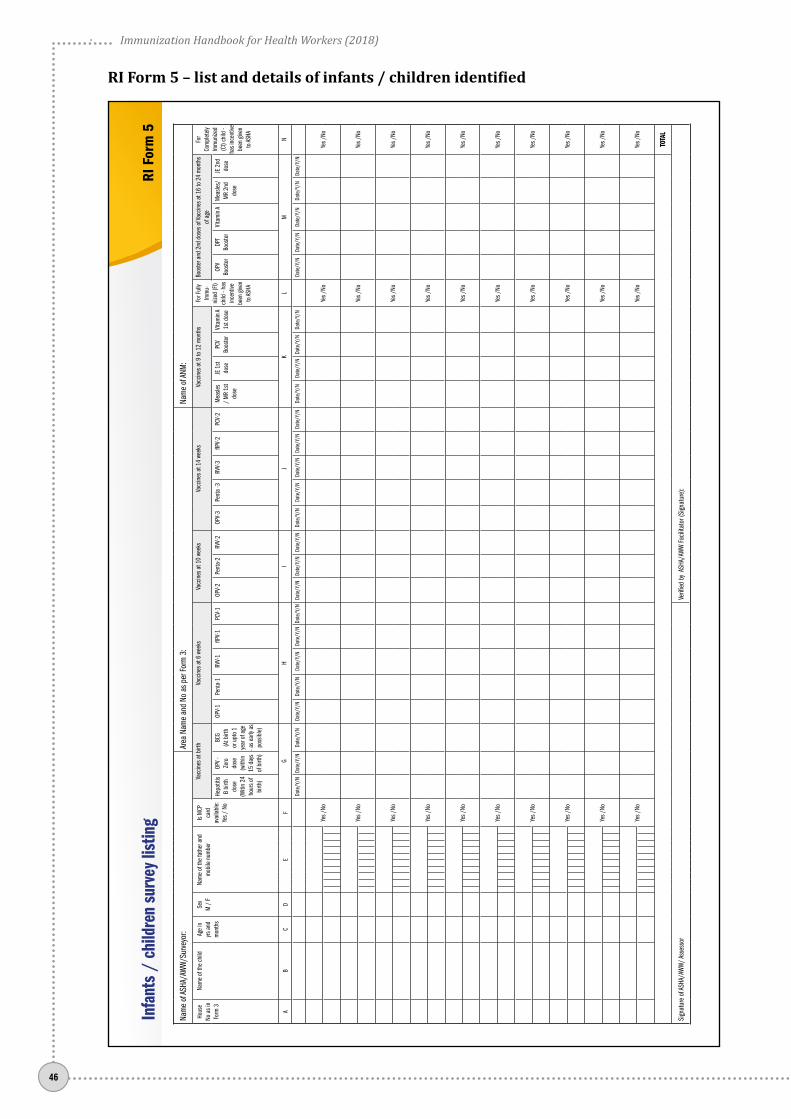
Immunization Handbook for Health Workers (2018)
46
RI Form 5 – list and details of infants / children identified
Nam
e of
ASHA
/AW
W/S
urve
yor:
Area
Nam
e an
d No
as p
er Fo
rm 3
:Na
me
of AN
M:
Hous
e No
as i
n Fo
rm 3
Nam
e of
the
child
Ag
e in
yrs
and
m
onth
s
Sex
M
/ F
Nam
e of
the
fath
er a
nd
mob
ile n
umbe
r
Is M
CP
card
av
aila
ble:
Ye
s / N
o
Vacc
ines
at b
irth
Vacc
ines
at 6
wee
ks
Vacc
ines
at 1
0 we
eks
Vacc
ines
at 1
4 we
eks
Vacc
ines
at 9
to 1
2 m
onth
s Fo
r Ful
ly Im
mu-
nize
d (F
I) ch
ild -
has
ince
ntive
be
en g
iven
to AS
HA
Boos
ter a
nd 2
nd d
oses
of V
accin
es a
t 16
to 2
4 m
onth
s of
age
For
Com
plet
ely
Imm
unize
d (C
I) ch
ild -
has i
ncen
tive
been
give
n to
ASHA
Hepa
titis
B bi
rth
dose
(Witi
n 24
ho
urs o
f bi
rth)
OPV
- Ze
ro
dose
(w
ithin
15
day
s of
birt
h)
BCG
(At b
irth
or u
pto
1 ye
ar o
f age
- a
s ear
ly as
po
ssib
le)
OPV-
1Pe
nta-
1RV
V-1
fIPV-
1PC
V-1
OPV-
2Pe
nta-
2RV
V-2
OPV-
3Pe
nta
-3RV
V-3
fIPV-
2PC
V-2
Mea
sles
/ M
R 1s
t do
se
JE 1
st do
sePC
V Bo
oste
rVi
tam
in A
1st d
ose
OPV
Boos
ter
DPT
Boos
ter
Vita
min
AM
easle
s/M
R 2n
d do
se
JE 2
nd
dose
AB
CD
EF
GH
IJ
KL
MN
Date
/Y/N
Date
/Y/N
Date
/Y/N
Date
/Y/N
Date
/Y/N
Date
/Y/N
Date
/Y/N
Date
/Y/N
Date
/Y/N
Date
/Y/N
Date
/Y/N
Date
/Y/N
Date
/Y/N
Date
/Y/N
Date
/Y/N
Date
/Y/N
Date
/Y/N
Date
/Y/N
Date
/Y/N
Date
/Y/N
Date
/Y/N
Date
/Y/N
Date
/Y/N
Date
/Y/N
Date
/Y/N
Yes /
NoYe
s /No
Yes /
No
Yes /
NoYe
s /No
Yes /
No
Yes /
NoYe
s /No
Yes /
No
Yes /
NoYe
s /No
Yes /
No
Yes /
NoYe
s /No
Yes /
No
Yes /
NoYe
s /No
Yes /
No
Yes /
NoYe
s /No
Yes /
No
Yes /
NoYe
s /No
Yes /
No
Yes /
NoYe
s /No
Yes /
No
Yes /
NoYe
s /No
Yes /
No
TOTA
L
Sign
atur
e of
ASHA
/AW
W/ A
sses
sor
Verifi
ed b
y AS
HA/A
WW
Facil
itato
r (Si
gnat
ure)
:
Infa
nts
/ ch
ildre
n su
rvey
list
ing
RI F
orm
5

Uni
t 4
47
SOPs for using RI Form 5
This form collates all the information of infants/children identified during the house-to-house survey.
When filled correctly, this form provides information needed to develop the beneficiary list of infants/children of the area. Accurate information on the number of children and the vaccines that they are due for will help to identify which vaccines a child is to receive, and when.
Column A: The number in Column A must be the same as that used to identify the household in Form 3. If there is more than one child in a house, the same house number will have to be entered for each of these children.
Columns B, C, D and E: These columns are used to collect identification information of each child. Attempt to collect the latest mobile number from the parent/household.
Column F: Enquire if the infant/child has been issued an RI/MCP card. If not, information should be shared with the ANM of the area to ensure that a card is issued at the earliest.
Column G: This records detail of vaccines administered at birth. Dates are to be entered of when BCG, OPV zero dose and Hepatitis B (within 24 h) were administered.
Column H: Dates of administration of Penta 1, Rotavirus 1(where applicable), fIPV1, PCV1(where applicable) and OPV 1
Column I: Dates of administration of Penta 2, Rotavirus 2(where applicable) and OPV 2
Column J: Dates of administration of Penta 3, Rotavirus 3(where applicable), fIPV2, PCV2(where applicable) and OPV 3
Column K: Enter the dates of administration of vaccines due between the age of 9 months and 1 year – measles/MR first dose, Vitamin A, PCV booster (where applicable) and Japanese Encephalitis (where applicable) vaccines.
Column L: Record whether the ASHA has received the incentive for the child who is fully immunized – encircle “Yes” or “No”. A child is to be considered as fully immunized if s/he has received all the due vaccines up to 1 year of age.
Column M: Dates of administration of vaccines due for a child between the ages of 1 and 2 years are to be entered in column M. This includes DTP booster, measles/MR second dose, OPV booster dose and JE2 vaccine, where applicable.
Column N: Whether the ASHA has received the incentive for the child who is completely immunized – encircle “Yes” or “No”. A child is to be considered as completely immunized if s/he has received all the due vaccines up to 2 years of age.

Immunization Handbook for Health Workers (2018)
48
You will get forms 3, 4 and 5 from each ASHA/AWW after completing the area survey.
Step 4 should be done at the SC and is to review the formats and compile the data and information. This meeting may be in batches if needed.
As the SC ANM you should organize this meeting. Inform participants about the venue, date and time 2–3 days in advance so that they attend the meeting with completed survey forms.
Facilitator: Sector MO/LHV/health supervisor
Participants: ANM, ASHA, ASHA facilitator, AWW
Key activities to be conducted:
zz Finalize area demarcation on the map.zz Review and refine RI plans as per actual head count and identification of any missed (migratory/
settled) pocket in sub centre area.zz Ensure functional tagging – areas tagged to existing RI sites should be practical.zz Consolidate the RI Microplan at sub centre – Forms 6, 7, 8 and 9.zz Develop mobilization plans. zz Update the map of sub-centre/urban health centre if needed
Prepare for the meeting
zz Review and finalize the information in forms 3, 4 and 5 collected during the house-to-house survey with the ASHA/AWW/link workers.
zz Prepare a simple map of the SC from the information and experiences of the workers who have completed the survey. This map need not be to scale, but should include area demarcation for ASHA/AWW/mobilizers and other information as mentioned above.
Outputs expected
zz Number of new areas identifiedzz Number of beneficiaries zz Consensus on listing of areas and HRAszz Consensus on demarcation of areaszz Formats collected after cross check and attestationzz Availability of maps.
Documents to be available after the SC meeting:
1. Completed RI Form 3, 4 and 5 for each area2. RI Form 7– proposed sessions planning for SC3. RI Form 2 - Map of the SC showing demarcation of areas for ANMs (if applicable), ASHAs and
AWWs
Step 4 zz Reveiw of all survey forms & consolidation of Sub centre microplans

Uni
t 4
49
RI Form 6 Per session due list
Update after each RI session
RI Form 7Number of
beneficiaries from actual head count
Calculation of injection load
Deciding number of RI sessions
RI Form 8 RI session plan Deciding location of RI sessions
Vaccine distribution plan
RI Form 9Per session
estimation of vaccines and logistics
RI Form 10 ANM workplan
RI Form 11 Communication plan
Roles and responsibilities
Personnel Activities to be performed SupervisorANM Conduct the meeting at SC
Finalize area listing and draft of plan for conducting RI sessions in the areas
MOIC, Sector MO
ASHA Contribute to final forms SC ANM/ASHA facilitatorAWW Contribute to final forms SC ANM/LS
An overview of RI Forms 6 to 11 used in the SC RI microplan is given in Fig. 4.10.
Fig. 4.10 Overview of Sub Centre RI Microplan – Forms 6 to 11

Immunization Handbook for Health Workers (2018)
50
RI Microplan Form 6 – Session beneficiary due list
This form is to be filled only after finalization of SC microplans with medical officer
Nam
e of
Sub
-Cen
tre:
PHC:
Nam
e Se
ssio
n Si
te:
Bloc
k:
Nam
e &
Ph N
o of
ANM
:Na
me
& Ph
No
of AS
HA:
Nam
e &
Ph N
o of
AWW
:
Deta
ils o
f Pre
gnan
t Wom
en /
Chi
ldre
n du
e fo
r vac
cina
tion
for R
I ses
sion
Afte
r the
RI s
essio
n
Sl. N
o.M
CTS
Regis
tratio
n No
.Na
me
of C
hild
/
Preg
nant
Wom
anDa
te O
f Birt
h /
Expe
cted
dat
e of
De
liver
y
Age
Sex
M /
FNa
me
of Fa
ther
/Hus
band
Vacc
ines
due
in
this
sess
ion
Did
the
preg
nant
wom
an
/ ch
ild a
rrive
toda
y?
(Yes/
No)
Vacc
ines
whi
ch w
ere
adm
inist
ered
to p
regn
ant w
oman
/
child
(If n
ot
given
men
tion
reas
on)
*Inc
entiv
e m
oney
Rs.
100
will
be p
ayab
le to
ASHA
und
er
Part
C.5.
A. fo
r Ful
l Im
mun
izatio
n
**In
cent
ive m
oney
Rs.
50 w
ill be
pay
able
to AS
HA
unde
r Par
t C.5
.B. f
or
Com
plet
e Im
mun
izatio
n
AB
CD
EF
GH
IJ
KL
1 2 3 4 5 6 7 8 9 10 11 12 13 14 15 16 17 18
Tota
l am
ount
rece
ived
Num
ber o
f ben
eficia
ries w
ho d
id n
ot a
ttend
Out o
f Villa
geSi
ckRe
fuse
dVa
ccin
ated
out
side
Othe
r
Have
thes
e be
nefic
iarie
s bee
n in
clude
d in
the
next
sess
ion?
Y/N
Y/N
Y/N
Y/N
Y/N
Sign
atur
e of
ANM
Sign
atur
e of
ASHA
Sign
atur
e of
AWW
Tota
l Num
ber o
f Pre
gnan
t wom
en a
s per
the
due
list
Tota
l wom
en v
accin
ated
Tota
l num
ber o
f chi
ldre
n as
per
due
list
Tota
l chi
ldre
n va
ccin
ated
RI S
essio
n Du
e Lis
tRI
For
m 6
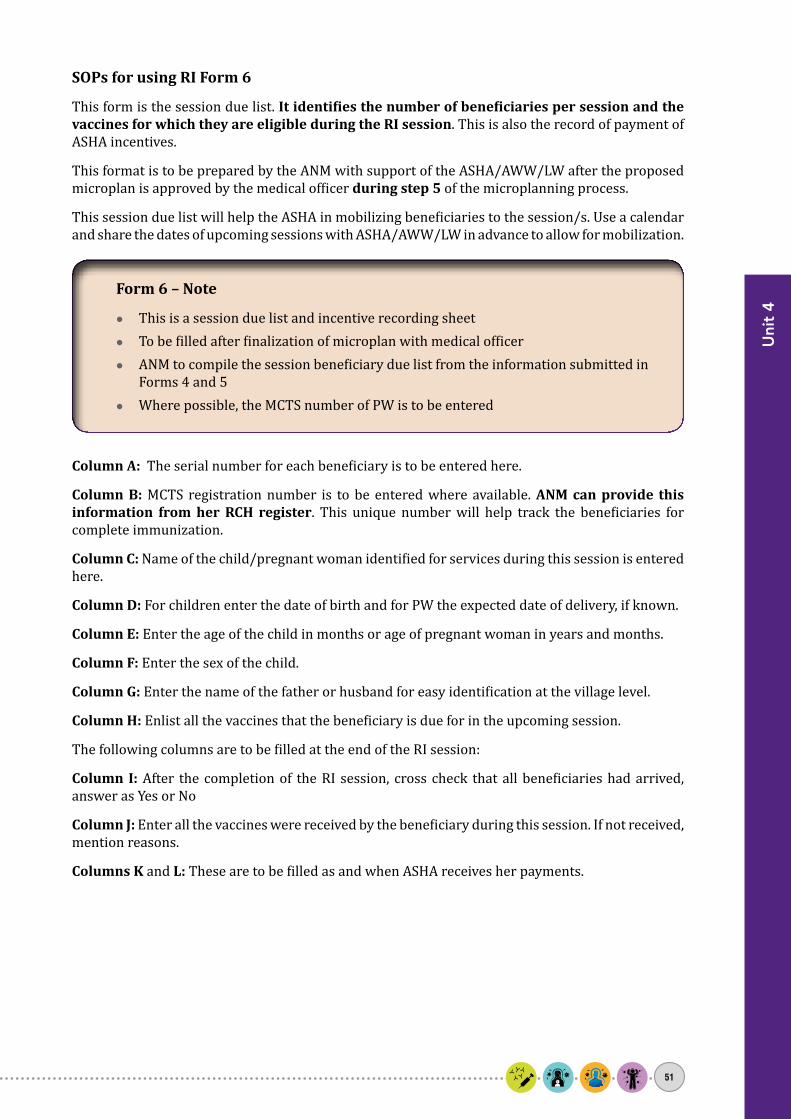
Uni
t 4
51
SOPs for using RI Form 6
This form is the session due list. It identifies the number of beneficiaries per session and the vaccines for which they are eligible during the RI session. This is also the record of payment of ASHA incentives.
This format is to be prepared by the ANM with support of the ASHA/AWW/LW after the proposed microplan is approved by the medical officer during step 5 of the microplanning process.
This session due list will help the ASHA in mobilizing beneficiaries to the session/s. Use a calendar and share the dates of upcoming sessions with ASHA/AWW/LW in advance to allow for mobilization.
Form 6 – Note
zz This is a session due list and incentive recording sheetzz To be filled after finalization of microplan with medical officerzz ANM to compile the session beneficiary due list from the information submitted in
Forms 4 and 5zz Where possible, the MCTS number of PW is to be entered
Column A: The serial number for each beneficiary is to be entered here.
Column B: MCTS registration number is to be entered where available. ANM can provide this information from her RCH register. This unique number will help track the beneficiaries for complete immunization.
Column C: Name of the child/pregnant woman identified for services during this session is entered here.
Column D: For children enter the date of birth and for PW the expected date of delivery, if known.
Column E: Enter the age of the child in months or age of pregnant woman in years and months.
Column F: Enter the sex of the child.
Column G: Enter the name of the father or husband for easy identification at the village level.
Column H: Enlist all the vaccines that the beneficiary is due for in the upcoming session.
The following columns are to be filled at the end of the RI session:
Column I: After the completion of the RI session, cross check that all beneficiaries had arrived, answer as Yes or No
Column J: Enter all the vaccines were received by the beneficiary during this session. If not received, mention reasons.
Columns K and L: These are to be filled as and when ASHA receives her payments.
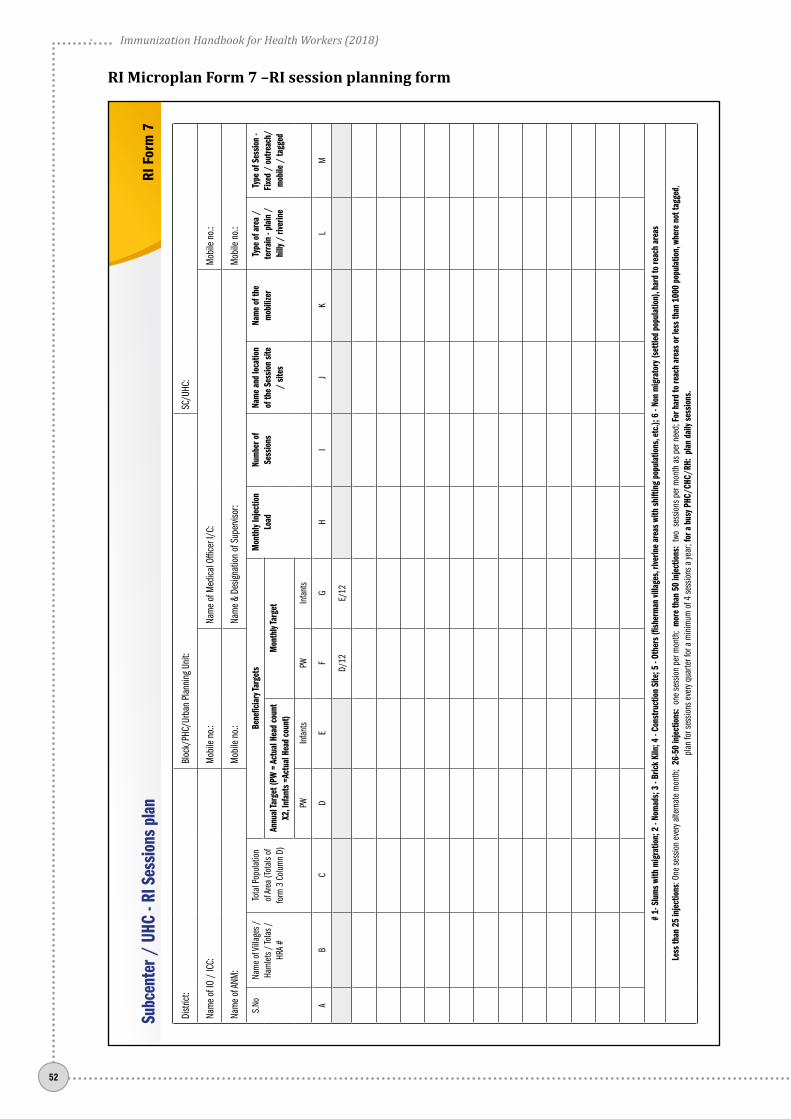
Immunization Handbook for Health Workers (2018)
52
RI Microplan Form 7 –RI session planning form
Distr
ict:
Bloc
k/PH
C/Ur
ban
Plan
ning
Uni
t: SC
/UHC
:
Nam
e of
IO /
ICC:
M
obile
no.
: Na
me
of M
edica
l Offi
cer I
/C:
Mob
ile n
o.:
Nam
e of
ANM
: M
obile
no.
: Na
me
& De
signa
tion
of S
uper
visor
: M
obile
no.
:
S.No
Nam
e of
Villa
ges /
Ha
mlet
s / To
las /
HR
A #
Tota
l Pop
ulat
ion
of Ar
ea (T
otal
s of
form
3 C
olum
n D)
Bene
ficia
ry Ta
rget
sM
onth
ly In
ject
ion
Load
Num
ber o
f Se
ssio
nsNa
me
and
loca
tion
of th
e Se
ssio
n sit
e /
sites
Nam
e of
the
mob
ilize
r Ty
pe o
f are
a /
terr
ain
- pla
in /
hi
lly /
rive
rine
Type
of S
essio
n -
Fixe
d /
outre
ach/
m
obile
/ ta
gged
Annu
al Ta
rget
(PW
= A
ctua
l Hea
d co
unt
X2, I
nfan
ts =
Actu
al H
ead
coun
t)M
onth
ly Ta
rget
PWIn
fant
sPW
Infa
nts
AB
CD
EF
GH
IJ
KL
M
D/12
E/12
# 1-
Slu
ms
with
mig
ratio
n; 2
- No
mad
s; 3
- Br
ick
Kiln
; 4 -
Cons
truct
ion
Site
; 5 -
Othe
rs (fi
sher
man
villa
ges,
river
ine
area
s wi
th s
hifti
ng p
opul
atio
ns, e
tc.);
6 -
Non
mig
rato
ry (s
ettle
d po
pula
tion)
, har
d to
reac
h ar
eas
Less
than
25
inje
ctio
ns: O
ne se
ssio
n ev
ery a
ltern
ate
mon
th;
26-5
0 in
ject
ions
: on
e se
ssio
n pe
r mon
th;
mor
e th
an 5
0 in
ject
ions
: tw
o se
ssio
ns p
er m
onth
as p
er n
eed;
For
har
d to
reac
h ar
eas
or le
ss th
an 1
000
popu
latio
n, w
here
not
tagg
ed,
plan
for s
essio
ns e
very
quar
ter f
or a
min
imum
of 4
sess
ions
a ye
ar; f
or a
bus
y PHC
/CHC
/RH:
pla
n da
ily s
essio
ns.
Subc
ente
r / U
HC -
RI S
essio
ns p
lan
RI F
orm
7

Uni
t 4
53
SOPs for using RI Form 7
Columns A and B: Enter the serial number and name of the villages keeping the same order as in Form 1. New areas /identified missed areas should be entered towards the end with clear marking that this is a new area, using an asterisk (*).
Column C: Using Form 3 Column D, enter the individual areas actual population (from the survey).
Calculating annual target population
Beneficiaries in the UIP are the PW and the children of an area who are eligible for any vaccinations. The cardinal numbers of these beneficiaries is obtained by conducting the area and house-to-house survey. Once the survey is completed, these figures will be available from Form 3. However, for calculation of the yearly and monthly number of beneficiaries it is necessary to do the following:
Column D: The survey will give the number of PW identified in an area at the time of conducting the survey.
The annual target of PW = actual number of PW as per head count X 2
Column E: The house-to-house survey also identifies child beneficiaries. For the calculation of the annual target the actual number identified is considered.
The annual target of children = actual number of children as per head count
Columns F and G:
Monthly target of PW = Annual target divided by 12
Monthly target of children = Annual target divided by 12
Column H: Enter the monthly injection load for each area.
Calculating injection load (only for determining the number of sessions)
This calculation is to be used only as a planning tool and not for estimation of vaccines or logistics.
Firstly, determine the total number of injections needed per beneficiary.
This gives a multiplying factor of 15 injections.
zz BCG – 1 injectionzz DPT – 2 booster injectionzz HiB containing Pentavalent – 3 injectionszz fIPV – 2 injectionszz MR Vaccine – 2 injectionszz PCV – 3 injections (where applicable)zz TT– 2 injections (for pregnant women)
For districts where JE is included in the schedule add 2 to the above number, giving the multiplying factor of 17 injections.
Monthly injection load = Monthly target of children from Column G multiplied by the above factor
Column I: Based on the monthly injection load the number of RI sessions to be conducted for each village/area is to be entered as per the guideline below.
Immunization Handbook for Health Workers (2018)
54
Column J describes the location of the vaccination site. It is important that the exact location be entered, preferably with a landmark. This helps to collate the information and makes it easier to develop the overall plan for RI sessions under the SC area.
Column K: Enter the name of the mobilizer. Mobilizers play an important role in mobilizing beneficiaries to the RI session site.
Column L describes the type of terrain, as this is a factor that contributes to determining the number of sessions in the area and the method of vaccine delivery. The areas may be as follows:
zz Plain – flat and accessible with no compromise in accessibilityzz Hilly – hilly area zz Riverine – area divided by a river or rivulets making access difficult zz Inaccessible – hard to reach due to absence of roads or is approachable only by foot.
Column M describes the type of session. Sessions can be:
zz Fixed. These sessions are held where vaccine storage is possible because of availability of ILR and deep freezer (DF), i.e. the sessions conducted at PHC/CHC
zz Outreach. All sessions conducted where vaccine has to be taken by vaccine carrier zz Mobile. Sessions conducted using a vehicle which moves from site to site along with the
immunization team and vaccinezz Tagged. Site/area, which does not have a session but is linked to the nearest session site.
Frequency of RI sessions depending on injection load –
zz 1 to 25 injections – 1 session every alternate monthzz 26 to 50 injections – 1 session every monthzz 51 to 100 injections - 2 sessions every month
For hard to reach areas or less than 1000 population, where not tagged, plan for sessions every quarter for a minimum of 4 sessions a year
Ensuring “Same day, Same site, Same time” policy will help to increase community faith and acceptance of services thus increasing utilization of services.

Uni
t 4
55
RI Microplan Form 8 –Per session injection load and vaccine Distribution plan – Form 8
Distr
ict:
Bloc
k/PH
C/Ur
ban
Plan
ning
Uni
t:SC
/UHC
:
Nam
e of
Med
ical O
ffice
r I/C
:M
obile
no.
:Na
me
of IO
/ IC
C:M
obile
no.
:
Nam
e of
ANM
:M
obile
no.
:Na
me
of S
uper
visor
:De
signa
tion:
Mob
ile n
o.:
THES
E CO
LUM
NS TO
BE
FILLE
D AF
TER
APPR
OVAL
OF P
ROPO
SED
PLAN
BY
MED
ICAL
OFF
ICER
S.No
Nam
e an
d lo
catio
n of
Se
ssio
n Si
te(E
xact
loca
tion)
IF >
1 se
ssio
n sit
es in
a
big
villa
ges
men
tion
sepa
rate
ly
Nam
e/s o
f villa
ge/s
ub
villa
ge a
rea
/ham
let/
urba
n wa
rd/
moh
alla
/ to
la c
over
ed b
y the
sit
e wi
th it
s sl n
o. fro
m
Form
at 1
(a
ll ar
eas
in o
ne c
ell
sepa
rate
d by
com
ma)
Freq
uenc
y of
Sess
ions
(O
nce
a qu
arte
r / o
nce
in 2
mon
ths /
nu
mbe
r)
Targ
et fo
r the
ses
sion
(add
if m
ultip
le ar
eas /
tola
s ar
e clu
bbed
or d
ivide
in c
ase
of b
ig vil
lage
)
Per S
essio
n do
ses
requ
ired
for e
ach
vacc
ine
& vit
amin
A
Inje
ctio
n Lo
ad fo
r the
se
ssio
n (T
T + B
CG +
DPT
+
Hep
B +
Pent
a +
MR
+ JE
+
PCV)
Mon
th 1
____
_
Mon
th 2
____
__
Mon
th 3
____
__
Vacc
ine
Distr
ibut
ion
PWIn
fant
sTT
BCG
DPT
OPV
Pent
a RV
VfIP
VM
RJE
Vit A
PCV
Mod
e of
Tra
nspo
rt Na
me
of p
erso
n re
spon
sible
Cont
act
num
ber
EX2
FX1
FX2
FX5
FX3
FX3
FX2
FX2
FX2
FX9
FX3
Day (
Wed
1-5
or S
at 1
-5)
AB
CD
EF
GH
IJ
KL
MN
OP
QR
ST
UV
1 2 3 4 5 6 7 8 9 10 11 12 13 14 15 # 1-
Slu
ms w
ith m
igrat
ion;
2 -
Nom
ads;
3 - B
rick
Kiln
; 4 -
Cons
truct
ion
Site
; 5 -
Othe
rs (fi
sher
man
villa
ges,
river
ine
area
s with
shift
ing
popu
latio
ns, e
tc.);
6 -
Non
migr
ator
y (se
ttled
pop
ulat
ion)
, har
d to
reac
h ar
eas
Sub
Cent
re/
UHC:
Per
Ses
sion
Inje
ctio
n lo
ad a
nd va
ccin
e di
strib
utio
n pl
anRI
For
m 8

Immunization Handbook for Health Workers (2018)
56
The form contains detailed information on each RI session site in the SC. It also contains details on frequency of sessions; the villages/areas covered or tagged with each site; the injection load per antigen and the vaccine distribution plan for each session.
SOPs for using RI Form 8
Column A: Enter the serial number.
Column B: Enter the name of the RI session site. Enter each RI session site in a separate row. It is important that the exact site location be entered. This will give the exact planning of sessions for the SC on a single page. If the site is located in an Anganwadi centre, also include the centre number and location. If the site is located in private premises, the house owner’s name should also be entered. Include a landmark where possible.
Column C: This contains the names of areas to which a RI session site provides services. Enter the names of the village/s or areas as per Form 1. For multiple areas, write the names separated by commas into this column. e.g. Village XYZ.
Column D: Enter the frequency of sessions at this RI site. It may be entered as:
zz Once in a quarter, i.e. once in three monthszz Once in two monthszz Twice a month zz Daily.
Columns E and F: The target of PW and infants per session is determined for each site. This is obtained from monthly targets in Form 7 columns F and G. If the site caters to more than one area, add the targets. If there are two RI sites in a large village, then the monthly target is to be divided by 2.
Example – monthly target for each area from Form 7 columns F and G
zz Village XYZ has 3 PW & 5 infants and its nearby tola XYZ 1 PW & 2 infants for RI session site no 1. z� Thus for RI session site no 1 the monthly target will be 4 PW & 7 infants.
zz Village XYZ has 8 PW & 12 infants with two RI session sites no 2 and 3z� Thus for RI session site no 2 the monthly target will be 4 PW & 6 infants and for RI session
site no 3 it is 4 PW & 6 infants.Note: For fixed site use daily average of PW and children vaccinated (number vaccinated per month/30)
Columns G to Q: Enter the per session doses required for vaccines and vitamin A. Using the target from Columns E and F, calculate the individual antigen dose requirement using the formula in the boxes.
Column R: The total injection load for each site is now available to enter into Column R. This is calculated by adding the number of beneficiaries in Columns G, H, I, K, M, N, O and Q. (Note that OPV, Rotavirus vaccine (where applicable) and Vit A should not be considered as injections.)
Columns S, T and U: Fill the exact time of RI site functioning in the next 3 months. Each column is for a month. The day is to be entered as follows:
– Days – Mon, Tue, Wed, Thu, Fri, Sat– Weeks – 1 to 5
E.g. If the session is held in Month 2 on the fourth Wednesday, the entry will be “Wed 4” in Column S.
Each state can customise this format for its own RI days and immunization schedule.

Uni
t 4
57
Method of vaccine distribution to each site is to be entered in the three Columns V .
zz Information on the mode of transport – two wheeler/three wheeler/four wheeler with its registration number, if possible
zz Name of the person transporting the vaccine and his contact number are to be entered.
RI Form 9 – Per Session estimation of Vaccine and logisticsDi
strict
:Bl
ock/
PHC/
Urba
n Pl
anni
ng U
nit:
SC/U
HC:
Nam
e of
Med
ical O
ffice
r I/C
:M
obile
no.
:Na
me
of IO
/ IC
C:M
obile
No.
Nam
e of
ANM
:M
obile
no.
:Na
me
of S
uper
visor
:M
obile
No.
S.No
Loca
tion
of se
ssio
n sit
eEs
timat
ion
of va
ccin
e via
ls an
d lo
gistic
s for
eac
h se
ssio
n (A
t lea
st on
e via
l of e
ach
vacc
ine
in e
ach
sess
ion)
This
shou
ld b
e fil
led w
ith th
e he
lp o
f For
mat
8
TTBC
GDP
T OP
VPe
nta
RVV
fIPV
MR
JEVi
tam
in A
PCV
ADS
0.1
ml
ADS
5
ml
Reco
nstit
utio
n sy
ringe
sPa
race
tam
ol
tabl
et/s
yrup
IFA
tabl
ets
Zinc
tabl
et /
sy
rup
ORS
pack
etRI
/ M
CP
card
Fam
ily w
elfar
e m
ater
ials
Calcu
latio
ns w
ith h
elp o
f co
lum
ns in
Form
at 8
G x1
.11/
10H
x 2 /
10I x
1.11
/1
0J x
1.11
/2
0K
x 1.1
1 /1
0L x
1.3
3 /
10M
x 1.
11
/50
N x1
.33
/5O
x1.3
3 /5
(P x
1ml)
+ {(
f x 8
) x
2ml)}
x 1.
11
Qx1.
11/4
(H+M
) x
1.11
(Tota
l DPT
/
Pent
a /
MR
/ PC
V /
JE in
j) x 1
.11
no. o
f BCG
, M
easle
s &
JE vi
als x
1.1
1
AB
CD
EF
GH
I J
KL
MN
OP
QR
ST
UV
1 2 3 4 5 6 7 8 9 10
TOTA
L
Sign
atur
e of
ANM
:Ve
rified
by M
edica
l Offi
cer (
Sign
atur
e):
Sub
Cent
re a
rea:
Per
Ses
sion
Estim
atio
n of
Vacc
ines
& lo
gist
ics
RI F
orm
9TO
BE
USED
WITH
FORM
AT 8
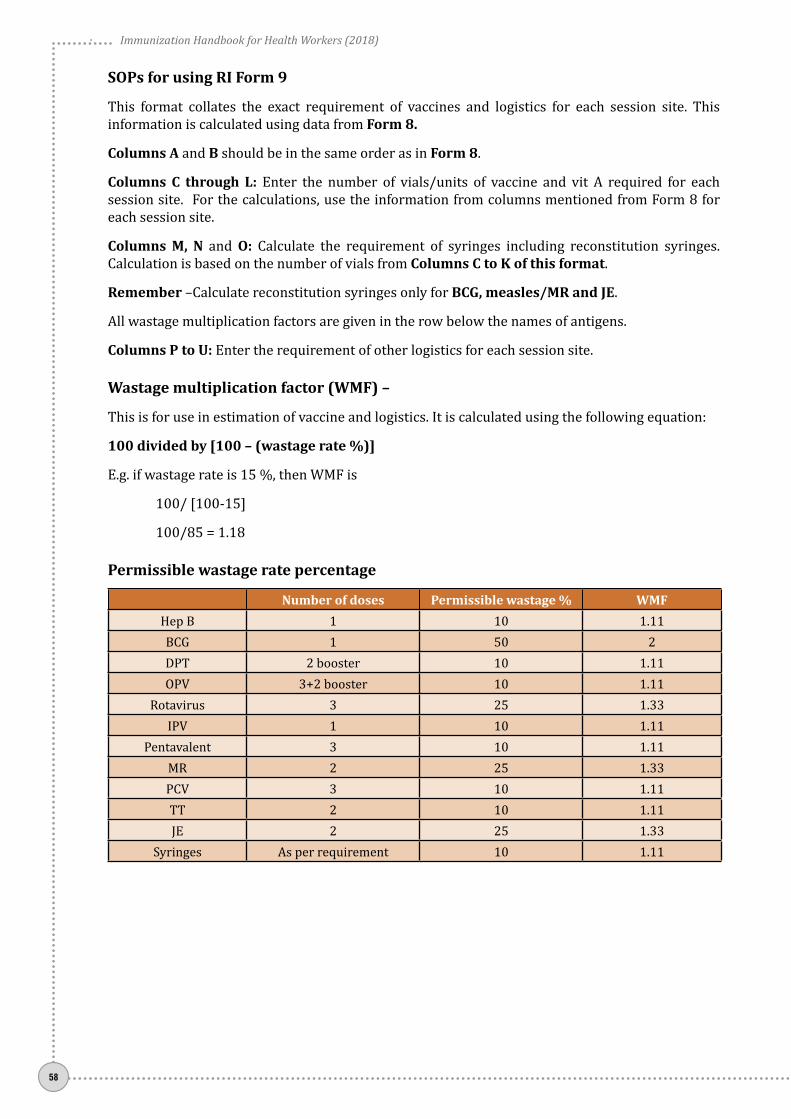
Immunization Handbook for Health Workers (2018)
58
SOPs for using RI Form 9
This format collates the exact requirement of vaccines and logistics for each session site. This information is calculated using data from Form 8.
Columns A and B should be in the same order as in Form 8.
Columns C through L: Enter the number of vials/units of vaccine and vit A required for each session site. For the calculations, use the information from columns mentioned from Form 8 for each session site.
Columns M, N and O: Calculate the requirement of syringes including reconstitution syringes. Calculation is based on the number of vials from Columns C to K of this format.
Remember –Calculate reconstitution syringes only for BCG, measles/MR and JE.
All wastage multiplication factors are given in the row below the names of antigens.
Columns P to U: Enter the requirement of other logistics for each session site.
Wastage multiplication factor (WMF) –
This is for use in estimation of vaccine and logistics. It is calculated using the following equation:
100 divided by [100 – (wastage rate %)]
E.g. if wastage rate is 15 %, then WMF is
100/ [100-15]
100/85 = 1.18
Permissible wastage rate percentage
Number of doses Permissible wastage % WMFHep B 1 10 1.11BCG 1 50 2DPT 2 booster 10 1.11OPV 3+2 booster 10 1.11
Rotavirus 3 25 1.33IPV 1 10 1.11
Pentavalent 3 10 1.11MR 2 25 1.33PCV 3 10 1.11TT 2 10 1.11JE 2 25 1.33
Syringes As per requirement 10 1.11

Uni
t 4
59
RI Form 10 - ANM work plan
This form will help you to plan your movement for the next 3 months. You should display your work plan in the premises of the subcentre. Enter the name of the session site and time against each month. The day columns may be customized for your state or district.
Distr
ict:
Bloc
k/PH
C/Ur
ban
Plan
ning
Uni
t:SC
:
Nam
e &
Mob
ile n
o. of
Med
ical O
ffice
r I/C
:Na
me
& M
obile
no.
of IO
/ IC
C:
Nam
e &
Mob
ile n
o. of
ANM
:Na
me
& M
obile
no.
of S
ecto
r Med
ical O
ffice
r:
Mon
thW
eek
Loca
tion
of R
I ses
sions
with
tim
ing
Mon
day
Tues
day
Wed
nesd
ayTh
ursd
ayFr
iday
Satu
rday
1 2 3 4 5 1 2 3 4 5 1 2 3 4 5
Sign
atur
e of
ANM
Verifi
ed b
y Med
ical O
ffice
r (Si
gnat
ure)
:
Sub
Cent
re -
ANM
’s W
orkp
lan
RI F
orm
10

Immunization Handbook for Health Workers (2018)
60
RI Form 11 - Sub Centre Communication Plan
Nam
e of
Blo
ck:
Nam
e of
ANM
:Na
me
of S
ubce
ntre
:
Nam
e of
Vill
age
Nane
of S
essio
n sit
e1-
2-3-
4-5-
6-
Activ
ities
Mik
ing
/ dr
um b
eatin
g- N
ame
and
cont
act n
umbe
r
Mos
que
anno
unce
men
t - C
onta
ct p
erso
n an
d nu
mbe
r - a
nnou
ncem
ent
time
Mee
tings
(Mot
hers
mee
ting,
AWW
mee
ting,
etc
- Con
tact
per
son
and
num
ber -
Mon
thly
/ we
ekly
)
VHSC
mee
ting
- con
tact
per
son
and
num
ber -
loca
tion
- at
tend
ed b
y ANM
M
onth
ly /
week
ly - e
nter
dat
e
Scho
ol R
allie
s - s
choo
l nam
e an
d co
ntac
t per
son
with
num
ber (
once
a
mon
th in
villa
ges o
n ro
tatio
n)
Cele
brat
ions
/ S
peci
al D
ays
(eg
Mot
hers
day,
heal
th d
ay e
tc) -
con
tact
pe
rson
and
num
ber
Wal
l pai
ntin
gs -
loca
tions
Bann
ers
- id
entif
y 4 k
ey lo
catio
ns -
Ensu
re d
ispla
y at l
east
one
day b
efor
e RI
day
Pain
ting
com
petit
ion
/ Ex
ihib
ition
- (o
nce
a qu
arte
r -sc
hool
nam
e an
d co
ntac
t per
son
with
num
ber
Post
ers
- ide
ntify
5 k
ey lo
catio
ns (
othe
r tha
n Pa
ncha
yat g
har,
Ratio
n sto
re, A
WW
cent
re, S
ub c
entre
, Bus
stan
d) -
ensu
re d
ispla
y at l
east
2 da
ys
befo
re R
I day
Pam
phle
ts /
Lea
flets
- av
aila
ble
with
- co
ntac
t per
son
nam
e an
d nu
mbe
r - d
istrib
ute
befo
re R
I ses
sion
day
Coun
selli
ng a
ids
/ jo
b ai
ds (fl
ip b
ooks
etc
.,) -
avai
labl
e wi
th -
cont
act
perso
n na
me
and
num
ber
Othe
r
Man
powe
r inv
olve
men
t - w
ith c
onta
ct n
umbe
r
Nam
e of
ASHA
Nam
e of
AWW
Nam
e of
Mob
ilizer
/ C
MC
Nam
e of
com
mun
ity in
fluen
cer
Nam
e of
PRI
mem
ber
Date
:Si
gn o
f ANM
:Si
gn o
f MO:
Sub
cent
re c
omm
unic
atio
n pl
an fo
r RI -
Quar
ter-
1 /
2 /
3 /
4RI
For
m 1
1

Uni
t 4
61
SOPs for using RI Form 11
Form 11 is the communication plan for SC. Information is to be filled for up to 6 session sites under a SC. Multiple formats may be used if needed.
In the first column, a number of activities have been identified; under the guidance of the medical officer, you have to identify the activities that can be conducted in your areas. It is important to firstly identify the contact person who will coordinate the activity such as a school principal or community leader.
Meetings such as VHSC, mothers meetings, AWW meetings are generally held regularly and the tentative dates should be entered in the columns. The medical officer can also support the visits by including them in MO plan.
For IEC materials (posters / banners) decide the appropriate locations and enter them in the columns.
Painting competitions / exhibitions require some planning but have a positive impact on the community. Conduct such activities once a quarter.
Pamphlets / leaflets / counseling aids are material that can be placed at the AWC or other locations and used during RI sessions / other meetings.
Having the names and contact numbers of frontline workers of each centre will help you to contact them in advance of RI session days. PRI / Community influencers can play a key role in RI and it is essential to identify them in a village or ward area.

Immunization Handbook for Health Workers (2018)
62
Who will attend?
Sector MO, ANM, LHV, Health supervisors
Activities at the final PHC meeting
zz Review and finalization of SC plans forz� Inclusion of all HRAsz� Special plans for difficult areasz� Adequate deployment of mobilizersz� Adequate session planning
zz Compile plans from all SCs to develop block planzz Prepare vaccine delivery and supervision planzz Recalculate vaccine and logistics requirement.
Outputs expected
Availability of the following documents after Step 5:
zz Forms 6, 7, 8, 9,10 and 11 for each SC
Step 5 zz Review and finalization of SC and finalization of session due lists
The final step in the RI microplanning exercise at the PHC consists of review and finalization of the newly updated/ proposed SC RI microplans and finalization of formats and session due lists.
Review of the updated / proposed RI plans
The outputs are now focused on the finalization of SC microplans and the development of the PHC microplan. Each ANM presents her sub centre microplans focusing on the following points:
1. Total number of areas identified – any increase or decrease? Form 12. Total number of HRAs identified – any increase or decrease? Form 13. Demarcation of areas – who will be looking after which area? Form 1 and 24. Number of RI sessions planned? Form 7 and 85. Are the maps updated? RI Form 26. Is sub centre RI microplan now complete?
Finalization of SC microplan: You need to compile all the RI-Microplan information for your SC and present it to your sector medical officer. After review the MO approves your SC microplan including the number of sessions and the sites. You can now develop the RI session due lists (Form 6) as per the RI sessions.
Plan to spend enough time with medical officer for this activity as it requires detailed discussion

Uni
t 4
63
Roles and responsibilities
Personnel Activities to be performed SupervisorMOIC Coordination of the activity/reviewing each SC plan DIOSector MO Oversee/review the microplans submitted by ANMs MOICData manager Clarify and finalize the names of villages. Data entry for generation of RIMP MOICANM Generate SC forms and suggest changes to the reviewing officer
Finalize the session due lists
Sector MO
Table 4.2 Checklist for RI microplan components – at SC
SN Components of Routine Immunization Microplan at SC AvailableYes No
1. Map of area -with name of village, urban area including all hamlets (tola), sub-villages, sub-wards, sector, mohallas, hard to reach areas, etc.)
2. Demarcation Map - This map allocates areas for each ANM if more than 2 ANMs are present in a SC. It can also show the exact boundaries and areas for ASHA and AWW.
3. Master list which includes all villages/areas/HRAs 4. Estimation of beneficiaries and injection load per area 5. Estimation of beneficiaries and injection load per HRA 6. Estimation of beneficiaries, injection load and mobilizers per RI session site 7. Estimation of vaccines and logistics 8. ANM work plan including mobilization plan 9. Beneficiary list - PW and children aged 0-2 years 10. Session due list 11. Vaccine coverage chart
Planning in HRAs
1. High-risk population groups/areas need special attention as they often miss routine and supplementary immunization and pose a risk for polio and other VPDs. HRAs are categorized as migratory and non-migratory (settled).z� Migratory HRAs: These are slums with migration, Nomads, Brick kilns and construction
sites etc.z� Non-migratory HRAs: These are areas with settled population with no migration and poor
immunization coverage. These include hard-to-reach areas and misinformed communities that refuse vaccination due to misplaced beliefs.
z� Hard to reach areas: Accessibility compromised areas i.e. due to geographical / topographical reasons and in areas where security is a concern poses a different challenge to delivering RI or any other services.
2. Provision of services in HRAs: RI microplanning should be flexible to respond to local situations and needs e.g.z� For areas with multiple pockets of nomads or construction sites:
z{ Ensure identification of each area or pocketz{ Identify a key person in each – eg. Manager, supervisor, group leaderz{ Explore use of mobile session for such areas

Immunization Handbook for Health Workers (2018)
64
z� For hilly regions:z{ Prepare microplan including maps to reflect the ground realitiesz{ Use available telecommunication/sending messages through school children returning
home or through other agencies for mobilizing the beneficiariesz{ Use alternate vaccine delivery options which may include pack animals or other modes
of transportz{ Prepare to stay overnight is some areas; arrange for extra vaccine carriers with extra ice
packs to ensure maintenance of cold chainz{ Plan for immunization waste to return to the centre for further management
Planning in Urban Areas
Urban areas are changing because of expansion of cities; as areas are added mainly on the outside border of cities HRAs - higher number of construction and nomadic sites; manpower shortages; large volume of transit / migrant population and unrecognized slums.
Provision of services to tackle challenges in urban areas:
a) Area demarcation: Prepare maps with clear demarcation of areas for AWW/ASHA/link worker. Superimpose ANM area on the map. Plan for field verification where boundaries are not well defined.
b) Accessibility: Identify local solutions based on the needs e.g.z� Use three or two wheelers to access narrow lanes;z� Seek support from local key influencers and community leaders;z� Get support from local civil service organizations – Rotary, Lions, professional bodies, etc.
c) Infrastructure for providing RI services:z� “Same day, Same site, Same time” provision of services: This should include all anganwadi
centres, dispensaries, clinics and maternity homes in the public sector; all NGOs, private institutions /practitioners engaged in providing health care in urban areas.
z� Urban outreach: Expand the network of urban service provision points e.g. in every urban slum . seek help from local bodies / shops / organizations.
z� Communication: Use various channels to inform the community about the timing of local immunization services; local service delivery points; the vaccines and schedule of immunization and the benefits of immunization.
d) Multiple departments / NGOs / organizations / coordination: Support the medical officer to identify and coordinate with the multiple agencies already working in the area. Joint planning will help to reduce duplication and improve the coverage of immunization services.
Intensification of Routine Immunization activities
Intensified activities aim to fully immunize children and pregnant women through innovative and planned approaches to reach all beneficiaries. They are aimed to rapidly increase the immunization coverage through special drives during specified months and also focused towards strengthening health systems for addressing equity issues in access to immunization.
Intensification activities such as Intensified Mission Indradhanush and campaigns give an opportunity for:
zz Identification of areas with unserved/low coverage pockets/missed RI session sites/Nomadic sites/areas with any disease outbreaks such as measles or diphtheria
zz Identification and enlisting of beneficiaries – targeting left outs and drop outs

Uni
t 4
65
zz Mobilization of identified beneficiaries – by ASHA, AWW and other mobilizers. Ensure involvement of NCC, NSS and NYK volunteers for maximum mobilization of beneficiaries. Ensure that the micro-plans include the names and contact details of volunteers of above mentioned organizations.
After any on these activities, it is important to benefit from the hard work put in by you and your ASHAs / AWWs other mobilizers and influencers. Compare the listing of beneficiaries with your records in RCH register and update where needed. Update the maps of your areas by including those new areas or missed areas.

Immunization Handbook for Health Workers (2018)
66
Uni
t 5
67
Unit 5: Managing the cold chain and the vaccine carrier

Immunization Handbook for Health Workers (2018)
68
Unit 5:Managing the cold chain and the vaccine carrier
Learning ObjectivesAt the end of the unit, you should be able to:
zz Define and describe the importance of the cold chainzz Describe which vaccines are sensitive to heat /light and freezingzz Demonstrate how to check vaccines for exposure to heat or freezingzz Demonstrate how to condition frozen ice packs and how to pack a vaccine carrier properly
Contentsz¾ Cold chain and Vaccine Sensitivitiesz¾ Checking vaccines for correct maintenance of cold chainz¾ Guidelines for use of open vaccine vials in immunization programmez¾ Cold chain equipment
5.1 The cold chain
Cold Chain is a system of storing and transporting vaccines at recommended temperatures from the point of manufacture to the point of use. The key elements of the cold chain are:
zz Personnel: to manage vaccine storage and distribution (vaccine and cold chain handler at each cold chain point).
zz Equipment: to store and transport vaccine and monitor temperature. zz Procedures: to ensure correct utilization of equipment and ensure vaccines are stored and
transported safely.
As a health worker, you are responsible to manage the cold chain at the session site and sometimes at the cold chain point also.
5.2 Vaccine sensitivities
Vaccines lose their potency due to exposure to heat (temperature above +8°C), cold (temperature below + 2°C) and light. The loss of potency due to either exposure to heat or cold is permanent and cannot be regained.
Reconstituted BCG, measles/MR and JE vaccines are the most heat and light sensitive. Since these live vaccines do not contain preservatives, there is risk of contamination with staphylococcus aureus leading to toxic shock syndrome and, therefore, they should be used within 4 hours of reconstitution. These light sensitive vaccines are supplied in amber-coloured vials.
Implementation of Open Vial Policy (OVP) allows reuse of partially used multi-dose vials of applicable vaccines under the UIP in subsequent sessions (both fixed and outreach) up to 4 weeks (28 days) subject to meeting certain conditions. This policy contributes to the reduction of vaccine wastage. (See guidelines under section 5.4)

Uni
t 5
69
Open Vial Policy YES NOVACCINE Hep B, OPV, DPT, pentavalent, TT, PCV and IPV. BCG, MR, RVV, JE
Only those diluents that are provided with the vaccine by the manufacturer should be used. Keep diluents in an ILR at +2°C to +8°C at least 24 hours before use to ensure that the vaccine and diluent are at the same temperature when being reconstituted. Keep diluents with the vaccines in plastic zipper bag inside the vaccine carrier during transportation.
Sensitivity of various vaccines to heat, light and freezing is given in Table 5.1.
Table 5.1 Sensitivity of vaccines to heat, light and freezing
Vaccine Exposure to heat/light Exposure to cold
Heat and light sensitive vaccines
OPV Sensitive to heat Not damaged by freezing
Measles/MR Sensitive to heat and light Not damaged by freezing
BCG, RVV and JE Relatively heat stable, but sensitive to light Not damaged by freezing.
Freeze sensitive vaccines
HepB/Penta/PCV Relatively heat stable Freezes at -0.5°C(Should not be frozen)
IPV, DPT and TT Relatively heat stable Freezes at -3°C(Should not be frozen)
At the PHC level, all vaccines are kept in the ILR for a period of one month at temperature of +2°C to +8°C
Vaccines sensitive to heat
zz BCG (after reconstitution) Most zz OPVzz IPVzz Measles, MRzz Rotaviruszz JEzz DPT zz BCG (before reconstitution)zz TT, zz Penta, HepB, PCV Least
Vaccines sensitive to freezing
zz HepB Mostzz PCVzz Pentazz IPV zz DPT zz TT
Least
5.3 Checking vaccines for correct maintenance of cold chain
Vaccines need to be checked both for damage from excessive heat as well as from freezing. However, the physical appearance of a vaccine may remain unchanged even after it is damaged.
Checking vaccines for heat damage
Vaccine Vial Monitor (VVM) is a label containing a heat sensitive material to record cumulative heat exposure over time. The combined effect of time and temperature cause the inner square of the VVM to darken gradually and irreversibly. Before opening a vial, check the status of the VVM (Figure 5.1). If the VVM shows change in colour to the end point, then discard the vaccines.

Immunization Handbook for Health Workers (2018)
70
Fig. 5.1 Checking the vaccines for heat damage
Checking vaccines for cold damage (freezing)
DPT, TT, IPV, HepB, PCV and Penta vaccines lose their potency if frozen. Moreover, the risk of adverse events following immunization, such as sterile abscesses, may increase. Discard the vial if it is frozen or it contains floccules after shaking. Shake Test is not applicable for IPV
Shake test - Test vial
zz Take a vaccine vial you suspect that may have been frozen – This is “TEST” vial.
Shake test - Control vial
zz Take a vaccine vial of the same antigen, same manufacturer, and same batch number as the suspect vaccine vial you want to test.
zz Freeze solid this vial at -20°C overnight in the DF, and this is the ‘CONTROL’ vial and label accordingly to avoid its usage.
zz Let it thaw. Do NOT heat it. zz Hold the Control and the Test vials together between thumb and forefinger, and vigorously
shake the vials for 10-15 seconds. zz Place both vials to rest on a flat surface, side-by-side and observe them for 30 minutes.zz Compare for rate of sedimentation. zz If the sedimentation rate in the ‘Test vial” is slower than in the “Frozen vial”, the vaccine has not
been damaged, it has passed the shake test. Use the vaccine batch – it is not damaged.zz If the sedimentation rate is similar in both vials or if sedimentation is faster in the “Test” vial
than in the “Frozen” vial, the vaccine is damaged, it failed in shake test. Do NOT use. Notify your supervisor.

Uni
t 5
71
Vaccines returned from RI session should be kept in separate and clearly marked bags/containers as per the guidelines
Vials that are expired, frozen or with VVM beyond the end point, should not be placed in the cold chain as they may be confused with those containing potent vaccines.
Vials from suspected AEFI cases must be clearly marked in seperate bags / containers.
Table 5.2. Dos and Dont’s in cold chain and vaccine sensitivities
Dos Dont’szz Keep all vaccines in ILR at +2°C to +8°C at PHC zz Use diluent provided by the manufacturer with
the vaccine zz Keep diluents in ILR at +2°C to +8°C at least 24
hours before usezz Use reconstituted Rotavirus vaccine, BCG,
Measles/MR and JE vaccine within 4 hours zz Discard all damaged vials for disinfection and
disposal
zz Do not keep in the cold chain:z{ Expired vials, z{ Frozen vials or z{ Vials with VVM beyond the end point
zz Do not use Rotavirus vaccine or reconstituted BCG, JE and Measles/MR vaccines after 4 hours.
zz Do not dispose damaged or empty vials in the village or surroundings of the session site.
Control Vial Test Vial
Fig. 4.10: Shake Test Passed - Vaccine usable
Test Vial Control Vial
Sedimentation
Fig. 4.11: Shake Test Failed - Do not use Vaccine
5.4 Guidelines for use of open vaccine vials in immunization programme
Open Vial Policy is only applicable to DPT, TT, Hep B, OPV, Hib containing pentavalent vaccine (Penta), PCV and injectable inactivated poliovirus vaccine (IPV).
Conditions that must be fulfilled for the use of open vial policy
Any vial of the applicable vaccines opened/used in a session (fixed or outreach) can be used at more than one immunization session up to 4 weeks (28 days) provided that:
Use if-
zz The expiry date has not passed;zz The vaccines are stored under appropriate cold-chain conditions both during transportation
and storage in cold-chain storage point;zz The vaccine vial septum has not been submerged in water or contaminated in any way;zz Aseptic technique has been used to withdraw vaccine doses, i.e. needle/septum has not been
contaminated in any way;

Immunization Handbook for Health Workers (2018)
72
zz The VVM has not reached/crossed the discard point. zz Date and time is written on vial
Mark for discard or disposal any vaccine vial in case any one of the following conditions are met:
zz Expiry date has passed; zz VVM has reached/crossed discard point (for freeze-dried vaccine, before reconstitution only) or
vaccine vials without VVM or disfigured VVM; zz No label/partially torn label and/or writing on label not legible; zz If date and time is not mentioned on vialzz Any vial thought to be exposed to non-sterile procedure for withdrawal; zz Open vials that have been under water or vials removed from a vaccine carrier that has water; zz Vaccine vial is frozen or contains floccules or any foreign body;zz There is breakage in the continuity of the vials (cracks/leaks);zz There is any AEFI from any of the vials; if so, do not use it, and retain it safely. Inform MO and/
or supervisor. zz Open Vial Policy does not apply to measles/MR, Rotavirus, BCG and JE vaccines.
Cold-chain maintenance during vaccine distribution
zz Maintain temperature of ILR between +2°C and +8°C for storage of vaccines and diluents. Monitor temperature twice daily regularly including on Sundays/holidays.
zz Note the name of the manufacturer, batch number and expiry date of the vaccine and diluent in the stock register.
zz Ensure proper recording and reporting of vaccine distribution and usage.zz Keep stock up to date, do not over-stock or under-stock vaccines and diluents. zz Multi-dose vials from which at least one dose has been removed may be at risk of contamination
of the vial septum. Never allow these vials to be submerged in water (from melted ice for example) to keep the septum clean and dry.
Note: Well-sealed conditioned and wiped clean ice packs should be used in vaccine carriers and water should not be allowed to accumulate where the vials are stored. Vaccine vials must be transported in properly locked plastic zipper bag.
zz Keep the “returned, partially used” vials in a separate box and label these clearly.zz Observe EARLY EXPIRY FIRST OUT (EEFO) policy for issuing vaccines. If the vaccines are of
same expiry date, the partially used vaccine vials should be re-issued. The vial opened earlier, as recorded on the label of the vial, should be issued first.
zz Contingency plan or emergency vaccine storage plan has to be in place in case of any emergencies such as power failure, equipment breakdown, etc.
5.5 Cold chain equipment
Cold chain equipment, both electrical and non-electrical, is used for storing vaccines and/or transporting them at appropriate temperatures.
ILR point or Cold Chain point: An ILR or cold chain point is any centre (PHC or CHC) with an Ice Lined Refrigerator for storage of vaccines and a Deep Freezer for preparation of frozen ice packs. There is usually a generator as power back up. The function of the ILR point is to receive, store and further distribute vaccines, diluents and other logistics to another ILR point or directly to the session sites.

Uni
t 5
73
Ice Lined Refrigerator (ILR): maintains a cabinet temperature between +2°C to +8°C; is used to store UIP vaccines at the PHC and district. ILR with top opening lid prevents loss of cold air during door opening; can keep vaccines safe with as little as 8 hours electricity supply in a 24-hour period.
Fig. 5.2 Storing vaccines in the ILR
In case basket is not available, two layers of empty ice packs can be laid flat on the bottom of the ILR to avoid contact with the inside floor of the cabinet; Vaccines should never be kept on the floor of the ILR.
Table 5.3. Dos and Dont’s for ILR use
Dos Dont’szz Keep all vaccines including those returned under
open vial policy, in the basket supplied along with the ILR.
zz Store diluents at +2°C to +8°C at least 24 hours before use
zz Leave space in between the vaccine boxes.zz Place a thermometer in the basket in between
the vaccines.zz Keep freeze sensitive vaccines at the top of the
basket. zz Keep heat sensitive vaccines in the bottom of the
basket. zz Arrange vaccines as per their expiry dates. (Early
expiry should be above the further expiry ones).
zz Do not store any other drugs/Non-UIP vaccines in the ILR.
zz Do not open the ILR frequentlyzz Do not keep food or drinking waterzz Do not keep vaccines, which have expired and
have crossed the discard point of VVM.zz Do not disturb the thermostat setting unless
needed.zz Do not place heavy weight on ILR.zz Do not store excess stock of vaccines i.e. more
than the maximum stock.zz Do not store any reconstituted vaccine vials.
NEVER keep any vials that are expired, frozen or with VVMs beyond the end point in the cold chain, as
they may be confused with those containing potent vaccines. Keep
them in the red bag for disinfection and
disposal.
IDENTIFY A DRY SPACE FOR STORING
EXPIRED/UNUSABLE VACCINES BEFORE FINAL DISPOSAL

Immunization Handbook for Health Workers (2018)
74
Table 5.4 Dos and Dont’s for DF use
Dos Dont’szz Use DF only for preparation of icepacks at the
sub-district level cold chain points (PHC / CHC / Sub-Centre)
zz Do not keep any vaccine in the DF at subdistrict level.
zz Never keep diluents in the deep freezer.
Voltage Stabilizer: electronic equipment that ensures a constant output voltage of 220 Volts, whatever the input voltage, thus safeguards equipment from excessive voltage variation. Each ILR or DF should be connected to the mains through its own independent voltage stabilizer with proper earthing.
Cold Box: an insulated box, used for transportation and emergency storage of vaccines and icepacks. It is available in 2 sizes, large and small. It is used to:
zz Collect and transport large quantities of vaccines.
zz Store vaccines for transfer up to five days, if necessary for outreach sessions or when there is power cut.
zz Store vaccines in case of breakdown of ILR as a contingency measure.
zz Also used for storing frozen icepacks, e.g. during emergency and before campaigns.
Packing a cold box:
zz Place conditioned icepacks at the bottom and sides of the cold box. zz Load the vaccines in cardboard cartons or polythene bags. zz Never place freeze sensitive vaccines in direct contact with the icepacks. Surround them with
OPV/BCG/JE vaccines.zz Keep a thermometer in the cold box.
Fig. 5.3 Freezing Ice-packs in Deep Freezer Fig. 5.4 Brick Layered ice packs in deep freezer
Deep Freezer (DF): maintains cabinet temperature between -15°C to -25°C. Unlike the ILR the DF has little or limited holdover time, depending on the number of frozen icepacks in it and the frequency of opening. At the PHC level, Deep freezer is used only for preparation of icepacks.
Fig. 5.5 Packing a cold box

Uni
t 5
75
zz Place 2 rows of conditioned icepacks above the vaccine vials.zz Place plastic sheet to cover the icepacks kept on top to ensure full hold over time.zz Securely close the lid of the cold box. zz Do not open the cold box unless needed.
Vaccine Carrier: It is an insulated box used for carrying vaccines (16-20 vials) and diluents from PHC/Cold chain point to session sites and to bring back the open vials (under the open vial policy) from the session sites to the cold-chain point on same day after the session for storage and subsequent use. Vaccine carrier (with 4 conditioned icepacks) maintains the inside temperature between +2°C to +8°C for 12 hours, if not opened frequently.
Packing a vaccine carrier:
zz Confirm that there are no cracks in the walls of the vaccine carrier.zz Take out the required number of icepacks from the deep freezer. zz Keep them out side for conditioning and wiped them dry before placing into carrier. zz Place four conditioned icepacks into the vaccine carrier along the sides.zz Wrap vaccine vials and diluent ampoules in thick paper (e.g. plain white paper) before putting
in polythene bag so as to prevent them from touching the icepacks. Place some packing material between `T’ series vaccine and the icepacks to prevent them from touching the icepacks.
zz Place the plastic bag in the centre away from the icepacks. zz Place foam pad on top of the icepacks. zz If more than one vaccine carrier is being carried, keep the whole range of the vaccines required
for the day’s use in each carrier so that only one carrier is opened at a time.
Fig. 5.6 Correct packing of the Vaccine Carrier
Prepare Ice-Packs for Freezing1 2
Condition frozen Ice-Packsn Fill the Ice-Packs with
water to mark. Check water level before every use. Do NOT add salt to this water
n Fit the stopper and screw on the cap tightly
n Make sure the Ice-Pack does not leak
n Wipe the Ice-Pack dry and place in the Deep Freezer
3Pack the Vaccine Carrier
n Place frozen Ice-Packs in the open till there is liquid water inside the ice packs
n Check if an Ice-Pack is conditioned, by shaking it and listening for movement of ice inside the ice pack
n Unconditioned Ice-Packs may DAMAGES freeze sensitive vaccines (DPT, TT, IPV, Penta, PCV and HepB)
n Place four conditioned Ice-Packs against the sides of the carrier
n Place the plastic bag containing all vaccines and diluents in the centre of the carrier
Place foam pad at the top of Ice packs
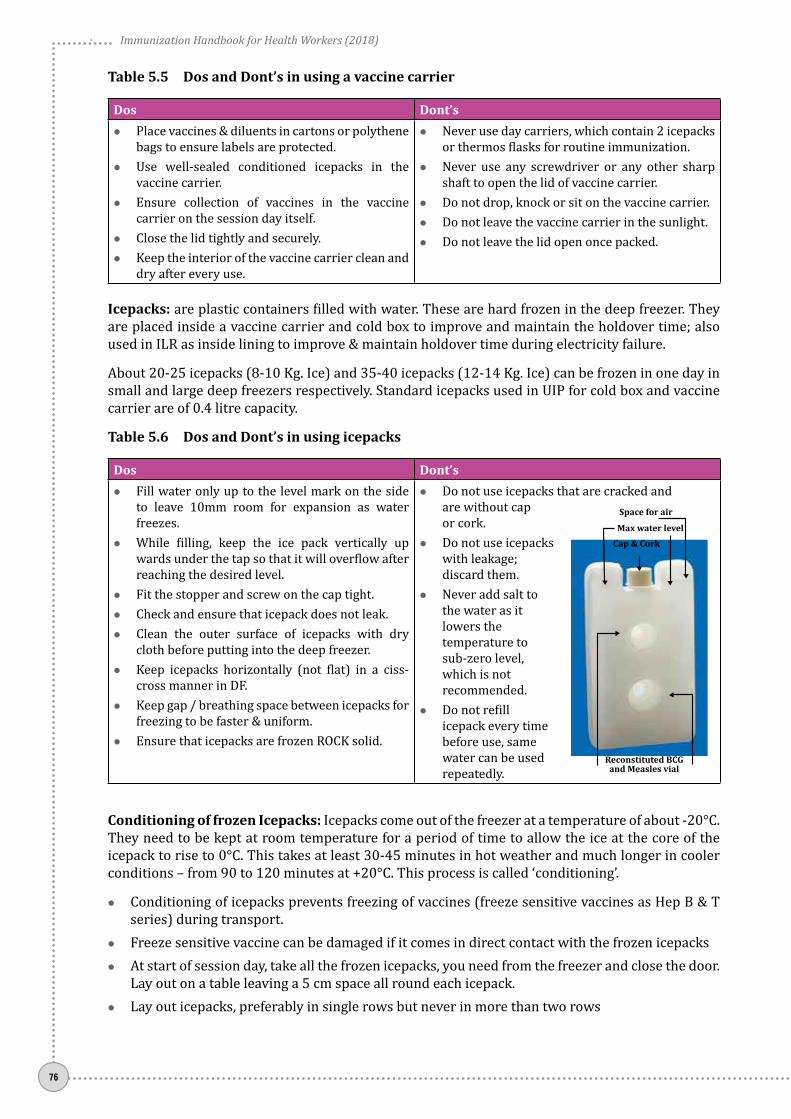
Immunization Handbook for Health Workers (2018)
76
Table 5.5 Dos and Dont’s in using a vaccine carrier
Dos Dont’szz Place vaccines & diluents in cartons or polythene
bags to ensure labels are protected.zz Use well-sealed conditioned icepacks in the
vaccine carrier.zz Ensure collection of vaccines in the vaccine
carrier on the session day itself.zz Close the lid tightly and securely.zz Keep the interior of the vaccine carrier clean and
dry after every use.
zz Never use day carriers, which contain 2 icepacks or thermos flasks for routine immunization.
zz Never use any screwdriver or any other sharp shaft to open the lid of vaccine carrier.
zz Do not drop, knock or sit on the vaccine carrier. zz Do not leave the vaccine carrier in the sunlight.zz Do not leave the lid open once packed.
Icepacks: are plastic containers filled with water. These are hard frozen in the deep freezer. They are placed inside a vaccine carrier and cold box to improve and maintain the holdover time; also used in ILR as inside lining to improve & maintain holdover time during electricity failure.
About 20-25 icepacks (8-10 Kg. Ice) and 35-40 icepacks (12-14 Kg. Ice) can be frozen in one day in small and large deep freezers respectively. Standard icepacks used in UIP for cold box and vaccine carrier are of 0.4 litre capacity.
Table 5.6 Dos and Dont’s in using icepacks
Dos Dont’szz Fill water only up to the level mark on the side
to leave 10mm room for expansion as water freezes.
zz While filling, keep the ice pack vertically up wards under the tap so that it will overflow after reaching the desired level.
zz Fit the stopper and screw on the cap tight. zz Check and ensure that icepack does not leak.zz Clean the outer surface of icepacks with dry
cloth before putting into the deep freezer.zz Keep icepacks horizontally (not flat) in a ciss-
cross manner in DF.zz Keep gap / breathing space between icepacks for
freezing to be faster & uniform.zz Ensure that icepacks are frozen ROCK solid.
zz Do not use icepacks that are cracked and are without cap or cork.
zz Do not use icepacks with leakage; discard them.
zz Never add salt to the water as it lowers the temperature to sub-zero level, which is not recommended.
zz Do not refill icepack every time before use, same water can be used repeatedly.
Conditioning of frozen Icepacks: Icepacks come out of the freezer at a temperature of about -20°C. They need to be kept at room temperature for a period of time to allow the ice at the core of the icepack to rise to 0°C. This takes at least 30-45 minutes in hot weather and much longer in cooler conditions – from 90 to 120 minutes at +20°C. This process is called ‘conditioning’.
zz Conditioning of icepacks prevents freezing of vaccines (freeze sensitive vaccines as Hep B & T series) during transport.
zz Freeze sensitive vaccine can be damaged if it comes in direct contact with the frozen icepacks zz At start of session day, take all the frozen icepacks, you need from the freezer and close the door.
Lay out on a table leaving a 5 cm space all round each icepack.zz Lay out icepacks, preferably in single rows but never in more than two rows
Reconstituted BCG and Measles vial
Cap & CorkMax water level
Space for air

Uni
t 5
77
zz Wait until there is liquid water inside the icepacks. zz Shake one of the icepacks every few minutes. The ice is conditioned as soon as ice cores move
inside the packs.
Temperature monitoring
Temperature recording is done in order to ensure that the vaccines are kept at recommended temperatures and the cold chain equipment is working properly. A break in the cold chain is indicated if temperature rises above +8°C or falls below +2°C in the ILR; and above -15°C in the Deep Freezer. Different type of thermometers and instruments are used to measure the temperature during storage and transport of vaccines e.g.
a. Alcohol Stem Thermometer
Alcohol thermometers are very sensitive and more accurate than dial thermometers. They can record temperatures from -50°C to +50°C and can be used for ILRs and deep freezers.
ILR (safe zone)
+20C to +8
0C
DF (safe zone)
-150C to -25
0C
Note: The personnel involved in preparing the vaccine carriers and “conditioned” icepacks may include other staff of the health center. It is essential to train these
staff also, on the importance and method of conditioning icepacks.
Fig. 5.7 Conditioning of frozen icepacks
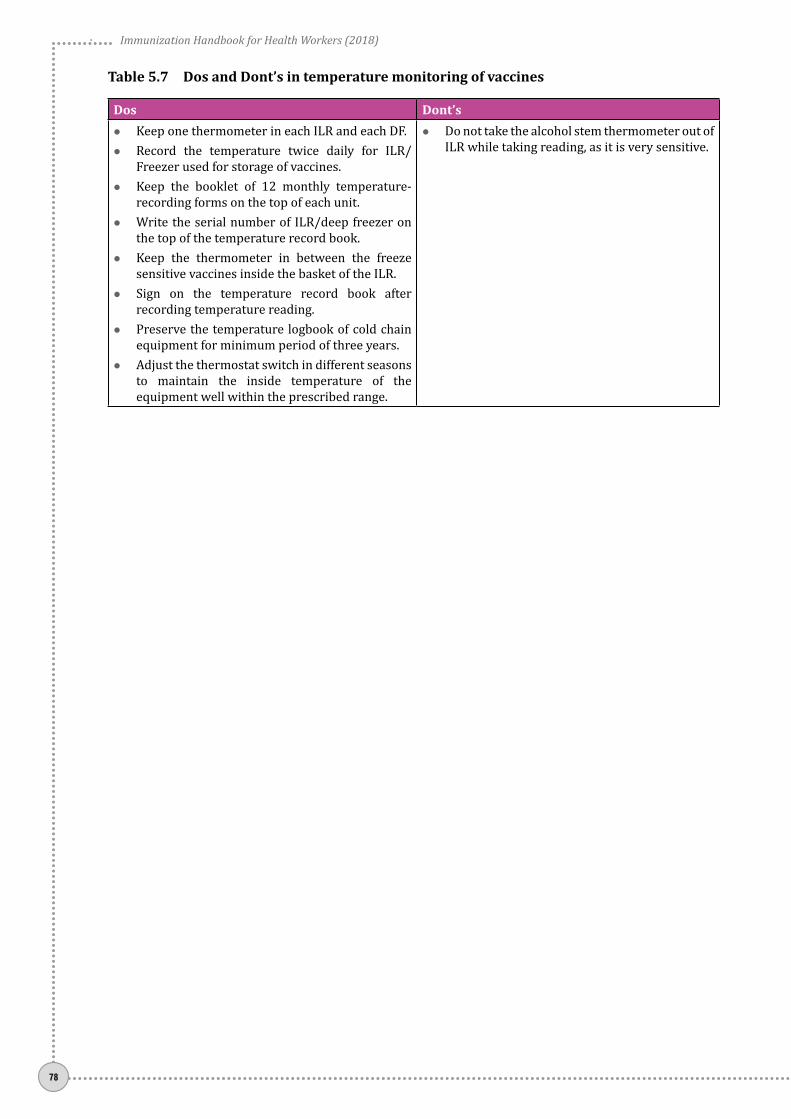
Immunization Handbook for Health Workers (2018)
78
Table 5.7 Dos and Dont’s in temperature monitoring of vaccines
Dos Dont’szz Keep one thermometer in each ILR and each DF.zz Record the temperature twice daily for ILR/
Freezer used for storage of vaccines. zz Keep the booklet of 12 monthly temperature-
recording forms on the top of each unit. zz Write the serial number of ILR/deep freezer on
the top of the temperature record book.zz Keep the thermometer in between the freeze
sensitive vaccines inside the basket of the ILR. zz Sign on the temperature record book after
recording temperature reading.zz Preserve the temperature logbook of cold chain
equipment for minimum period of three years. zz Adjust the thermostat switch in different seasons
to maintain the inside temperature of the equipment well within the prescribed range.
zz Do not take the alcohol stem thermometer out of ILR while taking reading, as it is very sensitive.

Uni
t 6
79
Unit 6: Safe injections and Waste disposal

Immunization Handbook for Health Workers (2018)
80
Reused needles and / or syringes
Beneficiary Health worker Community
Impac
ts
Impac
ts
Impac
ts
Unsafe collection of sharps waste
Unsafe disposal of sharps waste
Unit 6:Safe injections and Waste disposal
Learning ObjectivesAt the end of the unit, you should be able to:
zz Describe the importance of safe injections and ways to improve injection safetyzz Demonstrate how to use AD Syringes correctlyzz Explain the steps to ensure safe disposal of immunization waste
Contentsz¾ Importance of safe injection practices z¾ Simple ways to improve injection safetyz¾ Using AD syringes correctlyz¾ Steps to ensure safe disposal of immunization waste
6.1 Importance of safe injection practices
A safe injection is one that -
zz Does not harm the recipientzz Does not expose the health workers to any avoidable riskszz Does not result in waste, which is dangerous for the community
The most common, serious infections transmitted by unsafe injections are Hepatitis B, Hepatitis C, and HIV (the virus that causes AIDS). Poorly administered injections can also cause injuries or drug toxicity when the wrong injection site, vaccine, diluent, or dose is used. It is important to prevent the risks of accidental needle-stick injury, and necessary to dispose of used syringes and needles safely to prevent risks to the community at large.
The provision of auto disable syringes by the Government of India and the implementation of Central Pollution Control Board (CPCB) outlined waste management procedures are attempts to improve injection safety in the immunization program.
Fig. 6.1 Impacts of unsafe injections

Uni
t 6
81
6.2 Simple ways to improve injection safety
zz Keep hands clean before giving injectionsz� Wash or disinfect hands prior to preparing injection
material.z� Avoid giving injections if the skin at the site of
injection of the recipient is infected or compromised by local infection (such as a skin lesion, cut, or weeping dermatitis).
z� Cover any small cuts on your skin.
zz Use sterile injection equipment, every timez� Always use ADS for each injection and a new
disposable syringe to reconstitute each vial of BCG, Measles/MR and JE.
zz Prevent the contamination of vaccine and injection equipmentz� Prepare each injection in a designated clean area
where contamination from blood or body fluid is unlikely.
z� If the injection site is dirty, clean it with clean swab.z� Always pierce the rubber cap of the vial with a
sterile needle.z� Ensure opened vial septum is covered to prevent
contamination.z� Follow product-specific recommendations for use,
storage, and handling of a vaccine.z� Do not touch the needle or rubber cap of vial with
your finger.z� Discard any needle that has touched any non-sterile
surface.
zz Assume all used equipment is contaminatedz� Cut the used syringe at the hub immediately after
use.
zz Practice safe disposal of all medical sharps wastez� Used sharps (needles) must be collected in a hub
cutter and then carried to the PHC for safe disposal.
zz Prevent needle-stick injuriesz� Do not recap or bend needles.z� Collect sharps in a puncture proof container (Hub
cutter). z� Anticipate sudden movement of the child.

Immunization Handbook for Health Workers (2018)
82
6.3 Using Auto-Disable (AD) syringes
AD syringes have a fixed needle and are pre-sterilized in a sealed pack. They can only be used once. They are available in two sizes with vaccine drawing capacity of 0.1 ml and 0.5 ml.
Fig. 6.2 Correct use of AD syringes
1. Select the correct syringe for the vaccine to be administered –
0.1ml for BCG, fIPV and 0.5ml for all others.2. Check the packaging. Don’t use if the package is damaged,
opened, or expired.3. Peel open or tear the package from the plunger side and remove
the syringe by holding the barrel. Discard the packaging into a black plastic bag.
4. Remove needle cover/ cap and discard it into the black plastic bag.
5. Do not move the plunger until you are ready to fill the syringe with the vaccine and do not inject air into the vial as this will lock the syringe.
6. Take the appropriate vaccine vial, invert the vial, and insert the needle into the vial through the rubber cap. Insert the needle such that the tip is within the level of the vaccine. If inserted beyond you may draw air bubble which is very difficult to expel.
7. Do not touch the needle or the rubber cap (septum) of the vial.
8. Pull the plunger back slowly to fill the syringe. The plunger will automatically stop when the necessary dose of the vaccine has been drawn (0.1 or 0.5 ml).
9. Do not draw air into the syringe. In case air accidentally enters the syringe, remove the needle from the vial. Holding the syringe upright, tap the barrel to bring the bubbles towards the tip of syringe. Then carefully push the plunger to the dose mark (0.5 or 0.1 ml) thus expelling the air bubble.
10. Clean the injection site (if dirty) with a clean water swab. 11. Administer the vaccine.
zz BCG: upper arm LEFTzz DPT and Hep B: Anterolateral aspect (outer side) of midthigh
LEFTzz Pentavalent: Anterolateral aspect of mid-thigh LEFTzz fractional IPV: Upper arm RIGHTzz PCV: Anterolateral aspect of mid-thigh RIGHTzz MR: Upper arm RIGHTzz TT: Upper arm RIGHTzz JE: upper arm LEFT.
12. Push the plunger completely to deliver the dose. Do not rub the injection site after vaccine is given.
13. Do not recap the needle. Cut the hub of the syringe immediately after use with a hub-cutter that collects the sharps in its puncture proof container.
14. Then collect the plastic portion of the cut syringes in a red plastic bag.
Follow the guidelines for waste disposal as given in next section

Uni
t 6
83
6.4 Steps to ensure safe disposal of immunization waste
Follow the steps as given below for disposal of the immunization waste.
Step 1: At the session site, cut the needle of the AD syringe immediately after administering the injection. Use the Hub cutter to cut the plastic hub of the syringe and not the metal part of needle. The cut needles will get collected in the container of the hub-cutter. (Fig 6.3)
Step 2: Store the broken vials in a separate puncture proof container or in the same hub-cutter, in case its capacity is also able to accommodate broken vials / ampoules.
Step 3: Segregate and store the plastic portion of the cut syringes and unbroken (but discarded) vials in the red bag or container. Both the bags/containers should bear the biohazard symbol.
Step 4: Send the red bag and the hub cutter to PHC for disinfection and disposal by designated person at the PHC and dispose of the black bag as general waste. PHC may send the collected materials to the Common Bio-medical Waste Treatment Facilities (CBWTF). If the CBWTF doesn’t exist, go to step 5.
Step 5: Treat the collected material in an autoclave. If unable to impart autoclaving, boil the waste in water for at least 10 minutes or provide chemical treatment using sodium hypochlorite for 30 minutes to ensure that this results in disinfection. However, the district hospital/CHC/PHC will ultimately make the necessary arrangements to autoclave on a regular basis.
Step 6: Dispose the autoclaved (or boiled/chemically disinfected) waste as follows:
zz Dispose the needles and broken vials in a safety pit/tank zz Send the syringes and unbroken vials for recycling or landfill.
Step 7: Wash the hub cutters properly with sodium hypochlorite before reuse.
Step 8: Maintain a proper record of generation, treatment and disposal of waste at the District Hospitals/CHC/PHC/etc.
Fig. 6.3 Using the hub cutter correctly
CUT HERE
Hub
Needle
[
Handle
Insertion Hole
Puncture proof container
z Cut needles and hubz Broken vials and ampoules

Immunization Handbook for Health Workers (2018)
84
Fig. 6.4 Pictorial flow chart – disinfection and disposal sharps waste from RI session
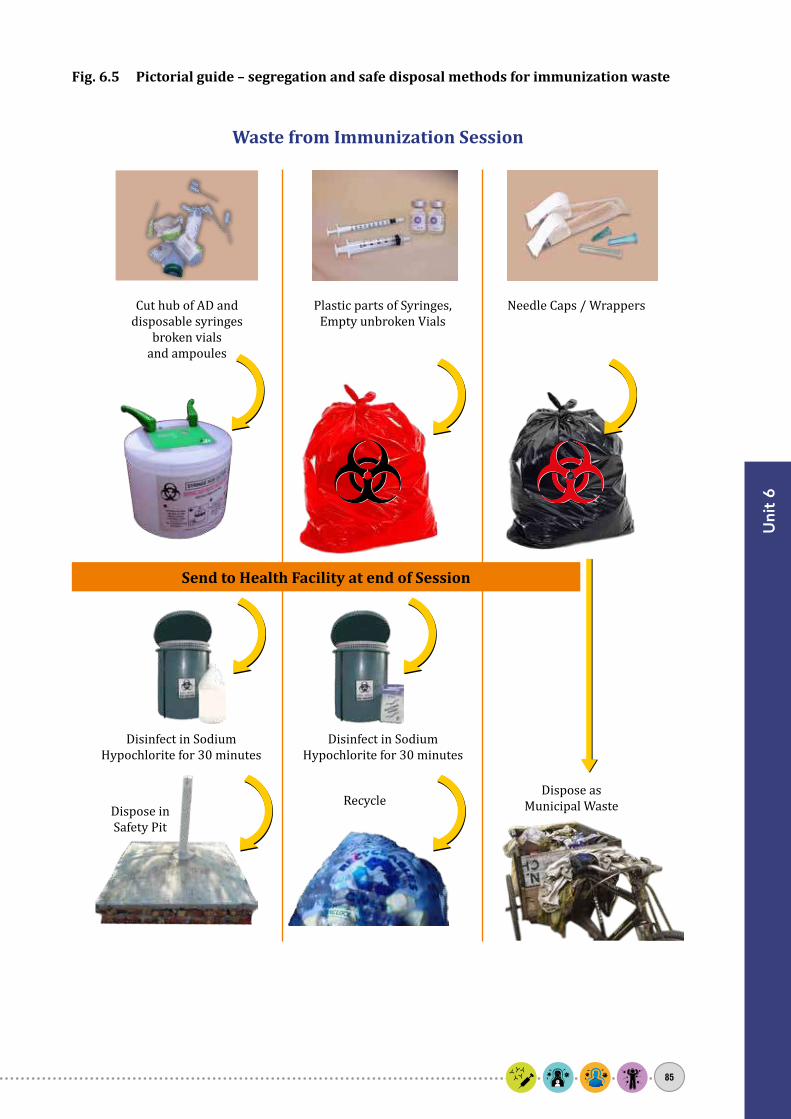
Uni
t 6
85
Fig. 6.5 Pictorial guide – segregation and safe disposal methods for immunization waste
Waste from Immunization Session
Dispose inSafety Pit
Disinfect in Sodium Hypochlorite for 30 minutes
Disinfect in Sodium Hypochlorite for 30 minutes
RecycleDispose as
Municipal Waste
Cut hub of AD anddisposable syringes
broken vials and ampoules
Plastic parts of Syringes, Empty unbroken Vials
Needle Caps / Wrappers
Send to Health Facility at end of Session

Immunization Handbook for Health Workers (2018)
86
Do not recap the needle
Do not leave the needle inside the vial
Do not touch the needle
Do not dispose of used needles in an open cardboard box
UNSAFE IMMUNIZATION PRACTICES

Uni
t 7
87
Unit 7: Managing an immunization session
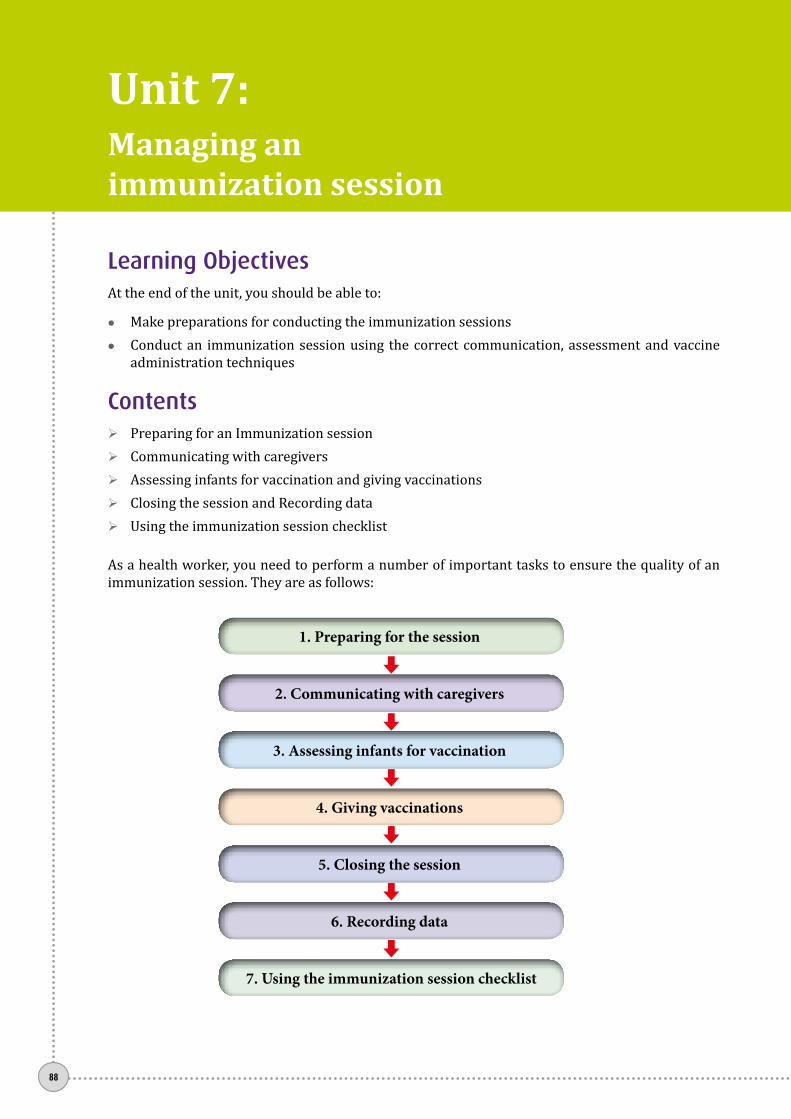
Immunization Handbook for Health Workers (2018)
88
Unit 7:Managing an immunization session
Learning ObjectivesAt the end of the unit, you should be able to:
zz Make preparations for conducting the immunization sessionszz Conduct an immunization session using the correct communication, assessment and vaccine
administration techniques
Contentsz¾ Preparing for an Immunization sessionz¾ Communicating with caregivers z¾ Assessing infants for vaccination and giving vaccinationsz¾ Closing the session and Recording dataz¾ Using the immunization session checklist
As a health worker, you need to perform a number of important tasks to ensure the quality of an immunization session. They are as follows:
1. Preparing for the session
2. Communicating with caregivers
3. Assessing infants for vaccination
4. Giving vaccinations
5. Closing the session
6. Recording data
7. Using the immunization session checklist

Uni
t 7
89
7.1 Preparing for the session
During microplanning you have already planned for the number of sessions, location of session sites, number of beneficiaries expected and the vaccines and logistics required. You know the names of the ASHA/AWW responsible for mobilizing the beneficiaries to the session site. In addition, before every session day you need to perform the following tasks:
a) Select an appropriate session site
Ideally, it should be:zz easily accessible and identified - using the IEC posters / banner at a visible point;zz located at the same place each time;zz in a clean area, out of sun and rain – No open air sites;zz having adequate space to accommodate beneficiaries before and after being vaccinated; space
for registration and recording.zz quiet enough for health workers to be able to explain what they are doing and to give advice.
Consider few points to see if the session site is GOOD. Does it have the following: a waiting area for beneficiaries a separate area for you to vaccinate children – preferably out of view of other beneficiaries area for waiting after the vaccine is administered. clean surroundings
How to get a good space for your RI session site:In most situations the Anganwadi centre or the Sub-centre space is used for immunization sessions. The health worker is encouraged to explore other spaces which are most suitable for immunization based on the characteristics of a good immunization session site.
During meetings with panchayat / ward always discuss the requirement for a good session site. Involve the ASHA/AWW/Link worker as they can also be local influencers to support you.
Furniture like tables, chairs, benches and mats are to be sourced from local areas / neighbours. This involves the community and creates a supportive
b) Arrange for the equipment and supplies required
Furniture zz A table to keep vaccines and injection equipmentzz A seat for a parent to sit while holding a child for vaccination and a seat for the HW zz Bench for beneficiaries in waiting areazz Bench or mats for beneficiaries after vaccination – post vaccination areazz 2 small buckets for the red and black bagszz Water for drinking zz Area for washing hands
Immunization records:zz MCH card / immunization cardszz RCH register zz IEC material – poster or banner zz Immunization tally sheetszz Counterfoils

Immunization Handbook for Health Workers (2018)
90
Logistics:zz AD syringeszz Metal file to open ampoules zz 5 ml disposable syringes (mixing or reconstitution syringes)zz Marker for writing date and time on vaccine vialszz Cotton swabs zz Hub cutter zz Black and Red bags for waste disposalzz Anaphylaxis management kit zz BP apparatus* zz Weighing machine*
Vaccine carrier with 4 conditioned ice packs: zz Paracetamol liquid or tabletszz Vaccines and diluents zz Vitamin A ,ORS, Zinc and IFA tablets*
*Items to be included when immunization session is part of Village Health and Nutrition Day (VHND)
c) Prepare due list of beneficiaries and share with AWW and ASHA for mobilizing beneficiaries
Refer to the following documents:
zz Counterfoils of immunization cardszz MCH / Immunization registerzz Register of AWW and ASHAzz Newborn tracking booklets of polio rounds
d) Arrange the vaccination session site
Place everything you need within reach. On the table you should keep
zz Vaccine carrierzz Hub Cutter zz Immunization cards and recordszz Cotton swabs
Keep red and black bags near the table, for disposing immunization waste. Also keep a bowl, water and soap for wasing your hands clean before beginning the vaccination session and every time your hands come in contact with any un-sterile surface.
e) Cold chain maintenance during the immunization session
zz While receiving the vaccine carrier, open it and check for the presence of four well-sealed conditioned icepacks; diluents and usable VVM on all vaccine vials. In case of any problems, inform the medical officer immediately to get the correct supplies.
zz Inspect vaccine vials for visible contamination, i.e. check for any change in the appearance of vaccine, any floating particles or cracks and leaks. DO NOT USE SUCH VIALS.
zz Mark all vaccine vials with date and time of opening at first use.

Uni
t 7
91
Fig.
7.1
La
yout
of
vacc
iati
on s
essi
on s
ite

Immunization Handbook for Health Workers (2018)
92
zz Note the name of the manufacturer, batch number and expiry date of the vaccine and diluent in the tally sheet.
zz ALWAYS VERIFY that you are USING THE CORRECT VACCINE for administration. zz Always pierce the septum with a sterile needle for drawing vaccine from the multi-dose vials
being used.zz OPV vial dropper should be recapped with stopper (small cap) after each use, and kept on the
ice pack.zz Vials of DPT, Hep B, pentavalent, IPV, PCV and TT should not be kept on the ice pack.
Fig. 7.2 Placement of vaccines at the RI session site
Specific attention while implementing open vial policy
zz OVP is not applicable to vials of measles/MR, Rotavirus, BCG and JE vaccine.zz Measles/MR, Rotavirus, BCG, and JE vaccine should not be used beyond 4 hours of
reconstitution/opening under any circumstances. zz Rotavirus vaccine does not require reconstitution but must not be used beyond 4 hours of
opening. zz Discard such vials after 4 hours of reconstitution or at the end of the session, whichever is earlier
7.2 Communicating with caregivers
Communication involves giving information verbally (including the tone of voice) and non-verbally (body language). Most communication is non-verbal. It is conveyed in many ways: posture, facial expression, gestures, eye contact and attitude. For example, welcoming families to an immunization session with a smile and a calm manner will reassure thoes who may be afraid or worried of injections.
Small handheld magnifying glasses were distributed to all ANMs in a district to enable them to read the small print of the vaccines vials. This has made it
easier to see the small print and encouraged them to check the vials before using!!!
Field tip: Magnifying glass for reading vaccine vial labels

Uni
t 7
93
Communicating with each beneficiary
At the start
zz Greet the caregiver or parent in a friendly manner. Thank them for coming for vaccination and for their patience if they had to wait.
zz Ask the caregiver if they have any questions or concerns and answer them politely
During assessment
zz Write the date of the vaccinations being given on the immunization card and explain the diseases against which the vaccination protects, use simple terms (in the local language). If there is a poster or chart, use it to help your explanation.
zz Mention possible adverse events and explain how to handle them. zz Explain the need for the child/beneficiary to return as per the immunization schedule to be fully
protected. Use the immunization card as an instructional guide, and congratulate the caretaker if the child has completed a series.
zz Write the date for the next vaccination on the immunization card and tell the caregiver. If appropriate, associate the date with a well-known day, such as a holiday or festival that will help them remember to return to complete their immunization schedule.
zz Ask the caregiver to repeat the date to be sure it is understood.zz Explain to the caregiver that if the child cannot come on the return date, they can obtain the next
vaccination at another location or another date close to the due date.zz Remind the caregiver to bring the immunization card when they bring the child back for the
next vaccination.zz Inform them to always carry the immunization card. If they are travelling to other places
during the next vaccination date, inform them that they can vaccinate their child / pregnant woman anywhere in the country if they have the vaccination card with them.
What vaccine was given and what disease it prevents
When and where to come for the next visit.
What are the minor side effects and how to deal with them.
To keep the immunization card safe and to bring it along for the next visit
Remind parents about
four key messages as follows:
Proceed with vaccination, including explanation of positioning, as described later.
After vaccination
zz Ask the beneficiary to wait for 30 minutes to observe for any adverse reactions.zz Remind the caregiver when to return with the infant.zz In the event of any out-of-stocks of vaccine at the time of the session, inform the caregiver where
and when to return for the next doses.zz Remind the caregiver about other services given during immunization session; for example,
vitamin A supplementation or tetanus toxoid for women.

Immunization Handbook for Health Workers (2018)
94
zz If immunization campaigns are planned in the coming months, inform the caregivers about the date of the campaign, what vaccination is being given, and where the vaccination site will be.
zz Offer relevant print information to caregivers who are literate.zz Ask the caregiver if they have any questions or concerns and answer them politely
7.3 Assessing infants for vaccination
a) Assess eligibility for immunization
zz Verify the infant’s age on the immunization card or ask the caregiver in case the card is not available.
zz Verify which vaccines the infant has received by reviewing the immunization card or ask the caregiver in case the card is not available. Fill a new card.
zz Verify all vaccines the infant needs at this session to allow efficient preparationz� If the infant is eligible for more than one type of vaccine, it is safe to give the different
vaccines at different injection sites during the same session z� Never give more than one dose of the same vaccine at one time.z� If the vaccine is overdue, do not restart the schedule. Simply provide the next needed dose
in the series.z� If there is a delay in starting the immunization schedule, give the vaccine(s) and an
appointment for the next dose at the interval as recommended in the national immunization schedule.
b) Assess possible contraindications
All infants should be immunized except in these situations:
zz Do not give a vaccine if the infant has had anaphylaxis (a serious allergic reaction) or other severe reaction to a previous dose of the vaccine or a vaccine component.
zz Do not vaccinate HIV-infected children with BCG vaccine. Do not give measles- and/or mumps- and/or rubella containing vaccines to cases of symptomatic HIV infections/AIDS.
zz High fever (>38.5°C). Do not give a vaccine if the caregiver objects to immunization for a sick infant after explanation that mild illness is not a contraindication. Ask the caregiver to come back when the infant is well.
Vaccinate malnourished children as usual as they are more likely than well-nourished children to die from vaccine-preventable diseases.
7.4 Giving vaccinations
a) Good oral administration technique - administer oral vaccines before injectable vccines
Rotavirus vaccine and OPV are the oral vaccines in the national immunization schedule.
1. Position: Use the cuddle position on the caregiver’s lap with the head supported and tilted slightly back. Vaccinator stands to one side (see Table 7.1).
2. Administration: Open the infant’s mouth by gently squeezing the cheeks between your thumb and index finger using gentle pressure. Firm squeezing can cause distress.z� For rotavirus vaccine, five drops and for OPV, let two drops of vaccine fall from the dropper
onto the tongue. Do not let the dropper touch the infant.3. Disposal: Discard the used oral vaccine vial into the red bag

Uni
t 7
95
b) Preparing to vaccinate
Use aseptic technique to prepare vaccines:
zz Start with handwashing – use soap and water and dry your hands thoroughlyzz Work on a clean tablezz Prepare vaccines individually for each child; do not prefill syringes.
Try to talk to the caregiver while preparing injections, as showing interest in the caregiver is reassuring.
c) Reconstitution of vaccines
Vaccines that need to be mixed with diluent before use are BCG, Measles/MR and JE vaccine. Use these vaccines as per following instructions:
zz Before reconstitution check that the vaccine is within the expiry date and that VVM has not reached/crossed the discard point.
zz When reconstituting, do so only with the diluent provided by manufacturer for that batch of vaccine.
zz Reconstitute the vaccine with diluent immediately before use.zz Reconstitute the vaccine even when only one eligible child is present.zz Write the date and time of reconstitution on the label of the vial immediately following
reconstitution. zz Use the reconstituted vials only for a single session; do not carry them from one session to
another, even if the session is close by.zz If any AEFI occurs following use of any vial, do not use that vial; mark it and retain safely for
AEFI investigation.
Steps for reconstitution
1. Check for VVM on the cap of the vial. This VVM indicates whether the dry vaccine is usable or not. Once reconstituted, VVM is of not needed, as the vaccine has to be used within 4 hours.
2. Double check each vial/ampoule to make sure it is not past its expiry date, and read the label carefully.
3. Open the vaccine vial. For a metal cap, use a file to lift the pre-cut centre and bend it back; for a plastic cap, flip it off with your thumb or slowly twist it depending on the specific instructions for the type of vial.
4. Open the glass ampoule (with diluent) by holding the ampoule between the thumb and middle finger and supporting the top with the index finger; scratch the ampoule neck with a file, then gently break off the top, taking care to avoid injury from the sharp glass (see Figure 7.3). If you injure yourself, discard the ampoule since the contents may have been contaminated. Cover the wound before opening a new ampoule.
5. Draw the entire diluent out with a new disposable reconstitution (mixing) syringe and needle.
6. Insert the needle of the reconstitution (mixing) syringe into the vaccine vial and empty all the diluent – depress the plunger slowly to avoid frothing inside the vaccine vial.
Fig. 7.3 Scratching and breaking the neck of the ampoule

Immunization Handbook for Health Workers (2018)
96
7. Remove the reconstitution needle and cut the mixing syringe at the hub with a hub-cutter. 8. To mix the diluent and vaccine, shake the vial gently by holding at the neck. Take care not to
touch the rubber membrane or opening.9. Write the date and time of reconstitution on the vial label.10. Put the reconstituted vaccine vial in the foam pad of your vaccine carrier.11. Use the reconstituted vaccine, within four hours of reconstitution. At the end of four hours, DO
NOT USE the vaccine. Reconstitute a new one if needed.
d) Positioning the child for vaccination
The aim of positioning is to keep the child still and the caregiver and vaccinator comfortable. The choice of position will depend on the number of vaccines to be given, the age of the child and the materials available.
Explain to the caregiver how to hold the child and that it is important to keep the child steady in order to reduce any pain.
Table 7.1 Different positions for vaccinating
Position Illustration Directions for caregiver
Advantages Disadvantages
Cuddle position:Semi-recumbent on caregiver’s lap
1. Sit on a chair holding the infant sideways on lap with one arm behind infant’s back.
2. Tuck the infants’s inside arm around their own back or against their body.
3. Bring their arm around the infant’s back to hug the shoulders and upper body close to their body.
4. Tuck the infant’s legs between their own to secure them or hold them with their other arm.
5. Vaccinators should position themself to avoid strain while giving vaccines at the correct angle.
1. Infant’s arm and legs securely held by caregiver.
2. Infant comforted by close contact and eye contact with caregiver.
3. Leg and arm injections possible without position change.
Delay between injections if 2 IM injections given.Possibility that secure restraintmay not occur after position change.

Uni
t 7
97
Position Illustration Directions for caregiver
Advantages Disadvantages
Bed position:Lying on back on flat surface
1. Lay the infant, with both legs bare, on a flat surface.
2. Stand on the other side of the bed and hold the infant’s hands and arms.
3. Vaccinator should stand at the infant’s feet and use non-injecting hand to gently cup the slightly bent knee of the leg to receive the vaccine.
1. Infant’s arms held securely by caregiver.
2. Infant comforted by close contact and eye contact with caregiver.
3. Injection in both legs possible without change in position of infant.
Vaccinator responsible for restraint of the legs
Upright position:Sitting upright on caregiver’s lap, facing straight outwards
1. Sit on a chair holding the infant sitting facing straight outwards on their lap.
2. Rest the infant’s back against their chest.
3. Encircle (hug) the infant’s upper body and arms with one arm and use the other arm or their knees to hold the infant’s lower legs (lower legs and feet one behind the other between the caregiver’s knees).
4. Vaccinator should stand on the side of the first injection and at the level where it can be given at a 90 degree angle.
1. Infant’s arms and legs held securely by caregiver.
2. Multiple injections possible without change in position.
Security of leg restraint dependent on caregiver – if too tight, muscles tense, if too loose leg may jerk out of restraint.No eye contact with caregiver.
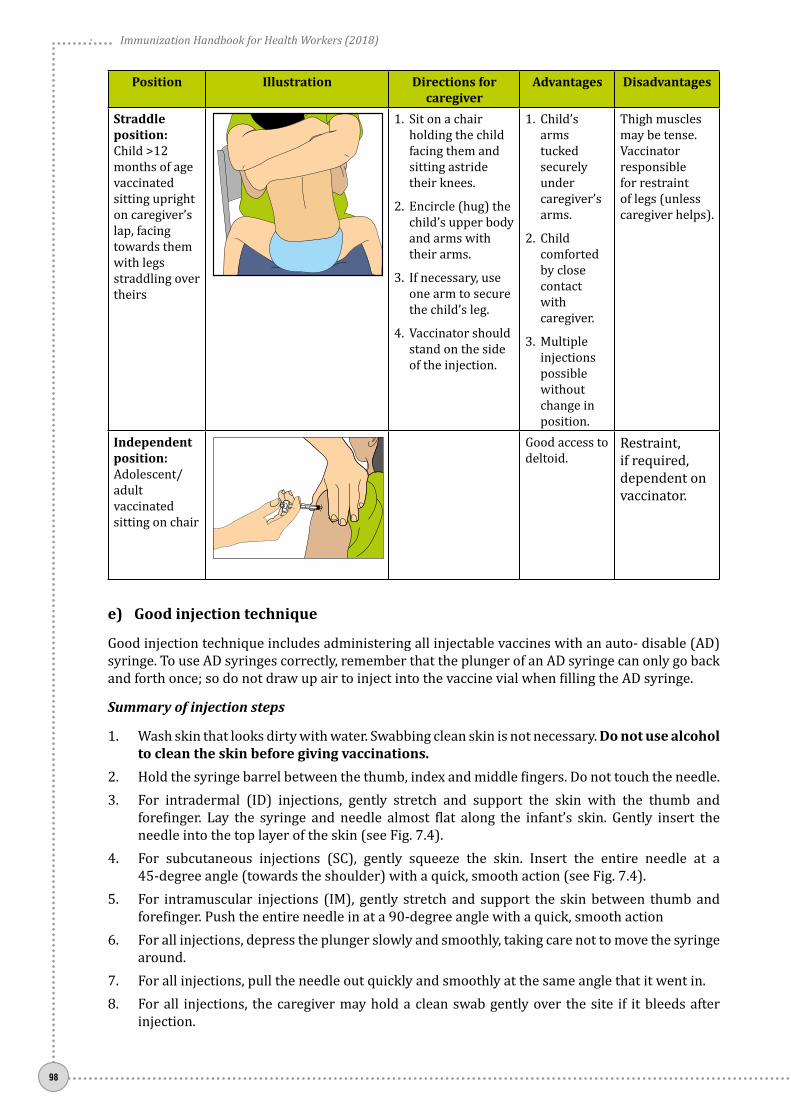
Immunization Handbook for Health Workers (2018)
98
Position Illustration Directions for caregiver
Advantages Disadvantages
Straddle position:Child >12 months of age vaccinated sitting upright on caregiver’s lap, facing towards them with legs straddling over theirs
1. Sit on a chair holding the child facing them and sitting astride their knees.
2. Encircle (hug) the child’s upper body and arms with their arms.
3. If necessary, use one arm to secure the child’s leg.
4. Vaccinator should stand on the side of the injection.
1. Child’s arms tucked securely under caregiver’s arms.
2. Child comforted by close contact with caregiver.
3. Multiple injections possible without change in position.
Thigh muscles may be tense.Vaccinator responsible for restraint of legs (unless caregiver helps).
Independent position:Adolescent/ adult vaccinated sitting on chair
Good access to deltoid.
Restraint, if required, dependent on vaccinator.
e) Good injection technique
Good injection technique includes administering all injectable vaccines with an auto- disable (AD) syringe. To use AD syringes correctly, remember that the plunger of an AD syringe can only go back and forth once; so do not draw up air to inject into the vaccine vial when filling the AD syringe.
Summary of injection steps
1. Wash skin that looks dirty with water. Swabbing clean skin is not necessary. Do not use alcohol to clean the skin before giving vaccinations.
2. Hold the syringe barrel between the thumb, index and middle fingers. Do not touch the needle.3. For intradermal (ID) injections, gently stretch and support the skin with the thumb and
forefinger. Lay the syringe and needle almost flat along the infant’s skin. Gently insert the needle into the top layer of the skin (see Fig. 7.4).
4. For subcutaneous injections (SC), gently squeeze the skin. Insert the entire needle at a 45-degree angle (towards the shoulder) with a quick, smooth action (see Fig. 7.4).
5. For intramuscular injections (IM), gently stretch and support the skin between thumb and forefinger. Push the entire needle in at a 90-degree angle with a quick, smooth action
6. For all injections, depress the plunger slowly and smoothly, taking care not to move the syringe around.
7. For all injections, pull the needle out quickly and smoothly at the same angle that it went in.8. For all injections, the caregiver may hold a clean swab gently over the site if it bleeds after
injection.

Uni
t 7
99
9. For all injections, cut the hub of the syringe with hub cutter and put the plastic part of the syringe into the red bag immediately after each vaccination.
10. For all injections, soothe and distract the child when all the vaccines have been given.
Fig. 7.4 Needle positions for ID, SC and IM injections
Fig. 7.5 Intradermal injection
f) Intradermal (ID) injection
BCG and IPV are injected intradermally (into the layers of the skin) for slow absorption. BCG - left upper arm and IPV - right upper arm. To measure and inject the very small dose (0.05 ml) accurately, a special syringe and needle are used (see Fig. 7.5)
How to give BCG/IPV intradermally
1. Position: Cuddle position on caregiver’s lap 2. Administration:
z� Hold the syringe barrel with fingers and thumb on the sides of the barrel and with the bevel (hole) of the needle facing upwards. (see box below)
z� Lay the syringe and needle almost flat along the infant’s skin.
z� Insert the tip of the needle under the surface of the skin just past the bevel.
z� Keep the needle close to the skin at the same angle as you inserted it.
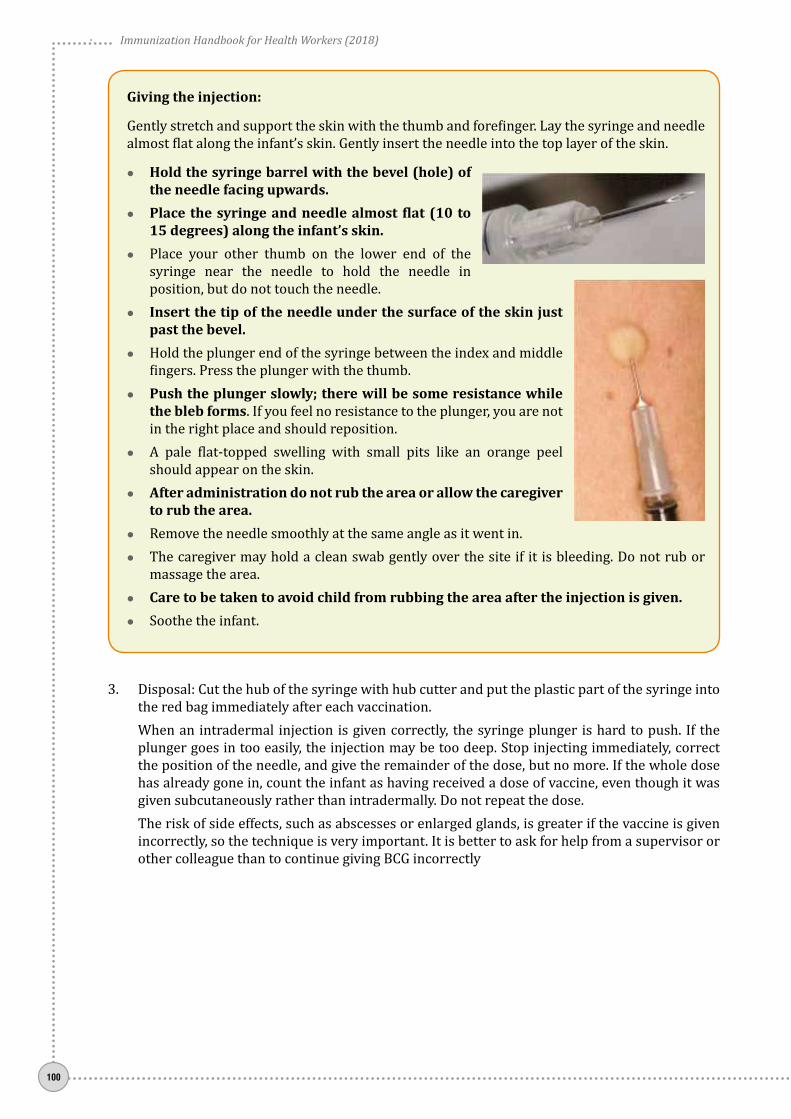
Immunization Handbook for Health Workers (2018)
100
Giving the injection:
Gently stretch and support the skin with the thumb and forefinger. Lay the syringe and needle almost flat along the infant’s skin. Gently insert the needle into the top layer of the skin.
zz Hold the syringe barrel with the bevel (hole) of the needle facing upwards.
zz Place the syringe and needle almost flat (10 to 15 degrees) along the infant’s skin.
zz Place your other thumb on the lower end of the syringe near the needle to hold the needle in position, but do not touch the needle.
zz Insert the tip of the needle under the surface of the skin just past the bevel.
zz Hold the plunger end of the syringe between the index and middle fingers. Press the plunger with the thumb.
zz Push the plunger slowly; there will be some resistance while the bleb forms. If you feel no resistance to the plunger, you are not in the right place and should reposition.
zz A pale flat-topped swelling with small pits like an orange peel should appear on the skin.
zz After administration do not rub the area or allow the caregiver to rub the area.
zz Remove the needle smoothly at the same angle as it went in.zz The caregiver may hold a clean swab gently over the site if it is bleeding. Do not rub or
massage the area.zz Care to be taken to avoid child from rubbing the area after the injection is given. zz Soothe the infant.
3. Disposal: Cut the hub of the syringe with hub cutter and put the plastic part of the syringe into the red bag immediately after each vaccination.
When an intradermal injection is given correctly, the syringe plunger is hard to push. If the plunger goes in too easily, the injection may be too deep. Stop injecting immediately, correct the position of the needle, and give the remainder of the dose, but no more. If the whole dose has already gone in, count the infant as having received a dose of vaccine, even though it was given subcutaneously rather than intradermally. Do not repeat the dose.
The risk of side effects, such as abscesses or enlarged glands, is greater if the vaccine is given incorrectly, so the technique is very important. It is better to ask for help from a supervisor or other colleague than to continue giving BCG incorrectly

Uni
t 7
101
Fig. 7.6 Subcutaneous injection
g) Subcutaneous (SC) injection in the upper arm
The injection is given into the layer below the skin on the upper arm. Right arm is used for measles vaccine and left arm is used for JE vaccine.
How to give a subcutaneous injection
1. Position: The position depends on the age of the child, the number of vaccinations to be given and what is easiest and most convenient for the vaccinator.
2. Administration:z� Hold the syringe barrel with fingers and
thumb on the sides of the barrel and with the bevel (hole) of the needle facing upwards.
z� Quickly push the needle into pinched-up skin; the needle should point towards the shoulder at a 45-degree angle. (See fig. 7.6)
z� Depress the plunger smoothly, taking care not to move the needle under the skin.z� Pull the needle out quickly and smoothly at the same angle as it went in.z� The caregiver may hold a clean swab gently over the site if it is bleeding. Do not rub or
massage the area.z� Soothe and distract the infant.
3. Disposal: Cut the hub of the syringe with hub cutter and put the plastic part of the syringe into the red bag immediately after each vaccination.
h) Intramuscular (IM) injection in infants
The muscle on the upper outer part of the thigh is large and safe for intramuscular injections. (See Fig. 7.7)
In children aged less than 15 months the deltoid muscle of the upper arm is not safe to use since it is not developed enough to absorb the vaccine and the radial nerve is close to the surface. The deltoid muscle may be used in older children, adolescents and adults.
How to give an intramuscular injection to an infant
1. Position: The position depends on the age of the child, the number of vaccinations to be given and what is easiest and most convenient for the vaccinator.
2. Administration:z� Hold the syringe barrel with fingers and
thumb on the sides of the barrel and with the bevel (hole) of the needle facing upwards.
z� Gently stretch and support the skin on the upper, outer thigh with the other hand and quickly push the needle at a 90-degree angle down through the skin into the muscle.
Fig. 7.7 Intramuscular injection

Immunization Handbook for Health Workers (2018)
102
z� Depress the plunger smoothly, taking care not to move the needle under the skin.
z� Pull the needle out quickly and smoothly at the same angle as it went in.
z� The caregiver may hold a clean swab gently over the site if it is bleeding. Do not rub or massage the area.
z� Soothe and distract the infant.
3. Disposal: Cut the hub of the syringe with hub cutter and put the plastic part of the syringe into the red bag immediately after each vaccination.
7.5 Closing the session
1. After immunization session is overz� Segregate the vaccine vials (used and unused) and keep these inside in a properly sealed
zipper pouch/bag in the vaccine carrier under the cold chain and ensure carrier is picked up by the AVD mechanism to deliver at the designated vaccine/cold storage point.
z� Under no circumstances will the vaccine carrier/vaccines be kept in the field at places other than the designated cold-chain point such as ANM/LHV/other HW/ASHA/AWW’s house, etc. In such an instance, the vials should be discarded and not used for subsequent sessions.
2. At the vaccine storage/cold-chain point at the end of immunization day Cold chain handler should ensure appropriate segregation of the vaccines into opened and
unopened vials, and follow the instructions as below:
Unopened vialsz� If VVM is intact and in usable stage, retain the vial in ILR as per guidelines, and issue
accordingly.z� If VVM is not in usable stage or there is partial/complete defacement of the label, retain the
vial in a plastic box clearly marked “Not to be used” in ILR. Discard such vial after 48 hours or before the next session, whichever is earlier.
Opened vials z� Segregate the vials on which Open Vial Policy (OVP) is not applicable such as measles/MR
/ Rotavirus /BCG/JE and retain in a plastic box clearly marked “Not to be used” in ILR. Discard these vials after 48 hours or before the next session, whichever is earlier. In case of any reported AEFI, they will not be discarded but retained for investigation.
z� Segregate the vials for which OVP is applicable such as OPV/DPT/Hep B/pentavalent/PCV/IPV as below:z{ If VVM is intact and is in usable stage, retain the vaccine vial in ILR as per guideline,
subject to the condition that the vial is used within 28 days of opening (as found from date marked on the vial) and re-issue in the next session after ensuring that it has not exceeded 28 days after opening the vial.
z{ If VVM is intact and is in usable stage, but the vaccine vial has exceeded 28 days after opening (as found from date marked on the vial), discard the vials after ascertaining that these vials are not required for AEFI investigation.
z{ If VVM is not in usable stage or there is partial/complete defacement of the label, retain in a plastic box clearly marked “Not to be used” in ILR. These vaccine vials should be discarded after 48 hours or before the next session, whichever is earlier.
z� If there is any vial, which has been used, and there is a report of an AEFI, that vial (even if it is in usable stage) has to be kept separately in a properly sealed zipper bag earmarked “For AEFI investigation” in ILR under special custody and in the knowledge of the MO. This vial should never be issued to anyone unless authorized by DIO.

Uni
t 7
103
z� The cold-chain handler should document the return of used (complete/partial) and unused vials in the vaccine distribution register.
z� Wipe the carrier with a damp cloth and check it for cracks. Repair any cracks with adhesive tape and leave the carrier open to dry.
3. Dispose of immunization waste safely Follow the guidelines for safe disposal of immunization waste as mentioned in unit-6.
4. Leave the site clean and tidy Specifically after using an outreach site:
z� Do not leave anything behind that might be a health threat to the community.z� Clean and return tables, chairs and other equipment to their owners.z� Thank the local people who have helped to organize the session and remind them of the
date of the next session.
7.6 Recording data
Accurate and reliable records are vital, not only for the individual child but also to track the immunization status of communities through monthly and annual reporting.
During a session, individual immunization cards and health centre records – such as registers, counter foils and tally sheets – have to be completed. (See unit 9)
Analyse the session due list and tally sheet
After every RI session, try to address the following questions:
zz Who are the children who were due for vaccination today but did not turn up?zz Why did they not turn up?zz Who are the children we did not list for today’s session?
Enlist all children who had not come in for the session conducted, irrespective of the reason. After these names, enter the names of children who will be due for any vaccine in the next session. Share this list with the ASHA/AWW/LW so as to give them sufficient time to visit these houses and use all possible methods to convince the parents or ensure that the children are vaccinated at the fixed site at the PHC or in the next session.
The reasons for not coming, once identified, must be addressed by the team. Seek support from local influencers/key persons to identify any children or beneficiaries before leaving the session site.
Remind the ASHA/AWW/LW on the next session date before leaving the session site.

Immunization Handbook for Health Workers (2018)
104
7.7 Using the immunization session checklist
Immunization session checklist (Table 7.2) can help ensure safety before, during and after immunization. This checklist is a reminder of key points in preparation, vaccination and closure of sessions that are described above, and is meant to reinforce positive actions. A printed copy of this checklist can be posted on a wall in the immunization area for easy viewing throughout sessions.
Table 7.2. Immunization session checklist
Before the immunization session
For selected clients attending the immunization session
After the immunization session
DID YOU:
1. CHECK if sufficient quantities of vaccines and diluents are available for the session? Y/N
2. CHECK vials for the following and take appropriate action:
• Expiry dates? Y/N
• Open vial date/time? Y/N
• VVM status? Y/N
• Freezing status? Y/N
3. PLACE vials in the appropriate place in the immunization area? Y/N
4. ENSURE sufficient supplies are available for the session including:
• Auto-disable (AD) syringes? Y/N
• Reconstitution syringes? Y/N
• Hub cutter? Y/N
• Black and red bag?s Y/N
• Immunization register? Y/N
• Immunization tally sheets? Y/N
• Blank immunization cards? Y/N
5. WASH your hands with soap? Y/N
DID YOU:
1. GREET the client and caregiver? Y/N
2. REVIEW the client’s immunization card? Y/N
3. DETERMINE eligible vaccinations based on the national schedule, client’s age and possible contraindications? Y/N
4. RECONSTITUTE each vaccine with its matched diluent (for lyophilized vaccines)? Y/N
5. FILL syringes just before administration using aseptic technique? Y/N
6. ADMINISTER each vaccine according to recommended technique and correct injection site? Y/N
7. IMMEDIATELY cut syringes with hub cutter after each injection? Y/N
8. RECORD all vaccinations in register, tally sheet and immunization card? Y/N
9. COMMUNICATE key messages, including potential AEFIs and date of next visit? Y/N
DID YOU:
1. CORRECTLY ASSESS if open vials can be used in the next session in accordance with open vial policy? Y/N
2. DISCARD open vials that should not be used? Y/N
3. RECORD date and time of opening on vials that can be used and PLACE them in the “use first” box in the ILR? Y/N
4. RETURN unopened vials to the ILR? Y/N
5. COMPLETE Session due-list cum Tally sheet? Y/N
6. LIST the names of children who missed vaccination and require follow up? Y/N
7. HANDLE immunization waste correctly? Y/N
8. TAKE appropriate action to ensure sufficient vaccine stock for the next session? Y/N
9. INFORM COMMUNITY of date and time of next session? Y/N
Advantages of multiple injectionsGiving a child several vaccinations during the same visit offers three major advantages:
1. Protecting children: Immunizing children as soon as possible provides protection during the vulnerable early months of their lives. Often, diseases are more severe in babies.
2. Fewer vaccination visits: Giving several vaccinations at the same time means parents and caregivers do not need to make as many vaccination visits.
3. Increasing efficiency: It means that you will be able to more efficiently provide and deliver other health services by reducing the time they need to spend providing vaccinations.

Uni
t 7
105
Common health care provider and parent/caregiver questions about multiple injections
Will my child experience more pain or discomfort during vaccination when there are multiple injections? Children will experience slightly more pain or discomfort when there are multiple injections. However, you should remind parents the pain or discomfort from vaccination is very brief – and that even one injection can cause pain or discomfort, with children often not noticing the pain or discomfort caused by subsequent injections.
If more immunization visits are used to provide children with need vaccinations that means there will be more times when children will experience pain or discomfort from vaccinations.
zz Confidence in vaccine effectiveness, such as “Will the vaccines be as effective as if given alone?” zz Concern about adverse events, such as “Is there a greater likelihood of a child experiencing an
adverse event?”
It is important to remember that giving all the eligible vaccines during the visit is essential. It is safe to give multiple injections and you should inform the parents of the safety and importance to vaccinate fully. Parents and caregivers will be willing to have their children receive multiple injections during the same visit if you answer their questions and concerns about the safety and effectiveness of multiple vaccinations.
How can you decrease or minimize the pain from multiple vaccine injections? There are things that you can do when providing multiple injections to minimize pain. Pain during immunization can be decreased by:
1. Having the child sit up to receive injections or by having a caregiver or provider hold an infant during the vaccinations;
2. Stroking the skin or applying pressure close to the injection site before and during injection; 3. Injecting the least painful vaccine first when two vaccines are being administered sequentially
during a single office visit; and 4. Performing a rapid intramuscular injection without aspiration.
Is it safe for children to receive two or three injections of vaccines at one time? Yes. Children are given vaccines at a young age because this is when they are most vulnerable to polio, diphtheria, whooping cough (pertussis), Hib and pneumococcal disease. Vaccination schedules that involve multiple vaccine injections during the same visit are based on many years of safety and effectiveness information. An infant’s immune system is more than ready to respond to the very small number of weakened and killed antigens (bacteria and viruses) in vaccines.
However, these same children , if exposed to a disease without having been vaccinated, an infant’s immune system may not be strong enough to fight the disease.
Is it safe for children to receive three vaccine injections at one time? Yes. An infant’s immune system is more than ready to respond to the very small number of weakened and killed antigens (bacteria and viruses) in vaccines. From the time they are born, babies are exposed to thousands of germs and other antigens in the environment and their immune systems are readily able to respond to these large numbers of antigenic stimuli.
Is there any evidence that some multiple injections of vaccines may increase the risk for adverse events?
In most cases, multiple injections carry no greater risk for adverse events. However, these risks must be balanced against the risk of disease if one of the vaccinations is not given.

Immunization Handbook for Health Workers (2018)
106

Uni
t 8
107
Unit 8: Adverse Events Following Immunization (AEFIs)

Immunization Handbook for Health Workers (2018)
108
Unit 8:Adverse Events Following Immunization (AEFIs)
Learning ObjectivesAt the end of the unit, you should be able to:
zz Identify common adverse events.zz Manage an adverse event when it ccurszz List the responsibilities of health service providers in minimizing AEFIs
Contentsz¾ Adverse events following Immunization (AEFIs)z¾ Types of AEFIs z¾ Managing AEFI when it occurs z¾ Responsibilities of health service providers in minimizing AEFIs z¾ Reporting of AEFIs
8.1 Adverse events following immunization
Adverse event following immunization (AEFI) is defined as any untoward medical occurrence which follows immunization and which does not necessarily have a causal relationship with the usage of the vaccine.
The adverse event may be any unfavorable or unintended sign, abnormal laboratory finding, symptom or disease.
Majority of the adverse event are coincidental i.e unrelated to vaccine or vaccination process but have to be reported as the symptoms or signs have occurred after vaccination.
8.2 Types of AEFIs
In 2015, revised classification relevant to cause-specific categorization of AEFIs has been introduced (Table 8.1).
Table 8.1. Cause-specific categorization of AEFIs
Cause-specific type of AEFI Definition1 Vaccine product-related reaction An AEFI that is caused or precipitated by a vaccine due to one
or more of the inherent properties of the vaccine product2 Vaccine quality defect-related reaction
(Both 1 & 2 were earlier categorised in Vaccine Reaction)
An AEFI that is caused or precipitated by a vaccine that is due to one or more quality defects of the vaccine product, including its administration device as provided by the manufacturer
3 Immunization error-related reaction (formerly “programme error”)
An AEFI that is caused by inappropriate vaccine handling, prescribing or administration and thus by its nature is preventable

Uni
t 8
109
Cause-specific type of AEFI Definition4 Immunization anxiety-related
reaction(formerly “injection reaction”)
An AEFI arising from anxiety about the immunization
5 Coincidental event An AEFI that is caused by something other than the vaccine product, immunization error or immunization anxiety
a) Vaccine reactions
Vaccine reactions may be classified into common, minor reactions; severe reactions; or serious reactions. Most vaccine reactions are minor and settle on their own. More severe and serious reactions are very rare and in general do not result in long-term problems.
Common minor vaccine reactions
A vaccine induces immunity by causing the recipient’s immune system to react to the vaccine. Therefore, local reaction, fever and systemic symptoms can result as part of the immune response. In addition, some of the vaccine’s components (e.g. aluminium adjuvant, stabilizers or preservatives) can lead to reactions.
Local reactions (pain, swelling and/or redness at the injection site) and fever can be expected in about 10% of vaccinees, except for those injected with DPT, or tetanus boosters, where up to 50% can be affected. BCG causes a specific local reaction that starts as a papule (lump) two or more weeks after immunization, which becomes ulcerated and heals after several months, leaving a scar. Measles/MR vaccine causes fever, rash and/or conjunctivitis, and affects 5–15% of vaccinees. It is very mild compared to “wild” measles.
Serious and severe vaccine reactions
An AEFI will be considered serious if it results in death, requires hospitalization, results in persistent or significant disability/incapacity or a cluster (two or more cases) of AEFIs occur in a geographical area.
AEFIs that are not minor but do not result in death, hospitalization or disability are categorized as severe. Examples include non-hospitalized cases of seizures, hypotonic hyporesponsive episodes (HHEs), persistent screaming, anaphylaxis, severe local reaction, injection site abscesses, intussusception, etc. Anaphylaxis, while potentially fatal, is treatable without leaving any long-term effects.
Recognition of anaphylaxis
Anaphylaxis is a very rare but severe and potentially fatal allergic reaction. You should be able to distinguish anaphylaxis from fainting (vasovagal syncope), anxiety and breath-holding spells, which are common benign reactions (Table 8.2).
Table 8.2 Distinguish anaphylaxis from fainting (vasovagal reaction)
Fainting AnaphylaxisOnset Usually at the time or soon after the
injectionUsually some delay, between 5 to 30 mins, after injection
SystemicSkin Pale, sweaty, cold and clammy Red, raised and itchy rash; swollen eyes, face,
generalized rashRespiratory Normal to deep breaths Noisy breathing from airways obstruction
(wheeze or stridor)Cardiovascular Bradycardia, transient hypotension Tachycardia, hypotensionGastrointestinal Nausea, vomiting Abdominal crampsNeurological Transient loss of consciousness,
relieved by supine postureLoss of consciousness, not relieved by supine posture

Immunization Handbook for Health Workers (2018)
110
Signs and symptoms of anaphylaxis are given in Table 8.3. In general, the more severe the reaction, the more rapid is the onset. Most life-threatening reactions begin within 10 mins of immunization. That is why it is advised that the beneficiary be kept under observation for at least 30 mins after the injection.
Table 8.3 Signs and symptoms of anaphylaxis
Clinical progression Progression of signs and symptoms of anaphylaxisMild, early warning signsLate,
life-threatening symptoms
Itching of the skin, rash and swelling around injection site. Dizziness, general feeling of warmth.
Painless swellings in parts of the body e.g. face or mouth. Flushed, itching skin, nasal congestion, sneezing, tears.
Hoarseness, nausea, vomiting
Swelling in the throat, difficult breathing, abdominal pain.
Wheezing, noisy and difficult breathing, collapse, low blood pressure, irregular weak pulse.
b) Immunization error-related reactions
An adverse event can occur as a result of inappropriate handling, prescribing or administration of a vaccine. It is very important to identify and correct these errors, as they are preventable (Table 8.4).
Immunization error Examples Related reaction (AEFI)Error in vaccine (and diluent) handling
Exposure to excess heat or cold (using hard frozen ice packs in RI) as a result of inappropriate transport, storage or handling of the vaccine (and its diluent) where applicable
Use of a product after the expiry date
Systemic or local reactions due to changes in the physical nature of the vaccine, such as agglutination of aluminium-based excipients in freeze-sensitive vaccines
Failure to vaccinate as a result of loss of potency or non-viability of an attenuated product
Error in vaccine prescribing or non-adherence to recommendations for use
Failure to adhere to a contraindication
Failure to adhere to vaccine indications or prescription (dose or schedule)
Anaphylaxis, disseminated infection with an attenuated live vaccine
Systemic and/or local reactions, neurological, muscular, vascular or bony injury due to incorrect injection site, equipment or technique
Error in administration
Use of an incorrect diluent or injection of a product other than the intended vaccine
Incorrect sterile technique or inappropriate procedure with a multidose vial
Failure to vaccinate due to incorrect diluent. Reaction due to the inherent properties of whatever was administered other than the intended vaccine or diluent
Infection at the site of injection/beyond the site of injection
Immunization error-related reactions
c) Immunization anxiety-related reactions (formerly “injection reactions”)
Immunization anxiety-related reactions are common in children over 5 years of age, resulting from fear or pain of injection rather than the vaccine. This reaction is unrelated to the content of the vaccine.
Minimize overcrowding by proper planning of the immunization sessions to reduce waiting time. Prepare vaccine out of recipient’s view and ensure privacy during the procedure to prevent anxiety.

Uni
t 8
111
d) Coincidental event
Coincidental event – this means that the event has occurred after immunization, and is not caused due to the vaccine or process of administration.
Vaccines are normally scheduled early in life when infections and other illnesses are common, including manifestations of an underlying congenital or neurological condition. It is, therefore, possible to encounter many events, including deaths, to be falsely attributed to vaccine through chance association.
A coincidental event is more likely if the same or similar events also affected others in the same age group around the same time but who did not receive the suspect vaccine(s). There may also be evidence showing that the event is not related to immunization.
Immediate investigation is important as in order to reply to the community’s concern about vaccine safety and to maintain public confidence in immunization.
It is important that all AEFIs are reported and communication with the Medical Officer be done immediately. The process of finding out the reasons for the AEFI will help the MO and you to understand why the event happened. This is not to find fault with any health worker but to guide and improve the quality of health services.
8.3 Managing AEFI when it occurs
When a serious or severe adverse event occurs, you should immediately:
zz Provide immediate first aid: lay child flat; ensure airway is clear. If child is unconscious, put in semi-prone position.
zz Refer to the MO (PHC) or nearest AEFI management centre for prompt treatment. Accompany the patient if needed.
zz Inform the MO (PHC) at the health centre immediately by the fastest means possible e.g. telephonically.
zz Report and assist in investigation of AEFIs.Treat minor/non-serious AEFIs symptomatically as per Table 8.5 below:
Table 8.5 Minor reactions due to vaccines
Minor vaccine reactions Treatment When to reportLocal reaction (pain, swelling, redness) zz Cold cloth at injection site
zz Give Paracetamolzz In case of an abscess
Fever > 38.5°C zz Give extra fluidszz Give tepid spongingzz Give Paracetamol
zz When accompanied by other symptoms
Irritability, malaise and systemic symptoms
zz Give extra fluidszz Give Paracetamol
zz When severe or unusual
8.4 Responsibilities of health service providers in minimizing AEFIs
Community level
Anganwadi and ASHA/volunteers/frontline workers
zz Follow up with beneficiaries to identify AEFIs after the vaccination session, using the beneficiaries’ list provided by the ANM.
zz Inform the adverse event immediately by telephone to concerned ANM, MO, etc.

Immunization Handbook for Health Workers (2018)
112
zz Assist in referral of any suspected caseszz Assist the team investigating the eventzz Support in building community confidence.
Sub Centre level
ANM
zz Screen each beneficiary for contraindications to avoid serious reactions. For example, vaccines are contraindicated if there is a possibility of serious allergy to a vaccine or its components. Live vaccines should not be given to immune deficient children.
zz Follow best immunization practices. Prior to starting vaccination at the RI site, the ANM must note down (in vaccinator’s logistics diary) the following particulars. This will help mitigate AEFIs at session site level:z� Manufacturer’s namez� Expiry datez� Batch numberz� VVM status (for new and partially used vaccines)z� Date on the label of partially used vaccine (in case of OVP)z� In case of reconstituted vaccines, date and time on the label.
zz Ensure that vaccine vial septum has not been submerged in water or contaminated in any way.zz Use Measles, BCG and JE vaccine within 4 hours of reconstitution. zz Never carry and use reconstituted vaccine from one session site to another.zz Do not store other drugs or substances in the ILR. These refrigerators are only meant for
vaccines. zz After injection, do not attempt to re-cap or bend the needle.zz Ask the beneficiaries to wait for half an hour after vaccination to observe for any AEFI.zz Provide a list of children vaccinated during the session to the AWW/ASHA and request them to
be alert, follow up and report AEFIs (if any) to her and the concerned MO.zz Ensure reasons for dropouts are entered in the immunization card counterfoils.zz Share details of all AEFIs (serious/severe and minor) with the MOIC in the weekly block level
meeting. Ensure details of all serious/severe and minor cases are entered in the AEFI case register maintained at the block PHC (see Annexure 1 for suggested format for AEFI Case Register).
zz Assist in investigation of AEFIs and take corrective action in response to the guidance from the MO (PHC).
Health supervisors (HSs)
zz Supervise and provide hands-on training to the ANMs/vaccinators in the field. This includes provision of information on referral transport and concerned officials in case of crisis.
zz Monitor the community for adverse events during supervisory visits to immunization sites or SCs. Also monitor and ensure follow-up of beneficiaries by HWs. Ensure reasons for dropouts are entered in the counterfoils.
zz Encourage the HWs to report AEFIs. Serious/severe AEFIs should be notified immediately by the fastest means possible.
zz Analyze the reported AEFIs in the SC monthly reports and keep track of HWs who have not reported any AEFI over a period of time.
zz Assist the investigation team in conducting the investigation.

Uni
t 8
113
8.5 Reporting of AEFIs (Fig. 8.1)
zz Immediately inform all serious/severe AEFIs by telephone / in person. zz Provide details of all AEFIs in your area on a weekly basis. Submit weekly NIL report only after
making efforts to look for these events in the children recently vaccinated. zz Notify detailed information of all serious, severe and minor AEFIs to be recorded in the block
AEFI register.zz Communicate and share the results of investigation with the community whenever instructed
by the medical officer.
Fig. 8.1 Reporting of AEFIs
MinorAEFI
SeriousAEFI
SevereAEFI
Weekly H-002 Report
District D-001 Report
Monthly HMIS report
Annexure 1 – Format for block AEFI register
Week No
Name ofSC
Name of vaccinee
Father’s name
Age Date of vaccination
Name of vaccines
given
AEFI noted
(sympt- oms)
Category (serious/severe/minor)
Case seen by MOIC
(Yes/No)
Entered in case
reporting form
(Yes/No)
1. Kindly follow the AFP surveillance calendar to identify week number.2. Information on serious and severe AEFIs should be shared weekly with the district along with
the H-002 form.3. The details of minor AEFI are to be maintained at block level and monthly cumulative data is to
be entered in HMIS report.

Immunization Handbook for Health Workers (2018)
114
Sample Block AEFI register – example on how to fill the information

Uni
t 8
115
8.6 First line Management of Anaphylaxis in Field SettingsSOP for administration of one dose of Intra-muscular Adrenaline by ANM
Q1. What is Anaphylaxis? How does it manifest?Anaphylaxis is an extreme and severe allergic reaction, that is potentially life threatening.
The whole body is affected, often within minutes of exposure to the allergen (substance causing the allergic reaction), but sometimes after hours. It occurs because the immune system overreacts to an allergen, and causes secretion of chemical substances that cause swelling of blood vessels. Common allergens include foods such as peanuts, dairy products, eggs etc. and non-foods such as wasp or bee sting, medications, vaccines, latex etc. The symptoms of an anaphylactic reaction include generalized flushing of the skin, nettle rash (hives) anywhere on the body, swelling of throat and mouth, difficulty in swallowing or speaking, alterations in heart rate, severe asthma, abdominal pain, nausea and vomiting, sudden feeling of weakness (drop in blood pressure), collapse and unconsciousness.
Q2. How will you suspect a case of anaphylaxis?In anaphylaxis, there is sudden onset of symptoms which rapidly worsens. Individual may complain of difficulty in breathing and/or giddiness/loss of consciousness, hypotension, skin changes such as generalized rashes, swelling of the lips and tongue (angioedema), hives (urticaria) and flushing. The person may have had a severe allergic reaction or anaphylaxis in the past. However, this may be the first time. Sudden onset and rapid progression of ≥ 1 signs and symptoms of any of the two systems (respiratory, cardiovascular and dermatological/ mucosal) should be suspected as a case of anaphylaxis.
8.7 Role of ANM/vaccinatorANMs are in continuous contact with the community and are responsible for delivery of multiple health services, including immunization, antenatal care, reproductive and child health. They are trained on safe injection practices and also can administer injectable vaccines (infants, children and adults), intramuscular magnesium sulphate to pregnant women and gentamycin for possible serious bacterial infection or sepsis in young infants. In order to initiate the process of timely management of anaphylaxis cases by ANMs, they need to be trained for:
1) Early recognition of a case of anaphylaxis 2) Immediate administration of a single age-appropriate dose of injection adrenaline
intramuscularly 3) Arranging immediate transportation of patient to the nearest health facility/ center (well
equipped to manage anaphylaxis)4) Providing details of the patient to medical officer for follow up and proper documentation in
records and reports
Fig. 8.2 Steps for Initial Management of Anaphylaxis
Assess case and suspect anaphylaxis
If anaphylaxis
is suspected
Administer one dose of adrenaline as per age
intramuscularly
Inform medical officer about
the patient and the referal
Arrange for transportation of
patient immediately to nearest health
facility
1 2 3 4

Immunization Handbook for Health Workers (2018)
116
8.8 Steps to be taken by an ANMa) Assess case and suspect anaphylaxisb) Initial management of suspected anaphylaxis case with one time use of injection adrenalinec) Transporting suspected anaphylaxis case to the nearest health facilityd) Inform medical officer and documentation
a) Assess case and suspect anaphylaxis
A case of anaphylaxis is suspected if the following criteria are met:
Usually respiratory, dermatological and cardiovascular systems are involved in anaphylaxis. The signs and symptoms under each of the three systems are listed in table below.
Table 8.6 Signs and symptoms of Anaphylaxis*
System Signs and SymptomsRespiratory zz Swelling in tongue, lip, throat, uvula or larynx
zz Difficulty in breathingzz Stridor (Harsh vibrating sounds during breathing)zz Wheezing (breath with whistling or rattling sound in the chest)zz Cyanosis (bluish discoloration of arms and legs, tongue, ears, lips
etc.) (Figure 8.3)zz Grunting (noisy breathing)
Cardiovascular zz Decreased level /loss of consciousness (fainting, dizziness)zz Low blood pressure ( measured hypotension)zz Tachycardia (increased heart rate, palpitation)
Dermatological or mucosal
zz Generalized urticaria (raised red skin lesion, rash with itching) (Figure 8.4)
zz Generalized erythema (redness of skin) zz Local or generalized angioedema- itchy/ painful swelling of
subcutaneous tissues such as upper eyelids, lips, tongue, face etc. (Figure 8.5)
zz Generalized pruritus (itching) with skin rash
Early onset and rapid progression of ≥ ONE sign/s and symptom/s of any two of the following three systems –
zz respiratory, zz cardiovascular and zz dermatological/mucosal
In most cases of anaphylaxis, skin and mucous membrane are affected. In addition to the signs and symptoms given in Table 2, following features may also be observed: anxiety, diarrhea, abdominal cramps, nausea, vomiting and sneezing or rhinorrhea.
*Modified from The Brighton Collaboration Anaphylaxis Working Group; Anaphylaxis: Case Definition and Guidelines for data collection, analysis, and presentation of immunization safety data; Vaccine; Vol. 25, (2007); 5675-5684

Uni
t 8
117
Respiratoryzz Swelling in tongue, lip,
throat, uvula or larynxzz Difficulty in breathingzz Stridor (Harsh vibrating
sounds during breathing)zz Wheezing (breath with
whistling or rattling sound in the chest)
zz Cyanosis (bluish discoloration of arms and legs, tongue, ears, lips etc.)
zz Grunting (noisy breathing)
Cardiovascularzz Decreased level / loss of
consciousness (fainting, dizziness)
zz Low blood pressure (measured hypotension)
zz Tachycardia (increased heart rate, palpitation)
Dermatological / Mucosal
zz Generalized urticaria (raised red skin lesion, rash with itching)
zz Generalized erythema (redness of skin)
zz Local or generalized Angioedema - itchy/ painful swelling of subcutaneous tissues such as upper eyelids, lips, tongue, face etc.
zz Generalized pruritus (itching) with skin rash
Fig. 8.5 Angioedema
Fig. 8.4 Urticaria
Fig. 8.3 Cyanosis

Immunization Handbook for Health Workers (2018)
118
b) Initial management of suspected anaphylaxis case
Following vaccination, a case of anaphylaxis can be suspected if there is early onset of symptoms (within minutes to 6 hours) with rapid progression. In such a case,
zz The ANM should reassure the patient, parents and relatives. zz The suspected case should never be left alone. zz If the patient is conscious, he/she should be kept in a supine position with lower limbs raised
higher than head level.zz If the patient is unconscious, he/she should be kept in left lateral position. zz As per the age of patient (see table 8.7), ANM must administer one dose of injection adrenaline
by deep intramuscular route. zz ANM should seek help to immediately arrange for an ambulance/vehicle to transport the patient
to the nearest health facility (PHC/CHC/District Hospital/Civil Hospital).
Steps for administration of injection adrenaline by ANM
zz Take one ampoule of adrenaline (1:1000 dilution) solution from Anaphylaxis Kit (Box No.1) and check name, dilution and expiry date on label of vial (not from kit label). Remember that adrenaline ampoules are also labelled as epinephrine. Epinephrine is another name for adrenaline.
zz Take a 1 ml tuberculin syringe or a 40 unit insulin syringe and a 24/25 G one inch long needle zz Using the “age specific dosing chart” available in the anaphylaxis kit, load the syringe with the
appropriate dose of adrenaline. [Table 8.7]zz Use swab to clean the middle 1/3rd of anterolateral aspect of the thigh of the opposite limb to
that in which vaccine was given. zz Give deep intramuscular injection at 90 degree angle to skin in middle 1/3rd of anterolateral
aspect of thigh.
Fig.8.6 Administration of intramuscular injection
Table 8.7 Chart listing age-specific dose of adrenaline (1:1000) to be administered intramuscularly using tuberculin / insulin syringes for one-time management of anaphylaxis by health worker
Age group Dose in mL (tuberculin syringe)# Equivalent volume in insulin syringe#0-1 year 0.05 21-6 years 0.1 4
6-12 years 0.2 812-18 years 0.3 12
Adults 0.5 20
# Based on type of syringe available (tuberculin 1mL/insulin), choose relevant volume of adrenaline for administration

Uni
t 8
119
Box No.1 Anaphylaxis kit for ANM
Anaphylaxis Kit – Each kit should contain the following items:
zz Annexure 1 of these guidelines translated into local language taped to inside of the box lid – 1 no.
zz 1 mL ampoule of adrenaline (1:1000) – 3 nos.zz 1 mL tuberculin syringes / 40 unit insulin syringes without fixed needles – 3 nos.zz 24/25 G needles of 1 inch length – 3 nos. zz Swabs – 3 nos. zz Up to date contact information of Medical Officer(s) of PHC/CHC and local ambulance
services. zz Format for quarterly certification of anaphylaxis kit by Medical Officer of PHC
Store the contents in a plastic air tight container away from light.
Ensure the contents of Anaphylaxis kits are verified every three months. Adrenaline has a short expiry date.
Anaphylaxis kit for ANM
In order to ensure availability of adrenaline and the required syringes and needles for administration at the session site, an anaphylaxis kit should be available with the ANM at every session. The contents of the anaphylaxis kit is listed in Box No. 1 and shown in Figure no. 8.7.
Fig. 8.7 Anaphylaxis Kit

Immunization Handbook for Health Workers (2018)
120
Based on the availability of tuberculin or insulin syringe and considering the age of the patient, the appropriate dose of adrenaline should be loaded in the syringe. A comparison of the markings on tuberculin (in mL) and insulin (in units) syringes for corresponding volumes is shown in figure below.
Fig. 8.9 Markings of age appropriate dosage of adrenaline in mL (tuberculin syringes) and equivalent volume in units when using insulin syringes
The anaphylaxis kit may have either tuberculin syringe or insulin syringe (without fixed needles).
Usually insulin syringes are more easily available as compared to tuberculin syringes. The needle to be used should be of 24G or 25G with length of one inch for IM administration.
Fig. 8.8 Parts of tuberculin and insulin syringes with separate 24/25G needles of one inch length

Uni
t 8
121
ANM should administer only one dose of adrenaline and refer the patient to health facility well equipped to manage anaphylaxis. The following details of the patient should be conveyed to the medical officer of the health facility well equipped to manage anaphylaxis: Name, age, date, time, site, route and dose of adrenaline administered. The same should be available as a record with the ANM after transferring the patient.
About injection adrenaline
Epinephrine and adrenaline are synonyms. Adrenaline ampoules may also be labeled as epinephrine. The ampoules may be plain or amber coloured. These should not be exposed to temperature above 25 degree Celsius.
Key features of adrenaline are as follows:
zz Adrenaline is a naturally occurring catecholamine.zz Dosage: 0.01ml/Kg body weight (refer to age appropriate
dosing chart)zz Route of administration: Intramuscular zz Site of injection: middle 1/3rd of anterolateral aspect
of thigh in children and deltoid region of arm in case of adults.
zz Preparation: injection adrenaline is available in 1 mg/ml preparation.
zz Storage: Store in airtight containers, protected from light.
zz Expiry: 12 to 18 months from manufacturing
c) Transporting suspected anaphylaxis case to the nearest health facility
As soon as the ANM suspects anaphylaxis, she should administer injection adrenaline intramuscular and call for the ambulance. The ANM should ensure that the patient is transferred to the ambulance / vehicle without delay and refer the case to nearest health facility well equipped to manage anaphylaxis for further management.
zz The ANM should keep contact details of an alternate vehicle owner/driver always. If an ambulance is not available or it is delayed, the ANM should contact the owner/driver of the alternate vehicle to transport the case to nearest health facility equipped to manage anaphylaxis. The untied sub centre funds may be used to reimburse cost of transportation.
d) Informing the medical officer and documentation
zz As the child is being transferred, the ANM will inform the medical officer about the case with necessary details (name, age, date, time, site, route and dose of adrenaline administered) for further management at the health facility well equipped to manage anaphylaxis and for follow up.
zz The anaphylaxis reaction (suspected or confirmed) should be recorded in the immunization card in block letters and further vaccinations should be given only as per prescription of a medical officer in hospital settings with availability of adrenaline and other resuscitation equipment.
zz The case details should also be recorded in the AEFI register and reported as a serious/severe AEFI case by the MO in the CRF to the DIO.
Fig. 8.10 Ampoule of adrenaline may be plain or amber coloured

Immunization Handbook for Health Workers (2018)
122
Flow Chart: Initial management of Anaphylaxis by ANM
AFTER IMMUNIZATION LET THE PARENTS OR GUARDIANS WAIT FOR 30 MINUTES. Suspect* Anaphylaxis in a case with following symptoms and signs.
Manage anaphylaxis
Refer to higher center
Step 2: Administer one dose of adrenaline
deep IM
Step 1: Assess Case
Step 3: Refer immediately
Step 4: Document suspected
anaphylaxis
Early onset (within few minutes to 6 hours) & rapid progression of >=1 signs & symptoms of any of the two systems (Respiratory, cardiovascular and dermatological / mucosal)
Respiratory:zz Swelling of tongue, lip, throat, uvula, larynxzz Difficulty in breathingzz Stridor (harsh vibrating sounds during breathing)zz Wheezing (breathing with whistling or rattling sound in the chest)zz Cyanosis ((bluish discoloration of arms and legs, tongue, ears, lips etc.)zz Grunting (noisy breathing)
Cardiovascular:zz Decreased level /loss of consciousness (fainting, dizziness)zz Low blood pressure ( measured hypotension)zz Tachycardia (increased heart rate, palpitation)
Dermatological or mucosal:zz Generalized urticaria (raised red skin lesion, rash with itching)zz Generalized erythema (redness of skin) zz Local or generalized Angioedema- itchy/ painful swelling of subcutaneous tissues
such as upper eyelids, lips, tongue, face etc.zz Generalized pruritus (itching) with skin rash
Other signs/symptoms: anxiety, diarrhea, abdominal cramps, nausea, vomiting and sneezing or rhinorrhea.
zz Reassure patient, parents/ relativeszz Immediately administer one dose of injection Adrenaline by deep IM routezz Seek help to immediately arrange for ambulance to transport the patient to
the nearest health facility (PHC/CHC/District Hospital/Civil Hospital)zz Do not leave the patient alonezz If patient is conscious, he/she should be kept in supine position with lower
limbs raised higher than headzz If patient is unconscious, he/she should be kept in left lateral position
zz Call for ambulancezz Inform MO about the case before arriving at the health facility for timely
management
zz Document suspected anaphylaxis on immunization card in block letters against vaccines administered
*Many of the initial signs and symptoms are similar in both mild allergic reactions and severe allergic reactions / anaphylaxis. ANM may administer a single dose of adrenaline injection at the first sign or symptom suggestive of allergy or anaphylaxis.

Uni
t 8
123
Quarterly certification of anaphylaxis kits by Medical Officer zz Medical officer will ensure availability of anaphylaxis kit with all ANMs at session sites / sub
centres during field visits.zz He will examine and certify contents of the anaphylaxis kit during March, June, September and
December i.e. at least once a quarterzz He will ensure injection adrenaline and other logistics do not have expiry dates within the next
three months of date of examination/certification.zz If the expiry date of any logistics is within three months of visit, this will be replaced during the
next visit of the ANM to the PHC and signed by the Medical Officer in the following format which will be part of the kit:
13
FOR
MA
T F
OR
QU
AR
TE
RL
Y C
ER
TIF
ICA
TIO
N O
F A
NA
PHY
LA
XIS
KIT
S B
Y M
ED
ICA
L O
FFIC
ER
PH
C
Nam
e of
AN
M:
Su
bcen
tre:
N
ame,
con
tact
num
ber
of M
O:
Dat
e of
ch
ecki
ng
Con
tent
s E
xpir
y da
tes
Sign
atur
e of
MO
A
ctio
n re
quir
ed (r
epla
ce
ampo
ule/
syri
nge)
A
ctio
n ta
ken,
sign
atur
e of
M
O, d
ate
1
mL
ampo
ule
adre
nalin
e (1
:100
0) –
3 n
os.
1 m
L/40
uni
t syr
inge
s – 3
nos
.
24/2
5 G
one
inch
nee
dle-
3 n
os.
1
mL
ampo
ule
adre
nalin
e (1
:100
0) –
3 n
os.
1 m
L/40
uni
t syr
inge
s – 3
nos
.
24/2
5 G
one
inch
nee
dle-
3 n
os.
1
mL
ampo
ule
adre
nalin
e (1
:100
0) –
3 n
os.
1 m
L/40
uni
t syr
inge
s – 3
nos
.
24/2
5 G
one
inch
nee
dle-
3 n
os.
1
mL
ampo
ule
adre
nalin
e (1
:100
0) –
3 n
os.
1 m
L/40
uni
t syr
inge
s – 3
nos
.
24/2
5 G
one
inch
nee
dle-
3 n
os.

Immunization Handbook for Health Workers (2018)
124
Common AEFIs and their management
Adverse event Signs and symptoms, reporting Treatment Vaccines Involved
Fever Fevers below 102ᵒF/ < 39°C (low/medium grade) may be listed in AEFI register as minor AEFI if medical care was sought.
Symptomatic;
Paracetamol
Any vaccine
Severe local reaction
Redness and/or swelling around the injection site and one or more of the following:
zz Swelling beyond the nearest jointzz Pain, redness and swelling of more than
3 days durationzz Requires hospitalization.
Local reactions of lesser intensity occur commonly and are trivial and do not need to be reported. Settles spontaneously within a few days to a week.
Symptomatic treatment with analgesics.
Antibiotics are inappropriate.
Any vaccine
Injection site abscess
Fluctuant or draining fluid-filled lesion at the site of injection. Bacterial if evidence of infection (e.g. purulent, inflammatory signs, fever, culture), sterile abscess if not. Reported and investigated as serious, if hospitalized for treatment.
Incise and drain
Anti-inflammatory (e.g. Syp. Ibuprofen)
Antibiotics if bacterial
Any vaccine
Seizures Occurrence of generalized convulsions that are not accompanied by focal neurological signs or symptoms. Febrile seizures; if temperature elevated >100.4 ᵒF/ > 38°C (rectal) Afebrile seizures: if temperature normal. Self-limiting.
Supportive care
Paracetamol and cooling if febrile
Rarely anticonvulsants
All, especially Pertussis containing vaccine (DPT, Penta), Measles
Persistent inconsolable screaming
Inconsolable continuous crying lasting 3 hours or longer accompanied by high-pitched screaming.
Settles within a day or so
Analgesics may help.
DPT, Penta
Hypotonic Hypo-responsive Episode (HHE) or shock-collapse
Event of sudden onset occurring within 48 (usually less than 12) hours of vaccination and lasting from one minute to several hours, in children younger than 10 years of age. All of the following must be present:
zz Limpness (hypotonic)zz Reduced responsiveness
(hyporesponsive)zz Pallor or cyanosis
Episode is transient and self-limiting
Does not require specific treatment
Not a contraindication for further doses of the vaccine.
Mainly DPT, Penta rarely others

Uni
t 8
125
Differential diagnosis for Breath holding spell, Convulsion and Anaphylaxis
Breath holding spell Convulsion Anaphylaxis Triggering factor Triggered by sudden
fright/ pain/injury to head; occurs in young children
Illness, fever, medication, or injury
Any drug including vaccine, food, insect bite etc.
Clinical features Child becomes pale, loses consciousness, develops facial flushing & cyanosis, may become sweaty, or stiffen, have a few body jerks or loose bladder control
Child cries/groans loudly. Tonic phase – body is rigid, with clenched teeth. Lips may turn blue. Clonic phase- Resumes shallow breathing; arms and legs jerk quickly and rhythmically; pupils contract and dilate
Urticaria, swollen eyes, face, generalized rash; Noisy breathing from airways obstruction; Tachycardia; Weak carotids;
Loss of consciousness; little response in prone position
Duration Episodes are brief and lasts less than minute
Generally lasts 1 - 3 minutes. Seizure lasting more than five minutes requires emergency medical help.
With early and appropriate intervention, anaphylaxis can pass within a few hours. If progresses to a serious stage, recovery may take a few days. May cause death within minutes or hours after onset if appropriate steps are not taken
Recovery Child will regain consciousness, recognises people but may seem sleepy
Child relaxes, may lose control of bowel or bladder. Regains consciousness slowly. May appear drowsy, confused, anxious, or depressed.
Potentially fatal if not recognised and treated appropriately soon after onset. Recovery may take days.
Differential diagnosis for Mild and Severe allergic reactions
Mild allergic reactions Severe allergic reactions / AnaphylaxisOnset and progression
Fast onset immediately following vaccination, does not progress in severity; not life threatening
Quick onset, progresses quickly in severity
Signs and symptoms
Itching, redness, mucosal involvement (swelling of lips, face, eyes), tingling sensation in mouth, abdominal pain
In addition to dermatological involvement as in mild allergic reactions, the case may progress quickly to involve other systems such as cardiac (persistent dizziness, pale appearance, sudden collapse) or respiratory system (difficulty /noisy breathing, swelling /tightness of throat, difficulty in talking /hoarse voice, wheeze).
Management Requires symptomatic treatment and refer to medical officer for further management
ANM can safely administer single dose of adrenaline intramuscularly before referring the case immediately to appropriate health facility.
Many of the initial symptoms and signs are similar in both mild allergic reactions and severe allergic reactions/anaphylaxis. ANM may administer a single dose of adrenaline injection at the first sign or symptom suggestive of allergy or anaphylaxis.

Immunization Handbook for Health Workers (2018)
126

Uni
t 9
127
Unit 9: Records, reports and using data for action

Immunization Handbook for Health Workers (2018)
128
Unit 9:Records, reports and using data for action
Learning ObjectivesAt the end of the unit, you should be able to:
zz List the records and reports to be maintained at the subcentrezz Explain the correct use of the Mother and Child Protection (MCP) cardzz Demonstrate correct use of tracking bag to keep the counterfoils zz Record the information accurately in the registers and reporting formatszz Use coverage monitoring chart to track the progress
Contentsz¾ Importance of record-keepingz¾ Mother and Child Protection (MCP) card with counterfoil z¾ Tracking Bagz¾ Immunization/RCH/MCTS Registers z¾ Name based list of due beneficiaries and Tally Sheet z¾ Monthly Progress Report z¾ Coverage Monitoring Chart
9.1 Importance of Record-Keeping
Systematic and regular recording of the vaccinations given at each session ensures that the immunization services reach all beneficiaries, identifies defaulters and helps to actively follow up all those who need to complete their vaccinations.
The following records and reports are the basis of all the information generated at the sub- center and higher levels:
zz Mother and Child Protection (MCP) card with counterfoil zz Tracking Bagzz Mother and child register / Immunization Registerzz Name based due list and Tally Sheetzz Coverage Monitoring chart zz Monthly progress report
9.2 Mother and Child Protection (MCP) card with counterfoil
The MCP Card is a tool for families to learn, understand and follow positive practices for achieving good health of pregnant women, young mothers and children. The card gives information on the immunization schedule and the doses of Vitamin A to be given to the child during the first five years. Boxes in the chart indicate each type of vaccine, date to be given, date when it was given and age.

Uni
t 9
129
Details that would be available from MCP Card are:
zz Next vaccination date - top box - when the child is expected to come for next immunization.zz Date of vaccination - against vaccine name - when the child was immunized.
How to use the card
zz During the first visit, fill the information on the cover page on “Family Identification and Birth Record”.
zz Record the date, month and year of all entries clearly.zz Explain the section on immunization by explaining which vaccines have been given and which
vaccines are due, with dates.zz Do not leave any cells or columns blank.zz After filling up all the columns, retain the smaller portion of the card (counterfoil).zz Give the rest of the filled-in card to the parent of the child after immunization and ask her to
bring the same card during her subsequent visits to the health centre.zz Advise families to keep the card in a safe place to prevent it from damage.zz Advise families to bring the card along when they visit the Anganwadi Centre (AWC), SC, health
centre, private doctor or a hospital.zz At the end of each session, the counterfoils should be placed in the appropriate pocket of the
tracking bag.zz Each month, look at the counterfoils in the tracking bag and make sure those children come for
immunization. If they miss the session, ask the ASHA/AWW to follow up with those families and ensure that they attend the next session.
Fig 9.1 Infant RI card and counterfoil

Immunization Handbook for Health Workers (2018)
130
9.3 Tracking Bag
Keeping counterfoils in tracking bag helps in:
zz Preparing a session-wise name-based list of due beneficiaries for sharing with the ASHA/AWW/mobilizer
zz Estimating the vaccine requirement for the next session
zz Tracking the dropoutszz Providing information, if the beneficiary/parent has
lost the immunization card.
The counterfoils need to be filed separately for each session site. A cloth-tracking bag with 15 pockets is a simple, easy to use tool for filing the counterfoils (Fig.9.2). The first 12 pockets indicate each of the 12 months of the year. The thirteenth pocket is for those who left/died during the period, the fourteenth pocket is for fully immunized children and the fifteenth pocket is to store blank MCP cards.
Once a beneficiary is immunized, the counterfoil would be placed in the month (pocket) due for the next dose (see Fig 9.3). For example, if a child comes for Penta 1 in January, Penta 2 is due in February. Update and place the counterfoil in the February pocket. When the Penta 2 dose is given in February, update the counterfoil and move to the pocket for March. When the Penta 3 dose is given in March, then update and place the counterfoil in the September/October pocket since the child has to return for measles/MR vaccine.
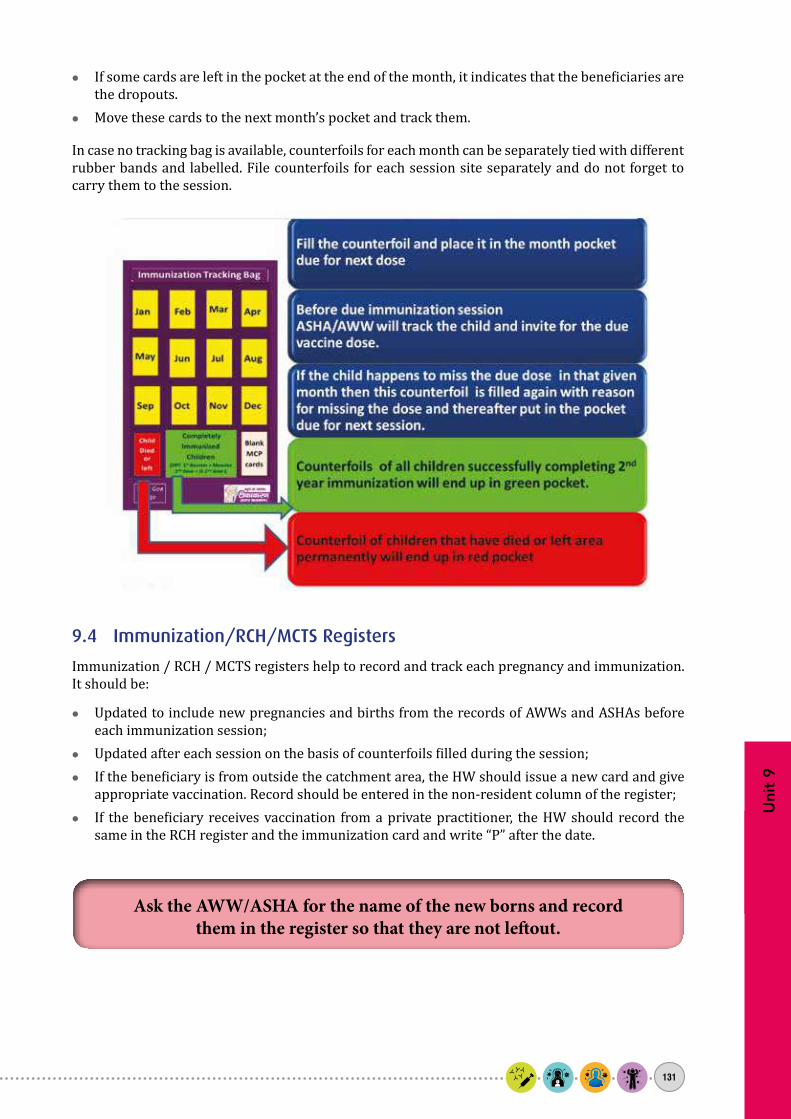
Uni
t 9
131
zz If some cards are left in the pocket at the end of the month, it indicates that the beneficiaries are the dropouts.
zz Move these cards to the next month’s pocket and track them.
In case no tracking bag is available, counterfoils for each month can be separately tied with different rubber bands and labelled. File counterfoils for each session site separately and do not forget to carry them to the session.
9.4 Immunization/RCH/MCTS Registers
Immunization / RCH / MCTS registers help to record and track each pregnancy and immunization. It should be:
zz Updated to include new pregnancies and births from the records of AWWs and ASHAs before each immunization session;
zz Updated after each session on the basis of counterfoils filled during the session;zz If the beneficiary is from outside the catchment area, the HW should issue a new card and give
appropriate vaccination. Record should be entered in the non-resident column of the register;zz If the beneficiary receives vaccination from a private practitioner, the HW should record the
same in the RCH register and the immunization card and write “P” after the date.
Ask the AWW/ASHA for the name of the new borns and record them in the register so that they are not leftout.

Immunization Handbook for Health Workers (2018)
132
9.5 Name based list of due beneficiaries and Tally Sheet
For each session, these forms record the names of beneficiaries due for each vaccine, antigen-wise coverage by gender and age as well as vaccines and syringes issued and consumed. Use them as follows:
zz Consult RI Microplan Form 6 – Session beneficiary due list.zz Use counterfoils in tracking bags and the RCH register to prepare the list of due beneficiaries
before each session.zz Keep a booklet of sheets - use three copies for every session as follows:
z� One copy, share with ASHA and AWW to track due beneficiaries for the session.z� Second copy, record every dose of vaccine given and keep with you. z� Third copy, send to PHC with AVD as session reporting format.
zz Cross check the list of due beneficiaries with the remaining counterfoils at the end of the session. Try to find out the reasons for dropouts.
zz Administer the dose first and then record the coverage in the tally sheet.zz Use the completed tally sheets to prepare the monthly progress report.

Uni
t 9
133
9.6 Monthly Progress Report
The Monthly Progress Report is a report of the SC submitted by the ANM at the end of each month. This report is based on correctly filled tally sheets, Maternal and Child Health (MCH)/ Reproductive and Child Health (RCH) registers and other records. Data must be recorded completely and correctly as follows:
zz Yearly target of infants must be based on actual head count.zz Immunization with each antigen dose needs to be filled in correctly.zz All VPDs should be reported to the PHC for followup.zz All AEFIs (serious and minor ) should be recorded in the AEFI register.
The cumulative coverage will enable you to calculate the coverage of each antigen and the dropout rates. Since this is the basis of obtaining all coverage and epidemiological data at state and national levels, the data must be recorded accurately.
9.7 Coverage Monitoring Chart
Coverage monitoring chart is a useful tool which provides information at a glance on target figures and the immunization coverage, particularly in terms of leftouts and dropouts. The supervisor should plot the immunization data on the chart during visits to the SC (as given in Fig.9.4). It should be updated every month.
Here is an example for calculating coverage, dropouts and leftouts for Penta1 and Penta3. A similar chart can be prepared for other vaccines.
Fig 9.4 Coverage Monitoring Chart

Immunization Handbook for Health Workers (2018)
134
The coverage-monitoring chart has a vertical and a horizontal axis. Vertical axis is divided into 12 equal parts, each representing the monthly target. Write cumulative target against each month. If the yearly target of infants in a Sub-centre is 360 children, then the monthly target is 360 /12 = 30 children. Therefore, the cumulative target for April will be 30; for May it will be 60 (30 + 30); for June it will be 90 (30 + 30 + 30); for July it will be 120 (30 + 30 + 30 + 30), etc.
On the horizontal axis, the months of the year are given starting from April to March. In the rows below each month, write the total number of children immunized with Penta 1 and Penta 3 during that month and also cumulative till that month. On the graph, plot the cumulative total of Penta 1 for each month (on the right side of the column). Similarly, plot for Penta 3 in a different colour in the same column.
Calculating coverage for an antigen at any time= Total Antigen administered X 100
Yearly target
Eg- Coverage for Penta 1 from Apr till July is:104 / 360 X 100 = 28.8% rounded off = 29%
Calculate the total number of dropouts and the Dropout Rate (%) as follows:= (Penta 1 cumulative total - Penta 3 cumulative total) x100
Penta 1 Cumulative total

Uni
t 10
135
Unit 10: Mother and Child Tracking System (MCTS)/Reproductive and Child Health (RCH) Portal and ANMOL Application

Immunization Handbook for Health Workers (2018)
136
The objective of programme through
MCTS/RCH portal is to assist in reducing Infant Mortality Rate (IMR), to improve the nutritional
level of the child, to ensure completion of
immunization in children by tracking the proper growth of individual child, and to reduce
Maternal Mortality Ratio (MMR) and Total Fertility
Rate (TFR).
1. Mother and Child Tracking System (MCTS) / Reproductive & Child Health (RCH) portal
Health of women and children has been a development concern in India. It is estimated that around 44 thousand women die every year in the country due to preventable pregnancy and delivery associated complications. It is also estimated that every year around 8.4 lacs babies fail to survive before they complete one year.
Most of these deaths can be prevented by ensuring timely delivery of healthcare services to every pregnant women and child. Evidence shows that the effective use of IT enabled healthcare system can improve access to better quality services and empower healthcare service providers as well as beneficiaries. These efforts will contributeto a reduction in maternal, child morbidity and mortality.
Considering the benefits the Ministry of Health and Family Welfare (MoHFW) has introduced ‘Mother & Child Tracking System (MCTS)’ which is an online and name based software application to be used by ANMs . This software will help in the timely and regular delivery of maternal and child healthcare
Unit 10:Mother and Child Tracking System (MCTS)/Reproductive and Child Health (RCH) Portal and ANMOL Application
Learning ObjectivesAt the end of the unit, you should be able to:
zz Understand the importance of MCTS/RCH portal and ANMOL application as an effective IT tool for early identification and timely delivery of reproductive and child healthcare services.
zz Follow up of registered beneficiaries for service delivery protocol so as to ensure timely delivery of full component of antenatal, postnatal & delivery services and tracking of children for complete immunization services.
zz Describe the utility of IT enabled healthcare system to strengthen the existing RCH service delivery and monitoring system.
Contentsz¾ Importance of MCTS/RCH portalz¾ Benefits of MCTS / RCHz¾ Protocol for beneficiary identification and service delivery.z¾ Key features of ANMOL application.
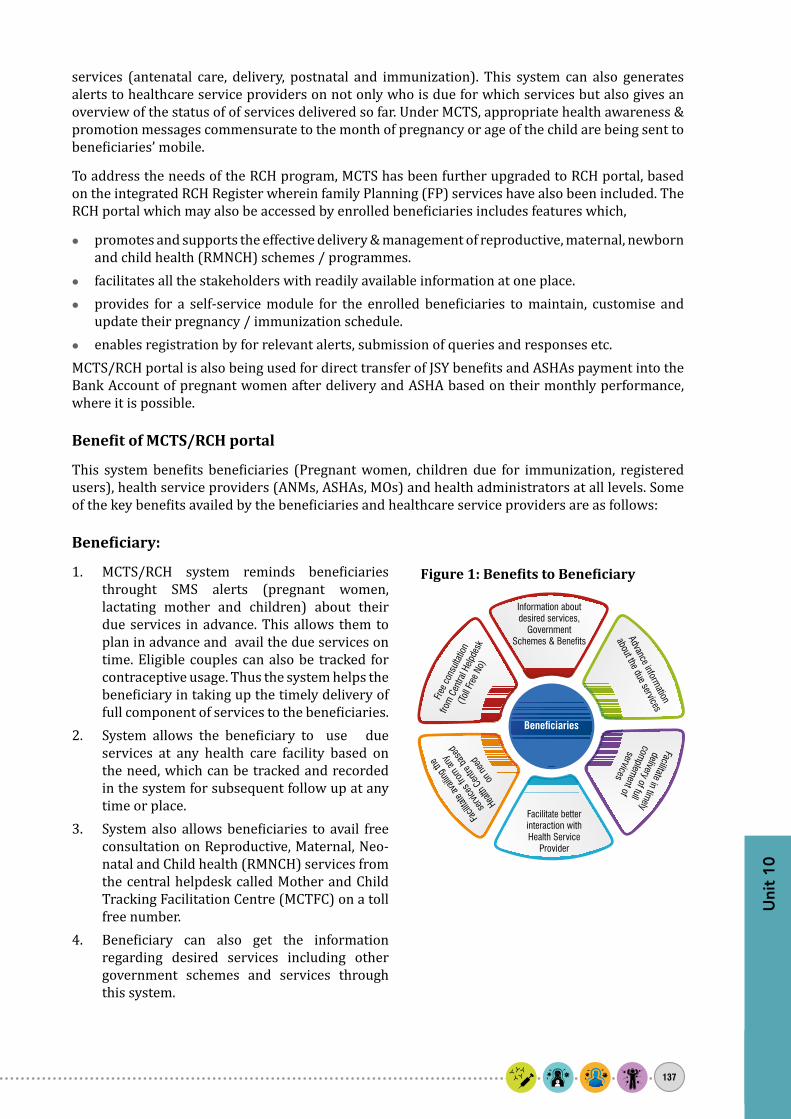
Uni
t 10
137
services (antenatal care, delivery, postnatal and immunization). This system can also generates alerts to healthcare service providers on not only who is due for which services but also gives an overview of the status of of services delivered so far. Under MCTS, appropriate health awareness & promotion messages commensurate to the month of pregnancy or age of the child are being sent to beneficiaries’ mobile.
To address the needs of the RCH program, MCTS has been further upgraded to RCH portal, based on the integrated RCH Register wherein family Planning (FP) services have also been included. The RCH portal which may also be accessed by enrolled beneficiaries includes features which,
zz promotes and supports the effective delivery & management of reproductive, maternal, newborn and child health (RMNCH) schemes / programmes.
zz facilitates all the stakeholders with readily available information at one place. zz provides for a self-service module for the enrolled beneficiaries to maintain, customise and
update their pregnancy / immunization schedule. zz enables registration by for relevant alerts, submission of queries and responses etc.
MCTS/RCH portal is also being used for direct transfer of JSY benefits and ASHAs payment into the Bank Account of pregnant women after delivery and ASHA based on their monthly performance, where it is possible.
Benefit of MCTS/RCH portal
This system benefits beneficiaries (Pregnant women, children due for immunization, registered users), health service providers (ANMs, ASHAs, MOs) and health administrators at all levels. Some of the key benefits availed by the beneficiaries and healthcare service providers are as follows:
Beneficiary:
1. MCTS/RCH system reminds beneficiaries throught SMS alerts (pregnant women, lactating mother and children) about their due services in advance. This allows them to plan in advance and avail the due services on time. Eligible couples can also be tracked for contraceptive usage. Thus the system helps the beneficiary in taking up the timely delivery of full component of services to the beneficiaries.
2. System allows the beneficiary to use due services at any health care facility based on the need, which can be tracked and recorded in the system for subsequent follow up at any time or place.
3. System also allows beneficiaries to avail free consultation on Reproductive, Maternal, Neo-natal and Child health (RMNCH) services from the central helpdesk called Mother and Child Tracking Facilitation Centre (MCTFC) on a toll free number.
4. Beneficiary can also get the information regarding desired services including other government schemes and services through this system.
Figure 1: Benefits to Beneficiary

Immunization Handbook for Health Workers (2018)
138
Health Service Providers (ANM/ASHA)1. MCTS/RCH portal provides an accurate and
auto-generated work plan that can be used by health service providers for micro-planning and VHND.
2. ANMs gets contact details of beneficiary that helps in connecting with them to provide timely assistance and services.
3. ANMs can real time monitor the registration and service delivery performance of their respective sub-centre.
4. MCTS/RCH portal provides a readily available services due list with beneficiary details for better service delivery follow up.
5. Health service providers can get the better guidance from senior supervisors
MCTS/RCH Implementation Status
Currently, RCH portal has been launched and is in use across 25 States/UTs. Central/State based RCH portal will soon be implemented country wide by April, 2018.
As on 27th February, 2018, approximately 1.39 crore pregnant women and 10 crore children up to 5 years are being followed up for delivery of due services using MCTS/RCH portal.
MCTS/RCH portal will give support to the ANMs in carrying out their daily work efficiently. It will also givevalue addition in terms of facilitation in attaining universal coverage of beneficiary, support in service delivery follow up, micro-planning of immunization services and VHND, real time monitoring of service delivery performance and intensive care of high risk beneficiaries.
Figure 3: RCH Implementation Status
Figure 2: Benefits to Health Service Provider

Uni
t 10
139
Figure 4: Beneficiary identification, service delivery and data flow protocol
2. Beneficiary Identification and Service Delivery Protocol
MCTS/RCH portal can facilitate in identification of all beneficiaries and establish an effective service delivery mechanism using field functionaries as follows:
1. Beneficiary Identification and Data Collection ANM (Auxiliary nurse midwife) with support of Accredited Social Health Activist (ASHA) does
the community/household survey on periodic basis for a village and identifies the beneficiary through household visits. ASHA maintains the record of beneficiary identified by her and Shares the information with ANM during the ANMs field visit or during meetings to review the survey.
2. Service Delivery MCTS/RCH portal provides an auto-generated work plan, which assists in planning visits for
Village Health and Nutrition Day (VHND). ANMs carries medicines and immunization vaccines and provides services to all the identified beneficiaries.
3. Record Keeping and Creation of Missed Services Records of Beneficiary ANM records the beneficiary detail in integrated RCH register and generates the list of missed
services of the beneficiary for further follow up and ensuring timely delivery of full component of services.
4. Data Entry in MCTS/RCH Portal ANM shares the beneficiary and services delivery records through register or follow up format
with data entry operator for entry into MCTS/RCH portal.5. MCTS/RCH Data Quality ANM reviews the beneficiary data entered in MCTS/RCH portal and accordingly she can
update/correct beneficiary records to further strengthen the system. 6. Programme Monitoring and Evaluation MCTS/RCH portal generates reports for ANM and health supervisor through which they can
readily view status of RCH healthcare services delivered. Using this information the ANM with help from the supervisor or Medical Officer canthen focus interventions to solve problems and ensure effective programme implementation. MCTS/RCH portal also facilitates in establishing a

Immunization Handbook for Health Workers (2018)
140
supporting supervision framework that ensures timely and effective interventions. RCH portal and ANMOL also has dashboard which is a performance measurement system that provides at glance view of indicators and extent to which they have achieved intended goals.
One commonly faced issue in the field for ANMs is the delay from when submission of the beneficiary data to the data entry operator and the actual entry in the MCTS/RCH portal.
To address this problem the MoHFW has introduced an initiative named, ANM On Line (ANMOL), an app for tablets where this software application will provide the ANM an opportunity to also enter the data directly themselves This also reduces the possibility of delay and error in data reported in RCH portal as the data is directly entered by the ANMs through this application. ANMs can report the quality data right from the place of service delivery, which reduces the delay in data reported in RCH portal. ANMs can also check and correct the beneficiary data entered in the RCH portal thus ensuring the quality of data entered in the system. It also helps in attaining the universal coverage of beneficiary by ANMs as her performance vis a vis the target can be real time monitored for prompt action.
ANMOL application has been designed to meet the requirements of the RMNCH program by incorporating additional functionality and features of Reproductive and Child Health. The application is easy to understand and works both offline and online and also acts as a job aid to guide ANMs in decision making and client counselling in the field.
3. ANM On Line (ANMOL)
ANMOL is a tablet-based RCH application which empowers ANMs (Auxiliary Nurse Midwife) and frontline health workers to carry out their day to day work efficiently and effectively. ANMOL allows ANMs to enter and update the service records of beneficiaries on real / near real time basis and on their own.
ANMOL provides a strong support to the ANMs by providing them with readily available information such as due list, a dashboard showing information at a glance, counselling, messages and material and also gives alerts to the ANM for guidance , all based on the data entered. This standardizes the maternal and child health care services provided by ANMs. ANMs can plan the Village Health and Nutrition Day (VHND) as per the date specified along with the vaccines and logistics required. This is proposed to be integrated with point of care diagnostics.
ANMOL has been launched with the following objectives:
zz To ensure effective and timely delivery of quality healthcare services to all beneficiaries including rural and unreached urban population.
zz Establish better communication of ANMs with beneficiaries and doctors through remote assistance which will improve the quality of services.
zz Bringing awareness among potential beneficiaries and unserved community through images, videos and educating them about Government initiatives on health, maintenance of good hygiene, basic health care & precautions. Audio and video counselling facility of ANMOL helps create awareness among beneficiaries about various government schemes and facilitates beneficiaries getting authentic knowledge about family planning, pregnancy and child care.

Uni
t 10
141
Key Modules of ANMOL
ANMOL has been made user friendly and has easy user interface for data entry with selections, drop downs etc. to ensure minimum typing. In addition, proper validations have been provided to ensure quality data input. Ready count of beneficiary is available in each module. To monitor growth of child and ANMOL generates growth chart of child based on weight for age entered for that child.
In addition to data entry ANMOL also provides complete package of counselling module:
1. Video Counselling: Videos for beneficiary counselling with provision to share the videos.2. Audio Counselling: Kilkari audio messages generated based on beneficiary LMP / DoB can be
shared with beneficiary through online or offline medium3. ANM Tutorials: Provision for interactive tutorials for ANM’s to provide an eLearning platform4. User Manuals & eBooks: Provision to send guidelines, updated manuals or notices to ANM’s 5. Beneficiary wise Counselling: Counselling materials and medical prompts auto generated
to guide ANM to provide appropriate advice to beneficiary based on risk factor identified. These counselling modules serve a dual purpose which helps in counselling the beneficiaries and increasing their own capacity in field. In addition, SMS and call functions have also been incorporated in ANMOL.
The application has an option to link with Aadhar both online and offline by scanning QR code, biometric identification, and OTP to capture beneficiary demographic details and directly upload them into system, thus avoiding duplication of data. With ANMOL being a digital eRegister, the need for maintaining physical registers have been completely eliminated. The system has brought about integration of Government’s Universal ID database, the Reproductive Child Health (RCH) portal and has the potential to integrate other future innovations for real time monitoring and interventions.
ANMOL application was launched by Hon’ble Minister for Health & Family Welfare on “World Health Day” 7th April, 2016. ANMOL has been successfully implemented in the State of Andhra Pradesh, Telangana, Madhya Pradesh, Odisha, Himachal Pradesh and Chhattisgarh. Country wide implementation of ANMOL is envisaged in phased manner to be completed by year 2020.
Thus, ANMOL acts both as real-time data monitoring tool, which helps in capacity building of ANMs and also is a platform for beneficiaries’ behavior change through in-built videos and audio counselling contents specifically designed and developed for them.
Figure 5: ANMOL Application Modules

Immunization Handbook for Health Workers (2018)
142
ANMOL provides a comprehensive solution for reporting, counselling, tracking, monitoring and using data for action for RCH services at all levels.
MoHFW is committed to empower ANMs and enable them to efficiently carry out their work in the field. MCTS/RCH and ANMOL are initiatives thwill eventually strengthen the health care service delivery system in the country.
ANMs are encouraged to make best use of these systems and efficiently carry out their job using MCTS/RCH portal and ANMOL.
Key Features of ANMOLzz Integrated with RCH portal for seamless data flowzz Ticketing System for ANM’s to raise any issues with screen shotszz Online notification for ANM’szz Frequently asked question (FAQ)zz Provision to provide services to beneficiaries out of ANM’s catchment areazz Auto synchronizationzz Delete unsynchronized or rejected records Upcoming video chat modulezz Monitor ANM’s performance through web interfacezz Restore & backup local data (Admin Privileges)

Uni
t 11
143
Unit 11: Partnering with communities to increase coverage

Immunization Handbook for Health Workers (2018)
144
Unit 11:Partnering with communities to increase coverage
Learning ObjectivesAt the end of the unit, you should be able to:
zz Identify the reasons for children missing vaccinations (dropouts or leftouts) and possible interventions
zz Involve community to support immunizationzz Use effective IPC skills for communicating with caregivers zz Conduct an effective community meeting
Contentsz¾ Reasons for missed children and possible interventions z¾ Involving the community to support immunization z¾ Using interpersonal communication skills effectivelyz¾ Holding an effective community meeting
10.1 Introduction
As a health worker you are responsible for immunization services in your sub-center area. Your goal is to ensure that all children in your area are fully immunized before their first birthday.
The immunization-targeted community can be divided into three groups as shown in Fig.10.1. Your aim as a health worker is to expand the inner circle to cover the entire universe of eligible children in your catchment area.
Fully immunized
Dropouts
Leftouts/unreached
From a service delivery perspective:
zz Leftouts are those children who have never been vaccinated or reached (thus remaining unimmunized);
zz Dropouts are those children who started vaccination but did not complete the schedule (thus remaining partially immunized).
From a behavioural perspective, a large percentage of dropouts is a serious problem because it reflects the poor perception of parents/caregivers’ about the benefits of

Uni
t 11
145
vaccination or of the immunization service delivery system, or both, combined with other barriers that forces them to place immunization on a low priority.
People who “dropout” of the immunization system are the easiest to reach and be convinced to return for full immunization.
10.2 Reasons for missed children and possible interventions
Table 10.1 below gives the common reasons for missed children (leftouts and dropouts) and the possible interventions to reach them.
Table 10.1 Reasons for missed children and possible interventions
Possible reasons Possible interventionsDemand-side issues1. Parents not motivated to
immunize children because of their poor understanding of its purpose and importance
zz Engage with community leaders, school teachers, faith/religious leaders, youth networks, women’s self-help groups (SHGs) and encourage them to talk to parents about the benefits of immunization.
zz Counsel and effectively communicate with parents and the community on the importance of immunization.
zz Disseminate information on the benefits of immunization at health fairs and other events and make people aware of immunization services.
zz Use other communication channels such as local cable television, wall paintings and posters, mosque and temple announcements, traditional and folk media.
2. Cultural or religious reasons for refusal of vaccination (myths, rumours and misconceptions)
zz Find out the reasons for reluctance by talking directly to communities/leaders. Try to address their misconceptions, doubts and fears by listening to them and offering support.
zz Involve community leaders (particularly the ones favourable to immunization) and other staff working within that particular community in order to encourage their fellow members to have their children immunized.
zz Arrange for an interaction between resistant groups and satisfied beneficiaries in the area to promote immunization.
3. Fear of side-effects or AEFI in the community discourages parents to immunize their children
zz Involve religious leaders, village elders, school teachers and panchayati raj institution (PRI) members to accompany the field level workers (FLWs) during their house-to-house mobilization visits, organize folk shows to educate parents and communities on the importance of RI for children and dispel myths and misconceptions.
zz Remind to always tell parents/caregivers about common side effects that may occur and what to do should they occur.
zz Help investigate any AEFI and apprise the community of the details of the case, possible causes and actions taken.
4. Financial or gender barriers to immunization, e.g. husbands disallowing wives to attend sessions because of time/lost labour, expense and/or fear of side-effects
zz Counsel opinion leaders and influential persons about the dangers of VPDs and the benefits of immunization.
zz Encourage peer counselling by fathers of children who accept immunization.
zz Publicize that immunization services are entirely free

Immunization Handbook for Health Workers (2018)
146
Possible reasons Possible interventions5. Refugees/families that fear
contact with government, e.g. those who lack documents/scheduled castes or tribes/nomadic groups/homeless families/urban slums/street children
zz Determine where these populations reside.zz Visit the communities and work with local mobilizers/educators/
community groups/leaders to discuss reasons why they have never accessed immunization services.
zz Provide information on the importance of vaccination and date, time and place of the next nearest session.
zz Develop a list of children who have never accessed immunization services in the area and share it with HWs of the area for immunization and ensure follow-up.
Supply-side issues1. All newborns and infants not
identified and listedzz Involve AWWs/ASHAs to identify and share lists of newborns and
children.2. Sessions too infrequent
or timings and days not convenient/not understood
zz Plan sessions after consulting the community, e.g. early in the morning/late evening.
3. Session site too far away, e.g. border populations
zz Include all the areas in the microplan.zz Reorganize the catchment area so that remote sites are visited
at least once every 2 or 3 months (plan at least 4 immunization sessions a year).
zz Work with neighbouring health facilities to coordinate services for border areas.
zz Improve outreach to communities through appropriate transport, additional staff and publicize outreach services.
4. Parents do not return because sessions are not held as planned or vaccines are unavailable
zz In case of HW being on leave, deploy alternate vaccinators.zz Ensure alternate delivery of vaccines to session sites.zz Encourage community groups to report problems regarding HWs’
attendance on session days to the PHC.zz Ensure adequate supplies of vaccines and logistics.
5. HWs do not clearly explain to parents what vaccines are due, when they are due and why they are needed
zz HWs/AWWs/ASHAs to always convey the 4 key messages to parents in a simple and understandable language.
zz HWs to provide filled-in MCP cards to all beneficiaries and to write the next due date on the card.
zz Ask caregivers to repeat the information given to them in order to increase the chances that they will remember when to return. Praise correct answers.
zz Thank the parents for bringing the child.zz Publicize the immunization schedule.
6. HWs do not show respect towards parents or interest in the child’s health, e.g. long waits, HWs shouting at mothers for forgetting the card or bringing the baby in late
zz HWs, ASHAs and AWWs to communicate with and treat parents with respect, warmth, friendliness and should empathize with the parents’ situation. Encourage and praise the parents for bringing their children for immunization. Encourage parents to ask questions.
zz HWs to visit dropouts before the next session to find out the reasons why they missed the session.
7. HWs do not know which children are due and what vaccines are due
zz Organize tracking of children using RI Cards, immunization registers, counterfoils and tracking bags.
zz HWs can involve community teams (NGOs, community based organizations (CBOs), youth clubs, school teachers, volunteers, etc.) to identify children who are leftouts and dropouts
zz Remind parents about the importance of full immunization; inform them about the date and time of the next session and mobilize parents for immunization sessions.

Uni
t 11
147
Possible reasons Possible interventions8. HWs do not understand/
explain to caregivers that immunization may be given to mildly ill children (false contraindication)
zz HWs should understand that immunization can be safely provided to mildly ill children and that they should convince parents about this fact.
9. Children and mothers are not immunized when coming to the HWs for curative care (missed opportunities)
zz When providing other services, always keeps an eye on eligible children visiting the session with a parent or sibling. Enquire about their immunization status or refer to the list of due beneficiaries and provide services, as appropriate.
zz Put a reminder about immunization in the facility’s waiting area.
10.3 Involving the community to support immunization
Involve the community members right from planning phase to build their confidence, trust and ownership of the immunization programme as given below.
Planning
HWs should:
zz Consult communities about service locations and timings to ensure a convenient service, e.g. shifting vaccination hours from mornings to afternoons in areas where mothers are busy in the fields in the morning;
zz Involve village elders, religious leaders and village youth to motivate the community to access the immunization sessions, dispel myths and misconceptions.
Implementation
Communities can assist with:
zz Arranging a clean outreach site such as a school, club, panchayat bhawan, community meeting room;
zz Informing families initially of scheduled outreach, and again when the HW has actually arrived;zz Educating the community regarding free availability of these services;zz Registering patients, controlling crowds, and making waiting areas more comfortable (by
providing shade and organizing space and seating);zz Disseminating appropriate messages and answering questions (health education);zz Identifying and referring newborns and/or infants who have recently arrived in the community
and sharing the list with the HW to include in the immunization register; facilitate transporting vaccines and HWs in some hard to reach areas;
zz Motivating fellow community members to use immunization services and helping bridge cultural or educational gaps between HWs and caregivers;
zz Identifying dropouts and leftouts. Making home visits when children are behind schedule to explain the importance of adherence to the immunization schedule and to motivate caregivers;
zz Communicating with local people and informing HWs about suspected VPDs
Evaluation
Community leaders can contribute by responding to questions about the quality of services, including counselling provided by front-line workers.

Immunization Handbook for Health Workers (2018)
148
10.4 Using interpersonal communication skills effectively
As a health worker you are in direct contact with parents and caregivers, you can play a very important role in increasing vaccination coverage through effective interpersonal communication skills.
Four key messages to be given to caregivers
1. What vaccine was given and what disease it prevents2. What minor adverse events could occur and how to deal with them3. When and where to come for the next visit4. To keep the immunization card safe and to bring it along for the next visit
Tips for effective IPC skills for communicating with caregivers
Speak clearly
zz Use encouraging/helpful non-verbal communication.zz Posture – keep your head level.zz Spend enough time; do not be in a hurry.zz Use responses and gestures to show interest.zz Listen carefully and repeat what the mother says.
Greet
zz Smile.Speak in a pleasant voice and tone.zz Maintain eye contact.zz Introduce yourself and your organization.
Ask
zz Ask open-ended questions—What? When? Where? Why? How? Who?z� How many children do you have?z� Why did you not vaccinate your child?z� How did you know about the immunization session?
Tell
zz What diseases are prevented by vaccination.zz Where and when will the session be held.zz What minor side-effects can occur after vaccination and how these can be managed.
Help: Encourage the parents to come for vaccination by telling them about how to manage AEFIs.
Explain: Use info-kits to explain the importance of immunization and the immunization schedule.
Repeat: Use your visit to find out reasons for leftouts and dropouts.

Uni
t 11
149
10.5 Holding an effective community meeting
1. Identify local community representatives who would participate in the meeting;2. Hold the meeting at a convenient time and place, e.g. on market days, close to places of worship;3. Be prepared with data on the coverage and dropout rates and a map of the health areas with
low coverage;4. Provide a comfortable and welcoming environment for the discussion;5. Listen to the community; find out what the community already knows about VPDs and
immunization;6. Provide information, using basic language and non-scientific terminology, on the importance
of immunization, the status of the immunization programme and where and when services are available. Dispel misinformation and doubts that sometimes surround immunization;
7. Encourage the participants to ask questions so that everyone can be better informed;8. Use stories, short plays, songs and visual aids to hold the group’s attention and make meetings
interesting;9. Involve as many group members as possible in the discussion and ask them to suggest solutions
to problems;10. Help mobilize resources for immunization.

Immunization Handbook for Health Workers (2018)
150

Uni
t 12
151
Unit 12: Surveillance of Vaccine Preventable Diseases

Immunization Handbook for Health Workers (2018)
152
11.1 The role of surveillance in the Immunization Program
Surveillance means data collection for action. Disease surveillance is a regular system of collecting, analyzing and interpreting data and then using it to guide disease-control and immunization strategies. It helps in the following ways:
zz To find out What disease is occurring zz To find out Who gets the disease – e.g. In a particular population or group of peoplezz To find out Where the disease is occurring - this helps to identify areas requiring special
attention and where system performance is poorzz To understand When the disease is occurring and how many get the disease zz To understand Why the disease is occurring – eg due to less vaccination or due to zz To decide How the disease can be prevented, controlled or eliminated.
11.2 Conducting disease surveillance
Prerequisites for effective surveillance
zz Standard case definitions (to ensure uniformity in reporting)zz Recording and reporting system (to ensure regularity in reporting)zz List of all the reporting units (to ensure completeness in reporting)
The quality of surveillance data depends upon correct diagnostic criteria, timeliness and completeness of reports.
Step 1: Learn to recognize the disease
As a health worker, it is important that you understand the definition of a disease and be able to match it up with what your village informant has told you.
Unit 12:Surveillance of vaccine preventable diseases
Learning ObjectivesAt the end of the unit, you should be able to:
zz Describe importance of surveillance in the Immunization Programme.zz Describe how to conduct surveillance for the VPDs.
Contentsz¾ The role of surveillance in the immunization program.z¾ Conducting disease surveillance.z¾ The surveillance report
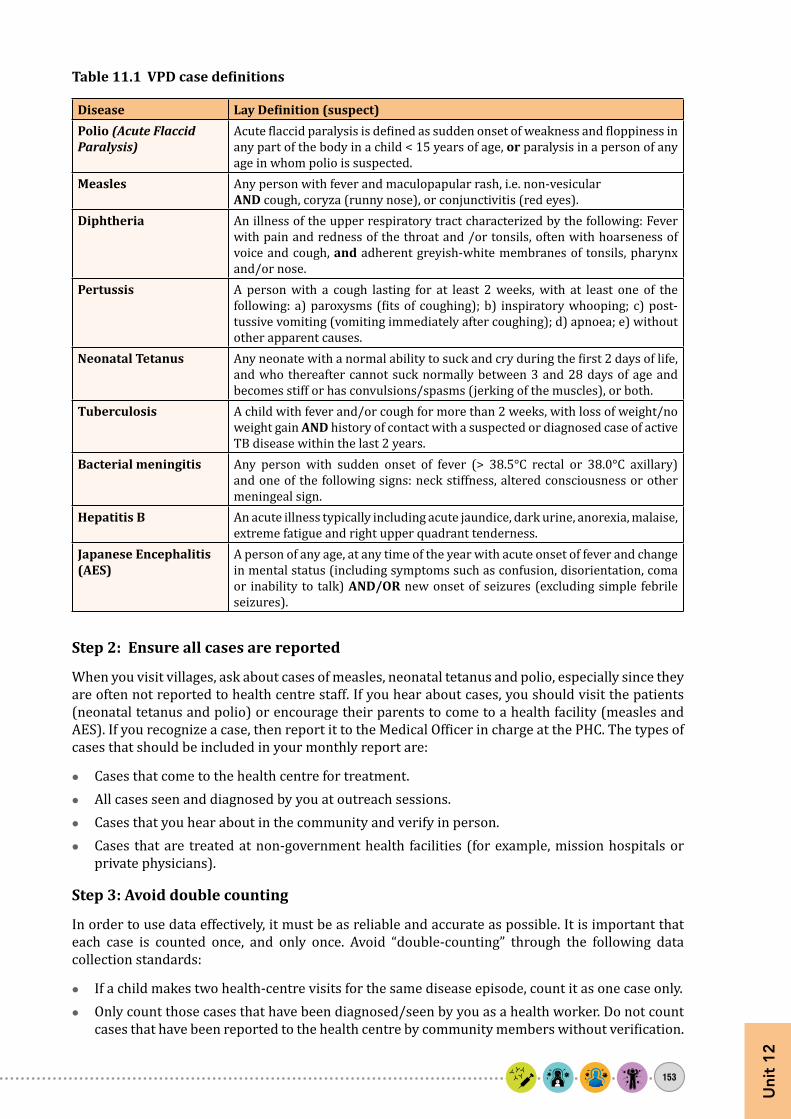
Uni
t 12
153
Table 11.1 VPD case definitions
Disease Lay Definition (suspect)Polio (Acute Flaccid Paralysis)
Acute flaccid paralysis is defined as sudden onset of weakness and floppiness in any part of the body in a child < 15 years of age, or paralysis in a person of any age in whom polio is suspected.
Measles Any person with fever and maculopapular rash, i.e. non-vesicularAND cough, coryza (runny nose), or conjunctivitis (red eyes).
Diphtheria An illness of the upper respiratory tract characterized by the following: Fever with pain and redness of the throat and /or tonsils, often with hoarseness of voice and cough, and adherent greyish-white membranes of tonsils, pharynx and/or nose.
Pertussis A person with a cough lasting for at least 2 weeks, with at least one of the following: a) paroxysms (fits of coughing); b) inspiratory whooping; c) post-tussive vomiting (vomiting immediately after coughing); d) apnoea; e) without other apparent causes.
Neonatal Tetanus Any neonate with a normal ability to suck and cry during the first 2 days of life, and who thereafter cannot suck normally between 3 and 28 days of age and becomes stiff or has convulsions/spasms (jerking of the muscles), or both.
Tuberculosis A child with fever and/or cough for more than 2 weeks, with loss of weight/no weight gain AND history of contact with a suspected or diagnosed case of active TB disease within the last 2 years.
Bacterial meningitis Any person with sudden onset of fever (> 38.5°C rectal or 38.0°C axillary) and one of the following signs: neck stiffness, altered consciousness or other meningeal sign.
Hepatitis B An acute illness typically including acute jaundice, dark urine, anorexia, malaise, extreme fatigue and right upper quadrant tenderness.
Japanese Encephalitis (AES)
A person of any age, at any time of the year with acute onset of fever and change in mental status (including symptoms such as confusion, disorientation, coma or inability to talk) AND/OR new onset of seizures (excluding simple febrile seizures).
Step 2: Ensure all cases are reported
When you visit villages, ask about cases of measles, neonatal tetanus and polio, especially since they are often not reported to health centre staff. If you hear about cases, you should visit the patients (neonatal tetanus and polio) or encourage their parents to come to a health facility (measles and AES). If you recognize a case, then report it to the Medical Officer in charge at the PHC. The types of cases that should be included in your monthly report are:
zz Cases that come to the health centre for treatment.zz All cases seen and diagnosed by you at outreach sessions.zz Cases that you hear about in the community and verify in person.zz Cases that are treated at non-government health facilities (for example, mission hospitals or
private physicians).
Step 3: Avoid double counting
In order to use data effectively, it must be as reliable and accurate as possible. It is important that each case is counted once, and only once. Avoid “double-counting” through the following data collection standards:
zz If a child makes two health-centre visits for the same disease episode, count it as one case only.zz Only count those cases that have been diagnosed/seen by you as a health worker. Do not count
cases that have been reported to the health centre by community members without verification.

Immunization Handbook for Health Workers (2018)
154
11.3 The Surveillance report
Monthly report of disease incidence and mortality should be prepared in the monthly reporting format. To find out the number of cases and deaths (if any) as a result of the diseases, you will:
zz Count the number of VPD cases from your daily diary.zz Ensure that same case or same episode is not recorded more than once (which may happen if
you have visited many times or because different informants told you about the same case).zz Fill up the number of cases in appropriate boxes of the report.zz If there are no VPD cases reported, write ZERO in the report.
11.4 Active case search (ACS) in community:
Searching for additional cases of similar VPDs in the community helps in identifying clustering of cases. This can prevent an impending outbreak by early identification and public health interventions.
Attempts should be made to conduct active case search soon after identification of a suspected case preferably within seven days of case investigation.
1. Besides conducting the active case search in household and neighbourhood, the workplace or school contacts should also be actively assessed for the illness.
2. ACS has to be conducted after proper microplanning and training. Logistics of sample collection and shipment should be arranged beforehand by the medical officer.
3. While conducting ACS look for additional cases according to the case definition that has been communicated during training.
4. During ACS usually the case definitions are simplified and made more sensitive e.g. for diphtheria, screening of recent sore throat in all age groups may be required. Standardized forms are to be used to facilitate ACS in the community.
5. On identification of a suspected case, the detailed information of the illness has to be captured in the form.
6. These suspected cases are then investigated by a medical officer who would also suggest interventions.

155
Notes

Immunization Handbook for Health Workers (2018)
156
Notes