Embed Size (px)
Citation preview
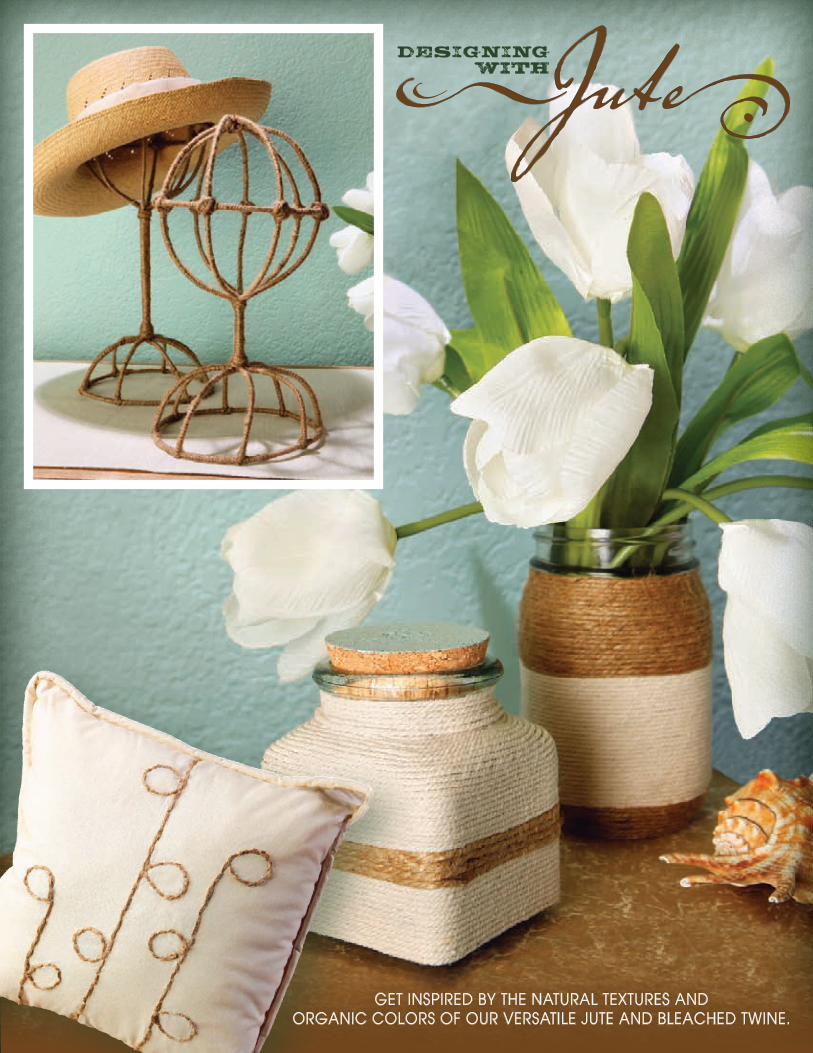
designing with
GET INSPIRED BY THE NATURAL TEXTURES AND ORGANIC COLORS OF OUR VERSATILE JUTE AND BLEACHED TWINE.
2 Hobby Lobby Product Inspirations
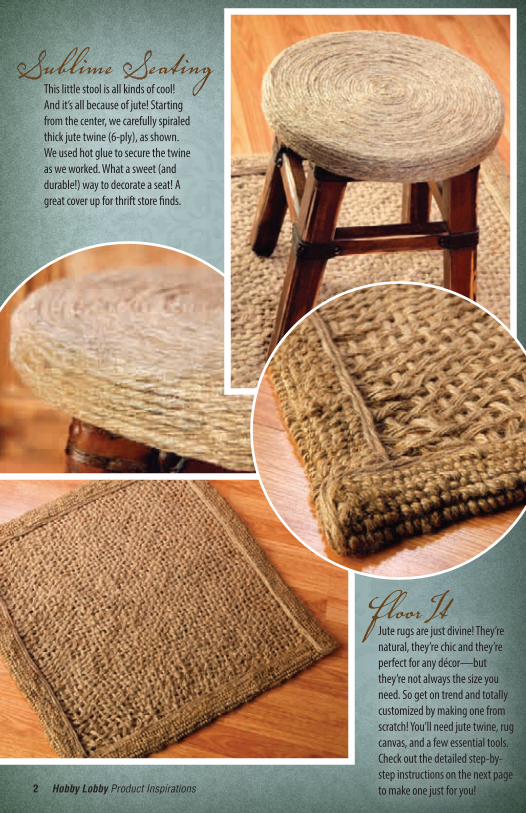
Sublime SeatingThis little stool is all kinds of cool! And it’s all because of jute! Starting from the center, we carefully spiraled thick jute twine (6-ply), as shown. We used hot glue to secure the twine as we worked. What a sweet (and durable!) way to decorate a seat! A great cover up for thrift store finds.
FloorItJute rugs are just divine! They’re natural, they’re chic and they’re perfect for any décor—but they’re not always the size you need. So get on trend and totally customized by making one from scratch! You’ll need jute twine, rug canvas, and a few essential tools. Check out the detailed step-by-step instructions on the next page to make one just for you!
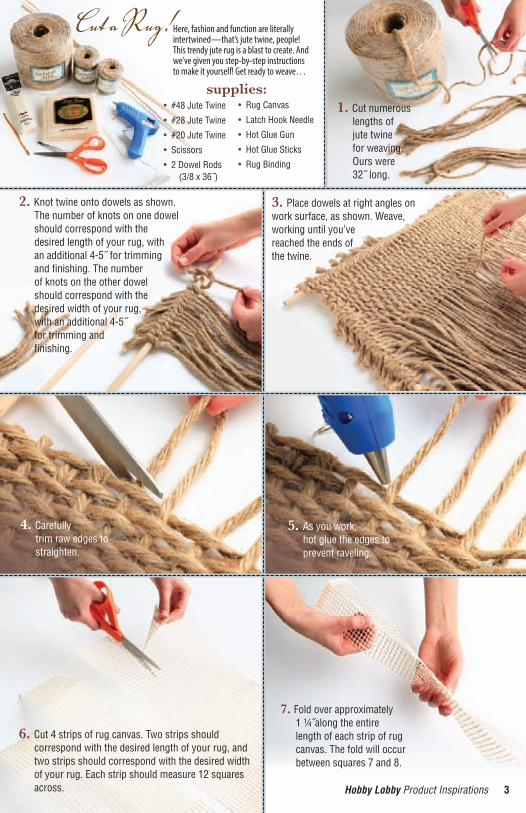
• #48 Jute Twine
• #28 Jute Twine
• #20 Jute Twine
• Scissors
• 2 Dowel Rods (3/8 x 36˝)
1. Cut numerous lengths of jute twine for weaving. Ours were 32˝ long.
2. Knot twine onto dowels as shown. The number of knots on one dowel should correspond with the desired length of your rug, with an additional 4-5˝ for trimming and finishing. The number of knots on the other dowel should correspond with the desired width of your rug, with an additional 4-5˝ for trimming and finishing.
4. Carefully trim raw edges to straighten.
5. As you work, hot glue the edges to prevent raveling.
6. Cut 4 strips of rug canvas. Two strips should correspond with the desired length of your rug, and two strips should correspond with the desired width of your rug. Each strip should measure 12 squares across.
7. Fold over approximately 1 ¼˝along the entire length of each strip of rug canvas. The fold will occur between squares 7 and 8.
Cut a Rug! Here, fashion and function are literally intertwined—that’s jute twine, people! This trendy jute rug is a blast to create. And we’ve given you step-by-step instructions to make it yourself! Get ready to weave…
supplies:• Rug Canvas
• Latch Hook Needle
• Hot Glue Gun
• Hot Glue Sticks
• Rug Binding
Hobby Lobby Product Inspirations 3
3. Place dowels at right angles on work surface, as shown. Weave, working until you’ve reached the ends of the twine.

8. Using the latch hook needle, begin hooking #28 jute into the second row of canvas, using #20 jute as your locking string.
9. Hook 5-6 loops before pulling the hook through the loops to lock into place, as shown. You’ll need a total of 6 hooked rows.
11. Hot glue each strip of rug canvas to the corresponding edge of woven jute. Sandwich the woven jute between the sides of the fold as shown, with the hooked side of the canvas on what will become the front side of the rug.
12.
On front of rug, use
double strands of #48 jute to
disguise the raw edges of rug canvas. Hot glue into
place, as shown.
13. Wrap ends of double strands to back of rug, hot gluing to secure.
15. For a finished
look, miter the corners as you
work.
10. Repeat process for each strip of rug canvas.
14. Measure and cut lengths
of rug binding to correspond with the
edges of your rug. Hot glue binding over exposed rug
canvas, as shown.
4 Hobby Lobby Product Inspirations
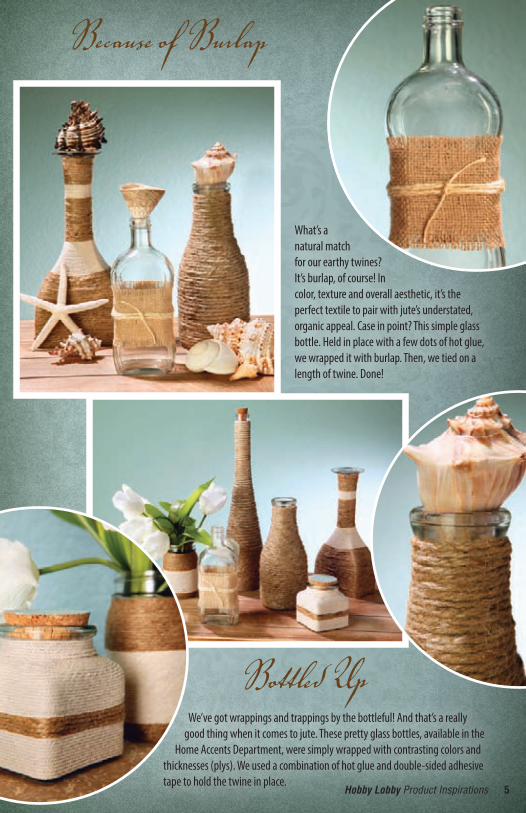
We’ve got wrappings and trappings by the bottleful! And that’s a really good thing when it comes to jute. These pretty glass bottles, available in the
Home Accents Department, were simply wrapped with contrasting colors and thicknesses (plys). We used a combination of hot glue and double-sided adhesive tape to hold the twine in place.
Because of Burlap
What’s a natural match for our earthy twines? It’s burlap, of course! In color, texture and overall aesthetic, it’s the perfect textile to pair with jute’s understated, organic appeal. Case in point? This simple glass bottle. Held in place with a few dots of hot glue, we wrapped it with burlap. Then, we tied on a length of twine. Done!
Hobby Lobby Product Inspirations 5
Bottled U
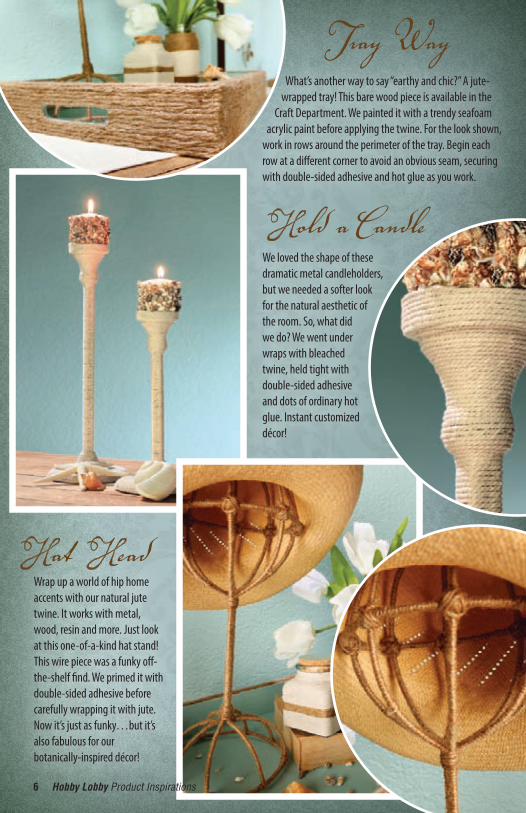
Hold a CandleWe loved the shape of these dramatic metal candleholders, but we needed a softer look for the natural aesthetic of the room. So, what did we do? We went under wraps with bleached twine, held tight with double-sided adhesive and dots of ordinary hot glue. Instant customized décor!
Hat HeadWrap up a world of hip home accents with our natural jute twine. It works with metal, wood, resin and more. Just look at this one-of-a-kind hat stand! This wire piece was a funky off-the-shelf find. We primed it with double-sided adhesive before carefully wrapping it with jute. Now it’s just as funky…but it’s also fabulous for our botanically-inspired décor!
Tray WayWhat’s another way to say “earthy and chic?” A jute-
wrapped tray! This bare wood piece is available in the Craft Department. We painted it with a trendy seafoam
acrylic paint before applying the twine. For the look shown, work in rows around the perimeter of the tray. Begin each row at a different corner to avoid an obvious seam, securing with double-sided adhesive and hot glue as you work.
6 Hobby Lobby Product Inspirations
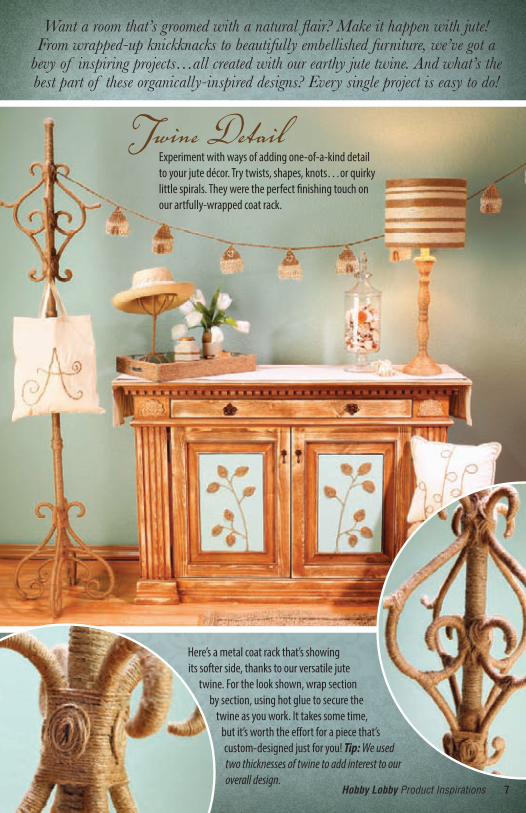
Twine Detail
Hobby Lobby Product Inspirations 7
Want a room that’s groomed with a natural flair? Make it happen with jute! From wrapped-up knickknacks to beautifully embellished furniture, we’ve got a
bevy of inspiring projects…all created with our earthy jute twine. And what’s the best part of these organically-inspired designs? Every single project is easy to do!
Experiment with ways of adding one-of-a-kind detail to your jute décor. Try twists, shapes, knots…or quirky little spirals. They were the perfect finishing touch on our artfully-wrapped coat rack.
Here’s a metal coat rack that’s showing its softer side, thanks to our versatile jute
twine. For the look shown, wrap section by section, using hot glue to secure the
twine as you work. It takes some time, but it’s worth the effort for a piece that’s custom-designed just for you! Tip: We used two thicknesses of twine to add interest to our overall design.
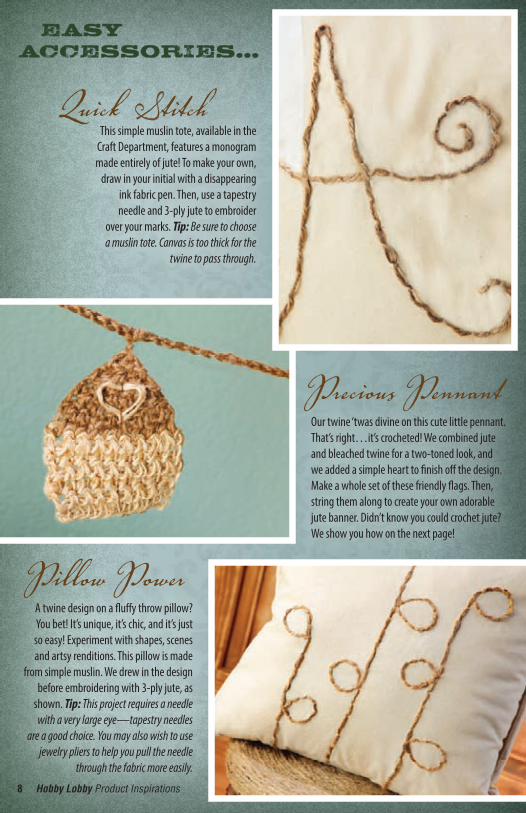
Q uick StitchThis simple muslin tote, available in the
Craft Department, features a monogram made entirely of jute! To make your own,
draw in your initial with a disappearing ink fabric pen. Then, use a tapestry needle and 3-ply jute to embroider
over your marks. Tip: Be sure to choose a muslin tote. Canvas is too thick for the
twine to pass through.
Precious PennantOur twine ‘twas divine on this cute little pennant. That’s right…it’s crocheted! We combined jute and bleached twine for a two-toned look, and we added a simple heart to finish off the design. Make a whole set of these friendly flags. Then, string them along to create your own adorable jute banner. Didn’t know you could crochet jute? We show you how on the next page!
Pillow PowerA twine design on a fluffy throw pillow? You bet! It’s unique, it’s chic, and it’s just so easy! Experiment with shapes, scenes and artsy renditions. This pillow is made
from simple muslin. We drew in the design before embroidering with 3-ply jute, as
shown. Tip: This project requires a needle with a very large eye—tapestry needles
are a good choice. You may also wish to use jewelry pliers to help you pull the needle
through the fabric more easily.
EASYACCESSORIES...
8 Hobby Lobby Product Inspirations
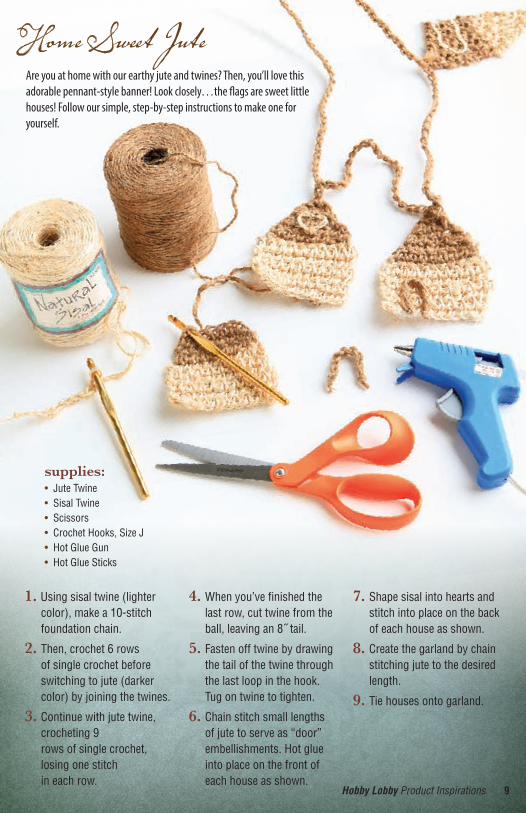
supplies:• Jute Twine• Sisal Twine• Scissors• Crochet Hooks, Size J• Hot Glue Gun• Hot Glue Sticks
1. Using sisal twine (lighter color), make a 10-stitch foundation chain.
2. Then, crochet 6 rows of single crochet before switching to jute (darker color) by joining the twines.
3. Continue with jute twine, crocheting 9 rows of single crochet, losing one stitch in each row.
4. When you’ve finished the last row, cut twine from the ball, leaving an 8˝ tail.
5. Fasten off twine by drawing the tail of the twine through the last loop in the hook. Tug on twine to tighten.
6. Chain stitch small lengths of jute to serve as “door” embellishments. Hot glue into place on the front of each house as shown.
7. Shape sisal into hearts and stitch into place on the back of each house as shown.
8. Create the garland by chain stitching jute to the desired length.
9. Tie houses onto garland.
Home Sweet JuteAre you at home with our earthy jute and twines? Then, you’ll love this adorable pennant-style banner! Look closely…the flags are sweet little houses! Follow our simple, step-by-step instructions to make one for yourself.
Hobby Lobby Product Inspirations 9
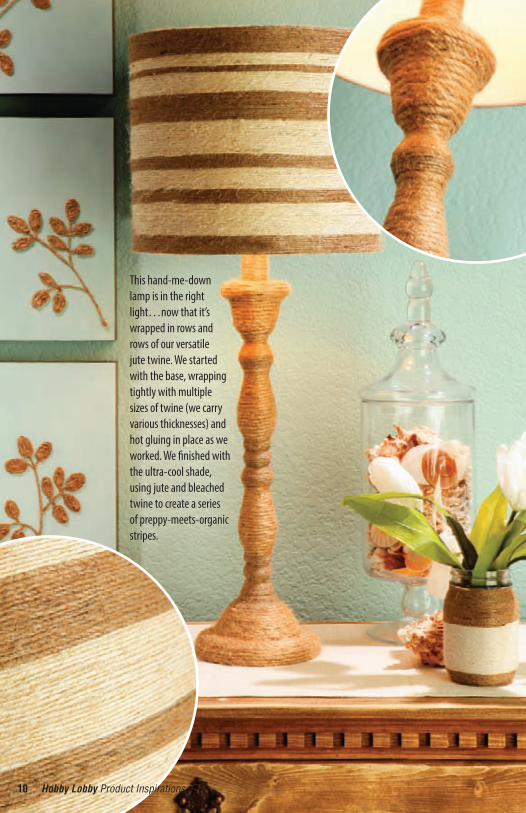
This hand-me-down lamp is in the right light…now that it’s wrapped in rows and rows of our versatile jute twine. We started with the base, wrapping tightly with multiple sizes of twine (we carry various thicknesses) and hot gluing in place as we worked. We finished with the ultra-cool shade, using jute and bleached twine to create a series of preppy-meets-organic stripes.
10 Hobby Lobby Product Inspirations
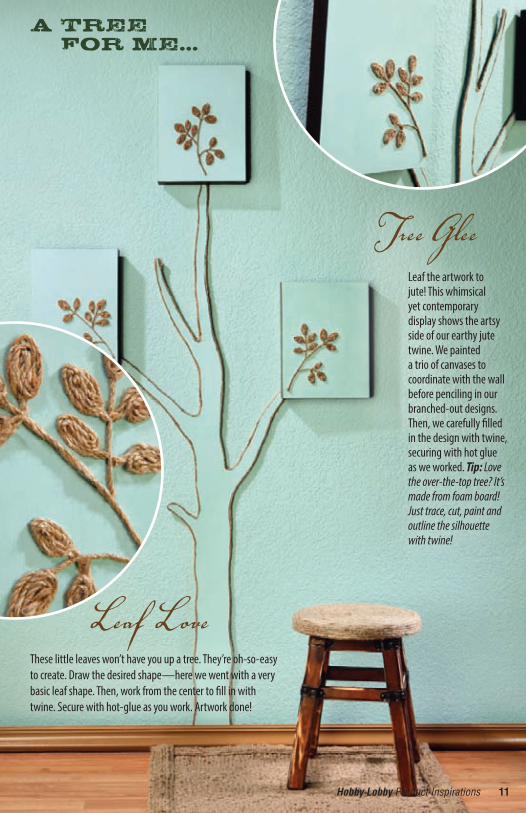
These little leaves won’t have you up a tree. They’re oh-so-easy to create. Draw the desired shape—here we went with a very basic leaf shape. Then, work from the center to fill in with twine. Secure with hot-glue as you work. Artwork done!
Leaf the artwork to jute! This whimsical yet contemporary display shows the artsy side of our earthy jute twine. We painted a trio of canvases to coordinate with the wall before penciling in our branched-out designs. Then, we carefully filled in the design with twine, securing with hot glue as we worked. Tip: Love the over-the-top tree? It’s made from foam board! Just trace, cut, paint and outline the silhouette with twine!
Tree Glee
A TREE FOR ME...
Leaf Love
Hobby Lobby Product Inspirations 11
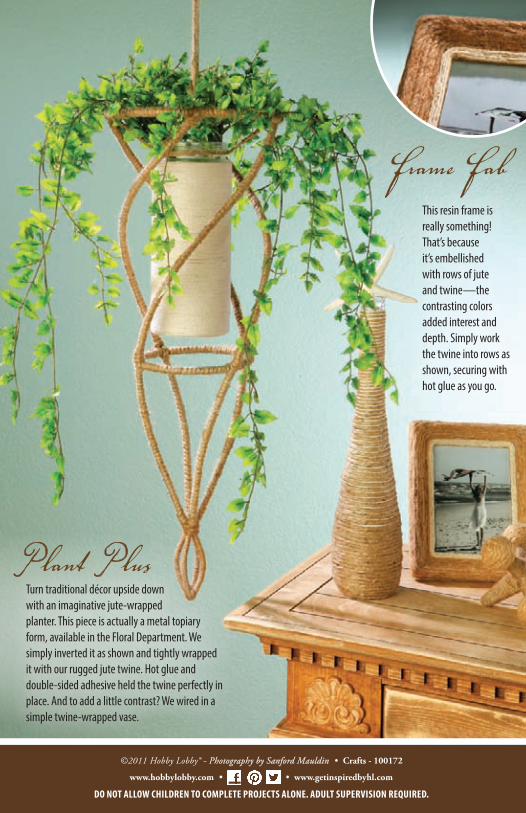
Turn traditional décor upside down with an imaginative jute-wrapped planter. This piece is actually a metal topiary form, available in the Floral Department. We simply inverted it as shown and tightly wrapped it with our rugged jute twine. Hot glue and double-sided adhesive held the twine perfectly in place. And to add a little contrast? We wired in a simple twine-wrapped vase.
P lant P lus
This resin frame is really something! That’s because it’s embellished with rows of jute and twine—the contrasting colors added interest and depth. Simply work the twine into rows as shown, securing with hot glue as you go.
Frame Fab
©2011 Hobby Lobby® - Photography by Sanford Mauldin • Crafts - 100172
DO NOT ALLOW CHILDREN TO COMPLETE PROJECTS ALONE. ADULT SUPERVISION REQUIRED.
www.hobbylobby.com • • www.getinspiredbyhl.com