Embed Size (px)
Citation preview
http://www.instructables.com/id/4-Hour-No-Knead-bread/
Home Sign Up! Browse Community Submit
All Art Craft Food Games Green Home Kids Life Music Offbeat Outdoors Pets Photo Ride Science Tech
4-Hour No-Knead bread.by daniel_reetz on April 23, 2009
Table of Contents
License: Attribution (by) . . . . . . . . . . . . . . . . . . . . . . . . . . . . . . . . . . . . . . . . . . . . . . . . . . . . . . . . . . . . . . . . . . . . . . . . . . . . . . . . . . . . . . . . . . . . . . . . . . . . . . . . 2
Intro: 4-Hour No-Knead bread. . . . . . . . . . . . . . . . . . . . . . . . . . . . . . . . . . . . . . . . . . . . . . . . . . . . . . . . . . . . . . . . . . . . . . . . . . . . . . . . . . . . . . . . . . . . . . . . . . . . 2
step 1: Materials. . . . . . . . . . . . . . . . . . . . . . . . . . . . . . . . . . . . . . . . . . . . . . . . . . . . . . . . . . . . . . . . . . . . . . . . . . . . . . . . . . . . . . . . . . . . . . . . . . . . . . . . . . . . . . 2
step 2: Putting Things Together and Mixing Them. . . . . . . . . . . . . . . . . . . . . . . . . . . . . . . . . . . . . . . . . . . . . . . . . . . . . . . . . . . . . . . . . . . . . . . . . . . . . . . . . . . . . 3
step 3: Making Your Dough "Shaggy". . . . . . . . . . . . . . . . . . . . . . . . . . . . . . . . . . . . . . . . . . . . . . . . . . . . . . . . . . . . . . . . . . . . . . . . . . . . . . . . . . . . . . . . . . . . . . 3
step 4: I Love Yeast . . . . . . . . . . . . . . . . . . . . . . . . . . . . . . . . . . . . . . . . . . . . . . . . . . . . . . . . . . . . . . . . . . . . . . . . . . . . . . . . . . . . . . . . . . . . . . . . . . . . . . . . . . . 4
step 5: . . . . . . . . . . . . . . . . . . . . . . . . . . . . . . . . . . . . . . . . . . . . . . . . . . . . . . . . . . . . . . . . . . . . . . . . . . . . . . . . . . . . . . . . . . . . . . . . . . . . . . . . . . . . . . . . . . . . . 5
step 6: Into the Dish! . . . . . . . . . . . . . . . . . . . . . . . . . . . . . . . . . . . . . . . . . . . . . . . . . . . . . . . . . . . . . . . . . . . . . . . . . . . . . . . . . . . . . . . . . . . . . . . . . . . . . . . . . . 6
step 7: Pre-Oven Prep . . . . . . . . . . . . . . . . . . . . . . . . . . . . . . . . . . . . . . . . . . . . . . . . . . . . . . . . . . . . . . . . . . . . . . . . . . . . . . . . . . . . . . . . . . . . . . . . . . . . . . . . . 6
step 8: INTO THE DARKNESS . . . . . . . . . . . . . . . . . . . . . . . . . . . . . . . . . . . . . . . . . . . . . . . . . . . . . . . . . . . . . . . . . . . . . . . . . . . . . . . . . . . . . . . . . . . . . . . . . . 7
step 9: Baking . . . . . . . . . . . . . . . . . . . . . . . . . . . . . . . . . . . . . . . . . . . . . . . . . . . . . . . . . . . . . . . . . . . . . . . . . . . . . . . . . . . . . . . . . . . . . . . . . . . . . . . . . . . . . . . 7
step 10: ENJOY. . . . . . . . . . . . . . . . . . . . . . . . . . . . . . . . . . . . . . . . . . . . . . . . . . . . . . . . . . . . . . . . . . . . . . . . . . . . . . . . . . . . . . . . . . . . . . . . . . . . . . . . . . . . . . 7
Related Instructables . . . . . . . . . . . . . . . . . . . . . . . . . . . . . . . . . . . . . . . . . . . . . . . . . . . . . . . . . . . . . . . . . . . . . . . . . . . . . . . . . . . . . . . . . . . . . . . . . . . . . . . . . . . 8
Advertisements . . . . . . . . . . . . . . . . . . . . . . . . . . . . . . . . . . . . . . . . . . . . . . . . . . . . . . . . . . . . . . . . . . . . . . . . . . . . . . . . . . . . . . . . . . . . . . . . . . . . . . . . . . . . . . . 8
Comments . . . . . . . . . . . . . . . . . . . . . . . . . . . . . . . . . . . . . . . . . . . . . . . . . . . . . . . . . . . . . . . . . . . . . . . . . . . . . . . . . . . . . . . . . . . . . . . . . . . . . . . . . . . . . . . . . . . 8

http://www.instructables.com/id/4-Hour-No-Knead-bread/
License: Attribution (by)
Intro: 4-Hour No-Knead bread.There are many good bread Instructables already, but when making bread, you can never have too many fail-safe techniques, and this recipe works almost every time.
This is a four-hour process; you need that much time to let the dough rise. I like to throw it together while snacking on lunch, and then when I get home after school it isready to throw in the oven.
My recipe differs from most no-knead recipes in that you do not drop it it into a heated pan. I changed the recipe because I had too many burns from handling a breadpan at 400+ degrees, and one of my Pyrex dishes shattered on me when I accidentally set the edge of it on a wet washcloth.
I hope you enjoy this tutorial and the resulting mouthwatering delicious bread.
Image Notes1. LOAF!!
step 1: Materials.Flour:
To make good bread, you need good flour. Flour which is marked "bread flour" typically has 11-12% protein (gluten) which is higher than normal flour. This allows the loafto have good structure and texture. You can cut cheaper white flour with bread flour if you don't have enough of either.
If you are in Germany, type 550 flour works well. Thanks t.rohner and stryke!
Yeast:I use yeast from a Polish market. While you can buy Fleischmann's yeast from the supermarket, it is really expensive, especially in packets. If you have access to anEastern European or Balkan market, often they sell 1lb bags of yeast for just a few dollars, a huge savings over the grocery store stuff. You need a small spoonful, theamount is not critical.
Salt:I use sea salt, but you can use any kind of salt. Salt adds flavor and slows the growth of yeast slightly. I like to put about half a spoonful in.
Container:You need a bake-proof container with a lid (the lid saves you from having to use foil every time and results in a more consistent crust). I got my Pyrex baking dish (visiblein Step 7) at a local thrift store for just a few dollars. It is really the perfect dish for this kind of thing
Ingredients:3 cups flour.Some salt. (see picture 2)Some yeast. (see picture 2)

http://www.instructables.com/id/4-Hour-No-Knead-bread/
Image Notes1. the magic of Photoshop
step 2: Putting Things Together and Mixing Them.Pour your ingredients in a bowl. Mix the dry ingredients a bit before adding 1.5 cups warm(ish) water.
Be sure to add the water slowly - pour it in a small but steady stream. Some flours take more or less. You just want your dough to be "shaggy" -- pictured in the next step.
step 3: Making Your Dough "Shaggy".Your dough should be this consistency or a little more damp. It's easy to add too much water -- it's better to add less, because when you let it sit for 4 hours, the water willdiffuse through the loaf.
If you added too much, add more flour to get it back to "shaggy", my favorite texture.
http://www.instructables.com/id/4-Hour-No-Knead-bread/
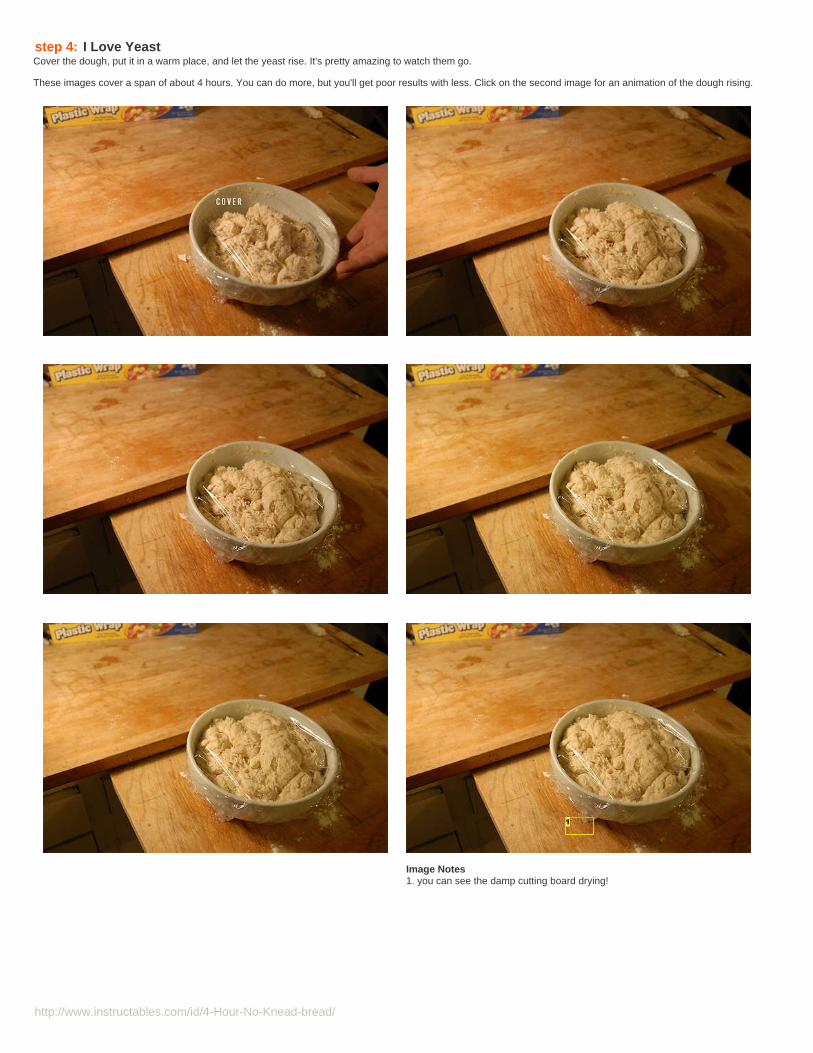
step 4: I Love YeastCover the dough, put it in a warm place, and let the yeast rise. It's pretty amazing to watch them go.
These images cover a span of about 4 hours. You can do more, but you'll get poor results with less. Click on the second image for an animation of the dough rising.
Image Notes1. you can see the damp cutting board drying!

http://www.instructables.com/id/4-Hour-No-Knead-bread/
step 5: This part is critical. I have an old burnt pan that I use for just this purpose.
Put a tablespoon or so of oil on the surface.
Let the oil spread around.
Remove the dough from your mixing bowl. Mash it once as shown. Do not mash or knead it any more than once or, if you must, two times.
Roll up the flat thing you just made.
Done with this step!
http://www.instructables.com/id/4-Hour-No-Knead-bread/
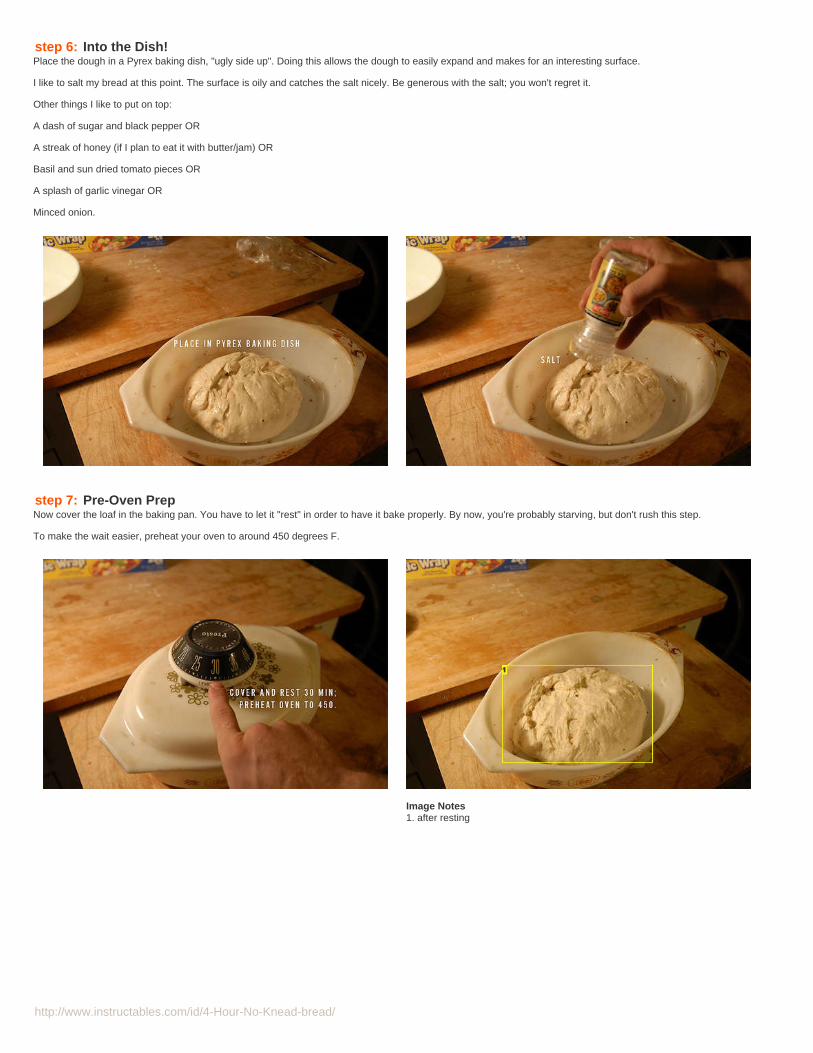
step 6: Into the Dish!Place the dough in a Pyrex baking dish, "ugly side up". Doing this allows the dough to easily expand and makes for an interesting surface.
I like to salt my bread at this point. The surface is oily and catches the salt nicely. Be generous with the salt; you won't regret it.
Other things I like to put on top:
A dash of sugar and black pepper OR
A streak of honey (if I plan to eat it with butter/jam) OR
Basil and sun dried tomato pieces OR
A splash of garlic vinegar OR
Minced onion.
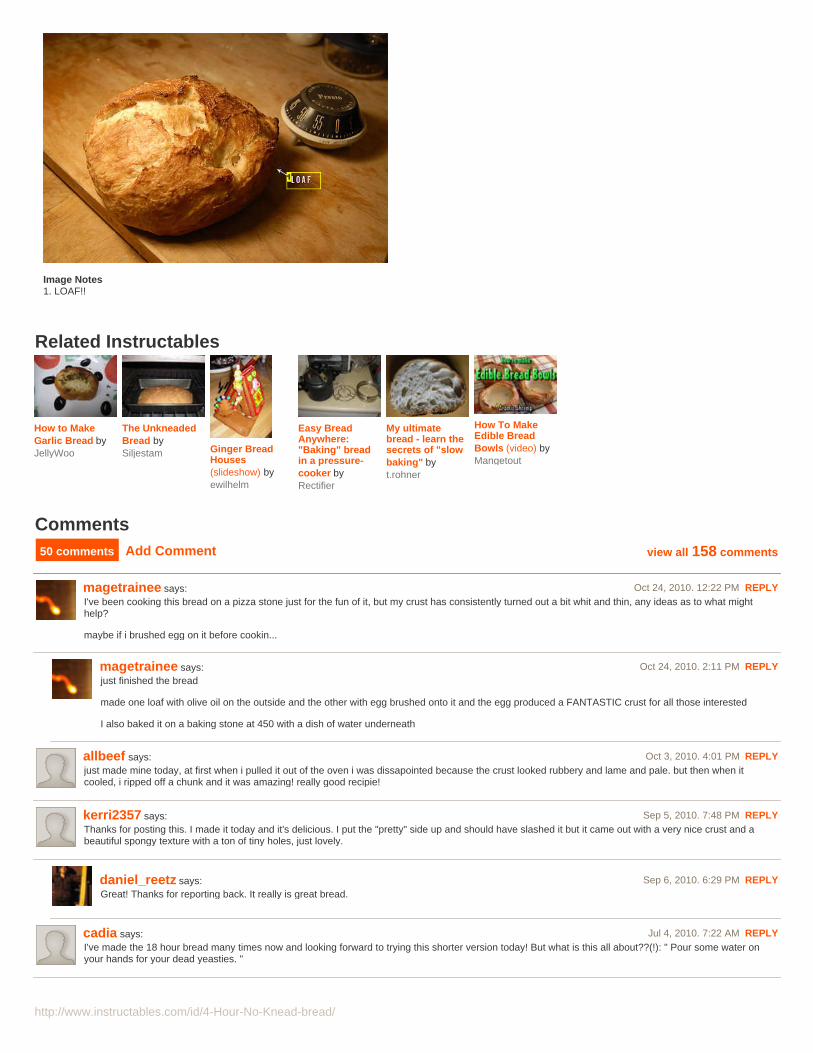
step 7: Pre-Oven PrepNow cover the loaf in the baking pan. You have to let it "rest" in order to have it bake properly. By now, you're probably starving, but don't rush this step.
To make the wait easier, preheat your oven to around 450 degrees F.
Image Notes1. after resting

http://www.instructables.com/id/4-Hour-No-Knead-bread/
step 8: INTO THE DARKNESSPut your dough in the oven.
Pour some water on your hands for your dead yeasties.
Image Notes1. the darkness
step 9: BakingBake your bread for 30 minutes with the cover on.
Then, if you want an extra crispy, nutty, amazing crust, remove the lid and bake 5 more minutes.
Image Notes1. i meant to point at this...
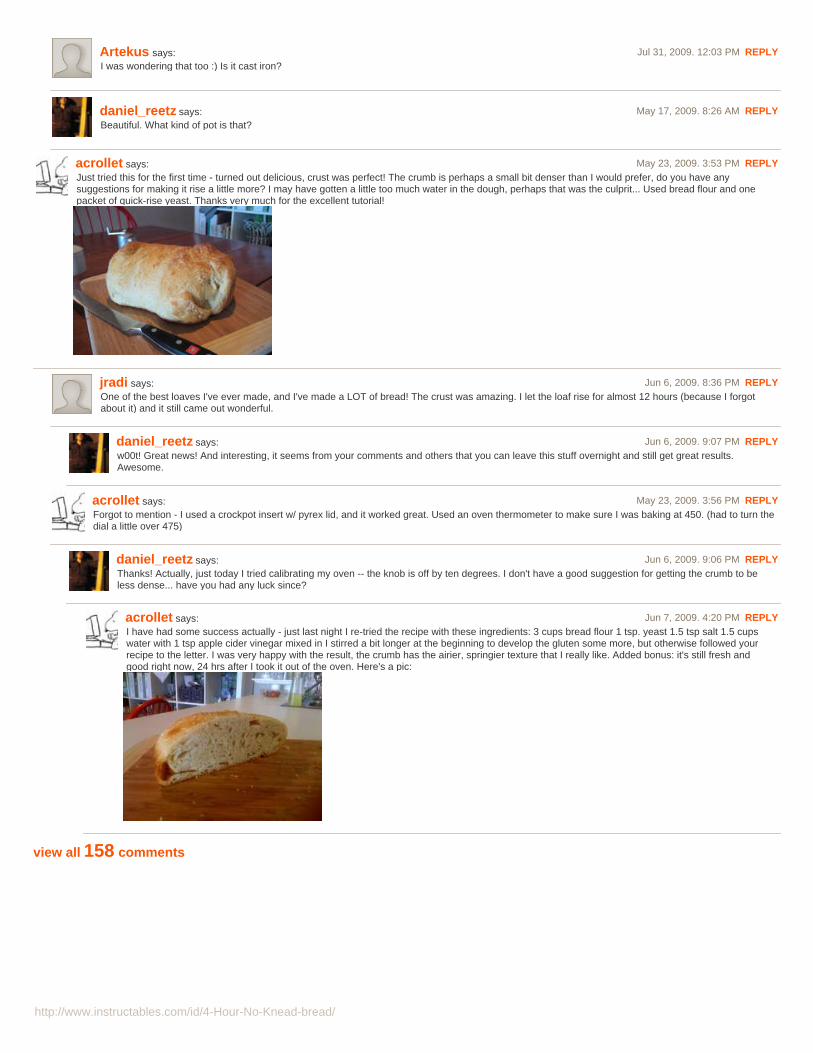
step 10: ENJOY.By now, your whole house smells of baking and you're starving. Take the loaf from the oven, remove it from the pan, and let it cool for a minute. Cut it with a bread knifeor tear it open with your hands like a hungry caveman.
One of the simplest and most delicious things to eat with the finished product is a small bowl with oil, salt, and Italian spices like basil. I like to keep such a bowl in myfridge, ready for each new loaf. Dipping fresh bread in such a mixture is just outstanding eating.
I won't even go into the money you'll save baking for yourself, because if you could buy this kind of bread at the store, you wouldn't care what it cost.
http://www.instructables.com/id/4-Hour-No-Knead-bread/
Image Notes1. LOAF!!
Related Instructables
How to MakeGarlic Bread byJellyWoo
The UnkneadedBread bySiljestam Ginger Bread
Houses(slideshow) byewilhelm
Easy BreadAnywhere:"Baking" breadin a pressure-cooker byRectifier
My ultimatebread - learn thesecrets of "slowbaking" byt.rohner
How To MakeEdible BreadBowls (video) byMangetout
Advertisements
Comments50 comments Add Comment view all 158 comments
magetrainee says: Oct 24, 2010. 12:22 PM REPLYI've been cooking this bread on a pizza stone just for the fun of it, but my crust has consistently turned out a bit whit and thin, any ideas as to what mighthelp?
maybe if i brushed egg on it before cookin...
magetrainee says: Oct 24, 2010. 2:11 PM REPLYjust finished the bread
made one loaf with olive oil on the outside and the other with egg brushed onto it and the egg produced a FANTASTIC crust for all those interested
I also baked it on a baking stone at 450 with a dish of water underneath
allbeef says: Oct 3, 2010. 4:01 PM REPLYjust made mine today, at first when i pulled it out of the oven i was dissapointed because the crust looked rubbery and lame and pale. but then when itcooled, i ripped off a chunk and it was amazing! really good recipie!
kerri2357 says: Sep 5, 2010. 7:48 PM REPLYThanks for posting this. I made it today and it's delicious. I put the "pretty" side up and should have slashed it but it came out with a very nice crust and abeautiful spongy texture with a ton of tiny holes, just lovely.
daniel_reetz says: Sep 6, 2010. 6:29 PM REPLYGreat! Thanks for reporting back. It really is great bread.
cadia says: Jul 4, 2010. 7:22 AM REPLYI've made the 18 hour bread many times now and looking forward to trying this shorter version today! But what is this all about??(!): " Pour some water onyour hands for your dead yeasties. "

http://www.instructables.com/id/4-Hour-No-Knead-bread/
beehard44 says: Jul 30, 2010. 12:03 AM REPLYthe yeast dies when exposed to huge amounts of heat
hay_jumper says: Jun 7, 2010. 7:49 PM REPLYYour photos are great, and the text is entertaining and educational. I'm going to ditch the Bittman version of this bread I've been making. Nice job all around.
daniel_reetz says: Jun 7, 2010. 8:07 PM REPLYThank you very much! Please post pics of your bread! I'm going to be making more soon, a friend of mine replaced my broken Pyrex dish. w00t!
cadia says: Jun 7, 2010. 5:18 PM REPLYI'm wondering how the recipe would be cooked in a cast iron pot and what size it should be ( I have one about 8 inches round) . I've made many no-kneadbreads now with many variations, can't tolerate store -bought now !!
daniel_reetz says: Jun 7, 2010. 8:07 PM REPLYI think there might have been a comment below (don't have time to search at the moment) saying how to do it. I think the trick was to pre-heat the castiron pot... but maybe I read that somewhere else. If you figure it out, please post back here!
the4est says: Apr 18, 2010. 1:10 PM REPLYI tried this for the first time yesterday, and it worked wonderfully! the whole loaf got eaten very quickly. i guessed the quantities of the ingredients and itworked, but you might consider posting the amount of yeast and salt recommended.
annienygma says: Jan 29, 2010. 8:15 PM REPLY This is my favorite no-knead bread recipe... My favorite pan to use is a cast iron skillet for this bread (go figure).. I share this recipe with everyone!
daniel_reetz says: Jan 29, 2010. 9:24 PM REPLYThat's fantastic. I'm really interested in other kinds of baking dishes. How do you cover your skillet?
macrumpton says: Mar 20, 2010. 9:10 PM REPLYI use a enameled giant turkey roaster pan that I got for $9 at Target. It works great for these no-knead recipes. It is also big enough to make hugeloaves.When I use the hot pan technique I put the dough on a piece of baking parchment and lower it into the pan using the edges of the parchment. It iseasier to avoid burns that way.
annienygma says: Jan 29, 2010. 10:53 PM REPLY Sometimes I tent aluminum foil over it, but mostly I just bake it uncovered.. I prefer the crust if it is uncovered actually.
annienygma says: Jan 29, 2010. 10:53 PM REPLY Sometimes I tent aluminum foil over it, but mostly I just bake it uncovered.. I prefer the crust if it is uncovered actually.
macrumpton says: Mar 20, 2010. 9:12 PM REPLYMost of the hot pot no-knead recipes recommend that you bake it with the lid on for just over half the baking time to allow the steam to rise thebread to it's max, and then you remove the lid for the rest of the time to get the nice crispy crust.
GibbonsRock says: Apr 25, 2009. 11:33 AM REPLYHi! I am (attempting) to make this right now, and from 3 cups flour and 1.5 cups water, I've got pancake batter! Maybe it's cuz' I'm using regular all porpoiseflour? does it take a while to get "shaggy"? I'll add some more flour... thanks for the fun instructible!
isaac! says: Jan 12, 2010. 4:29 PM REPLYthis has absolutely nothing to do with anything, but when i read "all-porpoise flour", i lmao'd out the door.
gyongyi says: Oct 24, 2009. 6:59 PM REPLYLocal humidity plays a huge role in how much water is needed for the 3 cups of flour. Used to live in the desert ( very low humidity) and 1.5 cup waterwas not enough water to 3 cups of flour, now with local high humidity here in KY I use less than 1.5 cup of water to 3 cups of flour. Just need to get thefeel for the right consistency of the dough and then you can replicate that in any conditions.The pictures attached to the instructions are a great help forthat. Good luck and enjoy your bread.Daniel I want to thank you for the great step by step instructions, I used to do the 18+2 hours no knead bread which is great, but sometimes we had notime to wait that long. Your method gives me excellent results, hubby and I both love the bread with lots of salt and seeds on it ( sunflower, sesame,poppy etc).

http://www.instructables.com/id/4-Hour-No-Knead-bread/
daniel_reetz says: Apr 25, 2009. 1:12 PM REPLYYikes! At least with my flour, I definitely don't have pancake batter. I think you have the right idea to add more water. For anyone else trying this, just addwater until it is "shaggy" and then stop -- I suppose different flours may give different results. I may change the instructable to reflect this.
daniel_reetz says: Apr 26, 2009. 5:55 AM REPLYWhen I said more water, of course I meant: more flour.
daniel_reetz says: Apr 26, 2009. 5:58 AM REPLYAnd I updated step 2. Thanks for the feedback,GR.
GibbonsRock says: Apr 26, 2009. 8:49 AM REPLYHi Dan!
Thanks for the update! I was literally typing one handed yesterday, my other hand dripping with pancake dough. My dough got a lot betterwith considerably more flour (I'd say over a cup extra!) but it never did quite make it to the shaggy stage. Anyhoo, I let it rise out on the deckfor several hours, refrigerated overnight (duh'oh! had plans!)
I just baked it and it came out very good- with your bread being the "great" mark. ;)
Now my wife and I are about to enjoy a mediterranean lunch of Brie, homemade pesto, a glass of wine and a loaf of "4 hour no knead bread."
Here's a pic for ya and your readers.
Thanks again!
daniel_reetz says: Apr 26, 2009. 10:53 AM REPLYThat looks excellent, much better than my first try. Super cool to see the outcome! Thanks for your experience and info!
At Liberty says: Dec 18, 2009. 6:23 PM REPLY Was they pyrex that exploded on you new, or vintage? I've been hearing of this occurring more & more, and I'm spooked to use mine.
arzthaus says: May 25, 2009. 4:45 PM REPLYjust tried this. i don't think i mixed the water well enough, it was kinda flaky and dusty. Still good though. Is there a way to make it less dense? Perhaps let itrise a bit longer? Just wondering. Great instructable btw
cofosho says: Oct 22, 2009. 11:05 AM REPLYFor a longer rise-time and richer flavor, I strongly recommend NY baker Jim Lahey's "No Knead Bread" recipe, found here in the NYT andreprinted/revised by Mark Bittman in How to Cook Everything.
daniel_reetz says: Jun 7, 2009. 5:54 PM REPLYlooks like acrollet found a solution above. I'm testing it now.
frankenfoof says: Jun 8, 2009. 2:41 PM REPLYFor a great explanation on the mechanics of breadmaking, see the section on French bread in Julia Child's Mastering the Art of French Cooking Vol.2 . You can probably find it in your local library. Personally, I genuflect before her picture every day! ;-)
e-lizard says: Sep 27, 2009. 4:04 PM REPLYThanks very much for an easy to follow yummy recipe, I modified mine just a bit, added 1 cup grated sharp cheddar, 1/2 cup parmesan cheese, 1/4 tsp garlicpowder, 1/4 tsp dried parsley to the four before adding the water, didn't need quite as much water with all that cheese to get the "shaggy" results....Increased the "rest time" just before baking by approx 40 minutes (because I was baking something else in the oven) and am pleased with the results.... agreat soup dipper............

http://www.instructables.com/id/4-Hour-No-Knead-bread/
daniel_reetz says: Sep 27, 2009. 4:06 PM REPLYCongrats! Did you just add those ingredients on top of the existing ones? That sounds delicious -- and it's just getting cold here in Fargo. I'm thinkingabout making up a batch today...
e-lizard says: Sep 28, 2009. 6:19 AM REPLYYeap, I did everything else just the way you posted it - well kind of, I didn't have bread flour so I added 4 tsp of wheat glueten to my all purpose flour,experience told me I'd need it.. It turned out really great. I made some creamy veggie soup (from pulp left over when juicing - waste not want not) andthe bread was perfect for dunking. Thanks again for the recipe. The temp today here in Indiana is only going to be mid 50's (f) so a perfect soup andbread day..... :)
vaclov says: Sep 18, 2009. 2:37 PM REPLYOpps! I must correct myself. Amount of yeast should read 1/4 tsp
vaclov says: Sep 18, 2009. 2:28 PM REPLYI have not seen it shown but one tsp of yeast should added to the flour mix.
AaronJBobb says: Sep 12, 2009. 7:43 PM REPLYTurned out amazing! I wanted to post a picture, but my loaf magically disappeared (carb loving sister).
daniel_reetz says: Sep 12, 2009. 8:08 PM REPLYGreat! I'm looking for a new baking dish, as mine broke. What kind of baking dish did you use?
AaronJBobb says: Sep 12, 2009. 10:05 PM REPLYI used a pyrex casserole dish.
mandras says: Aug 17, 2009. 9:40 AM REPLYCool recipe! Fast process with impressive result. I will try with bread flour next time.
daniel_reetz says: Sep 12, 2009. 8:07 PM REPLYAwesome. That looks great. What kind of baking dish did you use?
b.biter says: May 12, 2009. 6:42 PM REPLYMine turned out good!!!! My kids loved it,and I am making a second batch tonight!!!
http://www.instructables.com/id/4-Hour-No-Knead-bread/
Artekus says: Jul 31, 2009. 12:03 PM REPLYI was wondering that too :) Is it cast iron?
daniel_reetz says: May 17, 2009. 8:26 AM REPLYBeautiful. What kind of pot is that?
acrollet says: May 23, 2009. 3:53 PM REPLYJust tried this for the first time - turned out delicious, crust was perfect! The crumb is perhaps a small bit denser than I would prefer, do you have anysuggestions for making it rise a little more? I may have gotten a little too much water in the dough, perhaps that was the culprit... Used bread flour and onepacket of quick-rise yeast. Thanks very much for the excellent tutorial!
jradi says: Jun 6, 2009. 8:36 PM REPLYOne of the best loaves I've ever made, and I've made a LOT of bread! The crust was amazing. I let the loaf rise for almost 12 hours (because I forgotabout it) and it still came out wonderful.
daniel_reetz says: Jun 6, 2009. 9:07 PM REPLYw00t! Great news! And interesting, it seems from your comments and others that you can leave this stuff overnight and still get great results.Awesome.
acrollet says: May 23, 2009. 3:56 PM REPLYForgot to mention - I used a crockpot insert w/ pyrex lid, and it worked great. Used an oven thermometer to make sure I was baking at 450. (had to turn thedial a little over 475)
daniel_reetz says: Jun 6, 2009. 9:06 PM REPLYThanks! Actually, just today I tried calibrating my oven -- the knob is off by ten degrees. I don't have a good suggestion for getting the crumb to beless dense... have you had any luck since?
acrollet says: Jun 7, 2009. 4:20 PM REPLYI have had some success actually - just last night I re-tried the recipe with these ingredients: 3 cups bread flour 1 tsp. yeast 1.5 tsp salt 1.5 cupswater with 1 tsp apple cider vinegar mixed in I stirred a bit longer at the beginning to develop the gluten some more, but otherwise followed yourrecipe to the letter. I was very happy with the result, the crumb has the airier, springier texture that I really like. Added bonus: it's still fresh andgood right now, 24 hrs after I took it out of the oven. Here's a pic:
view all 158 comments