Embed Size (px)
Citation preview


Windows 8: Out of the Box
Mike Halsey
Beijing • Cambridge • Farnham • Köln • Sebastopol • Tokyo

Windows 8: Out of the Boxby Mike Halsey
Copyright © 2012 Mike Halsey. All rights reserved.Printed in the United States of America.
Published by O’Reilly Media, Inc., 1005 Gravenstein Highway North, Sebastopol,CA 95472.
O’Reilly books may be purchased for educational, business, or sales promotionaluse. Online editions are also available for most titles (http://my.safaribooksonline.com). For more information, contact our corporate/institutional sales depart-ment: 800-998-9938 or [email protected].
Editor: Rachel RoumeliotisProduction Editor: Rachel SteelyCopyeditor:Proofreader: FIX ME!
Indexer:Cover Designer: Karen MontgomeryInterior Designer: David FutatoIllustrator: Robert Romano
September 2012: First Edition.
Revision History for the First Edition:2012-09-04 First release
See http://oreilly.com/catalog/errata.csp?isbn=9781449326647 for release details.
Nutshell Handbook, the Nutshell Handbook logo, and the O’Reilly logo are regis-tered trademarks of O’Reilly Media, Inc. !!FILL THIS IN!! and related trade dressare trademarks of O’Reilly Media, Inc.
Many of the designations used by manufacturers and sellers to distinguish theirproducts are claimed as trademarks. Where those designations appear in this book,and O’Reilly Media, Inc., was aware of a trademark claim, the designations havebeen printed in caps or initial caps.
While every precaution has been taken in the preparation of this book, the publisherand authors assume no responsibility for errors or omissions, or for damages re-sulting from the use of the information contained herein.
ISBN: 978-1-449-32664-7
[?]
1346784529

Table of Contents
Preface . . . . . . . . . . . . . . . . . . . . . . . . . . . . . . . . . . . . . . . . . . . . . . . . . . . . . . . . . . . . . vii
1. Using Windows 8 . . . . . . . . . . . . . . . . . . . . . . . . . . . . . . . . . . . . . . . . . . . . . . . . 1Top Tips from This Chapter 1The Start Screen vs The Desktop: What You Need to Know 2Starting Windows 8 2Finding Your Way Around the New Start Screen 3Using the Charms Menu 5Using the App Bar 6Finding All the Apps in Windows 8 7Switching Between Running Apps in Windows 8 8
Docking Apps to the Left or Right of the Screen 8Logging Out Of and Locking Windows 8 9Using Touch Gestures in Windows 8 11Using Windows 8 with a Keyboard and Mouse 11Using the On-Screen Keyboard 11Shutting Down and Restarting Windows 8 12Summary 12
2. Using Email and the Internet . . . . . . . . . . . . . . . . . . . . . . . . . . . . . . . . . . . . . 15Top Tips from This Chapter 15Getting Online with Windows 8 15
Step by Step: Connecting to a Wireless Network 16Getting Quick Access to Your Email 18Using the Internet Explorer 10 App 18
Saving Your Favorite Websites to the Start Screen 21Internet Explorer on the Desktop 22
Using Windows Live Mail 22Step by Step: Setting Up Email in Windows Live Mail 23
Summary 24
iii

3. Sharing Your Files, Photos, Music, and Video . . . . . . . . . . . . . . . . . . . . . . . . 27Top Tips from This Chapter 27The Windows 8 Sharing Tool 28Sharing with Other People in Your Home 29
Sharing with Other Media Devices 30Creating and Joining HomeGroups 30
Connecting Windows 8 and Your Xbox 360 30Connecting to Your Xbox 360 Using the Xbox Companion App 31
Connecting to Other Devices in Your Home 33Connecting to Devices from the Charms Menu 33Connecting to Devices from File Explorer 34
Summary 35
4. Downloading and Using Apps and Programs . . . . . . . . . . . . . . . . . . . . . . . . 37Top Tips from This Chapter 37Using the Windows Store 38Updating Apps in Windows 8 39
Making Tiles Smaller and Larger 39Organizing App Icons on the Start Screen 41
Arranging the Start Screen Step by Step 41Arranging Groups of Tiles 41
Viewing All Your Installed Apps and Programs 42Switching Between Running Apps and Programs 44Viewing Two Apps Side by Side 45Viewing Two Desktop Windows Side by Side 46Uninstalling Apps and Programs in Windows 8 47Summary 47
5. Watching and Listening to Your Videos and Music . . . . . . . . . . . . . . . . . . . 49Top Tips from This Chapter 49Watching Your Videos in Windows 8 49Playing Your Music in Windows 8 51Using Windows Media Player 53Summary 55
6. Importing, Viewing, and Editing Your Digital Photographs and Videos . .57Top Tips from This Chapter 57Importing Photos and Video from Your Digital Camera 57Advanced Photo and Video Import Using Windows Photo Gallery 59
Review, Organize, and Group Items to Import 60
iv | Table of Contents

Import All New Items Now 62Viewing Your Photos in Windows 8 62Editing Your Photos in Windows Photo Gallery 64Summary 65
7. Connecting To and Using Extra Hardware with Your Computer . . . . . . . . . 67Top Tips from This Chapter 67Attaching and Using a Printer 67Setting the Default Printer 70Connecting to Network Storage and Devices 70Using a Second Screen with Your Computer 71
Customizing your Multiscreen Display 73Summary 73
8. Using Windows 8 for Work . . . . . . . . . . . . . . . . . . . . . . . . . . . . . . . . . . . . . . . 75Top Tips from This Chapter 75Using Microsoft Office in Windows 8 75
Microsoft Office Web Apps 76Using Microsoft Office on Windows 8 Tablets 76The Ribbon Explained 77Being Productive with Office 78
Using the Desktop in Windows 8 78Connecting and Using Projectors and Second Screens 81
Maximizing Battery Life on Your Laptop or Tablet 81The Windows Mobility Center 81
Summary 83
9. Using Older Software and Programs . . . . . . . . . . . . . . . . . . . . . . . . . . . . . . . 85Top Tips from This Chapter 85Windows Tablets and Desktop Programs 86Installing Desktop Programs in Windows 8 86
Installing a Program in Compatibility Mode 87Troubleshooting Program Compatibility 88
Running Programs on the Windows Desktop 89Uninstalling Desktop Programs in Windows 8 90Summary 91
10. Keeping You and Your Family Safe . . . . . . . . . . . . . . . . . . . . . . . . . . . . . . . . 93Top Tips from This Chapter 93Setting Up Additional Users on Your Computer 93Viruses, Malware, and Phishing Explained 95Using Windows Defender to Keep Your Computer Safe 96
Table of Contents | v

Browsing Safely with Internet Explorer 10 97Setting Up and Using Family Safety 98
Windows Web Filter 99Time Limits 100Games 101
Summary 101
11. Keeping Your Computer Running Smoothly . . . . . . . . . . . . . . . . . . . . . . . 103Top Tips from This Chapter 103How to Keep Your Files Backed Up 103Restoring Your Files from a Backup 107Restoring Windows 8 from a Backup 108Refreshing Windows 8 110Creating a Recovery Drive 111Using System Restore to Rescue Windows 112Maintaining Windows 8 113Summary 114
12. More Top Tips for Using Windows 8 . . . . . . . . . . . . . . . . . . . . . . . . . . . . . . 115Use a Picture Password 115Use a Secure Password 116Get Extra Information from the Start Screen 117Make Sure You Keep Regular Backups 117Create a Custom Refresh Image 118Using the Calendar and Clocks on the Desktop Taskbar 119Choosing the Programs that Open Files 120Managing Your Default Sound Devices 121Turn It Off and On Again 122Summary 123
vi | Table of Contents

Preface
Conventions Used in This BookThe following typographical conventions are used in this book:
ItalicIndicates new terms, URLs, email addresses, filenames, and file exten-sions.
Constant widthUsed for program listings, as well as within paragraphs to refer to programelements such as variable or function names, databases, data types, envi-ronment variables, statements, and keywords.
Constant width boldShows commands or other text that should be typed literally by the user.
Constant width italicShows text that should be replaced with user-supplied values or by valuesdetermined by context.
This icon signifies a tip, suggestion, or general note.
This icon indicates a warning or caution.
Using Code ExamplesThis book is here to help you get your job done. In general, you may use thecode in this book in your programs and documentation. You do not need to
vii

contact us for permission unless you’re reproducing a significant portion ofthe code. For example, writing a program that uses several chunks of codefrom this book does not require permission. Selling or distributing a CD-ROMof examples from O’Reilly books does require permission. Answering a ques-tion by citing this book and quoting example code does not require permission.Incorporating a significant amount of example code from this book into yourproduct’s documentation does require permission.
We appreciate, but do not require, attribution. An attribution usually includesthe title, author, publisher, and ISBN. For example: “Book Title by Some Au-thor (O’Reilly). Copyright 2012 Some Copyright Holder, 978-0-596-xxxx-x.”
If you feel your use of code examples falls outside fair use or the permissiongiven above, feel free to contact us at [email protected].
Safari® Books OnlineSafari Books Online (www.safaribooksonline.com) is an on-de-mand digital library that delivers expert content in both book andvideo form from the world’s leading authors in technology andbusiness.
Technology professionals, software developers, web designers, and businessand creative professionals use Safari Books Online as their primary resourcefor research, problem solving, learning, and certification training.
Safari Books Online offers a range of product mixes and pricing programs fororganizations, government agencies, and individuals. Subscribers have accessto thousands of books, training videos, and prepublication manuscripts in onefully searchable database from publishers like O’Reilly Media, Prentice HallProfessional, Addison-Wesley Professional, Microsoft Press, Sams, Que,Peachpit Press, Focal Press, Cisco Press, John Wiley & Sons, Syngress, MorganKaufmann, IBM Redbooks, Packt, Adobe Press, FT Press, Apress, Manning,New Riders, McGraw-Hill, Jones & Bartlett, Course Technology, and dozensmore. For more information about Safari Books Online, please visit us online.
How to Contact UsPlease address comments and questions concerning this book to the publisher:
O’Reilly Media, Inc.1005 Gravenstein Highway NorthSebastopol, CA 95472800-998-9938 (in the United States or Canada)
viii | Preface

707-829-0515 (international or local)707-829-0104 (fax)
We have a web page for this book, where we list errata, examples, and anyadditional information. You can access this page at http://www.oreilly.com/catalog/<catalog page>.
To comment or ask technical questions about this book, send email [email protected].
For more information about our books, courses, conferences, and news, seeour website at http://www.oreilly.com.
Find us on Facebook: http://facebook.com/oreilly
Follow us on Twitter: http://twitter.com/oreillymedia
Watch us on YouTube: http://www.youtube.com/oreillymedia
Preface | ix

CHAPTER 1
Using Windows 8
Windows 8 is very different to previous versions of Windows from Microsoftprimarily in that it has a new look that’s been redesigned to be easy to use withtouch as well as with a mouse and keyboard. For the first time, it’s no longernecessary to understand how small and fiddly drop-down menus work, or tounderstand how to control programs using complicated desktop menus whereyou have to manage and juggle multiple programs on your screen at one time.
Windows 8 can be operated by a keyboard and mouse but it is best used witha touchscreen computer or tablet, and it is here that you will benefit from therichest experience.
Everything has changed to make it not just easier to find and control docu-ments, apps, and programs, but to make overall control of Windows and yoursettings simpler. At last, you don’t need to be a technical user to get the bestout of using Windows.
When you use Windows 8 on your computer, laptop, or tablet for the firsttime you’ll notice how different it looks and works. This new look makes iteasier for you to see what’s going on in your online life at a glance with LiveTiles, which can show you information about your email, calendar, instantmessaging, social networking, sports, news, and much more, all without everleaving the new Start screen.
In this chapter, I’ll show what these new interface elements are and how youuse them.
Top Tips from This Chapter1. You can open menus and options on the Start screen by swiping in with
your finger from any edges on the screen.
1

2. Move your mouse to the corners of the screen to display options and me-nus.
3. On your keyboard you can hold down the Windows Key in the bottom leftof the keyboard and press Z or C to open menus and options.
The Start Screen vs The Desktop: What You Need to KnowI’ve already mentioned the new interface in Windows 8, the Start screen. Thetraditional Windows desktop still exists. Though, so that you can use softwareyou’re used to in Windows 7.
There is a new style of program in Windows 8, however, called an App. Theseapps (or applications) run full screen and are easier and friendlier to use thandesktop programs. Windows 8 comes preinstalled with many apps for email,calendar, news, and so on, and you can download more from the new Win-dows Store. You will see the Store tile on the Start screen. I will show you howto use the Windows Store and install apps and programs in Chapter 4.
If you are using a Windows 8 tablet you will only be able to install apps fromthe Windows store. You can’t install desktop software on tablet computers.The only exception to this is Windows 8 Pro tablets; you should check thedocumentation that came with your tablet to see which type of device youhave.
Starting Windows 8When Windows 8 starts, you will see the lock screen (Figure 1-1). This displaysthe time and date and can also show extra information including how manyemails you have and what your next calendar appointment is.
You open the lock screen by swiping upwards on the screenwith your finger, if you have a touch display, or by pressingany key on the computer’s keyboard.
When you first started using your computer, you may have set a password foryour user account. If you did, you will be asked for this before you can unlockthe computer. You can also create a number password for Windows 8 or usea Picture Password. I will show you how to do this in Chapter 12.
2 | Chapter 1: Using Windows 8

To switch between a standard password, PIN, or picture if youhave one set, click/touch sign-in-options at the sign-in screenwhen asked for your password.
Finding Your Way Around the New Start ScreenThe Start screen (Figure 1-2), in Windows 8 is based around square and rec-tangular colored blocks called Tiles, each one when clicked or tapped startsan app, which will perform a specific task such as sending and receiving email,viewing web pages, editing photographs, or play a game. The Start screen pansleft to right across your screen.
Swipe left and right with your finger to pan across the Startscreen. If you are using a mouse, you will see a scroll bar atthe bottom of the screen when you move the mouse. Click/Touch and drag this left and right to look around the Startscreen. You can also use the scroll wheel (up and down) onyour mouse to move left and right on the Start scren.
Figure 1-1. The Windows 8 lock screen
Finding Your Way Around the New Start Screen | 3

As you look around the Start screen you will see that some Tiles change oc-casionally to display text or images. These are Live Tiles, which give you in-formation from inside the app or show you what is new or changed, such asgiving you a message.
These messages can include details of new emails or social network messages,informing you of the number of updates that are available for your apps in theWindows Store or giving you news headlines.
You can rearrange Tiles on the Start screen by dragging them around anddropping them into a new location, which can help you organize them to bestsuit you. I will show you how to organize the Start screen in Chapter 4.
When you drag a Tile between groups, you will see a coloredvertical bar appear. If you drop the Tile onto this bar you cancreate a new group. This can be useful to separate apps. Forexample, you can separate games, websites, and so on.
Figure 1-2. The Windows 8 Start screen
4 | Chapter 1: Using Windows 8

Using the Charms MenuThe Start Button from previous versions of Windows (sometimes known asthe Windows Orb), which you would find in the bottom left hand corner ofyour desktop screen, and that you would click/touch to find and run programs,has moved in Windows 8 to a new Charms Menu (Figure 1-3). This pops outfrom the right side of the screen and contains icons for useful tasks in Windows8.
You can open the Charms Menu by swiping in from the right of the screenwith your finger or by pressing WindowsKey+C on your keyboard (the Win-dowsKey is the key in the bottom left of your keyboard with the Windows logoon it). To open the Charms Menu with a mouse, move your mouse to thebottom right or the top right corner of the screen.
On the Charms Menu you will find the following options:
Figure 1-3. The Charms menu
Using the Charms Menu | 5

• Search opens the search panel so you can find apps, documents, andWindows 8 Settings
• Share allows you to share text, pictures, and more between Windows 8apps
• Start returns you to the Start screen; this is also available by pressing theWindows Key on your keyboard or the Windows button on your tabletcomputer
• Devices allows you to work with printers, display projectors, and otherhardware devices
• Settings displays basic Windows 8 Settings and controls
You can also search for apps, settings, and files by typing di-rectly at the Start screen. You do not need to open the Searchpanel.
Using the App BarIf you have used an earlier version of Windows, you might know that pressingthe right mouse button can bring up a menu of options associated with an iconor program. In Windows 8 apps and on the Start screen, this right-click nowdisplays the App Bar.
The App Bar (Figure 1-4), which is also available by swiping up from the bot-tom of your screen with your finger or swiping down from the top, containsmenu options that are available for that app.
To open the App Bar with your mouse, right-click in an app or on the Startscreen. To open the App Bar from your keyboard, press the WindowsKey+Z.
These options are the equivalent to drop-down menus in Windows desktopprograms and can perform many functions, each of which depends on thecontext of where you are and what you are doing.
To perform an action on a Tile on the Start screen, such ashiding it from the Start screen completely (I will show you howto organize apps and tiles on the Start screen in Chapter 4),you can right-click/touch on the Tile with your mouse, ortouch and swipe downwards with your finger, and the AppBar will appear with options for actions you can perform onthat Tile. You can open the App Bar from your keyboard bypressing WindowsKey+Z in any app or from the Start screen.
6 | Chapter 1: Using Windows 8

If ever you want to open a menu in an app or on the Start screen, you will dothis from the App Bar. This is where all the controls for apps can be found.
Finding All the Apps in Windows 8Not all the apps and software in Windows 8 will appear on the Start screen.For example, you may have chosen to hide a Tile to keep your Start screentidy, or perhaps you don’t use it regularly.
You can see all the apps that are installed in Windows 8, including Windowsdesktop programs by right-clicking in any blank space on the Start screen (alsoby touching a blank space and dragging down) and then clicking All Apps onthe app bar.
In the All Apps view (Figure 1-5), you will see every app and all your desktopsoftware that is installed on the computer. The apps appear on the left of thescreen and your desktop software, on the right, are organized into clearly la-belled categories to make things easy to find. You can move left and right inthe All Apps view as you would on the Start screen.
Figure 1-4. The App Bar in Windows 8
Finding All the Apps in Windows 8 | 7

If you want to pin an app or program back on the Start screen,right-click (touch and drag down) on it and select Pin toStart from the App Bar
Switching Between Running Apps in Windows 8You can press the Windows Key on your keyboard or the Start icon in theCharms menu at any time to return to the Start screen, but you can also switchbetween apps by dragging the previous app in from the left of the screen withyour finger. With a keyboard, you can use the WindowsKey+Tab keys to switchbetween running apps.
Docking Apps to the Left or Right of the ScreenWhen you drag an app in from the left of the screen with your finger, you willsee a vertical bar appear in the left quarter of the screen or the right quarter ofthe screen depending where you are dragging it at that point. Dropping an app
Figure 1-5. Finding all apps in Windows 8
8 | Chapter 1: Using Windows 8

when you see this bar will dock it to the far left or the far right of the screen(Figure 1-6).
If you then return to the Start screen by pressing the Windows Key, the nextapp you run will fill the remaining space, so you have two apps side by side.You can drag the vertical bar separating them left and right to switch the focusfrom one app to the other, or to move one app off the screen completely.
To dock apps side by side using a mouse (this also works with touch), dragthe app from the top center of the screen toward the center of the screen. Youwill see the app change to a thumbnail image. You can now drag this thumbnailto the left or right of the screen and drop it when you see the vertical dock barappear.
Logging Out Of and Locking Windows 8If several people use Windows 8 on your computer and you want to switch toa different user, you can do this by clicking or touching your user icon andname in the top right of the Start screen. This will bring up a menu with threeoptions (Figure 1-7).
If you want to change your password, you can do this fromthe Users page in PC Settings. Click/Touch Settings in theCharms menu and then click Change PC Settings to access theoptions.
Figure 1-6. Arranging apps on screen in Windows 8
Logging Out Of and Locking Windows 8 | 9

• Change Account Picture will allow you to choose a new picture for youraccount from images that you have on your computer.
• Lock will lock the computer so that a password, PIN, or picture passwordis needed to sign in again. This is useful if you are leaving your computerunattended for a while.
• Sign-Out will sign out of your account so that others can use the com-puter.
If you have multiple user accounts set up in Windows, perhapsfor different members of your family (I will show you how toset these up in Chapter 10), these people will also appear inthe user list when you click/touch your name in the top rightof the Start screen. You can switch directly to another user byclicking their icon (you will not be logged out). This meansthat if you have any files or documents open that you have notsaved, they might be lost if another user then shuts the com-puter down. They will be warned, however, by Windows 8 ifanother user is still logged in when they turn the computer off.
Figure 1-7. The User Menu in Windows 8
10 | Chapter 1: Using Windows 8

Using Touch Gestures in Windows 8I have already shown you some of the touch gestures you can use in Windows8, including touching a Tile to open it and touching and dragging down toselect it.
There are other gestures you can use, including two finger pinch actions tozoom in and out (pinch in to zoom out and pinch out to zoom in).
To select an item and open App Bar options for it on the Start screen, touch itand drag it downward slightly. This is slightly different if you are using touchin desktop programs where you should touch and hold the item, this will sim-ulate a mouse right-click.
Using Windows 8 with a Keyboard and MouseIf you are using Windows 8 with a keyboard and mouse, there are several time-saving shortcuts that you can use instead of touch gestures.
• Right mouse click or press the WindowsKey+Z to display the App Bar inapps and at the Start screen
• Press the WindowsKey+C to open the Charms Menu
• Press the WindowsKey+Tab to switch between running apps
You can also move your mouse to the four corners of the screen; these arecalled hot corners, and each one will display different options. The top andbottom right-side corners will open the App Bar, and the top and bottom leftcorners will allow you to switch between running apps and opening the Startscreen.
Using the On-Screen KeyboardWhen you are using Windows 8 on a touchscreen, the on-screen keyboard willappear whenever you tap in a place where you would enter text, such as theaddress bar in Internet Explorer or a form on a website. When it appears, youwill see the keyboard fills the full width of your screen, but if you’re using yourthumbs to type while holding your tablet in both hands, reaching the keys inthe center of the keyboard can be tricky.
You can make using the on-screen keyboard easier to use when you are holdingyour tablet in both hands by clicking the keyboard icon in the bottom right ofthe on-screen keyboard (Figure 1-8) to display different layout options, in-cluding:
Using the On-Screen Keyboard | 11

• The standard full screen–width keyboard
• A thumbs keyboard where the keys are moved to the far left and right ofthe screen
• Handwriting recognition if your tablet comes with a stylus
• Hiding the on-screen keyboard
You can select international characters on the on-screen key-board by touching and holding a letter for one second. Thiswill display accented letters that you can then touch to select.
Shutting Down and Restarting Windows 8To restart or shut down Windows 8, follow these instructions.
• Open the Charms Menu
• Click/touch Settings
• In the panel that appears, click/touch Power
• In the menu that appears, click/touch Shut Down, Restart, or Sleep (Fig-ure 1-9)
Sleep puts your computer into a low-power standby state. This makes it veryquick to switch on again, but it does consume a small amount of power, whichcan drain the battery on a laptop or tablet computer.
SummaryWindows 8 certainly offers a very new way of working, but it is simple andintuitive to use. In this chapter, I have shown you how to navigate the interface,launch apps, display menus, and move items to rearrange them, includingarranging apps on your screen.
Figure 1-8. The Windows 8 on-screen keyboard
12 | Chapter 1: Using Windows 8

In Chapter 2, we will look at the things you will actually be doing with yourcomputer and I will show you how to connect to the Internet and check youremail.
Figure 1-9. Restarting and shutting down Windows 8
Summary | 13

CHAPTER 2
Using Email and the Internet
Whether you use a tablet, laptop, or desktop computer, you’ll have it connec-ted to the Internet. The Internet is now at the center of everything we do withour computers, from sending and receiving email to chatting and sharing pho-tos and stories with friends and family. In Chapter 1, I showed you how to usethe new interface in Windows 8. Now, let’s see how you can get online anduse the Internet Explorer web browser app and Windows 8’s email app.
When you get a new computer, one of the very first things many people do isconnect to the Internet to check email and catch up with friends and family.Windows 8 makes it very simple to get online, and all the tools you need areliterally right at your fingertips.
Top Tips from This Chapter1. If you sign into Windows 8 using the same login you use for your Hotmail
or Live mail (this is called a Microsoft Account), many options in Win-dows 8 such as email, calendar, and the new Windows App Store will beautomatically set up for you.
2. You can swipe left and right with your finger to automatically load thenext and previous pages on a website.
3. The desktop version of Internet Explorer supports more features and al-lows you to organize many more Internet Favorites.
Getting Online with Windows 8In your home you will have an Internet router, this is the box that plugs intoyour phone line and provides Internet access for you. Some computers thatremain static in the home, such as desktop PCs, can connect to these via anetwork cable. This is a physical cable connecting the computer to the router.
15

This is usually the best way to get a stable and super-quick Internet connection.If you use WiFi to connect to your computer place your router in a locationwhere you will get a good signal throughout the building and try to avoidputting it in a place where solid walls might block the signal.
Fixing WiFi Signal ProblemsIf you have a problem with your WiFi signal in your home see if you can moveyour router to a better location, perhaps by using a telephone extension cable,or see if it is possible to install a network cable (that’s all you need to ask forwhen purchasing one) that runs to the dead spots. Please note though that acable does tie a computer to one location, some small laptops and tabletswon’t have a socket to plug the cable into, and trailing cables can also be atrip hazard.
If you connect a computer to your Internet router via a network cable, thenwithin a few seconds you will have Internet access (if you don’t then try turningthe router and PC off and on again).
Step by Step: Connecting to a Wireless NetworkYou will commonly want to connect your computer to the Internet via WiFi.You can also connect via a 3G or 4G connection if your laptop or tablet sup-ports it, and if you have either a SIM card installed in your computer, or awireless broadband USB stick plugged in (Figure 2-1).
1. Open the Charms Menu by swiping in from the right of your screen withyour finger or pressing WindowsKey+C on your keyboard.
2. Click/Touch the Settings icon.
3. Click/Touch the Network icon, which is the first of six icons that willappear near the bottom right corner of your screen. It will say Availableif Wireless Networks have been detected.
4. You will see Mobile Broadband (if your computer supports this) and WiFinetworks listed separately. Click/Touch the name of the network you wishto connect to.
5. You may be asked for a password; enter it here.
You can right-click (touch and hold) on any network in theavailable networks list to Show [your] estimated data use. Thiscan be a useful way to ensure you don’t go over your monthlydata allowance on a 3G or 4G network.
16 | Chapter 2: Using Email and the Internet

When you connect to a network you may be asked what type of network youare connecting to:
• Home networks should only be chosen when you are on your own WiFinetwork in your own home. This allows file sharing of files, documents,and printers between computers.
• Work networks allow certain sharing of files, documents, and printersbut they keep your own personal files safe from prying eyes.
• Public networks should always be selected if you are using WiFi in a coffeeshop, on a train, or in another public location. This settings keeps yourfiles, documents, and access to your computer safe and secure.
Additionally, any network where you do not need a password to get online iscertainly insecure in that anybody can gain access to it. You should not allowthe sharing of files on public networks or networks that are not protected bya password.
Figure 2-1. The WiFi and mobile broadband connection
Getting Online with Windows 8 | 17

If your WiFi connection isn’t working, try restarting yourrouter and perhaps your computer as well. If you connect tothe Internet via a WiFi or Mobile broadband USB dongle, tryunplugging it from the computer and plugging it into a differ-ent USB port. Also, do you have Airplane Mode switched on?You can check this at the top right of the screen when con-necting to a network.
Getting Quick Access to Your EmailWindows 8 comes with a new email app called Mail, which you will see onthe Start screen. Here you can easily send and receive emails using either akeyboard and mouse or the on-screen keyboard. If you log into your computerusing the same Microsoft Account you use to access your Hotmail or Live Mailaccount, then opening the Mail app on the Start screen will automatically dis-play your email.
If you use a different email provider, perhaps Gmail, you can add your emailto the Mail app by following these instructions:
1. Open the People app from the Start screen; it is in this app that you man-age all your accounts for email, social networking, and messaging.
2. On the left of the screen you will see a panel that allows you to connectnew accounts to Windows 8 (Figure 2-2).
You can also manage your email accounts by opening theCharms menu in the Mail app and clicking/tapping the Set-tings icon. An Accounts link will then appear in the top rightof the screen.
Using the Internet Explorer 10 AppWindows 8 comes with a copy of the Internet Explorer web browser. InternetExplorer is very simple to use (Figure 2-3). The address bar, where you typethe addresses of the websites you want to visit, is at the bottom of the screenalong with controls for Back (to the left of the address bar) to take you back apage and Refresh (to the right of the address bar) to reload the page. You candisplay these at any time by opening the App Bar.
Internet Explorer allows you to open multiple websites and switch betweenthem using tabs. You can manage your tabs in Internet Explorer by opening
18 | Chapter 2: Using Email and the Internet

the app bar and you will see thumbnail images of your open tabs at the top ofthe screen.
You can also use touch gestures in Internet Explorer to move backwards topreviously loaded pages (swipe left to right) or to automatically move pagesback and forth on a website (swipe right to left). This enables you to movethrough the pages of a website without needing to know what the next link isto click.
If you want to zoom into a part of a web page, or perhaps you are finding sometext difficult to read or links too small to click or touch, the zoom feature canhelp here as well. You can make a two-finger pinch zoom gesture on the screento zoom in and out of any part of a web page in both the app and desktopversions of Internet Explorer. If you use a keyboard and mouse, you will needto be using the desktop version of Internet Explorer to zoom on, and the zoomcontrols can be found in the bottom right corner of the window.
To open a new browser tab in Internet Explorer, click/touch or tap the + buttonin the top right of the screen when the App Bar is open and the tabs are show-ing.
Figure 2-2. Connecting a new email account in Mail
Using the Internet Explorer 10 App | 19

You can clean up all of your tabs by pressing the icon belowthe new tab button and selecting Clean up Tabs from the op-tions that appear. This will automatically close all but the cur-rently open tab.
When you click/touch the address bar, Internet Explorer will show you thewebsites you have visited recently and also any Favorites that you have saved.These favorites are automatically displayed on the Start screen.
These saved favorites appear both next to the list of recently visited websites,and also on the Start screen (Figure 2-4). You can organize and arrange theseinto groups, and I will show you how to do this in more detail in Chapter 4.
You can open the app bar with your mouse in Internet Ex-plorer by right-clicking in any blank space on a web page.
Figure 2-3. Internet Explorer 10 in Windows 8
20 | Chapter 2: Using Email and the Internet
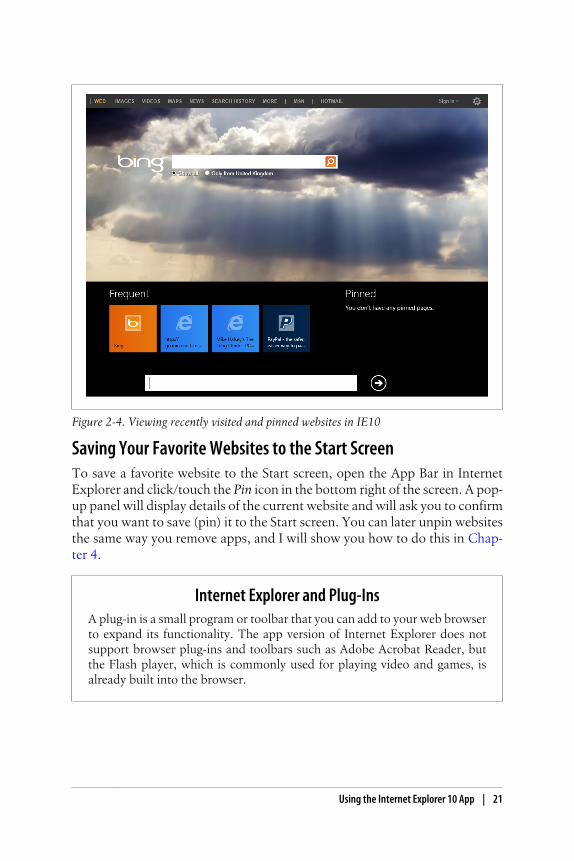
Saving Your Favorite Websites to the Start ScreenTo save a favorite website to the Start screen, open the App Bar in InternetExplorer and click/touch the Pin icon in the bottom right of the screen. A pop-up panel will display details of the current website and will ask you to confirmthat you want to save (pin) it to the Start screen. You can later unpin websitesthe same way you remove apps, and I will show you how to do this in Chap-ter 4.
Internet Explorer and Plug-InsA plug-in is a small program or toolbar that you can add to your web browserto expand its functionality. The app version of Internet Explorer does notsupport browser plug-ins and toolbars such as Adobe Acrobat Reader, butthe Flash player, which is commonly used for playing video and games, isalready built into the browser.
Figure 2-4. Viewing recently visited and pinned websites in IE10
Using the Internet Explorer 10 App | 21

Internet Explorer tells you if a website is known to be safe orunsafe by turning the address bar green or red. For shoppingand banking websites, it will also display a padlock on theaddress bar if the website has adequate security. You shouldalways look for a green address bar and/or the padlock whenshopping or banking online.
Using InPrivate ModeWhen you clean up your browser tabs in Internet Explorer, you will see a linkto use InPrivate Mode. This is a special secure mode of Internet Explorer thatprevents the browser from tracking where you have been, and also stops thewebsite placing any tracking files, known as cookies, on your computer.
InPrivate Mode is especially useful for birthdays and holidays when you’reshopping for presents and surprises, and you don’t want other people whouse your computer to know what you’re getting them.
Internet Explorer on the DesktopEarlier I mentioned Internet Explorer on the Windows 8 desktop. This versioncan add more flexibility than is available in the app version of Internet Explorer10. You open Internet Explorer on the desktop by clicking or tapping theDesktop tile on the Start screen. You will then see Internet Explorer pinned tothe Taskbar that runs along the bottom of the screen.
Unlike the app version of Internet Explorer, this desktop version supportsbrowser plug-ins and toolbars and it also is much better if you have a greatmany Internet favorites that you like to visit.
It works in the same way as previous versions of Internet Explorer and otherInternet browsers, and some users may prefer to use this version of the webbrowser.
If you are viewing a web page in the app Internet Explorer app,you can open it in the full desktop browser by clicking thewrench icon in the App Bar, and then selecting View on theDesktop from the options that appear.
Using Windows Live MailWhile Windows 8 does include a Mail app, some people want a more fullyfeatured program that works more like Microsoft Outlook that you might use
22 | Chapter 2: Using Email and the Internet

at work. Windows Live Mail is a great free alternative to Outlook that you candownload from http://download.live.com or from the Windows Store. Win-dows Live Mail is part of the excellent Windows Essentials Suite that includesWindows Photo Gallery, which I will discuss in Chapter 6.
Remember that you can’t install additional desktop softwareon a Windows Tablet.
Windows Live Mail (Figure 2-5) runs on the Windows Desktop and includesmany of the features present in Microsoft Outlook, which you might use atwork, while at the same time being very easy to use. There are five tabs acrossthe top of the program in a ribbon. This is where you control the program:
• File is a tab you will probably not need, but here you can customize theoptions for the program or add and remove email accounts.
• Home is the main tab that includes all the functions you need to create,send, and receive email.
• Folders is where you can organize your email by moving and copyingthem, and by creating folders.
• View is where you can change how email is displayed in Windows LiveMail.
• Accounts is where you can manage and tell Windows Live Mail aboutyour existing email account.
If you have used a Microsoft Account to sign in to Windows8, Windows Live Mail will automatically recognize this andconfigure your email account for you.
Step by Step: Setting Up Email in Windows Live Mail1. Click/Touch the Accounts tab on the Ribbon.
2. Click/Touch the Email Button.
3. Enter the email address and password for your account and your name.
4. Click/Touch Next and Windows Live Mail will now download your email(this may take some time if you have a lot of email) (Figure 2-6).
Using Windows Live Mail | 23

SummaryIt is very easy to get online with Windows 8, and if you use a Microsoft Accountto sign into your computer then Windows 8 takes all the strain out of settingup and configuring your email account, calendar, and more. Even if you use aGmail, Yahoo!, or other account, it is quick and simple to set up your accountsin the People app.
If you want more control, the Windows Essentials Suite is an excellent packagewith some fantastic programs in it for blogging, photo editing, messaging, andmore and you can install it on desktop and laptop computers.
Now that you’re online, in Chapter 3 I’ll show you how you can share yourfiles, photos, and more with friends and family both inside your home and onthe Internet.
Figure 2-5. Windows Live Mail
24 | Chapter 2: Using Email and the Internet

Figure 2-6. Setting up an email eccount in Windows Live
Summary | 25


CHAPTER 3
Sharing Your Files, Photos, Music,and Video
Sharing our lives and experiences online is becoming ever more popular asdigital cameras and smartphones reduce in price and improve with every newmodel. Add to this social networking websites and instant messaging and it’seasy to see why hundreds of millions of people are sharing things with friendsand family online.
You might want to share files and memories with members of your own familyand friends. Windows 8 is the most connected operating system Microsoft hasever produced with features that are built in to make it simpler than ever beforeto share files, photographs, music, and videos with family, friends, or the widerworld through a blog or photo and video sharing website.
In Chapter 2, I showed you how to get online with Windows 8. Now let’s lookat how you can make sharing the best moments of your life enjoyable andproblem free.
Top Tips from This Chapter1. Windows 8 includes features for sharing your files, photos, music, and
videos, which you can access by clicking/touching Share in the CharmsMenu.
2. You can share your files and even printers with other computers runningWindows 8 or Windows 7 by setting up a HomeGroup.
3. You can share pictures, music, and video with non-Windows devices byturning on the Media Sharing feature in Windows 8.
27

The Windows 8 Sharing ToolWindows 8 includes a new sharing tool that can be selected at any time fromthe Charms Menu. If you are looking at a picture, file, video, or other type ofcontent that you want to share with other people, click/touch Share and youwill be shown a list of apps that you can share this content with instantly. Thislist will vary depending on what apps you have installed (Figure 3-1).
This is where the real power of social apps comes into play and where appsthat you can download from the Windows 8, Store can be much better andeasier to use than visiting websites in Internet Explorer.
In Chapter 4, I will show you how to find and install apps in Windows 8, butfor now let me explain how Windows 8 sharing works and why using appscan be better than visiting a website.
Let’s say, for example, that you have photos that you want to share on Face-book or a video you want to upload to YouTube.
In earlier versions of Windows, you would open Internet Explorer or anotherweb browser, go to the website, log in, and upload them. However, if you havea compatible app installed in Windows 8 for these websites, let’s say a You-Tube app, you can be viewing the video you want to share, open the Charms
Figure 3-1. The Share Menu options in the Charms Menu
28 | Chapter 3: Sharing Your Files, Photos, Music, and Video

Menu, click/touch Share, and you will see the YouTube app appear in the listof compatible sharing apps.
Clicking/Touching this app will automatically share the video with the app,and therefore on the website as well, with a minimum of fuss to yourself.
Sharing with Other People in Your HomeWhile Windows 8 makes it easy for you to share photos, videos, and morewith friends and family on the Internet, it makes it just as easy to share thingswith people in your home on other computers. It does this using a HomeGroup.
You can find the settings for the HomeGroup by Clicking Settings in theCharms menu and then clicking Change PC Settings. The HomeGroup optionsare near the bottom of the PC Settings panel (Figure 3-2).
Here you will see switches making it easy to share Documents, Music, Pictures,and Videos from this computer. Each computer in a HomeGroup can be con-figured differently so that, for example, a computer that’s used in a home officemight not share its Documents.
You can also share printers and other devices plugged into your computer.This makes it easy for people to be able to remotely print documents or access
Figure 3-2. HomeGroup options in Windows 8
Sharing with Other People in Your Home | 29

other hardware such as scanners or external hard disks, though the computerthese are physically plugged in to will need to be switched on.
If you have a wireless printer, this can be accessed directly byother computers and won’t need to be shared using Home-group. I will show you how to set up printers in Chapter 7.
Sharing with Other Media DevicesBelow the options to choose what you want to share from your Windows 8computer you will see an option to Allow all devices on the network such asTVs and game consoles to play my shared content, but what does this mean?
Many devices in the home can now share content such as music and video eventhough they don’t run Microsoft Windows. You might have a games consolesuch as an Xbox 360 or a Wii U, an Internet-connected Smart TV, or an Internetradio. If you turn this option on, then all of these devices, if the feature is alsoenabled on them, will be able to access your shared content.
The advantage of this is that you can, for example, play your music libraryfrom your computer on your Internet radio in the garden, or watch videos youhave stored on your computer on your living room TV.
Creating and Joining HomeGroupsAny computer running Windows 7 or Windows 8 can join a HomeGroup. Youcan find the Homegroup options in PC Settings under the Homegroup section.You can create a HomeGroup by turning the feature on, and you will be showna password that will need to be entered on other computers when they jointhe HomeGroup.
If a HomeGroup has already been created on another computer, you will seea Join button, which you can click/touch or tap where you will be promptedto enter the HomeGroup password. You can find this password in the Home-Group settings on the computer the HomeGroup was created on.
If you no longer wish for a computer to be a member of a HomeGroup, youcan also leave the HomeGroup by clicking/tapping the Leave button.
Connecting Windows 8 and Your Xbox 360If you have an Xbox 360 console in your home you can connect your Windows8 computer to it. This gives you the advantage of being able to enjoy yourmusic, photos, and videos on your TV.
30 | Chapter 3: Sharing Your Files, Photos, Music, and Video
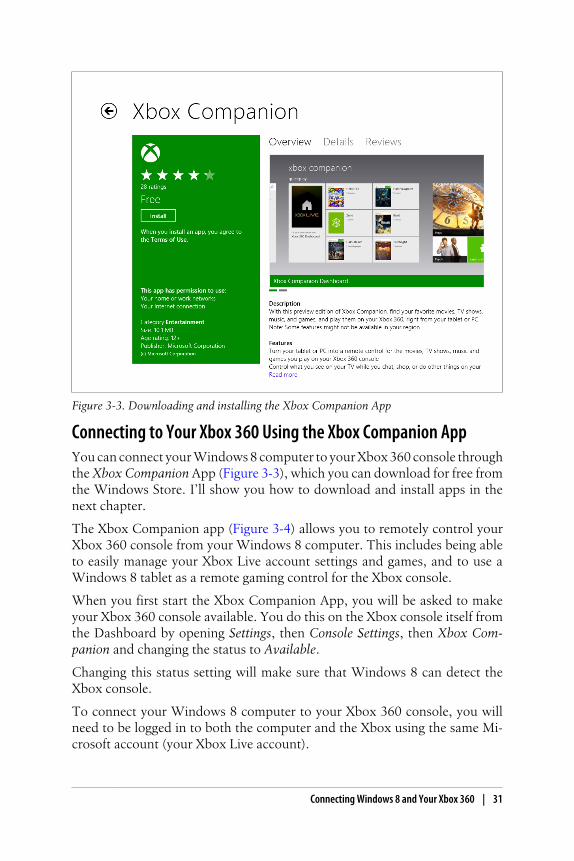
Connecting to Your Xbox 360 Using the Xbox Companion AppYou can connect your Windows 8 computer to your Xbox 360 console throughthe Xbox Companion App (Figure 3-3), which you can download for free fromthe Windows Store. I’ll show you how to download and install apps in thenext chapter.
The Xbox Companion app (Figure 3-4) allows you to remotely control yourXbox 360 console from your Windows 8 computer. This includes being ableto easily manage your Xbox Live account settings and games, and to use aWindows 8 tablet as a remote gaming control for the Xbox console.
When you first start the Xbox Companion App, you will be asked to makeyour Xbox 360 console available. You do this on the Xbox console itself fromthe Dashboard by opening Settings, then Console Settings, then Xbox Com-panion and changing the status to Available.
Changing this status setting will make sure that Windows 8 can detect theXbox console.
To connect your Windows 8 computer to your Xbox 360 console, you willneed to be logged in to both the computer and the Xbox using the same Mi-crosoft account (your Xbox Live account).
Figure 3-3. Downloading and installing the Xbox Companion App
Connecting Windows 8 and Your Xbox 360 | 31

Connecting to Your Xbox 360 Using Windows Media CenterWhen you connect your Xbox 360 console to your computer using the Win-dows Media Center software on your desktop or laptop computer, you canshare your pictures, music, and videos with the console and enjoy it on yourTV.
To do this, you will need Windows Media Center installed on your computer.You can check by going to the All Apps view where, if Media Center is in-stalled, it will appear in the Windows Accessories section. If you don’t haveMedia Center installed, it is a chargeable extra that you can buy by searchingfor Add Features at the Start screen and selecting Add Features to Windows 8from the Settings search results.
You will need to buy an upgrade to Windows 8, which you can do by clickingthe I want to buy a product key online button, which will upgrade you to thefull version of Windows 8 Pro with Media Center (Figure 3-5).
To connect your Xbox 360 console to your Windows 8 computer using Win-dows Media Center, start Windows Media Center from the Video panel onyour Xbox 360 Dashboard and follow the simple instructions.
Figure 3-4. Setting up the Xbox Companion App
32 | Chapter 3: Sharing Your Files, Photos, Music, and Video

If you do not have the full version of Windows 8 Pro withMedia Center you can share your pictures, music, and videos,with an Xbox 360 console by turning on the Allow all deviceson the network such as TVs and game consoles to play my sharedcontent setting in HomeGroup from PC Settings.
Connecting to Other Devices in Your HomeWhile you can use HomeGroup to share files and printers between other Win-dows 7 and Windows 8 computers in your home, and you can use the XboxCompanion App or Windows Media Center to connect to an Xbox 360 con-sole, you can also connect your Windows 8 computer to other networkeddevices in your home. These could include a USB hard disk plugged into yourInternet router or a wireless printer. There are a couple of ways that you cando this.
Connecting to Devices from the Charms MenuOpen the Charms menu and select Devices to see other hardware devices youcan use and access from your Windows 8 computer. Not all devices will appear
Figure 3-5. Adding features to Windows 8
Connecting to Other Devices in Your Home | 33

in this view, so you may find that the specific device you want to use isn’tdisplayed, but this is a good way to connect quickly to hardware that’s fullycompatible with Windows 8 features.
Connecting to Devices from File ExplorerTo connect to other networked devices in your home, open Desktop from theStart screen and on the Taskbar that runs along the bottom of the desktop,click/touch the yellow folder icon to open File Explorer. Once File Explorer isopen on your desktop, look in its left-hand panel, where you will see a link forNetwork.
Click/Touch this link to see all compatible network devices in your home. Thiswill include other computers running Windows and any compatible comput-ers such as Macs, networked media devices such as Internet radios, and anyadditional hardware such as a USB hard disk plugged into your Internet routerif your router supports this feature (Figure 3-6).
You can access external hardware and computers directly from this panel toshare files between them and your Windows 8 computer. Not all hardwaredevices will appear, however, and some that appear might not allow you toshare files this way. For example, if you have a non-Windows 8 tablet such as
Figure 3-6. Viewing network devices in Windows 8
34 | Chapter 3: Sharing Your Files, Photos, Music, and Video

an iPad or Android device, you will probably not be able to share files wire-lessly. You might need to physically plug that tablet in to a desktop or laptopcomputer to copy files to it.
SummarySharing is becoming an ever more important and increasingly central part ofour everyday lives. In Windows 8, it’s easier than ever before to share yourfiles, photos, music, and videos between Windows 8 apps and websites. If youhave other hardware in your home that you want to share files with, perhapsto create a backup of your files, this is easy to do as well. I will show you howto create backups in Chapter 11.
I’ve mentioned already that some of the features I have talked about in thischapter require you to get apps from the Windows Store, and in Chapter 4 I’llshow you how to use the Windows Store; how you can find, download, andinstall apps; and how you can manage them on your computer.
Summary | 35


CHAPTER 4
Downloading and Using Apps andPrograms
To get the very best out of using your computer, you will want to install appsand programs. These can be anything from games to file and photo sharingand technical or financial apps, which are all now found in the new WindowsStore. You can access the Store from the Start screen.
It is the strength and variety of apps and programs that make Windows flexibleand powerful, and can allow people to use their computers for whatever tasksthey wish from entertainment to work.
While your Windows 8 computer comes with some great apps, including Mail,Photos, Music, and Messaging, you will probably want to install more appsonto it, and even programs that run on the Windows desktop, especially if youalready have software from a previous PC that you want to use and that youare comfortable with at this time.
Windows 8 makes it easier than ever before to find software with the newStore, which can be launched from the Start screen. All Windows 8 apps canbe found here; you can’t get them from anywhere else. Not only does this makeapps simple to find, but it also makes the process of paying for them anddownloading them much more secure because Microsoft scans all apps formalware.
Top Tips from This Chapter1. The Windows Store is the central and safe place to find apps and pro-
grams.
2. You can drag and rearrange Tiles and icons on the Start screen to makethem easier to find and organize.
37

3. You can view apps and desktop programs side by side, which can makeworking easier.
Using the Windows StoreYou open the Windows Store by clicking the Store icon on the Start screen. Itis arranged into app categories including Games, Entertainment, and Books& Reference. There are also quick links for the most popular and highest ratedapps (Figure 4-1).
You can find out more information on an app by clicking it. Here you will seethe main information about the app in a panel on the left and on the right linksto view the app’s Overview, Details, and Reviews.
On the bottom left you will see a section called “This app has permission touse,” where the Store will tell what personal information on your computer,if any, the app will want access to. Why is this important? Your personal in-formation is of great economic value to companies. They want to know moreabout you so that they can directly target advertising at you and they may sellthe information they hold about you to other companies.
Figure 4-1. The new Windows Store
38 | Chapter 4: Downloading and Using Apps and Programs

If you allow an app access to information such as your email or Facebookaccount, you are potentially giving it huge volumes of very private informationabout you that you would otherwise not share. Always be careful in choosingapps, and do not install any that request access to information they should notordinarily need.
Below this is an age rating for the app. This can be especially useful if you haveyoung children who use your computer to play games.
You can install an app by clicking/touching the Install button, however thoughyou will have to register a credit or debit card with the Store to buy any appsthat are not free.
At all stages while browsing apps, a back button will appear in the top leftcorner of your screen so that can you return to the Store main page. You canalso return to the main store page by clicking/touching Home from the AppBar.
You can often find extra options and controls in an app byopening the Charms menu and clicking/tapping the Settingsicon. If available in that app, extra options will appear in thetop right of your screen.
Updating Apps in Windows 8Occasionally, the apps you install on your Windows 8 computer will be up-dated with new features and fixes. The Windows Store will inform you of thisby displaying the number of current updates on the Store Live Tile (Figure 4-2).
When updates are available for apps and when you open the Store app, youwill see a notification in the top right of your screen of how many updates areavailable, and clicking this notification will allow you to install all the updatesquickly and simply.
It is usually a good idea to install app updates, because some might be securityrelated and fix flaws that could make you vulnerable to criminals or that couldmake your copy of Windows unstable. Some may also add new features to theapp.
Making Tiles Smaller and LargerSome Tiles can be made larger and smaller, to display less or more information.You might want to make the Mail tile smaller, for example, so that it onlyshows you the number of new emails and not the senders and subjects (ifperhaps other people can read over your shoulder), or you may have a news
Updating Apps in Windows 8 | 39

Tile that when made larger shows you additional information about currentevents (you can see an example of different sizes of Tile in Figure 4-3).
You can make a Tile larger or smaller by touching it and dragging downwardswith your finger or right-clicking it with your mouse. From the App Bar, youcan then click/touch the Smaller or Larger button. If you do not see a smalleror larger option, then the tile you have selected cannot be resized.
You can also turn the Live Tile off for an app completely, perhaps for privacyreasons, by selecting Turn Live Tile Off from the App Bar when you have se-lected it. This prevents the Tile from displaying information such as details ofemails, photos, or calendar appointments.
Figure 4-2. The Store Tile tells you when app updates are available
Figure 4-3. Different sized tiles
40 | Chapter 4: Downloading and Using Apps and Programs

Organizing App Icons on the Start ScreenWhen you install new apps on your Windows 8 computer, or create an InternetFavorite in the Internet Explorer App, these will all appear as tiles on the farright of the Start screen. The problem this can cause is that quite quickly yourStart screen can become cluttered, making it very difficult to find what you arelooking for. As you add Tiles to the Start screen, it expands to the right andcan get very large.
You can move these Tiles around to organize them, and even hide them com-pletely from the main view to help keep them organized.
Remember that, if you are using a mouse, look for the scroll bar at the bottomof your screen. You can drag this to move left and right on the Start screen.You can also use your mouse scroll wheel to pan left and right on the Startscreen.
You might want to reorganize the tiles on your Start screen so that all the apps,websites, and programs you use regularly have their Tiles on the far left of yourscreen, to make them easier to access. You might also install software such asMicrosoft Office and want to hide the extra programs it installs, such as theOffice Picture Viewer.
Arranging the Start Screen Step by StepTo arrange your apps, websites, and programs on the Start screen (Fig-ure 4-4), follow these quick steps:
• Click/Touch and then hold, drag, and drop tiles around the Start screento rearrange them using either your finger or your mouse.
• Hold a tile between groups to create a new group again using either yourfinger or your mouse. Drop it on the vertical bar that appears.
• Remove a tile from the Start screen by touching it and dragging down-wards, or right-clicking with your mouse, and then click/touch Unpin fromStart from the App Bar.
If you unpin a Tile from the Start screen it will be removed, but you will stillbe able to access it when you want to. I will show you how to do this later inthis chapter.
Arranging Groups of TilesI mentioned previously that you can create new groups of Tiles by dragging aTile to the space between groups and, when you see a vertical bar appear,
Organizing App Icons on the Start Screen | 41

dropping the Tile. You can also name and rearrange whole groups of Tilessimply and quickly.
You can give groups of Tiles names by zooming out of the Start screen (Fig-ure 4-5). You can do this in one of three ways:
• Make an outward pinch zoom gesture with your fingers
• Click with your mouse in the very bottom right corner of the Start screen
• Hold the Ctrl key on your keyboard and use your mouse wheel to zoom out
You can now drag and rearrange whole groups of tiles to arrange them howbest suits you. You can also give groups names, such as “Websites” or perhaps“Desktop Programs” by right-clicking on or touching and dragging down-wards on an app group.
Viewing All Your Installed Apps and ProgramsI showed you earlier how you can hide apps and programs from your Startscreen. But surely if you hide them you then can’t use them? Fortunately, it’seasy to see all of the apps and programs that you have installed on your com-puter at any time.
Figure 4-4. Working with Live Tiles
42 | Chapter 4: Downloading and Using Apps and Programs

To see hidden apps and programs, from the Start screen open the app bar andclick/touch the All Apps button. Here you will be able to see all the apps andprograms that are installed on your computer (Figure 4-6). Programs are or-ganized into groups as you would see in the Start Menu in previous versionsof Windows.
You cannot rearrange apps and programs in the All Apps view into differentgroups, but it is easy to see all the software you have installed. Remember, thisview can also expand outward to the right, so you may need to swipe left andright to view everything. Again, if you are using a mouse, a scroll bar will appearat the bottom of the screen.
Don’t Have Too Much Software InstalledSometimes it’s easy to have lots of apps and programs installed on your Win-dows 8 computer. Perhaps you have downloaded apps to try them, and youlater decide you don’t want to use them.
You should always keep the number of apps and programs on your computerto a minimum. Having too much software installed can cause Windows 8 tobecome unstable over time and it can also make it much more difficult to findthe app or program you want to use.
Figure 4-5. Zooming out of the Start screen
Viewing All Your Installed Apps and Programs | 43

I would also recommend against installing any app or program that duplicatesa function that is already part of Windows, for example, CD or DVD burningsoftware, mapping software, or another web browser. Each extra piece ofsoftware just adds to the overall complexity of the computer, and with com-plexity can come instability, as I write about in my book Troubleshoot andOptimize Windows 8 Inside Out.
Switching Between Running Apps and ProgramsApps in Windows 8 run full screen by default, but you will want to switchbetween them and use more than one at a time. There are several differentways to switch between runing apps and programs on your computer. If youare using touch, then dragging your finger in from the left of your screen willdrag the previously seen app onto the screen.
With your keyboard you can use the WindowsKey+Tab keypress to switchbetween running apps or the Alt+Tab key combination to switch between allrunning app and desktop programs. The WindowsKey is in the bottom rightof your keyboard with the Windows logo on it, and Tab can be found near thetop left of the keyboard.
Figure 4-6. The All Apps view
44 | Chapter 4: Downloading and Using Apps and Programs

To switch between apps using the keyboard, hold down the Alt or WindowsKey and keep pressing Tab until you get to the program you want. The cur-rently running apps and programs will appear as thumbnail images at eitherthe left side of the screen or in the center of the screen.
Viewing Two Apps Side by SideYou can also view apps (and even the desktop) side by side on your screen. Toview apps side by side, grab the app at the top of the screen with your fingeror mouse and drag it toward the center of the screen. You will see that itchanges to a thumbnail image. When you drag this thumbnail to the left orright of the screen, you will see a vertical bar appear; this signifies that droppingthe app there will dock it in a panel to that side of the window (Figure 4-7).
You can now return to the Start screen and run another app. This second appwill appear filling the main portion of the screen with your docked app sittingat the left or right of it.
You can also select another running app by holidng down theWindowsKey on your keyboard and pressing the Tab key tocycle through thumbnail images of running apps. For desktopprograms, use the key combination Shift+Tab instead.
You can change which app fits the small window and which takes the mainfocus of your screen by dragging the bar that separates them left and right. You
Figure 4-7. Viewing two apps side by side
Viewing Two Apps Side by Side | 45

can also drag this bar to the far edge of the screen to remove the smaller appfrom view completely.
Viewing Two Desktop Windows Side by SideYou can also view desktop programs side by side (Figure 4-8). This can be veryuseful for comparing two documents or web pages. To do this, click/touch ortouch and hold the top of the desktop program window and drag it to the farleft or right of your screen. You will see a shadow appear when your mousetouches the screen edge to show you that the program will be resized to fillexactly half of your screen’s width and docked to one side of the screen.
Drag your other program to the opposite side of the screen and it will fill theother half of your screen’s width. You can return them to their original shapeand size by dragging them away from the side of the screen in the same waythat you put them there.
To compare two web pages side by side when you have multiple tabs open inthe desktop version of Internet Explorer, drag an individual tab out of thewindow and it will then appear in its own Internet Explorer Window. Thesecan then be snapped to the left and right of the screen.
Figure 4-8. Viewing two desktop programs side by side
46 | Chapter 4: Downloading and Using Apps and Programs

Uninstalling Apps and Programs in Windows 8You won’t always want to have every app or program installed forever. Youmay, for example, have installed something just to try it out or because youthought it was what you were looking for, only to discover later that it is anapp or program you don’t want to keep.
You can uninstall any app or program from the Start screen or the All Appsview by Touching it and dragging downwards or Right-clicking on it, and in theapp bar you will see an uninstall option.
If you are uninstalling a desktop program, you will be taken to the Programsand Features window on the desktop. Here you should click the program youwish to uninstall and on the toolbar near the top of the window you will seean option to uninstall the program.
SummaryThere are a great many really cool ways to work with apps and programs inWindows 8, and the new Windows Store will help keep malware off yourcomputer as well as making it much simpler to find the software you want.Security is still important though, and I will show you how to keep your com-puter safe in Chapter 10.
It’s well worth spending some time arranging your apps and programs intogroups on the Start screen because this will make it much easier to find thingslater on.
Now that I’ve shown you how to use and work with apps and programs inWindows 8, in Chapter 5 I’ll show you how you can enjoy playing your musicand videos.
Summary | 47


CHAPTER 5
Watching and Listening to YourVideos and Music
As you accumulate your collections of digital music and videos, you’ll want toenjoy this content on your Windows 8 computer. Windows 8 comes with someexcellent apps that make it easy to enjoy and organize your media.
Top Tips from This Chapter1. Windows 8 comes with apps for playing both music and videos.
2. When looking at links in apps that have a down arrow to their right, youcan click/touch the arrow for more options.
3. If you have a desktop computer, a laptop, or a Windows 8 Pro tablet, youcan also use Windows Media Player to sort, organize, and play your musicand video collection.
Watching Your Videos in Windows 8You can play your videos in the Videos App, which you can access from theStart screen. When you first open the Videos App, you will be presented witha display showing videos that you can watch or purchase online (Figure 5-1).
To view your own videos, you should pan left either with a swipe of your fingeror by moving your mouse to the bottom of the screen, where you will find thescroll bar. You can also use the scroll wheel on your mouse to move aroundleft and right in Apps.
Your videos display will show you your most recently added videos. To viewall of your videos click/touch the My Videos link at the top of this section tobe taken to a new view where you will see all of your videos.
49

Click or tap the back arrow in the top left of the screen at anytime to return to the previous page.
There are several different ways to organize your videos. Near the top left ofthe screen, you can click/touch on the Date Added link to view your videolibrary in different ways, such as A to Z or by duration. You can click/touchon any video to play it and you will see play controls appear on the screen,which will fade when you don’t touch the screen or move the mouse for a fewseconds, but that will reappear when you do touch the screen or move themouse.
At any time, you can right-click with your mouse or swipeupward with your finger from the bottom of the screen to openmore controls on the App Bar.
You may have videos stored in different folders on your computer or perhapsin a different location, such as an external USB hard disk. To play files indifferent locations, open the App Bar and click/touch Open File. This will open
Figure 5-1. The Videos App
50 | Chapter 5: Watching and Listening to Your Videos and Music

the folder view where you can look through all your files and folders to viewany videos (Figure 5-2). This also applies to the Music App in Windows 8.
Using the Folder ViewThe Open File view allows you to view any files you have stored not just onyour own computer but also in compatible Internet services such as MicrosoftSkyDrive. You can click/touch on any link that has a view. For example,clicking the Files link will display folders including your documents, pictures,and even your entire computer and network. Below this are links to otheravailable locations such as SkyDrive.
You move around folders in this view by clicking on them. If you want to moveup a folder location, click/touch the Go Up link. Videos can be opened andplayed by clicking or touching them.
Playing Your Music in Windows 8The Music App is also opened from the Start screen and looks and works in avery similiar way to the Video App. When you first open it you are shownmusic that you can purchase online. Swipe left to view your own music col-
Figure 5-2. The Folder view
Playing Your Music in Windows 8 | 51

lection (or move your mouse to the bottom of the screen and a scroll bar willappear that you can drag left).
The Music App will show you your most recently added music first, click/touch the My Music link to view the whole music collection on your computer.Here you can arrange your music by Songs, Albums, or Artists, by clicking thelinks on the left side of the screen (Figure 5-3) or view any Playlists you havecreated. More on creating playlists shortly.
When you are looking at the Playlists view, you can click/touch the + button to create a new playlist.
You can click/touch the Date Added link at the top left of the screen to sortand arrange your music in different ways, including by genre or by A to Z.
When you click/touch on an album, the screen will dim and your selectedalbum will be highlighted in the center of the screen (Figure 5-4). Here youcan click/touch on an individual track to play; you when you select the track
Figure 5-3. Viewing your music collection
52 | Chapter 5: Watching and Listening to Your Videos and Music

a Play button will appear. Alternatively, you can click/touch the Play buttonunder the album cover artwork to play the whole album.
At any time you can also click/touch Add to Now Playing to add the track theend of the current music playlist. As with the Video App, playback controlswill appear on screen and will fade when you are not moving the mouse ortouching the screen.
Open the App Bar at any time to display play controls in theMusic and Video Apps.
Using Windows Media PlayerIf you want more control over your music library and you are using a desktopcomputer, laptop, or Windows 8 Pro tablet, you can use Windows MediaPlayer (Figure 5-5). You can start Windows Media Player by searching formedia at the Start screen.
Figure 5-4. Playing music
Using Windows Media Player | 53

This software offers several advantages over the Music App, especially forpeople with large music collections. In the left panel are quick links to let youarrange and view your music by Artist, Album, or Genre and you can also viewyour Videos and Pictures here as well. Below these links are direct links to anyother computers or network devices that are sharing pictures, music, and videoon your network. This can include other computers and network storage.
Perhaps the best functionality with Windows Media Player is the advancedability to control playlists. Click/Touch Create Playlist in the options bar thatruns along the top of the window and you can create either a standard playlistor an auto playlist. Let me explain the difference.
When you create a Standard Playlist, it will appear in the left-side navigationpanel in Windows Media Player. You can drag and drop music onto this play-list using your mouse to add music to it.
Auto playlists, however, will automatically add music to the playlists depend-ing on various criteria that you set (Figure 5-6). You can choose from a great
Figure 5-5. Windows Media Player
54 | Chapter 5: Watching and Listening to Your Videos and Music

many options here to create, for example, auto playlists of your most playedmusic or even music tracks that you’ve never played.
If at any time you want to create an audio CD, perhaps to play in the car, ofyour favorite music, you can do this by clicking the Burn link in the top rightof the window and dragging and dropping the music tracks, you want into thepanel that appears. When you have selected the tracks you want, click/touchthe Start Burn button to burn your audio CD (you will need a blank CD anda CD burner drive in your computer to do this).
SummaryThe built-in apps for playing music and videos in Windows 8 are perfectlycapable, although you might prefer to use an alternative player such as theexcellent Zune Desktop software from Microsoft or, if you have an iPhone,iTunes software. If you are using a Windows 8 tablet, you won’t be able toinstall these desktop software packages, but alternative music and video play-ing apps will be available in the Windows Store. See Chapter 4 for details ofhow to install apps and software.
Figure 5-6. Windows Media Player
Summary | 55

In Chapter 6, I’ll show you how you can view your pictures and photographson your computer, how you can import images from a digital camera, how youcan do basic editing on your photos, and then how you can display them asshow slideshows.
56 | Chapter 5: Watching and Listening to Your Videos and Music

CHAPTER 6
Importing, Viewing, and EditingYour Digital Photographs and
Videos
Photographs are an ever important part of life, allowing us to relive preciousmoments or to share in the experiences of our friends and family. Digital cam-eras have allowed us to take many more photographs than we could have withfilm cameras and to share them in new and exciting ways both with friendsand family and also with the wider world. You can read more about how toshare your digital photographs in Chapter 3.
While your digital camera will probably come with software that will enableyou to import photos and organize them in different ways, Windows 8 includesmany of these features as standard so that in many cases there’s no need toinstall the additional software that came with with your camera.
Top Tips from This Chapter1. Windows Photo Gallery, free from Microsoft, includes some excellent
photo-management and editing tools.
2. You can choose what happens when you plug a memory card into yourcomputer through the Default Programs panel.
3. Tags can be added to photos to make them easier to find.
Importing Photos and Video from Your Digital CameraYou can import photos and video from your digital camera or camcorder inthe same way, either by plugging your camera directly into your computer
57

using a cable, or by removing the memory card from the camera and insertingit into a card reader built into or attached to the PC.
You can’t import photos to all Windows 8 tablets, especiallythe consumer tablets. This is because many of these tabletsdon’t support external devices and hardware in the way desk-top computers do. If you are thinking of buying a Windows 8tablet, you should ask if it supports memory cards.
When you insert your memory card into your PC or plug your camera in viaa USB or other cable, an alert will appear in the top right of your screen sayingthat Windows 8 has found your storage device (Figure 6-1). Click/Touch thisalert to tell Windows that you want to use this device and then click/touch theImport Photos and Videos option that appears.
The Photo and Video import wizard will then appear and automatically selectall the photos and videos on the camera or memory card for import (Fig-ure 6-2). By default, it will create a folder in your Pictures library named forthe date (year, month, day) you have imported the photos but you can renamethe file. To change the name of the folder your photos and video will be im-ported to, perhaps from 2012-06-14 to Amsterdam, October 2012, click/touchthe white box at the bottom of the screen to edit the folder name.
By default, Windows 8 will import every photo and video on the card and youcan see what is selected because a small check icon will appear in the top rightof each thumbnail image displayed. You can select and remove items frombeing imported by tapping them.
If not all of your photos and videos are appearing on thescreen, scroll to the right to view more of them as only so manywill be displayed on the screen at one time.
When you are ready to import photos and videos to your computer, click/touch the Import button in the bottom right of the screen to start the import
Figure 6-1. Choose what to do with a memory card
58 | Chapter 6: Importing, Viewing, and Editing Your Digital Photographs and Videos

process. When this is complete, you will be asked if you want to open thealbum you have created to view the imported photos and videos on your com-puter.
The imported photos will not be deleted from your memory card or cameraduring this import process, so you will have to delete them afterwards, eitherusing File Explorer on the Windows 8 desktop or in the camera settings.
Advanced Photo and Video Import Using Windows PhotoGallerySometimes you want more control over your photos, certainly when it comesto editing them, and this is where Microsoft’s Windows Photo Gallery softwareis useful. You can download it as part of the Windows Essentials Suite fromhttp://download.live.com.
With Windows Photo Gallery installed on your Windows 8 computer (it won’tinstall on a Windows 8 tablet), you get much more control over the photo andvideo import process.
Figure 6-2. The Photo and Video Import Wizard
Advanced Photo and Video Import Using Windows Photo Gallery | 59

To import photos using Windows Photo Gallery, open the Photo Gallery soft-ware and click/tap the File tab in the top left of the window. From the optionsthat appear, click/tap Import photos and videos.
If you are automatically taken to the Windows 8 Photo andVideo Importer App, search for Default at the Start screen andrun the Default Programs option that appears. Click/TouchChange autoplay settings in the page that appears and changethe Camera Storage option to either Import Photos and Videos(Windows Photo Gallery) or Ask me every time.
A new import window will now appear where you have more choices. Let’slook at each of these in turn.
Review, Organize, and Group Items to ImportThis option will group your photos by the date they were taken. This allowsyou to split photos taken on a longer trip or vacation into different folders tokeep them separate. At the top of each group, as you can see in Figure 6-4, youcan enter a name for that group. Let’s say you were on a European road trip.On the first day you were in the Netherlands, on the second and third daysyou were in Germany, and on the fourth day you visited Poland. Because theImport Wizard splits the photos into groups sorted by date, you can label eachgroup of photos appropriately.
Figure 6-3. The Photo and Video Import Wizard (Windows Photo Gallery)
60 | Chapter 6: Importing, Viewing, and Editing Your Digital Photographs and Videos

If the photo groups are not appearing correctly, you can usethe Adjust groups slider in the bottom right of the window tocreate more or fewer groups, again arranged by date and time.
You can also select which photos and videos you wish to import by checkingand unchecking the boxes in the top left of each thumbnail image. There arethree different types of box you can check.
1. The Select all check box will select every photo and video for import.
2. You can check the box to the left of each group to select all of the itemsin that group.
3. You can select photos and videos individually using the check box to leftof its thumbnail image.
In the bottom left of the import window is a More options link. This providesadditional functionality such as choosing the default import folder locationfor pictures and videos, the default naming convention for new photos andvideos, whether you want Windows Photo Gallery to automatically rotate im-
Figure 6-4. The Photo and Video Import Wizard (Windows Photo Gallery)
Advanced Photo and Video Import Using Windows Photo Gallery | 61

ages so they are correctly oriented, and if you want photos and videos to beautomatically deleted from your camera or memory card on import to Win-dows.
Import All New Items NowThe second option at the main import screen is much more straightforward.It will import every photo and video from the camera or memory card. Youwill be prompted to give a name for the photos, perhaps Dusseldorf, October2012, and this will be the name of the folder, and each imported photo andvideo will be labelled according to this name.
Additionally, you can click/touch the Add tags link to add key words to thephotos and videos that can make them easier to search for and organize. Forexample, you might add the words holiday and Germany. You can then searchfor Germany in Windows Photo Gallery or File Explorer to bring up all photostaken in that country. You should separate all individual tags with a semicolon(;).
If the photo and video import options aren’t appearing whenyou plug your camera or memory card into your computer,open the Photos app and from the App Bar select Import. Hereyou will be able to tell Windows 8 where to import your pic-tures from.
Viewing Your Photos in Windows 8The Photos App, accessible from the Start screen is your main location forviewing your digital photo collection. This allows you to not only view picturesand photos stored on your computer, but also ones that you have stored inInternet services such as SkyDrive, Facebook, and Flickr.
The main photos view shows your photos and folders as a series of panels thatyou can click/touch to open. These panels run left to right across your screen;if you are using a mouse with your computer you will see a scroll bar appearat the bottom of the screen that you can click/touch and drag left and right.You can also use the scroll wheel on your mouse to move left and right in theMusic App.
62 | Chapter 6: Importing, Viewing, and Editing Your Digital Photographs and Videos
You can hide some photo locations from the main screen ofthe Photos App by clicking the Hide link in the top right oftheir thumbnail image. For example, you might want to hideFlickr because you do not use this Internet service to store anyphotos.
At any time you can move back a folder by clicking the back arrow in the topleft of the screen.
Viewing Photo SlideshowsYou can show slideshows of photos in the currently displayed folder by open-ing the App Bar and clicking the Slideshow button. This will automaticallydisplay a slideshow of all the currently selected photos, which you can cancelat any time by tapping the screen or pressing the Esc key on your keyboard.
Figure 6-5. The Photos App in Windows 8
Viewing Your Photos in Windows 8 | 63

If you want to share one or more photos by email or on theInternet, select them by either right-clicking each one withyour mouse or by tapping and pulling downwards with yourfinger. Alternatively, you can open the App Bar and click/touch the Select All button. You can now open the CharmsMenu and click/touch Share. A list of compatible apps youcan use to share your photos will appear; tap the appropriateapp to share the photos.
Editing Your Photos in Windows Photo GalleryThe Photos App in Windows 8 doesn’t support editing your photos and it’swell worth looking through the Microsoft Store to find photo editing apps thatyou can use. If you see Adobe Photoshop Touch available, this is always anexcellent purchase.
If you have downloaded the Windows Essentials Suite, however, fromdownload.live.com to your desktop computer, laptop, or Windows 8 Pro tab-let, Windows Photo Gallery offers some easy to use and really quite powerfulphoto editing tools. You can double-click/touch a picture to open it in editingmode and you will see the Ribbon at the top of the window changes to anEdit tab. Here there are many controls, but I want to detail the ones you aremost likely to use.
• The Manage section includes controls for rotating the image.
• The Organize section allows you to add and manage tags. These can beused to make it easier to search for specific images.
• The Adjustments panel is where the editing tools can be found.
— Auto adjust will attempt to intelligently edit the brightness, contrast,rotation, and other aspects of the photograph.
— Crop allows you to trim the image down to a smaller size, removingunwanted items from around the main focus of the picture.
— Red eye will help remove the red eye effect caused by some cameras.You can click/touch on the red in people’s eyes to have it intelligentlyremoved.
— Fine Tune gives you more control over the adjustments made by theAuto adjust feature.
— Revert to Original is a very useful feature if you have made changesto a picture that you did not intend to make or that changed the photoin an unwelcome way. When you edit a photo using Windows PhotoGallery, a backup of the original image is automatically made. At any
64 | Chapter 6: Importing, Viewing, and Editing Your Digital Photographs and Videos

time you can click/touch the Revert to Original button to restore thatoriginal image and undo any changes you have made.
SummaryOur photographs are very precious and we want to be able to enjoy and pre-serve them. Windows 8 includes some excellent features that enable us toimport them from digital cameras and also to share your digital photographswith friends and family.
You may want to print out your photos, though, and in Chapter 7 I’ll showyou how to use printers and other external hardware with your Windows 8computer.
Figure 6-6. Windows Photo Gallery
Summary | 65


CHAPTER 7
Connecting To and Using ExtraHardware with Your Computer
In Chapter 6, I showed you how to import your digital photographs to yourWindows 8 computer and how you can view them and perform some basicediting on them using Windows Live Photo Gallery. At some point, however,you might want to print some photographs or documents or connect yourcomputer to external hardware. Let’s start with printers.
Top Tips from This Chapter1. Windows 8 can automatically detect and install wireless printers.
2. You can access network storage drives easily in File Explorer.
3. Windows 8 supports new multiscreen features including panoramic wall-papers.
Attaching and Using a PrinterWindows 8 can automatically detect and install printers, even ones that areon your home or work WiFi network. You might find that the first time youwant to print something that the printer has already been automatically in-stalled.
You can check if your printer (or other external hardware) is installed byopening PC Settings and clicking/touching the Devices section (Figure 7-1).You will see a list of all installed hardware in the top right side of the screen,and at the top of the list is an Add a device button that you can click/touch toadd something that hasn’t been installed already.
67

To connect a wireless printer or other wireless network deviceto your home network, press the WPS button on both theprinter and on your home Internet router to pair the devices.Check the documentation that came with your printer androuter to see if this feature is supported on your devices andwhere the button is located.
When you click/touch the Add a device button, Windows 8 will search fordevices connected directly to your computer via a cable and also for devicesthat are connected to your network. When Windows finds the device, it willappear in a list of new hardware, and Windows 8 will try to install it auto-matically.
To help with installing printers, make sure your computer isconnected to the Internet when you connect the printer, sothat Windows 8 can download the necessary software to in-stall the printer correctly.
Sometimes a printer does not automatically install or perhaps doesn’t installcorrectly. If this happens, then Windows 8 includes a utility to help you man-
Figure 7-1. The Devices Panel in PC Settings
68 | Chapter 7: Connecting To and Using Extra Hardware with Your Computer

age and reinstall the devices. This is called the Devices and Printers Panel(Figure 7-2), and you can open it by searching for device at the Start screen,which can be found in the Settings search results.
Sometimes, and this is possible with WiFi network printers that Windows 8has installed incorrectly, you might need to remove a printer or other devicebefore you can reinstall it. Look for it in the list of installed devices, and if itappears in the list, right-click (or tap and hold) it and from the options thatappear select Remove Device.
You can now click/touch the Add a Printer link near the top left of the Devicesand Printers panel and Windows 8 will automatically search for printers thatare both attached to the computer or that are on your network.
Printers and other devices usually come with a CD or DVDcontaining software and drivers. If you put this disk in yourcomputer’s DVD or Blu-Ray drive, Windows 8 will ask youwhat you want to do. Select the Run Setup option to installyour hardware.
The biggest difference between Windows 8 automatically installing printersand other devices and doing it yourself through the Devices and Printers Panel
Figure 7-2. The Devices and Printers Panel
Attaching and Using a Printer | 69

is that you can specify the correct driver to install, making sure that the hard-ware works correctly with your computer.
After you have selected the device to install, Windows 8 will ask if you wantto install the device automatically or Browse my computer for driver software.It is this second option that you want to select. Make sure the driver CD thatcame with your hardware is in your DVD drive.
A Browse button will appear. Click/Touch this and navigate to the CD or DVDwhere the drivers for your hardware can be found. Make sure you have checkedthe Include subfolders box in this panel so that Windows 8 searches the entiredisk. When you are ready, click/touch the Next button to install your device.
Setting the Default PrinterIf you have more than one printer, or perhaps if an error occurred when yourprinter was installed, you might find that when you try to print something it’seither not printing, printing on the wrong printer, or popping up a save win-dow on your screen instead. This happens because the default printer has notbeen set correctly.
To rectify this, open the Devices and Printers panel and then right-click (or tapand hold) on the printer you want to print from as the default printer. Whenoptions appear, click/touch Set as default printer. Every print job will now besent to this printer on your computer.
Connecting to Network Storage and DevicesYou might have network storage in your home that you want to be able to usewith your Windows 8 computer. This can include USB hard disks that youcan plug into some Internet routers to provide shared storage and backup forpeople in your home. This can be especially useful for sharing files betweendifferent computers or for having a location away from your main computerto back up documents, music, pictures, and videos.
To access network computers and drives, click/touch Desktop from the Startscreen and on the Taskbar that runs along the bottom of the desktop, click/touch the yellow folder icon to open File Explorer.
In the left-hand panel, as seen in Figure 7-3, you have quick links to yourFavorite links, Libraries, HomeGroup, and Computer. At the bottom of thislist is a Network link. Click/Touch this and File Explorer will show you all theavailable network computers and drives (remember they need to be switchedon to be visible).
70 | Chapter 7: Connecting To and Using Extra Hardware with Your Computer

You can save network drives to your Start screen to give youeasy access in the future. Right-click on a network drive andfrom the options that appear click/touch Pin to Start. A short-cut link to the network storage will then be placed on yourStart screen.
Using a Second Screen with Your ComputerSometimes, and especially if you use your Windows 8 computer in a homeoffice, you will want to attach a second screen to the computer. You can attachthis to your computer via a VGA or DVI video cable (both of which are a D-shaped plug in either blue or white) or via an HDMI video lead. You shouldcheck the documentation that came with your computer to see what videoports are supported.
Windows 8 will automatically detect the second screen and perhaps even giveyou a picture on it straight away. You can also choose what is displayed on thesecond screen manually. However, by opening the Charms menu and clicking/touching Devices. Now you should click/touch the Second screen option.
Figure 7-3. Accessing Network Storage in File Explorer
Using a Second Screen with Your Computer | 71

You now have four options for how to extend your screen to the second display(Figure 7-4).
• PC Screen only turns off the second screen.
• Duplicate will display the same thing on both screens.
• Extend will use both monitors together as a big, extended display.
• Second Screen only turns off the display on your main computer.
Figure 7-4. Using a second screen with your Computer
72 | Chapter 7: Connecting To and Using Extra Hardware with Your Computer

Whichever you choose, when you unplug the second screen your computer’sdisplay will return to normal.
Customizing your Multiscreen DisplayWindows 8 includes some new features for multidisplay computers, includingsupport for panoramic wallpapers on the desktop. To take advantage of this,right-click anywhere in empty space on the desktop and then click/touch Per-sonalize from the options that appear.
At the bottom of the window that appears next, click/touch Desktop back-ground. You will see some multiscreen wallpapers and you can click/touch theBrowse button to use one or several of your own. When you have selected thecorrect image, click/touch the Picture position button at the bottom left of thepanel and then click/touch Span from the available options (Figure 7-5).
SummaryWindows 8 is excellent at automatically detecting new hardware and installingit for you, even network printers that earlier versions of Windows haven’t beenable to do. It doesn’t always get it right, though, but the controls that areavailable to you to fix problems are simply laid out and easy to use.
Moving on from connecting a second display to your computer, in Chap-ter 8 I’ll show you how to set up and use your Windows 8 computer for work,so that you can be at your most productive.
Figure 7-5. Setting a multiscreen wallpaper
Summary | 73


CHAPTER 8
Using Windows 8 for Work
Whether it’s for work, college, or personal finance, Windows has always beenthe choice for being productive and getting things done. In Chapter 4, I showedyou how you can snap two desktop windows side by side, which is a great wayto compare two documents, and it’s a feature that I use all the time.
There is much more that you can do with the desktop, though, and I’ll showyou how in this chapter. What’s more, almost every version of Windows 8comes with a free copy of Microsoft Office, either the Starter edition that youwill find on desktops, laptops, and Windows 8 Pro tablets or a more extensiveyet still free version on Windows 8 consumer tablets.
Top Tips from This Chapter1. The free Office Starter that comes with Windows 8 is suitable for many of
the things home users will want to do in Word and Excel.
2. The Ribbon can be operated with touch and its tabs group similar func-tions together.
3. The Mobility Center has tools that can dramatically extend the battery lifeof a laptop or tablet.
Using Microsoft Office in Windows 8As I’ve said in the introduction to this chapter, there are different versions ofOffice provided with your Windows 8 computer depending on what versionof Windows 8 you have. I’ll discuss the two different versions later in thischapter.
Microsoft Office is based around the company’s Ribbon interface, which wasfirst seen in Office 2007. This is an alternative way to access a program’s fea-
75

tures to the older-style drop-down menus. If you’re not used to it, then testout some of the desktop programs supplied with Windows 8 including FileExplorer, Paint, and WordPad. These all include the Ribbon. I will show youhow to use the Ribbon shortly.
Microsoft Office Web AppsWindows 8 on desktops and laptops doesn’t come with a version of MicrosoftOffice installed, but you might see links to the Office Web Apps. You can findthem on the Internet at http://office.microsoft.com/web-apps. These are basedon Microsoft’s new look for their latest version of Office and includes Word(Figure 8-1) and Excel. They look slightly different but are still based aroundthe Ribbon interface.
There are no limits to using the free version of the Office Web Apps, but youwill need a live Internet connection to be able to use them. You will probablyfind that the web apps do almost everything you need in terms of a basic wordprocessor and spreadsheet.
Using Microsoft Office on Windows 8 TabletsIf you have bought a Windows 8 tablet, you might find a more comprehensiveversion of Office installed. The programs here are still feature-limited versions
Figure 8-1. Microsoft Word 2013
76 | Chapter 8: Using Windows 8 for Work

of the full Office suite but they include Word, Excel, PowerPoint (for makingpresentations), and OneNote (the note taking program that works very wellon touch screens).
These versions cannot be upgraded to the full version of Office but, like theStarter edition, should meet most of your needs and they also support all ofthe formatting from the full Office apps.
The Ribbon ExplainedThe Ribbon is made up of tabs: File, Home, Insert and so on, each of whichwhen clicked or touched shows commands that are organized into groups(Figure 8-2). As you make the window bigger, more commands appear on theRibbon, so to see all of the Ribbon commands you can maximize the windowto make it full screen. The maximize button is a small square in the top rightof the window, next to the close button.
Each version of an Office program has the same four tabs on the left side ofthe Ribbon.
• File is where you will find the new document, and open and save com-mands.
• Home is where all of the text and other formatting commands can befound.
• Insert is where you have options to insert images and other items such assound and video into documents.
• Page Layout is where you can control the size and other aspects of yourdocument.
In the Microsoft Word, you will also see a Mailings tab where you can controlmail merges, which can be very useful for small businesses, organizations, andgroups to send letters and emails to many people.
In Microsoft Excel, you will see a Formulas tab where you can add automaticcalculations to your spreadsheets.
Figure 8-2. The Ribbon interface
Using Microsoft Office in Windows 8 | 77

Being Productive with OfficeSome features in Microsoft Office can help you be very productive. In the verytop left of the window, you will see the Quick Access Toolbar. Here are iconsyou can click/touch for some of the most common tasks (Figure 8-3). By de-fault there are icons for Save, Undo, and Refresh.
If you click/touch the down arrow to the right of these icons, you can add andremove icons from the menu by simply selecting them from the drop-downoptions menu that appears.
In the top right of the window, just below the minimize, maximize, and closebuttons, you will see a small arrow (Figure 8-4). Clicking the arrow will min-imize (or maximize) the buttons on the Ribbon so that it only appears whenyou click/touch on a Ribbon tab or it appears all the time. This can be usefulif you have a small screen. There is also a Question Mark icon in the top rightof the window that, when clicked, will display help.
In the bottom right of the window are controls for moving about within pages,viewing your document in different ways, but most importantly, the zoomcontrol (Figure 8-5). You can use this to make your document larger or smallerin the window, which is useful if you find small text difficult to read or if youneed to see more of the document on your screen.
Using the Desktop in Windows 8In Chapter 4, I showed you how to snap two desktop windows side by side.There is so much more you can do on the desktop, however.
Figure 8-3. Tabs on the Ribbon
Figure 8-4. Hiding the Ribbon and Help
78 | Chapter 8: Using Windows 8 for Work

For instance, if you don’t want to keep switching back and forth between theStart screen and desktop when launching programs you can pin programs di-rectly onto the desktop Taskbar, the bar that runs along the bottom of thescreen so that they are there all the time, enabling you to get quick access tothem.
To do this, right-click on a program (or tap and pull downwards with yourfinger) and from the App Bar click/touch Pin to Taskbar.
Program icons on the Taskbar also have their own Jumplists. You can accessthese by touching the icon and pushing upwards or right-clicking with yourmouse. Each Jumplist contains controls for things you can do with that pro-gram, such as launching another instance of it or closing it.
Jumplists also contain a list of recently opened files. You can pin a file to theJumplist so that it always appears there (Figure 8-6). This can be very usefulif you have files that you need to access regularly. You can unpin files the sameway.
You can also see thumbnail images of open programs, even if they are mini-mized from the Taskbar. This can be useful if you have many windows openon your desktop or are perhaps using a web browser with many tabs open atthe same time. To do this, hover your mouse over an open program on theTaskbar and a thumbnail image of the program will appear (Figure 8-7).(NOTE: You can’t do this with a touch gesture.)
If you have a lot of windows open, moving your mouse over a thumbnail willtemporarily hide all other windows and show you the one you have selected(even if it is minimized itself). You can then, if you want to, switch directly tothat window by clicking the thumbnail.
Hiding and Restoring All the Open Desktop WindowsIf you have a lot of windows open on your screen and you want to minimizethem all, perhaps when you go for a break, you can click/touch with yourmouse in the far right of the desktop Taskbar, to the right of the time anddate. This will minimize all windows. You can then restore them all by clickingthis area again. Moving your mouse cursor to the very bottom right of your
Figure 8-5. Making things bigger or smaller
Using the Desktop in Windows 8 | 79

screen will temporarily minimize every window. They will be restored whenyou move your mouse away from this area.
Figure 8-6. Pinning documents to Jumplists
Figure 8-7. Viewing thumbnails of running programs
80 | Chapter 8: Using Windows 8 for Work

Connecting and Using Projectors and Second ScreensWindows 8 is excellent at detecting additional hardware such as projectorsand secondary displays. You can access these by opening the Charms Menuand clicking Devices.
Here you will see a list of additional displays connected to your computer. Thisincludes projectors. Clicking on a display will bring up several options for thatdisplay (Figure 8-8).
• PC Screen Only will turn off the image to the secondary display.
• Duplicate will put the same image on both displays.
• Extend will use the second screen to extend your desktop.
• Second Screen Only will use only the second display until you unplug it.
Maximizing Battery Life on Your Laptop or TabletBattery life is always an important issue for computers. If you have a newWindows 8 tablet you may be getting 10 hours or more out of your battery,but on a laptop or Windows 8 Pro tablet you’ll more likely be getting just 4 or5 hours.
You can maximize your battery life by using tools in the Windows MobilityCenter, which I will talk about in the next section, but other things you cando include:
• Turn off any keyboard backlight.
• Turn down your screen brightness.
• Don’t leave programs and apps that will read/write to your hard disk run-ning, such as music players
• Turn off WiFi (if your computer has a WiFi on/off switch) and your mobilebroadband when you’re not using it. You can also do this by switching onAirplane mode. See Chapter 2 for how to do this.
The Windows Mobility CenterThe Windows Mobility Center (Figure 8-9) can be found by searching forMobility at the Start screen (it will be in the Settings search results) is the bestplace to go to balance your battery life with on-the-road performance.
Here you can adjust your display brightness, speaker volume, and more. Someof the more interesting and useful features are:
Maximizing Battery Life on Your Laptop or Tablet | 81

• Battery Status enables you to choose several different battery modes foryour computer including a power saving mode.
• Presentation Settings if turned on while using your computer to give apresentation, will silence all desktop and other alerts. This includes pop-up messages informing you of new email. Windows will also be preventedfrom turning off the display during a period of inactivity or going to sleepwith this mode activated.
Figure 8-8. Choosing how to extend your display to a second screen
82 | Chapter 8: Using Windows 8 for Work

SummaryWindows 8 contains some excellent tools and utilities for being productiveand working for long periods away from a power socket. The inclusion oftrimmed down versions of Microsoft Office, which is suitable for most every-day tasks, is a welcome bonus, and the Windows Mobility Center is a greatway to manage your battery life.
These features, coupled with some of the excellent and sometimes hidden waysyou can interact with and use programs on the desktop, make Windows 8 agreat tool for being productive, whatever you need it for and wherever you are.
Sometimes you will want to use older software with Windows 8, perhaps soft-ware that you’re really comfortable with or that you need for a specific task.In Chapter 9, I will show you how to make sure this software runs properly inWindows 8.
Figure 8-9. The Windows Mobility Center
Summary | 83


CHAPTER 9
Using Older Software andPrograms
Even though there are already a great many new apps specifically for Windows8, many of which are completely free, you might still have older desktop pro-grams that you like to use or even brand new desktop programs.
There’s a Desktop tile on the Windows 8 Start screen, but how do you installdesktop programs, do you get it all from the Windows Store, and how can youmake sure that the older programs you’ve come to either love or rely on stillwork?
You cannot install desktop programs on a Windows 8 tablet.
Top Tips from This Chapter1. Not all Windows XP programs will work in Windows 8, but you can turn
on Compatibility Mode for programs that don’t work properly.
2. Do not allow program installations unless you specifically intended toinstall it because it could be malware.
3. You can uninstall apps and programs directly from the Start screen byright-clicking them, or tapping and dragging down.
Why Won’t My Program Run?Some programs designed for Windows XP just won’t work in Windows 8.When Microsoft released Windows Vista in 2006 they made fundamentalchanges to the way Windows works. This included introducing completelynew features to the operating system and removing others.
85

Because of this, some programs designed for Windows 98 and Windows XPneed to use operating system features that just don’t exist any more, and thatwere removed to improve security or reliability.
Windows Tablets and Desktop ProgramsIf you have a consumer Windows 8 tablet, you will not be able to install desk-top programs onto the computer. The desktop still exists, and you will knowthat you have this type of tablet because you will have feature-limited versionsof Microsoft’s Office programs Word, Excel, PowerPoint, and OneNote al-ready installed.
The reason you can’t install desktop programs on Windows 8 tablets is becauseof incompatibilities with the different type of hardware your tablet has insideit. Simply put, Windows desktop programs won’t run on this hardware be-cause it is incompatible with it. You can still install desktop programs on aWindows 8 Pro tablet though.
Installing Desktop Programs in Windows 8So where do you get desktop programs and how do you install them? It is mostcommon to download programs from the Internet, and some desktop pro-grams can be downloaded from the Windows Store, but you can also installprograms from a USB flash drive or a CD/DVD.
When you plug a disk, a USB flash drive, or another type of drive into yourWindows 8 computer, a pop-up alert will appear in the top right of your screenasking what you want to do with it (Figure 9-1).
Figure 9-1. Windows alerts you when you insert a disk or drive
You are given several choices in this pop-up alert (Figure 9-2). If you intendedto install programs, you will probably see the option to Run Setup.exe, whichis the usual name for a program installer.
86 | Chapter 9: Using Older Software and Programs

You will also see options to Open a folder… to view the contents of the disk.You may want to do this if you are copying files from the disk, or if Windows8 has not recognized the correct program to install.
If you tell Windows to install the programs, you are taken to the desktop andthe program will install from there. You will be presented with a security panelasking you to confirm that you do actually want to install this programs. Thissecurity feature is here to help prevent viruses and other malware from makingchanges to your computer.
Be Careful What Programs You InstallWhile all apps downloaded and installed from the Windows Store have beenscanned for malware by Microsoft, programs you install or download fromanother source do not come with a guarantee that it won’t contain a virus.
Try to avoid installing trial programs and/or too many programs. Installingtrialware means that you are likely to end up with lots of expired programsthat won’t run (usually after 30 days), that will take up space and that couldcause other problems. Installing too many programs could cause your com-puter to become unstable over time.
Installing a Program in Compatibility ModeWindows 8 is very good at detecting if programs might not run correctly, forinstance, because the program you wish to install was designed and written
Figure 9-2. Do you want to run setup.exe
Installing Desktop Programs in Windows 8 | 87

for an earlier version of Windows such as XP. If this happens then it will alertyou that there might be problems with the program and that it might not runproperly (Figure 9-3).
If you know the programs works fine in Windows 8 (most programs that workin Windows 7 will also work in Windows 8) then click/touch This programinstalled correctly but if you are not sure click/touch Reinstall using recom-mended settings. Windows 8 will then reinstall the program, applying differentsettings that make older programs more likely to run without problems.
Troubleshooting Program CompatibilityIf you are still having problems getting programs to run properly, you canmanually set the compatibility for the program. Windows 8 provides a wizardto help you through this issue (Figure 9-4). To manually set the compatibilityfor a program, follow these instructions:
1. From the Start screen or All Apps view, right-click on the relevant program.
2. From the App Bar, click/touch Open File Location and a window will openwith the program highlighted.
3. Right-click (touch and hold) on the program and an options menu willappear.
4. Select Troubleshoot Compatibility and the Automatic Troubleshooter willappear.
5. Click/Touch the Troubleshoot Program button.
Figure 9-3. Installing programs in Compatibility Mode
88 | Chapter 9: Using Older Software and Programs

You are now asked a series of questions about how the program worked in thepast. At the end of this process Windows automatically sets the compatibilityfor the program and asks you to test it. If it still does not work, it will allowyou to change the compatibility settings and try again.
Running Programs on the Windows DesktopIcons for installed desktop programs appear on your Start screen. In Chap-ter 4, I showed you how you can arrange and organize Tiles and icons on theStart screen, including hiding them. Some desktop programs will also installutilities (including uninstallers), which you may want to hide to keep the Startscreen tidy and easy to use.
You can run a desktop program from the Start screen by clicking/touching it.If it is a desktop program you are starting you will immediately be taken to thedesktop and the program will be started.
Making the Best of the TaskbarIn Chapter 4, I showed you how you can pin desktop programs to the Win-dows 8 desktop Taskbar. If you spend a lot of time working on the desktop
Figure 9-4. Manually troubleshooting program compatibility
Running Programs on the Windows Desktop | 89

this is a good way to avoid having to switch between the Start screen and thedesktop to run a program.
When a program is running you can also right-click on its desktop icon andselect Pin to Taskbar (or Unpin from Taskbar).
Uninstalling Desktop Programs in Windows 8Uninstalling programs in Windows 8 is, if anything, slightly easier than inprevious versions of Windows. To uninstall a program, right-click (or tap anddrag downwards) its icon on the Start screen or in the All Apps view and fromthe App Bar select Uninstall.
Apps will be uninstalled automatically, but if you are uninstalling a programyou will be taken to the Programs and Features window on the desktop. Hereyou will need to find the program by looking for its name in the list.
Once you have found the program, click/tap on the program name and in thetoolbar above the list of programs you will see an Uninstall or a Remove optionappear. Click/Touch this to uninstall the program (Figure 9-5).
Figure 9-5. Uninstalling a desktop program
90 | Chapter 9: Using Older Software and Programs

You can click/touch on the column headers Name, InstalledOn, etc. to sort the installed programs in different ways; forexample, showing the most recently installed programs at thetop of the list.
SummaryWindows 8 is compatible with most of the programs that ran on Windows 7and Windows Vista. It is sadly not compatible with all Windows XP programsthough. You might find that just small parts of an older program fail to work.I have an old program I like to use that does this and I can get by with it inWindows 8 because the bit that doesn’t work is a feature I don’t really need.
The compatibility settings can go some way to helping make older programsrun in Windows 8 but if, in the case of the program I like to use, it calls aWindows feature that’s long since been removed, there’s nothing that can bedone to make it work properly.
I’ve spoken throughout this book and in this chapter about the dangers ofhaving malware on your computer. In Chapter 10, I’ll show you how to keepyour family safe when you’re using your computer and going online.
Summary | 91


CHAPTER 10
Keeping You and Your Family Safe
One of the biggest challenges people face when using computers is keepingsafe when they’re on the Internet. How do you keep malware off your com-puter, how can you tell a fake website from a real one, and how do you keepyour children safe from inappropriate web content and unsuitable games?
These are concerns, not just for parents but also for every Internet user. In thischapter, I want to show you how Windows 8 can help keep you, your friends,and your family safe.
Top Tips from This Chapter1. Each user should have their own account to separate their personal files
and Internet favorites.
2. Criminals will try and trick you into installing malware/viruses; do notclick/touch things casually.
3. The Family Safety features in Windows 8 can help keep your children safeonline.
Setting Up Additional Users on Your ComputerWhen you first use Windows 8 you will be asked to create a user account,either a local one on the computer or one created using a Microsoft Account,which will be the same login you use for a Hotmail or Live email account orfor your Xbox.
When you are using Windows 8 in a family environment, it’s always a goodidea to give each user their own user account, but what is the difference be-tween a local account and a Microsoft Account?
93

• A local account is stored only on a single computer, and it’s exclusive tothat computer. It only gives a person access to that one computer. Itdoesn’t come with an email address nor does it come with the ability topurchase apps or games.
• A Microsoft account synchronises your computer with your email, calen-dar, and contacts and also allows you to buy apps and games from theStore. This account type also allows you to log in to multiple Windows 8computers and automatically see all of your own Internet favorites, email,and apps on each and every computer.
This doesn’t mean that anybody with a Hotmail or Xbox Live account cansimply gain access to your computer. You need to specifically give them theirown account first, and I will show you how to do this shortly.
The other benefit to people having their own user accounts is that it keeps eachperson’s files and Internet favorites separate, so they don’t get mixed up andone person’s files can’t be deleted by another person accidentally.
To create a new user account you need to go to the PC Settings panel (rememberyou get to this by opening the Charms menu, clicking/touching Settings, thenclicking/touching Change PC Settings).
1. Click/Touch Users in the left-hand panel (Figure 10-1).
2. Click/Touch Add a user in the main panel.
a. To add someone who already has a Microsoft Account, enter theiremail address. You will need to be connected to the Internet at thispoint.
b. To sign up for a Microsoft Account, click/touch Sign up for a newemail address. You will need to be connected to the Internet to createan account.
c. To create a local user account, click/touch Don’t want this user to signin with a Microsoft Account? This does not require Internet access.
You will be asked for a password. This is required with a Microsoft Accountbut it is optional for a local account. For example, you might not want to seta password for young children because it is easy for them to forget, and dothey need their own password on your computer anyway?
When starting your computer, if you do not see the user ac-count you want displayed, click/touch the back button nextto the user picture to display all the user accounts on the com-puter you can log in with.
94 | Chapter 10: Keeping You and Your Family Safe

Viruses, Malware, and Phishing ExplainedSo you’ve created your user accounts and you’re browsing the Internet. Areyou safe doing this? Well, there are criminals who want to trick you into in-stalling viruses onto your computer and surrendering personal and sensitiveinformation.
I’m going to lump all nasties and meanies together under the malware namebut technically, malware is a malicious program, file, and email intended tosteal your personal information (credit card details, passwords, date of birth,mother’s maiden name) or to trick you into revealing them yourself.
Malware spreads in several ways:
• Websites that try to trick you into downloading a file pretending that youneed it to play video or perform a specific action.
• Downloaded files from file-sharing websites; these are commonly ladenwith malware.
• Infected email attachments, Adobe PDF files, or Word, Excel, or Power-Point documents are common targets.
• Infected storage devices such as USB flash drives.
Figure 10-1. The Users panel in PC Settings.bmp
Viruses, Malware, and Phishing Explained | 95

The simple rule is that if you did not visit a website to download something,DON’T download anything. If you go to YouTube and receive a message say-ing a codec is required to watch a video, it’s lying. If you go to any other websitethat tries to download files to your computer, just say No.
If you are ever in doubt about attachments sent by a friend or colleague, justemail them asking if they intended to send it, before you open it.
Phishing is the act of sending emails that try to trick you into believing thatthey’re from a reputable bank or website (such as PayPal). They say they needyou to log in to confirm your security or personal details. The link they providewill always take you to a fake website and your details will be stolen.
The rule here is that NO reputable bank or website will EVER email youasking you to log in to confirm your security details.
Fake Antivirus Software: Be AlertOne other thing to be aware of is when a website says they have scanned yourcomputer and found malware, but their software can get rid of it for you. NOwebsite is capable of scanning your computer for malware without your ex-press permission. These websites are always fake and their software is mal-ware intended to scam you out of your credit card and other personal details.
Using Windows Defender to Keep Your Computer SafeThe good news is that all versions of Windows 8 come with antimalware soft-ware built in. It’s call Windows Defender and you can find it by searching fordefender at the Start screen. You probably won’t need to open it though be-cause it will update itself and scan regularly in the background.
Windows Defender is updated through Windows Update so it is very impor-tant not to turn that off! I will show you how to use Windows Update inChapter 11.
If you do want to open Windows Defender, it has a very friendly interface thatchanges color from green to amber and red to alert you to its current status(Figure 10-2). If it is not currently up to date, an Update button will appear onthe front screen and you can choose to run either a Quick Scan, which scansWindows and your documents or a Full Scan, which scans every file on yourcomputer for malware.
96 | Chapter 10: Keeping You and Your Family Safe

Browsing Safely with Internet Explorer 10Internet Explorer is very good at alerting you to both safe and unsafe websiteswhen you visit them, and also to malware and malicious downloads. The firstthing it does is highlight the actual name of the website. In Figure 10-3, youcan see that the name paypal.com is bolder than the rest of the text. This isso you can tell if you are at the correct website, perhaps because you’ve clickedon a link in an email.
Whenever you visit a website for banking or shopping, you will also see apadlock symbol on the right of the address bar on any page that requires youto type personal details. This sometimes also appears with the name of thecompany and this is assurance that a valid security certificate is owned by thiscompany, and that all your personal details are encrypted before your webbrowser sends them on.
Figure 10-2. Windows Defender
Figure 10-3. Internet Explorer tells you when websites are safe or not
Browsing Safely with Internet Explorer 10 | 97

You will also see in Figure 10-3 that the address bar has turned green. This isInternet Explorer’s way of telling you that this website is known to be safe. Ifthe address bar turns red, then you are visiting a website that is known to beinsecure and may contain malware, you should immediately leave the website.
Internet Explorer also scans all the documents and files you download. It doesthis using Windows Defender and a feature in Internet Explorer calledSmartScreen. This checks all downloads against lists of known safe and unsafefiles. If it thinks a file might be potentially dangerous to you or your computerthen it will alert you and ask you if you want to continue.
Setting Up and Using Family SafetyWhen you set up a user account, Windows 8 will ask you if this account is fora child. If it is, Windows can give you reports showing what that user has doneonline, but this doesn’t stop them from visiting inappropriate websites orviewing unsuitable content to begin with. That is where the Windows 8 FamilySafety features come in.
If you have young children then you will want to keep them safe online. Win-dows 8 contains an excellent and fully featured set of Family Safety options inwhich you can choose:
• What times of day and on what days they can use the computer
• What types of games they can play
• What websites they can visit
You can open the Family Safety area by searching for family at the Start screen.You will find it under the Settings search results.
To use Family Safety, your child must already have their ownuser account created in PC Settings and your own user accountmust have a password on it. This prevents the child fromchanging the parental control settings themselves.
Always use strong passwords. Preferably ten characters ormore in length and a mixture of upper and lower case letters,numbers, and symbols (remember you can substitute somenumbers and symbols for letters, e.g., 1 = i or l, & = a, 5 = sor S). I will show you more ways to create a strong passwordin Chapter 12.
98 | Chapter 10: Keeping You and Your Family Safe

At the main Family Safety panel, click/touch on the child’s account for whichyou want to create controls. You need to set up each child’s account individ-ually.
You will see a button to turn the Family Safety on or off for this child (Fig-ure 10-4). You can also turn activity reporting for the child on and off. Theseactivity reports are available at any time by clicking the View activity reportslink on the right side of the page.
There are four main categories of Family Safety controls you can set. The al-lowed programs category is quite complex and you will probably not want touse it, but the other categories are excellent and include the following.
Windows Web FilterHere you can block certain types of websites on the account based on five easyto understand filtering levels:
• Allow list only, where you manually specify the website that can be vis-ited, although this can be time consuming
• Child-friendly, in which all adult websites and content are blocked
Figure 10-4. Setting Family Safety
Setting Up and Using Family Safety | 99

• General interest expands the list of child-friendly websites for slightlyolder children of school age
• Online communication allows children to access email and social net-working websites
• Warn an adult will provide unlimited access but will warn the child whenthey might be visiting an adult website
You can also click/touch the link Allow or Block Websites in the left hand panelto customize the list of websites that children can and cannot visit. This isuseful if a website if automatically blocked that you want to allow or that achild might need for school.
Time LimitsThis is where you can control the times of day and the days of the week thatthe child can use the computer or just the maximum number of hours that thecomputer can be used for each day (Figure 10-6). You can specify when thechild can use the computer in the Set curfew controls by coloring in a chart.You can drag your finger or mouse around this chart to specify the blocks oftime when the computer cannot be used.
Figure 10-5. Allowing or blocking specific websites
100 | Chapter 10: Keeping You and Your Family Safe

The computer is not automatically shut down out of these times; the child isgiven plenty of warning by Windows 8 that he or she is coming to the end ofthe allocated time and that, perhaps, it is time for bed.
GamesHere you can block certain games according to their rating so that only gamesthat are rated as suitable for your child’s age can be played. Note, however,that not all games are rated this way and so some games might slip past thiscertification (Figure 10-7). This does also not block Internet games that areplayed online and not directly installed on your computer.
SummaryIt’s fairly straightforward to stay safe with Windows 8 because it not onlycomes with all the basic security a family needs, but out of the box it’s also setup the way you need it.
The Family Safety options in Windows 8 because an excellent way to keepyour children safe online, and the lists of safe and unsafe websites that Win-
Figure 10-6. You can specify when children can use a computer
Summary | 101

dows 8 uses to determine which websites are suitable for your children to visitare being constantly monitored by Microsoft and security organizations. Theability to manually add or block specific websites from this list is an additionaladded bonus.
As is always the advice, it’s best to take an interest in what your children doonline so that you can monitor them and make sure that they’re safe and notexposed to unsuitable material.
Now that you and your family are safe, in Chapter 11 I’ll show you how youcan keep your copy of Windows 8 running safely and smoothly so that itdoesn’t cause you problems.
Figure 10-7. You can block unsuitable games in Family Safety
102 | Chapter 10: Keeping You and Your Family Safe

CHAPTER 11
Keeping Your Computer RunningSmoothly
One of the biggest concerns facing home computer users is the thought thatsooner or later something’s going to go wrong and either the computer won’tstart or it will misbehave. This can result in being without your computer fora while and paying expensive repair costs.
As the author of Troubleshoot and Optimize Windows 8 Inside Out, I’d like toshare with you some of the best ways that you can keep Windows 8 runningsmoothly and can rescue it easily in the event something goes wrong.
Top Tips from This Chapter1. Always keep a regular and up-to-date backup copy of your files!
2. You can Refresh Windows 8 easily to a working copy if it starts to mal-function.
3. You can create a Recovery Drive that can be used to rescue Windows 8 inthe event that it won’t start.
How to Keep Your Files Backed UpFiles and documents on your computer may be important, so if somethingdisastrous happens to your computer or if you have to reinstall Windows fromscratch, you’d be pretty upset if they were wiped. This is why the most impor-tant thing you can ever do with a computer is to keep regular backups of yourfiles.
Windows 8 includes an excellent backup program that you can find by search-ing for recovery at the Start screen and running Windows 8 File Recovery from
103

the Settings results. It can be set to automatically keep an updated copy of yourfiles backed up, and is very easy to use (Figure 11-1).
The best place to keep a backup copy of your files is on anexternal hard disk. These are very cheap and can often beplugged in to your Internet router, which allows the files to beaccessed by any computer in your home.
1. At the Windows 8 File Recovery panel, click/touch the Set up backup linkon the right-hand side.
2. You will then be asked where you want to store your backups (Fig-ure 11-2).
a. If you are using a network location, such as an external hard diskplugged in to your Internet router, then click/touch the Save on aNetwork button. This brings up a new window where you can click/touch the Browse button to find your hard disk on the network.
3. Once you have found the correct hard disk, click/touch the OK button.
Figure 11-1. Windows 8 File Recovery Panel
104 | Chapter 11: Keeping Your Computer Running Smoothly

When you have selected your backup location, click/touch Next and then youwill have two backup choices (Figure 11-3).
• Let Windows choose what to back up. This will back up your documents,pictures, music, and video libraries along with other things such as yourInternet favorites. It will also back up Windows 8 itself, complete with allthe software you have installed.
• Let me choose what to back up gives you complete control over what isbacked up on your computer.
So what’s the difference between these two options? Well you might only havea small hard disk to back up your files to, and a full backup of Windows 8 andall your software can take up a lot of space. You might also have a second harddisk in your computer containing additional files, perhaps work files, you wantto include in the backup. For both of these circumstances, the Let me chooseoption is best.
Figure 11-2. Choosing a backup location
How to Keep Your Files Backed Up | 105

If you choose this second option, then after pressing the Next button you willbe asked what you want to include in your backup (Figure 11-4). This is pre-sented as a list that can be expended by clicking the arrows to the left of eachitem. You can select (and deselect) items for the backup by checking and un-checking the boxes. Click/Touch the Next button when you are happy withyour choices.
At the very bottom of this list, there is an option to Include a system image ofWindows. This is the option to create a full backup copy of Windows 8. It isextremely useful because if Windows won’t start you can restore it and be upand running again quickly with all your files, documents, and programs safeand intact. If you are short on space, you can create one separately on a dif-ferent hard disk or on DVDs, and I will show you how to do this later in thischapter. Uncheck this box if do not want to create a backup copy of Windowsat this time.
Finally, you will be presented with a screen that shows you what you havechosen to back up, where it is going to be backed up, and how often. It is here
Figure 11-3. The Backup Wizard
106 | Chapter 11: Keeping Your Computer Running Smoothly

that you can click/touch the Change schedule link to specify when and howoften backups should be kept (Figure 11-5).
I would recommend that you keep backups at least once amonth, but if you make regular changes to documents andadd new files, you should back them up every week.
When you are ready to start your first backup, click/touch the Save settingsand backup button to begin your backup for the first time.
Restoring Your Files from a BackupOnce you have created your first file backup, the Windows 8 File Recoverypage will display details of when the last backup was completed and what wasbacked up. Here you will see a link that you can click/touch to restore your
Figure 11-4. Choosing what to back up
Restoring Your Files from a Backup | 107

files. You don’t need to restore all of them if they’ve not all been lost, however,and the wizard will guide you through what files you want restored from thebackup.
Restoring Windows 8 from a BackupThere are two ways to restore Windows 8. If you have used the Windows 8File Recovery panel to create a backup copy of Windows 8 itself, then you’llwant to restore this in the event of a disaster.
If you need to restore your copy of Windows 8, this usually means that Win-dows 8 won’t start and the Startup Repair feature will appear when you turnon your computer. You will be prompted to try and repair the computer, butif Startup Repair can’t fix your computer, you will be presented with severaloptions. The one you want is System Image Recovery (Figure 11-6).
Figure 11-5. Reviewing your backup settings
108 | Chapter 11: Keeping Your Computer Running Smoothly

If you use WiFi to connect your computer to your Internetrouter and your backed up copy of Windows is on the net-work, perhaps on a USB hard disk plugged into the router,then you will need to physically connect your computer to therouter to restore Windows from the backup. Ask at your localcomputer store for a Network cable. You might need 5 or 10feet or more of cable to stretch between the computer and therouter.
System Image Recovery will automatically select, if you are physically con-nected to the hard disk containing your backup as per the previous tip, yourbackup image of Windows 8. The restore can be started with a couple of clicks,and Windows 8 can be restored to working condition in less than 20 minuteson average.
Restoring Windows 8 from a backup image will require you to also restoreyour files from a backup because these files might be wiped during the rein-stallation process. You can easily restore your files from a backup using theinstructions I detailed earlier in this chapter.
You can manually create a backup image of Windows 8 too,again from the Windows 8 File Recovery panel by clicking theCreate a system image link on the left side of the panel.
Figure 11-6. Restoring a backup Windows image
Restoring Windows 8 from a Backup | 109

Refreshing Windows 8The System Image backup can be complicated for some people, however, andthere is a better and easier to use option available. This is especially useful ifyou don’t use desktop software and stick to using apps. This feature is calledRefresh.
1. Open the Charms menu.
2. Click/Touch Settings.
3. Click/Touch Change PC Settings.
4. In the General section of PC Settings in the Refresh your PC without af-fecting your files section, click/touch the Get started button (Figure 11-7).
At the next screen, Windows 8 will tell you what it will do (Figure 11-8).Refreshing your computer won’t delete any of your files but you will need toreinstall your apps from the Windows Store (the Store will tell you which appsyou have already purchased to make this easier). You will also need to reinstallany desktop software you have been using. The important thing, however, isthat your files will be safe so long as they are stored in the main libraries andyou haven’t stored any somewhere else!
Figure 11-7. Starting Refresh
110 | Chapter 11: Keeping Your Computer Running Smoothly

When you are ready to start the Refresh process, click/touch the Next button.
Creating a Recovery DriveIf your computer won’t start at all, you can still restore it from a backup orRefresh it. To do this you first need to create a Recovery Drive. This is a USBFlash Drive that you can use to start your computer.
To create a Recovery Drive search for recovery at the Start screen and runRecovery from the Settings search results. In the panel that appears, click/touchthe Create a recovery drive link (Figure 11-9).
You will need to have a USB flash drive plugged in to your computer that you’renot using for anything else. If it is a large enough flash drive, and if your com-puter came with a Recovery Partition when you bought it, you can also copyacross this backup copy of Windows 8 to the drive. This means that if Win-dows 8 won’t start and you can’t restore it from a backup image or a Refreshimage, you can still restore it to how it was when you bought the computer.
Figure 11-8. Refreshing your copy of Windows 8
Creating a Recovery Drive | 111

When purchasing a USB Flash Drive large enough to store thesystem backup copy of Windows that came with your com-puter, choose one that is 32GB or preferably 64GB in size.
Using System Restore to Rescue WindowsIn the Recovery panel, you will also find System Restore. A restore point is asnapshot of critical Windows files taken when a change is made such as in-stalling a new piece of hardware, installing new software, or running WindowsUpdate.
Should something go wrong and Windows becomes unstable, you can click/touch Open System Restore to find a restore point that was made recently andwhen your computer was running well. By clicking/touching a restore pointand then clicking/touching the Next button, you can restore Windows files tothis point. This does not affect your files and documents, which will not beaffected.
Figure 11-9. Creating a recovery drive
112 | Chapter 11: Keeping Your Computer Running Smoothly

Maintaining Windows 8So far, this chapter has focused on backing up and restoring Windows andyour files should disaster strike. But, ideally, you just want to keep Windows8 running smoothly so that problems don’t occur, right?
Well, Windows 8 is able to perform maintenance tasks on itself and you canaccess this feature by searching for maintenance at the Start screen and click-ing Change automatic maintenance settings in the Settings search results.
In the window that appears you have just two options (Figure 11-10). Whendoes automatic maintenance run and can the computer be woken up to runit. This second option will only work if the computer is set to Sleep and notshut down, and if it is plugged in. If this is unlikely, then try setting mainte-nance to run at a time when you will often be using the computer, such as inthe evening for example. Maintenance won’t prevent the computer fromworking and it won’t stop you from doing what you are doing.
The maintenance tool will clean up unwanted temporary files that accrue dur-ing daily use of your computer, perform diagnostic tests, and make sure yoursecurity and Windows Updates are up to date. This really is a great solution
Figure 11-10. Changing the Automatic Maintenance Settings
Maintaining Windows 8 | 113

because it takes all of the hassle out of keeping your Windows 8 computerrunning smoothly.
You can always check the Windows Update settings manually in PC Settings,and indeed I would recommend you do this now and again, but the automaticmaintenance of Windows 8 should provide all the peace of mind that you need.
SummaryWindows 8 is great at maintaining itself, but in the event that somethingdoes go wrong, all is not lost. If you only or predominantly use Windows 8apps and not desktop software, the Refresh option is a great way to get Win-dows working again when it misbehaves. Sometimes though you will knowthat, having just done a Windows Update for example, the PC is misbehaving.In this case, a simple System Restore will commonly fix the problem.
If disaster strikes, then you’re still not out of options. It’s wise to create aRecovery Drive and a System Image copy of Windows 8 if you can if you haveenough spare hard disk space for one, either on an external USB hard disk oron a second internal hard disk in your computer.
You should always make sure you keep regular and up-to-date backups of yourfiles. This is by far the most important thing you can do on your computer. Ifyou can also try to keep a copy of your files outside of your home, perhaps inan Internet service such as Microsoft’s SkyDrive, this helps protect your filesif the worst happens and you suffer a theft or a fire.
There have been a lot of tips in this chapter for keeping Windows 8 runningsmoothly, and in Chapter 12 I’m going to share with you even more top tipsfor getting the maximum benefit out of Windows 8.
114 | Chapter 11: Keeping Your Computer Running Smoothly

CHAPTER 12
More Top Tips for Using Windows 8
Throughout this book I’ve shown you how to do the things that you’ll mostcommonly want to do with your Windows 8 computer, but what about all theother cool stuff that makes using your desktop PC, laptop, or tablet really easy?In this chapter, I’ll share with you my favorite tips and tricks for getting Win-dows 8 to work for you, and for making your Windows 8 computer a reallyfun thing to use.
Use a Picture PasswordWindows 8 practically begs you to log in to your computer using a MicrosoftAccount. This does have some big advantages such as automatically settingup your email, calendar, Internet favorites, and the Windows Stores for apps,music, and videos. To keep yourself secure, though, you will need a strongpassword, and I’ll show you how to create one in the next section of this chap-ter.
Typing this long password into Windows 8 every time you want to use thecomputer can be annoying, so why not create a picture password instead? Youcan choose any picture on your computer and use it to unlock your computerby touching and tapping it. The actions you can choose from include tappingthe picture, drawing straight lines on it and drawing circles.
Picture passwords can be every bit as secure as a regular strong password be-cause they can seem completely random. In Figure 12-1, you will see a pictureof baby Gilbert and you might tickle his tummy, poke his nose, and then drawa circle around his face to unlock your computer.
115
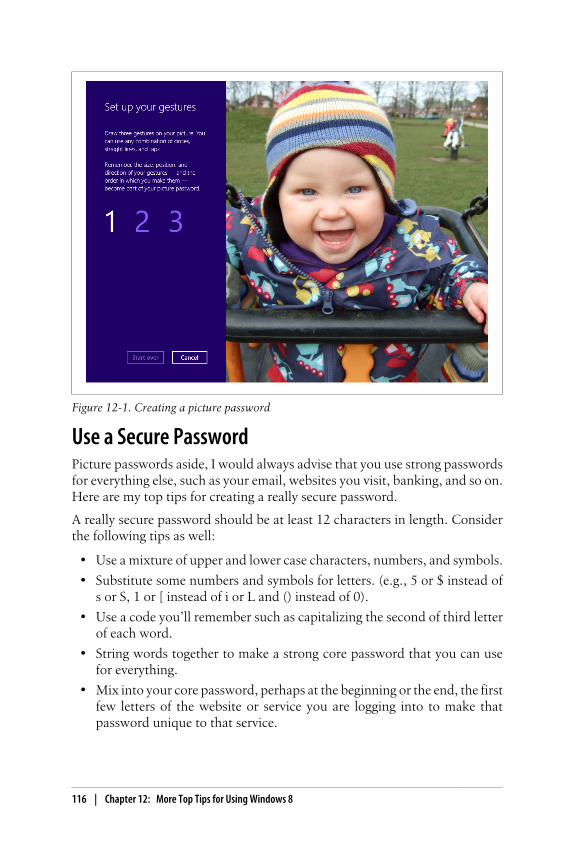
Use a Secure PasswordPicture passwords aside, I would always advise that you use strong passwordsfor everything else, such as your email, websites you visit, banking, and so on.Here are my top tips for creating a really secure password.
A really secure password should be at least 12 characters in length. Considerthe following tips as well:
• Use a mixture of upper and lower case characters, numbers, and symbols.
• Substitute some numbers and symbols for letters. (e.g., 5 or $ instead ofs or S, 1 or [ instead of i or L and () instead of 0).
• Use a code you’ll remember such as capitalizing the second of third letterof each word.
• String words together to make a strong core password that you can usefor everything.
• Mix into your core password, perhaps at the beginning or the end, the firstfew letters of the website or service you are logging into to make thatpassword unique to that service.
Figure 12-1. Creating a picture password
116 | Chapter 12: More Top Tips for Using Windows 8

• Check how secure your password is at http://www.howsecureismypassword.net.
Get Extra Information from the Start ScreenThe Live Tiles on Start Screen Apps are a great way to get lots of informationabout a very wide range of subjects, all really quickly and at a glance. Youmight not find a general use for a Finance App, for example, although its LiveTile might also be able to give you helpful information about currency ex-change rates.
You can search within an app by opening Search from theCharms menu, for example, to search for new games or othersoftware in the Windows Store.
Make Sure You Keep Regular BackupsYour files, pictures, music, and videos are the most precious things you willever keep on your computer and it’s essential to keep them securely and prop-erly backed up. I showed you how to create backups in Chapter 11, but thereare other tips I can offer.
I would always recommend that you keep two backups, one locally on anexternal USB hard disk (and these are very cheap these days) and another usinga cloud backup service such as Microsoft SkyDrive, Amazon S3, Mozy, orDropBox.
You should always keep regular backups; once a month is usually best but youmight want to keep them more regularly if you use your computer for collegeor work or if you add or change files often.
If you can’t use an Internet cloud backup service, perhaps you can keep a copyof your backup off site on a USB hard disk that you bring home once a monthto update. Perhaps you have a USB hard disk you can leave with a friend orfamily member. This helps protect your files from fire, flood, and theft.
Don’t rely on CDs and DVDs for backups. These can degrade over time, mak-ing them unreadable, and there’s never any clue as to when they will fail.
Make Sure You Keep Regular Backups | 117

If you really miss the Start Menu from earlier versions of Win-dows there are several ways to either restore it or get an alter-native. The best place to start is http://www.stardock.com,which provides a wide range of Windows customization prod-ucts. Another option is ViStart, which you can download fromhttp://www.lee-soft.com/vistart.
Create a Custom Refresh ImageIn Chapter 11, I showed you how to refresh your computer if it malfunctions.While this will restore Windows 8 to a fully working copy, you will have toreinstall all of your desktop software and apps afterwards.
You can create a custom refresh image, however, but for this you will need asecond hard disk or a rescue partition in your computer with enough free spaceon it.
A custom refresh image differs from the standard one included with Windows8 in that it will include your user accounts and Windows settings. This canmake getting up and running again after refreshing your computer muchquicker and simpler, especially if you have changed time-consuming settingssuch as Family Safety.
You can check if you have this by opening File Explorer on the desktop andclicking on Computer in the left panel. If you see a D:\ hard disk listed, youhave a second hard disk in your computer.
To create a custom refresh image, press the Windows Key+X on your keyboardand in the menu that opens click/touch Command Prompt (Admin) (Fig-ure 12-2). You will then also need to click/touch okay on a security prompt.
In the window that appears, type the following two commands, pressing theEnter key on your keyboard after each one:
• mkdir D:\Win8Refresh - This creates a new store folder for your customRefresh image.
• recimg -CreateImage D:\Win8Refresh - This creates a custom Refreshimage for your copy of Windows 8.
118 | Chapter 12: More Top Tips for Using Windows 8
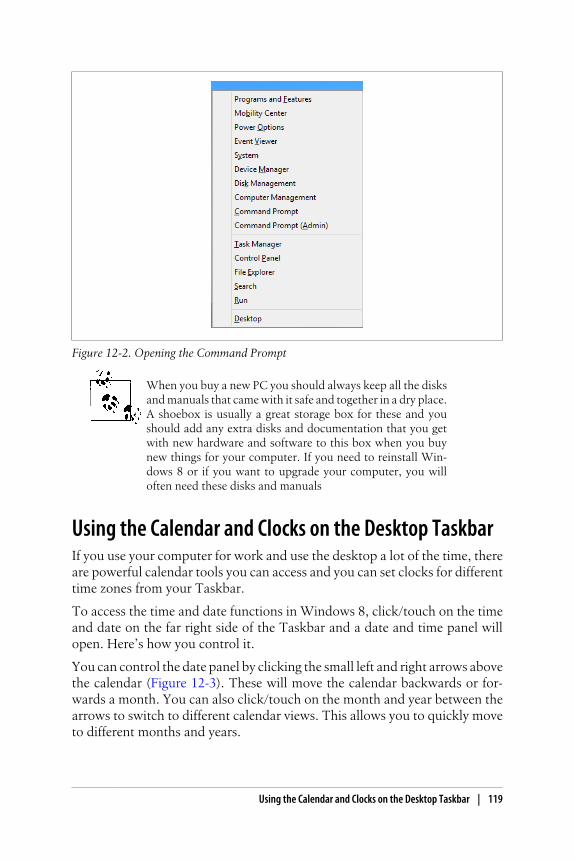
When you buy a new PC you should always keep all the disksand manuals that came with it safe and together in a dry place.A shoebox is usually a great storage box for these and youshould add any extra disks and documentation that you getwith new hardware and software to this box when you buynew things for your computer. If you need to reinstall Win-dows 8 or if you want to upgrade your computer, you willoften need these disks and manuals
Using the Calendar and Clocks on the Desktop TaskbarIf you use your computer for work and use the desktop a lot of the time, thereare powerful calendar tools you can access and you can set clocks for differenttime zones from your Taskbar.
To access the time and date functions in Windows 8, click/touch on the timeand date on the far right side of the Taskbar and a date and time panel willopen. Here’s how you control it.
You can control the date panel by clicking the small left and right arrows abovethe calendar (Figure 12-3). These will move the calendar backwards or for-wards a month. You can also click/touch on the month and year between thearrows to switch to different calendar views. This allows you to quickly moveto different months and years.
Figure 12-2. Opening the Command Prompt
Using the Calendar and Clocks on the Desktop Taskbar | 119

You can add additional clocks for different time zones to this panel by clickingthe Change date and time settings link at the bottom of the panel. In the windowthat appears, click/touch the Additional clocks tab and you can add up to twomore clocks, specifying the time zone you want for each one.
Choosing the Programs that Open FilesIf you find that a file is opening with the wrong program or isn’t opening atall, you can fix this by searching for default at the Start screen and click/touchDefault Programs when it appears in the search results. In the next panel, youhave several options, including choosing what happens when you plug thingsin, such as USB flash drives, CDs, DVDs, and extrenal hard disks to yourcomputer (Figure 12-4).
To change the program or app a file opens with, click/touch the Set your defaultprograms link. This will open a new panel where, on the left, you will see a listof all your installed software and apps. Find the program that you want to useas the default to open its particular type of file. For example, if you want toopen music files in Windows Media Player, find Windows Media Player in thelist and click/touch it.
In the right side of the panel, you can choose to set this program as the defaultfor every type of file it can open, which in this case is music and video, or youcan Choose defaults for this program instead if perhaps you want to use it formusic but not videos (Figure 12-5).
Figure 12-3. The Date and Time Panel
120 | Chapter 12: More Top Tips for Using Windows 8

Managing Your Default Sound DevicesIf you find that sound on your computer isn’t working correctly, perhaps be-cause you’ve plugged in headphones but the sound is still coming out of yourspeakers, it’s easy to change the default sound device. To do this, go to thedesktop and right-click with your mouse on the speaker icon next to the timeand date on the Taskbar (Figure 12-6).
From the options that appear, click/touch Playback devices and this will opena new panel showing all the sound playback devices in or attached to yourcomputer. To change the default sound device, click/touch the device youwant to use for sound and then click/touch the Set Default button at the bottomof the panel (Figure 12-7).
When you have finished, you may need to set the defaultplayback device back again to what it was before so that youcan continue to listen to sound and music (e.g., if you switchedtemporarily from speakers to headphones).
Figure 12-4. The Default Programs Panel
Managing Your Default Sound Devices | 121

Turn It Off and On AgainThis is the perennial troubleshooting tip and the most commonly given pieceof advice by computer professionals. If you find that something isn’t workingor is malfunctioning just try turning everything off and then on again. You’dbe surprised how many times this fixes a problem.
If you still have trouble, Windows 8 comes with some easy to use automatedtroubleshooters (Figure 12-8). To find these, search for troubleshooting atthe Start screen and run Troubleshooting from the Settings search results.
Figure 12-5. Setting the default program
Figure 12-6. Opening the Playback Devices Panel
122 | Chapter 12: More Top Tips for Using Windows 8

Opening Settings from the Charms menu inside an app canreveal additional options for that app that will appear in thetop right of your screen.
The automated troubleshooters are separated in categories such as Programsand Hardware and Sound to make it easy to find what it is you are looking for.Each troubleshooter takes you through a series of questions to help it diagnoseand repair problems.
SummaryIn this book, I’ve guided you through everything you need to get started withWindows 8. You can use your computer to have fun, share things with friendsand family, or to work and be productive. I hope you’ve found it helpful.
I offer additional help and support, including tutorial videos, all of which youcan at my website http://www.thelongclimb.com. If I was to finish through withone simple piece of advice it is that you shouldn’t panic when something goes
Figure 12-7. Setting the default sound device
Summary | 123

wrong. Your computer still isn’t as dependable as your microwave and canstop working or misbehave occasionally. Don’t get duped into spendingmoney on expensive technical support.
I would suggest visiting my website for more help and working through thefixes and repairs to Windows 8 I have detailed in this book.
Whatever you do with your computer, though, I sincerely hope you enjoy usingWindows 8.
Figure 12-8. Using the Automated Troubleshooters
124 | Chapter 12: More Top Tips for Using Windows 8

About the AuthorMike Halsey is the author of several Windows books including Troubleshoot-ing Windows 7 Inside Out and the Windows 8 Power Users Guide. He is a Mi-crosoft MVP (Most Valuable Professional) awardee and a recognized Windowsexpert. He regularly makes help, how to, and troubleshooting videos and holdslive webcasts on the first Thursday of every month for O’Reilly. Other previousroles have included spending several years as a club singer and working as aphotographer. Mike has an open mailbag and always welcomes questions andcomments from readers. He sincerely hopes you have enjoyed this book andthat you will consider reviewing it online. He lives in an eco-home in Sheffield(Yorkshire, UK) with his rescue border collie, Jed.