Embed Size (px)
DESCRIPTION
SwOS is an operating system designed specifically for administration of MikroTik Switch products that use Switch OS (SwOS) for RB250GS and now RB260GS with SFP Port for extend the network to up to 20KM ans support VLAN and VLAN Trunk on Gigabit Ethernet.
Citation preview
SwOS 1
SwOS
SummarySwOS is an operating system designed specifically for administration of MikroTik Switch products.SwOS is configurable from your web browser. It gives you all the basic functionality for a managed switch, plusmore: Allows to manage port-to-port forwarding, broadcast storm control, apply MAC filter, configure VLANs,mirror traffic, apply bandwidth limitation and even adjust some MAC and IP header fields.
Connecting to the SwitchOpen your web browser and enter IP address of your Switch (192.168.88.1 by default) and login screen will appear.
SwOS default IP address: 192.168.88.1, user name: admin and there is no password.Note: MikroTik neighbor discovery protocol tools can be used to discover IP address of Mikrotik Switch.Manual:IP/Neighbor_discovery
Interface Overview
SwOS interface menu consists of 10 tabs: Link, Forwarding, Statistics, VLAN, VLANs, StaticHosts, Hosts, SNMP, ACL and System.Description of buttons in SwOS configuration tool:• Append - add new item to the end of the list• Apply All - applies current configuration changes• Cut - removes item from the list• Clear - resets properties of the item• Discard Changes - removes unsaved configuration• Insert - add new item to the list (places it before current item)• Sort - sort VLAN table by VLAN-IDs; sort host table by MAC addresses• Change Password - changes password of the switch• Logout - logout from current Switch• Reboot - reboot the switch• Reset Configuration - reset configuration back to factory defaults
SwOS 2
• Choose File - browse for upgrade or backup file• Upgrade - upgrade firmware of the Switch• Restore Backup - restore Switch using selected backup file• Save Backup - generate and download backup file from the Switch
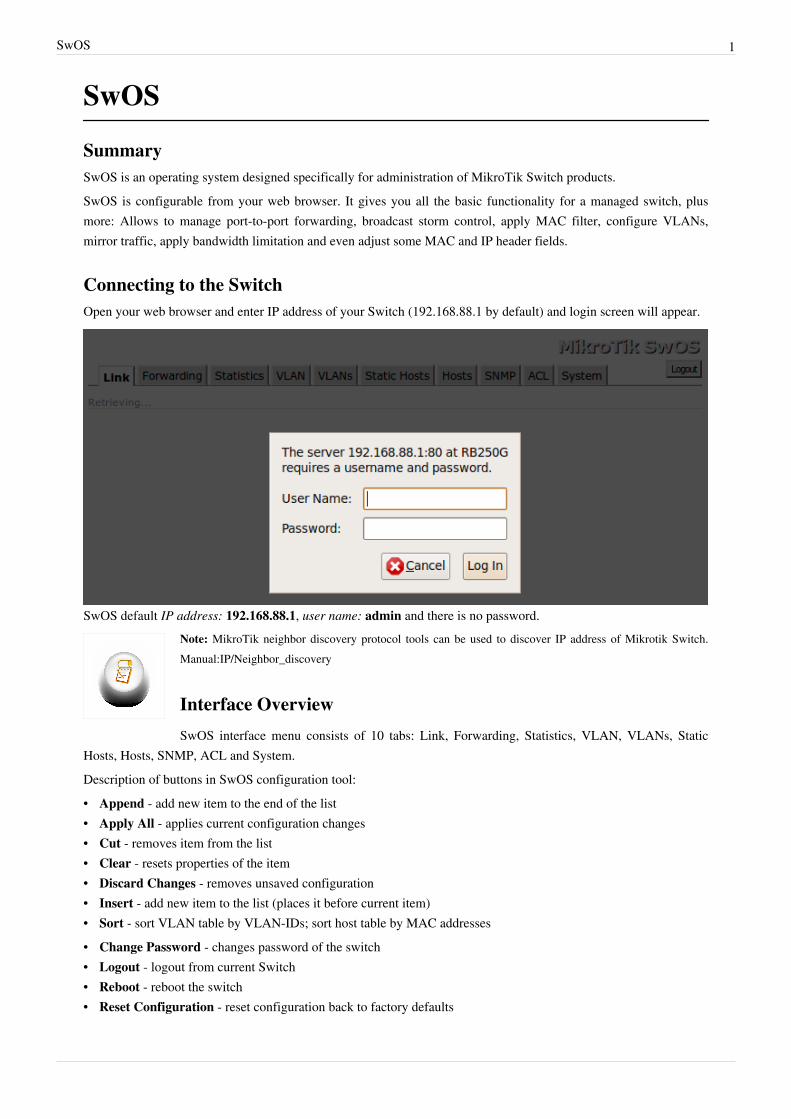
System Tab
System Tab performs the followingfunctions:•• General information about Switch•• Switch management•• Configuration reset•• Backup and restore configuration•• Firmware upgrade
Property Description
IP Address IP address of the Switch
Identity Name of the Switch (for Mikrotik neighbor discovery protocol)
Allow From IP address from which the service is accessible. Default value is '0.0.0.0/0' - any address
Allow From Ports List of switch ports from which the service is accessible
Allow From VLAN VLAN ID with which the service is accessible (VLAN Mode on ingress port must be other than disabled in orderto connect)
Mikrotik DiscoveryProtocol
Enable or disable Mikrotik neighbor discovery protocol
Watchdog Enable or disable system watchdog. It will reset CPU of the switch in case of fault condition
MAC Address MAC address of the Switch (Read-only)
Version Firmware version of the Switch
Uptime Current Switch uptime
SwOS 3
Note: SwOS uses a simple algorithm to ensure TCP/IP communication - it just replies to the same IP andMAC address packet came from. This way there is no need for Default Gateway on the device itself.
Firmware Upgrade
Firmware can be upgraded/downgraded by selecting firmware file and pressing upgrade button.Switch will reboot automatically after successful upgrade.
Note: Manual power cycle is necessary 5 seconds after upgrade button is pressed if you are upgrading fromSwOS v1.0
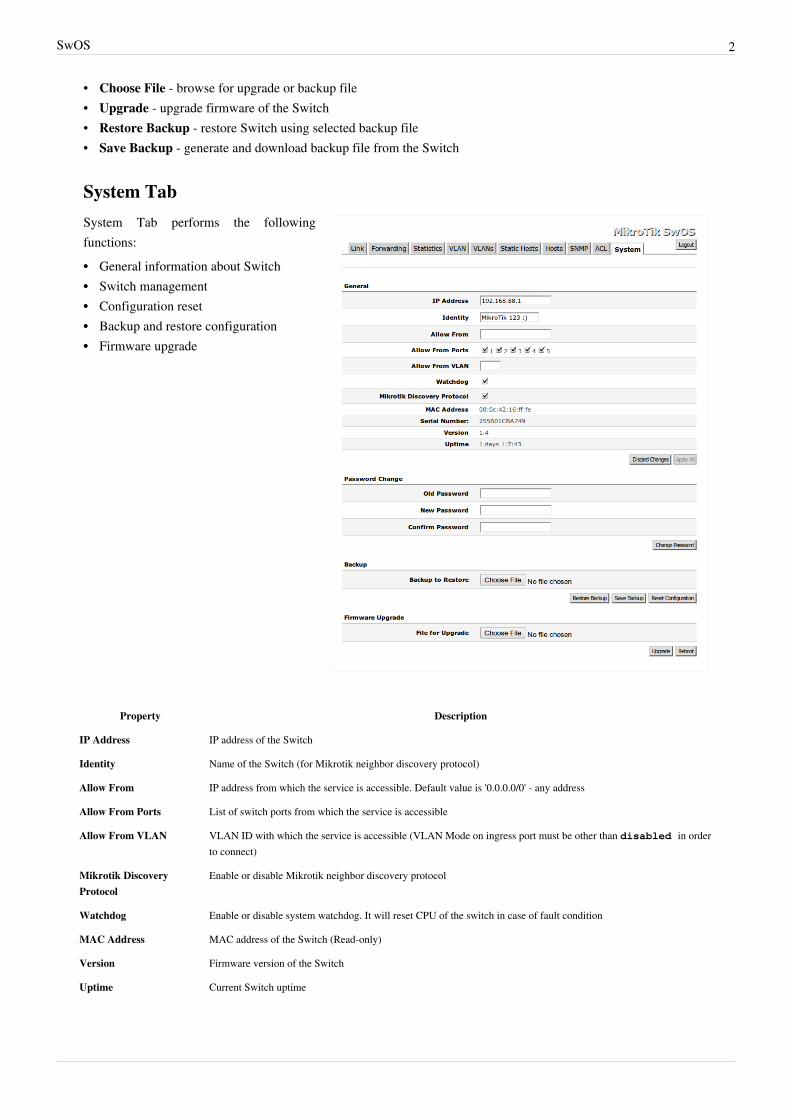
Link Tab
Link Tab allows you to:•• Configure Ethernet ports•• Monitor status of Ethernet ports
Property Description
Enabled Enable or disable port
Link Status Current link status (Read-only)
Auto Negotiation Enable or disable auto negotiation
Speed Specify speed setting of the port (requires auto negotiation to be disabled to specify)
Full Duplex Specify duplex mode of the port (requires auto negotiation to be disabled to specify)
Flow control Enable or disable flow control
SwOS 4
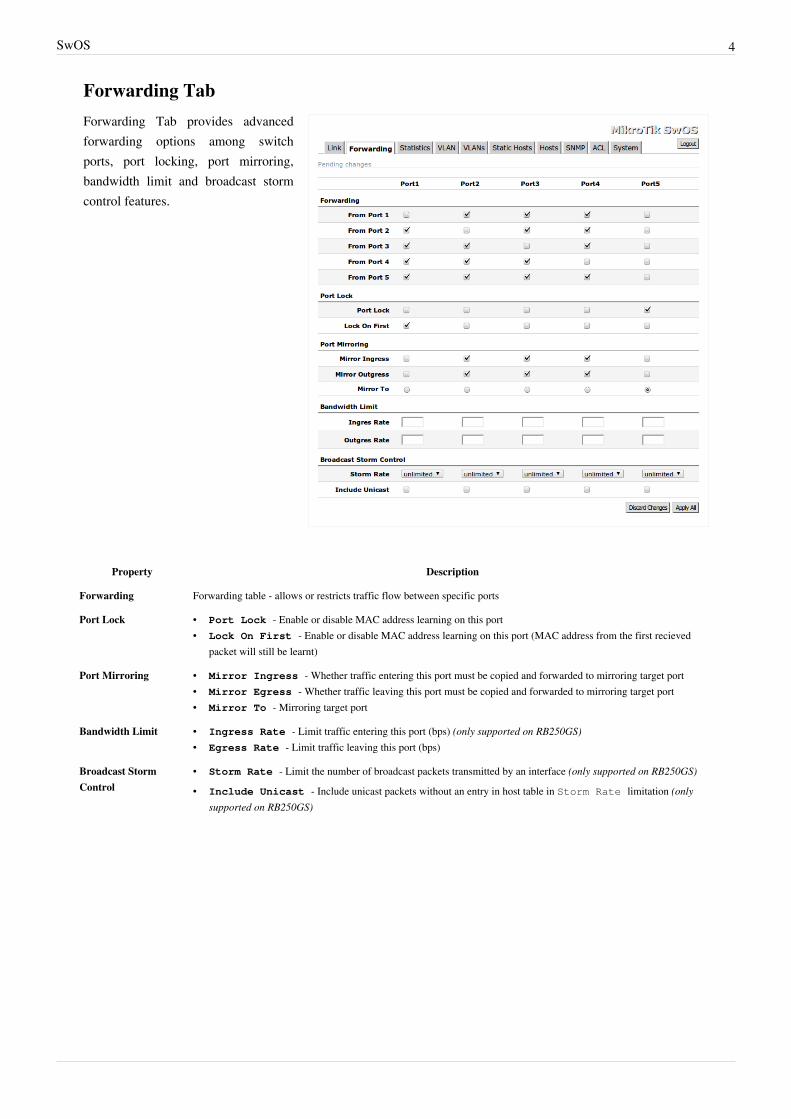
Forwarding Tab
Forwarding Tab provides advancedforwarding options among switchports, port locking, port mirroring,bandwidth limit and broadcast stormcontrol features.
Property Description
Forwarding Forwarding table - allows or restricts traffic flow between specific ports
Port Lock • Port Lock - Enable or disable MAC address learning on this port• Lock On First - Enable or disable MAC address learning on this port (MAC address from the first recieved
packet will still be learnt)
Port Mirroring • Mirror Ingress - Whether traffic entering this port must be copied and forwarded to mirroring target port• Mirror Egress - Whether traffic leaving this port must be copied and forwarded to mirroring target port• Mirror To - Mirroring target port
Bandwidth Limit • Ingress Rate - Limit traffic entering this port (bps) (only supported on RB250GS)• Egress Rate - Limit traffic leaving this port (bps)
Broadcast StormControl
• Storm Rate - Limit the number of broadcast packets transmitted by an interface (only supported on RB250GS)
• Include Unicast - Include unicast packets without an entry in host table in Storm Rate limitation (onlysupported on RB250GS)

SwOS 5
Statistics Tab
Provides detailed information aboutreceived and transmitted packets.
Packet Flow
Packet processing through RB250GSis described here: Atheros8316 packetflow diagram [1]
VLAN Tab
VLAN configuration for Switch ports.
SwOS 6
Property Description
VLAN Mode VLAN mode for ingress port:
• disabled - VLAN table is not used. Switch ignores VLAN tag part of tagged packets• optional - Handle packets with VLAN tag ID that is not present in VLAN table just like packets without VLAN tag• enabled - Drop packets with VLAN tag ID that is not present in VLAN table. Packets without VLAN tag are treat as tagged
packets with Default VLAN ID• strict - Same as enable, but also checks VLAN support for inbound interface (drop packets with VLAN tag ID and
ingress port that are not present in VLAN table)
VLANReceive
Defines the type of allowed packets on ingress port: any / only tagged / only untagged (only supported onRB260GS)
Default VLANID
Switch will treat untagged ingress packets as they are tagged with this VLAN ID. VLAN tag itself will be added only if there isVLAN Header = add if missing specified on egress port
Force VLANID
Whether to apply Default VLAN ID to incoming packets with VLAN tag
VLAN Header • leave as is - if VLAN header is present it remains unchanged• always strip - if VLAN header is present it is removed from the packet• add if missing - if VLAN header is not present it is added to the packet (VLAN ID will be Default VLAN ID of
ingress port)
Note: VLAN modes enabled and strict require VLAN ID 1 in VLANs table to allow access ofuntagged traffic to switch itself.
Example
• 802.1Q Trunk [2]
• 802.1Q Trunk with two switches [3]
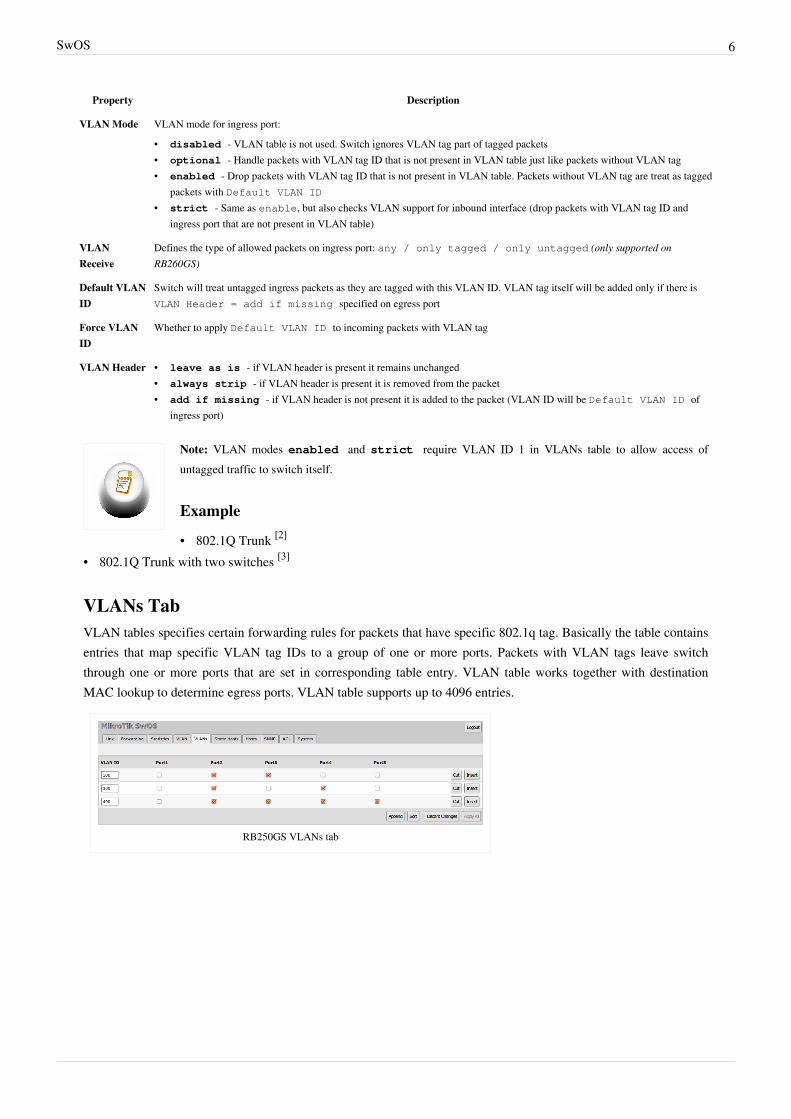
VLANs TabVLAN tables specifies certain forwarding rules for packets that have specific 802.1q tag. Basically the table containsentries that map specific VLAN tag IDs to a group of one or more ports. Packets with VLAN tags leave switchthrough one or more ports that are set in corresponding table entry. VLAN table works together with destinationMAC lookup to determine egress ports. VLAN table supports up to 4096 entries.
RB250GS VLANs tab
SwOS 7
Property Description
VLAN ID VLAN ID of the packet
Ports Ports the packet should be mapped to
RB260GS VLANs tab
Property Description
VLANID
VLAN ID of the packet
Ports Each port has individual VLAN header options for each VLAN ID. Depending on VLAN mode if lookup is done in this table, egressaction of packets is processed by this option. Egress option from VLAN tab is ignored.
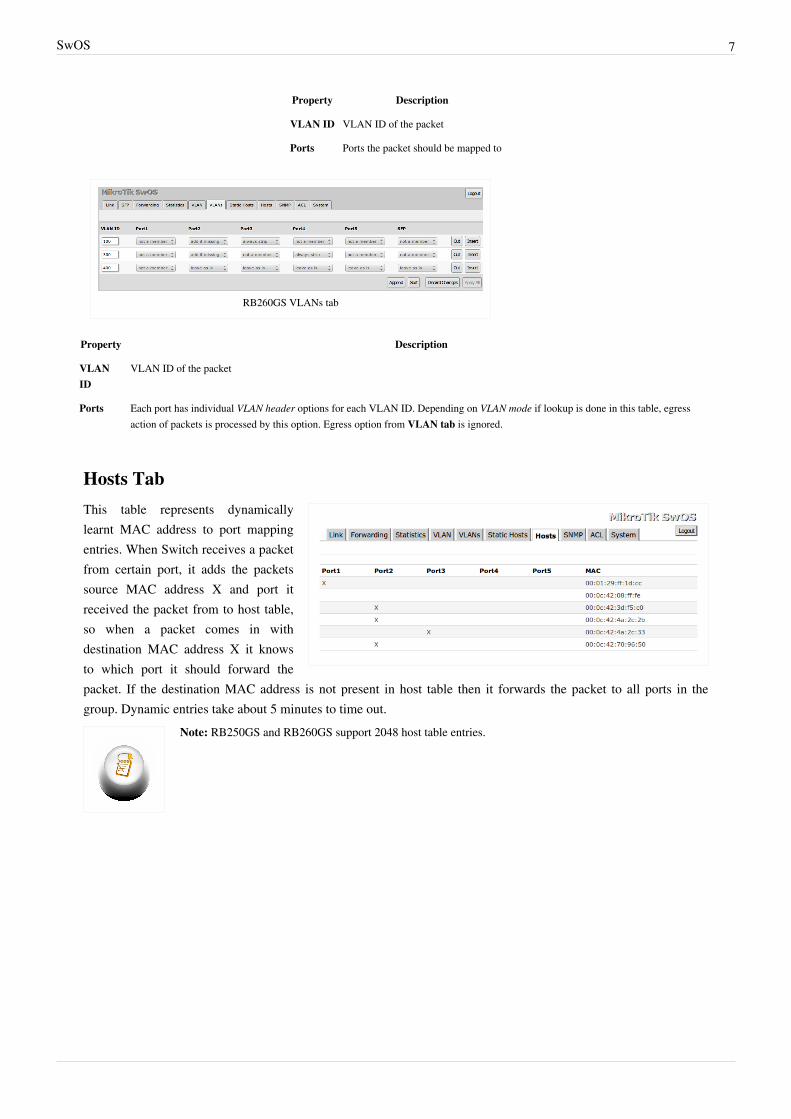
Hosts Tab
This table represents dynamicallylearnt MAC address to port mappingentries. When Switch receives a packetfrom certain port, it adds the packetssource MAC address X and port itreceived the packet from to host table,so when a packet comes in withdestination MAC address X it knowsto which port it should forward thepacket. If the destination MAC address is not present in host table then it forwards the packet to all ports in thegroup. Dynamic entries take about 5 minutes to time out.
Note: RB250GS and RB260GS support 2048 host table entries.
SwOS 8
Property Description
MAC MAC address (Read-only)
Ports Ports the packet should be forwarded to (Read-only)
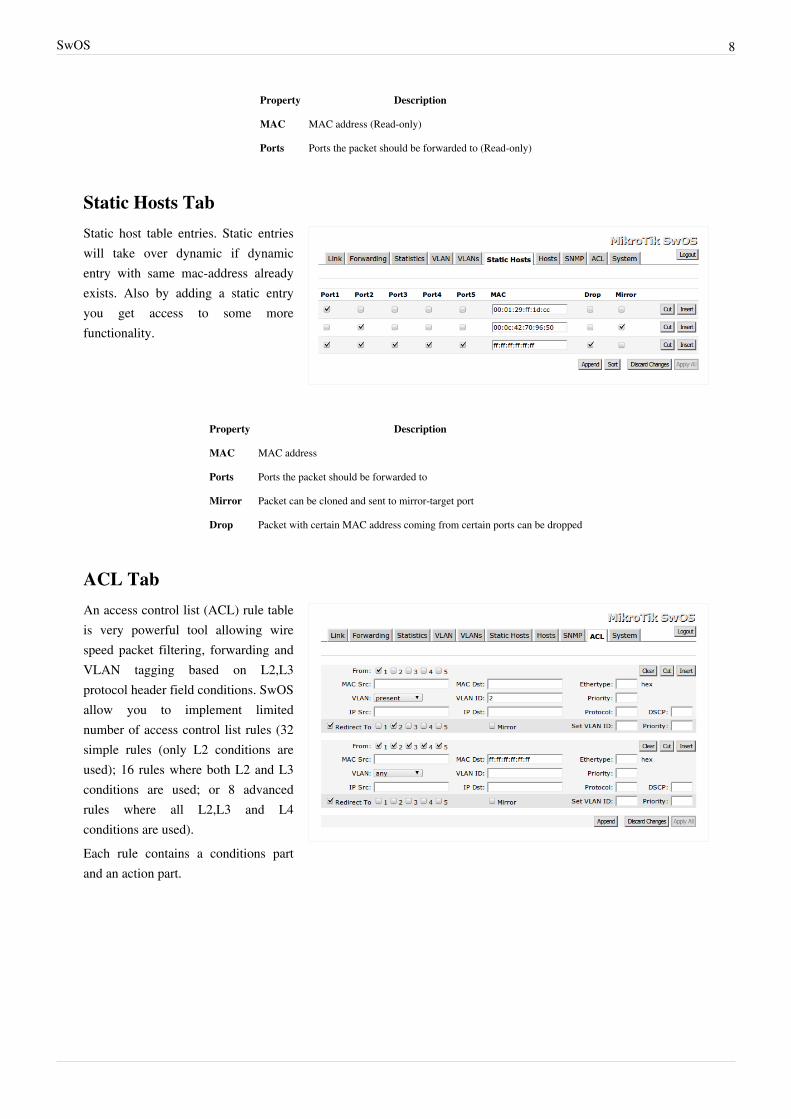
Static Hosts Tab
Static host table entries. Static entrieswill take over dynamic if dynamicentry with same mac-address alreadyexists. Also by adding a static entryyou get access to some morefunctionality.
Property Description
MAC MAC address
Ports Ports the packet should be forwarded to
Mirror Packet can be cloned and sent to mirror-target port
Drop Packet with certain MAC address coming from certain ports can be dropped
ACL Tab
An access control list (ACL) rule tableis very powerful tool allowing wirespeed packet filtering, forwarding andVLAN tagging based on L2,L3protocol header field conditions. SwOSallow you to implement limitednumber of access control list rules (32simple rules (only L2 conditions areused); 16 rules where both L2 and L3conditions are used; or 8 advancedrules where all L2,L3 and L4conditions are used).Each rule contains a conditions partand an action part.
SwOS 9
Property Description
From Port that packet came in from
MAC Src Source MAC address and mask
MAC Dst Destination MAC address and mask
Ethertype Protocol encapsulated in the payload of an Ethernet Frame
VLAN VLAN header presence:
•• any•• present•• not present
VLAN ID VLAN tag ID
Priority Priority in VLAN tag
IP Src (IP/netmask:port) Source IP address, netmask and L4 port number
IP Dst (IP/netmask:port) Destination IP address, netmask and L4 port number
Protocol IP protocol
DSCP IP DSCP field
Property Description
Redirect To Whether to force new destination ports (If Redirect To is enabled and no ports specified in Redirect To Ports,packet will be dropped )
Redirect ToPorts
Destination ports for
Mirror Clones packet and sends it to mirror-target port
Rate Limits bandwidth (bps) (only supported on RB260GS)
Set VLAN ID Changes the VLAN tag ID, if VLAN tag is present
Priority Changes the VLAN tag priority bits, if VLAN tag is present
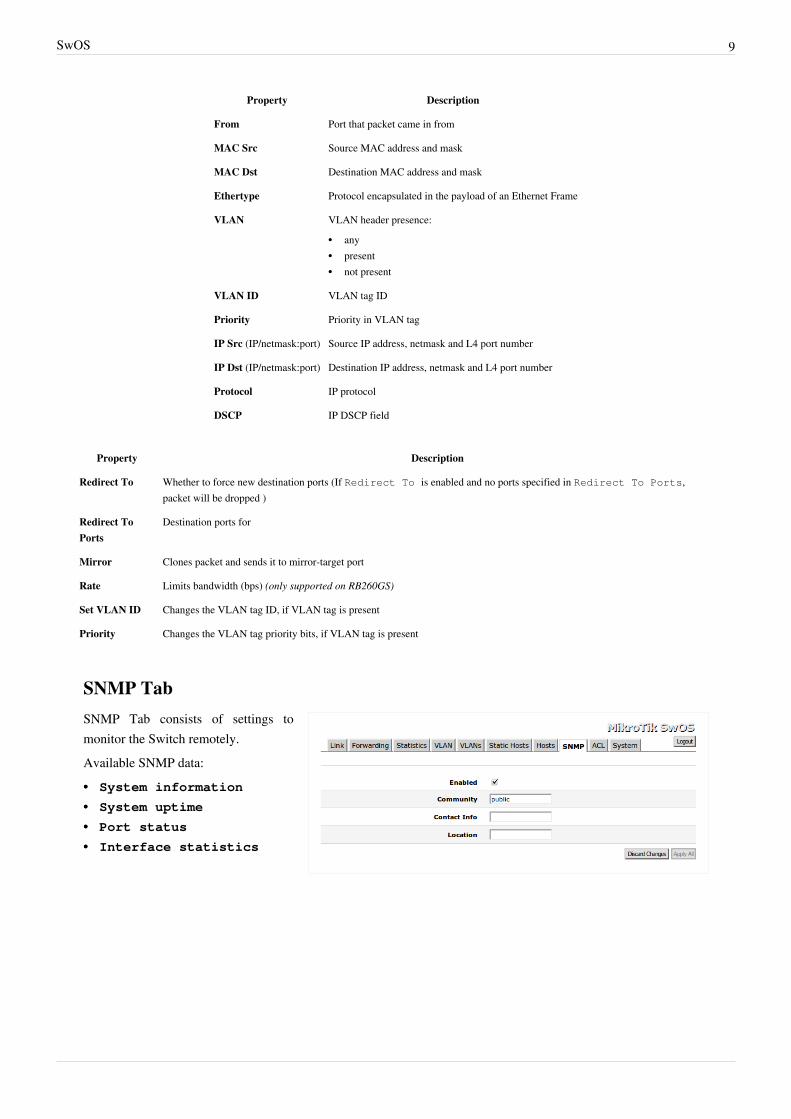
SNMP Tab
SNMP Tab consists of settings tomonitor the Switch remotely.Available SNMP data:•• System information
•• System uptime
•• Port status
•• Interface statistics
SwOS 10
Property Description
Enabled Enable or disable SNMP service
Community SNMP community name
Contact Info Contact information for the NMS
Location Location information for the NMS
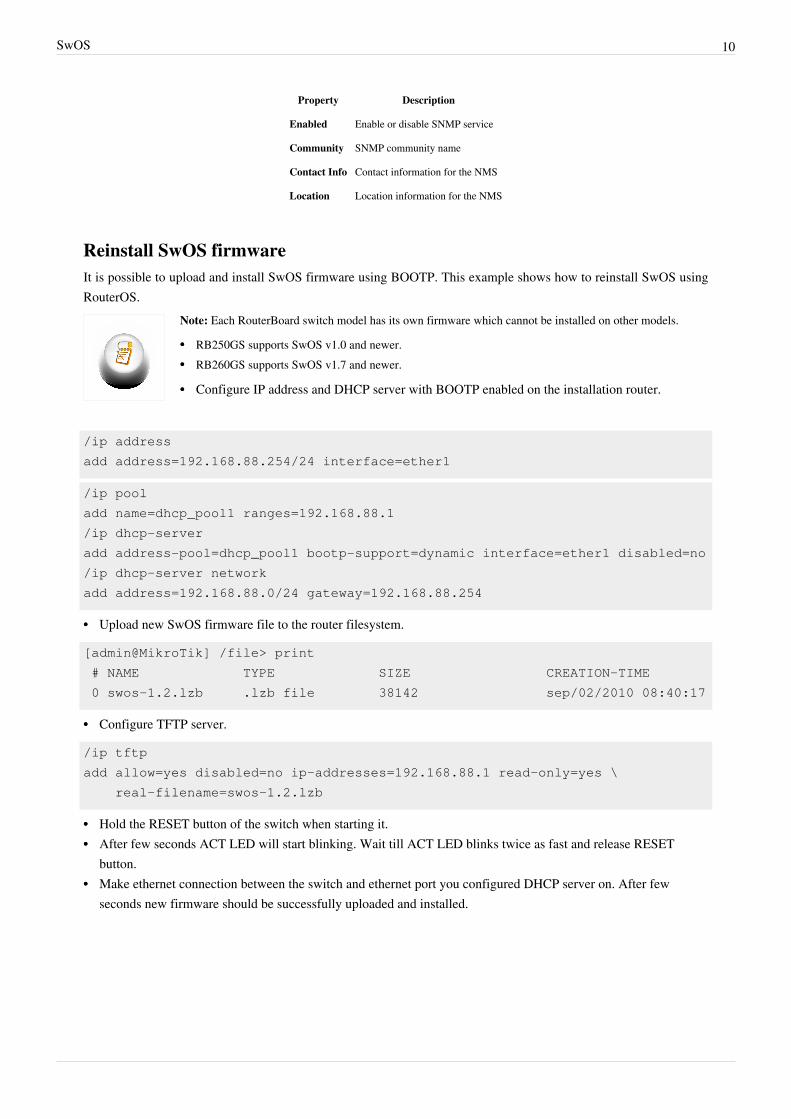
Reinstall SwOS firmwareIt is possible to upload and install SwOS firmware using BOOTP. This example shows how to reinstall SwOS usingRouterOS.
Note: Each RouterBoard switch model has its own firmware which cannot be installed on other models.
•• RB250GS supports SwOS v1.0 and newer.•• RB260GS supports SwOS v1.7 and newer.
•• Configure IP address and DHCP server with BOOTP enabled on the installation router.
/ip address
add address=192.168.88.254/24 interface=ether1
/ip pool
add name=dhcp_pool1 ranges=192.168.88.1
/ip dhcp-server
add address-pool=dhcp_pool1 bootp-support=dynamic interface=ether1 disabled=no
/ip dhcp-server network
add address=192.168.88.0/24 gateway=192.168.88.254
•• Upload new SwOS firmware file to the router filesystem.
[admin@MikroTik] /file> print
# NAME TYPE SIZE CREATION-TIME
0 swos-1.2.lzb .lzb file 38142 sep/02/2010 08:40:17
•• Configure TFTP server.
/ip tftp
add allow=yes disabled=no ip-addresses=192.168.88.1 read-only=yes \
real-filename=swos-1.2.lzb
•• Hold the RESET button of the switch when starting it.•• After few seconds ACT LED will start blinking. Wait till ACT LED blinks twice as fast and release RESET
button.•• Make ethernet connection between the switch and ethernet port you configured DHCP server on. After few
seconds new firmware should be successfully uploaded and installed.

SwOS 11
References[1] http:/ / wiki. mikrotik. com/ wiki/ Manual:Packet_flow_through_Atheros8316[2] http:/ / wiki. mikrotik. com/ wiki/ SwOS/ Router-On-A-Stick[3] http:/ / wiki. mikrotik. com/ wiki/ SwOS/ SWOS-802. 1Q-TrunkTwoSwitches

Article Sources and Contributors 12
Article Sources and ContributorsSwOS Source: http://wiki.mikrotik.com/index.php?oldid=25593 Contributors: Becs, Kirshteins, Marisb, Normis
Image Sources, Licenses and ContributorsFile:swos_login.png Source: http://wiki.mikrotik.com/index.php?title=File:Swos_login.png License: unknown Contributors: KirshteinsImage:Icon-note.png Source: http://wiki.mikrotik.com/index.php?title=File:Icon-note.png License: unknown Contributors: Marisb, RouteFile:swos_system.png Source: http://wiki.mikrotik.com/index.php?title=File:Swos_system.png License: unknown Contributors: KirshteinsFile:swos_link.png Source: http://wiki.mikrotik.com/index.php?title=File:Swos_link.png License: unknown Contributors: KirshteinsFile:swos_forwarding.png Source: http://wiki.mikrotik.com/index.php?title=File:Swos_forwarding.png License: unknown Contributors: KirshteinsFile:swos_statistics.png Source: http://wiki.mikrotik.com/index.php?title=File:Swos_statistics.png License: unknown Contributors: KirshteinsFile:swos_vlan.png Source: http://wiki.mikrotik.com/index.php?title=File:Swos_vlan.png License: unknown Contributors: KirshteinsFile:rb250gsvlans.png Source: http://wiki.mikrotik.com/index.php?title=File:Rb250gsvlans.png License: unknown Contributors: BecsFile:rb260gsvlans.png Source: http://wiki.mikrotik.com/index.php?title=File:Rb260gsvlans.png License: unknown Contributors: BecsFile:swos_hosts.png Source: http://wiki.mikrotik.com/index.php?title=File:Swos_hosts.png License: unknown Contributors: KirshteinsFile:swos_static_hosts.png Source: http://wiki.mikrotik.com/index.php?title=File:Swos_static_hosts.png License: unknown Contributors: KirshteinsFile:swos_acl.png Source: http://wiki.mikrotik.com/index.php?title=File:Swos_acl.png License: unknown Contributors: KirshteinsFile:swos_snmp.png Source: http://wiki.mikrotik.com/index.php?title=File:Swos_snmp.png License: unknown Contributors: Kirshteins
SwOS/SWOS-802.1Q-TrunkTwoSwitches 1
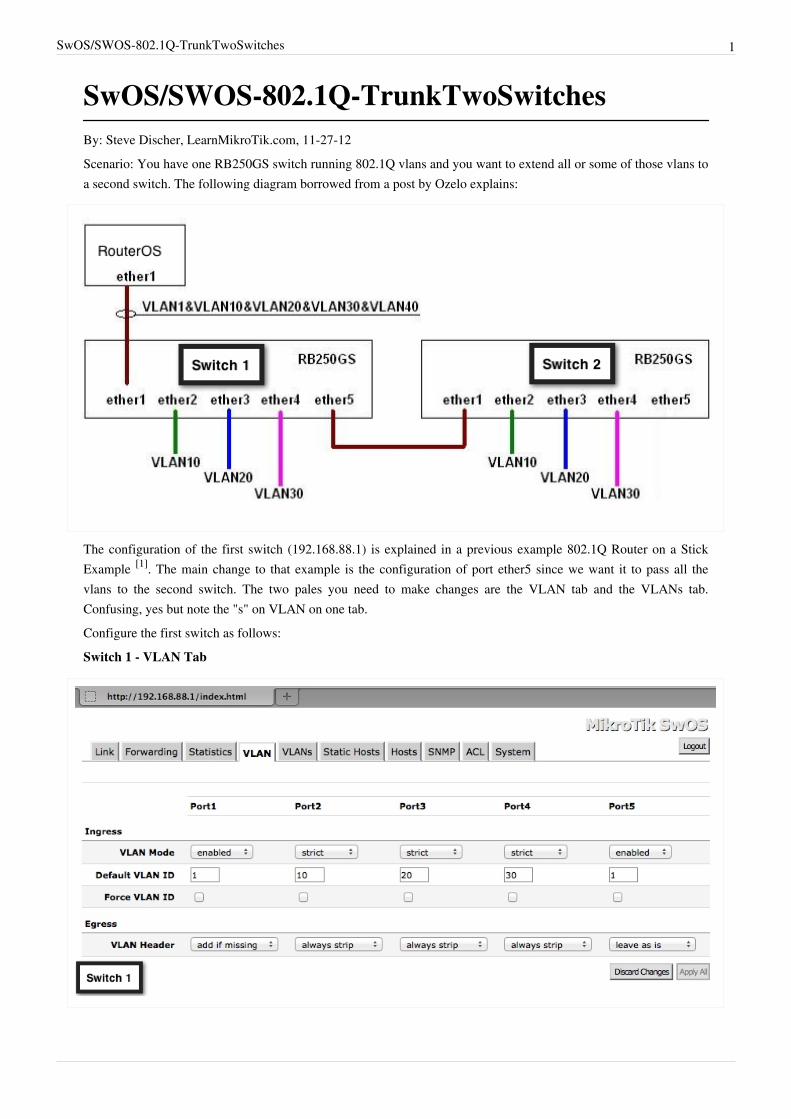
SwOS/SWOS-802.1Q-TrunkTwoSwitchesBy: Steve Discher, LearnMikroTik.com, 11-27-12Scenario: You have one RB250GS switch running 802.1Q vlans and you want to extend all or some of those vlans toa second switch. The following diagram borrowed from a post by Ozelo explains:
The configuration of the first switch (192.168.88.1) is explained in a previous example 802.1Q Router on a StickExample [1]. The main change to that example is the configuration of port ether5 since we want it to pass all thevlans to the second switch. The two pales you need to make changes are the VLAN tab and the VLANs tab.Confusing, yes but note the "s" on VLAN on one tab.Configure the first switch as follows:Switch 1 - VLAN Tab

SwOS/SWOS-802.1Q-TrunkTwoSwitches 2
Switch 1 - VLANs Tab
Then configure the second switch as follows. Please note we have set the IP address of the second switch to192.168.88.10 so as not to duplicate the witch 1 IP address. This is done on the System tab. In case you ever wonderwhy there is no setting for netmask or default gateway, that is because the switch does a little magic in determiningthe source of the packet and returning it to the host without the need for those two pieces of information.Switch 2 - VLAN Tab
SwOS/SWOS-802.1Q-TrunkTwoSwitches 3
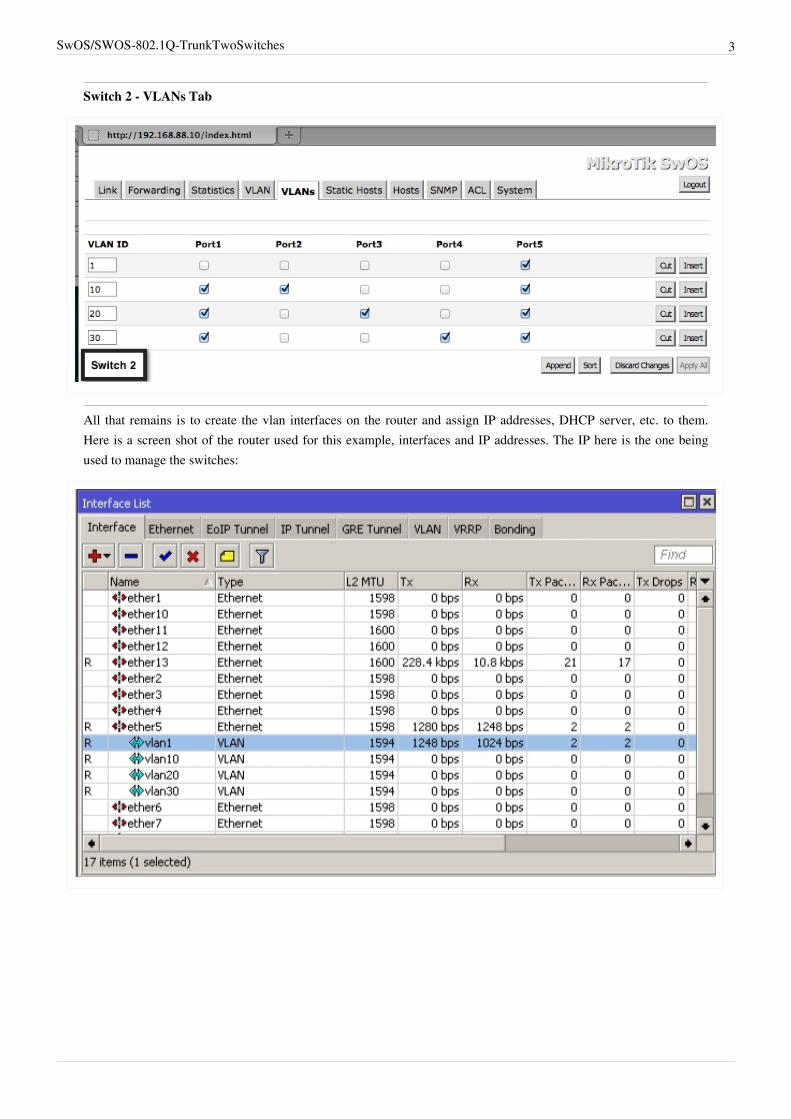
Switch 2 - VLANs Tab
All that remains is to create the vlan interfaces on the router and assign IP addresses, DHCP server, etc. to them.Here is a screen shot of the router used for this example, interfaces and IP addresses. The IP here is the one beingused to manage the switches:

SwOS/SWOS-802.1Q-TrunkTwoSwitches 4
That is it, you should now have two switches trunked together passing vlans to the second switch.
References[1] http:/ / wiki. mikrotik. com/ wiki/ SwOS/ Router-On-A-Stick

Article Sources and Contributors 5
Article Sources and ContributorsSwOS/SWOS-802.1Q-TrunkTwoSwitches Source: http://wiki.mikrotik.com/index.php?oldid=24716 Contributors: Sdischer
Image Sources, Licenses and ContributorsFile:OverallDiagram.png Source: http://wiki.mikrotik.com/index.php?title=File:OverallDiagram.png License: unknown Contributors: SdischerFile:Switch1-1.png Source: http://wiki.mikrotik.com/index.php?title=File:Switch1-1.png License: unknown Contributors: SdischerFile:Switch1-2.png Source: http://wiki.mikrotik.com/index.php?title=File:Switch1-2.png License: unknown Contributors: SdischerFile:Switch2-1.png Source: http://wiki.mikrotik.com/index.php?title=File:Switch2-1.png License: unknown Contributors: SdischerFile:Switch2-2.png Source: http://wiki.mikrotik.com/index.php?title=File:Switch2-2.png License: unknown Contributors: SdischerFile:Interfaces.png Source: http://wiki.mikrotik.com/index.php?title=File:Interfaces.png License: unknown Contributors: SdischerFile:IPAddresses.png Source: http://wiki.mikrotik.com/index.php?title=File:IPAddresses.png License: unknown Contributors: Sdischer
SwOS/Router-On-A-Stick 1
SwOS/Router-On-A-Stick
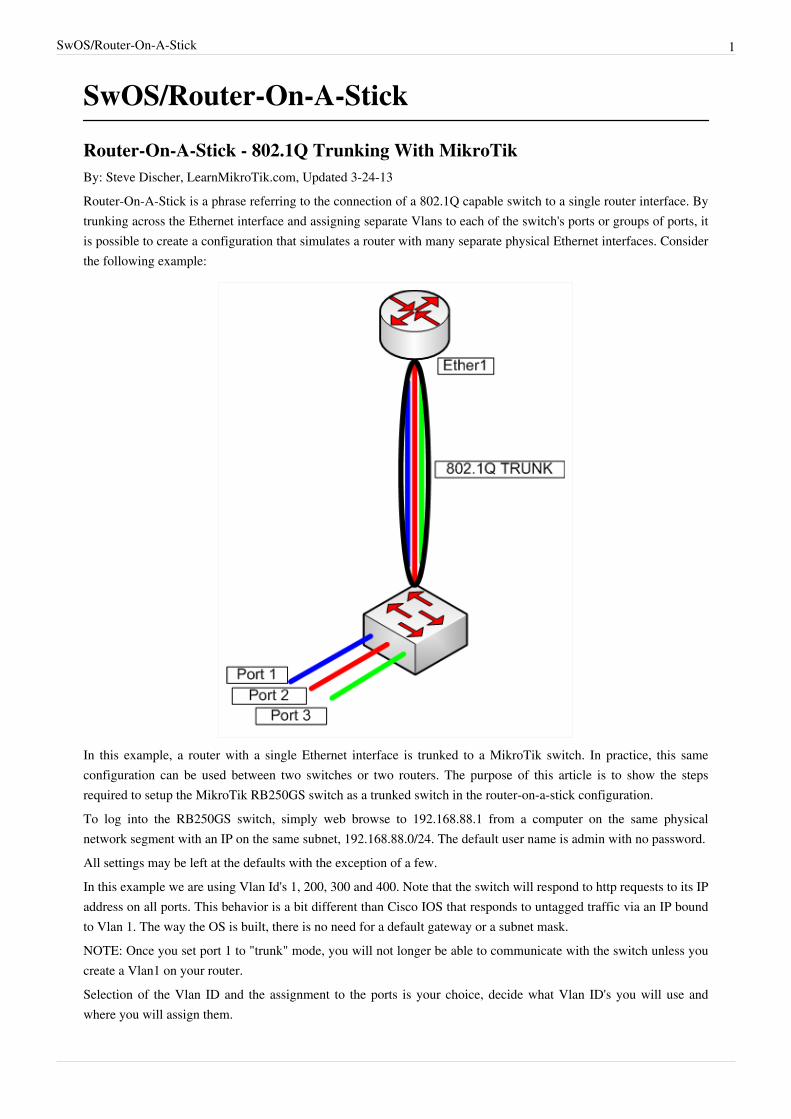
Router-On-A-Stick - 802.1Q Trunking With MikroTikBy: Steve Discher, LearnMikroTik.com, Updated 3-24-13Router-On-A-Stick is a phrase referring to the connection of a 802.1Q capable switch to a single router interface. Bytrunking across the Ethernet interface and assigning separate Vlans to each of the switch's ports or groups of ports, itis possible to create a configuration that simulates a router with many separate physical Ethernet interfaces. Considerthe following example:
In this example, a router with a single Ethernet interface is trunked to a MikroTik switch. In practice, this sameconfiguration can be used between two switches or two routers. The purpose of this article is to show the stepsrequired to setup the MikroTik RB250GS switch as a trunked switch in the router-on-a-stick configuration.To log into the RB250GS switch, simply web browse to 192.168.88.1 from a computer on the same physicalnetwork segment with an IP on the same subnet, 192.168.88.0/24. The default user name is admin with no password.All settings may be left at the defaults with the exception of a few.In this example we are using Vlan Id's 1, 200, 300 and 400. Note that the switch will respond to http requests to its IPaddress on all ports. This behavior is a bit different than Cisco IOS that responds to untagged traffic via an IP boundto Vlan 1. The way the OS is built, there is no need for a default gateway or a subnet mask.NOTE: Once you set port 1 to "trunk" mode, you will not longer be able to communicate with the switch unless youcreate a Vlan1 on your router.Selection of the Vlan ID and the assignment to the ports is your choice, decide what Vlan ID's you will use andwhere you will assign them.
SwOS/Router-On-A-Stick 2
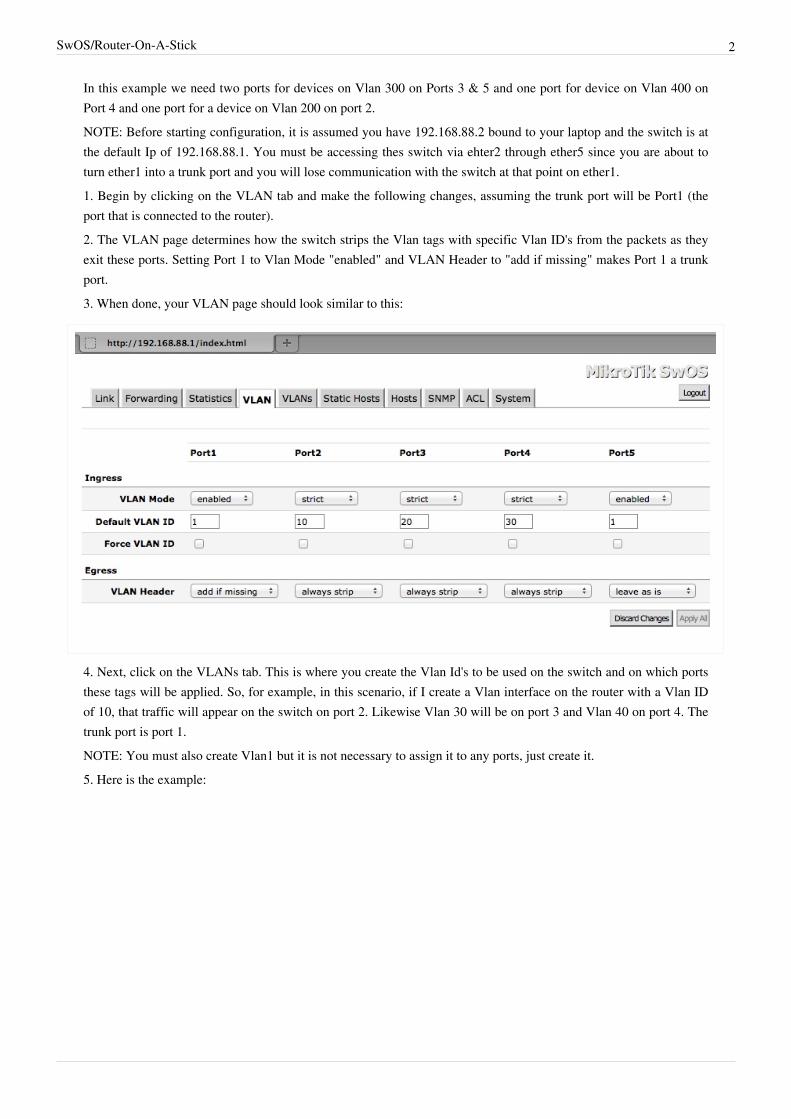
In this example we need two ports for devices on Vlan 300 on Ports 3 & 5 and one port for device on Vlan 400 onPort 4 and one port for a device on Vlan 200 on port 2.NOTE: Before starting configuration, it is assumed you have 192.168.88.2 bound to your laptop and the switch is atthe default Ip of 192.168.88.1. You must be accessing thes switch via ehter2 through ether5 since you are about toturn ether1 into a trunk port and you will lose communication with the switch at that point on ether1.1. Begin by clicking on the VLAN tab and make the following changes, assuming the trunk port will be Port1 (theport that is connected to the router).2. The VLAN page determines how the switch strips the Vlan tags with specific Vlan ID's from the packets as theyexit these ports. Setting Port 1 to Vlan Mode "enabled" and VLAN Header to "add if missing" makes Port 1 a trunkport.3. When done, your VLAN page should look similar to this:
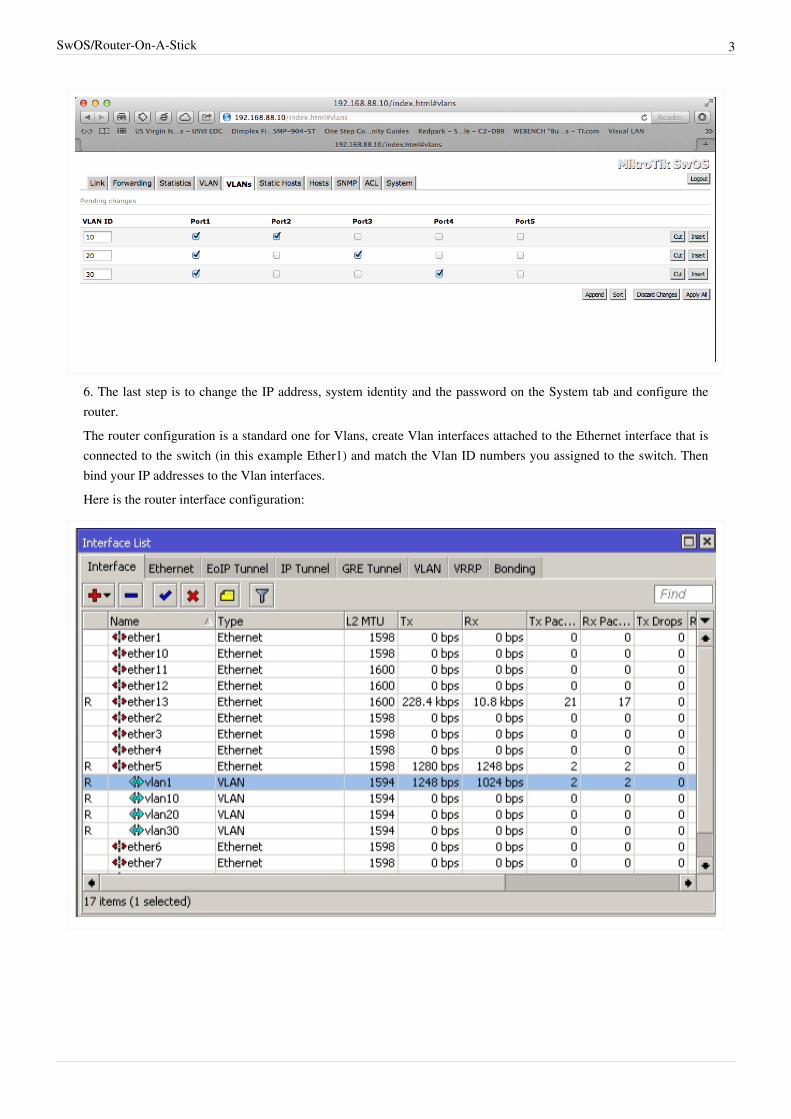
4. Next, click on the VLANs tab. This is where you create the Vlan Id's to be used on the switch and on which portsthese tags will be applied. So, for example, in this scenario, if I create a Vlan interface on the router with a Vlan IDof 10, that traffic will appear on the switch on port 2. Likewise Vlan 30 will be on port 3 and Vlan 40 on port 4. Thetrunk port is port 1.NOTE: You must also create Vlan1 but it is not necessary to assign it to any ports, just create it.5. Here is the example:
SwOS/Router-On-A-Stick 3
6. The last step is to change the IP address, system identity and the password on the System tab and configure therouter.The router configuration is a standard one for Vlans, create Vlan interfaces attached to the Ethernet interface that isconnected to the switch (in this example Ether1) and match the Vlan ID numbers you assigned to the switch. Thenbind your IP addresses to the Vlan interfaces.Here is the router interface configuration:
SwOS/Router-On-A-Stick 4
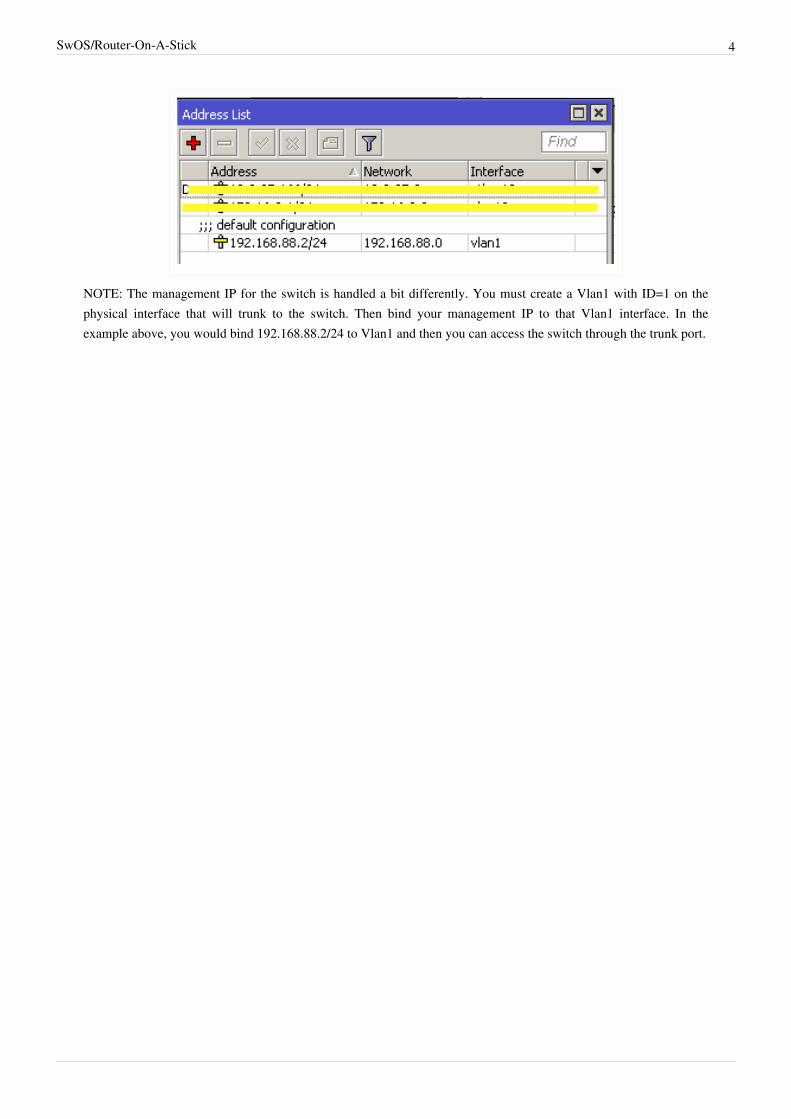
NOTE: The management IP for the switch is handled a bit differently. You must create a Vlan1 with ID=1 on thephysical interface that will trunk to the switch. Then bind your management IP to that Vlan1 interface. In theexample above, you would bind 192.168.88.2/24 to Vlan1 and then you can access the switch through the trunk port.

Article Sources and Contributors 5
Article Sources and ContributorsSwOS/Router-On-A-Stick Source: http://wiki.mikrotik.com/index.php?oldid=25093 Contributors: Sdischer
Image Sources, Licenses and ContributorsFile:RouterOnAStick.png Source: http://wiki.mikrotik.com/index.php?title=File:RouterOnAStick.png License: unknown Contributors: SdischerFile:VLAN.png Source: http://wiki.mikrotik.com/index.php?title=File:VLAN.png License: unknown Contributors: SdischerFile:VLANs.png Source: http://wiki.mikrotik.com/index.php?title=File:VLANs.png License: unknown Contributors: SdischerFile:2012-11-27 15-58-28.jpg Source: http://wiki.mikrotik.com/index.php?title=File:2012-11-27_15-58-28.jpg License: unknown Contributors: SdischerFile:IPAddresses.png Source: http://wiki.mikrotik.com/index.php?title=File:IPAddresses.png License: unknown Contributors: Sdischer


![Mikrotik Router OS - Basic TCP/IP [Part-2]](https://img.pdfslide.us/doc/110x75/5482722bb4af9fcc788b4589/mikrotik-router-os-basic-tcpip-part-2.jpg)