Embed Size (px)
Citation preview

HP OpenView Self-Healing Services
User’s Guide
Software Version: 2.50
for the following operating systems:HP-UX 11.x
Solaris 7, 8, 9Microsoft Windows 2000 SP-4, 2003 Server, XP Professional
Manufacturing Part Number : None
Document Release Date: August 2006
Software Release Date: August 2006
© Copyright 2003-2006 Hewlett-Packard Development Company, L.P.

Legal Notices Warranty.
The only warranties for HP products and services are set forth in the express warranty statements accompanying such products and services. Nothing herein should be construed as constituting an additional warranty. HP shall not be liable for technical or editorial errors or omissions contained herein.
The information contained herein is subject to change without notice.
Restricted Rights Legend.
Confidential computer software. Valid license from HP required for possession, use or copying. Consistent with FAR 12.211 and 12.212, Commercial Computer Software, Computer Software Documentation, and Technical Data for Commercial Items are licensed to the U.S. Government under vendor's standard commercial license.
Copyright Notices.
©Copyright 2003-2006 Hewlett-Packard Development Company, L.P.
No part of this document may be copied, reproduced, or translated to another language without the prior written consent of Hewlett-Packard. The information contained in this material is subject to change without notice.
Trademark Notices.
HP-UX Release 10.20 and later and HP-UX Release 11.00 and later (in both 32- and 64-bit configurations) on all HP 9000 computers are Open Group UNIX 95 branded products.
Microsoft®, Windows®, and Windows® XP are U.S. registered trademarks of Microsoft Corporation.
UNIX® is a registered trademark of the Open Group.
Itanium® is a registered trademark of Intel Corporation or its subsidiaries in the United States and other countries.
Java™ is a U.S. trademark of Sun Microsystems, Inc.
Adobe® and Acrobat® are trademarks of Adobe Systems Incorporated.
Additional Notices
This product includes software developed by the Apache Software Foundation (http://www.apache.org/).
2

Contents
1. Introduction to Self-Healing ServicesIn This Chapter . . . . . . . . . . . . . . . . . . . . . . . . . . . . . . . . . . . . . . . . . . . . . . . . . . . . . . . . . . . . . . . . . . . . . 16About Self-Healing Services . . . . . . . . . . . . . . . . . . . . . . . . . . . . . . . . . . . . . . . . . . . . . . . . . . . . . . . . . . . 17An Overview of Software Fault Management . . . . . . . . . . . . . . . . . . . . . . . . . . . . . . . . . . . . . . . . . . . . . 18What Is Self-Healing? . . . . . . . . . . . . . . . . . . . . . . . . . . . . . . . . . . . . . . . . . . . . . . . . . . . . . . . . . . . . . . . . 19
When is Self-Healing Useful?. . . . . . . . . . . . . . . . . . . . . . . . . . . . . . . . . . . . . . . . . . . . . . . . . . . . . . . . . 19How Does Self-Healing Services Help? . . . . . . . . . . . . . . . . . . . . . . . . . . . . . . . . . . . . . . . . . . . . . . . . . 20
What is HP OpenView Self-Healing Services? . . . . . . . . . . . . . . . . . . . . . . . . . . . . . . . . . . . . . . . . . . . . . 21Self-Healing Services Roles . . . . . . . . . . . . . . . . . . . . . . . . . . . . . . . . . . . . . . . . . . . . . . . . . . . . . . . . . . . . 23Self-Healing Process . . . . . . . . . . . . . . . . . . . . . . . . . . . . . . . . . . . . . . . . . . . . . . . . . . . . . . . . . . . . . . . . . 27
Data Collection . . . . . . . . . . . . . . . . . . . . . . . . . . . . . . . . . . . . . . . . . . . . . . . . . . . . . . . . . . . . . . . . . . . . 29Analysis . . . . . . . . . . . . . . . . . . . . . . . . . . . . . . . . . . . . . . . . . . . . . . . . . . . . . . . . . . . . . . . . . . . . . . . . . . 29Report Life Cycle. . . . . . . . . . . . . . . . . . . . . . . . . . . . . . . . . . . . . . . . . . . . . . . . . . . . . . . . . . . . . . . . . . . 29
2. The Self-Healing Services Client User InterfaceIn This Chapter . . . . . . . . . . . . . . . . . . . . . . . . . . . . . . . . . . . . . . . . . . . . . . . . . . . . . . . . . . . . . . . . . . . . . 32Overview. . . . . . . . . . . . . . . . . . . . . . . . . . . . . . . . . . . . . . . . . . . . . . . . . . . . . . . . . . . . . . . . . . . . . . . . . . . 33Start or Stop the Self-Healing Services Client. . . . . . . . . . . . . . . . . . . . . . . . . . . . . . . . . . . . . . . . . . . . . 34Start the Self-Healing Services User Interface . . . . . . . . . . . . . . . . . . . . . . . . . . . . . . . . . . . . . . . . . . . . 35Local Managed Client Page . . . . . . . . . . . . . . . . . . . . . . . . . . . . . . . . . . . . . . . . . . . . . . . . . . . . . . . . . . . . 36Configuration Center Page . . . . . . . . . . . . . . . . . . . . . . . . . . . . . . . . . . . . . . . . . . . . . . . . . . . . . . . . . . . . 41
3. Customizing Your Self-Healing EnvironmentIn This Chapter . . . . . . . . . . . . . . . . . . . . . . . . . . . . . . . . . . . . . . . . . . . . . . . . . . . . . . . . . . . . . . . . . . . . . 46Specifying Global Settings at the Configuration Center . . . . . . . . . . . . . . . . . . . . . . . . . . . . . . . . . . . . . 47
Change Your User Name or Password. . . . . . . . . . . . . . . . . . . . . . . . . . . . . . . . . . . . . . . . . . . . . . . . . . 47Customize the Default Rule Settings . . . . . . . . . . . . . . . . . . . . . . . . . . . . . . . . . . . . . . . . . . . . . . . . . . 50Configure the Notification Settings . . . . . . . . . . . . . . . . . . . . . . . . . . . . . . . . . . . . . . . . . . . . . . . . . . . . 52Configure the E-mail Server Settings . . . . . . . . . . . . . . . . . . . . . . . . . . . . . . . . . . . . . . . . . . . . . . . . . . 59Change Your Contact Information . . . . . . . . . . . . . . . . . . . . . . . . . . . . . . . . . . . . . . . . . . . . . . . . . . . . . 61Add, Edit, or Remove Managed Clients. . . . . . . . . . . . . . . . . . . . . . . . . . . . . . . . . . . . . . . . . . . . . . . . . 63Add, Edit, Remove, or Flush a Communication Gateway . . . . . . . . . . . . . . . . . . . . . . . . . . . . . . . . . . 67
Add a Gateway . . . . . . . . . . . . . . . . . . . . . . . . . . . . . . . . . . . . . . . . . . . . . . . . . . . . . . . . . . . . . . . . . . 69Change the Port Number for a Gateway . . . . . . . . . . . . . . . . . . . . . . . . . . . . . . . . . . . . . . . . . . . . . . 70Remove a Gateway . . . . . . . . . . . . . . . . . . . . . . . . . . . . . . . . . . . . . . . . . . . . . . . . . . . . . . . . . . . . . . . 71Flush a Gateway . . . . . . . . . . . . . . . . . . . . . . . . . . . . . . . . . . . . . . . . . . . . . . . . . . . . . . . . . . . . . . . . . 71
Customizing Settings for Each Managed Client . . . . . . . . . . . . . . . . . . . . . . . . . . . . . . . . . . . . . . . . . . . 72Customize the Specific Fault Rules . . . . . . . . . . . . . . . . . . . . . . . . . . . . . . . . . . . . . . . . . . . . . . . . . . . . 72Customize the Triggers . . . . . . . . . . . . . . . . . . . . . . . . . . . . . . . . . . . . . . . . . . . . . . . . . . . . . . . . . . . . . 76
Add or Modify a Trigger . . . . . . . . . . . . . . . . . . . . . . . . . . . . . . . . . . . . . . . . . . . . . . . . . . . . . . . . . . . 79Advanced Functions. . . . . . . . . . . . . . . . . . . . . . . . . . . . . . . . . . . . . . . . . . . . . . . . . . . . . . . . . . . . . . . . . . 81
Deactivate a Configuration Center . . . . . . . . . . . . . . . . . . . . . . . . . . . . . . . . . . . . . . . . . . . . . . . . . . . . 82Deactivate a Communication Gateway . . . . . . . . . . . . . . . . . . . . . . . . . . . . . . . . . . . . . . . . . . . . . . . . . 85View or Modify the Configuration Center Settings . . . . . . . . . . . . . . . . . . . . . . . . . . . . . . . . . . . . . . . 86
4. Managing Incidents
3

Contents
In This Chapter . . . . . . . . . . . . . . . . . . . . . . . . . . . . . . . . . . . . . . . . . . . . . . . . . . . . . . . . . . . . . . . . . . . . . 90View Incidents and Collected Data . . . . . . . . . . . . . . . . . . . . . . . . . . . . . . . . . . . . . . . . . . . . . . . . . . . . . . 91
View Data Collected for a Particular Incident . . . . . . . . . . . . . . . . . . . . . . . . . . . . . . . . . . . . . . . . . . . 95Establish Data Filter Settings . . . . . . . . . . . . . . . . . . . . . . . . . . . . . . . . . . . . . . . . . . . . . . . . . . . . . . . . 97
View an Incident Summary Report. . . . . . . . . . . . . . . . . . . . . . . . . . . . . . . . . . . . . . . . . . . . . . . . . . . . . 101About the Incident Summary Report. . . . . . . . . . . . . . . . . . . . . . . . . . . . . . . . . . . . . . . . . . . . . . . . . . 102
Submit Incidents on Hold . . . . . . . . . . . . . . . . . . . . . . . . . . . . . . . . . . . . . . . . . . . . . . . . . . . . . . . . . . . . 105Change Your Filter Settings . . . . . . . . . . . . . . . . . . . . . . . . . . . . . . . . . . . . . . . . . . . . . . . . . . . . . . . . . . 106Submit a System Assessment . . . . . . . . . . . . . . . . . . . . . . . . . . . . . . . . . . . . . . . . . . . . . . . . . . . . . . . . . 109Manually Submit an Incident . . . . . . . . . . . . . . . . . . . . . . . . . . . . . . . . . . . . . . . . . . . . . . . . . . . . . . . . . 111View or Modify Incident Deletion Settings. . . . . . . . . . . . . . . . . . . . . . . . . . . . . . . . . . . . . . . . . . . . . . . 114
5. Incident Analysis ReportsIn This Chapter . . . . . . . . . . . . . . . . . . . . . . . . . . . . . . . . . . . . . . . . . . . . . . . . . . . . . . . . . . . . . . . . . . . . 118Access the Self-Healing Services Support Web Site. . . . . . . . . . . . . . . . . . . . . . . . . . . . . . . . . . . . . . . . 119Use the Incident Manager . . . . . . . . . . . . . . . . . . . . . . . . . . . . . . . . . . . . . . . . . . . . . . . . . . . . . . . . . . . . 121Find an Incident Analysis Report . . . . . . . . . . . . . . . . . . . . . . . . . . . . . . . . . . . . . . . . . . . . . . . . . . . . . . 124The Incident Analysis Report . . . . . . . . . . . . . . . . . . . . . . . . . . . . . . . . . . . . . . . . . . . . . . . . . . . . . . . . . 129
Incident Summary . . . . . . . . . . . . . . . . . . . . . . . . . . . . . . . . . . . . . . . . . . . . . . . . . . . . . . . . . . . . . . . . 130Detailed Incident Analysis Report. . . . . . . . . . . . . . . . . . . . . . . . . . . . . . . . . . . . . . . . . . . . . . . . . . . . 132
Product Configuration Analysis . . . . . . . . . . . . . . . . . . . . . . . . . . . . . . . . . . . . . . . . . . . . . . . . . . . . 132Patch Analysis . . . . . . . . . . . . . . . . . . . . . . . . . . . . . . . . . . . . . . . . . . . . . . . . . . . . . . . . . . . . . . . . . . 134Document Analysis . . . . . . . . . . . . . . . . . . . . . . . . . . . . . . . . . . . . . . . . . . . . . . . . . . . . . . . . . . . . . . 138Discussion Forum Analysis. . . . . . . . . . . . . . . . . . . . . . . . . . . . . . . . . . . . . . . . . . . . . . . . . . . . . . . . 139
Case Management and Report Feedback Utilities . . . . . . . . . . . . . . . . . . . . . . . . . . . . . . . . . . . . . . . 139Open a Support Case . . . . . . . . . . . . . . . . . . . . . . . . . . . . . . . . . . . . . . . . . . . . . . . . . . . . . . . . . . . . . . . . 140Submit Feedback to HP . . . . . . . . . . . . . . . . . . . . . . . . . . . . . . . . . . . . . . . . . . . . . . . . . . . . . . . . . . . . . . 146Change the System Handle/SAID Associated with an Incident . . . . . . . . . . . . . . . . . . . . . . . . . . . . . . 151View Your Support Contract Information. . . . . . . . . . . . . . . . . . . . . . . . . . . . . . . . . . . . . . . . . . . . . . . . 154Metric Reports . . . . . . . . . . . . . . . . . . . . . . . . . . . . . . . . . . . . . . . . . . . . . . . . . . . . . . . . . . . . . . . . . . . . . 159
View your metric reports . . . . . . . . . . . . . . . . . . . . . . . . . . . . . . . . . . . . . . . . . . . . . . . . . . . . . . . . . . . 160Create a metric report . . . . . . . . . . . . . . . . . . . . . . . . . . . . . . . . . . . . . . . . . . . . . . . . . . . . . . . . . . . . . 161Copy a metric report . . . . . . . . . . . . . . . . . . . . . . . . . . . . . . . . . . . . . . . . . . . . . . . . . . . . . . . . . . . . . . . 161Delete a Metric Report . . . . . . . . . . . . . . . . . . . . . . . . . . . . . . . . . . . . . . . . . . . . . . . . . . . . . . . . . . . . . 162
Download Client Software . . . . . . . . . . . . . . . . . . . . . . . . . . . . . . . . . . . . . . . . . . . . . . . . . . . . . . . . . . . . 163Your Self-Healing Services Sign-In Information . . . . . . . . . . . . . . . . . . . . . . . . . . . . . . . . . . . . . . . . . . 165About HP Passport. . . . . . . . . . . . . . . . . . . . . . . . . . . . . . . . . . . . . . . . . . . . . . . . . . . . . . . . . . . . . . . . . . 166
6. Understanding Service NotificationsIn This Chapter . . . . . . . . . . . . . . . . . . . . . . . . . . . . . . . . . . . . . . . . . . . . . . . . . . . . . . . . . . . . . . . . . . . . 172Welcome to Self-Healing Services Notification. . . . . . . . . . . . . . . . . . . . . . . . . . . . . . . . . . . . . . . . . . . . 173Entitlement Action Required Notification . . . . . . . . . . . . . . . . . . . . . . . . . . . . . . . . . . . . . . . . . . . . . . . 174Report Available Notification . . . . . . . . . . . . . . . . . . . . . . . . . . . . . . . . . . . . . . . . . . . . . . . . . . . . . . . . . 178Additional Data Requested Notification. . . . . . . . . . . . . . . . . . . . . . . . . . . . . . . . . . . . . . . . . . . . . . . . . 179Additional Data Received Notification . . . . . . . . . . . . . . . . . . . . . . . . . . . . . . . . . . . . . . . . . . . . . . . . . . 180Metric Report Available Notification . . . . . . . . . . . . . . . . . . . . . . . . . . . . . . . . . . . . . . . . . . . . . . . . . . . 181
4

Contents
7. Troubleshooting InformationUnderstanding Potential Problem Locations . . . . . . . . . . . . . . . . . . . . . . . . . . . . . . . . . . . . . . . . . . . . . 184
Self-Healing Services Process . . . . . . . . . . . . . . . . . . . . . . . . . . . . . . . . . . . . . . . . . . . . . . . . . . . . . . . 184Diagnosing a Problem Using E-Mail Messages . . . . . . . . . . . . . . . . . . . . . . . . . . . . . . . . . . . . . . . . . . . 186Diagnosing a Problem Using Error Messages . . . . . . . . . . . . . . . . . . . . . . . . . . . . . . . . . . . . . . . . . . . . 188Diagnosing a Problem Using Other Indicators . . . . . . . . . . . . . . . . . . . . . . . . . . . . . . . . . . . . . . . . . . . 192Collecting Information for HP Support. . . . . . . . . . . . . . . . . . . . . . . . . . . . . . . . . . . . . . . . . . . . . . . . . . 196
A. ScriptsAvailable Scripts . . . . . . . . . . . . . . . . . . . . . . . . . . . . . . . . . . . . . . . . . . . . . . . . . . . . . . . . . . . . . . . . . . . 198
B. Log FilesAvailable Log Files. . . . . . . . . . . . . . . . . . . . . . . . . . . . . . . . . . . . . . . . . . . . . . . . . . . . . . . . . . . . . . . . . . 202
C. Supported ApplicationsSupported Applications . . . . . . . . . . . . . . . . . . . . . . . . . . . . . . . . . . . . . . . . . . . . . . . . . . . . . . . . . . . . . . 206
D. Data CollectedData Collected by Self-Healing Services. . . . . . . . . . . . . . . . . . . . . . . . . . . . . . . . . . . . . . . . . . . . . . . . . 210
System Information Collected . . . . . . . . . . . . . . . . . . . . . . . . . . . . . . . . . . . . . . . . . . . . . . . . . . . . . . . 210
5

Contents
6
SupportYou can visit the HP OpenView support web site at:
http://www.hp.com/managementsoftware/support
This web site provides contact information and details about the products, services, and support that HP OpenView offers.
HP OpenView online software support provides customer self-solve capabilities. It provides a fast and efficient way to access interactive technical support tools needed to manage your business. As a valued support customer, you can benefit by using the support site to:
• Search for knowledge documents of interest• Submit enhancement requests online• Download software patches• Submit and track progress on support cases• Manage a support contract• Look up HP support contacts• Review information about available services• Enter discussions with other software customers • Research and register for software training
Most of the support areas require that you register as an HP Passport user and log in. Many also require a support contract.
To find more information about access levels, go to:
http://www.hp.com/managementsoftware/access_level
To register for an HP Passport ID, go to:
http://www.managementsoftware.hp.com/passport-registration.html
7

8

In This GuideThis guide describes HP OpenView Self-Healing Services. It includes an overview of the architecture and operation of Self-Healing Services, as well as detailed instructions for customizing and using this product in your environment.
Audience The audience for this guide is IT administrators. To understand and use the information in this guide, the reader must have the following background:
• Understands and has a working knowledge of UNIX® commands
• Understands and has a solid working knowledge of Windows® operating systems
• Understands networking concepts and language
• Understands the function and operation of one or more of the HP OpenView applications supported by Self-Healing Services.
• Understands the HP OpenView support process and has an HP support contract system handle or service agreement identifier (SAID)
• Is familiar with HP Instant Support Enterprise Edition (ISEE)
• Understands network security issues
9

10

ConventionsThe following typographical conventions are used in this guide.
Font What the Font Represents Example
Italic Book or manual titles, and manpage names
See the HP OpenView Self-Healing Services Installation guide for more information.
Provides emphasis You must follow these steps.
Specifies a variable that you must supply when entering a command
Run the command:
swinstall <fileName>
Parameters to a method
The assigned_criteria parameter returns an ACSE response.
Bold New terms The distinguishing attribute of this class...
Computer Text and items on the computer screen
The system replies: Press Enter
Command names Use the grep command ...
Method names The get_all_replies() method does the following...
File and directory names
Edit file /opt/hp/config/datamon.xml
Process names Check to see if cron is running.
Window/dialog box names
In the Test and Track dialog...
XML tag references Use the <DBTable> tag to...
Computer Bold
Text that you must type
At the prompt, type: ls -l
Keycap Keyboard keys Press Return.
Button Buttons on the user interface.
Click Delete.
Menu Items
A menu name followed by an arrow (→) means that you select the menu and then the item.
Select Locate→Objects→by Comment
11
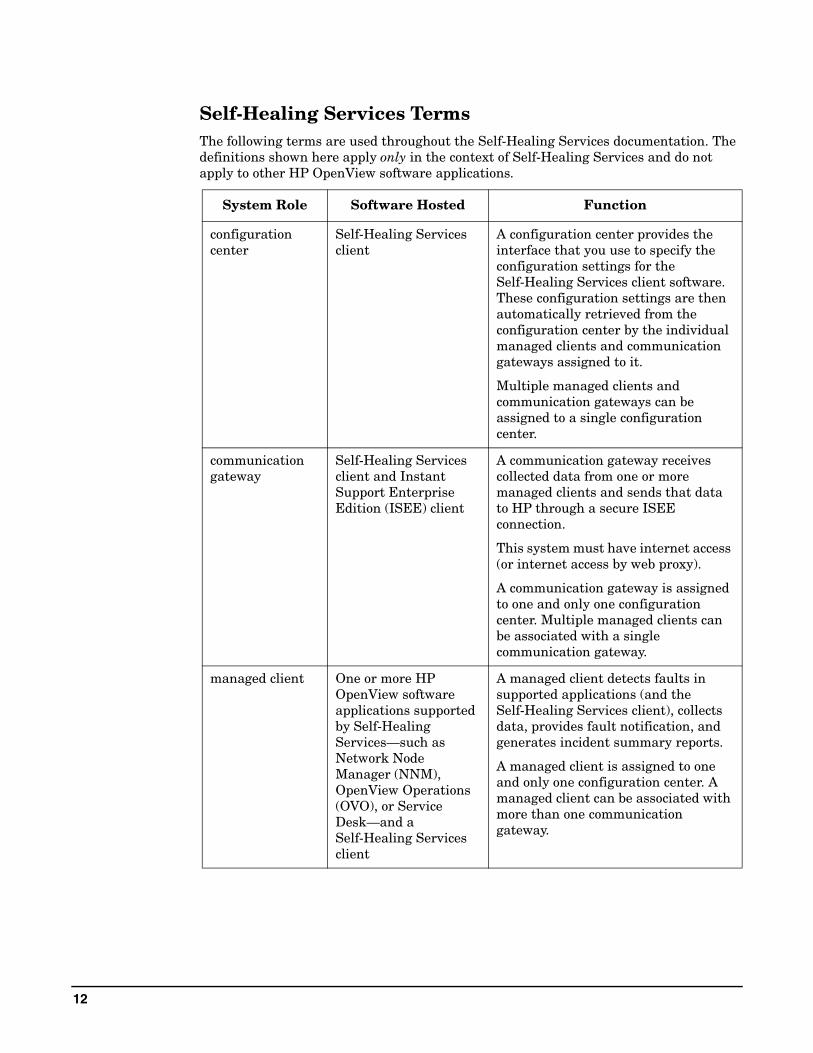
Self-Healing Services TermsThe following terms are used throughout the Self-Healing Services documentation. The definitions shown here apply only in the context of Self-Healing Services and do not apply to other HP OpenView software applications.
System Role Software Hosted Function
configuration center
Self-Healing Services client
A configuration center provides the interface that you use to specify the configuration settings for the Self-Healing Services client software. These configuration settings are then automatically retrieved from the configuration center by the individual managed clients and communication gateways assigned to it.
Multiple managed clients and communication gateways can be assigned to a single configuration center.
communication gateway
Self-Healing Services client and Instant Support Enterprise Edition (ISEE) client
A communication gateway receives collected data from one or more managed clients and sends that data to HP through a secure ISEE connection.
This system must have internet access (or internet access by web proxy).
A communication gateway is assigned to one and only one configuration center. Multiple managed clients can be associated with a single communication gateway.
managed client One or more HP OpenView software applications supported by Self-Healing Services—such as Network Node Manager (NNM), OpenView Operations (OVO), or Service Desk—and a Self-Healing Services client
A managed client detects faults in supported applications (and the Self-Healing Services client), collects data, provides fault notification, and generates incident summary reports.
A managed client is assigned to one and only one configuration center. A managed client can be associated with more than one communication gateway.
12

NOTE Individual systems can play multiple roles in the Self-Healing Services environment. Because communication gateways and configuration centers host the Self-Healing Services client, for example, they also serve as managed clients. If a configuration center hosts the ISEE client, it can also serve as a communication gateway. A single system can, in fact, play all three roles.
Installation Directories
Variable Used Description and Default Locations
<installDir> Application directory chosen during installation.
Windows default: C:\Program Files\HP OpenView
UNIX default: /opt/OV
<dataDir> Data directory chosen during installation
Windows default: C:\Program Files\HP OpenView\data
UNIX default: /var/opt/OV
13

14

1 Introduction to Self-Healing Services
This chapter presents an overview of HP OpenView Self-Healing Services. It begins with an introduction to software fault management and concludes with a description of the capabilities, structure, and operation of Self-Healing Services.
Chapter 1 15

Introduction to Self-Healing ServicesIn This Chapter
In This ChapterThis chapter provides an introduction to HP OpenView Self-Healing Services. It contains the following topics:
• “About Self-Healing Services” on page 17
• “An Overview of Software Fault Management” on page 18
• “What Is Self-Healing?” on page 19
• “What is HP OpenView Self-Healing Services?” on page 21
• “Self-Healing Services Roles” on page 23
• “Self-Healing Process” on page 27
Chapter 116

Introduction to Self-Healing ServicesAbout Self-Healing Services
About Self-Healing ServicesHP OpenView Self-Healing Services provides the following functions for HP OpenView applications that offer full Self-Healing Services support:
• Rapid, automated management software fault detection
• Data collection at the time fault occurs
• Automated problem analysis and recommendations
• Automated patch analysis
• Efficient support case initiation
Self-Healing Services also allows you to manually submit a software fault to HP for applications that offer either full or basic Self-Healing Services support. In this case, Self-Healing Services provides automated problem analysis and recommendations, automated patch analysis, and efficient support case initiation as well.
See the Self-Healing Services web site for a list of applications that offer full or basic Self-Healing Services support:
http://support.openview.hp.com/self_healing.jsp
You must properly install and configure the Self-Healing Services client on your management server or agent according to the instructions provided in the HP OpenView Self-Healing Services Installation Guide before you can customize or use Self-Healing Services.
IMPORTANT Do not install Self-Healing Services on a remote console. It is only supported on management servers and agents.
NOTE A web browser must be installed on any machine from which you will access your Self-Healing Services client. The minimum requirements are Microsoft® Internet Explorer 6.0 (or later) or Netscape 7.0 (or later).
The web browser does not need to be installed on all systems that host the Self-Healing Services client. It can be installed anywhere there is connectivity to the Self-Healing Services managed environment.
Windows 2000 systems MUST have Internet Explorer 6.0 (or later) installed.
Chapter 1 17

Introduction to Self-Healing ServicesAn Overview of Software Fault Management
An Overview of Software Fault ManagementThe life cycle of a software fault often generates lively debate about how the break/fix process should be handled. How it is handled today often reflects the technological history of a given organization. Some organizations have a rich collection of tools to capture, analyze, and fix problems that occur in the production environment. Others simply keep track of the fact that a problem occurred and restart the production system in question, hoping that the problem will not recur. More sophisticated organizations have implemented a software management framework, such as HP OpenView Operations (OVO) and Network Node Manager (NNM), to mechanically watch the infrastructure, services, and applications that make up the modern data center.
Management Framework
The correct and consistent operation of products such as OVO and NNM has, in fact, become critical to ensuring IT success for many organizations. Such management frameworks have become so ingrained in the operating model that a framework failure constitutes a critical service failure. These kinds of failures are extremely difficult to capture and analyze, and pinpointing the root causes can be frustrating and expensive. It has therefore become necessary to manage the management software.
Fault Detection & Problem Analysis
In the traditional model, software faults are detected by people. Those people then contact the software manufacturer, describing the fault and the series of events that led up to the fault. The support engineer then asks the customer to collect a significant number of artifacts (files, messages, etc.). Next, the support engineer searches a database of known problems and issues in an effort to determine if the issue is known and whether a solution exists for that issue. If the issue is known, the results are given back to the customer, often with a directive to “try this and let me know if it works.”
The process of investigating a software fault consists of three distinct phases: data collection, problem analysis, and reporting. In the traditional model, this process is inherently iterative. The data collection and analysis phases, for example, are often repeated until the problem can be reproduced and adequately characterized by the support engineer. The process is often protracted, as delay is introduced each time information is exchanged between the customer and the support engineer. The process can also be error-prone, as it relies on data that is collected manually.
Automating the Process
Self-healing is the next step in the evolutionary cycle of management. In the self-healing model, software faults are detected by both independent monitors and self-management modules in the management software itself. The detection of a fault causes the traditional fault life cycle to be initiated, but with a twist. In the self-healing model, the process of fault detection, data collection, problem analysis, and reporting is not conducted by people; it is conducted by computers.
Chapter 118

Introduction to Self-Healing ServicesWhat Is Self-Healing?
What Is Self-Healing?Self-healing is a process by which software and services can recognize when a failure occurs and automatically take immediate action to begin diagnosing the underlying problem. Self-healing reduces the time it takes to resolve break/fix technical issues associated with management software and proactively reduces unscheduled downtime.
When is Self-Healing Useful?
One of the most challenging aspects of network administration is troubleshooting problems with complex software applications. This often requires a call to the software provider’s response center. A typical problem resolution interaction with the response center is shown in Figure 1-1.
Figure 1-1 Traditional Problem Resolution Process
This process can be inherently time-consuming and frustrating for the network administrator, as well as the support engineer, for numerous reasons:
1.Data collection does not usually begin in earnest until the support call is made.
2.Multiple data collection iterations are often required before a solution can be successfully determined.
3.The wrong data is often gathered only to be discarded later.
4.Data is no longer valid because too much time has elapsed since the failure.
5.If an escalation is required, more delay is introduced, and one or more additional data collection iterations is almost always also required.
To avoid this potential frustration, most network administrators attempt to self-solve problems before contacting the response center. To do this, they often search available knowledge bases manually for clues to the problem’s root cause and its solution.
The success of this manual process, however, relies on their ability to provide the correct keywords, in the correct combination, to the knowledge base search engine. Depending on an administrator’s experience with a particular application, this can be an inefficient and sometimes fruitless process.
Chapter 1 19

Introduction to Self-Healing ServicesWhat Is Self-Healing?
How Does Self-Healing Services Help?
Self-Healing Services liberates you from the frustration of the typical break/fix problem resolution process. By automating the fault detection and investigation process, Self-Healing Services increases the effectiveness and efficiency of the fault resolution process with no cost to you. These services reduce the time required to resolve technical issues associated with HP management software and work proactively to minimize unscheduled downtime.
Self-Healing Services saves you time by freeing you from having to:
• Manually search through the HP Support Knowledge Base and IT Resource Center forum messages to obtain the information you need to self-solve a problem.
• Manually collect troubleshooting data and system information and submit it by e-mail to HP support so they can troubleshoot a problem.
• Reproduce a management software fault to collect troubleshooting data.
Self-Healing Services increases your efficiency when self-solving a problem by providing you with:
• Rapid, automated detection of management software faults.
• Automated data collection of system information and data for troubleshooting at the time a fault occurs, reducing the potential for collecting inaccurate data.
• Automated transport of collected data to HP for analysis and entry into the HP Response Center database through a secure network connection called HP Instant Support Enterprise Edition (ISEE).
• Automated recording of fault metrics.
• A custom Incident Analysis Report published on a private and secure HP OpenView Self-Healing Services Support web page for each fault submitted to HP (see “The Incident Analysis Report” on page 129).
Self-Healing Services increases your efficiency when solving a problem with the assistance of an HP support engineer by:
• Providing a support case submission link located at the end of each incident analysis report that electronically opens a support case when you click it.
• Providing your HP support engineer with the collected data and system information for the software fault before the support case is opened.
• Allowing you to submit additional data needed by your HP support engineer through an ISEE connection using the Self-Healing Services user interface.
Chapter 120

Introduction to Self-Healing ServicesWhat is HP OpenView Self-Healing Services?
What is HP OpenView Self-Healing Services?HP OpenView Self-Healing Services is a service that significantly decreases the time and effort involved in fixing management software faults within the HP OpenView product suite by automating fault detection and much of the troubleshooting process. In effect, Self-Healing Services allows HP to manage its own management software. This leading-edge technology makes it possible for system administrators to spend less time maintaining their OpenView software and more time managing their business.
Self-Healing Services carries out four primary steps: fault detection, data collection, incident analysis, and reporting. It performs these steps automatically without intervention on your part. In most cases, your first contact with Self-Healing Services happens when you receive a notification e-mail message informing you that a problem has been detected, and an Incident Analysis Report is ready for your review. You can also trigger the Self-Healing Services process manually using the Self-Healing Services user interface.
Figure 1-2 HP OpenView Self-Healing Services
You can customize Self-Healing Services to meet the needs of your environment. You can specify which faults are submitted to HP and how often they are submitted. You can also specify how you prefer to receive fault and service notifications. To protect your security and privacy, you can instruct Self-Healing Services to remove specific data items from your incident packages before they are submitted to HP.
Chapter 1 21

Introduction to Self-Healing ServicesWhat is HP OpenView Self-Healing Services?
Self-Healing Services provides you with two types of audit output: an incident summary and individual incident reports. An incident summary enables you to quickly determine which of your Self-Healing Services nodes have submitted faults to HP or have faults on hold. Incident reports enable you to quickly determine where faults are occurring, what types of faults are occurring, and the self-healing status of each fault (received, failed, hold, ignored, submitted, or suppressed).
Self-Healing Services also provides you with an incident viewer that allows you to view the data that has been collected for each individual fault.
Chapter 122

Introduction to Self-Healing ServicesSelf-Healing Services Roles
Self-Healing Services RolesA Self-Healing Services managed environment includes three roles:
• One or more managed clients
• One, and only one, configuration center
• Zero or more communication gateways
Each role maps to a specific function in the environment, as shown in Figure 1-6.
A managed client detects faults in supported applications (and the Self-Healing Services client), collects data, provides fault notification, and generates incident summary reports. A managed client can only be associated with one configuration center at any given time. A managed client can, however, be associated with more than one communication gateway.
A configuration center provides the interface that you use to specify the configuration settings for the Self-Healing Services client software. These configuration settings are then automatically retrieved from the configuration center by the individual managed clients and communication gateways assigned to that configuration center. Multiple managed clients and communication gateways can be assigned to one configuration center.
A communication gateway receives data collected from one or more managed clients and sends that data to HP through a secure ISEE connection. The system hosting the communication gateway must have Internet access, either directly or by web proxy. Multiple managed clients can be associated with a single communication gateway. A communication gateway can only be assigned to one configuration center at any given time. Multiple communication gateways, however, can be assigned to a single configuration center. This is recommended for fail-over purposes. A Self-Healing Services managed environment can have multiple communication gateways. It can also have no communication gateway—in this offline mode, however, incidents cannot be submitted to HP for analysis.
The following table summarize the types of relationships that the roles have to each other in the Self-Healing Services managed environment.
Table 1-1 Self-Healing Services Roles and Relationships
Configuration Center
Communication Gateways
Managed Clients
A Self-Healing Services managed environment includes...
One Zero or more One or more
A configuration center connects to...
Zero or more One or more
A communication gateway connects to...
One One or more
A managed client connects to...
One Zero or more
Chapter 1 23

Introduction to Self-Healing ServicesSelf-Healing Services Roles
Figure 1-3 Example of a Self-Healing Services Managed Environment
A Self-Healing Services managed environment consists of a single configuration center with at least one managed client assigned to it. It may or may not have a communication gateway. A managed client or communication gateway can only be assigned to one configuration center.
NOTE You can have more than one configuration center. In this case, you would have multiple Self-Healing Services managed environments. Each individual managed client and communication gateway, however, can only be assigned to one configuration center. In other words, a managed client or communication gateway can only belong to one Self-Healing Services managed environment at a time.
Figure 1-6 is an example of a valid Self-Healing Services managed environment with one configuration center, two communication gateways, and two managed clients. This environment is operating in fully connected mode. It can detect faults, collect data, notify you by e-mail when a fault occurs, and submit incidents to HP for analysis. Managed clients download configuration information from the configuration center at specific intervals and whenever they are restarted.
Figure 1-4 is an example of a valid Self-Healing Services managed environment without a communication gateway. This environment is operating in offline mode. It can detect faults, collect data, and notify you by e-mail when a fault occurs, but it cannot submit incidents to HP for analysis. Managed clients download configuration information from the configuration center at specific intervals and whenever they are restarted.
Figure 0-3 is an example of three Self-Healing Services managed clients that are not connected to either a configuration center or a communication gateway. These managed clients are operating in silent mode. They can detect faults, collect data, and notify you by e-mail when a fault occurs, but they cannot submit incidents to HP for analysis.
Chapter 124

Introduction to Self-Healing ServicesSelf-Healing Services Roles
Managed clients operating in silent mode cannot retrieve configuration information from a configuration center. If you want to receive fault notifications from clients that are operating in silent mode, you must configure the e-mail server settings for those clients.
Figure 1-4 Offline Mode
Figure 1-5 Silent Mode
Individual systems within the Self-Healing Services managed environment often play multiple roles. Because the Self-Healing Services client software is installed on them, for example, communication gateways and configuration centers also act as managed clients. Communication gateways and configuration centers perform their specific functions as well as the functions of a managed client.
When you configure the Self-Healing Services client software on a particular computer, you specify whether you want that computer to act as a configuration center, communication gateway, managed client, or some combination thereof. The following combinations are possible:
• Configuration center, communication gateway, and managed client
• Configuration center and managed client
• Communication gateway and managed client
• Managed client only
For a system to be used as a communication gateway, it must host the Instant Support Enterprise Edition (ISEE) client and have Internet access (or Internet access by web proxy).
In the simplest Self-Healing Services configuration, a single system acts as a configuration center, a communication gateway, and a managed client. This configuration is called a single-system or standard configuration.
Chapter 1 25

Introduction to Self-Healing ServicesSelf-Healing Services Roles
IMPORTANT A Self-Healing Services managed client must be installed on a machine that serves as either a management server (in NNM or Service Desk, for example) or an agent (in OVO, for example) in order to detect faults. The Self-Healing Services client will not detect faults if it is installed on a remote console.
For a list of applications currently supported by Self-Healing Services, refer to the following web page:
http://support.openview.hp.com/self_healing_downloads.jsp
Chapter 126

Introduction to Self-Healing ServicesSelf-Healing Process
Self-Healing ProcessA managed client monitors supported software applications installed on it. When a managed client detects a fault, it consults its rule configuration settings to determine if it should ignore, suppress, hold, or submit the fault for analysis (see Table 3-2 on page 72 for descriptions of these rules). If the rule configuration settings say to hold or submit the fault, the managed client immediately collects data and system information (see “Data Collection” on page 29 for details), and creates an incident package. If the rule configurations say to submit the fault, the managed client consults its filter policy settings to determine whether data should be removed from the incident package before it is submitted to HP; it then removes the specified data and sends the incident package to an available communication gateway.
The communication gateway receives the incident package and sends it to HP for analysis through a secure connection called ISEE—a multi-level, layered security structure that uses encryption, authentication, industry-standard security protocols, and best practices integrated at the physical, network, application, and operational levels to protect your systems and data. Transactions from your enterprise network to HP are restricted and tightly controlled through this single secure access point.
NOTE For additional information about ISEE, see the following web site:
http://www.hp.com/hps/hardware/hw_enterprise.html
When the incident package arrives at HP, the following five things happen:
1. The Self-Healing Services entitlement system determines whether the system handle/service agreement identifier (SAID) submitted with the incident package is valid.
2. If the system handle/SAID is invalid, Self-Healing Services sends you a service notification by e-mail with instructions about how to correct the entitlement issue. This notification includes a link to an HP OpenView Self-Healing Services Support web page where you can re-enter your system handle or investigate the status of your support agreement with HP (see “Entitlement Action Required Notification” on page 174).
3. If the system handle/SAID is valid, Self-Healing Services copies the incident package to an HP Response Center server for support engineer access. If you choose to open a support case, your HP support engineer will be able to immediately access this copy of the incident package.
4. Self-Healing Services analyzes the incident package (see “Analysis” on page 29) and generates a comprehensive incident analysis report. It then stores your incident analysis report on a private and protected web page on the HP OpenView Self-Healing Services Support web site.
5. Self-Healing Services sends you a service notification by e-mail containing a link that you can use to access the report (see “Report Available Notification” on page 178).
Chapter 1 27

Introduction to Self-Healing ServicesSelf-Healing Process
Figure 1-6 Self-Healing Services Conceptual Architecture
Chapter 128

Introduction to Self-Healing ServicesSelf-Healing Process
Data Collection
Data is collected for all faults that are not suppressed or ignored. The type and amount of data is controlled by the context of the fault and the specific application that experiences the problem. Whenever a fault is detected by the software, it passes information known as “context” to the Self-Healing Services client. This context information allows the data collector to target specific data relative to the fault. This also prevents the collection of large amounts of irrelevant data, as it focuses the collection on the problem being handled.
All collections include the base operating environment information: operating system, version numbers, and so forth. They also include a list of the applications and application patches installed on the machine. This allows for detection of missing patches, conflicting patches, and conflicting applications. Targeted collections are performed for faults on software applications with full Self-Healing Services support and include key data specific to the application. For additional information about what information is collected, see Appendix D, “Data Collected,” on page 209.
Analysis
Once your system handle or service agreement identifier (SAID) is validated, the analysis engine checks your application software patch level and determines what software patches (if any) are required to bring your system up-to-date. The analysis engine also searches the HP knowledge base and IT Resource Center (ITRC) Forums for troubleshooting and solution documents that match the problem.
If the software fault occurred on an HP OpenView Operations (OVO) management server or agent, the analysis engine performs a product configuration analysis and determines if the parameter configuration values meet the minimum required values.
Report Life Cycle
Self-Healing Services incorporates an incident analysis report life cycle process that enables you to manage your list of incident analysis reports. You can delete an incident analysis report by “closing” the incident associated with the report (see Figure 5-6 on page 130). If the closed incident is not re-opened within 90 days, the incident analysis report associated with the incident is deleted and can no longer be viewed.
Incidents associated with incident analysis reports that you have not accessed for 30 days will also be demoted to the “closed” state automatically. However, you can always access the incident analysis reports associated with closed incidents and re-open them if the need arises. If a closed incident is not re-opened within 90 days, its associated incident analysis report is deleted and can no longer be viewed.
Chapter 1 29

Introduction to Self-Healing ServicesSelf-Healing Process
Chapter 130

2 The Self-Healing Services Client User Interface
This chapter describes the Self-Healing Services client user interface and how to access it from a web browser.
Chapter 2 31

The Self-Healing Services Client User InterfaceIn This Chapter
In This ChapterThis chapter contains the following topics:
• “Overview” on page 33
• “Start or Stop the Self-Healing Services Client” on page 34
• “Start the Self-Healing Services User Interface” on page 35
• “Local Managed Client Page” on page 36
• “Configuration Center Page” on page 41
Chapter 232

The Self-Healing Services Client User InterfaceOverview
OverviewThe Self-Healing Services client includes a graphical user interface (UI) that allows you to customize its functions, view incident summary reports, and examine individual incident packages. The UI is implemented as a set of web pages and is accessible to you through your web browser. You can access the UI from any system that can successfully ping the system hosting the Self-Healing Services managed client.
The Self-Healing Services client UI has two main portal pages:
• The Local Managed Client page (provides the managed client view)
• The Configuration Center page (provides the configuration center view)
If you access a managed client or communication gateway using the UI, only the Local Managed Client page is visible. If you access a configuration center, both portal pages are visible.
You perform most of your Self-Healing Services customization by accessing the configuration center using the Self-Healing Services client UI and specifying the global configuration settings there. These configuration settings are then automatically retrieved from the configuration center by the communication gateways and managed clients assigned to it.
The two exceptions are specific fault rule configuration and filter settings. Fault rule configuration and filter settings are specific to each managed client. You can customize these settings by accessing the UI functions available from the Local Managed Client page.
Related Topics
“Start or Stop the Self-Healing Services Client” on page 34“Start the Self-Healing Services User Interface” on page 35“Local Managed Client Page” on page 36“Configuration Center Page” on page 41
Chapter 2 33

The Self-Healing Services Client User InterfaceStart or Stop the Self-Healing Services Client
Start or Stop the Self-Healing Services ClientYou can start or stop the Self-Healing Services client at any time as follows:
• To start Self-Healing Services, type this command:
ovc -start ovtomcatA
• To stop Self-Healing Services, type this command:
ovc -stop ovtomcatA
• To stop and restart Self-Healing Services, type this command:
ovc -restart ovtomcatA
• To determine whether Self-Healing Services is running, type this command:
ovc -status
If the ovtomcatA service is running, the Self-Healing Services client is also running.
NOTE To view the list of possible options for the ovc command, type ovc -h.
Chapter 234

The Self-Healing Services Client User InterfaceStart the Self-Healing Services User Interface
Start the Self-Healing Services User InterfaceIn the Address box of your web browser, type the following URL:
https://<hostName>:<portNumber>/SAM
where <hostName> is the host name of the system where this Self-Healing Services client resides, and <portNumber> is the port number that the client uses for https communication. The default port number is 8443.
NOTE The web browser does not need to be on the Self-Healing Services system that you are accessing. It can be installed anywhere there is connectivity to the Self-Healing Services managed environment.
Figure 2-1 Sign-In Page
Type admin for both your initial user name and password. Then, click Sign-In. The Local Managed Client page opens, as shown in Figure 2-2 on page 36.
NOTE Your initial user name and password are established when you install the Self-Healing Services client. You can change your user name and password after you set up your configuration center.
IMPORTANT The default time-out setting for the Self-Healing Services client UI is 10 minutes. If you are signed in to the UI, and the UI is idle for more than 10 minutes, your user session times out and you must sign in again.
Always click the Sign-out link to sign out of the Self-Healing Services client UI before you close the web browser window. If you do not, you will have to wait 10 minutes for the existing session to time out before you can sign in again.
After you set up the configuration center, you can change the idle time-out setting on the User Name and Password page.
Chapter 2 35

The Self-Healing Services Client User InterfaceLocal Managed Client Page
Local Managed Client PageThe Local Managed Client page contains links to the functions that apply to a particular managed client. This page is available when you access a managed client using the Self-Healing Services client user interface (see “Start the Self-Healing Services User Interface” on page 35).
Figure 2-2 Managed Client View
Information
LeftNavigationMenu
Setup
Main Portal Area
Chapter 236

The Self-Healing Services Client User InterfaceLocal Managed Client Page
The Local Managed Client page includes 3 primary parts:
• The main portal area
• The left navigation menu
• The setup information
TIP Click the buttons in the Self-Healing Services UI to display further instructions.
Click the Help link in the left navigation menu to display online help.
Main Portal Area
The main portal is the portion of the Local Managed Client page that lies to the right of the left navigation menu and below the setup information. The main portal contains links to and brief descriptions of each of the functions you can perform when you access a managed client.
In Table 2-1, links to pages that are read-only are marked with an asterisk (*). The information displayed on these pages is specified and maintained on the configuration center associated with this managed client. These settings apply to all managed clients associated with this configuration center.
Table 2-1 Local Managed Client Functions
Link Purpose
Contact information* The information on this page includes the primary e-mail address where fault and service notifications are sent. It also includes your system handle or support agreement identifier (SAID), which must be validated before your incidents can be analyzed.
User name & password* The information on this page includes the user name that you use to sign in to the Self-Healing Services user interface (UI) as well as the e-mail address to which your user name and password are sent if you click the Forgot user name and/or password link on the Sign-In page. It also includes the idle timeout setting for the Self-Healing Services UI.
Notification settings* The information on this page includes the settings that determine how Self-Healing Services fault notifications are displayed in the OVO message browser and the NNM incident browser. It also includes the list of e-mail addresses that fault and service notifications are sent to.
E-mail server settings* The information on this page shows you the e-mail server settings that are used for offline operation.
Chapter 2 37

The Self-Healing Services Client User InterfaceLocal Managed Client Page
System assessment This page enables you to request a system assessment for this managed client. A system assessment is a report about the HP OpenView software installed on this managed client and all of the other managed clients, if any, assigned to the same configuration center. It offers a software inventory of the configuration center topology and updates all of the baseline information for the managed client from which it is submitted.
Communication gateways* This page lists the communication gateways connected to this managed client and the status (up or down) of each. You can add managed clients to or delete them from the list by using the configuration center.
Manual incident submission This page enables you to submit an incident to HP manually. This is useful if you want to test your setup, or if a particular fault is not automatically detected by Self-Healing Services
Incident summary report* This page contains a summary of the number and types of incidents processed by Self-Healing Services on this managed client during a particular period of time.
Incident viewer This page enables you to search for and list incidents that have occurred on this managed client. You can view all the incidents for this client, or you can view a subset that matches specific search criteria. You can view the contents of the incident package for each incident in the list as well.
Filter settings This page lists the data items that are removed from incident packages before those packages are submitted to HP for analysis. Filter settings are established and maintained for each managed client. You can establish different filter settings for each managed client in your Self-Healing Services managed environment.
Rule settings This pages enables you to establish the incident processing rule settings for this managed client. The first time a particular fault is encountered, the default rule is applied. Thereafter, a specific fault rule is applied. Specific fault rules are maintained on each managed client; default rules are maintained on the configuration center.
Table 2-1 Local Managed Client Functions (Continued)
Link Purpose
Chapter 238

The Self-Healing Services Client User InterfaceLocal Managed Client Page
Left Navigation Menu
The left navigation menu contains links to all the functions listed on the main menu. It also contains links to the following items:
• The online help system for the Self-Healing Services UI.
• The Sign-Out page.
• The Analysis Reports page on the secure HP server.
• The software Downloads page for Self-Healing Services.
Setup Information
The setup information tells you five things:
• Whether or not this client is connected to HP through a communication gateway.
If the following message appears, this client is operating in offline mode:
You are currently not connected to HP.
If no message appears, this client is connected to a communication gateway.
Immediately after installation, every client is in offline mode because it is not yet connected to a communication gateway. When you run the Self-Healing Services setup function, you can either make this client a communication gateway—in which case the ISEE client must be installed, configured, and running on this system—or you can connect this client to a remote communication center. You can also choose to continue operating this client in offline mode.
• The host name of the system where this managed client resides.
This host name matches the host name you specified in the URL when you started the Self-Healing Services UI (see page 35).
Trigger settings This page enables you to configure a managed client to trigger fault events based on error messages that appear in HP OpenView product log files or based on error/crash files created under specific HP OpenView product directories.
Self-Healing Services setup This page enables you to run the Self-Healing Services setup function. By using this function, you can either create a new configuration center or associate this client with an existing configuration center. If the system hosting this client has HP Instant Support Enterprise Edition (ISEE) installed and running, you can also create a communication gateway
Configuration center This page enables you to remove the association between this managed client and its configuration center. This is useful, for example, if you decide to host the configuration center on a different system.
Table 2-1 Local Managed Client Functions (Continued)
Link Purpose
Chapter 2 39

The Self-Healing Services Client User InterfaceLocal Managed Client Page
• The current configuration version.
The configuration version for every client is initially 2.0. Each time the configuration settings are modified on the configuration center, the number to the right of the decimal point is incremented by 1. The first time the configuration settings change, the configuration version becomes 2.1; the twelfth time, it becomes 2.12. This happens on the configuration center.
Every update cycle (default is 24 hours), each managed client checks its own configuration version number against that of the configuration center. If the configuration version of the managed client is less than that of the configuration center, the managed client retrieves updated settings from the configuration center.
When you reset the configuration center from the Local Managed Client page, the configuration version for that managed client becomes 2.0 again.
• The version number for the client software.
In this example, the software version number is 02.50.220.
• The name of the configuration center, if any, that this managed client is connected to.
Immediately after installation, the client is not connected to a configuration center. When you run the setup function, you can either make this client a configuration center, or you can connect it to an existing configuration center. You can also choose to continue operating this client in silent mode.
Chapter 240

The Self-Healing Services Client User InterfaceConfiguration Center Page
Configuration Center PageThe Configuration Center page contains links to the configuration functions that apply to all clients in the Self-Healing Services managed environment. This page is available when you access a configuration center using the Self-Healing Services client user interface (see “Start the Self-Healing Services User Interface” on page 35).
Figure 2-3 Configuration Center View
Information
LeftNavigationMenu
Setup
Main Portal Area
Chapter 2 41
The Self-Healing Services Client User InterfaceConfiguration Center Page
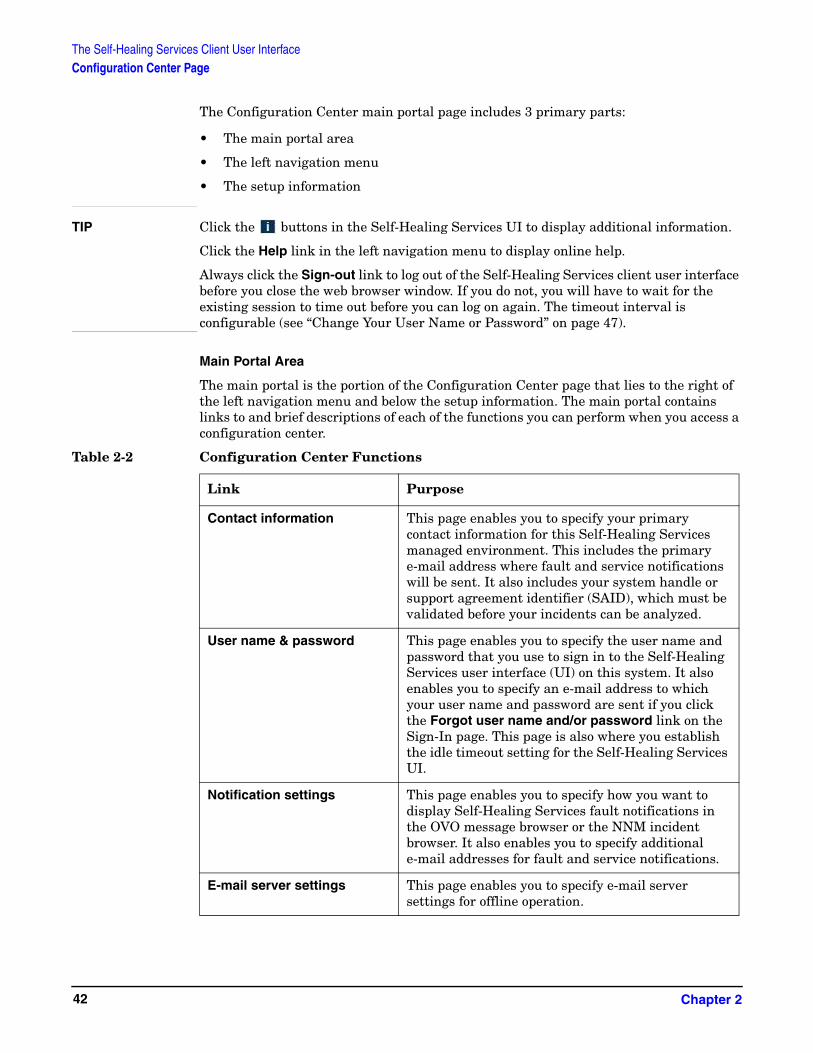
The Configuration Center main portal page includes 3 primary parts:
• The main portal area
• The left navigation menu
• The setup information
TIP Click the buttons in the Self-Healing Services UI to display additional information.
Click the Help link in the left navigation menu to display online help.
Always click the Sign-out link to log out of the Self-Healing Services client user interface before you close the web browser window. If you do not, you will have to wait for the existing session to time out before you can log on again. The timeout interval is configurable (see “Change Your User Name or Password” on page 47).
Main Portal Area
The main portal is the portion of the Configuration Center page that lies to the right of the left navigation menu and below the setup information. The main portal contains links to and brief descriptions of each of the functions you can perform when you access a configuration center.
Table 2-2 Configuration Center Functions
Link Purpose
Contact information This page enables you to specify your primary contact information for this Self-Healing Services managed environment. This includes the primary e-mail address where fault and service notifications will be sent. It also includes your system handle or support agreement identifier (SAID), which must be validated before your incidents can be analyzed.
User name & password This page enables you to specify the user name and password that you use to sign in to the Self-Healing Services user interface (UI) on this system. It also enables you to specify an e-mail address to which your user name and password are sent if you click the Forgot user name and/or password link on the Sign-In page. This page is also where you establish the idle timeout setting for the Self-Healing Services UI.
Notification settings This page enables you to specify how you want to display Self-Healing Services fault notifications in the OVO message browser or the NNM incident browser. It also enables you to specify additional e-mail addresses for fault and service notifications.
E-mail server settings This page enables you to specify e-mail server settings for offline operation.
Chapter 242

The Self-Healing Services Client User InterfaceConfiguration Center Page
Left Navigation Menu
The left navigation menu contains links to all the functions listed in the main portal area. It also contains links to the following items:
• The Local Managed Client hosted on the same system as this configuration center.
• The Self-Healing Services Setup function.
• The online help system for the Self-Healing Services UI.
• The Sign-Out page.
• The Analysis Reports page on the secure HP server.
• The software and documentation Downloads page for Self-Healing Services.
Setup Information
The setup information for a configuration center tells you four things:
Managed clients This page lists the managed clients connected to this configuration center. You can add managed clients to or delete them from the list by using this page.
Communication gateways This page lists the communication gateways connected to this configuration center and the status (up or down) of each. You can add managed clients to or delete them from the list by using this page.
Manual incident submission This page enables you to submit an incident to HP manually. This is useful if you want to test your setup, or if a particular fault is not automatically detected by Self-Healing Services
Incident summary report This page contains a summary of the number and types of incidents processed by Self-Healing Services on all managed clients associated with this configuration center during a particular period of time.
Default rule setting This pages enables you to establish the default incident processing rule setting: Submit, Suppress, Hold, or Ignore. The first time a particular fault is encountered, the default rule is applied.
Self-Healing Services setup This page enables you to run the setup function, which allows you to specify the Self-Healing Services role that a particular client will play.
Deactivate configuration center
This page enables you to turn off the configuration center function for this client. This is useful if you decide to host the configuration center on another system.
Table 2-2 Configuration Center Functions (Continued)
Link Purpose
Chapter 2 43
The Self-Healing Services Client User InterfaceConfiguration Center Page
• Whether or not this client is connected to HP through a communication gateway.
If the following message appears, this client is operating in offline mode:
You are currently not connected to HP.
If no message appears, this client is connected to a communication gateway.
Immediately after installation, every client is in offline mode because it is not yet connected to a communication gateway. When you run the Self-Healing Services setup function, you can either make this client a communication gateway—in which case the ISEE client must be installed, configured, and running on this system—or you can connect this client to a remote communication center. You can also choose to continue operating this client in offline mode.
• The host name of the system where this configuration center resides.
This host name matches the host name you specified in the URL when you started the Self-Healing Services UI (see “Start the Self-Healing Services User Interface” on page 35).
• The current configuration version.
The configuration version for every client is initially 2.0. Each time the configuration settings are modified on the configuration center, the number to the right of the decimal point is incremented by 1. The first time the configuration settings change, the configuration version becomes 2.1; the twelfth time, it becomes 2.12. This happens only on the configuration center.
Every update cycle (default is 24 hours), each managed client checks its own configuration version number against that of the configuration center. If the configuration version of the managed client is less than that of the configuration center, the managed client retrieves updated settings from the configuration center.
When you reset the configuration center from the Local Managed Client page, the configuration version for that managed client becomes 2.0 again.
• The version number for the client software.
In this example, the software version number is 02.50.220.
Chapter 244

3 Customizing Your Self-Healing Environment
This chapter explains how to use the Self-Healing Services client user interface to customize the behavior of HP OpenView Self-Healing Services for your environment.
Chapter 3 45

Customizing Your Self-Healing EnvironmentIn This Chapter
In This ChapterThis chapter contains the following topics:
• “Specifying Global Settings at the Configuration Center” on page 47
— “Change Your User Name or Password” on page 47
— “Customize the Default Rule Settings” on page 50
— “Configure the Notification Settings” on page 52
— “Configure the E-mail Server Settings” on page 59
— “Change Your Contact Information” on page 61
— “Add, Edit, or Remove Managed Clients” on page 63
— “Add, Edit, Remove, or Flush a Communication Gateway” on page 67
• “Customizing Settings for Each Managed Client” on page 72
— “Customize the Specific Fault Rules” on page 72
— “Customize the Triggers” on page 76
• “Advanced Functions” on page 81
— “Deactivate a Configuration Center” on page 82
— “Deactivate a Communication Gateway” on page 85
— “View or Modify the Configuration Center Settings” on page 86
NOTE To improve the clarity of the screen images in this chapter, the left navigation menus are not shown.
Chapter 346
Customizing Your Self-Healing EnvironmentSpecifying Global Settings at the Configuration Center
Specifying Global Settings at the Configuration CenterMost of the configuration and customization that you will do for your Self-Healing Services managed environment happens at the configuration center. The purpose of the configuration center, in fact, is to be the repository for all global configuration settings. These settings are periodically retrieved by the managed clients assigned to the configuration center. Only specific fault rules, filter settings, and triggers are customized for each managed client.
NOTE A managed client retrieves configuration settings from its configuration center once every update cycle (24 hours by default) and whenever that managed client is restarted. See “Start or Stop the Self-Healing Services Client” on page 34 for additional information.
When you run the Self-Healing Services setup function immediately after installation, you establish most of the configuration settings for your environment. See the HP OpenView Self-Healing Services Installation Guide for more information about the setup function. The information in this guide pertains to changes that you make after the initial setup is completed.
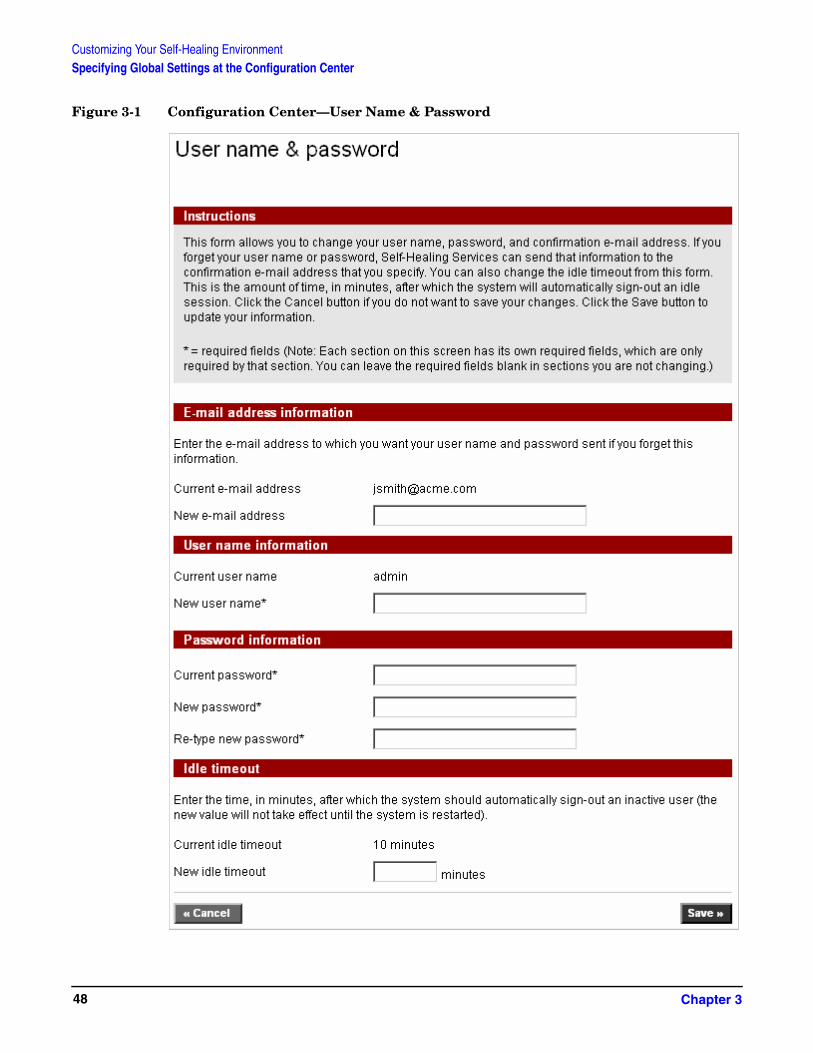
Change Your User Name or Password
You can change any or all of the following settings on the User Name & Password page:
• User name
• Password
• E-mail address for forgotten sign-in information
• Idle timeout setting
When you install Self-Healing Services, your initial user name and password are both set to admin. Be sure to change your initial user name and password to make your Self-Healing Services installation more secure.
The e-mail address shown in the Current e-mail address box is where Self-Healing Services sends your user name and password if you click the Forgot user name and/or password link on the Sign-In Information page. If the Current e-mail address box is blank, and you do not specify an e-mail address, this information is sent to the e-mail address specified on the Contact Information page for this configuration center.
The idle timeout setting specifies the time, in minutes, after which the system should automatically sign out an inactive user. This is also the time that you must wait to sign in to the Self-Healing Services UI again if you close its browser window without first signing out. This setting does not take effect until Self-Healing Services is restarted.
The required field indicator (*) applies only within a particular setting. For example, if you want to change your password but not your user name, you do not need to specify anything in the New user name box even though it is marked as a required field.
Chapter 3 47
Customizing Your Self-Healing EnvironmentSpecifying Global Settings at the Configuration Center
Figure 3-1 Configuration Center—User Name & Password
Chapter 348

Customizing Your Self-Healing EnvironmentSpecifying Global Settings at the Configuration Center
To access the User Name & Password page:
1. Start and sign in to the Self-Healing Services user interface (UI) for the configuration center.
To change any of the settings on the User Name & Password page, you must access the configuration center. This page is read-only for managed clients.
2. In the left navigation menu, click User name & password.
To change your user name, password, e-mail address or idle timeout setting:
1. To change your e-mail address for sign-in information, type a different e-mail address in the New e-mail address box.
2. To change your user name, type the new user name in the New user name box.
3. To change your password, follow these steps:
a. In the Current password box, type your existing password.
b. In the New password box, type your new password.
c. In the Re-type new password box, type your new password again.
4. If you want to change the idle timeout setting, type the new timeout duration (in minutes) in the New idle timeout box.
If you specify a new idle timeout period, the change will not take effect for the configuration center until you restart Self-Healing Services. It will not take effect for the managed clients assigned to the configuration center until they update their configuration information.
5. Click Save. Your changes are saved and can then be shared with the managed clients assigned to the configuration center that you are working with.
If you want to return to the main Configuration Center page without saving your changes, click Cancel.
TIP You can change your user name, password, e-mail address, or idle timeout setting independently. Simply leave the text fields empty for the fields that you do not want to change.
Each of the sections on this page has its own required fields, which are required only when changing the settings in that section.
Chapter 3 49

Customizing Your Self-Healing EnvironmentSpecifying Global Settings at the Configuration Center
Customize the Default Rule Settings
Self-Healing Services detects software faults on the managed client systems where it is installed. When it detects a fault, Self-Healing Services consults the fault rules for that particular fault to determine whether to submit, suppress, hold, or ignore the fault. It then performs the action specified in the rule.
There are two types of rules: specific fault rules and default rules. The default rule settings are used the first time a particular fault occurs on a managed client. From that point forward, the specific fault rule is used when that fault occurs. The default rule settings are configured on the configuration center. Specific fault rules are configured on a managed client. Specific fault rules are derived in one of two ways:
• They are created when a specific type of fault is detected at least once on a managed client.
• They are provided with Self-Healing Services (only for managed clients).
You can customize the fault rules on each of your managed clients to meet the needs of your environment. To do this, use the Local Managed Client page in the Self-Healing Services user interface. Each managed client has its own set of specific fault rules.
NOTE The default rule settings for a configuration center are automatically retrieved by the managed clients assigned to it. The managed client default rule settings are overwritten by the configuration center default rule settings.
Table 3-1
Setting: Action:
Submit Self-Healing Services collects context-specific troubleshooting and system data at the time that the fault occurs and places the data in an incident package. The incident package is then immediately processed based on the filtration settings for that managed client and sent to the communication gateway. The gateway submits the incident to HP via ISEE.
Suppress Self-Healing Services determines whether the same fault was already submitted to HP within the selected suppression time period. If it was, the fault is ignored (see Ignore). If it was not, the fault is submitted (see Submit). Only one instance of the fault is submitted for each increment of the suppression time period. The default suppression time period is 8 hours.
Hold Self-Healing Services collects context-specific troubleshooting and system data at the time the fault occurs and places the data in an incident package. The incident package is then held until you explicitly release it to be submitted to HP (see Submit).
Ignore No action is taken.
Chapter 350

Customizing Your Self-Healing EnvironmentSpecifying Global Settings at the Configuration Center
Figure 3-2 Configuration Center—Default Rule Setting
To access the Default Rule Setting page:
1. Start and sign in to the Self-Healing Services user interface (UI) for the configuration center.
2. In the left navigation menu, click Default rule setting.
To configure the default rule settings:
1. In the left navigation menu, click Rule configuration.
2. From the Action list, choose the default rule action that you want to use: Hold, Suppress, Submit, or Ignore (see rule settings).
TIP If you set the default rule action to Hold, you can manually remove (filter out) specific data from every incident package before it is submitted to HP. This ensures that sensitive data, not already removed from each incident package by your filter settings, is not submitted to HP.
3. If you chose Suppress as the default action, specify the suppression time in hours and minutes. The minimum suppression time is 1 minute; the maximum is 23 hours and 59 minutes.
4. Click Save.
Chapter 3 51

Customizing Your Self-Healing EnvironmentSpecifying Global Settings at the Configuration Center
Configure the Notification Settings
There are two types of notifications that Self-Healing Services provides: fault notifications and service notifications.
A fault notification occurs when a fault is either submitted to HP or placed on hold. The locally installed Self-Healing Services client will e-mail fault notifications to you and anyone else that you specify. However, you must first configure both your notification settings, as described below, and your e-mail server settings (see “Configure the E-mail Server Settings” on page 59) on the configuration center.
In addition to e-mail, you can receive fault notifications from Self-Healing Services through your HP OpenView Operations (OVO) or Network Node Manager (NNM) browser.
A service notification occurs when one of the following things happens:
• You perform a connectivity test.
• An incident is submitted to HP through Self-Healing Services.
• A fault is submitted to HP with an invalid system handle/SAID.
• You upload additional data for an open support case and submit it to HP through Self-Healing Services.
The Self-Healing Services server at HP will e-mail service notifications to you by default when one of these events occurs. If you want anyone else to also receive copies of your service notifications, you must add their e-mail addresses to the list of recipients. See “Understanding Service Notifications” on page 171 for additional information.
Chapter 352

Customizing Your Self-Healing EnvironmentSpecifying Global Settings at the Configuration Center
Figure 3-3 Fault Notification Example
Chapter 3 53

Customizing Your Self-Healing EnvironmentSpecifying Global Settings at the Configuration Center
Figure 3-4 Service Notification Example
Chapter 354

Customizing Your Self-Healing EnvironmentSpecifying Global Settings at the Configuration Center
Figure 3-5 Configuration Center—Notification Settings
To access the Notification Settings page:
1. Start and sign in to the Self-Healing Services user interface (UI) for the configuration center.
2. In the left navigation menu, click Notification settings.
Chapter 3 55

Customizing Your Self-Healing EnvironmentSpecifying Global Settings at the Configuration Center
To configure OVO or NNM to receive fault notifications:
1. In the Fault notification options section, select one or both of the following fault notification options:
• Operations (OVO) message browser
• Network Node Manager incident browser
2. For each browser that you selected in step 1, choose the fault severity that you want Self-Healing Services to assign to the fault notification: Critical, Major, Minor, Warning, or Normal.
3. Click Save.
NOTE Self-Healing Services does not verify which HP OpenView applications are installed on your system. If you select the OVO message browser check box or the NNM incident browser check box, make sure the respective application is, indeed, installed and running on your system. If you select the OVO message browser check box, also be sure that OVO is configured to send messages to the OVO management server.
To add an e-mail address to the notifications list:
1. Click Add E-mail Address.
Chapter 356

Customizing Your Self-Healing EnvironmentSpecifying Global Settings at the Configuration Center
2. In the E-mail address box, type the e-mail address to which you want Self-Healing Services to send notifications.
3. Select the country to which this e-mail will be delivered.
4. If your e-mail client does not accept UTF-8 encoding, clear the My email client accepts UTF-8 box.
Most mail readers do support UTF-8 encoding. If this box is not selected, e-mail will be sent using US-ASCII encoding, which only supports United States (US) based characters.
5. Optional: Select Fault Notification if you want the Self-Healing Services client to notify this individual by e-mail when an incident package is submitted to HP or placed on hold.
6. Optional: Select Service Notification if you want the Self-Healing Services server to send service notifications from HP to this individual.
7. Click Save. The Notification settings page is displayed again, and the list now includes the e-mail address that you just added.
Repeat these steps to add another e-mail address.
To change the notification type settings for one or more e-mail addresses in the list:
1. On the Notification Settings page, select Fault Notification, Service Notification, or both for each e-mail address in the list:
2. Click Save Checked Notifications.
To edit the settings for an individual e-mail address in the list:
1. On the Notification Settings page, in the E-mail address column, click the link for the e-mail address that you want to work with.
2. Change the settings as needed.
3. Click Save.
Chapter 3 57

Customizing Your Self-Healing EnvironmentSpecifying Global Settings at the Configuration Center
NOTE To edit the primary contact, which is the first e-mail address listed on this page, click the Contact information link in the left navigation menu, and edit the information on the Contact Information page.
To delete an e-mail address from the notification list:
1. On the Notification Settings page, in the Delete column, select box corresponding to the e-mail address (or addresses) that you want to delete.
2. Click Delete Checked E-mails.
Chapter 358

Customizing Your Self-Healing EnvironmentSpecifying Global Settings at the Configuration Center
Configure the E-mail Server Settings
NOTE The E-mail Server Settings page is read-only when you are accessing a managed client using the Self-Healing Services user interface. To change your e-mail server settings, you must access the configuration center.
If your Self-Healing Services managed environment is not connected to HP through a communication gateway, you must configure your e-mail server settings so that you can receive fault notifications. You cannot complete the setup process for a configuration center until you either establish a communication gateway or specify your e-mail server settings.
To access the E-mail Server Settings page:
1. Start and sign in to the Self-Healing Services user interface (UI) for the configuration center.
2. In the left navigation menu, click E-mail server settings.
To configure your e-mail server settings:
1. In the IP Address box, type the IP address of the SMTP mail server that will be used to send notifications from Self-Healing Services to the recipients you specify on the Notification settings page.
2. Choose one of the following two options:
• In the From E-mail Address box, type the e-mail address that fault notifications will appear to come from.
For example, if the From e-mail address is [email protected], your fault notifications will appear to come from [email protected].
• In the E-Mail Domain box, type the domain that fault notifications will appear to come from.
For example, if the E-mail domain is xyz.com, your fault notifications will appear to come from [email protected].
NOTE If you provide both a From e-mail address and an E-mail domain, the From e-mail address is used.
3. Optional: In the SMTP Port box, specify the SMTP port on which the SMTP mail server is listening; the default is port 25.
4. Optional: In the Retry Frequency box, type the number of times that Self-Healing Services will attempt to connect to the SMTP mail server; the default is 3 attempts.
5. Optional: In the Socket Timeout box, specify the length of time in minutes after which a timeout will occur on the socket connection to the SMTP mail server; the default is 5 minutes.
6. Optional: In the Sleep Time box, specify the length of time in minutes that Self-Healing Services sleeps between retries; the default is 3 minutes.
7. Optional: In the Server Admin IP Address, specify the administration IP address for the SMTP server; this information is normally not required.
Chapter 3 59

Customizing Your Self-Healing EnvironmentSpecifying Global Settings at the Configuration Center
8. Click Save. Your changes are saved and automatically downloaded to the communication gateways and managed clients assigned to this configuration center.
Figure 3-6 Configuration Center—E-mail Server Settings
Chapter 360

Customizing Your Self-Healing EnvironmentSpecifying Global Settings at the Configuration Center
Change Your Contact Information
NOTE The Contact Information page is read-only for managed clients and communication gateways. You can only change your contact information on a configuration center.
You can, however, perform a connectivity test from the Contact Information page on a managed client or a communication gateway. Click Send Connectivity Test to perform this test.
When you create a configuration center using the Self-Healing Services setup function, you must provide your contact information. You can change or add to your contact information for that configuration center at any time thereafter. After you update your contact information on a configuration center, the information is shared with all managed clients and communication gateways associated with that configuration center.
To enter your contact information, type or paste the information in the boxes provided. Boxes marked with an asterisk (*) are required.
Chapter 3 61

Customizing Your Self-Healing EnvironmentSpecifying Global Settings at the Configuration Center
Figure 3-7 Contact Information Page
If your e-mail client does not accept UTF-8 encoding, be sure to clear the My e-mail client accepts UTF-8 box. Most mail readers do support UTF-8. If this box is not selected, e-mail will be sent from HP using US-ASCII encoding, which only supports United States (US) based characters.
Your system handle/service agreement identifier (SAID) is case-sensitive. If you change it, be sure to type your system handle/SAID in the box exactly as it appears in your support contract with HP. If you type it incorrectly, all your faults submitted to HP will fail the entitlement check, and you will have to manually re-associate each incident submitted with a valid system handle/SAID to resolve the entitlement check failure.
To save your contact information and continue the setup process, click Next.
Chapter 362

Customizing Your Self-Healing EnvironmentSpecifying Global Settings at the Configuration Center
To change your contact information:
1. In the configuration center view, click the Contact information link in the left navigation menu. The Contact Information page opens (see Figure 3-7 on page 62).
2. Change your contact information as needed. Items marked with an asterisk (*) are required.
3. If your e-mail client does not accept UTF-8 encoding, clear the My e-mail client accepts UTF-8 check box. Most mail readers do support UTF-8 encoding. If this check box is not selected, e-mail will be sent from HP using US-ASCII encoding, which only supports United States (US) based characters.
4. In the System Handle/SAID box, type your system handle or service agreement identifier (SAID).
IMPORTANT Your system handle/SAID is case-sensitive. If you change this field, Be sure to type your customer-specific HP OpenView application system handle/SAID exactly as it appears in your support contract with HP.
If you type it incorrectly, all your faults that get submitted to HP will fail the entitlement check, and you will have to manually re-associate each incident submitted with a valid system handle/SAID to resolve the entitlement check failure. See “Entitlement Action Required Notification” on page 174 for details.
5. Choose one of the following options:
• To save your changes without performing a connectivity test, click Save.
• To save your changes and then perform a connectivity test for the configuration center, click Save and Send Connectivity Test.
If the connectivity test is successful, you will receive a service notification welcoming you to Self-Healing services (see Figure 6-1 on page 173). If a connectivity test fails due to an entitlement issue, you will receive a service notification from Self-Healing Services indicating that the system handle/SAID is invalid. See “Entitlement Action Required Notification” on page 174 for further information and instructions. If you do not receive either notification, see “Diagnosing a Problem Using E-Mail Messages” on page 186.
When you save your changes at the configuration center, they are automatically downloaded to the communication gateways and managed clients assigned to it.
NOTE To perform a connectivity test for a communication gateway or managed client, follow these steps:
1. Open the Self-Healing Services UI for that client.
2. Click the Contact information link. The Contact Information page opens.
3. Click Send Connectivity Test.
Add, Edit, or Remove Managed Clients
You can add, edit, or remove managed clients assigned to a configuration center at any time using the Managed Clients page. This page lists the managed clients assigned to a configuration center (see Figure 3-8 on page 64). Because the configuration center also serves as a managed client, the configuration center appears in the list of managed
Chapter 3 63

Customizing Your Self-Healing EnvironmentSpecifying Global Settings at the Configuration Center
clients. Because communication gateways also serve as managed clients, the communication gateways assigned to the configuration center also appear in the list. The following information is displayed for each client in the list:
• The port number for the Self-Healing Services client.
• The date on which its configuration information was last updated.
• The current configuration version.
• The number of faults it has on hold.
The configuration version for a configuration center is incremented each time you change its configuration. The configuration version for gateway and managed clients indicates the latest configuration version each node has downloaded from the configuration center.
Managed clients are automatically added to the list when you configure them during the Self-Healing Services setup process. You do not need to manually add any managed clients to the list if they were configured during setup.
Figure 3-8 Managed Clients Page
TIP By default, the clients in the table are listed alphabetically by host name. You can sort the managed client table by Host name, Updated date, or the number of Incidents on hold by clicking the link at the top of the appropriate column. When you click a link, it changes to bold type, indicating the current sort column.
Chapter 364

Customizing Your Self-Healing EnvironmentSpecifying Global Settings at the Configuration Center
To add a managed client to the list:
1. In the configuration center view, click Managed clients in the left navigation menu. The Managed clients page opens (see Figure 3-8 on page 64).
2. Click Add managed client. The Add Self-Healing Services client page opens (see Figure 3-9).
3. In the Host name box, type the host name or IP address of the managed client that you want to assign to this configuration center.
4. In the Port box, type 5814 for the port number—unless you will be changing the Self-Healing Services client default port number as described in the HP OpenView Self-Healing Services Installation Guide. In that case, use that port number instead.
5. Click Save.
The Managed clients page is displayed again (see Figure 3-8). The list now includes the managed client you just added.
NOTE The maximum number of managed clients that can be supported by a single configuration center is 100.
A managed client can only be assigned to one configuration center. If you attempt to add a managed client that is already assigned to a configuration center, you get an error. Similarly, if you attempt to add a client that is, itself, a configuration center, you get an error.
Figure 3-9 Add Self-Healing Services Client Page
Chapter 3 65

Customizing Your Self-Healing EnvironmentSpecifying Global Settings at the Configuration Center
To change the port number for a managed client already assigned to this configuration center:
1. In the configuration center view, click Managed clients in the left navigation menu. The Managed clients page opens (see Figure 3-8 on page 64).
2. Click the Host name link for the node that you want to work with. The Edit managed client page opens (see Figure 3-10 for an example).
3. In the Port box, type the new port number.
4. Click Save.
Figure 3-10 Edit Managed Client Page
Chapter 366

Customizing Your Self-Healing EnvironmentSpecifying Global Settings at the Configuration Center
To remove a managed client from the list:
1. In the configuration center view, click Managed clients in the left navigation menu. The Managed clients page opens (see Figure 3-8 on page 64).
2. In the Delete column, click the check box for each node that you want to remove from the list.
3. Click Delete Checked Client.
Figure 3-11 Managed Clients Page with Clients Marked for Deletion
When a managed client is removed from the list, it can still detect faults and collect data. If this managed client is configured to also serve as a communication gateway, it can continue to submit incident packages to HP for analysis. If it is not configured to serve as a communication gateway, it will be unable to submit incidents. It can no longer receive configuration setting updates from the configuration center to which it was assigned, nor can it provide the configuration center with incident summary information.
Add, Edit, Remove, or Flush a Communication Gateway
You can add, edit, remove, or flush a communication gateway assigned to a configuration center at any time using the Communication Gateways page. This page lists the communication gateways assigned to a particular configuration center (see Figure 3-12 on page 68). If the configuration center also serves as a communication gateway, it appears in the list as well. The following information is displayed for each node in the list:
Chapter 3 67

Customizing Your Self-Healing EnvironmentSpecifying Global Settings at the Configuration Center
• The port number for the Self-Healing Services client.
• The date on which its configuration information was last updated.
• The current configuration version.
• Whether the node is able to send incident packages to HP (Status = Up or Down).
• The number of incident packages that the node is in the process of submitting to HP (Flush count).
The configuration version for a configuration center is incremented each time you change its configuration. The configuration version for gateway and managed clients indicates the latest configuration version each node has downloaded from the configuration center.
Figure 3-12 Communication Gateways Page
You can sort the communication gateway table by Host name or Updated date by clicking the link at the top of the appropriate column. When you click it, the link changes to bold type, indicating the current sort column.
Chapter 368

Customizing Your Self-Healing EnvironmentSpecifying Global Settings at the Configuration Center
Add a Gateway
It is recommended that you assign more than one communication gateway to a configuration center for failover protection. Before you can add a new gateway to the list, the following things must be true:
• The Self-Healing Services client is installed on that system.
• The ISEE client is installed on that system.
• You have run the Self-Healing Services setup function on that system and designated it to be a local communication gateway.
To add a communication gateway:
1. In the configuration center view, click the Communication gateways link in the left navigation menu. The Communication Gateways page opens (see Figure 3-12 on page 68).
2. Click Add communication gateway. The Add Communication Gateway page opens (see Figure 3-13).
3. In the Host name box, type the host name or IP address of the communication gateway that you want to assign to this configuration center.
4. In the Port box, type 8443 for the port number—unless you changed the Self-Healing Services client default port number as described in the HP OpenView Self-Healing Services Installation Guide. In that case, use the new port number instead.
5. Click Save.
The Communication Gateways page opens again (see Figure 3-12 on page 68). The list now includes the communication gateway you just added.
Figure 3-13 Add Communication Gateway Page
NOTE A communication gateway must only be assigned to one configuration center for Self-Healing Services to function correctly. The maximum number of communication gateways that can be supported by a single configuration center is 100.
Chapter 3 69

Customizing Your Self-Healing EnvironmentSpecifying Global Settings at the Configuration Center
Change the Port Number for a Gateway
If you change the Self-Healing Services port for a client serving as a communication gateway, you must tell the configuration center about the new port number. You can do this by using the Edit Communicate Gateway page.
To change the port number for a communication gateway already assigned to this configuration center:
1. In the configuration center view, click the Communication gateways link in the left navigation menu. The Edit Communication Gateway page opens.
2. Click the Host name link for the node that you want to work with. The Edit Communication Gateway page opens (see Figure 3-14 for an example).
3. In the Port box, type the new port number.
4. Click Save.
Figure 3-14 Edit Communication Gateway Page
Chapter 370

Customizing Your Self-Healing EnvironmentSpecifying Global Settings at the Configuration Center
Remove a Gateway
You can remove a communication gateway from the list of gateways associated with a configuration center. When you remove a gateway from the list, it becomes unavailable to the configuration center and any other managed clients connected to that configuration center. The gateway still functions as a local gateway on the system where it is resident, however.
To remove a communication gateway:
1. In the configuration center view, click the Communication gateways link in the left navigation menu. The Communication Gateways page opens (see Figure 3-12 on page 68).
2. In the Delete column, click the check box for each node that you want to remove from the list.
3. Click Delete Communication Gateways.
The communication gateway removed will finish submitting to HP any incident packages it has received from the managed clients. It will no longer receive any new incident packages from the managed clients associated with the configuration center.
Flush a Gateway
To flush a communication gateway:
1. In the configuration center view, click the Communication gateways link in the left navigation menu. The Communication Gateways page opens (see Figure 3-12 on page 68).
2. Click the number in the Flush column for the communication gateway that you want to flush. If this column contains N/A, there are no incident packages in the process of being submitted to HP from that communication gateway.
Figure 3-15 Flush Link Detail
WARNING Flushing a communication gateway deletes the incident packages that are in the process of being submitted to HP. There is no way to recover, view, or resubmit incident packages to HP after they are flushed.
Chapter 3 71

Customizing Your Self-Healing EnvironmentCustomizing Settings for Each Managed Client
Customizing Settings for Each Managed ClientIn addition to the global settings that you specify at the configuration center, you can establish customized local settings for each managed client in your Self-Healing Services managed environment.
Customize the Specific Fault Rules
The Self-Healing Services client detects software faults on each system where it is installed. When it detects a fault on a managed client, it consults that managed client’s fault rule for that particular fault to determine whether to submit, suppress, hold, or ignore the fault. It then performs the specified action.
The default rule settings are used the first time a particular fault occurs on a managed client. From that point forward, the fault-specific rule is used whenever that particular fault occurs. The default rule settings are configured at the configuration center. Fault-specific rules are configured on each managed client.
You can customize your fault rules to meet the needs of your environment. Each managed client has its own set of specific fault rules.
NOTE A configuration center’s default rule settings are automatically downloaded to the managed clients assigned to it. The default rule settings on the managed client are overwritten by the default rule settings on the configuration center each time the configuration is updated. The fault-specific rules, however, are not overwritten.
Table 3-2 Rule Settings
Setting Action
Submit The Self-Healing Services client collects context-specific troubleshooting and system data at the time the fault occurs and places the data in an incident package. The incident package is then immediately processed based on the filtration rules for that managed client and sent to the communication gateway. The communication gateway submits it to HP via the ISEE client.
Suppress The Self-Healing Services client determines if the same fault was already submitted to HP within the selected suppression time period. If it was, the fault is ignored (see Ignore). If it was not, the fault is submitted (see Submit). Only one instance of the fault will be submitted for each increment of the suppression time period. The default suppression time period is 8 hours.
Hold The Self-Healing Services client collects context-specific troubleshooting and system data at the time the fault occurs and places the data in an incident package. The incident package is then held until you explicitly release it for submittal to HP, as described in “Submit Incidents on Hold” on page 105 (see Submit).
Ignore No action is taken.
Chapter 372
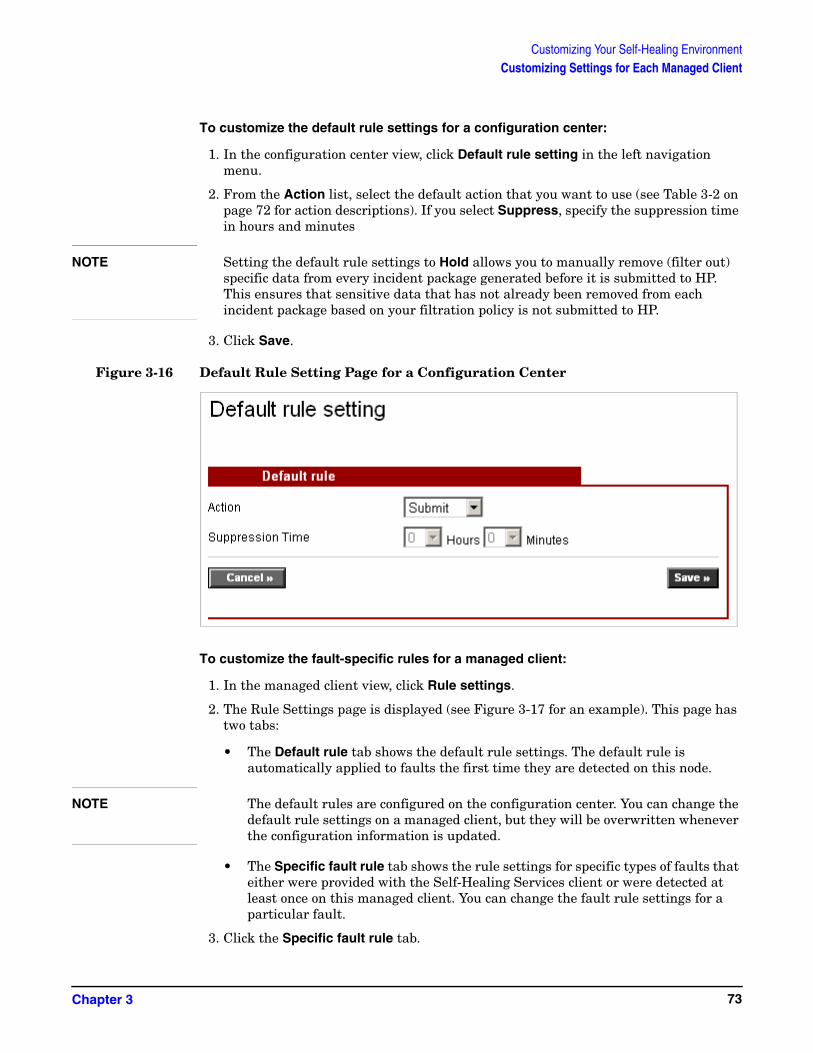
Customizing Your Self-Healing EnvironmentCustomizing Settings for Each Managed Client
To customize the default rule settings for a configuration center:
1. In the configuration center view, click Default rule setting in the left navigation menu.
2. From the Action list, select the default action that you want to use (see Table 3-2 on page 72 for action descriptions). If you select Suppress, specify the suppression time in hours and minutes
NOTE Setting the default rule settings to Hold allows you to manually remove (filter out) specific data from every incident package generated before it is submitted to HP. This ensures that sensitive data that has not already been removed from each incident package based on your filtration policy is not submitted to HP.
3. Click Save.
Figure 3-16 Default Rule Setting Page for a Configuration Center
To customize the fault-specific rules for a managed client:
1. In the managed client view, click Rule settings.
2. The Rule Settings page is displayed (see Figure 3-17 for an example). This page has two tabs:
• The Default rule tab shows the default rule settings. The default rule is automatically applied to faults the first time they are detected on this node.
NOTE The default rules are configured on the configuration center. You can change the default rule settings on a managed client, but they will be overwritten whenever the configuration information is updated.
• The Specific fault rule tab shows the rule settings for specific types of faults that either were provided with the Self-Healing Services client or were detected at least once on this managed client. You can change the fault rule settings for a particular fault.
3. Click the Specific fault rule tab.
Chapter 3 73

Customizing Your Self-Healing EnvironmentCustomizing Settings for Each Managed Client
4. To change the fault rule settings for a single fault, follow these steps:
a. Click the Rule description link for that fault. The Edit Rule Settings page opens (see Figure 3-18).
b. Choose the Action that you want to use (see Table 3-2 on page 72). If you choose Suppress, specify the suppression time in hours and minutes.
c. Optional: If you want to change the rule description to be more meaningful for your environment, select the text in the Rule Description box, and type a new rule description.
NOTE Rule descriptions can be anything you like. They are not referenced by the Self-Healing Services client to identify specific faults. The client identifies specific faults using the trigger IDs it assigns them (see Figure 3-17). Rule descriptions are strictly for your benefit.
d. Click Save. Your changes are now visible on the Specific Fault Rule tab.
5. To change the fault rule settings for multiple faults, follow these steps:
a. In the Select column, select the check box for each fault whose rule settings you want to change.
b. In the Change selected rules from above section at the bottom of the Rule Configuration page, choose the Action that you want to use (see Table 3-2 on page 72). If you choose Suppress, specify the suppression time in hours and minutes.
c. Click Save. Your changes are now visible on the Specific Fault Rule tab.
TIP You can sort the Specific Fault Rules table by Rule Description, Trigger ID (see “Customize the Triggers” on page 76), Content ID, Action, or Product/Application. To do so, click the link at the top of the appropriate column. When one of these links is clicked, it changes to bold type, indicating the current sort column.
Chapter 374

Customizing Your Self-Healing EnvironmentCustomizing Settings for Each Managed Client
Figure 3-17 Rule Settings Page – Specific Fault Rule Tab
Figure 3-18 Edit Rule Settings Page
Chapter 3 75

Customizing Your Self-Healing EnvironmentCustomizing Settings for Each Managed Client
Customize the Triggers
You can configure a managed client to trigger Self-Healing fault events based on error messages that appear in HP OpenView product log files or based on error/crash files created under specific HP OpenView product directories. You can use the trigger configuration process to create or update custom trigger rules for HP OpenView product faults. When the trigger conditions for a given rule are met, the Self-Healing Services client triggers a fault event and the subsequent collection of fault data. There are two kinds of triggers that you can configure:
• Triggers that look for specific error patterns in a log file
• Triggers that watch for the creation of error or crash files under a specific directory
The HP OpenView products that support trigger configuration for Self-Healing Services are listed in the Product/Application drop-down list on the Product Trigger Information page (see Figure 3-19 on page 77). Each product or application in the list has one or more resources—a log file, for example—that its triggers monitor. You cannot delete an existing trigger. You can, however, choose to make it either active or inactive. If a trigger is inactive, no pattern matching is performed for that trigger.
A trigger consists of four required parameters and up to four additional optional parameters. These parameters are described in Table 3-3 on page 78. When you create a new trigger rule, you must provide values for each of the four required parameters.
To customize the triggers for a supported application or product:
1. In the managed client view, click Trigger settings in the left navigation menu.
2. From the Product or application list, select the application that you want to work with.
3. From the Monitored resource list, select the resource that you want to work with.
4. Click Refresh to refresh the Resource Path and the set of triggers for the monitored resource selected. The Resource Path is the path of the log file or directory associated with this monitored resource.
The following information is displayed for each trigger:
Activate Flag Whether this trigger is active for monitoring
Trigger Description A short description of the trigger's purpose
Trigger ID The unique identifier assigned to the trigger
Context The context passed to the collector when this trigger fires
5. Perform one or more of the following actions:
• To edit or update the properties of an existing trigger, click the trigger description link.
• To add a new trigger, click Click here to add a new trigger (see “Add or Modify a Trigger” on page 79).
• Select the Activate box for all triggers that you want to use, clear the Activate box for all triggers that you do not want to use, and then click Update trigger activations.
• To sort the rules by Name, Message-ID or Context name, click the corresponding column header.
Chapter 376

Customizing Your Self-Healing EnvironmentCustomizing Settings for Each Managed Client
Figure 3-19 Trigger Settings Page
Chapter 3 77

Customizing Your Self-Healing EnvironmentCustomizing Settings for Each Managed Client
Table 3-3 Trigger Parameters
Name Description
Trigger ID A unique identifier within the set of triggers for this monitored resource. When you are updating an existing trigger, this field is read-only. When you are creating a new trigger, you must provide a Trigger ID that is unique among all the triggers for this monitored resource.
Trigger description
A short description of the trigger’s purpose.
Context name The context information associated with the detected fault. The context name is passed to the data collector so that the data collector collects fault-specific data.
Each HP OpenView product defines a set of contexts for Self-Healing data collection. Self-Healing Services attempts to retrieve the list of contexts that are supported by the Self-Healing data collector for that product. If Self-Healing Services successfully retrieves the list, it creates a drop-down list of those contexts. Otherwise, an input text field is provided where you can type in the context name.
For descriptions of the context names for a specific HP OpenView product, see the following XML file:
<installDir>/conf/dc/<productName>.xml
where <installDir> is the directory where the Self-Healing Services client is installed, and <productName> is the abbreviated name of the HP OpenView application.
For example, for information about contexts for Network Node Manager (NNM) installed on a UNIX operating system platform, see the file:
/opt/hpsupport/conf/dc/nnm.xml
On a Windows operating system platform, the default location of the file is as follows:
C:/Program Files/Hewlett Packard/conf/dc/nnm.xml
Chapter 378

Customizing Your Self-Healing EnvironmentCustomizing Settings for Each Managed Client
Add or Modify a Trigger
You can add or modify triggers for any HP OpenView products or applications that support triggers (see Appendix C, “Supported Applications,” on page 205). A trigger is defined by the parameters described in Table 3-3. If you are adding a new trigger, you must provide values for all four parameters.
To add or modify a trigger rule for a supported application or a product:
1. In the managed client view, click Trigger settings in the left navigation menu.
2. From the Product or application list, select the product or application that you want to work with.
3. From the Monitored resource list, select the resource that you want to work with.
4. Click Refresh to refresh the Resource Path and the set of triggers for the monitored resource selected. The Resource Path is the path of the log file or directory associated with this monitored resource.
The following information is displayed for each trigger that is listed:
Activate Flag Whether this trigger is active for monitoring
Trigger Description A short description of the trigger's purpose
Trigger ID The unique identifier assigned to the trigger
Context The context passed to the collector when this trigger fires
5. To add a new trigger, click Click here to add a new trigger (see “Add or Modify a Trigger” on page 79). To view or modify an existing trigger, click the trigger description link for that trigger.
6. Provide values for the four trigger parameters described in Table 3-3.
a. If you are adding a new trigger, type a unique identifier for the new trigger Trigger ID box.
Pattern A pattern that will be used for detecting faults in the application. The pattern must be a valid regular expression. The regular expression will be matched in the following ways:
• For a log file or windows event log resource, this regular expression will be matched against log messages written to the log file. The pattern must match a substring of the log message.
• For a directory resource this regular expression will be matched against the names of the error/crash files created under that directory.
Self-Healing Services uses standard Java regular expression matching and is constrained as such.
Special characters such as ( ) [ ], etc. must be preceded by a back slash (\) in the regular expression. The pattern string is case-sensitive.
Table 3-3 Trigger Parameters (Continued)
Name Description
Chapter 3 79

Customizing Your Self-Healing EnvironmentCustomizing Settings for Each Managed Client
If you are modifying an existing trigger rule, this box will be read-only.
b. In the Trigger description box, type a short description of the trigger’s purpose.
c. From the Context name list, select the context for this trigger rule.
NOTE Self-Healing Services attempts to populate the Context name drop-down list using the information in the <ProductName>.xml file. If this file is missing or not readable, the list is not created. If the drop-down list is not available, you can type in the context name.
d. In the Error pattern box, type the regular expression that you want Self-Healing Services to match in the log file or error/crash file.
7. Click Save trigger.
Figure 3-20 Trigger Page for an Existing Rule
Chapter 380

Customizing Your Self-Healing EnvironmentAdvanced Functions
Advanced FunctionsThe following functions are described in this section:
• “Deactivate a Configuration Center” on page 82
• “Deactivate a Communication Gateway” on page 85
• “View or Modify the Configuration Center Settings” on page 86
These functions are discussed separately, as they are not part of the typical setup or operation of Self-Healing Services. They are useful when you want to restructure your Self-Healing Services managed environment.
Chapter 3 81
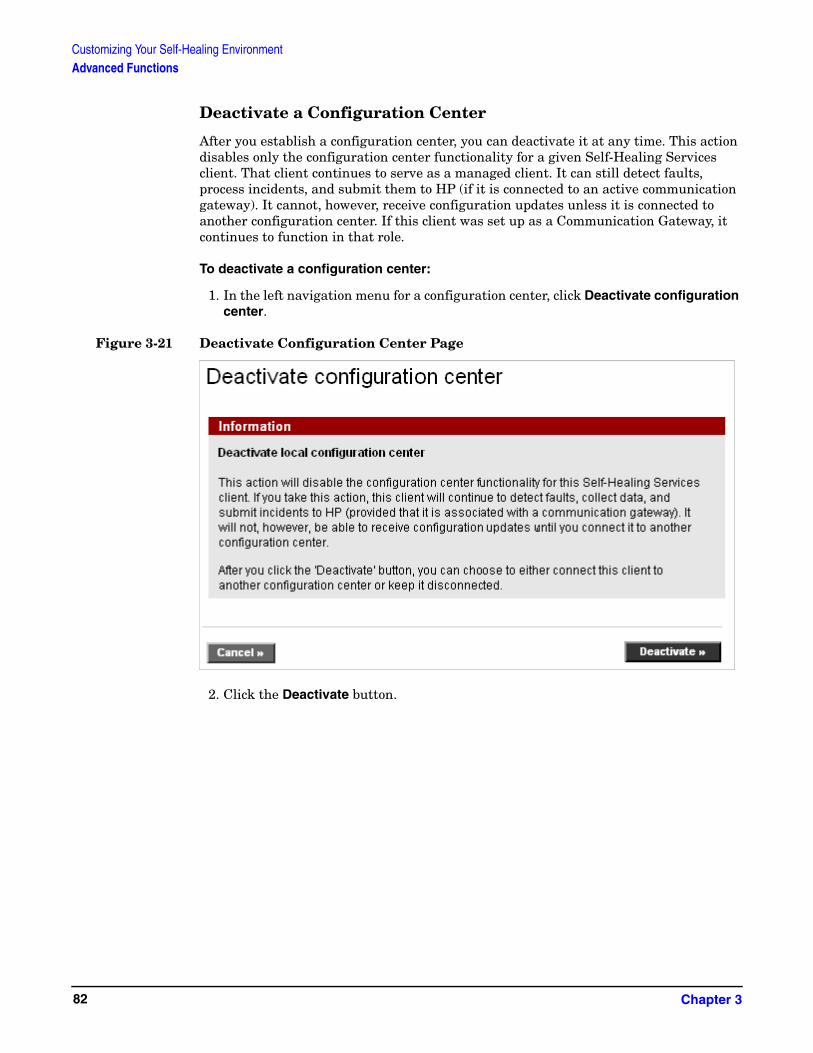
Customizing Your Self-Healing EnvironmentAdvanced Functions
Deactivate a Configuration Center
After you establish a configuration center, you can deactivate it at any time. This action disables only the configuration center functionality for a given Self-Healing Services client. That client continues to serve as a managed client. It can still detect faults, process incidents, and submit them to HP (if it is connected to an active communication gateway). It cannot, however, receive configuration updates unless it is connected to another configuration center. If this client was set up as a Communication Gateway, it continues to function in that role.
To deactivate a configuration center:
1. In the left navigation menu for a configuration center, click Deactivate configuration center.
Figure 3-21 Deactivate Configuration Center Page
2. Click the Deactivate button.
Chapter 382

Customizing Your Self-Healing EnvironmentAdvanced Functions
After the configuration center is deactivated, the Add a Configuration Center page opens.
Figure 3-22 Add a Configuration Center Page
3. If you want to associate this managed client with a different configuration center, follow these steps:
a. In the Host name box, type the host name of the new configuration center.
b. In the Port box, type the port number that the new configuration center will use to communicate with this managed client.
c. In the Configuration update period field, select the time in hours and minutes that this managed client should wait before retrieving updated configuration information from the configuration center. The minimum setting is 5 minutes, and the maximum is 24 hours (the default).
If you specify 6 hours 0 minutes, for example, the managed client will attempt to retrieve configuration information from the configuration center every 6 hours.
Chapter 3 83
Customizing Your Self-Healing EnvironmentAdvanced Functions
NOTE Configuration updates cause heavy network traffic. If you make the update period too short, this may degrade network performance.
d. Click Save.
If you do not want to associate this managed client with a configuration center, click Cancel.
To reactivate a configuration center:
1. In the left navigation menu, click Self-Healing Services setup.
2. Click the Set up a new configuration center link.
3. Follow steps 1 through 5 in the Self-Healing Services setup process.
Chapter 384

Customizing Your Self-Healing EnvironmentAdvanced Functions
Deactivate a Communication Gateway
After you establish a local communication gateway, you can deactivate it at any time. This action disables only the local communication gateway functionality for a given Self-Healing Services client. That client continues to serve as a managed client. It can still detect faults, process incidents, and receive configuration updates from its configuration center. It cannot, however, submit incidents to HP.
To deactivate a communication gateway:
1. In the left navigation menu for a managed client, click Deactivate communication gateway.
Figure 3-23 Deactivate Communication Gateway Page
2. Click the Deactivate button.
After the communication gateway is deactivated, the Local Managed Client page opens.
To reactivate a communication gateway:
1. In the left navigation menu, click Self-Healing Services setup.
2. Click either the Set up a new configuration center link or the Use existing configuration center link.
3. Follow steps 1 through 5 in the Self-Healing Services setup process.
Select Local communication gateway to reactivate the communication gateway functionality for this client.
Chapter 3 85

Customizing Your Self-Healing EnvironmentAdvanced Functions
View or Modify the Configuration Center Settings
When the managed client that you are working with is associated with a remote configuration center, you can view or change this association. The initial association between a configuration center and a managed client is established during the setup process. You can change this association, however, at any time.
To view or change the configuration center for a managed client:
1. On the left navigation menu, click Local managed client.
2. On the Local Managed Client page, click the Configuration center link. This link is located in the lower right corner of the page.
Figure 3-24 Edit Configuration Center Node Page
3. If you want to change any of the configuration center settings, follow these steps:
a. In the Host name box , type the fully qualified host name for system where the new configuration center resides.
b. In the Port box, type the port number that the managed client will use to communicate with the configuration center.
c. In the Configuration update period field, select the time in hours and minutes that this managed client should wait before retrieving updated configuration information from the configuration center. The minimum setting is 5 minutes, and the maximum is 24 hours (the default).
If you specify 6 hours 0 minutes, for example, the managed client will attempt to retrieve configuration information from the configuration center every 6 hours.
NOTE Configuration updates cause heavy network traffic. If you make the update period too short, this may degrade network performance.
Chapter 386

Customizing Your Self-Healing EnvironmentAdvanced Functions
d. Click Save.
You can also reset the configuration center association for a particular managed client. This disconnects the managed client from its configuration center. When a managed client is not associated with a configuration center, it cannot receive configuration updates. It can still detect faults and submit them, provided that it is associated with an active communication gateway.
To disconnect a managed client from its configuration center:
1. On the Local Managed Client page, click the Configuration center link. This link is located in the lower right corner of the page.
2. Click Reset Configuration Center.
3. Click Save.
Chapter 3 87

Customizing Your Self-Healing EnvironmentAdvanced Functions
Chapter 388

4 Managing Incidents
This chapter explains how to view your detected faults, incident packages, and incident summary reports. It explains how to submit an incident to HP that is on hold, submit additional data to HP for a previously submitted fault, and send a system assessment to HP. It also explains how to configure your filter policy and how to manually submit a fault.
Chapter 4 89
Managing IncidentsIn This Chapter
In This ChapterThere are two ways to view incident information in the Self-Healing Services client user interface (UI). The incident viewer lists the individual incidents processed by a managed client and the shows the status of each incident. An incident summary report contains an overview of all incident activity for a particular managed client; it lists the number of incidents in each state of the incident life cycle.
This chapter contains the following topics:
• “View Incidents and Collected Data” on page 91
• “View an Incident Summary Report” on page 101
• “Submit Incidents on Hold” on page 105
• “Change Your Filter Settings” on page 106
• “Submit a System Assessment” on page 109
• “Manually Submit an Incident” on page 111
Chapter 490

Managing IncidentsView Incidents and Collected Data
View Incidents and Collected DataYou can use a managed client’s Incident Viewer to see a list of incidents that match specific search criteria (see Figure 4-1). You can view all or a subset of the incidents that have occurred on that client, and you can view the data that has been collected for each incident.
To use the Incident Viewer:
1. In the managed client view, click Incident viewer in the left navigation menu.
2. Optional: In the Status box, select one or more options (see Table 4-1 on page 92 for status descriptions).
To select multiple options, hold the CTRL key down and click each option that you want to select.
3. Optional: In the Product or application box, select one or more applications.
4. Click Search. The Incident viewer search results page is displayed (see Figure 4-2 on page 93).
NOTE If you click Search without selecting any search parameters, Self-Healing Services searches for all incidents associated with all supported applications installed on this system.
The list of incidents does not automatically refresh when a new fault is detected. You must click Search again to refresh the list.
Figure 4-1 Incident Viewer Prior to Search
Chapter 4 91

Managing IncidentsView Incidents and Collected Data
Table 4-1 Incident Viewer Status Fields
Status Description
Received An incident is marked Received from the point at which a fault is detected in a supported application until Self-Healing Services decides whether the incident should be Suppressed, Ignored, Held, Submitted, or Failed.
Failed An incident is marked Failed if it was supposed to be submitted to HP, but the submission process failed. If submission fails, it is re-attempted a set number of times with a certain time interval between retries. Once the number of retries has been exceeded, the incident is placed on Hold. To submit it after submission failed, perform the steps in “Submit Incidents on Hold” on page 105.
Hold An incident is marked Hold under two conditions: (1) the action for the fault rule associated with this type of fault is set to Hold; (2) the action for the fault rule associated with this type of fault is set to Submit, but the submission process has failed (see Failed).
Ignored An incident is marked Ignored if the fault rule for this type of fault is set to Ignore. The incident will not be processed further at any time.
Submitted An incident is marked Submitted if it was successfully submitted to HP.
Suppressed An incident is marked Suppressed if Self-Healing Services detected a fault in a supported application, but it is a duplicate of a previous fault and is within the suppression time limit. Once the suppression time limit has expired, the next incident of this type will be submitted.
Offline An incident is marked Offline if the managed client was not connected to an active communication gateway at the time the incident was generated. You can resubmit an Offline incident—the same way that you can submit an incident on Hold—after the managed client is connected to a communication gateway.
Chapter 492

Managing IncidentsView Incidents and Collected Data
Figure 4-2 Incident Viewer Search Results
TIP You can sort the Incident Search Results table by Incident name, Status, Date/Time, or Source. To do so, click the link at the top of the column that you want to sort by. When one of these links is clicked, it changes to bold type, indicating the current sort column.
Chapter 4 93

Managing IncidentsView Incidents and Collected Data
To permanently delete one or more incidents from the list:
1. In the far left column, select the check box for each incident that you want to delete.
2. Click Delete Checked Incidents.
IMPORTANT Deleted faults cannot be recovered. Any collected data stored for this incident is also deleted. This operation cannot be undone.
To view the details for an incident:
Click the Incident name. The Incident details page is displayed (see Figure 4-3).
Figure 4-3 Incident Details for a Submitted Incident
Chapter 494

Managing IncidentsView Incidents and Collected Data
View Data Collected for a Particular Incident
The Incident Details page provides information about the incident as well as a link that you can follow to view the data collected by the Self-Healing Services client. If the incident either was submitted or is on hold, you can view the data collected (see Figure 4-5 on page 97 and Figure 4-6 on page 98, respectively). If the incident was previously submitted, you can upload additional information pertaining to it.
To view the data collected for a fault:
1. Open the Incident viewer, and display the incident details for a particular incident (see page 94).
2. Click the View collected data submission settings link. The Collected data filter page opens, (see Figure 4-5 on page 97).
3. When you are finished working with the data for this fault, click Back to Search Results to return to the Incident viewer page.
To upload additional data and submit it to HP:
1. Open the Incident viewer, and display the incident details for a particular incident (see page 94).
2. Click Browse.
3. Locate the file that you want to upload—only local files can be uploaded.
4. Click Upload File.
The file is uploaded, submitted to HP, and stored at HP with the other data collected for this incident. The maximum file size that can be uploaded is 1 MB. After submitting additional data to HP, you will receive an Additional Data Received service notification by e-mail confirming that your data has been received by HP.
NOTE From the Incident Details page, you can also submit an incident that is on hold (see Figure 4-4 on page 96). This removes the incident from hold status and allows Self-Healing Services to submit it to HP.
To submit an incident that is on hold:
1. Click Submit This Incident (see Figure 4-4 on page 96).
2. See “Submit Incidents on Hold” on page 105 for further instructions.
Chapter 4 95

Managing IncidentsView Incidents and Collected Data
Figure 4-4 Incident Details for an Incident On Hold
Chapter 496

Managing IncidentsView Incidents and Collected Data
Establish Data Filter Settings
When you click the View collected data submission settings link from the Incident Details page, the Collected Data Filter—Table of Contents page opens. This page provides links to detailed information about the data collected for this incident. The data submission settings are read-only for incidents that have already been submitted to HP (see Figure 4-5). You can change the settings for faults that are on hold (see Figure 4-6 on page 98).
Figure 4-5 Collected Data Filter—Table of Contents Page for a Submitted Incident
Chapter 4 97

Managing IncidentsView Incidents and Collected Data
Figure 4-6 Collected Data Filter—Table of Contents Page for an Incident on Hold
Chapter 498

Managing IncidentsView Incidents and Collected Data
You can exclude data items from an incident package before it is submitted to HP for analysis. This is useful if you have sensitive or confidential data items that you do not want to send outside your company. There are two ways to exclude data items from an incident package:
• Using the filter policy settings (see “Change Your Filter Settings” on page 106)
• Manually specifying exclusions while the package is on hold
When an incident is on hold, you can view and alter the data filter settings for that incident package. If your filter policy excludes certain data items from being submitted to HP, those items are marked as excluded on the Collected Data Filter page (see Figure 4-7). In addition to the data items excluded by your filter policy, you can manually exclude other data items. You can also override your filter policy (in part or entirely) to allow additional data to be submitted to HP.
Figure 4-7 Excluded Data
When you working with a particular incident on hold, you can change the filter policy for all future incidents (see “Change Your Filter Settings” on page 106).
Chapter 4 99

Managing IncidentsView Incidents and Collected Data
NOTE When an incident has already been submitted to HP, any data items excluded from the incident package do not appear on the Collected Data Filter page. After the incident shown in Figure 4-7 is submitted, for example, the SYSTEMJAVAPATH, PATH, and TERMCAP environment variables will not appear on the Collected Data Filter page for that incident.
If all the data items in a particular category are excluded, that category no longer appears in the table of contents for the incident.
To exclude data items from an incident package:
1. Open the Incident viewer, and display the Incident details for a particular incident (see page 91).
2. Click View collected data submission settings.
3. Click the link in the table of contents that pertains to the category of data items that you want to exclude.
NOTE If an application that appears in the Application Information list is not installed—or if it is installed, but some of its files have become corrupted—the status of that application will be listed as unknown. This can also happen if an application is installed using a nonstandard installation process.
4. In the Exclude column, select the check box for each data item that you want to exclude.
5. Optional: If you want to exclude these items from this and all future incident packages, select the Apply to default filtration settings box.
If you do not select this box, the data items will only be excluded from this incident package.
6. Click the Save <category name> settings button to save your new settings. In this case, <category name> matches the table of contents link that you clicked in step 3.
7. Repeat steps 3 through 5 until you have selected all the data items that you want to exclude from this incident package.
Chapter 4100

Managing IncidentsView an Incident Summary Report
View an Incident Summary ReportSelf-Healing Services provides an incident summary report in both the managed client and configuration center views. From the managed client view, the incident summary report shows the number of incidents either submitted to HP or placed on hold by that managed client. From the configuration center view, the incident summary report shows this information for each of the managed clients assigned to that configuration center.
To view an incident summary report:
Click Incident summary report in the left navigation menu.
• If you are accessing a configuration center, the search page opens (see Figure 4-8 on page 101). Follow these steps:
1. Choose one of the following options:
— Select All managed clients to view the incident summary report for all managed clients assigned to this configuration center.
— Select Managed clients on hold to view the incident summary report for only those managed clients assigned to this configuration center that have faults on hold.
2. Click Search.
The Incident summary search results page is displayed (see Figure 4-9 on page 102).
3. Choose one of the following options:
— Click the host name of one of the managed clients listed in the search results to see the incident summary report for that client.
— Click the value in the Hold column to see the incident viewer for that client.
• If you are accessing a managed client, the incident summary report for that client opens immediately.
Figure 4-8 Incident Summary Report Search Page
Chapter 4 101

Managing IncidentsView an Incident Summary Report
Figure 4-9 Incident Summary Report Search Results Page
The links in the Host name column take you to the individual incident summary reports for the managed clients associated with this configuration center. The incident viewer lists the faults detected by that client and the status of each related incident. See “About the Incident Summary Report” on page 102 for additional information.
The links in the On hold column take you to the incident viewers for the clients in the list (see “View Incidents and Collected Data” on page 91 for further information). You can use the incident viewer to search for incidents that match specific search criteria
NOTE When you click a link in the Host name or On hold column for a managed client other than the configuration center, the Sign-in page opens in a new window (see Figure 2-1 on page 35). You must sign in to the Self-Healing Services client UI for that managed client before you can see its incident summary report or incident viewer.
About the Incident Summary Report
Each managed client has an incident summary report. An incident summary report lists the faults detected by that client and the status of each related incident (see Table 4-1 on page 92 for status descriptions).
The incident summary report includes three tabbed pages (see Figure 4-10 on page 103):
• The Today tab lists the number of incidents in each status category that have been processed during the last 24 hours.
Chapter 4102
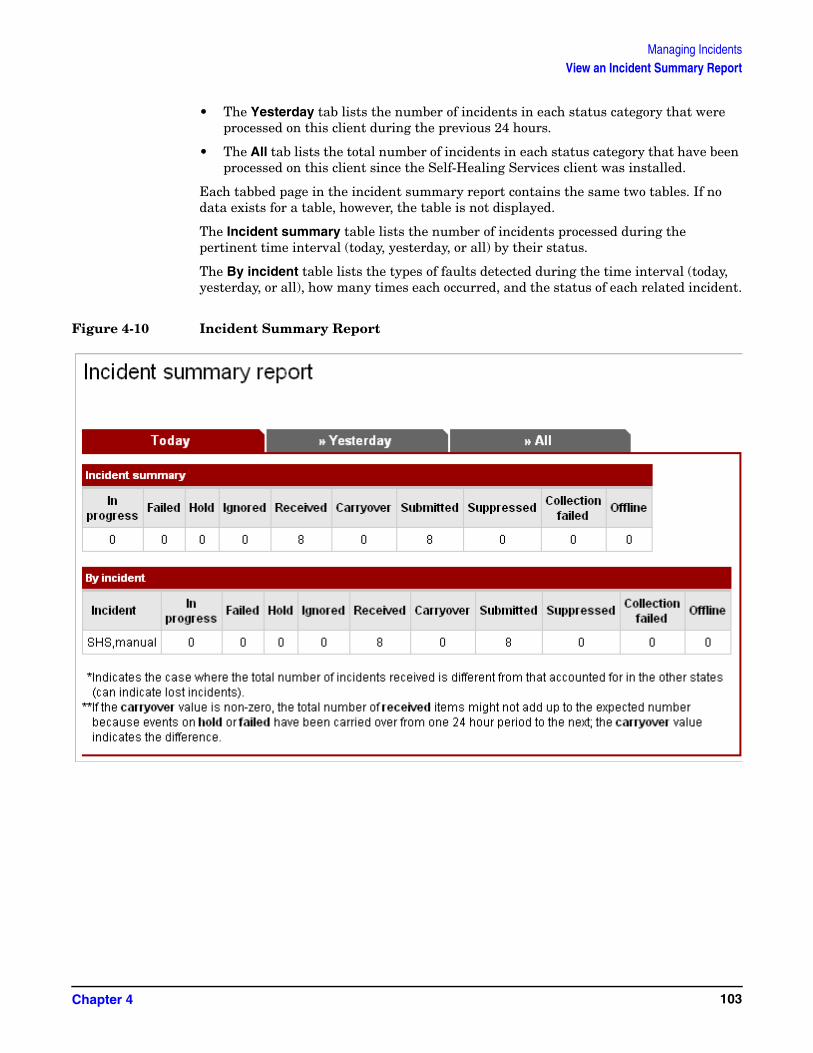
Managing IncidentsView an Incident Summary Report
• The Yesterday tab lists the number of incidents in each status category that were processed on this client during the previous 24 hours.
• The All tab lists the total number of incidents in each status category that have been processed on this client since the Self-Healing Services client was installed.
Each tabbed page in the incident summary report contains the same two tables. If no data exists for a table, however, the table is not displayed.
The Incident summary table lists the number of incidents processed during the pertinent time interval (today, yesterday, or all) by their status.
The By incident table lists the types of faults detected during the time interval (today, yesterday, or all), how many times each occurred, and the status of each related incident.
Figure 4-10 Incident Summary Report
Chapter 4 103

Managing IncidentsView an Incident Summary Report
To view an incident summary report from the configuration center:
1. In the configuration center view, click Incident summary report in the left navigation menu. The search page opens (see Figure 4-8 on page 101).
2. Select either All managed clients or Managed clients on hold.
3. Click Search.
4. Click a link in the Host name column to view the incident summary report for one of the managed clients assigned to this configuration center.
When you click a link to view an incident summary report for another client, the Sign-in page opens in a new window (see Figure 2-1 on page 35). Sign in to the Self-Healing Services client UI for that managed client. The Incident summary report page is displayed (see Figure 4-10 on page 103).
To view the incident viewer for a specific managed client by accessing it directly:
1. In the managed client view, click the Incident summary report link in the left navigation menu. The report for this client opens.
2. Click the tab for the time period you are interested in: Today, Yesterday, or All.
Chapter 4104

Managing IncidentsSubmit Incidents on Hold
Submit Incidents on HoldThere may be times when you want to create an incident package (collect data) when a fault occurs but not submit that incident package to HP. This is useful in the following situations:
• When you want to attempt to self-solve the problem.
• When you want to view the incident package before it is submitted.
• When you want to remove certain sensitive pieces of data from the package before it is submitted to HP.
In any of these scenarios, the rule for this fault should be set to Hold (see “Customize the Default Rule Settings” on page 50). When the rule is set to Hold, the Self-Healing Services client collects context-specific troubleshooting and system data at the time the fault occurs and places that data in an incident package. The incident package is then held until you explicitly release it for submittal to HP.
To submit an incident that is on hold to HP:
1. In the managed client view, open the Incident viewer, and display the Incident details for a particular fault (see page 91).
2. Click Submit This Incident. The incident is removed from its hold status and submitted to HP.
Chapter 4 105
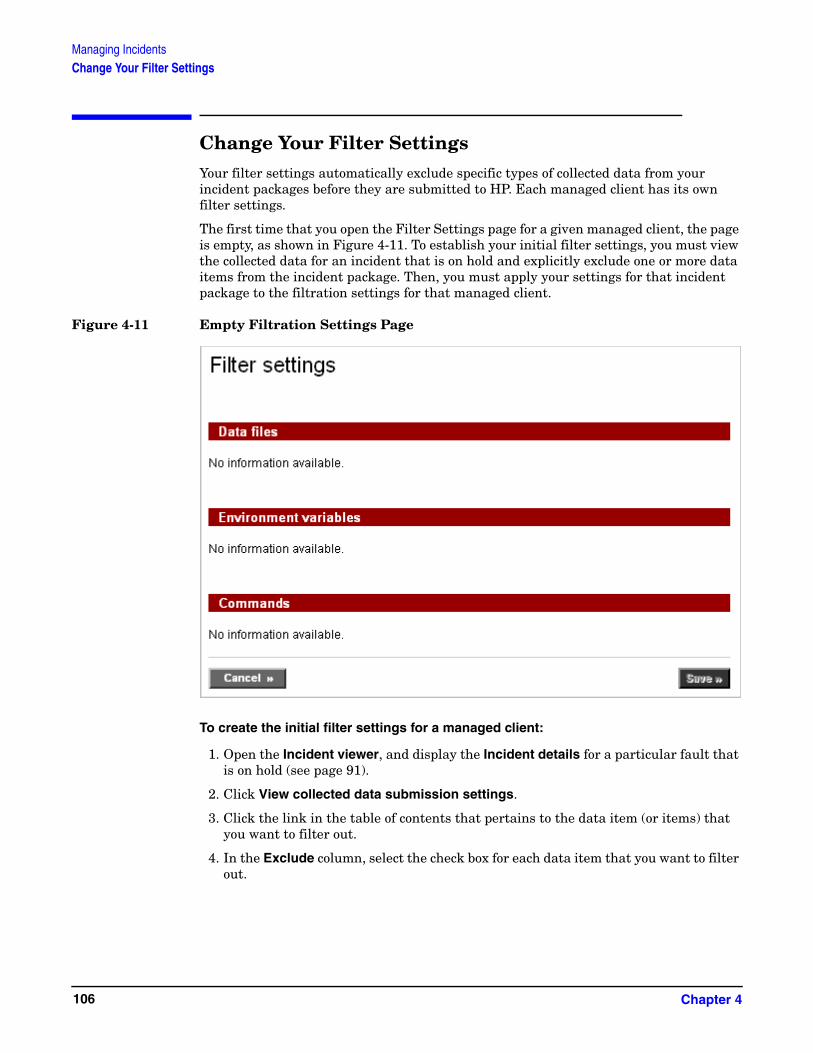
Managing IncidentsChange Your Filter Settings
Change Your Filter SettingsYour filter settings automatically exclude specific types of collected data from your incident packages before they are submitted to HP. Each managed client has its own filter settings.
The first time that you open the Filter Settings page for a given managed client, the page is empty, as shown in Figure 4-11. To establish your initial filter settings, you must view the collected data for an incident that is on hold and explicitly exclude one or more data items from the incident package. Then, you must apply your settings for that incident package to the filtration settings for that managed client.
Figure 4-11 Empty Filtration Settings Page
To create the initial filter settings for a managed client:
1. Open the Incident viewer, and display the Incident details for a particular fault that is on hold (see page 91).
2. Click View collected data submission settings.
3. Click the link in the table of contents that pertains to the data item (or items) that you want to filter out.
4. In the Exclude column, select the check box for each data item that you want to filter out.
Chapter 4106
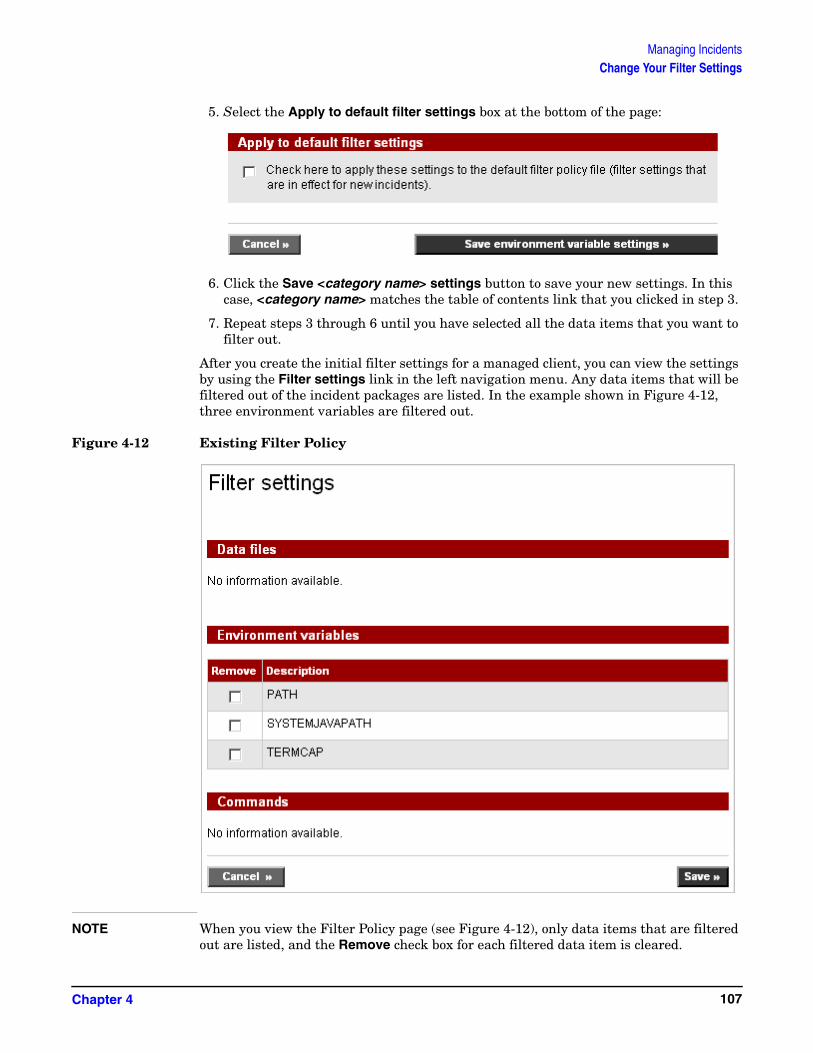
Managing IncidentsChange Your Filter Settings
5. Select the Apply to default filter settings box at the bottom of the page:
6. Click the Save <category name> settings button to save your new settings. In this case, <category name> matches the table of contents link that you clicked in step 3.
7. Repeat steps 3 through 6 until you have selected all the data items that you want to filter out.
After you create the initial filter settings for a managed client, you can view the settings by using the Filter settings link in the left navigation menu. Any data items that will be filtered out of the incident packages are listed. In the example shown in Figure 4-12, three environment variables are filtered out.
Figure 4-12 Existing Filter Policy
NOTE When you view the Filter Policy page (see Figure 4-12), only data items that are filtered out are listed, and the Remove check box for each filtered data item is cleared.
Chapter 4 107

Managing IncidentsChange Your Filter Settings
When you view the Collected Data Filter page for a particular incident (see Figure 4-7 on page 99), all data items are listed, and the Exclude check box is selected for those data items that will be excluded.
To view or modify the filter settings for a managed client:
1. In the managed client view, click the Filter settings link in the left navigation menu. The Filter Settings page opens.
2. In the Remove column, select the check box for any data item that you want to remove from the filter. This allows that data item to be submitted to HP.
3. Click Save to save any changes that you have made.
NOTE You can also change the filter settings for a managed client when you modify the filter settings for a particular incident on that client. See page 100 for additional information.
Chapter 4108
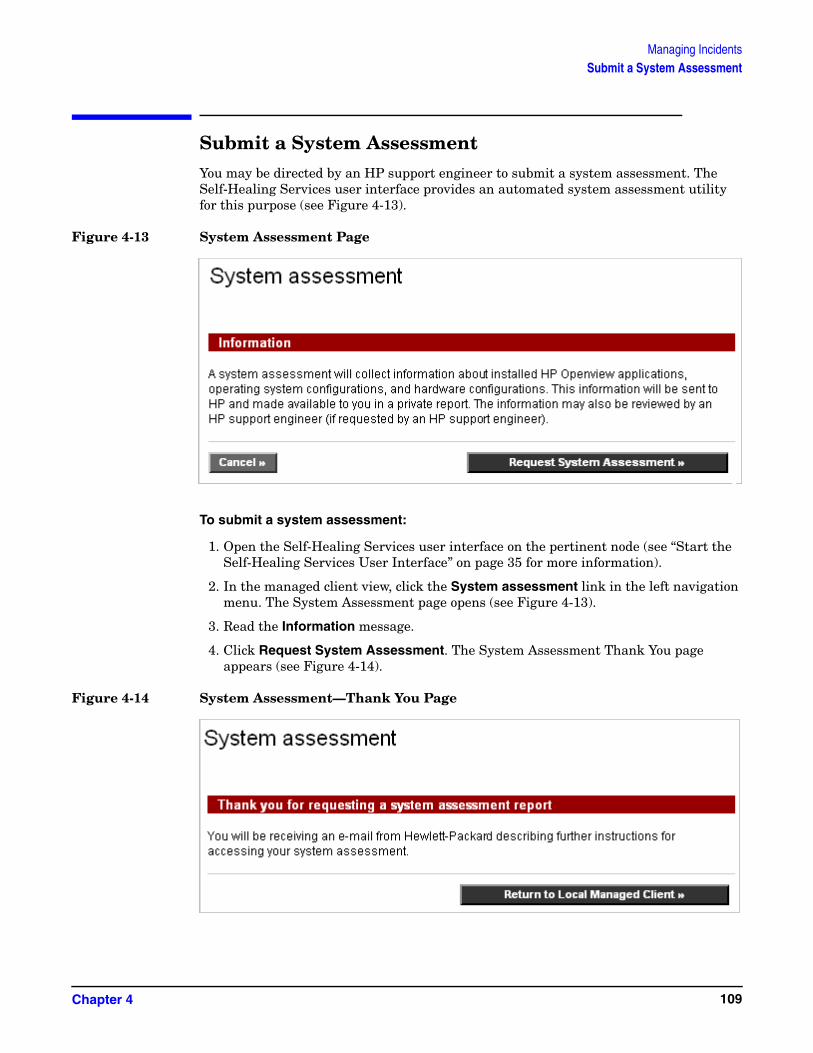
Managing IncidentsSubmit a System Assessment
Submit a System AssessmentYou may be directed by an HP support engineer to submit a system assessment. The Self-Healing Services user interface provides an automated system assessment utility for this purpose (see Figure 4-13).
Figure 4-13 System Assessment Page
To submit a system assessment:
1. Open the Self-Healing Services user interface on the pertinent node (see “Start the Self-Healing Services User Interface” on page 35 for more information).
2. In the managed client view, click the System assessment link in the left navigation menu. The System Assessment page opens (see Figure 4-13).
3. Read the Information message.
4. Click Request System Assessment. The System Assessment Thank You page appears (see Figure 4-14).
Figure 4-14 System Assessment—Thank You Page
Chapter 4 109

Managing IncidentsSubmit a System Assessment
You will receive an e-mail notification containing a link to an incident analysis report that contains the results of your system assessment. Click this link to access your report (see Chapter , “Access the Self-Healing Services Support Web Site,” on page 119).
Chapter 4110

Managing IncidentsManually Submit an Incident
Manually Submit an IncidentIf you experience a problem that is not recognized as a fault by the supported HP OpenView applications on your systems, you can manually submit an incident from the Self-Healing Services user interface (UI). This will trigger the Self-Healing Services process to generate an incident package and submit it to HP for analysis. Manually submitted incidents are processed the same as incidents generated when faults are automatically detected by Self-Healing Services with one exception: fault rules are not applied to manually submitted incidents.
To manually submit an incident:
1. In the managed client view, click the Manual submission link. The Manual Submission page appears.
NOTE You can also submit an incident manually from the configuration center view. You must first choose the managed client that you want to submit the incident. All the managed clients assigned to this configuration center are listed when you click the Manual incident submission link (Figure 4-15 on page 112).
Click the name of the client that you want to manually submit the incident.
If you choose a different client than the one you are currently logged on to, the Sign-in page for that client opens in a new window (see Figure 2-1 on page 35). Sign in to the UI for that client to complete the manual submission process.
2. Select an application for from the Product list. This list contains all the applications supported by the Self-Healing Services client that are installed on this client (see Figure 4-16 on page 112). If you do not see the application that you want to use, click Refresh.
3. Type the actual error text for the incident in the Problem title field.
4. Type a description for the fault in the Problem description field.
5. Click Submit.
If you configured your notification and e-mail server settings so that you receive fault notifications, you should receive a fault notification from Self-Healing Services shortly after you manually submit a fault (see Figure 3-3 on page 53).
You should receive a service notification from Self-Healing Services later indicating that an incident analysis report is available (see Figure 6-5 on page 178). If the incident package fails the entitlement check, however, you will not receive this service notification.
If the incident package fails the entitlement check, you will receive a service notification from Self-Healing Services indicating that the system handle/SAID submitted with the incident package is invalid (see Figure 6-3 on page 176).
You will receive fault and service notifications from HP in the manner you specify on the Notification Settings page of the Self-Healing Services client user interface (see “Configure the Notification Settings” on page 52).
Chapter 4 111
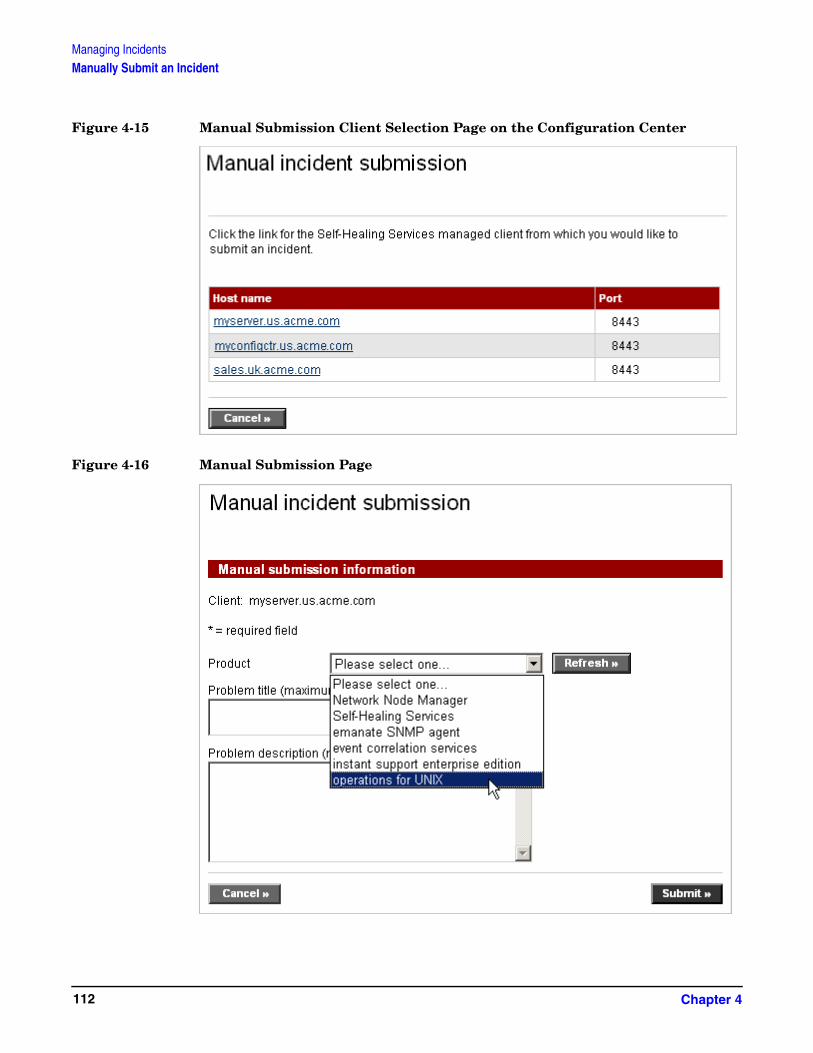
Managing IncidentsManually Submit an Incident
Figure 4-15 Manual Submission Client Selection Page on the Configuration Center
Figure 4-16 Manual Submission Page
Chapter 4112

Managing IncidentsManually Submit an Incident
Chapter 4 113

Managing IncidentsView or Modify Incident Deletion Settings
View or Modify Incident Deletion SettingsYou can specify how long incident packages are stored on each client system. You can also specify how many incident packages can be stored at any given time. These settings help you manage the amount of disk space consumed by incident packages.
To configure the incident deletion settings:
1. In the left navigation menu, click Incident Deletion.
Figure 4-17 Incident Deletion Settings Page
2. If you want to specify how long a particular incident package is stored on this client system, follow these steps:
a. Select Enter the number of days that an incident package will be stored on this system (1 - 999).
b. Enter the number of days an incident can be stored. The default is 30 days. When an incident becomes older than this number of days, it is automatically deleted from the system.
3. If you want to specify how many incident packages can be stored on this client at one time, follow these steps:
a. Select Enter the maximum number of incident packages that can be stored on this system (1 - 99,999).
Chapter 4114

Managing IncidentsView or Modify Incident Deletion Settings
b. Enter the number of incidents that can be stored. The default is 1000. If this limit is exceeded, the oldest incidents on this system are automatically deleted until the total number is equal to this limit.
4. Click Save.
Self-Healing Services runs a deletion cycle once every hour. Therefore, it is possible to temporarily exceed the incident limit between deletion cycles. Consider the following example:
• The incident limit is 100.
• 100 incident packages are stored on the system.
• Two new incidents are generated, making the total number of incidents 102.
After the next deletion cycle, the two oldest incident packages are deleted.
If you set the maximum number of incidents to a number lower than the current number of incidents, Self-Healing Services deletes the surplus incidents at the next deletion cycle. For example:
• The incident limit is 100.
• 100 incident packages are stored on the system.
• You reset the incident limit to 80.
After the next deletion cycle, the 20 oldest incident packages are deleted.
Chapter 4 115

Managing IncidentsView or Modify Incident Deletion Settings
Chapter 4116

5 Incident Analysis Reports
This chapter describes how to access and use your incident analysis reports. These reports are located on the secure HP OpenView Self-Healing Services web site.
Chapter 5 117

Incident Analysis ReportsIn This Chapter
In This ChapterThis chapter contains all the instructions you need to access and use your incident analysis reports on the HP OpenView Self-Healing Services Support web site.
It contains the following topics:
“Access the Self-Healing Services Support Web Site” on page 119
“Find an Incident Analysis Report” on page 124
“The Incident Analysis Report” on page 129
“Open a Support Case” on page 140
“Submit Feedback to HP” on page 146
“Change the System Handle/SAID Associated with an Incident” on page 151
“View Your Support Contract Information” on page 154
“Download Client Software” on page 163
“About HP Passport” on page 166
Chapter 5118

Incident Analysis ReportsAccess the Self-Healing Services Support Web Site
Access the Self-Healing Services Support Web SiteYou can access your Self-Healing Services incident analysis reports from the HP OpenView Self-Healing Services Support web site. From this site, you can also do the following things:
• Review your support contract information.
• Re-associate an incident with a new system handle/SAID.
• Provide feedback to HP regarding an incident analysis report.
• Open a support case for an incident.
• Investigate your HP support contract.
• Download the latest version of the Self-Healing Services or ISEE client.
• View this user guide and the Self-Healing Services Installation Guide online.
To access the HP OpenView Self-Healing Services Support web site:
1. Open a web browser and go to the following address:
http://support.openview.hp.com/software/analysis/main
The HP Passport Sign-In page appears (see Figure 5-1).
2. In the User ID box, type your HP Passport user ID.
3. In the Password box, type your HP Passport password.
4. Click Sign-in.
Chapter 5 119
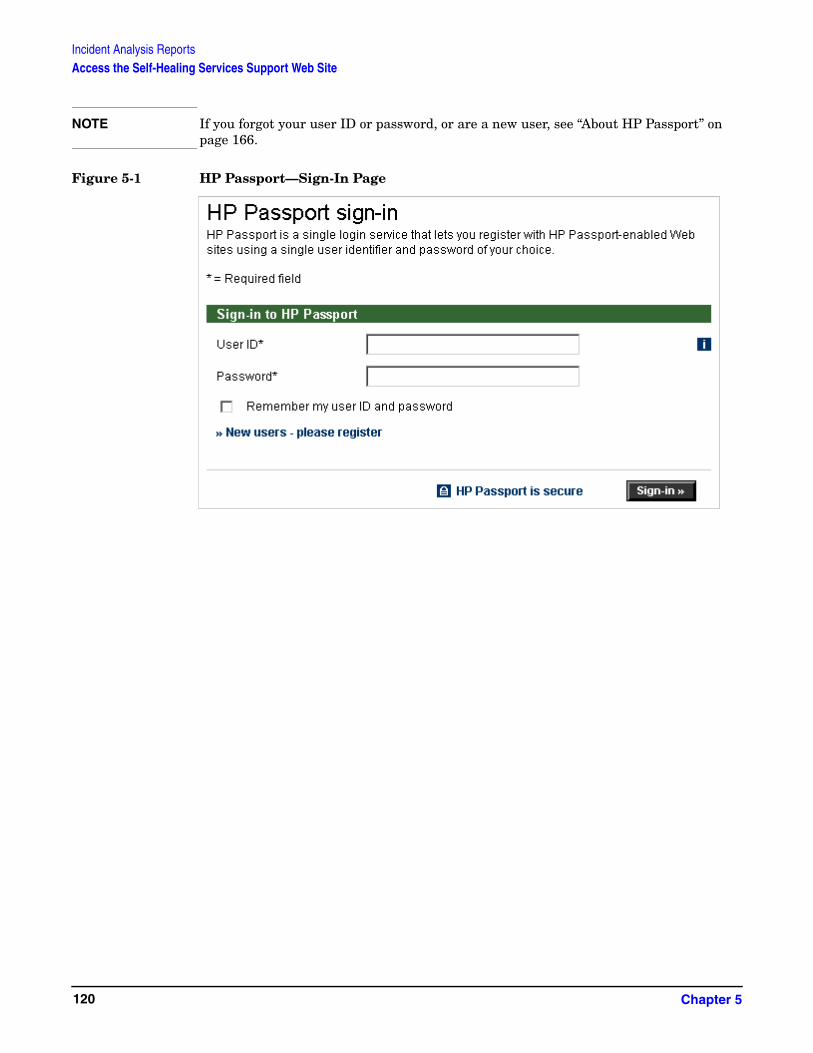
Incident Analysis ReportsAccess the Self-Healing Services Support Web Site
NOTE If you forgot your user ID or password, or are a new user, see “About HP Passport” on page 166.
Figure 5-1 HP Passport—Sign-In Page
Chapter 5120

Incident Analysis ReportsUse the Incident Manager
Use the Incident ManagerAfter you have signed in to HP Passport, the Incident Manager page appears. This page provides a list of links to your incident analysis reports (see Figure 5-2). For each incident listed, it tells you when the incident was created, whether it is open or closed, and what its support case status is.
NOTE Only incidents associated with the system handles/SAIDs in your HP Passport profile are listed on this page.
If you see the Support Contract Information page when you sign in to HP Passport— instead of the Incident Manager page or one of your incident analysis reports—you do not have a valid system handle/SAID in your HP Passport profile.
Click the Support contract info link, and add a valid system handle/SAID to your HP Passport profile. See “View Your Support Contract Information” on page 154 for additional information.
In addition to the incident analysis reports, the Incident Manager page provides links to the following Self-Healing Services functions:
• Find incident analysis reports—use this function to search for reports based on their characteristics (see “Find an Incident Analysis Report” on page 124).
• Re-associate incidents with new system handles/SAIDs—use this function to view an incident that was submitted with an invalid system handle (see “Change the System Handle/SAID Associated with an Incident” on page 151).
• View metric reports summarizing the Self-Healing Services activity in your environment over a specified date range.
• View support contract information—use this function to view the system handles/SAIDs associated with your support contract (see “View Your Support Contract Information” on page 154).
• Download self-healing software—use this function to download a copy of the Self-Healing Services client software or the ISEE client software (see “Download Client Software” on page 163).
The Incident Manager also provides links to the following information resources:
• User’s Guide—full text of the HP OpenView Self-Healing Services User’s Guide.
• Help information—online help for the Self-Healing Services Support web site.
• Installation Guide—full text of the HP OpenView Self-Healing Services Installation Guide for all platforms.
• Product data sheet—technical details about Self-Healing Services.
TIP To return to the Incident Manager page at any time, click the Incident Manager link in the bread crumbs at the top of the page:
Chapter 5 121

Incident Analysis ReportsUse the Incident Manager
Figure 5-2 Incident Manager
Chapter 5122

Incident Analysis ReportsUse the Incident Manager
To view an incident analysis report:
In the Incident ID/Summary column, click the incident ID for the report you want to see.
To sort the incident analysis reports:
1. Click the column header that you want to sort the table by: Incident ID/Summary, Date/Time, Incident status, or Case status.
When you click it, the column header will change to bold type, indicating the current sort column.
2. Optional: Click the column header again to reverse the direction of the sort.
An up-arrow ( ↑ ) in the column header indicates an ascending sort (A→Z, oldest→most recent); a down-arrow ( ↓ ) indicates a descending sort.
NOTE The left navigation menu on the Incident Manager page contains links to the HP OpenView Support web site home page, the self-solve search engine, the software patches page, the support case manager page, and the discussion forums web page.
Figure 5-3 Incident Manager (left navigation menu)
Chapter 5 123

Incident Analysis ReportsFind an Incident Analysis Report
Find an Incident Analysis ReportYou can access an incident analysis report one of three ways:
• Click the incident ID listed in the table on the Incident Manager main page (see page 123).
• Search for the report either by incident ID or by specific criteria using the Find Reports function (see below).
• Click the link to the report in your Report Available service notification e-mail (see page 178).
All three methods require you to sign in to HP Passport before you can view an incident analysis report.
To search for an incident analysis report by incident ID:
1. Access the HP OpenView Self-Healing Services Support web site by using the instructions on page 119.
2. Click the Find incident reports link in the left navigation menu. The Find Incident Analysis Reports page opens (see Figure 5-4 on page 126).
3. In the Enter an incident identifier box, type or paste the incident ID for the report that you want to find.
4. Click Find Report.
TIP The incident ID for a particular report is shown in the Report Available service notification e-mail you received (see Figure 6-5 on page 178).
To search for incident analysis reports by specific criteria:
1. Access the HP OpenView Self-Healing Services Support web site using the instructions on page 119.
2. Click the Find incident reports link in the left navigation menu. The Find Incident Analysis Reports page opens (see Figure 5-4).
3. Required: On the Incident type line, select Fault, System assessment, or both.
A fault report is generated when Self-Healing Services detects a fault in a supported application. A system assessment report is generated when you initiate a system assessment from the Self-Healing Services user interface.
4. Required: On the Incident status line, select Open, Closed, or both.
Incidents are open until you explicitly close them.
5. Required: On the Support case status line, select Open, Closed, Not Created, or any combination of these three options.
If you create a support case for a particular incident, that support case remains open until you explicitly close it.
6. Recommended: Narrow your search by specifying any or all of the following optional search criteria:
Chapter 5124

Incident Analysis ReportsFind an Incident Analysis Report
a. Optional: From the System handle/SAID list, select the system handle or SAID that is associated with the incident analysis reports that you want to find.
If you do not select a specific system handle/SAID, the search will include all valid system handles/SAIDs associated with your HP Passport profile.
NOTE If you do not see the system handle/SAID that you want to specify in the list, add that system handle/SAID to your HP Passport profile. See “About HP Passport” on page 166.
b. Optional: From the Submitted since list, choose the time interval that you want to search.
If you do not specify a time interval, the search will include all time intervals.
c. Optional: From the Product list, choose the HP OpenView product associated with the reports that you want to find.
If you do not specify a product, the search will include all supported products.
d. Optional: From the Managed client list, choose the managed client associated with the reports that you want to find.
If you do not specify a node, the search will include all managed clients for which incident analysis reports exist.
e. Optional: In the Contact last name box, type or paste the last name of the individual specified on the Contact Information page in the Self-Healing Services UI when the reports that you want to find were published.
f. Optional: From the Reports per page list, choose the number of reports that you want to appear on each page in the search results: 10, 20, or 25.
7. Click Find Reports.
The List of Incident Analysis Reports page opens (see Figure 5-5 on page 127).
NOTE Only incident analysis reports associated with valid system handles/SAIDs that you have added to your HP Passport profile are displayed in the search results. Incident analysis reports associated with an expired system handle/SAID are not displayed.
To add system handles/SAIDs to your HP Passport profile, follow the instructions in “View Your Support Contract Information” on page 154.
To view an incident analysis report associated with an expired system handle/SAID, re-associate the incident analysis report with a valid (not expired) system handle/SAID, following the instructions in “Change the System Handle/SAID Associated with an Incident” on page 151.
Chapter 5 125

Incident Analysis ReportsFind an Incident Analysis Report
Figure 5-4 Find Incident Analysis Reports Page
Chapter 5126

Incident Analysis ReportsFind an Incident Analysis Report
Figure 5-5 Results of Find Reports Operation
Chapter 5 127

Incident Analysis ReportsFind an Incident Analysis Report
The List of Incident Analysis Reports page lists the incident IDs for the incident analysis reports that match the search criteria you specified. It shows the date and time each incident was created, the incident’s status, and the incident’s support case status. In the example shown in Figure 5-5 on page 127, the list contains all the reports published in the last 2 days for fault associated with the HP OpenView Network Node Manager (NNM) product.
To view a report, click the incident ID associated with that report.
To perform a new search, click Return to Find Reports.
Chapter 5128
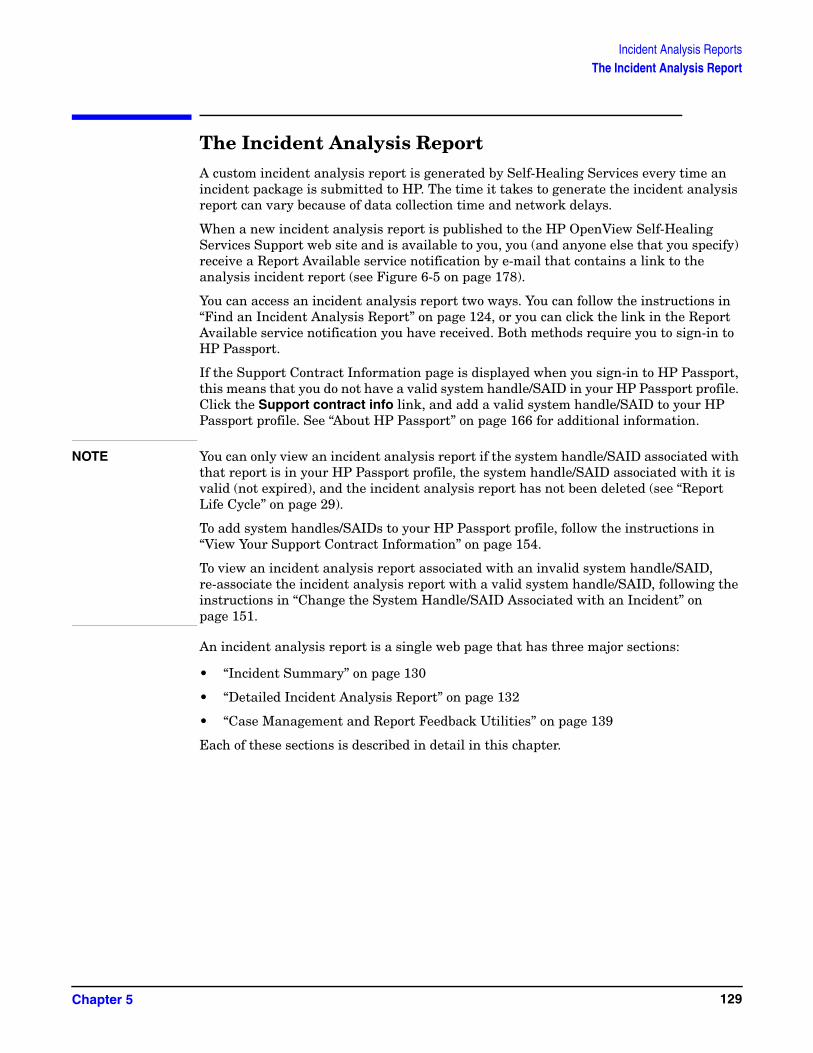
Incident Analysis ReportsThe Incident Analysis Report
The Incident Analysis ReportA custom incident analysis report is generated by Self-Healing Services every time an incident package is submitted to HP. The time it takes to generate the incident analysis report can vary because of data collection time and network delays.
When a new incident analysis report is published to the HP OpenView Self-Healing Services Support web site and is available to you, you (and anyone else that you specify) receive a Report Available service notification by e-mail that contains a link to the analysis incident report (see Figure 6-5 on page 178).
You can access an incident analysis report two ways. You can follow the instructions in “Find an Incident Analysis Report” on page 124, or you can click the link in the Report Available service notification you have received. Both methods require you to sign-in to HP Passport.
If the Support Contract Information page is displayed when you sign-in to HP Passport, this means that you do not have a valid system handle/SAID in your HP Passport profile. Click the Support contract info link, and add a valid system handle/SAID to your HP Passport profile. See “About HP Passport” on page 166 for additional information.
NOTE You can only view an incident analysis report if the system handle/SAID associated with that report is in your HP Passport profile, the system handle/SAID associated with it is valid (not expired), and the incident analysis report has not been deleted (see “Report Life Cycle” on page 29).
To add system handles/SAIDs to your HP Passport profile, follow the instructions in “View Your Support Contract Information” on page 154.
To view an incident analysis report associated with an invalid system handle/SAID, re-associate the incident analysis report with a valid system handle/SAID, following the instructions in “Change the System Handle/SAID Associated with an Incident” on page 151.
An incident analysis report is a single web page that has three major sections:
• “Incident Summary” on page 130
• “Detailed Incident Analysis Report” on page 132
• “Case Management and Report Feedback Utilities” on page 139
Each of these sections is described in detail in this chapter.
Chapter 5 129

Incident Analysis ReportsThe Incident Analysis Report
Incident Summary
The Incident Summary contains basic information that identifies the incident, its status, system information for the managed client on which the fault occurred, the configuration center to which the managed client is assigned, and contact information associated with the incident (see Figure 5-6 on page 130). It also includes the system handle/SAID associated with the incident.
Figure 5-6 Incident Analysis Report—Incident Summary
Chapter 5130

Incident Analysis ReportsThe Incident Analysis Report
From the incident summary, you can view the full description of the incident. You can also close an incident if you no longer need it or reopen an incident that was previously closed.
To view the full incident description:
In the Incident Summary, click View full description. The Incident Description page opens (see Figure 5-7).
Figure 5-7 Incident Description Page
To close an incident:
In the Incident Summary, click Close this incident.
IMPORTANT Closed incidents are deleted from the HP OpenView Self-Healing Services Support web site if they are not re-opened within 90 days (see “Report Life Cycle” on page 29 for further information).
To reopen a closed incident:
In the Incident Summary, click Reopen this incident.
Chapter 5 131

Incident Analysis ReportsThe Incident Analysis Report
Detailed Incident Analysis Report
The detailed Incident Analysis Report section of the report includes the following items:
• Product configuration analysis
• Patch analysis
• Document analysis
• Discussion forum analysis
It may also include a solution note, depending on the product that generated the fault. A solution note provides a solution recommendation and troubleshooting tip for the incident. Figure 5-8 shows an example of a solution note for HP OpenView Operations (OVO) for UNIX:
Figure 5-8 Solution Note Example
NOTE For a particular fault, some components of the report may not be included, or they may be empty. For example, only faults that occur in HP OpenView Operations (OVO) for UNIX and HP OpenView Network Node Manager (NNM) include the product configuration analysis.
Product Configuration Analysis
The product configuration analysis shows the parameter configuration values for the managed client that submitted the incident and compares these values to the minimum required values. Those parameters that do not have a status of “Unacceptable Values.” Those that do have a status of “Acceptable.” To view the configured and required parameter configuration values, click the name of a product in the Product Configuration Analysis table (see Figures Figure 5-9 on page 133 and Figure 5-10 on page 134). Parameter configuration values displayed in red text on the Product Configuration Analysis page are unacceptable values.
Chapter 5132

Incident Analysis ReportsThe Incident Analysis Report
Figure 5-9 Product Configuration Analysis Example (page 1 of 2)
Chapter 5 133

Incident Analysis ReportsThe Incident Analysis Report
Figure 5-10 Product Configuration Analysis Example (page 2 of 2)
Patch Analysis
The patch analysis lists the HP OpenView application patches currently installed on the managed client that submitted the incident. This list only includes patches for applications currently supported by Self-Healing Services; it does not include operating system patches (see Figure 5-11).
Figure 5-11 Patch Analysis Summary Example (page 1 of 2)
The Version column lists the application versions installed on the Self-Healing Services managed client that submitted the incident. The Latest product version column lists the latest application versions available from HP.
Chapter 5134

Incident Analysis ReportsThe Incident Analysis Report
The Patches Available column indicates whether or not more recent patches are available for the application.
To see the list of patches for a specific application, click the name of the application. The detailed Patch Analysis page is displayed (see Figure 5-11 on page 134, Figure 5-12 on page 136, and Figure 5-14 on page 138). This page also lists application patches that are available, but not installed on the managed client. Click the links for each patch on this page to display additional details about the patch, so you can determine whether or not to install the patch on the managed client that submitted the incident.
Chapter 5 135

Incident Analysis ReportsThe Incident Analysis Report
Figure 5-12 Patch Analysis Detail Example for NNM (page 1 of 3)
Chapter 5136

Incident Analysis ReportsThe Incident Analysis Report
Figure 5-13 Patch Analysis Detail Example for NNM (page 2 of 3)
Chapter 5 137

Incident Analysis ReportsThe Incident Analysis Report
Figure 5-14 Patch Analysis Detail Example for NNM (page 3 of 3)
Document Analysis
The document analysis lists the documents in the HP Support Knowledge Base that may contain information relevant to the incident. The documents are listed in order of relevance. The Score column indicates the how relevant a document is to the fault. Scores range from 0% (not relevant) to 100% (perfect match).
If a large number of documents are relevant, only the highest scoring documents are shown on the main page of the detailed Incident Analysis Report. Click the View all document analyses for this incident link to see a comprehensive list. To view one of the documents listed, click its title.
Figure 5-15 Document Analysis Example
Chapter 5138

Incident Analysis ReportsThe Incident Analysis Report
Discussion Forum Analysis
The discussion forum analysis lists messages from the IT Resource Center (ITRC) forums that may contain information relevant to the incident. These messages are listed in order of relevance. Click the Subject links to view the messages. Only the most relevant messages are displayed on the main page of the incident analysis report. To view all the messages identified, click the View all discussion forum analyses for this incident link.
Figure 5-16 Discussion Forum Analysis Example
Case Management and Report Feedback Utilities
The Case Management and Report Feedback section provides links you can use to open a support case for the incident and to provide feedback to HP on the incident analysis report. See “Open a Support Case” on page 140 and “Submit Feedback to HP” on page 146 for further information.
Chapter 5 139
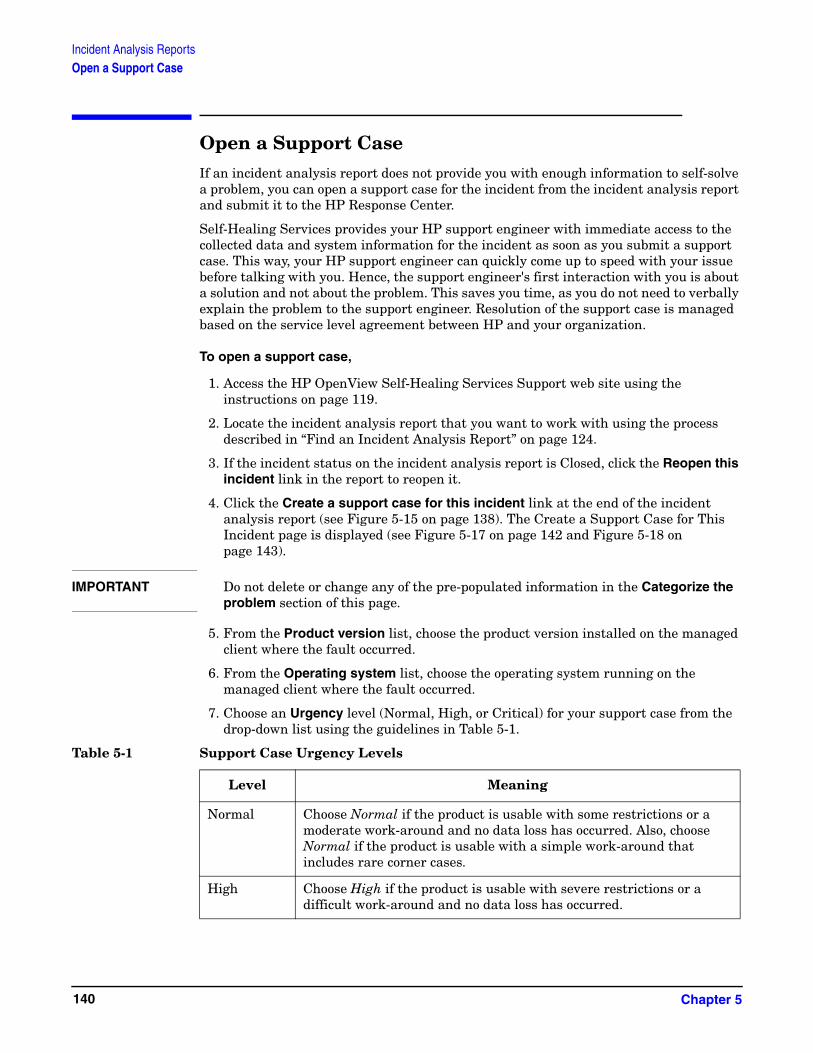
Incident Analysis ReportsOpen a Support Case
Open a Support CaseIf an incident analysis report does not provide you with enough information to self-solve a problem, you can open a support case for the incident from the incident analysis report and submit it to the HP Response Center.
Self-Healing Services provides your HP support engineer with immediate access to the collected data and system information for the incident as soon as you submit a support case. This way, your HP support engineer can quickly come up to speed with your issue before talking with you. Hence, the support engineer's first interaction with you is about a solution and not about the problem. This saves you time, as you do not need to verbally explain the problem to the support engineer. Resolution of the support case is managed based on the service level agreement between HP and your organization.
To open a support case,
1. Access the HP OpenView Self-Healing Services Support web site using the instructions on page 119.
2. Locate the incident analysis report that you want to work with using the process described in “Find an Incident Analysis Report” on page 124.
3. If the incident status on the incident analysis report is Closed, click the Reopen this incident link in the report to reopen it.
4. Click the Create a support case for this incident link at the end of the incident analysis report (see Figure 5-15 on page 138). The Create a Support Case for This Incident page is displayed (see Figure 5-17 on page 142 and Figure 5-18 on page 143).
IMPORTANT Do not delete or change any of the pre-populated information in the Categorize the problem section of this page.
5. From the Product version list, choose the product version installed on the managed client where the fault occurred.
6. From the Operating system list, choose the operating system running on the managed client where the fault occurred.
7. Choose an Urgency level (Normal, High, or Critical) for your support case from the drop-down list using the guidelines in Table 5-1.
Table 5-1 Support Case Urgency Levels
Level Meaning
Normal Choose Normal if the product is usable with some restrictions or a moderate work-around and no data loss has occurred. Also, choose Normal if the product is usable with a simple work-around that includes rare corner cases.
High Choose High if the product is usable with severe restrictions or a difficult work-around and no data loss has occurred.
Chapter 5140

Incident Analysis ReportsOpen a Support Case
8. Review the Case title and Case details supplied by Self-Healing Services, and add any information you feel would be helpful to your support engineer.
9. Review the contact information shown for your case, and make any necessary modifications. The pre-populated e-mail address and telephone number come directly from your HP Passport profile.
If you would like to change this information permanently, click the Edit your profile link at the very top of the page. This will take you to the profile editing functions for your HP Passport account. See “About HP Passport” on page 166 for additional information.
If you want to change the e-mail address and telephone number for this support case but not alter the information stored with your HP Passport profile, edit the pre-populated e-mail address and telephone number information on the form (see Figure 5-18 on page 143). The HP support engineer who is assigned to the support case will only have visibility to the e-mail address and telephone number you have submitted on this form.
10. Click Send Case to submit your support case to the appropriate HP Response Center. The HP Response Center will be selected based on your support system handle or service agreement identifier (SAID).
The Create Support Case - Thank You page is displayed with a summary of the information you provided (see Figure 5-19 on page 144).
Critical Choose Critical if the product is unusable with no work-around, or if data loss or data corruption has occurred. Any failure requiring a restart of the client or server should be submitted as Critical.
Table 5-1 Support Case Urgency Levels (Continued)
Level Meaning
Chapter 5 141

Incident Analysis ReportsOpen a Support Case
Figure 5-17 Create a Support Case for This Incident Page (page 1 of 2)
Chapter 5142

Incident Analysis ReportsOpen a Support Case
Figure 5-18 Create a Support Case for This Incident Page (page 2 of 2)
Chapter 5 143

Incident Analysis ReportsOpen a Support Case
Figure 5-19 Create Support Case—Thank You Page
Chapter 5144

Incident Analysis ReportsOpen a Support Case
Once you create a support case, the Create a support case for this incident link at the end of the incident analysis report is replaced with a View/edit case... link as shown in Figure 5-20. Click this link to see information about your case while it is being addressed by the HP Response Center.
Figure 5-20 Incident Analysis Report page with Support Case Created
NOTE In Figure 5-20, the customer has already provided feedback on the analysis to HP, so the link now reads Provide additional feedback on the analysis of this incident.
Chapter 5 145

Incident Analysis ReportsSubmit Feedback to HP
Submit Feedback to HPYou can submit feedback to HP regarding the quality and usefulness of an incident analysis report by clicking the Provide feedback on the analysis of this incident link at the end of the incident analysis report. Your feedback is used to improve the quality and relevance of the recommended solutions in future Self-Healing Services incident analysis reports.
To submit feedback,
1. Access the HP OpenView Self-Healing Services Support web site using the instructions on page 119.
2. Locate the incident analysis report that you want to work with using the process described in “Find an Incident Analysis Report” on page 124.
3. Click the Provide feedback on the analysis of this incident link at the end of the incident analysis report (see Figure 5-15 on page 138). The Incident Analysis Feedback page is displayed (see Figure 5-21 on page 147 and Figure 5-22 on page 148).
4. Complete the feedback form, providing feedback on how helpful each section of the report was to you, and provide any pertinent comments. Fields marked with an asterisk are required.
5. Click Send Feedback.
6. The Feedback - Thank You page is displayed with a summary of the information you provided (see Figure 5-23 on page 149).
Chapter 5146

Incident Analysis ReportsSubmit Feedback to HP
Figure 5-21 Incident Analysis Feedback Form (page 1 of 2)
Chapter 5 147

Incident Analysis ReportsSubmit Feedback to HP
Figure 5-22 Incident Analysis Feedback Form (page 2 of 2)
Chapter 5148

Incident Analysis ReportsSubmit Feedback to HP
Figure 5-23 Feedback - Thank You Page (1 of 2)
Chapter 5 149

Incident Analysis ReportsSubmit Feedback to HP
Figure 5-24 Feedback - Thank You Page (2 of 2)
Chapter 5150

Incident Analysis ReportsChange the System Handle/SAID Associated with an Incident
Change the System Handle/SAID Associated with an IncidentWhen an incident package is submitted to HP, the system handle/service agreement identifier (SAID) you provided on the Self-Healing Services client user interface (UI) Contact Information page is submitted with it. The system handle/SAID is used for entitlement to HP OpenView Self-Healing Services. If the system handle/SAID is valid, the incident passes the entitlement check. The incident is then “received” by Self-Healing Services, and a custom incident analysis report is generated.
The system handle/SAID submitted with an incident can expire. If it does, you will no longer have access to view the incident or its analysis report until you re-associate the incident with a new valid system handle/SAID and add the new system handle/SAID to your HP Passport profile.
You can change the system handle/SAID associated with any of your submitted incidents from your HP OpenView Self-Healing Support web pages.
To re-associate an incident:
1. Access the HP OpenView Self-Healing Services Support web site using the instructions on page 119.
2. Click the Re-associate incident link in the left navigation menu. The Re-associate Incident page is displayed (see Figure 5-25 on page 152).
3. In the Incident ID box, type or paste the incident ID.
TIP The incident ID can be found in the Report Available service notification you received by e-mail (see Figure 6-5 on page 178).
4. From the System handle/SAID list, choose the new system handle/SAID that you want to associate with the incident.
NOTE If you do not see the system handle or SAID that you want to use in the drop-down list, add the system handle/SAID to the list by clicking the Support contract info link and adding this system handle/SAID to your HP Passport profile as described in “View Your Support Contract Information” on page 154.
5. Select the Update all incidents... box if you also want to re-associate all the incidents associated with the same system handle/SAID as the incident you typed above.
6. Click Next. The Incidents to be Re-associated page is displayed (see Figure 5-26 on page 153).
7. If you approve of the incident re-associations listed on the Incidents to be Re-associated page, click Re-associate Incidents. The System Handle/SAID Updated page is displayed (see Figure 5-27 on page 153).
8. If you do not approve of the incident re-associations listed, click Previous Page, and change your selections.
Chapter 5 151

Incident Analysis ReportsChange the System Handle/SAID Associated with an Incident
Figure 5-25 Re-associate Incident Page
Chapter 5152

Incident Analysis ReportsChange the System Handle/SAID Associated with an Incident
Figure 5-26 Incidents to be Re-associated Page
Figure 5-27 System Handle/SAID Updated page
Chapter 5 153

Incident Analysis ReportsView Your Support Contract Information
View Your Support Contract InformationYou can view and modify your HP support contract information at any time from your HP OpenView Self-Healing Services Support web pages. This information includes all system handles/SAIDs that you have added to your HP Passport profile. The following information is available for each of your system handles/SAIDs:
• Expiration date
• Status (Active or Inactive)
• Number of support contract incidents available for that system handle/SAID.
To view your HP support contract information:
1. Access the HP OpenView Self-Healing Services Support web site using the instructions on page 119.
2. Click the Support contract info link in the left navigation menu. The Support Contract Information page is displayed (see Figure 5-28 on page 155).
To add a system handle/SAID to your profile,
1. In the System handle or SAID box, type or paste the system handle or SAID exactly as it appears in your HP support contract. Your system handle/SAID is case-sensitive.
NOTE Your HP support contract may refer to your System Handle/SAID as your “Support Account Reference.”
2. Click Add System Handle/SAID to Profile. The new system handle/SAID is added to your list.
If you are unable to add a system handle/SAID that you believe to be valid to your HP Passport profile, you can submit a request for HP to research your HP support contract.
To ask HP to research your support contract:
1. Click the Investigate my contracts, system handles, or service agreement identifiers link.
2. Provide as much of the information requested on the Investigate Support Contract page as you can to enable HP to research your support contract (see Figure 5-29 on page 156).
3. Click Submit. The Investigate Support Contract - Thank You page is displayed with a summary of the information you provided (see Figure 5-31 on page 158).
4. Click Continue.
To delete a system handle/SAID from your profile:
1. Click the Delete link for that system handle/SAID. A dialog box opens asking you if you really want to delete this system handle/SAID.
2. Click OK.
Chapter 5154

Incident Analysis ReportsView Your Support Contract Information
To get HP Sales contact information:
Click Contact HP sales for assistance to view a list of HP OpenView resellers, US and Canadian sales contact e-mail addresses and phone numbers, and international sales contact e-mail addresses and phone numbers.
Figure 5-28 Support Contract Information Page
NOTE Anytime that you want to return to the Self-Healing Services support web site, click Finished.
Chapter 5 155
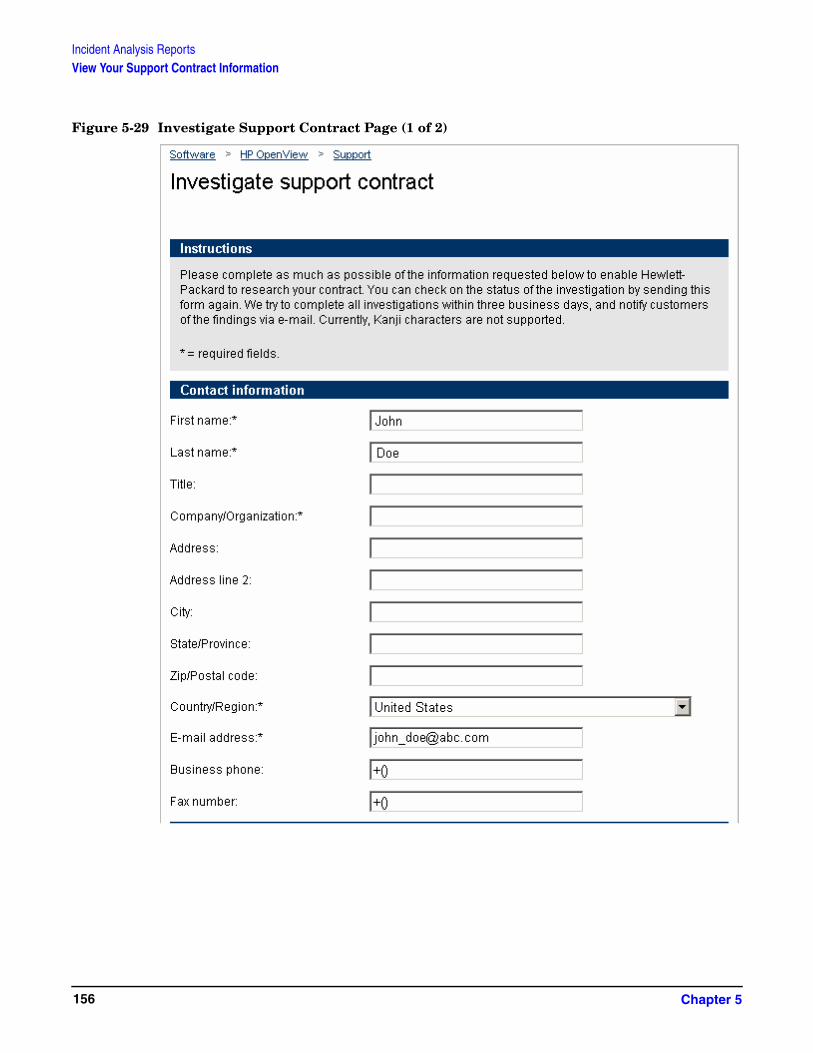
Incident Analysis ReportsView Your Support Contract Information
Figure 5-29 Investigate Support Contract Page (1 of 2)
Chapter 5156

Incident Analysis ReportsView Your Support Contract Information
Figure 5-30 Investigate Support Contract Page (2 of 2)
Chapter 5 157
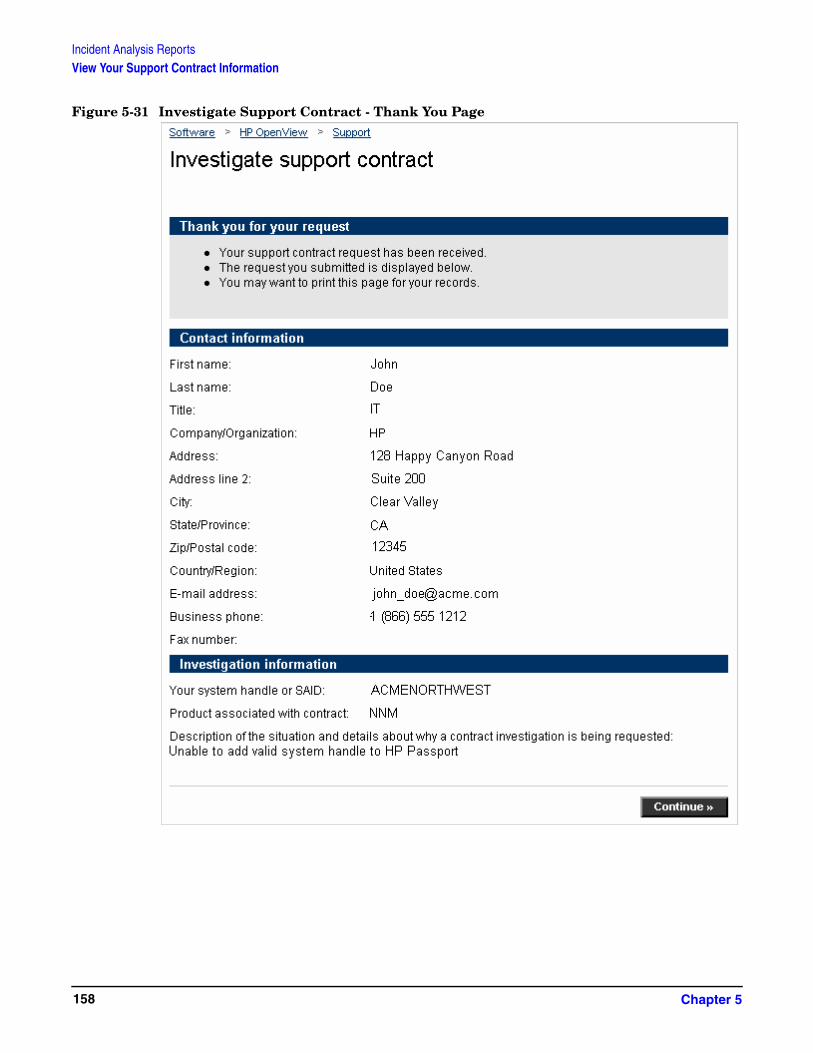
Incident Analysis ReportsView Your Support Contract Information
Figure 5-31 Investigate Support Contract - Thank You Page
Chapter 5158

Incident Analysis ReportsMetric Reports
Metric ReportsMetric reports tally the number of faults that occur, incidents that are generated, or support cases that are opened for a single managed node or for all the managed nodes in a Self-Healing Services managed environment over a specific period of time.
Metric reports provide a snapshot of Self-Healing Services activities that have taken place in your environment over a specified period of time. Using a metric report, you can quickly determine the following things for any or all of your managed nodes:
• Number of faults that were detected
• Number of incidents that were submitted
• Number of support cases that were created
You can create and view metric reports in the Incident Manager on the HP OpenView Self-Healing Services Support web page. When you create a metric report, you can use the following filter criteria:
— HP OpenView product (or products)
— Managed node (or nodes)
— Date range
— System handle (or SAID)
You can create metric reports for one particular managed node or all the managed nodes associated with the system handle/SAID that you specify. Likewise, you can create reports for one specific product or all products associated with that system handle/SAID.
There are three types of metric reports available:
Report Type Description
Incident frequency report An incident frequency report shows you how many times a particular incident occurred during the specified time period. The data is summarized by month.
Sample incident frequency report
Fault frequency report A fault frequency report shows you the total number of incidents that occurred during the specified time period. The data is summarized by month. Unlike the incident frequency report, the fault frequency report does not indicate which specific incidents occurred or which HP OpenView products were involved.
Sample fault frequency report
Case creation report A case creation report shows you how many support cases were created during the specified time period. The data is organized by managed node and then by product. The total number of support cases is shown for each managed node included in the report.
Sample case creation report
Chapter 5 159

Incident Analysis ReportsMetric Reports
NOTE These reports only include incidents that are associated with actual faults. They do not include incidents associated with system assessments, audits, additional data submissions, or connectivity tests.
TIP Metric reports are presented in portable document format (PDF). To view a metric report, you must use the Adobe Acrobat Reader. You can download a free copy of the reader at the following web site:
http://www.adobe.com
View your metric reports
You can view existing metric reports using the Incident Manager at the HP OpenView Self-Healing Services Support web site. You must have an active support contract and valid HP Passport sign-in to view your reports.
To access the HP OpenView Self-Healing Services Support web site:
1. Open a web browser and go to the following address:
http://support.openview.hp.com/software/analysis/main
The HP Passport Sign-In page opens.
2. In the User ID box, type your HP Passport user ID.
3. In the Password box, type your HP Passport password.
4. Click Sign-in.
To view an existing metric report:
1. In the left navigation menu, click Metric reports.
The Metric Report page appears. The reports are listed in order from most recent to least recent. Any reports generated during the last 24 hours have a icon. Only the 20 most recent reports created during the last 30 days are listed. Reports more than 30 days old are removed from the system.
2. To view a report, click the Date/Time generated link for that report.
The File Download dialog opens.
3. Choose one of the following options:
• Click Open to view the report from its current location.
The PDF file containing the report is displayed in a new window.
• Click Save to save a copy of the report locally.
Browse to a location of your choice, and save the PDF file.
Chapter 5160

Incident Analysis ReportsMetric Reports
Create a metric report
A metric report is truly a snapshot in time. After a metric report is created, it is not updated as new information becomes available. You can create a new metric report at any time, however, using the Metric Report page on the HP OpenView Self-Healing Services web site.
Before you can work with metric reports, you must log on to the web site using HP Passport. See view your metric reports for details. The following instructions assume that you have logged on and are now viewing the Metrics Report page.
To create a new metric report:
1. Click the Create New Report button.
The Create New Report page opens.
2. In the Description of report box, type a description for your report that will differentiate it from the other reports in the list.
3. From the Report type list, choose the type of report that you want to create.
For information about report types, see page 159.
4. From the System Handle/SAID list, choose the system handle (or SAID) that is associated with the faults, incidents, or support cases that you want to work with.
5. Optional: From the Product list, choose the specific HP OpenView product whose faults, incidents, or support cases you want to view, or choose All products.
6. Optional: From the Managed node list, choose the specific managed node that you want to work with, or choose All managed nodes.
7. Click the calendar button to the right of the Start date box, and choose the date that you want to start the reporting interval.
8. Click the calendar button to the right of the End date box, and choose the date that you want to end the reporting interval.
9. In the E-mail address box, type your e-mail address.
The E-mail address box is prepopulated with the e-mail address from your HP Passport profile. You can specify a different address if you prefer.
10. Click Create Report.
The Thank You page appears. After Self-Healing Services creates your report, it sends you an e-mail notifying you that the report is available and providing a link that you can click to view the report.
Copy a metric report
You can use an existing metric report as a template for a new report. This saves you time, for example, if you want to generate the same report you created last month and simply change the dates and title.
Before you can work with metric reports, you must log on to the web site using HP Passport. See view your metric reports for details for details. The following instructions assume that you have logged on and are now viewing the Metrics Report page.
Chapter 5 161

Incident Analysis ReportsMetric Reports
To copy an existing metric report:
1. On the Metric Reports page, click the Copy link for the report that you want to copy.
The Copy of a Report page appears. The fields on this page are filled out identically to the report you copied.
2. Change any of the fields that you want to customize for the new report. To return all the fields to the state they were in when you clicked the Copy link, click Reset.
3. Click Create Report.
The Thank You page appears. After Self-Healing Services creates the new report, it sends you an e-mail notifying you that the report is available and providing a link you can click to view the report.
Delete a Metric Report
You can delete any metric report that you have the ability to view. After a report is deleted, it cannot be retrieved.
Before you can work with metric reports, you must log on to the web site using HP Passport. See view your metric reports for details. The following instructions assume that you have logged on and are now viewing the Metrics Report page.
To delete a metric report:
1. On the Metric Reports page, click the Delete link for the report that you want to delete.
2. Click OK to delete the report.
The report is deleted, and the table of reports is updated to reflect this.
Chapter 5162

Incident Analysis ReportsDownload Client Software
Download Client SoftwareYou can download the latest Self-Healing Services and/or ISEE client software from your HP OpenView Self-Healing Services Support web pages.
To download client software:
1. Access the HP OpenView Self-Healing Services Support web site using the instructions on page 119.
2. Click the Downloads link. The Download Software page is displayed.
3. In the Downloads section of the page, click the Self-Healing Services or ISEE client link for the operating system running on the node where you will install it.
4. Read the HP Software License Terms.
5. Click I Agree if you accept the terms of the license.
6. Click Save.
7. Browse to the directory where you want to store the downloaded file.
8. Click Save.
In addition to the client software, you can download the following documents from the Self-Healing Services Download Software page:
• HP OpenView Self-Healing Services User’s Guide
• HP OpenView Self-Healing Services Installation Guide
• Quick Installation & Configuration Guides for the Self-Healing Services Client
• Quick Installation & Configuration Guides for the ISEE Client
• Frequently Asked Questions (FAQ)
• Self-Healing Services Data Sheet
Chapter 5 163

Incident Analysis ReportsDownload Client Software
• Self-Healing Services White Paper
NOTE You can also reach the Download Software page using the link in the Self-Healing Services user interface or directly using the following web address:
http://support.openview.hp.com/self_healing_downloads.jsp
Chapter 5164
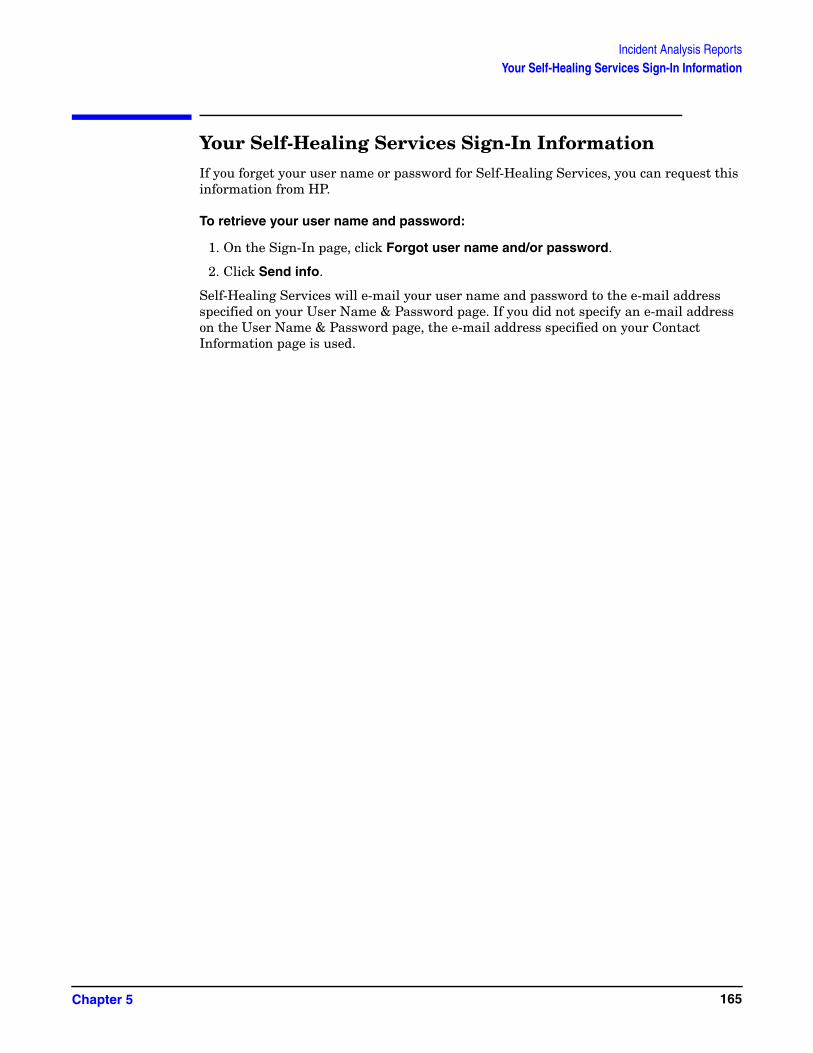
Incident Analysis ReportsYour Self-Healing Services Sign-In Information
Your Self-Healing Services Sign-In InformationIf you forget your user name or password for Self-Healing Services, you can request this information from HP.
To retrieve your user name and password:
1. On the Sign-In page, click Forgot user name and/or password.
2. Click Send info.
Self-Healing Services will e-mail your user name and password to the e-mail address specified on your User Name & Password page. If you did not specify an e-mail address on the User Name & Password page, the e-mail address specified on your Contact Information page is used.
Chapter 5 165

Incident Analysis ReportsAbout HP Passport
About HP PassportHP Passport is a single login service that lets you register with HP Passport-enabled web sites using a single user identifier and password of your choice. HP Passport stores your basic personal information—user ID, password, name, e-mail address, country and language preferences—so you don't have to retype it when you return to one of HP's many web sites in the future.
HP Passport profile information is protected by industry-standard encryption technology and follows strict HP privacy policies.
If you have forgotten you HP Passport password, you must establish a new password.
To establish a new HP Passport password,
1. Click the Forgot password link. The Forgot Your HP Passport Password page is displayed (see Figure 5-32).
2. Type your User ID.
3. Type your E-mail address.
4. Click Submit. An e-mail will be sent to your e-mail address.
5. When you receive the e-mail, click the web link in the e-mail.
6. Type your User ID.
7. Click Next.
8. In the New password box, type a new password.
9. In the Confirm new password box, type your new password again.
10. Click Submit.
Chapter 5166

Incident Analysis ReportsAbout HP Passport
Figure 5-32 Forgot Your HP Passport Password Page
Chapter 5 167

Incident Analysis ReportsAbout HP Passport
If you are new to HP Support, you must create a new HP Passport user account.
To create a new HP Passport account:
1. Click the New users - please register link. The HP Passport New User Registration page is displayed (see Figure 5-33 on page 169).
2. Type the User ID and Password you want to use when you sign-in to HP Passport.
3. In the Confirm password box, type your password in again.
4. Type your First name, Last name, and E-mail address.
5. From the respective drop-down lists, select your Preferred language and your Country/region of residence.
6. In the HP Privacy Policy, select the appropriate radio buttons to specify how you want HP to contact you.
7. Optional: If you want to provide business or home contact information, click Optional Contact Information, and fill in the information that you want to provide.
8. Click Continue. This creates your HP Passport account.
9. To use your account with Self-Healing Services, you will need to add at least one system handle or SAID to your HP Passport profile. See “View Your Support Contract Information” on page 154 for additional information.
Chapter 5168

Incident Analysis ReportsAbout HP Passport
Figure 5-33 HP Passport New User Registration Page
Chapter 5 169

Incident Analysis ReportsAbout HP Passport
Chapter 5170

6 Understanding Service Notifications
This chapter describes the Self-Healing Services service notifications you will receive from HP when you install Self-Healing Services, when an incident is submitted to HP through Self-Healing Services, when a fault is submitted to HP with an invalid system handle/SAID, or when you upload additional data for an open support case and submit it to HP through Self-Healing Services.
Chapter 6 171

Understanding Service NotificationsIn This Chapter
In This ChapterThis chapter describes the following service notifications:
“Welcome to Self-Healing Services Notification” on page 173
“Entitlement Action Required Notification” on page 174
“Report Available Notification” on page 178
“Additional Data Received Notification” on page 180
Chapter 6172

Understanding Service NotificationsWelcome to Self-Healing Services Notification
Welcome to Self-Healing Services NotificationYou will receive a Welcome to HP OpenView Self-Healing Services notification when the Self-Healing Services client is successfully installed and your connection to HP using ISEE is operating correctly (see Figure 6-1). You will also receive this notification each time you change your Contact Information in the Self-Healing Services client user interface and click the Save and Send Connectivity Test button.
Figure 6-1 Welcome to HP OpenView Self-Healing Services Notification
Chapter 6 173

Understanding Service NotificationsEntitlement Action Required Notification
Entitlement Action Required NotificationIf an incident or system assessment is submitted to HP with an invalid system handle or service agreement identifier (SAID), you will receive a service notification by e-mail informing you there is an entitlement issue and the incident cannot be processed by HP until it is corrected (see Figure 6-3 and Figure 6-4).
The following conditions will cause entitlement problems:
• Your support contract has expired.
• Your system handle or SAID has changed.
• You typed your system handle or SAID incorrectly when you customized your contact information using the Self-Healing Services client user interface (see Figure 3-7 on page 62)
NOTE Your system handle is case-sensitive, so make sure your customer-specific HP OpenView application system handle or SAID in the System handle/SAID field on the Contact Information page exactly matches what appears in your HP support contract.
To correct an entitlement issue:
1. Read the entire e-mail message.
2. Click the link in the e-mail. If you are not already signed in to HP Passport, The HP Passport Sign-In page opens.
3. If the HP Passport Sign-In page opens, sign in to HP Passport. See “Access the Self-Healing Services Support Web Site” on page 119 for additional information.
After you sign in to HP Passport, the Invalid System Handle/SAID page opens (see Figure 6-2).
4. From the System handle/SAID list, select the system handle or SAID that you want to associate with the incident from the list.
If the system handle or SAID that you want to use does not appear in the list, follow these steps:
a. Click the support contract information to update your system handles/SAIDs link at the bottom of the page.
b. Follow the instructions on page 154 to add the system handle or SAID to your HP Passport profile. Remember that your system handle/SAID is case-sensitive.
5. Follow the instructions in “Change the System Handle/SAID Associated with an Incident” on page 151 to re-associate the valid system handle/SAID with the incident.
6. On the configuration center to which the managed client that submitted the incident is assigned, delete the invalid system handle/SAID, and replace it with a valid one (see“Change Your Contact Information” on page 61 for instructions).
Chapter 6174

Understanding Service NotificationsEntitlement Action Required Notification
NOTE If you are unable to correct the entitlement issue, you can initiate an investigation of your support contract from the Support Contract Information page (see Figure 5-28 on page 155) by clicking the Investigate my contracts, system handles, or service agreement identifiers link.
Figure 6-2 Invalid System Handle/SAID page
Chapter 6 175

Understanding Service NotificationsEntitlement Action Required Notification
Figure 6-3 Entitlement Action Required Notification for an Incident
Chapter 6176

Understanding Service NotificationsEntitlement Action Required Notification
Figure 6-4 Entitlement Action Required Notification for a System Assessment
Chapter 6 177

Understanding Service NotificationsReport Available Notification
Report Available NotificationWhen an incident is submitted to HP, a custom analysis incident report is created for that incident and published to a private HP OpenView Self-Healing Services Support web page. Once the analysis incident report is available on the web, you will receive a service notification containing a link to the analysis incident report (see Figure 6-5).
Figure 6-5 Report Available Notification
Chapter 6178

Understanding Service NotificationsAdditional Data Requested Notification
Additional Data Requested NotificationIf you have opened a support case for a particular incident, you may receive a request from Self-Healing Services for additional data. If a support engineer requests additional data about the incident, you will receive a notification asking you to view the incident analysis report and retrieve the request. You can fulfil the request by using the upload additional data function on the Self-Healing Services client user interface on the node where the incident occurred.
Figure 6-6 Additional Data Requested Notification Example
Chapter 6 179

Understanding Service NotificationsAdditional Data Received Notification
Additional Data Received NotificationYou can provide HP with additional data pertaining to a previously submitted incident by uploading a file and submitting it to HP from the Incident Details page (see Figure 4-3 on page 94). Shortly after you submit additional data for an incident, you will receive a service notification indicating that the additional data was received and containing a link to view the incident package (see Figure 6-7 for an example).
Figure 6-7 Additional Data Received Notification
Chapter 6180

Understanding Service NotificationsMetric Report Available Notification
Metric Report Available NotificationAfter Self-Healing Services generates a metric report for you, it sends you a service notification e-mail with instructions for accessing the report.
Figure 6-8 Metric Report Available
Chapter 6 181

Understanding Service NotificationsMetric Report Available Notification
Chapter 6182

7 Troubleshooting Information
This chapter contains information you can use to troubleshoot problems with your Self-Healing Services managed environment.
Chapter 7 183

Troubleshooting InformationUnderstanding Potential Problem Locations
Understanding Potential Problem LocationsThe self-healing process has six primary steps, as discussed in “Self-Healing Process” on page 27. The first two steps, fault detection and data collection, take place entirely on the managed clients. The next step, data transport, takes place through ISEE. The ISEE client, which initiates the data transport, runs on one or more communication gateways and sends data to an HP ISEE server. The following three steps - entitlement verification, analysis, and reporting and notification - are initiated on a collection of HP OpenView support servers.
Self-Healing Services Process
Problems can potentially occur during each of these six primary steps or between them. The first trouble- shooting task is to pinpoint the location of the problem. After you identify the location of the problem, you can proceed to determine its root cause and take action to resolve it.
Fault Detection Problems
Fault detection problems can occur for a number of reasons. For example, the Self-Healing Services client may not be installed correctly or the client may not be running. The OpenView application being monitored may not be able to communicate with the Self-Healing Services client. The fault rules may have been customized to suppress or ignore all potential faults.
Data Collection Problems
The Self-Healing Services client can fail to collect data when a fault occurs. You can view the data collected for a fault instance using the Incident Viewer (see “View Incidents and Collected Data” on page 91). If an error has occurred in the data collection process, an error message will be displayed in the Incident Viewer.
Data Transport Problems
Incident packages are transported to HP using the ISEE client installed on the communication gateway(s). If the ISEE client was not installed properly, it will be unable to send incident packages to HP. If the ISEE client cannot connect to the ISEE server, it will be unable to send incident packages to HP. This can occur, for example, if your Web proxy settings are not specified correctly in your ISEE client configuration.
Chapter 7184

Troubleshooting InformationUnderstanding Potential Problem Locations
Entitlement Verification Problems
Entitlement problems can occur if your system handle/service agreement identifier (SAID) has expired or if the system handle/SAID you provided in the Self-Healing Services client user interface (UI) Contact Information page is invalid.
Analysis Problems
Problems during data analysis are extremely rare. If Self-Healing Services cannot complete an incident analysis, it will send you a service notification by e-mail.
Reporting and Notification Problems
Reporting and notification problems can occur if the e-mail addresses specified in the Self-Healing Services client user interface Notification Settings page are invalid. These problems can also occur if either the OVO message browser or the NNM browser was specified as the preferred notification method and that browser is not running on your system.
The fault and service notifications you receive from HP will contain garbled (unreadable) text if your mail reader does not support UTF-8 encoding and you selected the UTF-8 check box on your Self-Healing Services client user interface Contact Information page for your configuration center. This is also true of any persons you have selected to receive your service notifications from HP on your Self-Healing Services client user interface Notification Settings page.
Chapter 7 185

Troubleshooting InformationDiagnosing a Problem Using E-Mail Messages
Diagnosing a Problem Using E-Mail MessagesThe first sign that Self-Healing Services may not be operating correctly can be found in your e-mail box. If a fault is detected and the self-healing process is successfully executed, you will receive a service notification by e-mail indicating that an Incident Analysis Report is available for review from the HP OpenView Self-Healing Services Support web site (see “Report Available Notification” on page 178).
If you do not receive this service notification, there may be a problem with your installation or configuration. Self-Healing Services will also send you a service notification if a submitted incident package fails the entitlement check (see “Entitlement Action Required Notification” on page 174).
In all, Self-Healing Services sends four different types of service notifications (see Chapter 6, “Understanding Service Notifications,” on page 171 for further information). These service notifications and the likely location of the problem are summarized in Table 7-1.
Table 7-1 E-Mail Messages Sent By Self-Healing Services
Type Service Notification Likely Location of Problem
1 Welcome to Self-Healing Services Notification
If you do not receive this notification after performing a connectivity test, you likely have a problem with your installation or configuration. See “Test Your Installation” on page 87 of the HP OpenView Self-Healing Services Installation Guide for additional information.
2 Report Available Notification
If you do not receive this notification when Self-Healing Services submits a fault to HP, you likely have a problem with your installation or configuration. See “Test Your Installation” on page 87 of the HP OpenView Self-Healing Services Installation Guide for additional information.
3 Entitlement Action Required Notification
This service notification provides instructions about how to change the system handle/SAID associated with the incident package or edit your HP Passport profile to include the system handle/SAID.
Chapter 7186

Troubleshooting InformationDiagnosing a Problem Using E-Mail Messages
4 Additional Data Received Notification
If you do not receive this notification when you submit additional data for a previously submitted fault to HP using the Self-Healing Services UI, you likely have a problem with your configuration or installation. See “Test Your Installation” on page 87 of the HP OpenView Self-Healing Services Installation Guide for additional information.
Table 7-1 E-Mail Messages Sent By Self-Healing Services
Type Service Notification Likely Location of Problem
Chapter 7 187

Troubleshooting InformationDiagnosing a Problem Using Error Messages
Diagnosing a Problem Using Error MessagesAnother sign that Self-Healing Services may not be operating correctly can be found in your Self-Healing Services log file, auditFile.txt. The following error messages can appear in this file.
Table 7-2 Error Messages Logged By Self-Healing Services
Description Implications How to Troubleshoot the Problem
Unable to connect to https://<hostname>:8443
This message appears in the web browser; it is not logged in auditFile.txt
A port conflict with the Self-Healing Services client has occurred.
Determine whether port 8443 is being listened to by typing the command:
HP-UX and Solaris:netstat -an|grep <port number>
Windows:netstat -an|more
NOTE: The default port number is 8443. If you changed the port number, it will be different. If port 8443 is not being listened to, stop and restart the Self-Healing Services client following the instructions in “Start or Stop the Self-Healing Services Client” on page 91 in the HP OpenView Self- Healing Services Installation Guide.
NOTE: Be sure to wait a few minutes after starting Self-Healing Services before attempting to access the Self-Healing Services client user interface.
If port 8443 is being listened to, you likely have a firewall between the machine running the web browser and the machine running the Self-Healing Services client. You can either open the port on your firewall or change the port on which your firewall allows traffic.
See “Change the Self-Healing Services Client Port” on page 90 of the HP OpenView Self-Healing Services Installation Guide for additional information.
Chapter 7188

Troubleshooting InformationDiagnosing a Problem Using Error Messages
This page cannot be displayed.
This message appears in the web browser; it is not logged in auditFile.txt
The URL may have specified http instead of https.
Be sure to specify https://<hostname>:<portnumber> to start the Self-Healing Services user interface.
Application Monitor could not be started due to initialization error.
Internal errors, such as a configuration file syntax error or an I/O error, have occurred.
Call HP Support.
Table 7-2 Error Messages Logged By Self-Healing Services (Continued)
Description Implications How to Troubleshoot the Problem
Chapter 7 189

Troubleshooting InformationDiagnosing a Problem Using Error Messages
Error messages pertaining to potential port conflicts.
There may be port conflicts between Self-Heaing Services and other applications. For example, there are known default port conflicts between NNM 7.5 and Self-Healing Services.
Normally, the Self-Healing Services shutdown port must be changed to eliminate conflicts.
To determine whether a port conflict exists, look for indicators in the following files:
Windows:
<logDir>\stdout.log
<logDir>\stderr.log
In this case, <logDir> is as follows:
<installDir>\nonOV\tomcat\a\logs
where <installDir> is the directory in which Self-Healing Services is installed. By default this is C:\Program Files\HP OpenView
HP-UX or Solaris:
<installDir>/nonOV/tomcat/a/logs/catalina.out
By default, <installDir> is /opt/OV.
You can determine the Self-Healing Services HTTPS port by using the following command:
Windows:
cscript <installDir>/bin/OvTomcatCtl.vbs –getconf
HP-UX or Solaris:
<installDir>/bin/ovtomcatctl –getconf
For information about changing ports, run the ovtomcatctl command with the -help option:
Windows:
cscript <installDir>/bin/OvTomcatCtl.vbs –help
HP-UX or Solaris:
<installDir>/bin/ovtomcatctl –help
Table 7-2 Error Messages Logged By Self-Healing Services (Continued)
Description Implications How to Troubleshoot the Problem
Chapter 7190

Troubleshooting InformationDiagnosing a Problem Using Error Messages
Table 7-3 Error Messages Logged By ISEE
Description Implications How to Troubleshoot the Problem
Unable to connect to http://<client-node-name>:5060/start.html
Logged in
HP-UX and Solaris: /var/opt/hpservices/log/mad.log
Windows:C:\Program Files\Hewlett-Packard\ISEE\MotiveChorus\log\mad.log
A port conflict with the ISEE client has occurred.
Uninstall and reinstall the ISEE client. If that does not solve the problem, contact HP OpenView support.
Chapter 7 191
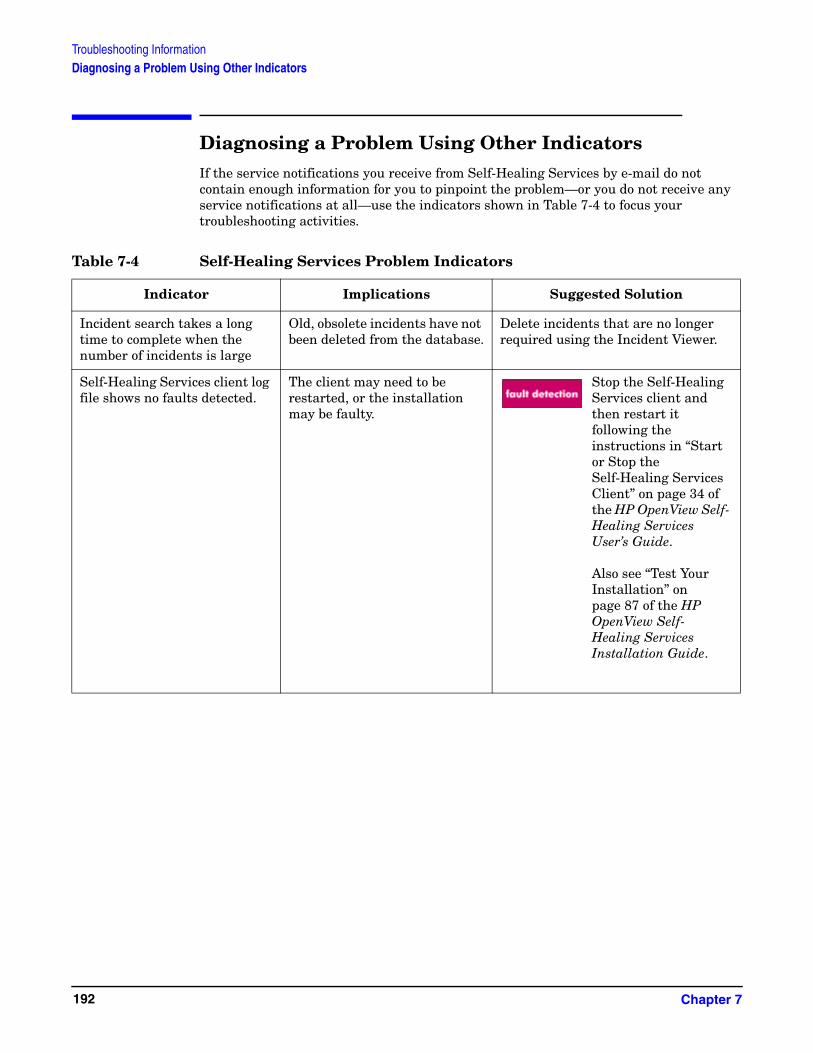
Troubleshooting InformationDiagnosing a Problem Using Other Indicators
Diagnosing a Problem Using Other IndicatorsIf the service notifications you receive from Self-Healing Services by e-mail do not contain enough information for you to pinpoint the problem—or you do not receive any service notifications at all—use the indicators shown in Table 7-4 to focus your troubleshooting activities.
Table 7-4 Self-Healing Services Problem Indicators
Indicator Implications Suggested Solution
Incident search takes a long time to complete when the number of incidents is large
Old, obsolete incidents have not been deleted from the database.
Delete incidents that are no longer required using the Incident Viewer.
Self-Healing Services client log file shows no faults detected.
The client may need to be restarted, or the installation may be faulty.
Stop the Self-Healing Services client and then restart it following the instructions in “Start or Stop the Self-Healing Services Client” on page 34 of the HP OpenView Self- Healing Services User’s Guide.
Also see “Test Your Installation” on page 87 of the HP OpenView Self- Healing Services Installation Guide.
Chapter 7192

Troubleshooting InformationDiagnosing a Problem Using Other Indicators
The Self-Healing Services client log file indicates that a fault has been detected but data has not been collected.
The client may need to be restarted, or the installation may be faulty. The permissions on the files accessed during data collection may be restrictive.
You can stop and restartthe Self-Healing Services client at any time following the instructions “Start or Stop the Self-Healing Services Client” on page 91 of the HP OpenView Self- Healing Services Installation Guide.
Also see “Test Your Installation” on page 87 of the HP OpenView Self- Healing Services Installation Guide.
Table 7-4 Self-Healing Services Problem Indicators (Continued)
Indicator Implications Suggested Solution
Chapter 7 193

Troubleshooting InformationDiagnosing a Problem Using Other Indicators
You forgot your Self-Healing Services username or password.
You need to request that your username and password be e-mailed to you or reset your username and password to their initial state:username = adminpassword = admin
To request that your username and password be e-mailed to you, click the Forgot username and/or password? link on the Self-Healing Services client user interface sign-in page. Then, click [Send Info] on the next page displayed to have Self-Healing Services e-mail your username and password to the e-mail address provided on the Username & Password page.
To reset your username and password to their initial state, do the following:
First, copy the login.xml file from:HP-UX and Solaris:/opt/OV/newconfig/shsto /var/opt/OV/conf
Windows:C:\Program Files\HP OpenView\newconfig\shsto C:\Program Files\HP OpenView\data\Conf
Then, stop and restart the Self-Healing Services client following the instructions in “Start or Stop the Self-Healing Services Client” on page 91 of the HP OpenView Self- Healing Services Installation Guide.
Table 7-4 Self-Healing Services Problem Indicators (Continued)
Indicator Implications Suggested Solution
Chapter 7194

Troubleshooting InformationDiagnosing a Problem Using Other Indicators
You can manually submit a fault using the UI, but you do not receive any service notification by e-mail from Self-Healing Services.
and
The Self-Healing Services client log file indicates that a fault has been detected, data has been collected, and the data has been sent to the ISEE client.
The e-mail address or addresses that you specified in the Notification Settings page of the UI may be incorrect.
or
The ISEE client is not successfully transporting your data to HP. This is often caused by errors in the web proxy specifications entered into the ISEE interface during installation and configuration. If your web proxy password changes, for example, you will need to reconfigure the ISEE client.
See “Configure the Notification Settings” on page 52.
See “Verify Internet Connectivity for Communication Gateways” on page 26 of the HP OpenView Self- Healing Services Installation Guide.
See “Test Your Installation” on page 87 of the HP OpenView Self- Healing Services Installation Guide.
Also see the ISEE documentation available at the following web site: http://www.hp.com/hps/hardware/hw_enterprise.html
ISEE client log indicates that data has been received from the Self-Healing Services client, but was not sent to HP.
See above. See “Verify Internet Connectivity for Communication Gateways” on page 26 of the HP OpenView Self- Healing Services Installation Guide.
Also see “Test Your Installation” on page 87 of the HP OpenView Self- Healing Services Installation Guide.
Table 7-4 Self-Healing Services Problem Indicators (Continued)
Indicator Implications Suggested Solution
Chapter 7 195

Troubleshooting InformationCollecting Information for HP Support
Collecting Information for HP SupportIf problems occur with your Self-Healing Services installation that you are unable to diagnose, you can use the following script to collect information and e-mail it to your HP Response Center support engineer:
HP-UX and Solaris:/opt/OV/bin/hps_diag.sh
Windows:C:\Program Files\HP OpenView\bin\hps_diag.bat
This script collects Self-Healing Services client log files and configuration files, and Instant Support Enterprise Edition (ISEE) client log files if the ISEE client is installed on the system.
The collected data is saved to:
HP-UX and Solaris:/var/opt/OV/tmp/hps_diag.tar.Z
Windows:C:\Program Files\HP OpenView\data\tmp\hps_diag\hps_diag.zip
Chapter 7196

A Scripts
This appendix contains locations and descriptions of scripts that you can use to configure, operate, and maintain your Self-Healing Services installation.
Appendix A 197

ScriptsAvailable Scripts
Available ScriptsThe following table provides locations and descriptions of the scripts that are available for your Self-Healing Services installation. Unless otherwise indicated, HP-UX and Solaris files are located in the /opt/OV/bin directory and Windows files are located in C:\Program Files\HP OpenView\bin.
Table A-1 HP-UX and Solaris Scripts
Script Description
ovc -start ovtomcatA Starts the ovtomcatA component; this starts the Self-Healing Services client.
Note that this command may also start other applications that use the ovtomcatA component.
ovc -stop ovtomcatA Stops the Tomcat component; this stops the Self-Healing Services client.
Note that this command will also stop any other applications that use the ovtomcatA component.
ovc -restart ovtomcatA Stops and restarts the Self-Healing Services client.
ovc -status Tells you whether the Self-Healing Services client is running.
shsctrl.[vbs,sh] -enablesam Enables the Self-Healing Services client such that it starts whenever the ovtomcatA component starts.
shsctrl.[vbs,sh] -disablesam Disables the Self-Healing Services client such that it does not start when the ovtomcatA component starts.
ovtomcatctl Changes the port on which Self-Healing Services listens. See “Change the Self-Healing Services Client Port” on page 90 in the HP OpenView Self-Healing Services Installation Guide.
hpservices start Starts the ISEE client. Located in /sbin/init.d
hpservices stop Stops the ISEE client. Located in /sbin/init.d
hps_diag.sh Gathers ISEE and Self-Healing Services log files and configuration files, installation status, and patch information for all applications that Self-Healing Services supports. This file is used by recon to gather Self-Healing Services, ISEE, and system diagnostic information.
iseeConnectivityTest.sh Performs an ISEE connectivity test. Located in /opt/hpservices/RemoteSupport/bin
Appendix A198

ScriptsAvailable Scripts
recon.sh Runs the Self-Healing Services data collectors for all supported HP OpenView applications that are installed on this system.
Table A-1 HP-UX and Solaris Scripts (Continued)
Script Description
Appendix A 199

ScriptsAvailable Scripts
Table A-2 Windows Scripts
Script Description
OvTomcatCtl.vbs Changes the port on which Self-Healing Services listens. See “Change the Self-Healing Services Client Port” on page 90 in the HP OpenView Self-Healing Services Installation Guide.
hps_diag.bat Gathers ISEE and Self-Healing Services log files and configuration files, installation status, and patch information for all applications that Self-Healing Services supports. This file is used by recon to gather Self-Healing Services, ISEE, and system diagnostic information. Located in the <InstallDir>\bin directory.
iseeConnectivityTest.bat Performs an ISEE connectivity test. Located in <ISEE_InstallDir>\remotesupport\config
recon.bat Runs the Self-Healing Services data collectors for all supported HP OpenView applications that are installed on this system. Located in the <InstallDir>\bin directory.
NOTE: The -d option to display debug messages will not work on the Windows NT operating system.
Appendix A200

B Log Files
This appendix contains the names and descriptions of the log files used by HP OpenView Self-Healing Services.
Appendix B 201

Log FilesAvailable Log Files
Available Log FilesUnless otherwise noted, the following log files are located in:
HP-UX and Solaris:
/var/opt/OV/log
Windows:
C:\Program Files\HP OpenView\data\log
Table B-1 Self-Healing Services Log Files
File Description
auditFile.txt Main log file. Contains all log messages for the Self-Healing Services client.
collector-registration.log Log file that has an entry each time that a collector for a supported application is registered; used during installation.
swagent.log Installation error messages on HP-UX. Located in /var/adm/sw.
catalina.log HP-UX and Solaris only. Contains messages pertaining to the initialization and operation of the Self-Healing Services user interface. Located in the following directory:
<installDir>/nonOV/tomcat/a/logs
where <installDir> is the default application directory that you specified at installation time. By default, this is /opt/OV.
stdout.log
stderr.log
Windows only. Contains messages pertaining to the initialization and operation of the Self-Healing Services user interface. Located in the following directory:
<installDir>/nonOV/tomcat/a/logs
where <installDir> is the default application directory that you specified at installation time. By default, this is C:\Program Files\HP OpenView.
Appendix B202

Log FilesAvailable Log Files
Table B-2 ISEE Log File
File Description
HP-UX and Solaris:/var/opt/hpservices/log/mad.log
Windows: C:\Program Files\Hewlett-Packard\ISEE\MotiveChorus\log\mad.log
Error log for ISEE client
Appendix B 203

Log FilesAvailable Log Files
Appendix B204

C Supported Applications
This appendix lists the Self-Healing Services supported applications.
Appendix C 205

Supported ApplicationsSupported Applications
Supported ApplicationsThe table below lists the applications currently supported by Self-Healing Services. More applications will be supported in the future. Applications not listed may also integrate with Self-Healing Services. Check the product documentation provided with the application to see if it supports integration with Self-Healing Services.
The Level of Support column indicates the level of support that Self-Healing Services provides for the application. These levels are defined as follows:
• Premium Support: Provides all the features of Full Support plus advanced analysis capabilities.
• Full Support: Provides rapid, automated management software fault detection, data collection at the time fault occurs, automated problem analysis and recommendations, automated patch analysis, and efficient support case initiation.
• Basic Support: Provides automated problem analysis and recommendations, automated patch analysis (except for SPI applications), and efficient support case initiation when the user manually submits a software fault to HP for that application using the Self-Healing Services client user interface.
Table C-1 Applications Supported by Self-Healing Services
Application Platform Version(s) Support
Data Protector HP-UX/Solaris/Windows 5.0 Full
GlancePlus HP-UX C.04.00 Basic
Solaris C.03.75, C.04.00 Basic
Instant Support Enterprise Edition (ISEE)
HP-UX/Windows 3.50, 3.9x Basic
Solaris 3.70, 3.95 Basic
Network Node Manager (NNM)
excludes extended topology
HP-UX/Solaris 6.1, 6.2, 6.3, 6.4, 7.01, 7.50
7.51 is supported for Itanium platforms
Premium
Windows 6.2, 6.4, 7.01, 7.50 Premium
NNM—Extended Topology
HP-UX/Solaris/Windows All Full
OpenView Operations (OVO)
HP-UX/Solaris 6.x, 7.x, 8.0, 8.10, 8.14 Premium
Windows 6.0, 6.1, 7.00, 7.10, 7.20, 7.21, 7.50
Premium
Performance Agent (OVPA)
HP-UX/Solaris C.03.71 Basic
Windows C.03.65 Basic
Appendix C206

Supported ApplicationsSupported Applications
Performance Manager
(OVPM)
HP-UX/Solaris/Windows 6.0 Basic
Reporter Windows C.03.00, C.03.01 Basic
Self-Healing Services
HP-UX/Solaris/Windows 2.50 Premium
Service Desk Windows 4.0, 4.5, 5.1 Full
HP-UX/Solaris 5.1 Full
Service Information Portal
Windows 3.0, 3.1, C.03.05 Basic
HP-UX/Solaris 3.0, 3.1 Basic
Service Navigator
HP-UX/Solaris A.06.02, A.07.00 Basic
Table C-1 Applications Supported by Self-Healing Services (Continued)
Application Platform Version(s) Support
Appendix C 207

Supported ApplicationsSupported Applications
Appendix C208

D Data Collected
This appendix contains a link to detailed descriptions of the data collected when Self-Healing Services detects a fault in a supported software application.
Appendix D 209

Data CollectedData Collected by Self-Healing Services
Data Collected by Self-Healing ServicesData is collected by the Self Healing Services client when a fault is detected in a supported HP OpenView software application (see Appendix C, “Supported Applications,” on page 205 for the list of supported applications). The data is then packaged into an incident package that is sent back to HP for automated analysis. Information sent to HP consists of system information as well as application-specific information for the fault.
All the system information listed in “System Information Collected” in this appendix is collected when a fault is detected in a supported application.
NOTE When a fault is detected in a supported application with only Self-Healing Services basic support, the system information listed in “System Information Collected” in this appendix and patch information is the only information collected. See Appendix C, “Supported Applications,” on page 205 for a list of applications with basic support.
System Information Collected
Hostname
OS name and version
Machine type
Model
Amount of swap space
Amount of physical memory
Amount of total disk space
Amount of available disk space
File system info ( using bdf on HP-UX, df on Solaris )
DCE information ( rpccp show mapping )
Environment variables
Locale information ( locale )
Network status ( netstat )
Uptime info ( uptime )
Process info ( top and sar on HP-UX, ps and psrinfo on Solaris )
Configurable kernel parameters
List of installed applications ( swlist on HP-UX, pkginfo on Solaris)
Contents of the following files: /etc/inetd.conf and /etc/nsswitch.conf
Appendix D210