Embed Size (px)
DESCRIPTION
hello
Citation preview


MongoDB: The Definitive Guide


MongoDB: The Definitive Guide
Kristina Chodorow and Michael Dirolf
Beijing • Cambridge • Farnham • Köln • Sebastopol • Tokyo

MongoDB: The Definitive Guideby Kristina Chodorow and Michael Dirolf
Copyright © 2010 Kristina Chodorow and Michael Dirolf. All rights reserved.Printed in the United States of America.
Published by O’Reilly Media, Inc., 1005 Gravenstein Highway North, Sebastopol, CA 95472.
O’Reilly books may be purchased for educational, business, or sales promotional use. Online editionsare also available for most titles (http://my.safaribooksonline.com). For more information, contact ourcorporate/institutional sales department: (800) 998-9938 or [email protected].
Editor: Julie SteeleProduction Editor: Teresa ElseyCopyeditor: Kim WimpsettProofreader: Apostrophe Editing ServicesProduction Services: Molly Sharp
Indexer: Ellen Troutman ZaigCover Designer: Karen MontgomeryInterior Designer: David FutatoIllustrator: Robert Romano
Printing History:September 2010: First Edition.
Nutshell Handbook, the Nutshell Handbook logo, and the O’Reilly logo are registered trademarks ofO’Reilly Media, Inc. MongoDB: The Definitive Guide, the image of a mongoose lemur, and related tradedress are trademarks of O’Reilly Media, Inc.
Many of the designations used by manufacturers and sellers to distinguish their products are claimed astrademarks. Where those designations appear in this book, and O’Reilly Media, Inc., was aware of atrademark claim, the designations have been printed in caps or initial caps.
While every precaution has been taken in the preparation of this book, the publisher and authors assumeno responsibility for errors or omissions, or for damages resulting from the use of the information con-tained herein.
ISBN: 978-1-449-38156-1
[M]
1283534198

Table of Contents
Foreword . . . . . . . . . . . . . . . . . . . . . . . . . . . . . . . . . . . . . . . . . . . . . . . . . . . . . . . . . . . . . . . . . . . xi
Preface . . . . . . . . . . . . . . . . . . . . . . . . . . . . . . . . . . . . . . . . . . . . . . . . . . . . . . . . . . . . . . . . . . . . xiii
1. Introduction . . . . . . . . . . . . . . . . . . . . . . . . . . . . . . . . . . . . . . . . . . . . . . . . . . . . . . . . . . . 1A Rich Data Model 1Easy Scaling 2Tons of Features… 2…Without Sacrificing Speed 3Simple Administration 3But Wait, That’s Not All… 4
2. Getting Started . . . . . . . . . . . . . . . . . . . . . . . . . . . . . . . . . . . . . . . . . . . . . . . . . . . . . . . . . 5Documents 5Collections 7
Schema-Free 7Naming 8
Databases 8Getting and Starting MongoDB 10MongoDB Shell 11
Running the Shell 11A MongoDB Client 12Basic Operations with the Shell 12Tips for Using the Shell 14
Data Types 15Basic Data Types 16Numbers 18Dates 19Arrays 19Embedded Documents 20_id and ObjectIds 20
v

3. Creating, Updating, and Deleting Documents . . . . . . . . . . . . . . . . . . . . . . . . . . . . . . . 23Inserting and Saving Documents 23
Batch Insert 23Inserts: Internals and Implications 24
Removing Documents 25Remove Speed 25
Updating Documents 26Document Replacement 26Using Modifiers 27Upserts 36Updating Multiple Documents 38Returning Updated Documents 39
The Fastest Write This Side of Mississippi 41Safe Operations 42Catching “Normal” Errors 43
Requests and Connections 43
4. Querying . . . . . . . . . . . . . . . . . . . . . . . . . . . . . . . . . . . . . . . . . . . . . . . . . . . . . . . . . . . . . 45Introduction to find 45
Specifying Which Keys to Return 46Limitations 47
Query Criteria 47Query Conditionals 47OR Queries 48$not 49Rules for Conditionals 49
Type-Specific Queries 49null 49Regular Expressions 50Querying Arrays 51Querying on Embedded Documents 53
$where Queries 55Cursors 56
Limits, Skips, and Sorts 57Avoiding Large Skips 58Advanced Query Options 60Getting Consistent Results 61
Cursor Internals 63
5. Indexing . . . . . . . . . . . . . . . . . . . . . . . . . . . . . . . . . . . . . . . . . . . . . . . . . . . . . . . . . . . . . 65Introduction to Indexing 65
Scaling Indexes 68Indexing Keys in Embedded Documents 68
vi | Table of Contents

Indexing for Sorts 69Uniquely Identifying Indexes 69
Unique Indexes 69Dropping Duplicates 70Compound Unique Indexes 70
Using explain and hint 70Index Administration 75
Changing Indexes 76Geospatial Indexing 77
Compound Geospatial Indexes 78The Earth Is Not a 2D Plane 79
6. Aggregation . . . . . . . . . . . . . . . . . . . . . . . . . . . . . . . . . . . . . . . . . . . . . . . . . . . . . . . . . . 81count 81distinct 81group 82
Using a Finalizer 84Using a Function as a Key 86
MapReduce 86Example 1: Finding All Keys in a Collection 87Example 2: Categorizing Web Pages 89MongoDB and MapReduce 90
7. Advanced Topics . . . . . . . . . . . . . . . . . . . . . . . . . . . . . . . . . . . . . . . . . . . . . . . . . . . . . . . 93Database Commands 93
How Commands Work 94Command Reference 95
Capped Collections 97Properties and Use Cases 98Creating Capped Collections 99Sorting Au Naturel 99Tailable Cursors 101
GridFS: Storing Files 101Getting Started with GridFS: mongofiles 102Working with GridFS from the MongoDB Drivers 102Under the Hood 103
Server-Side Scripting 104db.eval 104Stored JavaScript 105Security 106
Database References 107What Is a DBRef? 107Example Schema 107
Table of Contents | vii
Driver Support for DBRefs 108When Should DBRefs Be Used? 108
8. Administration . . . . . . . . . . . . . . . . . . . . . . . . . . . . . . . . . . . . . . . . . . . . . . . . . . . . . . . 111Starting and Stopping MongoDB 111
Starting from the Command Line 112File-Based Configuration 113Stopping MongoDB 114
Monitoring 114Using the Admin Interface 115serverStatus 116mongostat 118Third-Party Plug-Ins 118
Security and Authentication 118Authentication Basics 118How Authentication Works 120Other Security Considerations 121
Backup and Repair 121Data File Backup 121mongodump and mongorestore 122fsync and Lock 123Slave Backups 124Repair 124
9. Replication . . . . . . . . . . . . . . . . . . . . . . . . . . . . . . . . . . . . . . . . . . . . . . . . . . . . . . . . . . 127Master-Slave Replication 127
Options 128Adding and Removing Sources 129
Replica Sets 130Initializing a Set 132Nodes in a Replica Set 133Failover and Primary Election 135
Performing Operations on a Slave 136Read Scaling 137Using Slaves for Data Processing 137
How It Works 138The Oplog 138Syncing 139Replication State and the Local Database 139Blocking for Replication 140
Administration 141Diagnostics 141Changing the Oplog Size 141
viii | Table of Contents

Replication with Authentication 142
10. Sharding . . . . . . . . . . . . . . . . . . . . . . . . . . . . . . . . . . . . . . . . . . . . . . . . . . . . . . . . . . . . 143Introduction to Sharding 143Autosharding in MongoDB 143
When to Shard 145The Key to Sharding: Shard Keys 145
Sharding an Existing Collection 145Incrementing Shard Keys Versus Random Shard Keys 146How Shard Keys Affect Operations 146
Setting Up Sharding 147Starting the Servers 147Sharding Data 148
Production Configuration 149A Robust Config 149Many mongos 149A Sturdy Shard 150Physical Servers 150
Sharding Administration 150config Collections 150Sharding Commands 152
11. Example Applications . . . . . . . . . . . . . . . . . . . . . . . . . . . . . . . . . . . . . . . . . . . . . . . . . . 155Chemical Search Engine: Java 155
Installing the Java Driver 155Using the Java Driver 155Schema Design 156Writing This in Java 158Issues 159
News Aggregator: PHP 159Installing the PHP Driver 160Using the PHP Driver 161Designing the News Aggregator 162Trees of Comments 162Voting 164
Custom Submission Forms: Ruby 164Installing the Ruby Driver 164Using the Ruby Driver 165Custom Form Submission 166Ruby Object Mappers and Using MongoDB with Rails 167
Real-Time Analytics: Python 168Installing PyMongo 168Using PyMongo 168
Table of Contents | ix

MongoDB for Real-Time Analytics 169Schema 169Handling a Request 170Using Analytics Data 170Other Considerations 171
A. Installing MongoDB . . . . . . . . . . . . . . . . . . . . . . . . . . . . . . . . . . . . . . . . . . . . . . . . . . . 173
B. mongo: The Shell . . . . . . . . . . . . . . . . . . . . . . . . . . . . . . . . . . . . . . . . . . . . . . . . . . . . . 177
C. MongoDB Internals . . . . . . . . . . . . . . . . . . . . . . . . . . . . . . . . . . . . . . . . . . . . . . . . . . . 179
Index . . . . . . . . . . . . . . . . . . . . . . . . . . . . . . . . . . . . . . . . . . . . . . . . . . . . . . . . . . . . . . . . . . . . . 183
x | Table of Contents

Foreword
In the last 10 years, the Internet has challenged relational databases in ways nobodycould have foreseen. Having used MySQL at large and growing Internet companiesduring this time, I’ve seen this happen firsthand. First you have a single server with asmall data set. Then you find yourself setting up replication so you can scale out readsand deal with potential failures. And, before too long, you’ve added a caching layer,tuned all the queries, and thrown even more hardware at the problem.
Eventually you arrive at the point when you need to shard the data across multipleclusters and rebuild a ton of application logic to deal with it. And soon after that yourealize that you’re locked into the schema you modeled so many months before.
Why? Because there’s so much data in your clusters now that altering the schema willtake a long time and involve a lot of precious DBA time. It’s easier just to work aroundit in code. This can keep a small team of developers busy for many months. In the end,you’ll always find yourself wondering if there’s a better way—or why more of thesefeatures are not built into the core database server.
Keeping with tradition, the Open Source community has created a plethora of “betterways” in response to the ballooning data needs of modern web applications. They spanthe spectrum from simple in-memory key/value stores to complicated SQL-speakingMySQL/InnoDB derivatives. But the sheer number of choices has made finding theright solution more difficult. I’ve looked at many of them.
I was drawn to MongoDB by its pragmatic approach. MongoDB doesn’t try to be ev-erything to everyone. Instead it strikes the right balance between features and com-plexity, with a clear bias toward making previously difficult tasks far easier. In otherwords, it has the features that really matter to the vast majority of today’s web appli-cations: indexes, replication, sharding, a rich query syntax, and a very flexible datamodel. All of this comes without sacrificing speed.
Like MongoDB itself, this book is very straightforward and approachable. NewMongoDB users can start with Chapter 1 and be up and running in no time. Experi-enced users will appreciate this book’s breadth and authority. It’s a solid reference foradvanced administrative topics such as replication, backups, and sharding, as well aspopular client APIs.
xi

Having recently started to use MongoDB in my day job, I have no doubt that this bookwill be at my side for the entire journey—from the first install to production deploymentof a sharded and replicated cluster. It’s an essential reference to anyone seriously look-ing at using MongoDB.
—Jeremy ZawodnyCraigslist Software Engineer
August 2010
xii | Foreword
Preface
How This Book Is Organized
Getting Up to Speed with MongoDBIn Chapter 1, Introduction, we provide some background about MongoDB: why it wascreated, the goals it is trying to accomplish, and why you might choose to use it for aproject. We go into more detail in Chapter 2, Getting Started, which provides an in-troduction to the core concepts and vocabulary of MongoDB. Chapter 2 also providesa first look at working with MongoDB, getting you started with the database andthe shell.
Developing with MongoDBThe next two chapters cover the basic material that developers need to know to workwith MongoDB. In Chapter 3, Creating, Updating, and Deleting Documents, we describehow to perform those basic write operations, including how to do them with differentlevels of safety and speed. Chapter 4, Querying, explains how to find documents andcreate complex queries. This chapter also covers how to iterate through results andoptions for limiting, skipping, and sorting results.
Advanced UsageThe next three chapters go into more complex usage than simply storing and retrievingdata. Chapter 5, Indexing, explains what indexes are and how to use them withMongoDB. It also covers tools you can use to examine or modify the indexes used toperform a query, and it covers index administration. Chapter 6, Aggregation, covers anumber of techniques for aggregating data with MongoDB, including counting, findingdistinct values, grouping documents, and using MapReduce. Chapter 7, AdvancedTopics, is a mishmash of important tidbits that didn’t fit into any of the previous cat-egories: file storage, server-side JavaScript, database commands, and databasereferences.
xiii

AdministrationThe next three chapters are less about programming and more about the operationalaspects of MongoDB. Chapter 8, Administration, discusses options for starting the da-tabase in different ways, monitoring a MongoDB server, and keeping deployments se-cure. Chapter 8 also covers how to keep proper backups of the data you’ve stored inMongoDB. In Chapter 9, Replication, we explain how to set up replication withMongoDB, including standard master-slave configuration and setups with automaticfailover. This chapter also covers how MongoDB replication works and options fortweaking it. Chapter 10, Sharding, describes how to scale MongoDB horizontally: itcovers what autosharding is, how to set it up, and the ways in which it impactsapplications.
Developing Applications with MongoDBIn Chapter 11, Example Applications, we provide example applications usingMongoDB, written in Java, PHP, Python, and Ruby. These examples illustrate how tomap the concepts described earlier in the book to specific languages and problemdomains.
AppendixesAppendix A, Installing MongoDB, explains MongoDB’s versioning scheme and how toinstall it on Windows, OS X, and Linux. Appendix B, mongo: The Shell, includes someuseful shell tips and tools. Finally, Appendix C, MongoDB Internals, details a littleabout how MongoDB works internally: its storage engine, data format, and wireprotocol.
Conventions Used in This BookThe following typographical conventions are used in this book:
ItalicIndicates new terms, URLs, email addresses, collection names, database names,filenames, and file extensions.
Constant widthUsed for program listings, as well as within paragraphs to refer to program elementssuch as variable or function names, command-line utilities, environment variables,statements, and keywords.
Constant width boldShows commands or other text that should be typed literally by the user.
xiv | Preface

Constant width italicShows text that should be replaced with user-supplied values or by values deter-mined by context.
This icon signifies a tip, suggestion, or general note.
This icon indicates a warning or caution.
Using Code ExamplesThis book can help you get your job done. In general, you may use the code in thisbook in your programs and documentation. You do not need to contact us for permis-sion unless you’re reproducing a significant portion of the code. For example, writinga program that uses several chunks of code from this book does not require permission.Selling or distributing a CD-ROM of examples from O’Reilly books does require per-mission. Answering a question by citing this book and quoting example code does notrequire permission. Incorporating a significant amount of example code from this bookinto your product’s documentation does require permission.
We appreciate, but do not require, attribution. An attribution usually includes thetitle, author, publisher, and ISBN. For example: “MongoDB: The Definitive Guide byKristina Chodorow and Michael Dirolf (O’Reilly). Copyright 2010 Kristina Chodorowand Michael Dirolf, 978-1-449-38156-1.”
If you feel your use of code examples falls outside fair use or the permission given here,feel free to contact us at [email protected].
Safari® Books OnlineSafari Books Online is an on-demand digital library that lets you easilysearch more than 7,500 technology and creative reference books and vid-eos to find the answers you need quickly.
With a subscription, you can read any page and watch any video from our library online.Read books on your cell phone and mobile devices. Access new titles before they areavailable for print, and get exclusive access to manuscripts in development and postfeedback for the authors. Copy and paste code samples, organize your favorites, down-load chapters, bookmark key sections, create notes, print out pages, and benefit fromtons of other time-saving features.
Preface | xv

O’Reilly Media has uploaded this book to the Safari Books Online service. To have fulldigital access to this book and others on similar topics from O’Reilly and other pub-lishers, sign up for free at http://my.safaribooksonline.com.
How to Contact UsPlease address comments and questions concerning this book to the publisher:
O’Reilly Media, Inc.1005 Gravenstein Highway NorthSebastopol, CA 95472800-998-9938 (in the United States or Canada)707-829-0515 (international or local)707 829-0104 (fax)
We have a web page for this book, where we list errata, examples, and any additionalinformation. You can access this page at:
http://www.oreilly.com/catalog/9781449381561
To comment or ask technical questions about this book, send email to:
For more information about our books, conferences, Resource Centers, and theO’Reilly Network, see our website at:
http://www.oreilly.com
AcknowledgmentsWe would like to thank Eliot Horowitz and Dwight Merriman, who made all of thispossible by starting the MongoDB project. We’d also like to thank our tech reviewers:Alberto Lerner, Mathias Stearn, Aaron Staple, James Avery, and John Hornbeck. Youguys made this book immeasurably better (and more correct). Thank you, Julie Steele,for being such a terrific editor and for helping us every step of the way. Thanks toeverybody else at O’Reilly who helped get this book into production. Finally, a bigthanks is owed to the entire MongoDB community, which has supported the project(and this book) from the very beginning.
Acknowledgments from KristinaThanks to all of my co-workers at 10gen for sharing your knowledge and advice onMongoDB (as well as your advice on ops, beer, and plane crashes). Also, thank you,Mike, for magically making half of this book appear and correcting some of my moreembarrassing errors before Julie saw them. Finally, I would like to thank Andrew,
xvi | Preface

Susan, and Andy for all of their support, patience, and suggestions. I couldn’t havedone it without you guys.
Acknowledgments from MichaelThanks to all of my friends, who have put up with me during this process (and ingeneral). Thanks to everyone I’ve worked with at 10gen for making working onMongoDB a blast. Thank you, Kristina, for being such a great coauthor. Most impor-tantly, I would like to thank my entire family for all of their support with this andeverything I undertake.
Preface | xvii


CHAPTER 1
Introduction
MongoDB is a powerful, flexible, and scalable data store. It combines the ability toscale out with many of the most useful features of relational databases, such as secon-dary indexes, range queries, and sorting. MongoDB is also incredibly featureful: it hastons of useful features such as built-in support for MapReduce-style aggregation andgeospatial indexes.
There is no point in creating a great technology if it’s impossible to work with, so a lotof effort has been put into making MongoDB easy to get started with and a pleasure touse. MongoDB has a developer-friendly data model, administrator-friendly configura-tion options, and natural-feeling language APIs presented by drivers and the databaseshell. MongoDB tries to get out of your way, letting you program instead of worryingabout storing data.
A Rich Data ModelMongoDB is a document-oriented database, not a relational one. The primary reasonfor moving away from the relational model is to make scaling out easier, but there aresome other advantages as well.
The basic idea is to replace the concept of a “row” with a more flexible model, the“document.” By allowing embedded documents and arrays, the document-orientedapproach makes it possible to represent complex hierarchical relationships with a singlerecord. This fits very naturally into the way developers in modern object-oriented lan-guages think about their data.
1

MongoDB is also schema-free: a document’s keys are not predefined or fixed in anyway. Without a schema to change, massive data migrations are usually unnecessary.New or missing keys can be dealt with at the application level, instead of forcing alldata to have the same shape. This gives developers a lot of flexibility in how they workwith evolving data models.
Easy ScalingData set sizes for applications are growing at an incredible pace. Advances in sensortechnology, increases in available bandwidth, and the popularity of handheld devicesthat can be connected to the Internet have created an environment where even small-scale applications need to store more data than many databases were meant to handle.A terabyte of data, once an unheard-of amount of information, is now commonplace.
As the amount of data that developers need to store grows, developers face a difficultdecision: how should they scale their databases? Scaling a database comes down to thechoice between scaling up (getting a bigger machine) or scaling out (partitioning dataacross more machines). Scaling up is often the path of least resistance, but it has draw-backs: large machines are often very expensive, and eventually a physical limit isreached where a more powerful machine cannot be purchased at any cost. For the typeof large web application that most people aspire to build, it is either impossible or notcost-effective to run off of one machine. Alternatively, it is both extensible and eco-nomical to scale out: to add storage space or increase performance, you can buy anothercommodity server and add it to your cluster.
MongoDB was designed from the beginning to scale out. Its document-oriented datamodel allows it to automatically split up data across multiple servers. It can balancedata and load across a cluster, redistributing documents automatically. This allowsdevelopers to focus on programming the application, not scaling it. When they needmore capacity, they can just add new machines to the cluster and let the database figureout how to organize everything.
Tons of Features…It’s difficult to quantify what a feature is: anything above and beyond what a relationaldatabase provides? Memcached? Other document-oriented databases? However, nomatter what the baseline is, MongoDB has some really nice, unique tools that are not(all) present in any other solution.
IndexingMongoDB supports generic secondary indexes, allowing a variety of fast queries,and provides unique, compound, and geospatial indexing capabilities as well.
2 | Chapter 1: Introduction

Stored JavaScriptInstead of stored procedures, developers can store and use JavaScript functionsand values on the server side.
AggregationMongoDB supports MapReduce and other aggregation tools.
Fixed-size collectionsCapped collections are fixed in size and are useful for certain types of data, suchas logs.
File storageMongoDB supports an easy-to-use protocol for storing large files and file metadata.
Some features common to relational databases are not present in MongoDB, notablyjoins and complex multirow transactions. These are architectural decisions to allowfor scalability, because both of those features are difficult to provide efficiently in adistributed system.
…Without Sacrificing SpeedIncredible performance is a major goal for MongoDB and has shaped many designdecisions. MongoDB uses a binary wire protocol as the primary mode of interactionwith the server (as opposed to a protocol with more overhead, like HTTP/REST). Itadds dynamic padding to documents and preallocates data files to trade extra spaceusage for consistent performance. It uses memory-mapped files in the default storageengine, which pushes the responsibility for memory management to the operating sys-tem. It also features a dynamic query optimizer that “remembers” the fastest way toperform a query. In short, almost every aspect of MongoDB was designed to maintainhigh performance.
Although MongoDB is powerful and attempts to keep many features from relationalsystems, it is not intended to do everything that a relational database does. Wheneverpossible, the database server offloads processing and logic to the client side (handledeither by the drivers or by a user’s application code). Maintaining this streamlineddesign is one of the reasons MongoDB can achieve such high performance.
Simple AdministrationMongoDB tries to simplify database administration by making servers administratethemselves as much as possible. Aside from starting the database server, very littleadministration is necessary. If a master server goes down, MongoDB can automaticallyfailover to a backup slave and promote the slave to a master. In a distributed environ-ment, the cluster needs to be told only that a new node exists to automatically integrateand configure it.
Simple Administration | 3

MongoDB’s administration philosophy is that the server should handle as much of theconfiguration as possible automatically, allowing (but not requiring) users to tweaktheir setups if needed.
But Wait, That’s Not All…Throughout the course of the book, we will take the time to note the reasoning ormotivation behind particular decisions made in the development of MongoDB.Through those notes we hope to share the philosophy behind MongoDB. The best wayto summarize the MongoDB project, however, is through its main focus—to create afull-featured data store that is scalable, flexible, and fast.
4 | Chapter 1: Introduction
CHAPTER 2
Getting Started
MongoDB is very powerful, but it is still easy to get started with. In this chapter we’llintroduce some of the basic concepts of MongoDB:
• A document is the basic unit of data for MongoDB, roughly equivalent to a row ina relational database management system (but much more expressive).
• Similarly, a collection can be thought of as the schema-free equivalent of a table.
• A single instance of MongoDB can host multiple independent databases, each ofwhich can have its own collections and permissions.
• MongoDB comes with a simple but powerful JavaScript shell, which is useful forthe administration of MongoDB instances and data manipulation.
• Every document has a special key, "_id", that is unique across the document’scollection.
DocumentsAt the heart of MongoDB is the concept of a document: an ordered set of keys withassociated values. The representation of a document differs by programming language,but most languages have a data structure that is a natural fit, such as a map, hash, ordictionary. In JavaScript, for example, documents are represented as objects:
{"greeting" : "Hello, world!"}
This simple document contains a single key, "greeting", with a value of "Hello,world!". Most documents will be more complex than this simple one and often willcontain multiple key/value pairs:
{"greeting" : "Hello, world!", "foo" : 3}
5

This example is a good illustration of several important concepts:
• Key/value pairs in documents are ordered—the earlier document is distinct fromthe following document:
{"foo" : 3, "greeting" : "Hello, world!"}
In most cases the ordering of keys in documents is not important.In fact, in some programming languages the default representationof a document does not even maintain ordering (e.g., dictionariesin Python and hashes in Perl or Ruby 1.8). Drivers for those lan-guages usually have some mechanism for specifying documentswith ordering for the rare cases when it is necessary. (Those caseswill be noted throughout the text.)
• Values in documents are not just “blobs.” They can be one of several different datatypes (or even an entire embedded document—see “Embedded Docu-ments” on page 20). In this example the value for "greeting" is a string, whereasthe value for "foo" is an integer.
The keys in a document are strings. Any UTF-8 character is allowed in a key, with afew notable exceptions:
• Keys must not contain the character \0 (the null character). This character is usedto signify the end of a key.
• The . and $ characters have some special properties and should be used only incertain circumstances, as described in later chapters. In general, they should beconsidered reserved, and drivers will complain if they are used inappropriately.
• Keys starting with _ should be considered reserved; although this is not strictlyenforced.
MongoDB is type-sensitive and case-sensitive. For example, these documents aredistinct:
{"foo" : 3}{"foo" : "3"}
As are as these:
{"foo" : 3}{"Foo" : 3}
A final important thing to note is that documents in MongoDB cannot contain duplicatekeys. For example, the following is not a legal document:
{"greeting" : "Hello, world!", "greeting" : "Hello, MongoDB!"}
6 | Chapter 2: Getting Started
CollectionsA collection is a group of documents. If a document is the MongoDB analog of a rowin a relational database, then a collection can be thought of as the analog to a table.
Schema-FreeCollections are schema-free. This means that the documents within a single collectioncan have any number of different “shapes.” For example, both of the following docu-ments could be stored in a single collection:
{"greeting" : "Hello, world!"}{"foo" : 5}
Note that the previous documents not only have different types for their values (stringversus integer) but also have entirely different keys. Because any document can be putinto any collection, the question often arises: “Why do we need separate collections atall?” It’s a good question—with no need for separate schemas for different kinds ofdocuments, why should we use more than one collection? There are several goodreasons:
• Keeping different kinds of documents in the same collection can be a nightmarefor developers and admins. Developers need to make sure that each query is onlyreturning documents of a certain kind or that the application code performing aquery can handle documents of different shapes. If we’re querying for blog posts,it’s a hassle to weed out documents containing author data.
• It is much faster to get a list of collections than to extract a list of the types in acollection. For example, if we had a type key in the collection that said whethereach document was a “skim,” “whole,” or “chunky monkey” document, it wouldbe much slower to find those three values in a single collection than to have threeseparate collections and query for their names (see “Subcollections”on page 8).
• Grouping documents of the same kind together in the same collection allows fordata locality. Getting several blog posts from a collection containing only posts willlikely require fewer disk seeks than getting the same posts from a collection con-taining posts and author data.
• We begin to impose some structure on our documents when we create indexes.(This is especially true in the case of unique indexes.) These indexes are definedper collection. By putting only documents of a single type into the same collection,we can index our collections more efficiently.
As you can see, there are sound reasons for creating a schema and for grouping relatedtypes of documents together. MongoDB just relaxes this requirement and allows de-velopers more flexibility.
Collections | 7

NamingA collection is identified by its name. Collection names can be any UTF-8 string, witha few restrictions:
• The empty string ("") is not a valid collection name.
• Collection names may not contain the character \0 (the null character) becausethis delineates the end of a collection name.
• You should not create any collections that start with system., a prefix reserved forsystem collections. For example, the system.users collection contains the database’susers, and the system.namespaces collection contains information about all of thedatabase’s collections.
• User-created collections should not contain the reserved character $ in the name.The various drivers available for the database do support using $ in collectionnames because some system-generated collections contain it. You should not use$ in a name unless you are accessing one of these collections.
Subcollections
One convention for organizing collections is to use namespaced subcollections sepa-rated by the . character. For example, an application containing a blog might have acollection named blog.posts and a separate collection named blog.authors. This is fororganizational purposes only—there is no relationship between the blog collection (itdoesn’t even have to exist) and its “children.”
Although subcollections do not have any special properties, they are useful and incor-porated into many MongoDB tools:
• GridFS, a protocol for storing large files, uses subcollections to store file metadataseparately from content chunks (see Chapter 7 for more information aboutGridFS).
• The MongoDB web console organizes the data in its DBTOP section bysubcollection (see Chapter 8 for more information on administration).
• Most drivers provide some syntactic sugar for accessing a subcollection of a givencollection. For example, in the database shell, db.blog will give you the blog col-lection, and db.blog.posts will give you the blog.posts collection.
Subcollections are a great way to organize data in MongoDB, and their use is highlyrecommended.
DatabasesIn addition to grouping documents by collection, MongoDB groups collections intodatabases. A single instance of MongoDB can host several databases, each of which canbe thought of as completely independent. A database has its own permissions, and each
8 | Chapter 2: Getting Started

database is stored in separate files on disk. A good rule of thumb is to store all data fora single application in the same database. Separate databases are useful when storingdata for several application or users on the same MongoDB server.
Like collections, databases are identified by name. Database names can be any UTF-8string, with the following restrictions:
• The empty string ("") is not a valid database name.
• A database name cannot contain any of these characters: ' ' (a single space), ., $, /,\, or \0 (the null character).
• Database names should be all lowercase.
• Database names are limited to a maximum of 64 bytes.
One thing to remember about database names is that they will actually end up as fileson your filesystem. This explains why many of the previous restrictions exist in the firstplace.
There are also several reserved database names, which you can access directly but havespecial semantics. These are as follows:
adminThis is the “root” database, in terms of authentication. If a user is added to theadmin database, the user automatically inherits permissions for all databases.There are also certain server-wide commands that can be run only from the ad-min database, such as listing all of the databases or shutting down the server.
localThis database will never be replicated and can be used to store any collections thatshould be local to a single server (see Chapter 9 for more information about rep-lication and the local database).
configWhen Mongo is being used in a sharded setup (see Chapter 10), the config databaseis used internally to store information about the shards.
By prepending a collection’s name with its containing database, you can get a fullyqualified collection name called a namespace. For instance, if you are using theblog.posts collection in the cms database, the namespace of that collection would becms.blog.posts. Namespaces are limited to 121 bytes in length and, in practice, shouldbe less than 100 bytes long. For more on namespaces and the internal representationof collections in MongoDB, see Appendix C.
Databases | 9

Getting and Starting MongoDBMongoDB is almost always run as a network server that clients can connect to andperform operations on. To start the server, run the mongod executable:
$ ./mongod./mongod --help for help and startup optionsSun Mar 28 12:31:20 Mongo DB : starting : pid = 44978 port = 27017dbpath = /data/db/ master = 0 slave = 0 64-bitSun Mar 28 12:31:20 db version v1.5.0-pre-, pdfile version 4.5Sun Mar 28 12:31:20 git version: ...Sun Mar 28 12:31:20 sys info: ...Sun Mar 28 12:31:20 waiting for connections on port 27017Sun Mar 28 12:31:20 web admin interface listening on port 28017
Or if you’re on Windows, run this:
$ mongod.exe
For detailed information on installing MongoDB on your system, seeAppendix A.
When run with no arguments, mongod will use the default data directory, /data/db/ (orC:\data\db\ on Windows), and port 27017. If the data directory does not already existor is not writable, the server will fail to start. It is important to create the data directory(e.g., mkdir -p /data/db/), and to make sure your user has permission to write to thedirectory, before starting MongoDB. The server will also fail to start if the port is notavailable—this is often caused by another instance of MongoDB that is already running.
The server will print some version and system information and then begin waiting forconnections. By default, MongoDB listens for socket connections on port 27017.
mongod also sets up a very basic HTTP server that listens on a port 1,000 higher thanthe main port, in this case 28017. This means that you can get some administrativeinformation about your database by opening a web browser and going to http://localhost:28017.
You can safely stop mongod by typing Ctrl-c in the shell that is running the server.
For more information on starting or stopping MongoDB, see “Startingand Stopping MongoDB” on page 111, and for more on the adminis-trative interface, see “Using the Admin Interface” on page 115.
10 | Chapter 2: Getting Started

MongoDB ShellMongoDB comes with a JavaScript shell that allows interaction with a MongoDB in-stance from the command line. The shell is very useful for performing administrativefunctions, inspecting a running instance, or just playing around. The mongo shell is acrucial tool for using MongoDB and is used extensively throughout the rest of the text.
Running the ShellTo start the shell, run the mongo executable:
$ ./mongoMongoDB shell version: 1.6.0url: testconnecting to: testtype "help" for help>
The shell automatically attempts to connect to a MongoDB server on startup, so makesure you start mongod before starting the shell.
The shell is a full-featured JavaScript interpreter, capable of running arbitrary JavaScriptprograms. To illustrate this, let’s perform some basic math:
> x = 200200> x / 5;40
We can also leverage all of the standard JavaScript libraries:
> Math.sin(Math.PI / 2);1> new Date("2010/1/1");"Fri Jan 01 2010 00:00:00 GMT-0500 (EST)"> "Hello, World!".replace("World", "MongoDB");Hello, MongoDB!
We can even define and call JavaScript functions:
> function factorial (n) {... if (n <= 1) return 1;... return n * factorial(n - 1);... }> factorial(5);120
Note that you can create multiline commands. The shell will detect whether the Java-Script statement is complete when you press Enter and, if it is not, will allow you tocontinue writing it on the next line.
MongoDB Shell | 11

A MongoDB ClientAlthough the ability to execute arbitrary JavaScript is cool, the real power of the shelllies in the fact that it is also a stand-alone MongoDB client. On startup, the shell con-nects to the test database on a MongoDB server and assigns this database connectionto the global variable db. This variable is the primary access point to MongoDB throughthe shell.
The shell contains some add-ons that are not valid JavaScript syntax but were imple-mented because of their familiarity to users of SQL shells. The add-ons do not provideany extra functionality, but they are nice syntactic sugar. For instance, one of the mostimportant operations is selecting which database to use:
> use foobarswitched to db foobar
Now if you look at the db variable, you can see that it refers to the foobar database:
> dbfoobar
Because this is a JavaScript shell, typing a variable will convert the variable to a string(in this case, the database name) and print it.
Collections can be accessed from the db variable. For example, db.baz returns the bazcollection in the current database. Now that we can access a collection in the shell, wecan perform almost any database operation.
Basic Operations with the ShellWe can use the four basic operations, create, read, update, and delete (CRUD), tomanipulate and view data in the shell.
Create
The insert function adds a document to a collection. For example, suppose we wantto store a blog post. First, we’ll create a local variable called post that is a JavaScriptobject representing our document. It will have the keys "title", "content", and"date" (the date that it was published):
> post = {"title" : "My Blog Post",... "content" : "Here's my blog post.",... "date" : new Date()}{ "title" : "My Blog Post", "content" : "Here's my blog post.", "date" : "Sat Dec 12 2009 11:23:21 GMT-0500 (EST)"}
This object is a valid MongoDB document, so we can save it to the blog collection usingthe insert method:
12 | Chapter 2: Getting Started

> db.blog.insert(post)
The blog post has been saved to the database. We can see it by calling find on thecollection:
> db.blog.find(){ "_id" : ObjectId("4b23c3ca7525f35f94b60a2d"), "title" : "My Blog Post", "content" : "Here's my blog post.", "date" : "Sat Dec 12 2009 11:23:21 GMT-0500 (EST)"}
You can see that an "_id" key was added and that the other key/value pairs were savedas we entered them. The reason for "_id"’s sudden appearance is explained at the endof this chapter.
Read
find returns all of the documents in a collection. If we just want to see one documentfrom a collection, we can use findOne:
> db.blog.findOne(){ "_id" : ObjectId("4b23c3ca7525f35f94b60a2d"), "title" : "My Blog Post", "content" : "Here's my blog post.", "date" : "Sat Dec 12 2009 11:23:21 GMT-0500 (EST)"}
find and findOne can also be passed criteria in the form of a query document. This willrestrict the documents matched by the query. The shell will automatically display upto 20 documents matching a find, but more can be fetched. See Chapter 4 for moreinformation on querying.
Update
If we would like to modify our post, we can use update. update takes (at least) twoparameters: the first is the criteria to find which document to update, and the secondis the new document. Suppose we decide to enable comments on the blog post wecreated earlier. We’ll need to add an array of comments as the value for a new key inour document.
The first step is to modify the variable post and add a "comments" key:
> post.comments = [][ ]
Then we perform the update, replacing the post titled “My Blog Post” with our newversion of the document:
> db.blog.update({title : "My Blog Post"}, post)
MongoDB Shell | 13

Now the document has a "comments" key. If we call find again, we can see the new key:
> db.blog.find(){ "_id" : ObjectId("4b23c3ca7525f35f94b60a2d"), "title" : "My Blog Post", "content" : "Here's my blog post.", "date" : "Sat Dec 12 2009 11:23:21 GMT-0500 (EST)" "comments" : [ ]}
Delete
remove deletes documents permanently from the database. Called with no parameters,it removes all documents from a collection. It can also take a document specifyingcriteria for removal. For example, this would remove the post we just created:
> db.blog.remove({title : "My Blog Post"})
Now the collection will be empty again.
Tips for Using the ShellBecause mongo is simply a JavaScript shell, you can get a great deal of help for it bysimply looking up JavaScript documentation online. The shell also includes built-inhelp that can be accessed by typing help:
> helpHELP show dbs show database names show collections show collections in current database show users show users in current database show profile show recent system.profile entries w. time >= 1ms use <db name> set current database to <db name> db.help() help on DB methods db.foo.help() help on collection methods db.foo.find() list objects in collection foo db.foo.find( { a : 1 } ) list objects in foo where a == 1 it result of the last line evaluated
Help for database-level commands is provided by db.help();, and help at the collec-tions can be accessed with db.foo.help();.
A good way of figuring out what a function is doing is to type it without the parentheses.This will print the JavaScript source code for the function. For example, if we are curiousabout how the update function works or cannot remember the order of parameters, wecan do the following:
> db.foo.updatefunction (query, obj, upsert, multi) { assert(query, "need a query"); assert(obj, "need an object"); this._validateObject(obj); this._mongo.update(this._fullName, query, obj,
14 | Chapter 2: Getting Started

upsert ? true : false, multi ? true : false);}
There is also an autogenerated API of all the JavaScript functions provided by the shellat http://api.mongodb.org/js.
Inconvenient collection names
Fetching a collection with db.collectionName almost always works, unless the collec-tion name actually is a property of the database class. For instance, if we are trying toaccess the version collection, we cannot say db.version because db.version is a databasefunction. (It returns the version of the running MongoDB server.)
> db.versionfunction () { return this.serverBuildInfo().version;}
db’s collection-returning behavior is only a fallback for when JavaScript cannot find amatching property. When there is a property with the same name as the desired col-lection, we can use the getCollection function:
> db.getCollection("version");test.version
This can also be handy for collections with invalid JavaScript in their names. For ex-ample, foo-bar is a valid collection name, but it’s variable subtraction in JavaScript.You can get the foo-bar collection with db.getCollection("foo-bar").
In JavaScript, x.y is identical to x['y']. This means that subcollections can be accessedusing variables, not just literal names. That is, if you needed to perform some operationon every blog subcollection, you could iterate through them with something like this:
var collections = ["posts", "comments", "authors"];
for (i in collections) { doStuff(db.blog[collections[i]]);}
Instead of this:
doStuff(db.blog.posts);doStuff(db.blog.comments);doStuff(db.blog.authors);
Data TypesThe beginning of this chapter covered the basics of what a document is. Now that youare up and running with MongoDB and can try things on the shell, this section willdive a little deeper. MongoDB supports a wide range of data types as values in docu-ments. In this section, we’ll outline all of the supported types.
Data Types | 15

Basic Data TypesDocuments in MongoDB can be thought of as “JSON-like” in that they are conceptuallysimilar to objects in JavaScript. JSON is a simple representation of data: the specifica-tion can be described in about one paragraph (http://www.json.org proves it) and listsonly six data types. This is a good thing in many ways: it’s easy to understand, parse,and remember. On the other hand, JSON’s expressive capabilities are limited, becausethe only types are null, boolean, numeric, string, array, and object.
Although these types allow for an impressive amount of expressivity, there are a coupleof additional types that are crucial for most applications, especially when working witha database. For example, JSON has no date type, which makes working with dates evenmore annoying than it usually is. There is a number type, but only one—there is noway to differentiate floats and integers, never mind any distinction between 32-bit and64-bit numbers. There is no way to represent other commonly used types, either, suchas regular expressions or functions.
MongoDB adds support for a number of additional data types while keeping JSON’sessential key/value pair nature. Exactly how values of each type are represented variesby language, but this is a list of the commonly supported types and how they are rep-resented as part of a document in the shell:
nullNull can be used to represent both a null value and a nonexistent field:
{"x" : null}
booleanThere is a boolean type, which will be used for the values 'true' and 'false':
{"x" : true}
32-bit integerThis cannot be represented on the shell. As mentioned earlier, JavaScript supportsonly 64-bit floating point numbers, so 32-bit integers will be converted into those.
64-bit integerAgain, the shell cannot represent these. The shell will display them using a specialembedded document; see the section “Numbers” on page 18 for details.
64-bit floating point numberAll numbers in the shell will be of this type. Thus, this will be a floating-pointnumber:
{"x" : 3.14}
As will this:
{"x" : 3}
stringAny string of UTF-8 characters can be represented using the string type:
16 | Chapter 2: Getting Started

{"x" : "foobar"}
symbolThis type is not supported by the shell. If the shell gets a symbol from the database,it will convert it into a string.
object idAn object id is a unique 12-byte ID for documents. See the section “_id and Ob-jectIds” on page 20 for details:
{"x" : ObjectId()}
dateDates are stored as milliseconds since the epoch. The time zone is not stored:
{"x" : new Date()}
regular expressionDocuments can contain regular expressions, using JavaScript’s regular expressionsyntax:
{"x" : /foobar/i}
codeDocuments can also contain JavaScript code:
{"x" : function() { /* ... */ }}
binary dataBinary data is a string of arbitrary bytes. It cannot be manipulated from the shell.
maximum valueBSON contains a special type representing the largest possible value. The shell doesnot have a type for this.
minimum valueBSON contains a special type representing the smallest possible value. The shelldoes not have a type for this.
undefinedUndefined can be used in documents as well (JavaScript has distinct types for nulland undefined):
{"x" : undefined}
arraySets or lists of values can be represented as arrays:
{"x" : ["a", "b", "c"]}
embedded documentDocuments can contain entire documents, embedded as values in a parentdocument:
{"x" : {"foo" : "bar"}}
Data Types | 17
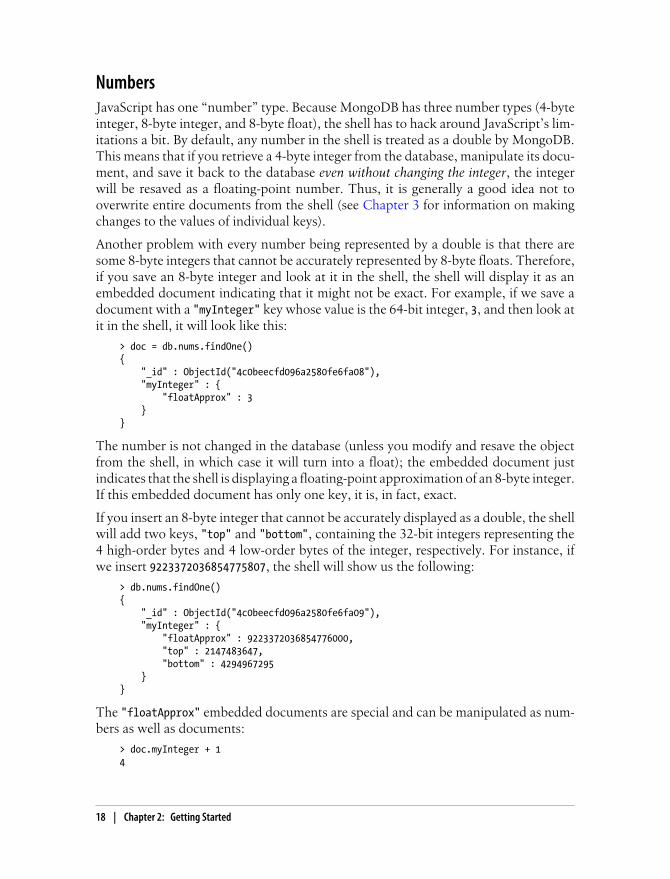
NumbersJavaScript has one “number” type. Because MongoDB has three number types (4-byteinteger, 8-byte integer, and 8-byte float), the shell has to hack around JavaScript’s lim-itations a bit. By default, any number in the shell is treated as a double by MongoDB.This means that if you retrieve a 4-byte integer from the database, manipulate its docu-ment, and save it back to the database even without changing the integer, the integerwill be resaved as a floating-point number. Thus, it is generally a good idea not tooverwrite entire documents from the shell (see Chapter 3 for information on makingchanges to the values of individual keys).
Another problem with every number being represented by a double is that there aresome 8-byte integers that cannot be accurately represented by 8-byte floats. Therefore,if you save an 8-byte integer and look at it in the shell, the shell will display it as anembedded document indicating that it might not be exact. For example, if we save adocument with a "myInteger" key whose value is the 64-bit integer, 3, and then look atit in the shell, it will look like this:
> doc = db.nums.findOne(){ "_id" : ObjectId("4c0beecfd096a2580fe6fa08"), "myInteger" : { "floatApprox" : 3 }}
The number is not changed in the database (unless you modify and resave the objectfrom the shell, in which case it will turn into a float); the embedded document justindicates that the shell is displaying a floating-point approximation of an 8-byte integer.If this embedded document has only one key, it is, in fact, exact.
If you insert an 8-byte integer that cannot be accurately displayed as a double, the shellwill add two keys, "top" and "bottom", containing the 32-bit integers representing the4 high-order bytes and 4 low-order bytes of the integer, respectively. For instance, ifwe insert 9223372036854775807, the shell will show us the following:
> db.nums.findOne(){ "_id" : ObjectId("4c0beecfd096a2580fe6fa09"), "myInteger" : { "floatApprox" : 9223372036854776000, "top" : 2147483647, "bottom" : 4294967295 }}
The "floatApprox" embedded documents are special and can be manipulated as num-bers as well as documents:
> doc.myInteger + 14
18 | Chapter 2: Getting Started

> doc.myInteger.floatApprox3
All 4-byte integers can be represented exactly by an 8-byte floating-point number, sothey are displayed normally.
DatesIn JavaScript, the Date object is used for MongoDB’s date type. When creating a newDate object, always call new Date(...), not just Date(...). Calling the constructor as afunction (that is, not including new) returns a string representation of the date, not anactual Date object. This is not MongoDB’s choice; it is how JavaScript works. If youare not careful to always use the Date constructor, you can end up with a mishmash ofstrings and dates. Strings do not match dates, and vice versa, so this can cause problemswith removing, updating, querying…pretty much everything.
For a full explanation of JavaScript’s Date class and acceptable formats for the con-structor, see ECMAScript specification section 15.9 (available for download at http://www.ecmascript.org).
Dates in the shell are displayed using local time zone settings. However, dates in thedatabase are just stored as milliseconds since the epoch, so they have no time zoneinformation associated with them. (Time zone information could, of course, be storedas the value for another key.)
ArraysArrays are values that can be interchangeably used for both ordered operations (asthough they were lists, stacks, or queues) and unordered operations (as though theywere sets).
In the following document, the key "things" has an array value:
{"things" : ["pie", 3.14]}
As we can see from the example, arrays can contain different data types as values (inthis case, a string and a floating-point number). In fact, array values can be any of thesupported values for normal key/value pairs, even nested arrays.
One of the great things about arrays in documents is that MongoDB “understands”their structure and knows how to “reach inside” of arrays to perform operations ontheir contents. This allows us to query on arrays and build indexes using their contents.For instance, in the previous example, MongoDB can query for all documents where3.14 is an element of the "things" array. If this is a common query, you can even createan index on the "things" key to improve the query’s speed.
MongoDB also allows atomic updates that modify the contents of arrays, such asreaching into the array and changing the value pie to pi. We’ll see more examples ofthese types of operations throughout the text.
Data Types | 19

Embedded DocumentsEmbedded documents are entire MongoDB documents that are used as the value for akey in another document. They can be used to organize data in a more natural waythan just a flat structure.
For example, if we have a document representing a person and want to store his address,we can nest this information in an embedded "address" document:
{ "name" : "John Doe", "address" : { "street" : "123 Park Street", "city" : "Anytown", "state" : "NY" }}
The value for the "address" key in the previous example is another document with itsown values for "street", "city", and "state".
As with arrays, MongoDB “understands” the structure of embedded documents and isable to “reach inside” of them to build indexes, perform queries, or make updates.
We’ll discuss schema design in depth later, but even from this basic example, we canbegin to see how embedded documents can change the way we work with data. In arelational database, the previous document would probably be modeled as two separaterows in two different tables (one for “people” and one for “addresses”). With MongoDBwe can embed the address document directly within the person document. When usedproperly, embedded documents can provide a more natural (and often more efficient)representation of information.
The flip side of this is that we are basically denormalizing, so there can be more datarepetition with MongoDB. Suppose “addresses” were a separate table in a relationaldatabase and we needed to fix a typo in an address. When we did a join with “people”and “addresses,” we’d get the updated address for everyone who shares it. WithMongoDB, we’d need to fix the typo in each person’s document.
_id and ObjectIdsEvery document stored in MongoDB must have an "_id" key. The "_id" key’s valuecan be any type, but it defaults to an ObjectId. In a single collection, every documentmust have a unique value for "_id", which ensures that every document in a collectioncan be uniquely identified. That is, if you had two collections, each one could have adocument where the value for "_id" was 123. However, neither collection could containmore than one document where "_id" was 123.
20 | Chapter 2: Getting Started

ObjectIds
ObjectId is the default type for "_id". It is designed to be lightweight, while still beingeasy to generate in a globally unique way across disparate machines. This is the mainreason why MongoDB uses ObjectIds as opposed to something more traditional, likean autoincrementing primary key: it is difficult and time-consuming to synchronizeautoincrementing primary keys across multiple servers. Because MongoDB was de-signed from the beginning to be a distributed database, dealing with many nodes is animportant consideration. The ObjectId type, as we’ll see, is easy to generate in a shardedenvironment.
ObjectIds use 12 bytes of storage, which gives them a string representation that is 24hexadecimal digits: 2 digits for each byte. This causes them to appear larger than theyare, which makes some people nervous. It’s important to note that even though anObjectId is often represented as a giant hexadecimal string, the string is actually twiceas long as the data being stored.
If you create multiple new ObjectIds in rapid succession, you can see that only the lastfew digits change each time. In addition, a couple of digits in the middle of theObjectId will change (if you space the creations out by a couple of seconds). This isbecause of the manner in which ObjectIds are created. The 12 bytes of an ObjectId aregenerated as follows:
0 1 2 3 4 5 6 7 8 9 10 11
Timestamp Machine PID Increment
The first four bytes of an ObjectId are a timestamp in seconds since the epoch. Thisprovides a couple of useful properties:
• The timestamp, when combined with the next five bytes (which will be describedin a moment), provides uniqueness at the granularity of a second.
• Because the timestamp comes first, it means that ObjectIds will sort in roughlyinsertion order. This is not a strong guarantee but does have some nice properties,such as making ObjectIds efficient to index.
• In these four bytes exists an implicit timestamp of when each document was cre-ated. Most drivers expose a method for extracting this information from anObjectId.
Because the current time is used in ObjectIds, some users worry that their servers willneed to have synchronized clocks. This is not necessary because the actual value of thetimestamp doesn’t matter, only that it is often new (once per second) and increasing.
The next three bytes of an ObjectId are a unique identifier of the machine on which itwas generated. This is usually a hash of the machine’s hostname. By including thesebytes, we guarantee that different machines will not generate colliding ObjectIds.
Data Types | 21

To provide uniqueness among different processes generating ObjectIds concurrentlyon a single machine, the next two bytes are taken from the process identifier (PID) ofthe ObjectId-generating process.
These first nine bytes of an ObjectId guarantee its uniqueness across machines andprocesses for a single second. The last three bytes are simply an incrementing counterthat is responsible for uniqueness within a second in a single process. This allows forup to 2563 (16,777,216) unique ObjectIds to be generated per process in a single second.
Autogeneration of _id
As stated previously, if there is no "_id" key present when a document is inserted, onewill be automatically added to the inserted document. This can be handled by theMongoDB server but will generally be done by the driver on the client side. There area couple of reasons for that:
• Although ObjectIds are designed to be lightweight and easy to generate, there isstill some overhead involved in their generation. The decision to generate them onthe client side reflects an overall philosophy of MongoDB: work should be pushedout of the server and to the drivers whenever possible. This philosophy reflects thefact that, even with scalable databases like MongoDB, it is easier to scale out at theapplication layer than at the database layer. Moving work to the client side reducesthe burden requiring the database to scale.
• By generating ObjectIds on the client side, drivers are capable of providing richerAPIs than would be otherwise possible. For example, a driver might have itsinsert method either return the generated ObjectId or inject it directly into thedocument that was inserted. If the driver allowed the server to generateObjectIds, then a separate query would be required to determine the value of"_id" for an inserted document.
22 | Chapter 2: Getting Started

CHAPTER 3
Creating, Updating, andDeleting Documents
This chapter covers the basics of moving data into and out of the database, includingthe following:
• Adding new documents to a collection
• Removing documents from a collection
• Updating existing documents
• Choosing the correct level of safety versus speed for all of these operations
Inserting and Saving DocumentsInserts are the basic method for adding data to MongoDB. To insert a document intoa collection, use the collection’s insert method:
> db.foo.insert({"bar" : "baz"})
This will add an "_id" key to the document (if one does not already exist) and save itto MongoDB.
Batch InsertIf you have a situation where you are inserting multiple documents into a collection,you can make the insert faster by using batch inserts. Batch inserts allow you to passan array of documents to the database.
Sending dozens, hundreds, or even thousands of documents at a time can make insertssignificantly faster. A batch insert is a single TCP request, meaning that you do notincur the overhead of doing hundreds of individual requests. It can also cut insert timeby eliminating a lot of the header processing that gets done for each message. Whenan individual document is sent to the database, it is prefixed by a header that tells the
23

database to do an insert operation on a certain collection. By using batch insert, thedatabase doesn’t need to reprocess this information for each document.
Batch inserts are intended to be used in applications, such as for inserting a couplehundred sensor data points into an analytics collection at once. They are useful only ifyou are inserting multiple documents into a single collection: you cannot use batchinserts to insert into multiple collections with a single request. If you are just importingraw data (for example, from a data feed or MySQL), there are command-line tools likemongoimport that can be used instead of batch insert. On the other hand, it is oftenhandy to munge data before saving it to MongoDB (converting dates to the date typeor adding a custom "_id") so batch inserts can be used for importing data, as well.
Current versions of MongoDB do not accept messages longer than 16MB, so there is alimit to how much can be inserted in a single batch insert.
Inserts: Internals and ImplicationsWhen you perform an insert, the driver you are using converts the data structure intoBSON, which it then sends to the database (see Appendix C for more on BSON). Thedatabase understands BSON and checks for an "_id" key and that the document’s sizedoes not exceed 4MB, but other than that, it doesn’t do data validation; it just savesthe document to the database as is. This has a couple of side effects, most notably thatyou can insert invalid data and that your database is fairly secure from injection attacks.
All of the drivers for major languages (and most of the minor ones, too) check for avariety of invalid data (documents that are too large, contain non-UTF-8 strings, or useunrecognized types) before sending anything to the database. If you are running a driverthat you are not sure about, you can start the database server with the --objcheckoption, and it will examine each document’s structural validity before inserting it (atthe cost of slower performance).
Documents larger than 4MB (when converted to BSON) cannot besaved to the database. This is a somewhat arbitrary limit (and may beraised in the future); it is mostly to prevent bad schema design and en-sure consistent performance. To see the BSON size (in bytes) of thedocument doc, run Object.bsonsize(doc) from the shell.
To give you an idea of how much 4MB is, the entire text of War andPeace is just 3.14MB.
MongoDB does not do any sort of code execution on inserts, so they are not vulnerableto injection attacks. Traditional injection attacks are impossible with MongoDB, andalternative injection-type attacks are easy to guard against in general, but inserts areparticularly invulnerable.
24 | Chapter 3: Creating, Updating, and Deleting Documents

Removing DocumentsNow that there’s data in our database, let’s delete it.
> db.users.remove()
This will remove all of the documents in the users collection. This doesn’t actuallyremove the collection, and any indexes created on it will still exist.
The remove function optionally takes a query document as a parameter. When it’s given,only documents that match the criteria will be removed. Suppose, for instance, that wewant to remove everyone from the mailing.list collection where the value for "opt-out" is true:
> db.mailing.list.remove({"opt-out" : true})
Once data has been removed, it is gone forever. There is no way to undo the removeor recover deleted documents.
Remove SpeedRemoving documents is usually a fairly quick operation, but if you want to clear anentire collection, it is faster to drop it (and then re-create any indexes).
For example, in Python, suppose we insert a million dummy elements with thefollowing:
for i in range(1000000): collection.insert({"foo": "bar", "baz": i, "z": 10 - i})
Now we’ll try to remove all of the documents we just inserted, measuring the time ittakes. First, here’s a simple remove:
import time
from pymongo import Connection
db = Connection().foocollection = db.bar
start = time.time()
collection.remove()collection.find_one()
total = time.time() - startprint "%d seconds" % total
On a MacBook Air, this script prints “46.08 seconds.”
If the remove and find_one are replaced by db.drop_collection("bar"), the time dropsto .01 seconds! This is obviously a vast improvement, but it comes at the expense of
Removing Documents | 25

granularity: we cannot specify any criteria. The whole collection is dropped, and all ofits indexes are deleted.
Updating DocumentsOnce a document is stored in the database, it can be changed using the update method.update takes two parameters: a query document, which locates documents to update,and a modifier document, which describes the changes to make to the documentsfound.
Updates are atomic: if two updates happen at the same time, whichever one reachesthe server first will be applied, and then the next one will be applied. Thus, conflictingupdates can safely be sent in rapid-fire succession without any documents being cor-rupted: the last update will “win.”
Document ReplacementThe simplest type of update fully replaces a matching document with a new one. Thiscan be useful to do a dramatic schema migration. For example, suppose we are makingmajor changes to a user document, which looks like the following:
{ "_id" : ObjectId("4b2b9f67a1f631733d917a7a"), "name" : "joe", "friends" : 32, "enemies" : 2}
We want to change that document into the following:
{ "_id" : ObjectId("4b2b9f67a1f631733d917a7a"), "username" : "joe", "relationships" : { "friends" : 32, "enemies" : 2 }}
We can make this change by replacing the document using an update:
> var joe = db.users.findOne({"name" : "joe"});> joe.relationships = {"friends" : joe.friends, "enemies" : joe.enemies};{ "friends" : 32, "enemies" : 2}
26 | Chapter 3: Creating, Updating, and Deleting Documents

> joe.username = joe.name;"joe"> delete joe.friends;true> delete joe.enemies;true> delete joe.name;true> db.users.update({"name" : "joe"}, joe);
Now, doing a findOne shows that the structure of the document has been updated.
A common mistake is matching more than one document with the criteria and thencreate a duplicate "_id" value with the second parameter. The database will throw anerror for this, and nothing will be changed.
For example, suppose we create several documents with the same "name", but we don’trealize it:
> db.people.find(){"_id" : ObjectId("4b2b9f67a1f631733d917a7b"), "name" : "joe", "age" : 65},{"_id" : ObjectId("4b2b9f67a1f631733d917a7c"), "name" : "joe", "age" : 20},{"_id" : ObjectId("4b2b9f67a1f631733d917a7d"), "name" : "joe", "age" : 49},
Now, if it’s Joe #2’s birthday, we want to increment the value of his "age" key, so wemight say this:
> joe = db.people.findOne({"name" : "joe", "age" : 20});{ "_id" : ObjectId("4b2b9f67a1f631733d917a7c"), "name" : "joe", "age" : 20}> joe.age++;> db.people.update({"name" : "joe"}, joe);E11001 duplicate key on update
What happened? When you call update, the database will look for a document match-ing {"name" : "joe"}. The first one it finds will be the 65-year-old Joe. It will attemptto replace that document with the one in the joe variable, but there’s already a docu-ment in this collection with the same "_id". Thus, the update will fail, because "_id"values must be unique. The best way to avoid this situation is to make sure that yourupdate always specifies a unique document, perhaps by matching on a key like "_id".
Using ModifiersUsually only certain portions of a document need to be updated. Partial updates canbe done extremely efficiently by using atomic update modifiers. Update modifiers arespecial keys that can be used to specify complex update operations, such as altering,adding, or removing keys, and even manipulating arrays and embedded documents.
Suppose we were keeping website analytics in a collection and wanted to increment acounter each time someone visited a page. We can use update modifiers to do this
Updating Documents | 27

increment atomically. Each URL and its number of page views is stored in a documentthat looks like this:
{ "_id" : ObjectId("4b253b067525f35f94b60a31"), "url" : "www.example.com", "pageviews" : 52}
Every time someone visits a page, we can find the page by its URL and use the "$inc"modifier to increment the value of the "pageviews" key.
> db.analytics.update({"url" : "www.example.com"},... {"$inc" : {"pageviews" : 1}})
Now, if we do a find, we see that "pageviews" has increased by one.
> db.analytics.find(){ "_id" : ObjectId("4b253b067525f35f94b60a31"), "url" : "www.example.com", "pageviews" : 53}
Perl and PHP programmers are probably thinking that any characterwould have been a better choice than $. Both of these languages use $as a variable prefix and will replace $-prefixed strings with their variablevalue in double-quoted strings. However, MongoDB started out as aJavaScript database, and $ is a special character that isn’t interpreteddifferently in JavaScript, so it was used. It is an annoying historical relicfrom MongoDB’s primordial soup.
There are several options for Perl and PHP programmers. First, youcould just escape the $: "\$foo". You can use single quotes, which don’tdo variable interpolation: '$foo'. Finally, both drivers allow you to de-fine your own character that will be used instead of $. In Perl, set$MongoDB::BSON::char, and in PHP set mongo.cmd_char in php.ini to =, :, ?,or any other character that you would like to use instead of $. Then, ifyou choose, say, ~, you would use ~inc instead of \$inc and ~gt insteadof \$gt.
Good choices for the special character are characters that will not nat-urally appear in key names (don’t use _ or x) and are not characters thathave to be escaped themselves, which will gain you nothing and be con-fusing (such as \ or, in Perl, @).
When using modifiers, the value of "_id" cannot be changed. (Note that "_id" can bechanged by using whole-document replacement.) Values for any other key, includingother uniquely indexed keys, can be modified.
28 | Chapter 3: Creating, Updating, and Deleting Documents
Getting started with the "$set" modifier
"$set" sets the value of a key. If the key does not yet exist, it will be created. This canbe handy for updating schema or adding user-defined keys. For example, suppose youhave a simple user profile stored as a document that looks something like the following:
> db.users.findOne(){ "_id" : ObjectId("4b253b067525f35f94b60a31"), "name" : "joe", "age" : 30, "sex" : "male", "location" : "Wisconsin"}
This is a pretty bare-bones user profile. If the user wanted to store his favorite book inhis profile, he could add it using "$set":
> db.users.update({"_id" : ObjectId("4b253b067525f35f94b60a31")},... {"$set" : {"favorite book" : "war and peace"}})
Now the document will have a “favorite book” key:
> db.users.findOne(){ "_id" : ObjectId("4b253b067525f35f94b60a31"), "name" : "joe", "age" : 30, "sex" : "male", "location" : "Wisconsin", "favorite book" : "war and peace"}
If the user decides that he actually enjoys a different book, "$set" can be used again tochange the value:
> db.users.update({"name" : "joe"},... {"$set" : {"favorite book" : "green eggs and ham"}})
"$set" can even change the type of the key it modifies. For instance, if our fickle userdecides that he actually likes quite a few books, he can change the value of the “favoritebook” key into an array:
> db.users.update({"name" : "joe"},... {"$set" : {"favorite book" :... ["cat's cradle", "foundation trilogy", "ender's game"]}})
If the user realizes that he actually doesn’t like reading, he can remove the key altogetherwith "$unset":
> db.users.update({"name" : "joe"},... {"$unset" : {"favorite book" : 1}})
Now the document will be the same as it was at the beginning of this example.
Updating Documents | 29

You can also use "$set" to reach in and change embedded documents:
> db.blog.posts.findOne(){ "_id" : ObjectId("4b253b067525f35f94b60a31"), "title" : "A Blog Post", "content" : "...", "author" : { "name" : "joe", "email" : "[email protected]" }}> db.blog.posts.update({"author.name" : "joe"}, {"$set" : {"author.name" : "joe schmoe"}})> db.blog.posts.findOne(){ "_id" : ObjectId("4b253b067525f35f94b60a31"), "title" : "A Blog Post", "content" : "...", "author" : { "name" : "joe schmoe", "email" : "[email protected]" }}
You must always use a $ modifier for adding, changing, or removing keys. A commonerror people often make when starting out is to try to set the value of "foo" to "bar" bydoing an update that looks like this:
> db.coll.update(criteria, {"foo" : "bar"})
This will not function as intended. It actually does a full-document replacement, re-placing the matched document with {"foo" : "bar"}. Always use $ operators for mod-ifying individual key/value pairs.
Incrementing and decrementing
The "$inc" modifier can be used to change the value for an existing key or to create anew key if it does not already exist. It is very useful for updating analytics, karma, votes,or anything else that has a changeable, numeric value.
Suppose we are creating a game collection where we want to save games and updatescores as they change. When a user starts playing, say, a game of pinball, we can inserta document that identifies the game by name and user playing it:
> db.games.insert({"game" : "pinball", "user" : "joe"})
When the ball hits a bumper, the game should increment the player’s score. As pointsin pinball are given out pretty freely, let’s say that the base unit of points a player canearn is 50. We can use the "$inc" modifier to add 50 to the player’s score:
> db.games.update({"game" : "pinball", "user" : "joe"},... {"$inc" : {"score" : 50}})
30 | Chapter 3: Creating, Updating, and Deleting Documents

If we look at the document after this update, we’ll see the following:
> db.games.findOne(){ "_id" : ObjectId("4b2d75476cc613d5ee930164"), "game" : "pinball", "name" : "joe", "score" : 50}
The score key did not already exist, so it was created by "$inc" and set to the incrementamount: 50.
If the ball lands in a “bonus” slot, we want to add 10,000 to the score. This can beaccomplished by passing a different value to "$inc":
> db.games.update({"game" : "pinball", "user" : "joe"},... {"$inc" : {"score" : 10000}})
Now if we look at the game, we’ll see the following:
> db.games.find(){ "_id" : ObjectId("4b2d75476cc613d5ee930164"), "game" : "pinball", "name" : "joe", "score" : 10050}
The "score" key existed and had a numeric value, so the server added 10,000 to it.
"$inc" is similar to "$set", but it is designed for incrementing (and decrementing)numbers. "$inc" can be used only on values of type integer, long, or double. If it is usedon any other type of value, it will fail. This includes types that many languages willautomatically cast into numbers, like nulls, booleans, or strings of numeric characters:
> db.foo.insert({"count" : "1"})> db.foo.update({}, {$inc : {count : 1}})Cannot apply $inc modifier to non-number
Also, the value of the "$inc" key must be a number. You cannot increment by a string,array, or other non-numeric value. Doing so will give a “Modifier "$inc" allowed fornumbers only” error message. To modify other types, use "$set" or one of the arrayoperations described in a moment.
Array modifiers
An extensive class of modifiers exists for manipulating arrays. Arrays are common andpowerful data structures: not only are they lists that can be referenced by index, butthey can also double as sets.
Array operators can be used only on keys with array values. For example, you cannotpush on to an integer or pop off of a string, for example. Use "$set" or "$inc" to modifyscalar values.
Updating Documents | 31

"$push" adds an element to the end of an array if the specified key already exists andcreates a new array if it does not. For example, suppose that we are storing blog postsand want to add a "comments" key containing an array. We can push a comment ontothe nonexistent "comments" array, which will create the array and add the comment:
> db.blog.posts.findOne(){ "_id" : ObjectId("4b2d75476cc613d5ee930164"), "title" : "A blog post", "content" : "..."}> db.blog.posts.update({"title" : "A blog post"}, {$push : {"comments" :... {"name" : "joe", "email" : "[email protected]", "content" : "nice post."}}})> db.blog.posts.findOne(){ "_id" : ObjectId("4b2d75476cc613d5ee930164"), "title" : "A blog post", "content" : "...", "comments" : [ { "name" : "joe", "email" : "[email protected]", "content" : "nice post." } ]}
Now, if we want to add another comment, we can simple use "$push" again:
> db.blog.posts.update({"title" : "A blog post"}, {$push : {"comments" :... {"name" : "bob", "email" : "[email protected]", "content" : "good post."}}})> db.blog.posts.findOne(){ "_id" : ObjectId("4b2d75476cc613d5ee930164"), "title" : "A blog post", "content" : "...", "comments" : [ { "name" : "joe", "email" : "[email protected]", "content" : "nice post." }, { "name" : "bob", "email" : "[email protected]", "content" : "good post." } ]}
A common use is wanting to add a value to an array only if the value is not alreadypresent. This can be done using a "$ne" in the query document. For example, to pushan author onto a list of citations, but only if he isn’t already there, use the following:
32 | Chapter 3: Creating, Updating, and Deleting Documents

> db.papers.update({"authors cited" : {"$ne" : "Richie"}},... {$push : {"authors cited" : "Richie"}})
This can also be done with "$addToSet", which is useful for cases where "$ne" won’twork or where "$addToSet" describes what is happening better.
For instance, suppose you have a document that represents a user. You might have aset of email addresses that they have added:
> db.users.findOne({"_id" : ObjectId("4b2d75476cc613d5ee930164")}){ "_id" : ObjectId("4b2d75476cc613d5ee930164"), "username" : "joe", "emails" : [ "[email protected]", "[email protected]", "[email protected]" ]}
When adding another address, you can use "$addToSet" to prevent duplicates:
> db.users.update({"_id" : ObjectId("4b2d75476cc613d5ee930164")},... {"$addToSet" : {"emails" : "[email protected]"}})> db.users.findOne({"_id" : ObjectId("4b2d75476cc613d5ee930164")}){ "_id" : ObjectId("4b2d75476cc613d5ee930164"), "username" : "joe", "emails" : [ "[email protected]", "[email protected]", "[email protected]", ]}> db.users.update({"_id" : ObjectId("4b2d75476cc613d5ee930164")},... {"$addToSet" : {"emails" : "[email protected]"}})> db.users.findOne({"_id" : ObjectId("4b2d75476cc613d5ee930164")}){ "_id" : ObjectId("4b2d75476cc613d5ee930164"), "username" : "joe", "emails" : [ "[email protected]", "[email protected]", "[email protected]", "[email protected]" ]}
You can also use "$addToSet" in conjunction with "$each" to add multiple unique val-ues, which cannot be done with the "$ne"/"$push" combination. For instance, we coulduse these modifiers if the user wanted to add more than one email address:
> db.users.update({"_id" : ObjectId("4b2d75476cc613d5ee930164")}, {"$addToSet" :... {"emails" : {"$each" : ["[email protected]", "[email protected]", "[email protected]"]}}})> db.users.findOne({"_id" : ObjectId("4b2d75476cc613d5ee930164")}){
Updating Documents | 33

"_id" : ObjectId("4b2d75476cc613d5ee930164"), "username" : "joe", "emails" : [ "[email protected]", "[email protected]", "[email protected]", "[email protected]" "[email protected]" "[email protected]" ]}
There are a few ways to remove elements from an array. If you want to treat the arraylike a queue or a stack, you can use "$pop", which can remove elements from eitherend. {$pop : {key : 1}} removes an element from the end of the array. {$pop :{key : -1}} removes it from the beginning.
Sometimes an element should be removed based on specific criteria, rather than itsposition in the array. "$pull" is used to remove elements of an array that match thegiven criteria. For example, suppose we have a list of things that need to be done butnot in any specific order:
> db.lists.insert({"todo" : ["dishes", "laundry", "dry cleaning"]})
If we do the laundry first, we can remove it from the list with the following:
> db.lists.update({}, {"$pull" : {"todo" : "laundry"}})
Now if we do a find, we’ll see that there are only two elements remaining in the array:
> db.lists.find(){ "_id" : ObjectId("4b2d75476cc613d5ee930164"), "todo" : [ "dishes", "dry cleaning" ]}
Pulling removes all matching documents, not just a single match. If you have an arraythat looks like [1, 1, 2, 1] and pull 1, you’ll end up with a single-element array, [2].
Positional array modifications
Array manipulation becomes a little trickier when we have multiple values in an arrayand want to modify some of them. There are two ways to manipulate values in arrays:by position or by using the position operator (the "$" character).
Arrays use 0-based indexing, and elements can be selected as though their index werea document key. For example, suppose we have a document containing an array witha few embedded documents, such as a blog post with comments:
> db.blog.posts.findOne(){ "_id" : ObjectId("4b329a216cc613d5ee930192"),
34 | Chapter 3: Creating, Updating, and Deleting Documents

"content" : "...", "comments" : [ { "comment" : "good post", "author" : "John", "votes" : 0 }, { "comment" : "i thought it was too short", "author" : "Claire", "votes" : 3 }, { "comment" : "free watches", "author" : "Alice", "votes" : -1 } ]}
If we want to increment the number of votes for the first comment, we can say thefollowing:
> db.blog.update({"post" : post_id},... {"$inc" : {"comments.0.votes" : 1}})
In many cases, though, we don’t know what index of the array to modify withoutquerying for the document first and examining it. To get around this, MongoDB has apositional operator, "$", that figures out which element of the array the query documentmatched and updates that element. For example, if we have a user named John whoupdates his name to Jim, we can replace it in the comments by using the positionaloperator:
db.blog.update({"comments.author" : "John"},... {"$set" : {"comments.$.author" : "Jim"}})
The positional operator updates only the first match. Thus, if John had left more thanone comment, his name would be changed only for the first comment he left.
Modifier speed
Some modifiers are faster than others. $inc modifies a document in place: it does nothave to change the size of a document, only the value of a key, so it is very efficient. Onthe other hand, array modifiers might change the size of a document and can be slow.("$set" can modify documents in place if the size isn’t changing but otherwise is subjectto the same performance limitations as array operators.)
MongoDB leaves some padding around a document to allow for changes in size (and,in fact, figures out how much documents usually change in size and adjusts the amountof padding it leaves accordingly), but it will eventually have to allocate new space fora document if you make it much larger than it was originally. Compounding this
Updating Documents | 35

slowdown, as arrays get longer, it takes MongoDB a longer amount of time to traversethe whole array, slowing down each array modification.
A simple program in Python can demonstrate the speed difference. This program insertsa single key and increments its value 100,000 times.
from pymongo import Connection
import time
db = Connection().performance_testdb.drop_collection("updates")collection = db.updates
collection.insert({"x": 1})
# make sure the insert is complete before we start timingcollection.find_one()
start = time.time()
for i in range(100000): collection.update({}, {"$inc" : {"x" : 1}})
# make sure the updates are complete before we stop timingcollection.find_one()
print time.time() - start
On a MacBook Air this took 7.33 seconds. That’s more than 13,000 updates per second(which is pretty good for a fairly anemic machine). Now, let’s try it with a documentwith a single array key, pushing new values onto that array 100,000 times:
for i in range(100000): collection.update({}, {'$push' : {'x' : 1}})
This program took 67.58 seconds to run, which is less than 1,500 updates per second.
Using "$push" and other array modifiers is encouraged and often necessary, but it isgood to keep in mind the trade-offs of such updates. If "$push" becomes a bottleneck,it may be worth pulling an embedded array out into a separate collection.
UpsertsAn upsert is a special type of update. If no document is found that matches the updatecriteria, a new document will be created by combining the criteria and update docu-ments. If a matching document is found, it will be updated normally. Upserts can bevery handy because they eliminate the need to “seed” your collection: you can have thesame code create and update documents.
Let’s go back to our example recording the number of views for each page of a website.Without an upsert, we might try to find the URL and increment the number of viewsor create a new document if the URL doesn’t exist. If we were to write this out as a
36 | Chapter 3: Creating, Updating, and Deleting Documents
JavaScript program (instead of a series of shell commands—scripts can be run withmongo scriptname.js), it might look something like the following:
// check if we have an entry for this pageblog = db.analytics.findOne({url : "/blog"})
// if we do, add one to the number of views and saveif (blog) { blog.pageviews++; db.analytics.save(blog);}// otherwise, create a new document for this pageelse { db.analytics.save({url : "/blog", pageviews : 1})}
This means we are making a round-trip to the database, plus sending an update orinsert, every time someone visits a page. If we are running this code in multiple pro-cesses, we are also subject to a race condition where more than one document can beinserted for a given URL.
We can eliminate the race condition and cut down on the amount of code by justsending an upsert (the third parameter to update specifies that this should be an upsert):
db.analytics.update({"url" : "/blog"}, {"$inc" : {"visits" : 1}}, true)
This line does exactly what the previous code block does, except it’s faster and atomic!The new document is created using the criteria document as a base and applying anymodifier documents to it. For example, if you do an upsert that matches a key and hasan increment to the value of that key, the increment will be applied to the match:
> db.math.remove()> db.math.update({"count" : 25}, {"$inc" : {"count" : 3}}, true)> db.math.findOne(){ "_id" : ObjectId("4b3295f26cc613d5ee93018f"), "count" : 28}
The remove empties the collection, so there are no documents. The upsert creates a newdocument with a "count" of 25 and then increments that by 3, giving us a documentwhere "count" is 28. If the upsert option were not specified, {"count" : 25} would notmatch any documents, so nothing would happen.
If we run the upsert again (with the criteria {count : 25}), it will create another newdocument. This is because the criteria does not match the only document in the col-lection. (Its "count" is 28.)
The save Shell Helper
save is a shell function that lets you insert a document if it doesn’t exist and update itif it does. It takes one argument: a document. If the document contains an "_id" key,
Updating Documents | 37

save will do an upsert. Otherwise, it will do an insert. This is just a convenience functionso that programmers can quickly modify documents in the shell:
> var x = db.foo.findOne()> x.num = 4242> db.foo.save(x)
Without save, the last line would have been a more cumbersomedb.foo.update({"_id" : x._id}, x).
Updating Multiple DocumentsUpdates, by default, update only the first document found that matches the criteria. Ifthere are more matching documents, they will remain unchanged. To modify all of thedocuments matching the criteria, you can pass true as the fourth parameter to update.
update’s behavior may be changed in the future (the server may updateall matching documents by default and update one only if false is passedas the fourth parameter), so it is recommended that you always specifywhether you want a multiple update.
Not only is it more obvious what the update should be doing, but yourprogram won’t break if the default is ever changed.
Multiupdates are a great way of performing schema migrations or rolling out new fea-tures to certain users. Suppose, for example, we want to give a gift to every user whohas a birthday on a certain day. We can use multiupdate to add a "gift" to their account:
> db.users.update({birthday : "10/13/1978"},... {$set : {gift : "Happy Birthday!"}}, false, true)
This would add the "gift" key to all user documents with birthdays on October 13,1978.
To see the number of documents updated by a multiple update, you can run thegetLastError database command (which might be better named "getLastOpStatus").The "n" key will contain the number of documents affected by the update:
> db.count.update({x : 1}, {$inc : {x : 1}}, false, true)> db.runCommand({getLastError : 1}){ "err" : null, "updatedExisting" : true, "n" : 5, "ok" : true}
"n" is 5, meaning that five documents were affected by the update. "updatedExisting"is true, meaning that the update modified existing document(s). For more on databasecommands and their responses, see Chapter 7.
38 | Chapter 3: Creating, Updating, and Deleting Documents

Returning Updated DocumentsYou can get some limited information about what was updated by callinggetLastError, but it does not actually return the updated document. For that, you’llneed the findAndModify command.
findAndModify is called differently than a normal update and is a bit slower, because itmust wait for a database response. It is handy for manipulating queues and performingother operations that need get-and-set style atomicity.
Suppose we have a collection of processes run in a certain order. Each is representedwith a document that has the following form:
{ "_id" : ObjectId(), "status" : state, "priority" : N}
"status" is a string that can be “READY,” “RUNNING,” or “DONE.” We need to findthe job with the highest priority in the “READY” state, run the process function, andthen update the status to “DONE.” We might try querying for the ready processes,sorting by priority, and updating the status of the highest-priority process to mark it is“RUNNING.” Once we have processed it, we update the status to “DONE.” This lookssomething like the following:
ps = db.processes.find({"status" : "READY").sort({"priority" : -1}).limit(1).next()db.processes.update({"_id" : ps._id}, {"$set" : {"status" : "RUNNING"}})do_something(ps);db.processes.update({"_id" : ps._id}, {"$set" : {"status" : "DONE"}})
This algorithm isn’t great, because it is subject to a race condition. Suppose we havetwo threads running. If one thread (call it A) retrieved the document and another thread(call it B) retrieved the same document before A had updated its status to “RUNNING,”then both threads would be running the same process. We can avoid this by checkingthe status as part of the update query, but this becomes complex:
var cursor = db.processes.find({"status" : "READY"}).sort({"priority" : -1}).limit(1);while ((ps = cursor.next()) != null) { ps.update({"_id" : ps._id, "status" : "READY"}, {"$set" : {"status" : "RUNNING"}});
var lastOp = db.runCommand({getlasterror : 1}); if (lastOp.n == 1) { do_something(ps); db.processes.update({"_id" : ps._id}, {"$set" : {"status" : "DONE"}}) break; } cursor = db.processes.find({"status" : "READY"}).sort({"priority" : -1}).limit(1);}
Also, depending on timing, one thread may end up doing all the work while anotherthread is uselessly trailing it. Thread A could always grab the process, and then B would
Updating Documents | 39

try to get the same process, fail, and leave A to do all the work. Situations like this areperfect for findAndModify. findAndModify can return the item and update it in a singleoperation. In this case, it looks like the following:
> ps = db.runCommand({"findAndModify" : "processes",... "query" : {"status" : "READY"},... "sort" : {"priority" : -1},... "update" : {"$set" : {"status" : "RUNNING"}}){ "ok" : 1, "value" : { "_id" : ObjectId("4b3e7a18005cab32be6291f7"), "priority" : 1, "status" : "READY" }}
Notice that the status is still “READY” in the returned document. The document isreturned before the modifier document is applied. If you do a find on the collection,though, you will see that the document’s "status" has been updated to “RUNNING”:
> db.processes.findOne({"_id" : ps.value._id}){ "_id" : ObjectId("4b3e7a18005cab32be6291f7"), "priority" : 1, "status" : "RUNNING"}
Thus, the program becomes the following:
> ps = db.runCommand({"findAndModify" : "processes",... "query" : {"status" : "READY"},... "sort" : {"priority" : -1},... "update" : {"$set" : {"status" : "RUNNING"}}).value> do_something(ps)> db.process.update({"_id" : ps._id}, {"$set" : {"status" : "DONE"}})
findAndModify can have either an "update" key or a "remove" key. A "remove" key indi-cates that the matching document should be removed from the collection. For instance,if we wanted to simply remove the job instead of updating its status, we could run thefollowing:
> ps = db.runCommand({"findAndModify" : "processes",... "query" : {"status" : "READY"},... "sort" : {"priority" : -1},... "remove" : true).value> do_something(ps)
The values for each key in the findAndModify command are as follows:
findAndModifyA string, the collection name.
queryA query document, the criteria with which to search for documents.
40 | Chapter 3: Creating, Updating, and Deleting Documents

sortCriteria by which to sort results.
updateA modifier document, the update to perform on the document found.
removeBoolean specifying whether the document should be removed.
newBoolean specifying whether the document returned should be the updated docu-ment or the preupdate document. Defaults to the preupdate document.
Either "update" or "remove" must be included, but not both. If no matching documentis found, the command will return an error.
findAndModify has a few limitations. First, it can update or remove only one documentat a time. There is also no way to use it for an upsert; it can update only existingdocuments.
The price of using findAndModify over a traditional update is speed: it is a bit slower.That said, it is no slower than one might expect: it takes roughly the same amount oftime as a find, update, and getLastError command performed in serial.
The Fastest Write This Side of MississippiThe three operations that this chapter focused on (inserts, removes, and updates) seeminstantaneous because none of them waits for a database response. They are not asyn-chronous; they can be thought of as “fire-and-forget” functions: the client sends thedocuments to the server and immediately continues. The client never receives an “OK,got that” or a “not OK, could you send that again?” response.
The benefit to this is that the speed at which you can perform these operations is terrific.You are often only limited by the speed at which your client can send them and thespeed of your network. This works well most of the time; however, sometimes some-thing goes wrong: a server crashes, a rat chews through a network cable, or a data centeris in a flood zone. If the server disappears, the client will happily send some writes toa server that isn’t there, entirely unaware of its absence. For some applications, this isacceptable. Losing a couple of seconds of log messages, user clicks, or analytics in ahardware failure is not the end of the world. For others, this is not the behavior theprogrammer wants (payment-processing systems spring to mind).
The Fastest Write This Side of Mississippi | 41

Safe OperationsSuppose you are writing an ecommerce application. If someone orders something, theapplication should probably take a little extra time to make sure the order goes through.That is why you can do a “safe” version of these operations, where you check whetherthere was an error in execution and attempt to redo them.
MongoDB developers made unchecked operations the default becauseof their experience with relational databases. Many applications writtenon top of relational databases do not care about or check the returncodes, yet they incur the performance penalty of their application wait-ing for them to arrive. MongoDB pushes this option to the user. Thisway, programs that collect log messages or real-time analytics don’t haveto wait for return codes that they don’t care about.
The safe version of these operations runs a getLastError command immediately fol-lowing the operation to check whether it succeeded (see “Database Com-mands” on page 93 for more on commands). The driver waits for the database re-sponse and then handles errors appropriately, throwing a catchable exception in mostcases. This way, developers can catch and handle database errors in whatever way feels“natural” for their language. When an operation is successful, the getLastError re-sponse also contains some additional information (e.g., for an update or remove, itincludes the number of documents affected).
The same getLastError command that powers safe mode also containsfunctionality for checking that operations have been successfully repli-cated. For more on this feature, see “Blocking for Replica-tion” on page 140.
The price of performing “safe” operations is performance: waiting for a database re-sponse takes an order of magnitude longer than sending the message, ignoring theclient-side cost of handling exceptions. (This cost varies by language but is usually fairlyheavyweight.) Thus, applications should weigh the importance of their data (and theconsequences if some of it is lost) versus the speed needed.
When in doubt, use safe operations. If they aren’t fast enough, startmaking less important operations fire-and-forget.
More specifically:
• If you live dangerously, use fire-and-forget operations exclusively.
42 | Chapter 3: Creating, Updating, and Deleting Documents

• If you want to live longer, save valuable user input (account sign-ups, credit cardnumbers, emails) with safe operations and do everything else with fire-and-forgetoperations.
• If you are cautious, use safe operations exclusively. If your application is automat-ically generating hundreds of little pieces of information to save (e.g., page, user,or advertising statistics), these can still use the fire-and-forget operation.
Catching “Normal” ErrorsSafe operations are also a good way to debug “strange” database behavior, not just forpreventing the apocalyptic scenarios described earlier. Safe operations should be usedextensively while developing, even if they are later removed before going into produc-tion. They can protect against many common database usage errors, most commonlyduplicate key errors.
Duplicate key errors often occur when users try to insert a document with a duplicatevalue for the "_id" key. MongoDB does not allow multiple documents with the same"_id" in the same collection. If you do a safe insert and a duplicate key error occurs,the server error will be picked up by the safety check, and an exception will be thrown.In unsafe mode, there is no database response, and you might not be aware that theinsert failed.
For example, using the shell, you can see that inserting two documents with the same"_id" will not work:
> db.foo.insert({"_id" : 123, "x" : 1})> db.foo.insert({"_id" : 123, "x" : 2})E11000 duplicate key error index: test.foo.$_id_ dup key: { : 123.0 }
If we examine the collection, we can see that only the first document was successfullyinserted. Note that this error can occur with any unique index, not just the one on"_id". The shell always checks for errors; in the drivers it is optional.
Requests and ConnectionsFor each connection to a MongoDB server, the database creates a queue for that con-nection’s requests. When the client sends a request, it will be placed at the end of itsconnection’s queue. Any subsequent requests on the connection will occur after theenqueued operation is processed. Thus, a single connection has a consistent view ofthe database and can always read its own writes.
Note that this is a per-connection queue: if we open two shells, we will have two con-nections to the database. If we perform an insert in one shell, a subsequent query inthe other shell might not return the inserted document. However, within a single shell,if we query for the document after inserting, the document will be returned. This be-havior can be difficult to duplicate by hand, but on a busy server, interleaved inserts/
Requests and Connections | 43

queries are very likely to occur. Often developers run into this when they insert data inone thread and then check that it was successfully inserted in another. For a second ortwo, it looks like the data was not inserted, and then it suddenly appears.
This behavior is especially worth keeping in mind when using the Ruby, Python, andJava drivers, because all three drivers use connection pooling. For efficiency, thesedrivers open multiple connections (a pool) to the server and distribute requests acrossthem. They all, however, have mechanisms to guarantee that a series of requests isprocessed by a single connection. There is detailed documentation on connectionpooling in various languages on the MongoDB wiki.
44 | Chapter 3: Creating, Updating, and Deleting Documents

CHAPTER 4
Querying
This chapter looks at querying in detail. The main areas covered are as follows:
• You can perform ad hoc queries on the database using the find or findOne functionsand a query document.
• You can query for ranges, set inclusion, inequalities, and more by using$ conditionals.
• Some queries cannot be expressed as query documents, even using $ conditionals.For these types of complex queries, you can use a $where clause to harness the fullexpressive power of JavaScript.
• Queries return a database cursor, which lazily returns batches of documents as youneed them.
• There are a lot of metaoperations you can perform on a cursor, including skippinga certain number of results, limiting the number of results returned, and sortingresults.
Introduction to findThe find method is used to perform queries in MongoDB. Querying returns a subsetof documents in a collection, from no documents at all to the entire collection. Whichdocuments get returned is determined by the first argument to find, which is a docu-ment specifying the query to be performed.
An empty query document (i.e., {}) matches everything in the collection. If find isn’tgiven a query document, it defaults to {}. For example, the following:
> db.c.find()
returns everything in the collection c.
When we start adding key/value pairs to the query document, we begin restricting oursearch. This works in a straightforward way for most types. Integers match integers,booleans match booleans, and strings match strings. Querying for a simple type is as
45

easy as specifying the value that you are looking for. For example, to find all documentswhere the value for "age" is 27, we can add that key/value pair to the query document:
> db.users.find({"age" : 27})
If we have a string we want to match, such as a "username" key with the value "joe",we use that key/value pair instead:
> db.users.find({"username" : "joe"})
Multiple conditions can be strung together by adding more key/value pairs to the querydocument, which gets interpreted as “condition1 AND condition2 AND … ANDconditionN.” For instance, to get all users who are 27-year-olds with the username“joe,” we can query for the following:
> db.users.find({"username" : "joe", "age" : 27})
Specifying Which Keys to ReturnSometimes, you do not need all of the key/value pairs in a document returned. If thisis the case, you can pass a second argument to find (or findOne) specifying the keys youwant. This reduces both the amount of data sent over the wire and the time and memoryused to decode documents on the client side.
For example, if you have a user collection and you are interested only in the "username" and "email" keys, you could return just those keys with the following query:
> db.users.find({}, {"username" : 1, "email" : 1}){ "_id" : ObjectId("4ba0f0dfd22aa494fd523620"), "username" : "joe", "email" : "[email protected]"}
As you can see from the previous output, the "_id" key is always returned, even if itisn’t specifically listed.
You can also use this second parameter to exclude specific key/value pairs from theresults of a query. For instance, you may have documents with a variety of keys, andthe only thing you know is that you never want to return the "fatal_weakness" key:
> db.users.find({}, {"fatal_weakness" : 0})
This can even prevent "_id" from being returned:
> db.users.find({}, {"username" : 1, "_id" : 0}){ "username" : "joe",}
46 | Chapter 4: Querying

LimitationsThere are some restrictions on queries. The value of a query document must be a con-stant as far as the database is concerned. (It can be a normal variable in your own code.)That is, it cannot refer to the value of another key in the document. For example, if wewere keeping inventory and we had both "in_stock" and "num_sold" keys, we couldcompare their values by querying the following:
> db.stock.find({"in_stock" : "this.num_sold"}) // doesn't work
There are ways to do this (see “$where Queries” on page 55), but you will usually getbetter performance by restructuring your document slightly, such that a normal querywill suffice. In this example, we could instead use the keys "initial_stock" and"in_stock". Then, every time someone buys an item, we decrement the value of the"in_stock" key by one. Finally, we can do a simple query to check which items are outof stock:
> db.stock.find({"in_stock" : 0})
Query CriteriaQueries can go beyond the exact matching described in the previous section; they canmatch more complex criteria, such as ranges, OR-clauses, and negation.
Query Conditionals"$lt", "$lte", "$gt", and "$gte" are all comparison operators, corresponding to <, <=,>, and >=, respectively. They can be combined to look for a range of values. For ex-ample, to look for users who are between the ages of 18 and 30 inclusive, we can do this:
> db.users.find({"age" : {"$gte" : 18, "$lte" : 30}})
These types of range queries are often useful for dates. For example, to find people whoregistered before January 1, 2007, we can do this:
> start = new Date("01/01/2007")> db.users.find({"registered" : {"$lt" : start}})
An exact match on a date is less useful, because dates are only stored with millisecondprecision. Often you want a whole day, week, or month, making a range querynecessary.
To query for documents where a key’s value is not equal to a certain value, you mustuse another conditional operator, "$ne", which stands for “not equal.” If you want tofind all users who do not have the username “joe,” you can query for them using this:
> db.users.find({"username" : {"$ne" : "joe"}})
"$ne" can be used with any type.
Query Criteria | 47

OR QueriesThere are two ways to do an OR query in MongoDB. "$in" can be used to query for avariety of values for a single key. "$or" is more general; it can be used to query for anyof the given values across multiple keys.
If you have more than one possible value to match for a single key, use an array ofcriteria with "$in". For instance, suppose we were running a raffle and the winningticket numbers were 725, 542, and 390. To find all three of these documents, we canconstruct the following query:
> db.raffle.find({"ticket_no" : {"$in" : [725, 542, 390]}})
"$in" is very flexible and allows you to specify criteria of different types as well as values.For example, if we are gradually migrating our schema to use usernames instead of userID numbers, we can query for either by using this:
> db.users.find({"user_id" : {"$in" : [12345, "joe"]})
This matches documents with a "user_id" equal to 12345, and documents with a"user_id" equal to "joe".
If "$in" is given an array with a single value, it behaves the same as directly matchingthe value. For instance, {ticket_no : {$in : [725]}} matches the same documents as{ticket_no : 725}.
The opposite of "$in" is "$nin", which returns documents that don’t match any of thecriteria in the array. If we want to return all of the people who didn’t win anything inthe raffle, we can query for them with this:
> db.raffle.find({"ticket_no" : {"$nin" : [725, 542, 390]}})
This query returns everyone who did not have tickets with those numbers.
"$in" gives you an OR query for a single key, but what if we need to find documentswhere "ticket_no" is 725 or "winner" is true? For this type of query, we’ll need to usethe "$or" conditional. "$or" takes an array of possible criteria. In the raffle case, using"$or" would look like this:
> db.raffle.find({"$or" : [{"ticket_no" : 725}, {"winner" : true}]})
"$or" can contain other conditionals. If, for example, we want to match any of the three"ticket_no" values or the "winner" key, we can use this:
> db.raffle.find({"$or" : [{"ticket_no" : {"$in" : [725, 542, 390]}}, {"winner" : true}]})
With a normal AND-type query, you want to narrow your results down as far as pos-sible in as few arguments as possible. OR-type queries are the opposite: they are mostefficient if the first arguments match as many documents as possible.
48 | Chapter 4: Querying

$not"$not" is a metaconditional: it can be applied on top of any other criteria. As an example,let’s consider the modulus operator, "$mod". "$mod" queries for keys whose values, whendivided by the first value given, have a remainder of the second value:
> db.users.find({"id_num" : {"$mod" : [5, 1]}})
The previous query returns users with "id_num"s of 1, 6, 11, 16, and so on. If we want,instead, to return users with "id_num"s of 2, 3, 4, 5, 7, 8, 9, 10, 12, and so on, we canuse "$not":
> db.users.find({"id_num" : {"$not" : {"$mod" : [5, 1]}}})
"$not" can be particularly useful in conjunction with regular expressions to find alldocuments that don’t match a given pattern (regular expression usage is described inthe section “Regular Expressions” on page 50).
Rules for ConditionalsIf you look at the update modifiers in the previous chapter and previous query docu-ments, you’ll notice that the $-prefixed keys are in different positions. In the query,"$lt" is in the inner document; in the update, "$inc" is the key for the outer document.This generally holds true: conditionals are an inner document key, and modifiers arealways a key in the outer document.
Multiple conditions can be put on a single key. For example, to find all users betweenthe ages of 20 and 30, we can query for both "$gt" and "$lt" on the "age" key:
> db.users.find({"age" : {"$lt" : 30, "$gt" : 20}})
Any number of conditionals can be used with a single key. Multiple update modifierscannot be used on a single key, however. For example, you cannot have a modifierdocument such as {"$inc" : {"age" : 1}, "$set" : {age : 40}} because itmodifies "age" twice. With query conditionals, no such rule applies.
Type-Specific QueriesAs covered in Chapter 2, MongoDB has a wide variety of types that can be used in adocument. Some of these behave specially in queries.
nullnull behaves a bit strangely. It does match itself, so if we have a collection with thefollowing documents:
> db.c.find(){ "_id" : ObjectId("4ba0f0dfd22aa494fd523621"), "y" : null }
Type-Specific Queries | 49

{ "_id" : ObjectId("4ba0f0dfd22aa494fd523622"), "y" : 1 }{ "_id" : ObjectId("4ba0f148d22aa494fd523623"), "y" : 2 }
we can query for documents whose "y" key is null in the expected way:
> db.c.find({"y" : null}){ "_id" : ObjectId("4ba0f0dfd22aa494fd523621"), "y" : null }
However, null not only matches itself but also matches “does not exist.” Thus, queryingfor a key with the value null will return all documents lacking that key:
> db.c.find({"z" : null}){ "_id" : ObjectId("4ba0f0dfd22aa494fd523621"), "y" : null }{ "_id" : ObjectId("4ba0f0dfd22aa494fd523622"), "y" : 1 }{ "_id" : ObjectId("4ba0f148d22aa494fd523623"), "y" : 2 }
If we only want to find keys whose value is null, we can check that the key is null andexists using the "$exists" conditional:
> db.c.find({"z" : {"$in" : [null], "$exists" : true}})
Unfortunately, there is no "$eq" operator, which makes this a little awkward, but"$in" with one element is equivalent.
Regular ExpressionsRegular expressions are useful for flexible string matching. For example, if we want tofind all users with the name Joe or joe, we can use a regular expression to do case-insensitive matching:
> db.users.find({"name" : /joe/i})
Regular expression flags (i) are allowed but not required. If we want to match not onlyvarious capitalizations of joe, but also joey, we can continue to improve our regularexpression:
> db.users.find({"name" : /joey?/i})
MongoDB uses the Perl Compatible Regular Expression (PCRE) library to match reg-ular expressions; any regular expression syntax allowed by PCRE is allowed inMongoDB. It is a good idea to check your syntax with the JavaScript shell before usingit in a query to make sure it matches what you think it matches.
MongoDB can leverage an index for queries on prefix regular expres-sions (e.g., /^joey/), so queries of that kind can be fast.
Regular expressions can also match themselves. Very few people insert regular expres-sions into the database, but if you insert one, you can match it with itself:
> db.foo.insert({"bar" : /baz/})> db.foo.find({"bar" : /baz/})
50 | Chapter 4: Querying

{ "_id" : ObjectId("4b23c3ca7525f35f94b60a2d"), "bar" : /baz/}
Querying ArraysQuerying for elements of an array is simple. An array can mostly be treated as thougheach element is the value of the overall key. For example, if the array is a list of fruits,like this:
> db.food.insert({"fruit" : ["apple", "banana", "peach"]})
the following query:
> db.food.find({"fruit" : "banana"})
will successfully match the document. We can query for it in much the same way asthough we had a document that looked like the (illegal) document: {"fruit" : "apple","fruit" : "banana", "fruit" : "peach"}.
$all
If you need to match arrays by more than one element, you can use "$all". This allowsyou to match a list of elements. For example, suppose we created a collection with threeelements:
> db.food.insert({"_id" : 1, "fruit" : ["apple", "banana", "peach"]})> db.food.insert({"_id" : 2, "fruit" : ["apple", "kumquat", "orange"]})> db.food.insert({"_id" : 3, "fruit" : ["cherry", "banana", "apple"]})
Then we can find all documents with both "apple" and "banana" elements by queryingwith "$all":
> db.food.find({fruit : {$all : ["apple", "banana"]}}) {"_id" : 1, "fruit" : ["apple", "banana", "peach"]} {"_id" : 3, "fruit" : ["cherry", "banana", "apple"]}
Order does not matter. Notice "banana" comes before "apple" in the second result.Using a one-element array with "$all" is equivalent to not using "$all". For instance,{fruit : {$all : ['apple']} will match the same documents as {fruit : 'apple'}.
You can also query by exact match using the entire array. However, exact match willnot match a document if any elements are missing or superfluous. For example, thiswill match the first document shown previously:
> db.food.find({"fruit" : ["apple", "banana", "peach"]})
But this will not:
> db.food.find({"fruit" : ["apple", "banana"]})
and neither will this:
> db.food.find({"fruit" : ["banana", "apple", "peach"]})
Type-Specific Queries | 51

If you want to query for a specific element of an array, you can specify an index usingthe syntax key.index:
> db.food.find({"fruit.2" : "peach"})
Arrays are always 0-indexed, so this would match the third array element against thestring "peach".
$size
A useful conditional for querying arrays is "$size", which allows you to query for arraysof a given size. Here’s an example:
> db.food.find({"fruit" : {"$size" : 3}})
One common query is to get a range of sizes. "$size" cannot be combined with another$ conditional (in this example, "$gt"), but this query can be accomplished by addinga "size" key to the document. Then, every time you add an element to the array, in-crement the value of "size". If the original update looked like this:
> db.food.update({"$push" : {"fruit" : "strawberry"}})
it can simply be changed to this:
> db.food.update({"$push" : {"fruit" : "strawberry"}, "$inc" : {"size" : 1}})
Incrementing is extremely fast, so any performance penalty is negligible. Storing docu-ments like this allows you to do queries such as this:
> db.food.find({"size" : {"$gt" : 3}})
Unfortunately, this technique doesn’t work as well with the "$addToSet" operator.
The $slice operator
As mentioned earlier in this chapter, the optional second argument to find specifiesthe keys to be returned. The special "$slice" operator can be used to return a subsetof elements for an array key.
For example, suppose we had a blog post document and we wanted to return the first10 comments:
> db.blog.posts.findOne(criteria, {"comments" : {"$slice" : 10}})
Alternatively, if we wanted the last 10 comments, we could use -10:
> db.blog.posts.findOne(criteria, {"comments" : {"$slice" : -10}})
"$slice" can also return pages in the middle of the results by taking an offset and thenumber of elements to return:
> db.blog.posts.findOne(criteria, {"comments" : {"$slice" : [23, 10]}})
This would skip the first 23 elements and return the 24th through 34th. If there arefewer than 34 elements in the array, it will return as many as possible.
52 | Chapter 4: Querying

Unless otherwise specified, all keys in a document are returned when "$slice" is used.This is unlike the other key specifiers, which suppress unmentioned keys from beingreturned. For instance, if we had a blog post document that looked like this:
{ "_id" : ObjectId("4b2d75476cc613d5ee930164"), "title" : "A blog post", "content" : "...", "comments" : [ { "name" : "joe", "email" : "[email protected]", "content" : "nice post." }, { "name" : "bob", "email" : "[email protected]", "content" : "good post." } ]}
and we did a "$slice" to get the last comment, we’d get this:
> db.blog.posts.findOne(criteria, {"comments" : {"$slice" : -1}}){ "_id" : ObjectId("4b2d75476cc613d5ee930164"), "title" : "A blog post", "content" : "...", "comments" : [ { "name" : "bob", "email" : "[email protected]", "content" : "good post." } ]}
Both "title" and "content" are still returned, even though they weren’t explicitly in-cluded in the key specifier.
Querying on Embedded DocumentsThere are two ways of querying for an embedded document: querying for the wholedocument or querying for its individual key/value pairs.
Querying for an entire embedded document works identically to a normal query. Forexample, if we have a document that looks like this:
{ "name" : { "first" : "Joe", "last" : "Schmoe" },
Type-Specific Queries | 53

"age" : 45}
we can query for someone named Joe Schmoe with the following:
> db.people.find({"name" : {"first" : "Joe", "last" : "Schmoe"}})
However, if Joe decides to add a middle name key, suddenly this query won’t workanymore; it doesn’t match the entire embedded document! This type of query is alsoorder-sensitive; {"last" : "Schmoe", "first" : "Joe"} would not be a match.
If possible, it’s usually a good idea to query for just a specific key or keys of an embeddeddocument. Then, if your schema changes, all of your queries won’t suddenly breakbecause they’re no longer exact matches. You can query for embedded keys using dot-notation:
> db.people.find({"name.first" : "Joe", "name.last" : "Schmoe"})
Now, if Joe adds more keys, this query will still match his first and last names.
This dot-notation is the main difference between query documents and other documenttypes. Query documents can contain dots, which mean “reach into an embeddeddocument.” Dot-notation is also the reason that documents to be inserted cannot con-tain the . character. Oftentimes people run into this limitation when trying to save URLsas keys. One way to get around it is to always perform a global replace before insertingor after retrieving, substituting a character that isn’t legal in URLs for the dot (.)character.
Embedded document matches can get a little tricky as the document structure getsmore complicated. For example, suppose we are storing blog posts and we want to findcomments by Joe that were scored at least a five. We could model the post as follows:
> db.blog.find(){ "content" : "...", "comments" : [ { "author" : "joe", "score" : 3, "comment" : "nice post" }, { "author" : "mary", "score" : 6, "comment" : "terrible post" } ]}
Now, we can’t query using db.blog.find({"comments" : {"author" : "joe", "score" :{"$gte" : 5}}}). Embedded document matches have to match the whole document,and this doesn’t match the "comment" key. It also wouldn’t work to dodb.blog.find({"comments.author" : "joe", "comments.score" : {"$gte" : 5}}),
54 | Chapter 4: Querying

because the author criteria could match a different comment than the score criteria.That is, it would return the document shown earlier; it would match "author" :"joe" in the first comment and "score" : 6 in the second comment.
To correctly group criteria without needing to specify every key, use "$elemMatch". Thisvaguely named conditional allows you to partially specify criteria to match a singleembedded document in an array. The correct query looks like this:
> db.blog.find({"comments" : {"$elemMatch" : {"author" : "joe", "score" : {"$gte" : 5}}}})
"$elemMatch" allows us to “group” our criteria. As such, it’s only needed when you havemore than one key you want to match on in an embedded document.
$where QueriesKey/value pairs are a fairly expressive way to query, but there are some queries thatthey cannot represent. For queries that cannot be done any other way, there are"$where" clauses, which allow you to execute arbitrary JavaScript as part of your query.This allows you to do (almost) anything within a query.
The most common case for this is wanting to compare the values for two keys in adocument, for instance, if we had a list of items and wanted to return documents whereany two of the values are equal. Here’s an example:
> db.foo.insert({"apple" : 1, "banana" : 6, "peach" : 3})> db.foo.insert({"apple" : 8, "spinach" : 4, "watermelon" : 4})
In the second document, "spinach" and "watermelon" have the same value, so we’d likethat document returned. It’s unlikely MongoDB will ever have a $ conditional for this,so we can use a "$where" clause to do it with JavaScript:
> db.foo.find({"$where" : function () {... for (var current in this) {... for (var other in this) {... if (current != other && this[current] == this[other]) {... return true;... }... }... }... return false;... }});
If the function returns true, the document will be part of the result set; if it returnsfalse, it won’t be.
We used a function earlier, but you can also use strings to specify a "$where" query; thefollowing two "$where" queries are equivalent:
> db.foo.find({"$where" : "this.x + this.y == 10"})> db.foo.find({"$where" : "function() { return this.x + this.y == 10; }"})
$where Queries | 55

"$where" queries should not be used unless strictly necessary: they are much slowerthan regular queries. Each document has to be converted from BSON to a JavaScriptobject and then run through the "$where" expression. Indexes cannot be used to satisfya "$where", either. Hence, you should use "$where" only when there is no other way ofdoing the query. You can cut down on the penalty by using other query filters in com-bination with "$where". If possible, an index will be used to filter based on the non-$where clauses; the "$where" expression will be used only to fine-tune the results.
Another way of doing complex queries is to use MapReduce, which is covered in thenext chapter.
CursorsThe database returns results from find using a cursor. The client-side implementationsof cursors generally allow you to control a great deal about the eventual output of aquery. You can limit the number of results, skip over some number of results, sortresults by any combination of keys in any direction, and perform a number of otherpowerful operations.
To create a cursor with the shell, put some documents into a collection, do a query onthem, and assign the results to a local variable (variables defined with "var" are local).Here, we create a very simple collection and query it, storing the results in the cursorvariable:
> for(i=0; i<100; i++) {... db.c.insert({x : i});... }> var cursor = db.collection.find();
The advantage of doing this is that you can look at one result at a time. If you store theresults in a global variable or no variable at all, the MongoDB shell will automaticallyiterate through and display the first couple of documents. This is what we’ve beenseeing up until this point, and it is often the behavior you want for seeing what’s in acollection but not for doing actual programming with the shell.
To iterate through the results, you can use the next method on the cursor. You can usehasNext to check whether there is another result. A typical loop through results lookslike the following:
> while (cursor.hasNext()) {... obj = cursor.next();... // do stuff... }
cursor.hasNext() checks that the next result exists, and cursor.next() fetches it.
The cursor class also implements the iterator interface, so you can use it in a forEachloop:
56 | Chapter 4: Querying

> var cursor = db.people.find();> cursor.forEach(function(x) {... print(x.name);... });adammattzak
When you call find, the shell does not query the database immediately. It waits untilyou actually start requesting results to send the query, which allows you to chain ad-ditional options onto a query before it is performed. Almost every method on a cursorobject returns the cursor itself so that you can chain them in any order. For instance,all of the following are equivalent:
> var cursor = db.foo.find().sort({"x" : 1}).limit(1).skip(10);> var cursor = db.foo.find().limit(1).sort({"x" : 1}).skip(10);> var cursor = db.foo.find().skip(10).limit(1).sort({"x" : 1});
At this point, the query has not been executed yet. All of these functions merely buildthe query. Now, suppose we call the following:
> cursor.hasNext()
At this point, the query will be sent to the server. The shell fetches the first 100 resultsor first 4MB of results (whichever is smaller) at once so that the next calls to next orhasNext will not have to make trips to the server. After the client has run through thefirst set of results, the shell will again contact the database and ask for more results.This process continues until the cursor is exhausted and all results have been returned.
Limits, Skips, and SortsThe most common query options are limiting the number of results returned, skippinga number of results, and sorting. All of these options must be added before a query issent to the database.
To set a limit, chain the limit function onto your call to find. For example, to onlyreturn three results, use this:
> db.c.find().limit(3)
If there are fewer than three documents matching your query in the collection, only thenumber of matching documents will be returned; limit sets an upper limit, not a lowerlimit.
skip works similarly to limit:
> db.c.find().skip(3)
This will skip the first three matching documents and return the rest of the matches. Ifthere are less than three documents in your collection, it will not return any documents.
sort takes an object: a set of key/value pairs where the keys are key names and thevalues are the sort directions. Sort direction can be 1 (ascending) or -1 (descending). If
Cursors | 57

multiple keys are given, the results will be sorted in that order. For instance, to sort theresults by "username" ascending and "age" descending, we do the following:
> db.c.find().sort({username : 1, age : -1})
These three methods can be combined. This is often handy for pagination. For example,suppose that you are running an online store and someone searches for mp3. If youwant 50 results per page sorted by price from high to low, you can do the following:
> db.stock.find({"desc" : "mp3"}).limit(50).sort({"price" : -1})
If they click Next Page to see more results, you can simply add a skip to the query,which will skip over the first 50 matches (which the user already saw on page 1):
> db.stock.find({"desc" : "mp3"}).limit(50).skip(50).sort({"price" : -1})
However, large skips are not very performant, so there are suggestions on avoidingthem in a moment.
Comparison order
MongoDB has a hierarchy as to how types compare. Sometimes you will have a singlekey with multiple types, for instance, integers and booleans, or strings and nulls. If youdo a sort on a key with a mix of types, there is a predefined order that they will be sortedin. From least to greatest value, this ordering is as follows:
1. Minimum value
2. null
3. Numbers (integers, longs, doubles)
4. Strings
5. Object/document
6. Array
7. Binary data
8. Object ID
9. Boolean
10. Date
11. Timestamp
12. Regular expression
13. Maximum value
Avoiding Large SkipsUsing skip for a small number of documents is fine. For a large number of results,skip can be slow (this is true in nearly every database, not just MongoDB) and shouldbe avoided. Usually you can build criteria into the documents themselves to avoid
58 | Chapter 4: Querying

having to do large skips, or you can calculate the next query based on the result fromthe previous one.
Paginating results without skip
The easiest way to do pagination is to return the first page of results using limit andthen return each subsequent page as an offset from the beginning.
> // do not use: slow for large skips> var page1 = db.foo.find(criteria).limit(100)> var page2 = db.foo.find(criteria).skip(100).limit(100)> var page3 = db.foo.find(criteria).skip(200).limit(100)...
However, depending on your query, you can usually find a way to paginate withoutskips. For example, suppose we want to display documents in descending order basedon "date". We can get the first page of results with the following:
> var page1 = db.foo.find().sort({"date" : -1}).limit(100)
Then, we can use the "date" value of the last document as the criteria for fetching thenext page:
var latest = null;
// display first pagewhile (page1.hasNext()) { latest = page1.next(); display(latest);}
// get next pagevar page2 = db.foo.find({"date" : {"$gt" : latest.date}});page2.sort({"date" : -1}).limit(100);
Now the query does not need to include a skip.
Finding a random document
One fairly common problem is how to get a random document from a collection. Thenaive (and slow) solution is to count the number of documents and then do a find,skipping a random number of documents between 0 and the size of the collection.
> // do not use> var total = db.foo.count()> var random = Math.floor(Math.random()*total)> db.foo.find().skip(random).limit(1)
It is actually highly inefficient to get a random element this way: you have to do a count(which can be expensive if you are using criteria), and skipping large numbers of ele-ments can be time-consuming.
It takes a little forethought, but if you know you’ll be looking up a random element ona collection, there’s a much more efficient way to do so. The trick is to add an extra
Cursors | 59

random key to each document when it is inserted. For instance, if we’re using the shell,we could use the Math.random() function (which creates a random number between 0and 1):
> db.people.insert({"name" : "joe", "random" : Math.random()})> db.people.insert({"name" : "john", "random" : Math.random()})> db.people.insert({"name" : "jim", "random" : Math.random()})
Now, when we want to find a random document from the collection, we can calculatea random number and use that as query criteria, instead of doing a skip:
> var random = Math.random()> result = db.foo.findOne({"random" : {"$gt" : random}})
There is a slight chance that random will be greater than any of the "random" values inthe collection, and no results will be returned. We can guard against this by simplyreturning a document in the other direction:
> if (result == null) {... result = db.foo.findOne({"random" : {"$lt" : random}})... }
If there aren’t any documents in the collection, this technique will end up returningnull, which makes sense.
This technique can be used with arbitrarily complex queries; just make sure to have anindex that includes the random key. For example, if we want to find a random plumberin California, we can create an index on "profession", "state", and "random":
> db.people.ensureIndex({"profession" : 1, "state" : 1, "random" : 1})
This allows us to quickly find a random result (see Chapter 5 for more information onindexing).
Advanced Query OptionsThere are two types of queries: wrapped and plain. A plain query is something like this:
> var cursor = db.foo.find({"foo" : "bar"})
There are a couple options that “wrap” the query. For example, suppose we performa sort:
> var cursor = db.foo.find({"foo" : "bar"}).sort({"x" : 1})
Instead of sending {"foo" : "bar"} to the database as the query, the query gets wrappedin a larger document. The shell converts the query from {"foo" : "bar"} to {"$query" :{"foo" : "bar"}, "$orderby" : {"x" : 1}}.
Most drivers provide helpers for adding arbitrary options to queries. Other helpfuloptions include the following:
$maxscan : integerSpecify the maximum number of documents that should be scanned for the query.
60 | Chapter 4: Querying

$min : documentStart criteria for querying.
$max : documentEnd criteria for querying.
$hint : documentTell the server which index to use for the query.
$explain : booleanGet an explanation of how the query will be executed (indexes used, number ofresults, how long it takes, etc.), instead of actually doing the query.
$snapshot : booleanEnsure that the query’s results will be a consistent snapshot from the point in timewhen the query was executed. See the next section for details.
Getting Consistent ResultsA fairly common way of processing data is to pull it out of MongoDB, change it in someway, and then save it again:
cursor = db.foo.find();
while (cursor.hasNext()) { var doc = cursor.next(); doc = process(doc); db.foo.save(doc);}
This is fine for a small number of results, but it breaks down for large numbers ofdocuments. To see why, imagine how the documents are actually being stored. Youcan picture a collection as a list of documents that looks something like Figure 4-1.Snowflakes represent documents, because every document is beautiful and unique.
Figure 4-1. A collection being queried
Now, when we do a find, it starts returning results from the beginning of the collectionand moves right. Your program grabs the first 100 documents and processes them.When you save them back to the database, if a document does not have the paddingavailable to grow to its new size, like in Figure 4-2, it needs to be relocated. Usually, adocument will be relocated to the end of a collection (Figure 4-3).
Cursors | 61
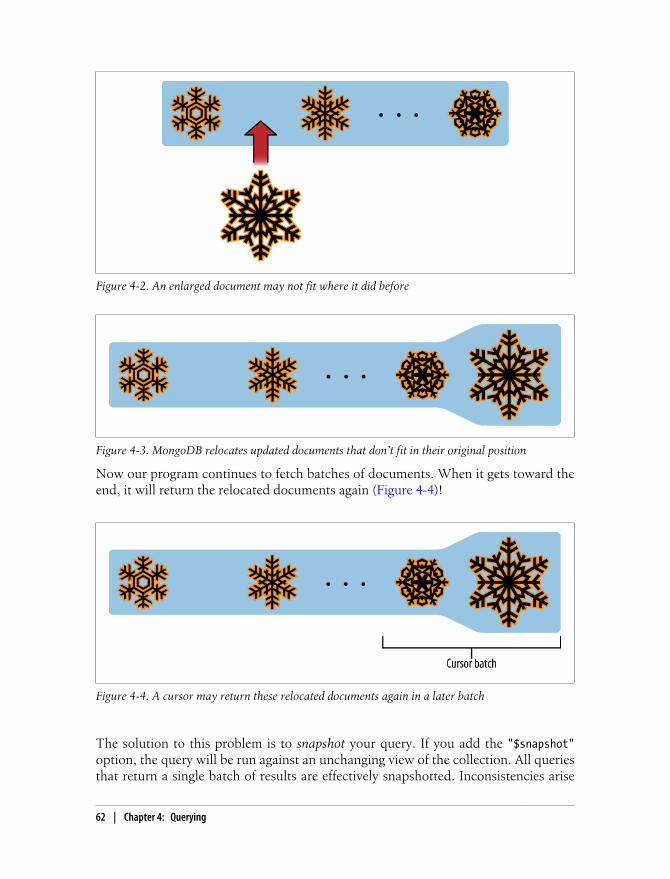
Now our program continues to fetch batches of documents. When it gets toward theend, it will return the relocated documents again (Figure 4-4)!
Figure 4-4. A cursor may return these relocated documents again in a later batch
The solution to this problem is to snapshot your query. If you add the "$snapshot"option, the query will be run against an unchanging view of the collection. All queriesthat return a single batch of results are effectively snapshotted. Inconsistencies arise
Figure 4-2. An enlarged document may not fit where it did before
Figure 4-3. MongoDB relocates updated documents that don’t fit in their original position
62 | Chapter 4: Querying

only when the collection changes under a cursor while it is waiting to get another batchof results.
Cursor InternalsThere are two sides to a cursor: the client-facing cursor and the database cursor thatthe client-side one represents. We have been talking about the client-side one up untilnow, but we are going to take a brief look at what’s happening on the server side.
On the server side, a cursor takes up memory and resources. Once a cursor runs out ofresults or the client sends a message telling it to die, the database can free the resourcesit was using. Freeing these resources lets the database use them for other things, whichis good, so we want to make sure that cursors can be freed quickly (within reason).
There are a couple of conditions that can cause the death (and subsequent cleanup) ofa cursor. First, when a cursor finishes iterating through the matching results, it willclean itself up. Another way is that, when a cursor goes out of scope on the client side,the drivers send the database a special message to let it know that it can kill that cursor.Finally, even if the user hasn’t iterated through all the results and the cursor is still inscope, after 10 minutes of inactivity, a database cursor will automatically “die.”
This “death by timeout” is usually the desired behavior: very few applications expecttheir users to sit around for minutes at a time waiting for results. However, sometimesyou might know that you need a cursor to last for a long time. In that case, many drivershave implemented a function called immortal, or a similar mechanism, which tells thedatabase not to time out the cursor. If you turn off a cursor’s timeout, you must iteratethrough all of its results or make sure it gets closed. Otherwise, it will sit around in thedatabase hogging resources forever.
Cursor Internals | 63


CHAPTER 5
Indexing
Indexes are the way to make queries go vroom. Database indexes are similar to a book’sindex: instead of looking through the whole book, the database takes a shortcut andjust looks in the index, allowing it to do queries orders of magnitude faster. Once itfinds the entry in the index, it can jump right to the location of the desired document.
Extending this metaphor to the breaking point, creating database indexes is like de-ciding how a book’s index will be organized. You have the advantage of knowing whatkinds of queries you’ll be doing and thus what types of information the database willneed to find quickly. If all of your queries involve the "date" key, for example, youprobably need an index on "date" (at least). If you will be querying for usernames, youdon’t need to index the "user_num" key, because you aren’t querying on it.
Introduction to IndexingIt can be tricky to figure out what the optimal index for your queries is, but it is wellworth the effort. Queries that otherwise take minutes can be instantaneous with theproper indexes.
MongoDB’s indexes work almost identically to typical relational data-base indexes, so if you are familiar with those, you can skim this sectionfor syntax specifics. We’ll go over some indexing basics, but keep inmind that it’s an extensive topic and most of the material out there onindex optimization for MySQL/Oracle/SQLite will apply equally wellto MongoDB.
Suppose that you are querying for a single key, such as the following:
> db.people.find({"username" : "mark"})
65

When only a single key is used in the query, that key can be indexed to improve thequery’s speed. In this case, you would create an index on "username". To create theindex, use the ensureIndex method:
> db.people.ensureIndex({"username" : 1})
An index needs to be created only once for a collection. If you try to create the sameindex again, nothing will happen.
An index on a key will make queries on that key fast. However, it may not make otherqueries fast, even if they contain the indexed key. For example, this wouldn’t be veryperformant with the previous index:
> db.people.find({"date" : date1}).sort({"date" : 1, "username" : 1})
The server has to “look through the whole book” to find the desired dates. This processis called a table scan, which is basically what you’d do if you were looking for infor-mation in a book without an index: you start at page 1 and read through the wholething. In general, you want to avoid making the server do table scans, because it is veryslow for large collections.
As a rule of thumb, you should create an index that contains all of the keys in yourquery. For instance, to optimize the previous query, you should have an index ondate and username:
> db.ensureIndex({"date" : 1, "username" : 1})
The document you pass to ensureIndex is of the same form as the document passed tothe sort function: a set of keys with value 1 or -1, depending on the direction you wantthe index to go. If you have only a single key in the index, direction is irrelevant. Asingle key index is analogous to a book’s index that is organized in alphabetical order:whether it goes from A–Z or Z–A, it’s going to be fairly obvious where to find entriesstarting with M.
If you have more than one key, you need to start thinking about index direction. Forexample, suppose we have a collection of users:
{ "_id" : ..., "username" : "smith", "age" : 48, "user_id" : 0 }{ "_id" : ..., "username" : "smith", "age" : 30, "user_id" : 1 }{ "_id" : ..., "username" : "john", "age" : 36, "user_id" : 2 }{ "_id" : ..., "username" : "john", "age" : 18, "user_id" : 3 }{ "_id" : ..., "username" : "joe", "age" : 36, "user_id" : 4 }{ "_id" : ..., "username" : "john", "age" : 7, "user_id" : 5 }{ "_id" : ..., "username" : "simon", "age" : 3, "user_id" : 6 }{ "_id" : ..., "username" : "joe", "age" : 27, "user_id" : 7 }{ "_id" : ..., "username" : "jacob", "age" : 17, "user_id" : 8 }{ "_id" : ..., "username" : "sally", "age" : 52, "user_id" : 9 }{ "_id" : ..., "username" : "simon", "age" : 59, "user_id" : 10 }
Let’s say we index them with {"username" : 1, "age" : -1}. MongoDB will organizethe users as follows:
{ "_id" : ..., "username" : "jacob", "age" : 17, "user_id" : 8 }{ "_id" : ..., "username" : "joe", "age" : 36, "user_id" : 4 }
66 | Chapter 5: Indexing

{ "_id" : ..., "username" : "joe", "age" : 27, "user_id" : 7 }{ "_id" : ..., "username" : "john", "age" : 36, "user_id" : 2 }{ "_id" : ..., "username" : "john", "age" : 18, "user_id" : 3 }{ "_id" : ..., "username" : "john", "age" : 7, "user_id" : 5 }{ "_id" : ..., "username" : "sally", "age" : 52, "user_id" : 9 }{ "_id" : ..., "username" : "simon", "age" : 59, "user_id" : 10 }{ "_id" : ..., "username" : "simon", "age" : 3, "user_id" : 6 }{ "_id" : ..., "username" : "smith", "age" : 48, "user_id" : 0 }{ "_id" : ..., "username" : "smith", "age" : 30, "user_id" : 1 }
The usernames are in strictly increasing alphabetical order, and within each name groupthe ages are in decreasing order. This optimizes sorting by {"username" : 1, "age" :-1} but is less efficient at sorting by {"username" : 1, "age" : 1}. If we wanted tooptimize {"username" : 1, "age" : 1}, we would create an index on {"username" : 1,"age" : 1} to organize ages in ascending order.
The index on username and age also makes queries on username fast. In general, if anindex has N keys, it will make queries on any prefix of those keys fast. For instance, ifwe have an index that looks like {"a" : 1, "b" : 1, "c" : 1, ..., "z" : 1}, weeffectively have an index on {"a" : 1}, {"a" : 1, "b" : 1}, {"a" : 1, "b" : 1, "c" :1}, and so on. Queries that would use the index {"b" : 1}, {"a" : 1, "c" :1}, and soon will not be optimized: only queries that can use a prefix of the index can take ad-vantage of it.
The MongoDB query optimizer will reorder query terms to take advantage of indexes:if you query for {"x" : "foo", "y" : "bar"} and you have an index on {"y" : 1, "x" :1}, MongoDB will figure it out.
The disadvantage to creating an index is that it puts a little bit of overhead on everyinsert, update, and remove. This is because the database not only needs to do theoperation but also needs to make a note of it in any indexes on the collection. Thus,the absolute minimum number of indexes should be created. There is a built-in max-imum of 64 indexes per collection, which is more than almost any application shouldneed.
Do not index every key. This will make inserts slow, take up lots ofspace, and probably not speed up your queries very much. Figure outwhat queries you are running, what the best indexes are for these quer-ies, and make sure that the server is using the indexes you’ve createdusing the explain and hint tools described in the next section.
Sometimes the most efficient solution is actually not to use an index. In general, if aquery is returning a half or more of the collection, it will be more efficient for thedatabase to just do a table scan instead of having to look up the index and then thevalue for almost every single document. Thus, for queries such as checking whether akey exists or determining whether a boolean value is true or false, it may actually bebetter to not use an index at all.
Introduction to Indexing | 67

Scaling IndexesSuppose we have a collection of status messages from users. We want to query by userand date to pull up all of a user’s recent statuses. Using what we’ve learned so far, wemight create an index that looks like the following:
> db.status.ensureIndex({user : 1, date : -1})
This will make the query for user and date efficient, but it is not actually the best indexchoice.
Imagine this as a book index again. We would have a list of documents sorted by userand then subsorted by date, so it would look something like the following:
User 123 on March 13, 2010User 123 on March 12, 2010User 123 on March 11, 2010User 123 on March 5, 2010User 123 on March 4, 2010User 124 on March 12, 2010User 124 on March 11, 2010...
This looks fine at this scale, but imagine if the application has millions of users whohave dozens of status updates per day. If the index entries for each user’s status messagestake up a page’s worth of space on disk, then for every “latest statuses” query, thedatabase will have to load a different page into memory. This will be very slow if thesite becomes popular enough that not all of the index fits into memory.
If we flip the index order to {date : -1, user : 1}, the database can keep the lastcouple days of the index in memory, swap less, and thus query for the latest statusesfor any user much more quickly.
Thus, there are several questions to keep in mind when deciding what indexes to create:
1. What are the queries you are doing? Some of these keys will need to be indexed.
2. What is the correct direction for each key?
3. How is this going to scale? Is there a different ordering of keys that would keepmore of the frequently used portions of the index in memory?
If you can answer these questions, you are ready to index your data.
Indexing Keys in Embedded DocumentsIndexes can be created on keys in embedded documents in the same way that they arecreated on normal keys. For example, if we want to be able to search blog post com-ments by date, we can create an index on the "date" key in the array of embedded"comments" documents:
> db.blog.ensureIndex({"comments.date" : 1})
68 | Chapter 5: Indexing

Indexes on keys in embedded documents are identical to those on top-level keys, andthe two can be combined in compound indexes.
Indexing for SortsAs your collection grows, you’ll need to create indexes for any large sorts your queriesare doing. If you call sort on a key that is not indexed, MongoDB needs to pull all ofthat data into memory to sort it. Thus, there’s a limit on the amount you can sortwithout an index: you can’t sort a terabyte of data in memory. Once your collection istoo big to sort in memory, MongoDB will just return an error for queries that try.
Indexing the sort allows MongoDB to pull the sorted data in order, allowing you tosort any amount of data without running out of memory.
Uniquely Identifying IndexesEach index in a collection has a string name that uniquely identifies the index and isused by the server to delete or manipulate it. Index names are, by default,keyname1_dir1_keyname2_dir2_..._keynameN_dirN, where keynameX is the index’s keyand dirX is the index’s direction (1 or -1). This can get unwieldy if indexes contain morethan a couple keys, so you can specify your own name as one of the options toensureIndex:
> db.foo.ensureIndex({"a" : 1, "b" : 1, "c" : 1, ..., "z" : 1}, {"name" : "alphabet"})
There is a limit to the number of characters in an index name, so complex indexes mayneed custom names to be created. A call to getLastError will show whether the indexcreation succeeded or why it didn’t.
Unique IndexesUnique indexes guarantee that, for a given key, every document in the collection willhave a unique value. For example, if you want to make sure no two documents canhave the same value in the "username" key, you can create a unique index:
> db.people.ensureIndex({"username" : 1}, {"unique" : true})
Keep in mind that insert, by default, does not check whether the document was ac-tually inserted. Therefore, you may want to use safe inserts if you are inserting docu-ments that might have a duplicate value for a unique key. This way, you will get aduplicate key error when you attempt to insert such a document.
A unique index that you are probably already familiar with is the index on "_id", whichis created whenever you create a normal collection. This is a normal unique index, asidefrom the fact that it cannot be deleted.
Unique Indexes | 69

If a key does not exist, the index stores its value as null. Therefore, ifyou create a unique index on a key and try to insert more than onedocument that is missing the indexed key, the inserts will fail becauseyou already have a document with a value of null.
Dropping DuplicatesWhen building unique indexes for an existing collection, some values may be dupli-cates. If there are any duplicates, this will cause the index building to fail. In some cases,you may just want to drop all of the documents with duplicate values. The dropDupsoption will save the first document found and remove any subsequent documents withduplicate values:
> db.people.ensureIndex({"username" : 1}, {"unique" : true, "dropDups" : true})
This is a bit of a drastic option; it might be better to create a script to preprocess thedata if it is important.
Compound Unique IndexesYou can also create a compound unique index. If you do this, individual keys can havethe same values, but the combination of values for all keys must be unique.
GridFS, the standard method for storing large files in MongoDB (see Chapter 7), usesa compound unique index. The collection that holds the file content has a unique indexon {files_id : 1, n : 1}, which allows documents that look like (in part) thefollowing:
{files_id : ObjectId("4b23c3ca7525f35f94b60a2d"), n : 1}{files_id : ObjectId("4b23c3ca7525f35f94b60a2d"), n : 2}{files_id : ObjectId("4b23c3ca7525f35f94b60a2d"), n : 3}{files_id : ObjectId("4b23c3ca7525f35f94b60a2d"), n : 4}
Note that all of the values for "files_id" are the same, but "n" is different. If youattempted to insert {files_id : ObjectId("4b23c3ca7525f35f94b60a2d"), n : 1} again,the database would complain about the duplicate key.
Using explain and hintexplain is an incredibly handy tool that will give you lots of information about yourqueries. You can run it on any query by tacking it on to a cursor. explain returns adocument, not the cursor itself, unlike most cursor methods:
> db.foo.find().explain()
explain will return information about the indexes used for the query (if any) and statsabout timing and the number of documents scanned.
70 | Chapter 5: Indexing

Let’s take an example. The index {"username" : 1} works well to speed up a simplekey/value pair lookup, but many queries are more complicated. For example, supposeyou are querying and sorting the following:
> db.people.find({"age" : 18}).sort({"username" : 1})
You may be unsure if the database is using the index you created or how effective it is.If you run explain on the query, it will return the index currently being used for thequery, how long it took, and how many documents the database needed to scan to findthe results.
For a very simple query ({}) on a database with no indexes (other than the index on"_id") and 64 documents, the output for explain looks like this:
> db.people.find().explain(){ "cursor" : "BasicCursor", "indexBounds" : [ ], "nscanned" : 64, "nscannedObjects" : 64, "n" : 64, "millis" : 0, "allPlans" : [ { "cursor" : "BasicCursor", "indexBounds" : [ ] } ]}
The important parts of this result are as follows:
"cursor" : "BasicCursor"This means that the query did not use an index (unsurprisingly, because there wasno query criteria). We’ll see what this value looks like for an indexed query in amoment.
"nscanned" : 64This is the number of documents that the database looked through. You want tomake sure this is as close to the number returned as possible.
"n" : 64This is the number of documents returned. We’re doing pretty well here, becausethe number of documents scanned exactly matches the number returned. Ofcourse, given that we’re returning the entire collection, it would be difficult to dootherwise.
"millis" : 0The number of milliseconds it took the database to execute the query. 0 is a goodtime to shoot for.
Using explain and hint | 71
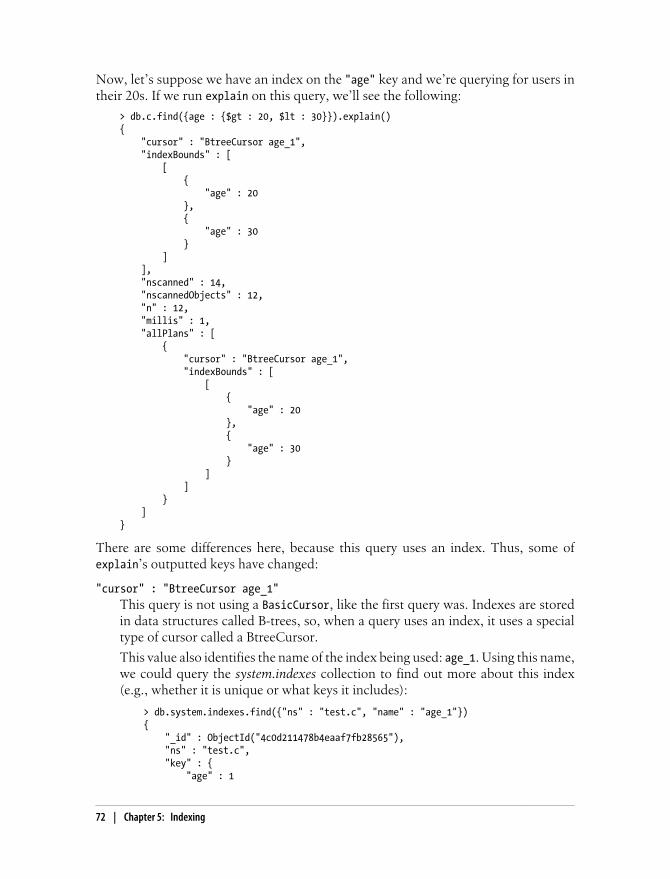
Now, let’s suppose we have an index on the "age" key and we’re querying for users intheir 20s. If we run explain on this query, we’ll see the following:
> db.c.find({age : {$gt : 20, $lt : 30}}).explain(){ "cursor" : "BtreeCursor age_1", "indexBounds" : [ [ { "age" : 20 }, { "age" : 30 } ] ], "nscanned" : 14, "nscannedObjects" : 12, "n" : 12, "millis" : 1, "allPlans" : [ { "cursor" : "BtreeCursor age_1", "indexBounds" : [ [ { "age" : 20 }, { "age" : 30 } ] ] } ]}
There are some differences here, because this query uses an index. Thus, some ofexplain’s outputted keys have changed:
"cursor" : "BtreeCursor age_1"This query is not using a BasicCursor, like the first query was. Indexes are storedin data structures called B-trees, so, when a query uses an index, it uses a specialtype of cursor called a BtreeCursor.
This value also identifies the name of the index being used: age_1. Using this name,we could query the system.indexes collection to find out more about this index(e.g., whether it is unique or what keys it includes):
> db.system.indexes.find({"ns" : "test.c", "name" : "age_1"}){ "_id" : ObjectId("4c0d211478b4eaaf7fb28565"), "ns" : "test.c", "key" : { "age" : 1
72 | Chapter 5: Indexing

}, "name" : "age_1" }
"allPlans" : [ ... ]This key lists all of the plans MongoDB considered for the query. The choice herewas fairly obvious, because we had an index on "age" and we were querying for"age". If we had multiple overlapping indexes and a more complex query, "allPlans" would contain information about all of the possible plans that could havebeen used.
Let’s take a slightly more complicated example: suppose you have an index on {"username" : 1, "age" : 1} and an index on {"age" : 1, "username" : 1}. What happensif you query for username and age? Well, it depends on the query:
> db.c.find({age : {$gt : 10}, username : "sally"}).explain(){ "cursor" : "BtreeCursor username_1_age_1", "indexBounds" : [ [ { "username" : "sally", "age" : 10 }, { "username" : "sally", "age" : 1.7976931348623157e+308 } ] ], "nscanned" : 13, "nscannedObjects" : 13, "n" : 13, "millis" : 5, "allPlans" : [ { "cursor" : "BtreeCursor username_1_age_1", "indexBounds" : [ [ { "username" : "sally", "age" : 10 }, { "username" : "sally", "age" : 1.7976931348623157e+308 } ] ] } ], "oldPlan" : { "cursor" : "BtreeCursor username_1_age_1", "indexBounds" : [
Using explain and hint | 73

[ { "username" : "sally", "age" : 10 }, { "username" : "sally", "age" : 1.7976931348623157e+308 } ] ] }}
We are querying for an exact match on "username" and a range of values for "age", sothe database chooses to use the {"username" : 1, "age" : 1} index, reversing the termsof the query. If, on the other hand, we query for an exact age and a range of names,MongoDB will use the other index:
> db.c.find({"age" : 14, "username" : /.*/}).explain(){ "cursor" : "BtreeCursor age_1_username_1 multi", "indexBounds" : [ [ { "age" : 14, "username" : "" }, { "age" : 14, "username" : { } } ], [ { "age" : 14, "username" : /.*/ }, { "age" : 14, "username" : /.*/ } ] ], "nscanned" : 2, "nscannedObjects" : 2, "n" : 2, "millis" : 2, "allPlans" : [ { "cursor" : "BtreeCursor age_1_username_1 multi", "indexBounds" : [ [
74 | Chapter 5: Indexing

{ "age" : 14, "username" : "" }, { "age" : 14, "username" : { } } ], [ { "age" : 14, "username" : /.*/ }, { "age" : 14, "username" : /.*/ } ] ] } ]}
If you find that Mongo is using different indexes than you want it to for a query, youcan force it to use a certain index by using hint. For instance, if you want to make sureMongoDB uses the {"username" : 1, "age" : 1} index on the previous query, youcould say the following:
> db.c.find({"age" : 14, "username" : /.*/}).hint({"username" : 1, "age" : 1})
Hinting is usually unnecessary. MongoDB has a query optimizer and is very clever aboutchoosing which index to use. When you first do a query, the query optimizer tries outa number of query plans concurrently. The first one to finish will be used, and the restof the query executions are terminated. That query plan will be remembered for futurequeries on the same keys. The query optimizer periodically retries other plans, in caseyou’ve added new data and the previously chosen plan is no longer best. The only partyou should need to worry about is giving the query optimizer useful indexes to choosefrom.
Index AdministrationMetainformation about indexes is stored in the system.indexes collection of eachdatabase. This is a reserved collection, so you cannot insert documents into it or removedocuments from it. You can manipulate its documents only through ensureIndex andthe dropIndexes database command.
The system.indexes collection has detailed information about each index, but thesystem.namespaces collection also lists their names. If you look at this collection, you
Index Administration | 75

can see that there are at least two documents for each collection: one for the collectionitself and one for each index it contains. For a collection with just the standard "_id"index, its system.namespaces entries would look like this:
{ "name" : "test.foo" }{ "name" : "test.foo.$_id_"}
If we add a compound index on the name and age keys, a new document is added tosystem.namespaces with the following form:
{ "name" : "test.foo.$name_1_age_1" }
In Chapter 2, we mentioned that collection names are limited to 121 bytes in length.This somewhat strange limit is because the "_id" index’s namespace needs 6 extra bytes(".$_id_"), bringing the namespace length for that index up to a more sensical 127bytes.
It is important to remember that the size of the collection name plus the index namecannot exceed 127 bytes. If you approach the maximum namespace size or have largeindex names, you may have to use custom index names to avoid creating namespacesthat are too long. It’s generally easier just to keep database, collection, and key namesto reasonable lengths.
Changing IndexesAs you and your application grow old together, you may find that your data or querieshave changed and that the indexes that used to work well no longer do. You can addnew indexes to existing collections at any time with ensureIndex:
> db.people.ensureIndex({"username" : 1}, {"background" : true})
Building indexes is time-consuming and resource-intensive. Using the {"background" :true} option builds the index in the background, while handling incoming requests. Ifyou do not include the background option, the database will block all other requestswhile the index is being built.
Blocking lets index creation go faster but means your application will be unresponsiveduring the build. Even building an index in the background can take a toll on normaloperations, so it is best to do it during an “off” time; building indexes in the backgroundwill still add extra load to your database, but it will not bring it grinding to a halt.
Creating indexes on existing documents is slightly faster than creating the index firstand then inserting all of the documents. Of course, creating an index beforehand is anoption only if you’re populating a new collection from scratch.
If an index is no longer necessary, you can remove it with the dropIndexes commandand the index name. Often, you may have to look at the system.indexes collection tofigure out what the index name is, because even the autogenerated names vary some-what from driver to driver:
> db.runCommand({"dropIndexes" : "foo", "index" : "alphabet"})
76 | Chapter 5: Indexing

You can drop all indexes on a collection by passing in * as the value for the index key:
> db.runCommand({"dropIndexes" : "foo", "index" : "*"})
Another way to delete all indexes is to drop the collection. This will also delete theindex on _id (and all of the documents in the collection). Removing all of the documentsin a collection (with remove) does not affect the indexes; they will be repopulated whennew documents are inserted.
Geospatial IndexingThere is another type of query that is becoming increasingly common (especially withthe emergence of mobile devices): finding the nearest N things to a current location.MongoDB provides a special type of index for coordinate plane queries, called ageospatial index.
Suppose we wanted to find the nearest coffee shop to where we are now, given a latitudeand longitude. We need to create a special index to do this type of query efficiently,because it needs to search in two dimensions. A geospatial index can be created usingthe ensureIndex function, but by passing "2d" as a value instead of 1 or -1:
> db.map.ensureIndex({"gps" : "2d"})
The "gps" key must be some type of pair value, that is, a two-element array or embeddeddocument with two keys. These would all be valid:
{ "gps" : [ 0, 100 ] }{ "gps" : { "x" : -30, "y" : 30 } }{ "gps" : { "latitude" : -180, "longitude" : 180 } }
The keys can be anything; for example, {"gps" : {"foo" : 0, "bar" : 1}} is valid.
By default, geospatial indexing assumes that your values are going to range from -180to 180 (which is convenient for latitude and longitude). If you are using it for othervalues, you can specify what the minimum and maximum values will be as options toensureIndex:
> db.star.trek.ensureIndex({"light-years" : "2d"}, {"min" : -1000, "max" : 1000})
This will create a spatial index calibrated for a 2,000 × 2,000 light-year square.
Geospatial queries can be performed in two ways: as a normal query (using find) or asa database command. The find approach is similar to performing a nongeospatialquery, except the conditional "$near" is used. It takes an array of the two target values:
> db.map.find({"gps" : {"$near" : [40, -73]}})
This finds all of the documents in the map collection, in order by distance from thepoint (40, -73). A default limit of 100 documents is applied if no limit is specified. Ifyou don’t need that many results, you should set a limit to conserve server resources.For example, the following code returns the 10 nearest documents to (40, -73):
> db.map.find({"gps" : {"$near" : [40, -73]}}).limit(10)
Geospatial Indexing | 77

This same type of query can be performed using the geoNear command:
> db.runCommand({geoNear : "map", near : [40, -73], num : 10});
geoNear also returns the distance of each result document from the query point. Thedistance is in whatever units you inserted the data in; if you inserted degrees of longitudeand latitude, the distance is in degrees. find with "$near" doesn’t give you the distancefor each point but must be used if you have more than 4MB of results.
MongoDB also allows you to find all of the documents within a shape, as well as neara point. To find points in a shape, we use the "$within" conditional instead of the"$near" conditional. "$within" can take an increasing number of shapes; check theonline documentation for geospatial indexing to see the most up-to-date list of what’ssupported (http://www.mongodb.org/display/DOCS/Geospatial+Indexing). As of thiswriting, there are two options: you can query for all points within a rectangle or a circle.To use a rectangle, use the "$box" option:
> db.map.find({"gps" : {"$within" : {"$box" : [[10, 20], [15, 30]]}}})
"$box" takes a two-element array: the first element specifies the coordinates of thelower-left corner, the second element the upper right.
Also, you can find all points within a circle with "$center", which takes an array withthe center point and then a radius:
> db.map.find({"gps" : {"$within" : {"$center" : [[12, 25], 5]}}})
Compound Geospatial IndexesApplications often need to search for more complex criteria than just a location. Forexample, a user might want to find all coffee shops or pizza parlors near where theyare. To facilitate this type of query, you can combine geospatial indexes with normalindexes. In this situation, for instance, we might want to query on both the"location" key and a "desc" key, so we’d create a compound index:
> db.ensureIndex({"location" : "2d", "desc" : 1})
Then we can quickly find the nearest coffee shop:
> db.map.find({"location" : {"$near" : [-70, 30]}, "desc" : "coffeeshop"}).limit(1){ "_id" : ObjectId("4c0d1348928a815a720a0000"), "name" : "Mud", "location" : [x, y], "desc" : ["coffee", "coffeeshop", "muffins", "espresso"]}
Note that creating an array of keywords is a good way to perform user-defined searches.
78 | Chapter 5: Indexing

The Earth Is Not a 2D PlaneMongoDB’s geospatial indexes assumes that whatever you’re indexing is a flat plane.This means that results aren’t perfect for spherical shapes, like the earth, especially nearthe poles. The problem is that the distance between lines of longitude in the Yukon ismuch shorter than the distance between them at the equator. There are variousprojections that can be used to convert the earth to a 2D plane with varying levels ofaccuracy and corresponding levels of complexity.
Geospatial Indexing | 79


CHAPTER 6
Aggregation
MongoDB provides a number of aggregation tools that go beyond basic query func-tionality. These range from simply counting the number of documents in a collectionto using MapReduce to do complex data analysis.
countThe simplest aggregation tool is count, which returns the number of documents in thecollection:
> db.foo.count()0> db.foo.insert({"x" : 1})> db.foo.count()1
Counting the total number of documents in a collection is fast regardless of collectionsize.
You can also pass in a query, and Mongo will count the number of results for that query:
> db.foo.insert({"x" : 2})> db.foo.count()2> db.foo.count({"x" : 1})1
This can be useful for getting a total for pagination: “displaying results 0–10 of 439.”Adding criteria does make the count slower, however.
distinctThe distinct command finds all of the distinct values for a given key. You must specifya collection and key:
> db.runCommand({"distinct" : "people", "key" : "age"})
81

For example, suppose we had the following documents in our collection:
{"name" : "Ada", "age" : 20}{"name" : "Fred", "age" : 35}{"name" : "Susan", "age" : 60}{"name" : "Andy", "age" : 35}
If you call distinct on the "age" key, you will get back all of the distinct ages:
> db.runCommand({"distinct" : "people", "key" : "age"}){"values" : [20, 35, 60], "ok" : 1}
A common question at this point is if there’s a way to get all of the distinct keys in acollection. There is no built-in way of doing this, although you can write something todo it yourself using MapReduce (described in a moment).
groupgroup allows you to perform more complex aggregation. You choose a key to group by,and MongoDB divides the collection into separate groups for each value of the chosenkey. For each group, you can create a result document by aggregating the documentsthat are members of that group.
If you are familiar with SQL, group is similar to SQL’s GROUP BY.
Suppose we have a site that keeps track of stock prices. Every few minutes from 10 a.m.to 4 p.m., it gets the latest price for a stock, which it stores in MongoDB. Now, as partof a reporting application, we want to find the closing price for the past 30 days. Thiscan be easily accomplished using group.
The collection of stock prices contains thousands of documents with the followingform:
{"day" : "2010/10/03", "time" : "10/3/2010 03:57:01 GMT-400", "price" : 4.23}{"day" : "2010/10/04", "time" : "10/4/2010 11:28:39 GMT-400", "price" : 4.27}{"day" : "2010/10/03", "time" : "10/3/2010 05:00:23 GMT-400", "price" : 4.10}{"day" : "2010/10/06", "time" : "10/6/2010 05:27:58 GMT-400", "price" : 4.30}{"day" : "2010/10/04", "time" : "10/4/2010 08:34:50 GMT-400", "price" : 4.01}
You should never store money amounts as floating-point numbers be-cause of inexactness concerns, but we’ll do it anyway in this examplefor simplicity.
We want our results to be a list of the latest time and price for each day, somethinglike this:
82 | Chapter 6: Aggregation

[ {"time" : "10/3/2010 05:00:23 GMT-400", "price" : 4.10}, {"time" : "10/4/2010 11:28:39 GMT-400", "price" : 4.27}, {"time" : "10/6/2010 05:27:58 GMT-400", "price" : 4.30}]
We can accomplish this by splitting the collection into sets of documents grouped byday then finding the document with the latest timestamp for each day and adding it tothe result set. The whole function might look something like this:
> db.runCommand({"group" : {... "ns" : "stocks",... "key" : "day",... "initial" : {"time" : 0},... "$reduce" : function(doc, prev) {... if (doc.time > prev.time) {... prev.price = doc.price;... prev.time = doc.time;... }... }}})
Let’s break this command down into its component keys:
"ns" : "stocks"This determines which collection we’ll be running the group on.
"key" : "day"This specifies the key on which to group the documents in the collection. In thiscase, that would be the "day" key. All of the documents with a "day" key of a givenvalue will be grouped together.
"initial" : {"time" : 0}The first time the reduce function is called for a given group, it will be passed theinitialization document. This same accumulator will be used for each member ofa given group, so any changes made to it can be persisted.
"$reduce" : function(doc, prev) { ... }This will be called once for each document in the collection. It is passed the currentdocument and an accumulator document: the result so far for that group. In thisexample, we want the reduce function to compare the current document’s timewith the accumulator’s time. If the current document has a later time, we’ll set theaccumulator’s day and price to be the current document’s values. Remember thatthere is a separate accumulator for each group, so there is no need to worry aboutdifferent days using the same accumulator.
In the initial statement of the problem, we said that we wanted only the last 30 daysworth of prices. Our current solution is iterating over the entire collection, however.This is why you can include a "condition" that documents must satisfy in order to beprocessed by the group command at all:
> db.runCommand({"group" : {... "ns" : "stocks",... "key" : "day",
group | 83

... "initial" : {"time" : 0},
... "$reduce" : function(doc, prev) {
... if (doc.time > prev.time) {
... prev.price = doc.price;
... prev.time = doc.time;
... }},
... "condition" : {"day" : {"$gt" : "2010/09/30"}}
... }})
Some documentation refers to a "cond" or "q" key, both of which areidentical to the "condition" key (just less descriptive).
Now the command will return an array of 30 documents, each of which is a group.Each group has the key on which the group was based (in this case, "day" : string)and the final value of prev for that group. If some of the documents do not contain thekey, these will be grouped into a single group with a day : null element. You caneliminate this group by adding "day" : {"$exists" : true} to the "condition". Thegroup command also returns the total number of documents used and the number ofdistinct values for "key":
> db.runCommand({"group" : {...}}){ "retval" : [ { "day" : "2010/10/04", "time" : "Mon Oct 04 2010 11:28:39 GMT-0400 (EST)" "price" : 4.27 }, ... ], "count" : 734, "keys" : 30, "ok" : 1}
We explicitly set the "price" for each group, and the "time" was set by the initializerand then updated. The "day" is included because the key being grouped by is includedby default in each "retval" embedded document. If you don’t want to return this key,you can use a finalizer to change the final accumulator document into anything, evena nondocument (e.g., a number or string).
Using a FinalizerFinalizers can be used to minimize the amount of data that needs to be transferred fromthe database to the user, which is important, because the group command’s outputneeds to fit in a single database response. To demonstrate this, we’ll take the example
84 | Chapter 6: Aggregation

of a blog where each post has tags. We want to find the most popular tag for each day.We can group by day (again) and keep a count for each tag. This might look somethinglike this:
> db.posts.group({... "key" : {"tags" : true},... "initial" : {"tags" : {}},... "$reduce" : function(doc, prev) {... for (i in doc.tags) {... if (doc.tags[i] in prev.tags) {... prev.tags[doc.tags[i]]++;... } else {... prev.tags[doc.tags[i]] = 1;... }... }... }})
This will return something like this:
[ {"day" : "2010/01/12", "tags" : {"nosql" : 4, "winter" : 10, "sledding" : 2}}, {"day" : "2010/01/13", "tags" : {"soda" : 5, "php" : 2}}, {"day" : "2010/01/14", "tags" : {"python" : 6, "winter" : 4, "nosql": 15}}]
Then we could find the largest value in the "tags" document on the client side. How-ever, sending the entire tags document for every day is a lot of extra overhead to sendto the client: an entire set of key/value pairs for each day, when all we want is a singlestring. This is why group takes an optional "finalize" key. "finalize" can contain afunction that is run on each group once, right before the result is sent back to the client.We can use a "finalize" function to trim out all of the cruft from our results:
> db.runCommand({"group" : {... "ns" : "posts",... "key" : {"tags" : true},... "initial" : {"tags" : {}},... "$reduce" : function(doc, prev) {... for (i in doc.tags) {... if (doc.tags[i] in prev.tags) {... prev.tags[doc.tags[i]]++;... } else {... prev.tags[doc.tags[i]] = 1;... }... },... "finalize" : function(prev) {... var mostPopular = 0;... for (i in prev.tags) {... if (prev.tags[i] > mostPopular) {... prev.tag = i;... mostPopular = prev.tags[i];... }... }... delete prev.tags... }}})
group | 85

Now, we’re only getting the information we want; the server will send back somethinglike this:
[ {"day" : "2010/01/12", "tag" : "winter"}, {"day" : "2010/01/13", "tag" : "soda"}, {"day" : "2010/01/14", "tag" : "nosql"}]
finalize can either modify the argument passed in or return a new value.
Using a Function as a KeySometimes you may have more complicated criteria that you want to group by, not justa single key. Suppose you are using group to count how many blog posts are in eachcategory. (Each blog post is in a single category.) Post authors were inconsistent,though, and categorized posts with haphazard capitalization. So, if you group by cat-egory name, you’ll end up with separate groups for “MongoDB” and “mongodb.” Tomake sure any variation of capitalization is treated as the same key, you can define afunction to determine documents’ grouping key.
To define a grouping function, you must use a $keyf key (instead of "key"). Using"$keyf" makes the group command look something like this:
> db.posts.group({"ns" : "posts",... "$keyf" : function(x) { return x.category.toLowerCase(); },... "initializer" : ... })
"$keyf" allows you can group by arbitrarily complex criteria.
MapReduceMapReduce is the Uzi of aggregation tools. Everything described with count,distinct, and group can be done with MapReduce, and more. It is a method of aggre-gation that can be easily parallelized across multiple servers. It splits up a problem,sends chunks of it to different machines, and lets each machine solve its part of theproblem. When all of the machines are finished, they merge all of the pieces of thesolution back into a full solution.
MapReduce has a couple of steps. It starts with the map step, which maps an operationonto every document in a collection. That operation could be either “do nothing” or“emit these keys with X values.” There is then an intermediary stage called the shufflestep: keys are grouped and lists of emitted values are created for each key. The reducetakes this list of values and reduces it to a single element. This element is returned tothe shuffle step until each key has a list containing a single value: the result.
The price of using MapReduce is speed: group is not particularly speedy, butMapReduce is slower and is not supposed to be used in “real time.” You run
86 | Chapter 6: Aggregation
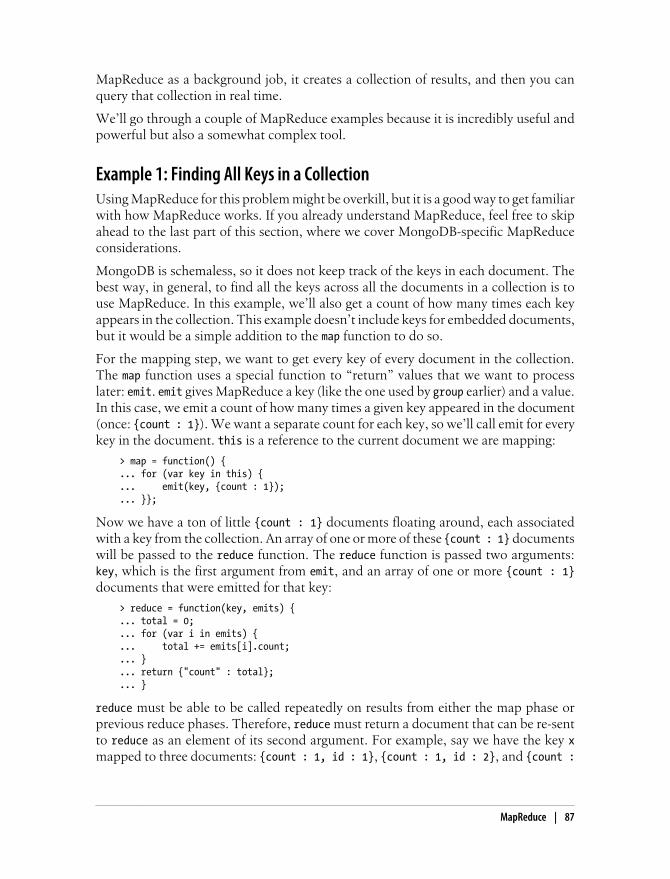
MapReduce as a background job, it creates a collection of results, and then you canquery that collection in real time.
We’ll go through a couple of MapReduce examples because it is incredibly useful andpowerful but also a somewhat complex tool.
Example 1: Finding All Keys in a CollectionUsing MapReduce for this problem might be overkill, but it is a good way to get familiarwith how MapReduce works. If you already understand MapReduce, feel free to skipahead to the last part of this section, where we cover MongoDB-specific MapReduceconsiderations.
MongoDB is schemaless, so it does not keep track of the keys in each document. Thebest way, in general, to find all the keys across all the documents in a collection is touse MapReduce. In this example, we’ll also get a count of how many times each keyappears in the collection. This example doesn’t include keys for embedded documents,but it would be a simple addition to the map function to do so.
For the mapping step, we want to get every key of every document in the collection.The map function uses a special function to “return” values that we want to processlater: emit. emit gives MapReduce a key (like the one used by group earlier) and a value.In this case, we emit a count of how many times a given key appeared in the document(once: {count : 1}). We want a separate count for each key, so we’ll call emit for everykey in the document. this is a reference to the current document we are mapping:
> map = function() {... for (var key in this) {... emit(key, {count : 1});... }};
Now we have a ton of little {count : 1} documents floating around, each associatedwith a key from the collection. An array of one or more of these {count : 1} documentswill be passed to the reduce function. The reduce function is passed two arguments:key, which is the first argument from emit, and an array of one or more {count : 1}documents that were emitted for that key:
> reduce = function(key, emits) {... total = 0;... for (var i in emits) {... total += emits[i].count;... }... return {"count" : total};... }
reduce must be able to be called repeatedly on results from either the map phase orprevious reduce phases. Therefore, reduce must return a document that can be re-sentto reduce as an element of its second argument. For example, say we have the key xmapped to three documents: {count : 1, id : 1}, {count : 1, id : 2}, and {count :
MapReduce | 87

1, id : 3}. (The ID keys are just for identification purposes.) MongoDB might callreduce in the following pattern:
> r1 = reduce("x", [{count : 1, id : 1}, {count : 1, id : 2}]){count : 2}> r2 = reduce("x", [{count : 1, id : 3}]){count : 1}> reduce("x", [r1, r2]){count : 3}
You cannot depend on the second argument always holding one of the initial docu-ments ({count : 1} in this case) or being a certain length. reduce should be able to berun on any combination of emit documents and reduce return values.
Altogether, this MapReduce function would look like this:
> mr = db.runCommand({"mapreduce" : "foo", "map" : map, "reduce" : reduce}){ "result" : "tmp.mr.mapreduce_1266787811_1", "timeMillis" : 12, "counts" : { "input" : 6 "emit" : 14 "output" : 5 }, "ok" : true}
The document MapReduce returns gives you a bunch of metainformation about theoperation:
"result" : "tmp.mr.mapreduce_1266787811_1"This is the name of the collection the MapReduce results were stored in. This is atemporary collection that will be deleted when the connection that did the Map-Reduce is closed. We will go over how to specify a nicer name and make the col-lection permanent in a later part of this chapter.
"timeMillis" : 12How long the operation took, in milliseconds.
"counts" : { ... }This embedded document contains three keys:
"input" : 6The number of documents sent to the map function.
"emit" : 14The number of times emit was called in the map function.
"output" : 5The number of documents created in the result collection.
"counts" is mostly useful for debugging.
88 | Chapter 6: Aggregation

If we do a find on the resulting collection, we can see all of the keys and their countsfrom our original collection:
> db[mr.result].find(){ "_id" : "_id", "value" : { "count" : 6 } }{ "_id" : "a", "value" : { "count" : 4 } }{ "_id" : "b", "value" : { "count" : 2 } }{ "_id" : "x", "value" : { "count" : 1 } }{ "_id" : "y", "value" : { "count" : 1 } }
Each of the key values becomes an "_id", and the final result of the reduce step(s)becomes the "value".
Example 2: Categorizing Web PagesSuppose we have a site where people can submit links to other pages, such asreddit.com. Submitters can tag a link as related to certain popular topics, e.g., “poli-tics,” “geek,” or “icanhascheezburger.” We can use MapReduce to figure out whichtopics are the most popular, as a combination of recent and most-voted-for.
First, we need a map function that emits tags with a value based on the popularity andrecency of a document:
map = function() { for (var i in this.tags) { var recency = 1/(new Date() - this.date); var score = recency * this.score;
emit(this.tags[i], {"urls" : [this.url], "score" : score}); }};
Now we need to reduce all of the emitted values for a tag into a single score for that tag:
reduce = function(key, emits) { var total = {urls : [], score : 0} for (var i in emits) { emits[i].urls.forEach(function(url) { total.urls.push(url); } total.score += emits[i].score; } return total;};
The final collection will end up with a full list of URLs for each tag and a score showinghow popular that particular tag is.
MapReduce | 89

MongoDB and MapReduceBoth of the previous examples used only the mapreduce, map, and reduce keys. Thesethree keys are required, but there are many optional keys that can be passed to theMapReduce command.
"finalize" : functionA final step to send reduce’s output to.
"keeptemp" : booleanIf the temporary result collection should be saved when the connection is closed.
"output" : stringName for the output collection. Setting this option implies keeptemp : true.
"query" : documentQuery to filter documents by before sending to the map function.
"sort" : documentSort to use on documents before sending to the map (useful in conjunction withthe limit option).
"limit" : integerMaximum number of documents to send to the map function.
"scope" : documentVariables that can be used in any of the JavaScript code.
"verbose" : booleanWhether to use more verbose output in the server logs.
The finalize function
As with the previous group command, MapReduce can be passed a finalize functionthat will be run on the last reduce’s output before it is saved to a temporary collection.
Returning large result sets is less critical with MapReduce than group, because the wholeresult doesn’t have to fit in 4MB. However, the information will be passed over the wireeventually, so finalize is a good chance to take averages, chomp arrays, and removeextra information in general.
Keeping output collections
By default, Mongo creates a temporary collection while it is processing the MapReducewith a name that you are unlikely to choose for a collection: a dot-separated stringcontaining mr, the name of the collection you’re MapReducing, a timestamp, and thejob’s ID with the database. It ends up looking something like mr.stuff.18234210220.2. MongoDB will automatically destroy this collection when the con-nection that did the MapReduce is closed. (You can also drop it manually when you’redone with it.) If you want to persist this collection even after disconnecting, you canspecify keeptemp : true as an option.
90 | Chapter 6: Aggregation
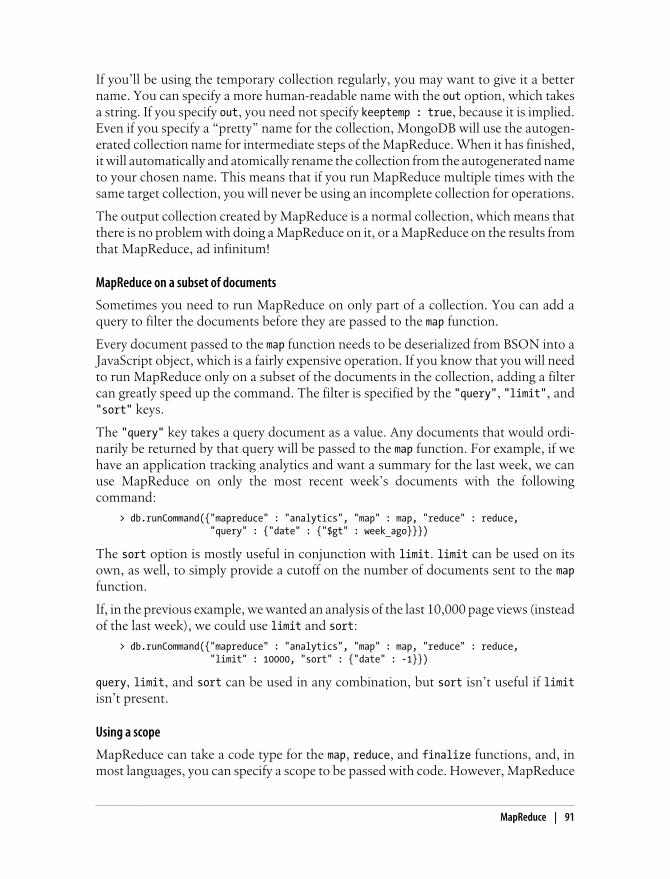
If you’ll be using the temporary collection regularly, you may want to give it a bettername. You can specify a more human-readable name with the out option, which takesa string. If you specify out, you need not specify keeptemp : true, because it is implied.Even if you specify a “pretty” name for the collection, MongoDB will use the autogen-erated collection name for intermediate steps of the MapReduce. When it has finished,it will automatically and atomically rename the collection from the autogenerated nameto your chosen name. This means that if you run MapReduce multiple times with thesame target collection, you will never be using an incomplete collection for operations.
The output collection created by MapReduce is a normal collection, which means thatthere is no problem with doing a MapReduce on it, or a MapReduce on the results fromthat MapReduce, ad infinitum!
MapReduce on a subset of documents
Sometimes you need to run MapReduce on only part of a collection. You can add aquery to filter the documents before they are passed to the map function.
Every document passed to the map function needs to be deserialized from BSON into aJavaScript object, which is a fairly expensive operation. If you know that you will needto run MapReduce only on a subset of the documents in the collection, adding a filtercan greatly speed up the command. The filter is specified by the "query", "limit", and"sort" keys.
The "query" key takes a query document as a value. Any documents that would ordi-narily be returned by that query will be passed to the map function. For example, if wehave an application tracking analytics and want a summary for the last week, we canuse MapReduce on only the most recent week’s documents with the followingcommand:
> db.runCommand({"mapreduce" : "analytics", "map" : map, "reduce" : reduce, "query" : {"date" : {"$gt" : week_ago}}})
The sort option is mostly useful in conjunction with limit. limit can be used on itsown, as well, to simply provide a cutoff on the number of documents sent to the mapfunction.
If, in the previous example, we wanted an analysis of the last 10,000 page views (insteadof the last week), we could use limit and sort:
> db.runCommand({"mapreduce" : "analytics", "map" : map, "reduce" : reduce, "limit" : 10000, "sort" : {"date" : -1}})
query, limit, and sort can be used in any combination, but sort isn’t useful if limitisn’t present.
Using a scope
MapReduce can take a code type for the map, reduce, and finalize functions, and, inmost languages, you can specify a scope to be passed with code. However, MapReduce
MapReduce | 91

ignores this scope. It has its own scope key, "scope", and you must use that if there areclient-side values you want to use in your MapReduce. You can set them using a plaindocument of the form variable_name : value, and they will be available in your map,reduce, and finalize functions. The scope is immutable from within these functions.
For instance, in the example in the previous section, we calculated the recency of a pageusing 1/(new Date() - this.date). We could, instead, pass in the current date as partof the scope with the following code:
> db.runCommand({"mapreduce" : "webpages", "map" : map, "reduce" : reduce, "scope" : {now : new Date()}})
Then, in the map function, we could say 1/(now - this.date).
Getting more output
There is also a verbose option for debugging. If you would like to see the progress ofyour MapReduce as it runs, you can specify "verbose" : true.
You can also use print to see what’s happening in the map, reduce, and finalize func-tions. print will print to the server log.
92 | Chapter 6: Aggregation

CHAPTER 7
Advanced Topics
MongoDB supports some advanced functionality that goes well beyond the capabilitiesdiscussed so far. When you want to become a power user, this chapter has you covered;in it we’ll discuss the following:
• Using database commands to take advantage of advanced features
• Working with capped collections, a special type of collection
• Leveraging GridFS for storing large files
• Taking advantage of MongoDB’s support for server-side JavaScript
• Understanding what database references are and when you should consider usingthem
Database CommandsIn the previous chapters we’ve seen how to create, read, update, and delete documentsin MongoDB. In addition to these basic operations, MongoDB supports a wide rangeof advanced operations that are implemented as commands. Commands implement allof the functionality that doesn’t fit neatly into “create, read, update, delete.”
We’ve already seen a couple of commands in the previous chapters; for instance, weused the getLastError command in Chapter 3 to check the number of documents af-fected by an update:
> db.count.update({x : 1}, {$inc : {x : 1}}, false, true)> db.runCommand({getLastError : 1}){ "err" : null, "updatedExisting" : true, "n" : 5, "ok" : true}
93
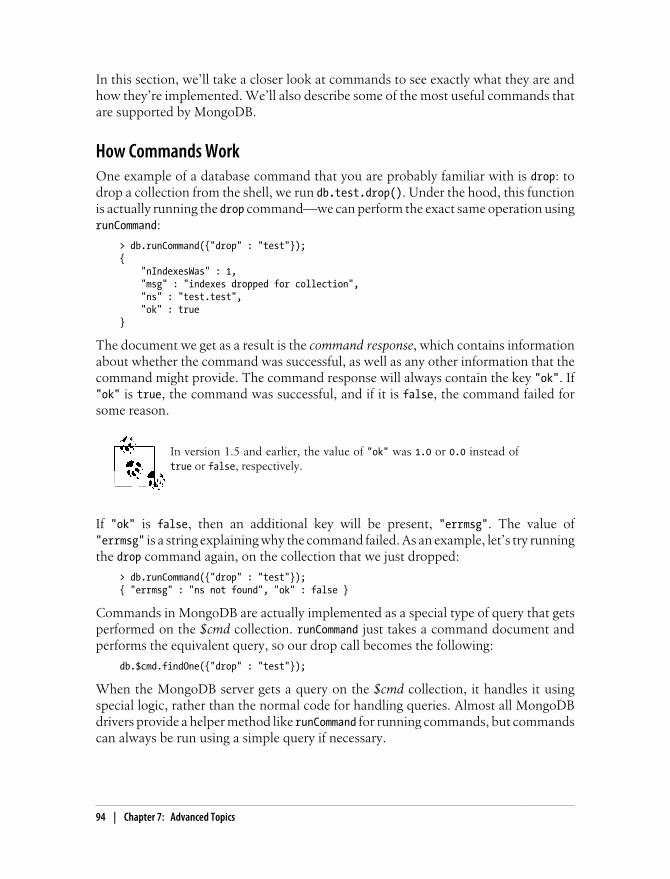
In this section, we’ll take a closer look at commands to see exactly what they are andhow they’re implemented. We’ll also describe some of the most useful commands thatare supported by MongoDB.
How Commands WorkOne example of a database command that you are probably familiar with is drop: todrop a collection from the shell, we run db.test.drop(). Under the hood, this functionis actually running the drop command—we can perform the exact same operation usingrunCommand:
> db.runCommand({"drop" : "test"});{ "nIndexesWas" : 1, "msg" : "indexes dropped for collection", "ns" : "test.test", "ok" : true}
The document we get as a result is the command response, which contains informationabout whether the command was successful, as well as any other information that thecommand might provide. The command response will always contain the key "ok". If"ok" is true, the command was successful, and if it is false, the command failed forsome reason.
In version 1.5 and earlier, the value of "ok" was 1.0 or 0.0 instead oftrue or false, respectively.
If "ok" is false, then an additional key will be present, "errmsg". The value of"errmsg" is a string explaining why the command failed. As an example, let’s try runningthe drop command again, on the collection that we just dropped:
> db.runCommand({"drop" : "test"});{ "errmsg" : "ns not found", "ok" : false }
Commands in MongoDB are actually implemented as a special type of query that getsperformed on the $cmd collection. runCommand just takes a command document andperforms the equivalent query, so our drop call becomes the following:
db.$cmd.findOne({"drop" : "test"});
When the MongoDB server gets a query on the $cmd collection, it handles it usingspecial logic, rather than the normal code for handling queries. Almost all MongoDBdrivers provide a helper method like runCommand for running commands, but commandscan always be run using a simple query if necessary.
94 | Chapter 7: Advanced Topics

Some commands require administrator access and must be run on the admin database.If such a command is run on any other database, it will return an “access denied” error.
Command ReferenceAt the time of this writing, MongoDB supports more than 75 different commands, andmore commands are being added all the time. There are two ways to get an up-to-datelist of all of the commands supported by a MongoDB server:
• Run db.listCommands() from the shell, or run the equivalent listCommands com-mand from any other driver.
• Browse to the http://localhost:28017/_commands URL on the MongoDB admininterface (for more on the admin interface see Chapter 8).
The following list contains some of the most frequently used MongoDB commandsalong with example documents showing how each command should be represented:
buildInfo
{"buildInfo" : 1}
Admin-only command that returns information about the MongoDB server’s ver-sion number and host operating system.
collStats
{"collStats" : collection}
Gives some stats about a given collection, including its data size, the amount ofstorage space allocated for it, and the size of its indexes.
distinct
{"distinct" : collection, "key": key, "query": query}
Gets a list of distinct values for key in documents matching query, across a givencollection.
drop
{"drop" : collection}
Removes all data for collection.
dropDatabase
{"dropDatabase" : 1}
Removes all data for the current database.
dropIndexes
{"dropIndexes" : collection, "index" : name}
Deletes the index named name from collection, or all indexes if name is "*".
Database Commands | 95

findAndModifySee Chapter 3 for a full reference on using the findAndModify command.
getLastError
{"getLastError" : 1[, "w" : w[, "wtimeout" : timeout]]}
Checks for errors or other status information about the last operation performedon this connection. The command will optionally block until w slaves have repli-cated the last operation on this connection (or until timeout milliseconds have goneby).
isMaster
{"isMaster" : 1}
Checks if this server is a master or slave.
listCommands
{"listCommands" : 1}
Returns a list of all database commands available on this server, as well as someinformation about each command.
listDatabases
{"listDatabases" : 1}
Admin-only command listing all databases on this server.
ping
{"ping" : 1}
Checks if a server is alive. This command will return immediately even if the serveris in a lock.
renameCollection
{"renameCollection" : a, "to" : b}
Renames collection a to b, where both a and b are full collection namespaces (e.g.,"foo.bar" for the collection bar in the foo database).
repairDatabase
{"repairDatabase" : 1}
Repairs and compacts the current database, which can be a long-running opera-tion. See “Repair” on page 124 for more information.
serverStatus
{"serverStatus" : 1}
Gets administrative statistics for this server. See “Monitoring” on page 114 formore information.
96 | Chapter 7: Advanced Topics
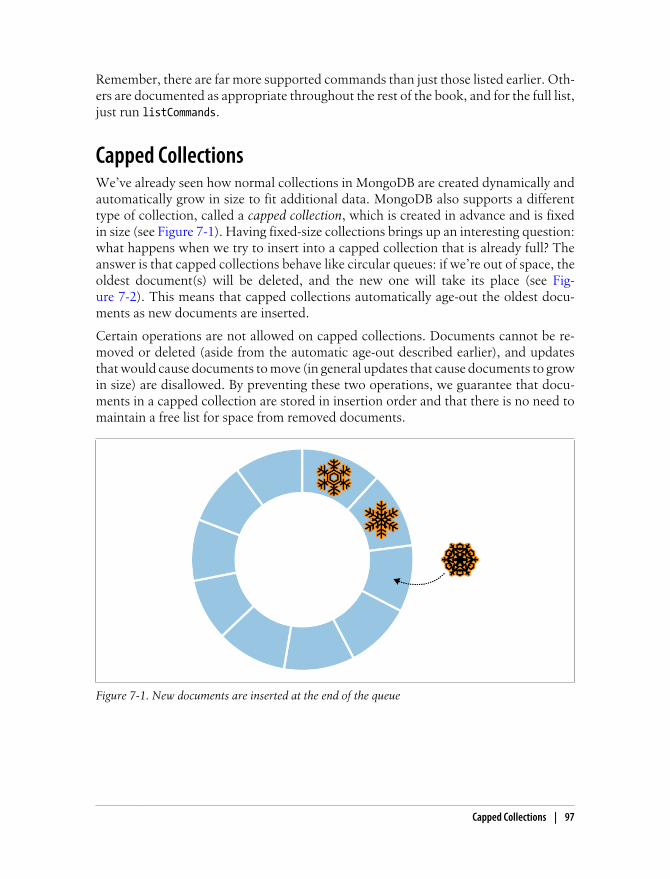
Remember, there are far more supported commands than just those listed earlier. Oth-ers are documented as appropriate throughout the rest of the book, and for the full list,just run listCommands.
Capped CollectionsWe’ve already seen how normal collections in MongoDB are created dynamically andautomatically grow in size to fit additional data. MongoDB also supports a differenttype of collection, called a capped collection, which is created in advance and is fixedin size (see Figure 7-1). Having fixed-size collections brings up an interesting question:what happens when we try to insert into a capped collection that is already full? Theanswer is that capped collections behave like circular queues: if we’re out of space, theoldest document(s) will be deleted, and the new one will take its place (see Fig-ure 7-2). This means that capped collections automatically age-out the oldest docu-ments as new documents are inserted.
Certain operations are not allowed on capped collections. Documents cannot be re-moved or deleted (aside from the automatic age-out described earlier), and updatesthat would cause documents to move (in general updates that cause documents to growin size) are disallowed. By preventing these two operations, we guarantee that docu-ments in a capped collection are stored in insertion order and that there is no need tomaintain a free list for space from removed documents.
Figure 7-1. New documents are inserted at the end of the queue
Capped Collections | 97

Figure 7-2. When the queue is full, the oldest element will be replaced by the newest
A final difference between capped and normal collections is that in a capped collection,there are no indexes by default, not even an index on "_id".
Properties and Use CasesThe set of features and limitations possessed by capped collections combine to givethem some interesting properties. First, inserts into a capped collection are extremelyfast. When doing an insert, there is never a need to allocate additional space, and theserver never needs to search through a free list to find the right place to put a document.The inserted document can always be placed directly at the “tail” of the collection,overwriting old documents if needed. By default, there are also no indexes to updateon an insert, so an insert is essentially a single memcpy.
Another interesting property of capped collections is that queries retrieving documentsin insertion order are very fast. Because documents are always stored in insertion order,queries for documents in that order just walk over the collection, returning documentsin the exact order that they appear on disk. By default, any find performed on a cappedcollection will always return results in insertion order.
Finally, capped collections have the useful property of automatically aging-out old dataas new data is inserted. The combination of fast inserts, fast queries for documentssorted by insertion order, and automatic age-out makes capped collections ideal foruse cases like logging. In fact, the primary motivation for including capped collectionsin MongoDB is so that they can be used to store an internal replication log, the oplog(for more on replication and the oplog, see Chapter 9). Another good use case to
98 | Chapter 7: Advanced Topics

consider for capped collections is caching of small numbers of documents. In general,capped collections are good for any case where the auto age-out property is helpful asopposed to undesirable and the limitations on available operations are not prohibitive.
Creating Capped CollectionsUnlike normal collections, capped collections must be explicitly created before theyare used. To create a capped collection, use the create command. From the shell, thiscan be done using createCollection:
> db.createCollection("my_collection", {capped: true, size: 100000});{ "ok" : true }
The previous command creates a capped collection, my_collection, that is a fixed sizeof 100,000 bytes. createCollection has a couple of other options as well. We can specifya limit on the number of documents in a capped collection in addition to the limit ontotal collection size:
> db.createCollection("my_collection", {capped: true, size: 100000, max: 100});{ "ok" : true }
When limiting the number of documents in a capped collection, youmust specify a size limit as well. Age-out will be based on the numberof documents in the collection, unless the collection runs out of spacebefore the limit is reached. In that case, age-out will be based on col-lection size, as in any other capped collection.
Another option for creating a capped collection is to convert an existing, regular col-lection into a capped collection. This can be done using the convertToCappedcommand—in the following example, we convert the test collection to a capped col-lection of 10,000 bytes:
> db.runCommand({convertToCapped: "test", size: 10000});{ "ok" : true }
Sorting Au NaturelThere is a special type of sort that you can do with capped collections, called a naturalsort. Natural order is just the order that documents appear on disk (see Figure 7-3).
Because documents in a capped collection are always kept in insertion order, naturalorder is the same as insertion order. As mentioned earlier, queries on a capped collectionreturn documents in insertion order by default. You can also sort in reverse insertionorder with a natural sort (see Figure 7-4):
> db.my_collection.find().sort({"$natural" : -1})
Capped Collections | 99

Sorting by {"$natural" : 1} is identical to the default sort. Noncapped collections donot guarantee that documents are stored in any particular order, so their natural or-dering is not as significant.
Figure 7-3. Sort by {"$natural" : 1}
Figure 7-4. Sort by {"$natural" : -1}
100 | Chapter 7: Advanced Topics

Tailable CursorsTailable cursors are a very special type of persistent cursor that are not closed whentheir results are exhausted. They were inspired by the tail -f command and, similar tothe command, will continue fetching output for as long as possible. Because the cursorsdo not die when they runs out of results, they can continue to fetch new results as theyare added to the collection. Tailable cursors can be used only on capped collections.
Again, the Mongo shell does not allow you to use tailable cursors, but using one in PHPlooks something like the following:
$cursor = $collection->find()->tailable();
while (true) { if (!$cursor->hasNext()) { if ($cursor->dead()) { break; } sleep(1); } else { while (cursor->hasNext()) { do_stuff(cursor->getNext()); } }}
Although the cursor has not died, it will be either processing results or waiting for moreresults to arrive.
GridFS: Storing FilesGridFS is a mechanism for storing large binary files in MongoDB. There are severalreasons why you might consider using GridFS for file storage:
• Using GridFS can simplify your stack. If you’re already using MongoDB, GridFSobviates the need for a separate file storage architecture.
• GridFS will leverage any existing replication or autosharding that you’ve set up forMongoDB, so getting failover and scale-out for file storage is easy.
• GridFS can alleviate some of the issues that certain filesystems can exhibit whenbeing used to store user uploads. For example, GridFS does not have issues withstoring large numbers of files in the same directory.
• You can get great disk locality with GridFS, because MongoDB allocates data filesin 2GB chunks.
GridFS: Storing Files | 101

Getting Started with GridFS: mongofilesThe easiest way to get up and running with GridFS is by using the mongofiles utility.mongofiles is included with all MongoDB distributions and can be used to upload,download, list, search for, or delete files in GridFS. As with any of the other command-line tools, run mongofiles --help to see the options available for mongofiles. The fol-lowing session shows how to use mongofiles to upload a file from the filesystem toGridFS, list all of the files in GridFS, and download a file that we’vepreviously uploaded:
$ echo "Hello, world" > foo.txt$ ./mongofiles put foo.txtconnected to: 127.0.0.1added file: { _id: ObjectId('4c0d2a6c3052c25545139b88'), filename: "foo.txt", length: 13, chunkSize: 262144, uploadDate: new Date(1275931244818), md5: "a7966bf58e23583c9a5a4059383ff850" }done!$ ./mongofiles listconnected to: 127.0.0.1foo.txt 13$ rm foo.txt$ ./mongofiles get foo.txtconnected to: 127.0.0.1done write to: foo.txt$ cat foo.txtHello, world
In the previous example, we perform three basic operations using mongofiles: put,list, and get. The put operation takes a file in the filesystem and adds it to GridFS,list will list any files that have been added to GridFS, and get does the inverse ofput: it takes a file from GridFS and writes it to the filesystem. mongofiles also supportstwo other operations: search for finding files in GridFS by filename and delete forremoving a file from GridFS.
Working with GridFS from the MongoDB DriversWe’ve seen how easy it is to work with GridFS from the command line, and it’s equallyeasy to work with from the MongoDB drivers. For example, we can use PyMongo, thePython driver for MongoDB, to perform the same series of operations as we did withmongofiles:
>>> from pymongo import Connection>>> import gridfs>>> db = Connection().test>>> fs = gridfs.GridFS(db)>>> file_id = fs.put("Hello, world", filename="foo.txt")>>> fs.list()[u'foo.txt']>>> fs.get(file_id).read()'Hello, world'
102 | Chapter 7: Advanced Topics

The API for working with GridFS from PyMongo is very similar to that of mongofiles:we can easily perform the basic put, get, and list operations. Almost all of theMongoDB drivers follow this basic pattern for working with GridFS, while often ex-posing more advanced functionality as well. For driver-specific information on GridFS,please check out the documentation for the specific driver you’re using.
Under the HoodGridFS is a lightweight specification for storing files that is built on top of normalMongoDB documents. The MongoDB server actually does almost nothing to “special-case” the handling of GridFS requests; all of the work is handled by the client-sidedrivers and tools.
The basic idea behind GridFS is that we can store large files by splitting them up intochunks and storing each chunk as a separate document. Because MongoDB supportsstoring binary data in documents, we can keep storage overhead for chunks to a min-imum. In addition to storing each chunk of a file, we store a single document that groupsthe chunks together and contains metadata about the file.
The chunks for GridFS are stored in their own collection. By default chunks will usethe collection fs.chunks, but this can be overridden if needed. Within the chunks col-lection the structure of the individual documents is pretty simple:
{ "_id" : ObjectId("..."), "n" : 0, "data" : BinData("..."), "files_id" : ObjectId("...")}
Like any other MongoDB document, the chunk has its own unique "_id". In addition,it has a couple of other keys. "files_id" is the "_id" of the file document that containsthe metadata for this chunk. "n" is the chunk number; this attribute tracks the orderthat chunks were present in the original file. Finally, "data" contains the binary datathat makes up this chunk of the file.
The metadata for each file is stored in a separate collection, which defaults to fs.files.Each document in the files collection represents a single file in GridFS and can containany custom metadata that should be associated with that file. In addition to any user-defined keys, there are a couple of keys that are mandated by the GridFS specification:
_idA unique id for the file—this is what will be stored in each chunk as the value forthe "files_id" key.
lengthThe total number of bytes making up the content of the file.
GridFS: Storing Files | 103

chunkSizeThe size of each chunk comprising the file, in bytes. The default is 256K, but thiscan be adjusted if needed.
uploadDateA timestamp representing when this file was stored in GridFS.
md5An md5 checksum of this file’s contents, generated on the server side.
Of all of the required keys, perhaps the most interesting (or least self-explanatory) is"md5". The value for "md5" is generated by the MongoDB server using the filemd5 com-mand, which computes the md5 checksum of the uploaded chunks. This means thatusers can check the value of the "md5" key to ensure that a file was uploaded correctly.
When we understand the underlying GridFS specification, it becomes trivial to imple-ment features that the driver we’re using might not implement for us. For example, wecan use the distinct command to get a list of unique filenames stored in GridFS:
> db.fs.files.distinct("filename")[ "foo.txt" ]
Server-Side ScriptingJavaScript can be executed on the server using the db.eval function. It can also be storedin the database and is used in some database commands.
db.evaldb.eval is a function that allows you to execute arbitrary JavaScript on the MongoDBserver. It takes a string of JavaScript, sends it to MongoDB (which executes it), andreturns the result.
db.eval can be used to imitate multidocument transactions: db.eval locks the database,executes the JavaScript, and unlocks the database. There’s no built-in rollback, but thisdoes give you a guarantee of a series of operations occurring in a certain order (unlessan error occurs).
There are two options for sending code: enclosing it in a function or not. The followingtwo lines are equivalent:
> db.eval("return 1;")1> db.eval("function() { return 1; }")1
Defining an enclosing function is necessary only if you are passing in arguments. Thesecan be passed using db.eval’s second argument, which is an array of values. Forexample, if we wanted to pass the username as an argument to a function, we couldsay the following:
104 | Chapter 7: Advanced Topics
> db.eval("function(u) { print('Hello, '+u+'!'); }", [username])
You can pass in as many arguments as necessary. For instance, if we want a sum ofthree numbers, we can do the following:
> db.eval("function(x,y,z) { return x + y + z; }", [num1, num2, num3])
num1 becomes x, num2 becomes y, and num3 becomes z. If you would like to use a variablenumber of parameters, arguments in JavaScript are stored in an arguments array whena function is called.
As a db.eval expression becomes more complex, debugging can be tricky. The Java-Script code is run by the database and often doesn’t have useful line numbers in errormessages. A good way of debugging is printing to the database log, which you can dowith the print function:
> db.eval("print('Hello, world');");
Stored JavaScriptMongoDB has a special collection for each database called system.js, which can storeJavaScript variables. These variables can then be used in any of MongoDB’s JavaScriptcontexts, including "$where" clauses, db.eval calls, and MapReduce jobs. You can addvariables to system.js with a simple insert:
> db.system.js.insert({"_id" : "x", "value" : 1})> db.system.js.insert({"_id" : "y", "value" : 2})> db.system.js.insert({"_id" : "z", "value" : 3})
This defines variables x, y, and z in the global scope. Now, if we want to find their sum,we can execute the following:
> db.eval("return x+y+z;")6
system.js can be used to store JavaScript code as well as simple values. This can behandy for defining your own utilities. For example, if you want to create a loggingfunction to use in JavaScript code, you can store it in system.js:
> db.system.js.insert({"_id" : "log", "value" :... function(msg, level) {... var levels = ["DEBUG", "WARN", "ERROR", "FATAL"];... level = level ? level : 0; // check if level is defined... var now = new Date();... print(now + " " + levels[level] + msg);... }})
Now, in any JavaScript context, you can call this log function:
> db.eval("x = 1; log('x is '+x); x = 2; log('x is greater than 1', 1);");
The database log will then contain something like this:
Fri Jun 11 2010 11:12:39 GMT-0400 (EST) DEBUG x is 1Fri Jun 11 2010 11:12:40 GMT-0400 (EST) WARN x is greater than 1
Server-Side Scripting | 105

There are downsides to using stored JavaScript: it keeps portions of your code out ofsource control, and it can obfuscate JavaScript sent from the client.
The best reason for storing JavaScript is if you have multiple parts of your code (or codein different programs or languages) using a single JavaScript function. Keeping suchfunctions in a central location means they do not need to be updated in multiple placesif changes are required. Stored JavaScript can also be useful if your JavaScript code islong and executed frequently, because storing it once can cut down on networktransfer time.
SecurityExecuting JavaScript is one of the few times you must be careful about security withMongoDB. If done incorrectly, server-side JavaScript is susceptible to injection attackssimilar to those that occur in a relational database. Luckily, it is very easy to preventthese attacks and use JavaScript safely.
Suppose you want to print “Hello, username!” to the user. If the username is in a variablecalled username, you could write a JavaScript function such as the following:
> func = "function() { print('Hello, "+username+"!'); }"
If username is a user-defined variable, it could contain the string "'); db.dropDatabase(); print('", which would turn the code into this:
> func = "function() { print('Hello, '); db.dropDatabase(); print('!'); }"
Now your entire database has been dropped!
To prevent this, you should use a scope to pass in the username. In PHP, for example,this looks like this:
$func = new MongoCode("function() { print('Hello, "+username+"!'); }",... array("username" => $username));
Now the database will harmlessly print this:
Hello, '); db.dropDatabase(); print('!
Most drivers have a special type for sending code to the database, since code can actuallybe a composite of a string and a scope. A scope is just a document mapping variablenames to values. This mapping becomes a local scope for the JavaScript function beingexecuted.
The shell does not have a code type that includes scope; you can onlyuse strings or JavaScript functions with it.
106 | Chapter 7: Advanced Topics

Database ReferencesPerhaps one of the least understood features of MongoDB is its support for databasereferences, or DBRefs. DBRefs are like URLs: they are simply a specification for uniquelyidentifying a reference to document. They do not automatically load the document anymore than a URL automatically loads a web page into a site with a link.
What Is a DBRef?A DBRef is an embedded document, just like any other embedded document inMongoDB. A DBRef, however, has specific keys that must be present. A simple examplelooks like the following:
{"$ref" : collection, "$id" : id_value}
The DBRef references a specific collection and an id_value that we can use to find asingle document by its "_id" within that collection. These two pieces of informationallow us to use a DBRef to uniquely identify and reference any document within aMongoDB database. If we want to reference a document in a different database, DBRefssupport an optional third key that we can use, "$db":
{"$ref" : collection, "$id" : id_value, "$db" : database}
DBRefs are one place in MongoDB where the order of keys in a docu-ment matters. The first key in a DBRef must be "$ref", followed by"$id", and then (optionally) "$db".
Example SchemaLet’s look at an example schema that uses DBRefs to reference documents across col-lections. The schema consists of two collections, users and notes. Users can create notes,which can reference users or other notes. Here are a couple of user documents, eachwith a unique username as its "_id" and a separate free-form "display_name":
{"_id" : "mike", "display_name" : "Mike D"}{"_id" : "kristina", "display_name" : "Kristina C"}
Notes are a little more complex. Each has a unique "_id". Normally this "_id" wouldprobably be an ObjectId, but we use an integer here to keep the example concise. Notesalso have an "author", some "text", and an optional set of "references" to other notesor users:
{"_id" : 5, "author" : "mike", "text" : "MongoDB is fun!"}{"_id" : 20, "author" : "kristina", "text" : "... and DBRefs are easy, too", "references": [{"$ref" : "users", "$id" : "mike"}, {"$ref" : "notes", "$id" : 5}]}
The second note contains some references to other documents, each stored as aDBRef. Our application code can use those DBRefs to get the documents for the “mike”
Database References | 107

user and the “MongoDB is fun!” note, both of which are associated with Kristina’s note.This dereferencing is easy to implement; we use the value of the "$ref" key to get thecollection to query on, and we use the value of the "$id" key to get the "_id" toquery for:
> var note = db.notes.findOne({"_id" : 20});> note.references.forEach(function(ref) {... printjson(db[ref.$ref].findOne({"_id" : ref.$id}));... });{ "_id" : "mike", "display_name" : "Mike D" }{ "_id" : 5, "author" : "mike", "text" : "MongoDB is fun!" }
Driver Support for DBRefsOne thing that can be confusing about DBRefs is that not all drivers treat them as normalembedded documents. Some provide a special type for DBRefs that will be automati-cally translated to and from the normal document representation. This is mainly pro-vided as a convenience for developers, because it can make working with DBRefs a littleless verbose. As an example, here we represent the same note as earlier using PyMongoand its DBRef type:
>>> note = {"_id": 20, "author": "kristina",... "text": "... and DBRefs are easy, too",... "references": [DBRef("users", "mike"), DBRef("notes", 5)]}
When the note is saved, the DBRef instances will automatically be translated to theequivalent embedded documents. When the note is returned from a query, the oppositewill happen, and we’ll get DBRef instances back.
Some drivers also add other helpers for working with DBRefs, like methods to handledereferencing or even mechanisms for automatically dereferencing DBRefs as they arereturned in query results. This helper functionality tends to vary from driver to driver,so for up-to-date information on what’s supported, you should reference driver-specificdocumentation.
When Should DBRefs Be Used?DBRefs are not essential for representing references to other documents in MongoDB.In fact, even the previous example does some referencing using a different mechanism:the "author" key in each note just stores the value of the author document’s "_id" key.We don’t need to use a DBRef because we know that each author is a document in theusers collection. We’ve seen another example of this type of referencing as well: the"files_id" key in GridFS chunk documents is just an "_id" reference to a file document.With this option in mind, we have a decision to make each time we need to store areference: should we use a DBRef or just store an "_id"?
Storing "_id"s is nice because they are more compact than DBRefs and also can be alittle more lightweight for developers to work with. DBRefs, on the other hand, are
108 | Chapter 7: Advanced Topics

capable of referencing documents in any collection (or even database) without the de-veloper having to know or remember what collection the referenced document mightreside in. DBRefs also enable drivers and tools to provide some more enhanced func-tionality (e.g., automatic dereferencing) and could allow for more advanced supporton the server side in the future.
In short, the best times to use DBRefs are when you’re storing heterogeneous referencesto documents in different collections, like in the previous example or when you wantto take advantage of some additional DBRef-specific functionality in a driver or tool.Otherwise, it’s generally best to just store an "_id" and use that as a reference, becausethat representation tends to be more compact and easier to work with.
Database References | 109

CHAPTER 8
Administration
Administering MongoDB is usually a simple task. From taking backups to setting upmultinode systems with replication, most administrative tasks are quick and painless.This reflects a general philosophy of MongoDB, which is to minimize the number ofdials in the system. Whenever possible, configuration is done automatically by thesystem rather than forcing users and administrators to tweak configuration settings.That said, there are still some administrative tasks that require manual intervention.
In this chapter we’ll be switching gears from the developer perspective and discussingwhat you need to know to work with MongoDB from the operations or administrationside. Whether you’re working for a startup where you are both the engineering and opsteams or you’re a DBA looking to work with MongoDB, this is the chapter for you.Here's the big picture:
• MongoDB is run as a normal command-line program using the mongod executable.
• MongoDB features a built-in admin interface and monitoring functionality that iseasy to integrate with third-party monitoring packages.
• MongoDB supports basic, database-level authentication including read-only usersand a separate level of authentication for admin access.
• There are several different ways of backing up a MongoDB system, the choice ofwhich depends on a couple of key considerations.
Starting and Stopping MongoDBIn Chapter 2, we covered the basics of starting MongoDB. This chapter will go intomore detail about what administrators need to know to deploy Mongo robustly inproduction.
111

Starting from the Command LineThe MongoDB server is started with the mongod executable. mongod has many configu-rable startup options; to view all of them, run mongod --help from the command line.A couple of the options are widely used and important to be aware of:
--dbpathSpecify an alternate directory to use as the data directory; the default is /data/db/(or C:\data\db\ on Windows). Each mongod process on a machine needs its own datadirectory, so if you are running three instances of mongod, you’ll need three separatedata directories. When mongod starts up, it creates a mongod.lock file in its datadirectory, which prevents any other mongod process from using that directory. Ifyou attempt to start another MongoDB server using the same data directory, it willgive an error:
"Unable to acquire lock for lockfilepath: /data/db/mongod.lock."
--portSpecify the port number for the server to listen on. By default, mongod uses port27017, which is unlikely to be used by another process (besides other mongod pro-cesses). If you would like to run more than one mongod process, you’ll need to specifydifferent ports for each one. If you try to start mongod on a port that is already beingused, it will give an error:
"Address already in use for socket: 0.0.0.0:27017"
--forkFork the server process, running MongoDB as a daemon.
--logpathSend all output to the specified file rather than outputting on the command line.This will create the file if it does not exist, assuming you have write permissions tothe directory. It will also overwrite the log file if it already exists, erasing any olderlog entries. If you’d like to keep old logs around, use the --logappend option inaddition to --logpath.
--configUse a configuration file for additional options not specified on the command line.See “File-Based Configuration” on page 113 for details.
So, to start the server as a daemon listening on port 5586 and sending all output tomongodb.log, we could run this:
$ ./mongod --port 5586 --fork --logpath mongodb.logforked process: 45082all output going to: mongodb.log
When you first install and start MongoDB, it is a good idea to look at the log. Thismight be an easy thing to miss, especially if MongoDB is being started from an initscript, but the log often contains important warnings that prevent later errors from
112 | Chapter 8: Administration

occurring. If you don’t see any warnings in the MongoDB log on startup, then you areall set. However, you might see something like this:
$ ./mongodSat Apr 24 11:53:49 Mongo DB : starting : pid = 18417 port = 27017dbpath = /data/db/ master = 0 slave = 0 32-bit****WARNING: This is development version of MongoDB. Not recommended for production.****
** NOTE: when using MongoDB 32 bit, you are limited to about** 2 gigabytes of data see** http://blog.mongodb.org/post/137788967/32-bit-limitations** for more
Sat Apr 24 11:53:49 db version v1.5.1-pre-, pdfile version 4.5Sat Apr 24 11:53:49 git version: f86d93fd949777d5fbe00bf9784ec0947d6e75b9Sat Apr 24 11:53:49 sys info: Linux ubuntu 2.6.31-15-generic ...Sat Apr 24 11:53:49 waiting for connections on port 27017Sat Apr 24 11:53:49 web admin interface listening on port 28017
The MongoDB being run here is a development version—if you download a stablerelease, it will not have the first warning. The second warning occurs because we arerunning a 32-bit build of MongoDB. We are limited to about 2GB of data when running32 bit, because MongoDB uses a memory-mapped file-based storage engine (see Ap-pendix C for details on MongoDB’s storage engine). If you are using a stable release ona 64-bit machine, you won’t get either of these messages, but it’s a good idea to un-derstand how MongoDB logs work and get used to how they look.
The log preamble won’t change when you restart the database, so feel free to runMongoDB from an init script and ignore the logs, once you know what they say. How-ever, it’s a good idea to check again each time you do an install, upgrade, or recoverfrom a crash, just to make sure MongoDB and your system are on the same page.
File-Based ConfigurationMongoDB supports reading configuration information from a file. This can be usefulif you have a large set of options you want to use or are automating the task ofstarting up MongoDB. To tell the server to get options from a configuration file, usethe -f or --config flags. For example, run mongod --config ~/.mongodb.conf to use~/.mongodb.conf as a configuration file.
The options supported in a configuration file are exactly the same as those accepted atthe command line. Here’s an example configuration file:
# Start MongoDB as a daemon on port 5586
port = 5586fork = true # daemonize it!
Starting and Stopping MongoDB | 113

logpath = mongodb.log
This configuration file specifies the same options we used earlier when starting withregular command-line arguments. It also highlights most of the interesting aspects ofMongoDB configuration files:
• Any text on a line that follows the # character is ignored as a comment.
• The syntax for specifying options is option = value, where option is case-sensitive.
• For command-line switches like --fork, the value true should be used.
Stopping MongoDBBeing able to safely stop a running MongoDB server is at least as important as beingable to start one. There are a couple of different options for doing this effectively.
The most basic way to stop a running MongoDB server is to send it a SIGINT orSIGTERM signal. If the server is running as the foreground process in a terminal, thiscan be done by pressing Ctrl-C. Otherwise, a command like kill can be used to sendthe signal. If mongod has 10014 as its PID, the command would be kill -2 10014(SIGINT) or kill 10014 (SIGTERM).
When mongod receives a SIGINT or SIGTERM, it will do a clean shutdown. This meansit will wait for any currently running operations or file preallocations to finish (thiscould take a moment), close all open connections, flush all data to disk, and halt.
It is important not to send a SIGKILL message (kill -9) to a runningMongoDB server. Doing so will cause the database to shut down with-out going through the steps outlined earlier and could lead to corruptdata files. If this happens, the database should be repaired (see “Re-pair” on page 124) before being started back up.
Another way to cleanly shut down a running server is to use the shutdown command,{"shutdown" : 1}. This is an admin command and must be run on the admin database.The shell features a helper function to make this easier:
> use adminswitched to db admin> db.shutdownServer();server should be down...
MonitoringAs the administrator of a MongoDB server, it’s important to monitor the health andperformance of your system. Fortunately, MongoDB has functionality that makesmonitoring easy.
114 | Chapter 8: Administration

Using the Admin InterfaceBy default, starting mongod also starts up a (very) basic HTTP server that listens on aport 1,000 higher than the native driver port. This server provides an HTTP interfacethat can be used to see basic information about the MongoDB server. All of the infor-mation presented can also be seen through the shell, but the HTTP interface gives anice, easy-to-read overview.
To see the admin interface, start the database and go to http://localhost:28017 in a webbrowser. (Use 1,000 higher than the port you specified, if you used the --port optionwhen starting MongoDB.) You’ll see a page that looks like Figure 8-1.
Figure 8-1. The admin interface
As you can see, this interface gives access to assertion, locking, indexing, and replicationinformation about the MongoDB server. It also gives some more general information,like the log preamble and access to a list of available database commands.
To make full use of the admin interface (e.g., to access the command list), you’ll needto turn on REST support with --rest. You can also turn off the admin interface alto-gether by starting mongod with the --nohttpinterface option.
Monitoring | 115

Do not attempt to connect a driver to the HTTP interface port, and donot try to connect to the native driver port via HTTP. The driver porthandles only the native MongoDB wire protocol; it will not handleHTTP requests. For example, if you go to http://localhost:27017 in a webbrowser, you will see:
You are trying to access MongoDB on the native driver port. For http diagnostic access, add 1000 to the port number
Similarly, you cannot use the native MongoDB wire protocol when con-necting on the admin interface’s port.
serverStatusThe most basic tool for getting statistics about a running MongoDB server is theserverStatus command, which has the following output (exact keys present may varyby platform/server version):
> db.runCommand({"serverStatus" : 1}){ "version" : "1.5.3", "uptime" : 166, "localTime" : "Thu Jun 10 2010 15:47:40 GMT-0400 (EDT)", "globalLock" : { "totalTime" : 165984675, "lockTime" : 91471425, "ratio" : 0.551083556358441 }, "mem" : { "bits" : 64, "resident" : 101, "virtual" : 2824, "supported" : true, "mapped" : 336 }, "connections" : { "current" : 141, "available" : 19859 }, "extra_info" : { "note" : "fields vary by platform" }, "indexCounters" : { "btree" : { "accesses" : 1563, "hits" : 1563, "misses" : 0, "resets" : 0, "missRatio" : 0 } }, "backgroundFlushing" : { "flushes" : 2, "total_ms" : 44,
116 | Chapter 8: Administration

"average_ms" : 22, "last_ms" : 36, "last_finished" : "Thu Jun 10 2010 15:46:54 GMT-0400 (EDT)" }, "opcounters" : { "insert" : 38195, "query" : 8874, "update" : 4058, "delete" : 389, "getmore" : 888, "command" : 17731 }, "asserts" : { "regular" : 0, "warning" : 0, "msg" : 0, "user" : 5054, "rollovers" : 0 }, "ok" : true}
Raw status information can also be retrieved as JSON using theMongoDB HTTP interface, at the /_status (http://localhost:28017/_status) URL: this includes the output of serverStatus, as well as the outputof some other useful commands. See “Using the Admin Inter-face” on page 115 for more on the admin interface.
serverStatus provides a detailed look at what is going on inside a MongoDB server.Information such as the current server version, uptime (in seconds), and current num-ber of connections is easily available. Some of the other information in theserverStatus response might need some explaining, however.
The value for "globalLock" gives a quick look at how much time a global write lock hasbeen held on the server (the times are given in microseconds). "mem" contains informa-tion on how much data the server has memory mapped and what the virtual and resi-dent memory sizes are for the server process (all in megabytes). "indexCounters" givesinformation on the number of B-Tree lookups that have had to go to disk ("misses")versus successful lookups from memory ("hits")—if this ratio starts to increase youshould consider adding more RAM, or system performance might suffer. "backgroundFlushing" tells us how many background fsyncs have been performed and how longthey’ve taken. One of the most important pieces of the response is the "opcounters"document, which contains counters for each of the major operation types. Finally,"asserts" counts any assertions that have occurred on the server.
All of the counters in the serverStatus output are tracked from the time the server wasstarted and will eventually roll over if the counts get high enough. When a rolloveroccurs for any counter, all counters will roll over, and the value of "rollovers" in the"asserts" document will increment.
Monitoring | 117

mongostatAlthough powerful, serverStatus is not exactly a user-friendly mechanism for moni-toring server health and performance. Fortunately, MongoDB distributions also shipwith mongostat, which puts a friendly face on the output of serverStatus.
mongostat prints some of the most important information available fromserverStatus. It prints a new line every second, which gives a more real-time view tothe static counters we saw previously. The columns printed by mongostat have nameslike inserts/s, commands/s, vsize, and % locked, each of which corresponds exactly todata available in serverStatus.
Third-Party Plug-InsMost administrators are probably already using monitoring packages to keep track oftheir servers, and the presence of serverStatus and the /_status URL make it pretty easyto write a MongoDB plug-in for any such tool. At the time of this writing, MongoDBplug-ins exist for at least Nagios, Munin, Ganglia, and Cacti. For an up-to-date list ofthird-party plug-ins, check out the MongoDB documentation on monitoring tools.
Security and AuthenticationOne of the first priorities for any systems administrator is to ensure their systems aresecure. The best way to handle security with MongoDB is to run it in a trusted envi-ronment, ensuring that only trusted machines are able to connect to the server. Thatsaid, MongoDB supports per connection authentication, albeit with a pretty coarse-grained permissions scheme.
Authentication BasicsEach database in a MongoDB instance can have any number of users. When securityis enabled, only authenticated users of a database are able to perform read or writeoperations on it. In the context of authentication, MongoDB treats one database asspecial: admin. A user in the admin database can be thought of as a superuser. Afterauthenticating, admin users are able to read or write from any database and are able toperform certain admin-only commands, like listDatabases or shutdown.
Before starting the database with security turned on, it’s important that at least oneadmin user has been added. Let’s run through a quick example, starting from a shellconnected to a server without security turned on:
> use adminswitched to db admin> db.addUser("root", "abcd");{ "user" : "root",
118 | Chapter 8: Administration

"readOnly" : false, "pwd" : "1a0f1c3c3aa1d592f490a2addc559383"}> use testswitched to db test> db.addUser("test_user", "efgh");{ "user" : "test_user", "readOnly" : false, "pwd" : "6076b96fc3fe6002c810268702646eec"}> db.addUser("read_only", "ijkl", true);{ "user" : "read_only", "readOnly" : true, "pwd" : "f497e180c9dc0655292fee5893c162f1"}
Here we’ve added an admin user, root, and two users on the test database. One of thoseusers, read_only, has read permissions only and cannot write to the database. Fromthe shell, a read-only user is created by passing true as the third argument to addUser.To call addUser, you must have write permissions for the database in question; in thiscase we can call addUser on any database because we have not enabled security yet.
The addUser method is useful for more than just adding new users: itcan be used to change a user’s password or read-only status. Just calladdUser with the username and a new password or read-only setting forthe user.
Now let’s restart the server, this time adding the --auth command-line option to enablesecurity. After enabling security, we can reconnect from the shell and try it:
> use testswitched to db test> db.test.find();error: { "$err" : "unauthorized for db [test] lock type: -1 " }> db.auth("read_only", "ijkl");1> db.test.find();{ "_id" : ObjectId("4bb007f53e8424663ea6848a"), "x" : 1 }> db.test.insert({"x" : 2});unauthorized> db.auth("test_user", "efgh");1> db.test.insert({"x": 2});> db.test.find();{ "_id" : ObjectId("4bb007f53e8424663ea6848a"), "x" : 1 }{ "_id" : ObjectId("4bb0088cbe17157d7b9cac07"), "x" : 2 }> show dbsassert: assert failed : listDatabases failed:{ "assertion" : "unauthorized for db [admin] lock type: 1
Security and Authentication | 119

", "errmsg" : "db assertion failure", "ok" : 0}> use adminswitched to db admin> db.auth("root", "abcd");1> show dbsadminlocaltest
When we first connect, we are unable to perform any operations (read or write) on thetest database. After authenticating as the read_only user, however, we are able to per-form a simple find. When we try to insert data, we are again met with a failure becauseof the lack of authorization. test_user, which was not created as read-only, is able toinsert data normally. As a nonadmin user, though, test_user is not able to list all of theavailable databases using the show dbs helper. The final step is to authenticate as anadmin user, root, who is able to perform operations of any kind on any particulardatabase.
How Authentication WorksUsers of a given database are stored as documents in its system.users collection. Thestructure of a user document is {"user" : username, "readOnly" : true, "pwd" :password hash}. The password hash is a hash based on the username and passwordchosen.
Knowing where and how user information is stored makes performing some commonadministration tasks trivial. For example, to remove a user, simply remove the userdocument from the system.users collection:
> db.auth("test_user", "efgh");1> db.system.users.remove({"user" : "test_user"});> db.auth("test_user", "efgh");0
When a user authenticates, the server keeps track of that authentication by tying it tothe connection used for the authenticate command. This means that if a driver or toolis employing connection pooling or fails over to another node, any authenticated userswill need to reauthenticate on any new connections. Some drivers may be capable ofhandling this transparently, but if not, it will need to be done manually. If that is thecase, then it might be best to avoid using --auth altogether (again, by deployingMongoDB in a trusted environment and handling authentication on the client side).
120 | Chapter 8: Administration

Other Security ConsiderationsThere are a couple of options besides authentication that should be considered whenlocking down a MongoDB instance. First, even when using authentication, theMongoDB wire protocol is not encrypted. If that is a requirement, consider using SSHtunneling or another similar mechanism to encrypt traffic between clients and theMongoDB server.
We suggest always running your MongoDB servers behind a firewall or on a networkaccessible only through your application servers. If you do have MongoDB on a ma-chine accessible to the outside world, however, it is recommended that you start it withthe --bindip option, which allows you to specify a local IP address that mongod will bebound to. For instance, to only allow connections from an application server runningon the same machine, you could run mongod --bindip localhost.
As documented in the section “Using the Admin Interface” on page 115, by defaultMongoDB starts up a very simple HTTP server that allows you to see informationabout current operations, locking, and replication from your browser. If you don’t wantthis information exposed, you can turn off the admin interface by using the--nohttpinterface option.
Finally, you can entirely disallow server-side JavaScript execution by starting thedatabase with --noscripting.
Backup and RepairTaking backups is an important administrative task with any data storage system. Of-ten, doing backups properly can be tricky, and the only thing worse than not takingbackups at all is taking them incorrectly. Luckily, MongoDB has several different op-tions that make taking backups a painless process.
Data File BackupMongoDB stores all of its data in a data directory. By default, this directory is /data/db/ (or C:\data\db\ on Windows). The directory to use as the data directory is config-urable through the --dbpath option when starting MongoDB. Regardless of where thedata directory is, its contents form a complete representation of the data stored inMongoDB. This suggests that making a backup of MongoDB is as simple as creating acopy of all of the files in the data directory.
It is not safe to create a copy of the data directory while MongoDB isrunning unless the server has done a full fsync and is not allowing writes.Such a backup will likely turn out to be corrupt and need repairing (seethe section “Repair” on page 124).
Backup and Repair | 121

Because it is not safe in general to copy the data directory while MongoDB is running,one option for taking a backup is to shut down the MongoDB server and then copy thedata directory. Assuming the server is shut down safely (see the section “Starting andStopping MongoDB” on page 111), the data directory will represent a safe snapshot ofthe data stored when it was shut down. That directory can be copied as a backup beforerestarting the server.
Although shutting down the server and copying the data directory is an effective andsafe method of taking backups, it is not ideal. In the remainder of this chapter, we’lllook at techniques for backing up MongoDB without requiring any downtime.
mongodump and mongorestoreOne method for backing up a running instance of MongoDB is to use the mongodumputility that is included with all MongoDB distributions. mongodump works by queryingagainst a running MongoDB server and writing all of the documents it contains to disk.Because mongodump is just a regular client, it can be run against a live instance ofMongoDB, even one handling other requests and performing writes.
Because mongodump operates using the normal MongoDB query mecha-nism, the backups it produces are not necessarily point-in-time snap-shots of the server’s data. This is especially evident if the server is activelyhandling writes during the course of the backup.
Another consequence of the fact that mongodump acts through the normalquery mechanism is that it can cause some performance degradation forother clients throughout the duration of the backup.
Like most of the command-line tools included with MongoDB, we can see the optionsavailable for mongodump by running with the --help option:
$ ./mongodump --helpoptions: --help produce help message -v [ --verbose ] be more verbose (include multiple times for more verbosity e.g. -vvvvv) -h [ --host ] arg mongo host to connect to ("left,right" for pairs) -d [ --db ] arg database to use -c [ --collection ] arg collection to use (some commands) -u [ --username ] arg username -p [ --password ] arg password --dbpath arg directly access mongod data files in the given path, instead of connecting to a mongod instance - needs to lock the data directory, so cannot be used if a mongod is currently accessing the same path --directoryperdb if dbpath specified, each db is in a separate directory -o [ --out ] arg (=dump) output directory
122 | Chapter 8: Administration

Along with mongodump, MongoDB distributions include a corresponding tool for re-storing data from a backup, mongorestore. mongorestore takes the output from runningmongodump and inserts the backed-up data into a running instance of MongoDB. Thefollowing example session shows a hot backup of the database test to the backup di-rectory, followed by a separate call to mongorestore:
$ ./mongodump -d test -o backupconnected to: 127.0.0.1DATABASE: test to backup/test test.x to backup/test/x.bson 1 objects$ ./mongorestore -d foo --drop backup/test/connected to: 127.0.0.1backup/test/x.bson going into namespace [foo.x] dropping 1 objects
In the previous example, we use -d to specify a database to restore to, in this case foo.This option allows us to restore a backup to a database with a different name than theoriginal. We also use the --drop option, which will drop the collection (if it exists)before restoring data to it. Otherwise, the data will be merged into any existing collec-tion, possibly overwriting some documents. Again, for a complete list of options, runmongorestore --help.
fsync and LockAlthough mongodump and mongorestore allow us to take backups without shutting downthe MongoDB server, we lose the ability to get a point-in-time view of the data.MongoDB’s fsync command allows us to copy the data directory of a runningMongoDB server without risking any corruption.
The fsync command will force the MongoDB server to flush all pending writes to disk.It will also, optionally, hold a lock preventing any further writes to the database untilthe server is unlocked. This write lock is what allows the fsync command to be usefulfor backups. Here is an example of how to run the command from the shell, forcing anfsync and acquiring a write lock:
> use adminswitched to db admin> db.runCommand({"fsync" : 1, "lock" : 1});{ "info" : "now locked against writes, use db.$cmd.sys.unlock.findOne() to unlock", "ok" : 1}
At this point, the data directory represents a consistent, point-in-time snapshot of ourdata. Because the server is locked for writes, we can safely make a copy of the data
Backup and Repair | 123

directory to use as a backup. This is especially useful when running on a snapshottingfilesystem, like LVM* or EBS†, where taking a snapshot of the data directory is a fastoperation.
After performing the backup, we need to unlock the database again:
> db.$cmd.sys.unlock.findOne();{ "ok" : 1, "info" : "unlock requested" }> db.currentOp();{ "inprog" : [ ] }
Here we run the currentOp command to ensure that the lock has been released. (It maytake a moment after the unlock is first requested.)
The fsync command allows us to take very flexible backups, without shutting downthe server or sacrificing the point-in-time nature of the backup. The price we’ve paid,however, is a momentary block against write operations. The only way to have a point-in-time snapshot without any downtime for reads or writes is to backup from a slave.
Slave BackupsAlthough the options discussed earlier provide a wide range of flexibility in terms ofbackups, none is as flexible as backing up from a slave server. When running MongoDBwith replication (see Chapter 9), any of the previously mentioned backup techniquescan be applied to a slave server rather than the master. The slave will always have acopy of the data that is nearly in sync with the master. Because we’re not dependingon the performance of the slave or its availability for reads or writes, we are free to useany of the three options above: shutting down, the dump and restore tools, or thefsync command. Backing up from a slave is the recommended way to handle databackups with MongoDB.
RepairWe take backups so that when a disaster occurs, which could be anything from a powerfailure to an elephant on the loose in the data center, our data is safe. There will un-fortunately always be cases when a server with no backups (or slaves to failover to)fails. In the case of a power failure or a software crash, the disk will be fine when themachine comes back up. Because of the way MongoDB stores data, however, we arenot guaranteed that the data on the disk is OK to use: corruption might have occurred(see Appendix C for more on MongoDB’s storage engine). Luckily, MongoDB has built-in repairing functionality to attempt to recover corrupt data files.
* A logical volume manager for Linux
† Amazon’s Elastic Block Store
124 | Chapter 8: Administration

A repair should be run after any unclean shutdown of MongoDB. If an unclean shut-down has occurred, you’ll be greeted with the following warning when trying to startthe server back up:
**************old lock file: /data/db/mongod.lock. probably means unclean shutdownrecommend removing file and running --repairsee: http://dochub.mongodb.org/core/repair for more information*************
The easiest way to repair all of the databases for a given server is to start up a serverwith --repair: mongod --repair. The underlying process of repairing a database is ac-tually pretty easy to understand: all of the documents in the database are exported andthen immediately imported, ignoring any that are invalid. After that is complete, allindexes are rebuilt. Understanding this mechanism explains some of the properties ofrepair. It can take a long time for large data sets, because all of the data is validated andall indexes are rebuilt. Repairing can also leave a database with fewer documents thanit had before the corruption originally occurred, because any corrupt documents aresimply ignored.
Repairing a database will also perform a compaction. Any extra freespace (which might exist after dropping large collections or removinglarge number of documents, for example) will be reclaimed after arepair.
To repair a single database on a running server, you can use the repairDatabase methodfrom the shell. If we wanted to repair the database test, we would do the following:
> use testswitched to db test> db.repairDatabase(){ "ok" : 1 }
To do the same from a driver rather than the shell, issue the repairDatabase command,{"repairDatabase" : 1}.
Repairing to eliminate corruption should be treated as a last resort. The most effectiveway to manage data is to always stop the MongoDB server cleanly, use replication forfailover, and take regular backups.
Backup and Repair | 125


CHAPTER 9
Replication
Perhaps the most important job of any MongoDB administrator is making sure thatreplication is set up and functioning correctly. Use of MongoDB’s replication func-tionality is always recommended in production settings, especially since the currentstorage engine does not provide single-server durability (see Appendix C for details).Replicas can be used purely for failover and data integrity, or they can be used in moreadvanced ways, such as for scaling out reads, taking hot backups, or as a data sourcefor offline batch processing. In this chapter, we’ll cover everything you need to knowabout replication.
Master-Slave ReplicationMaster-slave replication is the most general replication mode supported by MongoDB.This mode is very flexible and can be used for backup, failover, read scaling, and more(see Figures 9-1 and 9-2).
Figure 9-1. A master with one slave
127

The basic setup is to start a master node and one or more slave nodes, each of whichknows the address of the master. To start the master, run mongod --master. To start aslave, run mongod --slave --source master_address, where master_address is the ad-dress of the master node that was just started.
It is simple to try this on a single machine, although in production you would usemultiple servers. First, create a directory for the master to store data in and choose aport (10000):
$ mkdir -p ~/dbs/master$ ./mongod --dbpath ~/dbs/master --port 10000 --master
Now set up the slave, choosing a different data directory and port. For a slave, you alsoneed to tell it who its master is with the --source option:
$ mkdir -p ~/dbs/slave$ ./mongod --dbpath ~/dbs/slave --port 10001 --slave --source localhost:10000
All slaves must be replicated from a master node. There is currently no mechanism forreplicating from a slave (daisy chaining), because slaves do not keep their own oplog(see “How It Works” on page 138 for more on the oplog).
There is no explicit limit on the number of slaves in a cluster, but having a thousandslaves querying a single master will likely overwhelm the master node. In practice,clusters with less than a dozen slaves tend to work well.
OptionsThere are a few other useful options in conjunction with master-slave replication:
--onlyUse on a slave node to specify only a single database to replicate. (The default isto replicate all databases.)
Figure 9-2. A master with three slaves
128 | Chapter 9: Replication

--slavedelayUse on a slave node to add a delay (in seconds) to be used when applying operationsfrom the master. This makes it easy to set up delayed slaves, which can be usefulin case a user accidentally deletes important documents or inserts bad data. Eitherof those operations will be replicated to all slaves. By delaying the application ofoperations, you have a window in which recovery from the bad operation ispossible.
--fastsyncStart a slave from a snapshot of the master node. This option allows a slave tobootstrap much faster than doing a full sync, if its data directory is initialized witha snapshot of the master’s data.
--autoresyncAutomatically perform a full resync if this slave gets out of sync with the master(see “How It Works” on page 138).
--oplogSizeSize (in megabytes) for the master’s oplog (see “How It Works” on page 138 formore on the oplog).
Adding and Removing SourcesYou can specify a master by starting your slave with the --source option, but you canalso configure its source(s) from the shell.
Suppose we have a master at localhost:27017. We could start a slave without any sourceand then add the master to the sources collection:
$ ./mongod --slave --dbpath ~/dbs/slave --port 27018
Now we can add localhost:27017 as a source for our slave by starting the shell andrunning the following:
> use local> db.sources.insert({"host" : "localhost:27017"})
If you watch the slave’s log, you can see it sync to localhost:27017.
If we do a find on the sources collection immediately after inserting the source, it willshow us the document we inserted:
> db.sources.find(){ "_id" : ObjectId("4c1650c2d26b84cc1a31781f"), "host" : "localhost:27017"}
Master-Slave Replication | 129

Once the slave’s log shows that it has finished syncing, the document will be updatedto reflect this:
> db.sources.find(){ "_id" : ObjectId("4c1650c2d26b84cc1a31781f"), "host" : "localhost:27017", "source" : "main", "syncedTo" : { "t" : 1276530906000, "i" : 1 }, "localLogTs" : { "t" : 0, "i" : 0 }, "dbsNextPass" : { "test_db" : true }}
Now, suppose we are going into production and we want to change the slave’s con-figuration such that it slaves off of prod.example.com. We can change the source for theslave using insert and remove:
> db.sources.insert({"host" : "prod.example.com:27017"})> db.sources.remove({"host" : "localhost:27017"})
As you can see, sources can be manipulated like a normal collection and provides agreat deal of flexibility for managing slaves.
If you slave off of two different masters with the same collections,MongoDB will attempt to merge them, but correctly doing so is notguaranteed. If you are using a single slave with multiple different mas-ters, it is best to make sure the masters use different namespaces.
Replica SetsA replica set is basically a master-slave cluster with automatic failover. The biggestdifference between a master-slave cluster and a replica set is that a replica set does nothave a single master: one is elected by the cluster and may change to another node ifthe current master goes down. However, they look very similar: a replica set always hasa single master node (called a primary) and one or more slaves (called secondaries). SeeFigures 9-3, 9-4, and 9-5.
The nice thing about replica sets is how automatic everything is. First, the set itself doesa lot of the administration for you, promoting slaves automatically and making sureyou won’t run into inconsistencies. For a developer, they are easy to use: you specify afew servers in a set, and the driver will automatically figure out all of the servers in theset and handle failover if the current master dies.
130 | Chapter 9: Replication

Figure 9-3. A replica set with two members
Figure 9-4. When the primary server goes down, the secondary server will become master
Figure 9-5. If the original primary comes back up, it will begin slaving off of the new primary
Replica Sets | 131

Initializing a SetSetting up a replica set is a little more involved than setting up a master-slave cluster.We’ll just start out by setting up the smallest set possible: two servers.
You cannot specify localhost addresses as members, so you need tofigure out what the hostname is of your machine. On *NIX, this can bedone with the following:
$ cat /etc/hostnamemorton
First, we create our data directories and choose ports for each server:
$ mkdir -p ~/dbs/node1 ~/dbs/node2
We have one more decision to make before we start up the servers: we must choose aname for this replica set. This name makes it easy to refer to the set as a whole anddistinguish between sets. We’ll call our replica set "blort".
Now we can actually start up the servers. The only new option is --replSet, which letsthe server know that it’s a member of the replSet "blort" that contains another memberat morton:10002 (which hasn’t been started yet):
$ ./mongod --dbpath ~/dbs/node1 --port 10001 --replSet blort/morton:10002
We start up the other server in the same way:
$ ./mongod --dbpath ~/dbs/node2 --port 10002 --replSet blort/morton:10001
If we wanted to add a third server, we could do so with either of these commands:
$ ./mongod --dbpath ~/dbs/node3 --port 10003 --replSet blort/morton:10001$ ./mongod --dbpath ~/dbs/node3 --port 10003 --replSet blort/morton:10001,morton:10002
One of the nice things about replica sets is that they are self-detecting: you can specifya single server in the set, and MongoDB will figure out and connect to the rest of thenodes automatically.
Once you have a few servers up, you’ll notice that the server logs are complaining aboutthe replica set not being initialized. This is because there’s one more step: initializingthe set in the shell.
Connect to one of the servers (we use morton:10001 in the following example) with theshell. Initializing the set is a database command that has to be run only once:
$ ./mongo morton:10001/adminMongoDB shell version: 1.5.3connecting to localhost:10001/admintype "help" for help> db.runCommand({"replSetInitiate" : {... "_id" : "blort",... "members" : [... {
132 | Chapter 9: Replication

... "_id" : 1,
... "host" : "morton:10001"
... },
... {
... "_id" : 2,
... "host" : "morton:10002"
... }
... ]}}){ "info" : "Config now saved locally. Should come online in about a minute.", "ok" : true}
The initialization document is a bit complicated, but going through it key by key shouldmake sense:
"_id" : "blort"The name of this set.
"members" : [...]A list of servers in the set. You can add more later. Each server document has (atleast) two keys:
"_id" : NEach server needs a unique ID.
"host" : hostnameThis is the key that actually specifies the host.
Now you should see some log messages about which server is being elected primary.
If we connect to the other server and do a find on the local.system.replset namespace,you can see that the configuration has been propagated to the other server in the set.
At the time of this writing, replica sets are still under development andhave not yet been released in a production version of MongoDB. Assuch, the information here is subject to change. For the most up-to-datedocumentation on replica sets, see the MongoDB wiki.
Nodes in a Replica SetAt any point in time, one node in the cluster is primary, and the rest are secondary. Theprimary node is essentially the master, the difference being that which node is desig-nated as primary can vary over time.
Replica Sets | 133

There are several different types of nodes that can coexist in a replica set:
standardThis is a regular replica set node. It stores a full copy of the data being replicated,takes part in voting when a new primary is being elected, and is capable of becomingthe primary node in the set.
passivePassive nodes store a full copy of the data and participate in voting but will neverbecome the primary node for the set.
arbiterAn arbiter node participates only in voting; it does not receive any of the data beingreplicated and cannot become the primary node.
The difference between a standard node and a passive node is actually more of a slidingscale; each participating node (nonarbiter) has a priority setting. A node with priority0 is passive and will never be selected as primary. Nodes with nonzero priority will beselected in order of decreasing priority, using freshness of data to break ties betweennodes with the same priority. So, in a set with two priority 1 nodes and a priority 0.5node, the third node will be elected primary only if neither of the priority 1 nodes areavailable.
Standard and passive nodes can be configured as part of a node’s description, using thepriority key:
> members.push({... "_id" : 3,... "host" : "morton:10003",... "priority" : 40... });
The default priority is 1, and priorities must be between 0 and 1000 (inclusive).
Arbiters are specified using the "arbiterOnly" key.
> members.push({... "_id" : 4,... "host" : "morton:10004",... "arbiterOnly" : true... });
There is more information about arbiters in the next section.
Secondary nodes will pull from the primary node’s oplog and apply operations, justlike a slave in a master-slave system. A secondary node will also write the operation toits own local oplog, however, so that it is capable of becoming the primary. Operationsin the oplog also include a monotonically increasing ordinal. This ordinal is used todetermine how up-to-date the data is on any node in the cluster.
134 | Chapter 9: Replication
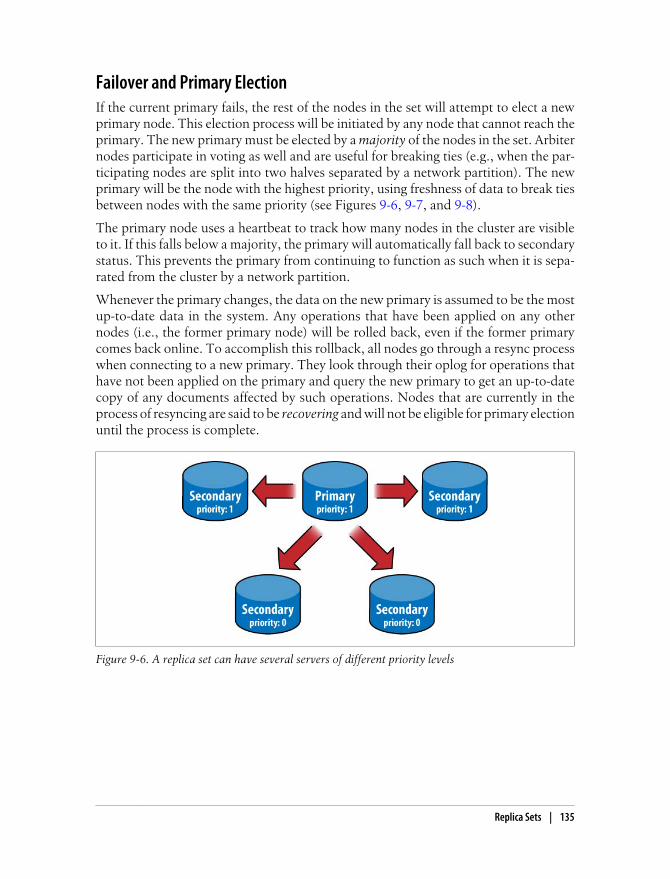
Failover and Primary ElectionIf the current primary fails, the rest of the nodes in the set will attempt to elect a newprimary node. This election process will be initiated by any node that cannot reach theprimary. The new primary must be elected by a majority of the nodes in the set. Arbiternodes participate in voting as well and are useful for breaking ties (e.g., when the par-ticipating nodes are split into two halves separated by a network partition). The newprimary will be the node with the highest priority, using freshness of data to break tiesbetween nodes with the same priority (see Figures 9-6, 9-7, and 9-8).
The primary node uses a heartbeat to track how many nodes in the cluster are visibleto it. If this falls below a majority, the primary will automatically fall back to secondarystatus. This prevents the primary from continuing to function as such when it is sepa-rated from the cluster by a network partition.
Whenever the primary changes, the data on the new primary is assumed to be the mostup-to-date data in the system. Any operations that have been applied on any othernodes (i.e., the former primary node) will be rolled back, even if the former primarycomes back online. To accomplish this rollback, all nodes go through a resync processwhen connecting to a new primary. They look through their oplog for operations thathave not been applied on the primary and query the new primary to get an up-to-datecopy of any documents affected by such operations. Nodes that are currently in theprocess of resyncing are said to be recovering and will not be eligible for primary electionuntil the process is complete.
Figure 9-6. A replica set can have several servers of different priority levels
Replica Sets | 135
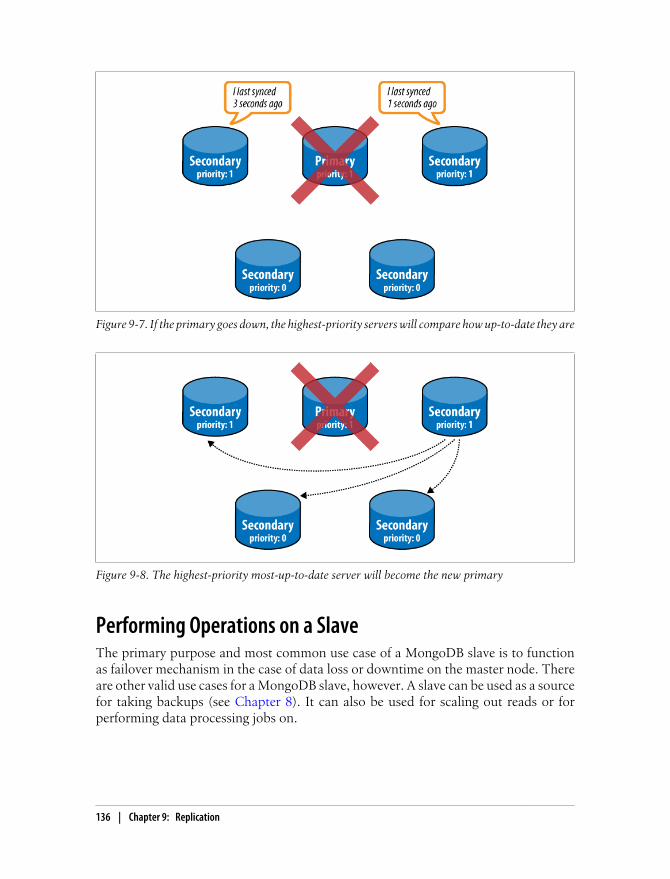
Figure 9-7. If the primary goes down, the highest-priority servers will compare how up-to-date they are
Figure 9-8. The highest-priority most-up-to-date server will become the new primary
Performing Operations on a SlaveThe primary purpose and most common use case of a MongoDB slave is to functionas failover mechanism in the case of data loss or downtime on the master node. Thereare other valid use cases for a MongoDB slave, however. A slave can be used as a sourcefor taking backups (see Chapter 8). It can also be used for scaling out reads or forperforming data processing jobs on.
136 | Chapter 9: Replication
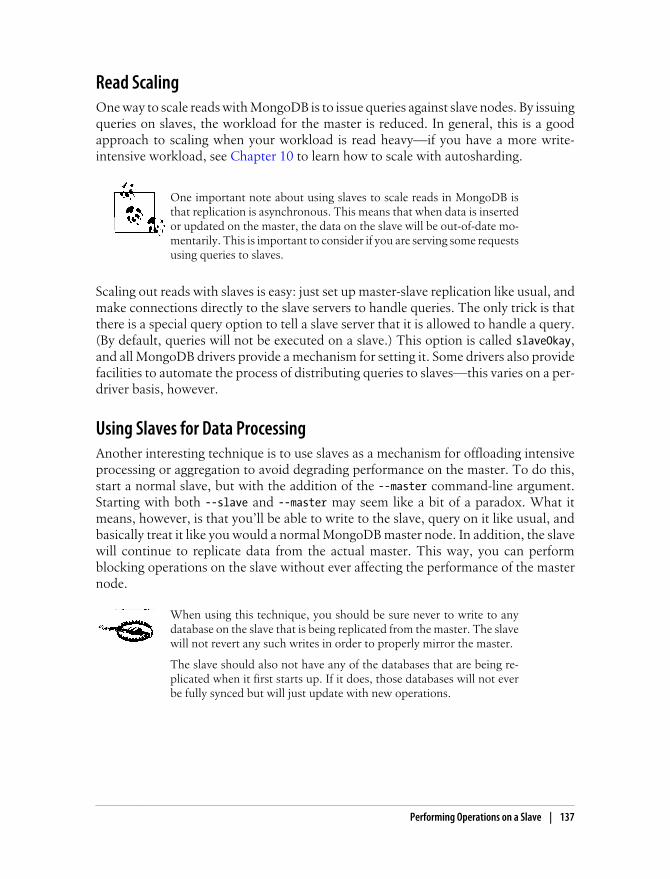
Read ScalingOne way to scale reads with MongoDB is to issue queries against slave nodes. By issuingqueries on slaves, the workload for the master is reduced. In general, this is a goodapproach to scaling when your workload is read heavy—if you have a more write-intensive workload, see Chapter 10 to learn how to scale with autosharding.
One important note about using slaves to scale reads in MongoDB isthat replication is asynchronous. This means that when data is insertedor updated on the master, the data on the slave will be out-of-date mo-mentarily. This is important to consider if you are serving some requestsusing queries to slaves.
Scaling out reads with slaves is easy: just set up master-slave replication like usual, andmake connections directly to the slave servers to handle queries. The only trick is thatthere is a special query option to tell a slave server that it is allowed to handle a query.(By default, queries will not be executed on a slave.) This option is called slaveOkay,and all MongoDB drivers provide a mechanism for setting it. Some drivers also providefacilities to automate the process of distributing queries to slaves—this varies on a per-driver basis, however.
Using Slaves for Data ProcessingAnother interesting technique is to use slaves as a mechanism for offloading intensiveprocessing or aggregation to avoid degrading performance on the master. To do this,start a normal slave, but with the addition of the --master command-line argument.Starting with both --slave and --master may seem like a bit of a paradox. What itmeans, however, is that you’ll be able to write to the slave, query on it like usual, andbasically treat it like you would a normal MongoDB master node. In addition, the slavewill continue to replicate data from the actual master. This way, you can performblocking operations on the slave without ever affecting the performance of the masternode.
When using this technique, you should be sure never to write to anydatabase on the slave that is being replicated from the master. The slavewill not revert any such writes in order to properly mirror the master.
The slave should also not have any of the databases that are being re-plicated when it first starts up. If it does, those databases will not everbe fully synced but will just update with new operations.
Performing Operations on a Slave | 137

How It WorksAt a very high level, a replicated MongoDB setup always consists of at least two servers,or nodes. One node is the master and is responsible for handling normal client requests.The other node(s) is a slave and is responsible for mirroring the data stored on themaster. The master keeps a record of all operations that have been performed on it.The slave periodically polls the master for any new operations and then performs themon its copy of the data. By performing all of the same operations that have been per-formed on the master node, the slave keeps its copy of the data up-to-date with themaster’s.
The OplogThe record of operations kept by the master is called the oplog, short for operation log.The oplog is stored in a special database called local, in the oplog.$main collection.Each document in the oplog represents a single operation performed on the masterserver. The documents contain several keys, including the following:
tsTimestamp for the operation. The timestamp type is an internal type used to trackwhen operations are performed. It is composed of a 4-byte timestamp and a 4-byteincrementing counter.
opType of operation performed as a 1-byte code (e.g., “i” for an insert).
nsNamespace (collection name) where the operation was performed.
oDocument further specifying the operation to perform. For an insert, this wouldbe the document to insert.
One important note about the oplog is that it stores only operations that change thestate of the database. A query, for example, would not be stored in the oplog. Thismakes sense because the oplog is intended only as a mechanism for keeping the dataon slaves in sync with the master.
The operations stored in the oplog are also not exactly those that were performed onthe master server itself. The operations are transformed before being stored such thatthey are idempotent. This means that operations can be applied multiple times on aslave with no ill effects, so long as the operations are applied in the correct order (e.g.,an incrementing update, using "$inc", will be transformed to a "$set" operation).
A final important note about the oplog is that it is stored in a capped collection (see“Capped Collections” on page 97). As new operations are stored in the oplog, they willautomatically replace the oldest operations. This guarantees that the oplog does notgrow beyond a preset bound. That bound is configurable using the --oplogSize option
138 | Chapter 9: Replication

when starting the server, which allows you to specify the size of the oplog in megabytes.By default, 64-bit instances will use 5 percent of available free space for the oplog. Thisspace will be allocated in the local database and will be preallocated when the serverstarts.
SyncingWhen a slave first starts up, it will do a full sync of the data on the master node. Theslave will copy every document from the master node, which is obviously an expensiveoperation. After the initial sync is complete, the slave will begin querying the master’soplog and applying operations in order to stay up-to-date.
If the application of operations on the slave gets too far behind the actual operationsbeing performed on the master, the slave will fall out of sync. An out-of-sync slave isunable to continue to apply operations to catch up to the master, because every oper-ation in the master’s oplog is too “new.” This could happen if the slave has had down-time or is busy handling reads. It can also happen following a full sync, if the sync takeslong enough that the oplog has rolled over by the time it is finished.
When a slave gets out of sync, replication will halt, and the slave will need to be fullyresynced from the master. This resync can be performed manually by running thecommand {"resync" : 1} on the slave’s admin database or automatically by startingthe slave with the --autoresync option. Either way, doing a resync is a very expensiveoperation, and it’s a situation that is best avoided by choosing a large enough oplog size.
To avoid out of sync slaves, it’s important to have a large oplog so that the master canstore a long history of operations. A larger oplog will obviously use up more disk space,but in general this is a good trade-off to make (hence the default oplog size of 5 percentof free space). For more information on sizing the oplog, see “Administra-tion” on page 141.
Replication State and the Local DatabaseThe local database is used for all internal replication state, on both the master and theslave. The local database’s name is local, and its contents will never be replicated.Thus, the local database is guaranteed to be local to a single MongoDB server.
Use of the local database isn’t limited to MongoDB internals. If you havedocuments that you don’t want to replicate, just store them in a collec-tion in the local database.
How It Works | 139

Other replication state stored on the master includes a list of its slaves. (Slaves performa handshake using the handshake command when they connect to the master.) This listis stored in the slaves collection:
> db.slaves.find(){ "_id" : ObjectId("4c1287178e00e93d1858567c"), "host" : "127.0.0.1", "ns" : "local.oplog.$main", "syncedTo" : { "t" : 1276282710000, "i" : 1 } }{ "_id" : ObjectId("4c128730e6e5c3096f40e0de"), "host" : "127.0.0.1", "ns" : "local.oplog.$main", "syncedTo" : { "t" : 1276282710000, "i" : 1 } }
Slaves also store state in the local database. They store a unique slave identifier in theme collection, and a list of sources, or nodes, that they are slaving from, in the sourcescollection:
> db.sources.find(){ "_id" : ObjectId("4c1287178e00e93d1858567b"), "host" : "localhost:27017", "source" : "main", "syncedTo" : { "t" : 1276283096000, "i" : 1 }, "localLogTs" : { "t" : 0, "i" : 0 } }
Both the master and slave keep track of how up-to-date a slave is, using the timestampstored in "syncedTo". Each time the slave queries the oplog for new operations, it uses"syncedTo" to specify which new operations it needs to apply or to find out if it is outof sync.
Blocking for ReplicationMongoDB’s getLastError command allows developers to enforce guarantees abouthow up-to-date replication is by using the optional "w" parameter. Here we run agetLastError that will block until at least N servers have replicated the last writeoperation:
> db.runCommand({getLastError: 1, w: N});
If N is not present or is less than two, the command will return immediately. If N istwo, the master won’t respond to the command until at least one slave has replicatedthe last operation. (The master itself is included toward N.) The master uses the"syncedTo" information stored in local.slaves to track how up-to-date each slave is.
When specifying "w", getLastError takes an additional parameter, "wtimeout", whichis a timeout in milliseconds. This allows the getLastError to time out and return anerror before the last operation has replicated to N servers. (By default the command hasno timeout.)
Blocking for replication will cause write operations to slow down significantly, partic-ularly for large values of "w". In practice, setting "w" to two or three for importantoperations will yield a good combination of efficiency and safety.
140 | Chapter 9: Replication
AdministrationIn this section, we’ll introduce some administration concepts that are specific toreplication.
DiagnosticsMongoDB includes a couple of useful administrative helpers for inspecting the statusof replication. When connected to the master, use the db.printReplicationInfofunction:
> db.printReplicationInfo(); configured oplog size: 10.48576MB log length start to end: 34secs (0.01hrs) oplog first event time: Tue Mar 30 2010 16:42:57 GMT-0400 (EDT) oplog last event time: Tue Mar 30 2010 16:43:31 GMT-0400 (EDT) now: Tue Mar 30 2010 16:43:37 GMT-0400 (EDT)
This gives information about the size of the oplog and the date ranges of operationscontained in the oplog. In this example, the oplog is about 10MB and is only able tofit about 30 seconds of operations. This is almost certainly a case where we shouldincrease the size of the oplog (see the next section). We want the log length to be atleast as long as the time it takes to do a full resync—that way, we don’t run into a casewhere a slave is already out of sync by the time its initial sync (or resync) is finished.
The log length is computed by taking the time difference between thefirst and last operation in the oplog. If the server has just started, thenthe first operation will be relatively recent. In that case, the log lengthwill be small, even though the oplog probably still has free space avail-able. The log length is a more useful metric for servers that have beenoperational long enough for the oplog to “roll over.”
We can also get some information when connected to the slave, using thedb.printSlaveReplicationInfo function:
> db.printSlaveReplicationInfo(); source: localhost:27017 syncedTo: Tue Mar 30 2010 16:44:01 GMT-0400 (EDT) = 12secs ago (0hrs)
This will show a list of sources for the slave, each with information about how far behindthe master it is. In this case, we are only 12 seconds behind the master.
Changing the Oplog SizeIf we find that the oplog size needs to be changed, the simplest way to do so is to stopthe master, delete the files for the local database, and restart with a new setting for
Administration | 141

--oplogSize. To change the oplog size to size, we shut down the master and run thefollowing:
$ rm /data/db/local.*$ ./mongod --master --oplogSize size
size is specified in megabytes.
Preallocating space for a large oplog can be time-consuming and mightcause too much downtime for the master node. It is possible to manuallypreallocate data files for MongoDB if that is the case; see the MongoDBdocumentation on halted replication for more detailed information.
After restarting the master, any slaves should either be restarted with the--autoresync or have a manual resync performed.
Replication with AuthenticationIf you are using replication in tandem with MongoDB’s support for authentication (see“Authentication Basics” on page 118), there is some additional configuration that needsto be performed to allow the slave to access the data on the master. On both the masterand the slave, a user needs to be added to the local database, with the same usernameand password on each node. Users on the local database are similar to users on ad-min; they have full read and write permissions on the server.
When the slave attempts to connect to the master, it will authenticate using a userstored in local.system.users. The first username it will try is “repl,” but if no such useris found, it will just use the first available user in local.system.users. So, to set upreplication with authentication, run the following code on both the master and anyslaves, replacing password with a secure password:
> use localswitched to db local> db.add User("repl", password);{ "user" : "repl", "readOnly" : false, "pwd" : "..."}
The slave will then be able to replicate from the master.
142 | Chapter 9: Replication

CHAPTER 10
Sharding
Sharding is MongoDB’s approach to scaling out. Sharding allows you to add moremachines to handle increasing load and data size without affecting your application.
Introduction to ShardingSharding refers to the process of splitting data up and storing different portions of thedata on different machines; the term partitioning is also sometimes used to describethis concept. By splitting data up across machines, it becomes possible to store moredata and handle more load without requiring large or powerful machines.
Manual sharding can be done with almost any database software. It is when an appli-cation maintains connections to several different database servers, each of which arecompletely independent. The application code manages storing different data on dif-ferent servers and querying against the appropriate server to get data back. This ap-proach can work well but becomes difficult to maintain when adding or removing nodesfrom the cluster or in the face of changing data distributions or load patterns.
MongoDB supports autosharding, which eliminates some of the administrative head-aches of manual sharding. The cluster handles splitting up data and rebalancing auto-matically. Throughout the rest of this book (and most MongoDB documentation ingeneral), the terms sharding and autosharding are used interchangeably, but it’s im-portant to note the difference between that and manual sharding in an application.
Autosharding in MongoDBThe basic concept behind MongoDB’s sharding is to break up collections into smallerchunks. These chunks can be distributed across shards so that each shard is responsiblefor a subset of the total data set. We don’t want our application to have to know whatshard has what data, or even that our data is broken up across multiple shards, so werun a routing process called mongos in front of the shards. This router knows where allof the data is located, so applications can connect to it and issue requests normally. As
143

far as the application knows, it’s connected to a normal mongod. The router, knowingwhat data is on which shard, is able to forward the requests to the appropriate shard(s).If there are responses to the request, the router collects them and sends them back tothe application.
In a nonsharded MongoDB setup, you would have a client connecting to a mongodprocess, like in Figure 10-1. In a sharded setup, like Figure 10-2, the client connects toa mongos process, which abstracts the sharding away from the application. From theapplication’s point of view, a sharded setup looks just like a nonsharded setup. Thereis no need to change application code when you need to scale.
Figure 10-1. Nonsharded client connection
Figure 10-2. Sharded client connection
144 | Chapter 10: Sharding

If you are using an old version of MongoDB, you should upgrade to atleast 1.6.0 before using sharding. Sharding has been around for a while,but the first production-ready release is 1.6.0.
When to ShardOne question people often have is when to start sharding. There are a couple of signsthat sharding might be a good idea:
• You’ve run out of disk space on your current machine.
• You want to write data faster than a single mongod can handle.
• You want to keep a larger proportion of data in memory to improve performance.
In general, you should start with a nonsharded setup and convert it to a sharded one,if and when you need.
The Key to Sharding: Shard KeysWhen you set up sharding, you choose a key from a collection and use that key’s valuesto split up the data. This key is called a shard key.
Let’s look at an example to see how this works: suppose we had a collection of docu-ments representing people. If we chose "name" as our shard key, one shard could holddocuments where the "name" started with A–F, the next shard could hold names fromG–P, and the final shard would hold names from Q–Z. As you added (or removed)shards, MongoDB would rebalance this data so that each shard was getting a balancedamount of traffic and a sensible amount of data (e.g., if a shard is getting a lot of traffic,it might have less data than a shard with data that is less “hot”).
Sharding an Existing CollectionSuppose we have an existing collection of logs and we want to shard it. If we enablesharding and tell MongoDB to use "timestamp" as the shard key, we’ll have a singleshard with all of our data. We can insert any data we’d like, and it will all go to thatone shard.
Now, suppose we add a new shard. Once this shard is up and running, MongoDB willbreak up the collection into two pieces, called chunks. A chunk contains all of thedocuments for a range of values for the shard key, so one chunk would have documentswith a timestamp value between -∞ and, say, June 26, 2003, and the other chunk wouldhave timestamps between June 27, 2003 and ∞. One of these chunks would then bemoved to the new shard.
If we get a new document with a timestamp value before June 27, 2003, we’ll add thatto the first chunk; otherwise, we’ll add the document to the second chunk.
The Key to Sharding: Shard Keys | 145

Incrementing Shard Keys Versus Random Shard KeysThe distribution of inserts across shards is very dependent on which key we’resharding on.
If we choose to shard on something like "timestamp", where the value is probably goingto increase and not jump around a lot, we’ll be sending all of the inserts to one shard(the one with the [June 27, 2003, ∞] chunk). Notice that, if we add a new shard and itsplits the data again, we’ll still be inserting on just one server. If we add a new shard,MongoDB might split [June 27, 2003, ∞] into [June 27, 2003, December 12, 2010) and[December 12, 2010, ∞]. We’ll always have a chunk that will be “some date throughinfinity,” which is where our inserts will be going. This isn’t good for a very high writeload, but it will make queries on the shard key very efficient.
If we have a high write load and want to evenly distribute writes across multiple shards,we should pick a shard key that will jump around more. This could be a hash of thetimestamp in the log example or a key like "logMessage", which won’t have any par-ticular pattern to it.
Whether your shard key jumps around or increases steadily, it is important to choosea key that will vary somewhat. If, for example, we had a "logLevel" key that had onlyvalues "DEBUG", "WARN", or "ERROR", MongoDB won’t be able to break up your data intomore than three chunks (because there are only three different values). If you have akey with very little variation and want to use it as a shard key anyway, you can do soby creating a compound shard key on that key and a key that varies more, like"logLevel" and "timestamp".
Determining which key to shard on and creating shard keys should be reminiscent ofindexing, because the two concepts are similar. In fact, often your shard key will justbe the index you use most often.
How Shard Keys Affect OperationsTo the end user, a sharded setup should be indistinguishable from a nonsharded one.However, it can be useful, especially when setting up sharding, to understand howdifferent queries will be done depending on the shard key chosen.
Suppose we have the collection described in the previous section, which is sharded onthe "name" key and has three shards with names ranging from A to Z. Different querieswill be executed in different ways:
db.people.find({"name" : "Susan"})mongos will send this query directly to the Q–Z shard, receive a response from thatshard, and send it to the client.
db.people.find({"name" : {"$lt" : "L"}})mongos will send the query to the A–F and G–P shards in serial. It will forward theirresponses to the client.
146 | Chapter 10: Sharding

db.people.find().sort({"email" : 1})mongos will query all of the shards and do a merge sort when it gets the results tomake sure it is returning them in the correct order. mongos uses cursors to retrievedata from each server, so it does not need to get the entire data set in order to startsending batches of results to the client.
db.people.find({"email" : "[email protected]"})mongos does not keep track of the "email" key, so it doesn’t know which shard tosend this to. Thus, it sends the query to all of the shards in serial.
If we insert a new document, mongos will send that document to the appropriate shard,based on the value of its "name" key.
Setting Up ShardingThere are two steps to setting up sharding: starting the actual servers and then decidinghow to shard your data.
Sharding basically involves three different components working together:
shardA shard is a container that holds a subset of a collection’s data. A shard is either asingle mongod server (for development/testing) or a replica set (for production).Thus, even if there are many servers in a shard, there is only one master, and all ofthe servers contain the same data.
mongosThis is the router process and comes with all MongoDB distributions. It basicallyjust routes requests and aggregates responses. It doesn’t store any data or config-uration information. (Although it does cache information from the config servers.)
config serverConfig servers store the configuration of the cluster: which data is on which shard.Because mongos doesn’t store anything permanently, it needs somewhere to get theshard configuration. It syncs this data from the config servers.
If you are working with MongoDB already, you probably have a shard ready to go.(Your current mongod can become your first shard.) The following section shows howto create a new shard from scratch, but feel free to use your existing database instead.
Starting the ServersFirst we need to start up our config server and mongos. The config server needs to bestarted first, because mongos uses it to get its configuration. The config server can bestarted like any other mongod process:
$ mkdir -p ~/dbs/config$ ./mongod --dbpath ~/dbs/config --port 20000
Setting Up Sharding | 147
A config server does not need much space or resources. (A generous estimate is 1KB ofconfig server space per 200MB of actual data.)
Now you need a mongos process for your application to connect to. Routing serversdon’t even need a data directory, but they need to know where the config server is:
$ ./mongos --port 30000 --configdb localhost:20000
Shard administration is always done through a mongos.
Adding a shard
A shard is just a normal mongod instance (or replica set):
$ mkdir -p ~/dbs/shard1$ ./mongod --dbpath ~/dbs/shard1 --port 10000
Now we’ll connect to the mongos process we started and add the shard to the cluster.Start up a shell connected to your mongos:
$ ./mongo localhost:30000/adminMongoDB shell version: 1.6.0url: localhost:30000/adminconnecting to localhost:30000/admintype "help" for help>
Make sure you’re connected to mongos, not a mongod. Now you can add this shard withthe addshard database command:
> db.runCommand({addshard : "localhost:10000", allowLocal : true}){ "added" : "localhost:10000", "ok" : true}
The "allowLocal" key is necessary only if you are running the shard on localhost.MongoDB doesn’t want to let you accidentally set up a cluster locally, so this lets itknow that you’re just in development and know what you’re doing. If you’re in pro-duction, you should have shards on different machines (although there can be someoverlap; see the next section for details).
Whenever we want to add a new shard, we can run the addshard database command.MongoDB will take care of integrating it into the cluster.
Sharding DataMongoDB won’t just distribute every piece of data you’ve ever stored: you have toexplicitly turn sharding on at both the database and collection levels. Let’s look at anexample: we’ll shard the bar collection in the foo database on the "_id" key. First, weenable sharding for foo:
> db.runCommand({"enablesharding" : "foo"})
148 | Chapter 10: Sharding

Sharding a database results in its collections being stored on different shards and is aprerequisite to sharding one of its collections.
Once you’ve enabled sharding on the database level, you can shard a collection byrunning the shardcollection command:
> db.runCommand({"shardcollection" : "foo.bar", "key" : {"_id" : 1}})
Now the collection will be sharded by the "_id" key. When we start adding data, it willautomatically distribute itself across our shards based on the values of "_id".
Production ConfigurationThe example in the previous section is fine for trying sharding or for development.However, when you move an application into production, you’ll want a more robustsetup. To set up sharding with no points of failure, you’ll need the following:
• Multiple config servers
• Multiple mongos servers
• Replica sets for each shard
• w set correctly (see the previous chapter for information on w and replication)
A Robust ConfigSetting up multiple config servers is simple. As of this writing, you can have one configserver (for development) or three config servers (for production).
Setting up multiple config servers is the same as setting up one; you just do it three times:
$ mkdir -p ~/dbs/config1 ~/dbs/config2 ~/dbs/config3$ ./mongod --dbpath ~/dbs/config1 --port 20001$ ./mongod --dbpath ~/dbs/config2 --port 20002$ ./mongod --dbpath ~/dbs/config3 --port 20003
Then, when you start a mongos, you should connect it to all three config servers:
$ ./mongos --configdb localhost:20001,localhost:20002,localhost:20003
Config servers use two-phase commit, not the normal MongoDB asynchronous repli-cation, to maintain separate copies of the cluster’s configuration. This ensures that theyalways have a consistent view of the cluster’s state. It also means that if a single configserver is down, the cluster’s configuration information will go read-only. Clients arestill able to do both reads and writes, but no rebalancing will happen until all of theconfig servers are back up.
Many mongosYou can also run as many mongos processes as you want. One recommended setup isto run a mongos process for every application server. That way, each application server
Production Configuration | 149

can talk to mongos locally, and if the server goes down, no one will be trying to talk toa mongos that isn’t there.
A Sturdy ShardIn production, each shard should be a replica set. That way, an individual server canfail without bringing down the whole shard. To add a replica set as a shard, pass itsname and a seed to the addshard command.
For example, say we have a replica set named "foo" containing a server atprod.example.com:27017 (among other servers). We could add this set to the clusterwith the following:
> db.runCommand({"addshard" : "foo/prod.example.com:27017"})
If prod.example.com goes down, mongos will know that it is connected to a replica setand use the new primary for that set.
Physical ServersThis may seem like an overwhelming number of machines: three config servers, at leasttwo mongods per shard, and as many mongos processes as you want. However, not ev-erything has to have its own machine. The main thing to avoid is putting an entirecomponent on one machine. For example, avoid putting all three config servers, all ofyour mongos processes, or an entire replica set on one machine. However, a config serverand mongos processes can happily share a box with a member of a replica set.
Sharding AdministrationSharding information is mostly stored in the config database, which can be accessedfrom any connection to a mongos process.
config CollectionsAll of the code in the following sections assume that you are running a shell connectedto a mongos process and have already run use config.
Shards
You can find a list of shards in the shards collection:
> db.shards.find(){ "_id" : "shard0", "host" : "localhost:10000" }{ "_id" : "shard1", "host" : "localhost:10001" }
Each shard is assigned a unique, human-readable _id.
150 | Chapter 10: Sharding

Databases
The databases collection contains a list of databases that exist on the shards and infor-mation about them:
> db.databases.find(){ "_id" : "admin", "partitioned" : false, "primary" : "config" }{ "_id" : "foo", "partitioned" : false, "primary" : "shard1" }{ "_id" : "x", "partitioned" : false, "primary" : "shard0" }{ "_id" : "test", "partitioned" : true, "primary" : "shard0", "sharded" : { "test.foo" : { "key" : {"x" : 1}, "unique" : false } }}
Every database available is listed here and has some basic information available.
"_id" : stringThe _id is the database’s name.
"partitioned" : booleanIf "partitioned" is true, then the enablesharding command has been run on thisdatabase.
"primary" : stringThe value corresponds to a shard "_id" and indicates where this database’s “home”is. A database always has a home, whether it is sharded. In a sharded setup, a newdatabase will be created on a random shard. This home is where it will start creatingdata files. If it is sharded, it will use other servers as well, but it will start out onthis shard.
Chunks
Chunk information is stored in the chunks collection. This is where things get moreinteresting; you can actually see how your data has been divided up across the cluster:
> db.chunks.find(){ "_id" : "test.foo-x_MinKey", "lastmod" : { "t" : 1276636243000, "i" : 1 }, "ns" : "test.foo", "min" : { "x" : { $minKey : 1 } }, "max" : { "x" : { $maxKey : 1 } },
Sharding Administration | 151

"shard" : "shard0"}
This is what a collection with a single chunk will look like: the chunk range goes from-∞ (MinKey) to ∞ (MaxKey).
Sharding CommandsWe’ve already covered some of the basic commands, such as adding chunks and ena-bling sharding on a collection. There are a couple more commands that are useful foradministering a cluster.
Getting a summary
The printShardingStatus function will give you a quick summary of the previouscollections:
> db.printShardingStatus()--- Sharding Status --- sharding version: { "_id" : 1, "version" : 3 } shards: { "_id" : "shard0", "host" : "localhost:10000" } { "_id" : "shard1", "host" : "localhost:10001" } databases: { "_id" : "admin", "partitioned" : false, "primary" : "config" } { "_id" : "foo", "partitioned" : false, "primary" : "shard1" } { "_id" : "x", "partitioned" : false, "primary" : "shard0" } { "_id" : "test", "partitioned" : true, "primary" : "shard0", "sharded" : { "test.foo" : { "key" : { "x" : 1 }, "unique" : false } } } test.foo chunks: { "x" : { $minKey : 1 } } -->> { "x" : { $maxKey : 1 } } on : shard0 { "t" : 1276636243000, "i" : 1 }
Removing a shard
Shards can be removed from a cluster with the removeshard command. removesharddrains all of the chunks on a given shard to the other shards.
> db.runCommand({"removeshard" : "localhost:10000"});{ "started draining" : "localhost:10000", "ok" : 1}
As the shard is drained, removeshard will give you the status of how much remains onthe shard.
> db.runCommand({"removeshard" : "localhost:10000"});{ "msg" : "already draining...", "remaining" : { "chunks" : 39, "dbs" : 2 },
152 | Chapter 10: Sharding

"ok" : 1 }
Finally, when the shard has finished draining, removeshard shows that the shard hasbeen successfully removed.
As of version 1.6.0, if a removed shard was the primary shard for adatabase, the database has to be manually moved (using themoveprimary command):
> db.runCommand({"moveprimary" : "test", "to" : "localhost:10001"}){ "primary" : "localhost:10001", "ok" : 1}
This will likely be automated in future releases.
Sharding Administration | 153

CHAPTER 11
Example Applications
Throughout this text, almost all of the examples have been in JavaScript. This chapterexplores using MongoDB with languages that are more likely to be used in a realapplication.
Chemical Search Engine: JavaThe Java driver is the oldest MongoDB driver. It has been used in production for yearsand is stable and a popular choice for enterprise developers.
We’ll be using the Java driver to build a search engine for chemical compounds, heavilyinspired by http://www.chemeo.com. This search engine has the chemical and physicalproperties of thousands of compounds on file, and its goal is to make this informationfully searchable.
Installing the Java DriverThe Java driver comes as a JAR file that can be downloaded from Github. To install,add the JAR to your classpath.
All of the Java classes you will probably need to use in a normal application are in thecom.mongodb and com.mongodb.gridfs packages. There are a number of other packagesincluded in the .JAR that are useful if you are planning on manipulating the driver’sinternals or expanding its functionality, but most applications can ignore them.
Using the Java DriverLike most things in Java, the API is a bit verbose (especially compared to the otherlanguages’ APIs). However, all of the concepts are similar to using the shell, and almostall of the method names are identical.
The com.mongodb.Mongo class creates a connection to a MongoDB server. You can accessa database from the connection and then get a collection from the database:
155
import com.mongodb.Mongo;import com.mongodb.DB;import com.mongodb.DBCollection;
class ChemSearch {
public static void main(String[] args) { Mongo connection = new Mongo(); DB db = connection.getDB("search"); DBCollection chemicals = db.getCollection("chemicals");
/* ... */ }}
This will connect to localhost:27017 and get the search.chemicals namespace.
Documents in Java must be instances of org.bson.DBObject, an interface that is basicallyan ordered java.util.Map. While there are a few ways to create a document in Java, thesimplest one is to use the com.mongodb.BasicDBObject class. Thus, creating the docu-ment that could be represented by the shell as {"x" : 1, "y" : "foo"} would look likethis:
BasicDBObject doc = new BasicDBObject();doc.put("x", 1);doc.put("y", "foo");
If we wanted to add an embedded document, such as "z" : {"hello" : "world"}, wewould create another BasicDBObject and then put it in the top-level one:
BasicDBObject z = new BasicDBObject();z.put("hello", "world");
doc.put("z", z);
Then we would have the document {"x" : 1, "y" : "foo", "z" : {"hello" :"world"}}.
From there, all of the other methods implemented by the Java driver are similar to theshell. For instance, we could say chemicals.insert(doc) or chemicals.find(doc). Thereis full API documentation for the Java driver at http://api.mongodb.org/java and somearticles on specific areas of interest (concurrency, data types, etc.) at the MongoDB JavaLanguage Center.
Schema DesignThe interesting thing about this problem is that there are thousands of possible prop-erties for each chemical, and we want to be able to search for any of them efficiently.Take two simple examples: silicon and silicon nitride. A document representing siliconmight look something like this:
{ "name" : "silicon",
156 | Chapter 11: Example Applications

"mw" : 32.1173}
mw stands for “molecular weight.”
Silicon nitride might have a couple other properties, so its document would looklike this:
{ "name" : "silicon nitride", "mw" : 42.0922, "ΔfH°gas" : { "value" : 372.38, "units" : "kJ/mol" }, "S°gas" : { "value" : 216.81, "units" : "J/mol×K" }}
MongoDB lets us store chemicals with any number or structure of properties, whichmakes this application nicely extensible, but there’s no efficient way to index it in itscurrent form. To be able to quickly search for any property, we would need to indexalmost every key! As we learned in Chapter 5, this is a bad idea.
There is a solution. We can take advantage of the fact that MongoDB indexes everyelement of an array, so we can store all of the properties we want to search for in anarray with common key names. For example, with silicon nitride we can add an arrayjust for indexing containing each property of the given chemical:
{ "name" : "silicon nitride", "mw" : 42.0922, "ΔfH°gas" : { "value" : 372.38, "units" : "kJ/mol" }, "S°gas" : { "value" : 216.81, "units" : "J/mol×K" }, "index" : [ {"name" : "mw", "value" : 42.0922}, {"name" : "ΔfH°gas", "value" : 372.38}, {"name" : "S°gas", "value" : 216.81} ]}
Silicon, on the other hand, would have a single-element array with just the molecularweight:
{ "name" : "silicon", "mw" : 32.1173,
Chemical Search Engine: Java | 157

"index" : [ {"name" : "mw", "value" : 32.1173} ]}
Now, all we need to do is create a compound index on the "index.name" and"index.value" keys. Then we’ll be able to do a fairly quick search through the chemicalcompounds for any attribute.
Writing This in JavaGoing back to our original Java code snippet, we’ll create a compound index with theensureIndex function:
BasicDBObject index = new BasicDBObject();index.put("index.name", 1);index.put("index.value", 1);
chemicals.ensureIndex(index);
Creating a document for, say, silicon nitride is not difficult, but it is verbose:
public static DBObject createSiliconNitride() { BasicDBObject sn = new BasicDBObject(); sn.put("name", "silicon nitride"); sn.put("mw", 42.0922);
BasicDBObject deltafHgas = new BasicDBObject(); deltafHgas.put("value", 372.38); deltafHgas.put("units", "kJ/mol");
sn.put("ΔfH°gas", deltafHgas);
BasicDBObject sgas = new BasicDBObject(); sgas.put("value", 216.81); sgas.put("units", "J/mol×K");
sn.put("S°gas", sgas);
ArrayList<BasicDBObject> index = new ArrayList<BasicDBObject>(); index.add(BasicDBObjectBuilder.start() .add("name", "mw").add("value", 42.0922).get()); index.add(BasicDBObjectBuilder.start() .add("name", "ΔfH°gas").add("value", 372.38).get()); index.add(BasicDBObjectBuilder.start() .add("name", "S°gas").add("value", 216.81).get());
sn.put("index", index);
return sn;}
Arrays can be represented by anything that implements java.util.List, so we createa java.util.ArrayList of embedded documents for the chemical’s properties.
158 | Chapter 11: Example Applications

IssuesOne issue with this structure is that, if we are querying for multiple criteria, searchorder matters. For example, suppose we are looking for all documents with a molecularweight of less than 1000, a boiling point greater than 0°, and a freezing point of -20°.Naively, we could do this query by concatenating the criteria in an $all conditional:
BasicDBObject criteria = new BasicDBObject();
BasicDBObject all = new BasicDBObject();
BasicDBObject mw = new BasicDBObject("name", "mw");mw.put("value", new BasicDBObject("$lt", 1000));
BasicDBObject bp = new BasicDBObject("name", "bp");bp.put("value", new BasicDBObject("$gt", 0));
BasicDBObject fp = new BasicDBObject("name", "fp");fp.put("value", -20);
all.put("$elemMatch", mw);all.put("$elemMatch", bp);all.put("$elemMatch", fp);criteria.put("index", new BasicDBObject("$all", all));
chemicals.find(criteria);
The problem with this approach is that MongoDB can use an index only for the firstitem in an $all conditional. Suppose there are 1 million documents with a "mw" keywhose value is less than 1,000. MongoDB can use the index for that part of the query,but then it will have to scan for the boiling and freezing points, which will take a longtime.
If we know some of the characteristics of our data, for instance, that there are only 43chemicals with a freezing point of -20°, we can rearrange the $all to do that query first:
all.put("$elemMatch", fp);all.put("$elemMatch", mw);all.put("$elemMatch", bp);criteria.put("index", new BasicDBObject("$all", all));
Now the database can quickly find those 43 elements and, for the subsequent clauses,has to scan only 43 elements (instead of 1 million). Figuring out a good ordering forarbitrary searches is the real trick of course, of course. This could be done with patternrecognition and data aggregation algorithms that are beyond the scope of this book.
News Aggregator: PHPWe will be creating a basic news aggregation application: users submit links to inter-esting sites, and other users can comment and vote on the quality of the links (and other
News Aggregator: PHP | 159

comments). This will involve creating a tree of comments and implementing a votingsystem.
Installing the PHP DriverThe MongoDB PHP driver is a PHP extension. It is easy to install on almost any system.It should work on any system with PHP 5.1 or newer installed.
Windows install
Look at the output of phpinfo() and determine the version of PHP you are running(PHP 5.2 and 5.3 are supported on Windows; 5.1 is not), including VC version, ifshown. If you are using Apache, you should use VC6; otherwise, you’re probably run-ning a VC9 build. Some obscure Zend installs use VC8. Also notice whether it is thread-safe (usually abbreviated “ts”).
While you’re looking at phpinfo(), make a note of the extension_dir value, which iswhere we’ll need to put the extension.
Now that you know what you’re looking for, go to Github. Download the package thatmatches your PHP version, VC version, and thread safety. Unzip the package, and movephp_mongo.dll to the extension_dir directory.
Finally, add the following line to your php.ini file:
extension=php_mongo.dll
If you are running an application server (Apache, WAMPP, and so on), restart it. Thenext time you start PHP, it will automatically load the Mongo extension.
Mac OS X Install
It is easiest to install the extension through PECL, if you have it available. Try runningthe following:
$ pecl install mongo
Some Macs do not, however, come with PECL or the correct PHP libraries to installextensions.
If PECL does not work, you can download binary builds for OS X, available atGithub (http://www.github.com/mongodb/mongo-php-driver/downloads). Run php -i tosee what version of PHP you are running and what the value of extension_dir is, andthen download the correct version. (It will have “osx” in the filename.) Unarchive theextension, and move mongo.so to the directory specified by extension_dir.
After the extension is installed via either method, add the following line to yourphp.ini file:
extension=mongo.so
160 | Chapter 11: Example Applications

Restart any application server you might have running, and the Mongo extension willbe loaded the next time PHP starts.
Linux and Unix install
Run the following:
$ pecl install mongo
Then add the following line to your php.ini file:
extension=mongo.so
Restart any application server you might have running, and the Mongo extension willbe loaded the next time PHP is started.
Using the PHP DriverThe Mongo class is a connection to the database. By default, the constructor attempts toconnect to a database server running locally on the default port.
You can use the __get function to get a database from the connection and a collectionfrom the database (even a subcollection from a collection). For example, this connectsto MongoDB and gets the bar collection in the foo database:
<?php
$connection = new Mongo();
$collection = $connection->foo->bar;
?>
You can continue chaining getters to access subcollections. For example, to get thebar.baz collection, you can say the following:
$collection = $connection->foo->bar->baz;
Documents are represented by associative arrays in PHP. Thus, something like {"foo" :"bar"} in JavaScript could be represented as array("foo" => "bar") in PHP. Arrays arealso represented as arrays in PHP, which sometimes leads to confusion: ["foo", "bar","baz"] in JavaScript is equivalent to array("foo", "bar", "baz").
The PHP driver uses PHP’s native types for null, booleans, numbers, strings, and arrays.For all other types, there is a Mongo-prefixed type: MongoCollection is a collection,MongoDB is a database, and MongoRegex is a regular expression. There is extensivedocumentation in the PHP manual for all of these classes.
News Aggregator: PHP | 161

Designing the News AggregatorWe’ll be creating a simple news aggregator, where users can submit links to interestingstories and other users can vote and comment on them. We will just be covering twoaspects of it: creating a tree of comments and handling votes.
To store the submissions and comments, we need only a single collection, posts. Theinitial posts linking to some article will look something like the following:
{ "_id" : ObjectId(), "title" : "A Witty Title", "url" : "http://www.example.com", "date" : new Date(), "votes" : 0, "author" : { "name" : "joe", "_id" : ObjectId(), }}
The comments will be almost identical, but they need a "content" key instead of a"url" key.
Trees of CommentsThere are several different ways to represent a tree in MongoDB; the choice of whichrepresentation to use depends on the types of query being performed.
We’ll be storing an array of ancestors tree: each node will contain an array of its parent,grandparent, and so on. So, if we had the following comment structure:
original link|- comment 1| |- comment 3 (reply to comment 1)| |- comment 4 (reply to comment 1)| |- comment 5 (reply to comment 4)|- comment 2| |- comment 6 (reply to comment 2)
then comment 5’s array of ancestors would contain the original link’s _id, comment1’s _id, and comment 4’s _id. Comment 2’s ancestors would be the original link’s_id and comment 2’s _id. This allows us to easily search for “all comments for linkX" or “the subtree of comment 2’s replies.”
This method of storing comments assumes that we are going to have a lot of them andthat we might be interested in seeing just parts of a comment thread. If we knew thatwe always wanted to display all of the comments and there weren’t going to bethousands, we could store the entire tree of comments as an embedded document inthe submitted link’s document.
162 | Chapter 11: Example Applications

Using the array of ancestors approach, when someone wants to create a new comment,we need to add a new document to the collection. To create this document, we createa leaf document by linking it to the parent’s "_id" value and its array of ancestors.
function createLeaf($parent, $replyInfo) { $child = array( "_id" => new MongoId(), "content" => $replyInfo['content'], "date" => new MongoDate(), "votes" => 0, "author" => array( "name" => $replyInfo['name'], "name" => $replyInfo['name'], ), "ancestors" => $parent['ancestors'], "parent" => $parent['_id'] );
// add the parent's _id to the ancestors array $child['ancestors'][] = $parent['_id'];
return $child;}
Then we can add the new comment to the posts collection:
$comment = createLeaf($parent, $replyInfo);
$posts = $connection->news->posts;$posts->insert($comment);
We can get a list of the latest submissions (sans comments) with the following:
$cursor = $posts->find(array("ancestors" => array('$size' => 0)));$cursor = $cursor->sort(array("date" => -1));
If someone wants to see the comments for a given post, we can find them all with thefollowing:
$cursor = $posts->find(array("ancestors" => $postId));
In fact, we can use this query to access any subtree of comments. If the root of thesubtree is passed in as $postId, every child will contain $postId in its ancestor’s arrayand be returned.
To make these queries fast, we should index the "date" and "ancestors" keys:
$pageOfComments = $posts->ensureIndex(array("date" => -1, "ancestors" => 1));
Now we can quickly query for the main page, a tree of comments, or a subtree ofcomments.
News Aggregator: PHP | 163

VotingThere are many ways of implementing voting, depending on the functionality and in-formation you want: do you allow up and down votes? Will you prevent users fromvoting more than once? Will you allow them to switch their vote? Do you care whenpeople voted, to see if a link is trending? Each of these requires a different solution withfar more complex coding than the simplest way of doing it: using "$inc":
$posts->update(array("_id" => $postId), array('$inc' => array("votes", 1)));
For a controversial or popular link, we wouldn’t want people to be able to vote hun-dreds of times, so we want to limit users to one vote each. A simple way to do this isto add a "voters" array to keep track of who has voted on this post, keeping an arrayof user "_id" values. When someone tries to vote, we do an update that checks the user"_id" against the array of "_id" values:
$posts->update(array("_id" => $postId, "voters" => array('$ne' => $userId)), array('$inc' => array("votes", 1), '$push' => array("voters" => $userId)));
This will work for up to a couple million users. For larger voting pools, we would hitthe 4MB limit, and we would have to special-case the most popular links by puttingspillover votes into a new document.
Custom Submission Forms: RubyMongoDB is a popular choice for Ruby developers, likely because the document-oriented approach meshes well with Ruby’s dynamism and flexibility. In this examplewe’ll use the MongoDB Ruby driver to build a framework for custom form submissions,inspired by a New York Times blog post about how it uses MongoDB to handlesubmission forms (http://open.blogs.nytimes.com/2010/05/25/building-a-better-submission-form/). For even more documentation on using MongoDB from Ruby, check outthe Ruby Language Center.
Installing the Ruby DriverThe Ruby driver is available as a RubyGem, hosted at http://rubygems.org. Installationusing the gem is the easiest way to get up and running. Make sure you’re using an up-to-date version of RubyGems (with gem update --system) and then install themongo gem:
$ gem install mongoSuccessfully installed bson-1.0.2Successfully installed mongo-1.0.22 gems installedInstalling ri documentation for bson-1.0.2...Building YARD (yri) index for bson-1.0.2...Installing ri documentation for mongo-1.0.2...Building YARD (yri) index for mongo-1.0.2...
164 | Chapter 11: Example Applications

Installing RDoc documentation for bson-1.0.2...Installing RDoc documentation for mongo-1.0.2...
Installing the mongo gem will also install the bson gem on which it depends. Thebson gem handles all of the BSON encoding and decoding for the driver (for more onBSON, see “BSON” on page 179). The bson gem will also make use of C extensionsavailable in the bson_ext gem to improve performance, if that gem has been installed.For maximum performance, be sure to install bson_ext:
$ gem install bson_extBuilding native extensions. This could take a while...Successfully installed bson_ext-1.0.11 gem installed
If bson_ext is on the load path, it will be used automatically.
Using the Ruby DriverTo connect to an instance of MongoDB, use the Mongo::Connection class. Once we havean instance of Mongo::Connection, we can get an individual database (here we use thestuffy database) using bracket notation:
> require 'rubygems' => true> require 'mongo' => true> db = Mongo::Connection.new["stuffy"]
The Ruby driver uses hashes to represent documents. Aside from that, the API is similarto that of the shell with most method names being the same. (Although the Ruby driveruses underscore_naming, whereas the shell often uses camelCase.) To insert the docu-ment {"x" : 1} into the bar collection and query for the result, we would do thefollowing:
> db["bar"].insert :x => 1 => BSON::ObjectID('4c168343e6fb1b106f000001')> db["bar"].find_one => {"_id"=>BSON::ObjectID('4c168343e6fb1b106f000001'), "x"=>1}
There are some important gotchas about documents in Ruby that you need to beaware of:
• Hashes are ordered in Ruby 1.9, which matches how documents work inMongoDB. In Ruby 1.8, however, hashes are unordered. The driver provides aspecial type, BSON::OrderedHash, which must be used instead of a regular hashwhenever key order is important.
• Hashes being saved to MongoDB can have symbols as either keys or values. Hashesreturned from MongoDB will have symbol values wherever they were present inthe input, but any symbol keys will be returned as strings. So, {:x => :y} willbecome {"x" => :y}. This is a side effect of the way documents are represented inBSON (see Appendix C for more on BSON).
Custom Submission Forms: Ruby | 165
Custom Form SubmissionThe problem at hand is to generate custom forms for user-submitted data and to handleuser submissions for those forms. Forms are created by editors and can contain arbitraryfields, each with different types and rules for validation. Here we’ll leverage the abilityto embed documents and store each field as a separate document within a form. A formdocument for a comment submission form might look like this:
comment_form = { :_id => "comments", :fields => [ { :name => "name", :label => "Your Name", :help_text => "Required", :required => true, :type => "string", :max_length => 200 }, { :name => "email", :label => "Your E-mail Address", :help_text => "Required, but will not be displayed", :required => true, :type => "email" }, { :name => "comment", :label => "Your Comment", :help_text => "Comments will be moderated", :required => true, :type => "string", :word_limit => 200 } ]}
This form shows some of the benefits of working with a document-oriented databaselike MongoDB. First, we’re able to embed the form’s fields directly within the formdocument. We don’t need to store them separately and do a join—we can get the entirerepresentation for a form by querying for a single document. We’re also able to specifydifferent keys for different types of fields. In the previous example, the name field hasa :max_length, key and the comment field has a :word_limit key, while the email fieldhas neither.
In this example we use "_id" to store a human-readable name for our form. This workswell because we need to index on the form name anyway to make queries efficient.Because the "_id" index is a unique index, we’re also guaranteed that form names willbe unique across the system.
When an editor adds a new form, we simply save the resultant document. To save thecomment_form document that we created, we’d do the following:
166 | Chapter 11: Example Applications

db["forms"].save comment_form
Each time we want to render a page with the comment form, we can query for the formdocument by its name:
db["forms"].find_one :_id => "comments"
The single document returned contains all the information we need in order to renderthe form, including the name, label, and type for each input field that needs to berendered. When a form needs to be changed, editors can easily add a field or specifyadditional constraints for an existing field.
When we get a user submission for a form, we can run the same query as earlier to getthe relevant form document. We’ll need this in order to validate that the user’s sub-mission includes values for all required fields and meets any other requirements speci-fied in our form. After validation, we can save the submission as a separate documentin a submissions collection. A submission for our comment form might look like this:
comment_submission = { :form_id => "comments", :name => "Mike D.", :email => "[email protected]", :comment => "MongoDB is flexible!"}
We’re again leveraging the document model by including custom keys for each sub-mission (here we use :name, :email, and :comment). The only key that we require in eachsubmission is :form_id. This allows us to efficiently retrieve all submissions for a certainform:
db["submissions"].find :form_id => "comments"
To perform this query, we should have an index on :form_id:
db["submissions"].create_index :form_id
We can also use :form_id to retrieve the form document for a given submission.
Ruby Object Mappers and Using MongoDB with RailsThere are several libraries written on top of the basic Ruby driver to provide things likemodels, validations, and associations for MongoDB documents. The most popular ofthese tools seem to be MongoMapper and Mongoid. If you’re used to working withtools like ActiveRecord or DataMapper, you might consider using one of these objectmappers in addition to the basic Ruby driver.
MongoDB also works nicely with Ruby on Rails, especially when working with one ofthe previously mentioned mappers. There are up-to-date instructions on integratingMongoDB with Rails on the MongoDB site.
Custom Submission Forms: Ruby | 167

Real-Time Analytics: PythonThe Python driver for MongoDB is called PyMongo. In this section, we’ll use PyMongoto implement some real-time tracking of metrics for a web application. The most up-to-date documentation on PyMongo is available at http://api.mongodb.org/python.
Installing PyMongoPyMongo is available in the Python Package Index and can be installed usingeasy_install (http://pypi.python.org/pypi/setuptools):
$ easy_install pymongoSearching for pymongoReading http://pypi.python.org/simple/pymongo/Reading http://github.com/mongodb/mongo-python-driverBest match: pymongo 1.6Downloading ...Processing pymongo-1.6-py2.6-macosx-10.6-x86_64.eggMoving ...Adding pymongo 1.6 to easy-install.pth file
Installed ...Processing dependencies for pymongoFinished processing dependencies for pymongo
This will install PyMongo and will attempt to install an optional C extension as well.If the C extension fails to build or install, everything will continue to work, but per-formance will suffer. An error message will be printed during install in that case.
As an alternative to easy_install, PyMongo can also be installed by running pythonsetup.py install from a source checkout.
Using PyMongoWe use the pymongo.connection.Connection class to connect to a MongoDB server. Herewe create a new Connection and use attribute-style access to get the analytics database:
from pymongo import Connectiondb = Connection().analytics
The rest of the API for PyMongo is similar to the API of the MongoDB shell; like theRuby driver, PyMongo uses underscore_naming instead of camelCase, however.Documents are represented using dictionaries in PyMongo, so to insert and retrieve thedocument {"a" : [1, 2, 3]}, we do the following:
db.test.insert({"a": [1, 2, 3]})db.test.find_one()
Dictionaries in Python are unordered, so PyMongo provides an ordered subclass ofdict, pymongo.son.SON. In most places where ordering is required, PyMongo provides
168 | Chapter 11: Example Applications
APIs that hide it from the user. If not, applications can use SON instances instead ofdictionaries to ensure their documents maintain key order.
MongoDB for Real-Time AnalyticsMongoDB is a great tool for tracking metrics in real time for a couple of reasons:
• Upsert operations (see Chapter 3) allow us to send a single message to either createa new tracking document or increment the counters on an existing document.
• The upsert we send does not wait for a response; it’s fire-and-forget. This allowsour application code to avoid blocking on each analytics update. We don’t needto wait and see whether the operation is successful, because an error in analyticscode wouldn’t get reported to a user anyway.
• We can use an $inc update to increment a counter without having to do a separatequery and update operation. We also eliminate any contention issues if multipleupdates are happening simultaneously.
• MongoDB’s update performance is very good, so doing one or more updates perrequest for analytics is reasonable.
SchemaIn our example we will be tracking page views for our site, with hourly roll-ups. We’lltrack both total page views as well as page views for each individual URL. The goal isto end up with a collection, hourly, containing documents like this:
{ "hour" : "Tue Jun 15 2010 9:00:00 GMT-0400 (EDT)", "url" : "/foo", "views" : 5 }{ "hour" : "Tue Jun 15 2010 9:00:00 GMT-0400 (EDT)", "url" : "/bar", "views" : 5 }{ "hour" : "Tue Jun 15 2010 10:00:00 GMT-0400 (EDT)", "url" : "/", "views" : 12 }{ "hour" : "Tue Jun 15 2010 10:00:00 GMT-0400 (EDT)", "url" : "/bar", "views" : 3 }{ "hour" : "Tue Jun 15 2010 10:00:00 GMT-0400 (EDT)", "url" : "/foo", "views" : 10 }{ "hour" : "Tue Jun 15 2010 11:00:00 GMT-0400 (EDT)", "url" : "/foo", "views" : 21 }{ "hour" : "Tue Jun 15 2010 11:00:00 GMT-0400 (EDT)", "url" : "/", "views" : 3 }...
Each document represents all of the page views for a single URL in a given hour. If aURL gets no page views in an hour, there is no document for it. To track total pageviews for the entire site, we’ll use a separate collection, hourly_totals, which has thefollowing documents:
{ "hour" : "Tue Jun 15 2010 9:00:00 GMT-0400 (EDT)", "views" : 10 }{ "hour" : "Tue Jun 15 2010 10:00:00 GMT-0400 (EDT)", "views" : 25 }{ "hour" : "Tue Jun 15 2010 11:00:00 GMT-0400 (EDT)", "views" : 24 }...
The difference here is just that we don’t need a "url" key, because we’re doing site-wide tracking. If our entire site doesn’t get any page views during an hour, there willbe no document for that hour.
Real-Time Analytics: Python | 169

Handling a RequestEach time our application receives a request, we need to update our analytics collectionsappropriately. We need to add a page view both to the hourly collection for the specificURL requested and to the hourly_totals collection. Let’s define a function that takes aURL and updates our analytics appropriately:
from datetime import datetime
def track(url): hour = datetime.utcnow().replace(minute=0, second=0, microsecond=0) db.hourly.update({"hour": hour, "url": url}, {"$inc": {"views": 1}}, upsert=True) db.hourly_totals.update({"hour": hour}, {"$inc": {"views": 1}}, upsert=True)
We’ll also want to make sure that we have indexes in place to be able to perform theseupdates efficiently:
from pymongo import ASCENDING
db.hourly.create_index([("url", ASCENDING), ("hour", ASCENDING)], unique=True)db.hourly_totals.create_index("hour", unique=True)
For the hourly collection, we create a compound index on "url" and "hour", while forhourly_totals we just index on "hour". Both of the indexes are created as unique, becausewe want only one document for each of our roll-ups.
Now, each time we get a request, we just call track a single time with the requestedURL. It will perform two upserts; each will create a new roll-up document if necessaryor increment the "views" for an existing roll-up.
Using Analytics DataNow that we’re tracking page views, we need a way to query that data and put it touse. Here we print the hourly page view totals for the last 10 hours:
from pymongo import DESCENDING
for rollup in db.hourly_totals.find().sort("hour", DESCENDING).limit(10): pretty_date = rollup["hour"].strftime("%Y/%m/%d %H") print "%s - %d" % (pretty_date, rollup["views"])
This query will be able to leverage the index we’ve already created on "hour". We canperform a similar operation for an individual url:
for rollup in db.hourly.find({"url": url}).sort("hour", DESCENDING).limit(10): pretty_date = rollup["hour"].strftime("%Y/%m/%d %H") print "%s - %d" % (pretty_date, rollup["views"])
The only difference is that here we add a query document for selecting an individual"url". Again, this will leverage the compound index we’ve already created on "url",and "hour".
170 | Chapter 11: Example Applications

Other ConsiderationsOne thing we might want to consider is running a periodic cleaning task to remove oldanalytics documents. If we’re displaying only the last 10 hours of data, then we canconserve space by not keeping around a month’s worth of documents. To remove alldocuments older than 24 hours, we can do the following, which could be run usingcron or a similar mechanism:
from datetime import timedelta
remove_before = datetime.utcnow() - timedelta(hours=24)
db.hourly.remove({"hour": {"$lt": remove_before}})db.hourly_totals.remove({"hour": {"$lt": remove_before}})
In this example, the first remove will actually need to do a table scan because we haven’tdefined an index on "hour". If we need to perform this operation efficiently (or anyother operation querying by "hour" for all URLs), we should consider adding a secondindex on "hour" to the hourly collection.
Another important note about this example is that it would be easy to add tracking forother metrics besides page views or to do roll-ups on a window other than hourly (oreven to do roll-ups on multiple windows at once). All we need to do is to tweak thetrack function to perform upserts tracking whatever metric we’re interested in, atwhatever granularity we want.
Real-Time Analytics: Python | 171


APPENDIX A
Installing MongoDB
Installing MongoDB is a simple process on most platforms. Precompiled binaries areavailable for Linux, Mac OS X, Windows, and Solaris. This means that, on most plat-forms, you can download the archive from http://www.mongodb.org, inflate it, and runthe binary. The MongoDB server requires a directory it can write database files to anda port it can listen for connections on. This section covers the entire install on the twovariants of system: Windows and everything else (Linux, Max, Solaris).
When we speak of “installing MongoDB,” generally what we are talking about is settingup mongod, the core database server. mongod is used in a single-server setup as eithermaster or slave, as a member of a replica sets, and as a shard. Most of the time, this willbe the MongoDB process you are using. Other binaries that come with the downloadare covered in Chapter 8.
Choosing a VersionMongoDB uses a fairly simple versioning scheme: even-point releases are stable, andodd-point releases are development versions. For example, anything starting with 1.6is a stable release, such as 1.6.0, 1.6.1, and 1.6.15. Anything starting with 1.7 is adevelopment release, such as 1.7.0, 1.7.2, or 1.7.10. Let’s take the 1.6/1.7 release as asample case to demonstrate how the versioning timeline works:
1. Developers release 1.6.0. This is a major release and will have an extensive change-log. Everyone in production is advised to upgrade as soon as possible.
2. After the developers start working on the milestones for 1.8, they release 1.7.0.This is the new development branch that is fairly similar to 1.6.0, but probablywith an extra feature or two and maybe some bugs.
3. As the developers continue to add features, they will release 1.7.1, 1.7.2, and so on.
4. Any bug fixes or “nonrisky” features will be backported to the 1.6 branch, and1.6.1, 1.6.2, and so on, will be released. Developers are conservative about what
173

is backported; few new features are ever added to a stable release. Generally, onlybug fixes are ported.
5. After all of the major milestones have been reached for 1.8.0, developers will releasesomething like, say, 1.7.5.
6. After extensive testing of 1.7.5, usually there are a couple minor bugs that need tobe fixed. Developers fix these bugs and release 1.7.6.
7. Developers repeat step 6 until no new bugs are apparent, and then 1.7.6 (or what-ever the latest release ended up being) is renamed 1.8.0. That is, the last develop-ment release in a series becomes the new stable release.
8. Start over from step 1, incrementing all versions by .2.
Thus, the initial releases in a development branch may be highly unstable (x.y.0, x.y.1,x.y.2), but usually, by the time a branch gets to x.y.5, it’s fairly close to production-ready. You can see how close a production release is by browsing the core server road-map on the MongoDB bug tracker.
If you are running in production, you should use a stable release unless there are featuresin the development release that you need. Even if you need certain features from adevelopment release, it is worth first getting in touch with the developers through themailing list and IRC to let them know you are planning on going into production witha development release and get advice about keeping your data safe. (Of course, this isalways a good idea.)
If you are just starting development on a project, using a development release may bea better choice. By the time you deploy to production, there will probably be a stablerelease (MongoDB keeps a regular cycle of stable releases every couple of months), andyou’ll get to use the latest features. However, you must balance this against the possi-bility that you would run into server bugs, which could be confusing or discouragingto most new users.
Windows InstallTo install MongoDB on Windows, download the Windows zip from the MongoDBdownloads page. Use the advice in the previous section to choose the correct versionof MongoDB. There are 32-bit and 64-bit releases for Windows, so select whicheverversion you’re running. When you click the link, it will download the .zip. Use yourfavorite extraction tool to unzip the archive.
Now you need to make a directory in which MongoDB can write database files. Bydefault, MongoDB tries to use C:\data\db as its data directory. You can create thisdirectory or any other empty directory anywhere on the filesystem. If you chose to usea directory other than C:\data\db, you’ll need to specify the path when you startMongoDB, which is covered in a moment.
174 | Appendix A: Installing MongoDB

Now that you have a data directory, open the command prompt (cmd.exe). Navigateto the directory where you unzipped the MongoDB binaries and run the following:
$ bin\mongod.exe
If you chose a directory other than C:\data\db, you’ll have to specify it here, with the--dbpath argument:
$ bin\mongod.exe --dbpath C:\Documents and Settings\Username\My Documents\db
See the Chapter 8 section for more common options, or run mongod.exe --help to seeall options.
Installing as a ServiceMongoDB can also be installed as a service on Windows. To install, simply run withthe full path, escape any spaces, and use the --install option. For example:
$ C:\mongodb-windows-32bit-1.6.0\bin\mongod.exe --dbpath "\"C:\Documents and Settings\Username\My Documents\db\"" --install
It can then be started and stopped from the Control Panel.
POSIX (Linux, Mac OS X, and Solaris) InstallChoose a version of MongoDB, based on the advice in the section “Choosing a Ver-sion” on page 173. Go to the MongoDB downloads page, and select the correct versionfor your OS.
If you are using a Mac, check whether you’re running 32-bit or 64-bit.Macs are especially picky that you choose the correct build and willrefuse to start MongoDB and give confusing error messages if youchoose the wrong build. You can check what you’re running by clickingthe apple in the upper-left corner and selecting the About This Macoption.
You must create a directory for the database to put its files. By default, the databasewill use /data/db, although you can specify any other directory. If you create the defaultdirectory, make sure it has the correct write permissions. You can create the directoryand set the permissions by running the following:
$ mkdir -p /data/db$ chown -R $USER:$USER /data/db
mkdir -p creates the directory and all its parents, if necessary (i.e., if the /data directorydidn’t exist, it will create the /data directory and then the /data/db directory). chownchanges the ownership of /data/db so that your user can write to it. Of course, you canalso just create a directory in your home folder and specify that MongoDB should usethat when you start the database, to avoid any permissions issues.
POSIX (Linux, Mac OS X, and Solaris) Install | 175
Decompress the .tar.gz file you downloaded from http://www.mongodb.org.
$ tar zxf mongodb-linux-i686-1.6.0.tar.gz$ cd mongodb-linux-i686-1.6.0
Now you can start the database:
$ bin/mongod
Or if you’d like to use an alternate database path, specify it with the --dbpath option:
$ bin/mongod --dbpath ~/db
See Chapter 8 for a summary of the most common options, or run mongod with--help to see all the possible options.
Installing from a Package ManagerOn these systems, there are many package managers that can also be used to installMongoDB. If you prefer using one of these, there are official packages for Debian andUbuntu and unofficial ones for Red Hat, Gentoo, and FreeBSD. If you use an unofficialversion, make sure to check the logs when you start the database; sometimes thesepackages are not built with UTF-8 support.
On Mac, there are also unofficial packages in Homebrew and MacPorts. If you go forthe MacPorts version, be forewarned: it takes hours to compile all the Boost libraries,which are MongoDB prerequisites. Start the download, and leave it overnight.
Regardless of the package manager you use, it is a good idea to figure out where it isputting the MongoDB log files before you have a problem and need to find them. It’simportant to make sure they’re being saved properly in advance of any possible issues.
176 | Appendix A: Installing MongoDB
APPENDIX B
mongo: The Shell
Throughout this text, we use the mongo binary, which is the database shell. We generallyassume that you are running it on the same machine as mongod and that you are runningmongod on the default port, but if you are not, you can specify this on startup and havethe shell connect to another server:
$ bin/mongo staging.example.com:20000
This would connect to a mongod running at staging.example.com on port 20000.
The shell also, by default, starts out connected to the test database. If you’d like db torefer to a different database, you can use /dbname after the server address:
$ bin/mongo localhost:27017/admin
This connects to mongod running locally on the default port, but db will immediatelyrefer to the admin database.
You can also start the shell without connecting to any database by using the --nodboption. This is useful if you’d like to just play around with JavaScript or connect later:
$ bin/mongo --nodbMongoDB shell version: 1.5.3type "help" for help>
Keep in mind that db isn’t the only database connection you can have. You can connectto as many databases as you would like from the shell, which can be handy in multi-server environments. Simply use the connect() method, and assign the resulting con-nection to any variable you’d like. For instance, with sharding, we might want mongosto refer to the mongos server and also have a connection to each shard:
> mongos = connect("localhost:27017")connecting to: localhost:27017localhost:27017> shard0 = connect("localhost:30000")connecting to: localhost:30000localhost:30000> shard1 = connect("localhost:30001")
177

connecting to: localhost:30001localhost:30001
Then, we can use mongos, shard0, or shard1 as the db variable is usually used. (Althoughspecial helpers, such as use foo or show collections, will not work.)
Shell UtilitiesThere are a number of useful shell functions that were not covered earlier.
For administrating multiple databases, it can be useful to have multiple database var-iables, not db. For example, with sharding, you may want to maintain a separate variablepointing to your config database:
> config = db.getSisterDB("config")config> config.shards.find()...
You can even connect to multiple servers within a single shell using the connectfunction:
> shard_db = connect("shard.example.com:27017/mydb")connecting to shard.example.com:27017/mydbmydb>
The shell can also run shell commands:
> runProgram("echo", "Hello", "world")shell: started mongo program echo Hello world0> sh6487| Hello world
(The output looks strange because the shell is running.)
178 | Appendix B: mongo: The Shell
APPENDIX C
MongoDB Internals
For the most part, users of MongoDB can treat it as a black box. When trying to un-derstand performance characteristics or looking to get a deeper understanding of thesystem, it helps to know a little bit about the internals of MongoDB, though.
BSONDocuments in MongoDB are an abstract concept—the concrete representation of adocument varies depending on the driver/language being used. Because documents areused extensively for communication in MongoDB, there also needs to be a represen-tation of documents that is shared by all drivers, tools, and processes in the MongoDBecosystem. That representation is called Binary JSON (BSON).
BSON is a lightweight binary format capable of representing any MongoDB documentas a string of bytes. The database understands BSON, and BSON is the format in whichdocuments are saved to disk.
When a driver is given a document to insert, use as a query, and so on, it will encodethat document to BSON before sending it to the server. Likewise, documents beingreturned to the client from the server are sent as BSON strings. This BSON data isdecoded by the driver to its native document representation before being returned tothe client.
The BSON format has three primary goals:
EfficiencyBSON is designed to represent data efficiently, without using much extra space.In the worst case BSON is slightly less efficient than JSON and in the best case(e.g., when storing binary data or large numerics), it is much more efficient.
TraversabilityIn some cases, BSON does sacrifice space efficiency to make the format easier totraverse. For example, string values are prefixed with a length rather than relying
179

on a terminator to signify the end of a string. This traversability is useful when theMongoDB server needs to introspect documents.
PerformanceFinally, BSON is designed to be fast to encode to and decode from. It uses C-stylerepresentations for types, which are fast to work with in most programminglanguages.
For the exact BSON specification, see http://www.bsonspec.org.
Wire ProtocolDrivers access the MongoDB server using a lightweight TCP/IP wire protocol. Theprotocol is documented on the MongoDB wiki but basically consists of a thin wrapperaround BSON data. For example, an insert message consists of 20 bytes of header data(which includes a code telling the server to perform an insert and the message length),the collection name to insert into, and a list of BSON documents to insert.
Data FilesInside of the MongoDB data directory, which is /data/db/ by default, there are separatefiles for each database. Each database has a single .ns file and several data files, whichhave monotonically increasing numeric extensions. So, the database foo would bestored in the files foo.ns, foo.0, foo.1, foo.2, and so on.
The numeric data files for a database will double in size for each new file, up to amaximum file size of 2GB. This behavior allows small databases to not waste too muchspace on disk, while keeping large databases in mostly contiguous regions on disk.
MongoDB also preallocates data files to ensure consistent performance. (This behaviorcan be disabled using the --noprealloc option.) Preallocation happens in the back-ground and is initiated every time that a data file is filled. This means that the MongoDBserver will always attempt to keep an extra, empty data file for each database to avoidblocking on file allocation.
Namespaces and ExtentsWithin its data files, each database is organized into namespaces, each storing a specifictype of data. The documents for each collection have their own namespace, as doeseach index. Metadata for namespaces is stored in the database’s .ns file.
The data for each namespace is grouped on disk into sections of the data files, calledextents. In Figure C-1 the foo database has three data files, the third of which has beenpreallocated and is empty. The first two data files have been divided up into extentsbelonging to several different namespaces.
180 | Appendix C: MongoDB Internals
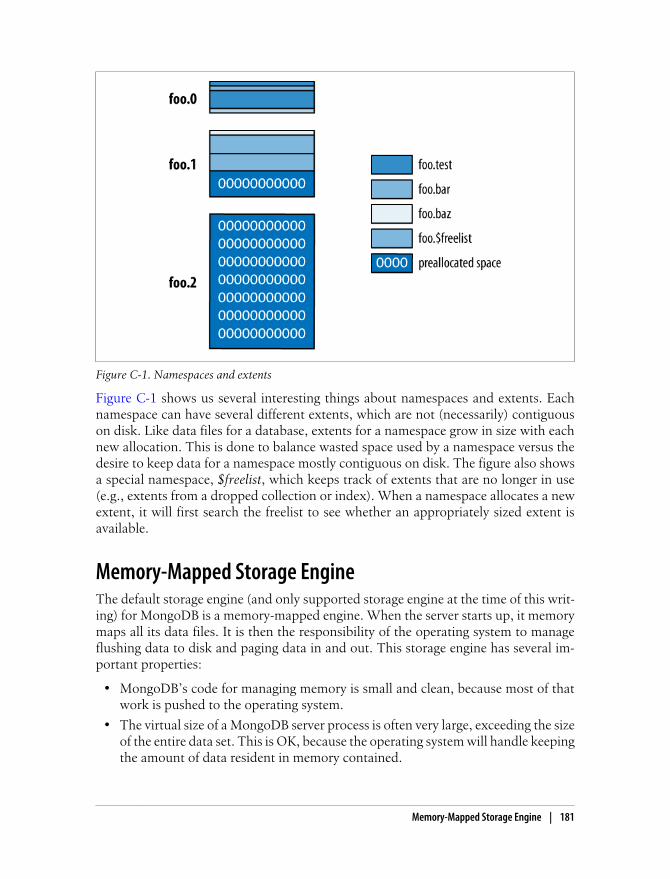
Figure C-1 shows us several interesting things about namespaces and extents. Eachnamespace can have several different extents, which are not (necessarily) contiguouson disk. Like data files for a database, extents for a namespace grow in size with eachnew allocation. This is done to balance wasted space used by a namespace versus thedesire to keep data for a namespace mostly contiguous on disk. The figure also showsa special namespace, $freelist, which keeps track of extents that are no longer in use(e.g., extents from a dropped collection or index). When a namespace allocates a newextent, it will first search the freelist to see whether an appropriately sized extent isavailable.
Memory-Mapped Storage EngineThe default storage engine (and only supported storage engine at the time of this writ-ing) for MongoDB is a memory-mapped engine. When the server starts up, it memorymaps all its data files. It is then the responsibility of the operating system to manageflushing data to disk and paging data in and out. This storage engine has several im-portant properties:
• MongoDB’s code for managing memory is small and clean, because most of thatwork is pushed to the operating system.
• The virtual size of a MongoDB server process is often very large, exceeding the sizeof the entire data set. This is OK, because the operating system will handle keepingthe amount of data resident in memory contained.
Figure C-1. Namespaces and extents
Memory-Mapped Storage Engine | 181

• MongoDB cannot control the order that data is written to disk, which makes itimpossible to use a writeahead log to provide single-server durability. Work isongoing on an alternative storage engine for MongoDB to provide single-serverdurability.
• 32-bit MongoDB servers are limited to a total of about 2GB of data per mongod.This is because all of the data must be addressable using only 32 bits.
182 | Appendix C: MongoDB Internals

Index
Symbols32-bit integer type, 1664-bit floating point number type, 1664-bit integer type, 16$ (dollar sign) reserved character, 8
in conditionals, 45key names and, 6in update modifiers, 28
using to add, change, or remove key/value pairs, 30
. (dot)dot notation in queries for embedded keys,
54in namespaced subcollection names, 8key names and, 6
\0 (null character), 8" " (quotes, double), using in strings, 28' ' (quotes, single), using with strings, 28_ (underscore), key names starting with, 6
AaddShard command, 148$addToSet array modifier, 33addUser( ) method, 118admin database, 9
switching to, 114users as superusers, 118
admin interface, 115administration, 3, 111–125
authentication basics, 118backup and repair, 121–125
repairing corrupted data files, 124slave backups, 124using fsync and lock, 123
using mongodump and mongorestore,122
file-based configuration, 113monitoring, 114–118of replication, 141
authentication, 142changing oplog size, 142diagnostics, 141
security and authentication, 118–121how authentication works, 120other security considerations, 121
of sharding, 150–153config collections, 150printShardingStatus( ) function, 152removeshard commands, 152
starting MongoDB from command line,112–113
stopping MongoDB, 114age-out (automatic), of data in capped
collections, 99aggregation, 3aggregation tools, 81–92
count( ) function, 81distinct command, 81finalizers, 85function as grouping key, 86group command, 82MapReduce, 86–92
categorizing web pages (example), 89finding all keys in collection (example),
87–89MongoDB and MapReduce, 90
$all conditional, 51, 159allowLocal key, 148
We’d like to hear your suggestions for improving our indexes. Send email to [email protected].
183
analytics application (real-time), using Python,168–171
application examples, 155–171custom submission forms, using Ruby
driver, 164–167custom form submission, 166installing Ruby driver, 164object mappers and MongoDB with
Rails, 167using Ruby driver, 165
news aggregator using PHP driver, 160–164
designing news aggregator, 162installing PHP driver, 160trees of comments, 162using PHP driver, 161voting, 164
real-time analytics using Python driver, 168handling a request, 170installing PyMongo, 168other considerations, 171schema, 169using analytics data, 170using PyMongo, 168
search engine for chemicals, using Javadriver, 155–159
coding in Java, 158installing Java driver, 155issues with, 159schema design, 156using Java driver, 155
arbiter nodes, 134arbiterOnly key, 134array modifiers, 31–34
$ positional operator, 34$addToSet, 33
using with $each, 33$ne, 32$pop, 34$pull, 34$push, 32positional array modifications, 34speed of, 35
array of ancestors tree, 162array type, 17ArrayList class (Java), 158arrays, 19
indexing of elements in MongoDB, 157querying, 51–53
$all conditional, 51$size conditional, 52$slice operator, 52
ascending sorts, 58authentication, 118–120
basics of, 118how it works, 120replication with, 142
autosharding, 143, 144(see also sharding)
Bbackground fsyncs, 117background option for building indexes, 76backups, 121–124
restores from, using mongorestore, 123slave server, 124using fsync and lock commands, 123using mongodump, 122
BasicDBObject class (Java), 156batch inserts, 23binary data type, 17binary files, storing (see GridFS)blocking
during index creation, 76for replication, 140
boolean type, 16$box option, finding points within rectangle,
78BSON, 179bson gem and bson_ext gem, 165buildInfo command, 95
Ccapped collections, 97–101
creating, 99natural sorting, 99properties and use cases, 98tailable cursors, 101
case-sensitivity in MongoDB, 6$center option, finding points within a circle,
78characters
not allowed in database names, 9not allowed in keys, 6
chunks, 144distribution over shards, 145information about, 151
184 | Index

splitting documents into (GridFS), 103chunkSize key (GridFS), 104client, shell as stand-alone MongoDB client,
12$cmd collection, 94code examples from this book, xvcode type, 17collections, 5, 7
capped (see capped collections)dropping all indexes on, 77enabling sharding on, 148fetching collections with inconvenient
names, 15fixed-size, 3fully qualified names (namespaces), 9grouped into databases by MongoDB, 9help for, 14inserting documents into, 23MongoCollection, 161names of, and index name size, limiting for
namespaces, 76naming, 8reasons for separate collections, 7schema-free, 7subcollections, 8system.indexes, 75
collStats command, 95com.mongodb and com.mongodb.gridfs
packages, 155com.mongodb.BasicDBObject class, 156com.mongodb.Mongo class, 155command line, starting MongoDB, 112command response, 94commands (see database commands)comparison operators, 47comparison order for types, 58compound geospatial indexes, 78compound unique indexes, 70condition, including for group command, 83conditionals, 47–49
$not metaconditional, 49in OR queries, 48rules for, 49
config database, 9config servers, 147
setting up multiple, 149starting, 147
configuration file, 113connect( ) method, 177
Connection class (PyMongo), 168Connection class (Ruby), 165connection pooling, 44connections, client requests and, 43convertToCapped command, 99count( ) function, 81create operations, MongoDB shell, 12createCollection command, 99Ctrl-C to stop MongoDB, 114currentOp command, 124cursor.hasNext( ) method, 56cursor.next( ) method, 56cursors, 56–63
advanced query options, 60avoiding large skips, 59–60client-side and database, 63death and cleanup of, 63getting consistent results, 61limits, skips, and sorts, 57tacking explain onto, 70tailable, 101
Ddata directory, 10, 121
creating on Linux, Mac OS X, and Solaris,175
creating on Windows, 174data files, 180data model, document-oriented, 1data processing, using slave servers, 137data types, 15–22
arrays, 19basic, 16changing key type with $set update
modifier, 29comparison order, 58dates, 19embedded documents, 20_id and ObjectIds, 20numbers, 18type-sensitivity in MongoDB, 6type-specific queries, 49–53used by PHP driver, 161values in documents, 6
database commands, 93–97how they work in MongoDB, 94listing commands supported by MongoDB
server, 95
Index | 185
most frequently used MongoDB commands,95
database references (DBRefs), 107–109definition of DBRef, 107driver support for, 108example schema, 107when to use, 108
databasesenabling sharding on, 148help for database-level commands, 14listing for shards, 151in MongoDB, 9, 161
datesdata types for, 19date type, 17
db variable, 12db.addUser( ) method, 118db.drop_collection( ) function, 26db.eval( ) function, 104db.getCollection( ) function, 15db.listCommands( ) function, 95db.printReplicationInfo( ) function, 141db.runCommand( ) function, 93db.version function, 15DBObject interface, 156decrementing, using $inc update modifier, 30deletes
all indexes on a collection, 77delete operations, MongoDB shell, 14
descending sorts, 58diagnostic tools for replication, 141dictionaries in Python, 169distinct command, 81, 95
listing unique filenames stored in GridFS,104
document-oriented databases, 1documents
in Java, 156in MongoDB, 5in PHP, 161in Python, 168real-time analytics application using
PyMongo, 169removing outdated, in analytics application,
171in Ruby, gotchas with, 165
dot notation (.), querying for embedded keys,54
doubles, representing numbers in MongoDB,18
drop command, 94, 95dropDatabase command, 95dropIndexes command, 76, 95drop_collection( ) function, 26duplicates
dropping when creating indexes, 70duplicate keys, not allowed in MongoDB, 6
dynamic query optimizer (see query optimizer)
E$each array modifier, 33$elemMatch conditional, 55embedded document type, 17embedded documents, 20
indexing keys in, 68querying on, 53
emit function, 87encrypting traffic between clients and server,
121errors
catching normal errors with safe operations,43
getLastError command, 38, 93, 96escaping special characters, 28eval( ) function, 104example applications (see application
examples)$exists conditional, 50explain tool, 70–75
output from query using index on two keys,73
output from query with index on single key,72
output from simple query on databasewithout indexes, 71
extents, 180
Ffeatures in MongoDB, 2file storage, 3files, storing (see GridFS)files_id keys, 103finalizers, 85
passing finalize function to MapReduce, 90find( ) method, 13, 45
chaining limit( ) method to, 57
186 | Index

chaining skip method to, 57geospatial queries, 77sorting returns, 58specifying keys to return, 46
findAndModify command, 39–41, 96values for keys, 40
findOne( ) method, 13fire-and-forget functions, 41fixed-size collections, 3floating-point numbers, 16
representation of integers as doubles inMongoDB, 18
forEach loop, using cursor class in, 56fs.chunks collection, 103fs.files collection, 103fsync command, 123functions
JavaScript, defining and calling, 11printing JavaScript source code for, 14using as keys, 86
GgeoNear command, 78geospatial indexes, 77–79
assumption of a flat plane, spherical earthand, 79
compound, 78values range, 77
getLastError command, 38, 93, 96Github, 160gps key, 77GridFS, 101–104
file storage, 101getting started with, using mongofiles, 102how it works, 103use of compound unique index, 70working with, from MongoDB drivers, 102
group command, 82component keys, 83condition for documents to be processed,
83using a finalizer, 85using function as key, 86
$gt (greater than) conditional, 47$gte (greater than or equal to) conditional, 47
Hhandshake command, 140
hardware failures, 41hashes in Ruby, 165hasNext( ) method, 56help command, 14hint tool, 75HTTP admin interface, 10, 115
I_id keys, 20
autogeneration of, 22DBRefs versus, 108GridFS, 103unique indexes on, 69
immortal function, 63importing data, using batch inserts, 24$in conditional
type-specific queries, 50using in OR queries, 48
$inc update modifier, 28incrementing a counter, 169incrementing and decrementing with, 30
indexesadministration of, 75
adding, removing, and dropping allindexes, 76
$all conditional and, 159for collections of documents in MongoDB,
7compound geospatial indexes, 78dropIndexes command, 95forcing Mongo to use indexes you want for
a query, 75real-time analytics using PyMongo
(example), 170unique, 69
compound unique indexes, 70dropping duplicates, 70
uniquely identifying, 69indexing, 2, 65–79
on all keys in your query, 66arrays, selecting elements by index, 34chemical search engine using Java driver
(example), 157creating compound index, 158
disadvantage of indexes, 67geospatial, 77–79keys in embedded documents, 68on multiple keys, considering index
direction, 66
Index | 187

questions to consider when creatingindexes, 68
scaling indexes, 68on single key used in query, 65for sorts, 69using explain, 70–75using hint, 75
insert( ) method, 12inserts, 23
batch inserts, 23into capped collections, 98insert( ) method, 12interleaved inserts/queries, 44internals and implications, 24safe inserts for documents with duplicate
value for unique key, 69safe operations, 42upserts, 36
installation, MongoDB, 173–176choosing a version, 173POSIX install on Linux, Mac OS X, and
Solaris, 175Windows install, 174
integers32- and 64-bit, 16basic data types and, 16representation as floating-point numbers,
18isMaster command, 96
JJava
documentation for Java driver and articles,156
search engine for chemical compounds,155–159
java.util.ArrayList, 158JavaScript
Date class, 19executing as part of query with $where
clause, 55MongoDB shell, 11server-side execution, disallowing, 121server-side scripting, 104–107
db.eval( ) function, 104security and, 106stored JavaScript, 105
stored, in MongoDB, 3JSON (JavaScript Object Notation), 16
data types, 16
K$keyf key, 86key/value pairs
functions as keys, 86keys in MapReduce operations, 90in MongoDB documents, 6specifying keys to return with find method,
46keys
removing with $unset update modifier, 29setting value with $set update modifier, 29
kill command, 114
Llatitude and longitude in geospatial indexing,
77length key (GridFS), 103libraries (JavaScript), leveraging in MongoDB
shell, 11limits for query results, 57Linux
installing MongoDB, 175installing PHP driver, 161
listCommands command, 95, 96listDatabases command, 96local database, 9, 139
user for slave and master server, 142local.system.replset namespace, 133local.system.users namespace, 142localhost, running shard on, 148locking
fsync command, holding a lock, 123information about, 117
loggingcreating function for JavaScript code, 105inspecting MongoDB log after installation,
113use of capped collections for, 99
$lt (less than) conditional, 47
MMac OS X
installing MongoDB, 175installing PHP driver, 160
manual sharding, 143
188 | Index

map collection, finding all documents in orderby distance from a point, 77
map step (MapReduce), 86getting all keys of all documents in
collection, 87MapReduce, 3, 86–92
finalize function passed to, 90finding all keys in a collection, 87
MapReduce function in MongoDB, 88metainformation in document returned,
88getting more output from, 92keeping output collections from, 90optional keys that can be passed to, 90running on subset of documents, 91using scope with, 92
master-slave replication, 127–130adding and removing sources, 129options, 128
Math.random function, 60maximum value type, 17md5 key (GridFS), 104memory management, 3
information on memory from serverStatus,117
keeping index in memory, 68memory-mapped storage engine, 181metadata for namespaces, 180minimum value type, 17modifiers, update (see update modifiers)mongo (shell), 177–178, 177
(see also shell)--nodb option, 177utilities, 178
Mongo class (Java), 155mongo gem, installing, 164Mongo::Connection class (Ruby), 165mongod executable
--master option, 128--replSet option, 132--rest option, 115running, 10--slave option, 128startup options, 112
--bindip, 121--config, 112--dbpath, 112, 176--fork, 112--logpath, 112
--nohttpinterface, 115--noscripting, 121--oplogSize, 139--port, 112, 115--repair, 125
stopping, 10, 114mongod.exe, installation options, 175MongoDB
advantages offered by, 1–4data types, 15getting and starting, 10installing, 173–176shell, 11–15
MongoDB Java Language Center, 156mongodump utility, 122mongofiles utility, 102mongorestore utility, 123mongos routing process, 144, 147
connecting to, 148running multiple, 150
mongostat utility, 118monitoring, 114–118
server health and performance, usingserverStatus, 116
third-party plug-ins for, 118using admin interface, 115using mongostat for serverStatus output,
118
Nnamespaced subcollections, 8namespaces, 9
and extents, 180for indexes, 76
namingcollections, 8databases, 9indexes, 69
natural sorts, 99$ne (not equal) conditional, 47$near conditional, 77news aggregator using PHP (example), 160–
164next( ) method, using on cursor, 56$nin (not in) conditional, 48nodes
master and slave (see master-slavereplication)
types in replica sets, 133
Index | 189
$not conditional, 49null character (\0), 8null type, 16
queries for, 49numbers, data types for, 18
Oobject id type, 17ObjectIds, 20–22oplog, 99, 138
changing size of, 142getting information about, 141
OR queries, 48org.bson.DBObject interface, 156
Ppackage manager, installing MongoDB from,
176pagination
combining find, limit, and sort methods for,58
query results without skip, 59partitioning, 143passive nodes, 134performance, 3
index creation and, 76indexes and, 67price of safe operations, 42speed of update modifiers, 35
Perl$ (dollar sign) in MongoDB update
modifiers, 28Perl Compatible Regular Expression (PCRE)
library, 50PHP
$ (dollar sign) in MongoDB updatemodifiers, 28
news aggregator application (example),160–164
using tailable cursor in, 101PID (process identifier) for ObjectId-generating
process, 22ping command, 96plain queries, 60point-in-time data snapshots, 123points
finding document in map collection by orderof distance from, 77
finding in a shape, 78$pop array modifier, 34positional operator ($), 34POSIX install (MongoDB), 175preallocation of data files, 180primary, 130primary node, 133
failure of, and election of new primary, 135printReplicationInfo( ) function, 141printShardingStatus( ) function, 152priority key, 134processes
PID for ObjectId-generating process, 22status of, 39
$pull array modifier, 34$push array modifier, 32PyMongo
DBRef type, 108real-time analytics application (example),
168–171pymongo.connection.Connection class, 168Python Package Index, 168
Qqueries, 45–63
commands implemented as, 94cursors, 56–63
advanced query options, 60avoiding large skips, 59–60getting consistent results, 61limits, skips, and sorts, 57
find( ) method, 45specifying keys to return, 46
geospatial, 77–79handling on slave servers, 137matching more complex criteria, 47
conditionals, 47$not conditional, 49OR queries, 48rules for conditionals, 49
querying on embedded documents, 53restrictions on, 47type-specific, 49–53
arrays, 51–53null type, 49regular expressions, 50
$where clauses in, 55query optimizer, 3
choosing index to use, 75
190 | Index

reordering query terms to take advantage ofindexes, 67
quotation marks in strings, 28
Rrandom function, 60range queries, using conditionals, 47read scaling with slave servers, 137real-time analytics, MongoDB for, 169reduce step (MapReduce), 86
calling reduce in MongoDB (example), 87references to documents, uniquely identifying
(see database references)regular expressions, 50
MongoRegex, 161regular expression type, 17
relational databasesdocument-oriented databases versus, 1features not available in MongoDB, 3
remove( ) function, 14query document as parameter, 25
removes, 25safe operations, 42speed of, 25
removeshard command, 152renameCollection command, 96repair of corrupt data files, 124repairDatabase command, 96repairDatabase( ) method, 125replica sets, 130
failover and primary election, 135initializing, 132
keys in initialization document, 133nodes in, 133shards as, 150
replication, 127–142administration of, 141
authentication, 142changing oplog size, 142diagnostics, 141
blocking for, 140master-slave, 127–130oplog, 138performing operations on a slave, 136replica sets (see replica sets)replication state and local database, 139syncing slave to master node, 139
replSetInitiate command, 132requests
batch inserts and, 24connections and, 43
reserved database names, 9REST support, 115restores, 121
(see also administration, backup and repair)using mongorestore utility, 123
resync command, 139retrieve operations, MongoDB shell, 13routing process (mongos), 144, 147, 148Ruby
custom submission forms application(example), 164–167
object mappers and using MongoDB withRails, 167
RubyGems, 164runCommand( ) function, 93
Ssafe operations, 42
catching normal errors, 43save function, 38scaling with MongoDB, 2schema-free collections, 7schema-free MongoDB, 2schemas
chemical search engine using Java driver(example), 156
example schema using DBRefs, 107real-time analytics application using
PyMongo, 169scope, using with MapReduce, 92search engine for chemicals, using Java driver
(example), 155–159secondaries, 130secondary nodes, 133security
authentication, 118–120execution of server-side JavaScript, 106other considerations, 121
server-side scripting, 104–107disallowing server-side JavaScript
execution, 121servers
database server offloading processing andlogic to client side, 3
for production sharding, 150serverStatus command, 96, 116–118
Index | 191

information from, printing with mongostat,118
$set update modifier, 29shapes, finding all documents within, 78shardCollection command, 149sharding, 143–153
administration, 150–153config collections, 150printShardingStatus command, 152removeshard command, 152
autosharding in MongoDB, 144database variable pointing to config
database, 178defined, 143production configuration, 149setting up, 147
sharding data, 148starting servers, 147
shard keys, 145effects of shard keys on operations, 146existing collection, 145incrementing, versus random shard keys,
146when to shard, 145
shards, 144adding a shard, 148defined, 147listing in shards collection, 150replica sets as, 150
shell, 5, 11–15, 177–178connecting to database, 177create operations, 12creating a cursor, 56delete operations, 14figuring out what functions are doing, 14help with, 14JavaScript functions provided by,
autogenerated API, 15MongoDB client, 12repairing single database on running server,
125retrieve operations, 13running, 11running scripts, 37save function, 38starting without connecting to database,
177update operations, 13utilities, 178
shutdown command, 114SIGINT or SIGTERM signal, 114skips
avoiding large skips, 59–60finding a random document, 59
skipping query results, 57slave nodes
adding and removing sources, 129secondaries, in replica sets, 130setting up, 128syncing to master node, 139
slave serversbackups, 124performing operations on, 136
$slice operator, 52snapshots of data, 123Solaris, installing MongoDB, 175sorting
find( ) method results, 58indexing for, 69natural sorts, 99
sources collection, 140sources for slave nodes, 129standard nodes, 134starting MongoDB, 111–113
file-based configuration, 113from command line, 112
status of processes, 39stopping MongoDB, 114storage engine, 113, 181strings
matching with regular expressions, 50string type, 16
subcollections, 8accessing using variables, 15
submission forms (custom), using Ruby, 164–167
symbol type, 17syncedTo, 140syncing slave to master node, 139system prefix, collection names, 8system.indexes collection, 75system.js collection, 105system.namespaces collection, lists of index
names, 76
Ttable scans, 66tailable cursors, 101
192 | Index

third-party plug-ins for monitoring, 118timestamps
in ObjectIds, 21stored in syncedTo, 140uploadDate in GridFS, 104
trees of comments (news aggregator example),162
type-sensitivity in MongoDB, 6
Uundefined type, 17Unix, installing PHP driver, 161update modifiers, 27–36
$ positional operator, 34$inc, 28, 30$set, 29$unset, 29array modifiers, 31–34
$addToSet, 33$ne, 32$pop, 34$pull, 34$push, 32
speed of, 35updates, 26
replacing a document, 26returning updated documents, 39–41safe operations, 42update operations, MongoDB shell, 13updating multiple documents, 38upserts, 36using modifiers, 27–36
uploadDate key (GridFS), 104upserts
real-time analytics application (example),170
real-time analytics using MongoDB, 169save shell helper function, 38
Vvalues in documents, 6variables
JavaScript, in shell, 12using to access subcollections, 15
versions, MongoDB, 173voting, implementing, 164
Wweb page for this book, xviweb pages
categorizing, using MapReduce, 89tracking views with analytics application,
168–170$where clauses in queries, 55Windows systems
installing MongoDB, 174installing PHP driver, 160running mongod executable, 10
wire protocol, 180$within conditional, 78wrapped queries, 60
Index | 193


About the AuthorsKristina Chodorow is a core contributor to the MongoDB project. She has workedon the database server, PHP driver, Perl driver, and many other MongoDB-relatedprojects. She has given talks at conferences around the world, including OSCON,LinuxCon, FOSDEM, and Latinoware, and maintains a website about MongoDB andother topics at http://www.snailinaturtleneck.com. She works as a software engineer for10gen and lives in New York City.
Michael Dirolf, also a software engineer at 10gen, is the lead maintainer for PyMongo(the MongoDB Python driver), and the former maintainer for the MongoDB Rubydriver. He has also contributed to the MongoDB server and worked on several otherrelated libraries and tools. He has given talks about MongoDB at major conferencesaround the world, but currently resides in New York City.
ColophonThe animal on the cover of MongoDB: The Definitive Guide is a mongoose lemur, amember of a highly diverse group of primates endemic to Madagascar. Ancestral lemursare believed to have inadvertently traveled to Madagascar from Africa (a trip of at least350 miles) by raft some 65 million years ago. Freed from competition with other Africanspecies (such as monkeys and squirrels), lemurs adapted to fill a wide variety of eco-logical niches, branching into the almost 100 species known today. These animals’otherworldly calls, nocturnal activity, and glowing eyes earned them their name, whichcomes from the lemures (specters) of Roman myth. Malagasy culture also associateslemurs with the supernatural, variously considering them the souls of ancestors, thesource of taboo, or spirits bent on revenge. Some villages identify a particular speciesof lemur as the ancestor of their group.
Mongoose lemurs (Eulemur mongoz) are medium-sized lemurs, about 12 to 18 incheslong and 3 to 4 pounds. The bushy tail adds an additional 16 to 25 inches. Females andyoung lemurs have white beards, while males have red beards and cheeks. Mongooselemurs eat fruit and flowers and they act as pollinators for some plants; they are par-ticularly fond of the nectar of the kapok tree. They may also eat leaves and insects.
Mongoose lemurs inhabit the dry forests of northwestern Madagascar. One of the twospecies of lemur found outside of Madagascar, they also live in the Comoros Islands(where they are believed to have been introduced by humans). They have the unusualquality of being cathemeral (alternately wakeful during the day and at night), changingtheir activity patterns to suit the wet and dry seasons. Mongoose lemurs are threatenedby habitat loss and they are classified as a vulnerable species.
The cover image is from Lydekker’s Royal Natural History. The cover font is AdobeITC Garamond. The text font is Linotype Birka; the heading font is Adobe MyriadCondensed; and the code font is LucasFont’s TheSansMonoCondensed.


![Hello, hello, hello! My name is [Host’s name], and I am so · Hello, hello, hello! My name is [Host’s name], and I am so pumped that you’re here with me today as we start our](https://img.pdfslide.us/doc/110x75/5fac1830e4d8f224c7404be0/hello-hello-hello-my-name-is-hostas-name-and-i-am-so-hello-hello-hello.jpg)
![- [Cynthia] Hello, we're live. - Hello. · - [Cynthia] Hello, we're live. - Hello. - [Cynthia] Hello Amber. - Welcome. - [Cynthia] I'm just gonna fix this real quick, cause there's](https://img.pdfslide.us/doc/110x75/5fa80dd6dbea1a2d276a8056/cynthia-hello-were-live-hello-cynthia-hello-were-live-hello-.jpg)