Embed Size (px)
Citation preview
Linux For Embedded Systems For Arabs
Ahmed ElArabawy
Course 102: Understanding Linux
Lecture 14: Users and Permissions
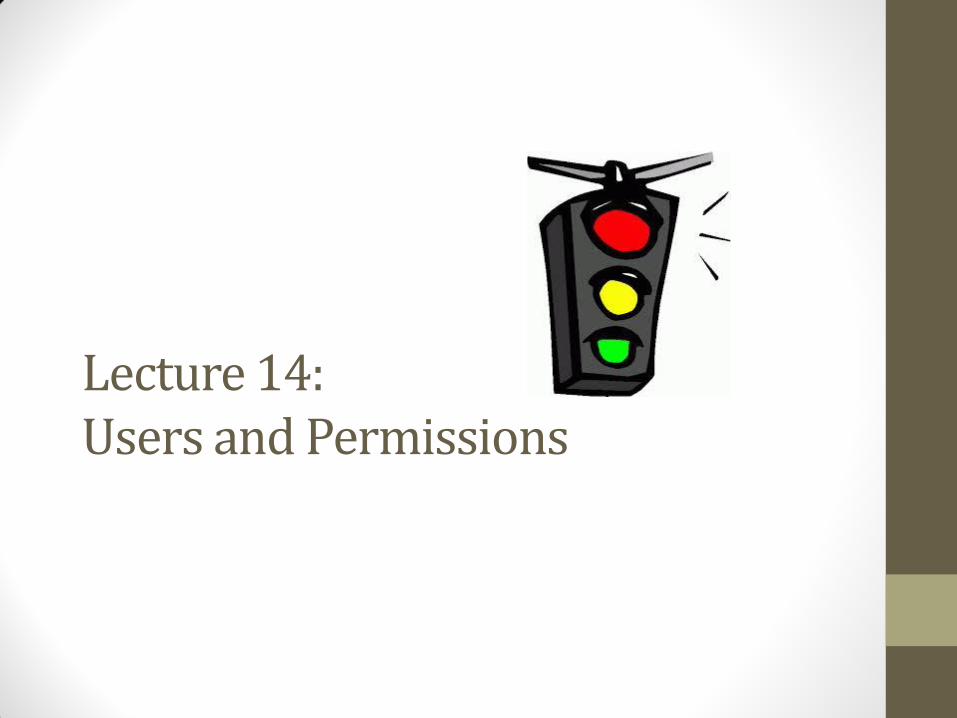
Multi-User System
• Unix was initially created to work with multiple users (before personal computers were introduced)
• Linux inherits multi-user support from UNIX systems
• This resulted in strong support for multi-users in Linux
Multi-User Support in Linux
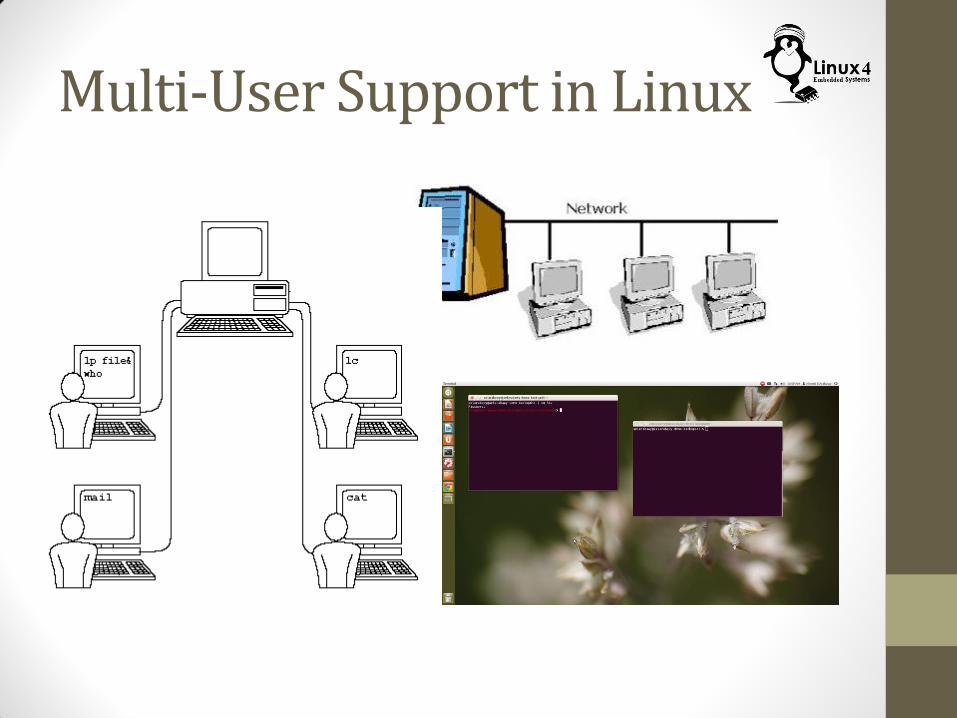
• Multiple users can access the system
• Simultaneously
• Using multiple physical terminals
• Using multiple virtual terminals
• Via a network connections (multiple users logged on to the same Linux machine)
• A mix of all the above
• At different time using the same interface
• Keep in mind, even if one user is using the Linux system, he may still be using multi-User features since there will be the root user as well
Multi-User Support in Linux
Multi-User Support in Linux
• So what does Linux need to do for multiple users
• Enable each user to have his own work area for his private files
• Enable each user to have his own environment settings
• Environment variables such as search paths, ….
• Aliases and shell functions
• Configuration parameters
• Protect each user files and resources from being manipulated by other users (unless the owner gives permission for that)
• Establish a multiple-tiered permission system, so a user maybe able to read a file but not able to modify it
• Enable multiple users to share some resources (such as files) with some level of permissions
• Protect system critical files from normal user access
Multi-User Support in Linux
• Linux provides, • Each user has his own home directory (for his private files and
directories) /home/tom/ or ~/
• Each user has his own environment settings (per user startup scripts),
~/.bashrc
• Each user can have his own resources • Files
• Directories
• Scripts and Binaries
• Sockets
• Devices
• Remember all these resources will be represented in Linux by files
Users and Groups
• Each user is identified with his user-name and user-id (UID)
• Users can join different user groups
• Groups has group-name and group-id (GID)
• A user can be a member of multiple groups
• He can be added to a group
• He can be removed from the group
• Each user has a primary group
• Initially it is a special group created under his same name when the user is created
• Can be modified later

Users and Groups
Resources
• When a user creates a system resource (such as a file, socket, …), the resource will be associated
• Owner User UID
• Owning Group User Primary GID
• Each resource in Linux has knowledge of :
• Which user own it (UID)
• Which group it belongs to (GID)
• Permissions for its owner, group, and the rest of the world
Permissions
• Permissions are associated with system resources not with users
• This means that each system resource will have an owner, and a set of permissions for its owner, and for non-owners
• There are 3 types of access rights
• Read (r)
• Write (w) (change, move, delete)
• Execute (x)
• And three levels of access levels
• User (u)
• Group (g)
• World, or others (o)
Permissions
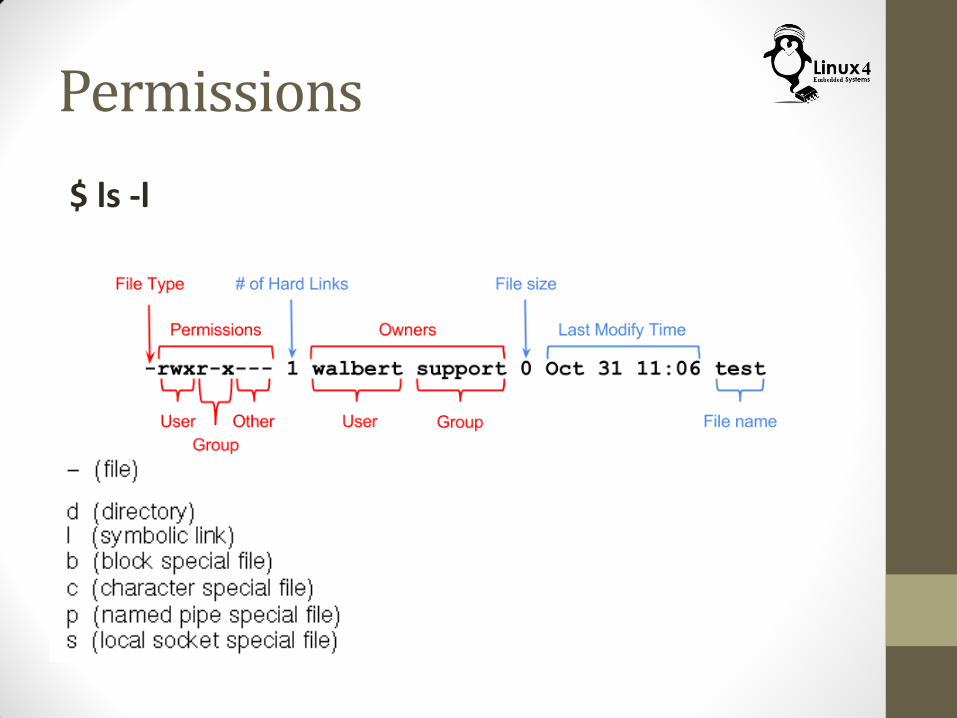
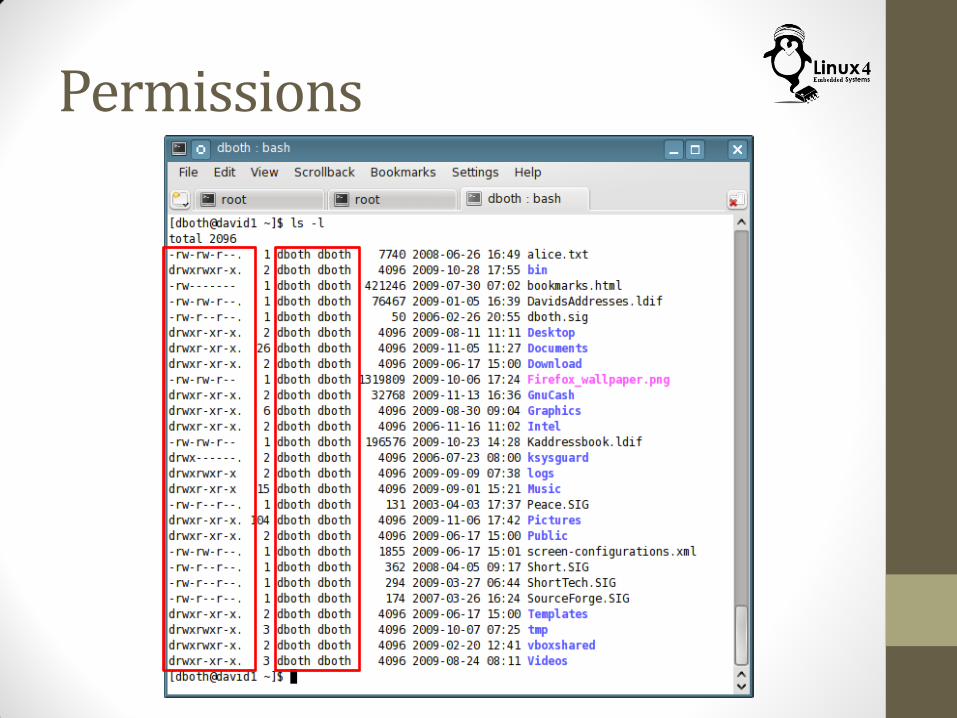
Permissions
$ ls -l
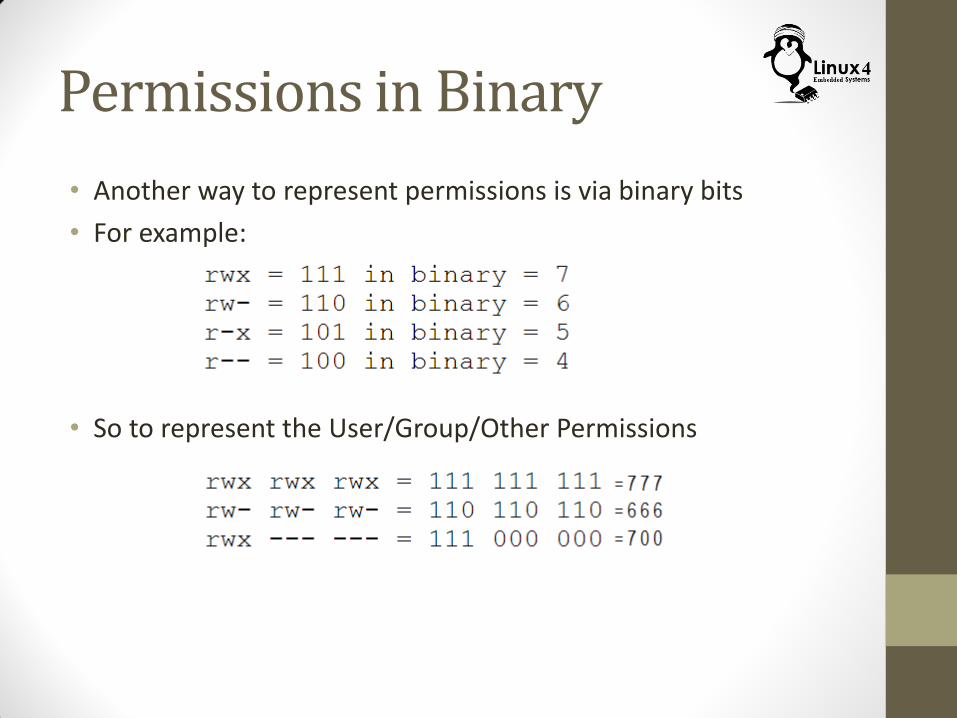
Permissions in Binary
• Another way to represent permissions is via binary bits
• For example:
• So to represent the User/Group/Other Permissions
Permissions of a file
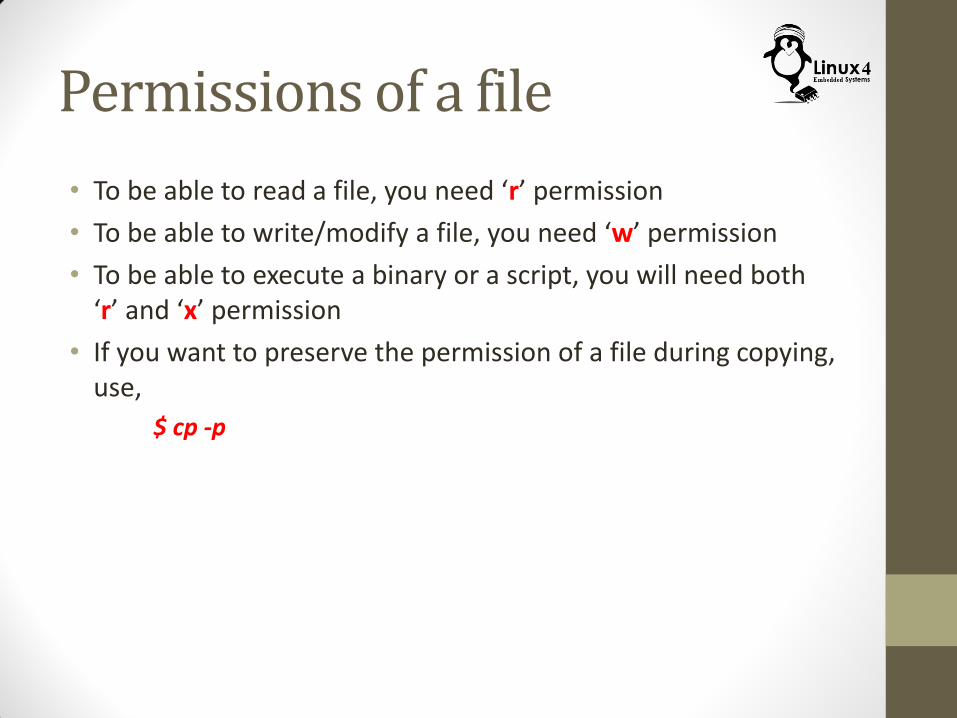
• To be able to read a file, you need ‘r’ permission
• To be able to write/modify a file, you need ‘w’ permission
• To be able to execute a binary or a script, you will need both ‘r’ and ‘x’ permission
• If you want to preserve the permission of a file during copying, use,
$ cp -p
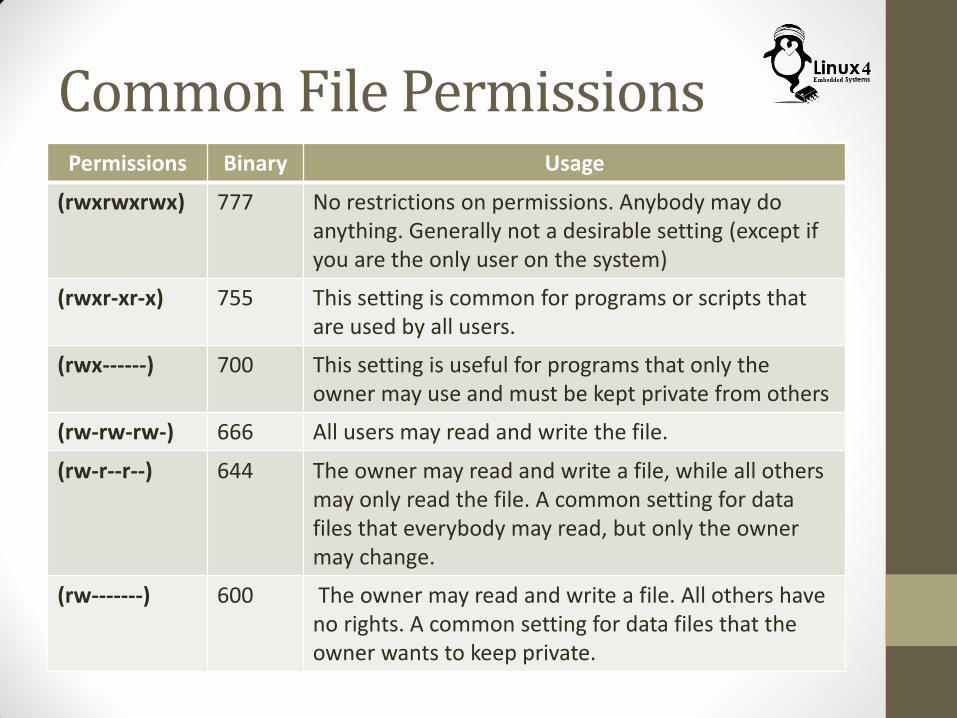
Common File Permissions Permissions Binary Usage
(rwxrwxrwx) 777 No restrictions on permissions. Anybody may do anything. Generally not a desirable setting (except if you are the only user on the system)
(rwxr-xr-x) 755 This setting is common for programs or scripts that are used by all users.
(rwx------) 700 This setting is useful for programs that only the owner may use and must be kept private from others
(rw-rw-rw-) 666 All users may read and write the file.
(rw-r--r--) 644 The owner may read and write a file, while all others may only read the file. A common setting for data files that everybody may read, but only the owner may change.
(rw-------) 600 The owner may read and write a file. All others have no rights. A common setting for data files that the owner wants to keep private.
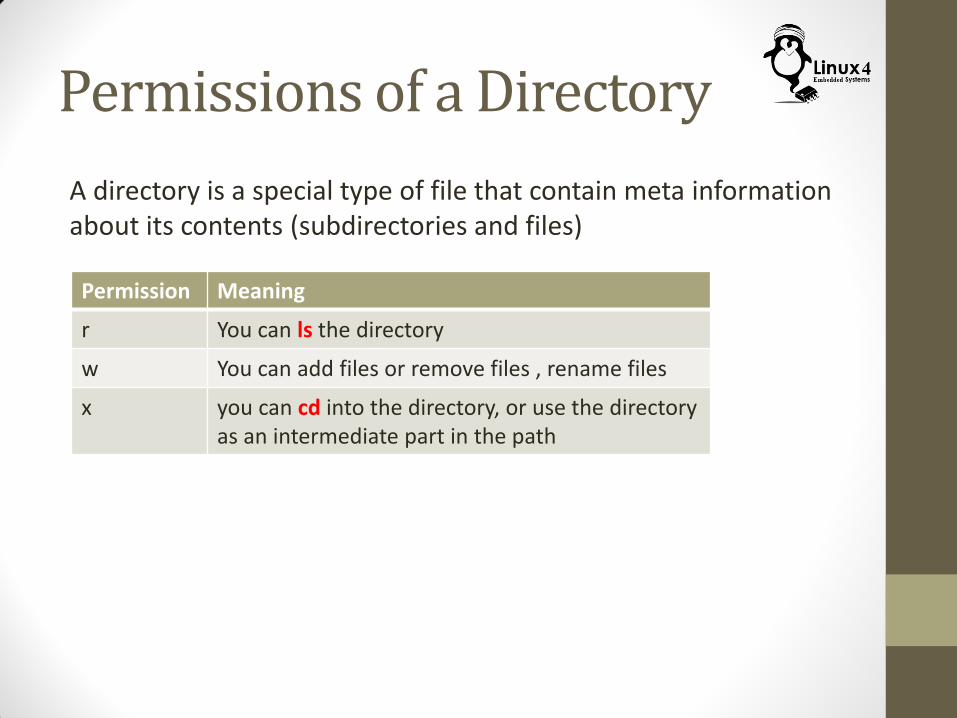
Permissions of a Directory
A directory is a special type of file that contain meta information about its contents (subdirectories and files)
Permission Meaning
r You can ls the directory
w You can add files or remove files , rename files
x you can cd into the directory, or use the directory as an intermediate part in the path
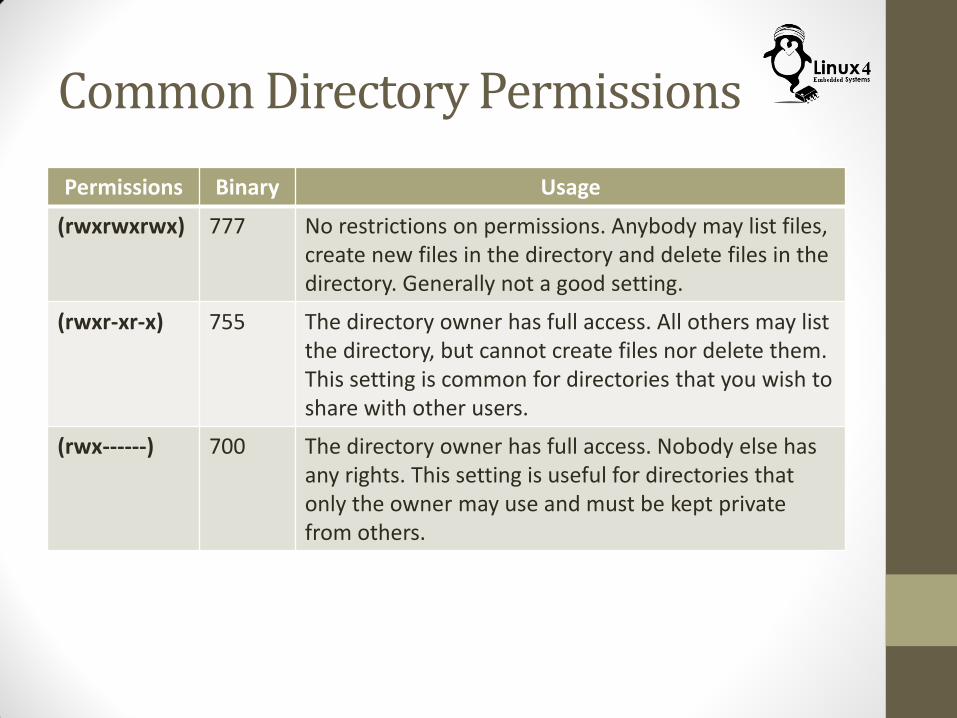
Common Directory Permissions
Permissions Binary Usage
(rwxrwxrwx) 777 No restrictions on permissions. Anybody may list files, create new files in the directory and delete files in the directory. Generally not a good setting.
(rwxr-xr-x) 755 The directory owner has full access. All others may list the directory, but cannot create files nor delete them. This setting is common for directories that you wish to share with other users.
(rwx------) 700 The directory owner has full access. Nobody else has any rights. This setting is useful for directories that only the owner may use and must be kept private from others.
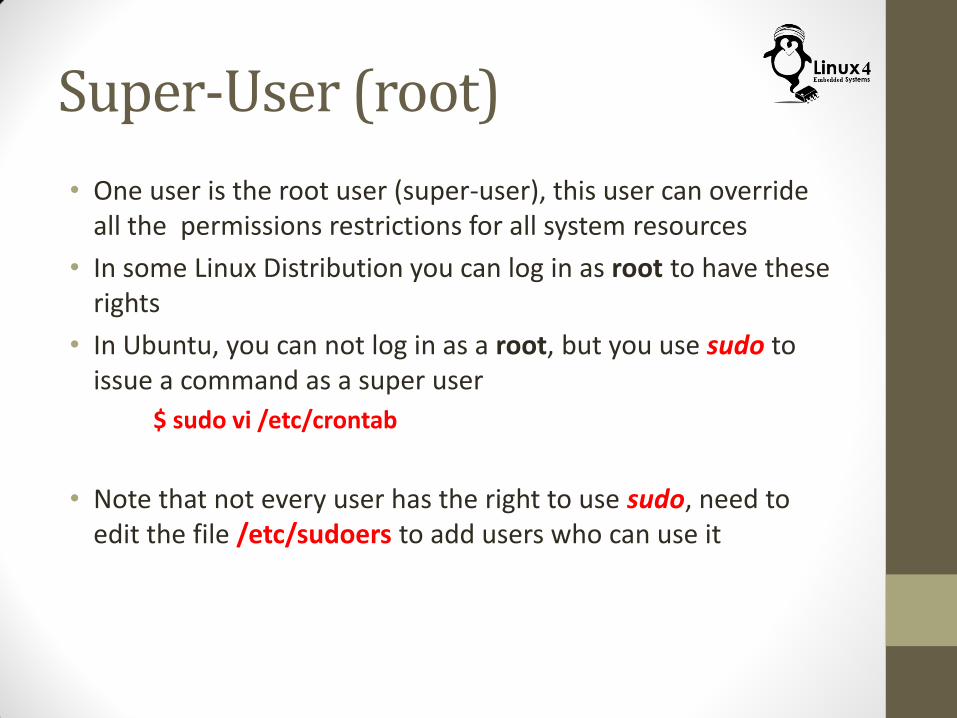
Super-User (root)
• One user is the root user (super-user), this user can override all the permissions restrictions for all system resources
• In some Linux Distribution you can log in as root to have these rights
• In Ubuntu, you can not log in as a root, but you use sudo to issue a command as a super user
$ sudo vi /etc/crontab
• Note that not every user has the right to use sudo, need to edit the file /etc/sudoers to add users who can use it
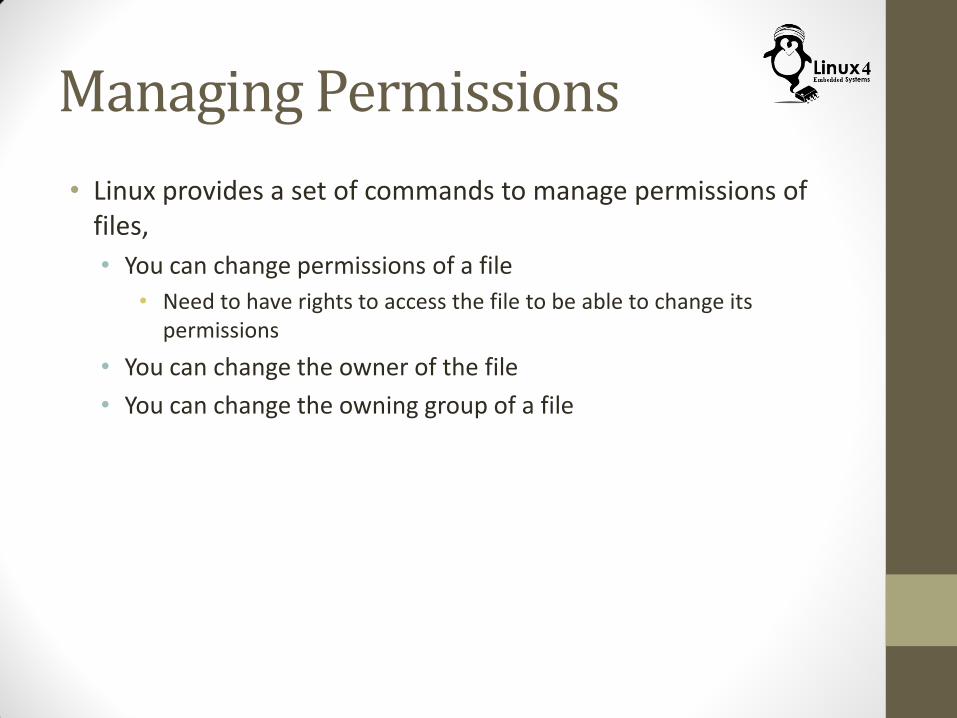
Managing Permissions
• Linux provides a set of commands to manage permissions of files,
• You can change permissions of a file
• Need to have rights to access the file to be able to change its permissions
• You can change the owner of the file
• You can change the owning group of a file
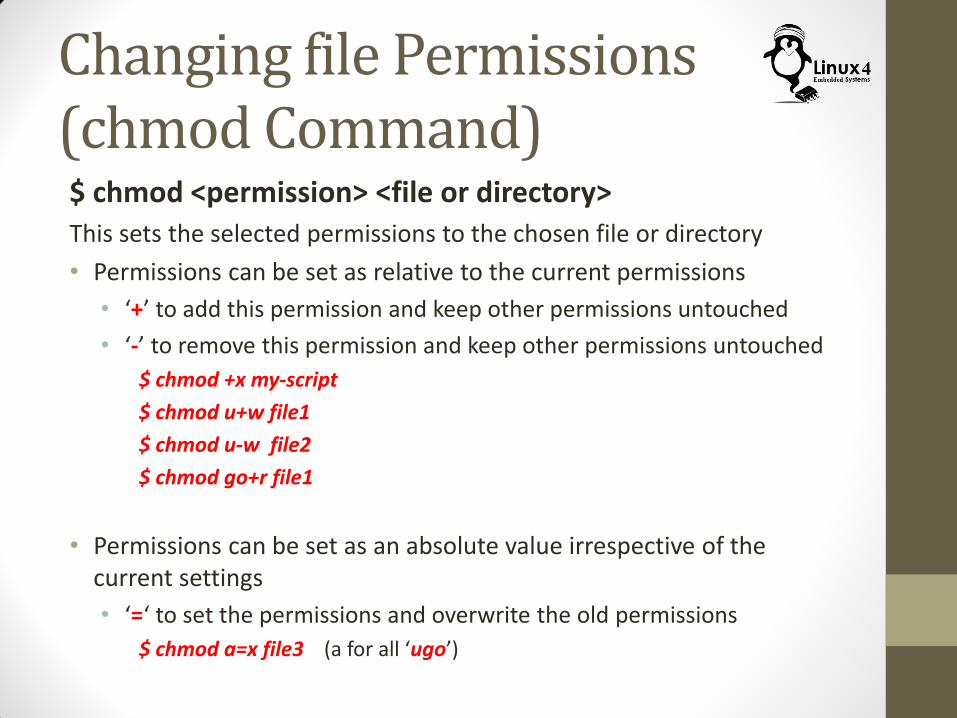
Changing file Permissions (chmod Command) $ chmod <permission> <file or directory> This sets the selected permissions to the chosen file or directory
• Permissions can be set as relative to the current permissions
• ‘+’ to add this permission and keep other permissions untouched
• ‘-’ to remove this permission and keep other permissions untouched
$ chmod +x my-script
$ chmod u+w file1
$ chmod u-w file2
$ chmod go+r file1
• Permissions can be set as an absolute value irrespective of the current settings
• ‘=‘ to set the permissions and overwrite the old permissions
$ chmod a=x file3 (a for all ‘ugo’)
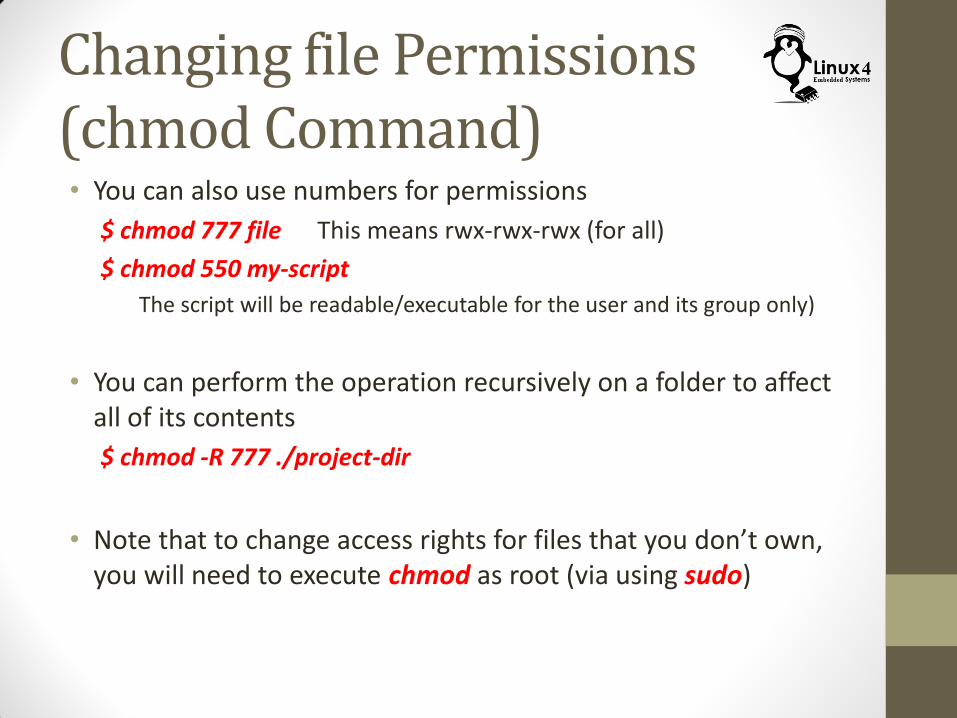
Changing file Permissions (chmod Command) • You can also use numbers for permissions
$ chmod 777 file This means rwx-rwx-rwx (for all)
$ chmod 550 my-script
The script will be readable/executable for the user and its group only)
• You can perform the operation recursively on a folder to affect all of its contents
$ chmod -R 777 ./project-dir
• Note that to change access rights for files that you don’t own, you will need to execute chmod as root (via using sudo)
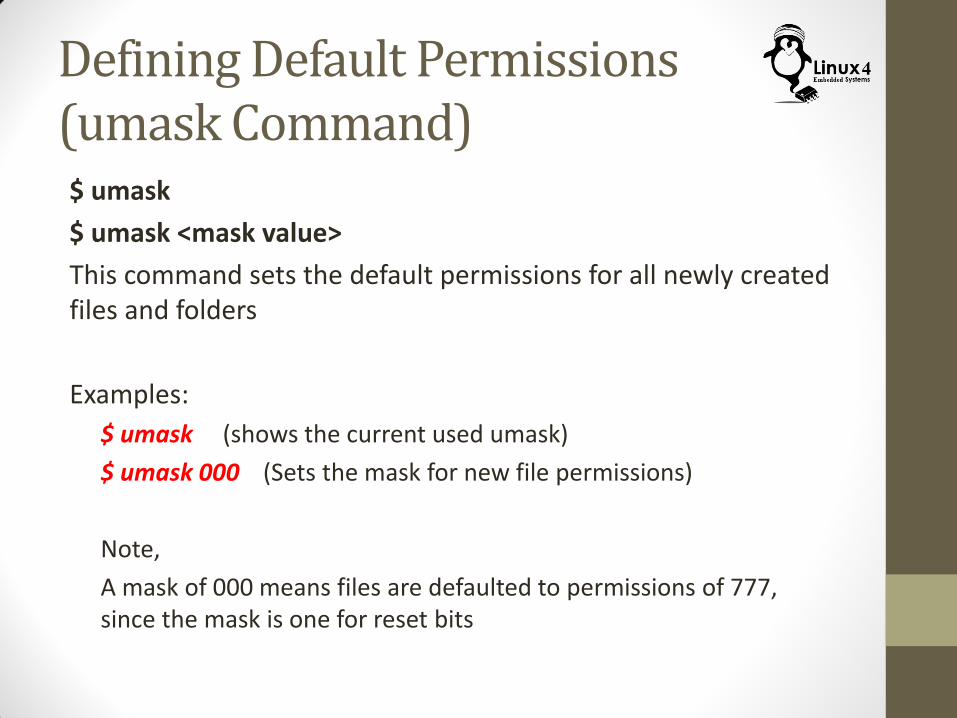
Defining Default Permissions (umask Command) $ umask
$ umask <mask value>
This command sets the default permissions for all newly created files and folders
Examples:
$ umask (shows the current used umask)
$ umask 000 (Sets the mask for new file permissions)
Note,
A mask of 000 means files are defaulted to permissions of 777, since the mask is one for reset bits
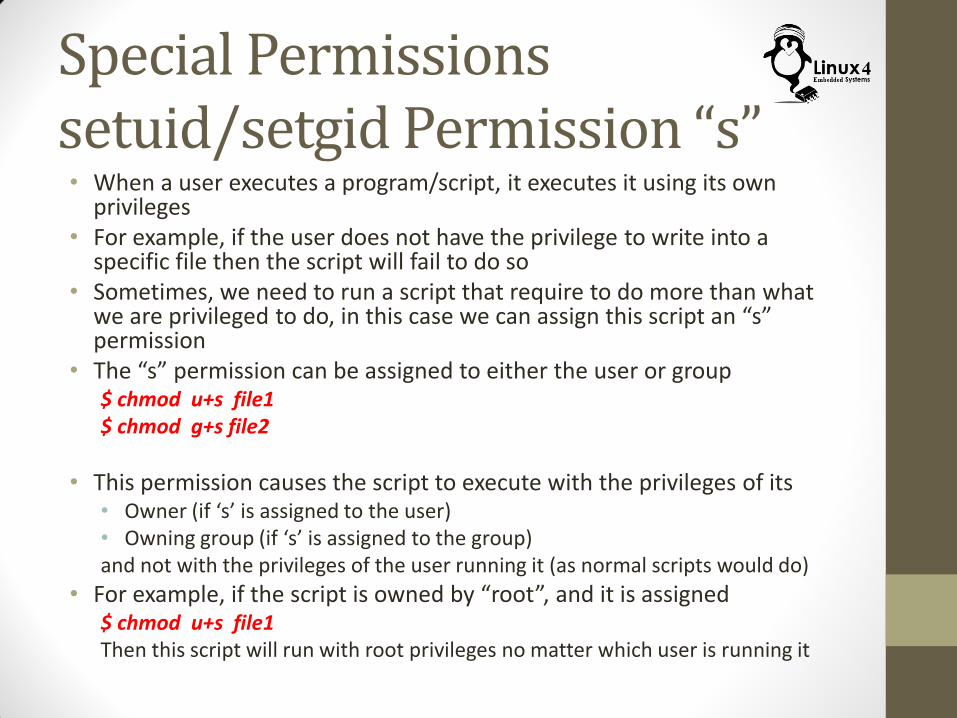
Special Permissions setuid/setgid Permission “s” • When a user executes a program/script, it executes it using its own
privileges • For example, if the user does not have the privilege to write into a
specific file then the script will fail to do so • Sometimes, we need to run a script that require to do more than what
we are privileged to do, in this case we can assign this script an “s” permission
• The “s” permission can be assigned to either the user or group $ chmod u+s file1 $ chmod g+s file2
• This permission causes the script to execute with the privileges of its • Owner (if ‘s’ is assigned to the user) • Owning group (if ‘s’ is assigned to the group) and not with the privileges of the user running it (as normal scripts would do)
• For example, if the script is owned by “root”, and it is assigned $ chmod u+s file1 Then this script will run with root privileges no matter which user is running it
Special Permissions Sticky bit Permission “t” • The sticky bit can be very useful in shared directories
• When a directory has its sticky bit set, then only file owner (or root) can rename or delete any of its content (subdirectories/files)
• In case of the sticky bit not set, any user with write access can do this
• This way, in the shared directory, you can give write access of the directory to different users, so they can add files, but limit the deletion/renaming to file owners or root
$ chmod +t dir1.
Changing the owner of a file (chown Command) $ sudo chown <user>:<group> <file>
This command change the owner of the file to a different user/group
Note that this command will need to have root access
Examples:
$ sudo chown tom file-1 (make the file owned by the user tom)
$ sudo chown -R tom dir-1 (recursive)
$ sudo chown tom:project-group file-1
$ sudo chown :project-group file-1
$ sudo chown tom: file-1 (group is the login group of the user)
Changing the Owning Group (chgrp Command) $ sudo chgrp <group> <file/dir>
This command will change the owning group of the file/dir
Examples:
$ sudo chgrp my-group file.txt
$ sudo chgrp -R my-group ./my-dir
Adding Users (useradd Command) $ useradd <options> <user-name> This command adds a user to the Linux System Examples:
• To Add a user “tom” $ sudo useradd tom
• To Add a user “tom” and create the home directory for him $ sudo useradd -m tom
• To list defaults for user additions, $ sudo useradd -D • To change defaults for user additions, $ sudo useradd –D <options>
Setting User Password (passwd Command) $ passwd
$ sudo passwd <username>
This command is used to set the password of the current user, or of a different user
Examples:
After adding the user “tom”, you will need to setup his password,
$ sudo passwd tom
Then you will need to enter the password for “tom” twice
If you need to change your own password $ passwd
Identifying Users (finger, id, who, whoami Commands) $ id
• Display uid, gid, for current user
$ who
• Lists users logged in the system
$ whoami
• Displays current user name
$ finger
$ finger (info about all users currently logged in)
$ finger username (info about username)
Deleting Users (userdel Command) • To delete a user
$ sudo userdel username
Adding and Deleting Groups (groupadd & groupdel Commands) • To add a group
$ sudo groupadd groupname
• To delete a group
$ sudo groupdel groupname
• To add a user to a group
$ sudo useradd -G <group name> <username>
• To modify the list of groups for a user
$ sudo usermod -G <list of group names> <username>
Displaying Groups (groups Command) $ groups
$ groups username
Display the groups for the current user, or for username
Adding Users and Groups Configuration Files • Users are added in /etc/passwd
• Groups are added in /etc/group
• Passwords of users are encrypted and stored in /etc/shadow
/etc/passwd
• This file contains a list of all users of the system
• For each user, a line shows the user attributes
username:password:uid:gid:name:homedir:login-shell
• Note,
• If password is null string, no password needed
• If password is ‘x’ or ‘*’, it is encrypted in /etc/shadow
/etc/group
• This file contains a list of all groups in the system
• Each line represents a group along with its attribute
groupName:password:gid:userlist
• Same rules apply for the password
/etc/shadow
• This file contains a list of users
• Each line contains a user along with its attributes. Attributes are separated by colons (:)
• User login Id
• Encrypted password (except of ! Or * Or empty)
• Date of Last Password change
• Minimum password age
• Maximum password age
• Password Warning Period
• Password inactivity period
• Other Options
Switching Users (su Command) $ su <Username> This command allows the user to switch to login as a different user Examples:
$ su <username> (switch to username and keep my environment) $ su – <username> (switch to username and load his environment) $ su (switch to the root , this is not acceptable in ubuntu) In all of the above cases, the user will be prompted for a password for the new user, if a password is set for him
• To execute command as root (the only option in ubuntu), we can use the command ‘sudo’ $ sudo <command> • For this to succeed, the username will need to be configured in the
configuration file /etc/sudoers