Embed Size (px)
DESCRIPTION
Build Your 2008R2 2-Node Cluster. Keywords: sql, cluster, citrix, storage
Citation preview

Page 1 of 38
Citrix HIGH AVAILABILITY SQL 2008 R2 TWO-NODE CLUSTER
BY BRIAN MURPHY
Table of Contents
SQL CLUSTERING REQUIREMENTS 2
SCOPE 2
UNDERSTANDING THE CHANGES IN WINDOWS 2008 R2 2
Cluster Validation in Windows 2008 amp R2 2
Windows 2008 R2 ndash Failover Clustering Improvements 3
Information You Should Know ndash Setup Improvements 3
2008 R2 - Virtualization Improvements 4
BEFORE WE BEGIN ndash NOTES REGARDING MSCS 5
CLUSTER QUORUM REQUIREMENTS 5
LOCAL INSTALL CONSIDERATIONS 6
MICROSOFT DISTRIBUTED TRANSACTION COORDINATOR (MS DTC) 6
INSTALL 2008 R2 MICROSOFT CLUSTER SERVICES 8
SQL CLUSTER WIZARD NODE 1 23
SQL CLUSTER WIZARD NODE 2 30
MANAGING CLUSTER SERVICES 36
MANAGING FAILOVER TESTING VALIDATION 37
DOCUMENTATION REFERENCE 38
Page 2 of 38
SQL Clustering Requirements
Scope
This document is a standard step-by-step guide written for purposes of creating a ldquorepeatablerdquo manual process for Microsoft
Server 2008 R2 Cluster Service and SQL 2008 R2 running two-node cluster and present options for high availability and scalability utilizing Active Directory Integrated DNS and DFS to add capacity only when required This applies to custom and dedicated installations to provide the highest economies of scale In addition this document proposes alternative solutions such as 2008 R2 NLB (Network Load Balancing) concepts for higher redundancy and ability to scale beyond normal constraints of clustering using several key technologies
1 Active Directory ndash File Services Role w caching
2 Microsoft 2008 R2 NTFS ndash Significant enhancements
3 Microsoft 2008 R2 GPT ndash Support for large disks combined with x64 4 Microsoft 2008 R2 - Network Load Balancing (SP 1 is out now) 5 Active Directory - Distributed File System
Although the core scope is installation and configuration of a 2-node cluster on Server 2008 R2 64 Bit there are opportunities to utilize additional technologies that I will document as optional with benefits for future prosperity The goal is to
1 Increase Economies Of Scale 2 Lower Operational Costs 3 Increate Return on Investment
4 Provide a secure design that complies with SOX HIPAA and other auditable methodologies 5 Open discussion to new designs utilizing newer technology available in 2008 R2 and now 2008 R2 SP1
a Technologies included with the OS at no additional charge b Technologies that have potential to lower costs but require validation testing
Understanding the Changes in Windows 2008 R2
Please review each section below these section is need-to-know information identified by the VCISS Design Team There are
enhancements to SQL Server 2008 R2 that are critical to understand the enhancements and key differences in security to MSCS and Microsoft Best Practice In this section I describe the key differences In the following sections I provide critical information regarding 2008 R2 that is designed to assure a successful install
Cluster Validation in Windows 2008 amp R2
One of the biggest changes in failover clustering in Windows Server 2008 was the removal of the requirement that the hardware used in the cluster must be listed in the Microsoft Hardware Compatibility List (HCL) in order for the cluster to be supported
Hardware Validationmdashto participate in the HCL OEM vendors had to submit specific hardware configurations for
testing While this ensured the systems worked with failover clustering it also tended to limit the number of systems available for failover clustering and contributed toward making these systems expensive
Page 3 of 38
Cluster Validation Wizardmdashthe OEM hardware submission requirement was eliminated with Windows Server 2008 and replaced by the new Cluster Validation Wizard
Validation Testingmdasha Windows Server 2008 failover cluster will be supported if it passes the cluster validation tests
Windows 2008 R2 ndash Failover Clustering Improvements
Configuration WizardmdashMicrosoft supports a failover cluster solution only if all the hardware components are marked as
Certified for Windows Server 2008 R2 In addition the complete configuration (servers network and storage) must pass all tests in the Validate a Configuration wizard which is included in the Failover Cluster Manager snap-in
Windows PowerShell cmdlets for Failover ClustersmdashWindows PowerShell is a new command-line shell and scripting
technology that uses consistent syntax and naming patterns across the roles and features in Windows Server 2008 R2 The new cmdlets for failover clusters provide powerful ways to script cluster configuration and management tasks Windows PowerShell cmdlets will eventually replace the Clusterexe command-line interface
o If you use the Server Core installation option of Windows Server 2008 R2 for your failover cluster the Windows PowerShell cmdlets for failover clusters simplify the local management of the cluster
Read-only Permissions Optionmdashyou can assign read-only permission to a user or group who might need to see the cluster but not change the configuration of the cluster
Cluster Shared Volumesmdashwith Cluster Shared Volumes the configuration of clustered virtual machines (supported by the Hyper-V feature) is much simpler than before With Cluster Shared Volumes
o You can reduce the number of LUNs (disks) required for your virtual machines instead of having to manage one LUN per virtual machine (Previously the recommended configuration was one LUN per virtual machine because the LUN was the unit of failover) Many virtual machines can use a single LUN and can fail over without causing the other virtual machines on the same LUN to also fail over
o You can make better use of disk space because you do not need to place each Virtual Hard Disk (VHD) file on a separate disk with extra free space set aside just for that VHD file Instead the free space on a Cluster Shared Volume can be used by any VHD file on that LUN
o You can more easily track the paths to VHD files and other files used by virtual machines You can specify the path names instead of identifying disks by drive letters (limited to the number of letters in the alphabet) or identifiers called GUIDs (which are hard to use and remember) With Cluster Shared Volumes the path appears to be on the system drive of the node under the ClusterStorage folder However this path is the same when viewed from any node in the cluster
o If you use a few Cluster Shared Volumes to create a configuration that supports many clustered virtual machines you can perform validation more quickly than you could with a configuration that uses many LUNs to support many clustered virtual machines With fewer LUNs validation runs more quickly (You perform validation by running the Validate a Configuration Wizard in the snap-in for failover clusters)
o There are no special hardware requirements beyond what is already required for storage in a failover cluster (although Cluster Shared Volumes require NTFS)
o Resiliency is increased because the cluster can respond correctly even if connectivity between one node and the SAN is interrupted or part of a network is down The cluster will re-route the Cluster Shared Volumes traffic through an intact part of the SAN or network
Information You Should Know ndash Setup Improvements
Simplified Cluster Setup and Managementmdashother important improvements in Windows Server 2008 R2 Failover
Clustering are the changes to the failover cluster setup and management process The new Create Cluster Wizard makes it easier to create clusters and the new Failover Cluster Manager streamlines the management experience
Support for GUID Partition Table Disksmdashrecent advances in storage technologies have resulted in very large capacity
storage Support for GUID (Globally Unique Identifier) Partition Tables (GPT) enables Windows Server clusters to utilize partitions that are larger than 2TB In addition GPT disks provide built-in redundancy for the storage of their partition information
Page 4 of 38
Support for Multiple SubnetsmdashWindows Server 2008 Failover Clustering also now allows cluster nodes to be placed on
different subnets This is an important improvement for supporting geographically dispersed clusters in the future and plays a role in multi-tenancy today
Maximum Node Improvementsmdashtaking advantage of the enhanced clustering support found in Windows Server 2008
R2 SQL Server 2008 R2 can now be implemented on up to 16 node clusters in Windows Server 2008 Datacenter Edition and Windows Server 2008 Enterprise Edition SQL Server 2008 Standard Edition supports a maximum of two nodes In addition SQL Server 2008 supports eight-node clustering on clustering A summary of Windows Server and SQL Server 2008 failover clustering maximum node support is shown below
Setup changes for SQL Server failover clusteringmdashintroduces new installation options one option forces you to run the
Setup program on each node of the failover cluster To add a node to an existing SQL Server failover cluster you must run SQL Server Setup on the node that is to be added to the SQL Server failover cluster instance Another option creates an enterprise push to nodes from the active node
Cluster nodes residing on different subnetsmdashWith Windows 2008 cluster nodes can now reside on different network
subnets across network routers You no longer have to stretch virtual local area networks to connect geographically separated cluster nodes This opens the door to clustered disaster recovery options
Instances per clustermdashSQL Server 2008 Enterprise Edition supports up to 25 SQL Server instances per cluster (up to 50
for a nonclustered server)
More cluster-aware applicationsmdashMany of the MS SQL Server 2008 products are cluster aware such as Analysis
Services Full Text Search Integration Services Reporting Services FILESTREAM and others making these applications more highly available and resilient
Isolation of the quorum disk in MSCSmdasha shared disk partition that is not on the same physical driveLUN as the quorum drive must be available in an attempt to reduce failure dependencies
Microsoft Clustering Service(s) Recoverymdashcan monitor applications and resources automatically recognizing and
recovering from many failure conditions This capability provides great flexibility in managing the workload within a cluster and it improves the overall availability of the system
2008 R2 - Virtualization Improvements
Increased Availability for Virtual Data Centers
One of the most important aspects of any data center is providing the highest possible availability for systems and
applications Virtual data centers are no exception to the need for consolidation high availability and most of all sophisticated management tools
Hyper-V in Windows Server 2008 R2 includes the Live Migration feature which allows you to move a virtual machine between two virtualization host servers without any interruption of service The users connected to the virtual machine being moved might notice only a slight slowing in performance for a few moments Otherwise they will be unaware that the virtual machine was moved from one physical computer to another
Live Migration Support through Cluster Shared Volumes
Live Migration uses the new Cluster Shared Volumes (CSV) feature within Failover Clustering in Windows Server 2008
R2 The CSV volumes enable multiple nodes in the same failover cluster to concurrently access the same logical unit number (LUN)
While CSVs are currently employed mainly for Live Migration their benefits will extend beyond that single scenario For one theyrsquore easy to configure using simple NTFS rather than some other proprietary format That means administrators
wonrsquot have to reformat their SANs to take advantage of CSVs
It also means administrators will have an easier time showing users only a single data repository rather than a small
forest of silosmdashno more drive letter metaphors for end-users just convenient networked storage And last CSVs donrsquot require config and management tools of their own Windows Server administrators used to the tools in Windows Server
2008 can continue using those same consoles and theyrsquoll simply work with CSVs in R2 Improved Cluster Node Connectivity Fault Tolerance
o Because of the architecture of CSV there is improved cluster node connectivity fault tolerance that directly affects VMs running on the cluster The CSV architecture implements a mechanism known as dynamic IO redirection where IO can be rerouted within the failover cluster based on connection availability
Enhanced Cluster Validation Tool
Page 5 of 38
o Windows Server 2008 R2 includes a Best Practices Analyzer (BPA) for all major server roles including Failover Clustering This analyzer examines the best practices configuration settings for a cluster and cluster nodes
o Improved Migration of Cluster Workloads
Before we Begin ndash Notes Regarding MSCS
Prior to starting a new install please make sure to review this list of ldquopre-requisiterdquo information This is a list of ldquolessons learnedrdquo from previous project and dynamic in content If you feel anything is missing from this list please forward this information to
MSCS is relatively sensitive to the hardware and network equipment The equipment leveraged by Dell VCISS solution complies with Microsoft hardware compatibility guidelines list accessible at the referenced link below
In addition SQL Server failover cluster instances are not supported where the cluster nodes are also domain controllers
Shared Nothing Disk ArraysmdashMSCS supports shared nothing disk arrays in which only one node can own a
given resource at any given moment All other nodes are denied access until they own the resource This protects the data from being overwritten when two computers have access to the same drives concurrently
Quorum Resourcemdashto ensure that the cluster always has an up-to-date copy of the latest configuration
information you should deploy the quorum resource on a highly available disk configuration (using mirroring triple-mirroring or RAID 10 at the very least)
SQL Server Service Accounts and Passwordsmdashshould be kept the same on all nodes or a node will not be
able to restart a SQL Server service You can use administrator or a designated account (for example Cluster or ClusterAdmin) that has administrator rights within the domain and on each server
Drive lettersmdashfor the cluster disks must be the same on all nodes (servers) Otherwise you might not be able
to access a clustered disk
TCPIPmdashyou might have to create an alternative method to connect to SQL Server if the network name is
offline and you cannot connect using TCPIP
Named Pipesmdashyou can use named pipes
o Specified as pipe$$SQLAsqlquery
Share Memory and VIAmdashshared memory and VIA are NOT supported on failover clusters
WOW64 a feature of 64-bit editions of Windows that enables 32-bit applications to run natively in 32-bit
mode Applications function in 32-bit mode even though the underlying operating system is running on the 64-bit operating system
o WOW64 is supported only for stand-alone instances of SQL Server o WOW64 is NOT supported for SQL Server failover cluster installations
SQL Management Tools x64mdashFor SQL Server 64-bit Edition installations on 64-bit supported operating
systems Management Tools are supported in WOW64
Server CoremdashSQL Server 2008 R2 is NOT supported on Windows Server 2008 SP2 Server Core or Windows Server 2008 R2 Server Core installations
Cluster Quorum Requirements
The requirements that follow pertain to ldquoNode and File Share Majorityrdquo option This option is a primary decision
point in the VCISS Design Document Please consider the following
Page 6 of 38
Microsoft Recommendationmdashutilizes a Node and File Share Majority quorum o Node and file share majority consists of each node in the cluster plus the designated file share
witness can vote when they are in communication
o The cluster will only function when more than half of the nodes are available This mode is recommended for multisite clusters for clusters with an even number of nodes and for clusters with no shared storage
Cluster Quorum Elementsmdashcan be cluster nodes a disk witness or a file share witness A disk or file share
witness is a shared cluster disk resource or a file share that is available on the cluster that the administrator has especially designated to serve as a part of the quorum
Witness Diskmdashthe disk witness quorum is a Windows disk that resides on shared storage and contains a
copy of the cluster configuration
File Share Witnessmdashthe file share witness is a file share that resides on a networked server that is accessible
by all cluster nodes The file share quorum does not maintain a copy of the cluster configuration
Quorum Disk Sizemdashit is recommended that you configure the quorum disk size to be 500 MB this size is the
minimum required for an efficient NTFS partition Larger disk sizes are allowable but are not currently needed
Local Install Considerations
Actual hard disk space requirements depend on your system configuration and the features that you decide to install The following table provides disk space requirements for SQL Server 2008 R2 components
Feature Disk space
requirement
Database Engine and data files Replication and Full-Text Search 711 MB
Analysis Services and data files 345 MB
Reporting Services and Report Manager 304 MB
Integration Services 591 MB
Client Components (Other than Books Online and Integration Services tools) 1823 MB
SQL Server Books Online 157 MB
Microsoft Distributed Transaction Coordinator (MS DTC)
The Microsoft Distributed Transaction Coordinator (MS DTC) is required for most SQL Server failover cluster
installations However if you are installing only the relational database engine or just Analysis Services then MS DTC is NOT required
MS DTC is required if you are installing
The workstation components SQL Server Integration Services or if you intend to use distributed transactions
Page 7 of 38
You can install MS DTC either before or after you install SQL Server 2008 R2 on the cluster but as it is a
requirement itrsquos simpler to install it before you begin the SQL Server R2 installation
MS DTC must be installed as a separate cluster resource from SQL Server 2008 R2 It must also have its own
shared storage thatrsquos separate from the shared storage used by VCISS SQL Server R2
Page 8 of 38
Install 2008 R2 Microsoft Cluster Services
Summary
2008 R2 Failover Support
Current Offering
Server 2008 R2 ENT Edition
SQL 2008 R2 STD Edition
Note Utilizing AD DFS allows for 2-node clusters
dynamically allocated as required behind DFS root to
maintain the illusion of a single share for Citrix UPM
-
Microsoft iSCSI Initiator Service
Default set to ldquoManualrdquo Set Service to Automatic
Start Service
Note This is required for a step further down the list when
configuring the iSCSI Initiator
Note The virtual IP address is used by the iSCSI clients to connect to the SAN This insulates the iSCSI clients from needing to know any configuration information about nodes that are added Instead clients
that connect using the iSCSI Initiator are configured to use the SANrsquos virtual IP address By Default iSCSI Initiator service is set to Manual
-
Configure BACS on NICs
This assumes BACS on Dell or similar hardware utilizing a dedicated network for iSCSI traffic
CLN01
CLN02
Page 9 of 38
Volume Description Data
Allocation
C Drive SQL Binaries Temp (1) 1 GB 1gt4GB
Volume 1 Quorum Drive 1 GB
Volume 2 SQL Data SQL Logs (See Below)
Volume 2 XenApp Farm (2) 200 MB
Volume 2 XenApp AMC Logging 1 GB
Volume 2 XenDesktop Farm (3) 40 GB
Volume 2 XenDesktop Logging 5 GB
Volume 2 PVS Server Farm 1 GB
Volume 3 PVS Write Cache (4) 25 TB
Volume 4 User Data (per 500) (5) 25 TB
Volume 4 User Profiles (per 500) (6) 250 GB
Volume 4 Application Packages (7) 60 GB
-
Storage Allocation
Based on 500 user POD
Note You must use shared storage that is
compatible with Windows Server 2008 R2
For this two-node cluster the quorum
configuration will be Node and Disk
Majority
Requirement Notes
XenApp SQL Temp(1)
A temp database on a partition with at least 1 GB of free disk space and set to grow
automatically Citrix recommends 4GB if the farm is large and includes multiple print drivers XenApp Farm SQL Farm DB(2)
Disk space approximately 100MB or every
250 servers and 50 published applications in the farm Initial POD Offering includes streaming and locally hosted applications XenDesktop Farm SQL DB (3)
40 GB based on Citrix published number of
20000 desktops equating to 150 GB SQL Instance 5000 users equals 375 GB 500 users equals 9375 GB (10) PVS Write Cache (4)
Based on 5 GB per user User Data (4)
Based on 5 GB per user User Profiles (5)
Based on 512 MB per user Application Packages (6)
Based on 2 GB per package and assumes 30 streamed packages
Two Node Utilility Cluster (CLN01 gt CLN02)
The storage contains at least four separate volumes (LUNs) configured at the hardware level
Storage requirements include the following
To use the native disk support included in failover clustering
use basic disks not dynamic disks
We recommend that you format the partitions with NTFS (for the witness disk the partition must be NTFS)
For the partition style of the disk you can use either master
boot record (MBR) or GUID partition table (GPT)
The witness disk is a disk in the cluster storage that is
designated to hold a copy of the cluster configuration
database (A witness disk is part of some not all quorum configurations)
For this two-node cluster the quorum configuration will be
Node and Disk Majority the default for a cluster with an
even number of nodes Node and Disk Majority means that the nodes and the witness disk each contain copies of the
cluster configuration and the cluster has quorum as long as a majority (two out of three) of these copies are available
Network infrastructure and domain account
requirements for a two-node failover cluster
Checklist
Network Checklist
Setting Notes Network settings When you use identical network adapters for
a network also use identical communication settings on those adapters (for example Speed Duplex Mode Flow Control and Media Type)
DNS The servers in the cluster must be using DNS
Page 10 of 38
Service Account Service Account Description
1 vdsSQLAgent SQL Agent Service Account
2 vdsSQLDB SQL Database Engine
3 vdsSQLvCenter vCenter Service Account
4 vdsSQLPVS Provisioning Server (PVS)
5 vdsSQLXDC XenDestkop 5 Site Database
6 vdsSQLXDCLogs XenDesktop 5 Site Change Log
7 vdsXenApp XenApp 60 Farm Database
8 vdxXenAppLogs XenApp 60 Change Log
9
for name resolution The DNS dynamic update protocol is recommended
Domain role Verify both nodes are members of the domain per the steps above
Domain controller Clustered servers should be member servers for purposes of this architecture
Cluster Administrator
This should always be the VCISS administrator or install
team administrator
A dedicated administrator is no longer
required with 2008 R2 SQL The DDVS Domain Local group should reside in the BUILTINAdministrator group of both cluster nodes Login using the pre-assigned accounts from the Active Directory documentation This is the only account required and it must reside in the Account
Operators group Create Service Accounts
-
SQL SERVICE ACCOUNTS
Required for multi-tenant and Dedicated customers
Service accounts must reside in the Service Account Domain Local Group
-
Cluter Drive Assignments ndash Best Practice
LUN Name Service LUN
Allocated to Cluster Drive Partition File
Sys
WITNESS WitnessQuorum drive
Q GPT NTFS
SQLDATA1 XenApp Farm Z GPT NTFS
SQLDATA2 XenDesktop Site X GPT NTFS
SQLLOGS SQL Logs L GPT NTFS
SOFTWARE ISO Software Citrix Tools Citrix Licensing
S GPT NTFS
APPSTREAM Application Data and Streaming Profiles
R GPT NTFS
PROFILES User Profiles P GPT NTFS
USERDATA User Data Home Folders
U GPT NTFS
Page 11 of 38
Subnet
Gateway
Reserved
Static
Range
Reserved
DHCP
Range
Reserved
Network
Devices
Purpose
XXXX23
XXXX123
NA
VCISS
DRAC and
ESX
Infrastructure
XXXX23
XXXX123
NA
VCISS -
VLAN for
Vmotion
VMs
XXXX23
XXXX123
NA
VCISS -
Storage
Network
XXXX23
XXXX123
XXXX TO
XXXX
XXXX TO
XXXX
XXXX TO
XXXX
VCISS
Customer
Network
XXXX23
XXXX123
NA
Backup
Recovery
XXXX23
XXXX123
NA
Monitoring
-
Network SegmentsVLANs
The file services cluster require access to minimum of the following networks listed on the right hand side This table is editable for purposes of tracking this information prior to installation
This information is required to configure the BACS on the cluster NICS later in this document
NETWORK SEGMENTS
-
Next you need to configure the iSCSI
Initiator on each of the Cluster Nodes To configure the iSCSI Initiator choose Start |
Administrative Tools | iSCSI Initiator
Assuming iSCSI is started
The second prompt will ask you if you want to unblock the Microsoft iSCSI service so it can communicate across the Windows
firewall Again yoursquoll want to answer Yes
You can also control this by manually configuring the Windows firewall and unblocking port 3260 To configure the Windows firewall open the Control Panel and then select the Windows Firewall applet
Page 12 of 38
Before connecting to the SAN you may need to configure the SAN with the iSCSI Initiator name The iSCSI Initiator name can
be found on the iSCSI Initiatorrsquos Configuration tab The example presented
here uses the name ldquoiqn1991-
05commicrosoftorportvsql01contosocomrdquo
The name used in your configuration will be
different depending on the system and domain names that are in use
To configure the iSCSI Initiator select the
Discovery tab and then click Discover
Portal This will display the Discover Target Portal dialog box
Using the Discover Target Portal dialog box enter the IP address used by the SAN
The default port of 3260 After entering the IP address click OK and the iSCSI Initiator will discover the storage resources that are available on the SAN All of the storage resources will be listed on
the iSCSI Initiatorrsquos Targets tab At this point you can select each
of the discovered targets and then click the Connect button
ISCSI INITIATOR TARGETS
All of the connected SAN resources will be displayed in the Targets list box The Status for each of the targets should show ldquoConnectedrdquo At this point the drives can be viewed using Disk Manager exactly as if they were locally attached storage Clicking OK ends the iSCSI Initiator
Page 13 of 38
Working with iSCSI SAN storage using Disk Management to Prepare Drives
Configure Each Drive
Right click each drive select Online
Select drive volume
Select Change Drive Letter and Paths
Format drives using NTFS and GPT
Take Drives Offline
After preparing the drives be sure to bring them offline so that the Create Cluster Wizard can use them as storage To bring the drives offline
Right-click each disk icon displayed
Select Offline from the context menu
Repeat Steps on Cluster Node 2
You will need to repeat the iSCSI configuration steps for Cluster Node 2 (CLN02) in order for Failover
-
REPEAT STEPS You will need to repeat the iSCSI configuration steps for Cluster Node 2 (CLN02) in order for Failover Cluster installation to work
Page 14 of 38
Adding the Failover Cluster Feature with Server Manager
Run Server Manager by selecting Start
Administrative Tools
Server Manager
Click the Features node
Click Add Features at right
Add Failover Clustering
Scroll through the list of features in the Select Features window until you see Failover Clustering
To add the Failover Clustering feature select its check box and then click Next
The Confirm Installation Selections screen
The Confirm Installation Selections dialog box confirms that you have elected to install the Failover Clustering feature
To proceed with the installation click Install
Page 15 of 38
Page 16 of 38
Running the Validate A Configuration Wizard
Run the Validate A Configuration Wizard either to test an existing cluster for errors or configuration problems
To test an existing cluster you would enter the cluster name To test a new cluster node you would enter the node name
Page 17 of 38
Page 18 of 38
Create Cluster Wizard Select Servers
Page 19 of 38
Create Cluster Wizard Access Point for Administering the Cluster
Create Cluster Wizard Confirmation
Create Cluster Wizard Creating New Cluster
Page 20 of 38
Create Cluster Wizard Summary
The Create Cluster Wizard displays the Summary screen after the cluster has been successfully created At this point you could begin to configure SQL Server to use the cluster However while the Create Cluster Wizard does a great job of setting up the required services on all of the cluster nodes it doesnrsquot always select the correct quorum drive to use The Create Cluster Wizard often selects the first shared drive available and thatrsquos not always the drive that you want to use as the quorum
To change the quorum drive yoursquoll need to start the Failover Cluster Management To start the Failover Cluster Management
Start gt Administrative Tools
Failover Cluster Manager
Configuring the Cluster Quorum
The Configure Cluster Quorum Wizard enables you to select the type of quorum that will be used by the cluster
Clicking Next displays the Select Quorum Configuration dialog box that enables you to configure the type of quorum for the VCISS Cluster
Node and Disk Majority
Starting the Configure Cluster Quorum Wizard
The Select Quorum Configuration screen that you can see in Figure 3-29 allows you to choose the type of quorum used by your failover cluster
The Configure Cluster Quroum Wizard automatically chooses the type of quorum that best fits the number of nodes that are in the cluster In Figure 3-29 you can see that the Configure Cluster Quorum Wizard recommends using the Node and Disk Majority cluster for a two-node cluster This is the best configuration for a typical two-node failover cluster
To configure the Node and Disk Majority quorum click Next to display the Configure Storage Witness dialog
Page 21 of 38
Configure Cluster Quorum Wizard Select Quorum Configuration
To configure Windows Server 2008 R2 Failover Clustering
Open the Failover Cluster Manager
Start | Administrative Tools
Failover Cluster Manager
To create a new failover cluster click the Create A Cluster link
The Create Cluster Wizard steps you through the process of creating a new failover cluster
Before running the Create Cluster Wizard be sure that all of the nodes that you are going to
configure have passed the validation tests
NOTE If the drives you expect to see arenrsquot listed be sure all of the drives
are visible to all of the cluster nodes Then make sure all of the drives are offline on all nodes Next rerun the Cluster Validation Wizard Then add the missing storage to the cluster by selecting the Storage node in the
Failover Cluster Management console and then clicking the Add A Disk
task This will display the Add Disks to a Cluster dialog box where you should be able to select the disks you want to add to the cluster
Configure Cluster Quorum Wizard Configure Storage Witness
Page 22 of 38
Configure Cluster Quorum Wizard Configure Storage Witness
Configure Cluster Quorum Wizard Summary
Page 23 of 38
SQL Cluster Wizard Node 1
Creating the Cluster Using the Create Cluster Wizard on Node 1
To configure Windows Server 2008 R2 Failover Clustering open the Failover Cluster Manager by selecting the Start | Administrative Tools | Failover Cluster Manager
To create a new failover cluster click the Create A Cluster link
The Create Cluster Wizard steps you through the process of creating a new failover cluster Before running the Create Cluster Wizard be sure that all of the nodes that you are going to configure have passed the validation tests
SQL Server Installation Center Installation
SQL Server 2008 Setup Setup Support Rules
The Setup Support Rules dialog box checks your system for problems that might prevent the successful installation of SQL Server 2008 R2
Clicking OK displays the Setup Support Files dialog box Installs the components that are required by the SQL Server 2008 R2 setup program
Clicking Install copies the required setup files to the system and displays the SQL Server 2008 R2 Setup Support Rules
A Red (X) indicates a problem needs to be
corrected before the setup can proceed Clicking the link under the Status column will provide more information about any error conditions that werenrsquot met
Installation performs tests for six different system requirements
including tests for the minimum operating system level tests to determine if you have administrative privileges and tests to check if the WMI service is running
The Setup Support Rules dialog box performs a second set of tests to determine if there will be any problems running the setup program A green check mark indicates the condition is OK and that the installation can proceed
Page 24 of 38
SQL Server 2008 Setup Setup Support Files
Install a SQL Server Failover Cluster Setup Support Rules
Network Connections Binding Order
Reference httpsupportmicrosoftcomkb955963
Evaluation Install
The Product Key screen in the SQL Server 2008 R2 setup process prompts you to enter your product key information If yoursquore installing one of the evaluation versions of SQL Server 2008 R2 (temporary) you would select the ldquoSpecify a free editionrdquo radio button and click Next
License Key Install Installing a licensed version of SQL Server 2008 R2 you would select the ldquoEnter the product keyrdquo radio button and then type in the product installation key and click Next This will display the End User License Agreement (EULA) in the License Terms dialog box The installation process will not proceed until you accept the SQL Server 2008 R2 license agreement You accept the license agreement by selecting the ldquoI accept the license termsrdquo check box
If you receive an error regarding the network binding you can verify and change the binding order by opening Network Connections pressing ALT to display the menu and then selecting Advanced | Advanced Settings
This error is typically caused by disabled or ghosted network adapters
You can find more information about this issue at Clicking Next continues the installation process and prompts you for the SQL Server 2008 R2 Product Key dialog box
Utilize this option when waiting for license keys
Evaluation mode profiles functionality for 180 days
Evaluation Mode
Page 25 of 38
Page 26 of 38
nstall a SQL Server Failover Cluste
I r
Disk Space Requirements
The Disk Space Requirements dialog box displays the installation directories that you previously selected as well as the
required and available storage space for each drive If you need to change the
selections you can use the Back button to page back to the Features Selection and Instance Configuration dialog boxes to
change the target directories
If the selected disk storage configuration is acceptable then clicking Next displays the
Cluster Resource Group
The Cluster Resource Group screen allows
you to specify the SQL Server cluster resource group name This is the name of the SQL Server resources that are used by
Windows failover clustering
By default the Install a SQL Server Failover Cluster Wizard uses the resource group name of SQL Server
(MSSQLSERVER)mdashthe same name as the
SQL Server instance name You can also specify a different name by typing in the new name
Page 27 of 38
Page 28 of 38
Page 29 of 38
Install a SQL Server Failover Cluster Complete
Page 30 of 38
SQL Cluster Wizard Node 2
After yoursquove successfully installed SQL Server 2008 R2 on the first cluster node the next step is to install SQL Server 2008 R2
onto the second node and to add that node to the cluster To add the second node to the cluster go to the second node in the cluster and run the SQL Server 2008 installation program
Assumptions
This option assumes that a Windows failover cluster has been previously configured and that an instance of SQL Server 2008
R2 has already been created on the cluster
Add Node
To install SQL Server 2008 on your second cluster node select the ldquoAdd node to a SQL Server failover clusterrdquo option
Clicking the ldquoAdd node to a SQL Server
failover clusterrdquo link will begin the installation process on the second cluster node and will display the Setup Support Rules
As with the installation of the first cluster
node if you havenrsquot previously installed SQL Server 2008 R2 on the second cluster node you will probably be prompted to update the Windows Installer and the
NET Framework
Page 31 of 38
Page 32 of 38
Page 33 of 38
Page 34 of 38
Page 35 of 38
Page 36 of 38
Managing Cluster Services
Page 37 of 38
Managing Failover Testing Validation
Page 38 of 38
Documentation Reference
Reference Link Source
Microsoft - Before Installing Failover Clustering Microsoft
Installing a SQL Server 2008 R2 Failover Cluster Microsoft
Hardware and Software Requirements for Installing SQL Server 2008 R2 Microsoft
Editions and Components of SQL Server 2008 R2 Microsoft
Features Supported by the Editions of SQL Server 2008 R2 Microsoft
How to Create a New SQL Server Failover Cluster (Setup) Microsoft
Using Upgrade Advisor to Prepare for Upgrades Microsoft
SQL Server support policy for Microsoft Clustering Microsoft
Microsoft 2008 R2 and SQL 2008 R2 Failover Clustering Microsoft
Whats New in Failover Clusters in Windows Server 2008 Microsoft
Whats New in Failover Clusters in Windows Server 2008 R2
Additional Tests in Cluster Validation
Microsoft
Microsoft
Additional Tests in Cluster Validation Microsoft
Support for SQL Server on iSCSI technology components Microsoft
Microsoft Certified Server Catalog for Windows 2008 R2 Microsoft
Catalog - Certified for Windows Server 2008 R2 ndash OS Microsoft
Catalog - Works with Windows Server 2008 R2 ndash OS Microsoft
Catalog - Supports Windows Server 2008 R2 - OS Microsoft
SQL Server 2008 - Before Installing Failover Clustering Microsoft
Features Supported by the Editions of SQL Server 2008 R2 Microsoft
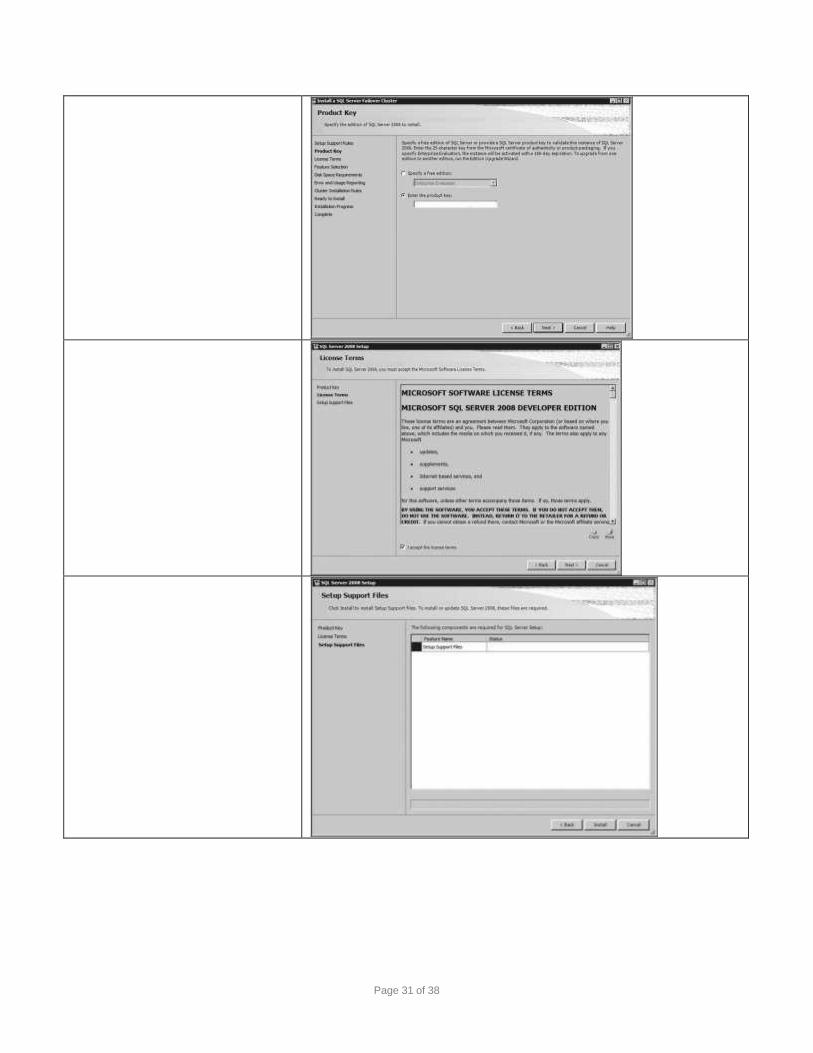
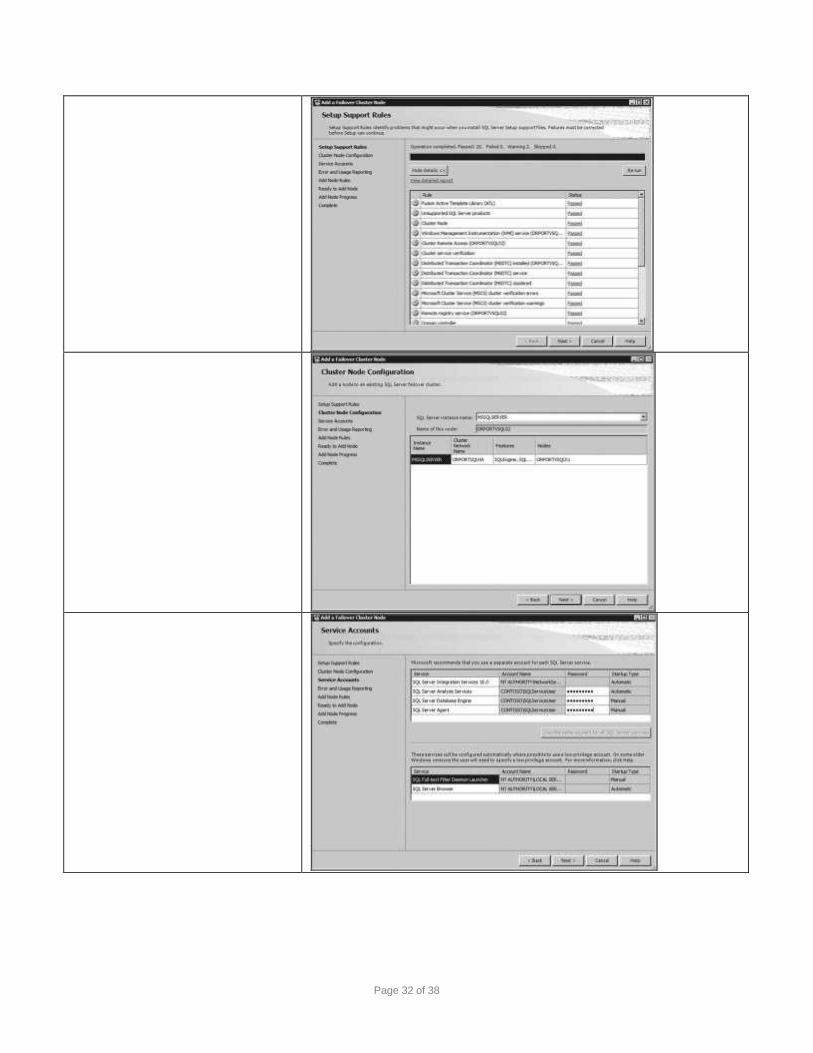