Embed Size (px)
Citation preview

C o m m u n i t y E x p e r i e n c e D i s t i l l e d
Your one-stop guide to developing Java® EE applications with the Eclipse IDE, Maven, and WildFly® 8.1
Advanced Java® EE Development with WildFly®D
eepak Vohra
Advanced Java® EE Development with WildFly®
This book starts with an introduction to EJB 3 and how to set up the environment, including the confi guration of a MySQL database for use with WildFly® and a demonstration of the use of Facelets in a web application. We will then develop object-relational mapping with Hibernate 4, build and package the application with Maven, and then deploy it in WildFly® 8.1.
Moving on from that, we will create an Ajax application in the Eclipse IDE, compile and package it using Maven, and run the web application on WildFly® 8.1 with a MySQL database. In the fi nal leg of this book, we will discuss support for generating and parsing JSON with WildFly® 8.1.
Who this book is written forThis book is for professional WildFly® developers. If you are already using JBoss or WildFly® but don't use the Eclipse IDE and Maven for development, this book will show you how the Eclipse IDE and Maven facilitate the development of Java® EE applications with WildFly® 8.1. This book does not provide a beginner-level introduction to Java® EE as it is written as an intermediate/advanced course in Java® EE development with WildFly® 8.1.
$ 49.99 US£ 32.99 UK
Prices do not include local sales tax or VAT where applicable
Deepak Vohra
What you will learn from this book
Use Maven to develop and deploy Java® EE applications with WildFly® 8.1
Develop Java® EE applications for WildFly® 8.1 using the Eclipse IDE
Create an EJB 3.0/JPA-based application with WildFly® 8.1
Familiarize yourself with object-relational mapping with Hibernate 4
Build and package a JSF 2.0 Facelets application with Maven and then deploy it in WildFly® 8.1
Build a JAX-WS 2.2 web service and a JAX-RS 2.0 RESTful web service and learn how to use Spring MVC 3.1
Advanced Java
® EE D
evelopment w
ith WildFly
®P U B L I S H I N GP U B L I S H I N G
community experience dist i l led
Visit www.PacktPub.com for books, eBooks, code, downloads, and PacktLib.
Free Sample
In this package, you will find: • The author biography • A preview chapter from the book, Chapter 1 'Getting Started with EJB 3.x' • A synopsis of the book’s content • More information on Advanced Java® EE Development with WildFly®
About the Author Deepak Vohra is a consultant and a principal member of the NuBean software company. He is a Sun Certified Java Programmer (SCJP) and Web Component Developer (SCWCD) and has worked in the fields of XML and Java programming and J2EE for over 5 years. Deepak is the coauthor of the Apress book Pro XML Development with Java Technology and is the technical reviewer for the O'Reilly book WebLogic: The Definitive Guide.
Deepak was also the technical reviewer for the Course Technology PTR book Ruby Programming for the Absolute Beginner, and the technical editor for the Manning Publications book Prototype and Scriptaculous in Action. He is also the author of the Packt Publishing books JDBC 4.0 and Oracle JDeveloper for J2EE Development, Processing XML documents with Oracle JDeveloper 11g, EJB 3.0 Database Persistence with Oracle Fusion Middleware 11g, Java 7 JAX-WS Web Services, and Java EE Development with Eclipse.

Advanced Java® EE Development with WildFly® WildFly is the new name for JBoss Application Server (JBoss AS) starting with version 8.0.0. WildFly provides high startup speed, low memory overhead, a high-performance, scalable web server, customizable runtime based on pluggable subsystems, and support for Java EE 7 and the latest web development standards. In past references to the server, "JBoss" is still used, but for subsequent references, "WildFly" is used. According to the Developer Productivity Report 2012, referred to subsequently as the "2012 report", JBoss is the most commonly used application server, with 28 percent of Java developers or organizations using the application server, more than any other application server. The same report indicated that 67 percent of Java developers use the Maven build tool, more than any other build tool. Eclipse is used by 68 percent of Java developers. The Java Tools and Technologies Landscape for 2014 report (referred to subsequently as the "2014 report") indicates that JBoss is the most commonly used application server in both development (16 percent) and production (17 percent). In the book, we discuss developing Java EE applications using WildFly 8.1.0, Maven 3, and Eclipse IDE. The book combines the most commonly used tools for Java EE development: WildFly, Maven, and Eclipse IDE.
The book is based on the Java EE standards 5, 6, and 7. We will discuss the commonly used technologies and frameworks JAX-RS 1.1, JSF 2.0, JPA 2.0, JAX-WS 2.2, EJB 3.0, Hibernate 4, Ajax, GWT 2.4, and Spring 3.1. The new Java EE7 support for JAX-RS 2.0 is discussed with RESTEasy. The new Java EE 7 feature for processing JSON is also discussed.
While several books on WildFly administration are available, none on Java EE application development with WildFly are available. WildFly is the most commonly used application server with support for all the commonly used Java EE technologies and frameworks. WildFly is efficient, lightweight, and modular, and provides a flexible deployment structure. JBoss Tools provides a set of plugins with support for WildFly, Maven, and Java EE frameworks such as JSF. Maven is the most commonly used build tool for compiling and packaging a Java EE application based on a project-object model (POM). Maven provides dependency management. The Eclipse IDE for Java EE developers is the most commonly used Java EE IDE.
The objective of the book is to discuss how a Java EE developer would develop applications with WildFly using Maven as the build tool and Eclipse IDE as the development environment. The book covers all aspects of application development, including the following topics:
• Setting the environment for an application • Creating sample data • Running a sample application
What This Book Covers In Chapter 1, Getting Started with EJB 3.x, we discuss developing an EJB 3.0/JPA-based application with WildFly 8.1.0. According to the 2012 report, JPA (at 44 percent) and EJB 3.0 (at 23 percent) are the two most commonly used Java EE standards.
In Chapter 2, Developing Object/Relational Mapping with Hibernate 4, we discuss using Hibernate 4 with WildFly 8.1.0. According to the 2012 report, Hibernate (at 54 percent) is one of the most commonly used application frameworks. According to the 2014 report, Hibernate (at 67.5 percent) is the top object/relational mapping framework.
In Chapter 3, Developing JSF 2.x Facelets, we discuss using JSF 2.0 with WildFly 8.1.0. According to the 2012 report, JSF (at 23 percent) is the second most commonly used web framework. According to the 2014 report also, JSF is ranked second (at 21 percent) among "web frameworks in use".
In Chapter 4, Using Ajax, we discuss developing an Ajax application with WildFly 8.1.0. Ajax is a trend started in 2004-2005 that makes use of a web technique to transfer data between a browser and a server asynchronously.
In Chapter 5, Using GWT, we use Google Web Toolkit to develop an application with WildFly. According to both, the 2012 report and the 2014 report, GWT is one of the top four web frameworks.
In Chapter 6, Developing a JAX-WS 2.2 Web Service, we discuss developing an application based on the JAX-WS 2.2 standard in the Eclipse IDE using the Maven build tool. We deploy and run the application on WildFly 8.1.0.
In Chapter 7, Developing a JAX-RS 1.1 Web Service, we discuss developing a web service based on the JAX-RS 1.1 standard in the Eclipse IDE using Maven as the build tool. We deploy and run the application on WildFly 8.1.0.
In Chapter 8, Using Spring MVC 4.1, we discuss using Spring MVC with WildFly 8.1.0. According to the 2012 report, Spring MVC (at 30 percent) is the most commonly used web framework. In the 2014 report also, Spring MVC (at 40 percent) is the most commonly used web framework.
In Chapter 9, Using JAX-RS 2.0 in Java EE 7 with RESTEasy, we introduce the support for JAX-RS 2.0: the Java API for RESTful Web Services added to Java EE 7. We discuss the new Client API introduced in JAX-RS 2.0. We also discuss the asynchronous processing feature of JAX-RS 2.0.
In Chapter 10, Processing JSON with Java EE 7, we introduce another new feature in Java EE 7, that is, the support for JSR 353: Java API for JSON Processing.
[ 1 ]
Getting Started with EJB 3.xThe objective of the EJB 3.x specifi cation is to simplify its development by improving the EJB architecture. This simplifi cation is achieved by providing metadata annotations to replace XML confi guration. It also provides default confi guration values by making entity and session beans POJOs (Plain Old Java Objects) and by making component and home interfaces redundant. The EJB 2.x entity beans is replaced with EJB 3.x entities. EJB 3.0 also introduced the Java Persistence API (JPA) for object-relational mapping of Java objects.
WildFly 8.x supports EJB 3.2 and the JPA 2.1 specifi cations from Java EE 7. While EJB 3.2 is supported, the sample application in this chapter does not make use of the new features of EJB 3.2 (such as the new TimerService API and the ability to disable passivation of stateful session beans). The sample application is based on Java EE 6 and EJB 3.1. The confi guration of EJB 3.x with Java EE 7 is also discussed, and the sample application can be used or modifi ed to run on a Java EE 7 project. We have used a Hibernate 4.3 persistence provider. Unlike some of the other persistence providers, the Hibernate persistence provider supports automatic generation of relational database tables, including the joining of tables.
In this chapter, we will create an EJB 3.x project and build and deploy this project to WildFly 8.1 using Maven. This chapter has the following sections:
• Setting up the environment• Creating a WildFly runtime• Creating a Java EE project• Confi guring a data source with MySQL database• Creating entities• Creating a JPA persistence confi guration fi le• Creating a Session Bean Facade• Creating a JSP client
Getting Started with EJB 3.x
[ 2 ]
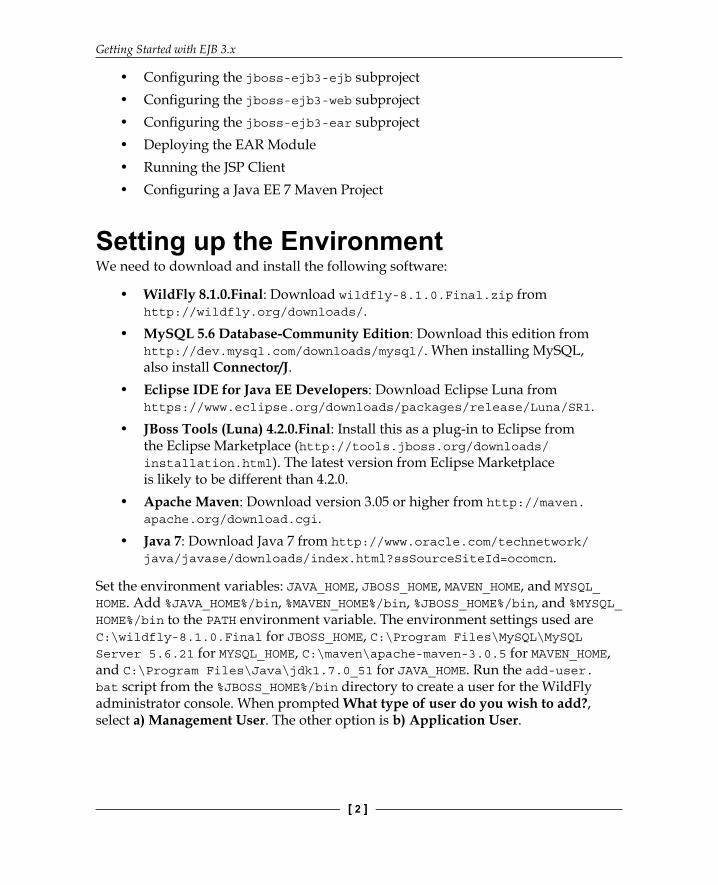
• Confi guring the jboss-ejb3-ejb subproject• Confi guring the jboss-ejb3-web subproject• Confi guring the jboss-ejb3-ear subproject• Deploying the EAR Module• Running the JSP Client• Confi guring a Java EE 7 Maven Project
Setting up the EnvironmentWe need to download and install the following software:
• WildFly 8.1.0.Final: Download wildfly-8.1.0.Final.zip from http://wildfly.org/downloads/.
• MySQL 5.6 Database-Community Edition: Download this edition from http://dev.mysql.com/downloads/mysql/. When installing MySQL, also install Connector/J.
• Eclipse IDE for Java EE Developers: Download Eclipse Luna from https://www.eclipse.org/downloads/packages/release/Luna/SR1.
• JBoss Tools (Luna) 4.2.0.Final: Install this as a plug-in to Eclipse from the Eclipse Marketplace (http://tools.jboss.org/downloads/installation.html). The latest version from Eclipse Marketplace is likely to be different than 4.2.0.
• Apache Maven: Download version 3.05 or higher from http://maven.apache.org/download.cgi.
• Java 7: Download Java 7 from http://www.oracle.com/technetwork/java/javase/downloads/index.html?ssSourceSiteId=ocomcn.
Set the environment variables: JAVA_HOME, JBOSS_HOME, MAVEN_HOME, and MYSQL_HOME. Add %JAVA_HOME%/bin, %MAVEN_HOME%/bin, %JBOSS_HOME%/bin, and %MYSQL_HOME%/bin to the PATH environment variable. The environment settings used are C:\wildfly-8.1.0.Final for JBOSS_HOME, C:\Program Files\MySQL\MySQL Server 5.6.21 for MYSQL_HOME, C:\maven\apache-maven-3.0.5 for MAVEN_HOME, and C:\Program Files\Java\jdk1.7.0_51 for JAVA_HOME. Run the add-user.bat script from the %JBOSS_HOME%/bin directory to create a user for the WildFly administrator console. When prompted What type of user do you wish to add?, select a) Management User. The other option is b) Application User.
Chapter 1
[ 3 ]
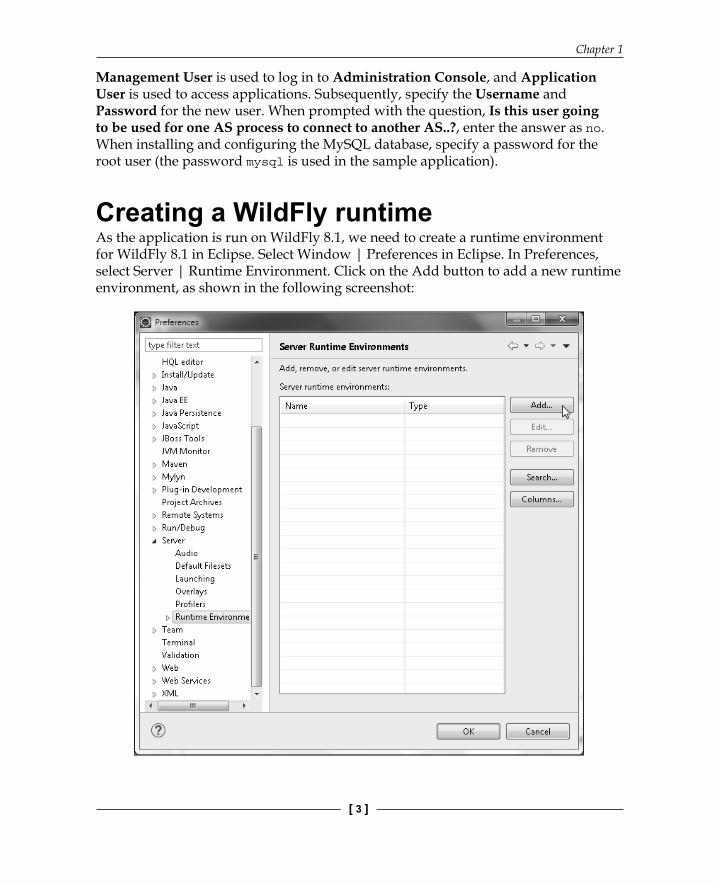
Management User is used to log in to Administration Console, and Application User is used to access applications. Subsequently, specify the Username and Password for the new user. When prompted with the question, Is this user going to be used for one AS process to connect to another AS..?, enter the answer as no. When installing and confi guring the MySQL database, specify a password for the root user (the password mysql is used in the sample application).
Creating a WildFly runtimeAs the application is run on WildFly 8.1, we need to create a runtime environment for WildFly 8.1 in Eclipse. Select Window | Preferences in Eclipse. In Preferences, select Server | Runtime Environment. Click on the Add button to add a new runtime environment, as shown in the following screenshot:
Getting Started with EJB 3.x
[ 4 ]
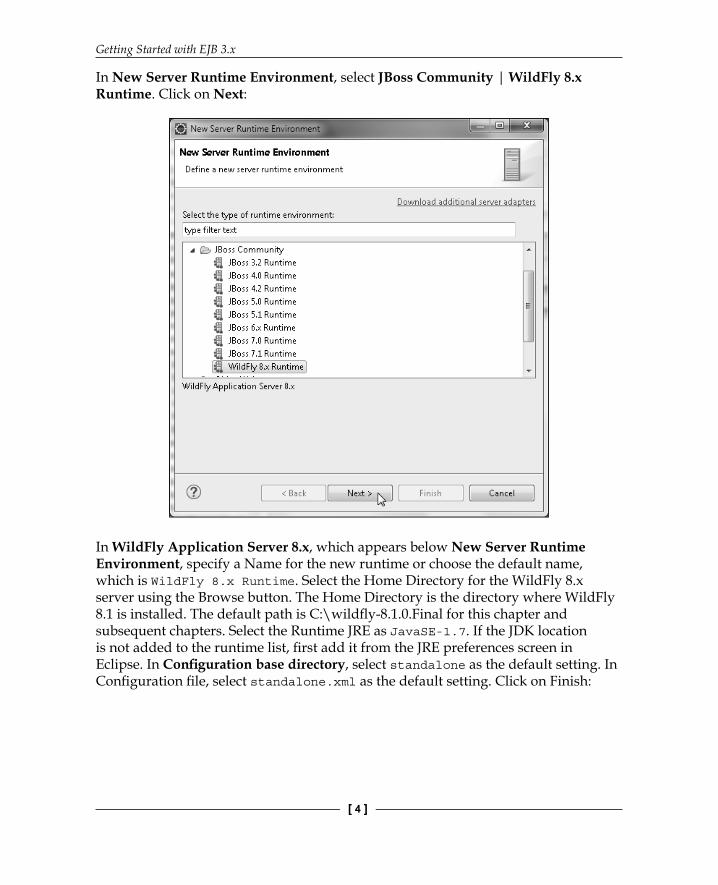
In New Server Runtime Environment, select JBoss Community | WildFly 8.x Runtime. Click on Next:
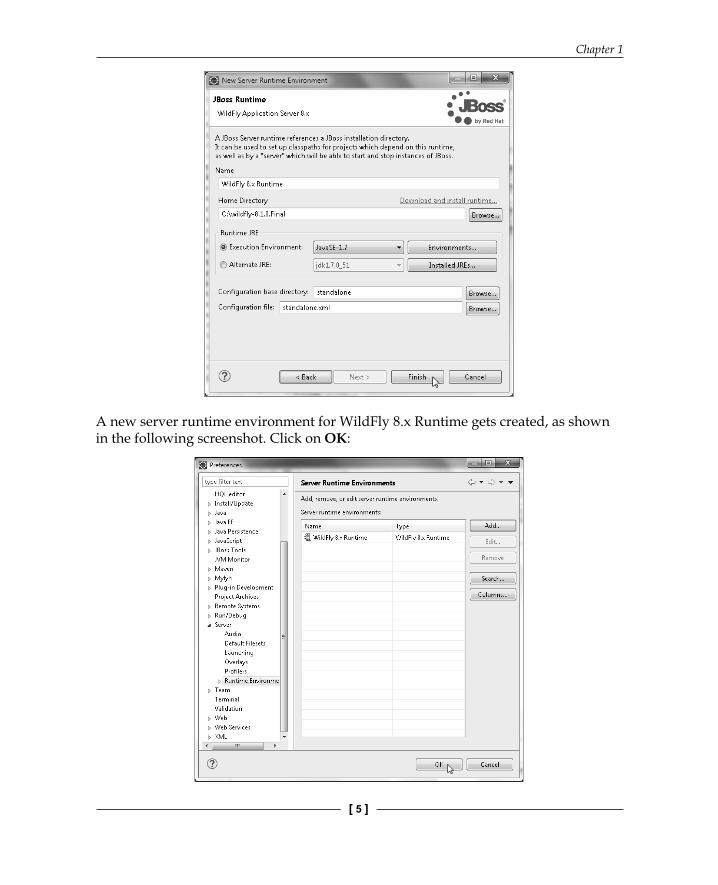
In WildFly Application Server 8.x, which appears below New Server Runtime Environment, specify a Name for the new runtime or choose the default name, which is WildFly 8.x Runtime. Select the Home Directory for the WildFly 8.x server using the Browse button. The Home Directory is the directory where WildFly 8.1 is installed. The default path is C:\wildfl y-8.1.0.Final for this chapter and subsequent chapters. Select the Runtime JRE as JavaSE-1.7. If the JDK location is not added to the runtime list, fi rst add it from the JRE preferences screen in Eclipse. In Confi guration base directory, select standalone as the default setting. In Confi guration fi le, select standalone.xml as the default setting. Click on Finish:
Chapter 1
[ 5 ]
A new server runtime environment for WildFly 8.x Runtime gets created, as shown in the following screenshot. Click on OK:
Getting Started with EJB 3.x
[ 6 ]
Creating a Server Runtime Environment for WildFly 8.x is not a prerequisite for creating a Java EE project in Eclipse. In the next section, we will create a new Java EE project for an EJB 3.x application.
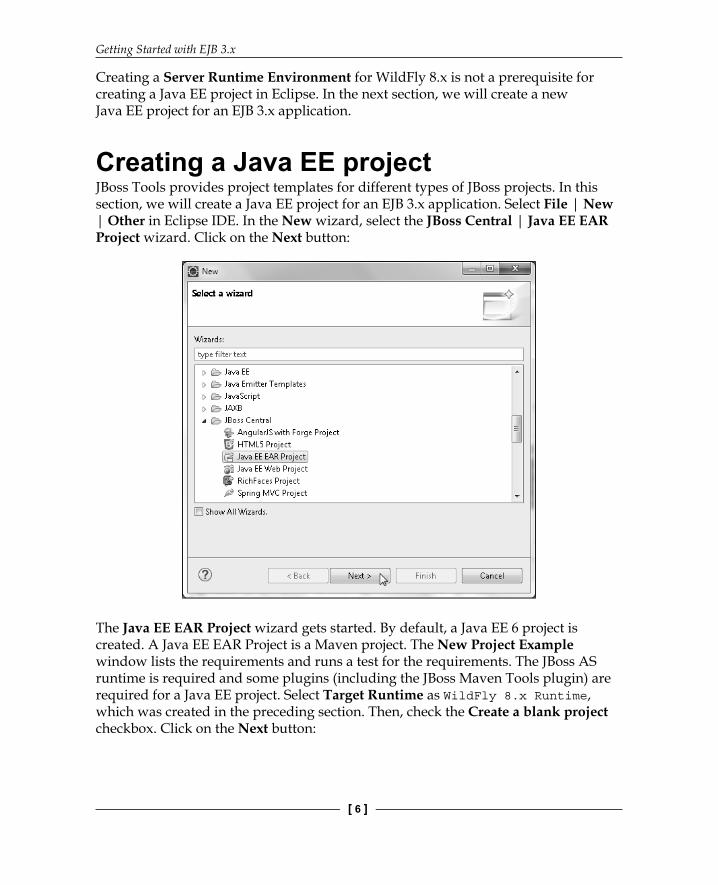
Creating a Java EE projectJBoss Tools provides project templates for different types of JBoss projects. In this section, we will create a Java EE project for an EJB 3.x application. Select File | New | Other in Eclipse IDE. In the New wizard, select the JBoss Central | Java EE EAR Project wizard. Click on the Next button:
The Java EE EAR Project wizard gets started. By default, a Java EE 6 project is created. A Java EE EAR Project is a Maven project. The New Project Example window lists the requirements and runs a test for the requirements. The JBoss AS runtime is required and some plugins (including the JBoss Maven Tools plugin) are required for a Java EE project. Select Target Runtime as WildFly 8.x Runtime, which was created in the preceding section. Then, check the Create a blank project checkbox. Click on the Next button:
Chapter 1
[ 7 ]
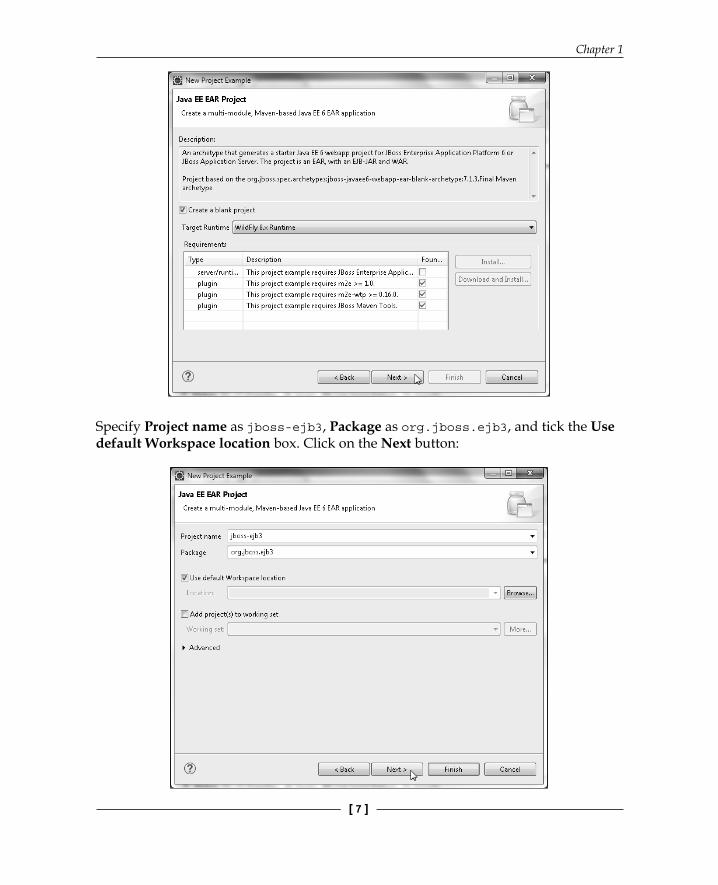
Specify Project name as jboss-ejb3, Package as org.jboss.ejb3, and tick the Use default Workspace location box. Click on the Next button:
Getting Started with EJB 3.x
[ 8 ]
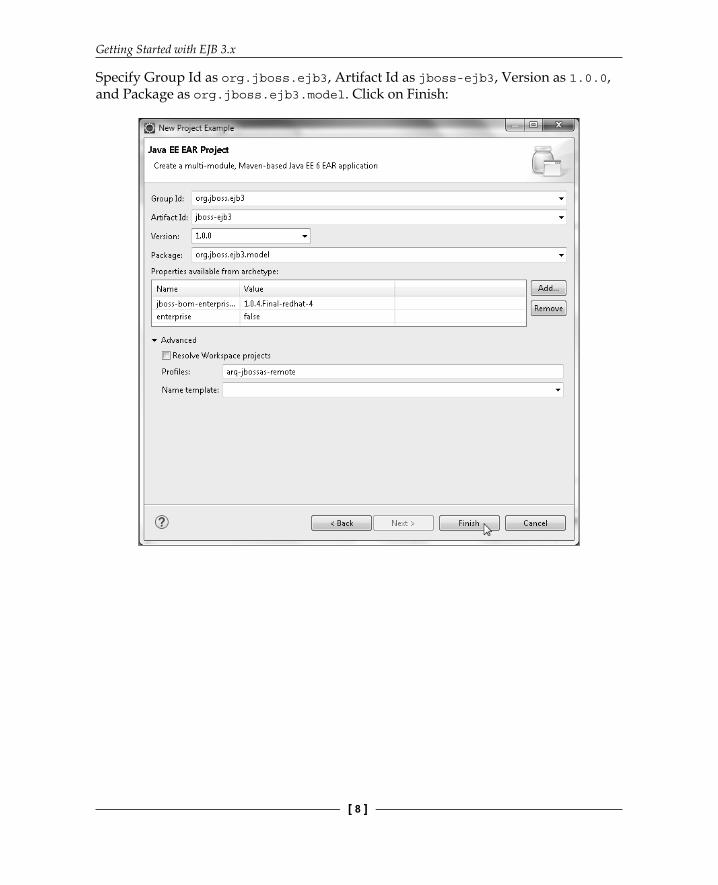
Specify Group Id as org.jboss.ejb3, Artifact Id as jboss-ejb3, Version as 1.0.0, and Package as org.jboss.ejb3.model. Click on Finish:
Chapter 1
[ 9 ]
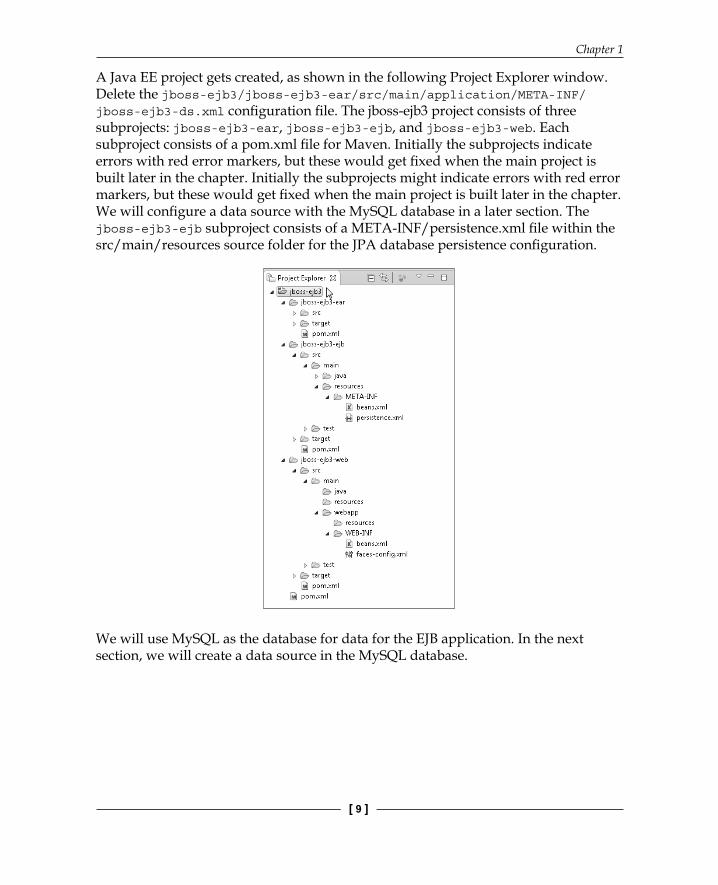
A Java EE project gets created, as shown in the following Project Explorer window. Delete the jboss-ejb3/jboss-ejb3-ear/src/main/application/META-INF/jboss-ejb3-ds.xml confi guration fi le. The jboss-ejb3 project consists of three subprojects: jboss-ejb3-ear, jboss-ejb3-ejb, and jboss-ejb3-web. Each subproject consists of a pom.xml fi le for Maven. Initially the subprojects indicate errors with red error markers, but these would get fi xed when the main project is built later in the chapter. Initially the subprojects might indicate errors with red error markers, but these would get fi xed when the main project is built later in the chapter. We will confi gure a data source with the MySQL database in a later section. The jboss-ejb3-ejb subproject consists of a META-INF/persistence.xml fi le within the src/main/resources source folder for the JPA database persistence confi guration.
We will use MySQL as the database for data for the EJB application. In the next section, we will create a data source in the MySQL database.
Getting Started with EJB 3.x
[ 10 ]
Confi guring a data source with MySQL databaseThe default data source in WildFly 8.1 is confi gured with the H2 database engine. There are several options available for a database. The top four most commonly used relational databases are Oracle database, MySQL database, SQL Server, and PostgreSQL Server. Oracle database and SQL Server are designed for enterprise level applications and are not open source. Oracle database offers more features to facilitate system and data maintenance. It also offers features to prevent system and data failure as compared to SQL Server. MySQL and PostgreSQL are open source databases with comparable features and designed primarily for small scale applications. We will use MySQL database. Some of the reasons to choose MySQL are discussed at http://www.mysql.com/why-mysql/topreasons.html.
We will confi gure a datasource with the MySQL database for use in the EJB 3.x application for object/relational mapping. Use the following steps to confi gure a datasource:
1. First, we need to create a module for MySQL database. For the MySQL module, create a module.xml fi le in the %JBOSS_HOME%/modules/mysql/main directory; the mysql/main subdirectory is also to be created. The module.xml fi le is listed in the following code snippet:<module xmlns="urn:jboss:module:1.1" name="mysql" slot="main"> <resources> <resource-root path="mysql-connector-java-5.1.33-bin.jar"/> </resources> <dependencies> <module name="javax.api"/> </dependencies></module>
2. Copy the mysql-connector-java-5.1.33-bin.jar (MySQL JDBC JAR) fi le from C:\Program Files (x86)\MySQL\Connector.J 5.1 to the %JBOSS_HOME%/modules/mysql/main directory. The MySQL mysql-connector-java JAR fi le version specifi ed in module.xml must be the same as the version of the JAR fi le copied to the /modules/mysql/main directory.
Chapter 1
[ 11 ]
3. Add a <datasource/> defi nition for the MySQL database to the <datasources/> element and a <driver/> defi nition to the <drivers/> element in the %JBOSS_HOME%/standalone/configuration/standalone.xml fi le within the <subsystem xmlns="urn:jboss:domain:datasources:2.0"> </subsystem> element. The <password/> tag in the <datasource/> confi guration tag is the password confi gured when the MySQL database is installed. The datasource class for the MySQL driver is a XA datasource, which is used for distributed transactions:<subsystem xmlns="urn:jboss:domain:datasources:2.0"> <datasources> <datasource jndi-name="java:jboss/datasources/MySQLDS" pool-name="MySQLDS" enabled="true" use-java-context="true"> <connection-url>jdbc:mysql://localhost:3306/test</connection-url> <driver>mysql</driver> <pool> <min-pool-size>10</min-pool-size> <max-pool-size>20</max-pool-size> <prefill>true</prefill> </pool> <security> <user-name>root</user-name> <password>mysql</password> </security> </datasource> <drivers> <driver name="mysql" module="mysql"> <driver-class>com.mysql.jdbc.Driver</driver-class> <xa-datasource-class>com.mysql.jdbc.jdbc2.optional.MysqlXADataSource</xa-datasource-class> </driver> </drivers> </datasources></subsystem>
4. If the server is running after modifying the standalone.xml confi guration fi le, restart WildFly 8.x server. The MySQL datasource gets deployed. To start or restart the WildFly server, double-click on the C:\wildfly-8.1.0.Final\bin\standalone batch fi le.

Getting Started with EJB 3.x
[ 12 ]
5. Log in to the WildFly 8 Administration Console with the URL: http://localhost:8080. Click on Administration Console, as shown in the following screenshot:
6. In the login dialog box, specify the username and password for the user added with the add-user.bat script.
7. Select the Runtime tab in Administration Console. The MySQL datasource is listed as deployed in Datasources Subsystems, as shown in the following screenshot. Click on Test Connection to test the connection:
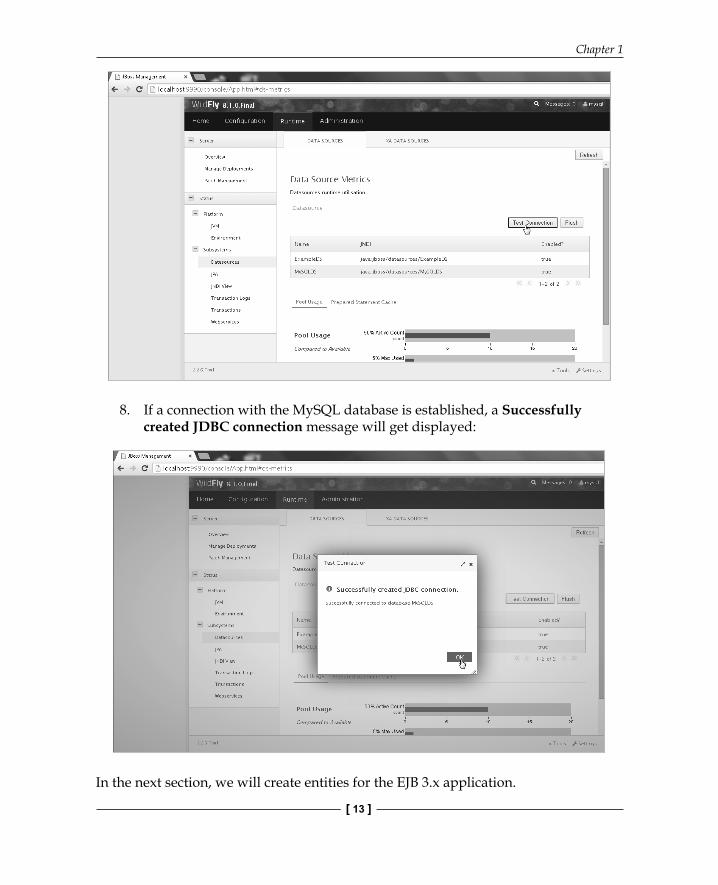
Chapter 1
[ 13 ]
8. If a connection with the MySQL database is established, a Successfully created JDBC connection message will get displayed:
In the next section, we will create entities for the EJB 3.x application.

Getting Started with EJB 3.x
[ 14 ]
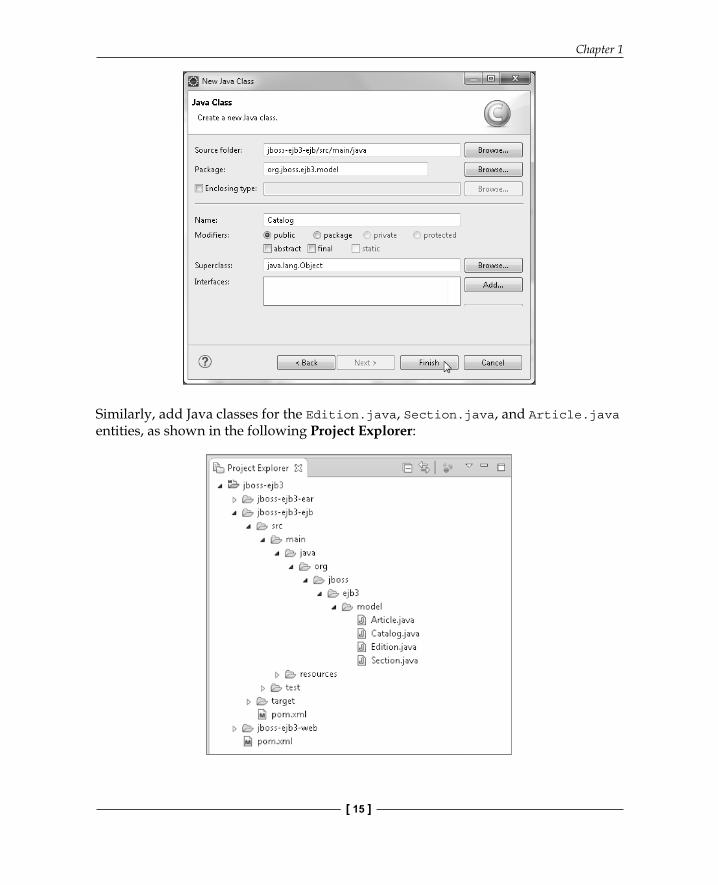
Creating entitiesIn EJB 3.x, an entity is a POJO (Plain Old Java Object) persistent domain object that represents a database table row. As an entity is a Java class, create a Java class in the jboss-ejb3-ejb subproject of the jboss-ejb3 project. Select File | New. In the New window, select Java | Class and click on Next:
Select/specify jboss-ejb3/jboss-ejb3-ejb/src/main/java as the Java Source folder, org.jboss.ejb3.model as the Package, and Catalog as the class Name. Click on Finish:
Chapter 1
[ 15 ]
Similarly, add Java classes for the Edition.java, Section.java, and Article.java entities, as shown in the following Project Explorer:
Getting Started with EJB 3.x
[ 16 ]
Next, we develop the EJB 3.x entities. A JPA persistence provider is required for the EJB entities, and we will use the Hibernate persistence provider. The Hibernate persistence provider has some peculiarities that need to be mentioned, as follows:
• If an entity has more than one non-lazy association of the following types, Hibernate fails to fetch the entity:
The java.util.List, java.util.Collection properties annotated with @org.hibernate.annotations.CollectionOfElements
The @OneToMany or @ManyToMany associations not annotated with @org.hibernate.annotations.IndexColumn
Associations marked as mappedBy must not define database mappings (such as @JoinTable or @JoinColumn)
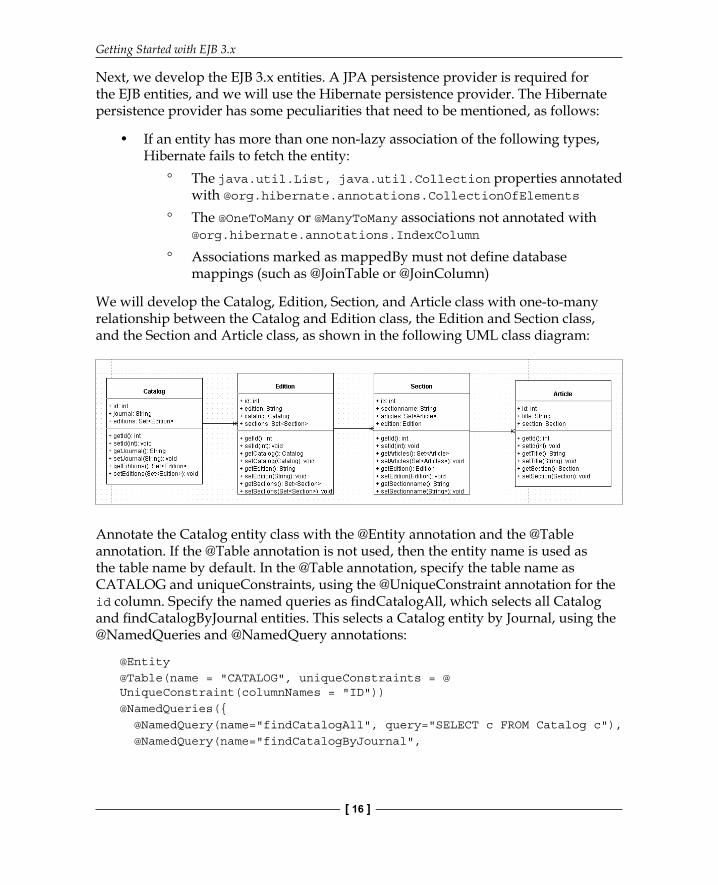
We will develop the Catalog, Edition, Section, and Article class with one-to-many relationship between the Catalog and Edition class, the Edition and Section class, and the Section and Article class, as shown in the following UML class diagram:
Annotate the Catalog entity class with the @Entity annotation and the @Table annotation. If the @Table annotation is not used, then the entity name is used as the table name by default. In the @Table annotation, specify the table name as CATALOG and uniqueConstraints, using the @UniqueConstraint annotation for the id column. Specify the named queries as fi ndCatalogAll, which selects all Catalog and fi ndCatalogByJournal entities. This selects a Catalog entity by Journal, using the @NamedQueries and @NamedQuery annotations:
@Entity@Table(name = "CATALOG", uniqueConstraints = @UniqueConstraint(columnNames = "ID"))@NamedQueries({ @NamedQuery(name="findCatalogAll", query="SELECT c FROM Catalog c"), @NamedQuery(name="findCatalogByJournal",
Chapter 1
[ 17 ]
query="SELECT c FROM Catalog c WHERE c.journal = :journal")})public class Catalog implements Serializable {}
Specify the no-argument constructor, which is required in an entity class. The Catalog entity class implements the Serializable interface to serialize a cache-enabled entity to a cache when persisted to a database. To associate a version number with a serializable class for a serialization runtime, specify a serialVersionUID variable. Declare String variables for id and journal bean properties and for a collection of Set<Edition> type, as the Catalog entity has a bi-directional one-to-many association to Edition. The collection is chosen as Set for the reason mentioned earlier. Hibernate does not support more than one EAGER association of the java.util.List type. Add get/set methods for the bean properties. The @Id annotation specifi es the identifi er property. The @Column annotation specifi es the column name associated with the property. The nullable element is set to false as the primary key cannot be null.
If we were using the Oracle database, we would have specifi ed the primary key generator to be of the sequence type, using the @SequenceGenerator annotation. The generation strategy is specifi ed with the @GeneratedValue annotation. For the Oracle database, the generation strategy would be strategy=GenerationType.SEQUENCE, but as MySQL database supports auto increment of primary key column values by generating a sequence, we have set the generation strategy to GenerationType.AUTO.
Specify the bi-directional one-to-many association to Edition using the @OneToMany annotation. The mappedBy element is specifi ed on the non-owning side of the relationship, which is the Catalog entity. The cascade element is set to ALL. Cascading is used to cascade database table operations to associated tables. The fetch element is set to EAGER. With EAGER fetching the associated entity, collection is immediately fetched when an entity is retrieved:
// bi-directional many-to-one association to Edition@OneToMany(mappedBy = "catalog", targetEntity=org.jboss.ejb3.model.Edition.class, cascade = { CascadeType.ALL }, fetch = FetchType.EAGER) public Set<Edition> getEditions() { return this.editions; }}

Getting Started with EJB 3.x
[ 18 ]
As mentioned earlier, associations marked with mappedBy must not specify @JoinTable or @JoinColumn. The get and set methods for the Edition collection are also specifi ed. The Catalog.java entity class is available in the code download for the chapter at http://www.packtpub.com/support.
Next, develop the entity class for the EDITION database table: Edition.java. Specify the @Entity, @Table, @Id , @Column, and @GeneratedValue annotations, as discussed for the Catalog entity. Specify the findEditionAll and findEditionByEdition named queries to fi nd Edition collections. Specify the bean properties and associated get/set methods for id and edition. Also, specify the one-to-many association to the Section entity using a collection of the Set type. The bi-directional many-to-one association to the Catalog relationship is specifi ed using the @ManyToOne annotation, and with cascade of type PERSIST, MERGE, and REFRESH. The Edition entity is the owning side of the relationship. Using the @JoinTable annotation, a join table is included on the owning side to initiate cascade operations. The join columns are specifi ed using the @JoinColumn annotation. The Edition.java entity class is available in the code download for the chapter.
Develop the entity class for the SECTION table: Section.java. Specify the findSectionAll and findSectionBySectionName named queries to fi nd Section entities. Specify the id and sectionname bean properties. Specify the bi-directional many-to-one association to Edition using the @ManyToOne annotation and the bi-directional one-to-many association to Article using @OneToMany. The @JoinTable and @JoinColumn are specifi ed only for the @ManyToOne association for which Section is the owning side. The Section.java entity class is available in the code download for the chapter.
Specify the entity class for the ARTICLE table: Article.java. The Article entity is mapped to the ARTICLE database table using the @TABLE annotation. Add the findArticleAll and findArticleByTitle named queries to fi nd Article entities. Specify id and sectionname bean properties and the associated get/set methods. The Article entity is the owning side of the bi-directional many-to-one association to Section. Therefore, the @JoinTable and @JoinColumn are specifi ed. The Article.java class is available in the code downloaded for the chapter.
Chapter 1
[ 19 ]
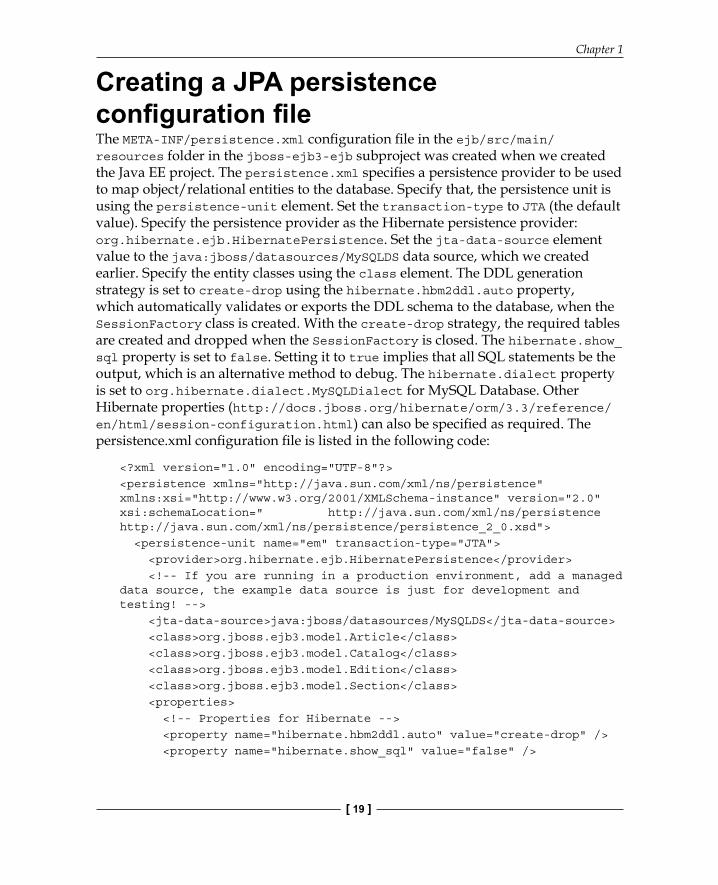
Creating a JPA persistence confi guration fi leThe META-INF/persistence.xml confi guration fi le in the ejb/src/main/resources folder in the jboss-ejb3-ejb subproject was created when we created the Java EE project. The persistence.xml specifi es a persistence provider to be used to map object/relational entities to the database. Specify that, the persistence unit is using the persistence-unit element. Set the transaction-type to JTA (the default value). Specify the persistence provider as the Hibernate persistence provider: org.hibernate.ejb.HibernatePersistence. Set the jta-data-source element value to the java:jboss/datasources/MySQLDS data source, which we created earlier. Specify the entity classes using the class element. The DDL generation strategy is set to create-drop using the hibernate.hbm2ddl.auto property, which automatically validates or exports the DDL schema to the database, when the SessionFactory class is created. With the create-drop strategy, the required tables are created and dropped when the SessionFactory is closed. The hibernate.show_sql property is set to false. Setting it to true implies that all SQL statements be the output, which is an alternative method to debug. The hibernate.dialect property is set to org.hibernate.dialect.MySQLDialect for MySQL Database. Other Hibernate properties (http://docs.jboss.org/hibernate/orm/3.3/reference/en/html/session-configuration.html) can also be specifi ed as required. The persistence.xml confi guration fi le is listed in the following code:
<?xml version="1.0" encoding="UTF-8"?><persistence xmlns="http://java.sun.com/xml/ns/persistence" xmlns:xsi="http://www.w3.org/2001/XMLSchema-instance" version="2.0" xsi:schemaLocation=" http://java.sun.com/xml/ns/persistence http://java.sun.com/xml/ns/persistence/persistence_2_0.xsd"> <persistence-unit name="em" transaction-type="JTA"> <provider>org.hibernate.ejb.HibernatePersistence</provider> <!-- If you are running in a production environment, add a managed data source, the example data source is just for development and testing! --> <jta-data-source>java:jboss/datasources/MySQLDS</jta-data-source> <class>org.jboss.ejb3.model.Article</class> <class>org.jboss.ejb3.model.Catalog</class> <class>org.jboss.ejb3.model.Edition</class> <class>org.jboss.ejb3.model.Section</class> <properties> <!-- Properties for Hibernate --> <property name="hibernate.hbm2ddl.auto" value="create-drop" /> <property name="hibernate.show_sql" value="false" />
Getting Started with EJB 3.x
[ 20 ]
<property name="hibernate.dialect" value="org.hibernate.dialect.MySQLDialect" /> </properties> </persistence-unit></persistence>
The JPA specifi cation does not mandate a persistence provider to create tables with the hibernate.hbm2ddl.auto property set to create-drop or create. Hibernate persistence provider supports creating tables. In addition to the entity tables, some additional tables (such as the join tables and the sequence table) are created by the Hibernate persistence provider.
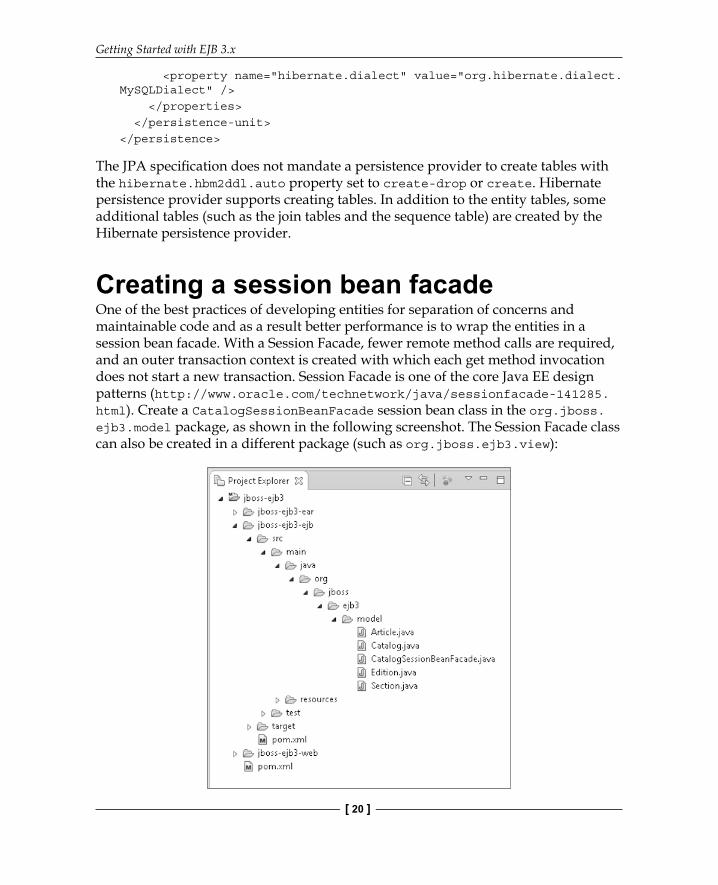
Creating a session bean facadeOne of the best practices of developing entities for separation of concerns and maintainable code and as a result better performance is to wrap the entities in a session bean facade. With a Session Facade, fewer remote method calls are required, and an outer transaction context is created with which each get method invocation does not start a new transaction. Session Facade is one of the core Java EE design patterns (http://www.oracle.com/technetwork/java/sessionfacade-141285.html). Create a CatalogSessionBeanFacade session bean class in the org.jboss.ejb3.model package, as shown in the following screenshot. The Session Facade class can also be created in a different package (such as org.jboss.ejb3.view):
Chapter 1
[ 21 ]
The session bean class is annotated with the @Stateless annotation:
@Statelesspublic class CatalogSessionBeanFacade {}
In the bean session, we use an EntityManager to create, remove, fi nd, and query persistence entity instances. Inject a EntityManager using the @PersistenceContext annotation. Specify the unitName as the unitName confi gured in persistence.xml. Next, specify the getAllEditions, getAllSections, getAllArticles, getAllCatalogs get methods to fetch the collection of entities. The get methods get all entities' collections with the named queries specifi ed in the entities. The createNamedQuery method of EntityManager is used to create a Query object from a named query. Specify the TransactionAttribute annotation's TransactionAttributeType enumeration to REQUIRES_NEW, which has the advantage that if a transaction is rolled back due to an error in a different transaction context from which the session bean is invoked, it does not affect the session bean.
To demonstrate the use of the entities, create the test data with the createTestData convenience method in the session bean. Alternatively, a unit test or an extension class can also be used. Create a Catalog entity and set the journal using the setJournal method. We do not set the id for the Catalog entity as we use the GenerationType.AUTO generation strategy for the ID column. Persist the entity using the persist method of the EntityManager object. However, the persist method does not persist the entity to the database. It only makes the entity instance managed and adds it to the persistence context. The EntityManager.flush() method is not required to be invoked to synchronize the entity with the database as EntityManager is confi gured with FlushModeType as AUTO (the other setting being COMMIT) and a fl ush will be done automatically when the EntityManager.persist() is invoked:
Catalog catalog1 = new Catalog();catalog1.setJournal("Oracle Magazine");em.persist(catalog1);
Similarly, create and persist an Edition entity object. Add the Catalog object: catalog1 using the setCatalog method of the Edition entity class:
Edition edition = new Edition();edition.setEdition("January/February 2009");edition.setCatalog(catalog1);em.persist(edition);
Getting Started with EJB 3.x
[ 22 ]
Likewise add the Section and Article entity instances. Add another Catalog object, but without any associated Edition, Section, or Article entities:
Catalog catalog2 = new Catalog();catalog2.setJournal("Linux Magazine");em.persist(catalog2);
Next, we will delete data with the deleteSomeData method, wherein we fi rst create a Query object using the named query findCatalogByJournal. Specify the journal to delete with the setParameter method of the Query object. Get the List result with the getResultList method of the Query object. Iterate the List result and remove the Catalog objects with the remove method of the EntityManager object. The remove method only removes the Catalog object from the persistence context:
public void deleteSomeData() { // remove a catalog Query q = em.createNamedQuery("findCatalogByJournal"); //q.setParameter("journal", "Linux Magazine"); q.setParameter("journal", "Oracle Magazine"); List<Catalog> catalogs = q.getResultList(); for (Catalog catalog : catalogs) { em.remove(catalog); }}
The CatalogSessionBeanFacade session bean class is available in the code downloaded for the chapter.
Creating a JSP clientNext, we will create a JSP client to test the EJB entities. We will look up the session bean using a local JNDI name. Subsequently, we will invoke the testData method of the session bean to test database persistence using these entities. First create a JSP fi le. Select File | New | Other, and in the New wizard, select Web | JSP File and click on Next, as in the following screenshot:
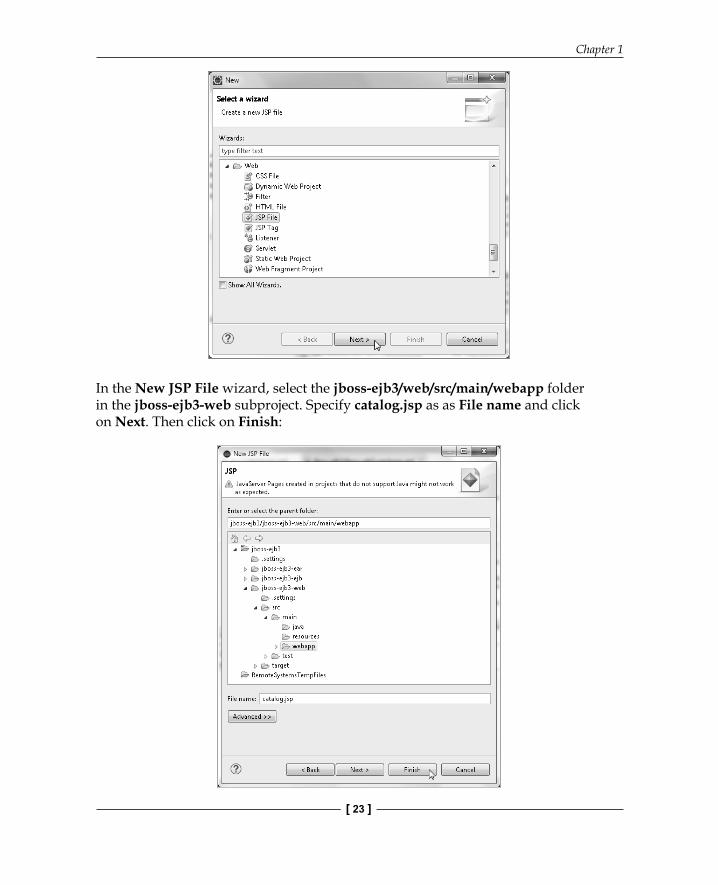
Chapter 1
[ 23 ]
In the New JSP File wizard, select the jboss-ejb3/web/src/main/webapp folder in the jboss-ejb3-web subproject. Specify catalog.jsp as as File name and click on Next. Then click on Finish:
Getting Started with EJB 3.x
[ 24 ]
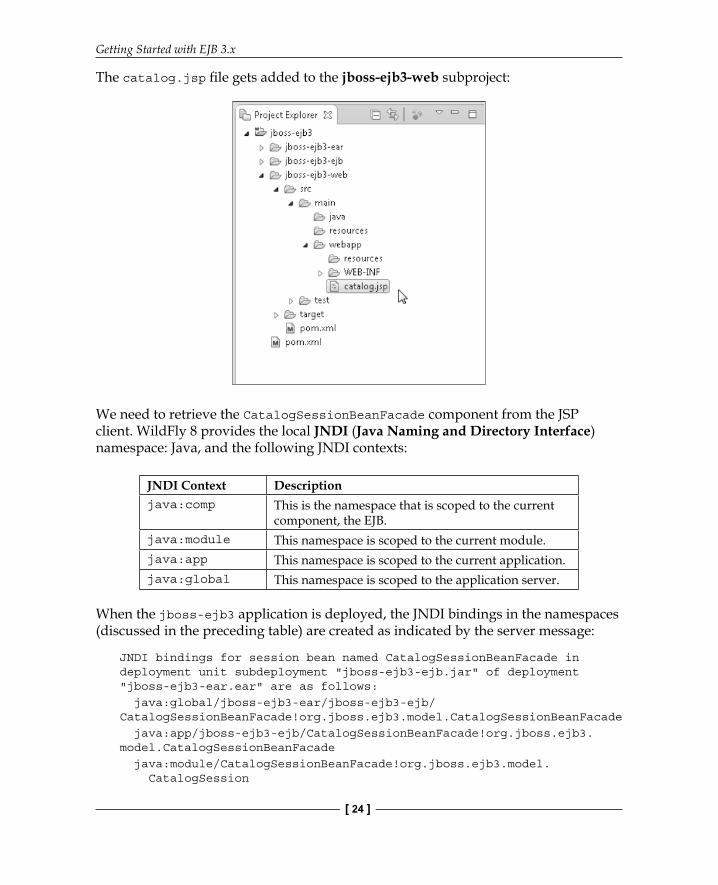
The catalog.jsp fi le gets added to the jboss-ejb3-web subproject:
We need to retrieve the CatalogSessionBeanFacade component from the JSP client. WildFly 8 provides the local JNDI (Java Naming and Directory Interface) namespace: Java, and the following JNDI contexts:
JNDI Context Descriptionjava:comp This is the namespace that is scoped to the current
component, the EJB.java:module This namespace is scoped to the current module.java:app This namespace is scoped to the current application.java:global This namespace is scoped to the application server.
When the jboss-ejb3 application is deployed, the JNDI bindings in the namespaces (discussed in the preceding table) are created as indicated by the server message:
JNDI bindings for session bean named CatalogSessionBeanFacade in deployment unit subdeployment "jboss-ejb3-ejb.jar" of deployment "jboss-ejb3-ear.ear" are as follows: java:global/jboss-ejb3-ear/jboss-ejb3-ejb/CatalogSessionBeanFacade!org.jboss.ejb3.model.CatalogSessionBeanFacade java:app/jboss-ejb3-ejb/CatalogSessionBeanFacade!org.jboss.ejb3.model.CatalogSessionBeanFacade java:module/CatalogSessionBeanFacade!org.jboss.ejb3.model. CatalogSession
Chapter 1
[ 25 ]
BeanFacade java:global/jboss-ejb3-ear/jboss-ejb3-ejb/CatalogSessionBeanFacade java:app/jboss-ejb3-ejb/CatalogSessionBeanFacade java:module/CatalogSessionBeanFacade
Next we will retrieve the session bean façade: CatalogSessionBeanFacade using the standard Java SE JNDI API, which does not require any additional confi guration, using the local JNDI lookup in the java:app namespace. For the local JNDI lookup, we need to create an InitialContext object:
Context context = new InitialContext();
Using the local JNDI name lookup in the java:app namespace ,retrieve the CatalogSessionBeanFacade component:
CatalogSessionBeanFacade bean = (CatalogSessionBeanFacade) context .lookup("java:app/jboss-ejb3-ejb/CatalogSessionBeanFacade!org.jboss.ejb3.model.CatalogSessionBeanFacade");
Invoke the createTestData method and retrieve the List Catalog entities. Iterate over the Catalog entities and output the catalog ID as the journal name:
bean.createTestData();List<Catalog> catalogs = beanRemote.getAllCatalogs();out.println("<br/>" + "List of Catalogs" + "<br/>");for (Catalog catalog : catalogs) { out.println("Catalog Id:"); out.println("<br/>" + catalog.getId() + "<br/>"); out.println("Catalog Journal:"); out.println(catalog.getJournal() + "<br/>");}
Similarly, obtain the Entity, Section, and Article entities and output the entity property values. The catalog.jsp fi le is available in the code downloaded for the chapter.
Confi guring the jboss-ejb3-ejb subprojectWe will generate an EAR fi le using the Maven project: jboss-ejb3, which includes the jboss-ejb3-ejb, jboss-ejb-web and jboss-ejb3-ear subproject/artifacts. We will use the Maven build tool to compile, package, and deploy the EAR application. The jboss-ejb3-ear module to be deployed to WildFly has two submodules: jboss-ejb3-web and jboss-ejb3-ejb.

Getting Started with EJB 3.x
[ 26 ]
The jboss-ejb3-ear, jboss-ejb3-web and jboss-ejb3-ejb modules may be referred to as ear, web, and ejb modules respectively. The ear module has dependency on the web module, and the web module has dependency on the ejb module, as shown in the following diagram:
The ejb, web, and ear modules can be built and installed individually using subproject-specifi c pom.xml, or these can be built together using the pom.xml fi le in the jboss-ejb3 project. If built individually, the ejb module has to be built and installed before the web module, as the web module has a dependency on the ejb module. The ear module is to be built after the web and ejb modules have been built and installed. We will build and install the top level project using the pom.xml fi le in the jboss-ejb3 project, which has dependency specifi ed on the jboss-ejb3-web and jboss-ejb3-ejb artifacts. The pom.xml fi le for the jboss-ejb3-ejb subproject specifi es packaging as ejb. The WildFly 8.x provides most of the APIs required for an EJB 3.x application. The provided APIs are specifi ed with scope set to provided in pom.xml. Dependencies for the EJB 3.1 API and the JPA 2.0 API are pre-specifi ed. Add the following dependency for the Hibernate Annotations API:
<dependency> <groupId>org.jboss.spec.javax.ejb</groupId> <artifactId>jboss-ejb-api_3.1_spec</artifactId> <version>1.0.0.Final</version> <scope>provided</scope></dependency><dependency> <groupId>org.hibernate.javax.persistence</groupId> <artifactId>hibernate-jpa-2.0-api</artifactId> <version>1.0.0.Final</version> <scope>provided</scope></dependency><dependency> <groupId>org.hibernate</groupId> <artifactId>hibernate-annotations</artifactId> <version>3.5.6-Final</version></dependency>

Chapter 1
[ 27 ]
The Hibernate Validator API dependency is also preconfi gured in pom.xml. The build is preconfi gured with the Maven EJB plugin, which is required to package the subproject into an EJB module. The EJB version in the Maven EJB plugin is 3.1:
<build> <finalName>${project.artifactId}</finalName> <plugins> <plugin> <artifactId>maven-ejb-plugin</artifactId> <version>${version.ejb.plugin}</version> <configuration> <!-- Tell Maven we are using EJB 3.1 --> <ejbVersion>3.1</ejbVersion> </configuration> </plugin> </plugins></build>
The Maven POM.xml fi le for the EJB subproject is available in the code downloaded for the chapter.
Confi guring the jboss-ejb3-web subprojectMost of the required confi guration for the jboss-ejb3-web subproject is pre-specifi ed. The packaging for the jboss-ejb3-web artifacts is set to war:
<artifactId>jboss-ejb3-web</artifactId><packaging>war</packaging><name>jboss-ejb3 Web module</name>
The pom.xml fi le for the subproject pre-specifi es most of the required dependencies. It also specifi es dependency on the jboss-ejb3-ejb artifact:
<dependency> <groupId>org.jboss.ejb3</groupId> <artifactId>jboss-ejb3-ejb</artifactId> <type>ejb</type> <version>1.0.0</version> <scope>provided</scope></dependency>
Getting Started with EJB 3.x
[ 28 ]
The EJB 3.1 API, the JPA 2.0 API, the JSF 2.1 API, and the JAX-RS 1.1 API are provided by the WildFly 8.x server, as indicated by the provided scope in the dependency declarations. Add the dependency on the hibernate-annotations artifact. The build is preconfi gured with the Maven WAR plugin, which is required to package the subproject into an WAR fi le:
<?xml version="1.0" encoding="UTF-8"?><build> <finalName>${project.artifactId}</finalName> <plugins> <plugin> <artifactId>maven-war-plugin</artifactId> <version>${version.war.plugin}</version> <configuration> <!-- Java EE 6 doesn't require web.xml, Maven needs to catch up! --> <failOnMissingWebXml>false</failOnMissingWebXml> </configuration> </plugin> </plugins></build>
The pom.xml fi le for the jboss-ejb3-web subproject is available in the code downloaded for the chapter.
Confi guring the jboss-ejb3-ear subprojectIn pom.xml for the jboss-ejb3-ear subproject, the packaging for the jboss-ejb3-ear artifact is specifi ed as ear:
<artifactId>jboss-ejb3-ear</artifactId><packaging>ear</packaging>
The pom.xml fi le specifi es dependency on the ejb and web modules:
<dependencies> <!-- Depend on the ejb module and war so that we can package them --> <dependency> <groupId>org.jboss.ejb3</groupId>
Chapter 1
[ 29 ]
<artifactId>jboss-ejb3-web</artifactId> <version>1.0.0</version> <type>war</type></dependency> <dependency> <groupId>org.jboss.ejb3</groupId> <artifactId>jboss-ejb3-web</artifactId> <version>1.0.0</version> <type>war</type></dependency></dependencies>
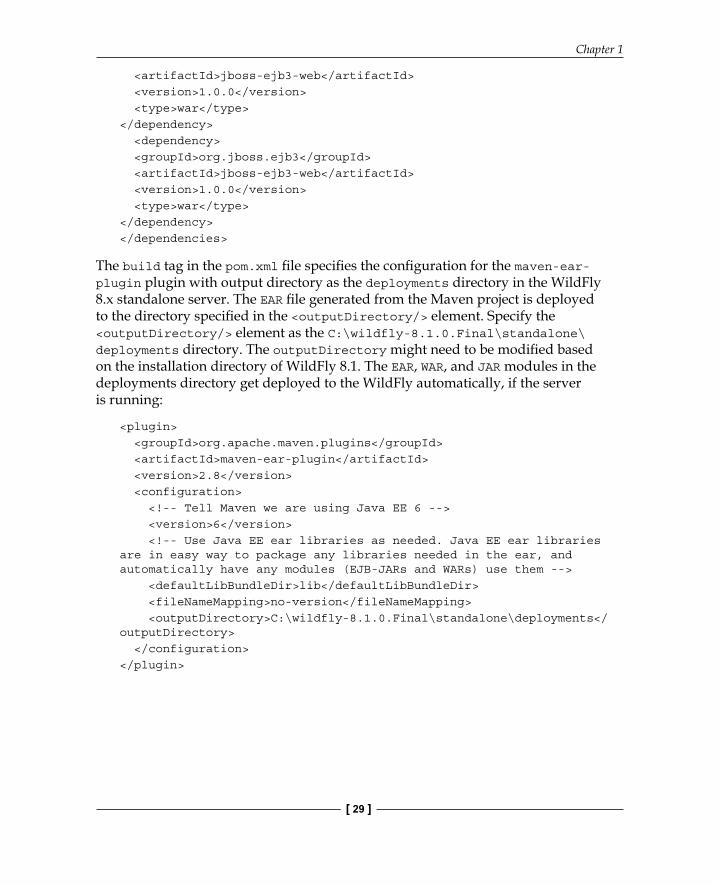
The build tag in the pom.xml fi le specifi es the confi guration for the maven-ear-plugin plugin with output directory as the deployments directory in the WildFly 8.x standalone server. The EAR fi le generated from the Maven project is deployed to the directory specifi ed in the <outputDirectory/> element. Specify the <outputDirectory/> element as the C:\wildfly-8.1.0.Final\standalone\deployments directory. The outputDirectory might need to be modifi ed based on the installation directory of WildFly 8.1. The EAR, WAR, and JAR modules in the deployments directory get deployed to the WildFly automatically, if the server is running:
<plugin> <groupId>org.apache.maven.plugins</groupId> <artifactId>maven-ear-plugin</artifactId> <version>2.8</version> <configuration> <!-- Tell Maven we are using Java EE 6 --> <version>6</version> <!-- Use Java EE ear libraries as needed. Java EE ear libraries are in easy way to package any libraries needed in the ear, and automatically have any modules (EJB-JARs and WARs) use them --> <defaultLibBundleDir>lib</defaultLibBundleDir> <fileNameMapping>no-version</fileNameMapping> <outputDirectory>C:\wildfly-8.1.0.Final\standalone\deployments</outputDirectory> </configuration></plugin>
Getting Started with EJB 3.x
[ 30 ]
Deploying the EAR moduleIn this section, we will build and deploy the application EAR module to the WildFly 8.x server. The pom.xml for the jboss-ejb3 Maven project specifi es three modules: jboss-ejb3-ejb, jboss-ejb3-web, and jboss-ejb3-ear:
<modules> <module>jboss-ejb3-ejb</module> <module>jboss-ejb3-web</module> <module>jboss-ejb3-ear</module></modules>
Specify the JBoss AS version as 8.1.0.Final:
<version.jboss.as>8.1.0.Final</version.jboss.as>
The pom.xml for the jboss-ejb3 project specifi es dependency on the jboss-ejb3-web and jboss-ejb3-ejb artifacts:
<dependency> <groupId>org.jboss.ejb3</groupId> <artifactId>jboss-ejb3-ejb</artifactId> <version>${project.version}</version> <type>ejb</type></dependency><dependency> <groupId>org.jboss.ejb3</groupId> <artifactId>jboss-ejb3-web</artifactId> <version>${project.version}</version> <type>war</type> <scope>compile</scope></dependency>
Next, we will build and deploy the EAR module to WildFly 8.x while the server is running. Right-click on pom.xml for the jboss-ejb3 Maven project and select Run As | Maven install, as shown in the following screenshot:
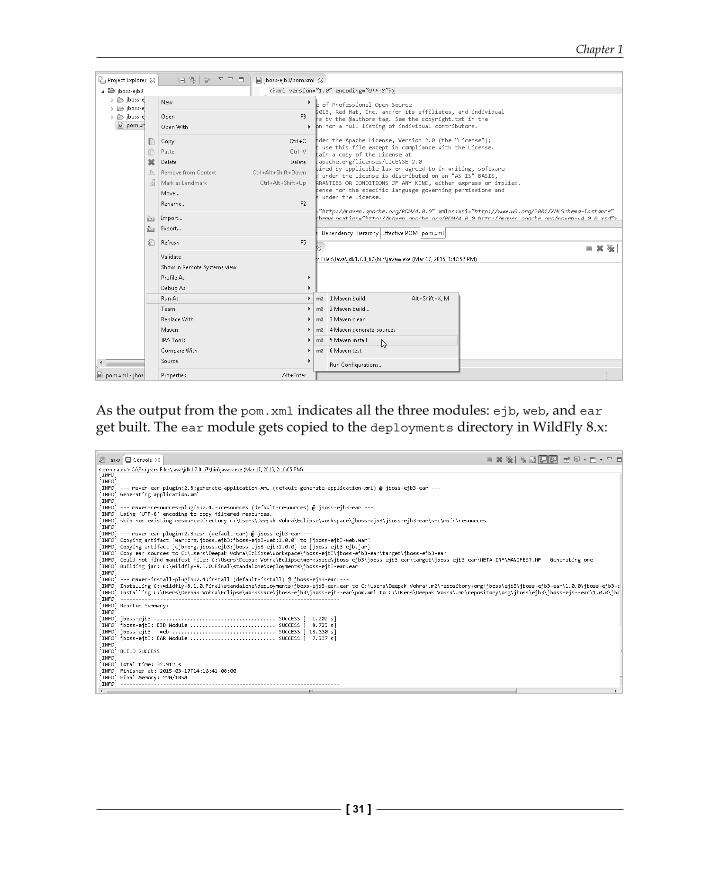
Chapter 1
[ 31 ]
As the output from the pom.xml indicates all the three modules: ejb, web, and ear get built. The ear module gets copied to the deployments directory in WildFly 8.x:
Getting Started with EJB 3.x
[ 32 ]
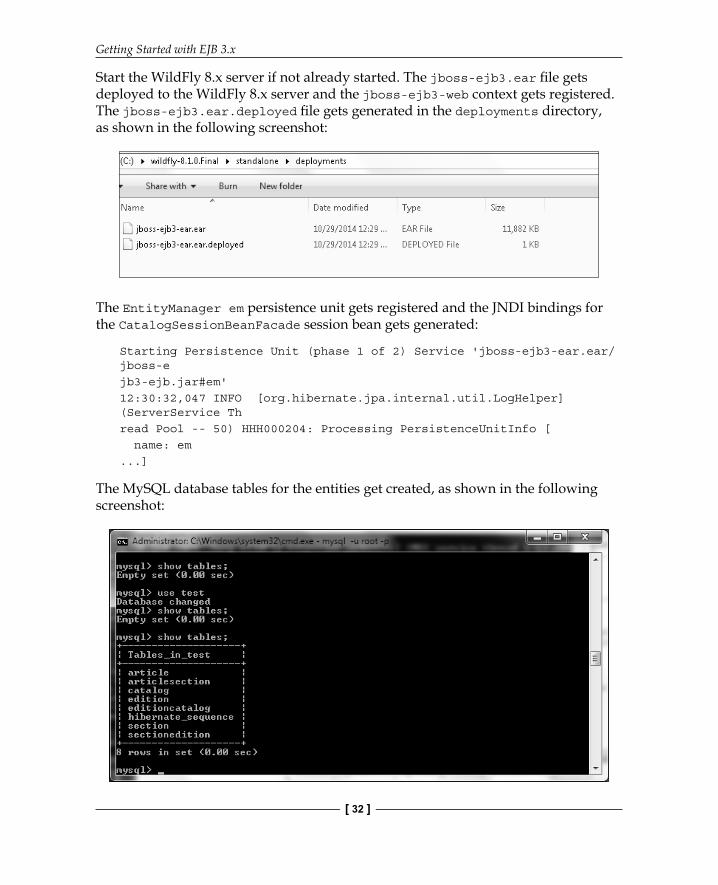
Start the WildFly 8.x server if not already started. The jboss-ejb3.ear fi le gets deployed to the WildFly 8.x server and the jboss-ejb3-web context gets registered. The jboss-ejb3.ear.deployed fi le gets generated in the deployments directory, as shown in the following screenshot:
The EntityManager em persistence unit gets registered and the JNDI bindings for the CatalogSessionBeanFacade session bean gets generated:
Starting Persistence Unit (phase 1 of 2) Service 'jboss-ejb3-ear.ear/jboss-ejb3-ejb.jar#em'12:30:32,047 INFO [org.hibernate.jpa.internal.util.LogHelper] (ServerService Thread Pool -- 50) HHH000204: Processing PersistenceUnitInfo [ name: em...]
The MySQL database tables for the entities get created, as shown in the following screenshot:
Chapter 1
[ 33 ]
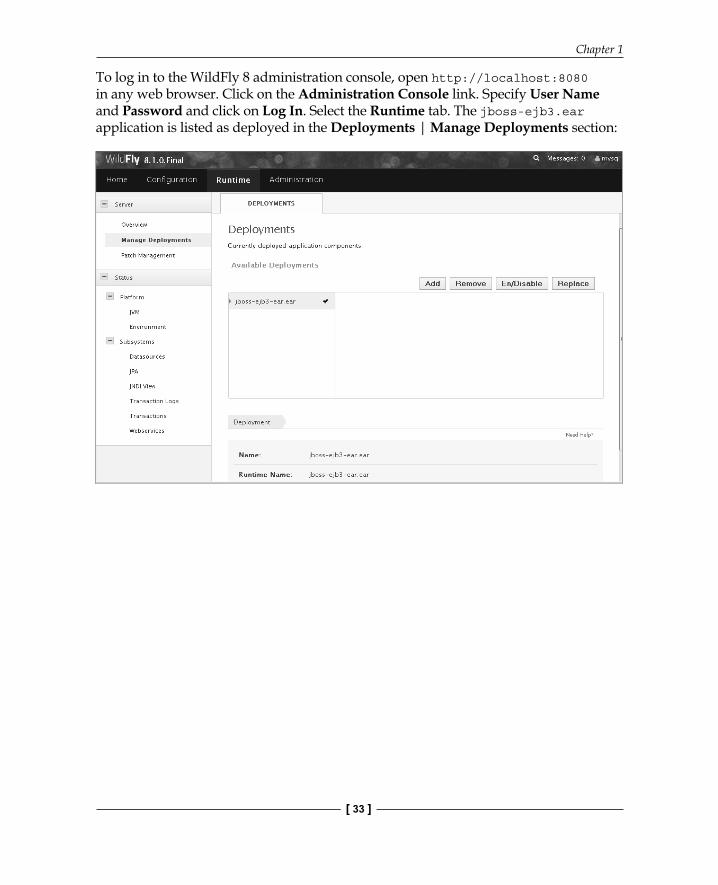
To log in to the WildFly 8 administration console, open http://localhost:8080 in any web browser. Click on the Administration Console link. Specify User Name and Password and click on Log In. Select the Runtime tab. The jboss-ejb3.ear application is listed as deployed in the Deployments | Manage Deployments section:
Getting Started with EJB 3.x
[ 34 ]
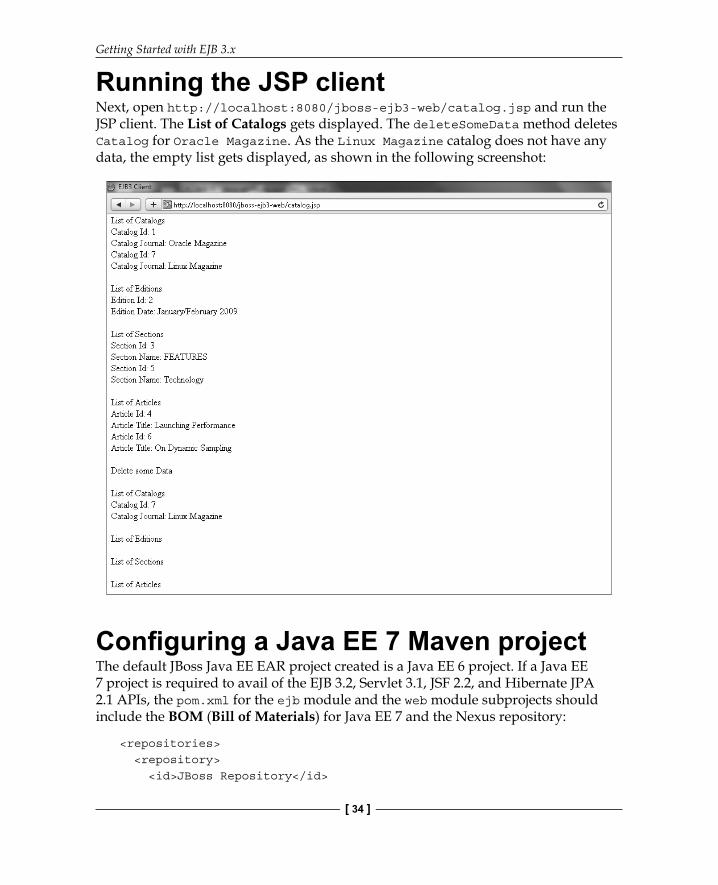
Running the JSP clientNext, open http://localhost:8080/jboss-ejb3-web/catalog.jsp and run the JSP client. The List of Catalogs gets displayed. The deleteSomeData method deletes Catalog for Oracle Magazine. As the Linux Magazine catalog does not have any data, the empty list gets displayed, as shown in the following screenshot:
Confi guring a Java EE 7 Maven projectThe default JBoss Java EE EAR project created is a Java EE 6 project. If a Java EE 7 project is required to avail of the EJB 3.2, Servlet 3.1, JSF 2.2, and Hibernate JPA 2.1 APIs, the pom.xml for the ejb module and the web module subprojects should include the BOM (Bill of Materials) for Java EE 7 and the Nexus repository:
<repositories> <repository> <id>JBoss Repository</id>
Chapter 1
[ 35 ]
<url>https://repository.jboss.org/nexus/content/groups/public/ </url> </repository></repositories><dependencyManagement> <dependencies> <dependency> <groupId>org.jboss.spec</groupId> <artifactId>jboss-javaee-7.0</artifactId> <version>1.0.0.Final</version> <type>pom</type> <scope>import</scope> </dependency> </dependencies></dependencyManagement>
In addition the pom.xml for the ejb module and web module subprojects should specify the dependencies for the EJB 3.2, JSF 2.2, Servlet 3.1, and Hibernate JPA 2.1 specifi cations, as required, instead of the dependencies for the EJB 3.1, JSF 2.1, Servlet 3.0, and Hibernate JPA 2.0:
<dependency> <groupId>org.jboss.spec.javax.ejb</groupId> <artifactId>jboss-ejb-api_3.2_spec</artifactId> <scope>provided</scope></dependency><dependency> <groupId>org.hibernate.javax.persistence</groupId> <artifactId>hibernate-jpa-2.1-api</artifactId> <scope>provided</scope></dependency><dependency> <groupId>org.jboss.spec.javax.servlet</groupId> <artifactId>jboss-servlet-api_3.1_spec</artifactId> <scope>provided</scope></dependency><dependency> <groupId>org.jboss.spec.javax.faces</groupId> <artifactId>jboss-jsf-api_2.2_spec</artifactId> <scope>provided</scope></dependency>

Getting Started with EJB 3.x
[ 36 ]
SummaryIn this chapter, we used the JBoss Tools plugin 4.2 in Eclipse Luna to generate a Java EE project for an EJB 3.x application in Eclipse IDE for Java EE Developers. We created entities to create a Catalog and used the Hibernate persistence provider to map the entities to the MySQL 5.6 database. Subsequently, we created a session bean façade for the entities. In the session bean, we created a catalog using the EntityManager API. We also created a JSP client to invoke the session bean facade using the local JNDI lookup and subsequently invoke the session bean methods to display database data. We used Maven to build the EJB, Web, and EAR modules and deploy the EAR module to WildFly 8.1. We ran the JSP client in a browser to fetch and display the data from the MySQL database. In the next chapter, we will discuss another database persistence technology: Hibernate.

Where to buy this book You can buy Advanced Java® EE Development with WildFly®from the Packt Publishing website. Alternatively, you can buy the book from Amazon, BN.com, Computer Manuals and most internet book retailers.
Click here for ordering and shipping details.
www.PacktPub.com
Stay Connected:
Get more information Advanced Java® EE Development with WildFly®

![Chapter 1: Java EE and Modern Architectural Methodologies · Chapter 2: Getting Familiar with WildFly Swarm [ 5 ] Chapter 3: Right-Sizing Your Services [ 6 ] [ 7 ] [ 8 ] Chapter 4:](https://img.pdfslide.us/doc/110x75/5ed3bf46a0e09216242fe0de/chapter-1-java-ee-and-modern-architectural-methodologies-chapter-2-getting-familiar.jpg)